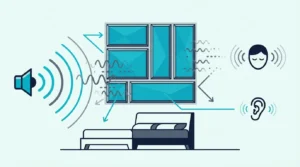
How to Hang Acoustic Panels: Every Method Explained [2026]
How to hang acoustic panels securely comes down to matching the hardware to your wall type — but most people skip that step and watch their panels hit the floor weeks later.
Wrong anchors, weak adhesive strips, or missing studs cause almost every panel failure. The frustration compounds when you damage drywall or lose a security deposit trying to fix it.
The right mounting method keeps panels up for years and takes about 15 minutes per panel. Start with a stud finder and your panel’s weight, then pick from the five methods below.
Best overall method: Z-clips for permanent installations on drywall — they hold 30+ pounds and self-level. Best for renters: Heavy-duty Command strips for panels under 16 pounds with zero wall damage.
What’s the Best Way to Hang Acoustic Panels?
Let’s start with the question everyone asks first: which method actually works? The answer depends on three things — your wall material, your panel weight, and whether you need to remove them someday.
Most fabric-wrapped acoustic panels weigh between 8 and 15 pounds. That puts them in “totally manageable” territory for most mounting methods, which is good news for DIYers.
Which Method Should You Choose?
Here’s what I’ve learned after seeing dozens of panel installations: it’s less about the panels and more about your walls. Your wall type determines everything else.
Drywall accepts almost any mounting hardware, but the strength comes from hitting studs or using proper anchors. Miss the studs with inadequate anchors, and you’ll learn this lesson the hard way when your panels hit the floor.
Concrete and brick are different beasts entirely. They require specialized fasteners that grip masonry, plus a hammer drill to create pilot holes.
The upside? Once those fasteners are in, they’re not coming out.
Renters have a unique problem — wall damage means losing deposits, and that changes everything. Command strips and adhesive solutions work surprisingly well for lighter panels under 16 pounds.
You’ll need to accept weight limitations, but zero wall damage is worth the tradeoff for many people.
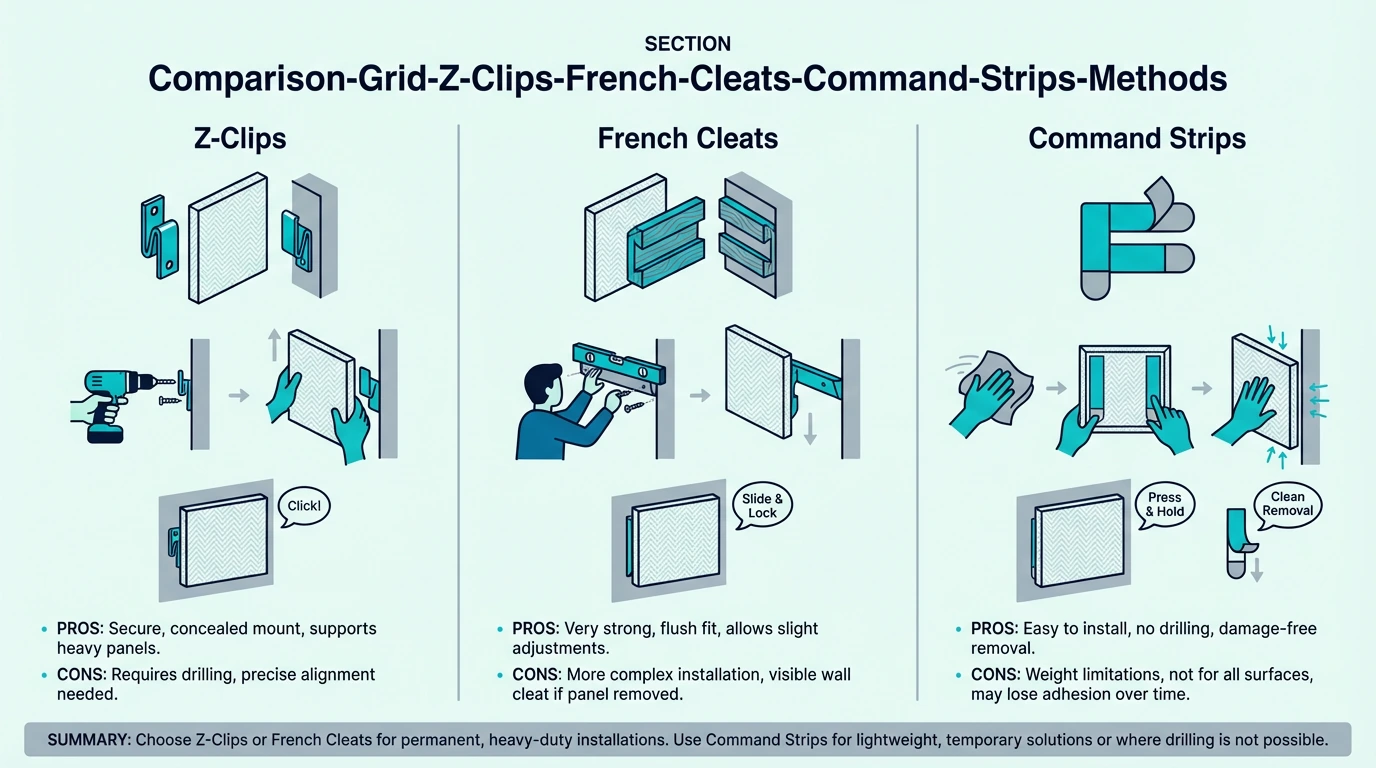
For permanent installations where you own the space, Z-clips or French cleats are what the pros use. These interlocking metal brackets distribute weight across their entire length rather than concentrating it at single screw points.
They’re also surprisingly affordable — under $10 for a pair.
One thing people consistently underestimate: panel weight. A single 24×48 inch fiberglass panel typically weighs 8-12 pounds, but add a dense wooden frame and you’re suddenly looking at 20-30 pounds.
Always check manufacturer specs before buying hardware.
What Hardware Do You Need?
This is where most failures start — using hardware that’s convenient rather than appropriate. French Cleat Z Hangers are the gold standard for most wall-mounted panels, and there’s a reason for that.
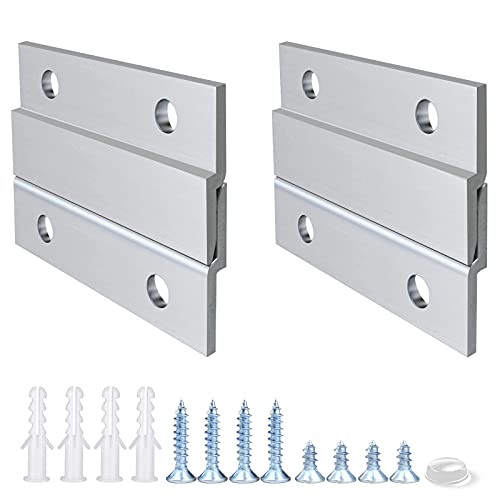
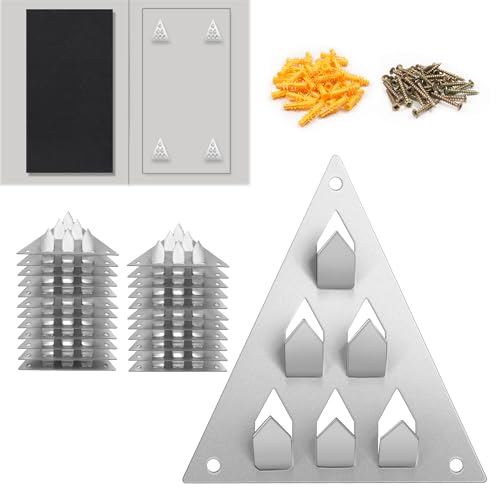
French Cleat Z Hangers
Z-clips need the clips themselves, screws appropriate for your wall type, and a level. French cleats need the same, plus a saw if you’re cutting them to size.
For concrete installations, you’ll need a hammer drill, masonry bits, and concrete-specific fasteners like Tapcon screws. The technique is straightforward once you understand it — and the holding power is incredible.
Don’t skip the stud finder for drywall work. Hitting a stud with even one screw provides dramatically more holding power than any drywall anchor alone.
Two minutes with a stud finder beats two hours patching holes from failed mounting attempts.
For a deeper dive into the full installation process beyond just hanging, check out our complete panel installation guide.
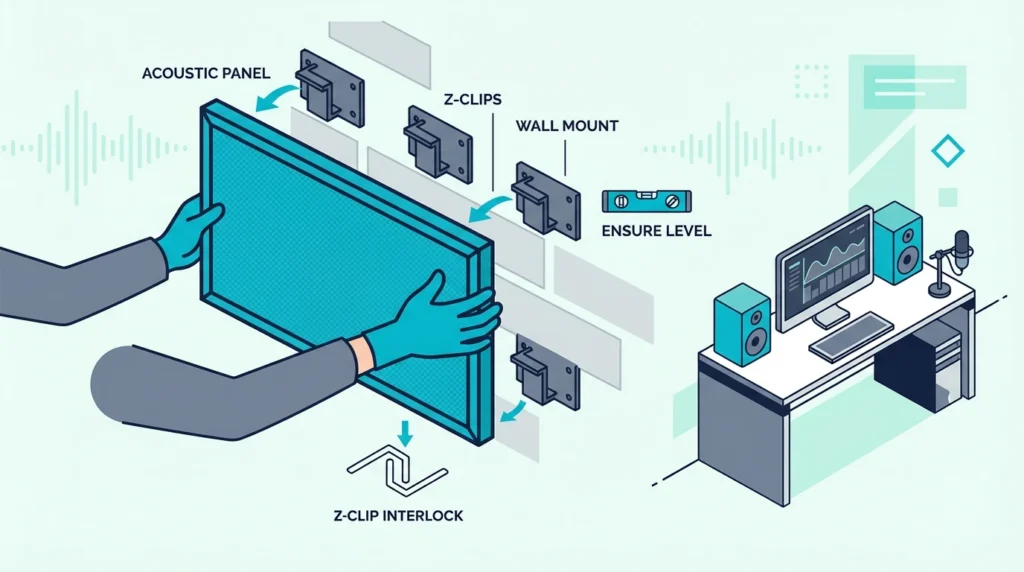
How Do You Hang Panels with Z-Clips?
Now that you understand what hardware exists, let’s dive into the most popular method — and honestly, the one I recommend for most people. Z-clips have earned their reputation for good reason.
These simple interlocking metal brackets handle serious weight while keeping installation straightforward. If you can use a drill and a level, you can install Z-clips.
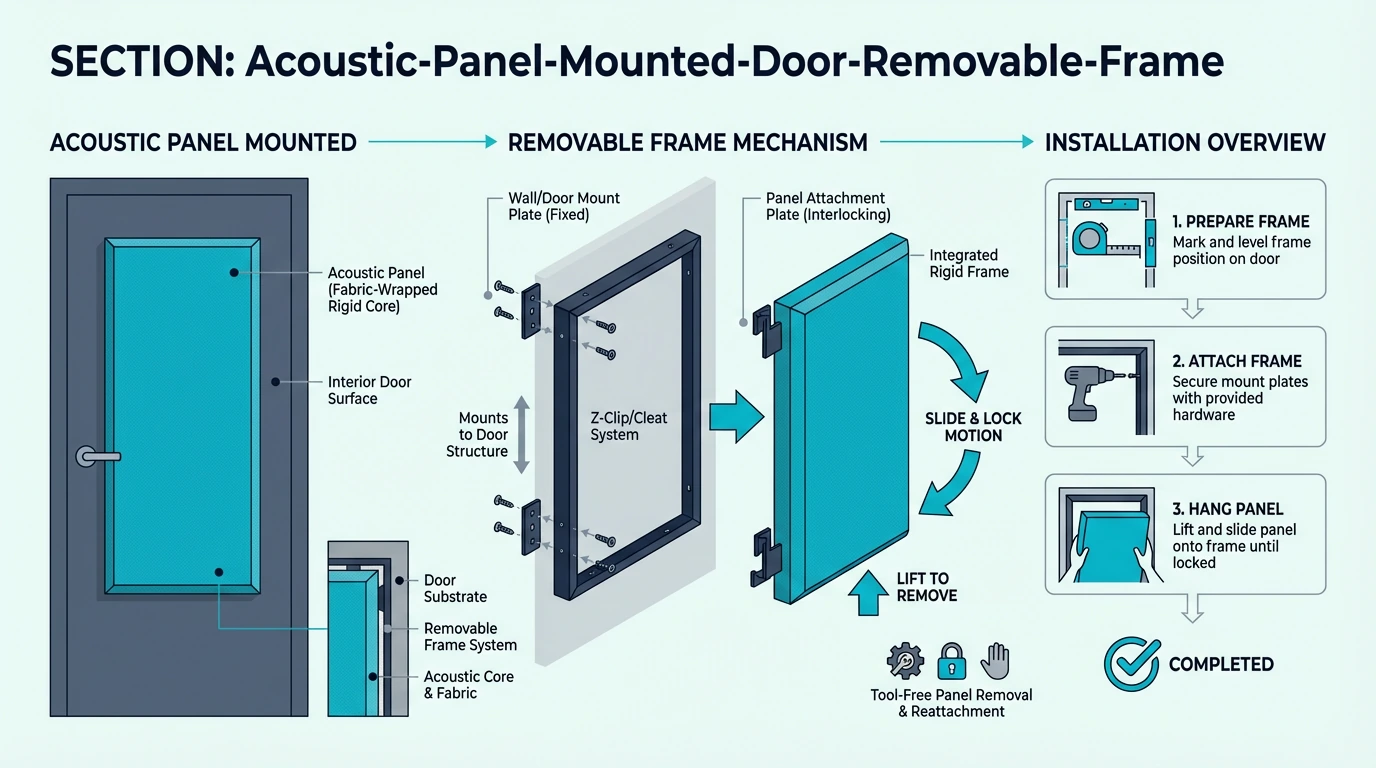
What Are Z-Clips and Why Are They Popular?
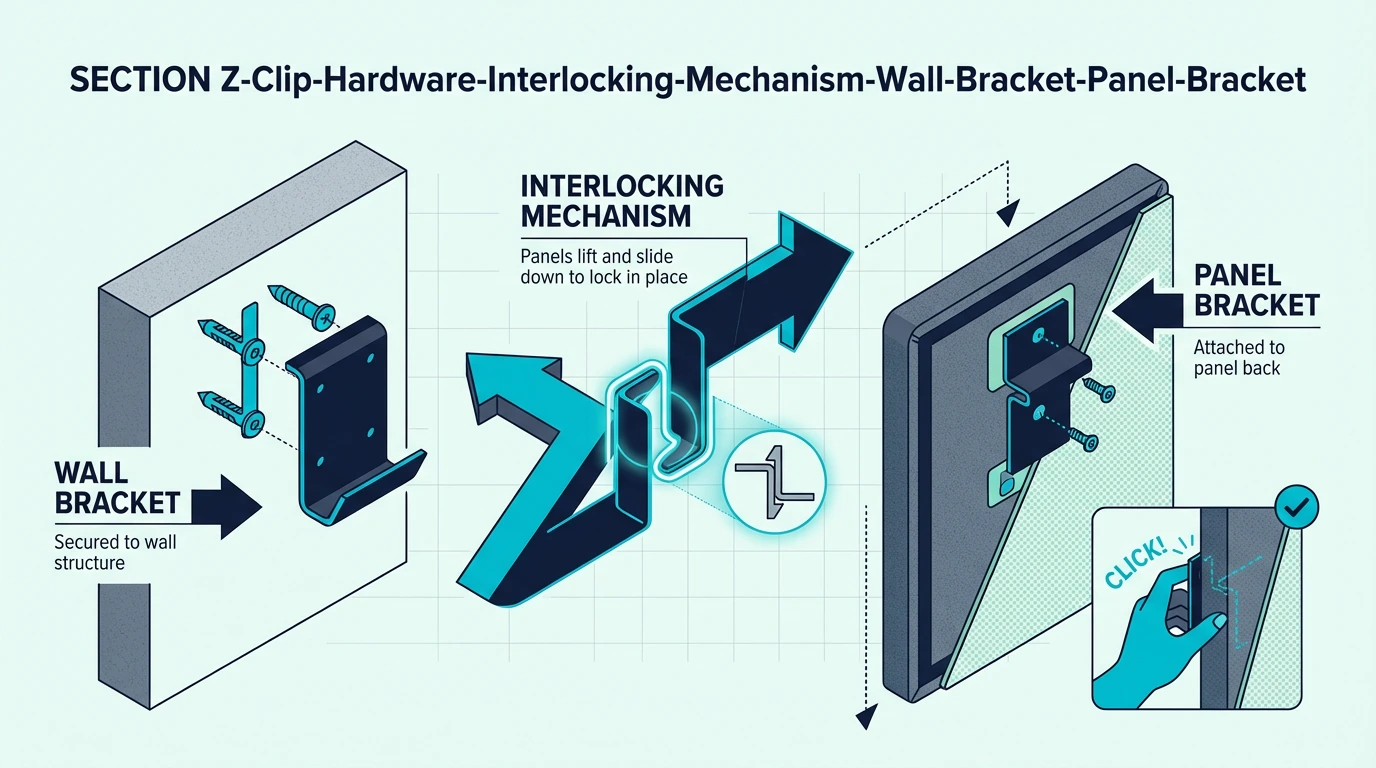
Z-clips get their name from their profile shape — view one from the side and it looks like the letter Z. One piece screws to your wall with the hook facing up, and the matching piece screws to your panel with the hook facing down.
The weight distributes across the entire length of the clip rather than concentrating at single screw points. A pair of 24-inch Z-clips can support substantially more weight than four individual screws ever could.
This matters because acoustic panels are surprisingly heavy once you factor in wooden frames. That weight distribution is what lets Z-clips safely hold 30+ pounds.
The installation forgiveness is another massive advantage. Because the clips interlock loosely before you release the panel’s weight, you get a few millimeters of adjustment for leveling.
That might not sound like much, but it’s the difference between panels that look professionally installed and ones that drive you crazy every time you look at them.
Z-clips also make future adjustments painless. You simply lift the panel up and off the wall brackets — no tools required.
The wall clips stay in place, ready for you to rehang whenever you want. Need to repaint? Lift off the panels.
Want to try a different arrangement? Move the wall clips.
Step-by-Step Z-Clip Installation
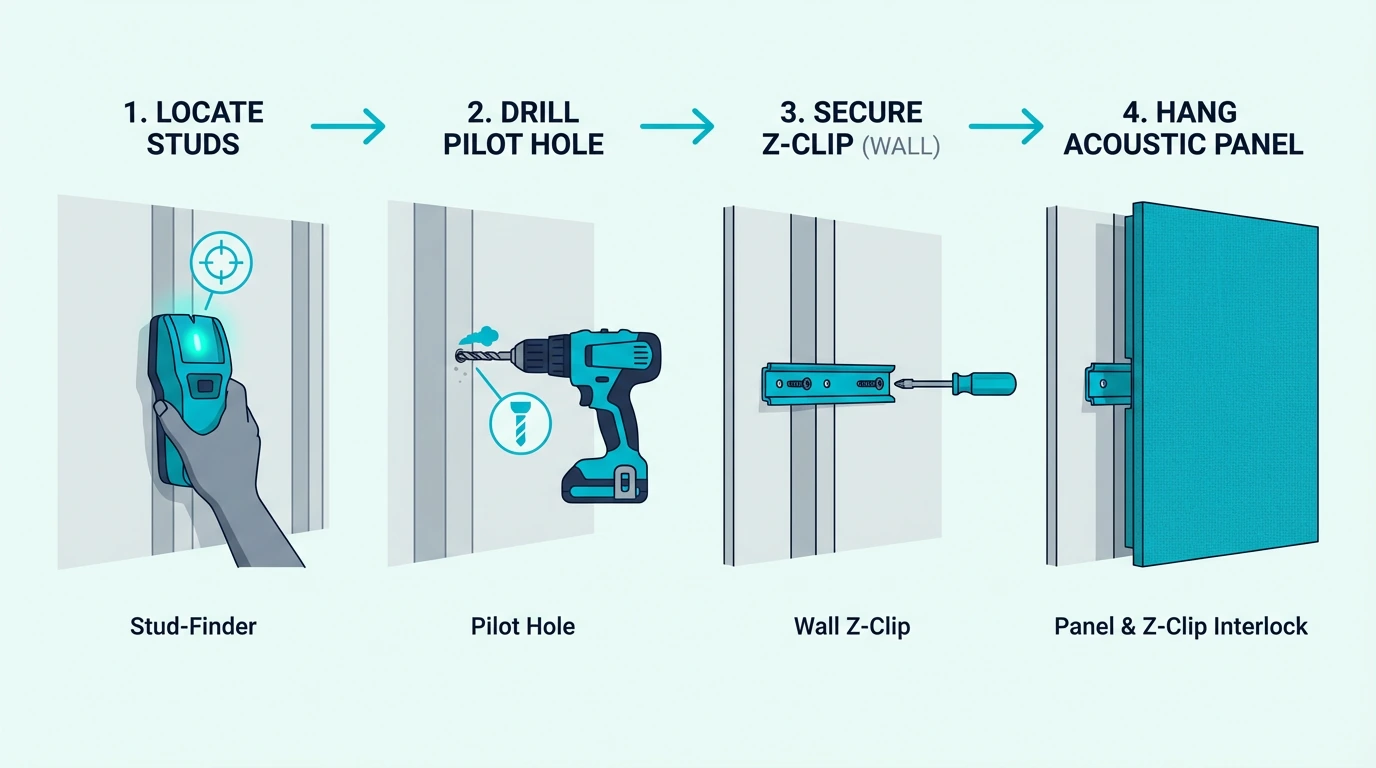
Let’s walk through the actual process, because it’s easier than most people expect. Start by marking where you want your panel’s top edge to sit — use a pencil and level to draw a light horizontal line.
Most people position panels with the top edge 2-3 inches below the ceiling for visual balance. This also leaves room for the mounting hardware and creates a more intentional look than jamming panels right against the ceiling.
Hold the wall-side Z-clip against your mark and grab your stud finder. This 30-second step saves enormous headaches later.
If studs align with your clip, drive screws directly into them — this is the strongest possible mount.
No studs where you need them? You’ll need drywall anchors rated for your panel weight.
Now attach the panel-side Z-clip to your acoustic panel’s frame. Position it 1-2 inches below the top edge so it stays hidden when hung.
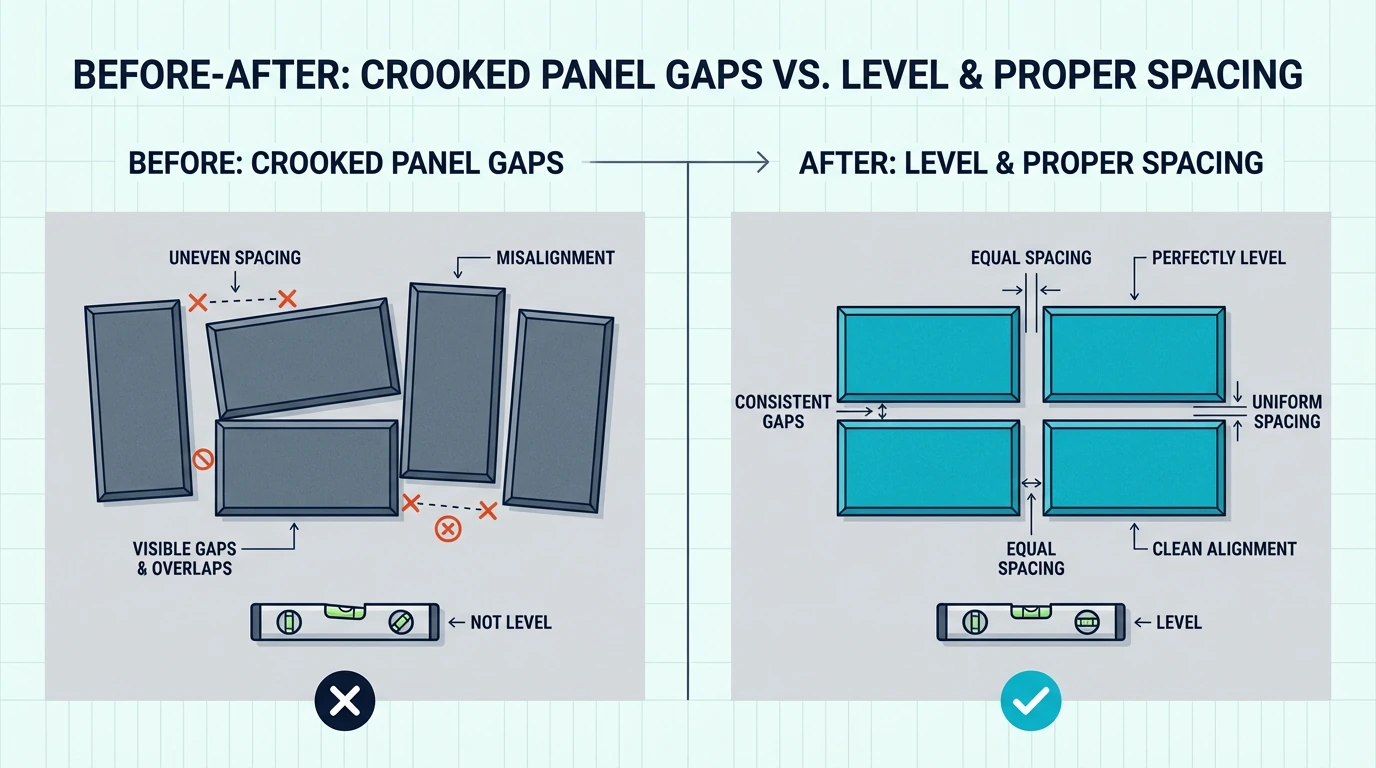
Make absolutely sure both clips are the same distance from the panel edges, or your panel will hang crooked.
Lift your panel, align the clips visually, and hook the panel bracket over the wall bracket. Lower the panel gently until it settles into position.
Check level one more time and adjust if needed. The whole process takes about 10 minutes per panel once you’ve done it once.
Get Studio Tips Weekly
Join 5,000+ creators getting acoustic treatment advice every week.
No spam. Unsubscribe anytime.How Do You Hang Panels Without Drilling?
Z-clips are great — unless you’re renting. If wall damage means losing your security deposit, you need a different approach entirely.
The good news? Adhesive mounting has come a long way. Command Large Picture Hanging Strips work beautifully for lighter panels and leave walls completely unmarked when removed properly.
Command Large Picture Hanging Strips
Do Command Strips Work for Acoustic Panels?
The honest answer is: yes, but with important limitations. Command strips absolutely work for acoustic panels — just not all of them.
Standard Command picture hanging strips hold about 4 pounds per pair. Heavy-duty strips hold up to 16 pounds total when you use multiple strips together.
That 16-pound limit rules out heavier fabric-wrapped panels, but it covers most foam panels and many lightweight fiberglass options.
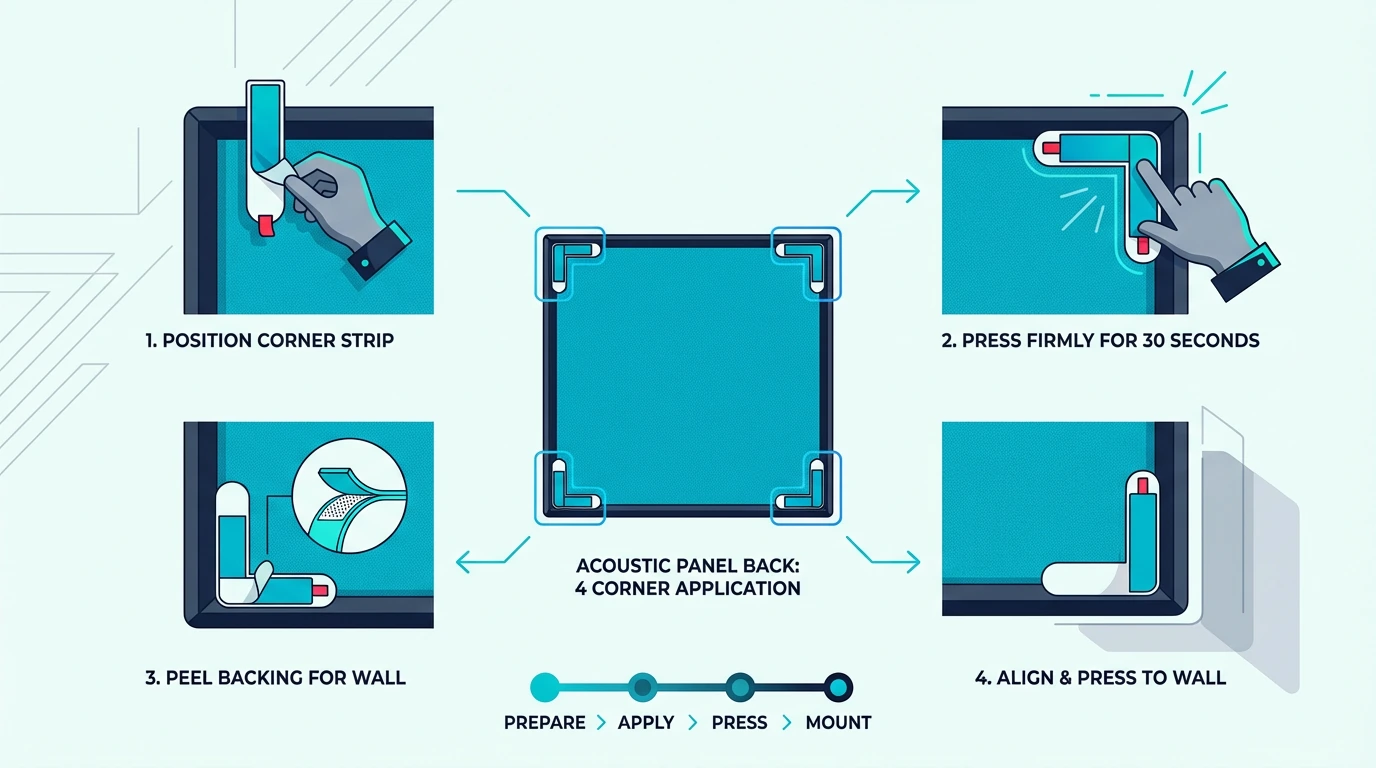
The math here is straightforward. For a 10-pound panel, use at least four large Command strip pairs positioned at the corners.
This provides safety margin and prevents the panel from tilting or slowly peeling away over time.
Here’s what most people get wrong: surface preparation. Both the wall and panel back must be clean, smooth, and completely dry.
Wipe both surfaces with rubbing alcohol to remove dust, oils, and any residue. Let them dry completely — rushing this step is why panels fall down three weeks later.
Application technique matters just as much. Press firmly on each strip for 30 seconds, and actually count to thirty — this activates the adhesive bond fully.
Then comes the hard part: waiting. Most Command strips need at least one hour to cure before hanging your panel.
For heavier items, overnight is better. Patience here prevents heartbreak later.
What Weight Can Adhesive Strips Hold?
Understanding weight limits prevents the frustrating experience of watching panels slowly peel off your wall over weeks. Different products have dramatically different capacities, and the packaging isn’t always clear.
Standard small Command strips max out around 4 pounds per pair. That rules them out for anything but the lightest foam panels — we’re talking the thin, decorative stuff.
Large Command strips handle about 12 pounds per pair. Heavy-duty Command strips reach 16 pounds total using multiple strips together.
Industrial Velcro strips typically hold around 10 pounds per pair.
But the packaging doesn’t tell you this: temperature and humidity affect adhesive performance significantly. Strips applied in cold rooms or high humidity may never bond fully.
They’ll seem fine for weeks, then suddenly release.
Adhesive strength also decreases over time, especially in rooms with temperature swings. If you’re in a humid climate or have poor climate control, add extra strips as insurance.
The safest approach is exceeding the minimum requirement by at least 50%. If your panel weighs 10 pounds and strips hold 16 pounds total, that’s technically sufficient.
Adding another pair costs almost nothing and dramatically reduces the chance of waking up to panels on the floor.
Understanding optimal panel placement helps you plan how many panels you’ll need — and whether adhesive mounting will work for your situation.
How Do You Hang Panels on Drywall?
Drywall is what most homes have, and it accepts virtually every mounting method we’ve discussed. The challenge is knowing when drywall alone provides enough support.
Standard half-inch drywall can hold surprising weight with proper anchors — the key word being “proper.” Wrong anchor type is the number one reason panels fall, and it happens way more often than you’d think.
Do You Need to Find Studs?
Here’s the simple rule: for panels over 15 pounds, hit at least one stud. Wall studs are solid wood framing behind your drywall, and they provide the strongest anchor points available in residential construction.
Standard stud spacing is 16 inches on center. That means at least one stud typically falls behind a 24-inch wide panel.
Now, lighter panels under 10 pounds work fine with drywall anchors alone — no studs required. Toggle bolts and snap toggles hold 25-50 pounds in half-inch drywall, far exceeding what most acoustic panels weigh.
The key is understanding how these anchors work. They spread force behind the drywall rather than relying on the drywall itself.
A stud finder makes locating studs trivial. These inexpensive tools detect density changes in the wall and beep when they find framing.
Even if your ideal panel position doesn’t align perfectly with studs, getting at least one screw into solid wood transforms mounting security. The stud carries most of the load while anchors handle the remaining screws.
If you’re calculating how many panels you need, plan stud locations early. It’s much easier to adjust positions by a few inches now than to move panels after they’re installed.
Which Anchors Work Best?
Not all drywall anchors are created equal, and choosing the wrong type is a common mistake. Let me break down what actually works.
Toggle bolts offer the strongest drywall anchor option for acoustic panels. They spread weight behind the drywall using spring-loaded wings that open after passing through the wall.
Quality toggle bolts hold 25-50 pounds depending on size and drywall thickness.
Snap toggles are the evolved version of traditional toggles. They’re easier to install because you can remove and reinsert the screw without losing the toggle behind the wall.
Same weight capacity, much better user experience if you need to adjust anything.
Plastic expansion anchors are what most people grab because they’re cheap and available everywhere. They work adequately for panels under 8 pounds but shouldn’t be your first choice for anything heavier.
The problem with plastic anchors is they creep and deform over time under sustained load. Your panel might stay up for months, then suddenly one morning it’s on the floor.
Self-drilling anchors offer a middle ground. These metal anchors drill their own pilot holes and hold 25-75 pounds depending on design.
They’re quick to install and strong enough for most acoustic panels.
When selecting products, you can find top-rated panels that include mounting hardware — which takes the guesswork out of anchor selection entirely.
How Do You Hang Panels on Concrete or Brick?
Concrete and brick walls require a completely different approach — one that intimidates a lot of people. Once you understand the technique, concrete mounting is actually more secure than drywall.
Your panels literally won’t come down unless you want them to.
The catch? You’ll need specialized hardware that most people don’t have lying around. A Tapcon Concrete Anchors gives you everything needed for professional-quality masonry mounting.
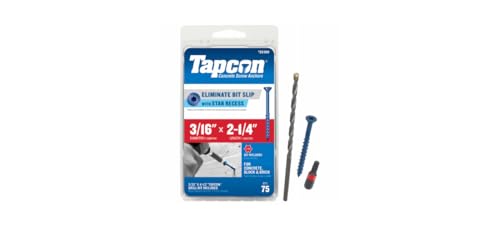
Tapcon Concrete Anchors
What’s Different About Hard Surfaces?
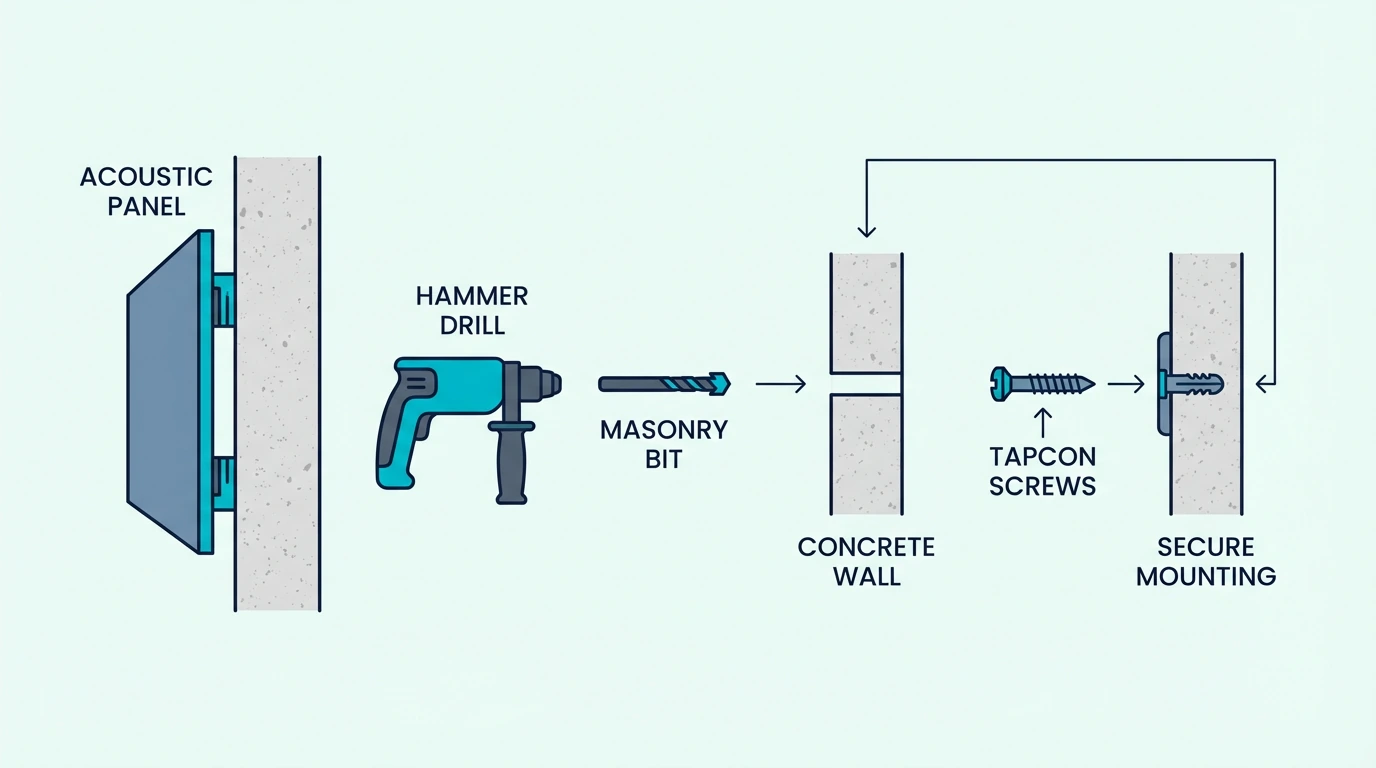
The fundamental difference is that concrete and brick don’t accept screws the way wood and drywall do. You can’t just drive a screw in — the material is too dense.
Instead, you must drill pilot holes first using a masonry-specific bit. Then you use fasteners designed to grip inside those holes.
A hammer drill is essential for concrete work. These tools combine rotation with rapid hammering action to break through hard materials.
Regular drills just spin on concrete — they’ll burn out their bits and barely make a mark. You can rent hammer drills from most hardware stores for about $40 per day if you don’t want to buy one.
The massive upside of masonry mounting is the incredible holding power. Once properly installed, concrete fasteners hold substantially more weight than any drywall method.
One detail most people overlook: dust management. Concrete drilling creates fine powder that fills the pilot hole and prevents fastener grip.
Blow out holes with compressed air or a shop vacuum after drilling. This simple step dramatically improves holding strength.
Which Hardware Works on Masonry?
Tapcon screws are the go-to concrete fastener for acoustic panel mounting. These self-tapping screws grip directly into concrete after you drill a pilot hole slightly smaller than the screw diameter.
A single Tapcon can hold 150+ pounds in solid concrete. That’s not a typo — we’re talking about holding power that makes drywall anchors look like toys.
Sleeve anchors provide even more holding power for very heavy installations. These expand behind the masonry surface for maximum grip.
They’re overkill for most acoustic panels, but essential for overhead ceiling installations or extremely heavy custom panels.
Adhesive mounting works on concrete too, though it’s typically a permanent solution. Construction adhesive like Liquid Nails bonds directly to concrete and holds firmly.
The panel can’t be removed without damage, but it will absolutely never fall.
The installation sequence for Tapcon mounting is simpler than it sounds. Mark your mounting points, drill pilot holes with your hammer drill and masonry bit, clear dust from the holes, then drive Tapcon screws through your Z-clip brackets.
The Z-clips work identically on concrete as they do on drywall — only the wall-side fastening method changes.
How Do You Hang Panels on Ceilings?

Ceiling mounting is where things get serious. Everything we’ve discussed so far needs to be stronger and more secure when you’re working overhead — gravity is constantly trying to pull your panels down.
A panel falling from a ceiling can cause serious injury. For detailed ceiling-specific techniques, see our ceiling panel installation guide.
Is Ceiling Hanging Different from Walls?
Yes, fundamentally different. Wall-mounted panels rest partially on their hardware, with gravity pushing them into the wall.
Ceiling panels hang entirely from their fasteners, with gravity working against you 24/7.
This changes the hardware requirements completely. You must hit ceiling joists for any panel over 10 pounds — no exceptions.
Joists are the solid wood framing in your ceiling, just like wall studs are in your walls.
Standard joist spacing is 16 inches on center, though some construction uses 24-inch spacing. A stud finder works on ceilings just like walls.
One practical challenge most people don’t anticipate: you can’t hold a panel overhead and drive screws simultaneously. You’ll need help.
A T-brace or helper holds the panel in position while you secure the fasteners. Plan for this before you’re standing on a ladder wondering how to proceed.
The location of ceiling panels matters for acoustic performance too. Recording studio setups often use ceiling “clouds” positioned above the listening position.
These suspended panels prevent sound from bouncing off flat ceiling surfaces and significantly improve room acoustics.
What Hardware Is Safe Overhead?
Direct joist mounting using 2.5-inch wood screws is the truly secure method for heavy overhead panels. Screws must penetrate at least 1.5 inches into the joist.
Toggle bolts work between joists but require careful weight calculations. For ceiling installations, never exceed 50% of the toggle’s rated capacity.
A toggle rated for 50 pounds should hold no more than 25 pounds on a ceiling. This safety margin accounts for dynamic loads — vibrations, air pressure changes, and long-term gravitational stress.
Suspended “cloud” panels using aircraft cable are beautiful but require professional consultation for installations over seating areas. The cables must be rated for dynamic loads, and ceiling anchors need to handle the combined weight of panel plus any lateral forces.
The safest approach for DIY ceiling work is keeping panels small and light. Multiple smaller panels are easier to install safely than single large panels and provide better acoustic coverage by distributing treatment across more ceiling area.
Can You Hang Panels on Doors or Windows?
Doors and windows are where people get creative — and sometimes frustrated. The challenge is that permanent mounting doesn’t make sense when you need to actually use the door or see through the window.
These applications require solutions that balance acoustic effectiveness with daily functionality. The good news is several approaches work well once you understand the constraints.
How Do You Mount Panels on Doors?
Command strips work surprisingly well for lightweight foam panels on doors. Door surfaces are typically smooth and clean, which is exactly what adhesive mounting needs.
But doors hang from hinges designed for the door’s weight alone. Adding even 5 pounds can stress hinges over time, leading to sagging or binding.
Heavier fabric panels require a completely different approach. A freestanding frame that leans against the closed door works better than direct mounting.
Build or buy a simple wooden frame slightly smaller than your doorway, cover it with acoustic material, and prop it in place. The frame moves out of the way when you need the door.
Over-door hooks provide another option for lightweight treatment. These hooks drape over the top of the door and support acoustic blankets or lightweight panels.
Adhesive options also work for temporary door mounting, especially for foam panels you might want to reposition later.
What About Removable Window Panels?
Acoustic window inserts are one of the more clever solutions out there. These custom-fit panels press against the window opening using foam weatherstripping around the edges.
Building removable window panels is straightforward. Measure your window opening precisely, build a lightweight frame 1/4 inch smaller in each dimension, cover it with acoustic material, and add foam weatherstripping around the perimeter.
The slight oversize after adding weatherstripping creates the pressure fit. Pop the panel in when you need acoustic treatment, pop it out for natural light.
For more permanent window treatment, mount panels on hinged frames that swing open. The hinges attach to the wall beside the window, not the window frame itself.
Magnetic mounting offers another option for metal window frames. Strong rare-earth magnets attached to panel corners grip metal frames securely and release instantly when you pull the panel away.
How Do All Hanging Methods Compare?
At this point, you’ve seen several different mounting methods — and you might be wondering which one actually makes sense for your situation. Let me break this down practically.
No single method wins across every category. The best choice depends entirely on your walls, your panels, and whether you’re renting or own the space.
For guidance on choosing panels themselves, our acoustic panels hub covers selection basics.
Z-clips take about 15 minutes per panel including measuring and leveling. They hold 30+ pounds reliably and remove easily for repositioning.
The tradeoff is small screw holes in your wall, which many renters can’t accept.
French cleats offer even higher weight capacity at 50+ pounds but require more precise installation. The angled interlocking design is stronger than Z-clips but less forgiving of measurement errors. A Heavy Duty French Cleat Hanger includes a built-in level for easier installation.
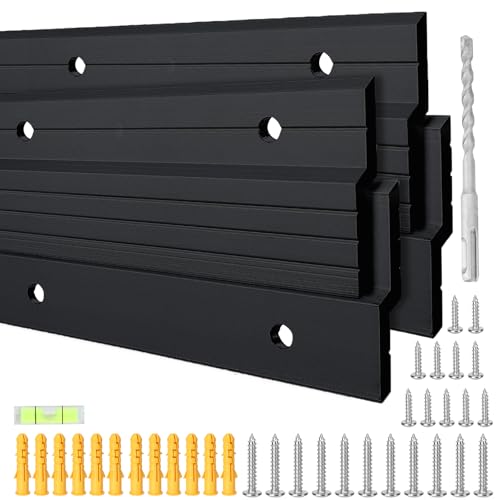
Heavy Duty French Cleat Hanger
Command strips take only 5 minutes but max out at 16 pounds. They’re perfect for renters and leave no wall damage when removed properly.
The catch is the adhesive bond can fail over time, especially in humid conditions.
Surface Mount Impaling Clips install in about 3 minutes but work only with foam panels and hold just 5 pounds maximum. They’re specialized hardware for a specific use case.
Surface Mount Impaling Clips
Tapcon mounting on concrete takes 20 minutes and requires a hammer drill, but provides 150+ pounds of holding power that will literally outlast the building. If you have concrete walls and own the space, this is honestly the best option.
For most home studio applications, Z-clips hit the sweet spot of strength, ease, and affordability. Use Command strips only when wall damage is absolutely unacceptable and your panels are genuinely lightweight.
Save concrete fasteners for permanent installations where failure isn’t an option.
What Mistakes Should You Avoid When Hanging Panels?
Let’s talk about what goes wrong — because learning from other people’s mistakes is a lot cheaper than making your own. Most installation failures come from rushing or choosing hardware based on convenience rather than actual requirements.
The single most common mistake is underestimating panel weight. A 15-pound panel on 12-pound-rated Command strips might stay up for weeks before suddenly releasing.
When it finally falls, it often lands face-down and damages the fabric covering.
If you’re building DIY acoustic panels, factor in frame weight when calculating total panel weight. That wooden frame adds more pounds than people expect.
Can Wrong Hardware Cause Panels to Fall?
Wrong hardware is the number one cause of acoustic panel failures. Mismatched weight capacity causes most problems, but anchor type matters just as much.
Plastic expansion anchors in drywall fail regularly under sustained load. They work fine initially, but the plastic material creeps and deforms over time.
Your panel might stay up for months before suddenly releasing one morning.
Using only one Z-clip per panel is another frequent mistake. A single clip creates a pivot point instead of stable mounting.
The panel swings with vibrations, stresses the clip, and eventually works loose.
Always use at least two clips per panel, positioned near the top corners. This isn’t optional — it’s the minimum for stable mounting.
Skipping pilot holes in masonry causes concrete to crack around fasteners. Without a proper pilot hole, the hammer drill’s energy goes into the surrounding material rather than the drill bit.
Cracked concrete doesn’t hold fasteners reliably.
Installing drywall anchors without checking for studs wastes the strongest mounting option available. Spending two minutes with a stud finder can transform a marginal installation into a bulletproof one.
Should Panels Have an Air Gap?
Here’s something most installation guides skip: air gaps significantly improve low-frequency absorption. Panels mounted flush against walls perform about 30% worse at bass frequencies compared to panels with 2-4 inches of space behind them.
The air gap creates a resonant chamber that enhances absorption at lower frequencies. Your panels actually work better when they’re not touching the wall.
Z-clips and French cleats automatically create a small air gap — usually about half an inch. This built-in spacing provides some acoustic benefit without additional effort.
For maximum bass control, use standoff spacers to increase the gap.
Building standoff spacers is simple. Cut small wooden blocks to your desired gap depth and attach them between the panel and wall.
The panel mounts to the spacers rather than directly to the wall. Two-inch spacers are common for home studio applications.
The air gap also prevents moisture issues. Panels mounted directly against exterior walls can trap condensation and develop mold over time.
The gap allows air circulation and keeps both the wall and panel dry. This matters especially in humid climates or basement studios.
Conclusion
Here’s what matters: matching your hardware to your panel weight and wall type. That single decision determines whether your panels stay up for years or end up on the floor.
Z-clips handle most drywall installations beautifully — they’re what professionals use, and they’re affordable enough for any budget. Command strips serve renters well for lighter panels when wall damage isn’t an option.
Tapcon screws make concrete mounting essentially permanent.
Take ten minutes to assess your specific situation before buying anything. Weigh your panels, identify your wall material, and decide whether you need easy removal later.
Start with your heaviest panel and work backward from there. If that panel needs Z-clips into studs, all your other panels probably do too.
If your heaviest panel is only 8 pounds, adhesive mounting might work throughout your room.
Either way, you now have the knowledge to make that decision confidently — and avoid the frustrating experience of watching your hard work crash to the floor.
Frequently Asked Questions
How Do You Hang Heavy Panels?
For panels over 20 pounds, mount directly into wall studs using 2.5-inch wood screws through Z-clips. If studs don’t align, use toggle bolts rated for at least 1.5 times your panel weight.
Toggle bolts distribute weight behind the drywall, providing far more holding power than surface-mounted anchors.
The key rule: never rely on drywall alone for panels over 25 pounds.
Can You Reposition Panels After Hanging?
Yes — if you chose the right hardware. Z-clips and French cleats allow easy repositioning.
Lift the panel up and off the wall clips, move the wall hardware to the new location, and rehang.
Command strips don’t allow repositioning — removing them destroys the adhesive bond. You’ll need fresh strips at the new location.
Will Hanging Panels Damage Walls?
Any screw-based method leaves holes, though the damage is minor. Z-clips and French cleats typically require 2-4 screw holes per panel.
These holes fill easily with spackle if you remove panels later, and a dab of touch-up paint makes them invisible.
Command strips claim damage-free removal, but they can pull paint in some cases. Test in an inconspicuous area before committing to visible locations.
How Many Mounting Points Does Each Panel Need?
Minimum two mounting points for stability, positioned near the top corners. Panels over 24 inches wide benefit from three points — left, center, and right — to prevent bowing or warping in the middle.
Ceiling panels always need at least four mounting points regardless of size. The constant downward force requires more security than wall mounting.
Position points near each corner and add center points for panels larger than 24×24 inches.