How to Attach Bass Traps and Acoustic Panels Safely [2025]
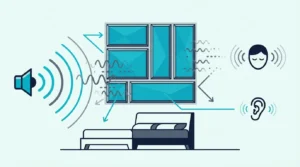
How to attach bass traps and acoustic panels without them crashing to the floor — the real goal is simple: nothing falls.
You can hang a lightweight panel with almost anything, but bass traps are heavier because they’re thicker and denser.
If you’re treating corners or ceiling junctions, you’re also working in the most awkward spots in the room. That’s where screws miss studs, anchors pull out, and renters start thinking about their deposit.
The fix is boring (in a good way): match your hardware to the weight, wall type, and mount style.
Below, you’ll find hardware options for every wall type — drywall, concrete, and rental-safe alternatives.
If you need a full placement plan (not just mounting), the studio acoustic panel placement guide maps out where each trap belongs in the room. And if you’re still building your treatment stack, the acoustic panels guide is the hub.
Mount bass traps using French cleats or L-brackets for floor-to-ceiling corner installations, eye bolts with aircraft cable for ceiling-wall junctions, and toggle bolts for drywall without studs. Bass traps are 2-3x heavier than standard panels — always verify your hardware’s weight rating before installation.
Why Is Mounting Bass Traps Different from Regular Panels?
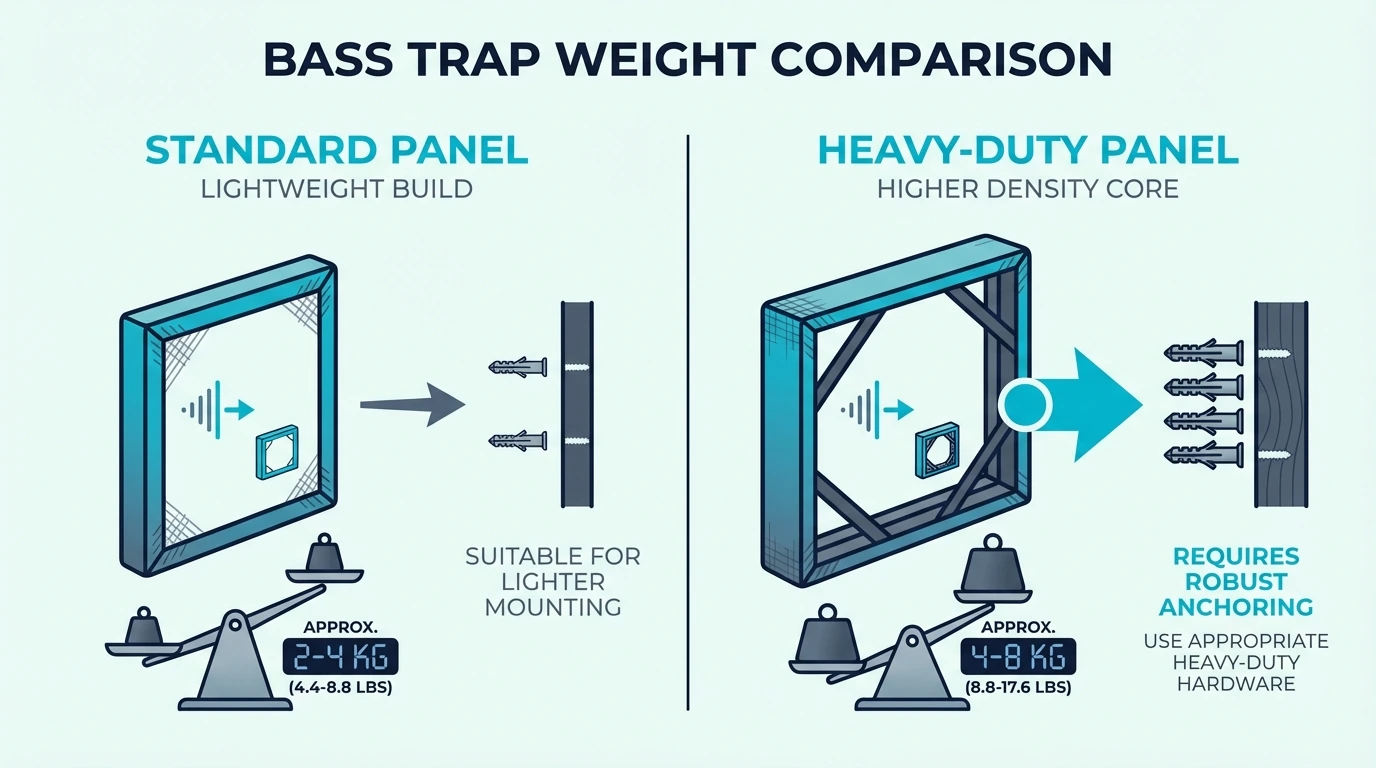
The first surprise is the weight.
A standard 2×4-foot acoustic panel might weigh 8–15 pounds. A well-built corner bass trap can hit 25–50 pounds (or more).
That gap changes everything about your mounting approach. The adhesive methods that work for light panels can fail catastrophically with heavier traps.
The line between panels and traps isn’t always obvious — bass traps vs acoustic panels breaks down the weight and sizing differences that affect which hardware you need.
What Makes Bass Traps Heavier?
That extra weight comes from the material itself. Low frequencies have long wavelengths, and absorbing them takes 4–6 inches of dense mineral wool or fiberglass — not the thin 2-inch batts you see in lightweight panels.
Add a rigid wooden frame around that insulation and you’re looking at 25–50 pounds per trap. Picture hooks and adhesive strips weren’t designed for that kind of load, which is why “mounting like a picture” usually ends with a cracked corner.
Triangular “superchunk” designs push the weight even further. They pack more insulation into the same corner footprint — better absorption, but heavier and harder to secure.
How Much Weight Can Different Hardware Hold?
All that extra insulation — 4 to 6 inches of it — means hardware has to keep up. If the hardware is barely rated for the trap, it will fail eventually.
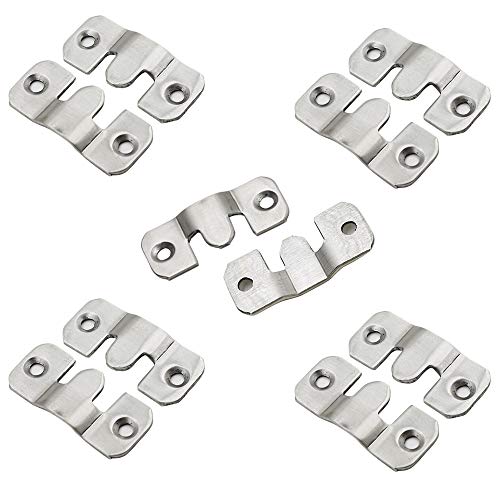
The French Cleat Picture Hanger (2-inch) gives you a strong, repeatable mount that distributes weight along its full length.
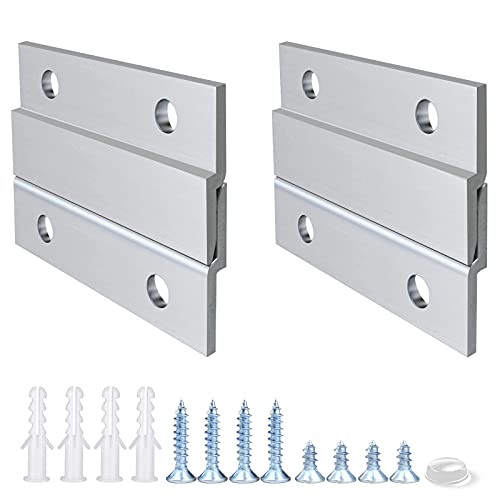
French Cleat Picture Hanger (2-inch aluminum Z-hanger)
For lighter treatments, the Luomorgo Z-Clips (10-pack) sit flush against the wall and make panels easy to remove.
Luomorgo Z-Clips (10-pack flush-mount brackets)
The Z-Clip 375 Panel Clips split the difference — sturdier than standard Z-clips but still removable when you need to reposition.
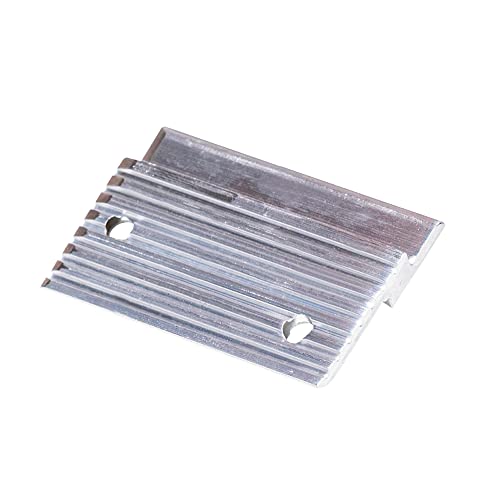
Z-Clip 375 Panel Clips (heavy-duty aluminum)
Which Mounting Systems Work Best?
French cleats handle the heaviest loads because they spread weight along their full length — no single screw takes all the stress. Z-clips use the same interlocking principle in a smaller package, which gives you a lower profile on the wall when the trap doesn’t need full-cleat strength.
L-brackets work differently from both. Instead of suspending weight from the wall, they create a shelf that holds the trap from below — you’re just stopping it from tipping forward, not fighting gravity.
What About Drywall Without Studs?
Cleats, Z-clips, and L-brackets all assume you can hit studs or solid backing — but plenty of walls don’t cooperate. Drywall alone isn’t a reliable anchor for heavy traps.
Toggle bolts solve this problem by gripping the back of the drywall. They spread the load across a much larger area than a plastic anchor.
The TOGGLER SNAPTOGGLE Drywall Anchor is one of the strongest snap-toggle options for this. Once the metal channel locks behind the drywall, it isn’t going anywhere.
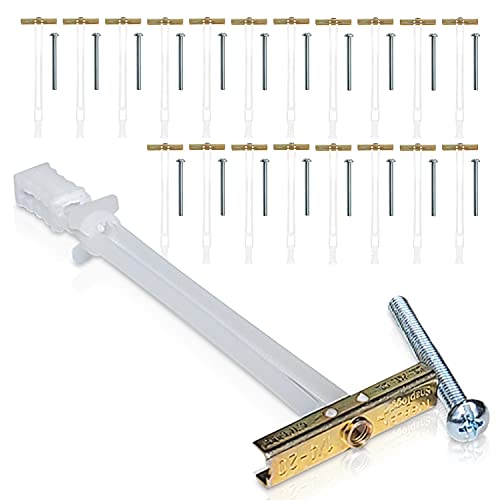
TOGGLER SNAPTOGGLE Drywall Anchor
The same anchor logic applies to standard panels — how to install acoustic panels runs through the full process for lighter treatments.
If you’re pairing panels with bass traps, the best acoustic panels roundup ranks the top options by room type and budget.
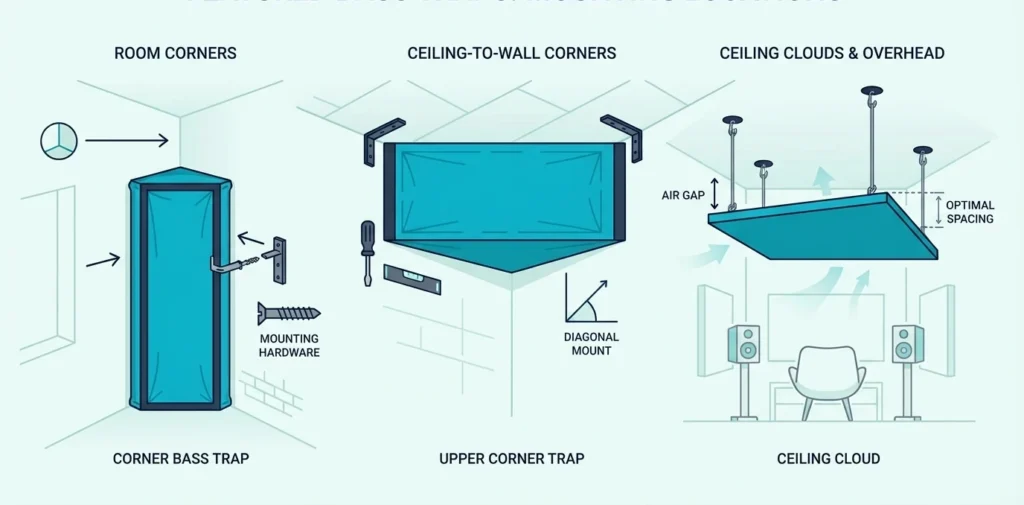
How Do You Mount Bass Traps in Corners?
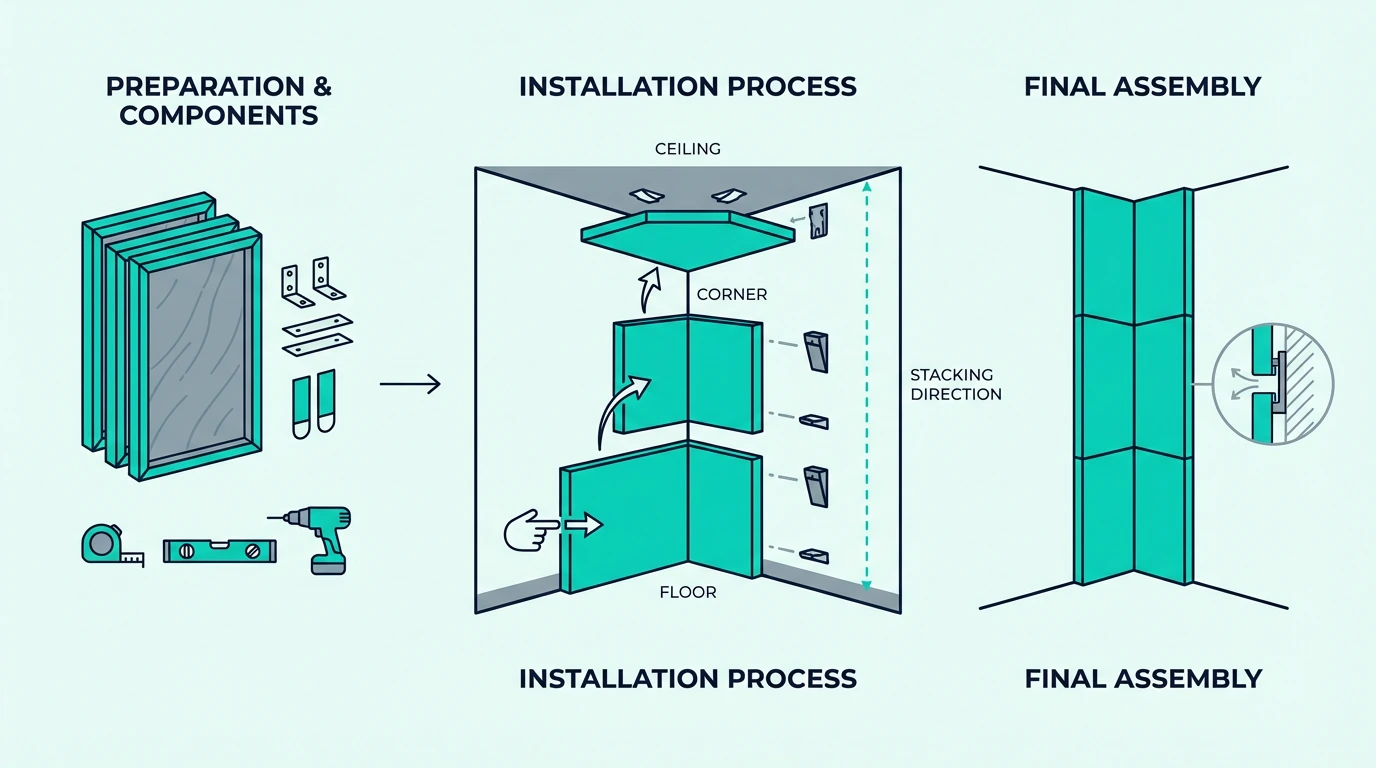
Corner mounting is the most common bass trap install for a reason. Bass piles up where surfaces meet, especially in the four vertical corners of a rectangular room.
Three setups cover most installs: a single floor-to-ceiling trap, stacked smaller modules, or triangular superchunks. If you’re deciding which corners matter most, where to install acoustic panels ranks the priority spots by room shape.
What’s the Best Approach for Floor-to-Ceiling Traps?
The first of those three setups — a single floor-to-ceiling trap — looks clean and gives you maximum coverage in one piece. The good news is you usually don’t need to suspend all that weight from the wall. Rest the bottom of the trap on the floor and let gravity do most of the work. Then use brackets or a cleat near the top to keep it from tipping forward.
Place your stabilizing brackets roughly 12–18 inches down from the top. Keep them level, or the trap will sit crooked and look sloppy.
Can You Stack Multiple Traps?
Full-height traps aren’t the only way to fill a corner. Stacking smaller modules gets you the same floor-to-ceiling coverage with pieces you can actually carry.
Start with the bottom trap resting on the floor. Add modules above it, securing each one to the wall so it can’t tip forward.
Smaller modules also make solo installs realistic. Wrestling a 60-pound trap into a corner is how you end up gouging drywall.
How Do You Mount Triangular Corner Traps?
Stacked or full-height, rectangular traps aren’t the only option. Triangular “superchunk” designs pack more insulation into the corner — but their shape makes mounting less intuitive.
The simplest approach uses two L-brackets, one on each wall, to create a shelf. Set both brackets at the same height so the trap sits naturally in the corner.
For extra security, run a short cleat across the back corner. That locks the trap into both walls while the brackets do the supporting.
Get Studio Tips Weekly
Join 5,000+ creators getting acoustic treatment advice every week.
No spam. Unsubscribe anytime.How Do You Mount Bass Traps on Ceilings?
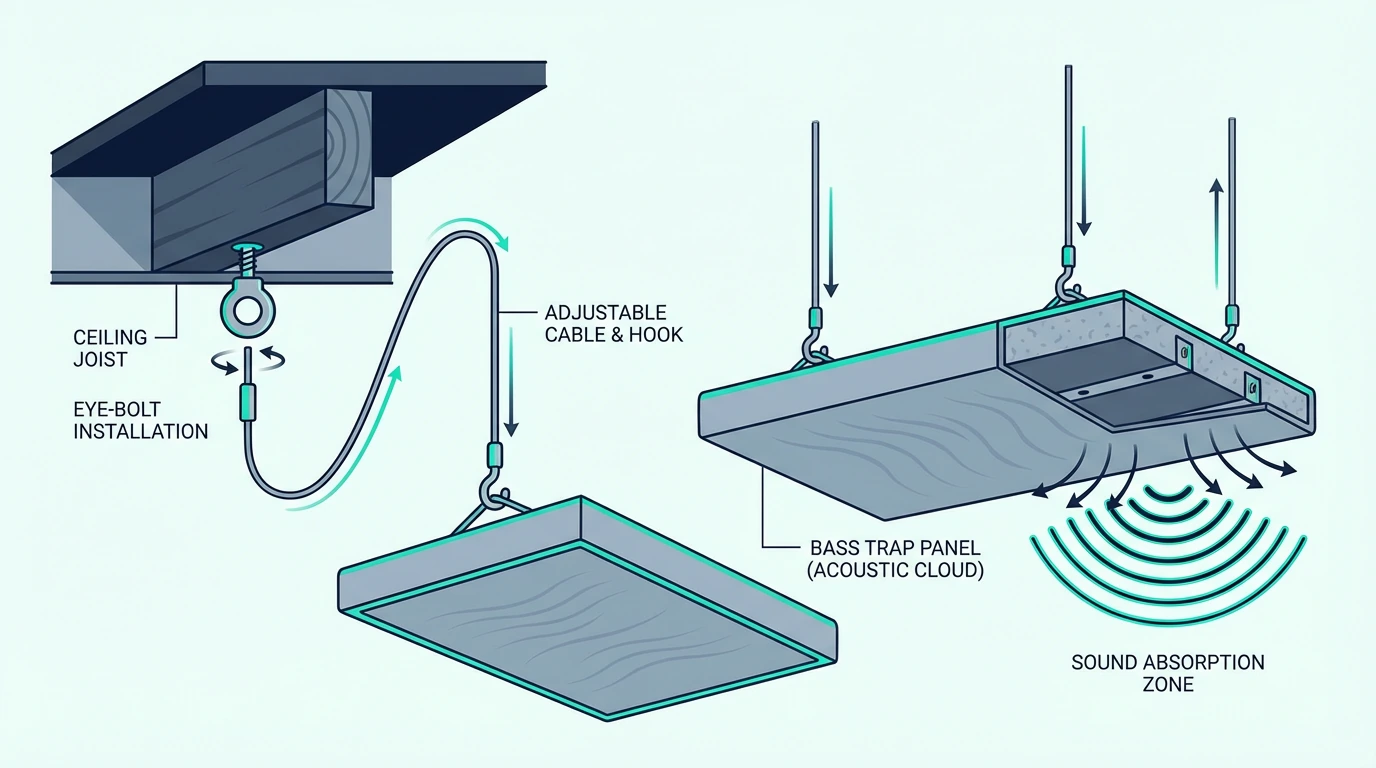
Once the vertical corners are treated, ceiling-wall junctions are the next priority. Bass collects in these horizontal corners the same way it collects in vertical ones — but the hardware, hanging distance, and mounting style all change when you’re working overhead.
What Hardware Works for Ceiling Mounting?
Working overhead means every fastener fights gravity full-time, so the hardware has to be anchored into structure — not just drywall. Eye bolts into ceiling joists are the starting point for most ceiling installs.
Aircraft cable (wire rope) connects eye bolts to the trap. It handles high loads without looking like hardware-store chain.
Turnbuckles (or adjusters) make leveling painless. That matters when you’re hanging multiple traps and you want the install to look intentional.
How Far Should Ceiling Traps Hang?
The hardware gets the trap up there — but how far it hangs from the ceiling determines how well it absorbs. An air gap behind a trap can increase low-frequency absorption.
If you’re targeting the ceiling-wall corner, mount your hang points a few inches out from the junction. That keeps the trap in the “bass zone” while still leaving breathing room behind it.
The exact height matters less than consistent spacing. Keep multiple traps at uniform distances so the room looks clean and professional.
Ceiling treatment goes beyond just hanging hardware — acoustic panels ceiling installation covers layout, spacing, and joist-vs-toggle decisions.
What About Soffit-Style Installation?
If hanging cables aren’t practical (or you want a cleaner look), soffit traps sit directly in the ceiling-wall corner. They fill the same space without dangling hardware.
Mount a support ledger (like a simple 1×2) on each wall near the ceiling. The trap rests on the ledgers and wedges into the corner.
This style is great for dedicated studios where appearance matters. It reads as “built-in” instead of “hung.”
How Do You Mount on Concrete or Masonry Walls?
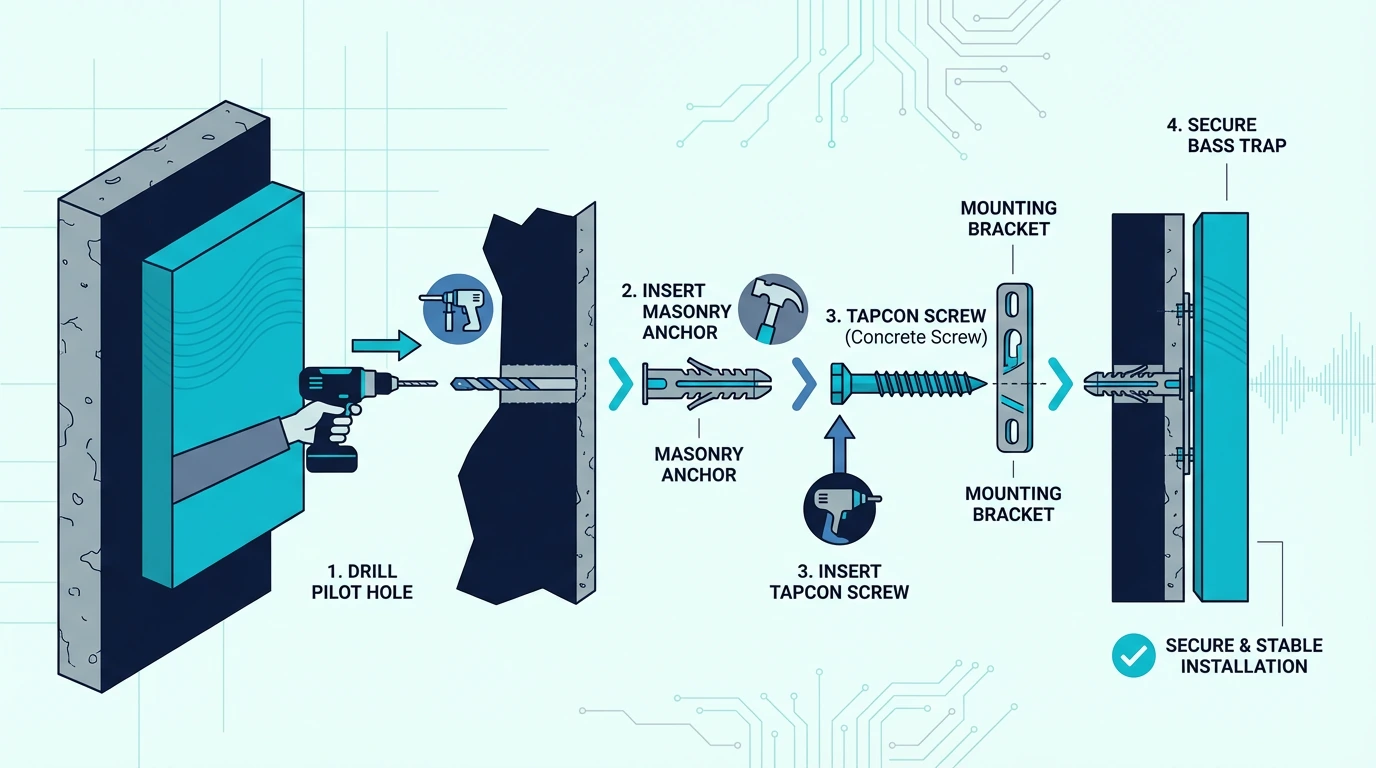
Basement studios and commercial spaces often have concrete or block walls. These surfaces need different hardware than drywall, but they can be very solid once you drill correctly.
What Fasteners Work in Concrete?
The go-to fastener for most concrete jobs is a Tapcon screw — it cuts its own threads into the concrete and holds well as long as you drill to the right depth. For very heavy traps or multi-trap rail systems, sleeve anchors give even more holding power, though they’re usually overkill for a single corner trap.
Either way, you need a hammer drill with a masonry bit. A standard drill will overheat the bit and barely scratch the surface.
What’s the Installation Process?
With Tapcons or sleeve anchors chosen, the drill-and-mount sequence is tight — and skipping a step usually means a fastener that spins instead of bites. Hold the cleat or bracket in place and mark through the holes.
Drill pilot holes with the bit size your fasteners require. Drill slightly deeper than the screw length so dust has somewhere to go.
Vacuum dust out of the holes before driving fasteners. Concrete dust is one of the most common reasons Tapcons “feel tight” but don’t actually hold.
Drive your Tapcons (or install anchors), attach the hardware, then mount the trap. Once you’ve done it once, it’s a quick, repeatable process.
How Do You Mount Bass Traps Without Drilling?
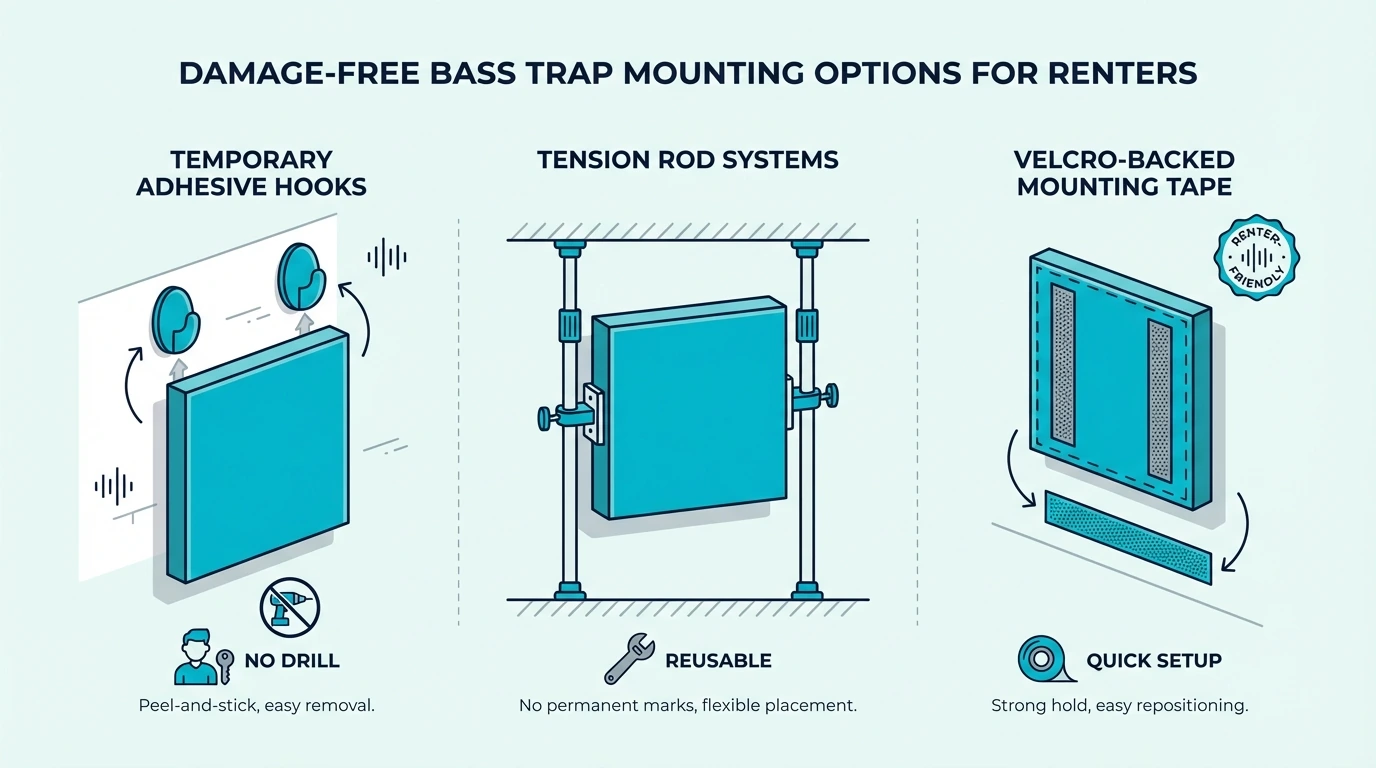
Renters have a real dilemma: bass traps are heavy, but holes cost money. Adhesives and freestanding setups are the two main alternatives — each with real tradeoffs.
Do Any Adhesive Options Work?
The most common adhesive approach is construction glue applied directly between the trap and the wall. It bonds hard and can hold serious weight once fully cured — but the tradeoff shows up on move-out day.
Ripping a glued trap off the wall tears paint, pulls drywall paper, and often leaves damage worse than a few screw holes would have. High-strength tape works for lightweight foam corner pieces, but foam corners absorb far less bass than a real mineral-wool trap — you’re trading performance for convenience.
What About Freestanding Options?
If adhesive removal sounds like trading one kind of wall damage for another, floor-standing traps skip the wall entirely. You can build or buy traps that lean into the corner and support themselves.
The angle matters. A slight backward lean keeps the trap stable without losing corner contact.
Add non-slip pads to prevent the trap from creeping across the floor. If you want “never moves,” add a simple base block at the floor.
For modular panels you can move between apartments, best hanging acoustic panels focuses on renter-friendly designs that hang without permanent hardware.
What Safety Considerations Matter?
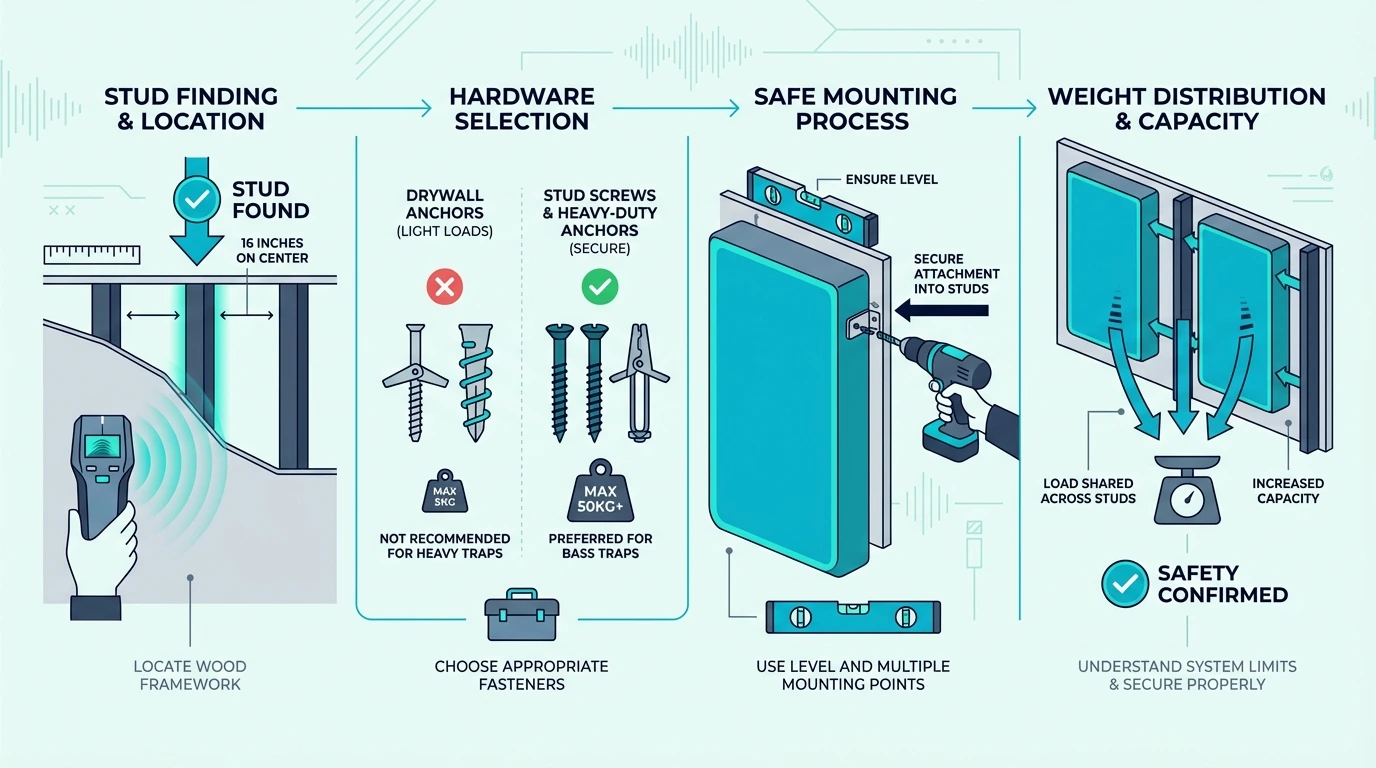
Every mounting method above assumes two things: the hardware can handle the weight, and the wall can handle the hardware. Verifying both — plus checking fire ratings — is the part most installers skip.
How Do You Verify Weight Capacity?
The simplest safety check is also the most skipped: weigh the finished trap on a bathroom scale, then pick hardware rated comfortably above that number. A trap that barely meets the hardware’s rating will hold at first — and fail later when temperature shifts loosen the anchors.
Wall type matters just as much as weight. A stud finder takes ten seconds and tells you whether you’re drilling into solid wood or hollow drywall — and hollow drywall can’t carry serious load without toggle bolts behind it.
Once everything is mounted, push and pull the trap gently before you walk away. Anything that shifts or creaks now will only get worse over time.
What About Fire Safety?
Weight capacity keeps traps on the wall — fire ratings keep the room safe. Most mineral wool and fiberglass insulation is non-combustible or self-extinguishing, but foam varies a lot — don’t assume it’s fire-rated unless the listing says so.
Fabric coverings can burn even when the core is safer. If you’re treating a commercial space, check local fire codes before you hang anything.
DIY wood frames add fuel in a fire. If fire safety is a primary concern, prioritize documented ratings and materials that don’t ignite easily.
The Bottom Line
The single rule behind every bass trap install: match the hardware to the weight. The shortcuts that work for lightweight panels don’t work for heavy traps.
Start with the vertical corners, where bass piles up the most. If the trap rests on the floor, your hardware job is stability, not suspension.
For renters, freestanding or leaning traps are often the best compromise. Perfect mounting is useless if you never install the treatment.
Frequently Asked Questions
Can Command Strips Hold Bass Traps?
No. Most bass traps are too heavy, and adhesive solutions tend to fail over time.
If you need a cleaner look, use French cleats, Z-clips, or brackets. If you need no holes, use freestanding traps.
What’s the Best Mounting Method for Heavy Bass Traps?
For heavy traps, a cleat system into studs (or strong anchors) is the best mix of strength and removability. For concrete, masonry fasteners (like Tapcons) are usually the simplest and strongest option.
How Many Mounting Points Does a Bass Trap Need?
Floor-standing traps usually need just one or two stabilizing brackets near the top — gravity handles the rest. Fully suspended traps need at least two anchor points. Add a third if the trap is wider than 24 inches or heavier than 30 pounds.
Should Bass Traps Touch the Wall?
Yes — a small air gap behind the trap actually improves low-frequency absorption, and most cleats or brackets create that gap automatically.