How Much Air Gap Do Acoustic Panels Need? [2026]
Best air gap for acoustic panels is usually 2–4 inches, but the ideal number depends on the frequency range causing problems in the room.
If your room still sounds boxy or boomy after hanging panels, the low-mids are likely still bouncing between parallel walls.
A small gap behind the panel can push absorption a full octave lower — if you are debating 1-inch vs 2-inch acoustic panels, an air gap matters just as much as panel thickness.
The rest of this guide covers gap sizing by frequency, mounting hardware options, and common mistakes — you’ll know exactly how much space to leave behind each panel by the end.
Start with a 2–4 inch air gap for most rooms to calm boxy low-mids. Create the gap with Z-clips or French cleats plus spacer blocks, and skip the extra complexity if treating only voice and high-frequency echo.
What Is an Air Gap for Acoustic Panels?
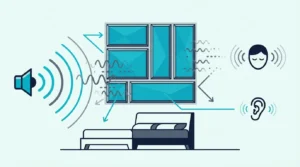
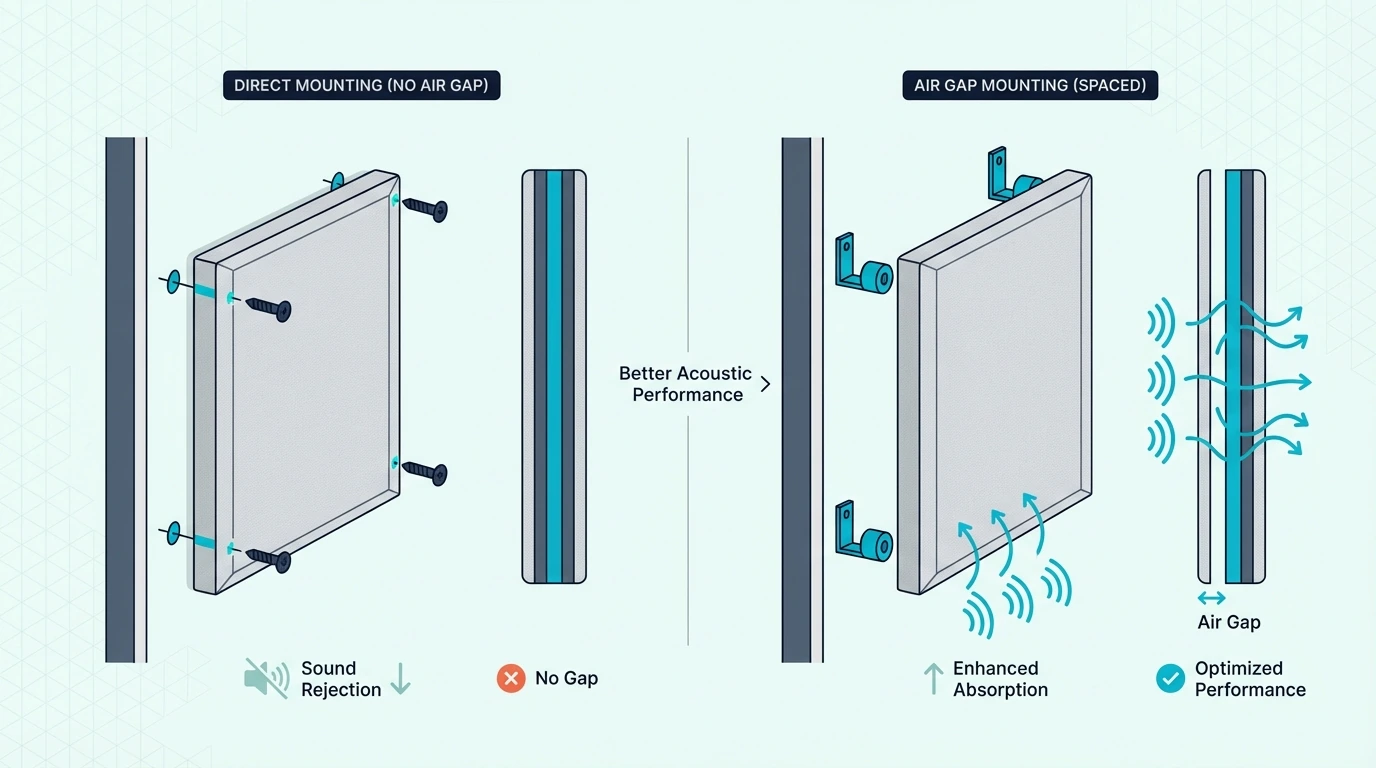
An air gap is simply the space between your acoustic panel and the wall or ceiling behind it.
Instead of mounting panels flat against the surface, you use spacers or standoff hardware to create a gap of 1-6 inches.
This gap doesn’t just hang panels away from the wall—it changes how absorption works.
The physics of sound absorption (which dictates how sound absorption is measured) means that maximum absorption occurs where particle velocity is highest, which happens at a specific distance from the reflecting surface.
Think of it this way: when you throw a ball against a wall, it moves fastest just before impact.
Sound waves behave similarly—the air moves most vigorously a bit away from the wall, not right at the surface.
An air gap positions your absorber in that high-velocity zone.
Why Do Acoustic Panels Need an Air Gap?

Three aspects shape how much an air gap helps: how absorption changes with distance from the wall, which frequencies gain the most, and whether the use case even calls for a gap.
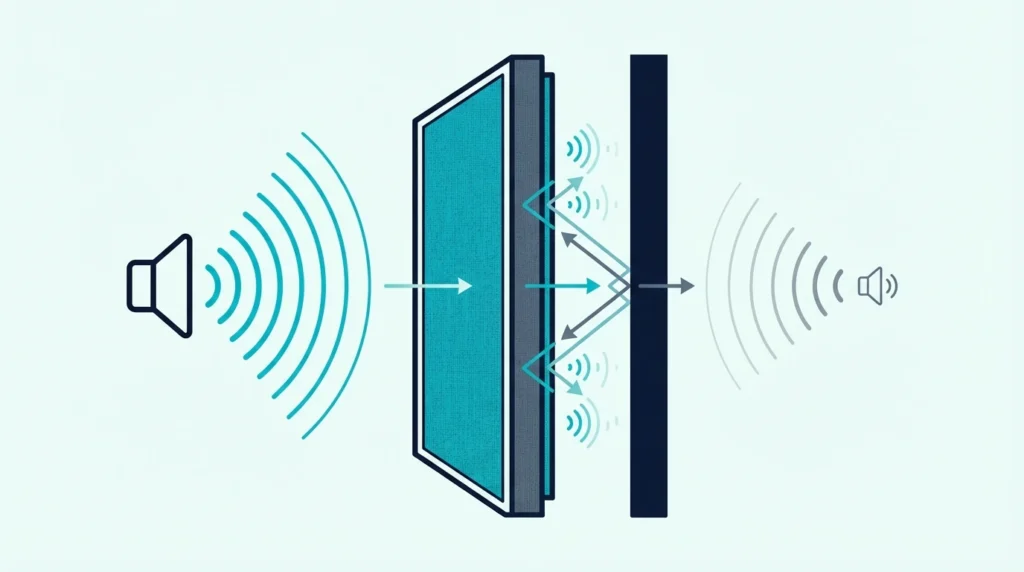
How Does an Air Gap Improve Sound Absorption?
Sound waves reflecting off a wall create what’s called a “velocity gradient.”
Right at the wall surface, air particles can’t move—they’re blocked by the solid boundary.
A quarter-wavelength away from the wall, particle velocity reaches maximum.
When you mount a panel with an air gap, you’re placing the absorber where air movement is greatest.
More air movement through the fibers means more friction, which means more absorption.
The panel converts more sound energy into heat.
A quick test proves the difference: clap your hands near a flush-mounted panel, then near one with a 4-inch air gap. The air-gapped panel creates noticeably more “dead” sound, especially on the lower frequencies of your clap.
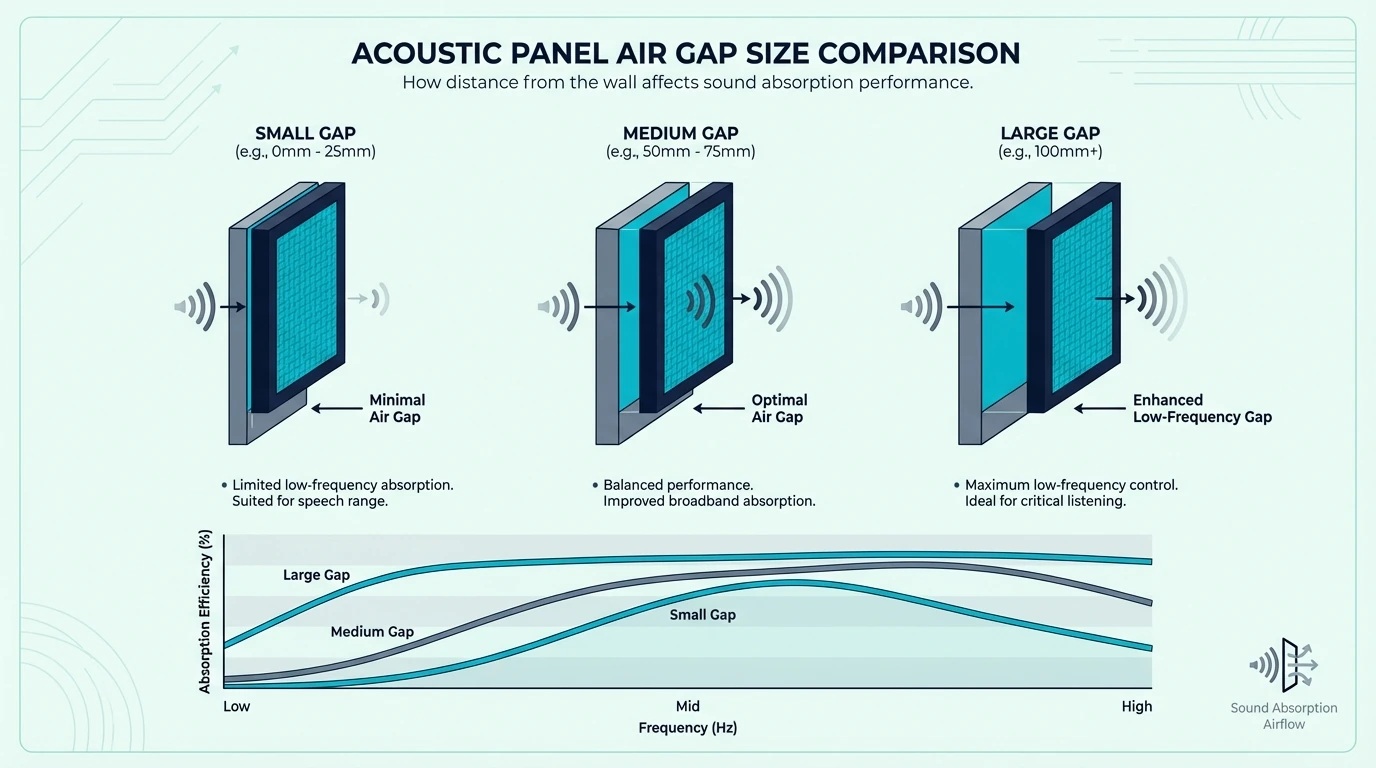
What Frequencies Benefit Most from Air Gaps?
Low frequencies benefit the most.
A 2-inch panel mounted flush might be effective down to 250Hz.
Add a 4-inch air gap, and that same panel becomes effective down to 125Hz—a full octave lower.
The math works like this: absorption is most effective at a quarter-wavelength.
For 250Hz, a quarter-wavelength is about 13 inches.
For 125Hz, it’s about 27 inches.
The air gap moves the panel closer to that quarter-wavelength sweet spot for lower frequencies.
High frequencies already absorb well with flush mounting because their wavelengths are short.
A 2000Hz wave has a quarter-wavelength of only about 2 inches, which is why thin panels still help with harshness.
The air gap helps too, but the improvement is smaller.
Do All Acoustic Panels Require an Air Gap?
No—and this is important.
If you’re treating a room primarily for voice recording, podcasting, or speech clarity, flush-mounted panels work fine.
Those applications focus on frequencies above 500Hz, where air gaps provide smaller gains.
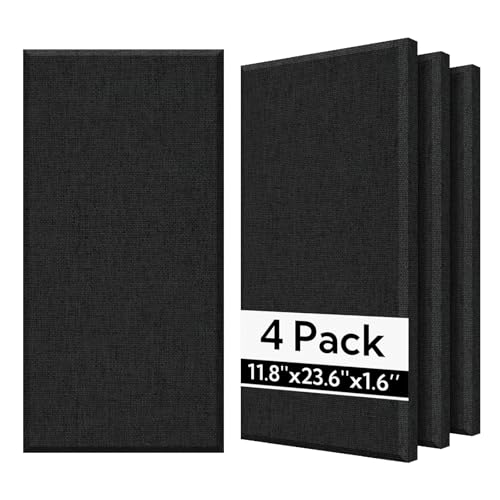
If you want a simpler install for that kind of general reverb control, BUBOS 4 Pack Thickened Acoustic Panels is more sensible than overengineering a gap for a voice-only room.
BUBOS 4 Pack Thickened Acoustic Panels
Air gaps matter most for: – Music studios (bass instruments, kick drums) – Home theaters (movie bass, subwoofer bleed) – Mixing rooms (accurate low-mid monitoring) – Rooms with boomy acoustics
The home theater panels guide has panel recommendations for cinema rooms where bass bleed is the main issue.
If your problem is high-frequency flutter echo or speech reverberation, save the installation complexity and mount flush.
Get Studio Tips Weekly
Join 5,000+ creators getting acoustic treatment advice every week.
No spam. Unsubscribe anytime.What Is the Best Air Gap Size for Acoustic Panels?
Three sizing questions come up in every install: the target gap for bass, the target for mids and highs, and the penalty for overshooting or undershooting.
What Is the Ideal Air Gap for Low-Frequency Absorption?
For maximum bass improvement, aim for 2-4 inches of air gap. This range provides the best balance between performance improvement and practical mounting.
A 4-inch gap is the target for 330Hz (quarter-wavelength = 10 inches total with a 2-inch panel). Combined with the panel thickness, you’re creating effective treatment for the 200-400Hz range where many room problems occur.
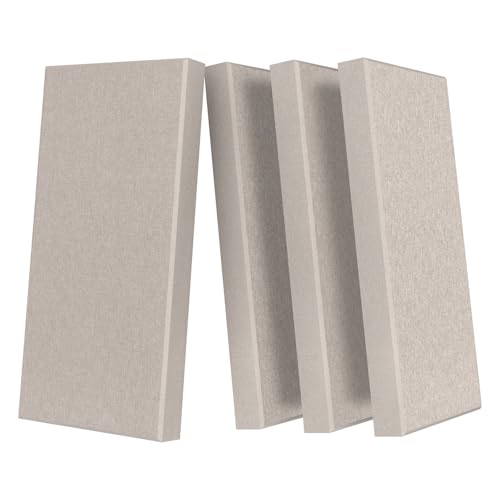
That is exactly why thicker fiberglass panels like the UMIACOUSTICS 4 PCS Acoustic Panels with Hanging Bracket benefit more from a proper gap than thin decorative panels do.

UMIACOUSTICS 4 PCS Acoustic Panels with Hanging Bracket
Going beyond 4 inches provides diminishing returns for most panels. The improvement continues but becomes marginal, and mounting complexity increases.
How Much Air Gap for Mid and High Frequencies?
Mid frequencies (500Hz-2000Hz) benefit from smaller gaps—1-2 inches is sufficient. High frequencies (2000Hz+) see minimal improvement from any gap size.
If your treatment goals focus on general reverb control rather than specific bass problems, 1-2 inch gaps provide a nice improvement without complicated mounting. Many Z-clips and French cleats naturally create this spacing.
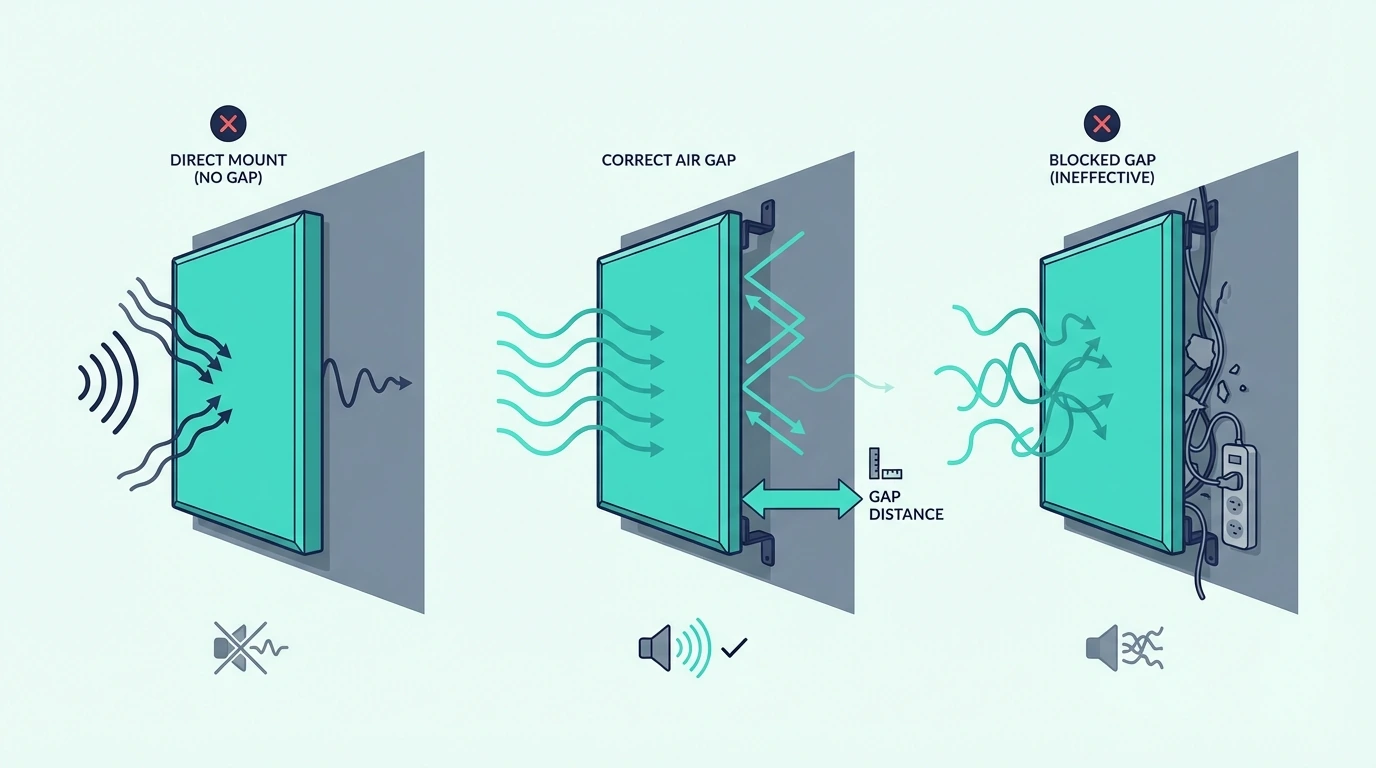
What Happens If the Air Gap Is Too Large or Too Small?
Too small (less than 1 inch): You’re not reaching the high-velocity zone for any problematic frequencies. The panel performs almost identically to flush mounting.
Not harmful, just not helpful.
Too large (beyond 6 inches): The panel may start to “miss” some frequencies entirely.
There’s also a structural concern—panels mounted far from the wall can wobble or resonate. Practical mounting becomes difficult.
The sweet spot is 2-4 inches for rooms with bass issues, 1-2 inches for general improvement.
How Do You Create an Air Gap When Installing Acoustic Panels?
Four hardware decisions shape the result: which bracket type to use, whether Z-clips suit the panel weight, how French cleats compare to impaling clips, and how to keep every gap uniform.
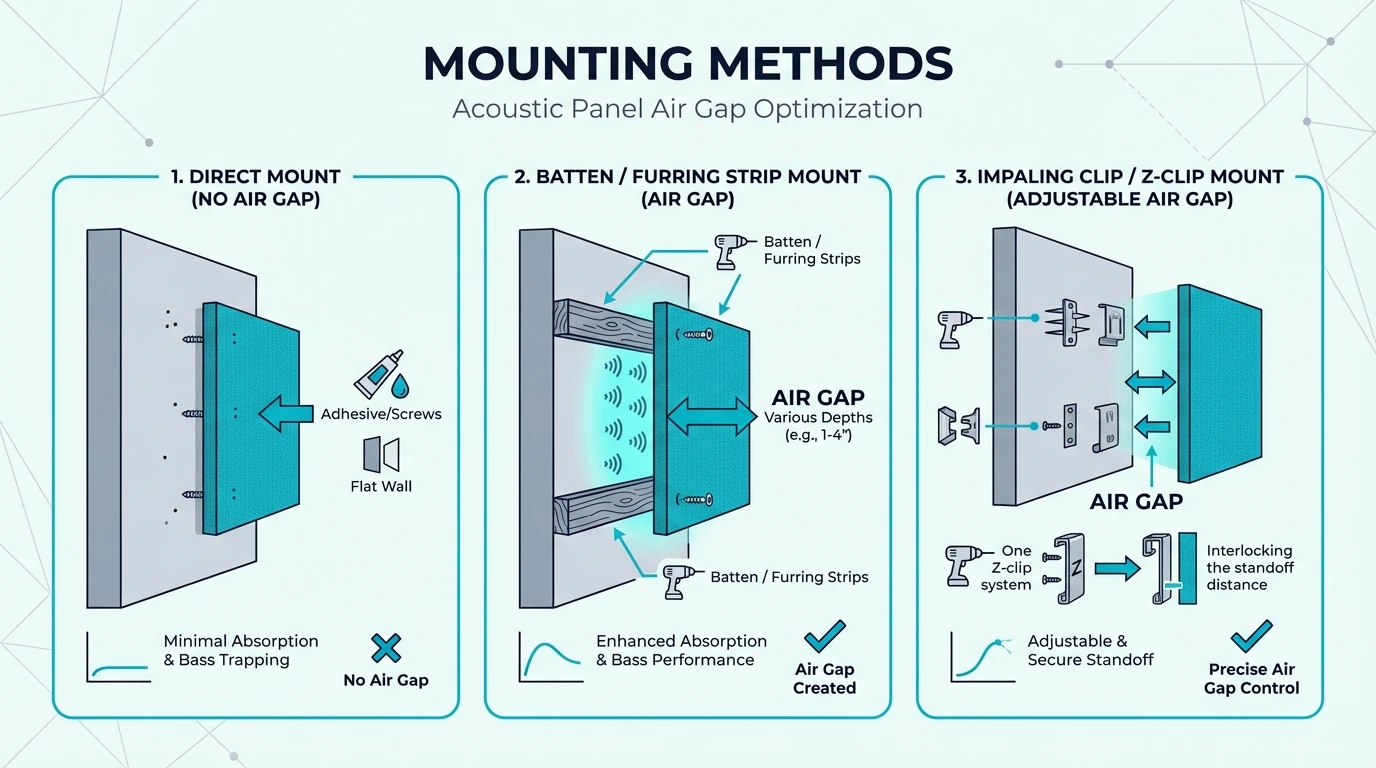
What Mounting Hardware Creates the Best Air Gap?
Several options work well, each with trade-offs between cost, complexity, and adjustability.
French cleats or Z-hangers combined with wooden spacer blocks create adjustable, secure mounting with any gap size you need.
Wood standoffs (1×2 or 2×2 lumber strips) provide the simplest DIY solution.
Mount strips to the wall, then mount panels to the strips. Gap size equals your lumber thickness.
If you want a ready-to-hang 2-inch set that still benefits from that spacing, UMIACOUSTICS 4 PCS Acoustic Panels with Hanging Brackets is the kind of panel pack that pairs well with a measured air-gap install.
UMIACOUSTICS 4 PCS Acoustic Panels with Hanging Brackets
Can You Use Z-Clips for Air Gap Installation?
Yes—Z-clips are excellent for air-gapped mounting.
Standard Z-clips provide approximately 0.5-1 inch of natural standoff. Add spacer blocks behind the wall-mounted clip for larger gaps.
The interlocking design makes leveling easy and allows panel removal for cleaning or repositioning. For studios where you might adjust treatment over time, Z-clips offer valuable flexibility.
What About French Cleats vs Impaling Clips?
French cleats create natural gaps through their angled profile—typically 0.5-1.5 inches depending on the cleat depth.
They’re ideal for heavy panels that need secure mounting.
That secure-mount point matters more with larger fiberglass units like Olanglab Sound Absorbing Acoustic Wall Panels (2-Pack), where the hardware has to carry more size and leverage than a compact foam tile.

Olanglab Sound Absorbing Acoustic Wall Panels (2-Pack)
Longer cleats spread the load across more wall area, which matters once you move beyond small panel sizes.
Impaling clips (spike-style mounts) typically create minimal gap—they’re designed for flush mounting foam, not air-gapped fiberglass panels. For air gap installation, choose Z-clips or cleats over impaling clips.
How Do You Maintain Consistent Air Gap Spacing?
Consistency matters for appearance and performance. Panels at different distances from the wall look unprofessional and may create uneven absorption.
If you’re also deciding how far apart to place panels from each other, the acoustic panel spacing guide covers that separately from air gaps.
It also helps to decide the panel size before you cut spacers. A compact pack like the Olanglab Fiberglass Acoustic Wall Panels (4-Pack) is easier to keep uniform across multiple positions than oversized panels if this is your first installation.
Olanglab Fiberglass Acoustic Wall Panels (4-Pack)
Cut spacer blocks to identical sizes using a stop block on your saw.
Pre-measure and mark wall positions before mounting any hardware.
Use a level across multiple mounting points to ensure uniform depth.
For large installations, create a jig—a piece of scrap at your target gap width that you hold against the wall while positioning each panel.
When mounting a full row, an interlocking cleat system helps keep every panel at the same standoff distance because the hardware self-levels across the row.
What Are Common Air Gap Mistakes to Avoid?
Two questions trip up most first-time installers: whether flush mounting is ever acceptable, and whether too much gap can backfire. A comparison table at the end puts the hardware options side by side.
Is Mounting Panels Flush to the Wall Ever Acceptable?
Yes—flush mounting is fine when: – Treating primarily for voice frequencies (podcasting, speech) – Using thick panels (4+ inches) that already reach low frequencies – Space is limited and any gap would be impractical – Aesthetics require panels tight to the wall
Flush mounting isn’t wrong—it’s just leaving performance on the table for bass frequencies. If bass isn’t your problem, flush works fine.
Can Too Much Air Gap Hurt Performance?
Theoretically, extreme gaps (12+ inches) could create problems, but in practice, mounting limitations prevent this. At normal gap sizes (1-6 inches), more gap doesn’t hurt—it just stops helping beyond certain points.
The real risk with large gaps is structural: panels mounted far from walls can wobble, resonate, or even fall if hardware isn’t adequate. Stay under 6 inches and use mounting hardware rated for the panel weight.
Mounting Hardware Comparison
| Method | Natural Gap | Adjustability | Cost | Best For |
|---|---|---|---|---|
| Z-Clips | 0.5-1 in | Medium | Low | Light panels, easy removal |
| French Cleats | 0.5-1.5 in | Medium | Medium | Heavy panels, secure mount |
| Wood Standoffs | Custom | Low | Low | DIY, exact gap control |
| Furring Strips | 0.75-1.5 in | Low | Low | Multiple panels, consistent gaps |
| Metal Brackets | 2-4 in | High | High | Commercial installations |
Z-clips and French cleats cover most residential installs because they balance cost, adjustability, and hold strength. Wood standoffs win on precision — cut them to the exact gap width and every panel sits at the same depth.
Metal brackets are overkill for a home studio, but commercial spaces with heavy 4-inch fiberglass panels need that load rating. Furring strips are the fastest option when treating an entire wall with uniform spacing.
Conclusion
Which air gap size to use depends on the frequency range causing problems. Music studios and mixing rooms benefit most from 3–4 inch gaps at first reflection points, where the extra distance pushes absorption down to 125–200 Hz and tightens low-mid clarity — the recording studio panels guide has specific product picks for that setup.
Home theaters need 2–4 inch gaps behind the main listening position, where bass buildup is worst. For general reverb control, 1–2 inch gaps from standard Z-clips or French cleats handle the job without extra spacers.
Voice-only recording rooms can skip the gap entirely and mount flush. The added complexity only pays off when bass frequencies are the problem.
The panel placement guide covers where to position panels, and the best acoustic panels guide reviews products with built-in air gap mounting systems.
Frequently Asked Questions
Do Foam Panels Need an Air Gap?
Foam panels benefit less from air gaps than fiberglass or rockwool panels. Foam’s lower density and effectiveness means the air gap improvement is proportionally smaller.
That said, foam with an air gap performs better than foam flush-mounted.
If you’re using foam and dealing with bass problems, a gap helps—but switching to fiberglass panels helps more.
Can You Adjust Air Gap After Installation?
With Z-clips or French cleats, yes—you can add or remove spacer blocks behind the wall-mounted hardware. With wood standoffs permanently mounted, adjustment requires reinstallation.
If you’re uncertain about ideal gap size, use adjustable mounting that allows experimentation. Test different gaps and listen to the difference in your specific room.
Does Air Gap Affect Panel Aesthetics?
Panels mounted with air gaps sit further from the wall, creating visible shadows and depth. Some people prefer this dimensional look; others want flush alignment.
The aesthetic impact is minor with 1-2 inch gaps, more noticeable at 4+ inches. If appearance is critical, consider the visual impact alongside acoustic benefits.
The 2-inch vs 4-inch comparison covers how panel depth interacts with air gap size.
Will Air Gap Cause Panels to Resonate or Rattle?
With secure mounting hardware, no. Panels should be securely attached with hardware rated for their weight.
Resonance problems typically indicate inadequate mounting—not air gap issues.
If panels vibrate audibly at certain frequencies, add more mounting points or switch to heavier-duty hardware — the installation guide covers techniques rated for any gap size.