What Are Acoustic Panels? The Complete Guide [2026]

What are acoustic panels, and why do recording studios, podcasters, and home theater enthusiasts treat them like essential equipment?

These fabric-wrapped rectangles might look simple, but they solve one of the most frustrating problems in audio: rooms that make everything sound hollow, echoey, or muddy.

If you’ve ever recorded a voice memo that sounded like you were in a bathroom, or struggled to understand dialogue during a movie, acoustic panels are the fix.

One critical fact trips up most buyers — acoustic panels are not soundproofing.

Mixing up absorption and soundproofing costs people hundreds of dollars when they buy panels expecting to block noise from neighbors. Understanding what panels actually do (and don’t do) saves you money and frustration.

Below you’ll find what acoustic panels are, how they work, and what you’ll want to look for when buying.

First up: what panels actually do inside a room.

Quick Takeaway

Acoustic panels are sound-absorbing devices that improve how a room sounds by reducing echo, reverb, and flutter. They make audio clearer for recording, video calls, and listening — but they cannot block sound from entering or leaving a room.

That requires soundproofing, which is a completely different approach involving mass and construction changes.

What Are Acoustic Panels?

Diagram explaining what an acoustic panel does in a room

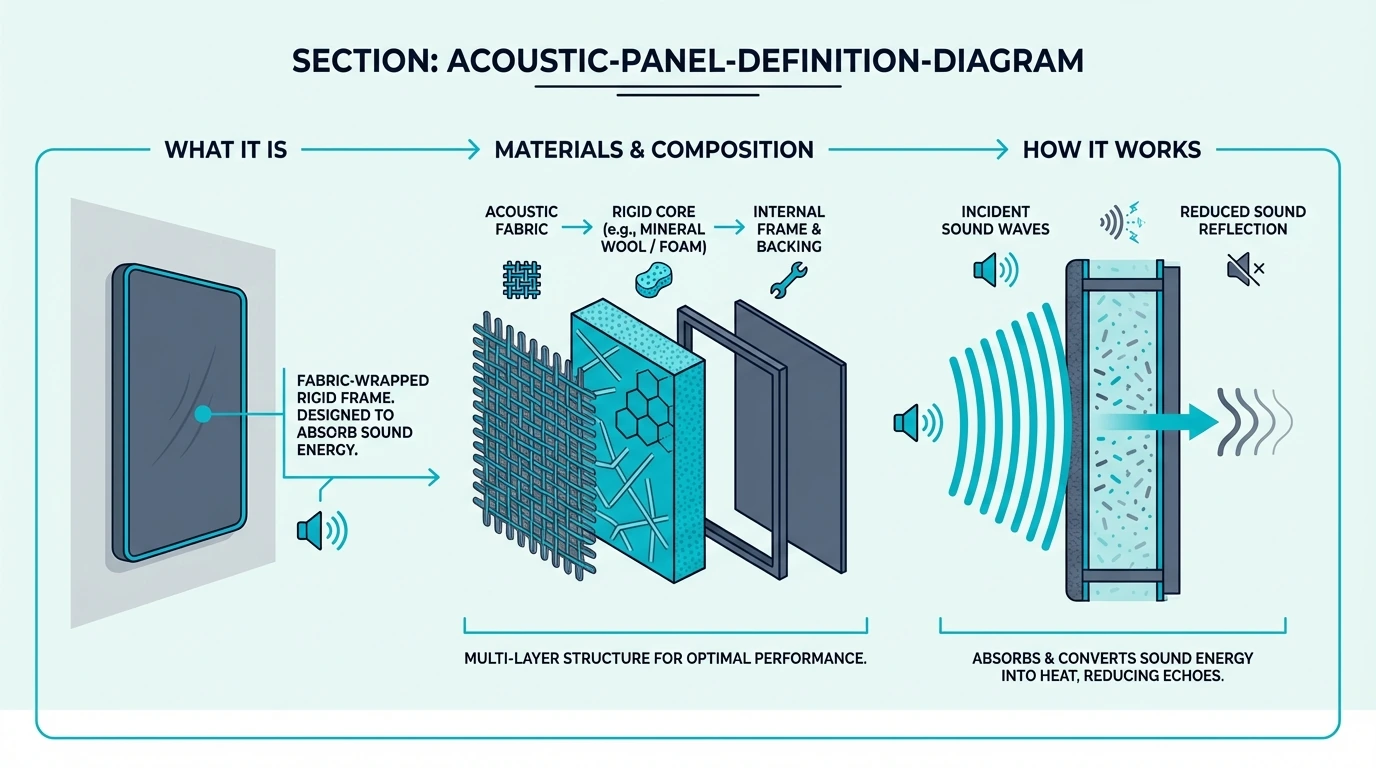
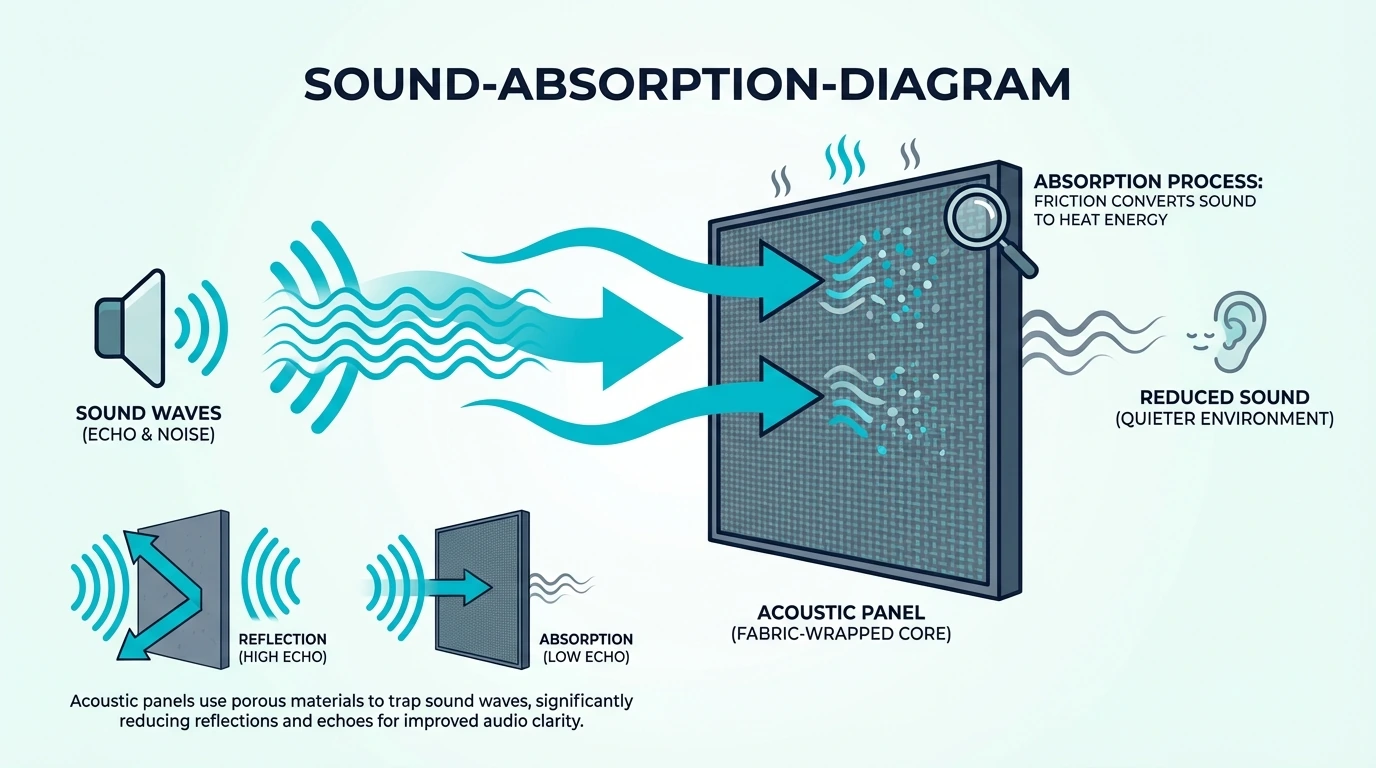
Acoustic panels are specialized devices designed to absorb sound waves and control how audio behaves inside a room. Think of them as sponges for sound — instead of letting audio bounce off your walls and create chaos, panels capture that energy before it can reflect back.

Two questions come up immediately: what do they actually do to the sound, and how are they different from soundproofing?

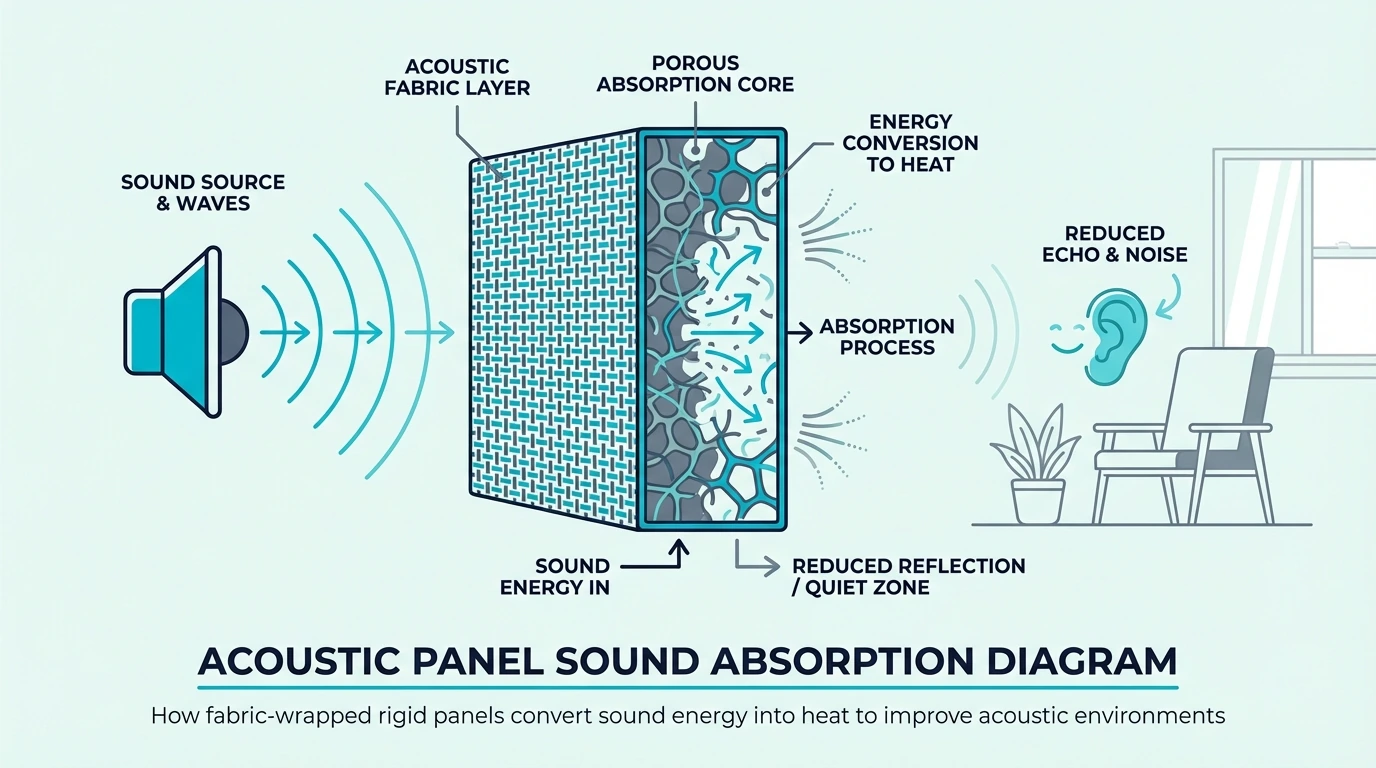
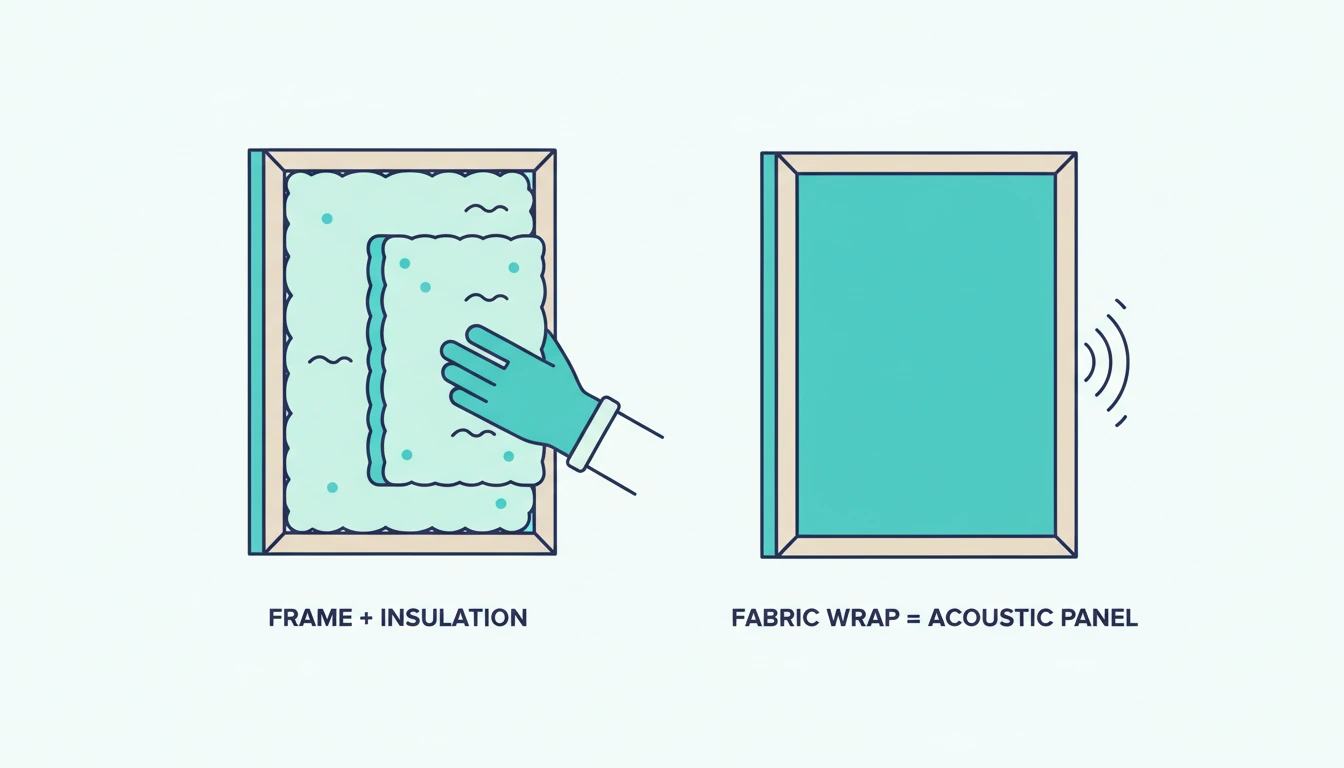
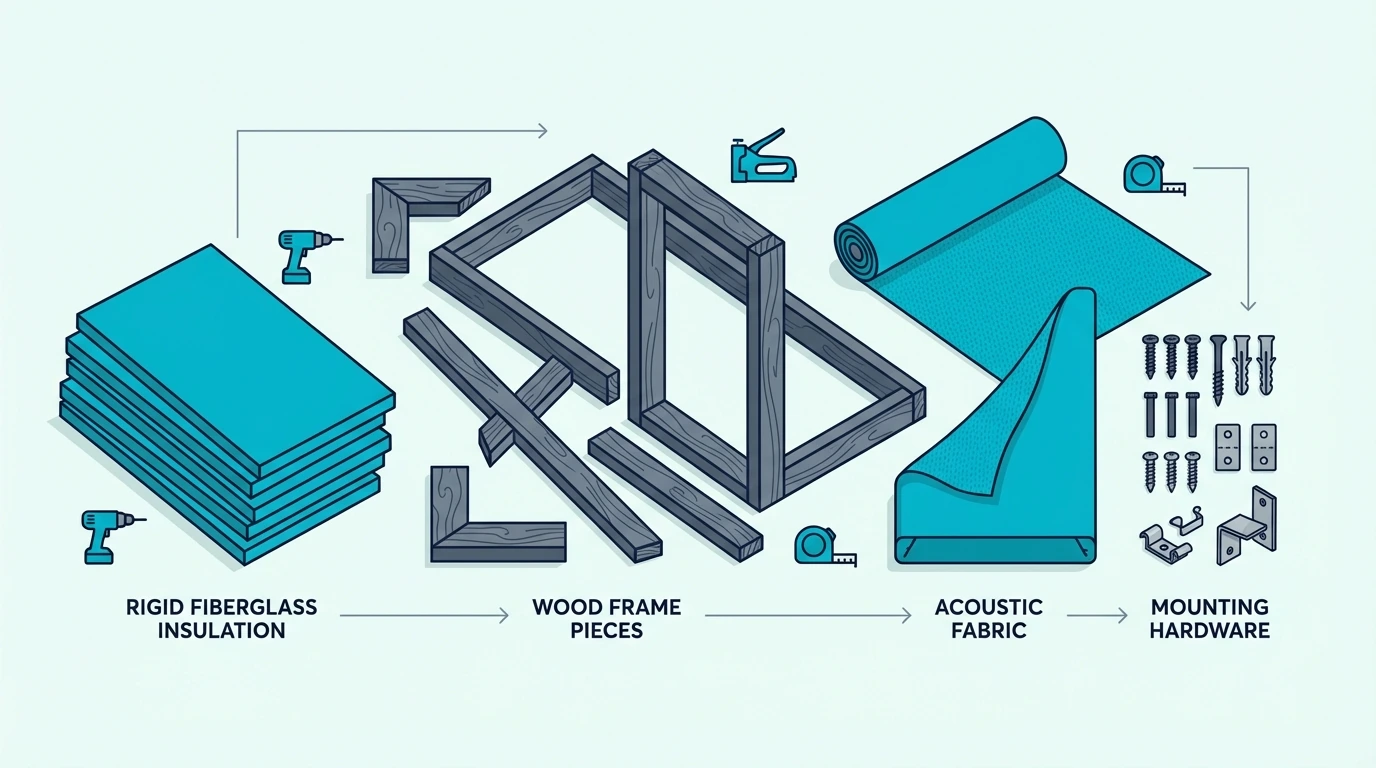
The typical acoustic panel is a rigid rectangle, usually 2 to 4 inches thick, covered in fabric. Inside is a dense, porous material (usually fiberglass or mineral wool) that traps sound waves.

When sound enters the panel, it bounces around inside the fibers. It loses energy with each collision until it disappears as tiny amounts of heat.

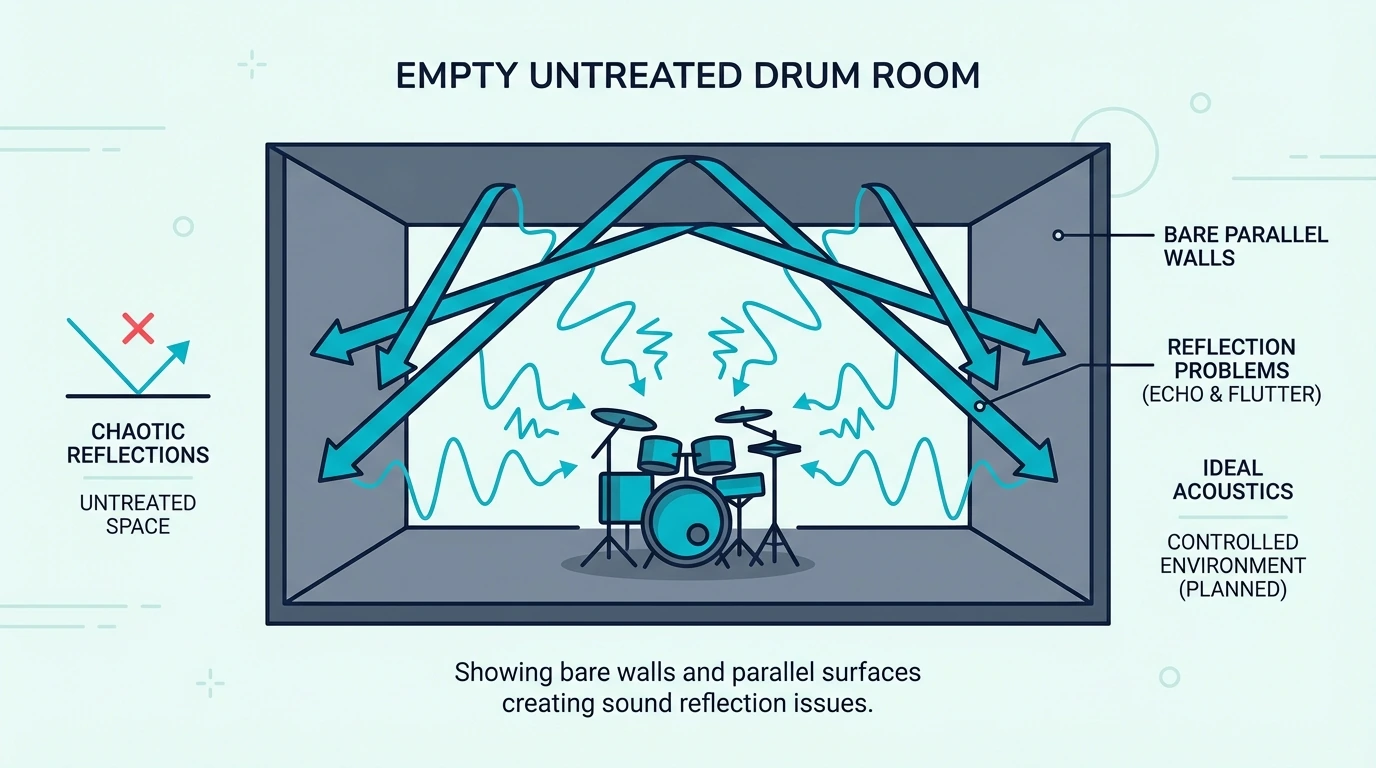
Every room has acoustic problems.

Hard surfaces like drywall, glass, and hardwood floors reflect sound waves back into the space. These reflections arrive at your ears milliseconds after the original sound.

The result is echo (distinct repeats), reverb (blurred, overlapping sound), and flutter (rapid repeating echoes between parallel walls). Acoustic panels interrupt this cycle by absorbing those reflections before they can bounce around.

What Do Acoustic Panels Actually Do?

The primary job of acoustic panels is reducing reflection. When you speak or play music in an untreated room, only a fraction of the sound goes directly to your ears.

The rest bounces off every surface first. In a typical bedroom, sound might reflect 6-8 times before dying out, and each reflection adds mud and confusion to what you hear.

Panels strategically placed at reflection points absorb those bouncing sound waves. The result is cleaner, clearer audio where you hear more of the direct sound and less of the room’s interference.

Recorded vocals sound present and professional instead of distant and roomy. Music and movies come through as the artist intended instead of filtered through your room’s reflections.

The improvement is measurable. Acousticians use RT60 (reverberation time) to quantify how long sound takes to decay by 60 decibels.

An untreated bedroom might have an RT60 of 0.8-1.2 seconds — sound lingers and overlaps. Add correct panel coverage and you can bring that down to 0.3-0.5 seconds.

That 0.3-0.5 second range is the sweet spot for most recording and critical listening applications.

How Are They Different from Soundproofing?

Absorption and soundproofing are two different things, and getting them confused costs people money.

Acoustic panels absorb sound inside a room. They reduce echo and reverb by capturing reflections.

The result is cleaner, more controlled sound within your space.

Soundproofing blocks sound from traveling between spaces. It prevents noise from entering or leaving a room by adding mass, creating air gaps, and sealing every possible sound path.

These are completely different problems requiring completely different solutions. Acoustic panels are lightweight fabric-wrapped absorbers.

Soundproofing involves heavy materials like mass loaded vinyl, double-layer drywall, isolated wall assemblies, and sealed doors and windows.

A quick test: if your problem is “I can hear my neighbor’s TV” or “my drumming bothers the apartment below,” panels will do nothing.

You don’t need soundproofing. If your problem is “my recordings sound echoey” or “I can’t understand movie dialogue in my living room,” panels are exactly what you need.

Panels affect sound quality inside your room. Soundproofing affects sound transmission between rooms.

Never confuse them.

What Are Acoustic Panels Made Of?

Cross section showing the layers inside an acoustic panel
Every acoustic panel has two main components: the absorptive core and the outer covering. Three core materials dominate the market, each with tradeoffs worth knowing before you buy.

What’s Inside an Acoustic Panel?

The core is where sound absorption happens. Professional panels use one of three main materials:

Fiberglass (like Owens Corning 703) has been the industry standard for decades. It’s made from extremely fine glass fibers pressed into rigid boards.

The millions of tiny air pockets between fibers create friction that converts sound energy into heat. Fiberglass offers excellent broadband absorption, meaning it works across low, mid, and high frequencies.

It’s also affordable and widely available. Professional options like the ATS Acoustics Panel achieve NRC 1.0 — meaning they absorb virtually all sound that hits them.

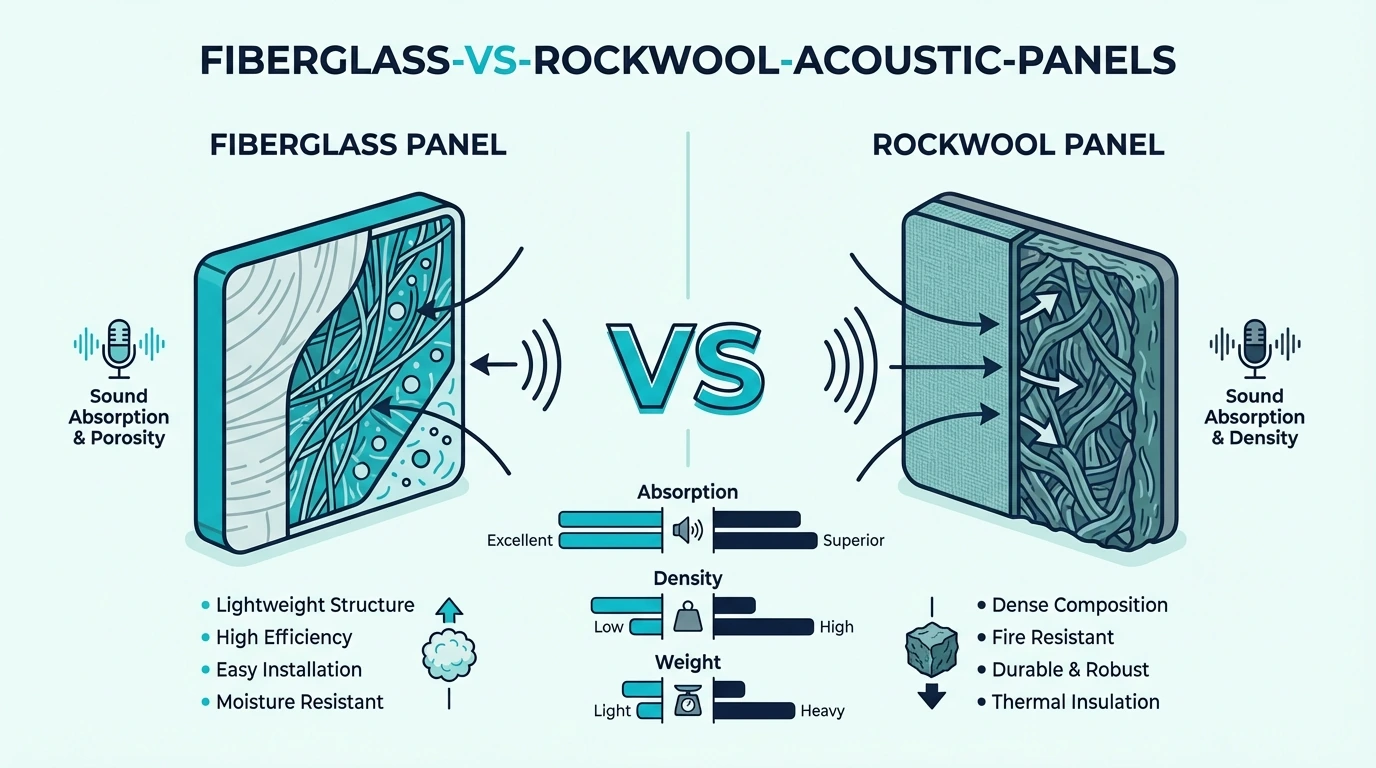
Mineral wool (often called rockwool or stone wool) performs similarly to fiberglass but is made from volcanic rock or slag spun into fibers. It’s denser, which helps with low-frequency absorption.

Mineral wool is also naturally fire-resistant and easier to cut and handle than fiberglass — no itchy fibers flying everywhere. Many DIYers prefer it for building their own panels.

Polyester fiber (PET) panels have gained popularity recently. They’re made from recycled plastic bottles pressed into dense boards.

PET is completely safe to handle with bare hands, comes in various colors, and can be left uncovered as a design element. The tradeoff is slightly lower absorption performance compared to fiberglass or mineral wool, especially at lower frequencies.

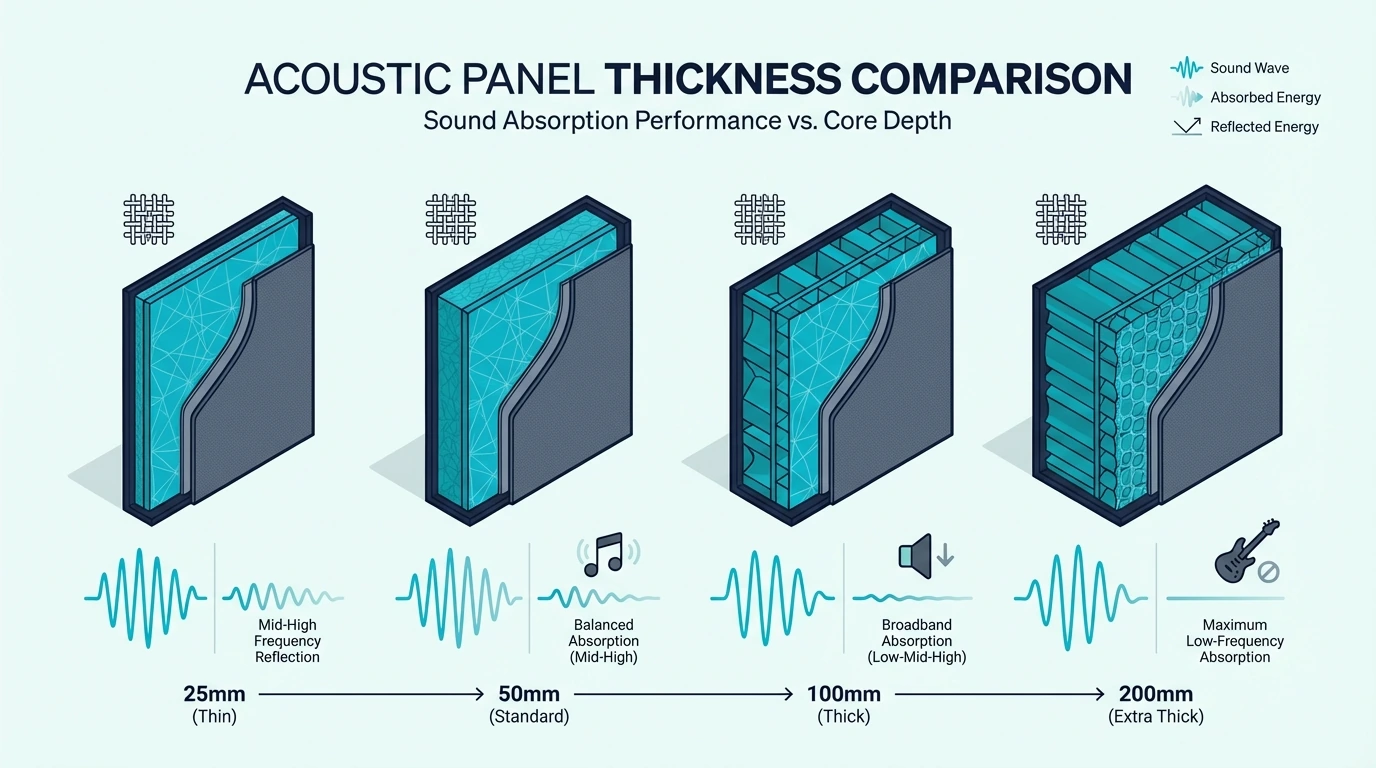
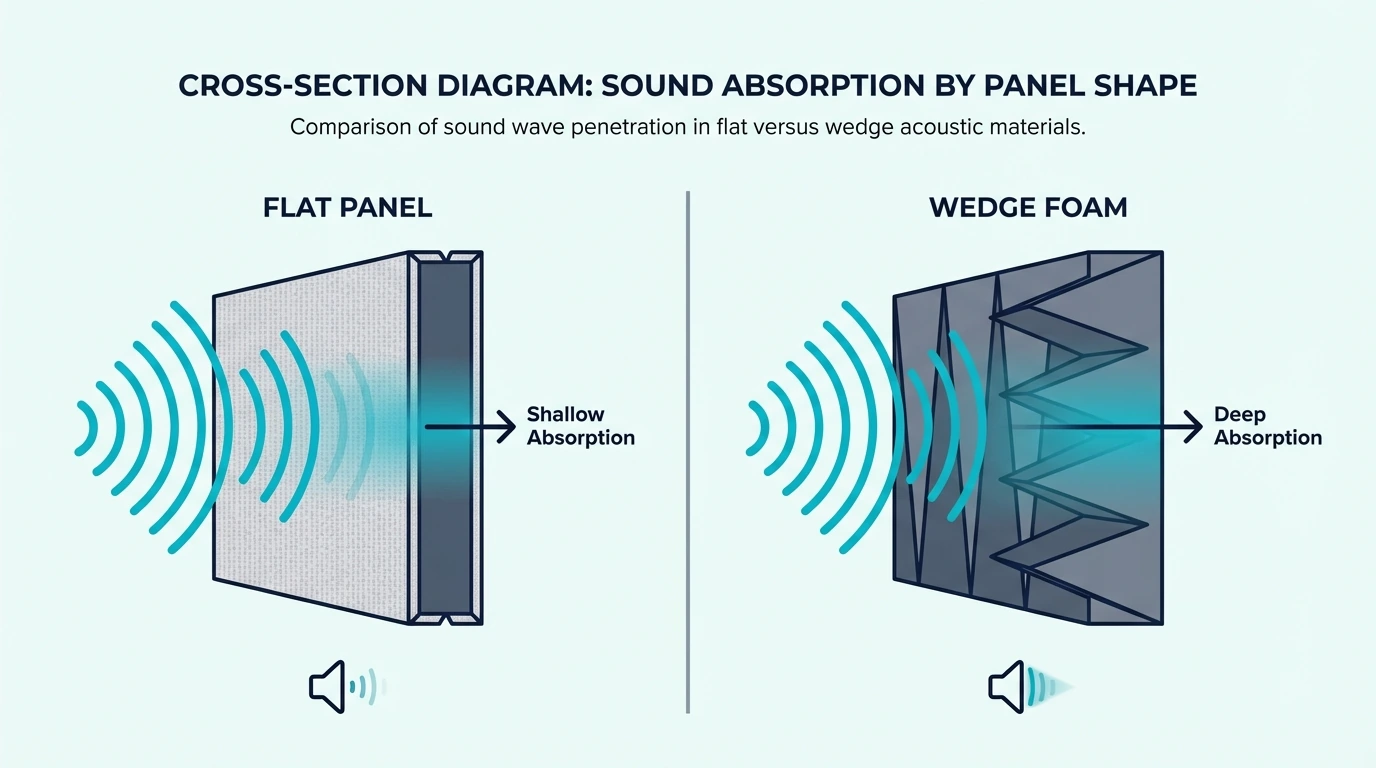
The thickness of the core directly affects which frequencies get absorbed. Thin panels (1-2 inches) primarily absorb high frequencies — the hiss and sibilance range.

Thicker panels (3-4 inches) reach down into the mid frequencies where vocals and most instruments live. For serious low-frequency control, you need 4-6 inch thick bass traps, typically placed in corners.

What’s the Difference Between Fiberglass and Rockwool?

Both materials achieve similar acoustic performance. A 2-inch panel of either will typically hit NRC ratings of 0.85-1.0.

That means they absorb 85-100% of sound across the frequency spectrum.

The practical differences are handling and availability. Fiberglass (Owens Corning 703, 705) requires careful handling — the tiny glass fibers can irritate skin and lungs.

Wear gloves, long sleeves, and a mask when cutting it. Rockwool (Rockwool Safe’n’Sound, AFB) is less irritating and easier to cut cleanly with a bread knife or insulation knife.

Mineral wool is slightly denser, which gives it marginally better low-frequency performance at the same thickness.

If you’re building bass traps, rockwool is often the better choice. For standard wall panels, either works excellently.

Price and availability vary by region. Check what’s stocked at your local building supply stores — whichever is readily available and reasonably priced is the right choice.

What Is the Fabric Covering?

The fabric serves two purposes: containing loose fibers from the core material, and making the panel look professional enough to hang in living spaces.

The critical requirement is acoustic transparency — the fabric must let sound pass through easily. If sound can’t penetrate the fabric, it bounces off before reaching the absorptive core, defeating the entire purpose.

Test acoustic transparency with the “blow test”: hold the fabric to your mouth and blow. If air passes through easily, sound will too.

Dense, tightly-woven fabrics fail this test. Acoustically transparent fabrics feel almost like wearing a thin t-shirt.

Guilford of Maine is the gold standard for acoustic fabric, used in professional studios worldwide. The acoustic panel fabric guide covers affordable alternatives that pass the blow test.

Avoid vinyl, leather, plastic-coated fabrics, or anything with a rubbery backing.

What Are Acoustic Panels Used For?

Examples of acoustic panel applications in different rooms
Acoustic panels solve problems wherever sound quality matters and room reflections get in the way. The applications range from professional studios to home offices to living rooms.

What Problems Do They Solve?

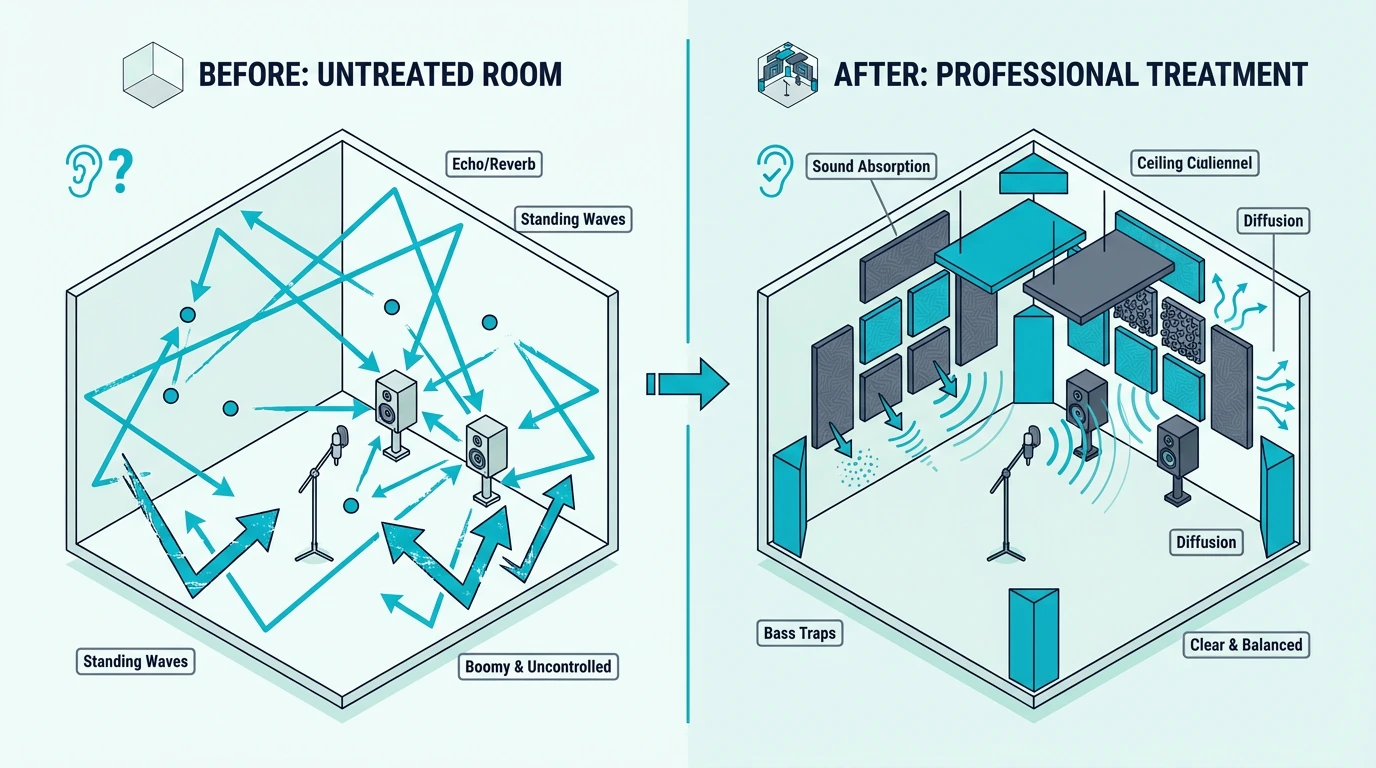
The core problems are echo, reverb, and flutter — all symptoms of sound bouncing off hard surfaces.

Echo is a distinct repeat of sound, like shouting in a canyon. You hear the original sound, then a delayed copy.

Hard, parallel walls in rectangular rooms create flutter echo — rapid repeating echoes that sound like a “sproing” or ringing when you clap.

Reverb is the blurred combination of thousands of reflections arriving at slightly different times. A little reverb sounds natural and pleasant (concert halls are designed for it).

Too much reverb turns speech into mush and makes recordings sound amateur and distant.

Comb filtering happens when direct sound and reflected sound arrive at your ears nearly simultaneously but slightly out of phase. Certain frequencies cancel out while others reinforce, creating an uneven, hollow tone.

This particularly affects recording quality.

Acoustic panels reduce all these problems by absorbing reflections before they can interfere with the direct sound you want to hear.

What Rooms Benefit from Acoustic Panels?

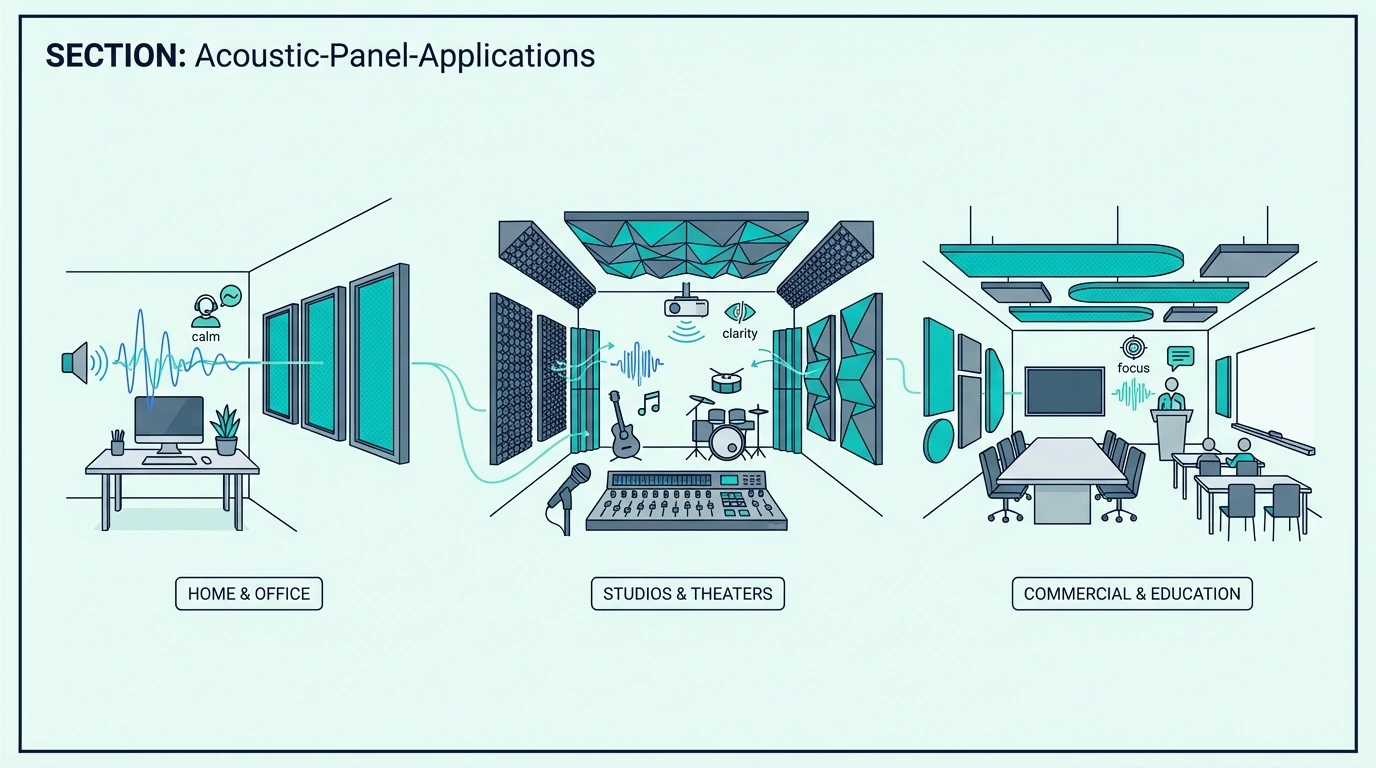
Recording spaces see the biggest improvement. Microphones are brutally honest about room problems — they capture every reflection and amplify issues you might not consciously notice when listening.

A properly treated recording room produces vocals that sound professional and present, not distant and boxy. Products like the UMIACOUSTICS 4-Pack with Brackets provide everything needed to treat first reflection points.

If you’re recording podcasts, voiceovers, music, or even just video calls, acoustic treatment is often the single biggest upgrade you can make. The best panels for recording studios guide covers which options work for different recording setups.

Home theaters and listening rooms benefit from controlled reflections. When early reflections from side walls interfere with the direct sound from your speakers, stereo imaging collapses and dialogue becomes muddy.

Strategic panel placement tightens the soundstage and improves clarity.

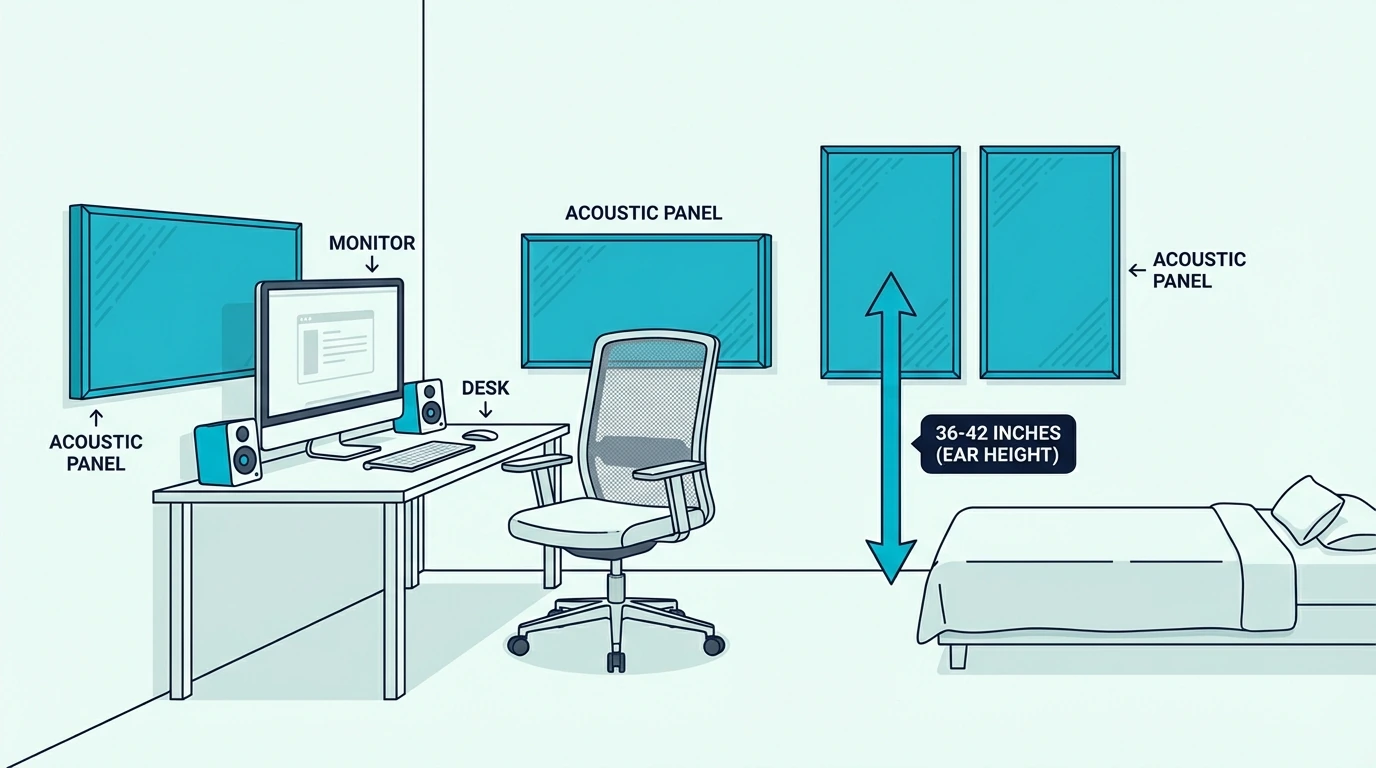
Home offices have become critical since remote work went mainstream. Video calls in untreated rooms sound echoey and unprofessional.

Even a few panels behind your desk and on the wall facing you clean up your audio noticeably. Renters wondering about acoustic panels for home offices have damage-free mounting options that work great.

Open-plan offices and restaurants use acoustic panels to reduce the buildup of noise. When dozens of conversations reflect off hard ceilings and walls, the cumulative noise level climbs until everyone is shouting.

Ceiling panels and strategic wall treatment bring noise levels down to manageable ranges.

What Is the Purpose of Acoustic Panels?

Diagram showing acoustic panels absorbing sound reflections
The fundamental purpose is controlling sound behavior inside a room — reducing unwanted reflections, shortening reverb time, and creating an acoustic environment suited to your activities. The reasons people buy panels differ, but the physics behind all of them is the same distinction between absorption and blocking.

Why Do People Use Acoustic Panels?

Different users have different goals, but they all come back to controlling reflections:

Content creators need clean audio. When your microphone captures room reflections along with your voice, the recording sounds amateur no matter how good your equipment is.

Panels let your mic hear mostly direct sound, producing professional results.

Musicians and producers need accurate monitoring. If your room colors the sound with excessive bass buildup in corners or flutter between walls, you can’t trust what you hear.

You’ll make mixing decisions based on room problems, not actual audio issues. Treatment creates a neutral environment where you hear the truth.

Home theater enthusiasts want immersive sound. When the center channel bounces off a glass coffee table before reaching you, dialogue suffers.

When side reflections arrive at the wrong times, surround effects lose their spatial impact. Panels optimize the acoustics for cinematic experiences.

Anyone working from home needs clear communication. Video calls in echoey rooms sound unprofessional and cause listener fatigue.

Panels in a home office improve both how you sound to others and how clearly you hear them.

What’s Sound Absorption vs Sound Blocking?

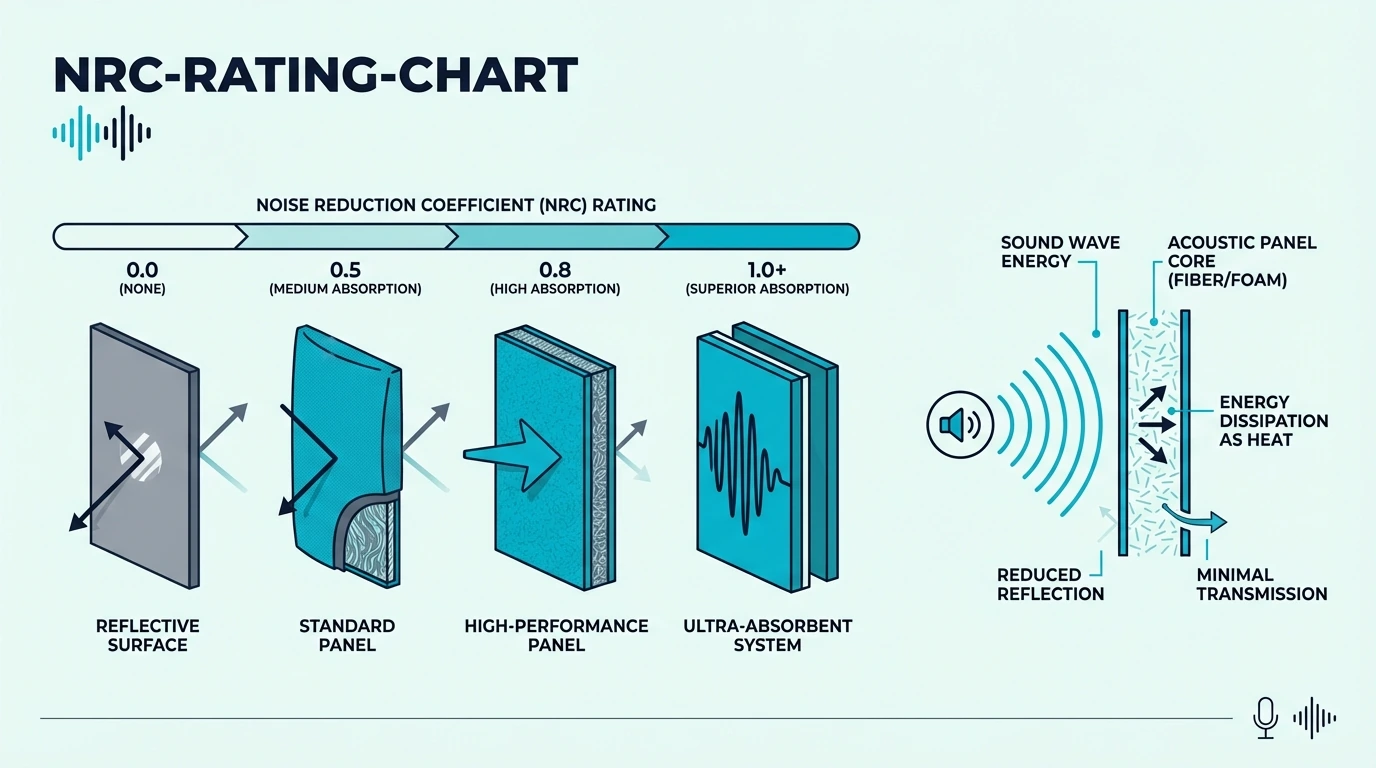
Sound absorption reduces sound energy within a space. Absorptive materials (porous, fibrous, soft) convert acoustic energy into heat through friction.

The sound doesn’t go anywhere — it dissipates and disappears.

Sound blocking prevents sound from passing through a barrier. Blocking requires mass, completeness, and often decoupling.

Heavy, dense materials reflect sound back rather than letting it transmit through. Sealing every gap matters because sound finds the weakest path.

Acoustic panels are absorbers. They reduce reflections inside your room but do not block sound transmission.

A panel hanging on your wall won’t stop your neighbor from hearing you, and won’t stop you from hearing them.

Can Acoustic Panels Block Noise?

No. This deserves emphasis because the misconception is so widespread.

Acoustic panels are lightweight (typically 5-15 pounds) and porous. Sound passes through them easily — that’s how they absorb it.

They have near-zero mass and create no barrier to sound transmission.

Blocking noise requires heavy, solid materials: multiple layers of drywall, mass loaded vinyl, solid core doors, sealed windows. It requires construction-level changes, not hanging fabric rectangles on walls.

If you need both — better sound inside AND less sound transmission — you need two separate solutions. Panels for internal acoustics, construction for isolation.

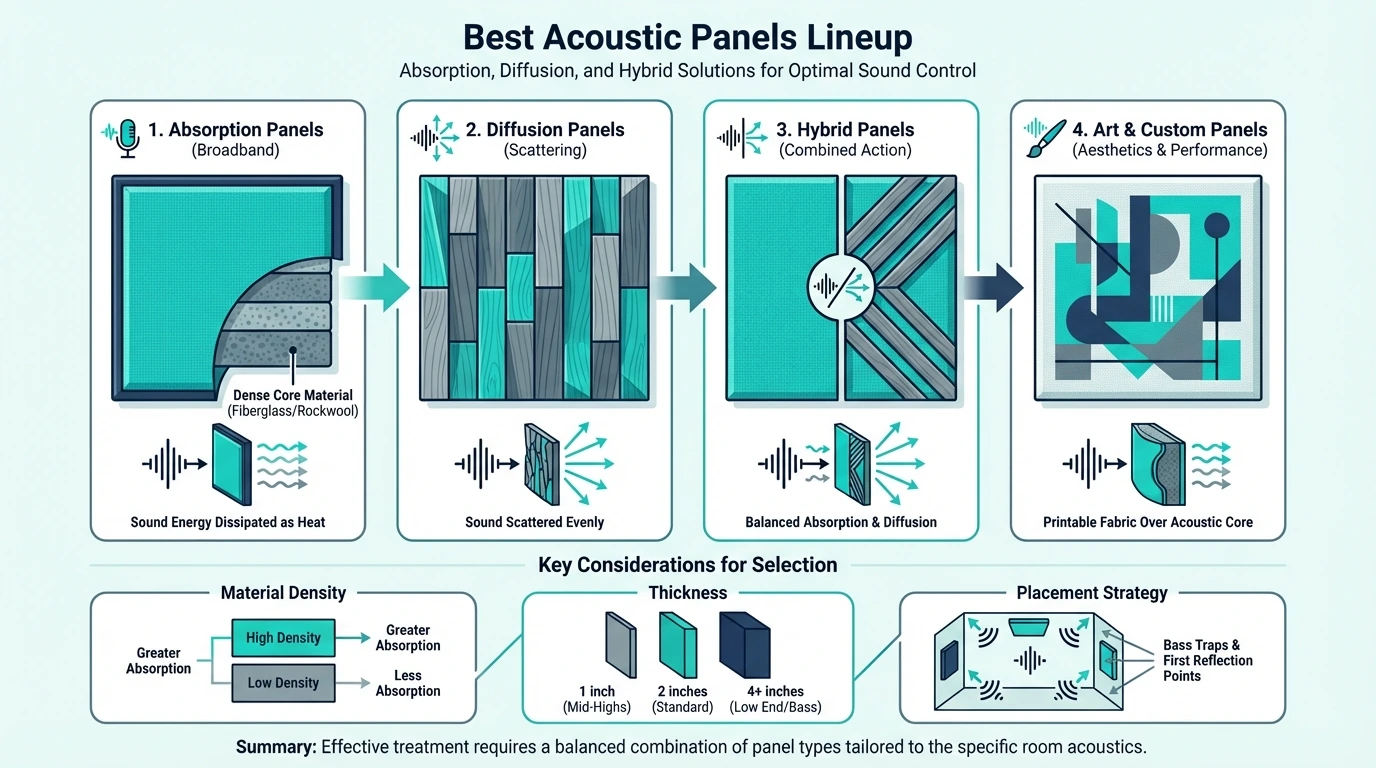
Do acoustic panels work for their intended purpose? Absolutely, but that purpose is absorption, not blocking.

What Are the Different Types of Acoustic Panels?

Comparison of different acoustic panel types
Not all acoustic panels are the same. Four main types cover everything from budget foam to professional fabric-wrapped panels to decorative wood slats and dedicated bass traps.

What Are Fabric-Wrapped Panels?

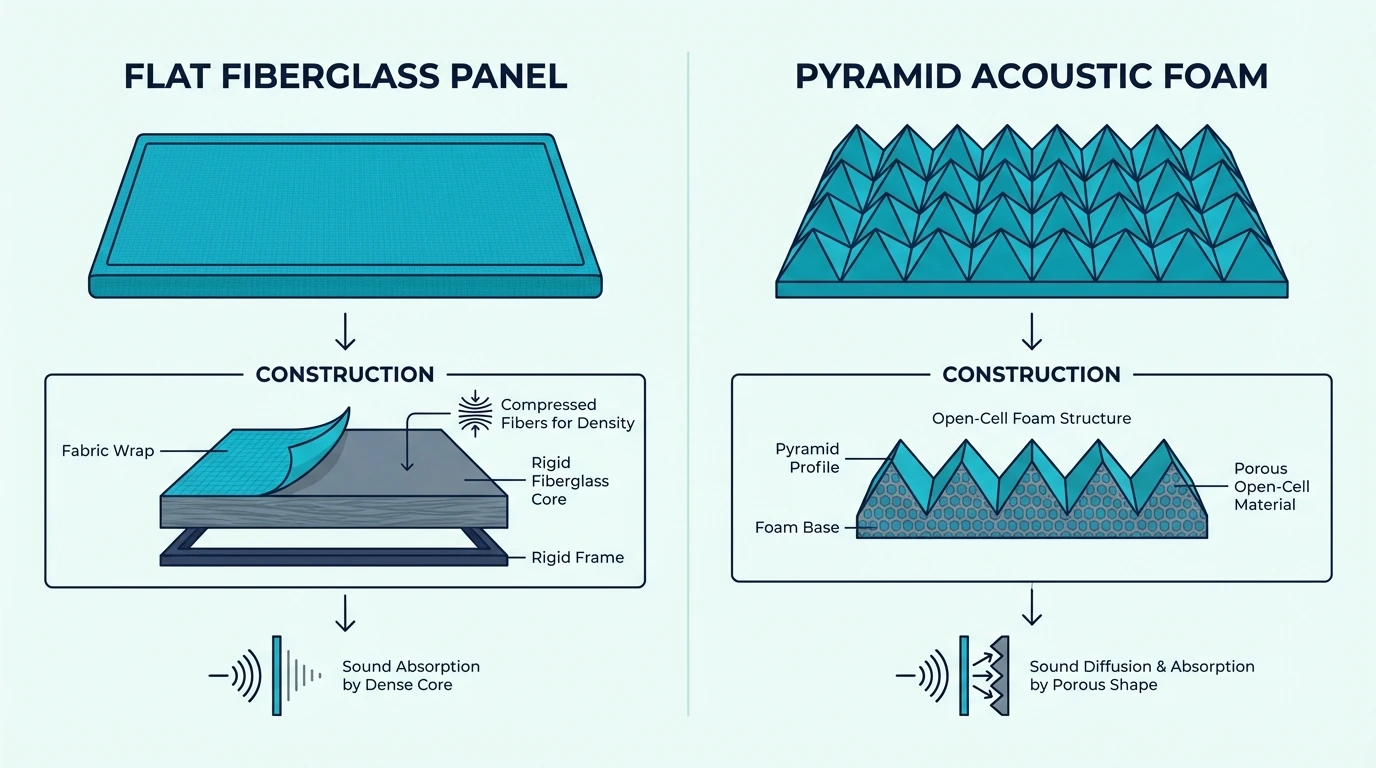
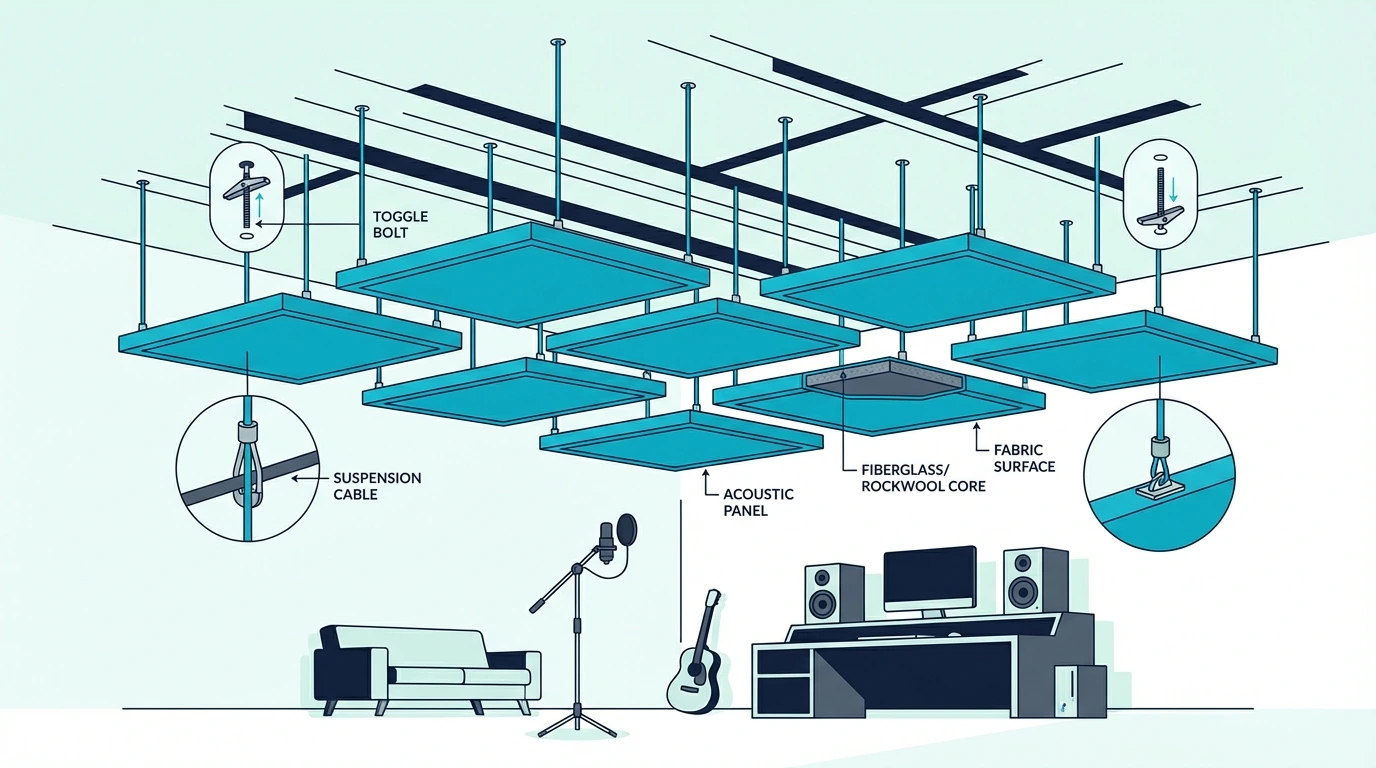
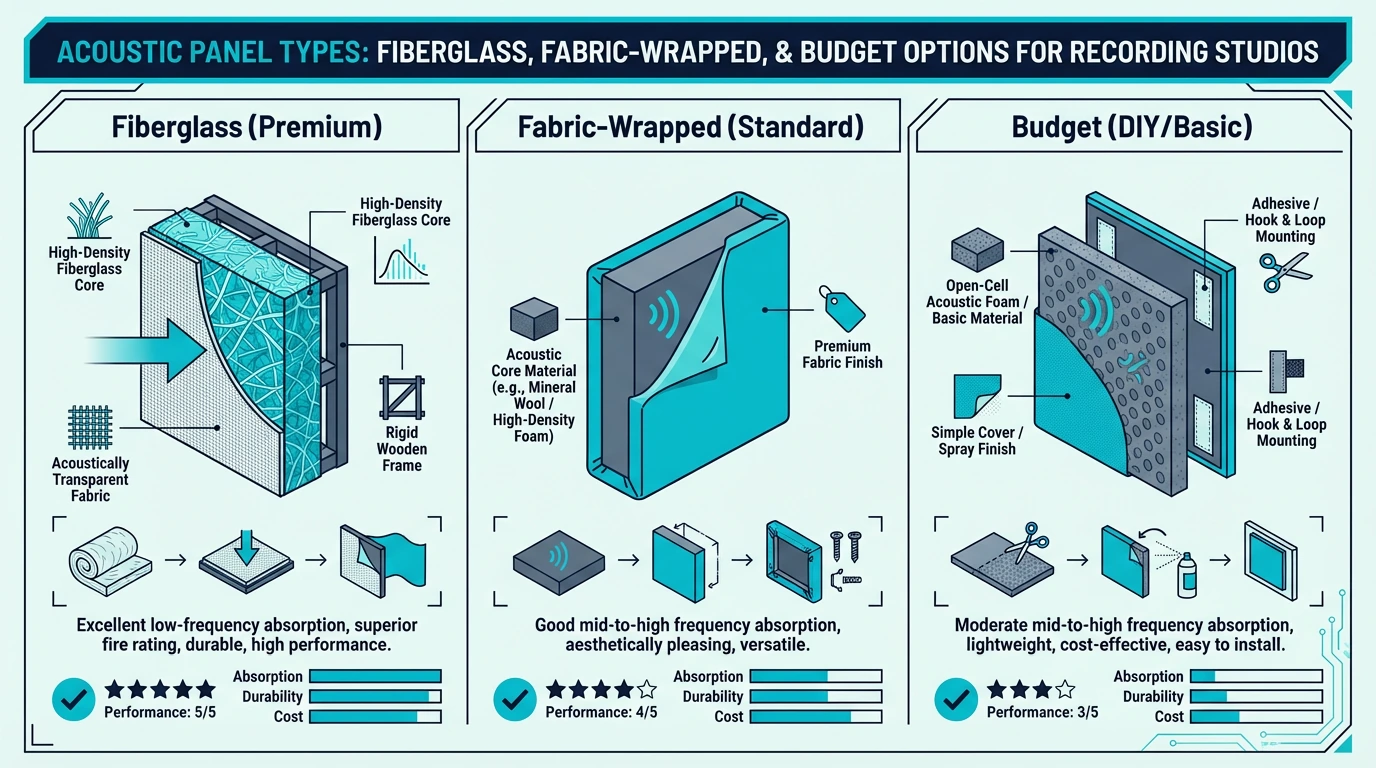
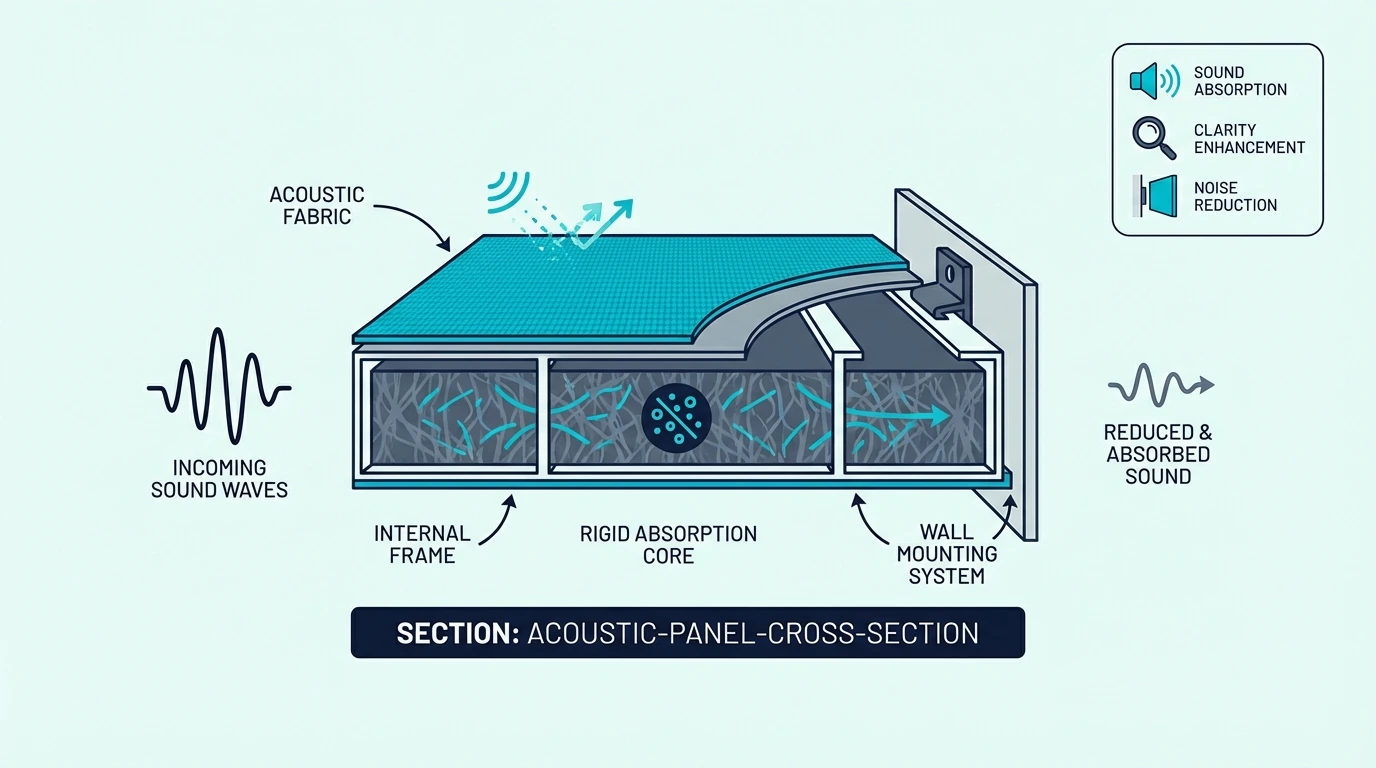
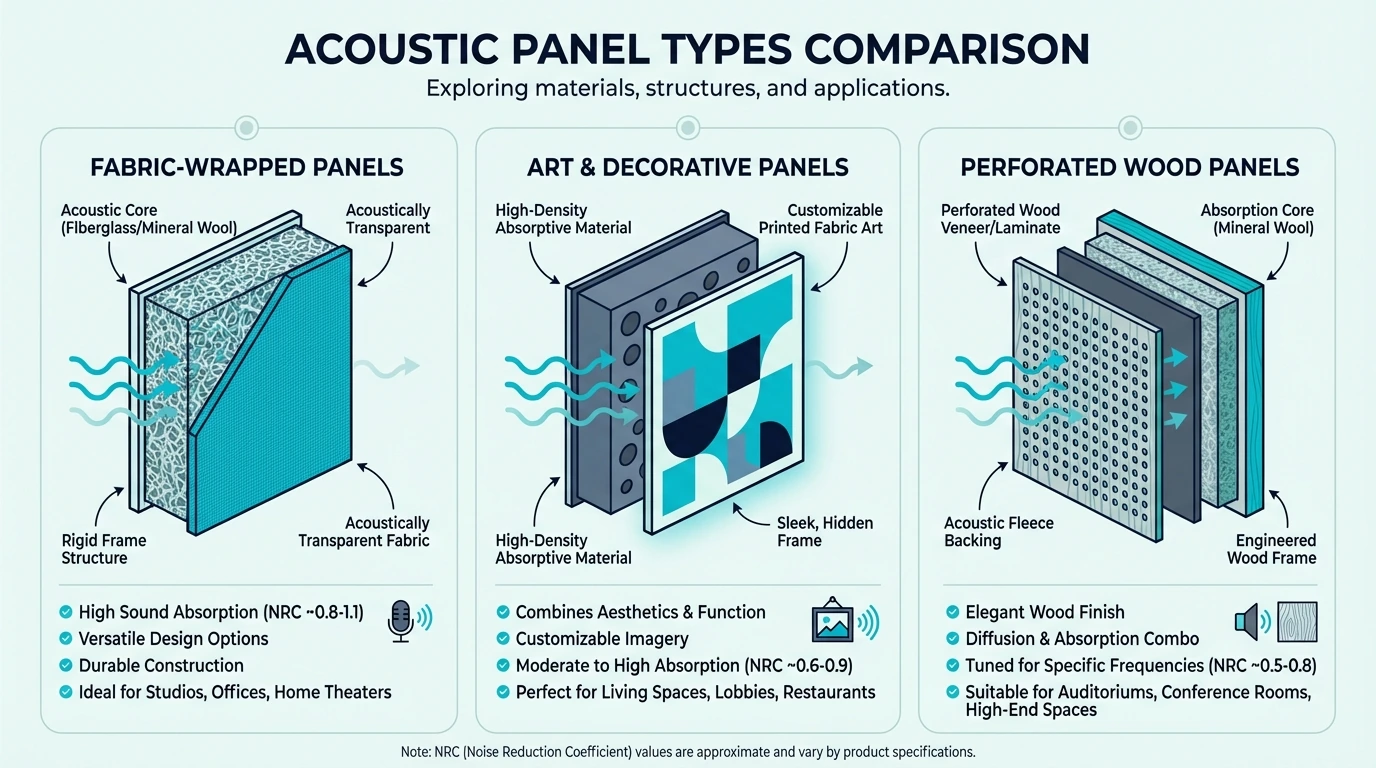
These are the professional standard. A rigid fiberglass or mineral wool core wrapped in acoustically transparent fabric, usually mounted in a wood or metal frame.

Fabric-wrapped panels offer the best broadband absorption — they work effectively across the entire frequency spectrum. They’re durable, professional-looking, and available in countless fabric colors to match any decor.

Most recording studios, broadcast facilities, and high-end home theaters use fabric-wrapped panels exclusively.

Quality examples like the UMIACOUSTICS 4-Pack Fiberglass Panels represent what serious users should target — correct fiberglass cores with professional fabric wrapping.

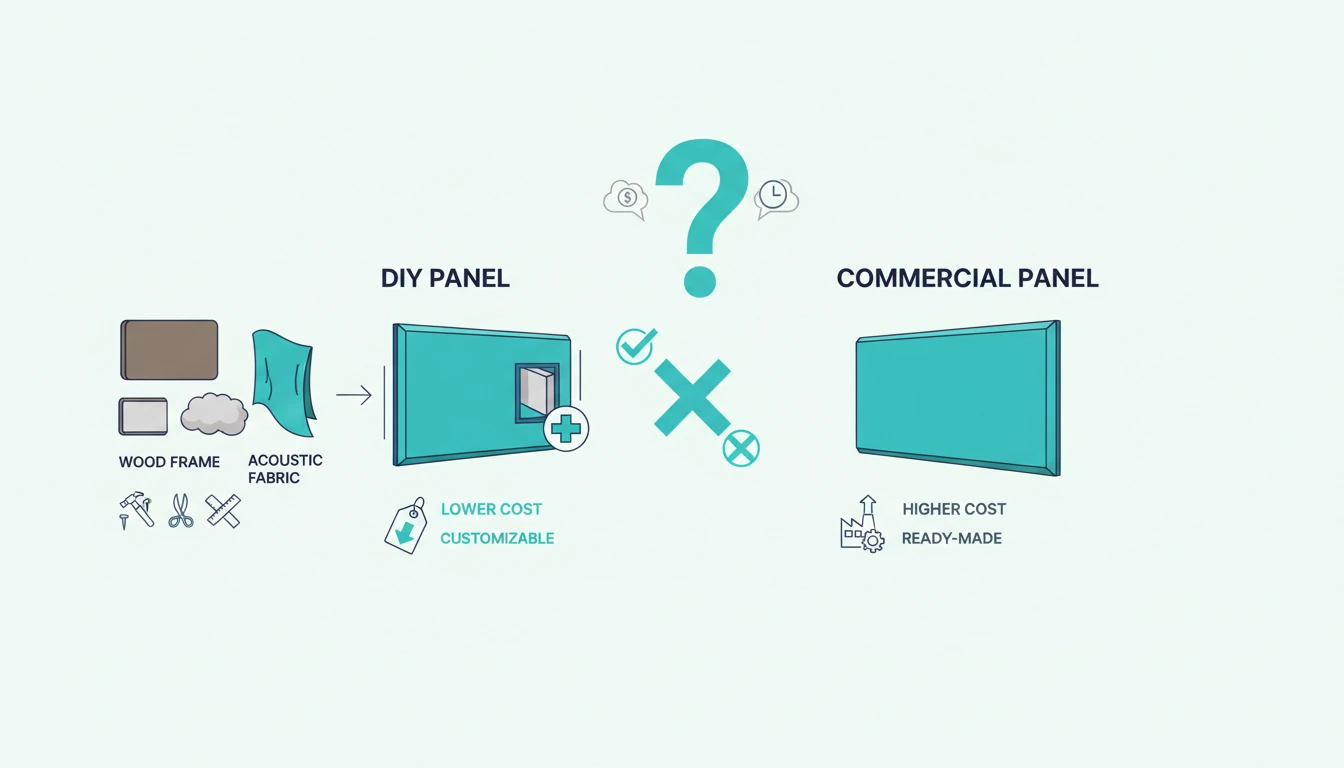
The main downside is cost. Quality fabric-wrapped panels run $50-150 each, though DIY versions cost far less if you’re willing to build them.

What Are Acoustic Foam Panels?

Foam panels are the budget entry point. Made from polyurethane or melamine foam, often shaped into wedges, pyramids, or egg-crate patterns.

Foam is cheap, lightweight, and easy to install — often just peel-and-stick. Beginners gravitate toward it because it feels like “doing something” about room sound without spending much.

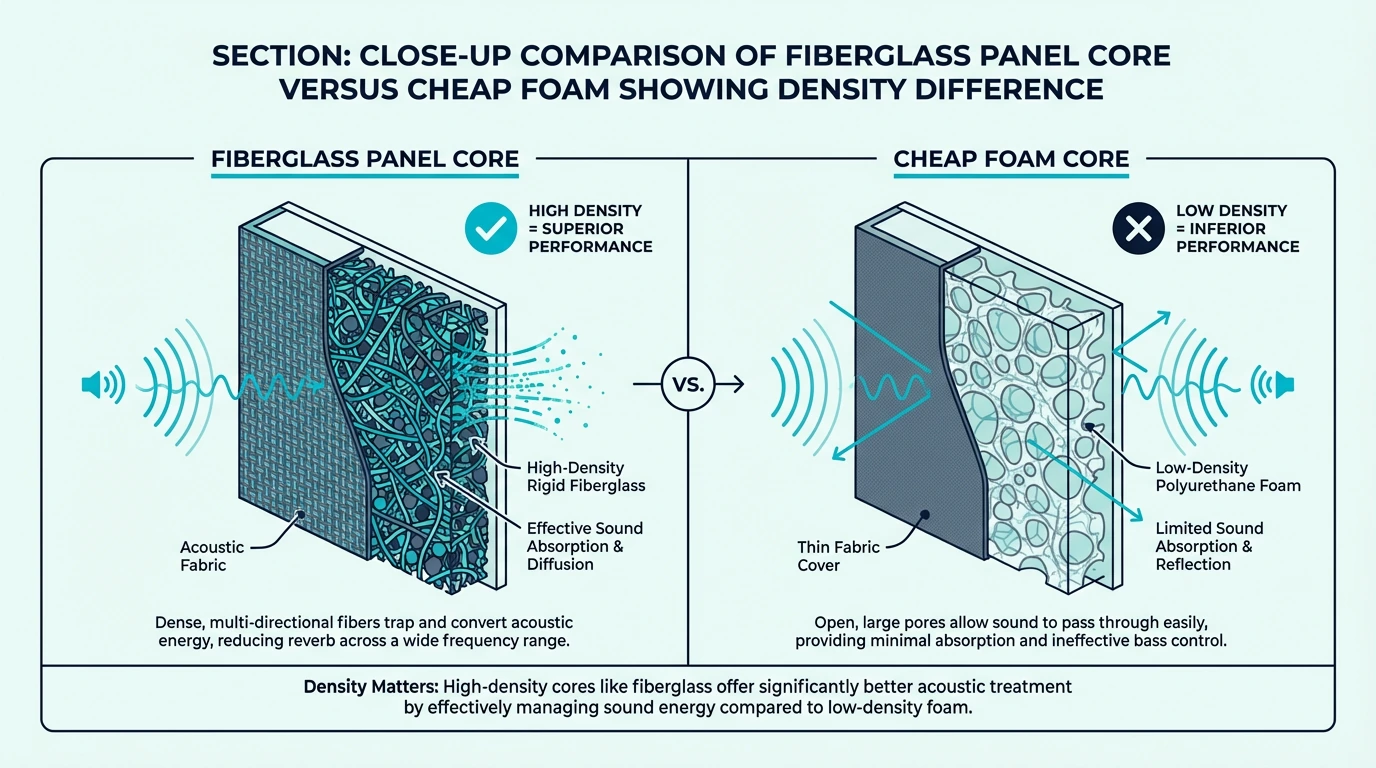
The limitation is performance. Foam primarily absorbs high frequencies.

The wedge and pyramid shapes have minimal impact on mid and low frequencies where most acoustic problems live. Comparing foam to correct panels reveals measurable performance gaps, especially for voice recording and music applications.

Foam also degrades over time, crumbling and losing effectiveness. It’s a starting point, not a destination.

What Are Wood Acoustic Panels?

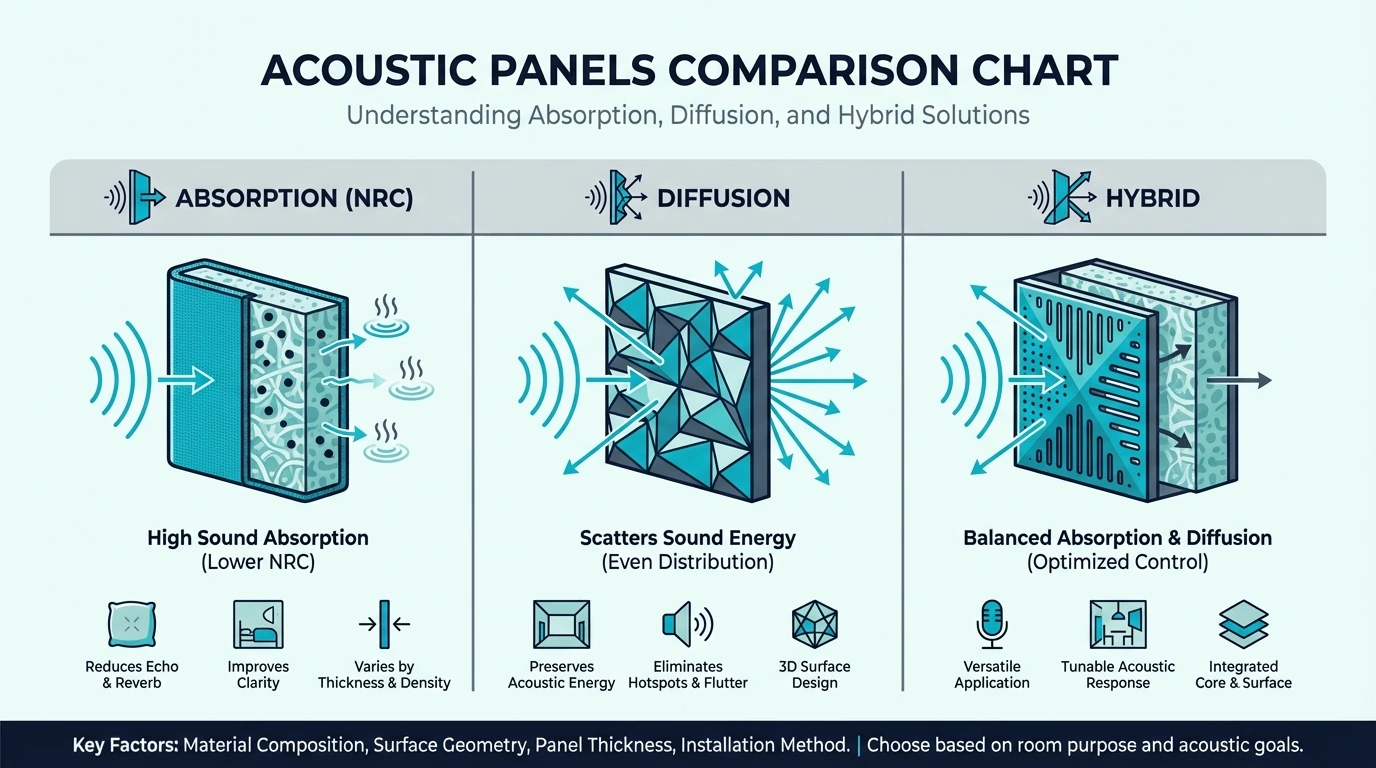
Wood slat panels and perforated wood panels combine absorption with diffusion. The acoustic slat panel guide covers how these work in detail.

Behind the decorative wood surface is an absorptive backing (usually felt or foam).

Sound enters through the gaps, gets absorbed by the backing, while the wood surface scatters some reflections.

These panels excel in spaces where aesthetics matter as much as acoustics — modern offices, restaurants, living rooms. They add visual warmth and texture while providing meaningful acoustic improvement.

The tradeoff is cost and reduced absorption compared to full fabric-wrapped panels. Wood panels are a design element that happens to help acoustics, rather than acoustics-first solutions.

What Are Bass Traps?

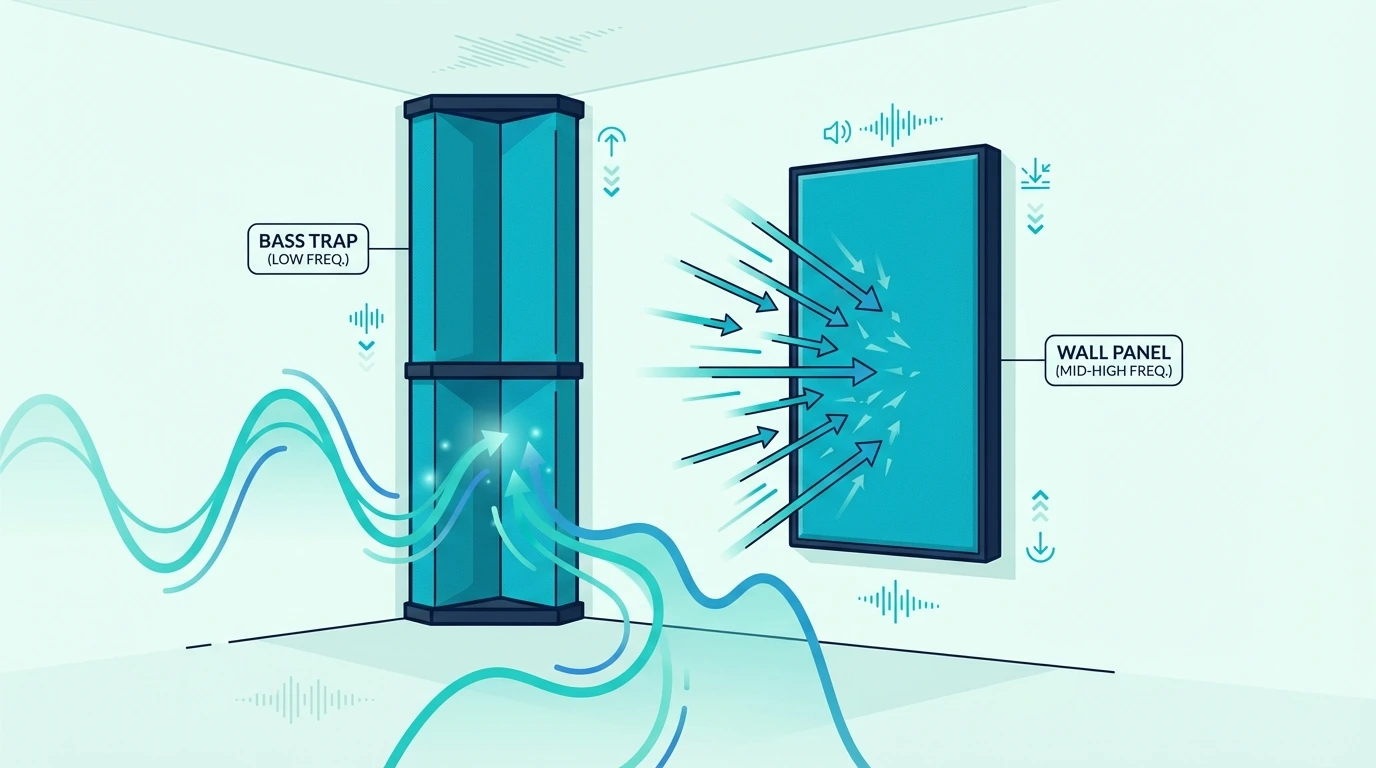
Bass traps are thick panels (typically 4-6 inches) designed specifically for low-frequency absorption. Regular 2-inch panels barely touch bass frequencies — the wavelengths are too long to be affected by thin absorbers.

Bass energy accumulates in room corners where walls meet walls and walls meet ceilings. Placing thick bass traps in these corners addresses the boomy, muddy low-end that plagues small rooms.

Most rooms need at least four bass traps (one per vertical corner) for balanced treatment.

How Do Acoustic Panels Work?

NRC rating chart for acoustic panel absorption performance
The physics behind acoustic panels is simple: porous materials convert sound energy into heat through friction. Two concepts explain how this works in practice — the absorption mechanism itself and the NRC rating system used to measure it.

What Is the Science Behind Sound Absorption?

Sound is pressure waves traveling through air. When these waves hit a porous material like fiberglass or mineral wool, they enter the maze of fibers and air pockets inside.

As sound waves navigate through the material, air molecules vibrate against the fibers. This vibration creates friction.

Friction converts kinetic energy (movement) into thermal energy (heat). The sound wave loses energy with each fiber collision until it dissipates entirely.

The heat generated is negligible — you won’t feel your panels warming up. But the acoustic energy genuinely disappears rather than reflecting back into the room.

Thicker panels absorb lower frequencies because bass wavelengths are longer — panel density plays a direct role in which frequencies get absorbed. A 100 Hz sound wave is about 11 feet long.

To effectively absorb it, you need a large material thickness and often an air gap behind the panel. High frequencies (short wavelengths) absorb easily in thin materials; low frequencies require thick, strategically-placed treatment.

What Is NRC Rating and Why Does It Matter?

NRC (Noise Reduction Coefficient) measures how much sound a material absorbs, averaged across four frequencies (250, 500, 1000, and 2000 Hz).

The scale runs from 0.0 (perfect reflection, like a mirror for sound) to 1.0 (perfect absorption).

An NRC of 0.85 means the material absorbs 85% of sound energy and reflects 15% back.

Professional acoustic panels typically achieve NRC ratings of 0.90-1.05 (values above 1.0 are possible due to edge effects and measurement methods).

For context: – Bare drywall: NRC ~0.05 (reflects almost everything) – Carpet: NRC ~0.30 (helps, but limited) – Cheap foam: NRC ~0.40-0.60 – Quality fiberglass panels: NRC ~0.95-1.05

When comparing products, NRC gives you an objective performance metric. Higher is better for absorption, but remember NRC is averaged across frequencies — it doesn’t tell you specifically about bass absorption, which requires looking at individual frequency measurements.

Where Should You Put Acoustic Panels?

Room diagram showing acoustic panel placement zones

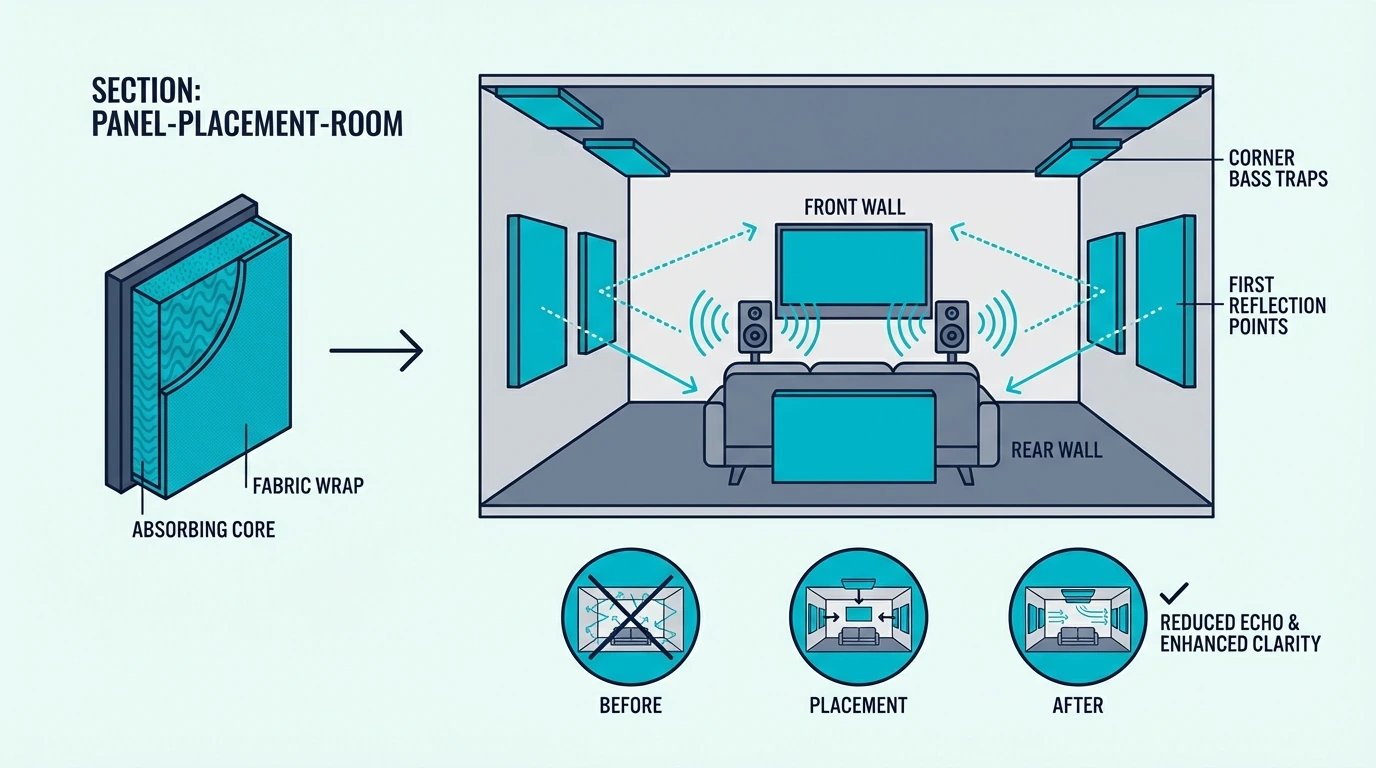
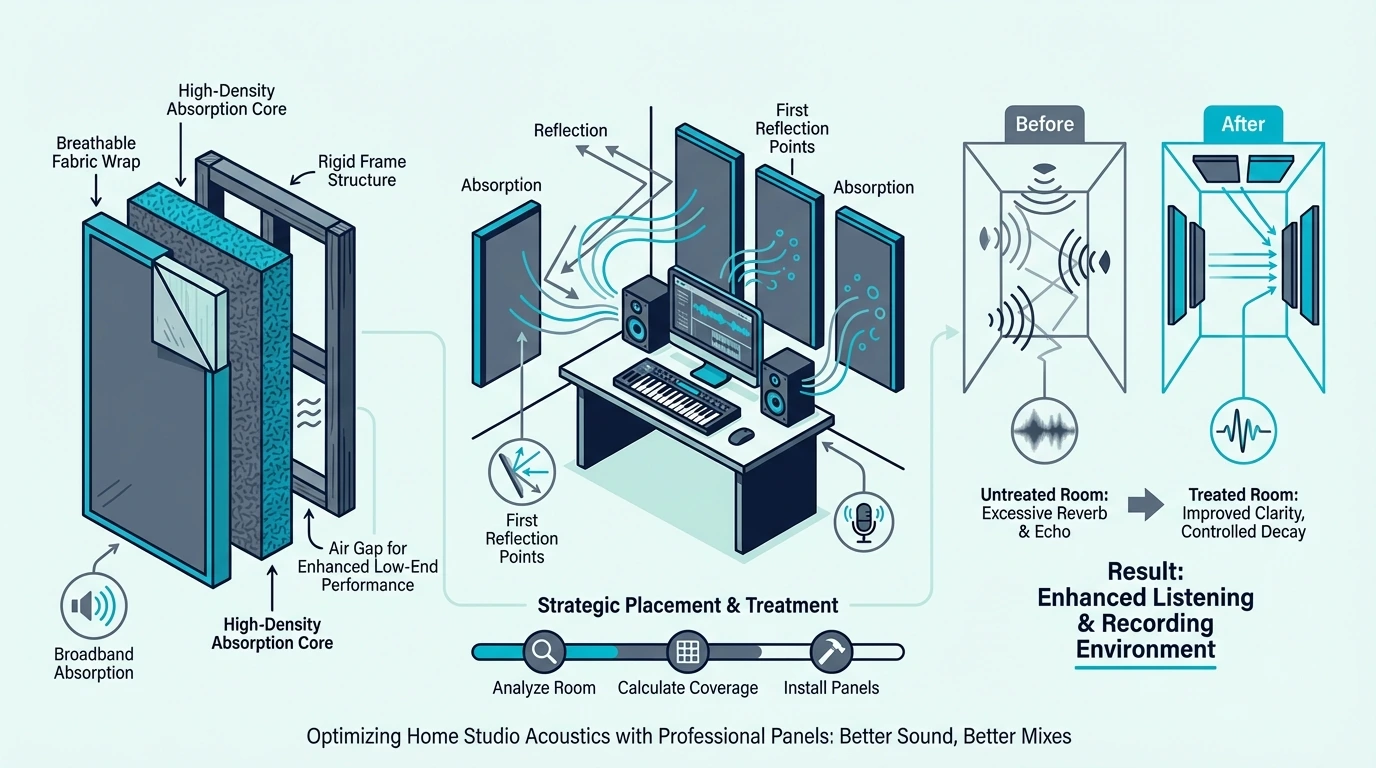
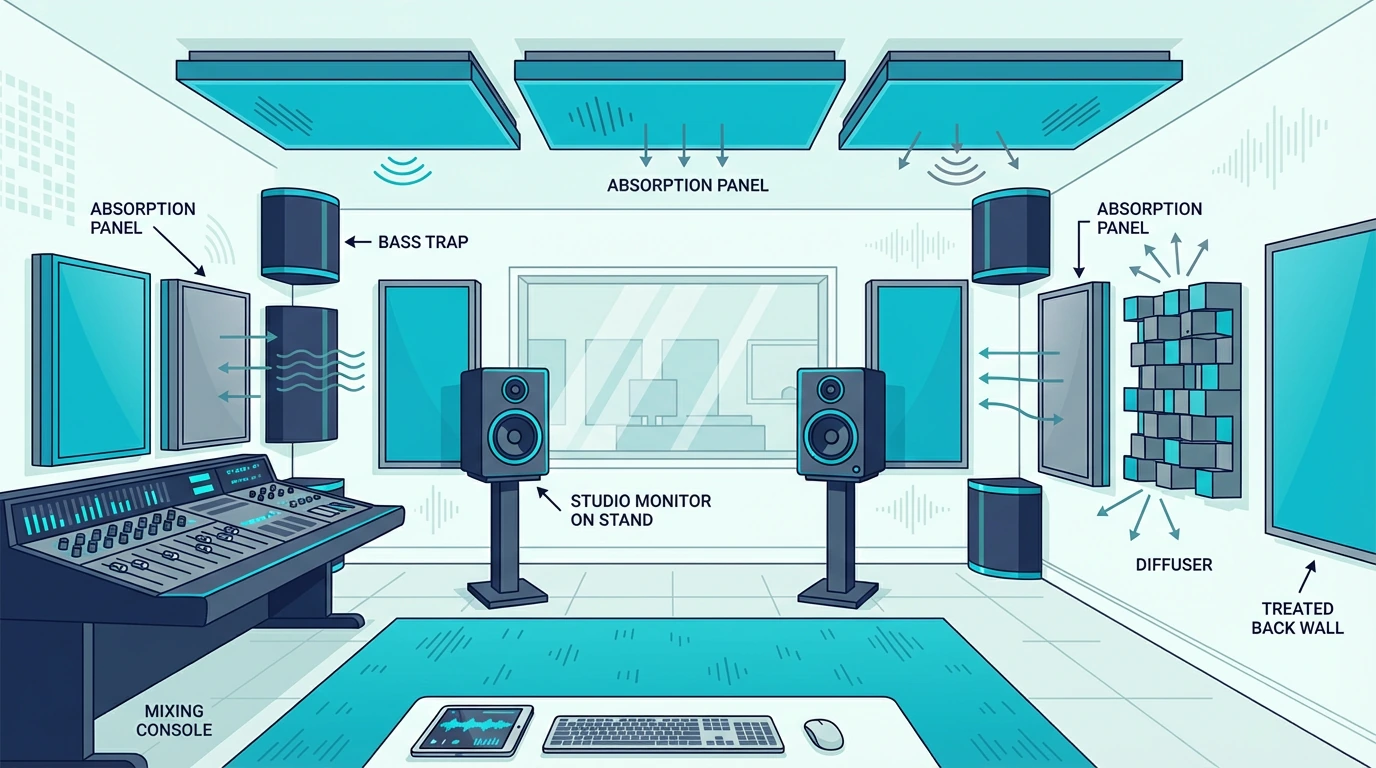
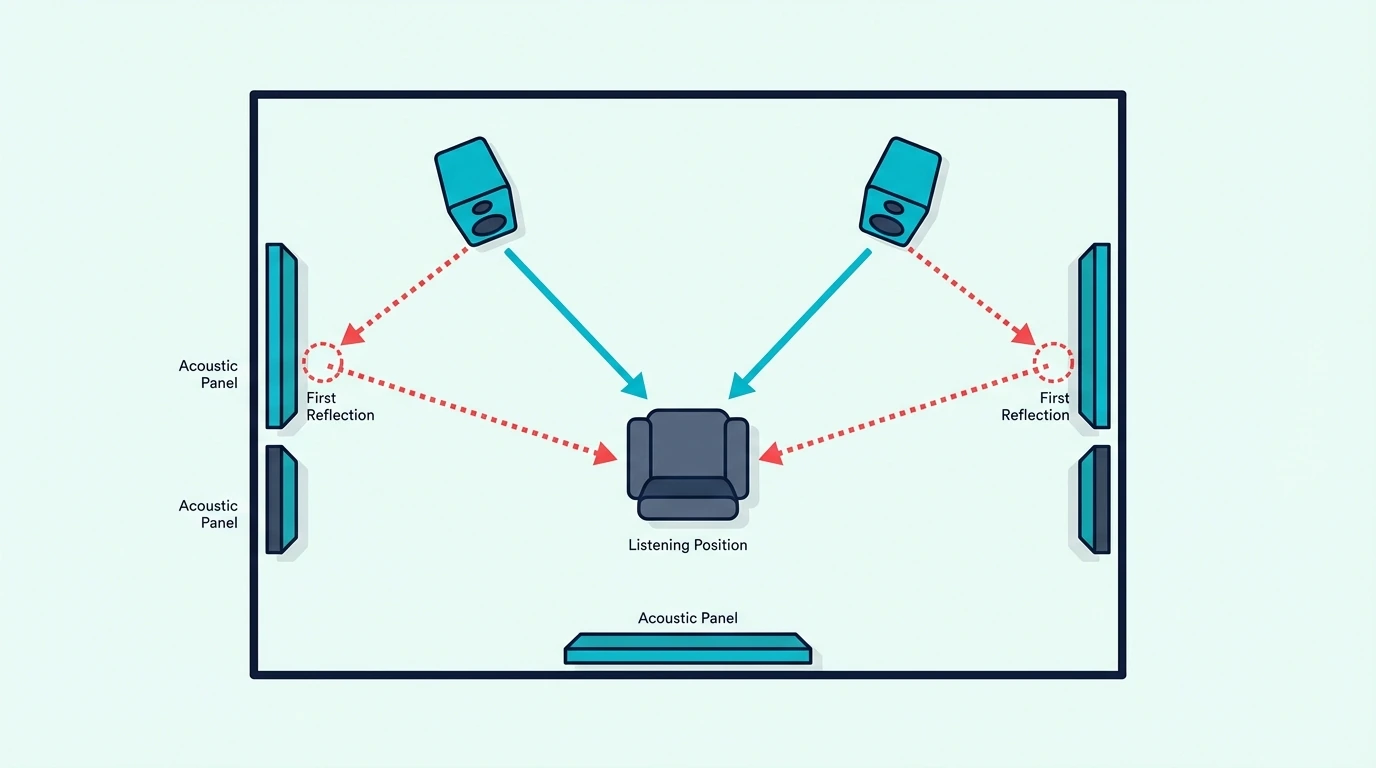
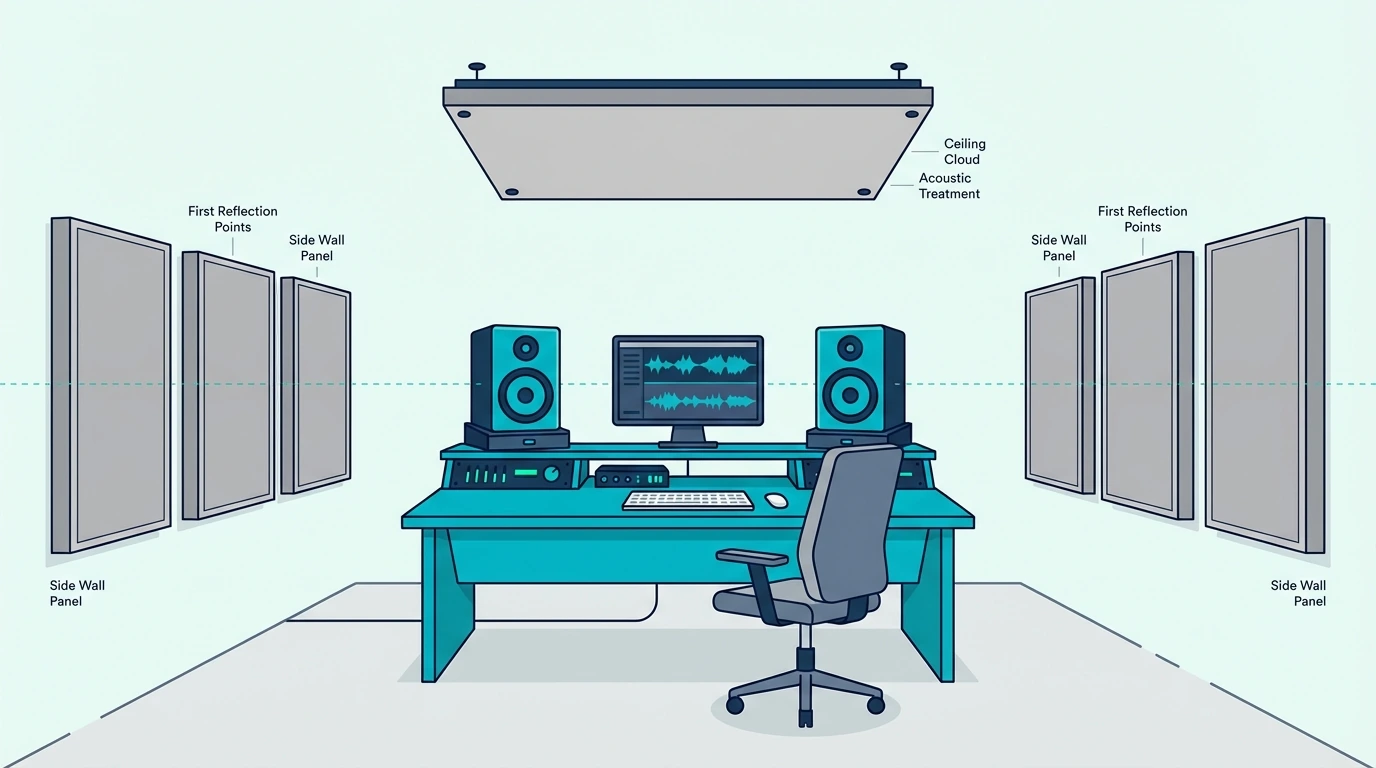
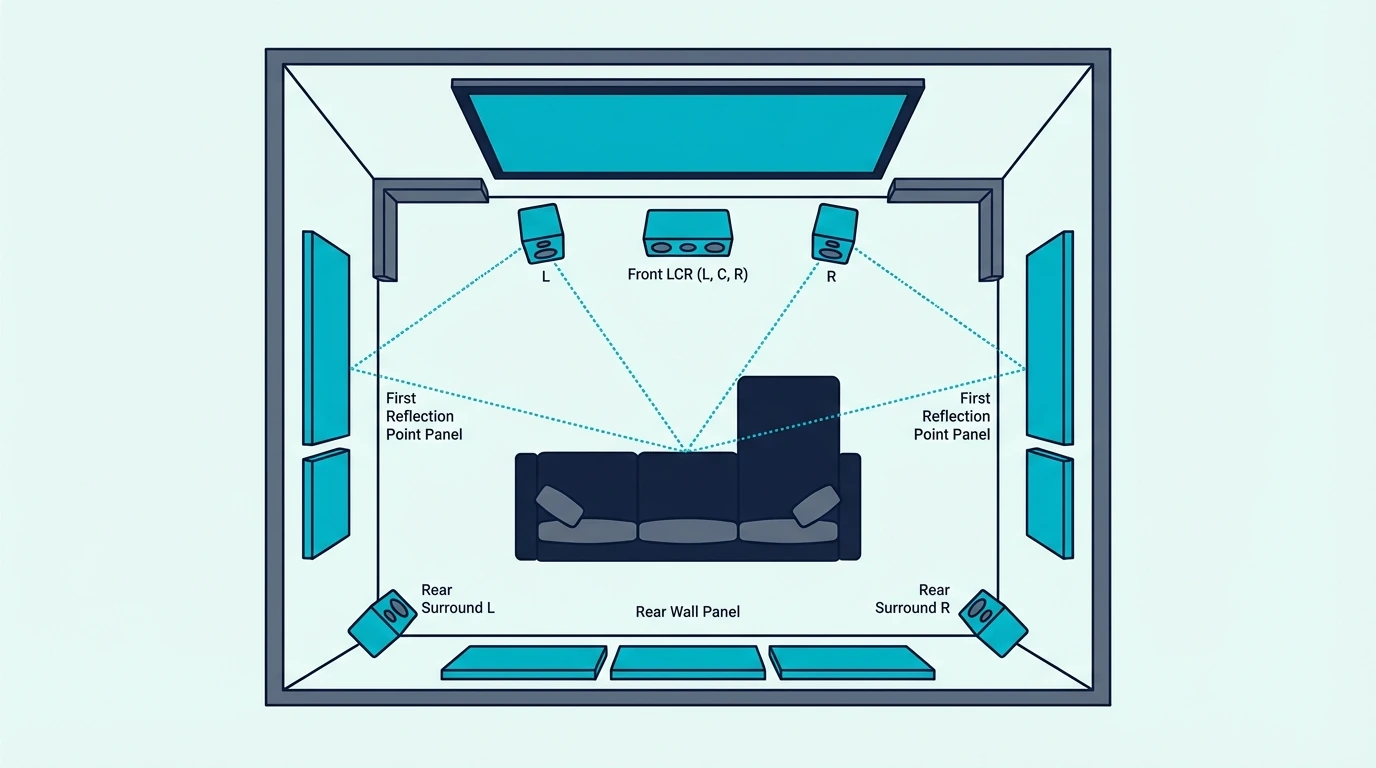
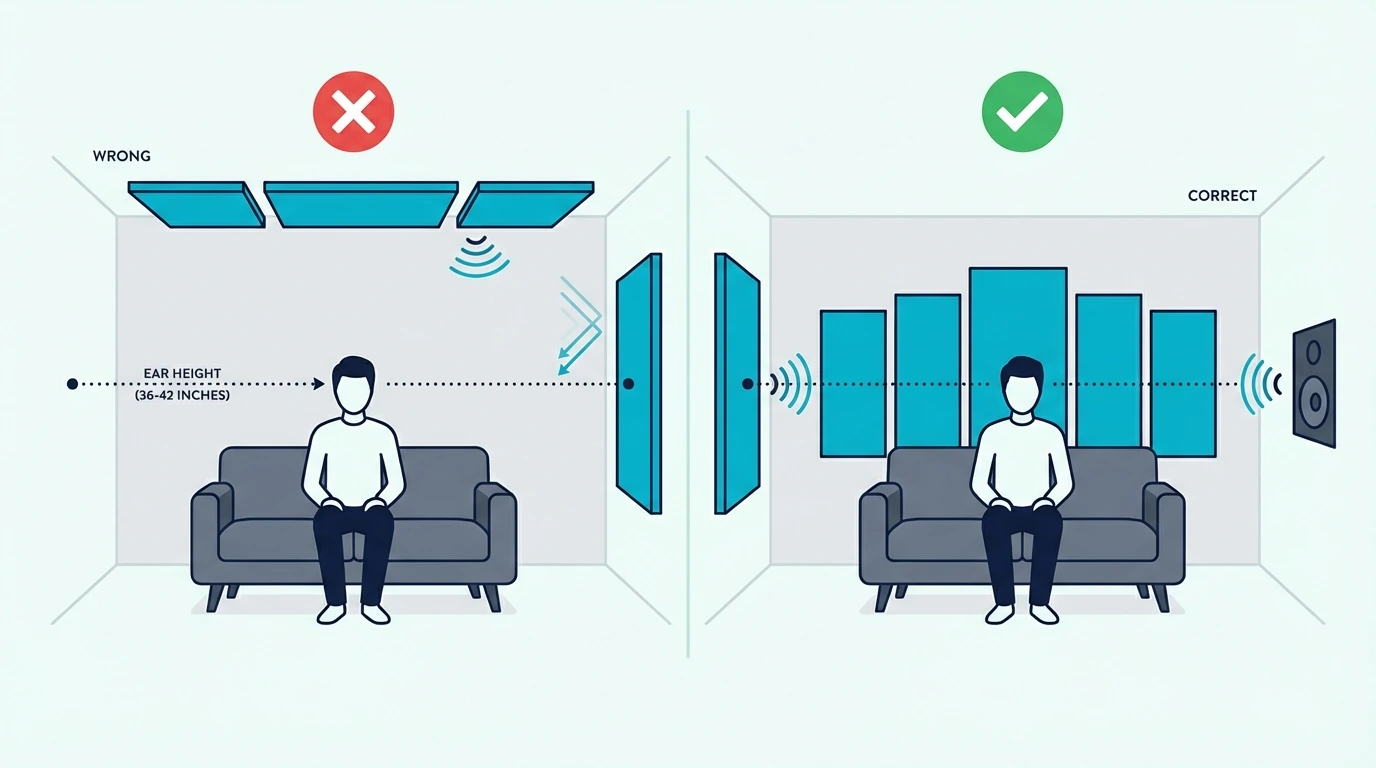
Placement matters as much as panel quality. Strategic positioning of 6-12 panels typically outperforms covering entire walls with twice as many panels in random locations.

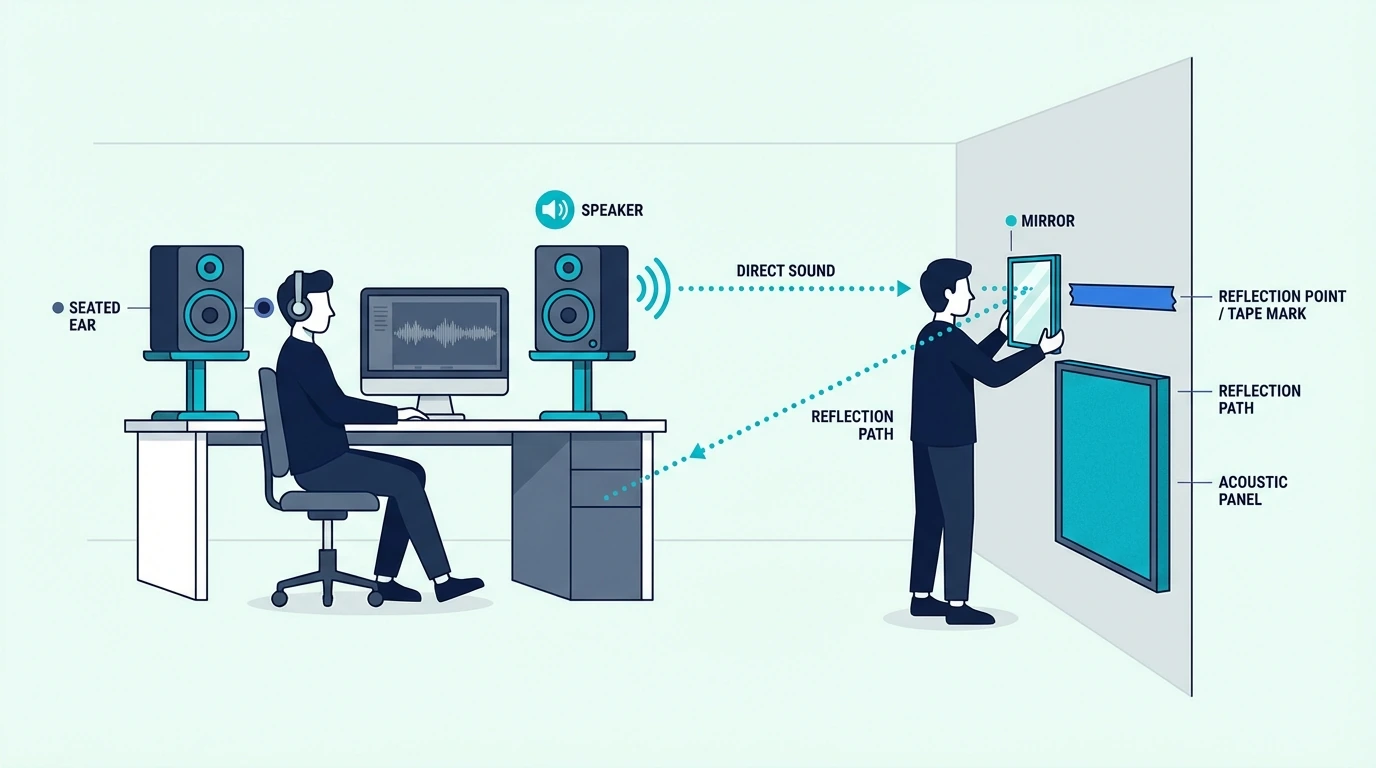
The priority targets are first reflection points — the spots on walls and ceiling where sound bounces directly from your speakers or sound source to your listening position. These early reflections cause the most damage to clarity and imaging.

To find first reflection points, sit in your listening position and have someone slide a mirror along the side walls. Where you can see your speakers (or your recording position) in the mirror, that’s a first reflection point.

Panels go there.

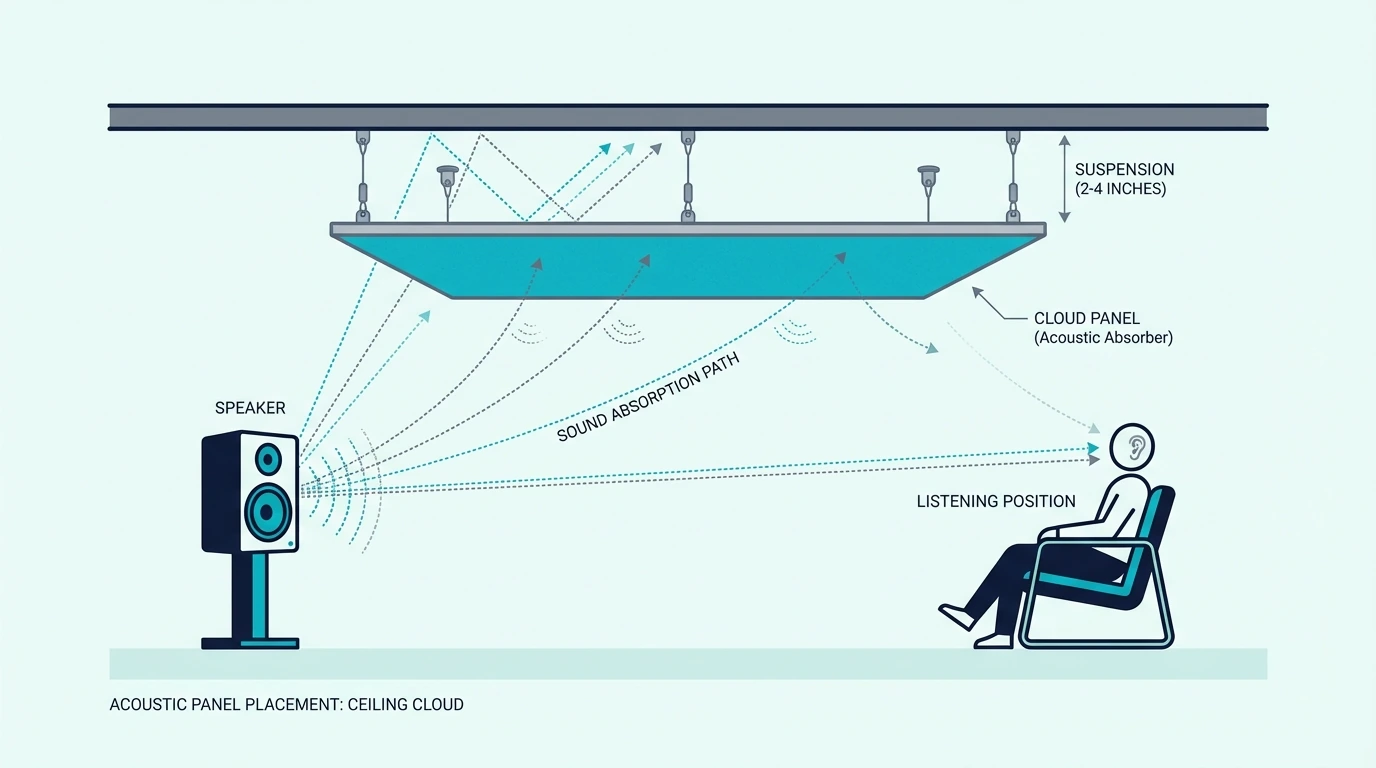
For recording, treat the wall behind your microphone position and the ceiling above. These reflections arrive quickly and muddy your recordings.

For room-specific guidance, the panel placement guide covers studios, home offices, and home theaters with specific recommendations.

Not sure about quantity? Figure out how many panels you need by calculating 15-25% coverage of your total wall surface area as a starting point.

More isn’t always better — over-treatment creates an unnaturally dead sound.

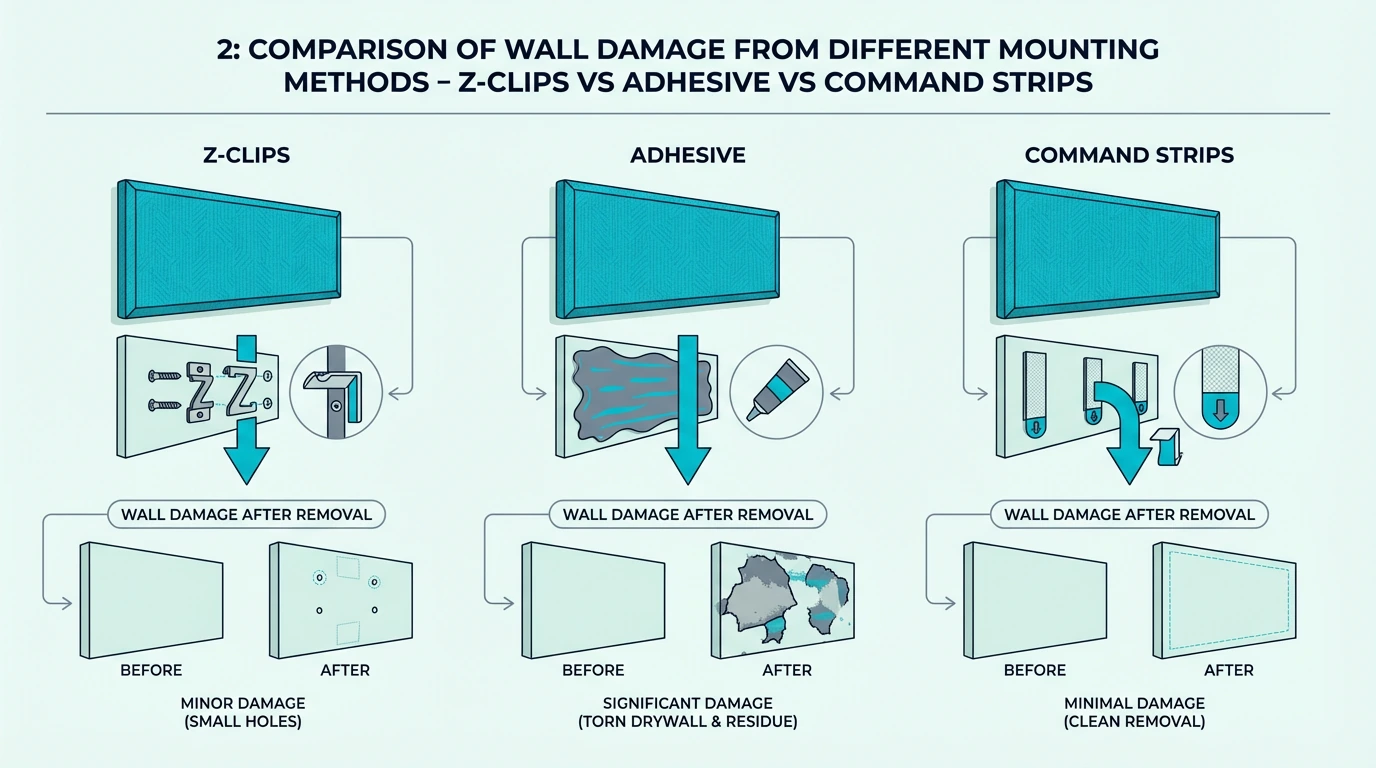
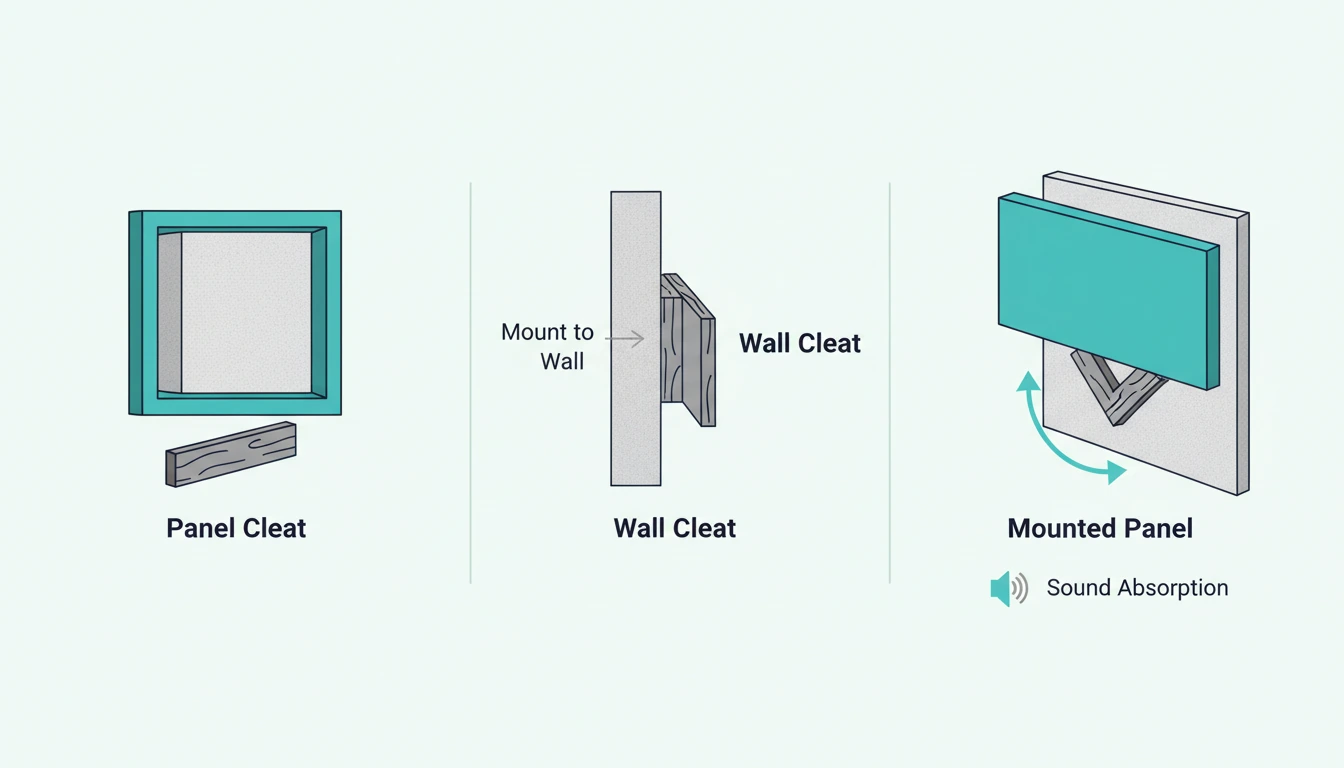
Once you know where panels go, the installation guide ensures they stay secure and look professional. For lighter panels, the hanging guide covers command strips, french cleats, and other methods.

How Much Do Acoustic Panels Cost?

Cost guide for acoustic panels by room and panel type

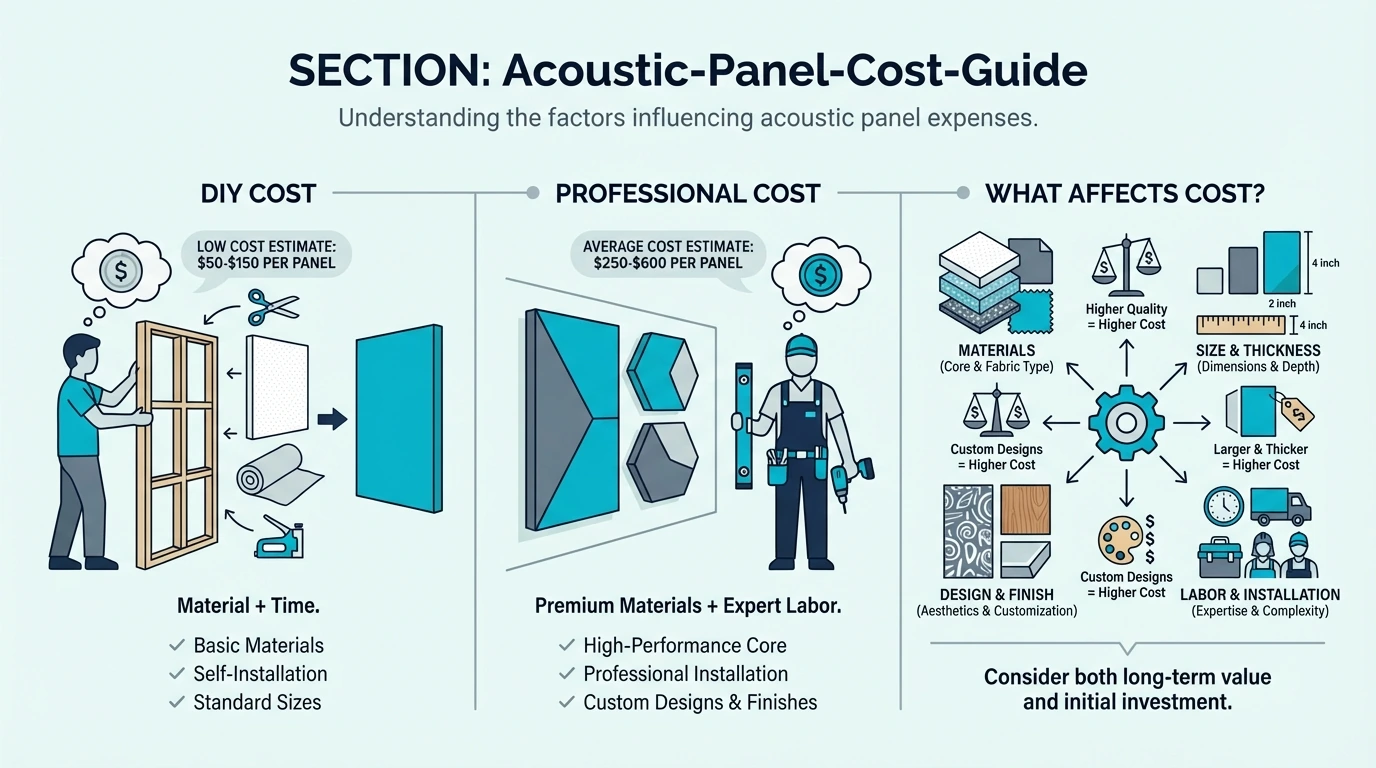
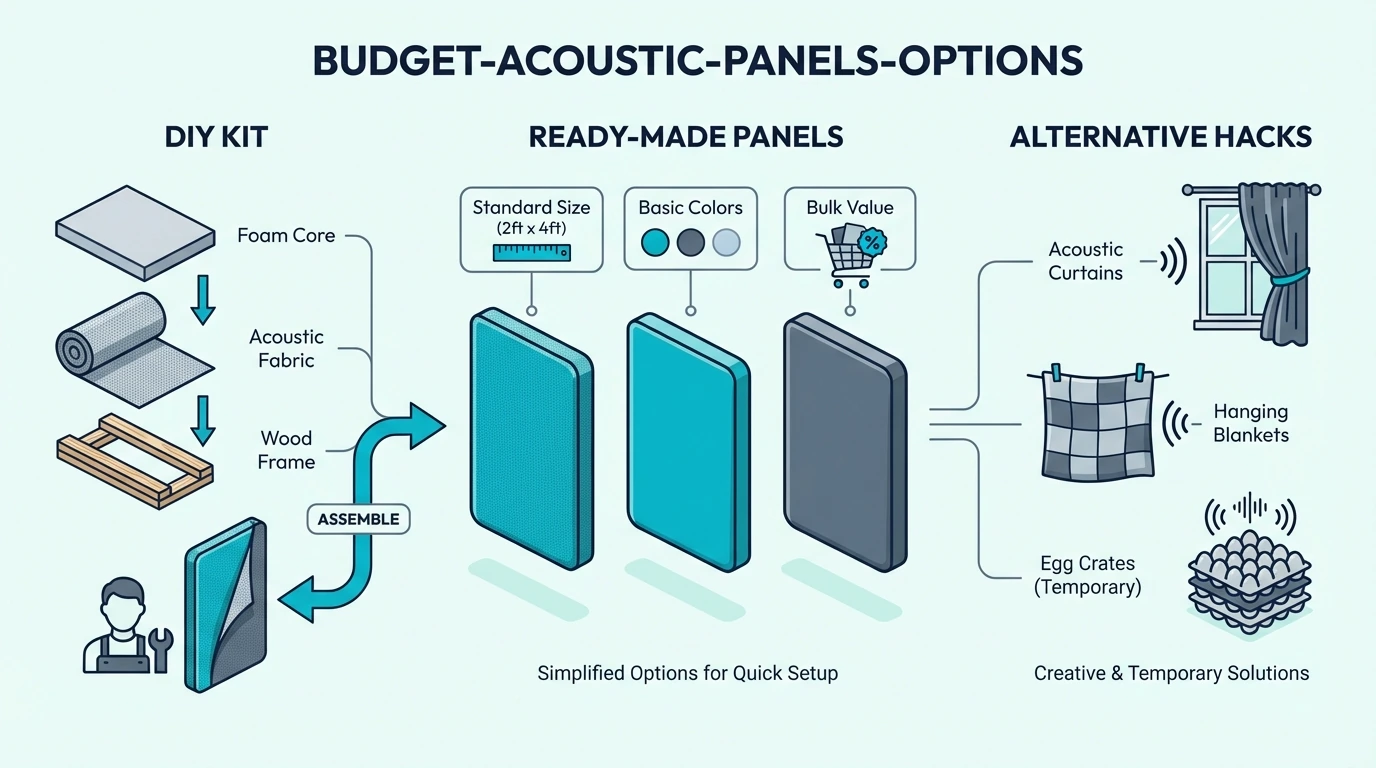
Prices vary widely based on size, materials, quality, and whether you buy pre-made or build your own. Here is what each tier costs and what you get for the money.

Budget foam panels run $1-3 per square foot. A pack of twelve 12×12” foam wedges costs $20-40.

Performance is limited to high frequencies, and longevity is questionable, but it’s an accessible entry point.

Entry-level fabric panels like the 2-Pack Fabric Acoustic Panels start around $27 for a pair. These work for testing whether treatment helps your specific situation before committing to larger purchases.

Mid-range professional panels from reputable brands cost $60-120 per 2×4 foot panel. This is where serious performance begins — correct fiberglass or mineral wool cores with professional fabric wrapping.

Premium panels from brands like GIK Acoustics, Primacoustic, and ATS Acoustics run $100-200 per 2×4 foot panel. You’re paying for quality control, consistent NRC ratings, and aesthetic options.

The best fiberglass panels guide compares top options in this range.

Large-format panels in the 47×24-inch range offer maximum coverage per unit. Each panel covers roughly four times the area of a standard 12×12-inch foam tile, making them the most efficient option for dedicated spaces.

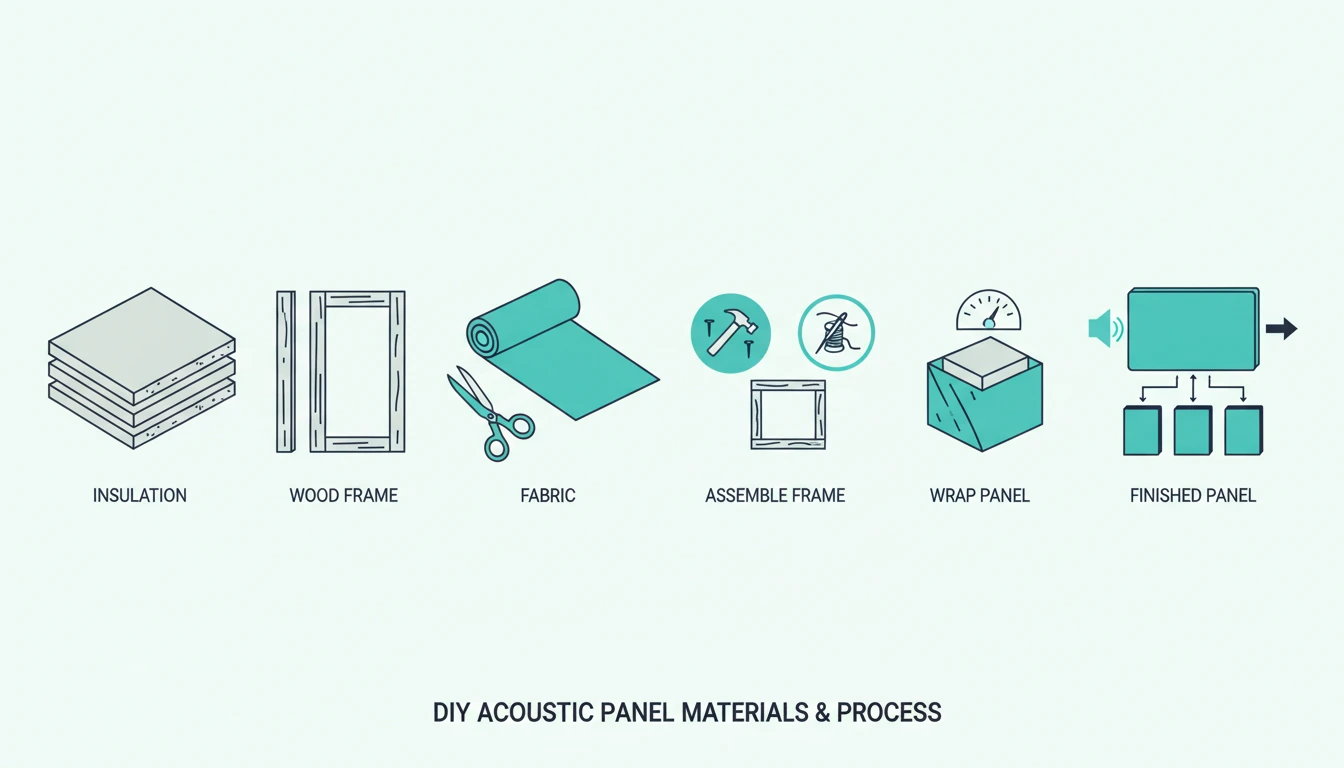
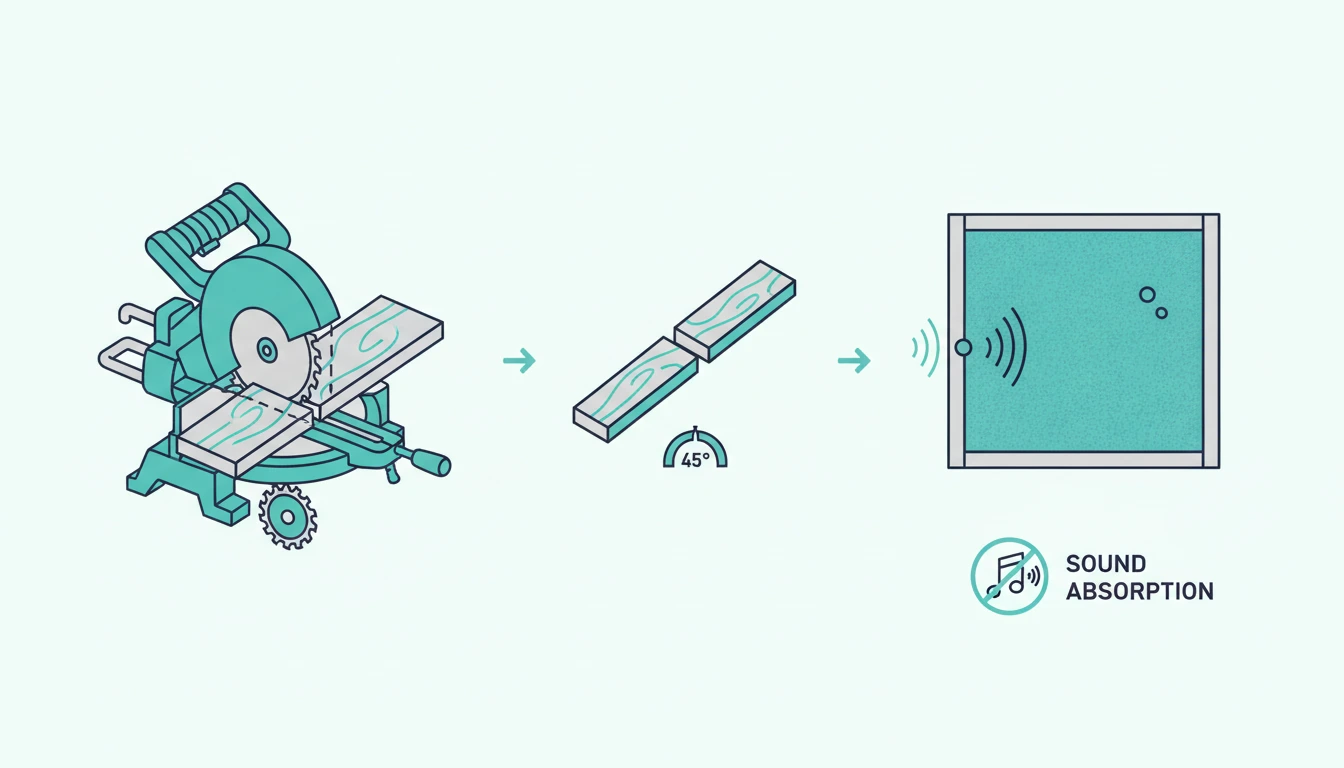
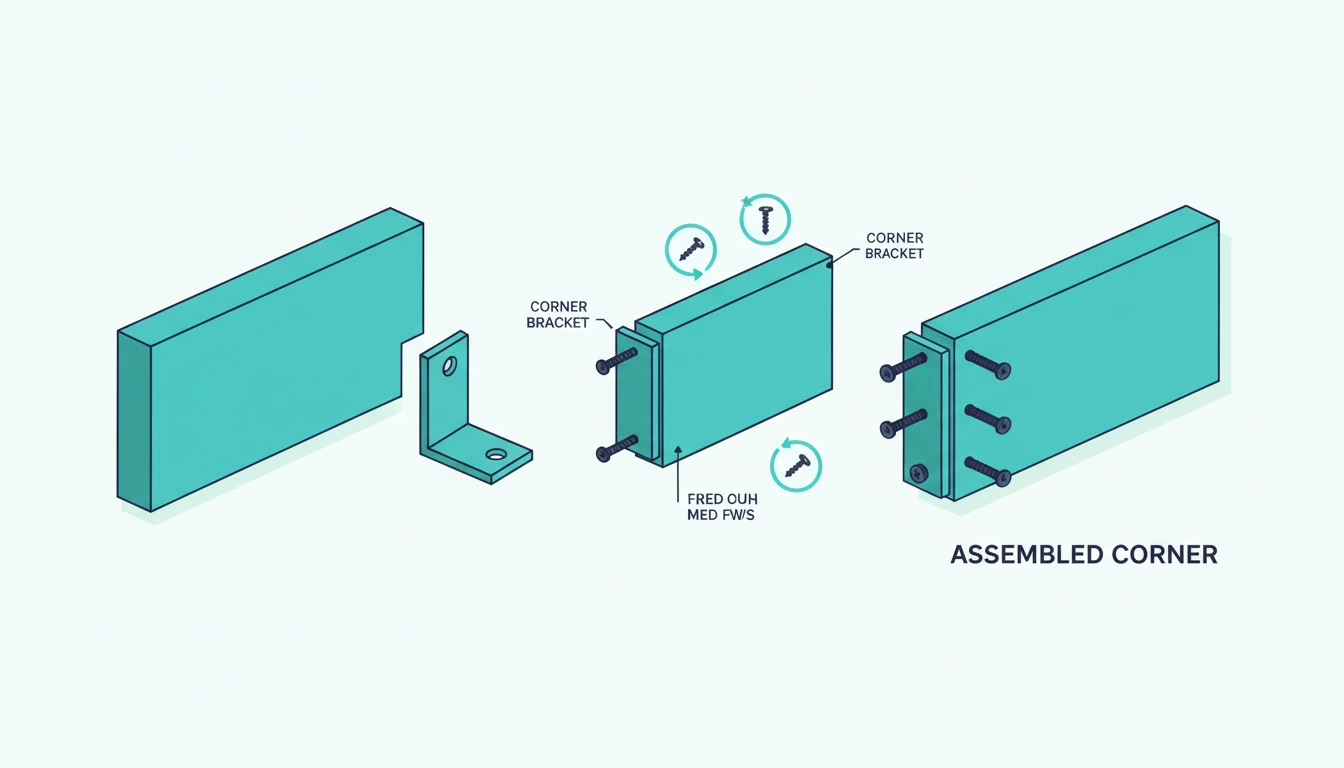
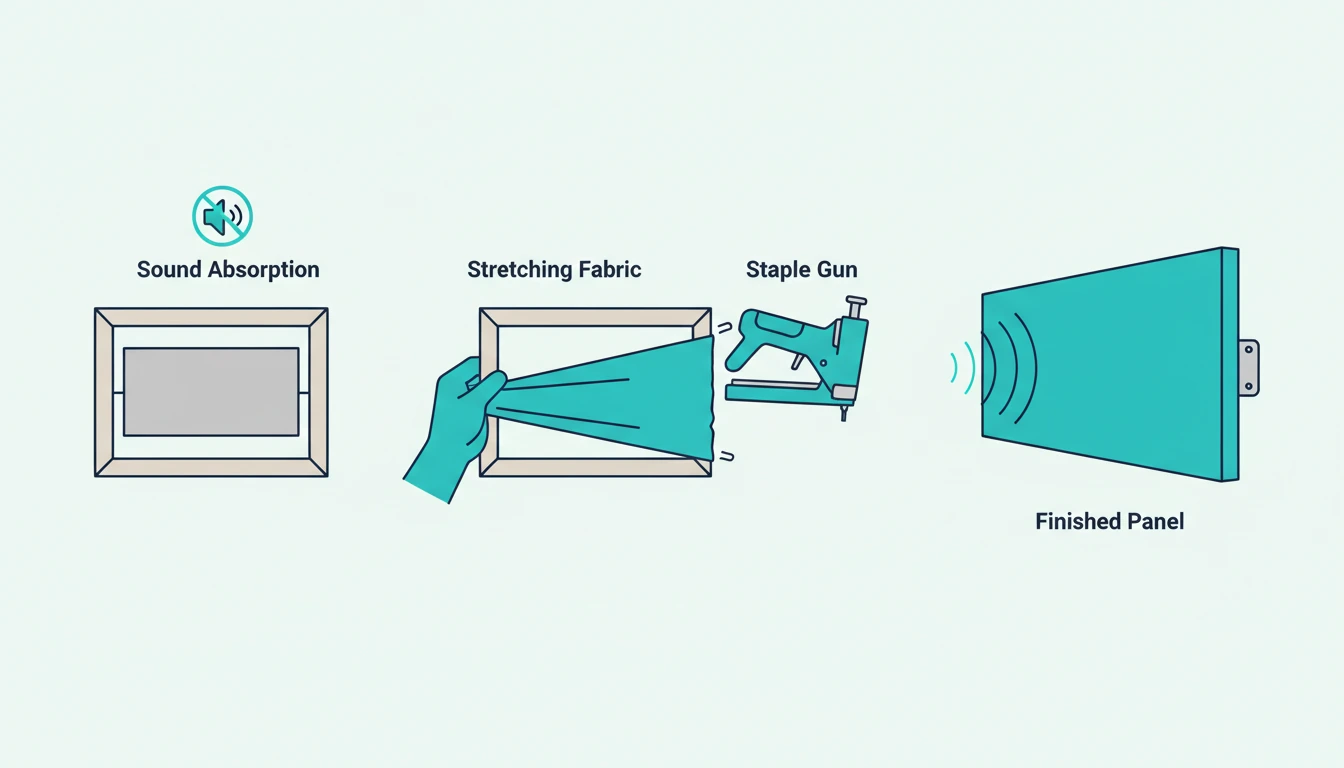
DIY panels offer the best value. Building your own fabric-wrapped panels costs $3-5 per square foot for materials — fiberglass or rockwool batts, simple wood frames, and acoustic fabric.

The rockwool selection guide covers the process. You get professional-grade performance at a fraction of retail prices.

What Should You Do Next?

Next steps for choosing and placing acoustic panels

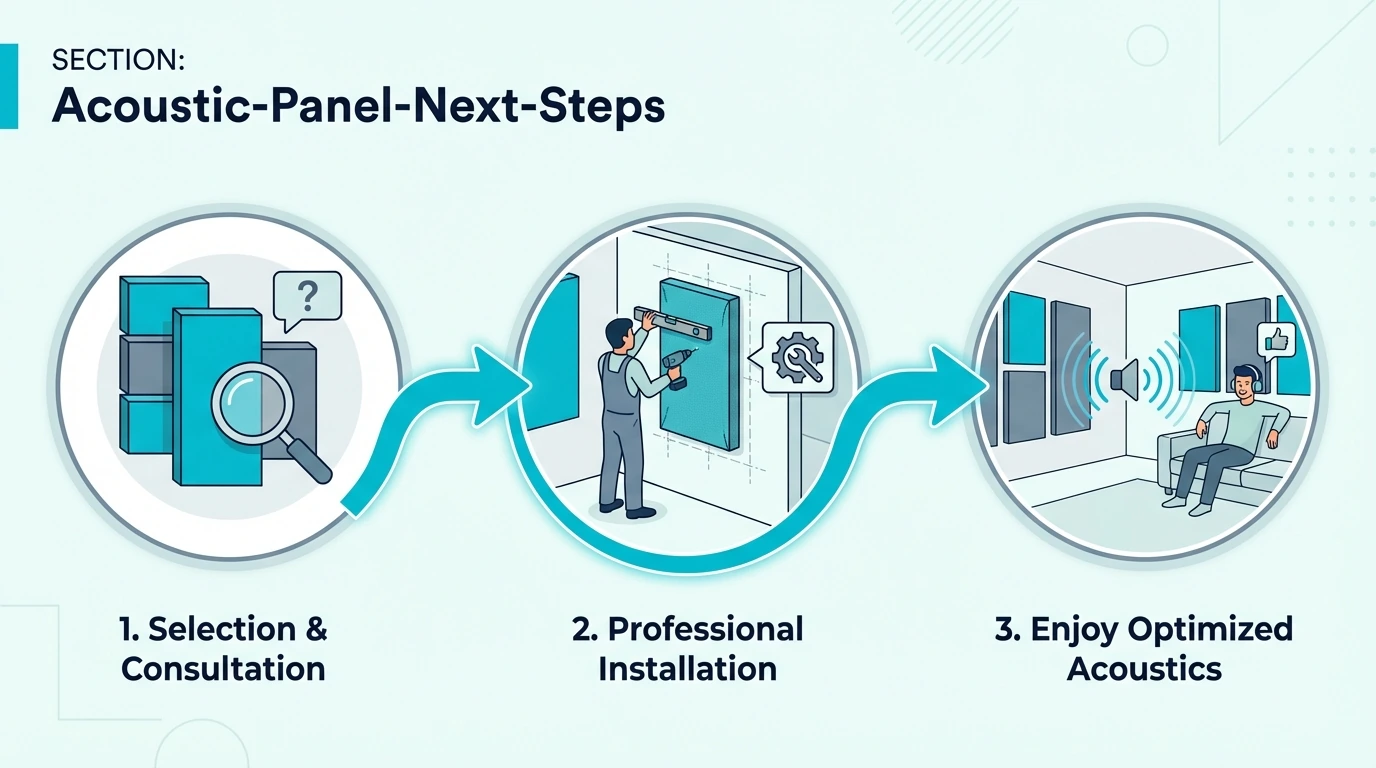
Acoustic panels make sense for a wide range of spaces. The next step depends on your situation.

If you’re ready to buy panels, the best acoustic panels guide covers top options for every budget, room type, and use case.

If you want to optimize placement, learn about first reflection points and strategic positioning. Good placement beats expensive panels in random locations.

If you’re calculating coverage, use the acoustic panel calculator to figure out exactly how many you need. The formula is simpler than you’d expect, and over-treatment wastes money without improving sound.

If you’re considering DIY, building your own panels saves 50-70% versus retail and delivers identical performance. The panel cutting guide covers construction and finishing.

For everything else, the acoustic panels hub collects all guides, comparisons, and recommendations in one place.

Conclusion

Acoustic panels are sound-absorbing tools that control how audio behaves inside a room. They reduce echo, reverb, and flutter by capturing reflections before they can bounce around and muddy your sound.

The core construction is simple: porous materials like fiberglass or mineral wool wrapped in acoustically transparent fabric. Sound enters, bounces through the fiber matrix, and loses energy through friction until it disappears as negligible heat.

What panels do: improve sound quality inside your room for recording, calls, and listening.

What panels don’t do: block sound from traveling between spaces. That’s soundproofing — an entirely different discipline requiring mass, isolation, and construction.

Whether you choose quality pre-made options or build your own, treated rooms sound better from the very first recording session.

Start with first reflection points, aim for 15-25% wall coverage, and you’ll hear the difference from the first recording or listening session. Even adding rugs alongside panels contributes to overall absorption if you’re working on a budget.

Frequently Asked Questions

Are Acoustic Panels the Same as Soundproofing?

No — this is the most common and most expensive misconception.

Acoustic panels absorb sound inside a room to reduce echo and reverb. They improve how your room sounds for recording and listening.

Soundproofing blocks sound from passing between spaces. It requires heavy materials, construction changes, and complete sealing.

If you need to stop sound from entering or leaving your room, panels won’t help. If you need to improve sound quality inside your room, panels are exactly right.

Do Acoustic Panels Really Work?

Yes. Acoustic panels absolutely work — the physics of sound absorption is well-established science used in every professional recording studio, concert hall, and broadcast facility worldwide.

Properly placed panels measurably reduce reverb time (RT60) and improve clarity for recording and listening.

The difference between a treated room and an untreated room is immediately obvious to anyone who hears it.

The key is correct placement and sufficient coverage. A single panel won’t transform a room.

Strategic coverage of first reflection points and corners will.

Are Acoustic Panels Worth It?

For anyone recording audio, taking video calls, producing music, or serious about listening quality — absolutely worth it.

The difference is not subtle. Recording in a treated room produces professional-sounding results that no amount of post-processing can replicate in an untreated room.

Listening in a treated room reveals details and imaging you’ve never heard in your recordings.

The ROI question depends on your use case — a podcaster who records weekly benefits every session for years, while a casual listener might not notice the difference. Match your investment to how much clean audio matters to your activities.

What’s Better: Panels or Foam?

Professional fabric-wrapped panels outperform foam in nearly every measurable way.

Foam primarily absorbs high frequencies. Panels absorb effectively across the full spectrum including midrange and upper bass.

For voice recording, music, and home theater, the frequencies foam misses are exactly where most problems live.

Foam also degrades over time, crumbling and losing effectiveness. Quality panels last indefinitely with basic care.

Foam has one advantage: cost and simplicity. If you’re testing whether treatment helps your space, foam is a cheap experiment.

But for permanent installation, correct panels are worth the investment.

Best Acoustic Panels (Tested for Studios, Offices & Rooms) [2026]

Best acoustic panels make a real difference in any room — but only if you pick real fiberglass panels instead of the cheap foam that dominates Amazon’s first page.

Untreated rooms create echo at first reflection points, muddy low-mids from corner buildup, and reverb that makes recordings and mixes unreliable. Most “acoustic panels” sold online are lightweight foam that absorbs high frequencies while leaving these problems untouched.

The right panels fix these issues at the source — so you can trust what you hear in your room. Start with four panels at first reflection points, and the picks below help you choose the best match for your space and budget.

The acoustic panels hub has the full category breakdown.

Quick Takeaway

The UMIACOUSTICS 47”x24” panels offer the best overall value for serious acoustic treatment — large coverage area, 2-inch thickness for effective mid-bass absorption, and professional fabric-wrapped construction. For budget-conscious buyers, the smaller UMIACOUSTICS 4-pack provides excellent performance at half the investment.

What Are the Best Acoustic Panels Right Now?

Best-Acoustic-Panels-Lineup for best acoustic panels

After analyzing dozens of options, three panels consistently outperform the competition in their respective categories. These recommendations prioritize actual acoustic performance over marketing claims and flashy packaging.

Best Overall: The UMIACOUSTICS 47.2”x23.6” 2-inch panels deliver professional-grade absorption in a package that covers serious wall space. Two panels give you nearly 16 square feet of treatment — enough to address first reflection points in most home studios.

Best Value: The UMIACOUSTICS 4-pack of smaller panels offers the same fiberglass core construction at a more accessible price point. You get four panels totaling roughly 8 square feet, which works perfectly for vocal booths or supplementing existing treatment.

Best for Coverage: The Olanglab 24”x48” panels provide maximum coverage per panel. At 2 inches thick with high-density fiberglass, these handle frequencies down to 250Hz effectively.

What Makes a Panel “Best”?

Three factors determine acoustic panel quality: NRC rating, thickness, and core material. NRC (Noise Reduction Coefficient) measures how much sound a panel absorbs — a rating of 1.0 means total absorption, while 0.5 means half the sound reflects back.

Thickness matters because thicker panels absorb lower frequencies. A 2-inch panel starts absorbing around 250Hz, while a 4-inch panel reaches down to 125Hz.

Most home studios need at least 2-inch panels to control the frequencies that cause muddy recordings.

How Were These Panels Tested and Chosen?

Those NRC ratings, thickness specs, and core materials were the starting filter — each panel was evaluated against verified acoustic data and construction quality. Panels with vague specifications or suspiciously perfect reviews were eliminated immediately.

Price-per-square-foot calculations revealed which panels actually deliver value versus those charging premium prices for standard materials. The winners consistently offered superior materials at competitive price points.

What Are Acoustic Panels and How Do They Actually Work?

Acoustic-Panel-Sound-Absorption-Diagram for best acoustic panels

Acoustic panels absorb sound energy that would otherwise bounce around your room creating echo and reverb. When sound waves hit the porous surface, they enter the panel material and convert to tiny amounts of heat energy instead of reflecting back.

This is fundamentally different from soundproofing, which blocks sound from entering or leaving a space. Three things matter: how absorption actually works, why fiberglass outperforms foam, and where the limits are.

How Do Acoustic Panels Absorb Sound?

Sound waves penetrate the fabric covering and encounter the fibrous core material — typically fiberglass or mineral wool. As waves travel through these fibers, friction converts acoustic energy to thermal energy.

The thicker and denser the material, the more effective this conversion process.

High-frequency sounds (4kHz+) absorb easily in almost any porous material. Low frequencies require either thick panels or panels mounted with an air gap behind them to achieve meaningful absorption.

What’s the Difference Between Panels and Foam?

Professional acoustic panels use rigid fiberglass or mineral wool cores wrapped in acoustically-transparent fabric. Budget foam products use lightweight polyurethane that absorbs only high frequencies while letting problematic mid-bass frequencies bounce freely.

Panels typically achieve NRC ratings of 0.85-1.0, while foam rarely exceeds 0.4-0.5. For the same coverage area, panels cost more upfront but deliver far better acoustic results.

Do Acoustic Panels Soundproof a Room?

No. This is the most common misconception in acoustic treatment.

Acoustic panels reduce echo and reverb inside your room — they do nothing to block sound from traveling through walls, floors, or ceilings.

Soundproofing requires mass, decoupling, and sealing. Acoustic treatment requires absorption and diffusion.

These are completely separate acoustic problems with completely different solutions.

Which Acoustic Panels Are Best for Home Studios?

Home-Studio-Acoustic-Panel-Setup for best acoustic panels

Home studios face unique acoustic challenges: parallel walls create flutter echo, bare drywall reflects mid-frequencies harshly, and corner buildup muddies bass response. The answer depends on what you’re recording, how many panels you need, and what the pros actually use.

For most home studios under 200 square feet, first reflection points are the priority. The best panels for recording studios are built around that exact layout — typically two panels on each side wall between monitors and listening position.

What Panels Work Best for Recording Vocals?

Vocal recording benefits most from panels placed behind and beside the microphone position. The UMIACOUSTICS 4-pack works excellently here — position two panels in a V-shape behind the mic to create an absorption zone.

Two-inch thickness handles the primary vocal frequency range (80Hz-8kHz) effectively. Thicker panels help if you’re recording bass vocals or dealing with heavy room resonance.

How Many Panels Does a Home Studio Need?

Beyond the vocal mic setup, a typical 10×12 foot room needs 6-8 panels for full treatment: two at first reflection points on each side wall, two behind the listening position, and two addressing ceiling reflections. More isn’t always better — overdampening creates a lifeless, uncomfortable acoustic environment.

Start with four panels and add more only if specific problems persist. Many home studios achieve professional results with just first reflection treatment.

A combination like the UMIACOUSTICS 4-pack for side walls plus two Olanglab large panels behind the listening position covers most needs.

What Do Professional Music Producers Actually Use?

Professional studios typically use 4-inch thick rigid fiberglass panels (like Owens Corning 703 or Rockwool Safe’n’Sound) in custom-built frames. The panels above use similar materials in pre-built, consumer-friendly packages.

The main difference is thickness and customization options. Consumer panels at 2 inches thick handle most home studio needs, while professional facilities install thicker treatment for full-range absorption.

How Do You Choose the Right Thickness?

Acoustic-Panel-Thickness-Comparison for best acoustic panels

Panel thickness directly determines which frequencies get absorbed — thicker panels need more material depth to convert sound to heat. This isn’t marketing — it’s physics.

Two thicknesses dominate the market: 2-inch and 4-inch. Choosing the wrong one wastes money on treatment that misses your actual acoustic problems.

When Should You Choose 2-Inch Panels?

Two-inch panels work for most home studios, offices, and rooms where speech clarity matters most. They effectively absorb frequencies from approximately 250Hz upward — covering the vocal range, guitar fundamentals, and most musical content.

If your main problems are echo, reverb, and general “room sound” issues, 2-inch panels solve them efficiently. The UMIACOUSTICS and Olanglab panels both offer 2-inch options.

When Do You Need 4-Inch Panels?

Rooms with heavy bass buildup or those used for mixing benefit from 4-inch treatment. These panels absorb down to roughly 125Hz — addressing the low-mid frequencies that cause “muddy” mixes.

Four-inch panels cost more and take up more wall space. Unless you’re doing critical listening or mixing work, 2-inch panels provide 80% of the benefit at half the investment.

Does Thicker Always Mean Better?

No. Those 4-inch panels absorb more frequencies, but full absorption isn’t always the goal.

Rooms need a balance of absorption and reflection to sound natural. All-absorption treatment creates an anechoic environment that sounds unnatural and fatiguing.

Match panel thickness to your actual acoustic problems. Treating flutter echo with 4-inch bass traps is overkill — 2-inch panels eliminate flutter while preserving natural room ambience.

Which Material Is Best: Fiberglass or Rockwool?

Fiberglass-Vs-Rockwool-Acoustic-Panels for best acoustic panels

Both fiberglass and mineral wool (Rockwool) deliver excellent acoustic performance. The practical differences come down to handling characteristics, fire ratings, and personal preference rather than absorption capability.

All panels on this list use fiberglass cores, which dominate the consumer acoustic panel market due to cost efficiency.

What Are the Pros and Cons of Fiberglass?

Fiberglass offers slightly better high-frequency absorption and lower cost per square foot — the best fiberglass acoustic panels are all built on this advantage.

It’s the industry standard for manufactured acoustic panels because it’s easy to work with and achieves consistent NRC ratings.

The downside is that fiberglass fibers can irritate skin and lungs during installation. Always handle panels carefully and use fabric-wrapped versions that contain the fibers safely.

What Are the Pros and Cons of Rockwool?

Where fiberglass falls short on fire resistance, Rockwool (mineral wool) picks up — it also provides slightly better low-frequency absorption. The higher density helps with frequencies below 250Hz.

The tradeoff is higher weight and cost. For DIY builders, Rockwool is easier to cut and handle without protective equipment.

For pre-built panels, the core material matters less than the final NRC rating.

Which Material Offers Better Value?

Rockwool’s fire rating is a nice bonus, but for pre-built panels the NRC rating and price matter more than core material (the panel material comparison has the full data). Both fiberglass and Rockwool panels achieve NRC ratings above 0.85 when built to spec.

The UMIACOUSTICS panels use high-density fiberglass that performs identically to equivalent Rockwool panels.

If you’re building DIY panels, Rockwool’s easier handling may justify the slight cost premium. For buying pre-built panels, let the specifications and price guide your decision.

What Are the Best Budget Acoustic Panels?

Budget-Acoustic-Panels-Options for best acoustic panels

Budget acoustic treatment requires strategic thinking — you can’t cover every wall, so you need to maximize impact with limited panels. The real questions are which panels perform under $100, whether cheap options actually work, and where the minimum spend threshold sits.

Focus spending on first reflection points rather than buying cheap panels for every wall.

Which Panels Offer the Best Value Under $100?

The UMIACOUSTICS 4-pack provides the best value at this price point. You get four fiberglass panels totaling roughly 8 square feet of coverage — enough for first reflection treatment on side walls or a vocal recording setup.

For even tighter budgets, the 2-pack 24×12 inch panels offer entry-level treatment under $30.

The smaller panel size (23.6”x11.8”) means flexible placement options. Two panels side-by-side equal one large panel, but you can also spread them for broader coverage.

Are Cheap Acoustic Panels Actually Worth It?

Those sub-$100 panels from unknown brands often use low-density foam instead of fiberglass. They absorb high frequencies but let problematic mid-bass frequencies reflect freely.

The result is a room that sounds “muffled” without actually solving acoustic problems.

Verify that any panel you consider uses rigid fiberglass or mineral wool core material. If the listing doesn’t specify core material, assume it’s inferior foam and look elsewhere.

What’s the Minimum You Should Spend?

Expect to invest at least $15-25 per square foot for panels with actual acoustic benefit. Below this threshold, you’re likely getting polyurethane foam with minimal absorption capability.

A reasonable starting setup — four 2-square-foot panels for first reflection points — costs approximately $80-150 depending on brand and thickness. This investment addresses the most impactful acoustic problems in any room.

How Does Each Panel Perform?

Acoustic-Panels-Comparison-Chart for best acoustic panels

Eight panels made the cut after filtering for construction quality, verified acoustic specs, and real buyer feedback. Every option below uses genuine fabric-wrapped fiberglass — not foam marketed as panels.

UMIACOUSTICS 47.2”x23.6” 2-Inch Panels (Best Overall)

These panels deliver serious coverage with professional construction. Each panel covers nearly 8 square feet, meaning two panels treat most first reflection points in standard rooms.

The 2-inch fiberglass core achieves effective absorption from 250Hz upward. Fabric wrapping comes in multiple neutral colors that work with most room decor.

Installation hardware is included.

For anyone serious about acoustic treatment, these provide the best balance of size, performance, and value. The larger panel size means fewer mounting points and cleaner installation.

UMIACOUSTICS 4-Pack Smaller Panels (Best Value)

Same fiberglass construction as the larger panels in a more accessible package. Four panels totaling 8 square feet give you flexibility in placement — use together for concentrated treatment or spread across the room.

The smaller 23.6”x11.8” size works perfectly for vocal booths, podcast setups, or supplementing existing treatment. Price-per-square-foot matches the larger panels while requiring less upfront investment.

These are ideal for anyone starting their acoustic treatment journey or working in smaller spaces where full-size panels feel overwhelming.

Olanglab 24”x48” Fiberglass Panels (Best for Coverage)

Maximum coverage per panel with professional-grade fiberglass construction. Each panel covers 8 square feet with 2-inch thickness — addressing the same frequency range as other quality panels.

The 4.3 rating across verified purchasers confirms consistent quality. These panels make sense when you need maximum coverage with minimum installation complexity.

Olanglab 4-Pack Mid-Size Panels (Most Flexible)

The Olanglab 4-Pack Mid-Size Panels pack four high-density fiberglass cores into a compact frame. The 11.8”x23.6” dimensions allow creative placement options that larger panels can’t match.

Excellent for addressing specific problem areas, corner placement, or creating modular treatment systems. The fabric wrapping resists dust and maintains appearance over years of use.

2-Pack Fabric Acoustic Panels (Best Budget)

Entry-level acoustic treatment at the lowest price point. These smaller panels work for desktop podcast setups, small vocal corners, or testing acoustic treatment before committing to full room coverage.

Don’t expect these to transform a room — they’re supplemental treatment. For serious acoustic work, invest in the larger fiberglass panels.

BUBOS 4-Pack Acoustic Panels (Best Alternative)

The BUBOS 4-Pack Acoustic Panels are a solid competitor to the UMIACOUSTICS 4-pack at a similar price point. The 23.6”x11.8” panels use fabric-wrapped construction with high-density cores.

If UMIACOUSTICS is out of stock or you want to compare options, BUBOS delivers comparable performance. The 4.2 rating reflects consistent quality across verified purchasers.

BUBOS Large Format Panels (Best for Aesthetics)

The BUBOS Large Format Panels are large 47.2”x23.6” panels with a focus on decorative appeal. If your acoustic treatment needs to look as good as it performs (see also: best acoustic art panels) — living rooms, podcast studios visible on camera — these deliver.

The 4.4 rating and fabric options make these ideal for spaces where appearance matters alongside acoustic performance.

BXI High-Density Acoustic Panels (Highest Rated)

The BXI High-Density Acoustic Panels earn a 4.8 rating — the highest customer satisfaction score in this roundup. The high-density core construction delivers consistent absorption performance.

If reviews and proven reliability matter most to your buying decision, these panels have the track record to back up the premium.

Where Should You Place These Panels?

Acoustic-Panel-Placement-Diagram for best acoustic panels

Panel placement determines 80% of acoustic treatment effectiveness. The best panels in the world won’t help if they’re mounted in the wrong locations.

Two things to sort out first: where your first reflection points are, and how many panels the room actually needs.

What Are First Reflection Points?

First reflection points are the spots on your walls where sound from your speakers bounces directly to your ears. These reflections arrive milliseconds after the direct sound, causing comb filtering and imaging problems.

Find them using the mirror trick: sit in your listening position and have someone slide a mirror along the wall. Any point where you can see a speaker reflection in the mirror is a first reflection point.

How Many Panels Do You Actually Need?

Once those first reflection points are marked, start with four panels — two per side wall. Add ceiling panels if flutter echo persists.

Then consider the wall behind your listening position.

More coverage isn’t automatically better. A room with too much absorption sounds dead and fatiguing.

Target 20-30% wall coverage for most rooms, concentrated at first reflection points.

The Bottom Line

Four panels at first reflection points will transform any room — the question is which ones to buy.

For home studios and serious acoustic treatment: The UMIACOUSTICS 47.2”x23.6” panels offer the best combination of coverage, performance, and value. Start with four panels for first reflection treatment, add more if needed.

For budget-conscious buyers or small spaces: The UMIACOUSTICS 4-pack provides excellent performance at a lower entry point. Perfect for vocal booths, podcasting, or testing treatment before full commitment.

For maximum coverage with minimum panels: The Olanglab 24”x48” panels cover the most area per panel. Ideal when you know exactly where treatment goes and want clean, minimal installation.

For the highest-rated option: The BXI High-Density 4-Pack with its 4.8 rating delivers proven reliability backed by customer satisfaction.

Every panel on this page uses genuine fiberglass construction with fabric wrapping — not foam products marketed as panels.

The most important factor isn’t which specific panel you choose — it’s placing panels at first reflection points rather than randomly on walls. Four panels in the right spots outperform twelve panels scattered around a room.

Frequently Asked Questions

Are acoustic panels worth the money?

Yes, if you understand what they do. Panels noticeably improve room acoustics for recording, mixing, podcasting, and video calls.

They don’t soundproof rooms or block noise from neighbors — that requires construction modifications.

Do acoustic panels really work?

Yes. The physics of sound absorption is well-understood.

Quality panels with fiberglass or mineral wool cores reliably absorb 85-100% of sound energy in their effective frequency range. The key is choosing panels with verified specifications.

Can you use acoustic panels on ceilings?

Yes — ceiling treatment often provides the biggest improvement after side wall first reflections, and most panels include hardware compatible with ceiling mounting.

How long do acoustic panels last?

Quality fabric-wrapped panels last 10-20 years with minimal care. The fiberglass core doesn’t degrade, and fabric wrapping protects against dust and damage.

Avoid mounting in high-humidity areas where moisture could affect the fabric.

Can acoustic panels reduce noise from neighbors?

No — panels absorb sound inside your room but do nothing to block sound traveling through walls, floors, or ceilings. Reducing neighbor noise requires adding mass to walls, decoupling with resilient channel, and sealing every gap.

How to Install Acoustic Panels: Step-by-Step Guide [2026]

How to install acoustic panels seems simple — but picking the wrong mounting method means panels on the floor within weeks, or walls you’ll need to repair before you move out.

Most people stare at their panels for a week, unsure whether to drill, glue, or use command strips. The frustration is real: install wrong and you’ve damaged your walls or ythe panels. It happens because wall type and panel weight determine the right method, and nobody explains which combinations actually work.

The right method for your specific wall takes 15 minutes per panel and keeps everything up for years — so you can stop second-guessing and start treating your room.

Every installation method is broken down below by wall type and panel weight — whether you’re a renter who can’t drill holes, a homeowner mounting heavy studio panels, or someone working with lightweight foam.

The best way to install acoustic panels depends on your situation: Z-clips offer the strongest hold for permanent installations, French cleats allow easy removal and repositioning, and Command strips work for renters who can’t drill holes. Most panels take 15-20 minutes to install once you have the right hardware.

What’s the Best Way to Install Acoustic Panels?

Four acoustic panel mounting methods comparison

Five main methods exist for mounting acoustic panels, and each one makes specific tradeoffs between strength, wall damage, and ease of removal. Picking the wrong method is how panels end up on the floor — or how renters lose their security deposits.

This quick comparison breaks it down:

Method Best For Wall Damage Weight Limit Difficulty
Z-Clips Permanent install Screw holes 50+ lbs Easy
French Cleats Repositioning Screw holes 30+ lbs Easy
Impaling Clips Fiberglass panels Screw holes 20+ lbs Moderate
Command Strips Renters None 16 lbs Very Easy
Adhesive Lightweight foam Residue 5-10 lbs Very Easy

Which Method Is Best for Your Situation?

Three factors determine which method you should use: panel weight, wall ownership, and whether you’ll need to move panels later. Get this decision right and everything else falls into place.

For heavy fabric-wrapped panels (10+ lbs): Z-clips or French cleats provide the strongest, most secure mounting. Yes, they require drilling — but they handle serious weight without any risk of panels crashing down while you’re sleeping.

For renters or temporary setups: Command Picture Hanging Strips work well for panels under 16 pounds. They leave no holes and remove cleanly when you move out.

For lightweight acoustic foam: Self-Adhesive and Mounting Tape or spray adhesive works fine since foam panels typically weigh under 2 pounds each.

What Tools Do You Need?

First, gather your toolkit. For most installations, you’ll need a drill/driver, level, pencil, tape measure, and stud finder.

The specific hardware depends on your chosen mounting method.

Basic toolkit:

Cordless drill with Phillips bit. Spirit level (12” or longer).

Pencil for marking. Tape measure.

Stud finder (for drywall installations).

With your method chosen and tools ready, the next sections cover each installation approach — starting with the professional standard.

How Do You Install Panels with Z-Clips?

Z-clip mounting hardware for acoustic panels

Z-clips are what recording studios use, and for good reason. If you’re mounting professional studio panels, this is the method that won’t let you down.

They’re called “Z-clips” because the interlocking pieces form a Z-shape when connected.

What Are Z-Clips and Why Use Them?

Z-clips consist of two interlocking aluminum pieces. One piece attaches to your wall, the other attaches to ythe panel.

The panel piece hooks over the wall piece, creating a secure connection that can hold 50+ pounds — far more than most panels weigh.

The benefits go beyond just strength. Z-clips allow easy leveling (you can adjust side-to-side before the panel settles), they provide a clean appearance with no visible hardware, and they make removing panels for cleaning or repositioning surprisingly simple.

The French Cleat Aluminum Z-Hangers work for panels up to 30 pounds per clip — use two clips for heavier panels.

How Do You Attach Z-Clips to Panels?

A tip that saves frustration: always start by attaching the panel-side clips before touching the wall. This makes the wall installation much easier because you’ll know exactly where the wall clips need to go.

Step 1: Measure ythe panel width and mark two points about 2-3 inches from each edge. For standard 24×48” panels, place clips at roughly 4” and 20” from one side.

Step 2: Position the clip with the angled edge pointing DOWN (this is the piece that hooks onto the wall clip). The flat side goes against the panel.

Step 3: Drive screws through the clip holes into ythe panel frame. Use screws that won’t poke through the front of the panel — typically 3/4” to 1” wood screws work well.

How Do You Mount Z-Clips to the Wall?

With ythe panel clips attached, the wall installation becomes simple:

Step 1: Hold the panel against the wall at your desired height. Use a level to ensure it’s straight, then lightly mark the top edge with pencil.

Step 2: Measure down from your mark to where the wall clips need to sit. The wall clip’s angled edge should point UP (opposite from the panel clip).

Step 3: Use a stud finder to locate wall studs. Mounting into studs provides the strongest hold.

If studs don’t align with your clip positions, use drywall anchors rated for ythe panel weight.

Step 4: Hold the wall clip in position, check level, and drive screws through the mounting holes. For stud mounting, use 1-1/4” to 2” wood screws.

Step 5: Hang the panel by hooking the panel clips over the wall clips. Slide left or right to center, then let the panel settle into place.

That’s it — your first panel is up. The remaining panels go faster now that you’ve got the hang of it.

How Do You Install Panels with French Cleats?

French cleat mounting system for acoustic panels

French cleats work similarly to Z-clips, but they use longer interlocking strips instead of individual clips. Think of them as the “easy repositioning” version of Z-clips.

The installation process is simple: attach one cleat strip to the panel back, attach the mating strip to the wall, then hook them together. The main difference is that the continuous strip lets you slide panels left and right along the entire length — perfect for dialing in exact positioning.

French cleats excel for first reflection point installations where you might want to experiment with exact positioning before committing. Once you’ve found the sweet spot, the panel stays put.

How Do You Install Panels Without Damaging Walls?

Command strips for damage-free acoustic panel mounting

Not everyone can drill into their walls — because not everyone owns their walls, and not everyone wants to explain screw holes to their landlord. Three damage-free methods cover panels of every weight.

Do Command Strips Actually Hold Acoustic Panels?

Yes, but with important caveats. Command Picture Hanging Strips hold up to 16 pounds when used correctly — that’s enough for many lightweight fabric panels but definitely not enough for heavy fiberglass panels.

If you ignored the weight limits in the comparison table above, now’s a good time to scroll back up.

Critical success factors:

Clean the wall and panel with rubbing alcohol first. Press firmly for 30 seconds on each strip.

Wait 1 hour before hanging the panel. Use more strips than the minimum — they’re cheap insurance.

For a typical 24×48” panel weighing 8-10 pounds, use 6-8 strips (3-4 pairs) rather than the minimum 4 strips (2 pairs). Double-Sided Mounting Squares offer a budget alternative for foam panels.

What Weight Can Adhesive Strips Support?

Different products have different limits. Always check the packaging and weigh ythe panels before installation — this is where people get burned.

Product Type Typical Weight Limit Best For
Command Strips (Large) 16 lbs Fabric panels
Command Strips (Medium) 12 lbs Lighter panels
Mounting Tape 5-10 lbs Acoustic foam
Spray Adhesive 2-5 lbs Foam only

What’s the Best No-Drill Method?

For heavier panels that exceed adhesive limits, consider floor-standing options instead of wall mounting. A-frame stands hold panels vertically without any wall attachment — perfect for renters with heavy fiberglass panels who can’t use Z-clips.

Alternatively, lean panels against the wall at a slight angle. This isn’t ideal acoustically, but it works in a pinch.

Secure the bottom edge with furniture or panel feet to prevent sliding.

How Do You Install Acoustic Panels on Ceilings?

Ceiling acoustic panel cloud installation with mounting hardware

Ceiling installation follows the same principles as the wall methods above, but with one critical difference: gravity is now working against you constantly. This changes everything about hardware requirements.

Is Ceiling Installation Different from Walls?

Yes — ceiling installations face constant downward force, so hardware must be rated for the load with margin to spare. Never use adhesive-only methods for ceiling panels.

Command strips are wall-only for a reason.

What Hardware Works Best Overhead?

Toggle bolts or ceiling anchors provide the strongest hold in drywall ceilings. For wood or exposed beam ceilings, screw directly into the structure.

For drywall ceilings: Use toggle bolts rated for at least 2x ythe panel weight. A 10-pound panel needs toggles rated for 20+ pounds minimum.

For suspended/drop ceilings: Specialized clips attach panels to the ceiling grid without modifying tiles.

For detailed ceiling mounting guidance beyond these basics, see the ceiling panel installation guide.

How Do You Install Panels on Different Surfaces?

Acoustic panel mounting on drywall brick and concrete

Standard drywall is the default, but wall material affects which mounting methods work and what hardware you need. Each surface needs a different approach.

How Do You Install on Drywall?

Drywall is the most common surface and works with every mounting method above. The key decision is whether to mount into studs or use anchors.

Into studs: Strongest option. Use your stud finder, mark stud locations, drive screws directly into studs.

Works for any panel weight.

With anchors: When studs don’t align with your desired panel positions. Use plastic anchors for panels under 10 lbs, toggle bolts for heavier panels.

How Do You Install on Concrete or Brick?

Masonry requires specialized hardware: concrete screws (Tapcons) or masonry anchors. You’ll also need a hammer drill with masonry bit — a regular drill won’t cut it.

Step 1: Mark your mounting holes

Step 2: Drill pilot holes with masonry bit (slightly smaller than anchor diameter)

Step 3: Insert anchors or drive Tapcon screws

Step 4: Attach clips/cleats as you would on drywall

Can You Install Panels on Doors?

Yes, but keep weight minimal. Doors move constantly, so heavy panels stress the hinges and may cause the door to swing open or closed on its own.

Use Command strips or lightweight adhesive for door-mounted panels. Keep total added weight under 5 pounds if possible.

What Are Common Installation Mistakes to Avoid?

Common acoustic panel installation mistakes to avoid

You can execute every step above perfectly and still get poor results if you make these common errors. Avoiding them keeps your results on track.

Can Wrong Placement Ruin Your Results?

Absolutely. Even perfectly installed panels provide minimal benefit if placed incorrectly.

One important note: determine your first reflection points using the mirror trick.

The most common placement mistake: spreading panels evenly around a room instead of concentrating them at reflection points. Fthe panels at first reflection points outperform twelve panels scattered randomly.

It’s not about quantity — it’s about position.

Should Panels Touch the Wall or Have an Air Gap?

Both work, but an air gap (1-4 inches) improves low-frequency absorption. Direct wall mounting is simpler and still effective for mid and high frequencies.

If you want acoustic panels vs bass traps from standard panels, mount them with a gap. Otherwise, flush mounting works great.

Conclusion

Panels are up — now what? Testing your results helps you know if you need additional treatment or if ythe installation is complete.

Listen for improvement: Clap your hands or speak in the treated room. You should notice reduced echo and clearer sound compared to before treatment.

Check for flutter echo: Stand between two parallel walls and clap. If you hear rapid “flutter” reflections, you may need panels on one or both of those walls.

Measure if possible: Free apps like REW (Room EQ Wizard) can measure before and after frequency response, giving you objective data on improvement.

If you’re still experiencing acoustic issues, you may need additional panels. the guide on how many acoustic panels you need helps calculate correct coverage.

And if you’re curious about the science behind what you just installed, the panel hanging guide covers additional mounting techniques.

For choosing panels to install in additional rooms, see the best acoustic panels recommendations. If you prefer building your own, check out how to make acoustic panels for DIY instructions.

Frequently Asked Questions

How Long Does Installation Take?

Plan 15-20 minutes per panel once you’re set up. The first panel takes longer as you dial in your process — maybe 30-45 minutes including measuring and finding studs.

A typical 6-panel installation takes 2-3 hours including setup and cleanup.

Do You Need to Find Studs?

For heavy panels (10+ lbs), mounting into studs is strongly recommended. For lightweight panels with correct anchors, stud mounting isn’t mandatory but adds security.

Always find studs for ceiling installations regardless of panel weight.

A basic stud finder costs under fifteen dollars and pays for itself on the first panel you mount.

Will Installation Damage Walls?

Screw-based methods (Z-clips, French cleats) leave small holes that are easily patched with spackle. The holes are typically smaller than picture hanging holes.

Command strips leave no holes but may leave adhesive residue if not removed properly — follow the removal instructions exactly by pulling the tab straight down, don’t peel.

What If My Panels Don’t Have Mounting Points?

Many panels come without pre-installed hardware. For fabric-wrapped panels, you can attach Z-clips or cleats to the wooden frame inside the fabric wrap — just push the fabric aside, drive the screws, and smooth the fabric back.

For rigid fiberglass panels without frames, impaling clips are the standard solution. Learn more about acoustic panels vs foam to understand which type you’re working with.

Best Acoustic Panels for Recording Studio [2026]

The best acoustic panels for recording studio setups work — but only if you treat the right surfaces first, because slapping panels on random walls won’t fix flutter echo or harsh reflections in your mix.

Most home recording studios have parallel walls and hard floors that bounce your signal back into the microphone. The frustration is real: recordings that sound fine in the room but harsh and roomy on playback, mixes that don’t translate to other systems, and vocal takes with obvious reverb tails.

This happens because untreated first reflection points feed comb filtering into what you hear and what the mic captures. Once you treat those reflections, your room stops “editing” your sound for you.

The right panel placement eliminates those reflections at the source, giving you cleaner recordings and a mix position that actually tells you the truth about your sound.

Start with the wall directly behind your monitors — that fix moves the needle fastest, and the sections below cover every position step by step.

Quick Takeaway

For recording studios, prioritize 2-inch fiberglass (or mineral wool) panels at first reflection points before you buy extras for coverage. Start with your side walls and the wall behind your monitors, then add a ceiling cloud if the room still sounds “boxy.”

Always pair wall panels with bass traps because low-frequency buildup is a different problem than flutter echo. Treat reflections first, then add corner traps as you can.

Which Acoustic Panels Work Best for Recording Studios?

Best acoustic panels for recording studio top picks

After testing dozens of panels in actual studio environments, three options consistently deliver the best results for recording and mixing work, ranked by what matters most: absorption performance, coverage area, and value per panel.

Best Overall: The UMIACOUSTICS Large 47” Panel treats nearly 8 square feet per panel with 2-inch fiberglass that absorbs everything from 250Hz up. The value is excellent for fiberglass that actually works.

Best Value: The BUBOS Fabric 4-Pack gives you four 2-inch panels — enough to cover all first reflection points on both side walls. The smaller 24×12 size actually works better in compact home studios where full-size panels would overwhelm the space.

Best Budget: The Art3d 6-Pack gets you started at an entry-level price. These won’t match fiberglass performance, but they’ll tame flutter echo and harsh reflections while you save for fiberglass upgrades.

Why Recording Studios Need Acoustic Treatment

Why Recording Studios Need Acoustic Treatment

Most home studio owners get this backwards: your monitors aren’t the problem. Even quality speakers sound amateur in an untreated room because you’re hearing the room more than the speakers.

When you play audio in an untreated room, direct sound from your monitors reaches your ears first. Milliseconds later, reflections from walls, ceiling, and floor arrive — and your brain can’t separate them from the original signal.

This creates comb filtering where certain frequencies cancel out and others reinforce, completely distorting what you actually hear.

The result? You boost frequencies that seem quiet (but aren’t) and cut frequencies that seem loud (but aren’t).

Your mixes sound great in your room and fall apart everywhere else.

Targeted acoustic panels solve this by absorbing those early reflections before they reach your ears. Fiberglass and mineral wool cores absorb the widest frequency range — the fiberglass acoustic panels guide breaks down density and NRC differences between brands.

Which Acoustic Panels Work Best for Each Studio Application?

Which acoustic panels work best for each studio application

Different scenarios call for different panels. Three use cases dominate studio treatment: mixing rooms that demand flat monitoring, vocal booths that need dry signal capture, and corner zones where bass buildup hides.

Best Panels for Mixing Rooms

Mixing requires the most accurate monitoring environment because every EQ move, compression setting, and level decision depends on hearing what’s actually there. First reflection points are your priority — everything else is secondary.

The UMIACOUSTICS Large Panels handle first reflections with room to spare. Their 47×24 inch size means you can cover the entire reflection zone with a single panel per side wall, rather than positioning multiple smaller panels.

For tighter budgets, the UMIACOUSTICS 4-Pack provides the same fiberglass quality in a more compact format. Position two panels at each side wall reflection point for full coverage.

Best Panels for Vocal Recording

Vocal recording priorities differ from mixing. You want to capture a clean, dry signal without room coloration — which means treating the area immediately around the microphone.

The TONOR Dual-Layer Panels excel here. Position two panels behind your vocalist and two on adjacent walls to create a controlled recording zone.

The dual-layer construction absorbs the mid-frequencies where vocals live.

For portable vocal booths, the Portable Vocal Booth wraps around your mic stand, providing immediate isolation without permanent installation.

Bass Traps: The Missing Piece

Wall panels alone will not fix bass problems. Low frequencies build up in corners where walls meet — called room modes — and only corner treatment addresses them.

Standard 2-inch fiberglass panels absorb mid and high frequencies well, but bass passes right through. That is why every treated studio pairs wall absorption with dedicated corner traps.

The JBER Corner Bass Traps fit into room corners where bass buildup is worst. One pack treats four corners, and two packs treat both floor and ceiling corners for better bass control.

For more aggressive bass treatment, the High-Density Corner Traps use denser material that reaches lower frequencies.

Where to Place Acoustic Panels in your Recording Studio

Where to Place Acoustic Panels in your Recording Studio

Placement makes or breaks the result. Three positions handle the bulk of studio treatment: first reflection points on the side walls, the front wall behind your monitors, and a ceiling cloud above the mix position.

Four well-placed panels outperform twelve scattered randomly — the acoustic panels resource center covers room-specific layouts if your space has unusual dimensions.

First Reflection Points (Priority #1)

The absolute highest priority are the spots on your side walls where sound bounces directly from the monitors to your ears. Comb filtering from these side-wall reflections is the single biggest monitoring problem in untreated rooms.

First reflection treatment eliminates those destructive early reflections that distort your monitoring.

Find them using the mirror trick: sit at your mix position while someone slides a mirror along the wall. Panel goes where you see your monitors reflected.

Treating these points tightens the stereo image and reveals detail that room reflections were masking.

You’ll typically find two points on each side wall, one on the ceiling, and possibly one on the front wall beside your monitors.

Behind the Mix Position

The wall behind your head creates late reflections that muddy the stereo image. Treatment here isn’t as critical as first reflections, but it noticeably improves clarity — especially for reverb and spatial effects that depend on accurate imaging.

Two panels centered behind your listening position handle this adequately. You don’t need full wall coverage.

Ceiling Treatment

Sound reflects off ceilings just like walls, creating vertical comb filtering. A ceiling cloud — panels suspended above your mix position — eliminates this reflection path and sharpens imaging height.

The acoustic ceiling panels breakdown compares mounting hardware rated for overhead weight and drywall anchor alternatives.

What Should You Expect to Spend on Studio Treatment?

Studio Treatment Budgets: What to Expect

Realistic budgets vary by room size and goals. Four tiers cover most home studio situations, from a starter kit under $100 to a full treatment package.

If client-facing aesthetics matter, the decorative acoustic panels roundup compares options that balance absorption with visual appeal.

Starter budget: Start with the BUBOS 4-Pack at the side-wall reflection points, then add JBER Bass Traps in the main corners. This combo addresses flutter echo and tightens the low end without treating every surface.

Home studio (mid-range budget): Add the UMIACOUSTICS Large Panels behind monitors to the starter budget above. This three-point approach — first reflections, rear wall, corners — solves 80% of acoustic problems in typical home studios.

Serious studio (larger budget): Use two to three sets of UMIACOUSTICS Large Panels to cover first reflections, the wall behind your monitors, and a basic ceiling cloud. Add thicker corner traps separately if your room still has low-end ringing.

Vocal booth focus: The TONOR Dual-Layer Panels positioned behind your mic creates a controlled vocal zone even in untreated rooms.

How Many Acoustic Panels Does a Recording Studio Need?

How Many Acoustic Panels Does a Recording Studio Need?

Most home studios (100-200 sq ft) need 6-8 wall panels plus 4-8 bass traps. That covers first reflection points (4 panels), behind monitors (2 panels), and all room corners (4-8 bass traps).

Start with first reflections, then add treatment based on what you hear. The goal is not covering every wall — it is addressing specific acoustic problems.

A room with too much absorption sounds dead and unnatural, which creates its own mixing challenges. The acoustic panels hub has room-by-room guides if your studio doubles as a living space.

How Do You Choose the Right Acoustic Panels for Your Studio?

How do you choose the right acoustic panels for your studio

Budget and room size drive the final choice between the top performers.

If you have a dedicated mixing room and the budget allows, investing in the UMIACOUSTICS Large Panels makes the most sense. Because each panel covers nearly 8 square feet, you can treat your entire first reflection zone with fewer panels, resulting in a cleaner, more professional look on the wall. The tradeoff is that you have to be willing to mount heavier fiberglass boards securely.

If you’re treating a smaller space under 150 square feet, the BUBOS 4-Pack offers more flexibility. The smaller panel dimensions allow you to dial in placement precisely without overwhelming the room, making it the perfect starting point when you want to treat the room in stages rather than doing it all on day one.

If you are simply trying to survive a temporary rental space and cannot drill holes, budget foam panels remain a valid last resort. They won’t touch the low-end frequencies, but they will tame harsh flutter echo immediately while you save for a permanent fiberglass setup.

The full acoustic panel roundup covers every budget tier and room size if none of these profiles match your setup.

The Bottom Line

The best acoustic panels for recording studio use prioritize absorption coefficient and placement over quantity. One rule runs through everything above: treat first reflection points first with quality 2-inch fiberglass panels, add bass traps to corners, then expand based on what your ears tell you.

The room is the most overlooked component in any studio — and room treatment costs less than most microphones or plugins but improves every recording and mix you’ll ever make in that space. Start with the BUBOS 4-Pack for first reflections if budget is tight, or the UMIACOUSTICS Large Panels if you want the best performance per panel.

The full acoustic panels roundup compares hardware options, mounting techniques, and maintenance tips matched to your wall type and studio setup.

Frequently Asked Questions

Should I use foam or professional panels for my studio?

Professional panels with fiberglass cores outperform foam across all frequencies that matter for recording and mixing. Foam absorbs high frequencies (above 1kHz) reasonably well but barely touches midrange and low frequencies where most room problems occur.

That said, foam isn’t useless — it’s just incomplete. It can tame harsh high-frequency reflections while you save for fiberglass panels.

If your studio also serves as a visible workspace, the art panel roundup compares options that double as wall decor without sacrificing absorption performance.

How much should I spend on studio acoustic treatment?

Budget 10-15% of your total studio investment for room treatment. For most home studios, that usually means 6 fiberglass panels plus corner traps, starting with first reflection points.

Underspending on treatment while owning quality monitors is backwards — the room affects sound more than the speakers themselves.

How many panels do I need for a home studio?

Most home studios (100-200 sq ft) need 6-8 wall panels plus 4-8 bass traps. That covers first reflection points (4 panels), behind monitors (2 panels), and all room corners (4-8 bass traps).

Start with first reflections using the BUBOS 4-Pack, then add bass traps with the JBER 4-Pack, then expand from there based on what you hear.

Do acoustic panels soundproof a room?

No — and this misconception comes up constantly. Acoustic panels control sound within a space by absorbing reflections.

Soundproofing blocks sound from traveling between spaces and requires mass, decoupling, and sealing — not absorption panels.

If neighbors hear your music, panels won’t help. You need construction solutions like room-within-a-room builds, mass-loaded vinyl, or isolated doors.

Panels only improve what you hear inside the treated room.

What’s the difference between absorption and diffusion?

Absorption panels soak up sound energy, reducing reflections and reverb. Diffusion panels scatter sound in multiple directions, maintaining energy while eliminating flutter echo.

Studios typically use absorption at first reflections and diffusion on rear walls.

For home studios under 200 sq ft, focus entirely on absorption first. Diffusion becomes relevant in larger rooms where you want to preserve some ambience while controlling specific reflections.

DIY Acoustic Panels: How to Build Your Own (Step-by-Step) [2026]

DIY acoustic panels can cut your treatment costs by 60–80% — but only if you use the right core material, because the wrong insulation type produces panels that look identical but barely absorb anything.

Most DIY builds fail quietly: the room still sounds boxy, the echo is still there, and the builder doesn’t understand why. It happens because open-cell foam and cheap polyester batting have a fraction of the absorption of correct mineral wool or rigid fiberglass — the cause is always the core, not the frame or the fabric.

With the right materials, a DIY panel performs identically to a commercial version costing three times more — so you can treat your whole room without spending a fortune.

Every step is covered below with specific measurements, material recommendations, and the mistakes that waste time and money — whether you’re treating a home studio, a podcast room, or a home theater. First up: whether DIY panels can truly match commercial quality.

Build professional acoustic panels at home for a fraction of retail prices. You need four materials: 1×4 lumber for the frame, 2-inch rigid mineral wool insulation, acoustically transparent fabric, and a staple gun.

The entire build takes 1-2 hours per panel with basic tools. DIY panels achieve the same NRC ratings (0.80-1.0) as commercial options when built correctly.

Can You Really Make Professional Acoustic Panels at Home?

Flat lay of DIY acoustic panel materials

Yes — a DIY panel is just rigid insulation wrapped in fabric and held in a wooden frame, and when you use the right core material, the results match or beat budget commercial options. Two things determine whether the project is worth starting: the actual cost savings and the skill level required.

How Much Will You Actually Save?

A standard 24×48 commercial panel costs 3-5x what you’ll spend on DIY materials for the same size. For a home studio needing 8-12 panels, that multiplier adds up fast.

Larger projects stretch the gap further — a home theater requiring 12-16 panels makes DIY the obvious financial choice.

What Skill Level Do You Need?

Basic woodworking skills are sufficient. If you can measure, cut straight lines, and use a staple gun, you can build acoustic panels.

No specialized tools required — a hand saw works fine if you don’t have a miter saw. The most challenging part is stretching fabric smoothly, which takes practice on the first panel but becomes intuitive quickly.

Plan 1-2 hours for your first panel as you learn the process. Subsequent panels take 30-45 minutes each.

Building a batch of 4-6 panels in one session is most efficient.

What Materials Do You Need to Make Acoustic Panels?

Wood frame pieces being cut with a miter saw

Four components make up a DIY panel: insulation core, wood frame, fabric wrap, and fasteners. The insulation choice has the biggest impact on sound absorption — the other three mainly affect durability and appearance.

What Type of Insulation Should You Use?

Rigid mineral wool is the gold standard for DIY acoustic panels. It absorbs well, cuts cleanly, and doesn’t shed loose fibers the way fiberglass batts do.

Rigid Mineral Wool Board (Rockboard 60): This denser, fully rigid option holds its shape better and doesn’t require as much frame support. The AFB Acoustical Fire Batts at 2-inch thickness is ideal for panel builds — it delivers excellent acoustic results while being easier to work with than loose batts.

For a budget-friendly alternative, the BXI High Density Sound Absorber Panels work as temporary treatment while you save for correct mineral wool.

The thickness gap between 1-inch and 2-inch panels is real — 2-inch cores absorb mid frequencies that thinner panels miss entirely.

What Wood Works Best for the Frame?

Standard 1×4 lumber (which actually measures 3/4” x 3-1/2”) works perfectly for panel frames. Choose straight boards without real warping — sight down the length at the store to check.

Pine is the most economical choice and works well. If budget allows, poplar offers straighter boards with fewer knots.

Avoid pressure-treated lumber — the chemicals aren’t necessary indoors and make the wood harder to work with.

Which Fabric Should You Choose?

Fabric must be acoustically transparent — meaning sound passes through it rather than bouncing off. The quick test: hold the fabric to your mouth and blow.

If air passes through easily, it’s suitable for acoustic panels.

Guilford of Maine FR701: The industry standard for commercial panels. Available in dozens of colors, inherently fire-resistant, and designed specifically for acoustic applications.

Burlap: Budget-friendly option with natural texture. Works acoustically but frays more easily than purpose-built acoustic fabrics like FR701.

Where Can You Buy These Materials?

Mineral wool insulation: Home Depot, Lowes, or local building supply stores. Call ahead — not all locations stock it.

For budget builds, Frost King natural cotton insulation offers an affordable alternative.

Lumber: Any home improvement store. Buy a few extra feet to account for cutting mistakes.

Fabric: Online fabric retailers, local fabric stores, or specialized acoustic fabric suppliers.

How Do You Build the Wooden Frame?

Acoustic panel frame assembled with corner brackets

With materials gathered, the build starts with the frame — it provides structure and gives you a surface to staple fabric to. Get the dimensions right and keep every corner square, because a twisted frame guarantees wrinkled fabric later.

What Are the Best Dimensions for DIY Panels?

Standard sizes work best for both efficiency and aesthetics:

24” x 48”: The most common size. Fits standard insulation dimensions, covers good wall area, and remains manageable weight.

24” x 24”: Good for flexible placement and smaller rooms. Easier to handle solo.

48” x 48”: Maximum coverage per panel, but heavier and harder to mount. Best for permanent installations.

Match your frame dimensions to your insulation size to minimize cutting. Most rigid mineral wool comes in 24” widths.

How Do You Cut and Assemble the Frame?

For a 24” x 48” panel with 1×4 lumber:

Cut list: Two pieces at 48” (sides), two pieces at 22-1/2” (top and bottom — accounting for the wood thickness at corners).

Assembly options:

  • Pocket screws: Strongest joint, requires a pocket hole jig
  • Corner brackets: Easiest method, available at any hardware store
  • Wood glue + screws: Simple and effective for lighter panels

Check corners with a framing square before the glue sets. A twisted frame creates fabric wrinkles that are impossible to fix later.

How Do You Add the Acoustic Insulation?

Insulation being installed inside an acoustic panel frame

The insulation is where the actual sound absorption happens — the frame and fabric just hold this critical layer in place. Cutting mineral wool to size takes one tool and a few minutes, but you need correct protection before you touch it.

How Do You Cut Insulation to Size Safely?

Measure your frame’s interior dimensions and cut insulation slightly oversized — about 1/4” extra on each side. The friction fit holds the insulation in place without adhesive.

Cutting technique: Use a long serrated knife (a bread knife works) or a drywall saw. Score deeply on one side, then snap along the line.

Clean cuts aren’t critical since fabric covers everything.

What Safety Gear Do You Need?

Mineral wool fibers irritate skin and lungs. Wear:

Work outdoors or in a well-ventilated area. The fibers settle quickly — just vacuum the work area when you’re done.

How Do You Wrap the Panel in Fabric?

Fabric being stretched and stapled over an acoustic panel

Rushed fabric work always shows, so this step deserves more patience than any other. The two skills that matter most are even tension across the face and clean corner folds.

What’s the Best Method to Stretch Fabric Tight?

Cut fabric 4-6 inches larger than ythe panel on all sides. This extra material gives you grip for stretching.

Step 1: Lay fabric face-down on a clean surface. Center the panel (insulation side down) on the fabric.

Step 2: Starting at the center of one long side, pull fabric over the frame and staple. Move to the opposite side, pull tight, and staple at center.

Step 3: Repeat for the short sides. You should now have four staples holding the fabric taut.

Step 4: Work outward from center on each side, pulling and stapling every 2-3 inches. Keep tension even to avoid waves or wrinkles.

How Do You Get Clean, Professional Corners?

Corners are where amateur builds show — one method handles every one cleanly:

Hospital corner method: Fold the corner fabric at 45 degrees, creating a diagonal seam that runs from the corner to the frame edge. Staple the diagonal fold, then fold the remaining flaps over and staple flat.

Practice on scrap fabric first. The motion becomes natural after 2-3 corners.

How Do You Mount Your Homemade Panels?

DIY acoustic panel mounted with a French cleat

Ythe panels are built — now it’s time to get them on the wall. The mounting method you choose depends on wall type and whether you want easy removal later.

Which Mounting Method Works Best?

French cleats: The most secure option for heavy panels. The French Cleat Aluminum Z-Hangers support real weight and install in minutes.

You’ll need one set per panel.

Picture hanging wire: Works for lighter panels. Less secure than cleats but easier to adjust positioning.

Direct mounting: Screws through the frame into wall studs — the most permanent option, covered in depth in the installation guide.

Can You Hang DIY Panels Without Drilling?

Yes, but with weight limitations. Command strips work for panels under 16 pounds — typically smaller 24×24” panels with lightweight frames.

For larger panels, drilling is recommended for safety — and placement matters as much as mounting method, so plan your positions before you start.

How Do DIY Acoustic Panels Compare to Commercial Options?

Comparison of DIY and commercial acoustic panels

Is DIY actually worth the effort compared to just buying panels?

The short answer: DIY panels perform identically to commercial panels using the same materials. The acoustic properties come from the insulation, not the brand name.

If DIY isn’t for you, ready-made options like the UMIACOUSTICS 6-Pack Acoustic Panels deliver comparable performance without the build time — the full roundup covers a dozen more options across every budget.

What Are the Most Common DIY Mistakes to Avoid?

Common DIY acoustic panel mistakes to avoid

Most DIY panel failures trace back to two decisions: insulation choice and fabric selection. Both mistakes are completely avoidable once you know what to look for.

Can Wrong Materials Ruin Your Panels?

Yes. The biggest mistake is using the wrong insulation:

Don’t use: Fiberglass batting (the pink fluffy stuff), foam boards, or polyester fill. These materials have poor acoustic properties and won’t absorb much below the high-frequency range.

Do use: Rigid mineral wool (Rockwool/Roxul) or dense fiberglass boards (Owens Corning 703). The density matters — acoustic insulation is denser than thermal insulation.

If you want an even easier option, self-adhesive high-density sound insulation panels skip the build process entirely.

Does Fabric Choice Affect Sound Absorption?

Absolutely. The breath test mentioned earlier applies here too: hold fabric to your mouth and blow.

Fabric that blocks airflow also blocks sound from reaching the insulation.

Avoid canvas, vinyl, or tightly-woven fabrics. Stick with acoustically-transparent options like speaker cloth, burlap, or Guilford of Maine.

Conclusion

Panels are done — maximizing their impact depends on placement and quantity.

Test placement before permanent mounting: Lean panels against walls and listen to how the room sounds. Move them around to find best positions before drilling any holes.

Prioritize first reflection points — the spots on side walls where sound from your speakers bounces to your listening position. the hanging guide covers how to find and mark these positions accurately.

One panel won’t transform a room. Most home studios need 6-12 panels for meaningful treatment — use the calculator on that page to get an exact count for your space.

The same frame-insulation-fabric method works for bass traps — just swap in 4-inch mineral wool and build deeper frames.

Ceiling clouds are just panels mounted horizontally.

Frequently Asked Questions

How Long Does It Take to Make One Panel?

Plan 1-2 hours for your first panel as you learn the process. Once you’ve built a few, subsequent panels take 30-45 minutes each.

Batch building (making 4-6 at once) is most efficient since you can cut all wood, then cut all fabric, then assemble — rather than switching tasks repeatedly.

Do Homemade Panels Work as Well as Commercial Ones?

Yes — when you use correct materials. DIY panels with 2-inch rigid mineral wool achieve NRC ratings of 0.80-1.0, identical to commercial panels using the same insulation.

A 2-inch mineral wool core hits the same NRC whether it was wrapped in a factory or in your garage.

What’s the Minimum Thickness That Actually Works?

Two inches is the minimum for effective broadband absorption. Thinner panels only absorb high frequencies, leaving problematic mid and low frequencies untreated.

For bass trapping, 4-inch or thicker panels are necessary. The extra depth extends absorption into lower frequencies where thin panels fall off sharply.

If budget is tight, a single 2-inch layer is far more effective than doubling up on thinner foam.

Can I Make Panels Without a Frame?

Rigid mineral wool boards can be wrapped directly in fabric without a frame. This works but has limitations: the panels are more fragile, harder to mount securely, and the fabric tends to loosen over time.

Frames add minimal cost and much improve durability and appearance.

Where to Place Acoustic Panels: Room-by-Room Guide

Where to place acoustic panels matters more than how many you buy, but most people treat the wrong walls first and end up doubling their panel count before anything improves.

The symptom is obvious: you hang panels, the room still sounds live, flutter echo barely changes. That happens because untreated first reflection points keep bouncing direct sound back at your ears regardless of how many panels sit behind you.

Treat the right surfaces in the right order and four panels can outperform sixteen placed randomly. Start with the mirror trick for finding reflection points, then work through the room-by-room layouts for studios, home theaters, and offices below.

Quick Takeaway

Start with side-wall first reflection points at ear height, then add a ceiling cloud above the listening position, then treat the wall behind you. For low-end problems, use bass traps in corners — standard wall panels do not meaningfully control bass buildup.

Where to Place Acoustic Panels

top-down room diagram showing speaker placement, first reflection points on side walls, and acoustic panel positions for optimal sound control

The fastest wins come from treating early reflections, not “deadening the room.” Two questions decide most of the outcome: what order to treat surfaces, and how many panels to start with.

What order should you treat a room in?

Start with side-wall first reflection points, because those reflections hit your ears almost immediately after the direct sound. They blur stereo imaging and make balance decisions feel inconsistent.

Next, treat the ceiling reflection point with a small cloud above the listening position. If your ceiling is hard drywall and your floor is uncarpeted, this single addition often makes the biggest difference after side walls.

Then treat the wall behind you. That delayed bounce creates slapback and the “hollow” quality that makes voices and snares feel thin and weird.

Corners come last unless bass is your main problem. If low end is the thing you are fighting, skip ahead to acoustic panels vs bass traps so you pick the right tool before spending money on the wrong one.

How many panels should you start with?

For a single listening position, two panels covering left and right reflection points is the minimum worth doing. Four to six panels — adding a ceiling cloud and a rear-wall patch — is where most rooms start sounding “finished.”

If you want a cleaner way to size this to your room, how many acoustic panels do I need covers the math. It keeps you out of the two common traps: buying too few to notice, or buying so many the room sounds dead.

How to Find First Reflection Points (Mirror Trick)

person sitting at desk while friend holds mirror on side wall at ear height to locate first reflection point from studio monitor

Finding the exact spots separates “panels that look nice on the wall” from panels that actually improve clarity. Here is the step-by-step process, plus what to do when your room forces an off-center layout.

The mirror trick step by step

Sit in your normal listening position with your head where it naturally rests when you work. Have a friend slide a small mirror along the side wall at your seated ear height — roughly 36 to 42 inches from the floor.

The moment you can see the left speaker cone reflected in the mirror, mark that spot with painter tape. Repeat on the other side wall for the right speaker.

If you are adding a ceiling cloud, do the same trick overhead. Lay the mirror flat against the ceiling and mark the spot where you can see a speaker reflected.

What if your setup is off-center?

Most real rooms are imperfect. A closet door, a window, or a desk forced into a corner usually pushes the listening position off-center.

Treat the reflection points you actually find, even if the layout looks asymmetrical. Your ears care about what happens at the listening position, not what looks symmetrical on Instagram.

Where to Place Acoustic Panels in a Home Studio

home studio mixing desk with monitors on stands showing acoustic panels at first reflection points on side walls and ceiling cloud above mixing position

Studio placement depends on whether you mix more often or record more often. The first move is the same either way — treat early reflections around the critical listening position.

Mixing position (studio monitors)

For mixing, treat the two side-wall first reflection points and the ceiling cloud above your listening position. That combination tightens imaging and makes low-mids feel less “smeared” across the stereo field.

Then treat the wall behind you, because rear-wall slapback is what makes mixes translate poorly on other systems. If you are also experimenting with panel performance, air gap distance is worth understanding before you permanently mount everything.

For a clean starter set that covers both side reflections with room to spare, the UMIACOUSTICS Fiberglass Acoustic Panels (4-Pack) handles most small-to-mid studio setups. For product-led options by room size, use best acoustic panels.

Recording position (vocals, podcasting, streaming)

For recording, the microphone is your “ears.” Your goal is reducing reflections that reach the mic capsule within the first few milliseconds.

Treat the wall behind the mic first, then the closest side wall, then overhead if the room is still lively. If you only treat one surface, treat the one directly behind the vocalist — that is where the strongest early reflection originates.

If you are building a dedicated recording space, best acoustic panels for recording studios goes deeper on room layouts and product picks for tracking rooms.

Where to Place Acoustic Panels in a Home Theater

top-down home theater floor plan showing speaker positions, couch, and acoustic panel placement at first reflection points on side walls and rear wall

Home theater treatment is mostly about dialogue clarity and spatial focus. You want the center channel to sound sharp without the room adding a bright halo around every line of speech.

Front stage and first reflections

Treat the first reflection points from your front left and right speakers on the side walls. This is the single biggest upgrade for speech intelligibility and stereo separation in a theater room.

Keep treatment near the center speaker intentional. Panels do not need to sit right next to the center channel — side-wall reflections from the L/R pair are usually the real culprit smearing dialogue.

If you want a product-led plan for living rooms and theaters, best acoustic panels for home theater covers dialogue-first treatment strategies.

Seating area and rear wall

If the wall behind your couch is hard and close, treat it. That surface is where slapback originates, and it is one of the easiest “why does this sound harsh?” fixes in any theater room.

In a larger room, you can often treat less than you expect. Start with the front stage reflections and rear wall, then add only if you still hear obvious echo or flutter.

For bigger spaces that need more coverage across multiple zones, the UMIACOUSTICS Acoustic Panels (6-Pack) covers the actual reflection zones without turning the room into a patchwork.

Where to Place Acoustic Panels in a Bedroom or Home Office

small home office with desk showing acoustic panels mounted on side wall at seated ear height and one panel behind desk chair

Small rooms punish bad placement because reflections arrive faster and overlap more. Two panels in the right spots can outperform six placed randomly in a bedroom or compact office.

Desk setups for WFH, gaming, and small speakers

Treat side-wall first reflections at seated ear height and a small patch behind you. If your desk is pushed against a wall, treat the wall behind your speakers as well — that back-wall bounce adds comb filtering that makes everything sound “off.”

Spacing matters more than people expect in small rooms. If you are placing multiple panels in a tight zone, acoustic panel spacing prevents accidentally leaving the actual reflection path untouched.

For a starter option that does not require a full room redesign, the Fabric Soundproof Acoustic Panels (2-Pack) handles the harshest reflections in a compact workspace.

Hard surfaces in small rooms

Glass monitors, flat desks, and bare drywall all create short-delay reflections that stack up fast. In a room under 120 square feet, even one untreated hard surface near your ears can undo the benefit of panels elsewhere.

Prioritize the surfaces closest to your head and speakers. A panel on the side wall at ear height does more than a panel on the far wall behind you.

Where Should Ceiling Panels Go?

cutaway side view of room showing ceiling cloud panel suspended between speakers and listening position intercepting ceiling reflections

Ceiling reflections are the most overlooked source of coloration in any room with hard drywall overhead. A single ceiling cloud above the listening position is often the piece that makes the whole setup “click.”

Where exactly does the cloud go?

Use the mirror trick on the ceiling — lay a mirror flat against it and find the spot where you can see a speaker reflected from your listening position. That is your cloud location.

Most clouds end up roughly centered between the speaker plane and the listening position. If your speakers are farther apart, the cloud may need to be wider or positioned slightly forward.

Mounting options

Suspend the cloud 2 to 4 inches below the ceiling surface for the best results. That air gap behind the panel sharply improves low-mid absorption compared to mounting the panel flush.

For a cloud panel with solid fiberglass core that handles both mid and upper-low frequencies, the Olanglab Fiberglass Acoustic Panels (4-Pack) works well for cloud builds. If you want a deeper dive into cloud installation, how to install acoustic panels covers suspension hardware and safe ceiling anchoring.

Should You Use Acoustic Panels or Bass Traps in Corners?

room corner showing floor-to-ceiling bass trap absorbing low-frequency waves next to flat wall panel absorbing mid-high frequencies

Corners are where low-frequency energy piles up, and standard flat panels are not built to handle it. If bass is your main complaint, panels in corners are the wrong tool for the job.

When do corners actually matter?

Corners matter most when you hear a “boomy” or “muddy” quality that does not improve after treating reflection points. That boominess comes from room modes — standing waves that reinforce specific bass frequencies in the corners and along walls.

Standard 2-inch acoustic panels absorb mid and high frequencies effectively, but they barely touch anything below 250 Hz. Corner treatment requires thick, dense absorbers (bass traps) that are at least 4 inches deep.

Panel vs bass trap placement

Keep your flat panels on the walls at reflection points. Reserve corners for dedicated bass traps — ideally floor-to-ceiling in at least two corners of the room.

If your budget forces a choice, treat reflection points first. Bass traps improve the room, but side-wall panels improve your actual listening accuracy more per dollar spent.

What Are Common Acoustic Panel Placement Mistakes?

split comparison showing wrong panel placement mounted too high near ceiling versus correct placement centered at seated ear height

Most placement mistakes share a root cause: treating visible wall space instead of treating the surfaces that actually matter acoustically. Here are the four most common ones.

Mounting panels too high on the wall

Panels centered near the ceiling look symmetrical but miss the reflection zone entirely. Sound travels in straight lines from your speakers to the walls to your ears — and your ears are at seated height, not ceiling height.

Center every panel at seated ear height, roughly 36 to 42 inches from the floor. If the panel is tall enough to cover from 30 to 54 inches, it catches the primary reflection zone for most seated positions.

Spreading panels evenly instead of targeting reflections

Distributing panels evenly around the room looks “professional” but wastes half your treatment. Two panels at first reflection points do more than eight panels scattered decoratively across every wall.

Use the mirror trick, mark the actual reflection points, and concentrate your panels there. Even coverage is a goal for recording studios with big budgets — not for rooms with 4 to 6 panels.

Treating only the wall you face

The wall in front of you (behind the speakers) is the least critical surface for reflection control. Side walls and the ceiling send reflections to your ears much sooner and with much more energy.

If you only have two panels, they belong on the side walls — not flanking your monitor or TV.

Using thin foam and expecting bass control

Thin foam tiles (half-inch or one-inch) absorb high frequencies and almost nothing else. They can actually make a room sound worse by removing treble while leaving all the bass and low-mid energy untouched.

If bass is the problem, you need thickness and density — not thinner foam in more places.

Conclusion

Where to place acoustic panels reduces to one priority: treat first reflection points before anything else. Side walls at ear height, then ceiling, then the wall behind you.

That sequence consistently delivers the most audible improvement per panel, regardless of room size or use case.

Skip the decorative scatter approach and use the mirror trick to place every panel where it intercepts a real reflection path. Four panels at the right spots will always outperform a dozen placed for looks.

Frequently Asked Questions

How high should acoustic panels be on the wall?

Center them at seated ear height — 36 to 42 inches from the floor for most people. The goal is intercepting the reflection path between your speakers and your ears, and that path travels at seated head level, not near the ceiling.

Do acoustic panels need to be directly at the reflection point?

Close counts. A panel shifted 6 inches from the exact mirror-trick spot still catches most of the reflection energy because the reflection zone is a region, not a pinpoint.

Being within a foot of the ideal spot gets you 80 to 90 percent of the benefit.

Can I put acoustic panels on the ceiling?

Yes — ceiling clouds are one of the most effective placements in any room. A cloud above the listening position catches overhead reflections that side-wall panels miss entirely.

Suspend it 2 to 4 inches below the ceiling surface for the best low-mid absorption.

Should I put acoustic panels behind my speakers?

Only after you have treated side walls and ceiling first. The wall behind your speakers contributes less to early reflections than the side walls do.

In small rooms where the speakers sit very close to the back wall, treating that surface can reduce comb filtering. But it is never the first priority.

How many acoustic panels does a small room need?

Most rooms between 80 and 150 square feet see a clear difference with 4 to 6 panels covering the side-wall reflection points, a ceiling cloud, and a rear-wall patch. Going beyond that in a small room risks over-damping, which makes the space sound unnaturally dead and fatiguing to work in.

How Does a Turntable Actually Work? A Beginner’s Guide to Vinyl Magic

You know that feeling when you drop the needle on a fresh record, and suddenly your room fills with warm, rich sound? It’s pure magic!

But have you ever wondered how these seemingly simple devices actually work their audio alchemy? Well, buckle up, because we’re about to dive into the fascinating world of turntables!

How Does a Turntable Actually Work?

A close-up image of a modern turntable spinning a vinyl record, with the stylus gently touching the grooves. The setting features warm ambient lighting, with speakers and vinyl records in the background, highlighting a cozy listening space.

A turntable works by converting the physical grooves on a vinyl record into sound waves we can hear. It’s like a time machine for music!

The record spins on a platter, and a needle (called a stylus) rides along the grooves. As it moves, it picks up tiny vibrations that get turned into electrical signals.

These signals are then amplified and sent to your speakers, bringing your favorite tunes to life. It’s a beautifully simple concept that’s been around for over a century, but there’s so much more to explore.

We’ll dig deeper into the nitty-gritty details below, but that’s the basic gist of how these groovy machines work their magic!

The Anatomy of a Turntable: Key Components

A modern direct-drive turntable setup with vinyl playing, accompanied by a mixer and speakers, in a cozy living room setting. The equipment reflects a high-quality audio system, with a focus on precision and sound clarity.

Alright, let’s break this bad boy down! A turntable might look simple on the outside, but it’s got some seriously cool parts working together to make the magic happen.

Trust me, I’ve taken apart (and sometimes successfully reassembled) more turntables than I care to admit!

First up, we’ve got the platter and motor. The platter is that big disc your record sits on, and the motor is what makes it spin.

It’s like a really fancy lazy Susan for your vinyl! I remember the first time I saw a direct-drive turntable in action – that thing started and stopped on a dime!

It blew my mind compared to my old belt-drive model that took its sweet time getting up to speed.

Next, we’ve got the tonearm. This is that long, slender arm that holds the cartridge and stylus.

It’s got a pretty important job – it needs to track the record grooves accurately while applying just the right amount of pressure. Too much, and you’ll wear out your records faster than you can say “audiophile.”

Too little, and you’ll be listening to more skips than a playground full of hopscotch enthusiasts!

Speaking of cartridges and styli (yeah, that’s the fancy plural for stylus), these little guys are the real MVPs of the turntable world. The stylus is that tiny needle that actually rides in the record groove, and the cartridge is what holds it and converts those physical vibrations into electrical signals.

It’s like a miniature translator, turning bumps and wiggles into sweet, sweet music.

Last but not least, we’ve got the preamp and outputs. Now, this is where things can get a bit confusing for newbies.

Some turntables have a built-in preamp, while others need an external one. I learned this the hard way when I first plugged my vintage turntable directly into my modern amplifier and got nothing but the faintest whisper of sound.

Talk about a facepalm moment!

The Physics Behind the Magic: How Sound is Extracted from Vinyl

Close-up of a stylus riding on the grooves of a vinyl record with a cozy, vintage-inspired listening room in the background, featuring shelves of records and classic audio equipment.

Okay, time to put on our science hats! Don’t worry, I promise to keep things fun – no boring lectures here.

Let’s talk about those grooves, baby! If you look at a record up close (and I mean really close, like “maybe I should invest in a microscope” close), you’ll see that the grooves aren’t just simple circles.

They’re more like a crazy roller coaster track, full of twists and turns.

As the record spins, the stylus rides along these grooves like the world’s tiniest surfer. Every little bump and wiggle in the groove causes the stylus to vibrate.

It’s kinda like when you were a kid and put a playing card in your bike spokes – remember how it would make that cool flapping sound as the wheel turned? Same principle, just way more precise!

Now, here’s where it gets really cool. The cartridge takes those tiny vibrations from the stylus and converts them into electrical signals.

It’s like magic, I swear! The first time I understood this concept, I was gobsmacked.

I mean, we’re talking about turning physical movement into electricity – how awesome is that?

But wait, there’s more! The grooves on a record aren’t just random squiggles.

They’re carefully engineered to represent the full range of sounds in the music. The depth, width, and shape of the groove all play a part in recreating the original audio.

It’s like a microscopic 3D map of the music!

I remember spending hours with a magnifying glass, peering at different records and trying to “see” the music. Let’s just say my roommates thought I’d lost it, but hey, sometimes you gotta embrace your inner nerd!

From Rotation to Sound: The Journey of Music Playback

Close-up of a person cleaning a modern turntable with a carbon fiber brush, stylus cleaning gel, and other tools arranged nearby in a cozy living room setting.

Alright, now that we’ve got the basics down, let’s follow the music from that spinning disc all the way to your ears! It’s a journey worthy of a hobbit, I tell ya.

First things first – speed is key. Your typical turntable spins at 33 1/3 or 45 RPM (rotations per minute), depending on the record.

And let me tell you, consistency is crucial here. Even tiny fluctuations in speed can make your favorite singer sound like they’ve been hitting the helium balloon a bit too hard!

I learned this the hard way when my old turntable’s belt started to wear out. Suddenly, every song sounded like it was being performed by a very musical chipmunk.

As the record spins, the tonearm glides across its surface, following those groovy… well, grooves! It’s got to maintain just the right pressure and angle to track accurately.

Too much pressure, and you’ll wear out your records faster than a pair of socks on a long hike. Too little, and you’ll be dealing with more skips than a game of hopscotch.

Now, remember those electrical signals we talked about earlier? This is where they really come into play.

As the stylus wiggles its way through the groove, the cartridge is busy converting those movements into teeny-tiny electrical currents. We’re talking seriously small here – like, “you’d need a microscope to see it” small.

But don’t worry, we’re not done yet! These itty-bitty signals need some serious boosting before they’re ready for primetime.

That’s where our friend the preamp comes in. It takes those whisper-quiet signals and amplifies them to a level your main amplifier can work with.

It’s like giving those signals a megaphone!

Finally, after all that, the amplified signals get sent to your speakers, and voila! Music to your ears, quite literally.

It’s a journey that happens in the blink of an eye, from a needle riding a plastic disc to sound waves hitting your eardrums. Pretty mind-blowing when you think about it!

Turntable Types: Direct Drive vs. Belt Drive

A detailed comparison image showcasing two turntables, one direct drive and one belt drive, side by side in a cozy, modern room setting with vinyl records in the background, highlighting the differences between the two popular turntable types.

Alright, turntable fans, it’s time for the great debate: direct drive vs. belt drive! It’s like the vinyl world’s version of “tastes great” vs. “less filling.”

Both have their die-hard supporters, and I’ve seen arguments over this get pretty heated at audio meetups!

Let’s start with belt drive turntables. These bad boys use a motor that’s offset from the platter, connected by a rubber belt.

It’s kind of like a really tiny, really precise conveyor belt. The advantage here is that the belt helps isolate the platter from the motor’s vibrations, which can lead to cleaner sound.

Plus, they tend to be quieter in operation. The downside?

They can be a bit slower to get up to speed, and the belts do wear out over time. I once had a belt snap on me right in the middle of a killer guitar solo – talk about a mood killer!

On the other side of the ring, we’ve got direct drive turntables. As the name suggests, these have the motor directly connected to the platter.

They’re like the sports cars of the turntable world – quick to start and stop, with rock-solid speed stability. DJs love ’em because they can stand up to the abuse of scratching and back-cueing.

But some audiophiles argue that you can sometimes hear slight motor noise, especially during quiet passages.

Now, here’s where I might ruffle some feathers: I don’t think one is inherently “better” than the other. Gasp!

I know, I know, that’s practically heresy in some vinyl circles. But hear me out!

I’ve heard amazing sound from both types of turntables. It really comes down to the overall quality of the components and design.

That said, I will admit to having a soft spot for my old direct drive turntable. There’s something satisfying about how quickly it starts up, like it’s as eager to play the music as I am to hear it!

Maintaining Your Turntable for Optimal Performance

Close-up of a person cleaning a modern turntable with a carbon fiber brush, stylus cleaning gel, and other tools arranged nearby in a cozy living room setting.

Listen up, folks, because this part is crucial! Taking care of your turntable is like taking care of a classic car – a little TLC goes a long way.

And trust me, I’ve learned some of these lessons the hard way!

First things first: keep it clean! Dust is the enemy of good sound.

I use a carbon fiber brush to gently clean my records before each play. It’s like giving them a little spa treatment before their performance.

And don’t forget about your stylus! A dirty stylus is bad news bears – it can damage your records and sound terrible to boot.

I use a special stylus cleaning gel, but be gentle! That tiny needle is more delicate than my grandma’s china.

Alignment is another biggie. Your cartridge needs to be properly aligned to track the groove accurately.

There are special protractors you can use for this, but I’ll be honest – the first time I tried to align my cartridge, I felt like I needed an engineering degree! It took some practice (and a few YouTube tutorials), but now I can do it with my eyes closed.

Well, not literally – that would be a bad idea.

Don’t forget about calibration! Proper tracking force (how heavily the stylus sits in the groove) and anti-skate (a force that counteracts the tonearm’s tendency to swing inward) are crucial for good sound and minimal wear on your records.

Too little force, and you’ll get skipping. Too much, and you’ll wear out your records faster than a top 40 hit.

Now, here’s a tip that took me way too long to figure out: pay attention to your turntable’s environment. Keep it level (I use a little bubble level for this), and try to isolate it from vibrations.

I once had my turntable on the same surface as my speakers, and every time the bass hit, it was like a mini earthquake for my poor stylus!

Lastly, know when to call in the pros. If you’re hearing consistent issues or something seems off, don’t be afraid to take your turntable to a reputable repair shop.

I once tried to fix a speed stability issue on my own and… well, let’s just say it didn’t end well. Sometimes, it’s worth paying for expertise!

The Digital Age: How Modern Turntables Integrate with Technology

A modern turntable setup in a cozy living room, featuring wireless speakers and a smartphone displaying a music app connected via Bluetooth. Vinyl records are visible on the shelves, with warm ambient lighting creating a stylish, relaxed atmosphere.

Alright, vinyl lovers, let’s talk about dragging our beloved turntables into the 21st century! Now, I know some purists out there are probably clutching their first-press Beatles albums in horror, but hear me out.

The marriage of analog and digital tech can be a beautiful thing!

First up, let’s chat about USB turntables. These nifty devices let you connect your turntable directly to your computer, allowing you to digitize your vinyl collection.

It’s like having a time machine for your music! I remember spending a whole weekend transferring my dad’s old jazz collection to digital files.

It was a labor of love, but now I can enjoy those rare recordings anywhere, anytime.

But here’s the thing – not all USB turntables are created equal. Some of the budget models out there… well, let’s just say they’re not doing your vinyl any favors.

It’s worth investing in a quality unit if you’re serious about preserving your collection digitally.

Now, let’s talk about something that blew my mind when I first encountered it: Bluetooth turntables. Yep, you read that right!

These bad boys can stream your vinyl directly to wireless speakers or headphones. It’s like black magic, I swear!

The first time I streamed a record to my Bluetooth speakers, I felt like I was living in the future. No more tripping over speaker wires or being tethered to one spot!

Of course, the audio purists out there might argue that you’re losing some quality with wireless transmission. And they’re not entirely wrong.

But for casual listening or for those of us who value convenience, it’s a game-changer.

Some modern turntables are even incorporating apps and smart features. You can control settings from your phone, get detailed info about your listening habits, or even have your turntable identify the record you’re playing.

It’s like having a super-knowledgeable record store clerk right in your living room!

But here’s my hot take: while all these digital features are cool, they should enhance, not replace, the core vinyl experience. There’s still something special about the ritual of pulling a record from its sleeve, gently lowering the needle, and sitting back to enjoy the warm, rich sound.

The tech should support that experience, not overshadow it.

I remember going to a friend’s house and seeing their all-singing, all-dancing smart turntable setup. It was impressive, sure, but they spent more time fiddling with the app than actually listening to music!

Don’t let the tech distract you from what really matters – the music itself.

Conclusion

Whew! What a journey we’ve been on, exploring the ins and outs of turntables!

From the basics of how these magical machines work to the nitty-gritty of maintenance and modern tech integration, we’ve covered a lot of ground. And you know what?

I’m still amazed by these devices every time I fire mine up.

There’s something undeniably special about the vinyl experience. The way a turntable transforms those tiny grooves into rich, warm sound is nothing short of engineering brilliance.

It’s a testament to human ingenuity that a technology developed over a century ago is not only still relevant but experiencing a major renaissance!

But here’s the thing – understanding how your turntable works isn’t just about satisfying curiosity (though that’s certainly part of it!). It’s about appreciating the music on a deeper level.

When you know what’s happening behind the scenes, every listen becomes a little more magical. You start to hear the subtle nuances, the depth of the soundstage, the breathtaking dynamic range that vinyl can offer.

And let’s not forget the practical side. Knowing your way around your turntable means you can keep it in tip-top shape, ensuring you get the best possible sound for years to come.

Trust me, your future self (and your record collection) will thank you!

As we wrap up, I want to encourage you to take this knowledge and run with it. Experiment with your setup.

Try different cartridges. Play with alignment.

Heck, maybe even build your own turntable if you’re feeling adventurous! (Just, uh, maybe don’t start with your most prized records for that one.)

Remember, at the end of the day, it’s all about the music. Whether you’re rocking a vintage manual turntable or a high-tech Bluetooth model, the goal is the same: to immerse yourself in the incredible world of sound that your records hold.

So go on, drop that needle, sit back, and enjoy the ride. And the next time someone asks you, “How does a turntable actually work?”, you can wow them with your newfound knowledge.

Just try not to go on for as long as I have – your friends might not share your newfound turntable obsession!

Happy listening, vinyl lovers!

P.S. I’d love to hear about your own turntable experiences! Got any funny stories about misaligned cartridges or belt mishaps?

Or maybe you’ve got some killer tips for keeping your setup in pristine condition? Drop a comment below and let’s keep the conversation going.

After all, the best part of being a vinyl enthusiast is sharing the love with fellow fans!

Manual Vs Automatic Turntables: What Are the Differences?

Hey there, vinyl enthusiasts and curious music lovers!

Today, we’re diving into the world of turntables, specifically the age-old debate of manual vs automatic turntables.

As someone who’s been spinning records for over two decades, I’ve had my fair share of experiences with both types.

So, let’s drop the needle on this topic and explore the key differences between these two turntable types!

Manual Vs Automatic Turntables: What Are the Differences?

A detailed side-by-side comparison of a manual and automatic turntable, with a hand manually placing the tonearm on one turntable, while the automatic turntable features a mechanical arm gently lowering the tonearm onto a spinning vinyl record. Both turntables are set on a wooden surface with warm lighting and stacks of vinyl records in the background.

Alright, let’s cut to the chase! The main difference between manual and automatic turntables is in how you start and stop playing a record.

With a manual turntable, you’re the DJ – you’ve gotta physically place the tonearm on the record to start it and lift it off when the side’s done.

Automatic turntables, on the other hand, do the heavy lifting for you. They’ll move the tonearm into place and return it when the record’s over.

It’s like having a little robot assistant for your vinyl! There’s a lot more to unpack here, so stick around as we dive deeper into the nitty-gritty of these two turntable types.

What Are Manual Turntables?

A cozy, vintage-inspired living room with a manual turntable on a wooden table. A hand is lowering the tonearm onto a vinyl record, surrounded by warm ambient lighting, vintage decor, and a shelf full of records in the background, creating an intimate vinyl listening experience.

Man, where do I even start with manual turntables? These babies are the purist’s dream! A manual turntable is exactly what it sounds like – you’re in control of every aspect of playing your records.

You gotta manually place the tonearm on the record to start playing and lift it off when the music’s done. It’s like being the conductor of your own little vinyl orchestra!

I remember when I got my first manual turntable. I was so nervous about dropping the needle, I practically held my breath every time!

But let me tell you, there’s something really special about that hands-on interaction with your music. It’s like you’re part of the playback process, you know?

Now, the cool thing about manual turntables is that they usually have fewer moving parts. This can mean better sound quality because there’s less chance for mechanical noise to interfere with your tunes.

Plus, you’ve got more control over where exactly you start playing on a record. Wanna skip straight to that killer guitar solo? No problem!

But I gotta be real with you – manual turntables aren’t for everyone. If you’re the type who likes to put on a record and forget about it, you might find yourself with a scratched-up vinyl when you forget to lift the tonearm at the end.

Trust me, I’ve made that mistake more times than I’d like to admit!

And let’s not forget about the learning curve. It took me a while to get comfortable with properly cueing up a record without making that cringeworthy scratch sound.

But hey, practice makes perfect, right?

Overall, manual turntables are great for folks who really want to be involved in the listening experience. They’re often favored by audiophiles and vinyl enthusiasts who appreciate that extra bit of control and potentially better sound quality.

Just be prepared to give your records a bit more attention!

What Are Automatic Turntables?

A cozy modern living room featuring an automatic turntable playing a vinyl record on a wooden table. The room is warmly lit with a comfortable couch and a bookshelf filled with vinyl records in the background, capturing the convenience and relaxation of using an automatic turntable.

Okay, now let’s talk about automatic turntables – the “set it and forget it” option of the vinyl world! These nifty devices take some of the manual labor out of playing records.

With an automatic turntable, you just hit a button, and voila! The tonearm moves into place, gently lowers onto the record, and when the side’s done, it lifts off and returns to its resting position.

It’s like magic!

I gotta admit, when I first tried an automatic turntable, it felt a bit like cheating. I mean, where’s the ritual, right?

But man, once I got used to it, I realized how convenient these things can be. You know those lazy Sunday afternoons when you just want to relax with some tunes? Automatic turntables are perfect for that!

Now, there are actually two types of automatic turntables: fully automatic and semi-automatic. Fully automatic ones do everything for you – start, stop, and return the tonearm.

Semi-automatic turntables usually require you to start playback manually, but they’ll lift the tonearm at the end of the record. It’s like a halfway house between manual and fully automatic!

One thing I love about automatic turntables is how beginner-friendly they are. I remember when my niece wanted to play some of my records.

I was so nervous she’d scratch them! But with the automatic turntable, she could enjoy the vinyl experience without me hovering over her shoulder like a crazy uncle.

But it’s not all roses with automatic turntables. All those extra mechanisms can potentially introduce more noise into the system.

And if something goes wrong with the automatic function, it can be a pain to fix. I once had an automatic turntable that decided it wanted to return the tonearm halfway through every record. Talk about a mood killer!

Price-wise, automatic turntables can be a mixed bag. Entry-level automatic models are often cheaper than their manual counterparts, but high-end automatic turntables can get pretty pricey.

In the end, automatic turntables are great for folks who want the vinyl experience without all the fuss. They’re perfect for background music or for when you’re multitasking.

Just don’t expect to impress your audiophile friends with your DJ skills!

Sound Quality Comparison

A high-end audiophile listening setup featuring both manual and automatic turntables, side by side, in a stylish modern living room. Surrounded by premium speakers, amplifiers, and a wall of records in the background, the cozy space emphasizes the comparison of sound quality between the two turntable types, with warm ambient lighting.

Alright, let’s get into the nitty-gritty – sound quality. This is where things can get a bit… contentious.

I’ve seen heated debates break out over this topic at audio shows, I kid you not!

First things first, let’s bust a myth: there’s no inherent reason why a manual turntable should sound better than an automatic one, or vice versa. The overall sound quality depends on a whole bunch of factors – the quality of the components, the design of the turntable, how well it’s set up, and even the condition of your records.

That being said, many audiophiles swear by manual turntables for sound quality. The argument goes that because manual turntables have fewer moving parts, there’s less potential for mechanical noise to interfere with the sound.

And you know what? There’s some truth to that. I’ve definitely heard some automatic turntables where you could hear the mechanism whirring away in quiet passages.

But here’s the thing – a well-designed automatic turntable can sound just as good as a manual one. I remember the first time I heard a high-end automatic turntable at a hi-fi show.

I was blown away! The sound was crystal clear, with no mechanical noise whatsoever. It really opened my eyes (or should I say ears?) to what was possible with automatic turntables.

One advantage that manual turntables often have is in the tonearm department. Because they don’t need to accommodate an automatic mechanism, manual tonearms can sometimes be designed with more focus on optimizing things like tracking force and anti-skate.

This can lead to better tracking of the record groove, which means better sound.

But let’s be real – unless you’re really into the minutiae of audio quality, chances are you might not even notice these differences. I’ve done blind tests with friends using similarly priced manual and automatic turntables, and most of the time, people couldn’t consistently tell which was which.

In my experience, factors like the quality of your cartridge, the condition of your records, and even the acoustics of your listening room often make a bigger difference to sound quality than whether your turntable is manual or automatic.

So, what’s the bottom line? If you’re chasing the absolute pinnacle of sound quality and are willing to put in the effort, a high-end manual turntable might give you a slight edge.

But for most of us, a well-designed turntable of either type can provide fantastic sound quality. The most important thing is to choose a turntable that you enjoy using and that fits your listening habits.

After all, the best-sounding turntable is the one that gets you listening to your records more often!

User Experience and Convenience

A cozy living room with two vinyl turntables set up side by side on a wooden table. One turntable is a manual, minimalist design with a tonearm resting in its cradle, while the other is an automatic turntable with buttons and a more complex setup. Warm lighting fills the room, with vinyl records on shelves and speakers in the background, creating a relaxed and nostalgic atmosphere.

Let’s chat about the user experience and convenience factor of manual versus automatic turntables. This is where the rubber really meets the road for most folks!

Manual turntables, as I mentioned earlier, require a bit more hands-on interaction. You’ve gotta be there to start and stop the record, which means you’re more engaged in the listening process.

For some people (like yours truly), this is part of the charm of vinyl. There’s something almost meditative about the ritual of selecting a record, carefully removing it from its sleeve, placing it on the platter, and gently lowering the tonearm.

But I’ll be the first to admit – it’s not always convenient. I can’t tell you how many times I’ve fallen asleep listening to records and woken up to the dreaded ‘tick-tick-tick’ of the needle at the end of the side.

Oops!

Automatic turntables, on the other hand, are all about convenience. You can set a record playing and go about your business without worrying about having to come back and lift the tonearm.

This is great for background music or when you’re doing other things while listening. I love using my automatic turntable when I’m cooking – I can start an album and know it’ll take care of itself while I’m chopping veggies.

When it comes to maintenance, manual turntables generally have the edge. With fewer moving parts, there’s less that can go wrong.

I’ve had my main manual turntable for over 15 years now, and aside from replacing the belt and cartridge, it’s never needed any work.

Automatic turntables, with their additional mechanisms, can sometimes be more prone to issues. I had a friend who bought a budget automatic turntable, and within a year, the auto-return function started acting up.

It wasn’t the end of the world, but it was annoying.

That said, modern automatic turntables, especially higher-end ones, are pretty reliable. And for some folks, the convenience factor outweighs the potential for additional maintenance down the line.

As for ease of use, automatic turntables definitely have the upper hand, especially for beginners. There’s less of a learning curve, and less chance of accidentally damaging your records.

I always recommend automatic turntables for friends who are just getting into vinyl.

Manual turntables, while not difficult to use, do require a bit more care and attention. You need to learn how to properly cue up a record, and how to lift the tonearm without scratching the vinyl.

It’s not rocket science, but it does take some practice.

In the end, the choice between manual and automatic often comes down to personal preference and listening habits. Do you see yourself as someone who wants to be actively involved in playing your records?

Or do you prefer to just press a button and let the music play? There’s no right or wrong answer – it’s all about what works best for you and your lifestyle.

Price Range and Value for Money

A cozy living room showcasing two turntables side-by-side on a wooden table. One is a budget-friendly automatic model with a basic design, and the other is a high-end manual turntable with premium features. The background features vinyl records, a plush sofa, and speakers, highlighting the contrast between affordability and luxury in turntable options.

Alright, let’s talk money! The price range for turntables, both manual and automatic, can vary wildly.

You’ve got everything from budget options under $100 to high-end audiophile gear that costs more than my first car!

In general, at the entry-level, you’ll find that automatic turntables are often cheaper than manual ones. This is because they’re usually aimed at casual listeners who want the vinyl experience without breaking the bank.

You can find decent automatic turntables from reputable brands for around $150-$300.

Manual turntables at this price point are often a bit more expensive, usually starting around $200-$250 for a good quality unit. The reason for this is that even budget manual turntables often put more emphasis on sound quality and build, since they’re targeting a slightly more enthusiast crowd.

As you move up the price range, things start to even out a bit. In the $500-$1000 range, you’ll find excellent options for both manual and automatic turntables.

This is where you start seeing really good build quality, better cartridges, and noticeable improvements in sound.

At the high end of the market (we’re talking $1000+), manual turntables tend to dominate. This is the realm of the serious audiophile, where every tiny improvement in sound quality is pursued, often at significant cost.

That said, there are some seriously impressive (and seriously expensive) automatic turntables out there too.

Now, let’s talk value for money. This is where things get a bit subjective.

In my experience, if sound quality is your top priority and you’re willing to be more hands-on, manual turntables often provide better value for money. The lack of automatic mechanisms means more of your money is going towards the components that directly affect sound quality.

On the other hand, if convenience is a big factor for you, an automatic turntable might provide better value. The ability to just press a button and have your records play automatically is worth a lot to some people.

I remember when I was shopping for my first “serious” turntable. I was torn between a $600 manual turntable and a $500 automatic one.

I ended up going for the manual one, and while I sometimes miss the convenience of automatic operation, I’ve never regretted the decision. The sound quality and the feeling of connection with the music were worth it for me.

But here’s the thing – I’ve got friends who’ve gone the other way and been just as happy. One buddy of mine swears by his automatic turntable.

He says being able to flip a record while he’s in the middle of cooking dinner is priceless!

In terms of long-term value, manual turntables might have a slight edge. They’re often simpler mechanically, which means there’s less that can go wrong over time.

Plus, many manual turntables are designed to allow for upgrades (like better cartridges or tonearms), which can extend their lifespan and improve performance over time.

That said, a well-made automatic turntable can last for decades with proper care. My dad still uses the automatic turntable he bought in the ’80s, and it works perfectly!

Ultimately, the best value for money comes from choosing a turntable that fits your needs and will encourage you to listen to your records more often. Whether that’s a budget automatic model or a high-end manual turntable depends on you, your listening habits, and your budget.

Which One Should You Choose?

A cozy living room setup showcasing two turntables side by side on a wooden table. One turntable has a vintage wooden design for manual operation, while the other is sleek and modern, with an automatic operation system. The background features a comfortable couch, bookshelf filled with vinyl records, and speakers, creating a warm, inviting atmosphere with soft lighting.

Alright, decision time! Choosing between a manual and an automatic turntable can feel like a big deal, especially if you’re new to the vinyl game.

But don’t sweat it – I’ve been through this dilemma myself, and I’m here to help you figure it out.

First things first, there’s no universally “right” choice. It all depends on your personal preferences, listening habits, and what you want to get out of your vinyl experience.

Let’s break it down:

Go for a manual turntable if:

  1. You’re all about that hands-on vinyl experience. If you love the ritual of playing records and don’t mind being more involved in the process, a manual turntable is your jam.
  2. Sound quality is your top priority. While both types can sound great, manual turntables often have a slight edge in the audiophile world.
  3. You’re into the idea of upgrading components over time. Manual turntables are often more modular and easier to upgrade.
  4. You don’t mind a bit of a learning curve. It takes some practice to use a manual turntable properly, but many find it rewarding.

Choose an automatic turntable if:

  1. Convenience is key for you. If you want to be able to put on a record and walk away, automatic is the way to go.
  2. You’re new to vinyl and want something more user-friendly to start with.
  3. You often listen to records while doing other things and can’t always be there to flip the record or lift the tonearm.
  4. You’re worried about potentially damaging your records. Automatic turntables can be more forgiving for beginners.

Now, here’s a pro tip: if you’re on the fence, consider a semi-automatic turntable. These bad boys give you the best of both worlds – you start the record manually (giving you that hands-on feel), but the tonearm lifts automatically at the end of the side.

It’s like the Switzerland of turntables – nicely neutral!

When I was helping my cousin choose her first turntable, we went through this whole process. She loved the idea of a manual turntable but was worried about falling asleep and leaving the needle running.

We ended up going with a semi-automatic model, and she couldn’t be happier!

If you have the chance, try to listen to both types before making a decision. Hit up your local hi-fi shop or see if any of your vinyl-head friends have different types you can check out.

There’s nothing like hands-on experience to help you decide.

And remember, at the end of the day, the best turntable is the one that gets you listening to your records more often. Whether that’s a high-end manual turntable or a budget-friendly automatic one doesn’t matter as much as the joy you get from spinning your favorite albums.

Conclusion

Whew! We’ve covered a lot of ground, haven’t we? From the nitty-gritty details of how manual and automatic turntables work, to sound quality face-offs and price comparisons, we’ve really dug into this topic.

Here’s the bottom line: both manual and automatic turntables have their place in the wonderful world of vinyl. Manual turntables offer a more engaged, hands-on experience and often edge out in terms of sound quality and upgrade potential.

Automatic turntables, on the other hand, bring convenience and user-friendliness to the table, making them great for casual listening or multitasking music lovers.

Your perfect choice depends on your personal preferences, listening habits, and how much involvement you want in the playback process. Whether you go manual or automatic, the most important thing is that you’re enjoying your music!

Remember, the vinyl community is all about sharing experiences and learning from each other. So, I’d love to hear from you!

What type of turntable do you use? Are you team manual or team automatic? Or maybe you’re rocking a semi-automatic setup?

Drop a comment below and share your turntable tales!

And hey, if you’re still feeling unsure, don’t hesitate to ask questions. We vinyl enthusiasts love nothing more than geeking out about our setups and helping fellow music lovers find their perfect match in the turntable world.

Now, if you’ll excuse me, I’ve got some records calling my name. Happy listening, folks!

How To Setup A Turntable: A Comprehensive Guide

Ah, the thrill of unboxing a new turntable! There’s something magical about setting up your very own record player, knowing that soon you’ll be dropping the needle on your favorite vinyl.

The warm, rich sound of analog music is unparalleled, and it’s no wonder vinyl has made such a comeback in recent years.

But I’ll let you in on a little secret – the setup process can make or break your listening experience. It’s not just about plugging in a few cables and hitting play.

Trust me, I’ve been there, fumbling with tonearms and cartridges, wondering why my records sounded more like a cat scratching a chalkboard than music!

The difference between a poorly set up turntable and one that’s dialed in perfectly is like night and day.

But don’t worry, friend. I’ve made all the mistakes so you don’t have to. Over the years, I’ve set up dozens of turntables, from vintage Technics to modern audiophile models.

In this guide, we’ll walk through every step of setting up your turntable, from unboxing to fine-tuning. We’ll cover everything you need to know to get your vinyl singing sweetly.

Whether you’re a vinyl newbie who just scored their first turntable at a garage sale, or an audiophile looking to perfect your setup, I’ve got you covered.

By the end of this guide, you’ll be able to set up your turntable like a pro.

So, grab a cup of coffee, put on your favorite record (in your mind, for now), and let’s dive into the world of turntable setup!

Trust me, the effort you put in now will pay off in spades when you’re lost in the music later.

How To Setup A Turntable

A close-up view of a modern turntable being set up, with tools like a vinyl brush, protractor, and small screwdriver nearby. The scene highlights the assembly of the platter and adjustment of the tonearm, all under warm lighting on a stable surface.

Setting up a turntable involves several key steps, each crucial for achieving the best possible sound quality. First, choose a stable, level surface for your turntable – this is more important than you might think.

Next, assemble the components, including the platter, belt (if applicable), and cartridge. This step requires a gentle touch and careful attention to detail.

Then comes one of the most critical steps: balancing the tonearm. This involves adjusting the counterweight, setting the tracking force, and calibrating the anti-skate mechanism.

Get this right, and you’re well on your way to audio bliss. Connect your turntable to your audio system, ensuring proper grounding to avoid any unwanted hum or buzz.

Finally, fine-tune the setup by adjusting the vertical tracking angle (VTA) and aligning the cartridge. These last steps can really take your sound from good to great.

The process requires patience and attention to detail, but don’t let that intimidate you. With this guide, you’ll be enjoying pristine vinyl sound in no time.

Remember, every step is important, from the initial unboxing to the final fine-tuning. Rushing through any part of the process could result in subpar sound or even damage to your precious vinyl.

Let’s dive into each step to ensure you get the most out of your turntable setup! By the end of this guide, you’ll be ready to experience your record collection like never before.

Unboxing and Initial Inspection

A new turntable being carefully lifted from its packaging, surrounded by foam inserts and accessories like the platter, dust cover, and manual. The scene captures the excitement and precision of unboxing a delicate audio instrument, with warm lighting enhancing the moment.

Alright, let’s start at the very beginning – unboxing your turntable. I know you’re excited (I always am when new audio gear arrives), but resist the urge to rip into that package like a kid on Christmas morning!

Turntables are delicate instruments, and rough handling during unboxing can throw things out of alignment before you even start. Take a deep breath and approach this methodically.

First things first, carefully remove the turntable from its box. Most come with foam or cardboard inserts to protect delicate parts during shipping.

Pay attention to how everything is packed – you might need to repack it someday. Remove these gently – you don’t want to accidentally yank out any important bits!

I once got a bit too eager and pulled out the tonearm along with the packing material. Not a great start!

Once it’s out, give your new baby a thorough once-over. Check for any obvious shipping damage. Look for cracks, dents, or loose parts.

I once received a turntable with a cracked dust cover – not fun, let me tell you. It took weeks to get a replacement, and I was paranoid about dust the whole time.

Make sure all the parts are there: platter, tonearm, cartridge (if not pre-installed), dust cover, and any accessories like a mat or alignment tools. Some higher-end turntables come with their own spirit level or even a specialized screwdriver – don’t throw these out by mistake!

If your turntable came with a manual (and I hope it did), now’s the time to familiarize yourself with it. Different models can have unique quirks or setup procedures.

I once spent hours trying to figure out why I couldn’t get any sound, only to realize I’d missed a tiny switch mentioned in the manual. Don’t be like me – read the manual!

Pro tip: Keep the box and packing materials, at least until you’re sure everything’s working perfectly. You never know when you might need to return or ship your turntable!

I learned this lesson the hard way when I had to send a turntable in for repair and had nothing but a flimsy Amazon box to pack it in. Needless to say, it arrived with a few extra “features” it didn’t have when I sent it.

Choosing the Right Location

A stylish turntable setup in a cozy living room, placed on a sturdy wooden shelf, showing a well-balanced and stable surface with warm ambient lighting, records, and speakers nearby.

Now that your turntable is out of the box, it’s time to find it a home. This step is crucial, folks. The right location can make the difference between mediocre and magnificent sound.

I once had my turntable set up on a wobbly IKEA side table – let’s just say the sound was less than ideal. Every time someone walked heavily across the room, the needle would jump. Not exactly conducive to losing yourself in the music!

You want a surface that’s stable, level, and free from vibrations. A sturdy shelf or dedicated audio rack is perfect. If you’re really serious, consider a wall-mounted shelf – it’s one of the best ways to isolate your turntable from floor vibrations.

Use a spirit level to ensure the surface is perfectly flat. Even a slight tilt can affect the tracking of your stylus.

Avoid putting your turntable directly on top of other audio components, especially amplifiers which can generate heat and vibrations. I made this mistake once and ended up with a warped record. Trust me, you don’t want to learn this lesson the hard way.

Consider room acoustics too. Corners can amplify bass, while placing your turntable too close to walls can create reflections. These reflections can muddy the sound and reduce the clarity you’re aiming for.

I find that placing the turntable along the short wall of a rectangular room often gives the best sound. It allows the sound to disperse more evenly throughout the room.

Think about practical considerations too. Is there enough space to access the turntable comfortably? Can you easily change records without contorting yourself into a pretzel?

Oh, and make sure you’ve got enough clearance to open that dust cover! I learned that lesson the hard way when I set up my first turntable under a low shelf. Oops!

Every time I wanted to play a record, I had to pull the whole unit forward. Not ideal, and definitely not good for maintaining a stable setup.

Lastly, consider the aesthetics. Your turntable is likely to become a centerpiece of your room. Choose a location where you can admire it, and where it complements your decor.

After all, vinyl isn’t just about the sound – it’s a whole experience, from the visual appeal of the turntable to the ritual of placing the needle on the record.

Assembling the Turntable

A stylish turntable setup in a cozy living room, placed on a sturdy wooden shelf, showing a well-balanced and stable surface with warm ambient lighting, records, and speakers nearby.

Okay, time to put this bad boy together! Don’t worry, it’s not as daunting as it might seem. Just take it step by step, and you’ll be fine.

First up, the platter. This is the heavy disc that your records will sit on. It’s usually the largest loose part in the box.

Handle it carefully – if it’s made of metal, it can be quite heavy, and you don’t want to drop it on your foot (trust me on this one). Place it gently onto the spindle in the center of your turntable.

If you’ve got a belt-drive turntable, you’ll need to install the belt too. This can be a bit fiddly – I once spent a good 10 minutes chasing a belt around the platter before I got it seated properly!

The belt usually loops around a motor pulley hidden under the platter. Some turntables come with a little tool to help you install the belt, but if not, clean hands and patience will do the trick.

Next, if your cartridge isn’t pre-installed, you’ll need to attach it to the headshell. This is where things get a bit delicate. The cartridge contains the stylus (needle), which is super fragile.

Handle with care! If you’re not confident, don’t be afraid to ask for help or even have a professional do this part.

Align the cartridge as best you can for now – we’ll fine-tune it later. Most cartridges attach with tiny screws, so you might need to break out your reading glasses for this part.

If your turntable came with a slipmat (usually a thin, felt-like disc), place this on top of the platter. If not, you might want to consider getting one – they can improve sound quality and protect your records.

Finally, pop on that dust cover. It might seem trivial, but trust me, keeping dust off your vinyl and stylus is crucial for good sound (and longevity of both).

Plus, it just looks nicer with the cover on when you’re not using it. Just remember to take it off when playing records – the vibrations from the music can transfer through the cover and back into the turntable if you leave it down while playing.

Balancing the Tonearm

A close-up view of a turntable setup with the tonearm floating parallel to the platter, counterweight adjusted, and anti-skate dial visible. Careful hands adjust the tonearm in a cozy room with records nearby, emphasizing precision and stability.

Now we’re getting to the nitty-gritty. Proper tonearm balance is crucial for good sound and to avoid damaging your records. This is probably the most technical part of the setup, but don’t worry – we’ll take it step by step.

Start by setting the anti-skate to zero and removing any tonearm locks. These locks keep the arm in place during transport, but they need to be disengaged for setup and play.

Next, we’ll set the initial balance. Adjust the counterweight (that’s the round weight at the back of the tonearm) until the tonearm floats parallel to the platter.

This is your zero point. It might take a few tries to get it just right – be patient. When it’s balanced, the arm should stay level when you let go, not rising or falling to either side.

Now, without moving the counterweight, rotate just the numbered dial on the front of it to zero. This dial is usually separate from the main body of the counterweight.

Next, we’ll set the tracking force. Your cartridge manual will recommend a range – start in the middle. To set this, rotate the entire counterweight (not just the dial) until the dial shows the desired tracking force.

For example, if you need 2 grams of tracking force, rotate the whole assembly until the dial reads 2. Too little force and you’ll get skipping; too much and you’ll wear out your records faster than you can say “limited edition pressing.”

Finally, set the anti-skate to match your tracking force. This prevents the arm from being pulled towards the center of the record. Usually, you’ll set it to the same number as your tracking force.

I remember the first time I tried to balance a tonearm. I was so nervous, my hands were shaking like I’d had ten espressos! I was terrified of damaging the stylus or scratching a record.

But take it slow, be patient, and you’ll get it. If you’re really unsure, there are plenty of YouTube videos that can give you a visual guide to this process.

Remember, this balance can be affected by temperature and humidity, so you might need to check and adjust it periodically. It’s a good habit to verify your tonearm balance every few months or if you move your turntable.

Connecting to Your Audio System

A scene of a turntable being connected to an audio system with high-quality RCA cables, visible red and white connectors, and a ground wire attached to the preamp's 'GND' terminal. The setup includes a neat audio rack with vinyl records nearby, ready to deliver clean sound through connected speakers.

Alright, we’re in the home stretch! Time to connect your turntable to your audio system. This is where we bring all the pieces together to make the magic happen.

First, identify your turntable’s output. There are two main types: phono and line. If it’s a phono output, you’ll need a phono preamp (either standalone or built into your receiver).

This is because the signal direct from a turntable is much weaker than other audio sources and needs amplification. If it’s a line output, you can plug it directly into any line input on your receiver or amplifier.

Use good quality cables – they really do make a difference. I learned this the hard way when I used some cheap cables and ended up with more hum than music!

Good cables don’t have to break the bank, but they should be well-shielded to prevent interference. Look for cables with solid connectors and good strain relief where the cable meets the plug.

When connecting the cables, make sure you match the channels correctly. Red is usually right, and white or black is usually left. Getting this wrong won’t damage anything, but your stereo image will be reversed.

Don’t forget the ground wire! There should be a ground terminal on your preamp or receiver. It usually looks like a small screw or post labeled ‘GND’.

Connect it there. This is crucial for reducing hum and noise in your system. I once forgot to connect the ground wire and spent hours troubleshooting a mysterious buzz, only to face-palm when I realized my silly mistake.

If you hear a hum when you turn everything on, try lifting the ground (disconnecting it). Sometimes, counterintuitively, this fixes the problem.

It’s due to something called a ground loop, which can occur when your system is grounded at multiple points. Audio can be quirky like that!

Once everything’s connected, double-check all your connections before powering on. Make sure everything’s snug and in the right place.

I once spent hours troubleshooting why I wasn’t getting any sound, only to realize I’d plugged the right channel into the left input. Don’t be like me – a little extra care now can save a lot of headache later!

Fine-tuning for Optimal Performance

A detailed scene of a person fine-tuning a turntable, adjusting the Vertical Tracking Angle (VTA) with a bubble level on the platter, checking azimuth alignment using a mirror, and positioning the cartridge with an alignment protractor. The setup includes a strobe disc for speed adjustments, surrounded by warm lighting and neatly stacked vinyl records.

We’re almost there, but these final adjustments can take your sound from good to great. This is where we really dial everything in for optimal performance.

First, check the Vertical Tracking Angle (VTA). Your tonearm should be parallel to the record when the stylus is in the groove. If it’s not, you may need to adjust the tonearm height.

This can usually be done at the base of the tonearm, but consult your manual for the specifics of your model. Getting the VTA right can dramatically improve the clarity and accuracy of your sound.

Next, set the azimuth. This ensures the cartridge is perfectly perpendicular to the record when viewed from the front. A mirror can help here – the reflection of the cartridge should line up perfectly with the cartridge itself.

Proper azimuth ensures that both channels of your stereo signal are picked up equally, giving you the best stereo imaging and frequency balance.

Finally, use an alignment protractor to perfectly position your cartridge. This step alone can dramatically improve your sound. The protractor will help you set the overhang and angle of your cartridge for the most accurate tracking across the entire record.

I once spent a whole afternoon perfecting my cartridge alignment – and the improvement in sound quality was like night and day! Suddenly, vocals were clearer, instruments were more distinct, and the whole soundstage opened up.

If your turntable has adjustable feet, now’s the time to make sure it’s perfectly level. Use a bubble level for this – even a slight tilt can affect the tracking of your stylus and the speed consistency of your platter.

Lastly, if your turntable has a speed adjustment, use a strobe disc to ensure it’s spinning at exactly the right speed. Even small speed discrepancies can change the pitch of your music.

Remember, these adjustments are about fine margins. Take your time, be patient, and trust your ears. The goal is to reach a point where you’re not just hearing your records, but experiencing them in all their analog glory.

Performing a Test Run

A cozy living room where a person is performing a test run of their turntable. A record is spinning, speakers are playing music, and the listener is sitting back, eyes closed, focusing on the sound. The scene features warm lighting, neatly arranged vinyl records, and a clean, organized audio system setup.

The moment of truth! All your careful setup is about to pay off. Choose a record you know well – preferably one that’s in good condition and has a wide dynamic range. A well-recorded classical or jazz album can be great for this.

Start it up and listen carefully. Pay attention to the overall balance of the sound. Is the stereo image centered? Close your eyes – can you “place” each instrument in space?

Are high frequencies clear without being harsh? Cymbals and strings are good indicators here. Is the bass full without being boomy? Listen for clear, articulate bass notes, not just a muddy rumble.

Pay attention to any distortion, especially in louder passages or toward the center of the record. If you hear any, you might need to check your tracking force or cartridge alignment.

Listen for any speed fluctuations. Does the pitch waver at all? If so, you might need to check your belt tension or platter bearing.

If something sounds off, don’t panic. Go back and double-check your setup. It might take a few tries to get everything dialed in perfectly.

Remember, every turntable is unique, and finding its sweet spot can take some patience. But trust me, when you hit that sweet spot, you’ll know it.

The music will have a presence and vitality that you might never have heard before, even from familiar records. It’s like rediscovering your entire music collection!

Try a variety of music during your test run. Different genres can reveal different aspects of your setup.

Classical music is great for checking soundstage and imaging, rock can test how well your system handles dynamic shifts, and electronic music can reveal any speed inconsistencies.

Don’t forget to test the entire surface of a record. Sometimes issues only show up on the inner or outer grooves. If you notice any significant changes in sound quality as the stylus moves across the record, you might need to revisit your cartridge alignment.

Maintenance and Care

A well-maintained turntable setup with a person gently brushing a vinyl record using a carbon fiber brush. A stylus brush is nearby, and a microfiber cloth rests on the turntable. Vinyl records are stored vertically on a shelf, while soft lighting emphasizes the organized and clean setup, ensuring long-term optimal performance.

Congratulations! Your turntable is set up and sounding great. But the work doesn’t stop here – proper maintenance is key to keeping it that way.

Think of your turntable as a precision instrument, like a fine watch. With regular care, it’ll keep performing beautifully for years to come.

Clean your records before and after each play with a carbon fiber brush. This simple step can dramatically extend the life of both your records and your stylus.

Dust and debris in the grooves don’t just affect sound quality – they can actually damage your stylus over time. A quick brush before each play only takes a few seconds and can save you a lot of trouble down the line.

For deeper cleaning, invest in a good record cleaning solution and soft cloths. There are many methods out there, from simple hand-cleaning to elaborate vacuum systems.

Find a method that works for you and make it a regular part of your vinyl ritual. Your ears (and your records) will thank you.

Keep your stylus clean too. A stylus brush is a good investment – just be gentle! I once pressed too hard and bent my stylus.

Not a mistake you want to make, believe me. A clean stylus not only sounds better but also reduces wear on your records.

There are also stylus cleaning solutions available, but be very careful with these. Always brush from back to front (the direction the record moves), never side to side.

And don’t forget about your turntable itself. A soft, dry cloth is usually all you need to keep it dust-free.

Pay special attention to the platter bearing and tonearm pivot – these can accumulate dust over time, affecting performance. Some people swear by fancy cleaning solutions, but in my experience, a simple microfiber cloth does the job just fine.

Check your belt (if you have a belt-drive turntable) every few months. Look for signs of stretching or wear, and replace it if necessary.

A worn belt can cause speed inconsistencies that can be subtle but very annoying once you notice them.

Every few months, go through the setup process again. Verify the tonearm balance, tracking force, and alignment.

Environmental changes can throw things off over time, and a quick check can prevent issues before they become noticeable.

Store your records properly too. Vertical is best, and avoid stacking them horizontally. I learned this the hard way when I found my prized first pressing of “Dark Side of the Moon” warped after leaving it stacked under a pile of other records. Heartbreaking!

Invest in good quality inner sleeves to protect against dust and static. And speaking of static, a carbon fiber brush or anti-static gun can be a game-changer, especially in dry climates.

Troubleshooting Common Setup Issues

A person troubleshooting their turntable, inspecting the ground wire and connections at the back of a belt-drive turntable. A lint-free cloth and isopropyl alcohol are nearby for cleaning, while the tonearm is raised to check the stylus alignment. Speakers are placed at a distance to avoid feedback, and the room is warmly lit, creating a focused and organized troubleshooting environment.

Even with the best setup, sometimes things go wrong. But don’t worry, I’ve probably encountered (and eventually fixed) every issue under the sun.

Let’s go through some common problems and their solutions. With a bit of troubleshooting, you’ll be back to sonic bliss in no time.

If you’re experiencing speed inconsistencies – where the pitch of the music wavers up and down – it could be a problem with your belt (if you have a belt-drive turntable) or the motor might need cleaning or lubrication.

Try cleaning the belt with a lint-free cloth slightly dampened with isopropyl alcohol. If that doesn’t help, you might need a replacement belt.

For direct-drive turntables, speed issues are often related to the motor or control circuits. These usually require professional servicing.

Hum and feedback are often grounding issues. Double-check your ground wire connection. Also, make sure your turntable is on a stable surface, away from vibrations.

Sometimes, hum can be caused by electrical interference. Try moving any nearby electronic devices, especially those with transformers, further away from your turntable.

If you’re getting distortion or skipping, check your tracking force and anti-skate settings. Also, make sure your stylus is clean and in good condition.

Skipping can also be caused by vibrations, so check your turntable’s isolation. Sometimes, simply moving your speakers further away from the turntable can solve this issue.

If you’re hearing a buzzing or motorboating sound, especially when you touch the tonearm, you might have a cartridge wiring issue. Check that all four wires from the headshell to the cartridge are securely connected.

For any noise that seems to get louder as you turn up the volume, start by checking all your cable connections. Loose or corroded connections can introduce all sorts of unwanted noise.

If you’re not getting any sound at all, work methodically through your system. Is the amp on and set to the correct input? Is the tonearm lowered onto the record?

If you have a switchable phono/line output on your turntable, make sure it’s set correctly for your setup.

Remember, troubleshooting is all part of the fun… or at least that’s what I tell myself when I’m on my hands and knees at 2 AM, trying to figure out why my favorite record sounds like it’s being played underwater!

Don’t be afraid to reach out to the vinyl community for help. Forums and local audio shops can be great resources when you’re stumped by a persistent issue.

Conclusion

Whew! We’ve covered a lot of ground, haven’t we? From unboxing your turntable to fine-tuning its performance, you’re now armed with everything you need to know about setting up a turntable.

We’ve journeyed through the critical steps: choosing the perfect location, carefully assembling the components, precisely balancing the tonearm, making the right connections, and fine-tuning for optimal performance.

Remember, the key to a great setup is patience and attention to detail. Don’t rush it – take your time, and you’ll be rewarded with fantastic sound quality that’ll make your vinyl collection shine.

Each step we’ve covered plays a crucial role in achieving that warm, rich analog sound that makes vinyl so special.

And here’s the best part – once you’ve got everything set up just right, you can sit back, drop the needle, and lose yourself in the warm, rich sound of your favorite records. There’s nothing quite like it!

The depth, the presence, the sheer musicality of a well-set-up turntable is something that digital audio, for all its convenience, struggles to match.

But remember, setting up a turntable isn’t a one-and-done deal. Regular maintenance and occasional adjustments will keep your system singing sweetly for years to come.

Don’t be afraid to revisit this guide as needed, whether you’re troubleshooting an issue or just giving your setup a periodic check-up.

So, what are you waiting for? Get out there and start setting up your turntable! Whether you’re rescuing a vintage deck from a thrift store or unboxing a brand new audiophile dream machine, the process is the same – and the rewards are immense.

And hey, if you’ve got any great setup tips of your own, why not share them in the comments? After all, the vinyl community is all about sharing the love of great music and great sound.

We’re all on this analog journey together, each of us chasing that perfect sound. Your experiences and insights could be just what another vinyl enthusiast needs to take their setup to the next level.

Happy listening, folks! May your records always spin true, your stylus track clean, and your music fill your home with joy. Here’s to the wonderful world of vinyl – enjoy every crackle, pop, and glorious note!

Understanding the Difference: Turntable vs. Record Player

Ah, the sweet, warm sound of vinyl! There’s nothing quite like it, right?

As I sit here, surrounded by stacks of records and the gentle hum of my audio setup, I can’t help but think about how confusing it can be for newcomers to the world of analog audio. One of the most common questions I get from friends just dipping their toes into this addictive hobby is, “What’s the difference between a turntable and a record player?” Well, buckle up, because we’re about to dive into the nitty-gritty of these vinyl-spinning marvels!

Turntable vs. Record Player: What’s the Difference?

A split-screen image comparing a modern turntable connected to external speakers with an all-in-one record player featuring built-in speakers. Both setups are displayed in a cozy vinyl listening room, with soft lighting and neatly stored vinyl records, highlighting the components and setup differences between a turntable and a record player.

Alright, let’s break it down in simple terms. A turntable is the core component that actually spins the record and holds the tonearm and cartridge.

It’s like the engine of your vinyl setup. On the other hand, a record player is an all-in-one system that includes a turntable plus built-in speakers and sometimes even an amplifier. Think of it as the whole car, not just the engine.

Now, I’ve made the mistake of using these terms interchangeably in the past, and let me tell you, it led to some pretty confusing conversations with my audiophile buddies! But don’t worry, we’re going to explore this topic more deeply below, so you’ll be a vinyl vocab pro in no time.

What is a Turntable?

A detailed close-up of a modern turntable setup, showcasing key components like the platter, tonearm, cartridge, and motor. The scene is set in a cozy, stylish listening room, with soft lighting emphasizing the precision of the turntable, surrounded by vinyl records and speakers on a wooden shelf. This image highlights the technical elegance that makes a turntable the heart of any serious vinyl system.

Let me tell you, when I first got into vinyl, I thought all turntables were created equal. Boy, was I wrong!

A turntable is the heart and soul of any serious vinyl setup. It’s the precision instrument that spins your records and extracts those sweet, sweet grooves.

Now, I remember the day I upgraded from my old hand-me-down record player to my first real turntable. It was like I was hearing my favorite albums for the first time all over again!

The clarity, the detail, the warmth – it was mind-blowing.

A typical turntable consists of a few key components:

  1. Platter: This is the circular platform where you place your record. It needs to spin at a consistent speed – 33 1/3, 45, or 78 RPM, depending on your record.
  2. Tonearm: This is the long, slender arm that holds the cartridge and needle. It’s responsible for tracking the grooves of your record accurately.
  3. Cartridge and Stylus: The cartridge houses the stylus (needle), which actually makes contact with the record grooves and converts the physical vibrations into electrical signals.
  4. Motor: This is what powers the platter’s rotation. There are two main types: belt drive and direct drive.

Each has its pros and cons, but that’s a whole other can of worms!

  1. Isolation System: This helps reduce vibrations from external sources that could interfere with sound quality. Trust me, you don’t want your tunes affected by every footstep in your house!

One of the biggest advantages of a standalone turntable is its upgradeability. You can swap out cartridges, upgrade the platter, or even change the tonearm to fine-tune your sound.

It’s like a never-ending quest for audio perfection – and let me tell you, it can get addictive!

But here’s the catch – a turntable by itself isn’t enough to actually play music. You’ll need to connect it to a phono preamp (sometimes built into amplifiers), an amplifier, and speakers.

It’s more complex, sure, but the payoff in sound quality can be huge.

I remember spending hours tweaking my first turntable setup, adjusting the tracking force, aligning the cartridge, and obsessing over every little detail. Was it overkill?

Maybe. But the first time I dropped the needle on a perfectly dialed-in system, I knew it was all worth it.

Turntables are the weapon of choice for serious audiophiles and vinyl enthusiasts. They offer superior sound quality, more precise playback, and the ability to upgrade and customize your setup over time.

However, they do require more knowledge and effort to set up and maintain properly.

If you’re the type who enjoys tinkering and wants the best possible sound from your vinyl collection, a turntable might be right up your alley. Just be warned – once you start down this path, you might find yourself constantly chasing that perfect sound!

What is a Record Player?

A cozy scene featuring a vintage-style record player with built-in speakers, set on a small wooden table surrounded by vinyl records. The record player has a suitcase design with a nostalgic feel, perfect for casual vinyl listening. Soft lighting enhances the warmth of the space, highlighting the simplicity and convenience of an all-in-one record player, ideal for newcomers to the vinyl experience.

Ah, record players – they’re like the Swiss Army knives of the vinyl world! When I first started getting into records, I actually began with an old record player that belonged to my grandparents.

It was bulky, had a slightly wonky speed, but man, did it have charm!

A record player, unlike a turntable, is an all-in-one solution for playing vinyl. It typically includes:

  1. A turntable mechanism (similar to what we discussed earlier)
  2. A built-in phono preamp
  3. An amplifier
  4. Speakers

Basically, it’s everything you need to start spinning records, all in one convenient package. Just plug it in, pop on a record, and you’re good to go!

Now, I’ll be honest – when I first got that hand-me-down record player, I thought I was hot stuff. I’d invite friends over, show off my growing vinyl collection, and act like I was some kind of audio connoisseur.

Little did I know, I had barely scratched the surface of what vinyl playback could offer!

But you know what? That old record player served its purpose perfectly.

It got me hooked on the warm, rich sound of vinyl and the tactile experience of physically handling my music.

The biggest advantage of a record player is its simplicity and convenience. There’s no need to worry about matching components or setting up a complex system.

It’s perfect for casual listeners or those just getting into vinyl.

I remember when my cousin wanted to start listening to some old jazz records she’d inherited. She was intimidated by all the talk of cartridges, preamps, and whatnot.

I pointed her towards a decent entry-level record player, and she was over the moon. Sometimes, simpler really is better!

Record players also tend to be more compact and portable than a full turntable setup. Some even come in cute suitcase designs – perfect for those impromptu vinyl listening parties!

(Just be careful with those – some can be pretty rough on your records if you’re not careful.)

However, there are some trade-offs with record players:

  1. Sound Quality: While they can sound good, especially at the higher end, they generally don’t match the audio quality of a well-set-up component turntable system.
  2. Upgradability: Most record players are closed systems. You can’t upgrade the cartridge or other components like you can with a turntable.
  3. Durability: The all-in-one nature means if one part breaks, the whole system might need replacing.
  4. Vibration Issues: Having the speakers in the same unit as the turntable can sometimes cause feedback or vibration problems.

Despite these limitations, record players have their place. They’re great for casual listening, for those who want a simple, hassle-free way to enjoy vinyl, or as a starting point for new collectors.

I still have a soft spot for that old record player that started my vinyl journey. Sure, it couldn’t hold a candle to my current setup in terms of sound quality, but the memories of discovering new music on that thing?

Absolutely priceless.

Comparing Turntables and Record Players

 A side-by-side comparison of a modern turntable setup with separate speakers and a vintage suitcase-style record player with built-in speakers. Both are placed in a cozy vinyl listening room, surrounded by vinyl records, emphasizing the key differences in sound quality, customization, and size between the two devices.

Alright, let’s get down to brass tacks and compare these vinyl-spinning contenders! Having used both extensively (and made plenty of rookie mistakes along the way), I can give you the real scoop on how turntables and record players stack up.

In my experience, this is where turntables really shine when it comes to sound quality. A well-set-up turntable connected to quality components can deliver audio that’ll make your jaw drop.

I remember the first time I heard a high-end turntable at an audio show – it was like hearing my favorite albums for the first time all over again!

Record players, on the other hand, can sound good, but they’re often limited by their built-in components. Don’t get me wrong, some high-end all-in-one systems can sound fantastic, but generally, they can’t match the clarity and detail of a dedicated turntable setup.

If you’re anything like me and love to tinker, turntables are your playground when it comes to customization. You can swap cartridges, upgrade platters, experiment with different phono preamps – the sky’s the limit!

I once spent an entire weekend trying different cartridge and preamp combinations, much to my partner’s amusement (or was it exasperation?).

Record players are more of a “what you see is what you get” situation. While some might allow for cartridge upgrades, most are closed systems without much room for customization.

Here’s where record players take the lead in terms of ease of use. They’re plug-and-play – just set it up, pop on a record, and you’re good to go.

Perfect for those days when you just want to listen to music without fussing with settings.

Turntables require more setup and additional components. I remember spending hours trying to perfectly align my first cartridge – talk about a test of patience!

Record players win on compactness when it comes to space requirements. Everything’s in one unit, which is great for small spaces or if you want to move your setup around.

A full turntable system with separate amp and speakers will take up more room. But hey, it gives you an excuse to show off your gear, right?

You can find both turntables and record players at various price points. Entry-level record players are often cheaper to get started with since you don’t need to buy separate components.

However, turntables offer more flexibility in budgeting. You can start with a basic setup and upgrade components over time.

I started with a modest turntable and slowly built up my system as my budget (and obsession) grew.

Quality turntables can last for decades with proper care when it comes to longevity. I’ve seen vintage turntables from the 70s that still sound amazing!

Record players, especially at the lower end, might not have the same lifespan. If one component fails, you might need to replace the entire unit.

Turntables, especially high-end ones, are designed to minimize vibrations for cleaner playback when it comes to vibration handling. Some even have elaborate suspension systems.

Record players can be more prone to vibration issues since the speakers are in the same unit as the turntable. I learned this the hard way when I cranked up the volume on my first all-in-one player and got a nasty feedback loop!

In the end, the choice between a turntable and a record player comes down to your priorities. Do you want the best possible sound quality and don’t mind a bit of complexity?

Go for a turntable. Want something simple and convenient to get started with vinyl?

A record player might be your best bet.

Just remember, whichever you choose, the most important thing is enjoying the music. After all, that’s what this vinyl journey is all about!

Which One Should You Choose?

A cozy living room featuring two turntable setups with vinyl records spinning, vintage stereo equipment, large speakers, and a soft couch in the background, illuminated by warm lighting. A guitar rests against the wall, and a collection of vinyl records is displayed on shelves

Alright, decision time! After years of experimenting with both turntables and record players (and yes, making plenty of questionable purchases along the way), I’ve got some insights to help you choose the right option for your vinyl journey.

First things first, ask yourself: what kind of listener are you?

If you’re just dipping your toes into the vinyl world, or if you prefer a no-fuss listening experience, a record player might be your best bet. I remember when my sister wanted to start listening to vinyl – she’s not much of a tech person, so I recommended a decent all-in-one record player.

She loves it! It’s simple, compact, and lets her enjoy her small but growing record collection without any hassle.

On the other hand, if you find yourself obsessing over sound quality and dreaming about upgrading your audio gear, a turntable is probably calling your name. That was me about a decade ago – I started with a basic turntable, and before I knew it, I was down the rabbit hole of cartridge alignments and phono preamp comparisons!

For those living in a small apartment or dorm room, a record player’s compact, all-in-one design might be a lifesaver. I used a record player during my college years, and it was perfect for my tiny dorm room.

But if you’re a vintage enthusiast who loves the idea of hunting for and restoring classic audio gear, go for a turntable. There’s something special about bringing a decades-old turntable back to life.

Just be prepared for some frustration along the way – I once spent weeks trying to fix a ground hum on a vintage table!

If you think you might want to improve your system over time, start with a turntable. You can upgrade components piece by piece as your budget allows.

Trust me, it’s a slippery slope – you start with a cartridge upgrade, and before you know it, you’re considering a second mortgage for that limited edition audiophile pressing! However, if the idea of setting up and maintaining a complex system sounds like a chore rather than a joy, stick with a record player.

Sometimes you just want to listen to music without worrying about tracking force and anti-skate settings.

Now, let’s talk budget. If you’re on a tight budget, you can find decent record players for under $100, while good entry-level turntables usually start around $200-$300 (not including additional necessary components).

With a mid-range budget, you’ve got options with both. Quality record players can be found in the $300-$500 range, while that same budget can get you a nice turntable (though you’ll need to factor in costs for a preamp, amp, and speakers).

If money is no object, high-end options exist for both, but turntables have a much higher ceiling in terms of quality and price. Be warned – this hobby can get expensive fast!

My personal recommendation? If you’re serious about getting into vinyl and think this might become more than a passing interest, start with a decent entry-level turntable.

Yes, it’s a bit more work upfront, but it gives you room to grow and upgrade. I started this way, and while there were definitely some frustrating moments (like the time I accidentally dropped my cartridge and had a minor meltdown), the journey has been incredibly rewarding.

But here’s the most important thing: don’t let perfectionism or gear obsession get in the way of enjoying the music. Whether you’re spinning records on a high-end turntable or a budget-friendly record player, what matters most is the joy of dropping the needle and immersing yourself in the warm, rich sound of vinyl.

After all, isn’t that why we fell in love with records in the first place?

Maintaining Your Vinyl Listening Equipment

A detailed scene of a person cleaning a turntable with a soft brush, surrounded by tools such as a tracking force gauge, alignment protractor, stylus cleaning brush, and small bottles of cleaning solution on a wooden table.

Whether you’ve chosen a turntable or a record player, proper maintenance is key to ensuring your vinyl listening experience remains top-notch. Trust me, I’ve learned this lesson the hard way – nothing’s worse than discovering your favorite record sounds like it’s being played underwater because you neglected your equipment!

Let’s start with turntables. These precision instruments require a bit more TLC, but it’s worth it for the superior sound quality.

First and foremost, keep your turntable clean and dust-free. I make it a habit to gently dust my turntable with a soft, anti-static brush before each listening session.

It only takes a few seconds, but it makes a world of difference.

One of the most critical aspects of turntable maintenance is cartridge alignment and tracking force. I remember the first time I tried to align my cartridge – it felt like I was performing microsurgery!

But once I got the hang of it, I realized how much it improved my sound quality. Invest in a good alignment protractor and a digital tracking force gauge.

Trust me, your records (and ears) will thank you.

Don’t forget about your stylus (needle)! A dirty or worn stylus can not only sound terrible but can actually damage your records.

I learned this the hard way when I noticed some of my favorite albums starting to sound distorted. Turns out, my stylus was well past its prime.

Now, I clean my stylus with a specialized brush after every few plays and replace it according to the manufacturer’s recommendations.

For belt-drive turntables, check your belt periodically. If it’s looking stretched out or worn, it’s time for a replacement.

I once ignored a slipping belt, thinking it wasn’t a big deal. Let’s just say Radiohead’s “OK Computer” sounded more like “Not OK Computer” until I fixed it!

Now, onto record players. While they’re generally lower maintenance than turntables, they still need some care.

Keep the exterior clean and dust-free, just like with a turntable. Pay special attention to the tonearm and cartridge area – dust buildup here can affect your sound quality.

Many record players have ceramic cartridges, which are more durable than the moving magnet or moving coil cartridges found in most turntables. However, they can still wear out over time.

Conclusion

Whew! We’ve come a long way on this vinyl journey, haven’t we? From breaking down the differences between turntables and record players to diving into maintenance tips, we’ve covered a lot of ground.

But you know what? This is just the beginning of your adventure in the world of vinyl.

As we wrap up, let’s recap the key differences between turntables and record players. Turntables offer superior sound quality and customization options but require more setup and additional components.

Record players, on the other hand, provide an all-in-one solution that’s perfect for beginners or those who prefer simplicity.

But here’s the thing – there’s no universally “right” choice. The best option for you depends on your personal preferences, budget, and how deep you want to dive into the vinyl hobby.

Whether you choose a high-end turntable or a budget-friendly record player, what matters most is that you’re enjoying the music.

I remember when I first started out, I was so caught up in trying to have the “perfect” setup that I almost forgot why I got into vinyl in the first place – the music! Don’t make the same mistake I did.

Choose the option that fits your lifestyle and brings you joy.

If you go the turntable route, embrace the learning curve. There’s something incredibly satisfying about fine-tuning your system and hearing the improvements in sound quality.

And if you opt for a record player, revel in the simplicity and convenience. There’s a certain charm in being able to start listening to your favorite album with just the flip of a switch.

Remember, vinyl is more than just a way to listen to music – it’s an experience. It’s the ritual of carefully removing a record from its sleeve, gently placing it on the platter, and watching the stylus make contact with those grooves.

It’s about rediscovering albums you thought you knew by heart and hearing details you never noticed before.

So, whether you’re team turntable or team record player, the most important thing is to enjoy the journey. Explore new music, revisit old favorites, and don’t be afraid to make a few mistakes along the way – that’s all part of the fun!

And hey, why not share your experiences? Join online forums, visit local record stores, or invite friends over for listening sessions.

The vinyl community is full of passionate, knowledgeable people who are always happy to share tips and recommendations.

As for me, my vinyl journey is far from over. There’s always a new album to discover, a new piece of gear to try, or a new technique to perfect.

And you know what? I wouldn’t have it any other way.

So, what are you waiting for? Whether you’re setting up your first turntable or dusting off that old record player, it’s time to drop the needle and let the music play.

Happy listening, and welcome to the wonderful world of vinyl!