Bass Traps vs Acoustic Foam: Why You Usually Need Both
Bass traps vs acoustic foam sounds like a choice between two competing products, but picking one over the other leaves half your room’s problems completely untreated.
If your mixes still sound muddy even after covering walls in foam, it’s because foam physically cannot absorb the low frequencies causing that muddiness — you’ve been treating the wrong part of the spectrum.
Getting the right absorber into the right part of your room finally stops that bass buildup and clears the reflections, so your mixes translate correctly on every system.
Start with the quick takeaway below, then we’ll break down exactly why these two products handle completely different frequency ranges and where each one belongs.
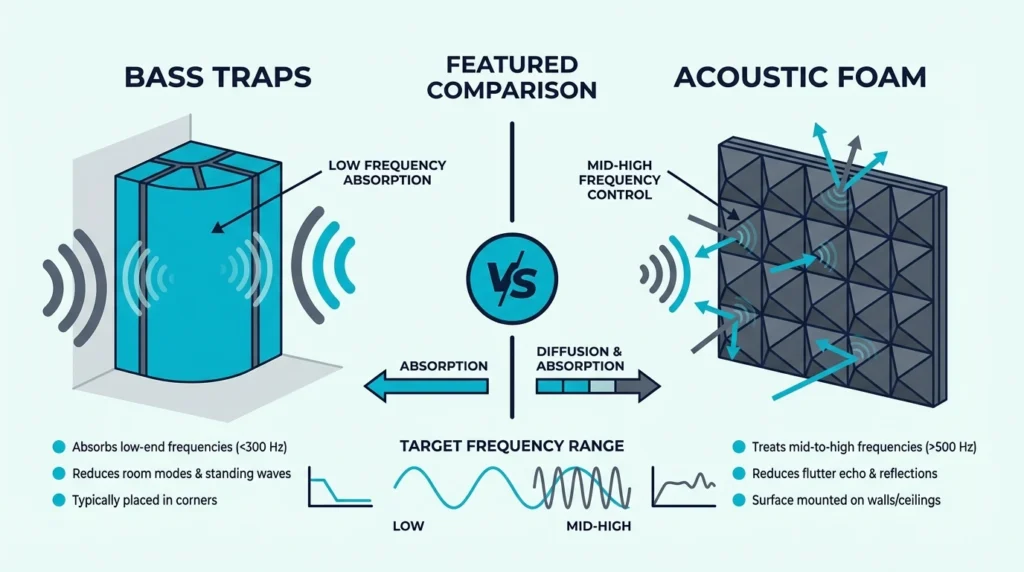
The Short Answer: Bass traps and acoustic foam aren’t competing products — they handle completely different frequency ranges. Bass traps go in corners for frequencies below 300Hz. Foam goes on walls for frequencies above 500Hz. For complete treatment, you need both. If budget forces a choice, start with bass traps — low-frequency problems cause more recording issues than high-frequency reflections.
Bass Traps vs Foam: The Quick Answer
The confusion between bass traps and acoustic foam comes from marketing that lumps all “acoustic treatment” together. In reality, these products work on opposite ends of the frequency spectrum. Here is how that spectrum is divided.
Different Products for Different Frequencies
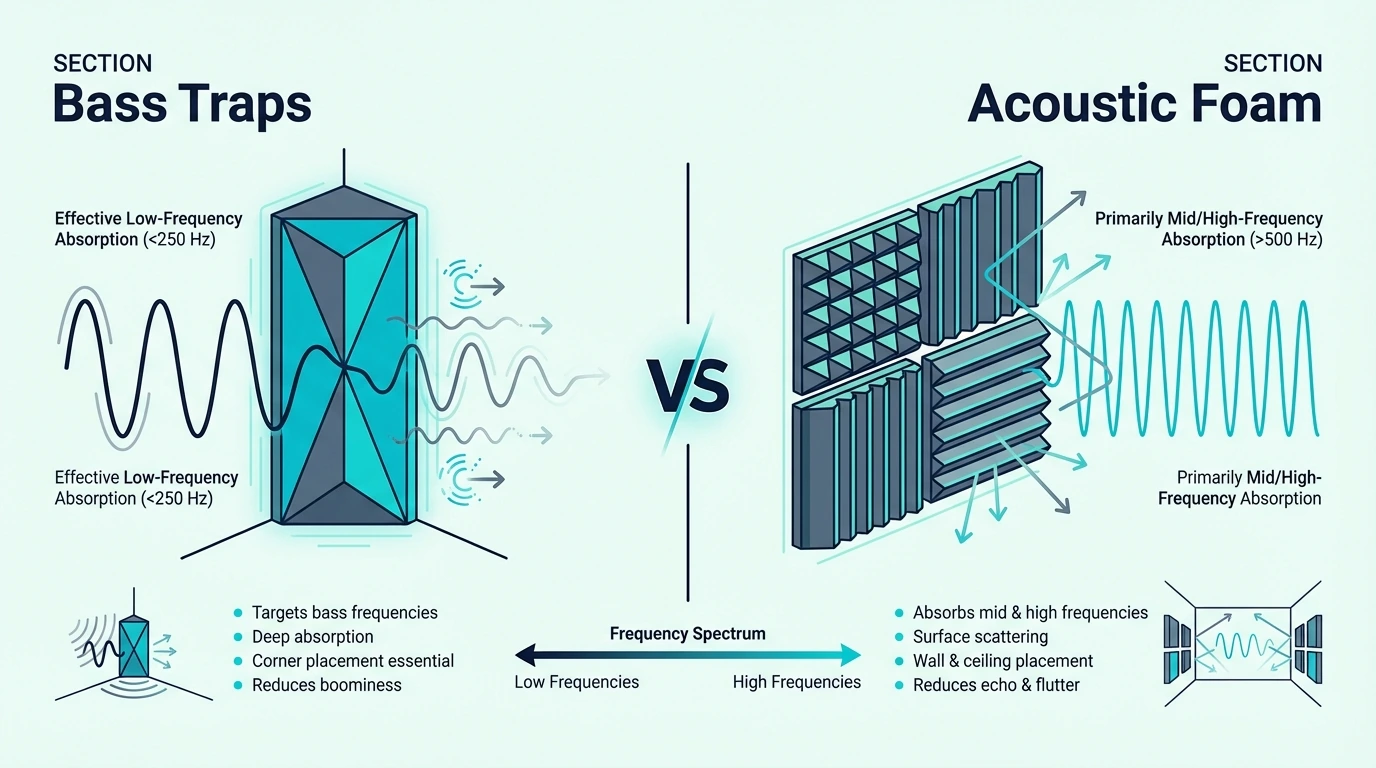
Sound frequencies behave differently based on their wavelength. Low frequencies (bass) have wavelengths measured in feet — a 100Hz wave is about 11 feet long.
High frequencies have wavelengths measured in inches.
This wavelength difference determines what absorbs each frequency. Thin materials like foam can absorb short wavelengths (high frequencies).
Long wavelengths (low frequencies) pass right through thin materials without losing energy. That means you need something built specifically to stop them.
Bass Traps: Low Frequencies in Corners
Bass traps are thick, dense absorbers designed for frequencies below 300Hz. They’re typically 4-12 inches thick and made from rigid fiberglass or mineral wool.
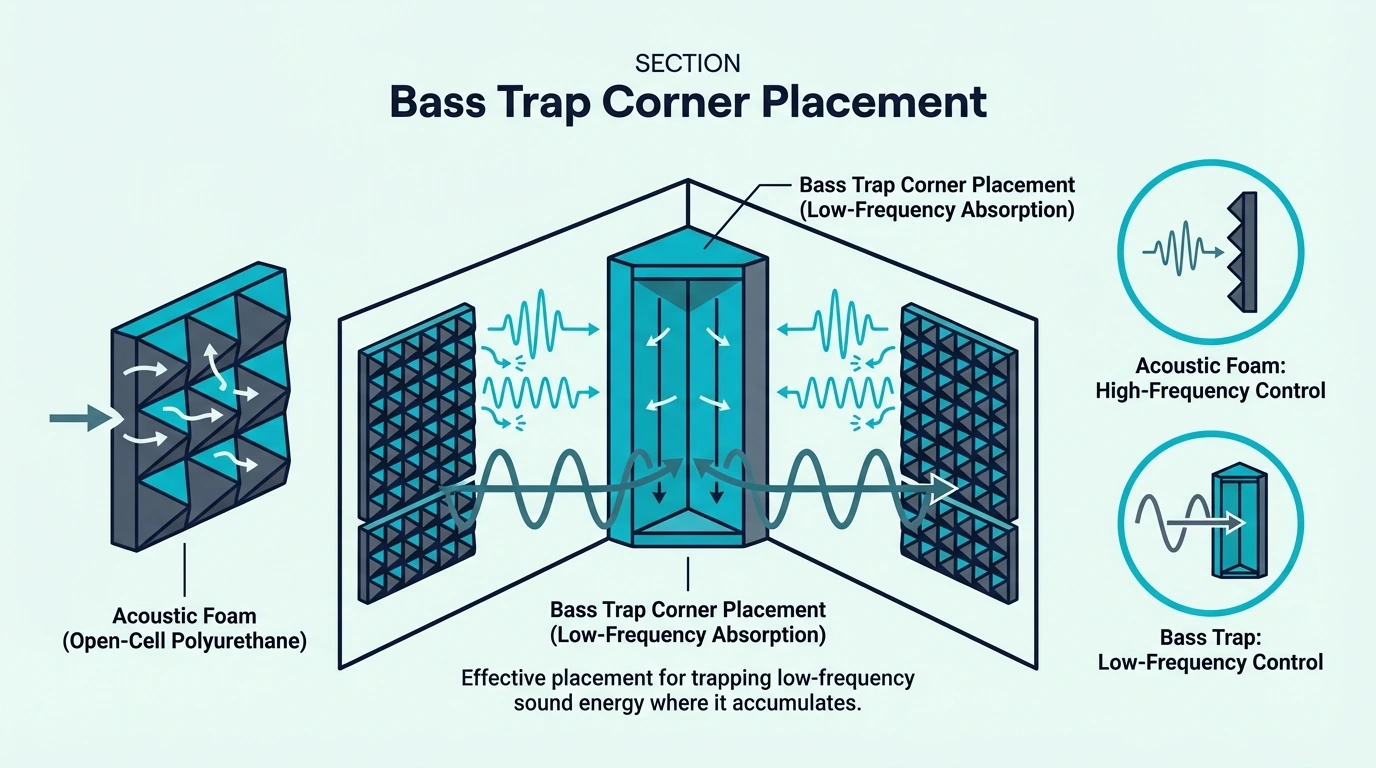
Corners are where bass traps belong because low frequencies accumulate there.
Understanding proper placement is essential. Sound waves bounce between walls and pile up in corners, creating “bass buildup” that muddies recordings and makes mixing impossible. Once those lows are controlled, you can handle the rest of the spectrum.
Acoustic Foam: Mid/High Frequencies on Walls
Acoustic foam handles frequencies above 500Hz — the range where voice clarity, cymbal shimmer, and guitar presence live.
Standard 1-2 inch foam absorbs these shorter wavelengths effectively. Learn more about acoustic foam thickness and how it affects absorption.
Foam belongs on walls at first reflection points, not in corners. Placing foam in corners wastes material on a job it can’t do.
What Are Bass Traps?
If you’ve ever wondered why your mixes sound great in your studio but muddy everywhere else, bass traps are probably the missing piece. They’re specialized absorbers built to handle the low frequencies that standard foam literally cannot touch.
The Problem Bass Traps Solve
Here’s what’s happening in your room right now: low frequencies are bouncing between your walls like a ping-pong ball in slow motion.
A 60Hz bass note has a wavelength of nearly 19 feet. In a 12-foot room, that wave doesn’t fit — it bounces back and forth, reinforcing itself in some spots and canceling in others. Stand in one corner and the bass sounds boomy. Move two feet and it nearly disappears.
These “standing waves” make accurate mixing impossible. You think you’ve got the bass right, but you’re actually hearing your room’s distortion, not your mix. Bass traps break this cycle by absorbing that energy before it can bounce. But they have to be built correctly to do it.
The Physics: Why Thickness Matters
Bass traps work through friction — sound waves pass through dense material and lose energy. But here’s the catch: the absorber needs to be a significant fraction of the wavelength to work.
That 60Hz wave at 19 feet long? A 2-inch panel is laughably thin by comparison. It’s like trying to stop a truck with a speed bump.
This is why real bass traps are thick. A 4-inch trap reaches down to around 250Hz. Professional 12-inch traps can absorb below 80Hz — the frequencies that actually cause problems.
The 8 Pack Corner Bass Traps provides an affordable starting point, though serious bass control requires thicker fiberglass or mineral wool traps. Once you have the right thickness, you have to put them in the right spot.
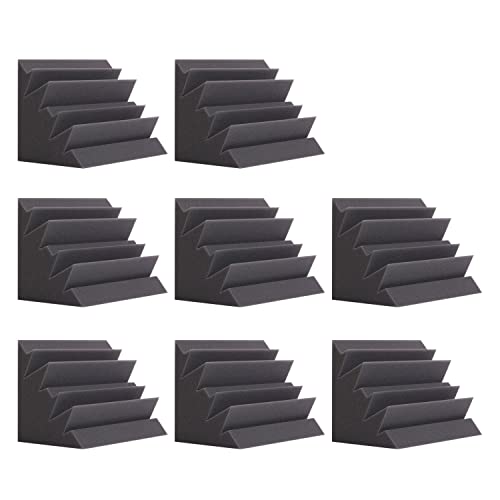
8 Pack Corner Bass Traps
Why Corners? The Pressure Zone Effect
Bass doesn’t accumulate randomly — it piles up where surfaces meet. Physics calls these “pressure zones,” and corners are the worst offenders.
Tri-corners (where two walls meet the ceiling) collect the most bass energy. Wall-wall vertical corners are second. Floor-wall junctions matter too, though they’re harder to treat without blocking floor space.
This is actually good news: you don’t need to treat your entire room. Target the corners with floor-to-ceiling traps and you’ve addressed the biggest bass problems with minimal material.
Get Studio Tips Weekly
Join 5,000+ creators getting acoustic treatment advice every week.
No spam. Unsubscribe anytime.What Is Acoustic Foam?

Now let’s talk about the product you probably came here asking about — those pyramid or wedge-shaped panels you see in every YouTube studio and Twitch stream. Acoustic foam handles a completely different job than bass traps, and understanding the distinction saves you from expensive mistakes.
The Problem Foam Actually Solves
Record a voice in an untreated room and you’ll hear it: that hollow, echoey quality that screams “amateur.” That’s not bass — it’s mid and high-frequency reflections bouncing off your walls and arriving at your microphone milliseconds after your direct voice.
Your brain interprets these delayed reflections as “room sound.” In a cathedral, that’s beautiful reverb. In your bedroom, it’s mud that obscures detail and makes editing a nightmare.
Foam absorbs these reflections before they reach your mic. The result is cleaner, more direct sound that’s easier to process and more professional to listeners. This targeted absorption is a feature, not a bug.
Why Foam Works for Highs But Not Lows
Remember that wavelength discussion from the bass traps section? It works in reverse here.
A 4kHz frequency (the “presence” range that makes voices cut through) has a wavelength of about 3 inches. A 2-inch foam panel is a significant obstacle for that wave — plenty of material to create friction and absorb energy.
This is why foam excels at the 500Hz-8kHz range where speech intelligibility and musical detail live. The wavelengths are short enough that thin material actually works. It’s also why acoustic foam is worth it for voice recording specifically.
The TroyStudio 36 Pack 2-Inch Panels offers the thickness needed for effective mid-frequency absorption — thick enough to reach down to 500Hz where voice warmth lives. To get the most out of them, placement is everything.
TroyStudio 36 Pack 2-Inch Panels
Placement: The Mirror Trick
Unlike bass traps (which go in corners because that’s where bass accumulates), foam placement requires a bit more thought. You’re targeting “first reflection points” — the spots where sound bounces directly from source to listener.
Here’s the trick professionals use: sit in your recording or listening position and have someone slide a mirror along each wall. Where you see your speakers (or microphone) reflected, that’s a first reflection point. Mark it. Put foam there.
Side walls at ear level, the wall behind your monitors, and the ceiling above your position are typical foam locations. Our acoustic foam placement guide covers this technique in detail.
Bass Traps vs Foam: Side-by-Side Comparison
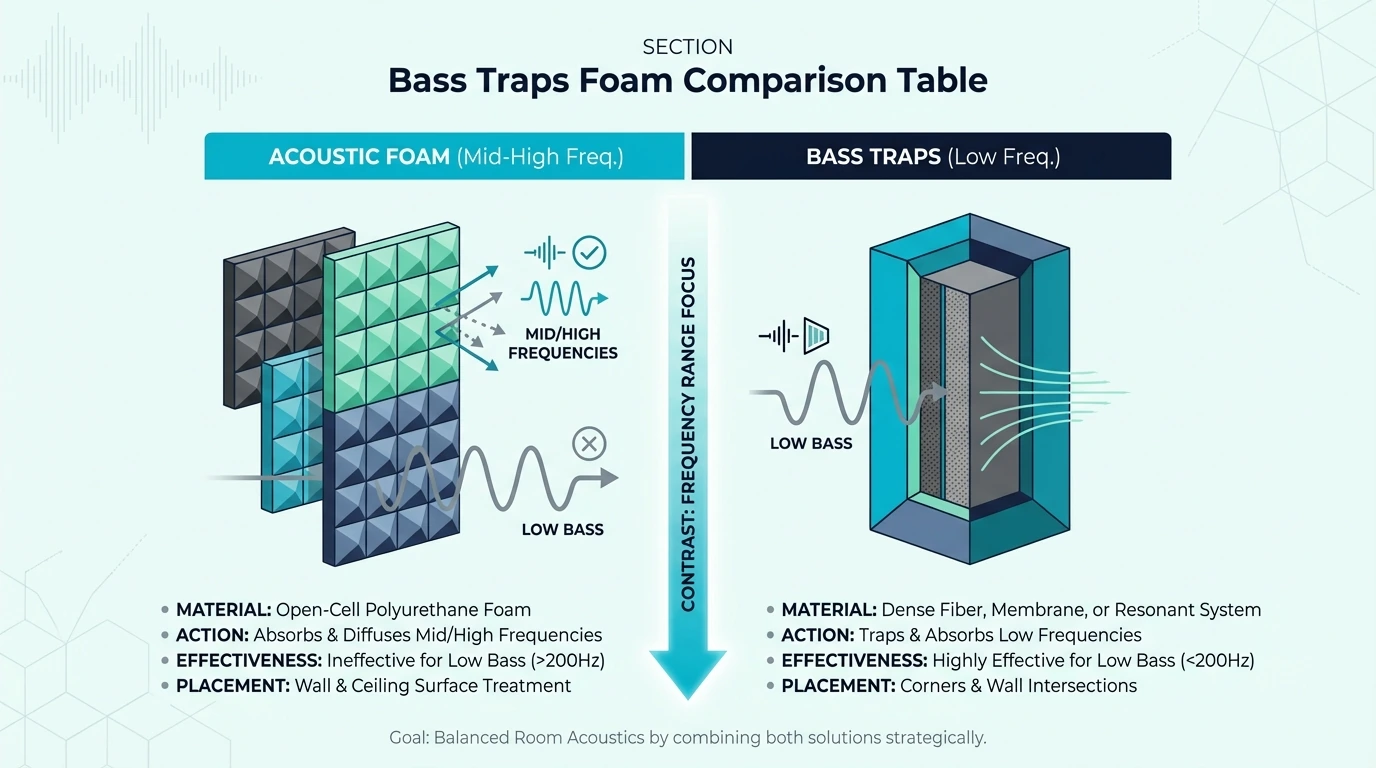
| Feature | Bass Traps | Acoustic Foam |
|---|---|---|
| Frequency Range | Below 300Hz | Above 500Hz |
| Typical Thickness | 4-12 inches | 1-2 inches |
| Placement | Corners | Walls |
| Material | Fiberglass, mineral wool, dense foam | Open-cell polyurethane |
| Cost per Unit | Higher | Lower |
| Coverage Needed | 4-8 corners | 20-40% of wall space |
| Primary Benefit | Tightens bass, reduces muddiness | Reduces echo, improves clarity |
The comparison makes clear why you can’t substitute one for the other. A room full of foam still has bass problems.
A room with only bass traps still has flutter echo.
Do You Need Both?
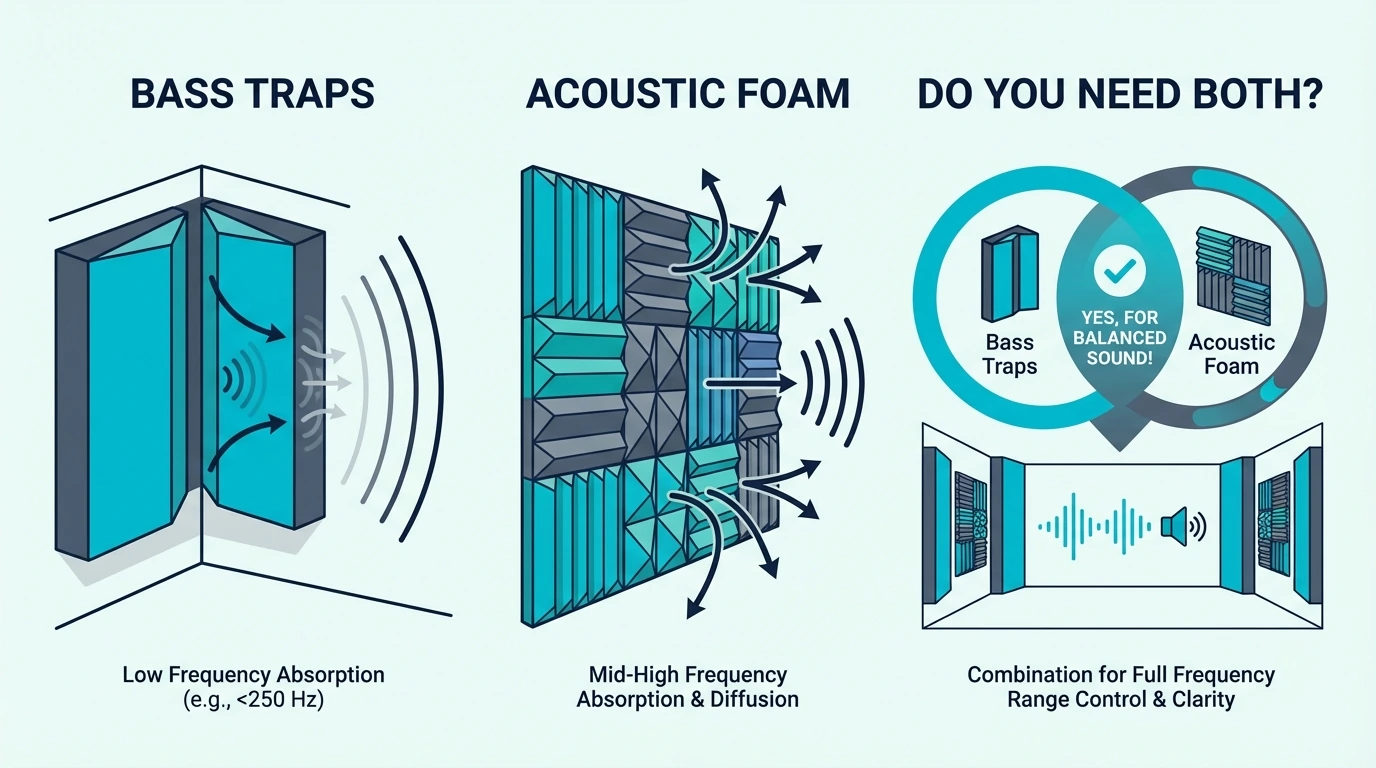
The short answer: yes, if you want complete acoustic treatment. But budget constraints are real, so let’s prioritize.
Yes — Complete Treatment Requires Both
Professional studios treat both frequency ranges because problems in either range compromise recordings and mixes.
Untreated bass creates a muddy low end where kick drums and bass guitars blur together. Untreated reflections create harsh, echoey vocals and guitars.
Treating only one range improves that range while leaving the other problematic. Half-measures produce half-results. If you can’t buy everything at once, you have to prioritize.
Which to Buy First: Bass Traps
If budget forces a choice, start with bass traps. Low-frequency problems cause more severe issues than high-frequency reflections.
Bass buildup affects your entire mix. If you can’t hear bass accurately, you’ll make bad mixing decisions that translate poorly to other playback systems.
High-frequency reflections are annoying but less destructive. You can partially compensate with microphone positioning and post-processing. Here is the most efficient way to spend your budget.
Budget Priority Order
Here’s the optimal order for building acoustic treatment on a budget:
Step 1: Corner bass traps (4 minimum, 8 ideal). The 8 Pack Corner Bass Traps covers all four vertical corners.
Step 2: First reflection point foam (12-24 panels). The JBER 6 Pack 2-Inch Panels provides a starting point.
JBER 6 Pack 2-Inch Panels
Step 3: Additional wall coverage (24-48 panels). The 50 Pack 2-Inch Foam Panels handles comprehensive wall treatment.
50 Pack 2-Inch Foam Panels
Step 4: Ceiling treatment and additional bass traps as budget allows.
Do Foam Bass Traps Work?
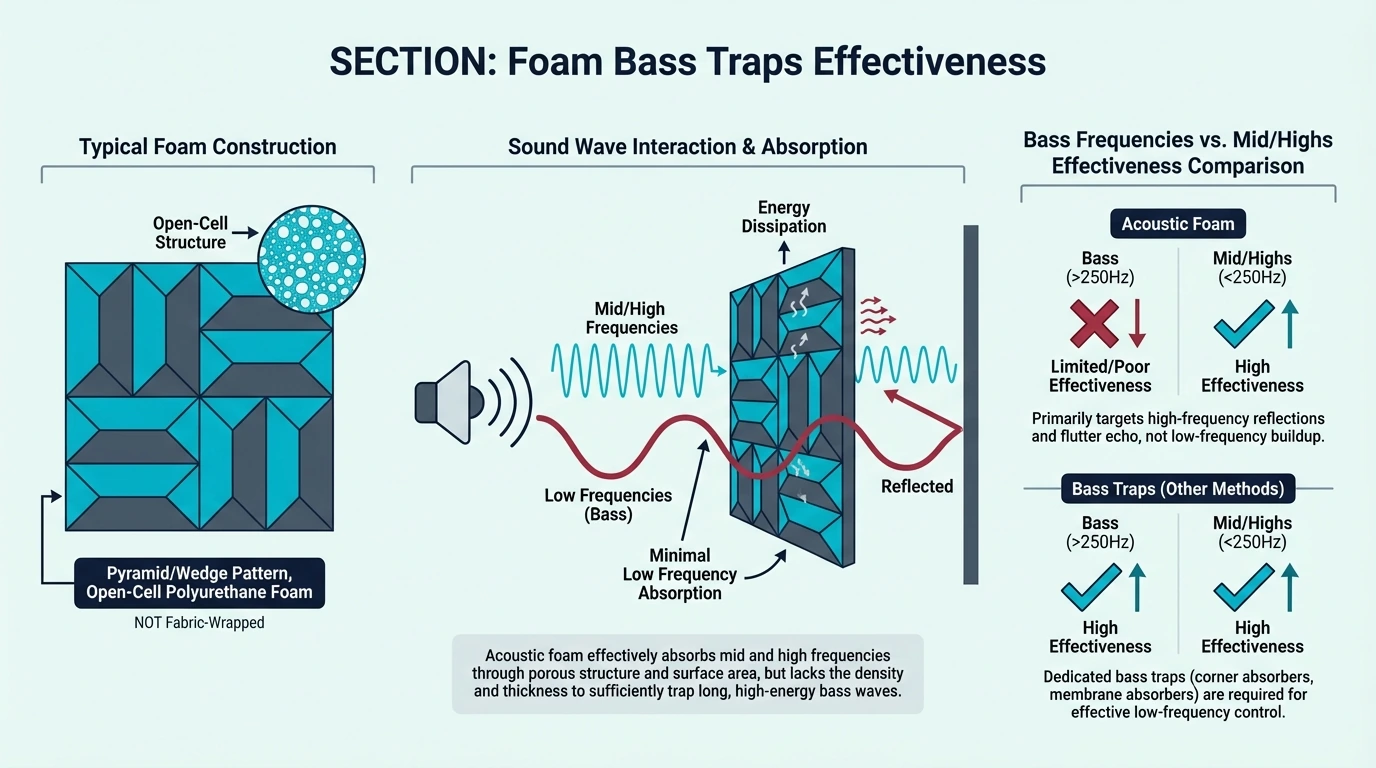
This question comes up constantly because many products marketed as “bass traps” are actually just foam corner pieces. Let’s clarify what works and what doesn’t.
Foam Corner Pieces: Limited Effectiveness
Triangular foam pieces designed for corners provide some benefit, but they’re not true bass traps. Their thin profile (typically 2-4 inches) can’t absorb frequencies below 250-300Hz effectively.
These products reduce upper-bass and low-mid buildup in corners. That’s useful, but it’s not the same as controlling the 60-150Hz range where serious bass problems live. For that, you need heavier materials.
Real Bass Traps: Thick Fiberglass or Mineral Wool
Effective bass traps use dense, rigid materials at least 4 inches thick. Professional options use 6-12 inches of fiberglass or mineral wool.
The physics are non-negotiable. Low frequencies require thick absorbers.
No marketing claim changes the relationship between wavelength and absorption depth. Here is what you should actually look for.
What Actually Works for Low Frequencies
For true low-frequency control, you need:
Thickness: Minimum 4 inches, ideally 6-12 inches for frequencies below 100Hz.
Density: Rigid fiberglass (3-6 lbs/ft³) or mineral wool outperforms foam.
Placement: Floor-to-ceiling corner mounting maximizes effectiveness.
Quantity: More is better for bass. Unlike foam, you can’t really over-treat corners.
Budget foam corner pieces like the 8 Pack Corner Bass Traps provide entry-level corner treatment. For serious bass control, consider DIY fiberglass traps or professional options.
Placement Guide: Using Both Together
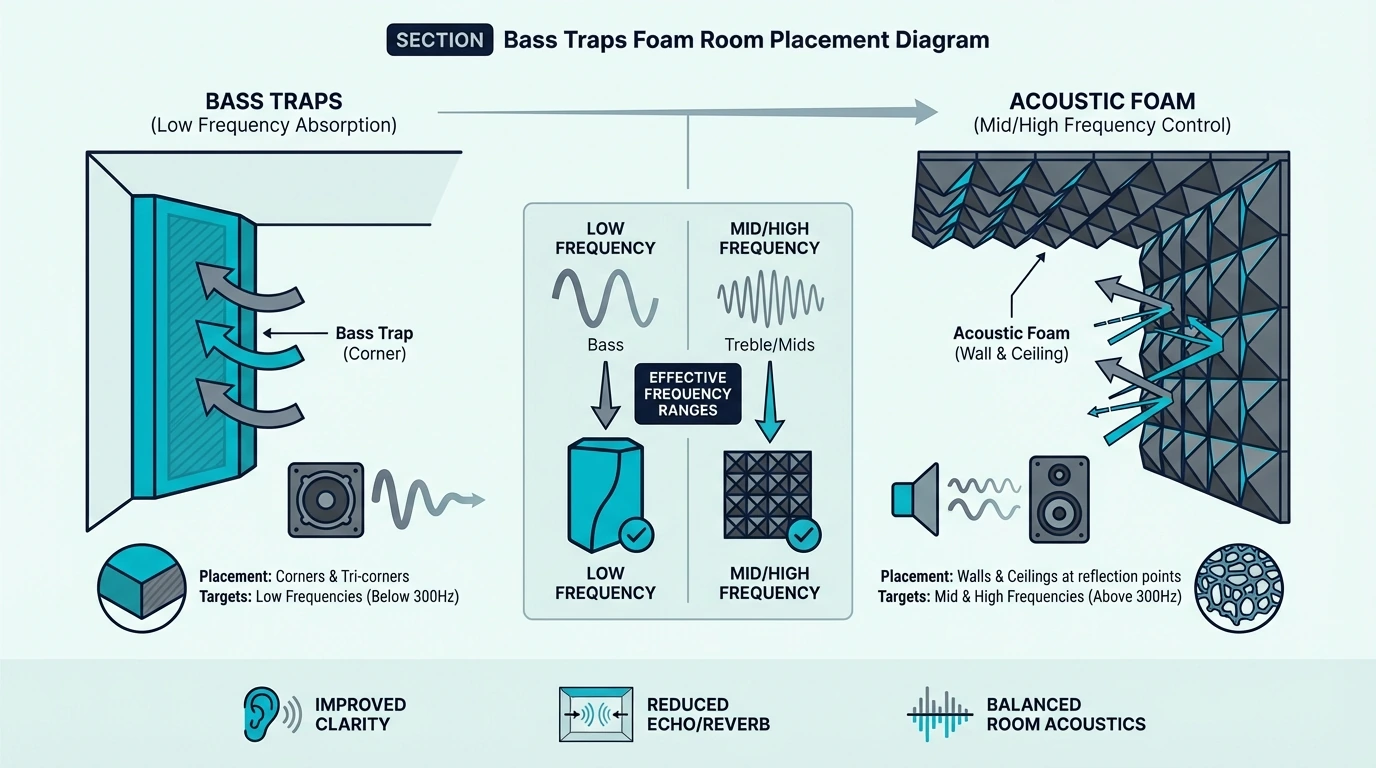
Now that you understand what each product does, let’s talk about how they work together in a real room. Think of this as a recipe — bass traps and foam are different ingredients that combine to create a balanced acoustic environment.
Start With Corners: Your Bass Trap Foundation
Before you stick a single foam panel on your wall, address your corners. This feels counterintuitive because foam is more visible and satisfying to install, but bass problems undermine everything else you do.
Vertical corners first. All four wall-wall corners from floor to ceiling. These collect the most bass energy and provide the biggest improvement per trap. If you can only afford four bass traps, put them here.
Tri-corners second. Where walls meet the ceiling — those eight corner points where three surfaces intersect. These are bass accumulation hotspots that vertical traps alone don’t fully address.
Wall-ceiling junctions third. The horizontal lines where walls meet the ceiling, between the tri-corners. These matter more in rooms with low ceilings where bass has less vertical space to dissipate.
Behind your listening position fourth. If your chair sits within a few feet of the rear wall, bass traps behind you prevent that wall’s bass buildup from coloring what you hear. Once the low end is under control, you can move to the higher frequencies.
Then Add Foam: Targeting Reflections
With corners treated, now you can address the mid/high frequency reflections that foam handles. The key word here is “targeted” — random foam placement wastes material.
First reflection points are priority one. Use the mirror trick: side walls at ear level where you see your speakers or mic reflected. These create the strongest high-frequency reflections that smear your sound. Our acoustic foam placement guide walks through this technique step by step.
The wall behind your monitors is priority two. Sound from your speakers hits this wall first and bounces straight back at you. Foam here tightens your stereo image and reduces that “wall of sound” blur.
Ceiling above your position is priority three. Ceiling reflections get overlooked because we don’t naturally look up, but they contribute significantly to room echo. A cloud of foam panels directly above your listening/recording spot makes a noticeable difference.
Rear wall is priority four. If you sit far from the rear wall (6+ feet), foam there reduces late reflections that smear transients and muddy detail. If you sit close to the rear wall, bass traps matter more than foam there. When you combine both treatments correctly, the difference is immediate.
The Balanced Room: What to Aim For
Here’s what a well-treated home studio typically looks like:
- 8 corner bass traps (all vertical corners, floor to ceiling)
- 24-36 foam panels (first reflection points + ceiling cloud + partial rear wall)
- 40-50% of total wall surface treated
- Some surfaces intentionally left bare
That last point matters. Over-treatment creates an unnaturally dead sound — your voice loses warmth when all reflections disappear. Leave some wall space reflective, especially surfaces far from your primary position. You want controlled acoustics, not an anechoic chamber.
The goal is balance: tight bass from corner treatment, clear mids/highs from wall foam, and enough natural ambience to sound like a real room rather than a padded cell.
Common Mistakes to Avoid
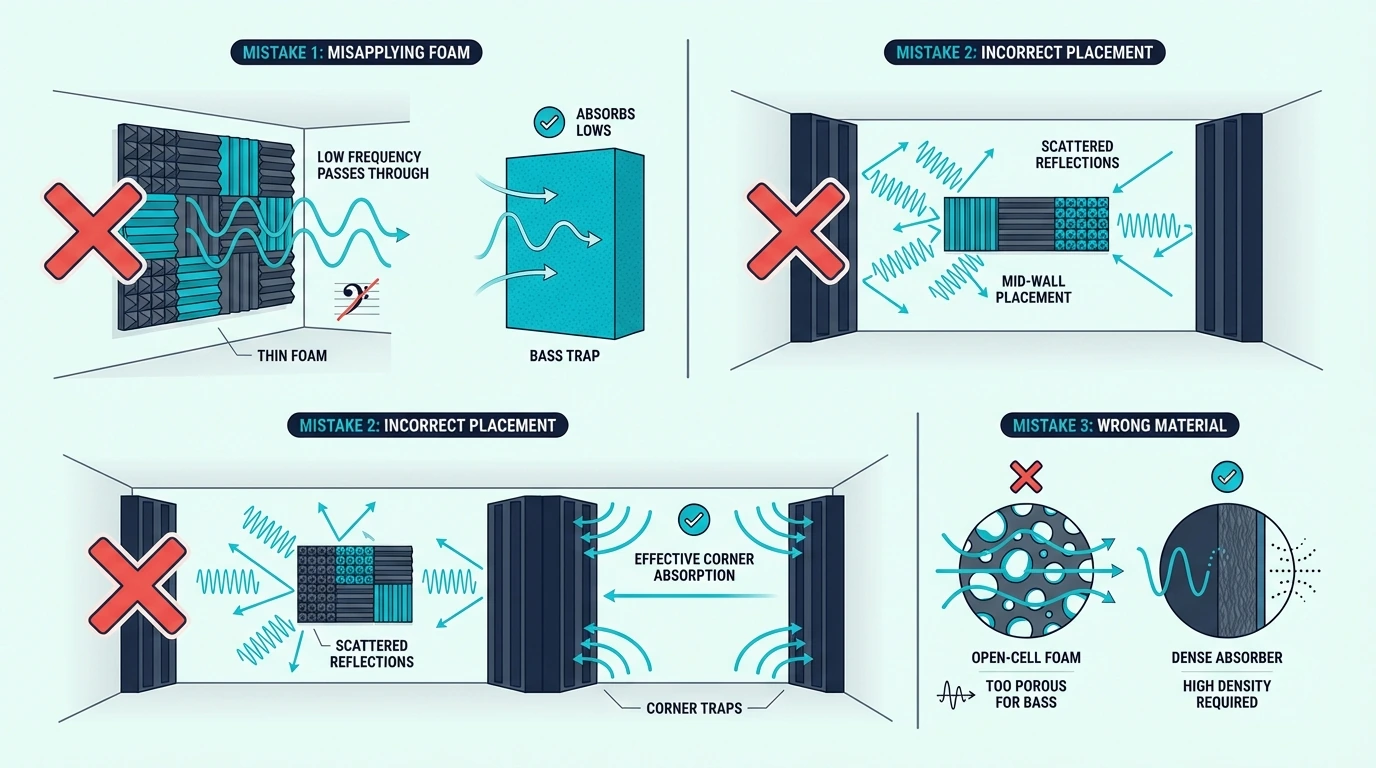
I see the same errors repeatedly in home studio setups. Most stem from misunderstanding what each product does — which is exactly why I spent so much time explaining the physics above. Here’s what to watch for:
Mistake 1: Foam in Corners (The Classic Blunder)
This is the most common waste of money I see. Someone buys 50 foam panels and sticks them everywhere, including corners.
Foam in corners does almost nothing. Those low frequencies pass right through thin foam like it’s not there. You’ve spent money on material that’s working at maybe 10% effectiveness in that location.
Save your foam for walls where it actually absorbs the frequencies it’s designed for. Use proper bass traps in corners — even budget foam corner pieces outperform flat foam panels in corner positions. This leads directly to the next issue.
Mistake 2: Expecting Foam to Fix Bass Problems
“I covered my walls in foam but my mixes still sound muddy.” I hear this constantly.
No amount of wall foam fixes bass problems. If your low end sounds boomy, undefined, or different in every spot you stand, that’s a bass issue. Adding more foam addresses frequencies that aren’t causing your problem.
Understanding what acoustic foam actually does prevents this frustration. Bass problems require bass traps. The physics are non-negotiable. Which makes the next mistake so incredibly common.
Mistake 3: All Foam, No Bass Treatment
Walk into most home studios and you’ll see walls covered in foam with zero corner treatment. It looks impressive on camera. Acoustically, it’s backwards.
The result: controlled highs but muddy, undefined bass. Vocals sound clean but the low end is a mess. Mixes translate poorly to other systems because the producer couldn’t hear bass accurately.
This happens because foam is cheaper, more visible, and more satisfying to install. But bass traps provide more acoustic improvement per dollar in most untreated rooms. See budget foam options that let you afford both. But going too far in the other direction is also an issue.
Mistake 4: Treating Only One Frequency Range
The opposite mistake exists too: studios that go all-in on bass traps while ignoring wall reflections. Tight bass, but harsh and echoey mids/highs.
Both approaches leave problems unsolved. Your room has issues across the frequency spectrum — treating only one range is like fixing half a leaky roof.
Complete treatment addresses both. Start with bass traps (they provide more bang for buck), then add foam at reflection points. The combination creates a balanced acoustic environment where you can actually trust what you hear.
The Bottom Line
Bass traps and acoustic foam aren’t competing products — they’re complementary tools for different frequency ranges.
Bass traps handle low frequencies and belong in corners. The 8 Pack Corner Bass Traps provides budget-friendly corner treatment.
Acoustic foam handles mid/high frequencies and belongs on walls. The TroyStudio 36 Pack 2-Inch Panels offers effective wall coverage.
For complete acoustic treatment, you need both. Start with bass traps if budget is limited — they provide more improvement per dollar in most untreated rooms.
For more guidance on acoustic treatment, visit our acoustic foam guide or explore our best acoustic foam panels recommendations. If you’re setting up a home studio, check out best budget acoustic foam options or learn how many panels you need for your space.
Frequently Asked Questions
Should I get bass traps or panels first?
Bass traps first. Low-frequency problems affect your entire frequency perception and cause more mixing errors than high-frequency reflections.
Start with corner treatment, then add wall foam as budget allows. The 8 Pack Corner Bass Traps provides affordable corner coverage.
Can foam absorb bass?
Standard 1-2 inch foam cannot absorb bass effectively. The frequencies are too low and wavelengths too long for thin materials to absorb.
See our foam thickness guide for details on frequency absorption by thickness.
Thick foam (4+ inches) provides some bass absorption, but dedicated bass traps using fiberglass or mineral wool perform significantly better.
How many bass traps do I need?
Minimum: 4 (one per vertical corner). Ideal: 8-12 (vertical corners plus tri-corners).
More bass traps generally means better bass control. Unlike foam, you can’t really over-treat corners for bass.
Are corner bass traps worth it?
Yes — corner treatment provides the highest return on investment for acoustic treatment. Bass problems affect your entire mix, and corners are where bass accumulates most.
Even budget foam corner pieces improve bass response. Professional fiberglass traps provide even better results.
What’s the difference between bass traps and acoustic panels?
Bass traps are thick absorbers (4-12 inches) designed for low frequencies below 300Hz. They mount in corners.
Acoustic panels (including foam) are thinner absorbers (1-2 inches) designed for mid/high frequencies above 500Hz. They mount on walls.
The terms sometimes overlap in marketing, but the physics are distinct.

