Best Beginner Acoustic Foam for Home Studios: Starter Guide
Best beginner acoustic foam for home studio setups can turn a boxy bedroom into a usable recording space — but most first-time buyers pick panels that are too thin and stick them in the wrong spots.
The result? Recordings still sound roomy and reflective, and the foam gets blamed for not working.
The actual problem is almost always 1-inch thickness (which barely absorbs anything) or random placement that misses the walls your microphone actually hears.
The fix is simple: start with 2-inch foam, treat the wall behind your mic first, then hit the closest side-wall reflection points. That alone cleans up most bedroom-studio takes.
Below are four starter picks, a placement priority list, and the mistakes that trip up most first-time buyers.
For a broader look at how acoustic foam works, start with the acoustic foam hub.
Start with minimum 2-inch thick foam — 1-inch panels barely absorb anything useful. Treat the wall behind your microphone first (4-6 panels), then side walls at first reflection points. A 12-pack is enough to hear a clear difference in most bedrooms. Expand only after you hear what your room still needs.
What Beginners Actually Need

Before buying anything, understand what acoustic foam does and doesn’t do.
What Foam Accomplishes
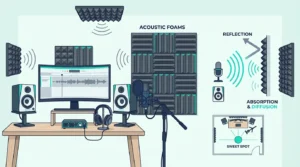
Acoustic foam absorbs sound reflections within your room. When you speak or play music, sound bounces off walls, ceiling, and floor. These reflections reach your microphone milliseconds after the direct sound, creating:
- Echo and reverb in recordings
- Harsh, “roomy” sound quality
- Inconsistent frequency response
- Difficulty hearing mix details accurately
Foam reduces these reflections, giving you cleaner recordings and more accurate monitoring. For a deeper look at what foam can do for recordings, see the best acoustic foam for recording guide.
What Foam Doesn’t Do
Foam does NOT soundproof. It won’t stop noise from entering your room or prevent your recordings from disturbing neighbors.
Soundproofing requires mass, decoupling, and sealing—completely different from absorption. The acoustic panels hub covers heavier panel options for more demanding setups.
Foam also doesn’t effectively absorb bass frequencies. Low-end control requires bass traps or thick fiberglass panels.
Standard foam handles mid and high frequencies only.
Understanding these limitations prevents disappointment and wasted money on products that can’t deliver what you expect.
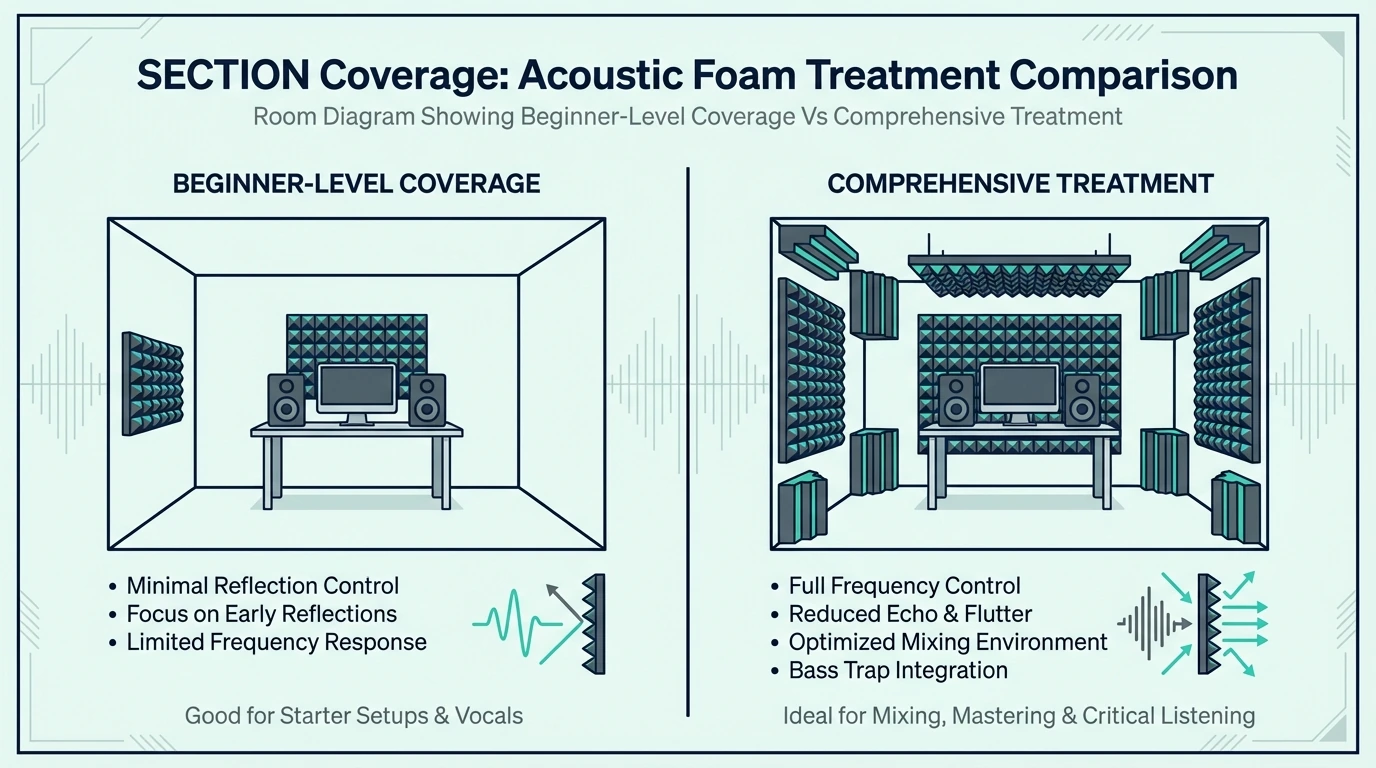
Beginner vs Professional Needs
Professional studios require full-room treatment: bass traps, broadband absorbers, diffusers, and precisely calculated placement. This costs thousands and requires acoustic knowledge.
Beginners need targeted treatment in the recording area. A few well-placed panels around your microphone and listening position provide 80% of the benefit at 20% of the cost.
Start simple, expand as your skills and needs grow.
Best Beginner Acoustic Foam: Top Picks
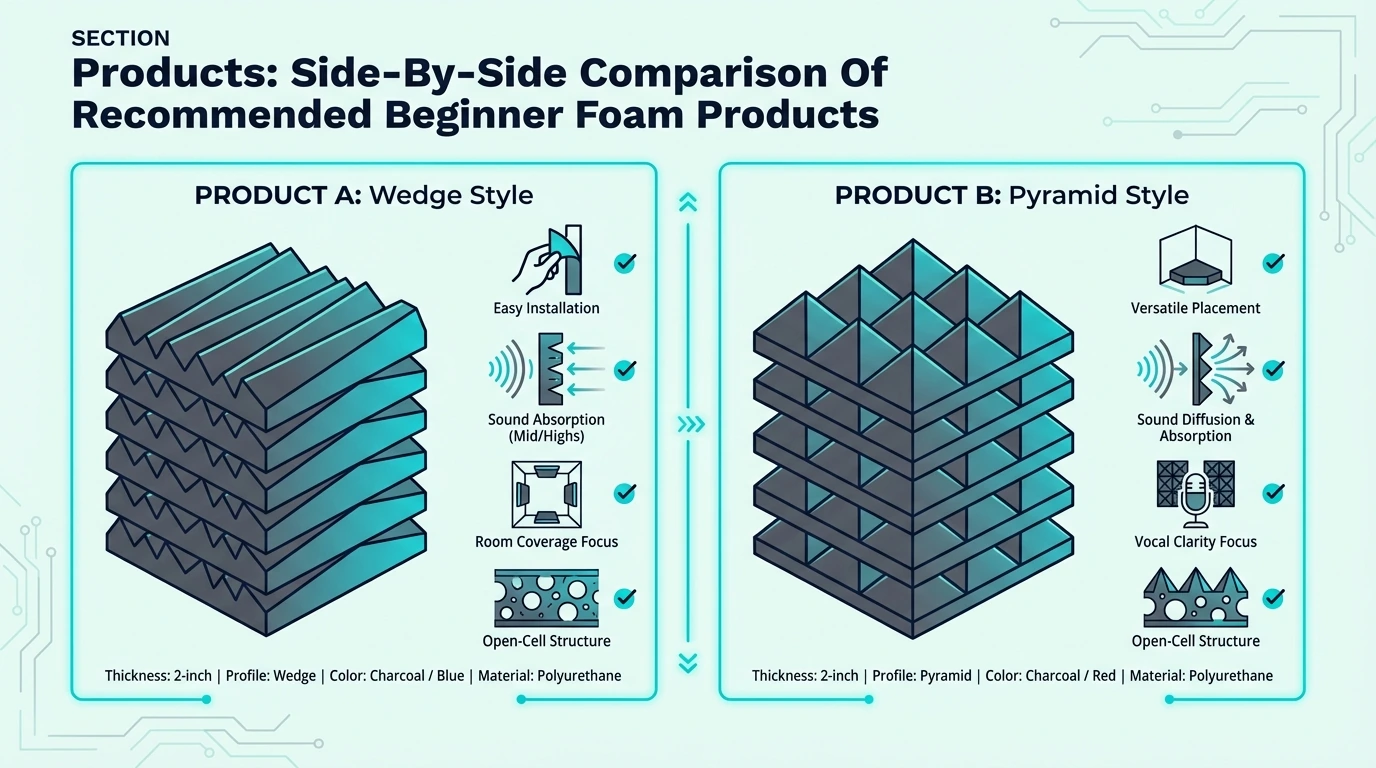
Best Starter Pack: JBER 6 Pack Acoustic Foam Wedge
The JBER 6 Pack Acoustic Foam Wedge is a low-risk way to hear what foam treatment does in your room.
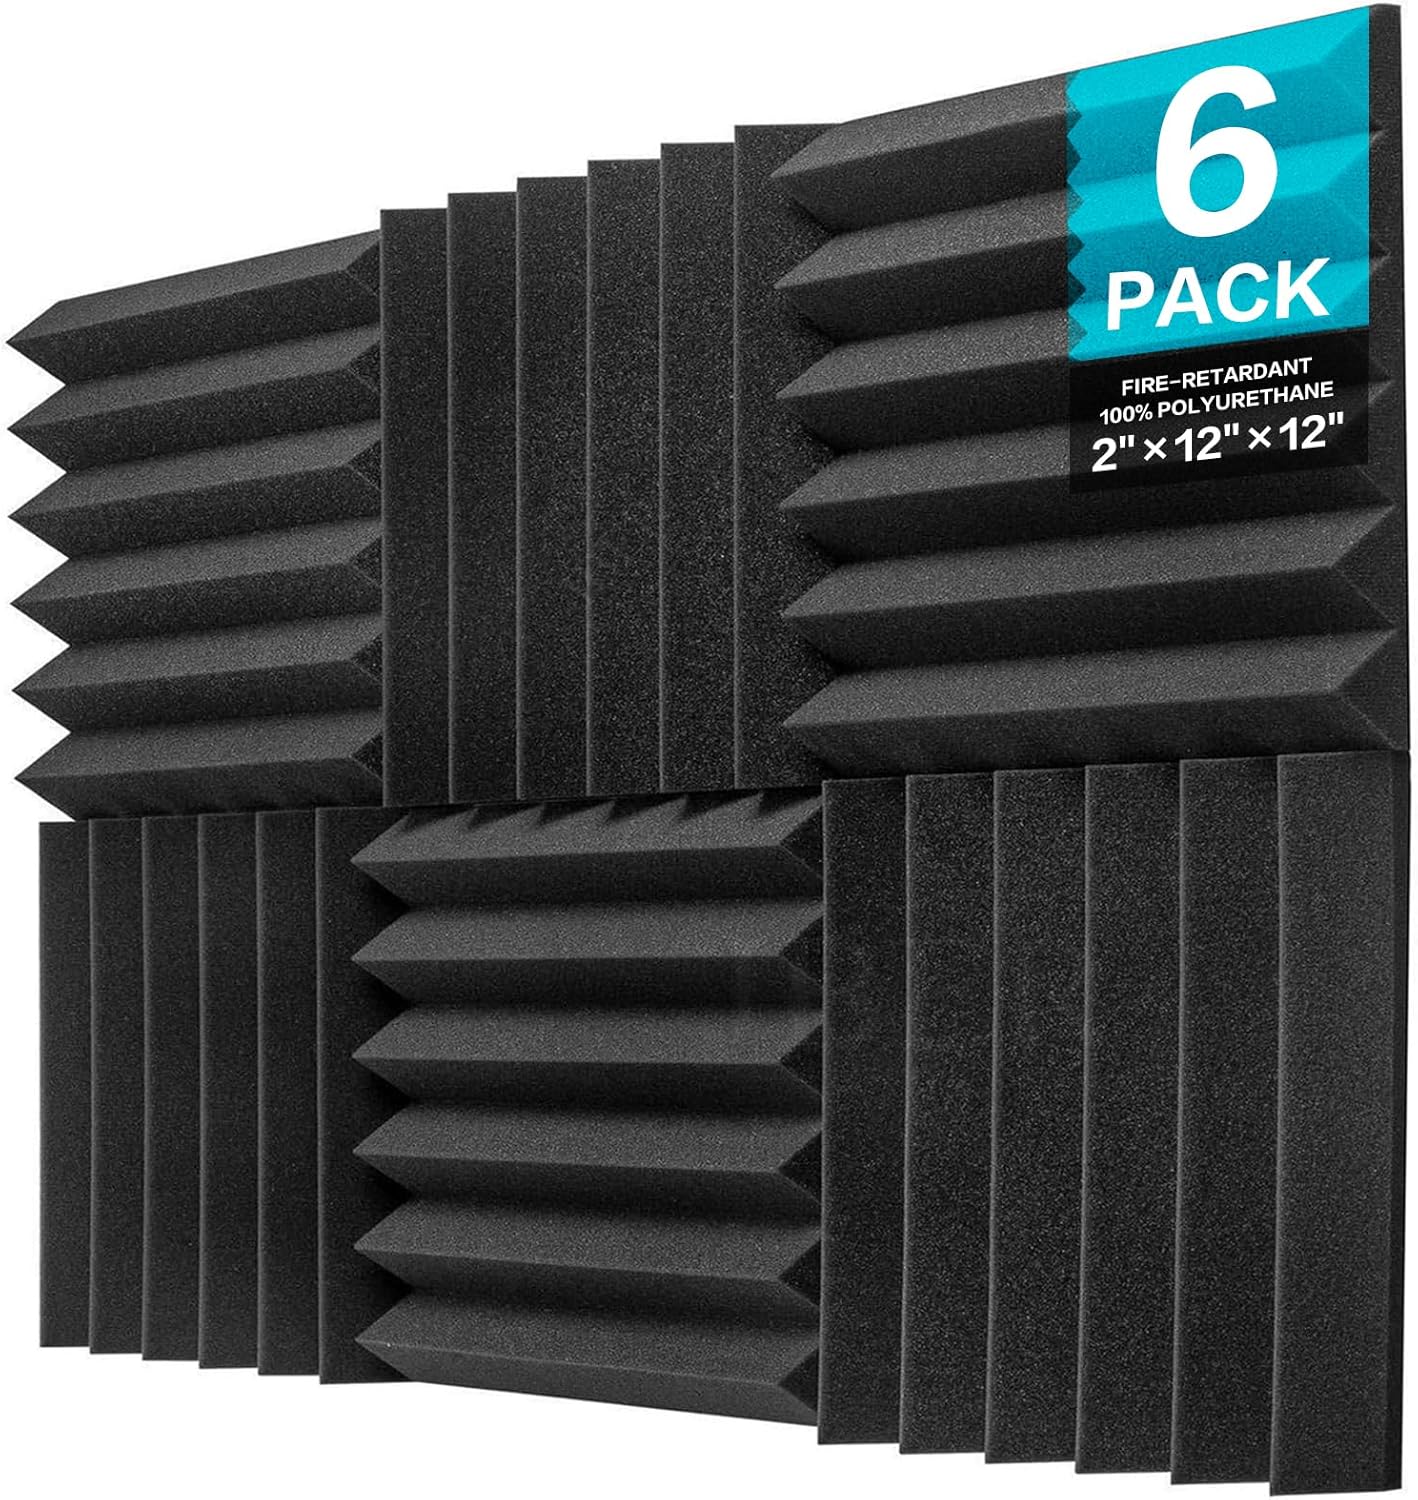
JBER 6 Pack Acoustic Foam Wedge
At $14 for six 2-inch wedge panels, it’s cheap enough to experiment with placement before committing to a bigger order. Place all six behind your microphone and you’ll hear the difference on your next vocal take.
Six panels won’t treat a full room, but they cover the single most important wall. Order two or three packs once you confirm the improvement.
Best Value Pack: TroyStudio Thick Acoustic Foam Panels
The TroyStudio Thick Acoustic Foam Panels deliver 36 panels at a price that works out to roughly $1.25 per panel.
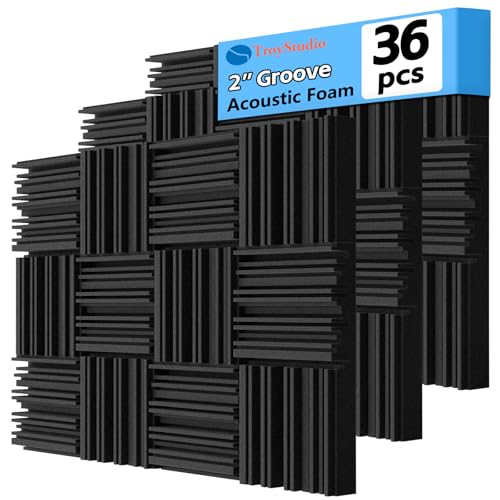
TroyStudio Thick Acoustic Foam Panels
That’s enough to treat the wall behind your mic, both side-wall reflection points, and still have panels left over for the ceiling. The consistent 2-inch thickness means every panel pulls its weight.
For beginners who want one order that covers an entire bedroom studio, this pack hits the sweet spot between quantity and quality.
For recording-specific recommendations, see the best acoustic foam for recording guide.
Best Coverage: 50 Pack Sound Proof Foam Panels
The 50 Pack Sound Proof Foam Panels give you maximum coverage for the money when you need to treat a larger space or multiple walls.
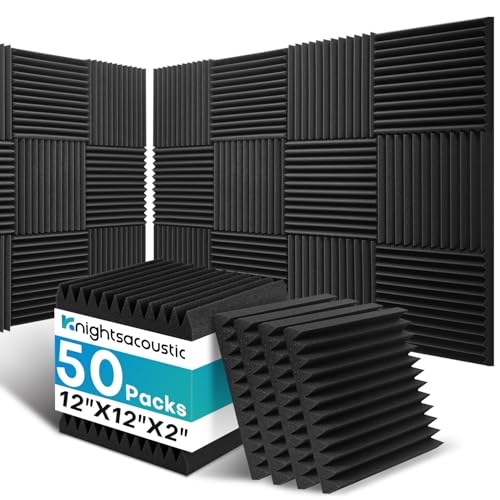
50 Pack Sound Proof Foam Panels
Fifty 2-inch panels cover roughly 50 square feet — enough for a full bedroom studio. At just over a dollar per panel, the per-unit cost is hard to beat.
Start by installing half the pack on priority walls. Keep the rest for expansion once you hear where your room still needs help.
Best for Vocals: TroyStudio Portable Vocal Booth
The TroyStudio Portable Vocal Booth wraps around your microphone and absorbs reflections from three sides without touching a single wall.
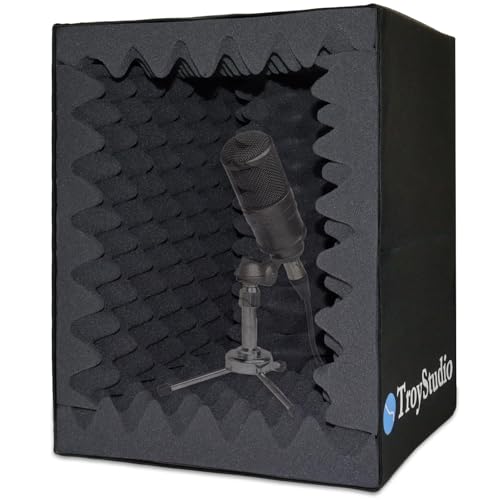
TroyStudio Portable Vocal Booth
For renters, podcasters, or anyone who records in different spots, this portable shield delivers immediate improvement. It folds flat for storage and sets up in seconds.
The trade-off: it only treats what’s directly behind and beside the mic. Wall reflections from behind you still reach the capsule.
For the best results, pair it with a few wall panels at your primary recording position.
For podcast-specific setups, see the best acoustic foam for podcasts guide.
Get Studio Tips Weekly
Join 5,000+ creators getting acoustic treatment advice every week.
No spam. Unsubscribe anytime.How Much Foam Do Beginners Need?
More isn’t always better. Strategic placement beats maximum coverage.
Minimum Effective Setup (12-16 panels)
Treat these areas first: – Wall behind your microphone (4-6 panels) – Walls to either side of your recording position (2-4 panels each) – Optional: ceiling above recording position (2-4 panels)
This minimal setup addresses the most problematic reflections—those arriving shortly after the direct sound. It’s enough for noticeably cleaner recordings.
Recommended Starter Setup (20-30 panels)
Expand to include: – First reflection points at your listening position – Wall behind your monitors – Additional ceiling coverage
This level provides good recording quality and improved monitoring accuracy. Most home studios don’t need more than this.
Signs You Need More
- Audible echo or reverb in recordings
- Difficulty hearing mix details
- Inconsistent sound when moving slightly
- Flutter echo (rapid repeating reflections)
If problems persist after treating the basics, add more panels strategically rather than covering every surface. The acoustic treatment hub covers broader room treatment strategies.
Be careful not to over-treat — too much absorption creates an unnaturally dead sound that’s fatiguing to work in.
Where to Place Foam First
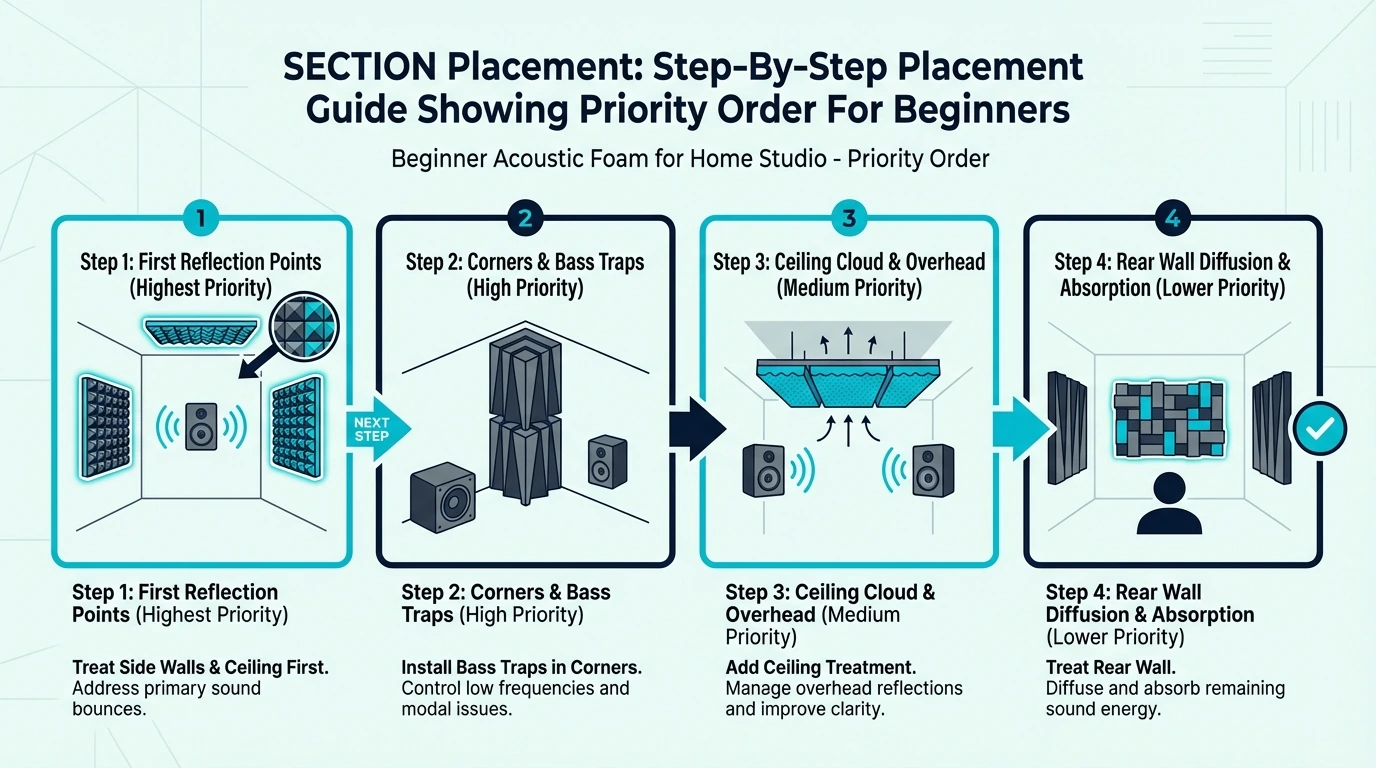
Placement matters more than quantity. Treat the right spots first.
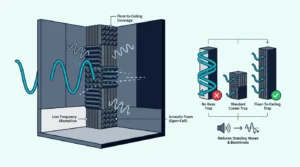
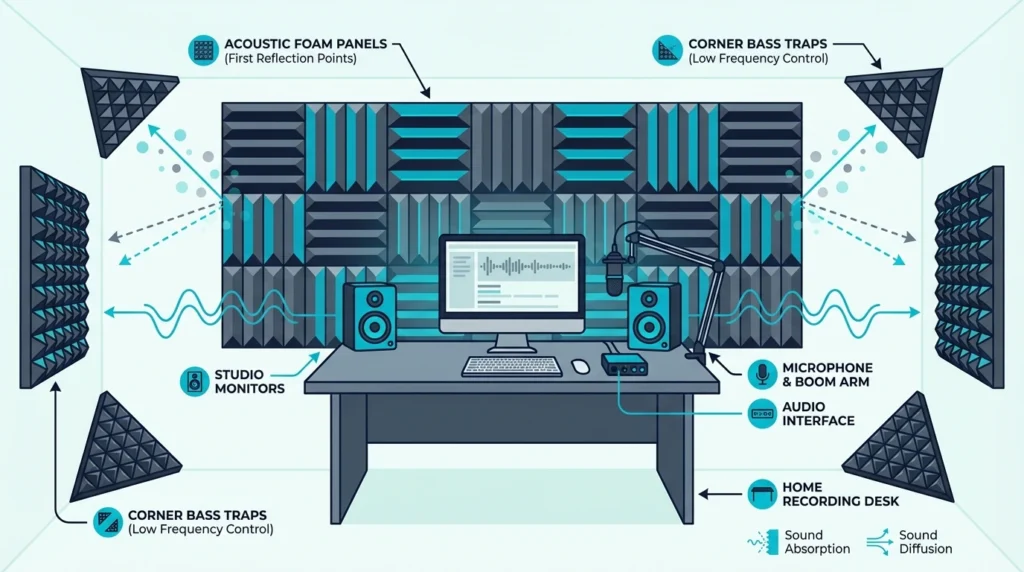
Priority 1: Behind Your Microphone
Sound from your voice or instrument travels past the microphone and hits the wall behind it. That reflection bounces back into the mic, creating a hollow, roomy sound.
Place 4-6 panels on this wall, centered on your microphone position. This single treatment often provides the most noticeable improvement.
Priority 2: Side Walls (First Reflection Points)
Sound also bounces off side walls. These “first reflections” arrive at your microphone (and ears) shortly after the direct sound, causing comb filtering and coloration.
Find first reflection points using the mirror trick: sit at your recording/listening position and have someone move a mirror along the wall. Where you see your speakers or mic position reflected, place treatment.
Priority 3: Ceiling Above Recording Position
Ceiling reflections are often overlooked but impactful. If your ceiling is standard height (8-9 feet), reflections arrive quickly and affect recordings noticeably.
Mount 4-6 panels on the ceiling directly above your primary recording/listening position.
Priority 4: Wall Behind Listening Position
For mixing and monitoring, treat the wall behind where you sit. This reduces reflections that bounce back toward your ears, improving stereo imaging and clarity.
For more on choosing the right shape for each spot, see the best acoustic foam shape guide.
Installation for Beginners
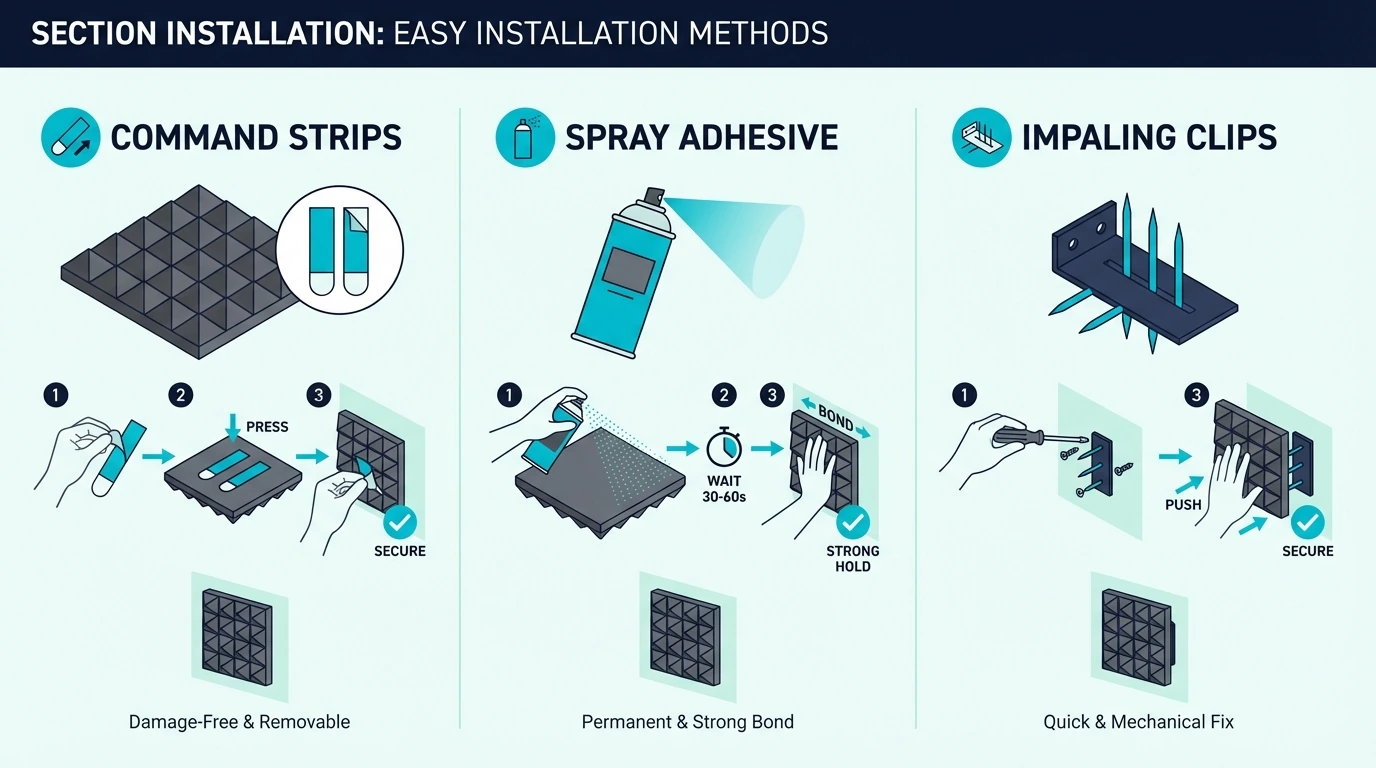
You don’t need professional installation skills. Several beginner-friendly methods work well.
Command Strips (Easiest, Removable)
3M Command strips attach foam to walls without damage. Perfect for renters or anyone wanting removable installation.
How to: 1. Clean wall surface 2. Attach strips to foam back (3-4 per panel) 3. Press firmly to wall 4. Wait 1 hour before releasing
Pros: No wall damage, fully removable, repositionable Cons: May fail in humid conditions, limited weight capacity
Spray Adhesive (Permanent, Professional)
3M Super 77 or 78 spray adhesive creates a permanent bond for professional results.
How to: 1. Protect surrounding areas from overspray 2. Spray both foam back and wall 3. Wait until tacky (30-60 seconds) 4. Press foam firmly to wall
Pros: Strong permanent bond, professional results Cons: Permanent (damages wall on removal), requires ventilation
Impaling Clips (Semi-Permanent)
Metal clips with sharp points mount to walls; foam presses onto the points.
How to: 1. Mount clips to wall with screws or adhesive 2. Press foam onto clip points 3. Clips grip foam securely
Pros: Foam removable without damage, clips reusable Cons: Leaves small holes in wall, clips visible if foam removed
For detailed mounting instructions, see the acoustic foam hub.
Common Beginner Mistakes
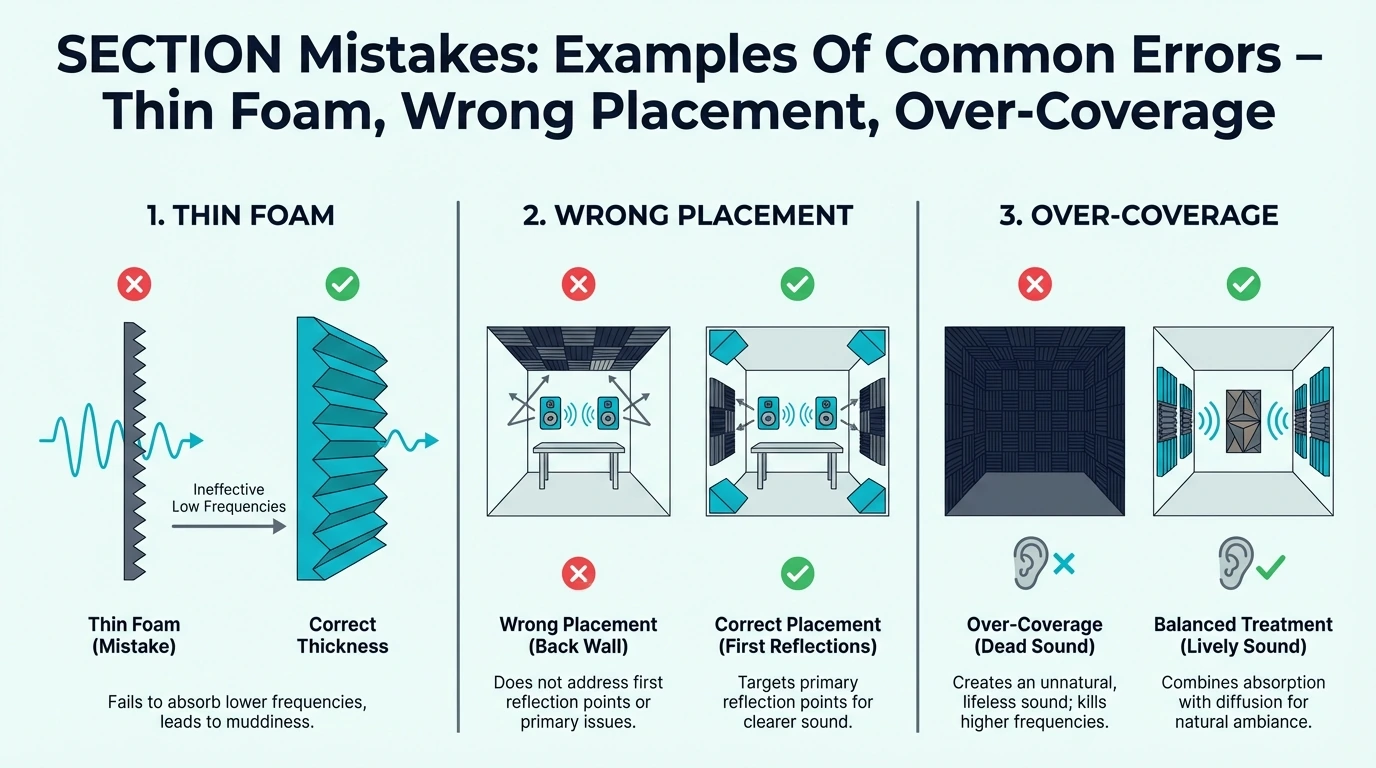
Learn from others’ errors to get better results from the start.
Buying 1-Inch Foam
One-inch foam is cheap but nearly useless. It only absorbs very high frequencies, leaving the problematic mid-range reflections untreated.
Always buy minimum 2-inch thickness. The small price difference delivers noticeably better results. The best budget foam guide compares affordable 2-inch options.
Covering Every Surface
More foam isn’t better. Rooms need some reflection to sound natural.
Over-treated rooms sound dead, uncomfortable, and fatiguing.
Start with 25-35% wall coverage in your recording area. Add more only if problems persist.
Expecting Soundproofing
Foam absorbs reflections inside your room. It doesn’t block sound transmission.
If you need to stop sound from entering or leaving, you need mass (drywall, mass-loaded vinyl) and sealing—not foam.
Understand foam’s purpose before buying. It improves how your room sounds inside, not how much sound passes through walls.
Random Placement
Foam stuck randomly on walls provides random results. Strategic placement at reflection points delivers consistent improvement.
Use the mirror trick to find first reflection points. Treat those spots first.
Ignoring Corners
Standard foam panels don’t address bass buildup in corners. If your room sounds boomy, corner treatment (bass traps) helps more than additional wall panels.
Consider corner treatment if bass is problematic. The best corner acoustic foam guide covers dedicated corner solutions.
Budget Allocation Guide
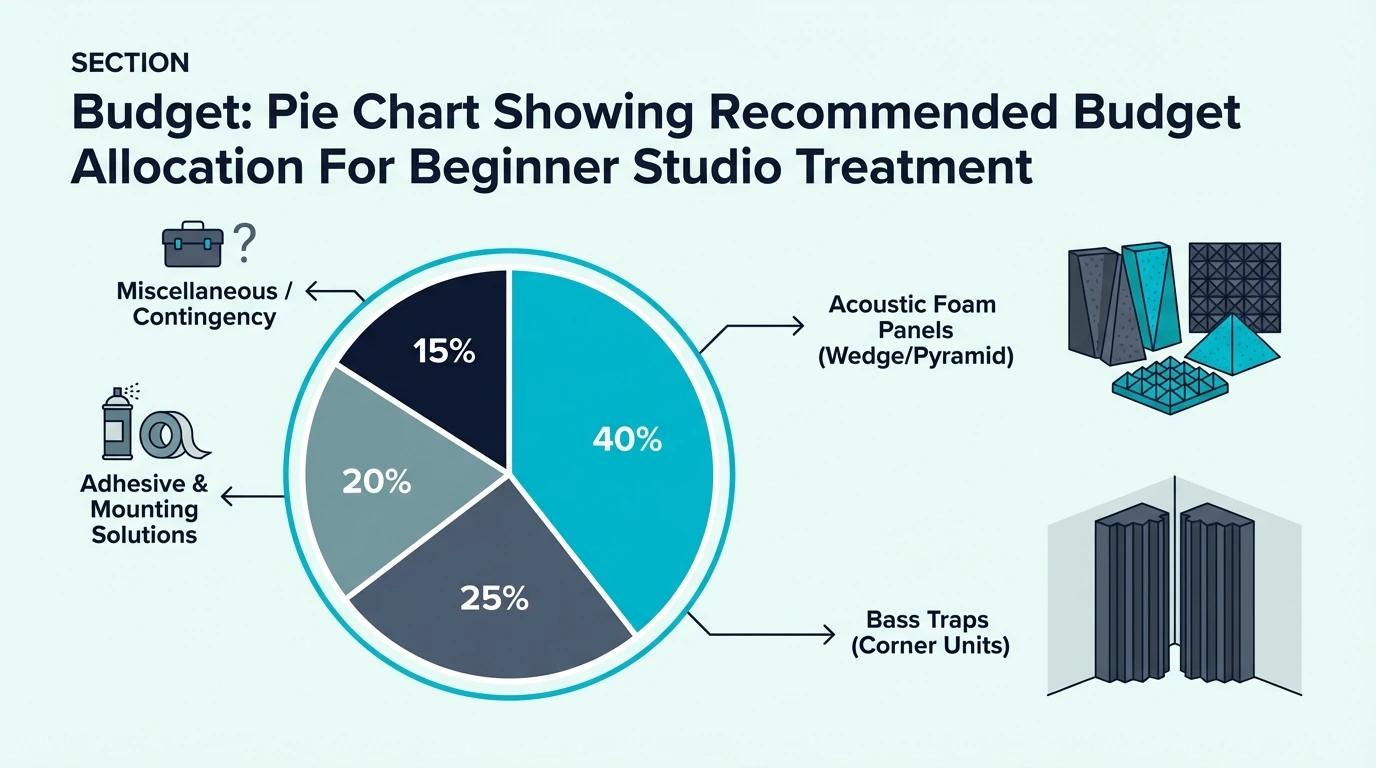
How to spend your acoustic treatment budget wisely.
Tight Budget (Under $100)
Recommended allocation: – 12-pack budget foam panels (Foamily or similar) – Focus on recording position only – DIY mounting (command strips)
This provides basic treatment for noticeably cleaner recordings. Upgrade later as budget allows.
Moderate Budget ($100-250)
Recommended allocation: – 24-pack quality foam (Auralex or equivalent) – 2-4 corner foam pieces – Proper mounting hardware
This covers recording and listening positions adequately. Suitable for serious hobbyists.
Comfortable Budget ($250-500)
Recommended allocation: – Quality foam panels for walls – Dedicated bass traps for corners – Ceiling treatment – Professional mounting
This approaches project studio quality. Sufficient for most home recording needs.
Where NOT to Spend
- Expensive “designer” foam (performance rarely justifies premium)
- Foam bass traps when fiberglass traps cost similarly
- Full room coverage before treating priority areas
- Soundproofing products when you need absorption
Foam vs Alternatives for Beginners
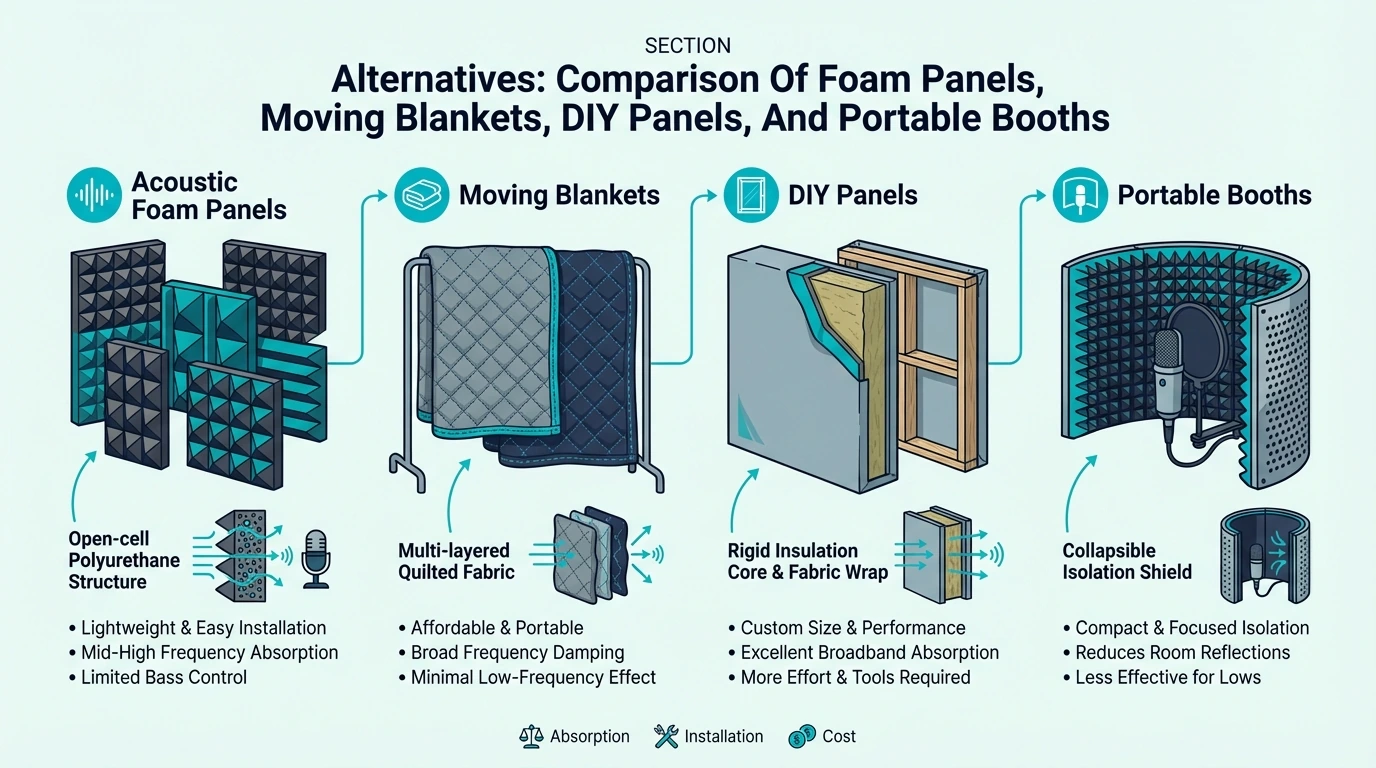
Foam isn’t the only option. Alternatives may suit some beginners better.
Moving Blankets
Heavy moving blankets absorb sound reasonably well. Hang them behind your mic or on reflection points.
Pros: Very cheap, readily available, no installation Cons: Look unprofessional, less effective than foam, temporary solution
DIY Rockwool Panels
Building panels from rockwool insulation and fabric costs less than commercial panels while performing better.
Pros: Superior performance, lower cost, customizable Cons: Requires construction time, handling precautions needed
DIY panels are a strong alternative if you have the time to build them.
Portable Vocal Booths
Collapsible booths surround your microphone with absorptive material.
Pros: Portable, no installation, focused treatment Cons: Only treats one direction, doesn’t help room acoustics overall
The Verdict for Beginners
Foam panels offer the best balance of effectiveness, ease, and cost for most beginners. They’re simple to install, reasonably priced, and provide immediate improvement.
The best acoustic foam panels guide ranks the full range of options.
DIY panels are better if you have time and enjoy building. Moving blankets work as a temporary solution while you save for proper treatment.
Conclusion
The best beginner acoustic foam balances quality, coverage, and cost. The JBER 6 Pack is the lowest-risk entry point, while the TroyStudio 36-Pack covers most bedroom studios in a single order.
Whatever you choose, prioritize 2-inch minimum thickness and strategic placement over maximum coverage. Treat the wall behind your microphone first, then side walls and ceiling.
Start with 6-12 panels and expand only if problems persist.
Avoid common mistakes: don’t buy 1-inch foam, don’t cover every surface, don’t expect soundproofing. Understand what foam does (absorbs reflections) and doesn’t do (block sound transmission, absorb bass).
Your first acoustic treatment doesn’t need to be perfect or cover every wall. Basic treatment at key positions provides most of the benefit.
Start simple, learn what your room needs, and expand thoughtfully.
Frequently Asked Questions
How much acoustic foam does a beginner need?
Start with 12-24 panels (12”x12” size) for a typical bedroom studio. This covers the key areas: wall behind your microphone, side walls at first reflection points, and optionally the ceiling above your recording position. You can always add more later—starting minimal helps you learn what your specific room needs.
What thickness acoustic foam should beginners buy?
Minimum 2 inches, always. One-inch foam only absorbs very high frequencies and leaves problematic mid-range reflections untreated. Two-inch foam effectively absorbs frequencies above 500 Hz, covering the range most important for voice and instrument clarity. Four-inch foam extends absorption lower but isn’t necessary for most beginners.
Is expensive acoustic foam worth it for beginners?
Quality foam (Auralex, Primacoustic) offers better density, consistency, and longevity than budget options. For serious hobbyists planning to grow their studio, investing in quality makes sense—you won’t need to replace it. For casual use or tight budgets, mid-range options (Foamily) provide adequate performance. Avoid the cheapest options, which often underperform after a few months.
Where should beginners put acoustic foam first?
Behind your microphone—this single placement often provides the most noticeable improvement. Sound travels past your mic, hits the wall, and bounces back into the mic creating a hollow sound. Treating this wall first addresses the most direct reflection. Next, treat side walls at first reflection points, then ceiling above your position.
Can acoustic foam soundproof my home studio?
No. Acoustic foam absorbs sound reflections within your room but doesn’t block sound transmission through walls. Soundproofing requires mass (thick walls, mass-loaded vinyl), decoupling (isolated wall structures), and sealing (no air gaps). These are construction projects, not foam installations. Foam improves how your room sounds inside; it won’t stop sound from entering or leaving.
Should beginners buy foam panels or a vocal booth?
For voice-only recording (podcasts, voiceover), a portable vocal shield provides focused treatment without wall installation—good for renters or temporary setups. For music production, instrument recording, or mixing, wall panels provide broader treatment that improves the entire room. Many beginners benefit from both: panels for general treatment, shield for close-mic vocal recording.