How To Connect Soundbar To TV — HDMI ARC, Optical, Bluetooth & Fixes

How to connect soundbar to TV is usually simple, but only if you match the connection method to the ports your TV and soundbar actually have.
The pain is that most setup failures come from using the wrong HDMI port, leaving the TV audio output on internal speakers, or treating HDMI ARC, optical, and Bluetooth like they all behave the same way.
Choose the right connection path and the whole setup gets easier: one cable, the correct audio output setting, and a soundbar that actually takes over your TV sound instead of sitting there powered on with no audio.
So start by checking whether your TV and soundbar support HDMI ARC or eARC, because that tells you whether to use HDMI first, optical as a fallback, or wireless only for convenience.
Now that the order is clear, let us walk through how to connect a soundbar to a TV step by step and fix the problems that usually stop it from working.
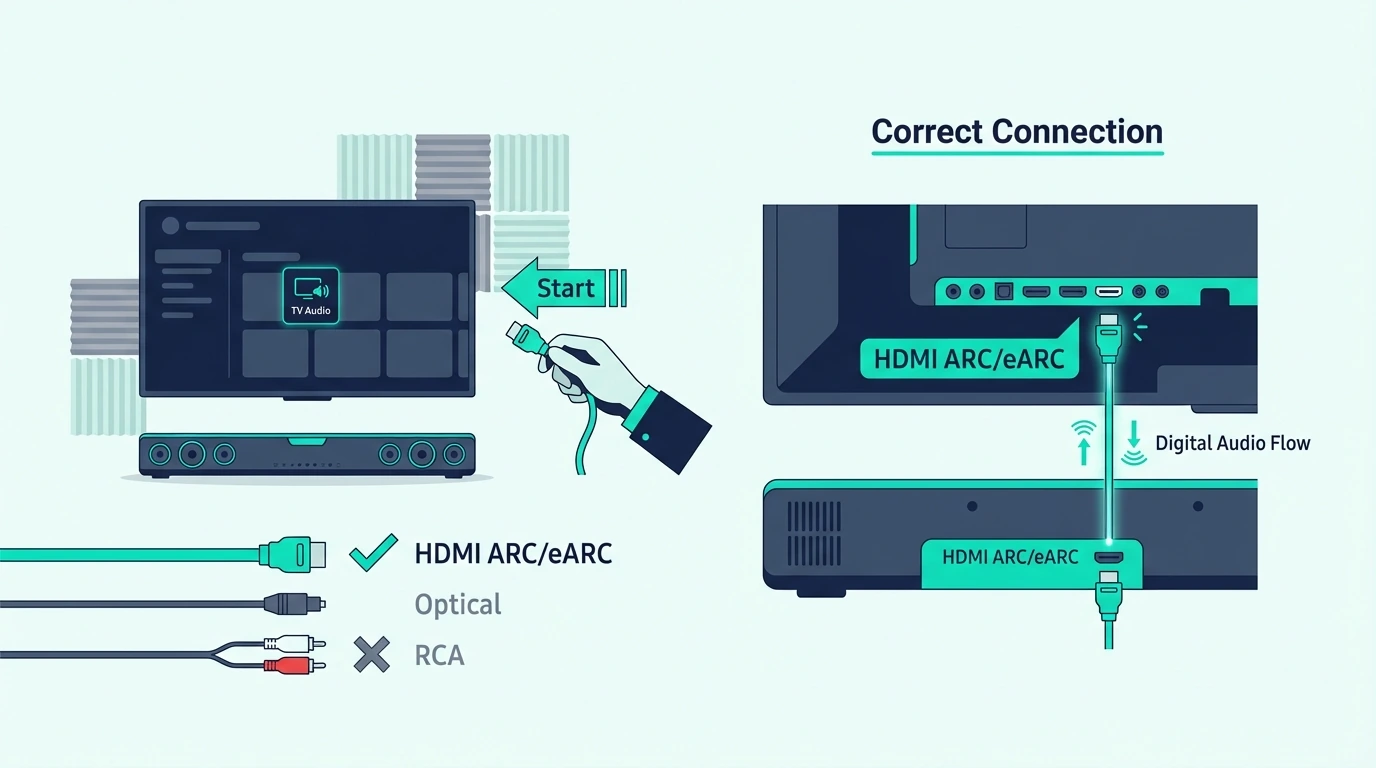
To connect a soundbar to your TV, use HDMI ARC or eARC first if both devices support it. If they do not, use optical, and only use Bluetooth when convenience matters more than lip-sync and remote control. After the cable is connected, switch the TV audio output to the soundbar in the settings menu and confirm you used the correct ARC or optical port.
What Is the Right Port for Connecting a Soundbar to a TV?
Before you touch a cable, look at the back or side of the TV and the soundbar. The labels matter more than the cable brand.
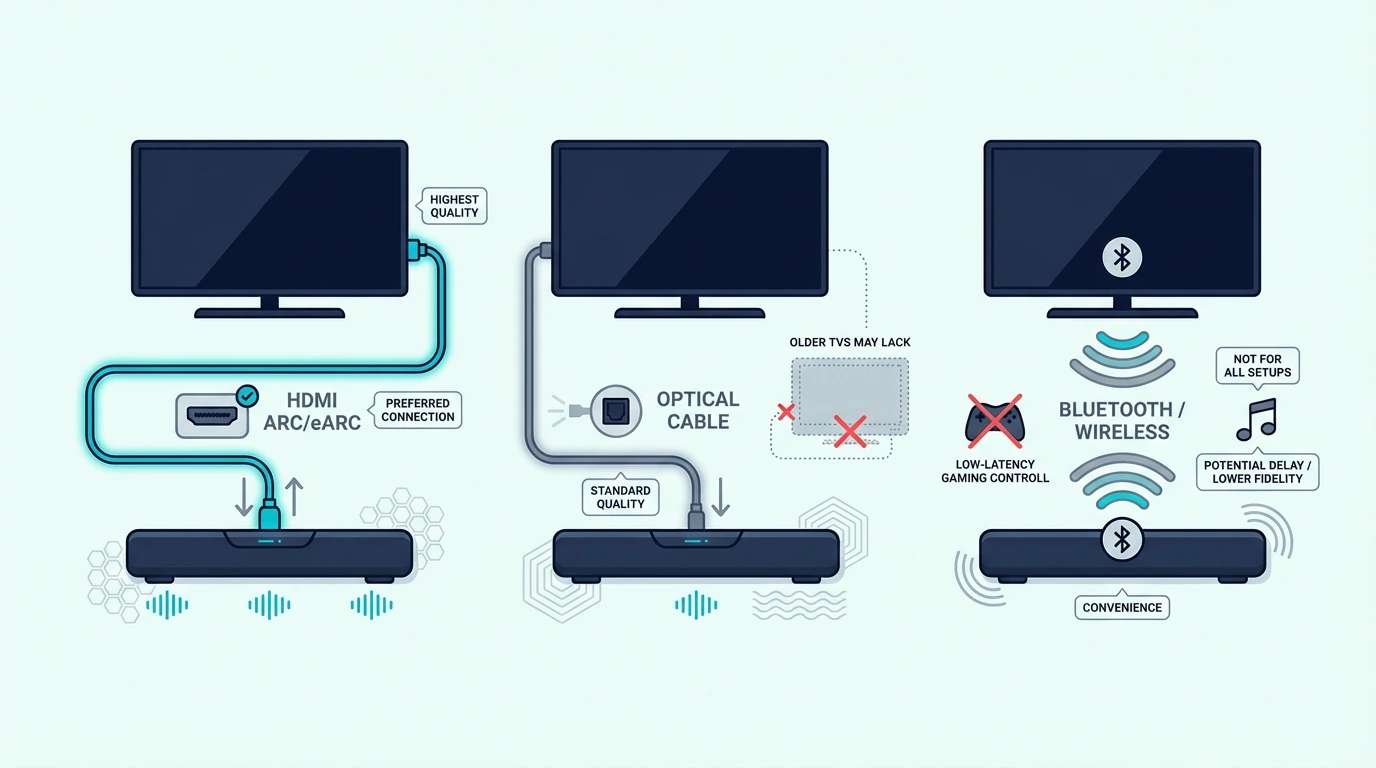
If you see HDMI ARC or HDMI eARC on both devices, that should be your first choice. It gives you the cleanest setup, lets the TV remote control volume through CEC, and supports better audio formats than optical on newer gear.
If you only see Optical, Digital Audio Out, or TOSLINK, that is your fallback. It still works well for TV and streaming, but it cannot pass the full lossless formats that make the best Dolby Atmos soundbars worthwhile.
If you need a new HDMI cable for this first step, a certified cable like the UGREEN 8K HDMI 2.1 Cable is a safe default. It is especially useful if you are comparing ARC behavior against our HDMI vs HDMI ARC soundbar guide.

UGREEN 8K HDMI 2.1 Cable
The other thing to check is your TV menu. Most sets need you to choose Audio Output, External Speaker, or Receiver before the soundbar takes over.
If the soundbar is failing across every input or still refuses to take over TV audio, the no-sound guide and reset soundbar guide usually solve the real problem faster than repeating the same cable swap.
How Do You Connect a Soundbar to a TV with HDMI ARC or eARC?
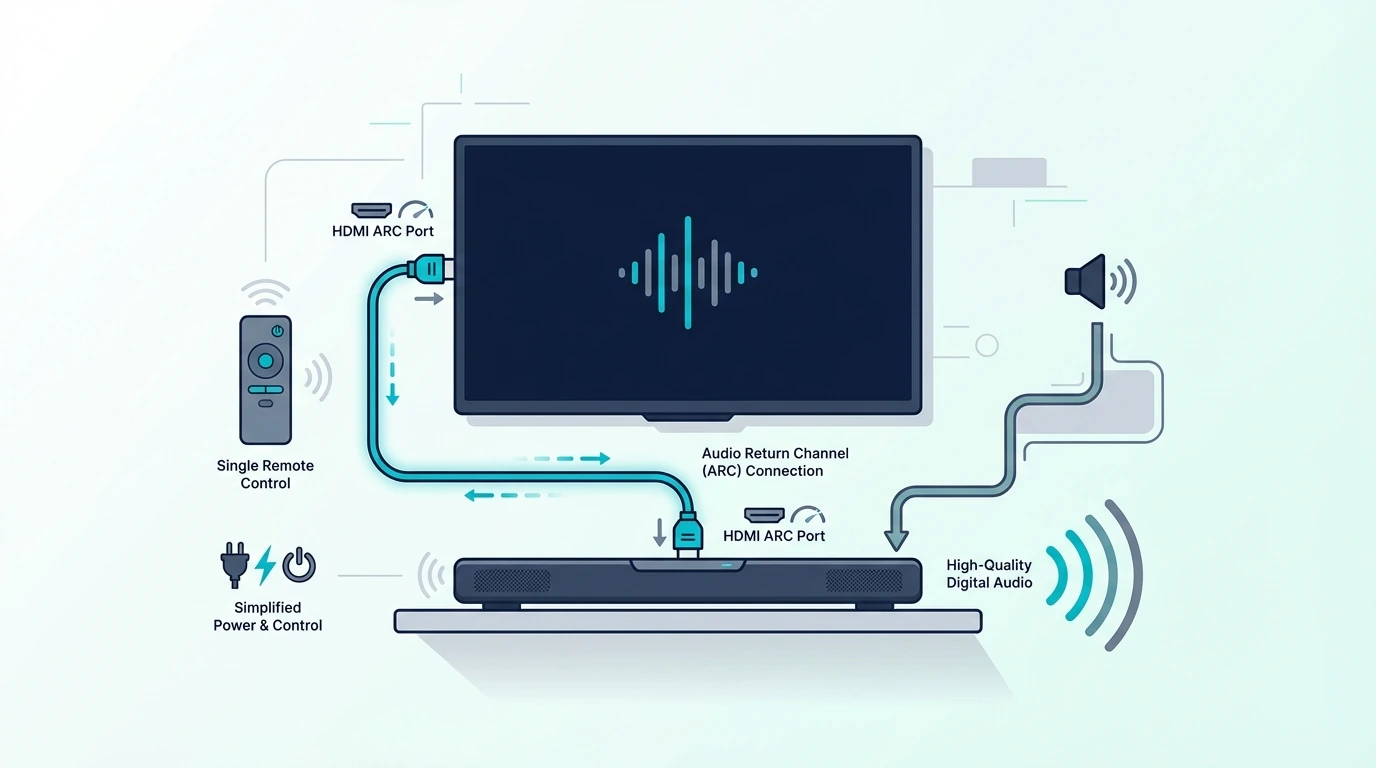
Now that you know the correct port, HDMI ARC or eARC is the method to use first. It is the cleanest one-cable connection for most modern TVs.
Plug one end of the HDMI cable into the TV port labeled ARC or eARC, then plug the other end into the matching HDMI port on the soundbar. If you plug into a normal HDMI input, the soundbar may power on but never receive return audio.
After that, open the TV settings and select the soundbar as the audio output. On many TVs, you also need to turn on CEC, Anynet+, Simplink, or a similar control setting so the TV remote can change the soundbar volume.
A cable like the Silkland HDMI ARC/eARC Cable is useful when you want a cable that is explicitly designed around this TV-to-soundbar return path. That matters most when you are trying to keep ARC or eARC stable across a modern TV setup.

Silkland HDMI ARC/eARC Cable
If you are using eARC, leave the TV audio format on Auto or Passthrough when possible. If you force PCM too early, you may lose surround information before it reaches the soundbar.
Get Studio Tips Weekly
Join 5,000+ creators getting acoustic treatment advice every week.
No spam. Unsubscribe anytime.How Do You Connect a Soundbar to a TV with Optical?

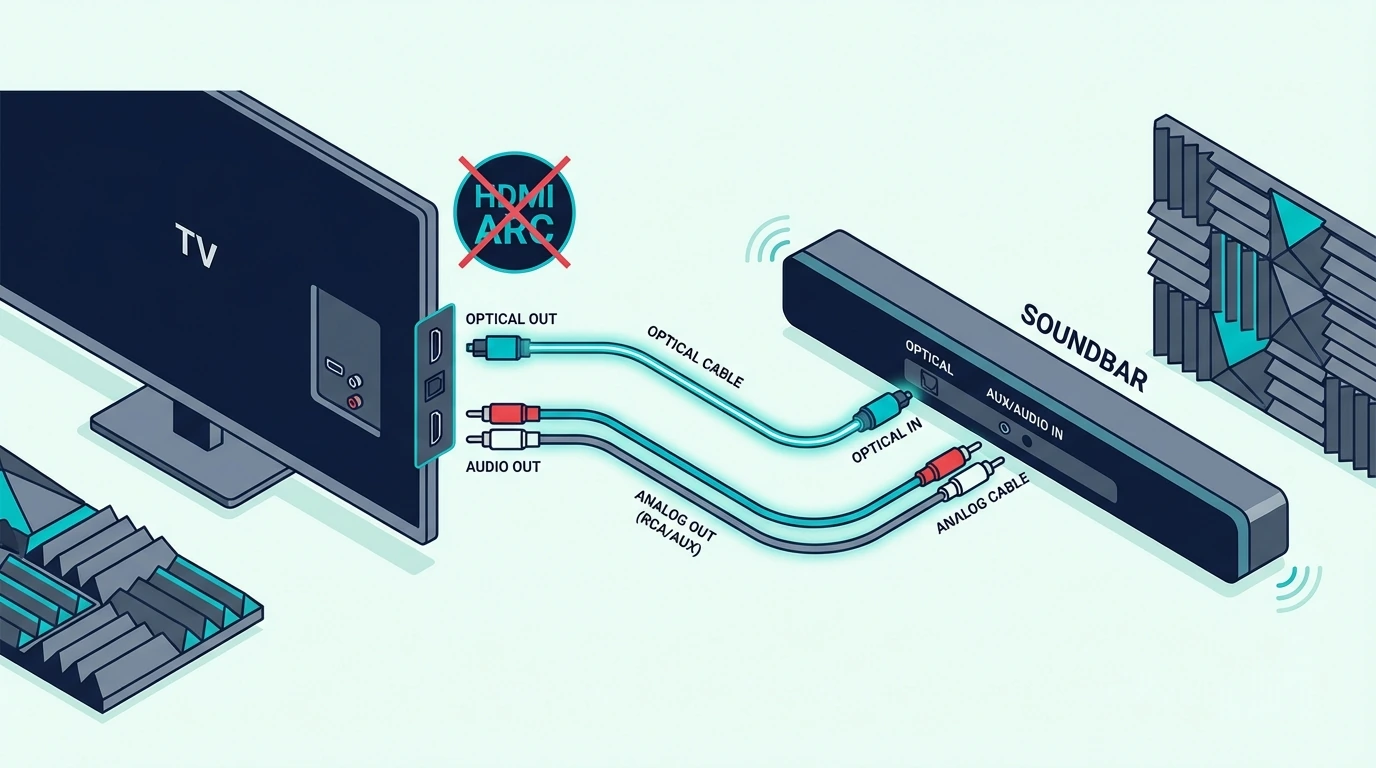
If HDMI ARC is not available, optical is the next best wired choice. It is still a very normal way to connect a soundbar to a TV.
Connect the optical cable from the TV’s Optical Out or Digital Audio Out port to the soundbar’s optical input. Then switch the soundbar input to Optical or D.IN, depending on the brand.
After that, go back to the TV settings and select optical or external audio output. Some TVs mute the optical port until you explicitly change the output mode.
A simple cable like the KabelDirekt TOSLINK Optical Audio Cable is exactly the kind of accessory that fits this use case. Optical works especially well for older living-room setups, budget bars from our best budget soundbar roundup, and simpler movie systems where stability matters more than advanced formats.
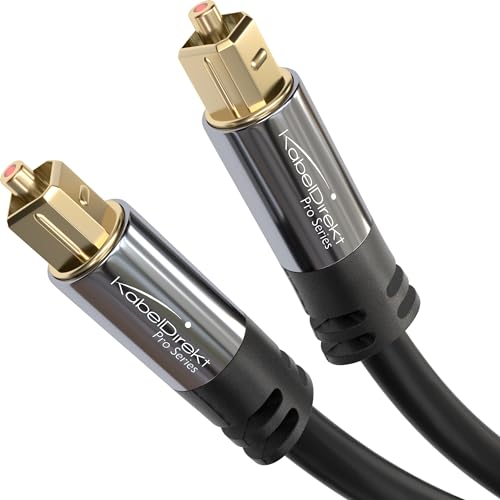
KabelDirekt TOSLINK Optical Audio Cable
The limitation is bandwidth. Optical can handle standard Dolby Digital and 5.1, but not the full higher-end formats that newer bars can decode over eARC.
How Do You Connect a Soundbar to a TV Without HDMI ARC?
If your TV does not have HDMI ARC, do not panic. You can still connect the soundbar, but the best method changes.
Optical is usually the cleanest fallback. If the TV has no optical output either, check whether the soundbar accepts AUX, coaxial, or Bluetooth.
Some older TVs also work better when your streamer or cable box connects to the soundbar first and then passes video forward to the TV. That only works if the soundbar has HDMI input, but it can bypass the TV’s weak audio return options completely.
If you are testing more than one HDMI path at once, the JSAUX 8K HDMI 2.1 2-Pack is practical because it lets you test the TV-to-soundbar link and a second source-chain cable without buying twice. That is most useful when the TV also serves gaming setups like the ones in our gaming soundbar guide.

JSAUX 8K HDMI 2.1 2-Pack
If none of those ports exist, Bluetooth may be the last remaining option, but it should be treated as a convenience method rather than the best long-term connection.
Why Is the TV Still Not Playing Through the Soundbar?
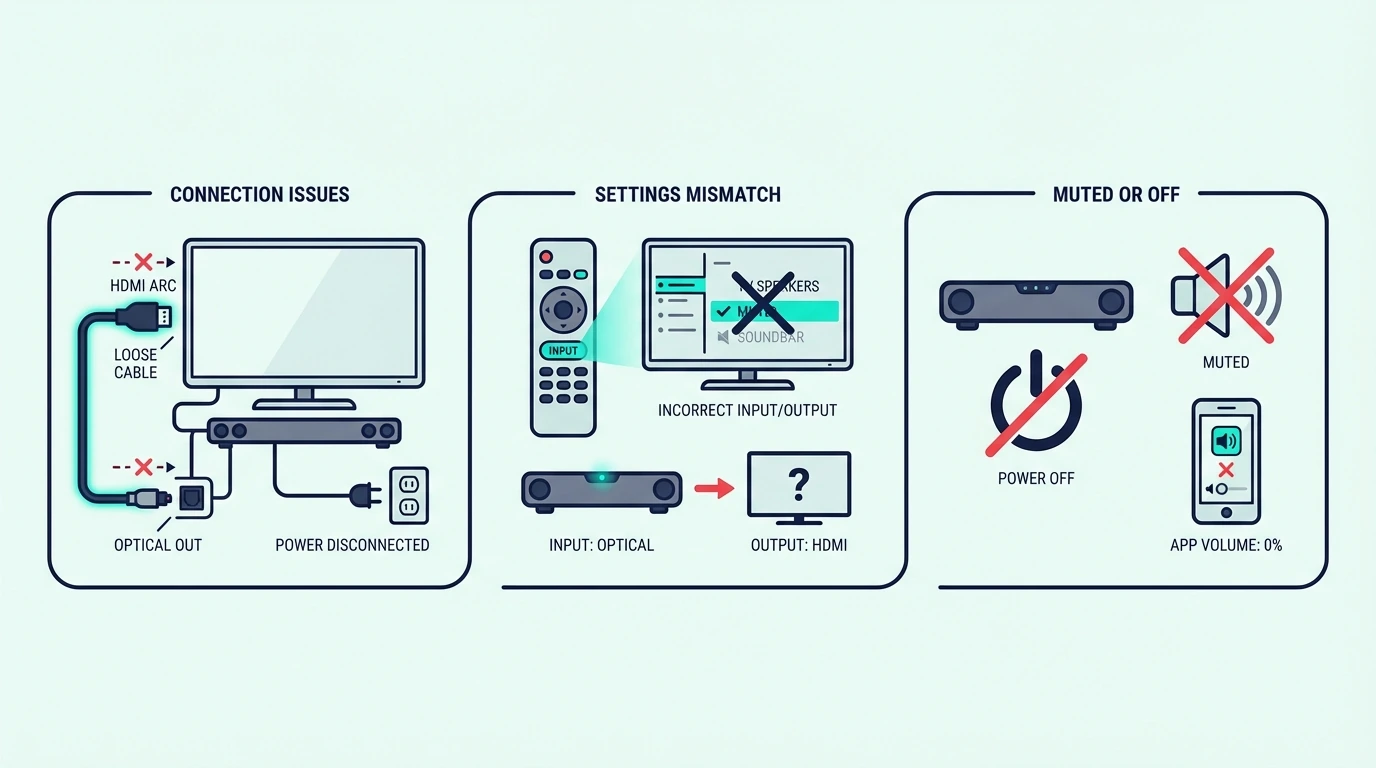
Now that the cable path is clear, the most common problem is not the cable itself. It is the TV still sending sound somewhere else.
First, make sure the soundbar input matches the cable you used. If the bar is waiting on HDMI but you connected optical, you will get silence even though the hardware is plugged in correctly.
Second, go into the TV menu and change the output to External Speaker, Receiver, Audio System, or the brand-specific equivalent. Many TVs stay on internal speakers until you switch that setting manually.
Third, confirm that the HDMI cable is in the actual ARC or eARC port. Using the wrong HDMI input is one of the fastest ways to create a no-sound problem that looks mysterious but is actually simple.
If you still get no sound, power-cycle both devices, turn CEC off and back on, and try a different cable. This is also where keeping a second known-good HDMI lead helps during troubleshooting rather than just initial setup.
If you want to go deeper on bad-signal symptoms, our broader best soundbar roundup helps if the real problem is the bar itself rather than the cable path.
Which Soundbars Work with Which TVs?
Most soundbars connect to most TVs, but not always through the same method. Compatibility is usually about matching ports, not matching brand names.
A newer soundbar and a newer TV usually connect through HDMI ARC or eARC. Older TVs often rely on optical, and some ultra-basic bars add AUX or Bluetooth for fallback compatibility.
What you do not always get is full feature parity. A bar may connect physically but still lose the nicer parts of the experience, like single-remote volume control, Dolby Atmos, or automatic power-on.
That is why the best soundbar for a small bedroom TV is not always the same as the best one for a newer OLED or gaming setup. If you are still narrowing that down, our small-room soundbar guide and soundbars with subwoofers roundup help you match the bar to the room before you worry about connection details.
Can You Connect a Soundbar to a TV Wirelessly?

Yes, you can connect a soundbar to a TV wirelessly if both devices support Bluetooth. The setup is simple: put the soundbar in pairing mode, open the TV’s Bluetooth audio menu, and select the soundbar as the audio device.
The trade-off is latency. Bluetooth can be fine for casual viewing or background TV, but lip-sync errors are more common than with HDMI or optical.
Wireless TV-to-soundbar connections also tend to be less consistent across brands and older TVs. If you want the setup that works most often and causes the fewest headaches, wired still wins.
Bluetooth is best treated as a backup or convenience feature, not the default method for movie and gaming use. If you specifically need the TV-side wireless pairing steps, go to our TV-to-soundbar Bluetooth guide.
The Bottom Line
The best way to connect a soundbar to a TV is HDMI ARC or eARC when both devices support it. It is the cleanest path for better audio, easier remote control, and the fewest setup headaches.
If ARC is not available, optical is the best fallback. If neither wired option is available, Bluetooth can still work, but it is usually the least reliable method for serious TV use.
If you are still unsure which connection path or cable type makes sense, compare your setup against the TV-to-soundbar cable guide and the broader soundbar hub so you can match the connection method to the actual gear you own.
Frequently Asked Questions
How do I connect my sound bar to my TV?
Use HDMI ARC or eARC first if both the TV and soundbar support it. If they do not, connect them with an optical cable and then change the TV audio output to the soundbar in the settings menu.
Does it matter which HDMI port I use for a soundbar?
Yes. You need to use the HDMI port labeled ARC or eARC on the TV, otherwise the TV usually will not send audio back to the soundbar.
Why is my TV not playing sound through my soundbar?
The most common reasons are the wrong input selected on the soundbar, the TV still set to internal speakers, or the HDMI cable plugged into a non-ARC HDMI port. Power-cycling both devices and rechecking the audio output setting solves most cases.
Do all soundbars connect to all TVs?
Most do, but often through different methods. HDMI ARC, optical, AUX, and Bluetooth cover most compatibility cases, but older TVs and older soundbars may lose some convenience features depending on the connection type.