How To Pair My Subwoofer To My Soundbar — Auto Pair, Re-Pair & What To Check
How to pair my subwoofer to my soundbar looks like a one-button fix, but it only works if the subwoofer is the original matched unit and the bar finishes startup before you force pairing.
Random pairing presses will not fix a subwoofer that was never meant to pair with that soundbar.
You also need to let the soundbar finish its normal startup before forcing manual pairing.
The frustrating version is easy to recognize.
The sub keeps blinking, and the soundbar looks connected.
There is still no bass because the pair was reset, placed too far apart, or never meant to work together in the first place.
Handle the pairing in the right order and the answer gets much clearer. You can tell whether the system only needs a clean re-pair or whether the real problem is incompatible or failing hardware.
Start by confirming you have the correct bar-and-sub pair. Then let auto pairing happen before you move to any manual re-pair steps.
Now that the pairing path is clear, let us walk through how to pair my subwoofer to my soundbar the smart way.
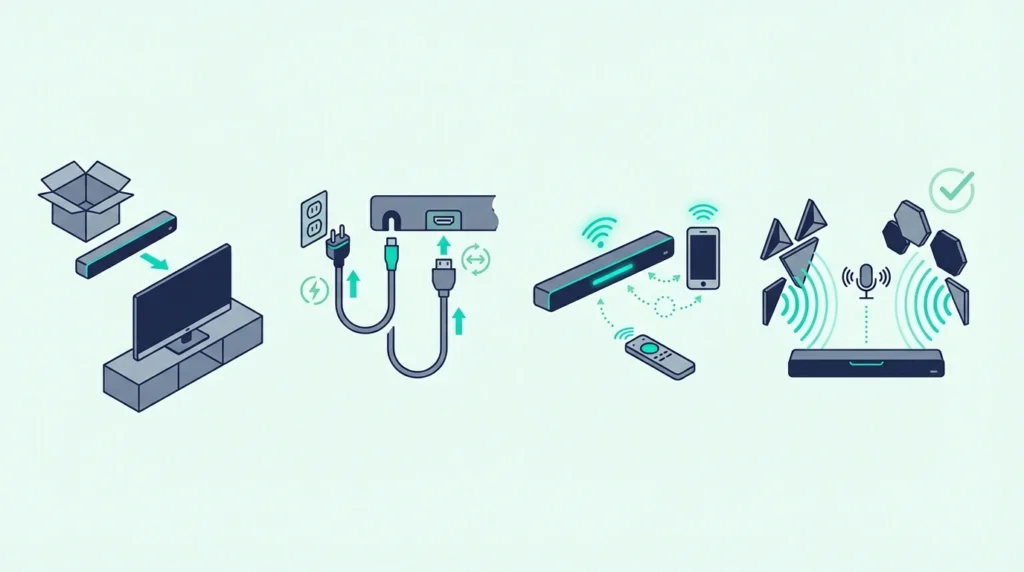
To pair a subwoofer to a soundbar, first confirm the subwoofer is the original bundled or officially compatible unit.
Power both devices on and let auto pairing happen before you touch any pairing buttons.
If the subwoofer still does not connect, move it closer, check the status light, reboot both devices, and then follow the brand’s manual re-pair method.
If that still fails, treat the problem as compatibility or hardware, not universal wireless pairing.
Why Does Soundbar-Subwoofer Pairing Matter?

Pairing a subwoofer to a soundbar is not the same thing as connecting a soundbar to a TV. Most modern soundbar systems expect the subwoofer to pair with its own matching soundbar.
That is why so many readers waste hours trying to pair a subwoofer that was never meant to work with that bar. A bundled wireless subwoofer usually has a dedicated pairing relationship with the soundbar it shipped with.
A random third-party wireless subwoofer usually does not. A wired subwoofer only works if the soundbar has the right sub output and the system actually supports that path.
The first question is not which button to press. It is whether the soundbar and subwoofer belong together in the first place.
It also helps to separate subwoofer pairing from the rest of the setup chain. If the bar is not installed correctly yet, finish that first.
Our best soundbar roundup and best soundbars with subwoofers roundup help with the hardware side. Pair the sub after the core bar setup is stable, not before.
That same order shows up in every stable workflow. Get the main audio path working first, then add the extra speaker.
If you reverse that order, you create too many variables and make every failure harder to diagnose.
This topic also overlaps with troubleshooting, but it is narrower than a full repair guide.
If the subwoofer was working and suddenly stopped, the better next pages are the best budget soundbar guide and the broader soundbar hub. Use those once you confirm the pairing relationship itself is failing.
The biggest practical lesson is simple: most successful soundbar-subwoofer pairing is really matched-system recovery, not universal device pairing.
How Do You Pair or Re-Pair a Subwoofer to a Soundbar?

The cleanest pairing workflow starts with the least invasive method first. Let the system do what it was designed to do automatically before you force manual pairing or factory reset steps.
Start with auto pairing first
Most bundled wireless subwoofers are meant to pair automatically when both the soundbar and the subwoofer have power.
Start simple. Plug both units in and power them on.
Keep them reasonably close for the first connection. Wait long enough for the link to finish.
Do not start by pressing every pairing button you can find. Some brands expect auto pairing first and manual pairing only after automatic connection fails.
The early check is basic but important. Make sure the subwoofer power cable is fully seated.
Make sure the soundbar is actually on. Keep the sub close enough for a first connection instead of putting it across the room behind thick furniture.
If the original bundled system is already unreliable, a matched replacement can be cleaner than endless re-pair attempts.
An entry-level option like the Hisense HS2100 soundbar system makes the pairing path much simpler because the bar and sub are designed as one package.

Hisense HS2100 soundbar system
Use manual re-pair only if auto pairing fails
If the sub still does not connect automatically, move to the manual re-pair flow for your brand.
This usually means putting the subwoofer into pairing mode with a small button on the back. Then power the soundbar on or trigger the matching pairing command from the soundbar or remote.
The exact button names vary by brand. One system may use a dedicated Pairing button on the sub.
Another may use an ID SET workflow. Another may need a specific function key on the bar or remote.
The principle stays the same. Put the sub in pairing mode first, let the soundbar complete the handshake, and use the status light to confirm whether the link succeeded.
Model-specific instructions matter once you reach manual pairing. Guessing at the button sequence can put the system into the wrong state and waste time.
If your original bar and sub were serviced, replaced separately, or factory reset, manual re-pair is especially likely to be required.
That is not proof the system is dead. It means the saved wireless relationship may need to be rebuilt.
When the original pair keeps failing after correct re-pair steps, a known matched replacement can be more realistic than forcing an unrelated subwoofer into the chain.
A midrange option like the Polk Signa S4 makes more sense when the real issue is no longer just one failed pairing attempt.

Polk Signa S4
Know what the status lights and test result actually mean
A successful pairing should give you more than a hopeful guess.
Most systems show a status-light change on the subwoofer.
That light tells you whether it is connecting, connected, in standby, or not powered properly.
Brand colors vary, but the general logic is consistent.
A blinking light usually means pairing is in progress. A solid connection light usually means the link is established.
A red or standby state often points to a bad connection or a powered subwoofer that is not actually linked to the bar.
No light at all may mean the subwoofer is not receiving power.
After the light looks right, run a real listening test instead of assuming success.
Play something with obvious low-end weight. Confirm the sub level is turned up enough to hear.
Make sure the sound you are hearing is real bass from the sub, not just the bar getting louder overall.
If you are within a specific brand ecosystem and the old pair is failing, a matched replacement can be cleaner than mixing components.
For example, the LG S70TY soundbar system is easier to reason about than an unknown LG-compatible combination that may never pair properly.

LG S70TY soundbar system
Readers already in that ecosystem can compare broader bundled options in our best LG soundbar guide.
What if the subwoofer still will not pair?
If auto pair and manual re-pair both fail, simplify the environment before you escalate.
Move the sub closer to the soundbar. Unplug both devices for about a minute.
Reconnect power and try again in the recommended order.
Also remove avoidable interference. Wireless subs can behave worse when they are tucked behind dense furniture, pushed too far from the bar, or sitting in crowded wireless environments.
Power layout can matter too. Some users get more stable behavior when both units share the same nearby power area.
A full factory reset should come after these simpler steps, not before. Resetting is useful when the system is stuck in bad saved behavior, but it will not make an incompatible or failing sub become compatible.
If the pairing still fails after the right brand-specific method, the problem may no longer be pairing alone.
The subwoofer amplifier, wireless board, or the soundbar’s own transmitter may be failing.
At that point, a premium matched replacement path can be more realistic than endless troubleshooting loops.
The JBL Bar 700MK2 soundbar system is the kind of bundle that removes the pairing guesswork when the old pair no longer locks reliably.

JBL Bar 700MK2 soundbar system
If you reach that point, the better next step is either a brand-approved repair path or a complete matched replacement system.
What usually does not work is assuming any spare wireless subwoofer in the house can join the existing soundbar just because both devices are called wireless. The same ecosystem rule applies to wired subwoofers and passive speakers — most soundbars do not have a subwoofer output, pre-out, or passive speaker terminals because the expansion path is closed unless the bar was built for it, so forcing the connection can damage equipment.
For broader replacement help after repeated pairing failure, the best soundbars with subwoofers roundup, the best budget soundbar guide, and the broader soundbar hub are the right next pages.
Get Studio Tips Weekly
Join 5,000+ creators getting acoustic treatment advice every week.
No spam. Unsubscribe anytime.The Bottom Line
How to pair my subwoofer to my soundbar comes down to a clean order.
Confirm the sub is the correct matched unit. Let auto pairing happen first.
Use the brand’s manual re-pair method only when needed. Verify the result with both the status light and a real listening test.
Most pairing failures are not solved by random button presses.
They are solved by correct order and correct hardware. They also depend on knowing when a reboot or proper re-pair is enough and when the system itself is no longer a reliable match.
If the sub still will not connect after the right workflow, stop assuming the problem is just user error.
At that point, the better answer is usually brand-specific repair guidance or a complete matched replacement. Endless pairing attempts with incompatible hardware rarely help.
Frequently Asked Questions
Why is my soundbar not pairing with my subwoofer?
The most common reasons are simple. The subwoofer may not be the original matched unit.
The automatic pairing step may not have completed. The sub may also be too far away during first connection or need a manual re-pair after reset or service.
How do I reset a woofer?
The exact reset or re-pair method depends on the brand and model. Start with a simple power reboot first, then use the official pairing or reset button sequence only if the reboot does not restore the connection.
How do I know if my subwoofer is connected to my soundbar?
Check the subwoofer status light first.
Then confirm with a listening test that real bass is coming from the sub rather than just louder output from the bar.
A stable connection usually shows a solid connection light instead of a blinking or standby state.
Can any wireless subwoofer pair with any soundbar?
Usually no. Most wireless soundbar subwoofers are designed to pair only with the matching soundbar they shipped with or with very specific compatible replacements.
That is why cross-brand or random spare-sub pairing usually fails.

