Is your loft space an echo chamber of disruptive noise that prevents relaxation?
Targeted soundproofing enhancements can dramatically reduce noise transmission in loft spaces.
Let’s dive into the optimal methods for soundproofing loft floors, walls, ceilings and windows against noise infiltration.
Common Noise Problems in Lofts

Before jumping straight into solutions, it is important to understand the most prevalent sources of noise and sound transmission issues in loft spaces.
Identifying the specific problems you need to solve will inform the best approaches and materials to address them. Here are some of the main noise challenges lofts commonly face:
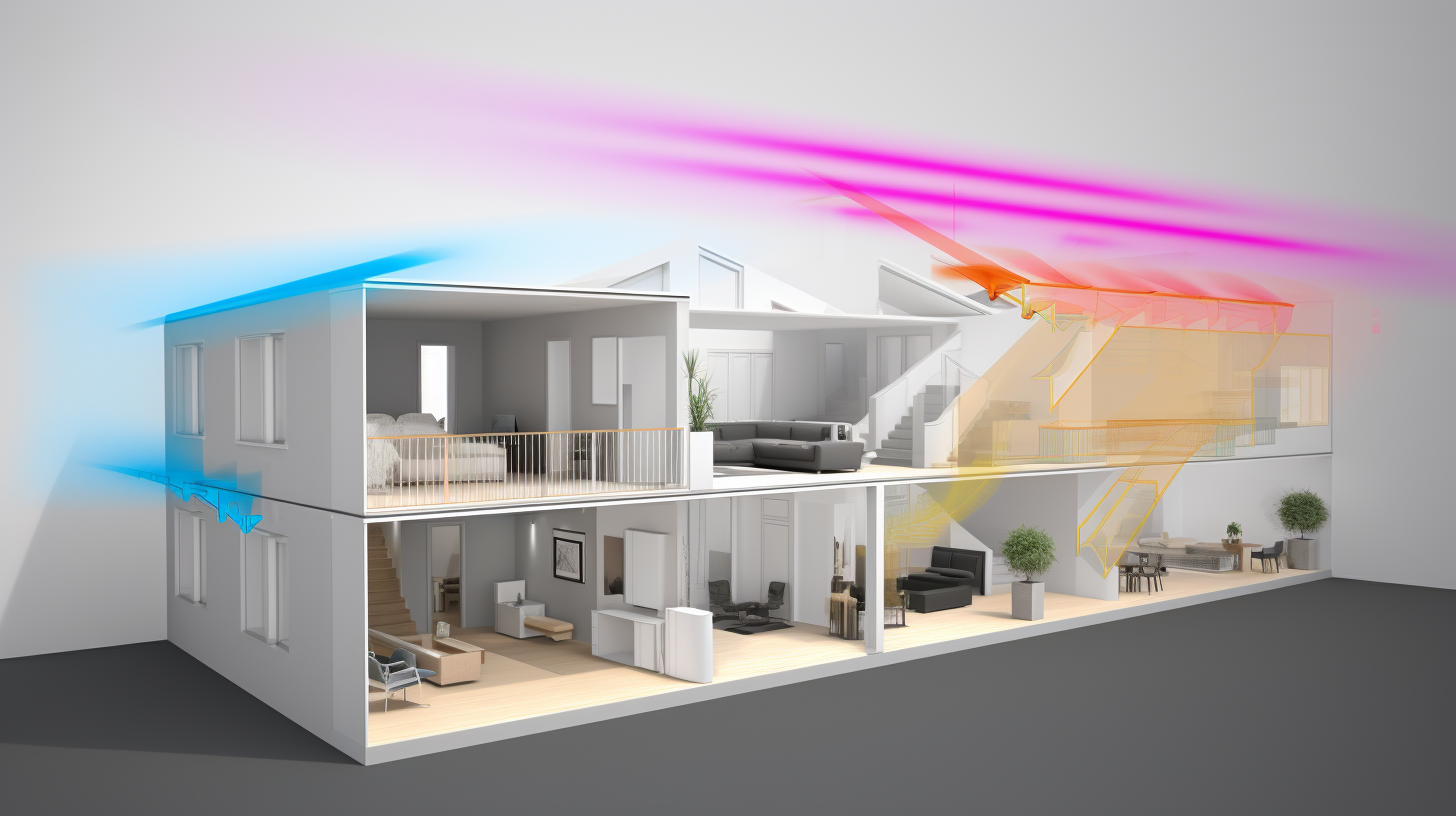
Noise Flanking Down from Loft Into Rooms Below
One of the biggest and most disruptive noise issues in a loft conversion is transmitted sound traveling down into the rooms below the loft floor.
This can include footsteps, voices, home theater sound systems, music, mechanical equipment, and more.
Without proper soundproofing, these noises can easily penetrate through the loft floor and impact residents on lower levels.
Hard flooring surfaces like laminate, engineered wood, tile, and even thin carpet offer very little acoustic insulation on their own.
Impact noises like footsteps are especially disruptive without additional sound absorbing materials.
Any air gaps, unsupported sections, or lack of mass in the floor assembly also allow sound to infiltrate downwards fairly easily.
Tackling this issue requires a multi-pronged approach to floor soundproofing, including adding mass, isolating the floor from joists, sealing penetrations, and employing targeted insulation.
Stopping overhead noise transfer is one of the most important jobs in a loft soundproofing project. The goal is to keep floor-generated noises in the loft only.
Noise Flanking Up Into the Loft Space From Below
While downward sound transmission is a major concern, noise migration also frequently goes the other direction from lower rooms up into the loft space.
In this case, sounds from the floor below like voices, televisions, music, mechanical systems, and general living noises can pass through the ceiling and compromise the quiet loft environment.
Even with thick carpet, padding, or other relatively effective noise-blocking flooring in the rooms underneath the loft, sound intrusion from below often remains a problem in many loft conversions.
Much of this unwanted noise is able to infiltrate upwards because loft ceilings typically lack mass, insulation, and isolation from joists and framing.
Adding mass and dedicated sound-absorbing insulation materials is key to curtailing noise intrusion from below.
This helps prevent everyday living sounds from interfering with the peaceful loft space. Creating an acoustic barrier between the loft and floor below is crucial.
Noise Transmission Through Interior and Exterior Walls
In addition to overhead and underfoot noise migration, transmitted sound through walls is another problematic issue in lofts, especially in apartments, condominiums, and other shared units with adjoining residences.
Even muffled conversations, louder music, home theater audio, and more from neighboring units can penetrate through walls surprisingly easily and disturb the peace and privacy.
Since loft walls often lack substantial insulation, especially interior walls between separate units in a building, noise has an easier time traveling through them.
Televisions, voices, foot traffic, and other sounds from next door or across a shared wall can quite readily penetrate into the loft space and disrupt its quiet environment.
Implementing sound-blocking insulation within the wall cavities, adding mass with extra layers of drywall, and sealing air leaks are critical for keeping nuisance noise from flanking through walls.
Stopping loud neighbors and external noise sources from intruding is essential.
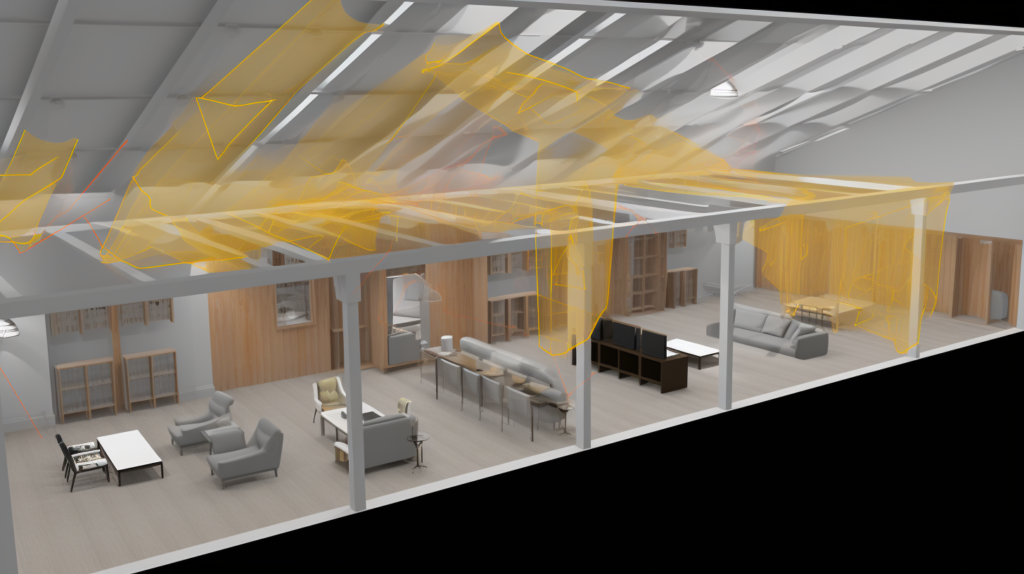
Exterior Noise Infiltrating In From Outside
On top of interior noise issues from adjacent rooms and floors, exterior noises penetrating in from outside can also plague loft spaces.
Common culprits include traffic noises from nearby busy roads, overhead planes, loud vehicles and municipal sounds, nearby commercial districts, echoing schoolyards, and more.
Lofts often feature large windows and open architectural designs with cathedral ceilings and skylights that readily allow these types of urban clamor and other outside noises to enter the space unimpeded.
Pigeons cooing and scratching right above the ceiling or on the roof also frequently generate bothersome noise that invades loft spaces.
Since lofts are positioned at the very top and outskirts of a home without the benefit of buffering floors and rooms in between, they tend to be more exposed and susceptible to noise intrusion from all directions unless proper soundproofing is in place.
Special steps must be taken to isolate the loft from these external acoustic invaders.
Common Misconception About Loft Insulation and Noise
Before delving further into specific soundproofing strategies and materials for lofts, it is important to clarify a common misconception around different types of insulation and their noise reduction capabilities.
Most lofts already have some amount of standard thermal insulation installed, typically fiberglass batts, blown cellulose, or rigid foam panels.
While this existing loft insulation provides crucial energy efficiency and temperature regulation, it unfortunately does little on its own to minimize noise transmission.
Additional dedicated soundproofing modifications are needed to effectively block noise.
The Difference Between Thermal Insulation and Acoustic Insulation
Thermal insulation, usually comprising fiberglass, rock wool, cellulose, cotton, recycled denim, wool, and other fibers mainly works by trapping air pockets within wall, floor, and ceiling cavities.
This creates resistance to heat flow and helps moderate indoor temperature. But these materials do not have much inherent density or mass.
Acoustic insulation, on the other hand, focuses specifically on impeding and absorbing sound vibrations using dense materials engineered for this purpose.
Common types are mass loaded vinyl (MLV), specialized rock wool, soundproofing foam and caulk, noise dampening composites, and similar products selected specifically for their acoustic isolation properties, not just thermal characteristics.
So while standard loft insulation from companies like Roxul or Owens Corning provides crucial energy efficiency and indoor climate control, it does not offer substantial standalone sound blocking capabilities.
Effective soundproofing requires augmenting the existing insulation with dedicated mass-loaded acoustic materials, isolation techniques, and air sealing methods.
Combining Approaches for Optimal Noise Control
In most retrofit cases, some amount of loft insulation like batts or loose fill is already present, so soundproofing initiatives simply focus on enhancing and improving upon the existing installation.
A multilayered approach works best, combining standard thermal insulation with specialized acoustic products and noise isolation techniques.
Simply adding more standard insulation likely will not move the needle much in terms of curtailing noise transmission on its own unless very thick quantities are used.
Targeted soundproofing modifications must be made throughout the loft to address common issues like airborne noises, impact sounds, flanking, resonance, vibrations and more.
With an intelligent mix of sound-absorbing insulation paired with mass loaded noise barriers and isolation best practices, it is possible to successfully soundproof a loft space, build upon existing insulation, save money, and keep messy removal work to a minimum.
A well-planned combination of enhancements is key.
How to Soundproof a Loft Floor Against Overhead Noise
Soundproofing the loft floor helps prevent noises generated by occupants moving above from transferring down into the rooms below.
This includes mitigating everything from normal footsteps and voices to home theater system rumble and floor-transmitted bass vibrations.
Here are the best practices for loft floor soundproofing:
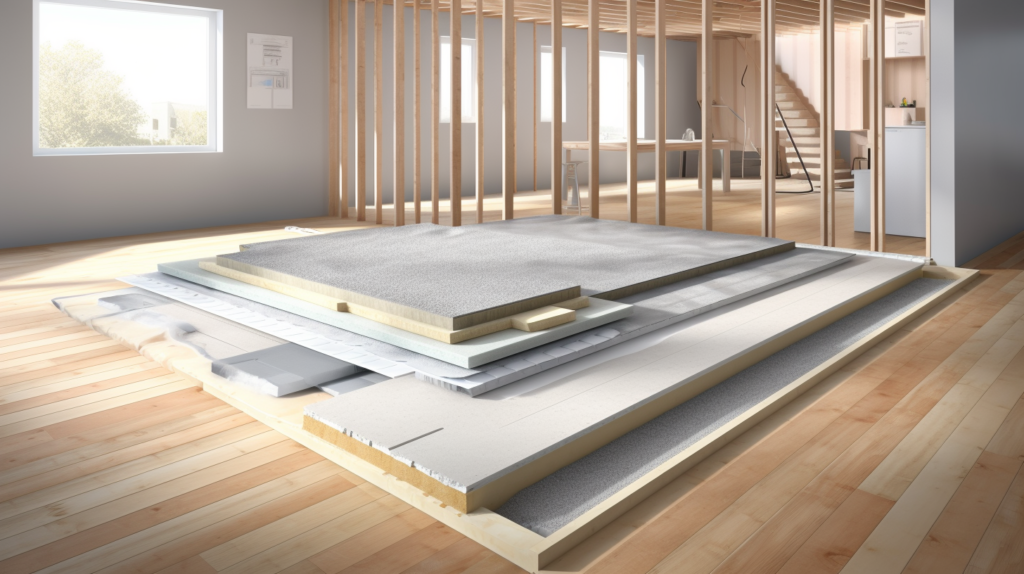
Expose or Add New Layers Atop the Existing Floor
If the loft floor is completely unfinished with exposed joists and no decking, this provides an ideal blank slate for direct sound installation between joists.
However, most loft conversion projects involve existing finished flooring materials already in place whether carpet, laminate, hardwood, tile, or other surfaces.
In these scenarios, the simplest and least invasive tactic is to install new soundproofing materials and layers directly atop the existing floor rather than demolishing and removing it. Glue down or mechanically fasten new layers over the current floor.
This saves time and money while minimizing dust and debris.
If the floorboards can be safely removed to expose joists without damaging finishes below, this allows for more comprehensive insulation installation within joist cavities. But removing floors is labor intensive and not strictly necessary to achieve meaningful noise reduction.
Choose the Right Type of Insulation Material
For the most effective noise blocking, use acoustic insulation specifically formulated for soundproofing rather than basic thermal insulation.
Good options are noise-reducing rock wool like Roxul Safe’n’Sound or fiberglass batts designed with sound dampening properties. Avoid blown-in cellulose or standard fiberglass.
Install insulation between joists if exposed, or on top of boards between new furring strips if adding layers over existing floors. Pack insulation to completely fill cavities and eliminate any air pockets or compression.
The goal is to create uniform coverage without gaps that allow noise intrusion.
If adding atop finished flooring, use dense materials like mass loaded vinyl (MLV), cork underlayment, or specially constructed sound mats. MLV in particular excels at blocking airborne noise transfer to rooms below due to its high density properties.
Use thick 1/8” MLV for maximum effectiveness.
Decouple and Isolate Floors from Framing With Resilient Channels
In addition to adding mass and insulation, isolating the floor from the surrounding framing is also extremely important for preventing noise transfer.
One of the best ways to achieve this is by installing resilient metal channels beneath floors and attaching finished layers like drywall to the channels instead of directly to joists.
Resilient channels work by “floating” layers above framing. This stops vibrations and noise from transferring through structural elements like joists, allowing finished materials to work independently in reducing sound transmission.
Isolate noise before it reaches floors below.
Position channels perpendicular to framing members and fasten to joists or new furring strips using special acoustic isolation clips or grommets to prevent rigid contact.
Then install finished layers like drywall or subflooring above so they hang in the channels without rigidly contacting framing.
Build Up Layers of Drywall for Additional Thickness
With insulation and isolation layers in place, adding multiple layers of thick 5/8” or 1/2″ drywall screws into the resilient channels provides mass and density that blocks sound.
Staggering the drywall seams between layers improves effectiveness.
Two or three layers of drywall offer vastly improved noise reduction over just a single layer.
The extra mass impedes noise vibrations, forcing sounds to lose energy as they try to transmit through the multiple heavy, limp layers.
Seal drywall seams thoroughly with acoustic sealant and tape for air tightness. Eliminate any air gaps that allow noise flanking around drywall.
The drier and more airtight the assembly, the better the sound isolation achieved.
Install Floating Subfloor for Extra Isolation
For even greater acoustic isolation and noise absorption, install a floating subfloor atop ceiling drywall before attaching finished flooring. This provides further decoupling from joists, allowing the floor to move independently and slightly isolate sounds.
Floating subfloors or underlayments are installed so they do not rigidly contact framing. An extra layer of plywood or OSB screwed into resilient channels works well.
Cork, felt, and rubber underlayments also help dampen sounds and vibrations.
The finish flooring then simply floats atop the extra decoupled layer. This added separation reduces noise transmission through footsteps, vibrations, and other impact sounds conducting through flooring above to rooms below.
Caulk and Seal Penetrations, Gaps, Edges
Finally, seal up any remaining gaps, cracks, or penetrations around floor edges, electrical outlets, ducting, gas lines, drainage pipes, and other openings with acoustic sealant like Green Glue Noiseproofing Sealant.
Meticulously caulking all peripheries, corners, penetrations, and transitions stops uncontrolled airflow and noise flanking.
Air tightness is vital for keeping sound contained in the loft rather than spreading to other areas of the home.
Leave no cracks unsealed.
With diligent installation of sound-absorbing insulation, vibration damping, multiple drywall layers, isolation techniques, and thorough air sealing, overhead noise transmission from loft floors can be drastically reduced.
Strive for a high performance assembly specifically designed to trap sounds in the loft space.
How to Soundproof Loft Walls Against Noise Intrusion
In addition to floors, walls also warrant attention during loft soundproofing projects to prevent noise transfer from adjacent rooms and outside sources.
Similar principles and technologies used for soundproofing floors can be applied to walls:
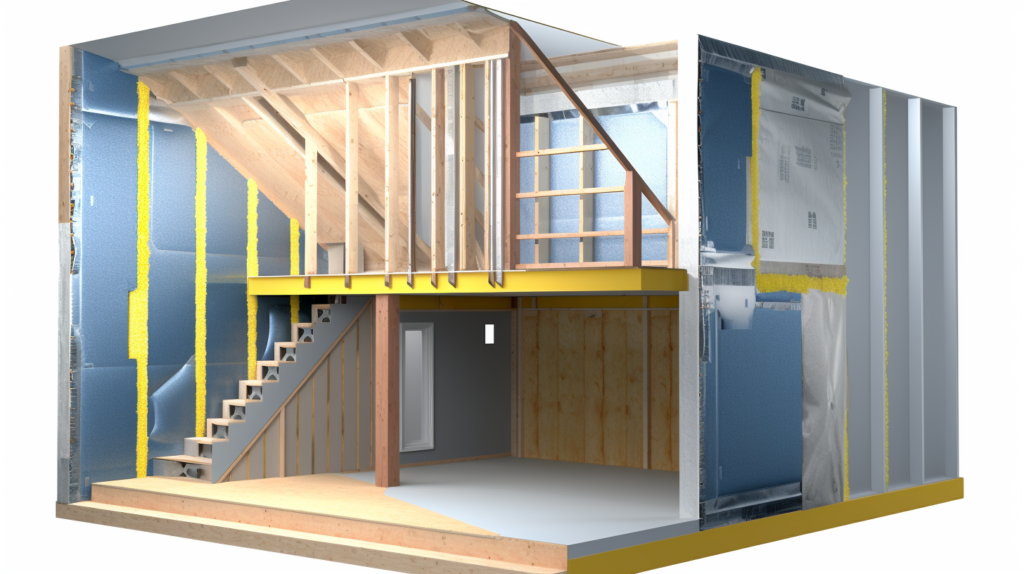
Expose and/or Add New Wall Layers
If possible and non-disruptive, removing wall finishes like drywall to expose the stud cavities enables the most direct access for installing acoustic insulation in the bays between each stud.
But demolishing existing walls is extremely messy and labor intensive.
Adding new layers over existing walls with acoustic upgrades sandwiched in between offers a simpler method.
Install new furring strips or studs directly over the wall surface while packing insulation batts in the new cavities as they get built out.
This sandwiches sound dampening treatments within new and old wall framing without needing to tear down original drywall.
Only remove wall layers if easily accessible or severely compromised.
Otherwise add new enhanced layers over existing surfaces for straightforward soundproofing.
Pack Wall Cavities With Insulation
Once able to access within wall stud bays either directly or covered with furring strips, fill the cavities completely with soundproofing insulation like Roxul Safe’n’Sound, Owens Corning QuietZone, or similar.
Avoid fluffy fiberglass.
Dense packed rock wool insulation excels at absorbing noise flanking through interior loft walls, significantly dropping decibel levels.
This blocks direct transmission and also helps mitigate internal wall resonances that amplify noise.
Leave no voids or gaps.
Additionally install insulation and soundproofing boards over exterior walls to dampen outdoor noise sources trying to enter the loft.
Multi-layered dampening keeps wall cavities from transmitting noise, forcing sounds to dissipate.
Isolate Walls Using Resilient Channels
As with floors, isolating walls from surrounding studs and framing prevents vibration transfer and noise conduction through structural elements.
Install horizontal resilient metal channels attached to studs using acoustic isolation clips and grommets.
Then fasten multiple layers of drywall to the resilient channels instead of directly to studs so the drywall can “float” independently.
This stops direct stud contact which conducts noise.
Drywall installed in channels can flex and impede noise vibrations better.
Position channels 16 or 24 inches apart for walls depending on drywall size. Stagger channels on opposite sides of shared walls for additional decoupling.
Isolate and interrupt noise paths through framework surrounding walls.
Build Up Layers of Drywall for Thickness
Add multiple layers of thick 5/8” or 1/2” drywall affixed to channels to substantially increase mass which blocks noise. Two, three or even four layers of drywall provide exponentially improved damping versus a single layer.
Stagger drywall seams and edges between layers for extra mass buildup and to eliminate stiff connections between sheets that degrade performance. More limp mass equals better sound isolation.
Seal and tape seams thoroughly for air tight installation.
The cumulative effect of multiple heavy drywall sheets with staggered joints generates extremely effective noise blocking and absorption within the wall assembly. Mass loaded barriers prevent noise vibrations.
Seal All Gaps and Cracks
Finally, seal up any remaining cracks, openings, or gaps around wall perimeters, electrical boxes, vents, piping penetrations, etc using acoustic sealant. This is vital for preventing sound flanking around edges of insulation.
Meticulous caulking and taping seals the assembly against air leaks that allow noise to bypass insulation through voids.
Stopping sound infiltration through cracks is just as important as adding insulation and mass.
Leave no breaches unsealed.
Together these enhancements create walls fortified against noise intrusion whether from adjacent rooms, other units, or exterior penetration.
Upgraded loft walls stop unwanted sounds passing through original vulnerable barriers.
How to Soundproof a Loft Ceiling Against Outside Noises

Since lofts are located directly under the roof, soundproofing the ceiling is crucial to block exterior noises from intruding in from above.
This includes dampening sounds from rainfall, wildlife, traffic, overhead planes, and other external noise sources.
The principles are similar to soundproofing walls and floors:
Add Density and Mass
Begin by installing dense insulation like rock wool between existing or added ceiling joists to increase sound-blocking mass. Fully pack cavities to leaving no gaps.
Supplement with additional mass loaded materials like MLV over the ceiling.
The greater the density and weight of materials, the more they impede noises and vibrations from transmitting through the ceiling from outside sources above the roof.
Mass is key for noise reduction.
Isolate the Ceiling
Next, install resilient channels atop the ceiling perpendicularly across joists before attaching drywall. This decouples the drywall from joists to prevent vibration transfer through framing and isolate the ceiling.
Drywall attached to channels can flex and block noises independently. The channels act as shock absorbers, stopping noise from passing through structural elements above.
Build Up Drywall Layers
Affix multiple layers of 5/8” or 1/2” drywall to the resilient channels to add mass and density. 2 or 3 staggered drywall layers provide exponentially improved noise blocking compared to a single layer.
The heavier the drywall assembly, the more incoming sounds from rain and external sources are dissipated and lose energy before reaching interior spaces.
Thicker = better acoustic isolation.
Eliminate Gaps
Seal all drywall seams and gaps around edges, penetrations, etc thoroughly with acoustic caulk. This seals flanking paths where outside noise could sneak through.
Forced airtightness maximizes soundproofing capacity.
With sufficient mass, isolation, staggered blocking layers, and comprehensive air sealing, the loft ceiling will effectively block unwanted exterior noise from compromising the indoor acoustic environment.
How to Soundproof Loft Windows Against Outside Noise
While floors, walls and ceilings are the most important areas for loft soundproofing, windows should also receive some upgrades to prevent noise infiltration from outside sources.
Here are some good ways to reduce noise penetration through windows:
Install Double or Triple-Pane Windows
Replace existing windows with new models featuring double or triple-pane glass. The additional panes and interior air chambers improve sound blocking.
Also select laminated or thicker glass for more mass.
If unable to replace windows, adding secondary panes is another option. Interior removable plastic sheets or exterior glass storm windows create noise-dampening dual glazing.
Every layer and air gap helps block outside sound.
Use High-Performance Frames and Materials
Upgrade to well-insulated window framing made from materials like composite wood fiberglass, vinyl, or reinforced aluminum instead of standard hollow vinyl or aluminum frames that easily transfer noise.
Likewise ensure glass units employ advanced noise-reducing technologies like acrylic and layered polymer laminates. Specialized materials and engineered frames improve acoustics.
Add Interior or Exterior Storm Windows
If unable to replace primary windows, adding secondary storm windows can also help reduce noise infiltration. Interior removable acrylic sheets or exterior glass storms provide extra air chambers and mass.
Interior window films or plastic sheets mounted directly to frames are simpler to install. Exterior storms require more work but block noise earlier before entering the building.
Both improve sound isolation.
Seal Frames and Gaps
Carefully seal the perimeter of window frames where they meet exterior walls using acoustic sealant.
This closes any cracks that allow noise to flank around window units instead of through them.
Also seal any remaining gaps around openings, ductwork, electrical boxes, baseboards, and other potential sound leak points throughout the loft using caulk. This completes the acoustic seal.
With upgraded multi-pane windows, high-performance materials, isolation techniques, and meticulous air sealing, undesirable outside noises are prevented from intruding into loft living spaces.
Occupants can better enjoy quieter indoor relaxation.
Conclusion
With lofts being more exposed and less insulated from surrounding spaces than lower floors, they commonly suffer from excessive noise transfer issues from upstairs floors, adjacent rooms, and outside sources.
But by methodically addressing each weak point using the right combination of sound-dampening insulation, decoupled barriers, airtight sealing techniques, vibration isolation, and mass loading, their noise problems can be dramatically reduced.
While no space can be made 100% acoustically impenetrable short of a recording studio, diligent installation of the appropriate soundproofing enhancements outlined above can successfully transform a loud, disruptive loft into a reasonably peaceful oasis.
But solving a loft’s acoustic issues requires comprehensive treatment using the right materials and methodologies.
With knowledge of soundproofing principles and physics, lofts can go from noisy to tranquil.