Best Acoustic Treatment For Corners (Bass Traps Guide)
Best acoustic treatment for a corner is a thick bass trap straddled across the corner with an air gap behind it — but most people either skip corners entirely or treat them with thin panels that do nothing for the low frequencies where corners cause the most damage.
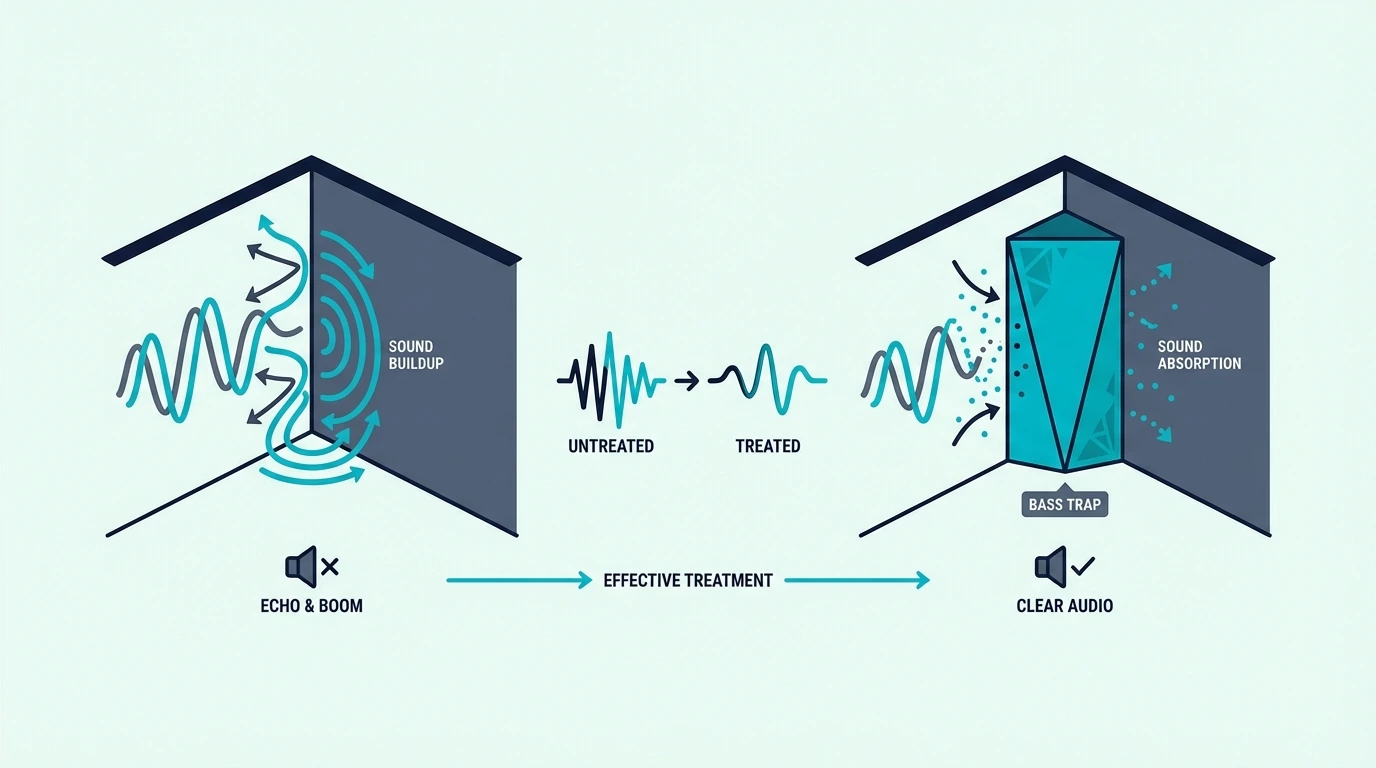
Corners are where bass energy is highest in any room. Sound pressure doubles at every wall boundary and quadruples where three surfaces meet.
Treating corners first gives the biggest acoustic improvement per panel of any treatment position in the room.
The reason corners matter more than walls is physics: low-frequency standing waves always peak at room boundaries. A bass trap in a corner absorbs energy at the point of maximum pressure, which is dramatically more effective than the same panel placed on a flat wall section.
Below you will find why corners accumulate bass energy, what types of corner treatment work best, how many corners to treat, and the specific panel thickness required for effective low-frequency absorption. Start with the four vertical wall-wall corners — they provide the most improvement for the least cost.
Corners accumulate the most bass energy in any room. Treat all four vertical wall-wall corners with bass traps at least 4 inches thick, straddled diagonally across the corner with an air gap behind. Add tri-corner treatment (where walls meet the ceiling and floor) for maximum bass control. Corner treatment provides more acoustic improvement per panel than any other placement position.
Why Do Corners Need Special Treatment?
Sound pressure in a room is not evenly distributed. Low-frequency standing waves create pressure patterns where certain positions have very high pressure and others have very low pressure.
Corners consistently have the highest pressure of any position in the room. This is why professional studios always treat corners before any other surface — the return on investment per panel is highest at these positions.
How Bass Builds Up In Corners
Low-frequency standing waves peak at room boundaries — the walls, floor, and ceiling. At a single wall boundary, sound pressure is approximately double the mid-room value.
Where two walls meet (a vertical corner), the pressure from both boundaries combines. The result is approximately four times the pressure found at the center of the room.
This pressure multiplication is why a single bass trap in a corner absorbs more low-frequency energy than the same trap placed anywhere else in the room. The panel intercepts sound at maximum pressure, which maximizes the energy transfer from sound wave to heat.
This concentration of energy makes corners the most effective location for bass absorption. A bass trap in a corner encounters far more low-frequency energy per square foot than the same trap on a flat wall.
The how treatment works guide explains the physics of standing waves and pressure distribution in detail.
Tri-Corners Vs Wall-Wall Corners
Tri-corners — where two walls meet the ceiling or floor — have the highest pressure of any position in a room. Three boundaries converge at these points, creating approximately eight times the mid-room pressure.
Wall-wall vertical corners are the next highest-pressure location. These run floor-to-ceiling at each of the four room corners and are the most practical positions to treat because they offer the most surface area for bass trap placement.
In a typical rectangular room, the four vertical corners provide approximately 32-40 linear feet of treatment surface in a room with 8-10 foot ceilings. That is more than enough space to mount effective bass traps without consuming usable floor or wall area.
For small rooms where bass problems are most severe, treating both tri-corners and vertical corners provides the maximum bass control possible. For most rooms, starting with the four vertical corners delivers the majority of the improvement.
What Types Of Corner Treatment Work Best?
Not all corner treatment is equally effective. The key variables are panel thickness, mounting method, and the air gap behind the panel.
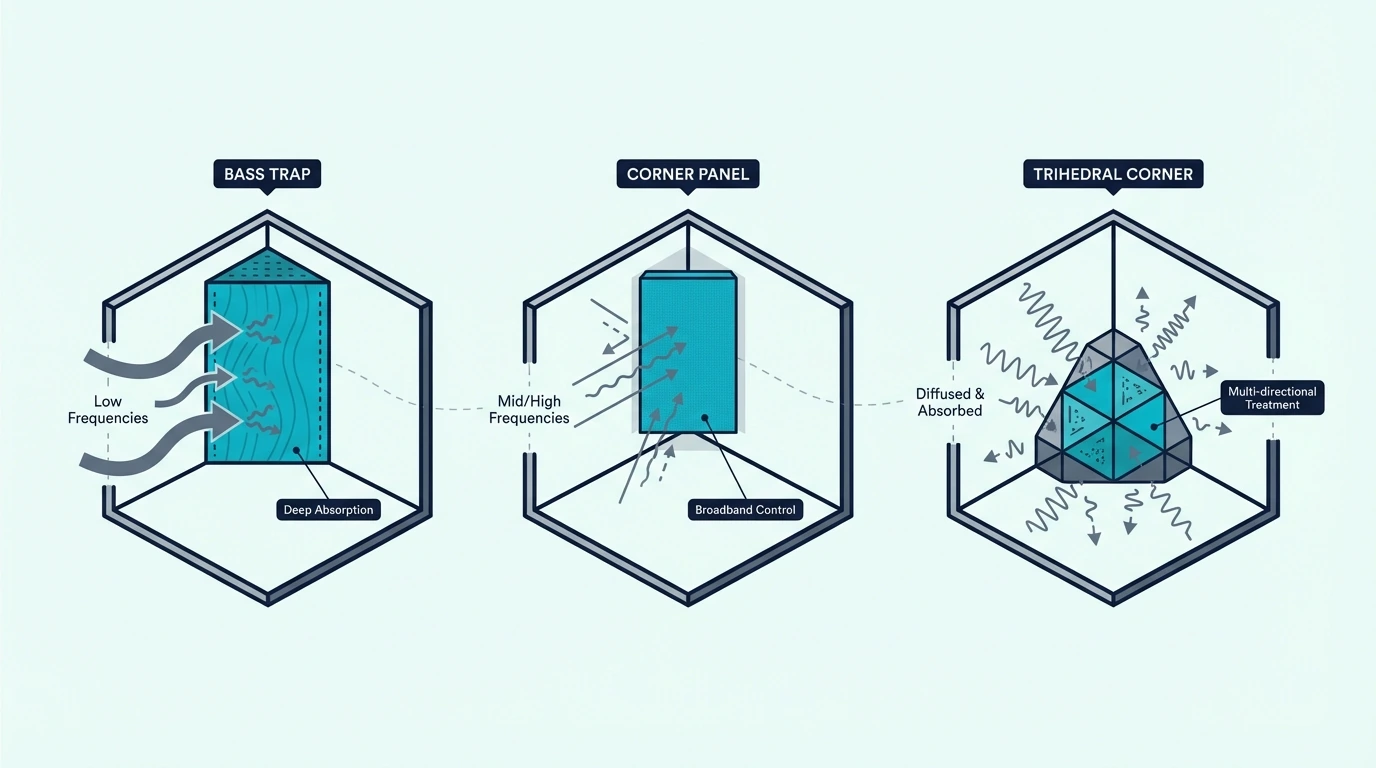
Straddled Broadband Absorbers
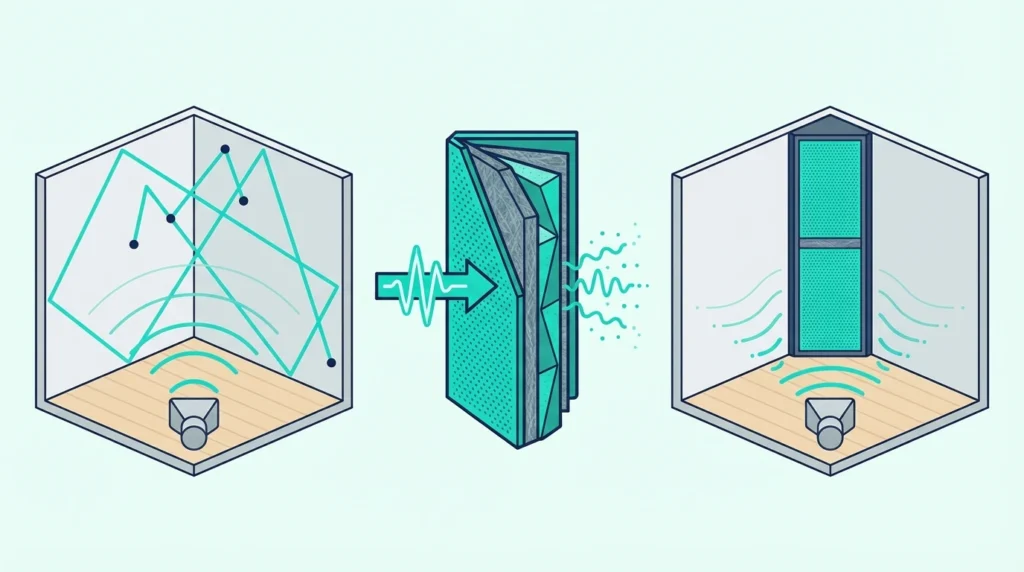
A flat panel mounted diagonally across a corner — straddled from wall to wall — is the most effective and most common approach. The panel sits at a 45-degree angle with a triangular air gap behind it.
This air gap is critical. It adds effective absorption depth without increasing the panel thickness.
A 4-inch panel straddled across a corner with a 12-inch air gap behind it absorbs bass frequencies as effectively as a much thicker panel mounted flush.
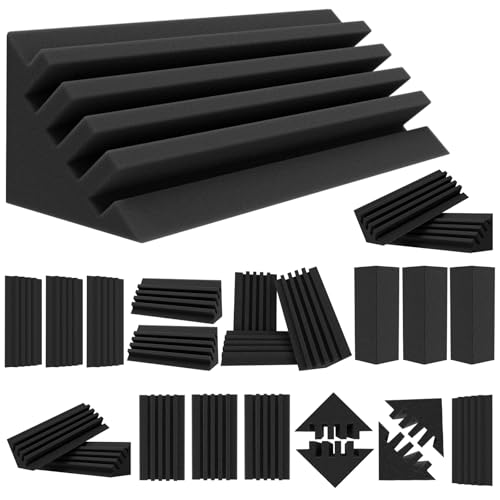
Rockboard 60 mineral wool boards at 6 lb per cubic foot density are ideal for building straddled corner bass traps. Stack two boards to 4 inches of thickness and mount them diagonally across each corner with L-brackets attached to the adjacent walls.
Rockboard 60 mineral wool boards
The DIY treatment guide covers step-by-step construction of straddled corner bass traps including frame dimensions and fabric wrapping techniques.
Triangular Corner Traps
Triangular traps are wedge-shaped panels that fit flush into the corner rather than straddling across it. They use less room space than straddled panels but have a smaller air gap behind them, which reduces their low-frequency effectiveness.
Triangular traps work best as a supplement to straddled panels — not as a replacement. Use them in corners where a straddled panel would protrude too far into the room, such as behind a door or in a walkway.
The absorption performance difference between straddled and triangular traps is significant. A straddled 4-inch panel with a 12-inch air gap absorbs effectively down to 80 Hz, while a triangular trap of the same thickness in the same corner only reaches approximately 150 Hz before performance drops off.
Pre-Built Panel Options
For those who prefer ready-to-hang treatment without DIY construction, UMIACOUSTICS fiberglass panels with included hanging brackets can be straddled across corners using the brackets mounted to adjacent walls. The 2-inch fiberglass core provides broadband absorption, and the air gap behind adds effective low-frequency depth.

UMIACOUSTICS fiberglass panels
The fiberglass treatment guide compares panel thicknesses and their absorption coefficients at different frequencies.
Get Studio Tips Weekly
Join 5,000+ creators getting acoustic treatment advice every week.
No spam. Unsubscribe anytime.How Many Corners Should You Treat?
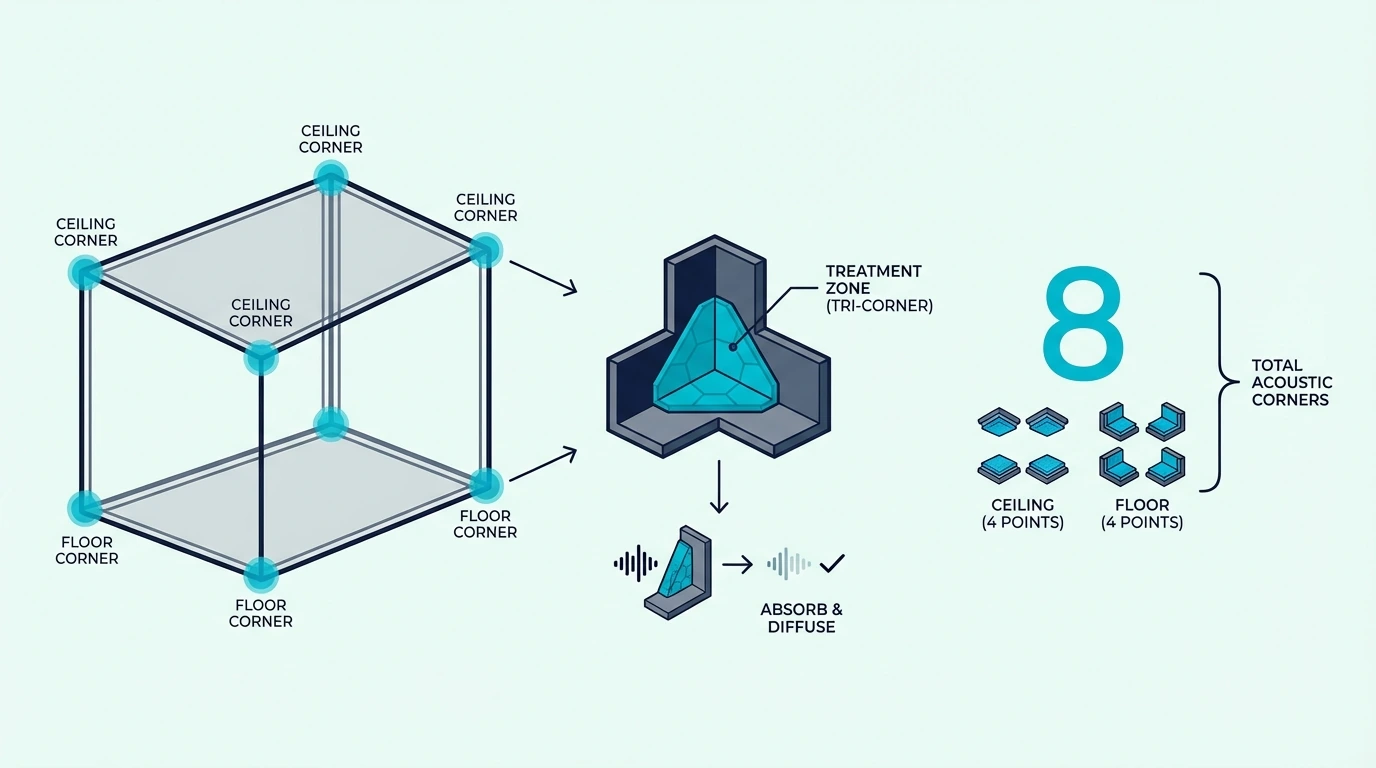
All of them, ideally. At minimum, treat the four vertical wall-wall corners from floor to ceiling.
This addresses the highest-pressure locations with the most practical surface area for treatment.
After the four vertical corners, add treatment to the wall-ceiling tri-corners above the listening position. These are the next highest-priority locations for bass control.
A room with all four vertical corners and all four ceiling tri-corners treated will have significantly flatter bass response than a room with panels covering twice as much flat wall area. The placement matters more than the total square footage of treatment.
Olanglab 24×48 inch fiberglass panels provide substantial corner coverage when straddled diagonally. A 2-pack treats the two front corners behind the speakers — the highest-priority pair for mixing rooms.
Olanglab 24×48 inch fiberglass panels
For mixing rooms, symmetrical corner treatment is essential. Treat corresponding corners identically to maintain balanced stereo imaging.
Asymmetrical treatment creates different bass absorption on each side of the listening position, which shifts the perceived stereo center.
The cost breakdown guide helps budget for corner treatment across different room sizes and treatment quality levels.
The Bottom Line
Corners are the highest-priority treatment position in any room. Bass energy concentrates at room boundaries, and corners — where two or three boundaries meet — have the highest pressure of any position.
Treat all four vertical corners with panels at least 4 inches thick, straddled diagonally with an air gap behind them. Add tri-corner treatment for maximum bass control.
The full guide to acoustic treatment covers the complete treatment workflow from corner bass traps through wall panels and ceiling clouds. For home studio builders, corner treatment is always the first step.
Frequently Asked Questions
Does acoustic treatment need to be symmetrical?
For mixing and critical listening, yes. Symmetrical treatment ensures balanced stereo imaging by creating equal absorption on both sides of the listening position.
For general recording or voice work, symmetry is less critical. Treat the corners and first reflection points that are accessible and practical for your room layout.
Can acoustic panels go around corners?
Yes — straddling a panel diagonally across a corner with an air gap behind it is the most effective bass trap placement method. The air gap dramatically increases low-frequency absorption compared to mounting the same panel flat on a wall.
Mount the panel using L-brackets or wire attached to both adjacent walls. The panel should span from wall to wall at a 45-degree angle.
How thick should corner bass traps be?
Minimum 4 inches for meaningful low-frequency absorption. 6 inches is better, and the air gap behind a straddled panel adds effective depth beyond the panel thickness itself.
A 4-inch panel straddled across a corner with a 12-inch air gap behind it absorbs bass frequencies down to approximately 80-100 Hz effectively. Thicker panels or larger air gaps extend absorption to even lower frequencies.
For rooms with severe bass problems below 80 Hz, stacking panels to 6 inches thick and maximizing the air gap is the most cost-effective approach. As a budget starting point while you plan thicker fiberglass builds, TroyStudio foam bass traps fill all four corners immediately for under 35 dollars and tame the mid-bass while you build more serious fiberglass traps.