How to Put Acoustic Foam on Wall: 5 Methods That Won’t Damage Your Walls
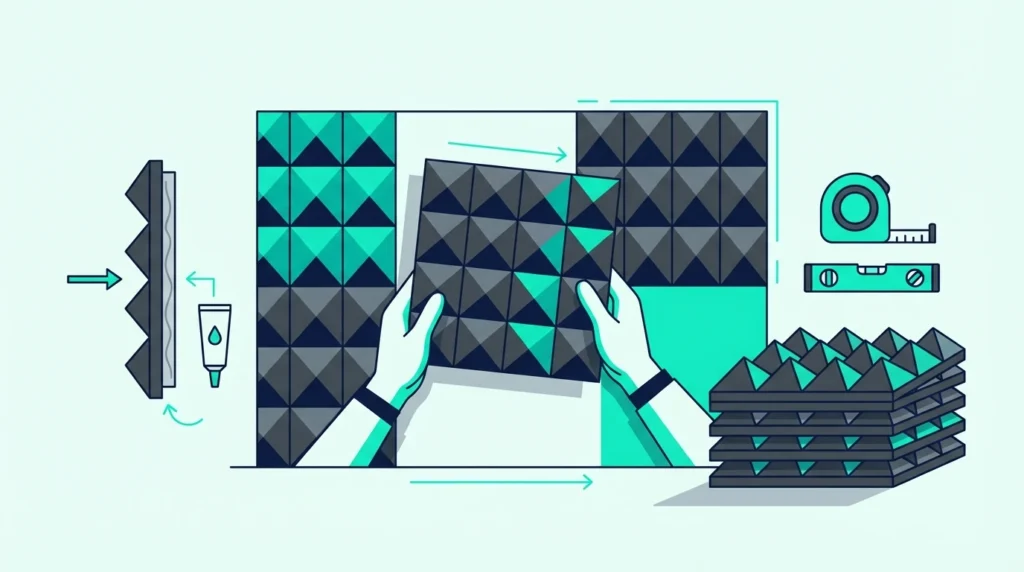
How to put acoustic foam on a wall is simple — but the wrong mounting method is how panels end up on the floor (or your paint ends up on the panels).
If your recordings sound roomy or you’re fighting slap echo, those bare-wall reflections are the culprit — and a bad install means your treatment never stays put long enough to fix them.
You’ll get five proven mounting methods (renter-safe to permanent) so you can tame reflections and get cleaner, more direct sound without wrecking your walls.
Start by deciding whether you need damage-free removal, then begin with the wall behind your mic (or your first reflection points) and follow the step-by-step method that matches your wall surface.
Command strips are best for renters on smooth walls, while spray adhesive is best for permanent installs (but expect paint damage on removal). For maximum flexibility, mount foam to backing boards and hang the boards with removable hooks; use double-sided tape or T-pins when strips and spray aren’t a fit.
What’s the Best Way to Put Acoustic Foam on a Wall?
The answer depends entirely on one question: do you need to remove this foam later without damage? That single factor determines which method makes sense for your situation.
Renters and anyone in temporary spaces should stick to Command strips or the mounting board technique. These methods leave walls completely unharmed when removed correctly.
Homeowners planning permanent installations can use spray adhesive for the strongest, most reliable bond — but understand that removal means repainting.
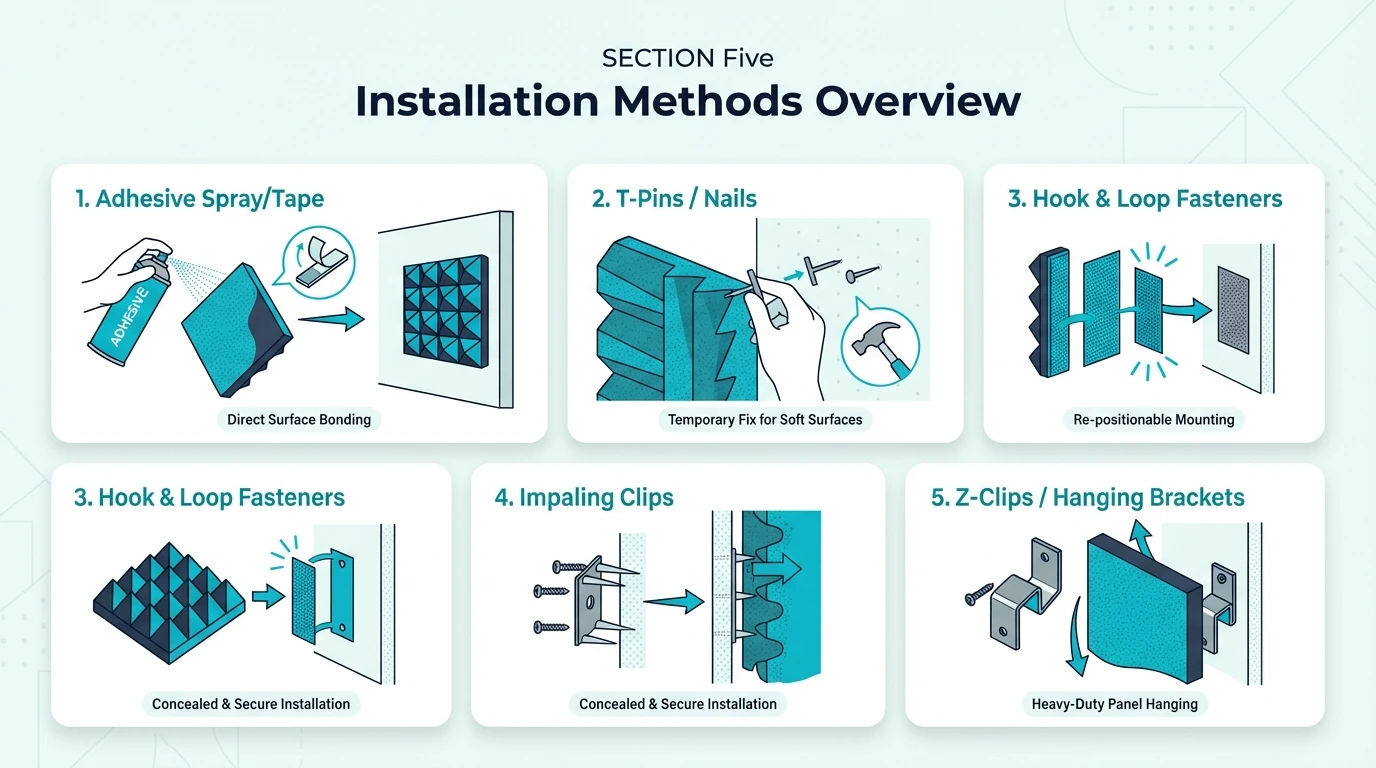
The 5 Main Methods (Overview)
Each installation method sits somewhere on a spectrum from “completely removable” to “permanent fixture.” Understanding where each falls helps you pick the right approach for your situation.
Command strips anchor the removable end — they hold well, come off cleanly, and leave zero damage when you follow the pull-tab technique. Our best adhesive guide covers the top Command strip options.
The trade-off is hold strength. Heavy panels or high-humidity environments can cause strips to fail over time.
Spray adhesive anchors the permanent end. Nothing holds foam more securely, but removal tears paint off drywall.
If you’re considering this route, our adhesive comparison helps you choose the right product. There’s no middle ground here — it’s essentially permanent.
The mounting board method sits in between. You attach foam to lightweight backing boards, then hang the boards using removable hooks.
The foam itself never touches your wall, giving you complete flexibility to rearrange or remove without damage.
Double-sided tape offers a quick middle option. Stronger than Command strips, easier than spray adhesive, but removal typically pulls some paint.
T-pins work specifically for textured walls where adhesives fail to grip properly.
Which Method Is Best for Renters? (Damage-Free Options)
If your security deposit matters — and it should — focus on Command strips or the mounting board method. These are your only truly damage-free options.
Command strips work well for standard 12”x12” foam panels on smooth walls. Apply strips in an X pattern across the back, press firmly for 30 seconds, and they’ll hold for years.
When you move out, the pull-tab removal leaves walls pristine if you follow the instructions exactly.
The mounting board approach eliminates any risk entirely. Your foam attaches to foam board or cardboard, and the board hangs on removable picture hooks.
You could rearrange panels weekly without touching your walls. This method takes more setup time but offers unmatched flexibility.
Skip spray adhesive completely in rentals. Even “removable” spray adhesives will pull paint when you try to remove foam panels.
No adhesive marketed as permanent should touch rental walls. The marketing claims don’t match real-world removal outcomes. Instead, let’s look at what works when you actually own the walls.
Which Method Is Best for Permanent Installation?
Homeowners treating a dedicated studio, podcast room, or theater should use spray adhesive. Nothing else matches its holding power or long-term reliability.
The bond strength matters because acoustic foam is surprisingly heavy in bulk. A wall covered with 24 panels puts significant load on whatever mounting system you choose.
Spray adhesive distributes that load across the entire back surface of each panel, eliminating failure points.
The permanence also becomes an advantage in dedicated spaces. You won’t want to rearrange foam panels in a properly treated room — the placement is based on acoustic principles, not aesthetics.
Once you’ve identified reflection points and calculated coverage percentages, those panels should stay put for years. For help finding those reflection points, see our foam placement guide.
Accept the trade-off upfront: removing spray-adhesive-mounted foam means repainting that wall. If you might change your mind, use the mounting board method instead and preserve your options.
What Supplies Do You Need to Install Acoustic Foam?
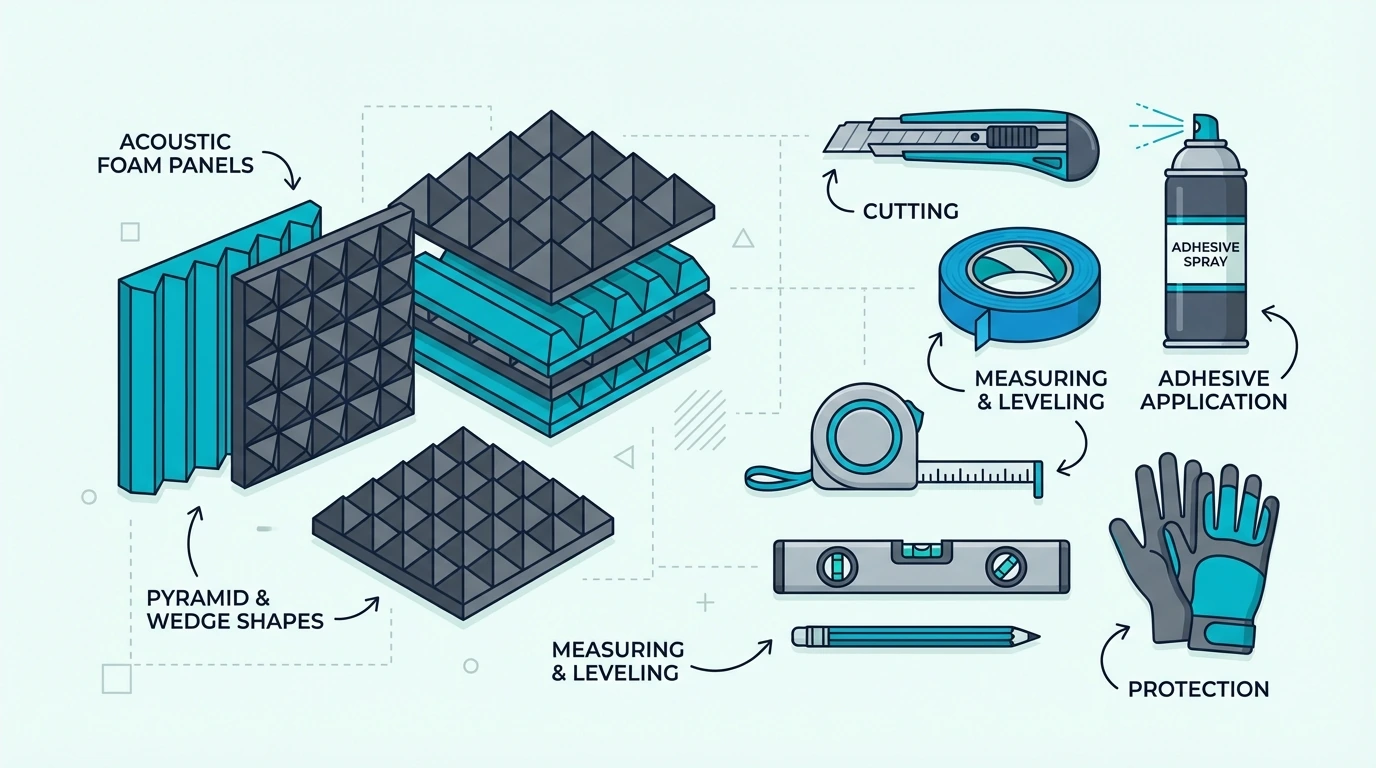
With your method chosen, gather everything before starting. Running to the hardware store mid-project wastes time and kills momentum — especially frustrating when you’ve already got adhesive drying on foam panels.
Before you open any adhesive, check the exact condition of the surface you’re treating.
Essential Tools for Every Method
Some items appear in every installation regardless of which mounting approach you use. Get these first, then add method-specific supplies.
A tape measure and pencil let you mark panel positions before committing. Eyeballing placement leads to crooked rows that become obvious once you step back.
A level keeps rows straight across the wall. Even a 2-degree tilt compounds across multiple panels, creating a visible wave pattern that screams “amateur installation.”
Painter’s tape marks positions and protects surfaces during spray adhesive application. It’s cheap insurance against messy mistakes.
A step stool or ladder reaches upper wall areas safely. Foam installation involves sustained overhead reaching — don’t make it harder by stretching on tiptoes.
With your tools ready, you need to match your adhesive to your specific wall type.
How Does Installation Differ by Wall Surface?
Not all walls are created equal, and the same adhesive behaves differently on drywall versus brick versus plaster. Understanding your surface saves failed installations and wasted materials.
Painted Drywall — the most forgiving surface. Most adhesive methods work well on smooth painted drywall. Semi-gloss and gloss paints bond better than flat paint finishes. Clean with rubbing alcohol, let dry completely, and proceed with your chosen method.
Textured Drywall — orange peel and knockdown textures prevent full adhesive contact. Skip tape-based methods entirely. Use T-pins, picture hooks with mounting boards, or spray adhesive applied heavily enough to fill texture gaps.
Plaster Walls — old plaster can be surprisingly fragile. Test a small area first — some plaster pulls off in chunks with aggressive adhesives. Command strips often work better than spray adhesive on older plaster surfaces.
Brick and Cinder Block — porous surfaces that drink adhesive without bonding properly. The mounting board method works best here. Attach foam to rigid backing, then hang the boards using masonry hooks or adhesive putty designed for rough surfaces.
Painted Concrete — similar to painted drywall if the paint is solid. Check for flaking or peeling paint first. Spray adhesive on unstable paint will peel everything off the wall together. With your surface prepared, you can evaluate the three primary ways to stick foam to a wall.
Adhesive Options Compared (Spray, Tape, Command Strips)
The adhesive you choose determines both hold strength and removal damage. These aren’t interchangeable options — each serves a specific use case.
Spray adhesive like 3M Super 77 creates the strongest bond. One can covers 15-20 standard panels and creates an essentially permanent installation.
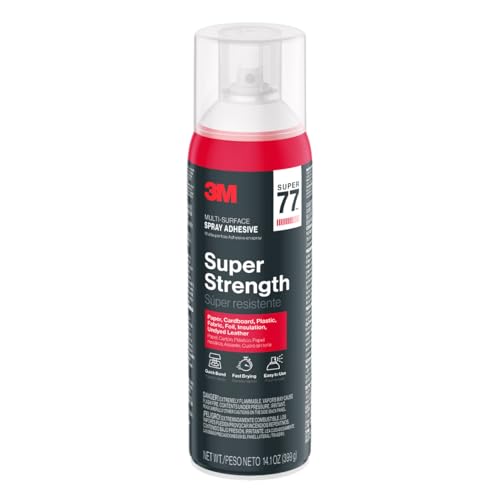
3M Super 77
The foam becomes part of your wall — removal requires scraping and repainting.
Command strips balance hold strength with clean removal. A 14-pack mounts 7 standard panels (two strips per panel minimum).
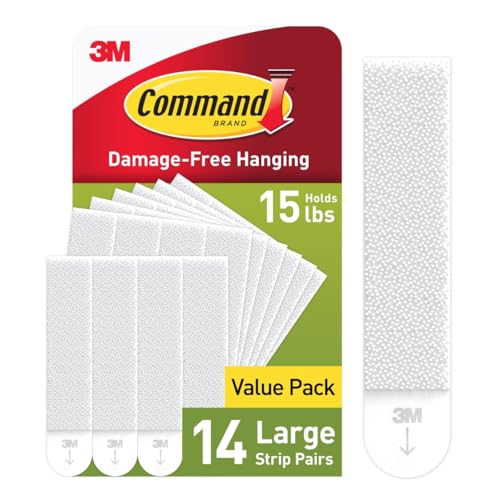
Command strips
They work excellently on smooth painted walls, struggle on textured surfaces, and fail in high-humidity environments like basements.
Double-sided mounting tape like Gorilla Heavy Duty Mounting Tape or Scotch-Mount Indoor tape offers middle-ground permanence. Holds stronger than Command strips, removes easier than spray adhesive, but typically pulls some paint.
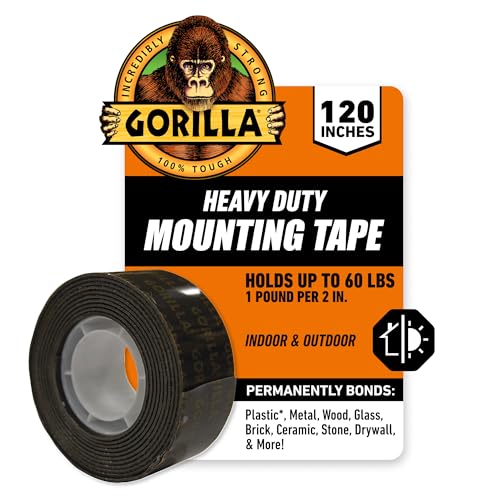
Gorilla Heavy Duty Mounting Tape
If all three adhesive options sound too risky for your walls, there’s a workaround that avoids sticking foam to drywall entirely.
Optional: Mounting Boards for Easy Removal
The mounting board technique deserves special mention because it eliminates the adhesive-to-wall contact entirely. You’re attaching foam to boards, then hanging boards on the wall.
Foam core board from craft stores works perfectly — it’s lightweight, accepts adhesive well, and costs about $1-2 per 20”x30” sheet. Each sheet backs 3-4 standard foam panels arranged together.
Cardboard works too, especially thick cardboard from shipping boxes. It’s free if you’re resourceful, slightly less rigid than foam core, but perfectly functional for lighter foam panels.
Picture hanging hooks or Command strips attach the boards to walls. Since you’re hanging flat boards rather than lumpy foam, even basic picture hooks work reliably.
This separates your foam from your walls completely — ideal for rentals or anyone wanting flexibility. For ceiling installations, the mounting board method becomes even more valuable.
Get Studio Tips Weekly
Join 5,000+ creators getting acoustic treatment advice every week.
No spam. Unsubscribe anytime.Method 1: How to Install Acoustic Foam with Command Strips
Command strips represent the gold standard for damage-free foam installation. When applied correctly, they hold reliably for years and remove without leaving marks.
The key phrase is “applied correctly.” Most Command strip failures trace back to surface prep shortcuts or insufficient press time. Follow these steps exactly and you’ll avoid the morning surprise of foam panels on your floor.
Step-by-Step Instructions
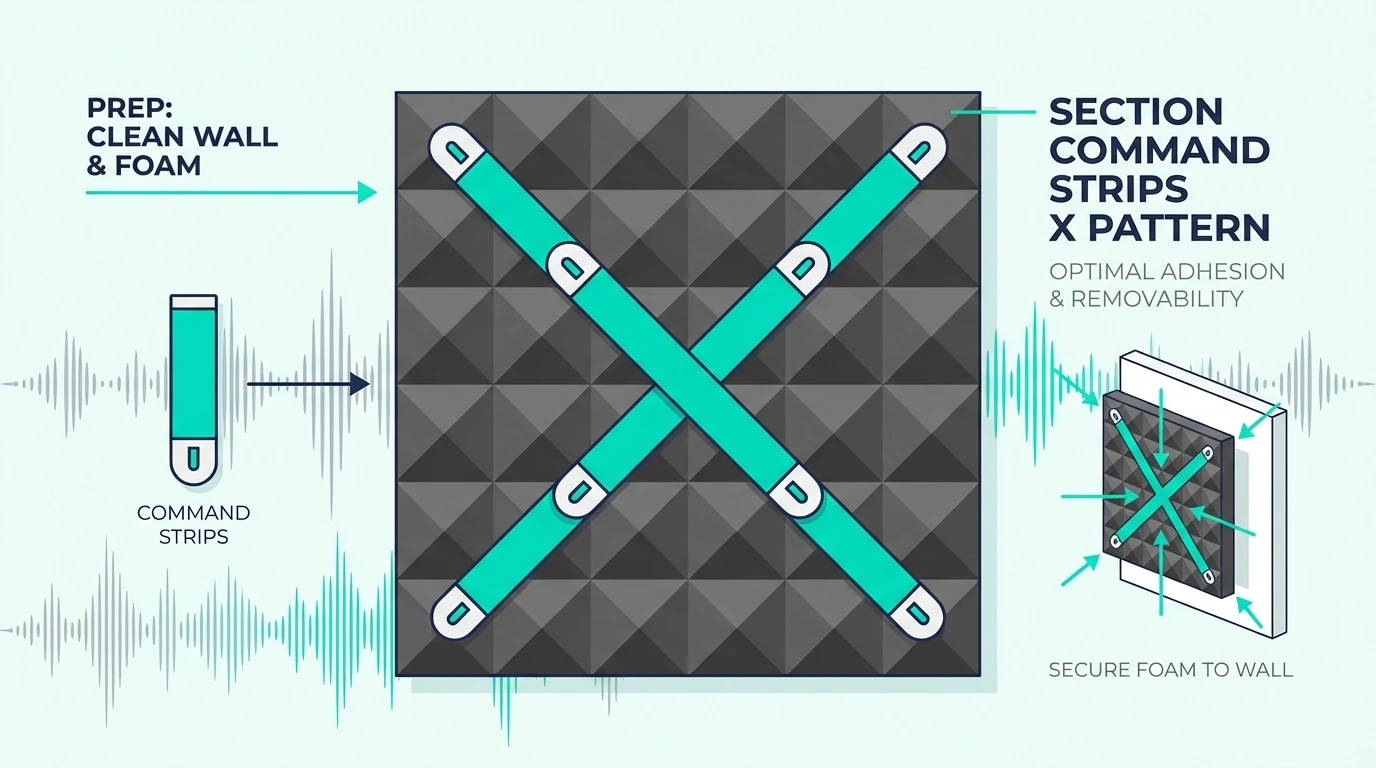
Start with clean walls. Wipe the mounting area with rubbing alcohol — not glass cleaner, not wet wipes, specifically rubbing alcohol.
It removes the invisible oils and residue that prevent proper adhesive bonding.
Remove Command strips from packaging and separate the interlocking halves. Press the foam side firmly onto your panel back — sticky side against foam, velcro side faces out.
Apply strips in an X pattern for 12”x12” panels. One strip in each corner area plus one crossing through the center.
Press each strip firmly for 30 seconds — don’t rush this step. The foam-to-strip bond matters as much as the strip-to-wall bond.
Count it out. Most failures happen because people press for 5 seconds instead of 30.
Remove the wall-side backing from each strip, position your panel, and press the entire panel against the wall for 30 seconds. Apply pressure across the full surface, not just the center.
Wait an hour before hanging additional panels above or beside the first. The bond strengthens significantly in that first hour — rushing leads to panels pulling each other off as you work.
Beyond the installation process, consider the long-term implications.
Pros and Cons of Command Strips
Command strips excel in one critical area: clean removal. Follow the pull-tab technique and your walls come out unmarked.
For renters, this single advantage outweighs everything else.
The downsides show up in challenging environments. Humidity weakens the adhesive over time — basement studios or bathrooms can see strip failures within months.
Heavy panels (thicker than 2 inches) may exceed the weight capacity of standard strips.
Cost per panel runs higher than spray adhesive once you account for needing multiple strips per panel. A full room treatment costs $40-60 in Command strips alone versus $15-20 for spray adhesive.
Tips to Make Command Strips Hold Better
Surface prep makes or breaks Command strip adhesion. Beyond cleaning with alcohol, check your paint finish.
Semi-gloss and gloss paints work best — flat or matte paints sometimes fail to bond properly.
Use more strips than you think necessary, especially on heavier foam. Two strips barely hold a standard 12”x12” panel.
Four strips distributed across the back gives you a real safety margin. The extra cost is trivial compared to re-mounting fallen panels.
Temperature affects initial bonding. Apply strips in climate-controlled conditions between 50–100°F.
Cold garage walls or hot summer attics can prevent proper adhesive activation.
Press panels immediately after removing the wall-side backing. Leaving exposed adhesive while you measure or adjust lets dust contaminate the surface.
Work efficiently — peel, position, press.
Method 2: How to Install Acoustic Foam with Spray Adhesive

Spray adhesive creates the strongest, most reliable foam installation. Professional installers use this method almost exclusively in permanent spaces.
The trade-off is permanence. Spray-mounted foam cannot be removed cleanly — attempting it tears paint off drywall and often damages the foam itself.
Only use this method when you’re certain about placement and committed to the installation lasting years. Here is the process to get that permanent bond.
Step-by-Step Instructions
Surface prep matters even more for spray adhesive than Command strips. Clean walls with rubbing alcohol, then let them dry completely.
Any dust or residue creates weak spots where adhesive won’t bond fully.
Work in a ventilated area. Open windows and run fans.
Spray adhesive fumes are intense during application, so consider a respirator mask if you’re in a tight room.
Protect floors and surrounding surfaces with drop cloths or newspaper. Overspray travels farther than you expect, and adhesive mist settles on everything within several feet.
Hold foam panels face-down and apply a light, even coat across the back surface. Start 6–8 inches from the foam and spray in steady sweeping motions.
Coverage should be uniform without heavy pooling — you want tacky, not wet.
Wait 30–60 seconds for the adhesive to become tacky. Fresh spray adhesive is wet and won’t grab properly.
Touch a corner with your finger — it should feel sticky, not slippery. This step is critical.
Position the panel carefully and press straight down. You get one chance — spray adhesive bonds immediately on contact and doesn’t allow repositioning.
Work methodically, double-check alignment before pressing, and commit once contact is made.
Press firmly across the entire panel surface for 30 seconds. Start from the center and work outward to eliminate air pockets.
The bond strengthens significantly in the first few hours, so avoid disturbing panels during this period. The success of this method depends heavily on the product you use.
Which Spray Adhesive Works Best?
For most people, 3M Super 77 is the standard for acoustic foam installation.
It has strong initial tack, good coverage per can, and is widely available at hardware stores (one can handles 15–20 standard panels depending on application thickness).
Loctite spray adhesive offers a budget-friendly alternative with similar performance. Slightly thinner consistency means faster tack time but potentially less coverage per can.
Avoid “low-VOC” or “environmentally friendly” spray adhesives for foam installation. They typically lack the aggressive bonding chemistry that holds foam reliably long-term.
This is one application where standard formulations outperform green alternatives. Even with the right product, technique matters.
How to Avoid Common Spray Adhesive Mistakes
Applying too much adhesive causes problems. Heavy application stays wet longer, takes forever to tack up, and can cause foam to slide down walls before bonding fully.
Light, even coats work better than heavy saturation.
Skipping the tack time causes immediate failures. Pressing foam onto wet adhesive creates a weak bond that fails within days.
Those 30–60 seconds of waiting make the difference between permanent installation and foam on your floor.
Working in extreme temperatures prevents proper curing. Cold adhesive sprays unevenly and bonds weakly.
Hot conditions make adhesive tack too quickly, before you’ve positioned the panel. Aim for 60–80°F for best results.
Forgetting ventilation leads to unpleasant experiences. Spray adhesive fumes can cause headaches and dizziness in enclosed spaces.
Open windows, use fans, take breaks — or wear a respirator if you’re working in a poorly ventilated room.
Method 3: How to Mount Acoustic Foam on Cardboard/Foam Board
The mounting board method offers something no other approach can: complete separation between your foam and your walls. Your acoustic treatment becomes modular — rearrangeable, removable, rental-safe.
This technique takes more initial setup than direct mounting, but the flexibility often proves worth the effort. Especially valuable for renters, anyone unsure about placement, or rooms where treatment needs might evolve.
Why Use a Backing Board?
The core advantage is wall protection. Your foam attaches to the board, the board hangs on the wall.
No adhesive ever touches your painted surface directly.
Secondary benefits compound that advantage. Backing boards make panels easier to handle during installation — you’re hanging flat, rigid boards instead of floppy foam.
Rearranging becomes trivial when panels lift off hooks rather than peeling off walls.
The method also enables larger panel groupings. Arrange 4–6 foam pieces on a single large board, then hang that board as one unit.
Installation goes faster, alignment is cleaner, and future adjustments are easier. Here is how to assemble them.
Step-by-Step Instructions
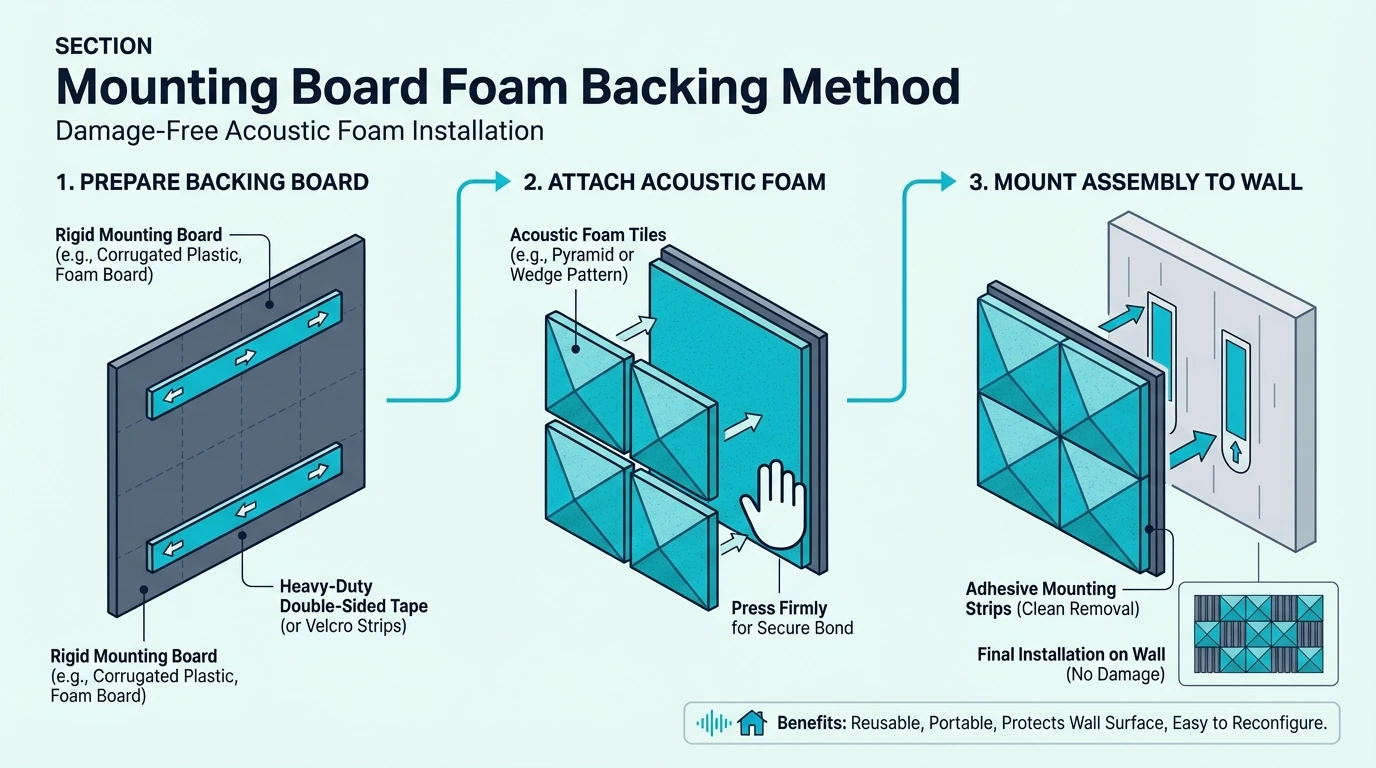
Gather backing materials first. Foam core board (available at craft and office supply stores) works ideally — lightweight, rigid, and easy to glue to.
Thick cardboard from appliance boxes serves as a free alternative.
Cut boards to fit your desired panel arrangements. A standard 20”x30” foam core sheet comfortably backs a 2×2 grid of 12”x12” panels with margins.
Larger boards create bigger modular units.
Attach foam to boards using spray adhesive or strong double-sided tape. Spray adhesive creates the strongest bond; Command strips work but add bulk that makes boards harder to hang flat.
Let board assemblies cure for 24 hours before hanging. The foam-to-board bond needs time to reach full strength, especially important for heavier arrangements. Once they are cured, you can get them on the wall.
How to Hang the Boards on Your Wall
Several options exist for hanging completed boards, each with different trade-offs in ease and permanence.
Command picture hanging strips work excellently for lightweight boards. Apply to the board back exactly as you would for direct foam installation.
Removal leaves no marks on walls — the strips are now stuck to boards you own, not walls you rent.
Standard picture hooks handle heavier boards. One or two hooks at the top of each board create secure mounting points.
This does put small nail holes in walls, but those fill easily with spackling paste.
Velcro strips enable quick-change installations. Mount hook side on walls (permanent-ish), loop side on boards (removable).
Swap board positions without tools — useful if you’re still dialing in treatment placement. This board method is also the foundation for temporary setups.
How Do You Install Foam Temporarily for Events?
Conference rooms, pop-up podcast setups, and temporary recording spaces need foam that goes up fast and comes down faster. The mounting board method we just covered works perfectly here — with a few event-specific tweaks.
Pre-assemble your foam-on-board panels before the event. Attach foam to rigid backing at home, let everything cure for 24 hours, then transport the completed panels ready to hang.
You’ll save an hour of setup time when it matters most.
Freestanding panel solutions work even faster. Lean large foam-covered boards against walls at angles, or use portable room dividers as foam mounting surfaces.
No wall contact means zero removal hassle — just pack and leave.
For truly temporary setups lasting hours rather than days, consider tension rod solutions. Mount tension rods horizontally, drape foam panels over them, and the whole system collapses in minutes.
Works best in narrow spaces like closets-turned-vocal-booths.
One reality check: temporary installations perform slightly worse than permanent ones. Foam pressed firmly against walls outperforms foam with air gaps behind it.
For critical recordings, that performance difference matters. For quick content capture or meeting audio improvement, temporary mounting works fine.
Method 4: How to Install Acoustic Foam with Double-Sided Tape
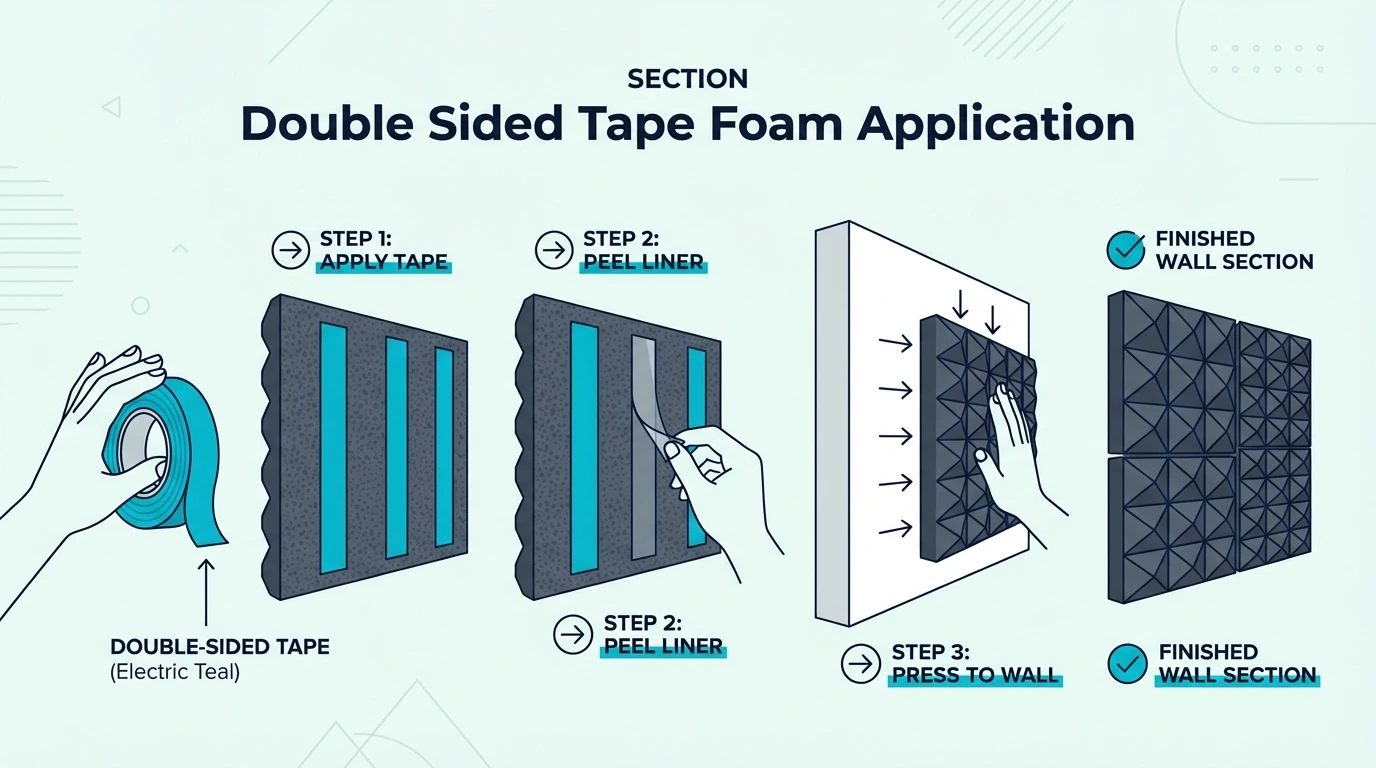
Double-sided mounting tape occupies the middle ground between Command strips and spray adhesive. Stronger hold than strips, easier application than spray, moderate wall damage on removal.
Choose this method when you need reliable hold but don’t want the permanence of spray adhesive. Ideal for semi-permanent installations where you might move in a few years but want something more robust than strips.
Step-by-Step Instructions
Clean walls with rubbing alcohol and let dry completely. Tape adhesion depends entirely on surface contact quality — any contamination creates weak spots.
Cut tape strips to run along all four edges of your foam panel, plus an X through the center. The perimeter strips handle shear forces (foam wanting to slide down); the center X prevents the middle from bulging away from the wall.
Apply tape to foam first, pressing firmly along the full length of each strip. The foam-to-tape bond needs to be solid before introducing the wall side.
Peel backing from wall-side tape, position panel carefully, and press firmly across the entire surface for 30 seconds. Unlike spray adhesive, you get minor repositioning ability in the first few seconds — but don’t count on it.
Work accurately from the start. Like spray adhesive, choosing the right product is critical.
Best Double-Sided Tape for Acoustic Foam
Gorilla Heavy Duty Mounting Tape has proven itself reliable for foam installation. Strong initial grab, reasonable removal characteristics, widely available.
Scotch-Mount Indoor tape offers a lighter-duty option suitable for smaller panels. Less aggressive adhesive means easier removal but potentially less holding power on heavier foam.
Scotch-Mount Indoor tape
Avoid thin craft-store double-sided tape. It lacks the thickness and adhesive strength for mounting anything heavier than paper.
Acoustic foam requires mounting-specific tape designed for significant weight loads. But even the best tape has limitations.
When Does Tape Work (and When Does It Fail)?
Double-sided tape excels on smooth, clean surfaces. Fresh paint with good adhesion, semi-gloss or gloss finishes, and climate-controlled environments produce reliable results.
Tape struggles with textured walls. The raised pattern prevents full contact, creating a weak bond that fails as foam weight stresses those limited contact points.
Switch to T-pins or the mounting board method for textured surfaces.
High humidity degrades tape adhesive over time. Basement studios or bathroom installations see tape failures within months as moisture weakens the bond.
Climate control or alternative methods become necessary. For humid environments, consider the mechanical mounting options in our complete foam guide.
Method 5: How to Install Acoustic Foam with T-Pins or Nails
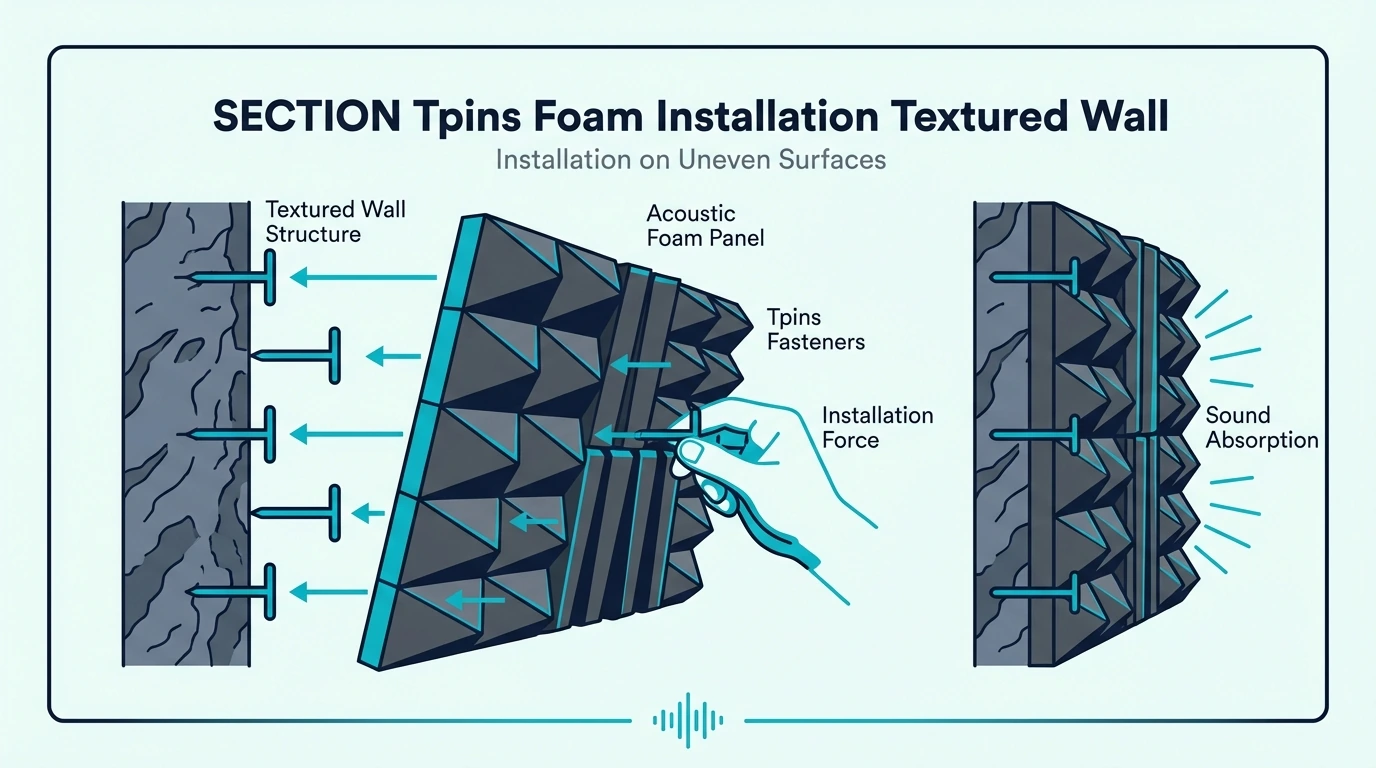
T-pins and finish nails serve a specific niche: textured walls where adhesive methods fail. Orange peel, knockdown, popcorn ceilings — any surface with significant texture prevents adhesive contact and eventually causes foam to fall.
This method leaves small holes in walls, but those holes fill easily with spackling paste. The trade-off between tiny nail holes and reliable mounting usually favors the pins.
Step-by-Step Instructions
Standard T-pins (1.5” length) work for most foam thicknesses. Push pins through foam corners at 45-degree angles, angling toward the wall center.
This prevents the pin from pulling straight through foam under load.
Position the panel and push pins through foam into the wall. For drywall, pins slide in easily with finger pressure.
Plaster or harder surfaces may require tapping with a small hammer.
Use 4 pins minimum per standard panel — one near each corner. Heavy panels or those mounted overhead benefit from 6-8 pins distributed across the surface.
For cleaner appearance, some installers push pins entirely through foam until only the head shows. The colored pin heads become nearly invisible against dark foam panels. While the damage is minimal, you still want to handle it correctly.
How to Minimize Wall Damage with Pins
The holes from T-pins are smaller than pushpin holes — we’re talking 1mm diameter or less. A single wall may accumulate 50-100 of these tiny marks, but they’re genuinely easy to repair.
When removing foam, pull pins straight out to avoid enlarging holes. Angle pulling creates larger, messier marks that require more spackle to fill.
Quick repair method: dab holes with white spackling paste, wipe excess with a damp finger, and let it dry. Standard wall paint usually hides repairs completely.
For large installations, budget about 30 minutes of repair time when you eventually remove panels.
How to Install Acoustic Foam Without Damaging Walls
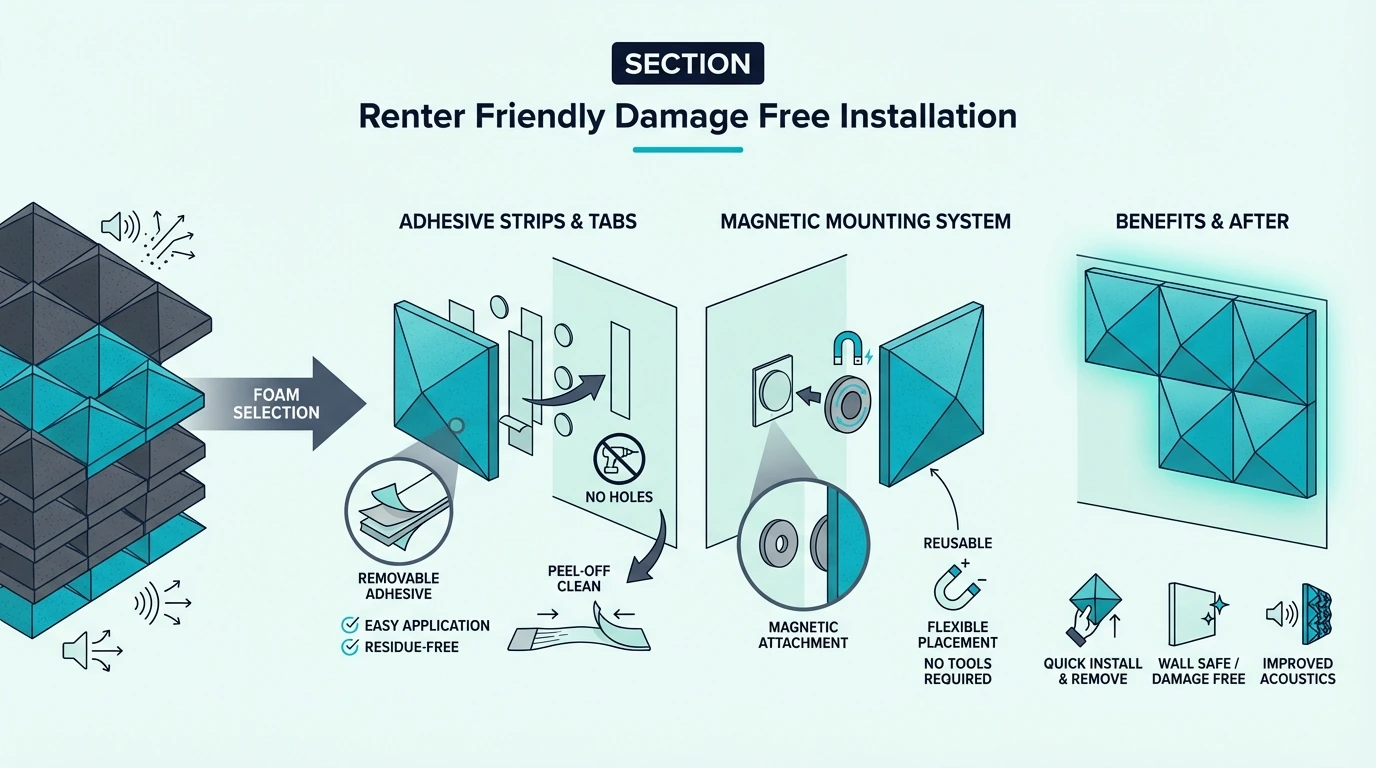
Renters face a specific challenge: they need acoustic treatment but can’t risk their deposit. This section consolidates the damage-free approaches with rental-specific guidance.
The mounting board method provides the safest rental option. Zero adhesive touches your walls, removal takes minutes, and your deposit stays completely protected.
The Mounting Board Technique (Best for Renters)
Build your mounting boards before installation day. Attach foam to foam core or cardboard using spray adhesive (this doesn’t touch walls), let cure for 24 hours, then hang completed boards using Command strips.
The Command strips now stick to your boards, not your walls. When you move, simply lift boards off strips, pull tabs to remove strips cleanly, and you’re left with unmarked walls and portable acoustic panels.
This double-layer approach — adhesive on boards, removable attachment to walls — provides professional-quality installation with zero risk. Worth the extra hour of prep for anyone protecting a security deposit.
How to Remove Foam Without Damaging Paint
Even careful installations sometimes require removal. Following proper technique minimizes damage and keeps repair efforts manageable.
For Command strips, use the pull-tab as designed. Grip the tab, stretch straight down (not outward), and keep stretching until the strip releases.
Pulling outward or trying to peel causes strip breakage and potential wall damage.
For double-sided tape, apply heat with a hair dryer before attempting removal. Warm adhesive releases more easily than cold.
Work slowly, peeling at a low angle rather than yanking straight off.
What to Do If Adhesive Pulls Off Paint
Paint damage happens despite best efforts. Knowing repair options in advance reduces stress when it occurs.
For small spots, touch-up paint usually blends reasonably well. Match your wall color at the hardware store (bring a chip if possible), dab damaged areas with a small brush, and let dry.
Larger damaged areas may require more substantial repair. Skim-coating with joint compound smooths rough patches, followed by primer and matching paint.
Budget 2–3 hours of repair work for a heavily treated wall.
Document the wall condition before installation with photos. If disputes arise with landlords, having before-and-after documentation helps establish what damage (if any) your installation actually caused.
How Do You Move Acoustic Foam to a New Location?
Moving day arrives and you’re staring at walls covered in foam panels. The good news is that most properly installed foam survives relocation — if you remove it correctly.
Command strip installations transfer easiest. Pull the stretch-release tabs, lift panels off, and the foam stays intact.
You’ll need fresh strips at the new place, but that’s a small price for zero hassle.
Spray adhesive installations are trickier. The foam might survive, but expect some backing material to stay on the old wall.
Cut your losses — plan to trim any damaged backing before remounting.
Here’s what trips people up: trying to reuse old adhesive. Fresh adhesive on both the foam back and the new wall surface creates reliable bonds.
Layering new adhesive over crusty old residue leads to failure within weeks.
If you’re moving foam that’s been up for years, inspect it first. Foam degrades over time, especially in direct sunlight.
Crumbling or discolored panels won’t perform well in the new space anyway — sometimes replacement makes more sense than relocation.
Transport foam panels flat, not rolled. Rolling creates permanent creases that affect both appearance and absorption performance.
Conclusion
The decision tree is simpler than it might seem. Two questions narrow down your best option:
Question 1: Do you rent, or might you remove the foam within 5 years?
If yes, use Command strips for small installations (under 12 panels) or the mounting board method for larger treatments. Both preserve your walls completely.
If you own your space and want permanent installation, spray adhesive provides the strongest, most reliable long-term solution. Accept that removal means repainting.
Question 2: Are your walls textured?
Textured walls eliminate most adhesive options. Use T-pins/nails or the mounting board method with mechanical hanging (hooks, screws).
Don’t fight adhesive failures on textured surfaces — choose methods designed for that challenge.
For smooth walls in owned spaces, spray adhesive. For smooth walls in rentals, Command strips or mounting boards.
For textured walls anywhere, T-pins or mechanical mounting. Those three rules cover 95% of situations.
The installation supplies cost less than the foam itself. Don’t cheap out on adhesive quality to save a few dollars — failed installations waste far more time and money than buying proper mounting materials upfront.
Your foam placement matters at least as much as mounting method. Start with first reflection points and the wall behind your mic, then scale coverage up based on how live the room still sounds.
If you want specific adhesive picks, see our best adhesive for acoustic foam guide. For placement guidance, check our foam positioning guide.
For foam product recommendations, see our best acoustic foam panels guide.
For everything else foam-related, our complete acoustic foam resource hub covers topics from effectiveness to aesthetics to alternatives.
Frequently Asked Questions
Can You Use Gorilla Glue for Acoustic Foam?
Standard Gorilla Glue (the brown, foaming type) isn’t suitable for foam installation. It expands significantly while curing, potentially warping foam panels and creating messy overflow.
Gorilla Spray Adhesive works fine — it’s essentially equivalent to 3M Super 77. The key distinction is glue type: spray adhesives yes, liquid glues no.
Construction adhesive like Liquid Nails also fails for foam mounting. Too thick to spread evenly, too rigid when cured, and causes foam to crack over time.
How Long Does Spray Adhesive Take to Dry?
Spray adhesive reaches working tack in 30-60 seconds — that’s when you should press foam to walls. Full cure takes 24-72 hours depending on humidity and ventilation.
Avoid disturbing panels during the first hour. The bond is functional but not at full strength.
Moving or repositioning panels during this period weakens the final installation.
Maximum bond strength develops over 3-7 days. Heavy panels or critical installations benefit from waiting before adding additional load or adjacent panels.
Will Acoustic Foam Fall Off the Wall?
Properly installed foam stays up for years. When panels fall, the cause is almost always installation error: dirty surfaces, insufficient adhesive, rushing press time, or wrong method for conditions.
The most common failure pattern: panels seem fine for days or weeks, then fall overnight. This indicates marginal adhesion that weakened over time — typically from surface contamination during installation.
If panels fall repeatedly despite following instructions, switch methods. Some wall surfaces simply don’t accept certain adhesives well.
The mounting board method bypasses surface compatibility issues entirely. Check our acoustic foam hub for troubleshooting guides.
What If Foam Panels Arrive Compressed?
Most acoustic foam ships vacuum-packed to reduce shipping costs. Compressed panels need 24-72 hours to expand fully before installation.
Open packaging immediately and lay panels flat in a dry area. The foam expands as trapped air returns to the cellular structure.
Installing compressed foam means it continues expanding on your wall — potentially breaking adhesive bonds.
Check panel thickness before mounting. Manufacturers list specifications, so verify your panels match before permanent installation.
Significantly under-expanded foam won’t absorb sound effectively anyway. Our best foam panels guide lists proper expansion times for popular products.
What If My Foam Keeps Falling Off?
Panels falling repeatedly point to one of three culprits: surface contamination, wrong adhesive choice, or environmental factors. Start troubleshooting at the surface.
Wipe the wall with rubbing alcohol and let it dry completely — not window cleaner, not damp cloth, specifically rubbing alcohol. Invisible residue from cleaning products, cooking smoke, or even hand oils prevents proper bonding.
If the surface is clean and panels still fall, you’ve got a mismatch between adhesive and conditions. High humidity degrades Command strips and tape adhesives over time.
Basements, bathrooms, and humid climates usually need spray adhesive or mechanical mounting (T-pins, hooks).
Temperature swings cause problems too. Foam expands and contracts slightly with temperature changes.
Rigid adhesives can crack under this stress, while flexible adhesives like spray adhesive handle it better.
For panels that fell once and you’re remounting, don’t just reapply adhesive to the same spot. That wall section is contaminated with old adhesive residue.
Either clean thoroughly with adhesive remover and rubbing alcohol, or mount the panel slightly offset from the original position.

