DIY Acoustic Foam Panels: Build Better Sound Treatment at Home
DIY acoustic foam panels can cost less than store-bought treatment — but only if you build them with the right core and thickness.
If your room still sounds hollow or “roomy,” thin foam is usually absorbing the easy highs while leaving the harder reflections and lower mids untouched.
Build simple mineral wool or rigid fiberglass panels so your recordings sound tighter and less reflective without covering every wall in foam.
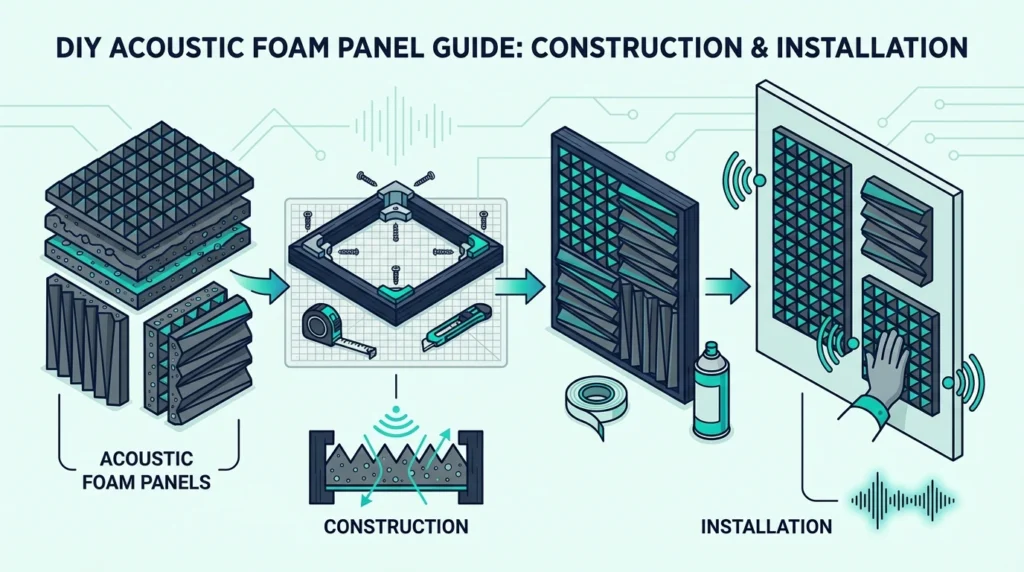
Start with a basic 2×4 frame, choose a safe insulation thickness, then wrap it in breathable fabric.
Below is a step-by-step build (with cut list, insulation options, and mounting methods) so you can make panels that work and still look clean in your space.
Build a 1×4 lumber frame, fill it with mineral wool or rigid fiberglass, and wrap it in breathable fabric (burlap, speaker cloth, or cotton). Each panel takes 30-60 minutes and costs roughly one-third to one-half of commercial panel prices. DIY mineral wool panels typically outperform common foam panels, especially when you build them thicker.
Why Build DIY Panels Instead of Buying Foam?
DIY is mainly about performance per dollar.
Once you hear what a few panels do to the room, the time investment starts to make sense.
Superior Acoustic Performance
Commercial acoustic foam often improves higher-frequency reflections, but DIY panels built from dense fibrous cores can absorb more broadly and more effectively.
In practice, that means fewer “slap” reflections and less boxy room tone on recordings.
If you want the deeper explanation of why foam hits a wall (and what panels do differently), see how acoustic foam works.
The materials that make professional studio panels expensive—rigid fiberglass, mineral wool—are cheap when you buy them as insulation. You’re paying for the same materials, just without the markup.
Real Cost Savings
A commercial 2×4 foot acoustic panel can get expensive fast.
The same size DIY panel usually costs about one-third to one-half as much in materials.
For a whole room, the gap gets bigger.
Eight DIY panels often cost about what two or three pre-made panels run.
The time investment is real, so expect 30–60 minutes per panel.
If the savings matter more than the build time, DIY is the obvious trade.
Complete Customization
Commercial panels come in standard sizes.
DIY panels can be whatever size your room needs, including odd walls and awkward corners.
Fabric choice is basically unlimited.
You can match the room instead of settling for whatever color a brand sells.
Thickness is adjustable too.
If you want 4-inch panels, you can build them without paying the premium most brands charge.
For more background on what foam can and can’t do (and when panels make more sense), see does acoustic foam work.
For a direct comparison between foam and the mineral wool approach used in most DIY builds, see acoustic foam vs rockwool.
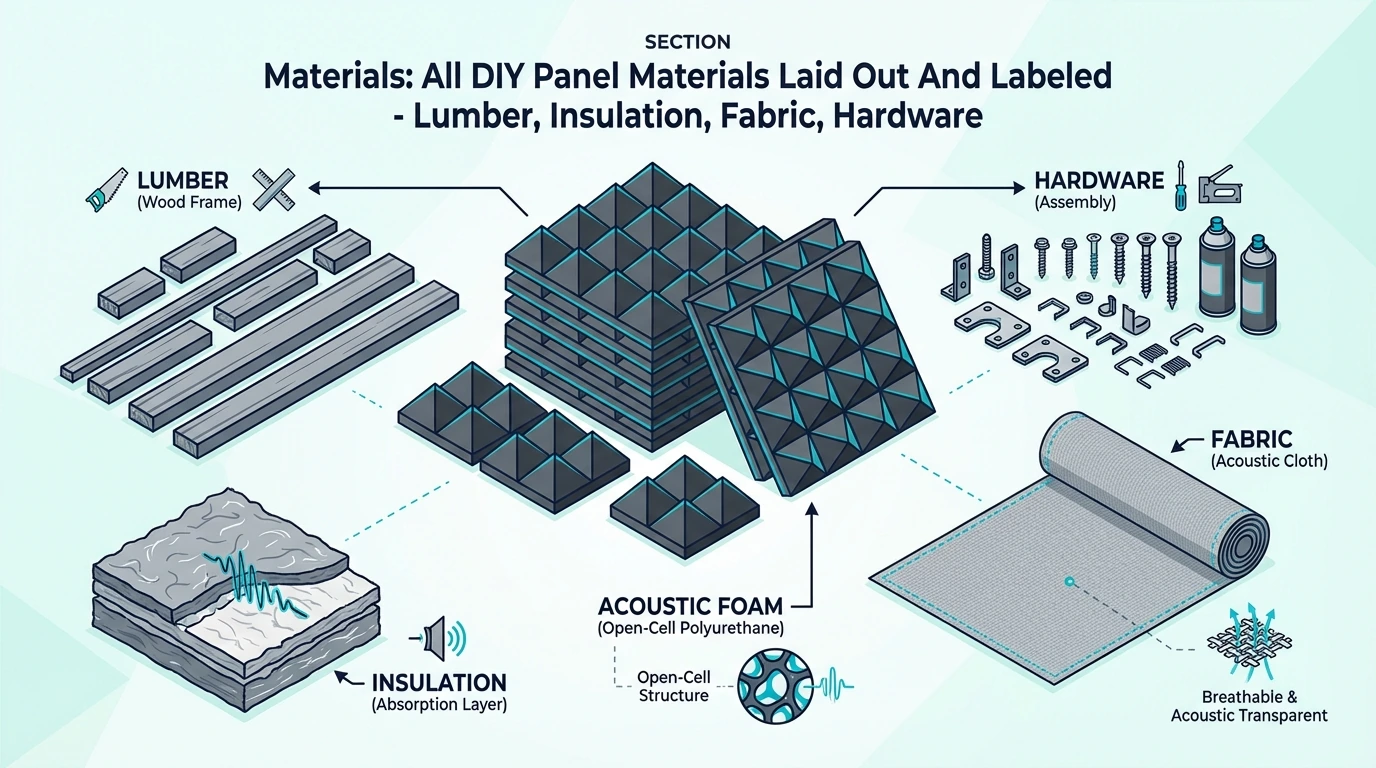
Materials You’ll Need
Buying everything first saves you from the mid-build hardware-store run.
This is the short list you actually need.
Frame Materials
Lumber: 1×4 boards (actual dimension 0.75” x 3.5”) work well for 2-inch panels.
For thicker panels, use 1×6 or build up with multiple boards.
Fasteners: Wood screws, pocket screws, or corner brackets.
Pocket screws look cleaner but need a pocket hole jig, while butt joints work fine for most builds.
Wood glue: Optional but adds strength to joints. Any wood glue works.
Insulation Options
Mineral Wool (Recommended): – Mineral wool batts or rigid mineral wool board – Excellent absorption across frequencies – Fire resistant, moisture resistant – Easy to cut with bread knife or insulation knife – Slightly irritating to skin—wear gloves
If you want a rigid board that’s easy to frame and tends to perform well for broadband absorption, start with Rockwool ComfortBoard 80.

Rockwool ComfortBoard 80
Rigid Fiberglass: – Industry standard for professional panels – Excellent absorption, especially 703 – More irritating than mineral wool—full PPE recommended – Requires fabric wrapping to contain fibers
Avoid: Soft fiberglass batts (pink insulation), foam board, polystyrene. These don’t provide adequate absorption.
To understand why foam behaves differently than fibrous insulation, see does acoustic foam work.
Fabric Selection
The fabric must be acoustically transparent—sound passes through it to reach the insulation. Test by holding fabric to your mouth and blowing; if air passes easily, sound will too.
Good options: – Acoustic panel fabric (made to stay breathable) – Burlap (cheap, effective, rustic look) – Speaker grill cloth – Breathable cotton or linen – Microfiber
Avoid: Vinyl, leather, tightly woven fabrics, anything that blocks airflow.
Tools Required
- Saw (miter saw, circular saw, or hand saw)
- Drill/driver
- Staple gun with 3/8” or 1/2” staples
- Measuring tape
- Square
- Scissors or rotary cutter for fabric
- Safety equipment (gloves, mask, eye protection)
Get Studio Tips Weekly
Join 5,000+ creators getting acoustic treatment advice every week.
No spam. Unsubscribe anytime.Building the Frame
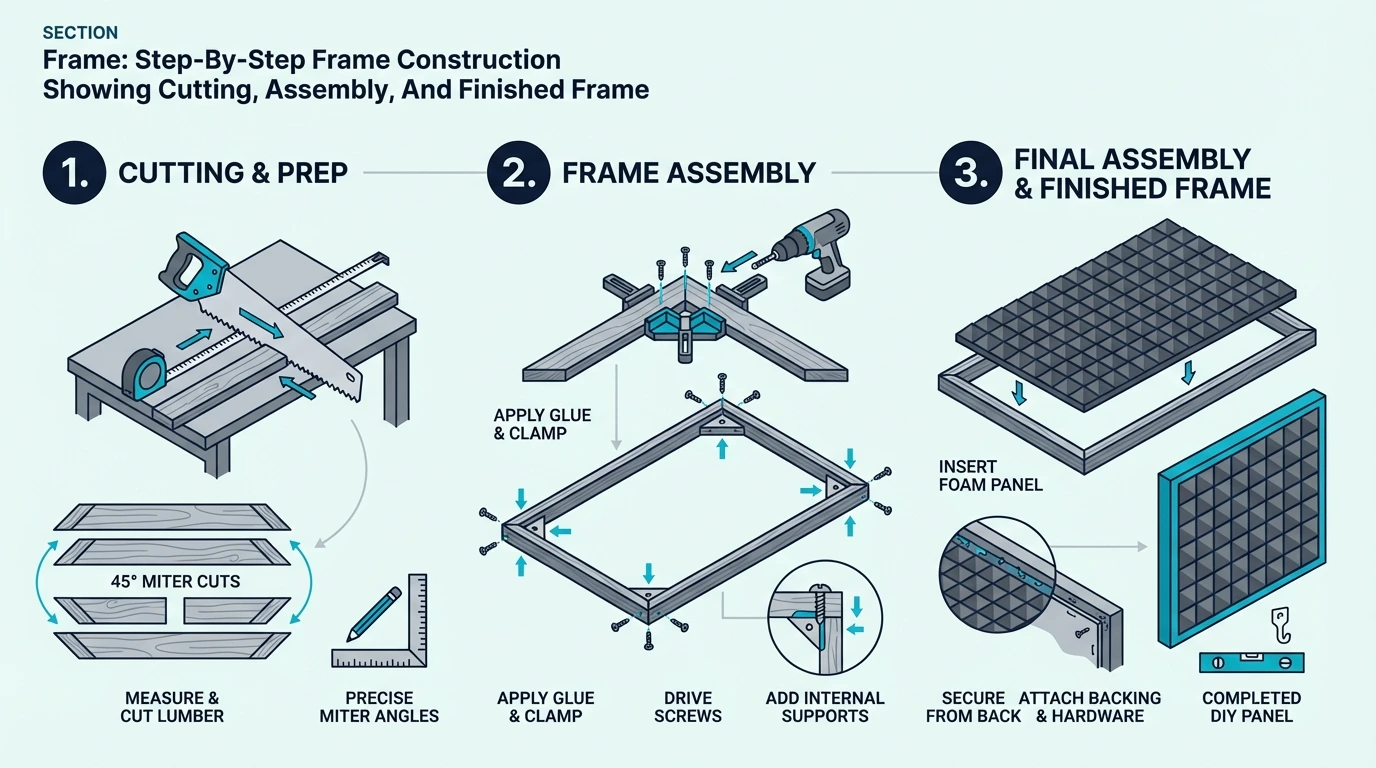
The frame is just a shallow box that holds the insulation and gives you something to hang.
If you can cut straight and keep things square, you can build these.
Cutting the Lumber
For a 24×48 inch panel using 1×4 lumber: – Cut two pieces at 48 inches (long sides) – Cut two pieces at 22.5 inches (short sides, accounting for lumber width)
Measure twice, cut once.
Consistent cuts make the corners line up and keep the panel from twisting.
Assembly Methods
Butt joints (simplest): Position short pieces between long pieces.
Pre-drill to prevent splitting, then drive two screws through each joint.
Pocket screws (cleanest): Drill pocket holes in the short pieces, then clamp everything square.
Drive the pocket screws to pull the frame tight.
Corner brackets (fastest): Use metal corner brackets on the inside of each corner. Quick but visible if you look inside the panel.
Adding a Cross Brace
For panels larger than 24×24 inches, add a center cross brace to prevent warping.
Cut a piece to fit across the middle and secure it with screws or pocket holes.
The brace also helps hold insulation in place, especially with softer materials like mineral wool batts.
Frame Tips
- Check for square before final tightening—measure diagonals, which should be equal
- Sand any rough edges that might snag fabric
- Consider painting or staining frames if edges will be visible
- Build all frames at once for efficiency
Installing the Insulation
Insulation is easy to install, but fit matters.
Gaps and sloppy edges are where performance drops.
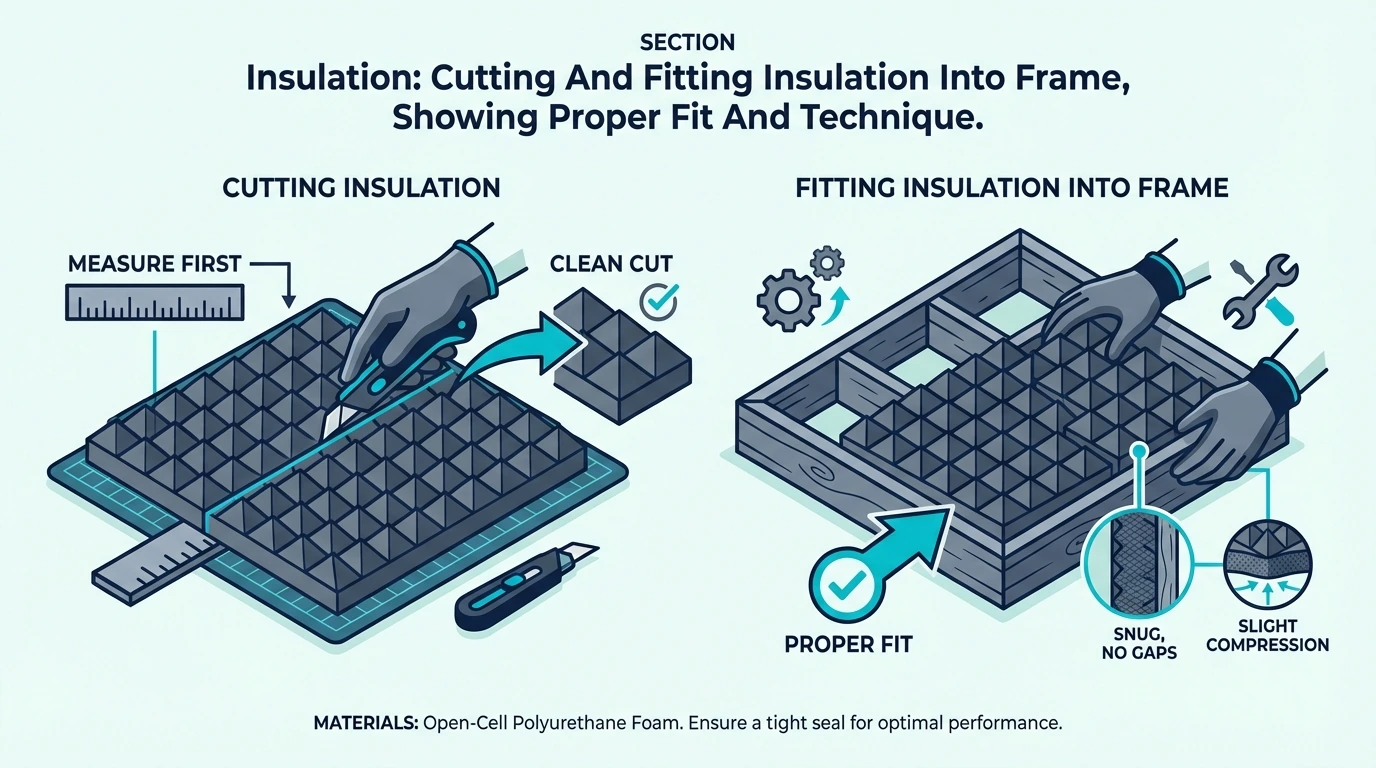
Cutting Insulation
Mineral wool and rigid fiberglass cut easily with a long serrated knife (a bread knife works well) or a dedicated insulation knife.
Mark your cut line and use a straightedge as a guide.
Cut slightly oversized so it friction-fits without leaving gaps.
For mineral wool batts, you can often tear to size along the fibers rather than cutting.
Safety Precautions
Both mineral wool and fiberglass contain fibers that can irritate skin, eyes, and lungs:
- Wear long sleeves and pants
- Use work gloves
- Wear safety glasses
- Use N95 respirator or dust mask
- Work in ventilated area
- Shower after handling
The irritation is temporary but unpleasant.
Basic protection makes the whole build a lot more comfortable.
Fitting Insulation in Frame
Press the insulation into the frame.
It should fit snugly without being crushed.
If the insulation is loose and wants to sag, add a fabric backing or a simple backer.
You’re just trying to keep it from drooping over time.
For 4-inch panels, stack two 2-inch layers.
Stagger the seams between layers.
Proper arrangement matters as much as materials—see the how to arrange acoustic foam guide for reflection-point placement examples.
Wrapping with Fabric
This is the step that turns “a box of insulation” into a panel you’ll actually want in the room.
Take a minute here and the finished panel will look clean.
Preparing the Fabric
Cut fabric 4-6 inches larger than the panel on all sides.
That gives you enough slack to pull it tight and staple the back.
Iron the fabric if it’s wrinkled.
Work on a clean surface so you don’t press dust into the face.
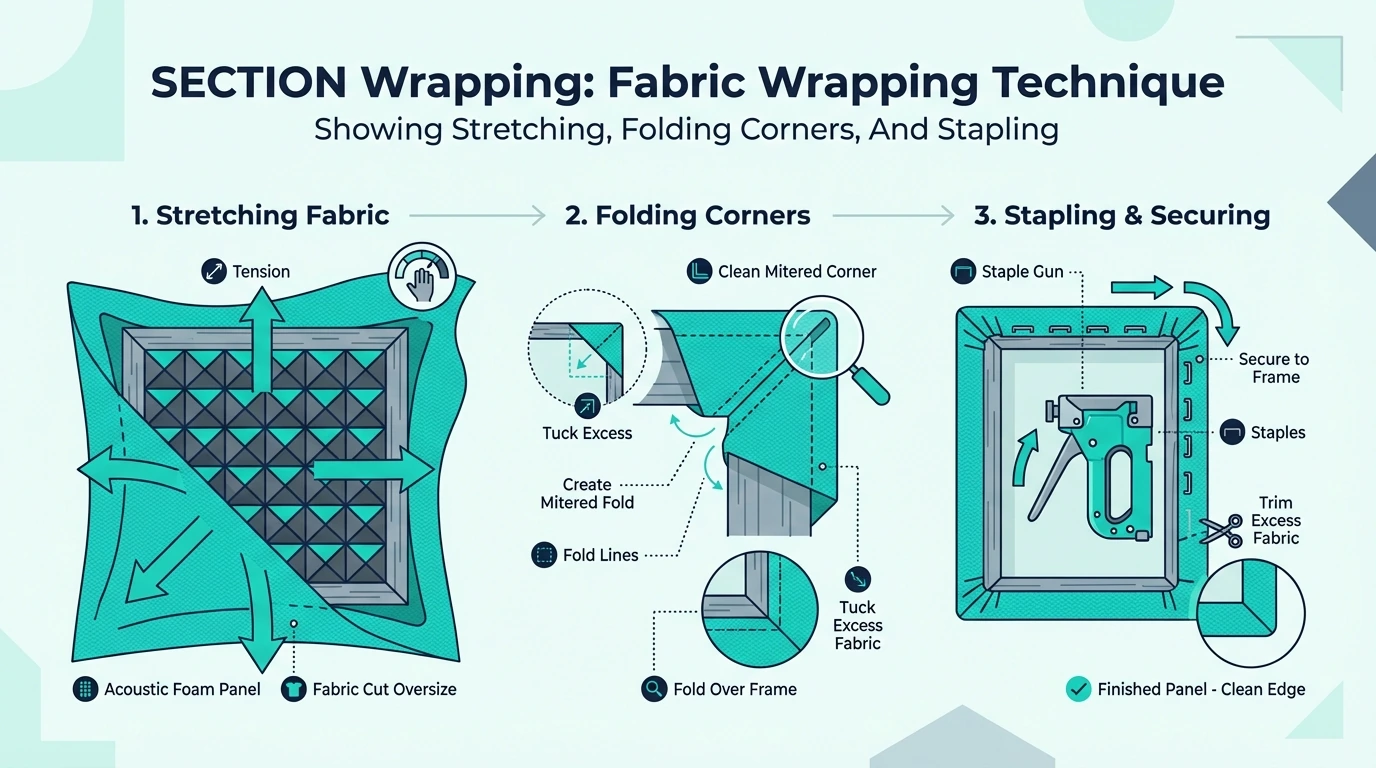
Wrapping Technique
- Lay fabric face-down on a clean surface
- Center the panel face-down on the fabric
- Pull fabric taut over one long edge and staple every 2-3 inches
- Pull the opposite long edge taut and staple (tight, but not bending the frame)
- Repeat for the short edges
- Fold corners neatly (like wrapping a gift) and staple
Aim for even tension.
Too loose looks saggy, and too tight can warp the frame.
Corner Folding
Hospital corners (like making a bed) create the cleanest look:
- Fold the corner point toward the center
- Fold one side over
- Fold the other side over
- Staple through all layers
Alternatively, pleat the excess fabric into a neat fold.
Either method works, so choose what suits the fabric.
Finishing the Back
The back doesn’t need to be pretty, but neat staples make it feel finished.
Some builders add a thin dust cover over the back to contain loose fibers.
If panels will be visible from behind (freestanding use), wrap the back with fabric too or add a finished backer board.
For fabric covering techniques on existing panels, see the how to decorate with acoustic foam guide for fabric covering techniques.
Mounting Your DIY Panels
Mounting is mostly about safety.
Use hardware you trust, especially for heavier panels.
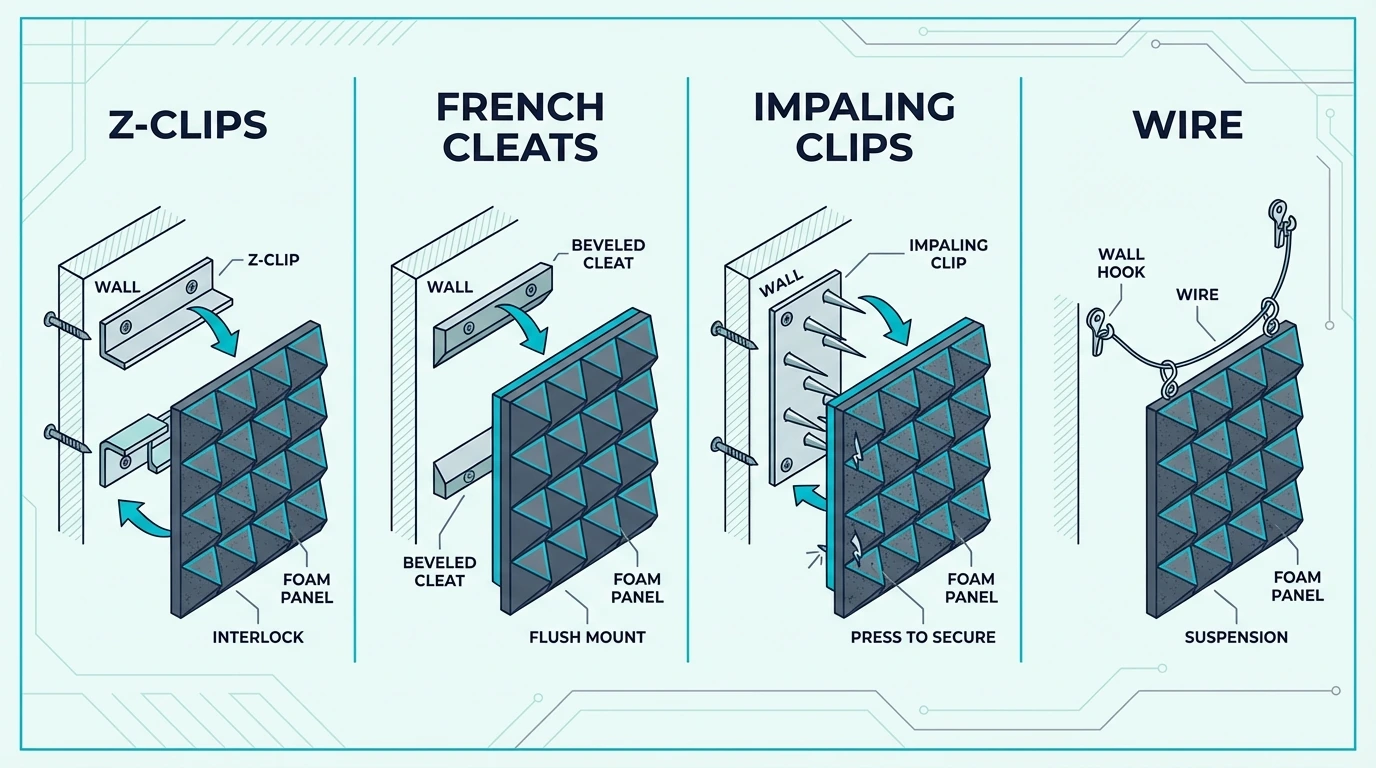
Z-Clips (Recommended)
Z-clips are interlocking brackets.
One half goes on the wall, the other goes on the frame, and the panel lifts on and off.
Attach the panel half to the frame’s top rail. Mount the wall half level where you want the panel.
Hang the panel by hooking the clips together.
They hold weight well and make it easy to reposition panels after you do a few test recordings.
French Cleats
French cleats are angled wooden strips that interlock. Cut a board at 45 degrees lengthwise, mount one piece to wall (angle pointing up), one to panel (angle pointing down).
If you want the “buy it once” version without cutting your own cleat, French Cleat Aluminum Z-Hangers are a simple alternative.
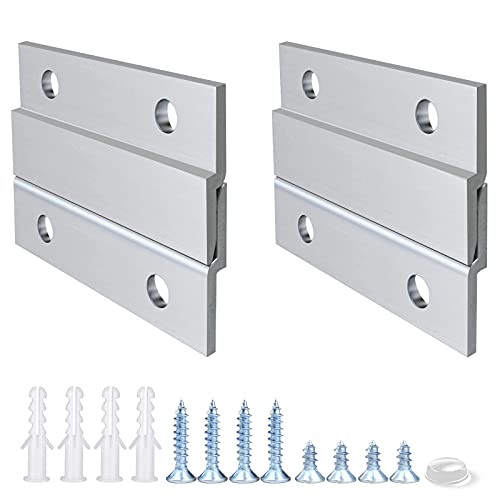
French Cleat Aluminum Z-Hangers
French cleats are strong, adjustable side-to-side, and can be made from scrap lumber. They’re slightly more visible than Z-clips but completely DIY-able.
Impaling Clips
Impaling clips are metal plates with sharp points.
Mount the clips to the wall, then press the panel onto the points. They grab the frame or insulation.
For a multi-panel install, Surface Mount Impaler Panel Hardware (36 Pack) is a fast option.
Surface Mount Impaler Panel Hardware (36 Pack)
They work for lighter panels.
For heavier 4-inch builds, cleats and Z-clips are the safer bet.
Wire Hanging
Picture wire attached to eye hooks works for lighter panels.
It’s adjustable, but panels can shift more than they do with clips.
For detailed mounting guidance, see the how to put acoustic foam on walls guide.
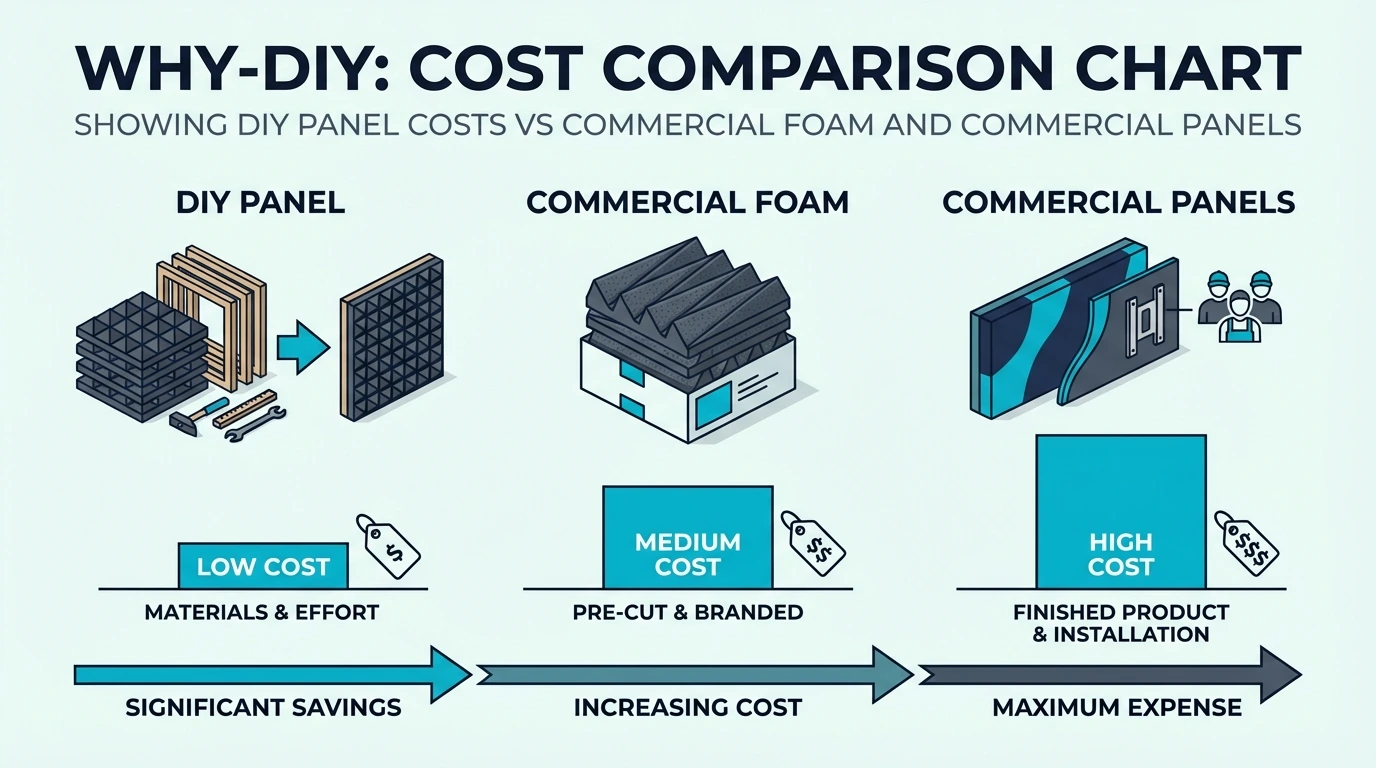
Cost Breakdown: DIY vs Commercial
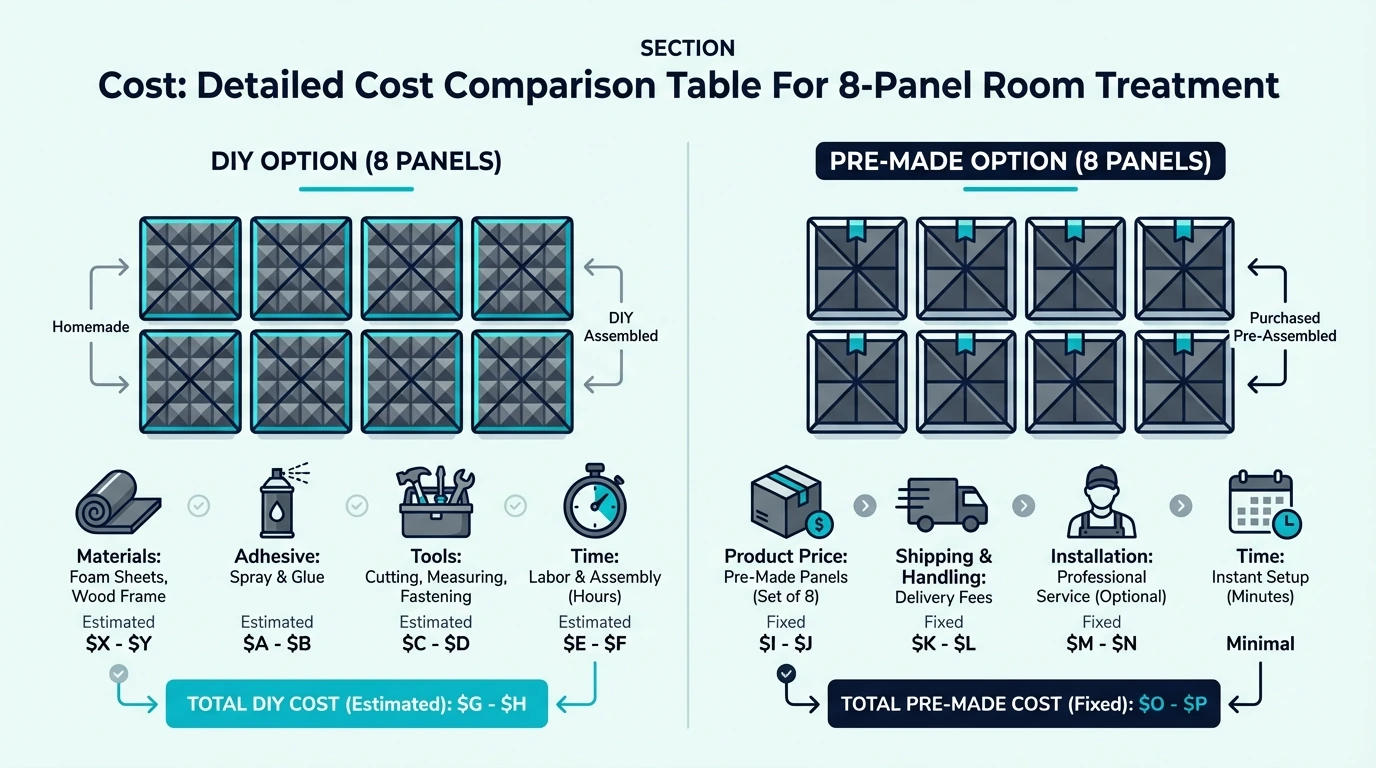
Here’s what it usually looks like for an 8-panel setup.
DIY Panel Costs (8 panels)
| Material | Quantity | Approximate Cost |
|---|---|---|
| 1×4 lumber | 80 linear feet | Variable |
| Mineral wool batts | 2 bags | Variable |
| Fabric (6 yards) | 1 bolt | Variable |
| Screws, staples | 1 box each | Variable |
| Z-clips | 8 pairs | Variable |
| Total | Roughly 1/3 to 1/2 of commercial |
Commercial Panel Costs (8 panels)
Quality commercial panels cost considerably more per panel.
Eight panels usually comes out to several times the DIY total.
Commercial Foam Costs (Equivalent Coverage)
Budget foam panels cost less per unit but typically require more coverage to get similar reflection control, and the absorption bandwidth is different.
The Verdict
DIY panels cost roughly one-third to one-half of commercial panels with equal or better performance. The savings fund additional panels, bass traps, or other studio improvements.
If you’re curious why finished panels carry higher price tags, see why acoustic panels are so expensive.
Common DIY Mistakes to Avoid
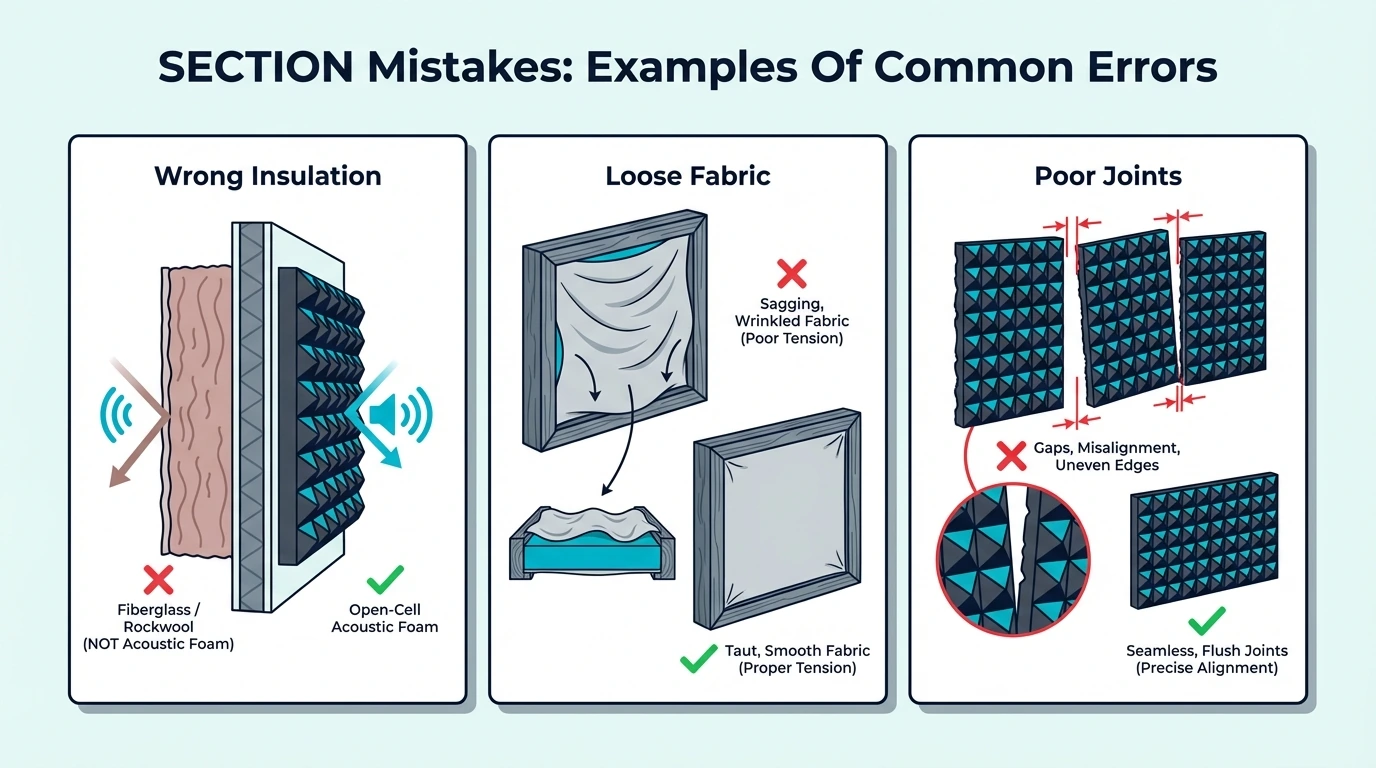
Most DIY panel problems come from the same handful of mistakes.
Avoid these and your first set will come out clean.
Using Wrong Insulation
Soft fiberglass batts compress too easily and don’t absorb the same way.
Foam board and polystyrene reflect more than they absorb.
Stick with mineral wool or rigid fiberglass. These materials are specifically effective for sound absorption.
Fabric Too Tight or Loose
Over-tensioned fabric warps frames and creates stress points that may tear. Under-tensioned fabric sags and looks unprofessional.
If you’re unsure, do a quick test wrap on a scrap frame.
You’re aiming for taut, not stressed.
Gaps in Insulation
Gaps between insulation and frame reduce effectiveness. Sound passes through gaps without being absorbed.
Cut insulation slightly oversized for friction fit. Fill any gaps with scraps.
Skipping Safety Gear
The irritation is real.
The few minutes saved by skipping protection aren’t worth hours of itching.
Always wear gloves, long sleeves, eye protection, and a dust mask when handling insulation.
Frames Not Square
Out-of-square frames look bad and don’t hang properly. Always check diagonals before final assembly.
Variations and Advanced Builds
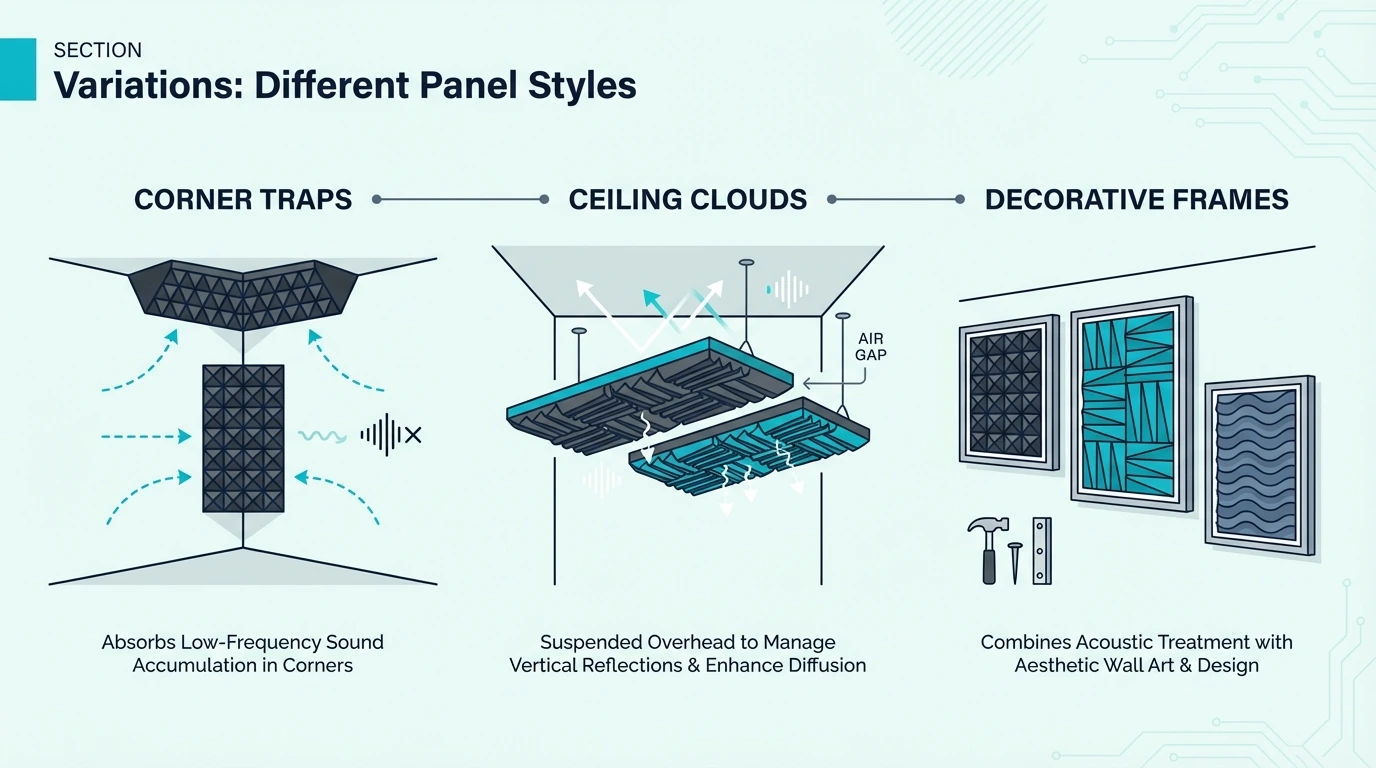
If you like what panels do for your room, these are the next builds people usually add.
Pick the one that matches the reflection you’re still hearing.
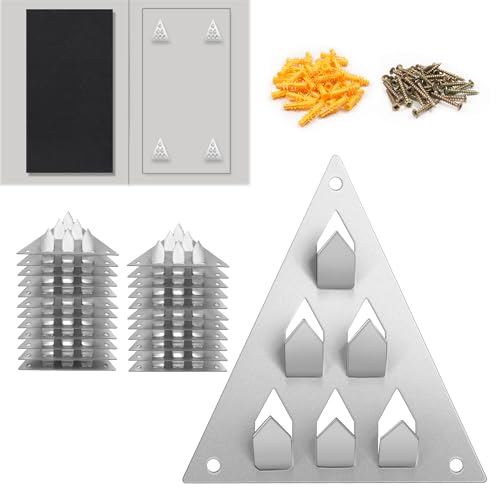
Corner Bass Traps
Build triangular frames that fit across room corners. Fill with thicker mineral wool for low-frequency absorption.
Corner traps address bass problems that flat wall panels can’t solve. They’re critical for complete room treatment.
For more on bass treatment, see acoustic panels vs bass traps.
Ceiling Clouds
Build standard panels but add hanging hardware instead of wall mounts. Suspend from ceiling using wire or chain.
Ceiling clouds are great if your room sounds bright or “tappy” from above.
They also clean up overhead reflections in small rooms.
Decorative Frames
Add decorative molding to frame edges for a high-end look. Paint or stain frames to match room décor.
You can use prints or patterns.
Panels don’t have to look like studio gear.
Portable Gobos
Build panels with legs or casters for moveable treatment. Useful for recording different instruments in different positions.
The Bottom Line
DIY panels are one of the cheapest ways to make a room sound less reflective.
Mineral wool or fiberglass in a simple frame, wrapped in breathable fabric, is enough for most home setups.
Build one first.
Once you have your workflow down, batch-building the rest is much faster.
Compared to thin foam, panels absorb more broadly.
That’s why a few panels can do more than covering a wall with 1-inch tiles.
If you can spare a weekend, DIY panels are usually the best move.
The savings can go into more panels, bass traps, or a better mic. For a broader overview of acoustic treatment options, see the acoustic treatment hub.
Frequently Asked Questions
How long does it take to build DIY acoustic panels?
Expect 30-60 minutes per panel once you have materials ready and a basic system.
The first panel usually takes longer, and batching steps (frames first, then insulation, then wrapping) speeds things up.
What’s the best insulation for DIY acoustic panels?
For most DIY builds, a rigid mineral wool board like Rockwool ComfortBoard 80 is a solid starting point.
Mineral wool batts and rigid fiberglass can work too, but fiberglass is usually more irritating to cut and handle. For store-bought alternatives, see the best acoustic foam panels guide.
Can I use regular home insulation for acoustic panels?
Soft fiberglass batts (pink insulation) compress too easily and don’t hold their shape.
Use mineral wool or rigid fiberglass products that stay firm inside a frame.
How do DIY panels compare to commercial acoustic foam?
DIY mineral wool panels generally absorb more broadly than common foam. They also tend to be more effective in the low-mids that thin foam often misses.
What fabric works best for acoustic panels?
Any acoustically transparent fabric works, so test by blowing through it.
Burlap, speaker grill cloth, and breathable cotton or linen are common choices, and vinyl/leather/tight weaves should be avoided.
Do I need special tools to build acoustic panels?
Basic tools are enough: a saw (any type), drill, staple gun, measuring tape, and scissors.
A miter saw and pocket hole jig help, but the most important “tool” is proper safety gear for handling insulation.

