How to Arrange Acoustic Foam: Strategic Placement for Best Results
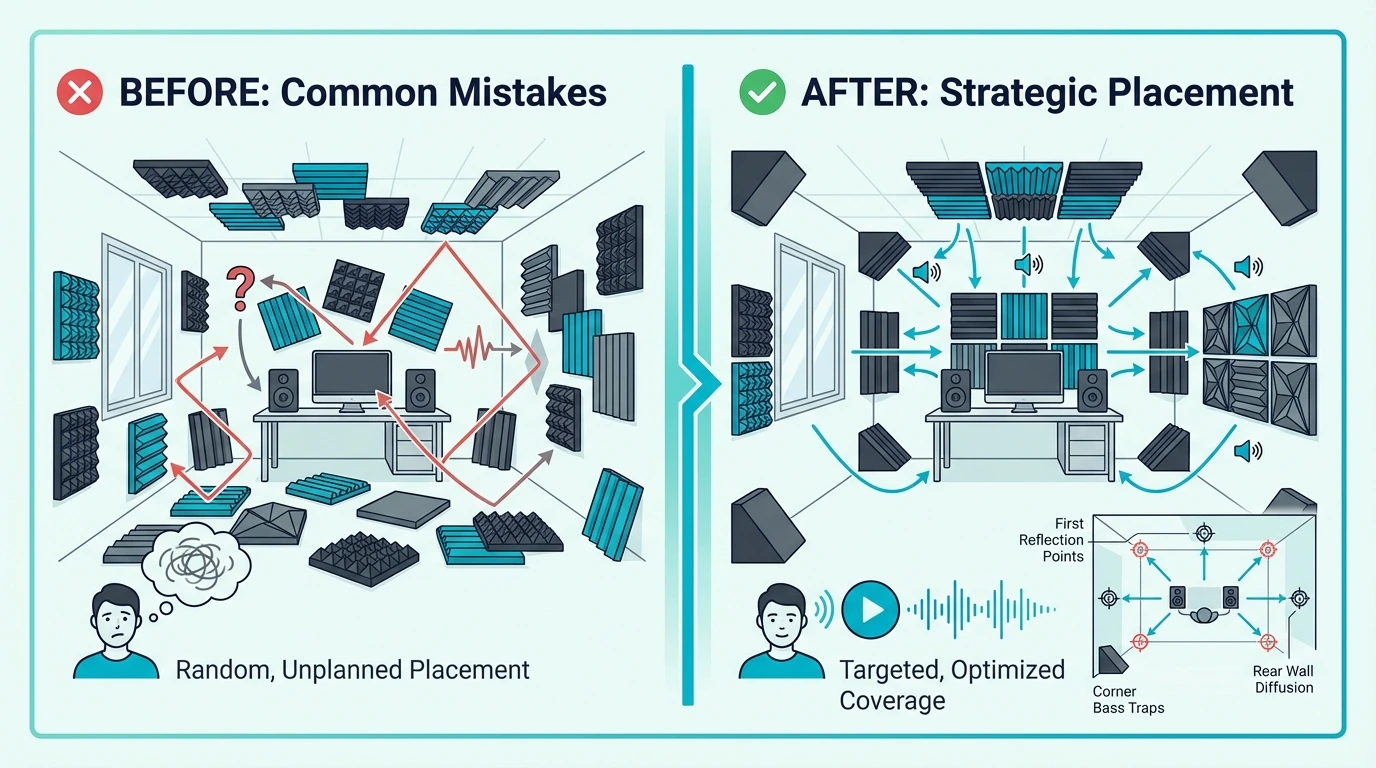
Acoustic foam works, but only if you put it in the right spots. Strategic placement of 8-12 panels outperforms 30+ panels scattered randomly — position matters more than quantity.
Most people stick foam wherever it fits or looks good. This wastes money and leaves acoustic problems unsolved. The reflections causing your issues come from specific locations, and treating those locations fixes the problems while random coverage doesn’t.
Below, you’ll see exactly where to place foam for maximum impact, whether you’re building a recording studio, improving a home office, or just making a room sound better.
For a foundational understanding of how foam works, see how acoustic foam works.
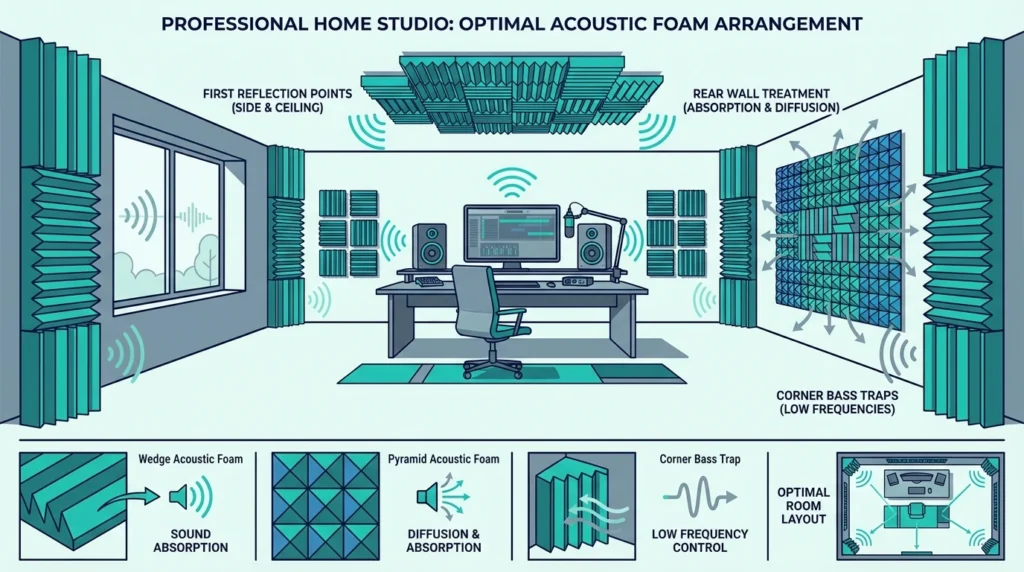
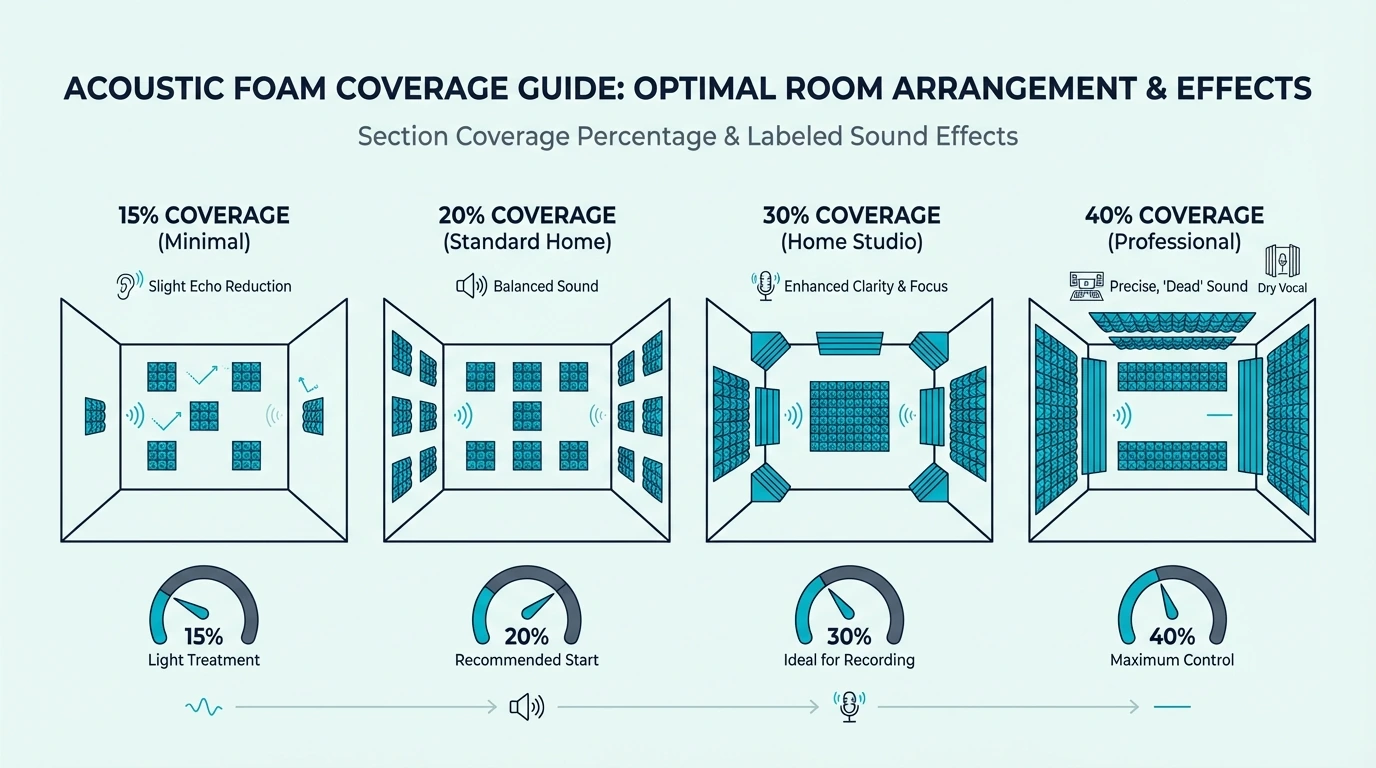
Start with first reflection points on side walls (highest impact), then the wall behind speakers or recording position, then the ceiling above your listening spot, then the rear wall behind you, and finally corners for bass control (which need bass traps, not standard foam). Cover 20-30% of wall surface at these priority positions. More coverage isn’t better — over-treatment makes rooms sound dead and unnatural. Test after each addition and stop when problems are solved.
Why Does Foam Arrangement Matter More Than Quantity?
Sound doesn’t bounce randomly around your room. It follows predictable paths based on physics.
Understanding these paths tells you exactly where treatment helps and where it’s wasted.
The Physics of Room Reflections
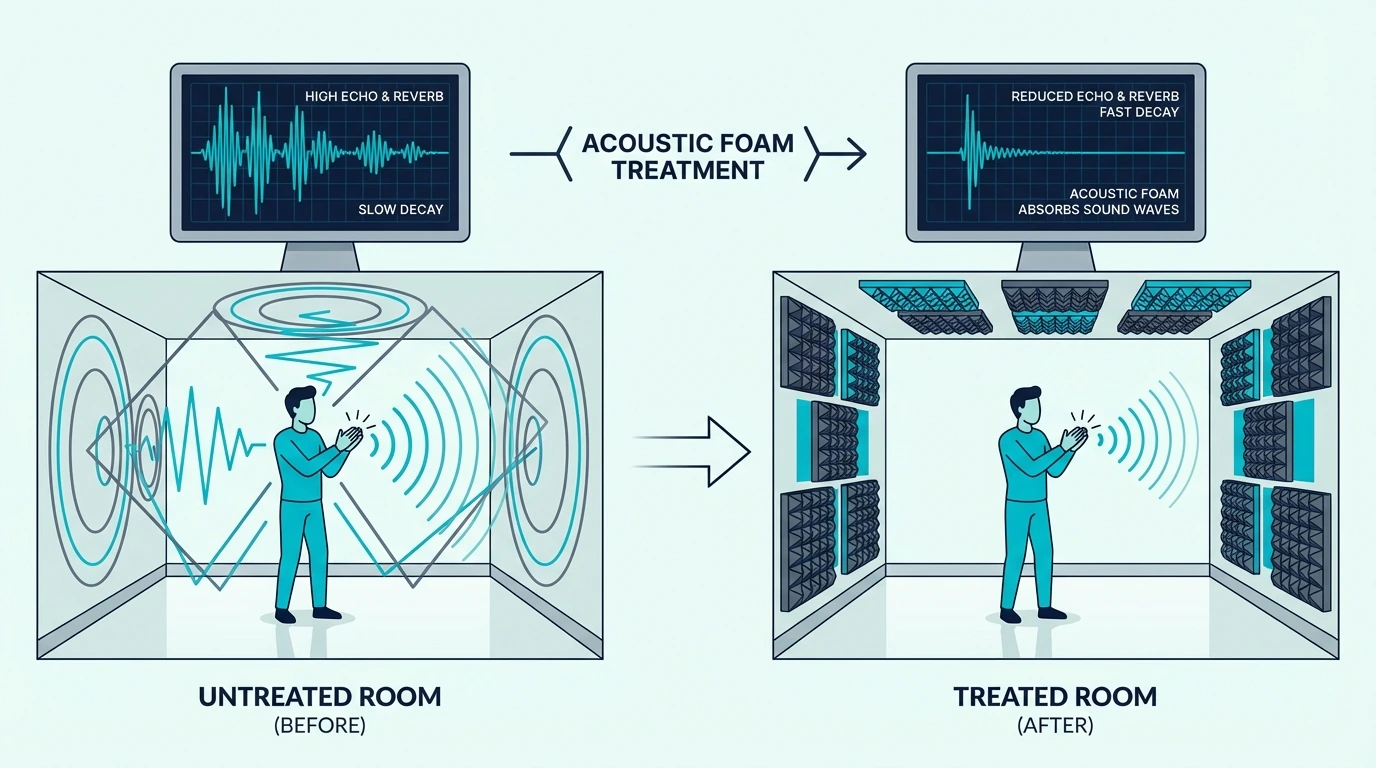
When you speak or play music, sound radiates outward in all directions. Some travels directly to your ears (or microphone). The rest hits walls, ceiling, and floor, then bounces back.
These reflections arrive at your ears milliseconds after the direct sound. Early reflections (within 20-30ms) color your perception of the source.
Late reflections create reverb and echo. Both can be problematic, but early reflections cause more issues for critical listening and recording.
The key insight: reflections come from specific surfaces at specific angles. Treating those surfaces eliminates those reflections. Treating other surfaces does nothing for those particular problems.
Why Random Placement Fails
Sticking foam wherever it fits ignores reflection paths. You might cover 50% of your walls while missing the exact spots where problematic reflections originate.
Imagine a leak in your roof. Putting buckets randomly around the house doesn’t help—you need buckets where water actually drips. Acoustic treatment works the same way: you need absorption where reflections actually occur.
Random placement also tends to over-treat some areas while under-treating others. This creates uneven frequency response — some frequencies get absorbed too much, others not enough.
The result sounds worse than balanced treatment.
The Strategic Approach
Strategic placement identifies reflection paths first, then places treatment to intercept them. This approach uses fewer panels more effectively.
The mirror trick finds first reflection points. Bass builds up in corners.
The wall behind your speakers creates strong early reflections. These facts don’t change based on room size or shape — the physics is consistent.
Following a strategic approach, you’ll spend less money, achieve better results, and avoid the dead, over-treated sound that plagues many home studios.
How Do You Find Your First Reflection Points?
First reflection points are your highest-priority treatment locations. Sound bouncing off these spots reaches your ears just milliseconds after the direct sound, causing the most audible problems.
The Mirror Trick Explained
Sit in your primary listening or working position. Have a helper slide a mirror along the side wall at ear height (or do it yourself with a small mirror on a stick).
Watch the mirror as it moves along the wall. At certain positions, you’ll see your speaker (or where sound originates) reflected in the mirror. Mark these spots—they’re your first reflection points.
The physics is simple: if you can see the sound source in the mirror, sound from that source reflects off that spot directly to your eyes (and ears). These reflections arrive almost simultaneously with direct sound and cause comb filtering and imaging problems.
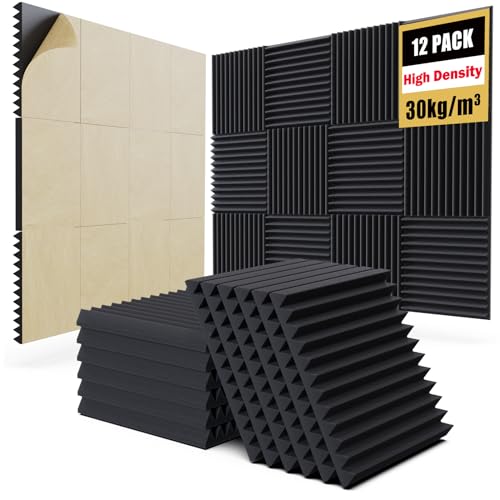
For first reflection points, a budget-friendly option like the Sonic Acoustics 24-pack fire-retardant wedge panels covers several reflection points in one purchase.
Sonic Acoustics 24-pack fire-retardant wedge panels
Typical First Reflection Locations
In most rooms, you’ll find first reflection points:
- Side walls: Usually 2-4 feet from your listening position, at ear height
- Ceiling: Directly above or slightly in front of your position
- Floor: Between you and your speakers (often covered by carpet/rug)
- Front wall: Beside your speakers (if speakers aren’t against the wall)
Side wall reflections typically cause the most problems because they’re at ear level and arrive with significant energy. Ceiling reflections matter in rooms with hard ceilings.
Floor reflections are often already addressed by carpet or rugs.
Marking and Treating First Reflections
Mark each first reflection point with painter’s tape. You’ll likely find 2-4 points on each side wall, plus ceiling locations.
Standard 12×12 or 24×24 inch panels work well at first reflection points. You don’t need massive coverage — just enough to catch the primary reflection.
One or two panels per marked spot typically suffices.
Mount panels centered on your marked points at ear height when seated. The goal is intercepting the reflection path, so precise positioning matters more than panel size. For mounting techniques, see the how to put acoustic foam on walls guide.
Get Studio Tips Weekly
Join 5,000+ creators getting acoustic treatment advice every week.
No spam. Unsubscribe anytime.How Should You Arrange Foam Behind Speakers and Monitors?
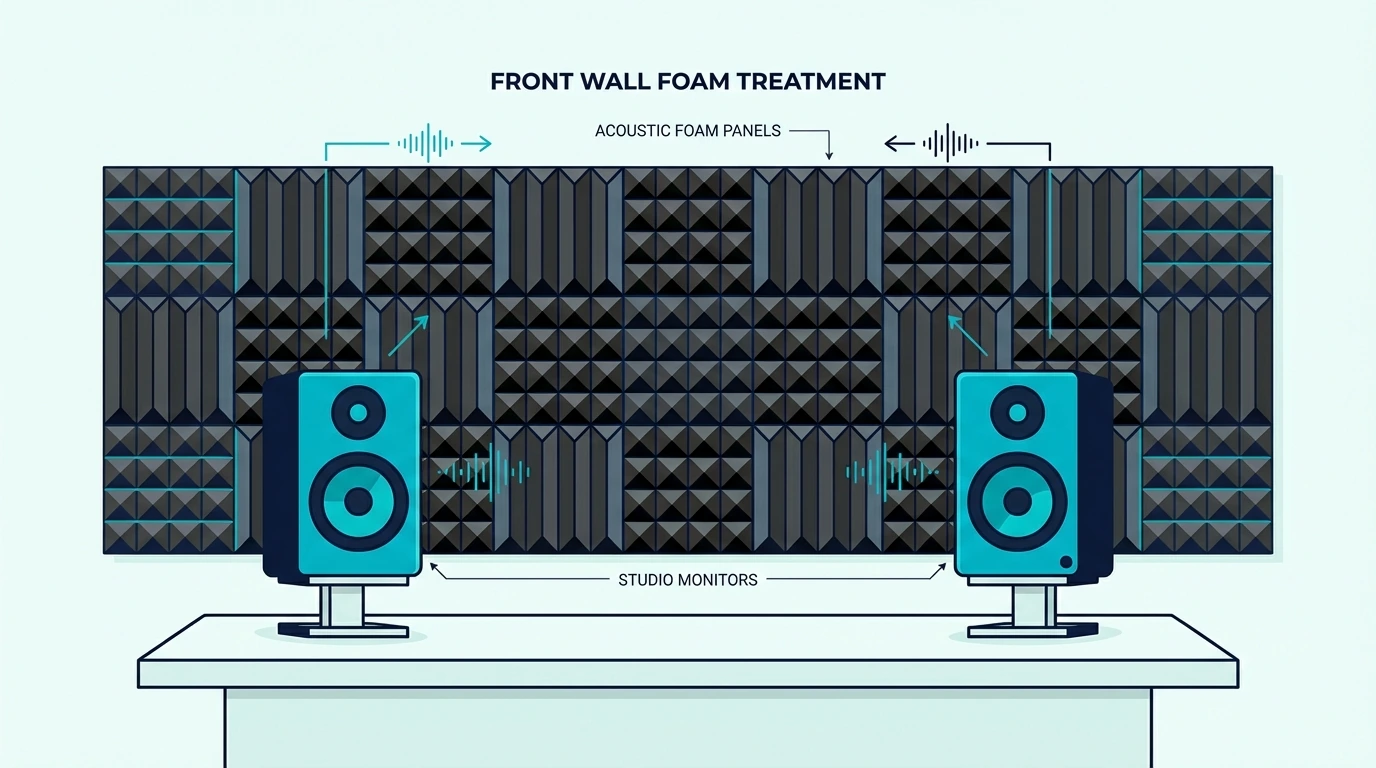
The wall behind your speakers creates strong early reflections that interfere with direct sound. Treating this area improves clarity and imaging noticeably.
Why This Wall Matters
Sound from your speakers travels forward to your ears, but also backward to the wall behind them. This backward sound reflects and returns, arriving at your ears shortly after the direct sound.
These reflections cause comb filtering—certain frequencies cancel out while others reinforce. The result is colored, inaccurate sound that changes based on where you sit.
For mixing and critical listening, this coloration prevents accurate decisions. For recording, reflections from this wall can reach microphones and contaminate captures.
Coverage Recommendations
Treat the wall behind speakers with 40-60% coverage in the area between and around the speakers. You don’t need floor-to-ceiling treatment—focus on the zone from speaker height down to desk level.
If your speakers are close to the wall (within 2 feet), more coverage helps. If they’re pulled out into the room (3+ feet), less treatment is needed because the reflection path is longer and weaker.
For near-field monitoring (speakers close to you), this wall treatment is especially important. The short distances mean reflections arrive quickly and with significant energy.
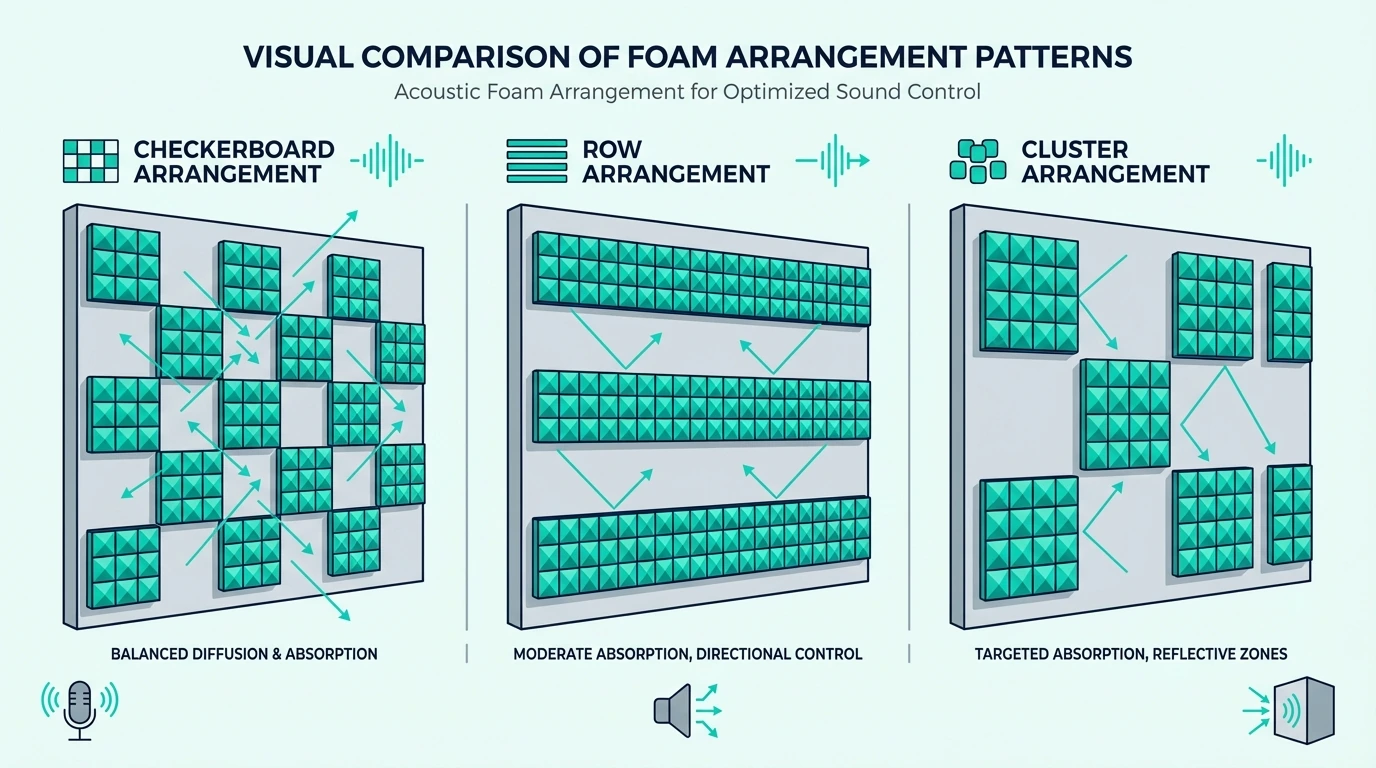
Panel Arrangement Patterns
Several arrangement patterns work well behind speakers:
Centered cluster: Group panels directly behind and between speakers. This catches the strongest reflections from both speakers.
Spread pattern: Distribute panels across the wall with small gaps. This provides more even coverage and can look more intentional.
Checkerboard: Alternate panels and bare wall in a grid pattern. This balances absorption with some remaining reflection for natural sound.
Any of these patterns works acoustically. Choose based on aesthetics and how much coverage you need.
How Do You Arrange Acoustic Foam on the Ceiling?
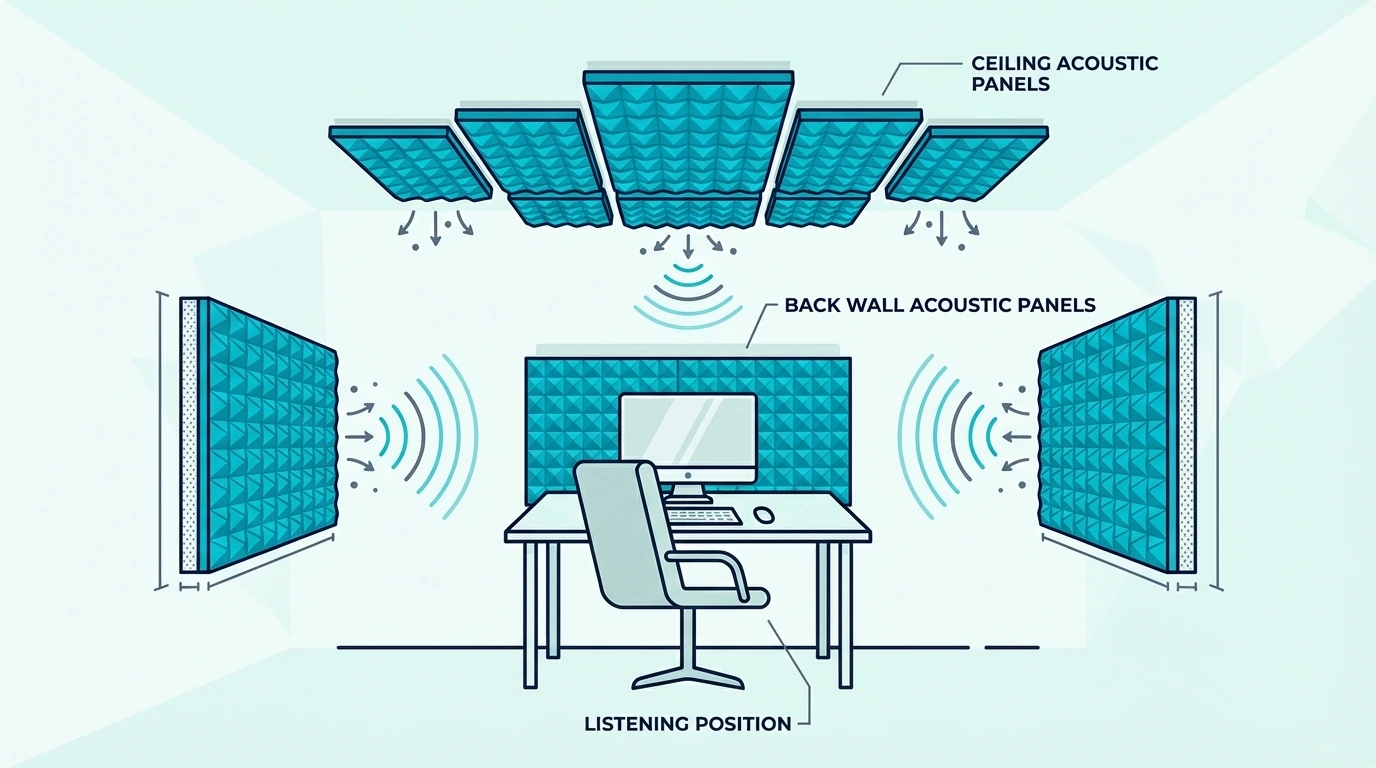
Ceiling reflections contribute to room problems, especially in rooms with hard, flat ceilings. A ceiling “cloud” above your listening position addresses this.
When Ceiling Treatment Matters
Hard ceilings (drywall, plaster, concrete) reflect sound strongly. If your ceiling is within 10 feet and untreated, it’s contributing reflections that affect your sound.
Rooms with cathedral or vaulted ceilings have less ceiling reflection problems—the angled surfaces scatter sound rather than reflecting it directly back.
Drop ceilings with acoustic tiles already provide some absorption. Additional treatment may not be necessary unless you’re doing critical listening or recording.
Cloud Placement
A ceiling cloud is a group of panels mounted horizontally above your listening or recording position. The term “cloud” comes from the panels appearing to float below the ceiling.
Position the cloud so it covers the ceiling’s first reflection point — typically directly above your head or slightly forward toward your speakers. A 4×4 foot cloud (four 24×24 panels) handles most situations.
For ceiling clouds and behind-speaker treatment, thicker panels like the 2-inch self-adhesive pyramid foam panels (12-pack) reach lower frequencies that 1-inch foam misses.

2-inch self-adhesive pyramid foam panels (12-pack)
The cloud doesn’t need to touch the ceiling. Mounting it 4-6 inches below the ceiling surface actually improves low-frequency absorption by creating an air gap.
Mounting Considerations
Ceiling mounting is more challenging than wall mounting. Adhesive alone often fails over time—gravity works against you constantly.
Secure mounting options include: – Wire suspension: Hang panels from eye hooks in ceiling joists – Z-clips: Metal brackets that interlock for secure mounting – T-bar grid: Suspended ceiling grid designed for acoustic panels – Direct mechanical fastening: Screws through panels into ceiling (damages panels)
For renters, freestanding panel frames or boom-mounted panels can provide ceiling-area treatment without permanent installation.
What’s the Best Way to Arrange Foam on the Rear Wall?
The wall behind your listening position affects how your room sounds, but treatment choice here is less obvious than other locations.
Absorption vs Diffusion
The rear wall is where the absorption-versus-diffusion debate matters most. Both approaches work, but they create different results.
Absorption on the rear wall reduces overall reverb and creates a tighter, drier sound. This works well in small rooms or when you want maximum control.
Diffusion scatters rear-wall reflections without absorbing them, maintaining room liveliness while eliminating focused reflections. This works better in larger rooms or when you want natural ambience.
For most home studios under 200 square feet, absorption is the safer choice. Diffusion requires distance to work effectively—in small rooms, you’re too close to the rear wall for diffusion to function properly.
Absorption Arrangement
If using absorption on the rear wall, cover 40-60% of the wall surface at ear height. You don’t need floor-to-ceiling coverage—focus on the zone where reflections would reach your ears.
Spread panels across the wall rather than clustering them in one spot. This provides more even absorption and prevents creating a “dead spot” in one area while leaving others reflective.
Leave some bare wall if the room feels too dead. The rear wall is often where you can reduce coverage without losing much benefit—first reflection points and the front wall matter more.
Diffusion Arrangement
If using diffusers, center them on the rear wall at ear height. Diffusers need to be directly in the reflection path to work effectively.
Quality diffusers are expensive, so most people use fewer diffusers than they would absorption panels. A single 2×4 foot diffuser or a pair of smaller units often suffices for the rear wall.
Combine diffusion with absorption by placing absorptive panels in corners and diffusers on the flat wall sections. This addresses bass buildup while maintaining midrange liveliness.
For more on choosing between these approaches, see acoustic foam vs diffusers.
How Should You Arrange Foam in Corners?
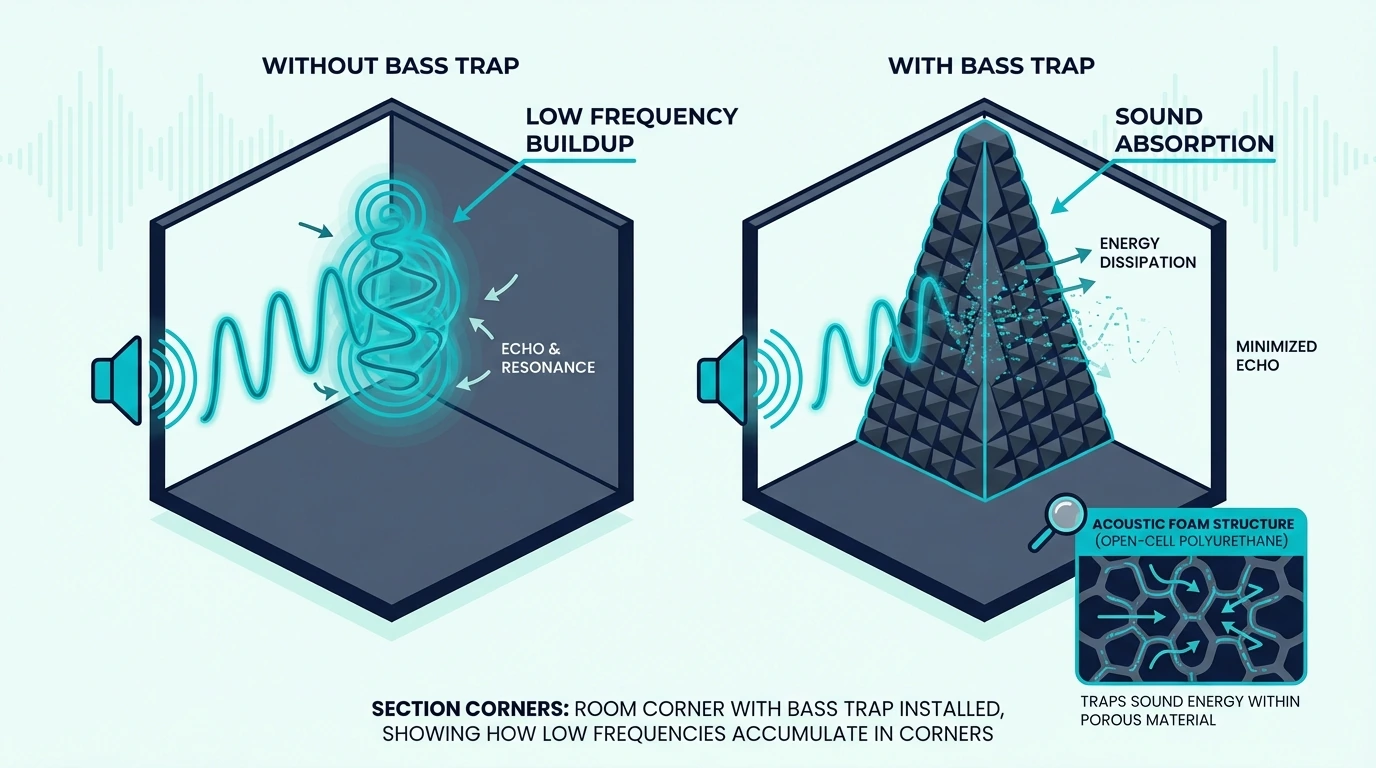
Corners are where bass frequencies accumulate. Standard foam panels don’t address this—you need bass traps specifically designed for low-frequency absorption.
Why Corners Need Special Treatment
Low frequencies have long wavelengths. A 100Hz tone has a wavelength over 11 feet—it doesn’t “see” thin foam panels and passes right through.
But corners create pressure zones where bass energy builds up. The geometry of two or three surfaces meeting concentrates low-frequency energy.
This causes boomy, muddy bass that foam on flat walls can’t fix.
If your room sounds boomy or bass-heavy, corner treatment is essential. No amount of wall panels will solve corner-related bass problems.
Bass Trap Placement
Place bass traps in corners, starting with the front corners (behind/beside your speakers). These corners contribute most to what you hear at the listening position.
Floor-to-ceiling placement is ideal—bass traps work better with more surface area. If full-height traps aren’t practical, prioritize the upper portions of corners where you’re more likely to hear the effects.
Rear corners matter too, especially for music production where accurate bass response is critical. A complete corner treatment setup includes all four vertical corners.
Straddling Corners
Bass traps work best when they “straddle” the corner—mounted diagonally across the corner rather than flat against one wall.
This positioning places the trap in the highest-pressure zone where bass accumulates most. It also creates an air gap behind the trap, improving low-frequency absorption.
Commercial corner traps are often triangular or designed to fit across corners. DIY traps can be rectangular panels mounted on brackets that hold them diagonally.
For more on bass treatment, see bass traps vs acoustic foam.
How Does Arrangement Change by Room Type?

Different rooms have different needs. Here’s how to adapt the general principles to specific spaces.
Home Recording Studio
Recording studios need the most thorough treatment because microphones capture everything.
Priority arrangement: 1. Heavy treatment behind microphone position (60-80% coverage) 2. First reflection points on side walls (2-3 panels each side) 3. Ceiling cloud above recording position 4. Corner bass traps (at least front corners) 5. Moderate treatment on remaining walls (20-30% coverage)
The area around the microphone matters most. Create a “recording zone” with concentrated treatment even if the rest of the room has less coverage.
For detailed studio placement, the priority list above applies — just increase coverage density around the mic position.
Home Office / Video Call Space
Home offices need enough treatment for clear video calls without over-treating a living space.
Priority arrangement: 1. Wall behind your camera/facing your microphone (40-50% coverage) 2. Side walls at desk level (1-2 panels each side) 3. Optional: ceiling treatment if echo is severe
You don’t need full room treatment for video calls—just enough absorption near your desk to control reflections that reach your microphone.
Aesthetic panels work well in offices. Fabric-wrapped options or decorative foam patterns look professional while providing absorption.
Living Room / Media Room
Living spaces need balanced treatment that improves sound without making the room feel dead or looking industrial.
Priority arrangement: 1. First reflection points for primary seating (2-4 panels) 2. Wall behind TV/speakers (30-40% coverage) 3. Optional: rear wall treatment if echo is noticeable
Living rooms often have built-in absorption from furniture, curtains, and carpet. You may need less treatment than you expect.
Prioritize aesthetics in living spaces. Art panels, fabric-wrapped treatments, and decorative patterns integrate better than industrial-looking foam. For ideas on improving foam appearance, see how to decorate with acoustic foam.
Bedroom Studio
Bedrooms have built-in absorption from bedding, clothes, and soft furnishings. Treatment needs are often minimal.
Priority arrangement: 1. First reflection points (if walls are bare at those spots) 2. Wall behind recording/listening position 3. Corner treatment only if bass is problematic
Do the clap test before buying anything. Many bedrooms only need 4-6 panels at first reflection points — the existing soft materials handle the rest.
If you do need a small starter set, a 12-pack self-adhesive wedge panel set covers the key spots without overbuying. If you’re wondering whether foam is even necessary for your space, the does acoustic foam work guide covers the fundamentals.
12-pack self-adhesive wedge panel set
What Are the Most Common Arrangement Mistakes?
Avoid these errors that waste money and produce poor results.
Mistake 1: Covering Only Corners
Some people put all their foam in corners because “that’s where sound builds up.” This addresses bass (if using proper bass traps) but ignores mid/high frequency reflections from walls.
Corners need bass traps, not standard foam. And wall treatment at first reflection points matters more for most acoustic problems than corner treatment.
Balance your arrangement: first reflection points first, then corners, then general coverage.
Mistake 2: Floor-to-Ceiling on One Wall
Covering one wall completely while leaving others bare creates uneven absorption. Some frequencies get over-absorbed while others remain problematic.
Distribute treatment across multiple walls rather than concentrating it on one. Even coverage produces more balanced results.
Mistake 3: Ignoring the Ceiling
Many people treat walls thoroughly while ignoring the ceiling entirely. In rooms with hard ceilings, this leaves significant reflections unaddressed.
At minimum, consider a ceiling cloud above your primary position. This single addition often provides as much improvement as several wall panels.
Mistake 4: Symmetrical Obsession
Acoustic treatment doesn’t need to be perfectly symmetrical. While balanced coverage helps, obsessing over mirror-image placement wastes panels.
Focus on treating actual reflection points rather than creating visual symmetry. If one side wall has a window and the other is bare drywall, they need different treatment—not identical coverage.
Mistake 5: Too Much Coverage
More isn’t always better. Rooms with 50%+ coverage often sound dead, muffled, and uncomfortable. Speech sounds unnatural, music loses life.
Aim for 20-30% coverage at strategic locations. Test after each addition and stop when problems are solved. You can always add more later if needed. For echo-specific treatment strategies, see how to stop echo with acoustic foam.
How Do You Test if Your Arrangement Is Working?
After arranging your foam, verify that it’s actually solving your problems.
The Clap Test
Stand in your listening position and clap sharply. Listen to the decay—how long the sound rings before dying out.
In a well-treated room, the decay is short and tight. In a problematic room, you hear extended ringing, especially metallic-sounding flutter echo.
Compare different positions in the room. Treatment should reduce decay consistently, not just in one spot.
The Voice Test
Speak normally and listen to how your voice sounds. In an over-treated room, your voice sounds muffled and dead. In an under-treated room, it sounds echoey and distant.
Well-arranged treatment produces natural-sounding speech—clear and present without excessive reverb or unnatural deadness.
Recording Comparison
If you’re treating for recording, make test recordings before and after treatment. The difference should be obvious—treated recordings sound tighter and cleaner.
If recording quality hasn’t improved enough, reassess your arrangement. You may need more treatment at specific locations or different placement of existing panels.
The Bottom Line
Arranging acoustic foam strategically transforms room acoustics more effectively than random placement ever could. First reflection points, the wall behind your speakers, ceiling clouds, and corner bass traps—these priority locations deserve your panels before general wall coverage.
The 20-30% coverage guideline prevents over-treatment while ensuring meaningful improvement. Start with minimum effective treatment at priority locations, test results, and add more only where problems persist.
Every room is different, but the physics of sound reflection is consistent. Find your first reflection points with the mirror trick, treat those spots first, then expand coverage based on what you hear.
This approach uses fewer panels more effectively than any amount of random placement. For help choosing between foam types and thicknesses, see how to choose acoustic foam.
Frequently Asked Questions
What is the best pattern to arrange acoustic foam?
The best pattern prioritizes first reflection points on side walls, then the wall behind speakers, then ceiling and rear wall. Within each area, spread panels evenly rather than clustering them.
Checkerboard patterns work well for partial coverage. The specific pattern matters less than treating the right locations.
How far apart should acoustic foam panels be?
Spacing depends on your coverage goals. For first reflection points, panels can touch or have small gaps — you want complete coverage of the reflection zone.
For general wall treatment, 6-12 inch gaps between panels provide good coverage while using fewer panels. Avoid large gaps (2+ feet) that leave significant reflective areas.
Should acoustic foam be evenly distributed?
Not necessarily. Concentrate treatment at priority locations (first reflection points, behind speakers) rather than distributing evenly across all walls. Strategic concentration at problem areas works better than even distribution that may miss key reflection points while over-treating less important areas.
Do I need to cover the entire wall with acoustic foam?
No. Most rooms need only 20-30% wall coverage, concentrated at specific locations.
Full wall coverage often creates an over-treated, dead-sounding space. Start with first reflection points and add coverage only where testing reveals remaining problems.
Where should I NOT put acoustic foam?
Avoid placing foam where it won’t intercept reflections—low on walls below ear level, in corners without bass traps, or on walls far from your listening position. Also avoid over-treating any single surface while leaving others bare. Balance matters more than maximum coverage in any one location.
How do I know if I’ve arranged my foam correctly?
Do the clap test: a well-treated room has short, tight decay without metallic ringing. Your voice should sound natural — clear but not muffled.
Recordings should sound cleaner than before treatment. If problems persist, reassess placement at first reflection points and consider adding treatment at specific problem locations.

