How to Stop Echo With Acoustic Foam (Without Covering Every Wall)
Yes, acoustic foam can stop echo — but only if you put it where the reflections actually hit, not where the wall happens to be empty.
Most “foam didn’t work” stories come from random placement that misses first reflection points and the parallel-wall ping-pong that creates flutter echo.
This guide shows you where to start, how much coverage is usually enough, and when you need corner bass traps instead of more foam.
Start with the quick takeaway, then treat first reflection points first and work outward.
To stop echo with acoustic foam, treat first reflection points and one wall of each parallel pair before you chase total coverage. Aim for around 20–30% wall coverage, then add corner bass traps if the room still sounds boxy.
Why Your Room Has Echo (And Why It Matters)
Echo isn’t just annoying—it actively degrades everything you do in that space. Understanding why it happens helps you fix it efficiently.
The Physics of Room Echo
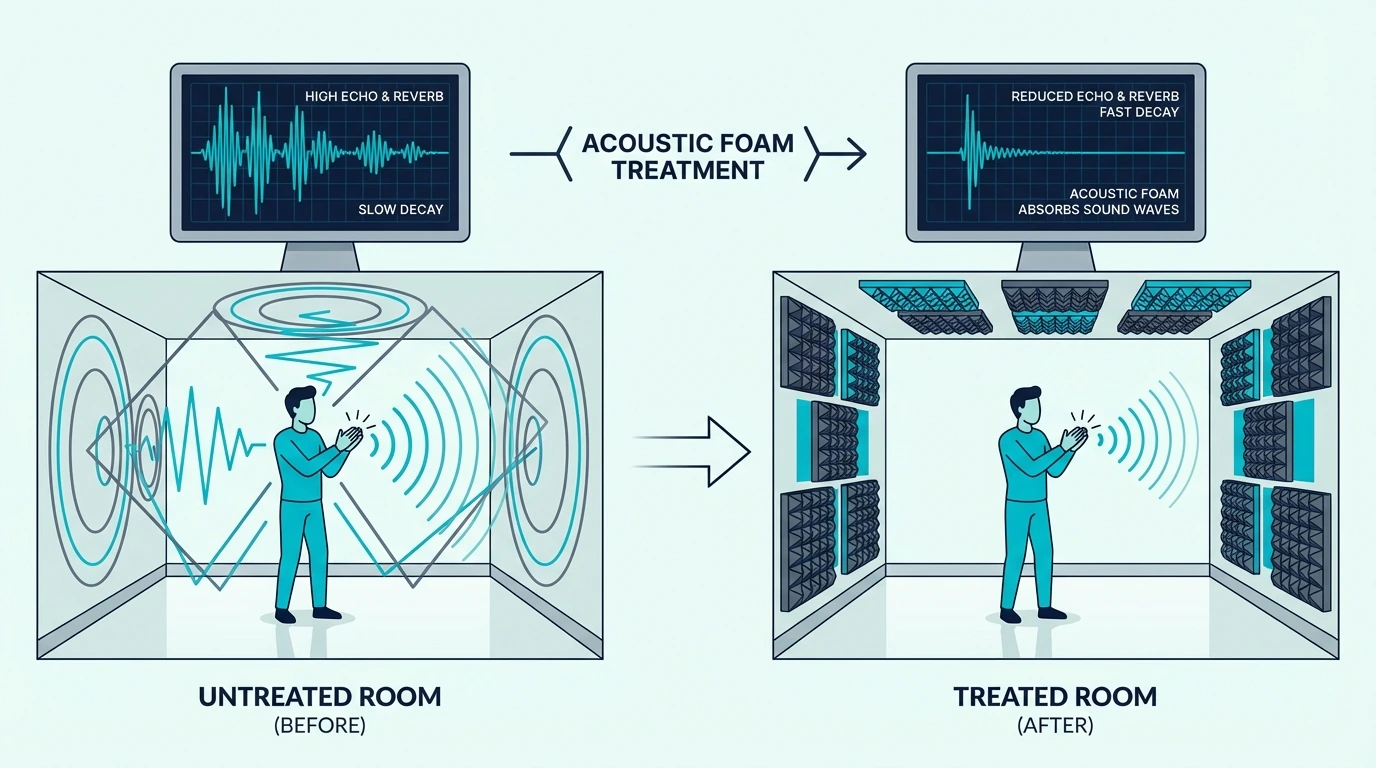
Sound travels in waves. When those waves hit a hard surface, they bounce back like a ball off a wall.
In a room with multiple hard surfaces, reflections bounce around until they finally lose enough energy to fade out. That “tail” is what makes a room feel hollow.
You’ll usually hear two different problems: early reflections and late reflections. Early reflections arrive quickly and smear the direct sound.
Late reflections arrive later and create the reverb tail that makes rooms sound echoey. You don’t need the exact timing to fix it, but the “early vs late” split explains why placement matters.
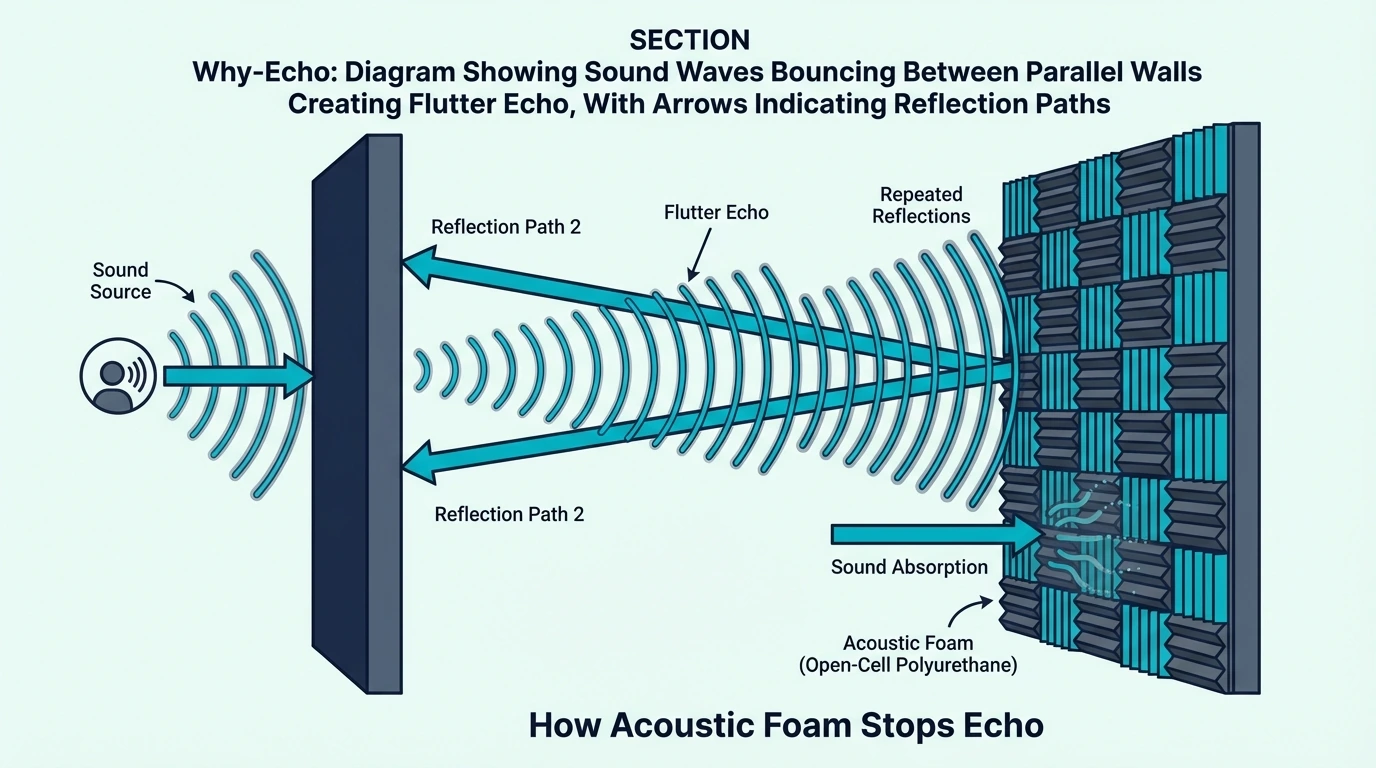
Flutter echo is the worst offender. It happens between parallel surfaces—two walls facing each other, or the floor and ceiling.
Sound bounces back and forth rapidly, creating a metallic ringing that’s obvious when you clap. Foam fixes flutter when you break the ping-pong path.
That’s the mechanism. The reason it matters is simple: echo changes what you hear and what your mic captures, so it can make good gear sound bad.
How Echo Affects Your Space
In recording environments, echo contaminates everything your microphone captures. Your voice sounds distant even if you’re right on the mic.
Music recordings keep that amateur “room” on top of everything. Fixing echo is one of the fastest upgrades you can make.
For video calls and podcasts, echo makes you harder to understand. The reflections compete with your direct voice, reducing clarity and making listeners work harder to follow what you’re saying.
Even in normal living spaces, excessive echo is fatiguing. Conversations feel strained and music gets harsh.
Treating echo makes the room more comfortable day-to-day, not just “studio” nicer. If you’re in an apartment, read does acoustic foam help in apartments so you don’t confuse echo control with soundproofing.
Once you understand the problem, the next step is figuring out where it’s worst in your room. The clap test is the fastest way to do that without any gear.
The Clap Test: Finding Your Echo Problems
Stand in the center of your room and clap once, sharply. Listen to what happens after the clap.
A well-treated room produces a short, tight decay—the sound dies quickly without ringing. A problematic room produces a long tail with metallic ringing, especially noticeable in the high frequencies.
Walk around the room clapping in different spots. Echo is often worse in certain areas—usually between parallel walls or in corners.
Those hotspots tell you where to treat first. Don’t guess.
First Reflection Points: Your Highest Priority
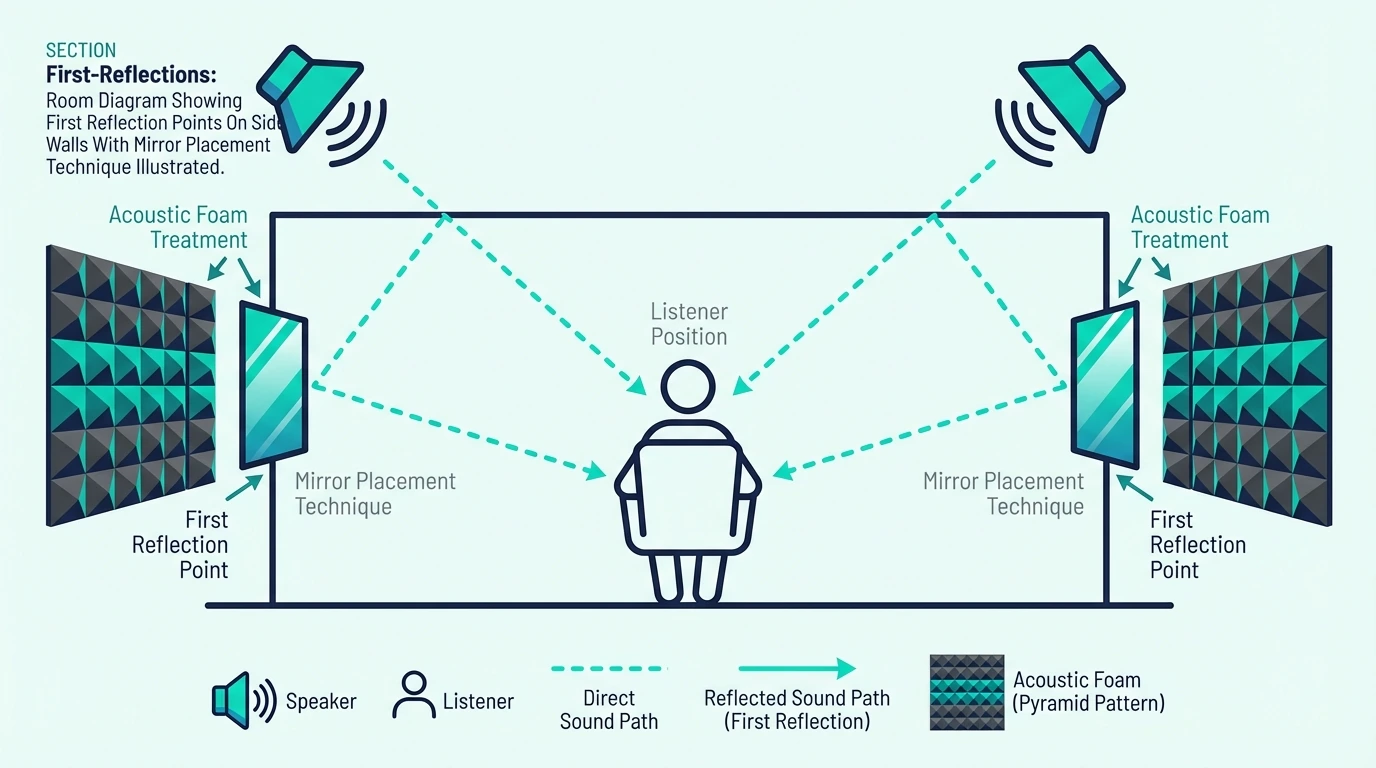
First reflection points are where sound bounces from your source (speakers, your mouth) to your ears via the nearest walls. Treating these points provides more improvement than any other placement.
Finding First Reflection Points
The mirror trick makes this easy. Sit in your primary listening or recording position.
Have someone slide a mirror along the side wall at ear height. When you can see your speaker (or your mic position) in the mirror, that’s a first reflection point.
Wherever you can see your speaker (or where your microphone would be) in the mirror, that’s a first reflection point. Mark these spots—they’re your priority treatment locations.
Typically, you’ll find first reflection points on both side walls, roughly 2-4 feet from your position depending on room geometry. The ceiling also has a first reflection point, though it’s harder to find without lying down.
Once you’ve found those spots, it helps to understand why they punch above their weight. That context keeps you from wasting foam on random walls just because they’re empty.
Why First Reflections Matter Most
First reflections arrive at your ears just milliseconds after the direct sound. Your brain can’t separate them—it perceives them as part of the original sound, but colored by the room’s acoustic signature.
These early reflections cause comb filtering, where certain frequencies cancel out and others reinforce. The result is an inaccurate, colored sound that changes based on where you sit.
Eliminating first reflections lets you hear the source without the room fighting you. It’s one of those changes that feels immediate.
For mixing, it means you trust what you’re hearing. For recording and calls, it means cleaner captures and better intelligibility.
So if you want the biggest audible win per panel, treat these first. Here’s the practical placement so you can do it without guessing.
Treating First Reflection Points
Place foam panels at each marked first reflection point. Standard 12×12 or 24×24 inch panels work well—you don’t need massive coverage, just enough to catch the primary reflection.
Mount panels at ear height when seated. If you stand while recording, raise them.
The goal is to intercept the reflection path between the source and your ears. If you want the mental model, read how acoustic foam works.
Two panels per side wall (four total) often handles first reflections adequately. This minimal treatment produces dramatic improvement—often more than covering entire walls randomly.
If you want a starter pack sized for these high-impact spots, JBER acoustic studio foam (24-pack) gives you enough tiles to hit first reflections without going overboard. Treat those spots first, then decide if you even need more.
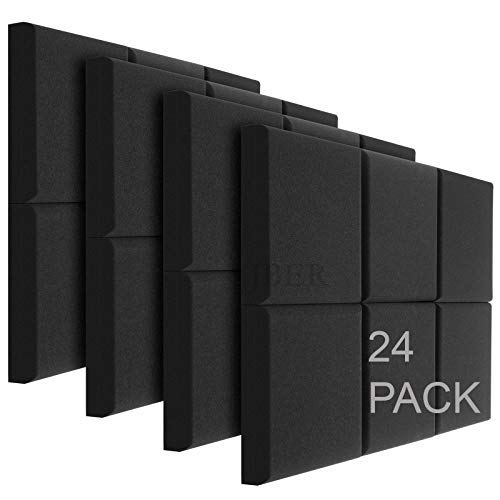
JBER Acoustic Studio Foam (24-pack, 2-inch)
For detailed mounting techniques, see our guide on how to put acoustic foam on walls.
If you’re renting, Command picture hanging strips (heavy duty) are the easiest damage-minimizing mount for foam tiles. Just clean the wall first and use the pull-tab removal method when you take them down.
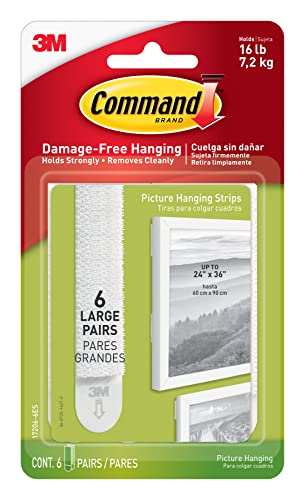
Command Picture & Frame Hanging Strips (Heavy Duty, Large)
Get Studio Tips Weekly
Join 5,000+ creators getting acoustic treatment advice every week.
No spam. Unsubscribe anytime.Breaking Up Parallel Surfaces
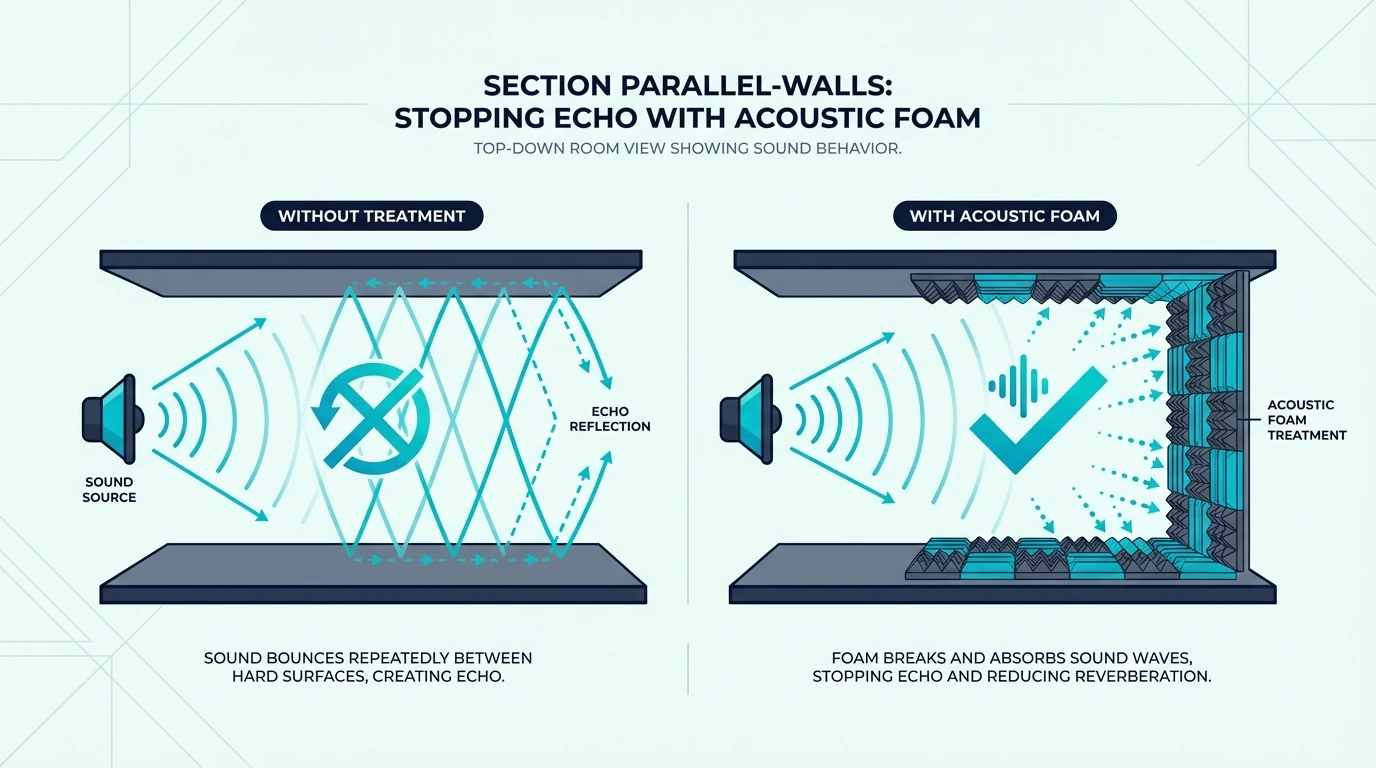
Parallel surfaces create flutter echo—that metallic ringing when you clap. Breaking up at least one surface in each parallel pair eliminates this problem.
Identifying Parallel Surface Problems
Most rooms have multiple parallel surface pairs: front and back walls, side walls, floor and ceiling. Each pair can create flutter echo if both surfaces are hard and reflective.
The clap test reveals which pairs are problematic. Stand between two parallel walls and clap.
If you hear rapid ringing (almost like a “boing” sound), that pair needs treatment. If it’s a short, dull decay, you can move on.
Some parallel pairs matter more than others. Walls at ear level when seated tend to cause more obvious problems than floor/ceiling reflections.
Prioritize the pairs you can actually hear. Treating what you can’t hear is how you burn panels for no payoff.
Once you’ve found the worst parallel pair, the fix is simpler than most people expect. You don’t need to treat both walls—you just need to break the ping-pong path.
Treatment Strategy for Parallel Walls
You don’t need to treat both walls in a parallel pair. Treating just one breaks the reflection pattern enough to eliminate flutter echo.
Choose the wall that makes the most sense practically. If one wall has windows and the other is bare drywall, treat the drywall.
If one wall is behind your listening position, that’s often the better choice. You’re catching reflections that would otherwise bounce back into your ears.
Coverage doesn’t need to be complete. A few panels scattered across the wall—breaking up the flat surface—often suffices.
The goal is preventing clean reflections, not absorbing every sound wave. Think “break the mirror,” not “wrap the room in foam.”
That leads to the natural question: how much foam is “enough” for flutter echo? Here’s a realistic target so you don’t overbuy.
How Much Coverage Stops Flutter Echo
For flutter echo specifically, 30-40% coverage of one wall in a parallel pair usually eliminates the problem. That’s less than most people expect.
The panels don’t even need to be contiguous. Scattered placement actually works better for flutter echo because it breaks up the reflection pattern more effectively than a single large treated area.
Test after each addition. Clap between the walls and listen.
When the metallic ringing disappears, you’ve added enough. More treatment can help with other issues, but it won’t make flutter echo “more gone.”
Corner Treatment for Low-Frequency Echo
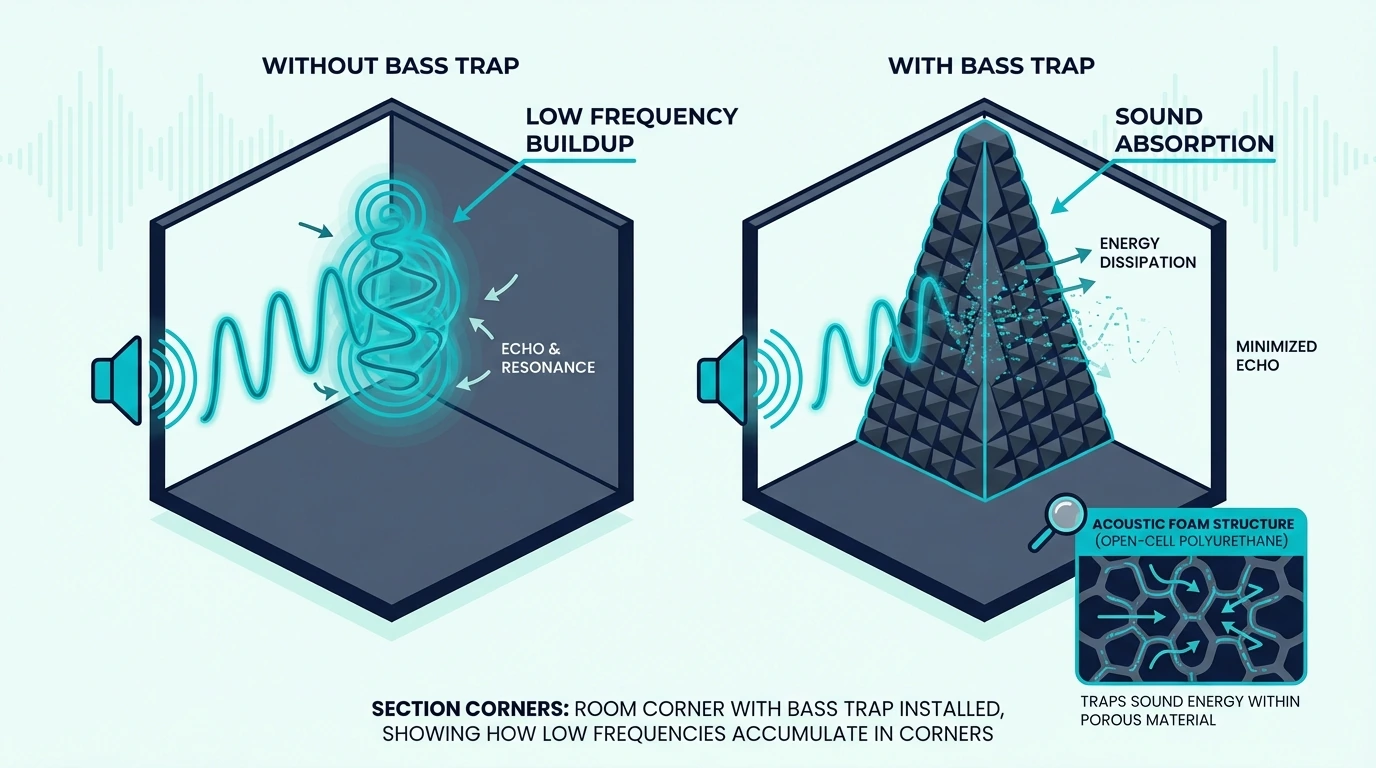
Standard foam panels don’t address bass frequencies effectively. For low-frequency echo and boominess, you need corner treatment.
Why Corners Accumulate Bass
Low frequencies have long wavelengths—a 100Hz tone has a wavelength over 11 feet. These waves don’t “see” thin foam panels; they pass right through.
Corners are where bass energy accumulates. The geometry creates pressure zones where low frequencies build up.
That buildup causes boomy, muddy sound that flat-wall foam can’t fix. It’s a different problem with a different solution.
If your room sounds boomy or bass-heavy in certain spots, corner treatment is the solution. This is separate from treating echo in the mid and high frequencies.
So if the room still sounds boxy after you tame the slap and flutter, you’re probably hearing low-frequency buildup. That’s where bass traps earn their keep.
Bass Traps vs Regular Foam
Bass traps are thicker, denser absorbers designed specifically for low frequencies. They’re typically 4-6 inches thick minimum, compared to 1-2 inches for standard foam panels.
Placing bass traps in corners—especially the corners behind your speakers—addresses low-frequency buildup that regular foam misses. The improvement in bass clarity is often dramatic.
One reliable corner add-on is Auralex LENRD bass traps (2-pack) when you’ve handled reflections but the room still sounds boxy. They’re not soundproofing, but they can tame corner buildup that foam tiles miss.
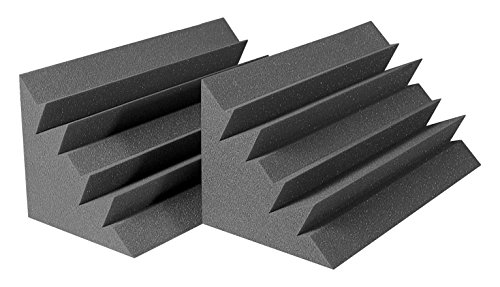
Auralex LENRD Bass Traps (2-pack)
You can use commercial bass traps or build DIY versions from rigid fiberglass or rockwool. Either way, corner treatment complements wall treatment for complete echo control.
For more on this topic, see our comparison of bass traps vs acoustic foam.
Once you pick traps, placement matters as much as product. Start with the corners that affect what you hear the most.
Corner Placement Strategy
Start with the front corners—behind and beside your speakers or primary sound source. These corners contribute most to what you hear at the listening position.
Rear corners matter too, especially for music production where accurate bass response is critical. A full corner treatment setup includes all four vertical corners, floor to ceiling.
If budget is limited, prioritize front corners first. Two bass traps in front corners provide more improvement than four regular foam panels on walls.
The 20-30% Coverage Rule
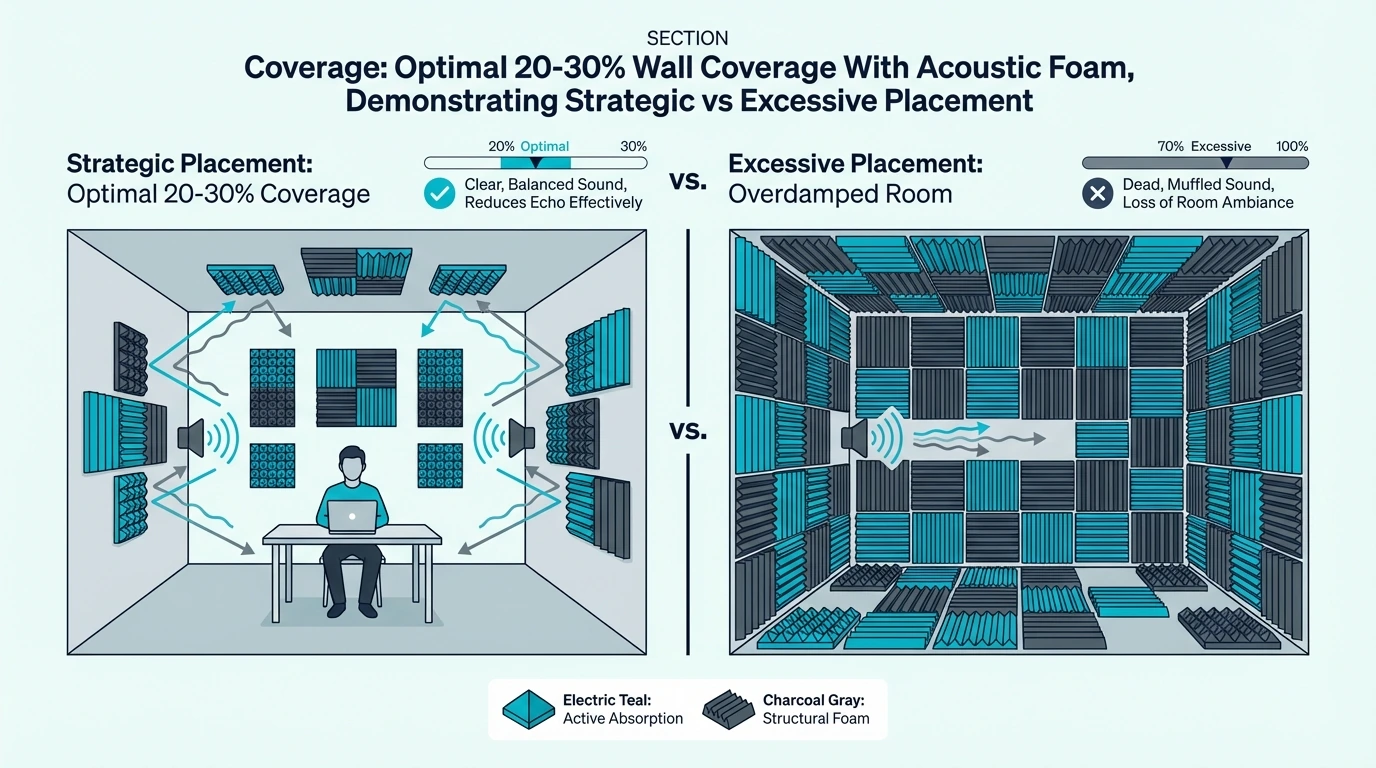
More foam isn’t always better. Over-treating a room creates problems as bad as under-treating it.
Why Full Coverage Backfires
Rooms need some reflection to sound natural. When you absorb too much, the space sounds “dead”—quiet in a weird way.
Speech gets muffled, music loses life, and the room starts feeling oppressive. If it feels like you’re talking into a pillow, you overshot.
Professional studios aim for controlled acoustics, not dead acoustics. They use absorption strategically while preserving enough reflection for a natural sound.
The 20-30% coverage guideline keeps you in the sweet spot. Enough absorption to control echo, not so much that the room sounds like a padded cell.
So the goal isn’t “more foam”—it’s “enough foam in the right places.” Here’s how to translate that into a rough square-foot number for your room.
Calculating Your Coverage
Measure your total wall surface area. For a 10×12 room with 8-foot ceilings, that’s roughly 352 square feet of wall space (not counting floor and ceiling).
At 25% coverage, you need about 88 square feet of treatment. That’s roughly 22 standard 2×2 foot panels—far less than covering every wall.
This calculation gives you a target, not a requirement. Use it to stop yourself from buying 100 tiles out of panic.
Some rooms need more and some need less. Use the clap test and your ears to decide when you’ve added enough.
Now you’ve got a target number. Next is spending that coverage wisely instead of sprinkling tiles wherever they fit.
Strategic vs Random Placement
88 square feet of foam placed strategically outperforms 150 square feet placed randomly. Location matters more than quantity.
Prioritize in this order:
First reflection points: highest impact
One wall of each parallel pair: eliminates flutter echo
Corners: bass control
Additional coverage: only after the above
Following this order ensures each panel addition provides maximum benefit. Random placement wastes panels on low-impact locations while leaving high-impact spots untreated.
Room-by-Room Echo Solutions
Different rooms have different echo challenges. Here’s how to approach common spaces.
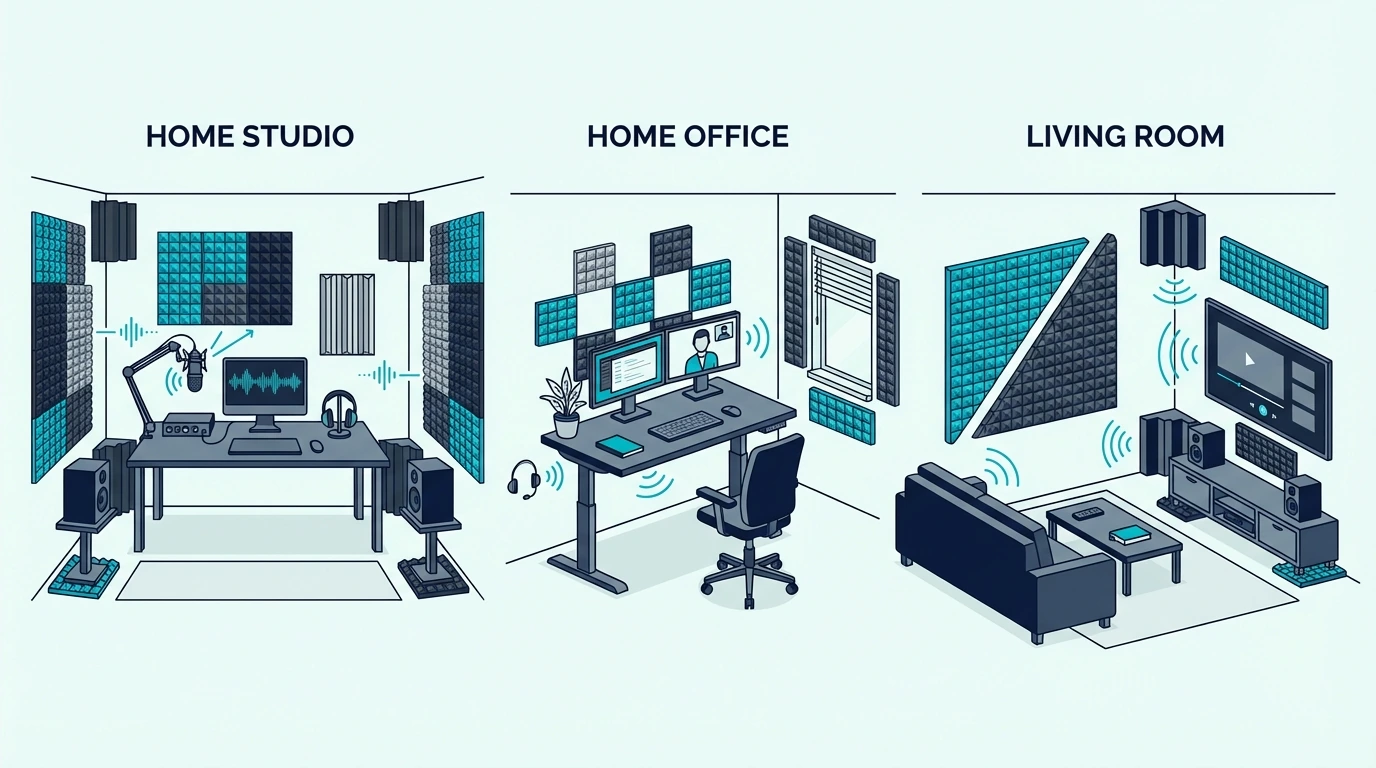
Home Studio / Recording Room
Recording rooms need the most aggressive treatment because microphones capture everything. Echo that’s barely noticeable to your ears becomes obvious in recordings.
Focus on the area around your recording position. Foam behind the microphone, at side reflection points, and potentially overhead creates a controlled recording environment within the larger room.
You don’t need to treat the entire room for recording—just the immediate area where the microphone lives. This “room within a room” approach is more effective and less expensive than full-room treatment.
For complete studio setup guidance, see where to place acoustic foam in home studios.
If you’re not recording music and you just need to sound clear on calls, you can do a lighter version of this. Home office treatment is basically “treat what your mic sees” and stop once the hollowness is gone.
Home Office / Video Call Space
Video call quality depends heavily on room acoustics. Echo makes you sound unprofessional and harder to understand.
Treatment can be minimal but targeted. Foam on the wall behind your camera (which your microphone faces) makes the biggest difference.
Side wall treatment at your desk position helps further. If you have to pick only one area, treat what your mic “sees.”
Even 4-6 panels strategically placed transform video call audio. You don’t need a fully treated room—just enough absorption to control reflections near your desk.
Once the desk zone sounds tight, you can apply the same reflection logic to a couch-and-TV setup. Living rooms need a lighter touch so the space still feels natural day to day.
Living Room / Media Room
Living spaces need balanced treatment. You want to reduce echo without making the room feel dead or uncomfortable for daily use.
Focus on the wall behind your TV or speakers, plus treatment at first reflection points for your primary seating position. This improves audio clarity for movies and music without over-treating.
Aesthetic panels work well in living spaces. Fabric-wrapped panels or decorative foam options add absorption while still looking intentional.
If you want foam-specific ideas, use how to make acoustic foam look good.
Bedrooms are their own category because you already have a giant absorber: the bed. That usually means you can treat less and still get a real before/after.
Bedroom Studio
Bedrooms often have built-in absorption—bedding, curtains, carpet, clothes. You may need less treatment than you expect.
Do the clap test before buying anything. Many bedrooms only need treatment at first reflection points; the existing soft furnishings handle the rest.
If your bedroom still sounds echoey after you account for furnishings, add foam at reflection points first. That’s the highest return per panel.
The bed and closet often do some low-end damping already, so corner treatment may be less urgent. For a simple layout, use how to arrange acoustic foam.
Step-by-Step Echo Treatment Process
Follow this process for systematic echo reduction.
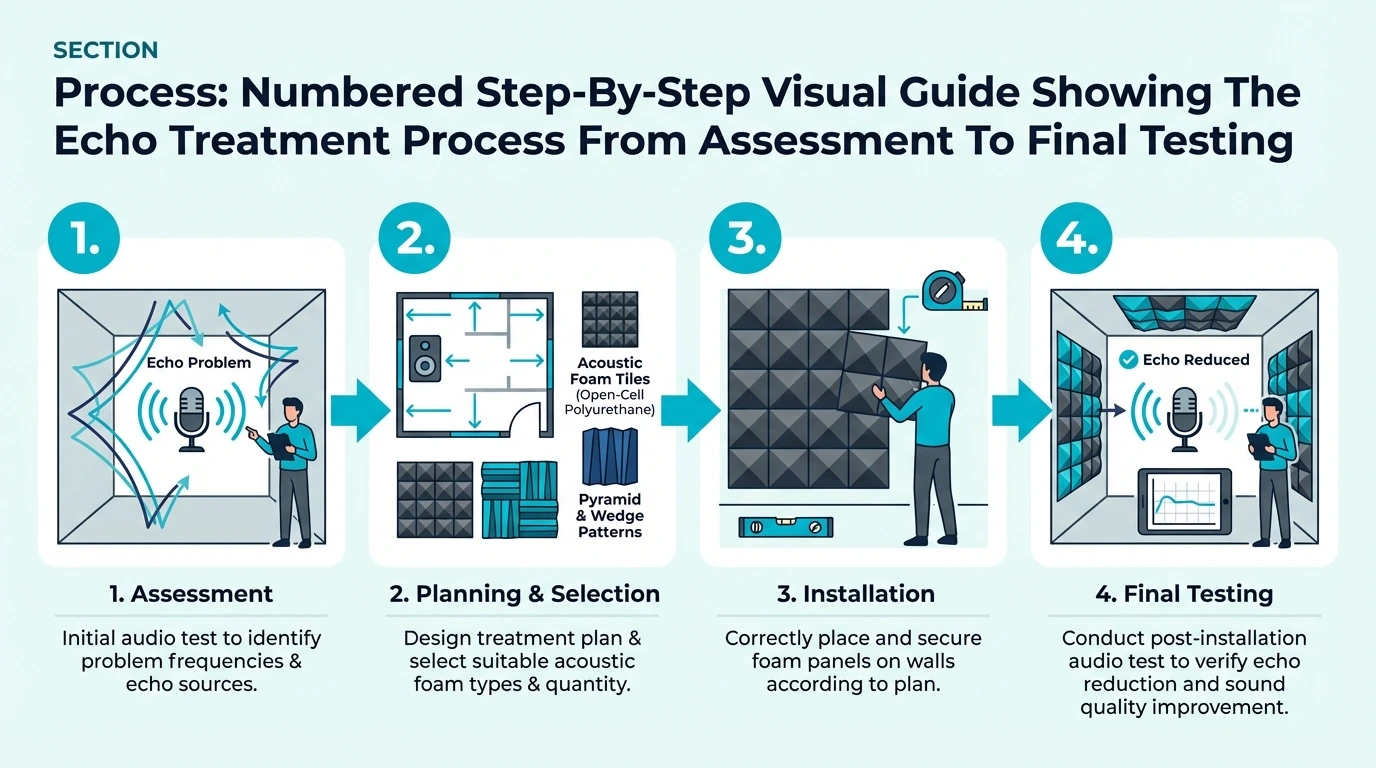
Step 1: Assess Your Current Acoustics
Before buying anything, understand your room’s specific problems.
Do the clap test in multiple locations. Note where echo is worst.
Identify which parallel surface pairs create flutter echo. Listen for bass buildup in corners.
This assessment tells you what treatment you actually need. Many people buy foam for problems they don’t have while ignoring problems they do have.
Once you know what’s actually wrong, you can prioritize instead of buying foam out of panic. Here’s how to rank what to treat first.
Step 2: Identify Treatment Priorities
Based on your assessment, rank your treatment needs:
Severe flutter echo: treat parallel walls first
Recording quality issues: treat around the microphone position
General reverb: treat first reflection points
Bass problems: add corner treatment
Your priority determines where your first panels go. Don’t skip this step—it prevents wasted money on low-impact placements.
Now you’ve got an order of operations. Next is doing the smallest install that could plausibly fix the problem, then retesting.
Step 3: Start With Minimum Effective Treatment
Begin with the smallest amount of treatment that might solve your problem. For most rooms, that’s 4-6 panels at first reflection points.
Install these panels and reassess. Do the clap test again.
Then listen to a quick recording or a video call sample. Ask yourself: did the problem improve enough?
If yes, stop there. If no, name what’s still wrong and treat that specifically.
That loop keeps you from over-treating the room.
If the room is better but not there yet, don’t jump to full coverage. Add panels only to address the specific symptom you still hear.
Step 4: Add Treatment Incrementally
Each addition should target a specific remaining problem. Don’t add panels randomly hoping they’ll help somehow.
After first reflection points, typical next steps depend on what’s still bothering you.
Rear wall: add foam if echo still seems to come from behind you. This is common when your desk or mic position is near the middle of the room.
More side-wall coverage: if flutter echo is still ringing between a parallel pair, add a few more tiles on one wall. Retest after each small addition.
Corners: if the room sounds boxy or boomy, switch to corner bass traps instead of adding more flat wall foam. Foam tiles won’t do much down there.
Ceiling: if you hear slap from above, add a ceiling panel (a “cloud”) over your position. One panel can be enough to hear the room tighten up.
Test after each addition. Stop when the problems are solved.
Once the big problems are gone, tiny placement tweaks matter more than buying more foam. This is the “squeeze more performance out of what you already installed” step.
Step 5: Fine-Tune Placement
Once you have enough panels, experiment with exact positioning. Small adjustments can improve results without adding more treatment.
Try moving panels a few inches in each direction. Angle them slightly off the wall.
If you can, add a small air gap behind panels. It can improve low-frequency absorption.
These refinements extract maximum performance from your existing treatment.
Common Echo Treatment Mistakes
Avoid these errors that waste money and produce poor results.
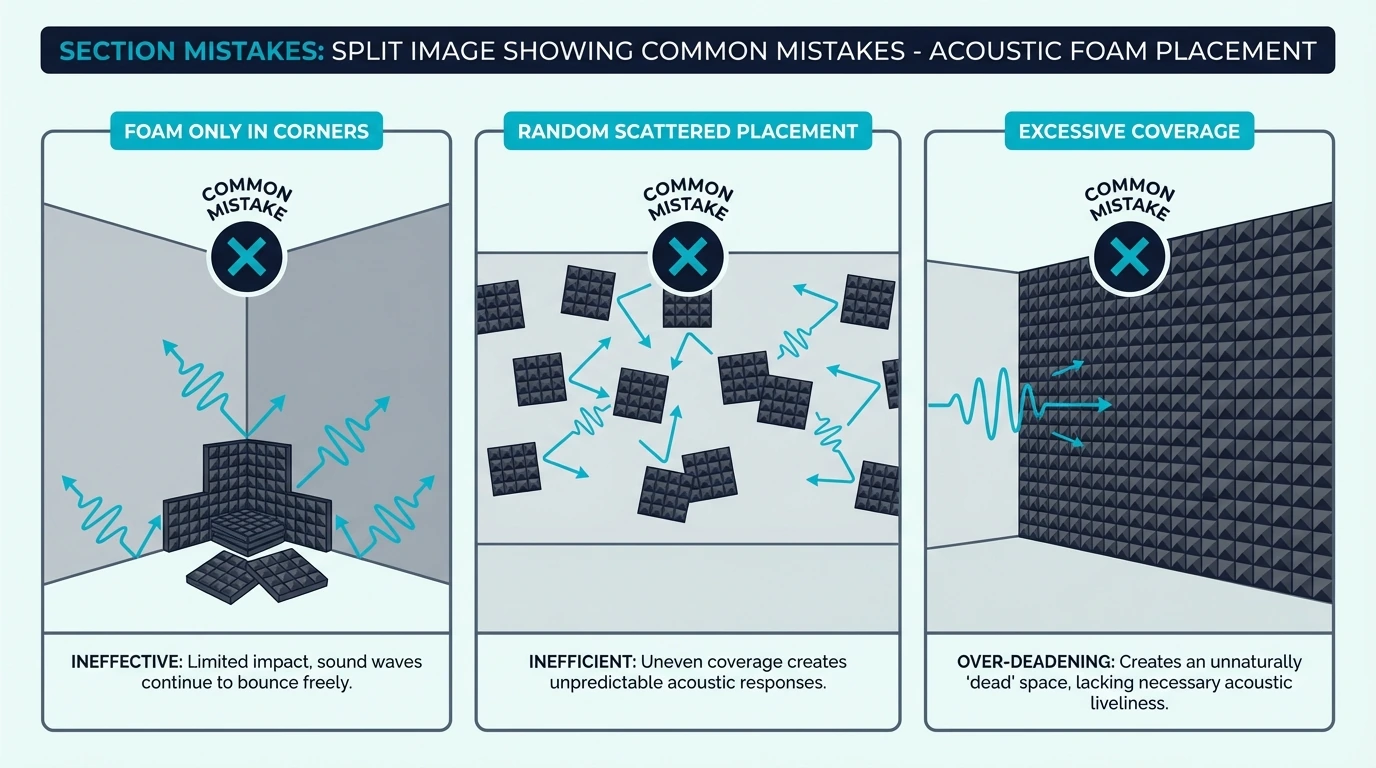
Mistake 1: Treating Only Corners
Corners are important for bass, but standard foam in corners doesn’t address mid/high frequency echo. You need wall treatment too.
Some people put all their foam in corners because “that’s where sound builds up.” This addresses bass but leaves flutter echo and first reflections completely untreated.
Balance corner treatment with wall treatment. Both serve different purposes; neither alone solves all echo problems.
Mistake 2: Random Scattered Placement
Placing panels wherever they fit or look good rarely produces optimal results. Acoustic treatment isn’t decoration—placement follows acoustic principles.
A panel in a low-impact location does almost nothing. The same panel at a first reflection point can transform your sound.
Location is what makes treatment work.
Use the mirror trick and clap test to find high-impact locations. Place panels there first, regardless of aesthetics.
Mistake 3: Covering Everything
Full wall coverage seems logical but creates dead, uncomfortable spaces. Professional studios don’t do this—they treat strategically.
If your room sounds dead and lifeless after treatment, you’ve added too much. Remove a few panels and see if the sound improves.
Sometimes less is more.
Aim for controlled sound, not dead sound. You want to reduce echo while maintaining natural room ambience.
Mistake 4: Ignoring the Ceiling
Ceiling reflections contribute to echo, especially in rooms with hard ceilings. Many people treat walls thoroughly while ignoring the ceiling entirely.
At minimum, consider treatment at the ceiling’s first reflection point—directly above your listening or recording position. A single ceiling panel or cloud makes noticeable difference.
Full ceiling treatment is rarely necessary, but targeted ceiling absorption often is.
Mistake 5: Using the Wrong Thickness
Thin foam (1 inch or less) only absorbs high frequencies. If your echo problem includes mid frequencies, thin foam won’t fully solve it.
For comprehensive echo treatment, use 2-inch foam minimum. Thicker panels (3-4 inches) provide better absorption across a wider frequency range.
If you’re unsure which thickness to choose, our best acoustic foam panels guide compares options.
The thickness that works depends on your specific problems. High-frequency flutter echo responds to thin foam; broader reverb needs thicker treatment.
For guidance on thickness selection, see our comparison of 1-inch vs 2-inch acoustic foam.
Testing Your Results
After treatment, verify that you’ve actually solved the problem.
The Clap Test Revisited
Return to the clap test. Stand where echo was worst before treatment and clap sharply.
Compare the decay to your memory of the untreated room. The tail should be noticeably shorter, and any metallic ringing should be gone or greatly reduced.
If problems persist, identify what’s still wrong. Then match the fix to the symptom:
Flutter echo: treat more of the parallel surfaces
General reverb: add a bit more absorption where reflections hit first
Bass boom: add corner treatment (foam tiles won’t do much down there)
Recording Test
If you’re treating for recording, make test recordings before and after treatment. Speak or play music and compare the results.
The difference should be obvious. Treated recordings sound tighter, clearer, and more professional.
Untreated recordings have that hollow, echoey quality.
If recording quality hasn’t improved enough, your treatment may be in the wrong locations. Reassess placement around your microphone position.
The Conversation Test
For general living spaces, have a conversation in the treated room. Does speech sound clearer?
Is it easier to understand people?
In well-treated rooms, conversation feels effortless. In echoey rooms, you strain to hear and be heard.
The improvement should be noticeable in daily use.
The Bottom Line
Stopping echo with acoustic foam requires strategy, not just coverage. First reflection points, parallel wall treatment, and corner absorption—in that order—address echo systematically and efficiently.
Start with the clap test to understand your room’s specific problems. Then treat high-impact locations first: first reflection points on side walls.
Next, treat one surface of each parallel pair that’s creating flutter echo. Add corner treatment if bass is boomy.
The 20-30% coverage guideline prevents over-treatment. More foam isn’t better—strategic placement of fewer panels beats random placement of many.
Test after each addition. Stop when the problem is solved.
Echo treatment transforms rooms from uncomfortable and unprofessional to controlled and pleasant. The investment pays off in better recordings, clearer video calls, and more enjoyable daily living.
Follow the process and trust your ears. Your room will sound dramatically better.
Frequently Asked Questions
How many acoustic foam panels do I need to stop echo?
Most rooms need 8-16 panels for effective echo control, covering roughly 20-30% of wall surface. The exact number depends on room size and how strong the echo is.
Start with 4-6 panels at first reflection points, then add more based on results. Strategic placement matters more than quantity.
Eight well-placed panels beat 20 random ones.
Where is the best place to put acoustic foam for echo?
First reflection points on side walls provide the highest impact. Find them using the mirror trick: sit in your listening position and slide a mirror along the wall until you can see your speakers.
After first reflections, treat one wall of any parallel pair that’s causing flutter echo. Then add corner treatment if bass is still boomy.
Will acoustic foam completely eliminate echo?
Foam significantly reduces echo but rarely eliminates it completely—and that’s okay. Some room ambience is natural and desirable.
The goal is controlled acoustics, not dead silence. Properly treated rooms have short, tight decay without the harsh ringing of untreated spaces.
Can I use too much acoustic foam?
Yes. Over-treated rooms sound dead, muffled, and uncomfortable.
Speech sounds unnatural and music loses life. If your room sounds lifeless after treatment, remove a few panels.
The 20-30% coverage guideline helps prevent over-treatment.
Does acoustic foam work on all frequencies?
Standard foam (1-2 inches) primarily absorbs mid and high frequencies. Bass passes through thin foam largely unaffected.
For low-frequency echo and bass buildup, you need thicker bass traps (4+ inches) placed in corners. Complete echo treatment often needs both wall panels and corner traps.
How long does it take to notice a difference after adding foam?
The difference is immediate and obvious. The moment you add panels at first reflection points, you’ll hear tighter, more controlled sound.
The clap test shows a big improvement even with minimal treatment. You don’t need to “break in” acoustic foam—it works the moment it’s installed.

