Does Acoustic Foam Help in an Apartment? The Honest Answer
Does acoustic foam help in an apartment? Yes—when your problem is echo and harsh reflections inside your room.
But if you’re trying to stop footsteps, bass, or TV noise coming through the wall, foam won’t move the needle.
That’s because foam absorbs sound in the air. It doesn’t add mass to your walls or stop the building from vibrating.
Foam is an acoustic treatment tool, not a soundproofing tool.
Below, you’ll figure out whether you’re hearing room echo or neighbor noise. Then you’ll know exactly what to do next in a rental without wrecking your paint.
If your apartment sounds hollow on calls or your recordings feel “roomy,” foam helps because it absorbs reflections bouncing around your room. Start with the wall behind your mic/desk and the first reflection points—don’t cover everything.
If your real issue is neighbor noise (footsteps, bass, voices through the wall), foam won’t fix it because the wall is vibrating. Skip to the “neighbor noise” section for the options that actually change what you hear.
Aim for controlled treatment (roughly 30–50% coverage in the problem zone), then stop and retest. If you want a deeper walkthrough, use this acoustic foam placement guide.
What does acoustic foam actually do in an apartment?
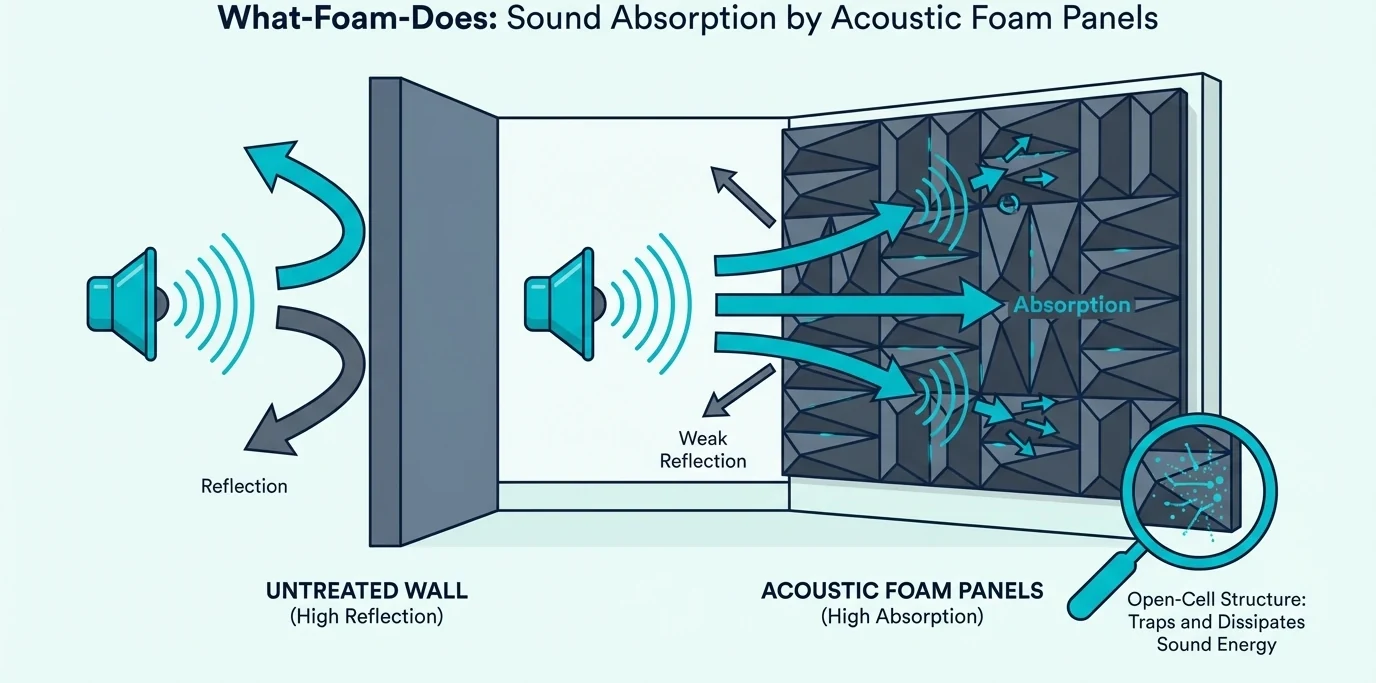
Once you stop expecting foam to “block” sound, the benefits become obvious. Foam’s job is to reduce reflections so your voice (or speakers) sounds more direct and less like it’s bouncing around a tiled bathroom.
Why it kills echo faster than you’d expect
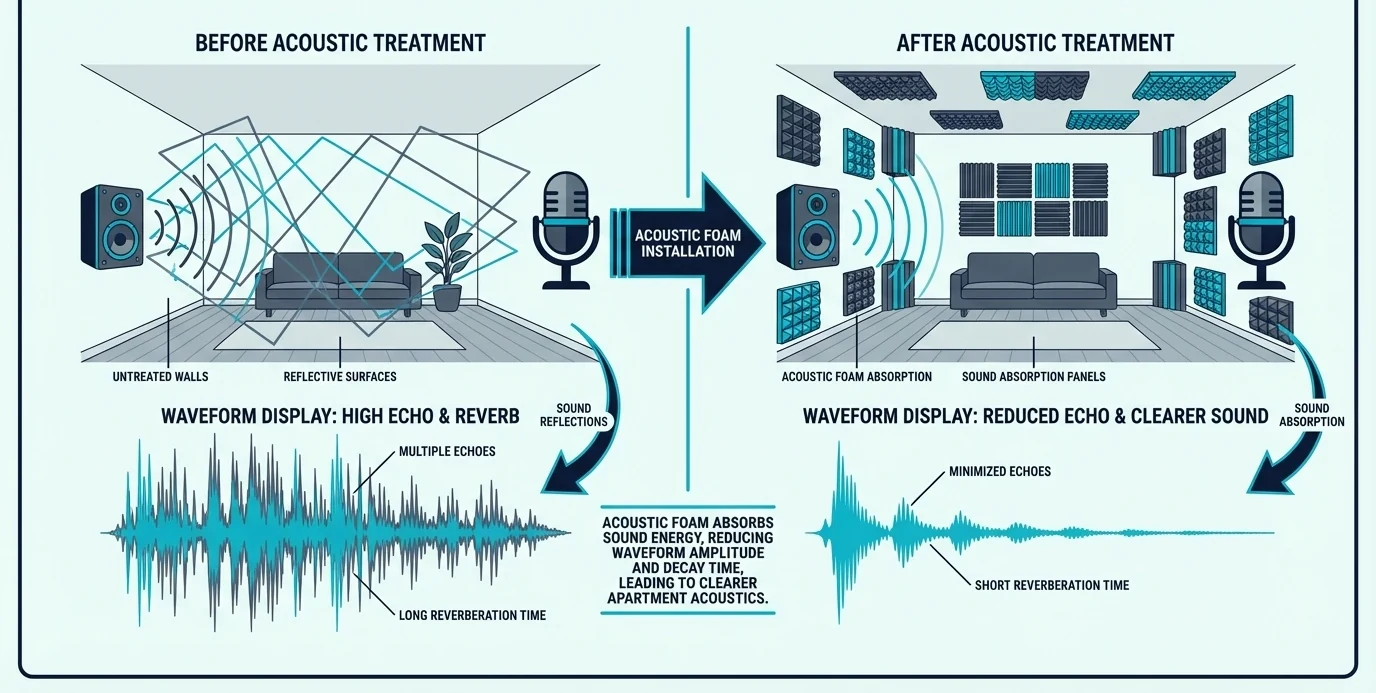
In most apartments, the worst culprit is mid‑to‑high frequency reflections coming off drywall, windows, and bare floors. That’s the harsh “ring” you hear when you clap, and it’s why calls can sound distant even with a good mic.
Foam works when you place it where the reflection path actually hits. A few panels in the right spots can shorten the reverb tail dramatically without changing the overall “quietness” of the room.
Try this: clap once in the middle of the room, then clap again while facing a different wall. If the ring changes, you’re hearing reflections—and that’s exactly what foam is meant to control.
If you want a step-by-step echo fix, treat in stages and retest after each change. That keeps you from buying a second box of foam when the real issue is placement.
Why recordings and video calls sound “closer”
So once you’ve tamed the obvious ring, the next thing you notice is what your mic is picking up. Foam makes recordings feel “closer” because it cuts the early reflections that smear your direct voice.
When you record in an untreated room, your mic captures your voice and the reflections that arrive a fraction of a second later. That’s the “roomy” haze that makes audio sound amateur even if the microphone itself is high quality.
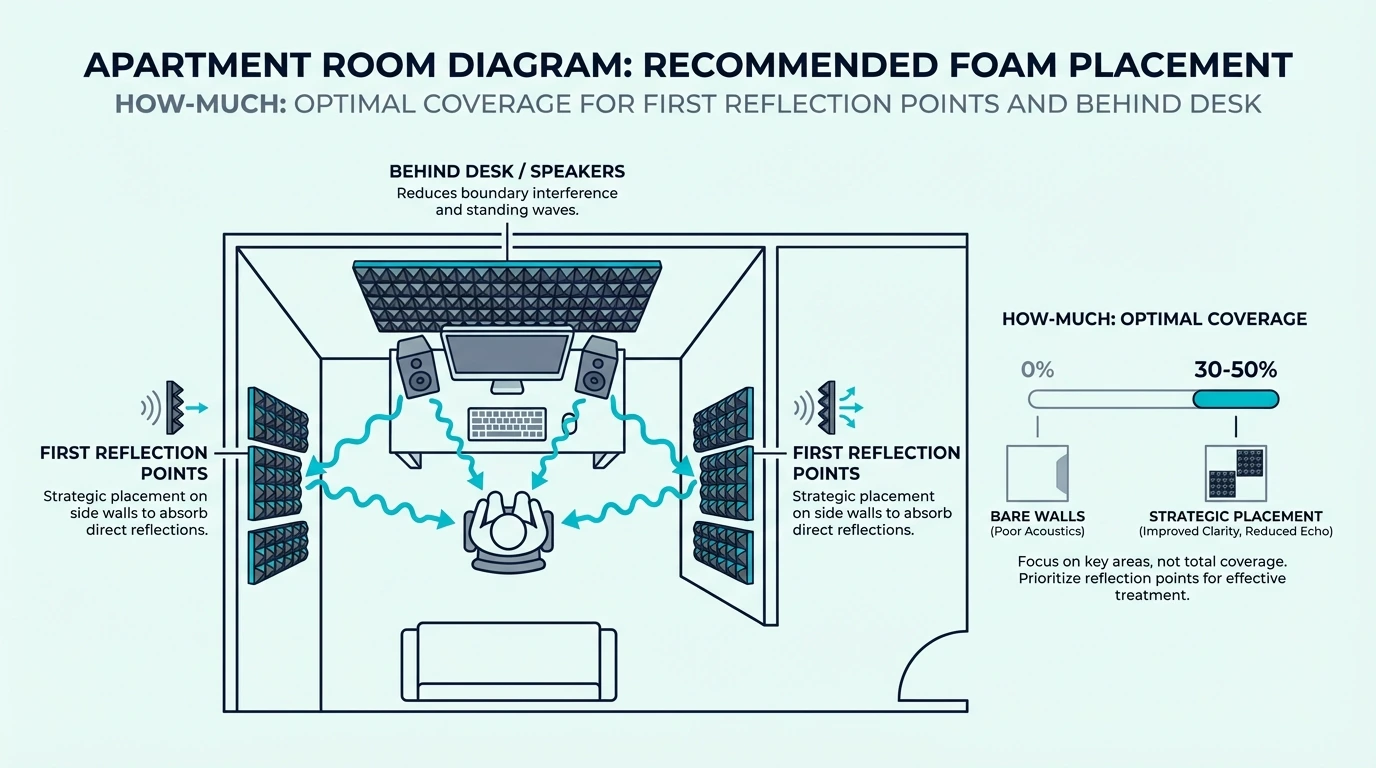
Foam doesn’t have to cover the whole room to help—you just need to reduce the reflections your mic hears first. That usually means the wall behind your mic and the nearby side walls at head height.
The easiest way to pick those spots is the mirror trick: sit where you work, slide a mirror along the wall, and mark where you see your speaker or mic position. Those marks are your first reflection points, and they’re priority #1.
If you’re still unsure what foam can and can’t do, this “does acoustic foam work?” breakdown sets expectations with real-world examples. It also explains why thickness matters more than shape for most apartment setups.
What it changes for day-to-day comfort
And even if you never hit record, fewer reflections change how the room feels. This is the part you notice in conversation, TV dialogue, and music playback.
Even if you don’t record, cutting reflections can make a hard-surface apartment feel less stressful. Conversations stop sounding sharp, and music playback feels cleaner because you’re hearing less of the room’s splash.
This is most noticeable in minimally furnished spaces—hard floors, bare walls, and lots of glass. Foam won’t replace rugs and curtains, but it can tame the worst “ping” without remodeling your living room.
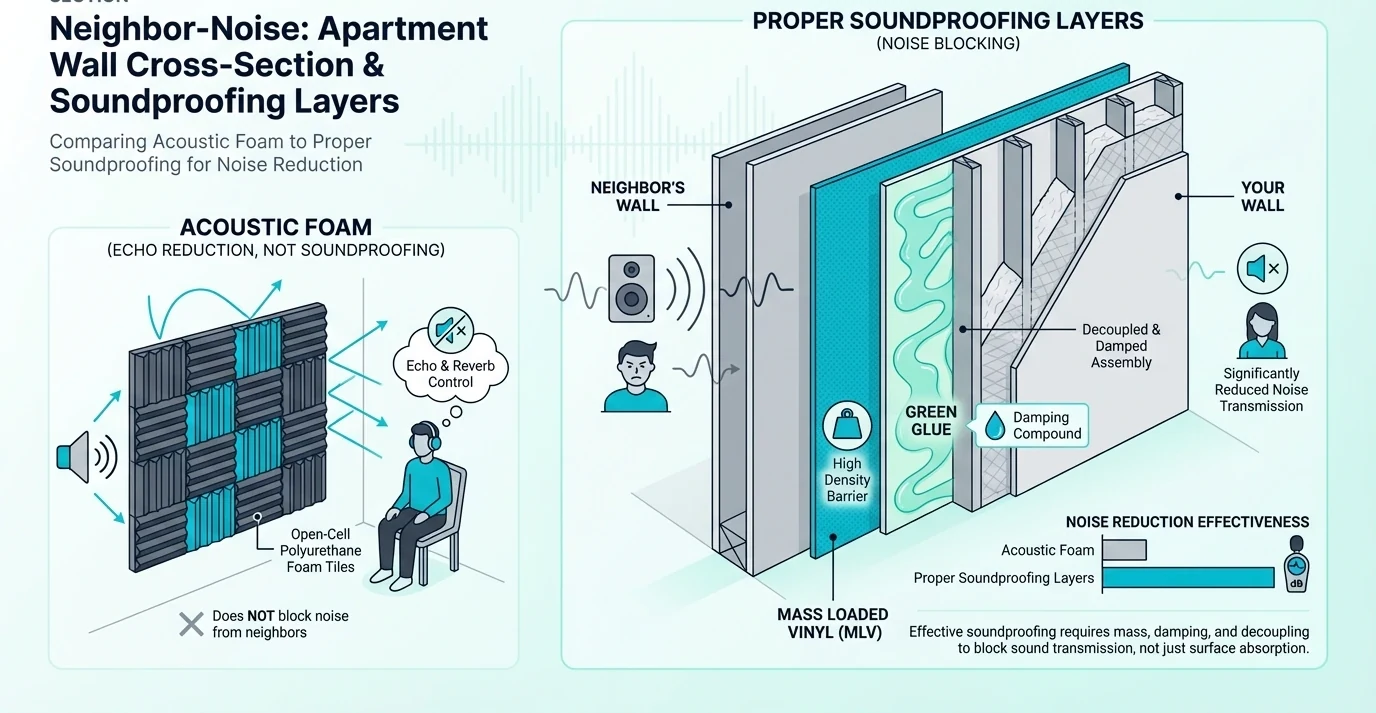
Why doesn’t acoustic foam block neighbor noise?
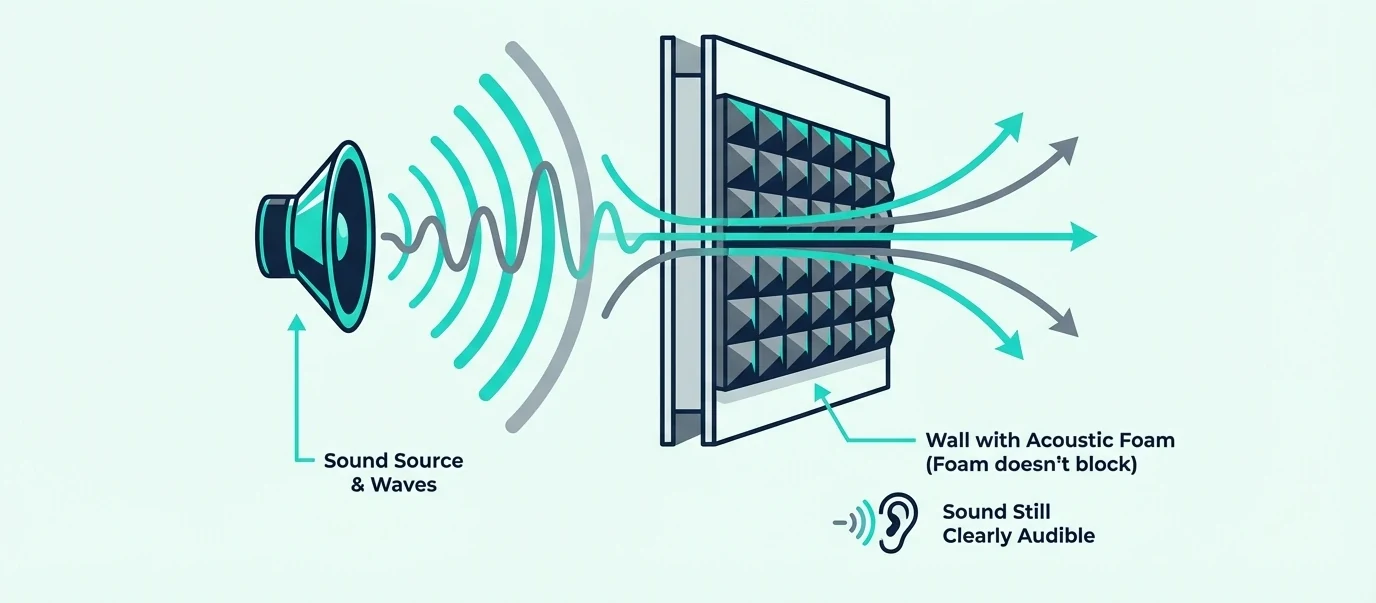
Here’s the part most people get wrong: neighbor noise is usually a structure problem, not an air problem. If the wall or ceiling is vibrating, foam on the surface is like putting a sponge on a drum—it doesn’t stop the drum from being a drum.
Airborne sound vs structure-borne sound (the wall becomes the speaker)
Your neighbor’s bass and footsteps travel through the building framing and shake the surfaces in your room. Those surfaces then re-radiate sound into your air, which is why it feels like the noise is “coming from the wall.”
Foam only absorbs sound after it’s already in your room and moving through the air. It doesn’t add mass, it doesn’t decouple the structure, and it doesn’t seal gaps, so it can’t meaningfully stop transmission.
That’s why marketing phrases like “soundproof foam” are misleading. If you’re chasing soundproofing, start with a “does acoustic foam work?” breakdown so you don’t burn money on the wrong tool.
Will foam stop you from bothering neighbors?
So even if you don’t care about incoming noise, you might wonder about keeping your sound in. Foam can tidy up your room sound, but it won’t stop transmission through walls.
Foam can take the edge off high-frequency reflections inside your room, but that’s not what neighbors complain about. Most complaints are about audible vocals, TV, and especially bass—exactly the stuff that travels through structure.
If you want to be a better neighbor, the biggest wins are volume management, speaker placement, and decoupling (like putting monitors on isolation pads). Foam is great for improving your room sound, but it’s not a “keep sound in” solution.
What soundproofing actually requires
That’s why the fix isn’t “more foam,” it’s a different category of work. Soundproofing is about mass, sealing, and breaking vibration paths.
Real soundproofing means adding mass, sealing air leaks, and reducing vibration paths. That’s why the real fixes look like weatherstripping, door sweeps, decoupling, and sometimes construction.
In a rental, you’re limited, which is why the practical question becomes: what can you do without opening a wall? We’ll cover the renter-friendly moves in the neighbor-noise section below.
Get Studio Tips Weekly
Join 5,000+ creators getting acoustic treatment advice every week.
No spam. Unsubscribe anytime.When is acoustic foam worth it in an apartment?
So if foam isn’t for neighbor noise, when is it still a smart buy? Any time you care about how your room sounds inside the room, foam can be a shortcut to “good enough” acoustics.
Video calls and remote work
For calls, you don’t need a studio look, you need fewer reflections hitting your mic. Two to four panels near your desk (especially behind your monitor/camera) can remove the hollow “conference room” sound.
If you can only treat one area, treat the surfaces closest to your mouth and mic. That small change often beats scattering foam across the room.
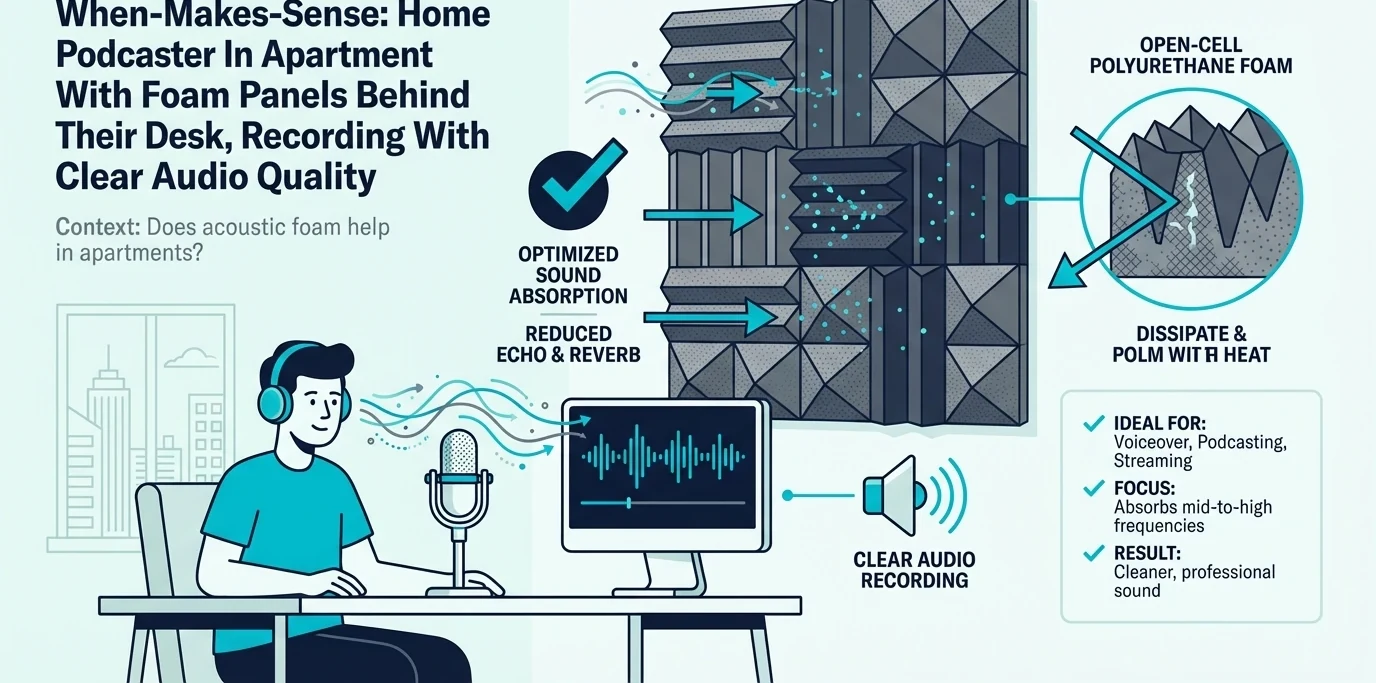
Podcasting, streaming, and vocals
So if calls are the baseline, voice recording is where foam feels like a cheat code. Voice lives in the midrange, which is exactly where foam absorbs best.
This is foam’s best apartment use case because voice lives in the midrange foam absorbs well. You don’t need perfect treatment—you just need to remove the obvious room sound.
A starter set like 2-inch wedge acoustic foam panels is enough to treat the wall behind your mic and your first reflection points. Mount them, record the same sentence twice, and you’ll hear the difference immediately.
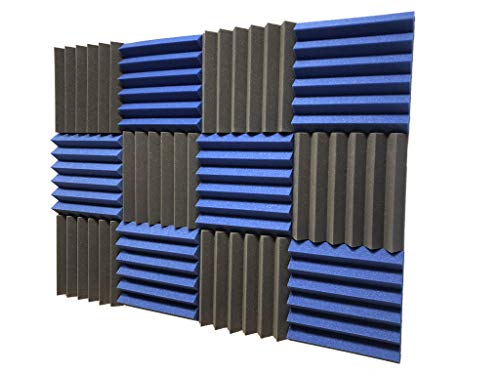
2-inch Wedge Acoustic Foam Panels (12 Pack)
Music listening (and basic mixing)
Once your voice sounds tighter, the same reflection rules apply to speakers. Treating first reflection points is what sharpens stereo image and dialogue clarity.
If you listen on speakers, reflections smear the stereo image and make everything feel less focused. Treating first reflection points helps you hear what your speakers are actually doing, not what your walls are adding.
Use a placement guide for the highest-impact surfaces, then stop and reassess. In small rooms, smart placement beats maximum coverage every time.
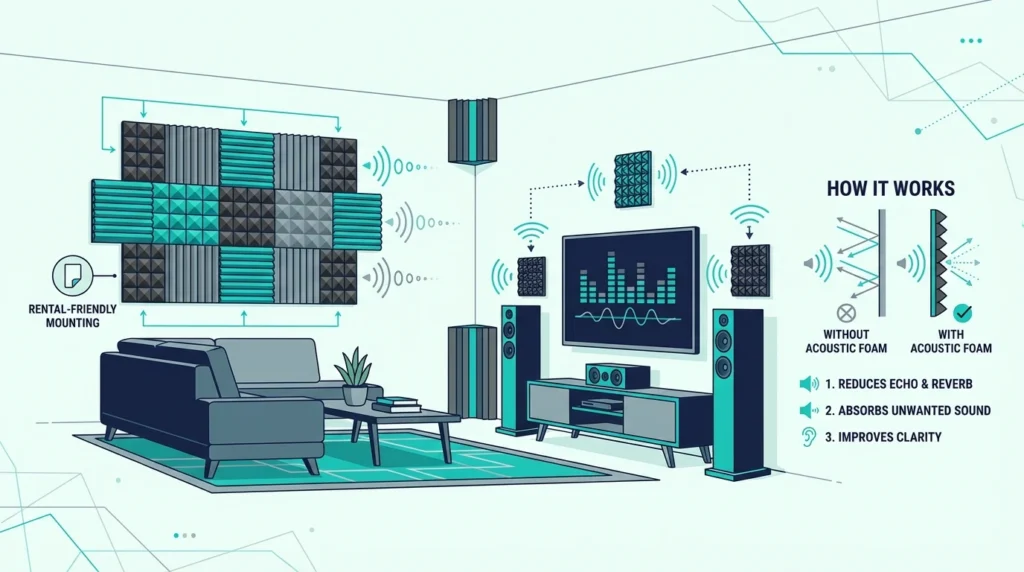
How can you install acoustic foam in a rental without damaging walls?
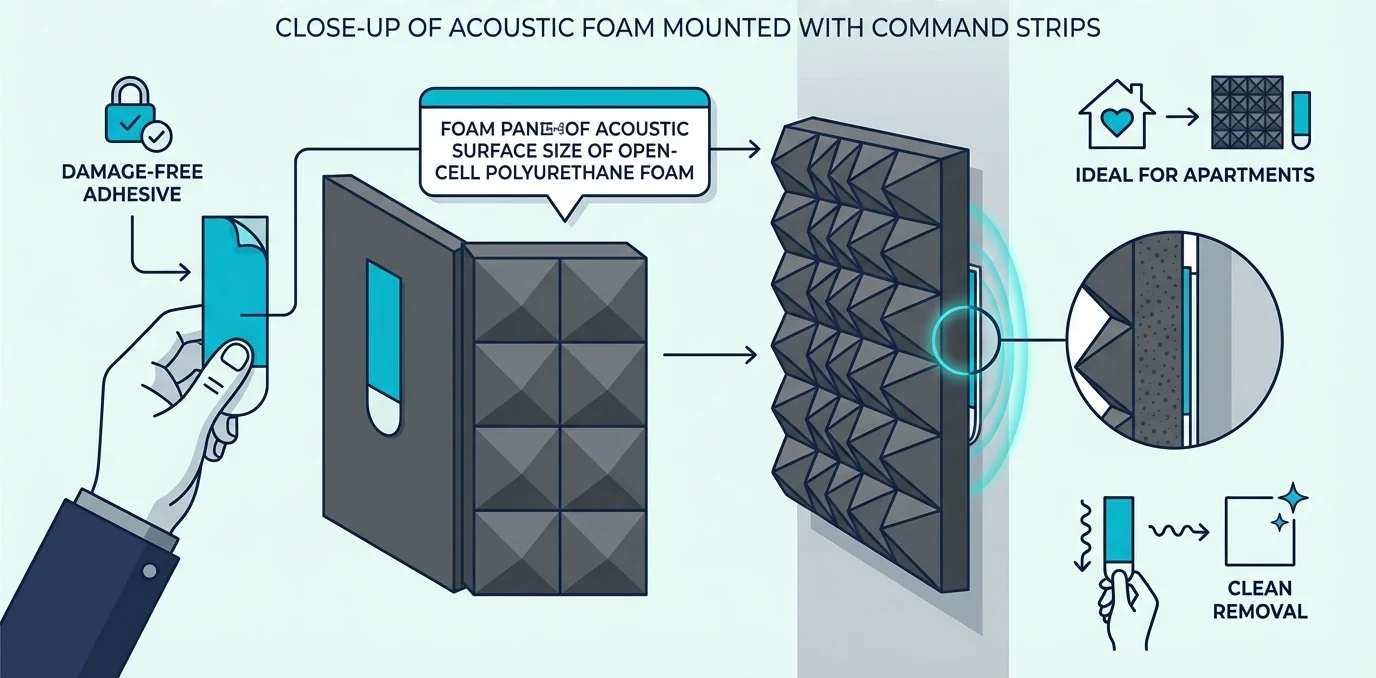
Renters usually don’t hate foam—they hate losing paint when they move out. The trick is choosing mounting that’s strong enough to hold, but reversible when your lease ends.
Do the boring wall prep first
Before you stick anything up, wipe the wall and let it dry. Dust and oily paint are why panels fall at 2am, not “bad foam.”
Do a small test patch in a hidden spot and remove it the next day. If the paint peels, switch to a freestanding or backer-board approach.
Use mounting you can reverse later
So after you prep the wall, the next decision is whether you want the setup to be removable. Reversible mounting lets you test placement without turning your paint into a science experiment.
Start with the methods in our acoustic foam wall install guide. It covers renter-friendly adhesives, backer boards, and how to avoid residue.
If you want something repositionable (move panels while you test placement), 3M Dual Lock reclosable fastener can work well on clean, smooth walls. Treat it like a strong adhesive: test first, and don’t use it on flaky paint.
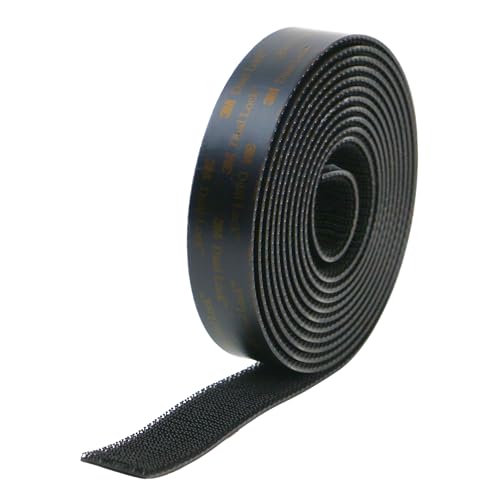
3M Dual Lock Reclosable Fastener (SJ3550, 1 in x 10 ft)
Zero-wall-contact setups (when your lease is strict)
If your lease is strict (or your paint is fragile), skip adhesives entirely. A backer-board setup gives you absorption where you need it with zero wall contact.
You can treat the room by mounting foam on lightweight boards and leaning them behind your desk or couch. You get absorption where you need it, and you leave zero evidence when you move.
This also makes removal easy later, which matters if you learn you placed panels in the wrong spots. If you ever need to take foam down cleanly, this removal guide is worth bookmarking.
What actually helps with neighbor noise in an apartment?
If your goal is sleep and sanity, this is the section that matters. Foam can make your room sound nicer, but it won’t change what comes through the wall.
Seal the obvious leaks first
The fastest renter-friendly win is sealing gaps around doors and windows. Hallway noise often comes through the door perimeter and the gap at the bottom, not through the drywall.
A door sweep and weatherstripping won’t stop bass, but they can cut voices and TV bleed enough to make evenings tolerable. Do the cheap sealing steps before you spend on any “soundproof” product.
Add mass where you can (without construction)
So start with leaks because they’re cheap wins, but don’t expect them to stop bass. To actually reduce transmission, you need mass on the shared wall—usually in the form of dense furniture and textiles.
Mass is what blocks sound, which is why foam can’t substitute for it. In a rental, the most practical “mass” is furniture: bookcases full of books, wardrobes, and dense textiles against the shared wall.
It’s not perfect, but it shifts the problem in the right direction without asking your landlord for drywall work. If you want the deeper “why,” acoustic foam alternatives lays out what actually works for isolation.
Masking: the “works tonight” option
And when the building is the problem and you need relief tonight, masking is the practical move. It won’t lower the noise, but it can make it much easier to ignore.
Sometimes the best apartment fix is masking, not blocking. A consistent background sound makes intermittent noise (voices, hallway footsteps) less attention-grabbing.
A device like the LectroFan white noise machine is a simple, non-destructive way to improve sleep when the building is loud. Place it between you and the shared wall to get the most benefit.
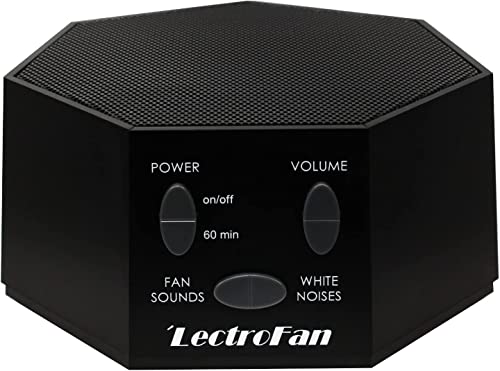
LectroFan Classic White Noise Machine
How much acoustic foam do you need for an apartment?
Once you’re buying foam for the right reason, the next trap is buying too much. You’re aiming for control, not a dead, muffled room.
A simple coverage target (30–50%)
A practical starting range is treating about 30–50% of the wall area in the problem zone. That’s usually enough to kill the ring without turning the room into a foam cave.
If you go far beyond that, you can end up with a room that feels weirdly lifeless. If you’re worried you’ve overdone it, this guide to too much acoustic foam explains the signs.
Where to place your first panels
So once you have a coverage target, placement is what makes it work. Start with first reflection points and the wall behind your desk, then retest before you buy more.
Start with first reflection points on the side walls and the wall behind your desk or mic. Those spots give you the biggest “before and after” change per panel.
Use a quick placement map to pick your first surfaces, then retest with a clap or a short voice recording. If the ring is gone, stop buying panels and start enjoying the room.
When corners matter (and when they don’t)
If the ring is gone but the room still feels boxy, you’re hearing a different problem. That’s when corners and thicker treatment matter more than adding another row of thin tiles.
Thin foam is not a bass solution, so don’t chase low-frequency problems with more wall foam. If the room is still boomy, that’s when corners and thicker treatment matter.
For the clear explanation, read bass traps vs acoustic foam so you know what foam can’t do. It’ll save you from buying the wrong “bass foam” products.
What results should you realistically expect?
This is where expectations make or break your satisfaction. Foam can deliver a big upgrade inside your room, but it has a hard ceiling in an apartment.
What you’ll notice immediately
Echo reduction is instant—you can hear it on the first clap test. Calls sound closer, and your voice stops bouncing around the room.
Recordings also clean up fast because the mic hears fewer reflections. It’s one of the rare upgrades where you don’t need “golden ears” to notice the difference.
What won’t change
So you’ll hear a fast echo improvement, but don’t expect it to change what comes through the wall. Neighbor bass is transmission, and foam is the wrong tool for transmission.
If your neighbor’s bass is the problem, the bass will still be the problem tomorrow. Foam doesn’t change wall transmission, so it won’t fix the main apartment complaint.
The same goes for your noise reaching neighbors. Foam helps your sound quality, not your sound leakage.
How to test whether you’re done
Once you know what should change, you need a simple way to confirm you’re done. Use a repeatable clap/recording test so you’re adjusting placement, not guessing.
Use a repeatable test: clap in the same two spots, and record the same sentence with the same mic position. If the ring is gone and the voice sounds tighter, you’re done—even if your walls aren’t covered.
If you still hear a sharp flutter, it’s usually placement, not quantity. Go back to the echo guide and treat the specific reflection path.
How much should you spend on apartment acoustic treatment?
Price isn’t the real problem—wasted purchases are. The goal is to buy just enough treatment for the outcome you want.
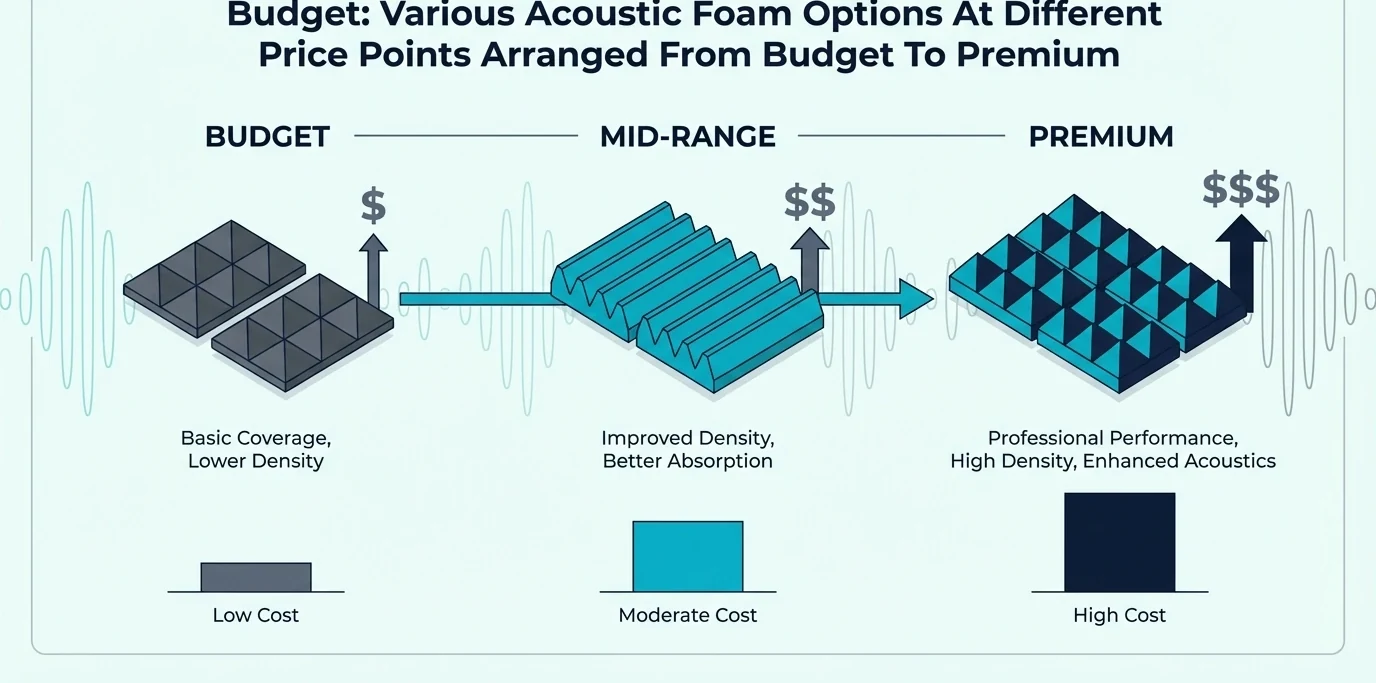
When budget foam is enough
If you’re mainly trying to make calls and voice recordings sound cleaner, budget foam is usually fine. You’re fixing mid/high reflections, and you don’t need boutique specs to hear an improvement.
If you’re shopping, start with best budget acoustic foam and look for consistent reviews and realistic thickness. That avoids the ultra-thin “decor foam” packs that barely absorb anything.
When paying more makes sense
So if budget foam gets you most of the result, paying more only makes sense when it solves a real pain. Thickness and consistency are the two upgrades you actually feel in an apartment.
If you want more consistent performance, thickness matters more than shape. For most apartments, 2-inch foam is a practical minimum for audible echo control, and this foam buying guide breaks down what to look for.
Safety matters too, especially in rentals where you don’t control building rules. If you’ve never thought about fire ratings, read our acoustic foam safety guide before you buy the cheapest option.
The “don’t waste money” shortcut
And the best money-saving move isn’t finding a cheaper tile—it’s pausing after the first install. Treat reflection paths, live with it for a day, then decide whether you need more.
Treat the reflection paths first, live with it for a day, then decide if you need more. That one pause saves you from over-treating and from buying foam to solve a neighbor-noise problem.
If you’re on the fence, our “is acoustic foam worth it” guide helps you decide based on your goal, not marketing claims. It’s the difference between a smart upgrade and a box of foam you never install.
The Bottom Line
Acoustic foam helps an apartment when your problem is echo, harsh reflections, or “roomy” recordings. It makes calls and content sound cleaner because your mic hears fewer reflections.
Acoustic foam does not help with neighbor noise in the way most people mean it. If the noise is coming through the wall, you’ll get more relief from sealing gaps, adding mass with furniture, and masking at night.
Buy less foam than you think, place it smarter than you think, and stop once the ring is gone. When you match the tool to the problem, foam is one of the fastest upgrades you can make in a rental.
Frequently Asked Questions
Does acoustic foam help with neighbor noise?
Not in the way most people mean it. Foam reduces echo inside your room, but it doesn’t stop sound traveling through walls and ceilings.
Will acoustic foam stop my neighbors from hearing me?
No—most sound that bothers neighbors travels through the structure, not through the air in your room. Foam can improve your room sound, but it won’t “contain” your audio.
How many panels do I need for a small apartment room?
Most people get a noticeable improvement with a starter set and smart placement, not full-wall coverage. Start at first reflection points and the wall behind your desk, then add only if the clap test still rings.
What’s the best place to put foam for video calls?
Treat the wall behind your monitor/camera and the side walls closest to your desk. Those are the surfaces that throw your own voice back into your mic.
Is 1-inch foam enough for an apartment?
It can help with the sharpest reflections, but it’s limited. For most rooms, 2-inch foam is the more reliable “you’ll actually hear it” starting point.
Can I remove foam without damaging paint?
Yes if you use renter-friendly mounting and test your wall first. The biggest risks are aggressive adhesives and flaky paint, so a small test patch saves a lot of regret.

