Where to Place Acoustic Panels: Room-by-Room Guide
Where to place acoustic panels matters more than how many you buy, but most people treat the wrong walls first and end up doubling their panel count before anything improves.
The symptom is obvious: you hang panels, the room still sounds live, flutter echo barely changes. That happens because untreated first reflection points keep bouncing direct sound back at your ears regardless of how many panels sit behind you.
Treat the right surfaces in the right order and four panels can outperform sixteen placed randomly. Start with the mirror trick for finding reflection points, then work through the room-by-room layouts for studios, home theaters, and offices below.
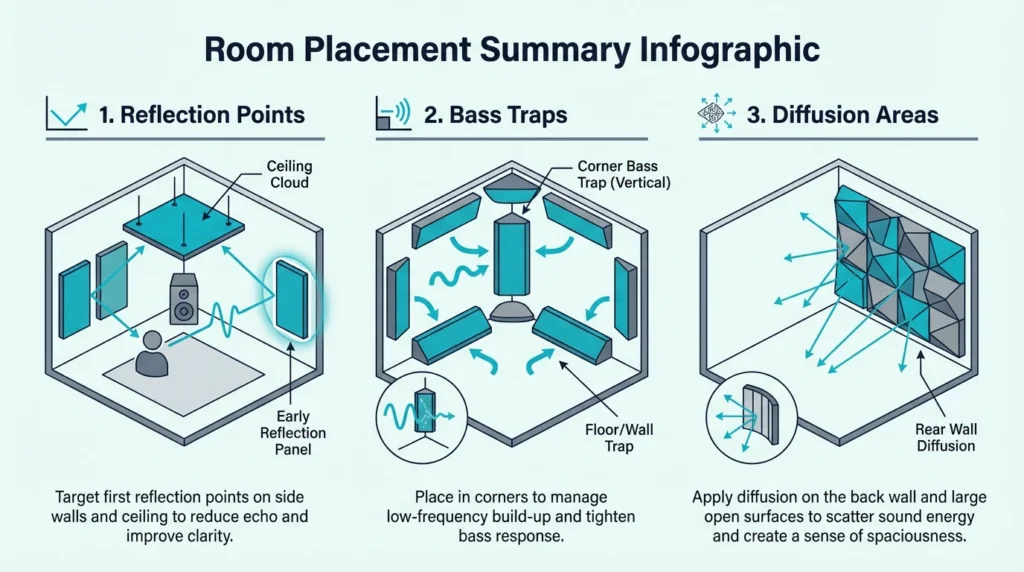
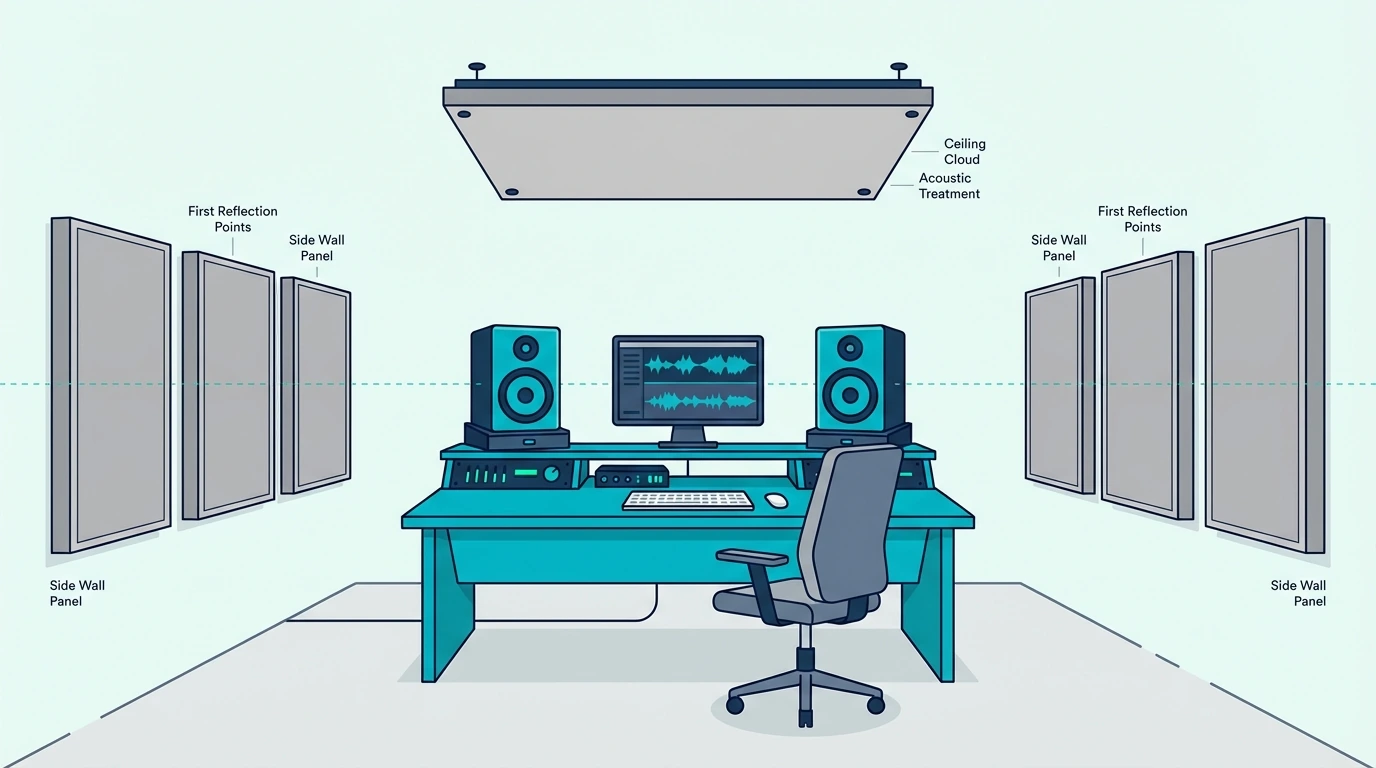
Start with side-wall first reflection points at ear height, then add a ceiling cloud above the listening position, then treat the wall behind you. For low-end problems, use bass traps in corners — standard wall panels do not meaningfully control bass buildup.
Where to Place Acoustic Panels
The fastest wins come from treating early reflections, not “deadening the room.” Two questions decide most of the outcome: what order to treat surfaces, and how many panels to start with.
What order should you treat a room in?
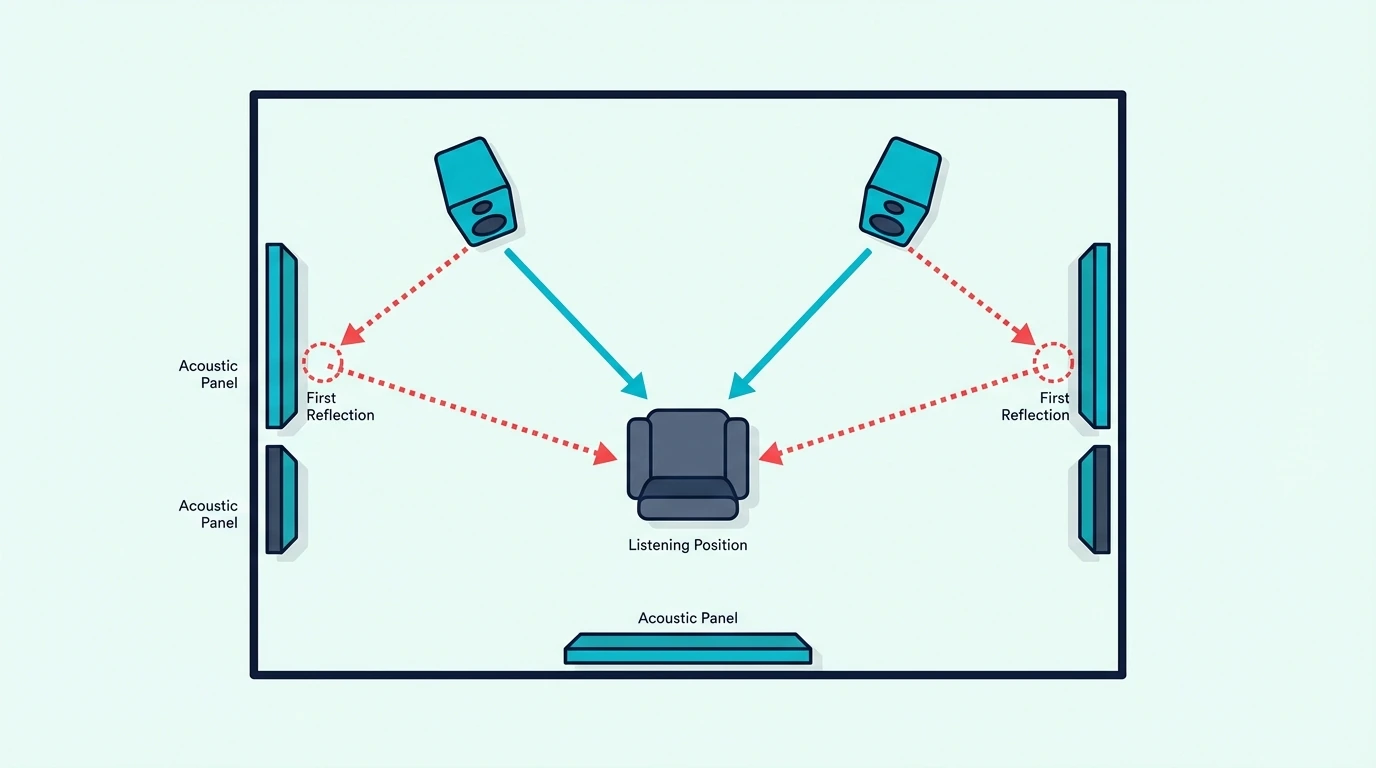
Start with side-wall first reflection points, because those reflections hit your ears almost immediately after the direct sound. They blur stereo imaging and make balance decisions feel inconsistent.
Next, treat the ceiling reflection point with a small cloud above the listening position. If your ceiling is hard drywall and your floor is uncarpeted, this single addition often makes the biggest difference after side walls.
Then treat the wall behind you. That delayed bounce creates slapback and the “hollow” quality that makes voices and snares feel thin and weird.
Corners come last unless bass is your main problem. If low end is the thing you are fighting, skip ahead to acoustic panels vs bass traps so you pick the right tool before spending money on the wrong one.
How many panels should you start with?
For a single listening position, two panels covering left and right reflection points is the minimum worth doing. Four to six panels — adding a ceiling cloud and a rear-wall patch — is where most rooms start sounding “finished.”
If you want a cleaner way to size this to your room, how many acoustic panels do I need covers the math. It keeps you out of the two common traps: buying too few to notice, or buying so many the room sounds dead.
How to Find First Reflection Points (Mirror Trick)
Finding the exact spots separates “panels that look nice on the wall” from panels that actually improve clarity. Here is the step-by-step process, plus what to do when your room forces an off-center layout.
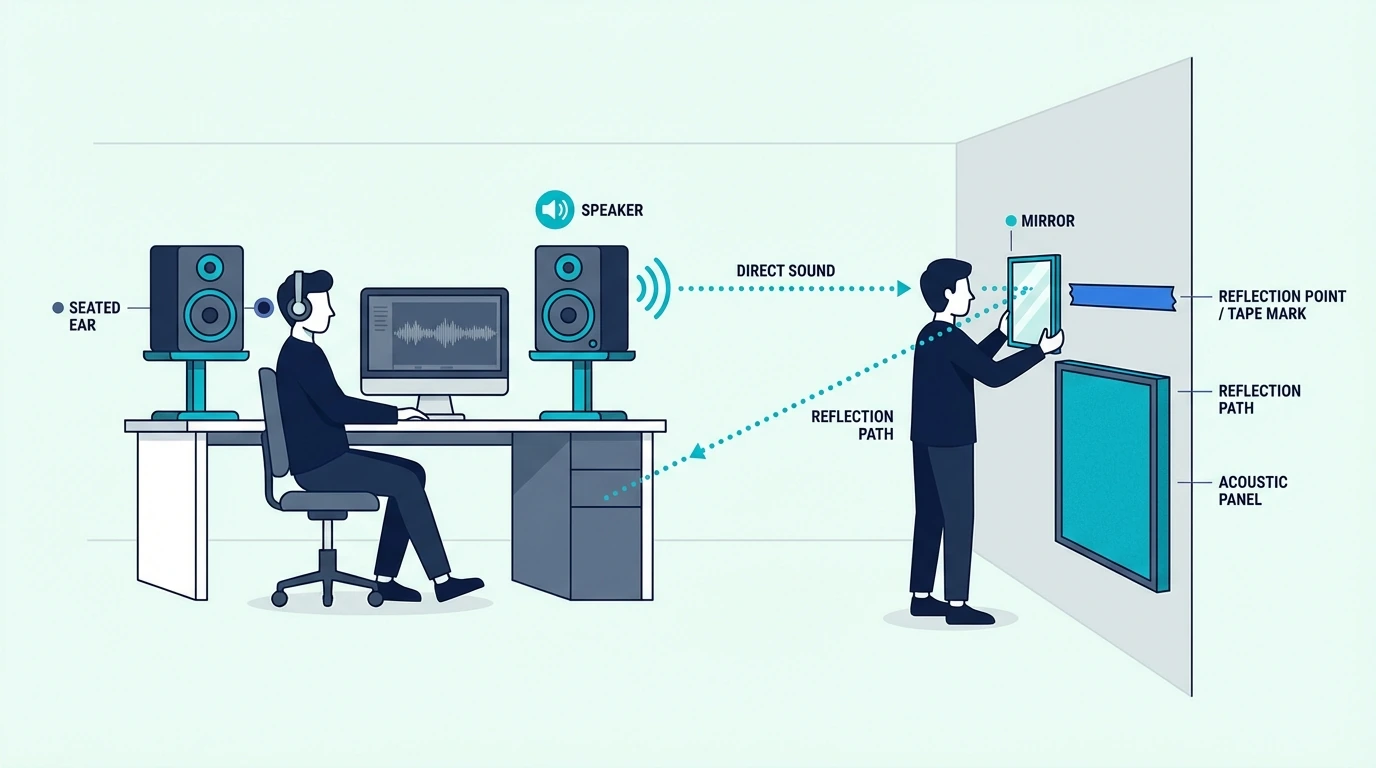
The mirror trick step by step
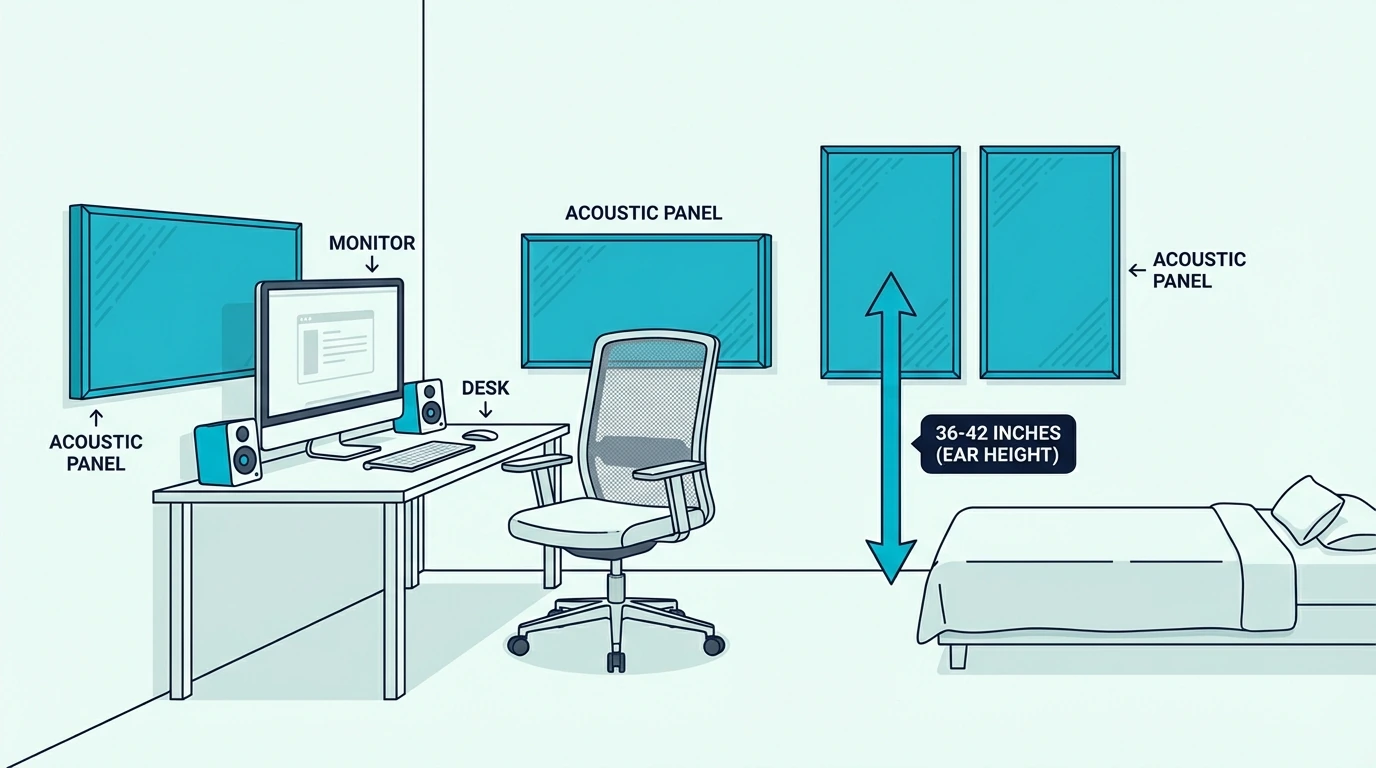
Sit in your normal listening position with your head where it naturally rests when you work. Have a friend slide a small mirror along the side wall at your seated ear height — roughly 36 to 42 inches from the floor.
The moment you can see the left speaker cone reflected in the mirror, mark that spot with painter tape. Repeat on the other side wall for the right speaker.
If you are adding a ceiling cloud, do the same trick overhead. Lay the mirror flat against the ceiling and mark the spot where you can see a speaker reflected.
What if your setup is off-center?
Most real rooms are imperfect. A closet door, a window, or a desk forced into a corner usually pushes the listening position off-center.
Treat the reflection points you actually find, even if the layout looks asymmetrical. Your ears care about what happens at the listening position, not what looks symmetrical on Instagram.
Get Studio Tips Weekly
Join 5,000+ creators getting acoustic treatment advice every week.
No spam. Unsubscribe anytime.Where to Place Acoustic Panels in a Home Studio
Studio placement depends on whether you mix more often or record more often. The first move is the same either way — treat early reflections around the critical listening position.
Mixing position (studio monitors)
For mixing, treat the two side-wall first reflection points and the ceiling cloud above your listening position. That combination tightens imaging and makes low-mids feel less “smeared” across the stereo field.
Then treat the wall behind you, because rear-wall slapback is what makes mixes translate poorly on other systems. If you are also experimenting with panel performance, air gap distance is worth understanding before you permanently mount everything.
For a clean starter set that covers both side reflections with room to spare, the UMIACOUSTICS Fiberglass Acoustic Panels (4-Pack) handles most small-to-mid studio setups. For product-led options by room size, use best acoustic panels.

UMIACOUSTICS Fiberglass Acoustic Panels (4-Pack)
Recording position (vocals, podcasting, streaming)
For recording, the microphone is your “ears.” Your goal is reducing reflections that reach the mic capsule within the first few milliseconds.
Treat the wall behind the mic first, then the closest side wall, then overhead if the room is still lively. If you only treat one surface, treat the one directly behind the vocalist — that is where the strongest early reflection originates.
If you are building a dedicated recording space, best acoustic panels for recording studios goes deeper on room layouts and product picks for tracking rooms.
Where to Place Acoustic Panels in a Home Theater
Home theater treatment is mostly about dialogue clarity and spatial focus. You want the center channel to sound sharp without the room adding a bright halo around every line of speech.
Front stage and first reflections
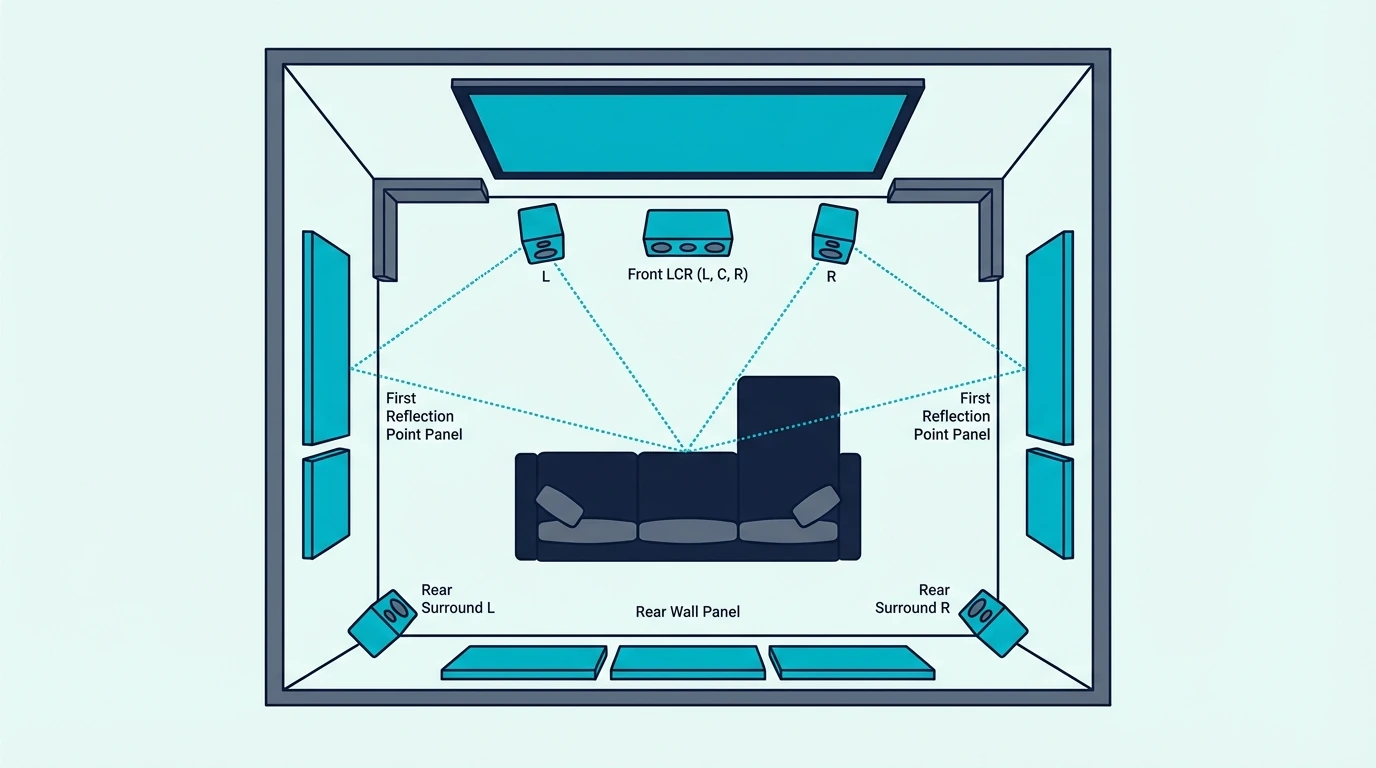
Treat the first reflection points from your front left and right speakers on the side walls. This is the single biggest upgrade for speech intelligibility and stereo separation in a theater room.
Keep treatment near the center speaker intentional. Panels do not need to sit right next to the center channel — side-wall reflections from the L/R pair are usually the real culprit smearing dialogue.
If you want a product-led plan for living rooms and theaters, best acoustic panels for home theater covers dialogue-first treatment strategies.
Seating area and rear wall
If the wall behind your couch is hard and close, treat it. That surface is where slapback originates, and it is one of the easiest “why does this sound harsh?” fixes in any theater room.
In a larger room, you can often treat less than you expect. Start with the front stage reflections and rear wall, then add only if you still hear obvious echo or flutter.
For bigger spaces that need more coverage across multiple zones, the UMIACOUSTICS Acoustic Panels (6-Pack) covers the actual reflection zones without turning the room into a patchwork.

UMIACOUSTICS Acoustic Panels (6-Pack)
Where to Place Acoustic Panels in a Bedroom or Home Office
Small rooms punish bad placement because reflections arrive faster and overlap more. Two panels in the right spots can outperform six placed randomly in a bedroom or compact office.
Desk setups for WFH, gaming, and small speakers
Treat side-wall first reflections at seated ear height and a small patch behind you. If your desk is pushed against a wall, treat the wall behind your speakers as well — that back-wall bounce adds comb filtering that makes everything sound “off.”
Spacing matters more than people expect in small rooms. If you are placing multiple panels in a tight zone, acoustic panel spacing prevents accidentally leaving the actual reflection path untouched.
For a starter option that does not require a full room redesign, the Fabric Soundproof Acoustic Panels (2-Pack) handles the harshest reflections in a compact workspace.
Fabric Soundproof Acoustic Panels (2-Pack)
Hard surfaces in small rooms
Glass monitors, flat desks, and bare drywall all create short-delay reflections that stack up fast. In a room under 120 square feet, even one untreated hard surface near your ears can undo the benefit of panels elsewhere.
Prioritize the surfaces closest to your head and speakers. A panel on the side wall at ear height does more than a panel on the far wall behind you.
Where Should Ceiling Panels Go?
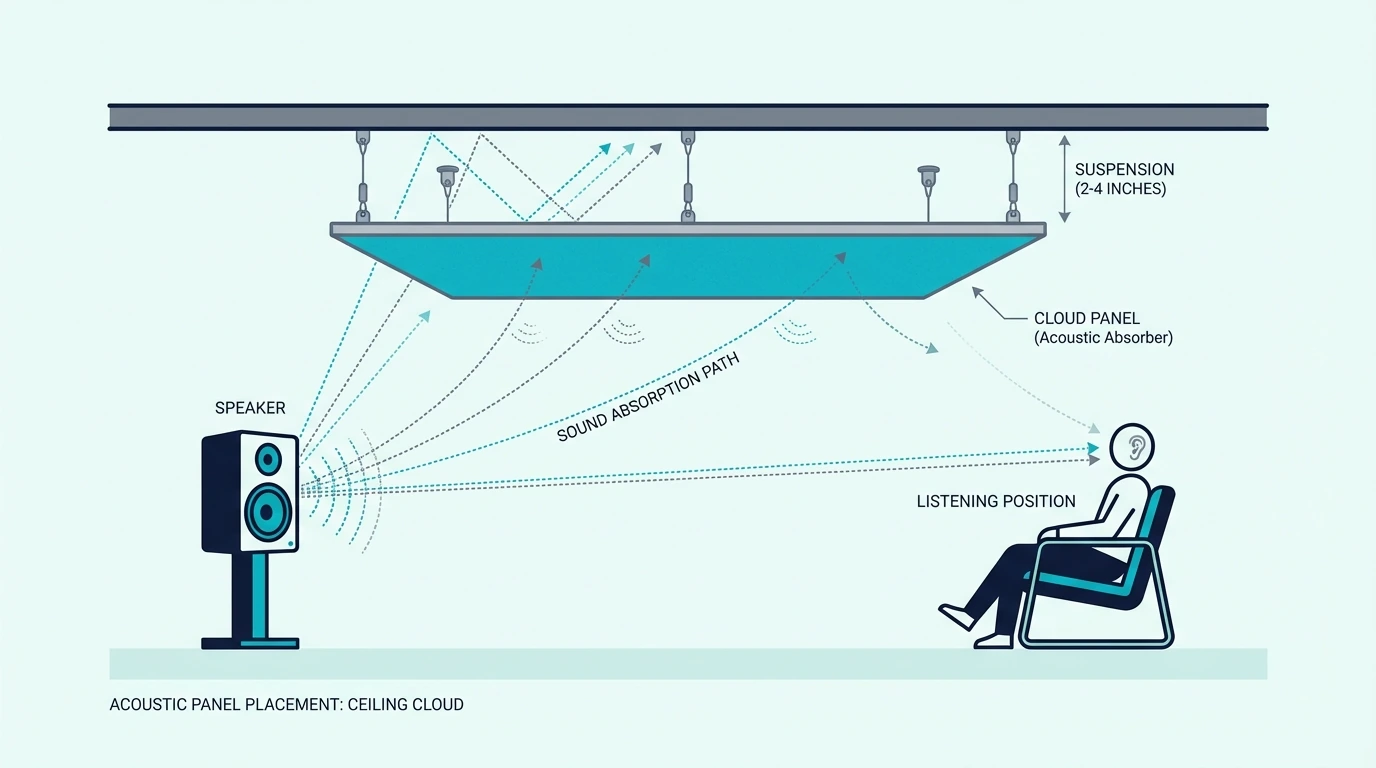
Ceiling reflections are the most overlooked source of coloration in any room with hard drywall overhead. A single ceiling cloud above the listening position is often the piece that makes the whole setup “click.”
Where exactly does the cloud go?
Use the mirror trick on the ceiling — lay a mirror flat against it and find the spot where you can see a speaker reflected from your listening position. That is your cloud location.
Most clouds end up roughly centered between the speaker plane and the listening position. If your speakers are farther apart, the cloud may need to be wider or positioned slightly forward.
Mounting options
Suspend the cloud 2 to 4 inches below the ceiling surface for the best results. That air gap behind the panel sharply improves low-mid absorption compared to mounting the panel flush.
For a cloud panel with solid fiberglass core that handles both mid and upper-low frequencies, the Olanglab Fiberglass Acoustic Panels (4-Pack) works well for cloud builds. If you want a deeper dive into cloud installation, how to install acoustic panels covers suspension hardware and safe ceiling anchoring.
Olanglab Fiberglass Acoustic Panels (4-Pack)
Should You Use Acoustic Panels or Bass Traps in Corners?
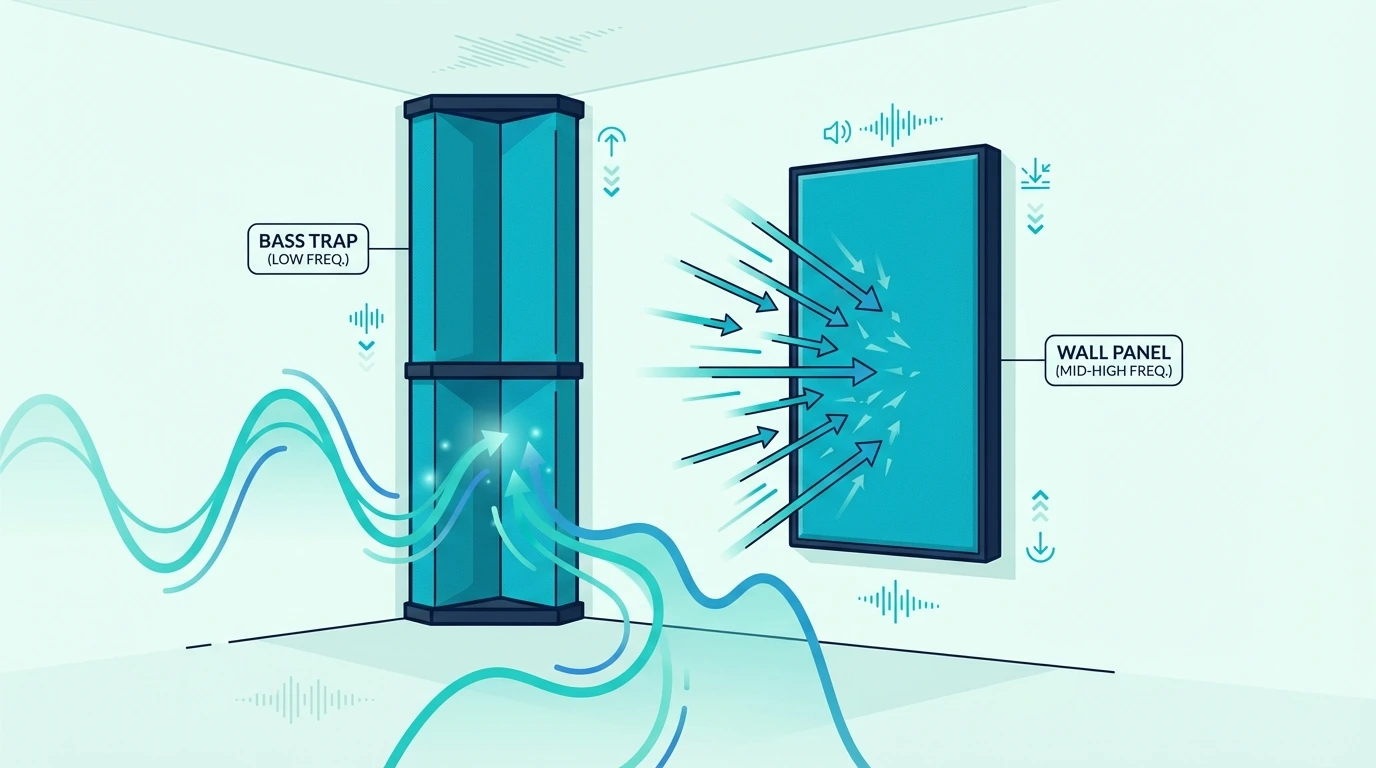
Corners are where low-frequency energy piles up, and standard flat panels are not built to handle it. If bass is your main complaint, panels in corners are the wrong tool for the job.
When do corners actually matter?
Corners matter most when you hear a “boomy” or “muddy” quality that does not improve after treating reflection points. That boominess comes from room modes — standing waves that reinforce specific bass frequencies in the corners and along walls.
Standard 2-inch acoustic panels absorb mid and high frequencies effectively, but they barely touch anything below 250 Hz. Corner treatment requires thick, dense absorbers (bass traps) that are at least 4 inches deep.
Panel vs bass trap placement
Keep your flat panels on the walls at reflection points. Reserve corners for dedicated bass traps — ideally floor-to-ceiling in at least two corners of the room.
If your budget forces a choice, treat reflection points first. Bass traps improve the room, but side-wall panels improve your actual listening accuracy more per dollar spent.
What Are Common Acoustic Panel Placement Mistakes?
Most placement mistakes share a root cause: treating visible wall space instead of treating the surfaces that actually matter acoustically. Here are the four most common ones.
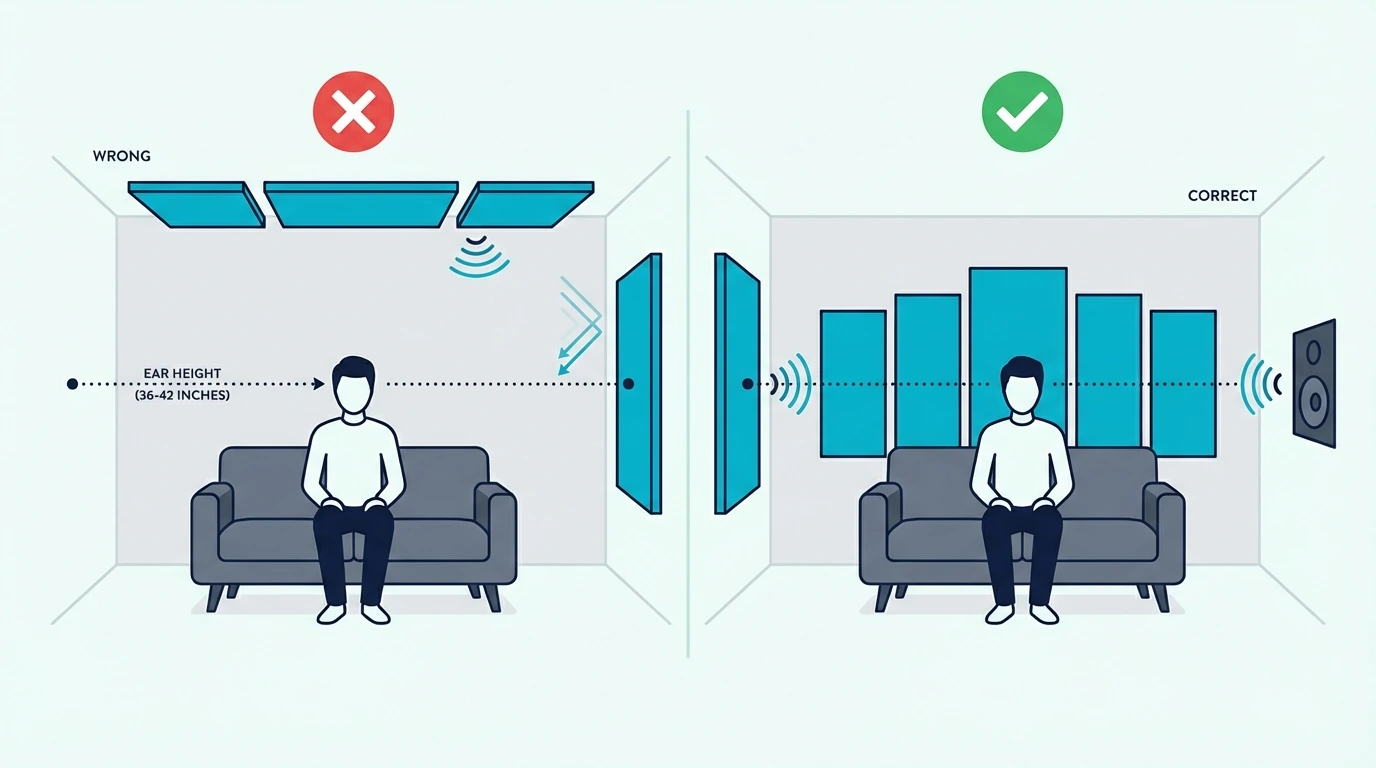
Mounting panels too high on the wall
Panels centered near the ceiling look symmetrical but miss the reflection zone entirely. Sound travels in straight lines from your speakers to the walls to your ears — and your ears are at seated height, not ceiling height.
Center every panel at seated ear height, roughly 36 to 42 inches from the floor. If the panel is tall enough to cover from 30 to 54 inches, it catches the primary reflection zone for most seated positions.
Spreading panels evenly instead of targeting reflections
Distributing panels evenly around the room looks “professional” but wastes half your treatment. Two panels at first reflection points do more than eight panels scattered decoratively across every wall.
Use the mirror trick, mark the actual reflection points, and concentrate your panels there. Even coverage is a goal for recording studios with big budgets — not for rooms with 4 to 6 panels.
Treating only the wall you face
The wall in front of you (behind the speakers) is the least critical surface for reflection control. Side walls and the ceiling send reflections to your ears much sooner and with much more energy.
If you only have two panels, they belong on the side walls — not flanking your monitor or TV.
Using thin foam and expecting bass control
Thin foam tiles (half-inch or one-inch) absorb high frequencies and almost nothing else. They can actually make a room sound worse by removing treble while leaving all the bass and low-mid energy untouched.
If bass is the problem, you need thickness and density — not thinner foam in more places.
Conclusion
Where to place acoustic panels reduces to one priority: treat first reflection points before anything else. Side walls at ear height, then ceiling, then the wall behind you.
That sequence consistently delivers the most audible improvement per panel, regardless of room size or use case.
Skip the decorative scatter approach and use the mirror trick to place every panel where it intercepts a real reflection path. Four panels at the right spots will always outperform a dozen placed for looks.
Frequently Asked Questions
How high should acoustic panels be on the wall?
Center them at seated ear height — 36 to 42 inches from the floor for most people. The goal is intercepting the reflection path between your speakers and your ears, and that path travels at seated head level, not near the ceiling.
Do acoustic panels need to be directly at the reflection point?
Close counts. A panel shifted 6 inches from the exact mirror-trick spot still catches most of the reflection energy because the reflection zone is a region, not a pinpoint.
Being within a foot of the ideal spot gets you 80 to 90 percent of the benefit.
Can I put acoustic panels on the ceiling?
Yes — ceiling clouds are one of the most effective placements in any room. A cloud above the listening position catches overhead reflections that side-wall panels miss entirely.
Suspend it 2 to 4 inches below the ceiling surface for the best low-mid absorption.
Should I put acoustic panels behind my speakers?
Only after you have treated side walls and ceiling first. The wall behind your speakers contributes less to early reflections than the side walls do.
In small rooms where the speakers sit very close to the back wall, treating that surface can reduce comb filtering. But it is never the first priority.
How many acoustic panels does a small room need?
Most rooms between 80 and 150 square feet see a clear difference with 4 to 6 panels covering the side-wall reflection points, a ceiling cloud, and a rear-wall patch. Going beyond that in a small room risks over-damping, which makes the space sound unnaturally dead and fatiguing to work in.