Home Theater Acoustic Panels: Best Placement & Setup Guide [2026]

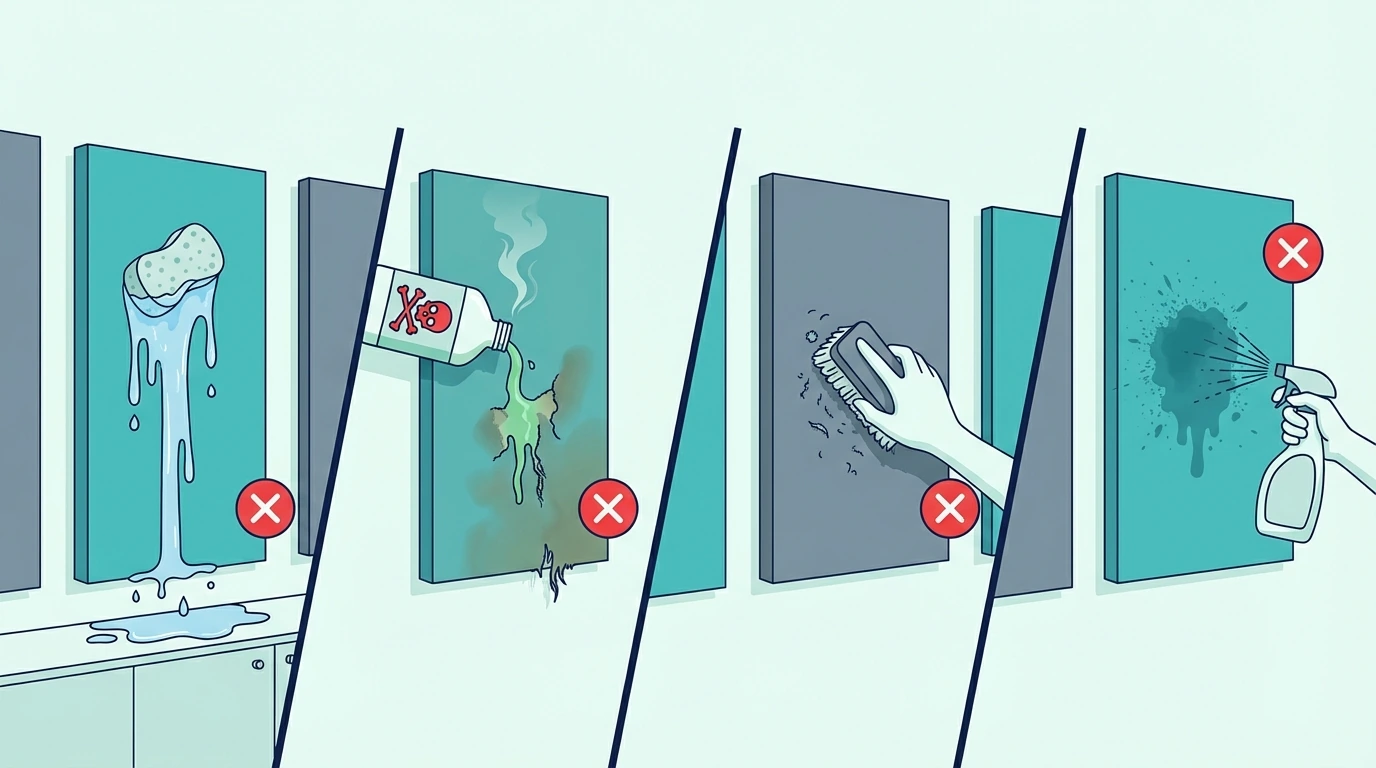
Do I need acoustic panels home theater treatment can’t skip? Yes — but panels in the wrong spots add cost without improving sound.

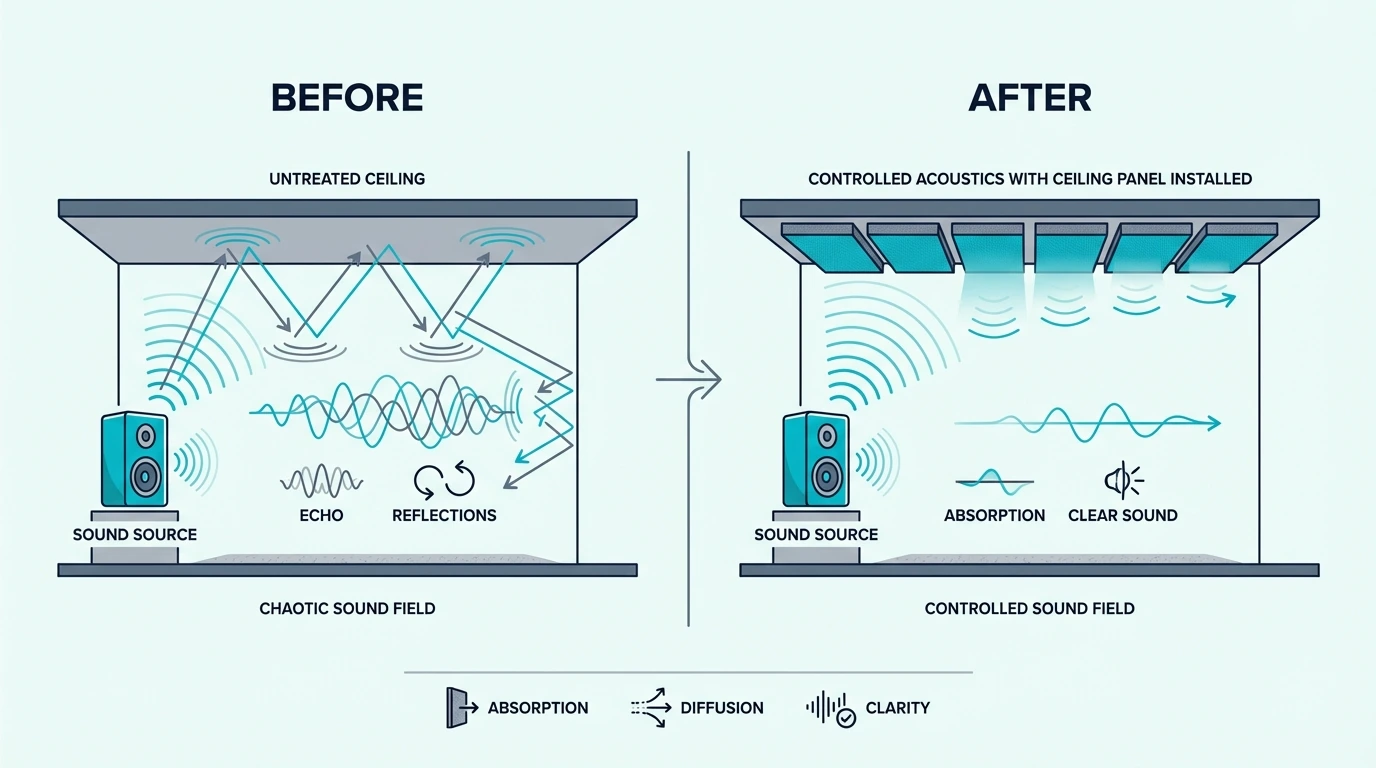
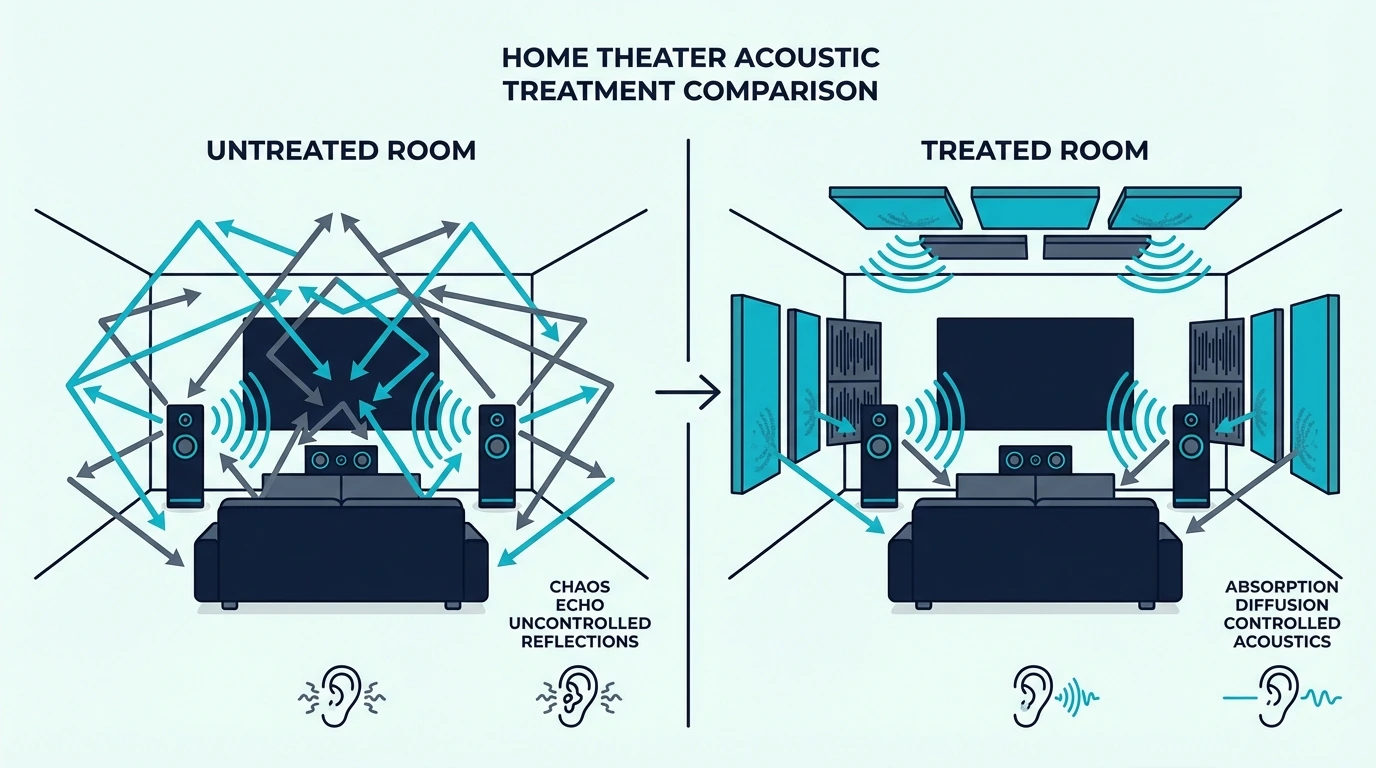
Most home theaters still have harsh reflections and muddy bass even after adding panels. The frustration comes from untreated first reflection points on side walls and ceiling — reflections that no speaker system can overcome without acoustic treatment.

The right placement approach clears up dialogue intelligibility, tightens bass, and lets your system perform at its actual capability.

We’ll walk you through placement priorities, coverage targets, and what to avoid below.

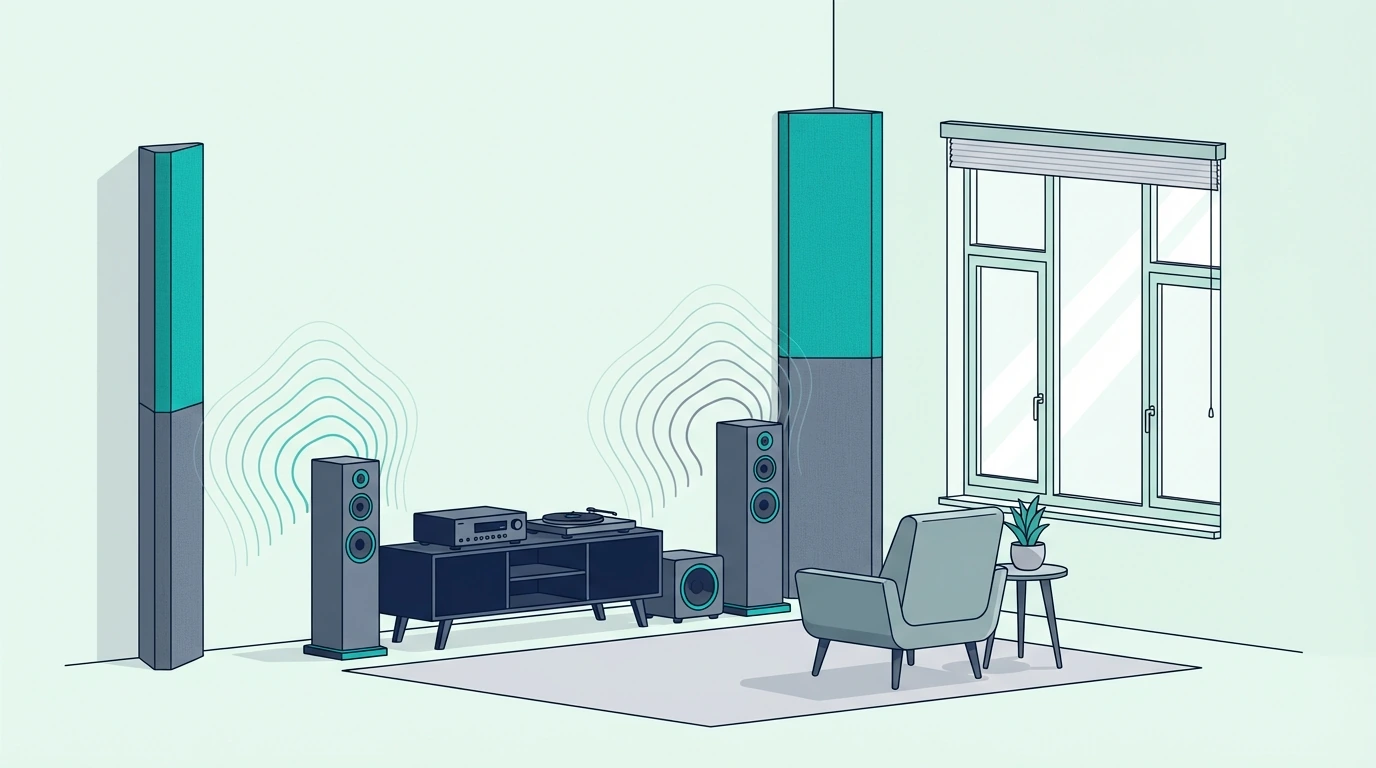
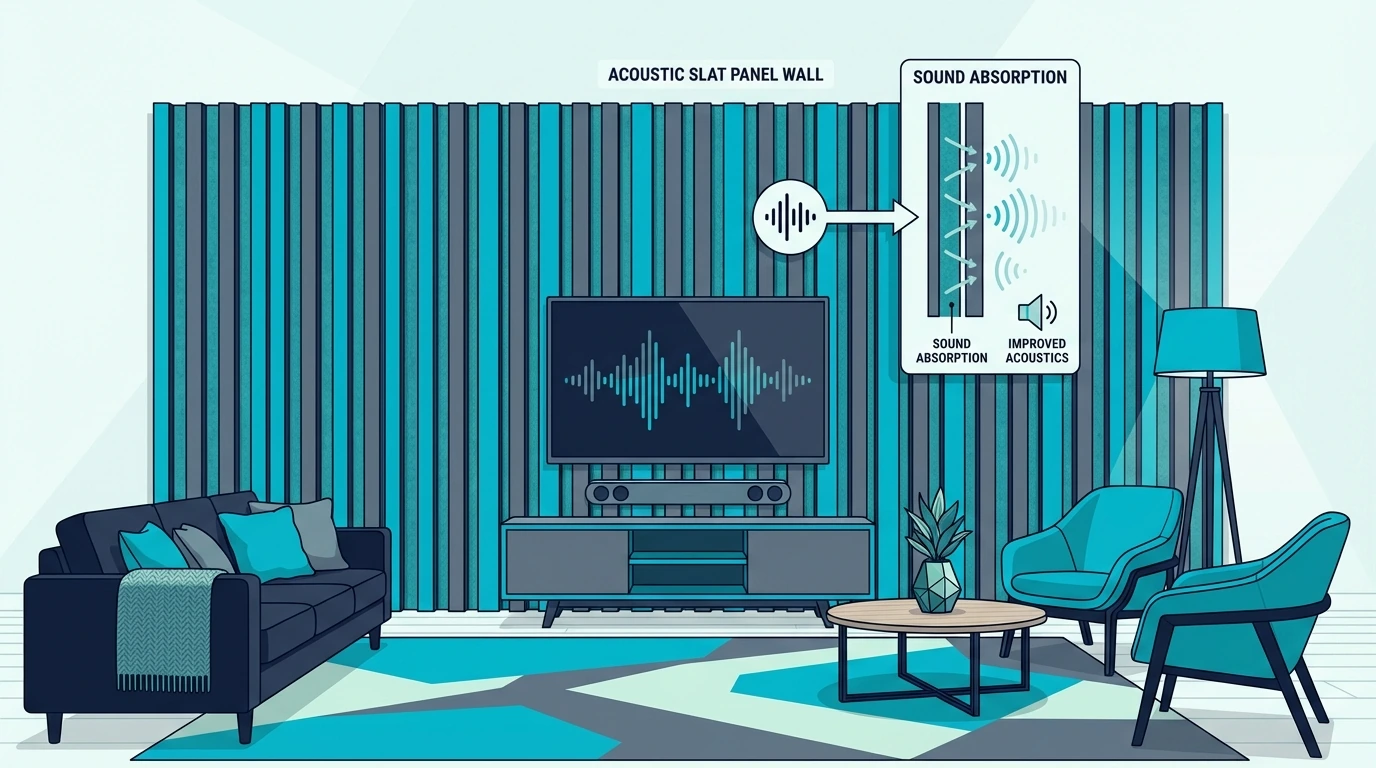
Most home theaters benefit much from acoustic treatment. Panels improve dialogue clarity, tighten bass response, and enhance surround sound immersion.

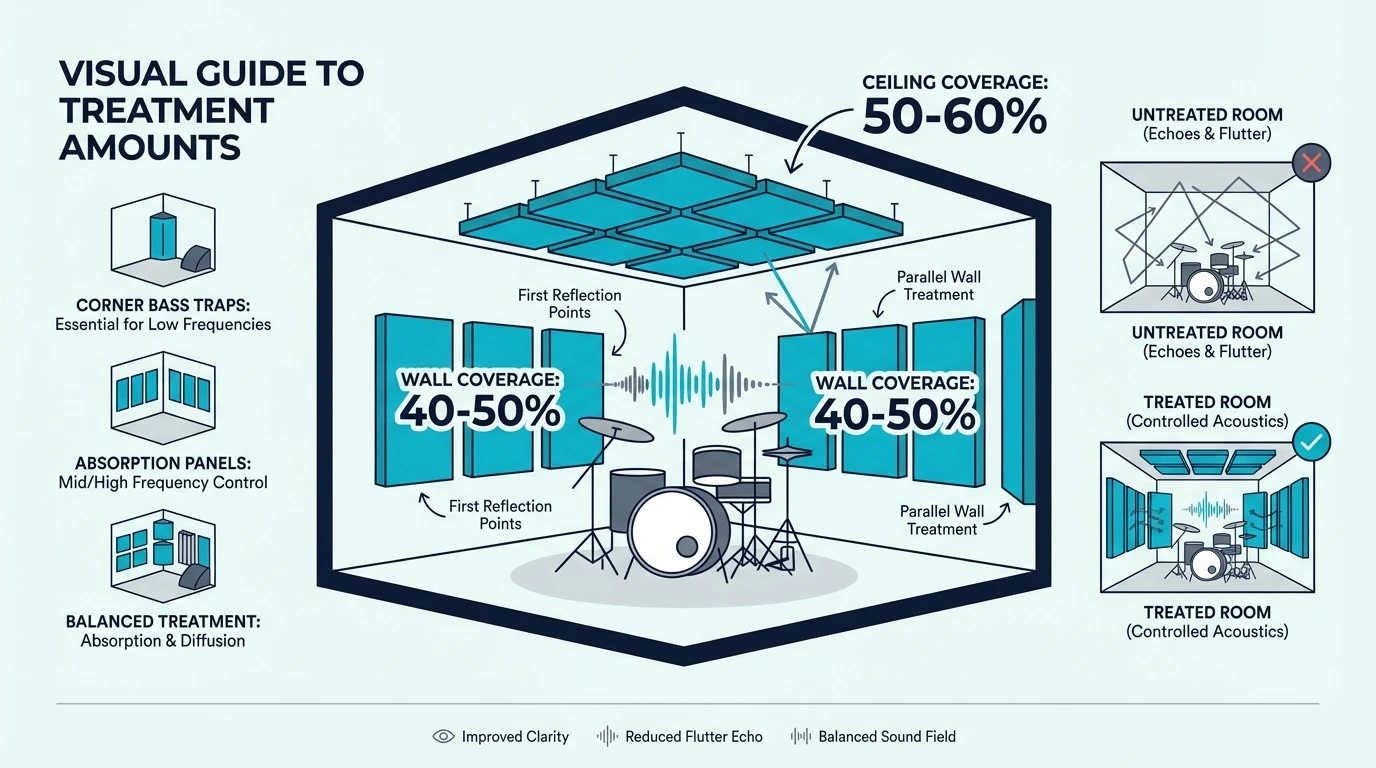
Focus on first reflection points on side walls, ceiling treatment for Atmos systems, and bass traps in corners. Budget 30-50% wall coverage for meaningful improvement.

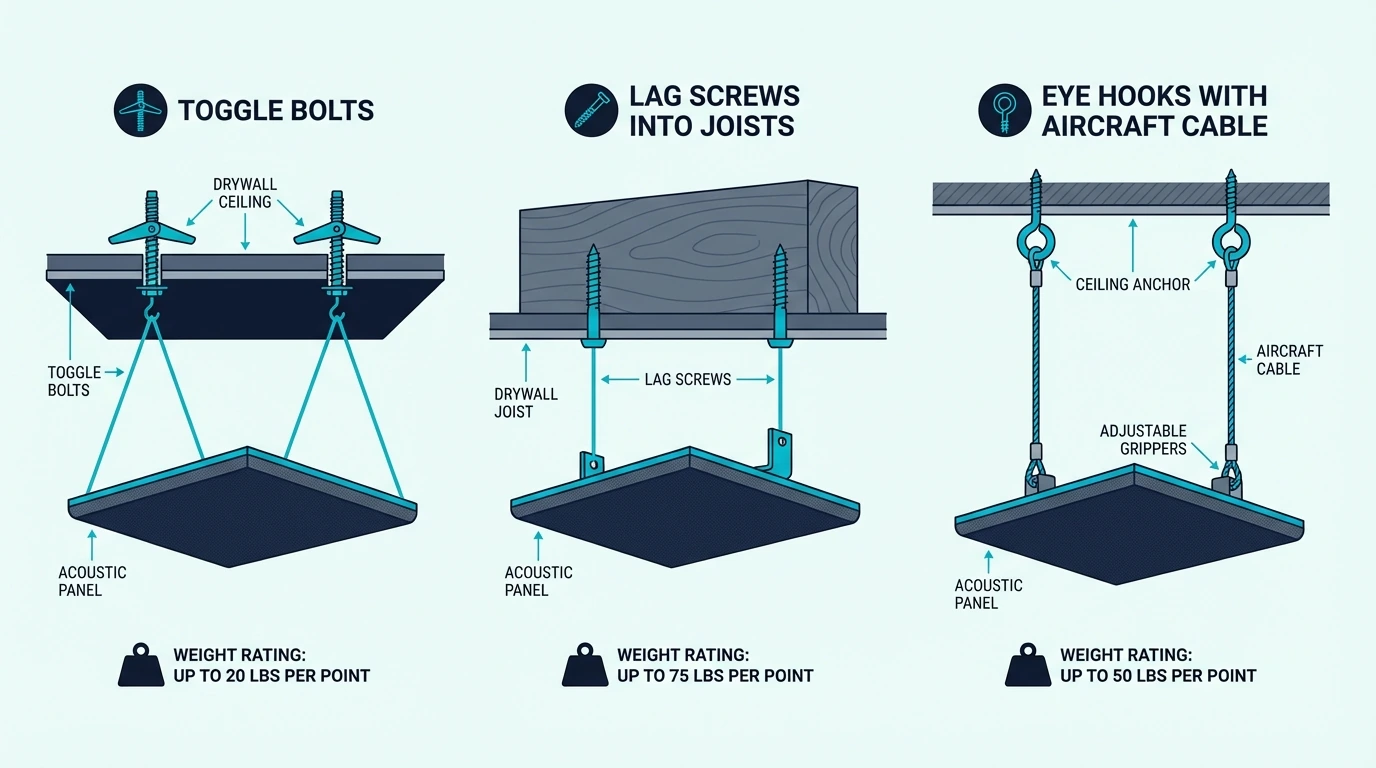
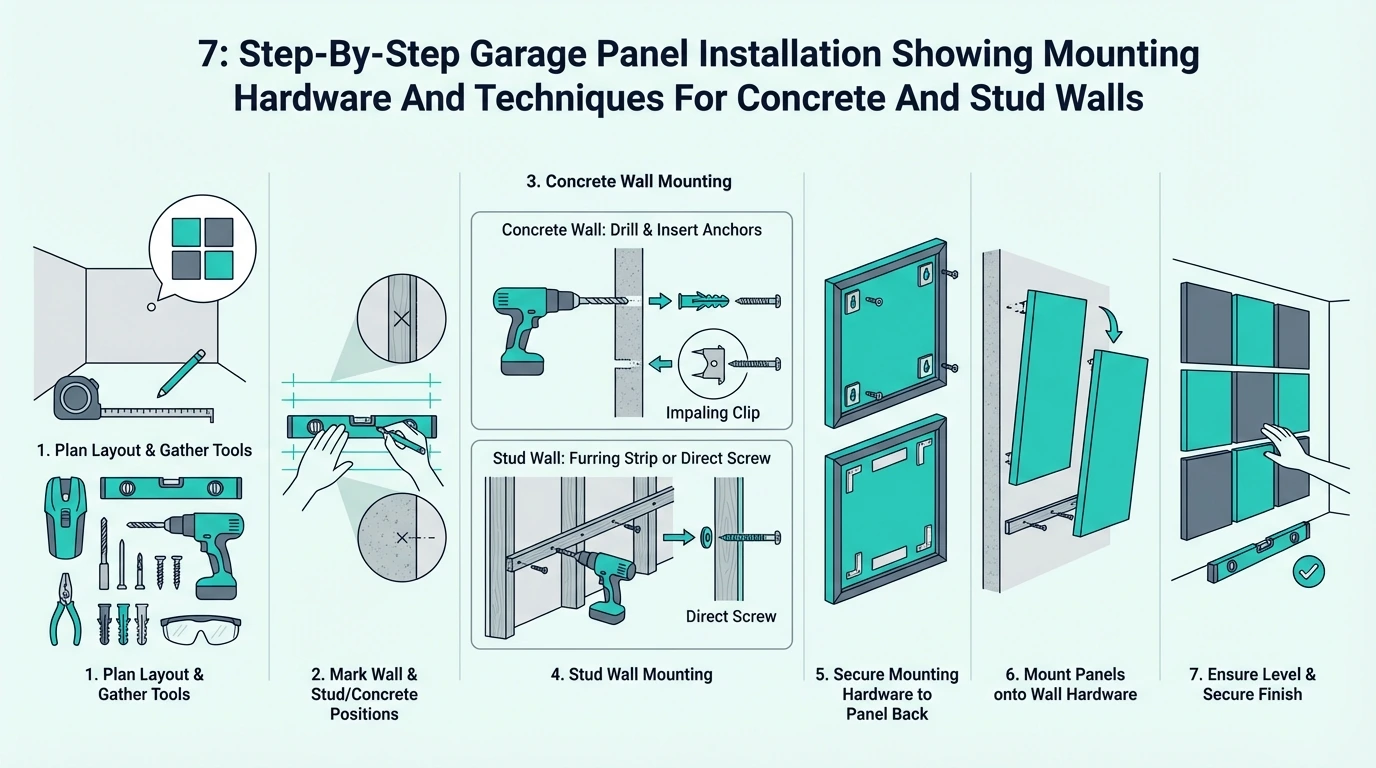
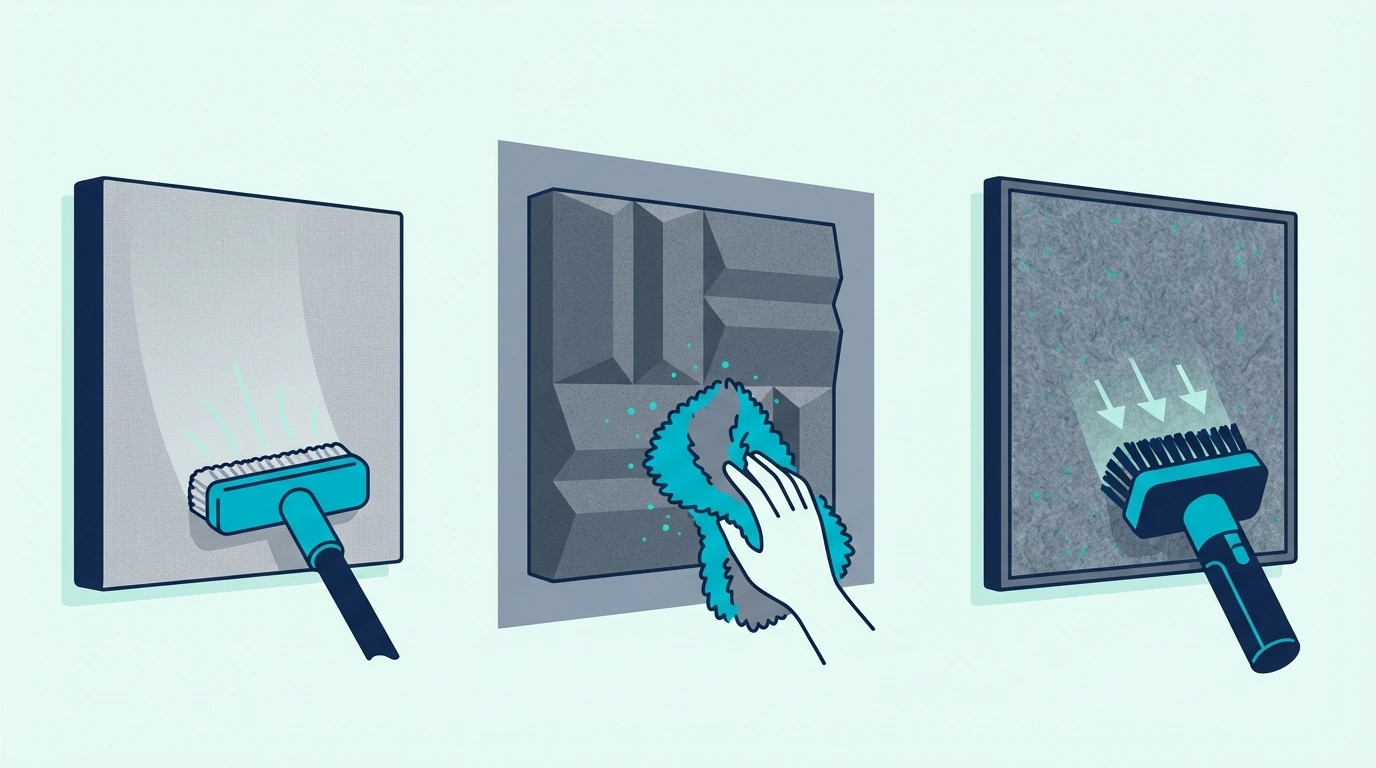
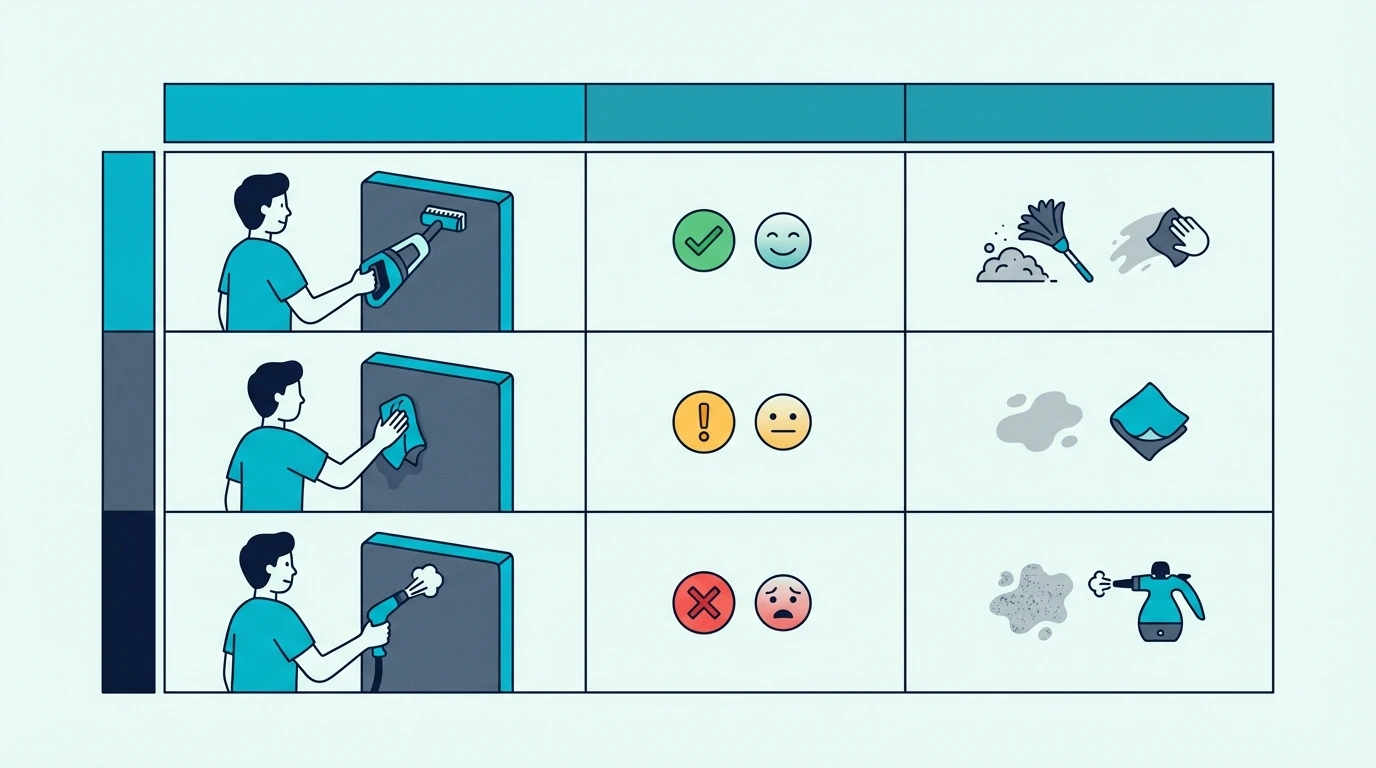
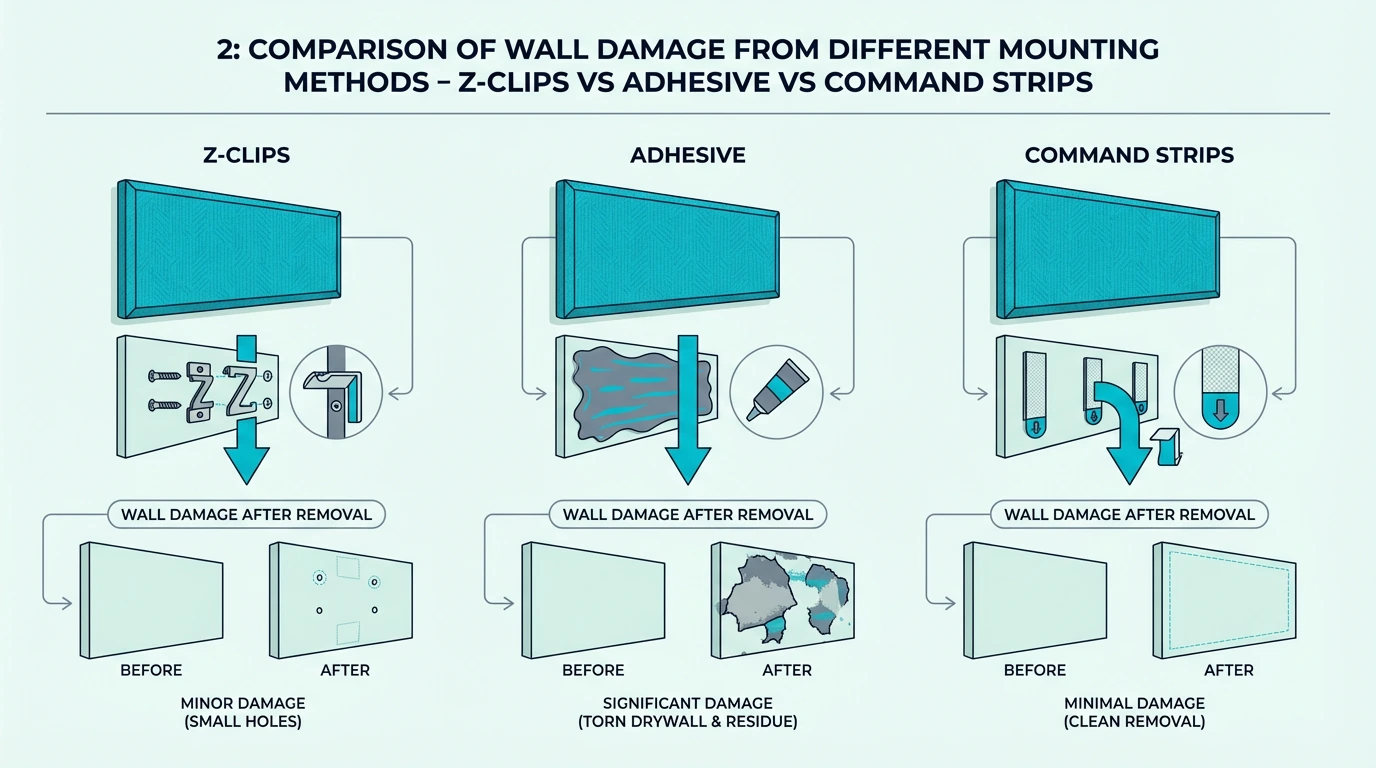
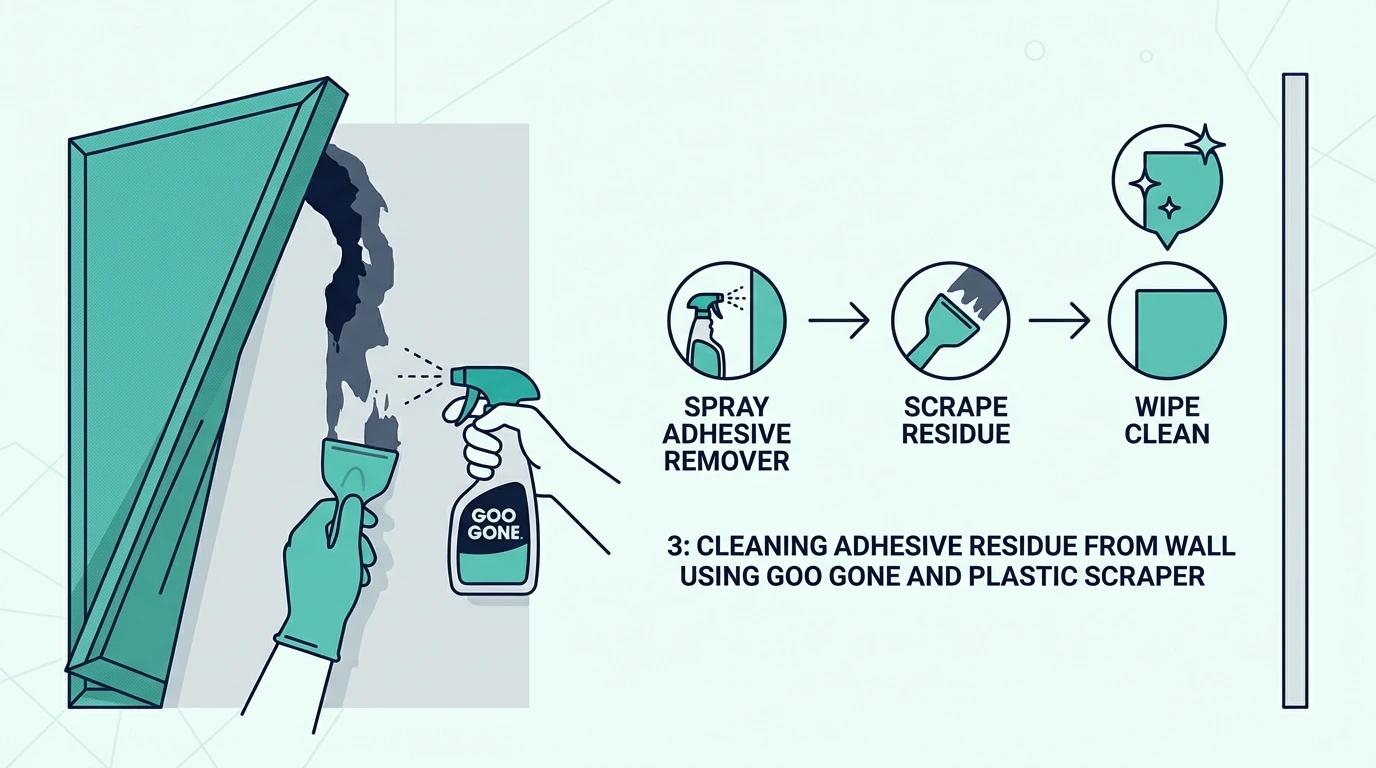
For the actual installation, check the acoustic panel hanging guide to match hardware to your wall type.

For step-by-step setup, the full installation guide covers every mounting method for both drywall and masonry.

Start with first reflection point placement before treating any other surface — it delivers the biggest improvement per panel.

Do You Actually Need Acoustic Panels for Home Theater?

Home theater acoustic treatment comparison

The short answer is yes for any dedicated or semi-dedicated theater space. The longer answer depends on your room and expectations.

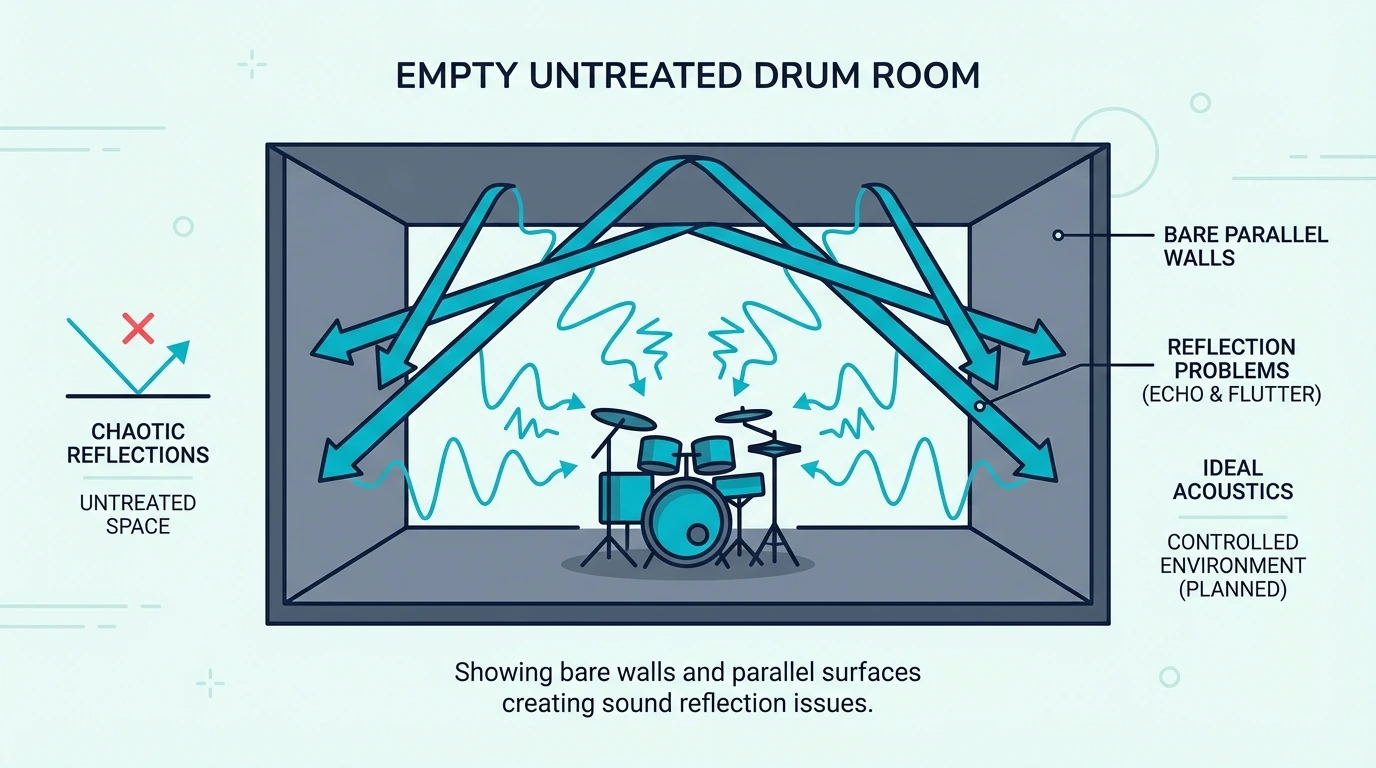
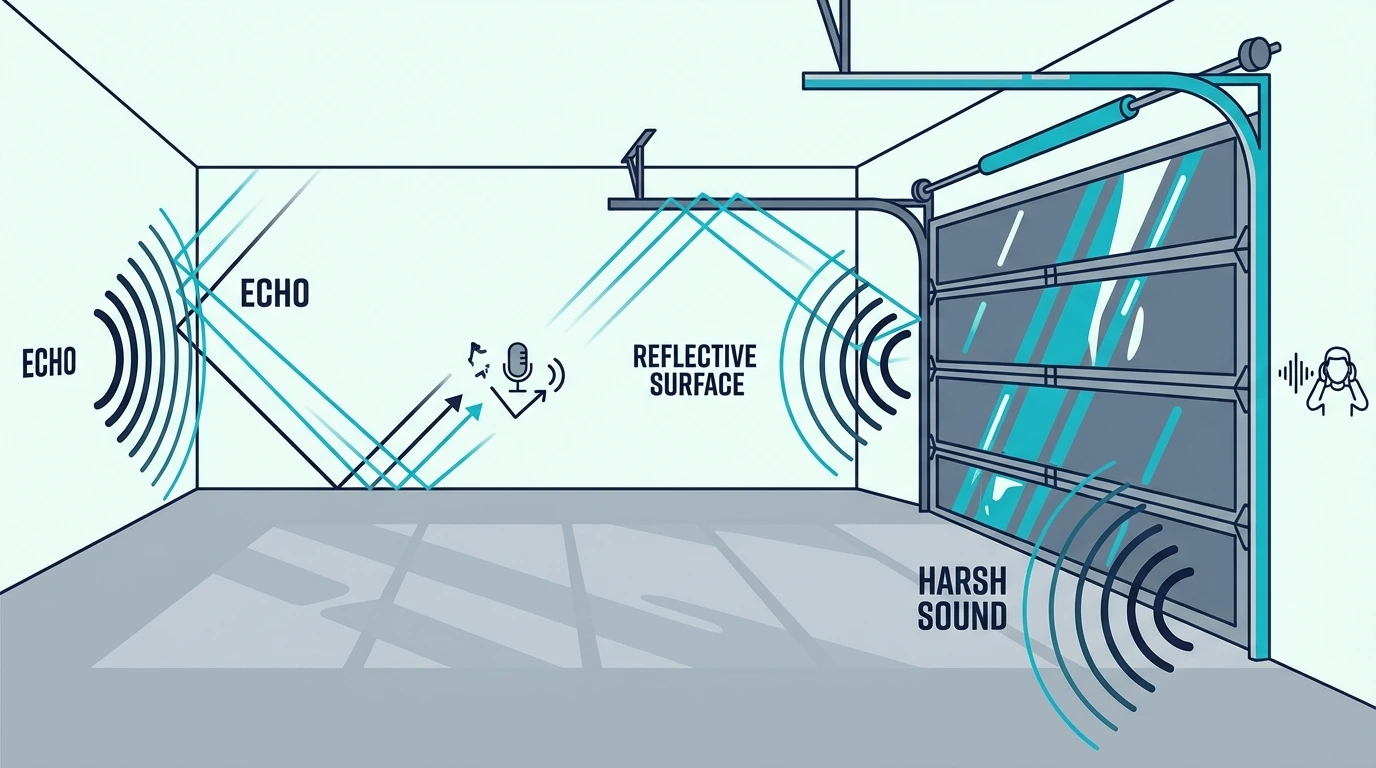
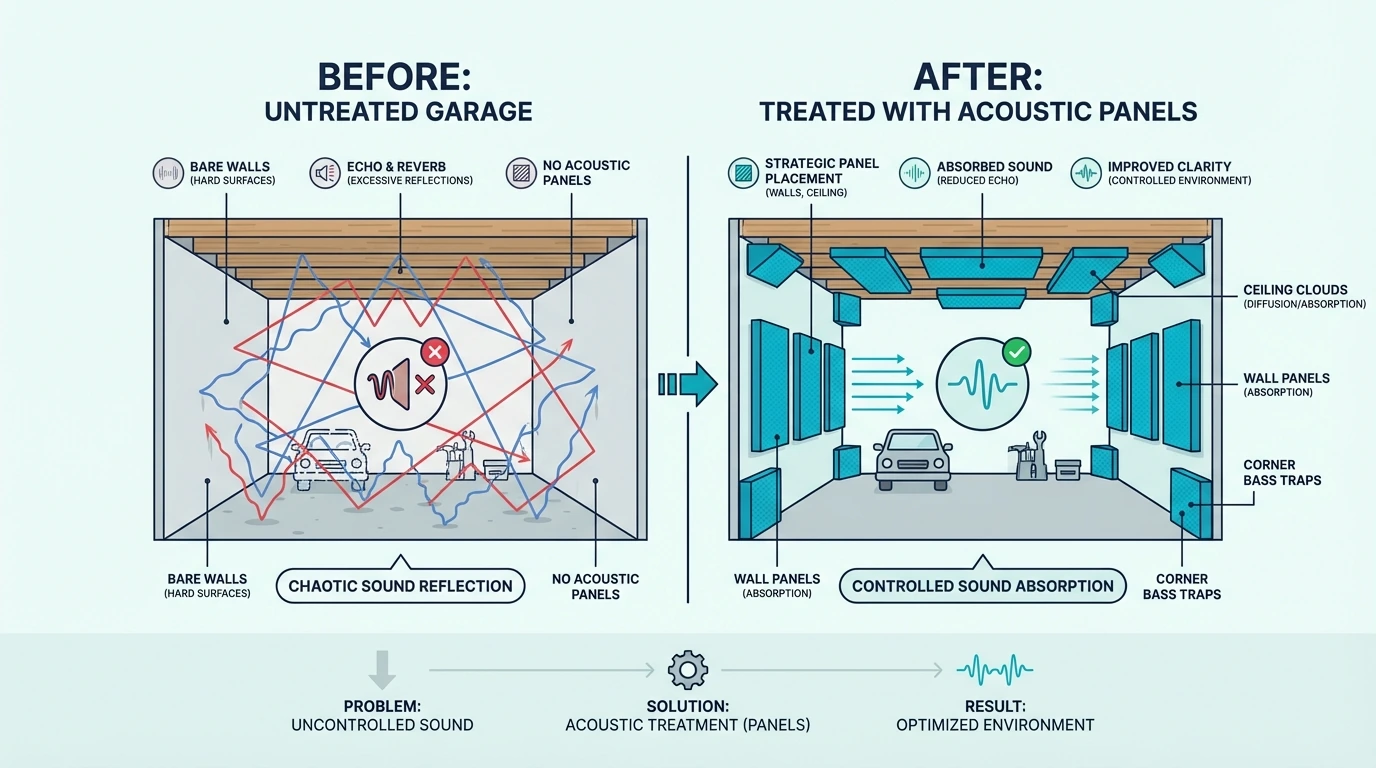
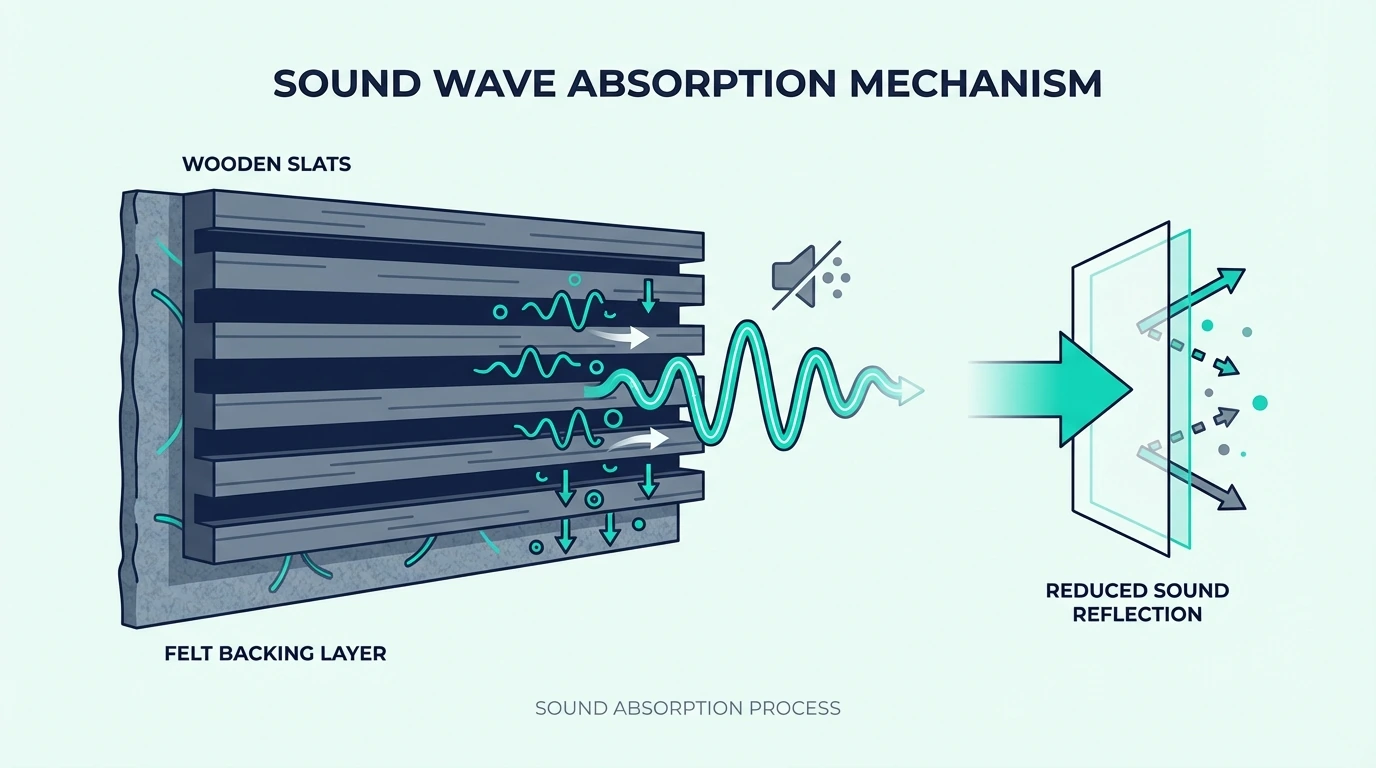
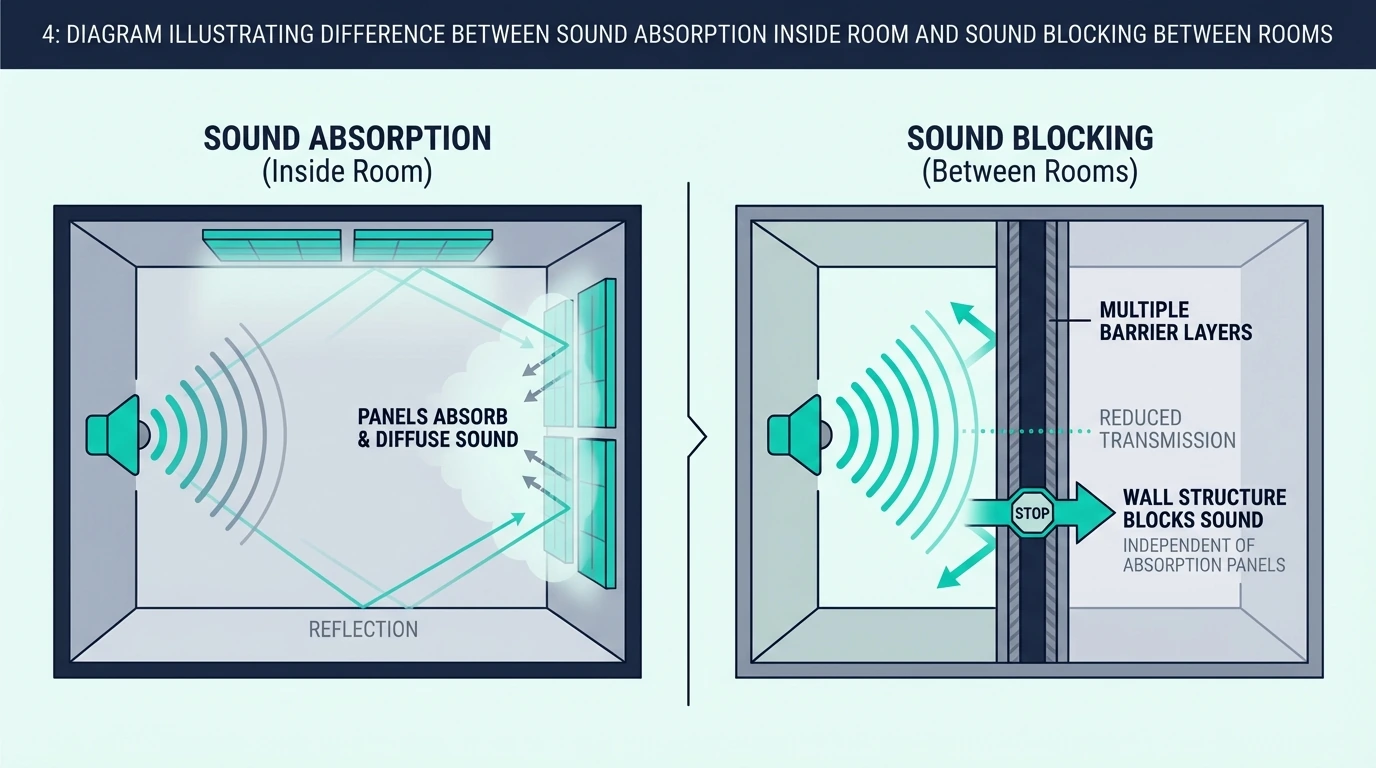
Untreated rooms sabotage even expensive audio equipment. Sound bounces off hard surfaces — drywall, hardwood, glass — and reaches your ears milliseconds after the direct sound from your speakers. your brain can’t separate these reflections from the original audio, so everything sounds muddy and unclear. Understanding the difference between absorption and soundproofing is key to solving this.

When Are Panels Essential?

Dedicated theater rooms with hard surfaces need treatment. If your walls are drywall, your floor is hardwood or tile, and your ceiling is standard height, you’re dealing with real acoustic problems.

Rooms where you’ve noticed echo or boomy bass are obvious candidates. Try the clap test: stand in the center of your theater and clap once sharply.

If you hear a ringing tail or flutter echo, treatment will make a dramatic difference.

When Can you Skip Them?

Living rooms with lots of soft furniture, carpet, and curtains may not need additional treatment. These elements already absorb sound and reduce reflections naturally.

Casual viewers who mostly watch with dialogue-heavy content at moderate volumes might not notice enough improvement to justify the investment. But anyone who watches action movies, listens critically, or has a surround sound system will hear the difference immediately.

What Problems Do Untreated Home Theaters Have?

Untreated home theater acoustic problems

So what exactly goes wrong in untreated rooms? Understanding the specific problems helps you target the right solutions.

Untreated theaters suffer from three main categories of problems that panels address directly.

Why Does Dialogue Sound Muddy?

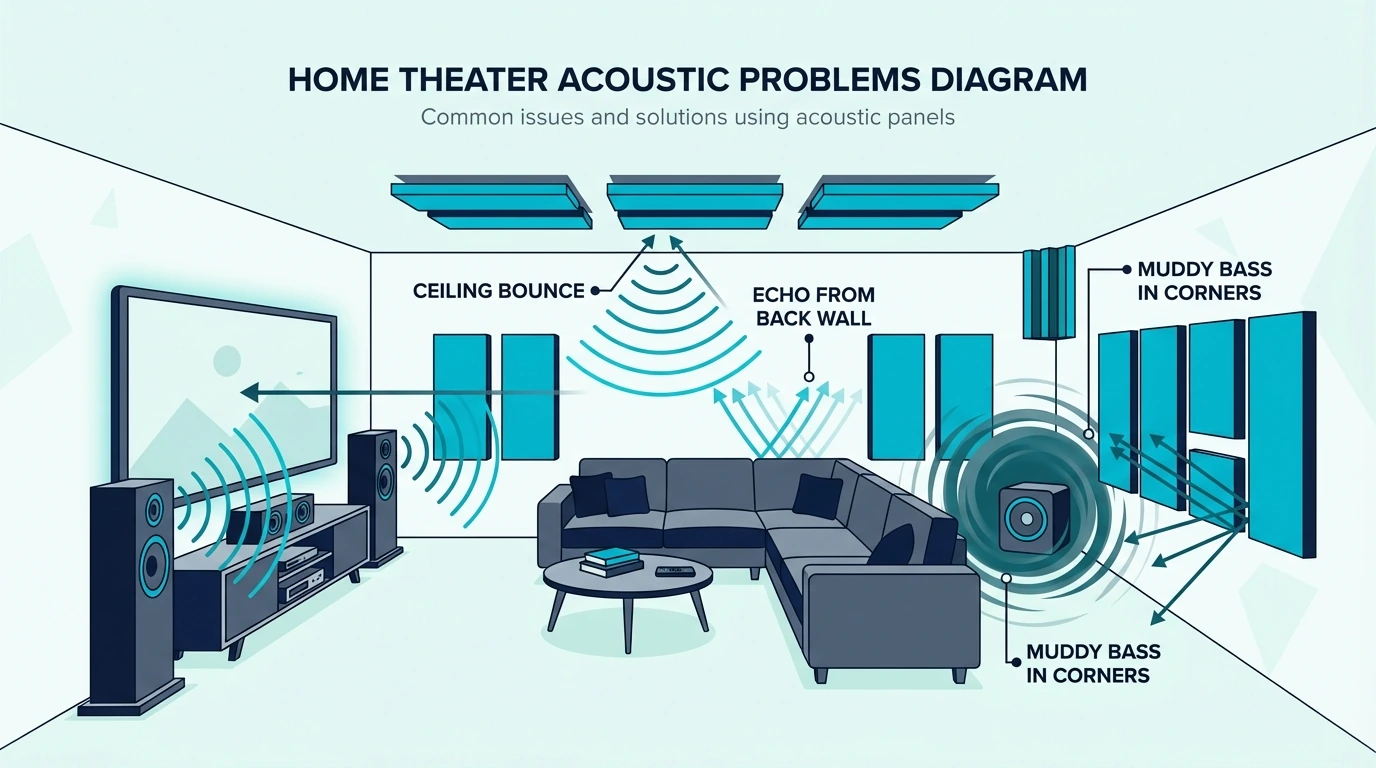
First reflections from side walls arrive at your ears within 25 milliseconds of the direct sound. your brain fuses these together, and the result is smeared, unclear dialogue. Actors sound like they’re speaking through a blanket.

The center channel in a home theater carries almost all dialogue. When reflections from nearby walls interfere with that channel, every conversation becomes harder to follow. you’ll find yourself reaching for the volume or rewinding to catch what was said.

Why Does Bass Sound Boomy or Uneven?

Low frequencies behave differently than mid and high frequencies. Bass waves are physically large — a 50Hz tone has a wavelength of about 22 feet.

These long waves bounce around your room and pile up in certain spots while canceling out in others.

Corners are the worst offenders. Bass energy accumulates there, creating boom and muddiness.

Meanwhile, your seating position might be in a null where certain bass frequencies nearly disappear. This is why your subwoofer sounds great in one spot and terrible two feet away.

What Happens to Surround Sound?

Surround speakers are supposed to create an immersive soundfield that wraps around you. But in untreated rooms, reflections from walls confuse the spatial cues your brain relies on to locate sounds.

The result is a flat, unconvincing surround experience. Effects that should come from behind you get smeared across the side walls. Choosing panels with the right NRC rating ensures effective absorption at surround speaker positions.

The “bubble” of immersion collapses into a vague sense that sound exists somewhere besides the front speakers.

How Do Acoustic Panels Improve Home Theater?

How acoustic panels improve home theater sound

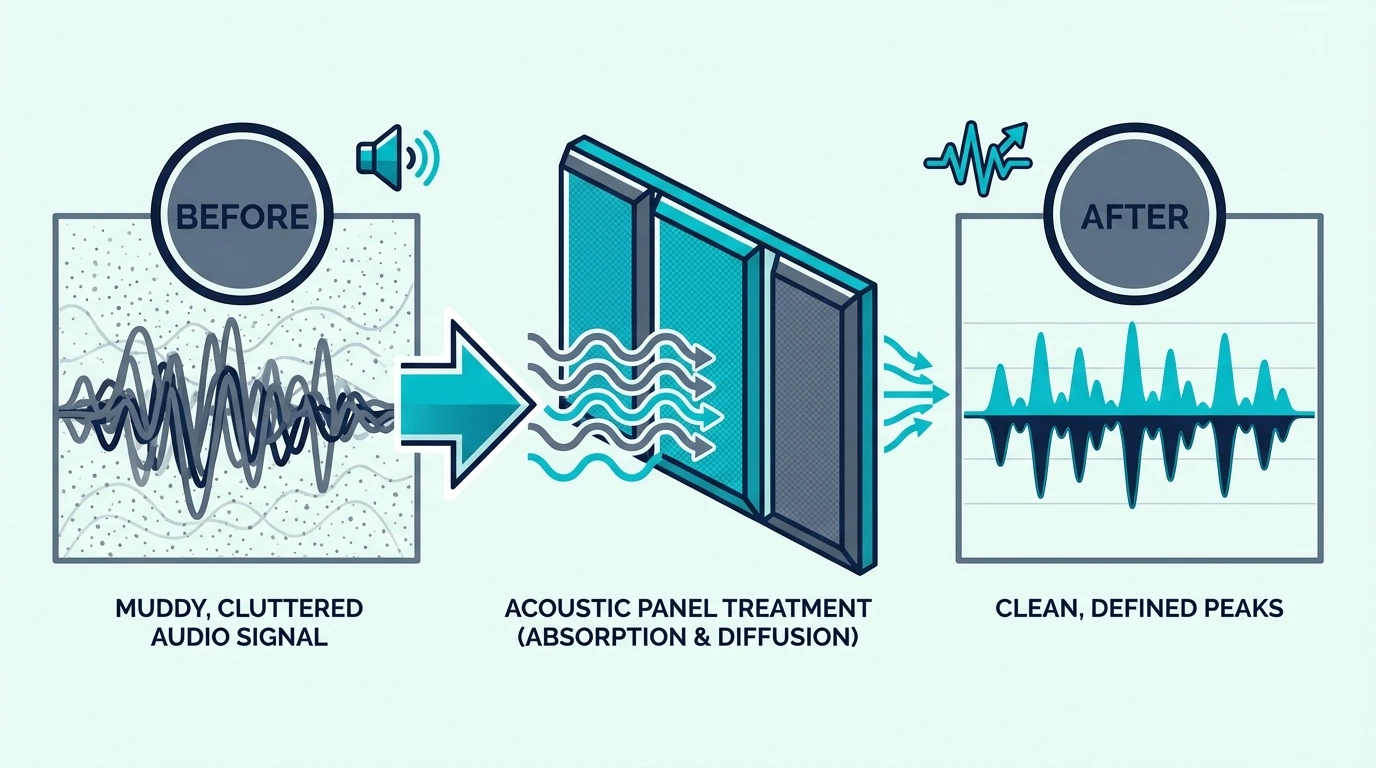
Panels solve each of these problems directly. The improvements are immediate and obvious to anyone who listens critically.

How Do Panels Improve Dialogue Clarity?

Panels at first reflection points absorb the early reflections that smear dialogue. When those competing arrivals disappear, the center channel comes through clean and clear.

The improvement is dramatic. Dialogue that required concentration to follow becomes effortless to understand. you’ll stop reaching for the remote to rewind, and you’ll hear details in voices you never noticed before.

Can Panels Improve Bass Response?

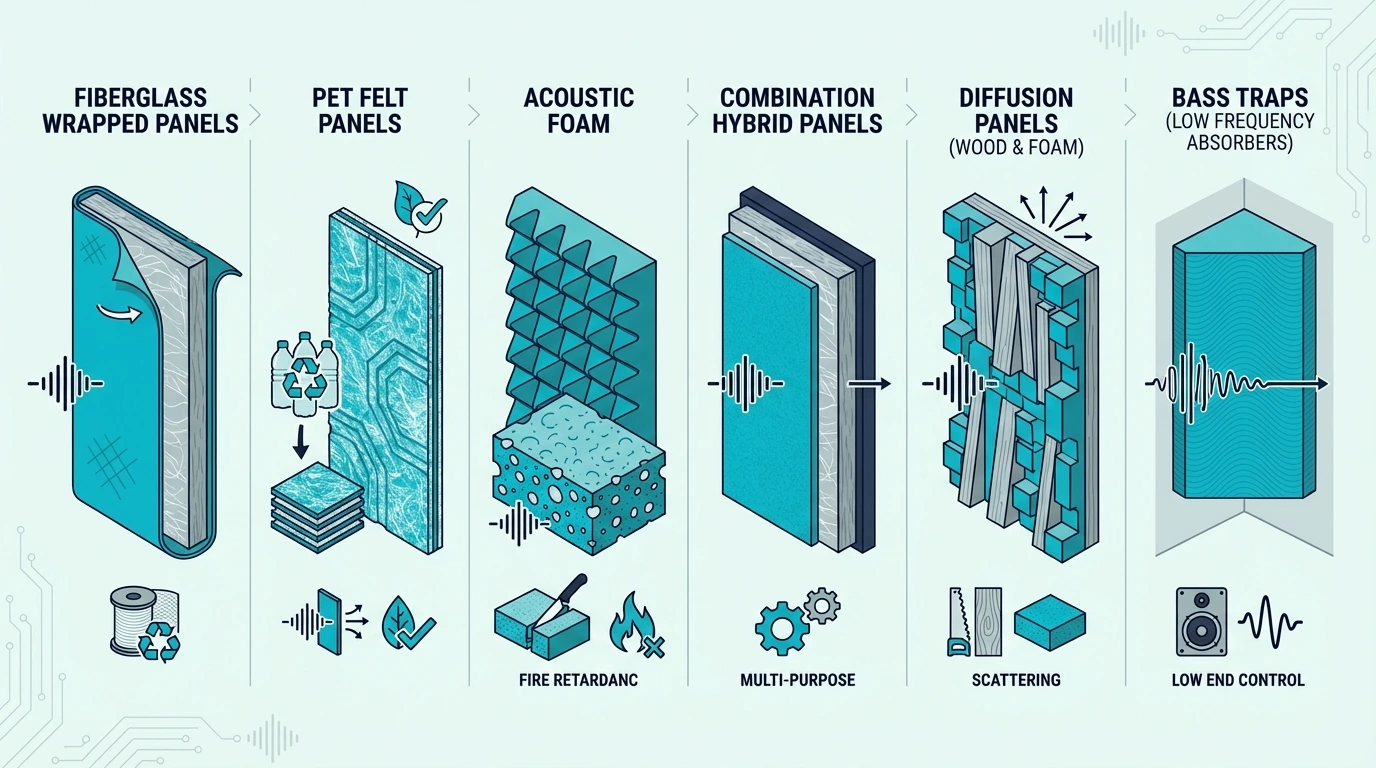
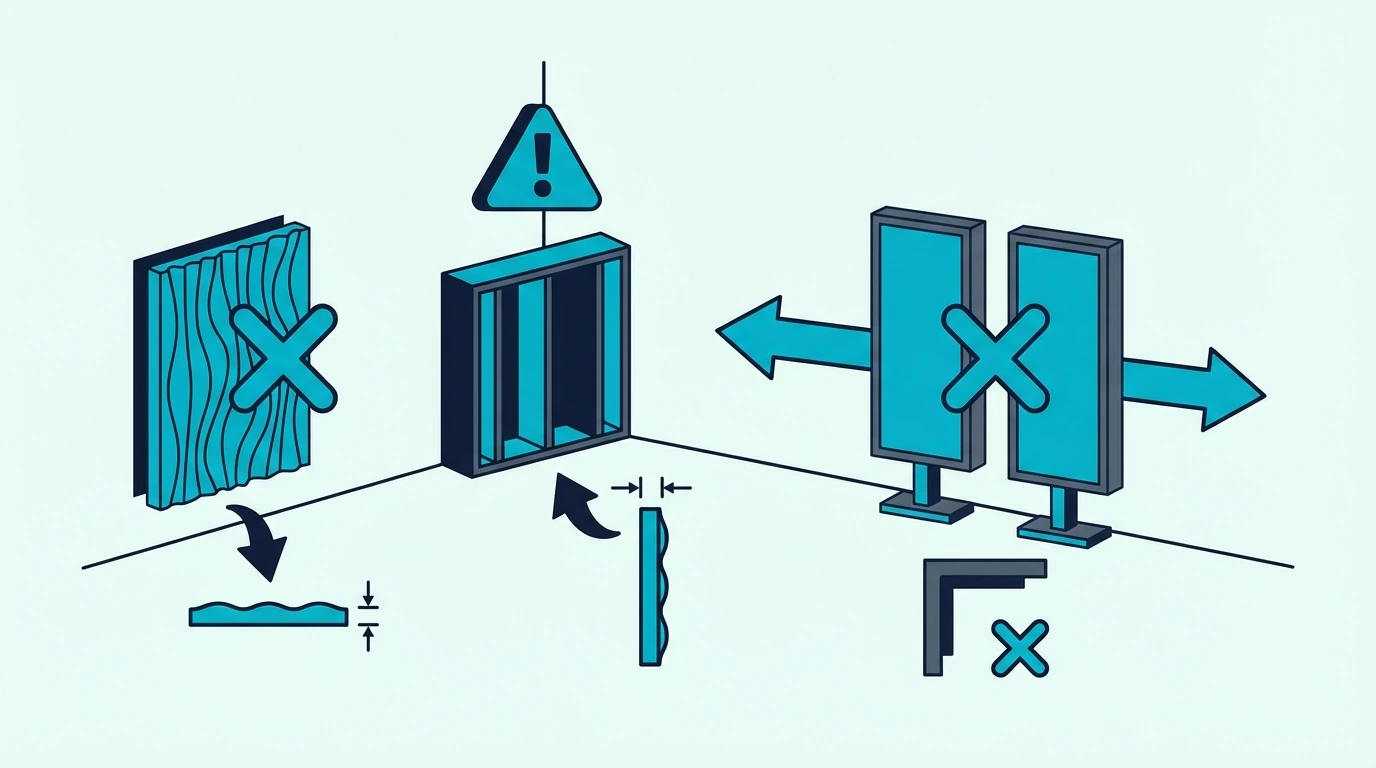
Standard wall panels don’t absorb much bass — that requires thicker treatment or dedicated bass traps. But even thin panels help by reducing mid-bass mud that masks low-frequency detail.

Bass traps in corners address the real low-frequency problems. They absorb the energy that accumulates there, tightening bass response and reducing the boom that makes action scenes fatiguing.

Four-inch panels in corners work as effective bass traps.

What About Surround Sound Performance?

Treating the walls around surround speakers restores the spatial precision your system was designed to deliver. Effects localize properly, and the immersive bubble returns.

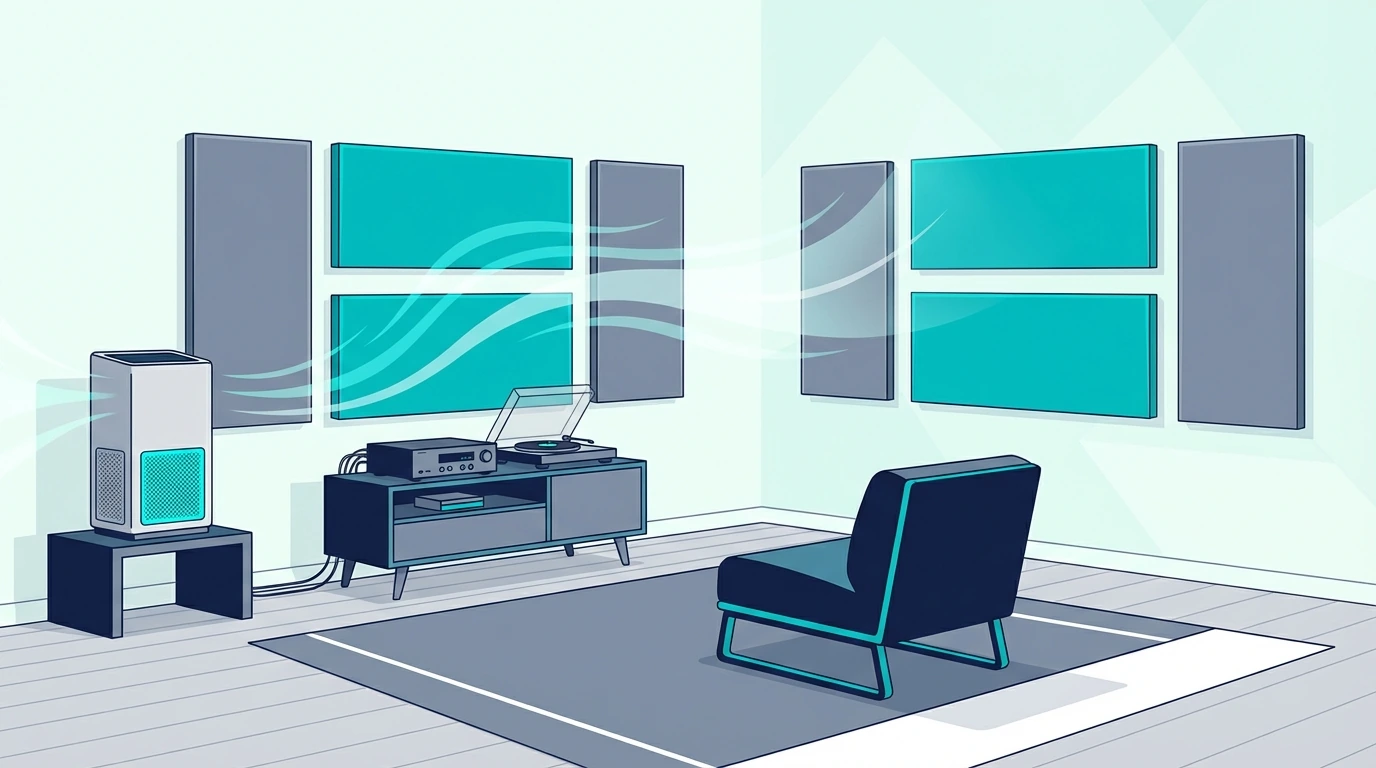
Ceiling treatment becomes critical for Dolby Atmos and DTS:X systems. Height channels rely on overhead reflections that get confused in untreated rooms.

Panels above the seating area let those height effects work as intended. For detailed placement strategies, the panel placement guide covers best positioning.

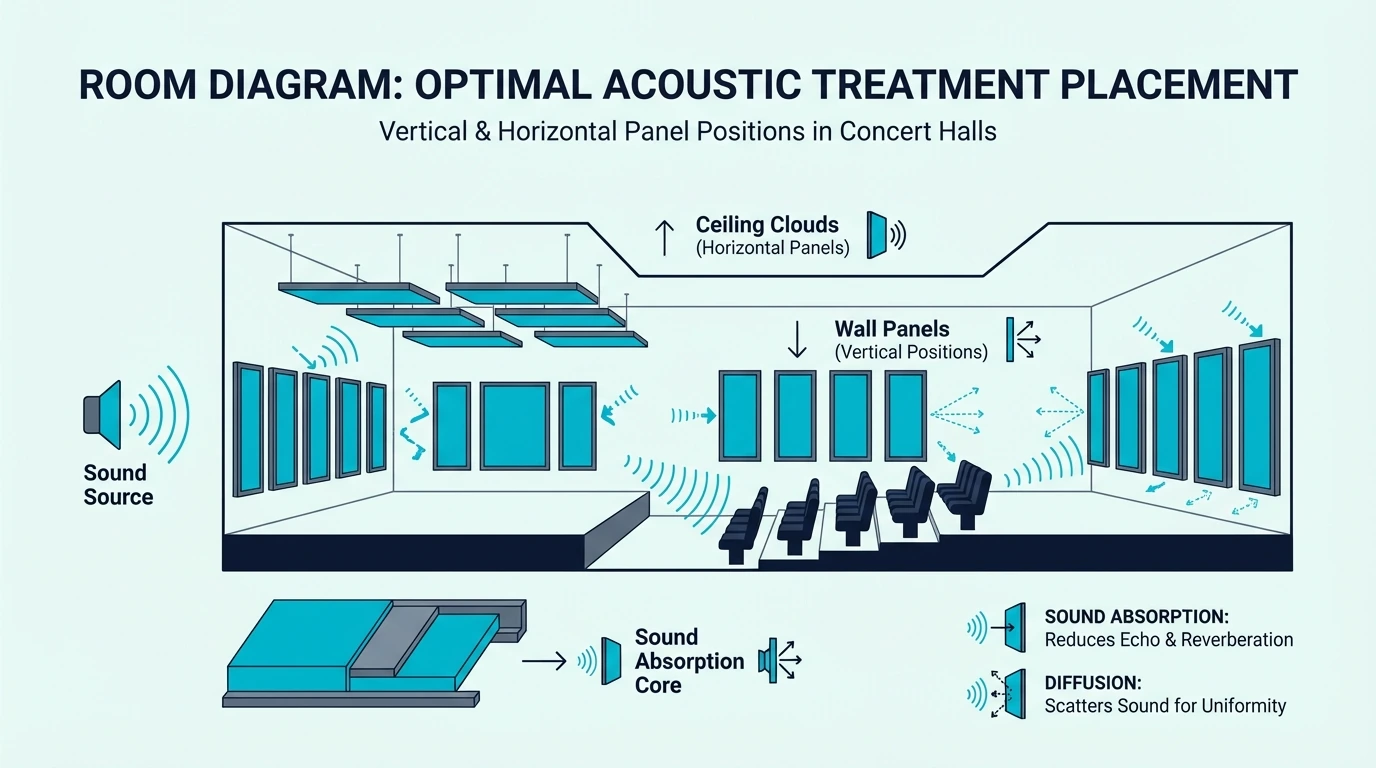
Where Do Panels Go in a Home Theater?

Best acoustic panel placement in home theater

Placement matters as much as panel quantity.

Strategic positioning delivers better results than covering every available surface.

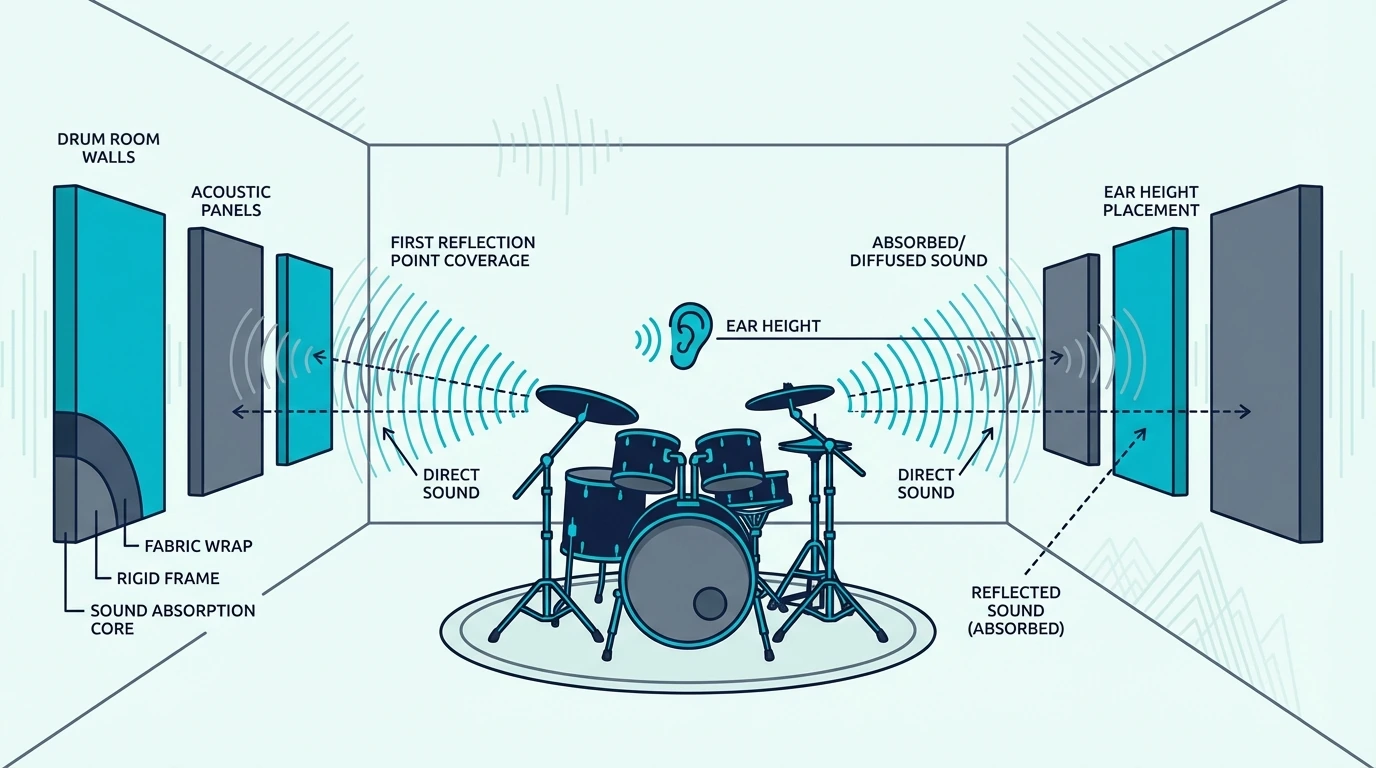
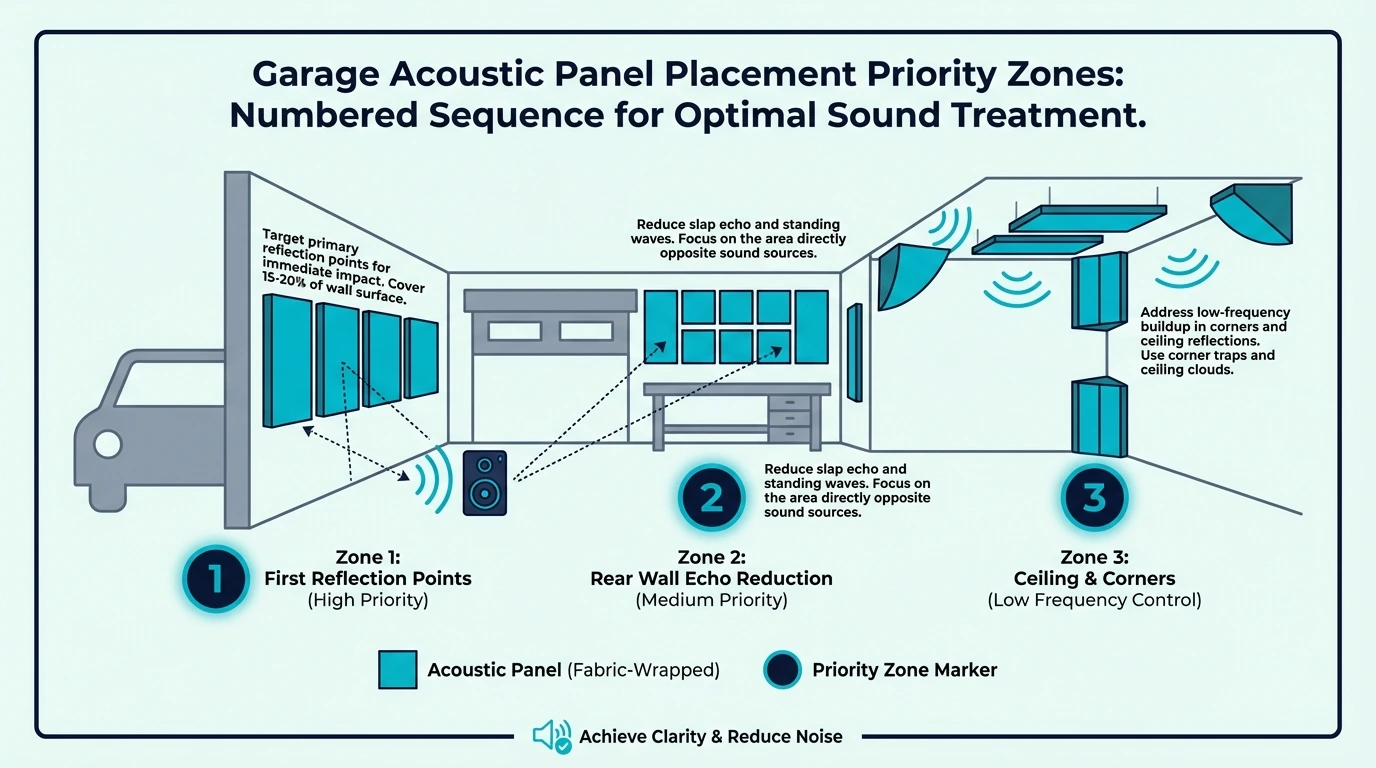
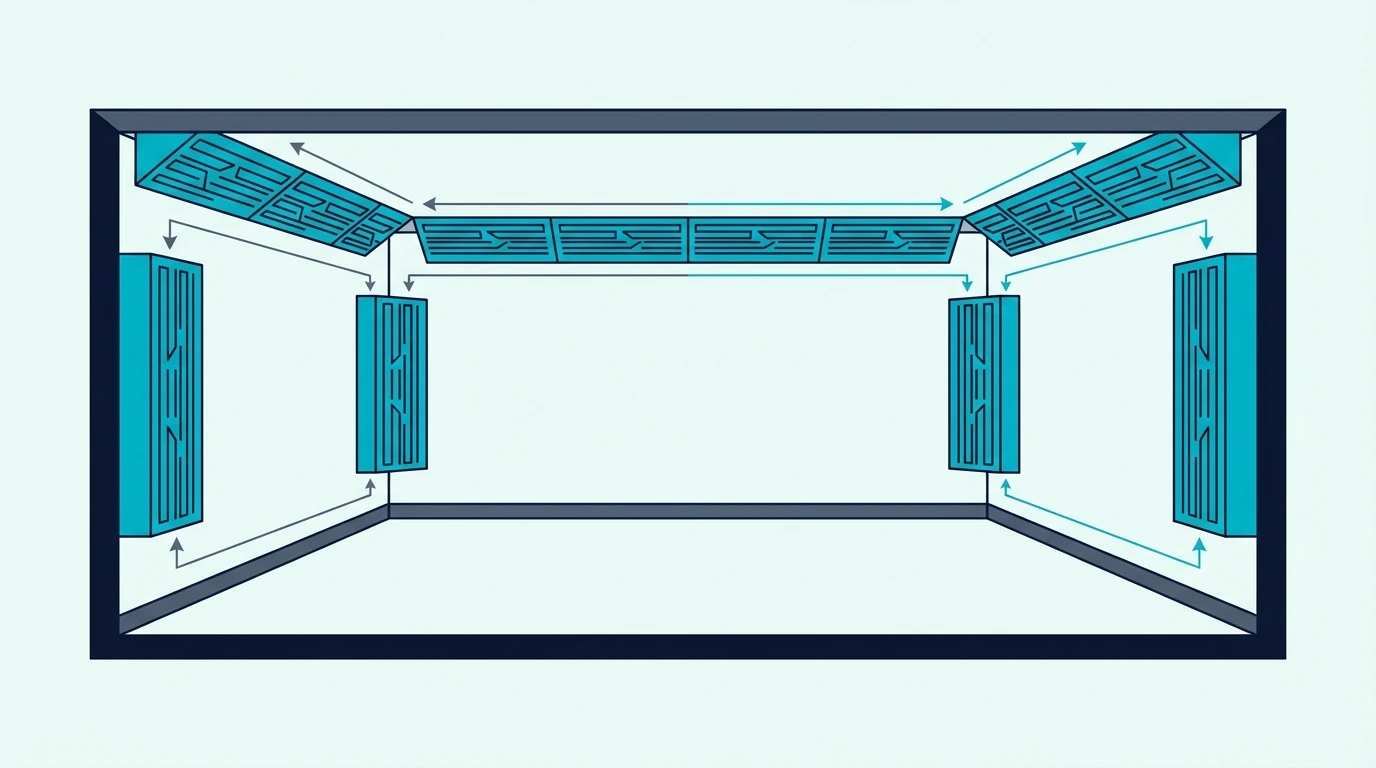
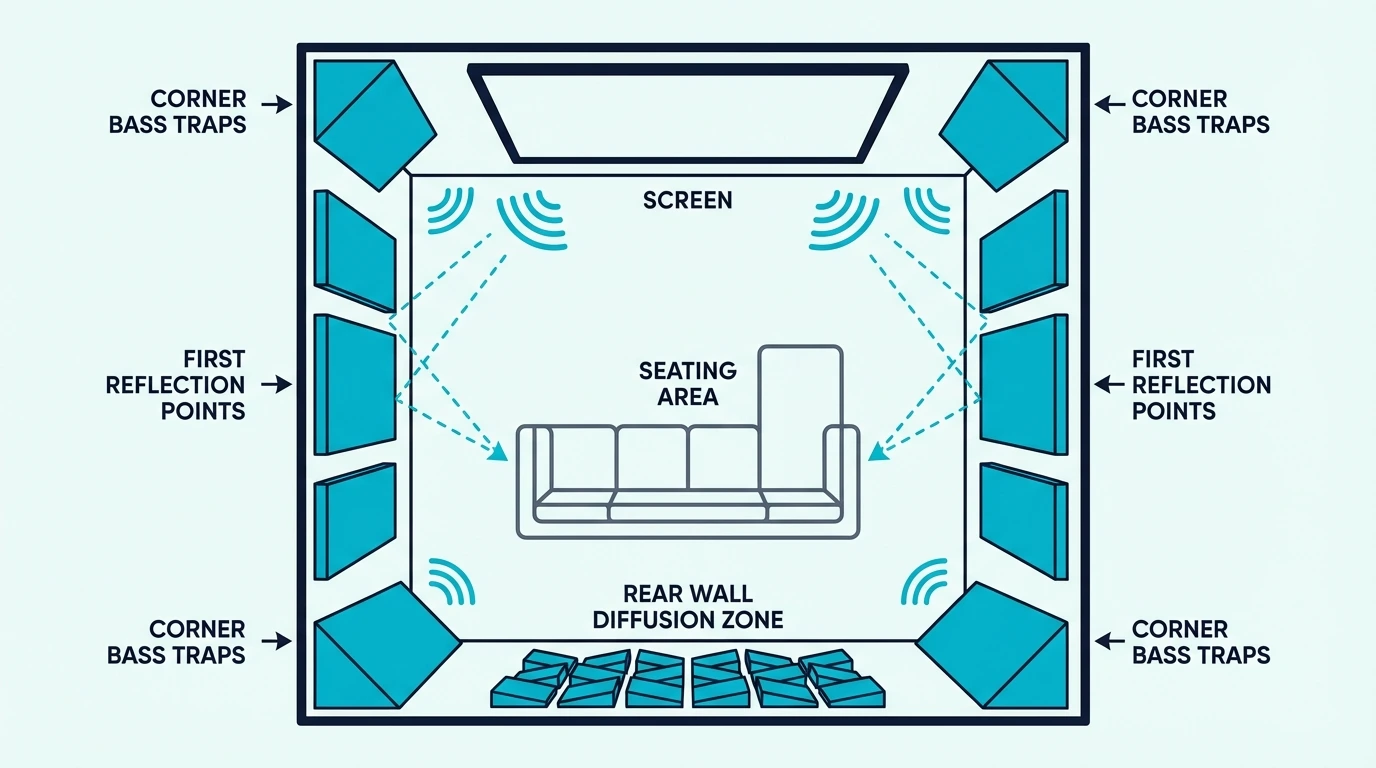
What Are First Reflection Points?

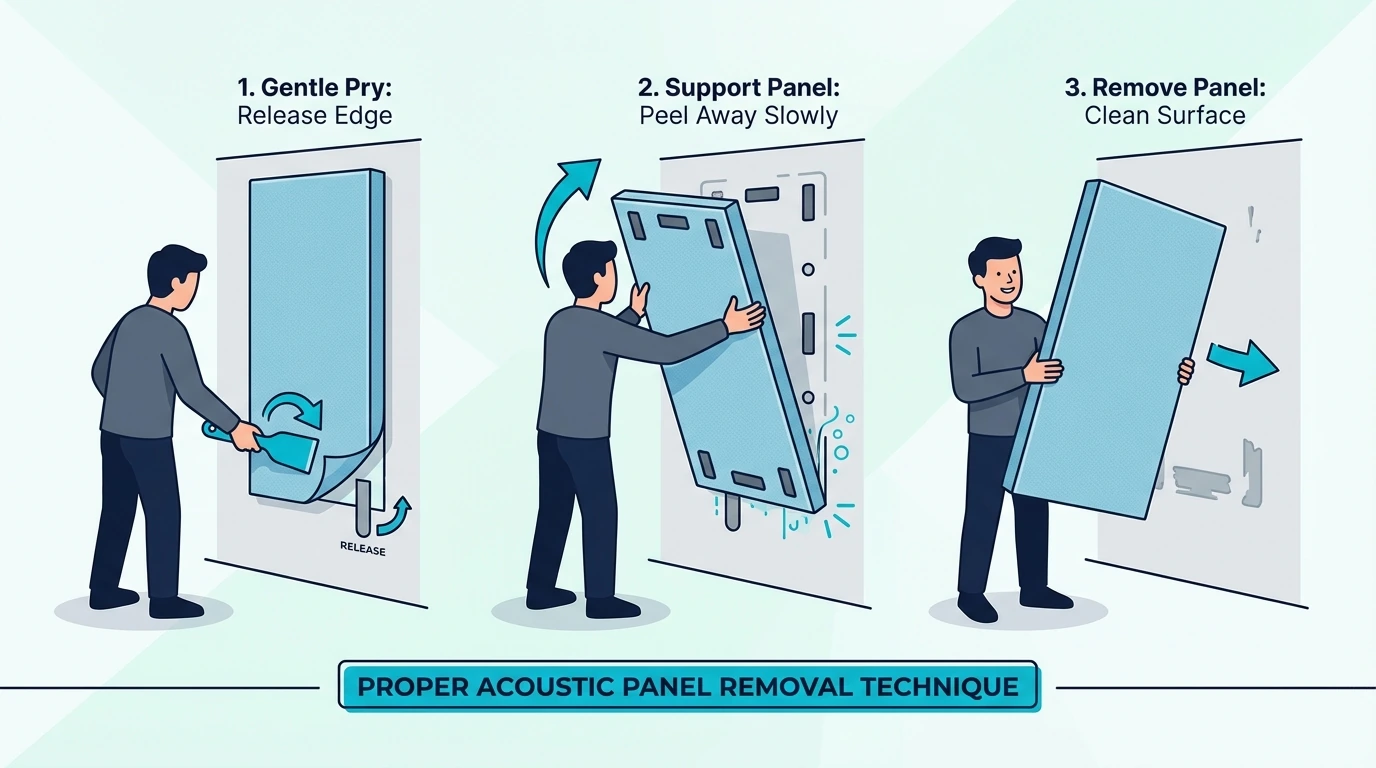
First reflection points are the spots on your walls where sound bounces directly from your speakers to your ears. Find them using the mirror trick: sit in your main viewing position, have someone slide a mirror along the wall, and mark every spot where you can see a speaker reflected.

These are your highest priority treatment locations. Panels here eliminate the reflections that cause the most audible problems.

Two panels per side wall at first reflection points often delivers 80% of the improvement you’ll get from wall treatment.

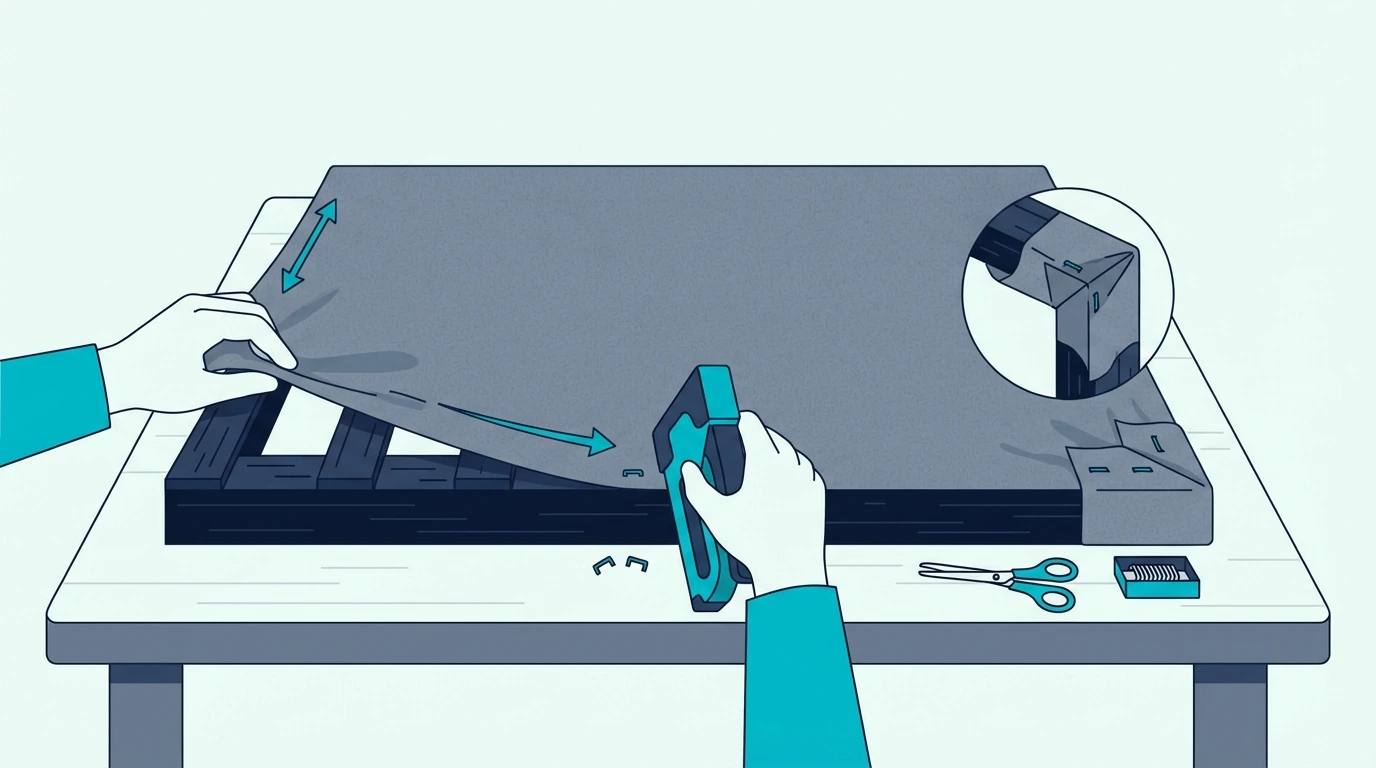
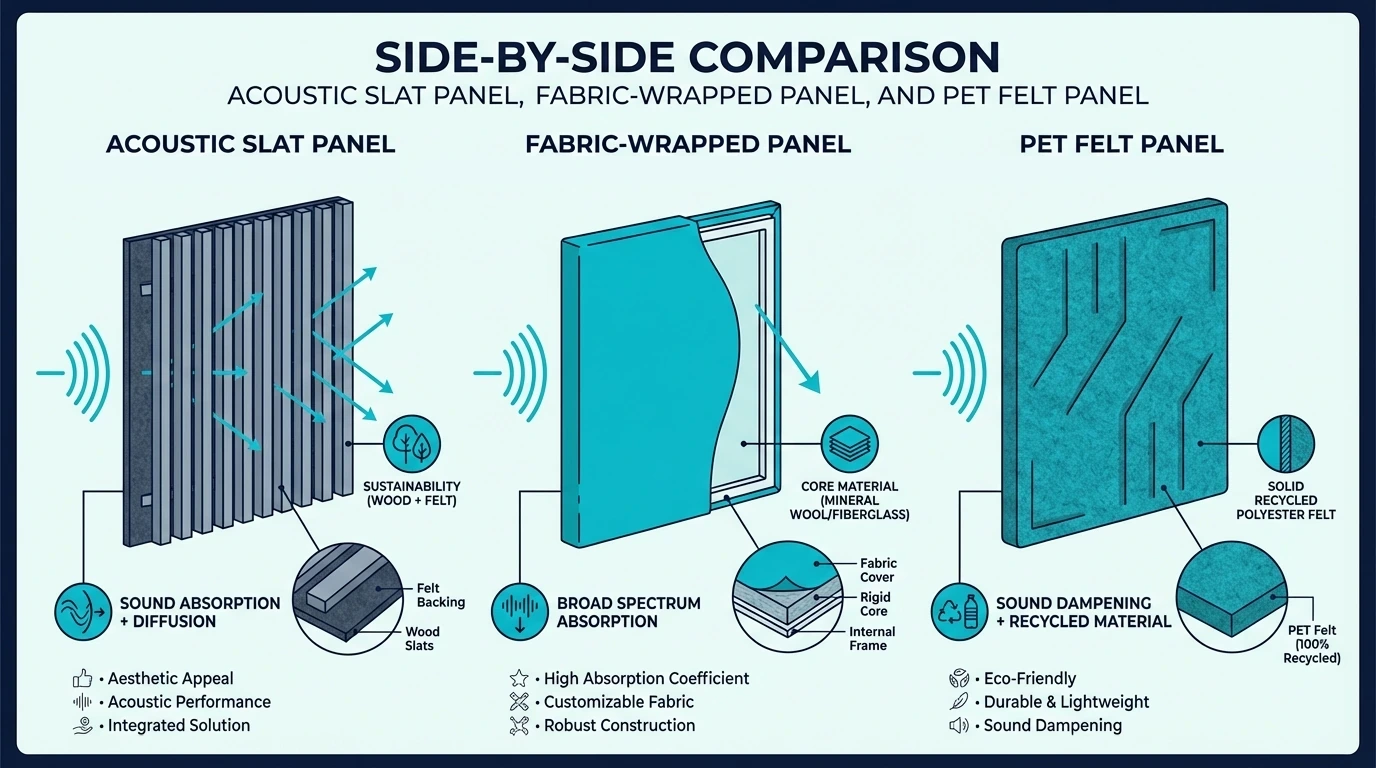
For first reflection points, 2-inch thick fiberglass panels work best. The UMIACOUSTICS 4-Pack Acoustic Panels include mounting hardware and provide the absorption you need at these critical locations.

Should You Treat the Rear Wall?

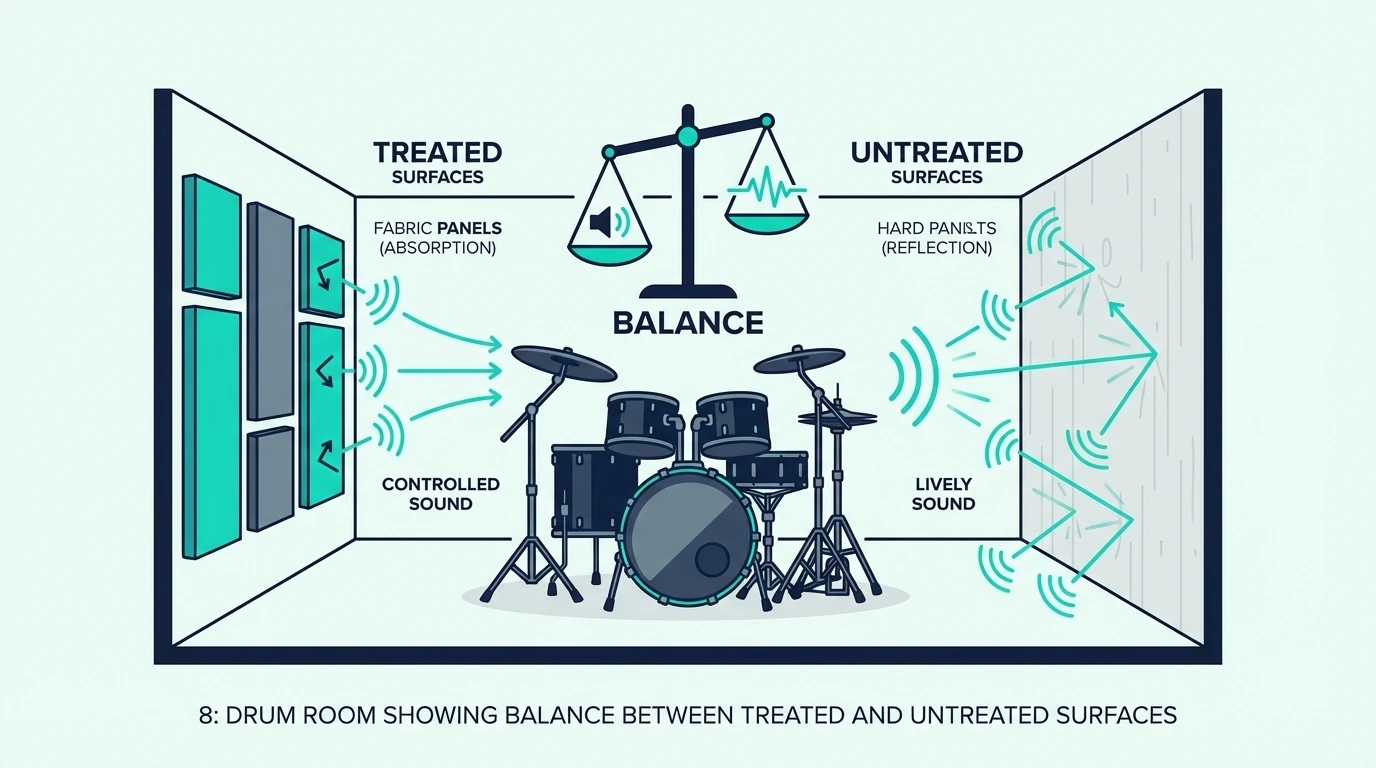
The rear wall matters, but the approach differs from side walls. Pure absorption can make the room feel dead and uncomfortable for movie watching.

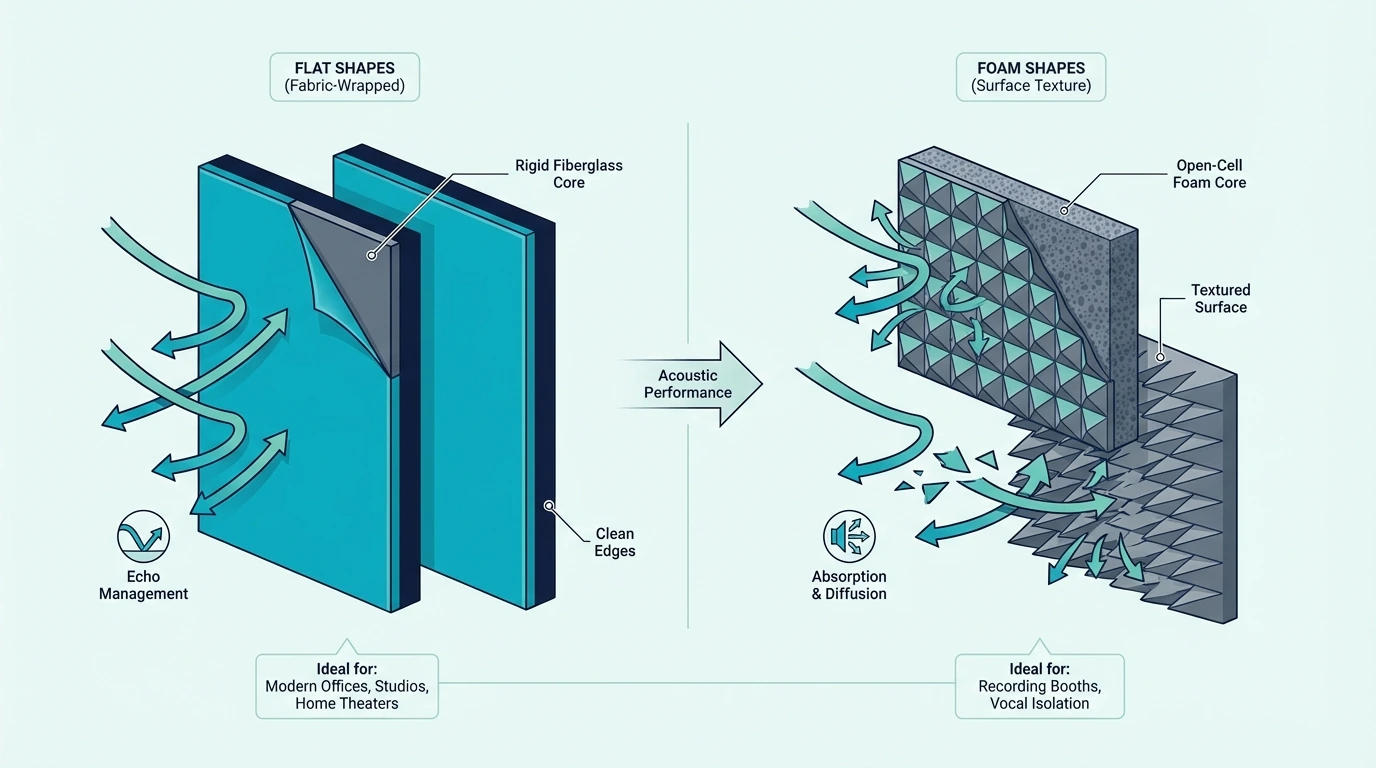
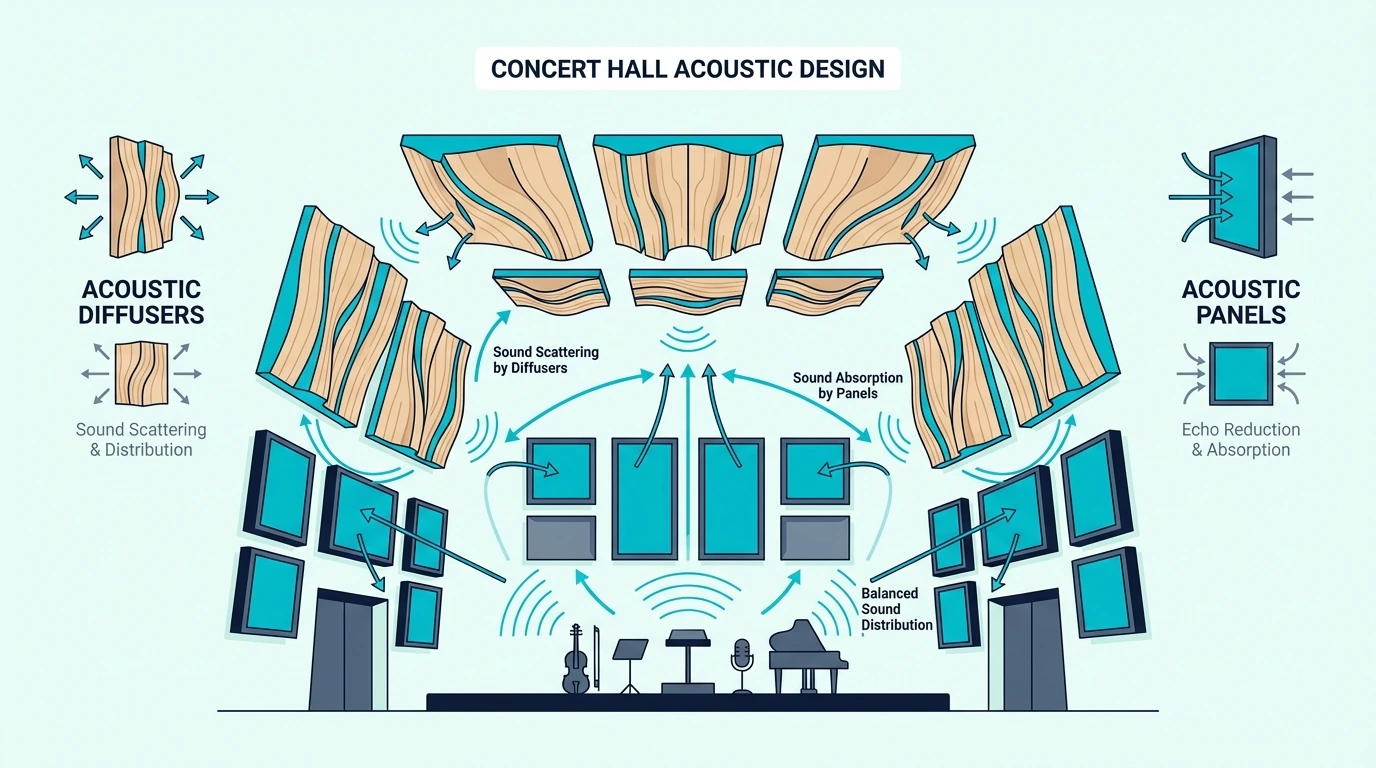
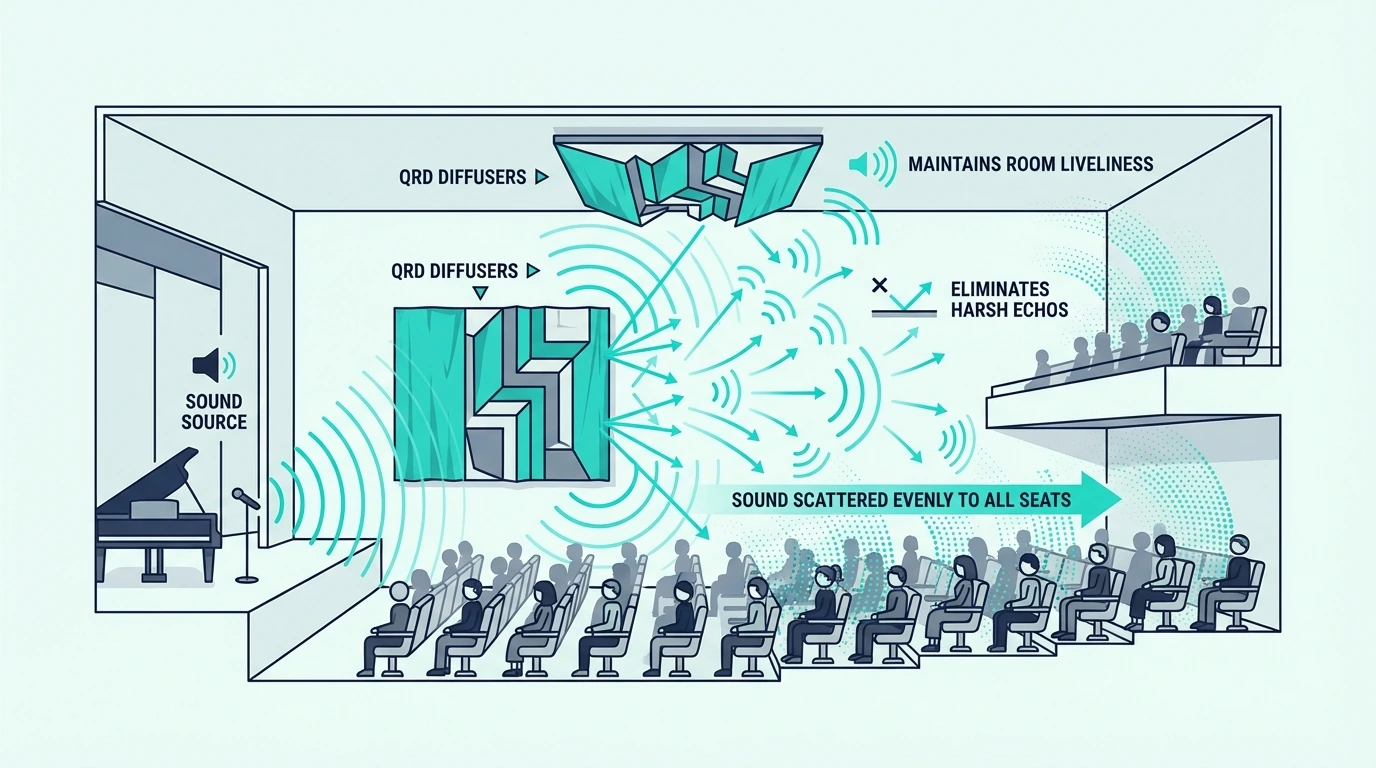
Consider a mix of absorption and diffusion on the rear wall. Diffusion scatters sound rather than absorbing it, maintaining some liveliness while eliminating distinct echoes.

Alternatively, heavy absorption on the lower portion with diffusion above works well in many theaters.

What About the Front Wall?

The front wall behind your speakers is often overlooked. Treatment here can improve imaging and soundstage, making the audio seem more three-dimensional.

Keep treatment to the sides of your screen or projection area. Avoid covering the entire front wall — you want some reflection to maintain the sense of space that makes movies feel cinematic.

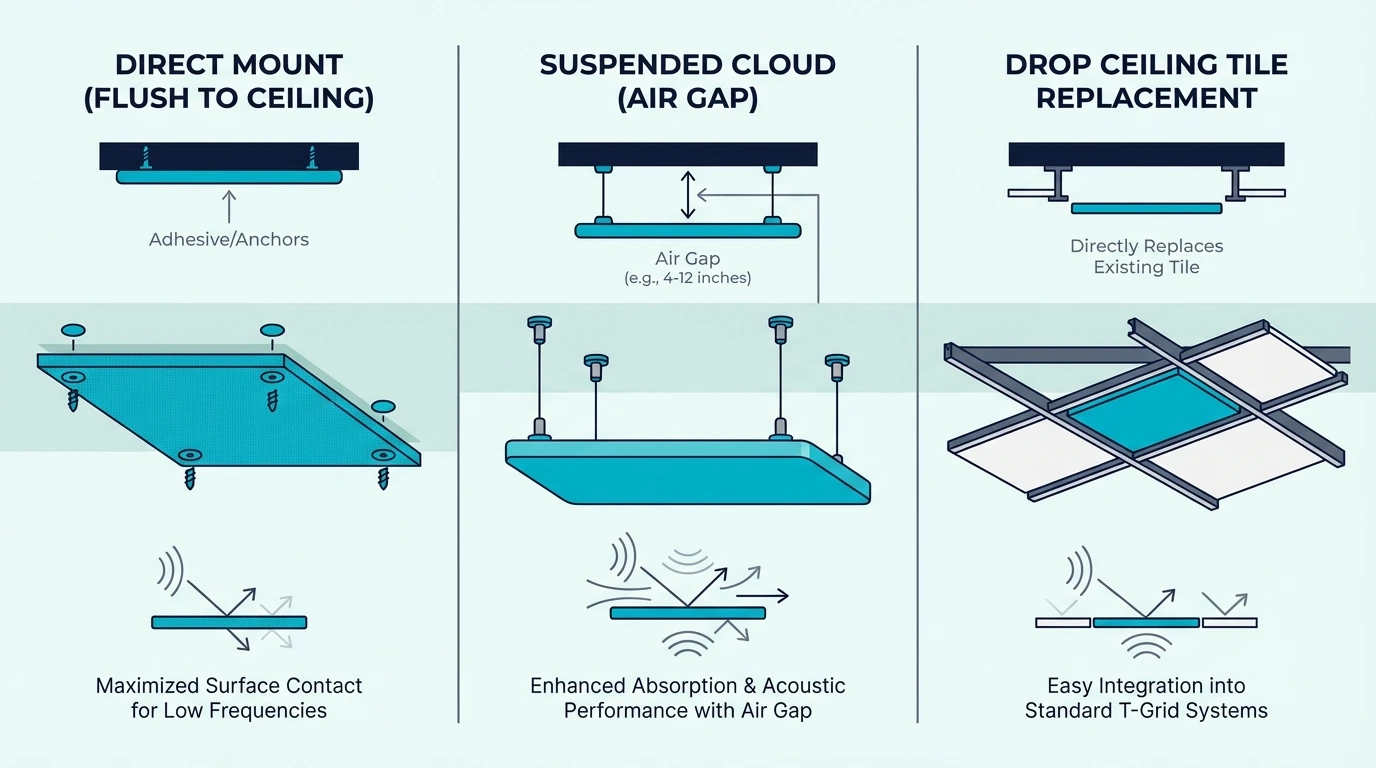
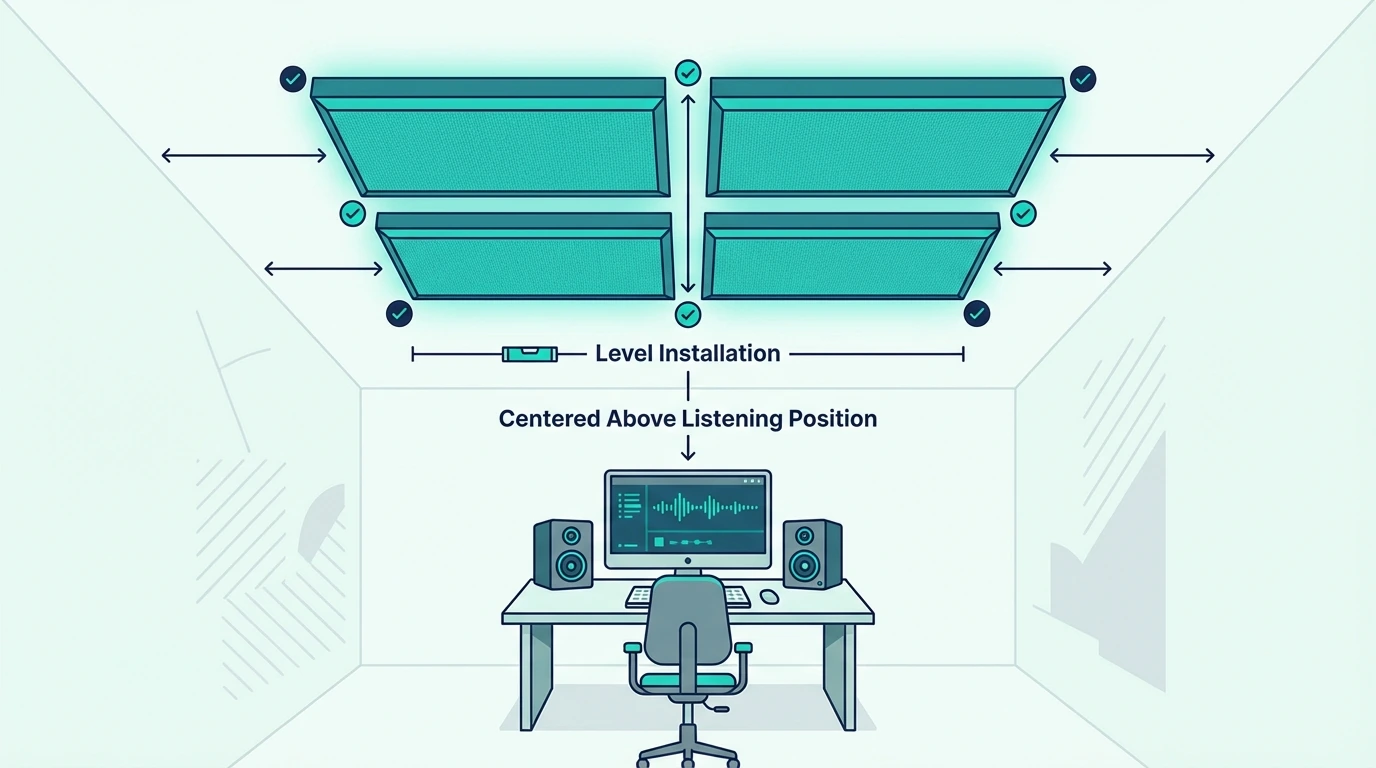
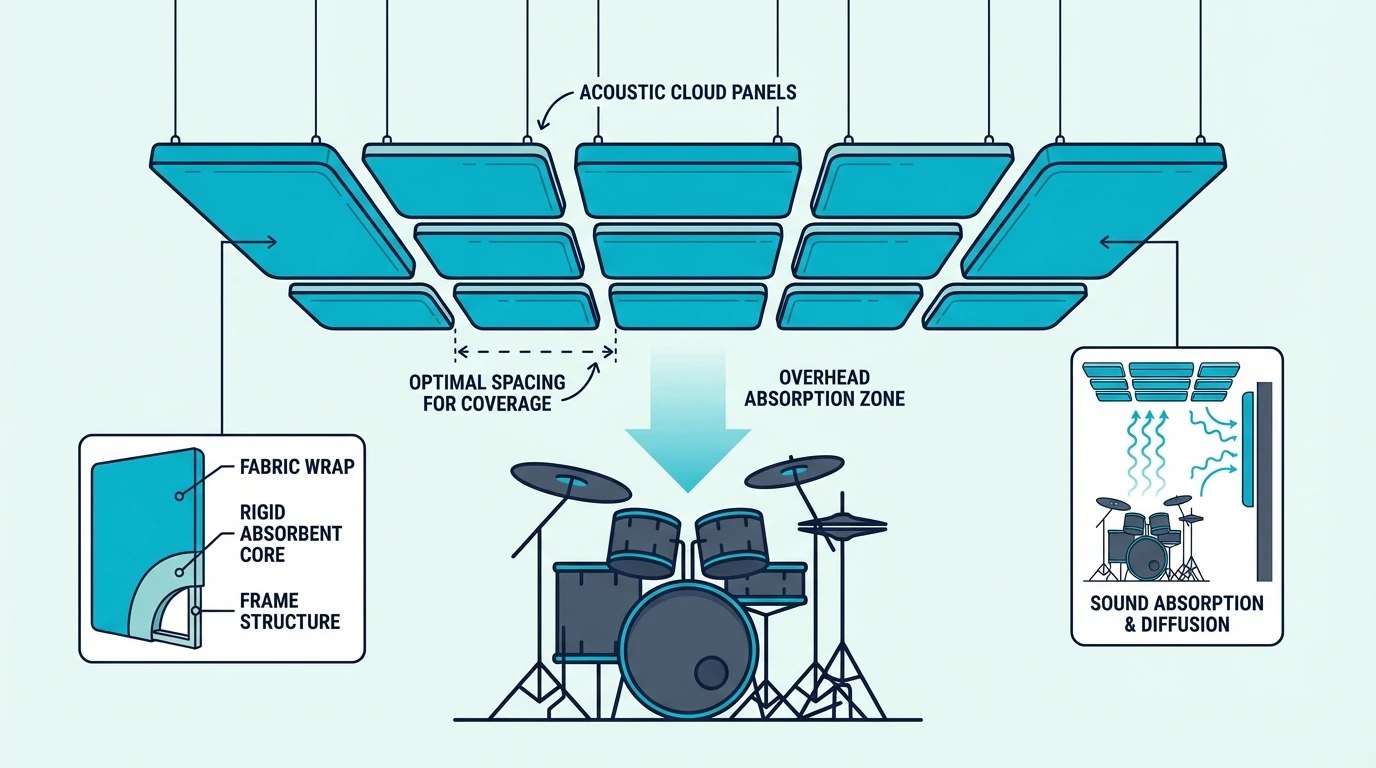
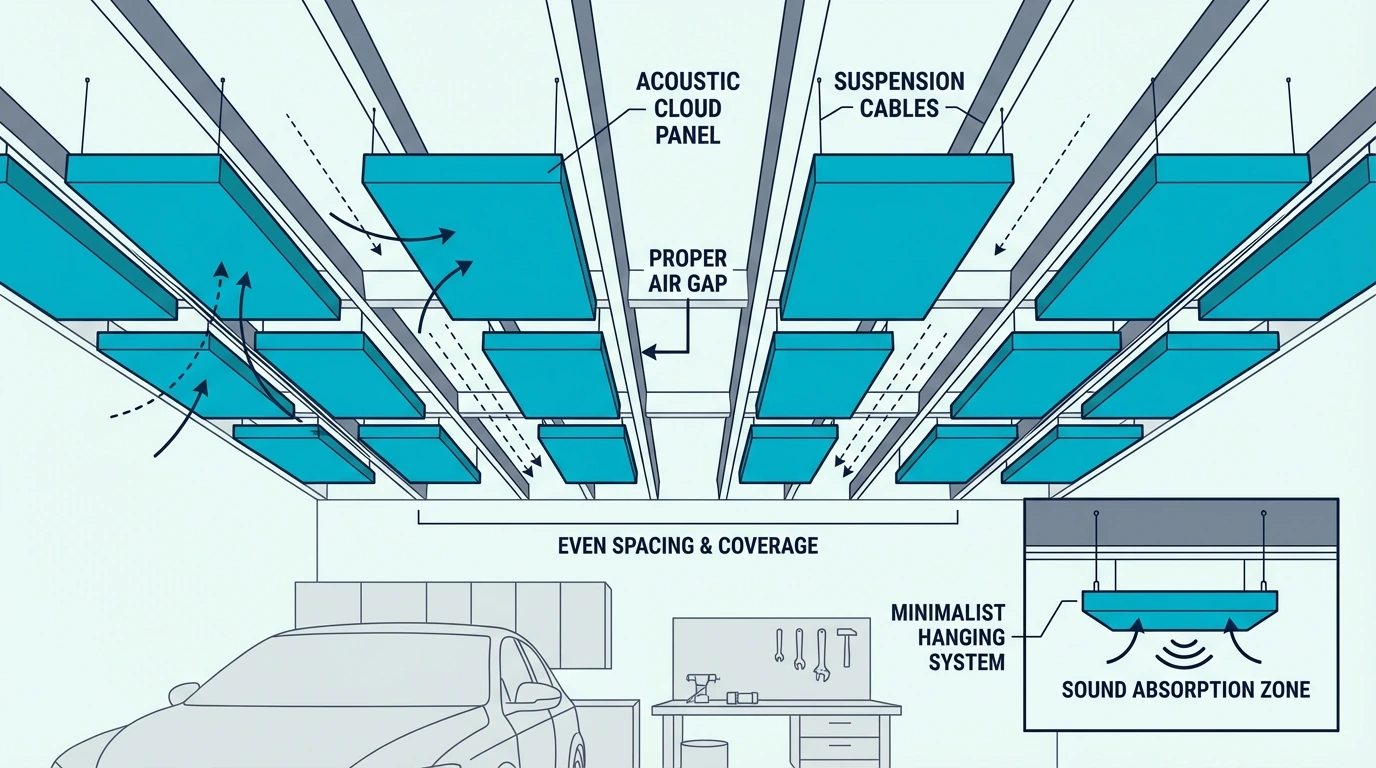
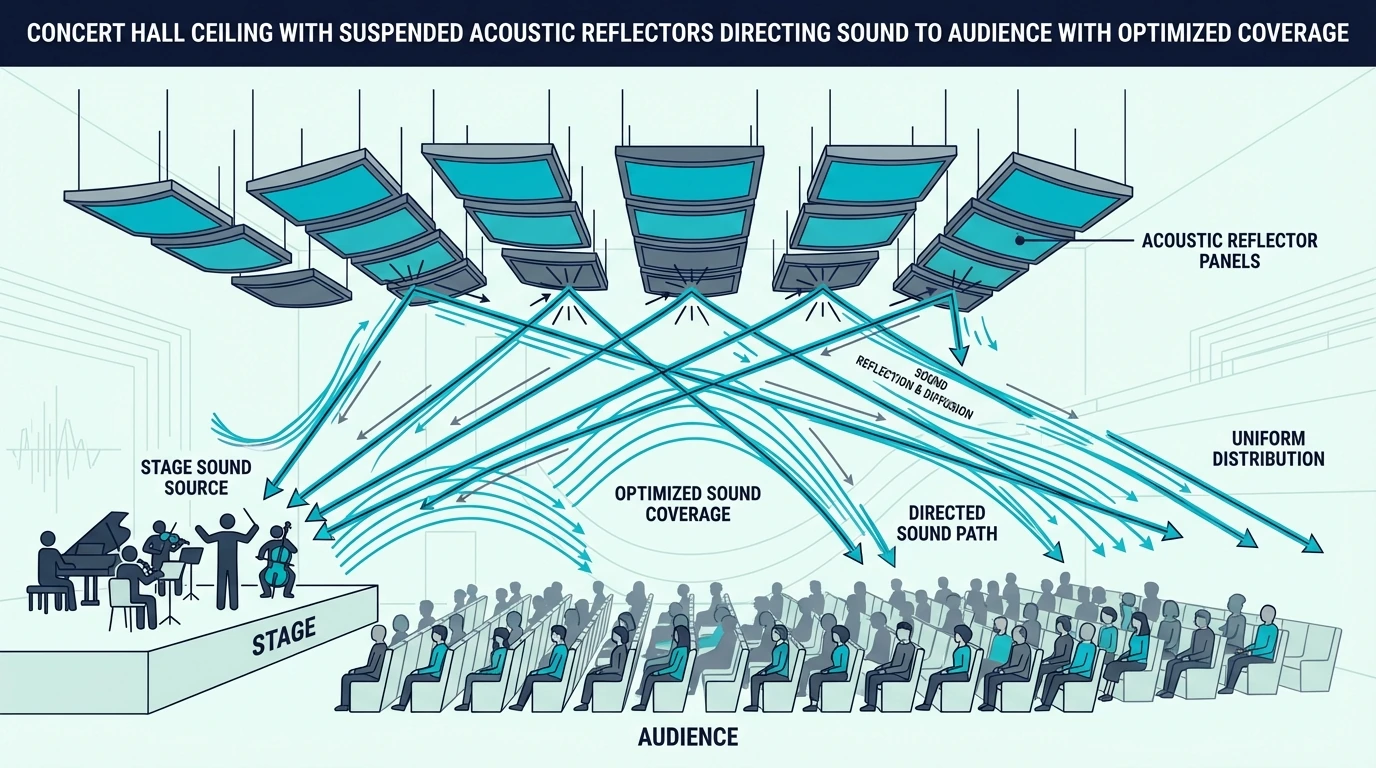
Don’t Forget the Ceiling Treatment

Ceiling treatment for home theater

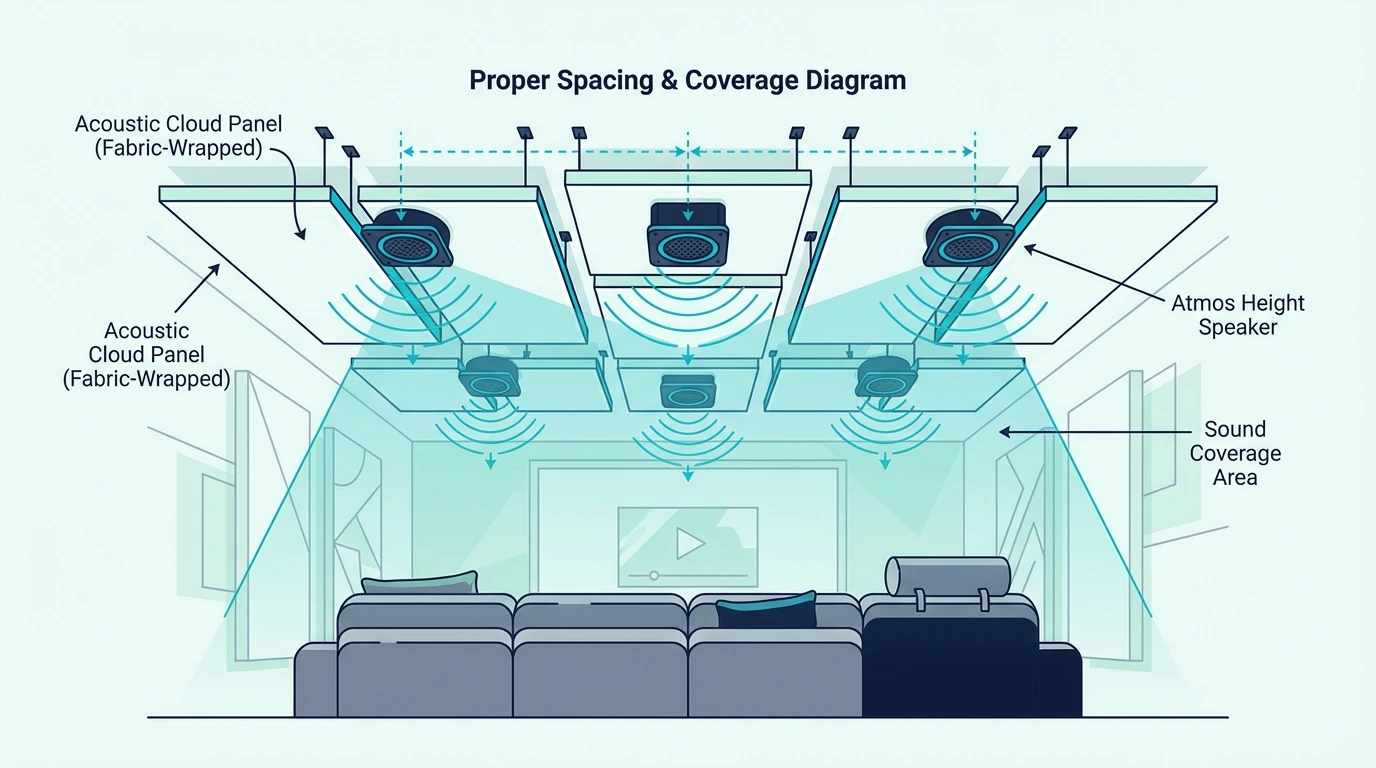
Wall treatment handles the obvious problems, but here’s what most people miss. Ceiling treatment is where many home theaters fall short.

The ceiling reflects just as much sound as the walls, and it’s the critical surface for height channel performance.

Why Is Ceiling Treatment Critical for Atmos?

Dolby Atmos and similar formats use height information to place sounds above you. In-ceiling speakers or upfiring modules rely on controlled overhead acoustics to work properly.

Without ceiling treatment, height effects get smeared and lose their sense of coming from above. The overhead dimension of the mix collapses back down to ear level, defeating the purpose of your Atmos investment.

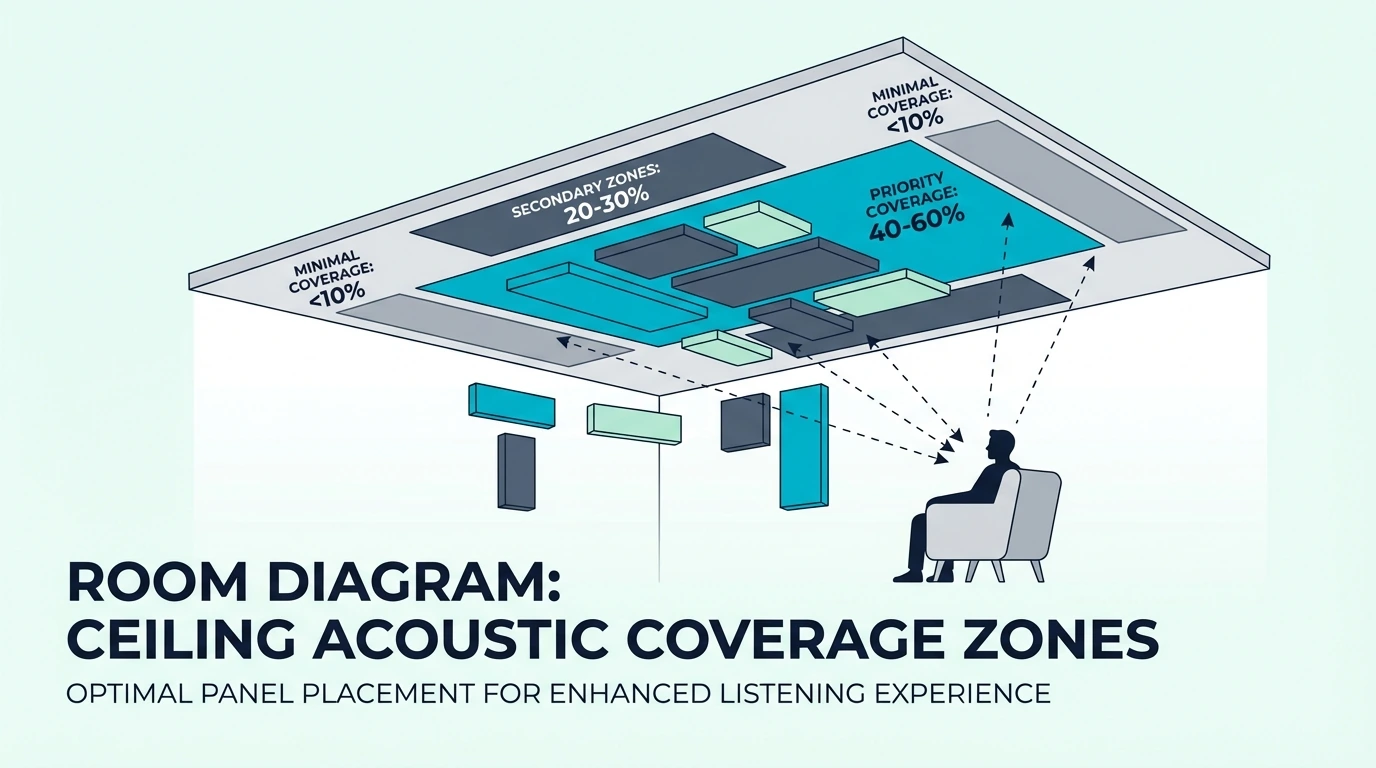
How Much Ceiling Coverage Do you Need?

Focus on the area directly above your seating positions. A rectangular zone covering the primary and secondary seating rows handles most reflection problems.

For most rooms, 30-40% ceiling coverage over the seating area provides excellent results. you don’t need to treat the entire ceiling — just the zone where first reflections from speakers would reach your ears. the ceiling treatment guide for installation methods.

Why Bass Traps Matter for Home Theater

Bass traps in home theater corners

Those wall and ceiling panels address mid and high frequencies. But here’s what they can’t do — standard acoustic panels don’t solve bass problems.

Low frequencies require dedicated treatment that most home theater owners overlook.

What Are Bass Traps?

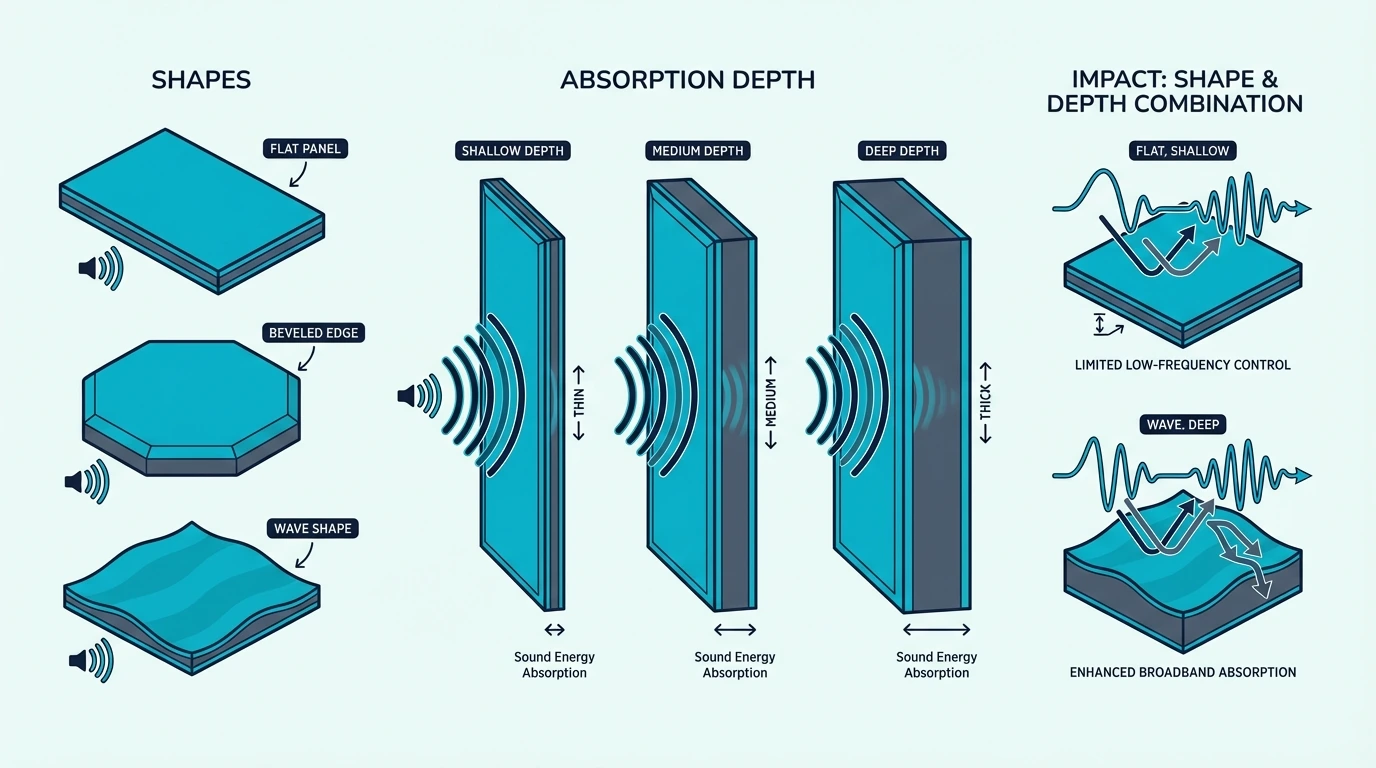
Bass traps are thick absorbers designed to control low frequencies. They work by providing enough depth for long bass wavelengths to lose energy as they pass through the absorptive material.

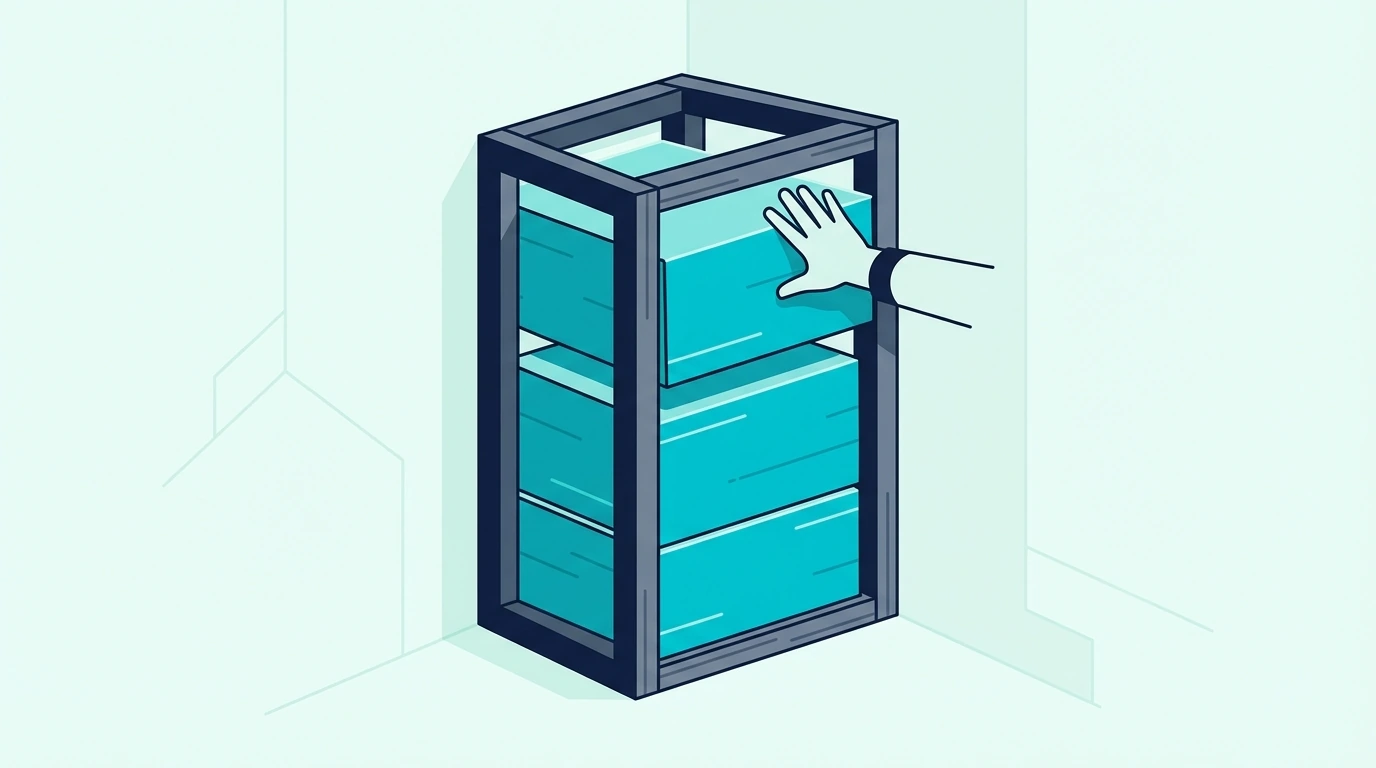
Effective bass traps are typically 4-6 inches thick minimum, often thicker. Corner-mounted traps work best because bass energy concentrates in room corners where walls meet.

Where Should Bass Traps Go?

Start with the front corners — where your front wall meets the side walls. These corners see the most bass energy from your main speakers and subwoofer.

Rear corners matter too, especially for rooms with real bass problems. Floor-to-ceiling traps in all four corners represents the gold standard for bass control, though even two front corner traps make a noticeable difference.

How Many Bass Traps Do you Need?

Two corner traps is the minimum for meaningful improvement. Four corner traps (front and rear) provides full bass control for most rooms.

For budget-friendly corner treatment, the JBER 4-Pack Bass Trap covers the basics. For serious low-frequency control, professional options like the ATS Acoustics Corner Bass Trap extends absorption into the lowest frequencies.

Rooms with severe bass problems — concrete construction, small dimensions, or multiple subwoofers — may need additional treatment on walls or ceiling. But start with corners and evaluate before adding more.

How Many Acoustic Panels Does a Home Theater Need?

Home theater acoustic panel coverage

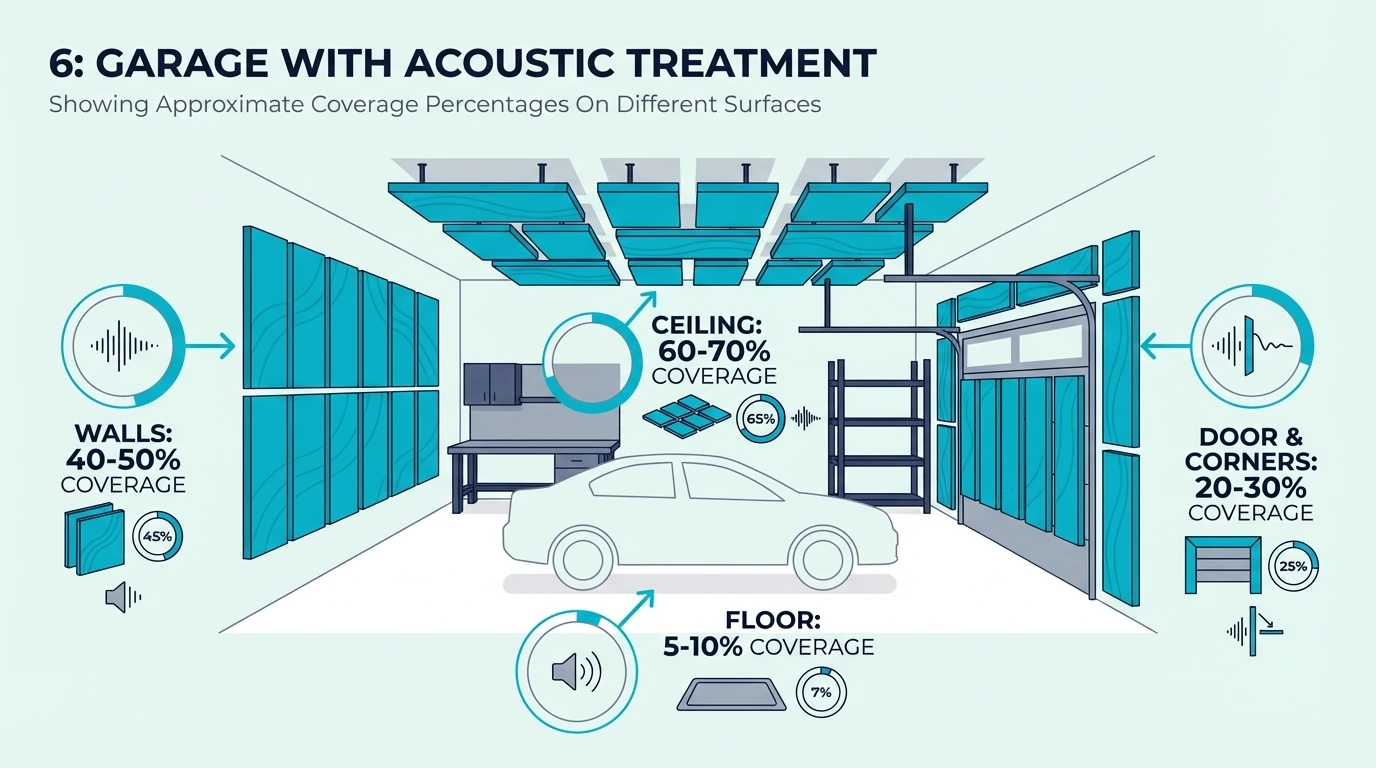
With wall panels, ceiling treatment, and bass traps covered, the next question is quantity. Coverage percentage provides a useful guideline, but quality of placement beats quantity of panels.

What’s the Minimum Effective Treatment?

First reflection points on both side walls plus two corner bass traps represents the minimum meaningful treatment. This might be as few as 6 panels total, but positioned correctly.

you’ll hear immediate improvement with this basic setup. Dialogue clears up, surround imaging improves, and bass tightens noticeably.

From here, additional treatment provides diminishing but still valuable returns.

How Do You Calculate Coverage?

Aim for 25-35% coverage of your wall surfaces for a balanced sound. More absorption (40-50%) works for critical listening but can make the room feel too dead for casual movie watching.

Calculate total wall area, then plan panel placement to hit your target percentage while prioritizing first reflection points.

Use our free tool: the acoustic panel calculator takes your room dimensions and tells you exactly how many panels you need for your target coverage. Enter your room size, select your treatment goals, and get a specific panel count — no guesswork required.

Can You Over-Treat a Home Theater?

Yes — and it’s a common mistake. Rooms with too much absorption feel uncomfortable.

Dialogue sounds unnaturally dry, and the cinematic sense of space disappears.

Keep some surfaces reflective. The goal is control, not elimination.

A well-treated theater should sound clear and defined, not anechoic.

What About Room Shape and Size?

Room dimensions affect which frequencies cause problems. Rectangular rooms with parallel walls create predictable standing waves that treatment can address.

Oddly shaped rooms may have fewer modal problems but can still benefit from first reflection treatment.

Smaller rooms (under 2,000 cubic feet) typically have more bass issues because the problematic frequencies fall in the audible range. Larger rooms push those modal frequencies lower, sometimes below what most content contains.

Either way, first reflection treatment helps regardless of room size.

Budget: How Much Should You Spend?

Home theater acoustic treatment budget

Understanding what you need helps you spend wisely.

Panels vs Equipment: What Gives Better Value?

Here’s an uncomfortable truth: $500 in acoustic treatment typically improves your listening experience more than $500 in speaker or receiver upgrades.

your equipment can only perform as well as your room allows. A $2,000 speaker system in an untreated room sounds worse than a $1,000 system in a treated room.

The room is the bottleneck, and panels remove it.

What’s a Reasonable Budget Range?

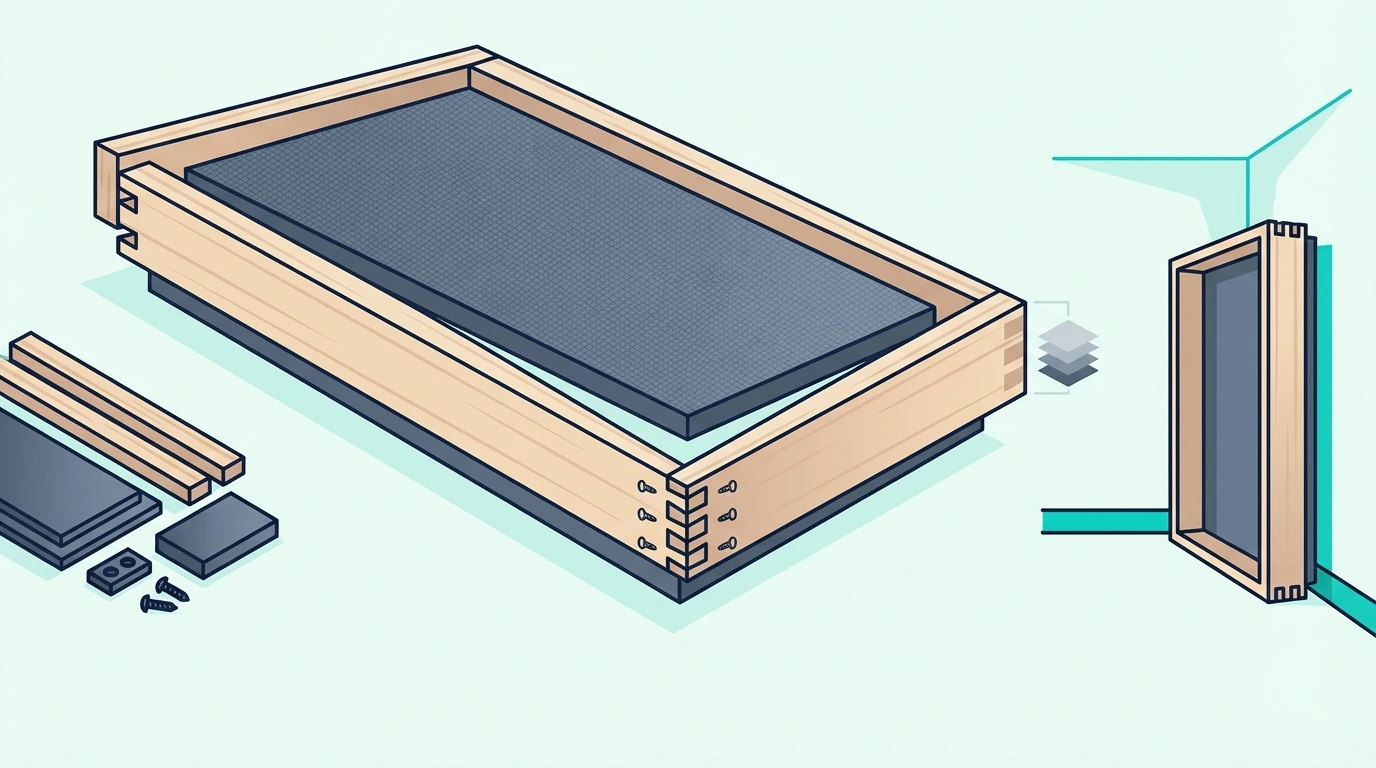
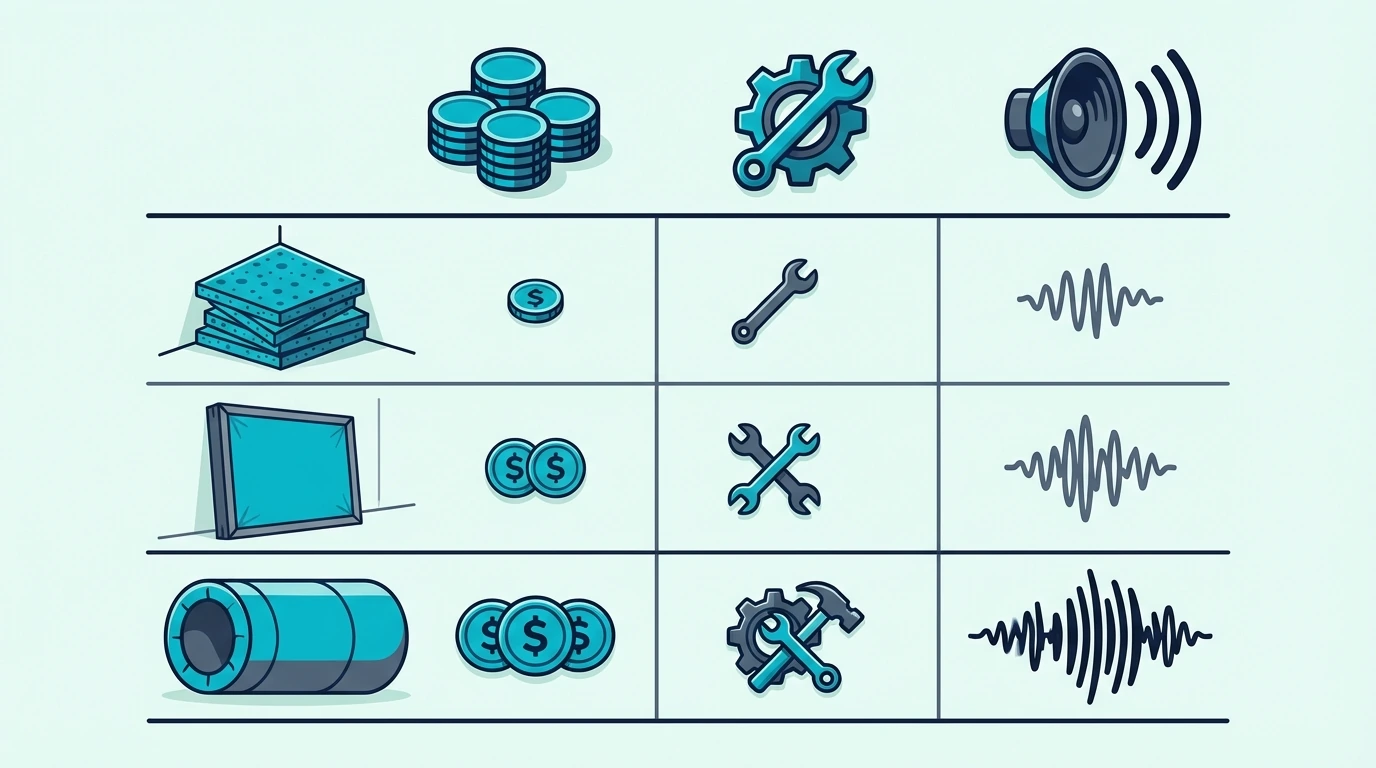
Basic effective treatment runs $300-600 for DIY panels or $600-1200 for commercial products. This covers first reflection points plus corner bass traps.

At the budget end, options like these fabric-wrapped acoustic panels let you start with first reflection points for under $100. Mid-range fiberglass panels like the Olanglab Fiberglass Panels offer better absorption at reasonable prices.

Full treatment — full side wall coverage, ceiling panels, and extensive bass trapping — ranges from $1000-3000 depending on room size and whether you DIY or buy commercial. For top-rated options at various price points, the panel recommendations cover the best values.

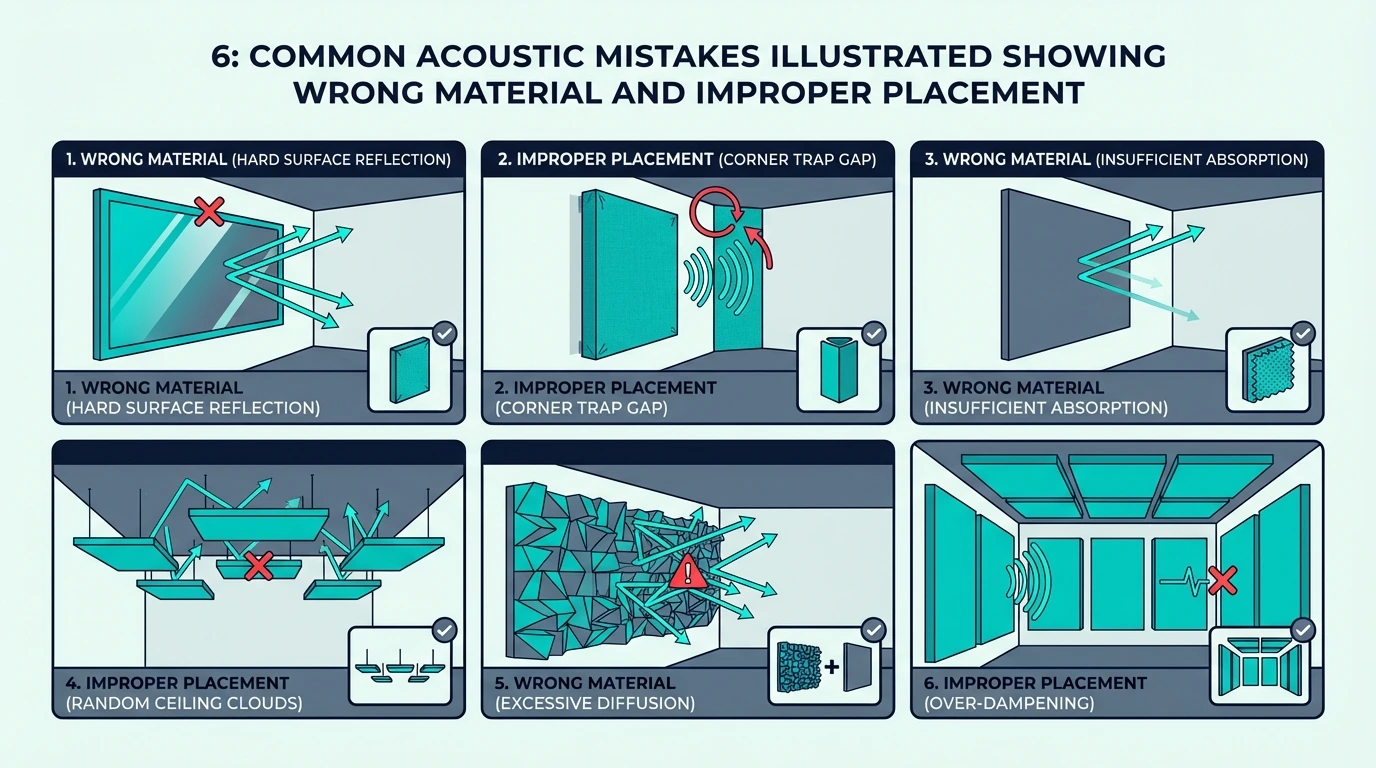
Common Home Theater Treatment Mistakes

Common home theater acoustic treatment mistakes

These are the mistakes that waste panels and money.

Over-Dampening the Room

Covering every surface with absorption creates a dead, uncomfortable space. Movies feel lifeless, and you’ll find yourself avoiding the theater because it’s unpleasant to spend time in.

Leave some surfaces reflective. The goal is control, not elimination.

A well-treated theater should sound clear and defined, not anechoic.

Ignoring Bass Treatment

Spending everything on wall panels while skipping bass traps leaves the biggest problem unsolved. you’ll have clear mids and highs with boomy, undefined bass.

Budget for corner treatment from the start. Two quality bass traps cost roughly the same as four wall panels but address problems the wall panels can’t touch. the panels vs bass traps comparison explains when each type works best.

Treating Only Behind the Seating

Some people only treat the wall behind where they sit. While rear wall treatment helps with echo, it misses the first reflection points that cause most dialogue clarity problems.

Side wall treatment at ear level provides more bang for your buck than rear wall treatment alone. Do both if budget allows, but prioritize the sides.

Wrong Panel Placement

Random placement wastes panels. Treating areas that don’t cause problems while ignoring first reflection points gives disappointing results.

Do the mirror trick. Find your actual first reflection points and treat those first.

Strategic placement of fewer panels outperforms random placement of many panels.

These panels consistently deliver results in dedicated home theater setups:

UMIACOUSTICS 4-Pack Acoustic Panels with Brackets

UMIACOUSTICS Standard Fiberglass Acoustic Panels

BUBOS 4-Pack Fabric Wrapped Acoustic Panels

Conclusion

Home theater acoustic treatment comes down to three priorities in order: first reflection panels on side walls, bass traps in corners, and ceiling treatment for height channels. Start with the mirror trick to find your reflection points, treat those first, then expand based on what you hear.

Budget $300-600 for DIY or $600-1200 for commercial panels to cover the basics. That investment typically improves your listening experience more than the same amount spent on equipment upgrades — because the room is the bottleneck, and panels remove it.

Frequently Asked Questions

These are the questions that come up most often about home theater acoustic treatment.

Do All Home Theaters Need Acoustic Panels?

Most dedicated or semi-dedicated theaters benefit much from treatment. Living rooms with lots of soft furnishings may already have adequate absorption naturally.

Do the clap test — if you hear ringing or echo, treatment will help.

Will Panels Improve My Sound System?

Yes, sharply. Panels remove the room as a limiting factor, letting your equipment perform as designed.

The improvement is often more noticeable than upgrading speakers or receivers.

Should I Treat Walls or Ceiling First?

Walls first, specifically the first reflection points on side walls. Ceiling treatment matters most for Atmos systems.

Start with side walls plus corner bass traps, then add ceiling treatment if budget allows.

Can I Skip Panels If I Have an Expensive System?

Expensive systems benefit even more from treatment. High-quality speakers reveal room problems that cheaper speakers mask.

The better your equipment, the more you’ll gain from correct acoustics.

How Long Does Treatment Take to Install?

A basic setup of 6-8 panels takes a few hours for most DIYers. Commercial panels with included mounting hardware install quickly.

Ceiling panels take longer due to overhead work. the installation guide covers the complete process step by step.

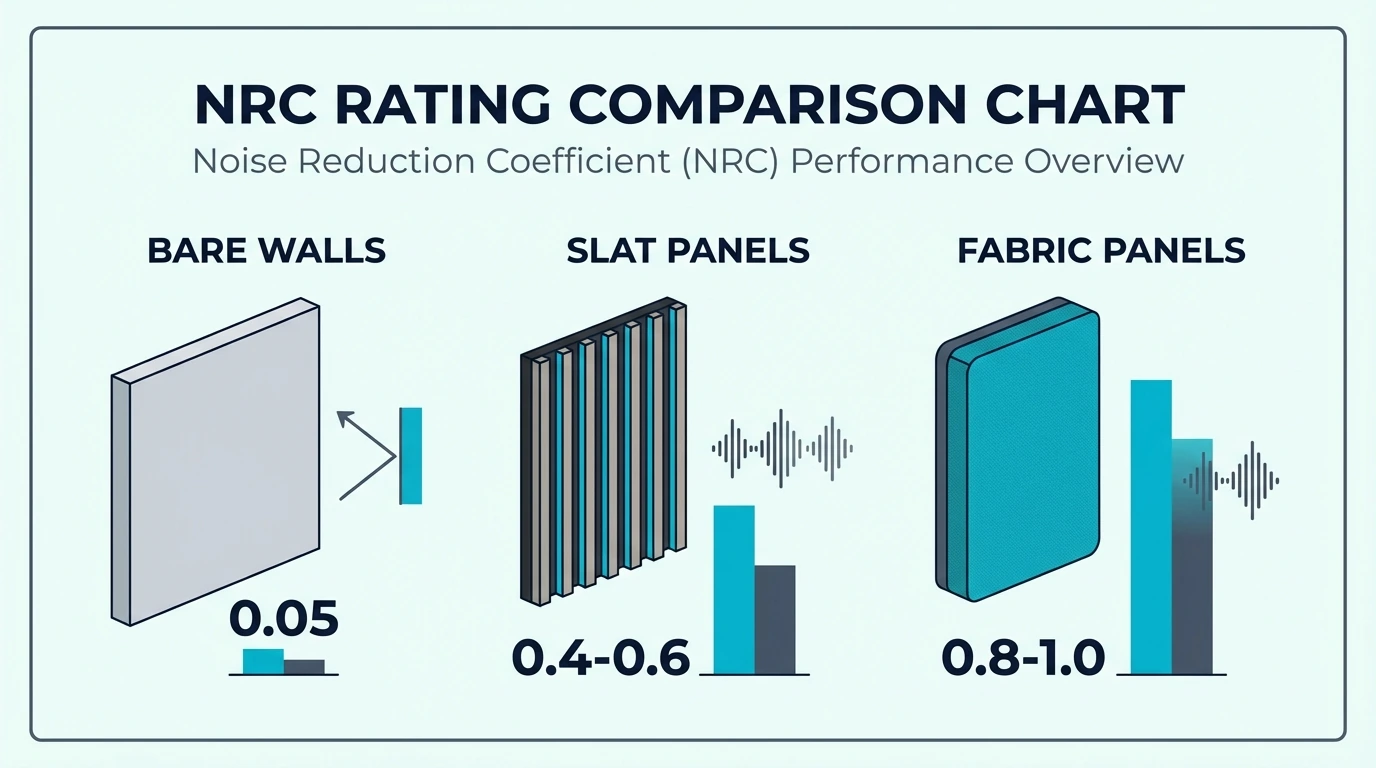
What NRC Rating Should Home Theater Panels Have?

Look for panels with NRC ratings of 0.85 or higher. This means the panel absorbs 85% of sound that hits it.

Lower-rated products like thin foam (NRC 0.30-0.50) won’t provide meaningful improvement for theater applications.

Ceiling Acoustic Panels: How They Work and When to Use Them [2026]

Can I put acoustic panels on ceiling surfaces? Yes — but only if your mounting hardware matches the panel weight and ceiling type, because improperly secured ceiling panels are a real safety hazard.

Most people focus on which panels to buy and skip the mounting research entirely. The frustration comes later: panels that sag, anchors that fail in drywall, or treatment that ends up on the floor. It happens because ceiling mounts carry panels over occupied areas, so the same command strip or adhesive you’d use on a wall isn’t safe overhead.

With the right hardware for your ceiling type, ceiling treatment is safe, permanent, and often delivers more improvement than wall panels alone.

We’ll walk you through every mounting method, panel type, coverage targets, and common mistakes below.

You can absolutely install acoustic panels on your ceiling using direct mounting, suspended clouds, or drop ceiling tiles. Ceiling treatment controls first reflections and flutter echo that wall panels miss entirely.

Use hardware rated for the panel weight and mount into joists or use appropriate anchors for drywall.

Why Does Ceiling Treatment Matter So Much?

Why ceiling treatment matters

That “yes” answer comes with important context. your ceiling is the largest untreated surface in most rooms. Sound travels upward from speakers, instruments, and voices, hits that flat surface, and bounces straight back down — arriving at your ears milliseconds after the direct sound.

These ceiling reflections cause more problems than you might expect. They create comb filtering that makes audio sound thin and phasey, and they contribute heavily to the reverb tail that makes rooms feel echoey.

What Are First Reflections From the Ceiling?

First reflections are the earliest sound bounces that reach your ears after the direct sound. The ceiling reflection typically arrives before wall reflections because the distance is shorter in most rooms.

your brain can’t separate these early reflections from the original sound. Instead of hearing them as echo, you perceive them as coloration — a harsh or hollow quality that affects everything you hear in the room.

Treating the ceiling eliminates or reduces these first reflections. The improvement is immediately noticeable, especially for anyone mixing audio or using the room for critical listening.

How Does Flutter Echo Involve the Ceiling?

Flutter echo happens when sound bounces rapidly between two parallel surfaces. your floor and ceiling create the perfect conditions for this — flat, reflective, and directly facing each other.

You can test for flutter echo by clapping sharply in an untreated room. That metallic ringing you hear is sound bouncing back and forth between floor and ceiling dozens of times per second.

Ceiling panels break up this flutter path. Even partial coverage disrupts the parallel surface reflection pattern and eliminates that ringing quality.

What Are the Main Ceiling Mounting Options?

Ceiling mounting options for acoustic panels

Three main approaches exist for ceiling mounting, each suited to different situations and skill levels.

How Does Direct Mounting Work?

Direct mounting attaches panels flush against the ceiling surface. This method works well when ceiling height is limited or when you want a clean, integrated look.

The process involves locating ceiling joists, marking panel positions, and using appropriate hardware to secure the panels. Z-clips, impaling clips, or construction adhesive are common attachment methods.

Direct mounting is moderately difficult. you’ll need a helper to hold panels in position while securing them, and working overhead causes fatigue quickly. For specific hardware recommendations, check the panel hanging guide.

What About Suspended Ceiling Clouds?

Suspended clouds hang below the ceiling with an air gap above them. This approach provides better low-frequency absorption because sound can enter the panel from both sides.

The installation uses eye hooks in the ceiling and cables or chains attached to the panel. Typical air gaps range from 2 to 6 inches depending on room height and aesthetic preference.

Cloud installations look more intentional than direct mounting. The floating appearance signals that the room has been acoustically treated, which matters for studios and professional spaces.

Can You Use Drop Ceiling Tiles?

Drop ceiling systems accept acoustic tiles in place of standard ceiling panels. If your room already has a suspended grid ceiling, this is by far the easiest approach.

Simply remove the existing tiles and drop in acoustic panels cut to fit the grid. Standard grid sizes are 2×2 feet or 2×4 feet, and many acoustic panels come pre-cut to these dimensions.

Office buildings, basements, and commercial spaces often have drop ceilings already installed. Taking advantage of the existing grid saves real installation time and effort.

What Safety Considerations Apply?

Safety considerations for ceiling panel mounting

Those mounting options all work — but only if you approach safety correctly. Ceiling installations carry more risk than wall mounting because gravity works against you.

How Much Weight Can Ceilings Support?

Drywall alone supports very little weight. A single drywall anchor might hold 10-15 pounds, but acoustic panels often weigh 5-15 pounds each depending on size and material.

Mounting into ceiling joists changes everything. A properly placed lag screw into a joist can support 50+ pounds easily.

This is why locating joists matters so much for ceiling installations.

For suspended clouds, calculate the total panel weight plus hardware weight. Distribute that load across multiple attachment points rather than relying on a single anchor.

How Do You Find Ceiling Joists?

A stud finder is the standard tool for locating ceiling joists. Run it across the ceiling surface and mark each joist location with pencil or painter’s tape.

Joists typically run parallel to each other, spaced 16 or 24 inches apart. Once you find one, measuring to locate others becomes simple.

Knock testing works as a backup method. The ceiling sounds hollow between joists and more solid directly over them.

Combine knock testing with stud finder results for confidence.

What Hardware Ensures Secure Mounting?

Toggle bolts provide the strongest drywall-only attachment. The wings spread behind the drywall to distribute load across a larger area than standard anchors.

For joist mounting, lag screws or heavy-duty wood screws work best. Pre-drill pilot holes slightly smaller than the screw diameter to prevent splitting.

Cable suspension systems need rated hardware. Aircraft cable rated for several hundred pounds provides huge safety margin for acoustic panel weights.

Don’t use decorative chain or lightweight wire.

What Panel Types Work Best on Ceilings?

Best panel types for ceiling installation

With safety fundamentals covered, material choice becomes the next decision. Not every panel type works equally well for ceiling applications.

Which Materials Handle Overhead Installation?

Lightweight panels make ceiling work easier and safer. PET felt and thin fiberglass panels weigh less per square foot than dense rockwool, reducing strain during installation.

Fiberglass wrapped in fabric remains the professional standard for ceiling clouds. The material offers excellent absorption while staying light enough for cable suspension systems.

Foam panels work for budget ceiling treatment but absorb less effectively than fiberglass alternatives. The weight savings don’t compensate for reduced performance in most serious applications.

Does Thickness Matter for Ceiling Panels?

Two-inch panels handle most ceiling treatment needs effectively. They absorb frequencies above 500Hz where first reflections cause the most audible problems.

Four-inch panels extend absorption into lower frequencies but add weight and cost. Reserve thicker panels for rooms with specific low-mid issues or professional recording applications.

For general guidance on panel thickness, the panel effectiveness guide explains frequency absorption.

How Many Ceiling Panels Do You Need?

How many ceiling acoustic panels needed

The practical question becomes quantity. How much of your ceiling actually needs treatment?

What Percentage Coverage Works Best?

Most rooms benefit from 25-50% ceiling coverage. This range provides meaningful acoustic improvement without making the room feel dead or over-treated.

Critical listening spaces like studios often push toward 40-60% coverage. The goal is controlling enough reflection to hear accurately while maintaining some natural room character.

Start with treatment directly above your primary listening or working position. That zone affects what you hear more than any other ceiling area.

The panel quantity calculator helps determine exact numbers.

Which Ceiling Areas Deserve Priority?

The first priority zone is directly above where you sit or stand most often. For home studios, that’s above the mixing position.

For home theaters, it’s above the main seating area.

Second priority goes to the ceiling area between your speakers (or sound source) and your listening position. First reflections in this zone have the most impact on what you hear.

The ceiling above equipment racks, corners, or doorways has lower priority. Sound interaction in these zones matters less for most use cases.

What Common Mistakes Should You Avoid?

Common ceiling panel installation mistakes

A few preventable errors cause most ceiling panel failures.

Why Do Some Ceiling Installations Fail?

Under-engineering the mounting is the primary cause of problems. Those weight limits and joist-mounting techniques matter here.

Ignoring them is exactly how panels fail.

People use hardware rated for exactly the panel weight with zero safety margin, then wonder why panels sag or fall after months of subtle vibration.

Ignoring joist locations leads to drywall-only mounts that can’t handle the load long-term. Always locate joists first and plan panel placement around secure mounting points.

How Can You Prevent These Issues?

Use hardware rated for at least double your panel weight. The cost difference between adequate and over-engineered hardware is minimal compared to the risk of failure.

Test your mounting before committing. Hang one panel and check it after a week.

If it stays secure under normal room conditions, proceed with the rest of your installation.

What Results Should You Expect?

Expected results from ceiling acoustic treatment

With secure mounting, the right panels, and strategic coverage, ceiling treatment delivers noticeable improvement that most people recognize immediately.

The room feels less echoey, voices sound clearer, and audio playback gains definition.

For recording and mixing, ceiling panels often provide the biggest single improvement over an untreated room. The clarity gained from controlling overhead reflections translates directly to better decisions during creative work.

The change is most obvious when someone else enters your treated room. They’ll comment on how different it sounds compared to typical spaces — that feedback confirms you’ve done something meaningful.

For product recommendations, the best ceiling panels guide covers top options.

These ceiling-ready panels are structurally rated for overhead mounting:

UMIACOUSTICS 4-Pack Acoustic Panels with Brackets

UMIACOUSTICS Standard Fiberglass Acoustic Panels

BUBOS 4-Pack Fabric Wrapped Acoustic Panels

The full installation guide walks through ceiling cloud setups step by step.

Use the panel count calculator to estimate how many ceiling panels your room needs before ordering.

Combine ceiling treatment with wall coverage using the placement guide for best results.

For ceiling clouds, 2-inch density panels absorb low-mid frequencies that 1-inch panels miss.

Ceiling panels accumulate dust quickly — see the cleaning guide for the right maintenance approach.

For ceiling mounts, fabric-wrapped panels hold up better than foam over time.

Building a DIY ceiling cloud costs 60–80% less than commercial options with identical performance.

Frequently Asked Questions

These are the questions that come up most often about ceiling panel installation.

Is It Safe to Mount Acoustic Panels on the Ceiling?

Yes, ceiling mounting is safe when done correctly. Use hardware rated for more than your panel weight, mount into joists when possible, and distribute load across multiple attachment points.

Avoid single-anchor installations for heavy panels.

Can Ceiling Panels Fall Down?

Properly installed ceiling panels should never fall. Failures occur when people use inadequate hardware, skip joist mounting, or exceed weight ratings.

Follow manufacturer guidelines and use appropriate safety margins.

Do Ceiling Panels Work as Well as Wall Panels?

Ceiling panels address different acoustic problems than wall panels. They’re particularly effective for first reflections, flutter echo, and overhead sound paths.

Most treated rooms need both ceiling and wall treatment for complete acoustic control.

How Far Should Ceiling Panels Hang Below the Surface?

Direct mount panels sit flush against the ceiling. Suspended clouds typically hang 2-6 inches below, with more gap providing better low-frequency absorption.

Room height determines what gap is practical — maintain at least 7 feet of clearance below panels.

Can I Install Ceiling Panels Myself?

DIY ceiling installation is possible but challenging. Working overhead causes fatigue, and you’ll need a helper to hold panels during attachment.

Start with lighter panels and simpler mounting methods if you’re new to acoustic treatment. Check the installation guide for complete instructions.

Where to Place Acoustic Panels for Drums [2026]

Where to place acoustic panels for drums is simple in theory, but drum rooms punish guesswork.

If your kit sounds harsh, phasey, or boxy, you are hearing ceiling and wall reflections hitting your ears and mics milliseconds after each hit. The louder you play, the more those reflections stack up.

A ceiling cloud, wall treatment at ear height, and full corner bass trapping will make the kit sound tighter and give you cleaner tracks. You can also play longer without ear fatigue.

Start with absorption directly above the kit and bass traps in the corners, then fill in the nearest wall reflection points around the throne. Next, learn why drums need heavier coverage than most rooms and how to place panels step by step.

Quick Takeaway

Place a ceiling cloud above the kit, treat the rear and side walls at ear height near the throne, and install bass traps in every corner. Most drum rooms need roughly 40–60% total surface coverage.

Why Do Drum Rooms Need Special Treatment?

Untreated drum room with bare walls and parallel reflective surfaces

Drums produce full-spectrum explosions from sub-bass kick energy below 100 Hz to cymbal splash above 10 kHz, all at 100+ decibels. That range and volume create two distinct problems: what makes drums acoustically unique compared to other instruments, and how those reflections color the sound before it reaches your ears or mics.

What Makes Drums Acoustically Unique?

Your drum kit produces sound differently than any other instrument. The 2-inch vs 4-inch comparison shows why thickness matters so much for the low-mid energy drums generate. Each drum creates a sharp transient attack followed by sustained resonance, and these events happen in rapid succession during even basic patterns.

The frequency range spans nearly the entire audible spectrum. Your kick generates sub-bass and low-mid energy, toms cover the low-mids and mids, snare pushes into the upper-mids, and cymbals splash across the high frequencies.

This full-spectrum assault means you cannot treat one frequency range and call it done. Panels that tame cymbal harshness will not touch the kick drum boom, and bass traps that control the low end do nothing for snare reflections.

The directional nature of drums matters too. Sound radiates outward in all directions from multiple sources positioned at different heights and angles.

Your snare fires upward while your kick aims forward, creating a complex web of reflections that hit walls, ceiling, and floor at different times.

How Do Reflections Affect Drum Sound?

Because the instrument projects omnidirectionally, the resulting reflections are devastating to the human ear. Early reflections bounce off the closest walls and arrive at your ears within 20 to 50 milliseconds of the stick hitting the skin. Your brain cannot physically separate that delayed echo from the original hit, meaning those reflections actively color everything you hear with a harsh, smeared, and phasey metallic character.

In a small untreated bedroom, these violent reflections actually cause phase cancellation, making a massive 22-inch kick drum sound small, thin, and hollow. The comb filtering that occurs when the direct and reflected sounds collide literally deletes certain frequencies while boosting others completely unpredictably.

Once you add in the late reflections—the sound waves that have bounced three or four times before reaching you—you get the notorious washy reverb tail that muddies the entire kit. After just an hour of playing in this kind of untreated acoustic chaos, your ears will feel physically fatigued from constantly processing the dense, clashing reverb.

This problem multiplies when you introduce recording microphones, which pick up every single reflection indiscriminately. What sounds “live and energetic” to your ears in the room instantly translates to an “unusable wash of noise” in the DAW mix. This is precisely why professional drum recordings only happen in treated spaces—untreated reflections make raw drum tracks completely unusable, regardless of whether you are using a $50 mic or a $5,000 one.

Where Should Panels Go on the Ceiling?

Ceiling cloud panels above a drum kit with proper spacing

Cymbals and snare fire energy straight up, and in an untreated room that ceiling return is the single biggest source of harshness and phase in overhead mics. Ceiling treatment depends on sizing the cloud panel to your kit footprint and choosing how far below the ceiling to hang it for maximum low-frequency reach.

What Size Cloud Panel Works Best?

A ceiling cloud directly above your kit should cover roughly the same footprint as your drums. For a standard five-piece kit, that means a treatment zone approximately 6×8 feet — about 48 square feet of ceiling coverage.

You do not need to cover the entire ceiling, but you do need heavy coverage in this critical zone. The panel spacing guide covers gap calculations, and panels covering less than 75% of the kit footprint will leave noticeable gaps in absorption.

How Far Should Ceiling Panels Hang?

The gap between your ceiling and the panels affects how deep the absorption reaches. Mounting panels with a 4-6 inch air gap behind them extends their effective absorption into lower frequencies.

This air gap technique works because sound waves compress and expand as they travel. The gap allows the panel to absorb energy at a point in the wave travel where more energy can be captured.

Practical mounting typically uses cables or chains attached to eye hooks in the ceiling — the ceiling panel installation guide covers the hardware. Leave at least 3 feet between your highest cymbal and the bottom of the panels so crashes do not hit them.

How Should You Treat the Walls?

Drum room wall panels at ear height covering first reflection points

After treating the ceiling, you have to address the energy firing outward from the shells—and the walls closest to the kit create the earliest, most destructive reflections.

Which Walls Need Treatment First?

The absolute highest priority is the wall directly behind your drum throne. Every ounce of sound from your snare, toms, and cymbals travels straight past your ears, slams into this rear wall, and bounces directly back at the back of your head. When that reflection returns, it interferes violently with the next beat, creating the most noticeable comb filtering in the entire room.

Your side walls come next in the hierarchy—specifically the flat drywall positioned within arm’s reach of your seated position. These are your primary first reflection points, where the crash cymbals bounce directly off the drywall and back into the overhead mics.

Surprisingly, the wall facing you as you play (directly in front of the kick drum) is actually the lowest priority of the four walls. Because the sound has to travel across the entire physical depth of the kit before reaching it, the reflections return much later and contribute more to the general room reverb than to the destructive early reflection phase problems.

How High Should Wall Panels Be Mounted?

Once you identify the correct walls, you must mount the panels at the correct height to actually catch the sound. You want to blanket the zone from about 3 feet off the floor up to 6 feet high—the acoustic panel installation guide covers the exact hardware required for each surface type. This 3-to-6 foot band captures the critical reflections at ear level whether you are sitting at the throne playing or standing in the room listening back to a mix.

Because drums are positioned so low to the floor, they send acoustic energy upward at sharp angles that hit the walls much higher than you might assume. You can verify this yourself by holding a mirror flat against the side wall while sitting at the kit; move the mirror up and down until you can see your crash cymbals in the reflection, and you have found the exact height where your panel belongs.

While floor-to-ceiling wall coverage is the acoustic ideal, it is rarely practical for home budgets. If you are limited to a specific number of panels, concentrate them entirely in this dense 3-to-6 foot ear-level zone rather than scattering them randomly across the entire height of the wall.

Why Are Bass Traps Essential for Drums?

Floor-to-ceiling corner bass traps in a drum room

Flat panels expertly handle the mids and highs, but your massive kick drum generates low-frequency energy that standard 2-inch panels literally cannot absorb—the panels vs bass traps guide explains the brutal physics behind this. To stop the room from booming, you must deploy dedicated corner trapping.

Where Do Bass Traps Provide Maximum Effect?

Low frequencies behave like water, actively seeking out the corners of the room where the acoustic pressure is highest. Because a 100Hz wave is roughly 11 feet long, it literally wraps around the physical dimensions of a small room and piles up in the 90-degree corners.

To capture this pooling energy, floor-to-ceiling corner traps work best because they intercept the bass waves at multiple height intervals. Bass does not travel in a straight, directional line like a cymbal crash does—it fills the entire volumetric space of the room instantly.

If you are on a tight budget and only have four traps to deploy, you must place them in the two corners closest to the front of your kick drum. The front of the drum room always experiences the highest, most violent concentration of low-frequency pressure.

Once the vertical corners are treated, the upper wall-to-ceiling junctions become the next target. Many drummers completely overlook these horizontal corners, but they trap exactly as much bass energy as the vertical floor corners while also helping to kill the long, rumbling low-frequency returns coming off the ceiling.

How Thick Should Bass Traps Be?

When it comes to bass, you cannot cheat physics: thin traps simply do not trap bass. The physical depth of the absorptive material must be directly proportional to the massive wavelength you are attempting to stop.

For effective, tight kick drum control below 100Hz, you must use traps that are an absolute minimum of 4 inches thick, though 6-to-8 inch thick traps will perform noticeably better and reach much lower into the sub-bass frequencies.

If you prefer to start with professional fiberglass rather than foam, the UMIACOUSTICS Large Panels can be mounted diagonally across a corner to create a massive air gap, working as a giant bass trap.

Basic foam wedges like the 8-Pack Foam Bass Traps work as a highly affordable starting point, though serious recording rooms inevitably require doubling up on corner coverage to get enough physical mass into the corners. If you need heavier low-end control on a budget, the 12-Pack Corner Bass Traps provide more individual pieces per pack, making it far easier to build continuous floor-to-ceiling stacks.

How Much Coverage Does a Drum Room Need?

Drum room wall and ceiling coverage percentages for acoustic treatment

Nailing the placement is only half the job—drum rooms naturally demand far more total wall coverage than a vocal booth or a podcast desk. To handle the raw decibel output of a kit, you must calculate exactly how much total square footage you need to cover.

What Is the Minimum Effective Coverage?

For a casual practice space where pristine sonic perfection is not the ultimate goal, covering 30-40% of the total wall and ceiling surface creates a massive, noticeable improvement. In this scenario, you focus exclusively on the mandatory hotspots: the ceiling cloud, the rear wall directly at ear height, and at least four solid corner traps.

If the room is being built specifically for recording, that minimum target jumps sharply. You must push closer to 50-60% total surface coverage to ensure the overhead microphones are capturing the pristine sound of the maple shells rather than the chaotic wash of the drywall.

How Do You Calculate Panel Quantity?

To find your exact panel count, you must first calculate the total surface area of the room. A standard 12×14 foot room featuring 8-foot ceilings contains exactly 752 square feet of combined wall and ceiling space. You must use this combined wall-plus-ceiling number, not just the square footage of the floor—the panel quantity calculator handles this math automatically.

At a 50% coverage target, that 752-square-foot room requires exactly 376 square feet of acoustic treatment. Because a standard 2×4 foot panel covers 8 square feet of drywall, you would need to order roughly 47 standard panels to achieve full studio-grade coverage.

For a ready-to-mount fiberglass option that eats up square footage quickly, the UMIACOUSTICS 4-Pack Fiberglass Panels works exceptionally well for blanketing those critical first reflection points. If you realize you need substantially thicker absorption on the flat walls to handle aggressive tom resonance, the TONOR Dual-Layer Thickened Panels provide the extra mass required to pull the boxiness out of the room.

What Panel Types Work Best for Drums?

Acoustic panel types for drums including fiberglass, PET felt, and foam

Those heavy coverage numbers assume you are actually using panels rated to handle the extreme sound pressure levels of a drum kit. The core material you select and its physical thickness determine whether the panel actually absorbs the low-mids or just acts like expensive wall decor.

Should You Use Fiberglass or Foam?

When dealing with the sheer volume of a drum kit, dense fiberglass panels will brutally outperform lightweight acoustic foam in every measurable acoustic metric. The heavy mass of a rigid fiberglass board—typically weighing between 3 and 6 pounds per cubic foot—forces the sound wave to work much harder to pass through it, converting vastly more acoustic energy into heat than airy, open-cell polyurethane foam ever could.

What Thickness Handles Drum Frequencies?

If budget and space allow, thick 4-inch panels are the undisputed best choice for drum rooms because they possess the physical depth to trap the fundamental frequencies of the toms and the batter head. Standard 2-inch panels are perfectly fine for killing cymbal harshness and snare rattle, but they are physically incapable of reaching down into the low-mid frequencies where a drum kit produces its most aggressive, muddying energy.

How Do You Install Panels in a Drum Room?

Step-by-step panel installation for drum room walls and ceiling

While basic installation follows standard acoustic principles, the sheer quantity of panels required for a drum room paired with the constant structural vibration of the kick drum demands highly secure mounting hardware.

What Mounting Methods Work Best?

For heavy, fabric-wrapped fiberglass panels, metal impaling clips mounted directly into the drywall studs provide the absolute most secure attachment. The heavy panel is simply pushed forcefully onto the sharp clips, permanently locking it in place and distributing its considerable weight across multiple anchor points so it cannot vibrate loose during heavy playing.

For thicker 4-inch panels or massive custom builds, heavy-duty aluminum Z-clips are the superior choice. One half of the interlocking metal bracket screws into the wall stud, while the receiving half screws into the wooden frame of the acoustic panel. These brackets easily hold 20+ pounds per pair, keep the panel perfectly level, and allow you to instantly lift the panel off the wall if you need to run microphone cables behind it.

For the mandatory ceiling clouds, flying the panels using heavy-duty aircraft cable or steel chain provides the safest and most flexible suspension method. The mounting points drilled into the ceiling joists only have to handle a straight vertical load, and the guide to hanging acoustic panels details exactly how to rig this hardware safely over your expensive cymbals.

Should You Leave Some Surfaces Untreated?

Drum room with balanced treated and untreated surfaces

Despite pushing for high coverage percentages, complete absorption is absolutely not the ultimate goal. A perfectly dead room kills the natural resonance of the drum shells, forcing you to play harder to hear yourself. You must purposefully leave some surfaces bare or introduce diffusion to keep the room breathing.

How Much Liveliness Should Remain?

If the sole purpose of the room is tracking drums for commercial recordings, you should always err heavily on the side of aggressive absorption. It is infinitely easier to add lush, expensive-sounding digital reverb to a dry snare drum during the mixing phase than it is to surgically remove a terrible, boxy room echo from a ruined take.

For this reason, professional tracking rooms regularly push past 60% coverage, and the NRC rating guide explains exactly how to read the spec sheets to guarantee you are buying the heavy absorption those studios demand. However, if the room is primarily a personal practice space where you just want to enjoy playing, limiting your coverage to 40% preserves the exciting acoustic feedback that makes drums fun to hit.

What About Diffusion for Drums?

Instead of leaving drywall completely bare to maintain that liveliness, professional rooms deploy heavy wooden diffusers. Diffusion actively shatters the incoming sound waves and scatters them across the room instead of sucking the energy into a fiberglass core, brilliantly maintaining the acoustic volume of the drums while completely destroying the harsh, direct flutter echoes.

In drum rooms, heavy QRD diffusers mounted directly on the rear wall (facing the front of the kick drum) preserve the expansive size of the room without allowing a focused slap-back reflection to return to the overhead mics.

However, because diffusers require several feet of distance to allow the scattered waves to disperse properly, they only work in larger rooms. If you are playing in a cramped 10×10 bedroom, skip the diffusers entirely; absorption must be your sole priority because you simply do not have the physical square footage required to scatter sound properly.

Conclusion

Where to place acoustic panels for drums starts with the ceiling cloud and full corner bass trapping, then extends to the rear and side wall reflection points around the throne. Once those zones are treated, scale coverage toward the 40–60% range and listen for the shift — individual drums separate, overhead mics pick up kit instead of wash, and practice sessions stop hammering your ears after thirty minutes.

If you are building treatment in phases, start overhead and in the corners, then add wall panels until the room feels controlled but still lively. The placement guide covers fundamentals you can adapt to any room shape, and the best acoustic panels page ranks products by room type. The best acoustic ceiling panels page narrows the list to overhead-rated options.

Frequently Asked Questions

Where Should I Put Acoustic Panels for Drums?

Ceiling first — directly above the kit. Then the wall behind your seated position at ear height, side walls near the kit, and bass traps in every corner starting with those closest to the kick drum.

How Many Panels Does a Drum Room Need?

Plan for 40–60% surface coverage — in a 12×14 foot room with 8-foot ceilings, that means roughly 30–50 panels.

Start with the ceiling cloud and corner bass traps for maximum impact per panel, then add wall panels gradually until the room feels controlled.

Do I Need Bass Traps for Drums?

Yes — kick drums push energy below 100 Hz that flat panels cannot absorb. Without corner traps, that bass piles up and turns your low end into undefined boom. Floor-to-ceiling traps in at least the four main corners make the biggest difference.

What Thickness Panels Work Best for Drums?

Four-inch panels handle the full frequency range of drums best. Two-inch panels work for cymbal and snare frequencies but miss the low-mid energy from toms and kick drum attack.

Should a Drum Room Be Completely Dead?

No. A completely dead room sounds unnatural and kills the energy that makes drums fun to play. Aim for 40–60% coverage for practice, up to 70% for recording — you can always add reverb in a mix, but you cannot subtract room sound from a track.

Where to Put Acoustic Panels in Garage [2026]

Where to put acoustic panels in garage sounds simple—just cover the walls, right? Yes, but garages punish the wrong placement because every surface is hard, parallel, and reflective.

If your rehearsal or recordings sound harsh and phasey, you are hearing early reflections from the wall behind you and the ceiling above you. Concrete floors and metal doors keep those reflections bouncing long enough to smear vocals, guitars, and kick drum.

Place panels in the right zones and the room gets clearer without feeling dead, so you can practice longer and mix faster. You will also spend less, because you are treating the highest-impact reflection paths first instead of guessing.

Start with absorption on the rear wall behind your listening or performance position and a ceiling cloud over your work zone. Next up: the garage-door workaround, moisture considerations, and a step-by-step layout you can copy.

Quick Takeaway

Put panels on the wall behind your listening/performance position, the ceiling above your work zone, and the side walls at first reflection points. Use heavy curtains or portable panels for the garage door, and choose moisture-resistant materials if the space is not climate-controlled.

Why Do Garages Need Acoustic Treatment?

Empty garage with concrete floor and metal door creating strong echo

Concrete floors, metal doors, and parallel drywall all sit near zero absorption, so reflections stack up faster than in any other room in the house. The specific acoustic challenges and the use case you are treating for drive every placement decision that follows.

What Makes Garage Acoustics So Challenging?

The surfaces in a typical garage have absorption coefficients near zero. Concrete reflects about 98% of sound.

Metal reflects even more, and painted drywall absorbs less than 5%. That is why the room keeps “ringing” after each hit or clap.

Sound bounces repeatedly before losing energy. In a living room with carpet, furniture, and curtains, those reflections die quickly.

In a garage, they persist and keep smearing what you hear. The goal of panel placement is to kill the earliest reflections first.

The result is excessive reverberation — that washy, indistinct sound that makes mixing impossible and band practice exhausting. After an hour in an untreated garage, your ears feel fatigued from processing all those reflections.

The box shape compounds everything because garages are basically hard-walled rectangles. Parallel walls plus the floor and ceiling create standing waves at specific frequencies.

That is why some bass notes boom while others disappear at your listening position. It is common to see 10–15dB peaks and nulls from room modes in an untreated garage. Those modes hit hardest when you actually use the space for something that depends on accurate sound.

What Are Garages Used For That Needs Treatment?

Band practice rooms represent the most common garage conversion. The space offers isolation from neighbors (somewhat) and room for a full drum kit, amps, and PA system.

Home recording studios increasingly occupy garages as remote work normalizes. The dedicated space means you can leave equipment set up and treat the room without negotiating with family members about aesthetics.

Home gyms generate heavy noise from dropped weights, cardio equipment, and workout music. Treatment helps contain sound and makes the space more pleasant for the person exercising.

Podcasting and content creation studios work well in garages because the separation from household noise reduces interruptions during recording.

Each use case has slightly different treatment priorities, but the core task is the same: cover reflective surfaces with absorptive material.

Where to Put Acoustic Panels in Garage

Garage wall placement diagram with priority zones for acoustic panels

Wall treatment follows the same physics as any room, but garages have more reflective area and unfinished studs that actually make mounting easier. The placement guide covers the universal baseline — which wall to treat first, how to work around the garage door, and what to do with unfinished surfaces are the three garage-specific priorities.

Which Wall Gets Treatment First?

The wall behind your listening or performance position takes priority. When you face your speakers, monitors, or the band, sound travels past you and hits the rear wall.

That reflection returns and interferes with new sound arriving directly. Treating this wall first is the fastest way to reduce comb filtering and slap-back in a garage.

If your setup includes monitors or a PA, treat the wall behind the speakers first, then use the mirror trick to find remaining first-reflection points and check panel spacing between each reflection zone.

Treating this wall first provides the biggest improvement per panel. A single 2×4-foot panel centered behind your head position can noticeably clean up the sound.

For full-room treatment, the UMIACOUSTICS 4-Pack Fiberglass Panels provide professional-grade absorption that handles the extended reverberation typical of garages.

After the rear wall, move to the side walls at first reflection points. These are the spots where sound from your speakers or the loudest instruments bounces directly to your ears.

How Do You Handle the Garage Door Wall?

The garage door presents a unique challenge. It is the largest reflective surface in the room, but you need it to function as a door.

Permanent panel installation is not practical because the door moves and panels would interfere with the mechanism. Heavy acoustic curtains offer a compromise — pull them closed during sessions.

Open them when you need vehicle access — the room setup guide works through the full layout including door workarounds.

Heavy moving blankets or purpose-built acoustic curtains provide reasonable absorption when closed while allowing full door operation. Curtains built specifically for acoustics outperform blankets, though they cost two to three times more.

Moving blankets absorb less than rigid panels but cost a fraction of the price and fold flat when you open the door.

Portable panel stands are another option — roll them in front of the door during sessions and move them aside when needed. Stands work especially well if you have converted the garage fully and rarely use the door, and they let you experiment with placement before committing to permanent mounts.

Do Unfinished Walls Help or Hurt?

Many garages have exposed studs or partial drywall. This actually simplifies treatment in some ways.

Insulation batts installed between studs provide baseline absorption before you add surface panels. Standard R-13 or R-19 fiberglass batts are not acoustic products, but they absorb high frequencies reasonably well.

If you are choosing between mineral wool and fiberglass, the panel density guide covers which fill weights absorb predictably once you add face panels.

Add acoustic panels over the insulation. The combination of depth (insulation fills the wall cavity) and surface absorption (panels face the room) handles a broader frequency range than panels alone.

If you are finishing the walls anyway, consider adding a layer of mass-loaded vinyl behind the drywall. This helps with sound isolation to neighbors — a separate issue from in-room absorption, but often relevant for garage conversions.

How Should You Treat the Garage Ceiling?

Garage ceiling with acoustic cloud panels installed with proper spacing

Ceiling reflections undo wall treatment fast — floor-to-ceiling bounces produce comb filtering across the entire room, and the overhead surface is usually the largest uninterrupted reflector in a garage. Where to place the cloud and how to mount it on garage framing close out the overhead plan.

Where Should Ceiling Panels Go?

Center ceiling treatment over your primary activity zone. For a mixing position, that means panels directly above where you sit.

For band practice, coverage over the drum kit and vocal position matters most. Pairing ceiling treatment with the wall behind you is the quickest way to make the room feel controlled.

Acoustic “clouds” — panels suspended below the ceiling with an air gap — provide better low-frequency absorption than surface-mounted panels. The air space acts as a quarter-wave resonator, and thicker cores extend that reach further; the 2-inch vs 4-inch comparison covers the trade-offs for overhead use.

Aim for coverage of at least 30-40% of the ceiling area in the performance zone. Full ceiling treatment works even better but requires a large panel count.

The Art3d Wood Slat Panels work well for ceiling applications — the construction is lighter than solid fiberglass, making overhead installation easier while adding visual interest.

How Do You Mount Panels on Garage Ceilings?

Exposed joists make ceiling mounting much easier. You can screw directly into the wood structure without hunting for supports behind drywall.

For finished ceilings, locate the joists with a stud finder. Standard drywall cannot support panel weight without hitting structural members.

Suspension systems work well for cloud installations. Eye hooks in the joists plus wire or chain drops create an adjustable system.

Leave 4-6 inches between the panel and ceiling surface for better low-frequency performance. That air gap is one of the easiest ways to get more absorption without buying thicker panels.

If your garage has a finished attic above, you might install bass trapping above the ceiling line to tame low-end buildup. The bass trap mounting guide covers mounting approaches that translate well to garage framing.

What Special Considerations Apply to Garages?

Garage moisture and temperature issues shown on metal and concrete surfaces

Garages swing from below freezing to over 100°F, concrete floors sweat, and metal doors condense moisture — conditions that can destroy panels built for climate-controlled offices. Temperature cycling, moisture exposure, and unfinished mounting surfaces each affect which panels you buy and how you attach them.

How Does Temperature Affect Panel Choice?

Extreme temperatures do not damage most acoustic materials directly. Fiberglass, mineral wool, and polyester remain stable across normal temperature ranges.

The concern is thermal cycling — repeated expansion and contraction that can stress mounting hardware, loosen adhesives, and crack rigid materials. Choose mechanical fasteners over adhesive mounting in garages with wide temperature swings.

Spray adhesive that works perfectly in a climate-controlled room may fail when temperatures hit 95°F in summer. Command strips can lose grip after a few freeze-thaw cycles.

Screws and Z-clips provide reliable mounting regardless of temperature. If you do use adhesive, treat it as supplemental hold instead of your primary fastener.

Fabric-wrapped panels handle thermal cycling well because the components can move slightly without visible damage. Rigid foam panels with painted surfaces may crack at edges where expansion stress concentrates.

How Does Moisture Affect Garage Panels?

Moisture creates real problems for certain acoustic materials. Fiberglass can absorb water and lose performance.

If moisture is a concern, the fabric cover guide details which wrap materials handle humidity without degrading.

Paper-faced products deteriorate over time, and organic materials can grow mold. If you see condensation regularly, prioritize moisture-resistant materials.

PET felt panels use construction that resists moisture far better than fiberglass — look for panels rated for high-humidity environments, which makes them a natural fit for garages without climate control.

If your garage has serious moisture issues — visible condensation, water intrusion, or high humidity — address those problems before installing acoustic treatment. Panels cannot fix acoustic issues if they are deteriorating from moisture damage.

For truly problematic environments, consider panels with waterproof backing or plastic-wrapped cores. These cost more but survive conditions that would destroy standard panels.

How Do Unfinished Surfaces Affect Installation?

Exposed studs, concrete block, and unfinished concrete offer different mounting challenges than finished drywall.

Concrete walls require masonry anchors or adhesive specifically formulated for concrete. Standard drywall anchors will not hold.

Tapcon screws or hammer-set anchors provide reliable mounting points. If you are using adhesive, pick one rated for masonry and temperature swings.

The installation guide covers the full hardware list — the techniques adapt to garage surfaces with the anchor and fastener swaps described above.

Exposed studs actually simplify things because you can screw directly into the wood. The stud spacing (typically 16 or 24 inches on center) will influence panel placement.

Align panel edges with studs for clean mounting, then fill in gaps where reflections are strongest. If you want more precision, use the mirror trick to confirm first-reflection points.

What Types of Panels Work Best in Garages?

Garage acoustic panel options including fiberglass, PET felt, and foam

Temperature, moisture, and impact resistance narrow the field — fabric-wrapped fiberglass, foam, and PET felt each trade off differently in a garage where panels get bumped by equipment and baked by summer heat.

Are Fabric-Wrapped Panels Good for Garages?

Fabric-wrapped fiberglass or mineral wool panels offer the best acoustic performance for the money. The rigid core absorbs effectively across a broad frequency range, and the fabric protects the core while providing finished appearance.

For garages, choose panels with durable fabric — not the delicate decorator fabrics used in corporate lobbies. Polyester fabric wraps resist abrasion better than cotton blends.

Professional installations often use panels rated for high-traffic commercial environments. These cost slightly more but withstand the incidental contact that happens in working spaces.

The ATS Acoustics Panel represents the professional standard — it is the same construction used in recording studios and broadcast facilities, built to last decades.

Does Foam Hold Up in a Garage?

Fiberglass panels set the performance bar, but they also set the price bar. Acoustic foam costs a fraction per square foot, though the trade-off shows up in frequency range — foam absorbs high frequencies well but does little for the mid and low frequencies where garage problems concentrate.

Foam can work as supplemental treatment after you have addressed primary reflection points with professional panels. Covering remaining wall areas with foam costs less than full professional coverage.

Fire rating matters in garages because vehicles, gasoline, and power tools create hazards that do not exist in living spaces. Choose foam with Class A or Class B fire ratings.

Avoid unrated foam sold primarily for appearance. If you cannot verify a fire rating, do not put it in a garage studio.

Standard polyurethane foam can release toxic fumes when burned. Melamine foam offers better fire performance but costs more.

For spaces where you store vehicles or flammable materials, fire-rated panels are not optional — factor fire safety into every panel choice.

Are PET Felt Panels Suitable for Garages?

PET felt panels offer an excellent middle ground for garage applications. They are moisture-resistant, do not irritate skin like fiberglass, and provide good mid-frequency absorption.

PET felt absorbs more of the midrange than foam does, and the NRC rating guide shows exactly where the crossover sits so you do not buy a material that only treats the top end.

The material comes from recycled plastic bottles, making it environmentally friendly. It does not support mold growth even in humid conditions.

Performance falls between foam and professional fiberglass panels. PET felt absorbs well from roughly 500Hz upward.

Low-frequency absorption requires serious thickness (4+ inches) or air gap mounting. If your garage is primarily for music, plan to add bass control separately.

For garages used primarily for speech (podcasting, calls) rather than music, PET felt may provide adequate performance at lower cost than fiberglass panels.

For music applications, supplement with bass trapping in corners — the panels vs bass traps comparison explains what each product is actually solving.

How Much Coverage Does a Garage Need?

Garage acoustic treatment coverage percentages across walls and ceiling

Garages start from zero absorption, so coverage percentages run higher than in furnished rooms — typically 40-50% of wall area for music or recording versus 15-20% in a living room. Calculating panel quantity and knowing the minimum effective treatment let you scale up in phases without overspending.

How Do You Calculate Panel Quantity?

Start with the surface area of the room. A typical two-car garage measures roughly 20×20 feet with 9-foot ceilings.

That is 400 square feet of floor, 400 of ceiling, and about 720 square feet of walls (accounting for the door). Use your real measurements if your garage is longer or taller.

For aggressive treatment targeting reverb reduction, aim to cover 40-50% of wall area and 30-40% of ceiling area. That is roughly 300-350 square feet of walls and 120-160 square feet of ceiling.

Using 2×4-foot panels (8 square feet each), you would need approximately 40-45 wall panels and 15-20 ceiling panels for full treatment. That is a large investment, which is why most people treat in phases.

The formula from the panel quantity calculator adapts to garages once you increase the target coverage percentage to account for the lack of existing absorption.

What is the Minimum Effective Treatment?

You can achieve meaningful improvement with much less than full treatment. Priority placement matters more than quantity.

Start with panels at first reflection points: the wall behind your primary position, the ceiling above where you work, and the side walls at ear level. This might require only 8-12 panels for a noticeable difference.

Add corner bass traps next. Garages have strong room modes due to parallel surfaces, and bass buildup in corners makes mixing difficult.

Four corner traps (floor-to-ceiling in each corner) handle the worst problems. If you cannot do all four, start with the two corners behind your speakers or the loudest instrument.

From there, add panels based on what you hear. If the rear of the room still sounds washy, add treatment there.

If specific walls create audible flutter, target those surfaces. Treat in phases and let the room tell you what to do next.

Minimal treatment: 15-20% wall coverage and 10-15% ceiling coverage (about 12-18 panels). Best for podcasting, calls, and light practice.

Moderate treatment: 25-35% wall coverage and 20-25% ceiling coverage (about 25-35 panels). Best for band practice and most home studios.

Comprehensive treatment: 40-50% wall coverage and 30-40% ceiling coverage (about 45-60 panels). Best for recording, mixing, and mastering.

How Do You Install Panels in a Garage?

Step-by-step garage panel installation for concrete and stud walls

Garage surfaces demand different fasteners than finished drywall, and temperature cycling means mechanical attachment beats adhesive every time. Choosing the right hardware and handling corners correctly keep panels secure through seasonal swings.

What Hardware Works for Garage Mounting?

The fastener you pick depends on what is behind the wall surface. For stud walls (finished or unfinished), #8 or #10 wood screws driven into studs provide secure mounting — pre-drill to prevent splitting, especially in older, dry lumber.

For concrete block walls, use masonry anchors. Drill with a hammer drill and masonry bit, insert plastic anchors, then drive screws.

Tapcon screws cut their own threads in concrete for a simpler approach. They are usually the fastest option for DIY garage installs.

For finished drywall over studs, Z-clips offer clean mounting. One clip attaches to the wall (into a stud), the mating clip attaches to the panel, and they interlock for a flush mount.

Avoid adhesive-only mounting in garages. Temperature cycling and humidity variations can cause adhesive failure.

If you still want adhesive as a secondary hold, the glue guide covers which formulas survive seasonal temperature swings in unconditioned spaces.

Use mechanical fasteners as primary attachment, with adhesive as supplemental hold if desired. That is the stable approach that will not fall off the wall when seasons change.

What Goes in Corners and Edges?

Corners benefit from bass traps more than flat panels. Stack triangular or rectangular traps floor-to-ceiling in as many corners as possible.

The 8-Pack Corner Bass Traps provide entry-level corner treatment. For serious bass control, thicker professional bass traps absorb noticeably more low end, but these foam traps offer a starting point.

Where walls meet ceiling, consider cove-mounted panels. Angling panels across the corner creates an air space behind that improves low-frequency absorption.

Cove mounting works especially well in garages with exposed ceiling joists. Mount panels diagonally from joist to wall top plate for a clean, rigid install.

Edge gaps between panels do not measurably affect acoustic performance. Sound waves are large compared to typical gaps.

Do not obsess over perfect panel-to-panel alignment; close is good enough. Focus on hitting the right zones instead.

What Are Common Garage Treatment Mistakes?

Before-and-after garage acoustic treatment with visible panel placement

The biggest mistake is treating only one surface — walls without ceiling treatment still produce vertical flutter, and ceiling without walls leaves horizontal reflections unchecked. Corner over-treatment and floor decisions are the two traps that waste budget after the primary surfaces are covered.

Why Does Over-Treating Corners Happen?

People often stack corner treatments excessively while ignoring wall centers. Corners do benefit from treatment, but the first priority is reducing direct reflections at ear level.

A garage with bass traps in every corner but bare walls at listening height will have controlled low frequencies but harsh, echoey midrange. Balance matters.

Start with primary reflection points on walls and ceiling. Add corner treatment for bass control.

Fill in remaining wall areas last. That order keeps your budget on the surfaces that actually change what you hear.

Is the Floor Worth Treating?

Garage floors present limited options. Concrete is nearly impossible to treat without covering it entirely.

If you are considering rugs, the rugs vs panels comparison quantifies the absorption gap so you know what flooring can and cannot solve.

Area rugs help but cannot match the absorption of wall treatment. Use them for comfort and a small reduction in high-frequency slap.

Interlocking foam floor tiles provide modest absorption while also making the space more comfortable for standing work. They will not solve major acoustic problems but contribute to overall absorption.

For recording studios in garages, consider floating floor systems. These decouple the room from the concrete, reducing vibration transmission.

The build is labor-intensive but provides both acoustic and comfort benefits. Most people should treat walls and ceiling first and only revisit the floor later.

For most garage uses, accept that the floor will remain reflective and compensate with additional wall and ceiling treatment.

Conclusion

Where to put acoustic panels in garage starts with treating the reflection paths that hit you first. Rear wall, ceiling cloud, side-wall first reflections, then corner bass control — that sequence drops reverb time from 2+ seconds to under 1 second in a typical two-car garage.

Music becomes clearer and less fatiguing, and the room responds well even at lower volume. Panels absorb sound inside the room but do not block it from leaving — absorption and soundproofing solve different problems. Treat in phases, listen after each round, and expand coverage only where the room still sounds harsh or boomy.

Frequently Asked Questions

Where Should I Put Acoustic Panels in My Garage?

Start with the wall behind your primary position (listening spot or performance area), then treat the ceiling above that zone. Add side wall panels at first reflection points, typically at ear height where sound bounces directly to your ears.

Corner bass traps complete the essential treatment. The garage door benefits from heavy curtains or portable panels that can move when you need door access.

What Type of Acoustic Panels Work Best in Garages?

Moisture-resistant panels suit garages best — PET felt resists humidity well, while fabric-wrapped fiberglass offers the best acoustic performance in dry conditions. Avoid paper-faced products and standard polyurethane foam if your garage has temperature extremes or moisture issues, and stick with fire-rated materials since garages often store vehicles and flammables.

How Many Panels Does a Garage Need?

A two-car garage typically needs 25-60 panels depending on your goals — 12-18 at priority positions for podcasting, 25-35 for band practice, and 45-60 for professional recording or mixing. Start with first reflection points and add panels based on what you hear.

Can I Treat Just Part of My Garage?

Partial treatment works if you focus on the zone where you work. Create an acoustic “bubble” around your listening or performance position with panels on the nearby walls and ceiling section.

Sound from the untreated portion will still reflect, but the immediate acoustic environment improves noticeably. Partial treatment suits garages that still double as vehicle storage.

Why Are Acoustic Panels Shaped the Way They Are? [2026]

Why are acoustic panels shaped the way they are—wedges, pyramids, hexagons, and “3D” patterns—when a flat rectangle seems like it should do the job? The truth is that complex shapes are mostly for show, but buyers assume those aggressive ridges are what actually absorb the sound.

If you’ve ever covered a wall with budget foam pyramids and still heard an awful flutter echo or a boxy resonance on your recordings, you’ve discovered the trap: the shape on the surface barely matters compared to the density of the material underneath it.

Once you stop prioritizing the surface pattern and start looking at the core material and mounting placement, you can actually buy fewer panels and get a noticeably cleaner-sounding room without wasting your budget.

Below you’ll find every common panel shape, what each one handles best, and how to pick the right structural option for your specific room. First, you’ll look at exactly why manufacturers use wedges and pyramids instead of flat blocks.

Quick Takeaway

Shape is mostly aesthetics; material, thickness, and placement drive performance. Flat fabric-wrapped fiberglass or mineral wool panels beat shaped foam in most rooms, especially once you treat first reflection points.

Why Do Acoustic Panels Come in Different Shapes?

Flat acoustic panels compared with shaped acoustic foam

The market for acoustic panels evolved from two completely different philosophies: performance-first professional treatment and consumer-grade foam designed specifically to look “acoustic” on a wall.

What Determines Acoustic Panel Shape?

For the vast majority of consumer foam, manufacturing efficiency and marketing drive the shape far more than actual acoustic theory.

The wedges, pyramids, and egg-crate patterns emerge simply from how massive blocks of polyurethane are molded and sliced. Manufacturers know that a heavily textured surface looks convincingly “acoustic” and professional to amateur buyers, making it much easier to sell than a plain, flat slab of foam.

By contrast, flat professional panels require a completely different manufacturing process involving a dense, rigid core and a tightly stretched fabric wrap. The material inside that wrap matters infinitely more than the exterior shape; a 2-inch flat fiberglass panel will absorb more sound energy across more frequencies than a 2-inch pyramid foam panel every single time.

Shape only becomes a relevant acoustic variable when comparing identical core materials. Two fiberglass panels of equal thickness and density will perform nearly identically, regardless of whether one happens to have a sculpted or beveled surface.

The home recording boom of the late 1990s and 2000s created a massive sudden demand for affordable room treatment. Foam manufacturers immediately responded with products that looked visually impressive on camera but cost pennies to produce.

Those iconic pyramid and wedge shapes offered visual proof to the buyer that something highly technical was happening on their walls. The textured surfaces photographed perfectly in magazines and made makeshift bedroom studios look like professional control rooms in marketing materials.

Crucially, those complex shapes also solved a massive practical problem for the manufacturers: hiding imperfect production. Heavily sculpted surfaces brilliantly mask the density inconsistencies and visual flaws that would be immediately obvious on a perfectly flat sheet of cheap foam.

How Do Panel Shapes Affect Sound Absorption?

How acoustic panel shape and depth affect absorption

Sound absorption occurs when acoustic energy physically enters a porous material and converts to heat through friction. The geometric shape of that entry surface plays a remarkably minor role compared to what happens deep inside the core.

Does Surface Area Matter for Absorption?

Mathematically, a pyramid face has far more surface area than a perfectly flat tile of the same width and height. That increased area theoretically creates more “entry points” for sound waves to penetrate the material, which many manufacturers aggressively tout as an acoustic advantage.

However, this theoretical advantage completely disappears once the sound actually enters the foam. The true metric that dictates performance is absorption depth — how far the sound wave must physically travel through dense material before bouncing off the drywall behind it.

A 2-inch flat panel and a 2-inch pyramid panel share the exact same maximum absorption depth. The pyramid’s extra entry surface area cannot compensate for the fact that the valleys between the pyramids are paper-thin, rendering the panel almost useless for absorbing lower frequencies. For true broadband absorption that handles both voice and music frequencies, panels with adequate, consistent thickness are the absolute baseline requirement.

Why Does Material Matter More Than Shape?

The physics of friction dictate that denser materials absorb more energy. Fiberglass and mineral wool have much higher density than standard polyurethane foam, creating far more resistance as sound waves attempt to pass through the fibrous matrix.

That density gap is why a flat ATS Acoustics fiberglass panel can achieve an NRC of 1.0, absorbing nearly 100% of the mid-range sound that hits it. By contrast, the absolute best pyramid foam on the market rarely exceeds an NRC of 0.65 because the material itself lacks the mass to stop the wave. The NRC rating guide explains exactly what that number captures and what it deliberately misses.

That 35% difference in absorption efficiency translates to a night-and-day difference in room acoustics. One properly treated corner using flat professional fiberglass panels will noticeably outperform an entire wall covered end-to-end in shaped foam pyramids.

What Are Common Acoustic Panel Shapes?

Common acoustic panel shapes and profiles

While the acoustic treatment market offers dozens of unique shape variations, almost all of them fall into three basic categories with highly predictable performance limits.

How Does Wedge and Pyramid Foam Perform?

Wedge and pyramid shapes completely dominate the budget acoustic foam market, appearing in countless YouTube studio tours and Amazon listings. The angled surfaces are designed to theoretically scatter incoming high-frequency reflections while the foam body absorbs the mid-to-high frequencies.

This dual-action approach works reasonably well above 500Hz, where the short audio wavelengths actually interact with the surface texture. However, the moment you drop below 500Hz, wedge and pyramid foam becomes almost acoustically transparent, allowing bass frequencies to pass through the thin material as if it wasn’t even on the wall.

For isolated voice recording in a small vocal booth, wedge foam can reduce flutter echo and harsh reflections quite affordably. But for full music mixing or accurate room treatment, those severe low-frequency limitations quickly become dealbreakers. The fiberglass panel guide puts the real NRC test data side-by-side so you can see the exact performance gap between foam wedges and rigid panels.

Does Egg Crate Foam Actually Work?

Egg crate foam—named for its obvious resemblance to cardboard egg cartons—offers the absolute maximum surface area of any common foam shape. The deep valleys and dramatic peaks create complex reflection patterns across the wall.

Unfortunately, that visual complexity provides almost zero functional acoustic benefit. Because the total absorption power is dictated by the thinnest point of the material, and the egg crate valleys are typically paper-thin, the sound waves punch right through to the drywall.

These patterns work best as pure visual elements in spaces where an aggressive industrial appearance matters more than acoustic precision. They have become iconic in recording studio photography, but their actual effectiveness is highly debatable.

Why Do Studios Use Flat Panels?

Given all these geometric options, flat fabric-wrapped panels remain the undisputed professional standard for serious acoustic treatment. Recording studios, broadcast facilities, and high-end concert halls worldwide rely almost exclusively on this simple rectangular design.

The flat shape is absolutely not a limitation—it is a massive advantage. It guarantees predictable absorption coefficients, delivers consistent performance across every square inch of the panel surface, and provides a clean, mature aesthetic that integrates perfectly with modern interior decor.

Professional flat panels typically use dense, rigid fiberglass or mineral wool cores wrapped tightly in acoustically transparent fabric. The UMIACOUSTICS fiberglass panels perfectly exemplify this no-nonsense construction approach.

How Do Sculptural and 3D Panels Work?

Three-dimensional acoustic panels used for sound treatment

The high-end acoustic panel market has completely moved beyond basic shapes and into complex sculptural designs that blur the line between room treatment and architectural art.

What Are 3D Sculptural Panels?

These premium sculptural panels use three-dimensional geometric patterns—sweeping waves, interlocking hexagons, or aggressive asymmetrical cuts—molded directly from dense acoustic materials like PET felt or fiberglass.

The massive advantage of a 3D surface is that it provides both heavy absorption and active diffusion simultaneously. When sound waves hit the deeply angled surfaces, the energy scatters in multiple directions across the room rather than reflecting directly back at the listener’s ear.

This dual-action combination makes sculptural panels highly versatile for hybrid environments. They excel in spaces where pure, flat absorption would create an uncomfortably “dead” acoustic environment, such as living rooms, corporate lobbies, or high-end restaurants.

The Art3d Wood Slat Panels represent the most popular hybrid approach on the market—rigid wood slats mounted over an absorptive felt backing, providing both a stunning visual focal point and legitimate acoustic function. The slat panel guide covers these wood-over-absorber designs in exhaustive detail.

Do Hexagon Panels Work Better Than Rectangles?

Because they look so futuristic, hexagonal panels have become massively trendy for home studios and streaming setups, allowing users to build visually interesting honeycomb patterns across their walls.

However, acoustically speaking, hexagons perform absolutely identically to basic rectangles of the exact same size and material. A 24-inch felt hexagon will absorb the exact same frequencies as a 24-inch felt square cut from the same factory sheet.

The advantage of the hexagon is entirely aesthetic and modular. Hexagons tessellate in unique ways that rigid rectangles cannot, allowing for highly creative wall arrangements and organic-looking installations that don’t look like a standard corporate office grid.

If you are currently calculating how many panels you need to fix your room, remember that shape does not change the math—only the total square footage of the surface area and the specific mounting placement actually matter.

Which Panel Shape Is Best for Your Space?

Room examples using different acoustic panel shapes

The right shape ultimately depends entirely on the room’s specific purpose and whether you are optimizing strictly for audio performance or balancing it with visual appearance.

When Should You Choose Flat Panels?

You must choose flat fiberglass or mineral wool panels whenever acoustic performance is the absolute priority. Critical environments like music production suites, voiceover booths, podcast studios, and high-end home theaters require the highly predictable, broadband absorption that only a flat, dense core can provide.

These flat panels also become mandatory when you need to hit specific reverberation decay targets in a professional space. By using air-gap mounting, you can easily extend their low-frequency reach without ever needing to change the panel’s physical shape.

Surprisingly, the budget also strongly favors flat panels. While a professional fiberglass board costs more per square foot than shaped polyurethane foam, you need much less wall coverage to achieve the exact same acoustic results.

When Should You Choose Shaped or Sculptural Panels?

You should pivot to shaped panels only when the visual impact of the room matters exactly as much as the acoustic improvement. Modern living rooms, open-plan offices, busy restaurants, and hotel lobbies need echo treatment, but they absolutely cannot look like a claustrophobic recording studio.

In these specific environments, sculptural 3D panels shine because complete, deadening absorption would feel unnatural and oppressive to guests. The physical combination of absorption and surface diffusion maintains the room’s natural liveliness while successfully controlling the harsh echoes.

The panel density guide thoroughly explains why the raw material and the physical thickness will always predict performance far better than any surface pattern ever could.

Panel Shape Best Use Case Absorption Range Cost Level
Flat Fiberglass Studios, theaters, critical listening 125Hz–8000Hz Mid-High
Wedge/Pyramid Foam Vocal booths, budget treatment 500Hz–8000Hz Low
Egg Crate Foam Visual appeal, light treatment 1000Hz–8000Hz Low
Wood Slat Living spaces, offices 250Hz–4000Hz Mid-High
3D Sculptural Design-focused spaces 500Hz–6000Hz High
Hexagon Creative arrangements Varies by material Mid

Conclusion

Panel shape ranks low on the list of factors that determine acoustic treatment success. Placement, coverage percentage, and material quality all matter more.

A room with properly placed flat panels will always outperform a room covered in poorly positioned sculptural panels — regardless of how impressive the shapes look.

Start with the basics: identify your room’s acoustic problems, calculate the coverage you need, and choose materials that address your specific frequency issues. Then select shapes that fit your aesthetic preferences.

For rooms with persistent bass problems, no panel shape compensates for inadequate thickness.

If you’re fighting boom, corner bass trap mounting addresses the frequencies that no flat panel can reach.

The most effective approach combines different panel types: flat absorption panels at first reflection points, diffusion or sculptural panels on rear walls, and bass traps in corners. This layered treatment addresses the full frequency spectrum.

The placement guide maps out where each panel type works best once you’ve chosen your shape.

Frequently Asked Questions

Why Are Acoustic Panels Shaped the Way They Are?

Most panel shapes are a manufacturing and marketing story, not a physics breakthrough.

Foam wedges and pyramids add a little surface area, but the core material still determines most absorption.

Studios stick with flat panels because the performance is predictable and broadband.

Does Panel Shape Affect Sound Absorption?

Shape affects absorption a bit at the very top end, but material and thickness dominate.

A 2-inch flat fiberglass panel can beat 2-inch pyramid foam by a wide margin on NRC, and the gap grows as you move lower in frequency.

What Is the Best Acoustic Panel Shape?

For pure acoustic performance, flat fabric-wrapped panels with fiberglass or mineral wool cores are the best default.

For living spaces and offices where you care about aesthetics, sculptural 3D panels or wood slat designs can be a good compromise.

Use wedge foam only for high-frequency flutter echo on a budget, and don’t expect it to fix low-mids or bass.

Are Pyramid Panels Better Than Flat Panels?

Pyramid foam panels aren’t better than flat fiberglass panels.

They’re less expensive, but also less effective—especially below 500Hz.

The shape adds surface area, but it can’t compensate for low-density foam and limited depth.

Professional studios choose flat panels because the performance difference is wide and measurable.

Why Are Acoustic Panels Used in Concert Halls? (Explained)

Why are acoustic panels used in concert halls when the music already sounds great, but can still turn muddy or harsh depending on where you sit? The problem is that a big room creates powerful reflections and long reverberation that can smear the direct sound.

Once you understand what concert hall panels absorb (and what they intentionally diffuse), you can get clearer sound without killing the warmth that makes live music feel alive. Start by thinking in zones — stage, ceiling, side walls, and audience — then see what each one does below.

Quick Takeaway

Concert halls use acoustic panels to control reverberation time, eliminate echo, and ensure every seat hears balanced sound. These panels absorb excess reflections while preserving the natural warmth that makes orchestral music feel alive.

Why Do Concert Halls Need Acoustic Treatment?

Concert hall interior with iconic acoustic design and wooden diffusers

When you deal with massive 2,000-seat venues featuring 40-foot vaulted ceilings, sound behaves in ways that no residential bedroom studio will ever encounter. The acoustic energy literally has time to separate, bounce off dozens of different surfaces, and arrive at the listener’s ear as a confusing, smeared wash of noise.

The goal for these massive spaces isn’t to kill all the reflections completely—that would make the orchestra sound thin and lifeless. The actual fix requires meticulously controlling exactly which reflections reach the audience and which ones get absorbed.

What Makes Concert Hall Acoustics Different From Studios?

Recording studios aim for a completely neutral, heavily controlled environment where the mixing engineer can shape every single element of the track manually. Concert halls require something infinitely more complex: a controlled but highly natural acoustic environment.

While a mixing studio might aggressively target a dead 0.3 seconds of reverberation time, a symphony hall intentionally aims for a massive 1.8 to 2.2 seconds of decay.

That physical difference explains why even the highest-resolution concert recordings never quite capture the sheer emotional impact of the live experience. In a properly designed space, the hall itself becomes an active instrument, adding a physical depth and dimension to the orchestra that stereo speakers simply cannot reproduce.

Professional acoustic designers spend decades studying the architecture of legendary venues like Vienna’s Musikverein and Boston Symphony Hall. The gorgeous acoustics in these spaces weren’t lucky accidents—they resulted from brilliant architectural geometry that naturally diffused and absorbed the sound before modern panels even existed.

How Does Sound Behave in Large Spaces?

The sheer scale of a concert hall completely changes the physics of low-frequency sound. Bass waves at 100 Hz measure roughly 11 feet long from peak to peak; in a typical home living room, these massive waves barely have room to form before slamming into a wall and creating muddy room modes.

Concert halls give those massive bass frequencies the physical space they need to breathe and develop fully. The brutal trade-off is that high frequencies—which have tiny wavelengths measured in mere inches—now have the opportunity to bounce unpredictably across vast distances before dying out.

Acousticians call the resulting problem “flutter echo”—rapid, metallic-sounding reflections trapped bouncing between parallel walls that make spoken words unintelligible and music painfully harsh. Strategically placed acoustic panels physically break up these specific reflection paths while leaving the rest of the room’s natural reverb untouched.

This acoustic challenge multiplies exponentially with audience size. Every single person in the room absorbs sound differently based on their winter clothing, their body position, and their specific seat location, making the acoustic balancing act extremely complex.

How Do Acoustic Panels Control Reverberation?

QRD diffusers scattering sound evenly in a concert hall

Reverberation time—the exact amount of time sound persists in the air after the orchestra stops playing—defines a hall’s entire acoustic character. Panels shape that character by physically converting the chaotic sound energy into microscopic heat through friction.

However, balancing the split between raw absorption and geometric diffusion is where the most critical design decisions happen.

What’s the Difference Between Absorption and Diffusion?

Concert halls must use both absorption and diffusion simultaneously, but the two treatments serve entirely opposite physics purposes. Absorption permanently removes sound energy from the room, while diffusion shatters and scatters it to keep the room feeling alive.

When you look at the walls of a modern concert hall, those gorgeous, sculptural wooden panels are almost entirely diffusers, not absorbers.

Those complex diffusers break up the direct sound waves and redirect them outward at multiple different angles simultaneously. The acoustic energy remains in the room so the music stays lively and powerful, but the scattering effect prevents any single harsh reflection from dominating the audience’s ears.

Conversely, the absorptive panels are typically hidden completely out of sight behind perforated wooden screens or stretched fabric ceilings. Acoustic designers integrate them deeply into the room’s architecture so they pull out the muddy frequencies without ruining the visual majesty of the hall.

Why Does Panel Thickness Matter for Bass?

When dealing with the massive low-end energy of a full orchestra, you cannot cheat physics: low frequencies require very thick treatment to be absorbed. A standard 2-inch panel might absorb 80% of the sound at 1000 Hz, but it will only catch about 20% of the energy down at 125 Hz. That gap is exactly what thickness comparisons quantify for smaller rooms.

To handle orchestral bass, concert halls must deploy absorption treatment that is 4 to 6 inches thick in strategic locations. Some of the most highly engineered venues use massive, custom-tuned bass traps hidden inside the architectural corners that extend 12 inches or deeper into the walls.

While the budget gap between professional concert hall treatment (millions of dollars) and home studio treatment (a few hundred dollars) is astronomical, it ultimately just scales with depth. The exact same unbending physics that govern panel thickness and bass absorption in a stadium apply to your bedroom studio.

What Acoustic Challenges Do Concert Halls Face?

Hidden absorption panels behind perforated wood in a concert hall

The central battle of concert acoustics is balancing crystal-clear articulation with massive, enveloping warmth. If you use too much absorption, the orchestra sounds thin and isolated; if you use too little, the complex instruments blur together into a wash of chaotic noise.

Why Is Reverberation Both Friend and Enemy?

Reverberation is the exact acoustic property that adds richness and emotional depth to live music. When a violinist plays a single note on stage, the reverberant field of the room blends that direct sound with thousands of tiny reflections bouncing off every architectural surface.

The resulting acoustic “bloom” is what makes live orchestral music feel overwhelmingly powerful in a way that stereo recordings can never fully capture. However, excessive reverberation destroys intelligibility instantly—fast cello passages blur together into a hum, and the aggressive punch of the percussion section is completely lost in the lingering echo.

Concert hall designers must hit highly specific reverberation targets to make the room work. The same targeting principle applies at home — panel spacing determines how evenly treatment distributes across a wall. They typically design for 1.8 to 2.2 seconds of decay for a symphony hall, but must design much shorter, drier decay times for opera houses where vocal lyric clarity matters more than instrumental warmth.

How Do Parallel Walls Create Problems?

Parallel wall surfaces create the absolute worst acoustic phenomenon: flutter echo. This is the distinctive, metallic “boing” sound you hear when you clap your hands forcefully in an empty hallway. In a massive concert hall, an untreated flutter echo makes the music sound painfully harsh and physically fatiguing to listen to for two hours.

Classical concert hall design fought this physics problem by simply avoiding parallel walls entirely. The famous “shoebox” design of many historic, legendary halls actually incorporates subtle architectural angles into the plaster that naturally break up those flutter patterns without needing modern foam.

Modern halls use heavily engineered acoustic panels and wooden diffusers to achieve these same pristine results without being locked into specific architectural shapes. Strategic panel placement physically breaks up the reflection paths between any parallel surfaces the architect decided to include.

Because the physics of a bouncing wave never change, this specific requirement for targeted positioning is exactly why panel placement strategy stays completely consistent whether you are treating a massive concert hall or a spare bedroom studio.

Where Do Concert Halls Place Acoustic Treatment?

Suspended acoustic reflectors directing sound toward a concert audience

Hanging the most expensive acoustic panel in the wrong location wastes thousands of dollars and often makes the room sound worse. Concert hall acousticians break the room into three critical zones—the stage, the audience, and the transition spaces—before mapping out the ceiling and side walls.

What Role Does the Ceiling Play?

The ceiling in a massive concert hall must serve double duty: it has to reflect sound outward toward the distant balcony seats while simultaneously preventing excessive reverberation from building up directly overhead.

To accomplish this, engineers use suspended reflector panels—those massive wooden clouds flying above the stage—to catch the acoustic energy and physically direct it to the back rows. Without these heavy reflectors, audience members sitting far from the stage would lose up to 6 dB of the direct, uncolored sound.

Many elite modern halls now use motorized, adjustable ceiling panels that can be raised or lowered on demand from a control booth. This mechanical flexibility allows the venue to instantly optimize the ceiling acoustics depending on whether they are hosting a booming symphony or a quiet solo performance.

The ceiling also requires heavy, targeted treatment at the extreme outer edges where it meets the walls. These upper tri-corner areas naturally trap and accumulate massive amounts of bass energy, requiring specialized, hidden absorption that is functionally identical to the corner-mounted panels you would use in a smaller home studio.

How Do Side Walls Affect Sound Quality?

Side wall reflections are arguably the most important acoustic element in the room because they provide key spatial information to the human brain. Early lateral reflections—the sound waves bouncing off the side walls and arriving at your ears within 20 milliseconds of the direct sound—are entirely responsible for creating the psychological sense of being completely enveloped by the music.

Concert halls must carefully balance heavy absorption with complex diffusion on these side walls. If they use too much absorption, they kill the lateral reflections entirely and eliminate the spacious feeling; if they use too little, they create harsh, highly distracting echoes that ruin the performance.

Most world-class halls solve this by using a combination of thick absorptive panels down at ear level to kill the direct slap-back, paired with massive wooden diffusion blocks higher up on the wall. This keeps the spatial richness that classical listeners expect while cutting the harsh, immediate bounces that cause listening fatigue. The exact same placement logic applies when treating home studios, just operating at a vastly smaller scale.

How Do Modern Concert Halls Optimize Acoustics?

Concert hall treatment placement diagram with vertical and horizontal panels

The physics of sound haven’t changed, but the tools available to architects have evolved massively. Computer modeling, highly engineered composite materials, and decades of granular acoustic research give modern halls control capabilities that historic architects couldn’t have imagined.

What Technology Do Concert Halls Use?

The biggest leap forward is the implementation of variable acoustics. Modern halls frequently incorporate massive, motorized acoustic panels and heavy curtains hidden inside the walls that can mechanically change position based on the specific needs of the performance. Some cutting-edge venues even use inflatable acoustic bladders that can be deployed from the ceiling or retracted into the architecture. Ceiling panel options for home spaces follow a simpler version of that overhead logic.

Beyond physical panels, electronic enhancement systems now actively supplement the natural acoustics in many multi-purpose halls. Hidden microphone arrays capture the live sound from the stage, feed it into massive DSP processors, and pump it back into the room through dozens of hidden speakers to artificially reinforce specific frequencies or extend the room’s spatial decay.

While these electronic systems remain highly controversial among classical music purists, the absolute best halls in the world still refuse to use them, relying entirely on passive acoustic treatment—meticulously engineered panels, complex diffusers, and flawless architectural geometry.

Can Acoustics Be Adjusted for Different Music?

Because those passive variable acoustic systems physically change the geometry of the room, they allow for astonishingly wide-ranging adjustments. Simply dropping massive, absorptive acoustic banners from the ceiling can instantly lower the room’s reverberation time by a full 0.5 seconds or more.

Mechanically lowering the massive ceiling panels physically shrinks the room’s effective air volume, completely changing how the low frequencies behave. Similarly, shifting the heavy wooden orchestra shell on the stage fundamentally alters how the initial acoustic energy is projected into the audience.

These massive structural adjustments matter because different genres of music demand entirely different acoustic environments. A sweeping, romantic symphony absolutely requires a long, luxurious reverberation tail to sound powerful, while intricate Baroque chamber music requires much drier, highly articulate acoustics to prevent the fast notes from blurring together.

Home listening spaces and bedroom studios can achieve this exact same flexibility on a smaller scale by mixing different types of treatment. By comparing NRC ratings across panel types, you can mathematically match the exact amount of absorption to your room’s specific acoustic needs.

What Can Home Spaces Learn From Concert Hall Design?

Common concert hall acoustic mistakes with wrong materials and placement

The exact same acoustic principles translate directly to your bedroom studio, but you have to adjust for the massive difference in physical scale. Because 100 Hz waves easily exceed the physical dimensions of a home space, you have to prioritize corner bass trapping far earlier than a concert hall architect would.

What Principles Apply to Home Studios?

The most critical principle to copy is prioritizing first reflections. Concert halls spend millions targeting the specific surfaces sitting directly between the sound source and the listener. In a home studio, treating those exact side-wall reflection points provides the biggest audible improvement per dollar spent, period.

The second principle is diffusion, which prevents the claustrophobic, “boxy” sound that plagues over-treated home studios. Even deploying basic wooden diffusion blocks on the back wall maintains the room’s liveliness while successfully controlling the rear reflections.

The wood slat acoustic panels that have become very popular in modern home studios actually rely on this exact same concert hall design principle, utilizing rigid wooden slats to provide high-frequency diffusion while the felt backing absorbs the muddy low-mids.

Should You Copy Concert Hall Techniques?

While the physical principles transfer perfectly, the reverberation targets absolutely do not. A home studio rarely needs the long, sweeping reverberation times that concert halls intentionally cultivate to support a symphony.

Most modern mixing and recording spaces target a dry 0.3 to 0.5 seconds of decay—a fraction of the 2.2 seconds designed into a classical hall. You need your home room to be much drier so you can actually hear the digital reverb you are adding to your vocal tracks without the room confusing your ears.

However, the core lesson of balanced treatment transfers directly: neither extreme absorption nor completely untreated reflections produce good results. The room’s physical size and its intended purpose must dictate how much panel coverage you actually need. If you need a reliable starting point for that baseline absorption, the UMIACOUSTICS 4-Pack Fiberglass Panels provide the exact density required to start bringing those decay times down into the home studio range.

Factor Concert Hall Home Studio
Target Reverb Time 1.8-2.2 seconds 0.3-0.5 seconds
Primary Goal Even distribution to all seats Accurate monitoring at mix position
Treatment Approach Balance absorption/diffusion Targeted absorption at reflection points
Bass Treatment Architectural integration Corner bass traps
Ceiling Treatment Reflectors + absorption Cloud panels above mix position
Budget Scale Millions of dollars Hundreds to thousands

What Should You Take Away From Concert Hall Acoustics?

Random panel placement fails at every scale — concert halls prove that physics rewards precision over square footage. Match your absorption-to-diffusion ratio to the room’s purpose, and you will get closer to the clarity concert designers spend years chasing.

Professional acoustic treatment pays for itself in results. Whether you’re building a concert venue or treating a bedroom studio, quality acoustic panels transform the listening experience.

The acoustic panels resource hub covers every treatment option, and when you are ready to mount, the installation guide covers each method step by step.

Conclusion

The single rule that transfers from a 2,000-seat symphony hall to a spare bedroom is this: treat selectively, not everywhere. Concert halls spend millions placing absorbers and diffusers in exact locations because physics rewards precision over coverage.

Apply that same logic at home — start with first-reflection points and corners, measure the result, and add treatment only where the room still fights you. That targeted approach is exactly what makes concert acoustics work at any budget.

Frequently Asked Questions

Why Do Concert Halls Use Acoustic Panels?

Panels control reverberation time, eliminate flutter echo, and ensure balanced sound reaches every seat. Without treatment, a large room creates chaotic reflections that blur music and make speech unintelligible.

How Many Panels Do Concert Halls Need?

Thousands of square feet, distributed across walls, ceilings, and architectural features. The exact amount depends on room volume, shape, and intended use — but placement matters more than raw quantity, which is why designers rely on computer modeling to optimize every panel location.

Are Concert Hall Panels Different From Home Panels?

Yes — the physics are identical. Concert hall panels are custom-designed and architecturally integrated, while home panels use the same absorption principles in standard sizes.

Professional-grade home panels with NRC ratings of 0.85 or higher use the same core materials as concert hall treatment: fiberglass or mineral wool wrapped in acoustically transparent fabric.

Can I Use Concert Hall Techniques at Home?

Absolutely — first-reflection treatment, corner bass trapping, and balanced absorption/diffusion all transfer to home spaces. The main scaling difference is target reverberation time: home studios aim for 0.3 to 0.5 seconds versus 1.8+ seconds in a symphony hall, so panel count and treatment density change accordingly.

How to Make DIY Bass Traps: Complete Build Guide [2026]

Can you make DIY bass traps that actually fix boomy low end? Yes — but only if you build them like real low-frequency treatment instead of filling corners with thin foam or decorative panels that merely look acoustic.

The pain is that bass buildup comes from room dimensions and corner pressure, not from a lack of generic wall coverage. That is why shallow foam, weak materials, and bad placement leave you with the same muddy lows and uneven monitoring after all the effort.

The upside is that a proper DIY build with rigid fiberglass or mineral wool can smooth room response, tighten bass, and make listening or mixing decisions far more trustworthy without forcing you into commercial-trap pricing.

Below, you’ll see the first moves that matter most: choose the right insulation, build enough depth into the frame, place the finished traps in the corners first, and avoid the common products that solve the wrong problem.

Quick Takeaway

Build DIY bass traps with rigid fiberglass or mineral wool at least 4 inches thick, wrap them in breathable fabric, and place them floor-to-ceiling in room corners. The material and thickness matter far more than cosmetic finish, and thin foam sheets are not a substitute for real bass trapping. Start with the rear corners, then add the front corners and wall-ceiling junctions if budget and space allow.

What Materials Do You Need for DIY Bass Traps?

DIY bass trap materials including rigid insulation, wood frame pieces, fabric, and hardware

The effectiveness of your bass traps depends almost entirely on choosing the right absorptive material. Foam won’t work — it’s too light and doesn’t absorb low frequencies effectively.

You need dense, rigid insulation specifically designed for acoustic applications. The two most common options are Owens Corning 703 (rigid fiberglass) and Rockwool Safe’n’Sound (mineral wool). Both work excellently for bass absorption.

Understanding the difference between bass traps and acoustic panels helps you choose the right thickness — bass traps need to be significantly thicker than standard panels.

Which Insulation Works Best?

Owens Corning 703 is the industry standard for DIY acoustic treatment. It’s rigid, easy to cut, and has excellent absorption characteristics across the frequency spectrum. A 4-inch thick panel absorbs effectively down to around 125 Hz.

A rigid fiberglass board option like Owens Corning 703 semi-rigid fiberglass board is the closest match to the classic studio-style DIY trap recipe.

If you want a more forgiving mineral-wool route for thicker corner builds, AFB Acoustical Fire Batts mineral wool insulation is a strong DIY-friendly alternative.

Both materials are safe when handled properly. Wear gloves, a dust mask, and long sleeves during construction — the fibers can irritate skin and lungs during cutting. For more on acoustic panel safety, the same principles apply to bass trap materials.

Complete Materials List

For a standard 2’ x 4’ floor-to-ceiling corner trap, you’ll need:

  • 2-4 panels of 2” mineral wool or rigid fiberglass insulation (stacked for 4”+ thickness)
  • 1” x 4” lumber for the frame (approximately 20 linear feet per trap)
  • Acoustically transparent fabric (enough to wrap the entire trap)
  • Wood screws (1.5” and 2.5”)
  • Staple gun and staples
  • Mounting hardware sized for the finished trap weight
  • Wood glue (optional but recommended)

Total cost runs $40-60 per trap depending on local material prices and insulation choice.

How Do You Build the Frame?

Wood frame construction for a bass trap with deep corner joints

The frame serves two purposes: it holds the insulation in place and provides a surface for mounting the fabric covering. A well-built frame also makes installation much easier.

Start by determining your trap dimensions. Standard bass traps are 2 feet wide and extend from floor to ceiling (typically 8 feet). The depth should accommodate at least 4 inches of insulation — I recommend building 4.5-inch deep frames to allow slight compression of the insulation.

Cut your 1” x 4” lumber to create a rectangular frame matching these dimensions. The 1×4 is actually 0.75” x 3.5”, so two pieces stacked give you the 4+ inch depth you need.

Step-by-Step Frame Construction

Cut two long pieces for the vertical sides (matching your ceiling height minus 1 inch for clearance). Cut horizontal pieces for top, bottom, and one or two cross-braces.

Assemble using wood screws and wood glue for maximum strength. Pre-drill holes to prevent splitting, especially near the ends of boards. The frame should be rigid enough that it doesn’t flex when you press on the center.

Add a cross-brace at the midpoint for traps taller than 4 feet. This prevents bowing and keeps the insulation properly positioned. The brace can be a single horizontal piece or an X-pattern for extra rigidity.

Frame Design Variations

For corner-mounted traps, you can build triangular frames that fit directly into corners. These “superchunk” designs pack more insulation into the corner where bass accumulates most intensely.

The triangular approach uses the corner itself as part of the structure, requiring less lumber and creating a more effective bass trap. Cut the frame pieces at 45-degree angles where they meet the walls.

Freestanding rectangular frames work better if you might relocate the traps later or want to position them slightly away from walls for additional absorption.

How Do You Install the Insulation?

Rigid insulation stacked snugly inside a wooden bass trap frame

Insulation installation is straightforward but requires attention to fit. Gaps between insulation panels reduce effectiveness, so aim for a snug fit throughout.

Cut your insulation panels to match the interior frame dimensions. Use a straightedge and utility knife for clean cuts — serrated bread knives also work surprisingly well for rigid fiberglass.

Stack multiple 2-inch panels to achieve 4+ inch thickness. The panels should press slightly against each other and the frame when installed, eliminating air gaps.

Cutting Techniques for Clean Edges

Mark your cut lines clearly before cutting. A permanent marker shows up well on both fiberglass and mineral wool. Measure twice — insulation isn’t cheap, and mistakes mean buying more.

For straight cuts, clamp a straightedge along your cut line and run the knife along it in multiple passes. Don’t try to cut through in one stroke — three or four lighter passes produce cleaner edges.

For notches around frame cross-braces, make the vertical cuts first, then the horizontal. Remove the waste piece carefully to avoid tearing adjacent material.

Ensuring Proper Density

The insulation should fill the frame completely without excessive compression. Moderate compression (about 10-15%) actually improves low-frequency absorption slightly, but heavy compression reduces effectiveness.

If your insulation is too loose in the frame, add an additional thin layer or use spray adhesive to secure panels to each other. If it’s too tight, you may need to trim slightly — forcing oversized insulation creates bulges that make fabric application difficult.

Check that no gaps exist between insulation panels or between insulation and frame edges. Even small gaps create acoustic “leaks” that reduce bass absorption.

How Do You Apply the Fabric Covering?

Breathable fabric stretched and stapled over a bass trap frame

The fabric covering gives your bass traps a finished appearance while protecting the insulation from damage. It must be acoustically transparent — sound needs to pass through easily to reach the absorptive material.

Burlap, muslin, and purpose-made speaker cloth all work well. Avoid tightly woven fabrics, vinyl, or anything with a plastic backing — these reflect sound instead of letting it through.

Test fabric transparency by holding it over your mouth and breathing through it. If airflow is easy and unrestricted, the fabric will work for acoustic applications.

Wrapping Technique

Cut your fabric at least 4 inches larger than the frame on all sides. This provides enough material to wrap around the edges and staple securely to the back.

Lay the fabric face-down on a clean surface. Center the bass trap frame (insulation side down) on the fabric. Pull one long edge taut and staple to the back of the frame every 2-3 inches.

Move to the opposite long edge. Pull the fabric tight (but not so tight it distorts the weave) and staple. Repeat for the short edges. The fabric should be smooth and wrinkle-free on the visible face.

Corner Finishing

Corners require neat folding to avoid bulky bunches of fabric. The hospital corner technique works well — fold one edge flat, then fold the adjacent edge over it at a 45-degree angle.

Trim excess fabric at corners before folding to reduce bulk. Leave enough material to secure properly, but remove thick layers that would create visible bumps.

Staple corners securely — they experience the most stress during handling and installation. A few extra staples here prevent future loosening.

Where Should You Place DIY Bass Traps?

Room diagram showing bass trap placement in corners and ceiling junctions

Placement determines how effectively your bass traps control low frequencies. Bass energy accumulates in corners where three surfaces meet (tri-corners) and along edges where two surfaces meet (di-corners).

Vertical room corners are the highest priority. The four vertical corners where walls meet contain the highest concentration of bass energy and should be treated first.

After vertical corners, address the horizontal junctions between walls and ceiling, then walls and floor. Full treatment of all corner junctions provides maximum bass control, but even treating the four vertical corners makes a significant difference.

Priority Placement Order

Start with the two corners behind your listening position. Bass buildup here creates the most audible problems — boomy low end, uneven frequency response, and masking of mid-range detail.

Add traps to the front corners next. These corners accumulate bass from your speakers or subwoofer before it has a chance to spread evenly through the room.

If budget allows, treat the ceiling-wall junctions above the front and rear walls. These horizontal traps catch bass that travels along the ceiling, further smoothing room response.

Mounting Options

Floor-to-ceiling traps can rest on the floor with simple L-bracket support at the top. This approach is stable and doesn’t require wall damage beyond a few screw holes. The mounting principles are similar to hanging acoustic panels, just scaled for larger, heavier units.

For ceiling-mounted horizontal traps, use sturdy eye hooks and aircraft cable for a clean, floating appearance. Make sure ceiling attachments hit studs or use appropriate anchors — bass traps are heavy. Proper acoustic panel installation techniques apply here as well.

Leaning traps against walls works for temporary setups but isn’t ideal. Any gap at the top allows bass to escape untreated, and the traps can shift over time.

What Mistakes Should You Avoid?

Common bass trap mistakes including thin foam, shallow depth, and poor placement

Building ineffective bass traps wastes time and money. These common mistakes reduce performance dramatically — avoid them from the start.

The biggest mistake is using the wrong absorptive material. Acoustic foam, egg crate foam, and moving blankets don’t absorb bass effectively. Their lightweight, porous structure works for high frequencies only. Rigid fiberglass or mineral wool is essential.

Insufficient thickness is another common problem. Two-inch thick traps absorb very little below 250 Hz. Four inches is the minimum for meaningful bass absorption; six inches or more is better.

Using Foam Instead of Rigid Insulation

Foam is lightweight and easy to work with, which makes it tempting for DIY projects. But physics works against foam for bass absorption — low frequencies require dense, thick material to absorb effectively.

A 4-inch foam panel absorbs less bass than a 2-inch rigid fiberglass panel. The density difference makes foam essentially useless for bass control, regardless of thickness.

This is where many buyers get misled by thin peel-and-stick products. A self-adhesive sheet like Kaqiluo high-density self-adhesive sound insulation may look convenient, but it targets a different problem than room-mode control.

Save foam for high-frequency reflection control. For bass traps, always use rigid fiberglass or mineral wool products with densities of 3-8 pounds per cubic foot.

The same warning applies to multi-pack peel-and-stick foam options like Kaqiluo 2 Pack self-adhesive sound insulation foam. It is fine for light utility use, but not for the low-frequency job this article is solving.

Placing Traps Away From Corners

Bass traps work by absorbing energy where it’s concentrated. Moving traps away from corners dramatically reduces their effectiveness because bass energy density drops rapidly with distance from corner junctions.

A bass trap in the middle of a wall absorbs perhaps 20-30% as much bass energy as the same trap in a corner. The corner position is worth more than doubling the trap size.

If corners are inaccessible, place traps as close to corners as possible. Even 6 inches of gap between trap and corner reduces effectiveness noticeably.

Bass Trap Types Comparison

Comparison chart of DIY bass trap designs by cost, difficulty, and effectiveness
Trap Type Best For Difficulty Cost Per Trap Effectiveness
Rectangular Panel Floor-to-ceiling corners Easy $40-60 Good
Superchunk (Triangular) Maximum bass absorption Medium $60-80 Excellent
Ceiling Cloud Wall-ceiling junctions Medium $50-70 Good
Freestanding Flexible placement Easy $45-65 Moderate
Commercial (Reference) Convenience None $150-400 Good to Excellent

How Should You Build Your DIY Bass Traps?

Finished DIY bass traps installed in room corners

Building effective DIY bass traps requires the right materials, proper construction, and strategic placement. Use rigid fiberglass or mineral wool insulation at least 4 inches thick, build sturdy frames, wrap in acoustically transparent fabric, and mount in room corners.

The cost savings are substantial — $40-60 per DIY trap versus $150-400 for commercial equivalents. Four corner traps for under $250 total can transform a boomy, uneven room into a controlled listening environment.

Start with the corners behind your listening position, then add front corners and ceiling junctions as budget allows. Even partial treatment makes a noticeable difference in bass clarity and overall room sound.

If your goal is a cleaner decorative finish after you handle the low end, a visible-room option like Acoustic Panels 4 Pack Room Kit Large 46 × 23 works better as a complement than a substitute.

For more information on acoustic treatment options, visit our bass traps guide or explore how bass traps compare to acoustic panels.

Frequently Asked Questions

How Do You Make DIY Bass Traps?

Build a wood frame sized for 4+ inches of rigid fiberglass or Rockwool insulation. Install the insulation snugly, wrap the assembly in acoustically transparent fabric, and mount in room corners floor-to-ceiling. Total cost runs $40-60 per trap.

The key is using dense, rigid insulation — not foam — and achieving at least 4 inches of thickness for effective low-frequency absorption.

What Is the Best Material for DIY Bass Traps?

Rigid fiberglass (Owens Corning 703) or mineral wool (Rockwool Safe’n’Sound) are the best options. Both offer excellent bass absorption at reasonable cost. Avoid foam, which is ineffective for low frequencies regardless of thickness.

Density matters more than brand — look for insulation rated 3-8 pounds per cubic foot for optimal bass absorption.

How Thick Should Bass Traps Be?

Minimum 4 inches for meaningful bass absorption. Six inches or more provides better low-frequency performance. Two-inch traps absorb very little below 250 Hz and function more like acoustic panels than true bass traps.

Thicker is always better for bass absorption, limited only by available space and budget.

Where Should You Put Bass Traps?

Vertical room corners are the highest priority — bass energy concentrates where walls meet. Treat the four vertical corners first, prioritizing corners behind the listening position. Then add horizontal traps at wall-ceiling junctions for additional control.

Corner placement is critical — the same trap placed mid-wall absorbs far less bass than when positioned in a corner.

How to Clean Acoustic Panels: Complete Maintenance Guide [2026]

How do you clean acoustic panels without wrecking the fabric, soaking the core, or turning a light dusting job into a replacement bill? The safe answer is simpler than most people think — but only if you match the method to the panel material.

The real problem is that acoustic panels are easy to damage with normal household cleaning instincts. Too much water, harsh chemicals, and aggressive scrubbing can permanently flatten foam, separate fabric from frames, or contaminate fiberglass and mineral-wool cores.

The good news is that routine care is straightforward. Light vacuuming, gentle blotting, and better prevention habits handle most maintenance without hurting acoustic performance.

Below, you’ll see which cleaning methods are safe for each panel type, what products to avoid, how to remove stains, and when replacement makes more sense than another cleaning attempt.

Quick Takeaway

For routine maintenance, vacuum fabric or PET felt panels monthly with a soft brush attachment on low suction. For stains, use a barely damp microfiber cloth with mild soap solution and blot gently rather than rubbing. Never soak panels — moisture damages acoustic cores and can loosen fabric. Foam panels are the most delicate, while PET felt panels are usually the easiest to maintain.

What Cleaning Methods Work for Different Panel Types?

Comparison of fabric, foam, and PET felt acoustic panels with safe cleaning tools

Before grabbing any cleaning supplies, identify what your panels are made of. Each material requires a different approach, and using the wrong method causes irreversible damage.

The core material matters as much as the outer covering. Fiberglass-core panels wrapped in fabric can handle gentle vacuuming but hate moisture. Foam panels are delicate and tear easily. PET felt panels are surprisingly durable and tolerate more aggressive cleaning.

Understanding your panel construction determines everything that follows. If you’re unsure what your panels are made of, check with the manufacturer before attempting any cleaning beyond light dusting.

How to Clean Fabric-Wrapped Panels

Fabric-wrapped fiberglass panels are the most common professional-grade acoustic treatment. The outer fabric is typically acoustically transparent polyester or burlap, stretched over a rigid fiberglass or mineral wool core.

Start with gentle vacuuming using a soft brush attachment. Set your vacuum to the lowest suction setting — high suction can pull fabric away from the frame or damage the weave. Work in one direction, top to bottom, rather than scrubbing back and forth.

For spots and stains, dampen a microfiber cloth with water and a tiny amount of mild dish soap. Blot the stain gently — never rub, which spreads the stain and damages fabric fibers. Let the area air dry completely before remounting.

How to Clean Foam Panels

Acoustic foam requires the gentlest approach of any panel type. The open-cell structure that makes foam effective at absorbing sound also makes it fragile and easily damaged.

Avoid vacuuming foam panels whenever possible. Even low suction can tear the delicate cell structure, especially at edges and peaks. Instead, use a soft-bristle brush or lint roller to remove surface dust.

For deeper cleaning, compressed air works better than any liquid method. Short bursts from a distance dislodge dust from foam cells without risking damage. If you must address a stain, barely damp is the maximum moisture level — foam absorbs water like a sponge and takes forever to dry.

How to Clean PET Felt Panels

PET felt panels (made from recycled plastic bottles) are the easiest to maintain. Their dense, non-porous surface resists dust accumulation and tolerates more aggressive cleaning than fabric or foam.

Vacuum PET felt panels using any brush attachment at normal suction. The material won’t stretch, tear, or separate like fabric panels. You can vacuum in any direction without concern.

Spot cleaning is straightforward — dampen a cloth and wipe the affected area. PET felt dries quickly and doesn’t absorb moisture into its core the way fiberglass panels do. For stubborn stains, mild upholstery cleaner works well without damaging the material.

Can You Vacuum Acoustic Panels?

Soft upholstery brush vacuuming a fabric acoustic panel on low suction

Vacuuming is the safest and most effective routine maintenance for most acoustic panels. Done correctly, it removes dust before it penetrates deep into the acoustic material where it’s impossible to reach.

The key is using the right attachment and suction level. Your vacuum’s standard floor attachment is too aggressive — the stiff bristles and high suction will damage fabric and potentially dislodge panel material.

This is where having the right tools makes a significant difference. A dedicated upholstery brush attachment with soft bristles protects fabric while still lifting dust effectively.

What Attachment Should You Use?

A soft upholstery brush attachment is essential for panel cleaning. These have flexible bristles that glide over fabric without catching or pulling, and they distribute suction across a wider area to prevent concentrated force on any single point.

If your vacuum didn’t come with an upholstery attachment, they’re inexpensive and widely available. Look for one with natural or soft synthetic bristles rather than stiff plastic.

For foam panels, even soft brush attachments can be too aggressive. Consider a crevice tool held slightly away from the surface, using suction to pull dust off without contact, or skip vacuuming entirely in favor of Innovera Compressed Air Duster Cleaner.

How Often Should You Vacuum?

Monthly vacuuming keeps dust from accumulating to problematic levels. More frequent cleaning is unnecessary unless you have pets, live in a dusty environment, or notice visible buildup between sessions.

High-traffic studios and commercial spaces may need weekly attention. Home studios with good air filtration can often extend to bi-monthly cleaning without issues.

Watch for visual cues — if you can see dust on panel surfaces, you’ve waited too long. Dust that’s visible has already penetrated the fabric and is affecting acoustic performance.

What Cleaning Products Are Safe for Acoustic Panels?

Safe acoustic panel cleaning supplies including distilled water and microfiber cloth

The safest cleaning solution is the simplest: distilled water with a tiny amount of mild dish soap. This handles most stains without risking chemical damage to fabric dyes or acoustic materials.

Avoid anything marketed as “heavy duty” or “industrial strength.” These products contain solvents that can dissolve fabric coatings, fade dyes, or break down foam structure. Even if the fabric survives, these chemicals can migrate into the acoustic core and cause degradation over time.

Our acoustic panels guide covers material considerations in depth, but the core principle is simple: gentle is always better than aggressive.

What Products Should You Avoid?

Bleach destroys both fabric and acoustic materials. Even diluted, it weakens fibers and causes permanent discoloration on anything except pure white fabric.

Ammonia-based cleaners (like many glass cleaners) can react with fabric treatments and dyes. The result is often uneven fading or sticky residue that attracts more dust than before.

Solvent-based cleaners (including many “stain removers”) dissolve adhesives holding fabric to frames and can break down foam and fiberglass binders. If a product smells strongly chemical, keep it away from your panels.

Can You Use Fabric Cleaner?

Mild upholstery cleaners formulated for delicate fabrics generally work well on acoustic panel fabric. Test any product on an inconspicuous area first — the back edge or a corner that faces the wall.

Apply cleaner to your cloth, not directly to the panel. This prevents oversaturation and gives you control over how much moisture contacts the fabric. Blot rather than rub, and use the minimum amount necessary.

If you’re dealing with panel installation in a commercial environment, consider professional cleaning services for liability and warranty reasons.

How Do You Remove Stains From Acoustic Panels?

Gentle stain blotting on a fabric acoustic panel with a damp microfiber cloth

Stain removal success depends on acting quickly and using the right technique. Fresh stains are dramatically easier to remove than set-in ones, so address spills immediately when possible.

The universal approach: blot with a clean, dry cloth first to absorb as much as possible. Then dampen (don’t soak) a microfiber cloth with mild soap solution and blot the stain from the outside edges toward the center. This prevents spreading.

Never rub stains. Rubbing pushes the stain deeper into fabric fibers and spreads it across a wider area. It also damages the fabric weave, leaving a visible rough patch even after the stain is gone.

What’s the Best Spot Cleaning Method?

Mix a small amount of mild dish soap with distilled water — roughly a teaspoon per cup. Distilled water prevents mineral deposits that can leave rings or residue on fabric after drying.

Dampen your microfiber cloth and wring it thoroughly. The cloth should feel barely moist, not wet. If you can squeeze water out of it, it’s too wet.

Blot the stain with light pressure, working from edges toward center. Flip to a clean section of cloth frequently to avoid redepositing the stain. Repeat until no more color transfers to the cloth.

When Should You Replace Instead of Clean?

Some stains are permanent regardless of effort. Oil-based stains (cooking grease, makeup, some inks) penetrate fabric immediately and resist water-based cleaning entirely. Attempting aggressive removal often makes things worse.

If a stain covers a significant portion of the panel’s visible face, replacement may be more cost-effective than professional cleaning. Small stains in corners or near edges are worth addressing; large central stains often mean the panel’s aesthetic life is over.

If you need a clean-looking replacement for a studio, office, or treatment wall, a thicker fiberglass option like UMIACOUSTICS 4 PCS Acoustic Panels with Hanging Bracket is a practical reset.

For more visible living rooms or theaters, a larger decorative option like Acoustic Panels 4 Pack Room Kit Large 46 × 23 can make replacement look like an upgrade instead of a patch job.

How Often Should You Clean Acoustic Panels?

Maintenance calendar for monthly dust removal and quarterly acoustic panel cleaning

Routine maintenance every 4-6 weeks keeps panels performing and looking their best. This means light vacuuming and visual inspection for stains or damage.

Deep cleaning — spot treatment, thorough vacuuming of backs and edges — should happen quarterly or when visible soiling appears. Over-cleaning causes more damage than under-cleaning, so resist the urge to clean panels that look fine.

Location dramatically affects cleaning frequency. Panels near cooking areas, high-traffic zones, or pet spaces need more attention than those in climate-controlled studios with good air filtration.

What Signs Indicate Cleaning Is Needed?

Visible dust accumulation is the obvious indicator. Run a clean finger lightly across the panel surface — if it comes away dusty, vacuuming is overdue.

Color changes can indicate heavy soiling. Compare panel color to a protected area (behind a frame edge or mounting hardware) to see the difference between clean and dirty fabric.

Reduced acoustic performance is a late-stage indicator. By the time dust affects sound absorption noticeably, panels are severely soiled and may need professional attention or replacement.

Does Location Affect Cleaning Schedule?

Absolutely. Home offices and bedrooms need less frequent cleaning than living rooms with pets and foot traffic. Recording studios with controlled environments need the least maintenance of all.

Panels mounted near windows collect more dust due to air circulation. Panels near HVAC vents face constant airflow carrying particles. Panels in kitchens or near cooking areas accumulate grease that’s harder to remove than ordinary dust.

If you need to remove panels for cleaning, plan your maintenance schedule to minimize how often you disturb the mounting system.

What Mistakes Should You Avoid When Cleaning Panels?

Warnings against over-wetting, harsh chemicals, scrubbing, and direct spray

The most common cleaning mistakes cause permanent damage that no amount of careful follow-up can fix. Knowing what NOT to do is as important as knowing the correct methods.

These mistakes seem intuitive — more water means cleaner, stronger products work better, scrubbing removes stains faster. But acoustic panels aren’t like ordinary household surfaces. Their construction makes them vulnerable to approaches that work fine on furniture or floors.

Using Too Much Water

Water is the enemy of fiberglass and mineral wool cores. These materials absorb moisture readily, and once wet, they take days or weeks to dry completely. During that time, mold can develop inside the panel where you’ll never see it until acoustic performance degrades or musty smells appear.

Even “dry” methods can introduce too much moisture. Barely damp means you can’t squeeze any water from the cloth. If the fabric feels wet to touch after cleaning, you’ve used too much.

If a panel does get soaked accidentally, remove it from the wall immediately and stand it on edge in a warm, well-ventilated area. A fan directed at the panel speeds drying. Don’t remount until the panel is completely dry — this can take several days.

Using Harsh Chemicals

Harsh chemicals don’t just risk fabric damage — they can compromise acoustic performance by breaking down the binders that hold fiberglass or foam together. The material becomes powdery and less effective at absorbing sound.

Fabric treatments that repel dust and stains can also be stripped by aggressive cleaners. Once gone, the fabric becomes more vulnerable to future soiling, creating a vicious cycle of increasingly difficult cleaning.

Stick to mild soap and water for routine cleaning. If that doesn’t work, the stain is likely permanent and further chemical attacks will only add damage without removing the mark.

Panel Cleaning Methods Comparison

Chart comparing safe acoustic panel cleaning methods by risk and use case
Method Best For Panel Types Frequency Risk Level
Soft Brush Vacuuming Routine dust removal Fabric, PET felt Monthly Low
Lint Roller Pet hair, light dust All types As needed Very Low
Compressed Air Dust in foam cells Foam only Monthly Low
Damp Cloth Blotting Spot stains Fabric, PET felt As needed Medium
Mild Soap Solution Stubborn stains Fabric, PET felt Rare Medium
Professional Cleaning Deep restoration All types Annually or less Low (if proper service)

How Should You Maintain Your Acoustic Panels?

Clean listening room with maintained acoustic panels and an air purifier

Regular maintenance prevents the need for aggressive cleaning that risks damage. A monthly vacuuming routine takes five minutes and keeps panels looking and performing their best for years.

Prevention matters more than remediation. Keep panels away from cooking areas when possible. Use air purifiers in dusty environments. Address spills immediately rather than letting them set.

For panels that need more than routine maintenance, always err on the side of gentler methods. A stain you can live with is better than permanent damage from over-aggressive cleaning attempts. And if you are already replacing panels in a high-visibility room, a premium fiberglass pair like Olanglab Sound Absorbing Acoustic Wall Panels 2 Pack is easier to justify than repeatedly cleaning a panel that is already ruined.

If panels are beyond cleaning, our acoustic panels hub has resources for replacement options and proper disposal of old treatment.

Frequently Asked Questions

How Do You Clean Acoustic Wall Panels?

Vacuum monthly with a soft brush attachment on low suction. For spots, blot with a barely damp microfiber cloth and mild soap solution. Never soak panels or use harsh chemicals.

The key is gentleness — acoustic panels are designed to absorb sound, not withstand aggressive cleaning. Treat them more delicately than you’d treat furniture upholstery.

Can You Vacuum Acoustic Panels?

Yes — vacuuming is the best routine maintenance for fabric and PET felt panels. Use a soft upholstery brush attachment and the lowest suction setting to avoid damaging fabric or pulling material from the frame.

Avoid vacuuming foam panels. Use compressed air or a lint roller instead.

Can Acoustic Panels Be Washed?

No — never submerge acoustic panels in water or run them through washing machines. Fiberglass and mineral wool cores absorb water and take days to dry, creating mold risk.

Spot cleaning with minimal moisture is the maximum safe water exposure. If a panel needs washing, it needs replacing.

How Often Should Panels Be Cleaned?

Monthly vacuuming for routine maintenance. Spot clean stains as they occur. Deep cleaning quarterly or when visible soiling appears.

Location affects frequency — high-traffic areas and pet-friendly spaces need more attention than controlled studio environments.

How to Remove Acoustic Panels Without Damaging Your Walls [2026]

How to remove acoustic panels without damaging your walls — but the method that works depends entirely on how they were originally mounted.

Most people peel command strips too fast or pour solvent on spray adhesive without testing first. The frustration is real: torn drywall paper, paint pulled off in chunks, or panels that crumble because the core got saturated. It happens because each mounting method has a specific removal technique, and skipping steps causes the damage.

With the right approach for your mounting type, panels come off cleanly and walls stay intact — so you can move, reposition, or replace treatment without a repair bill.

We’ll walk you through removal by mounting method, wall repair, and whether panels can be reused below.

Z-clip and French cleat panels lift straight off — no tools needed. Command strips require slow, downward pulling on the stretch tab.

Spray adhesive panels need heat application and careful prying. For adhesive residue, Goo Gone or rubbing alcohol removes most residue without damaging paint.

Always test removal technique on one panel first before tackling an entire room.

Before removing panels, it helps to know how many you originally needed — that guides whether you’re replacing or simply relocating them. Panel NRC ratings also degrade if cores are damaged during removal, so preserve them carefully.

How Do you Remove Different Types of Mounted Panels?

Removing acoustic panel from wall

Before grabbing tools and yanking panels off your wall, identify your mounting method. Each type requires a specific approach to avoid damage.

The mounting hardware you chose during panel installation determines your removal experience. Removable methods like Command strips and Z-clips were designed for easy takedown.

Permanent methods like spray adhesive fight back.

How to Remove Z-Clip Mounted Panels

Z-clips are the easiest mounting method to reverse. The interlocking brackets simply disengage when you lift the panel upward.

Grip the panel at both bottom corners. Lift straight up about an inch — you’ll feel the panel-side bracket clear the wall-side bracket.

Then pull the panel away from the wall.

That’s it. No tools, no damage, no residue.

The wall-side clips remain mounted with their screws, leaving only small screw holes if you remove those too.

For best placement after removal, you can reposition the wall clips anywhere. The panels themselves are completely unaffected by the removal process.

How to Remove Command Strip Panels

Command strips remove cleanly when you follow the stretch-release technique. Skip this step and you risk pulling paint off your wall.

Locate the pull tab on each strip — it should hang below the panel edge. If panels were mounted correctly, these tabs are accessible without removing the panel first.

Products like 3M Command Picture Hanging Strips are designed specifically for this clean removal process.

Grip the tab and pull slowly straight down, parallel to the wall. The strip stretches and releases from the wall surface.

Don’t pull outward — that’s how paint comes off.

For strips without accessible tabs, gently slide a putty knife behind the panel to separate it from the wall. Then access the tabs from behind.

How to Remove Adhesive-Mounted Panels

Spray adhesive and construction adhesive create the most challenging removal situations. These bonds were designed to be permanent.

Start with heat. A hair dryer or heat gun softens adhesive bonds, making separation easier.

Hold heat 6-8 inches from the panel surface and move continuously to avoid scorching.

After 2-3 minutes of heat application, slide a wide putty knife between the panel and wall. A plastic putty knife set works better than metal for this — less likely to gouge drywall.

Work slowly from one edge, applying more heat as needed. Rushing tears panel material or pulls chunks of drywall.

Accept that some damage is likely. Spray adhesive removal typically leaves residue on both the wall and panel back.

The panel may be unusable for remounting depending on material type.

Will Removing Panels Damage your Walls?

Wall damage comparison by mounting method

Understanding potential damage helps you plan repairs before removal begins. Some methods leave walls pristine; others require real touch-up work.

Which Mounting Methods Damage Walls?

Z-clips and French cleats leave only small screw holes — the same as hanging a picture frame. These fill easily with spackle and disappear with touch-up paint.

Command strips leave no damage when removed correctly using the stretch-release method. Incorrect removal (pulling outward) can peel paint.

Velcro strips often leave adhesive residue even when the strips themselves release cleanly. The residue requires solvent removal but usually doesn’t damage underlying paint.

Spray adhesive causes the most damage. Expect to remove some paint or drywall paper with the panels.

Budget for wall repair and repainting if you used this mounting method.

How Do You Minimize Damage?

Work slowly — rushing causes most removal damage. Heat softens adhesive bonds and prevents sudden releases that tear wall surfaces.

Test your technique on one panel in an inconspicuous location before removing visible panels. If damage occurs, you’ll know what repairs to prepare for.

Keep a putty knife angled low against the wall during prying. Steep angles dig into drywall.

Shallow angles slide along the surface.

How Do you Remove Adhesive Residue?

Cleaning adhesive residue from wall

Even careful removal often leaves sticky residue behind. Several products safely remove adhesive without damaging painted surfaces.

What Products Remove Adhesive?

Goo Gone Original works on most adhesive types and won’t damage paint when used as directed. Apply, wait 5 minutes, wipe with a cloth.

Rubbing alcohol (isopropyl 70%+) dissolves many adhesives and evaporates without residue. It’s safe for most painted surfaces but test on a hidden area first.

WD-40 removes stubborn adhesive but leaves an oily film requiring additional cleaning. Use it as a last resort for persistent residue.

Avoid acetone and paint thinner — these dissolve paint along with adhesive.

How Do You Clean Walls After Removal?

After removing adhesive, wash the area with warm water and mild dish soap. This removes solvent residue and prepares the surface for any needed repairs.

For walls that will be repainted, light sanding with fine-grit sandpaper (220 grit) creates a smooth surface. Wipe with a tack cloth before priming.

If the wall has texture, you may need to reapply texture compound before painting. This is common after spray adhesive removal where wall paper tears.

Can You Reuse Acoustic Panels After Removal?

Acoustic panels stored for reuse

Panel reusability depends on mounting method and material type. Some panels survive removal perfectly; others are single-use only.

Which Panels Can Be Reused?

Fabric-wrapped fiberglass panels with Z-clip or Command strip mounting typically survive removal without damage. The mounting hardware attaches to wooden frames, leaving the acoustic material untouched.

PET felt panels with removable mounting also reuse well. Their rigid construction resists the handling involved in removal.

Foam panels mounted with spray adhesive rarely survive intact. The adhesive bonds to foam material, tearing chunks during removal.

Consider foam panels mounted this way as disposable.

If you’re wondering whether panels are worth the investment, reusability is one factor that makes professional panels more cost-effective than cheap foam over time.

the acoustic panels guide covers panel material differences that affect durability and reusability.

How Do You Store Removed Panels?

Stand panels upright against a wall rather than stacking flat. This prevents compression damage to absorptive material.

If stacking is necessary, place cardboard or foam sheets between panels to prevent friction damage to fabric faces.

Store in climate-controlled spaces. Temperature and humidity swings can warp panel frames and grow mold in fiberglass cores.

What Should you Know Before Removing Panels?

Panel removal planning checklist

Planning removal before you start prevents surprises and ensures you have necessary supplies ready.

Gather tools based on your mounting type: putty knife for adhesive panels, step stool for high panels, heat gun if dealing with spray adhesive. Have a drop cloth ready to catch falling debris.

Photograph your current panel arrangement if you plan to reinstall elsewhere. Recreating effective panel placement is easier with reference images.

Check your lease if renting. Some damage from removal may affect security deposits — know what repairs are expected before move-out.

Panel Removal Methods Comparison

Panel removal methods comparison
Mounting Type Removal Difficulty Wall Damage Panel Reusable? Residue?
Z-Clips Very Easy Screw holes only Yes None
French Cleats Very Easy Screw holes only Yes None
Command Strips Easy None (if correct) Yes Minimal
Velcro Strips Easy Minimal Yes Moderate
Double-Sided Tape Moderate Possible paint damage Usually Moderate
Spray Adhesive Difficult Likely paint/drywall damage Rarely Heavy
Construction Adhesive Very Difficult Real damage No Heavy

The table breaks down into three tiers. Mechanical mounts (Z-clips, French cleats) come off with zero wall damage and no residue — the panels lift straight up and the only trace left behind is small screw holes from the wall bracket. Command strips and Velcro sit in the middle: easy removal with little to no damage, though Velcro leaves more residue than Command strips.

Adhesive-based methods are where removal gets expensive. Double-sided tape can pull paint, spray adhesive almost always damages drywall paper, and construction adhesive creates the worst scenario — expect real wall repair. The reusability column tells the same story: panels survive mechanical and strip removal intact, but adhesive bonds tear foam and can warp even rigid panels during separation.

If you’re choosing a mounting method for a new installation, this table is the strongest argument for spending slightly more on Z-clips or Command strips upfront. The removal experience is night-and-day compared to adhesive options.

What to Know Before Removing Acoustic Panels

What to know before removing acoustic panels

Removal difficulty is largely determined at installation time. If you chose removable mounting methods, takedown is simple.

Permanent adhesives create permanent challenges.

For future installations, consider Z-clips or Command strips if you might ever need to remove panels. The slight reduction in bond strength is worth the clean removal experience.

If you’re upgrading panels after removal, the best acoustic panels guide for current recommendations. Panel technology improves regularly, and replacement may outperform your original choices.

Whatever mounting method you choose next time, the lessons from this removal experience will inform better decisions. Removable mounting saves headaches — and walls.

UMIACOUSTICS 4-Pack Fiberglass Acoustic Panels

Art3d 6-Pack Self-Adhesive Acoustic Panels

BUBOS 4-Pack Fabric Acoustic Panels

Conclusion

Removing acoustic panels without wall damage comes down to matching your removal technique to the original mounting method. Command strips need slow, straight-down pulls. Z-clips and French cleats lift off cleanly. Spray adhesive requires patience with heat and solvents.

The key takeaway: your next installation should factor in removal from the start. Removable mounting methods like Z-clips or Command strips cost slightly more upfront but save hours of repair work later. If you’re replacing panels after removal, check the best acoustic panels guide for current options that pair strong performance with clean mounting solutions.

Frequently Asked Questions

Can you Remove Acoustic Panels Without Damaging Walls?

Yes — if you used removable mounting methods. Z-clips, French cleats, and Command strips all remove without wall damage when done correctly.

Spray adhesive and construction adhesive cause wall damage in most cases. The bond is designed to be permanent, and breaking it damages either the wall or panel (usually both).

How Do you Remove Old Adhesive?

Apply Goo Gone or rubbing alcohol to the residue. Wait 5 minutes for the solvent to soften the adhesive.

Wipe with a clean cloth, repeating as needed.

For stubborn residue, use a plastic scraper at a low angle to avoid gouging drywall. Metal scrapers can damage wall surfaces.

Can Acoustic Panels Be Moved and Reused?

Most professionally-made panels with removable mounting can be reused multiple times. Remove carefully, store properly, and they’ll perform identically in their new location.

Foam panels mounted with spray adhesive typically cannot be reused — the adhesive tears the foam during removal.

What’s the Easiest Mounting Method to Remove?

Z-clips are the absolute easiest — simply lift the panel straight up and pull away. No tools, no residue, no damage.

Command strips are second easiest when the stretch tabs remain accessible. The stretch-release mechanism provides clean removal on most painted surfaces.

Do Acoustic Slat Panels Work? Complete Guide [2026]

Acoustic slat panels work — but only when the wood slats sit over real acoustic backing (usually PET felt).

If there is no backing, you are paying for a feature wall that still sounds echoey. Get the backing right, and slats can tame reverb without turning your room into a black-fabric studio.

By the end of this guide, you’ll know what to look for, where to place them, and when fabric or PET panels are the smarter buy.

Quick Takeaway

Slat panels work if they have real acoustic backing behind the wood, because the backing does most of the absorbing. If a listing won’t name the backing material or an NRC rating, assume it’s decorative and buy a different treatment.

What Are Acoustic Slat Panels?

Cross section of an acoustic slat panel with wood slats and felt backing

Slat panels are a soft absorber wearing a decorative wood exterior. That hybrid construction explains both why they look great in a living room and why they can’t perform like a thick fiberglass studio panel.

How Do Timber Slatted Panels Work?

Sound waves pass through the gaps between the wood slats and hit the backing material. That backing absorbs a large portion of the sound energy instead of letting it bounce straight back into the room.

The wood slats themselves—whether MDF, natural veneer, or solid wood—do not absorb any meaningful sound energy. They exist for visual aesthetics, and solid wood is naturally a reflective acoustic surface.

The simplest mental model: picture a decorative wooden screen mounted in front of a standard acoustic panel. The screen provides the look; the backing behind it does all the acoustic work.

The NRC rating guide covers the physics behind how absorption numbers work. Here is how these panels are constructed to achieve those numbers.

What Is Inside Slat Panels?

Behind the decorative slats, most legitimate panels use a sheet of dark felt as the primary absorbing layer. Quality panels use dense, recycled PET felt; cheap knock-offs use thin decorative craft felt that looks similar but absorbs far less sound.

Thicker PET felt absorbs deeper into the low-mids, while thin felt mostly handles flutter echo and upper-mid harshness.

The popular Art3d Wood Slat Panels are a typical felt-backed option—wood slats mounted over a dense, dark PET sheet, with the felt visible from the side profile and raw edges. This construction creates a specific set of acoustic limitations.

What Makes Them Different From Fabric Panels?

The gaps between the slats—which let sound reach the backing—also limit how much total surface area is actively absorbing. A fabric-wrapped fiberglass panel, by contrast, presents its entire unbroken face to the incoming sound wave.

That is the core acoustic trade-off. Every square inch of a fabric panel works on absorption, while a slat panel reserves most of its visible surface for reflective, decorative wood.

Whether slats are worth it depends on your room’s aesthetic goals, your budget, and how much absorption you need to fix the echo.

How Effective Are Acoustic Slat Panels?

NRC comparison chart for slat panels, fabric panels, and bare walls

With that construction clear, the nextion, the real numbers follow. Performance varies widely based on backing material and slat spacing.

What NRC Rating Do Slat Panels Have?

Most legitimate felt-backed slat panels land around a 0.40–0.65 NRC rating when tested as a complete system. That provides meaningful, noticeable absorption, but it sits well below a thick fiberglass panel designed for maximum acoustic performance.

Premium fabric-wrapped fiberglass panels sit around 0.85–1.0 NRC—the performance range professional studios aim for when sound control matters more than visual aesthetics.

Core density drives this performance gap. Denser fiberglass cores absorb more sound energy across a wider frequency range, a reality the panel density guide covers in detail.

However, a standard slat panel still far outperforms untreated drywall. Even moderate absorption can make an echoey room feel noticeably less harsh and more comfortable to listen in.

Do They Work as Well as Fabric Panels?

That 0.40–0.65 range falls short of fabric panels, which start at roughly 0.85 and climb to a perfect 1.0. The performance gap comes from the wood slats themselves—because they are reflective, they bounce sound away instead of letting it penetrate into the backing.

That does not make slats “bad” acoustic products. It means they are engineered for living rooms where you need acoustic improvement without the studio look—not for critical control rooms where every decibel of absorption counts. Here is what that actually sounds like.

What Performance Can You Expect in a Room?

Despite the NRC gap, the jump from bare drywall (0.05) to a felt-backed slat panel (around 0.50) is immediately audible to anyone in the room. The slap echo drops off, the metallic “ring” on loud claps softens, and conversation gets noticeably clearer.

Slat panels won’t turn a lively living room into a dead recording room—but for most living spaces, maintaining some natural acoustic energy is the point.

If you need to treat a dedicated listening room, combine slats with higher-performance fiberglass panels. Use slats where you want them visible, and place fabric panels where aesthetics don’t matter.

Where Do Slat Panels Work Best?

Modern living room with an acoustic slat panel feature wall

With performance expectations set, the next step is identifying where slat panels shine. The right application maximizes their strengths while minimizing limitations.

What Rooms Benefit Most?

Living rooms and open-plan spaces benefit the most because they are reflective spaces that are also visually important to the homeowner. Slat panels improve the sound without making your living space look like a studio gear closet.

Home offices and video-call setups benefit too. Mounting a slat wall behind your desk reduces the roominess of your microphone audio while making your webcam background look intentional and professional.

Commercial restaurants and hospitality spaces use slats for the same reason. They reduce the harsh room noise from dozens of conversations while staying on-brand visually. Once you know the room, you need to know exactly where to put them.

Where Should Slat Panels Be Placed?

Panel placement follows the same rules as any other absorber: first reflection points and rear-wall slapback zones matter the most. The classic mirror trick placement method is the fastest, most accurate way to find those spots.

Slats also work well when covering a single feature wall. If you can only treat one wall due to budget, prioritize the surface creating the strongest early reflections.

Can You Use Them on Ceilings?

The ceiling follows the same placement logic—first reflections bounce off the ceiling too—but weight changes the installation equation. Wood slat panels are much heavier than foam or fabric panels, so ceiling installs require heavy-duty anchors and serious structural planning.

The mounting principles in the ceiling panel mounting guide apply to slats, but the extra weight makes every fastener choice more critical.

Do Slat Panels Work for Soundproofing?

Diagram comparing room sound absorption with sound blocking between rooms

This question reveals a common misunderstanding. This section clarifies what slat panels can and cannot do regarding sound isolation.

Can Slat Panels Block Sound?

No. Soundproofing requires mass, mechanical damping, and airtight sealing—none of which surface treatments provide.

Slat panels are porous and installed with air gaps. That open structure is good for absorption, but the opposite of what’s required for sound blocking.

What Is the Difference Between Absorption and Soundproofing?

That “no” trips people up because hanging slat panels does make a room sound different—just not between two separate rooms. Absorption reduces reflections and reverb inside your space; soundproofing blocks transmission through walls and ceilings.

Slat panels are purely absorption. If sound leaking to the next room is the problem you need to solve, the soundproofing vs acoustic panels guide explains what materials actually work.

How Do Acoustic Slat Panels Compare to Alternatives?

Comparison of acoustic slat panels, fabric panels, and PET felt panels

Understanding alternatives helps you make informed choices. Each option serves different priorities.

Slat Panels vs Fabric-Wrapped Panels

Fabric panels win on raw acoustic performance per square foot. They are the better choice for dedicated recording studios, home theaters, and critical listening environments.

The UMIACOUSTICS Fiberglass Acoustic Panels (4-Pack) are a typical fiberglass option at this price range. They deliver a high NRC rating, feature simple wall-mount brackets, and skip the wood aesthetics that drive up cost.

Conversely, slats win on high-end aesthetics. They are often the smartest choice for guest-facing living rooms where you would never install a wall of black fabric panels.

Slat Panels vs PET Felt Panels

If fabric panels sit at the performance end of the spectrum, PET felt panels split the difference. They provide more absorption per dollar than wood slats, and they come in modern geometric shapes and vibrant colors.

Dense PET is also naturally moisture-resistant, making it a safer choice than raw wood or fabric in bathrooms, kitchens, and humid climates.

Weight is the other advantage PET holds over wood slats. PET is light, which makes wall mounting simpler and opens up ceiling installs that would be risky with heavy wood panels. Here is how to make the final call.

When Should You Choose Slats?

Choose slats when you want a feature wall that also noticeably improves the sound of the room. Choose thick fabric panels when you want maximum absorption per square foot of surface area.

The polyester vs foam comparison covers the two most common non-wood alternatives if slats aren’t the right fit for your project.

Quick Performance Comparison (Slats vs Fabric vs PET)

Factor Slat Panels Fabric Panels PET Felt Panels
Typical NRC 0.40-0.65 0.85-1.0 0.65-0.85
Aesthetics Premium wood finish Functional/Industrial Modern colors
Cost High ($$$)</td><td>Moderate ($$) Moderate ($$)
Weight Heavy Light-Medium Light
Installation Moderate difficulty Easy Easy
Best For Feature walls Studios/Performance Design + function
Moisture Resistance Poor Poor Good

What Should You Look for When Buying Acoustic Slat Panels?

Specification checklist for acoustic slat panels including NRC and backing thickness

Buying legitimate slat panels depends on verifying what is behind the wood. Three checks—backing material, NRC rating, and total coverage needed—separate a real acoustic product from a decorative scam.

Verify the Backing Material

The felt backing is the entire acoustic point of the product. If the product photos and specs never mention a dense felt or PET backing, assume the panel is decorative and acoustically worthless.

Core thickness matters too. A thicker, denser felt backing absorbs more sound, especially as the problematic frequencies drop lower.

The best acoustic panel material guide explains why core thickness and density matter more than the front finish. But finding actual density specs can be difficult, which leads to the next check.

Check NRC Ratings (and Who Measured Them)

Backing quality is hard to judge from a product photo—which is why standardized NRC ratings exist. A legitimate acoustic product publishes a real NRC from an independent test report.

If a listing claims the product is “soundproof” but skips mentioning the specific NRC, the hidden backing is almost certainly cheap, decorative garbage. You must watch for cherry-picked acoustic numbers—citing one single high-frequency absorption figure is not a legitimate NRC rating. Once you verify the numbers are real, you have to buy enough of them to matter.

Plan Total Coverage (Slats Need More Area)

Even with a confirmed NRC rating, slat panels still require more total wall coverage than fabric panels. The reflective wood between the slats does not contribute to absorption, so you need to plan for roughly 30–50% more surface area to match the equivalent echo reduction from fabric.

The ATS Acoustics PET Panels are a dense PET-based alternative that covers more wall area per dollar. Useful if you need broad acoustic coverage on a tighter budget.

The panel count calculator gives you room-by-room area estimates, though placement usually matters more than chasing a slightly higher NRC.

Conclusion

Acoustic slat panels work well when the wood slats sit over real, dense acoustic backing. Without that backing, they are purely decorative.

They are a strong aesthetic choice for living rooms, home offices, and restaurants where you want less echo without changing the visual style of the space. For dedicated recording studios and home theaters, thick fabric-wrapped fiberglass panels give you more absorption per panel.

The hybrid approach is the sweet spot: use slats as the visible feature wall, paired with higher-absorption fiberglass panels where looks don’t matter. The best acoustic panels guide has a full shortlist comparing materials and budgets, and the acoustic panels hub ties everything together.

Frequently Asked Questions

Do Slat Panels Work Without Acoustic Backing?

No. Without the acoustic backing, the wood slats are purely decorative and highly reflective, so any acoustic absorption is minimal.

Are Slat Panels Better Than Solid Panels?

Not acoustically. Thick fabric panels outperform wood slats on raw absorption because every square inch of a fabric panel is an absorptive surface.

Wood slats trade some maximum absorption for a premium wood finish. If visual aesthetics matter as much as acoustic quality, slat panels are the stronger choice.

Can You DIY Acoustic Slat Panels?

Yes, if you can build a flat acoustic backing layer and tightly mount wood slats with perfectly consistent spacing. The hard part is making it look clean enough for a feature wall.

Do Slat Panels Reduce Echo?

Yes, when the backing is real acoustic felt or dense PET. Expect a noticeable reduction in slap echo, but not a completely dead room.

The thicker the backing behind the slats, the deeper the frequencies it can absorb. Most standard felt-backed slat panels handle mid and high frequencies well but leave deep sub-bass untouched.