Acoustic Panels on Windows: Do They Help and How to Mount Them [2026]

Can you put acoustic panels on windows? Technically yes, but it trades daylight and ventilation for only a small reduction in reflections.

Glass is a hard reflector, so windows can cause slapback echo, flutter, and a bright top end that makes a room feel harsh. Outside noise is a different problem, and it usually comes through air gaps and vibrating glass.

The goal is to control reflections without making the room unpleasant to use. With the right mix of curtains, wall treatment, and sealing, you can reduce echo and improve clarity while keeping the space livable.

Start by treating the wall sections beside the window or any first reflection points, then add heavy acoustic curtains if you need more control. If the real issue is traffic or neighbors, skip panels on the glass and focus on window inserts, secondary glazing, and weatherstripping.

The rest of this guide splits window fixes into echo control and outside noise, then covers curtains, inserts, and wall-panel placement so you can pick the first change that fits your room and budget.

Quick Takeaway

Do not put acoustic panels directly on windows because you will lose natural light and ventilation without blocking outside noise. For window reflections, use acoustic curtains or treat the walls around the window, and for outside noise use window inserts or secondary glazing.

Why Would You Want Acoustic Panels on Windows?

Window reflections creating echo in a home studio room

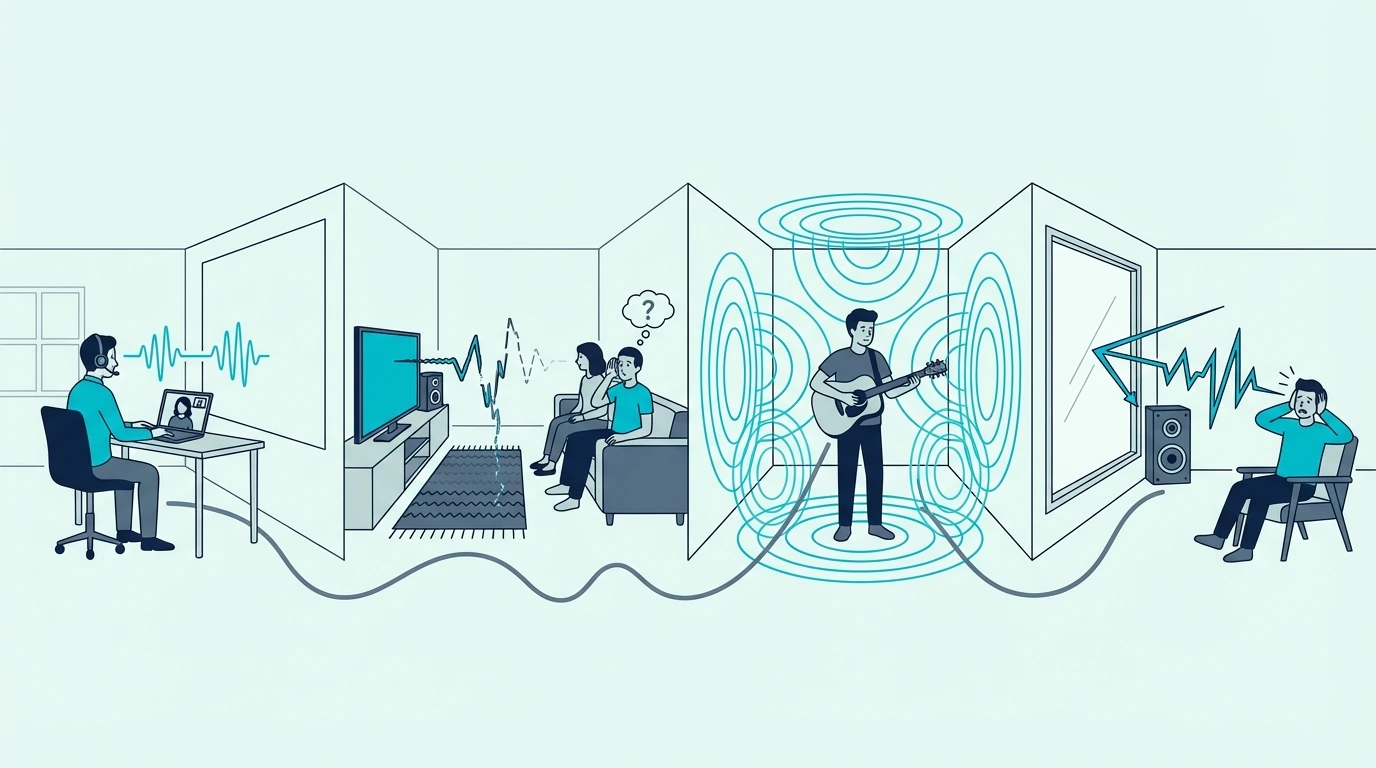
People reach for panels because a window acts like a hard mirror for sound. The catch is that windows create two different problems, and panels only address one.

Are Windows a Source of Acoustic Problems?

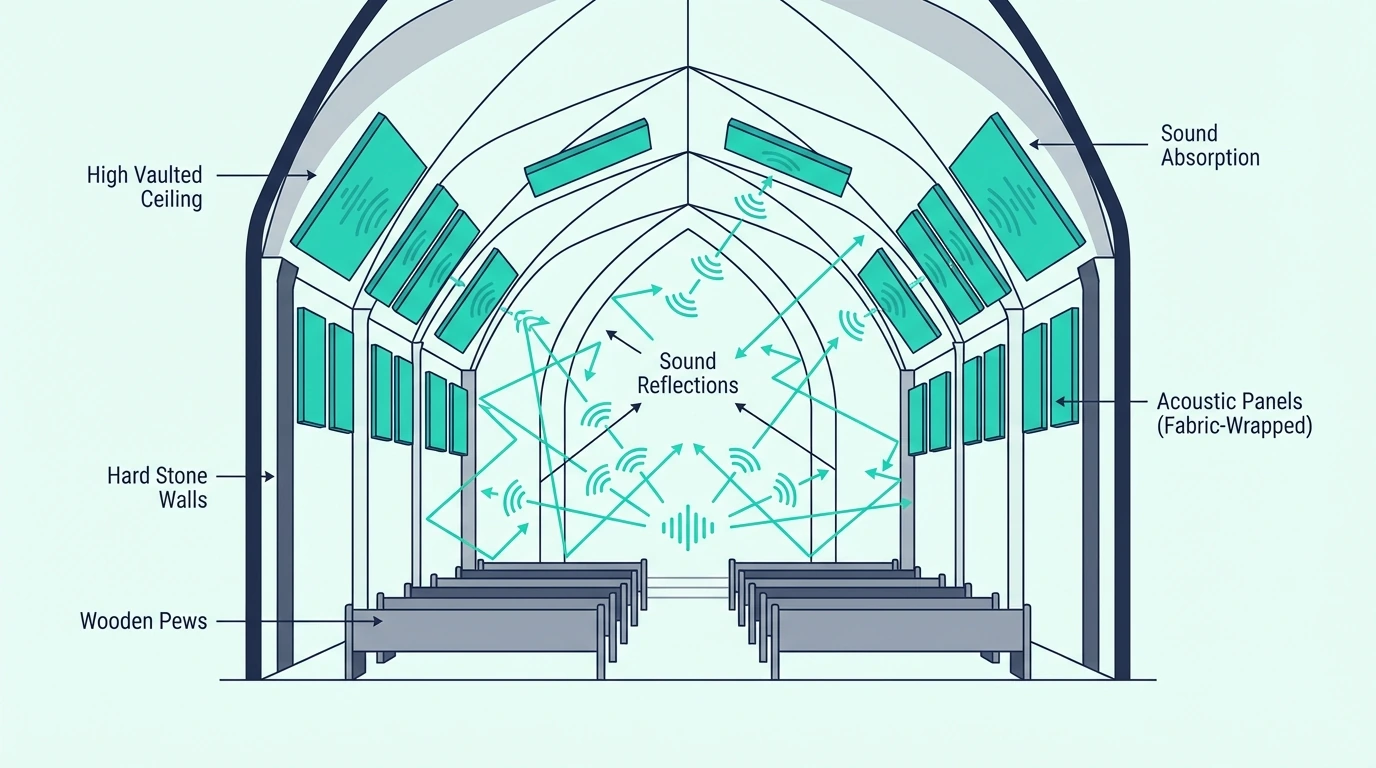
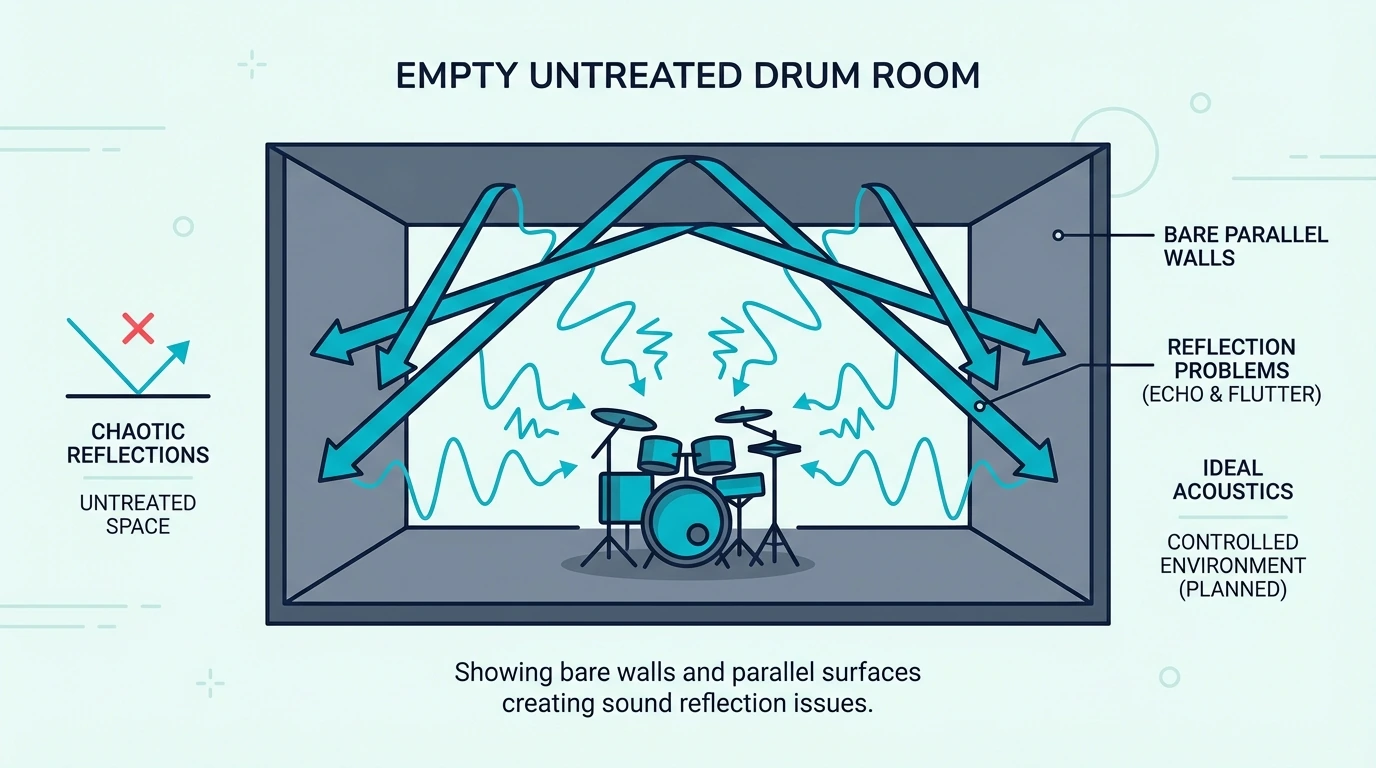
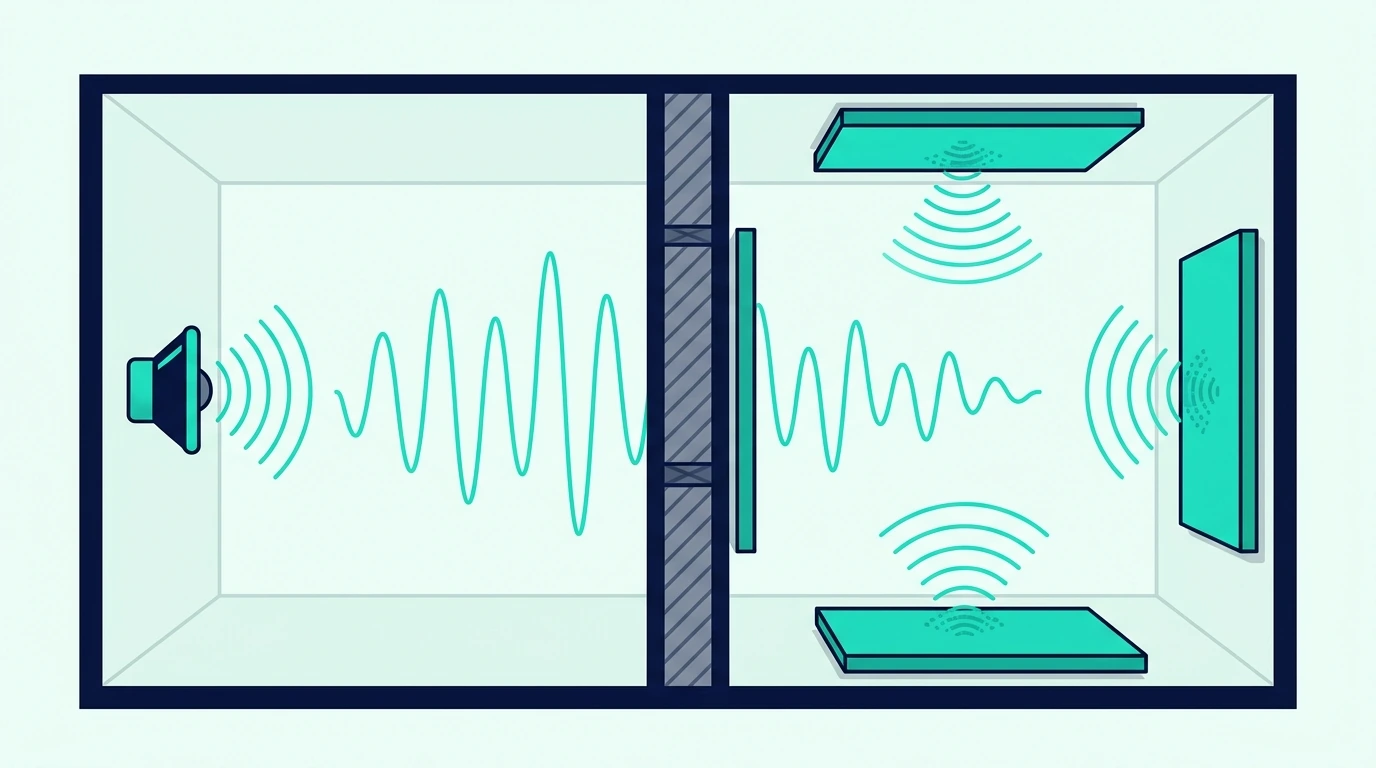
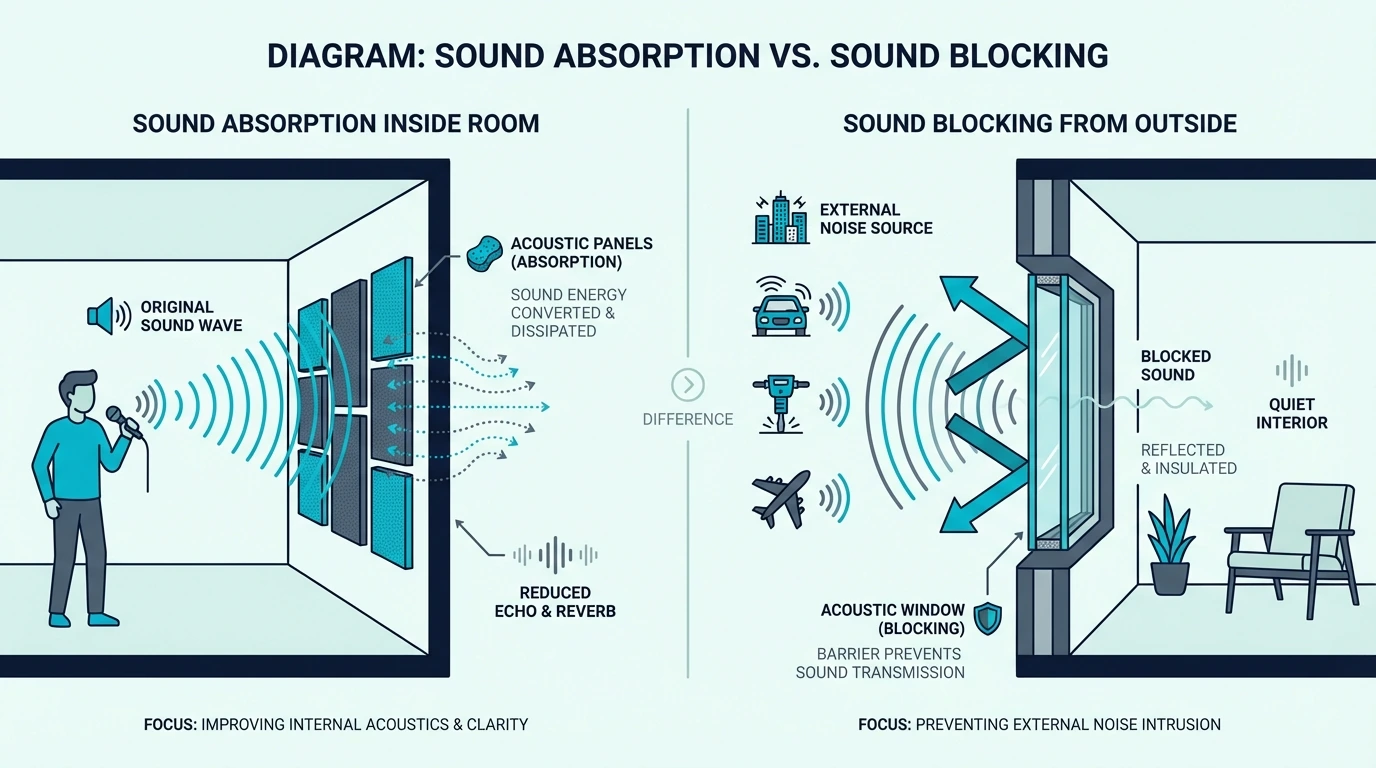
Windows are highly reflective surfaces. Glass bounces nearly 100% of sound energy back into the room, contributing to echo and reverb just like walls and ceilings.

In a room with large windows, those glass surfaces can dominate the reflection pattern. Sound from speakers or voices reflects off the glass and mixes with direct sound, creating the flutter and echo that degrades audio quality.

The acoustic panel density guide explains how panels absorb sound that would otherwise bounce back — which is why covering the glass seems like a logical fix.

Can Panels Block Outside Noise Through Windows?

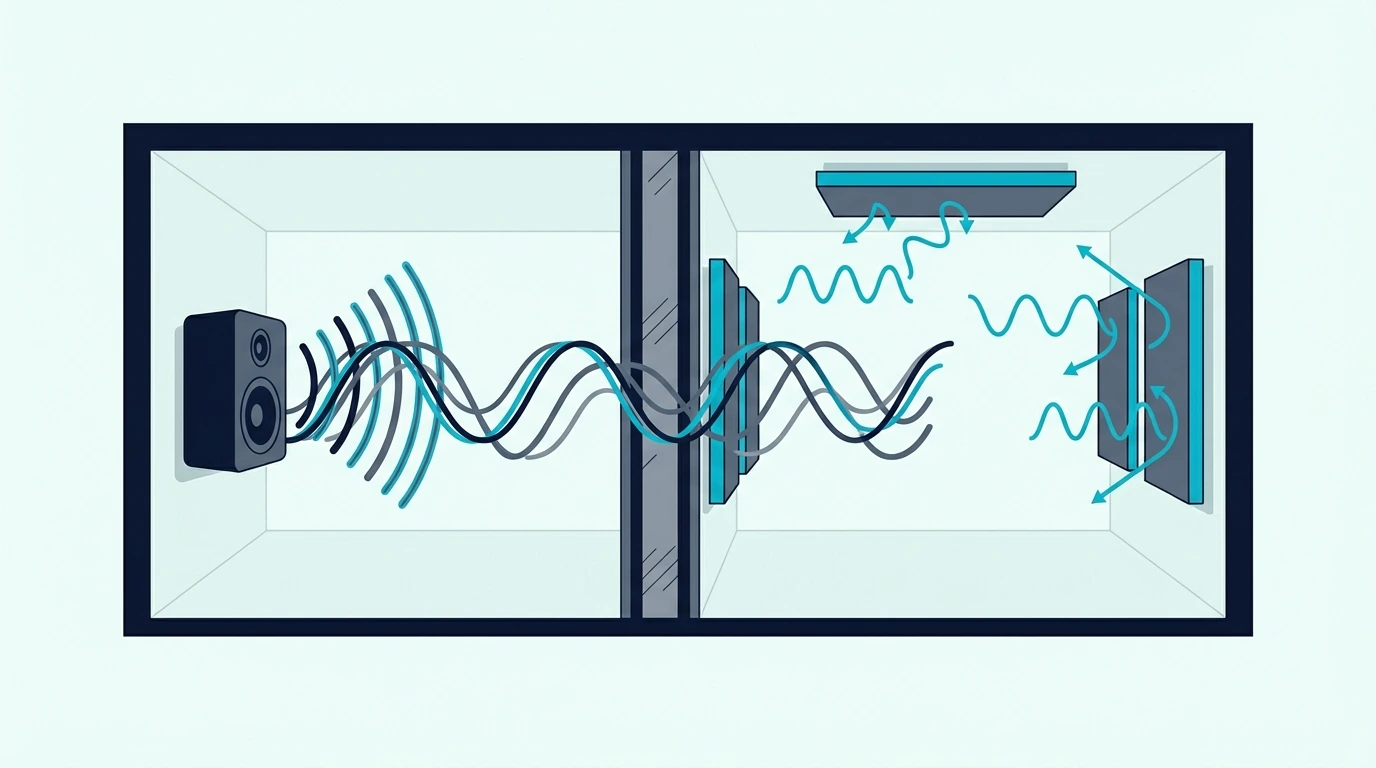
The confusion is that acoustic panels absorb sound inside your room, but they do not block sound from entering through windows.

Outside noise — traffic, neighbors, construction — enters through air gaps around windows and by vibrating the glass itself. Putting an acoustic panel over the window does nothing to seal those gaps or add mass to block vibration.

For outside noise reduction, you need soundproofing rather than acoustic treatment. If you want the full breakdown, see acoustic panels vs soundproofing.

What Happens If You Put Panels Over Windows?

Acoustic panel fully covering a window and blocking natural light

Even if a panel cuts some reflections, living with a blocked window is the real problem. Here is what you give up when you cover the glass.

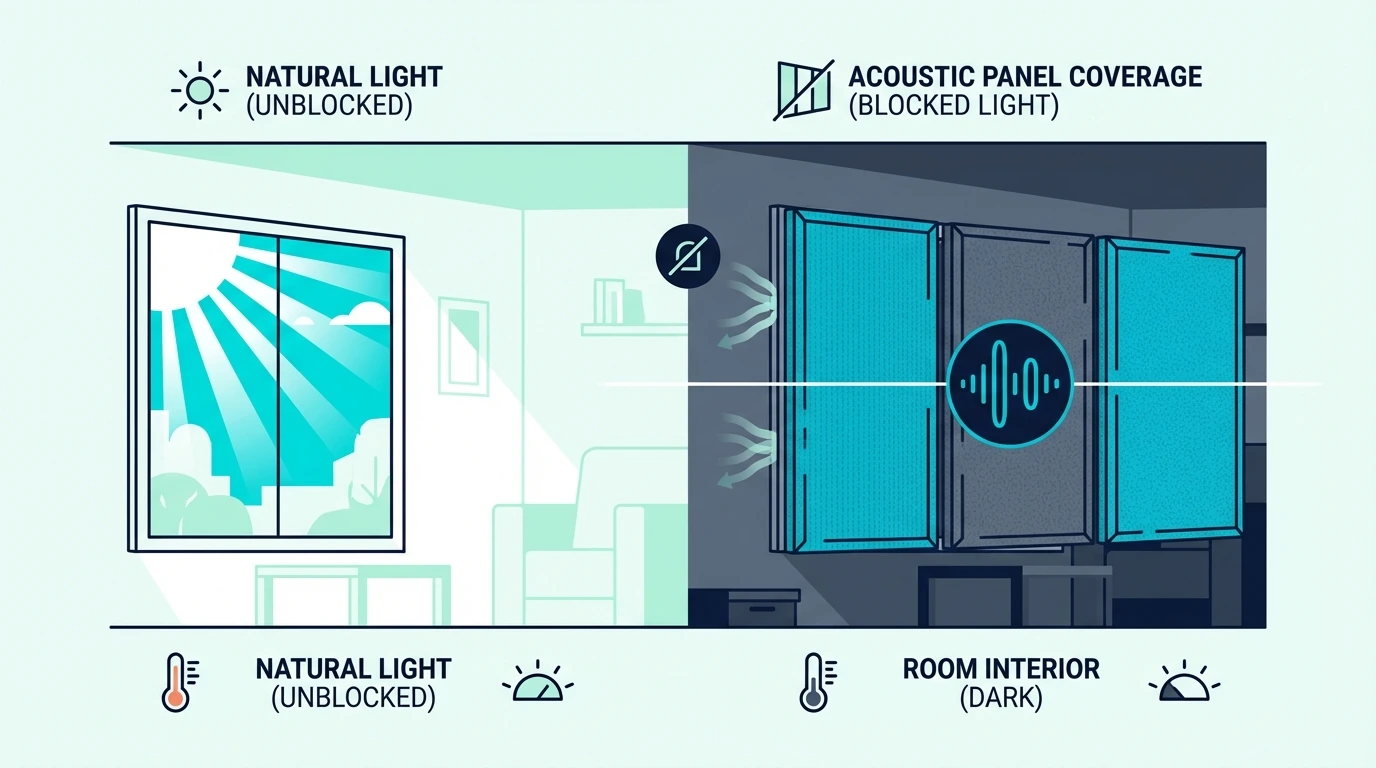
Do Panels Block Natural Light?

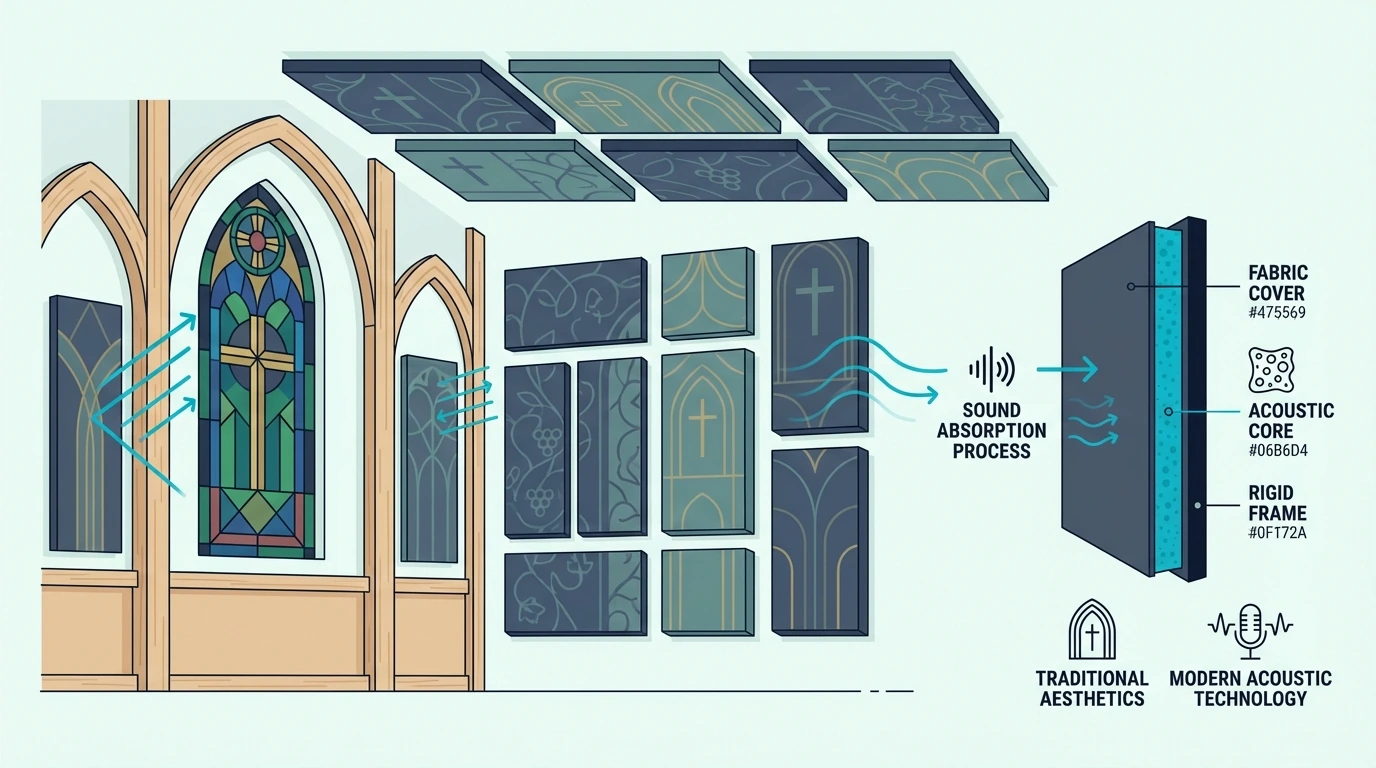
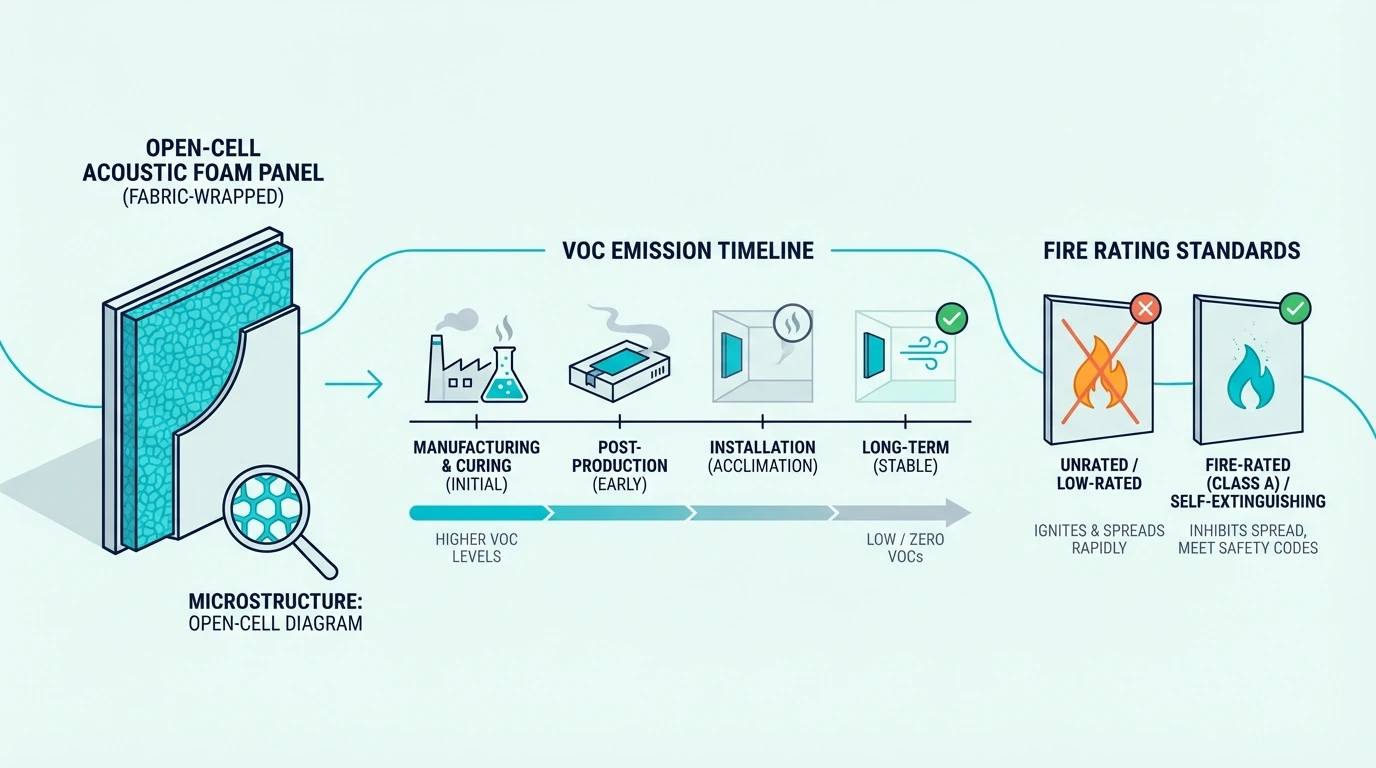
Completely, because standard acoustic panels are opaque — fiberglass or mineral wool cores wrapped in fabric. Zero light passes through.

Covering windows eliminates natural daylight, forcing reliance on artificial lighting during all hours. For home studios and offices where people spend extended time, this can affect mood, productivity, and circadian rhythms.

Some people try this temporarily for recording sessions, but the setup and removal still adds friction. Even occasional use proves impractical for most workflows.

Can You Still Open the Window?

Not if panels cover it, so you lose ventilation and emergency egress capability. In bedrooms, this can violate building codes that require an openable window for fire escape.

The loss of fresh air circulation matters more than most people anticipate. Rooms become stuffy quickly, especially during longer recording or work sessions.

Do Acoustic Panels Help With Window Noise?

Diagram comparing indoor sound absorption with outdoor noise blocking

If the issue is traffic or neighbors, panels are the wrong tool. The two sections below explain why treatment and soundproofing solve different problems, and what actually stops outside noise.

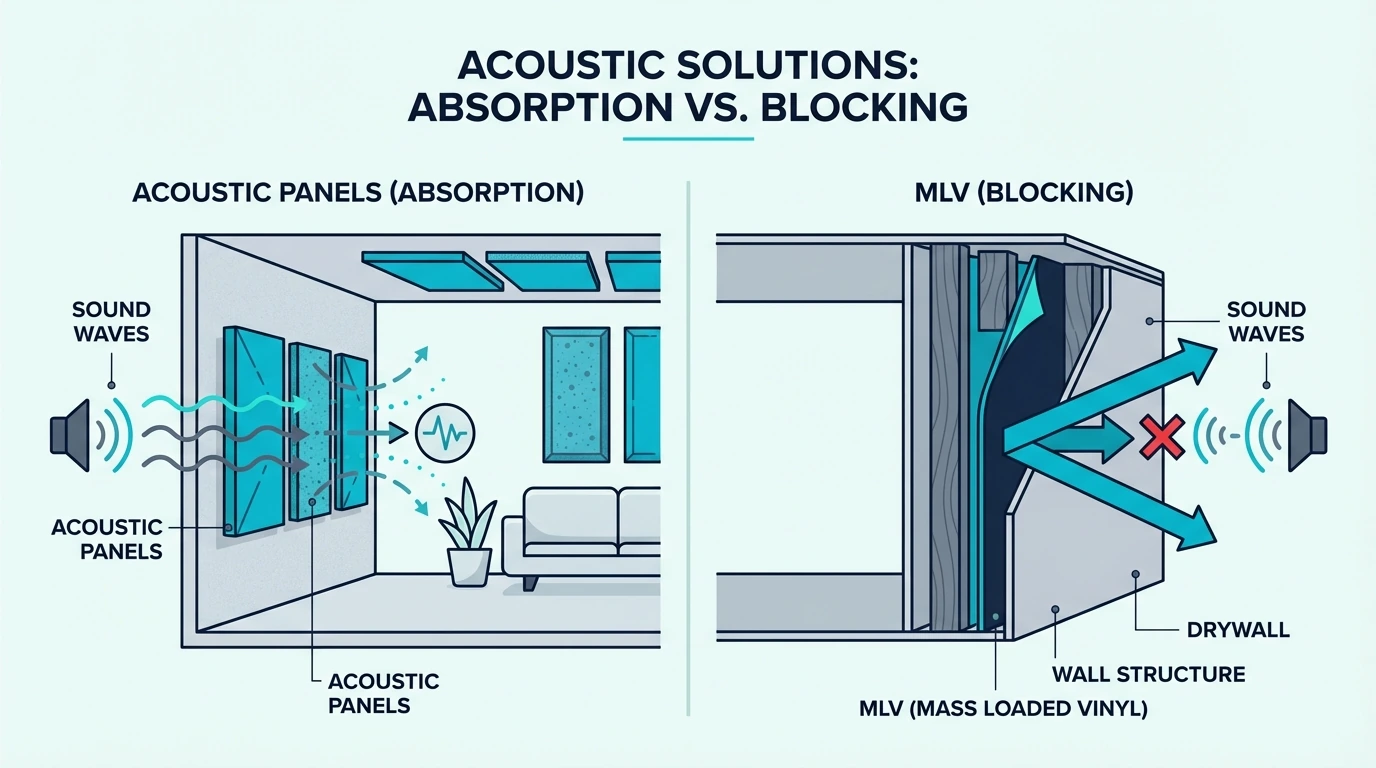
What Is the Difference: Treatment vs Soundproofing?

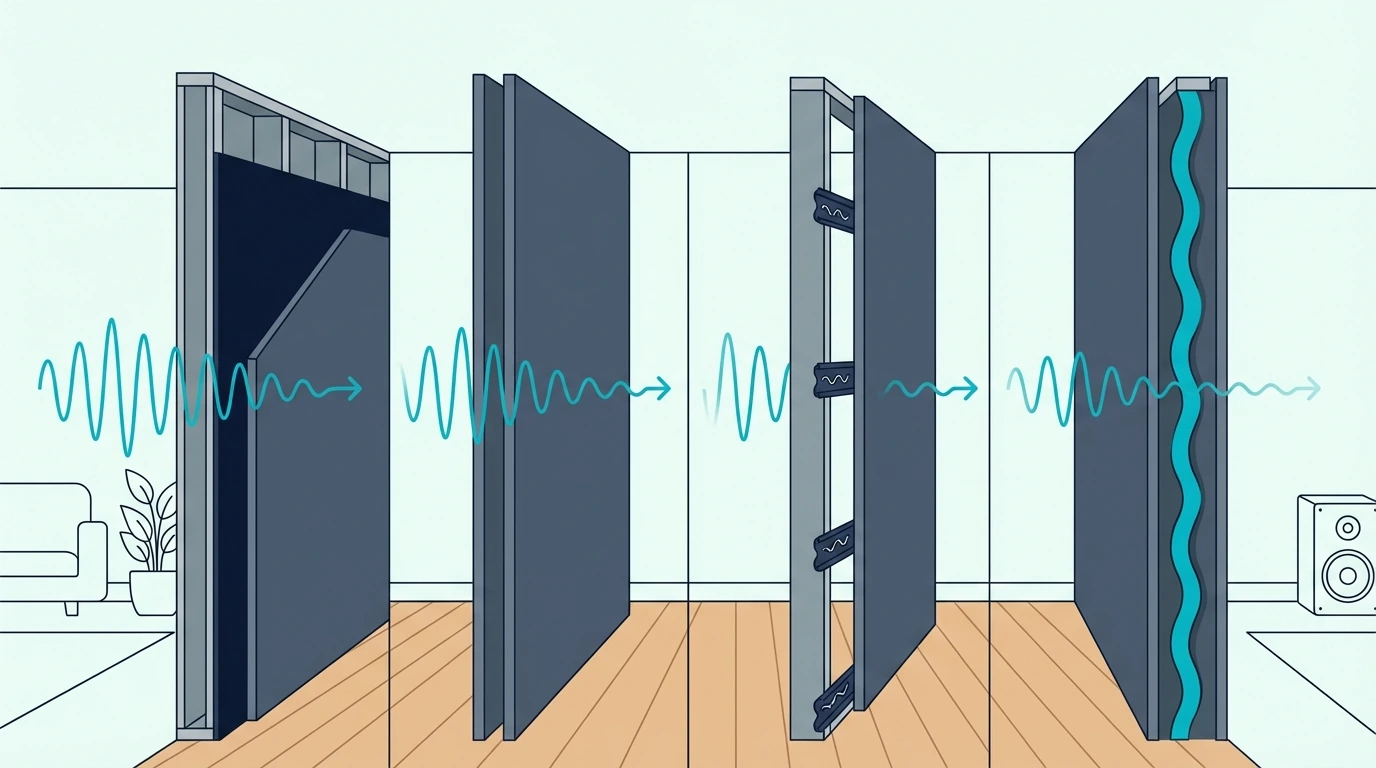
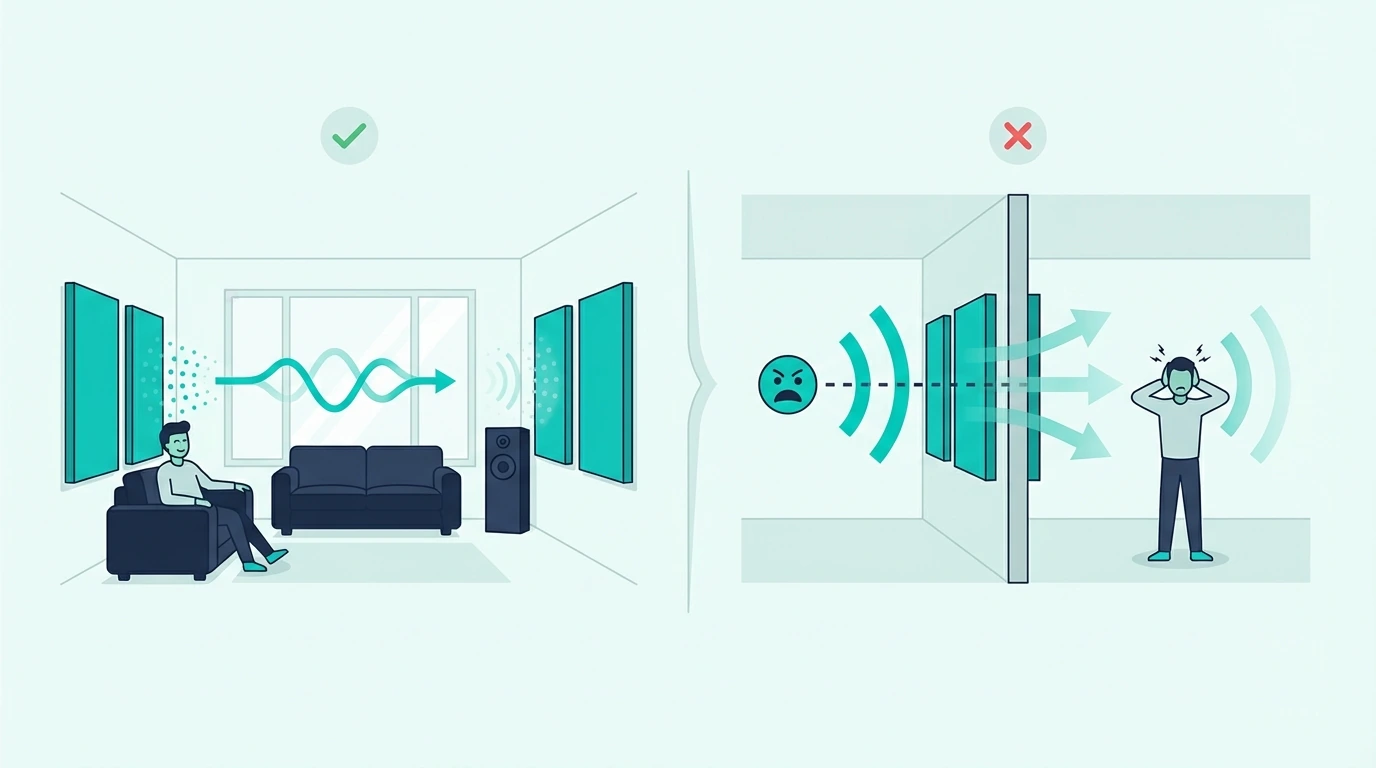
Acoustic treatment controls sound within a room — reducing echo, taming reverb, improving clarity. This is what acoustic panels do.

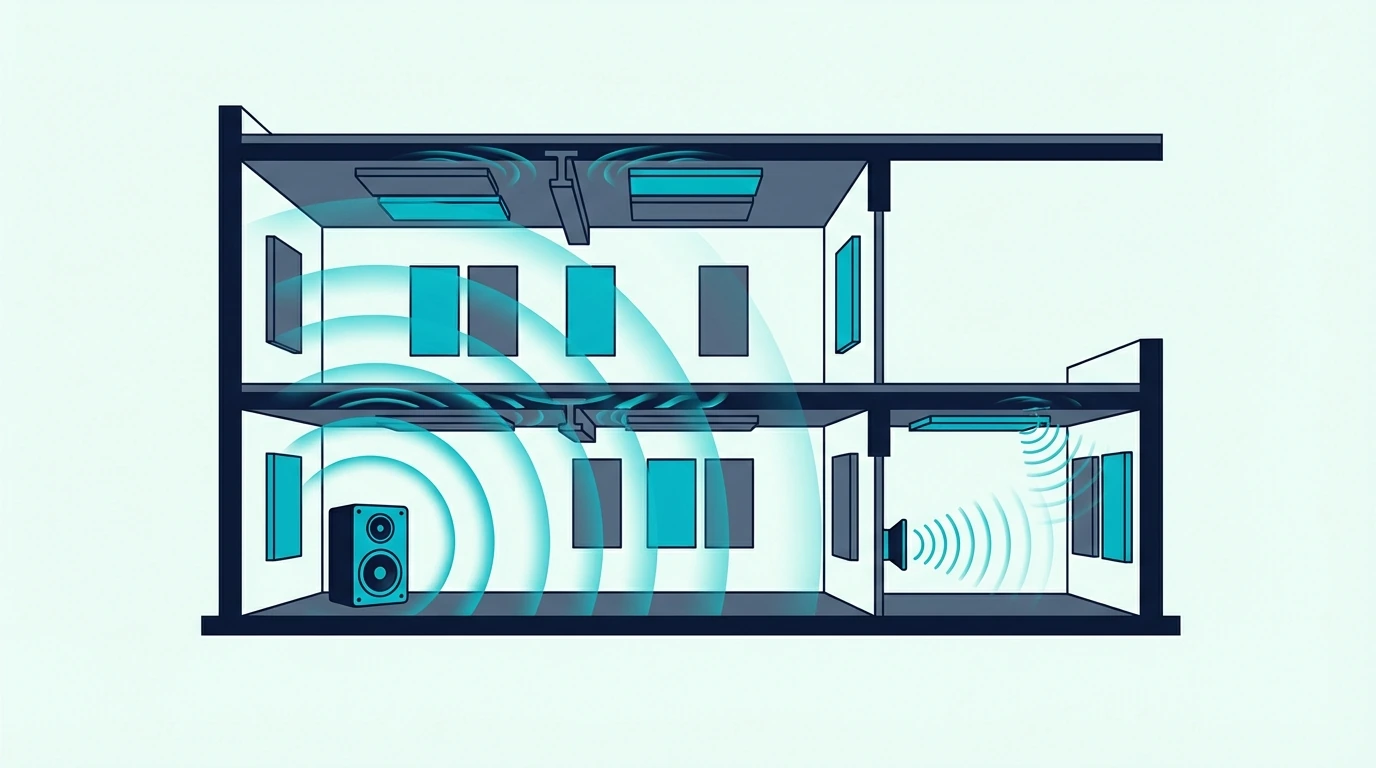
Soundproofing blocks sound transmission between spaces — keeping outside noise out or inside noise contained. This requires mass, damping, and sealing air gaps.

Panels provide treatment, not soundproofing. A panel over a window absorbs reflections from inside the room but does nothing to stop traffic noise from entering — the acoustic panels hub covers the full breakdown.

Will Panels Stop Traffic Noise?

No, because traffic noise enters through window glass vibration and air gaps around the frame. An acoustic panel sitting in front of the window does not address either transmission path.

Even if you sealed the panel against the window frame, the minimal mass of a 2-inch acoustic panel provides almost no sound blocking. Window inserts or secondary glazing is far more effective.

If your goal is to reduce outside noise, start with sealing and mass, not absorption. A good companion read is can acoustic panels reduce noise from neighbors.

If your goal is to keep your own sound from leaking out, acoustic panels still are not the right tool. Start with sealing and mass — the sound-blocking guide covers the basics.

What Are Better Alternatives to Panels on Windows?

Heavy acoustic curtains installed over a window

Do not treat the glass with panels. Choose a fix based on whether you need less echo, less outside noise, or both.

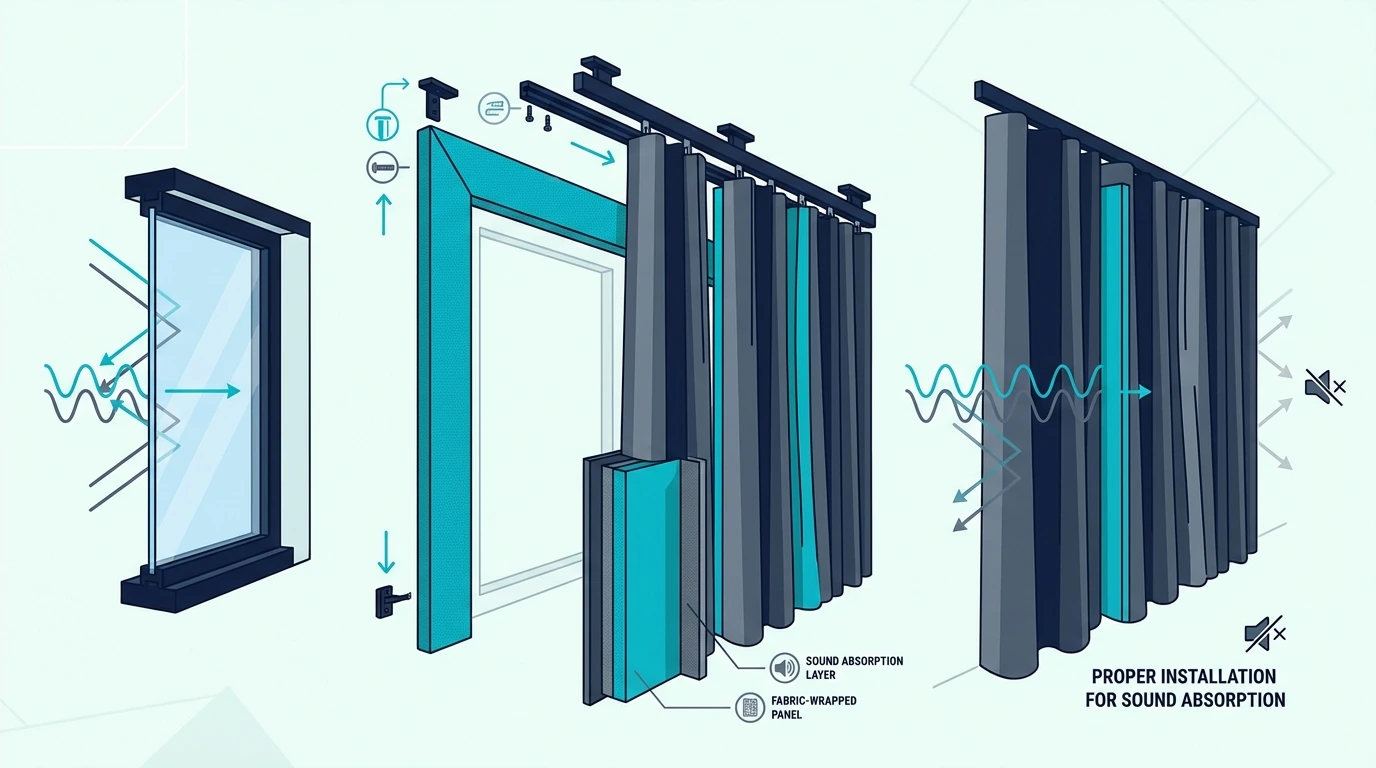
What Are Acoustic Curtains?

Acoustic curtains are heavy, dense fabric panels designed to absorb sound while functioning as window coverings. They reduce echo from window reflections without permanently blocking light.

Quality acoustic curtains use multiple fabric layers with mass-loaded materials sandwiched between. When closed, they absorb mid and high-frequency reflections.

When open, they let light through normally. This gives you absorption when you need it without permanently blocking the window.

If you are considering covering panels with fabric, acoustic curtains work on a similar absorption principle but with window-friendly functionality.

The RYB HOME 3-Layer Soundproof Curtains are a good example of multi-layer construction. The dense layers help reduce reflections and give the curtain real weight.

For a lower-cost option, single-layer blackout curtains also reduce reflections — not as well as triple-layer designs, but enough to tame a bright window without spending much.

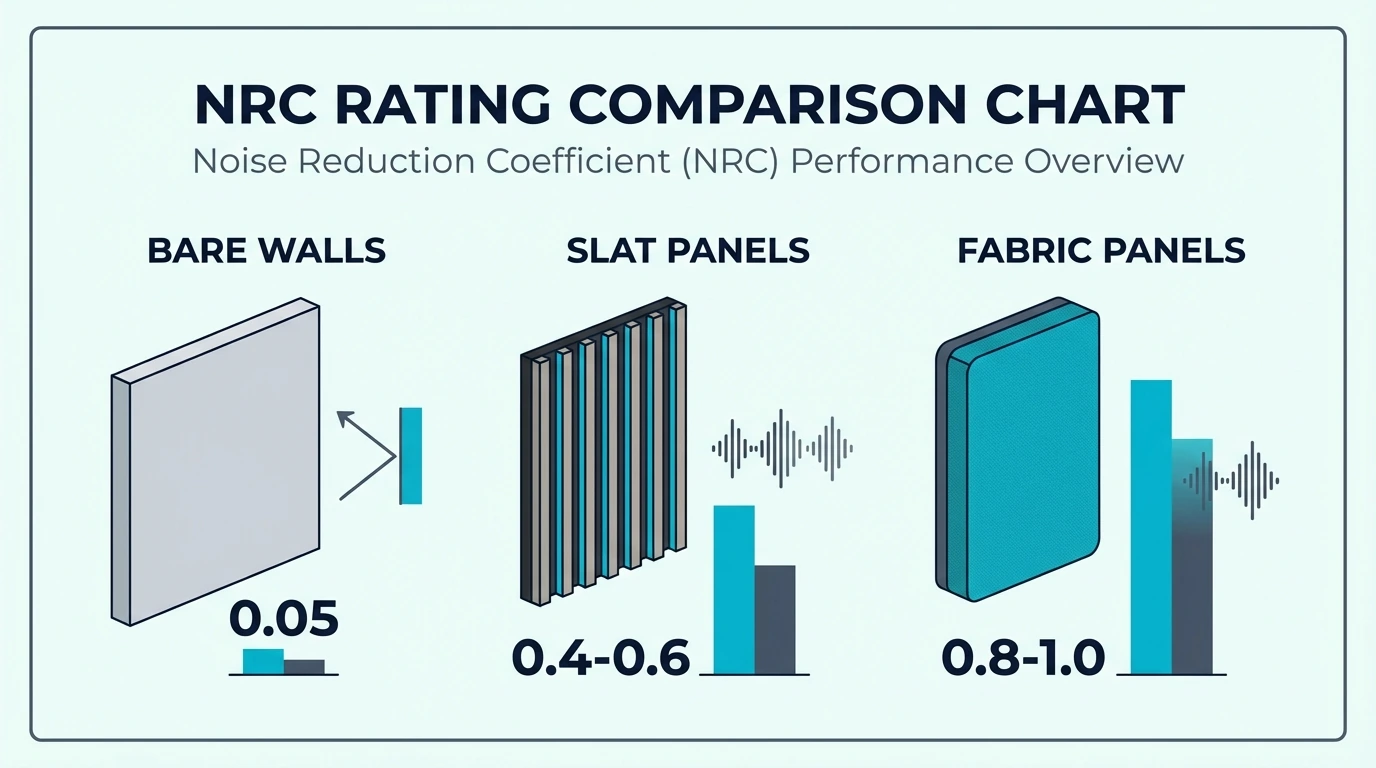
The best acoustic curtains achieve NRC ratings around 0.35-0.50 — less than dedicated panels but meaningful for window treatment. They address the reflection problem without the cave-room consequence.

What About Acoustic Window Inserts?

For outside noise blocking, window inserts provide the best non-permanent solution. These are secondary panes that press-fit into existing window frames, creating an air gap that blocks sound transmission.

Quality inserts use laminated glass or thick acrylic and seal tightly to the frame. They can reduce outside noise by 50-70% — far more than any panel approach.

Inserts preserve light and can be removed for ventilation when needed. They are especially popular in urban apartments facing busy streets.

Can Window Plugs Work?

DIY window plugs — rigid insulation boards cut to fit and wrapped in fabric — provide temporary blocking for both sound and light. They are removable panels designed for windows.

If curtains are your main tool for echo control, choose a heavier option with multiple layers. The KGORGE 4-in-1 Soundproof Curtains includes a melt-blown layer designed to reduce sound transmission and is most useful when you want maximum coverage during recording sessions.

Plugs work for dedicated recording sessions where you want maximum isolation temporarily. You block the window during recording, then remove the plug to restore normal room function.

The downside is storage — plugs sized for large windows take real space when not in use. Plan a place to store them before you build a set.

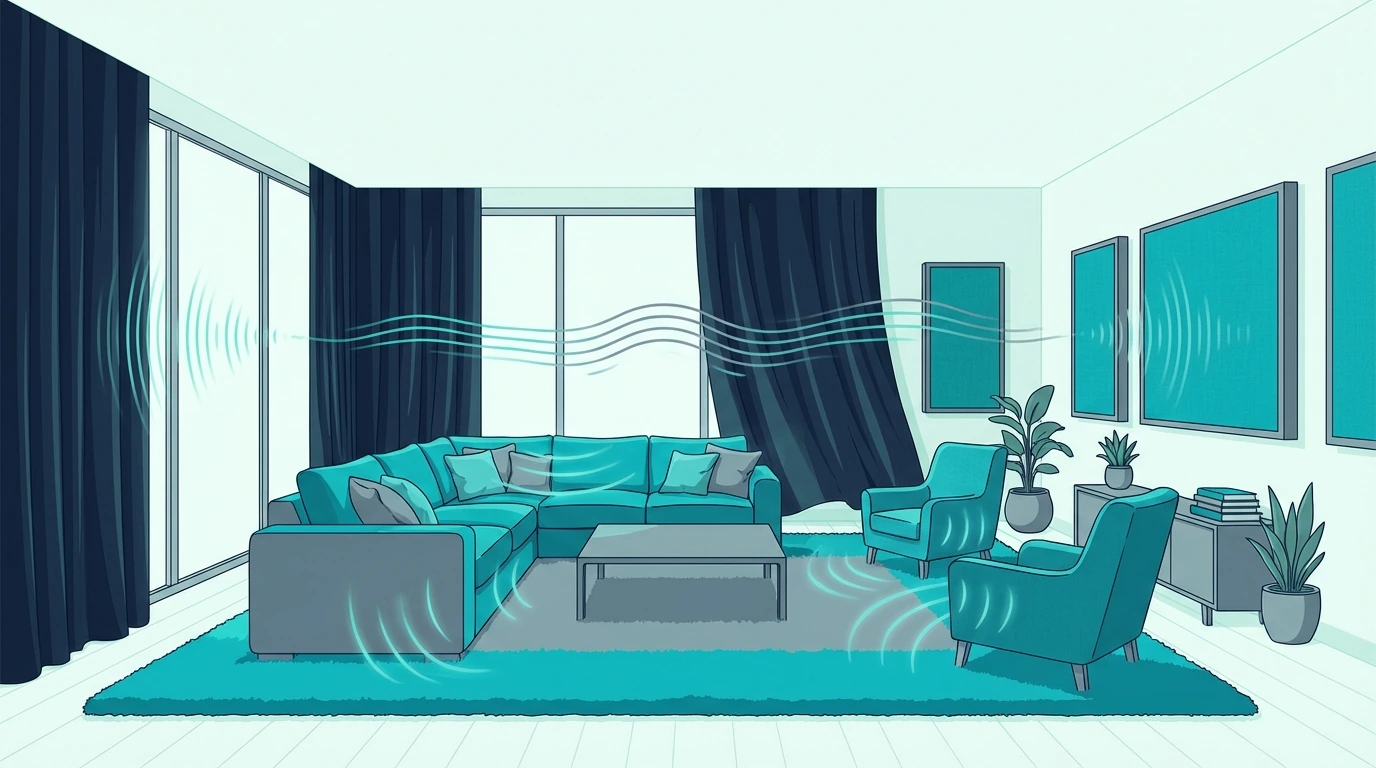
Should You Treat Walls Around Windows Instead?

Acoustic panels mounted beside a window while preserving access

Treat the wall surfaces around the window, not the glass itself. The two setups below show where to place panels and how to pair them with curtains for the best result.

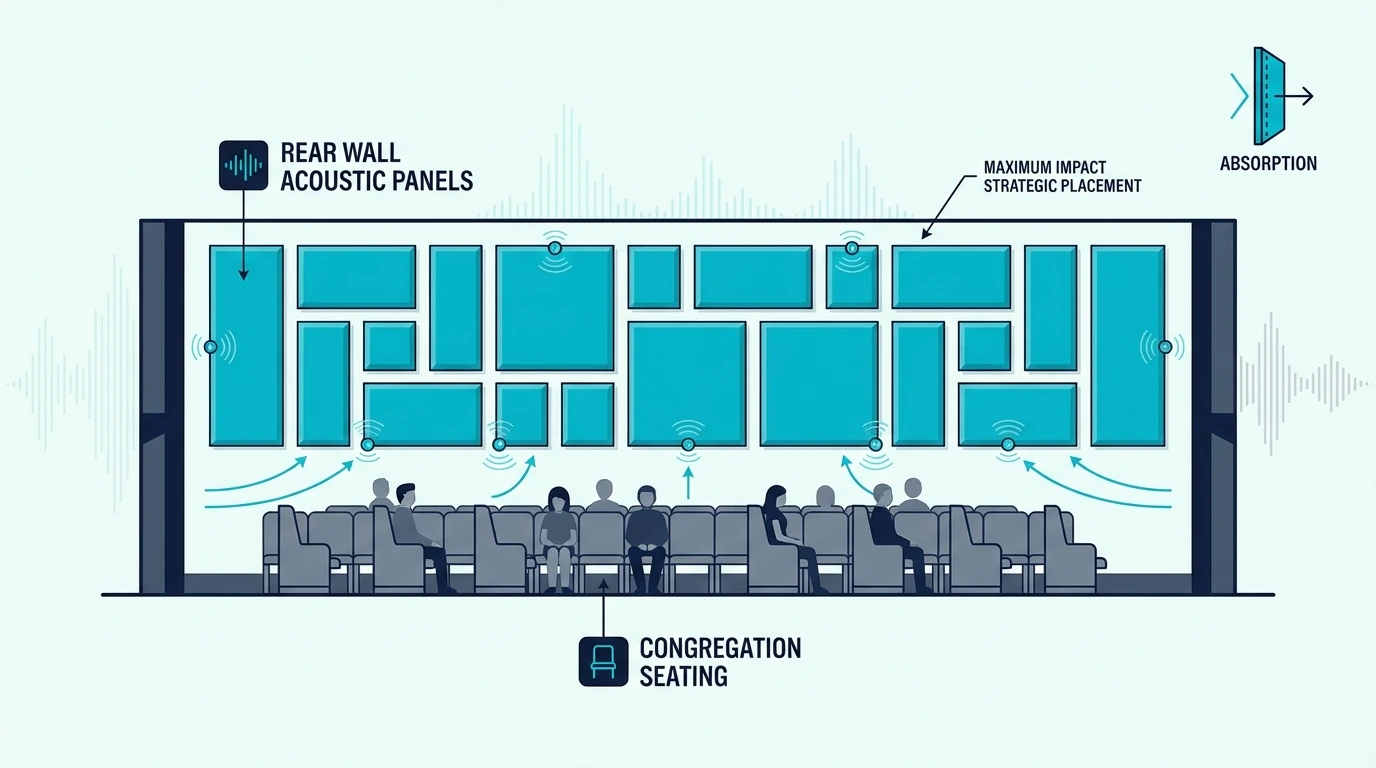
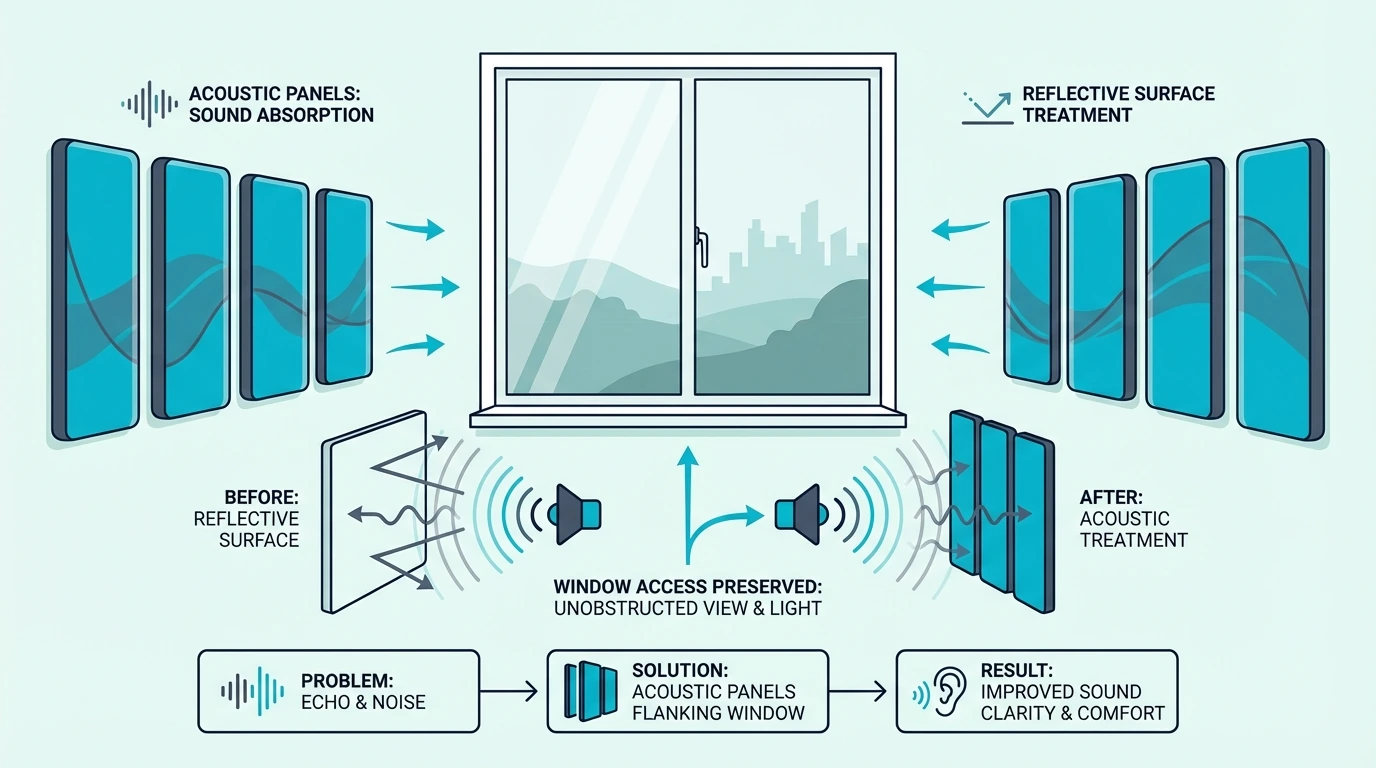
Where Should Panels Go Near Windows?

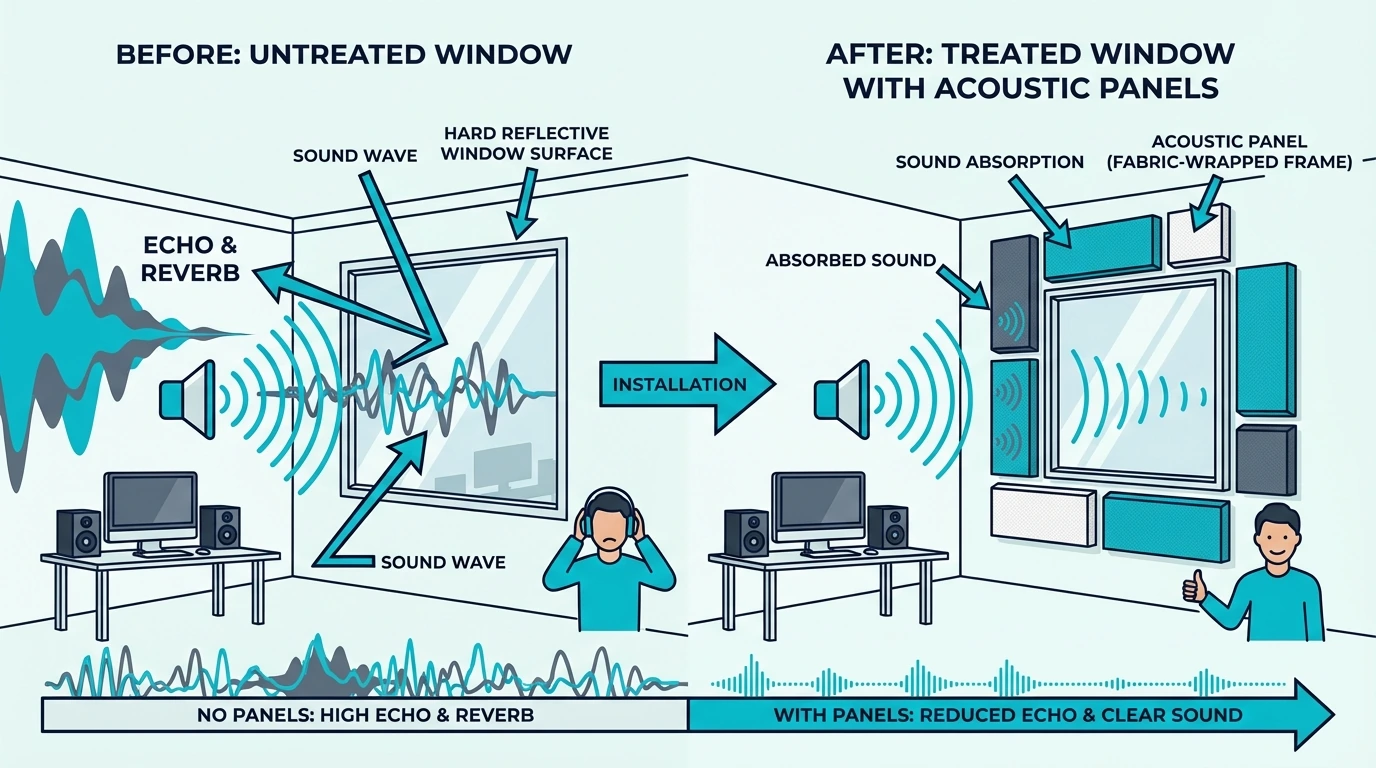
The wall sections immediately flanking windows create first reflections for many listening positions. Treating these surfaces with panels intercepts sound that would otherwise bounce off glass.

Position panels on the wall between windows or on the wall sections on either side of large windows. This placement catches reflections that the window would create while leaving the window itself unobstructed.

The panel placement guide covers the best positions for various room layouts.

What Is the Best Layout?

Wall-mounted panels around windows paired with acoustic curtains over the glass gives you the best of both worlds. Panels provide consistent absorption regardless of curtain position.

Curtains add adjustable high-frequency absorption — close them during critical listening or recording, then open them for daily use. The wall panels still do their job regardless of curtain position.

For a budget-friendly curtain to pair with wall panels, the NICETOWN Full Shade Curtains block light and dampen reflections at a fraction of the cost of multi-layer options.

For panel installation methods, wall mounting near windows uses the same techniques as any other wall location.

Window Acoustic Treatment Options Comparison

Infographic comparing acoustic curtains, inserts, plugs, and wall panels

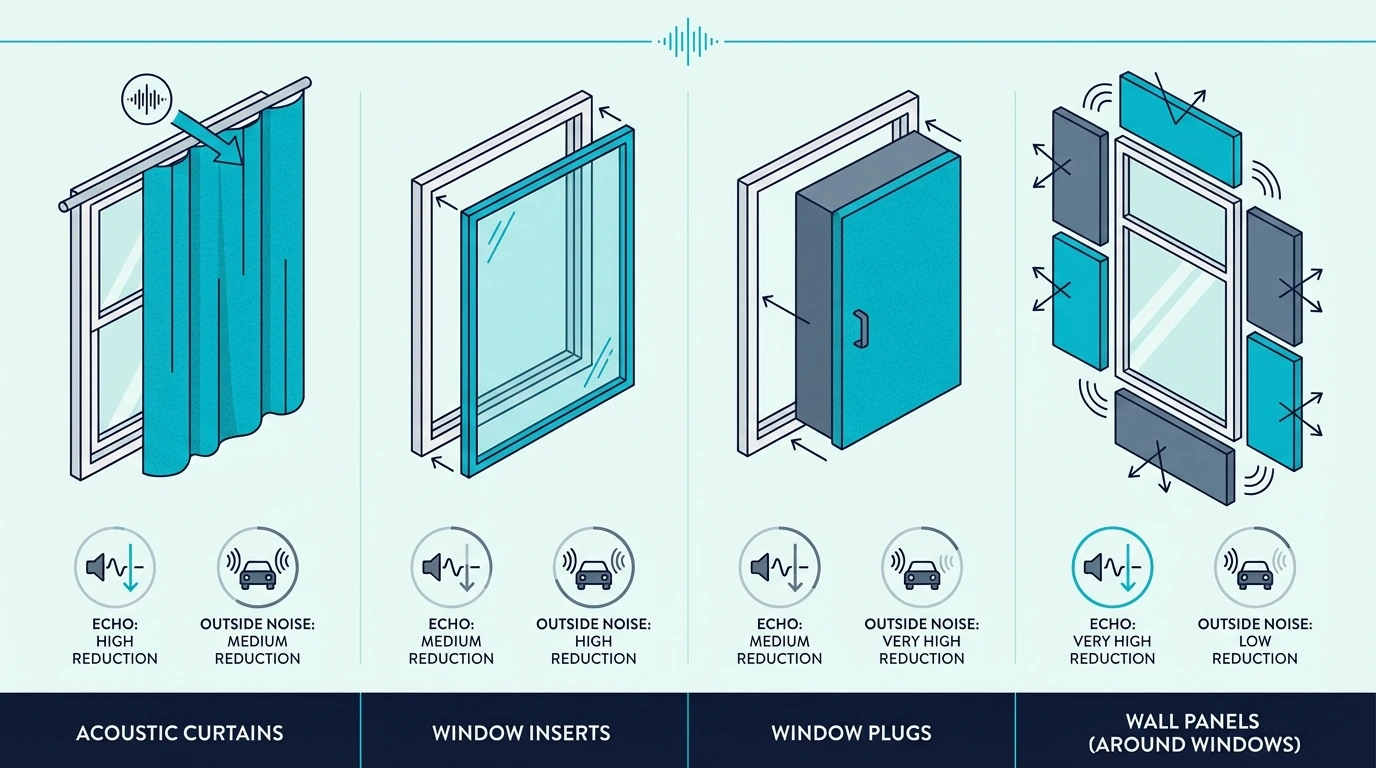
Panels on windows reduce reflections, but they eliminate light and ventilation. They also do not block outside noise.

Acoustic curtains reduce reflections while still working as a normal window covering. They can slightly reduce perceived outside noise, but they do not seal air gaps.

Window inserts or secondary glazing are for outside noise. They keep full light and window visibility while reducing traffic and neighbor sound.

Window plugs are a temporary option for recording sessions. They can improve isolation, but they block light and need storage space.

Panels around windows reduce reflections without covering the glass. This is a good way to treat echo while keeping the room livable.

Curtains plus wall panels is the most balanced setup for most rooms. It keeps daily usability while giving you extra control during recording or critical listening.

Conclusion

For most situations, do not put acoustic panels on windows. Instead, combine acoustic curtains with panels mounted on walls around the window area.

Curtains plus wall panels reduces reflections while keeping natural light and ventilation. Curtains give you adjustable treatment, and the wall panels give you consistent baseline absorption.

If your primary concern is outside noise rather than echo, window inserts or secondary glazing addresses the actual problem. Panels will not help with traffic or neighbor noise regardless of placement.

The best acoustic panels guide has wall-mounting options that complement window treatments.

Use the panel count guide to calculate how many panels your room needs before ordering.

Frequently Asked Questions

Can You Cover Windows With Acoustic Panels?

Physically possible but not recommended. You will lose natural light and ventilation while gaining only marginal acoustic benefit over better alternatives.

If you need temporary complete coverage for dedicated recording sessions, consider removable window plugs instead. These provide similar acoustic effect while being designed for removal and storage.

Do Acoustic Curtains Work as Well as Panels?

Not quite, but close enough for window applications — quality acoustic curtains achieve NRC ratings around 0.35-0.50 compared to 0.85-1.0 for dedicated panels, yet curtains are adjustable, let light through when open, and solve the reflection problem without the drawbacks of panel placement.

What Is the Best Way to Treat Windows for Sound?

For echo reduction: acoustic curtains plus wall-mounted panels flanking the window. This provides effective treatment while preserving window function.

For outside noise blocking: window inserts or secondary glazing. These address the actual transmission paths that let external noise enter.

Combining both approaches — inserts for blocking plus curtains for absorption — covers both problems for windows facing noisy environments.

Can You Soundproof Windows Cheaply?

Budget options exist but with trade-offs, and the best low-cost win is weatherstripping that seals air gaps around the window frame. Heavy blankets can add temporary blocking, but they are awkward and often leak around the edges.

For permanent solutions, expect a real investment — quality window inserts often cost hundreds per window. Secondary glazing or window replacement costs more, but it also yields the largest reduction and cheap soundproofing rarely works well.

Where to Place Acoustic Panels in Church: Complete Placement Guide [2026]

Where to place acoustic panels in church is simple enough—but only if you treat the surfaces that create the worst reflections first.

If your sanctuary sounds echoey or muddy, the problem usually is not your speakers. It is long reverb plus slap-back reflections that smear speech.

With the right placement, acoustic panels make sermons clearer and reduce listener fatigue without making the room feel dead. You keep musical warmth while tightening intelligibility.

Start with the rear wall behind the congregation, then treat side walls at ear height, and add ceiling clouds only where they reduce vertical reflections over seating.

Next, look at what makes churches acoustically difficult. Those problems point directly to the surfaces worth treating.

Quick Takeaway

Start with the rear wall behind the congregation, then treat side walls at ear height, then add ceiling clouds over seating (not the stage). Most churches do well with 15–25% coverage spread across multiple surfaces.

Why Are Churches So Difficult Acoustically?

Large church sanctuary with vaulted ceilings, stone walls, and wooden pews

Church architecture combines high ceilings, hard parallel walls, and zero soft furnishings—three factors that stack into long reverb tails and smeared speech. Ceiling height adds the longest delays, hard surfaces keep energy bouncing, and parallel walls create distinct flutter echoes that smear every syllable.

High Ceilings and Massive Air Volumes

Most churches have ceiling heights between 20 and 40 feet — sometimes higher in cathedrals and historic buildings. This massive air volume means sound travels farther before hitting surfaces, creating long reverb tails that smear speech into unintelligible mush.

In a typical church, a spoken word can linger for three to five seconds before it decays. In a well-treated room, reverb time can be closer to half a second.

The congregation hears the direct sound from the speaker, then waves of reflections that arrive milliseconds later, each overlapping with the next syllable.

This reverb can be beautiful for organ music and choral performances, which is why cathedrals became famous for sound. Modern services with speech and amplified music need tighter control.

Hard, Reflective Surfaces Everywhere

Stone walls, wooden pews, tile floors, and plaster ceilings reflect almost all sound energy. Very little in the room absorbs sound naturally.

When sound hits these surfaces, nearly 100% bounces back into the room. It bounces again and again.

Each reflection adds to the reverberant field until the space becomes an acoustic chaos of overlapping sound waves.

Contrast this with a carpeted living room where sofas, curtains, and soft furnishings absorb real energy. Churches have almost none of these natural absorbers.

Every surface acts like a mirror for sound.

Parallel Walls Create Flutter Echo

Many churches feature long parallel walls running the length of the sanctuary. Sound bouncing between these parallel surfaces creates flutter echo — a rapid, metallic repetition that sounds like a playing card in bicycle spokes.

Flutter echo is particularly distracting during quiet moments. A single cough or page turn can trigger a cascade of repetitions that takes seconds to fade.

This effect is separate from general reverb and requires treatment on at least one of the parallel surfaces.

Where Should Acoustic Panels Go First?

Acoustic panels installed on the rear wall behind church seating

Not every surface matters equally. The rear wall, side walls, and ceiling each send reflections back into the seating area at different intensities—treat them in this order to get the biggest improvement per panel.

Rear Wall Behind the Congregation

The back wall is your absolute highest-priority treatment zone. Sound leaves the stage speakers, travels completely over the heads of the congregation, hits the hard rear wall, and bounces straight back toward the front.

This creates a devastating slap-back echo that actively fights the speaker’s direct voice. Treating 30-50% of the rear wall with acoustic panels completely severs this reflection path. The improvement in speech clarity is usually immediate and dramatic—congregants sitting in the middle rows who previously struggled to understand the sermon will suddenly hear every syllable cleanly.

Mount panels at seated ear height (roughly 3-5 feet from floor) and extend upward. The exact coverage depends on your reverb time goals and the balance between speech clarity and musical ambiance.

Side Walls at Ear Level

Once the rear wall is secured, the side walls become the next logical target. These parallel surfaces bounce sound rapidly back and forth across the seating area, creating a harsh flutter echo that severely degrades clarity.

You don’t need to cover the side walls from floor to ceiling to fix this. Focusing a horizontal band of treatment exactly at seated and standing ear level (roughly 3 to 6 feet off the floor) perfectly intercepts the critical reflection paths. This targeted approach is especially critical for long, narrow sanctuaries where the side walls are uncomfortably close to the outer seating sections.

Ceiling Treatment for Vertical Reflections

Finally, you must address the massive vertical dimension. High church ceilings create very long reflection paths that add devastating amounts of reverb to the room. Sound travels 30 feet up, bounces off the vault, and returns to the congregation a full 60 milliseconds later—which is more than enough delay to completely blur human speech.

Suspended ceiling clouds are the most effective solution for this specific problem because they intercept the sound wave twice: once on the way up, and again on the bounce down. You must hang these clouds directly over the congregation seating area rather than over the stage; the stage actually benefits from some natural ceiling reflection for monitor reinforcement, but the listeners need controlled, clear audio. The acoustic panel spacing guide shows how to calculate this cloud distribution across a massive seating zone.

How Do You Balance Acoustics and Aesthetics?

Decorative fabric-wrapped acoustic panels blending with church decor

Placement solves the acoustic problem, but the congregation still needs to feel at home in the space. Fabric color matching, strategic positioning in low-attention zones, and working with existing arches and alcoves let you add absorption without turning the sanctuary into a recording studio.

Fabric-Wrapped Panels in Church Colors

Modern acoustic panels come in hundreds of colors and can match traditional church aesthetics beautifully. Custom fabric matching and strategic placement in less-visible areas help treatment blend with existing decor.

Deep burgundies, forest greens, navy blues, and warm golds work well in traditional church settings. The fabric hides the absorptive core while presenting a finished appearance that blends with surrounding architecture.

Panels like the Olanglab Fiberglass 4-Pack come in neutral colors that work in most traditional settings. Not every weave stays acoustically transparent, though—the acoustic panel fabric guide shows which ones let sound pass through to the core.

Custom printing allows panels to feature religious imagery, stained glass patterns, or other church-appropriate artwork. These acoustic art panels serve dual purposes — treatment and decoration.

Strategic Placement That Minimizes Visual Impact

Placement affects visibility as much as performance. Panels behind the congregation see less visual attention than panels flanking the altar.

Map sight lines and focal points before choosing mounting locations.

The rear wall and back sections of side walls receive less visual scrutiny than front areas. Concentrating treatment in these zones accomplishes acoustic goals while keeping the most visible areas untreated.

For historic churches with preservation concerns, removable mounting systems allow treatment without permanent modification to protected surfaces. Panels can be installed with minimal intervention and removed if needed.

Working With Architectural Features

Arches, alcoves, and architectural details can incorporate treatment invisibly. Panels installed within recessed areas or behind decorative screens provide absorption without visible modification.

Target surfaces that already have less ornamental value. Plain walls between windows or simple surfaces in auxiliary spaces offer treatment opportunities that do not compete with notable architectural features.

What Coverage Percentage Do Churches Need?

Church floor plan diagram with acoustic treatment zones marked

Coverage math matters more than picking a single perfect panel. Typical percentage ranges, the delicate tradeoff between speech and music, and knowing when to finally hire an acoustician all hinge entirely on your current reverb time and your ultimate acoustic goal.

Typical Coverage Ranges

As a baseline rule, most untreated churches achieve excellent results by covering 15-25% of their total wall surface area with absorption. Hitting that specific target range reliably cuts the overall reverb time by one to three seconds, tightening the room noticeably while preserving just enough liveness for the choir.

Massive, highly reverberant cathedrals suffering from 5+ second reverb times may need to push that coverage to 30% or more just to reach acceptable speech clarity. Conversely, modern architectural churches built with lower ceilings and carpeted floors might only need a surgical 10% coverage to lock the room in.

Whatever your target percentage, you must distribute that coverage evenly across the rear wall, side walls, and ceiling rather than dumping 30% of your panels onto one massive back wall.

Balancing Speech and Music

That exact coverage percentage is entirely dictated by what happens on your stage every Sunday. If your services are strictly speech and sermon-focused, you want a very short reverb time—often pushing down to one second flat. That hyper-controlled decay massively improves word intelligibility and sharply reduces listening fatigue for older congregants.

If your services lean heavily into traditional musical worship with choirs and organs, you actually need the room to breathe. Pushing the decay time out to two full seconds allows the musical notes to blend beautifully in the air. Over-treating a music-first room until it hits one second of reverb will make the choir feel painfully flat and disconnected.

Professional Assessment Value

If you are trying to walk that razor-thin line between perfect speech clarity and beautiful musical resonance in a 50,000 cubic foot sanctuary, guessing is an expensive mistake. Complex church acoustics absolutely demand a professional measurement before you order fifty panels.

An acoustic engineer will physically measure your exact reverb times across every frequency band, identifying the specific low-mid buildups that generic calculators miss. While DIY approaches work perfectly for home studios and small chapels, attempting to blind-treat a massive historic sanctuary usually results in over-buying the wrong materials.

If you just want to run the baseline math for your budget proposals before calling a professional, the acoustic panel quantity guide provides the raw coverage formulas that scale up to church-sized rooms. General acoustic principles that dictate how sound behaves in any room shape are covered in the acoustic panels placement guide, and the acoustic panels hub ties all these concepts together.

What Panel Types Work Best in Churches?

Comparison of church acoustic panel types including wall panels and clouds

Once you know your total square footage target, panel selection becomes an exercise in scale. Trying to treat a 40-foot wall with tiny 12-inch foam squares is a logistical nightmare; you must move to large-format panels, heavy ceiling clouds, and dedicated corner traps to match the massive volume of the sanctuary.

Large-Format Panels for Coverage Efficiency

While standard 2×4-foot panels work perfectly in home studios, they require an absurd number of individual mounting brackets to cover a church wall. Transitioning to 4×4-foot or custom oversized fiberglass boards allows you to cover massive surface areas with a fraction of the installation labor and far fewer visible seams.

The UMIACOUSTICS 47×24” fiberglass panels offer exactly the kind of coverage efficiency churches require, knocking out nearly 8 square feet of reflection per unit.

These oversized, rigid panels also inherently feature better low-frequency absorption due to their mass, helping to control the muddy bass buildup that constantly plagues large reverberant spaces. To aggressively target that low-end rumble, you must insist on a 2-inch minimum thickness like the 2” Thick Fiberglass Panels with Hanging Hardware. That physical depth allows the panel to absorb frequencies all the way down to 125Hz, cleaning up the low male vocal ranges that thin panels completely ignore.

Ceiling Clouds and Baffles

When you shift focus to the ceiling, suspended treatments become mandatory. Hanging acoustic clouds flat below the ceiling—or dropping vertical baffles from the rafters—allows you to aggressively treat the overhead reflections without ever drilling into historic plaster or obscuring painted ceiling murals.

In a massive church setting, flat horizontal clouds generally provide better acoustic return on investment than vertical baffles. Because they sit parallel to the floor, clouds intercept the acoustic energy traveling up from the congregation, and then immediately absorb the secondary reflections bouncing back down from the hard ceiling above them.

Bass Traps for Low-Frequency Control

Finally, the sheer architectural volume of a church almost guarantees massive bass buildup in the corners and along the upper wall-ceiling junctions. If the organ or bass guitar sounds overwhelmingly boomy in the back rows, standard flat wall panels cannot fix it.

You must deploy dedicated bass traps in these high-pressure zones to physically stop the low frequencies from endlessly circling the room. Floor-to-ceiling corner traps address these massive wavelengths with a surprisingly minimal visual footprint, especially since the dark corners of a sanctuary rarely draw the congregation’s visual attention anyway.

Where Should You Avoid Placing Panels?

Diagram showing where not to place acoustic panels in a church

Some reflective surfaces must absolutely stay reflective. If you aggressively kill every hard surface in the room, the sanctuary loses the glorious natural liveness that makes congregational singing feel powerful and unified.

Stage and Platform Areas

The single biggest mistake is blanketing the entire front stage wall in thick absorption. Performers, choir members, and the pastor actually rely on that natural acoustic feedback bouncing off the wall behind them to hear themselves properly.

Creating an unnaturally dead black hole on the stage completely isolates the musicians from each other. If you have a specific slap-back problem causing feedback in the stage microphones, you must treat those specific reflection paths surgically rather than suffocating the entire platform in fiberglass.

Near Stained Glass and Artwork

From a purely aesthetic standpoint, acoustic treatment must never compete with the architecture. You should aggressively avoid mounting panels anywhere near historic stained glass windows, religious murals, or ornate woodwork where they will inevitably draw the eye away from the focal point of the room.

Exit Paths and Safety Signage

Most importantly, acoustic panels cannot override building codes. You must never mount thick panels where they narrow a required fire exit path, obscure emergency lighting, or block line-of-sight to safety signage. When treating tight hallways or sanctuary vestibules, always consult your local fire marshal or facilities director before bolting heavy fiberglass panels to the walls.

Conclusion

Where to place acoustic panels in church starts with prioritizing the reflections that hurt speech the most. The rear wall addresses slap-back echo, while side walls control flutter echo between parallel surfaces.

Ceiling treatment helps when high ceilings add long delays over the seating area. You do not need to treat every surface to hear a real improvement.

Start with the rear wall and expand to side walls and ceiling treatment as scope allows. The goal is not a dead room.

The goal is controlled clarity that still feels like a church during music and singing. The acoustic panels hub connects every topic covered here, and the best acoustic panels page ranks specific products by room type if you need a shortlist.

Leadership often asks what the numbers on a spec sheet mean—the NRC rating guide explains absorption scores in plain language. Once the panels arrive, the installation guide covers secure mounting on drywall, masonry, and suspended grid ceilings.

Frequently Asked Questions

Where should acoustic panels go in a church?

Start with the rear wall behind the congregation. This single surface often produces the most dramatic improvement in speech clarity.

Then treat portions of side walls at ear height to control flutter echo. Finally, add ceiling clouds over seating to reduce high-ceiling reflections.

How many acoustic panels does a church need?

Most churches land in the 15–25% wall coverage range. A 5,000-square-foot sanctuary typically needs 40–60 standard panels spread across the rear wall, side walls, and ceiling.

Will acoustic panels look bad in a church?

Not if you match fabric colors to existing woodwork, stone, or upholstery. Panels behind the congregation and along side walls draw far less attention than panels near the altar—most congregants never notice them.

Can you treat a church without permanent modifications?

Yes — many mounting systems allow installation without drilling into historic surfaces. Ceiling clouds can suspend from removable hardware.

Wall panels can mount to freestanding frames or temporary backing systems that do not damage original materials.

What is the difference between church acoustics and home studio treatment?

Scale. Churches can exceed 20-foot ceilings and 50,000 cubic feet; home studios rarely top 10 feet and 1,000 cubic feet.

That volume difference means churches need far more treatment area and must balance absorption with preserving the liveness that makes congregational singing and organ music feel full.

Can You Cover Acoustic Panels With Fabric? Yes — Here’s How [2026]

Can you cover acoustic panels with fabric? Absolutely — but only if you choose the right material.

Cover it with the wrong fabric and you’ve built an expensive wall decoration that won’t absorb a single sound wave.

The mistake most people make is assuming the fabric covering is fixed or proprietary, because that assumption sends them to expensive replacements when a simple 30-minute re-wrap would fix the problem entirely.

Below you’ll find which fabrics work acoustically, which ones you’ll want to avoid, and how to wrap a panel in under 30 minutes without wrinkling the front face.

First, the one selection rule that determines whether your project works at all.

Quick Takeaway

Can you cover acoustic panels with fabric? Yes — most acoustic panels are already fabric-wrapped, and you can re-cover them with any acoustically transparent material. The key is choosing fabric that lets sound pass through. Test by holding it to your mouth and blowing — if air flows freely, the fabric works. Avoid thick, tightly-woven materials that block airflow and reduce acoustic performance.

Why Cover Acoustic Panels With New Fabric?

Fabric and tools prepared for covering an acoustic panel

Most commercial acoustic panels already use fabric coverings over fiberglass or mineral wool cores. That fabric isn’t decorative — it’s functional.

It holds the absorbent material in place while allowing sound waves to pass through. You can swap it for something that matches your room’s aesthetic — as long as you choose the right material.

Matching Room Aesthetics

Standard acoustic panels come in limited colors — usually black, gray, or beige. These neutral tones work fine in recording studios but clash with living spaces, home offices, and bedrooms.

Re-covering lets you match your exact wall color or introduce patterns that complement your furniture. A panel wrapped in the same fabric as your curtains becomes part of the room design instead of an obvious acoustic treatment.

Refreshing Worn or Stained Panels

Fabric deteriorates over time. Dust accumulates, sunlight fades colors, and accidents happen.

A coffee splash or pet scratch doesn’t mean you need to replace the entire panel. The acoustic core — the fiberglass or mineral wool inside — doesn’t wear out.

Only the fabric covering shows age. Re-wrapping costs a fraction of replacement and takes about 30 minutes per panel.

Creating Custom Art Pieces

Printed acoustic panels cost far more than standard colors. By covering panels yourself, you can use any fabric with any design — family photos printed on canvas, band posters, abstract patterns, or custom artwork.

Rooms that need treatment but can’t sacrifice aesthetics — a living room, a home office, a bedroom — get the most out of thinking through acoustic panel placement when each panel doubles as a design decision.

What Fabric Works for Acoustic Panels?

Acoustic panel laid on fabric before wrapping

Not every material you find at the craft store works acoustically. The wrong covering will act like a brick wall against high frequencies, instantly reducing your expensive panel’s effectiveness by 50% or more.

Fortunately, a single physical test catches every unsuitable material in under five seconds before you ever open your wallet.

The Blow Test (Essential)

You don’t need lab equipment to verify acoustic transparency; you just need your lungs. By holding a fabric sample tightly against your mouth and blowing forcefully through it, you can instantly gauge its density.

If you feel strong airflow on the other side of your hand and virtually zero resistance pushing back against your mouth, the fabric is acoustically transparent. Because sound waves are simply pressure variations traveling through the air, materials that let air pass freely will inherently let sound waves pass freely. If the fabric pushes back like you are blowing into a thick pillow, it will act as a reflective acoustic barrier and ruin your panel.

Acoustically Transparent Options

Once you know the testing metric, several standard fabric types consistently pass with flying colors. Natural burlap offers a rustic, highly textured look with very open weaves that breathe perfectly.

Basic muslin provides a smooth, tight surface that remains nearly invisible acoustically. The absolute safest choice is dedicated speaker grill cloth—the exact same material used to cover studio monitors and guitar cabinets. Products like SoundAssured Acoustical Fabric are engineered specifically to pass the blow test every single time, removing any guesswork from the equation.

Guilford of Maine’s FR701 remains the undisputed industry standard for commercial acoustic panels because it balances perfect transparency with strict fire ratings. The acoustic panel fabric guide compares these premium options against budget alternatives in exhaustive detail.

Fabrics to Avoid

If you run the blow test on standard painting canvas, it fails universally. The brutally tight weave that makes canvas so durable for stretching also makes it highly reflective to acoustic energy, meaning your panel might look like high-end art, but it won’t absorb a single flutter echo.

The exact same physics apply to leather, faux leather, and heavy vinyl. These materials are completely non-permeable and will physically transform a broadband acoustic absorber into a low-mid reflector—the exact opposite of your acoustic goal. Denim, heavy velvet, and thick upholstery fabrics typically fail the test for the same reason, as their dense backing layers seal off the airflow completely.

How to Cover Acoustic Panels Step by Step

Fabric pulled tight around the acoustic panel frame

While re-wrapping sounds intimidating, it is basic upholstery work that requires zero specialized carpentry skills. The actual stapling process goes extremely fast; the secret to a flawless finish relies entirely on gathering the right tools before you tear the old fabric off.

Materials You’ll Need

The backbone of the project is a standard heavy-duty staple gun loaded with 1/4-inch or 3/8-inch staples, depending entirely on the depth and hardness of your panel’s wooden frame.

You must cut your replacement fabric roughly 4 to 6 inches larger than the physical panel dimensions on every single side. This excess material guarantees you have enough grip to pull the fabric taut around the back of the frame, creating clean, professional-looking edges. You also absolutely must iron the fabric completely flat before touching the staple gun—any wrinkles trapped under the stretched material will become permanent visual defects that you cannot fix without ripping out fifty staples and starting over.

Removing Old Fabric

The teardown phase requires patience. Lay the old panel face-down on a perfectly clean floor or table. Because most commercial fabric is secured with heavy industrial staples driven deep into the back perimeter, you will need a flathead screwdriver or dedicated staple remover to pry them out individually.

If the panel uses spray adhesive instead of staples, you must peel the fabric away very slowly to avoid tearing chunks of the acoustic core out with the glue. Once the frame is exposed, rigorously inspect the internal fiberglass or mineral wool; if the core material is heavily compressed, water-damaged, or structurally crumbling, the panel is dead and not worth the effort of re-covering.

Wrapping the New Fabric

With your freshly ironed fabric lying face-down on the table, center the bare acoustic panel on top of it, ensuring the “face” of the fiberglass pushes into the back of the fabric.

The wrapping technique mimics stretching a canvas. You pull one long edge tightly over the wooden frame and drive a row of staples every 2 to 3 inches. You then move directly to the opposite long edge, pulling the fabric firmly across the face of the panel to establish an even tension before stapling it down. Once the long edges are locked, you repeat the exact same tensioning process on the short edges, finishing the corners with tight, 45-degree folds exactly like wrapping a birthday present.

The goal is achieving a smooth, wrinkle-free face without applying so much tension that the wooden frame physically warps under the stress. For massive 4-foot panels, using a seamless, wide-format roll like the 96” x 54” Speaker Grill Cloth prevents you from having to stitch pieces together across the front face.

The DIY acoustic panels guide breaks down this corner-folding and stretching process with visual examples, while the hanging guide covers the best hardware for getting the newly wrapped panels back on the wall safely.

Does Covering Affect Acoustic Performance?

Corners folded neatly while covering an acoustic panel with fabric

You can start with a perfectly engineered 4-inch Owens Corning 703 core built into a solid pine frame. But if you stretch the wrong fabric over the top of it, the physics immediately collapse.

The performance gap between a highly permeable grill cloth and a non-permeable canvas is massive enough to cut a panel’s acoustic effectiveness directly in half—a failure that remains completely invisible until you sit down in the room and wonder why the harsh flutter echo is still ruining your recordings.

Transparent Fabric = No Performance Loss

When a fabric effortlessly passes the physical blow test, it becomes acoustically invisible to the sound waves traveling through the room. The dense fiberglass or mineral wool core does 100% of the actual physical absorption work.

Because the fabric doesn’t interfere, the panel’s original laboratory test ratings remain completely intact. Manufacturers could theoretically sell exposed yellow fiberglass blocks without any cover at all, but the fabric exists to contain the irritating glass fibers and make the product visually acceptable in a home environment. Covering a panel rated at NRC 0.95 with breathable speaker cloth ensures it will still operate at exactly NRC 0.95 when mounted on your wall. The insulation guide helps confirm your specific core material is actually worth the effort of re-covering.

Non-Permeable Fabric = Measurable Loss

Conversely, stretching a tight-weave canvas or a coated faux-leather over that same 0.95 NRC core creates a devastating acoustic bottleneck. Instead of transmitting the sound energy into the fiberglass, the rigid surface of the fabric acts like a mirror, reflecting the critical mid and high frequencies directly back into the room.

The NRC rating plummets from 0.95 down to 0.50 or worse, effectively destroying half the panel’s value. The frustrating aspect of this mistake is that a panel wrapped in canvas looks absolutely identical to a panel wrapped in Guilford of Maine acoustic cloth, meaning the catastrophic performance drop is completely hidden from the eye.

Testing Your Covered Panel

You never want to discover that massive performance drop after spending three hours wrapping and mounting a dozen panels. You must perform a crude but highly effective listening test on the very first panel you finish.

Prop the newly wrapped panel against a wall, stand roughly three feet away from it, and clap your hands sharply and loudly. Then take one step to the side and clap again at the bare, untreated drywall. The clap fired at the acoustic panel should instantly swallow the harsh, ringing “tail” of the echo, sounding completely dead and muffled compared to the sharp metallic slap off the drywall.

If the clap against the covered panel rings out exactly like the bare wall, your chosen fabric is actively blocking the sound waves and ruining the build. Before committing your entire budget to a bulk fabric order, buying a single yard of proven material like 1-yard speaker grill cloth lets you run this exact clap test without risking the whole project.

Can You Use Printed Fabric on Acoustic Panels?

Fabric stapled to the back of an acoustic panel frame

Printed fabric opens real creative possibilities — the catch is that the print process itself can close off the pores you need open.

Digital Prints on Acoustic Fabric

Some companies print directly onto acoustically transparent base fabrics. These keep the base fabric’s acoustic properties intact while printing custom designs on top.

Guilford of Maine offers custom printing services specifically for acoustic applications. The prints look professional and the fabric remains acoustically neutral.

Professional printing costs more than buying fabric off a roll, but you get guaranteed acoustic performance and image quality that home inkjet printing can’t match.

DIY Printing Considerations

Inkjet printing on fabric adds ink that can partially block pores. Light prints typically maintain acceptable airflow.

Heavy coverage with dark colors may reduce permeability. Test printed fabric with the blow test before committing — print a sample swatch and verify airflow before printing your full design.

Heat transfer printing applies a plastic layer that seals the fabric pores entirely — avoid it. Any process that coats the surface rather than penetrating it destroys acoustic performance.

Photo Canvas vs. Acoustic Panels

Stretched canvas photo prints look similar to fabric-wrapped panels but aren’t acoustically functional. Canvas blocks sound rather than allowing absorption.

If you want photo art that also treats acoustics, start with acoustic panels and appropriate printing — not canvas stretching services that use non-permeable materials.

If aesthetics and treatment both matter — a living room, a professional office — choosing the right panel material from the start makes far more difference than the covering you put on top.

What Are Common Mistakes When Covering Panels?

Finished fabric-covered acoustic panel ready to install

When acoustic treatment fails, the core material is rarely to blame. Almost every ruined DIY panel or sloppy re-wrap job traces back to someone cutting corners during the fabric selection or the final stapling phase.

Choosing Fabric by Appearance Only

The most devastating mistake any builder makes is buying a fabric simply because the color matches their couch, without ever testing its acoustic transparency. Buying gorgeous, thick velvet to wrap an acoustic panel guarantees you will completely block the sound waves from reaching the fiberglass.

Always prioritize physics over aesthetics. You must order a small physical swatch of the material, run the blow test on it, and definitively verify the airflow before you commit hundreds of dollars to a bulk order that might ruin your entire studio build.

Stretching Too Tight

While the fabric must look smooth, treating the wrapping process like tuning a snare drum causes catastrophic structural failures. If you apply massive, aggressive tension across the fabric, the immense pulling force will actively bow and warp the thin wooden frame of the panel.

A warped acoustic panel will never sit flush against the drywall when mounted. The resulting gap behind the frame looks amateurish, and the excessive tension will eventually tear the fabric fibers cleanly through the metal staples holding them in place.

Ignoring Frame Condition

If you are re-wrapping an old, tired acoustic panel, you must respect the physical limits of the wood. A frame that has been stapled and stripped three or four times will have edges completely chewed up by old hardware, meaning the soft pine will no longer grip a new staple securely.

If you staple tightly into damaged wood, the staples will slowly pull out over the next few months, leaving you with sagging, wrinkled fabric on the wall. Before wrapping, you must rigorously assess the frame; filling the old staple holes with wood filler adds necessary strength, but a severely splintered frame must be discarded and rebuilt from scratch.

Skipping the Test After Covering

Assuming your newly wrapped panel actually absorbs sound without verifying it guarantees you will waste time on the installation. You must run the clap test on the very first finished panel before moving down the assembly line to wrap the remaining five.

Discovering a fabric failure after you have mounted six heavy panels to your drywall requires tearing down the entire room and starting over. When you have finally verified the absorption and are ready to hang the hardware, the guide on where to install acoustic panels breaks down the exact reflection points that require treatment first.

Conclusion

The blow test is the only real gate in this entire process.

Before you buy a single yard of fabric, hold it to your mouth and blow. If there’s resistance, put it back.

The rest — wrapping, stapling, mounting — is upholstery work that gets faster every time you do it.

People re-cover panels to refresh a room, match new furniture, replace stained fabric, or add printed artwork. It’s one of the few acoustic upgrades that costs under $30 and takes an afternoon.

The acoustic panels hub covers treatment options beyond fabric covering, and the build-from-scratch guide walks through the full DIY process.

Frequently Asked Questions

Can any fabric work for acoustic panels?

No. Tight-weave fabrics like canvas, denim, and velvet block sound before it reaches the panel core — which means you’ve paid for a fiberglass panel that functions as an expensive wall decoration.

The blow test takes five seconds and catches every problematic material before you spend money on it.

Will covering panels void warranties?

Warranties typically cover the acoustic core, not the fabric — but return policies are a separate issue. Most manufacturers won’t accept a panel back after DIY modification.

How often should acoustic panel fabric be replaced?

Ten to fifteen years is typical for quality acoustic fabric in a normal room. Dust is usually the deciding factor — once the fabric is too clogged to clean, it’s also restricting airflow to the core.

The frame and fiberglass inside will outlast the fabric by decades. Re-covering is routine maintenance.

Can I paint acoustic fabric instead of replacing it?

Diluted latex in a very light coat can work, but most people apply too much and seal the pores.

Always test a swatch first — not the panel itself.

Honestly, just buy fabric in the color you want. It’s cheaper than ruining a re-cover job with bad paint.

Does fabric color affect acoustic performance?

Color has no effect on acoustic performance — only the fabric’s physical structure matters. A black panel and white panel with identical fabric construction perform identically.

Choose colors based purely on aesthetic preference. Acoustic transparency is determined by weave density, not pigment.

Are Acoustic Panels Waterproof? (And What to Use Instead) [2026]

Are acoustic panels waterproof? No — but the real question is whether yours will survive the humidity in your specific space.

Standard fiberglass and mineral wool panels absorb moisture just as easily as they absorb sound. Most people find this out the hard way after installing panels in a basement or bathroom, only to discover sagging, discoloration, or hidden mold months later.

The good news: the right material choice prevents all of that. PET polyester panels resist moisture because of their non-porous fiber structure — so you can stop worrying about humidity damage and focus on the acoustic results.

Below, you will find which materials survive moisture, what actually happens when panels get wet, and how to protect your investment in humid environments.

Quick Takeaway

Standard acoustic panels are not waterproof — fiberglass and mineral wool absorb moisture, lose acoustic performance, and can grow mold. PET polyester panels offer the best moisture resistance of any standard panel material. For truly wet environments (bathrooms, outdoor), use dedicated water-resistant acoustic products instead.

Are Acoustic Panels Waterproof? Understanding the Core Problem

Water droplets beading on a PET panel versus absorbing into fiberglass

Most panels fail in humid rooms for one reason: the same physics that absorb sound also absorb water. The mechanism is worth understanding before you pick a material.

How Acoustic Panels Absorb Sound (And Why That’s the Problem)

Sound waves travel through air as pressure variations. When these waves hit a hard surface like drywall, most energy bounces back — creating that echoey “bathroom sound” that ruins recordings.

Acoustic panels intercept these waves before they can reflect. The porous core material — typically fiberglass or mineral wool — contains millions of tiny air pockets.

As sound enters these pockets, friction between air molecules and fibers converts acoustic energy into microscopic amounts of heat. The sound disappears into the material.

Those same air pockets that absorb sound also absorb water vapor. A fiberglass panel does not distinguish between sound waves and humidity — it just absorbs whatever enters.

Thicker panels have more material to absorb both sound and moisture. Panels with high NRC ratings (0.85+) are typically more vulnerable because better absorption means more porosity — and more pathways for water to enter.

What Makes a Material “Waterproof” vs. “Water-Resistant”

These terms get thrown around loosely in acoustic product marketing, and the difference matters more than most buyers realize.

Waterproof means zero water penetration under normal conditions. Think plastic, glass, or sealed metal.

These materials reflect sound — the opposite of what you want from acoustic treatment.

Water-resistant means the material can handle some moisture exposure without immediate damage. PET polyester panels fall into this category — water beads on the surface rather than soaking in.

Standard acoustic panels (fiberglass, mineral wool, foam) are neither waterproof nor water-resistant. They are moisture-vulnerable by design.

The only truly waterproof acoustic solutions are specialized products for swimming pools and outdoor venues — and they cost three to five times more than standard panels.

Why Standard Panel Materials Fail in Humid Environments

Fiberglass panels use glass fibers bonded with adhesive resins. When water enters, it weakens these bonds and causes the material to sag permanently.

Mineral wool (Rockwool, Safe’n’Sound) handles occasional humidity slightly better than fiberglass. But sustained moisture still causes degradation over weeks.

Open-cell foam absorbs water readily and holds it like a sponge. Closed-cell foam resists better but offers poor acoustic absorption — defeating the purpose.

The fabric covering on most panels provides zero moisture protection. Acoustic fabric is intentionally breathable — sound needs to pass through to reach the absorbent core.

That breathability means humidity passes through just as easily.

What Happens When Acoustic Panels Get Wet?

Water-damaged acoustic panel with sagging, discoloration, and mold

Water damage does not stop at the surface. The progression follows a predictable sequence that gets worse the longer moisture remains — and the first signs are easy to miss.

The First 24 Hours: Immediate Damage

Water contact triggers problems immediately — even before visible damage appears.

When water first touches the fabric covering, it may bead briefly on tightly-woven materials. But fabric is not a barrier — it is designed to let sound through, which means it lets moisture through too.

Within minutes, water penetrates to the core. Fiberglass darkens visibly in the saturated area.

Weight increases sharply as water fills the air pockets. A fully saturated 2×4 panel can weigh three to four times its dry weight — a serious concern when calculating how many panels you need for proper coverage.

This added weight stresses mounting hardware. Panels mounted with lightweight adhesive strips may fall, and wall anchors rated for dry panel weight may pull out — a particular concern for ceiling-mounted panels where gravity amplifies the problem.

Days to Weeks: Structural Degradation

Even if surface drying begins quickly, internal damage continues developing.

Compressed fibers do not recover their original structure. The fiber matrix that creates air pockets for sound absorption gets crushed under the water weight, permanently reducing acoustic performance.

Adhesive bonds between fibers weaken. Many fiberglass panels use formaldehyde-based binders that break down when wet, causing the panel to crumble internally.

Fabric develops permanent water stains where minerals in the water deposit on fibers. These marks will not wash out — they are bonded to the fabric at a molecular level.

If the panel does not dry completely within 48-72 hours, biological growth begins. Mold spores are everywhere — they just need sustained moisture to colonize.

The Hidden Danger: Mold Inside Panels

The fiber compression from the previous stage is bad enough, but mold is the real risk. And it is usually invisible until the problem becomes severe.

Fiberglass and mineral wool provide ideal conditions for mold: sustained moisture, organic matter (adhesives, fabric fibers, dust), and darkness inside the panel structure.

Mold can establish within 24-48 hours of sustained moisture. By the time you see visible growth on the fabric surface, the interior is likely heavily colonized.

You cannot clean mold from inside a porous panel. Surface cleaning removes visible growth but leaves the interior contamination that continues spreading.

Moldy panels should be discarded immediately. They release spores into your room air every time they are disturbed — creating health risks far exceeding the cost of replacement panels.

Choosing a mold-resistant fabric covering from the start is the only reliable prevention once panels are installed in humid rooms.

Which Panel Materials Handle Moisture Best?

Moisture resistance comparison for fiberglass, mineral wool, foam, and PET

Not every panel material reacts to moisture the same way. Some tolerate occasional humidity; others need climate-controlled conditions to survive.

Fiberglass Panels: Poor Moisture Tolerance

Fiberglass offers excellent acoustic absorption (NRC 0.95-1.05) but poor moisture resistance. The glass fibers themselves don’t absorb water, but the binding agents do.

Positioning fiberglass panels in dry zones maximizes both performance and lifespan.

A finished fiberglass panel like ATS Acoustics Sound Absorbing Acoustic Panel 24 × 48 × 2 is exactly the kind of product that performs well in a climate-controlled room and ages badly in a damp one.

Most fiberglass panels use formaldehyde-urea or phenolic binders. These adhesives soften when wet, allowing fibers to shift and compress.

Recovery potential is limited. Once saturated, fiberglass rarely returns to original performance — expect a 20-40% drop in NRC rating even after complete drying, which pushes panels below useful absorption thresholds.

Best environment: climate-controlled studios, offices, and listening rooms with consistent 30-50% relative humidity.

Mineral Wool Panels: Slightly Better Than Fiberglass

Those binding-agent failures in fiberglass are less severe with mineral wool. The volcanic rock base material does not absorb water as readily as glass fibers, so mineral wool can often survive brief humidity spikes that would damage fiberglass.

A mineral wool product like AFB Acoustical Fire Batts Mineral Wool Insulation buys you a bit more forgiveness than fiberglass, but it is still a dry-room material rather than a wet-room fix.

However, sustained exposure still causes problems. Water eventually penetrates, and mineral wool becomes heavy and saggy like any porous material.

Panel density affects moisture resistance too — denser panels have fewer air pathways for water to enter, but also dry more slowly if they do get wet.

PET Polyester Panels: Best Moisture Resistance

Where mineral wool and fiberglass both eventually lose to sustained moisture, PET polyester avoids the problem entirely. PET panels are made from recycled plastic bottles processed into felt-like sheets — the synthetic fibers do not absorb water at all.

Water beads on PET surfaces instead of absorbing. You can wipe spills away without damage.

The catch is that many listings marketed as “soundproof wall decor” are not PET at all, so material verification matters more here than brand promises.

The trade-off: PET typically delivers lower NRC ratings (0.65-0.85) compared to fiberglass (0.95-1.05). You sacrifice some absorption for moisture resilience.

For rooms where panel placement controls most of the echo, the NRC difference may matter less than durability.

Melamine Foam: Moderate Moisture Handling

Melamine foam offers a middle ground — better moisture resistance than fiberglass, not as good as PET.

The closed-cell structure resists water penetration better than open-cell foams. Surface moisture wipes away easily.

However, melamine is brittle and damages easily from impact. It also tends to yellow over time when exposed to UV light.

Best use: environments with occasional humidity spikes but not sustained high moisture — like conference rooms with variable occupancy.

Can You Use Acoustic Panels in Bathrooms?

Moisture-resistant acoustic panels installed away from a shower area

Bathrooms present the most common moisture challenge for home acoustic treatment. The question isn’t whether panels CAN survive — it’s whether the environment allows any reasonable panel lifespan.

Why Bathrooms Are Problematic for Standard Panels

Average bathroom humidity during showers reaches 80-90% relative humidity. Steam condenses on every surface — walls, mirrors, and any acoustic panels you have installed.

Standard fiberglass panels will absorb this humidity repeatedly. Even if they dry between uses, the constant moisture cycling accelerates degradation.

Within three to six months, panels in active bathrooms typically show visible staining, sagging, and sometimes visible mold. They become eyesores and potential health hazards that you cannot simply clean back to normal.

The absorption capacity that makes panels effective at controlling echo makes them moisture magnets in high-humidity rooms. If your goal is sound blocking rather than echo control, bathroom placement adds moisture challenges to an already difficult problem.

Scenarios Where Bathroom Panels Work

Those 80-90% humidity levels apply to full bathrooms with showers, but not all bathroom environments are equally hostile.

Half-baths without showers experience much lower humidity. Standard panels can survive here with good ventilation — humidity levels stay closer to normal room conditions.

Large master bathrooms with enclosed shower stalls may have “dry zones” far enough from moisture sources. Panels on the wall opposite a closed shower — combined with proper exhaust ventilation — can work.

If you are only experimenting in a low-humidity powder room, a lighter self-adhesive pack like 12Pack Acoustic Panels Self-Adhesive 3D Brick Pattern is a lower-risk experiment than installing expensive fiberglass near a shower.

Better Alternatives for Bathroom Acoustics

If those dry-zone scenarios do not apply to your bathroom, consider approaches designed for wet environments instead of forcing standard panels to survive.

PET polyester panels handle bathroom humidity far better than fiberglass. They will not absorb steam and can be wiped clean when condensation forms.

Proper ventilation solves the root problem. An exhaust fan running during and 20 minutes after showers keeps humidity manageable for any wall treatment.

Textured ceramic tiles with acoustic backing offer built-in sound absorption without moisture vulnerability. Several manufacturers make tiles specifically designed for acoustic bathrooms.

Sometimes the answer is accepting that bathrooms need different solutions. Soft towels, bath mats, and curtains provide some absorption without the moisture risk panels introduce.

How to Protect Acoustic Panels from Moisture Damage

Home studio with 45 percent humidity and acoustic panels mounted with airflow

Prevention beats remediation every time. These strategies keep your panels dry and functional for years — but require ongoing attention to environmental conditions.

Monitor Your Room’s Humidity Levels

You cannot manage what you do not measure. Start with baseline humidity data before installing panels.

Ideal humidity for acoustic panels is 30-50% relative humidity. This range is also comfortable for people and safe for wooden instruments.

Above 60% sustained humidity, standard panels face accelerated degradation. Above 70%, mold risk jumps sharply.

Place hygrometers in different room locations — humidity varies noticeably between corners, near windows, and in the center of the space.

Track readings over several weeks before panel installation. Humidity patterns shift through weather changes and seasonal cycles — track long enough to catch the full range.

Climate Control Strategies

The humidity monitoring from the previous step tells you whether climate control is a necessity or a nice-to-have. For studios and listening rooms, it is almost always a necessity — both for your panels and your recording equipment.

Air conditioning naturally dehumidifies as it cools. Running AC during humid seasons protects panels while keeping the room comfortable for long sessions.

If you are going to the trouble of dehumidifying a room, it is usually because you want to preserve a serious absorber like Owens Corning 703 Semi Rigid Fiberglass Board rather than a decorative panel that never needed premium protection in the first place.

Air gaps behind panels serve double duty here — they improve low-frequency absorption and allow air circulation that prevents moisture buildup between the panel and the wall.

Proper ventilation prevents humidity buildup from human activity too. Even breathing adds moisture — a room full of podcast guests can spike humidity noticeably over a two-hour recording session.

Smart Panel Placement

Climate control handles the air; placement handles the surfaces. Strategic positioning avoids moisture problems before they start.

Keep panels away from exterior walls in cold climates. Warm interior air meeting cold wall surfaces creates condensation — placing panels there traps moisture between panel and wall.

Maintain one to two inch air gaps behind wall-mounted panels. Flush mounting traps any moisture that penetrates, preventing evaporation and accelerating damage.

Avoid placement near HVAC vents that might blow humid air directly onto treatment surfaces. Vents near kitchens and bathrooms carry more moisture than you would expect.

Proper panel installation accounts for both airflow and moisture management — the mounting method you choose affects how quickly trapped humidity can escape.

What If Your Panels Already Got Wet?

Wet acoustic panel drying upright with a fan in a utility space

Accidents happen — roof leaks, burst pipes, spilled drinks. Recovery splits into three stages: immediate drying, damage assessment after 24-72 hours, and the replace-versus-salvage decision — and speed through the first stage determines whether the other two even matter.

Immediate Response Protocol

Act within the first hour if possible. Every delay increases permanent damage.

Remove wet panels from the wall immediately. Leaving them mounted stresses saturated cores and risks mounting hardware failure.

Stand panels upright on edge rather than laying flat. This allows air circulation on both sides for faster, more even drying.

Point fans directly at the panels — multiple fans from different angles work best. Air movement is the single biggest factor in evaporation speed.

Avoid heat sources like space heaters or hair dryers. Rapid localized heating can warp frames, shrink fabric unevenly, and damage fiberglass binders.

Assessing Damage After Drying

Once fans have been running for 24-72 hours, the panel should be dry enough to assess. Do not rush the evaluation.

Check for visible mold first. Any fuzzy growth, black spots, or musty smell indicates mold colonization — discard these panels immediately, no exceptions.

Inspect for permanent deformation. Sagging, bulging, or warped panels have suffered structural damage that will not recover.

Test acoustic performance informally by clapping near the panel and listening for reflected sound. Damaged panels reflect noticeably more sound than healthy ones because compressed fibers have lost their absorption capacity.

When to Replace vs. Attempt Salvage

Minor surface exposure — a few drops that dried within hours — typically causes no lasting damage. The panel should perform normally.

Significant saturation lasting more than a few hours usually causes permanent degradation. Even if the panel looks acceptable after drying, NRC rating has likely dropped 20-40%.

Any signs of mold mean immediate replacement. Cleaning surface mold does not address interior contamination that continues spreading and releasing spores.

When replacing damaged panels, consider whether your environment contributed to the problem. If humidity was the culprit, switching to PET panels or addressing climate control prevents repeat damage — moisture tolerance varies widely between core materials, and the wrong replacement leads right back to the same cycle.

Frequently Asked Questions

Can acoustic panels survive in basements?

Yes — if the basement is finished, climate-controlled, and stays below 55% relative humidity consistently. Unfinished basements or spaces with visible moisture and musty smells are too risky for fiberglass or mineral wool.

PET panels offer a better chance of survival in marginal conditions. Monitor humidity for at least two weeks before installing any acoustic treatment in basement spaces — home theater setups face the same basement humidity challenge, and the solutions overlap.

Will humidity damage acoustic foam differently than fiberglass?

Open-cell polyurethane foam absorbs moisture readily and holds it like a sponge — potentially worse than fiberglass for sustained humidity. Closed-cell foams resist moisture better but offer poor acoustic absorption.

Melamine foam falls between, with moderate moisture resistance and acceptable absorption for non-critical applications.

How do I know if my panels have hidden mold?

Musty odor near the panels (even if they look clean), allergic reactions when in the room, or discoloration spreading from edges or mounting points. Interior mold often shows at edges first.

If you suspect mold, remove a panel and examine the back surface and mounting area. When in doubt, replace — the health risks of mold exposure exceed the cost of new acoustic treatment.

Can I seal panels to make them waterproof?

No. Sealing panels with plastic wrap, waterproof coatings, or similar barriers destroys their acoustic function — a sealed panel becomes a reflector, not an absorber. The only effective approach is choosing inherently moisture-resistant materials like PET polyester from the start.

What is the humidity threshold for safe panel use?

Below 50% relative humidity, standard panels function normally with minimal moisture risk. Between 50-60%, you are in a marginal zone — panels may survive but monitor closely for early damage signs.

Above 60% sustained, standard panels face high risk — consider PET alternatives or address climate control before installing treatment. Above 70%, no porous acoustic treatment will survive without active dehumidification.

The Bottom Line

The single most useful thing you can do before buying any acoustic panel is spend two weeks with a hygrometer in the room. If sustained humidity stays below 50%, standard fiberglass or mineral wool will serve you for years without any special precautions.

If readings regularly climb above 60%, PET polyester panels are the practical choice — you lose roughly 0.20 NRC compared to fiberglass, but you avoid the slow cycle of sagging, staining, and hidden mold that ruins porous panels in humid spaces.

For music rooms and recording studios, climate control is non-negotiable regardless of panel material. A dehumidifier and proper air gaps behind panels protect your investment and keep acoustic performance consistent session after session.

What Glue to Use for Acoustic Panels: Complete Guide [2026]

What glue to use for acoustic panels depends on what you’re gluing — and using the wrong type won’t just produce a weak bond. It’ll peel fabric you can’t reposition, crack frame joints you’ve clamped overnight, or lock panels permanently to drywall you’ll eventually need to remove.

Most failures happen because people reach for whatever adhesive is nearby. Each substrate behaves completely differently — fabric, wood frames, and painted drywall all need a specific approach.

You’ll avoid all of those mistakes by matching the right product to each job. Below you’ll find exactly which adhesive to use for each stage, and what goes wrong when you skip that match.

Quick Takeaway

For fabric wrapping, use 3M Super 77 spray adhesive — it bonds instantly without soaking through fabric. For frame construction, use Loctite PL Premium — it creates permanent structural bonds. For wall mounting, skip the glue entirely and use Command Strips or hardware unless you never plan to move the panels.

What Glue Works Best for Acoustic Panels?

Different Types Of Adhesives For Acoustic Panels Showing Spray Foam And Construction Glue

The right adhesive depends on which part of the panel you’re working on. Fabric wrapping, frame construction, and wall mounting each demand a different product — and using the wrong type wastes both time and materials.

Fabric Wrapping

Spray adhesive is the only real option for attaching fabric to acoustic panels. It applies evenly, bonds on contact, and doesn’t soak through fabric to create visible wet spots on the front side.

The key is choosing an adhesive rated for fabric and porous materials. Regular spray glues create weak bonds that peel within months — if you’re also deciding which fabric to use, the fabric wrap guide covers the best options.

Frame Construction

When you’re building wooden frames, you need something that creates a permanent structural bond. PL Premium and similar polyurethane adhesives expand slightly as they cure, filling gaps and forming rigid joints.

These adhesives work on wood, MDF, and rigid insulation. They’re waterproof once cured, which matters if your panels ever get exposed to humidity.

The acoustic panel density guide covers material selection tips.

Wall Mounting

Adhesive wall mounting is permanent — you’ll damage drywall, paint, and sometimes the panel itself when you eventually try to remove it.

For renters or anyone who might relocate panels, hardware mounting or removable strips are the smarter choice. The acoustic panel installation guide walks through each method.

What Are the Best Adhesives for DIY Panel Construction?

Lineup Of Recommended Adhesives For Acoustic Panel Installation Showing Three Product Types

Three products cover every stage of panel construction — spray adhesive for fabric, polyurethane for frames, and a budget backup for either.

3M Super 77 Spray Adhesive

The 3M Super 77 Spray Adhesive is the go-to choice for fabric wrapping. It creates an instant tack that lets you position fabric without it sliding around.

What makes Super 77 special is how it handles porous materials. Unlike cheaper spray adhesives, it doesn’t saturate through fabric to create visible wet spots on the front side.

One can covers approximately 140 square feet — enough for 4–6 standard panels. Apply it in sweeping motions about 6–8 inches from the surface for even coverage.

The bond is permanent within minutes, so get your positioning right the first time. The only downside is the fumes — work outdoors or in a well-ventilated garage.

Loctite PL Premium

For frame construction, standard wood glue like Titebond III works fine for lightweight panels — it’s cheaper and easier to clean up. But for heavier panels or frames that need gap-filling, polyurethane is the better choice.

Loctite PL Premium is the go-to when joints don’t fit perfectly or when using MDF instead of solid wood.

The polyurethane formula expands as it cures, filling small gaps between frame pieces. This creates joints stronger than the wood itself — the wood will break before the glue joint fails.

It also bonds rigid fiberglass and rockwool directly to wooden frames if needed. Apply a zigzag bead along joints, then clamp for at least 4 hours — full cure takes 24 hours.

Liquid Nails (Budget Backup)

If PL Premium isn’t available locally, standard Liquid Nails construction adhesive works as a backup. It’s weaker and takes longer to cure, but still creates serviceable joints for lightweight panels.

The main limitation is gap-filling ability. Liquid Nails shrinks slightly as it cures, so joints need to fit tightly — PL Premium remains the better choice when available.

What Glue for Fabric Wrapping?

Applying Spray Adhesive To Acoustic Panel Fabric Showing Correct Distance And Technique

Fabric wrapping is the step where most DIY panels go wrong — choosing the right spray adhesive is only half the job, and applying it without soaking through the fabric is the other half.

Why Spray Adhesive Works for Fabric

Liquid adhesives soak into fabric and create visible wet spots that never fully disappear. Spray adhesive deposits a thin, even layer that bonds without saturating.

The “tack” quality matters too. Good spray adhesive becomes sticky within seconds, letting you press fabric into place immediately — poor adhesives stay wet and allow fabric to shift.

The NRC rating of your panel won’t change based on adhesive choice — but visible glue stains make otherwise professional panels look amateur. The acoustic panel material guide covers the decisions that actually affect absorption.

How to Apply Without Soaking Through

Getting that even tack without bleed-through depends on distance and speed. Hold the can 6–8 inches from the surface and spray in smooth, overlapping passes. Two light coats beat one heavy coat every time.

Wait 30–60 seconds after spraying before pressing fabric. This lets solvents flash off and increases initial tack strength.

Work from the center outward when applying fabric. This pushes air bubbles toward the edges instead of trapping them in the middle.

What Glue for Mounting Panels to Walls?

Different Wall Mounting Options For Acoustic Panels Showing Adhesive Versus Hardware Methods

Wall mounting is where the adhesive decision has the biggest consequences — permanent bonds versus removable options, and what happens to your drywall either way.

Permanent vs Removable Mounting

Adhesive mounting creates a permanent bond between your panel and the wall. “Permanent” means you’ll tear drywall paper, pull off paint, or damage the panel backing when you eventually remove it.

For permanent installations in owned spaces, construction adhesive works. Apply it in a zigzag pattern on the panel back and press firmly against the wall.

For renters or anyone who values flexibility, Command Picture Hanging Strips offer damage-free mounting that actually works.

Will Adhesive Damage Your Walls?

Construction adhesive bonds so strongly that removal pulls off drywall facing paper, leaving rough patches that require patching and repainting.

Foam panels are especially problematic — the foam tears before the adhesive releases, leaving residue that’s nearly impossible to remove cleanly.

If you’re determined to use adhesive, test it first on a hidden wall area. Wait 48 hours, then try removal to see how your specific paint and drywall respond.

The smarter approach for most installations is hardware mounting. French cleats, Z-clips, or simple picture hangers let you hang and remove panels without wall damage — the acoustic panel spacing guide covers positioning strategy once you’ve chosen your mounting method.

How to Apply Adhesive Correctly

Spray Adhesive Being Applied To Acoustic Panel Showing Correct Distance And Overlapping Passes

Application technique separates professional results from DIY disasters — a clean surface and the right spray distance handle most of the work, and a few common mistakes account for most failures.

Application Tips

Surface prep does most of the work before you ever open the can. Clean surfaces before applying any adhesive. Dust, oil, or debris prevents a solid bond and causes failures weeks or months later.

Temperature matters more than most people realize. Most adhesives perform best between 50–90°F — cold temperatures slow curing and weaken bonds.

For spray adhesives, shake the can vigorously for at least 30 seconds before use. The propellant and adhesive separate when sitting — incomplete mixing causes sputtering and uneven coverage.

Common Mistakes to Avoid

Even with good prep, a few recurring errors account for most failures. Applying too much adhesive wastes product and creates mess without improving bond strength. Thin, even coverage outperforms thick globs every time — and once your panels are built, the acoustic panels placement guide covers where to hang them.

Rushing the cure time causes failures. If the label says 24 hours, wait 24 hours — stressing joints before full cure stretches and weakens the bond.

Using indoor adhesives outdoors (or vice versa) leads to premature failure. UV exposure, temperature swings, and moisture affect different formulations differently — and ignoring ventilation requirements is both a health risk and a fire hazard.

Conclusion

Match the adhesive to the task and you won’t have problems. That’s the whole story in one sentence.

Spray adhesive for fabric. Polyurethane for frames.

And the most important decision of the three: don’t use adhesive for wall mounting unless you’re certain those panels will never move. Removable mounting options protect both your walls and your investment.

The acoustic panel build guide covers the complete construction process, and the hanging guide covers mounting options beyond adhesive.

Frequently Asked Questions

Can you remove glued acoustic panels without damaging walls?

Panels mounted with construction adhesive rarely come off cleanly. The adhesive typically bonds stronger to drywall paper than the paper bonds to the gypsum core.

Expect drywall repair and repainting. For damage-free removal, use Command Strips or hardware mounting instead of adhesive.

Will glue affect the acoustic performance of panels?

No — adhesive used for fabric wrapping or frame construction doesn’t change NRC ratings. Acoustics depend on the insulation core material and thickness, not the adhesive holding everything together.

Can I use hot glue for acoustic panels?

Hot glue works for temporary or lightweight applications but fails under heat and stress over time. For permanent fabric attachment, spray adhesive creates stronger, more even bonds.

For frame construction, polyurethane adhesive far outperforms hot glue in strength and durability.

How long should I wait before handling glued panels?

Spray adhesive bonds instantly but reaches full strength in 24 hours. Construction adhesive needs 4–8 hours of clamping and 24 hours for full cure.

Why Are Acoustic Panels So Expensive? Cost Breakdown [2026]

You finally decide to fix your room’s echo, but you’re immediately hit with a question: why are acoustic panels so expensive? Yes, professional treatment can cost thousands, but understanding the price breakdown changes everything.

The sticker shock comes from the reality of sound physics—cheap foam bounces low frequencies right back at you, while dense professional materials actually absorb the energy. That persistent muddiness in your recordings or the harsh ring in your living room won’t disappear with $20 foam squares; you’re paying for actual mass and structure that stops sound dead.

Knowing exactly what drives the price up lets you build a treatment plan that delivers clean, direct sound without overspending.

Your first step is identifying which components matter most for your specific space—starting with the difference between core materials and aesthetic finishes.

Quick Takeaway

Acoustic panels are expensive because of material costs (rigid fiberglass cores and specialized acoustic fabric), labor-intensive manufacturing, and fire safety testing. Cheap foam costs a fraction of the price because it skips these materials and certifications entirely. You can save money by building DIY panels, choosing budget-friendly commercial alternatives, or mixing premium and budget options by room zone.

Why Are Acoustic Panels So Expensive?

Acoustic panel cost breakdown for core, fabric, frame, and labor

Premium materials, intensive manufacturing, and safety certifications add up quickly. Five specific cost drivers explain why a single 2×4-foot panel can run $100 to $200 at retail.

Quality Core Materials

The absorptive core eats the largest share of the budget. Professional panels use rigid fiberglass boards or dense mineral wool that cost several times more than standard wall insulation.

A basic 2-inch thick rigid fiberglass board — the kind used in the top fiberglass panels — runs around $15 to $20 per panel-sized piece. Multiply that by the dozen panels a typical room needs (if you’re wondering how many acoustic panels you need), and your raw core materials alone hit $200 before framing or fabric.

These dense rigid boards absorb sound energy effectively across a wide frequency range. Cheap alternatives use thinner, highly porous materials that only absorb high frequencies, leaving your room sounding muddy and unbalanced.

Specialized Acoustic Fabric

You cannot use standard decorative fabric to cover an acoustic panel. The covering must be acoustically transparent to allow sound waves to pass through into the absorptive core.

Brands like Guilford of Maine produce industry-standard acoustic fabrics that cost $15 to $30 per yard. Since a standard 2×4 panel requires slightly more than a yard of fabric, the wrapping alone adds $20 to $35 per unit.

Acoustic fabric also has to hold up visually in professional environments. Regular, tightly woven fabric reflects sound back into the room instead of letting it pass through — defeating the panel’s purpose entirely.

Frame Construction

Quality panel frames use solid wood like poplar or pine rather than cheap particle board or MDF. Solid wood frames resist warping over time and provide a secure anchor for mounting hardware.

Wood framing materials typically run $10 to $15 per panel. Add the skilled labor required to cut, assemble, route, and finish each frame, and the structural component alone costs $25 to $40.

Some premium manufacturers go further with edge-hardening techniques or metal internal frames. The result is crisp, professional edges that hold their shape even after years on the wall.

The Hidden Cost of Shipping “Air”

One major reason acoustic panels cost so much is the logistical nightmare of shipping them. Acoustic panels are lightweight, bulky boxes of air that consume cargo space far out of proportion to their weight.

Shipping carriers charge based on dimensional weight rather than actual physical weight. Because fully assembled panels cannot be flat-packed or compressed, manufacturers pass the inflated freight bill straight to the buyer.

Buying panels locally or building them yourself cuts the dimensional freight markup entirely. That single change can shave 20% to 30% off the final cost.

Fire Safety Certification

Professional acoustic panels undergo rigorous fire testing to achieve Class A fire ratings. This critical testing ensures the materials will not easily ignite or rapidly spread flames across your walls.

Earning and maintaining these safety certifications requires expensive laboratory testing. Manufacturers who skip this step cut overhead, but they leave you with unrated products of unknown fire behavior.

If you are treating a commercial space or a public building, these fire ratings are legally required by building codes. You are paying a premium for guaranteed, documented safety standards.

What’s the Difference Between Cheap and Expensive Panels?

Cheap thin foam panel compared with a premium fiberglass panel

Price alone tells you nothing — what matters is the performance gap between a $30 foam pack and a $150 fiberglass panel. The functional differences are larger than most buyers expect.

Performance and NRC Ratings

The Noise Reduction Coefficient (NRC) measures exactly how much sound energy a panel absorbs. Higher ratings indicate better absorption, with 1.0 representing theoretically perfect sound absorption.

Premium fiberglass panels typically achieve outstanding NRC ratings between 0.85 and 1.05. Budget foam panels often struggle to reach NRC 0.40 to 0.65, absorbing less than half as effectively as their premium counterparts.

In practice, you need roughly twice as many cheap panels to match the absorption of a single quality one. The upfront “savings” vanish once you account for the extra coverage.

Durability and Longevity

High-quality acoustic panels are designed to last for decades without degrading. The rigid fiberglass core refuses to sag or compress, while the premium fabric resists fading under UV light.

Conversely, cheap acoustic foam typically begins degrading within three to five years. It discolors, crumbles at the edges, and loses its structural integrity as the open-cell structure breaks down from oxidation.

Treat the room once with premium panels, and the job is done for decades. Cheap foam, on the other hand, crumbles within a few years — and scraping degraded adhesive off your walls is nobody’s idea of a good time.

Aesthetic Quality

Professional acoustic panels look like intentional, premium architectural design elements. Their tight fabric wrapping, perfectly square edges, and flawless construction make them suitable for highly visible, high-end installations.

Budget panels almost always look exactly like what they are—cheap, temporary acoustic treatment. Wrinkled fabric, visible glue seams, and inconsistent sizing severely limit where you can install them without looking amateurish.

Why Is Foam So Much Cheaper?

Open-cell foam panel construction compared with a professional panel

Foam panels typically cost $20 to $50 for a multi-pack that would run over $200 in professional fiberglass. The price gap reflects what manufacturers leave out.

What Foam Manufacturers Skip

Acoustic foam production is far simpler and cheaper than rigid panel manufacturing. There are no wooden frames to build, no expensive fabrics to stretch, and usually no fire testing to pass.

The raw polyurethane foam itself costs cents per panel to mass-produce in overseas factories. Most of what you pay covers packaging, international shipping, and marketing.

Foam can also be vacuum-sealed and shipped in tiny boxes, wiping out the dimensional shipping costs that inflate fiberglass panel pricing.

When Cheap Foam Actually Makes Sense

Despite its flaws, cheap acoustic foam is not always the wrong choice for every situation. For temporary treatment, budget-constrained experiments, or spaces where appearance simply does not matter, foam offers an accessible entry point.

If you are treating a raw garage band practice space or testing panel positions before investing heavily, foam serves an excellent purpose. Just temper your expectations and do not expect it to perform like dense, professional treatment.

The acoustic panels vs soundproofing comparison explains exactly where lightweight foam hits its absorption ceiling.

Are Expensive Acoustic Panels Worth It?

Cost, performance, and longevity comparison across acoustic panel types

The performance gap is clear — but does spending $150 per panel instead of $30 actually pay off? You have to calculate that return on investment based strictly on how you intend to use the space.

For Studios and Critical Listening

If you are mixing music or recording professional voiceovers, buying premium panels is completely non-negotiable. Accurate sound reproduction depends entirely on dense panels that absorb effectively down into the tricky lower midrange where voice and instruments clash.

Cheap treatment creates a highly unpredictable, unbalanced acoustic environment that actively lies to your ears. Your mixes will never translate accurately to other sound systems because you are constantly making EQ decisions to compensate for your room’s terrible acoustic coloration rather than the mix itself.

For Home Theaters

Dedicated cinematic viewing rooms also demand that higher tier of investment to sound right. High-quality panels strip out the muddy, booming bass buildup that plagues untreated rooms, instantly tightening dialogue clarity so you aren’t constantly reaching for the volume remote to hear what characters are saying.

Over thousands of hours of movie watching, that initial investment compounds rapidly. You actually hear the complex surround sound mix the audio engineers intended rather than a blurred, phasey mess of room reflections masking the details.

For Bedrooms and Casual Offices

However, if you are treating a casual, non-critical space, dumping thousands of dollars into premium panels is a complete waste of money. If your only goal is reducing the harsh, ringing echo on your Zoom calls or softening the loud slapback in a minimalist living room, budget alternatives work exceptionally well.

You simply do not need Class A fire-rated, studio-grade fiberglass treatment just to make a home office sound slightly less hollow (the home office acoustic treatment guide helps you decide how much is enough). In these scenarios, mid-range PET felt panels or strategic budget foam packs will serve the acoustic purpose perfectly without draining your wallet.

How Can You Save Money on Acoustic Panels?

DIY acoustic panel materials compared with commercial panel pricing

Every cost driver above has a workaround — and the savings depend on how much labor you are willing to trade.

Build Your Own DIY Panels

DIY panels use the exact same core materials as high-end commercial products. You eliminate the labor and shipping markups by providing the elbow grease yourself.

A high-quality DIY panel typically costs roughly $30 to $50 in raw materials, compared to $100 to $200 for an equivalent commercial unit. If you need a dozen panels, building them yourself easily saves over a thousand dollars.

The obvious catch is that you need adequate tools, dedicated space, and basic woodworking skills.

For some busy professionals, trading an entire weekend of free time just isn’t worth the financial savings. (The DIY acoustic panels guide walks through the build if you want to try it).

Choose Budget-Friendly Commercial Options

Not all effective commercial panels demand premium, studio-tier prices. Several reputable manufacturers offer thinner or frameless options that still outperform cheap acoustic foam by a wide margin.

For basic residential room treatment, prioritize core density and proven NRC ratings over expensive wood framing or designer fabrics. A budget 12-pack of high-density foam panels covers a lot of wall for under $30, though absorption stays limited to highs.

Stepping up to a 2-inch fiberglass panel set with hanging hardware brings real broadband absorption for under $100.

For larger coverage, a dual-layer thickened panel 4-pack delivers wide coverage at a mid-range price point.

Buy Standard Sizes

Custom architectural panel sizes cost exponentially more than standard, mass-produced dimensions. Manufacturers must price custom work heavily to cover setup time, material waste, and disrupted production lines.

You should strictly stick with common dimensions like 2×4 feet or 2×2 feet whenever possible. If your unique room architecture demands odd dimensions, try bridging the gap by arranging multiple standard panels creatively (panel placement matters more than having perfect custom sizes).

Wait for Seasonal Sales

Acoustic treatment companies reliably run aggressive promotions during major retail holidays. Black Friday, Cyber Monday, and end-of-year clearances often yield 20% to 40% savings on premium treatment packages.

If your acoustic project is not time-sensitive, a few weeks of patience can pay off. Set price alerts on the panels you want and buy when the seasonal discounts land.

Acoustic Panel Price Comparison

The table below puts all four tiers side by side.

Panel Type Price Range NRC Rating Lifespan Best Application
Budget Foam $20–$50 per pack 0.40–0.65 3–5 years Temporary spaces, tight budgets
Mid-Range PET Panels $50–$100 per panel 0.70–0.85 10–15 years Home offices, living rooms
Professional Panels $100–$200 per panel 0.85–1.05 20+ years Recording studios, home theaters
Premium DIY Panels $30–$50 per panel 0.85–1.05 20+ years Budget-conscious pro studios

Budget foam sits at the bottom of the table for a reason. The low NRC range (0.40–0.65) means it only absorbs mid-to-high frequencies, leaving bass and lower mids almost untouched.

Foam also degrades within a few years as the open-cell structure oxidizes. You will likely replace it at least once over the same period a single professional panel would last.

Mid-range PET panels close most of that performance gap without the studio-tier price tag. A 0.70–0.85 NRC handles the full speech range and tames most room flutter, which is exactly what a home office or living room needs.

PET felt is also lightweight, easy to mount, and does not shed fibers the way exposed fiberglass can.

Professional fiberglass panels occupy the 0.85–1.05 NRC band because their dense, rigid cores absorb energy across the entire audible spectrum, including the lower midrange that foam and thin PET miss. The 20+ year lifespan reflects the dimensional stability of the core and the UV-resistant acoustic fabric — once mounted, these panels rarely need maintenance or replacement.

DIY panels match that professional NRC band at a fraction of the retail price because you are buying the same rigid fiberglass and fabric directly. The $30–$50 per-panel cost covers raw materials only; you trade your own labor for the $50–$150 markup that commercial manufacturers charge for assembly, framing, and shipping.

Conclusion

Dense cores, acoustic fabric, solid frames, fire testing, and dimensional shipping — each one adds real cost for a reason. The question is never “cheap or expensive” but “which tier matches this room.”

Build DIY panels if you have a weekend and basic tools, or buy mid-range PET and frameless fiberglass if you don’t. Reserve $150+ studio-grade panels for rooms where accurate monitoring or critical listening pays for itself.

The best acoustic panels guide ranks top options across every tier.

Frequently Asked Questions

Why are acoustic panels so expensive?

Professional panels cost a premium because they use dense fiberglass cores, acoustically transparent fabrics, and solid wood frames. Add Class A fire safety testing, skilled assembly labor, and bulky dimensional shipping, and the total lands between $100 and $200 per panel.

Are expensive panels actually better than cheap ones?

Yes. High-end fiberglass panels achieve NRC ratings of 0.85 to 1.05, while cheap foam rarely breaks 0.50.

Quality panels also hold their shape for decades — cheap foam crumbles within three to five years.

Can I make my own acoustic panels cheaper?

Yes — and the savings are dramatic. Rigid fiberglass and acoustic fabric from the same suppliers commercial brands use will cost you $30 to $50 per panel in raw materials.

You get identical professional performance, provided you are willing to invest the weekend labor yourself.

What is a fair retail price for acoustic panels?

A professionally built, fabric-wrapped 2×4-foot fiberglass panel runs $80 to $150. Anything well below $60 usually means thin cores or unrated fabrics, and anything above $200 typically reflects luxury branding or custom sizing rather than better absorption.

Do I Need Acoustic Panels? [2026]

Do I need acoustic panels? Maybe — but buying them before you test the room is how people spend money and still end up with harsh calls, muddy dialogue, or recordings that sound more like the room than the source.

The real issue is usually not “I need panels everywhere.” It is reflection trouble in specific spots: hard surfaces, parallel walls, long decay after a clap, or poor clarity at the desk, sofa, or mix position. In softer furnished rooms, those problems can be mild enough that rugs, curtains, and placement changes solve most of it.

The good news: you can figure this out quickly. A clap test, a room-purpose check, and an honest look at your surfaces will tell you whether you need real treatment, a few targeted panels, or no purchase at all.

Below, you’ll see how to assess the room, what acoustic panels actually solve, how many you may need, and which panel options make sense if treatment is worth it for your space.

Quick Takeaway

You need acoustic panels if your room has obvious echo, poor speech clarity, or recording and listening problems caused by reflections. Start with the clap test and your actual use case: home office, studio, theater, or casual living space. If your room is already soft and furnished, you may need only minimal treatment—or none at all.

Do I Need Acoustic Panels?

Person using a clap test to assess echo decay in a room

The short answer is: maybe. Acoustic panels solve specific problems that not every room has.

If your space has hard, parallel surfaces—bare walls, hardwood floors, large windows—sound bounces around uncontrollably. This creates echo, flutter, and poor audio clarity that panels are designed to fix.

The Clap Test: Your 3-Second Assessment

Here’s the fastest way to know if you need treatment. Stand in the center of your room and clap once, loudly.

Listen for what happens next. In a well-treated room, the sound dies quickly—within half a second. In a problematic room, you’ll hear ringing, flutter (rapid repeating echoes), or a long decay tail.

If you hear clear flutter echo or ringing that lasts more than a second, acoustic panels will make a noticeable difference. If the clap dies quickly and cleanly, your room may not need treatment.

Signs You Probably Need Panels

Several symptoms indicate your room would benefit from acoustic treatment. Echo on video calls is the most common complaint—colleagues or clients hear their own voice bouncing back with delay.

Home theater dialogue intelligibility issues are another telltale sign. If you constantly adjust the volume because dialogue sounds muddy but explosions are deafening, uncontrolled reflections are the culprit.

Recording quality problems show up differently. Vocals sound harsh or “roomy,” instruments lack definition, and mixing becomes guesswork because you can’t trust what you hear.

Signs You Probably Don’t Need Panels

Not every room requires acoustic treatment. If your space is already well-furnished with soft materials, you may have enough absorption naturally.

Carpet absorbs high frequencies. Heavy curtains on windows do the same. Bookshelves filled with books scatter sound (called diffusion). Upholstered couches, rugs, and soft furniture all contribute absorption.

If your room has these elements and the clap test sounds reasonably dead, additional panels might be overkill. Save your money for other upgrades.

What Problems Do Acoustic Panels Actually Solve?

Now that you understand the assessment process, let’s clarify exactly what panels do—and don’t do. This distinction prevents expensive mistakes.

Infographic of acoustic problem signs including echo and harsh reflections

Echo and Reverberation

Acoustic panels absorb sound energy that would otherwise bounce between surfaces. Think of them like a sponge for sound—when audio hits the porous material, it gets absorbed and converted into tiny amounts of heat instead of bouncing back at you.

This reduces echo (distinct repeating reflections) and reverberation (the overall decay time of sound in a room). For more detail on this process, our guide on how acoustic panels work explains the physics.

Flutter Echo Between Parallel Walls

Flutter echo is that rapid “boing-boing-boing” sound you hear between two parallel surfaces. It’s particularly annoying in narrow hallways, between bare walls, or in rooms with high ceilings.

Even a few strategically placed panels break up flutter echo completely. This is often the most dramatic improvement you’ll notice—the room simply sounds “quieter” even at the same volume.

Recording and Listening Clarity

In studios and listening rooms, panels control early reflections that color what you hear. These reflections arrive within milliseconds of the direct sound and confuse your perception.

With proper treatment, you hear the source more accurately. Mixes translate better to other systems. Vocals sound cleaner without needing heavy processing. Learn more about where to place acoustic panels for optimal results.

What Panels Don’t Solve

Here’s the critical distinction: acoustic panels don’t block sound between rooms. They only control sound within a room.

Think of it like window blinds versus brick walls. Panels are the blinds—they manage what happens inside, controlling light (or sound) that’s already there. But they won’t stop your neighbor’s music from coming through, just like blinds won’t block noise from outside.

If your problem is noise coming through walls from neighbors, traffic, or adjacent rooms, you need soundproofing—not acoustic panels. These are completely different solutions. Our comparison of acoustic panels vs soundproofing explains the difference in detail.

Panels also don’t fix bass problems effectively. Low frequencies require specialized bass traps, not standard panels. If you hear boomy bass or dead spots in your room, explore our guide on acoustic panels vs bass traps.

Do Different Rooms Need Different Approaches?

Building on the problems panels solve, let’s examine specific room types. Your room’s purpose determines both whether you need panels and how many you’ll require.

Well-furnished room with carpet, curtains, and furniture providing absorption

Home Studios and Recording Spaces

Studios almost always need acoustic treatment. The goal is accurate monitoring—hearing your recordings without room coloration affecting your judgment.

A typical bedroom studio needs coverage at the first reflection points: side walls at mixing position, the wall behind monitors, and the ceiling above. Our how many acoustic panels calculator helps determine exact quantities.

Start with 6-8 panels covering roughly 20-25% of wall surfaces. You can add more based on the clap test results after initial placement.

Home Theaters

Home theaters benefit significantly from panels, but the approach differs from studios. You want controlled reflections for immersive surround sound, not a completely dead room.

Focus on treating the front wall behind speakers and the first side-wall reflection points. Leave the back wall partially reflective for diffusion. This maintains the “cinema feel” while improving dialogue clarity.

Home Offices and Video Call Spaces

If echo on calls is your main complaint, you need less treatment than you might think. A few panels behind your desk and on the wall facing you often solve the problem completely.

If you want something that looks finished in a visible workspace, a decorative set like Acoustical Wall Panels, 6-Piece Art Acoustic Panels is easier to live with than purely utilitarian treatment.

The microphone only picks up what it “hears” in its pickup pattern. Treating the surfaces directly around your call position makes the biggest difference.

Bedrooms and Living Spaces

Most bedrooms and living rooms don’t need acoustic treatment unless you’re using them for specific audio purposes. The furniture, bedding, and soft materials already provide sufficient absorption.

If you do want panels for aesthetic reasons, choose decorative options that double as art. For help selecting panels, browse our acoustic panels resource hub.

How Do You Know How Many Panels You Need?

With the room-specific guidance above, let’s get practical about quantities. The formula is straightforward, but execution matters more than math.

Acoustic assessment checklist for hard surfaces, echo, room use, and budget

The Coverage Percentage Rule

Room acoustics professionals typically recommend 20-30% coverage for general acoustic improvement. That means panels covering 20-30% of your total wall surface area.

For a 10×10 room with 8-foot ceilings, you have roughly 320 square feet of wall space. At 25% coverage, you need about 80 square feet of panels—that’s ten 2×4-foot panels.

Quality Over Quantity

Here’s something most people get wrong: placement matters more than panel count. Six panels at first reflection points outperform twelve panels scattered randomly.

Our guide on how to install acoustic panels covers proper placement techniques. Focus on reflection points first, then add panels based on remaining acoustic issues.

Start Small and Add

You can always add more panels, but returning them is harder. Start with the minimum recommended for your room type, perform the clap test again, and decide if more is needed.

Many people find that 4-6 panels solve their primary complaints. The law of diminishing returns kicks in quickly—each additional panel makes less difference than the one before.

What Are Alternatives to Acoustic Panels?

Before committing to panels, consider whether simpler solutions might work for your situation. These alternatives cost less and require no installation.

Alternative acoustic solutions including curtains, rugs, bookshelves, and furniture

Soft Furnishings and Furniture

Adding a large area rug over hard floors immediately reduces flutter echo. Thick curtains over windows serve the same purpose as budget acoustic panels—plus they’re removable.

Upholstered furniture, bookcases, and cushions all absorb sound. Before buying panels, try rearranging what you already own to break up parallel surfaces.

Acoustic Curtains vs Panels

Acoustic curtains offer a middle ground—more absorption than standard curtains, easier to install than panels. They work well for windows and doorways.

For a detailed comparison, check our guide on acoustic curtains vs panels. Curtains excel when you need temporary or adjustable treatment.

When Panels Are the Better Choice

Soft furnishings only go so far. If you’ve maximized furniture arrangement and still have acoustic problems, panels are your next step.

Panels offer precise placement at reflection points where furniture can’t go—walls and ceilings. They also provide consistent, measurable absorption rather than “maybe” improvements from adding cushions.

Should You Get Acoustic Panels? The Decision Framework

Decision flowchart for choosing acoustic panels or alternatives

Let’s pull together everything we’ve covered into a simple decision process.

Yes, Get Panels If:

Your clap test reveals obvious flutter echo or long reverb tails. Echo disrupts your video calls or recordings. You need accurate monitoring for music production or mixing.

Your room has mostly hard surfaces that can’t be softened with furniture. You’ve already tried soft furnishings with limited improvement.

Maybe Wait If:

Your room is already well-furnished and the clap test sounds reasonable. You’re not doing critical audio work. Your primary issue is noise from outside or adjacent rooms (that’s a soundproofing problem).

Where to Start

If you’ve decided panels will help, start with quality over quantity. A low-cost test pack like 18 Pack Acoustic Panels 12 × 12 Sound Absorbing Wall Panels is a reasonable way to test whether a lightly treated room improves. For more options, check our guide to well-made acoustic panels.

Consider what material works best for your needs—fiberglass offers superior absorption, while polyester panels are safer for bedrooms and kids’ rooms.

Focus on reflection points first. Add bass traps in corners if low-frequency problems exist. Build your treatment over time rather than buying everything at once.

Frequently Asked Questions

How do I know if I need acoustic panels?

Perform the clap test: clap loudly in the center of your room and listen. If you hear ringing, flutter echo, or sound that takes more than a second to decay, acoustic panels will help. Also assess your actual use—if you record audio, take video calls, or want accurate sound reproduction, panels improve these activities measurably.

Can I fix room acoustics without panels?

Yes, to some extent. Heavy curtains, thick rugs, upholstered furniture, and bookcases all absorb or scatter sound. Rearranging furniture to break up parallel surfaces helps reduce flutter echo. However, these solutions have limits—for serious acoustic control, panels provide targeted treatment at specific locations.

Are acoustic panels worth the investment?

For anyone doing audio work—podcasting, music production, video calls, home theater—yes. The improvement in sound quality is immediately noticeable. For general living spaces without specific audio needs, panels are usually overkill. Match the investment to your actual requirements.

What’s the minimum treatment needed?

For video call improvement, 2-4 panels behind and facing your desk often suffice. For recording, 6-8 panels at first reflection points create a functional space—a thicker fiberglass option like UMIACOUSTICS 4 PCS Acoustic Panels with Hanging Bracket is a better baseline. For dedicated studios or home theaters, 15-25% wall coverage is the baseline. Start minimal and add based on your clap test results.

Are Acoustic Panels Safe? What You Need to Know [2026]

Are acoustic panels safe? Yes — but only when the core material stays sealed inside fabric and the manufacturer can back up its fire and VOC claims.

Cheap foam off-gasses for weeks, exposed fiberglass irritates lungs and skin, and most budget panels ship with zero safety documentation. These problems are avoidable, but only if you know what to check before buying.

Three things separate safe panels from risky ones: material type, encapsulation quality, and third-party certifications. The first step is understanding what each core material does to your indoor air — from there, the certification table will help you verify any manufacturer’s safety claims.

Quick Takeaway

Fabric-wrapped fiberglass and rockwool panels are safe because the encapsulation traps particles inside — PET polyester is the safest option with no fibers and very low VOCs. Cheap foam may off-gas initially; air new panels out for 48–72 hours before installing in bedrooms or enclosed spaces.

Are Acoustic Panels Safe?

Safety hierarchy of acoustic panel materials

The short answer is yes — acoustic panels are safe for home and commercial use. Two factors decide the safety level: the core material and how well it is sealed inside the panel.

Professional Panels

Fabric-wrapped panels from reputable manufacturers go through three rounds of testing before they reach consumers. VOC emission tests confirm the adhesives and fire retardants do not off-gas harmful chemicals into your breathing space.

Fire resistance ratings verify the panel will not ignite and spread flames — untested panels can do exactly that. Particle containment checks confirm the fiberglass or mineral wool core stays sealed inside the fabric enclosure for the panel’s full lifespan.

The fabric wrap does more than look good — it locks the core material in, preventing fiber release during normal use. That encapsulation is the main reason professional panels cost more than raw insulation or bare foam.

The NRC rating guide explains how material choice affects both sound absorption and safety.

Budget Foam

Lower-cost acoustic foam panels have more variable safety profiles. The main issue with cheap imports is VOC off-gassing — some budget panels emit chemical odors for weeks after unboxing, while quality foam clears within days.

Fire ratings vary just as much. Panels that pass domestic safety standards cost more to produce, so ultra-cheap imports often skip testing entirely.

Certification paperwork rarely ships with budget panels, making it impossible to verify what is actually in the material.

None of that means all foam is unsafe — it means you need to verify certifications before buying, especially for bedrooms or rooms where children spend time.

What Are the Main Safety Concerns?

Fire safety testing of acoustic panels

Three concerns come up more than any others: chemical off-gassing from foam, loose fiberglass particles, and fire resistance. Each one has a straightforward fix once you know what to look for.

VOC Emissions (Off-Gassing)

VOCs are chemicals that evaporate at room temperature, creating that “new product” smell. The concern is prolonged exposure in enclosed, poorly ventilated spaces.

A simple test: if you can still smell a strong chemical odor from new panels after a week of airing out, that is a red flag. Quality panels have minimal smell within 48–72 hours.

Professional panels typically use low-VOC adhesives and fire retardants. Budget foam panels — especially those shipped directly from overseas — may contain higher VOC levels that take weeks to dissipate.

Mitigation: Unpack new panels in a garage or well-ventilated area for 48–72 hours before installing in living spaces.

Fiberglass and Mineral Wool Particles

VOC off-gassing fades over time, but particle exposure is an immediate physical reaction. Raw fiberglass and rockwool can irritate skin, eyes, and respiratory passages if particles become airborne — fabric-wrapped panels solve this completely because the encapsulation prevents particle release during normal use.

The only time particles become a concern is during DIY panel construction when cutting raw insulation. In that case, wear an N95 mask, safety glasses, long sleeves, and gloves.

The DIY acoustic panels guide covers safe handling practices for raw fiberglass and rockwool.

Fire Safety

Particles stay trapped inside wrapped panels, but fire behavior depends on something else entirely: the panel’s fire rating. Building codes in commercial spaces often require Class A, but residential installations have fewer requirements — and that gap matters in an emergency.

Fire ratings use a standardized scale: Class A provides the highest protection (flame spread index 0–25), Class B offers moderate protection (26–75), and Class C represents the minimum acceptable level (76–200). Unrated panels can score 200+ on this index, meaning flames spread rapidly across their surface.

The core material matters most. Rockwool and fiberglass are inherently non-combustible — a blowtorch held to rockwool will char the surface without igniting or spreading.

The fabric wrap adds another barrier — manufacturers treat the polyester or cotton fabric with fire-retardant chemicals that prevent flames from spreading across the panel surface. Even the adhesives are formulated to resist ignition rather than fuel a fire.

For home studios, the fire safety gap between budget foam and fabric-wrapped panels might seem abstract — until you factor in electrical equipment, hot lights, and enclosed spaces. Look for Class A or Class B fire ratings on any panel destined for a studio, office, or commercial space.

Are Fiberglass Acoustic Panels Safe?

Cross-section of fiberglass acoustic panel showing fabric encapsulation

Fiberglass gets more safety questions than any other panel material. The answer splits into two scenarios: wrapped panels that contain every fiber, and exposed boards that should never go into occupied rooms.

Fabric-Wrapped Fiberglass

Professional fiberglass panels like those made with Owens Corning 703 or 705 rigid boards have been used in recording studios, theaters, and commercial buildings for decades. The fabric encapsulation is the key safety feature.

Once wrapped, the fiberglass cannot release particles into the air during normal use. You would need to physically tear open the panel to expose the core — and even then, the rigid board format sheds fewer particles than loose batt insulation.

For perspective: the fiberglass insulation already in your walls contains the same material. The fabric wrap on acoustic panels provides an extra layer of containment that wall insulation does not have.

The panel density guide explains how core density affects both safety and sound absorption.

Exposed Fiberglass

Without that fabric covering, fiberglass should not be installed in occupied spaces. The loose fibers create real problems during normal activities.

Brushing against an exposed panel leaves microscopic glass strands on your skin, causing that persistent itchy sensation that will not stop until you shower. Breathing near uncovered fiberglass releases airborne particles that irritate your throat and nasal passages.

People with dust allergies or respiratory conditions may experience more severe reactions, including persistent congestion or asthma-like symptoms.

If you are building DIY panels, always wrap the fiberglass completely. Do not leave any gaps where fibers could escape.

The fabric cover guide explains which wrapping materials work best for different panel types.

Are Foam Acoustic Panels Safe?

Open-cell acoustic foam with safety considerations

Foam trades the particle risk of fiberglass for a different concern: chemical off-gassing. Two categories define the foam market — certified products with documented safety data, and unregulated imports with none.

Quality Foam

Acoustic foam from reputable brands with safety certifications poses minimal health risks. The CertiPUR-US certification tells you the polyurethane was made without ozone depleters, heavy metals like mercury or lead, formaldehyde, or phthalates.

A Class B or higher fire rating means the foam passed standardized burn tests and will not rapidly spread flames if ignited. Low-VOC documentation from the manufacturer confirms they tested the chemical emissions and found them within safe limits.

These foams may have mild initial off-gassing but reach negligible levels within a few weeks. CertiPUR-US certified foams must emit less than 0.5 ppm of total VOCs — roughly 10x lower than unregulated imports.

If you want fabric-wrapped panels with documented safety data, the Olanglab Fiberglass Acoustic Wall Panels carry the certifications covered in the next section.

Cheap Imported Foam

Budget foam panels — often sold in large packs at very low prices — may present legitimate concerns. The chemical smell from cheap foam can persist for weeks, indicating higher VOC levels that take longer to dissipate from indoor air.

Without fire rating documentation, you are gambling on whether the foam will melt and drip (spreading flames) or char in place (containing the fire). Some imported foams contain flame retardants banned in certain countries due to health concerns, but without testing paperwork there is no way to know what is in the panels.

None of that means cheap foam is unusable — it means you should air panels out thoroughly, avoid installing in bedrooms immediately, and ensure adequate room ventilation.

What Makes Acoustic Panels Safe?

Safety certification logos for acoustic panels

Material and encapsulation get a panel most of the way to “safe.” Two things close the remaining gap: low-VOC construction and third-party certifications that verify every claim under lab conditions.

Low-VOC Materials

Quality manufacturers specify VOC levels and use low-emission adhesives. Some panels achieve Greenguard Gold certification, which limits total VOCs to 0.5 mg/m³ — strict enough for schools and healthcare facilities where vulnerable populations spend time.

The certification process involves placing panels in a sealed chamber for 7 days, then measuring chemical emissions at various intervals. Products must pass both immediate and long-term emission tests.

That testing investment is the main reason certified panels cost more than uncertified alternatives.

Safety Certifications to Look For

Low-VOC construction only matters if an independent lab verified the numbers. Four certifications cover the safety claims that matter most for acoustic panels.

Certification What It Means Applies To
Class A Fire Rating Highest fire resistance All panel types
CertiPUR-US Low VOC foam Polyurethane foam
Greenguard Gold Low chemical emissions All materials
OEKO-TEX Textile safety Fabric and PET panels

Any panel carrying one of these certifications has undergone third-party lab testing to back up its safety claims.

Are Acoustic Panels Safe for Kids and Bedrooms?

Child bedroom with PET polyester acoustic panels

Kids’ rooms raise the stakes on every concern covered so far — encapsulation, VOC off-gassing, and certifications all matter more when children are involved. The safest material choice and the mounting method both deserve extra attention.

Safe Panel Materials for Bedrooms

Fabric-wrapped fiberglass panels are safe for bedroom installation. The Olanglab Fiberglass Acoustic Panels are a good example — the fiberglass core is fully sealed inside fabric, so particles stay contained and off-gassing is minimal.

For maximum safety in children’s rooms, PET polyester panels eliminate fiber concerns entirely. The TroyStudio Felt Acoustic Panels are made from recycled plastic bottles, similar to the material in fleece jackets.

No fiberglass, no mineral wool, and very low VOC emissions because there is no chemical adhesive binding the fibers together.

The acoustic panels resource hub covers more options across every price range.

Extra Precautions for Sensitive Spaces

The fiber-free construction of PET panels makes them the default choice for nurseries. Even with safe materials, air out any new panels for 3–7 days in a ventilated area before moving them into a child’s bedroom.

Mounting security matters more in kids’ rooms than anywhere else. A falling panel can injure a toddler, so use mounting hardware rated for twice the panel weight and check fasteners every few months — the hanging guide covers every mounting method.

Avoid sharp-edged metal clips or exposed hardware at child height — rounded mounting systems or panels positioned above reach are the safest approach.

Material Safety Comparison

Acoustic panel materials safety comparison chart

This table pulls together the VOC risk, particle risk, and best use case for each panel material.

Material Safe? VOC Concern Particle Concern Best For
Fiberglass (wrapped) ✅ Yes Low None when wrapped Studios, offices
Rockwool (wrapped) ✅ Yes Very low None when wrapped Fire-sensitive areas
PET Polyester ✅ Yes Very low None Bedrooms, kids rooms
Quality Foam ✅ Usually Moderate initially None Home studios
Cheap Foam ⚠️ Varies Higher initially None Air out first

The biggest takeaway: wrapped panels and PET polyester carry the lowest combined risk across every category. Cheap foam is the only material that needs active mitigation — airing out before installation — and even that risk drops to near zero after the first week.

If the room has children, pets, or anyone with respiratory sensitivity, PET polyester is the safest default. For studios and offices where fire codes apply, fiberglass or rockwool with a Class A rating covers both safety and performance.

Conclusion

Are acoustic panels safe? Yes — when the material is sealed inside fabric and the manufacturer backs up its claims with third-party certifications.

Professional fabric-wrapped fiberglass and rockwool panels keep particles contained, and certified foam keeps VOC levels within safe limits. The VOC off-gassing issues tied to cheap foam resolve with 48–72 hours of airing out in a ventilated space.

The safest options are PET polyester panels (no fibers, very low VOCs) and fabric-wrapped fiberglass or rockwool from reputable manufacturers. Budget foam works fine for home studios but should be aired out before going into bedrooms or enclosed spaces.

For nurseries or rooms where occupants have respiratory conditions, stick with certified low-emission panels and allow ventilation during the first few weeks after installation. The best acoustic panels buying guide covers top-rated options across every budget.

Professional panels have been used safely in schools, hospitals, and homes for decades. Choose a certified product, air it out if it is foam, and start treating your room.

Frequently Asked Questions

Are Acoustic Panels Toxic?

No. Professional acoustic panels are not toxic — they are made from fiberglass, mineral wool, polyester, or polyurethane foam, all commonly used in buildings, furniture, and consumer products.

The main concern is VOC off-gassing from some foam products, which dissipates over time. Fabric-wrapped panels contain their core materials completely, preventing any particle release.

Can Acoustic Panels Make You Sick?

Quality acoustic panels should not cause illness. Some people report sensitivity to new foam products during the initial off-gassing period — symptoms might include headache or mild respiratory irritation in poorly ventilated spaces.

These symptoms typically resolve within days to weeks as VOCs dissipate. If you are chemically sensitive, choose PET polyester panels or air out foam panels extensively before installation.

Do You Need to Wear Protection When Installing Panels?

For pre-wrapped panels, no special protection is needed — just standard precautions for any wall-mounting project. The installation guide covers safe mounting techniques.

For DIY panels where you are cutting raw fiberglass or rockwool, wear an N95 respirator, safety glasses, long sleeves, and gloves. The particles irritate skin and respiratory passages during handling but pose no long-term health risk with basic precautions.

Are Acoustic Panels Safe Near Heat Sources?

It depends on the panel’s fire rating. Fiberglass and rockwool cores are inherently non-combustible, but fabric wraps and foam cores may have varying fire resistance.

Never place non-rated foam panels near heat sources, radiators, or in locations where fire codes require rated materials. For areas near heat, choose panels with Class A fire ratings.

The placement guide covers safe positioning away from hazards while maximizing acoustic benefit.

Acoustic Panels vs MLV: Which Do You Actually Need? [2026]

Acoustic panels vs MLV—they sound like they do similar things, but they’re designed for completely different purposes. Acoustic panels absorb sound inside your room.

Mass loaded vinyl blocks sound from passing through walls. Choosing the wrong one wastes money on a product that can’t solve your actual problem.

Below you’ll find when you’ll want each, whether combining both makes sense, and the mistakes that send people back to square one.

First, the core difference between absorption and blocking.

Quick Takeaway

Acoustic panels absorb sound reflections inside your room (echo, reverb, clarity). MLV blocks sound transmission through walls (neighbor noise, isolation). They solve different problems — panels won’t block neighbor noise, and MLV won’t fix room echo.

What Makes Acoustic Panels Different from MLV?

Side-By-Side Comparison Of Fabric Acoustic Panel On Left Versus Mass Loaded Vinyl Roll On Right, Different Purposes Illustrated for acoustic panels vs mlv

The core difference is the problem each one solves:

Acoustic Panels treat sound inside your room. They absorb reflections that cause echo, reverb, and poor clarity.

When you clap in an empty room and hear ringing, panels fix that. They’re made of porous materials—fiberglass, mineral wool, or polyester—that convert sound energy to heat through friction.

Mass Loaded Vinyl (MLV) blocks sound from passing through structures. When your neighbor’s TV bleeds through the wall, MLV helps stop that.

It’s a dense, heavy barrier that resists vibration. The mass law principle: heavier barriers transmit less sound.

Choose panels when you need better room acoustics. Choose MLV when you need sound isolation between spaces.

Many projects require both.

What Are Acoustic Panels?

Fabric-Wrapped Acoustic Panel Absorbing Sound Waves Inside Room, Echo Reduction Illustrated With Wave Patterns for acoustic panels vs mlv

Acoustic panels are porous absorbers designed to control sound reflections within a space. They’re the foundation of room acoustic treatment—used in recording studios, home theaters, offices, and anywhere clarity matters.

What Materials Are Acoustic Panels Made Of?

Professional acoustic panels use dense, fibrous cores that trap and absorb sound energy. Fiberglass—like Owens Corning 703—offers excellent absorption across the full frequency spectrum and remains the industry standard for studio treatment.

Mineral wool (Rockwool) provides similar acoustic performance with better fire resistance, making it popular for commercial installations. Polyester fiber panels are lighter and safer to handle without protective equipment, though they typically cost more.

These cores get wrapped in acoustically transparent fabric—material that lets sound pass through to the absorbent core while providing clean aesthetics.

The key property is porosity. Sound waves enter the material, and friction between air molecules and fibers converts acoustic energy to small amounts of heat.

The NRC rating guide explains how this absorption process works at a fundamental level.

How Do Panels Change the Sound in a Room?

Panels reduce the sound reflections that cause common acoustic problems. The panel count guide covers how many panels different room sizes need.

Flutter echo—that metallic ringing you hear when you clap between parallel walls—disappears when panels absorb those back-and-forth reflections.

Excessive reverb that muddies speech and music gets controlled as panels absorb the reflected energy before it builds up. Comb filtering at listening positions and standing waves at specific frequencies also improve with strategic panel placement.

When you place panels at reflection points, the first reflections that would otherwise interfere with direct sound get absorbed instead. Clarity improves noticeably for recording, mixing, video calls, and critical listening.

For quality absorption, the UMIACOUSTICS 4-Pack Fiberglass Panels offer professional-grade absorption with NRC ratings suitable for studios and home theaters.

When to Use Acoustic Panels

Acoustic panels excel in spaces where sound clarity matters. Recording studios and vocal booths rely on panels to capture clean audio without room coloration.

Home theaters and listening rooms use panels to hear movies and music as intended, not filtered through room reflections.

Video conferencing and podcast spaces benefit from panels that eliminate the hollow, echoey sound that makes remote communication fatiguing.

Open offices use panels for speech privacy—absorbing conversations before they carry across the room.

They won’t block sound transmission. Someone in the next room will hear you just as clearly whether you have panels or not—your voice will just sound less reverberant on your side.

What Is Mass Loaded Vinyl?

Mass Loaded Vinyl Sheet Being Installed On Wall, Heavy Rubber-Like Material With Visible Density And Flexibility for acoustic panels vs mlv

Mass loaded vinyl is a dense, flexible barrier material designed to block sound transmission through walls, floors, and ceilings. It’s a soundproofing material, not an acoustic treatment material—a critical distinction.

What Is MLV Made Of?

MLV combines a vinyl polymer base with heavy mineral particles—typically barium sulfate or calcium carbonate—that give it exceptional density. Plasticizers keep the material flexible enough to drape over surfaces while maintaining its mass.

Standard MLV weighs 1 pound per square foot (1 lb/sq ft), though heavier versions (2 lb/sq ft) exist for demanding applications. This density is the source of its sound-blocking ability.

The material feels like thick, heavy rubber. It’s flexible enough to drape over surfaces but dense enough to resist the vibrations that transmit sound.

How Does MLV Block Sound?

MLV works through the mass law: adding mass to a barrier reduces sound transmission. When sound waves hit a wall, they cause the wall to vibrate, and those vibrations radiate sound on the other side.

Heavy materials resist vibration better than light ones. Adding MLV to a wall assembly increases its mass without adding much thickness—typically 1/8” thick but weighing considerably more per square foot than drywall.

The effectiveness is measured in STC (Sound Transmission Class) rating improvements. A standard drywall wall might rate STC 33-35.

Adding MLV can push that to STC 40-45, a noticeable reduction in transmitted sound.

For DIY soundproofing projects, the Trademark Mass Loaded Vinyl provides the industry-standard 1 lb per square foot density for effective sound blocking.

When to Use MLV

MLV excels at reducing sound transmission between rooms—the primary use case for most buyers. Home studios use it to isolate recording spaces from living areas, preventing bleed in both directions.

Traffic and industrial noise from outside can be reduced with MLV on exterior walls. Shared walls in apartments and condos see noticeable improvement, though landlord permission is typically required.

MLV also works well wrapped around HVAC ducts and pipes to reduce transmitted mechanical noise.

It doesn’t absorb sound or improve room acoustics. Your room will sound exactly the same with MLV installed—it just blocks what gets in or out.

When to Use Panels vs When to Use MLV

Split Diagram Showing Panels Absorbing Sound Waves Inside Room On Left, MLV Blocking Sound Through Wall Structure On Right for acoustic panels vs mlv

The choice depends entirely on which problem you’re solving. Many people buy the wrong product because they conflate “acoustic treatment” with “soundproofing.”

How to Choose Between Them

Choose panels if you experience echo when you clap or speak loudly. Difficulty understanding speech, muddy music, and ringing between parallel walls all point to absorption problems that panels solve.

Harsh reflections during video calls—that hollow, echoey quality—also respond well to panel treatment.

Choose MLV if you hear neighbors through walls or if sound from your space disturbs others. External traffic noise, the need for confidential conversations, and recording situations where you pick up sounds from other rooms all require blocking.

MLV provides that blocking capability.

Why Don’t Panels Work for Soundproofing?

The most frequent error is buying acoustic panels (or worse, acoustic foam) expecting them to block neighbor noise. Marketing sometimes implies soundproofing benefits that don’t exist.

The word “acoustic” sounds like it should handle all sound problems, but it only refers to absorption. And panels are so much easier to install than full wall soundproofing that people hope they’ll work anyway.

That porosity? It’s the problem here.

Panels are porous—sound passes through them easily.

They only absorb sound that’s already in your space. Sound transmitting through your wall bypasses the panel entirely.

The panels vs soundproofing comparison covers the absorption vs blocking difference further.

What Solution Does Each Room Type Need?

Room Type Typical Problem Solution
Home studio Echo + neighbor bleed Both: MLV in walls, panels on surfaces
Podcast room Echo only Panels at reflection points
Home theater Echo + bass from subs Panels + bass traps; MLV if disturbing others
Shared apartment Neighbor noise MLV (panels won’t help)
Office Speech privacy Panels for reverb, MLV for confidentiality

Can you Combine Panels and MLV?

Complete Treatment Showing MLV Layer In Wall Cavity For Isolation Plus Fabric Panels Mounted On Finished Surface For Room Acoustics for acoustic panels vs mlv

Yes, and many professional spaces do exactly this. Panels and MLV address different parts of the acoustic equation—using both gives you isolation AND good room sound.

What Does a Fully Treated Room Include?

A properly treated room starts with an MLV layer in the wall assembly—installed behind the drywall for isolation. Decoupled mounting using resilient channels breaks the vibration paths that would otherwise transmit sound through the structure.

On the finished surface, acoustic panels handle absorption for room acoustics. Bass traps in the corners control low-frequency buildup that panels can’t address.

The MLV prevents sound from entering or leaving. The panels control what happens to sound inside the room.

Neither can do the other’s job.

What Order Should you Install Them?

When building from scratch or renovating, start with the MLV layer on studs or existing drywall. Seal every seam with acoustic caulk—gaps defeat the entire purpose of the barrier.

Install new drywall over the MLV, ideally with green glue between layers for additional damping. Once the room is finished and painted, mount acoustic panels on the completed surface.

For existing rooms where you can’t access the wall cavity, surface-mounted MLV with a decorative covering becomes an option, though less effective than in-wall installation.

How Does Installation Differ?

Installation Comparison Showing Panel Wall Mounting On Surface Versus MLV Installation Behind Drywall In Wall Cavity for acoustic panels vs mlv

Panels and MLV sit at opposite ends of the installation spectrum.

How Hard Is Panel Installation?

Acoustic panels mount on finished surfaces using Z-clips, impaling clips, or French cleats. Some panels come with adhesive backing for even simpler installation.

No special tools are required, and the installation is fully reversible—making panels renter-friendly. The panels remain visible as design elements, which is why fabric color and style matter.

For renters who can’t modify walls, the VEVOR Sound Dampening Blanket provides portable sound reduction without permanent installation.

Coverage matters more than placement perfection. Aim for 25-40% wall coverage for noticeable improvement.

The 1-inch vs 2-inch panel guide covers how thickness affects coverage and positioning.

How Hard Is MLV Installation?

MLV installation is more involved—it goes inside wall assemblies, requiring access to stud cavities or adding layers to existing walls. The material is heavy; 100 square feet weighs 100 pounds, so handling requires planning.

All seams must be overlapped and sealed with acoustic caulk. Electrical boxes need acoustic putty pads to prevent sound flanking through outlets.

Once installed, MLV is hidden behind drywall and invisible in the finished room.

Flanking paths matter enormously. Sound finds the easiest route—an unsealed outlet or gap around the door frame can undermine an otherwise excellent MLV installation.

The barrier is only as good as its weakest point.

How Do Panels and MLV Compare Side by Side?

Split diagram showing acoustic panels absorbing reflections and MLV blocking wall noise

The table below puts every practical difference side by side. Scan the rows that matter most to your situation — the right choice usually becomes obvious once you see the tradeoffs lined up.

Factor Acoustic Panels Mass Loaded Vinyl
Primary Function Absorb reflections inside room Block sound through structures
Measures NRC rating (0-1.0+) STC rating improvement
Typical Cost $50-150 per panel $1-2 per sq ft
Installation Surface mount, DIY friendly In-wall, more complex
Reversibility Fully removable Permanent (in-wall)
Renter Friendly Yes Usually no
Visible Yes (design element) No (hidden)
Weight 5-15 lbs per panel 1-2 lbs per sq ft
Fire Safety Class A available Varies by product

Two rows tend to settle the decision for most buyers: function and reversibility.

If your problem is echo or muddy audio, panels solve it the same afternoon with zero wall damage. If sound is leaking between rooms, MLV is the only real fix — but it means opening walls or adding layers you can’t easily undo.

Cost per panel looks higher than cost per square foot of MLV, but that comparison is misleading. A full MLV installation includes drywall, caulk, labor, and finishing that push the real cost to $3-8 per square foot once the wall is closed back up.

Renters don’t have a choice here — panels are the only option that leaves the apartment intact. Homeowners who plan to stay long-term get the most value from MLV because the investment disappears into the wall and outlasts any surface treatment.

What Are the Cost and Practical Differences?

Side By Side Cost And Aesthetic Comparison Of Acoustic Panels On Wall Surface Versus Mass Loaded Vinyl Hidden Inside Wall Structure for acoustic panels vs mlv

Beyond performance, panels and MLV differ in price, visual impact, and code compliance — all three shape which option fits a given project.

How Much Does Each Option Cost?

Acoustic Panels: Budget foam tiles start around $15-30 for a multi-pack, but real absorption starts with fabric-wrapped panels at $30-50 per 2×4-foot panel. Professional fiberglass panels from brands like ATS Acoustics and GIK run $100-200 each.

A typical room needs 8-16 panels for adequate coverage, depending on room size and how reflective the surfaces are. Total investment ranges from $250-2,000+ — the wide range reflects the gap between budget polyester and premium fiberglass.

For budget-friendly panel treatment, the Olanglab Fiberglass 4-Pack provides solid absorption at reasonable cost. The best acoustic panels guide has specific recommendations across price points.

DIY panels cut costs by 50-70%. Buying fiberglass insulation, wood framing, and acoustic fabric separately runs $20-40 per panel — less than half the retail price for identical acoustic performance.

Mass Loaded Vinyl: The material itself costs $1-2 per square foot. A single 100-square-foot wall requires $100-200 in MLV alone — and most rooms have more than one wall that leaks sound.

The hidden costs add up fast. Every MLV installation needs acoustic caulk for seams ($10-15 per tube, multiple tubes per wall), putty pads for electrical outlets ($3-5 each), and often a second layer of drywall over the MLV ($0.50-1.00 per square foot).

Factor in green glue between drywall layers for extra damping and you’re looking at $300-800 per wall in materials and labor. A full room treatment can easily exceed $2,000-4,000 — and that’s before counting the disruption of tearing open walls.

The price gap explains why most homeowners try panels first. Panels are a weekend project; MLV is a renovation.

What Do They Look Like Once Installed?

Acoustic panels sit on the surface of your walls, fully visible. Aesthetics matter — and manufacturers know it.

Standard rectangular panels come in dozens of fabric colors, from neutral grays and blacks to bold reds and blues. Hexagonal, circular, and triangular shapes let you create geometric patterns that double as wall art.

Printed panels take this further — custom images, company logos, or abstract designs printed directly on the acoustic fabric. Some studios and offices treat their panel layout as interior design, arranging colors and shapes intentionally.

Wood slat panels have surged in popularity for living rooms and offices where a “studio look” doesn’t fit. They combine a decorative wood surface with an absorptive felt backing, though absorption performance is lower than fabric-wrapped fiberglass.

MLV is the opposite — it’s meant to disappear. When installed correctly inside wall assemblies, MLV sits behind drywall where nobody sees it.

The finished room looks identical to any other room.

Surface-mounted MLV is another story. The material is black, rubbery, and industrial-looking.

It needs covering with fabric, a second layer of drywall, or some other decorative finish — which adds cost and complexity.

Are There Fire Safety or Code Requirements?

Fire ratings matter more than most buyers realize, especially for panels that sit exposed on walls. Class A fire rating (ASTM E84) means the material has a flame spread index of 25 or less and a smoke development index of 450 or less — the strictest classification for interior finishes.

Professional fiberglass and mineral wool panels typically meet Class A without any special treatment. Polyester (PET) panels vary — some achieve Class A, others don’t, so check the spec sheet before buying.

Acoustic foam is the biggest fire concern. Most consumer-grade foam panels lack any fire rating.

In a house fire, untreated foam can ignite quickly and produce toxic smoke.

For MLV, fire ratings depend on the specific product formulation. Most quality MLV products meet building code requirements for in-wall installation, but local jurisdictions sometimes have additional rules about barrier materials in wall cavities.

Commercial spaces — offices, restaurants, studios open to the public — almost always require Class A panels by code. Insurance policies sometimes mandate fire-rated materials too, even in residential settings.

Residential projects have more flexibility, but choosing fire-rated panels costs little extra and eliminates a real safety risk. The price difference between rated and unrated panels is typically $5-15 per panel.

Conclusion

Acoustic panels and mass loaded vinyl solve fundamentally different problems. Panels absorb sound reflections inside your room—fixing echo, reverb, and clarity issues.

MLV blocks sound transmission through structures—providing isolation between spaces.

Buying panels expecting soundproofing results in disappointment. Installing MLV expecting better room acoustics misses the point entirely.

Identify your actual problem first. If you hear too much echo and reverb, panels are the answer.

If sound bleeds through walls, MLV is the answer. If both problems exist—as they do in many recording studios and media rooms—you need both solutions working together.

The panels vs soundproofing guide covers the full isolation approach for walls, floors, and ceilings.

Frequently Asked Questions

Will Acoustic Panels Stop Neighbor Noise?

No. Acoustic panels absorb sound that’s already inside your room—they won’t block sound from entering through walls.

Neighbor noise transmits through the wall structure itself and bypasses surface-mounted panels entirely. For neighbor noise, you need mass (like MLV), decoupling, and sealed construction.

Panels will make your room sound better acoustically, but they won’t reduce what you hear from next door.

Do I Need Both Panels and MLV?

It depends on your goals. If you only need better room acoustics (less echo, clearer sound), panels alone suffice.

If you only need isolation from external noise, MLV alone works. If you need both—like a home studio that sounds good AND doesn’t disturb family—you need both products, as many professional spaces demonstrate.

Is Acoustic Foam the Same as Acoustic Panels?

No. Acoustic foam is a budget absorption material with lower density and effectiveness compared to professional panels.

Foam typically provides NRC ratings of 0.4-0.7, while quality fiberglass or mineral wool panels achieve 0.8-1.0+. Foam also lacks the aesthetic finish of fabric-wrapped panels and may yellow or crumble over time.

For serious acoustic treatment, panels outperform foam in both absorption and durability by a wide margin.

Can I Use MLV Without Covering It?

Technically yes, but it’s not recommended. Exposed MLV has an industrial appearance and may release odors.

It’s designed to be installed behind drywall or covered with fabric. Some products are available with pre-attached fabric backing for exposed applications, but standard MLV works best as a hidden layer within the wall assembly.

Can Acoustic Panels Reduce Noise From Neighbors? [2026]

Can acoustic panels reduce noise from neighbors? No — and that mistaken purchase is why so many renters end up with cleaner-looking walls but the same late-night TV bleed, bass thump, or hallway noise.

Neighbor noise is a transmission problem through drywall, studs, ceilings, floors, and small air leaks. Acoustic panels only absorb reflections after sound is already inside your room, so they cannot stop the wall assembly itself from passing noise through.

The good news: once you separate soundproofing from room treatment, the buying decision gets much simpler. You can stop expecting panels to solve the wrong problem and choose either real blocking strategies or room-treatment panels that improve clarity inside your space.

Below, you’ll see why panels fail against neighbor noise, what actually reduces transmission, and which panel products still make sense when your real goal is better sound inside your room after you address the leakage paths first.

Quick Takeaway

Acoustic panels will not reduce noise from neighbors. They absorb sound reflections inside your room but do not block sound transmission through walls, ceilings, or floors. For neighbor noise, focus on sealing gaps, adding mass, and decoupling structures; use acoustic panels only to improve echo, reverb, and speech clarity inside your own space.

Why Acoustic Panels Don’t Block Neighbor Noise

Neighbor noise passing through a shared apartment wall despite acoustic panels

The confusion stems from mixing up two completely different acoustic problems. Understanding this distinction saves you from wasting money on treatments that won’t solve your actual issue.

Absorption vs Blocking: The Critical Difference

Acoustic panels absorb sound waves that hit them from inside your room. When you speak or play music, sound bounces off hard surfaces—walls, ceilings, floors. Panels catch those reflections and convert sound energy to heat through friction in the fibers.

But sound from neighbors doesn’t bounce around your room first. It transmits directly through the shared wall structure—through studs, drywall, and air gaps. By the time that sound reaches your panel, it’s already inside your space.

Think of it like a window screen. A screen blocks bugs that try to fly through it. But it does nothing to stop rain from coming through—rain passes right through the mesh. Acoustic panels work the same way with different types of sound problems.

How Sound Actually Travels Through Walls

Neighbor noise reaches you through structural transmission. Sound vibrates the wall on their side, those vibrations travel through the wall assembly, and the wall on your side radiates that sound into your room.

The path looks like this: neighbor’s sound → their drywall vibrates → studs transfer vibration → your drywall vibrates → sound radiates into your room.

Acoustic panels sit on top of your drywall. They can’t intercept sound that’s already transmitted through the structure. The panel only “sees” the sound after it’s already in your space—and at that point, blocking isn’t possible, only absorption of what’s already there.

This is why understanding the difference between panels and soundproofing matters before you spend money.

What Acoustic Panels Actually Do

Diagram showing noise transmission through a wall structure

Now that you understand why panels don’t block neighbor noise, let’s clarify what they’re actually designed for. Panels solve legitimate acoustic problems—just not the one you’re asking about.

Reduce Echo and Reverb Inside Your Room

When sound bounces between parallel hard surfaces, it creates flutter echo—that ringing “boing” you hear when you clap in an empty room. Panels absorb these reflections, making the room sound controlled rather than live.

This matters for recording, video calls, and music listening. It doesn’t help with neighbor noise because echo reduction only affects sound already inside your room.

Improve Speech Clarity and Recording Quality

Panels at first reflection points reduce comb filtering—the interference pattern created when direct sound and reflected sound reach your ears at slightly different times. This dramatically improves vocal recording quality and video call clarity.

If you’re trying to improve how you sound on calls or recordings, panels work effectively for this purpose. For apartment dwellers specifically, our guide on acoustic panels for apartments covers renter-friendly options. Just don’t expect them to block the neighbor’s TV from bleeding through.

If your goal is a more controlled room for calls, mixing, or content work, a denser fiberglass option like Olanglab Sound Absorbing Acoustic Wall Panels 2 Pack is the kind of panel that helps your room sound more direct and less splashy.

Make Your Own Sounds Less Reverberant

Panels reduce how much your own sounds bounce around. This can marginally reduce how much of your noise reaches neighbors—not because panels block transmission, but because there’s less reverberant energy bouncing around to transmit.

The reduction is minimal and won’t solve a real noise complaint situation.

What Actually Blocks Neighbor Noise?

Soundproofing options including MLV, double drywall, and resilient channels

With panel limitations clear, let’s discuss what actually works. Blocking sound transmission requires different physics—mass, decoupling, and sealing.

Mass: Heavy Materials That Resist Vibration

Sound transmission decreases when walls have more mass. Heavier walls resist vibration better than light ones. This is why concrete buildings tend to be quieter than wood-frame construction.

Adding mass means adding material: – Second layer of 5/8” drywall (the heavier, the better) – Mass loaded vinyl (MLV)—dense rubber-like sheeting – Multiple drywall layers with damping compound between them

Each doubling of wall mass reduces transmission by approximately 6 dB—noticeable but not dramatic improvement without additional strategies.

If you still want to improve how your room sounds after dealing with transmission, a panel like UMIACOUSTICS 4 PCS Acoustic Panels with Hanging Bracket helps with the room-side echo problem, not the wall-mass problem described here.

Decoupling: Breaking the Vibration Path

Sound travels through continuous solid connections. Breaking that path—decoupling—prevents vibrations from transferring efficiently.

Resilient channels mount drywall to the wall assembly with a flexible connection rather than rigid screws directly into studs. The channel absorbs vibration instead of transmitting it.

More aggressive decoupling uses completely separate wall assemblies—a new stud wall built in front of the existing wall with an air gap between them.

Sealing Gaps: Where Most Sound Leaks

Sound finds the path of least resistance. A small gap around an electrical outlet or under a door can leak as much sound as the entire wall transmits through its structure.

Sealing gaps is the most cost-effective first step: – Acoustic caulk around outlet boxes – Door sweeps and weatherstripping – Expanding foam in wall cavities (access points)

You might be surprised how much improvement comes from sealing before adding expensive mass or decoupling.

For budget-conscious renters, a finished panel kit like Acoustic Panels 4 Pack ROOM KIT Large can at least make your own apartment sound less harsh while you tackle the actual leakage paths first.

Acoustic Panels vs Soundproofing Comparison

Infographic comparing what acoustic panels can and cannot do for neighbor noise
Factor Acoustic Panels Soundproofing
Primary Function Absorb room reflections Block sound transmission
Neighbor Noise Reduction 0 dB (none) 10-30+ dB
Echo Reduction Excellent Minimal
Recording Improvement Significant None (different purpose)
Typical Cost $200-500 for room $1,000-10,000+
Installation DIY friendly Often requires contractor
Renter Friendly Yes (removable) Usually no (permanent)

The fundamental difference: panels treat sound that’s already in your room; soundproofing prevents sound from entering or leaving.

Realistic Options for Apartment Dwellers

Apartment setup using white noise, curtains, and furniture for noise management

Most people asking about neighbor noise live in apartments where major construction isn’t possible. Here’s what you can actually do as a renter.

Seal What You Can

Even without construction, you can often seal obvious gaps: – Outlet and switch plate foam gaskets – Door sweep on entry door – Weatherstripping if doors have visible gaps

These won’t transform a noisy apartment, but they’re cheap and help with the easiest leakage paths.

Sound Masking Over Sound Blocking

Since blocking isn’t realistic without construction, consider masking. White noise machines or fans create consistent background sound that makes intermittent neighbor noise less noticeable.

This doesn’t reduce the actual noise level—it raises your ambient noise floor so the neighbor sounds don’t contrast as sharply. Many people find this more practical than attempting inadequate soundproofing.

Strategic Furniture Placement

Heavy furniture against shared walls adds mass, though the effect is modest. A full bookshelf provides more mass than bare drywall. A heavy couch against a wall adds some damping.

Don’t expect dramatic results, but these changes are free and can provide marginal improvement.

When Real Soundproofing Makes Sense

If neighbor noise genuinely affects your quality of life, the honest answer is: move to a better-built building, or invest in proper soundproofing (if you own).

Half-measures like hanging panels on walls or adding thin foam rarely provide meaningful improvement for transmission problems. Either the construction blocks sound adequately, or it doesn’t.

What About Bass Noise From Neighbors?

Illustration showing bass traveling through building structure

Bass frequencies are particularly difficult because they transmit through structures more efficiently than higher frequencies. That thumping subwoofer from upstairs? Panels definitely won’t help.

Low frequencies require even more mass to block. A wall that adequately reduces conversation levels might still transmit bass freely. This is why nightclub soundproofing involves massive concrete construction—bass needs serious mass.

For bass specifically, decoupling becomes even more important than mass. Floating floor assemblies and isolated ceiling systems address low-frequency transmission better than simply adding drywall layers.

If your neighbor noise is primarily bass, your options are even more limited without construction. Bass masking is also harder—you’d need to play your own music loud enough to cover it, which creates its own problems.

Conclusion

Acoustic panels improve room acoustics—they reduce echo, improve recording quality, and control reverb. They’re excellent tools for the right application.

But they don’t block neighbor noise. That requires soundproofing: mass, decoupling, and sealing. These are different categories of acoustic treatment solving different problems.

Before spending money, identify your actual problem. If you want better room sound for recording or calls, panels help significantly. If you want to block neighbor noise, panels are the wrong purchase entirely.

Check our comprehensive acoustic panels guide for guidance on what panels actually do well, or read our soundproofing comparison for deeper understanding of these distinct approaches.

Frequently Asked Questions

Will ANY Type of Acoustic Panel Help With Neighbor Noise?

No. Whether fabric-wrapped fiberglass, acoustic foam, polyester panels, or any other absorption material—none block sound transmission through walls. The physics doesn’t change based on panel type. Absorption materials treat reflections inside your room; they don’t prevent sound from entering through structures. Expensive panels work better for echo reduction, but they’re equally useless for neighbor noise.

What About Thick Panels or Multiple Layers?

Adding panel thickness or stacking panels still doesn’t block transmission. You could cover an entire wall with 4-inch thick acoustic panels and neighbor noise would pass through essentially unchanged. The sound bypasses the panels by traveling through the wall structure itself. Panel thickness affects absorption frequency range, not blocking capability.

Can Panels at Least Reduce How Much of MY Noise Reaches Neighbors?

Marginally. Panels reduce reverberant sound in your room, so there’s slightly less total sound energy bouncing around to potentially transmit. But the direct sound from your voice, speakers, or instruments still transmits through walls normally. If a neighbor complains about your noise, panels won’t solve that complaint meaningfully.

What’s the Cheapest Effective Option for Neighbor Noise?

Seal gaps first—this is the cheapest intervention that actually affects transmission. Outlet gaskets cost a few dollars. Door sweeps are under $20. If gaps are your main leakage path, sealing provides noticeable improvement. For actual wall transmission, there’s no cheap effective option. Mass loaded vinyl is the most affordable material that adds meaningful mass, but proper installation still costs hundreds to thousands of dollars depending on wall area.