2 Inch vs 4 Inch Acoustic Panels: Which for Bass? [2026]

2 inch vs 4 inch acoustic panels is really a decision about your problem type: are you fixing reflections and clarity, or are you fighting low-mid boom? 4-inch panels reach lower, but they are not a replacement for bass traps.

If your room sounds muddy, the cause is often a mix of reflection buildup and modal energy in roughly the 80-200Hz zone. Panel thickness helps, but only when placement is right.

This guide gives you practical decision rules: what each thickness actually absorbs, where 4-inch depth pays off, and when to stop buying thicker panels and move to corner bass treatment. Start by identifying the main issue in your room, then match panel depth to location.

Quick Takeaway

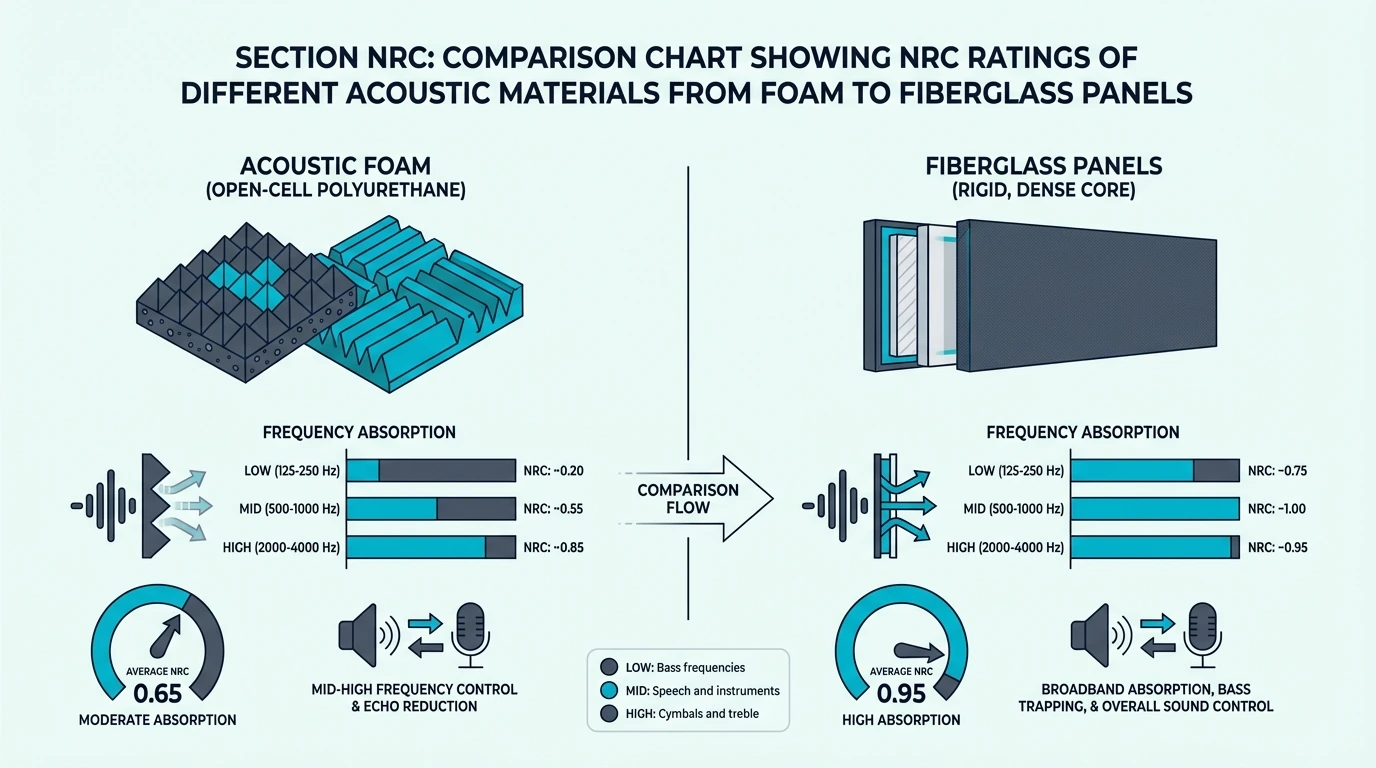
4-inch panels extend absorption down to approximately 125Hz compared to 250Hz for 2-inch panels, helping with upper bass and low-mid frequencies. Neither handles deep bass below 100Hz—you need dedicated bass traps for that.

What’s the Difference Between 2” and 4” Panels?

Thickness comparison between 2-inch and 4-inch acoustic panels

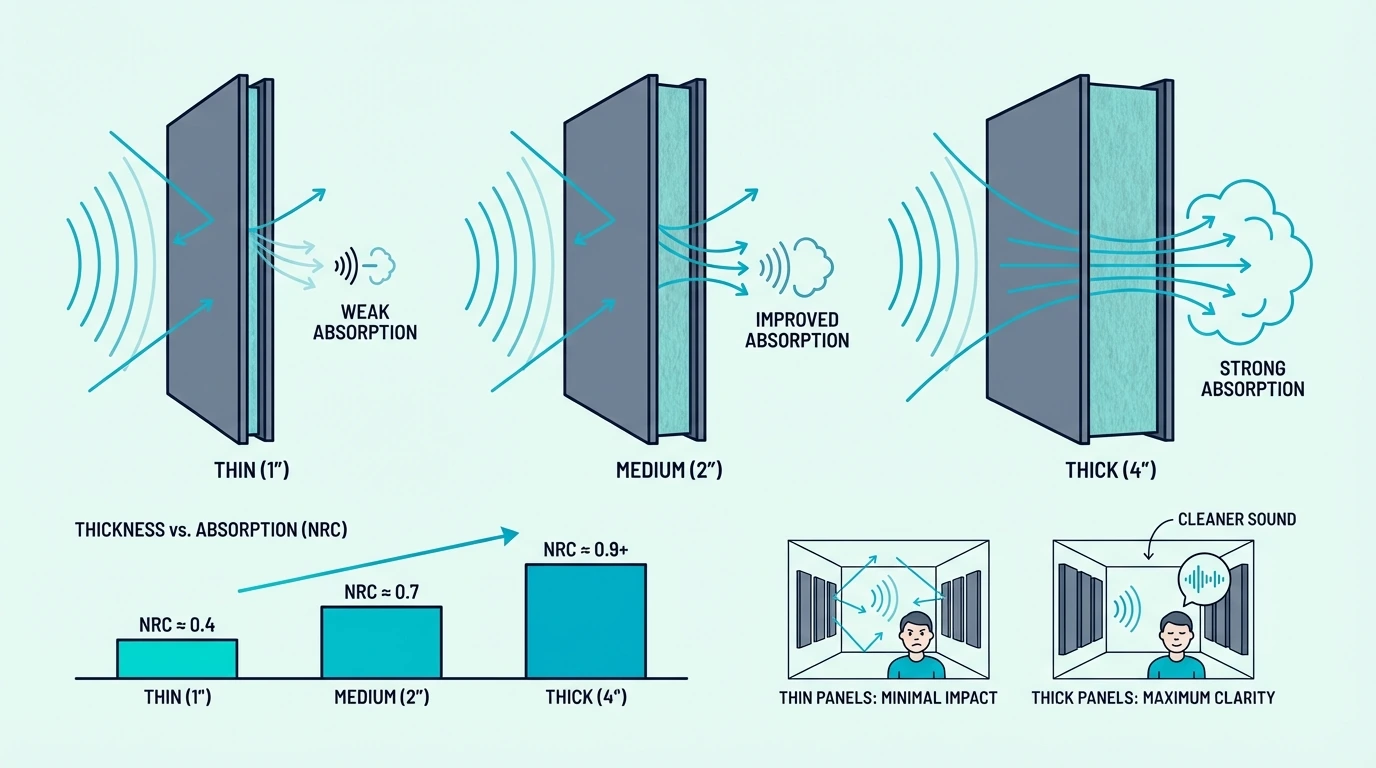
The core difference between the two is simply how low each panel absorbs — lower frequencies have longer wavelengths and need more porous depth before enough energy is dissipated to matter. In real rooms, doubling the material depth from 2 inches to 4 inches extends useful absorption down by exactly one octave.

What Do 2-Inch Panels Absorb?

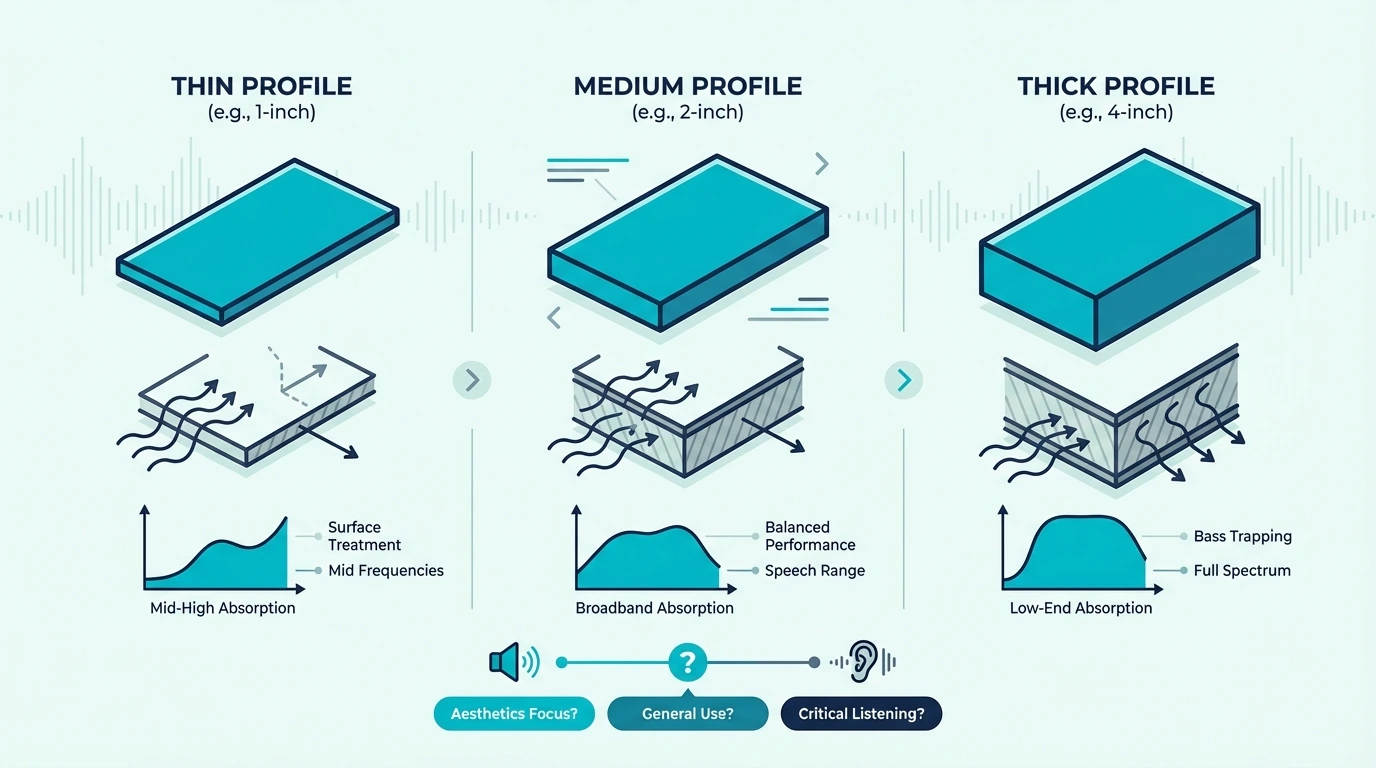
That standard 2-inch depth represents the industry default for acoustic treatment because it covers the vast majority of problems. The material absorbs effectively from approximately 250Hz upward, handling the critical mid-range and all high frequencies without eating up massive amounts of wall space.

This upper frequency range includes voice fundamentals, most musical instruments, and the harsh reflections that cause flutter echo and clarity issues. For many applications, 2-inch panels compared to 1-inch represent the absolute sweet spot between cost, visual footprint, and acoustic performance.

The UMIACOUSTICS 2-Inch 4-Pack exemplifies this quality 2-inch construction at a reasonable price point.

What Do 4-Inch Panels Absorb?

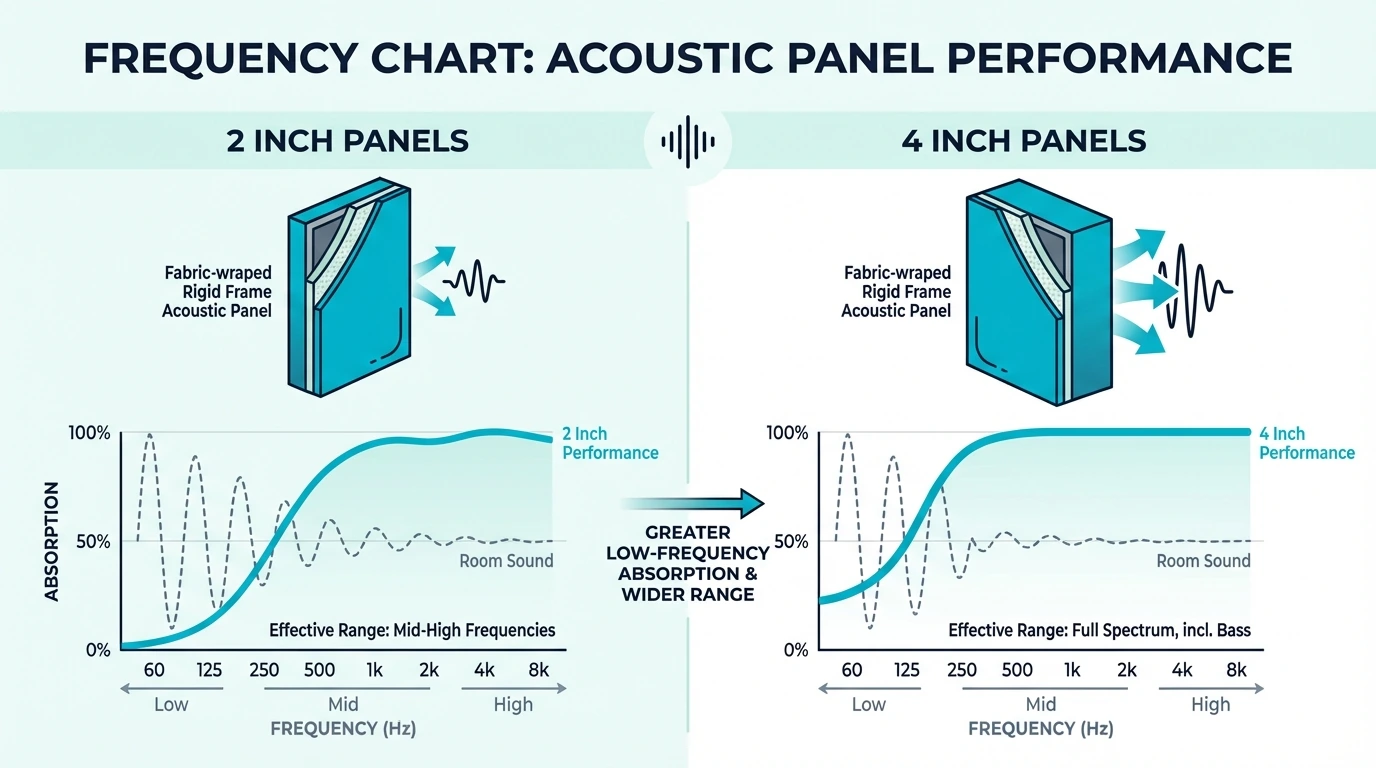
When you double the thickness to 4 inches, you push that effective absorption floor down from 250Hz to approximately 125Hz. This newly captured octave covers the problematic upper bass region—kick drum fundamentals, bass guitar lower notes, and the specific “chest thump” frequencies that create a boomy, overwhelming sensation in untreated rooms.

That added physical depth gives the slower, longer waves more path length to travel through the absorber, creating enough friction to pull the low-mid energy out of the room.

But that extra depth does not magically turn a flat wall panel into a bass trap. Deep bass energy below 100Hz (subwoofer territory) largely ignores the 4-inch panel and passes right through it.

If your room has heavy bass buildup vibrating the floorboards, thicker wall panels will help tighten the low-mids, but dedicated corner trapping is the only way to close the final gap.

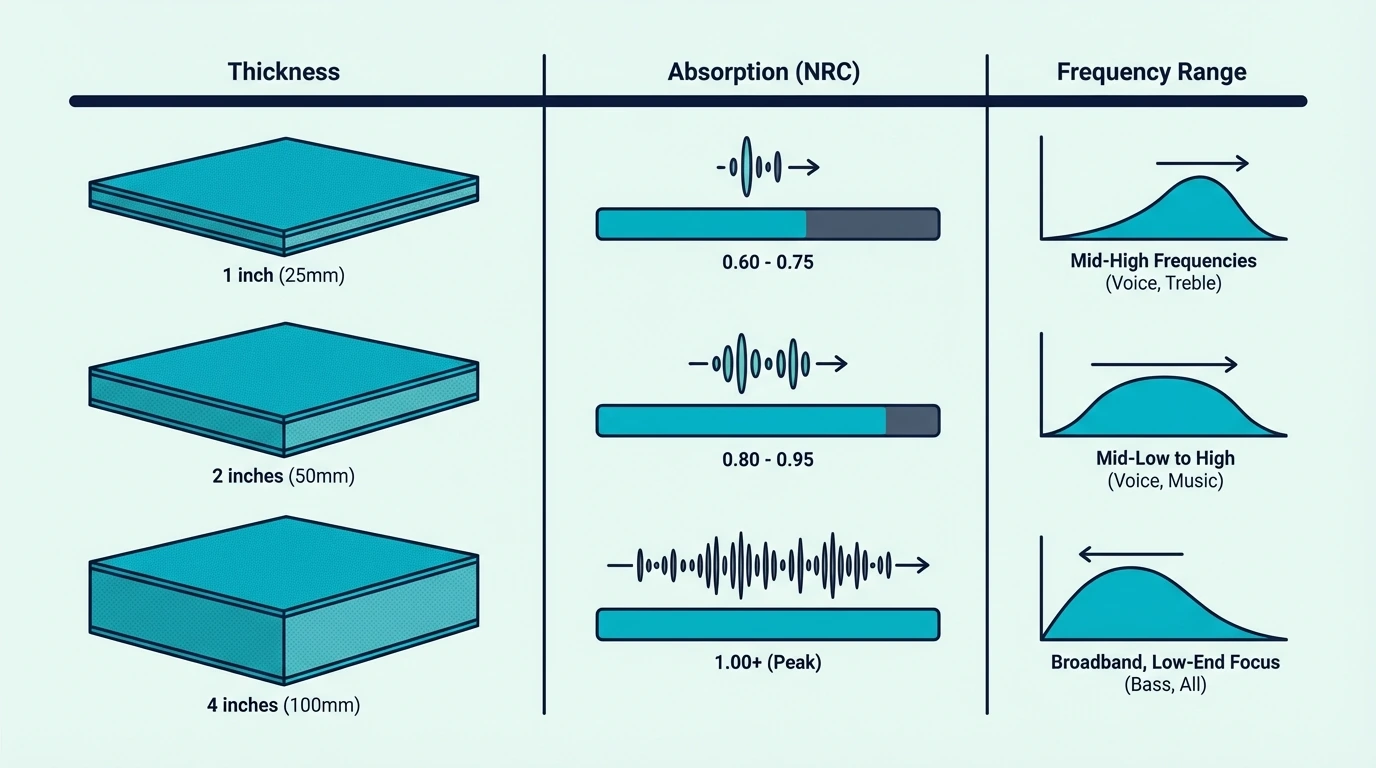
What Frequencies Does Each Absorb?

Frequency absorption chart for 2-inch and 4-inch panels

These technical specs are easier to use when you translate them into what you actually hear in your chair. Play a bass-heavy track and listen to whether each note stops cleanly or hangs on after the beat.

That lingering tail usually sits in the muddy 80-200Hz band, which dictates exactly which panel you need.

What Is the 2-Inch Frequency Range?

If the tail isn’t there and the room just sounds bright or harsh, standard 2-inch panels will provide strong absorption (NRC 0.85+) from 250Hz all the way up to 4000Hz. Performance drops off a cliff below 250Hz, reaching minimal effectiveness around 150Hz.

To put this in musical terms: 250Hz is roughly middle C on a piano. Everything above that note—vocals, guitars, cymbals, most of the sound you actively listen to—gets absorbed beautifully by a 2-inch core.

This covers the critical range for speech intelligibility and the mid-frequency reflections that cause comb filtering at your desk. Because of this, recording studios and home theaters benefit massively from 2-inch treatment even if they never add bass extension.

The limitation only becomes obvious when you’re mixing heavy electronic music or watching action movies at reference volume. Those massive low rumbles and kick drums punch right through 2-inch panels like they’re not even mounted to the wall.

What Is the 4-Inch Frequency Range?

Adding the extra two inches of depth extends that strong absorption down to approximately 125Hz while maintaining excellent mid and high-frequency performance above it. The overall NRC rating increases slightly (typically hitting 0.95+), but the real gain is the new low-frequency extension.

That extra octave of absorption (the gap between 250Hz and 125Hz) captures the critical “body” frequencies that give music its warmth and impact. Male vocals, cello fundamentals, and the physical punch of a kick drum all live in this exact range, making it vital for critical listening.

The UMIACOUSTICS Large Panels demonstrate the deeper, heavier frame construction that these 4-inch cores require.

Can Either Handle Deep Bass?

No matter which option you pick from the chart above, neither 2-inch nor 4-inch panels can effectively absorb frequencies below 100Hz. The 50-80Hz range where heavy subwoofers operate requires an entirely different approach—either corner-mounted bass traps or thick, heavy membrane absorbers.

The room modes and standing waves that create massive boom and dead null spots typically concentrate below 100Hz. If these severe pressure zones are your primary problem, debating panel thickness on your flat walls is a waste of time.

You need dedicated bass traps to handle that specific physics problem.

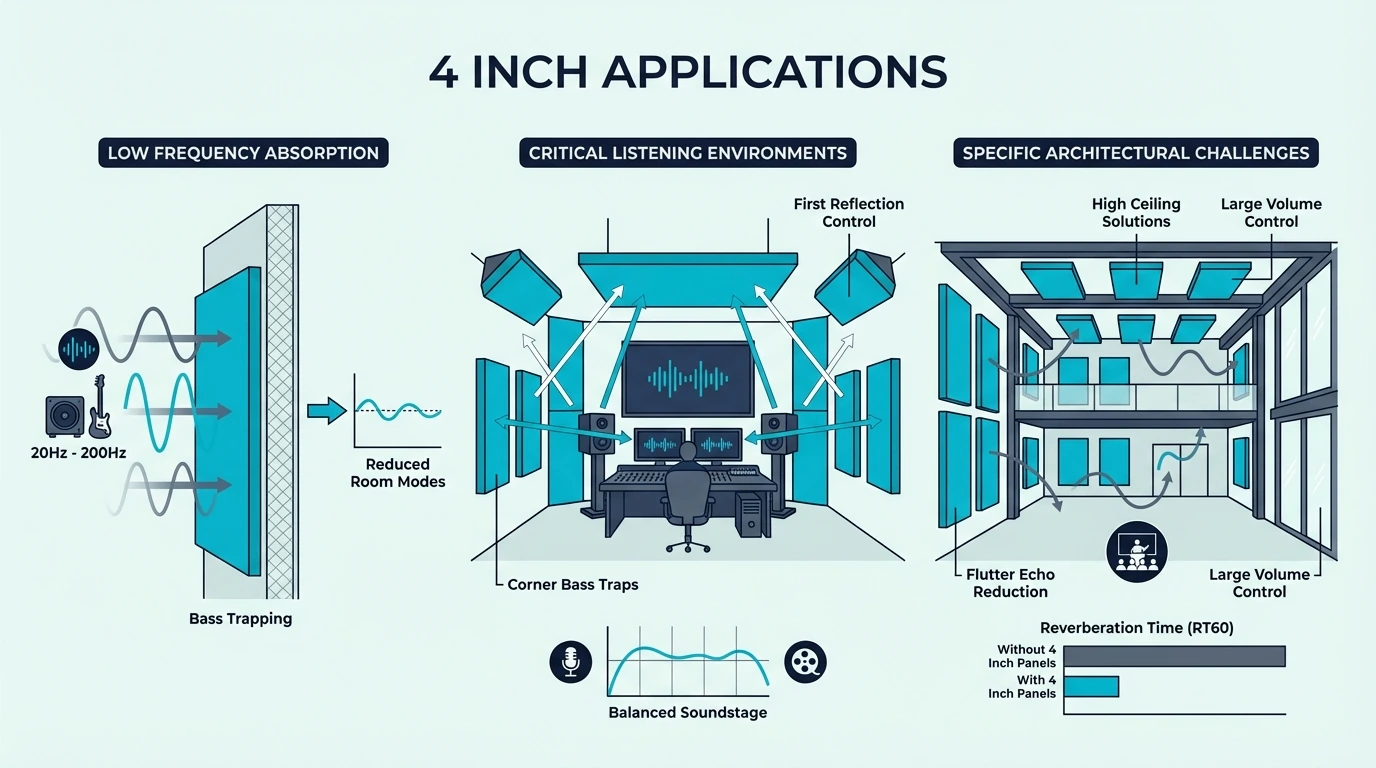
When Should You Choose 4 Inch?

Applications where 4-inch acoustic panels make sense

4-inch panels are worth the investment in some rooms and completely unnecessary in others. They cost more, project twice as far off the wall, and only pay off when low-mid control is explicitly part of the goal.

Do Home Studios Need 4-Inch Panels?

Because recording and mixing rooms often struggle heavily with low-mid frequency masking, they are the most obvious candidates for thicker treatment. The 125-250Hz range contains voice warmth, guitar body, and the fundamental frequencies of many instruments.

If your mixes sound muddy in the car but fine at your desk, upgrading to 4-inch panels at the first reflection points can strip away that masking. They won’t fix deep sub-bass problems, but they address the upper bass buildup that causes 90% of mix translation issues.

Those first reflection points—the specific spots on the walls beside and behind your listening position—benefit most from 4-inch treatment, and the recording studio panels guide has placement maps for those positions.

Do Home Theaters Need 4-Inch Panels?

Home theaters also fall into the high-priority category because modern surround systems rely heavily on the 80-200Hz range for cinematic impact. Crucially, dialogue intelligibility also depends on clean mid frequencies without any bass masking bleeding upward.

Placing four-inch panels directly behind and beside the primary seating area improves both the explosive dynamics and the vocal clarity—the home theater acoustic panels guide has placement maps for cinema rooms.

What If Budget Isn’t a Concern?

Even if budget isn’t constrained, defaulting to 4-inch panels everywhere is rarely the smartest move. While they provide objectively better performance across the entire frequency spectrum, the sheer physical bulk of hanging 4-inch boxes all over a small room can make the space feel cramped and claustrophobic.

For critical listening applications—mixing, mastering, high-end home theater—the thicker panels are usually worth the visual tradeoff. For general room treatment, podcast recording, or zoom calls, 2-inch panels deliver excellent results while keeping a much lower profile on the wall.

Is 4 Inch Worth the Extra Cost?

Cost comparison for 2-inch versus 4-inch acoustic panels

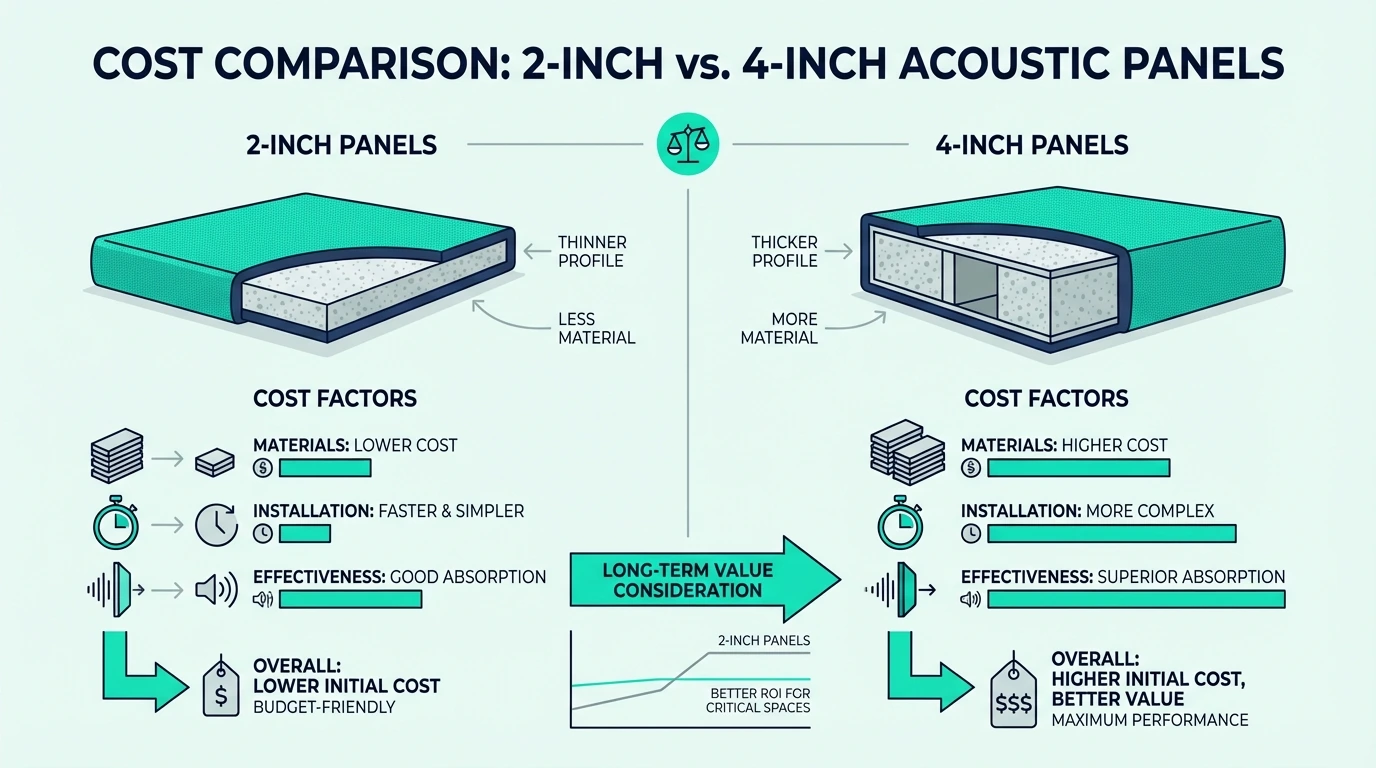
Cost is where most decisions get made. The jump from 2-inch to 4-inch is often 60–100% more for identical square footage, and you are strictly paying for lower-frequency extension, not a dramatic change in the mids and highs.

How Much More Do 4-Inch Panels Cost?

A typical 2-inch professional fiberglass panel often lands in the low-to-mid triple digits. A comparable 4-inch option from the exact same brand usually runs roughly 60–100% higher because it requires double the core material and a deeper, stronger internal frame.

When you multiply that premium across a full-room setup of 12 to 16 panels, that pricing gap adds up to a massive difference in your total budget.

The Olanglab 4-Pack Fiberglass Panels represent a mid-range 2-inch option that delivers solid value for general treatment, allowing you to cover far more wall area for the same money.

Is the Performance Gain Worth It?

The performance improvement is absolutely real, but it is proportional to the physical thickness, not the dollar cost. You are not getting double the total absorption for double the price—you are simply unlocking one extra octave of frequency extension at the bottom end.

For rooms where bass is not the primary problem, that extra octave of extension may not even be audible. If your main issues are slap echo, harsh glare, and speech intelligibility, spending double on 4-inch panels solves those exact same problems no better than 2-inch panels would have.

Can You Mix 2” and 4” Panels?

Room setup using mixed acoustic panel thicknesses

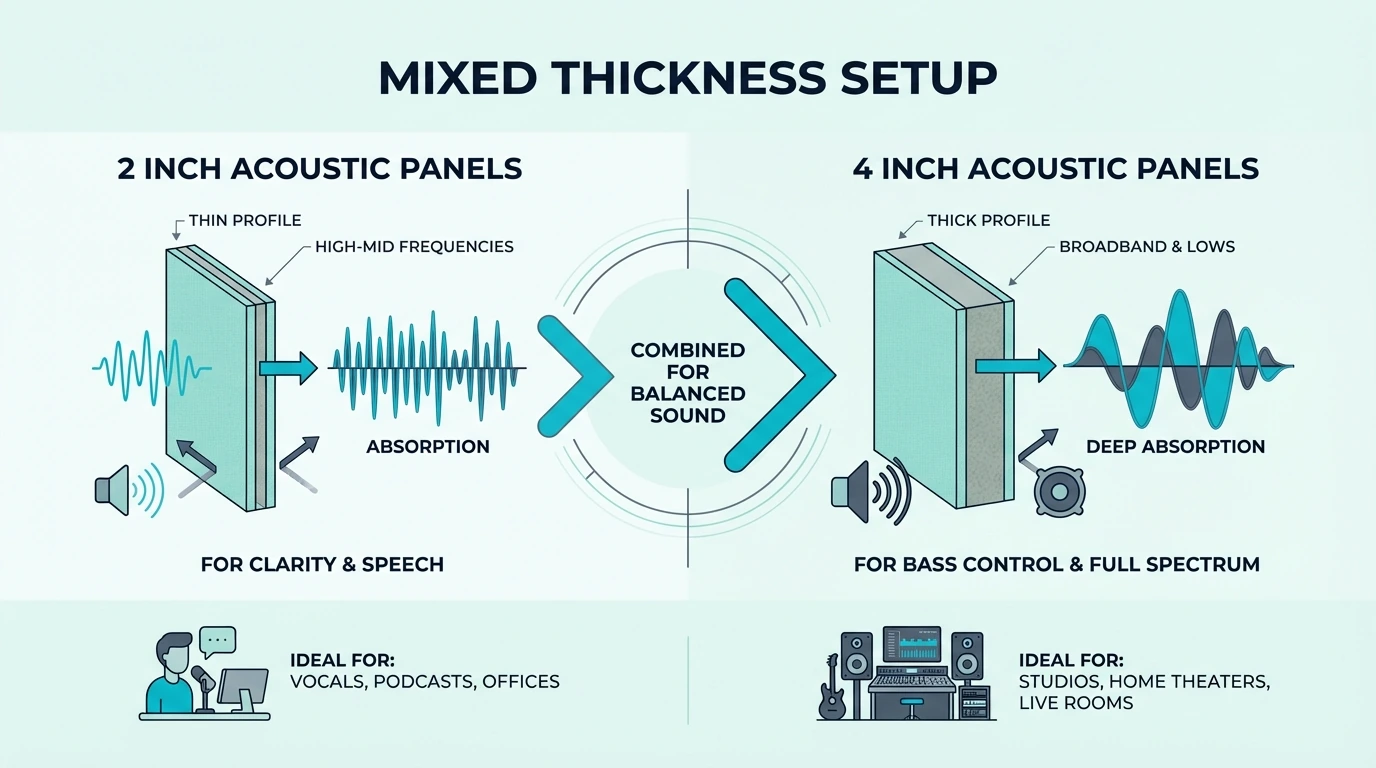
Because of that cost gap, you do not need one uniform thickness across the entire room. A mixed layout is often the smartest, most cost-effective setup you can build.

Can You Mix 2-Inch and 4-Inch Panels?

The strategy is simple: deploy 4-inch panels strictly where bass extension matters most, then fill the rest of your coverage targets with 2-inch panels for broader reflection control.

Concentrating your thickest treatment at the first-reflection spots puts your budget where it has the biggest physical impact. The listening triangle—the direct path between your speakers and your listening chair—benefits the most from maximum low-mid treatment.

The closer the panel is to what you hear directly, the more its low-frequency extension matters. Peripheral wall coverage away from the desk can easily be thinner without an audible compromise to your mix.

Where Should You Place 4-Inch Panels?

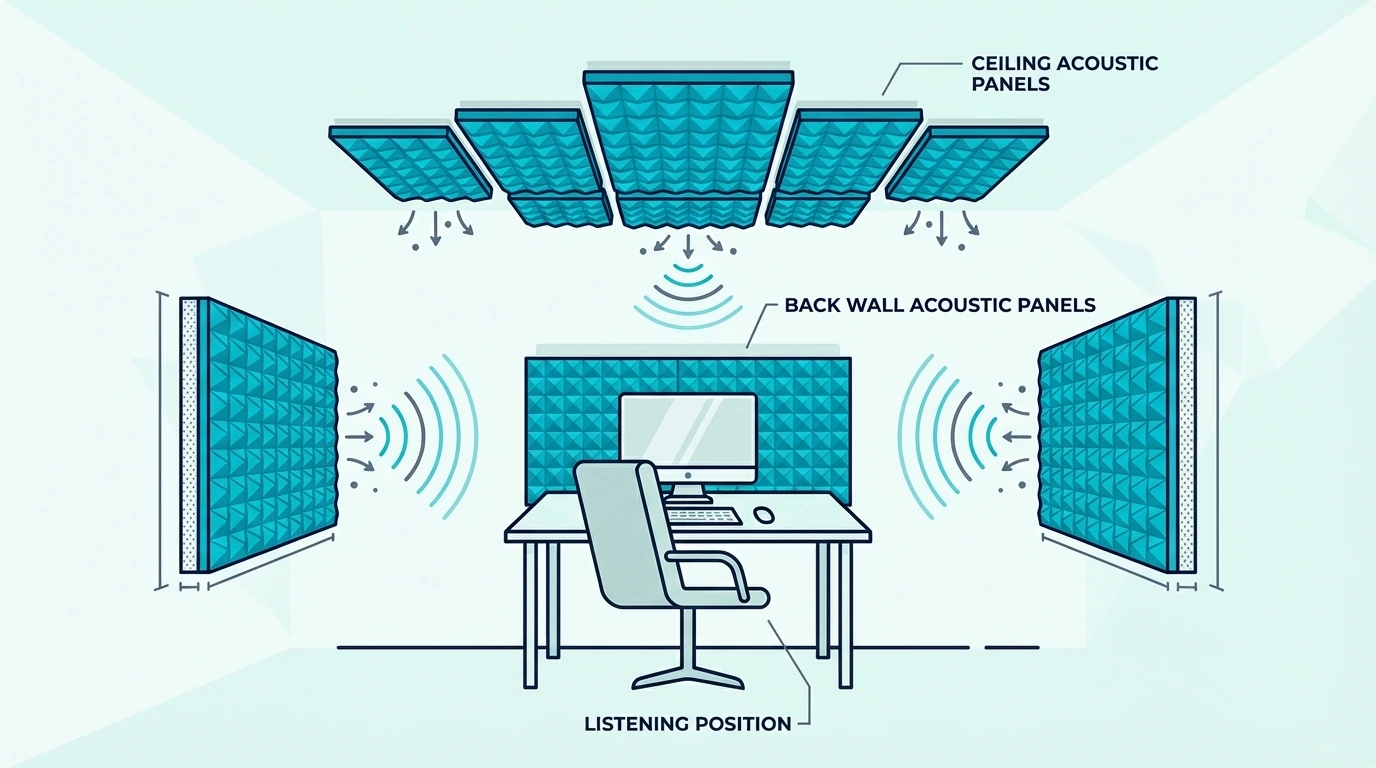
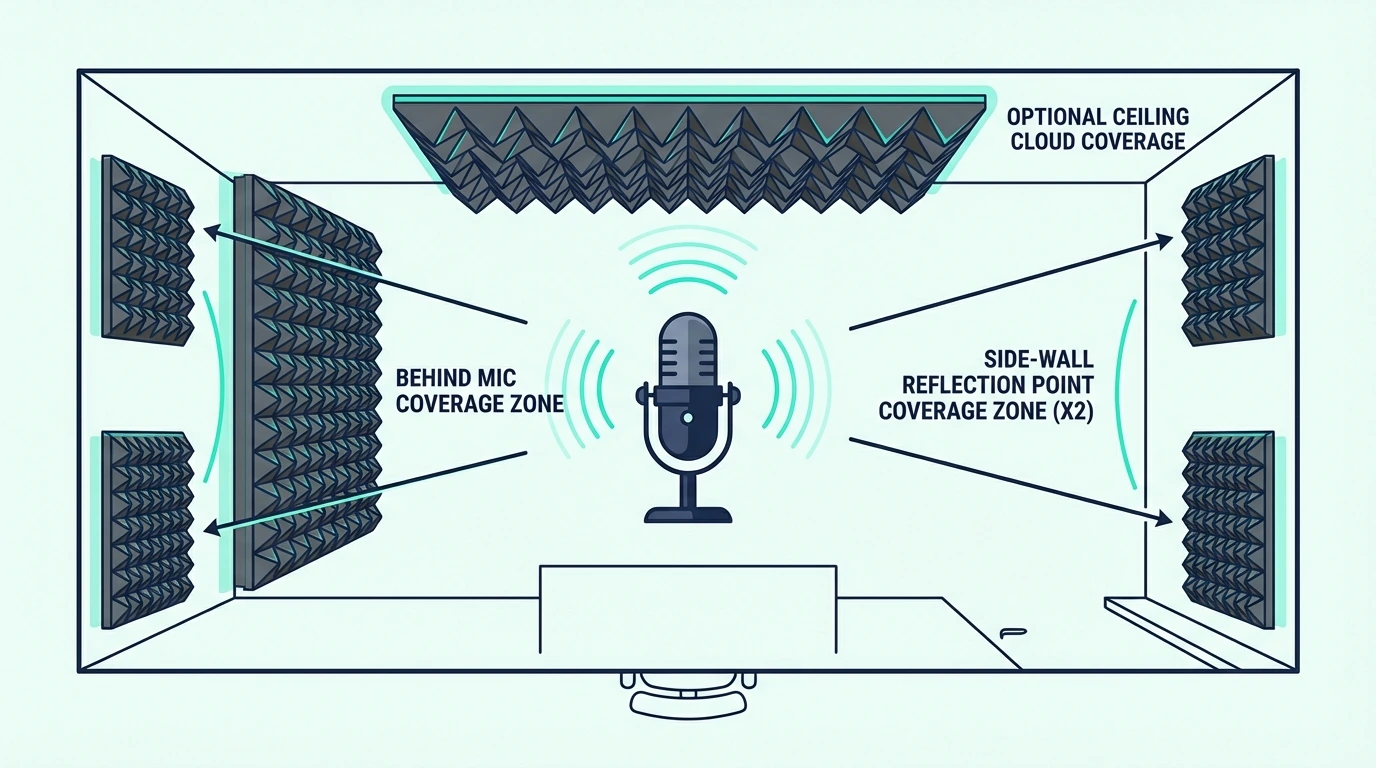
Your absolute highest priority positions for the 4-inch panels are the side walls at the first reflection points (the “mirror trick” spots) and the center of the rear wall directly behind your monitors.

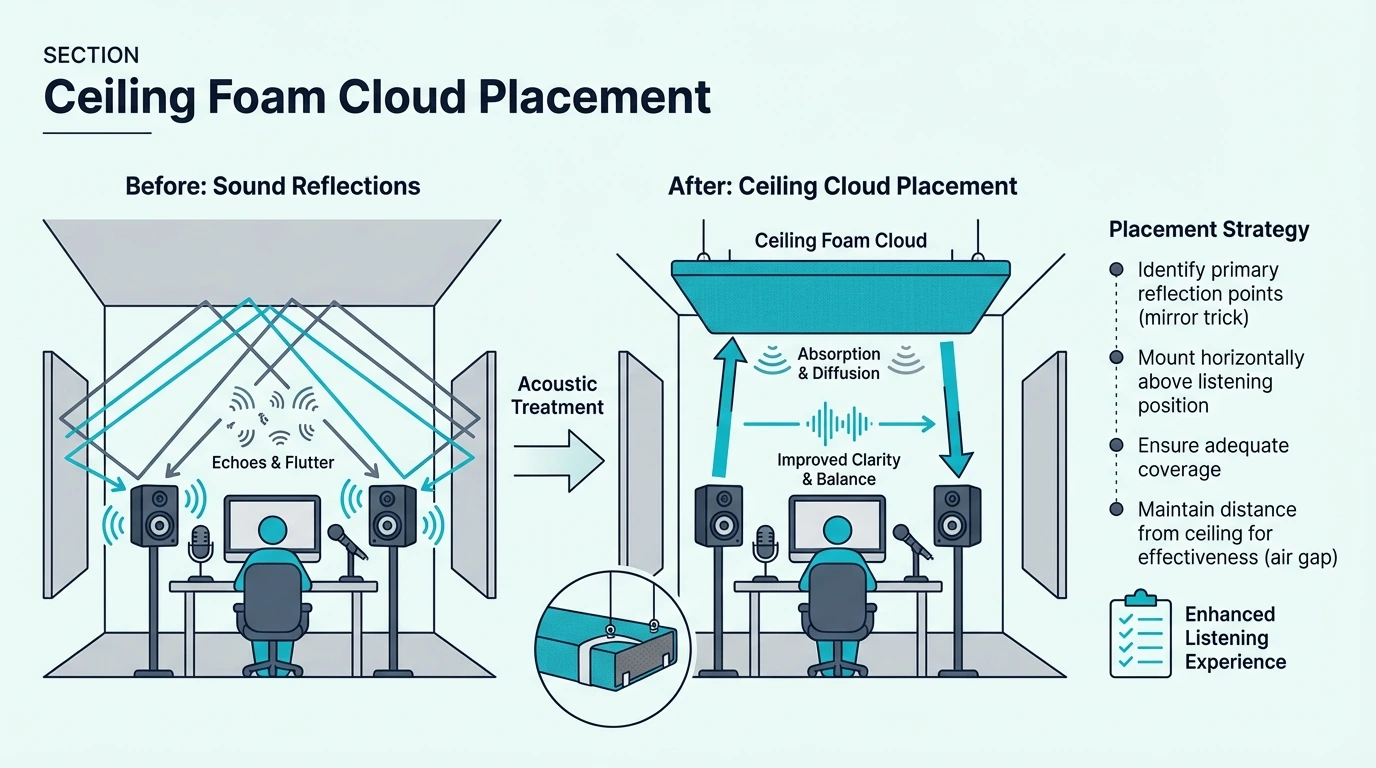
All secondary positions work perfectly fine with 2-inch boards: the ceiling cloud, the front wall out wide, and any additional scatter coverage. The ceiling cloud specifically benefits from using 2-inch panels because the 4-inch depth creates severe mounting challenges overhead.

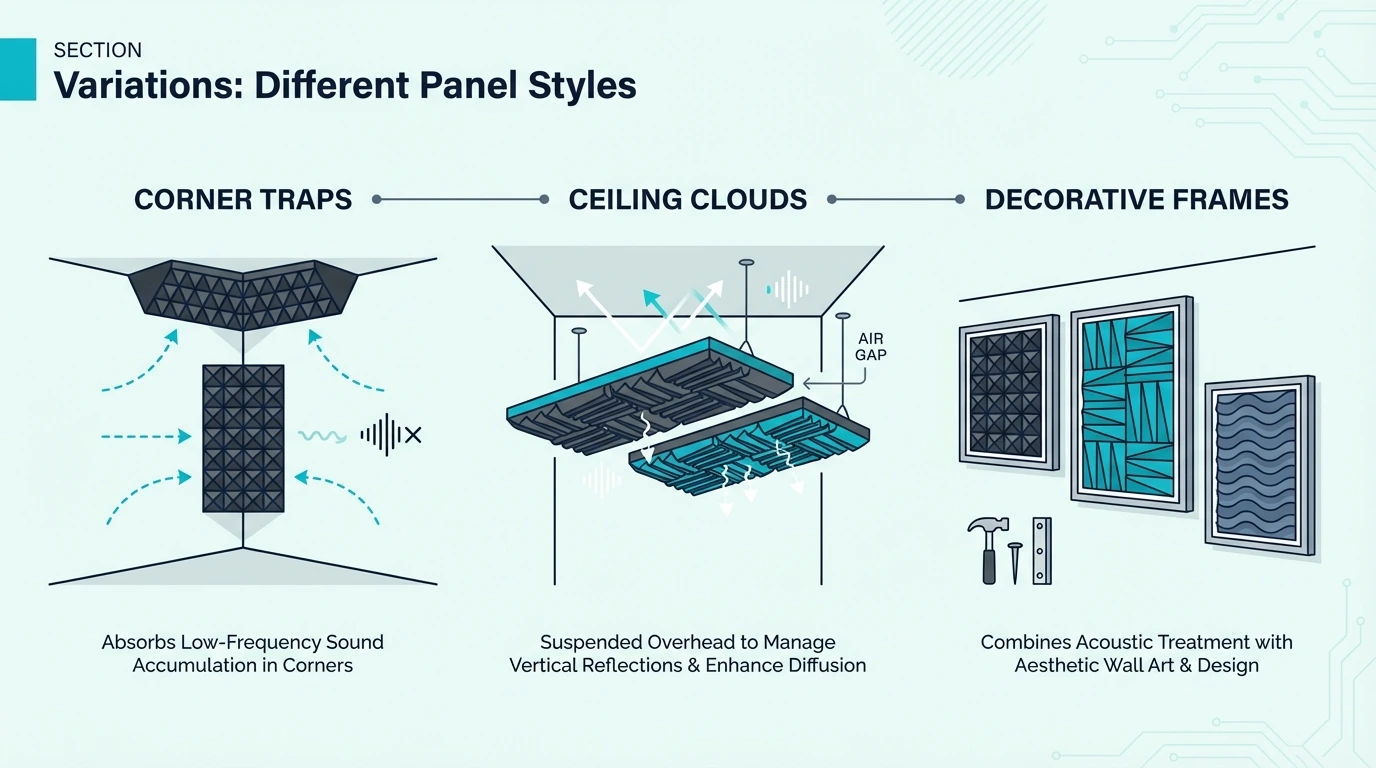
Keep the 4-inch panels out of the corners entirely—those spots should get dedicated, triangular bass traps. Corners are where bass builds up most severely, and even a 4-inch flat panel cannot provide adequate corner trapping.

How Do 2-Inch and 4-Inch Panels Compare Side by Side?

Comparison table for 2-inch and 4-inch acoustic panels
Factor 2 Inch 4 Inch
Effective Range 250Hz+ 125Hz+
Typical NRC 0.80-0.90 0.90-1.0
Wall Projection Moderate 4+ inches
Cost Standard 60-100% more
Best For General treatment Studios, theaters with bass issues
Bass Absorption Upper bass only Better but still limited
Deep Bass (<100Hz) None Minimal

Which Should You Choose?

Decision guide for choosing 2-inch or 4-inch acoustic panels

The right choice depends on the room’s dominant problem, not specs alone. Neither option is universally better.

If bass notes linger and the room feels swollen around kick and low vocals, place 4-inch panels at first reflection points and rear-wall hotspots.

If the room mostly has slap echo, glare, or weak speech clarity, 2-inch panels usually solve it at lower cost.

For many spaces, the best result is hybrid: 2-inch reflection treatment plus corner bass traps, then selective 4-inch upgrades only where listening tests still show low-mid buildup. The best acoustic panels guide has product picks across both thicknesses, and the NRC rating guide explains how to read the absorption specs on any panel you compare.

Conclusion

2 inch vs 4 inch is not a quality ranking; it is a targeting choice.

Use 2-inch panels when your priority is reflection control and clarity. Use 4-inch panels when you need more control in the 125-250Hz region.

For sub-100Hz boom, skip the thickness debate and add bass traps.

In most rooms, the fastest path is staged: treat first reflections, add corner traps, then upgrade select panel positions only if low-mids are still muddy.

Frequently Asked Questions

Before you buy, here are the two questions most people ask when deciding between 2-inch and 4-inch acoustic panels.

Do I Need 4” for a Home Studio?

Usually not at the start.

If your main issues are echo and imaging blur, 2-inch panels at first reflection points will get you most of the improvement.

Add corner bass traps early, then reassess.

Move to 4-inch panels only if low-mid buildup (roughly 125-250Hz) remains after placement and bass trapping are dialed in.

Can 2” Panels Handle Bass at All?

They can tame some upper bass in roughly the 200-300Hz range, but effectiveness drops quickly below that.

Treat 2-inch panels primarily as mid/high-frequency absorbers.

If your problems sit in the 125-250Hz zone—boomy lower vocals, muddy guitars, undefined kick—4-inch panels usually perform better. Below 125Hz, neither thickness provides meaningful absorption.

Do Acoustic Panels Work in Apartments? Renter’s Guide [2026]

Do acoustic panels work in apartments? Yes—but only for improving the sound inside your unit, not for blocking noisy neighbors.

If calls sound boxy or music feels harsh, you are hearing reflections bouncing off drywall, windows, and bare floors.

A few well-placed panels can calm that echo so your voice sounds more direct and your speakers sound clearer.

Start by treating the wall behind your microphone or desk, then hit the first reflection points to your left and right.

Below you’ll find what panels can and cannot do in an apartment, plus renter-friendly ways to mount them without damaging walls.

Quick Takeaway

Acoustic panels improve sound inside your apartment (less echo, clearer calls) but they do not block sound from neighbors. For renter-friendly installation, use Command strips, freestanding panels, or leaning panels that leave no wall damage.

Do Acoustic Panels Work in Apartments?

Apartment room echo reduction with acoustic panels

Yes, acoustic panels work in apartments—for acoustic treatment. They control sound within your space by absorbing reflections and reducing echo.

What they do not do is block sound from traveling between apartments.

That expectation is where most renters get disappointed.

What Panels CAN Do

Acoustic panels excel at taming the sound inside your room. Hard surfaces in apartments—hardwood floors, bare walls, large windows—create reflections that make spaces sound echoey and harsh.

Panels absorb these reflections, making your apartment sound warmer and more controlled.

Voice calls become clearer because your microphone picks up less room echo. Music sounds more defined because reflections are not muddying the original sound.

For work-from-home setups, panels behind your desk sharpen video call quality. The audio difference between a treated and untreated room is immediately noticeable to everyone on the call—the home office acoustic panels guide has the best options for desk setups.

What Panels Cannot Do ⚠️

The critical limitation: acoustic panels cannot block sound from traveling through walls, floors, or ceilings. Understanding the difference between panels and soundproofing matters before you spend money.

Sound travels through building structures via vibration. Your neighbor’s bass, footsteps upstairs, or TV sound moves through the physical materials connecting your apartments.

Panels sitting on your wall surface have zero effect on this transmission.

No amount of acoustic panels will stop you from hearing your upstairs neighbor’s footsteps. The sound travels through the floor/ceiling structure itself—panels only affect sound that’s already in your room.

Will Acoustic Panels Block Neighbor Noise?

Diagram showing sound passing through apartment walls

No. This is the biggest misconception about acoustic treatment, and it needs a direct answer before you spend money expecting the wrong results.

Why Panels Cannot Block External Sound

Sound transmission between apartments happens through structural pathways. When your neighbor plays music, the speaker vibrations transfer into the floor, which connects to your ceiling, which radiates sound into your space.

Acoustic panels are designed to absorb sound waves that are already traveling through air inside your room. They have no effect on sound traveling through solid materials like drywall, concrete, or wood framing.

Panels act like a sponge for sound already in your room. Neighbor noise is not in your room yet—it is coming through the structure itself.

The sponge cannot absorb what has not entered the air.

What Actually Soundproofs

True soundproofing requires mass, decoupling, and sealing—none of which acoustic panels provide.

Mass means heavy, dense materials that resist vibration. Adding mass-loaded vinyl to walls adds weight that reduces sound transmission.

Double or triple drywall layers work similarly.

Decoupling means separating wall layers so vibrations cannot transfer directly. Resilient channels and isolation clips create gaps that interrupt the structural pathway.

Sealing means eliminating air gaps around doors, windows, outlets, and any penetrations. Sound leaks through surprisingly small openings.

Most of these solutions are not practical for renters. You cannot add drywall layers or install resilient channels without major construction.

That is why managing expectations matters—panels help with what you can control (your room’s acoustics) rather than what you cannot (structural sound transmission).

What CAN Panels Do in an Apartment?

Apartment Panel Benefits for acoustic panels apartments

Once you stop worrying about the neighbors, you can focus on the acoustic problems panels are actually built to solve. The three benefits below completely change how a room feels to live and work in.

Reduce Echo and Reverb

Most modern apartments sound harsh simply because they are built from hard, reflective surfaces. Bare drywall, hardwood floors, massive windows, and minimalist furniture create a highly reverberant environment where every sound bounces multiple times before dying out.

The 2-Pack Fabric Acoustic Panels can start pulling that excess energy out of the air immediately. By absorbing those mid and high frequencies, the panels kill the “bathroom echo” effect, leaving the room feeling intimate and controlled rather than like an empty box.

Improve Call and Recording Quality

That controlled environment provides massive, immediate benefits for remote workers and content creators. Desktop microphones are notoriously sensitive, picking up not just your voice, but every single reflection bouncing off your apartment walls.

When you treat the room, the microphone captures a clean, direct signal rather than a muddy mix of voice and delayed echoes. This single upgrade makes your Zoom calls, podcast recordings, and Twitch streams sound professional instead of amateur.

Make Small Rooms Sound Better

This acoustic control is especially critical in typical apartment dimensions, because small rooms naturally suffer the worst acoustic problems. Sound has less physical distance to travel before slamming into a wall and bouncing back, creating intense, rapid-fire reflections and devastating flutter echo.

Strategic panel placement allows a tiny 10×10 bedroom to punch far above its weight class acoustically, often sounding noticeably better than an untreated 15×15 living room. The acoustic panel placement guide explains how to use the mirror trick to find exactly where those panels belong.

What Are the Best Renter-Friendly Installation Methods?

Renter-friendly mounting method for acoustic panels

Knowing where the panels belong is only half the battle for renters. The actual challenge is mounting them securely without triggering a massive deduction from your security deposit on move-out day.

Command Strips

The most popular solution relies on heavy-duty adhesives rather than drill bits. Because standard acoustic panels are surprisingly light, Command Large Picture Hanging Strips can comfortably hold them to the drywall.

You apply the strips to both the panel frame and the wall, let the adhesive cure for an hour before bearing weight, and then press them firmly together. The bond strengthens over the first 24 hours.

The danger with Command strips comes entirely during removal; if you yank the panel outward rather than pulling the tab straight down slowly, you will tear the paint off the wall regardless of what the packaging promises. The installation guide has the exact removal technique to avoid that disaster.

Freestanding Panels

If you refuse to risk the drywall entirely, freestanding panels bypass the wall mount completely. These systems use heavy floor stands or weighted frames to hold the absorption material vertically in the room.

A set like the UMIACOUSTICS 4-Pack with Hanging Brackets offers ultimate flexibility, allowing you to use the included hardware if permitted, or adapt them to freestanding studio stands if your lease is strict.

Leaning Panels

The simplest damage-free method requires no hardware at all: simply leaning large panels directly against the wall. Gravity handles the entire installation process, provided you angle the base out slightly so the panel rests stable against the drywall.

This leaning technique is the industry standard for corner bass traps, which naturally sit in low-traffic areas where they are unlikely to be knocked over. When your lease ends, you just pick them up and carry them straight to the moving truck without a second thought.

Do You Need Landlord Permission?

Landlord permission concept for apartment acoustic panels

Before you commit to a mounting strategy, you have to verify what your lease actually prohibits. Assuming you know the rules usually leads to expensive mistakes.

Damage-Free Options

If you stick strictly to Command strips, freestanding stands, or leaning panels, you rarely need to involve the landlord. Most standard leases only prohibit permanent modifications like drilling anchors or painting; they don’t restrict you from placing temporary, removable items against the wall.

However, ultra-strict corporate leases sometimes explicitly ban all wall adhesives to protect cheap builder-grade paint. If you use adhesives anyway, take clear photos of the pristine wall before installation and immediately after removal to protect yourself from false damage claims during the final inspection.

What to Ask

If your panels are too heavy for adhesive and require actual drywall anchors, you absolutely must get permission before drilling. The good news is that most reasonable landlords will approve small picture-hanging holes, provided you promise to patch them with spackle when you leave.

Frame the request as a functional upgrade for remote work rather than a messy DIY project. Keep the approval explicitly in writing—a simple email confirming the use of “small mounting hardware that will be patched upon move-out” gives you the legal cover you need.

Should You Get Acoustic Panels for Your Apartment?

Decision guide for using acoustic panels in an apartment

You know what panels can and cannot fix—now the question is whether your situation justifies spending the money.

Get panels if you work from home and want better call quality. The professional audio improvement justifies the investment for daily video meetings.

Get panels if you record content—podcasts, music, voiceovers, or streams. Acoustic treatment is the single biggest upgrade for audio quality after your microphone itself.

For recording setups, the recording studio panels guide has picks sorted by use case.

Get panels if your apartment sounds echoey and you want a more comfortable acoustic environment. Even for casual listening, reduced reflections make spaces more pleasant.

Do not get panels expecting soundproofing. They will not reduce neighbor noise, and disappointment is guaranteed if that is your goal.

Manage expectations correctly, and panels deliver real value.

For renter-friendly options that you can take with you, the Olanglab 4-Pack Fiberglass Panels offer a balance of performance and portability.

The best acoustic panels guide has a side-by-side comparison across budgets, from starter packs to professional-grade fiberglass.

Conclusion

The single biggest mistake apartment renters make with acoustic panels is expecting them to block neighbor noise—then feeling disappointed when the bass still comes through the floor.

Set the right goal from the start: better sound inside your unit. Two or three panels at first reflection points can turn a boxy home-office setup into clean, professional-sounding audio for every video call.

That alone pays for the investment within the first month of remote work. The acoustic panel density guide explains which core materials absorb the most sound per dollar.

Frequently Asked Questions

If you still have a few renter-specific questions, these are the answers that come up most often.

Will Panels Stop Upstairs Footsteps?

No. Footsteps travel through the floor/ceiling structure as impact vibration—panels only absorb sound already in the air.

Rugs at the source floor or a rebuilt ceiling with mass and decoupling are the real fixes, but neither is realistic for most renters.

A white noise machine masks footstep sounds by raising the ambient noise floor—not a fix, but a practical workaround that costs under $30. The acoustic panel NRC guide explains which frequencies panels actually absorb versus which ones pass right through.

Can I Take Panels When I Move?

Yes—and that portability is one of the strongest arguments for renters. Use Command strips or freestanding mounts and your panels become furniture that travels with you.

Your ear gets trained over time, too. You learn where first reflection points land, how many panels a room needs, and which walls matter most.

Every future apartment benefits from that knowledge, and you can recreate a solid setup in a new room within an hour.

Should I Get Panels or Soundproofing?

Panels. True soundproofing demands construction—double drywall, resilient channels, sealed air gaps—none of which landlords allow.

Panels improve what you actually control: the acoustics inside your unit. Use the acoustic panel calculator to figure out how many you need rather than guessing based on wall size alone.

Can You Paint Acoustic Panels? What Actually Happens to Sound [2026]

Can you paint acoustic panels? Yes — but doing so reduces their absorption by 30–50%, because paint seals the fabric pores that let sound waves enter the core material.

Most people discover this the hard way: they paint their panels to match a room refresh, the echo comes back, and they don’t understand why. The frustration happens because the color change looks great but the acoustic performance is gone — the cause is always the sealed surface.

The good news: there are ways to add color without sacrificing acoustics, so you can get the look you want and keep the treatment working.

We’ll walk you through what painting actually does to performance, when it’s acceptable, and the better alternatives below.

you can paint acoustic panels, but expect 10-30% performance reduction depending on paint thickness. Thin, breathable fabric paints work best.

Better alternatives include re-wrapping with new fabric or buying pre-colored panels. If you must paint, use light coats and avoid latex or acrylic paints that seal the surface.

Can you Paint Acoustic Panels?

Can you paint acoustic panels

Yes, you can paint acoustic panels—but the real question is whether you should. Understanding how acoustic panels work helps explain why painting creates problems.

How Does Paint Affect Sound Absorption?

Acoustic panels absorb sound because their porous surface allows sound waves to enter the material. Once inside, the sound energy gets converted to tiny amounts of heat as it travels through the fibrous core.

Paint disrupts this process by sealing the surface pores. When you apply paint to fabric, the liquid fills the gaps between fibers and dries into a continuous film. Sound waves that previously entered the panel now bounce off the painted surface instead.

The thicker the paint layer, the worse this effect becomes. A single light coat might reduce absorption by 10-15%. Multiple heavy coats can cut performance by 30% or more.

How Much Performance Will You Lose?

The performance impact depends on three factors: paint type, application thickness, and the panel’s original construction.

Fabric spray paints designed for upholstery cause the least damage. These formulas are engineered to remain flexible and somewhat porous after drying. you might lose 10-15% absorption with a single light coat.

Standard latex and acrylic paints create the biggest problems. These paints form a solid film that completely seals the surface. Expect 25-40% performance reduction with full coverage.

Oil-based paints are even worse—they penetrate deeply and create an impermeable barrier. Avoid them entirely for acoustic applications.

Can you Paint Fabric-Wrapped Panels?

Painting fabric-wrapped acoustic panels

Fabric-wrapped panels present unique challenges because the fabric itself is part of the acoustic design. Consider these factors before painting these common panel types.

What Happens to the Fabric?

The fabric on acoustic panels serves two purposes: it protects the core material and allows sound to pass through. Most acoustic fabrics have an open weave specifically designed for sound transparency.

Painting changes the fabric’s acoustic properties permanently. The paint fills the weave gaps that allow sound transmission, converting an acoustically-transparent fabric into a semi-reflective surface.

you’ll also change the fabric’s texture. A smooth guilford-style fabric becomes slightly rough and stiff after painting. The natural drape disappears, and the surface may crack over time as the dried paint ages.

Will It Clog the Weave?

Yes—that’s exactly what happens with most paints. Standard household paints are designed to create complete surface coverage, which means filling every gap and pore they encounter.

Even “thin” paints applied with a brush push pigment deep into the fabric weave. Spray paints work better because they deposit smaller droplets that sit on top of fibers rather than soaking through them.

If you’re determined to paint fabric-wrapped panels, spray application from 12+ inches away gives the best results. Multiple mist coats build color without saturating the fabric.

If you Must Paint, How Should you Do It?

How to paint acoustic panels correctly

Sometimes painting is the only practical option. Maybe you’re matching panels to a specific room color, or you’ve inherited panels that clash with your space. These steps minimize acoustic damage.

What Type of Paint Should you Use?

Fabric spray paints marketed for upholstery are ythe best choice. Brands like Tulip or Simply Spray are designed to remain flexible and somewhat breathable after drying.

Avoid acrylic craft paints, latex house paints, and any “all-surface” products. These create the solid film that destroys acoustic performance.

Water-based fabric dyes are another option—they change color without adding a paint layer. Dyes penetrate fibers rather than coating them, preserving more of the original acoustic transparency.

How Should you Apply the Paint?

The single biggest mistake is applying too much paint too quickly. Thick, wet coats create the impermeable surface that blocks sound.

Instead, hold your spray can 12-18 inches from the panel surface. Make quick, sweeping passes rather than focused spraying. Let each coat dry completely before adding another.

Two light mist coats will give better acoustic results than one heavy coat, even if the coverage looks similar. The goal is color change with minimal surface sealing.

Work outdoors or in a well-ventilated area. Fabric spray paints have strong fumes that linger in enclosed spaces.

What Are Better Alternatives?

Better alternatives to painting acoustic panels

Before painting, consider these alternatives that give you the color you want without sacrificing acoustic performance. Most take similar effort to painting but preserve ythe panels’ effectiveness.

Can You Re-Wrap with New Fabric Instead?

The best solution for fabric-wrapped panels is replacing the fabric entirely. you can purchase acoustically-transparent fabric in virtually any color and pattern.

The process involves removing the old fabric (usually stapled or glued to the frame), cutting new fabric to size, and reattaching it. Total time is about 30 minutes per panel once you’ve done a few.

Guilford of Maine and similar acoustic fabrics come in hundreds of colors. The SoundAssured Acoustical Fabric is designed specifically for panel wrapping and comes in multiple colors.

For larger projects, the 96” x 54” Speaker Grill Cloth covers multiple panels with a single purchase. you’ll maintain full acoustic performance while getting exactly the look you want. Building your own panels from scratch uses the same techniques. See the best fabric for acoustic panels guide for more fabric options.

Should you Buy Custom Color Panels?

Many manufacturers offer panels in custom colors for a modest upcharge. If you’re buying new panels anyway, ordering the right color eliminates the painting question entirely.

The UMIACOUSTICS 47.2”x23.6” panels come in neutral fabric that works with most room decors without painting. For a more affordable entry, the UMIACOUSTICS 4-pack gives you more panels at a lower cost.

Custom-colored panels use fabric that’s dyed before wrapping, not painted after. The acoustic properties remain unchanged because the color is in the fiber, not on top of it.

Lead times for custom colors are typically 2-4 weeks longer than standard colors. Planning ahead eliminates the temptation to paint and the performance loss that comes with it.

Are Art or Printed Panels a Better Option?

Acoustic art panels combine acoustic treatment with decorative prints. These panels use specialized printing techniques that maintain acoustic transparency while displaying images or patterns.

The 8-Pack Art Acoustic Panels give you professional-looking treatment without any painting required. The scenic designs work as wall art while providing real absorption.

For a more budget-friendly option, the Foggy Forest Art Panels offer the same color-without-painting benefit at a lower price point. See the best acoustic art panels guide for more options.

This option works particularly well when you want panels to complement room decor rather than disappear. Art panels become a design feature rather than something you’re trying to hide. For correct panel placement, art panels can double as both treatment and wall art.

Should You Paint Your Panels?

Decision framework for painting acoustic panels

After weighing the options, painting should be your last resort—not your first choice. The performance loss is real, and better alternatives exist for most situations.

Paint ythe panels if you need a quick fix and can accept reduced absorption. Choose fabric spray paint, apply light coats, and expect 10-20% performance loss at minimum.

Don’t paint if acoustic performance matters for your application. Recording studios, mixing rooms, and home theaters depend on effective absorption. Stick with pre-colored panels, re-wrapping, or acoustic art panels instead. The art panels mentioned above deliver the aesthetic customization you want without sacrificing a single decibel of absorption.

For more on acoustic panel selection, the best acoustic panels guide covers options in various colors and styles that eliminate the painting question entirely. If you’re hanging panels for the first time, getting the color right from the start saves future headaches.

Frequently Asked Questions

Does Paint Color Matter?

Darker colors require more paint coverage than lighter colors, which typically means more performance loss. If you’re painting panels, choose a color close to the original to minimize the amount of paint needed.

White and light gray panels can be tinted to pastels with very light spray coats. Going from white to deep navy or black requires heavy coverage that much impacts acoustics.

The paint’s chemical composition matters more than color for acoustic purposes—but color affects how much paint you’ll need.

Can you Remove Paint Later?

Not effectively. Once paint has dried into fabric, removal attempts cause more damage than the paint itself. Solvents that dissolve paint also damage panel materials.

Removing and replacing the fabric is your only real option after painting. The painted fabric comes off with the paint—you can’t strip just the paint layer.

Consider painting a permanent modification. If tHere is any chance you’ll want to restore original performance later, explore alternatives before committing to paint. The installation process is easier with unpainted panels that remain flexible.

Will Painting Void Warranty?

Almost certainly yes. Manufacturers design panels for specific acoustic performance. Painting modifies the panel in ways that affect acoustic performance, which most warranties explicitly exclude.

If ythe panels are still under warranty and you’re considering painting for cosmetic reasons, contact the manufacturer first. Some offer fabric replacement services or color-matching options that preserve warranty coverage.

Painted panels also won’t be eligible for performance claims. If a manufacturer rates their panels at NRC 0.85, that rating becomes meaningless after painting reduces absorption.

How to Hang Acoustic Panels on Ceiling: Step-by-Step Guide [2026]

How to hang acoustic panels on ceiling surfaces is simple, but only if you mount them for overhead loads. Hardware that feels fine on a wall can fail when gravity pulls straight down.

If your room sounds harsh, smeared, or “phasey,” ceiling reflections are often a major cause. If a panel is not anchored correctly, the problem becomes safety, not just sound.

Do it right and you will get clearer imaging, tighter vocals, and less fatigue when you listen or mix. You will also end up with panels that stay secure for years.

Start by finding joists and deciding whether you are direct mounting or building a suspended cloud with an air gap. Once those two decisions are set, the rest is clean layout and the right fasteners.

Quick Takeaway

Ceiling panels require secure anchoring—either into joists (preferred) or with rated drywall anchors. Direct mounting works for lightweight panels; suspended clouds need eye hooks with aircraft cable.

Can You Hang Acoustic Panels on the Ceiling?

Suspended acoustic cloud panel installation on a ceiling

Yes—and for many rooms, you should. Ceiling treatment addresses reflection points that wall panels miss entirely, particularly the first reflection above your listening position. Below is why that reflection matters and the three mounting methods you can choose from.

Why Ceiling Treatment Matters

Sound bounces off every surface in your room, including the ceiling. In untreated spaces, ceiling reflections arrive at your ears milliseconds after the direct sound, creating comb filtering that muddies your audio perception.

The ceiling first reflection point sits directly above your listening position. When you are mixing music, recording vocals, or even just watching movies, this reflection interferes with what you are trying to hear.

Wall panels alone cannot address it, so you need overhead treatment.

Recording studios prioritize ceiling clouds because the first-reflection improvement in imaging and clarity often exceeds what the same square footage of wall panels delivers.

The full priority order for treating an entire room is in the acoustic panels hub.

Methods Overview

You have three main approaches for ceiling installation, each suited to different situations and panel types.

Direct mounting attaches panels flush to the ceiling using screws, clips, or adhesive. This works best for lightweight panels and provides a clean, integrated look.

The downside is there is no air gap, so low-frequency absorption is reduced.

Suspended clouds hang panels below the ceiling with cables or chains, creating an air gap of 2-6 inches. The gap maximizes absorption because sound passes through the panel twice—once on the way in and again on the bounce back.

Studios prefer this approach for its superior acoustic performance, and the air gap guide explains how gap depth affects absorption at different frequencies.

Adhesive mounting works only for foam panels. The lightweight nature of acoustic foam allows simple glue-up installation, though it is permanent and not suitable for renters.

What Do You Need?

Tools and hardware laid out for ceiling acoustic panel installation

Before you climb the ladder, gather the right tools and hardware. Below are the tools, the mounting hardware for each method, and the safety gear you need when working overhead.

Tools Required

A quality stud finder is non-negotiable for ceiling work. Ceiling panels need solid anchoring, and joists are harder to locate overhead than wall studs.

The companion wall panel installation guide covers that process if you are treating walls at the same time.

You will also need a drill with both drilling and driving capabilities. Pre-drilling pilot holes prevents wood splitting and makes screw insertion much easier when you are working overhead.

A level ensures your panels hang straight. Crooked ceiling panels are obvious from every angle in the room.

A tape measure helps you mark joist locations and plan panel spacing. Pencil marks on the ceiling guide your installation and can be easily wiped away afterward.

Hardware Options

The hardware you need depends on your mounting method and what is behind your ceiling.

For direct mounting into joists, the French Cleat Z-Hangers provide a secure, removable mounting solution. The interlocking design lets you lift panels off for cleaning or repositioning without removing screws.

For suspended clouds, you need eye hooks rated for your panel weight. The Heavy Duty Stainless Steel Eye Hooks screw directly into joists and support the weight of standard acoustic panels without issue.

If you cannot locate joists where you need them, toggle bolts provide an alternative. However, toggle bolts in ceiling drywall have lower weight capacity than joist-mounted hardware, so verify your panel weight before relying on them.

Safety Equipment

Ceiling work means ladder work, and ladder work demands respect. Use a sturdy stepladder rated for your weight plus the weight of your panels.

Never stand on the top two steps.

Safety glasses protect your eyes from drywall dust when drilling overhead—debris falls directly toward your face. A dust mask is wise if you are drilling multiple holes.

If possible, have a helper steady the ladder and hand you panels. Wrestling a 4×2 panel overhead while balancing on a ladder is awkward at best and dangerous at worst.

How Do You Direct Mount Panels to Ceiling?

Direct mount method for ceiling acoustic panels

Because gravity is constantly pulling the hardware straight down, direct mounting requires driving metal fasteners directly through the drywall and deep into the wooden joists behind it.

Finding Joists

The entire structural integrity of your installation relies on mapping those hidden joists correctly. Ceiling joists typically run perpendicular to your roof rafters and are spaced exactly 16 or 24 inches apart. Your electronic stud finder will detect the edges of each wooden beam—you must mark both edges with a pencil to identify the absolute center where your screw needs to land.

By running your stud finder in parallel lines across the ceiling, you can map every joist in the target area before lifting a tool. If your stud finder struggles to read through thick ceiling texture, run a strong magnet across the drywall until it grabs a hidden screw; that screw is guaranteed to be driven into a joist, allowing you to simply measure 16 inches over to find the next one.

Step-by-Step Direct Mount Process

With your structural grid mapped out, you can focus on acoustic placement. For recording or mixing, you must position these panels exactly at the first reflection points directly above your mixing chair. You can find this spot by having someone hold a flat mirror flat against the ceiling while you sit at the desk; wherever you see your studio monitors reflected is the exact square foot where your panel belongs.

Once you outline that panel’s footprint on the ceiling, identify which marked joists cross through that box so you can align your hardware to hit the wood. Attach your Z-clips or French cleats to the back of the acoustic panel first, measuring their width to match the joist spacing on your ceiling map.

The secret to overhead work is never fighting the hardware. Always pre-drill pilot holes into the ceiling joists before attempting to drive the final screws. Have a helper support the heavy fiberglass panel tightly against the ceiling while you drive the screws through the mounting hardware into the pilot holes, checking the level one final time before tightening everything down.

How Do You Hang Cloud Panels (Suspended)?

Cloud Panel Suspension Steps for acoustic panels ceiling installation

Suspended clouds require more preparation than a flush mount, but the massive improvement in low-frequency control makes the extra labor mandatory for serious studios.

What Are Ceiling Clouds?

A ceiling cloud is simply a standard rigid acoustic panel suspended several inches below the ceiling drywall using metal cables or chains. This “floating” configuration creates a deliberate air gap that forces sound waves to pass through the fiberglass twice—once on the way up, and again after bouncing off the hard drywall above it.

That double-pass effect sharply improves the panel’s low-frequency absorption, allowing a standard 2-inch panel to act like a makeshift bass trap. Because the panel is suspended in free space, both the top and bottom faces actively absorb sound, effectively doubling the working surface area of the material. Beyond the acoustic benefits, the floating aesthetic immediately signals that the room is a professionally designed listening space.

How to Suspend Panels

The suspension process requires four solid anchoring points perfectly aligned above the panel corners. After mapping the joists above your reflection point, pre-drill pilot holes and drive four heavy-duty steel eye hooks directly into the wood until the eyelets sit completely flush against the drywall.

Once your ceiling anchors are secure, cut four identical lengths of aircraft cable or black chain, ensuring they are long enough to cover your desired drop distance. Aircraft cable provides a sleek, nearly invisible aesthetic from below, while chain offers a rugged, industrial look that allows for easy height adjustments link-by-link.

Attach the cables to the ceiling hooks using locking carabiners or threaded quick links, then thread the opposite ends through the D-rings mounted on the back of your panel frame. You will absolutely need a helper for this final step, as balancing a heavy panel on a ladder while tightening small cable clamps is nearly impossible for one person.

What Height Should Clouds Hang?

The best drop distance depends entirely on your ceiling height and your low-end problems. A tight 2-to-4 inch air gap provides a solid boost to low-mid absorption while keeping the panel tucked safely out of the way, which is usually the smartest choice for rooms with standard 8-foot ceilings.

If you are fighting serious low-frequency buildup and have the headroom to spare, dropping the cloud 6 to 8 inches creates maximum bass absorption by allowing the waves to hit the panel at the quarter-wavelength mark. In commercial studios with massive 12-foot ceilings, engineers often suspend clouds multiple feet down to bring the absorption closer to the speakers while creating a dramatic architectural canopy over the mix desk.

The panels from UMIACOUSTICS with Hanging Brackets come with the heavy-duty mounting hardware already included, simplifying the entire suspension process.

What About Foam Panels on Ceiling?

Foam adhesive method for mounting ceiling panels

If you are working with lightweight polyurethane foam instead of heavy fiberglass boards, your installation options change entirely because you no longer have to fight massive gravitational loads.

Adhesive Method

The low weight of acoustic foam allows for adhesive-only installation directly to the drywall without hunting for joists. For a temporary setup, spray adhesive specifically designed for foam allows you to quickly coat the back of the tile, wait until it feels tacky to the touch, and press it firmly against the ceiling.

For a permanent studio installation where panels cannot shift over time, heavy construction adhesive or foam-specific VHB mounting tape creates an unbreakable bond. You must clean the ceiling surface thoroughly before applying any permanent glue, as the microscopic dust and oils accumulating on overhead drywall will cause the adhesive to fail within weeks.

If you hate the idea of scraping dried glue off your ceiling when you move, the Surface Mount Impalers offer a clever alternative. These flat metal plates screw into the drywall and feature sharp upward-facing spikes that bite directly into the foam body, holding it securely while still allowing for easy removal.

Why Foam Is Easier

Foam ceiling installation completely eliminates the stressful parts of overhead mounting. You never have to calibrate a stud finder, pre-drill pilot holes while eating drywall dust, or wrestle with heavy hardware while balancing on a ladder. The placement guide maps the ceiling reflection points you should target regardless of mounting method.

The brutal tradeoff for that convenience is raw acoustic performance. Foam inherently provides much less absorption than rigid fiberglass, completely failing to touch the lower-mid frequencies where room boom actually occurs. The NRC rating guide shows exactly how much absorption you sacrifice when you choose foam over fiberglass.

You also have to remember that foam adhesives are notoriously vulnerable to climate changes. A humid summer can easily compromise the glue bond, meaning you must check your overhead foam tiles periodically to ensure they aren’t slowly peeling away from the paint.

What Are Common Mistakes?

Common mistakes when installing acoustic panels on a ceiling

When a ceiling panel falls, it invariably traces back to someone ignoring the fundamental physics of overhead weight. Avoiding these three critical hardware failures guarantees your heavy fiberglass frames stay safely locked to the ceiling.

Wrong Hardware

The most dangerous assumption amateur builders make is assuming that heavy-duty wall hardware works exactly the same on the ceiling. When you mount a frame to a wall, the hardware only has to handle shear force—preventing the panel from sliding down. When you mount that exact same frame to the ceiling, gravity applies constant pullout force, actively trying to rip the anchor straight down out of the gypsum.

Picture hanging wire, D-ring loops, and small finishing nails are catastrophic choices for overhead mounting because they rely on friction against a vertical wall to hold tension. Under a direct overhead load, they simply rip straight out. Even heavy-duty toggle bolts lose nearly 70% of their rated capacity when shifted from a wall to a ceiling.

Weight Issues

You must calculate a massive safety margin into your hardware choices before drilling. A standard 2×4 foot professional fiberglass panel usually weighs between 8 and 12 pounds, while a massive 4×4 cloud can easily exceed 25 pounds once you add the wooden frame and suspension cables.

The golden rule of overhead rigging is to multiply your panel’s total weight by three and buy hardware rated for that maximum number. If your finished acoustic cloud weighs 15 pounds, you must use ceiling hooks and aircraft cable officially rated for at least 45 pounds of static load to account for room vibration and building settling over time.

Missing Joists

Driving a standard wood screw into nothing but 1/2-inch drywall paper guarantees an eventual failure. The gypsum core has absolutely zero structural strength to hold a threaded screw under tension, and the panel will eventually rip a massive, ragged hole through the ceiling when it falls.

If your ideal reflection point places the panel directly between two joists, you cannot just compromise and use drywall anchors. The only safe solution is to build a pair of wooden mounting rails that span across the two joists, screwing the rails firmly into the structural wood, and then suspending your acoustic cloud directly from those heavy-duty rails.

Conclusion

Every ceiling mounting method hinges on one question: are you screwing into a joist or not? If you are, the panel stays up.

If you are not, the weight limit drops fast and the risk of a fallen panel climbs.

Start with the direct mount if your joists line up with your reflection points, and move to a suspended cloud when you need the air gap or when joist placement forces a compromise. The best acoustic ceiling panels guide covers which panels are designed specifically for overhead use.

Larger mounting jobs benefit from the French Cleat Multi-Pack for consistent mounting across all your panels.

Ceiling coverage typically accounts for 20-30% of your total treatment area—use the panel quantity calculator to figure out the exact number for your room size.

Frequently Asked Questions

Is Ceiling Installation Hard?

It is more challenging than wall mounting, but not by much. The main complications are working overhead (which is tiring) and locating joists (which requires patience).

With a helper, most DIYers finish in an afternoon. The actual mounting follows the same principles as wall work: pre-drill, align, secure.

Can Renters Do This?

Suspended clouds work if your lease allows small screw holes. Eye hooks leave four tiny holes per panel that spackle covers in seconds at move-out.

Foam adhesive is riskier—removing it often pulls ceiling paint off with it.

Command strips rated for your panel weight are the only truly damage-free option, but most Command products are not tested for overhead gravity loads. Verify the ceiling rating before trusting them.

How Much Weight Can Ceilings Hold?

Into joists, a single #8 screw holds 80+ pounds—more than any acoustic panel weighs. Practical limits come from the mounting hardware, not the joist.

Into drywall only, expect roughly 15 pounds per toggle bolt in 1/2-inch board and 25 pounds in 5/8-inch board. Heavy panels need joist mounting or they risk falling.

Always use multiple anchors and stay well under the theoretical maximum. The hanging guide covers hardware ratings in more detail.

Do Acoustic Panels Work Both Ways? Quick Answer

Do acoustic panels work both ways? Yes, but the real question is what “both ways” means once sound starts bouncing around your room.

If you’re hanging a ceiling cloud or using panels as dividers, it’s easy to get confused about which face should point at the speakers. That confusion can waste time and money and still leave you with a room that sounds echoey or roomy.

The reason is simple: porous panels work because reflections enter the fibers and lose energy, and reflections come from every direction once sound bounces off walls and ceilings. Once you understand that, you can focus on the moves that actually reduce harsh reverb and slapback.

Start by treating first reflection points, then use clouds or freestanding panels when both faces are exposed to the room. The rest of the answer depends on orientation, backing material, and the gap between absorption and soundproofing.

Quick Takeaway

Acoustic panels absorb sound from both sides, so flipping a standard panel does not change performance. They improve acoustics inside a room (echo and reverb), but they do not block sound between rooms — printed art panels can be an exception if they use a rigid backing.

Do Acoustic Panels Work Both Ways?

Front and back performance of acoustic panels compared

The basic physics of porous material dictate that sound is absorbed regardless of which face the wave hits first. Understanding how that works changes how you approach five common installation scenarios.

How Do Panels Absorb From Both Sides?

Because sound travels as pressure waves through the air, absorption is simply the process of slowing that air down. When waves enter an acoustic panel’s porous core—whether it is fiberglass, mineral wool, or dense polyester—the physical friction of rubbing against the microscopic fibers converts the acoustic energy into tiny amounts of heat.

That friction happens regardless of the wave’s entry point. A wall-mounted panel absorbs reflections coming back off the drywall just as effectively as it absorbs the direct sound hitting its front face.

The panel possesses no “listening side” and no directional bias. If the core material and the outer fabric layers are breathable, the wave enters, slows down, and dissipates from either direction. Airflow is the only metric that matters here: if you can easily breathe through the face fabric, sound waves can easily pass through it too.

Does Orientation Matter?

Because of that omnidirectional absorption, the orientation of a standard fabric-wrapped panel makes absolutely zero difference to the room’s acoustics. You can flip a panel upside down or mount it backward during installation without changing the performance curve at all.

The only variable that actually changes is the visual finish. Manufacturers typically wrap the front and sides tightly while stapling the excess fabric to the back, meaning the front simply looks better.

If you want a baseline example of a lightweight, highly breathable design, a thin multi-pack like this 12×12” multi-pack panel set fits the description perfectly—it is simply thin foam completely open to airflow on both faces.

Does It Matter Which Side Faces the Room?

Lab testing confirms what the physics predict: NRC ratings remain entirely unchanged regardless of which side faces the room. A fiberglass board rated at NRC 0.85 will absorb roughly the exact same amount of mid-range energy whether you are staring at its fabric face or its raw backing.

That consistency exists because the dense core does all the heavy lifting. The decorative fabric and the thin backing scrim are acoustically transparent compared to the heavy insulation trapped between them.

Rather than worrying about which way the panel faces, you must focus entirely on where you place your panels. Treating the first reflection points, hitting the corners, and flying a ceiling cloud will transform your room long before you ever need to worry about front-versus-back orientation. If you are debating between buying one massive panel or scattering multiple smaller ones, the panel count guide explains the math behind those coverage choices.

Do Printed or Art Panels Behave Differently?

The one major exception to this rule involves decorative panels printed with custom artwork. These specialty panels often require a heavy layer of ink or a dense canvas-style wrap to hold the high-resolution image, which partially seals the front face and forces it to reflect high frequencies rather than absorbing them.

Many of these printed products also rely on a rigid backing board to keep the canvas perfectly stiff. If you are mounting a standard art panel flat against a wall, this rigid backing doesn’t matter because it is hidden against the drywall anyway. But if you try to use an art panel as a freestanding room divider, you will quickly discover that the two sides perform very differently.

How Does a Solid Backing Change Absorption?

Any rigid backing immediately ruins the bi-directional nature of an acoustic panel. While a thin felt backing changes nothing, a solid sheet of MDF, rigid plastic, or foil-facing completely seals the rear airflow.

When sound hits that solid backing, it has zero paths into the porous core and simply bounces off the hard surface. The panel might still absorb some residual energy that wraps around the edges, but it will no longer behave as a fully breathable, two-sided absorber.

If you specifically need true two-sided performance for a freestanding studio gobo or an office divider, you must buy panels explicitly designed as baffles. Those specific products guarantee breathable, acoustically transparent coverings on both faces. If you are shopping for thicker, studio-grade fiberglass that remains breathable front-to-back, look for a 2-inch fiberglass panel pack like this.

Do Panels Block Sound in Both Directions?

Sound absorption compared with sound blocking

Most people asking about sound working “in both directions” are actually asking a completely different question: they want to know if hanging panels on a shared wall will block the neighbor’s noise from coming into their room. The answer is a hard no.

Absorption Is Not Blocking

Acoustic panels act as acoustic sponges; they do not act as brick walls. Expecting a porous fiber panel to block sound transmission through a wall leads to immediate disappointment every single time.

Absorption means capturing the reflections and reducing the reverb inside the specific room you are sitting in. When you install acoustic panels on your drywall, you are treating the air space between the four walls of that room, and nothing else.

Sound blocking requires an entirely different set of physics: massive weight, airtight sealing, and physical decoupling. A 2-inch fiberglass panel possesses none of those traits. The panel interacts with sound from both directions inside the room, but it will never isolate that room from the rest of the house.

If you suddenly notice that a room feels “quieter” after hanging panels, it is entirely because the internal reverberation dropped, masking the harshness of the source. The actual transmission of the noise through the drywall didn’t change at all. If your true goal is isolation, the acoustic panels vs soundproofing comparison explains the heavy construction required to actually stop sound.

When Panels Can Still Help With “Privacy” Complaints

While panels absolutely fail at stopping voices from traveling through a wall, they excel at reducing how far those voices carry across a large, open space. Pulling the reverb out of a room makes the space feel instantly calmer, which allows people to hold clear conversations at noticeably lower speaking volumes.

In an open-plan office, dropping the overall speaking volume translates into fewer distracting reflections bouncing across the room, which creates a noticeable improvement in perceived speech privacy. The effect mathematically falls short of true isolation, but the psychological comfort improvement for the workers is impossible to ignore.

Can You Hang Panels Mid-Room?

Cloud panels and divider panels for two-sided absorption

Because these panels work perfectly from either face, their bi-directional absorption delivers the absolute biggest payoff when you expose both sides to the open air. Suspending them from the ceiling or using them as freestanding room dividers exploits this physics trick perfectly.

Cloud Panels on Ceilings

Ceiling clouds are simply standard acoustic panels suspended several inches below the drywall using chains or wire. In this configuration, they actively absorb the direct sound firing up from the studio monitors, while the rear face simultaneously absorbs any lingering reflections bouncing back down from the hard ceiling above.

That intentional air gap forces the sound wave to pass through the fiberglass twice, sharply improving the panel’s low-frequency absorption compared to mounting it flush against the drywall. This two-for-one efficiency is exactly why ceiling panels are universally deployed above mix positions and drum kits in professional studios.

Because both sides of the cloud are working simultaneously, a suspended panel pulls far more acoustic energy out of the room than a wall-mounted panel of the exact same size. If you are flying a cloud over expensive studio gear, the hardware matters far more than the orientation. You must use secure anchors and follow a strict guide like how to hang acoustic panels to guarantee the heavy frame stays flat, level, and safely suspended over your head.

For smaller bedroom studios where a massive 48-inch cloud would overwhelm the ceiling, a compact panel size is far easier to suspend directly over the desk. Sets like these fiberglass wall panels provide the rigid core required for overhead mounting without dominating the visual space of the room.

Divider Panels and Freestanding Absorbers

The exact same bi-directional physics apply to portable gobos, heavy office dividers, and freestanding vocal screens. Because both faces are fully exposed to the room, sound from either side of the barrier gets absorbed immediately, reducing harsh reflections and killing speech spill in both directions simultaneously.

In a dense, open-plan corporate office, deploying these thick dividers between desks violently cuts the crosstalk between adjacent employees. In a recording studio, a heavy gobo acts as a portable wall of absorption, allowing an engineer to control the reflections around a wildly loud drum kit without having to build permanent isolation booths.

To get the most out of a freestanding setup, you must verify that the core breathes. A cheap divider with a sealed plastic back will only absorb sound from one side, acting as a hard reflector to anyone sitting behind it. If your goal is to tame a brutal flutter echo bouncing between two hard walls, placing a fully breathable, bi-directional divider squarely between them breaks the reflection path instantly.

Conclusion

Do acoustic panels work both ways? In almost all normal panel designs, yes—sound absorption is effectively bi-directional.

You can stop worrying about “which side faces out” and focus on placement, coverage, and thickness instead. Those factors determine how much reflection control you actually get.

Use the mirror trick to find reflection points: sit in your listening spot and mark where you can see the speaker in a mirror moved along the wall. Then start with panels there and add a ceiling cloud if the room still feels live.

If you’re trying to block noise between rooms, panels aren’t the right tool. Read soundproofing vs panels to choose fixes that actually improve isolation.

Frequently Asked Questions

Can You Flip Panels Around?

Yes. Flipping a standard panel won’t change absorption because the core is doing the work.

The only difference is appearance: the front is usually more finished than the back. If both sides are wrapped, flip them whenever it looks best.

For DIY panels you have built yourself, both faces are typically identical because you wrapped the fabric. That makes orientation purely a design choice.

Does the Fabric Side Need to Face Out?

Fabric side out is a visual choice, not an acoustic one — acoustic fabric lets sound pass through with minimal reflection. If the back will not be visible (behind furniture or in a utility space), mount whichever way is easier.

How to Cut Acoustic Panels: Every Material Covered [2026]

How to cut acoustic panels cleanly — but the method depends on the material, because the wrong tool leaves frayed edges, compressed cores, or fiberglass fibers airborne.

Most people grab a utility knife and start cutting without checking panel type first. The frustration comes when foam tears instead of cuts, or when fiberglass releases particles without correct PPE.

It happens because each material has a different fiber density and requires a different cutting approach.

The right tool for ythe panel type produces clean straight edges that look professional and don’t compromise the acoustic core.

We’ll cover every panel material with the right tool and technique, so you can cut with confidence below.

Most Amazon acoustic panels (PET felt, polyester fiber) cut easily with a sharp utility knife and metal straightedge. Work on a cutting mat, use fresh blades, and make multiple light passes rather than forcing through.

Measure twice, cut once.

Can you Cut Acoustic Panels?

Tools for cutting acoustic panels

Yes—and it’s easier than you think. The PET felt and polyester fiber panels sold on Amazon are designed to be cut with basic tools.

Why Would you Need to Cut Acoustic Panels?

Standard panel sizes rarely match every wall perfectly. you might need to fit around outlets, light switches, or architectural features. Corner placements often require angled cuts, and odd-shaped rooms demand custom sizing.

Maybe you bought a multi-pack and need smaller pieces for a specific area. Or the panels are slightly too large for the space between your desk and ceiling. Cutting to fit gives you exactly what you need.

The placement matters more than perfect sizing. A slightly smaller panel at the right reflection point outperforms a larger panel in the wrong location.

Which Types Can Be Cut at Home?

Easy to cut (this guide’s focus):
  • PET felt panels (most common on Amazon)
  • Polyester fiber panels
  • Fabric-wrapped polyester panels
  • Acoustic foam panels
Requires more work (see DIY guide):
  • Fiberglass panels with wooden frames
  • Mineral wool panels with frames
  • Any panel requiring frame disassembly

The key difference: ready-made PET panels are solid pieces you can cut directly. DIY-style panels have separate components (frame, insulation, fabric) that need individual handling.

What Tools Do you Need?

Tools needed to cut acoustic panels

With panel types identified, the right tools make the difference between clean cuts and ragged edges.

What About Essential Cutting Tools?

A sharp utility knife handles most PET panel cutting. The DIYSELF Craft Knife Kit comes with 11 replacement blades—essential since blade sharpness determines cut quality.

For heavier panels or extended cutting sessions, the Fiskars Detail Craft Knife offers superior ergonomics with its soft-grip handle.

A metal straightedge is non-negotiable. Plastic rulers flex and produce wavy cuts. A 24-inch or 36-inch aluminum ruler provides the rigidity needed for straight lines.

What About Protecting Your Work Surface?

Never cut panels directly on floors or tables—you’ll damage both the surface and your blade. A self-healing cutting mat protects your workspace and extends blade life.

The ArtAt Self-Healing Cutting Mat at 24×36 inches handles full-size panels. The printed grid lines help with measuring and ensure perpendicular cuts.

For frequent cutting or professional use, the Fiskars Self-Healing Cutting Mat offers premium durability that outlasts budget options.

What About Additional Helpful Items?

  • Pencil or chalk for marking cut lines (easily removed)
  • Measuring tape for precise dimensions
  • Masking tape to hold straightedge in place
  • Vacuum or brush for cleaning fiber debris

How Do you Measure and Mark Acoustic Panels?

Measuring and marking acoustic panels for cutting

With your cutting tools assembled, accurate measurement prevents wasted panels. The old carpenter’s rule applies here: measure twice, cut once.

What About Getting Accurate Measurements?

Measure your target space at multiple points. Walls aren’t always perfectly straight, so check dimensions at top, middle, and bottom. Use the smallest measurement to ensure ythe panel fits.

Account for any gap you want around edges. Most installation methods work best with 1/4 to 1/2 inch clearance from adjacent surfaces.

Transfer measurements to ythe panel using a pencil or tailor’s chalk. Light marks are easier to clean than heavy ones. For dark panels, chalk shows up better than pencil.

What About Marking Straight Lines?

Use your metal straightedge to connect measurement points. Hold the straightedge firmly or tape it in place—any movement during marking creates crooked lines.

For angled cuts, measure the angle carefully or create a paper template first. Fitting the template to your space before cutting the actual panel saves expensive mistakes.

Double-check your marks against the target space before cutting. Walking back and forth between panel and installation spot catches errors while they’re still fixable.

How Do you Cut PET Acoustic Panels?

Cutting PET acoustic panels

With accurate marks in place, the core cutting technique is simple. Sharp blades matter most here—PET felt and polyester fiber panels respond well to sharp blades and patient technique.

What About Step-by-Step Cutting Process?

Position ythe panel on the cutting mat with the marked line accessible. Place your metal straightedge along the cut line, leaving the marked portion on the waste side.

Hold the straightedge firmly with your non-cutting hand. Apply steady downward pressure—the straightedge must not move during cutting.

Using your utility knife, score the panel surface with a light first pass. Don’t try to cut through completely—this initial score creates a guide channel for subsequent passes.

Make additional passes, each slightly deeper than the last. Three to five passes typically cuts through a standard 1-inch PET panel. Let the blade do the work; forcing creates jagged edges.

What About Getting Clean Edges?

Blade sharpness is everything. A dull blade tears fibers instead of slicing them cleanly. Replace blades frequently—they’re cheap compared to ruined panels.

Maintain consistent blade angle throughout each pass. Tilting the blade mid-cut creates beveled edges that don’t sit flush against walls.

Cut from the visible side when possible. Any minor imperfections will be on the back, hidden against the wall after mounting.

For fabric-wrapped panels, score the fabric separately before cutting the core. This prevents the fabric from bunching or pulling during the deeper cuts.

How Do You Cut Acoustic Foam Panels?

Cutting acoustic panels with a straightedge

If you’re working with foam instead of PET felt, the same multiple-pass technique from the PET section works here too—but foam cuts even easier. The soft material yields to sharp blades with minimal resistance.

What About Foam Cutting Technique?

Standard wedge and pyramid foam panels cut cleanly with a sharp utility knife. The same technique applies—multiple light passes rather than forcing through.

For thick foam (3+ inches), an electric carving knife works better than manual cutting. The reciprocating blade slices through without compressing the foam.

Cut from the flat back side, not the textured front. This protects the decorative surface and gives you a stable cutting base.

What About Handling Different Foam Types?

Egg crate foam requires careful blade placement between the peaks. Cut through the valleys for cleanest results.

Dense acoustic foam may need more passes than lightweight options. Panel density directly affects cutting difficulty — denser material requires more patience.

Bass trap foam (the thick corner pieces) benefits from electric knife cutting. Manual cutting through 4+ inches of dense foam exhausts your arm and produces uneven results.

What About Fiberglass or Mineral Wool Panels?

Safely cutting fiberglass acoustic panels

DIY-style panels with wooden frames and mineral fiber insulation require a different approach entirely—the process differs much from cutting solid PET panels.

When to Use the DIY Guide Instead?

Panels with wooden frames can’t simply be cut through. you need to: 1. Remove the fabric wrapping 2. Disassemble or cut the frame 3. Cut the insulation to new size 4. Rebuild the frame 5. Re-wrap with fabric

This is essentially building a new panel. the DIY acoustic panels guide covers this complete process with correct safety equipment for handling fiberglass and mineral wool.

What About Cutting Bare Insulation (Safety Required)?

If you’re cutting raw fiberglass or rockwool for a DIY project, wear correct protection: N95 respirator, safety glasses, long sleeves, and gloves. These materials release irritating fibers during cutting.

The ALLEX Insulation Knife with its 8-inch serrated blade handles fiberglass and rockwool efficiently.

Work outdoors or in well-ventilated areas. Shower and change clothes after handling—fibers that reach bedding cause miserable nights.

How Do you Finish Cut Edges?

Finishing cut edges on acoustic panels

Clean cuts still need finishing. These steps ensure cut edges look professional and don’t unravel over time.

What About PET Panel Edge Finishing?

Most PET panels have clean enough cut edges to leave as-is. The compressed fiber doesn’t fray like woven fabric.

For panels that will be highly visible, a quick pass with fine sandpaper (220 grit) smooths any roughness. Sand in one direction only to avoid creating fuzz.

Dark-colored panels may show lighter cut edges. A matching fabric marker or paint pen disguises the exposed core.

What About Fabric-Wrapped Panel Edges?

If you cut through fabric-wrapped panels, the exposed edge may need treatment. Options include:

Fabric tape in matching color wraps exposed edges quickly. Not as refined as correct fabric wrapping but works for less visible locations.

For important panels, remove the fabric before cutting and re-wrap after. the guide on making acoustic panels covers fabric wrapping technique.

Conclusion

How to cut acoustic panels depends on matching your approach to ythe panel type. For PET and polyester panels from Amazon—the most common type—a sharp utility knife and metal straightedge deliver clean, professional cuts.

The key principles: use fresh blades, make multiple light passes, and protect your work surface with a cutting mat. Measure twice before cutting once, and always cut from the visible side when possible.

For DIY panels with wooden frames and mineral fiber insulation, the process is more involved. See the complete DIY guide for handling those materials safely.

Ready to install your newly-cut panels? the installation guide for mounting options that won’t damage your walls. And if cutting seems like too much hassle, the best acoustic panels guide features options in various sizes that might fit your space without modification.

Frequently Asked Questions

Does Cutting Reduce Acoustic Performance?

Minimally. you’re reducing total absorption area, but the remaining material performs identically per square inch. A 24×48 panel cut to 24×36 loses 25% of absorption capacity but works just as effectively in its coverage area.

For correct room treatment, having correctly-sized panels at reflection points matters more than maximum panel size.

What’s the Minimum Useful Panel Size?

THere is no hard minimum, but very small pieces become impractical. Below about 8×8 inches, panels are difficult to mount and provide minimal acoustic impact individually.

For bass frequencies, size matters more. But standard panels primarily address mid and high frequencies where smaller sizes remain effective.

Can I Cut Acoustic Panels into Custom Shapes?

Yes, with patience. Curved cuts require freehand knife work—go slowly and make many light passes. Create paper templates first to test your shapes.

For complex shapes, score the outline completely before making deeper cuts. The scored line guides subsequent passes and prevents wandering.

Acoustic Panels Vs Soundproofing (Why One Absorbs And The Other Blocks)

Acoustic panels vs soundproofing represents the single biggest misconception in room acoustics. The uncomfortable truth panel sellers won’t tell you: acoustic panels do NOT soundproof a room.

If your neighbor’s bass is shaking your walls or traffic noise is ruining your recordings, acoustic panels won’t fix it. They solve a completely different problem—and understanding that difference will save you hundreds of dollars and months of frustration.

Below you’ll find exactly what each solution does, when you need which one, and why so many people waste money buying panels when they actually need soundproofing (or vice versa).

Once you see how absorption and blocking actually work, you’ll know exactly which one to buy.

Quick Takeaway

Acoustic panels ABSORB sound inside a room (reducing echo and reverb). Soundproofing BLOCKS sound from entering or leaving a room (stopping noise transmission).

They’re completely different solutions for different problems. Panels can’t stop neighbor noise—only soundproofing can.

What’s the Difference Between Acoustic Panels and Soundproofing?

Neighbor noise passing through an apartment wall

The split is absorption versus blocking — physics-level differences, not marketing categories. Yet people confuse them constantly, and the reason says a lot about the industry.

Acoustic panels absorb sound waves that are already inside your room. Soundproofing blocks sound waves from passing through walls, floors, and ceilings.

One works within a space; the other works between spaces.

Why Do People Confuse Them?

Marketing is the main culprit. Search Amazon for “soundproof panels” and you’ll find hundreds of acoustic foam products claiming to “soundproof” your space.

They can’t—it’s physically impossible.

The confusion also stems from the word “sound” appearing in both terms. People assume anything that deals with sound must work the same way.

But absorbing sound energy and blocking sound transmission require completely different approaches.

Manufacturers benefit from this confusion. Foam panels are cheap to produce and easy to ship.

If customers believe they’re getting soundproofing for thirty dollars, companies profit from that misunderstanding.

The real giveaway? Check the product specifications.

Genuine soundproofing materials list STC (Sound Transmission Class) ratings. Acoustic panels list NRC (Noise Reduction Coefficient) ratings.

Different metrics because they measure completely different things.

Which One Do You Actually Need?

Ask yourself one question: where is the problem sound?

If the sound is inside your room—echo during calls, reverb in recordings, flutter between parallel walls—you need acoustic panels. They’ll absorb that excess sound energy and tighten up your room’s acoustics.

If the sound is coming from outside your room—neighbor’s TV, street traffic, your drums bothering the family—you need soundproofing. Panels won’t help because the sound isn’t bouncing around inside; it’s transmitting through your walls.

Many people need both, but they solve different problems. A recording studio might need soundproofing to keep external noise out AND acoustic panels to control the sound inside.

Neither can do the other’s job.

What Are Acoustic Panels?

Decision flowchart for acoustic panels vs soundproofing

Acoustic panels work through a single mechanism: converting sound energy into heat. That mechanism is powerful within its lane — but it has a hard ceiling that catches people off guard.

What Do Acoustic Panels Actually Do?

Acoustic panels convert sound energy into heat through friction. When sound waves enter the porous material—whether fiberglass, mineral wool, or polyester fiber—the air movement creates friction against the fibers.

That friction dissipates the sound energy as tiny amounts of heat.

This process is called absorption. The sound wave enters the panel and doesn’t come back out (or comes back much weaker).

The industry measures panels using NRC ratings—Noise Reduction Coefficient.

An NRC of 0.85 means 85% of the sound energy that hits the panel gets absorbed. The remaining 15% reflects back into the room.

Quality panels achieve NRC ratings between 0.80 and 1.0. The UMIACOUSTICS Fiberglass Panels hit NRC 0.95+ thanks to genuine fiberglass cores—the same material used in professional studio builds.

That friction process explains why thickness matters. Thicker panels absorb lower frequencies because those longer wavelengths need more material to fully dissipate.

A 2-inch panel handles speech frequencies well; you need 4 inches or more for bass.

What Problems Do They Solve?

That absorption process sounds technical, but the real-world payoff is immediate. Acoustic panels excel at controlling sound within a room.

They reduce echo—that audible repetition you hear in empty rooms with hard surfaces.

They tame reverb—the sustained “wash” of sound that makes rooms feel boomy or muddy.

Flutter echo is another target. This happens when sound bounces rapidly between two parallel surfaces, creating a distinctive ringing tone.

Panels on one or both surfaces break up that reflection pattern.

For home offices, panels improve speech clarity on video calls. For music rooms, they let you hear your instrument clearly without room coloration.

For home theaters, they tighten up dialogue and prevent bass from becoming a muddy mess.

The common thread: all these problems involve sound that’s already in the room behaving badly. Panels give you control over that behavior.

What Problems Can’t They Solve?

All those improvements happen inside the room — and that’s exactly where panels hit their ceiling. Acoustic panels cannot stop sound from passing through walls.

Sound transmission is a mass and isolation problem, not an absorption problem.

If you can hear your neighbor’s television, panels won’t help. That sound is transmitting through the shared wall structure—through the drywall, studs, and air gaps.

Putting foam on your side doesn’t block that transmission path.

Similarly, panels won’t contain your sound. If you’re a drummer worried about complaints, panels inside your room will make your drums sound better to you, but they won’t reduce what your neighbors hear.

The sound energy still hits your walls and transmits through.

That gap between physics and marketing is why “soundproof panels” claims are so misleading. People buy foam expecting their apartment to become sound-isolated.

It won’t—and can’t, based on how absorption physics work.

What Is Soundproofing?

Room treated with acoustic panels for sound absorption

Soundproofing operates on completely different physics — mass and isolation instead of absorption. The process is heavier, more invasive, and far more expensive for a reason.

What Does Soundproofing Actually Do?

Soundproofing prevents sound from traveling from one space to another. This requires stopping the sound wave’s energy from passing through the barrier between spaces—your walls, floor, ceiling, doors, and windows.

Sound transmission happens through two mechanisms: airborne and structure-borne. Airborne sound travels through the air and passes through gaps and thin materials.

Structure-borne sound travels through solid connections—vibrations that move through studs, joists, and concrete.

Effective soundproofing addresses both. It adds mass to block airborne sound, decouples structures to interrupt vibration paths, and seals gaps where sound can leak through.

The key measurement is STC—Sound Transmission Class. An STC rating of 50 means most speech is inaudible through the wall.

Construction-grade soundproofing aims for STC 50-60 or higher.

How Is Soundproofing Different from Sound Absorption?

That heavy-duty approach is the opposite of what panels do. Absorption lets sound in and converts it to heat.

Soundproofing does the opposite — it reflects or blocks sound from entering at all.

Think of it this way: a sponge absorbs water that lands on it. A plastic sheet blocks water from passing through.

Both deal with water, but through completely different mechanisms.

Absorption converts sound energy to heat inside the material. Blocking reflects or stops sound energy at the surface.

The sound wave either bounces back toward the source or gets stopped by mass it can’t move.

This is why you can’t substitute one for the other. Covering your wall with the best acoustic panels in the world won’t add the mass needed to block sound transmission.

The physics just don’t work that way.

Why Is Soundproofing More Expensive?

All that mass and decoupling comes at a price. Effective soundproofing requires construction-level intervention.

You’re adding mass, building isolated structures, and sealing every possible leak path.

This isn’t a weekend project with stick-on products.

Products like Soundsulate Mass Loaded Vinyl cost far more than acoustic panels per square foot. But MLV is just one component—you also need resilient channels, multiple drywall layers, acoustic caulk, and specialized door and window treatments.

Labor costs compound the material costs. Full soundproofing often means removing existing drywall, building new wall assemblies, and reinstalling everything.

Even “simpler” solutions like adding a second drywall layer require skilled installation.

For context: treating a room with acoustic panels might run a few hundred dollars. Soundproofing that same room properly can cost thousands to tens of thousands depending on the approach and existing construction.

What Is the Science Behind Absorption vs Blocking?

Comparison of sound absorption and sound blocking

Absorption and blocking rely on opposite material properties — porous versus dense, lightweight versus heavy. The physics behind each explains why swapping one for the other never works.

How Does Sound Absorption Work?

Sound waves are pressure variations traveling through air. When these waves encounter a porous material, the air molecules carrying the wave enter the material’s structure.

Inside the porous matrix—fiberglass fibers, mineral wool strands, or polyester batting—the air movement creates friction. That friction converts kinetic energy (sound) into thermal energy (heat).

The amount is tiny, but it’s enough to measurably reduce the reflected sound.

The absorption coefficient depends on material density, thickness, and mounting. A denser material creates more friction.

A thicker material allows lower frequencies (longer wavelengths) to fully enter and dissipate.

Air gaps behind panels actually improve low-frequency absorption. The gap allows the panel to move slightly, increasing the velocity of air entering the material.

That placement factor is why good positioning matters as much as panel quality.

How Does Sound Blocking Work?

Blocking takes the opposite approach — instead of letting sound in, it keeps sound out. Heavy materials are harder for sound waves to vibrate, so they transmit less energy through to the other side.

The Mass Law states that doubling the mass of a wall increases its STC by about 6 points. This is why adding layers of drywall helps—you’re adding mass that the sound must move to transmit through.

Damping compounds take that mass strategy further. Green Glue Noiseproofing Compound sandwiched between two drywall layers converts vibration into heat, boosting the wall’s STC beyond what extra mass alone achieves.

Decoupling adds another layer of effectiveness. When you break the physical connection between wall surfaces—using resilient channels, staggered studs, or completely separate wall structures—you interrupt the vibration path.

Sound can’t easily travel through something it’s not connected to.

Sealing prevents flanking paths. Sound finds the path of least resistance.

A wall with STC 60 is worthless if sound can leak around the edges or through electrical outlets. Complete soundproofing means closing every possible leak.

Can One Do the Other’s Job?

Given how differently absorption and blocking work at the material level, the answer is predictable. No — the physics are fundamentally incompatible for cross-purpose use.

Absorptive materials are light and porous by design. They need to let sound in to absorb it.

But “letting sound in” is exactly what you don’t want for blocking. Light materials vibrate easily and transmit sound readily.

Heavy blocking materials reflect sound instead of absorbing it. A concrete wall blocks sound transmission effectively but creates terrible room acoustics—sound bounces off it without absorption, creating harsh echoes and reverb.

Some materials provide minor amounts of both. Rockwool ComfortBoard 80 inside a wall cavity improves both the wall’s STC rating and reduces cavity resonance.

But it’s not substituting for either—it’s a complementary component in a larger system.

When to Use Acoustic Panels

Diagram showing acoustic panels absorbing reflections

Acoustic panels are the right tool when the problem sound is already inside your room. The trick is knowing where they shine — and recognizing the situations where they’re a waste of money.

Where Do Acoustic Panels Make the Biggest Difference?

Recording studios need acoustic panels to control room sound. Without treatment, reflections from walls color your recordings—microphones pick up both the direct sound and delayed reflections.

Panels at first reflection points eliminate this coloration. The Olanglab Fiberglass Panels work well at these key positions.

Home offices benefit from panels for video calls. Echo and reverb make you sound unprofessional and can trigger audio issues in conferencing software.

Even a few panels noticeably improve speech clarity.

Home theaters use panels to improve dialogue intelligibility and tighten bass response. Without treatment, sound bounces create comb filtering effects that muddy the audio.

Panels on side walls and rear walls clean up the sound field.

Podcast studios, streaming setups, and gaming rooms all share similar needs. Any space where you’re producing or consuming audio benefits from controlled acoustics.

When Are Panels the Wrong Solution?

Panels fail when the problem is noise transmission. If you’re trying to stop sound from leaving your room or entering from outside, panels are the wrong tool.

They’re also wrong for bass-heavy problems below about 100Hz. Standard 2-inch panels barely touch frequencies that low—the wavelengths are simply too long.

You’d need bass traps or very thick broadband absorbers.

Panels can’t fix fundamental room shape problems either. A room with severe flutter echo between parallel walls needs treatment, but if the room dimensions create standing wave problems, panels alone won’t solve it.

You might need diffusion or room layout changes.

Finally, panels won’t help if you simply need less volume. If your home theater is too loud, turning it down is free.

Panels control sound quality, not quantity.

When Should You Use Soundproofing?

Diagram showing soundproofing blocking noise transfer

Soundproofing becomes necessary when sound needs to stay in or stay out — a fundamentally different problem than echo control. The investment is steep, so knowing when it’s justified matters.

Where Does Soundproofing Make the Biggest Difference?

Apartment dwellers dealing with neighbor noise need soundproofing. Whether it’s footsteps from above, voices through walls, or bass from next door, the sound is transmitting through building structure.

Only soundproofing addresses this.

Drummers, bands, and loud musicians need soundproofing to contain their volume. Acoustic panels will improve how your playing sounds to you, but they won’t stop the sound from reaching your neighbors.

True isolation requires soundproofed walls.

Home theater enthusiasts who want cinema-level volume without disturbing the household need soundproofing. You can’t push 105dB action sequences if that sound transmits throughout your house.

Any situation where sound needs to stay in or stay out requires soundproofing, not just acoustic treatment.

When Is Soundproofing Overkill?

If your problem is echo or reverb inside your room, soundproofing wastes money. You don’t need to block sound from leaving; you need to control how it behaves while it’s there.

Panels solve that far more affordably.

For modest noise reduction—like reducing audibility by 30-40%—partial solutions may work. Adding mass-loaded vinyl to one wall won’t soundproof a room, but it might take the edge off.

Full soundproofing is only worth it when you need serious isolation.

Soundproofing is also overkill if you rent and can’t modify the structure. You’d be spending thousands on improvements you’ll leave behind.

In rental situations, focus on panels for acoustic improvement and accept that complete sound isolation isn’t practical.

How Do Acoustic Panels and Soundproofing Compare Side by Side?

Soundproofed wall construction with added mass and damping

This table summarizes the core differences at a glance:

Factor Acoustic Panels Soundproofing
Primary Function Absorb sound inside room Block sound between rooms
Solves Echo, reverb, flutter Noise transmission
Doesn’t Solve Neighbor noise, containment Room acoustics, echo
Key Metric NRC (0.0-1.0) STC (25-65+)
Typical Cost Budget to moderate Major investment
Installation DIY-friendly Usually requires contractors
Renter-Friendly Yes (removable) No (permanent modification)
Materials Fiberglass, mineral wool, foam MLV, drywall, clips, caulk

The cost difference deserves emphasis. Quality acoustic panels might total a few hundred dollars for a room.

Soundproofing that room properly often costs ten to twenty times more—and requires construction work you may not be able to do yourself.

Can Acoustic Panels Stop Noise from Neighbors?

Neighbor noise passing through an apartment wall

This is the most expensive misunderstanding in home acoustics — and foam sellers profit from it every day.

Why This Myth Is So Common?

Product marketing created this myth. Search “soundproof foam panels” on any shopping site and you’ll find thousands of results.

The products exist; the claims don’t hold up.

The visual similarity doesn’t help. Both acoustic panels and legitimate soundproofing materials mount on walls.

If you don’t understand the physics, they look like they should do the same thing.

Early results also mislead people. When you add panels to a room, it sounds different—less echoey, more controlled.

People assume that perceived improvement means sound isn’t escaping. But the room sounding better to you doesn’t mean the neighbors hear less.

Confirmation bias seals the deal. Once someone installs panels believing they’ll reduce noise complaints, they might play music slightly quieter (subconsciously), or their neighbors might complain less for unrelated reasons.

The panels get credit they don’t deserve.

What Actually Blocks External Noise?

None of those marketing tricks change the physics. Mass is the primary solution.

Heavy materials—multiple layers of drywall, mass loaded vinyl, concrete—resist the vibration that sound transmission requires.

The more mass, the more sound gets blocked.

Decoupling prevents sound from traveling through structural connections. Resilient channels, isolation clips, and staggered stud walls all break the vibration path.

Sound can’t easily cross a gap.

Sealing closes the remaining paths. Acoustic caulk around edges, solid-core doors with tight seals, and window treatments all address flanking paths where sound sneaks around your soundproofed wall.

None of these involve absorption. The goal is blocking sound from moving through, not absorbing sound that’s already arrived.

Completely different physics, completely different materials.

Can You Use Both Together?

Decision flowchart for acoustic panels vs soundproofing

Panels and soundproofing solve different problems, but many spaces genuinely need both working together. The key is knowing which one to tackle first — because getting the order wrong wastes time and money.

When Does It Make Sense to Combine?

Professional recording studios combine both because they need complete control. Soundproofing isolates the studio from external noise and keeps loud sessions from bothering neighbors.

Acoustic panels then control the sound inside the isolated space.

Home studios face similar needs at smaller scale. If you’re recording vocals and can hear traffic outside, you need some soundproofing.

But you also need panels to prevent room reflections from coloring your recordings.

Drum rooms and band rehearsal spaces represent extreme cases. The volume levels demand serious soundproofing for containment.

But playing drums in an untreated concrete bunker sounds terrible—you need acoustic treatment to make the space usable.

Even rooms with both echo and bass issues benefit from combined treatment. Soundproofing can reduce noise from adjacent rooms or outside.

Panels can improve speech clarity for video calls or create a more peaceful acoustic environment.

Which Should You Do First?

Once you’ve decided to combine both, the order matters more than most people expect. Soundproofing must come first. You can’t add soundproofing materials behind panels that are already installed without removing them first.

More practically: soundproofing is construction work. Panels are finishing touches.

You build the structure, then you treat the room. Doing it backward wastes time and money.

If budget is limited, decide which problem matters more. External noise bothering you?

Invest in soundproofing first; you can add panels later. Room acoustics the main issue?

Start with panels and accept that some external noise will persist.

For most home users, panels alone provide real value. Thoughtful panel placement transforms room acoustics affordably.

Full soundproofing is worth the investment only when noise transmission is genuinely problematic.

Which Solution Do You Need?

Room treated with acoustic panels for sound absorption

The answer depends entirely on your problem. Use this decision framework:

Choose acoustic panels if your room has echo, reverb, or flutter — if video calls sound boomy, recordings pick up room coloration, or you want better sound quality inside the room.

Choose soundproofing if neighbor noise bothers you, you need to contain loud sound, external traffic is audible, or sound leaking out causes problems.

Choose both if you need isolation AND good room sound, you’re building a serious studio, or your budget allows complete treatment.

Most people need panels, not soundproofing. The echo and reverb problems that panels solve are far more common than genuine noise transmission issues.

And panels cost a fraction of what soundproofing requires.

The acoustic panels guide has specific product picks for every budget. The NRC rating guide and panel quantity calculator help dial in the details.

Conclusion

The single test that matters: clap your hands in the room. If you hear ringing, flutter, or a long tail of reverb, acoustic panels fix that. If you hear your neighbor’s TV through the wall, no amount of panels will help — that’s a soundproofing problem.

Most people searching “acoustic panels vs soundproofing” actually need panels. Noise transmission complaints are rarer than echo problems, and panels cost a fraction of what construction-level soundproofing demands.

The expensive mistake is buying foam panels expecting them to block noise. Check the product specs: NRC rating means absorption, STC rating means blocking.

If the listing only shows NRC, it only absorbs — no matter what the marketing copy claims.

Start with the clap test, match the rating to the problem, and skip the products that promise both.

Frequently Asked Questions

Do Foam Panels Block Sound?

No. Foam panels—the pyramid and wedge shapes sold everywhere—are acoustic absorbers with modest NRC ratings.

They absorb some high-frequency sound inside your room but have zero effect on sound transmission. The foam material is too light to block anything.

Don’t confuse foam panels with soundproofing just because they’re often mislabeled. Check for NRC ratings (absorption) versus STC ratings (blocking).

Foam only has NRC ratings because blocking isn’t what it does.

Which Is Cheaper: Panels or Soundproofing?

Acoustic panels cost far less. Budget options like the 18-Pack Acoustic Panels start under fifty dollars; quality fiberglass panels range from moderate to premium depending on size and material.

Treating a room typically costs a few hundred dollars total.

Soundproofing costs far more because it requires construction materials and often professional labor. A single wall treatment with MLV, resilient channels, and additional drywall can easily exceed what you’d spend treating an entire room with panels.

Do Home Studios Need Both?

It depends on your situation. If you’re recording in a quiet house with no external noise issues, panels alone may suffice.

Many successful home recordings happen in panel-treated rooms without soundproofing.

If external noise intrudes on recordings or you need to play loud without disturbing others, you need both. The soundproofing handles isolation; the panels handle room sound.

Neither substitutes for the other.

The breakdown of how acoustic panels work covers the physics in more detail.

Best Acoustic Panel Material — Fiberglass, Rockwool, PET & Foam Compared [2025]

Best acoustic panel material comes down to four main options: fiberglass, rockwool, PET polyester felt, and foam. Each has distinct strengths that make it ideal for different situations, but the weaknesses matter more than manufacturers admit.

Fancy fabric, beautiful frames, and clever mounting systems won’t fix a room if the stuff inside doesn’t absorb sound. The core material carries the weight—everything else is cosmetic.

Start with the core material—that’s where your money matters most—and you’ll know which option fits your room before you spend a dime.

Quick Takeaway

Best acoustic panel material depends on your priorities. Fiberglass delivers the highest NRC ratings (0.9–1.0), rockwool offers fire resistance plus strong absorption, PET felt is safest for DIY, and foam works for tight budgets. For most rooms, fiberglass or rockwool wrapped in breathable fabric gives you the best results.

What Makes Acoustic Panel Material Effective?

Cross-section diagram showing sound wave interaction with different acoustic panel materials

Sound absorption happens when sound waves enter a porous material and lose energy through friction. The material’s density, thickness, and fiber structure determine how much sound gets absorbed versus how much bounces back.

Core Material vs Fabric Cover

The core material handles absorption. Fiberglass, rockwool, PET felt, and foam are the four main options you’ll encounter in commercial panels and DIY builds.

The fabric cover serves two purposes: protecting the core and providing aesthetic options. Acoustically transparent fabric lets sound pass through to reach the absorptive core.

If your fabric is too thick or dense, you’ll reflect sound before it reaches the core—defeating the purpose entirely.

For home studios and professional spaces, the core material matters far more than the fabric choice. Budget your money toward better cores, not fancier fabric.

Understanding NRC Ratings

That core vs. fabric gap shows up clearly in NRC ratings. NRC—Noise Reduction Coefficient—measures absorption on a scale from 0 to 1.0.

Think of it as a percentage: an NRC of 0.85 means 85% of sound energy gets absorbed.

This number separates marketing from reality. Cheap foam scores 0.30-0.50, meaning most sound bounces right off.

Quality fiberglass panels hit 0.95 or higher—the difference between “barely works” and “problem solved.”

When shopping, ignore products that don’t list NRC ratings. If manufacturers won’t tell you, assume performance is poor.

Why Is Fiberglass the Top Acoustic Panel Material?

Fiberglass Panel Core for best acoustic panel material

Fiberglass has dominated professional acoustic treatment for decades, and the NRC numbers explain why. It absorbs more sound per inch than any competing material—but you’ll need gloves to handle it.

Why Fiberglass Dominates

Fiberglass acoustic panels achieve NRC ratings between 0.90 and 1.05. That’s not a typo—NRC can exceed 1.0 due to edge diffraction effects, and fiberglass regularly hits these numbers.

The material’s fine glass fibers create millions of tiny air pockets. Sound waves entering these pockets lose energy through friction as they travel between fibers.

Thicker panels with denser fiberglass absorb lower frequencies more effectively.

Performance by Thickness

At 2 inches thick, fiberglass panels effectively absorb frequencies from about 500Hz upward. This covers most speech clarity issues, flutter echo, and high-frequency reverb problems that plague untreated rooms.

Jump to 4 inches and you’ll absorb down to roughly 250Hz—handling male vocals, guitar, and much of the problematic mid-bass range. The UMIACOUSTICS Fiberglass Panels hit that 2-inch sweet spot at a mid-range price.

For bass frequencies below 250Hz, you need dedicated bass traps—no wall panel, regardless of material, absorbs those long wavelengths well. The home theater guide digs into bass management for larger rooms.

Safety Considerations

All that absorption performance comes with a handling trade-off. Raw fiberglass irritates skin, eyes, and lungs.

The tiny glass fibers cause itching and discomfort on contact.

Once wrapped in breathable fabric, these concerns disappear—the fibers stay contained while sound passes through.

DIYers should wear gloves, long sleeves, safety glasses, and an N95 respirator when cutting fiberglass. Once wrapped and mounted, it’s completely safe—the fabric creates a permanent barrier.

Is Rockwool a Good Material for Acoustic Panels?

Rockwool Mineral Wool for best acoustic panel material

Rockwool matches fiberglass on absorption and adds genuine fire resistance—a combination that makes it the default for commercial installations. It costs slightly more, handles a bit easier, and won’t burn.

How Rockwool Compares

Rockwool—also called mineral wool or stone wool—achieves NRC ratings between 0.85 and 0.95. Slightly lower than fiberglass, but the difference is marginal in real-world applications.

The material is made from basite and slag spun into fibers. These fibers create the same porous structure that makes fiberglass effective, with one key advantage: rockwool is naturally fire resistant and won’t burn.

When to Choose Rockwool

Commercial installations often specify rockwool for fire code compliance. If your space requires fire-rated materials, rockwool meets those standards without sacrificing much acoustic performance.

Home studios in basements, near kitchens, or in older buildings benefit from rockwool’s fire resistance. The peace of mind matters even when not code-required.

For music rooms where you’ll spend hours recording, that safety margin adds real value.

DIY Friendliness

Rockwool cuts more easily than fiberglass and produces less airborne fiber dust. You still need protective gear, but the experience is somewhat more forgiving for first-time builders.

The material is slightly denser than fiberglass at similar thicknesses. This density provides a small edge on low-frequency absorption but makes panels heavier.

For wall-mounted panels, the weight difference rarely matters.

What Makes PET Felt the Safest DIY Option?

Pet Felt Panels for best acoustic panel material

PET felt removes the biggest barrier to DIY acoustic treatment: protective gear. It trades some absorption ceiling for a material you can handle bare-handed.

What Makes PET Different

PET—polyethylene terephthalate—is made from recycled plastic bottles spun into felt-like sheets. No glass fibers, no mineral particles, nothing that irritates skin or lungs.

NRC ratings for PET panels fall between 0.75 and 0.85—lower than fiberglass or rockwool, but enough to kill echo in most home rooms.

The DIY Advantage

That lack of irritants changes the entire installation experience. You can cut, handle, and install PET panels without any protective equipment.

No gloves needed, no respirator required—just measure, cut, and mount.

That accessibility matters more than it sounds. Fiberglass projects stall because people don’t want to suit up on a Saturday afternoon.

PET skips that friction and still delivers NRC 0.75–0.85—enough for most home echo problems.

Ideal Applications

With that ease of installation in mind, PET panels excel in home offices where you want echo reduction without the hassle of traditional acoustic materials. They’re also popular for bedrooms and living spaces where aesthetics and safety matter more than maximum absorption.

For dedicated studios chasing peak absorption, fiberglass or rockwool still wins. But for casual acoustic improvement in everyday spaces, PET offers the right balance of performance and convenience.

Streaming setups often use PET for this reason.

Decorative PET Art Panels

PET panels now come with printed artwork designs, combining acoustic function with visual appeal. These art panels use the same recycled polyester core but add decorative fabric prints on the surface.

The TONOR Dual-Layer Art Panels feature printed designs that look like actual wall art. Guests see a landscape print—you know there’s a dual-layer polyester core absorbing echo behind it.

Should You Use Wood Wool for Acoustic Panels?

Wood Wool Panels for best acoustic panel material

Wood wool panels—also called cement-bonded wood fiber—offer a natural aesthetic that synthetic materials can’t match. They look great exposed on a wall, but they’re heavy, expensive, and harder to install.

What Wood Wool Provides

These panels combine wood fibers with cement binder, creating an open-pored structure that absorbs sound. NRC ratings typically fall between 0.70 and 0.90 depending on thickness and mounting method.

The natural wood texture appeals to architects and designers seeking organic aesthetics. You’ll find wood wool in restaurants, lobbies, and modern offices where exposed acoustic treatment is part of the design language.

Limitations

That visual appeal comes at a cost. Wood wool panels are heavier than fiberglass or PET.

Installation requires sturdy mounting hardware—you can’t just stick them to walls.

They also cost far more than synthetic alternatives with similar NRC ratings.

For most home studios and DIY projects, fiberglass or rockwool delivers better performance per dollar. But if natural aesthetics matter and budget allows, wood wool creates a distinctive look that synthetic panels simply can’t replicate.

Does Foam Work as Acoustic Panel Material?

Foam Comparison for best acoustic panel material

Foam panels dominate Amazon search results because they’re cheap—and cheap is all they deliver.

What Foam Actually Does

Open-cell polyurethane foam—the pyramid and wedge shapes you see everywhere—absorbs sound in a limited frequency range. NRC ratings typically fall between 0.30 and 0.60.

That’s 30-60% absorption compared to fiberglass’s 90%+. Foam works for high frequencies (cymbals, sibilance, some flutter echo) but does almost nothing for mid and low frequencies.

When Foam Makes Sense

Given those NRC numbers, foam’s use cases are narrow. For extremely tight budgets in casual spaces, it provides some improvement over bare walls.

A bedroom podcast setup where you just need slightly less echo might be satisfied with foam.

Budget wedge foam like the 52 Pack Acoustic Foam Panels covers a lot of wall cheaply—but NRC stays around 0.35, so most of the sound still bounces back.

The Marketing Problem

Even in those narrow use cases, the way foam gets sold creates confusion. Manufacturers market their products as “soundproofing” or “studio treatment.”

Neither claim holds up to scrutiny.

Even casual gaming setups benefit from real panels over foam. Foam doesn’t soundproof anything—it provides limited absorption.

Professional studios use fiberglass or rockwool, not foam.

If your goal is genuine acoustic improvement, foam should be your last choice. If your goal is covering a wall cheaply, foam works fine—just don’t expect real results.

Which Is Better: Fiberglass or Rockwool?

Fiberglass Vs Rockwool for best acoustic panel material

These two materials dominate professional acoustic treatment—and the differences between them are smaller than most people expect. Here’s the head-to-head breakdown.

Performance Comparison

Property Fiberglass Rockwool
NRC (2”) 0.90-1.05 0.85-0.95
NRC (4”) 1.00-1.10 0.95-1.05
Low-Freq Good Slightly Better
High-Freq Excellent Excellent

Fiberglass wins on pure absorption numbers. Rockwool’s slightly higher density gives it a marginal edge on low frequencies, but the difference is subtle in most rooms.

Safety Comparison

Performance is nearly identical, so the decision often comes down to handling. Both materials require protective gear during cutting and handling.

Both are completely safe once wrapped in fabric and mounted.

Rockwool wins on fire resistance—it won’t burn and is often used as fire blocking material in construction. Fiberglass resists fire too, but not to the same degree.

Cost Comparison

With safety roughly equal too, price becomes the tiebreaker. Fiberglass typically costs slightly less than rockwool for equivalent performance.

Both cost much more than foam but deliver 2–3x the absorption.

The UMIACOUSTICS Panels with Brackets include mounting hardware, which offsets some of the material cost difference.

What Is the Best Fabric for Acoustic Panels?

Acoustic Fabric for best acoustic panel material

The core material handles absorption, but fabric determines whether sound actually reaches that core—and how the panel looks on your wall. Pick the wrong fabric and your fiberglass panel performs like foam.

Acoustically Transparent Fabrics

“Acoustically transparent” means sound passes through easily. You can test this by holding fabric against your mouth and breathing through it—if air flows easily, sound will too.

Guilford of Maine is the industry standard for professional panels. Their fabrics are engineered for acoustic applications, with published transparency ratings.

The acoustic panels fabric guide digs deeper into transparency ratings, budget picks, and exactly how the breath test works.

Budget Fabric Options

Guilford sets the benchmark, but you don’t have to pay benchmark prices. Burlap and speaker grill cloth work well for DIY panels at a fraction of the cost.

Polyester blends and loosely woven cotton can work if they pass the breath test.

Avoid fabrics with plastic backing, heavy canvas, or tight weaves. These reflect sound before it reaches the core—making your expensive fiberglass perform like cheap foam.

The fabric color and pattern are purely aesthetic—dark fabrics, light fabrics, patterns all work identically as long as the weave is open enough. For ceiling panels, fabric choice often matters more visually since you see them from below.

What Are the Best Materials for DIY Acoustic Panels?

Diy Materials for best acoustic panel material

Material choice matters even more for DIY builds, where you’re handling raw materials directly. Some cores are plug-and-play; others need a respirator and a ventilated garage.

Easiest to Work With

PET felt wins for beginners—no protective equipment, no irritation, simple cutting with scissors or utility knife. Many PET panels now feature self-adhesive backing that eliminates the need for mounting hardware entirely.

Rockwool ranks second—easier to cut than fiberglass, less dust, but still requires protective gear.

Fiberglass provides the best performance but demands careful handling. Worth it for dedicated studios, overkill for casual treatment.

Where to Buy Materials

Once you’ve picked your material, sourcing is simple. Owens Corning 703 and Rockwool SafeNSound are available at building supply stores.

Both work excellently for DIY panels when wrapped in breathable fabric.

Avoid generic “soundproofing insulation” that doesn’t specify density. True acoustic insulation has specific density ratings (usually 3-6 lb/ft³) that generic products often lack.

If you’d rather skip raw materials entirely, the best acoustic panels guide ranks ready-to-hang options by room type and budget.

How Do All Acoustic Panel Materials Compare?

Comparison Chart for best acoustic panel material

This table puts every material side by side:

Material NRC Rating DIY Difficulty Safety Cost Best For
Fiberglass 0.90-1.05 Medium Needs PPE Mid Studios, max performance
Rockwool 0.85-0.95 Medium Needs PPE Mid Fire safety, studios
Wood Wool 0.70-0.90 Hard Safe High Natural aesthetics
PET Felt 0.75-0.85 Easy No PPE needed High DIY, offices, bedrooms
Foam 0.30-0.60 Very Easy Safe Low Tight budgets only

Fiberglass and rockwool sit within ~0.10 NRC of each other. PET felt trails by another ~0.15—a real gap, but one most home rooms won’t notice.

Foam trails everyone by 0.40–0.50 NRC, and that gap you will notice.

The Bottom Line

Best acoustic panel material for raw performance is fiberglass, achieving NRC ratings above 0.90 that studios rely on. Rockwool comes close with added fire resistance.

PET felt trades some absorption for far easier handling. Foam works only when budget constraints leave no alternative.

Choose Fiberglass If

You want maximum absorption and don’t mind wearing protective gear during installation. Recording studios, home theaters, and critical listening rooms benefit most from fiberglass’s superior NRC ratings.

A 2-inch fiberglass panel absorbs roughly twice what a 2-inch foam panel does at the same wall position. That gap compounds across a whole room.

Choose Rockwool If

Fire safety matters for your space or local codes require fire-rated materials. The slight performance trade-off versus fiberglass is negligible in most applications.

Commercial installations and basement studios often choose rockwool for peace of mind. The material’s density also provides marginally better low-frequency absorption if that’s a concern.

Choose PET Felt If

Convenience trumps maximum performance. Home offices, bedrooms, and living spaces where you want acoustic improvement without the hassle of working with fiberglass benefit from PET’s safety and ease.

The NRC trade-off—0.75-0.85 versus 0.90-1.00—matters less in casual spaces. Most home office echo problems disappear at PET’s performance level.

Avoid Foam Unless

Your budget cannot stretch to better materials. Foam provides some absorption, but the gap versus real panels is enormous.

The money saved rarely justifies the performance lost.

If you start with foam planning to upgrade later, you’ll spend more total than buying the right materials once. The adhesive residue alone makes swapping panels a headache.

Pick the best core you can handle—fiberglass if you don’t mind PPE, PET if you want zero hassle—and wrap it in breathable fabric. Everything else is secondary.

For product recommendations sorted by room type, the acoustic panels hub has buying guides for every budget.

Frequently Asked Questions

What’s the safest acoustic panel material?

PET polyester felt requires no protective equipment to handle, cut, or install. Fiberglass and rockwool are completely safe once wrapped and mounted, but require gloves, long sleeves, safety glasses, and respirators during installation.

Does thickness matter more than material?

Both matter. A 4-inch foam panel still performs worse than a 2-inch fiberglass panel because the material’s NRC efficiency outweighs raw thickness.

Within the same material, thicker panels absorb lower frequencies better.

Can I mix different materials in one room?

Yes. Many studios use fiberglass panels on walls with rockwool bass traps in corners.

PET panels in living areas and fiberglass in a connected studio work fine together.

Each material absorbs sound regardless of what’s nearby.

How do I know if my fabric is acoustically transparent?

Hold it against your mouth and exhale. If air flows through easily, sound will too.

If you feel resistance or if the fabric puffs out, it’s too dense. Guilford of Maine fabrics always pass this test.

Is recycled material less effective?

No. PET panels made from recycled plastic bottles perform identically to virgin materials.

The recycling process doesn’t change acoustic properties.

Some rockwool contains recycled industrial slag with no performance penalty either.

What’s the minimum NRC I should accept?

Target NRC 0.70 or higher for meaningful treatment. Below that, you’re getting more decoration than function.

Most problems that motivate acoustic treatment need NRC 0.80+ to solve.

Best Acoustic Art Panels (That Actually Help Echo) [2026]

The best acoustic art panels don’t just decorate a room—they reduce the “hard, empty” reflections that make voices and music feel sharp, but only if they’re built like real acoustic panels.

The catch is that a lot of “acoustic wall art” listings are just canvas prints with marketing copy.

This guide shows you which panels are real treatment, which ones are mostly decor, and how to pick the right amount for your room.

Start with the Top Picks if you want a fast buy, then use the buying checklist to avoid the common (expensive) mistakes.

Quick Takeaway

Acoustic art panels work when they’re built like real acoustic panels (absorptive core + acoustically transparent print). If the listing can’t tell you what’s inside the panel, assume it’s wall art—not treatment.

Best Acoustic Art Panels (Top Picks)

Overview of decorative acoustic art panel options

These picks are all “art first” panels that still behave like acoustic treatment. The differences come down to review volume, design options, and how confidently you can buy without returns.

Best Overall: A full-wall 8-pack that actually changes the room

If you want the fastest, most obvious improvement, go for coverage—not a single “statement panel.” The 8-Pack Scenic Art Panels is the simplest way to get there.

It’s also the least “fussy” option because you’re not trying to make one panel do all the work. When you cover a real chunk of wall area, echo drops in a way you can hear immediately.

This is the pick for big, reflective living rooms with hard floors and bare walls. Hang them where your voice or speakers first hit a wall, and you’ll hear less “splash” right away.

Best Rating: The safest buy if you care about finish quality

Some rooms need panels that look premium up close, not just from across the couch. The Foggy Forest Panels stands out here with the strongest average rating.

This is the pick for people who hate returns. If a panel looks slightly cheap or prints poorly, you’ll notice it every day.

It’s especially smart for home offices, entryways, and any wall you’ll see from a few feet away. The calmer the art style, the easier it is to make panels feel “intentional” instead of like equipment.

If you’re intentionally matching a traditional interior style, a modern abstract print can fight the room. The Monet Reproduction Panels is a clean “looks like art” option.

It’s ideal when the panel needs to blend in, not announce itself. In a living room, that matters as much as absorption.

Classic art works best when the room already has other framed pieces, warm wood tones, or traditional furniture. If your space is ultra-modern, you may prefer a simpler print that doesn’t compete with the architecture.

Best Value: The most review-validated way to cover a big wall

If you’re buying art panels for a whole room, price per panel becomes the real budget line. The Soon Global 8-Pack is hard to ignore.

It’s the “buy once, cover the wall” choice for people who want better sound but don’t want to overthink details. Read the lower-star reviews before you commit, because art taste is personal.

This is also a great pick for open-plan rooms where you need more coverage to feel the difference. The most common “it didn’t help” complaint is simply not having enough surface area treated.

Best Design Variety: Great when you’re matching a specific aesthetic

When the room already has a color palette, you don’t want to gamble on a print that clashes. The JaneTech 8-Pack Panels is the easiest way to “shop by vibe.”

This is also a smart pick for open-plan spaces where panels are visible from multiple angles. If a print looks odd in one lighting setup, you’ll notice it across the whole room.

If you’re pairing panels with existing artwork, aim for a cohesive set instead of mixing unrelated prints. A matching “series” looks like design, while mismatched panels can look accidental even if the acoustics are fine.

Best for Home Theater: Darker prints that disappear when the lights go down

Home theaters need absorption, but they also need the room to stay visually calm. The HushHues 8-Pack is built for that use case.

If your theater is already dark, you’ll appreciate panels that don’t pull attention away from the screen. You still get absorption, but the room stays “cinema,” not “decor showroom.”

For theater placement, start with side walls near the main seating position. If dialogue feels “smeared,” a few panels at first reflections usually do more than adding panels randomly behind the screen.

If art panels alone fall short, the best acoustic panels for home theater are built for that exact problem.

Best Budget: A lower-stress entry point for small rooms

If you’re treating a small office or a corner setup, you don’t always need an ultra-premium kit. The Art3d 8-Pack is a good “try it without regret” option.

Budget matters, but so does finish quality. This pick keeps you out of the ultra-cheap “decor canvas pretending to be acoustic” zone.

If you’re not sure art panels are “worth it,” start here and treat one problem area first. Once you hear the reduction in slap and harshness, it’s easier to justify expanding coverage.

Best Premium: A sturdier build if you’re chasing performance first

If you care less about the print and more about the acoustic result, look for thicker construction. The UMIACOUSTICS 6-Pack is the “build quality” pick.

This is the one you choose when you’ve already tried cheap solutions and you’re done experimenting. You want the room to sound tighter, full stop.

If your room is boomy or “washed out,” thicker construction usually helps more than prettier prints. Use these where performance matters most, and use the best-looking acoustic panels where visual fit is the priority.

What Are Acoustic Art Panels?

Plain acoustic panel compared with a custom printed fabric art panel

An acoustic art panel is a real acoustic panel with a printed face. The “art” is basically a custom fabric wrap over an absorptive core.

That’s why good art panels can work just as well as plain fabric panels. The absorption comes from what’s inside the frame, not the image on the front.

The key phrase to look for is acoustically transparent fabric (or a fabric that’s meant for speakers and panels). If the fabric is thick, glossy, or sealed, it can reflect sound instead of letting sound reach the core.

Another fast tell is the spec sheet. Real acoustic art panels usually mention thickness, mounting method, and core material, while decorative wall art focuses on canvas, frames, and “premium print.”

If you can’t find a core material anywhere on the product page, assume it’s not real treatment. That one detail saves you the most time and money.

If you’re new to treatment, the acoustic panels hub covers the fundamentals that keep you from buying panels to solve the wrong problem.

Do Acoustic Art Panels Work as Well as Regular Acoustic Panels?

NRC comparison chart for foam, fiberglass, and acoustic art panels

They can, as long as the construction is comparable. A printed fabric panel with a real absorptive core is still a fabric panel.

Where people get disappointed is when the “panel” is mostly empty space, thin felt, or decorative foam. If the listing can’t tell you what the core is (PET felt, fiberglass, mineral wool, etc.), you don’t have enough information to trust performance claims.

Mounting matters too. Even a small air gap behind a panel can improve absorption, because it effectively makes the panel “feel thicker” to the sound wave.

If you mount panels dead-flat with no gap and very little coverage, you’ll still get improvement—but the difference will be subtle.

Also, art panels are still acoustic treatment, not soundproofing. They reduce reflections inside your room, but they won’t stop noise from leaking through a wall.

If you want maximum absorption per dollar and you don’t care about prints, the best fiberglass acoustic panels and the best acoustic panels show what raw performance costs without the art markup.

How to Choose Acoustic Art Panels (So They Don’t Just Look Good)

Acoustic assessment checklist for hard surfaces, echo, room use, and budget

Three things separate a good buy from an expensive mistake: core material and thickness, print-layer transparency, and mounting method. Get them in that order.

1) Verify the core material and thickness

Thickness is the biggest predictor of audible improvement. Thicker panels generally absorb lower frequencies, which is what makes rooms feel less “boomy” and less smeared.

If the listing doesn’t specify thickness, that’s a red flag. “High density” without numbers is usually marketing.

If you’re mainly fighting “pingy” echo, even moderate thickness helps. If you’re fighting boominess, you’ll usually need thicker treatment (or dedicated low-frequency control) to notice a difference.

2) Make sure the print layer is acoustically transparent

A solid core only works if sound can reach it — so the print should be on fabric, not a glossy surface. If the front feels like a sealed canvas print, it’s reflecting sound instead of letting it pass through.

When in doubt, look for panels that describe the fabric as speaker/panel-friendly. The goal is to let sound through the art.

If the panel uses a protective cover (plastic, acrylic, glass), treat it like wall art. A sealed front is great for protecting a print, but it defeats the point of absorption.

3) Plan mounting before you buy (especially in rentals)

After materials and fabric check out, the last question is how they go on the wall. If you can’t mount panels cleanly, you’ll procrastinate and they’ll sit in a box.

If you can mount with a small air gap, do it. You’ll get more absorption without buying thicker panels, and it’s often as simple as using spacers or a mounting system that naturally stands off the wall.

If you want ceiling treatment instead of wall art, stick to ceiling-first options like best acoustic ceiling panels and best hanging acoustical panels.

If budget is the main constraint, start with best low-price acoustic panels instead of under-buying art panels and being disappointed by the result.

Where Should You Put Art Panels in a Living Room or Office?

Living room with custom printed acoustic art panels blending with decor

The best placement is where sound first bounces back to you. In a living room, that’s often the side walls and the wall behind the couch.

In an office, it’s typically the wall behind your monitor or the wall behind your chair, depending on where you speak and where your mic sits.

If you’re only buying a few panels, think “reflection control,” not “whole room coverage.” A small number of panels in the right spots can beat a larger number placed randomly.

Don’t hide panels behind thick curtains or shelving if you want results. Art panels are meant to be seen, and they also need to be exposed to the room to absorb sound effectively.

If you’re outfitting a full listening space, add ceiling treatment as well. A lot of “room sound” comes from hard floors + ceiling reflections, not just side walls.

That’s also where panels built for critical listening can outperform random art-panel coverage, because you’re treating a reflection path with treatment designed for that spot.

What Are the Most Common Acoustic Art Panel Mistakes?

Diagram comparing sound absorption with sound blocking

The biggest mistake is buying “acoustic wall art” that never claims to have an absorptive core. If it’s basically a canvas print, it will look good and sound the same.

The second mistake is expecting soundproofing. Art panels can make a room clearer, but they won’t keep your neighbors from hearing you.

Another common miss is under-buying. One panel can make a corner feel nicer, but it won’t fix a hard, reflective room on its own.

One subtle mistake is choosing prints that don’t match the room, then moving panels somewhere “out of sight.” If the panels end up behind furniture, you lose both the design value and a chunk of the absorption.

If you want a safe rule of thumb: buy enough panels to treat at least one major reflection area (like a full couch wall), then add from there. Coverage beats perfection.

The Bottom Line

The best acoustic art panels are real acoustic panels with printed, acoustically transparent fabric. That’s why the “what’s inside” question matters more than the picture on the front.

If you want a fast, noticeable improvement, prioritize coverage with a well-reviewed multi-pack. If you’re optimizing for performance per dollar, traditional panels still win.

Start with the picks above, then use the checklist to avoid buying wall art that doesn’t absorb. If you want more options beyond prints, the best acoustic panels list is the widest starting point.

Frequently Asked Questions

Do acoustic art panels soundproof a room?

No. They reduce echo and reflections inside your room, but they don’t block sound from traveling through walls.

Can you print custom images on acoustic panels?

Yes, many art panel companies and print-wrap panels let you upload your own image. Just make sure the print layer is still acoustically transparent.

Some vendors print directly onto the fabric, while others apply a laminate layer. Ask about the printing method before ordering, because a sealed laminate defeats the absorption.

How many acoustic art panels do you need?

Enough to cover at least one meaningful reflection area, like a full wall behind a couch or desk. A single panel helps, but a cluster is what changes the room.

Do acoustic art panels help bass?

Rarely — art panels are usually too thin to absorb bass, so low-end problems need thicker treatment or dedicated bass traps.

Best Acoustic Ceiling Panels (That Actually Reduce Reverb) [2026]

The best acoustic ceiling panels can make a bigger difference than wall panels—but only if they’re placed where the ceiling reflection is actually hitting your ears or mic. Stick a couple of panels in random spots, and you’ll still hear the same “roomy” splash.

This guide helps you pick panels that are real treatment (not thin decor) and shows you the placements that give you the fastest audible win. Start with the Top Picks if you’re buying today, then use the coverage + placement sections to avoid under-treating.

Quick Takeaway

Acoustic ceiling panels work best as a “ceiling cloud” above the listening/recording position, because that’s where the strongest early reflection happens. Buy enough coverage to treat one meaningful zone first, then expand—one tiny panel won’t change the room.

Best Acoustic Ceiling Panels (Top Picks)

Overview of acoustic ceiling panel options

All of these picks are “real panels” you can mount to a ceiling as a cloud or direct-mount treatment. The best choice depends on how much area you want to cover and how permanent you want the install to be.

Ceiling panels are most valuable when they form a cloud above your listening or recording position. If you mount a panel above a random corner, you can spend money without hearing the payoff.

If you’re treating a low ceiling, prioritize a clean, low-profile mount. If you can hang a cloud with an air gap, you’ll usually get more absorption from the same panel thickness.

Best Overall: The safest balance of performance and finish quality

If you want one pick that works for most rooms, choose a dense, fabric-wrapped panel you can mount overhead without it looking like a DIY project. The BXI High-Density Acoustic Panels (4-Pack) is the “buy it and stop thinking” option.

It’s a strong match for home studios and offices because it treats the reflection that makes speech sound hard and “boxy.” Mount it above the desk or mix position and you usually hear clearer mids immediately.

Best Large Panel: Fewer pieces, cleaner look, faster coverage

Large panels matter when you’re treating a bigger listening area or you want the ceiling to look intentional. The UMIACOUSTICS 47-inch Panels helps you cover meaningful area without turning the ceiling into a patchwork.

This is a great pick for home theaters and dedicated studios where you want a “real install” look. You’re paying for fewer seams, fewer mounts, and a more professional finish overhead.

Best Value: The most cost-efficient path to real coverage

If you already know you need multiple panels, value is really about price-per-treated-area. The UMIACOUSTICS Standard Pack is the “buy enough to matter” option.

Use this when you’re treating a couch area, a desk setup, or a small studio and you want to cover a full zone instead of sprinkling panels around. Coverage beats perfection when you’re fighting reverb.

Best Budget: Good for testing the concept before committing

Ceiling treatment is one of those things you don’t fully believe until you hear it. The 2-Pack Fabric Acoustic Panels lets you do a low-risk “before/after” test.

It’s best for smaller problem areas like a desk corner or a tight office. If you love the result, you can upgrade to thicker fiberglass panels and scale up coverage.

Best Mid-Range: Fiberglass performance without the heavy spend

If you’re trying to beat foam tiles without jumping straight to premium installs, fiberglass is the move. The Olanglab Fiberglass Panels is a solid middle ground.

This is a good pick when your room has slap echo but you don’t need a full “studio ceiling cloud” yet. Treat the main reflection zone first, then decide if you need more.

Best Alternative: Same performance, different color options

Sometimes the “best” pick is the one that matches the room so you actually install it. The Olanglab Alternative Pack is for people who want the same general performance but a different look.

If your panels will be visible every day, “aesthetic fit” is not a small detail. The panels that match your ceiling and lighting are the ones you won’t regret.

Why Ceiling Treatment Works So Well

Desk listening position with ceiling and back wall acoustic panels

The ceiling is a giant, flat reflector that sits right between your speakers (or voice) and your ears. That’s why untreated ceilings often create a “halo” of reverb even when your walls are partially treated.

When you add a ceiling cloud, you’re usually killing one of the strongest early reflections in the room. That tends to improve clarity and reduce fatigue faster than chasing tiny changes on side walls.

Ceiling panels also help rooms that feel “ringy” because of hard floors. The floor and ceiling act like two mirrors, and sound bounces between them.

If you’re still mapping out a full plan (walls + corners + ceiling), the acoustic panels hub is the right starting point. Ceiling panels are just one piece — bass, isolation, and wall reflections each need different treatment.

Most rooms need both wall and ceiling treatment — the best acoustic panels list includes picks for both. If raw absorption matters more than aesthetics, fiberglass panels outperform polyester and foam at the same thickness.

What Are the Different Types of Acoustic Ceiling Panels?

Panel styles including corner traps, ceiling clouds, and decorative frames

“Ceiling panels” can mean a few different products, and choosing the right type prevents a lot of wasted money. Three options cover most installs: suspended clouds, direct-mount panels, and drop ceiling tiles.

Ceiling clouds (best for most home studios)

A cloud is a panel hung horizontally with an air gap above it. That air gap helps absorption and makes clouds very effective for reflections above the listening/recording position.

Clouds are the go-to ceiling treatment in recording studios, where the overhead reflection above the mic can make or break a vocal take.

Direct-mount ceiling panels (best when you need a low-profile look)

If a suspended cloud won’t fit your ceiling height, direct-mount panels are the alternative — they sit flush against the surface and look cleaner in low rooms. You lose the absorption boost from an air gap, but for many rooms the visual simplicity is worth it.

If you’re also treating walls and you want the room to look finished (not “treated”), art panels are a strong complement to ceiling treatment. Pair a ceiling cloud with tasteful wall treatment using best acoustic art panels, and the room can sound controlled without looking like a studio.

Drop ceiling tiles (best for grid ceilings)

Clouds and direct-mount panels assume a solid ceiling, but if you have a suspended grid, traditional acoustical tiles slot right in. They’re designed for that frame and can cover broad areas without visible “panels.”

Just make sure you’re buying acoustic tiles (rated for absorption), not basic decorative tiles. The grid makes it easy to treat a large surface area, which is why offices sound so different when tiles are chosen correctly.

How Many Ceiling Panels Do You Need?

Overhead room diagram showing recommended acoustic foam coverage zones

Think in zones, not in “number of panels.” Your first goal is to treat the ceiling reflection above the listening or recording position.

If you’re treating a desk setup, start above the desk and the space between you and your speakers. If you’re treating a couch area, start above the seating position where dialogue and music are actually heard.

Once that zone is treated, decide whether you still hear reverb when you clap or speak normally. If you do, expand outward rather than scattering panels across the ceiling randomly.

A good starting target is to cover the ceiling area directly above the listening position and the space between you and the speakers. In many small rooms, that’s less total area than people assume, but it’s placed where it matters.

If you’re on a tight budget, fully treat one zone with fewer, higher-quality panels instead of sprinkling thin panels everywhere. The panel material matters more than quantity — a dense fiberglass core in one zone absorbs more than polyester scattered across the whole ceiling.

How Do You Safely Mount Acoustic Panels to a Ceiling?

Person on a stepladder installing a ceiling acoustic panel with toggle bolts

Ceiling mounting has one rule: overbuild the attachment method. If you’re unsure about anchors, use hardware designed for overhead loads and don’t rely on “light-duty” hooks.

For clouds, use wire/cable kits rated for overhead load and use redundant hardware when possible. It’s cheap insurance when you’re mounting anything above people.

If you can find joists, mount into them. If you can’t, use rated toggle bolts or rated anchors and follow the panel manufacturer’s mounting guidance.

Avoid spray adhesives for ceiling installs in warm rooms. Gravity plus heat is a bad combination, and failed adhesive installs are messy to repair.

If you’re working with fiberglass panels, wear gloves and keep the panel fabric intact. You want the absorption, not fiberglass dust in your room.

Where Should You Place Ceiling Panels?

Ceiling foam cloud placement above a listening position

For listening rooms and home theaters, the highest-impact placement is usually a cloud above the main seating position. That’s where dialogue clarity and imaging improvements show up first.

For desk setups, place panels above the desk and slightly forward toward the speakers. You’re trying to catch the reflection that bounces off the ceiling and straight back to your ears.

For vocal recording, treat the ceiling above the mic position. A ceiling reflection above a mic can make recordings sound “roomy” even when walls are partially treated.

For a dedicated home theater, the ceiling cloud usually extends wider than a desk setup — covering the full seating row and the space between the seats and the screen improves surround imaging across all positions.

If you’re unsure, walk around the room and clap, then listen for where the echo blooms. Treat the ceiling above that area first, then expand.

The Bottom Line

Ceiling acoustic panels are one of the highest-impact upgrades you can make, because they target a major reflection path. They work best when you treat the zone above the listening/recording position, not when you scatter panels around the ceiling.

Start with a real fiberglass or high-density panel you can mount safely, then build coverage outward. Suspended clouds with an air gap give you more absorption per panel — and once the first zone sounds right, you’ll know exactly where to expand.

Frequently Asked Questions

Do acoustic ceiling panels soundproof a room?

No. They reduce echo and reflections inside your room, but they don’t block sound from passing through the ceiling to other rooms.

Are ceiling clouds worth it?

In most rooms with untreated ceilings, yes — a cloud above the listening position is one of the fastest upgrades you can make. You’ll usually hear the difference on the first clap test: less splash, tighter vocals, cleaner imaging.

Can you install ceiling panels without drilling?

Sometimes, but it depends on panel weight and ceiling surface. For safety, overhead installs should use rated mounting methods instead of relying on adhesives.

Do ceiling panels help in apartments?

For echo and call quality, absolutely. For blocking neighbor noise through the ceiling, no — that’s a soundproofing problem, and panels only treat what’s happening inside your room.