Best Acoustic Panels for Music Room: Setup and Placement Guide [2026]

Best acoustic panels for music room make a real difference in how clearly you hear yourself play — but only when matched to your instrument type, and most setups treat every instrument the same.

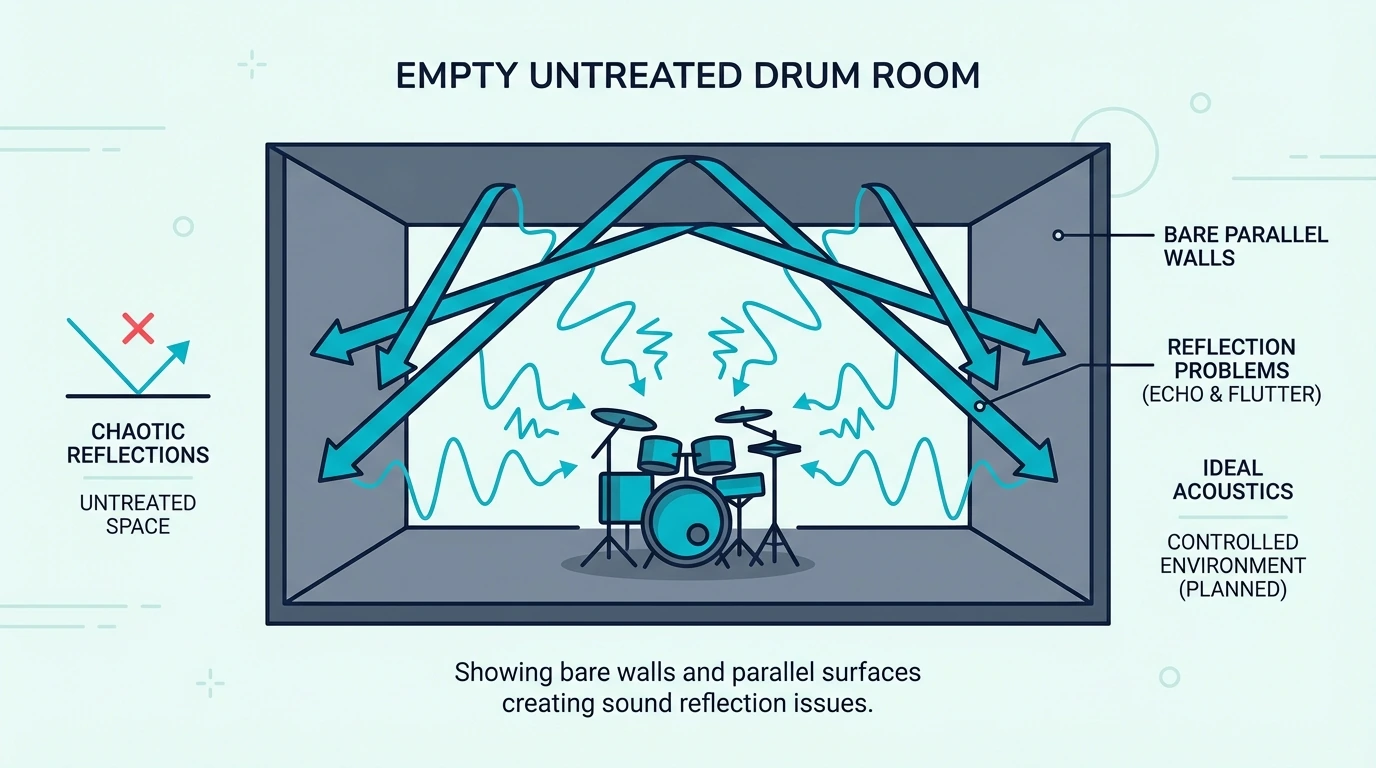
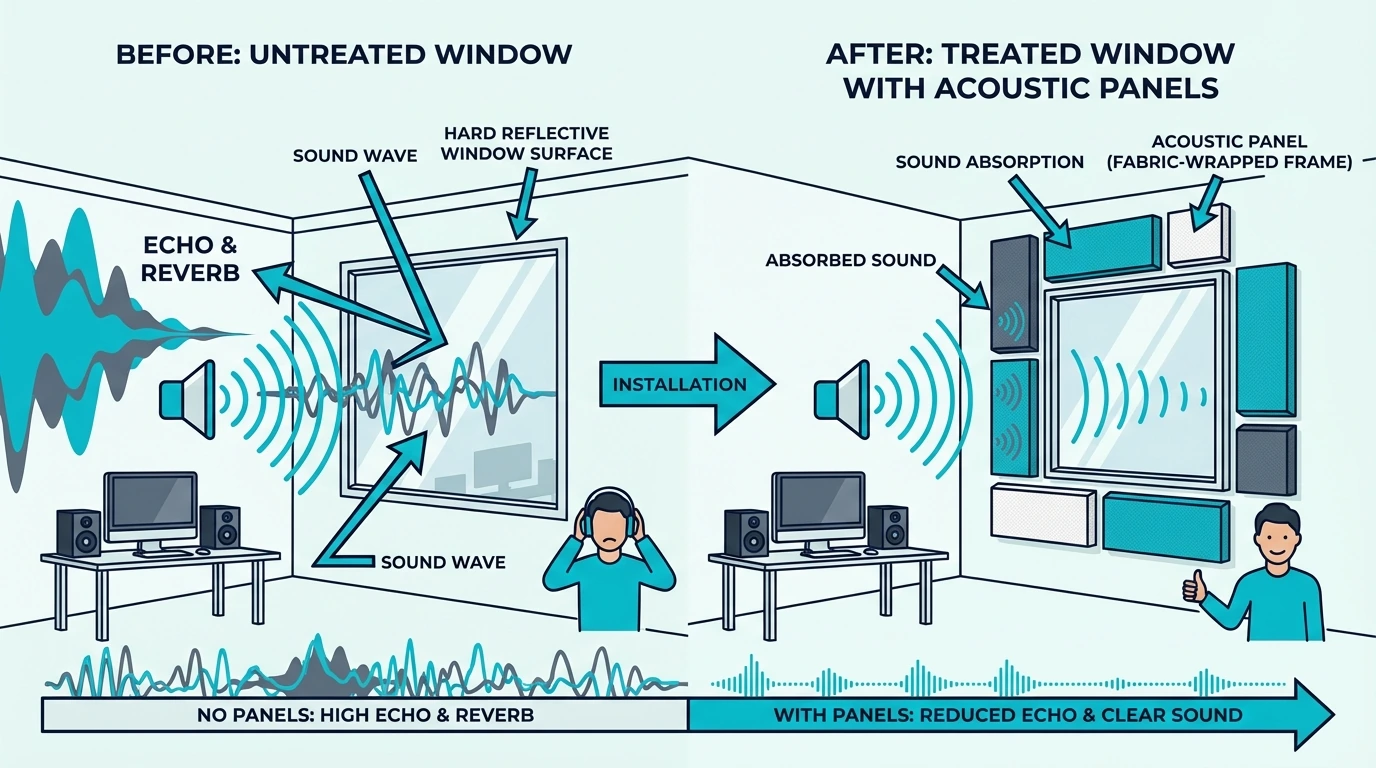
Practice rooms with parallel bare walls create flutter echo that masks timing errors and buries nuance. Vocals blur together, guitar tones smear, and piano note separation disappears.

What feels like a skill plateau is often just an acoustic problem.

The right panels in the right positions let you hear exactly what your instrument is doing, which makes every practice session more useful. Below you’ll find the best panels for each instrument type, how many you need by room size, and where to place them — you’ll have a clear treatment plan by the end.

Quick Takeaway

Acoustic panels for music room reduce the echo and reverb that muddy your practice sessions, letting you hear your instrument clearly. For drummers needing low-frequency control, add dedicated corner bass traps to tame kick drum and bass guitar frequencies.

Top Picks for Music Room Panels

Top Picks For Music Room Acoustic Panels Showing Different Panel Types For Various Instruments

These panels consistently deliver the clearest improvement across different instruments and room sizes.

Best Overall: The UMIACOUSTICS 4-Pack with Brackets earns the top spot with its 2-inch fiberglass core that handles vocals, guitar, and piano frequencies. The included mounting hardware eliminates guesswork.

Best for Instruments: The TONOR Dual-Layer Panels excel at absorbing the wider frequency range that instruments produce. The dual-layer construction handles both high and mid frequencies effectively.

Best Budget: The 18 Pack Black Acoustic Panels give musicians on a budget enough material to treat their primary playing area without breaking the bank.

Best Bass Trap: The 12 Pack Bass Traps are essential for drummers and bass players. Standard panels don’t touch low frequencies — you need corner treatment for that.

Why Music Rooms Need Acoustic Treatment

Why Music Rooms Need Acoustic Treatment Showing Sound Wave Reflections In Untreated Practice Room

Sound in small practice rooms works against clear practice — the physics of parallel walls, hard surfaces, and low ceilings create problems that panels solve.

Reduce Echo and Reverb

Untreated rooms add their own reverb to everything you play. Fast passages blur together because notes overlap with their own reflections.

Sustained notes ring with uneven coloration from room modes.

This extra reverb isn’t the pleasing kind you hear in concert halls. It’s short, harsh, and masks the detail in your playing.

You can’t hear whether your vibrato is even or your timing is tight. Acoustic panels absorb these early reflections, revealing the pure sound of your instrument.

Better Sound for Practice

Practicing in a treated room accelerates improvement because you hear your actual mistakes. In a reverberant room, the room covers subtle timing errors and tonal inconsistencies.

You think you sound better than you actually do.

Panels strip away this false flattery. Every detail becomes audible — which means every detail becomes correctable.

Musicians who practice in treated spaces develop better ears faster. The room stops lying to you.

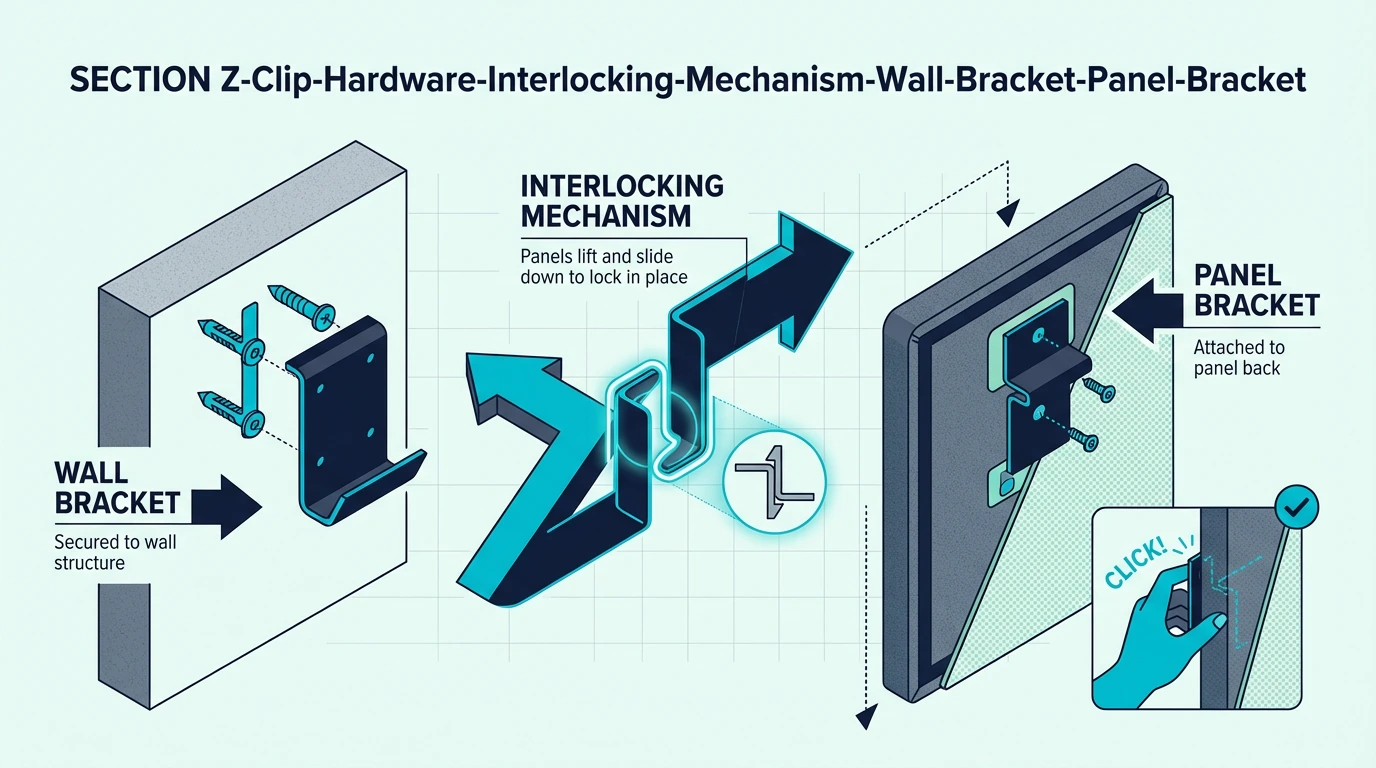
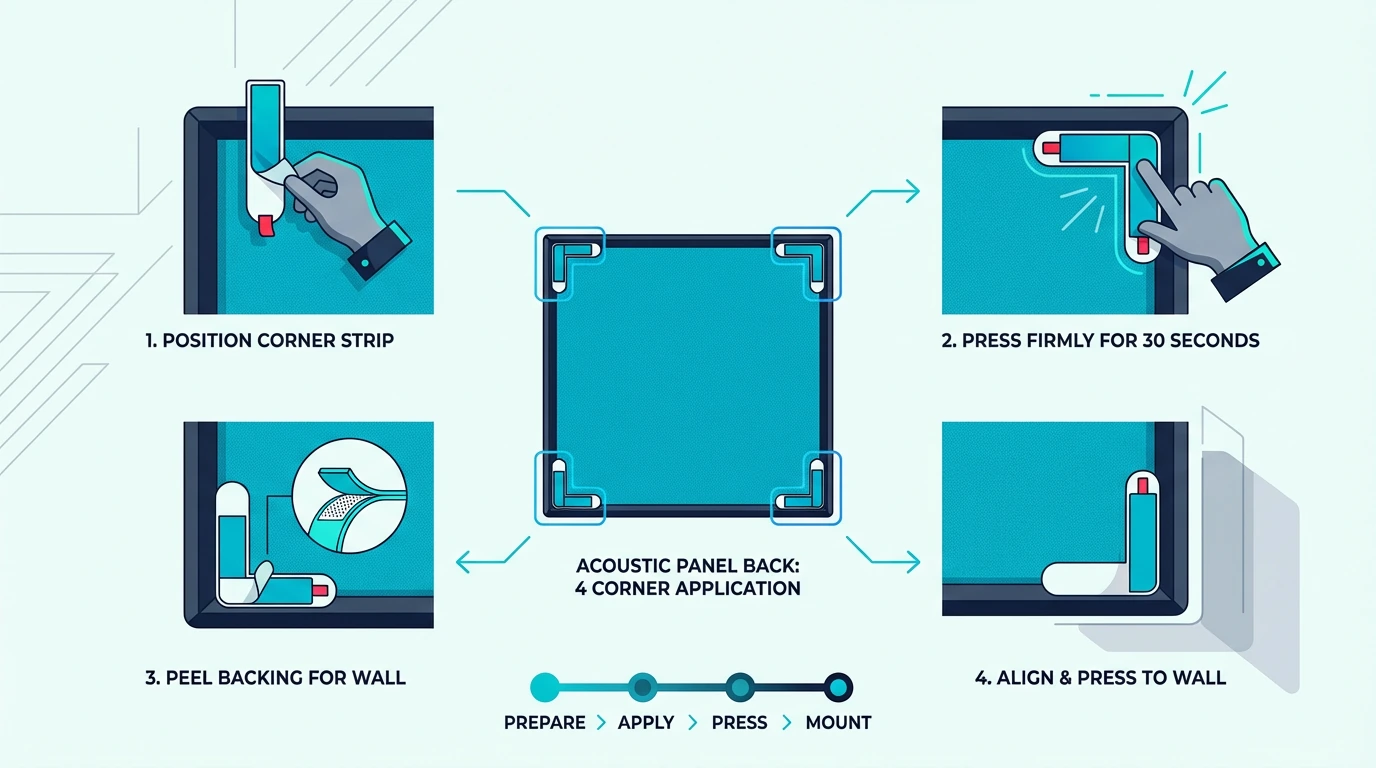
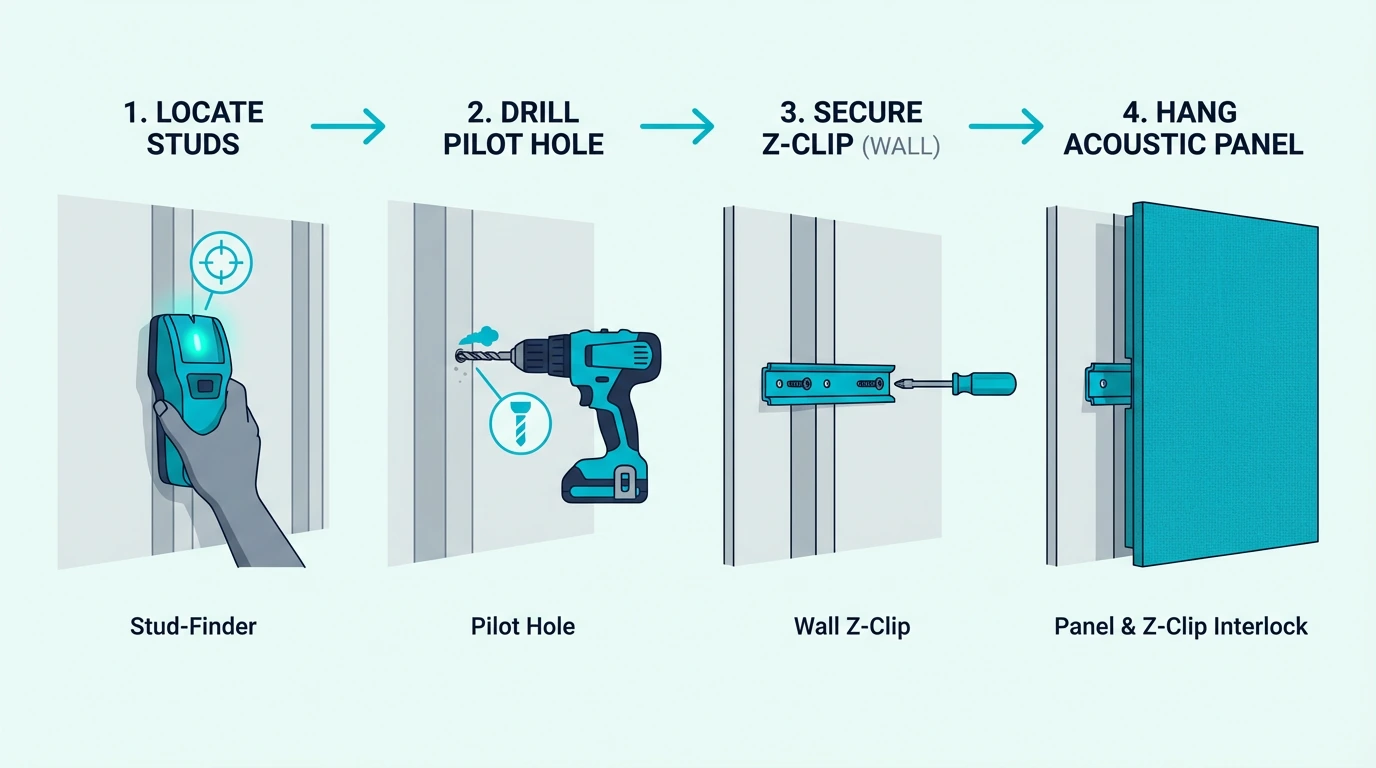
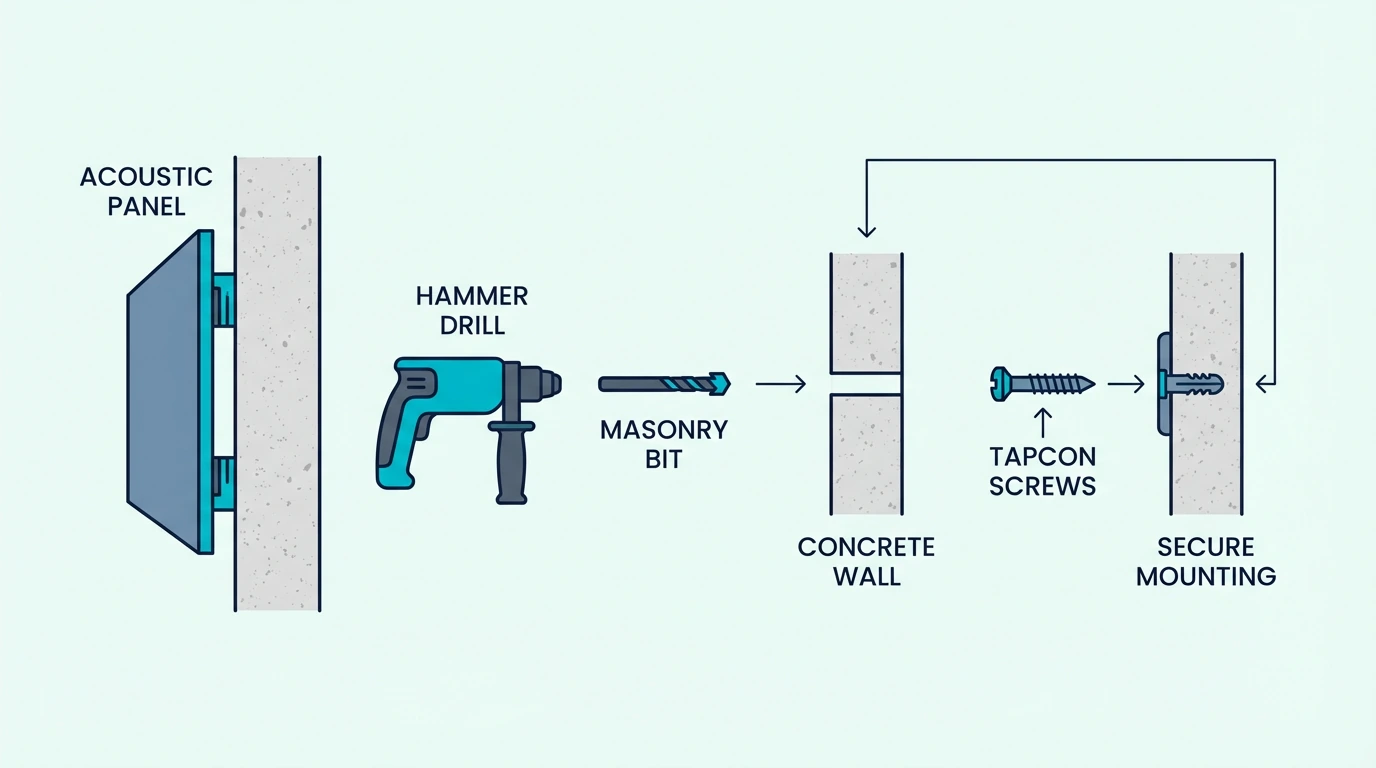
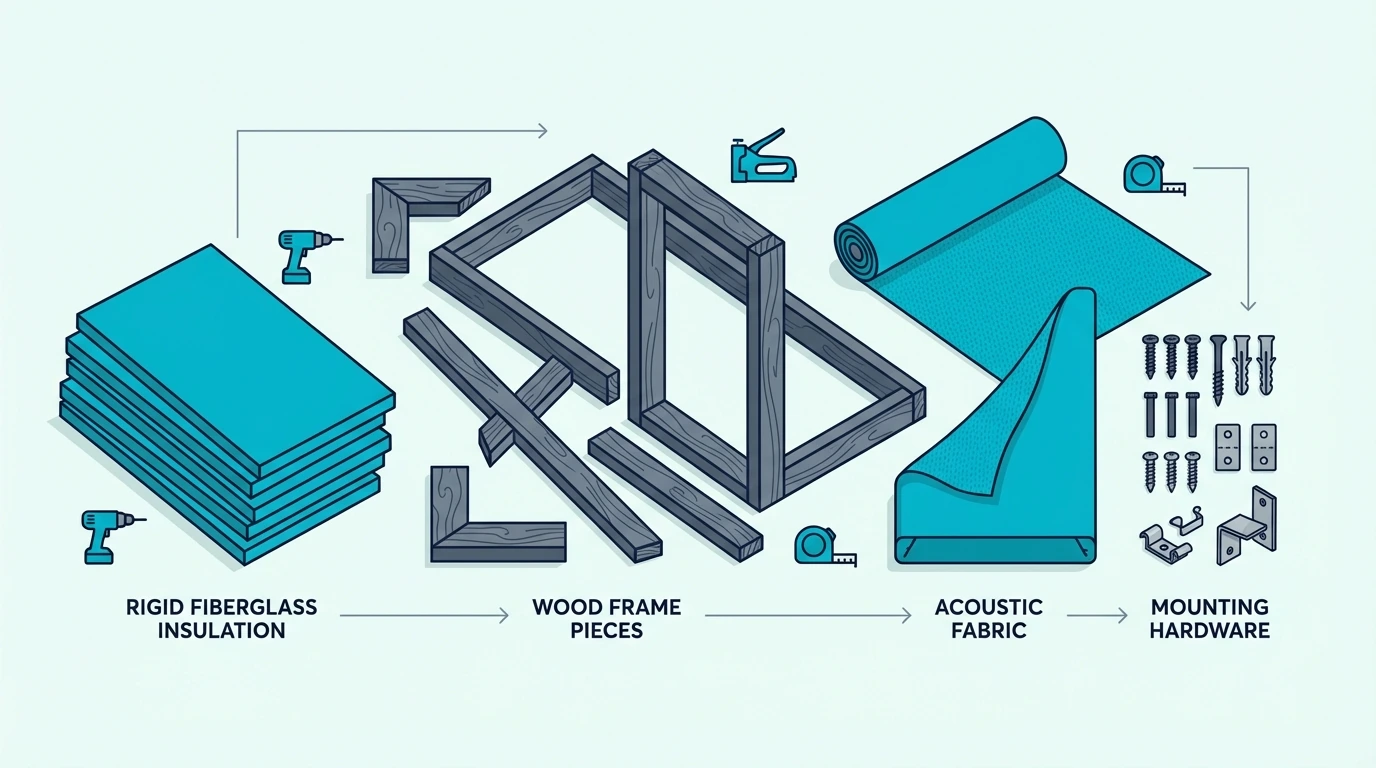
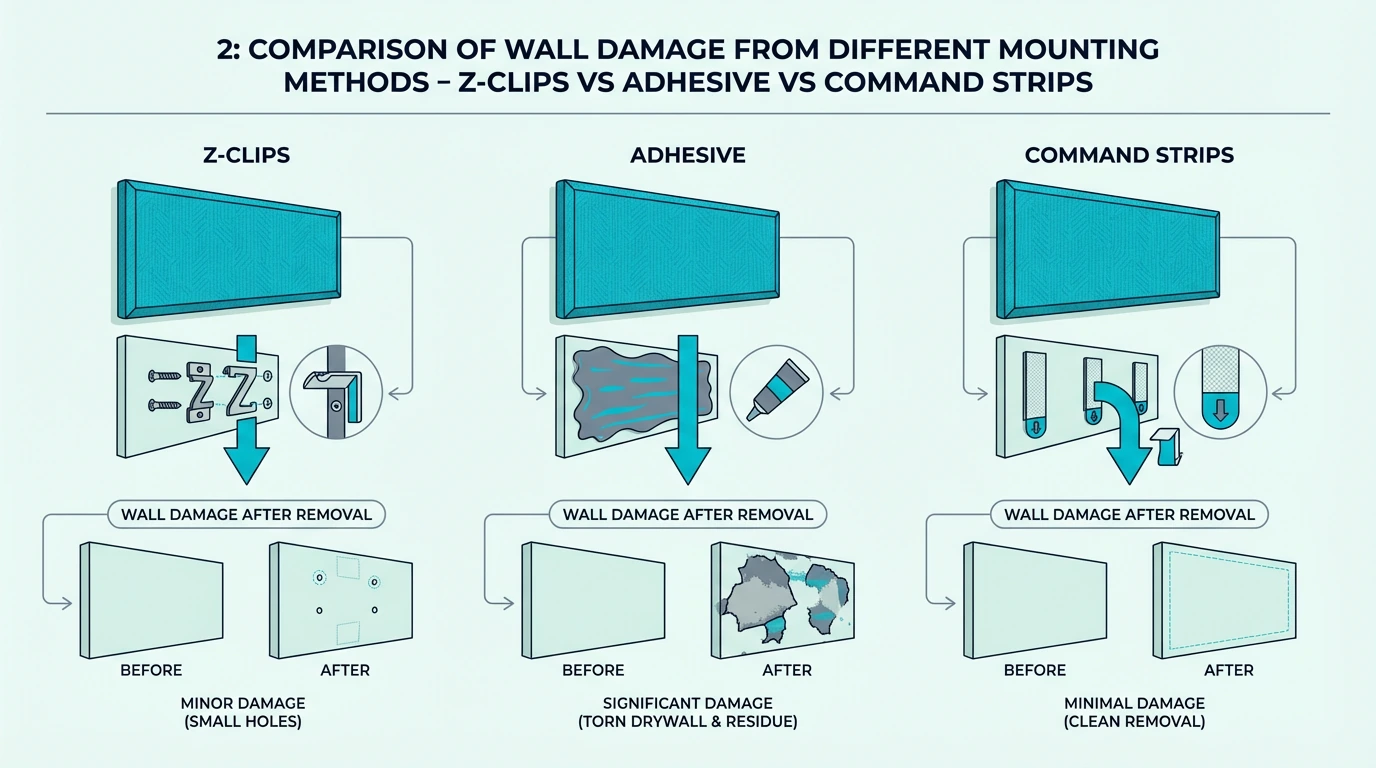
The installation guide covers every mounting method for getting panels up quickly.

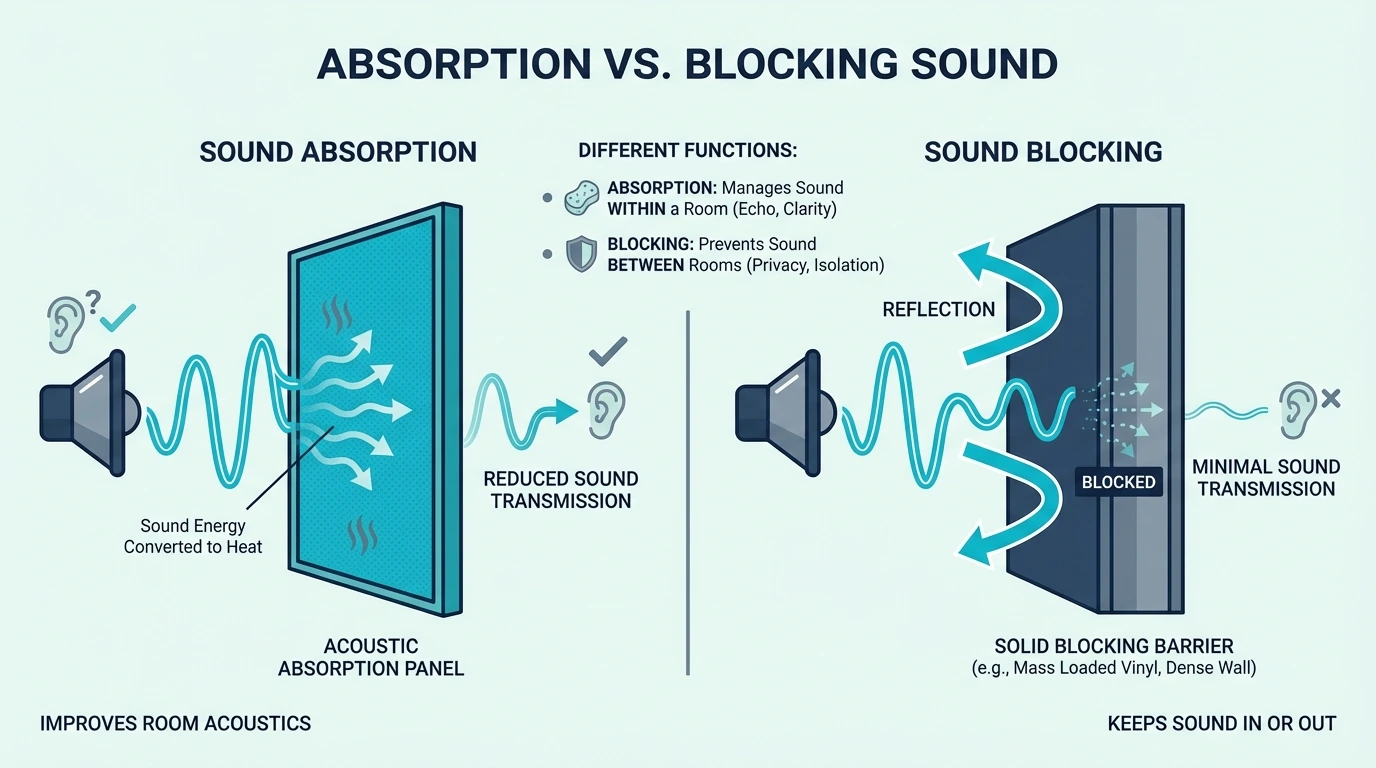
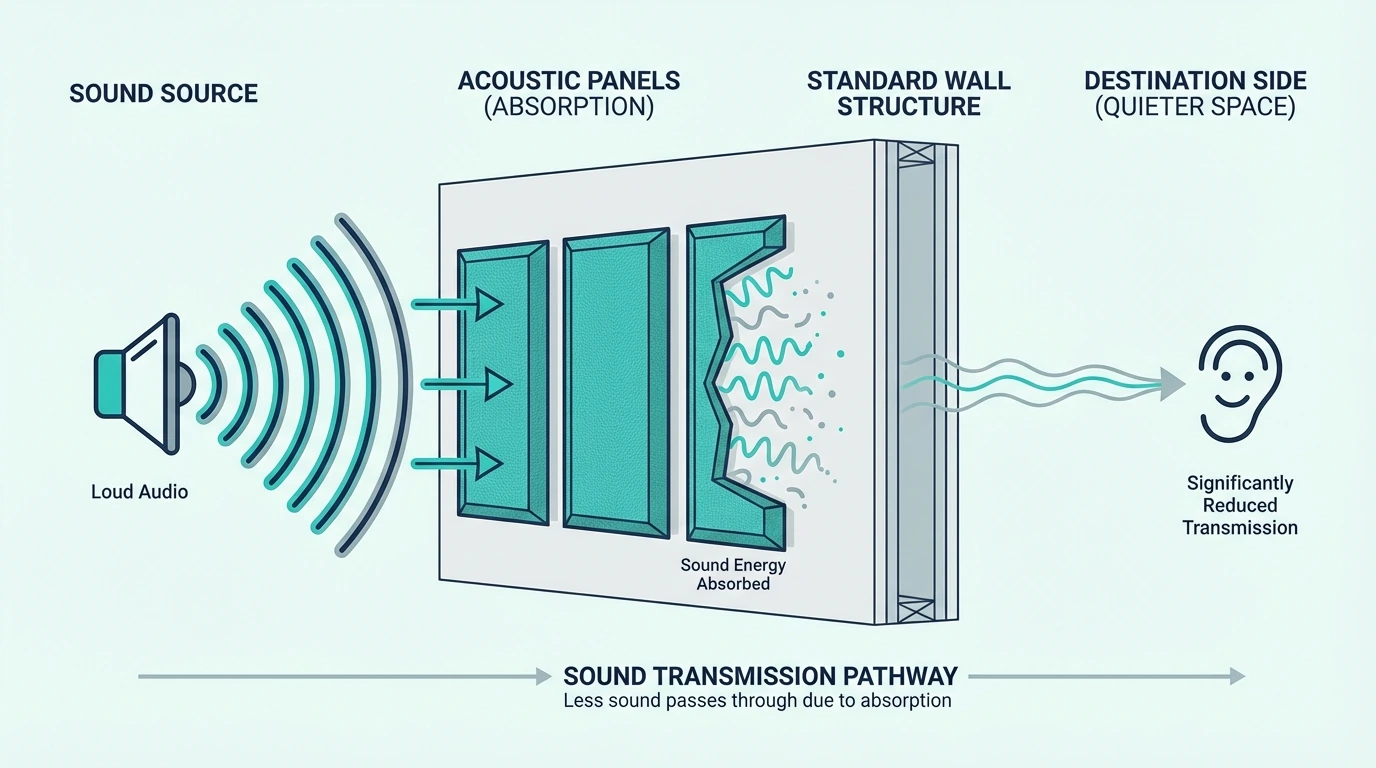
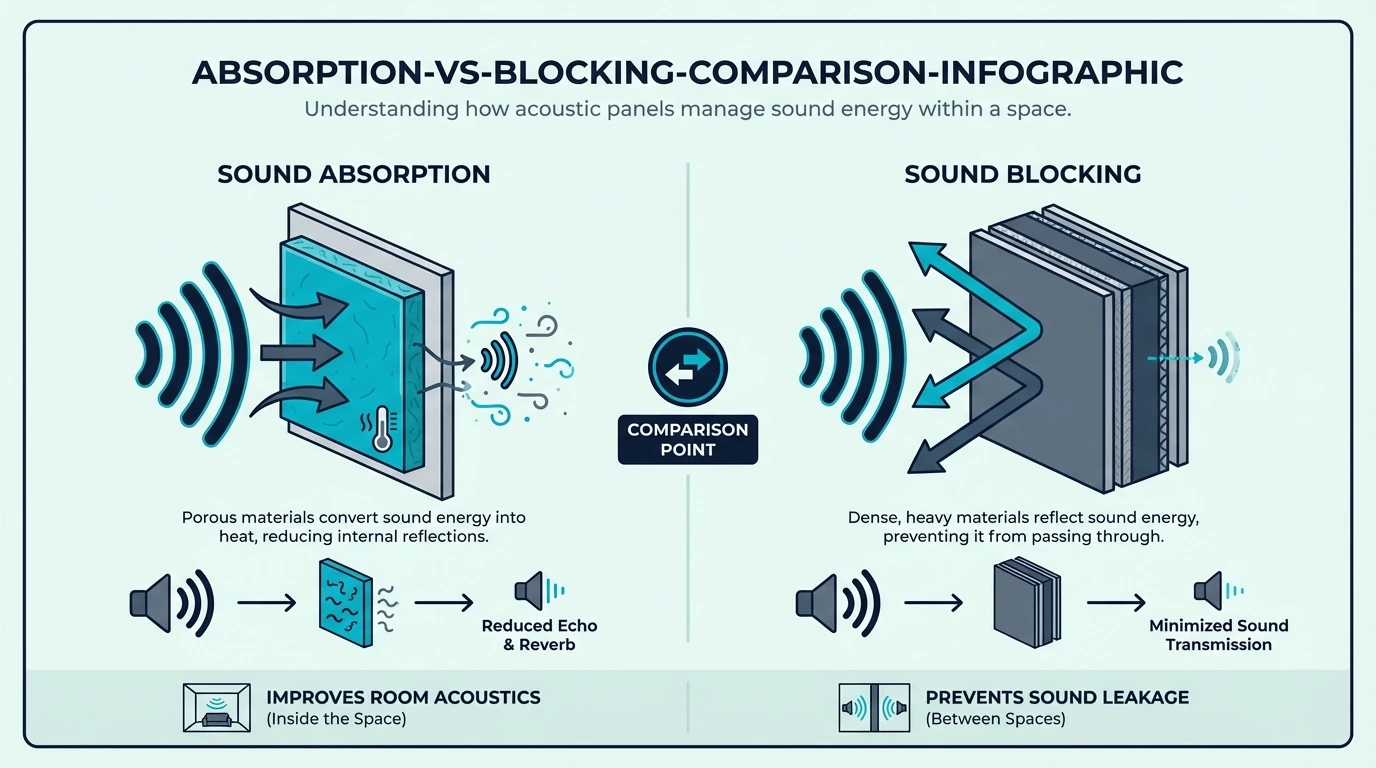
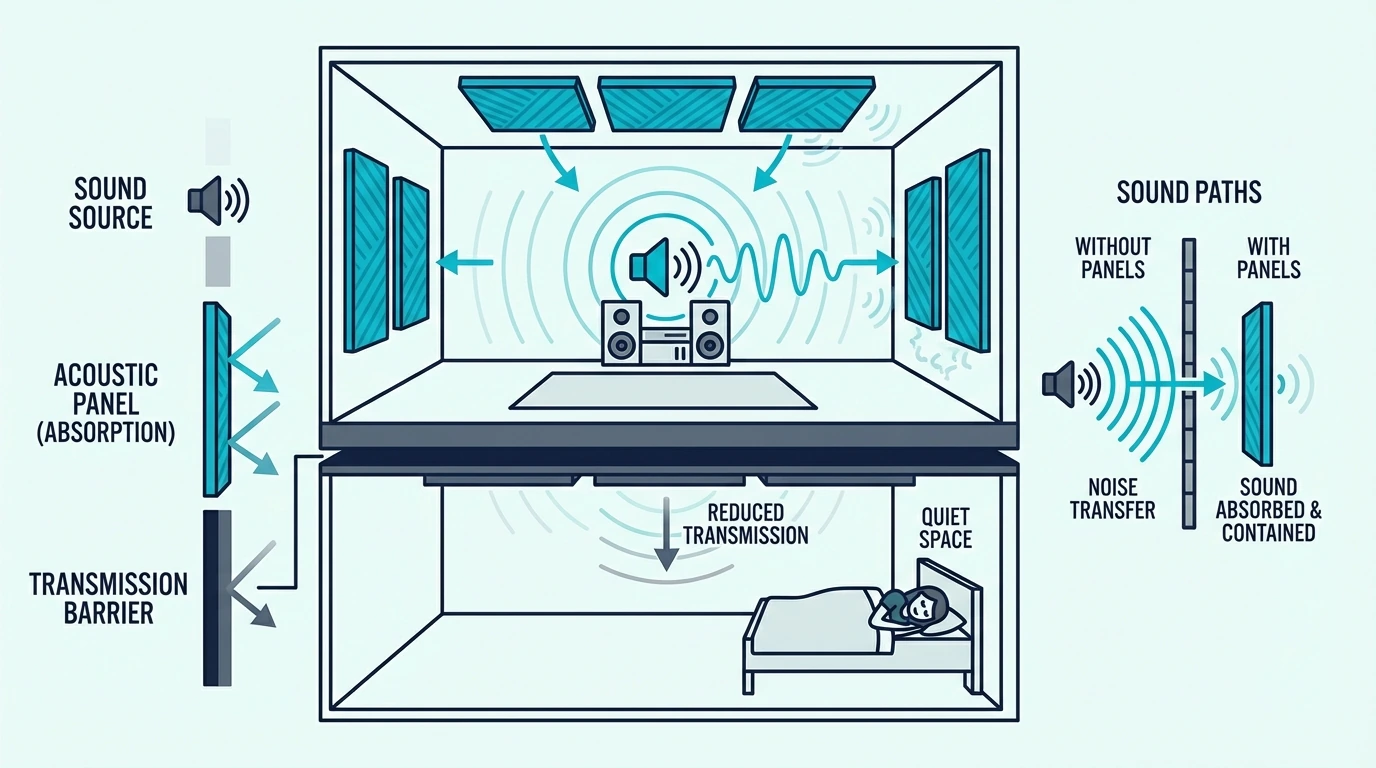
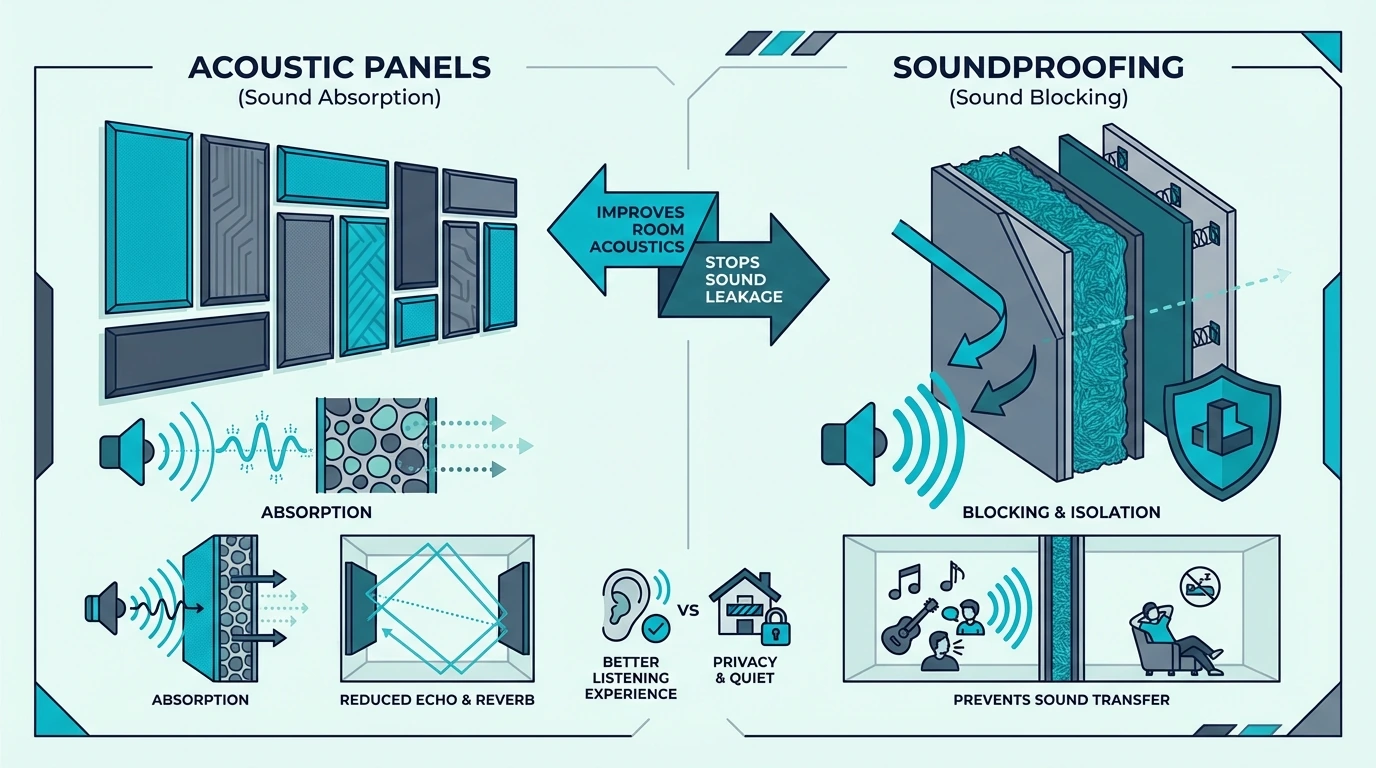
Panels Don’t Stop Noise Leaving (Important!)

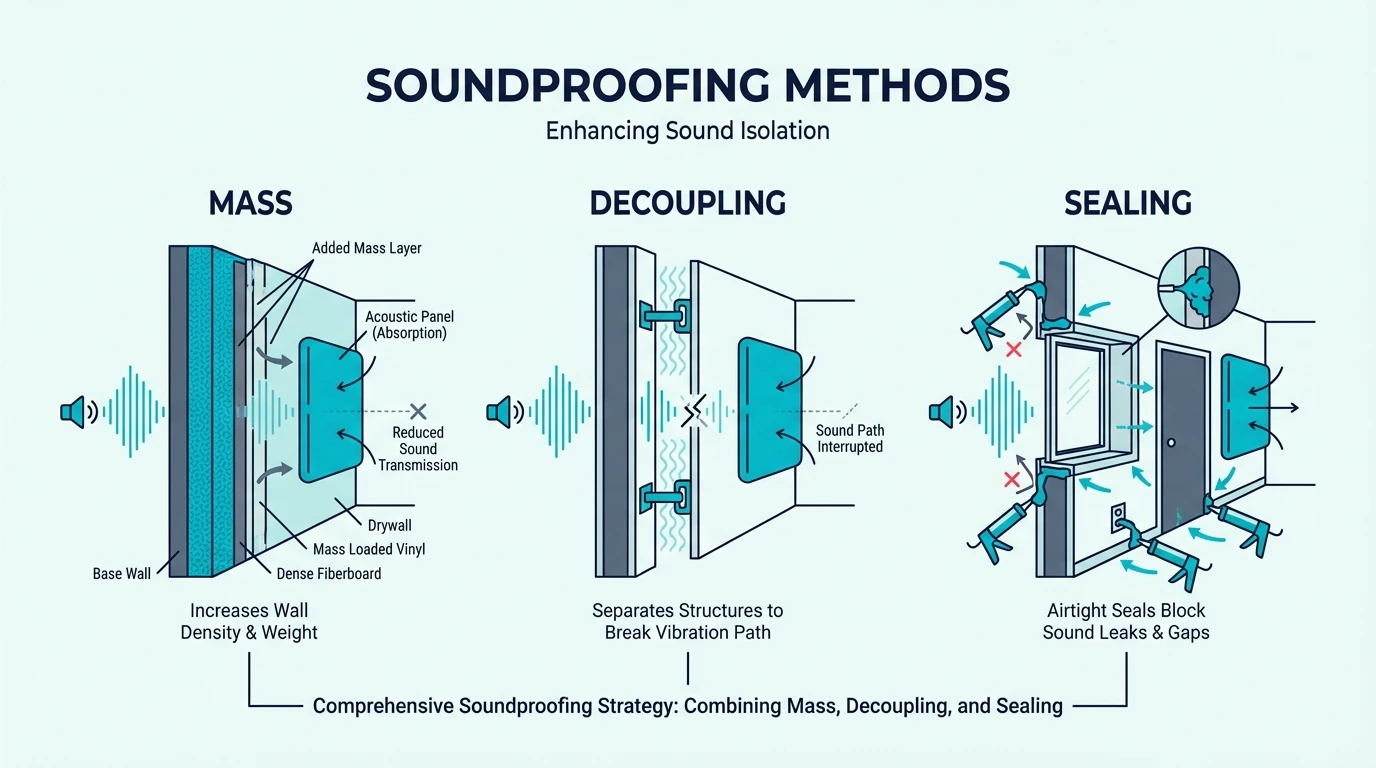
Clearer practice sound is one thing, but many musicians assume treatment also keeps the noise from bothering neighbors. Acoustic panels will NOT soundproof your music room. They don’t stop sound from traveling through walls to neighbors or other rooms in your house.

Panels absorb sound inside your room — they don’t block it from escaping. If you’re playing drums at 2 AM, your neighbors will still hear you.

That requires mass-loaded vinyl, double-layer drywall, decoupled framing, and other construction-level solutions. Understanding how absorption differs from soundproofing prevents buying the wrong product.

What panels DO accomplish: they make your room sound better to you while you’re playing. That’s a worthy goal on its own, but don’t expect them to solve noise complaints.

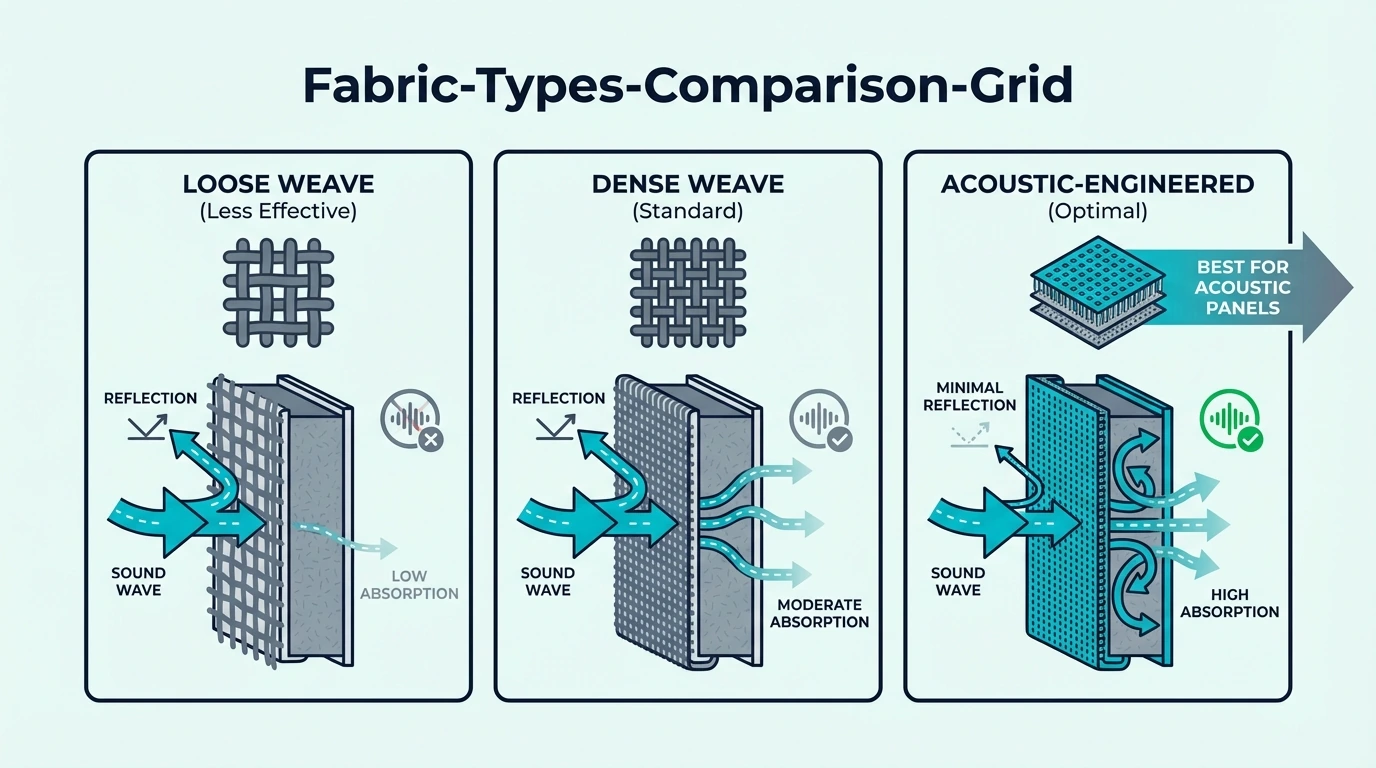
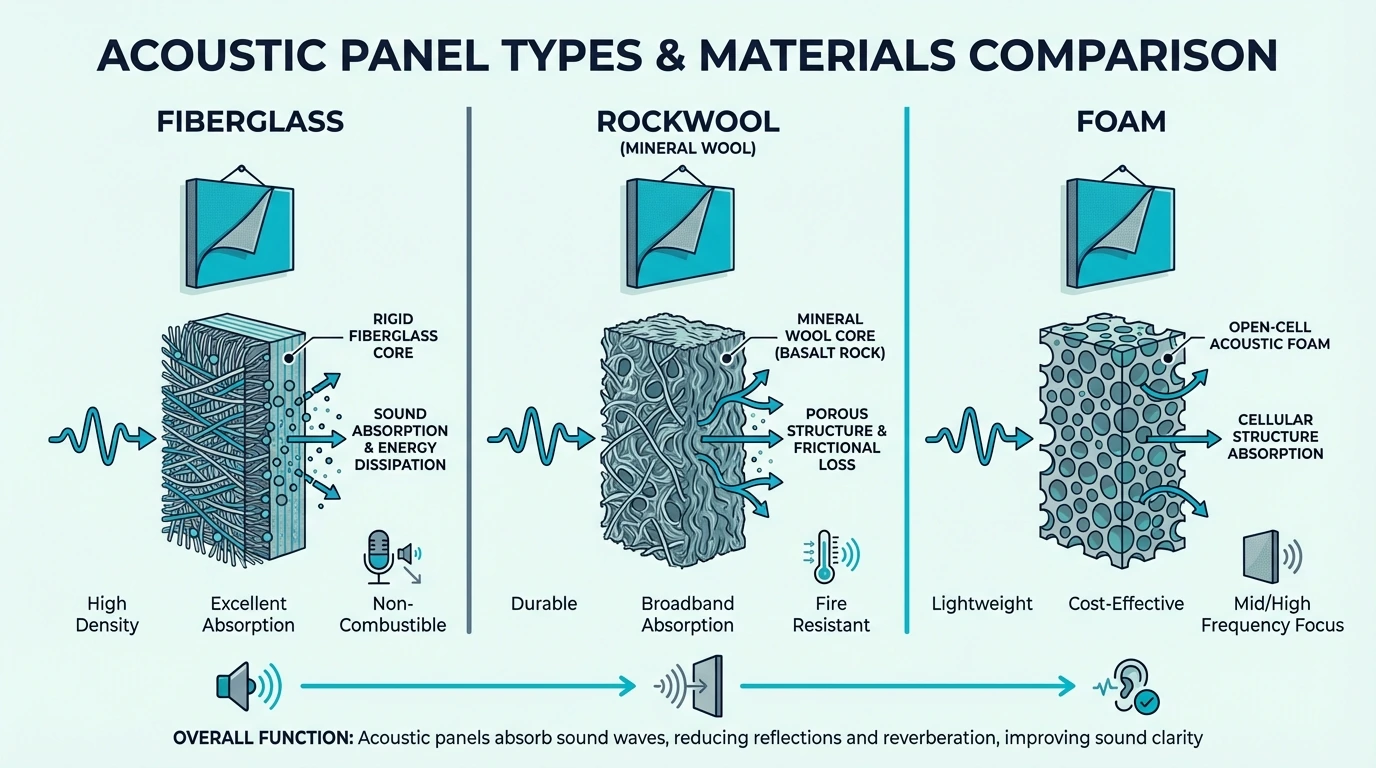
Best Acoustic Panels for Vocals and Guitar

NRC Rating Comparison For Vocal And Guitar Acoustic Panel Options

Vocalists and guitarists produce similar frequency ranges — both benefit from 2-inch fiberglass panels that absorb the 200-4000Hz band where voice and guitar fundamentals live.

UMIACOUSTICS with Hanging Bracket

The UMIACOUSTICS Panels with Bracket hit the sweet spot for vocal and guitar practice. The 2-inch fiberglass core absorbs the 200-4000Hz range where voice and guitar fundamentals live.

At 4.6 stars with 126 reviews, these panels have proven themselves across many home practice setups. The included mounting brackets are a genuine convenience — no hunting for compatible hardware.

For singers working on tone and breath control, these panels reveal subtleties that reverberant rooms hide. Guitarists hear pick attack and finger noise more clearly, enabling precise technique work.

Olanglab Fiberglass Panels

The Olanglab Fiberglass Panels offer genuine acoustic performance at a competitive price. The fiberglass core outperforms foam alternatives by a wide margin.

For acoustic guitarists especially, the clean absorption helps you hear the natural tone of your instrument. Finger squeaks, string buzz, and body resonance all become more distinct.

UMIACOUSTICS Standard Pack

The UMIACOUSTICS Standard 4-Pack delivers the same fiberglass quality without the mounting brackets. If you already have Command strips or picture hangers, this saves money without sacrificing absorption.

With 199 verified reviews, these panels have earned their reputation in home practice rooms. The 2-inch thickness handles vocal and guitar frequencies effectively.

Best Panels for Piano and Keyboard

Piano Room Acoustic Treatment Panel Options And Placement Considerations

Piano produces a wider frequency range than most instruments, requiring slightly different treatment — thicker panels and broader coverage handle the full keyboard span from bass notes to high treble.

TONOR Dual-Layer Panels

The TONOR Dual-Layer Panels excel at handling the wide frequency range of piano. The dual-layer construction absorbs more effectively across the spectrum from bass notes to high treble.

Each panel spans nearly four feet, meaning fewer panels cover more wall area. For a dedicated piano room, four panels treat the wall behind the instrument effectively.

At 868 reviews, these panels have proven themselves with home musicians. The professional appearance suits practice rooms that also serve as living spaces.

Large Coverage Panels

The 2-Pack Fabric Acoustic Panels offer an entry point for pianists unsure about acoustic treatment. At the low price, you can experiment with placement before committing to larger orders.

Start by placing these behind your piano, where direct reflections return to your ears. If you hear improvement, order more panels to expand coverage.

For custom sizing around piano alcoves, the panel cutting guide covers every material type safely.

Best Panels for Drums (Bass Traps Essential)

Drum Room Acoustic Treatment Showing Bass Trap Corner Placement And Panel Wall Coverage

Drums require a fundamentally different approach than melodic instruments — standard acoustic panels barely touch the frequencies that kick drums and floor toms produce.

Why Drums Need Bass Traps

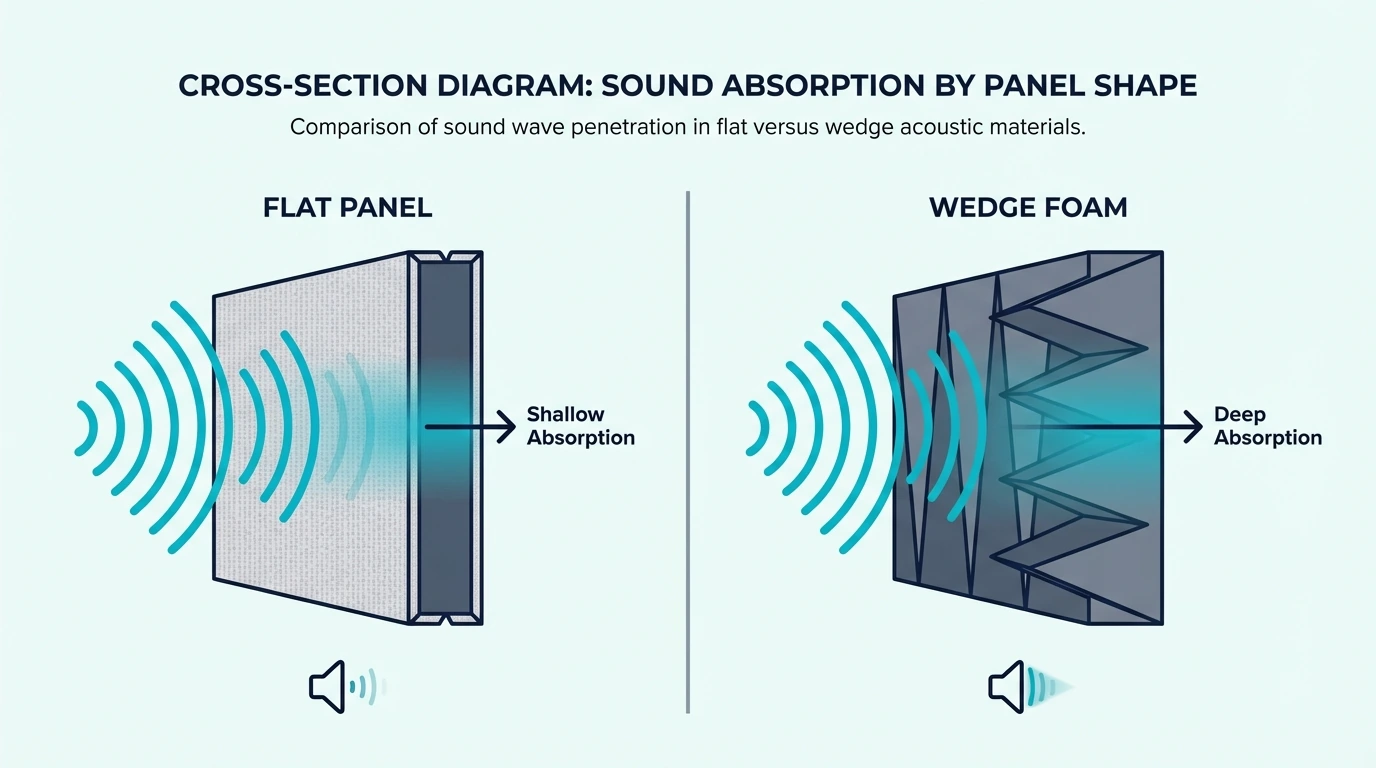
Kick drums and floor toms generate frequencies below 100Hz. Standard 2-inch acoustic panels absorb almost nothing at these frequencies — the wavelengths are simply too long.

Bass traps work differently. Their larger size and corner placement allow them to absorb low frequencies that panels can’t touch.

For drummers, bass traps are mandatory, not optional. Panels clean up cymbals and snare, bass traps clean up kick and toms — you need both for a complete drum treatment.

12 Pack Corner Bass Traps

The 12 Pack Bass Traps provide enough material to treat all four corners of your drum room. The triangular design fits snugly into corners where bass frequencies accumulate.

At the budget price, these are accessible for home drummers. They won’t match professional fiberglass bass traps, but they make a real difference in practice room clarity.

TroyStudio Bass Traps

The TroyStudio Bass Traps offer the most affordable entry into bass control. The smaller size works in tight practice spaces where larger traps won’t fit.

Stack these floor to ceiling in your corners for maximum effect. At this price, buying multiple packs makes financial sense.

Delta Bass Traps

The Delta Bass Traps feature a larger triangular design that catches more bass energy. The professional appearance suits practice rooms that guests might see.

Place these in the corners behind your drum kit where kick drum reflections build up. Two packs covers all four corners at floor level.

Sonic Acoustics Corner Panels

The Sonic Acoustics 12-Pack combine quantity and value effectively. With 1,540 verified reviews, these traps have proven themselves in countless home drum setups.

The 12-piece count means you can stack multiple traps per corner, increasing bass absorption. Budget drummers can treat their room thoroughly without major expense.

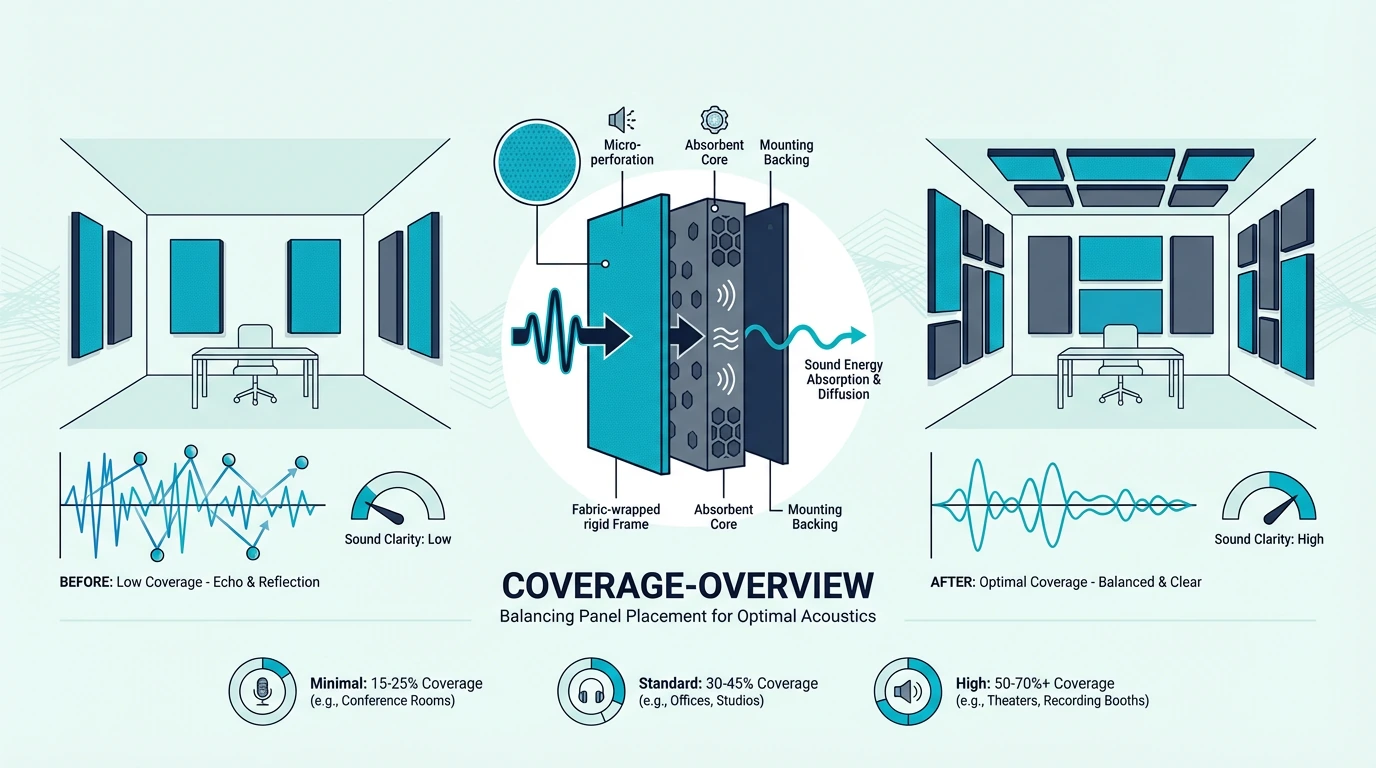
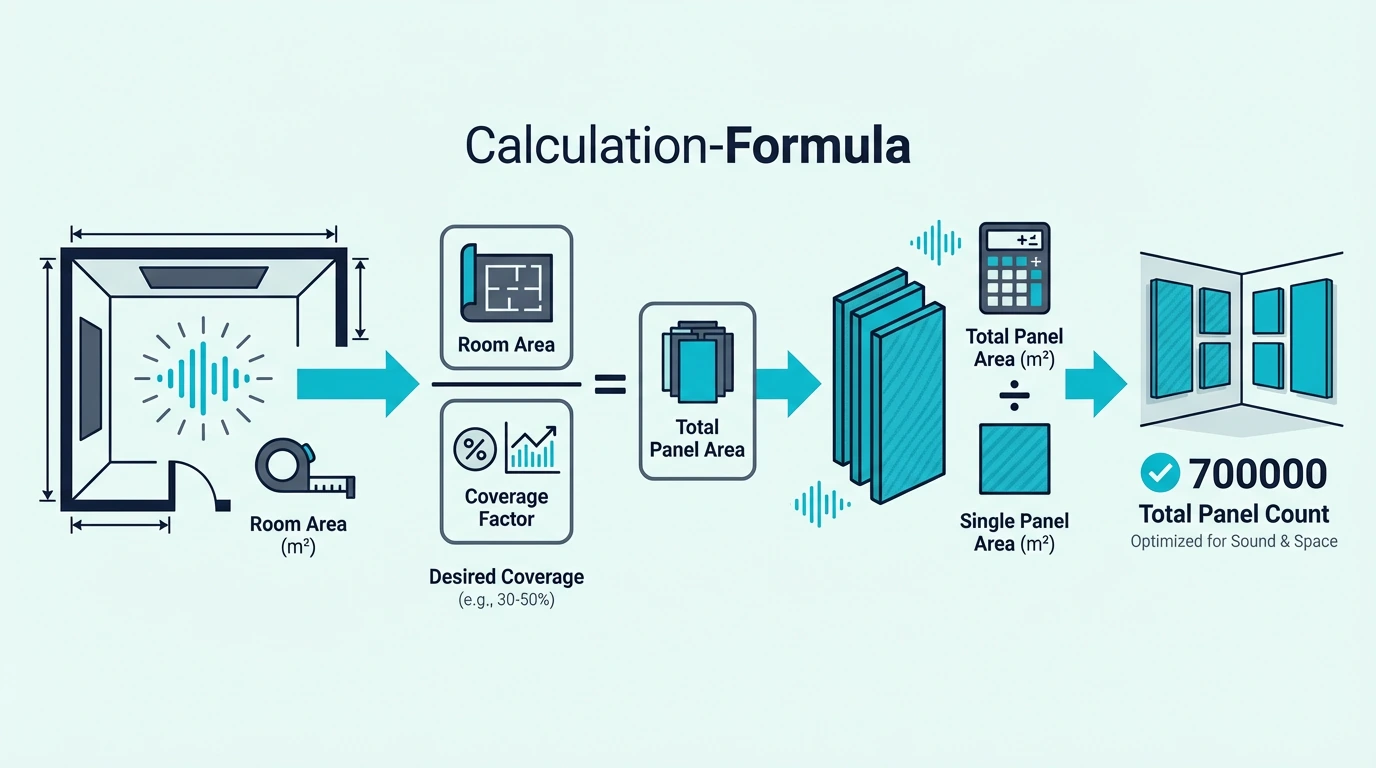
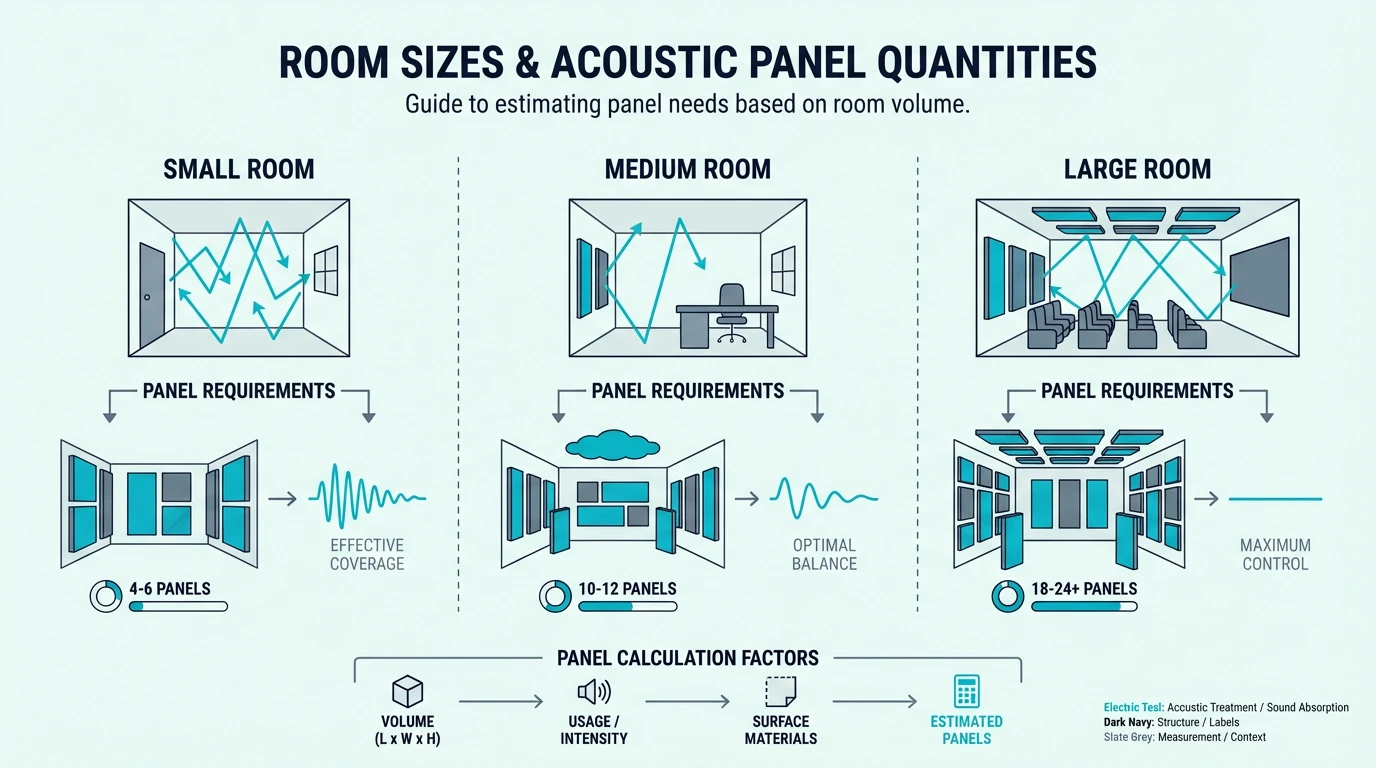
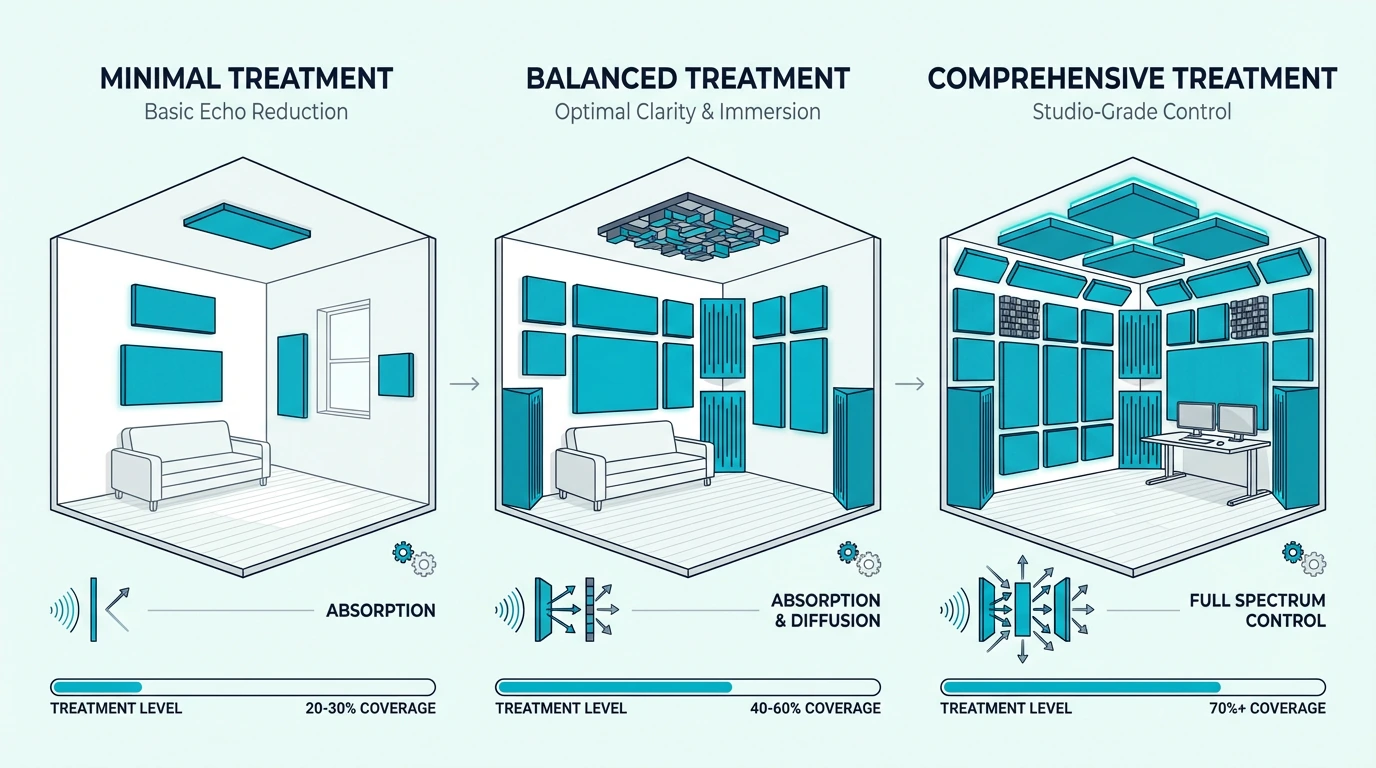
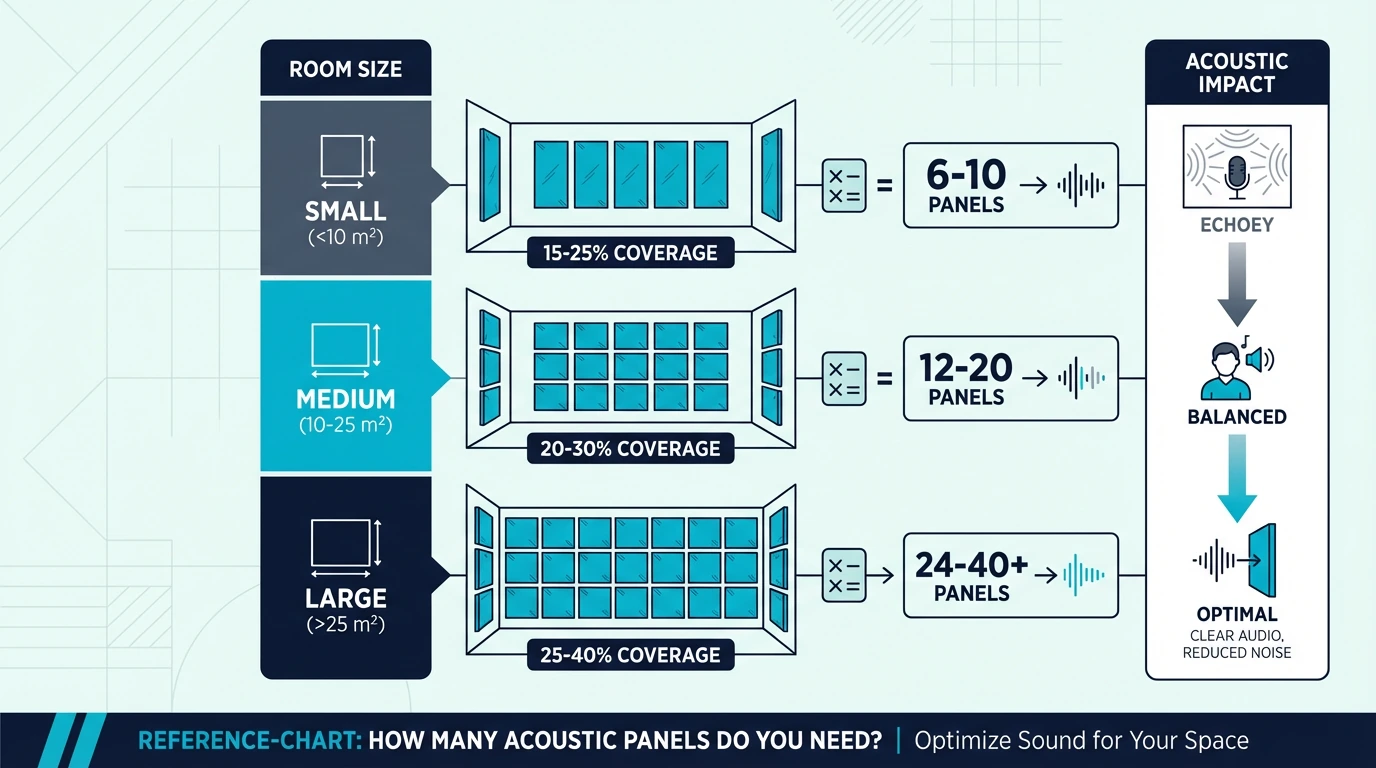
How Many Panels Do You Need?

Panel Count Guide Showing Coverage Requirements For Different Music Room Sizes

Coverage matters more than panel count, but rough guidelines help with planning and budgeting. The panel count calculator gives room-specific numbers based on your exact dimensions.

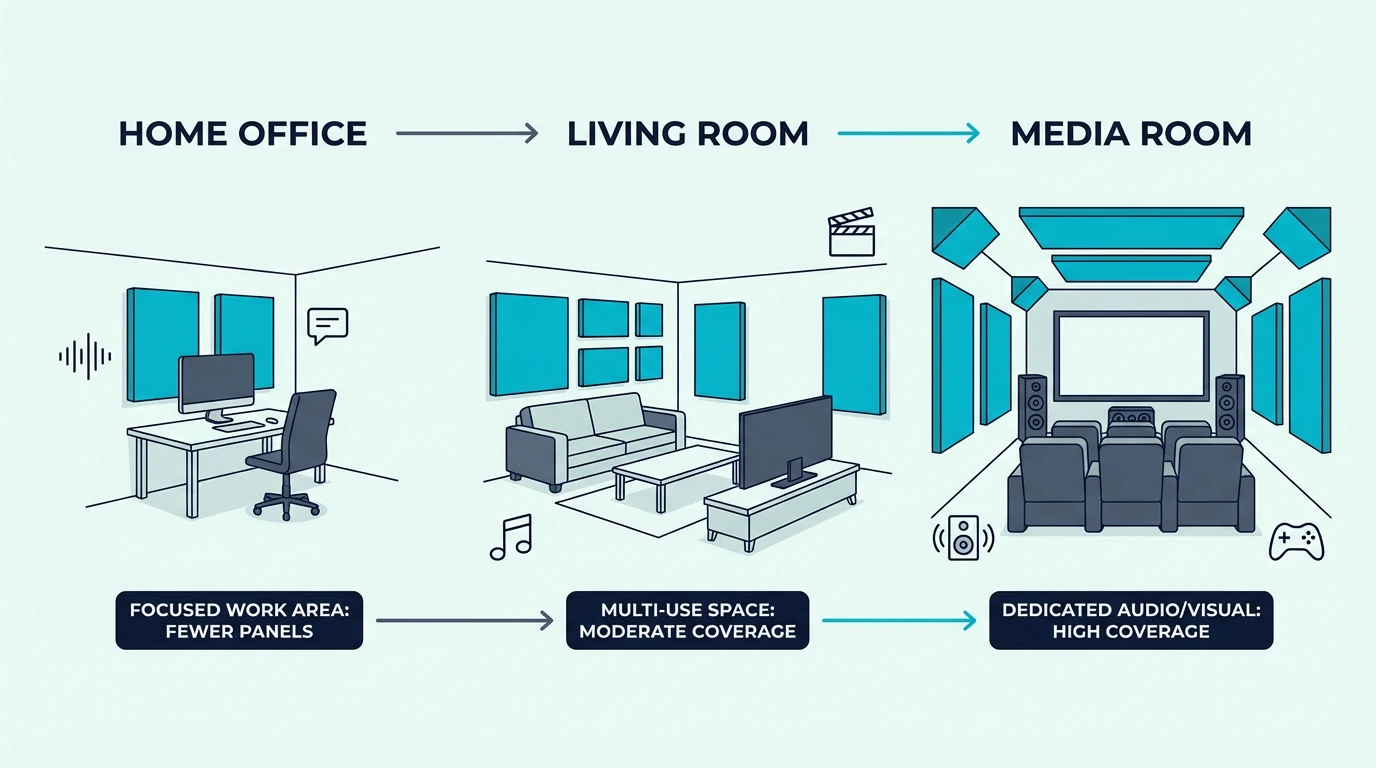
Vocal and Guitar Practice

For a small practice space focused on voice or acoustic guitar, 4-8 panels provides meaningful improvement. Concentrate them at your first reflection points — the walls directly beside and behind your playing position.

You don’t need floor-to-ceiling coverage. Strategic placement of limited panels outperforms random scattering of many panels.

Piano Room

Pianos project sound in multiple directions, requiring slightly more coverage. Plan for 8-12 panels covering the walls behind and beside the instrument.

The lid position matters too. With the lid open, more sound projects upward — ceiling treatment becomes more important.

With the lid closed, wall treatment dominates.

Drum Room

Drums need the most treatment due to their volume and frequency range. Plan for 12+ panels on walls plus bass traps in all four corners.

Prioritize the walls behind your kit first, then add side wall treatment. Ceiling treatment helps with cymbal wash if your budget allows.

Where to Place Acoustic Panels in a Music Room

Music Room Panel Placement Diagram Showing First Reflection Points And Corner Bass Trap Positions

Position matters more than quantity — four panels at first reflection points outperform a dozen scattered randomly. The placement guide covers the mirror trick and other positioning methods in full detail.

First Reflection Points

The first reflection points are exactly those high-impact spots the bridge above describes. Sit or stand at your playing position and have someone slide a mirror along each wall.

Wherever you can see your instrument in the mirror marks a first reflection point — treat these spots first. These reflections arrive at your ears just milliseconds after the direct sound, creating comb filtering that colors your tone.

The Wall Behind You

The wall behind your playing position sends reflections back toward your instrument and ears. This creates coloration in the mid and high frequencies that affects how you perceive your tone.

For singers especially, this wall treatment matters most. Vocal nuances become much clearer when rear wall reflections stop competing with your direct voice.

Corners (For Bass)

Standard panels don’t absorb bass — you need corner bass traps for low frequencies. This applies especially to drums, bass guitar, and piano’s lower octaves.

Bass energy accumulates in corners due to room modes. Treating corners with bass traps reduces the boom and mud that obscures low-end clarity.

The panel density guide explains how core weight affects low-frequency absorption.

Budget Options for Musicians

Budget Acoustic Panel Options For Musicians Showing Affordable Treatment Setups

Effective treatment doesn’t require premium prices — musicians on tight budgets can still get meaningful improvement with the right product choices.

18 Pack Black Panels

The 18 Pack Black Panels provide maximum coverage at minimum cost. Eighteen panels covers enough wall area to treat a small practice room’s critical spots.

The thinner profile means less bass absorption, but for voice and guitar practice, these work well. Focus them on your first reflection points for best results.

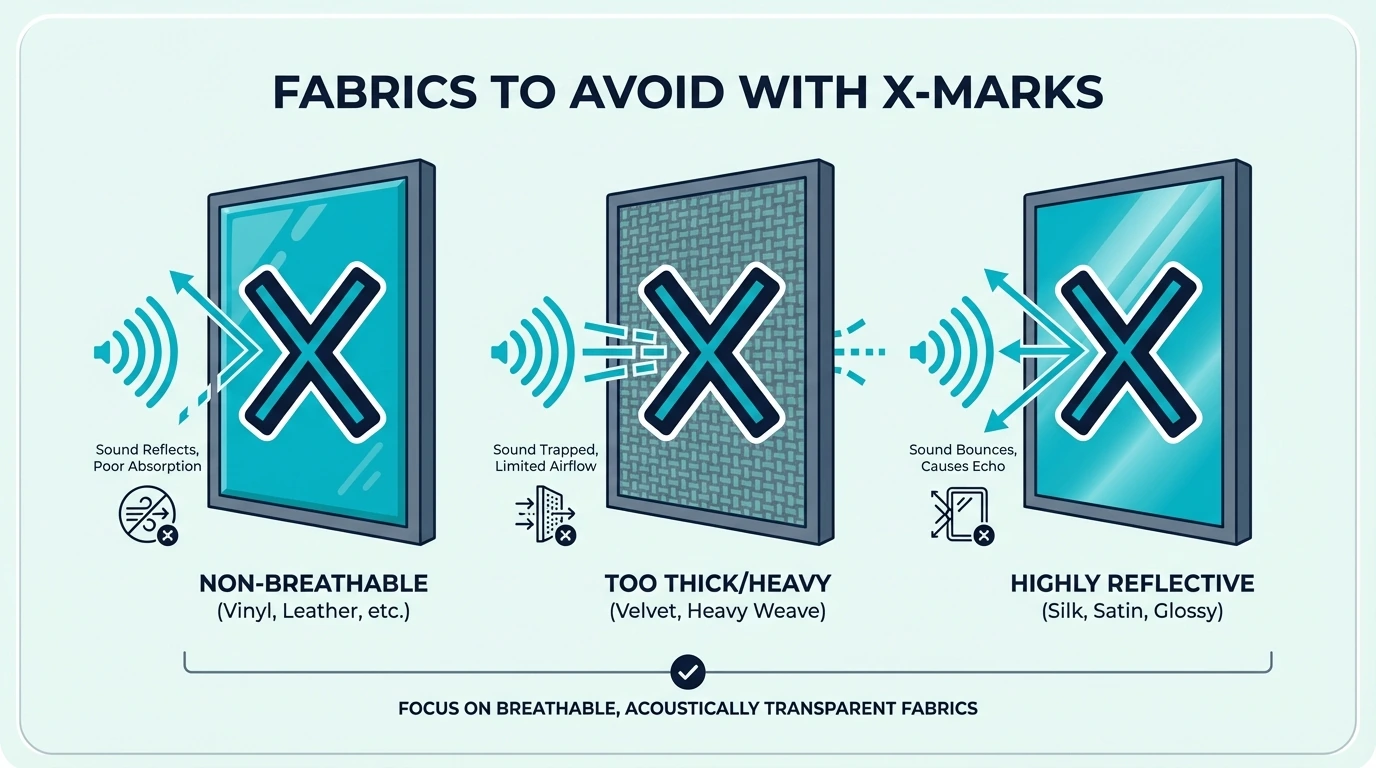
Painting panels to match your room is possible — the painting guide explains what that does to NRC and when it’s acceptable.

Secondary Olanglab Option

The Olanglab Fiberglass Panels offer a step up from budget options. The fiberglass core provides noticeably better absorption than polyester alternatives.

For musicians planning to upgrade their practice room over time, starting with quality fiberglass panels makes sense. You won’t outgrow them as your ear develops.

If you’re renting or plan to redecorate later, the removal guide shows how to take panels down without wall damage.

Instrument-Specific Treatment Summary

Instrument Specific Acoustic Treatment Requirements Comparison Table

Different instruments need different panel specs — this table gives a quick reference for each category.

Instrument Panel Thickness Bass Traps? Priority Placement
Vocals 2” Optional Behind singer, first reflections
Guitar 2” Optional Behind amp/player, first reflections
Piano 2-4” Recommended Behind piano, sidewalls
Drums 4” + bass traps Essential All corners, behind kit

Vocalists and guitarists share similar needs — 2-inch panels at first reflection points handle both instruments well. Pianists benefit from thicker panels and broader wall coverage due to the instrument’s wider frequency output.

Drummers face the biggest challenge because standard panels absorb almost nothing below 200Hz. Corner bass traps are non-negotiable for any drum practice space.

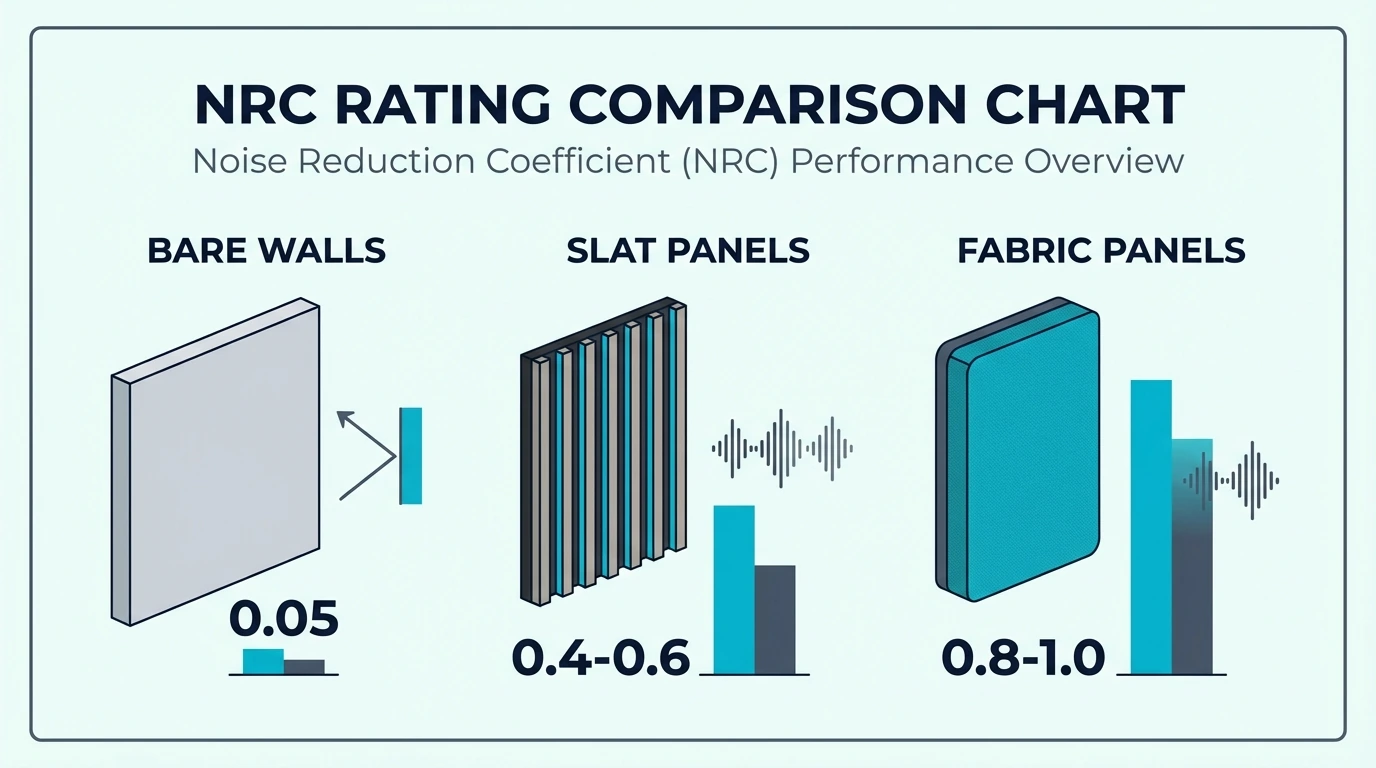
Panel NRC ratings help compare absorption performance across different products.

Conclusion

Acoustic panels for music room depend on what you play and how seriously you practice. Vocalists and guitarists benefit from 2-inch panels at first reflection points.

Pianists need broader coverage for their wider frequency range. Drummers must add bass traps — there’s no way around it.

For most musicians, the UMIACOUSTICS 4-Pack with Brackets provides the best starting point. The 2-inch fiberglass handles voice and instrument frequencies effectively, and the included mounting hardware simplifies installation.

Start with first reflection points — the spots where sound bounces directly from your instrument to your ears. Four well-placed panels outperform a dozen scattered randomly.

Drummers should pair wall panels with corner bass traps for low-frequency control. Standard panels won’t touch kick drum frequencies — only corner treatment handles that range.

The complete acoustic panels guide covers additional options beyond what’s listed here.

Budget-conscious musicians can start with the 18 Pack Black Panels to experience the improvement before investing in premium treatment.

Frequently Asked Questions

Will acoustic panels soundproof a music room?

No. Panels improve how your room sounds inside — they don’t stop sound from reaching neighbors.

Soundproofing requires construction-level solutions like mass-loaded vinyl, double drywall, and decoupled framing.

The home theater panel guide discusses this limitation in detail for rooms where both sound quality and noise isolation matter.

Do drummers need bass traps for guitar practice?

Optional but beneficial. Acoustic guitar fundamentals reach down into bass territory, and bass traps help clean up muddy low end.

For electric guitar through an amp, bass traps become more important — especially for high-gain tones.

How thick should panels be for music rooms?

2-inch panels handle most instruments well. For drums or bass-heavy practice, 4-inch panels work better, though you’ll still need corner bass traps for true low-frequency control.

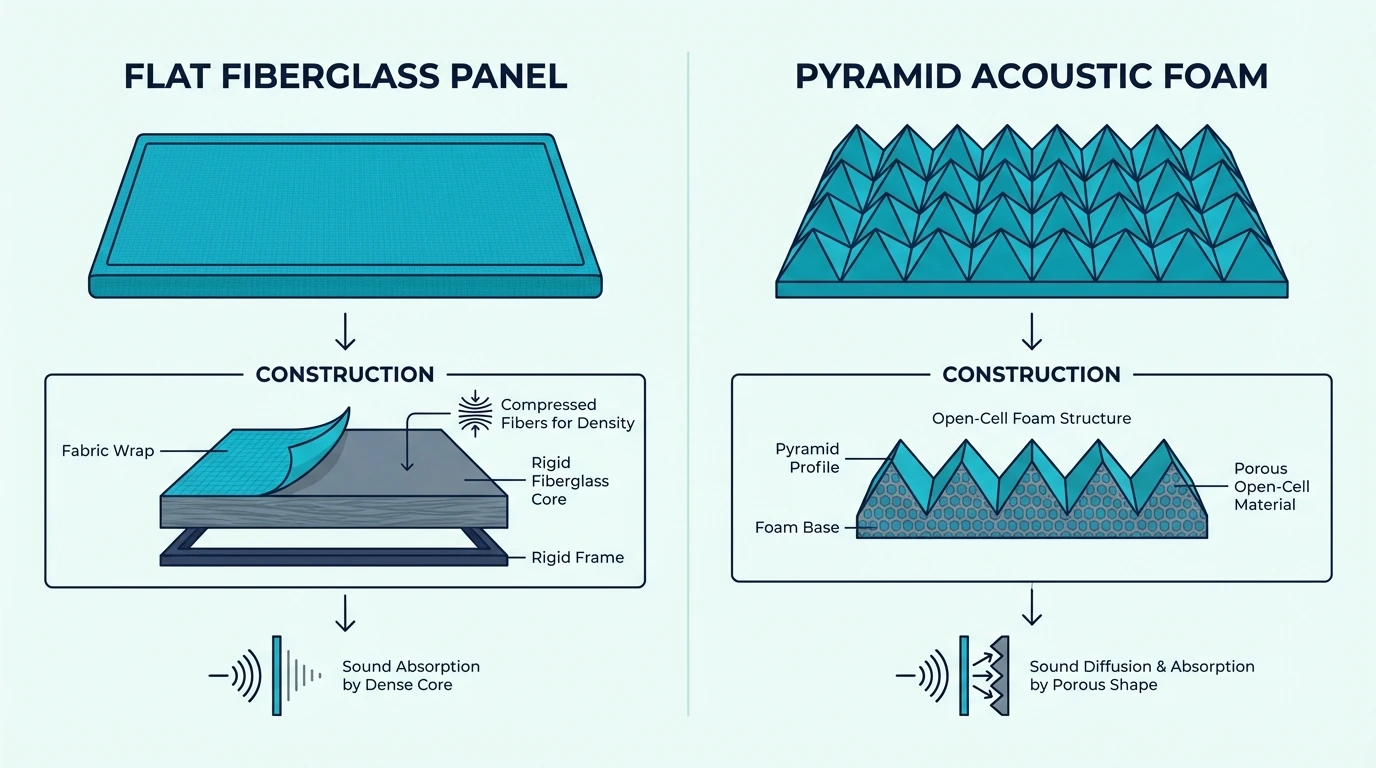
Can foam panels replace fiberglass?

Foam works for light absorption and high frequencies, while fiberglass provides broader, deeper absorption across the full spectrum.

For serious practice, fiberglass is worth the investment.

How many panels for a 10×12 room?

Start with 8-12 panels covering first reflection points and the wall behind your playing position. Add more based on results — you’ll hear when you’ve treated enough.

Should the ceiling be treated?

For drums and piano, ceiling treatment helps noticeably. For voice and guitar, wall treatment handles most problems.

Treat walls first, then add ceiling panels if budget and need align.

Best Acoustic Panels for Home Office: Reduce Echo on Video Calls [2026]

Best acoustic panels for home office setups go on the wall opposite the microphone — but only if the surfaces causing echo are treated first, not just the ones that look empty.

Most home offices have glass, painted drywall, and hard floors bouncing your voice back into the mic. The frustration is real: hollow sound, reverb tails, and colleagues asking you to repeat yourself.

Parallel hard surfaces create flutter echo that no microphone can overcome on its own.

The right panel placement eliminates mic reflections, cleans up your recorded voice, and makes calls sound like a professional studio. Below you’ll find which panels work best, exact placement positions, and what to avoid — you’ll have a clear setup plan by the end.

Quick Takeaway

Best acoustic panels for home office fix the hollow, echoey sound on Zoom calls by absorbing room reflections before they reach the mic. Treat the wall behind you first — it solves your video backdrop and audio quality in one move.

Best Acoustic Panels for Home Office

Top Home Office Acoustic Panel Picks For Video Calls And Voice Clarity

Three panels consistently perform best for work-from-home setups across voice clarity, video backdrop, and budget.

Best Overall: The UMIACOUSTICS 4-Pack with Brackets earns the top spot with its 2-inch fiberglass core and included mounting hardware. The 4.6-star rating reflects consistent performance across hundreds of home office installations.

Best for Video Backdrop: The TONOR Dual-Layer Panels dominate the video call category with massive 47-inch coverage. Four panels create a professional backdrop that clients and colleagues notice immediately.

Best Budget: The 18 Pack Black Acoustic Panels prove you don’t need a big budget to sound professional. Eighteen panels for under forty dollars covers your entire camera view.

Why Home Offices Need Acoustic Panels

Why Home Offices Need Acoustic Panels Showing Sound Reflection Paths

Home office acoustics affect both audio quality and how you appear on camera — the same panels solve both problems at once.

Cleaner Zoom and Teams Audio

Your laptop microphone or headset captures everything in your room, including the sound bouncing off walls, desk, and monitors. These reflections create the hollow, echoey quality that makes you sound less professional than colleagues in treated offices.

Acoustic panels absorb these reflections before they can bounce back to the mic. The result is cleaner voice capture that sounds like a dedicated office, not a spare bedroom.

Even expensive microphones can’t fix bad room acoustics. No amount of software noise reduction eliminates room echo — only physical treatment does.

The acoustic panels hub explains the physics behind absorption vs soundproofing in detail.

Professional Video Backdrop

What appears behind you on video calls matters more than most remote workers realize. Messy bookshelves distract from your message, virtual backgrounds often glitch, and blank walls look unfinished.

Acoustic panels create a clean, professional backdrop that requires zero post-processing. The consistent texture signals to clients and colleagues that you take your work environment seriously.

This visual upgrade happens automatically when you treat the wall behind you — solving audio and video problems with a single purchase. The gaming panels guide covers the same dual-purpose approach for streaming setups.

Reduced Distractions

Better audio and a cleaner backdrop help you project professionalism, but panels also affect how the room feels during the rest of your workday. Home offices rarely have the sound isolation of commercial buildings.

Kids, pets, street noise, and household sounds all compete for attention during your workday.

Panels don’t soundproof the space (nothing short of construction does), but they reduce the reverb that amplifies these distractions. A treated room feels noticeably calmer and more focused.

Best Acoustic Panels for Video Calls

NRC Rating Comparison For Video Call Acoustic Panel Options

Some panels suit video backdrops better than general treatment — these prioritize large coverage and clean appearance alongside absorption.

TONOR Dual-Layer Panels

The TONOR Dual-Layer Panels set the standard for video call backdrops. Each panel spans nearly four feet, meaning four panels cover the entire background of most webcam setups with minimal visible seams.

The dual-layer construction serves both purposes: the outer fabric creates a clean visual while the inner high-density core absorbs voice frequencies. With 868 verified reviews, these have been battle-tested by thousands of remote workers.

Self-adhesive backing simplifies installation, though Command strips offer easier removal for renters.

BUBOS Large Format Panels

The BUBOS Fabric Acoustic Panels deliver premium aesthetics for home offices where appearance matters. The 47×24-inch dimensions fill standard webcam frames beautifully.

The fabric wrapping photographs well under any lighting conditions — ring lights, natural light, or overhead fixtures all show these panels flatteringly. The professional appearance justifies the premium price for client-facing roles.

Olanglab Fiberglass Panels

The Olanglab Fiberglass Panels offer genuine acoustic performance at a mid-range price. The fiberglass core puts these in a different absorption class than budget polyester panels.

Remote workers who prioritize audio quality alongside visual appeal get both from these panels. The fiberglass acoustic panels guide has a full performance breakdown by NRC tier.

Best Budget Home Office Panels

Budget Acoustic Panel Options For Home Office Setups

Not every remote worker needs premium panels from day one — these budget options deliver meaningful improvement for those starting to optimize their home office.

18 Pack Black Panels

The 18 Pack Black Acoustic Panels dominate the budget category with sheer quantity. Eighteen panels means you can cover your entire video backdrop wall without buying multiple packs.

The 0.4-inch thickness won’t handle low frequencies, but for voice frequencies on video calls, these panels make an audible difference. The black color creates a professional backdrop that recedes on camera.

Over 3,400 reviews confirm these work for budget-conscious remote workers.

10 Pack Large Coverage Panels

The 10 Packs Large Acoustic Panels offer the best coverage value for larger home offices. Ten panels at 47×24 inches each means massive wall coverage at a reasonable price per square foot.

Remote workers with larger rooms or those wanting to treat multiple walls benefit from this quantity. The thinner profile works well for voice frequencies even if it won’t handle bass.

The recording studio panel guide covers the more aggressive treatment that combined office-and-studio spaces require.

Best Panels for Voice Clarity

Voice Clarity Panel Options Showing Fiberglass Core Cross Section

Voice clarity on calls depends on absorption in the 100-4000Hz range — these fiberglass-core panels cover that range effectively.

UMIACOUSTICS with Hanging Bracket

The UMIACOUSTICS Panels with Bracket lead the voice clarity category because of their 2-inch thickness. Voice frequencies primarily live in the 100-4000Hz range, and 2-inch panels absorb this range effectively.

The included hanging brackets mean you’re not hunting for compatible hardware. At 4.6 stars with 126 reviews, these panels have proven themselves across many home office setups.

Remote workers who spend hours on calls daily notice the audio improvement immediately. Clients and colleagues will hear the difference.

Standard Fiberglass 4-Pack

The 23.62” X 11.81” Fiberglass Panels deliver the same fiberglass core at a slightly lower price by skipping the mounting hardware. If you already have Command strips or picture hangers, this saves money without sacrificing quality.

The 2-inch fiberglass absorbs voice frequencies the same way regardless of brand — physics doesn’t change based on marketing. The same absorption principles apply whether you’re in a home studio or corporate office.

UMIACOUSTICS Standard Pack

The UMIACOUSTICS Standard 4-Pack offers another solid fiberglass option. With 199 verified reviews, these panels have established themselves as a reliable choice for home office audio improvement.

Where to Place Acoustic Panels in Home Office

Home Office Panel Placement Diagram Showing Priority Wall Positions

Placement determines whether panels actually improve your calls — the right spots make an immediate difference while the wrong spots change almost nothing. The bedroom panels guide covers the same mirror trick and positioning logic for smaller rooms.

Video Backdrop Wall

The wall that appears on camera is the first priority. This serves dual purposes: visual backdrop for video and acoustic treatment for sound bouncing toward the mic from behind.

Place panels to fill the webcam’s frame completely. Open your video conferencing app to check exactly what appears in the shot, then cover that area with panels.

Wall Behind Your Monitor

The second priority is treating the wall behind your monitor — the direction you face while working. Sound from your speakers (or your own voice if you don’t use headphones) bounces off this wall first.

If you’re using external speakers for calls, this placement becomes even more critical. Panels here prevent audio from bouncing back into the microphone.

Side Walls (Flutter Echo)

If the desk sits between two parallel walls, sound bounces back and forth creating “flutter echo.” This makes voices sound thin and metallic.

Treating even one side wall breaks this echo pattern. A few panels at ear height make a noticeable difference without requiring full wall coverage.

Installation Tips for Home Offices

Home Office Acoustic Panel Installation Methods Showing Command Strip And Leaning Options

Getting panels on the wall without damaging a rental is simple with the right method — Command strips, leaning, and desk mounts each serve different situations.

Command Strip Method

3M Command strips remain the best option for renters or anyone who might move their setup. The medium or large picture hanging strips support most acoustic panels without issue.

Apply strips in an X pattern on the back of each panel for maximum hold. Let them cure for at least an hour before mounting — rushing this step leads to panels falling during important calls.

When you move, Command strips remove cleanly from both panels and walls. The streaming panels guide covers permanent mounting methods for dedicated broadcast rooms.

Leaning Panels Behind Desk

If wall mounting isn’t possible, leaning panels against the wall behind the desk works surprisingly well. The camera can’t tell whether panels are mounted or leaning.

The acoustic benefit is slightly reduced compared to wall mounting, but the visual improvement remains the same. This approach works well for temporary setups or shared spaces.

Desk-Mounted Options

Some remote workers prefer panels that attach directly to the desk or monitor. These don’t provide the same coverage as wall-mounted options, but they help with first reflections near the microphone.

This approach supplements wall treatment rather than replacing it. The panels behind you matter most for video call quality.

Conclusion

Best acoustic panels for home office depend on matching priorities and budget to the right product. The market offers legitimate options from entry-level starters to professional broadcast quality.

The UMIACOUSTICS 4-Pack with Brackets provides the best starting point for most remote workers. The 2-inch fiberglass handles voice frequencies effectively, and the included mounting hardware simplifies installation.

Start with the video backdrop wall — it solves both audio quality and professional appearance in one move. Budget-conscious remote workers can begin with the 18 Pack Black Panels and upgrade as needs grow.

The ceiling panels guide covers overhead treatment options for offices where upward reflections also need attention.

Frequently Asked Questions

Do acoustic panels actually improve Zoom audio?

Yes. Panels absorb room reflections that make your voice sound hollow and echoey on video calls.

Colleagues notice cleaner audio immediately, even if they can’t identify why you sound more professional.

Should I prioritize audio or video backdrop?

Start with the video backdrop — the wall behind you that appears on camera. This serves both visual and acoustic purposes, giving you the most improvement from your first panels.

Will cheap acoustic panels work for home office?

Budget panels work for visual backdrop and high-frequency absorption. For serious audio improvement on important calls, thicker panels (2 inches) with fiberglass cores perform noticeably better.

Panel NRC ratings help compare absorption performance across different products and price tiers.

How many panels do I need for a home office?

For a typical video call backdrop, 4-8 panels cover the camera’s view — add 2-4 more behind the monitor for a total of 6-12 panels.

Can I use acoustic panels in a rental?

Command strips mount panels without damage, and many options have self-adhesive backing that removes cleanly.

Freestanding or leaning panels work too if you can’t mount anything.

Do panel colors affect audio quality?

No — the fabric color is purely aesthetic, and a black panel absorbs the same frequencies as a white one with identical construction.

Best Acoustic Panels for Streaming — Complete Creator Guide [2026]

Best acoustic panels for streaming solve two problems at once: they clean up your microphone audio and create a professional-looking backdrop for your camera — but picking the wrong panels leaves you with a wall of foam that absorbs nothing below 2 kHz.

The echo in your room affects your audience more than your microphone choice does. A budget mic in a treated room sounds better than a premium mic bouncing off bare walls.

Below you will find the best panels for microphone clarity, camera backdrop coverage, and budget setups — with placement tips so you get the maximum return from each panel. Start with the wall directly behind your microphone.

Quick Takeaway

Best acoustic panels for streaming improve both your mic audio and camera backdrop in one upgrade. Prioritize 2-inch fiberglass or high-density cores for voice-frequency absorption, and large-format panels for seamless on-camera backdrops.

Top Streaming Panel Picks

Top Streaming Panels for best acoustic panels for streaming Three panels consistently outperform for streaming-specific needs — one for mic clarity, one for camera backdrops, and one for tight budgets.

Best Overall: The High-Density Core 4 Pack earns the top spot with its 2-inch thickness that handles the full voice frequency range. The 4.8-star rating from verified buyers confirms these panels just work.

Best for Backdrop: The TONOR Dual-Layer Panels dominate the backdrop category with their massive 47-inch coverage. Four panels create a professional-looking wall that makes your stream look like it belongs on a major platform.

Best Budget: The 18 Pack Black Acoustic Panels prove you don’t need a big budget to start. Eighteen panels for under forty dollars means you can treat your primary streaming wall completely.

Why Streamers Need Acoustic Panels

Streamer Audio Problem for best acoustic panels for streaming Acoustic panels solve three problems that every streamer faces: microphone echo, amateur-looking backdrops, and viewer drop-off from poor audio.

Cleaner Microphone Audio

Your streaming microphone captures everything in your room — including the sound bouncing off your walls, desk, and monitors. These reflections reach your mic milliseconds after your direct voice, creating that hollow, echoey quality that viewers associate with amateur streams.

Acoustic panels absorb these reflections before they can bounce back. The result is voice capture that sounds like a professional studio, not a bedroom.

Even premium microphones like the Shure SM7B or Rode NT1 cannot compensate for bad room acoustics. No amount of EQ or noise reduction fixes room echo — only physical absorption does.

The best fiberglass acoustic panels guide covers the core materials that matter most for voice clarity.

Professional Camera Backdrop

What viewers see behind you matters almost as much as your audio quality. Bare walls look amateur, busy backgrounds distract from your content, and green screens require extra lighting and post-processing.

Acoustic panels create a clean, professional backdrop that requires zero post-production. The consistent texture and color look intentional on camera, signaling to viewers that you take your content seriously.

Treating the wall behind your camera solves audio and video problems with a single purchase — the same principle that makes panels effective in bedroom studio setups.

Viewer Retention

Your audience might not consciously notice good audio, but they definitely notice bad audio. Echoey streams cause viewers to click away within seconds, often before they even realize why.

Clean audio keeps viewers engaged longer. They can focus on your content instead of straining to understand you through room reverb.

Which Acoustic Panels Work Best for Camera Backdrop?

Camera Backdrop Panels for best acoustic panels for streaming Camera-facing panels need to look clean on stream while still absorbing sound. These options balance both.

TONOR Dual-Layer Panels

The TONOR Dual-Layer Panels set the standard for streaming backdrops. Each panel spans nearly four feet, meaning four panels cover eight square feet of wall with minimal seams.

The dual-layer construction serves both purposes: the outer fabric layer creates a clean visual surface while the inner high-density core absorbs sound. With 868 verified reviews, these panels have been battle-tested by thousands of content creators.

Self-adhesive backing simplifies installation, though Command strips give renters easier removal when moving.

BUBOS Large Format Panels

For streamers who want maximum coverage with minimal panels, the BUBOS Fabric Acoustic Panels deliver premium aesthetics. The 47×24-inch dimensions match popular streaming frame sizes.

The fabric wrapping adds a polished look that photographs well under any lighting conditions. These panels don’t develop the shiny spots that cheaper materials sometimes show on camera.

At the premium price point, these make most sense for dedicated streaming rooms where you want a permanent, professional installation.

Olanglab Fiberglass Panels

The Olanglab Fiberglass Panels offer genuine acoustic performance at a mid-range price. The fiberglass core puts these in a different absorption class than budget polyester panels.

For streamers who prioritize audio quality alongside visual appeal, these panels deliver both. The fabric finish looks professional on camera while the fiberglass handles voice frequencies effectively — the same core material used in recording studio panels.

Four panels won’t cover a full wall, but they create an excellent accent behind your primary streaming position. Order two packs for complete backdrop coverage.

Which Panels Deliver the Best Microphone Quality?

Mic Quality Panels for best acoustic panels for streaming Backdrop panels handle the visual side — but the panels closest to your microphone determine your actual audio quality. Thickness and core density matter most here.

High-Density Core 4 Pack

The High-Density Core 4 Pack leads the mic quality category because of its 2-inch thickness. Voice frequencies primarily live in the 100–4000 Hz range, and 2-inch panels absorb this range effectively.

The self-adhesive backing makes these particularly valuable for streamers who rent their space. No drilling, no damage, and you can take them with you when you move.

At 4.8 stars with verified buyers, these panels deliver the audio improvement streamers need. Position them behind and beside your microphone for best results.

UMIACOUSTICS with Hanging Bracket

The UMIACOUSTICS Panels with Bracket solve the mounting problem by including hanging brackets in the box. No hunting for compatible hardware.

The 2-inch fiberglass core matches professional studio panels in absorption capability. At 4.6 stars with 126 reviews, these panels have proven themselves across many streaming setups.

UMIACOUSTICS Standard Pack

The UMIACOUSTICS Standard 4 Pack delivers the same fiberglass core at a lower price by skipping the mounting hardware. If you already have Command strips or picture hangers, this saves money without sacrificing quality.

With 199 verified reviews, these panels are a reliable mid-range option for streamers. The fiberglass absorbs voice frequencies the same way regardless of price — physics does not care about branding.

What Are the Best Budget Streaming Panels?

Budget Streaming Panels for best acoustic panels for streaming Not every content creator needs premium panels from day one. These budget options deliver meaningful improvement for streamers just starting out.

18 Pack Black Acoustic Panels

The 18 Pack Black Acoustic Panels dominate the budget category with sheer quantity. Eighteen panels means you can cover your entire streaming wall without buying multiple packs.

At this price point, you are prioritizing coverage over maximum absorption. The 0.4-inch thickness will not handle low frequencies, but for standard voice and headset audio, these panels make an audible difference.

The black color creates a professional backdrop that recedes on camera. Over 3,400 reviews confirm these panels work for budget-conscious streamers.

Decorative Budget Starter

For streamers who want personality alongside function, the 2 PCS Decorative Acoustic Panels offer the lowest entry price. Under thirty dollars gets you started with real acoustic treatment.

Two panels will not transform your room, but they let you test placement and hear the difference before committing to a larger investment.

Art Panel Budget Option

The Art Acoustic Panels 8-Pack combine acoustic treatment with visual interest. Eight 48×32-inch panels with printed designs create a backdrop that stands out on camera.

For streamers building a brand aesthetic, these panels let you match your backdrop to your channel’s visual identity. The art prints show better on camera than plain black in many cases.

Where Should Streamers Place Acoustic Panels?

Streaming Placement Guide for best acoustic panels for streaming Placement determines whether panels actually improve your stream. Great panels in the wrong spots produce minimal results — three priority zones cover most streaming setups.

Backdrop Wall Coverage

The wall your camera sees is your first priority. It doubles as visual backdrop and acoustic treatment for sound bouncing toward your mic.

Place panels to fill your camera’s frame completely. Check your streaming software to see exactly what appears in your shot, then cover that area with panels.

For most webcam setups, treating a 4–6 foot wide section of wall is enough. Taller streamers or those with wider camera angles may need to extend coverage higher — the same logic applies to home theater setups where visual appearance matters.

Treatment Around Your Microphone

The second priority is treating the surfaces around your microphone. Sound from your voice bounces off nearby walls and returns to your mic, creating echo.

Panels on the wall behind you (from the mic’s perspective, not the camera’s) catch these first reflections. The mirror trick from the gaming panels guide applies here: if you can see your mic in a mirror on the wall, that wall is a reflection point.

Side walls within arm’s reach of your streaming position also matter. These surfaces create the “flutter echo” that makes voices sound metallic and thin — the acoustic panels placement guide covers the full priority order for any room shape.

Ceiling Treatment

Ceiling treatment helps but is not essential for most streamers. The walls behind your camera and around your mic handle the majority of problematic reflections.

If you have treated those primary spots and still hear echo, ceiling panels become the next upgrade. Walls deliver more improvement per panel for streaming setups.

How Do Streamers Install Panels Without Wall Damage?

Command Strip Mounting for best acoustic panels for streaming Getting panels on your walls without damaging your rental depends on your adhesive method. Two approaches cover most streaming setups.

Command Strip Method

3M Command strips remain the best option for streamers who rent. The medium or large picture hanging strips support most acoustic panels without issue.

Apply strips in an X pattern on the back of each panel for maximum hold. Let them cure for at least an hour before mounting — rushing this step leads to panels falling overnight.

When you move, Command strips remove cleanly from both panels and walls. Your deposit stays safe, and you take your acoustic investment to your next streaming space.

Self-Adhesive Panels

Many streaming-focused panels include self-adhesive backing. The trade-off is speed versus flexibility — once stuck, repositioning is difficult.

Test your placement with painter’s tape before committing to permanent adhesive. Stream a test session to verify your backdrop looks right on camera and your audio sounds clean.

For renters, self-adhesive panels may damage paint on removal. Weigh the installation convenience against potential move-out complications.

Behind-Desk Placement

If wall mounting is not possible, placing panels on a shelf or leaning them against the wall behind your desk works well for streaming backdrops.

The acoustic benefit is slightly reduced compared to wall mounting, but the visual improvement remains the same. Your camera does not know whether panels are mounted or leaning.

Conclusion

The right streaming panels match your priority — mic clarity, camera backdrop, or both — to a product and price point that fits your setup. Backdrop wall first, mic reflections second, ceiling last.

For full-spectrum voice absorption, the High-Density Core 4 Pack delivers professional-grade results with renter-friendly mounting. For maximum on-camera coverage, the TONOR Dual-Layer Panels fill your frame with four panels.

Budget-conscious creators can start with the 18 Pack Black Acoustic Panels and upgrade as the channel grows. The best acoustic panels guide covers every tier in detail.

Frequently Asked Questions

Do acoustic panels actually help streaming audio?

Yes. Panels absorb room reflections that make your voice sound echoey on stream.

Viewers notice cleaner audio immediately, even if they cannot pinpoint why the stream sounds more professional.

Should I prioritize backdrop or mic placement?

Start with your backdrop — the wall behind you that appears on camera. It doubles as visual upgrade and acoustic treatment, giving you the most improvement from your first panels.

Will cheap acoustic panels work for streaming?

Budget panels work for visual backdrop and high-frequency absorption. For serious mic improvement, thicker panels (2 inches) with fiberglass or high-density cores perform noticeably better.

How many panels do I need for streaming?

For a typical streaming backdrop, 4–8 panels cover the camera’s view. Add 2–4 more around your mic position for audio improvement — 6–12 panels total for full treatment.

The how many acoustic panels guide has a room-size calculator for precise numbers.

Can I use acoustic foam instead of panels?

Acoustic foam (pyramid or wedge shapes) absorbs high frequencies but misses the voice range. Real panels with fiberglass or dense cores deliver better results for streaming audio.

Do panel colors affect audio quality?

No. The fabric color is purely aesthetic — a black panel absorbs the same frequencies as a white one with identical construction.

Choose colors that match your streaming brand.

Best Acoustic Panels for Gaming — Complete Streamer Guide [2026]

Best acoustic panels for gaming transform your streaming setup from echoey amateur hour to professional broadcast quality. Your viewers notice audio quality before they notice your gameplay — but most gamers skip treatment entirely and wonder why their mic sounds terrible.

The uncomfortable truth most gaming gear sites skip: acoustic panels will not stop your neighbors from hearing your midnight rage sessions. They control echo and reverb inside your room, making your mic pick up your voice clearly instead of a muddy mess of reflections.

The difference between a treated room and an untreated one shows up immediately in voice chat clarity and stream audio quality — the same principle behind the best acoustic panels across every room type.

Below you’ll find which panels absorb voice frequencies most effectively, how to position them for maximum mic clarity, and why you’ll get more from two panels behind your gaming chair than from an expensive mic upgrade.

Quick Takeaway

Best acoustic panels for gaming improve mic clarity and reduce room echo during streams and voice chat. Panels absorb reflections inside your room so your mic captures voice cleanly — not the muddy echo of hard walls. Prioritize 2-inch panels behind your gaming position first, then treat first reflection points on side walls.

Top Gaming Panel Picks

Top Gaming Panel Picks Showing Best Acoustic Panels For Gaming Setup

Gaming setups narrow the field to three priorities: voice-range absorption, camera-ready appearance, and damage-free installation.

Best Overall: The High-Density Core 4 Pack delivers the best absorption for voice frequencies. The 2-inch thickness handles the 100–4000Hz range where most voice audio lives, and self-adhesive backing means no drilling into walls.

Best Budget: The 18 Pack Black Acoustic Panels gives you coverage without crushing your budget. Eighteen panels for under forty dollars means you can treat your primary gaming wall completely.

Best for Streamers: The TONOR Dual-Layer Panels combine absorption with aesthetics. The 47-inch panels create a professional backdrop that looks as good on camera as it sounds on mic.

Why Gamers Need Acoustic Panels

Gamer Room Echo Problem Showing Sound Reflections In Untreated Gaming Setup

Mic audio quality is the entire reason. Your gaming headset mic picks up every reflection in the room, and panels are the only fix that does not require construction work.

Hard walls, monitors, and glass windows bounce your voice around before it reaches the microphone, creating that hollow, echoey sound viewers hate. Acoustic panels absorb those reflections before they bounce back — the result is cleaner voice chat in competitive games and professional-sounding streams without expensive soundproofing.

The Echo Problem in Gaming Rooms

Most gaming setups are acoustic disasters. A desk, multiple monitors, and bare walls create a reflective nightmare for audio.

When you speak, sound waves hit these hard surfaces and bounce back to your mic milliseconds later. This creates what audio engineers call “flutter echo” — that metallic ringing that makes your voice sound like you’re in a bathroom.

Even mid-range mics like the Blue Yeti or Shure MV7 can’t fix room acoustics. No amount of software processing replaces real acoustic treatment — the acoustic panels hub explains why absorption is the foundation.

What Panels Actually Do

Acoustic panels absorb mid and high-frequency sound waves. When your voice hits the panel instead of a hard wall, the energy converts to tiny amounts of heat instead of bouncing back.

This doesn’t block sound from leaving your room — that’s soundproofing, which requires construction work. What it does is clean up the sound inside your room so your mic captures your voice, not your room’s reverb.

The practical result: your Discord calls sound clearer, your streams have better audio, and your recordings need less post-processing. Teams and squad members stop asking you to repeat yourself — a result consistent with how fiberglass acoustic panels perform in studio settings.

Which Acoustic Panels Work Best for Streaming Setups?

Streaming Setup Acoustic Panels Showing Professional Backdrop Treatment

Streaming panels have to absorb sound and look clean on camera at the same time. The two picks in this section handle both without compromise.

TONOR Dual-Layer Panels

The TONOR Dual-Layer Panels earned their reputation among content creators for good reason. The 47-inch panels cover serious wall space with just four units.

The dual-layer construction is the differentiator. The outer fabric layer handles aesthetics while the inner high-density core does the acoustic work — both absorption and a camera-ready backdrop in one product.

With 868 reviews from verified purchasers, these panels have been battle-tested in real streaming setups — including overhead positions where they double as ceiling panels above the mix desk. The self-adhesive backing simplifies installation, though Command strips work better for renters who want easier removal.

The size works both ways — you need dedicated wall space for these panels, and renters may find the large format harder to remove cleanly.

For smaller gaming rooms, the Olanglab fiberglass panels offer the same core quality in a more compact format.

Olanglab Fiberglass Panels

If the TONOR’s size feels excessive, the Olanglab Fiberglass Panels offer a more flexible approach. The 24-inch panels work in tighter spaces while still delivering real acoustic improvement.

The fiberglass core puts these in a different category than budget polyester panels. Fiberglass absorbs a broader frequency range — especially important for capturing deep voice tones without muddiness.

These panels work particularly well arranged in a grid pattern behind your streaming position. Four panels won’t transform your room, but they’ll noticeably improve the wall directly behind your mic.

What Are the Best Budget Gaming Panels?

Budget Gaming Acoustic Panels Showing Affordable Options For Gaming Setups

Not every gamer needs studio-grade treatment. Coverage at a low price point often beats a single premium panel — wall area matters more than individual panel cost.

18 Pack Black Acoustic Panels

The 18 Pack Black Acoustic Panels lead Amazon’s budget category with over 3,400 reviews at time of writing.

Eighteen 12-inch panels give you enough coverage to treat your primary gaming wall completely. At the budget price point, you’re getting quantity over individual panel quality — and for gaming setups, coverage often matters more than peak absorption.

The 0.4-inch thickness won’t absorb low frequencies effectively. Bass rumble from subwoofers or low male voices won’t be fully controlled — but for high-pitched headset audio and standard voice chat, these panels make a noticeable difference.

The black color works perfectly for streaming backdrops. These panels create a clean, professional look that doesn’t distract from your webcam feed.

At this price point, replacing a worn set after a year of heavy use costs less than a single premium panel.

2 PCS Decorative Acoustic Panels

The 2 PCS Decorative Acoustic Panels cost the least of any real panel option. Under thirty dollars gets you two fabric-wrapped panels to test whether treatment makes a difference in your setup.

These won’t transform your room alone — two panels simply can’t cover enough surface area. Think of them as a starter kit to test whether acoustic treatment makes sense for your setup before committing to a full order.

The decorative fabric finish means these panels won’t look out of place in a bedroom gaming setup. For meaningful improvement, plan on ordering 3–4 packs once you’ve confirmed the placement works.

Which Decorative Panels Fit Gaming Aesthetics?

Decorative Acoustic Panels For Gaming Room Showing RGB And Art Panel Options

Black panels work for streamers, but gamers who want their setup to pop need options from the acoustic art panels category that still absorb. Four designs span the range from large-format prints to graffiti.

Large Format Art Panels

The 72×48 Inch Art Acoustic Panels 6-Pack deliver serious visual impact. Each panel covers six square feet — the pack treats 36 square feet of wall space with vibrant artwork.

At 4.6 stars with 243 reviews, these panels have proven themselves in real gaming setups. The large format means fewer seams and a cleaner overall look compared to arranging multiple smaller panels.

UMIACOUSTICS Art Collection

For a balance of style and performance, the UMIACOUSTICS Art Acoustic 6-Pack score the highest rating in the decorative category. The 0.7-inch thickness provides meaningful absorption while the printed designs add personality.

The 0.7-inch thickness provides real absorption while keeping panel weight low enough for adhesive mounting. For RGB gaming setups, brighter color variants from the same product line catch LED glow and add atmosphere without extra hardware.

Graffiti and Street Art Styles

The FurnoFlexArt Graffiti Panels bring street art energy to gaming spaces. The urban aesthetic fits gaming culture and esports vibes perfectly.

With 169 reviews and a 4.2-star rating, these panels deliver on both style and acoustic performance. The self-adhesive backing makes installation quick for renters.

Budget Decorative Options

The Art Acoustic Panels 8-Pack offer decorative treatment without breaking the budget. Eight 48×32-inch panels cover real wall space while adding visual interest.

For gamers wanting more coverage, the HushHues 8-Pack Art Panels provide similar value with different design options. Both deliver meaningful acoustic improvement alongside gaming room aesthetics.

Complete Gaming Panel Reviews

Complete Gaming Panel Reviews Showing Detailed Comparison Of All Products

Each pick earned its spot for a different reason. Build quality, absorption range, and price per panel vary enough that the wrong choice wastes money.

High-Density Core 4 Pack — Best Overall

The High-Density Core 4 Pack landed at the top of the list because the 4.8-star average holds up across different room sizes. Verified buyers consistently report cleaner mic audio within the first session.

The 2-inch thickness matters for gaming audio. Voice frequencies sit primarily in the 100–4000Hz range, and 2-inch panels absorb this range effectively — thinner panels let these frequencies pass through largely unaffected.

Self-adhesive backing eliminates the drilling and mounting hardware hassle. For renters or gamers who don’t want permanent wall modifications, this feature alone justifies the premium price.

The trade-off is cost. These panels cost roughly three times more per panel than budget options, and full room treatment means multiple packs — overkill for casual gamers, justified for serious streamers.

Best for: Serious streamers, content creators, and competitive gamers who prioritize audio quality in voice chat.

UMIACOUSTICS Panels with Hanging Bracket

The UMIACOUSTICS Panels with Hanging Bracket solve the installation problem elegantly. The included brackets mean you don’t need to figure out mounting separately.

The 2-inch fiberglass core matches the absorption capability of professional studio panels. With 126 verified reviews and a 4.6-star rating, these panels deliver consistent results — on par with what the best recording studio panels offer at higher price points.

Best for: Gamers who want professional-grade absorption with included mounting hardware.

Olanglab Fiberglass Panels — Multiple Colors

The Olanglab Fiberglass Panels come in multiple color options to match your gaming room aesthetic. The same fiberglass core delivers consistent absorption across all color variants.

Color choice matters for streaming setups where panels appear on camera. Black creates a professional, receding backdrop — gray or other neutrals can complement specific room designs.

The fabric wrapping adds visual polish that bare foam panels lack. These look like intentional design choices rather than obvious acoustic treatment.

Best for: Gamers who want acoustic treatment that enhances rather than compromises room aesthetics.

Where to Place Panels in Your Gaming Room

Gaming Room Panel Placement Guide Showing Strategic Positions For Best Audio

Strategic placement completely determines whether your panels actually improve your microphone audio. Dumping ten expensive panels randomly in the corners of the room will always perform worse than placing just two panels exactly where the reflections occur.

Behind Your Mic

The absolute most critical placement for any streaming or gaming setup is the wall directly behind your chair. When you speak into the mic, your voice travels past the desk, slams into the back wall, and bounces straight back into the microphone’s pickup pattern, creating a massive slap-back echo.

Hanging panels squarely on this wall intercepts those direct reflections before they ever have a chance to return to the microphone. Even two basic panels positioned at head-height behind your chair will create an immediate, night-and-day difference in your Discord voice clarity. Additionally, if you’re streaming with a face-cam, this rear wall usually serves as your background, meaning those panels double as a professional set design.

First Reflection Points

Once the back wall is secured, the next priority is the side walls immediately to the left and right of your desk. These are your primary first reflection points—the spots where the sound coming out of your desktop speakers bounces off the drywall and hits your ears.

You can easily locate these exact spots by sitting in your gaming chair and having a friend slide a flat mirror horizontally along the side walls. The exact inch where you can see the reflection of your desktop speakers in the mirror is the exact spot where a panel must be mounted.

Blanketing these reflection points strips the “smearing” effect out of the room, completely tightening up your stereo imaging. In competitive FPS games, that clarity lets you pinpoint enemy footsteps with vastly more accuracy because the room reflections aren’t confusing your ears.

Behind Monitors

Finally, your massive gaming monitors act as hard, reflective glass surfaces sitting just inches from your face. When you speak, your voice bounces off the screens, hits the wall immediately behind the desk, and ricochets right back into the mic.

Mounting wall panels directly behind your monitors absorbs that secondary bounce, completely killing the tight, boxy resonance that plagues desktop recording setups. However, you must place the panels to catch the reflections bouncing off the drywall—never place panels physically between your ears and the speakers. Full room treatment requires analyzing your specific layout; the best fiberglass panels guide breaks down wall-by-wall placement strategies for different sized rooms.

How Do Renters Install Panels Without Wall Damage?

Renter Friendly Acoustic Panel Installation Showing Damage Free Mounting Methods

The single biggest roadblock for gamers in apartments or dorms is figuring out how to mount heavy acoustic treatment without permanently damaging the drywall. To protect your security deposit, you must completely avoid drilling anchors and instead rely on Command strips, controlled adhesives, or freestanding mounts.

Command Strips

Heavy-duty 3M Command strips remain the absolute gold standard for damage-free mounting, provided you use enough of them to handle the weight. To properly secure a standard fiberglass panel, apply four large picture-hanging strips to the back of the wooden frame in a wide X pattern to evenly distribute the load.

You must let the strips cure against the drywall for at least an hour before applying the weight of the panel. When your lease finally ends, pulling the tabs straight down slowly stretches the adhesive until it releases cleanly, letting you pack up your acoustic investment without leaving a single mark or torn paint chip behind.

Self-Adhesive Panel Considerations

Panels that ship with built-in adhesive backing seem very convenient, but that speed comes at the cost of flexibility. Once that industrial adhesive hits the drywall, the panel is locked in place—attempting to reposition it five minutes later will usually tear the paper right off the drywall.

Because of this permanence, you must test your acoustic placement first. Use gentle blue painter’s tape to hold the panels temporarily on the wall, run a few mic tests, and only peel the permanent adhesive backing once you are absolutely certain the placement works.

Freestanding Options

If you have a brutally strict landlord and zero tolerance for wall damage, simply abandon the wall mounts entirely. A heavy, 4-foot fiberglass panel simply leaned against the wall directly behind your gaming chair provides massive acoustic absorption without a single drop of adhesive.

This freestanding approach allows you to reposition the treatment instantly and guarantees zero move-out headaches. The home office panels guide covers the same renter-safe mounting logic for desk setups. The only compromise is aesthetics and stability; leaning panels simply don’t look as sharp as flush-mounted ones, and they can easily get knocked over if you roll your chair back too aggressively.

Conclusion

Two panels behind your mic beats zero panels every time.

That’s not a simplification — it’s the actual starting point.

Before worrying about exact placement, first reflection points, or panel thickness, get something on the wall behind your gaming position. The improvement shows up immediately in voice chat.

From there, scale up based on what you hear. Streamers who depend on audio quality should invest in 2-inch fiberglass panels.

Gamers who want their setup to look as good as it sounds should check the best acoustic art panels for options that double as wall art. Budget-conscious buyers can cover a full gaming wall with the 18-pack for under forty dollars.

The full acoustic panels guide covers every room type and budget tier.

Frequently Asked Questions

Do acoustic panels stop sound from leaving my gaming room?

No. Acoustic panels absorb sound inside your room to reduce echo and reverb.

They don’t block sound from reaching your neighbors — that requires soundproofing, which involves construction work like adding mass to walls or decoupling surfaces.

How many panels do I need for a gaming room?

For a typical bedroom-sized gaming space, 4–8 panels behind your gaming position and at first reflection points create the most noticeable improvement.

Full room treatment might need 12–20 panels depending on room size and how many hard surfaces you have, but starting with two behind your chair covers the highest-impact location.

Will acoustic panels help my headset mic sound better?

Yes — headset mics pick up room reflections that muddy your voice, and even two panels behind your chair produce noticeably cleaner audio in Discord and on stream.

Can I use acoustic foam instead of panels?

Acoustic foam works for high frequencies but absorbs less in the voice range than real panels with fiberglass or high-density cores.

For gaming audio, the gap matters most in the 200–1000Hz band where voice fundamentals sit. The streaming panels guide compares foam vs fiberglass for content creators. If you already own foam, doubling it up partially closes the gap — but dedicated panels remain the stronger choice.

Do panel colors affect acoustic performance?

No — a black panel absorbs the same frequencies as a white panel of identical construction. Color is purely aesthetic, so choose whatever matches your streaming backdrop.

Where should I put panels if I can only afford a few?

The wall directly behind your gaming chair — that single surface catches the strongest mic reflections and gives the highest return per panel. The bedroom panels guide covers the same behind-the-seat logic for smaller rooms.

Best Acoustic Panels for Home Theater: Top Picks for Movie Room Clarity [2026]

Best acoustic panels for home theater make a measurable difference in movie clarity — but only when placed at the right positions, and most home theaters get this wrong from day one.

Most theater owners invest thousands in equipment, then leave the room untreated. Bare drywall bounces sound off every surface, arriving at your ears milliseconds after the direct signal.

The result is muddy dialogue, blurred surround placement, and bass that sounds boomy in some spots and dead in others.

Two inches of fiberglass at the first reflection points fixes most of those problems in one installation.

Below you’ll find which panels perform best for theater use, where to place them for maximum impact, and what you’ll spend at each budget tier.

Quick Takeaway

The best acoustic panels for home theater are 2-inch thick fiberglass or mineral wool panels with fabric wrapping. Focus on first reflection points (side walls at ear level), the ceiling above seating, and rear wall treatment. Budget around 8-12 panels for a typical room, prioritizing side walls first.

What Are the Best Acoustic Panels for Home Theaters?

Best Acoustic Panels For Home Theater Showing Top Rated Options For Movie Room Treatment

Three panels consistently deliver the best results for home theater applications — one for value, one for budget, and one for dedicated rooms with no compromises.

Best Overall Pick

The UMIACOUSTICS 4 PCS Acoustic Panels with Hanging Bracket hits the sweet spot between performance and value. The 2-inch fiberglass core absorbs frequencies from 250Hz up to 4kHz effectively — exactly the range where dialogue clarity lives.

What sets these apart is the included mounting hardware. Most panels require separate purchases for hanging systems, which adds both cost and complexity.

The fabric wrap comes in multiple colors, including dark options that disappear into theater rooms. For a standard home theater, two packs (8 panels) cover first reflection points on both side walls.

These panels earn their “best overall” spot because they solve the most common home theater problems without requiring acoustic engineering expertise. Position them at ear level on side walls, and you’ll immediately notice cleaner dialogue and tighter bass response.

For detailed mounting techniques, the bedroom acoustic treatment guide covers each method.

Best Budget Pick

If your theater budget is already stretched, the 18 Pack Black Acoustic Panels prove you don’t need to spend a fortune to improve your room. With over 3,400 reviews, these are among the most purchased home theater panels on Amazon.

The tradeoff is thickness — at 0.4 inches, they primarily address flutter echo and high-frequency reflections. Don’t expect bass control from these.

However, for rooms with severe echo problems, 18 panels cover a large portion of wall space. The black color works perfectly in dedicated theater spaces with dark walls and ceilings.

Use these as supplementary treatment rather than your primary panels. They’re excellent for filling in rear walls and ceiling areas after you’ve addressed first reflection points with thicker options.

Best Premium Pick

For dedicated theater rooms where aesthetics and performance both matter, the UMIACOUSTICS 2 PCS Large Acoustic Panels offer studio-grade absorption in a visually impressive format.

These 47-inch by 24-inch panels mean fewer seams and a cleaner look. One panel covers what would require two or three smaller options.

The premium price reflects the professional construction — dense fiberglass core with careful fabric wrapping. These are the same quality you’d find in commercial cinema installations.

If your home theater is a showpiece room for entertaining guests, these panels look intentional rather than like afterthought treatment. They make a statement while solving acoustic problems.

Why Do Home Theaters Need Acoustic Treatment?

Home Theater Sound Reflection Diagram Showing Echo And Muddy Audio From Bare Walls

Home theater acoustics create problems that other rooms avoid. Powerful equipment in an enclosed space means every reflection competes directly with your speakers — and the three biggest casualties are dialogue, surround imaging, and bass control.

Reflection Problems in Enclosed Spaces

The enclosed shape of a typical theater room is exactly what makes reflections so aggressive. When your subwoofer hits a 40Hz explosion scene, that sound wave bounces off every surface in the room.

Without absorption, these reflections arrive at your ears milliseconds after the direct sound. Your brain tries to process both — and fails.

The result is muddy bass, unclear dialogue, and a sense that something is “off” even if you can’t identify why. Many theater owners blame their speakers when the room is actually the problem.

Acoustic panels absorb these reflections before they can bounce back. The sound that reaches your ears is primarily the direct signal from your speakers, not a confused mix of reflections.

Specific Improvements After Treatment

Once those reflections stop competing with the direct signal, the changes are audible across every part of the soundtrack. Dialogue clarity improves noticeably — you’ll stop reaching for the remote to turn up voices during quiet scenes.

Second, surround sound actually surrounds. Reflections from bare walls confuse the spatial placement of effects, making your 7.1 system sound like stereo with extra noise.

Third, bass tightens. Low frequencies are particularly prone to room interaction, creating “boomy” spots and dead zones.

Panels with sufficient thickness help smooth these inconsistencies.

The improvement is most noticeable during dynamic scenes where quiet dialogue follows loud action. Untreated rooms blur the transition; treated rooms maintain clarity throughout.

The decorative panel options guide covers the science behind absorption and room treatment.

What Types of Panels Work Best for Home Theaters?

Acoustic Panel Types For Home Theater Comparing Fiberglass Absorption Panels And Diffusers

Not all panels perform equally in home theater environments. The choice between absorbers, diffusers, and bass traps depends on your room size and primary problem.

Absorption Panels vs Diffusers

Home theaters primarily need absorption panels — the fabric-wrapped fiberglass or mineral wool products covered above. These convert sound energy into tiny amounts of heat, preventing reflections.

Diffusers scatter sound instead of absorbing it. They’re useful in large spaces where you want to maintain some liveliness while breaking up direct reflections.

For most home theaters under 500 square feet, focus on absorption first. Diffusers add complexity without solving the primary problems.

You can always add them later if the room feels too “dead” after treatment.

The Olanglab Fiberglass Acoustic Wall Panels offer excellent absorption at a reasonable price point for those building out full room treatment.

Bass Traps for Low-Frequency Control

Absorbers handle the mid and high range, but the low end plays by different rules. Bass frequencies accumulate in corners, creating boomy zones and null points where bass nearly disappears.

Standard acoustic panels help somewhat, but dedicated bass traps placed in room corners provide more effective low-frequency control. These are typically thicker — 4 inches or more — and mounted floor-to-ceiling.

For home theaters, address first reflection points with 2-inch panels first. If bass problems persist after basic treatment, corner traps are your next investment — the low-frequency panel guide covers dedicated bass solutions.

The acoustic panels hub covers bass trap options for deeper low-frequency control.

Panel Thickness and Frequency Range

The reason bass traps need to be so thick points to a broader rule that applies to every panel in your theater. Thin panels only catch high frequencies; thick panels absorb deeper into the bass range.

Two inches is the minimum recommended thickness for home theater panels. This handles the critical 250Hz-4kHz range where most movie soundtrack content lives.

The UMIACOUSTICS 4 PCS Acoustic Panels at 2 inches thick represent the sweet spot for most installations. Go thicker (4 inches) only if you have severe bass problems or a very large room.

Where to Place Panels in a Home Theater

Home Theater Acoustic Panel Placement Diagram Showing First Reflection Points On Side Walls

Placement determines whether your panels fix the problem. Strategic positions deliver audible improvement; random placement delivers marginal results.

First Reflection Points

These are the most critical positions in any home theater. First reflection points are the spots on side walls where sound from your front speakers bounces directly toward your listening position.

Find them by sitting in your primary seat while a helper slides a mirror along the side wall. When you can see the speaker in the mirror’s reflection, mark that spot.

Place panels at these locations first — typically two to three per side wall, centered at ear height when seated. This single improvement often delivers more audible benefit than any other treatment.

The Fiberglass Wall Panels 4 Pack are sized perfectly for first reflection treatment.

Ceiling Panels and Atmos Setups

The ceiling is the most neglected surface in home theaters. Sound reflects off your ceiling just as it does off walls, and the reflection path is often shorter.

A “cloud” — a panel or group of panels suspended above the primary seating area — addresses ceiling reflections effectively. This is particularly important for Dolby Atmos setups with height channels.

Mounting ceiling panels requires more planning than wall treatment. The ceiling panel guide covers mounting options that securely suspend panels without risking them falling onto viewers below.

Start with the ceiling area directly between your front speakers and listening position. Expand rearward over the seating area as budget allows.

How Many Panels Needed?

Room size determines panel count, but a typical home theater (150-300 square feet) benefits from 8-12 panels total. A practical starting framework follows.

Side walls: 4-6 panels (2-3 per side at first reflection points). Ceiling: 2-4 panels above seating.

Rear wall: 2-4 panels to prevent slap-back echo.

You can always add more, but starting with these positions covers the highest-impact treatment zones. The fiberglass panel guide helps determine exact quantities for your room dimensions.

How Do the Best Home Theater Acoustic Panels Compare?

All Home Theater Acoustic Panels Compared Showing Options From Budget To Premium

Beyond the top three picks, these options cover specific use cases — easy installation, decorative treatment, and budget full-room coverage.

Best for Easy Installation

Not everyone wants to drill into walls or fuss with mounting hardware. The 4 Pack High-Density Core Acoustic Panels feature self-adhesive backing that eliminates the mounting problem entirely.

The 4.8-star rating (highest on this list) reflects both acoustic performance and installation satisfaction. Users consistently praise the “peel and stick” simplicity.

The adhesive works best on smooth, painted surfaces. Textured walls or wallpaper may require supplemental mounting methods.

These are ideal for rental properties or situations where you want treatment without permanent wall modifications. The adhesive typically removes cleanly, though always test in an inconspicuous area first.

Best Looking Panels

Visual design matters as much as acoustic performance when the theater doubles as an entertainment room.

Dedicated home theaters are often showpiece rooms. The BUBOS Fabric Acoustic Panels bring designer aesthetics to acoustic treatment.

At nearly 4 feet by 2 feet per panel, these make statements on your walls while solving acoustic problems. The fabric wrapping includes decorative options beyond basic black.

Position these on the most visible walls — typically the side walls adjacent to seating that guests see when entering. Use more utilitarian panels on less visible surfaces like ceilings and rear walls.

The premium per-panel cost makes sense when aesthetics matter. For purely functional treatment in dedicated rooms with minimal visibility, less expensive options perform equally well acoustically.

Best for Dark Rooms

Home theaters often feature dark color schemes to reduce light reflection from projector screens. The Olanglab Fiberglass Acoustic Wall Panels Gray disappear into dark-painted rooms.

The gray fabric complements both black and charcoal wall colors common in serious home theaters. Against dark walls, these panels are nearly invisible from viewing distance.

Acoustic performance matches the other Olanglab fiberglass panels — solid construction with good mid-frequency absorption. The color choice is the primary differentiator.

Pair these with the black budget panels for full-room treatment that maintains your theater’s dark aesthetic throughout.

Best Entry Level Option

Committing to a full treatment plan without proof that panels help your specific room is a gamble. For testing whether acoustic treatment helps your specific room before committing to larger purchases, the 2 PCS Decorative Acoustic Panels offer the lowest risk entry point.

Two panels won’t transform a room, but they’ll demonstrate whether treatment helps your space. Position them at a first reflection point and listen for improvement in dialogue clarity.

If you notice a difference (most people do), scale up with broader coverage. If not, you’ve spent less than the cost of dinner for two to learn your room has other issues.

Once you’re convinced treatment helps, the recording studio panel guide shows options designed for critical listening.

The decorative fabric options also let you test aesthetic preferences before committing to full room treatment in a specific color.

How Much Does Home Theater Treatment Cost?

Home Theater Acoustic Treatment Budget Breakdown Showing Entry Mid Range And Premium Costs

Treatment costs less than most theater upgrades and outlasts most electronics. Three budget tiers cover entry-level echo treatment, full first-reflection coverage, and complete room professional results.

Budget Tier Breakdown

Three price tiers cover the range from basic echo control to full-room professional treatment.

Entry Level (Under $150): Addresses flutter echo and basic reflections. Expect 8-12 thin panels or 4 quality panels.

Noticeable improvement for dialogue clarity. Limited bass control.

Mid-Range ($150-$400): Full first reflection treatment plus ceiling coverage. 8-12 quality 2-inch panels. Noticeable improvement in overall sound quality.

Good value for most home theaters.

Premium ($400+): Full room treatment including bass traps. 16+ panels with varied placement. Professional-grade results.

Worth it for dedicated theater rooms with quality equipment.

Most home theater owners find the mid-range tier delivers the best return on investment. The best panels for the money guide ranks options by cost-effectiveness across all budgets.

You can always expand treatment later, but starting with quality 2-inch panels at first reflection points provides the foundation.

Compare these costs to what you’ve spent on speakers and electronics. If your equipment budget exceeded $2,000, spending 10-20% of that on room treatment makes your entire investment perform better.

Wood acoustic panels can reduce costs further if you want a decorative alternative.

Conclusion

Two packs of 2-inch fiberglass panels at first reflection points fix the majority of home theater acoustic problems. That covers dialogue clarity, surround imaging, and the worst bass modes — all in one installation session.

Start with side walls at ear height. Add ceiling treatment if you run Atmos or notice overhead reflections.

Expand to rear walls and corners only after confirming the first-reflection panels made the expected difference.

The best acoustic panels guide covers options beyond home theater applications, and the home office panel guide covers placement for smaller rooms where the same principles apply at a different scale.

Frequently Asked Questions

Do Home Theaters Really Need Treatment?

Yes — and it’s not a minor improvement. Untreated rooms waste much of your speaker investment by allowing reflections to muddy the sound.

Even modest treatment at first reflection points creates audible improvement that guests notice immediately. For serious home theater enthusiasts, treatment is as essential as quality speakers.

Foam or Professional Panels?

Professional fabric-wrapped panels outperform acoustic foam in every measurable way. Foam is thinner, absorbs less, and degrades faster.

The price gap has narrowed in recent years. For the cost of covering a wall with foam, quality fiberglass panels perform better and last longer.

Foam has one advantage: it’s easier to cut for custom shapes. If you need to treat unusual surfaces or irregular spaces, foam’s flexibility helps.

Otherwise, choose panels.

Will Panels Help Surround Sound?

Absolutely — surround sound benefits even more than stereo from room treatment. Surround systems rely on precise speaker placement to create spatial effects.

Reflections confuse spatial positioning, making rear channels blend with fronts and sides bleed into each other. Treatment allows each speaker to contribute its intended signal without room interference.

If you’ve invested in Atmos or DTS:X with height channels, ceiling treatment becomes particularly important. Height effects require the ceiling to not reflect competing signals back to listeners.

Best Fabric for Acoustic Panels: How to Choose [2026]

Best fabric for acoustic panels is what separates real absorption from an expensive decorative wall hanging. You can build the perfect frame and source premium rockwool insulation, but cover it with the wrong material and sound bounces off instead of passing through.

The fabric mistake is the most common DIY error because sound has to pass through the fabric before it can reach the absorbing core — and most craft store fabrics block it instead of letting it through.

Below you’ll find exactly which fabrics work, which ones to avoid, and how to test any material in five seconds before you spend money on it.

Your first step is the breath test — and after that, choosing between the proven options below based on your budget and aesthetic requirements.

Quick Takeaway

The best fabric for acoustic panels is acoustically transparent — meaning sound passes through easily. Top choices include speaker grill cloth, Guilford of Maine FR701, and certain polyester fabrics. Always perform the breath test: if you can breathe through it easily, sound can pass through too.

What Is the Best Fabric for Acoustic Panels?

Diagram showing acoustically transparent fabric over an acoustic panel

The technical term for material that lets sound waves reach the absorbing core is “acoustically transparent.” It means the fabric has an open enough weave that sound passes through instead of bouncing back into the room.

What Makes Fabric “Acoustically Transparent”?

That transparency depends on Air Flow Resistance (AFR). When the weave is loose, air — and therefore sound — moves through the gaps freely. Professional acoustic fabrics are engineered for specific AFR ratings, but you don’t need laboratory numbers to make a choice.

The practical test requires no equipment: if you hold the fabric to your mouth and can breathe through it easily, sound will pass through it. If it feels like blowing through a thick pillow, the material is too dense.

Does Fabric Choice Actually Affect Sound Absorption?

That density matters because the wrong cover can destroy a panel’s effectiveness by 20–40%. Your acoustic panel’s absorption happens entirely in the core material (fiberglass, rockwool, etc.), making the fabric just a visual shell to contain loose fibers.

But if that shell reflects high frequencies before they ever reach the core, you’ve built a very expensive wall decoration. It’s like wrapping a sponge in plastic wrap and expecting it to soak up a spill — the cover defeats the core’s entire purpose.

What Fabrics Work Best for Acoustic Panels?

Breath test demonstration for acoustic panel fabric

Speaker grill cloth, Guilford of Maine FR701, burlap, and certain polyesters all meet that transparency requirement — but they differ wildly in price, durability, and appearance.

What Is Guilford of Maine Fabric?

The industry standard that you’ll find covering commercial installations, theaters, and high-end recording studios is Guilford of Maine FR701. It earns that spot because it is specifically engineered for acoustic transparency while inherently passing strict fire codes.

The material wraps cleanly around sharp panel edges and maintains consistent color across massive dye lots, but that reliability comes at a steep premium per yard.

Can You Use Burlap for Acoustic Panels?

If that price breaks the budget for a DIY home studio, natural burlap offers the exact opposite proposition. The coarse, open weave easily passes the breath test and costs a fraction of professional fabric, making it a favorite for garage and basement setups.

The tradeoff is consistency: weave density varies wildly between bolts, and the rustic texture looks entirely out of place in a modern living room or corporate office. If budget is the absolute ceiling, check the recording studio panel guide for pre-made alternatives before wrestling with burlap.

Does Cotton Work for Panels?

Cotton introduces a different kind of risk because the name tells you nothing about the weave density. A thin muslin or cheesecloth will let sound through perfectly, but they are too fragile to survive being stretched and stapled tightly over a wooden frame.

Conversely, a sturdy cotton canvas will survive the stapling process but block the sound entirely. If you’re committed to cotton for aesthetic reasons, you have to buy samples and test each specific bolt before committing to a bulk order.

Can You Use Polyester Fabric?

Polyester actually strikes a safer balance when you choose the right blend. Because the synthetic fibers hold color without fading and resist sagging over time, many professional acoustic covers are polyester-based.

Products like SoundAssured Acoustical Fabric take the guesswork out of synthetic blends by engineering the material specifically for sound transmission. The key is avoiding polyester apparel fabrics, which are woven tightly to block wind and will do exactly the same to acoustic energy.

If polyester still feels too risky to judge on your own, the next option removes the guesswork entirely because it was built for audio from the start. The fundamental difference is that audio-grade materials have their thread density calibrated to transmit sound faithfully, while apparel polyester prioritizes wind resistance — the exact property that blocks acoustic energy.

What About Speaker Grill Cloth?

The most reliable budget alternative to Guilford of Maine is standard speaker grill cloth. It is designed for the exact same acoustic physics — protecting internal components while letting audio pass through untouched.

Speaker manufacturers have invested decades of research into materials that transmit audio faithfully, which is exactly what your panel cover needs. The cloth preserves the full frequency range while protecting drivers, and that same engineering translates directly to acoustic panel wrapping.

Because the material is mass-produced for the consumer electronics industry, it costs a fraction of specialty acoustic fabric while delivering identical transparency. That supply chain advantage makes it the go-to choice for DIYers building multiple panels on a budget.

A bulk roll like the FINDUFA Speaker Grill Cloth (96” x 54”) covers multiple large panels for the price of a single yard of premium fabric. The only real limitation is aesthetics, as speaker cloth almost universally ships in utilitarian black, gray, or tan.

How Do You Test if Fabric Is Acoustically Transparent?

Comparison chart of fabric options for acoustic panels

The fabric options above are proven quantities, but evaluating an unknown fabric requires a physical check before you commit your budget. Two simple tests filter out materials that will ruin your panel’s performance.

What Is the Breath Test?

The most reliable diagnostic tool is your own lungs. When you hold a fabric sample tightly against your mouth and blow, the air should pass through with almost zero resistance.

If you feel noticeable back-pressure — like blowing against a thick winter coat or a wall — the weave is too tight. Sound waves will hit that dense barrier and reflect right back into the room instead of sinking into the rockwool behind it.

What Is the Light Test?

You can confirm the breath test visually by holding the material up to a strong light source. A truly open weave will let pinpricks of light shine through the gaps between the threads.

This visual check is less definitive than the breath test because some glossy or coated fabrics pass light while still reflecting high frequencies. If a fabric completely blocks the light, it will definitely block sound — but if it passes the light test, you still need to breathe through it to be sure.

What Fabrics Should You Avoid?

Fabric wrapping technique for an acoustic panel

Those two tests immediately disqualify three of the most popular craft store materials: canvas, velvet, and upholstery fabric. All three look great on a frame, and all three destroy acoustic performance.

Why Doesn’t Canvas Work?

Canvas fails because the threads are packed tightly together to create a rigid, durable surface. That dense structure creates a hard boundary that bounces high and mid-frequency sound waves away before they ever reach your absorbing material.

While it’s easy to stretch tightly over a frame without tearing, that physical sturdiness is exactly what makes it an acoustic nightmare.

Is Velvet Bad for Acoustic Panels?

Velvet creates a different kind of trap because its plush, soft texture instinctively looks “acoustic” to most people. But softness does not equal transparency.

The dense pile that gives velvet its luxurious feel creates a solid wall against sound waves, failing the breath test completely. If you absolutely need the velvet aesthetic in a studio, use it to wrap diffusers instead — they are designed to scatter sound off a hard surface, so the thick fabric won’t hurt their function.

What’s Wrong with Thick Upholstery Fabric?

Furniture upholstery fabric combines the worst traits of both canvas and velvet. It is engineered specifically to resist wear, spills, and tearing, which requires a tight weave that is often reinforced with a sealed backing layer.

That backing layer turns the fabric into armor, sealing your insulation inside a reflective box. If you’re making your own acoustic panels using leftover couch fabric, you are building an expensive drumhead.

Understanding how to wrap acoustic panels correctly means nothing if the material itself fights your core insulation.

Which Fabrics Should You Buy for DIY Acoustic Panels?

Infographic showing where to buy acoustic panel fabric

Every fabric below passes the breath test and has verified acoustic transparency across multiple panel builds. Price and availability are the main differentiators.

For most DIYers on a budget, speaker grill cloth offers the best balance of price, availability, and consistent acoustic performance.

FINDUFA Speaker Grill Cloth (1 Yard) is an affordable entry point if you’re testing the concept.

Both options come in standard neutral tones that blend into most room setups, but if your panels double as wall decor, a textured finish can add depth without sacrificing transparency.

The single-yard cut is the smarter starting point for a first-time build because it covers one standard 24×48 panel with enough excess for the back wrap. Once you confirm the material works with your frame and stapling technique, ordering the larger 96×54 sheet from the previous section saves real money per square foot on multi-panel projects.

For rooms where panels face visitors or clients, the fabric finish carries more weight than in a tucked-away home studio. Flat speaker cloth disappears against the wall and lets the panel shape do the talking, while a textured weave catches light and turns each panel into a deliberate design element.

That textured approach requires verifying one extra detail: make sure the raised pattern does not seal the weave shut. Run the breath test on the textured side before committing, because some decorative fabrics sacrifice transparency for visual effect.

If appearance matters and you’re covering multiple panels, FINDUFA 3D Textured Speaker Fabric adds visual interest while maintaining acoustic transparency.

Where Can You Buy Acoustic Panel Fabric?

Comparison grid of fabric types for acoustic panels

Because craft stores cater to clothing and upholstery rather than acoustics, you have to source your materials strategically.

Online Fabric Stores

The most reliable path is ordering specialty acoustic fabric or speaker cloth from online retailers like Amazon, Fabric.com, or direct from manufacturers. Shopping online gives you access to exact AFR ratings and reviews from other studio builders who have verified the material’s transparency.

You can also find a wide selection of fabrics on Amazon, including products specifically marketed for speaker grills or acoustic applications. Stick with products that have reviews from other acoustic panel builders, and check the product specifications to ensure they meet your needs.

Local Fabric Shops

If you need material today, a local fabric shop is your only option, but you won’t find anything labeled “acoustic.” You have to hunt through the aisles for lightweight polyester meshes, loose burlap, or unbacked speaker cloth.

The smartest approach is bringing a small scrap of known speaker grill cloth with you to the store. Use it as a baseline to compare against any potential purchase using the breath test right in the aisle.

How Much Fabric Do You Need Per Panel?

Fabrics to avoid for acoustic panels marked with X symbols

Once you find the right material, you have to calculate your cuts precisely because you cannot splice two pieces of fabric in the middle of a panel face without ruining the look.

What’s the Fabric Coverage Formula?

The math for a standard rectangular panel is simple: take your panel dimensions, double the depth for the sides, and add 6 inches of excess for the back wrap. For a standard 24×48×2 inch frame, you need a single piece measuring at least 34×58 inches.

How Much Extra Should You Buy?

That formula covers a perfect build, but you will inevitably bunch a corner, tear a staple through the weave, or misalign a pattern on your first attempt. For your first bulk order, calculate your total square footage and add a 25% safety margin.

You also have to factor panel thickness into the raw width of the fabric bolt. If you buy a 54-inch wide roll to cover 48-inch wide panels, you’ll end up with a pile of useless 6-inch strips.

When your frames are finally wrapped and ready to hang, target the first-reflection points first — placing panels strategically matters just as much as what you cover them with.

The Bottom Line

The best fabric for acoustic panels is the one that passes the breath test and fits your budget — not the one that looks the most “acoustic” at the craft store. Speaker grill cloth and Guilford of Maine FR701 are the most reliable choices, while loose-weave burlap works well for budget builds.

Avoid canvas, velvet, and upholstery fabric entirely. Their tight construction blocks sound before it ever reaches your absorbing core.

If you already have your panel frame built, grab one of the fabric options above and run the breath test before buying in bulk. Build a single panel first to verify your wrapping technique before committing to a full room treatment.

Once your panels are covered, the panel count guide helps you calculate how many you need for your room, and the hanging guide covers hardware for every wall type.

Frequently Asked Questions

Does expensive fabric perform better acoustically?

No — acoustic transparency is binary. Either sound passes through or it doesn’t.

A cheap speaker cloth that passes the breath test performs identically to premium professional fabric acoustically. Expensive options offer benefits like fire resistance certifications, more color options, and consistent quality batch-to-batch — these matter for commercial installations but rarely justify the cost for home DIY projects.

Can you paint fabric on acoustic panels?

You can, but every coat of paint reduces acoustic transparency because it fills the gaps between threads. Thin spray coats are less damaging than brush or roller application.

The smarter move is painting the wall behind the panel instead. Neutral fabric over a colored wall achieves the same look without compromising absorption.

If you need a specific color, dye the fabric before wrapping rather than painting it after — dye saturates fibers without sealing the weave shut.

Can you reuse fabric from old panels?

Usually yes — if the fabric still passes the breath test and shows no visible wear or damage. The fabric itself doesn’t degrade acoustically from normal use.

Carefully remove staples and any backing material, then clean the fabric according to its care instructions. Re-stretch over your new panels as normal.

The main exception is fabric that’s absorbed heavy dust, smoke, or other contaminants. These can clog the weave and reduce transparency over time.

Do Acoustic Panels Keep Sound In? The Honest Answer [2026]

Do acoustic panels keep sound in? The short answer is no — but most “soundproofing panel” marketing will never tell you that, and buying the wrong solution wastes hundreds of dollars.

Acoustic panels absorb sound waves bouncing around inside your room. They reduce echo and reverb, but they do not block sound from traveling through walls, floors, or ceilings.

If you are hoping panels will stop your neighbors from hearing your music, the physics works against you.

Once you understand the difference between absorption and blocking, you’ll know exactly which approach fits your actual problem. Below you’ll find what panels do, what they cannot do, and what actually works for keeping sound contained.

Quick Takeaway

No — acoustic panels do NOT keep sound in or out. They reduce echo and reverb inside your room by absorbing sound waves, but they cannot block sound from traveling through walls. For actual sound containment, you need mass, decoupling, and sealing.

Do Acoustic Panels Actually Keep Sound In?

Absorption vs blocking sound diagram for do acoustic panels keep sound in

Acoustic panels cannot keep sound contained in a room. The reason is not quality or price — it is physics.

The confusion usually starts with misleading product labels, then gets worse when people misread the results of their own installation. Both problems have the same root cause.

Why People Think Panels Block Sound

The confusion starts with marketing. Terms like “soundproofing panels” and “noise reduction” appear everywhere, even on products that provide zero sound blocking.

When people install panels and notice their room sounds different, they assume the difference extends outside. It does not.

The room sounds better because there is less echo bouncing back — but the sound leaving your room has not changed at all. People cover entire walls with expensive acoustic foam expecting neighbors to stop complaining, yet the same amount of sound energy still reaches them.

What Panels Actually Do

Acoustic panels excel at one specific job: absorbing sound waves that would otherwise bounce off hard surfaces. The result is less echo, less reverb, and a tighter sound that benefits recordings and room clarity.

When sound hits a panel, the porous material — usually fiberglass, mineral wool, or dense foam — converts kinetic energy into tiny amounts of heat through friction. The sound does not bounce back into your room.

That absorption is valuable for cleaning up recordings and reducing “bathroom echo.” It just has nothing to do with keeping sound contained.

Can Acoustic Panels Block Noise From Entering or Leaving?

Sound transmission through walls diagram for do acoustic panels keep sound in

The answer is no across the board — but the reasons matter for finding the right solution. Two scenarios cover most questions.

Do Panels Stop Sound From Leaving Your Room?

No. Sound leaves your room primarily through structural vibration — your speakers or voice create pressure waves that vibrate the drywall, which vibrates the framing, which vibrates the adjacent room’s drywall.

Panels sit on top of the drywall. They might absorb some sound before it reaches the wall, but the vast majority of transmission happens through the structure itself.

Even covering every square inch of wall with panels does not meaningfully reduce what your neighbors hear.

Do Panels Stop Sound From Entering Your Room?

Also no. External noise — traffic, neighbors, airplanes — enters through the same structural paths.

Sound vibrates your walls, floor, and ceiling, then radiates into your room. Panels absorb some of that sound after it enters, potentially making the noise slightly less reverberant.

But the volume of outside noise reaching your room stays the same.

You might notice a subtle difference in how the noise sounds, but not how loud it is.

Why Absorption Does Not Equal Blocking

Think of it like a sponge versus a brick wall. A sponge absorbs water that touches it — but water still passes through if you push.

A brick wall blocks water entirely because it is dense and impermeable.

Acoustic panels are sponges. They are porous by design because absorption requires sound energy to enter the material and dissipate.

That same porosity means sound passes right through to whatever is behind them.

Sound blocking requires mass — heavy, dense materials like concrete, multiple layers of drywall, and mass-loaded vinyl that resist vibration. The opposite of what makes good acoustic panels.

What Is the Difference Between Absorption and Blocking?

Absorption vs blocking comparison infographic for do acoustic panels keep sound in

Absorption and blocking solve different physics problems — one kills reflections inside your room, the other stops energy from passing through walls. Each mechanism has its own materials, metrics, and practical limits.

How Sound Absorption Works

Sound absorption happens when sound waves enter a porous material and lose energy through friction. The fibers in acoustic panels create a maze that sound travels through, converting movement into heat.

High absorption means less sound bounces back into your room. An NRC rating of 0.85 means 85% of sound energy gets absorbed rather than reflected — and thicker panels reach deeper into the frequency range.

The practical effect is shorter reverb time, fewer distinct echoes, and better overall clarity. Absorption makes your room sound “tighter” and “deader” — exactly what recording studios want.

How Sound Blocking Works

Sound blocking — actual soundproofing — prevents sound from transmitting through a barrier. The physics are completely different: mass, isolation, and sealing.

Mass means heavy materials that resist vibration. Sound has to physically move the barrier to pass through, and heavier materials are harder to move.

Concrete walls block more sound than drywall because concrete is far heavier per square foot.

Decoupling means breaking the vibration path. If your drywall directly touches the framing, vibrations travel straight through.

Adding resilient channels or separate stud walls creates air gaps that interrupt transmission.

Sealing means eliminating air gaps. Sound travels through any opening — under doors, around electrical outlets, through HVAC ducts.

Even excellent wall mass fails if sound can go around it. For doorways and uncovered windows where rigid materials are not practical, a VEVOR Sound Dampening Blanket hung from a tension rod adds a temporary mass barrier without permanent modifications.

Critical sealing points include door perimeters (weatherstripping and door sweeps), electrical outlets (putty pads behind boxes), HVAC penetrations (flexible duct connections), and any pipe or wire pass-throughs. If air can pass through, so can sound.

Why These Problems Need Different Solutions

You probably need one approach or the other, not both.

If your problem is echo, reverb, or muddy recordings — panels solve it. If your problem is noise transfer between spaces — you need construction work, not panels.

Some situations benefit from both. A recording studio needs absorption for clean sound AND isolation to prevent bleed.

But these are separate systems solving separate problems.

Will Acoustic Panels Help With Neighbor Noise?

Apartment sound transmission cutaway for do acoustic panels keep sound in

Panels will not meaningfully reduce noise from neighbors above, below, or beside you. The sound travels through the building structure — shared walls, floor/ceiling assemblies, sometimes even through the entire building frame.

The two most common complaints — impact noise from above and street noise through windows — show why panels miss the mark entirely.

Impact Noise From Above or Below

Footsteps, dropped objects, and bass from speakers create impact noise that travels through floor joists. The ceiling and walls in your apartment vibrate because they are physically connected to the source.

Ceiling panels might slightly reduce how reverberant the noise sounds in your room, but they will not make it quieter. The structural transmission overwhelms any absorption benefit.

Real solutions for footstep noise include adding mass to your ceiling (another layer of drywall), decoupling (resilient channels or a dropped ceiling with air gap), or asking upstairs neighbors to add rugs and underlayment.

Street and Traffic Noise

Traffic noise typically enters through windows, which are the weakest point in any wall. Acoustic panels elsewhere in your room will not help because they are not in the sound’s path.

Window treatments matter here: heavy curtains, secondary glazing (adding a second window), or acoustic window inserts. Even sealing gaps around the window frame helps more than panels on your walls.

What Actually Keeps Sound In (or Out)?

Soundproofing methods mass decoupling sealing for do acoustic panels keep sound in

For actual sound blocking, Trademark Mass Loaded Vinyl adds the mass needed to reduce transmission through walls and floors.

Mass alone is only part of the equation though. Real sound containment requires three elements working together — mass, decoupling, and sealing — and skipping any one of them leaves an obvious weak point.

Mass: Heavy Materials

Sound struggles to vibrate heavy objects. Adding mass to walls, floors, or ceilings directly reduces transmission.

Options range from simple (additional drywall layers) to specialized (mass-loaded vinyl, or MLV). Double drywall with Green Glue compound between layers is a popular DIY approach — the compound converts vibration to heat.

For context: a single layer of 5/8” drywall provides about STC 33 (Sound Transmission Class). Double drywall can reach STC 40-45.

Full soundproof construction hits STC 55-65+.

Decoupling: Breaking Vibration Paths

Mass alone has limits because vibrations still travel through the structure. Decoupling interrupts this path with air gaps or resilient connections.

Resilient channels are metal strips that attach drywall to studs with a spring-like connection — a completely different mechanism from hanging acoustic panels on a finished wall. The drywall can vibrate somewhat independently from the framing, reducing transmission.

Separate stud walls — building a new wall with a small air gap from the existing wall — provide better decoupling. Professional studios use separate stud walls where maximum isolation matters.

Sealing: Eliminating Air Gaps

Sound finds every opening. A wall with excellent mass and decoupling fails if there is a 1/4” gap under the door.

Critical sealing points include door perimeters (weatherstripping and door sweeps), electrical outlets (putty pads behind boxes), HVAC penetrations (flexible duct connections), and any pipe or wire pass-throughs. If air can pass through, so can sound.

When to Use Acoustic Panels vs Soundproofing

Decision framework panels vs soundproofing for do acoustic panels keep sound in

If room acoustics — not soundproofing — is your actual problem, 2-inch absorption panels like the UMIACOUSTICS 4-Pack with Brackets are the right tool for the job. These two checklists sort out which path fits your situation.

Panels Are Right For

Echo and reverb control — If your room sounds like a gymnasium or bathroom, with voices trailing off and music sounding muddy, absorption solves this immediately.

Recording and mixing — You need to hear what your microphones and monitors actually capture, not what your room adds. Properly placed panels at first reflection points give you accurate sound.

Home theater clarity — Dialogue intelligibility improves when you reduce competing reflections, and surround effects localize better in a treated room. The home theater panel guide covers placement specifics.

Video calls and podcasts — That hollow, echoey sound on calls comes from room reflections. Even a few panels behind your camera noticeably improve audio quality.

Soundproofing Is Right For

Reducing what neighbors hear — If complaints about your music, drums, or home theater are the issue, you need mass and sealing, not absorption.

Blocking external noise — Traffic, construction, airplanes — these require window treatments, mass additions, and sealing rather than panels.

Privacy between rooms — Preventing conversation from being overheard requires sound blocking, not absorption.

Home studios in apartments — Recording yourself is one thing; preventing sound from bothering others requires actual construction. The studio panel guide covers recording-focused treatment.

Soundproofing typically requires professional assessment and construction work. It costs more and is more invasive than acoustic treatment.

Conclusion

Panels fix how your room sounds — mass, decoupling, and sealing fix what your neighbors hear. Buying the wrong solution is the most expensive mistake in room acoustics.

If your issue is room acoustics — echo, reverb, recording quality — acoustic panels are the right fix. Start with choosing the right panel thickness, then work out how many panels you need for your room size.

If your issue is sound transfer — neighbor noise, keeping sound contained — panels will not help. Mass-loaded vinyl, additional drywall, and door sealing are the starting points, and a soundproofing professional can assess the highest-impact improvements for your space.

For many home studios, the realistic approach is accepting some sound transfer while optimizing what you can control. Treat your room acoustically for better recordings, record during reasonable hours, and focus soundproofing efforts on the highest-impact areas like doors.

Frequently Asked Questions

Will panels make my room quieter?

Sort of — but not in the way you might hope. Panels reduce reverb, which makes the room feel less chaotic and “busy.” You might perceive this as quieter because there is less overlapping sound.

But the actual sound pressure level (dB) in your room does not drop meaningfully. External noise stays the same volume; it just sounds less reverberant.

And sound leaving your room is not reduced at all.

Can I record without soundproofing?

Yes — most home recordings happen without professional soundproofing. The key is managing what you can control.

Record during quiet times, use directional microphones that reject off-axis noise, and treat your room acoustically to get cleaner recordings. Some background noise is inevitable; noise reduction in post-production handles minor issues.

What is the cheapest way to block sound?

Mass-loaded vinyl (MLV) behind drywall and sealing doors properly offer the best cost-to-effectiveness ratio for DIY soundproofing. Weatherstripping around doors costs under fifty dollars and can noticeably reduce sound transfer if your door currently has gaps, and adding a second layer of 5/8” drywall with acoustic caulk at edges is the next most affordable step up.

Do acoustic foam panels block any sound?

Technically, any material blocks some sound — a piece of paper “blocks” sound too. But foam panels block so little (1-2 dB) that it is not meaningful for practical purposes.

Foam absorbs well at high frequencies, making it useful for reducing flutter echo. But its light weight means it has close to zero sound blocking capability.

Do not expect foam to help with neighbor noise or keeping sound contained.

Do Acoustic Panels Really Work? The Complete Truth [2026]

Do acoustic panels work? The honest answer is yes — but probably not for what you think.

If you’re hoping panels will stop your neighbor’s bass from rattling your walls or soundproof your bedroom, you’ll be disappointed. But if you want to reduce echo, clean up recordings, or make your room sound noticeably better, acoustic panels absolutely deliver — and the difference is often immediate.

Below you’ll find what panels actually do, where they fall short, and how you’ll know whether they’re the right fix for your room.

First up: what panels are designed to handle — and the one thing they physically cannot do.

Quick Takeaway

Yes, acoustic panels work — they absorb sound waves inside your room, reducing echo and reverb by 40-60% when properly placed. They cannot soundproof, block noise from neighbors, or stop bass from traveling through walls.

Do Acoustic Panels Actually Work?

Diagram showing how acoustic panels absorb sound reflections

Panels absorb sound energy inside a room — they do not block sound from entering or leaving. That single fact determines whether panels solve your problem or waste your money.

Acoustic panels are highly effective at what they’re actually designed to do — absorbing sound energy that bounces around inside your room.

The confusion happens because most people expect panels to block sound from entering or leaving. They don’t, and they physically can’t — that’s a completely different solution requiring construction, not fabric-wrapped panels.

What Do Acoustic Panels Actually Do?

Here’s the core function in plain terms. When sound waves hit hard surfaces like drywall, glass, or concrete, most of that energy bounces back into the room — creating echo, reverb, and that “bathroom sound” that makes recordings unusable.

Acoustic panels intercept those bouncing sound waves. The porous material — usually fiberglass or mineral wool — traps sound energy and converts it into tiny amounts of heat through friction.

The result? Less sound bouncing around.

Cleaner audio. Tighter bass response.

Conversations that don’t echo.

It’s the difference between talking in an empty gymnasium versus a furnished living room. Same space, completely different acoustic experience — and that’s what panels create artificially.

What Can You Realistically Expect?

Most marketing oversells what panels deliver. Here are actual numbers based on measured performance.

With correct placement at first reflection points, expect a 40-60% reduction in echo and reverb. Speech becomes noticeably clearer.

Music sounds tighter with better stereo imaging.

You won’t get studio-perfect acoustics from a few panels on random walls. But even modest, strategic treatment makes a difference that most people hear immediately — and that’s the honest benchmark.

How Do Acoustic Panels Work?

Sound wave absorption process inside an acoustic panel
The science behind absorption is simpler than acoustic companies make it seem. Two concepts matter most: how porous materials convert sound to heat, and how NRC ratings measure that conversion.

What Is Sound Absorption?

Sound travels as waves of pressure through air. When these waves hit a hard surface, most energy reflects back — bouncing off walls, ceiling, and floor multiple times before dying out.

That’s reverb. That’s echo.

That’s the “live” room sound that ruins recordings and makes conversations tiring.

Acoustic panels are made from porous materials with thousands of tiny air pockets. When sound enters the panel, waves travel through this maze of fibers — and friction converts kinetic energy into microscopic heat.

The sound doesn’t bounce back. It gets absorbed and dissipates inside the panel material.

How Do Panels Reduce Echo and Reverb?

Echo happens when sound bounces off a surface and returns to your ears with noticeable delay. Reverb is the buildup of many small reflections creating that “swimmy” room sound where everything blurs together.

Both problems come from sound bouncing where it shouldn’t. Panels solve this by intercepting reflections before they reach your ears.

The key is placement. Panels at first reflection points — where sound from your speakers bounces directly toward your listening position — capture the most problematic reflections.

Strategic placement matters more than panel quantity.

What Is NRC Rating?

NRC stands for Noise Reduction Coefficient. It measures how much sound a material absorbs on a scale from 0 to 1.0.

A rating of 0.85 means the panel absorbs 85% of sound that hits it. Only 15% reflects back.

This number matters because it separates marketing claims from measurable performance.

Quality fiberglass panels typically rate 0.80 to 1.0. Budget foam often scores 0.30 to 0.50 — meaning most sound bounces right off despite the textured appearance.

The panel thickness guide breaks down which thickness targets which frequency range.

Here’s the context that matters: bare drywall is about 0.05 NRC. Carpet is around 0.30.

Even decent panels massively outperform untreated walls.

When shopping, ignore products that don’t list NRC ratings. If they won’t tell you, assume it’s bad — reputable manufacturers publish their numbers proudly.

Are Acoustic Panels Worth It?

Infographic comparing the value of acoustic panel options
The science confirms panels absorb sound — but is the investment actually justified? The answer depends on your specific situation and the problem you’re trying to solve.

What Problems Do They Solve?

Panels excel at solving echo, reverb, flutter echo, and room coloration. If your room sounds “live” or conversations are hard to follow, panels help.

They’re particularly valuable for home studios, podcast rooms, home theaters, and open-concept offices. These are spaces where sound quality directly impacts the experience — and where even modest treatment delivers noticeable improvement.

The “is it worth it” question really translates to: is the sound quality in this room important enough to invest in? For recording musicians, the answer is obviously yes — bad room sound can’t be fixed in post-production.

When Are Panels NOT Worth It?

Panels can’t fix everything. If your goal is blocking noise from neighbors, traffic, or other rooms — panels won’t help.

You need mass and air sealing for sound blocking. That’s construction work: additional drywall layers, green glue, sealed gaps, possibly decoupled walls.

Panels provide zero sound blocking because they’re porous — sound passes right through.

Panels also won’t fix bass problems below 125Hz. Low frequencies have wavelengths too long for standard 2-inch panels to affect.

You need dedicated thick bass traps in corners for low-end control.

How Much Improvement Will You See?

Most people notice improvement with just 15-25% wall coverage. Treating first reflection points gives you roughly 80% of the benefit with 20% of the panels.

Beyond 50% coverage, you get diminishing returns unless you’re building a professional studio. Over-treating actually creates problems — rooms that sound “dead” and unnatural.

For most home applications, 6-12 panels strategically placed does the job. That’s a realistic benchmark, not marketing hype.

Are Acoustic Panels Effective for Soundproofing?

Visual comparison of sound absorption versus soundproofing
The biggest misconception in acoustics costs people hundreds of dollars on the wrong solution. Panels and soundproofing are two completely different things, and confusing them leads to wasted money every time.

Can Panels Soundproof a Room?

No. Acoustic panels cannot soundproof a room because they don’t block sound transmission.

This isn’t a limitation of cheap panels — it’s physics.

Soundproofing requires mass (heavy materials that sound can’t vibrate through), decoupling (breaking the vibration path between surfaces), and air sealing (filling every gap sound could travel through). Panels provide none of these.

The porous materials that make panels good absorbers — fiberglass, mineral wool, foam — are terrible blockers precisely because sound travels through them. That’s how they work.

Will Panels Stop Noise from Neighbors?

No. Sound travels through walls via structural vibration.

The thin, porous materials in acoustic panels do nothing to stop this.

If you can hear your neighbors now, you’ll still hear them after installing panels. The room might sound slightly different internally because of reduced reflections, but the noise transmission doesn’t change at all.

People cover entire walls with expensive panels expecting neighbor noise to disappear. It never does.

The money would’ve been better spent on weatherstripping their door or adding mass to the shared wall.

What’s the Difference: Absorption vs Blocking?

The difference between absorption and blocking determines whether panels are your solution — or a waste of money.

Absorption means sound energy enters a material and gets converted to heat. It works inside your room to control reflections.

This is what panels do.

Blocking means preventing sound from passing through a barrier. It requires mass and real construction techniques.

This is soundproofing — a completely different approach.

Think of it like water: a sponge absorbs water that touches it, but water still passes through if you push. A concrete wall blocks water completely.

Panels are sponges — useful for one purpose, useless for another.

Do Panels Work for Specific Situations?

Home studio setup with acoustic treatment panels
Panels perform differently depending on the room and the goal. Three common setups — studios, home theaters, and offices — each need a different treatment approach.

Home Studios and Recording

Panels are essential for recording. They reduce room coloration so your recordings capture the source, not the space.

The difference between a treated and untreated recording room is stark. Untreated rooms add reverb that makes vocals sound amateur and muddy — and unlike EQ or compression, room sound can’t be fixed in post-production.

Most home studios need treatment at first reflection points, behind the listening position, and potentially on the ceiling. The treated room becomes a controlled environment for accurate monitoring — where you hear what your speakers actually produce, not what your room adds.

For quality treatment, panels like the UMIACOUSTICS Fiberglass 4-Pack deliver professional absorption at reasonable cost.

Home Theaters

Home theaters benefit noticeably from treatment, but the approach differs from studios. You want improved dialogue clarity and tighter surround effects — without killing the room’s natural ambience.

Movies need some “space” to feel immersive. A completely dead theater room sounds unnatural.

The sweet spot is treating first reflections and corners while leaving some surfaces reflective.

The home theater panel guide has specific recommendations on balancing treatment with movie immersion.

Offices and Bedrooms

Open offices use panels to reduce speech intelligibility across workstations. The goal isn’t soundproofing — it’s making conversations harder to follow at distance so focus improves.

Bedrooms rarely need acoustic treatment unless you’re recording or have specific echo problems. Most bedrooms have enough soft furnishings — beds, curtains, rugs — to naturally absorb reflections.

If your bedroom doubles as a recording space, that changes things — and proper hanging techniques make installation simple. But for general living, you probably don’t need panels.

What Types of Panels Work Best?

Comparison of fiberglass, Rockwool, and foam acoustic panel types
Not all panels perform equally — material and construction quality directly impact effectiveness. The gap between budget foam and professional fiberglass is measurable and large.

Fabric-Wrapped vs Foam

Fabric-wrapped panels with fiberglass or mineral wool cores outperform foam by a wide margin. A 2-inch fabric panel typically absorbs 3-4 times more sound than same-thickness foam.

This isn’t marketing — it’s measurable NRC difference. Fiberglass panels hit 0.85-1.0 NRC.

Budget foam scores 0.30-0.50. That gap means foam panels let most sound bounce back while quality panels actually absorb.

Foam has its place for budget treatments or when fire codes prevent fiberglass. But for professional results, fabric-wrapped fiberglass is the standard — and the price difference is smaller than you’d expect.

For budget-conscious treatment that still performs, the Olanglab Fiberglass 4-Pack offers genuine absorption at an accessible price point.

Fiberglass vs Rockwool

Both work excellently. Fiberglass (like Owens Corning 703) and rockwool (like Roxul) have nearly identical acoustic performance.

Rockwool is denser and more fire-resistant. Fiberglass is lighter and sometimes cheaper.

Either choice delivers professional results when properly installed.

Do Decorative Panels Actually Work?

Some do, some don’t. The key is what’s behind the fabric.

If there’s actual acoustic material — fiberglass, mineral wool, or dense PET felt — they work. If it’s just fabric stretched over a frame with air inside, they’re purely decorative.

Check the NRC rating before buying. Any “acoustic” panel without published specs is probably hiding poor performance behind pretty fabric.

Learn more about what makes panels effective versus decorative.

How Do You Know If Panels Are Working?

Before-and-after room acoustics measurement for acoustic panels

You’ve chosen your panels and installed them — but how do you verify they’re actually doing their job? Testing does not require expensive equipment.

Your ears tell you most of what you need to know.

What Should You Hear After Installing?

The clap test works well. Clap your hands sharply in the center of your room and listen for the “tail” of sound.

In an untreated room, you’ll hear distinct flutter echo or a long reverberant tail. That flutter — the rapid “ping ping ping” between parallel walls — should be gone or noticeably reduced after treatment.

Speech should sound cleaner and less “swimmy.” Music should have tighter bass and clearer stereo imaging. If you’re recording, you’ll notice less room sound in your tracks immediately.

The change isn’t subtle. If you can’t tell a difference, either the panels aren’t working or they’re in the wrong positions.

Why Don’t My Panels Seem to Work?

Three common reasons: wrong placement, insufficient coverage, or panels that aren’t actually acoustic panels.

First reflection points matter most. If your panels are on random walls instead of where sound actually bounces from speakers to ears, they’re not intercepting the problematic reflections.

Understanding proper installation techniques ensures your panels actually improve acoustics instead of just looking nice on your walls.

Use the mirror trick — sit in your listening position and have someone move a mirror along the walls. Where you can see your speakers reflected, that’s where panels belong.

Physics guarantees it. For panels with verified performance and self-adhesive mounting, the TONOR Dual-Layer Acoustic Panels cover large areas and simplify correct placement.

What Are the Limitations of Acoustic Panels?

Infographic showing the limitations of acoustic panels
Even the best panels have boundaries. Knowing where those limits fall prevents disappointment and wasted money.

What Problems Can’t Panels Fix?

Bass frequencies below 125Hz pass right through standard 2-inch panels. The wavelengths are simply too long for thin absorbers to affect.

If your room has bass buildup in corners or low notes that ring and boom, you need thick bass traps — 4-inch minimum, preferably 6-inch — placed in corners where bass accumulates.

Structural noise like footsteps from upstairs, plumbing rumble, or HVAC vibration requires isolation solutions, not absorption. Panels also can’t fix bad speaker placement or problematic room dimensions — those need different solutions.

Do You Need to Cover Every Wall?

Absolutely not. Over-treating a room creates a “dead” sound that feels unnatural and uncomfortable.

Speech sounds muffled, music loses energy, and the room feels oppressive.

The goal is controlled acoustics, not complete absorption. Most rooms sound best with 15-30% coverage strategically placed — not panels on every available surface.

More isn’t always better. If your room sounds like you’re talking into a pillow, you’ve gone too far.

Conclusion

Do acoustic panels work? Yes — for exactly what they’re designed to do.

Panels absorb sound waves inside your room, reducing echo, taming reverb, and creating cleaner acoustics. They work well, they work immediately when properly placed, and quality panels last decades without degrading.

They don’t soundproof. They don’t block neighbors.

They don’t stop bass from traveling through walls. If those are your problems, you need construction solutions, not panels.

If your goal is better-sounding recordings, clearer audio playback, or reduced echo in a reverberant room — panels deliver real, measurable improvement. Start with first reflection points using the mirror trick, choose panels with published NRC ratings above 0.80, and add more only after covering the critical positions.

Ready to choose specific panels? The best acoustic panels guide covers recommendations across budgets and room types.

Frequently Asked Questions

Do cheap foam panels work at all?

They provide minimal absorption — typically NRC 0.30-0.50 compared to 0.85-1.0 for quality fiberglass. For high-frequency treatment in voice-only applications, cheap foam is marginally effective.

For music, home theater, or anything involving bass, cheap foam is decorative at best. One quality panel genuinely outperforms multiple foam panels — the NRC numbers prove it.

How many panels do I need to see results?

Two panels at first reflection points produce immediately audible improvement. Four panels — adding ceiling or behind-speaker treatment — is noticeably better.

Most rooms reach diminishing returns around 8-12 panels depending on size.

The key is strategic placement, not quantity — random placement wastes panels.

Do panels work on ceilings?

Yes — ceiling treatment is often more impactful than wall treatment, especially in rooms with hard floors. The ceiling is typically the largest untreated reflective surface in most rooms.

Ceiling “clouds” above the listening position catch reflections that wall panels miss. If you can only treat one surface, ceiling first reflection points often provide the single biggest improvement.

Do panels lose effectiveness over time?

Quality fiberglass and mineral wool panels maintain performance for decades. The materials don’t degrade under normal conditions — panels installed in studios 30 years ago still perform identically to new ones.

Foam degrades faster, particularly with UV exposure. Budget foam panels may start breaking down after 5-10 years, losing both structural integrity and acoustic performance.

If you’re considering DIY options, check where you can buy acoustic panels for the best material value.

How Many Acoustic Panels Do You Need? Room-by-Room Guide [2026]

How many acoustic panels do I need? It’s the right question — but the honest answer is probably fewer than you think, only if you place them where they’ll actually do something.

Most people either overbuy (40 panels when 12 would do) or underbuy (4 panels scattered randomly when you needed 16 in the right spots). Both mistakes waste money because nobody explains the actual formula up front.

One calculation works for 90% of rooms. Once you know the coverage formula, the guesswork disappears and you stop overspending on treatment that doesn’t move the needle.

You’ll get the exact formula first, then room-by-room breakdowns to help you buy the right number on the first order.

Quick Takeaway

Most rooms need 20-30% wall coverage for noticeable improvement. Calculate your wall surface area, multiply by your target percentage, and divide by panel size.

A typical 10×12 room needs 8-12 standard panels for a night-and-day difference in echo and clarity.

How Many Acoustic Panels Do You Actually Need?

Overview of acoustic panel coverage recommendations

Reality check: you probably need fewer panels than you think, but you need them in the right places. The magic number for most rooms falls between 20-40% wall coverage — and that range exists because different goals require different treatment levels.

The lower end (20-25%) handles echo reduction and basic room improvement. Push toward 30-40% and you’re treating for mixing accuracy — two things determine where you land: the baseline coverage rule and your room’s specific quirks.

What’s the Basic Coverage Rule?

Think of wall coverage like paint — you’re not trying to coat every surface, just enough to change the room’s character. Twenty percent coverage is where acoustic treatment starts making an audible difference.

Below that threshold, you’re decorating rather than treating. Buying 30 panels when you need 12 wastes money and can actually make your room sound worse — over-treated rooms feel uncomfortably dead, like recording inside a sleeping bag.

The goal is controlled acoustics, not silence. You can always add panels later, but you can’t un-buy the ones gathering dust in your closet because you over-treated.

What Factors Affect Panel Quantity?

That 20% starting point assumes 8-foot ceilings and standard finishes — but ceiling height alone changes everything. Those gorgeous 12-foot ceilings add 50% more wall surface area that needs treatment.

Hard surfaces multiply your panel needs too. Glass walls, concrete floors, tile, and hardwood all bounce sound aggressively — a room with floor-to-ceiling windows might need 30-35% coverage where a carpeted space with curtains only needs 20%.

Your purpose matters as well. Podcast recording is forgiving since you’re treating a small zone around one microphone, but mixing music demands accuracy across your entire listening position.

How Do You Calculate Acoustic Panel Coverage?

Formula for calculating how many acoustic panels a room needs

Those factors set the range — but the actual math turns abstract percentages into real numbers you can act on. The formula handles it with nothing harder than multiplication and division.

You need three numbers: total wall surface area, target coverage percentage, and panel size. Measuring your room takes less than five minutes, and the formula handles the rest.

What’s the Simple Coverage Formula?

That formula is the industry standard for estimating acoustic treatment, and it looks like this:

Wall Surface Area (sq ft) × Coverage % ÷ Panel Size (sq ft) = Number of Panels

A real example makes it concrete. A 12×12 room with 8-foot ceilings has four walls totaling 384 square feet of surface area.

At 25% coverage you need about 96 square feet of panels. Standard 2×4 foot panels are 8 square feet each, so 96 ÷ 8 = 12 panels.

That’s your starting point, not a commandment. The formula flexes with your goals — drop to 20% for lighter treatment, push to 35% for serious studio control.

Quick Panel Calculator

Get a fast estimate for your room

L
×
W
×
H

How Do You Measure Your Room?

The formula needs real measurements — grab a tape measure and multiply each wall’s length by your ceiling height. Add all four walls together for total wall surface area.

For that 10×12 room with 8-foot ceilings: (10×8) + (12×8) + (10×8) + (12×8) = 352 square feet. Don’t subtract windows or doors — their reflective surfaces need treatment nearby anyway, so the slight overestimate actually helps.

Got an L-shaped room or weird angles? Measure each section separately and add them up — the formula is guidance, not gospel, and being within 10-15% still delivers excellent results.

How Many Panels for Different Room Sizes?

Acoustic panel counts for different room sizes

The formula translates directly into practical numbers. Pre-calculated counts at 25% coverage — the sweet spot for most home applications — show what each room size actually needs.

These assume 8-foot ceilings and standard 2×4 foot panels. For higher ceilings, scale up proportionally using the coverage formula.

How Many Panels for a 10×10 Room?

Starting at the smallest typical footprint, a 10×10 room has 320 square feet of wall space. At 25% coverage, you need about 80 square feet of panels — that’s 10 standard 2×4 panels.

Start with 6-8 at first reflection points and evaluate. Even in this compact room, you’ll notice improvement after the first few panels go up.

Strategic panel positioning at reflection points matters more than raw panel count. Six panels at first reflections will outperform twelve scattered randomly.

How Many Panels for a 12×12 Room?

Stepping up from that 10×10 footprint to 12×12 gives you 384 square feet of walls — the most common size for home studios. At 25% coverage, that translates to 12 panels.

Place 6 at first reflection points on side walls, 4 behind your desk or monitors, and 2 on the back wall. This distribution addresses the acoustic problems that actually matter for recording and mixing.

The studio panel guide ranks the panels that perform best in rooms this size.

How Many Panels for Larger Rooms?

Those 12-panel counts might suggest bigger rooms scale proportionally — they don’t. The additional air volume provides natural absorption that smaller rooms lack, so coverage percentages actually drop.

A 15×20 room has 560 square feet of walls. At just 20% coverage, you need about 112 square feet — roughly 14 panels.

A 20×20 room pushes to 640 square feet, requiring 16 panels minimum at 20% coverage.

Focus on first reflection points first in large spaces, then expand outward based on how the room responds. The coverage formula becomes your planning tool — use it to budget before you buy.

How Many Panels for Different Room Types?

Acoustic panel recommendations by room type

The numbers above work as baselines, but your room’s purpose shifts those targets meaningfully. A bedroom needs different treatment than a mixing studio, even when dimensions match exactly.

Studios need accuracy, theaters need even coverage, offices need echo control, and bedrooms need barely anything — the targets shift with how you actually use the space.

How Many for a Home Studio?

Home studios demand the highest coverage — typically 30-40% — because you need to hear your mixes accurately. There’s no point spending hours on a track if your room is lying to you about how it sounds.

A typical 10×12 studio needs 12-16 panels minimum. Prioritize first reflection points, then behind your monitors, and ideally ceiling treatment if budget allows.

The best acoustic panels for studios prioritize NRC ratings above 0.8. Lower-rated panels mean you need more of them, which affects your budget calculations.

UMIACOUSTICS 4 PCS Acoustic Panels with Hanging Bracket is a stronger benchmark when you want the formula to translate into real treatment, not just more pieces on the wall.

How Many for a Home Theater?

Where studios optimize for one listening position, home theaters flip that requirement — you want even coverage across all seating positions, not just a sweet spot for one listener.

Plan for 25-35% coverage depending on room size. A dedicated 15×20 theater room typically needs 14-20 panels spread strategically across every wall surface.

Side wall panels control the reflections that muddy dialogue — if you’ve ever strained to understand actors, insufficient side treatment is often the culprit. The home theater panel guide has the placement map for surround-sound setups.

How Many for an Office?

After those higher-coverage studio and theater targets, offices need the least treatment of any room type. You’re optimizing for echo reduction and video call quality, not critical listening accuracy.

Plan for 15-25% coverage. A typical 10×10 home office needs just 6-8 panels to completely transform the space for Zoom calls and focus work.

Focus on the wall behind your monitor and the wall you face during calls. These two surfaces handle the echoes that make you sound like you’re broadcasting from a bathroom.

If your office math lands in the 6-8 panel range, a full-size option like ATS Acoustics Sound Absorbing Acoustic Panel 24 × 48 × 2 gets you there faster and with less clutter around the desk.

How Many for a Bedroom?

Bedrooms need even less than offices — 15-20% coverage handles most acoustic complaints. That translates to 4-6 panels in a typical 10×12 bedroom.

Comfort matters more than precision here. Reduced echo makes the space feel more intimate and sleep-friendly, but heavy treatment would make the room feel claustrophobic — definitely not what you want in a space meant for relaxation.

What’s Light vs Heavy Acoustic Treatment?

Treatment levels from light coverage to full room control

The terms “light treatment” and “heavy treatment” get thrown around without clear definitions. They map directly to the coverage percentages above — same concept, different vocabulary.

These definitions help you budget accurately and avoid the uncomfortable over-treated room that nobody warns you about until it’s too late.

What Is Light Treatment (20-30%)?

Light treatment tackles obvious problems without changing your room’s character. You’ll notice reduced echo, clearer speech, and better recording quality — but the room still sounds alive and natural.

One distinction worth making here: this is acoustic treatment, not soundproofing — panels control reflections inside your room, not noise passing through walls.

This level works perfectly for home offices, bedrooms, and casual listening spaces. It’s the minimum threshold where acoustic treatment becomes audible, and honestly, it’s where most people should start.

Cost stays manageable here — typically a few hundred dollars for a small room using panels rated NRC 0.8 or higher.

What Is Moderate Treatment (30-50%)?

Step past that 30% threshold and things get serious. Your room becomes noticeably controlled, and the audio accuracy gap between light and moderate treatment is immediately obvious.

This is the sweet spot for home studios and dedicated listening rooms. You’re investing real money — two to three times what light treatment costs — but you hear the difference the moment you sit down to mix.

Most audio professionals land somewhere in this range. Full studio treatment exceeds it, but home-based creators rarely need to go further.

What Is Heavy Treatment (50%+)?

Beyond 50% coverage, you’re into territory that even moderate-treatment users find excessive. The room becomes very controlled — some would say uncomfortably so for everyday use.

Most home users find heavy treatment fatiguing. The lack of natural reflections makes spaces feel dead, and conversations become weirdly intimate in ways that are hard to describe until you’ve experienced it.

Only invest this much if you’re running a commercial studio or have very specific acoustic requirements that justify the expense.

How Many Panels Does Each Room Size Need?

Reference chart for acoustic panel quantity planning

This chart distills the numbers into one actionable reference. Bookmark it for when you start shopping.

Room Size Wall Area Light (20%) Moderate (30%) Heavy (40%)
8×10 288 sq ft 7 panels 11 panels 14 panels
10×10 320 sq ft 8 panels 12 panels 16 panels
10×12 352 sq ft 9 panels 13 panels 18 panels
12×12 384 sq ft 10 panels 14 panels 19 panels
12×15 432 sq ft 11 panels 16 panels 22 panels
15×15 480 sq ft 12 panels 18 panels 24 panels
15×20 560 sq ft 14 panels 21 panels 28 panels
20×20 640 sq ft 16 panels 24 panels 32 panels

These assume 8-foot ceilings and 2×4 foot panels. Adjust proportionally for different ceiling heights or panel dimensions using the coverage formula.

What Should You Do After Calculating?

You’ve got your number — now comes the part that actually determines your results. Choosing quality panels and placing them strategically matters as much as hitting the right quantity.

The placement guide maps out first reflection points — the spots where panels make the biggest difference per dollar spent.

When you’re ready to buy, panels with NRC ratings of 0.8 or higher deliver the best value per panel — lower ratings mean buying more to hit the same coverage.

Olanglab Fiberglass Acoustic Wall Panels 4 Pack is a better mid-range fit when your calculation says you need to build coverage in repeatable four-panel steps.

For installation methods, Z-clips work best for permanent mounting while command strips handle lighter panels without wall damage. Either method keeps panels flush to the wall, which matters for both aesthetics and consistent absorption across the panel surface.

If you’re working with a tighter budget or want larger coverage per panel, sizing up makes a difference. Fewer big panels means fewer mounting points and a cleaner wall layout — especially in rooms where you’re only targeting first reflection points.

Panel thickness also factors into your buying decision. Two-inch panels handle mid and high frequencies well enough for most rooms, but 4-inch panels extend absorption down to around 125Hz — worth considering if your space has noticeable bass buildup or if you’re treating a home theater where low-end control matters.

Acoustic Panels 4 Pack Room Kit Large 46 × 23 makes more sense when your room plan calls for fewer, larger panels rather than a wall full of small tiles.

The acoustic panels hub has the full breakdown — placement, mounting, and panel comparisons — if you want to go deeper before buying.

Frequently Asked Questions

Can You Have Too Many Acoustic Panels?

Yes — and this mistake is harder to fix than having too few. Over-treatment makes rooms feel uncomfortably dead, voices sound muffled, and the space becomes fatiguing to spend time in.

Aim for the minimum coverage that solves your actual problem. Staying within the 20-40% range prevents over-treatment while still delivering real acoustic improvement.

Should You Start with Fewer or More Panels?

Start with fewer and add as needed. Six panels at first reflection points handles most issues in most rooms, and buying in stages saves money.

Adding panels one or two at a time also lets you hear each addition’s impact before spending more. You’ll develop better instincts for what your specific room needs rather than following generic recommendations blindly.

Can You Add Panels Later?

Absolutely — and that’s the biggest advantage of the panel-by-panel approach. Acoustic treatment is easily expandable, and many manufacturers sell panels individually.

The installation process stays the same whether you’re adding one panel or ten. Plan your initial layout with expansion in mind so future additions look intentional rather than haphazard.

Do Thicker Panels Mean Fewer Panels Needed?

Thicker panels absorb lower frequencies better, but they don’t reduce the quantity needed for wall coverage. You still need the same square footage of treatment regardless of thickness — the formula doesn’t change.

Two-inch panels handle frequencies down to about 250Hz effectively, while 4-inch panels extend to around 125Hz. For bass-heavy music or home theaters, thicker panels provide better low-frequency control — but the panel count stays consistent.

If you’re curious about the science here, the panel density guide breaks that trade-off down by core material and thickness.

How to Hang Acoustic Panels: Every Method Explained [2026]

How to hang acoustic panels seems simple enough — but most installations fail within weeks because people use the wrong hardware for their wall type.

If you’ve watched a panel peel off the wall in slow motion, you know how frustrating that is. The echo comes back, the wall gets damaged, and you’re starting over.

It happens when adhesive isn’t matched to wall texture or weight rating — the cause is always a mismatch between method and surface.

The right hardware for your specific wall type keeps panels up for years, so you can stop guessing and start treating your room with confidence.

Every hanging method is covered below by wall type and panel weight, starting with the most reliable options.

Quick Takeaway

Best overall method: Z-clips for permanent installations on drywall — they hold 30+ pounds and self-level. Best for renters: Heavy-duty Command strips for panels under 16 pounds with zero wall damage.

What’s the Best Way to Hang Acoustic Panels?

Best methods for hanging acoustic panels

Which method actually works? The answer depends on three things — your wall material, your panel weight, and whether you need to remove them someday.

Most fabric-wrapped acoustic panels weigh between 8 and 15 pounds. That puts them in “totally manageable” territory for most mounting methods, which is good news for DIYers.

Which Method Should You Choose?

After dozens of panel installations, one thing is clear: it’s less about the panels and more about your walls. Your wall type determines everything else.

Drywall accepts almost any mounting hardware, but here’s the catch — the strength comes from hitting studs or using proper anchors. Miss the studs with inadequate anchors, and you’ll learn this lesson the hard way when your panels hit the floor.

Concrete and brick are different beasts entirely. They require specialized fasteners that grip masonry, plus a hammer drill to create pilot holes.

The upside? Once those fasteners are in, they’re not coming out.

Ever.

Now, renters have a unique problem. Wall damage means losing deposits, and that changes everything.

Command strips and adhesive solutions work surprisingly well for lighter panels under 16 pounds. You’ll need to accept weight limitations, but zero wall damage is worth the tradeoff for many people.

For permanent installations where you own the space, Z-clips or French cleats are what the pros use. These interlocking metal brackets distribute weight across their entire length rather than concentrating it at single screw points.

They’re also surprisingly affordable — we’re talking under ten dollars for a pair.

One thing people consistently underestimate: panel weight. A single 24×48 inch fiberglass panel typically weighs 8-12 pounds, but add a dense wooden frame and you’re suddenly looking at 20-30 pounds.

Always check manufacturer specs before buying hardware.

What Hardware Do You Need?

Most failures start with hardware that’s convenient rather than appropriate. French Cleat Z Hangers handle 30+ pounds and self-level — which is why professionals reach for them first.

Z-clips need the clips themselves, screws appropriate for your wall type, and a level. That’s it.

French cleats need the same, plus a saw if you’re cutting them to size.

For concrete installations, you’ll need a hammer drill, masonry bits, and concrete-specific fasteners like Tapcon screws. This sounds intimidating, but the technique is simple once you understand it — and the holding power is incredible.

Don’t skip the stud finder for drywall work. Hitting a stud with even one screw provides far more holding power than any drywall anchor alone.

Two minutes with a stud finder beats two hours patching holes from failed mounting attempts.

The full installation guide covers the entire process beyond just hanging — from layout planning to final adjustments.

How Do You Hang Panels with Z-Clips?

Z-clip interlocking wall bracket and panel bracket for hanging acoustic panels

Z-clips are the most popular method for good reason — and they’re the right choice for most people. They’ve earned their reputation through reliable performance.

These simple interlocking metal brackets handle serious weight while keeping installation simple. If you can use a drill and a level, you can install Z-clips.

Z-clips get their name from their profile shape — view one from the side and it looks like the letter Z. The interlocking design is what makes them work.

One piece screws to your wall with the hook facing up, and the matching piece screws to your panel with the hook facing down.

The weight distributes across the entire length of the clip rather than concentrating at single screw points. A pair of 24-inch Z-clips can support substantially more weight than four individual screws ever could.

This matters because acoustic panels are surprisingly heavy once you factor in wooden frames. That weight distribution is what lets Z-clips safely hold 30+ pounds without breaking a sweat.

The installation forgiveness is another massive advantage. Because the clips interlock loosely, you get a few millimeters of adjustment for leveling.

That might not sound like much, but it’s the difference between panels that look professionally installed and ones that drive you crazy every time you look at them.

Z-clips also make future adjustments painless. Simply lift the panel up and off the wall brackets — no tools required, and the wall clips stay in place.

Need to repaint? Lift off the panels.

Want to try a different arrangement? Move the wall clips.

Fix crooked panels in 30 seconds.

Step-by-Step Z-Clip Installation

The actual process is easier than most people expect. Start by marking where you want your panel’s top edge to sit — use a pencil and level to draw a light horizontal line.

Most people position panels with the top edge 2-3 inches below the ceiling for visual balance. This also leaves room for the mounting hardware and creates a more intentional look than jamming panels right against the ceiling.

Hold the wall-side Z-clip against your mark and grab your stud finder. This 30-second step saves enormous headaches later.

If studs align with your clip, drive screws directly into them — this is the strongest possible mount.

No studs where you need them? You’ll need drywall anchors rated for your panel weight.

Toggle bolts work great here — more on those in the drywall section.

Now attach the panel-side Z-clip to your acoustic panel’s frame. Position it 1-2 inches below the top edge so it stays hidden when hung.

Make absolutely sure both clips are the same distance from the panel edges, or your panel will hang crooked.

Here comes the satisfying part. Lift your panel, align the clips visually, and hook the panel bracket over the wall bracket.

Lower the panel gently until it settles into position.

Check level one more time and adjust if needed. The whole process takes about 10 minutes per panel once you’ve done it once — and that first panel is always the slowest.

How Do You Hang Panels Without Drilling?

Command strips applied to acoustic panel back corners for damage-free mounting

Z-clips are great — unless you’re renting. If wall damage means losing your security deposit, you need a different approach entirely.

The good news? Adhesive mounting has come a long way.

Command Large Picture Hanging Strips (14-Pack) work beautifully for lighter panels and leave walls completely unmarked when removed properly.

Do Command Strips Work for Acoustic Panels?

The honest answer for renters: yes, but with important limitations. Command strips absolutely work for acoustic panels — just not all of them.

Standard Command picture hanging strips hold about 4 pounds per pair. Heavy-duty strips hold up to 16 pounds total when you use multiple strips together.

That 16-pound limit rules out heavier fabric-wrapped panels, but it covers most foam panels and many lightweight fiberglass options.

The math here is simple. For a 10-pound panel, use at least four large Command strip pairs positioned at the corners.

This provides safety margin and prevents the panel from tilting or slowly peeling away over time.

The step most people get wrong is surface preparation. This single factor determines success or failure more than anything else.

Both the wall and panel back must be clean, smooth, and completely dry.

Wipe both surfaces with rubbing alcohol to remove dust, oils, and any residue. Let them dry completely — rushing this step is why panels fall down three weeks later.

Application technique matters just as much. Press firmly on each strip for 30 seconds, and actually count to thirty.

This activates the adhesive bond fully and isn’t just marketing fluff.

Then comes the hard part: waiting. Most Command strips need at least one hour to cure before hanging your panel.

For heavier items, overnight is better. Yes, it’s tempting to hang everything immediately, but patience here prevents heartbreak later.

What Weight Can Adhesive Strips Hold?

Understanding weight limits prevents the frustrating experience of watching panels slowly peel off your wall over weeks. Different products have very different capacities, and the packaging isn’t always clear.

Standard small Command strips max out around 4 pounds per pair. That rules them out for anything but the lightest foam panels — we’re talking the thin, decorative stuff.

Large Command strips handle about 12 pounds per pair. Heavy-duty Command strips reach 16 pounds total using multiple strips together.

Industrial Velcro strips typically hold around 10 pounds per pair.

What the packaging doesn’t tell you: temperature and humidity affect adhesive performance more than people expect. Strips applied in cold rooms or high humidity may never bond fully.

They’ll seem fine for weeks, then suddenly release.

Adhesive strength also decreases over time, especially in rooms with temperature swings. If you’re in a humid climate or have poor climate control, add extra strips as insurance.

The safest approach is exceeding the minimum requirement by at least 50%. Your panel weighs 10 pounds and strips hold 16 pounds total?

That’s technically sufficient. But adding another pair costs almost nothing and greatly reduces the chance of waking up to panels on the floor.

Understanding panel placement helps you plan how many panels you’ll need — and whether adhesive mounting will work for your situation.

How Do You Hang Panels on Drywall?

Stud finder locating wall stud with Z-clip secured to drywall

Drywall is what most homes have, and it accepts virtually every mounting method on the table — the challenge is knowing when drywall alone provides enough support.

Standard half-inch drywall can hold surprising weight with proper anchors — the key word being “proper.” Wrong anchor type is the number one reason panels fall, and it happens way more often than you’d think.

Do You Need to Find Studs?

For panels over 15 pounds, hit at least one stud. Wall studs are solid wood framing behind your drywall, and they provide the strongest anchor points available in residential construction.

Standard stud spacing is 16 inches on center. That means at least one stud typically falls behind a 24-inch wide panel — the math works in your favor.

Lighter panels under 10 pounds work fine with drywall anchors alone — no studs required. Toggle bolts and snap toggles hold 25-50 pounds in half-inch drywall, far exceeding what most acoustic panels weigh.

What matters is how these anchors work. They spread force behind the drywall rather than relying on the drywall itself.

It’s physics, not magic.

A stud finder makes locating studs trivial. These inexpensive tools detect density changes in the wall and beep when they find framing.

That small time investment saves hours of frustration from failed mounts.

Even if your ideal panel position doesn’t align perfectly with studs, getting at least one screw into solid wood transforms mounting security. The stud carries most of the load while anchors handle the remaining screws.

This hybrid approach works beautifully for heavier panels.

If you’re calculating how many panels you need, plan stud locations early. It’s much easier to adjust positions by a few inches now than to move panels after they’re installed.

Which Anchors Work Best?

Not all drywall anchors are created equal, and choosing the wrong type is a common mistake. Each anchor type has distinct strengths.

Toggle bolts offer the strongest drywall anchor option for acoustic panels. They spread weight behind the drywall using spring-loaded wings that open after passing through the wall.

Quality toggle bolts hold 25-50 pounds depending on size and drywall thickness.

Snap toggles are the evolved version of traditional toggles. They’re easier to install because you can remove and reinsert the screw without losing the toggle behind the wall.

Same weight capacity, much better user experience if you need to adjust anything.

Plastic expansion anchors are what most people grab because they’re cheap and available everywhere. But they’re relatively weak.

They work adequately for panels under 8 pounds but shouldn’t be your first choice for anything heavier.

The problem with plastic anchors is they creep and deform over time under sustained load. Your panel might stay up for months, then suddenly one morning it’s on the floor.

Self-drilling anchors offer a middle ground. These metal anchors drill their own pilot holes and hold 25-75 pounds depending on design.

They’re quick to install and strong enough for most acoustic panels.

When selecting products, you can find top-rated panels that include mounting hardware — which takes the guesswork out of anchor selection entirely.

How Do You Hang Panels on Concrete or Brick?

Hammer drill with masonry bit and Tapcon screws for concrete wall mounting

Concrete and brick walls require a completely different approach — one that intimidates a lot of people. The truth: once you understand the technique, concrete mounting is actually more secure than drywall.

Your panels literally won’t come down unless you want them to.

The requirement? You’ll need specialized hardware that most people don’t have lying around.

Tapcon Concrete Anchors cover the hardware side — 75 screws per box handle multiple panel installations on any masonry surface.

What’s Different About Hard Surfaces?

The fundamental difference is that concrete and brick don’t accept screws the way wood and drywall do. You can’t just drive a screw in — the material is too dense.

Instead, you must drill pilot holes first using a masonry-specific bit. Then you use fasteners designed to grip inside those holes.

Regular drill bits won’t even scratch concrete effectively.

A hammer drill is required for concrete work.

These tools combine rotation with rapid hammering action to break through hard materials.

Regular drills just spin on concrete — they’ll burn out their bits and barely make a mark. You can rent hammer drills from most hardware stores for a reasonable day rate if you don’t want to buy one.

The massive upside of masonry mounting is the incredible holding power. Once properly installed, concrete fasteners hold substantially more weight than any drywall method.

Many professional studio installations on concrete walls are still secure decades later.

There’s one detail most people overlook: dust management. Concrete drilling creates fine powder that fills the pilot hole and prevents fastener grip.

Blow out holes with compressed air or a shop vacuum after drilling. This simple step improves holding strength more than you’d expect.

Which Hardware Works on Masonry?

Tapcon screws are the go-to concrete fastener for acoustic panel mounting. These self-tapping screws grip directly into concrete after you drill a pilot hole slightly smaller than the screw diameter.

A single Tapcon can hold 150+ pounds in solid concrete. That’s not a typo — we’re talking about holding power that makes drywall anchors look like toys.

Sleeve anchors provide even more holding power for very heavy installations. These expand behind the masonry surface for maximum grip.

They’re honestly overkill for most acoustic panels, but necessary for overhead ceiling installations or extremely heavy custom panels.

Adhesive mounting works on concrete too, though it’s typically a permanent solution. Construction adhesive like Liquid Nails bonds directly to concrete and holds firmly.

The panel can’t be removed without damage, but it will absolutely never fall.

The installation sequence for Tapcon mounting is simpler than it sounds. Mark your mounting points, drill pilot holes with your hammer drill and masonry bit, clear dust from the holes, then drive Tapcon screws through your Z-clip brackets.

The Z-clips work identically on concrete as they do on drywall — only the wall-side fastening method changes.

How Do You Hang Panels on Ceilings?

Person on stepladder mounting acoustic panel to ceiling with toggle bolts

Ceiling mounting is where things get serious. Every method needs to be stronger and more secure when you’re working overhead — gravity is constantly trying to pull your panels down.

A panel falling from a ceiling can cause serious injury — the ceiling panel installation guide covers joist-finding and weight distribution in detail.

Is Ceiling Hanging Different from Walls?

Yes, fundamentally different. Wall-mounted panels rest partially on their hardware, with gravity pushing them into the wall.

Ceiling panels hang entirely from their fasteners, with gravity working against you 24/7.

This changes the hardware requirements completely. You must hit ceiling joists for any panel over 10 pounds — no exceptions.

Joists are the solid wood framing in your ceiling, just like wall studs are in your walls.

Standard joist spacing is 16 inches on center, though some construction uses 24-inch spacing. A stud finder works on ceilings just like walls, so locating joists isn’t difficult.

A practical challenge most people don’t anticipate: you can’t hold a panel overhead and drive screws simultaneously. Unless you have unusually long arms and three hands, you’ll need help.

A T-brace or helper holds the panel in position while you secure the fasteners. Some installers build temporary supports from scrap lumber.

Either way, plan for this before you’re standing on a ladder wondering how to proceed.

The location of ceiling panels matters for acoustic performance too. Recording studio setups often use ceiling “clouds” positioned above the listening position.

These suspended panels prevent sound from bouncing off flat ceiling surfaces and noticeably improve room acoustics — the same principle that makes home theater panels effective on side walls.

What Hardware Is Safe Overhead?

Direct joist mounting using 2.5-inch wood screws is the only truly secure method for heavy overhead panels. Drive screws directly through Z-clips into ceiling joists, and make sure the screws penetrate at least 1.5 inches into the joist.

Toggle bolts work between joists but require careful weight calculations. A critical rule applies: for ceiling installations, never exceed 50% of the toggle’s rated capacity.

A toggle rated for 50 pounds should hold no more than 25 pounds on a ceiling. This safety margin accounts for dynamic loads — vibrations, air pressure changes, and the long-term stress of gravity constantly pulling.

Suspended “cloud” panels using aircraft cable are beautiful but require professional consultation for installations over seating areas. The cables must be rated for dynamic loads, and ceiling anchors need to handle the combined weight of panel plus any lateral forces.

This honestly isn’t a DIY project for beginners.

For DIY ceiling work, the smart move is keeping panels small and light. Multiple smaller panels are easier to install safely than single large panels.

They also provide better acoustic coverage by distributing treatment across more ceiling area — so you’re not sacrificing performance for safety.

Can You Hang Panels on Doors or Windows?

Acoustic panel mounted on door with removable frame

Doors and windows are where people get creative — and sometimes frustrated. The challenge is that permanent mounting doesn’t make sense when you need to actually use the door or see through the window.

These applications require solutions that balance acoustic effectiveness with daily functionality. Several approaches work well once you understand the constraints.

How Do You Mount Panels on Doors?

Command strips work surprisingly well for lightweight foam panels on doors. Door surfaces are typically smooth and clean, which is exactly what adhesive mounting needs.

Position panels to cover as much door area as practical while staying under adhesive weight limits.

A warning most people learn the hard way: doors hang from hinges designed for the door’s weight alone. Adding even 5 pounds can stress hinges over time, leading to sagging or binding.

Keep door-mounted panels as light as possible.

Heavier fabric panels require a completely different approach. A freestanding frame that leans against the closed door works better than direct mounting.

Build or buy a simple wooden frame slightly smaller than your doorway, cover it with acoustic material, and prop it in place.

This sounds janky, but it’s actually what many professional voice-over artists use. The frame moves out of the way when you need the door, and provides effective acoustic treatment when positioned.

Over-door hooks provide another option for lightweight treatment. These hooks drape over the top of the door and support acoustic blankets or lightweight panels.

They’re completely removable and leave no damage whatsoever.

Adhesive options also work for temporary door mounting, especially for foam panels you might want to reposition later.

What About Removable Window Panels?

Acoustic window inserts are one of the more clever solutions out there. These custom-fit panels press against the window opening using foam weatherstripping around the edges.

The pressure fit holds them securely without any permanent mounting.

Building removable window panels is actually simple. Measure your window opening precisely, build a lightweight frame 1/4 inch smaller in each dimension, cover it with acoustic material, and add foam weatherstripping around the perimeter.

The slight oversize after adding weatherstripping creates the pressure fit. Pop the panel in when you need acoustic treatment, pop it out when you want natural light or ventilation.

For more permanent window treatment, mount panels on hinged frames that swing open. This allows window access while providing acoustic control when closed.

The hinges attach to the wall beside the window, not the window frame itself.

Magnetic mounting offers another option for metal window frames. Strong rare-earth magnets attached to panel corners grip metal frames securely and release instantly when you pull the panel away.

Just note this only works with steel frames, not aluminum or vinyl.

How Do All Hanging Methods Compare?

Comparison grid of Z-clips, French cleats, and Command strips mounting methods

Several mounting methods are on the table — and the right one depends on your specific situation. This comparison cuts through the overlap.

No single method wins across every category. The best choice depends entirely on your walls, your panels, and whether you’re renting or own the space.

For guidance on choosing panels themselves, the acoustic panels hub covers selection basics.

Z-clips take about 15 minutes per panel including measuring and leveling. They hold 30+ pounds reliably and remove easily for repositioning.

The tradeoff is small screw holes in your wall, which many renters can’t accept.

French cleats offer even higher weight capacity at 50+ pounds but require more precise installation. The angled interlocking design is stronger than Z-clips but less forgiving of measurement errors.

A Heavy Duty French Cleat Hanger (2-Pack) includes a built-in level for easier installation.

Command strips take only 5 minutes but max out at 16 pounds. They’re perfect for renters and leave no wall damage when removed properly.

The tradeoff is the adhesive bond can fail over time, especially in humid conditions — so they’re not ideal for installations you want to last years.

Surface Mount Impaling Clips install in about 3 minutes but work only with foam panels and hold just 5 pounds maximum. They’re specialized hardware for a specific use case.

Tapcon mounting on concrete takes 20 minutes and requires a hammer drill, but provides 150+ pounds of holding power that will literally outlast the building. If you have concrete walls and own the space, this is honestly the best option.

The bottom line: for most home studio applications, Z-clips hit the sweet spot of strength, ease, and affordability. Use Command strips only when wall damage is absolutely unacceptable and your panels are genuinely lightweight.

Save concrete fasteners for permanent installations where failure isn’t an option.

What Mistakes Should You Avoid When Hanging Panels?

Before and after comparison of crooked panel gaps versus level proper spacing

Most installation failures come from rushing or choosing hardware based on convenience. The single most common mistake is underestimating panel weight — a 15-pound panel on 12-pound-rated strips might stay up for weeks before suddenly releasing.

If you’re building DIY acoustic panels, factor in frame weight when calculating total panel weight. That wooden frame adds more pounds than people expect.

Can Wrong Hardware Cause Panels to Fall?

Wrong hardware is the number one cause of acoustic panel failures. Mismatched weight capacity causes most problems, but anchor type matters just as much.

Plastic expansion anchors in drywall fail regularly under sustained load. They work fine initially, but the plastic material creeps and deforms over time.

Your panel might stay up for months, then suddenly one morning it’s on the floor.

Using only one Z-clip per panel is another frequent mistake. A single clip creates a pivot point instead of stable mounting.

The panel swings with vibrations, stresses the clip, and eventually works loose.

Always use at least two clips per panel, positioned near the top corners. This isn’t optional — it’s the minimum for stable mounting.

Skipping pilot holes in masonry causes concrete to crack around fasteners. The hammer drill generates enormous forces, and without a proper pilot hole, that energy goes into the surrounding material rather than the drill bit.

Cracked concrete doesn’t hold fasteners reliably.

Installing drywall anchors without checking for studs wastes the strongest mounting option available. Every wall has studs somewhere.

A quick scan with a stud finder can transform a marginal installation into a bulletproof one.

Should Panels Have an Air Gap?

Most installation guides skip this: air gaps improve low-frequency absorption by a wide margin. Panels mounted flush against walls perform about 30% worse at bass frequencies compared to panels with 2-4 inches of space behind them.

The physics here is interesting. The air gap creates a resonant chamber that improves absorption at lower frequencies.

Your panels actually work better when they’re not touching the wall.

Z-clips and French cleats automatically create a small air gap — usually about half an inch. This built-in spacing provides some acoustic benefit without additional effort.

For maximum bass control, use standoff spacers to increase the gap.

Building standoff spacers is simple. Cut small wooden blocks to your desired gap depth and attach them between the panel and wall.

The panel mounts to the spacers rather than directly to the wall. Two-inch spacers are common for home studio applications, especially when positioning panels behind studio monitors.

The air gap also prevents moisture issues. Panels mounted directly against exterior walls can trap condensation and develop mold over time.

The gap allows air circulation and keeps both the wall and panel dry. This matters especially in humid climates or basement studios.

The Bottom Line

One principle applies across the board: match your hardware to your panel weight and wall type.

That single decision determines whether your panels stay up for years or end up on the floor.

The best hanging hardware for most drywall installations is Z-clips — they’re what professionals use, and they’re affordable enough for any budget. Command strips serve renters well for lighter panels when wall damage isn’t an option.

Tapcon screws make concrete mounting practically permanent.

Take ten minutes to assess your specific situation before buying anything. Weigh your panels, identify your wall material, and decide whether you need easy removal later.

Those three factors point you toward the right hardware.

Start with your heaviest panel and work backward from there. If that panel needs Z-clips into studs, all your other panels probably do too.

If your heaviest panel is only 8 pounds, adhesive mounting might work throughout your room.

Either way, you now have the knowledge to make that decision confidently — and avoid the frustrating experience of watching your hard work crash to the floor.

Frequently Asked Questions

How Do You Hang Heavy Panels?

For panels over 20 pounds, mount directly into wall studs using 2.5-inch wood screws through Z-clips. If studs don’t align with your desired panel positions, use multiple toggle bolts rated for at least 1.5 times your panel weight.

Toggle bolts distribute weight behind the drywall, providing far more holding power than surface-mounted anchors. For extremely heavy panels or professional installations, consider having a contractor assess your wall structure.

One absolute rule: never rely on drywall alone for panels over 25 pounds. You need studs, toggle bolts, or some combination of both.

Can You Reposition Panels After Hanging?

Yes — if you chose the right hardware. Z-clips and French cleats allow easy repositioning.

Lift the panel up and off the wall clips, move the wall hardware to the new location, and rehang. The process takes only slightly longer than the original installation.

Command strips don’t allow repositioning — removing them destroys the adhesive bond. You’ll need fresh strips at the new location.

This is one of the major drawbacks of adhesive mounting for people still experimenting with panel placement positions.

Will Hanging Panels Damage Walls?

Any screw-based method leaves holes, though the damage is minor. Z-clips and French cleats typically require 2-4 screw holes per panel.

These holes fill easily with spackle if you remove panels later, and a dab of touch-up paint makes them invisible.

Command strips claim damage-free removal, but they can pull paint in some cases. Test in an inconspicuous area before committing to visible locations.

The adhesive removes cleanly from smooth, well-painted surfaces but may lift loose or old paint.

How Many Mounting Points Does Each Panel Need?

Minimum two mounting points for stability, positioned near the top corners. Panels over 24 inches wide benefit from three points — left, center, and right — to prevent bowing or warping in the middle.

Ceiling panels always need at least four mounting points regardless of size. The constant downward force requires more security than wall mounting.

Position points near each corner and add center points for panels larger than 24×24 inches.