Where to Put Acoustic Panels in Garage [2026]
Where to put acoustic panels in garage sounds simple—just cover the walls, right? Yes, but garages punish the wrong placement because every surface is hard, parallel, and reflective.
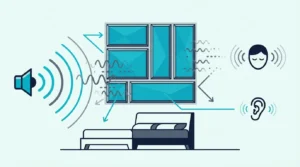
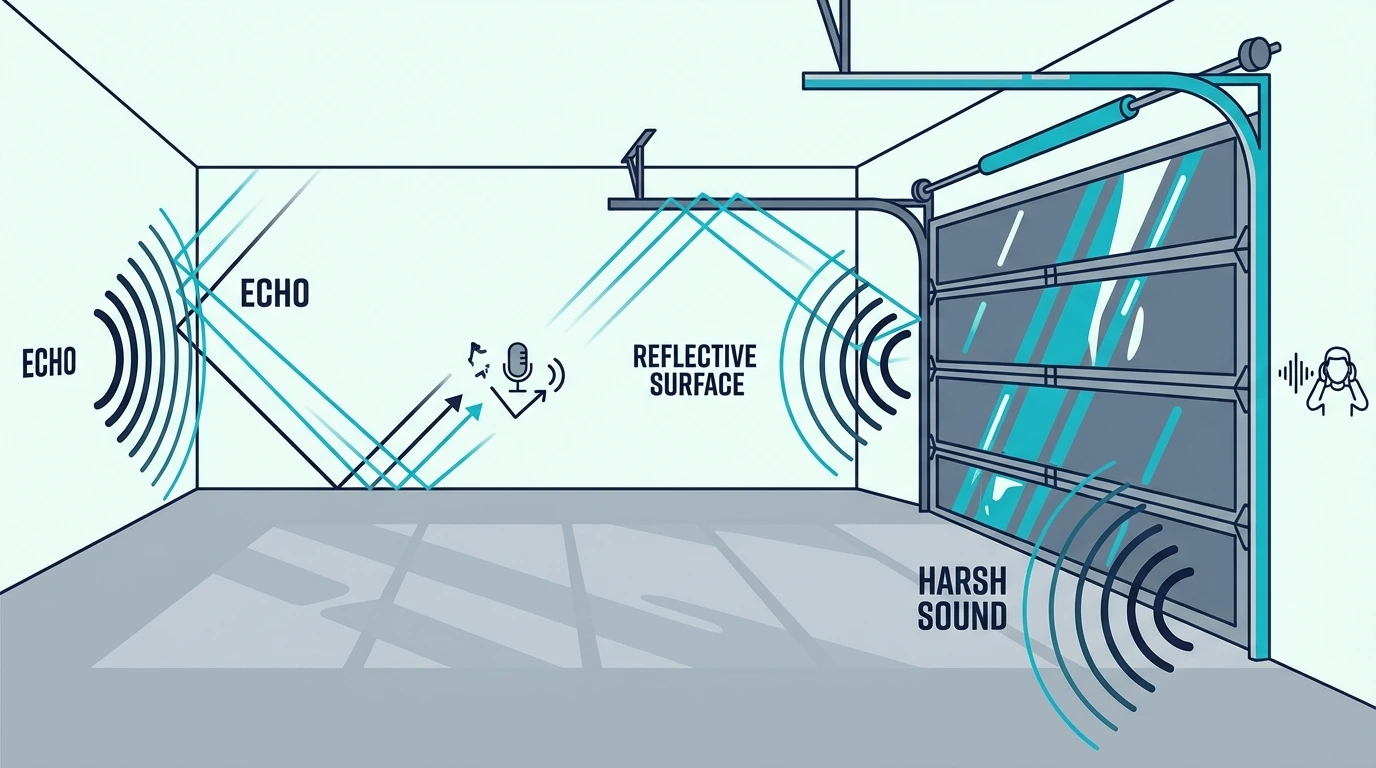
If your rehearsal or recordings sound harsh and phasey, you are hearing early reflections from the wall behind you and the ceiling above you. Concrete floors and metal doors keep those reflections bouncing long enough to smear vocals, guitars, and kick drum.
Place panels in the right zones and the room gets clearer without feeling dead, so you can practice longer and mix faster. You will also spend less, because you are treating the highest-impact reflection paths first instead of guessing.
Start with absorption on the rear wall behind your listening or performance position and a ceiling cloud over your work zone. Next up: the garage-door workaround, moisture considerations, and a step-by-step layout you can copy.
Put panels on the wall behind your listening/performance position, the ceiling above your work zone, and the side walls at first reflection points. Use heavy curtains or portable panels for the garage door, and choose moisture-resistant materials if the space is not climate-controlled.
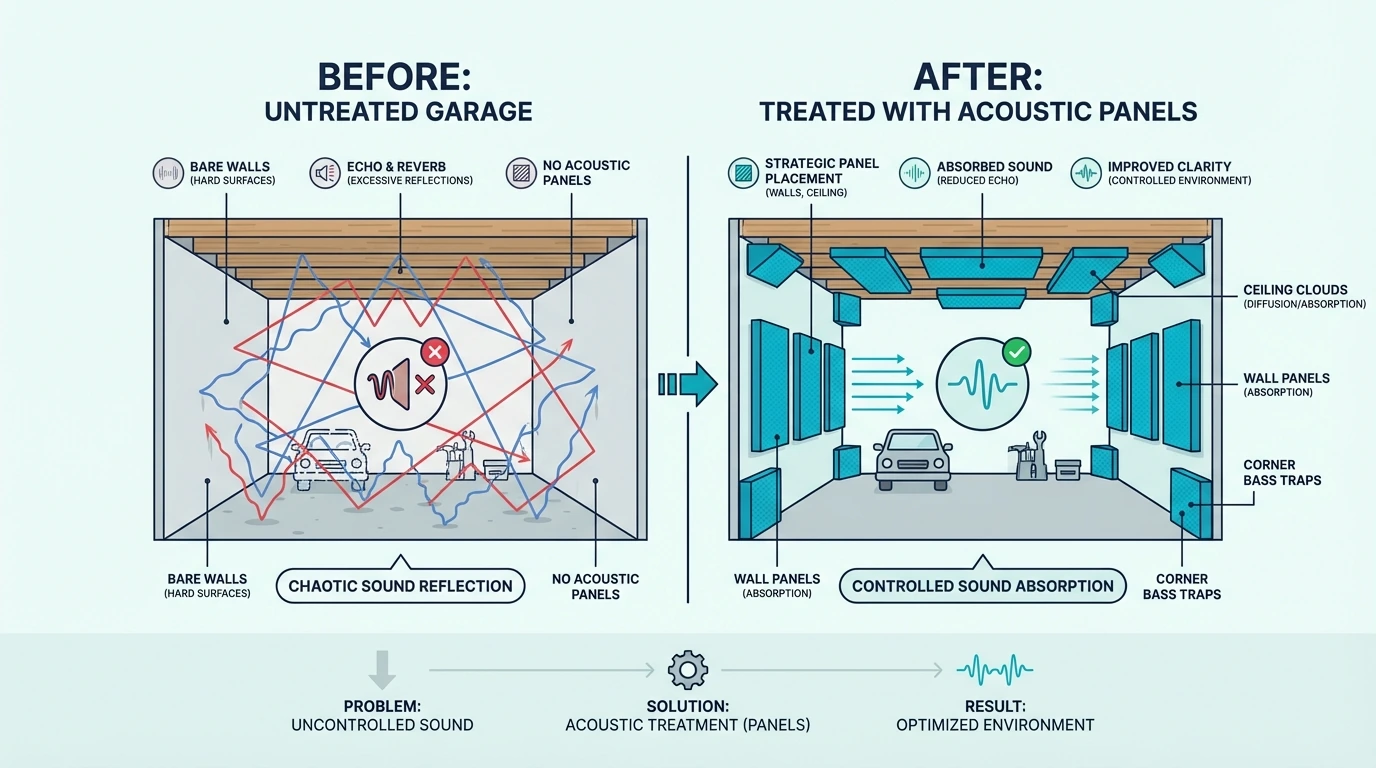
Why Do Garages Need Acoustic Treatment?
Concrete floors, metal doors, and parallel drywall all sit near zero absorption, so reflections stack up faster than in any other room in the house. The specific acoustic challenges and the use case you are treating for drive every placement decision that follows.
What Makes Garage Acoustics So Challenging?
The surfaces in a typical garage have absorption coefficients near zero. Concrete reflects about 98% of sound.
Metal reflects even more, and painted drywall absorbs less than 5%. That is why the room keeps “ringing” after each hit or clap.
Sound bounces repeatedly before losing energy. In a living room with carpet, furniture, and curtains, those reflections die quickly.
In a garage, they persist and keep smearing what you hear. The goal of panel placement is to kill the earliest reflections first.
The result is excessive reverberation — that washy, indistinct sound that makes mixing impossible and band practice exhausting. After an hour in an untreated garage, your ears feel fatigued from processing all those reflections.
The box shape compounds everything because garages are basically hard-walled rectangles. Parallel walls plus the floor and ceiling create standing waves at specific frequencies.
That is why some bass notes boom while others disappear at your listening position. It is common to see 10–15dB peaks and nulls from room modes in an untreated garage. Those modes hit hardest when you actually use the space for something that depends on accurate sound.
What Are Garages Used For That Needs Treatment?
Band practice rooms represent the most common garage conversion. The space offers isolation from neighbors (somewhat) and room for a full drum kit, amps, and PA system.
Home recording studios increasingly occupy garages as remote work normalizes. The dedicated space means you can leave equipment set up and treat the room without negotiating with family members about aesthetics.
Home gyms generate heavy noise from dropped weights, cardio equipment, and workout music. Treatment helps contain sound and makes the space more pleasant for the person exercising.
Podcasting and content creation studios work well in garages because the separation from household noise reduces interruptions during recording.
Each use case has slightly different treatment priorities, but the core task is the same: cover reflective surfaces with absorptive material.
Where to Put Acoustic Panels in Garage
Wall treatment follows the same physics as any room, but garages have more reflective area and unfinished studs that actually make mounting easier. The placement guide covers the universal baseline — which wall to treat first, how to work around the garage door, and what to do with unfinished surfaces are the three garage-specific priorities.
Which Wall Gets Treatment First?
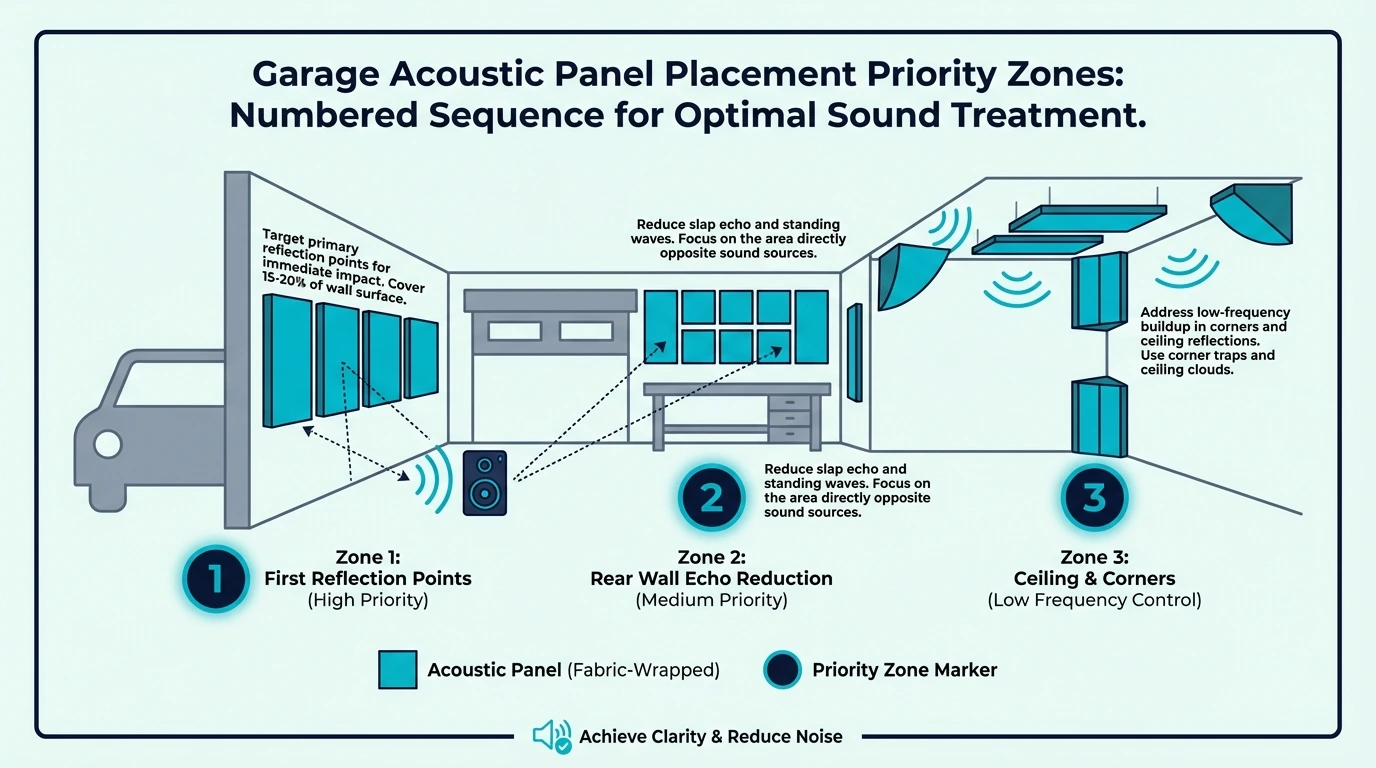
The wall behind your listening or performance position takes priority. When you face your speakers, monitors, or the band, sound travels past you and hits the rear wall.
That reflection returns and interferes with new sound arriving directly. Treating this wall first is the fastest way to reduce comb filtering and slap-back in a garage.
If your setup includes monitors or a PA, treat the wall behind the speakers first, then use the mirror trick to find remaining first-reflection points and check panel spacing between each reflection zone.
Treating this wall first provides the biggest improvement per panel. A single 2×4-foot panel centered behind your head position can noticeably clean up the sound.
For full-room treatment, the UMIACOUSTICS 4-Pack Fiberglass Panels provide professional-grade absorption that handles the extended reverberation typical of garages.

UMIACOUSTICS 4-Pack Fiberglass Panels
After the rear wall, move to the side walls at first reflection points. These are the spots where sound from your speakers or the loudest instruments bounces directly to your ears.
How Do You Handle the Garage Door Wall?
The garage door presents a unique challenge. It is the largest reflective surface in the room, but you need it to function as a door.
Permanent panel installation is not practical because the door moves and panels would interfere with the mechanism. Heavy acoustic curtains offer a compromise — pull them closed during sessions.
Open them when you need vehicle access — the room setup guide works through the full layout including door workarounds.
Heavy moving blankets or purpose-built acoustic curtains provide reasonable absorption when closed while allowing full door operation. Curtains built specifically for acoustics outperform blankets, though they cost two to three times more.
Moving blankets absorb less than rigid panels but cost a fraction of the price and fold flat when you open the door.
Portable panel stands are another option — roll them in front of the door during sessions and move them aside when needed. Stands work especially well if you have converted the garage fully and rarely use the door, and they let you experiment with placement before committing to permanent mounts.
Do Unfinished Walls Help or Hurt?
Many garages have exposed studs or partial drywall. This actually simplifies treatment in some ways.
Insulation batts installed between studs provide baseline absorption before you add surface panels. Standard R-13 or R-19 fiberglass batts are not acoustic products, but they absorb high frequencies reasonably well.
If you are choosing between mineral wool and fiberglass, the panel density guide covers which fill weights absorb predictably once you add face panels.
Add acoustic panels over the insulation. The combination of depth (insulation fills the wall cavity) and surface absorption (panels face the room) handles a broader frequency range than panels alone.
If you are finishing the walls anyway, consider adding a layer of mass-loaded vinyl behind the drywall. This helps with sound isolation to neighbors — a separate issue from in-room absorption, but often relevant for garage conversions.
Get Studio Tips Weekly
Join 5,000+ creators getting acoustic treatment advice every week.
No spam. Unsubscribe anytime.How Should You Treat the Garage Ceiling?
Ceiling reflections undo wall treatment fast — floor-to-ceiling bounces produce comb filtering across the entire room, and the overhead surface is usually the largest uninterrupted reflector in a garage. Where to place the cloud and how to mount it on garage framing close out the overhead plan.
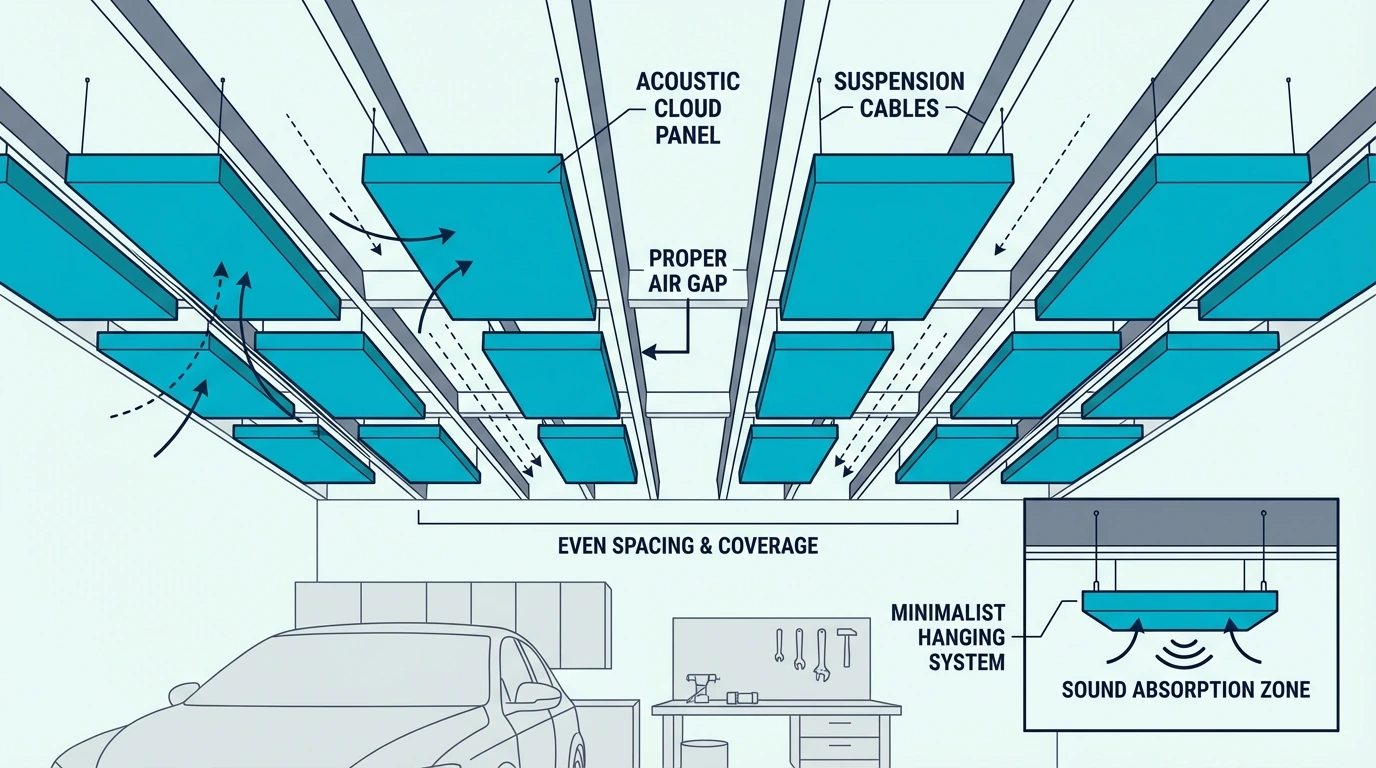
Where Should Ceiling Panels Go?
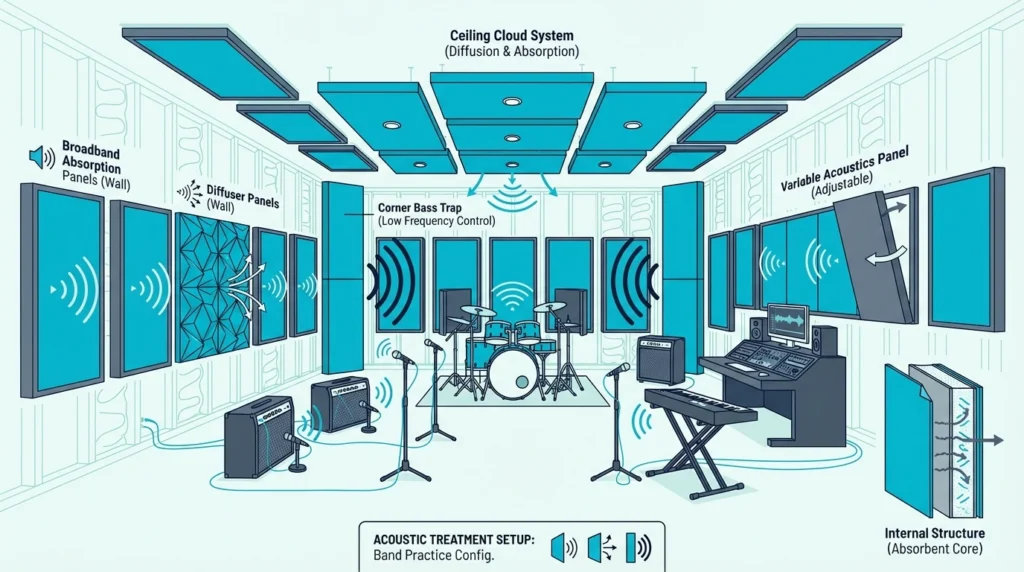
Center ceiling treatment over your primary activity zone. For a mixing position, that means panels directly above where you sit.
For band practice, coverage over the drum kit and vocal position matters most. Pairing ceiling treatment with the wall behind you is the quickest way to make the room feel controlled.
Acoustic “clouds” — panels suspended below the ceiling with an air gap — provide better low-frequency absorption than surface-mounted panels. The air space acts as a quarter-wave resonator, and thicker cores extend that reach further; the 2-inch vs 4-inch comparison covers the trade-offs for overhead use.
Aim for coverage of at least 30-40% of the ceiling area in the performance zone. Full ceiling treatment works even better but requires a large panel count.
The Art3d Wood Slat Panels work well for ceiling applications — the construction is lighter than solid fiberglass, making overhead installation easier while adding visual interest.
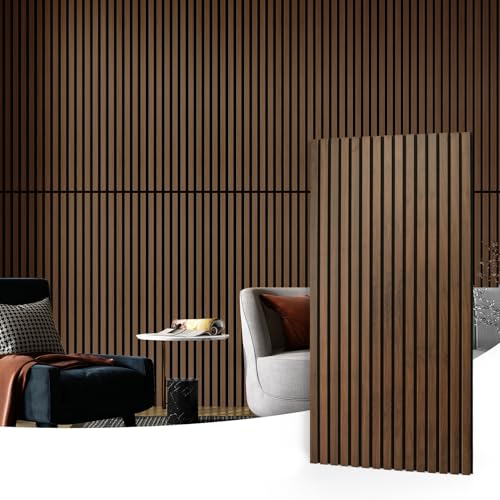
Art3d Wood Slat Panels
How Do You Mount Panels on Garage Ceilings?
Exposed joists make ceiling mounting much easier. You can screw directly into the wood structure without hunting for supports behind drywall.
For finished ceilings, locate the joists with a stud finder. Standard drywall cannot support panel weight without hitting structural members.
Suspension systems work well for cloud installations. Eye hooks in the joists plus wire or chain drops create an adjustable system.
Leave 4-6 inches between the panel and ceiling surface for better low-frequency performance. That air gap is one of the easiest ways to get more absorption without buying thicker panels.
If your garage has a finished attic above, you might install bass trapping above the ceiling line to tame low-end buildup. The bass trap mounting guide covers mounting approaches that translate well to garage framing.
What Special Considerations Apply to Garages?
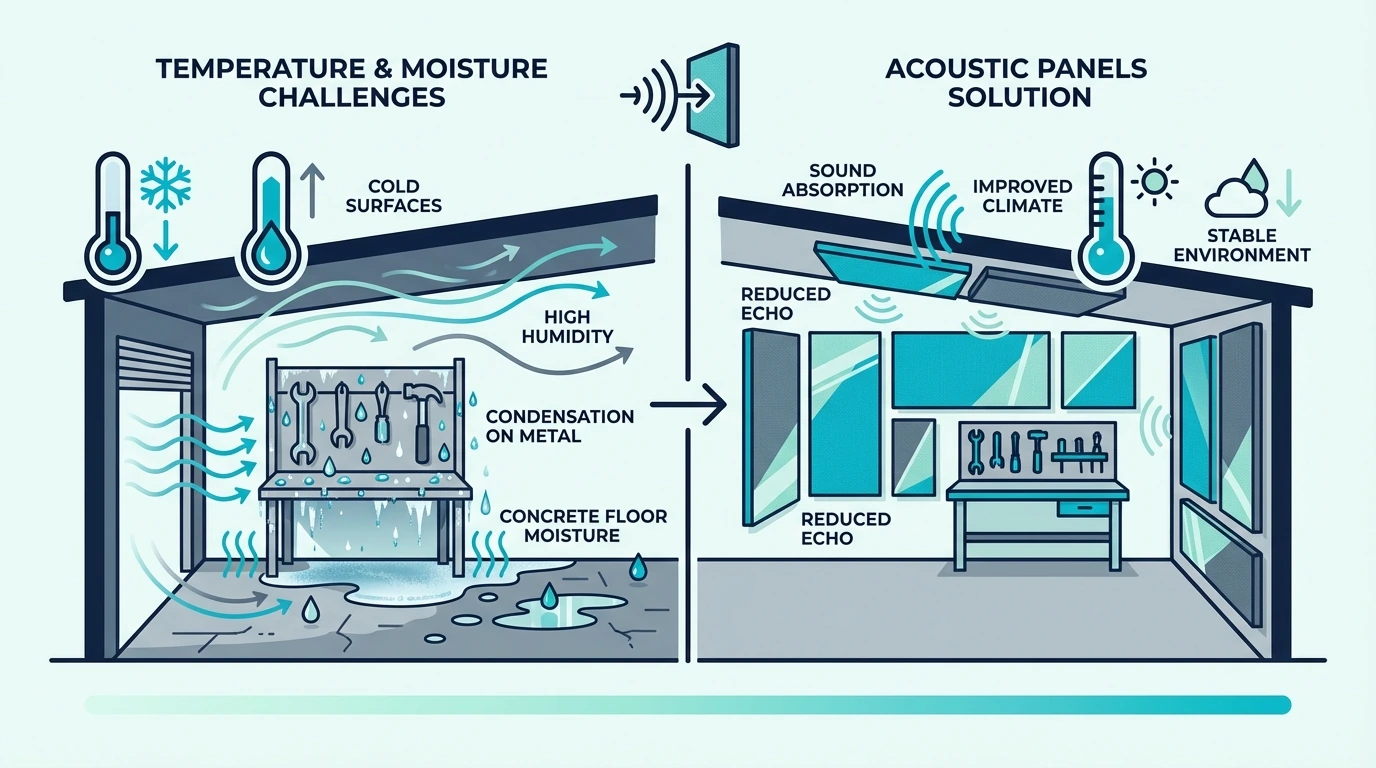
Garages swing from below freezing to over 100°F, concrete floors sweat, and metal doors condense moisture — conditions that can destroy panels built for climate-controlled offices. Temperature cycling, moisture exposure, and unfinished mounting surfaces each affect which panels you buy and how you attach them.
How Does Temperature Affect Panel Choice?
Extreme temperatures do not damage most acoustic materials directly. Fiberglass, mineral wool, and polyester remain stable across normal temperature ranges.
The concern is thermal cycling — repeated expansion and contraction that can stress mounting hardware, loosen adhesives, and crack rigid materials. Choose mechanical fasteners over adhesive mounting in garages with wide temperature swings.
Spray adhesive that works perfectly in a climate-controlled room may fail when temperatures hit 95°F in summer. Command strips can lose grip after a few freeze-thaw cycles.
Screws and Z-clips provide reliable mounting regardless of temperature. If you do use adhesive, treat it as supplemental hold instead of your primary fastener.
Fabric-wrapped panels handle thermal cycling well because the components can move slightly without visible damage. Rigid foam panels with painted surfaces may crack at edges where expansion stress concentrates.
How Does Moisture Affect Garage Panels?
Moisture creates real problems for certain acoustic materials. Fiberglass can absorb water and lose performance.
If moisture is a concern, the fabric cover guide details which wrap materials handle humidity without degrading.
Paper-faced products deteriorate over time, and organic materials can grow mold. If you see condensation regularly, prioritize moisture-resistant materials.
PET felt panels use construction that resists moisture far better than fiberglass — look for panels rated for high-humidity environments, which makes them a natural fit for garages without climate control.
If your garage has serious moisture issues — visible condensation, water intrusion, or high humidity — address those problems before installing acoustic treatment. Panels cannot fix acoustic issues if they are deteriorating from moisture damage.
For truly problematic environments, consider panels with waterproof backing or plastic-wrapped cores. These cost more but survive conditions that would destroy standard panels.
How Do Unfinished Surfaces Affect Installation?
Exposed studs, concrete block, and unfinished concrete offer different mounting challenges than finished drywall.
Concrete walls require masonry anchors or adhesive specifically formulated for concrete. Standard drywall anchors will not hold.
Tapcon screws or hammer-set anchors provide reliable mounting points. If you are using adhesive, pick one rated for masonry and temperature swings.
The installation guide covers the full hardware list — the techniques adapt to garage surfaces with the anchor and fastener swaps described above.
Exposed studs actually simplify things because you can screw directly into the wood. The stud spacing (typically 16 or 24 inches on center) will influence panel placement.
Align panel edges with studs for clean mounting, then fill in gaps where reflections are strongest. If you want more precision, use the mirror trick to confirm first-reflection points.
What Types of Panels Work Best in Garages?

Temperature, moisture, and impact resistance narrow the field — fabric-wrapped fiberglass, foam, and PET felt each trade off differently in a garage where panels get bumped by equipment and baked by summer heat.
Are Fabric-Wrapped Panels Good for Garages?
Fabric-wrapped fiberglass or mineral wool panels offer the best acoustic performance for the money. The rigid core absorbs effectively across a broad frequency range, and the fabric protects the core while providing finished appearance.
For garages, choose panels with durable fabric — not the delicate decorator fabrics used in corporate lobbies. Polyester fabric wraps resist abrasion better than cotton blends.
Professional installations often use panels rated for high-traffic commercial environments. These cost slightly more but withstand the incidental contact that happens in working spaces.
The ATS Acoustics Panel represents the professional standard — it is the same construction used in recording studios and broadcast facilities, built to last decades.

ATS Acoustics Panel
Does Foam Hold Up in a Garage?
Fiberglass panels set the performance bar, but they also set the price bar. Acoustic foam costs a fraction per square foot, though the trade-off shows up in frequency range — foam absorbs high frequencies well but does little for the mid and low frequencies where garage problems concentrate.
Foam can work as supplemental treatment after you have addressed primary reflection points with professional panels. Covering remaining wall areas with foam costs less than full professional coverage.
Fire rating matters in garages because vehicles, gasoline, and power tools create hazards that do not exist in living spaces. Choose foam with Class A or Class B fire ratings.
Avoid unrated foam sold primarily for appearance. If you cannot verify a fire rating, do not put it in a garage studio.
Standard polyurethane foam can release toxic fumes when burned. Melamine foam offers better fire performance but costs more.
For spaces where you store vehicles or flammable materials, fire-rated panels are not optional — factor fire safety into every panel choice.
Are PET Felt Panels Suitable for Garages?
PET felt panels offer an excellent middle ground for garage applications. They are moisture-resistant, do not irritate skin like fiberglass, and provide good mid-frequency absorption.
PET felt absorbs more of the midrange than foam does, and the NRC rating guide shows exactly where the crossover sits so you do not buy a material that only treats the top end.
The material comes from recycled plastic bottles, making it environmentally friendly. It does not support mold growth even in humid conditions.
Performance falls between foam and professional fiberglass panels. PET felt absorbs well from roughly 500Hz upward.
Low-frequency absorption requires serious thickness (4+ inches) or air gap mounting. If your garage is primarily for music, plan to add bass control separately.
For garages used primarily for speech (podcasting, calls) rather than music, PET felt may provide adequate performance at lower cost than fiberglass panels.
For music applications, supplement with bass trapping in corners — the panels vs bass traps comparison explains what each product is actually solving.
How Much Coverage Does a Garage Need?
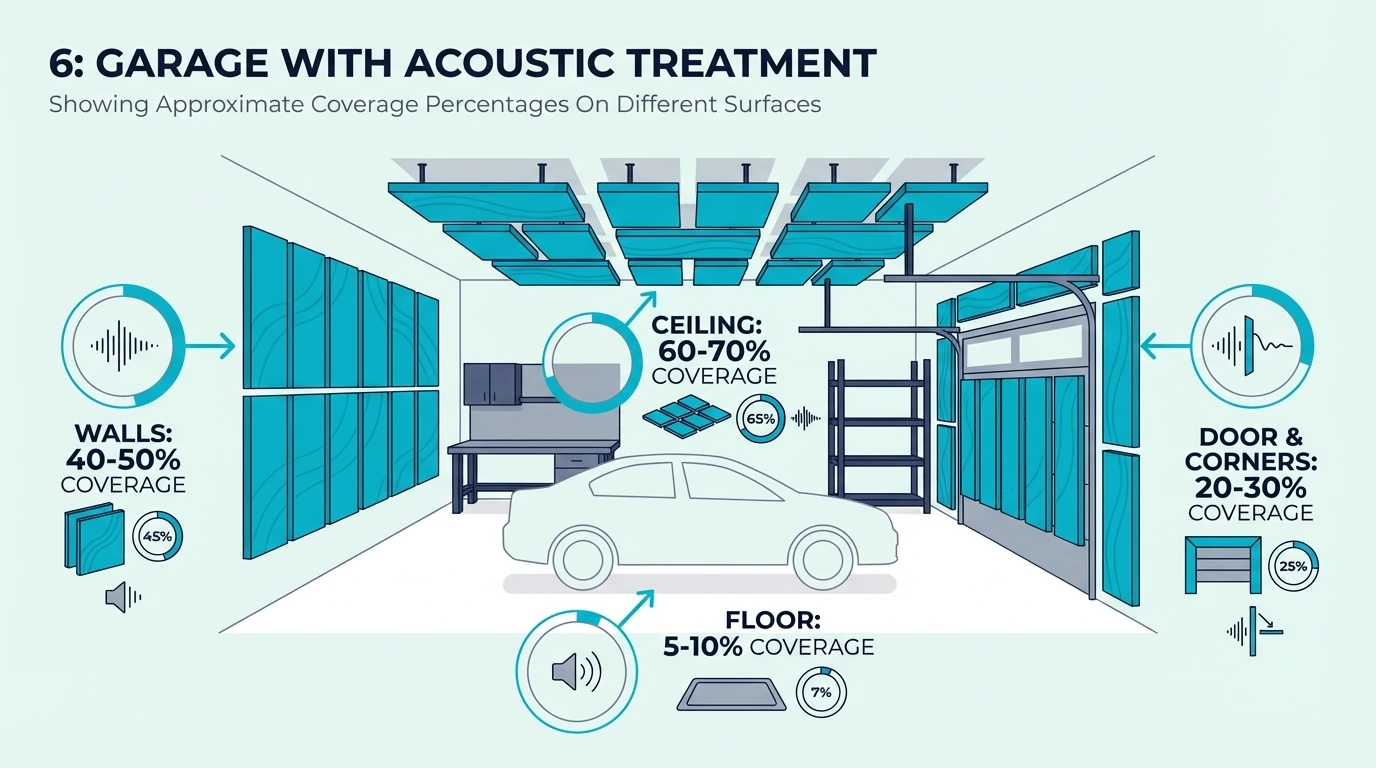
Garages start from zero absorption, so coverage percentages run higher than in furnished rooms — typically 40-50% of wall area for music or recording versus 15-20% in a living room. Calculating panel quantity and knowing the minimum effective treatment let you scale up in phases without overspending.
How Do You Calculate Panel Quantity?
Start with the surface area of the room. A typical two-car garage measures roughly 20×20 feet with 9-foot ceilings.
That is 400 square feet of floor, 400 of ceiling, and about 720 square feet of walls (accounting for the door). Use your real measurements if your garage is longer or taller.
For aggressive treatment targeting reverb reduction, aim to cover 40-50% of wall area and 30-40% of ceiling area. That is roughly 300-350 square feet of walls and 120-160 square feet of ceiling.
Using 2×4-foot panels (8 square feet each), you would need approximately 40-45 wall panels and 15-20 ceiling panels for full treatment. That is a large investment, which is why most people treat in phases.
The formula from the panel quantity calculator adapts to garages once you increase the target coverage percentage to account for the lack of existing absorption.
What is the Minimum Effective Treatment?
You can achieve meaningful improvement with much less than full treatment. Priority placement matters more than quantity.
Start with panels at first reflection points: the wall behind your primary position, the ceiling above where you work, and the side walls at ear level. This might require only 8-12 panels for a noticeable difference.
Add corner bass traps next. Garages have strong room modes due to parallel surfaces, and bass buildup in corners makes mixing difficult.
Four corner traps (floor-to-ceiling in each corner) handle the worst problems. If you cannot do all four, start with the two corners behind your speakers or the loudest instrument.
From there, add panels based on what you hear. If the rear of the room still sounds washy, add treatment there.
If specific walls create audible flutter, target those surfaces. Treat in phases and let the room tell you what to do next.
Minimal treatment: 15-20% wall coverage and 10-15% ceiling coverage (about 12-18 panels). Best for podcasting, calls, and light practice.
Moderate treatment: 25-35% wall coverage and 20-25% ceiling coverage (about 25-35 panels). Best for band practice and most home studios.
Comprehensive treatment: 40-50% wall coverage and 30-40% ceiling coverage (about 45-60 panels). Best for recording, mixing, and mastering.
How Do You Install Panels in a Garage?
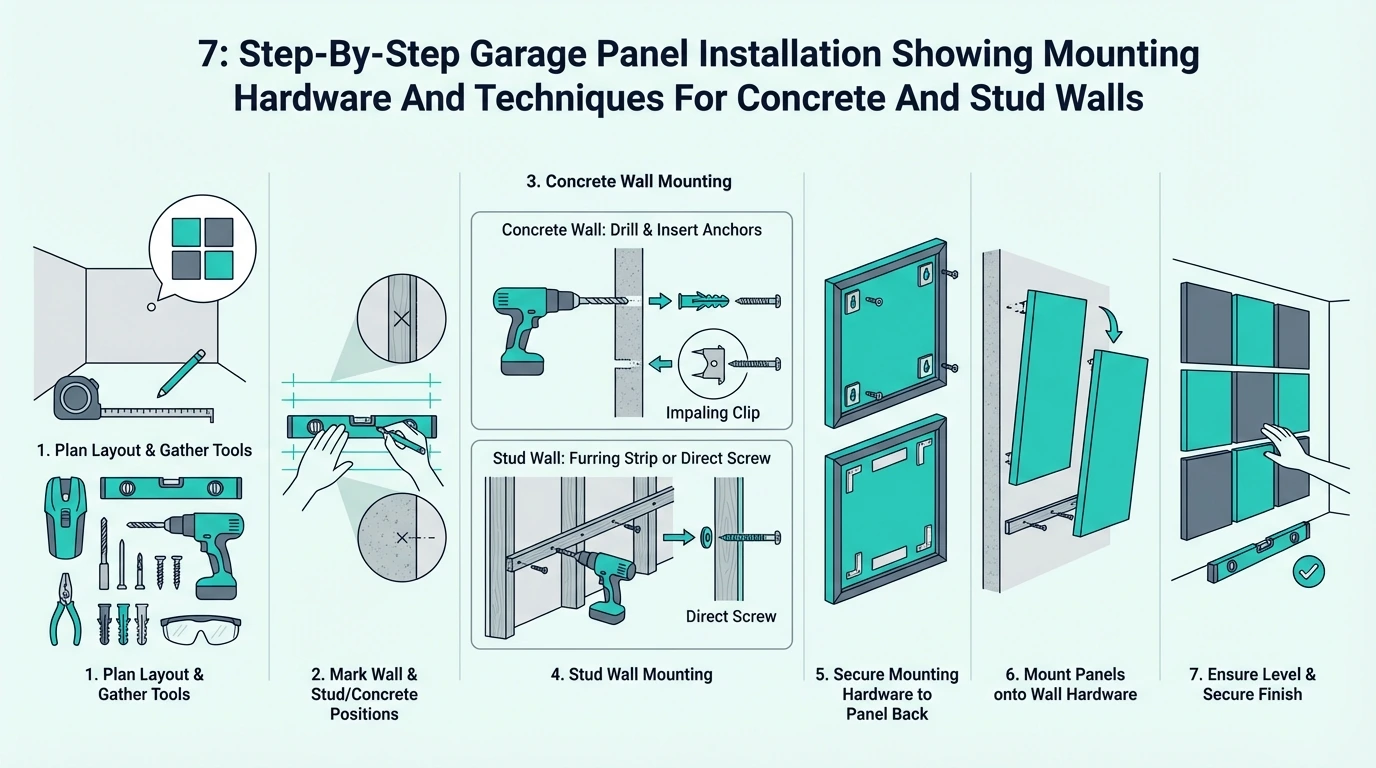
Garage surfaces demand different fasteners than finished drywall, and temperature cycling means mechanical attachment beats adhesive every time. Choosing the right hardware and handling corners correctly keep panels secure through seasonal swings.
What Hardware Works for Garage Mounting?
The fastener you pick depends on what is behind the wall surface. For stud walls (finished or unfinished), #8 or #10 wood screws driven into studs provide secure mounting — pre-drill to prevent splitting, especially in older, dry lumber.
For concrete block walls, use masonry anchors. Drill with a hammer drill and masonry bit, insert plastic anchors, then drive screws.
Tapcon screws cut their own threads in concrete for a simpler approach. They are usually the fastest option for DIY garage installs.
For finished drywall over studs, Z-clips offer clean mounting. One clip attaches to the wall (into a stud), the mating clip attaches to the panel, and they interlock for a flush mount.
Avoid adhesive-only mounting in garages. Temperature cycling and humidity variations can cause adhesive failure.
If you still want adhesive as a secondary hold, the glue guide covers which formulas survive seasonal temperature swings in unconditioned spaces.
Use mechanical fasteners as primary attachment, with adhesive as supplemental hold if desired. That is the stable approach that will not fall off the wall when seasons change.
What Goes in Corners and Edges?
Corners benefit from bass traps more than flat panels. Stack triangular or rectangular traps floor-to-ceiling in as many corners as possible.
The 8-Pack Corner Bass Traps provide entry-level corner treatment. For serious bass control, thicker professional bass traps absorb noticeably more low end, but these foam traps offer a starting point.
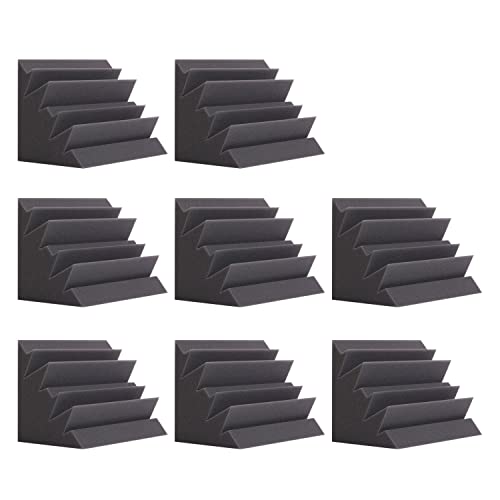
8-Pack Corner Bass Traps
Where walls meet ceiling, consider cove-mounted panels. Angling panels across the corner creates an air space behind that improves low-frequency absorption.
Cove mounting works especially well in garages with exposed ceiling joists. Mount panels diagonally from joist to wall top plate for a clean, rigid install.
Edge gaps between panels do not measurably affect acoustic performance. Sound waves are large compared to typical gaps.
Do not obsess over perfect panel-to-panel alignment; close is good enough. Focus on hitting the right zones instead.
What Are Common Garage Treatment Mistakes?
The biggest mistake is treating only one surface — walls without ceiling treatment still produce vertical flutter, and ceiling without walls leaves horizontal reflections unchecked. Corner over-treatment and floor decisions are the two traps that waste budget after the primary surfaces are covered.
Why Does Over-Treating Corners Happen?
People often stack corner treatments excessively while ignoring wall centers. Corners do benefit from treatment, but the first priority is reducing direct reflections at ear level.
A garage with bass traps in every corner but bare walls at listening height will have controlled low frequencies but harsh, echoey midrange. Balance matters.
Start with primary reflection points on walls and ceiling. Add corner treatment for bass control.
Fill in remaining wall areas last. That order keeps your budget on the surfaces that actually change what you hear.
Is the Floor Worth Treating?
Garage floors present limited options. Concrete is nearly impossible to treat without covering it entirely.
If you are considering rugs, the rugs vs panels comparison quantifies the absorption gap so you know what flooring can and cannot solve.
Area rugs help but cannot match the absorption of wall treatment. Use them for comfort and a small reduction in high-frequency slap.
Interlocking foam floor tiles provide modest absorption while also making the space more comfortable for standing work. They will not solve major acoustic problems but contribute to overall absorption.
For recording studios in garages, consider floating floor systems. These decouple the room from the concrete, reducing vibration transmission.
The build is labor-intensive but provides both acoustic and comfort benefits. Most people should treat walls and ceiling first and only revisit the floor later.
For most garage uses, accept that the floor will remain reflective and compensate with additional wall and ceiling treatment.
Conclusion
Where to put acoustic panels in garage starts with treating the reflection paths that hit you first. Rear wall, ceiling cloud, side-wall first reflections, then corner bass control — that sequence drops reverb time from 2+ seconds to under 1 second in a typical two-car garage.
Music becomes clearer and less fatiguing, and the room responds well even at lower volume. Panels absorb sound inside the room but do not block it from leaving — absorption and soundproofing solve different problems. Treat in phases, listen after each round, and expand coverage only where the room still sounds harsh or boomy.
Frequently Asked Questions
Where Should I Put Acoustic Panels in My Garage?
Start with the wall behind your primary position (listening spot or performance area), then treat the ceiling above that zone. Add side wall panels at first reflection points, typically at ear height where sound bounces directly to your ears.
Corner bass traps complete the essential treatment. The garage door benefits from heavy curtains or portable panels that can move when you need door access.
What Type of Acoustic Panels Work Best in Garages?
Moisture-resistant panels suit garages best — PET felt resists humidity well, while fabric-wrapped fiberglass offers the best acoustic performance in dry conditions. Avoid paper-faced products and standard polyurethane foam if your garage has temperature extremes or moisture issues, and stick with fire-rated materials since garages often store vehicles and flammables.
How Many Panels Does a Garage Need?
A two-car garage typically needs 25-60 panels depending on your goals — 12-18 at priority positions for podcasting, 25-35 for band practice, and 45-60 for professional recording or mixing. Start with first reflection points and add panels based on what you hear.
Can I Treat Just Part of My Garage?
Partial treatment works if you focus on the zone where you work. Create an acoustic “bubble” around your listening or performance position with panels on the nearby walls and ceiling section.
Sound from the untreated portion will still reflect, but the immediate acoustic environment improves noticeably. Partial treatment suits garages that still double as vehicle storage.