Acoustic Treatment Vs Directional Mic For Podcast (Which Matters More)
Acoustic treatment vs directional mic for podcast recording is not an either-or decision — but if you have to choose one first, treatment fixes problems that no microphone can solve, while a directional mic only reduces how much room sound reaches the capsule without actually improving the room itself.
Every podcaster eventually faces this question. The room sounds echoey or hollow, and the two most common solutions are buying a better microphone or treating the room with acoustic panels.
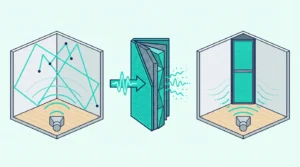
A directional microphone rejects sound from certain angles. Acoustic treatment removes reflections from the room entirely.
They solve different parts of the same problem, and understanding the difference saves you from spending money on the wrong upgrade first.
Below you will find exactly what each approach does for podcast audio, where each one falls short, and the specific order to invest in them for the biggest improvement per dollar. Start with basic treatment if your room has audible echo — no microphone can fix that.
A directional microphone reduces room pickup by rejecting sound from behind and the sides, but reflections arriving from the front still reach the capsule. Acoustic treatment removes those reflections from the room entirely, improving audio for every microphone and every person in the space. For podcast recording, treat the room first with panels at reflection points, then choose a cardioid dynamic mic for maximum room rejection.
How Does A Directional Microphone Help?
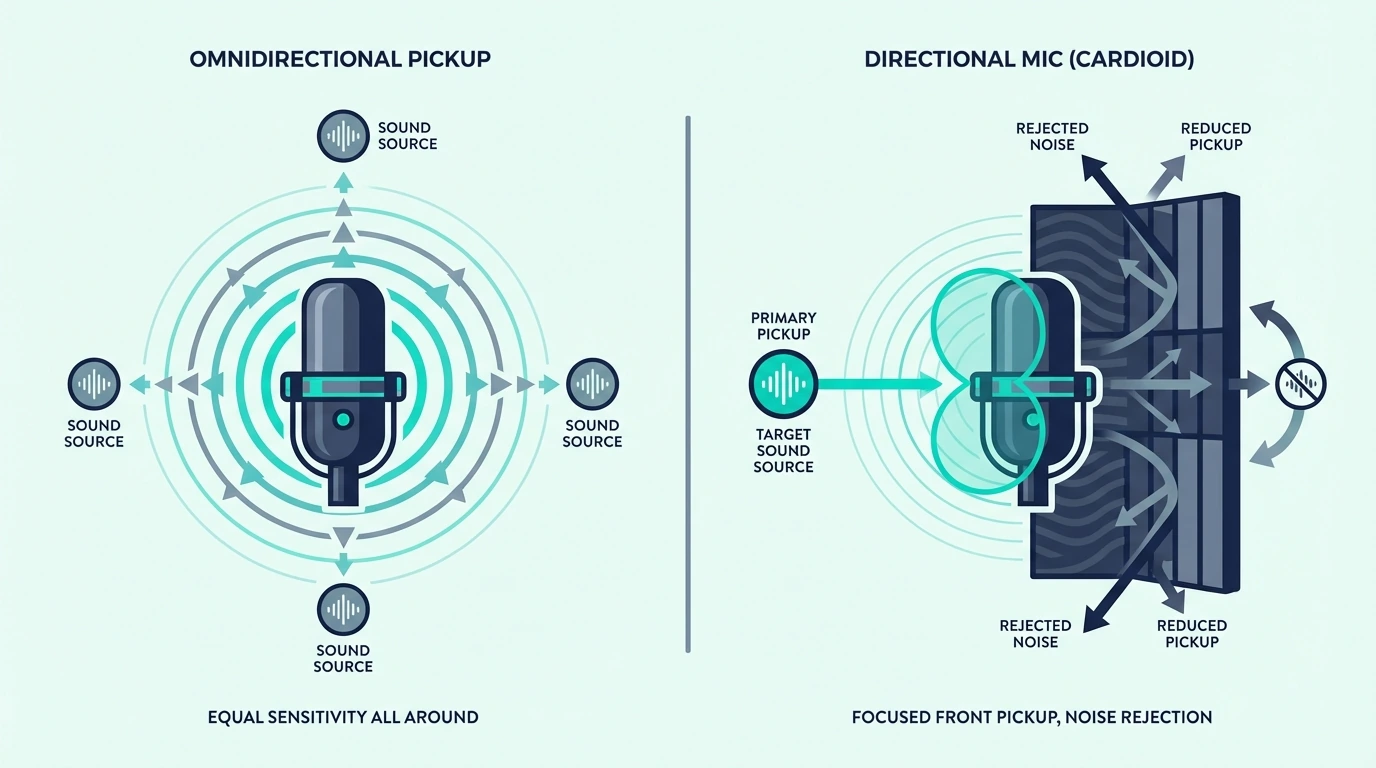
A directional microphone picks up sound primarily from one direction and rejects sound from other angles. This means room reflections arriving from behind and the sides of the mic are reduced relative to the speaker’s voice directly in front.
The most common directional pattern for podcasting is cardioid. A cardioid mic picks up sound from the front, partially from the sides, and rejects sound from directly behind.
Cardioid Vs Supercardioid Vs Shotgun
Cardioid mics reject sound from behind by approximately 20-25 dB. They have the widest front pickup angle, which is forgiving of slight head movements during long podcast sessions.
Supercardioid mics have a tighter front pickup but include a small rear lobe that picks up some sound from directly behind. They reject more from the sides than a cardioid, which helps in rooms where side wall reflections are the dominant problem.
Shotgun mics are extremely directional and reject the most off-axis sound. However, they color off-axis sound rather than simply reducing it, which can create an unnatural quality in reflective rooms.
Shotgun mics work best outdoors or in well-treated spaces where there are few reflections to color. They are rarely the right choice for indoor podcast recording.
For most podcasters, a dynamic cardioid mic like the Shure SM7B or Rode PodMic provides the best balance of room rejection and natural sound quality. Dynamic mics are also less sensitive than condenser microphones, which means they pick up less room ambience overall.
Limitations Of Directional Mics
Directional mics reduce room pickup but do not eliminate it. Reflections that arrive from the front — including the primary wall behind the speaker — still reach the capsule at full strength.
Close-mic technique (speaking 2-4 inches from the capsule) helps by increasing the ratio of direct voice to room reflections. But even with close-mic technique, a reverberant room still sounds reverberant.
Proximity effect is another consideration. All directional mics boost bass frequencies when the speaker is very close.
This can make podcast audio sound muddy or boomy, requiring EQ correction that reduces low-end clarity.
The is treatment necessary guide explains when mic technique alone is sufficient and when treatment becomes essential for professional-quality podcast audio.
How Does Acoustic Treatment Help Podcasting?
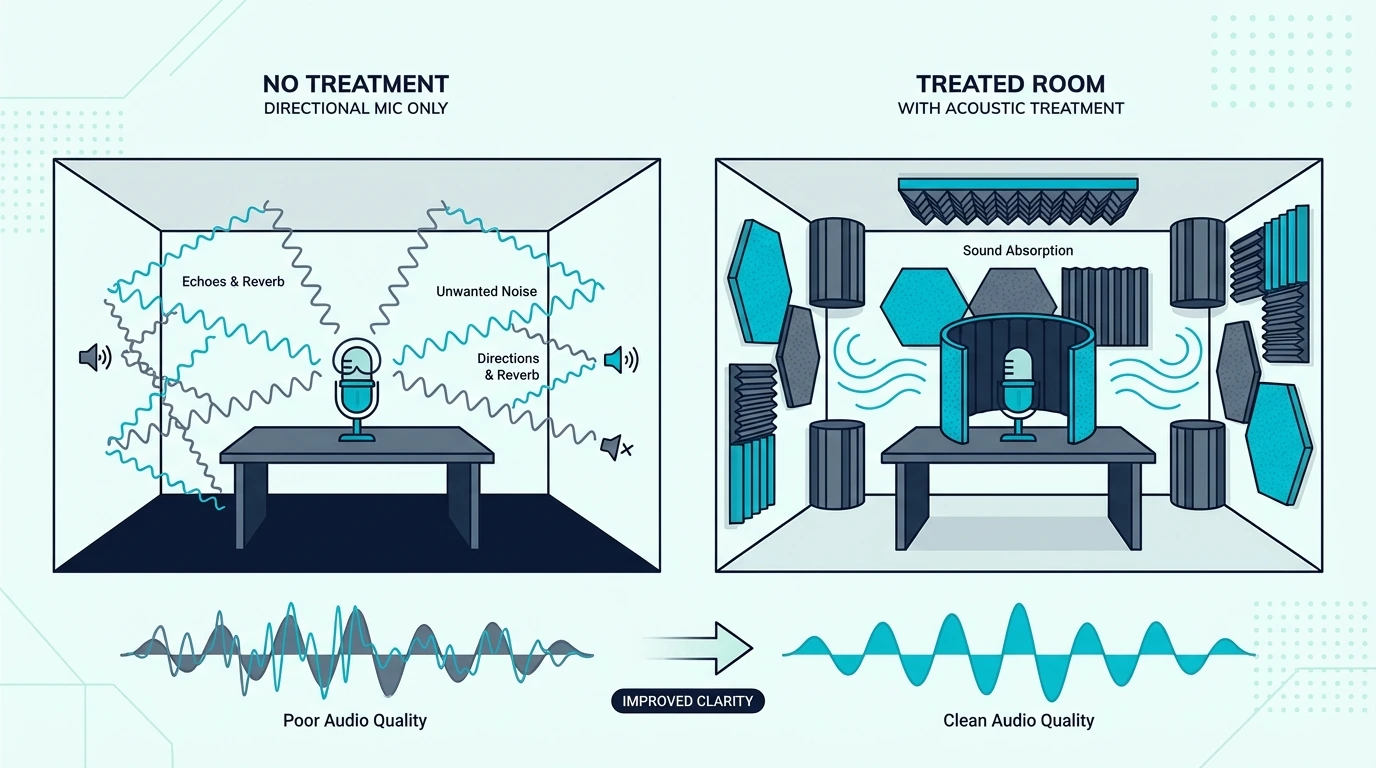
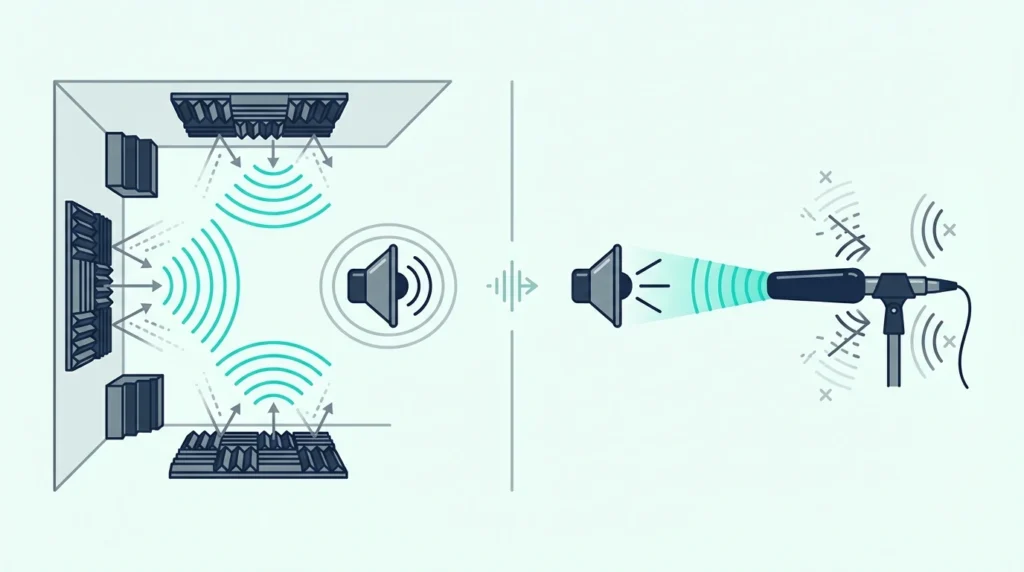
Acoustic treatment physically removes reflections from the room. Panels absorb sound energy so that reflections from walls, ceiling, and floor are dramatically reduced before they reach any microphone in the room.
This means treatment improves audio for every microphone — regardless of its polar pattern. A treated room makes an omnidirectional mic sound better, a cardioid mic sound better, and even a phone recording sound better.
What Treatment Does For Podcast Audio
Treatment reduces reverb time, which is the single biggest factor in podcast audio quality. A room with a reverb time above 0.5 seconds sounds echoey and unprofessional.
Treatment brings this down to 0.2-0.3 seconds, where speech sounds clean and intelligible.
Treatment also eliminates flutter echo — the rapid metallic ringing between parallel walls that creates a harsh, artificial quality in untreated rooms. The how treatment works guide explains the physics of reflection absorption in detail.
For video podcasters, treatment also reduces room coloration that viewers perceive as low production quality. Even if the audio is post-processed, listeners can tell the difference between a recording made in a treated room and one made in an untreated space with heavy processing applied after the fact.
The fiberglass treatment guide covers the specific panel materials that provide the best absorption for speech frequencies.
Minimum Treatment For A Podcast Room
A podcast room does not need full studio treatment. The minimum effective setup is two to four panels at first reflection points — the spots on the side walls where sound from the speaker bounces directly toward the microphone.
The small room guide explains how to find first reflection points using the mirror trick. The process takes five minutes.
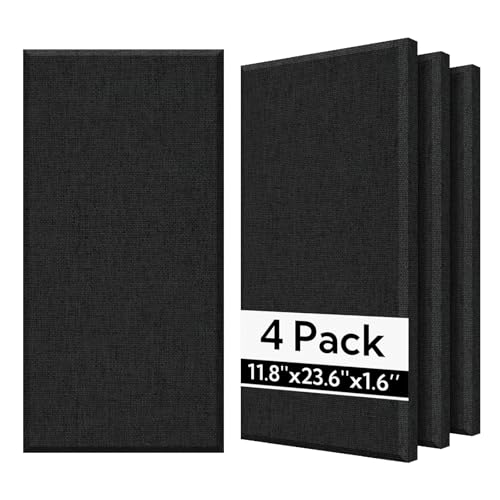
Fiberglass acoustic panels at first reflection points absorb the strongest reflections that reach a podcaster’s microphone from the front and sides. A 4-pack of 2-inch fiberglass panels treats both side wall reflection points and provides an immediately audible improvement.

Fiberglass acoustic panels
If the room sounds boomy, add corner bass traps to absorb low-frequency energy that builds up where walls meet. Even a single heavy blanket hung behind the microphone reduces direct reflections from the back wall.
Get Studio Tips Weekly
Join 5,000+ creators getting acoustic treatment advice every week.
No spam. Unsubscribe anytime.Which Should You Invest In First?
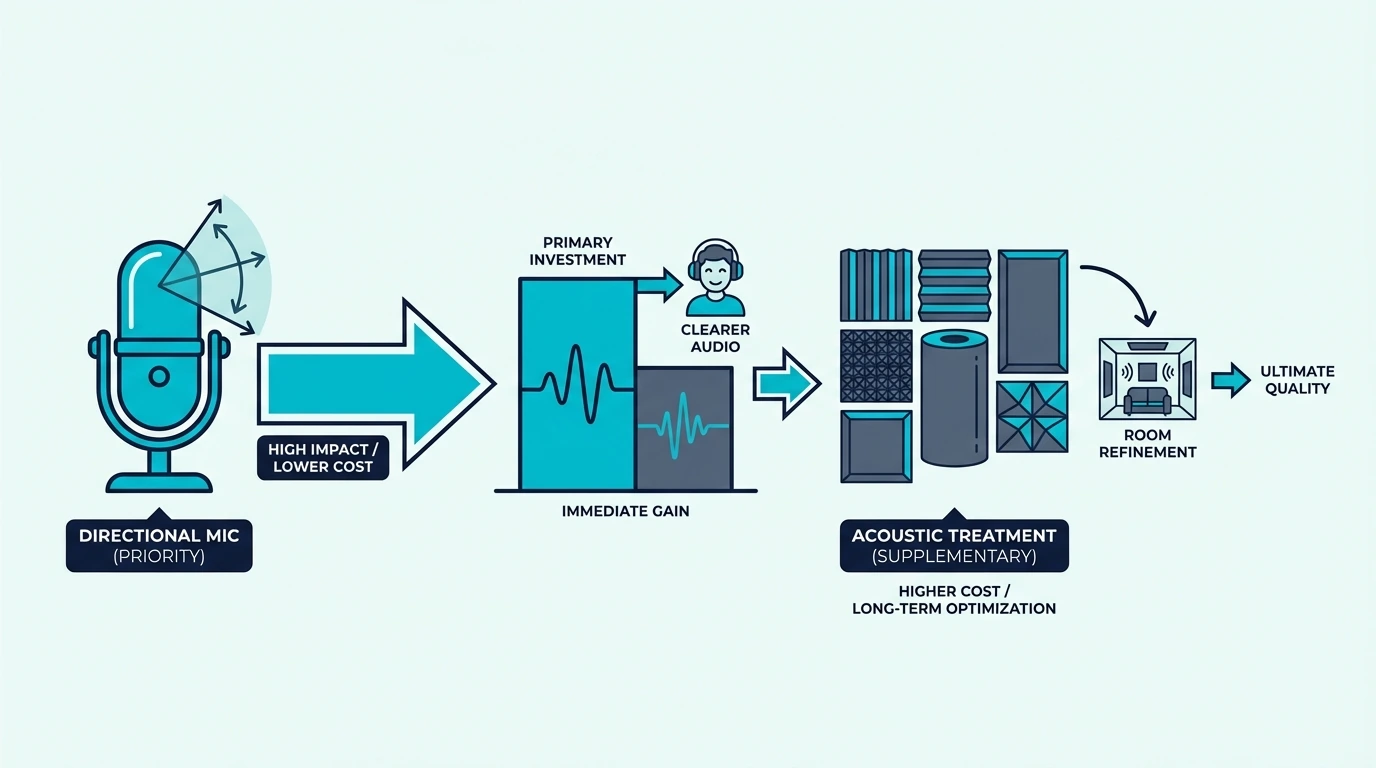
A good directional mic is cheaper and faster to set up. A dynamic cardioid mic costs 100-400 dollars and requires no room modifications.
Treatment requires panels, mounting hardware, and installation time.
But treatment has a bigger long-term impact. It fixes the room for every recording session, every microphone, and every person who records in the space.
A directional mic only reduces room pickup for one microphone position at one angle.
If your budget is limited, start with a dynamic cardioid mic and close-mic technique. This gives you the fastest improvement for the least money.
Then add treatment panels as budget allows, starting with first reflection points.
If your room has obvious echo or reverb, treatment should come first regardless of budget. No microphone — no matter how directional or expensive — can fix a room that rings.
For renters or podcasters in temporary spaces, Olanglab fiberglass panels mount with command strips and remove without damaging walls. The 1-inch fiberglass core absorbs speech-frequency reflections that a directional mic cannot reject.
Olanglab fiberglass panels
The temporary treatment guide covers portable and removable options for podcasters who cannot make permanent room changes. The cost breakdown guide compares treatment pricing across different room sizes and panel types.
The Bottom Line
Treatment and a directional mic solve different problems. Treatment removes reflections from the room.
A directional mic reduces how much of the remaining room sound reaches the capsule.
For the best podcast audio, use both. Treat the room first — even minimal treatment at reflection points dramatically improves recording quality.
Then use a dynamic cardioid mic with close-mic technique to maximize the voice-to-room ratio.
The full guide to acoustic treatment covers the complete workflow from first panel through full room setup. The home studio guide includes treatment priorities ranked by impact for recording spaces.
Frequently Asked Questions
What kind of mic is best for podcasts?
A dynamic cardioid microphone is the best choice for most podcasters. Dynamic mics are less sensitive than condensers, which means they pick up less room ambience.
The cardioid pattern rejects sound from behind.
Popular options include the Shure SM7B, Rode PodMic, and Electro-Voice RE20. All three are dynamic cardioid mics that perform well in untreated or partially treated rooms.
What are the disadvantages of a directional mic?
Proximity effect boosts bass when the speaker is very close, requiring EQ correction. Off-axis sound is colored rather than simply rejected, which can create an unnatural quality if strong reflections arrive from the sides.
Directional mics also require consistent positioning. Moving off-axis during a long recording session changes the tonal character of the voice, which creates inconsistent audio across the episode.
This is especially problematic for interview-style podcasts where multiple hosts move naturally while speaking. Each head turn shifts the voice off-axis and changes the recorded tone.
Can a good mic replace acoustic treatment?
No. A directional microphone reduces room pickup but cannot eliminate reflections that arrive from the front.
Treatment physically removes those reflections from the room, which no microphone technology can replicate.
The DIY treatment guide shows how to build effective panels for 15-25 dollars each — often less than the cost difference between a budget mic and a premium directional mic.