Acoustic Foam vs Diffusers: Which One Does Your Room Actually Need?

If you’re deciding between acoustic foam and diffusers, start by naming the problem. Is it too much echo/reverb, or a room that already feels controlled but still sounds harsh?
Foam absorbs sound energy (it removes reflections), while diffusers scatter it (they keep the room lively while breaking up focused reflections). Start with the quick takeaway, then we’ll walk through placement, room-size rules, and the “use both” setup that most rooms actually need.
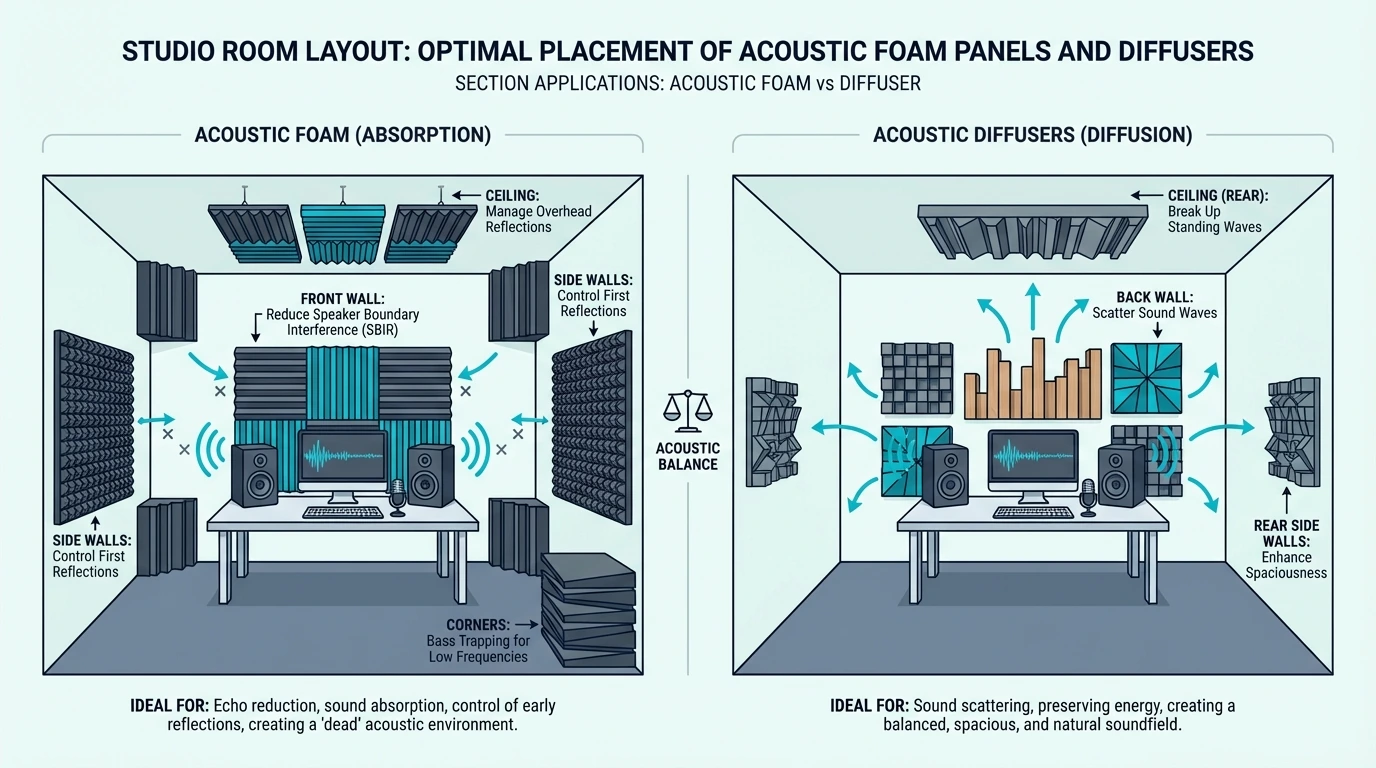
Use acoustic foam when you need to reduce echo/reverb (absorption), and use diffusers when you want to control reflections without making the room feel dead (diffusion). In small rooms, start with foam at first reflection points and only add diffusion later if you have enough distance and the room feels too dry.
What Acoustic Foam Actually Does
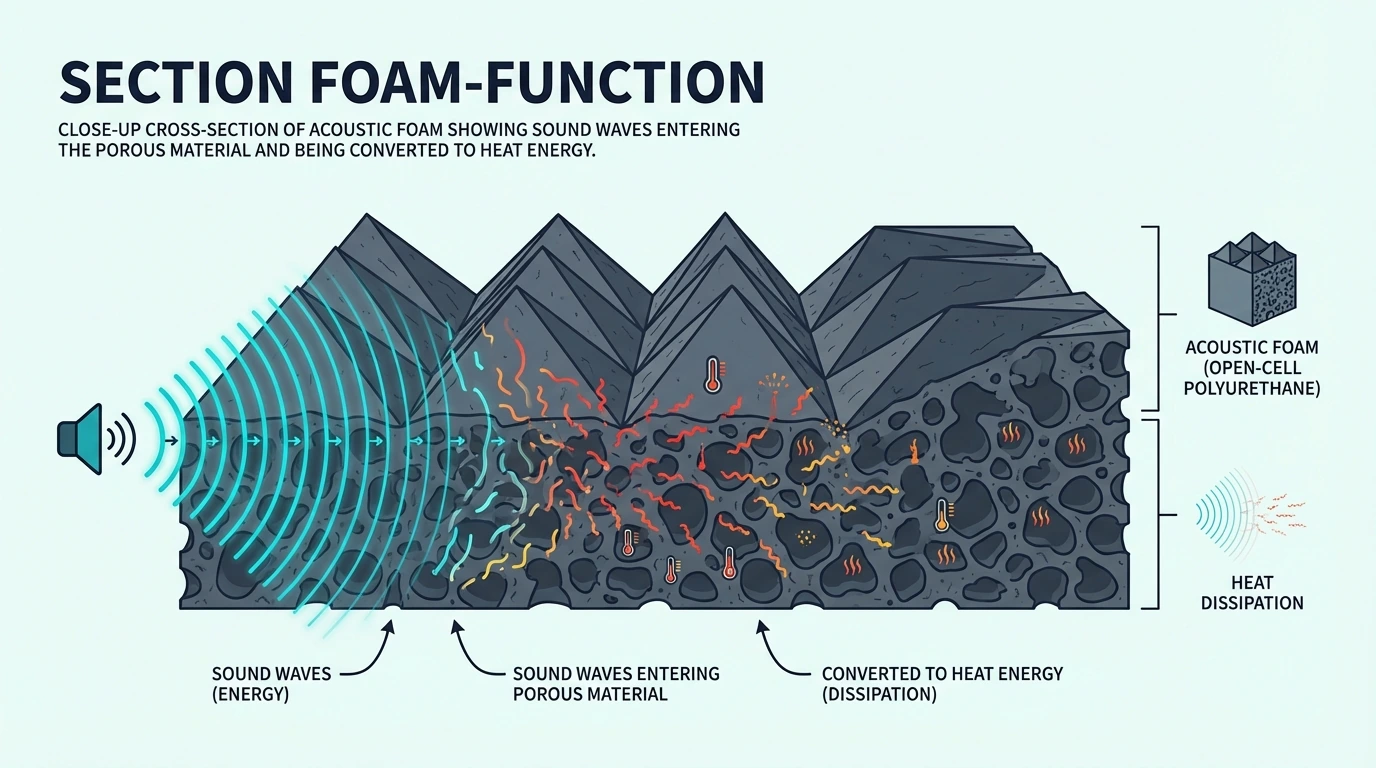
Acoustic foam absorbs sound energy by pulling reflections into its open-cell structure, where friction turns that motion into heat. Instead of bouncing back into the room, part of the reflection gets dissipated inside the foam.
That absorption reduces reflections inside your room, which shortens reverb. In an untreated space, sound bounces off hard surfaces again and again; foam catches some of those reflections before they can build up.
How Absorption Changes Your Room
You can hear the difference immediately—clap in an untreated room, then clap again after adding foam. The ringing tail gets shorter, and the room feels tighter and more controlled.
For recording, this matters because microphones capture room reflections just as easily as the source. Foam at the right spots reduces that splashy “bathroom” sound and gives you a cleaner, more direct take.
The tradeoff is that absorption removes acoustic energy permanently. Overdo it and the room can feel unnaturally dead—so placement and coverage matter.
What Foam Does Well
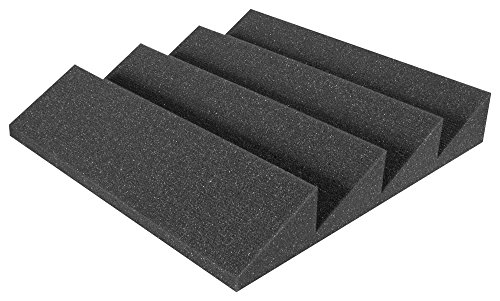
Foam excels at controlling mid and high frequencies. The pyramid and wedge shapes you see on studio walls target roughly 500Hz to 8kHz, where speech clarity and most musical detail lives.
Flutter echo—that metallic ringing between parallel walls—disappears with foam treatment. Even a few panels can break up the reflection pattern that causes it.
For home studios, podcasters, and content creators, foam often delivers the biggest improvement per dollar because it’s affordable, easy to install, and built for small-room reflections. The does acoustic foam work guide covers real-world results if you want a reality check before buying.
What Foam Does Poorly
Bass frequencies pass right through standard foam because the wavelengths are too long for thin panels to absorb. If you’re hearing boomy bass or muddy low-mids, skip more foam and go straight to bass traps.
Foam can’t add anything to your room — it only subtracts reflections. The normal foam vs acoustic foam comparison explains why material type matters for that subtraction. If the space already sounds lifeless, more absorption will make that worse, not better.
What Diffusers Actually Do

Diffusers scatter sound waves instead of absorbing them, so reflections get redirected rather than removed. The energy stays in the room, but it spreads out instead of firing back as a single harsh reflection.
This scattering eliminates harsh reflections without removing acoustic energy. Your room maintains its natural liveliness while losing the problematic focused reflections that cause flutter echo and comb filtering.
How Diffusion Changes Your Room
Diffusion is subtler than absorption, but it changes how a room feels. Instead of hearing reflections ping between specific surfaces, the space feels wider and more natural.
Professional studios use diffusion extensively, especially in control rooms and live rooms. It creates that “expensive studio sound” where the room enhances recordings rather than fighting them.
For critical listening—mixing, mastering, or high-end audio playback—diffusion provides accuracy that pure absorption can’t match. You hear the recording, not an artificially dead room.
What Diffusers Do Well
Diffusers excel at maintaining room ambience while controlling reflections. They’re the solution when absorption would make your space too dead but you still need to address flutter echo or harsh reflections.
Behind the listening position in a studio, diffusers scatter rear-wall reflections without creating the “anechoic chamber” effect that too much absorption causes. You get controlled sound without unnatural deadness. The foam vs rockwool comparison covers which absorber delivers that accuracy best.
For larger rooms—home theaters, music rooms, live performance spaces—diffusion often works better than absorption. These spaces need some reverb to sound natural; diffusers control it without eliminating it.
What Diffusers Do Poorly
Diffusers don’t reduce overall sound levels, so they won’t fix a room that’s obviously echoey on their own. If you need the reverb time to drop, you need absorption somewhere in the plan.
They’re also ineffective in very small rooms because diffusion needs distance to develop. In a tiny bedroom studio, you’re often too close for a diffuser to do meaningful work.
Quality diffusers also cost more than foam because the shapes have to be built precisely. It’s common for one well-designed QRD diffuser to cost more than treating a whole wall with foam.
Get Studio Tips Weekly
Join 5,000+ creators getting acoustic treatment advice every week.
No spam. Unsubscribe anytime.The Fundamental Difference Explained
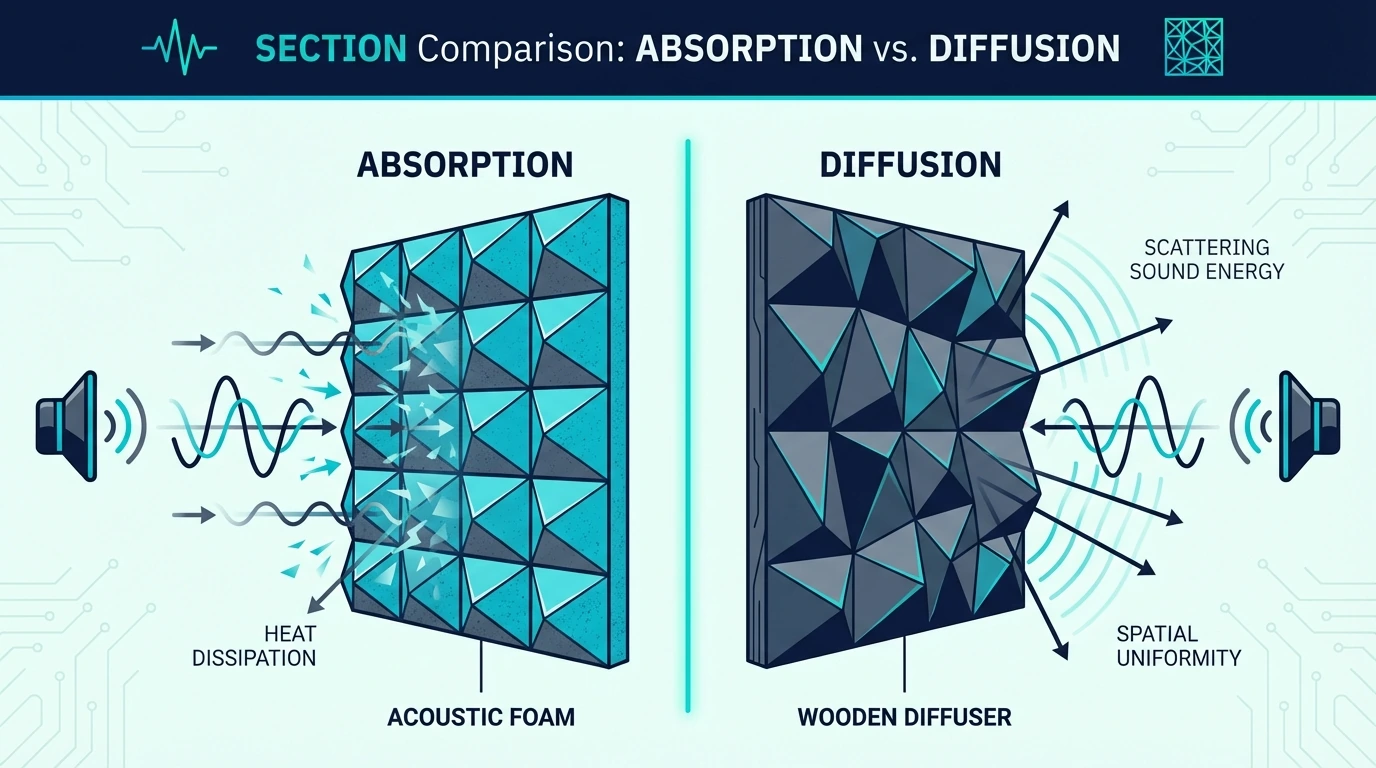
Think of it this way: foam is a sponge, diffusers are a prism.
A sponge soaks up water and it’s gone; foam does the same with sound energy. It pulls reflections in, turns that motion into heat, and removes energy from the room.
A prism takes light and spreads it into a rainbow—the light isn’t absorbed, just redirected. Diffusers take sound and spread it across the room—the energy stays but distributes evenly instead of focusing into problematic reflections.
When Energy Removal Helps
Absorption helps when you simply have too much sound energy bouncing around. In small rooms, each reflection stacks on the next until speech feels muddy and recordings pick up that amateur “room” sound.
Absorption brings order by lowering the total reflection energy, which shortens reverb and cleans up clarity. For most home studios, that’s the first win you need.
Recording spaces benefit from absorption because you want the mic to capture the source, not the room. Foam helps reduce the space’s fingerprint so your voice or instrument sounds more direct.
When Energy Preservation Helps
Preserving acoustic energy helps when your room sounds too dead or when you want natural ambience. Some reverb is desirable—it makes spaces feel alive and music feel connected to a physical environment.
Mixing and mastering rooms need accuracy, but they don’t need to feel anechoic. Too much absorption can push your decisions in the wrong direction, while diffusion helps keep the room natural without adding harsh reflections.
Live performance spaces, home theaters, and listening rooms benefit from controlled reverb. Diffusers let you shape the room’s sound without killing it entirely.
Room Size Matters More Than You Think
The size of your room largely determines whether foam, diffusers, or both make sense. This isn’t arbitrary—it’s physics.
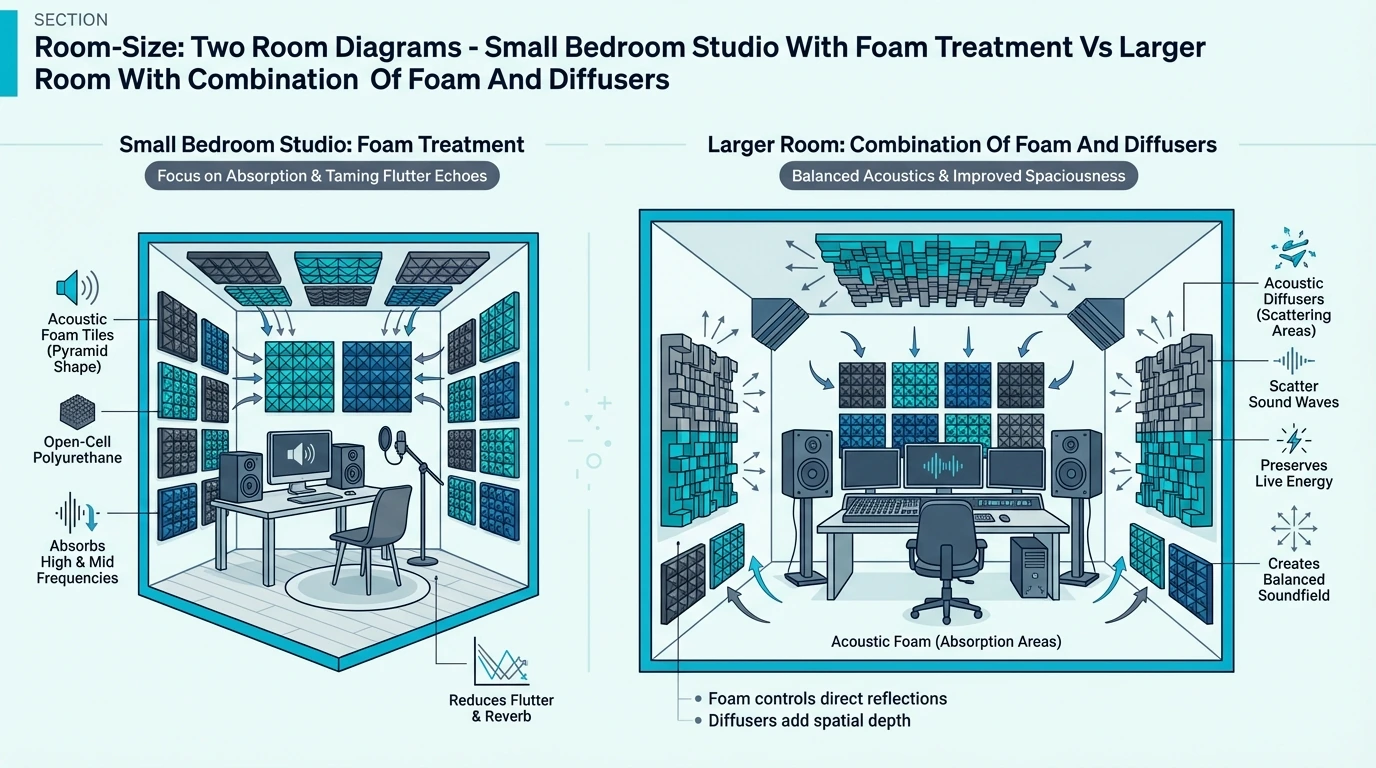
Small Rooms (Under 150 sq ft)
Small rooms need absorption more than diffusion. The walls are too close for diffusion to work effectively, and sound builds up quickly in confined spaces.
Most bedroom studios should start with absorption, not diffusion, because you’re usually too close to the walls for a diffuser to develop properly. The acoustic foam placement guide covers the key positions for small rooms.
Focus your budget on quality foam panels at key positions: behind your monitors, at side-wall reflection points, and behind your recording position. Skip diffusers unless you have specific problems that absorption can’t solve.
Medium Rooms (150-400 sq ft)
Medium rooms benefit from both treatments. You have enough space for diffusion to work, but the room is still small enough that absorption remains important.
The classic approach: foam at first reflection points (sides and ceiling), diffuser on the rear wall. This controls early reflections while maintaining some natural ambience from the back of the room.
For recording in medium rooms, you might use foam around the recording position and diffusers elsewhere. This creates a controlled recording environment without making the entire room feel dead.
Large Rooms (400+ sq ft)
Large rooms often need more diffusion than absorption. These spaces have natural reverb that sounds good—you don’t want to kill it entirely.
Home theaters, dedicated listening rooms, and music studios in larger spaces use diffusion extensively. The goal is controlling reflections while preserving the room’s natural acoustic character.
Absorption still has a role—bass traps in corners, foam at specific reflection points—but diffusion becomes the primary treatment for managing the room’s overall sound.
Practical Applications: Which to Use Where
Here’s where each treatment works best, position by position.
Behind Your Monitors/Speakers
Use: Absorption (foam or panels)
The wall behind your speakers creates strong early reflections that interfere with direct sound. These reflections cause comb filtering—frequency cancellations that color what you hear.
Foam or absorptive panels behind monitors eliminate this problem. You hear the speakers more accurately without the wall’s contribution muddying the sound.
Diffusers don’t work well here. You’re too close, and scattering the reflection doesn’t help—you need to eliminate it entirely.
Side Walls (First Reflection Points)
Use: Absorption (foam or panels)
First reflection points are where sound bounces from your speakers to your ears via the side walls. These reflections arrive milliseconds after the direct sound and confuse your perception of stereo imaging.
Find these points with the mirror trick: sit in your listening position and have someone slide a mirror along the wall. Where you see your speaker in the mirror, that’s a first reflection point.
Foam panels at these positions can clean up your stereo image noticeably, and it’s one of the highest-impact treatments you can make in any room. The wall installation guide covers step-by-step mounting for every surface type.
Rear Wall (Behind Listening Position)
Use: Diffusion (preferred) or Absorption
The rear wall is where diffusion shines. Reflections from behind you arrive late enough that scattering them works better than absorbing them entirely.
A diffuser on the rear wall maintains room ambience while preventing focused reflections from coloring your perception. The sound stays lively without being problematic.
If your room is very small or very reverberant, absorption might work better here. But for most medium-to-large rooms, diffusion is the superior choice for the rear wall.
Ceiling (Above Listening Position)
Use: Absorption or Diffusion (depends on height)
Ceiling reflections matter, especially if you have hard ceilings. The treatment choice depends on ceiling height.
Low ceilings (under 9 feet) benefit from absorption. You’re close enough that reflections are problematic, and there’s not enough distance for diffusion to work.
With higher ceilings, you can use either treatment depending on how you want the room to feel. Diffusion keeps the sense of vertical space, while absorption gives you maximum control.
Corners
Use: Bass Traps (specialized absorption)
Corners are where bass builds up. Neither standard foam nor diffusers address this—you need bass traps specifically designed for low-frequency absorption.
This is a separate topic from the foam vs diffuser debate, but it’s worth mentioning: if you have bass problems, neither foam panels nor diffusers will help. You need dedicated corner bass traps.
Cost Comparison: What You’ll Actually Spend
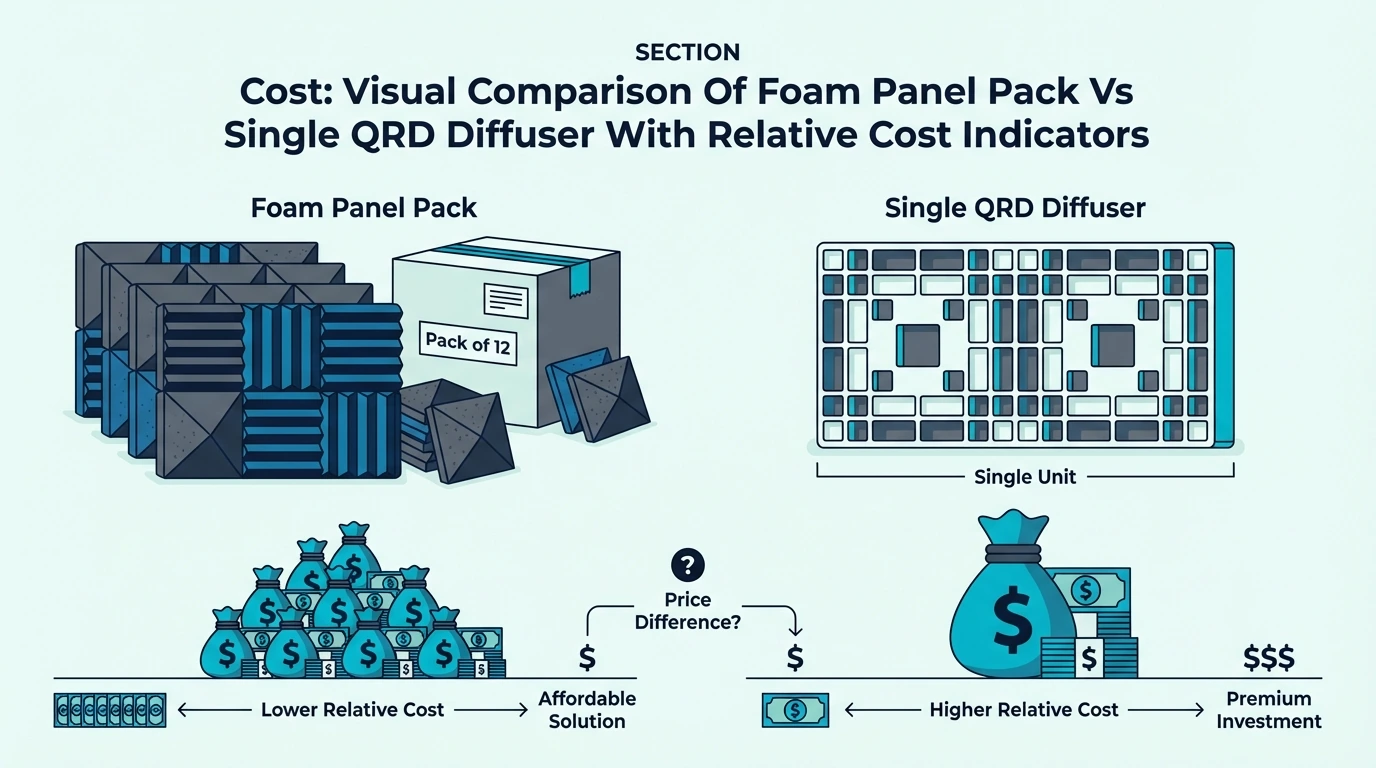
Budget often determines treatment choices as much as acoustics do. Here’s the reality.
Acoustic Foam Costs
Budget foam panels run cheap—you can treat a small room for relatively little. Quality varies enormously, but even budget foam provides meaningful absorption.
A budget 2-inch starter pack like FONESO 12-pack 2-inch foam panels is a simple way to get absorption on the wall without blowing the budget. Just remember placement matters more than blanket coverage.

FONESO 12-Pack 2-inch Foam Panels
Mid-range foam from brands like Auralex or Foamily costs more, but you usually get better consistency and durability. The best acoustic foam panels roundup compares options across price ranges.
If you want more predictable build quality, Auralex Studiofoam DST-114 (24-pack) is a premium option that trades dollars for consistency. It’s still mid/high-focused treatment, so pair it with bass traps if your room’s low end is messy.
Auralex Studiofoam DST-114 (24-pack)
Professional-grade absorption panels (fabric-wrapped fiberglass) cost more but outperform foam acoustically. For a deeper look at foam vs fabric-wrapped panels, that comparison covers when each makes financial sense. They’re the choice for dedicated studios where performance matters most.
Diffuser Costs
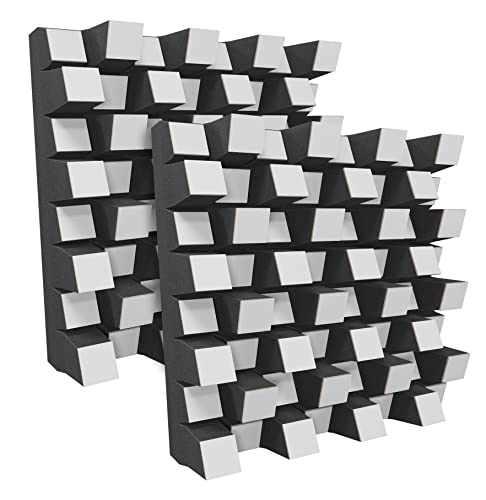
Diffusers are inherently more expensive. The complex shapes require precision manufacturing, and quality materials (hardwood, high-density foam) add cost.
A single 2×2 foot QRD diffuser often costs more than a 12-pack of foam panels. Treating a rear wall with diffusion can cost several times what full-room foam treatment would cost.
On the diffuser side, a true 2D QRD set like Sirius 2-pack QRD diffusers gives you enough surface area to matter on a rear wall. If you prefer wood, this wood acoustic diffuser panel is another option—just make sure your listening position isn’t right on top of it.
Sirius 2-Pack 2D QRD Diffuser
DIY diffusers can save money if you’re handy, because the designs are well-documented and building one from wood is doable. But it takes tools, time, and decent woodworking accuracy.
Value Calculation
For most home studios, foam provides better value. The acoustic improvement per dollar is higher, and the problems foam solves are more common in small spaces.
Diffusers become worthwhile when you’ve already addressed absorption needs and want to refine your room’s sound further. They’re a second-stage treatment for most people, not a starting point.
If budget is tight, spend it on foam first. Add diffusion later when you can afford quality units that actually work.
Common Mistakes to Avoid
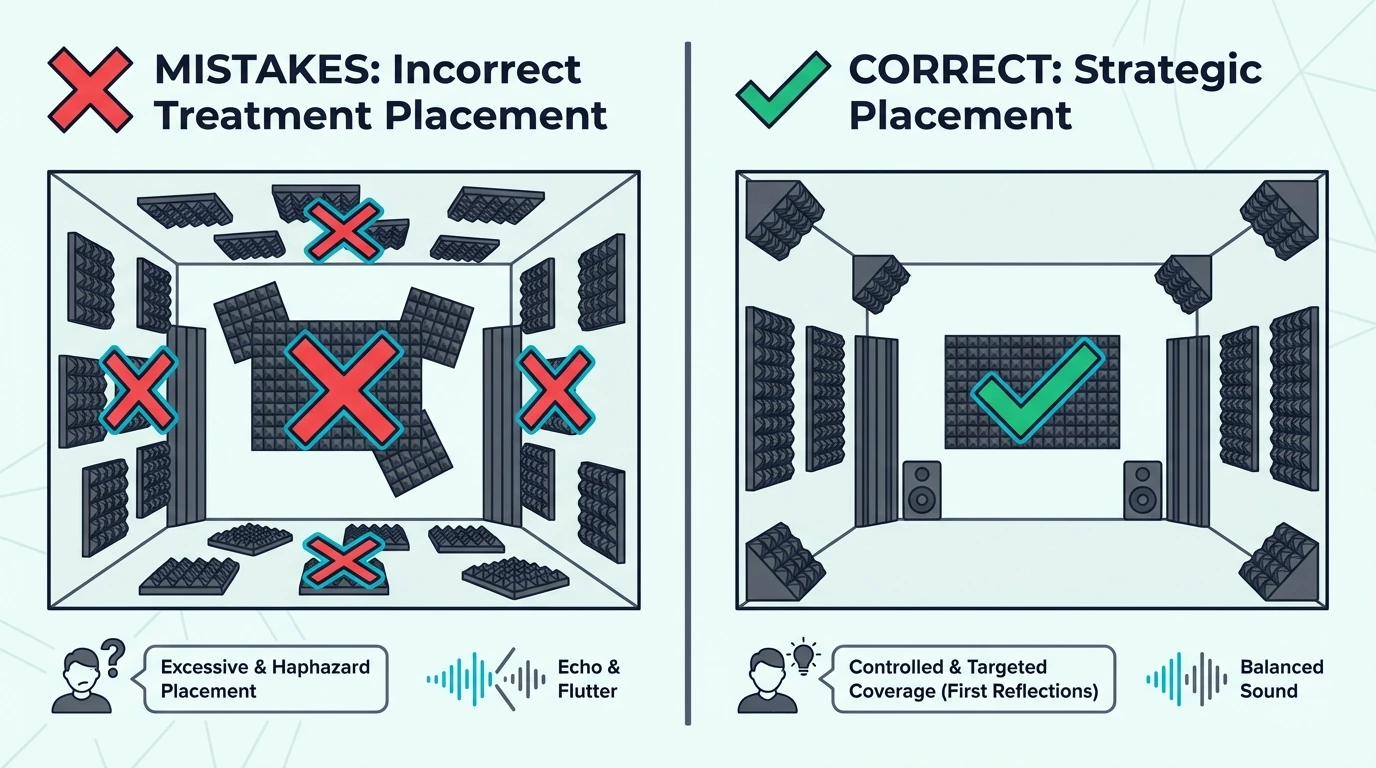
People make predictable errors when choosing between foam and diffusers. Here’s what to avoid.
Using Diffusers in Tiny Rooms
Diffusion needs distance to develop. In a small bedroom studio you might be only 3–4 feet from the rear wall, which puts you in the near-field where a diffuser can’t do much.
Save diffusers for rooms where you can sit at least 6-8 feet from the diffuser surface. In smaller spaces, absorption works better even on the rear wall.
Over-Absorbing the Room
Too much foam creates an unpleasant, dead-sounding space. Speech sounds muffled, music loses life, and the room feels oppressive.
The goal isn’t eliminating all reflections—it’s controlling the problematic ones. Aim for 20–30% absorption coverage (not floor-to-ceiling foam), and the too much acoustic foam guide sets a practical coverage target.
If your room already sounds dead, adding more foam makes it worse. The is acoustic foam worth it breakdown helps calculate how much treatment a room actually needs before you over-commit.
Ignoring Bass Problems
Neither foam nor diffusers address bass buildup. If your room has boomy low end or muddy bass response, you need bass traps—thick, dense absorbers designed for low frequencies.
People often keep adding foam trying to fix bass problems, but it doesn’t work. The wavelengths are too long for thin panels to absorb, so low-end issues need different treatment.
Buying Cheap Diffusers
Budget “diffusers” often don’t diffuse effectively. The wells aren’t deep enough, the materials aren’t rigid enough, or the design isn’t acoustically valid.
A poorly designed diffuser is just an expensive decoration. If you can’t afford quality diffusion, you’re better off with foam—at least it definitely works.
Before you buy, stick to diffuser designs with proven performance like QRD and skyline patterns. Random patterns and shallow wells often look cool, but they don’t diffuse much.
The Hybrid Approach: Using Both
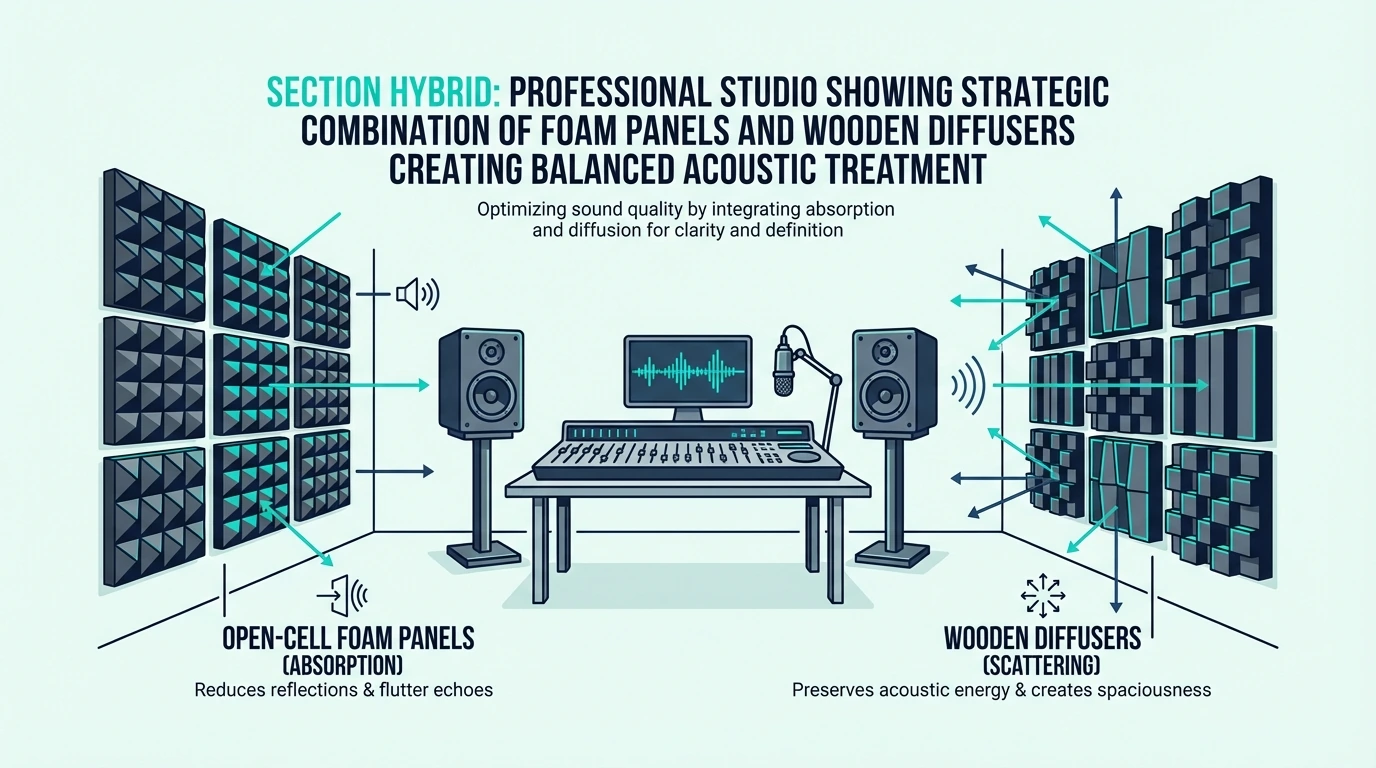
Most well-designed rooms use both absorption and diffusion. The question isn’t which one to use—it’s where to use each.
The Classic Studio Setup
Professional studios typically follow this pattern:
- Front wall (behind monitors): Absorption
- Side walls (first reflections): Absorption
- Rear wall: Diffusion
Then handle vertical reflections and bass separately:
- Ceiling (reflection point): Absorption or diffusion
- Corners: Bass traps
This combination controls early reflections with absorption while maintaining room ambience with rear-wall diffusion. It’s the standard approach because it works.
Adapting for Home Studios
Home studios can follow the same principles at smaller scale:
- Foam panels at first reflection points (sides)
- Foam behind monitors if wall is close
- Diffuser or absorption on rear wall (depending on room size)
- Bass traps in corners if bass is problematic
You don’t need to treat every surface—strategic placement of a few panels (and maybe one rear-wall diffuser) handles most problems in typical rooms. The acoustic foam arrangement guide covers layout strategies for every room shape.
When to Add Diffusion
Start with absorption because it solves the most common problems and costs less. Once your room sounds controlled but a bit too dead, that’s when diffusion starts making sense.
Signs you might benefit from diffusion:
- Room sounds unnaturally dead after foam treatment
- You want more “air” or ambience in recordings
- Mixes made in your room sound too dry elsewhere
- The space feels oppressive or uncomfortable
Diffusion restores liveliness without bringing back the problems absorption solved. It’s the refinement step after basic treatment is complete.
Making Your Decision
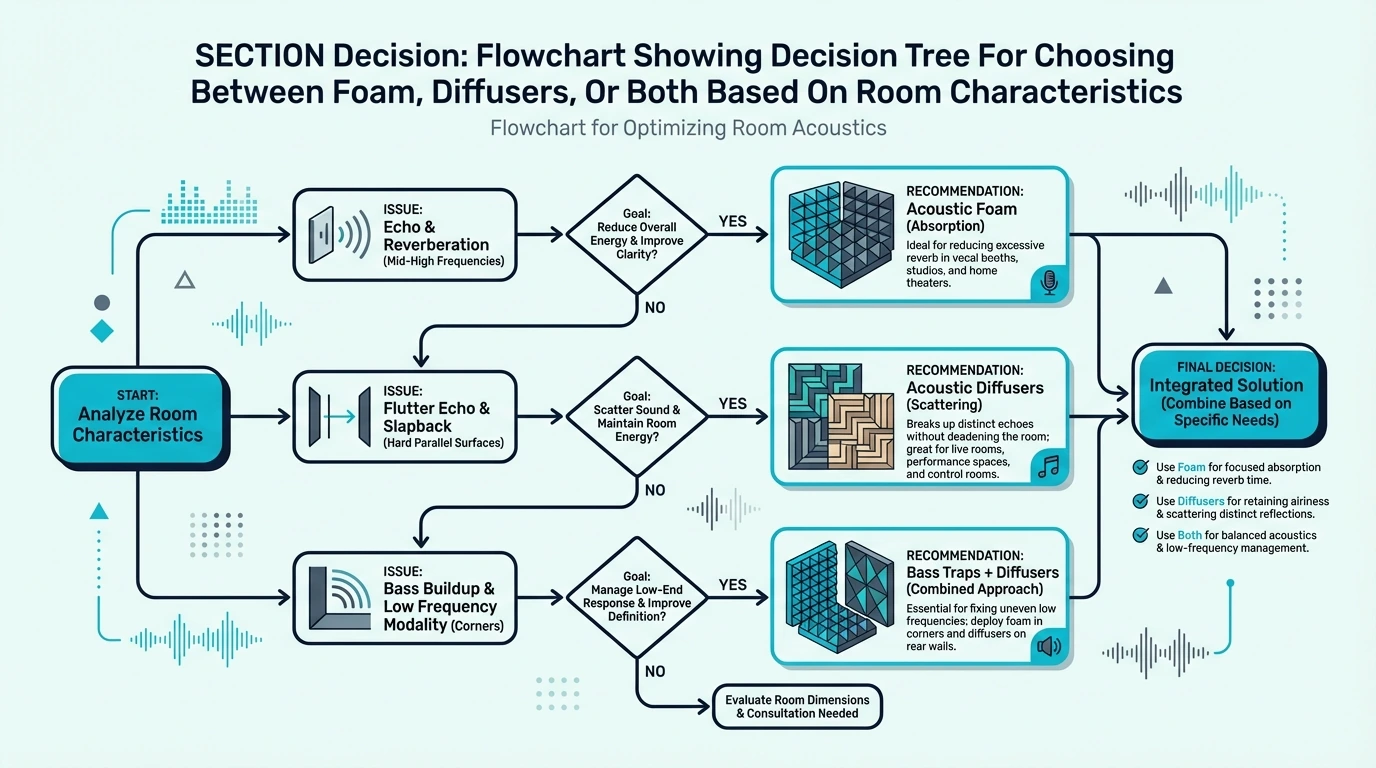
Here’s a simple framework for deciding what your room needs.
Start With These Questions
How big is your room?
- Under 150 sq ft: Focus on foam, skip diffusers
- 150-400 sq ft: Foam first, consider diffusers for rear wall
- Over 400 sq ft: Both treatments, more emphasis on diffusion
What’s your primary use?
- Recording: Absorption priority (clean, dry recordings)
- Mixing/mastering: Balanced approach (accuracy matters)
- Listening/home theater: Diffusion priority (natural ambience)
What’s your budget?
- Limited: Foam only (better value per dollar)
- Moderate: Foam plus one quality diffuser
- Generous: Full treatment with both
The Minimum Effective Treatment
If you can only do one thing, put foam panels at your first reflection points. This single treatment provides more improvement than any other placement.
Two foam panels on the side walls at first reflection points can transform how your room sounds, and it’s one of the cheapest upgrades you can make. Understanding how acoustic foam works helps you maximize those spots, and the pyramid vs wedge comparison narrows the shape choice.
Everything else—rear wall treatment, ceiling clouds, bass traps, diffusers—builds on this foundation. Start here regardless of your ultimate plans.
The Bottom Line
Foam absorbs sound and reduces reverb, which is why it’s usually the foundation for small rooms and recording setups. Diffusers scatter reflections to keep a room lively, which makes them more useful in larger spaces and critical listening rooms.
Most rooms benefit from both, but foam comes first for most home studios. It’s more affordable, solves more common problems, and works in spaces where diffusion can’t function effectively.
Start with absorption at first reflection points, add bass traps if the low end is still messy, and consider a rear-wall diffuser once the room is controlled. That progression fixes problems in the order you’ll actually notice them (and usually in the order that costs the least).
The goal isn’t a perfectly dead room or a perfectly diffuse one—it’s a controlled space where you can work accurately and comfortably. Foam and diffusers are just tools toward that goal, and each works best in a specific spot.
Frequently Asked Questions
Can I use both foam and diffusers in the same room?
Yes—most professional rooms use both: absorption at first reflection points and behind monitors, with diffusion on the rear wall. That combination controls the early reflections that cause problems while keeping the room from feeling unnaturally dead.
Which is better for a home recording studio?
For most home studios, start with foam because small rooms need absorption more than diffusion and it costs less. Add diffusion later only if the room feels too dry after basic foam placement (and in many bedroom studios, you won’t need it).
Do diffusers reduce echo like foam does?
Diffusers can reduce the perception of echo by scattering reflections, but they don’t remove energy from the room like foam does. If the room is obviously reverberant, absorption is the faster fix; diffusion is best when you want control without killing the room’s liveliness.
Why are diffusers so much more expensive than foam?
Effective diffusers need precise well depths and rigid materials to scatter sound correctly, so manufacturing costs more than cutting foam panels. Cheap diffusers often don’t work, while even budget foam still provides real absorption.
How do I know if my room needs more absorption or diffusion?
Clap and listen: if you hear a long tail or metallic ringing, you need more absorption. If the room feels muffled and lifeless, you might need less absorption or a bit of diffusion to bring back natural ambience.
Can I make DIY diffusers?
Yes—QRD designs are well-documented and DIY-friendly if you can cut wood accurately and follow the sequence for well depths. A QRD calculator will give you the dimensions for your target frequencies, and DIY can save money if you have the tools and patience.

