How to Install Acoustic Foam on Windows (Without Wrecking the Glass)
Acoustic foam on windows works, but only for the reflection bouncing back into your room — not for blocking outside noise. Glass is a hard, flat reflector right where your mic is most sensitive.
The annoying part is that windows are also the thing you don’t want to cover permanently. Nobody wants to turn a bright room into a cave just to tame one ugly reflection.
This guide walks you through the window-friendly ways to use acoustic foam: removable inserts, partial treatment, and full coverage for dedicated rooms — plus mounting methods that won’t wreck the glass and how to avoid condensation traps.
Start with the Quick Takeaway to pick the approach that matches your room, then follow the step-by-step sections below.
Best all-around: build a removable window insert panel (foam on a light frame) that you can pop in for recording and pull out afterward. It gives you repeatable results without adhesive drama. Fastest compromise: treat the frame/perimeter and the wall around the window — it makes the room less “glassy” while keeping daylight. Avoid sticking foam directly to the glass long-term in humid or cold climates, because trapped condensation leads to musty foam and a foggy window.
Are You Trying to Soundproof the Window, or Just Kill Reflections?
This topic gets confusing because it mixes two different goals. Once you decide whether you’re fighting echo inside the room or noise coming through the window, the right solution becomes obvious.
Foam helps with reflections (treatment), not noise coming through glass
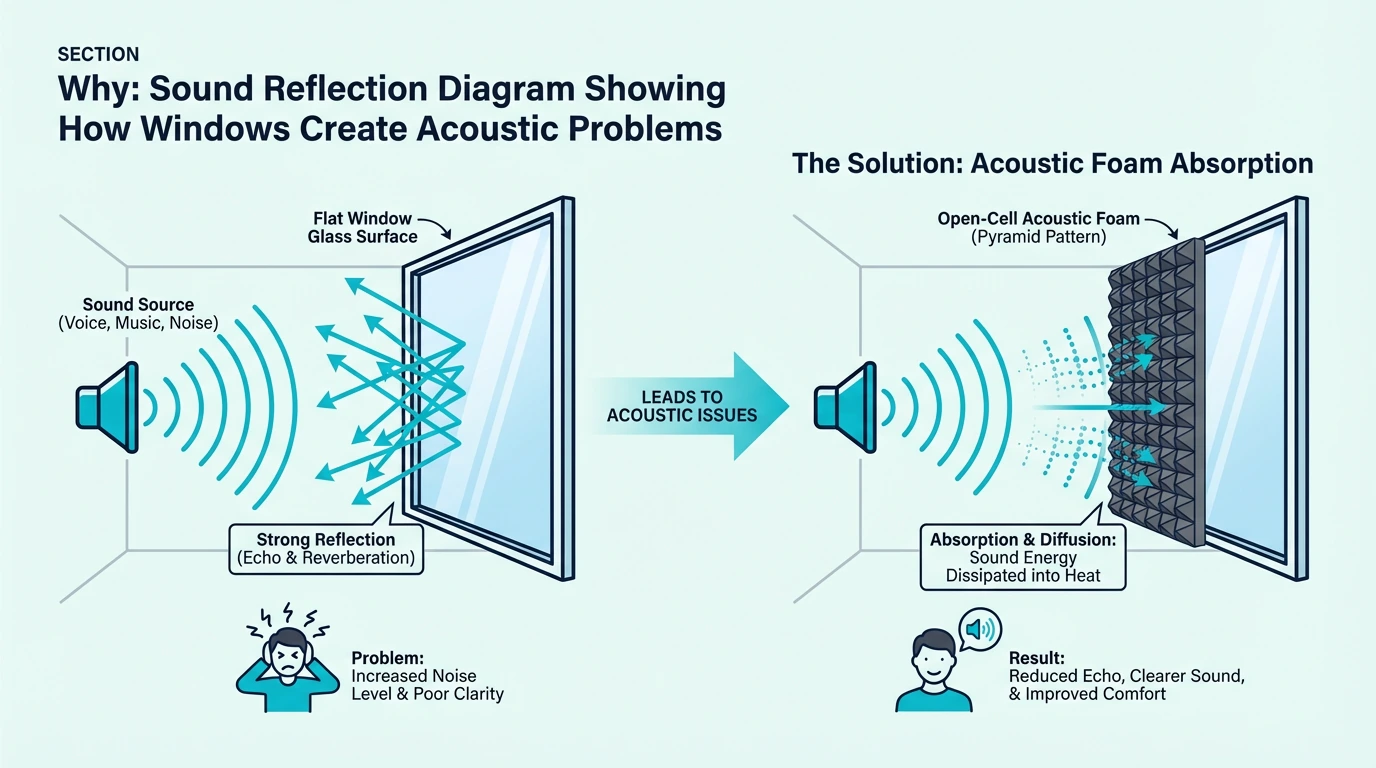
Acoustic foam is designed to absorb airborne reflections in your room, mainly in the mid and high frequencies. It can make vocals and dialogue sound tighter because less sound bounces off the window and back into the mic.
What it won’t do is stop traffic noise or neighbors because that’s transmission through glass, not reflection off glass. If that’s the problem you’re trying to solve, start with sound deadening material vs acoustic foam.
Now, if your recordings sound “roomy” even in a small room, the window is often the first reflection point causing it. That’s good news, because reflections are one of the things foam can actually help with.
The window is a big “hard mirror” for mids and highs
In the mid-to-high range, glass behaves like a mirror: sound hits it and comes right back. That’s why an untreated window can create a sharp slap-back, comb filtering, or a brittle edge on vocals.
When you cover the window (or the area around it), you’re basically taking that mirror out of the room for those frequencies. For the bigger picture, read what frequencies acoustic foam absorbs.
Quick test: is the window actually your problem?
Stand where your mic would be and clap once while facing the window. If you hear a quick “tick” or flutter coming back from that direction, you’ve found a reflection worth treating.
You can also record a short spoken phrase, then hang a thick blanket over the window temporarily and compare takes. If the difference is obvious, treating the window (or the wall around it) is usually worth it.
If there’s little change, your first reflections might be coming from somewhere else. In that case, start with how to arrange acoustic foam before you build anything window-specific.
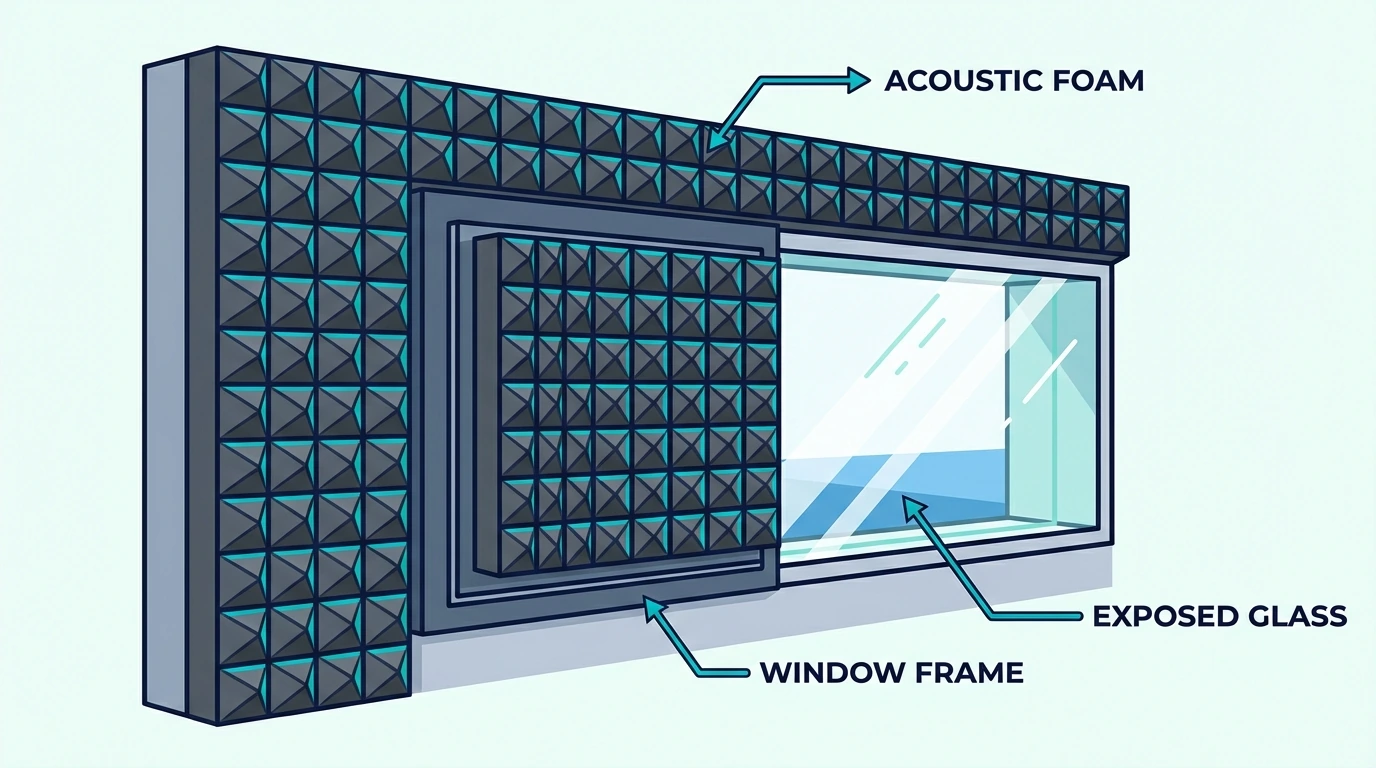
Should You Cover the Whole Window With Acoustic Foam?
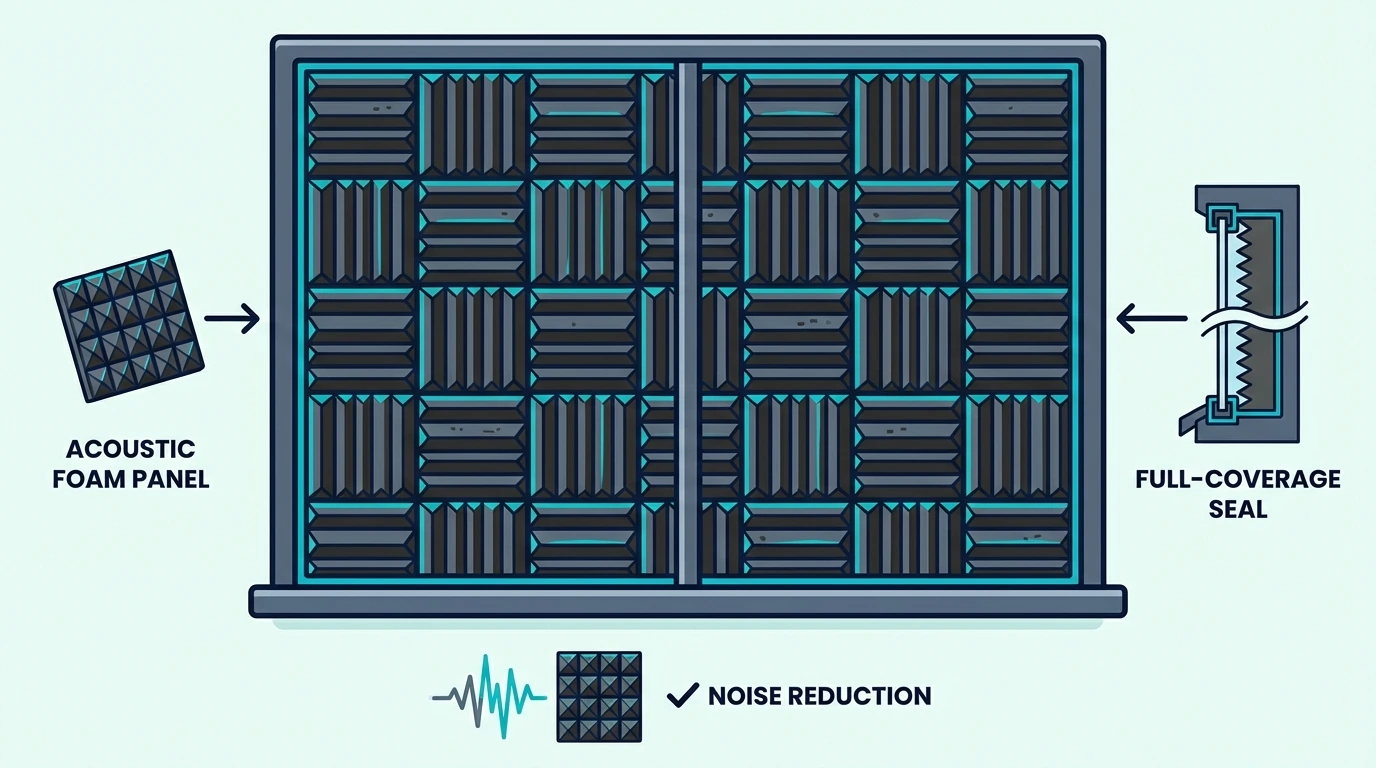
Full coverage is the blunt instrument option, and it works because you’re removing almost all of the reflective glass surface. The cost is obvious: you lose light, and you have to think about condensation.
When full coverage is worth it
If the room is a dedicated studio or you only use the window during sessions, full coverage can be the simplest fix. It’s also the most reliable method if the window is directly beside or behind the mic.
If you still need daylight, skip ahead to the removable insert method. It gives you most of the benefit without living in the dark, and it makes moisture checks easier too.
How to do full coverage without permanently gluing foam to glass
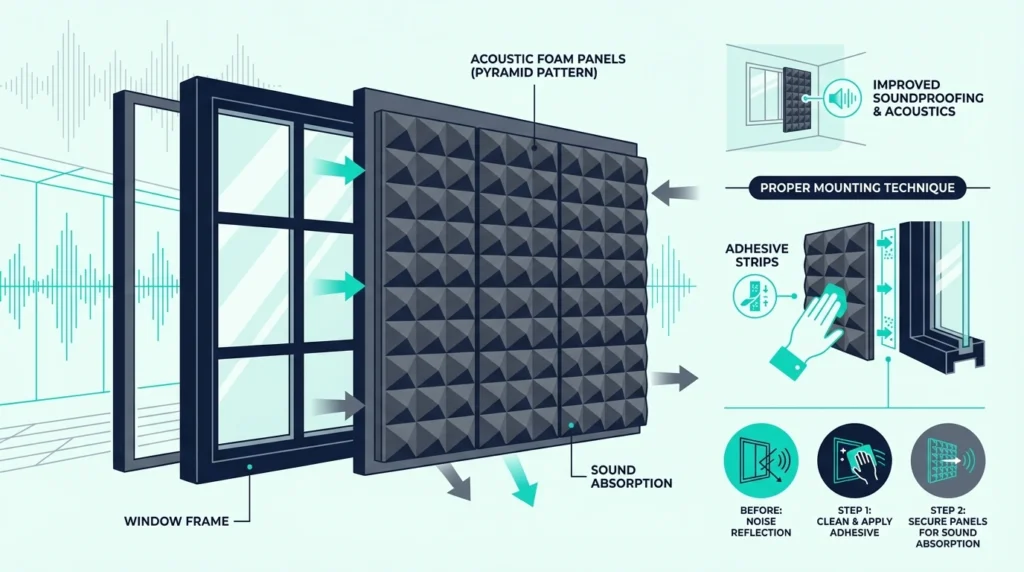
Instead of sticking foam straight onto the glass, mount it to a lightweight backing (thin plywood, foam board, or a simple frame) and attach that to the window frame. This keeps adhesive off the glass and lets you remove the whole panel if needed.
If you want a removable-but-strong connection between the backing panel and the trim, heavy-duty hook-and-loop strips like heavy-duty adhesive hook-and-loop strips can work well. They’re strong, so test in a corner first and avoid delicate paint.

Heavy-Duty Adhesive Hook and Loop Strips (3M VHB)
If you must mount on the glass, use a truly removable method and test it on a corner first. Heat from direct sun can soften adhesives and make them fail (or leave residue when you peel them off).
Full coverage works best when you treat it like a temporary “recording mode.” That naturally leads into the option most people actually want: a removable insert panel. For adhesive options that work on different surfaces, the best adhesive for acoustic foam guide covers the tradeoffs.
Get Studio Tips Weekly
Join 5,000+ creators getting acoustic treatment advice every week.
No spam. Unsubscribe anytime.What’s the Best Removable Window Foam Setup for Recording?
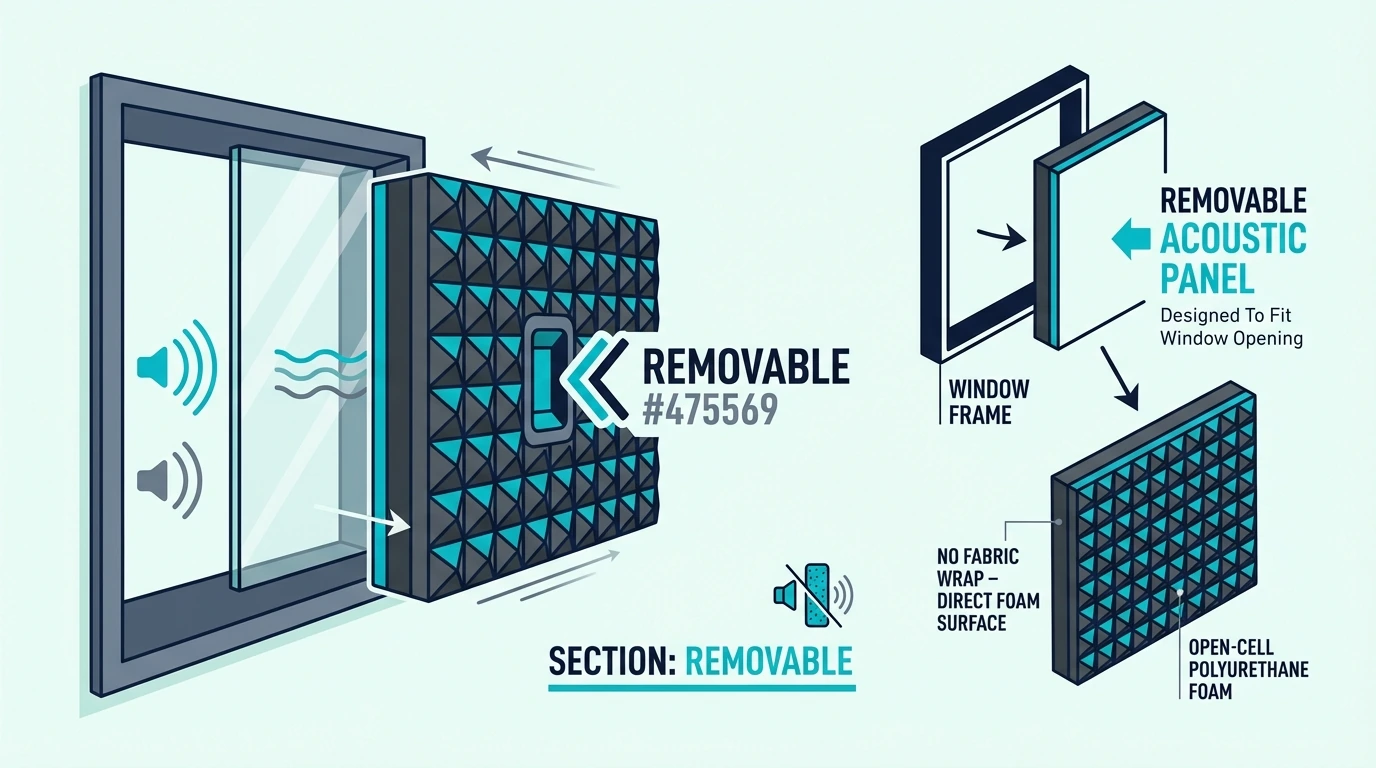
If you want the window to keep being a window, this is the method to start with. You build (or buy) a panel that fits the opening, then you pop it in when you’re recording.
Build a simple insert panel that friction-fits
Measure the inside of the window opening (the part you’d set a screen into), not the outer trim. You want an insert that presses in gently, not one that needs glue to stay put.
Build a thin frame that matches that opening and attach your foam to the room-facing side. If you care about looks, wrap the front with breathable fabric so the foam isn’t exposed.
Add a small handle or pull tab so you can remove it quickly. If it’s too tight, sand the frame edges rather than forcing it and cracking the trim.
If you want a deeper build guide, see DIY acoustic foam panels. The “mount foam to a frame” idea is the same, you’re just sizing it to a window opening.
Make it feel solid (without making it permanent)
If the insert rattles, add thin weatherstripping to the back edge so it compresses softly against the frame. You’ll get a snug fit and fewer vibration noises without needing screws.
If you want the foam itself to be removable from the insert frame, hook-and-loop fasteners like VELCRO Industrial Strength Fasteners keep it modular. That way, you can replace the foam later without rebuilding the frame.
VELCRO Brand Industrial Strength Fasteners
If you want the insert to help with outside noise too, the seal matters more than the foam. Just remember: even a perfect seal won’t turn thin glass into a soundproof wall.
Once you’ve got a removable panel, you can decide how aggressive you want to be. Some rooms only need partial treatment to feel “fixed.”
How Can You Treat a Window Without Blocking All the Glass?
Partial treatment is about taking the edge off the reflection while keeping the room bright. It’s also the safest approach in humid climates because you’re not sealing foam against cold glass.
Treat the frame and the wall around the window first
Start by treating the hard surfaces around the window: the frame, the trim, and the wall right next to it. This won’t eliminate the glass reflection, but it reduces the “ring” that comes from the surrounding hard edges.
It’s also easier to mount foam on painted drywall than on glass. For general mounting guidance, see how to put acoustic foam on walls.
Cover only the lower half (or the perimeter) if you need daylight
If the window is in your mic’s line of sight, covering the lower half can knock down the reflection that hits the mic first. The top half stays clear so you keep daylight.
Perimeter-only foam (a border around the glass) is the least intrusive option, but it’s also the least effective. Think of it as “better than nothing” for casual voice work, not a magic fix for a bad room.
If you want something even more livable than foam, curtains are the obvious alternative. Just set expectations correctly and you’ll be fine.
Are Acoustic Curtains a Better Option Than Foam on Windows?
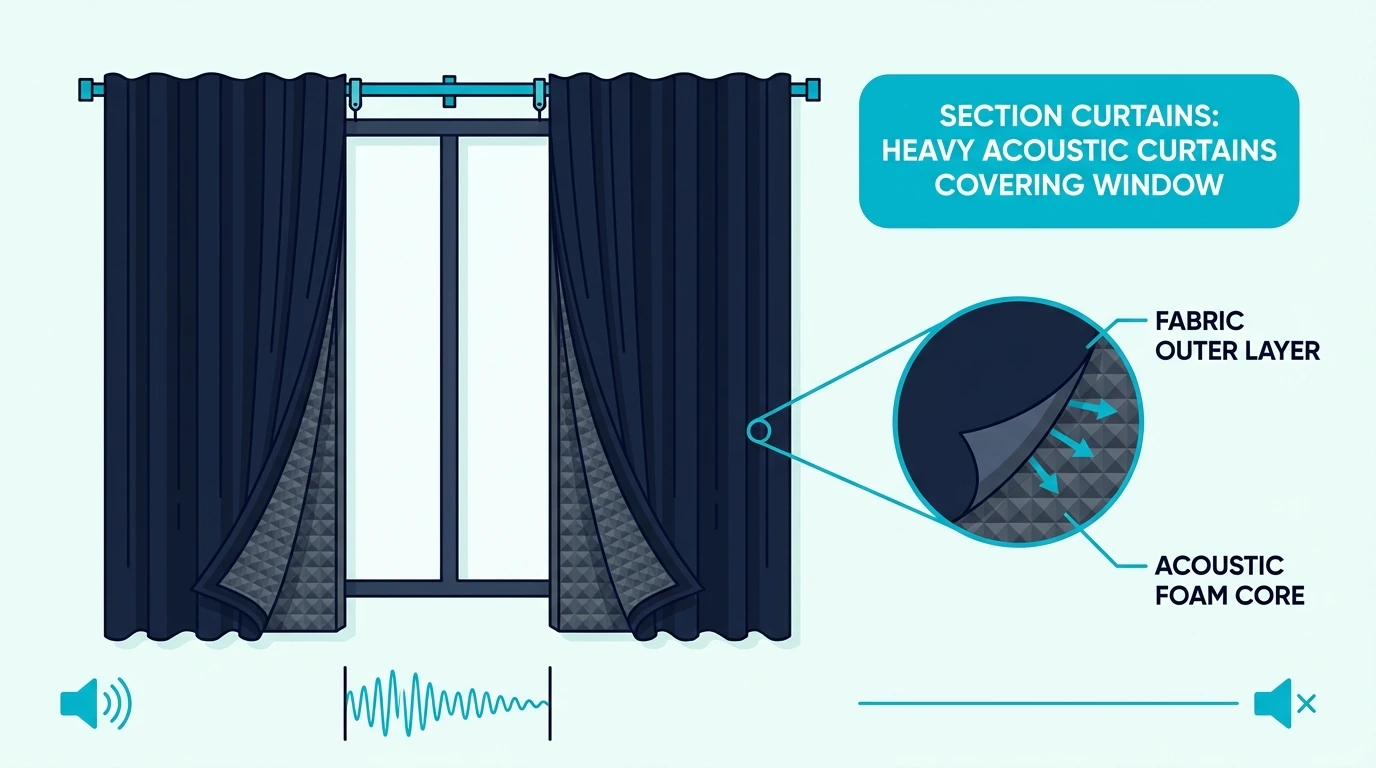
Curtains are popular because they don’t require adhesives, and you can open them in two seconds. The trade-off is that most curtains don’t absorb as much as foam, especially if they’re thin.
What curtains can (and can’t) improve
A heavy curtain adds a soft layer that can reduce some high-frequency slap and make the room feel less “bright.” It’s often enough to make speech recordings sound smoother, especially if the window is the main reflective surface.
But curtains won’t replace proper absorption if you’re doing critical vocal work, and they won’t soundproof the window by themselves. If you want other window-friendly options, see what you can use instead of acoustic foam.
How to make curtains work better
Pick the heaviest curtain you can tolerate and make sure it’s wide enough to bunch up when closed. That extra “fullness” creates more folds, which increases absorption.
Leave an air gap between the curtain and the glass if you can, because a soft layer with a gap tends to absorb better than a layer pressed flat. If you still need more control, that’s usually the sign to switch back to a removable insert panel.
Whether you choose foam or curtains, the mounting method matters. A clean install that you can undo is the one you’ll actually keep using.
How Do You Mount Acoustic Foam on Glass Without Damage?
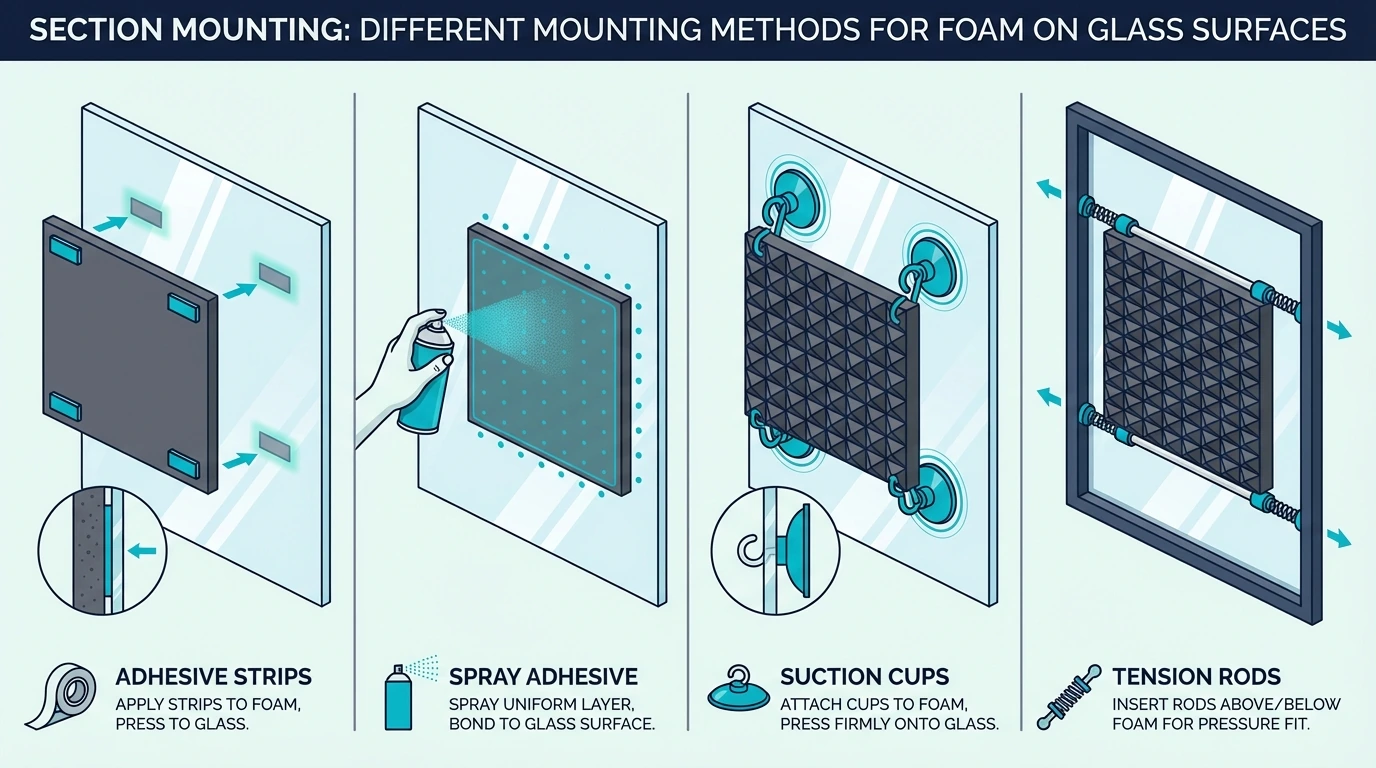
Glass is unforgiving, and so is window trim, so the default should be removable. The goal is strong enough to hold panels during a session, and gentle enough to remove without scraping.
The safest approach: mount foam to a backing, not the glass
If you can, attach your foam to a lightweight backing board or a frame, then attach the backing to the window frame. This keeps adhesive off the glass and makes removal a one-piece operation.
It also reduces condensation risk because foam isn’t pressed tight against cold glass. If you need more mounting ideas, how to put acoustic foam on walls has options you can adapt.
If you must mount on glass: test removable methods first
Removable picture-hanging strips like Command picture hanging strips are usually safer than permanent glue, but sun exposure can still weaken them over time. Clean the glass, apply one test strip, and leave it for a day before committing to a full panel.

Command Picture Hanging Strips (Assorted Pairs)
Suction cup hooks can work for very lightweight foam, but treat them as temporary. If a panel falling would damage gear, don’t trust suction cups alone. The is acoustic foam reusable guide covers what survives removal and what doesn’t.
Mounting solves the “falling off” problem, but there’s another one people forget: moisture. If you skip the moisture check, even a perfect mount can turn into a musty mess.
Will Foam on Windows Cause Condensation or Mold?
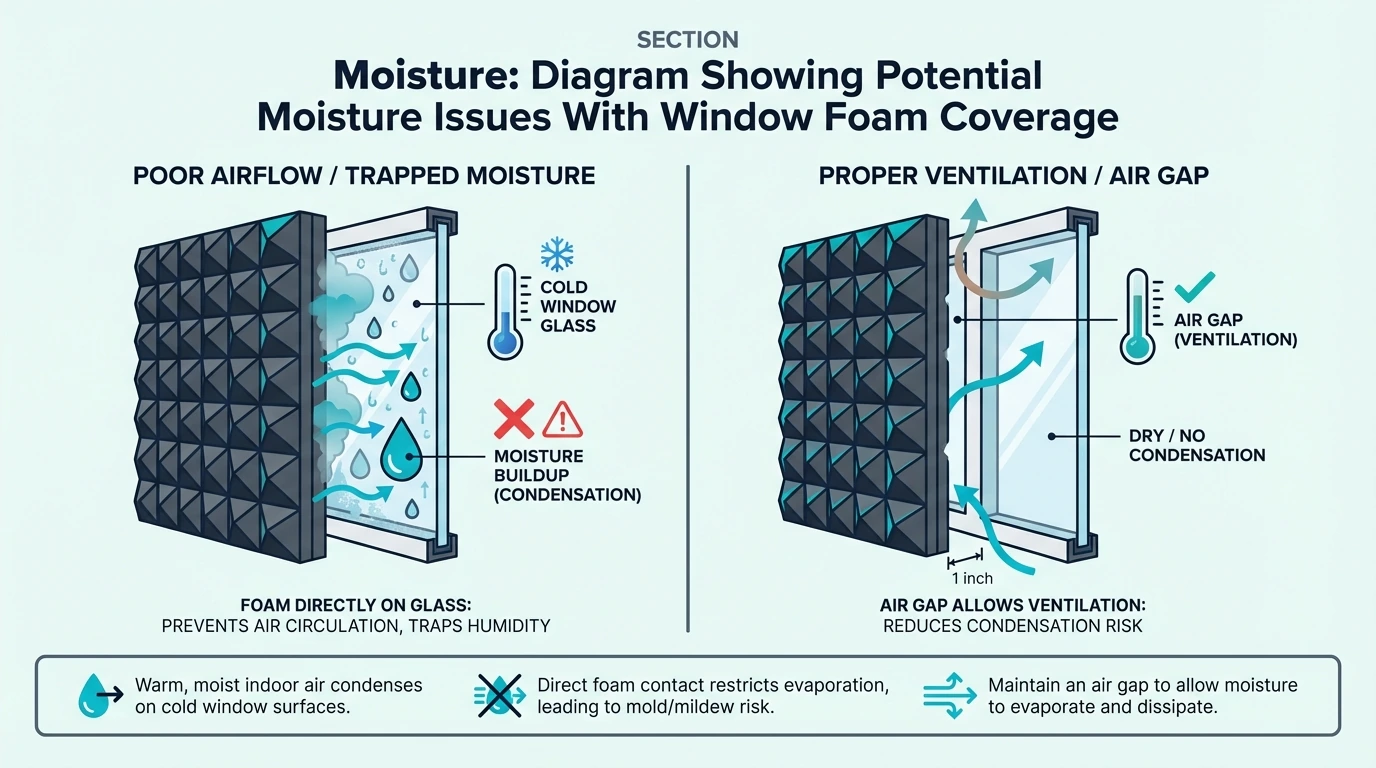
If you cover a cold window with an insulating layer, you change how that surface dries. That’s not a deal-breaker, but it does mean you should avoid permanent installs and check the window occasionally.
Why condensation gets trapped
In cold weather, warm indoor air can condense on cold glass. If foam is pressed against the glass, that moisture has nowhere to evaporate, so it sits there.
Over time, trapped moisture can lead to musty-smelling foam, mold spots, or adhesive failure. That’s why removable inserts are safer than direct-to-glass installs.
How to avoid problems
Take the panel down periodically to let the window dry, especially in winter. If you notice fogging behind the foam, treat that as a warning sign and switch to a removable frame method.
Ventilation matters too, especially if your room runs humid. You don’t need to panic, but you do need to check it before it becomes mold.
Conclusion
If your recordings sound harsh and “glassy,” the window is often the reflection doing it. Acoustic foam can help, but only for that reflection problem, not for soundproofing.
For most rooms, a removable insert panel is the best balance: strong improvement when you’re recording, daylight when you’re not. Full coverage works for dedicated rooms, and partial treatment or curtains are decent compromises.
Whatever method you use, avoid permanent glue on glass and keep an eye on condensation. A clean install that you can undo is the one you’ll actually keep using. For broader foam options beyond windows, the acoustic foam hub has the full map.
Frequently Asked Questions
Can you put acoustic foam directly on a window?
You can, but it’s rarely the best option. It’s easier to trap condensation and harder to remove cleanly than mounting foam to a removable backing or insert.
Will acoustic foam on windows reduce traffic noise?
Not really, because foam doesn’t add mass and it doesn’t seal air gaps. For outside noise, you need sealing and mass-focused strategies, not acoustic treatment.
What’s the best way to keep daylight and still treat the window?
Use a removable insert panel you can install during sessions and remove afterward. If you want an even faster option, heavy curtains can help with reflections while staying easy to open.
Do I need to cover the entire window to get results?
Covering the entire glass surface is the most effective for reflections. Partial treatment can still help, but the more glass you leave exposed, the more reflection remains.
How do you remove adhesive residue from glass?
Start with warm soapy water and a plastic scraper, then use isopropyl alcohol for stubborn spots. Avoid metal blades on glass, and always test solvents on a small corner first.
Will foam on windows cause mold?
It can if moisture gets trapped behind the foam and never dries. Removable panels and quick moisture checks are the simplest way to prevent it.

