Why Are Acoustic Panels Used in Concert Halls? (Explained)
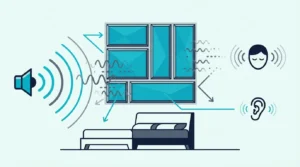
Why are acoustic panels used in concert halls when the music already sounds great, but can still turn muddy or harsh depending on where you sit? The problem is that a big room creates powerful reflections and long reverberation that can smear the direct sound.
Once you understand what concert hall panels absorb (and what they intentionally diffuse), you can get clearer sound without killing the warmth that makes live music feel alive. Start by thinking in zones — stage, ceiling, side walls, and audience — then see what each one does below.
Concert halls use acoustic panels to control reverberation time, eliminate echo, and ensure every seat hears balanced sound. These panels absorb excess reflections while preserving the natural warmth that makes orchestral music feel alive.
Why Do Concert Halls Need Acoustic Treatment?
When you deal with massive 2,000-seat venues featuring 40-foot vaulted ceilings, sound behaves in ways that no residential bedroom studio will ever encounter. The acoustic energy literally has time to separate, bounce off dozens of different surfaces, and arrive at the listener’s ear as a confusing, smeared wash of noise.
The goal for these massive spaces isn’t to kill all the reflections completely—that would make the orchestra sound thin and lifeless. The actual fix requires meticulously controlling exactly which reflections reach the audience and which ones get absorbed.
What Makes Concert Hall Acoustics Different From Studios?
Recording studios aim for a completely neutral, heavily controlled environment where the mixing engineer can shape every single element of the track manually. Concert halls require something infinitely more complex: a controlled but highly natural acoustic environment.
While a mixing studio might aggressively target a dead 0.3 seconds of reverberation time, a symphony hall intentionally aims for a massive 1.8 to 2.2 seconds of decay.
That physical difference explains why even the highest-resolution concert recordings never quite capture the sheer emotional impact of the live experience. In a properly designed space, the hall itself becomes an active instrument, adding a physical depth and dimension to the orchestra that stereo speakers simply cannot reproduce.
Professional acoustic designers spend decades studying the architecture of legendary venues like Vienna’s Musikverein and Boston Symphony Hall. The gorgeous acoustics in these spaces weren’t lucky accidents—they resulted from brilliant architectural geometry that naturally diffused and absorbed the sound before modern panels even existed.
How Does Sound Behave in Large Spaces?
The sheer scale of a concert hall completely changes the physics of low-frequency sound. Bass waves at 100 Hz measure roughly 11 feet long from peak to peak; in a typical home living room, these massive waves barely have room to form before slamming into a wall and creating muddy room modes.
Concert halls give those massive bass frequencies the physical space they need to breathe and develop fully. The brutal trade-off is that high frequencies—which have tiny wavelengths measured in mere inches—now have the opportunity to bounce unpredictably across vast distances before dying out.
Acousticians call the resulting problem “flutter echo”—rapid, metallic-sounding reflections trapped bouncing between parallel walls that make spoken words unintelligible and music painfully harsh. Strategically placed acoustic panels physically break up these specific reflection paths while leaving the rest of the room’s natural reverb untouched.
This acoustic challenge multiplies exponentially with audience size. Every single person in the room absorbs sound differently based on their winter clothing, their body position, and their specific seat location, making the acoustic balancing act extremely complex.
How Do Acoustic Panels Control Reverberation?
Reverberation time—the exact amount of time sound persists in the air after the orchestra stops playing—defines a hall’s entire acoustic character. Panels shape that character by physically converting the chaotic sound energy into microscopic heat through friction.
However, balancing the split between raw absorption and geometric diffusion is where the most critical design decisions happen.
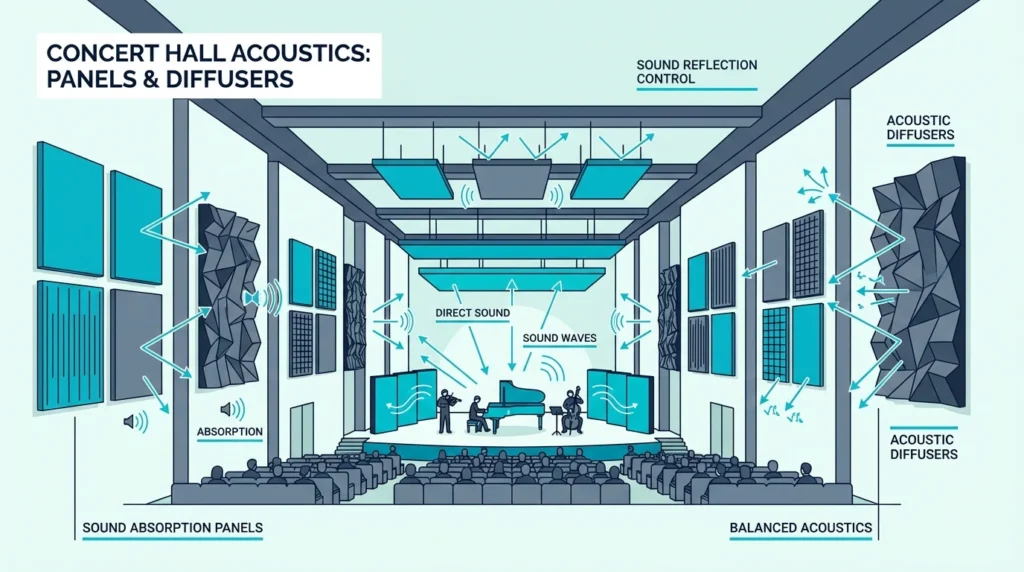
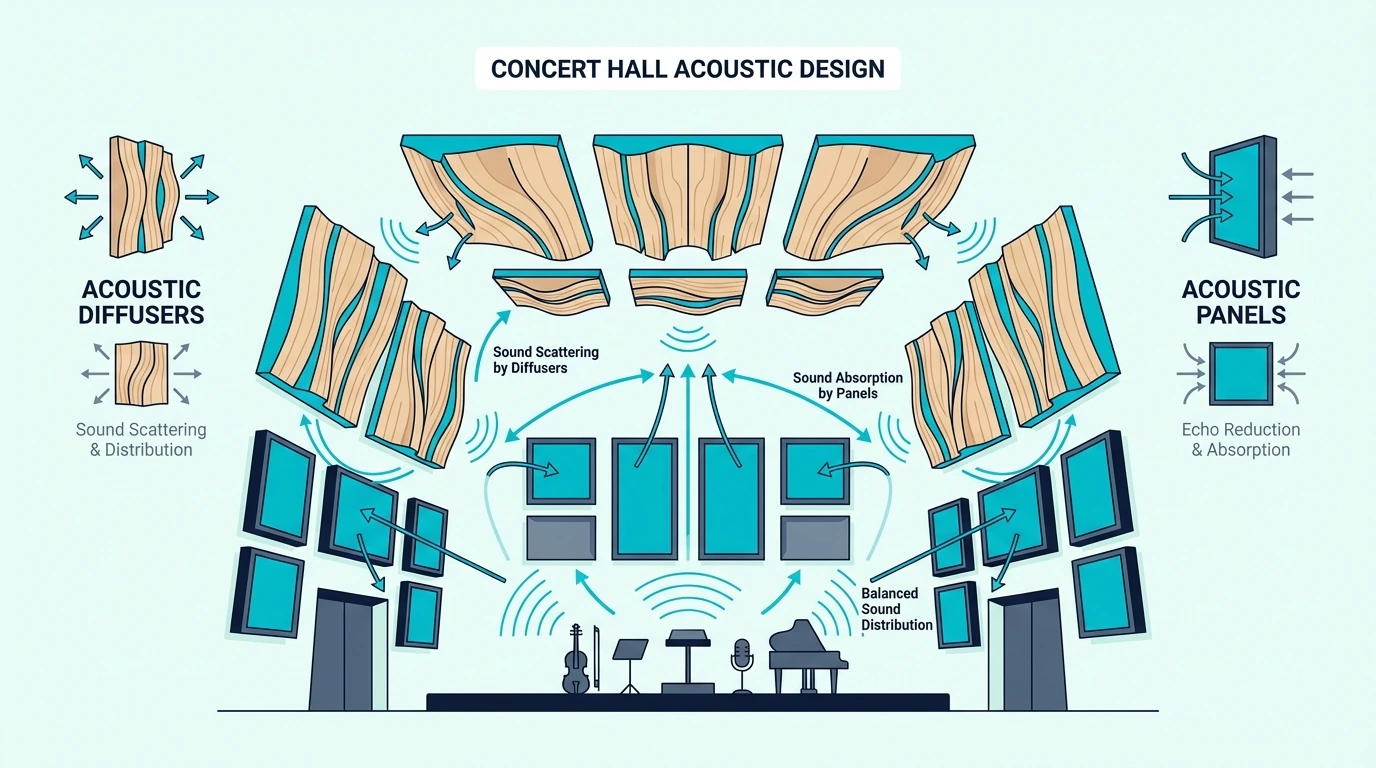
What’s the Difference Between Absorption and Diffusion?
Concert halls must use both absorption and diffusion simultaneously, but the two treatments serve entirely opposite physics purposes. Absorption permanently removes sound energy from the room, while diffusion shatters and scatters it to keep the room feeling alive.
When you look at the walls of a modern concert hall, those gorgeous, sculptural wooden panels are almost entirely diffusers, not absorbers.
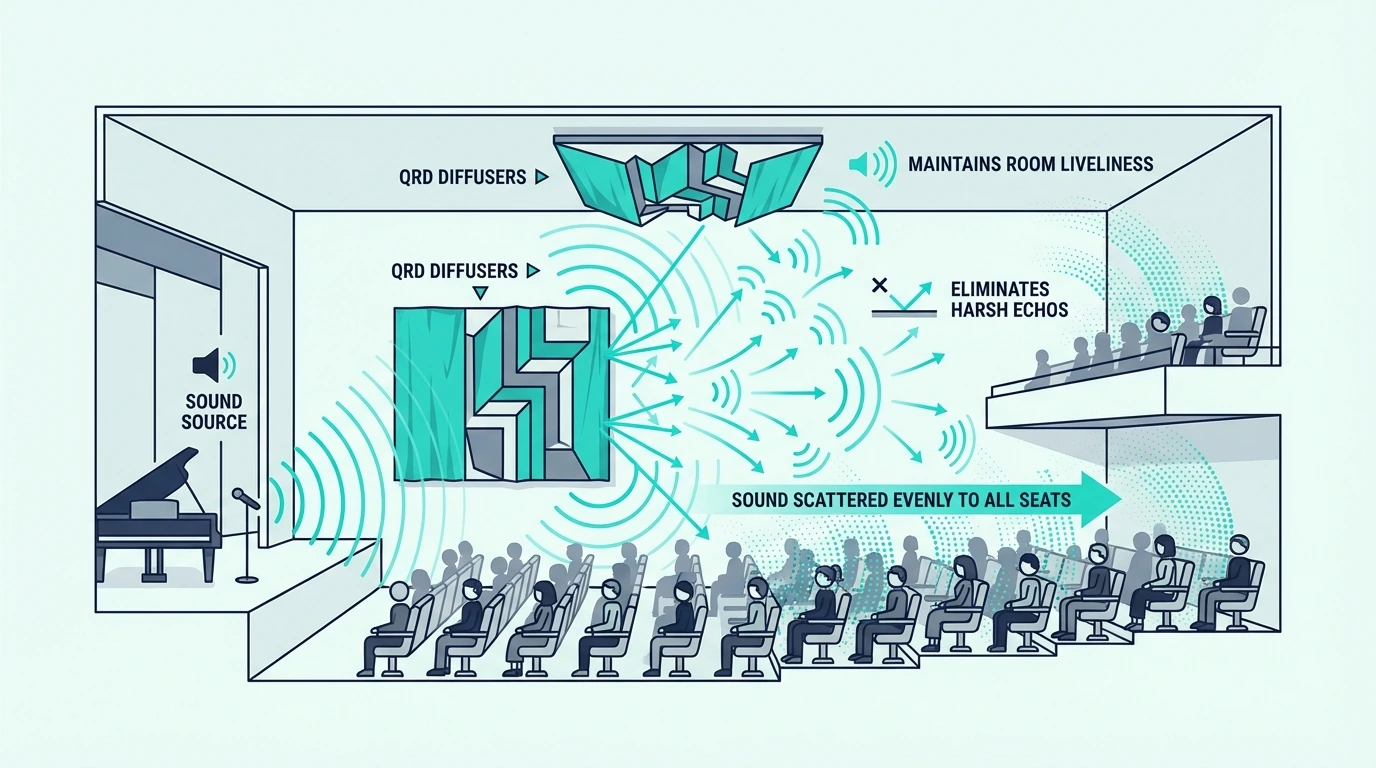
Those complex diffusers break up the direct sound waves and redirect them outward at multiple different angles simultaneously. The acoustic energy remains in the room so the music stays lively and powerful, but the scattering effect prevents any single harsh reflection from dominating the audience’s ears.
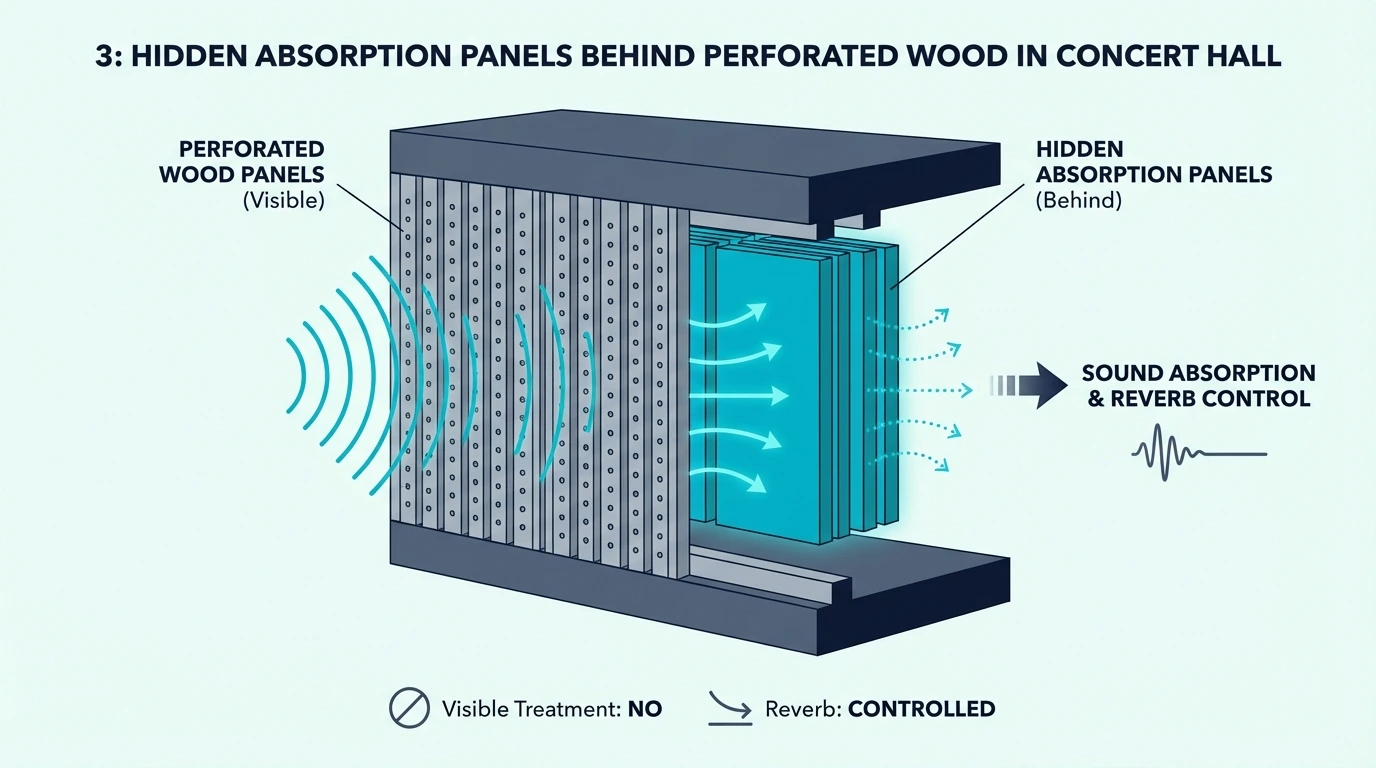
Conversely, the absorptive panels are typically hidden completely out of sight behind perforated wooden screens or stretched fabric ceilings. Acoustic designers integrate them deeply into the room’s architecture so they pull out the muddy frequencies without ruining the visual majesty of the hall.
Why Does Panel Thickness Matter for Bass?
When dealing with the massive low-end energy of a full orchestra, you cannot cheat physics: low frequencies require very thick treatment to be absorbed. A standard 2-inch panel might absorb 80% of the sound at 1000 Hz, but it will only catch about 20% of the energy down at 125 Hz. That gap is exactly what thickness comparisons quantify for smaller rooms.
To handle orchestral bass, concert halls must deploy absorption treatment that is 4 to 6 inches thick in strategic locations. Some of the most highly engineered venues use massive, custom-tuned bass traps hidden inside the architectural corners that extend 12 inches or deeper into the walls.
While the budget gap between professional concert hall treatment (millions of dollars) and home studio treatment (a few hundred dollars) is astronomical, it ultimately just scales with depth. The exact same unbending physics that govern panel thickness and bass absorption in a stadium apply to your bedroom studio.
Get Studio Tips Weekly
Join 5,000+ creators getting acoustic treatment advice every week.
No spam. Unsubscribe anytime.What Acoustic Challenges Do Concert Halls Face?
The central battle of concert acoustics is balancing crystal-clear articulation with massive, enveloping warmth. If you use too much absorption, the orchestra sounds thin and isolated; if you use too little, the complex instruments blur together into a wash of chaotic noise.
Why Is Reverberation Both Friend and Enemy?
Reverberation is the exact acoustic property that adds richness and emotional depth to live music. When a violinist plays a single note on stage, the reverberant field of the room blends that direct sound with thousands of tiny reflections bouncing off every architectural surface.
The resulting acoustic “bloom” is what makes live orchestral music feel overwhelmingly powerful in a way that stereo recordings can never fully capture. However, excessive reverberation destroys intelligibility instantly—fast cello passages blur together into a hum, and the aggressive punch of the percussion section is completely lost in the lingering echo.
Concert hall designers must hit highly specific reverberation targets to make the room work. The same targeting principle applies at home — panel spacing determines how evenly treatment distributes across a wall. They typically design for 1.8 to 2.2 seconds of decay for a symphony hall, but must design much shorter, drier decay times for opera houses where vocal lyric clarity matters more than instrumental warmth.
How Do Parallel Walls Create Problems?
Parallel wall surfaces create the absolute worst acoustic phenomenon: flutter echo. This is the distinctive, metallic “boing” sound you hear when you clap your hands forcefully in an empty hallway. In a massive concert hall, an untreated flutter echo makes the music sound painfully harsh and physically fatiguing to listen to for two hours.
Classical concert hall design fought this physics problem by simply avoiding parallel walls entirely. The famous “shoebox” design of many historic, legendary halls actually incorporates subtle architectural angles into the plaster that naturally break up those flutter patterns without needing modern foam.
Modern halls use heavily engineered acoustic panels and wooden diffusers to achieve these same pristine results without being locked into specific architectural shapes. Strategic panel placement physically breaks up the reflection paths between any parallel surfaces the architect decided to include.
Because the physics of a bouncing wave never change, this specific requirement for targeted positioning is exactly why panel placement strategy stays completely consistent whether you are treating a massive concert hall or a spare bedroom studio.
Where Do Concert Halls Place Acoustic Treatment?
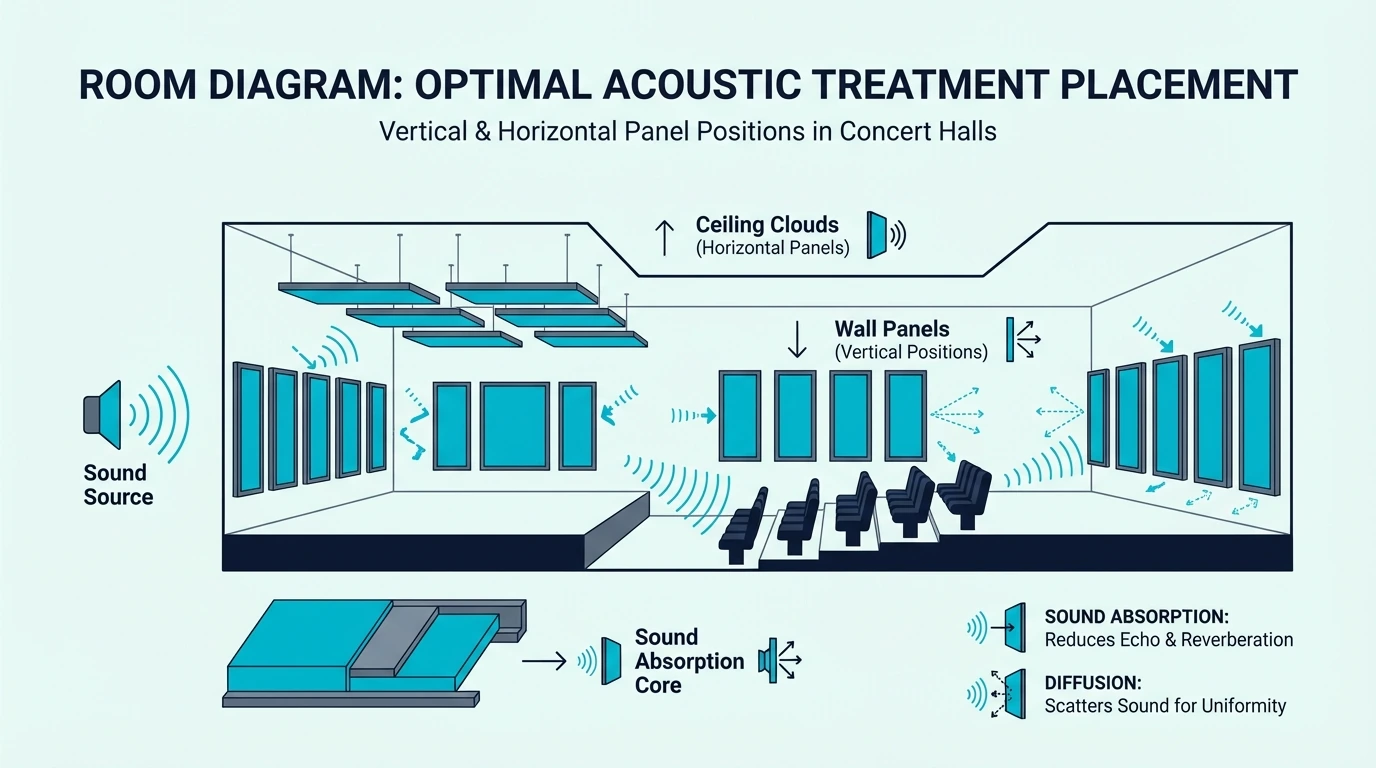
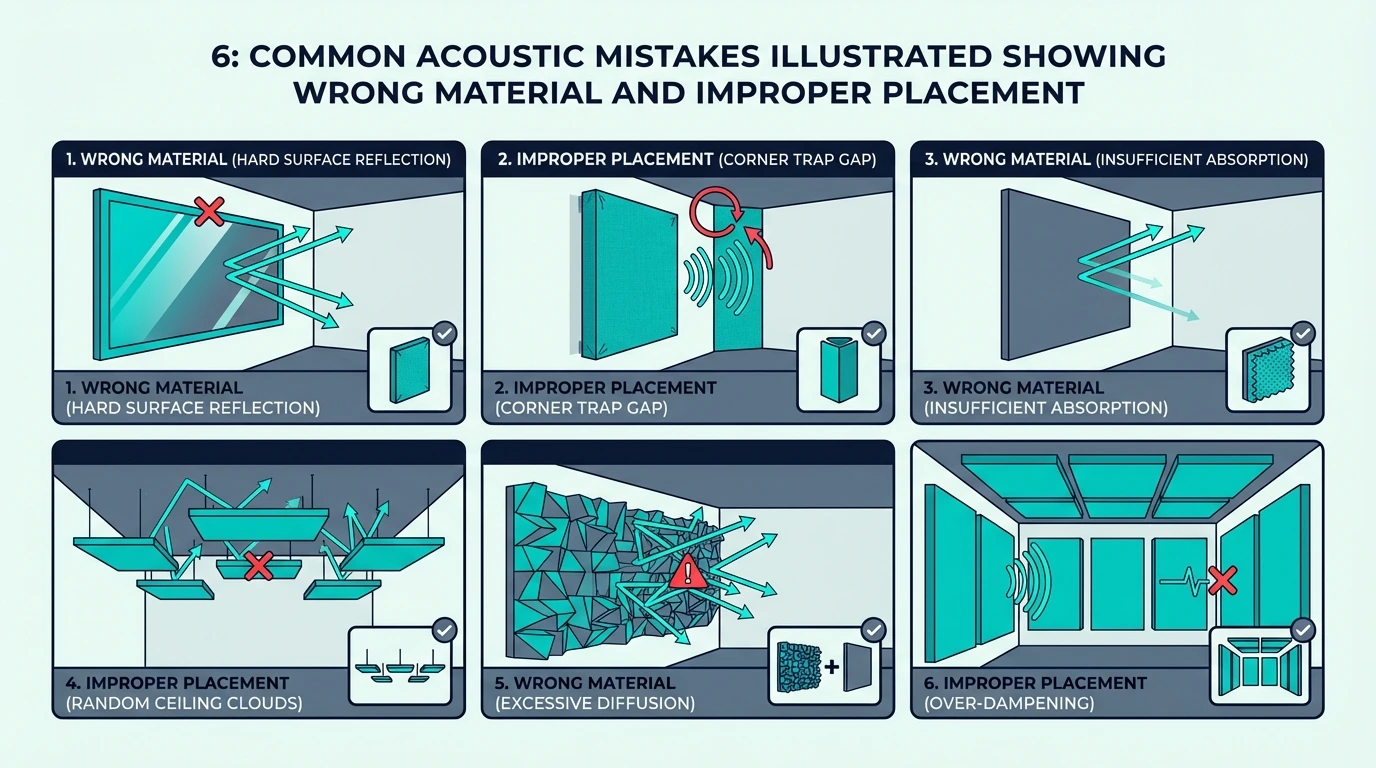
Hanging the most expensive acoustic panel in the wrong location wastes thousands of dollars and often makes the room sound worse. Concert hall acousticians break the room into three critical zones—the stage, the audience, and the transition spaces—before mapping out the ceiling and side walls.
What Role Does the Ceiling Play?
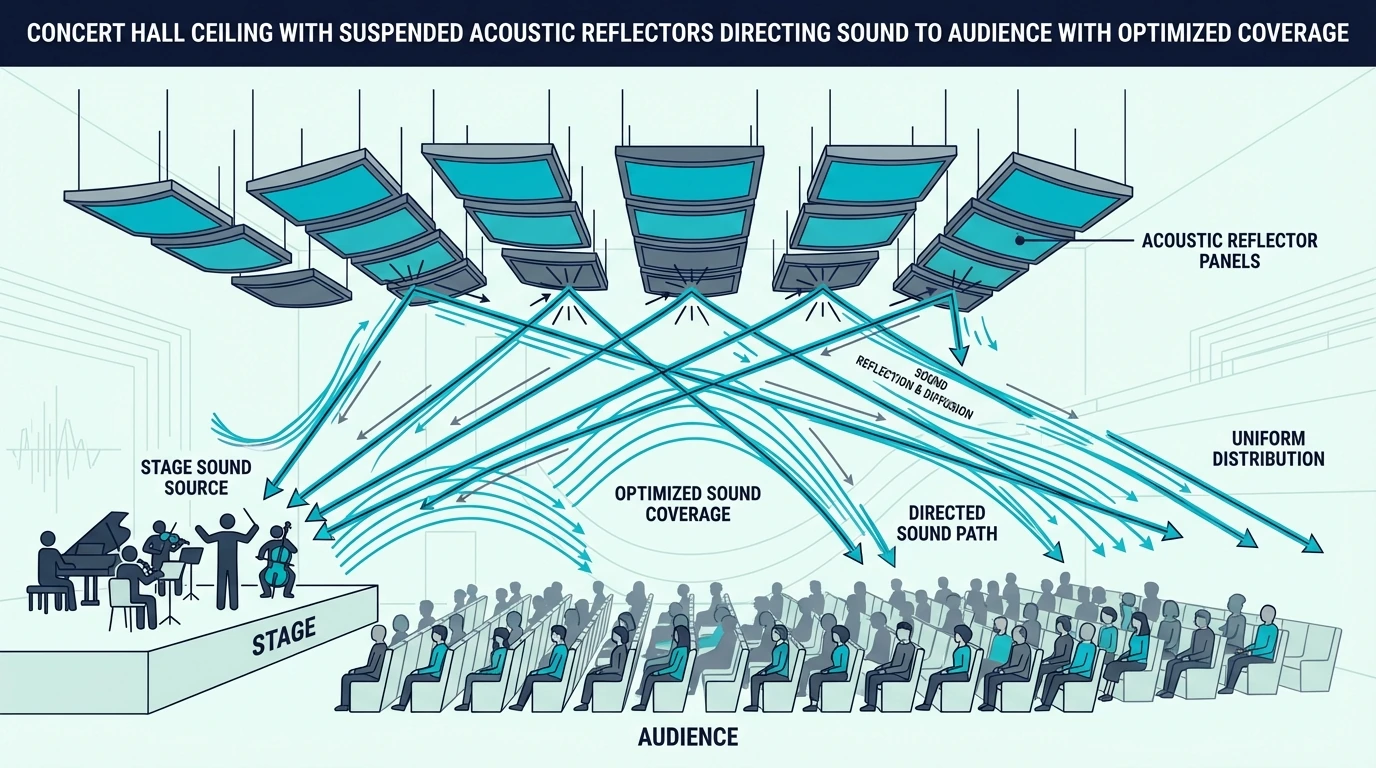
The ceiling in a massive concert hall must serve double duty: it has to reflect sound outward toward the distant balcony seats while simultaneously preventing excessive reverberation from building up directly overhead.
To accomplish this, engineers use suspended reflector panels—those massive wooden clouds flying above the stage—to catch the acoustic energy and physically direct it to the back rows. Without these heavy reflectors, audience members sitting far from the stage would lose up to 6 dB of the direct, uncolored sound.
Many elite modern halls now use motorized, adjustable ceiling panels that can be raised or lowered on demand from a control booth. This mechanical flexibility allows the venue to instantly optimize the ceiling acoustics depending on whether they are hosting a booming symphony or a quiet solo performance.
The ceiling also requires heavy, targeted treatment at the extreme outer edges where it meets the walls. These upper tri-corner areas naturally trap and accumulate massive amounts of bass energy, requiring specialized, hidden absorption that is functionally identical to the corner-mounted panels you would use in a smaller home studio.
How Do Side Walls Affect Sound Quality?
Side wall reflections are arguably the most important acoustic element in the room because they provide key spatial information to the human brain. Early lateral reflections—the sound waves bouncing off the side walls and arriving at your ears within 20 milliseconds of the direct sound—are entirely responsible for creating the psychological sense of being completely enveloped by the music.
Concert halls must carefully balance heavy absorption with complex diffusion on these side walls. If they use too much absorption, they kill the lateral reflections entirely and eliminate the spacious feeling; if they use too little, they create harsh, highly distracting echoes that ruin the performance.
Most world-class halls solve this by using a combination of thick absorptive panels down at ear level to kill the direct slap-back, paired with massive wooden diffusion blocks higher up on the wall. This keeps the spatial richness that classical listeners expect while cutting the harsh, immediate bounces that cause listening fatigue. The exact same placement logic applies when treating home studios, just operating at a vastly smaller scale.
How Do Modern Concert Halls Optimize Acoustics?
The physics of sound haven’t changed, but the tools available to architects have evolved massively. Computer modeling, highly engineered composite materials, and decades of granular acoustic research give modern halls control capabilities that historic architects couldn’t have imagined.
What Technology Do Concert Halls Use?
The biggest leap forward is the implementation of variable acoustics. Modern halls frequently incorporate massive, motorized acoustic panels and heavy curtains hidden inside the walls that can mechanically change position based on the specific needs of the performance. Some cutting-edge venues even use inflatable acoustic bladders that can be deployed from the ceiling or retracted into the architecture. Ceiling panel options for home spaces follow a simpler version of that overhead logic.
Beyond physical panels, electronic enhancement systems now actively supplement the natural acoustics in many multi-purpose halls. Hidden microphone arrays capture the live sound from the stage, feed it into massive DSP processors, and pump it back into the room through dozens of hidden speakers to artificially reinforce specific frequencies or extend the room’s spatial decay.
While these electronic systems remain highly controversial among classical music purists, the absolute best halls in the world still refuse to use them, relying entirely on passive acoustic treatment—meticulously engineered panels, complex diffusers, and flawless architectural geometry.
Can Acoustics Be Adjusted for Different Music?
Because those passive variable acoustic systems physically change the geometry of the room, they allow for astonishingly wide-ranging adjustments. Simply dropping massive, absorptive acoustic banners from the ceiling can instantly lower the room’s reverberation time by a full 0.5 seconds or more.
Mechanically lowering the massive ceiling panels physically shrinks the room’s effective air volume, completely changing how the low frequencies behave. Similarly, shifting the heavy wooden orchestra shell on the stage fundamentally alters how the initial acoustic energy is projected into the audience.
These massive structural adjustments matter because different genres of music demand entirely different acoustic environments. A sweeping, romantic symphony absolutely requires a long, luxurious reverberation tail to sound powerful, while intricate Baroque chamber music requires much drier, highly articulate acoustics to prevent the fast notes from blurring together.
Home listening spaces and bedroom studios can achieve this exact same flexibility on a smaller scale by mixing different types of treatment. By comparing NRC ratings across panel types, you can mathematically match the exact amount of absorption to your room’s specific acoustic needs.
What Can Home Spaces Learn From Concert Hall Design?
The exact same acoustic principles translate directly to your bedroom studio, but you have to adjust for the massive difference in physical scale. Because 100 Hz waves easily exceed the physical dimensions of a home space, you have to prioritize corner bass trapping far earlier than a concert hall architect would.
What Principles Apply to Home Studios?
The most critical principle to copy is prioritizing first reflections. Concert halls spend millions targeting the specific surfaces sitting directly between the sound source and the listener. In a home studio, treating those exact side-wall reflection points provides the biggest audible improvement per dollar spent, period.
The second principle is diffusion, which prevents the claustrophobic, “boxy” sound that plagues over-treated home studios. Even deploying basic wooden diffusion blocks on the back wall maintains the room’s liveliness while successfully controlling the rear reflections.
The wood slat acoustic panels that have become very popular in modern home studios actually rely on this exact same concert hall design principle, utilizing rigid wooden slats to provide high-frequency diffusion while the felt backing absorbs the muddy low-mids.
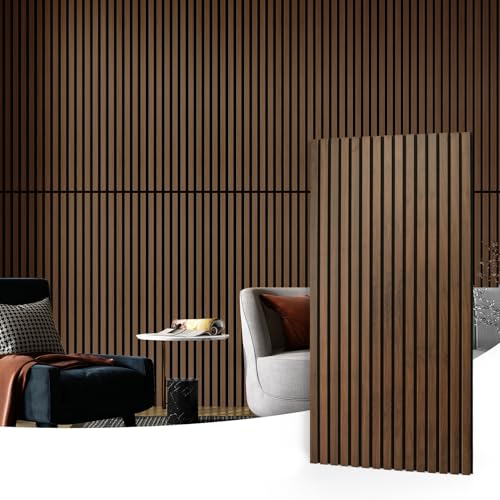
wood slat acoustic panels
Should You Copy Concert Hall Techniques?
While the physical principles transfer perfectly, the reverberation targets absolutely do not. A home studio rarely needs the long, sweeping reverberation times that concert halls intentionally cultivate to support a symphony.
Most modern mixing and recording spaces target a dry 0.3 to 0.5 seconds of decay—a fraction of the 2.2 seconds designed into a classical hall. You need your home room to be much drier so you can actually hear the digital reverb you are adding to your vocal tracks without the room confusing your ears.
However, the core lesson of balanced treatment transfers directly: neither extreme absorption nor completely untreated reflections produce good results. The room’s physical size and its intended purpose must dictate how much panel coverage you actually need. If you need a reliable starting point for that baseline absorption, the UMIACOUSTICS 4-Pack Fiberglass Panels provide the exact density required to start bringing those decay times down into the home studio range.
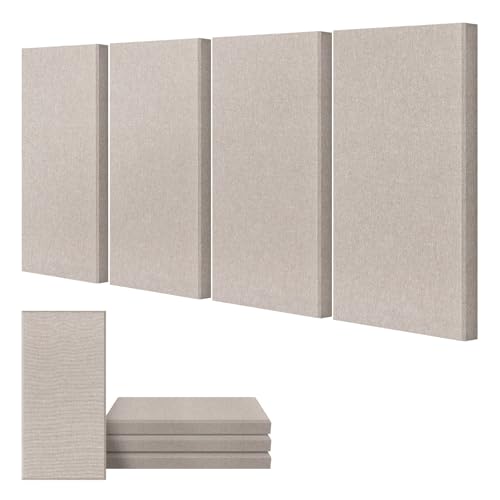
UMIACOUSTICS 4-Pack Fiberglass Panels
| Factor | Concert Hall | Home Studio |
|---|---|---|
| Target Reverb Time | 1.8-2.2 seconds | 0.3-0.5 seconds |
| Primary Goal | Even distribution to all seats | Accurate monitoring at mix position |
| Treatment Approach | Balance absorption/diffusion | Targeted absorption at reflection points |
| Bass Treatment | Architectural integration | Corner bass traps |
| Ceiling Treatment | Reflectors + absorption | Cloud panels above mix position |
| Budget Scale | Millions of dollars | Hundreds to thousands |
What Should You Take Away From Concert Hall Acoustics?
Random panel placement fails at every scale — concert halls prove that physics rewards precision over square footage. Match your absorption-to-diffusion ratio to the room’s purpose, and you will get closer to the clarity concert designers spend years chasing.
Professional acoustic treatment pays for itself in results. Whether you’re building a concert venue or treating a bedroom studio, quality acoustic panels transform the listening experience.

quality acoustic panels
The acoustic panels resource hub covers every treatment option, and when you are ready to mount, the installation guide covers each method step by step.
Conclusion
The single rule that transfers from a 2,000-seat symphony hall to a spare bedroom is this: treat selectively, not everywhere. Concert halls spend millions placing absorbers and diffusers in exact locations because physics rewards precision over coverage.
Apply that same logic at home — start with first-reflection points and corners, measure the result, and add treatment only where the room still fights you. That targeted approach is exactly what makes concert acoustics work at any budget.
Frequently Asked Questions
Why Do Concert Halls Use Acoustic Panels?
Panels control reverberation time, eliminate flutter echo, and ensure balanced sound reaches every seat. Without treatment, a large room creates chaotic reflections that blur music and make speech unintelligible.
How Many Panels Do Concert Halls Need?
Thousands of square feet, distributed across walls, ceilings, and architectural features. The exact amount depends on room volume, shape, and intended use — but placement matters more than raw quantity, which is why designers rely on computer modeling to optimize every panel location.
Are Concert Hall Panels Different From Home Panels?
Yes — the physics are identical. Concert hall panels are custom-designed and architecturally integrated, while home panels use the same absorption principles in standard sizes.
Professional-grade home panels with NRC ratings of 0.85 or higher use the same core materials as concert hall treatment: fiberglass or mineral wool wrapped in acoustically transparent fabric.
Can I Use Concert Hall Techniques at Home?
Absolutely — first-reflection treatment, corner bass trapping, and balanced absorption/diffusion all transfer to home spaces. The main scaling difference is target reverberation time: home studios aim for 0.3 to 0.5 seconds versus 1.8+ seconds in a symphony hall, so panel count and treatment density change accordingly.