How To Soundproof Between Floors (Footsteps, Voices, And Finished-Space Fixes)
How to soundproof between floors can work, but only if you stop treating footsteps, voices, and upstairs noise as one single problem.
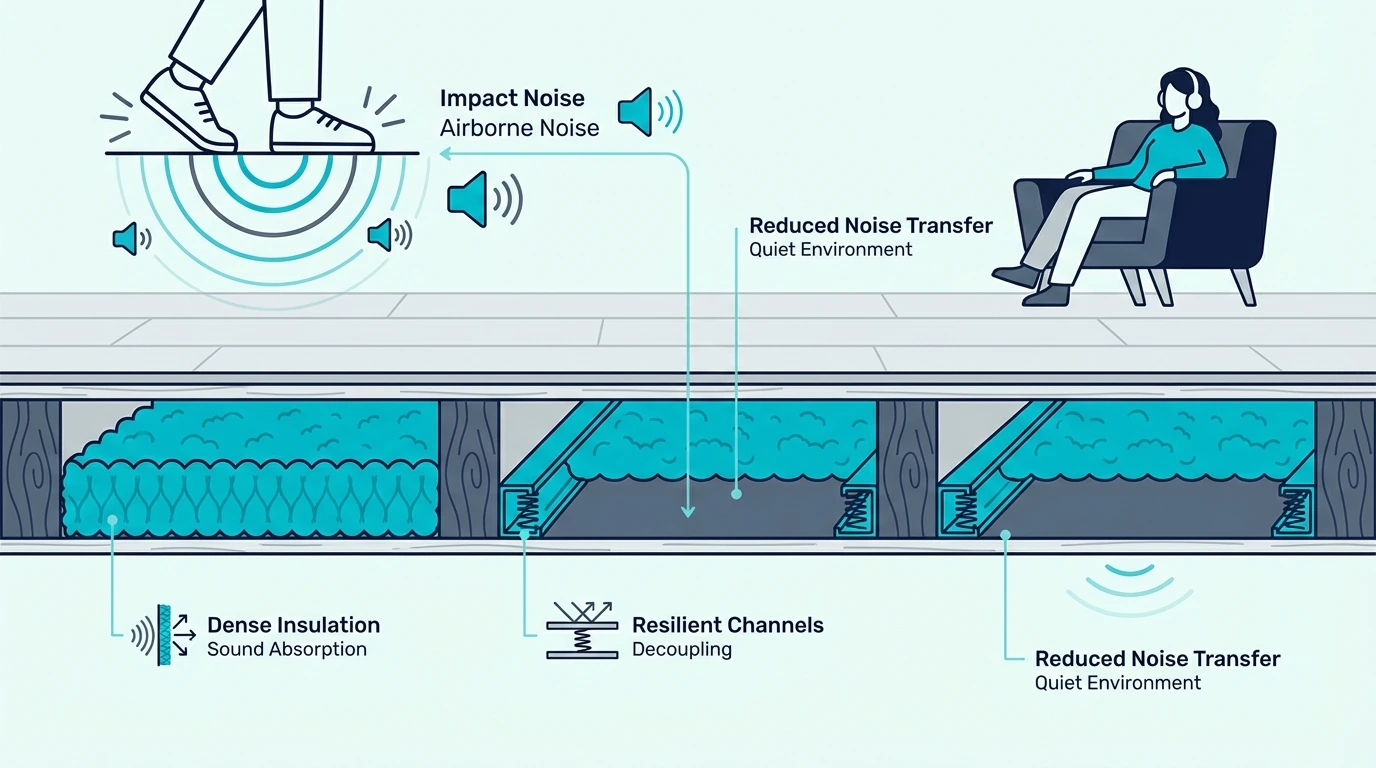
That is where most between-floor projects go wrong. Footsteps and dropped objects enter the structure as impact, while voices and TV bleed behave more like airborne transfer, so one light fix on the ceiling below often leaves the complaint untouched.
The good news is that once you separate those paths, the upgrade plan gets much clearer. You can reduce footstep noise, reduce speech bleed between levels, and decide whether a floor-side change, a ceiling-side retrofit, or a larger assembly rebuild is worth it.
Below, start by deciding which noise is moving between floors, then use that answer to choose the cheapest useful fix, the strongest upstairs-floor option, or the best ceiling-side compromise for a finished space.
Quick Takeaway
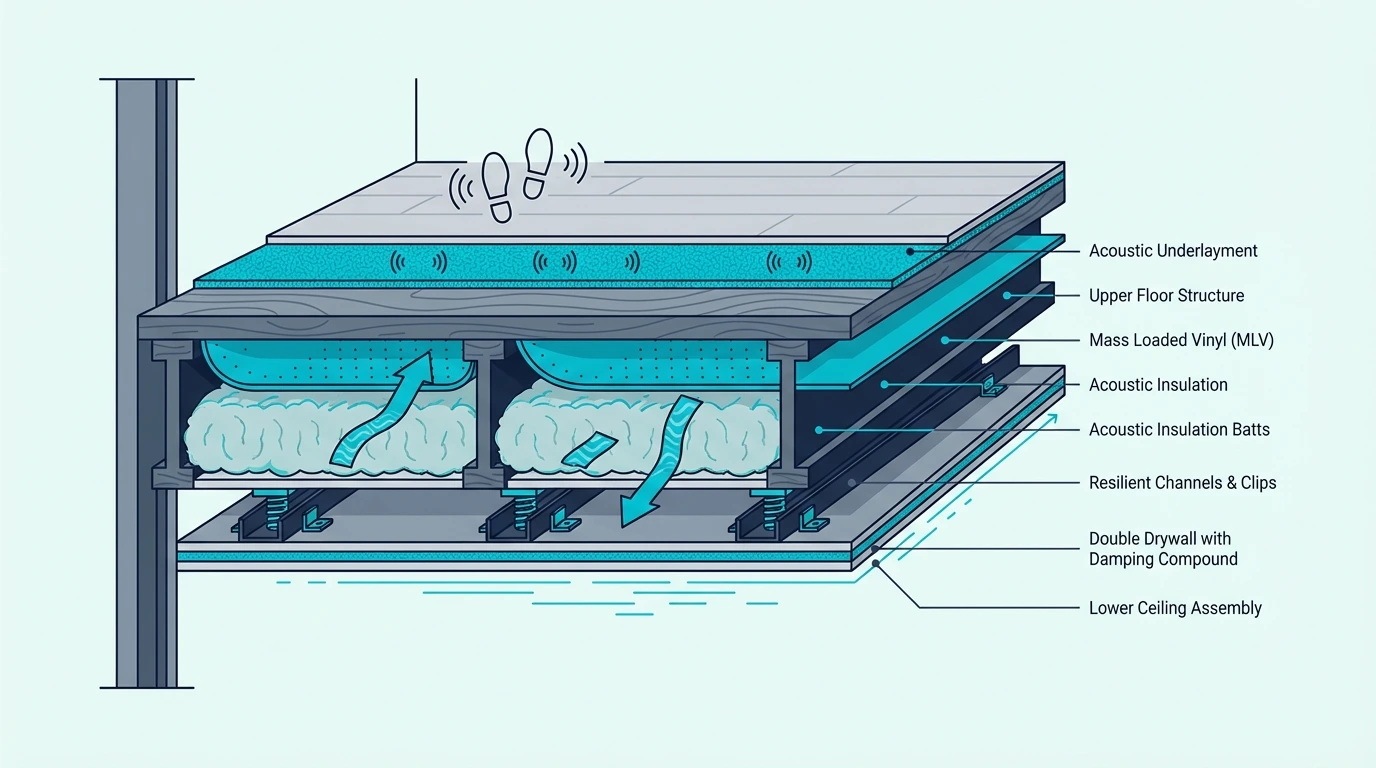
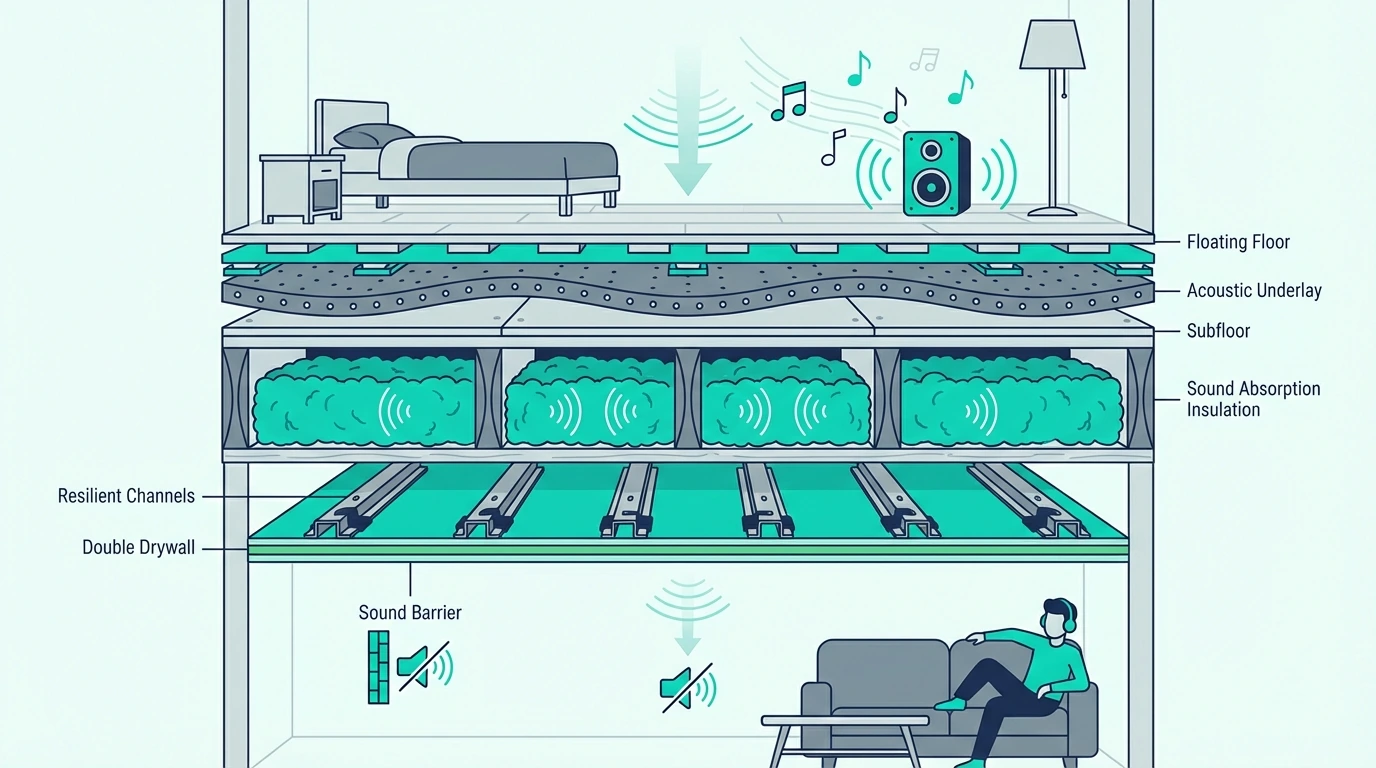
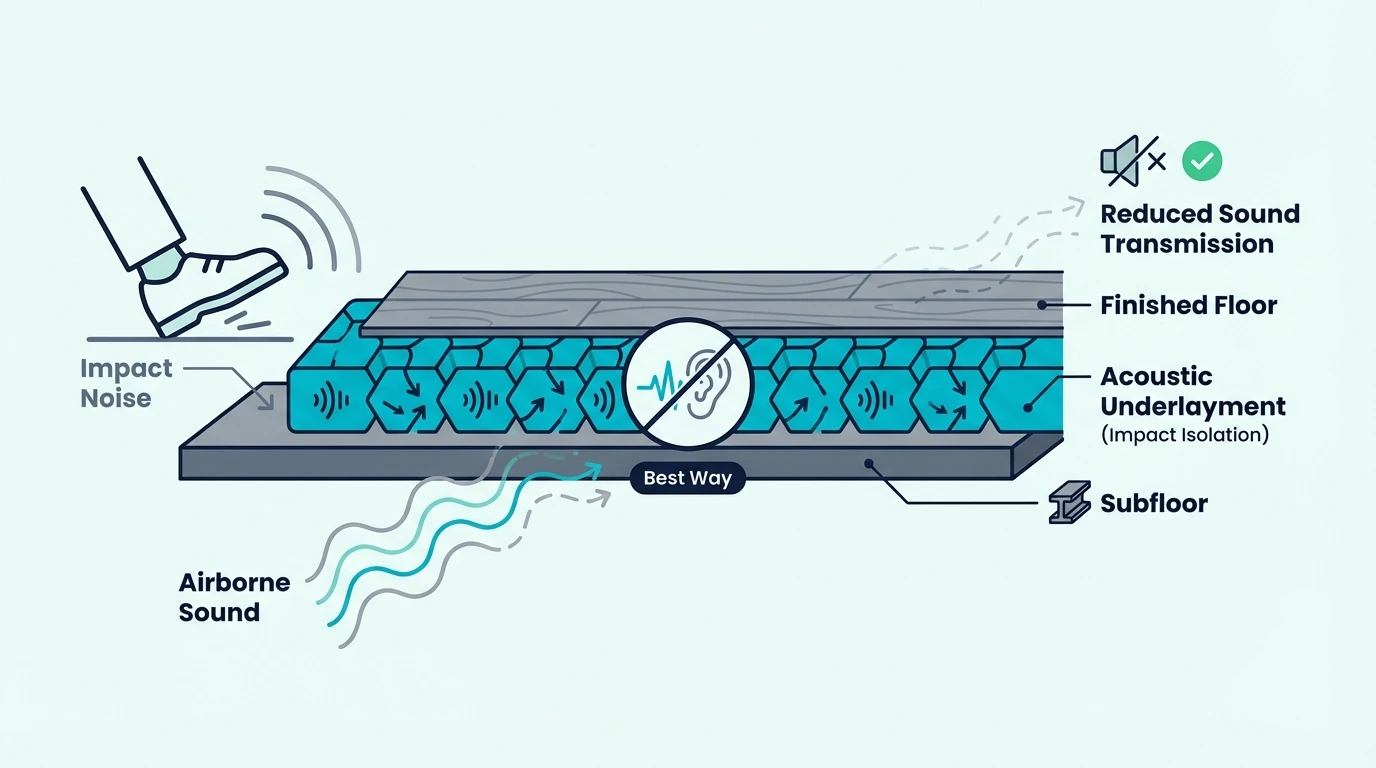
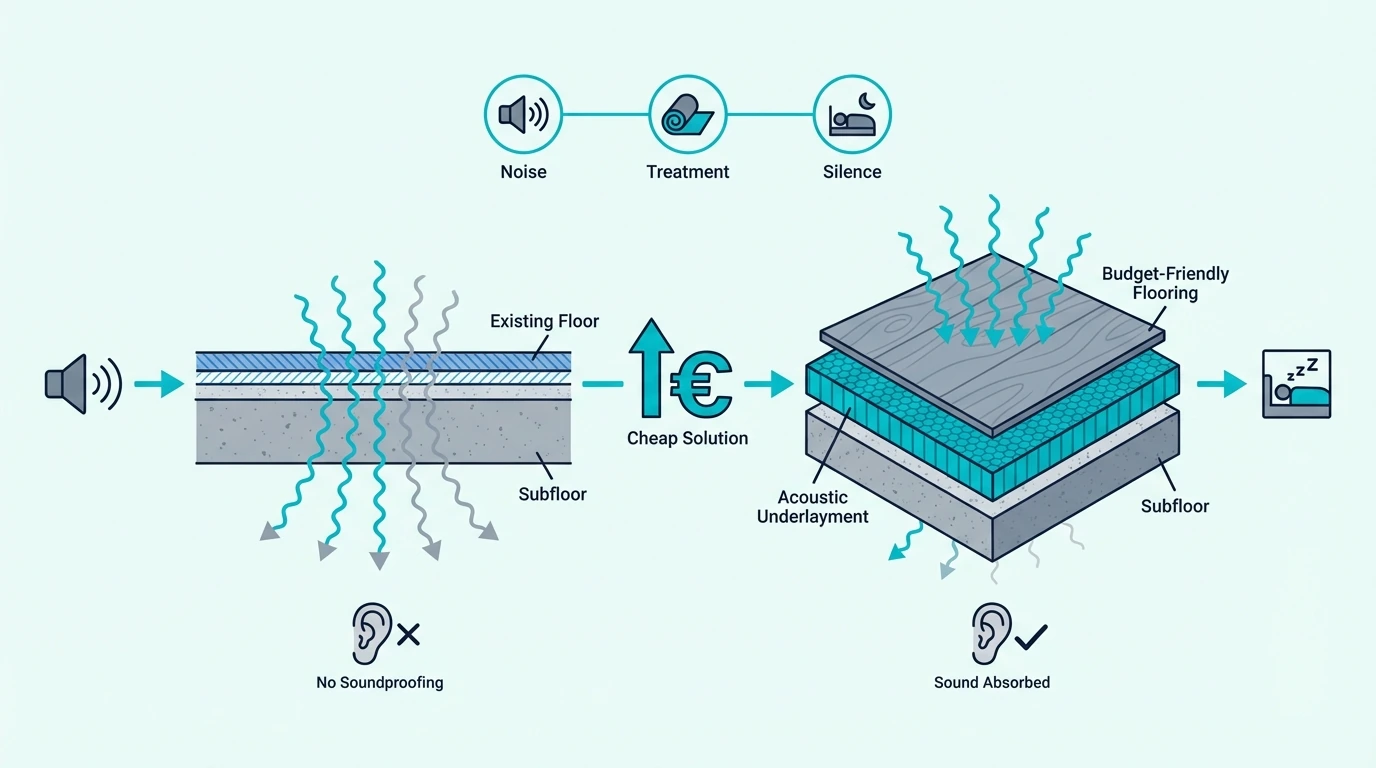
The best way to soundproof between floors is to treat the noise as close to the source as possible. For footsteps and dropped items, top-side fixes like rugs, pads, and better underlayment usually matter more than ceiling-only changes. For voices and TV bleed, mass, sealing, insulation, and stronger ceiling or floor rebuilds matter more. Cheap fixes can help, but major reductions usually require either access to the floor above or a more serious ceiling-side retrofit below.
Diagnose The Floor-Ceiling Assembly First
Between-floor soundproofing gets easier once you stop asking one product to solve every kind of noise.
The first decision is whether the assembly is carrying impact, airborne transfer, or both.
Start With The Noise Entering The Assembly
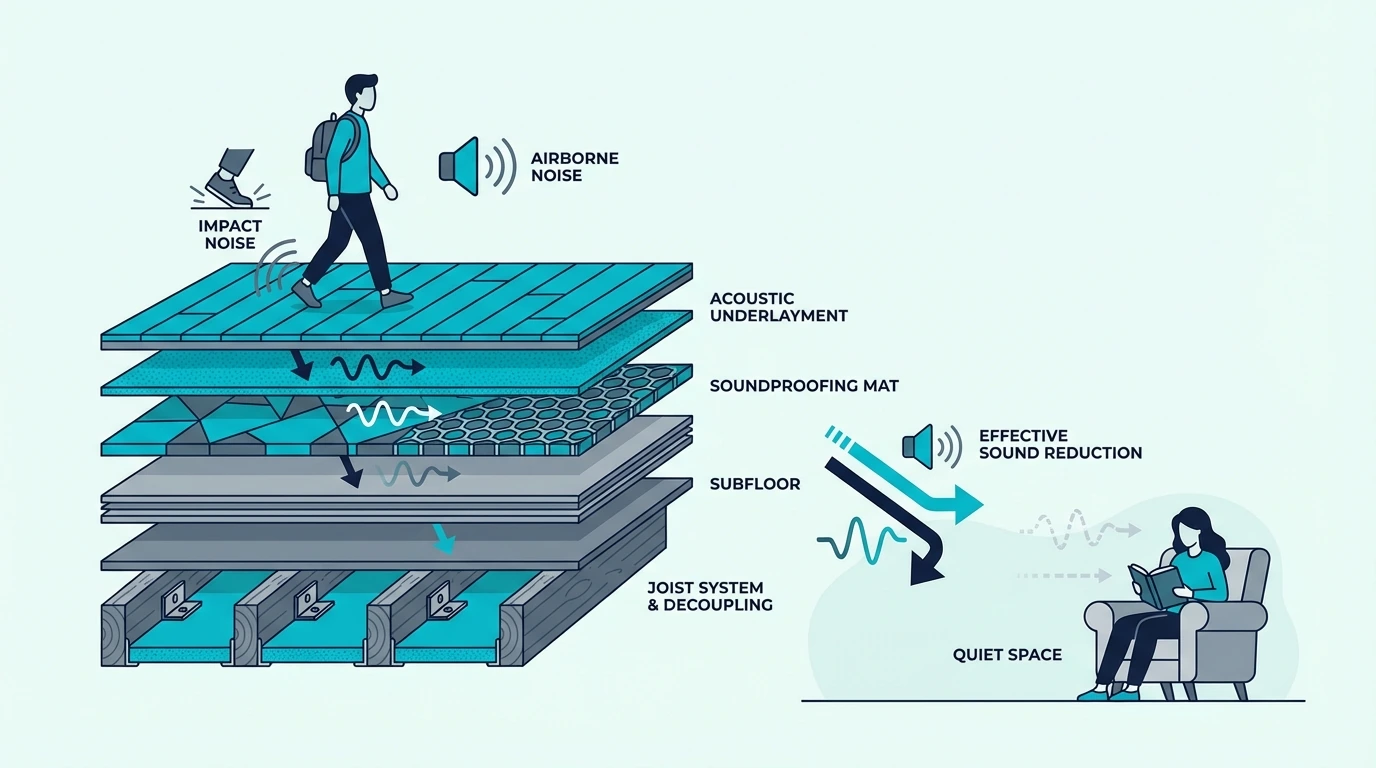
Footsteps, dropped items, pets, and chair movement are impact-noise problems. Those sounds enter the structure directly, which is why they often feel harder to stop than voices even when they are not technically louder.
Voices, TV, and general room sound are airborne-noise problems. Those usually respond better to mass, sealing, and a stronger assembly than to soft top layers alone.
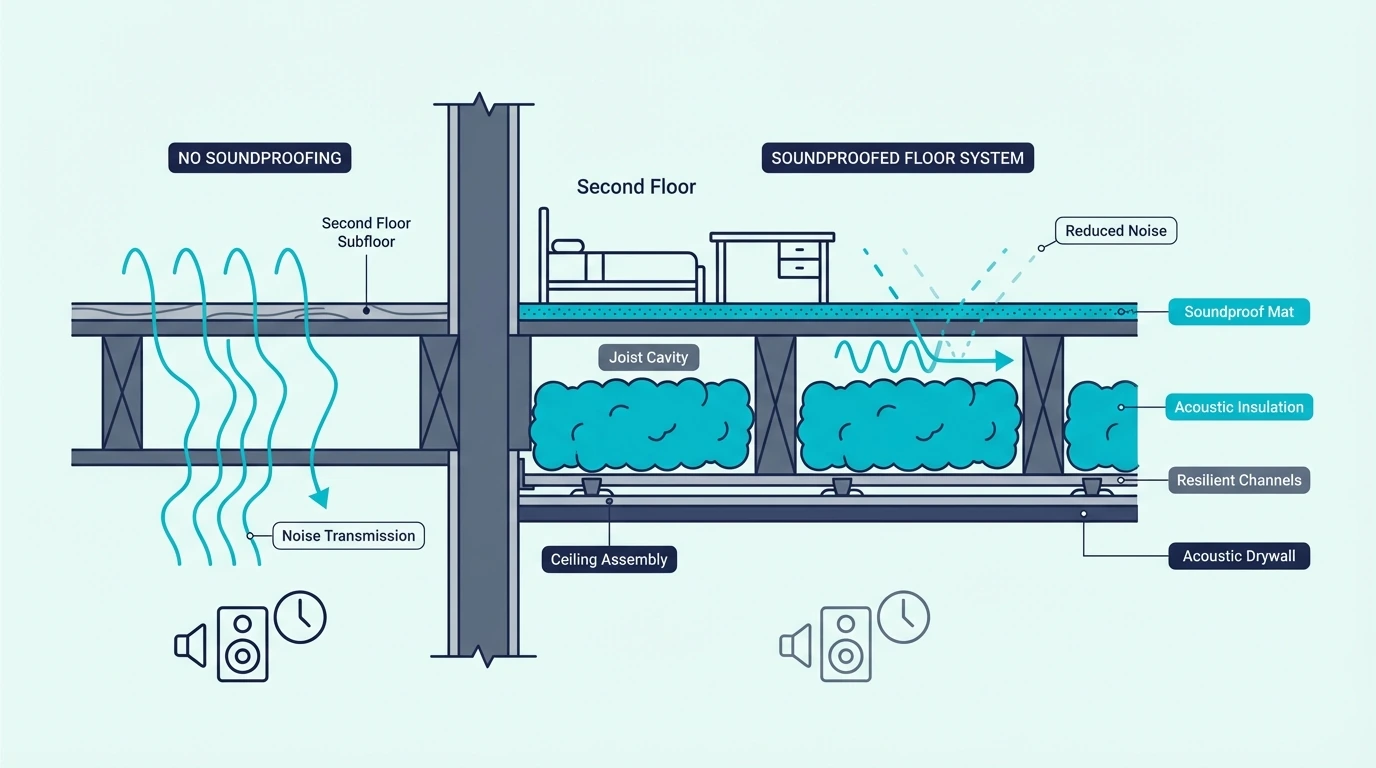
If you control the upstairs floor, that is usually the best side to treat first for impact noise because it lets you soften and interrupt vibration before it spreads into the joists. Once the vibration is already in the structure, the fix usually gets harder and more expensive.
If you only control the room below, the ceiling becomes the practical treatment side. That can still help, but it is often more of a compromise for footstep noise.
Expect Reduction Instead Of Silence
Realistic between-floor soundproofing usually means meaningful reduction, not complete silence.
That expectation matters because floors and ceilings are connected through joists, fasteners, and framing.
Cheap Fixes Only Help When They Match The Path
Once the noise type is clear, cheap fixes become much easier to judge honestly.
The best budget moves reduce the right path a little, while the worst ones pretend the structure is not involved.
Floor-Side Softening Is The Honest Budget Move
For footsteps, the cheapest helpful moves usually happen on the floor side. Rugs, dense rug pads, furniture foot pads, and better floor coverage all help reduce the sharpness of impact at the source.
Ceiling Patches Usually Trim Irritation, Not The Cause
From below, low-cost fixes are more limited. Sealing obvious perimeter gaps, addressing recessed-light leakage, and adding some mass during a planned ceiling refresh can help, but they usually will not equal source-side floor treatment for heavy footstep noise.
They are best treated as reduction moves, not full solutions. If the joists are still carrying most of the impact energy, a cheaper ceiling patch usually lowers irritation more than it changes the assembly.
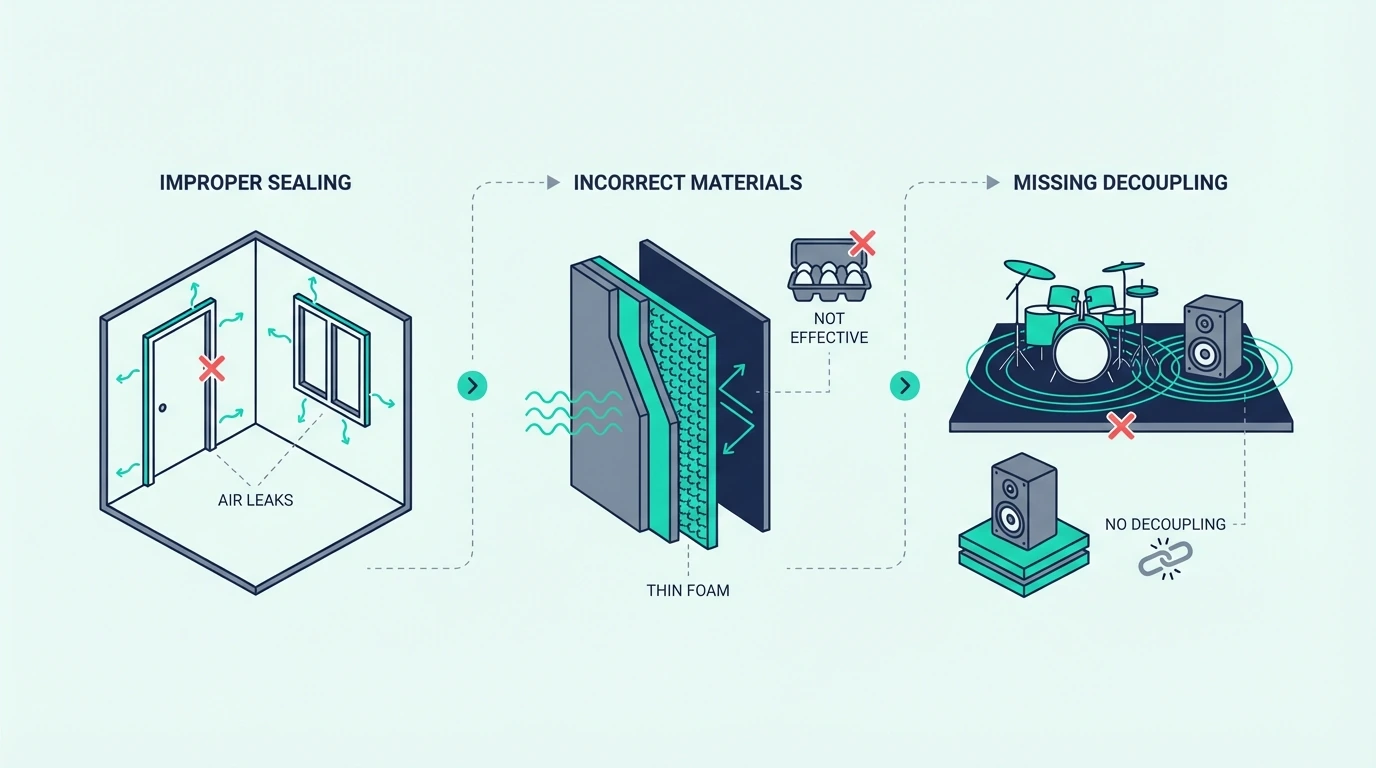
Cheap Products Fail When They Ignore The Assembly
Thin foam, decorative soft sheets, and random “soundproof” ceiling add-ons are the biggest hype zone here. They may change the feel of the room, but they do not usually solve the structural transmission path between floors.
Once cheap fixes hit their limit, the upstairs side is where the strongest between-floor strategy usually begins.
That is where you can still act before vibration spreads through the framing.
Source-Side Layers Work Before Vibration Spreads
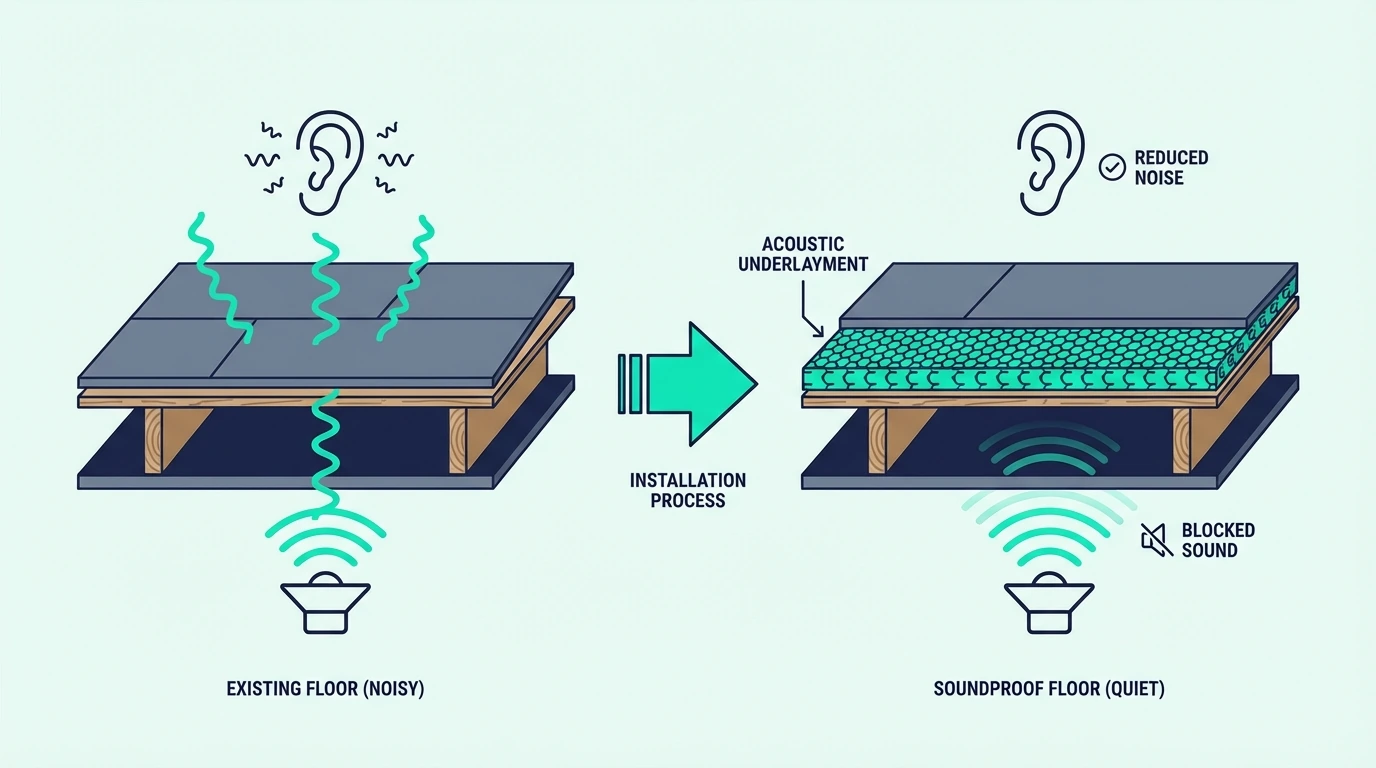
The best floor-side moves are the ones that reduce vibration before it enters the structure. Better underlayment, thicker soft finishes, and more thoughtful floor build-ups matter most when footsteps are the main complaint.
That is also why timing matters. If the upstairs flooring is already being replaced, that is the cleanest moment to add better layers like FloorMuffler Ultra Seal Underlayment.
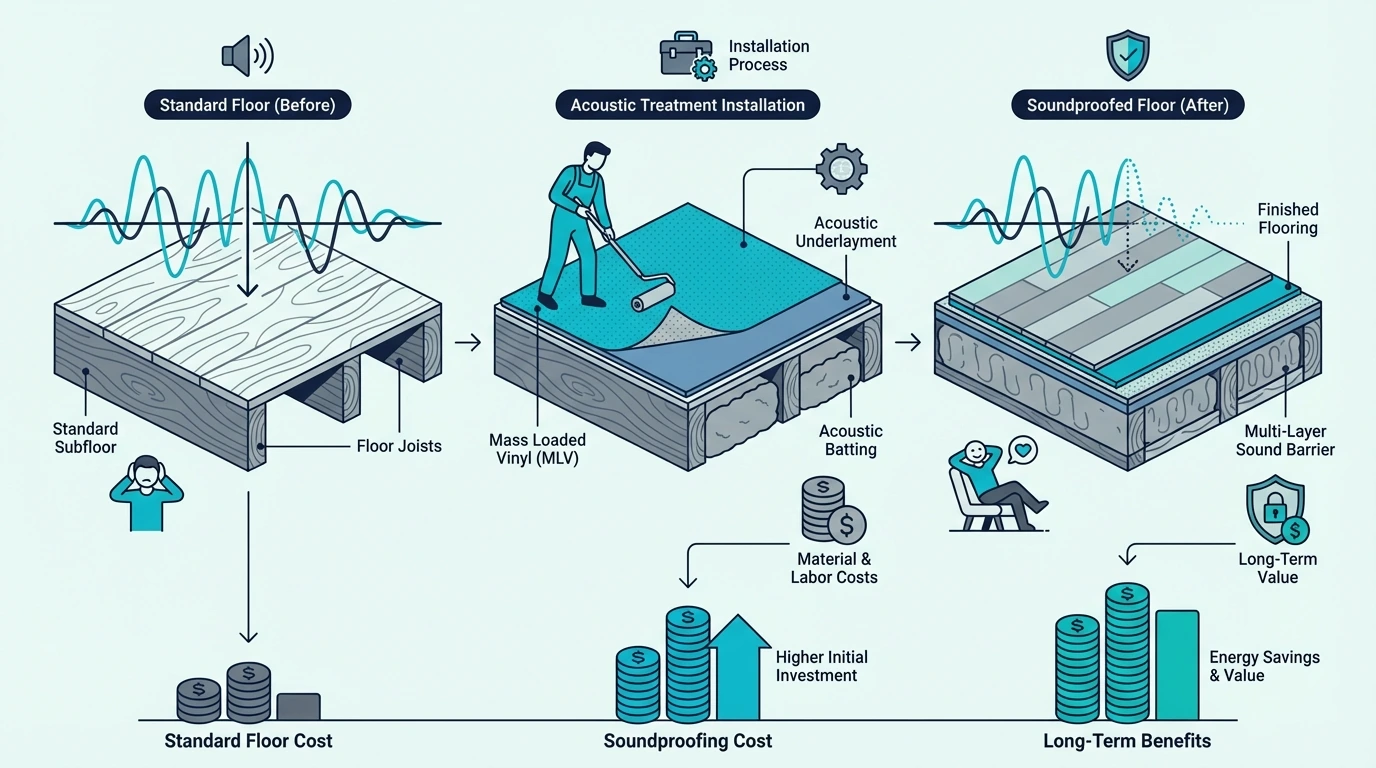
Open The Floor When The Upgrade Needs Real Mass
You need to open the floor when the noise is severe, the existing floor is already being replaced, or you want to add real mass and better layers instead of another temporary surface fix.
Finished Floors Need Better Timing, Not Random Tear-Outs
The best answer is to match the upgrade to a moment when the floor is already being touched. If the space must stay finished, source-side softening may still be smarter than a floor tear-up at the wrong time.
Ceiling-Side Retrofits Are The Finished-Space Compromise
If the upstairs floor is off limits, the lower ceiling becomes the practical treatment side.
That does not make it useless, but it does change the goal from ideal source control to the best realistic compromise below.
Added Mass And Damping Are The Best Moderate Move
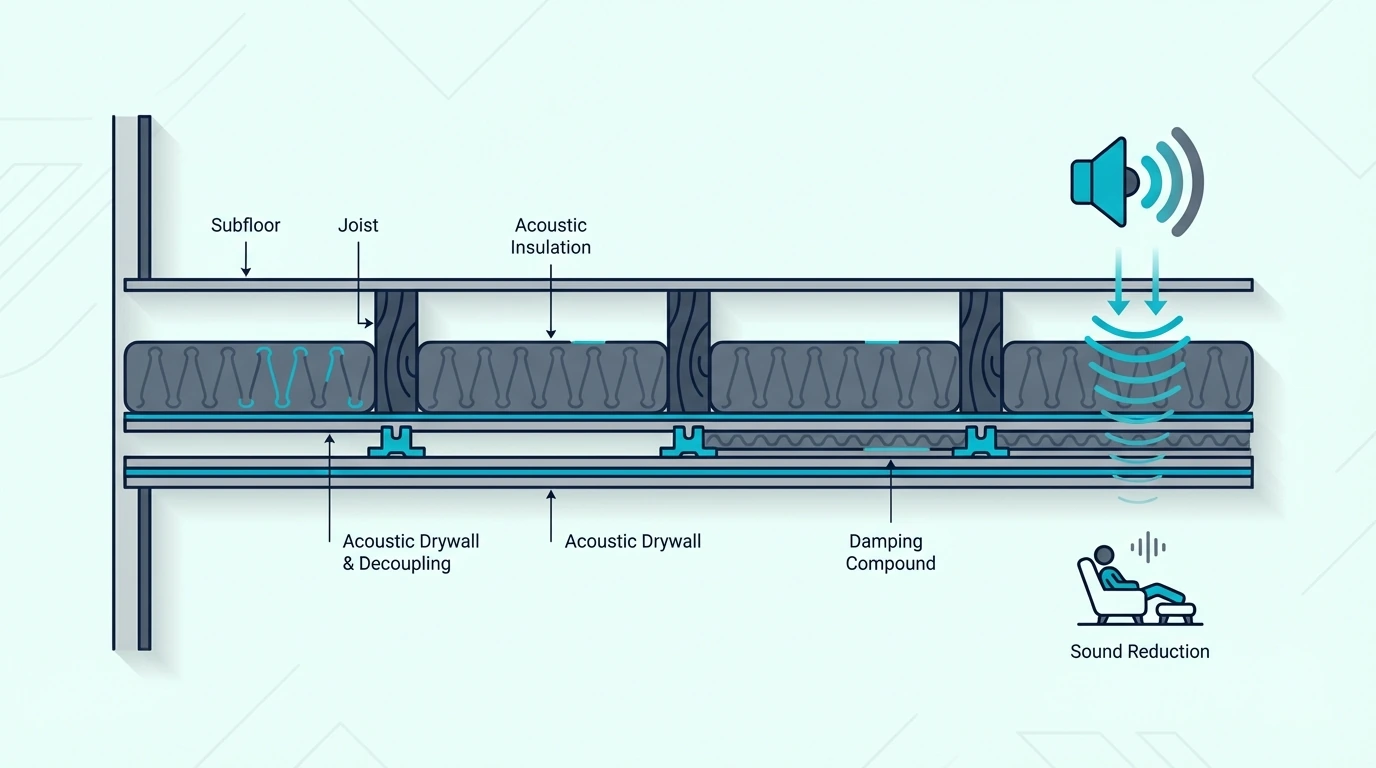
From below, the best moderate move is usually adding mass and damping. If the ceiling can take another drywall layer, damping between layers becomes a practical finished-space upgrade.
A product like Green Glue Noiseproofing Compound fits this stage because it supports a real ceiling-side assembly upgrade rather than another cosmetic patch.
If the project is moving into a real drywall build, this is also where better sheetrock choices matter more than decorative acoustic add-ons.
Ceiling Retrofits Make More Sense For Airborne Complaints
Ceiling-side fixes are worth doing when the upstairs floor cannot be changed, when airborne noise is part of the complaint, or when a lower-room renovation is already happening anyway. The same existing retrofit logic matters here too.
Open Ceilings Let You Build A Stronger Assembly
A full ceiling rebuild becomes the better choice when the noise is severe, insulation is missing, flanking paths are obvious, or impact noise keeps surviving lighter fixes. Once the ceiling is open, you can fill the cavity correctly and pair that with stronger layers below.
A product like AFB Mineral Wool Insulation Batts help illustrate that point because insulation matters more once it becomes part of a stronger total system.
Apartments Limit Which Side You Control
Apartment situations are the hardest because you often do not control both sides of the assembly.
That turns between-floor soundproofing into a strategy problem as much as a materials problem.
Renters Need Source-Side Softness First
Renters should start with source-side softness where they control it: rugs, pads, removable mats, furniture-foot protection, and fuller floor coverage.
If you live below the problem, part of the solution may still depend on what the upstairs unit is willing or allowed to change. That is one reason impact-noise complaints in apartments can stay stubborn after decent ceiling-side work.
Upstairs Behavior Can Still Control The Result
The upstairs neighbor is the real variable when the main complaint is footsteps, dragged furniture, pets, or other impact-heavy living patterns.
Pros Matter When The Building Is Bigger Than DIY
Call a professional when the complaint is severe, when the building is multi-unit, or when the solution may involve a ceiling rebuild, flooring removal, or a higher-performance isolation assembly.
The Bottom Line
How to soundproof between floors gets simpler once you answer three questions first.
Is the main problem impact noise or airborne noise?
Do you control the upstairs floor, the lower ceiling, or both?
And is the goal moderate reduction or a bigger rebuild-level improvement?
If the noise is impact-heavy and you control the floor above, start there.
If the floor above is off limits, use the ceiling below as the best compromise and keep expectations realistic.
If the complaint is mostly voices and TV bleed, move faster toward mass, sealing, insulation, and stronger ceiling or floor layers.
That is the decision rule that keeps between-floor projects from wasting money on the wrong side of the assembly.
Frequently Asked Questions
How do I reduce footstep noise from upstairs?
Reduce footstep noise from upstairs by softening the source side first with rugs, pads, mats, or better underlayment if the floor can be opened. If the upstairs floor cannot be changed, a stronger ceiling-side retrofit below may still help, but it usually works better as a compromise than as the ideal first choice.
What to put between floors to reduce noise?
To reduce noise between floors, the most useful materials are dense underlayment, insulation in the cavity, added mass layers, and better isolated ceiling or floor assemblies. The right combination depends on whether the main problem is impact noise, airborne noise, or both.
How To Soundproof An Existing Wall (Without Guessing At The Fix)
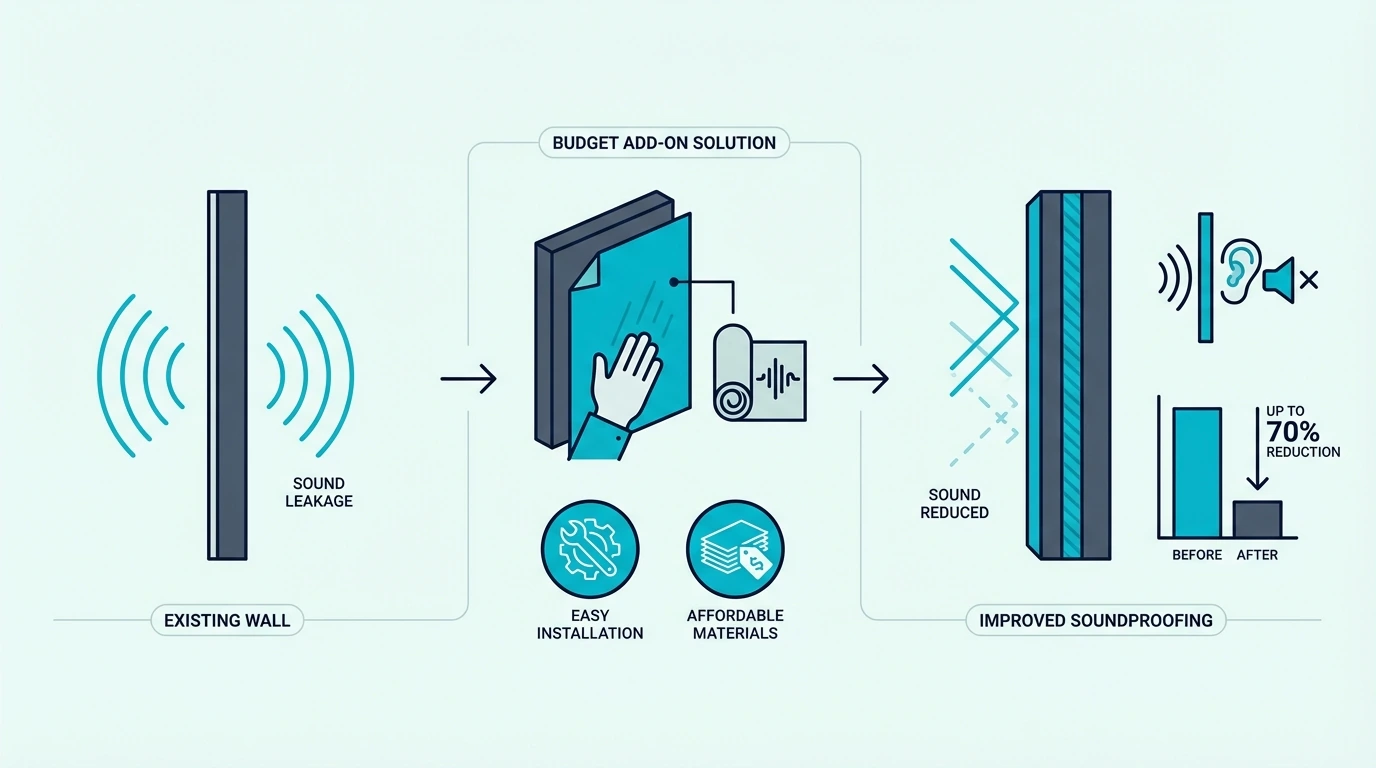
How to soundproof an existing wall can work, but only if you choose the retrofit path that matches the wall you already have. The fix for moderate voices through a finished bedroom wall is not the fix for bass through a shared party wall, and neither one works well if the real leak is actually the ceiling edge, outlets, or a nearby door.
Most finished-wall projects fail because people buy a product before they diagnose the weak path. Leak control, added mass, damping, cavity treatment, and isolated build-outs all belong in existing-wall work, but not in the same order for every wall.
The good news is that existing walls usually do improve when the diagnosis is right.
Start with the decision table, then move through the no-demo versus open-wall split, the shared-wall cases, and the cheap mistakes that waste money.
Quick Takeaway
The best way to soundproof an existing wall is usually to seal every leak first, then add mass with a second drywall layer and damping if the wall must stay closed. If the noise is bass-heavy, privacy-critical, or still obvious after those steps, opening the wall, improving the cavity, and sometimes decoupling are the stable next moves.
If your existing-wall situation is…
Best first move
Usually enough when…
Escalate when…
Moderate voices or TV through a finished wall
Seal leaks, then add a second drywall layer with damping
You want meaningful reduction, not silence
Speech is still clear after sealing and added mass
The wall must stay closed and space loss matters
Prioritize trim gaps, outlets, adjacent openings, and the strongest no-demo wall layer
The noise is light to moderate and mostly airborne
The wall is lightweight or bass-heavy
The wall is already open or being renovated
Add cavity treatment, reseal penetrations, and rebuild with stronger wall faces
You can control the cavity and finish details properly
Privacy matters a lot or low-end noise remains
You share the wall with neighbours
Treat leaks first, then add mass and damping on your side
The problem is mainly voices, TV, or daily living noise
The whole room vibrates or the sound wraps through ceiling and floor paths
Bass, subwoofer, or strong thumping is the main complaint
Expect stronger assembly work and possible decoupling
The low-end issue is mild and infrequent
Bass is the main problem or earlier wall-only fixes already failed
You need the cheapest worthwhile start
Fix obvious leak paths and nearby weak openings before buying bigger materials
The wall has clear leakage and the budget is tight
You are about to spend money on decorative “soundproof” products
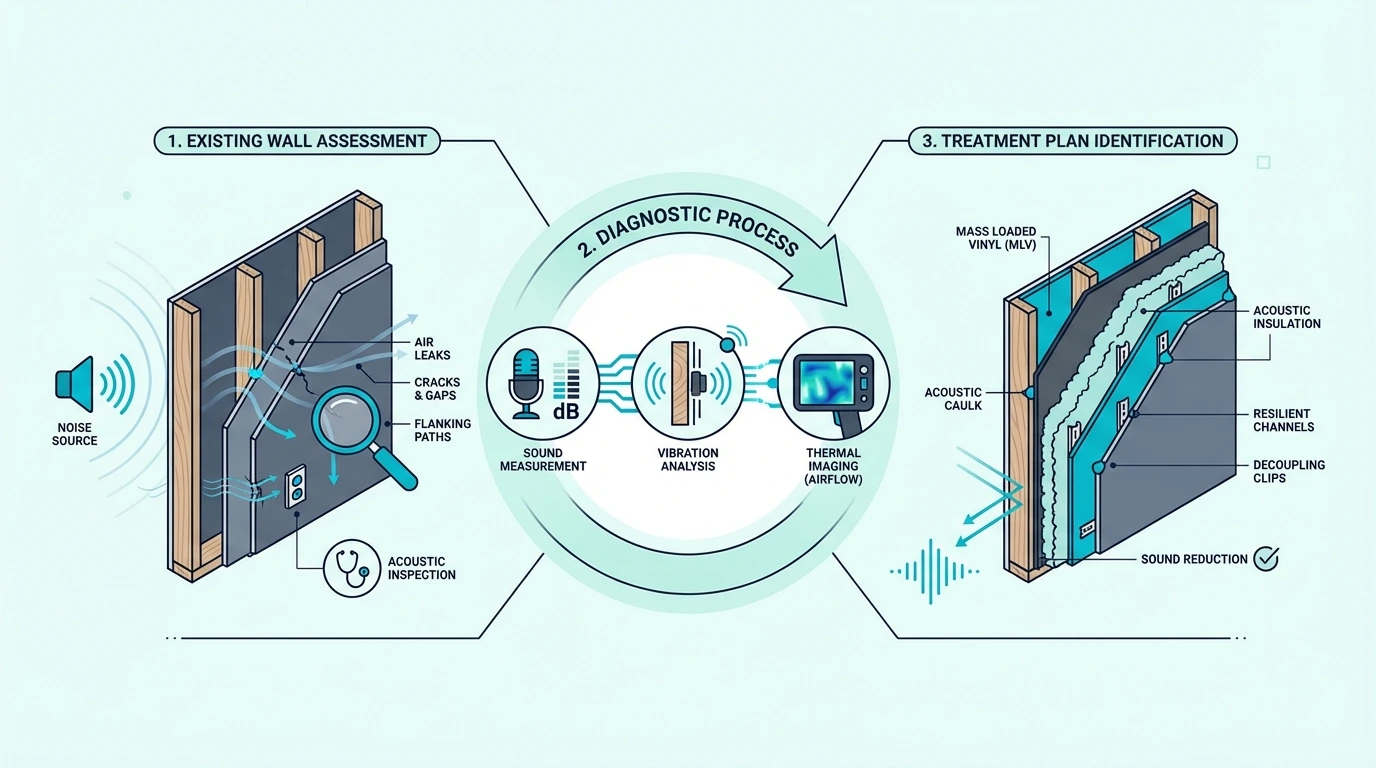
Existing-Wall Soundproofing Starts With Diagnosis
Existing-wall retrofits move much faster once you sort the problem into a few buckets first.
You need to know whether the wall is too light, too leaky, or not the only path carrying the noise before you buy materials.
Airborne Noise And Bass Need Different Expectations
Voices, TV bleed, and most daily household noise are airborne problems. That usually points toward better sealing, more wall mass, and damping so the wall face does not re-radiate sound as easily.
Bass, thumping, and stronger vibration are harder because they involve structure-borne transfer as well as airborne sound. That is where a simple surface-only upgrade can disappoint, especially if the framing, ceiling line, or floor line is helping the sound travel.
If you are still deciding whether the problem is the wall alone or the room more broadly, compare this with how to soundproof a room and how to soundproof a wall before buying wall materials blindly.
Existing Walls Usually Fail At The Edges First
Many existing walls fail at the easy-to-miss points first. Outlets, trim gaps, perimeter cracks, back-to-back boxes, a weak nearby door, or a leaky window can all bypass a wall that looks solid in the middle.
Wall diagnosis should include the surrounding surfaces too. If the obvious weak point is beside the wall rather than in the drywall face, fixing the door or the window can outperform another random layer on the wall itself.
Realistic Retrofits Aim For Reduction, Not Silence
For many finished-wall retrofits, realistic means meaningful reduction rather than total silence. If speech becomes much less intelligible or TV bleed drops into background murmur, that is already a strong real-world result.
That expectation matters because privacy-grade isolation from an already-built wall usually requires heavier construction choices. If your target is dramatic separation, the wall may eventually need more than a thin surface treatment.
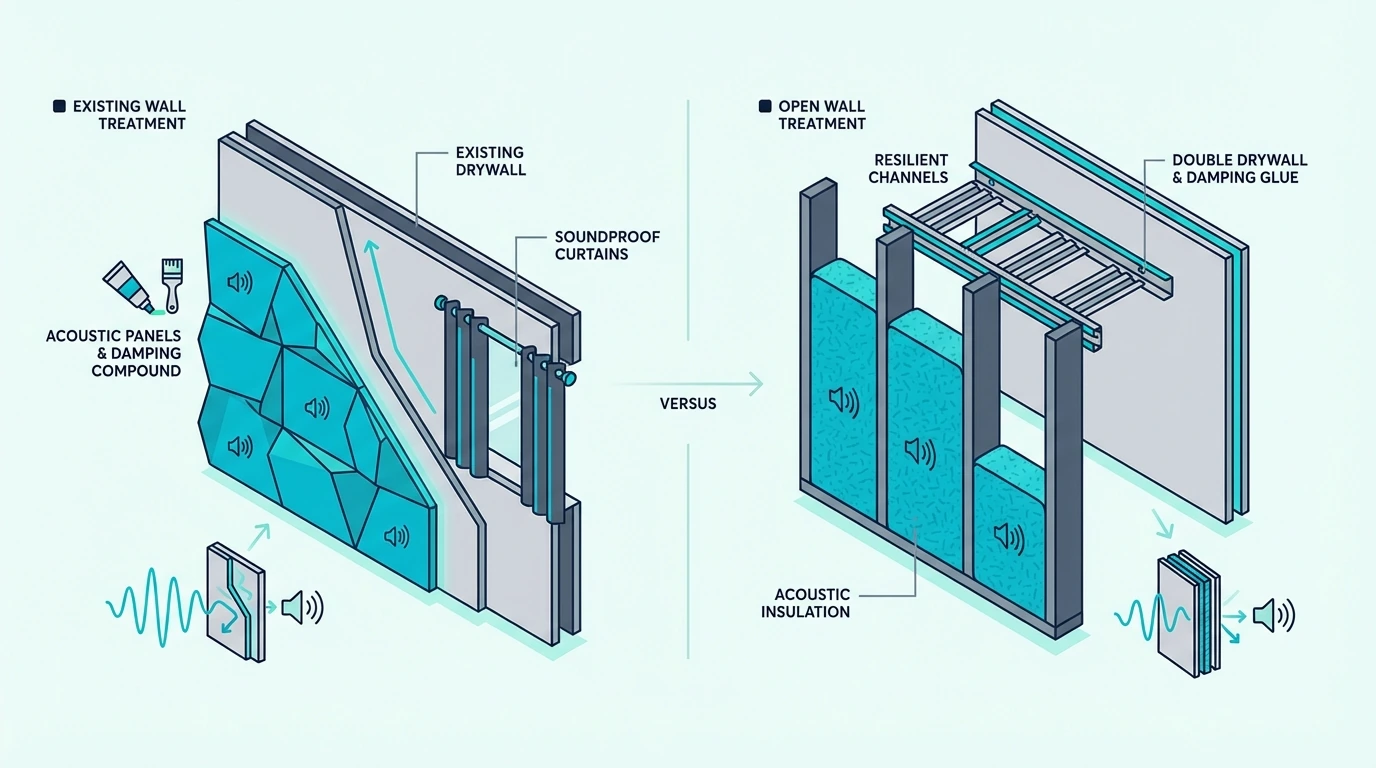
Closed Walls Need A No-Demo Upgrade Ladder
Once the wall is staying closed, the smartest move is to treat the no-demo options like a ladder. Sealing, added mass, and damping do not deliver the same return, so the order matters.
Leak Control Is The First No-Demo Upgrade
Tier one is leak control. If the wall has trim gaps, sloppy outlet cutouts, perimeter cracks, or nearby weak openings, those paths can erase more performance than people expect.
Existing-wall soundproofing should always include crack sealing, outlet attention, and any obvious leakage around trim or adjacent openings. If the wall includes a weak door or nearby window, you may also need to address the door or the window instead of blaming the wall alone.
Tier two is a serious new outer layer. A product like Green Glue Noiseproofing Compound usually makes more sense than decorative panels because it adds real mass and damping to the finished wall you already have.
Tier three is a denser build-up when the wall is still too light. Materials like Soundsulate Next Generation 1 lb MLV can help when it is part of a proper wall build-up, not when it is treated like a cosmetic shortcut.
Added Mass And Damping Carry The Main Closed-Wall Upgrade
A no-demo fix is often good enough when the main complaint is moderate voices, TV bleed, or general room-to-room noise and the wall is otherwise serviceable. In those cases, sealing plus a stronger face layer can deliver noticeable improvement without turning the project into a full rebuild.
It stops being enough when the complaint is heavy bass, repeated thumping, or privacy that still matters after the first serious upgrade. In those cases, a closed-wall approach is often just the strongest partial fix, not the final answer.
Closed-Wall Retrofits Still Hit A Hard Limit
The biggest limit is that the old wall assembly still controls part of the outcome. You cannot fully inspect the cavity, correct hidden back-to-back boxes, or remove every flanking weakness without opening more of the system.
Some finished-wall upgrades plateau. If the wall already has insulation, or if the real sound is wrapping through the ceiling, floor, or adjoining wall, more surface material on the target wall alone can underperform.
Open Walls Let You Rebuild The Assembly Properly
Once the wall is open, you can stop guessing about what is inside the assembly. That is where cavity treatment, penetration sealing, and stronger rebuild choices start to change the result for real.
Open Stud Bays Change What You Can Fix
Access to the stud bays lets you verify whether insulation is missing, whether the boxes and penetrations are sloppy, and whether the framing needs a better isolation plan. That is valuable because cavity-side fixes and face-layer fixes do different jobs.
Products like Rockwool ComfortBoard 80 and AFB Mineral Wool Insulation belong in the conversation. They help absorb energy inside the assembly, but they still work alongside mass, sealing, and stronger wall faces rather than replacing them.
Rigid boards make more sense when you are building out a new isolated face or need semi-rigid material that will stay put behind a new layer. Batt mineral wool makes more sense when you are refilling standard stud bays and want full, even cavity coverage without odd gaps.
If you are comparing whether the real upgrade belongs in the cavity or on the wall face, our guide on best insulation for soundproofing helps separate what insulation can do from what the wall faces still need to do.
Spray Foam Is Rarely The Core Soundproofing Answer
Usually no, not as the core answer. Spray foam can help with some air sealing and thermal performance, but it is not the stable centerpiece of a serious existing-wall soundproofing plan.
This is one of the biggest retrofit myths because people hear the word foam and assume a full cavity fill means full soundproofing. In reality, stronger wall assemblies still lean on mass, damping, sealing, and sometimes decoupling more than spray products.
Bigger Rebuilds Pay Off In Severe Cases
A bigger rebuild is worth it when the noise is constant, bass-heavy, privacy-critical, or already proven resistant to lighter upgrades. Shared bedroom walls, office privacy walls, and party walls with clear voices or thumping are the classic cases.
This is also where clip systems, resilient channel, thicker drywall stacks, and full build-outs start to make sense. If you are already opening the wall, it is usually smarter to build the stronger assembly once than to layer weaker fixes over time.
Shared walls are where existing-wall soundproofing becomes most frustrating because you only control one side. That makes scenario-based decisions more important than generic wall advice.
Voices And TV Usually Respond To Seal-Then-Mass Upgrades
For voices, TV, and daily household noise, the best practical sequence is seal first, add mass second, and escalate to damping or a stronger build-out if the wall still is not good enough. That keeps the project grounded in real wall physics instead of surface-level wishful thinking.
Bass And Thumping Push The Wall Into Harder Territory
Bass and impact-like noise push shared-wall projects into a harder category because the structure itself may be participating. A wall-only fix can still feel weak when the floor, ceiling, or common framing is helping carry the low-end energy.
This is also the point where expectations need to get stricter. If bass is the main complaint, stronger wall construction and flanking-path control matter more than simply adding one more surface product.
Flanking Paths Can Matter More Than The Party Wall Alone
The neighbor wall is not the only problem when the sound seems to wrap around the room, when the whole wall vibrates, or when the assembly shares framing with adjacent ceilings, floors, or side walls. In those cases, the wall may be part of the problem but not the only path.
Some party-wall fixes need help from the ceiling, the floor, or other connected surfaces. If you only treat one face while the flanking paths stay open, the sound often just reappears somewhere nearby.
Cheap Existing-Wall Fixes Only Work When They Target Weak Paths
Budget matters, especially when the wall is already built and the problem may be one part of a larger room issue. Cheap existing-wall soundproofing only works when the first dollars go to the highest-return weak points.
Cheap Wins Start With Leaks And Nearby Weak Openings
Sealing obvious gaps is the first cheap win because it targets direct leak paths without forcing a full rebuild. If the wall has trim gaps, bad outlet sealing, or obvious perimeter leakage, that is where the first dollars should go.
The next cheap win is controlling the nearby weak openings that keep bypassing the wall. A product like 33 Ft Gray Self-Adhesive Soundproofing Weather Stripping is not a wall-face upgrade, but it is a good example of the surrounding leak control that often deserves money before decorative wall products do.
After that, cheap stops being relative to ambition. A serious but still efficient move is saving for one strong mass-and-damping upgrade rather than scattering money across weak treatments that never add enough wall performance.
Foam, Paint, And Decorative Panels Do Not Add Real Isolation
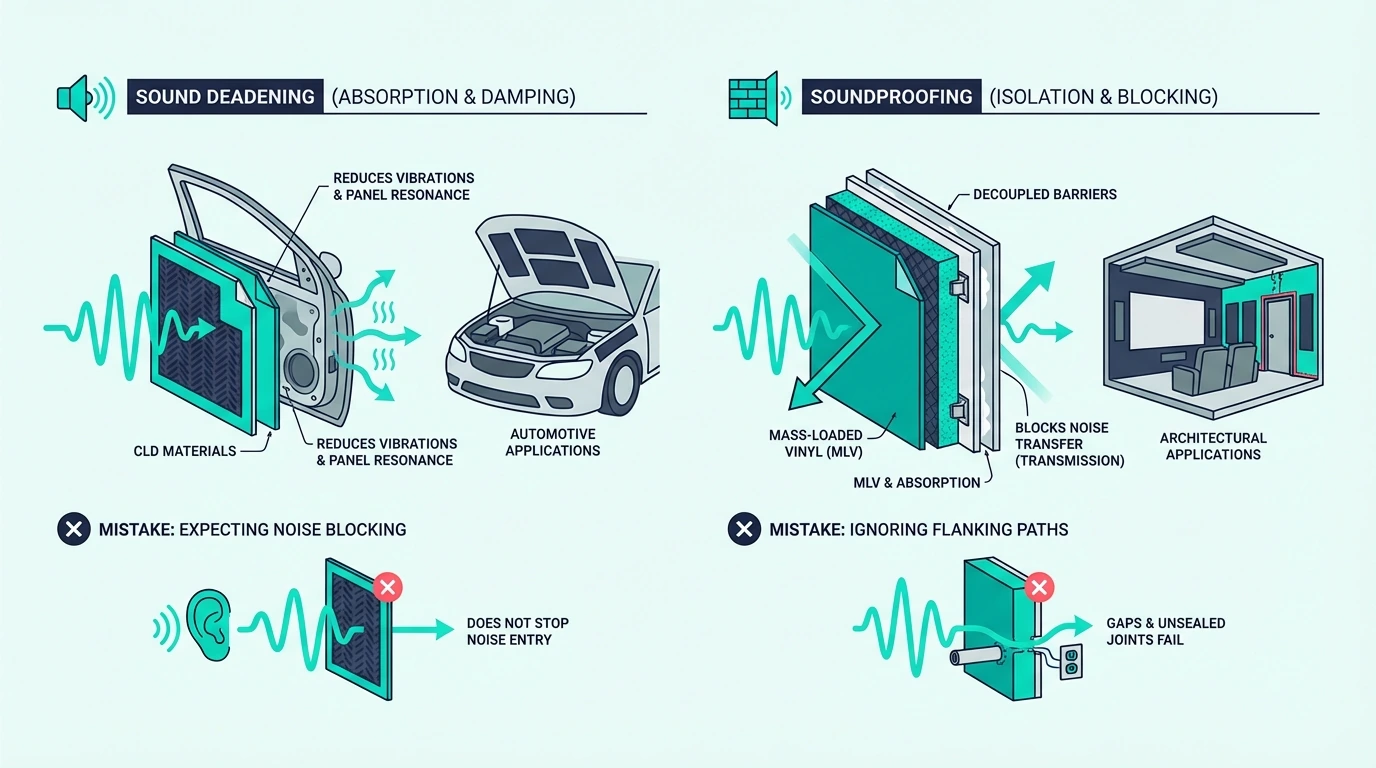
Acoustic foam, ordinary fabric panels, paint, and wallpaper are the biggest hype magnets when people try to soundproof a finished wall cheaply. They can change how the room sounds inside, but they usually do very little to stop transmission through a real wall.
A real absorber like Owens Corning 703 Fiberglass Boards can help if the room sounds harsh or echoey, but even that kind of panel does not add the barrier mass needed to stop neighbor noise through an existing wall.
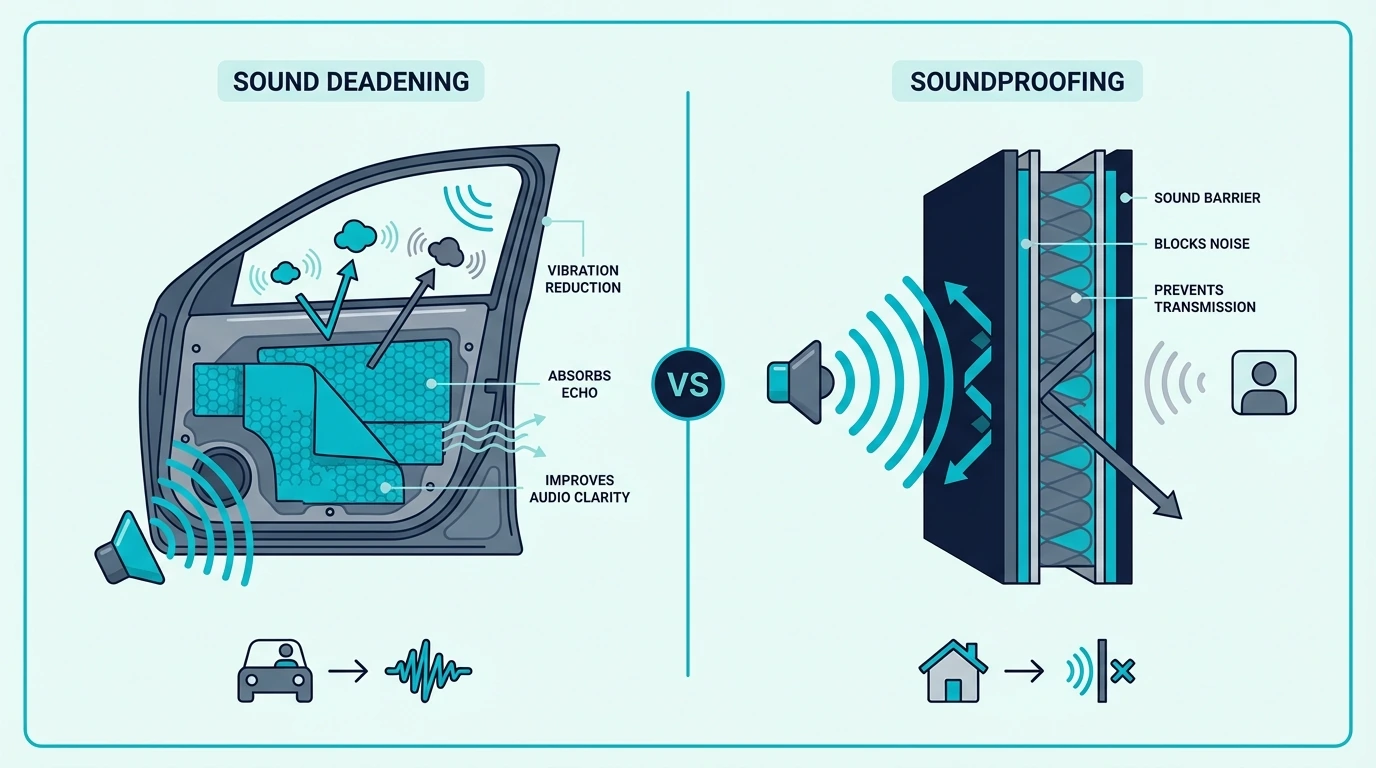
Readers should not confuse acoustic treatment with real retrofit soundproofing. If you are curious why soft panels get confused with isolation so often, compare this with sound deadening vs soundproofing and do soundproof panels work before spending money on the wrong category.
Cheap myths also include expecting furniture, rugs, or decorative layers to behave like construction materials. Those ideas can help a little at the margins, but if the wall is clearly the transmission path, the real answer still comes back to mass, sealing, and better assembly choices.
Stop Guessing When The Retrofit Gets Structural
Call a professional when the wall problem is severe, when you suspect complicated flanking, when the room shares ceiling voids or structural paths with another space, or when the fix may involve electrical relocation, trim rebuild, or a substantial independent wall system.
That is especially true if the goal is privacy in a bedroom, office, or attached-home setting where failure costs time and money. A professional is not always necessary, but guessing gets expensive fast when the wall is already finished and the problem is misdiagnosed.
The Bottom Line
How to soundproof an existing wall gets much easier once you match the fix to the path that is actually failing.
If the wall leaks through gaps and weak openings, seal those first.
If the wall is closed and simply too light, add mass and damping next.
If the wall is open, bass-heavy, privacy-critical, or still underperforming after the first serious upgrade, rebuild the assembly and consider stronger isolation.
If the sound keeps wrapping through the room, stop treating the wall like a single magic surface and bring the ceiling, floor, door, or other flanking paths into the plan.
Frequently Asked Questions
Can you soundproof an existing wall without removing drywall?
Yes, sometimes. The best no-demo version is usually leak control plus a second drywall layer with damping, but the result depends on how light the wall is and whether bass or flanking paths are still involved.
What works best on a shared wall with neighbours?
For voices and TV, the best order is usually seal first, then add mass and damping on your side. If bass is still getting through, the wall may need stronger construction and help from the ceiling, floor, or other connected paths.
Does rockwool soundproof by itself?
Rockwool helps inside a wall assembly because it absorbs energy in the cavity, but it does not replace mass, sealing, or a strong wall face. It is useful when the wall is open or being built out, not as a magic answer spread over a finished painted wall.
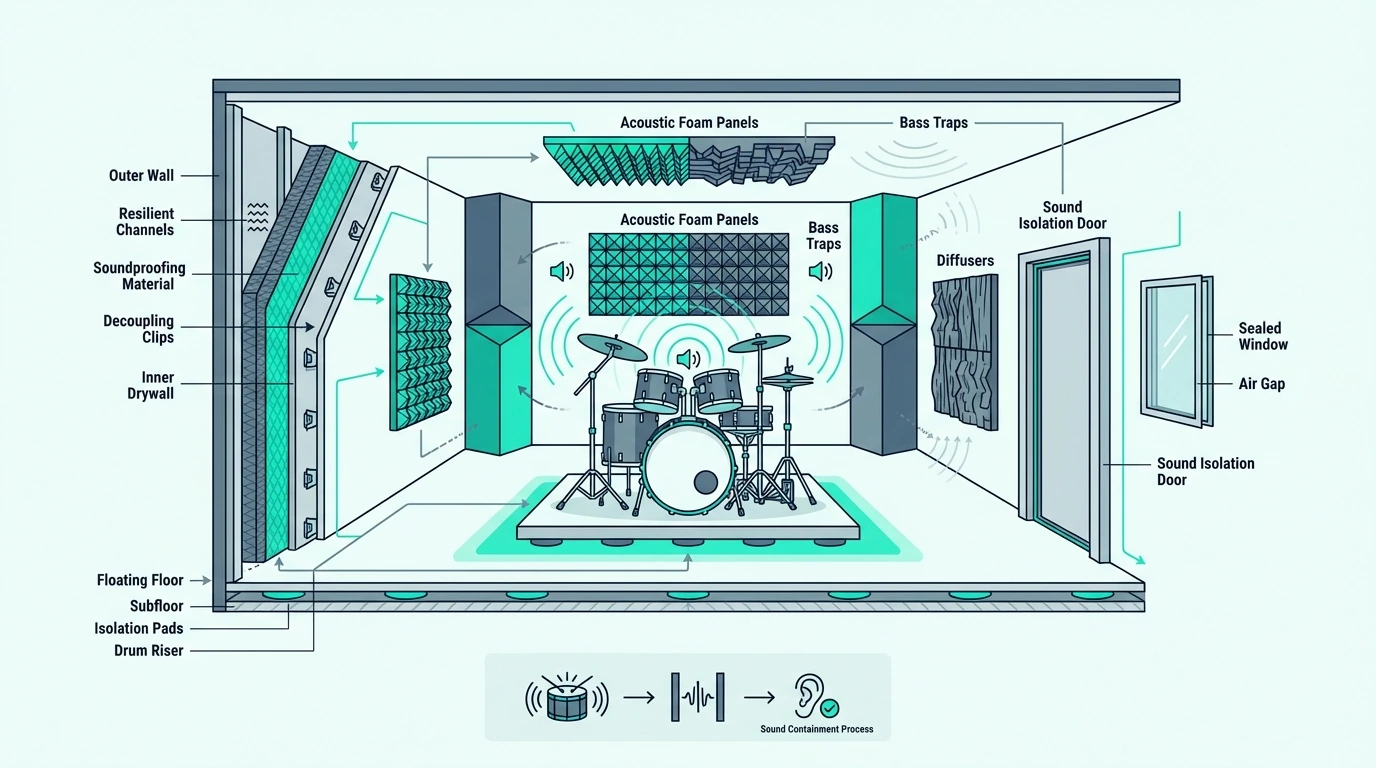
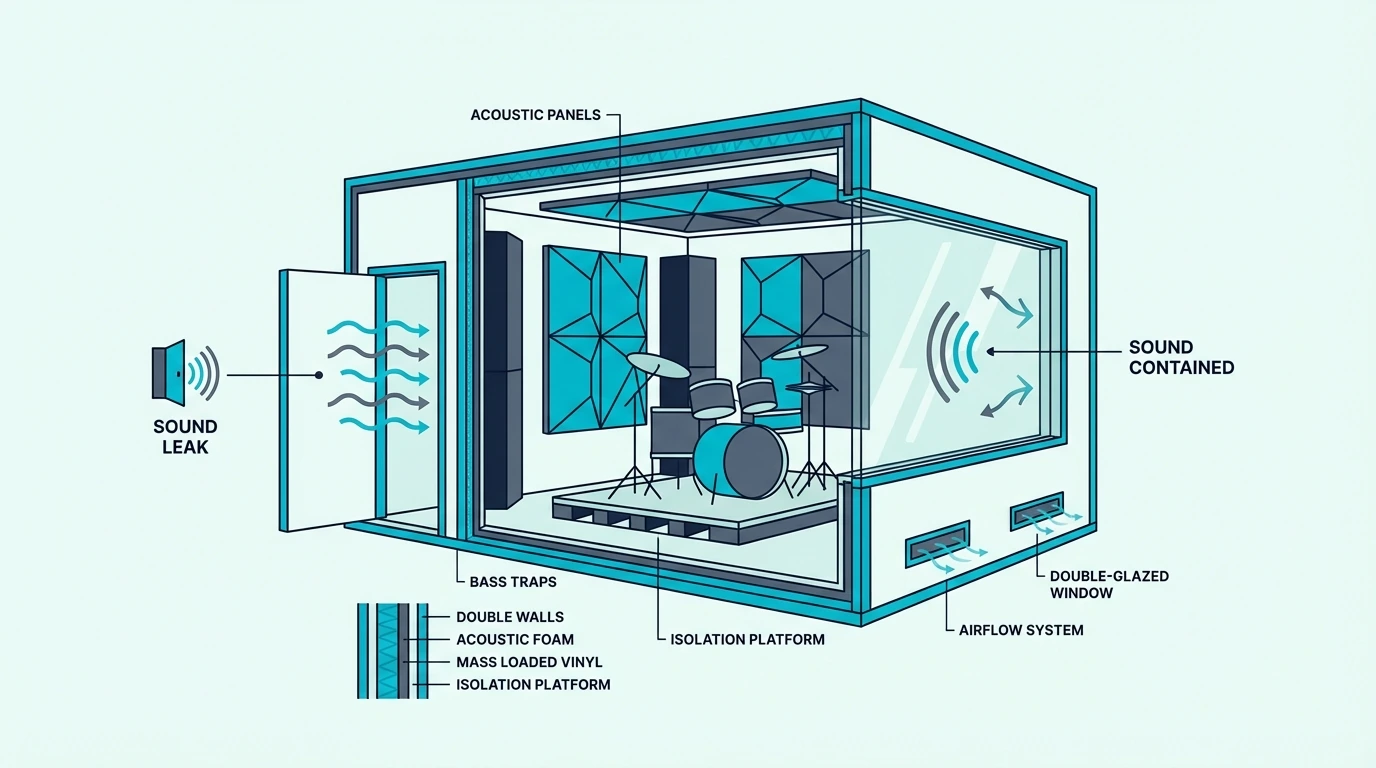
How To Soundproof A Room For Drums (Without Fooling Yourself)
How to soundproof a room for drums sounds like a music-room project, but drums punish floors, structures, and weak openings much faster than almost any other home setup.
That is why people still get complaints after hanging panels and closing the door. The kick pedal hits the floor, cymbals light up the room, and the shell of the room starts acting like part of the instrument.
The good news is that drum isolation gets much easier once you stop treating every room and every kit the same. A full acoustic kit upstairs, a low-volume practice setup in a basement, and an e-kit on a hard floor do not need the same plan.
Below, you’ll sort the problem by kit type, room position, floor path, booth decision, and build depth so you can tell when source reduction is enough, when the shell is failing, and when the room has outgrown cheap fixes.
Quick Takeaway
To soundproof a room for drums, start with the drum-specific failure points first: floor vibration, room choice, and the weakest openings. Low-volume kits, source reduction, mats, and better sealing can help a lot, but full acoustic drums in upstairs rooms, attached homes, or neighbor-sensitive houses usually need a stronger shell with more mass, better sealing, damping, and sometimes a booth, riser, or room rebuild.
Drums Break The Normal Soundproofing Playbook
Drum rooms fail differently from speaker rooms because the kit attacks the house in two ways at once.
First comes the airborne crack of cymbals and snare, then the kick pedal and hardware start feeding the structure.
Airborne Noise And Impact Arrive Together
Drums are hard to soundproof because they combine loud airborne noise with repeated impact. Cymbals and snares spray energy into the room while the kick pedal, stand hardware, and throne can feed vibration straight into the structure.
That double hit is what separates drums from a lot of other music-room problems. A guitar amp may mainly punish the wall, but a drum kit can light up the floor, the ceiling below, the shared wall, and the door in the same session.
Kit type changes how severe that gets. Full acoustic drums are the hardest case, low-volume cymbals and mesh heads ease the source, and e-drums can still create structure-borne noise if the pedals and rack are exciting the floor.
That is why drum advice has to be more specific than a general how to soundproof a room or even a broader music-room guide. Drums change the order of operations.
The First Leak Usually Starts Under The Kit
That two-part problem explains why the floor is so often the first failure point. In upstairs rooms or any house with someone below the kit, kick energy, stand vibration, and repeated foot force can create a worse downstairs complaint than the drummer expects.
Once the floor is active, the next failures are usually the wall and ceiling assemblies that share structure with bedrooms, offices, or the next unit over. In attached homes, those partitions may simply be too light for repeated drum energy.
Doors and windows still matter, but they are rarely the only issue in a real drum room. They become one more weak link inside a problem that is already being driven by impact and low-end transfer.
Room location changes that map fast. A basement or detached garage gives you a much better starting point than an upstairs bedroom because fewer sensitive rooms are directly connected to the kit.
Honest Targets Keep You From Buying The Wrong Fix
Once you know where the room is losing, you can set a target that matches reality. In a normal home, you can often make drumming much less intrusive, but full neighbor-proof isolation is difficult without deeper work on the assembly.
That gets harder with full acoustic kits in apartments, attached homes, and upstairs rooms. Those are the hardest environments because the structure is already working against you before you add a single material.
The easier cases start with separation built in. Basements, detached outbuildings, garages, and low-volume practice setups give you more room to win with staged upgrades.
If the real goal is late-night acoustic drumming with almost no outside audibility, be honest early. That is usually a serious build target, not a foam-and-accessory target.
The Upgrade Order Starts With The Floor
Once the target is honest, the spending order gets much clearer.
Drum rooms waste money when they decorate the walls before proving the floor path, the shell, and the weakest openings.
Start Where The Kick Pedal Hits The House
The floor matters because kick-pedal force and stand vibration can go straight into the structure. That is why downstairs complaints are often worse than the drummer expects even when the walls seem like the obvious culprit.
This is where drums pull away from the broader music-room conversation. A drummer often needs to think about mats, risers, pedal force, and floor contact before thinking about another wall layer.
A source-side product like TroyStudio Thick Sound Absorbing Interlocking Floor Mats is a good first-step fit when you want to reduce direct pedal and stand vibration on a finished floor. It is still mitigation rather than a true soundproof floor solution, but it matches the top-side problem honestly.
If the floor is still driving the complaint after that, stop asking which panel to buy.
The next question is whether the room needs a better riser, a better floor strategy, or a different room entirely.
Once The Structure Starts Ringing, Accessories Stop Working
If the floor fix helps but the room still lights up the rest of the house, the shell has moved into the spotlight. Walls and ceilings become the main problem when the room shares structure with bedrooms, offices, or the next unit over and the floor path is no longer the only obvious failure.
That is common in attached homes, basement rooms under bedrooms, and garages tied directly to the house. Once those surfaces are flexing, random accessories stop being the answer.
Now the room usually needs more mass, better sealing, and a more deliberate wall or ceiling build. A barrier layer like Soundsulate 1 lb MLV fits this stage better than one more soft surface layer.
Openings Still Matter, But They Rarely Lead The Whole Project
Even a stronger shell can still be undermined by obvious leaks at the door or window. Drum rooms punish weak openings fast, but those openings are usually the third priority after the floor path and the shell.
Visible light under the door, rattling glass, and clear air leakage are still worth fixing early. Those are honest quick wins because they remove a known leak instead of pretending to fix the whole room.
Keep the order honest, though. A better door seal may help, but it rarely replaces fixing the floor or the assembly that is carrying the kit.
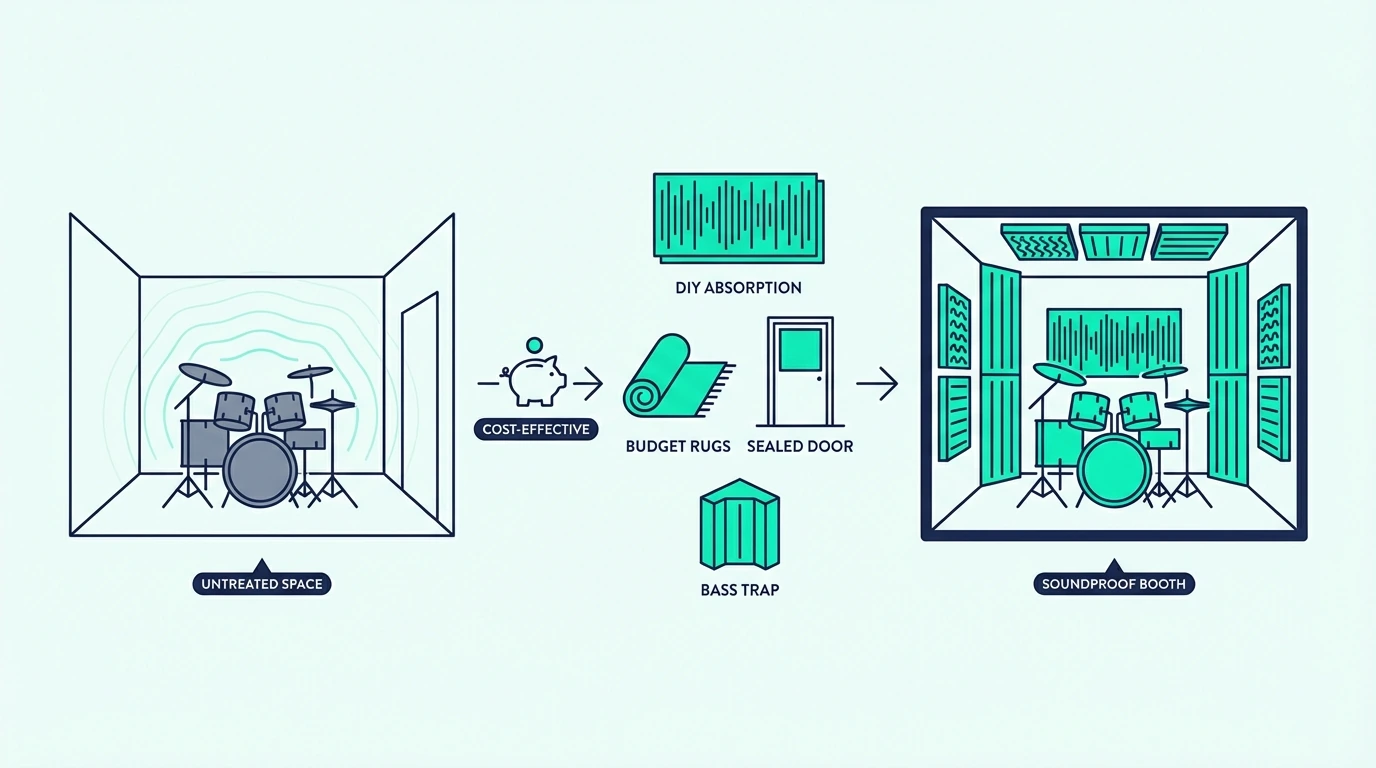
Budget Fixes Only Work When They Attack The Right Problem
That upgrade order also explains why cheap drum advice feels so inconsistent.
Budget fixes can buy real relief, but only when they reduce the source, calm the floor path, or tighten the exact place the room is losing.
Cheap Wins Usually Come From The Source Side
The best budget moves are usually source-side and weak-point focused. Better room choice, lower-volume components, floor control, door sealing, and obvious perimeter sealing help more than random decorative products.
This is where drummers gain the most by changing the source. Low-volume cymbals, mesh heads, mutes, practice pads, and even switching some sessions to an e-kit can cut the problem faster than another wall add-on.
If the room also has rattling trim or visible cracks around a window, door casing, or wall perimeter, Acoustical Caulk (29 oz) is one of the few cheap upgrades that actually matches the leak-path problem.
Budget help is still real help when the goal is fewer complaints and more usable practice time. It only works when the fix matches the target.
Most Cheap Drum Hacks Are Solving A Smaller Problem
Once you leave that honest budget lane, the hype starts. Foam-only advice is still the biggest trap because thin acoustic foam may improve reflections, but it does not stop much drum noise from escaping through a real wall, floor, or ceiling.
The same goes for egg cartons, thin “soundproof” sheets, one blanket hung on the wall, and random sticky tiles sold as isolation products. If the product does not reduce the source, tighten a leak, or strengthen the shell, it is probably solving a smaller problem than the drum kit is creating.
Bass traps get misunderstood for the same reason. They can help the room sound tighter inside, but they are not the same thing as stopping kick and tom energy from crossing the shell.
That split between inside sound and outside leakage is why drum-room hype often sounds convincing in the room and disappointing outside it. The internal acoustic problem and the isolation problem are not the same job.
The Budget Phase Ends When The Shell Keeps Losing
You have outgrown the budget phase when the kit is full-volume, the complaints are frequent, or the room shares structure with people who need quiet. Kick-heavy complaints are the biggest clue because structure-borne vibration can survive a lot of lightweight upgrades.
The same warning signs show up in upstairs rooms, attached homes, and late-night use. Those conditions raise the build requirement before you even start shopping.
If the room still leaks badly after you improve the floor path, the source, and the obvious openings, the answer is usually assembly strength rather than another small accessory. That is the point where the project stops being a budget patch and starts becoming a build decision.
Booths, Whole-Room Builds, And Acoustic Panels Solve Different Problems
Once the budget stage runs out, the decision stops being about accessories.
Now you are choosing between isolating one fixed drum position, rebuilding the whole shell, or improving the room sound inside without expecting extra isolation.
A Booth Makes Sense When The Kit Position Never Moves
A booth makes sense when the kit position is fixed, the room is too hard to rebuild fully, or you need a more controlled practice or tracking zone inside a larger space. It works best when you are isolating one predictable drum position rather than trying to fix every part of the room equally.
Booths also make more sense in basements, garages, and dedicated practice spaces than in already cramped bedrooms. A tiny room inside another bad room can create comfort, heat, and usability problems if the shell decision is not thought through.
When you want a removable proof-of-concept around a fixed kit position, a heavy layer like US Cargo Control Sound Dampening Blanket can help you test the concept. The key is using it as a diagnostic step, not as the final answer.
Whole-Room Work Wins When Multiple Surfaces Are Already Failing
That booth logic breaks down fast when the floor, ceiling, and door are all losing at once. Treating the whole room is better when the kit lives there full time and the room itself is the shell you need to improve.
That is usually the smarter path for dedicated basement rooms, garages, or other spaces where you can actually upgrade the walls, ceiling, floor, and openings together. It is also the better path when isolating only one little zone would leave too much of the problem untouched.
Whole-room work is usually more predictable because every surface is pushing in the same direction instead of one isolated fix carrying the whole load. That matters a lot with acoustic drums because the source is so energetic and repetitive.
Acoustic Panels Help The Drummer More Than The Neighbor
That distinction becomes important right when people start shopping for treatment. Acoustic panels change what happens inside the room by reducing reflections and making the kit sound less harsh at the listening position.
They do not automatically stop sound transfer through the shell. A room can sound tighter to the player and still leak badly to the next room or the room below.
This is one of the easiest places for drummers to spend money on the wrong problem. Compare that with do soundproof panels work and best soundproofing panels so you do not mistake acoustic treatment for drum isolation.
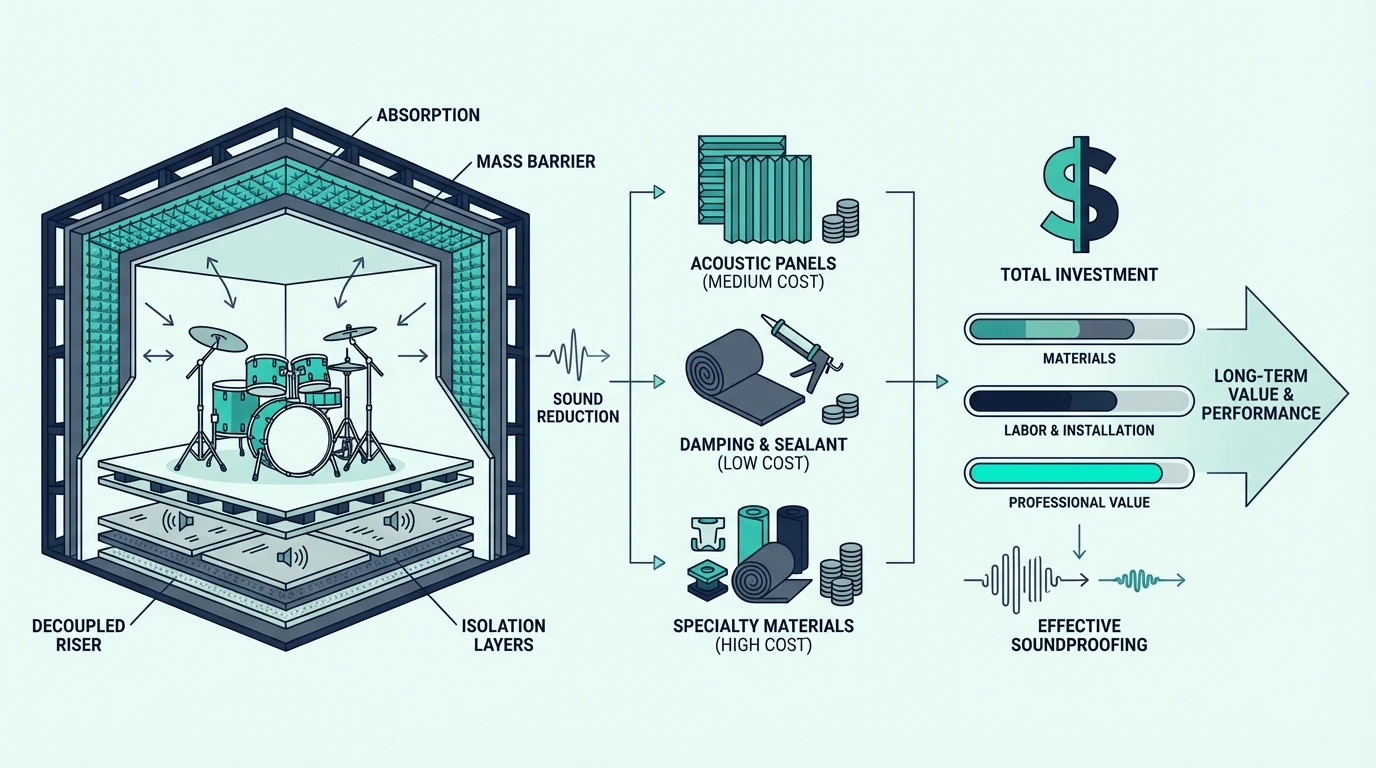
Cost Rises With Build Depth, Not Wishful Thinking
Once you separate reduction from true isolation, the cost range stops looking random.
Drum rooms get expensive when the fix starts touching more structure, more surfaces, and more labor than a lighter music-room problem.
The Entry Tier Buys Relief, Not Silence
A basic setup usually means better room choice, quieter kit components, a stronger floor-side strategy, and targeted sealing. The result is usually “less annoying,” not “can’t hear it.”
That can still be enough for practice-heavy households where the goal is fewer complaints and a more manageable room rather than studio-grade isolation. It is the right tier for many drummers who mainly need reduction and better coexistence.
Serious Isolation Starts Charging You For The Shell
Once you move past that tier, the shell itself is changing. A serious build may include better floor isolation, more wall mass, improved ceiling treatment, stronger doors, and layered assemblies with damping between surfaces.
That is where the project starts to overlap with partial room-within-room thinking even if you do not build a full floating shell. Once multiple surfaces are changing, labor and material depth rise fast.
A product like Green Glue Noiseproofing Compound belongs in this category. It is valuable when the build is already serious, not when it is treated like a magic fix for a weak room.
Professional Help Pays Off When The Wrong Guess Gets Expensive
That cost jump is also when guessing gets expensive. Call a professional when the room is for full-volume acoustic drums, repeated tracking, attached-home use, or ongoing neighbor complaints that have survived the obvious fixes.
The same goes for rooms that need a booth, a major riser, or multi-surface shell work and you do not want to guess wrong.
The Bottom Line
If you mainly need fewer complaints and more usable practice time, start with the quietest kit setup you can tolerate, the best room in the house, and the floor path before you touch anything else.
If you need a full acoustic kit to stay civil in an upstairs room, an attached home, or a neighbor-sensitive house, skip the fantasy stage and plan for real shell work, a booth, or a different room.
Frequently Asked Questions
How to play drums without disturbing neighbors?
Start by reducing the source first with quieter components and the best room you have available. Then control the floor path, the obvious leaks, and the shell in that order instead of assuming panels alone will carry the job.
What is the 80/20 rule in drumming?
In drumming, the 80/20 idea usually means focusing on the small set of skills and grooves that create most of your practical progress. It is not a soundproofing rule.
How do I cheaply soundproof my room?
Cheap fixes work best when they reduce the source and improve the obvious weak points. For drums, that usually means mats, seals, quieter hardware choices, and realistic expectations rather than expecting foam alone to contain the kit.
Can neighbors hear drum kits?
Yes, very easily in many homes. Drum kits combine loud airborne noise with structure-borne vibration, which is why neighbors can often hear them through floors, walls, and ceilings even when the room seems closed up.
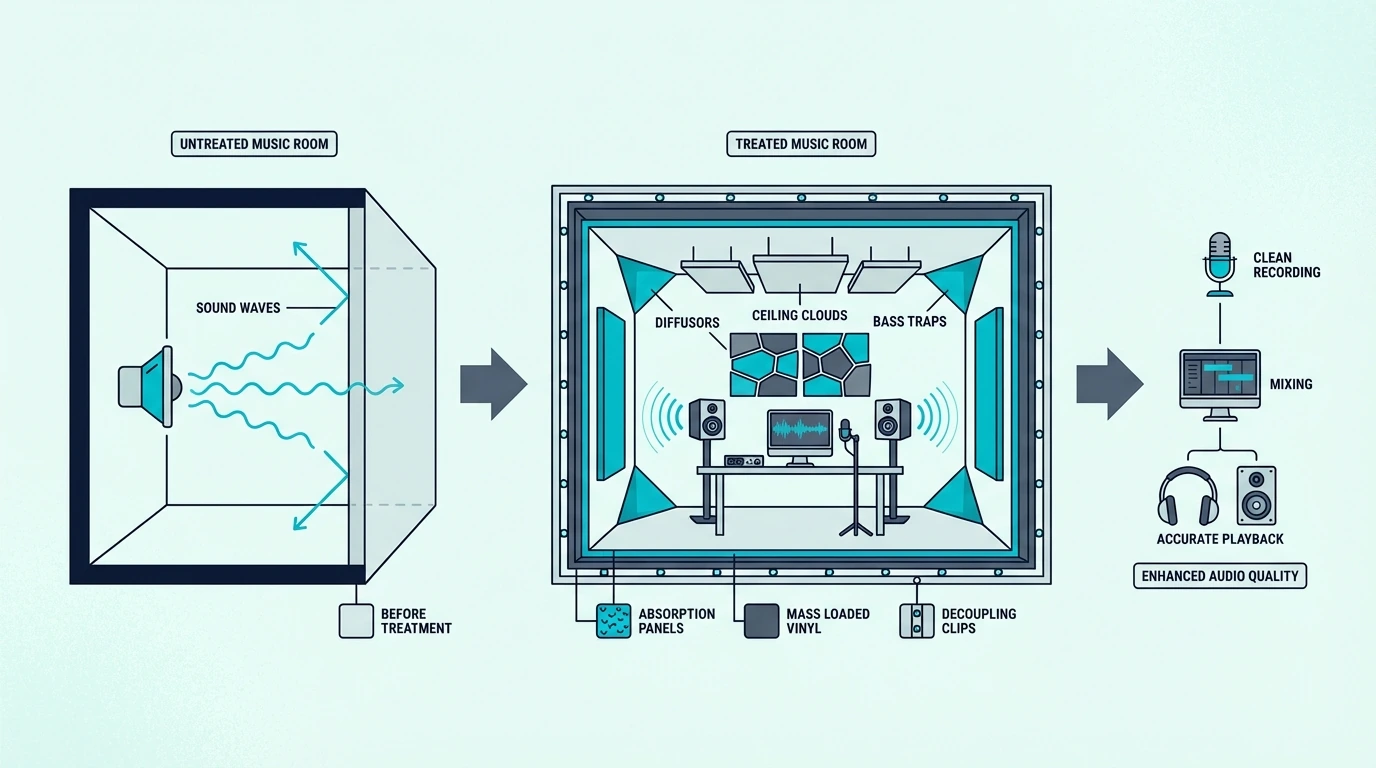
How to Soundproof a Room for Music (Without Fooling Yourself)
How to soundproof a room for music sounds simple, but music will not stay contained unless you treat the room like a shell problem instead of a foam problem.
That is the mistake that wastes money in bedroom studios, practice rooms, and home listening spaces, because the door leaks, the window leaks, the wall flexes, and bass keeps moving through the structure.
The good news is that you do not need the same answer for vocals, monitors, guitars, and drums, so you can stop overspending on fixes that do not match the way the room is actually used.
Below, you’ll sort the room by music use, leak path, and isolation goal so you can tell when sealing is enough, when the wall or floor has become the real problem, and when recording quality or neighbor pressure requires a deeper build.
Quick Takeaway
To soundproof a room for music, start by matching the room to the use case: vocals and light practice usually fail at the openings first, while loud monitors, bass, and drums quickly turn into wall, floor, and ceiling problems. Sealing and weak-point upgrades can help lighter rooms, but once bass, neighbor complaints, or recording isolation are on the table, real progress usually comes from more mass, better sealing, damping, and sometimes structural separation.
Music Rooms Fail Differently Depending On The Source
The first move is to classify the room before you buy anything.
Music rooms fail when people chase one generic fix instead of matching the room to the source, the volume, and the neighbor pressure.
Quiet Tracking Rooms And Loud Practice Rooms Break For Different Reasons
Casual listening, vocal tracking, guitar practice, monitor mixing, bass-heavy playback, and drum rehearsal do not stress a room in the same way. A quiet vocal booth can be ruined by street noise at the window, while a monitor-based bedroom studio may seem fine until late-night bass starts flexing the shared wall.
If the room is mostly for vocals, acoustic instruments, or voiceover, the top priority is usually keeping outside noise from contaminating the take and stopping obvious leakage at the door or window. That is a more opening-driven problem than a full shell rebuild, which is why it often starts closer to soundproofing a bedroom than to building a rehearsal room.
A room built around loud monitors, amps, or daily practice usually shifts the priority toward the wall, floor, and ceiling once the easy leaks are sealed. That is where people realize the room itself is too light for the amount of energy they are putting into it.
Drums and deep bass change the whole equation because they inject more low-frequency energy and more physical vibration into the structure. In those rooms, the floor and the surrounding assemblies stop being secondary details and start acting like part of the instrument.
Music Stays Longer And Hits More Of The Structure Than Speech
Conversation rises and falls quickly, and most people tolerate a little speech spill more easily than repeated music. Music stays on longer, spans more frequencies, and often includes bass notes or drum hits that keep pushing the same weak surfaces again and again.
Low-frequency energy is the part people underestimate. A room can seem fine for vocals or acoustic guitar and then fall apart the moment a subwoofer, kick drum, or bass amp starts loading the wall and floor.
Music setups also create structure-borne paths that speech rarely exposes as hard. Speaker stands, keyboard stands, pedal boards, amps on the floor, and drum hardware can feed vibration into the building before the airborne side is even controlled.
That is why “I already treated the room” often translates to “I made the room sound better to me, but the shell is still weak.” Music punishes that gap between internal acoustics and true isolation much faster than normal conversation does.
The First Leak Usually Depends On Where The Complaint Comes From
The first leaks are usually the openings because they are thinner and less airtight than the rest of the shell. A hollow door, a visible threshold gap, or a drafty window can undercut heavier upgrades on the wall beside it.
After the openings, the next question is adjacency. In apartments, duplexes, and bedroom studios, the shared wall often becomes the main failure point because the neighbor is close and the partition is light.
Floors and ceilings move up the list when the complaint comes from above or below, or when the setup includes bass, stands, or drums. An upstairs music room can bother the room below through vibration even when the wall seems quieter.
Recording rooms have the same map running in reverse. If traffic, voices, or HVAC noise are getting into the microphone, the door and the windows are often the first weak points to prove before you blame the whole room.
The Upgrade Order Starts With The Weakest Opening
Once you know how the room is failing, the next job is ranking the fixes in the right order.
Music projects get expensive when you start with deep wall work before proving the door, window, floor, or ceiling is really the bottleneck.
Openings Usually Give You The Fastest Honest First Win
Yes, in most music rooms, because weak openings leak in both directions. They let your practice spill out, and they also let outdoor noise ruin vocals, acoustic takes, or quiet monitoring sessions.
Start with the simple proof tests. If you can see light under the door, feel air at the jamb, or hear a sharp jump in outside noise when you stand near the glass, the room is telling you exactly where to begin.
If the room also has cracks around casing, trim, or the frame-to-wall joint, flexible sealing matters more than another decorative panel. That is the same opening-first logic behind how to soundproof a door and how to soundproof windows, and it is usually the cleanest first win in a bedroom studio.
Shared Walls Take Over Once The Easy Leaks Are Proven
Shared walls become the main problem when the openings are improved and the neighbors still hear clear musical content instead of just a faint presence. That usually means the partition itself is too light for the amount of sound you are making.
This shows up fastest with monitor playback, guitar amps, bass, and any room that backs directly onto a bedroom, office, or next-door apartment. The wall may be acceptable for speech and still fail badly once music stays loud for an hour.
At that point the upgrade path shifts from sealing to assembly strength. If you are already layering or rebuilding the wall, a barrier product like Soundsulate 1 lb MLV belongs there because it adds real mass inside a deliberate build instead of acting like a decorative afterthought.
Vertical Complaints Usually Mean The Structure Is Involved
Floors and ceilings matter most when the person complaining is above or below you, or when the setup keeps feeding vibration into the structure. That is why upstairs rooms, basement studios under bedrooms, and music rooms with subs or drums need a different level of honesty.
If the obvious problem is top-side vibration from a keyboard stand, subwoofer corner, or small practice setup on a hard floor, a removable first-step product like TroyStudio Thick Sound Absorbing Interlocking Floor Mats is one of the few surface fixes that actually matches the source-side problem.
In other words, the “wall vs floor vs ceiling” question is not academic. The complaint location tells you which assembly is actually carrying the music.
Budget Soundproofing Only Works When The Room Is Mostly Leaky
Once the priority order is clear, the budget conversation gets easier to judge honestly.
Cheap fixes can help a music room, but only when they are aimed at the right leak path and matched to modest expectations.
Cheap Wins Usually Come From Sealing And Source Control
The best cheap fixes are almost always sealing, room choice, and source-side control rather than fake “soundproof” décor. If you can move the setup away from the shared wall, lower the monitor level, or avoid putting speakers and stands directly on a lively floor, that often buys more than another random panel.
For the shell itself, perimeter sealing is still the cheapest real upgrade. A product like Acoustical Caulk (29 oz) makes sense around trim joints, frame edges, and visible cracks because music will use those little leak paths much more aggressively than people expect.
Cheap fixes also help differently depending on the room use. A vocal room may improve a lot from better door and window sealing, while a bass-heavy practice room may only get a small reduction until the wall or floor build changes.
That is why budget soundproofing should be treated as a screening phase. You are trying to identify whether the room is basically leaky or fundamentally too light.
Foam And Fake Soundproofing Products Solve A Smaller Problem
Foam-only advice is still the biggest trap because it addresses reflections far more than escape. Foam can make a room sound less harsh at the mic position or at your ears without meaningfully reducing what reaches the other side of the wall.
The same is true of egg cartons, thin peel-and-stick products, and anything sold as “soundproof” without explaining whether it seals, adds mass, damps vibration, or changes the assembly. If the mechanism is vague, the result usually is too.
Soft finishes can still be useful for room comfort, but that is a different job. In a music room, you have to separate “the room sounds calmer inside” from “the shell leaks less outside.”
A simple test keeps this honest. If the neighbor or the hallway still hears the same song clearly, the cheap treatment is not doing the real containment job.
Budget Fixes Stop Working When The Assembly Is Too Light
A budget fix is good enough when the room use is lighter, the schedule is reasonable, and the goal is reducing nuisance instead of creating true studio isolation. That can be enough for vocals, acoustic instruments, moderate monitors, or casual practice in a reasonably forgiving house.
It is usually not enough when the room shares a party wall, sits above another bedroom, or has to contain bass late at night. In those cases, the limit is not your effort but the assembly.
Recording use changes the threshold too. If outside traffic, neighbors, or household noise are still landing in the microphone, a “good enough” practice-room fix may not be good enough for takes you actually want to keep.
If the room lives inside a rental or shared building, the ceiling for cheap fixes often looks more like how to soundproof an apartment than like a blank-check studio build. The structure and your permission level decide a lot.
Most Music-Room Mistakes Come From Confusing Acoustics With Isolation
By now the pattern should be obvious: most bad music-room projects fail because the diagnosis was wrong before the buying started.
The last step is clearing up the mistakes that keep people confusing better sound inside the room with real isolation outside it.
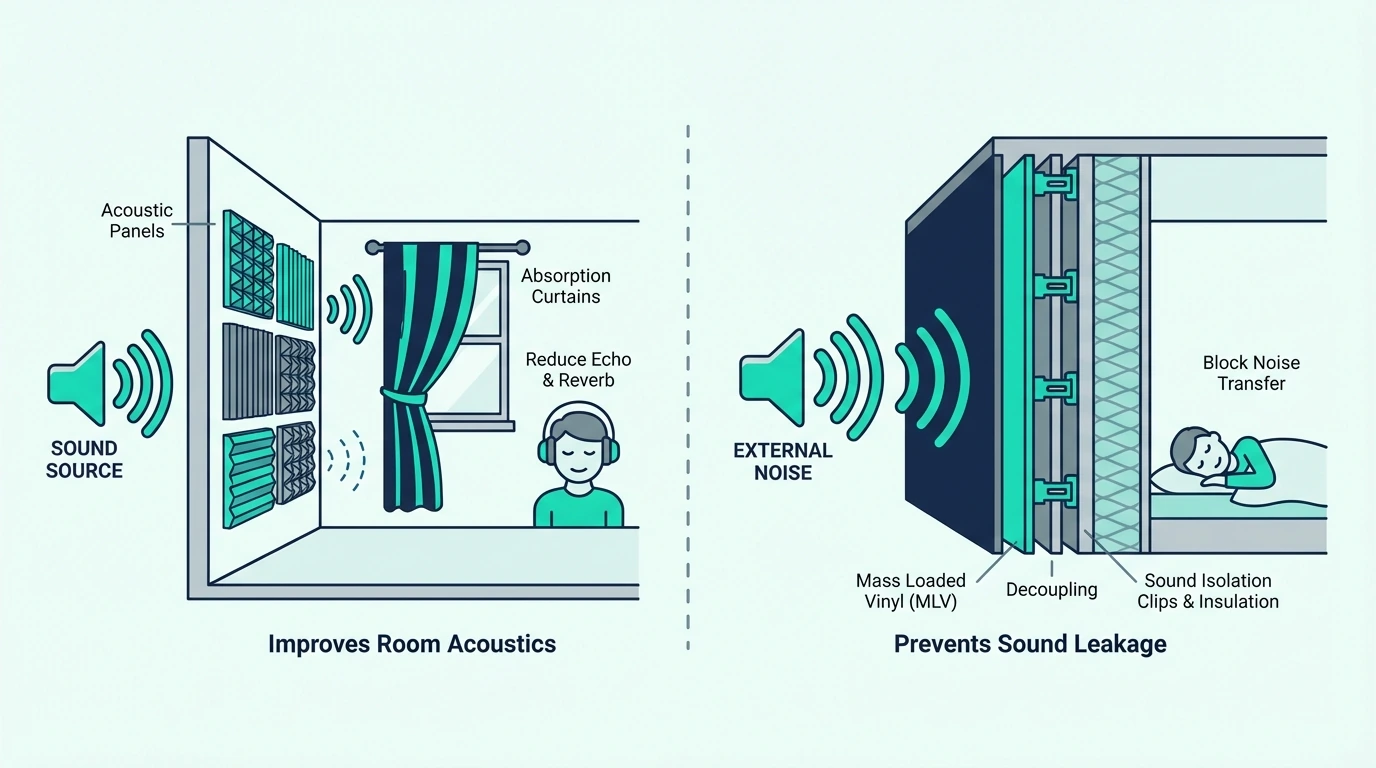
Acoustic Treatment Helps The Room More Than The Boundary
Acoustic treatment changes reflections, ringing, and monitoring accuracy inside the room. That matters for recording and mixing, but it is not the same as making the shell harder for sound to cross.
This confusion shows up all the time in home studios. A room can sound cleaner at the microphone or the listening position after panels go up and still leak almost the same amount through the door, window, or shared wall.
Treatment becomes valuable once the containment plan is honest. If you need the clean boundary on that distinction, compare your setup against do soundproof panels work and best soundproofing panels so you do not ask an absorber to do a barrier’s job.
Recording rooms especially need that separation. Good acoustics help you capture a cleaner take, but they do not stop traffic or neighbor noise from entering the room in the first place.
Bass Exposes Weak Assemblies Faster Than Almost Anything Else
Bass is hardest because low-frequency waves carry more energy and excite larger parts of the structure. Once the wall, floor, or ceiling starts moving with the music, light add-ons struggle to make a meaningful dent.
That is why bass problems often survive the same fixes that work for vocals or acoustic practice. The room can seem improved at midrange frequencies while the low end still reaches the next room almost unchanged.
When you are already building up a wall, door, or ceiling assembly, a real mass layer like Soundsulate 1 lb MLV belongs in the conversation because it adds barrier weight where the shell needs it.
Bass also forces harder choices about volume, room selection, and schedule. Sometimes the smartest fix is admitting the current room will never contain a subwoofer or drum-heavy playback gracefully without deeper construction.
Serious Isolation Starts When The Shell Has To Change
Call a professional or plan a rebuild when the room is for drums, loud band practice, serious vocal isolation, or repeated bass-heavy work that keeps generating complaints after the obvious leaks are fixed. Multiple failing surfaces usually mean you are past the point where accessories can carry the project.
That is also the right time when the goal is not just “less annoying” but dependable recording isolation from outdoor noise, household noise, or nearby neighbors. Once you need the room shell itself to behave differently, the job has moved from tweaking to building.
In those serious builds, a damping product like Green Glue Noiseproofing Compound makes sense because it belongs between layered surfaces in a deliberate assembly.
How to soundproof a room for music gets easier once you stop asking for one universal fix and start matching the room to the actual use. A vocal room, a late-night monitor room, and a drum room can share the same address but need completely different priorities.
The most useful rule is simple: fix the weakest opening first, then follow the complaint to the wall, floor, or ceiling that is actually carrying the music. When bass, neighbor pressure, or recording isolation keep surviving those steps, you are no longer shopping for room treatment and you are strengthening the shell.
Frequently Asked Questions
How do I cheaply soundproof my room?
Start with the openings, because leakage is the cheapest real problem to fix. Weatherstripping, perimeter sealing, and smarter room placement usually beat another decorative panel when the goal is containing music.
What materials block high frequency sound?
High frequencies are easier to tame than bass, so airtight seals, denser surfaces, and added layers usually help more quickly. That is why doors, windows, and lightweight wall sections often show improvement earlier than a bass-heavy floor or ceiling path.
How do I block noise on a shared wall?
Confirm first that the wall is truly the weak point and not the door, window, or ceiling path. If the wall is the culprit, the stronger answers are usually more mass, damping, and a better assembly rather than treatment-only products.
How do you block sound in a room?
You block sound by sealing air leaks, adding mass, damping vibration, and reducing direct structural transmission where possible. The louder and bass-heavier the music becomes, the more the room has to behave like a stronger shell instead of a lightly treated space.
How to Soundproof an Office (Privacy, Calls, and Real Weak Points)
How to soundproof an office can work, but only if you fix the right office problem first. A therapy room, home office, glass-front consult room, and open office all fail in different ways, so the wrong fix will not give you privacy or focus.
Office projects go sideways so often because people buy panels before checking the door, the drop ceiling, the glass, or the shared wall, then wonder why the office still leaks conversation or feels noisy.
The good news is that office soundproofing improves fast when you match the fix to the actual office type.
Start with the decision table, then move through the higher-ROI cheap fixes, the small-office scenarios, and the upgrade order that matters most.
This guide makes that order practical so you can decide whether you need better sealing, more absorption, or a stronger privacy assembly.
Quick Takeaway
Start with the opening and the leak path, not the product. Closed offices usually need better door sealing, wall or ceiling control, and sometimes more mass, while open offices usually need absorption, layout changes, and sound masking before they need true room-to-room soundproofing.
If your office situation is…
Best first move
Usually enough when…
Escalate when…
Private office with speech leaking into the hall
Seal and upgrade the door path first
Speech gets less intelligible outside the room
The door is fixed and calls are still clear through wall or ceiling
Open office with chatter and distraction
Use absorption, layout control, and sound masking first
The problem is focus and comfort more than confidentiality
You need true room-to-room privacy, not just a calmer space
Home office with traffic or exterior noise
Treat the window side first, then the door
Outside noise is the main call and concentration problem
The shared wall or ceiling is still dominating after window work
Leased office with a drop ceiling
Check the plenum and ceiling path before blaming the wall
The main leak is over the partition line
The wall is also lightweight or confidentiality is high
Glass-front office or consult room
Improve the door, seals, and privacy weak points around the glazing
You need a practical improvement, not total isolation
Speech privacy is still too weak because the envelope is too exposed
Small office on a budget
Rank door sealing, visible gaps, and selective softening first
The room mainly feels leaky or harsh
Cheap fixes stop improving privacy and the assembly is still weak
Office Soundproofing Starts With The Right Noise Problem
Before you buy anything, sort the office into the right problem bucket. Office noise gets easier to fix once you know whether the room is failing as a closed privacy room, an open collaborative area, a home office, or a leased suite with ceiling and glass weak points.
Speech Privacy, Distraction, And Exterior Noise Need Different Fixes
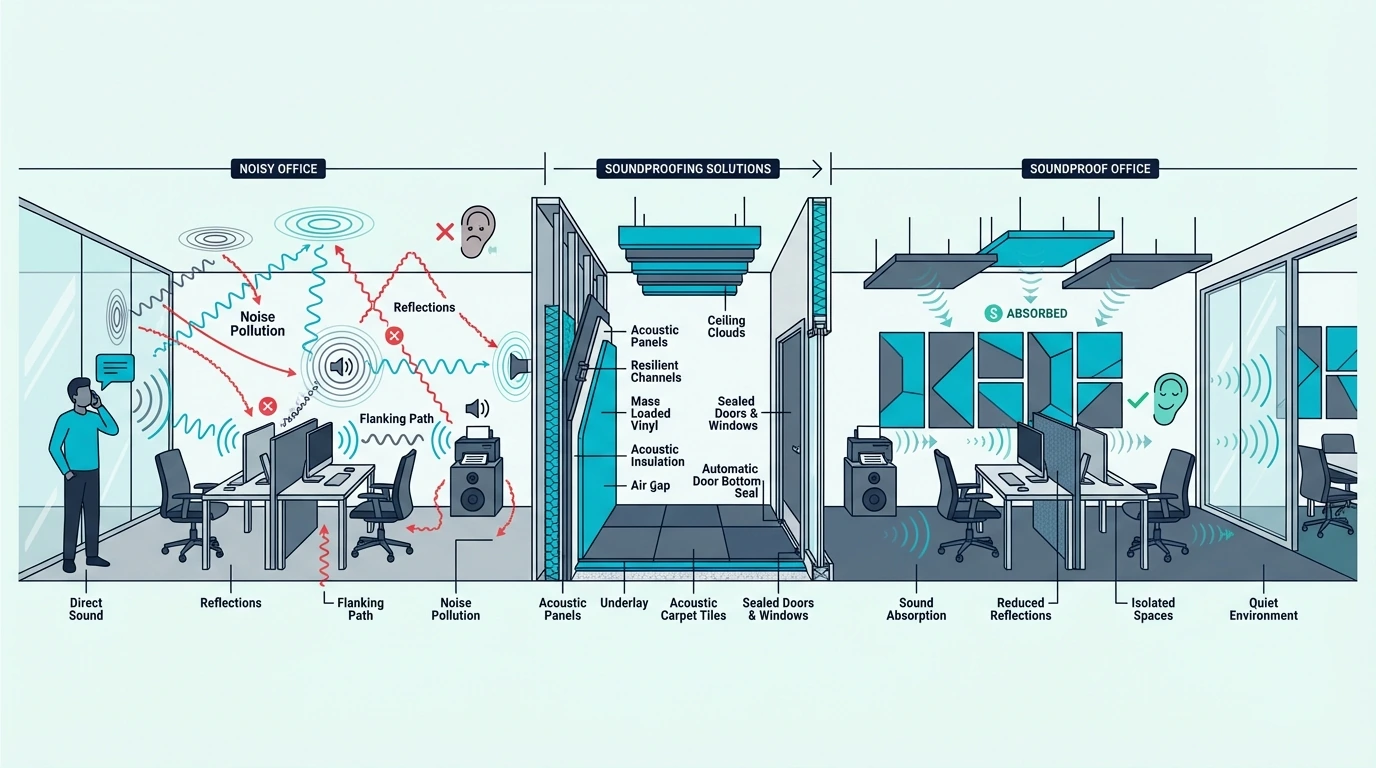
Closed offices with confidential calls are speech-privacy problems. Open offices are often distraction-and-reverb problems, which means they usually need acoustic control and sound masking sooner than they need wall reconstruction.
Home offices often split between exterior noise at the window and household noise at the door or shared wall. Mechanical noise is different again, because vents, return grilles, and office equipment can keep a room sounding busy even when the walls are decent.
Doors, Plenums, Glass, And Shared Walls Usually Leak First
The door is the first failure point in many offices, especially if it is hollow-core or badly sealed. In commercial suites, the plenum above a drop ceiling is just as important because sound can travel over the wall even when the partition looks solid at eye level.
Glass fronts, sidelites, shared walls, and small perimeter gaps come next. If the problem sounds like hallway speech, conference-room bleed, or street noise, compare the office path with the relevant guides for the door, the window, the wall, or the ceiling before buying generic office products.
Acoustic Treatment Leads When Privacy Outside The Room Is Not The Main Problem
If the office feels echoey, tiring, and hard to talk in but privacy outside the room is not the main issue, acoustic treatment is the first move. That is common in open offices, glass-heavy rooms, and small call rooms that sound loud inside before they truly leak outside.
If confidential speech is still understandable in the corridor or the next room, soundproofing has to lead. That is where sealing, mass, and better assemblies matter more than simply softening the inside experience.
Cheap Office Fixes Only Work When They Target The Leak Path
Once the room is staying mostly as-is, cheap office soundproofing becomes a ranking exercise. The best low-cost moves attack the highest-return leak paths first instead of scattering money across decorative products.
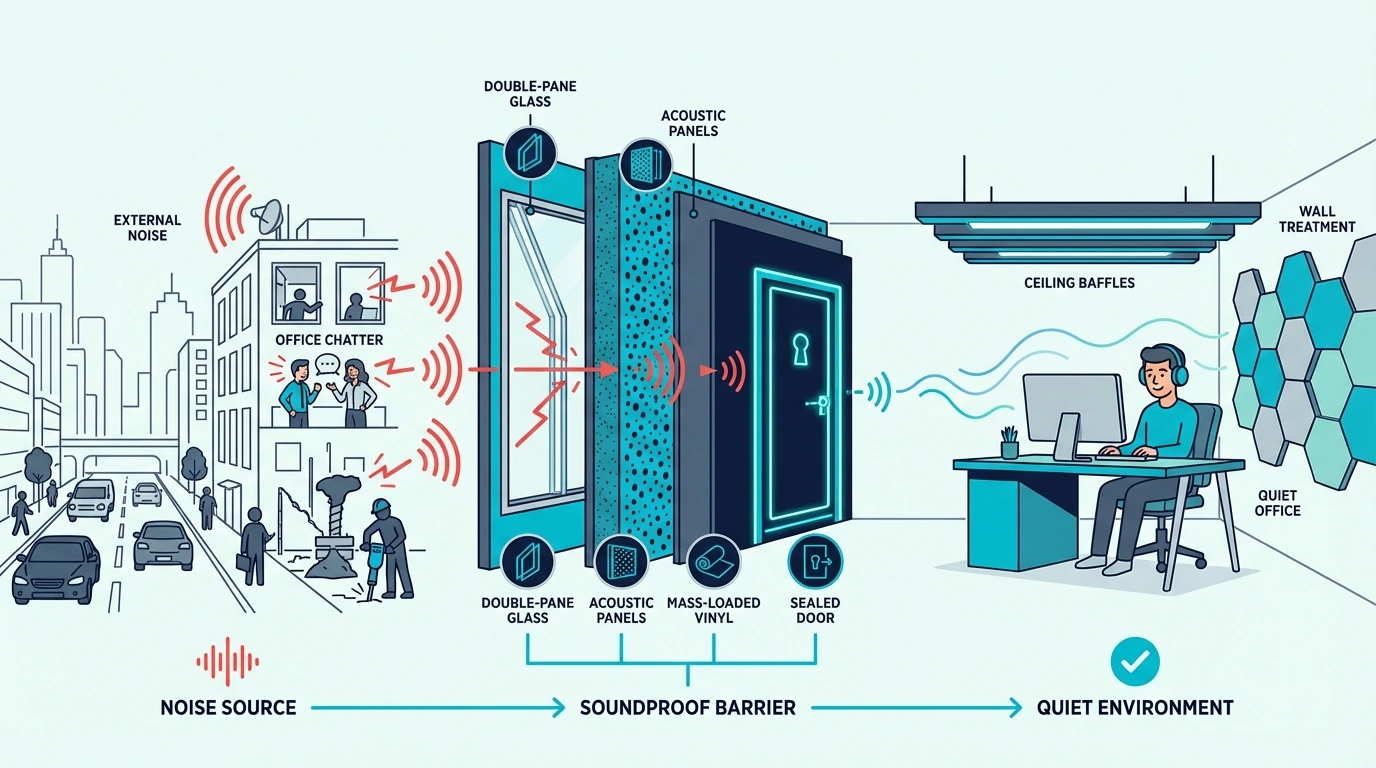
Door Paths And Gap Sealing Usually Have The Highest ROI
First, seal and upgrade the door path. A solid-core slab, perimeter seals, and a proper sweep usually beat random wall products because office doors leak far more sound than people expect.
Second, seal the room’s small weak points. Gaps at trim, outlets, data penetrations, glazing edges, and ceiling lines all act like bypass paths, which is why air-sealing often outperforms another cosmetic layer.
Third, calm the room after leakage control. Soft finishes, selective absorption, and basic sound masking help focus and call comfort once the obvious leaks are no longer dominating the room.
If you need a temporary, renter-safe way to test whether a heavier layer helps over a weak door or glass area, US Cargo Control sound dampening blanket is the kind of stopgap product that can make sense.
Decorative Quick Fixes Usually Waste Money On Privacy Problems
Thin foam on a shared partition is the classic office money sink. It can reduce some reflections inside the room, but it does almost nothing for real speech privacy when the door, ceiling path, or wall assembly is the actual failure point.
The same caution applies to vague “quiet office” products that do not add mass, create a seal, or absorb sound where it matters. If the main complaint is intelligible speech outside the room, the office needs more than a decorative accessory.
Cheap Fixes Are Good Enough For Focus Before They Are Good Enough For Confidentiality
A cheap fix is often good enough when the room is already structurally decent and the biggest problems are leakage, mild reverb, or moderate distraction. That is common in home offices, leased rooms with limited authority to rebuild, and small professional offices that need improvement rather than perfect isolation.
Cheap fixes stop being enough when confidentiality is high or when the drop ceiling, shared wall, or glass front is clearly the weak link. At that point it is usually smarter to save for one real assembly upgrade than to keep stacking minor products.
Small Offices Reward Selective Fixes Faster Than Blanket Coverage
Small offices improve fast, but they also reveal mistakes fast because every surface is close. That makes scenario-based choices more useful than blanket coverage.
Home Offices Usually Split Between House Noise And Exterior Noise
In a small home office, the usual split is house noise versus outside noise. Start with the door and window first, then decide whether the shared wall or ceiling actually needs more weight.
That order matters because many home-office complaints are half room problem and half house problem. A spare-bedroom office with family noise needs a different fix from a street-facing office with traffic and parking-lot noise.
If the window side is the first thing hurting calls and concentration, RYB HOME 3-Layer Soundproof Curtains is the kind of product that fits the home-office side of the problem naturally.
Use how to soundproof a room as the wider framework, then tighten it around the office-specific weak points instead of treating the office like a blank slate.
Small Professional Offices Live Or Die On Speech Privacy
A small professional office usually lives or dies on speech privacy. Therapy rooms, legal consult rooms, HR spaces, and medical offices need the door, the ceiling or plenum, and the shared wall checked before anyone talks about decorative panels.
Glass-heavy rooms make this harder because the inside experience and the privacy envelope are not the same thing. Acoustic treatment can make the room sound calmer, but true privacy still depends on how the glazing, door, and partition are built.
Privacy Improves Faster When The Room Stays Visually Open
Do not cover every wall first. Treat the door, the ceiling path, and the few surfaces with the highest payoff so the room keeps its visual space while the privacy problem actually improves.
When the wall or ceiling cavity is already open, a stud-bay product like AFB Mineral Wool Insulation supports the assembly without stealing visible office space. Our guide to best insulation for soundproofing helps you choose the hidden layer more deliberately.
Major Office Upgrades Start With The Weakest Opening
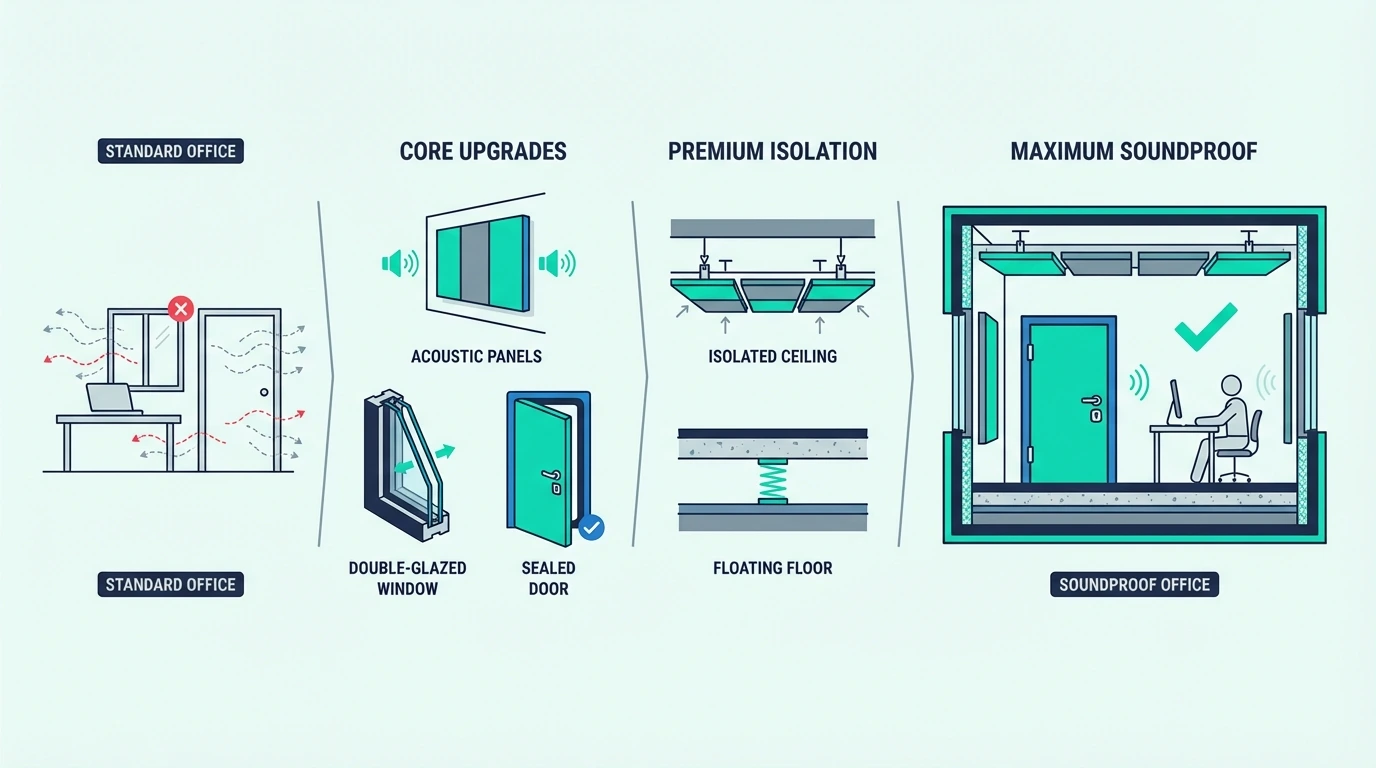
By this point, the upgrade order should be clearer. In offices, the biggest gains usually come from fixing the weakest opening first, then the assembly that still fails after that.
Doors, Windows, Ceilings, And Walls Need To Be Ranked In That Order
Start with the door if you can hear speech around or under it, or if the room has a hollow slab. Start with the window if the main complaint is street noise, parking lot noise, or glass-side reflection and leakage.
Start with the ceiling if the office has a drop ceiling, open plenum, or obvious sound transfer from above or over the wall line. Start with the wall only after you confirm the door, glass, and ceiling path are not the bigger problem.
That ranked logic is why many office upgrades look boring at first. But boring fixes like better seals and ceiling-path control often outperform glamorous wall products because they attack the true weak point.
Shared Walls And Drop Ceilings Become The Real Bottleneck After The Door
Shared walls become the real problem when the door is no longer the obvious failure and normal speech is still clear through the partition. Drop ceilings become the real problem when the sound seems to travel over the room rather than through the visible wall face.
A product like Soundsulate 1 lb MLV helps illustrate what a real barrier-layer or ceiling upgrade looks like when the assembly itself is too light.
That same decision tier includes a second drywall layer, better perimeter sealing, and sometimes a more complete soundproofing material decision. If the office fails because the partition or plenum path is fundamentally weak, surface treatment alone usually will not get you to private-room performance.
Professional Help Pays Off When Privacy Requirements Are High
Call a professional when confidentiality requirements are high, the ceiling or plenum path is unclear, the office uses lots of glass, or the project may involve ducts, electrical relocation, or structural flanking. Those are the office jobs where guessing gets expensive quickly.
Professional help also makes sense when you move from leak fixes to assembly upgrades. A product like Green Glue Noiseproofing Compound works best when it is part of a deliberate wall or ceiling build instead of an improvised patch.
If you are already at that point, compare the office plan against best soundproofing material and soundproofing a ceiling, then decide whether the room needs a better partition, a better plenum treatment, or both.
The Bottom Line
How to soundproof an office gets much easier once you match the fix to the office type and the leak path.
If the office is closed and speech privacy is failing, start with the door, the plenum, and the obvious perimeter gaps first.
If the office is open and the main complaint is distraction or fatigue, start with acoustic control, layout, and masking before you think about true isolation.
If cheap fixes stop improving privacy, move to the weakest assembly next instead of stacking more decorative products.
If you want the broader framework behind the office-specific advice, start with how to soundproof a room and then adapt it to the door, wall, ceiling, and privacy realities of the office you actually have.
Frequently Asked Questions
Does rockwool soundproof an office by itself?
Rockwool helps, but it does not soundproof an office by itself. It works best inside a wall or ceiling assembly where it reduces cavity resonance and supports better performance from drywall, sealing, and damping.
How Can I Make My Office More Private For Calls?
Start with the door, the perimeter gaps, and the obvious sound leaks before you buy treatment. If calls are still intelligible outside the room after sealing and softening the office, the wall or ceiling assembly probably needs more mass or damping.
What Is The Cheapest Office Fix That Usually Helps First?
The cheapest wins are usually sealing the door, sealing visible gaps, softening hard surfaces, and adding basic sound masking if the room still feels distracting. Those moves do not create full isolation, but they often improve focus and call comfort much faster than decorative quick fixes.
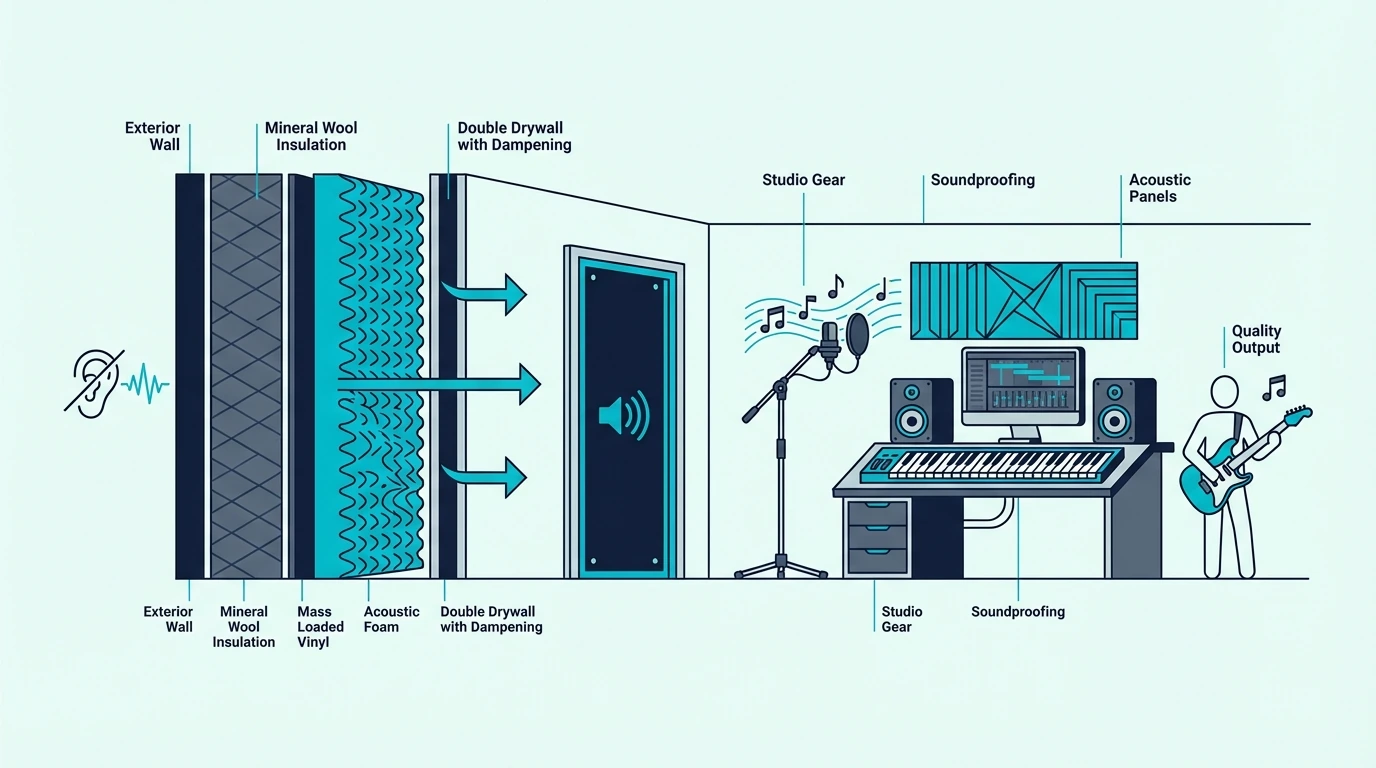
How Does Soundproofing Work? (Mass, Damping, Decoupling, And Real Limits)
How does soundproofing work? Yes, but only when the room shell gets harder to move, harder to leak, and harder to vibrate through.
That is where most bad advice falls apart. People calm echo with foam, then wonder why voices, traffic, and bass still pass through the wall.
Once you separate airborne leaks from structural vibration, the upgrade path gets much clearer and your budget stops chasing the wrong materials.
Below, you’ll see the three noise paths, the four core principles, and the point where a light fix stops being enough.
Quick Takeaway
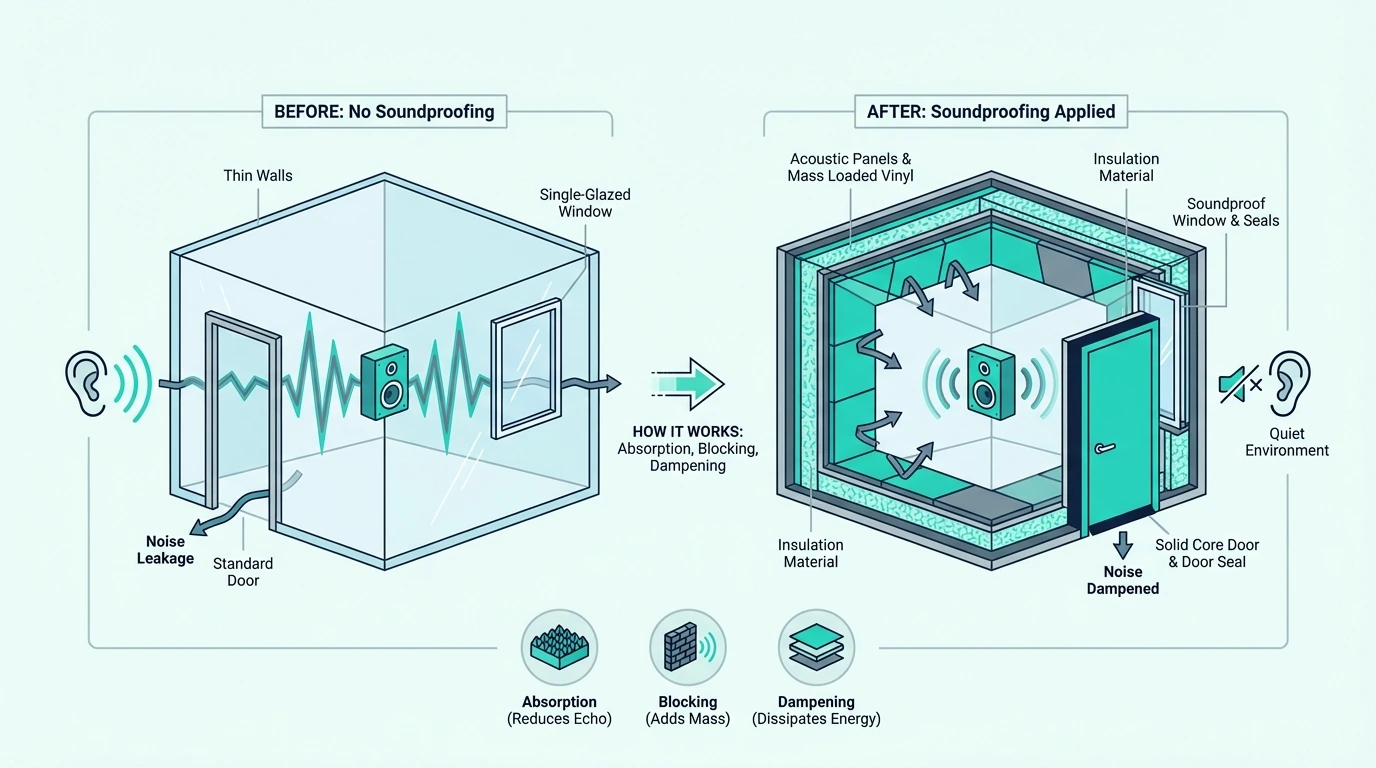
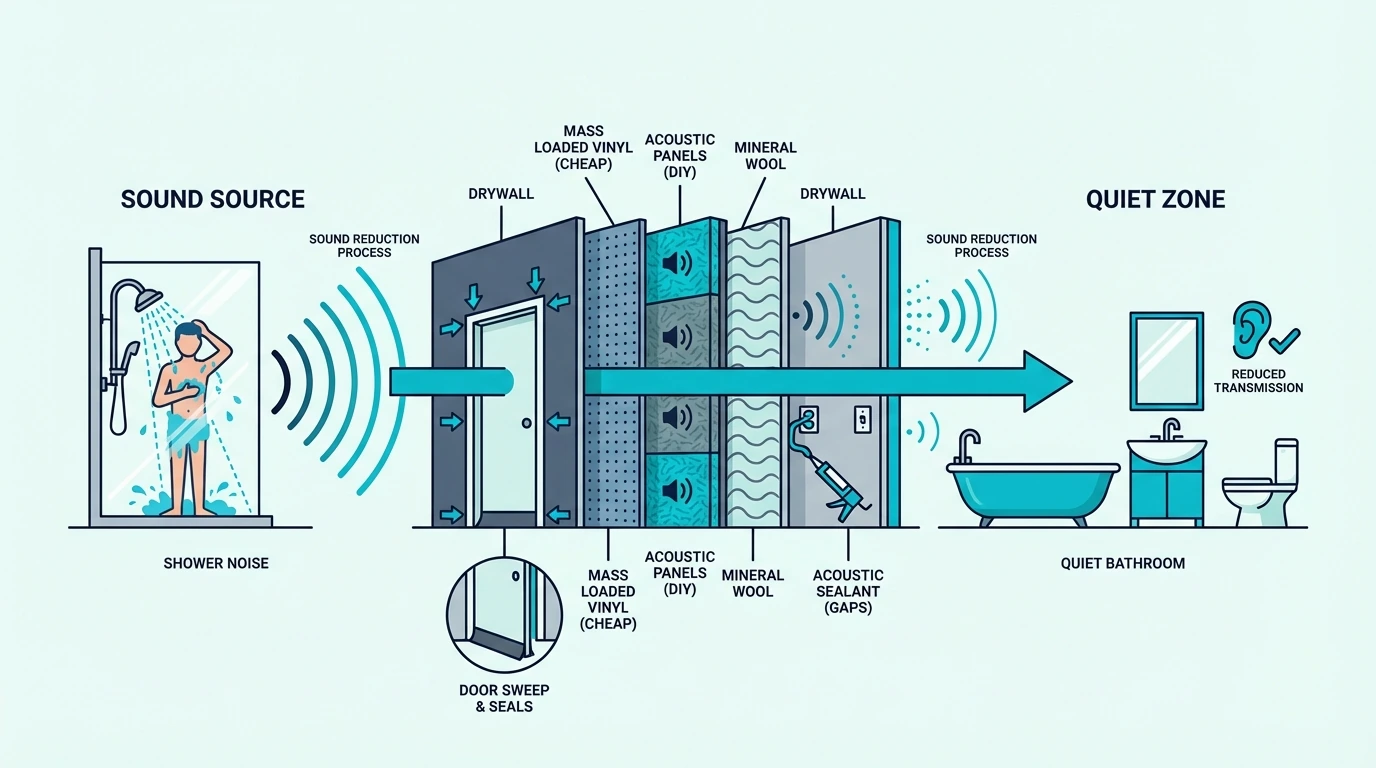
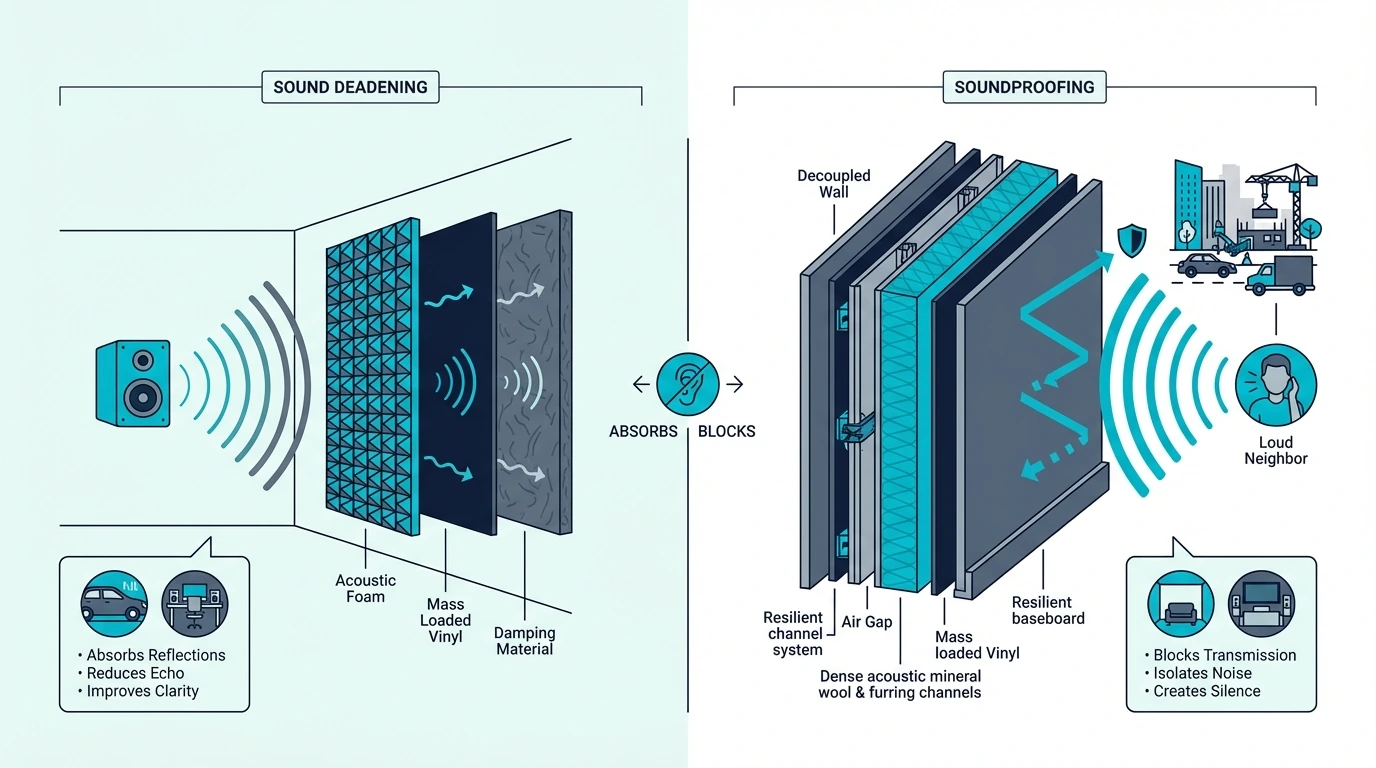
Soundproofing works by reducing sound transmission from one space to another. The core tools are sealing air leaks, adding mass, damping vibration inside an assembly, and decoupling surfaces so vibration cannot bridge straight through. Acoustic foam and panels can absorb sound inside a room, but they do not replace true soundproofing when your goal is blocking noise from getting in or out.
The Three Noise Paths and the Weak-Link Problem
Real soundproofing starts with diagnosis, not product names. Sound crosses a room shell through air, through structure, and through the weak links that let both slip past the main barrier.
That shell includes the walls, floor, ceiling, doors, windows, outlets, duct openings, and every joint where one material meets another. If even one part is weak, the whole room performs closer to that weak point than the strongest surface.
Airborne, impact, and structure-borne noise
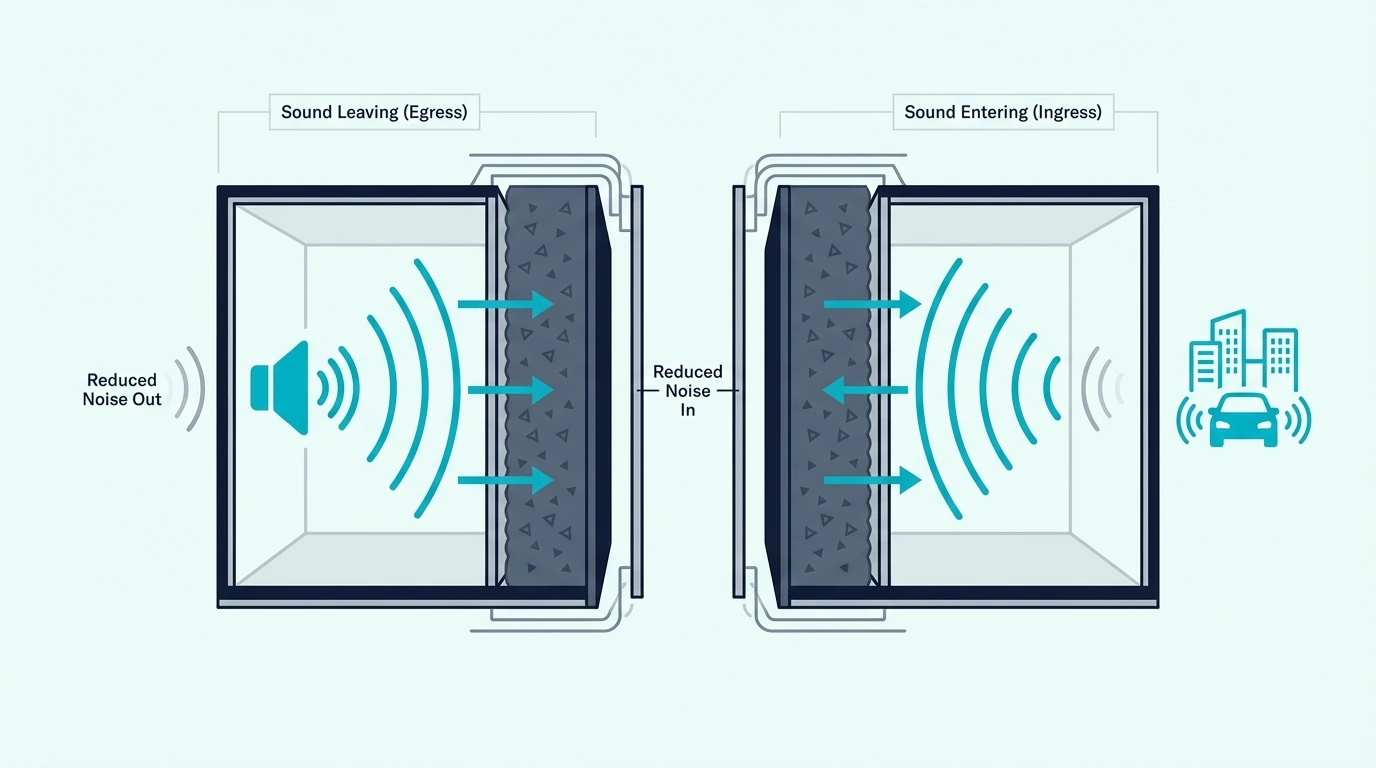
The first split is between noise that starts in the air and noise that turns the building into part of the problem. That includes less noise through the wall from your neighbor, less traffic noise entering through the window, or less of your music escaping into the next room.
Airborne noise includes voices, TV audio, barking dogs, and traffic because those sound waves begin in the air and then hit a surface. Impact noise starts with physical contact, like footsteps, dropped objects, or chair legs dragging across a floor.
Structure-borne sound goes one step further because that impact or bass energy keeps traveling through studs, joists, concrete, or framing and then re-radiates somewhere else in the building. Once the structure starts acting like the speaker, light surface fixes fall behind quickly.
That distinction matters because the right fix changes with the path. Airborne noise often responds well to sealing and added mass, while impact noise and low-frequency vibration usually need some form of isolation or decoupling to make real progress.
Why total silence is unrealistic
Once sound can use more than one path, total silence starts to look unrealistic. Sound waves spread, bend around edges, and excite whatever part of the structure is easiest to move.
Heavy construction helps because heavier surfaces resist vibration better than light ones. But even a very good wall can be undermined by a hollow door, a vent, a thin window, or a flanking path through the ceiling and floor.
This is why “soundproof” is usually marketing shorthand rather than a literal promise. In real homes, the goal is to significantly reduce sound, not to create a room where nothing at all gets through.
A drop of 10 decibels is already perceived by many people as roughly cutting the noise in half. That means a project can work very well in real life even when you still hear a faint murmur, a distant thump, or some background noise during louder moments.
The hardest part is low frequency energy. Bass from subwoofers, home theaters, drums, or heavy footsteps is stubborn because long wavelengths and structure vibration are much harder to stop with light materials.
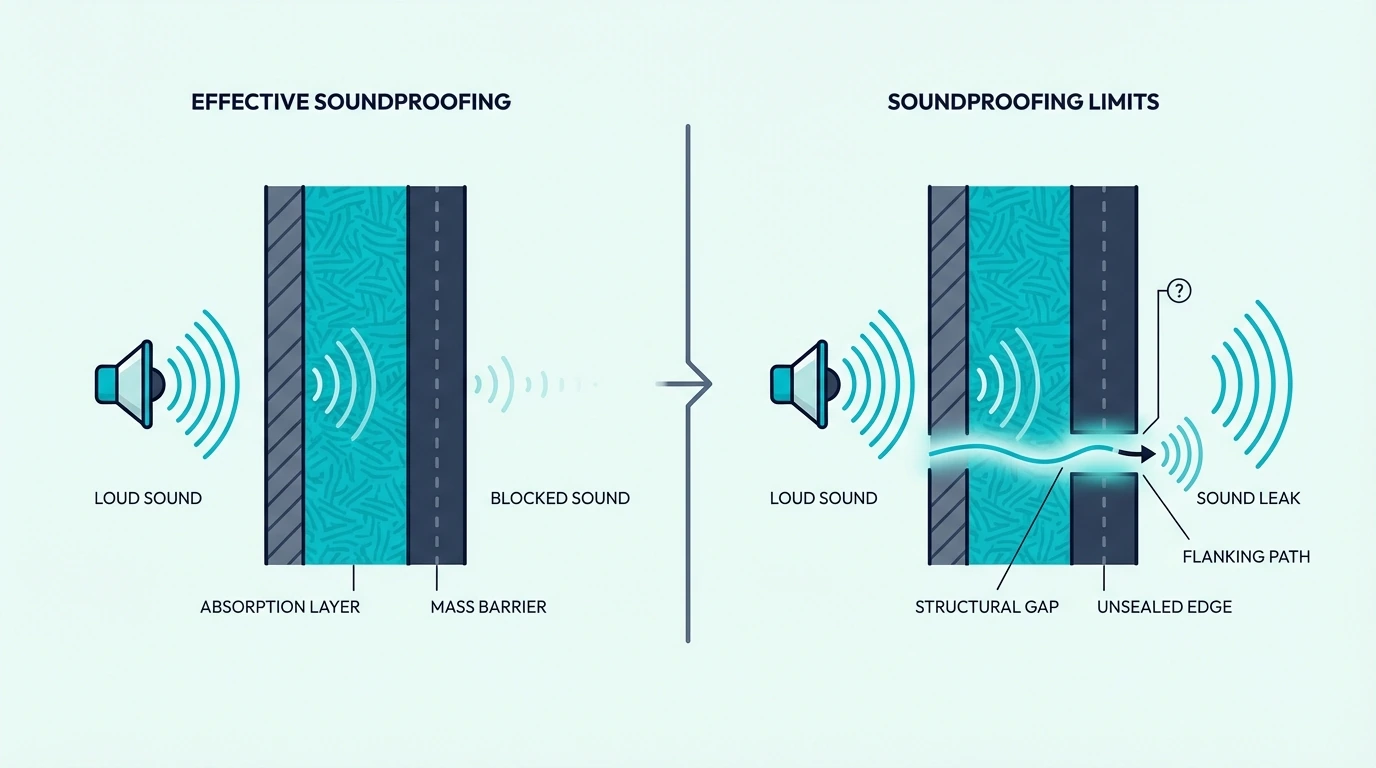
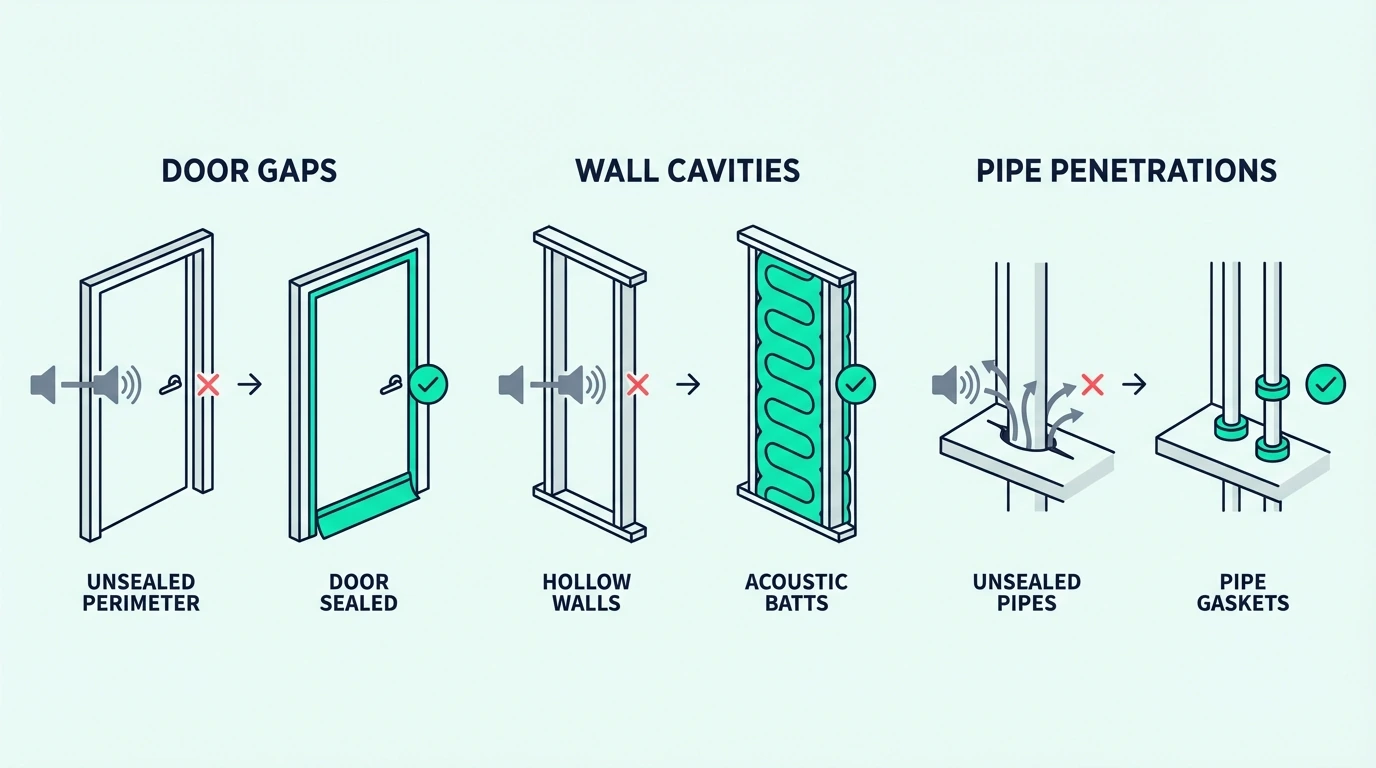
The gap problem
Of all those weak links, gaps are the easiest to underestimate. Sound follows the path of least resistance, so a tiny opening around a door or window can leak far more sound per square inch than the wall beside it.
That is why people get frustrated after treating the big surface while ignoring the edges. A wall can have respectable mass, but if the door has a visible undercut or the window frame has unsealed cracks, the room still leaks badly.
This is also where sealing products earn their keep. Something as simple as self-adhesive weather stripping matters because soundproofing works only as well as the weakest air leak in the room shell.
For fixed joints and perimeter cracks, acoustical caulk belongs in the same first-step category because stopping sound leakage is often more important than adding one more lightweight surface product.
Think of it like wearing a winter coat with the zipper half open. The insulation still exists, but the opening ruins the real-world performance.
If you want to test this yourself, stand next to the edges of a noisy door or window while sound plays on the other side. Your ears will usually tell you faster than any spec sheet where the real leak is.
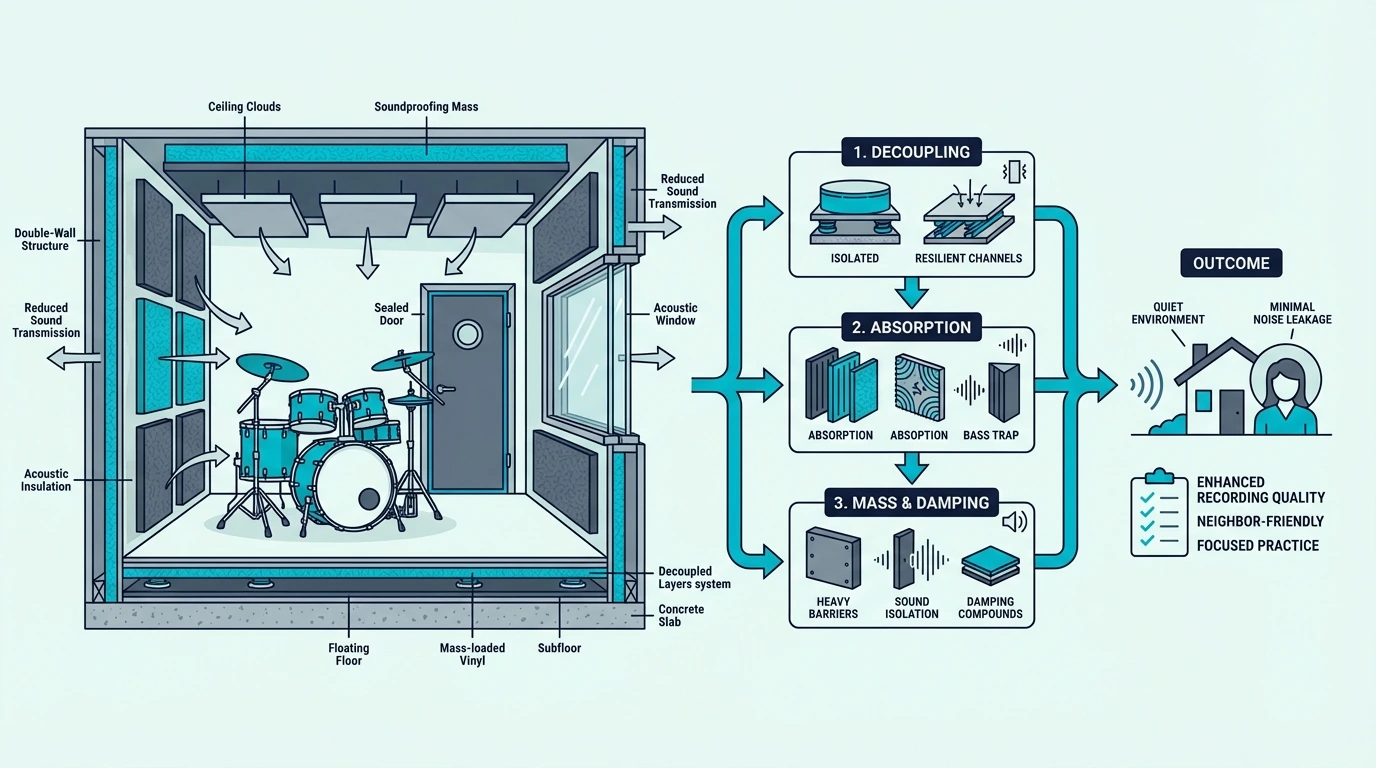
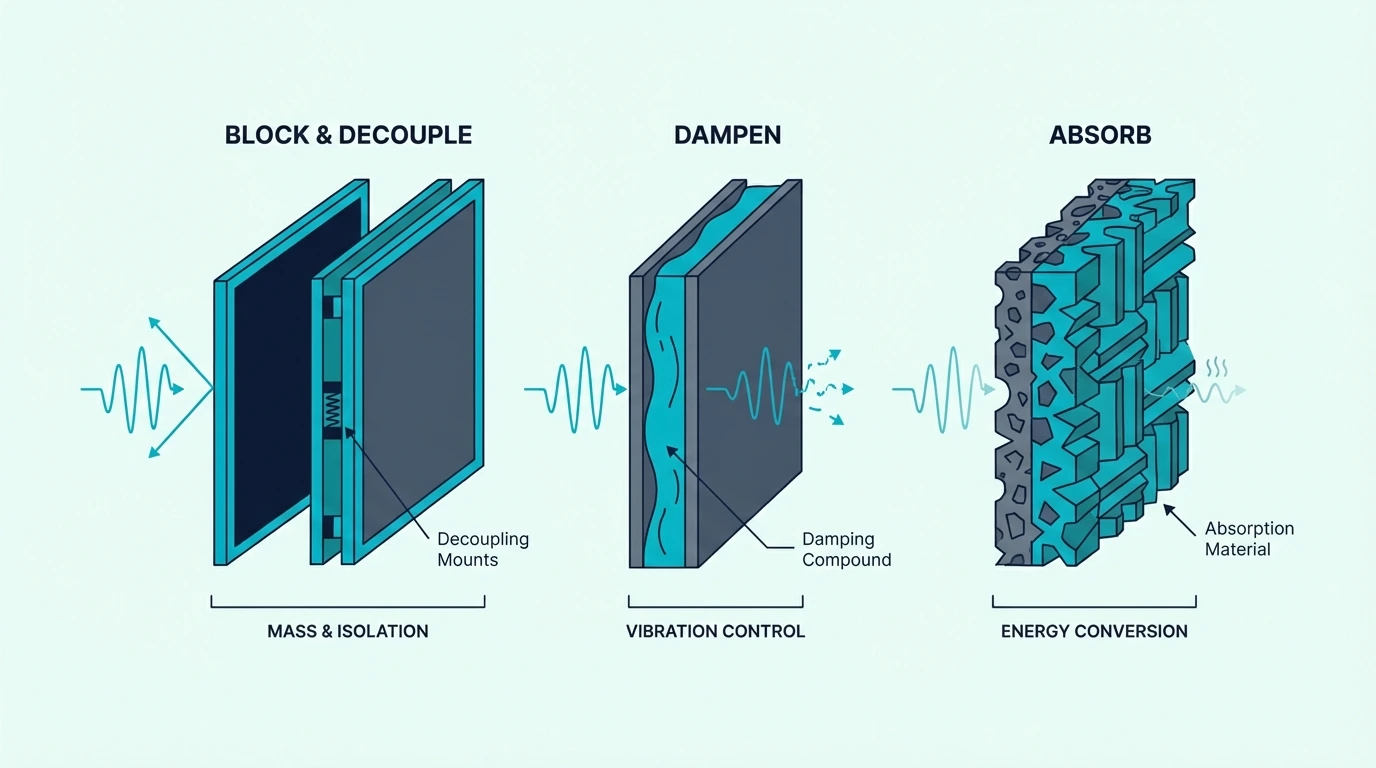
The Four Core Principles: Mass, Damping, Decoupling, and Absorption
Once the leak paths are clear, the assembly logic stops sounding mysterious. Most real soundproofing systems are just combinations of four jobs: resist motion, waste vibration, break the bridge, and calm the cavity.
Each one does a different job, and that is where people get tripped up. If you use the wrong tool for the wrong part of the problem, the project looks busy but the results feel disappointing.
Mass: heavier surfaces vibrate less
Mass comes first because every other layer benefits from a face that is harder to move. If a wall, ceiling, or door is light and flexible, it vibrates more easily and passes more energy to the other side.
That is why solid-core doors outperform hollow-core doors and why a double layer of drywall blocks more sound than a single thin layer. The surface has more weight, so sound waves have a harder time pushing it into motion.
A true soundproofing material like mass loaded vinyl works on that same idea. It adds a dense barrier layer to the assembly, which helps reduce sound transmission without adding a huge amount of thickness.
Mass is especially useful for everyday airborne noise like speech, TV audio, and general household noise. If your issue is conversation through a shared wall, added mass is usually part of the answer.
The catch is that mass alone is not enough when vibration is already traveling through framing. That is where the next two principles start doing the heavy lifting.
Damping: converting vibration to heat
Once the face has some weight, the next issue is what happens after it starts moving. Damping reduces how much of that vibration survives. Instead of letting the assembly ring like a drum skin, damping helps convert a portion of that vibration into a tiny amount of heat.
This is why damping compound gets mentioned so often in soundproofing builds. When you sandwich a viscoelastic layer between two solid surfaces, the vibration has to work harder to keep moving through the assembly.
A product like Green Glue Noiseproofing Compound makes the idea more concrete because it is built specifically to sit between drywall layers and waste more vibration inside the assembly.
That matters most in wall and ceiling upgrades where you are layering materials rather than rebuilding from scratch. Two rigid surfaces with no damping can still pass vibration between them surprisingly efficiently.
Once you add damping, the assembly becomes less “live.” Same idea, but the structure now wastes more energy internally instead of radiating it into the next room.
If mass is the brick wall part of the system, damping is the shock absorber. Same principle applies in cars, speakers, and buildings: if vibration is part of the problem, controlling resonance changes the result.
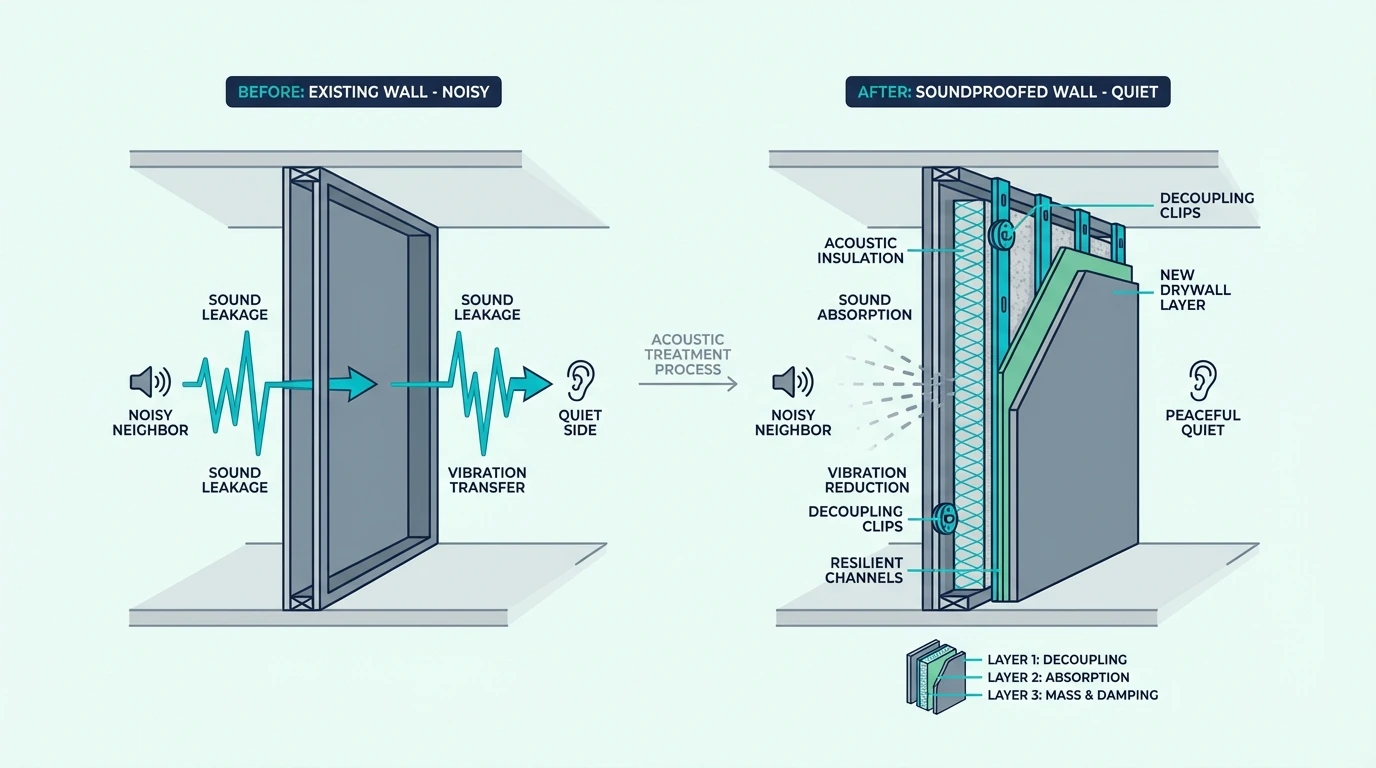
Decoupling: breaking the structural bridge
Mass and damping both help on the panel face, but they still leave one stubborn bridge: the framing. This is where soundproofing gets more construction-heavy. Decoupling means mechanically separating one side of an assembly from the other so vibration cannot bridge straight through the structure.
In a basic interior wall, the drywall on one side and the drywall on the other side are connected by the same studs. Sound hits one face, the studs carry vibration, and the opposite face re-radiates that energy into the next room.
Decoupling breaks that direct path. Resilient channel, isolation clips, staggered studs, double-stud walls, and floating floor systems all exist for the same reason: reduce sound transfer by interrupting the mechanical connection.
This is often the turning point for serious problems like bass, impact noise, home theaters, drum rooms, and upstairs footsteps. When the structure itself is carrying the noise, simply adding one more surface layer usually will not solve the root cause.
A good comparison is tapping one spoon against another versus tapping a spoon wrapped in rubber and suspended separately. The less rigid the connection, the less energy gets passed along.
Absorption: the misunderstood fourth layer
That is where absorption often gets misunderstood. Mass, damping, and decoupling all target the barrier path, while absorption helps reduce reflections inside a room and also helps inside wall cavities. It does not replace mass or decoupling when the goal is blocking sound between spaces.
That is why cavity insulation helps but does not finish the job. Mineral wool or fiberglass inside a wall can absorb sound energy moving through the cavity and reduce resonance, but the wall still needs proper faces, sealing, and sometimes decoupling.
This is also where product categories get muddled. A cavity product like AFB Acoustical Fire Batts, Mineral Wool Insulation helps inside an opened wall or ceiling assembly because it absorbs sound moving through the cavity and reduces resonance.
What it does not do by itself is create the full soundproofing system. The assembly still needs proper faces, sealing, and sometimes decoupling.
So where does absorption belong? Inside assemblies, inside room treatment plans, and inside conversations about echo control.
Where it does not belong is as a substitute for true soundproofing. If you are trying to stop neighbor noise, acoustic treatment and soundproofing are related topics, but they are not interchangeable.
Real-Room Results: Simple Fixes vs Full Assemblies
Once those four principles are in place, the practical question becomes cost versus depth. Yes, soundproofing a room really does work, but the result depends on the noise type, the weakest links, and whether the solution depth matches the problem.
That is why one person sees a noticeable improvement from weatherstripping and a door sweep while another needs clips, double drywall, and a much bigger budget. Context changes everything.
When simple fixes are enough
Simple fixes earn the best returns when the room is obviously leaking at the perimeter. A hollow-core door, a large gap under the slab, rattling window frames, back-to-back outlets, or a vent path can all leak enough sound that sealing them produces an immediate improvement.
This is where you want to start in almost every room. If the shell is leaking around the edges, there is no point pretending the bigger surface upgrades are doing all the work.
For renters and lighter-duty spaces, a temporary heavy layer can also help a bit. Something like a sound dampening blanket can add some removable mass over a weak area, especially on doors or thin openings.
The improvement from these moves is usually most noticeable with speech, TV bleed, and lighter outside noise. They do not transform a room into a studio bunker, but they can make the space calmer enough to sleep, work, or focus.
A good rule is this: if the noise sounds sharper at the edges than at the center of the wall, simple fixes deserve your attention first. That weak-link principle from earlier pays off here.
When the assembly itself needs upgrading
If those edge fixes barely move the needle, the assembly itself is probably too light. That means the wall, floor, or ceiling is passing sound because the whole structure is easy to excite.
This is common in shared walls, apartment ceilings, thin doors, older windows, and rooms with a lot of low-mass construction. The fix usually means adding mass, adding damping, or rebuilding with some level of decoupling.
For example, conversation through a shared bedroom wall often responds well to another drywall layer and damping. Footsteps from above usually point you toward floor treatment upstairs or a decoupled ceiling below.
Bass and home theater energy are where people discover the limits of surface-level fixes. If the subwoofer is energizing framing, you are no longer dealing with just one wall face – you are dealing with the building structure.
That is also why a how to soundproof a room plan usually has to look at the whole shell instead of one isolated product. Rooms are systems, and the loudest leak often shifts once you strengthen the first weak point.
Why some projects still disappoint
That is also the point where many DIY projects go sideways. Most disappointing projects fail for one of three reasons: wrong diagnosis, untreated weak links, or unrealistic expectations. People often buy products that affect room acoustics when their actual problem is sound transmission.
Foam on a shared wall is the classic example. It can absorb sound inside your room, but it does not stop much sound from getting through the wall, so the person who bought it feels like soundproofing is fake.
The second failure point is flanking. You treat the wall, but the sound goes through the ceiling, floor, ductwork, window frame, or door perimeter instead.
The third is expecting total silence from light retrofits. If your problem is drums, bass, or impact noise, a renter-safe setup and a heavy blanket are not competing with a decoupled room-within-a-room build.
When soundproofing disappoints, it usually is not because physics failed. It is because the project attacked the wrong path or did not go deep enough for the noise source.
Soundproofing Works Both Ways — With Caveats
Once people see the room as an assembly, this question comes up naturally. In principle, yes – a wall or floor assembly that reduces sound transmission can help reduce sound going out and sound coming in.
But the real-world answer still has some nuance because source strength, frequency, and installation quality shape what you experience on each side. Symmetry in theory does not always feel symmetrical in daily life.
The physics are symmetrical
The physics are symmetrical at the partition level. If the assembly is heavier, better sealed, and better isolated, it resists sound moving through it in either direction.
That is why the same upgraded wall can protect a bedroom from hallway noise and also keep your TV from bothering the next room. The underlying physics are about reducing sound transmission across the assembly, not choosing a favorite direction.
This is also why lab testing talks about wall performance rather than “inbound” or “outbound” mode. A tested partition has a certain ability to reduce sound transfer, and that benefit applies both ways under comparable conditions.
The complication is that room layout and the source itself can make one side feel worse. A subwoofer pressed against the wall or a loud speaker in a corner creates a harder test than everyday conversation several feet away.
So yes, soundproofing works both ways, but the source conditions still matter. Same wall, different stress level.
Why one direction can feel worse
That symmetry breaks down in perception, not in the wall itself. This is where people think the two-way idea failed, when really the source changed the challenge. A weak voice on one side and a high-output theater system on the other are not equivalent situations.
Placement matters too. If a speaker is touching the wall or a desk is physically coupled to the floor, the system is feeding vibration straight into the structure.
Low frequencies are the biggest example. Bass has longer wavelengths, carries more energy through structure, and often leaks through the floor and ceiling as much as the wall itself.
That is why source control can be part of the solution. Speaker isolation pads, pulling equipment off shared walls, and reducing direct contact do not replace soundproofing, but they lower how much punishment the assembly has to absorb.
You see the same principle in home offices and music rooms. If you reduce the force at the source, the room shell does not have to work as hard.
Lab results vs installed performance
The last complication is installation reality. Lab performance assumes a controlled assembly with controlled installation. Real homes have imperfect framing, old seals, recessed lights, ducts, outlets, uneven floors, and all the little shortcuts buildings accumulate over time.
That means installed performance usually depends on workmanship as much as materials. A great design with bad sealing can lose far more than most people expect.
It also means real homes have more flanking paths than test assemblies. Sound can go around the upgraded wall through joists, party-wall intersections, or attached structural elements.
This is why one room in a detached house may feel easy to quiet while an apartment with shared structure feels far harder. Same concept, different context.
If you want lab-style results, the installation has to be just as disciplined. Most residential projects land somewhere in the middle, which is why realistic expectations matter so much.
Honest Limits: What Soundproofing Cannot Fix
That brings the whole topic back to its limits. Soundproofing is powerful when the assembly and strategy are right, but it still has weak spots and tradeoffs.
That honesty is what saves you from wasting money. Knowing what soundproofing does not do well is often the fastest way to choose a smarter fix.
Foam and the absorption-vs-blocking confusion
Most foam failures start with a category mistake. Foam fails as a wall soundproofing solution because it is too light. To block sound transmission, a material needs enough mass and enough system support to resist movement.
Foam does the opposite job well: it lets sound enter and then absorbs part of that energy to reduce reflections. That can improve speech clarity, reduce echo, and make a room feel less harsh.
What it cannot do is behave like a dense barrier. If your goal is neighbor noise, hallway noise, or street noise coming through the wall, acoustic foam is solving the wrong problem.
This is the line people need to keep straight: acoustic treatment helps inside the room, soundproofing helps between rooms. If the problem is transmission, surface foam is a distraction more often than a cure.
That is also why foam explanations need to be blunt. It works for absorption, not for true wall isolation.
Bass: the hardest frequency to stop
Once that barrier mistake is clear, bass becomes the next reality check. Bass is difficult because low frequencies have long wavelengths and high energy. They move large surfaces easily, and they travel through structure better than lighter, higher-frequency sound.
That is why a room can block speech reasonably well but still struggle with subwoofer rumble or kick drum impact. The frequencies are different, and the structure responds differently.
Low-frequency control usually pushes you toward deeper construction solutions. More mass helps, but decoupling and source isolation become much more important as the frequency drops.
Bass also makes flanking more obvious. You may think the wall failed, when in reality the floor joists, ceiling plane, or connected framing are carrying most of the vibration.
So if your main complaint is bass, you need to budget for realism. It is the hardest noise to stop, and it exposes every shortcut in the room.
Choosing the right strategy
With foam limits and bass challenges both clear, the decision framework becomes practical. The smartest strategy starts with the path, not the product. First ask where the sound is crossing: through a gap, through a light assembly, or through connected structure.
If the main leak is a door or window gap, start there with sealing. If the issue is a thin shared wall, think about mass and damping.
If the room shakes from bass or footsteps, start thinking about decoupling, source isolation, and whether the floor or ceiling is part of the problem. Same principle, different path.
A practical ladder helps here: seal leaks first, add mass second, add damping where layering makes sense, and consider decoupling when vibration or low-frequency energy is the real enemy. If you can lower the punishment at the source too, the whole shell has less work to do.
Soundproofing works by reducing sound transmission, not by magically deleting sound from existence. The strongest results come from matching the fix to the path: sealing air leaks, adding mass, damping vibration, and decoupling structure when the problem is more serious.
The main mistake is confusing acoustic treatment with soundproofing. If you need less echo inside the room, absorption helps; if you need less noise getting through the wall, floor, ceiling, window, or door, the system needs true soundproofing materials and details.
You usually cannot block 100 percent of noise in a normal home with light retrofit materials alone. The closest approach is a fully isolated room-within-a-room build with heavy assemblies, airtight detailing, decoupling, and controlled ventilation, but even then real homes still have limits.
Does rockwool soundproof?
Rockwool helps soundproofing when it is used inside a wall, floor, or ceiling assembly because it absorbs sound energy in the cavity and reduces resonance. It does not replace mass, sealing, or decoupling, so it works best as one part of a larger system rather than a standalone fix.
How do I block noise on a shared wall?
Start by sealing every gap, outlet, and perimeter joint on the shared wall, because weak links often leak more sound than the field of the wall itself. If that is not enough, add mass with another drywall layer and damping, and move toward decoupling if the problem includes bass, impact noise, or persistent structure-borne vibration.
How To Soundproof A Garage Without Wasting Money
How to soundproof a garage can absolutely cut noise, but only if you treat the garage like a weak shell instead of a normal room.
Most wasted garage budgets come from hanging soft products on the walls while the roll-up door, service door, shared wall, and ceiling path keep leaking the same sound.
A garage gets quieter when you match the fix to the use case, the loudest path, and the level of isolation you actually need.
Start by deciding whether the garage is for drums, tools, a home gym, or general noise control, because that changes the whole order of work.
This guide shows which garage paths matter first, how honest to be about the roll-up door, what budget fixes are worth trying, and when the project needs a real rebuild.
Quick Takeaway
To soundproof a garage, treat the roll-up door, service door, shared wall, and ceiling as one linked system instead of one surface. Seal the obvious leaks first, be realistic about how much a roll-up door can ever block, and decide early whether you only need moderate noise reduction or a real high-performance build. Lighter garages can improve with targeted DIY work, but loud music, heavy tools, home gyms, and attached garages near living space usually need stronger wall and ceiling assemblies and a much more serious plan for the door.
Garage Soundproofing Starts With The Real Weak Path
Before you buy anything, decide what kind of garage problem you actually have. Garages punish generic soundproofing advice because one huge weak door and one house-side connection can overpower everything else.
The Use Case Sets The Isolation Target
A garage for drums or band practice needs much more isolation than a garage office or a moderate workshop. Loud music pushes the project toward serious wall, ceiling, and door work much faster than people expect.
A woodworking or tool garage is different because the noise is usually bursty rather than constant. That often makes leak control and targeted house-side protection more useful than pretending the whole shell needs studio-level construction.
A home gym shifts part of the problem to impact and vibration. Floor mats, equipment placement, and keeping heavy drops away from shared walls can matter as much as airborne sound control.
An office, hobby room, or lighter garage conversion often needs moderate reduction rather than extreme isolation. In those cases, better sealing and smarter path control can make a meaningful difference without a full rebuild.
Roll-Up Doors And Shared Paths Usually Leak First
The worst leak is usually the roll-up garage door because it is large, segmented, and rarely as heavy or airtight as the surrounding wall. After that, the side entry door, trim gaps, windows, penetrations, shared walls, and ceiling path become the next problem points.
That order matters because the garage changes normal room logic. On paper, a wall upgrade sounds important, but in practice the huge metal door or the leaky service door can cap the whole result first.
If the garage is attached, the ceiling and house-side wall deserve even more attention. If the garage is detached, the project often shifts toward outdoor spill and neighbor-facing leakage instead.
The broader logic from how to soundproof a room still matters, but the garage changes the priority order in a very specific way.
Attached Garages Raise The Stakes Fast
Attached garages are harder because the goal is not just bothering neighbors less. The real job is often protecting bedrooms, living areas, or a room above the garage from a noisy shell that is directly tied into the house.
That means the garage ceiling, shared wall, and service door often matter more than people think. If the garage sits under a bedroom or beside a family room, noise can move through framing and flanking paths long before the outside wall is the main issue.
Detached garages are simpler because the stakes are usually different. You still care about leakage and neighbors, but you are not also trying to keep the house calm on the other side of a shared structure.
Complete Isolation Is Not The Default Garage Outcome
Once the weak paths are clear, the next question is how far you can realistically push the result. Garage projects go wrong when people expect silence from a structure that still has a giant segmented door and multiple flanking paths.
Meaningful Reduction Is More Realistic Than Silence
Realistic garage soundproofing usually means meaningful reduction, not silence. If you seal the easy leaks, improve the weak door areas, and strengthen the surrounding assemblies, the garage can become much less annoying to the house and to outside listeners.
A lighter-use garage can feel dramatically better with modest upgrades. A drum room in an attached garage under a bedroom is a different class of project entirely.
The right expectation is not total isolation by default. The better target is to decide whether you need a less harsh garage, a tolerable workshop, or a true house-protection build.
The Roll-Up Door Usually Sets The Hard Limit
A roll-up garage door is usually the biggest challenge because the entire project can be limited by that one assembly. Even if you improve the walls, ceiling, and service door, the large segmented door can still leak enough sound to keep the result disappointing.
The problem is not just the size. It is the combination of moving sections, perimeter seams, low mass, and the fact that the door still has to operate like a door instead of a wall.
Garage-door expectations need to be more honest than advice for ordinary doors. You can reduce leakage and add some help around the zone, but a roll-up door often stays the structural bottleneck.
If the rest of the garage improves while the result still feels underwhelming, the project is often telling you the door has become the hard limit.
Loud Use Cases Need A Stronger Shell
A garage needs a more serious rebuild when the use case is loud enough that sealing alone will never be enough. Drums, amplified band practice, heavy tools, or protecting a bedroom over an attached garage can all push the project toward a real wall and ceiling build.
This is the section that decides whether your expectations stay realistic. Most garage-door upgrades help a little, but very few change the fact that the door is still the weakest assembly in the garage.
Perimeter Sealing And Temporary Coverage Help First
Seals, perimeter leak reduction, and temporary coverage can all help a little. The first garage-door lesson is that nearby leaks often deserve attention before you start layering things onto the door itself.
Fixed trim joints and penetrations deserve the same logic. A product like Acoustical Caulk (29 oz) 1 Tube with clean up wipe makes more sense around fixed edges than any material that depends on the roll-up seams behaving like a stationary wall.
The door is the main limiting factor when you keep improving the rest of the garage and the overall result barely changes. At that point, the project is telling you that the door assembly is still too weak for the goal.
This is especially common in music garages and attached garages. The wall and ceiling can improve while the door still leaks enough to keep the total reduction underwhelming.
A garage-door section has to stay brutally honest. Some upgrades make the area better, but many use cases still hit a hard ceiling because a roll-up door is not a studio wall.
House-Side Paths Can Outrank The Big Door
Focus elsewhere first when the garage has obvious service-door gaps, shared-house wall issues, or an under-treated ceiling path. Sometimes the roll-up door looks like the problem, but the more direct path is actually the side door or the rooms above the garage.
In attached garages, the ceiling and house-side wall often deserve the first real money. In lighter detached garages, the biggest return may still be leak sealing and source control before heavier door experiments.
Garage prioritization matters so much. The visible door is often the weak point, but it is not always the first weak point you should spend on.
Budget Garage Fixes Only Work When Ranked By Weak Path
Once the door reality is clear, the budget conversation gets simpler. Cheap garage work helps most when it is ranked by leak severity and use-case intensity instead of spread across random products.
Cheap Wins Start With The Service Door And Source Control
The best cheap fixes usually start with the service door and obvious perimeter leakage. A tighter service door often matters more than people expect because that smaller opening can leak sound constantly while the big garage door gets all the visual attention.
After that, source-side control usually beats random surface treatment. In home gyms and workshops, better equipment placement, floor protection, and moving the loudest activity away from the shared wall often help more than sticking soft material around the room.
Thin foam, decorative panels, and small patches of soft material are mostly hype when the real issue is leakage or weak structure. They may make the garage sound a little less harsh inside, but they will not block much sound through a roll-up door, a shared wall, or a lightly built ceiling.
The same applies to magical garage-door promises that ignore the assembly. If the product does not change leakage, mass, damping, or the source path in a meaningful way, it usually does not deserve to be the first buy.
That is where garage soundproofing goes wrong most often. The budget disappears into lightweight fixes while the biggest weak path stays almost untouched.
Budget Fixes Are For Moderate Goals, Not Studio Isolation
A budget fix is good enough when the goal is moderate noise reduction for lighter use. If you just want the workshop to sound less harsh, the gym to bother the house less, or the side door to leak less noise, those fixes can be worthwhile.
They are much less likely to be enough when the garage is attached to living space and the source is loud. A bedroom over a drum garage is almost never a cheap-fix problem.
So budget garage work is not fake. It just works best when the expectation is modest improvement, not total isolation.
Cost Rises Once The Garage Becomes A Real Shell Upgrade
After you know which tier you need, the cost side becomes much easier to read. Garage budgets stay manageable for leak control and light testing, but they rise quickly once the job becomes a real wall and ceiling build.
Basic Upgrades Stay In The Diagnosis-And-Leak-Control Tier
A basic upgrade is usually a low-three-figure kind of project rather than a full construction budget. That tier means service-door sealing, perimeter caulk, selective garage-door testing, and some source-side control.
It is also the smartest starting point for readers who have not yet proved the real weak spots. A modest garage budget goes further when it is used to diagnose the shell instead of pretending to finish it in one pass.
For many detached garages and lighter-use shops, this tier may be enough. For attached garages and louder use cases, it is often only the first layer of the project.
Higher-Performance Builds Spend On Shell Strength
A higher-performance build reaches the point where labor, coverage, and assembly detail matter as much as the shopping list. This is the tier where walls, ceilings, insulation, extra drywall, damping, and real mass layers start turning the garage into a stronger shell.
Attached garages with bedrooms above them usually hit this tier faster than detached garages do. The ceiling path and house-side assemblies can force a deeper build even when the garage itself seems simple.
This is also where the roll-up door becomes the most frustrating budget multiplier. You can spend serious money on the rest of the shell and still be limited by the door if the use case is loud enough.
Professional Help Pays Off When The Garage Touches Living Space
Call a professional when the garage is attached to occupied rooms, when drums or heavy tools are involved, or when you are about to spend serious money on wall and ceiling work without knowing the real limiting path.
That is especially true when there is a room above the garage or a direct shared wall to living space. At that point, getting the path wrong becomes more expensive than paying for better diagnosis.
How to soundproof a garage is mostly a prioritization problem, not a product hunt.
If the goal is moderate reduction in a detached or lighter-use garage, start with leak sealing, source control, and the service-door and perimeter weak points first.
If the garage is attached to the house or used for drums, heavy tools, or serious gym noise, move much faster toward stronger wall and ceiling assemblies and be brutally honest about how much the roll-up door will still limit the result.
Mass, airtightness, and decoupling block the most noise when they are built into the assembly correctly. Lightweight soft materials can help a little in some cases, but they are not substitutes for heavier wall, ceiling, or door upgrades.
Can you soundproof a garage door cheaply?
You can improve a garage door cheaply, but the gains are usually modest. Seals, adjacent leak control, and temporary heavier coverage can help, but a roll-up door usually stays the limiting assembly if the use case is loud.
Is it better to soundproof an attached garage from the house side?
Sometimes yes, especially when the main priority is protecting a room above or beside the garage. If the house-side wall or ceiling is the path carrying the most sound, that side can deserve the first serious money instead of the garage-door side.
How To Soundproof A Floor For Footsteps And Noise Transfer
How to soundproof a floor can absolutely reduce footsteps and room-to-room noise, but only if you diagnose three things first: the noise type, the floor assembly, and which side of the structure you can actually work on.
Floor soundproofing frustrates so many people because they add one soft layer on top, expect silence below, and then discover the vibration is still traveling through the finish floor, subfloor, joists, and ceiling underneath.
Floors are harder than many wall projects because they often carry two problems at once. Footsteps, dropped objects, chair movement, pets, and workouts create impact noise, while voices, TV, and music create airborne transfer through the same assembly.
The good news is that floor soundproofing does work when the fix matches the path. In many homes and apartments, the best results come from treating the upstairs floor first, upgrading the floor build during flooring work, and only leaning on the ceiling below when the source side is out of reach.
Start with the noise type, the floor assembly, and your access to the source side.
Then move through the floor-side upgrades that work, the limits of existing-floor retrofits, the cheap fixes that are actually worth trying, and the point where the whole floor-ceiling assembly needs a broader plan.
Quick Takeaway
The best way to soundproof a floor is to treat the source side first and match the fix to both the noise and the assembly. For impact noise like footsteps, dense top layers, underlayment, floating-floor strategies, and better isolation matter most.
For airborne noise, floor-side mass and any accessible cavity treatment can help, but once the complaint becomes a full between-floor problem, the right next move is usually a broader assembly strategy. Cheap surface fixes can help a little, but stronger floor-side results usually come from proper underlayment, added mass, and better build details.
Floor Noise Starts With The Right Diagnosis
Floor noise is hard to stop because the floor is both the surface people use and part of the building structure. Once vibration gets into the floor system, it can spread beyond the exact room where it started.
Impact Noise And Airborne Noise Need Different Fixes
Impact noise comes from footsteps, dropped items, chair legs, pets, exercise equipment, and anything else that physically strikes the floor. Airborne noise comes from voices, music, TV, and bass that pass through the floor-ceiling assembly instead.
That distinction matters because the right fix changes with it. If the main complaint is footsteps, think top-side softness, underlayment, and separation.
Most wood-frame floors leak both. Concrete floors are heavier and usually better for airborne noise, but they can still feel hard and loud under footfall when the finish layer is unforgiving.
Light Floor Assemblies Spread Vibration Fast
Every step energizes the floor directly. On hard flooring, that energy moves into the finish floor, subfloor, joists, fasteners, and ceiling below almost immediately, which is why footsteps can feel more intrusive than normal conversation.
Wood joist floors are usually worse for this than slab floors because they are lighter and springier. Hardwood, laminate, and tile also tend to reveal impact noise faster than carpeted floors because there is less softness at the source.
Source-Side Access Usually Beats Downstairs Guesswork
If you control the upstairs floor, that is usually the best place to start because stopping vibration at the source works better than catching it after it spreads. If you only control the room below, the ceiling may become the more realistic treatment side.
This is the first big decision in any between-floor complaint. A person with upstairs access can often get more from better floor coverage and underlayment than a downstairs-only owner can get from guesswork on the ceiling.
But if the upstairs floor cannot be touched, the ceiling below may be the only side where real structural improvement is possible. That is usually the point to move from a floor-specific plan into how to soundproof between floors or how to soundproof a ceiling.
The Best Floor Fix Starts At The Source Side
Once you know the noise type and which side you control, the treatment order gets easier to prioritize.
In a finished room without renovation, you are mostly managing symptoms at the source. In a flooring project or open assembly, you can actually change performance.
Underlayments Matter Most During Flooring Work
Underlayments help most when you are already installing or replacing flooring, especially laminate, engineered wood, or another floating finish. That is when you can add a continuous impact-control layer between the finished floor and the subfloor with a real product like FloorMuffler Ultra Seal Underlayment 300SF.
Timing matters so much here. If a renovation is already happening, spending more on the right full-coverage layer is usually smarter than trying to retrofit weak surface fixes later.
Floating Floors Build In More Separation
A floating floor makes sense when the project is large enough that you can build in more separation across the whole surface instead of just adding one thin layer. The goal is not simply softness but reducing how much vibration couples into the structure in the first place.
That makes it a better fit for full-room renovations, hard-surface replacements, and upstairs condos or apartments where impact noise is an ongoing complaint rather than a minor annoyance.
Serious Isolation Requires A Bigger Floor Rebuild
Serious floor-side isolation still starts with the floor build, not the ceiling finish. If the flooring or subfloor is open, cavity fill like AFB Acoustical Fire Batts, Mineral Wool Insulation becomes relevant because it can help a stronger floor-side rebuild absorb energy inside the joist space.
The key on this page is that serious floor soundproofing should stay focused on what changes when the floor itself is being rebuilt: full-coverage underlayment, better edge details, denser layered build-ups, and cavity treatment if the floor is already accessible.
If the complaint has reached the point where you are planning ceiling damping, decoupling, or a full rebuild from below, that is no longer just a floor project. That is where how to soundproof between floors takes over.
Existing Floors Improve Most At The Source Side
Yes, but the result depends on how much of the floor system you can actually access. Existing-floor retrofits are usually about improvement, not perfection.
Top-Side Layers Help When The Finish Floor Stays Put
Without pulling up the whole floor, you are mostly limited to top-side improvements and impact management. Large rugs, dense pads, interlocking mats, furniture feet, and better coverage in active zones can all reduce impact at the source, especially in apartments or finished rooms.
These changes are most helpful when the complaint is foot traffic, chair scraping, or pet movement. They are much less powerful when the complaint is voices or TV transfer between floors.
Pulling Up Flooring Changes The Ceiling On Results
Pulling up the flooring is worth it when impact noise is severe, the floor is being renovated anyway, or old hard flooring is going back down without any meaningful isolation layer. That is the point where real underlayment, better edge details, and full-coverage layers can make a permanent difference rather than a temporary one.
This is also where whole-room materials outperform targeted patches. If you are already at the subfloor, a proper underlayment or full mass layer does more than a small test strip because floor noise simply flanks around weak coverage.
No Subfloor Access Means Expectations Stay Lower
If you have no access to the subfloor, be realistic about what the floor alone can do. That usually means using source-side top layers now and then deciding whether the better long-term move is to open the ceiling below or wait for a larger flooring project.
For renters and finished apartments, this is often the real limit. You can make the room less sharp under foot, but you may not fundamentally change the assembly without access from one side or the other.
Cheap Floor Fixes Only Work When They Reduce Impact At The Source
Cheap floor soundproofing works best when it reduces the sharpness of impact at the source. It works much worse when it tries to imitate a rebuilt assembly with lightweight materials.
Budget Wins Come From Coverage In Active Zones
The best budget fixes are usually thick rugs, dense rug pads, interlocking mats in high-traffic zones, furniture foot pads, and fuller coverage over hard flooring. Those fixes will not equal a floating floor, but they can reduce annoyance in everyday spaces.
This is also why budget floor advice has to stay specific. A rug in the walking path, a pad under chairs, or a removable mat in a workout zone can help more than spreading thin foam randomly across a room.
Thin Gimmicks Barely Change Real Floor Noise
Thin foam, partial coverage, random peel-and-stick “soundproof” sheets, and any fix that ignores where people actually step usually barely work for real floor noise. The biggest reason is simple: impact noise flanks around weak coverage and keeps traveling through the structure.
Floor articles need to be stricter than wall articles about gimmicks. A floor is a physical load surface, so decorative acoustic logic usually fails even faster here.
Renters Need Removable Source-Side Control
Renters and upstairs neighbors should focus on removable source-side control first. That usually means rugs with dense pads, interlocking mats where activity is concentrated, furniture feet, and better coverage over hard flooring.
If the complaint is really voices, TV, or bass rather than footsteps, be honest about the limit. Floor-only renter fixes may underperform because the assembly problem is bigger than the finish surface, which is why how to soundproof an apartment and how much it costs to soundproof a room become the better next pages.
Cost Rises Fast Once The Assembly Changes
Floor soundproofing costs rise quickly as you move from soft top layers into real assembly work. The price jump makes sense because the stronger fixes usually involve labor, access, and rebuilding rather than one easy add-on.
Basic Retrofits Stay In The Soft-Layer Budget Tier
A basic retrofit usually means rugs, dense pads, interlocking mats, localized removable layers, and small comfort upgrades. In practice, this is the lower-cost tier because you are reducing impact at the source rather than rebuilding the assembly.
Full Build-Ups And Floating Floors Cost More For Real Reasons
A proper build-up or floating floor costs much more because the flooring often has to come up and new layers have to be installed continuously across the room. That is where material choice, coverage, labor, trim adjustments, and edge details all start to matter at once.
Professional Help Pays Off When The Whole Assembly Is In Play
Professional help is worth paying for when impact noise is severe, when the floor and ceiling are part of the same complaint, when you are in a condo or apartment where assemblies matter, or when a renovation is already planned. That is usually the point where a contractor or acoustic specialist can stop you from spending money on partial fixes twice.
That is especially true once multiple rooms, flooring removal, open cavities, or a larger floating-floor build are on the table. If the fix is expanding into the whole floor-ceiling assembly, move into the between-floor path rather than treating it like a simple flooring upgrade.
The Bottom Line
How to soundproof a floor gets much easier once you match the fix to the noise type, the floor assembly, and the side of the structure you can actually control.
If the complaint is mostly footsteps and you control the upstairs surface, start with source-side coverage and underlayment decisions first.
If the floor is being rebuilt, use that access to add better separation, more mass, and cavity treatment where it belongs.
Blocking 100% of noise in a normal home is usually unrealistic without extreme construction. The practical goal is meaningful reduction, which usually means matching the fix to the path instead of expecting one surface layer to solve everything.
What is the cheapest way to soundproof between floors?
From the floor side, the cheapest move is usually to reduce impact at the source with rugs, dense pads, interlocking mats, and better floor coverage. If you are solving the whole floor-ceiling assembly rather than just the floor, use how to soundproof between floors for the broader path.
Is It Better To Treat The Floor Or The Ceiling Below?
If you control the upstairs floor, treating the floor is usually better because it stops vibration earlier. If you only control the room below, then the ceiling may be the more realistic side to improve.
How To Soundproof A Bathroom For Better Privacy
How to soundproof a bathroom can absolutely improve privacy, but only if you fix the path that is actually leaking the sound.
Bathroom soundproofing goes wrong so often because people throw soft décor at the room, hope the exhaust fan will hide everything, or buy a random product when the real leak is usually the door, the gap under it, the shared wall, the vent path, or the plumbing penetrations around the toilet side.
Bathrooms are brutally exposing because tile, mirrors, glass, hollow doors, and pipe cutouts give sound easy ways to bounce around the room and escape into the next space.
Get the diagnosis right and the bathroom usually improves faster than people expect. Better privacy often comes from a few targeted upgrades, not from trying to soften every hard surface you can see.
Below, you’ll figure out whether the main problem is the door, the shared wall, the vent path, or the plumbing route, which fixes matter most, and when a cheap privacy upgrade stops being enough.
Quick Takeaway
The best way to soundproof a bathroom is to fix the leak path in the right order: bathroom door gaps and the door slab first, shared-wall and pipe penetrations next, then vent, ceiling, floor, or window paths only if they are still carrying sound. Cheap fixes can improve privacy more than most people expect when the weak point is the door or an obvious penetration, but stronger results usually come from better sealing, added mass, damping, and smarter wall or pipe-chase treatment rather than soft décor or decorative acoustic products.
Diagnosing The Leak Path
The fastest way to improve a bathroom is to stop thinking about “soundproofing the whole room” at once.
In most bathrooms, one path is doing most of the leaking, and the next three sections show how to find it.
Start With The Sound You Are Hearing
Start with the kind of noise, not the kind of product.
Voices, toilet sounds, and general privacy leakage into a hallway usually point toward the bathroom door and its gaps, while flush noise, water rush, and vibrating supply or drain lines usually point toward the wall cavity, pipe chase, or the ceiling and floor route around the plumbing.
The same bathroom does not leak every sound the same way.
A door problem, a pipe problem, and a vent problem can all sit in the same room while needing completely different fixes.
Bathrooms also have a unique embarrassment factor that changes what readers actually want. Most are not trying to build a silent room.
They are trying to stop private sounds from reaching a hallway, a bedroom, a living room, or a neighboring unit. A bathroom guide has to stay focused on privacy paths, not generic room acoustics.
Hard Surfaces Make Privacy Feel Worse
Once you know what kind of noise is escaping, the room itself explains why it feels so harsh.
Hard, reflective finishes make ordinary sound feel more obvious than it would in a softer room. Tile, mirrors, stone, glass, and painted drywall bounce sound around instead of absorbing much of it.
That harshness is only half the problem.
Bathrooms also tend to have unusually weak transmission points, including hollow doors, large bottom gaps, unsealed pipe cutouts, vent openings, fan housings, and lightweight shared walls.
Then the plumbing makes the room even trickier. Water movement, flush noise, and pipe vibration can turn one side of the bathroom into a speaker if the cavity around the drain or supply path is light and leaky.
This is why a bathroom can feel louder than a bedroom of the same size even when the walls look similar. The surfaces are harder, the openings are leakier, and the mechanical noise is more aggressive.
Bathrooms Need Moisture-Safe Fixes
Those leak paths are obvious, but bathrooms also punish the wrong kind of fix.
Moisture, cleaning, and ventilation constraints change what actually makes sense here, which is why generic room-treatment advice usually falls apart. A product that is fine in a bedroom can become damp, dirty, or simply impractical in a bathroom very quickly.
Soft “soundproofing” ideas are often worse here than in other rooms. Fabric-heavy blockers, decorative absorbers, and blanket-style hacks do not age well in wet spaces and rarely match the actual leak path anyway.
Ventilation also stays non-negotiable. A quieter bathroom that traps moisture, mildew, and stale air is not a good upgrade.
So the right bathroom plan has to respect three things at once: privacy, moisture, and airflow. If you need the broader decision sequence for stronger upgrades, use how to soundproof a room as the master page.
The Fixes That Matter Most
Once the leak path is clear, the order matters more than the shopping list.
In most existing bathrooms, the biggest gains come from the door assembly first, then the shared wall or plumbing side, then the vent or fan path, and only then the secondary routes.
Door Leaks Usually Come First
The bathroom door usually wins the race to worst leak because sound behaves like air.
A hollow slab, big bottom gap, or loose frame often leaks more privacy than the wall beside it.
The door is usually the best-value first fix in a bathroom.
If the privacy problem is reaching the hallway or nearby bedroom, start there before spending money on the far wall.
After that, the bottom gap usually deserves the next dollar. A moisture-tolerant sweep like Door Sweep Brush Silicone Seal Strip is a more bathroom-appropriate choice than a soft draft snake.
A sealed door handles the hallway side, but it does nothing for a bedroom, nursery, office, or living room sharing the toilet wall.
When flushing and voices are still obvious after the door is improved, soft surfaces inside the bathroom may calm the room a little, but they will not add real isolation to a weak wall assembly.
The first wall move is not more décor. It is sealing the penetrations around trim, pipe cutouts, and any obvious gaps in the bathroom side of the partition.
Once the solid surfaces are less leaky, vents and fans become easier to judge honestly.
They can connect the bathroom to other rooms through a light, hollow path that is hard to control without hurting airflow. A bathroom fan can mask some noise while it is running, but masking is not the same thing as stopping sound from traveling.
A noisy vent path is tricky because you may hear privacy leakage through a grille, a ceiling opening, or a shared duct route even when the wall itself is not the main problem.
The wrong move here is choking ventilation to chase privacy. Bathroom airflow is still non-negotiable because moisture control comes first.
The better approach is to improve the stronger leak paths first, then evaluate whether the vent or fan route is still the obvious weak point. If that ceiling route is clearly involved, the next comparison is usually how to soundproof a ceiling or how to soundproof a vent.
Cheap Bathroom Soundproofing
Once the high-value fixes are clear, the budget version gets much easier to judge.
Cheap bathroom soundproofing works best when it targets one obvious weakness at a time instead of spreading a small budget across several weak ideas.
Cheap Wins Still Start At The Door
Cheap fixes help most when they close a real leak with something that still makes sense in a damp room.
Bathroom cheap fixes usually mean seals, sweeps, caulk, and targeted penetration work instead of anything soft or decorative.
The highest-value cheap move is often still the door. A product like Door Sweep Brush Silicone Seal Strip is usually smarter than a fabric draft blocker because it targets the bottom leak without introducing another soft piece at floor level.
The next cheap win is the frame and penetration sealing around the room. Weatherstripping, caulk around plumbing cutouts, and fixing obvious gaps at trim lines can change privacy more than people expect because they treat the actual leak path.
Bathroom cheap-fix logic overlaps with how to soundproof a room cheaply, but with stricter moisture rules. The materials still need to make sense in a bathroom, not just on paper.
Cheap Products Fail When They Miss The Leak
Those cheap fixes work because they target real leak paths.
Thin foam, soft décor that never reaches the real leak, and any product that promises major privacy gains without adding mass or improving sealing all fall into the hype category. Towels and rugs can soften the room a little, but they do not change a hollow bathroom door, a pipe cutout, or a shared wall enough to be treated as primary fixes.
Bathrooms punish bad advice quickly. A blanket-style stopgap, a soft door blocker that stays damp, or a decorative panel that never addresses the door and penetrations can make the room uglier without making it more private.
Bathroom soundproofing has to be more disciplined than bedroom soundproofing in some ways. The wet environment removes a lot of the “maybe this helps a little” products from the table.
The simplest bathroom rule is this: if it is soft, exposed, and not solving a real leak path, it is probably not your first buy.
Cheap Fixes Stop Working When The Structure Takes Over
With the hype cleared out, a cheap fix is often good enough when the privacy problem is moderate rather than extreme and one obvious gap is doing most of the damage.
In a bathroom, that usually means a better door perimeter, a real bottom seal, and a sealed set of obvious cutouts around the pipe side.
That is especially true when the issue is the hallway hearing too much rather than the wall assembly being dramatically weak. Small upgrades can make a bathroom feel far less exposed without opening any wall at all.
The limit shows up when flushing, voices, or water rush are still strong after the obvious leaks are improved. That is the room telling you the structure, the chase, or the partition itself needs more than a cheap sealing pass.
So cheap bathroom fixes are not fake. They just work best when they are moisture-safe and tied to a single weak path instead of spread everywhere.
Reducing Plumbing And Toilet Noise
Door and wall fixes solve most privacy complaints, but bathrooms have one extra layer other rooms do not.
Once flushing, water rush, and pipe vibration start dominating, the job shifts from privacy leakage to mechanical noise at the source.
Toilet Privacy And Toilet Noise Are Not The Same
Toilet sounds get out in two ways.
Airborne sound leaves through openings, while vibration and water noise travel through the nearby wall, floor, or pipe route. A better door seal can help more than people expect, but it is not the whole answer if the wall behind the toilet is also light and full of penetrations.
Readers often misdiagnose the problem here. They hear a flush in the next room and assume the whole bathroom is loud, when the real problem may be the toilet-side wall, the chase behind it, or one cutout around the pipe path.
If the goal is simply to reduce how obvious the bathroom sounds from outside, start with the door and shared-wall side. If the goal is to reduce the actual mechanical rush and vibration, the work usually has to move closer to the plumbing.
The best bathroom articles keep privacy leakage and plumbing noise related but separate. One is often about openings, while the other is often about the assembly around the source.
Pipes Can Turn One Wall Into A Speaker
Once the rush of water is louder than voices, the pipe route becomes the better suspect.
One bathroom wall can act like a speaker if the cavity around a drain or supply route is light, open, and poorly isolated.
If the wall or chase is already open, then the strategy usually becomes absorption plus mass plus better closure around the route. That is where mineral wool around the pipe and a better boxed-in assembly start to matter more than any exposed room-side fix.
Open The Wall Only When The Room Keeps Pointing There
Pipe wrap helps at the source, but sometimes the room keeps pointing back to the assembly around it.
When the bathroom shares a critical wall with a bedroom, nursery, or living area and the noise is still obvious after the door, gaps, and easy weak points have been improved, opening the wall or calling a professional becomes the next step. If recurring flush noise, pipe vibration, or water rush still dominates, the assembly around the plumbing route usually needs real work.
The same is true when the vent path or ceiling route is clearly involved. A bathroom over another quiet room can push the problem into the floor and ceiling structure faster than readers expect.
This is also where continuing to buy small accessories becomes the expensive option. Once the bathroom is clearly telling you the wall, chase, or ceiling is the real problem, the next move should be planned around that route instead of around whatever product looks easy.
Once you understand the routes, the mistakes become predictable.
Bathroom privacy is usually about leakage, mass, damping, and path control, not just softening the room a little.
Soft Decor Only Softens The Room
Soft décor changes the feel of the room faster than the privacy outside it.
A plush rug or extra towel can make the bathroom sound slightly less harsh inside, but it usually does very little for the actual leak path between the bathroom and the next room.
That mismatch is why so many bathroom privacy attempts feel disappointing. The room may sound a little less sharp inside while still leaking just as much through the door, vent, or wall cutouts.
Bathrooms are especially unforgiving here because the surfaces are so hard. Small internal comfort changes can be real, but they are rarely the main privacy fix.
So if the goal is privacy, décor belongs in the support category at best. The first money still belongs on leaks and weak assemblies.
Ventilation Is Not The Trade-Off
Once décor fails the privacy test, the next bad instinct is brute-force blocking.
Ventilation is non-negotiable because a quieter bathroom that traps moisture creates a different problem you do not want. Keep the bathroom functional while you improve privacy around it rather than treating airflow like an acceptable sacrifice.
Bad soundproofing advice becomes risky here. A bathroom is not a closet.
If a fix interferes with exhaust, airflow, or the room’s ability to dry out properly, it is not a stable solution. Bathroom upgrades have to work acoustically without breaking the room’s basic job.
The better bathroom strategy is tighter doors, better sealing, smarter wall work, and more thoughtful treatment of vents and chases rather than brute-force blocking.
The Door Usually Beats The Wall First
That airflow rule circles back to the same lesson as the rest of the article.
The door is often more important than the wall because it is usually lighter, leakier, and less sealed than the partition around it. In real homes, the hallway hears the opening before it hears the wall build.
A bathroom door fix can outperform more expensive wall ideas when the privacy leak is still basic. If the bathroom still needs more after a smart door upgrade, then the wall and plumbing side become the right next target.
How to soundproof a bathroom is really a leak-path prioritization problem. The best results usually come from fixing the bathroom door and its gaps first, then the shared wall or plumbing side, and only then the vent, floor, ceiling, or window path if the noise is still obvious.
If the issue is moderate, a cheap sealing pass can improve privacy more than most people expect. If flushing, voices, or pipe noise are still strong after that, the bathroom usually needs more mass, better damping, better sealing, or a stronger wall or chase strategy rather than softer décor.
Start by reducing the leak path first, especially the bathroom door gaps and the shared wall around the toilet side. If the sound is still strong after sealing and door fixes, the next step is usually the wall or pipe route rather than more soft décor.
Does rockwool soundproof?
Rockwool can help soundproofing when it is part of a proper wall or ceiling assembly because it absorbs energy inside the cavity. On its own, though, it is usually not enough to solve a bathroom privacy problem without better sealing, more mass, and a stronger overall assembly.
What is the cheapest way to reduce noise through walls?
The cheapest improvement is usually to seal obvious leaks and focus the budget on the one weak wall or opening doing most of the damage. If the wall is truly the path, cheap fixes can help a little, but stronger results usually need better sealing, more mass, or a better wall build.
What soaks up sound?
Soft and porous materials soak up sound best inside a room, which is why rugs, fabric, and absorptive panels can reduce echo. That is useful for room comfort, but it is different from bathroom soundproofing, which is mainly about stopping sound from leaking through the structure.
Sound Deadening Vs Soundproofing (What Actually Changes Noise?)
Sound deadening vs soundproofing confuses people because both sit under the same “noise control” umbrella, but they solve different failures.
That is why the wrong products get bought first. Foam gets bought for neighbour noise, and heavy barrier products get bought for echo, even though both can disappoint when they are solving the wrong problem.
The cleanest way to separate them is to ask one question first: are you trying to calm sound inside a surface or room, or stop sound from crossing into another space?
The sections below turn that one question into a practical filter, so you can match the fix to the noise instead of guessing from product labels.
Quick Takeaway
Sound deadening usually means calming vibration, ringing, or harshness in a surface or room, while soundproofing means reducing sound transmission between spaces. Deadening and absorption can make a room feel calmer, but they do not replace mass, sealing, insulation, and structural separation when the goal is blocking neighbor noise, traffic, TV sound, or leakage through a wall, door, window, ceiling, or floor. If your problem is echo, panel buzz, or resonance, think deadening or absorption. If your problem is sound getting through the building shell, think soundproofing.
If you want the fastest answer first, use this table before the deeper explanations.
If your actual problem is
Usually think
Why
What not to expect
Car door buzz, metal ringing, or a resonant panel
Sound deadening
The surface itself is vibrating too much
It will not soundproof the next room
Echoey office, bedroom, or studio
Absorption or deadening-adjacent treatment
The room needs calmer reflections
It will not stop neighbor noise by itself
TV voices or neighbors through a wall
Soundproofing
The problem is transmission through the assembly
Foam alone will not solve it
Traffic through a door or window gap
Soundproofing
Leakage and weak openings matter more than room treatment
A heavy blanket alone will not rebuild the opening
A room that leaks sound and also sounds harsh inside
Both
One problem is transmission, the other is internal acoustics
Fixing one does not automatically fix the other
The Core Difference
The fastest way to separate the two is by asking where the problem lives. Sound deadening changes how a surface or room behaves, while soundproofing changes how much sound gets through an assembly.
What Sound Deadening Does
Sound deadening mainly reduces ringing and vibration in a surface. That is why you see it in cars, metal panels, resonant boxes, and other places where the surface itself is part of the problem.
In room talk, people also use the phrase more loosely for making a space feel calmer or less harsh. That is where deadening starts overlapping with absorption and acoustic treatment, even though those are not identical ideas.
What Soundproofing Does
Where deadening calms vibration inside a surface, soundproofing attacks transmission. It tries to stop or reduce how much sound crosses a wall, door, window, ceiling, or floor in the first place.
That usually means more mass, better sealing, cavity treatment, and in stronger builds some form of separation or decoupling. That is why shared walls, bedroom windows, noisy doors, ceilings, and floors belong with how to soundproof a room, how to soundproof a wall, and how to soundproof windows rather than with generic deadening advice.
Why The Terms Get Confused So Often
Those two jobs are distinct, but product marketing collapses everything into “soundproofing.” A blanket, foam tile, weather seal, damping mat, and full wall rebuild get sold with similar language even though they do very different jobs.
The safer model is to separate three buckets: deadening for vibration, absorption for echo inside the room, and soundproofing for transmission through the structure. Once you label the problem correctly, the product choices get much easier.
When Sound Deadening Is The Right Fix
Once the job stays inside the room or inside the surface, deadening starts to make more sense than soundproofing. The best use cases are resonance, ringing, vibration, or a room that feels too sharp, buzzy, or reflective rather than poorly isolated from the next room.
Cars, Panels, And Resonant Surfaces
Thin metal panels, car doors, equipment housings, and lightweight enclosures often need deadening because the surface itself keeps vibrating after the original sound hits it.
In those cases, the goal is not room-to-room isolation. The goal is to calm the panel so the surface adds less noise of its own.
Echo And Room Harshness
Panel vibration is one side of the deadening story, but room echo sits closer to absorption and acoustic treatment. If a room sounds bright, fluttery, or fatiguing, the problem is often reflections inside the room rather than sound transfer through the structure.
That distinction matters because a room can sound calmer to you while still leaking plenty of sound to the next room. If you are deciding between internal treatment and true isolation, compare this page with best soundproofing panels and best soundproofing material.
Deadening Materials
Whether the target is a resonant panel or a harsh room, the materials share one trait: they calm vibration or reduce harshness rather than build a barrier. Think damping mats for resonant panels, softer absorptive layers for room comfort, and temporary heavy soft layers when you need a compromise rather than a rebuilt assembly.
A product like US Cargo Control Sound Dampening Blanket fits that middle ground. It can soften a space or add a temporary layer, but it does not replace a properly upgraded wall, door, or ceiling system.
When Soundproofing Is The Right Fix
Once the problem crosses from room behavior to building transmission, the answer changes. If voices, TVs, traffic, footsteps, or neighbor noise are getting through the structure, that is a soundproofing problem.
Shared Walls, Windows, Doors, And Ceilings
Shared walls, windows, doors, ceilings, and floors are the classic transmission paths in homes and apartments.
Those transmission paths demand materials chosen for airtightness, mass, cavity performance, or structural separation. That is why light decorative products underperform when the real job is blocking transmission.
Mass, sealing, and cavity work all point toward construction, which is why soundproofing usually costs more than surface-level deadening. Blocking sound transmission often means changing the assembly itself, not just adding something decorative to the surface.
That difference becomes practical only when you turn it into a decision rule. The safest way to choose is to match the symptom to the job instead of matching the product label to the marketing promise.
If your real problem is
Choose
Why
Typical next step
Car door buzz or a ringing metal surface
Sound deadening
The surface vibration is the problem
Apply damping to the panel itself
Echoey bedroom, office, or studio
Absorption or deadening-adjacent treatment
The room needs calmer reflections
Add room treatment, not fake soundproofing claims
Neighbor TV through a wall
Soundproofing
The problem is transmission through the assembly
Start with gaps, then upgrade the wall or opening
Traffic through a window or door
Soundproofing
The weak opening and leakage path matter most
Improve seals, then strengthen the opening
A room that leaks sound and sounds harsh inside
Both
One issue is transmission and one is internal acoustics
Fix the complaint that bothers you most first
Neighbor Noise
If the problem is neighbor noise, you are almost always in soundproofing territory. Start by finding the weak path, then work through seals, doors, windows, walls, or ceilings in that order instead of buying a soft panel and hoping for isolation.
Neighbor noise lands squarely in the soundproofing column, but echo, flutter, and a room that sounds sharp inside itself point the other way. You are trying to change how sound behaves inside the space, not how much escapes to the next one.
When You Need Both
Those two categories are not always either-or, because some spaces have two separate problems at once. A rehearsal room, home studio, office, or nursery can leak sound to the next space and still sound harsh inside.
In that case, handle the transmission problem with soundproofing and the internal comfort problem with absorption or deadening. Start with the complaint that matters most, because making a room sound calmer does not guarantee it leaks less sound.
Common Mistakes When The Two Get Mixed Up
Most wasted noise-control spending starts with diagnosis errors rather than bad installation. People buy a real product for the wrong job, then conclude that all noise control is hype.
Foam On A Wall
Foam does not soundproof a wall because it lacks the mass and structural role needed to meaningfully block transmission. It can absorb some sound inside the room, but it does very little against a serious shared-wall or outside-noise problem.
That is why foam can make a room feel a bit less harsh without changing what the next room hears. Those are two different outcomes, and the article needs to keep them separate.
Heavy Mats And Blankets
Foam fails the mass test, but heavy mats and blankets at least bring weight. They can help for temporary barriers, light damping, or softening a space, yet they still do not automatically seal leaks, strengthen openings, or decouple a wall assembly.
Both foam and heavy mats disappoint when the diagnosis is wrong, which is why the right question matters more than the right product. Ask three: is the real problem vibration in the surface, harshness inside the room, or sound crossing into or out of the room?
If it is vibration, deadening belongs in the plan. If it is reflections, think absorption.
If it is transmission, move toward soundproofing instead.
That one filter prevents most bad purchases. It also makes product claims much easier to read critically.
The Bottom Line
The most useful difference between sound deadening and soundproofing is that they fix different failure points. Deadening and absorption change the behavior of a surface or room, while soundproofing changes how much sound gets through the building assembly.
No. Sound deadening reduces ringing, vibration, or internal harshness, while soundproofing reduces sound transmission between spaces.
People use the terms loosely in marketing, but the jobs are not interchangeable.
Can sound deadening materials stop neighbor noise?
Not on their own. Deadening materials can calm vibration or make a room feel less echoey, but they do not add the mass, airtightness, or assembly changes needed for serious neighbor-noise control.
If the complaint is what you hear through the wall, door, window, ceiling, or floor, treat it as a soundproofing problem first.
Do you need both sound deadening and soundproofing?
Sometimes, yes. A room can leak sound to the next space and still sound harsh or echoey inside, which means transmission and internal acoustics both need attention.
In that case, soundproofing handles the leakage and deadening or absorption handles the comfort problem inside the room. Start with whichever failure point is causing the bigger daily annoyance.