How to Choose Acoustic Foam: The Only Specs That Matter
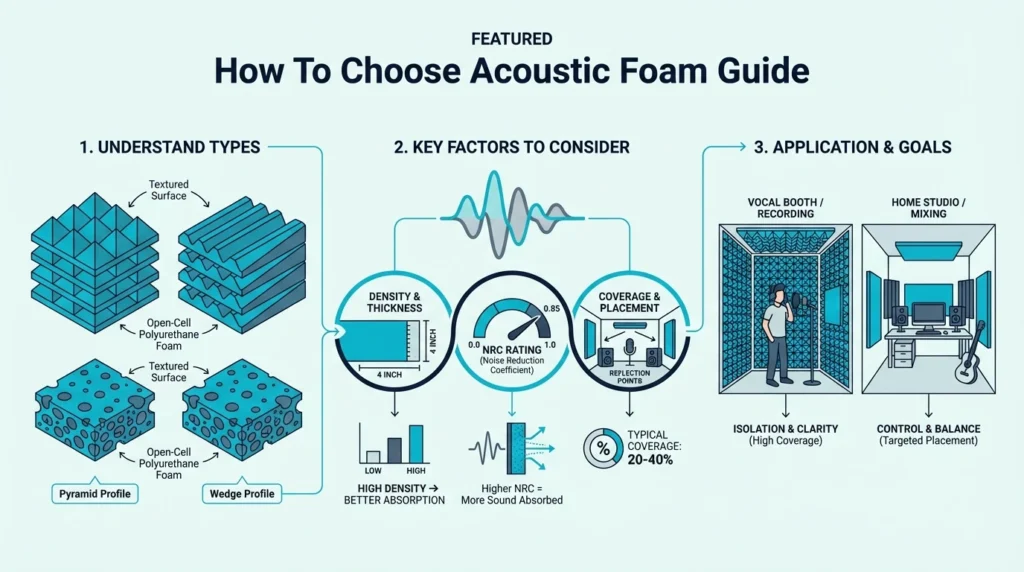
How to choose acoustic foam is easier once you stop thinking “foam = soundproofing” and start thinking “foam = echo control.” If your room sounds ringy, boxy, or harsh on a mic, foam can help — fast.
But if your problem is noise traveling through walls or keeping neighbors from hearing you, foam won’t move the needle. That’s construction (mass + sealing + decoupling), not something you fix with panels.
The real buying decision is matching foam specs to what you record and what your room is doing to the sound. Below is the quick takeaway, then a breakdown of what foam can and can’t do, which specs matter, and how to avoid the common “looks good, does nothing” traps.
Start with 2-inch acoustic foam and place it at first reflection points, not randomly. Plan on 12–24 panels for a first pass, then add only if the room still sounds splashy. Avoid ultra-cheap foam that feels weightless, because low density usually means weak absorption and faster collapse over time. If foam will live near outlets, lights, or hot gear, prioritize a product with a published fire rating.
What Does Acoustic Foam Actually Do?
Before you compare thickness or shape, you need a clean mental model of what foam can and can’t fix. Otherwise you’ll buy the right product for the wrong job.
What Foam Actually Does
Acoustic foam reduces reflections inside the room. That means less flutter echo, less “ring,” and cleaner recordings when your mic is picking up the room.
Foam works because sound can enter the open-cell structure. Once it’s inside, air movement rubs against the cell walls and bleeds off energy as heat.
This effect is strongest in the mid and high frequencies, where speech harshness and slap reflections live. The what is acoustic foam guide covers the science in more detail. That’s why foam can improve clarity without changing how “quiet” your room is to your neighbors.
If your main issue is boomy bass, thin foam won’t do much. For low-end control, bass traps are the right tool.
What Foam Cannot Do
Foam will not soundproof a room. It doesn’t add mass, it doesn’t seal gaps, and it doesn’t stop vibration traveling through walls.
So if your neighbor’s music bleeds through, foam won’t fix it. If your podcast is audible in the next room, foam won’t fix that either.
Soundproofing is a different system: mass, decoupling, and sealing. Foam is treatment for echo inside the room, not isolation between rooms.
If you want the full myth-busting breakdown, start here: does acoustic foam soundproof?. That one distinction will save you the most money.
What Specs Matter When Buying Acoustic Foam?
Once you’re choosing foam for the right job, the next mistake is buying based on looks or price. The foam that works and the foam that decorates can look identical in photos.
Here are the five specs that actually change what you hear, and how each one connects to a real problem like “hollow vocals” or “harsh reflections.”
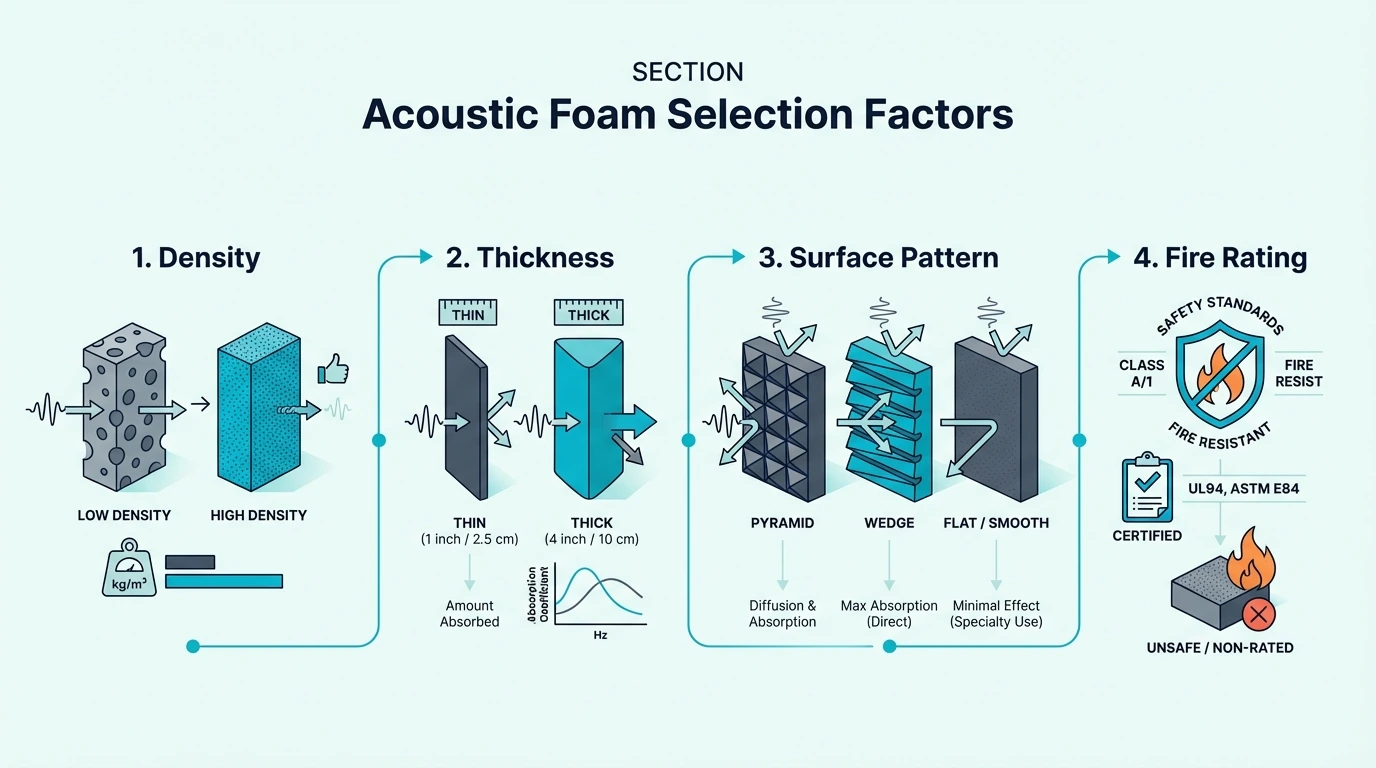
Factor 1: Thickness (Which Frequencies You Can Absorb)
Thickness controls how low the foam can absorb. That’s why 1-inch, 2-inch, and 4-inch foam can feel like totally different products.
Sound waves have physical length, so foam needs depth to slow the air down. A useful rule of thumb is quarter-wavelength: lower frequencies need thicker absorbers.
A 1-inch panel is mostly a high-frequency tool. It can tame “sizzle” and flutter, but it won’t touch the hollow 300–800Hz range that makes voices sound boxy.
2-inch foam reaches lower into the vocal range. For podcasts, voiceovers, and streaming, it’s usually the safest default thickness.
If you record instruments and you care about warmth, 3–4 inches at key reflection points can help the lower mids. The tradeoff is cost and bulk, so don’t buy it unless you actually need it.
The classic trap is buying 1-inch foam because it’s cheaper, then trying to fix a lower-mid problem it physically can’t absorb. If you hear “hollow” or “cardboard,” that’s usually not treble.
Factor 2: Density (Whether the Foam “Has Meat”)
If thickness decides which frequencies are in play, density decides whether the foam performs or just looks the part. Two panels can be the same shape and size and still absorb very differently.
Denser foam creates more friction as air moves through it. That friction is what steals energy from reflections instead of letting them bounce back.
The annoying part is that many listings don’t publish density. The practical workaround is weight—good foam feels surprisingly heavy for its size.
As a rough floor, under about 1.2 lbs/ft³ tends to compress and underperform quickly. Around 1.2–1.8 lbs/ft³ is a safer zone for most home setups.
Factor 3: NRC Rating (A Quick Reality Check)
NRC (Noise Reduction Coefficient) is one of the few objective specs you’ll see. Higher numbers generally mean less reflection energy gets bounced back into the room.
Budget foam often lands around 0.25–0.40. Mid-range foam is often closer to 0.50–0.70, which is where you start hearing obvious improvement.
Don’t obsess over one perfect number, because NRC is an average. Use it as a filter to avoid “mystery foam” that refuses to publish any data.
If a listing won’t show any test info at all, assume the numbers are not great. Good manufacturers publish their ratings because it’s a selling point, not a secret.
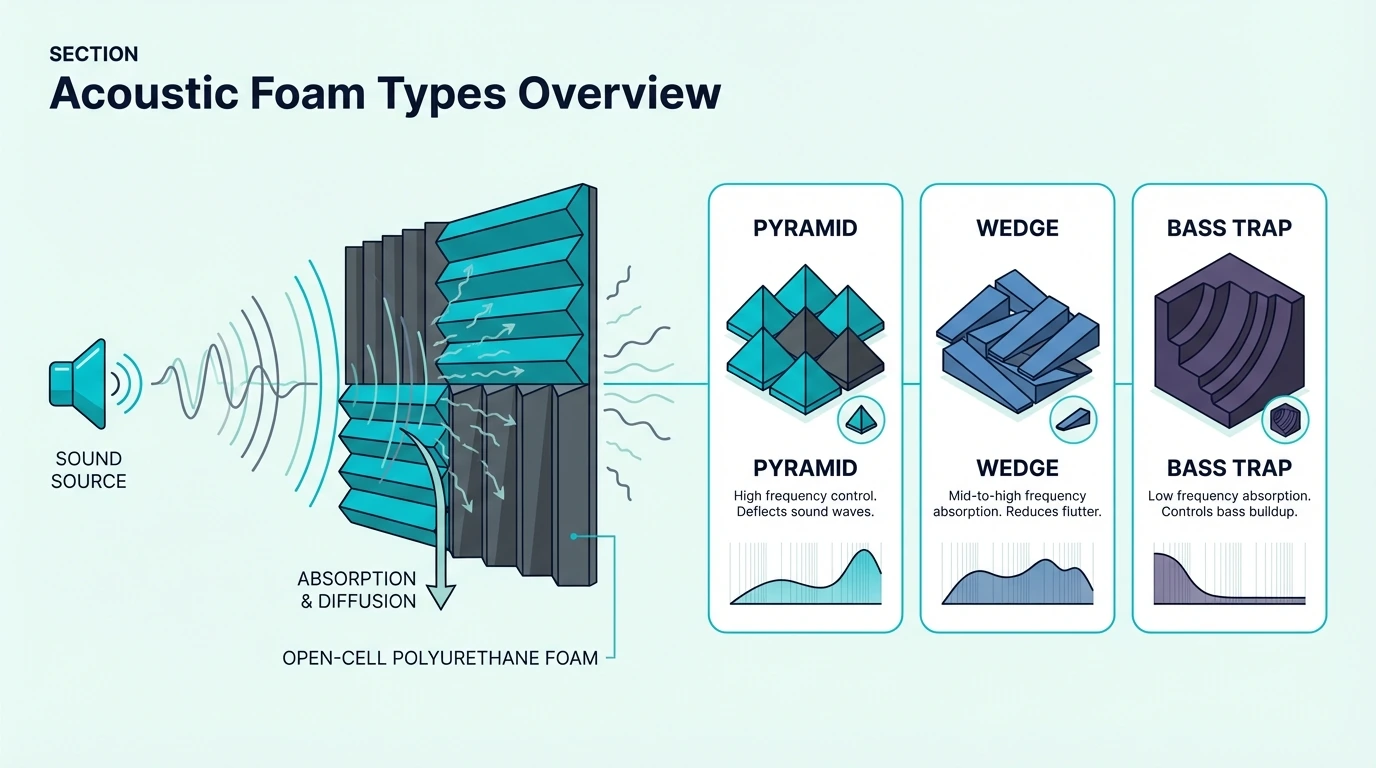
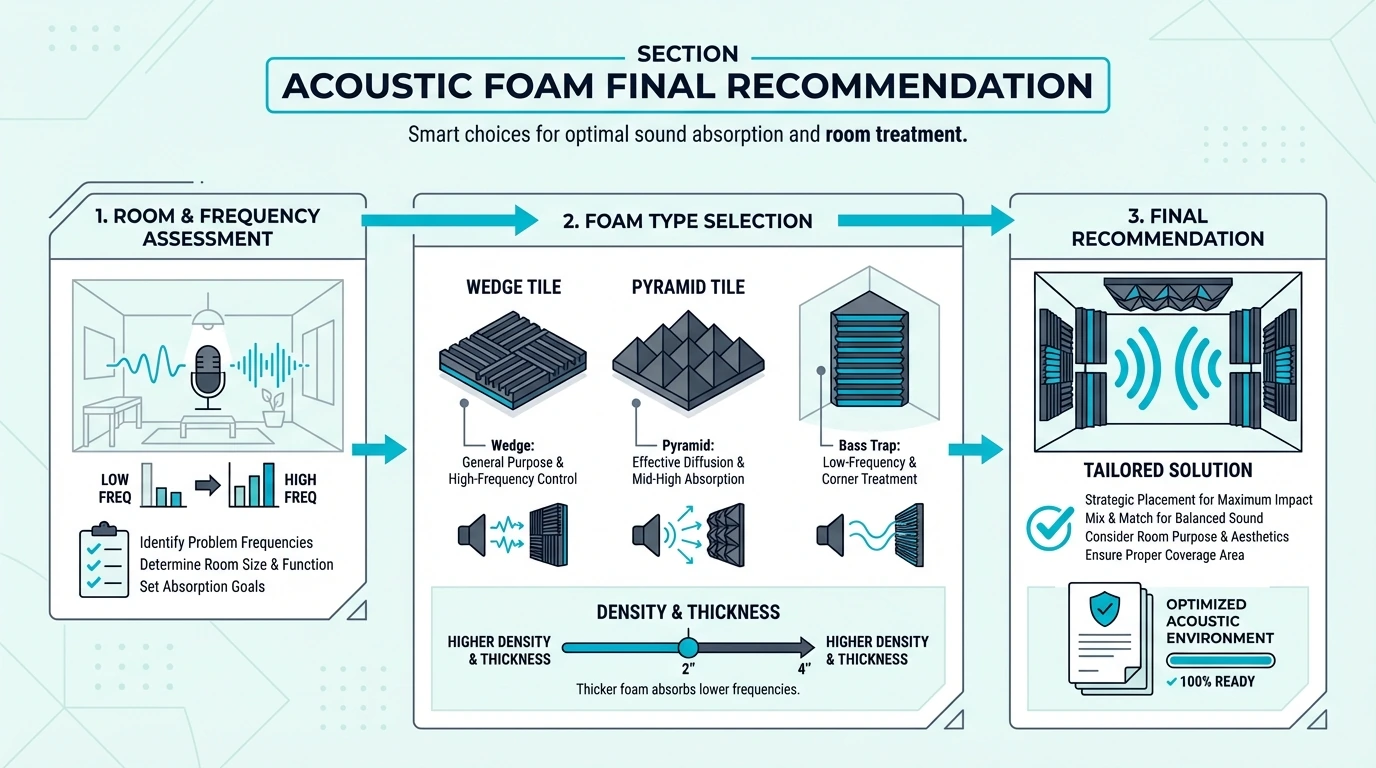
Factor 4: Shape (Usually Not the Decision-Maker)
Shape is the spec people argue about the most, but it’s rarely what makes or breaks results. At the same thickness and density, wedge vs pyramid vs egg crate is usually a small difference.
Pick shape based on what fits your room and what you can mount cleanly. If you want the nerdy breakdown, the pyramid vs wedge comparison covers it.
Factor 5: Fire Rating (Don’t Guess)
If you’re mounting foam near outlets, lights, or gear that runs hot, fire rating matters. Untreated foam can ignite and spread flame faster than most people expect.
For permanent installs, look for a published fire rating (often referenced as Class A / ASTM E84). Even in a home setup, documented material beats “random cheap foam” every time.
If a listing doesn’t show a fire rating, treat that as missing information—not as a green light. Use the manufacturer’s documentation first, then narrow your options by thickness and coverage.
Get Studio Tips Weekly
Join 5,000+ creators getting acoustic treatment advice every week.
No spam. Unsubscribe anytime.What Acoustic Foam Should You Use for Each Room?
Now that the specs make sense, here is how the decision plays out in real rooms. The right foam choice depends less on “best product” and more on what your mic and speakers are picking up in your space.
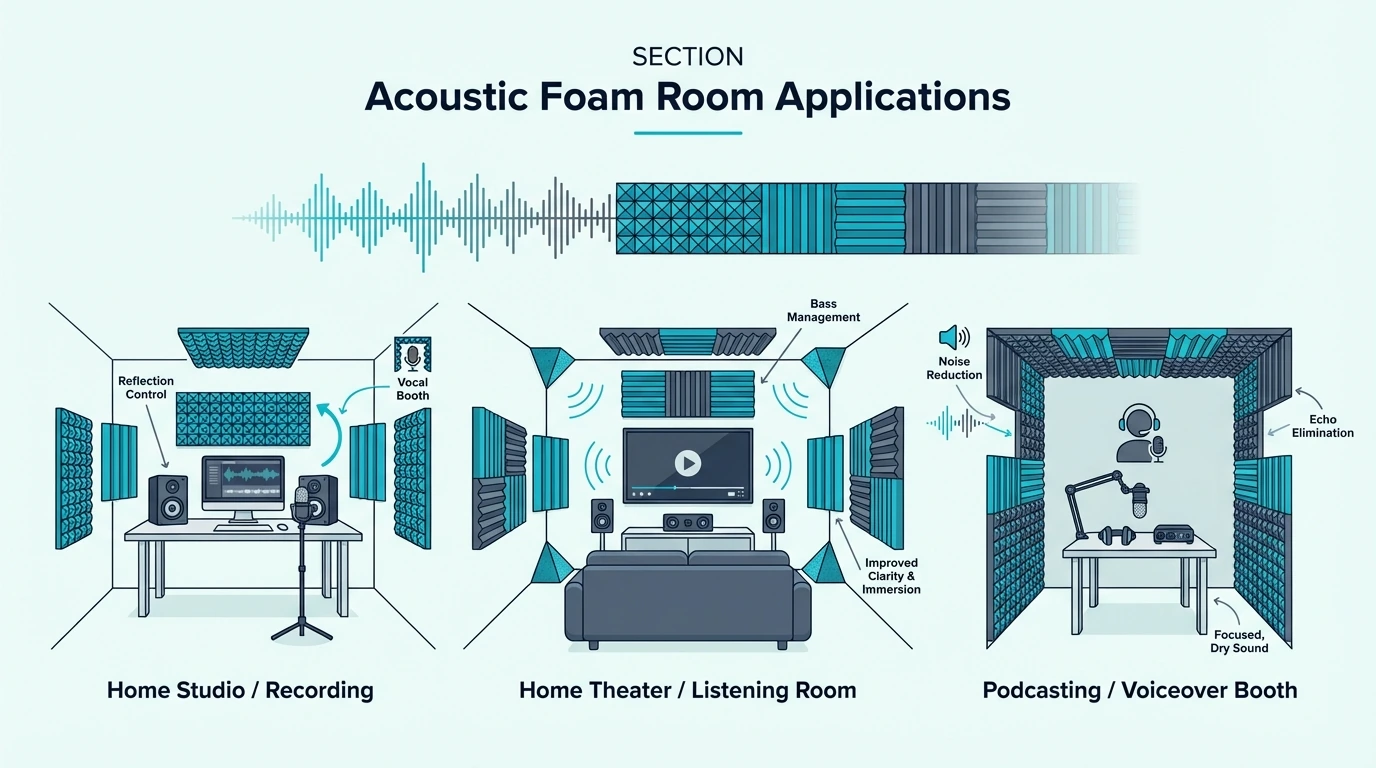
Home Recording Studios
Studios ask the most from acoustic treatment because you’re capturing everything. If you can hear the room in your takes, the room is part of the recording.
For most home studios, 2-inch foam is the minimum baseline. If you’re chasing warmth and reducing boxiness, 3–4 inches at key reflection points can help the lower mids feel less messy.
Don’t ignore corners if bass is part of your sound. Foam is not a bass solution, so pair it with bass traps if low end is boomy. If you want a foam-based corner add-on for early reflections, JBER Column Acoustic Wedge Corner Blocks can help in corners without pretending to solve bass on their own.
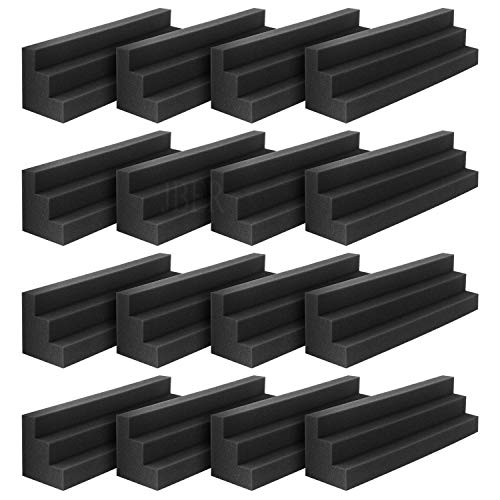
JBER Column Acoustic Wedge Corner Blocks
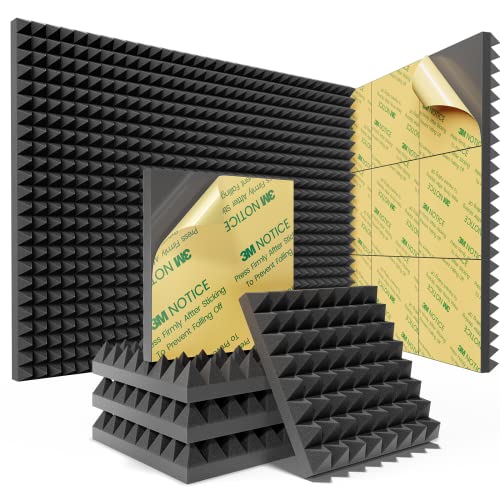
If you want a simple, solid 2-inch starting kit, Blue Pyramid Sound Proof Foam Panels (24-Pack) hits the thickness sweet spot without overthinking it. Start with reflection points, then decide if you need more coverage.

Blue Pyramid Sound Proof Foam Panels (24-Pack)
Podcast and Voiceover Rooms
Voice work is more forgiving than music because you’re dealing with a narrower range. If your room is small and hard-surfaced, you mostly need to tame mid/high reflections that make speech sound splashy.
That usually means treating behind the mic and the first reflection points to the sides. You don’t need full-room coverage to hear a big improvement.
If you’re starting on a tight budget, a small pack like Sonicism 12 Pack Pyramid Sound Proof Foam Panels is a quick “test the concept” option. If your voice still sounds hollow or your room is stubbornly reflective, move up to 2-inch foam next.
Sonicism 12 Pack Pyramid Sound Proof Foam Panels
For a deeper podcaster-specific setup, see best acoustic foam for podcasts. It’ll help you avoid overbuying and placing panels where they don’t matter.
Streaming and Gaming Rooms
Streaming is an audio problem and a camera problem. Foam everywhere can fix echo but make your background look cheap.
Treat the area around your mic first, especially the wall behind it. If foam will be visible, choose shapes and colors that look intentional, not like an afterthought. The how to decorate with acoustic foam guide covers layout and color tips.
Home Offices
For Zoom and video calls, the goal is simple: stop the room from sounding like a hallway. A few panels behind your desk and on the wall you face can remove that “untreated room” signature fast.
Start small and listen to a recording of your own voice on a call. The best budget acoustic foam guide has affordable picks for office setups. If the room still feels reflective, add a little more near the spots where sound bounces back at you.
Home Theaters
Home theaters are a two-problem room: dialogue clarity and bass control. Foam helps the first part, but it won’t fix low-frequency buildup on its own.
Treat first reflection points on walls and ceiling, then handle bass with corners and placement. If you’re dealing with vibration through the floor, that’s a different problem than echo.
How Much Acoustic Foam Do You Need?
Here’s the shortcut: start with 12–24 panels and see what changes. Strategic placement of 12 panels can beat random placement of 50.
The “calculate your wall area and pick a percentage” method sounds scientific, but it often leads to overbuying. Foam works best when you treat reflection points first, then expand only if the room still sounds live.
The Real-World Approach
Most home recording problems come from a few spots. Treat the wall behind your mic, then the side walls at ear level.
Record something after each change and listen. If the room still rings, add ceiling treatment above your position.
This iterative approach costs less and usually sounds better than covering every surface. Over-treated rooms can feel unnaturally dead, especially for spoken word.
Room Size Guidelines (A Practical Starting Point)
For a typical bedroom or small office (roughly 8×10 to 10×12 feet), here’s a sane starting range. Treat reflection points first, then add coverage only if you still hear echo.
Minimal treatment is often 12–18 panels. This is usually enough for podcasting and streaming when you place them correctly.
Standard treatment is often 24–36 panels. This is where most home studios land once they start listening critically.
Full treatment can be 48–80 panels depending on room size and how “dead” you want it. It’s often overkill for voice-only recording. If you already know the room needs broad coverage, a bulk pack like Knightsacoustic 96 Pack Sound Proof Foam Panels is easier to plan around than stitching together random small packs.

Knightsacoustic 96 Pack Sound Proof Foam Panels
Remember the thickness and density discussion from earlier. Twenty-four quality 2-inch panels can outperform forty-eight flimsy 1-inch panels.
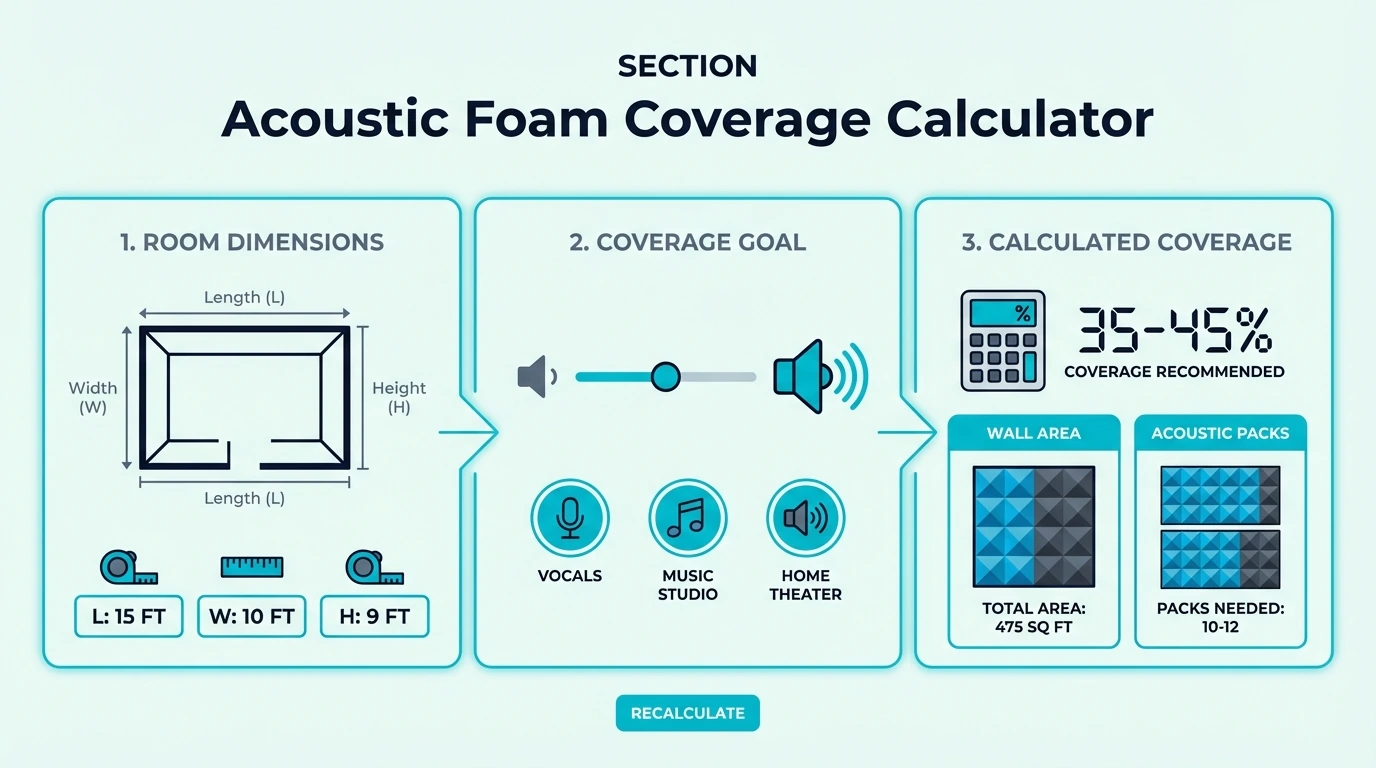
The Formula (If You Want to Estimate Coverage)
If you prefer calculating, start with total wall area: (length × height × 2) + (width × height × 2). Then treat 25–35% of that for moderate control, or 40–60% for heavier treatment.
For example, a 10×12 room with 8-foot ceilings has about 352 square feet of wall area. At 30% coverage, that’s about 105 square feet (roughly 105 standard 12×12 panels).
Use that number as an upper bound, not your first purchase. Most people should start with 24 panels at reflection points and grow from there.
Where to Start (Priority Order)
The specs tell you what to buy. Placement decides whether it works.
Start with the wall behind your microphone or monitors. Then treat the side walls where reflections hit your ears, followed by the ceiling above your position.
After each addition, test a recording or clap test and listen for the tail. You might find that 18 well-placed panels solve your problem without needing more.
Is Cheap Acoustic Foam Worth It?
Now that you can read thickness, density, and fire rating like a grown-up, price tiers make more sense. Cheap foam usually cuts density and documentation, and that shows up as weaker absorption and faster collapse.
The goal isn’t “buy expensive.” The goal is “buy foam that actually behaves like absorption instead of decoration.”
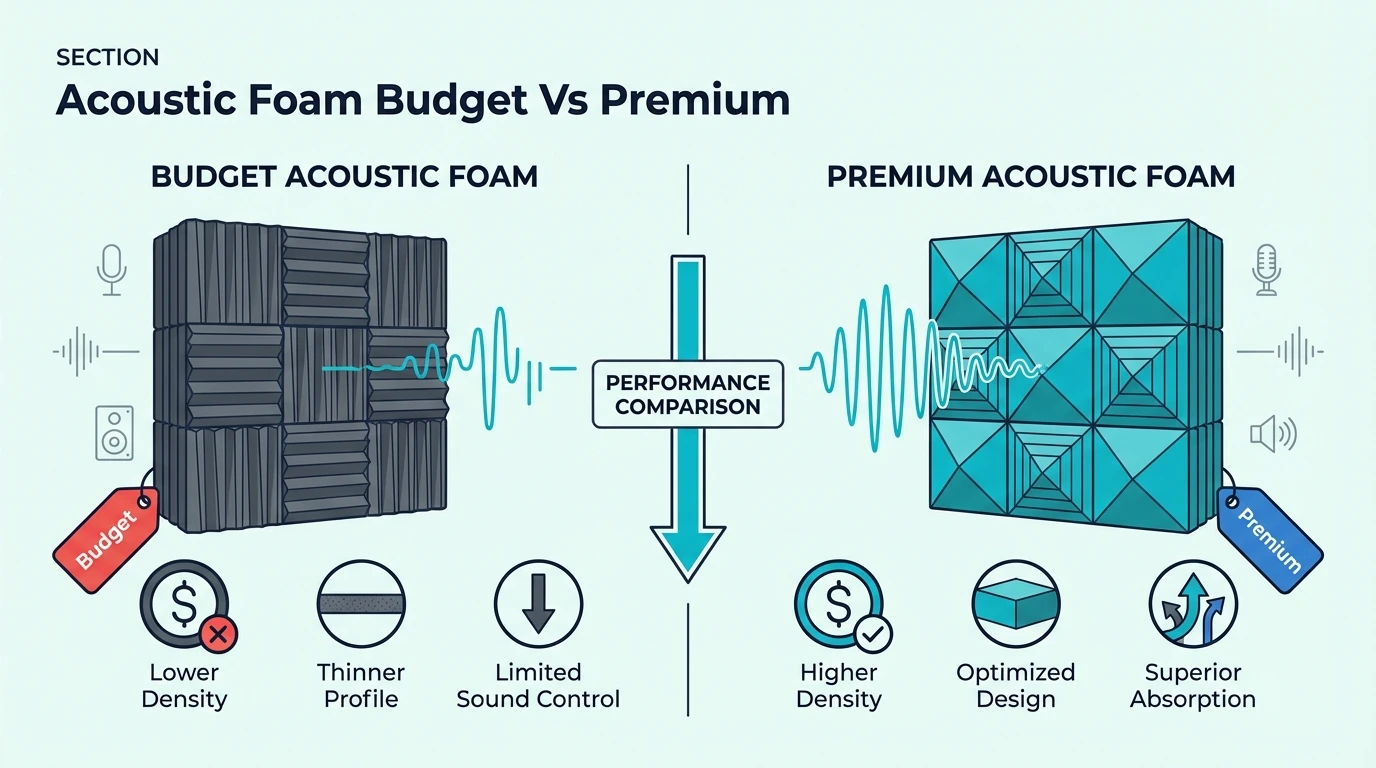
Budget Foam (Useful, With Limits)
Budget foam can be a good way to test whether treatment helps your room. It can also be fine for small improvements when expectations are realistic.
The downside is that very low-density foam can underperform from day one. It also tends to compress and lose effectiveness faster over time. If you want a budget listing with lots of review history, 52 Pack Acoustic Panels High Density Sound Foam is the kind of option worth comparing before you fall for mystery foam with no specs at all.
52 Pack Acoustic Panels High Density Sound Foam
Mid-Range Foam (The Best Value Tier)
Mid-range foam is where most people should aim if they care about results. This is where density and absorption start to feel consistent instead of “hit or miss.”
It’s also where you’re more likely to see published specs and basic safety documentation. That’s a big deal if foam will stay mounted long-term.
Premium Foam (When Consistency Matters)
Premium brands usually sell consistency, documentation, and fire certification. That matters in commercial installs and pro studios where you can’t afford surprises.
For most home setups, the audible jump from good mid-range to premium is smaller than the price jump. If you’re building a business studio, premium makes more sense.
The Bottom Line on Quality
If you’re serious about recording, aim for mid-range as a minimum and buy enough thickness to match your use case. If you’re unsure, start small to test placement and upgrade once you know what changes your room.
What Mistakes Should You Avoid When Buying Acoustic Foam?
Once you understand the specs, the biggest failures come from execution. These are the mistakes that make people say “foam doesn’t work,” even when foam wasn’t the problem.
Mistake 1: Buying Based on Price Alone
The cheapest foam often costs more long-term. Low-density foam compresses, degrades, and delivers weak absorption from the start.
Spending a little more for real density usually delivers a bigger improvement than buying more cheap panels. If you want value guidance, see is acoustic foam worth it?.
Mistake 2: Ignoring Thickness Requirements
This is the big one: people buy 1-inch foam because it’s cheap, then wonder why vocals still sound hollow. Hollow lives in the lower mids, and 1-inch foam isn’t built for that.
Match thickness to what you’re recording, not to your budget. If you want a deeper breakdown, the acoustic foam thickness guide explains the tradeoffs clearly.
Mistake 3: Over-Treating the Room
More foam isn’t always better. Rooms that are heavily covered can feel unnaturally dead and uncomfortable.
Start with reflection points and build slowly. It’s much easier to add panels than to remove them after you’ve mounted everything.
Mistake 4: Expecting Soundproofing
No amount of foam blocks sound transmission. If noise isolation is the goal, foam is the wrong product entirely.
The quickest fix here is mindset: foam is absorption, not blocking. Re-read does acoustic foam soundproof? if you’re on the fence.
Mistake 5: Random Placement
Foam scattered randomly across walls wastes material. Strategic placement at reflection points gives you more improvement with fewer panels.
Use the mirror trick to find first reflection points, then treat those. For a full map, see the acoustic foam arrangement guide.
The Bottom Line
Choose acoustic foam based on what you record and what the room is doing to the sound. For most voice-focused setups, 2-inch foam placed at reflection points is the safe “start here” move.
Use thickness and density to avoid buying decoration, and treat fire rating as a real spec if foam will live near gear. If you want curated picks, start with best acoustic foam panels, and if you want placement maps, start with the acoustic foam arrangement guide.
Frequently Asked Questions
What thickness acoustic foam do I need?
For voice (podcasts, streaming, voiceovers), 2-inch foam is usually the safe default because it reaches into the core vocal range. For music, 3–4 inch at first reflection points can help the lower mids feel less boxy.
1-inch foam is mostly a high-frequency tool, so it won’t fix hollow lower mids. If you’re buying only one thickness, skip 1-inch.
How do I know if foam is good quality?
Look for real thickness, real weight, and real documentation. If you can find density, aim for roughly 1.2–1.8 lbs/ft³ for most home setups.
If a listing won’t publish any useful specs, assume it’s decoration foam. A decent NRC number and a clear fire rating are both good signs.
Is expensive foam worth it?
Good mid-range foam usually gives you most of the audible improvement. Premium foam makes more sense when you need consistency and fire documentation for a permanent install.
How many panels do I need?
Start with 12–24 panels and place them at reflection points (behind the mic, side walls, and ceiling above you). Add more only if the room still sounds live after you test recordings.
Does foam shape matter?
At the same thickness and density, wedge, pyramid, and egg crate foam are usually close enough that you won’t hear a notable difference. Choose shape based on aesthetics and what installs cleanly.
Can I use foam for soundproofing?
No. Foam absorbs reflections inside a room, but it doesn’t block sound between rooms.
If you need soundproofing, you’re looking at construction (mass, sealing, decoupling), not surface foam. Start with does acoustic foam soundproof? to see what works and what doesn’t.

