How to Install Auralex Acoustic Foam: Complete Step-by-Step Guide
How to install Auralex acoustic foam comes down to planning, prep, and a mounting method that matches your walls. It won’t soundproof your room, but it can reduce flutter echo and tame harsh reflections when it’s placed correctly.
A clean install reduces flutter and slapback, and it keeps panels from peeling off a week later. Start by mapping your first reflection points, then prep the wall and choose a mounting method that matches the surface.
If you’re deciding between spray, tube adhesive, or removable options, the best adhesive for acoustic foam guide helps you pick without wrecking your paint. That choice also determines how easy removal will be and how clean the finished layout looks.
Mark your reflection points first, prep the wall, then mount the foam using a method that matches your surface and how removable you want the setup to be. The biggest mistake is skipping layout and surface prep, which leads to crooked rows, weak adhesion, and panels peeling off later.
What Should You Plan Before Installing Auralex Foam?
Proper planning prevents wasted panels and poor results. It also keeps you from chasing problems later with random placement and extra adhesive.
Assess Your Room
Start by listening to the room the way your mic will. Talk at normal volume, clap once, and pay attention to any quick “zing” or flutter that comes back from parallel walls.
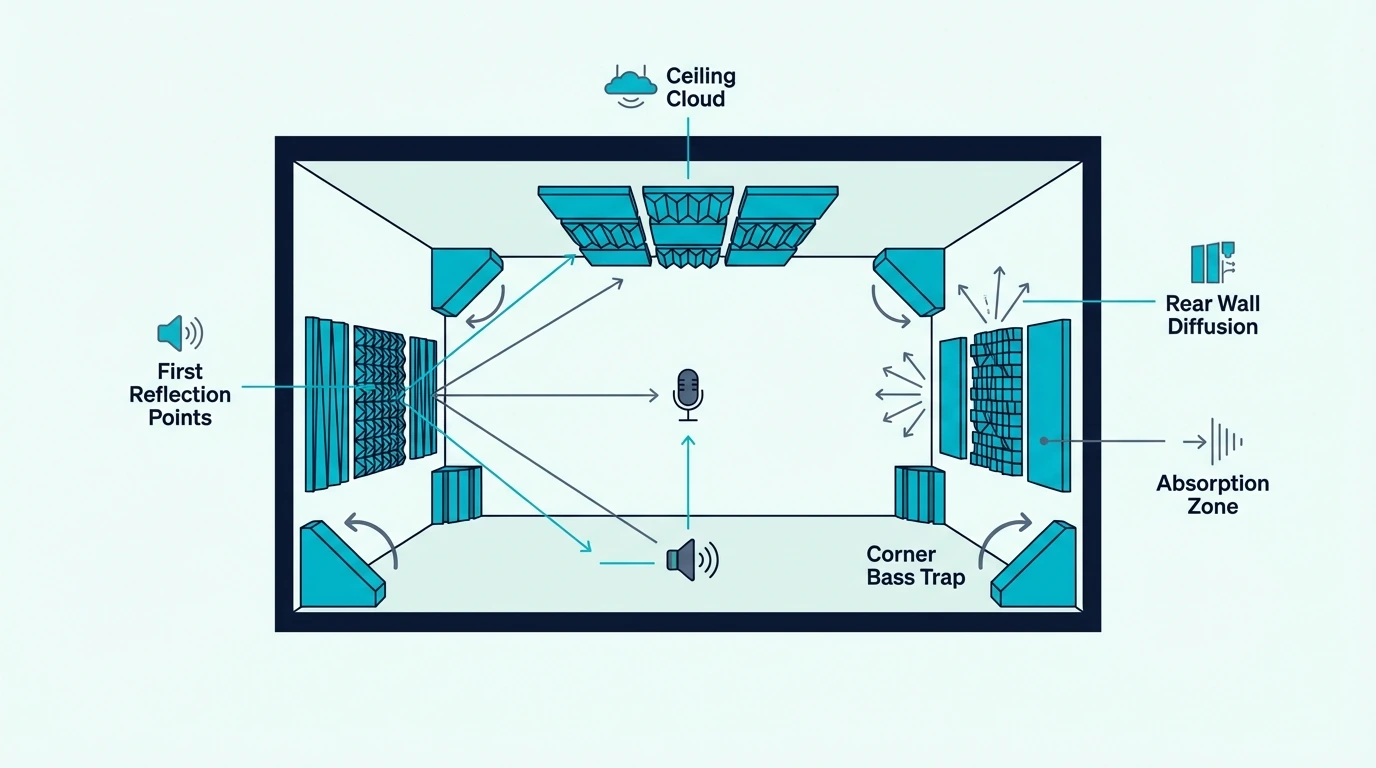
If you mix on monitors, your first reflection points on the side walls are the biggest early win. If you record vocals, the wall behind the microphone and the hard surfaces near the mic tend to matter most.
For monitor setups, the mirror trick is the fastest way to find first reflection points. Sit in your listening position and slide a mirror along the side wall, and treat the spots where you can see your speaker in the mirror.
If your mic is close to a desk, a bare tabletop can reflect straight into the capsule and make vocals sound harsher. In that case, move the mic away from the desk edge or add soft coverage to break up that bounce.
Calculate Coverage Needed
For voice recording, you can usually start with treatment focused around the mic position and the wall the mic “sees” behind it. For music production and mixing, prioritize the side-wall reflections from your monitors and consider a few panels overhead.
For general echo control in a multipurpose room, spread coverage across the most reflective surfaces instead of concentrating it on one spot. Auralex panels come in various sizes, so measure your target areas first and then convert that into the number of panels you need.
A simple way to estimate is to choose the “problem zone” you’re fixing and measure it in square feet. In a small bedroom studio, starting with a handful of panels at first reflection points and behind the mic is often more noticeable than buying a large pack and placing it randomly.
Once flutter echo is reduced, you can add panels in small batches and re-test instead of guessing at a final coverage number on day one. For help selecting the right Auralex products, see the best acoustic foam for recording guide.
Plan Your Layout
Before you open adhesive, do a quick dry-fit so you’re not making layout decisions with glue on your hands. Lay the panels on the floor in the pattern you want, then measure spacing so rows stay consistent.
Mark panel corners with painter’s tape and use a level to keep lines straight. Step back from your listening or recording position and confirm the pattern looks square and intentional.
If anything looks off, adjust now, because most mounting methods aren’t forgiving once you commit. A quick phone photo from across the room makes crooked rows obvious.
Gather Tools and Supplies
You don’t need a full contractor kit, but having the basics staged keeps you from rushing alignment while adhesive is setting. At minimum, have painter’s tape, a measuring tape, a level, a clean cloth, and drop cloths ready.
If you’re using spray adhesive, add a respirator or mask and plan for airflow so fumes don’t build up. For ceiling installs, a helper and a step stool make the job safer and prevent panels from shifting while the bond grabs.
For placement strategies, see the how to arrange acoustic foam guide. It shows where foam actually matters most for both recording and mixing.
Which Adhesive Works Best for Auralex Foam?
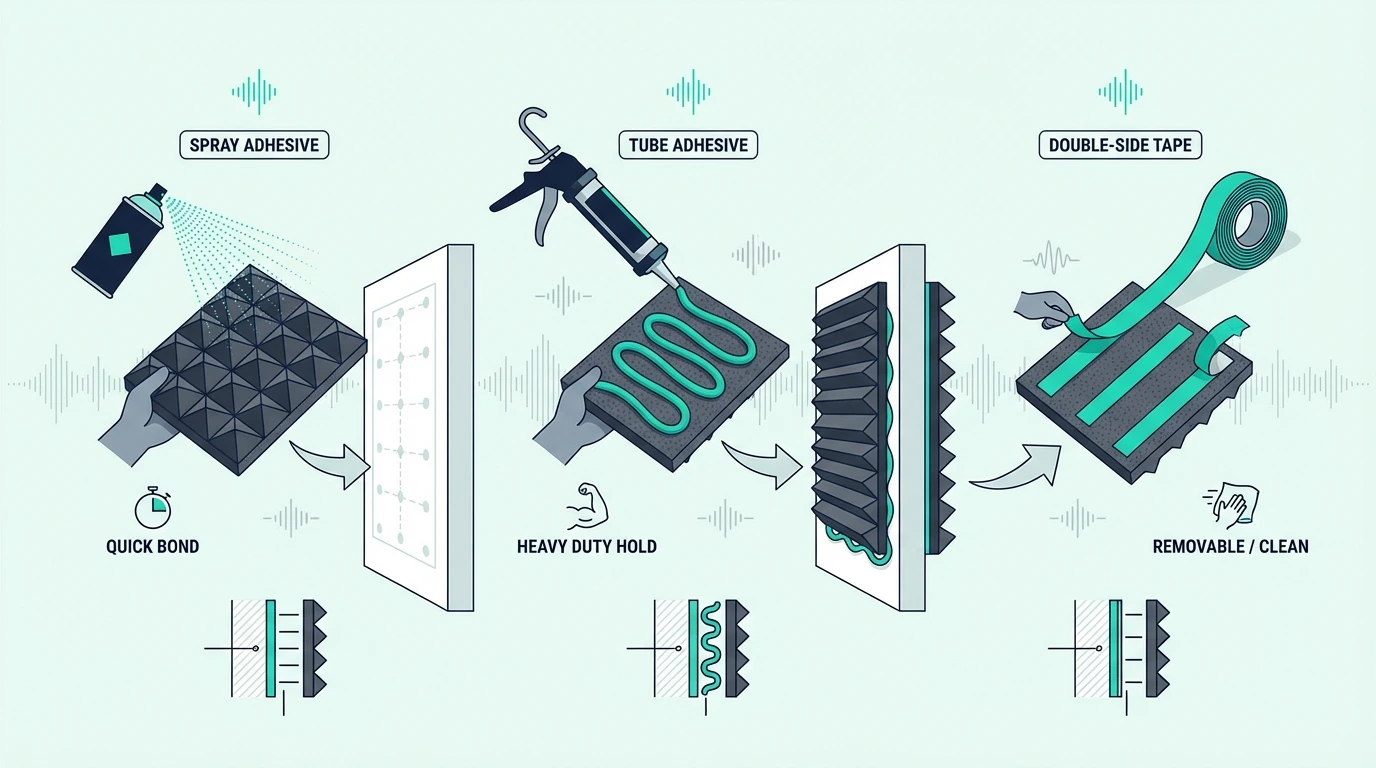
The adhesive you choose determines how strong the bond is, how easy removal will be, and whether you damage the wall. Here are the main options ranked by permanence.
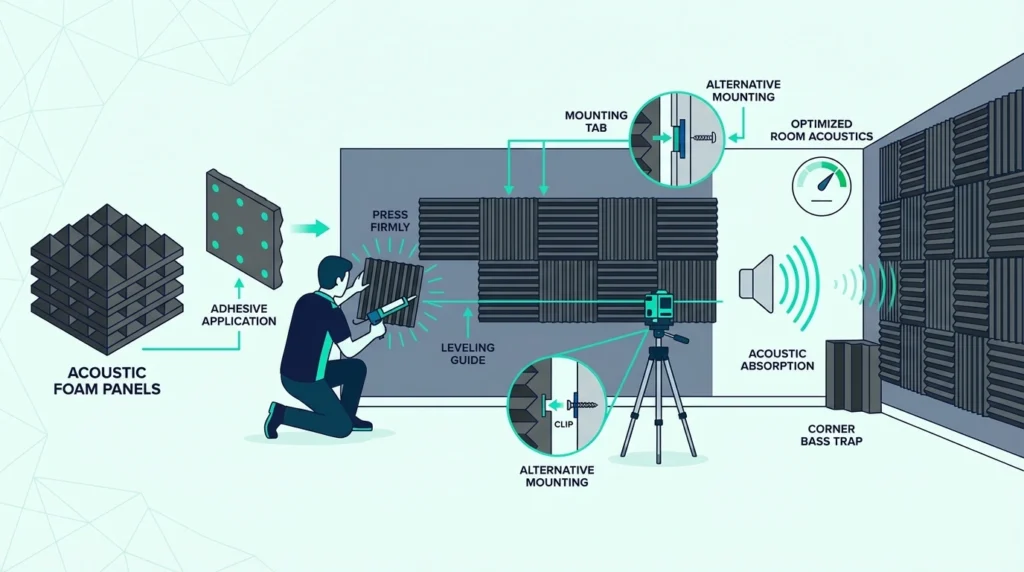
Auralex Tubetak Pro (Recommended)
Auralex Tubetak Pro is the brand’s tube adhesive designed specifically for studio foam. If you want the “known quantity” option for a long-term setup, Auralex Tubetak Pro is a solid default.

Auralex Tubetak Pro
The tradeoff is permanence. Once it cures, removal usually means paint damage and sometimes drywall paper coming with it.
Use small beads or a light zigzag pattern on the back of the foam, and avoid the outer edge to keep squeeze-out from showing. Press firmly and hold for a moment, because most “falling panel” failures come from not getting full contact across the back surface.
3M Super 77 Spray Adhesive
The 3M Super 77 Multi-Surface Spray Adhesive is a common pick for foam installs because it grabs quickly and spreads evenly. It’s a good fit when you want consistent coverage across many tiles without squeezing tube adhesive all day.
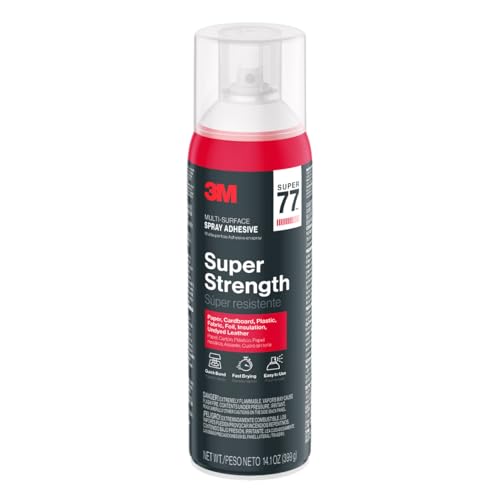
3M Super 77 Multi-Surface Spray Adhesive
It’s also practical when you’re doing a larger layout and don’t want to squeeze out tube after tube. Treat it like a paint job.
Mask edges, ventilate the room, and apply a light, even coat so you don’t end up with wet glue bleeding through the foam. For best grip, spray from a consistent distance and aim for coverage that looks misted, not soaked.
If you can smell strong fumes immediately, you usually need better airflow, not more adhesive. In most rooms, better ventilation improves both bonding consistency and comfort.
Removable Mounting (Renter-Friendly)
If you need to move later or you’re renting, aim for a method that doesn’t bond foam directly to the wall. The cleanest approach is to mount foam to thin backing boards, then hang the boards.
To keep boards level and easy to remove, aluminum Z-hanger wall-mount brackets give you a repeatable, straight layout. They’re especially helpful if you want perfect rows and the option to take the treatment down later.
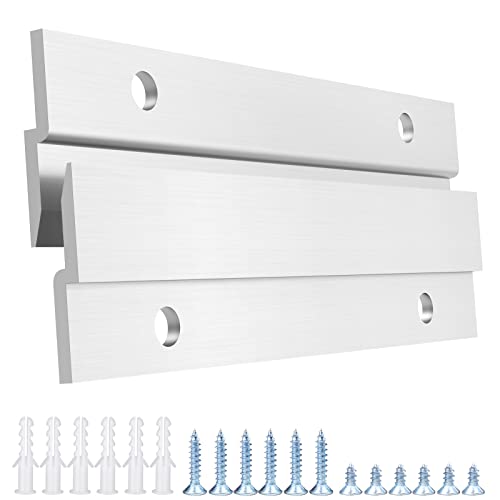
aluminum Z-hanger wall-mount brackets
If you want a simpler approach for lightweight foam on smooth painted walls, Command large picture hanging strips can work. They still depend on a clean surface, so prep matters just as much as it does with permanent adhesives.
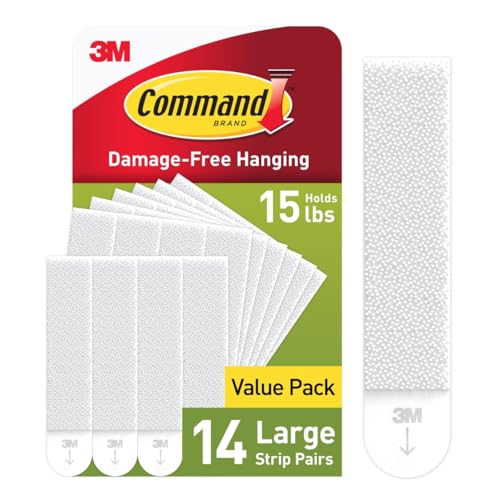
Command large picture hanging strips
Impaling Clips
Impaling clips are a middle-ground option when you can tolerate small wall holes. You mount the clip to the wall, then press the foam onto the spikes.
They work best when you want foam panels to be removable without redoing adhesive every time. They’re also useful on surfaces where spray adhesive doesn’t bond consistently.
If you’re using drywall anchors, place clips so the panel stays flat instead of bowing at the corners. For most tiles, using multiple clips is more reliable than relying on one center point.
Get Studio Tips Weekly
Join 5,000+ creators getting acoustic treatment advice every week.
No spam. Unsubscribe anytime.How Do You Prepare Walls for Auralex Foam?
Proper surface prep ensures adhesive bonds correctly. If foam is “mysteriously” falling off later, it’s almost always prep, not the brand of adhesive.
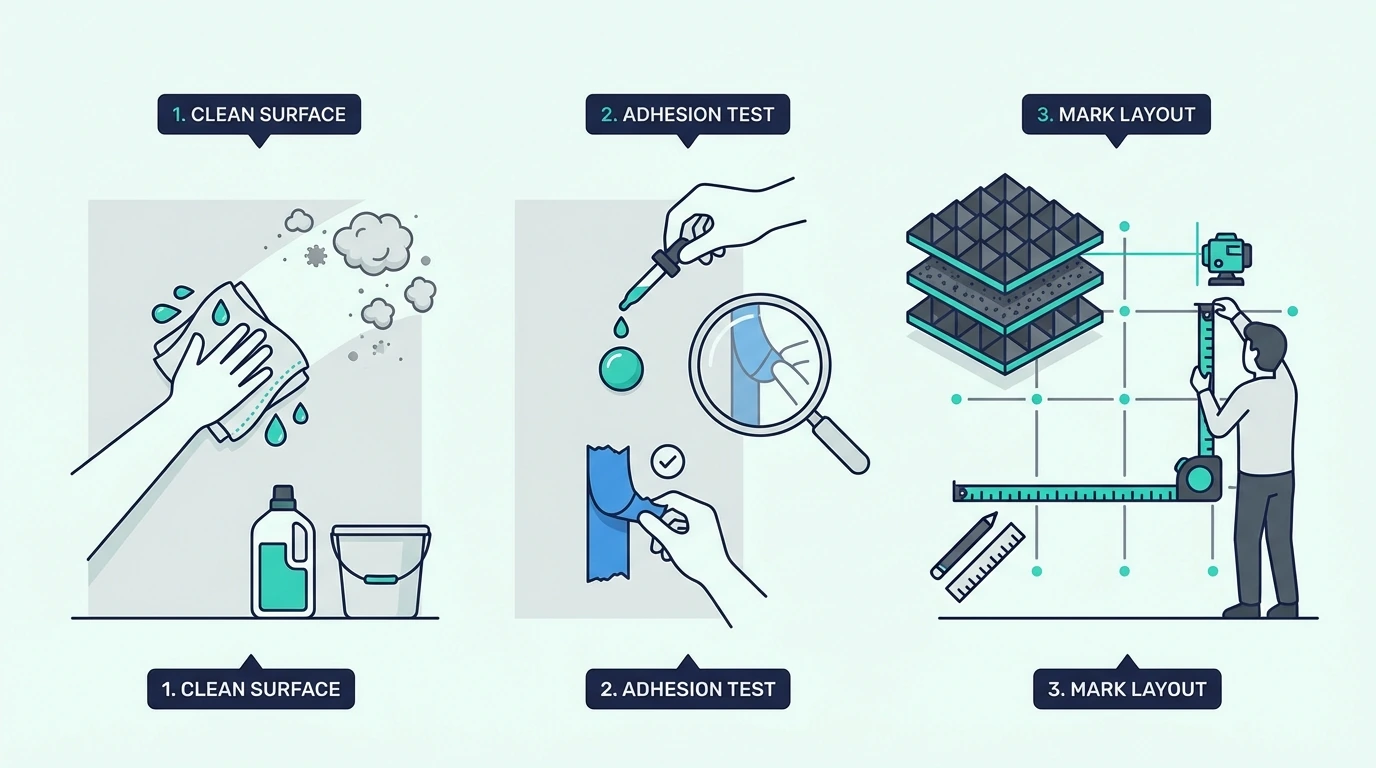
Clean the Surface
Dust, oils, and paint residue are what make panels fall off. Wipe the wall with a damp cloth, spot-clean greasy areas with a mild detergent, and let everything dry fully before you mount foam.
If the wall was painted recently, give it time to cure, because fresh paint can release oils that weaken the bond. Even paint that feels dry can still be curing underneath the surface.
Test Adhesive Compatibility
Before full installation, test on an inconspicuous area. Put a small dab of the adhesive you plan to use on a hidden spot, then press a foam offcut or a sacrificial tile into place.
Leave it overnight so the bond has time to fully set. Then remove it and check whether paint lifts, the adhesive stays gummy, or the wall feels oily.
If the paint comes away easily, switch to a removable approach instead of forcing a permanent bond. That’s the easiest way to avoid turning a small install into a drywall repair.
Some paints and wall coverings react poorly with certain adhesives. Testing prevents surprises.
For general wall mounting techniques, see the how to put acoustic foam on walls guide. It’s useful when you’re deciding between direct mounting and backing-board approaches.
Mark Your Layout
Treat this like hanging a gallery wall. Use painter’s tape to mark panel corners, check straight lines with a level, and measure spacing so the pattern stays consistent.
Once you commit to adhesive, small layout mistakes are what make the install look “DIY” even if the sound improves. Spending an extra few minutes here usually saves an hour of rework.
How Do You Install Auralex Foam Step by Step?
Follow these steps for professional results. The goal is consistent alignment and full contact, not speed.
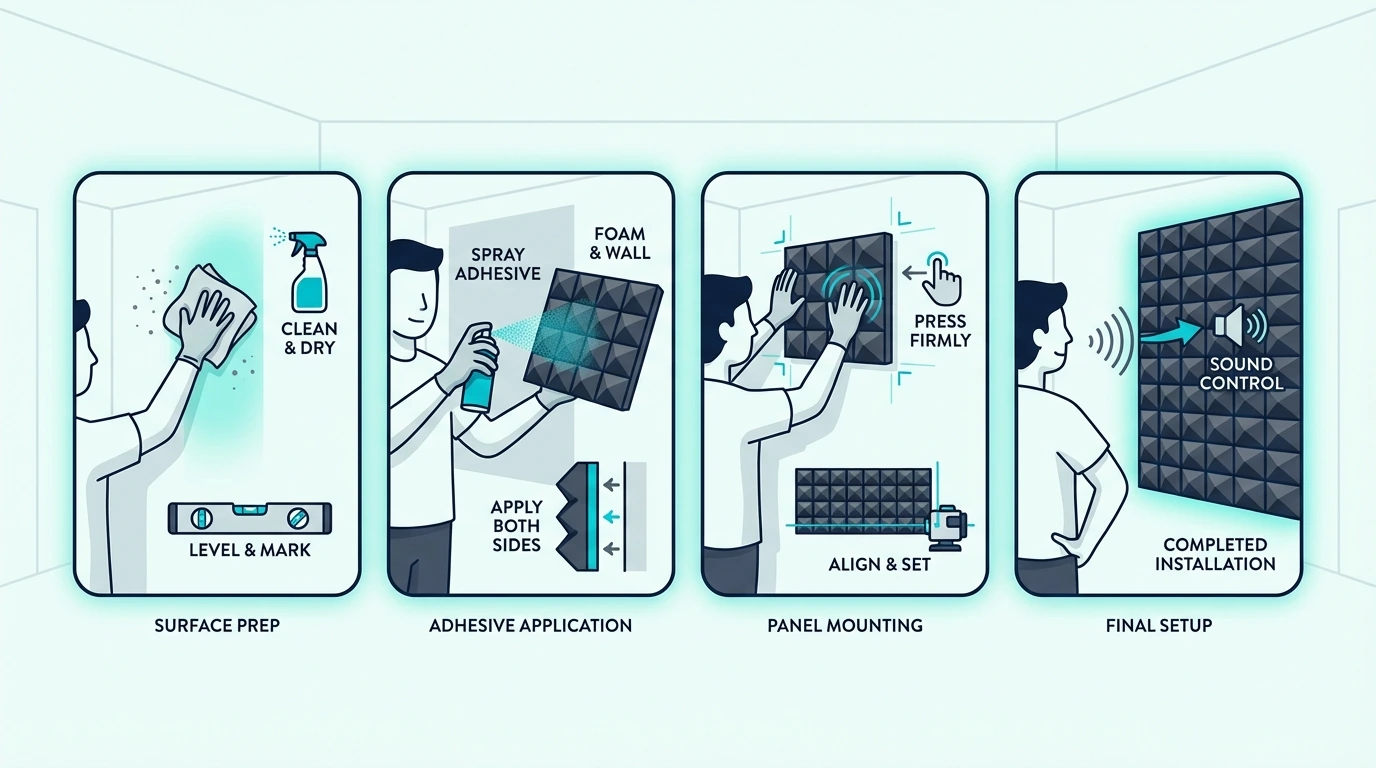
Step 1: Prepare Your Workspace
You want everything within arm’s reach before adhesive gets tacky. If you tend to touch the foam a lot while aligning, wear gloves so oils from your hands don’t reduce adhesion on the back surface.
Lay drop cloths, ventilate the room, and stage panels in the order you’ll hang them. If you’re doing a full wall pattern, stage your panels in stacks by row.
That small step keeps you from mixing patterns and fighting alignment as you work across the wall. It also makes it easier to keep rows consistent if you need to pause mid-install.
Step 2: Apply Adhesive
Match the application method to the adhesive. If you’re using Tubetak, apply a thin zigzag to the back of the panel and stop short of the edges to prevent squeeze-out.
If you’re using spray adhesive, apply a light coat to both the wall and the foam, then wait briefly until it feels tacky before you hang. Two light coats are usually safer than one heavy coat, because oversaturation is what causes bleed-through and a sloppy finish.
If you’re spraying indoors, keep fans running and avoid open flames, because aerosols are both smelly and flammable. Even a small amount of overspray lingers longer than you expect in a closed room.
Step 3: Position and Press
This part is simple, but it’s where most installs go crooked. Align the panel with your tape marks, then press from the center outward to avoid air pockets.
Hold steady pressure for about a minute, and don’t slide the panel around once it starts to grab. Step back to confirm spacing and level before you move on.
If a panel is off, fix it immediately, because repositioning gets harder by the minute. If you need to remove it, peel slowly from a corner instead of yanking straight out.
Step 4: Allow Curing
Adhesive bonds are weakest in the first day. Avoid adjusting panels for 24-48 hours and keep the room at a stable temperature so the bond sets evenly.
If you’re mounting in a cold basement or garage, give it extra time. Most adhesives cure more slowly when the room is cold or humid.
Step 5: Install Remaining Panels
Work in a consistent direction across the wall so spacing stays uniform. Check alignment every few panels, and clean any squeeze-out immediately before it grabs dust.
If you’re installing around outlets or trim, cut panels before you apply adhesive. Trying to trim foam after it’s mounted usually tears edges and makes the layout look uneven.
How Does Installation Change on Different Wall Types?
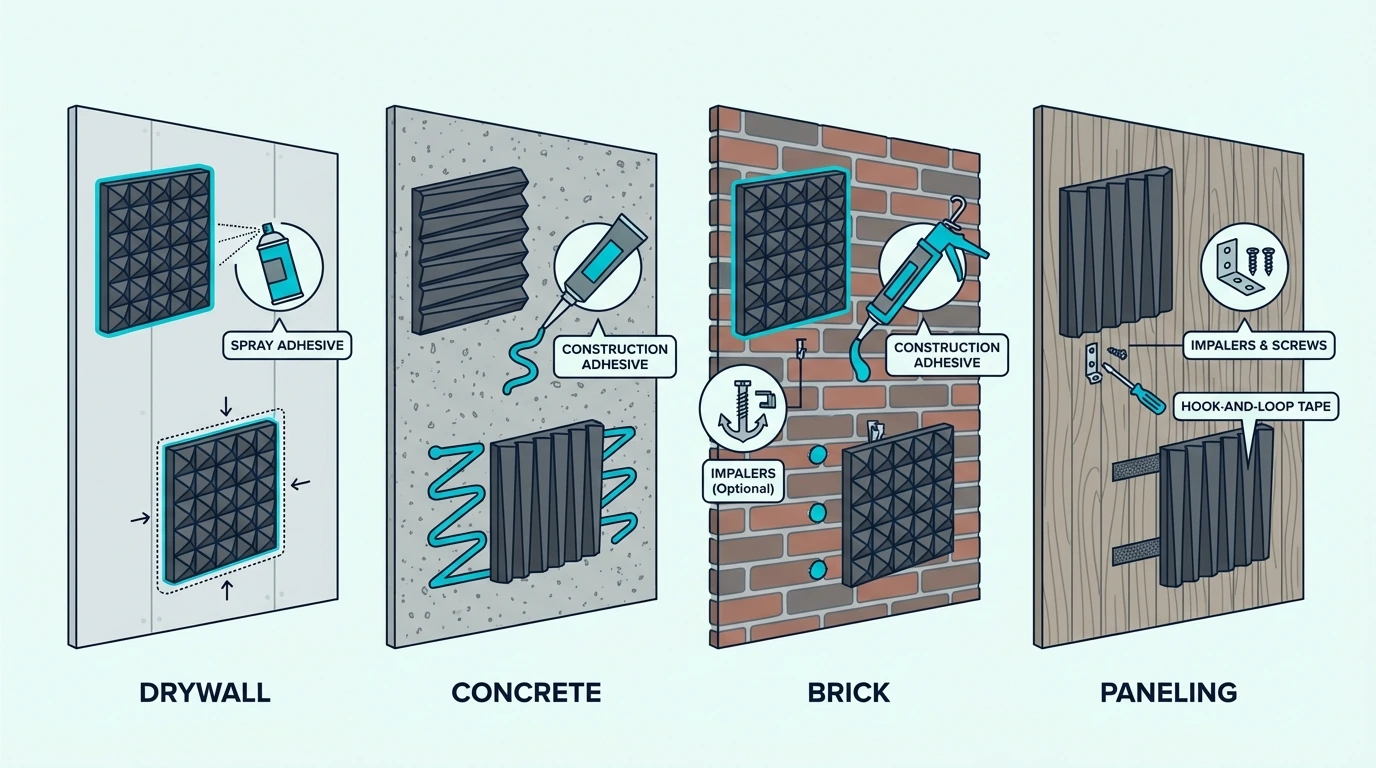
Different wall types require adjusted techniques. The goal is the same, but the prep and mounting method change based on texture and porosity.
Drywall (Most Common)
Painted drywall is the easiest surface for foam. Once the wall is clean and dry, a test patch tells you whether the paint finish will hold, and then you can follow the same installation steps above.
Concrete/Cinder Block
Porous surfaces soak up adhesive and dust, so prep matters more than the product you choose. Clean thoroughly, remove loose grit, and expect to use more adhesive than you would on drywall.
If you’re trying to treat a garage or basement wall, see the putting acoustic foam on cinder blocks guide for placement and mounting tactics. It goes deeper on surface prep and mounting methods that actually hold on rough block.
Brick
Brick can work, but the texture means foam won’t contact the wall evenly. Clean mortar dust thoroughly and use a method that creates solid contact across the panel.
See the applying acoustic foam to brick guide for detailed instructions. Brick is uneven enough that backing boards are often the cleanest path.
Wood Paneling
Finished wood can be slick, so a test patch is mandatory. Light sanding can improve adhesion, but if you don’t want to alter the surface, removable backing boards are often the cleaner solution.
Ceiling Installation
Ceiling mounting is where panels fail if you rush. Work in small sections, use a stronger mounting method, and have a helper support the panel while the adhesive grabs.
The does acoustic foam work guide covers what to expect from foam on different surfaces, including ceilings.
What Are the Most Common Auralex Installation Mistakes?
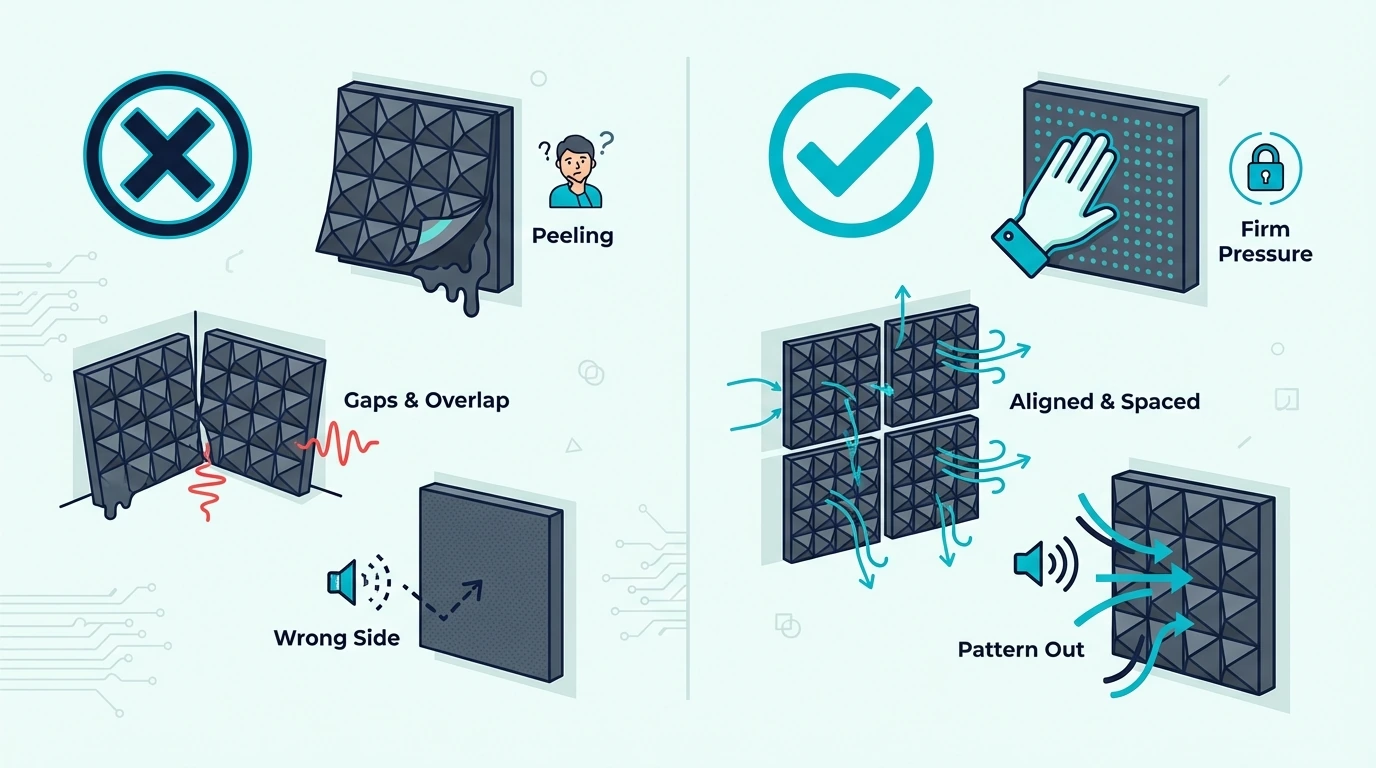
Avoid these errors that compromise results. Most of them are avoidable if you slow down at the prep and layout stage.
Too Much Adhesive
Too much adhesive usually shows up as dark spots on the foam face and glue squeeze-out on the edges. Apply a lighter coat that covers most of the back surface while staying away from the perimeter.
Poor Surface Prep
If the wall feels dusty or chalky, adhesive will stick to the dust and then the dust will let go. Clean the surface until a dry cloth comes away clean, then let it dry completely.
Rushing the Process
Rushing is what makes panels look crooked and fall over time. Slow down for alignment and give the bond the full cure time before you bump panels or move furniture.
Ignoring First Reflection Points
Random placement can look impressive on camera while barely changing the sound. Start at first reflection points and the surfaces closest to the mic or speakers, then expand outward if you need more control.
Be careful not to over-treat your room—see the whether you can put too much acoustic foam guide. It’s the easiest way to avoid turning your room dull while you’re trying to reduce harsh reflections.
How Do You Remove Auralex Foam Without Damage?

If you need to remove panels later, start by identifying how the foam was mounted. The right approach depends on whether you used a permanent adhesive or a removable mounting method.
Adhesive-Mounted Panels
Permanent adhesives usually mean wall damage. Pull slowly from one corner, use a putty knife to separate when needed, and plan on patching and repainting after removal.
Command Strip Mounted
If you used Command-style methods, follow the “stretch-release” technique. Pull the tab straight down slowly, then clean any residue so the next install has a clean surface.
Minimizing Damage
Heat can soften stubborn adhesive and reduce tearing. Work slowly and assume some damage if you used permanent adhesive, especially on older paint.
How Do You Maintain Auralex Foam Panels?
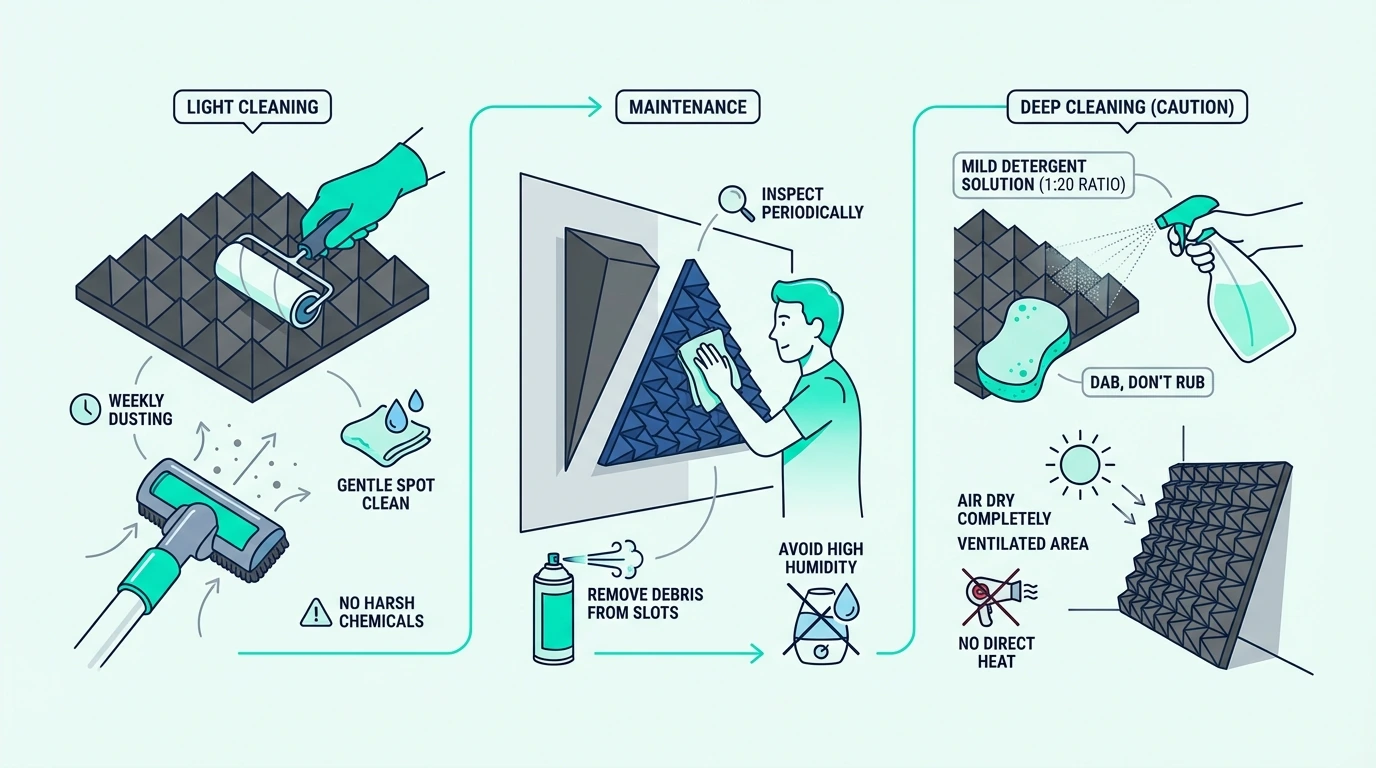
Proper care extends panel life. It also keeps foam from looking dusty, uneven, or worn out on camera.
For styling ideas, see how to decorate with acoustic foam.
Regular Cleaning
Dust buildup makes foam look worn and can reduce high-frequency absorption over time. Vacuum lightly with a brush attachment, and avoid water or cleaners that can break down the foam.
Addressing Damage
Small tears can be repaired with a foam-safe adhesive, but crushed foam usually doesn’t fully recover. If a panel is flattened or shedding, replacement is the better long-term fix.
Longevity Expectations
With stable humidity and normal indoor conditions, quality foam can last for years. Keep panels out of direct sunlight and avoid compressing them, because UV and physical wear are what shorten lifespan fastest.
The is acoustic foam reusable guide covers what to expect when swapping or relocating panels.
For more on foam lifespan, see the whether acoustic foam gets old guide. It covers what to expect in high-sun rooms and more humid spaces.
The Bottom Line
Installing Auralex acoustic foam correctly is less about sticking up more panels and more about placing the right panels in the right spots. Plan first reflection points, prep the wall, and pick a mounting method based on how permanent you want the setup to be.
Once panels are up, give the adhesive the full cure time so you’re not re-hanging foam every few days. If you want to double-check placement strategies, the how to arrange acoustic foam guide walks through the most effective positions.
For more foam guides in one place, start at the acoustic foam hub and drill down from there based on your room and goals. That’s the quickest way to find the right mounting and placement advice for your exact surface.
Frequently Asked Questions
What adhesive does Auralex recommend?
Auralex generally recommends using a foam-safe adhesive intended for permanent installs. Many installers also use a strong spray adhesive like 3M Super 77 Multi-Surface Spray Adhesive, as long as they prep the wall and keep overspray controlled.
Can I install Auralex foam without damaging walls?
Yes, but you usually need an extra layer between the foam and the wall. Mount the foam to thin backing boards and hang the boards with removable hardware, or use clips that only leave small holes.
For removable mounting, Command large picture hanging strips are a common choice when you want a clean removal. They’re most reliable when you attach the foam to a backing board first, then mount the board to the wall.
Just keep expectations realistic. Removable methods are usually less secure than permanent adhesive, especially on textured walls.
How long does Auralex adhesive take to cure?
Allow 24-48 hours for a full cure before you put stress on the bond. Avoid adjusting panels during that window, and remember colder temperatures and higher humidity can slow curing.
How many Auralex panels do I need?
Start with the positions that matter most. For voice recording, treat the area around the mic position and the wall behind it, then add panels if the room still sounds lively.
For mixing, prioritize first reflection points on the side walls and a little treatment overhead, because those reflections affect imaging and clarity. If the room still feels bright after that, add panels in small batches and re-test.
Can I reuse Auralex foam if I move?
Panels mounted with permanent adhesive are difficult to remove intact, so expect some damage to the foam and the wall. If you mount panels with removable methods, you have a much better chance of reusing them.
Should I install Auralex foam on the ceiling?
Ceiling treatment can noticeably improve room acoustics, especially for recording and mixing. Use a stronger mounting method for overhead installs, and consider having a helper support panels while the adhesive sets.

