Do loud neighbors keep you up at night as noise transfers easily through your shared party wall? Blocking sound transmission is possible with the right materials and methods.
This guide covers proven soundproofing techniques using mass loaded vinyl, insulation, and acoustic sealants to contain noise through party walls.
Let’s dive in to transform that paper-thin divider into a noise-blocking barrier.
Why Soundproof Your Party Wall?

Having a party wall that freely transmits noise between your home and your neighbor’s can be extremely disruptive to daily life. The sounds of loud music, boisterous conversations, stomping footsteps, and more can easily penetrate the shared wall and invade your personal space. This lack of acoustic isolation leads to regular distractions and makes it difficult to relax or focus in your own home.
Soundproofing the common wall between units can provide tremendous benefits that make it a worthwhile investment. By reducing noise transfer through the party wall, you can regain a sense of privacy, comfortably play music or watch movies without bothering others, and transform a noisy space into a peaceful sanctuary.
If you regularly hear neighbors through the wall, adding soundproofing can significantly reduce the amount of noise that filters through. Loud impacts like footsteps and voices will be muted, granting relief from constant disruptions. You’ll finally be able to unwind and enjoy your home without the next-door noise constantly encroaching.
Some of the major advantages of soundproofing a shared party wall include:
- Greatly reducing the level of neighbor noise that comes through the wall. This minimizes disruptions from loud music, boisterous conversations, footsteps, etc so you can use your space without constant interruption.
- Added privacy and confidentiality for your own conversations and phone calls since less sound will make it through the wall. You won’t have to worry as much about neighbors overhearing personal matters.
- Ability to play music, watch movies, game, or video chat at your desired volume without as much concern about disturbing people in the adjoining residence. Sound transmission to neighbors will be substantially decreased.
- A more comfortable and peaceful environment in your living space without as much noise intrusion from next door. Your home will feel calmer and quieter, allowing you to relax, work, or sleep better.
- Increased flexibility in how you use the rooms bordering the party wall. For instance, you may be able to convert it to a bedroom, home office, or entertainment room since noise will be reduced.
- Potentially higher rental income or property value when it comes time to sell. upgraded soundproofing is an attractive feature for both tenants and buyers.
In summary, applying soundproofing to the shared party wall is one of the most effective ways to reduce the nuisance of noise from adjoining units. The investment pays dividends by improving your living space, increasing usable room options, and enhancing confidentiality.
1. Prepare the Party Wall For Soundproofing
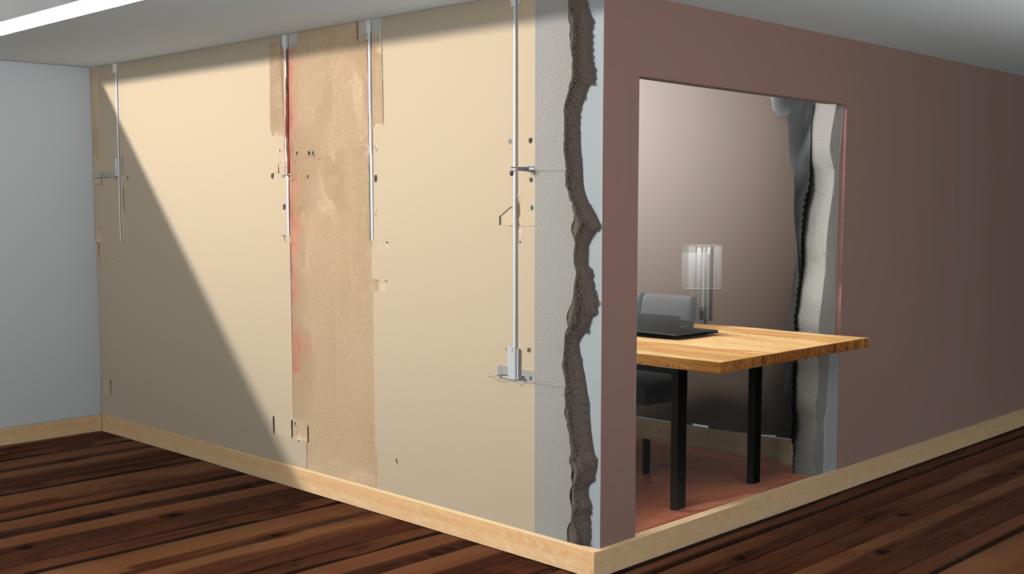
The first critical step in soundproofing a common party wall is properly preparing the wall itself before installing any noise reduction materials. This involves identifying what type of wall it is, exposing the studs if it is drywall construction, or building out new studs if it is solid concrete or concrete block.
Start by thoroughly examining the existing wall to determine what it is constructed from. Typical party walls are either standard drywall and studs or solid concrete/concrete blocks. Identifying the wall type is crucial for planning the preparation steps.
If the wall framing consists of drywall sheets installed over wood studs, the drywall will need to be carefully removed to access the studs and empty cavities. Use a drywall saw or utility knife to cut and pry off the drywall so you can see the entire framework. Watch for any electrical, plumbing or ductwork inside.
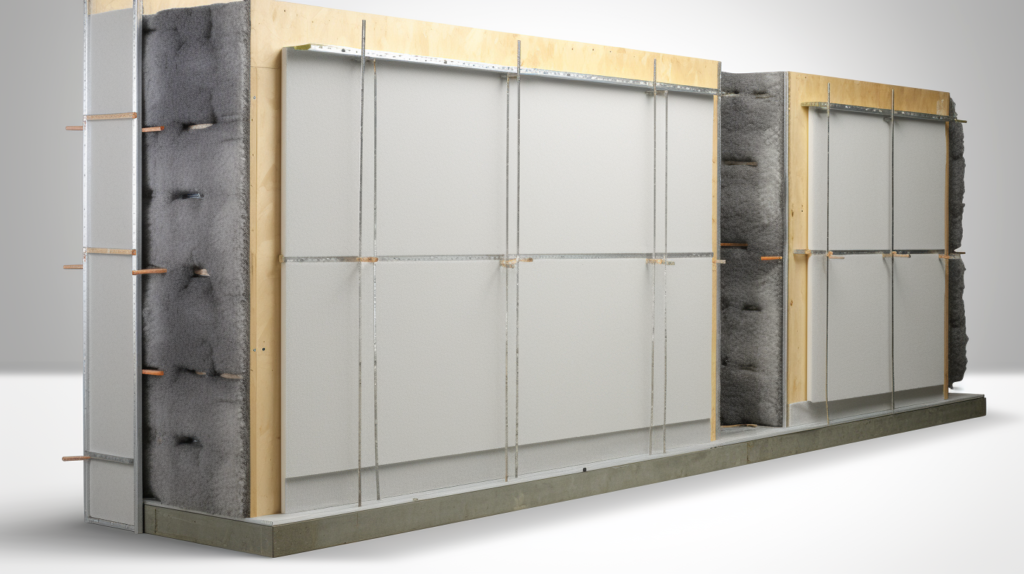
For concrete, concrete block, or other solid wall types, you will need to build a new stud wall anchored to the surface. This produces a small air gap between wall that helps break up sound vibration transmission. Fasten vertical steel or wood studs using appropriate concrete anchors or construction adhesive based on the manufacturer specifications.
Properly installing these new studs is vital, since they will support the full weight of the new soundproofed wall. Follow standard building code for stud size, gauge, spacing, and fastener type. Use acoustic caulk between the studs and wall to seal any gaps.
Careful wall preparation is a crucial first step for effective soundproofing. Identifying the existing wall construction and either exposing or installing studs allows you to properly apply materials. This will maximize their performance in blocking noise.
2. Add Soundproofing Materials Into Wall Studs
Once wall preparation is complete, the next stage is installing materials like mass loaded vinyl, specialized drywall, insulation, resilient channels, and acoustic sealant. These work together to dampen noise vibrations and block sound transmission.
For standard stud frame walls, fill all empty cavities between each stud with sound absorbing insulation such as mineral wool or fiberglass. This insulation prevents noise flanking through the cavities. Ensure facing is installed to contain fibers.
Next, securely attach horizontal resilient channels perpendicular to the wall studs using recommended screws. Resilient channels decouple the drywall from studs, preventing vibration transmission through framing. Follow manufacturer spacing guidelines.
When fastening drywall sheets to the channels, use acoustical caulk, sealant, or green glue between drywall and channels. This damps vibration. Apply special soundproofing drywall or mass loaded vinyl first to add mass.
Use at least two layers of drywall for improved effectiveness. Stagger joints between layers and seal all joints and perimeter edges with acoustical caulk. This seals flanking paths around panel edges.
Combined together, insulation, resilient channels, multiple drywall layers, and sealant create an effective soundproofed wall system that significantly blocks noise.
For concrete or concrete block walls, attach new studs as described in Step 1. Then fill the stud cavities with insulation and install resilient channels and multiple drywall layers as outlined above. This produces a complete soundproofed wall.
4. Seal All Penetrations And Possible Sound Leaks

As you install soundproofing materials, it’s vital to properly seal any penetrations like outlets, pipes and vents. These can allow noise to flank through the wall if left unsealed. Use acoustical caulk, spray foam or putty pads to seal openings.
Generously apply acoustic caulk around the edges of all electrical boxes, light fixtures, switches, valves, drains, ducting, and any other penetrations. Acoustic caulk works well for small gaps and openings.
For larger gaps around pipe penetrations, communication cabling, or ductwork, use expandable spray foam. Spray foam expands to fill the spaces completely.
For miscellaneous round holes and cable penetrations, specialized acoustic putty or modelling clay that can be pressed into holes works best. These seal out noise leakage.
Carefully check any sealants for fire rating and building code compliance. Improper products could present a safety hazard. Follow all manufacturer specifications for application and usage.
Sealing penetrations thoroughly prevents flanking paths where sound leaks through. Small overlooked openings can transmit surprising amounts of noise. Proper sealing is key for maximum soundproofing performance.
5. Check for Improvements To Make Soundproofing More Robust

Once installation is complete, it’s important to test the soundproofed wall for effectiveness. Conduct acoustic testing to identify any remaining areas of noise leakage that may need additional treatment.
The easiest method is to generate noise on one side of the wall while listening from various locations on the other side. Noise sources like speakers, banging objects, voices, or footsteps will reveal weak spots.
Use a decibel meter to take quantitative noise readings before and after soundproofing from multiple test points. Compare these measurements to pinpoint areas needing improvement.
Listen closely to detect types of noise getting through, like lower frequencies indicating insufficient insulation or high pitches suggesting gaps in caulking. Inspect these spots thoroughly to find the pathway.
Any areas showing higher post-treatment noise should be addressed with additional caulking, sealing, insulation, drywall, or installation improvements. You may need another layer of drywall, more acoustical sealant, extra isolation clips, etc.
Being meticulous in your acoustic testing and any remedial actions will ensure you achieve the maximum possible noise reduction through the party wall. The reward will be obvious in your improved home environment.
Conclusion
Soundproofing a shared party wall delivers immense benefits by curtailing noisy neighbors. Although it requires an investment in time and money, the payoff in terms of privacy, usability, and livability make soundproofing very worthwhile.
Following essential steps like proper wall prep, correctly installing materials, sealing penetrations thoroughly, and verifying improvements through careful testing will achieve the best outcome. Choosing the optimal combination of mass, damping, decoupling, and airflow sealing is key.
The resulting improvements to your living space will be readily noticeable in the newfound sense of peace and quiet, uninterrupted by next door’s disruptions. You’ll be able to comfortably enjoy your home without noise pollution from adjoining units.
While soundproofing does demand diligence in materials selection and proper installation technique, the rewards are more than worth it. With some research and care, you can successfully transform even the noisiest shared wall into a peaceful sanctuary, greatly enhancing your daily home life.