How To Do Acoustic Treatment For Home Studio (The Order That Fixes Your Room Fast)
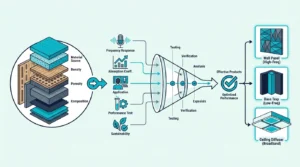
How to do acoustic treatment for home studio is not about buying the most panels first — yes, acoustic treatment works, but small rooms improve only when you solve bass buildup and early reflections in the right order before you start covering random wall space.
Most people buy a few panels, place them wherever there is empty drywall, and then wonder why the room still sounds muddy, sharp, and inconsistent from one seat to the next.
The fix is to set the listening position first, treat the corners next, handle the early reflections after that, and only then decide how much extra absorption the room actually needs.
Below, this guide walks through that order step by step so you can build acoustic treatment in a home studio without wasting money or solving the wrong problem first.
For most home studios, acoustic treatment should happen in this order: fix your listening position, add bass control in corners, place panels at first reflection points, hang a ceiling cloud, then decide whether the rear wall needs absorption or diffusion. If your budget is tight, do not spread treatment evenly across every wall. Put the first panels where the physics matters most and the room gets better much faster.
How To Do Acoustic Treatment For Home Studio — Where Do You Start?

The first move is choosing the right listening position, because every treatment decision depends on where your ears and monitors sit. Once the layout is centered, each panel solves a predictable problem instead of chasing a moving target.
If your desk faces the wrong wall or sits off-center, the room starts lying to you before any treatment goes up. One side reflects earlier, bass builds up differently behind each speaker, and the stereo image never feels fully locked in.
Facing the short wall is usually the safest starting point in a bedroom studio. That gives you more room depth behind you, which makes rear-wall reflections easier to control.
This is the same reason acoustic treatment placement matters more than raw panel count. A smaller number of well-placed panels beats a larger pile of treatment in random locations.
Center the desk between the side walls as closely as the room allows. Even a few inches of left-right imbalance can shift the image enough that you start making mix decisions that do not translate outside the room.
Avoid the exact middle of the room as well. That center spot often lands in a bass null, which makes the low end feel cleaner than it really is.
That is why how much acoustic treatment you need cannot be separated from layout. A bad layout demands more panels and still performs worse than a smarter setup with fewer of them.
If you are working in a 10×12 bedroom, try this simple test. Play a bass-heavy reference track, lean forward six inches, then lean back six inches.
If the low end changes dramatically, the room is showing you exactly why placement comes first. Treatment helps, but it cannot fully rescue a chair position that already sits inside a strong peak or null.
This is also why home studio plans should stay practical. You are not trying to build a perfect mastering room inside a spare bedroom.
You are trying to create a position that tells the truth often enough that your recording, editing, and balance decisions stop falling apart on headphones, in the car, and on other speakers.
How Should You Set Up Your Listening Position?
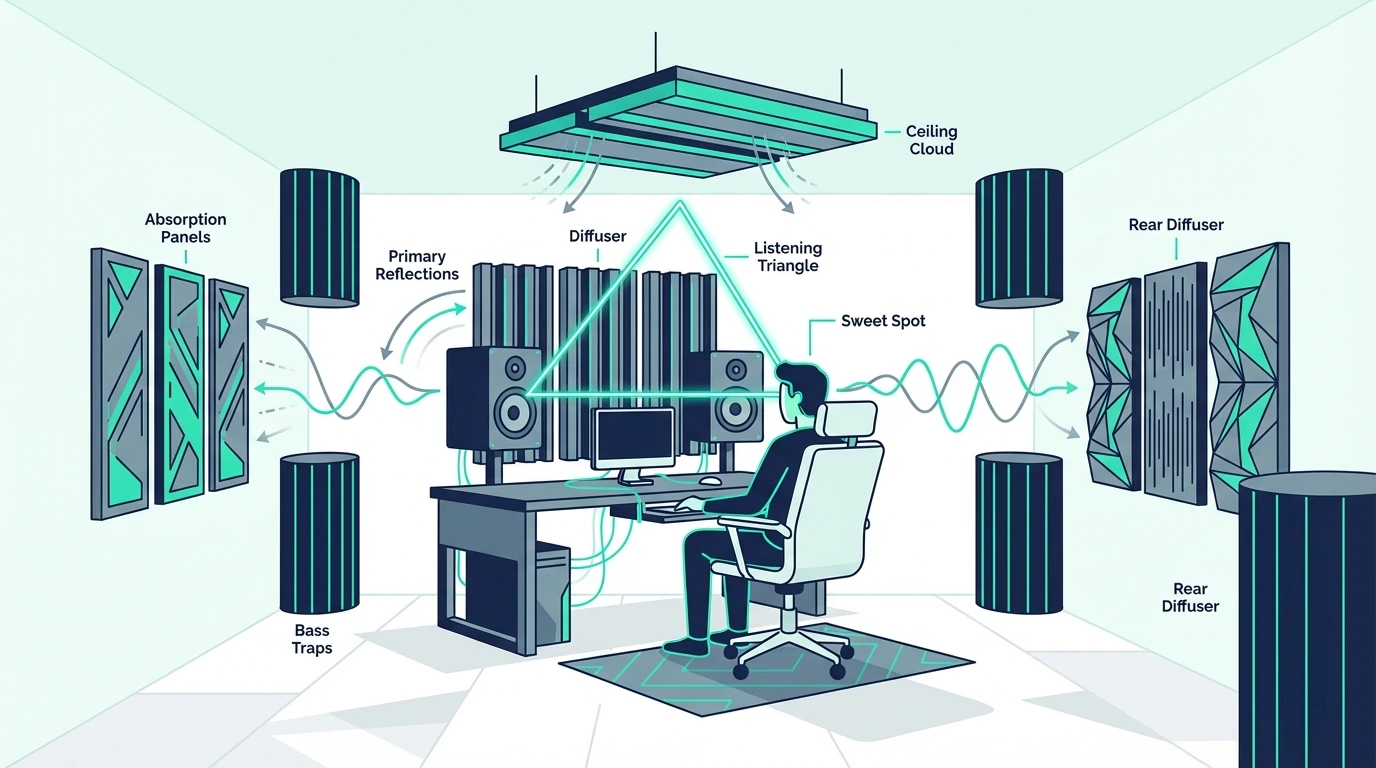
The listening position is the foundation for everything that follows. Start with the 38% rule, keep the monitors and your head in an equilateral triangle, and keep both speakers the same distance from the side walls.
This is where the room starts feeling intentional instead of improvised. Once the triangle is stable, your treatment plan becomes much easier to prioritize.
The 38% Rule For Speaker Placement
The 38% rule is the starting point for placing your chair far enough from the front wall to reduce the worst low-frequency peaks and nulls. Measure the room length and place your ears about 38% of that distance back from the front wall.
In a 12-foot room, that lands a little over 4.5 feet from the front wall.
It is not a perfect answer for every room, but it usually avoids the ugliest bass problems that happen when you sit too close to the center or too close to the wall.
Same principle applies in small rooms, where bass problems stack up faster because the boundaries are so close together. The tighter the room, the more every inch of chair position matters.
If you are building the room mainly for translation and editing, compare your choices against acoustic treatment for mixing. Home studio treatment and mixing-room treatment are almost the same conversation once monitors enter the picture.
Monitor Height And Angle
Tweeters should sit at ear height and the monitors should angle slightly toward your ears so the phantom center stays stable. If the tweeters fire above your head or into your chest, the tonal balance shifts before the room reflections even reach you.
Keep both speakers the same distance from the side walls. If one speaker hugs a wall while the other has breathing room, the stereo image leans to one side even when the mix itself is balanced.
Try to keep a little space between the speakers and the front wall too. A smarter layout with cleaner spacing often improves the room more than one extra panel purchase, which is why acoustic treatment cost should always be judged against setup quality first.
One more detail that helps more than people expect is monitor stand isolation. When the speakers couple directly into a desk, the desk itself starts acting like part of the room problem.
That does not replace treatment, but it explains why setup and treatment have to work together. The room only becomes trustworthy when the speaker position, desk position, and panel position all support the same goal.
Get Studio Tips Weekly
Join 5,000+ creators getting acoustic treatment advice every week.
No spam. Unsubscribe anytime.What Acoustic Treatment Does A Home Studio Need?
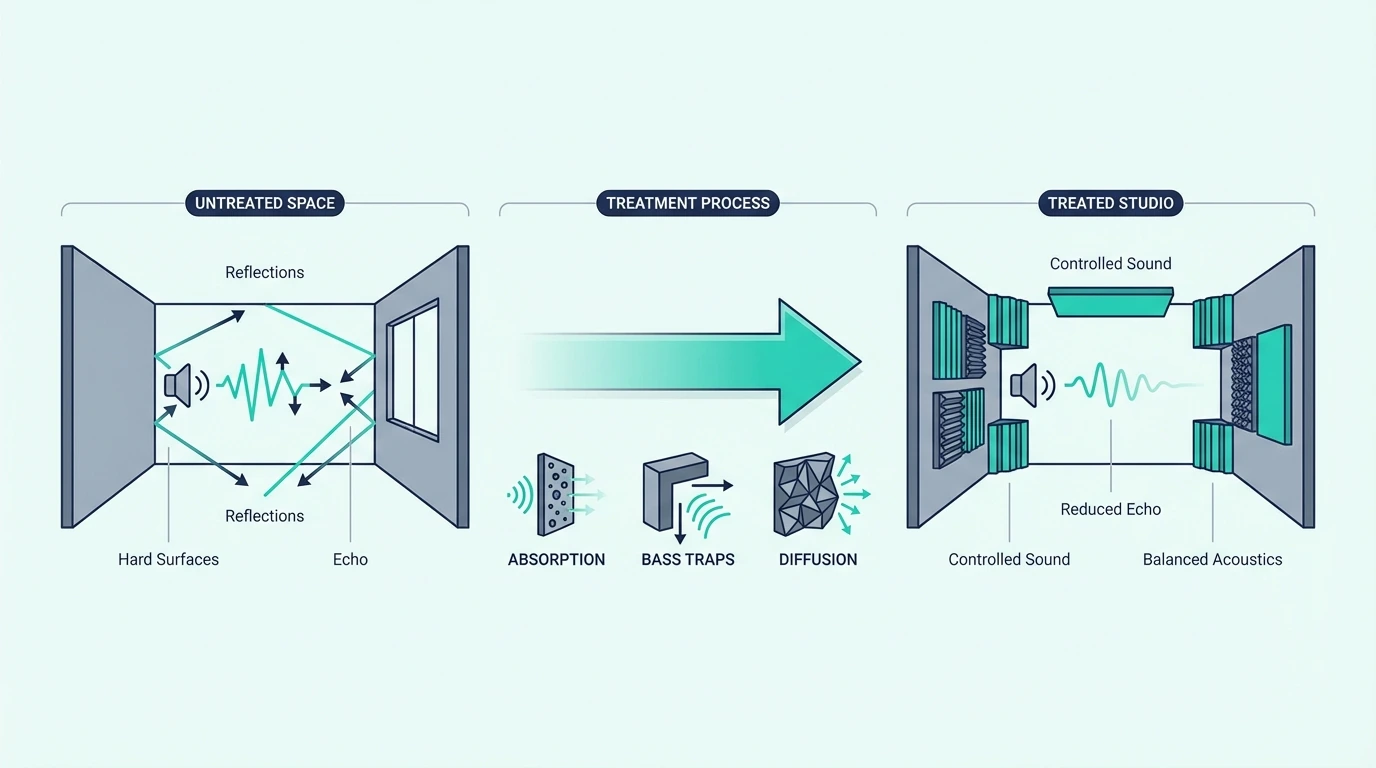
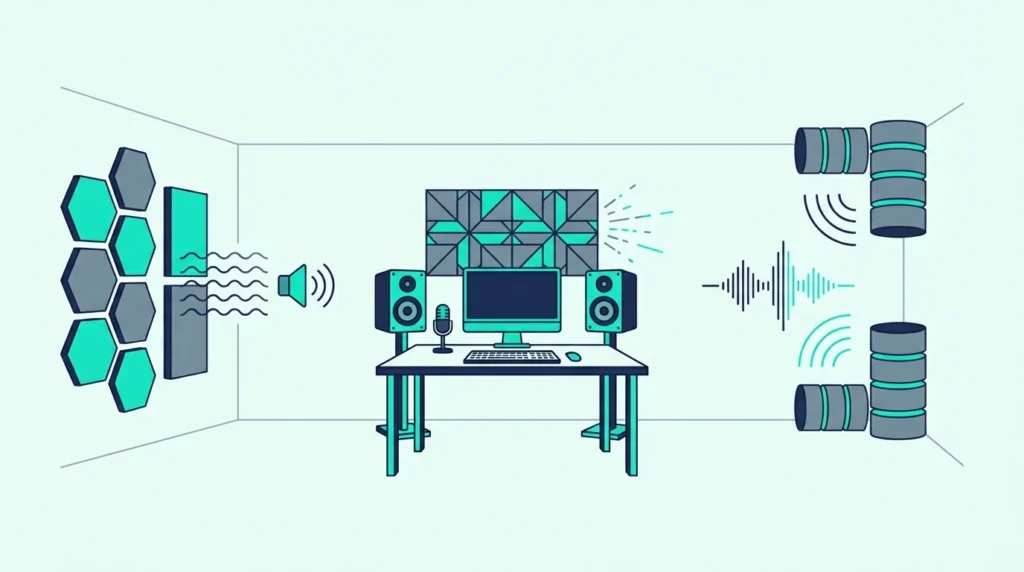
Home studios do not need every wall covered, but they do need the right problems solved in the right order: corners first, reflection points second, ceiling and rear wall after that.
That order matters because the room does not hurt every frequency equally. Bass buildup and early reflections usually do far more damage than a slightly lively rear wall or one untreated door.
Corner Bass Traps
Corners are the highest-value treatment positions in a home studio because low frequencies naturally pile up where boundaries meet. If the corners stay untreated, the room keeps sounding swollen and uneven even after the side walls look much cleaner.
This is where thickness matters more than appearance. A 100 Hz wave is roughly 11 feet long, which is why bass is so much harder to control than a bright slap off drywall.
The TroyStudio Bass Traps – 12 Pcs are a realistic starting point if you need to calm a bedroom studio without overspending immediately.
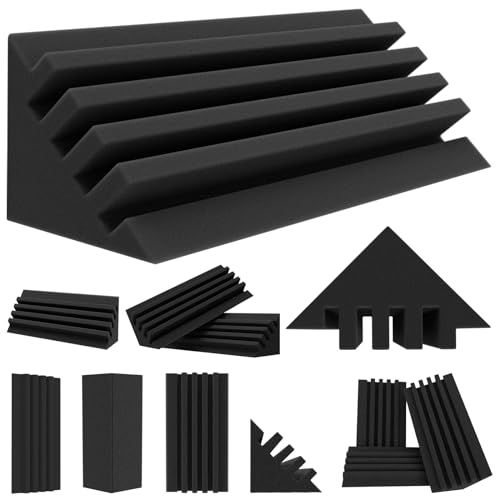
TroyStudio Bass Traps – 12 Pcs
They are still a starter solution, not a full broadband answer. If you want the deeper why behind that, best acoustic treatment materials and rockwool acoustic treatment explain why denser fiberglass and mineral wool reach lower than foam.
Treat the front corners first if you cannot do every corner at once. Those positions interact most strongly with the monitors, so they usually tighten the low end faster than any other single move.
If you later want to refine the corner plan, acoustic treatment for corners is the natural next step because corner strategy changes with ceiling height, air gap, and whether you can straddle the boundary instead of mounting flat.
First Reflection Panels
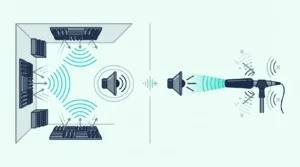
First reflection panels on the side walls reduce the early reflections that smear the stereo image and make panning harder to trust. These reflections arrive just milliseconds after the direct sound, which is exactly how comb filtering sneaks into a small studio.
Use the mirror trick here. Sit at the mix position, have someone move a mirror along the wall, and mark the point where you can see the speaker in the reflection.
The UMIACOUSTICS 4 PCS Acoustic Panels with Hanging Bracket fit this job well because one pack usually covers the critical side-wall positions in a typical bedroom studio.

UMIACOUSTICS 4 PCS Acoustic Panels with Hanging Bracket
This is also where acoustic treatment for vocals starts getting noticeably better. Once the early reflections calm down, microphones pick up less room splash and more of the actual source.
If one reflection point lands on glass, do not ignore it. That is when acoustic treatment for windows or a movable panel becomes more useful than pretending the window is acoustically neutral.
Most home studios feel dramatically better after corners and first reflections are handled. The room gets less edgy, the phantom center stabilizes, and pan moves start making sense much faster.
Ceiling Cloud And Rear Wall
A ceiling cloud handles the overhead bounce, while rear-wall treatment depends on room size and how live or controlled you want the room to feel. In an 8-foot room, the ceiling reflection is close enough to do real damage to clarity.
Hang the cloud above the line between the monitors and your ears rather than above the middle of the room. That is where the overhead reflection actually matters.
Leave an air gap if you can. The same panel becomes more effective when it sits away from the ceiling instead of hugging it flat.
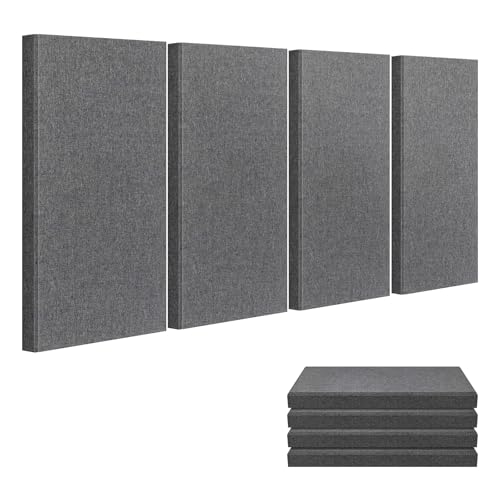
The UMIACOUSTICS 2 PCS Acoustic Panel makes sense when you want broad front-wall, rear-wall, or cloud coverage without piecing together several smaller panels.

UMIACOUSTICS 2 PCS Acoustic Panel
The front wall behind the monitors can benefit from absorption too, especially when the speakers sit close to it. That front-wall bounce muddies the low mids and makes the room feel slower than it really is.
If you want broader front-wall coverage without building frames yourself, the Acoustic Panels 6 Pack are more useful on the front wall and larger dead zones than in the corners.
Acoustic Panels 6 Pack
Rear-wall treatment depends on room depth. In shallow rooms, absorption usually wins because the reflection returns too quickly to feel helpful.
In deeper rooms, some diffusion can keep the studio from sounding over-damped. That tradeoff becomes easier to understand when you compare it with acoustic treatment for home theater, where spaciousness matters more than ruthless monitoring accuracy.
Can You Treat A Home Studio On A Budget?
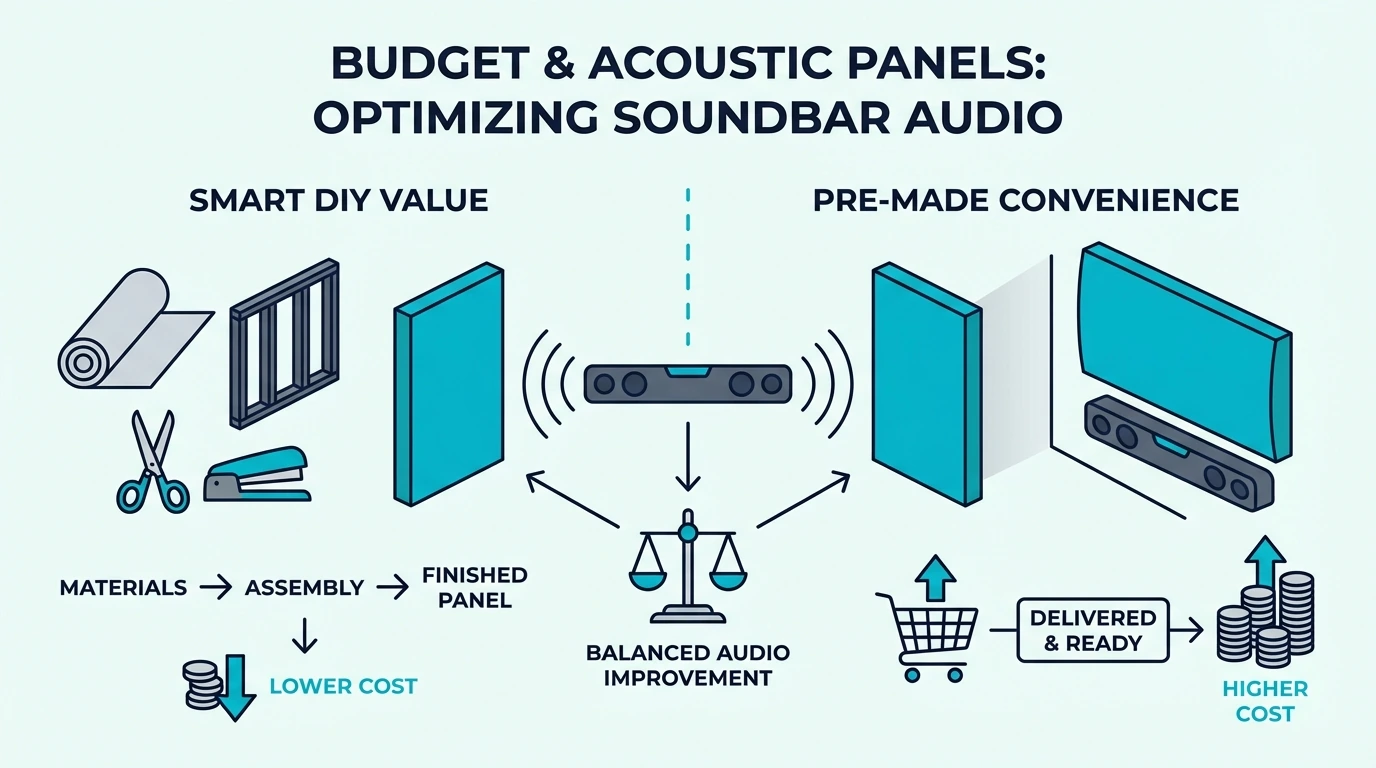
Yes, but budget treatment only works if you stay ruthless about priorities. Cheap treatment in the right positions beats premium treatment in the wrong ones every time.
Budget rooms go wrong when people try to make them look treated instead of making them work better. A few smart panels in the corners and reflection points do more than a wall full of decorative foam squares.
DIY Panel Build Basics
DIY panels still give the best performance per dollar when you use dense fiberglass or mineral wool and breathable fabric. That is why serious budget builds still revolve around insulation cores instead of surface texture alone.
The material differences we covered earlier show up immediately here. Fiberglass acoustic treatment and mineral wool both work because they offer real depth and density instead of just a shaped face.
Fabric matters too. If the fabric does not breathe, the panel stops acting like an absorber and starts acting like a decorative board.
That is where acoustic treatment fabric becomes part of the build, not an afterthought. Breathable fabric lets the insulation core do its job while still making the room look finished.
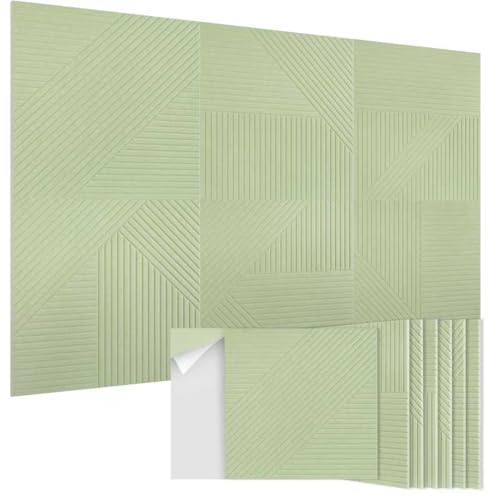
If you want a ready-made alternative without building your own frames, the Olanglab Fiberglass Acoustic Wall Panels 4 Pack are a sensible middle ground between DIY logic and a fully polished commercial room.

Olanglab Fiberglass Acoustic Wall Panels 4 Pack
They make more sense when you are renting, sharing the room, or still experimenting with layout. You can improve the room now without committing to a huge permanent build on day one.
That flexibility matters in apartments, spare bedrooms, and mixed-use rooms where the studio has to coexist with furniture, windows, and everyday life. A panel you can reposition is often more valuable than a larger panel stuck in the wrong place.
What To Skip When Money Is Tight
Skip decorative foam that looks impressive but tells you nothing about actual absorption. If the listing talks more about style than thickness, material, or use case, you are probably paying for appearance first.
Skip diffusion early too. Diffusion can help later, but it rarely fixes the first set of problems a bedroom studio actually has.
You can also skip the idea that every wall needs something on it. A room with good corners and good first reflections usually beats a room with thin treatment spread evenly across all four walls.
If you want product-led options after the fundamentals are in place, compare your next move with best budget acoustic treatment and best acoustic treatment kits. Those are useful only after you know which positions you are actually solving.
For modular expansion, the 4 Pack Fiberglass Wall Panels make more sense than buying a giant bundle you have not planned for properly.
4 Pack Fiberglass Wall Panels
The Bottom Line
Home studio acoustic treatment works best when you fix the room in order: listening position, corners, reflections, ceiling, then rear wall.
If you are asking how to do acoustic treatment for home studio without wasting money, that sequence is the answer because it gives you the biggest improvement per panel and keeps the room from sounding either muddy or dead.
It also keeps you from over-treating the easy surfaces while the real bass and reflection problems stay untouched.
The biggest mistake is trying to buy your way past setup errors. A smarter layout with focused treatment almost always beats a larger budget spent without a plan.
If you want the short version, start with the listening triangle, corner control, and first reflection points. After that, use panel-count guidance and placement strategy to decide whether the room still needs more.
Once those fundamentals are right, every later upgrade becomes more useful. That is when pages like best acoustic treatment materials and budget treatment options become genuinely helpful instead of distracting.
Frequently Asked Questions
How do I acoustically treat my home studio?
Start with corner bass control, add side-wall panels at first reflection points, then add a ceiling cloud above the listening position.
After those are in place, listen again before adding more treatment. A lot of home studios are already 70-80% improved once those priority positions are handled correctly.
What is the 38% rule room acoustics?
The 38% rule places your listening position about 38% of the room length away from the front wall so bass response is more even.
It is a starting point, not a permanent law. Use it to get out of the worst bass trouble, then fine-tune by moving the desk a few inches while listening to familiar material.
Where should acoustic treatments be placed in a studio?
Start in the corners, then move to side-wall reflection points, the ceiling between you and the monitors, and finally the rear wall.
That order gives you the fastest payoff because it targets the places where bass and early reflections do the most damage first.