Acoustic Treatment For Garage Studio (Complete Guide To Taming The Worst Room In Your House)
Best acoustic treatment for garage recording studio setups starts with accepting an uncomfortable truth — garages are acoustically the worst rooms in most houses, but they keep showing up in “build your home studio” guides as if slapping foam on the walls will fix them.
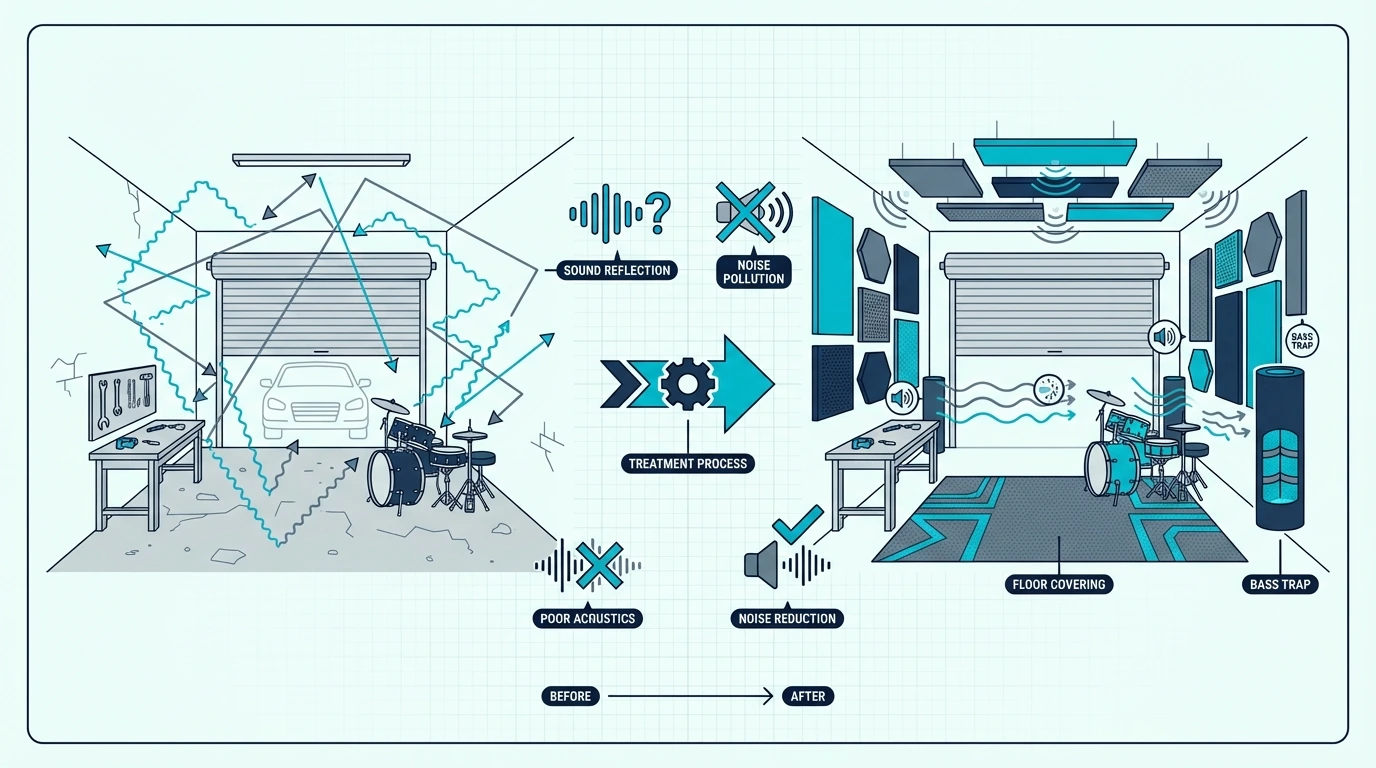
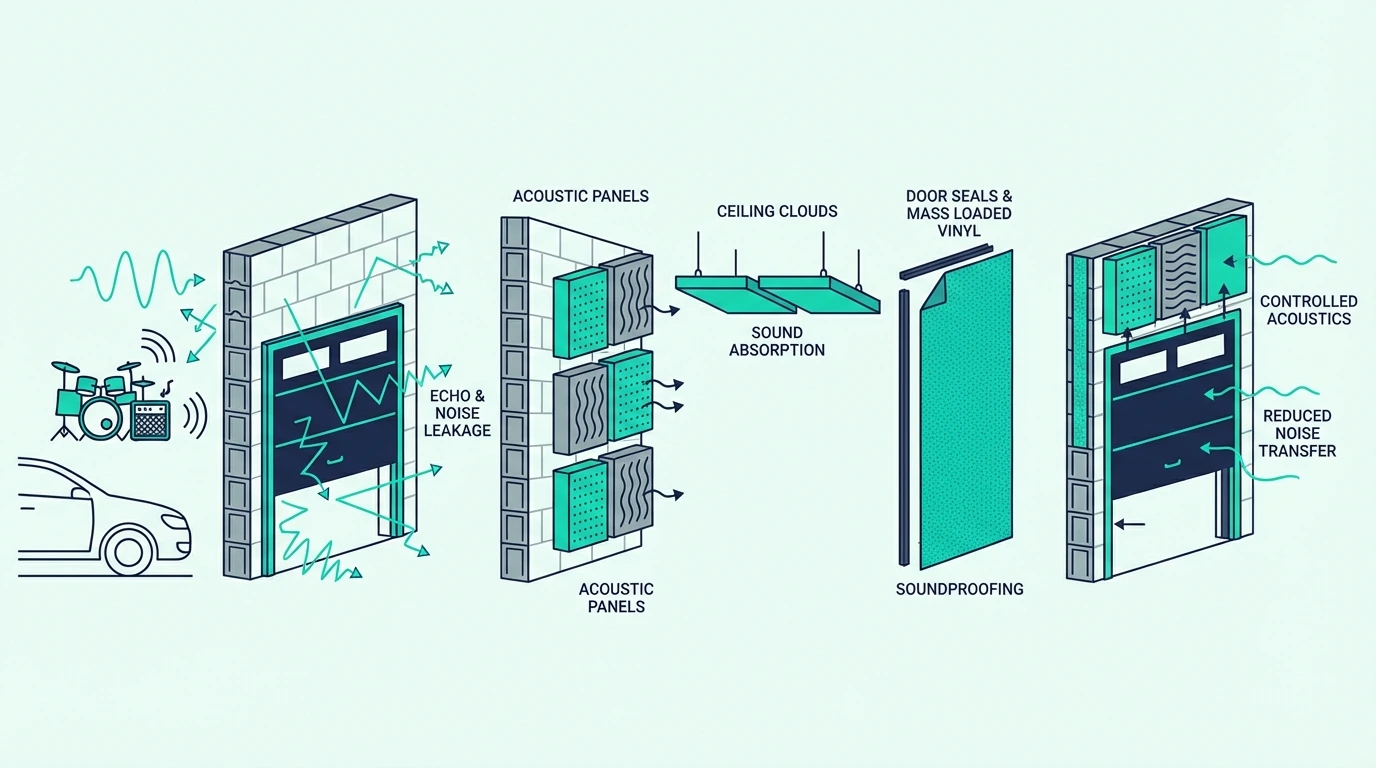
Concrete walls reflect nearly 100% of sound energy. Thin metal garage doors leak sound in both directions.
Bare concrete floors turn every footstep into a reverberant thud. The boxy shape of a standard two-car garage creates powerful room modes that stack bass energy in the corners until the low end is completely unreliable.
None of that means a garage cannot become a functional recording or mixing space. It can — but the treatment approach has to match the severity of the problems, and the problems in a garage are more severe than in any other room you are likely to work in.
This guide covers the specific acoustic challenges garages present, which treatment methods actually work on concrete and metal surfaces, how to treat the garage door wall without permanent modification, and how to build a treatment plan that prioritizes the highest-impact fixes first. Start with corner bass traps — they deliver the biggest improvement per dollar in any concrete room.
Garages are the most acoustically challenging rooms for recording and mixing because concrete walls, metal doors, and bare floors reflect nearly all sound energy. Treatment priorities are: corner bass traps first (6 in thick minimum for concrete rooms), wall panels mounted with air gaps off the concrete, a ceiling cloud above the listening position, and heavy blankets or removable panels over the garage door. Budget 500-1,500 dollars for meaningful treatment of a two-car garage.
Why Garages Are Acoustically Terrible
Every room has acoustic problems, but garages concentrate the worst ones into a single space. Understanding why garages are so much harder to treat than bedrooms or living rooms helps you avoid the common mistake of applying bedroom-level treatment to a garage-level problem.
Concrete And Cinder Block Walls
Concrete is one of the most reflective building materials for sound. A poured concrete or cinder block wall reflects over 97% of the sound energy that hits it across the entire frequency range — from deep bass through the highest audible frequencies.
Compare that to standard drywall on wood studs, which absorbs a small percentage of energy (especially at low frequencies where the drywall flexes slightly). In a bedroom, the walls are already doing a tiny amount of absorption before you add any treatment.
In a garage, the walls do nothing. Every sound wave that leaves your monitors or your vocalist’s mouth bounces off the concrete at nearly full strength, hits the opposite wall, bounces back, and continues rattling around the room until the energy finally dissipates through friction with the air.
The result is a reverb time (RT60) that can exceed 2 seconds in an untreated garage. For reference, a well-treated studio control room targets 0.3-0.4 seconds.
You are starting 5-7 times above the target. That gap is why garage treatment requires thicker materials and more coverage than a standard small room setup.
The Garage Door Problem
The garage door is the single weakest point in the room — acoustically and structurally. A standard single-layer metal garage door has almost no mass and provides minimal sound isolation.
Sound passes through the door in both directions. Neighbors hear your music production.
Traffic noise, lawn equipment, and environmental sounds enter your recordings. Even with the door fully closed, the thin metal panels transmit enough outside noise to ruin a quiet vocal take.
The door also vibrates sympathetically when bass frequencies hit it. The thin metal panels resonate at specific frequencies, which adds coloration to your monitoring and creates rattling artifacts during loud playback.
Sealing the gaps around the garage door is the first priority. The rubber gaskets at the bottom and sides of most garage doors are designed for weather, not sound.
Replacing them with acoustic-grade seals or adding a second layer of weatherstripping reduces the most obvious leakage path.
Bare Concrete Floor
A concrete floor reflects sound just as efficiently as concrete walls. Sound waves bounce off the floor and reach your ears (or your microphone) milliseconds after the direct sound, adding another layer of early reflections to an already reverberant space.
In rooms with carpet or wood over a subfloor, the floor provides some absorption — especially a thick carpet pad, which absorbs mid and high frequencies effectively. A bare concrete garage floor provides zero absorption.
Adding a thick area rug under and around your listening position is one of the cheapest and most effective treatments for a garage studio. It will not solve the bass problems, but it tames the mid and high frequency reflections from the floor that contribute to the overall harshness of the room.
Boxy Shape And Parallel Surfaces
Most garages are rectangular boxes with perfectly parallel walls, a flat ceiling parallel to the floor, and no architectural features that break up sound paths. This is the worst possible geometry for acoustics.
Parallel surfaces create flutter echo — a rapid series of reflections that bounce back and forth between two hard, flat surfaces. In a garage with concrete on every side, flutter echo is extreme and audible on every transient sound.
The rectangular shape also creates strong room modes — resonant frequencies where the room dimensions cause bass energy to reinforce itself at specific frequencies and cancel itself at others. A typical two-car garage (roughly 20 x 20 feet) has its fundamental axial modes in the 28-56 Hz range, which means bass notes in that range will be dramatically louder at some positions in the room and nearly silent at others.
No Existing Insulation
Most garages are unfinished spaces with no insulation in the walls or ceiling. In a bedroom, the fiberglass insulation inside the wall cavity provides some absorption (especially for sound that penetrates the drywall).
In a garage, there is nothing behind the concrete — just more concrete or the exterior of the building.
The ceiling situation varies. Some garages have an attic space above with insulation in the ceiling joists.
Others have a flat concrete or open-rafter ceiling with no insulation at all.
If your garage has an uninsulated ceiling, that becomes a third reflective surface (in addition to the floor and walls) that contributes to the overall reverb problem. An insulated ceiling at least provides some absorption overhead, which slightly reduces the starting RT60.
How Sound Behaves In A Concrete Room
Before jumping to treatment solutions, it helps to understand exactly what happens to sound in a concrete box. The physics explain why some treatments work in garages and others are a waste of money.
Reflection Patterns
In a drywall room, sound waves lose a few percent of their energy on each bounce. After 5-10 bounces, the reflected energy has decayed significantly.
In a concrete room, sound waves lose almost nothing on each bounce. This difference is what makes concrete rooms feel so much more reverberant than drywall rooms of the same size.
The practical effect is that reflected energy dominates the room much more aggressively than in a typical home studio. At your listening position, you hear a mix of direct sound from the monitors and a wall of reflected energy from every surface in the room.
That reflected energy arrives at different times depending on the distance from each surface. The first reflections from nearby walls arrive quickly and create comb filtering — a pattern of peaks and nulls in the frequency response that changes with every small head movement.
Later reflections from more distant surfaces blend together into a reverberant wash that smears transients, muddies the stereo image, and makes critical listening nearly impossible without treatment.
Room Modes In A Garage
Room modes are the most damaging acoustic problem in any small room, and they are especially severe in concrete garages because the rigid walls do not flex or absorb any bass energy.
An axial mode occurs when a bass frequency’s wavelength matches a dimension of the room (or a multiple of it). The sound wave bounces between two parallel surfaces and reinforces itself, creating a standing wave with areas of high pressure (where the bass sounds unnaturally loud) and areas of low pressure (where the bass nearly disappears).
In a 20-foot dimension, the fundamental axial mode is at approximately 28 Hz. The second harmonic is at 56 Hz, the third at 84 Hz, and so on.
A 16-foot dimension puts modes at 35 Hz, 70 Hz, and 105 Hz.
The three dimensions of the room each produce their own series of modes. Where modes from different dimensions overlap at similar frequencies, the bass problems intensify dramatically.
This is why corner bass traps are the highest priority treatment for a garage studio. The corners are where all three room dimensions intersect, and where bass energy from all axial modes concentrates at maximum pressure.
Why Foam Tiles Are Not Enough
Thin acoustic foam tiles (the 1-inch or 2-inch squares sold in packs of 12 or 24) are the most commonly purchased acoustic treatment on Amazon. In a bedroom with drywall walls, they provide modest absorption of mid and high frequencies and can reduce flutter echo noticeably.
In a concrete garage, foam tiles are nearly useless. They absorb a narrow slice of the frequency range (roughly 1 kHz and above) and do nothing for the massive bass and low-mid problems that dominate the room’s acoustic character.
A garage needs treatment that absorbs across the full frequency range — including the low frequencies where room modes cause the most damage. That requires thick, dense absorbers (4-6 inches of rigid fiberglass or mineral wool) and corner-mounted bass traps, not thin foam tiles on flat walls.
Get Studio Tips Weekly
Join 5,000+ creators getting acoustic treatment advice every week.
No spam. Unsubscribe anytime.How To Acoustically Treat A Garage Studio
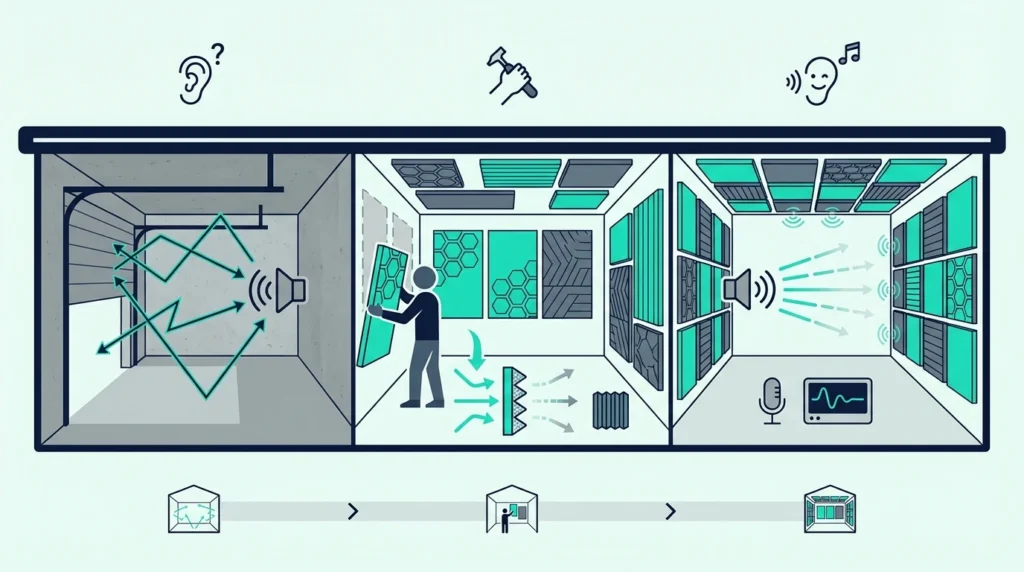
The treatment plan for a garage follows the same principles as any other room — but everything needs to be bigger, thicker, and more extensive because the starting conditions are so much worse.
Work through these priorities in order. Each step builds on the previous one, and skipping ahead wastes money because you will not hear the benefit of wall panels if the bass problems are not addressed first.
Priority 1: Corner Bass Traps — Extra Thick
Bass traps in the corners are the single highest-impact treatment you can install in a garage studio. If you only have budget for one thing, this is it.
In a drywall room, 4-inch bass traps are standard. In a concrete garage, go thicker — 6 inches of rigid fiberglass or mineral wool is the minimum recommended thickness for meaningful low-frequency absorption against concrete.
Fill every available corner. A standard garage has four vertical wall-wall corners, four ceiling-wall junctions, and four floor-wall junctions.
The vertical corners are the highest priority because they are the easiest to treat and address the widest range of modes.
For a budget starting point, foam corner traps like the TroyStudio Bass Traps 12-Pack provide a measurable improvement in the mid-bass range (200-500 Hz) at a fraction of the cost of fiberglass traps. They will not reach the deep bass modes below 100 Hz, but they tame the mid-bass buildup that contributes most to the muddy, boomy quality of an untreated garage.
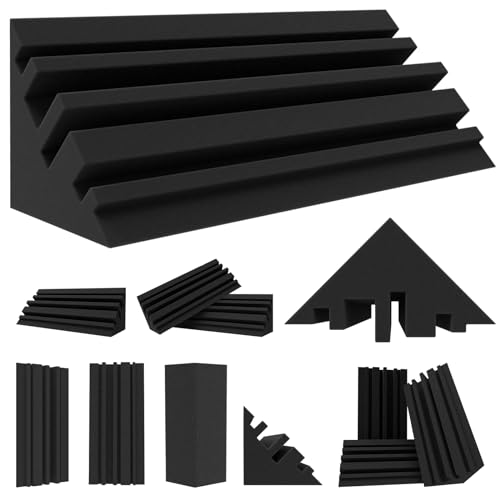
TroyStudio Bass Traps 12-Pack
For deeper bass control, build DIY corner traps from rigid fiberglass (Owens Corning 703 or equivalent) at 6 inches thick, mounted diagonally across each corner with an air gap behind them. The air gap extends the effective absorption depth and improves low-frequency performance significantly.
Priority 2: Wall Panels With Air Gaps
Wall panels on concrete need to be mounted differently than panels on drywall. The key difference is the air gap.
On drywall, you can mount a panel flat against the wall and get reasonable performance because the wall itself flexes slightly at low frequencies, adding a small amount of absorption. Concrete does not flex — it is acoustically rigid.
Mounting a 2-inch fiberglass panel flat against concrete gives you absorption starting at approximately 500 Hz. Mounting the same panel with a 2-inch air gap behind it effectively doubles the absorption depth, extending performance down to approximately 250 Hz.
A 4-inch air gap pushes absorption even lower. The air gap is free — it only costs a few dollars in mounting hardware — so there is no reason to skip it in a concrete room.
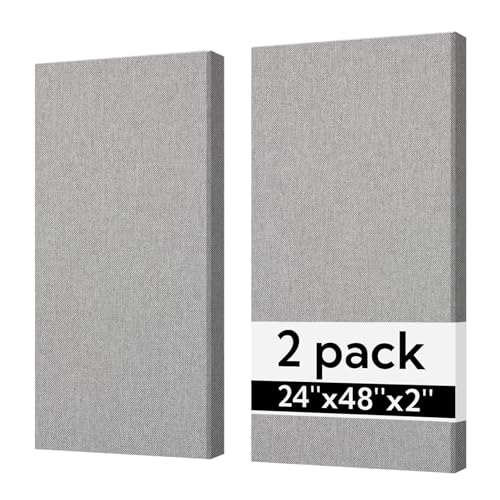
The UMIACOUSTICS Fiberglass Panels include hanging brackets that simplify mounting. Use concrete anchors (Tapcon screws or equivalent) to secure the brackets, and add spacers behind the panel to create a 2-4 inch air gap between the panel and the concrete wall.

UMIACOUSTICS Fiberglass Panels
Place panels at the first reflection points on both side walls, the wall behind your monitors, and the rear wall behind your listening position. In a garage, you will need more panels than in a bedroom because the room is larger and the reflections are stronger.
A two-car garage typically needs 12-16 panels (each 2 x 4 feet) to cover the primary reflection points adequately. That is 3-4 times the panel count of a bedroom studio — which is why treatment cost for a garage runs significantly higher.
Priority 3: Ceiling Cloud
A ceiling cloud is a large absorptive panel suspended horizontally below the ceiling above the listening position. It catches the strong vertical reflections between the ceiling and the floor that are among the earliest and most damaging reflections in any room.
In a garage, the ceiling cloud is especially important because most garage ceilings are low (8-9 feet) and made of drywall, open rafters, or concrete — all of which create strong overhead reflections.
Build a ceiling cloud from two or three large panels of 2-inch rigid fiberglass, suspended with eye bolts and wire. The cloud should cover an area of at least 4 x 6 feet centered above the mix position. Olanglab 24×48 inch fiberglass panels work well for pre-built ceiling clouds — two panels side by side create the minimum cloud footprint with no DIY construction required.
Olanglab 24×48 inch fiberglass panels
Hang the cloud 4-6 inches below the ceiling to create an air gap that improves low-frequency absorption. The suspension hardware also decouples the cloud from the ceiling structure, which prevents vibration transfer.
Priority 4: Treating The Garage Door Wall
The garage door wall is the most challenging surface in the room. The door itself is thin, vibrates at bass frequencies, leaks sound through gaps, and cannot support heavy panel mounts.
The most practical approach is removable treatment — panels or blankets that hang in front of the door during recording and mixing sessions and can be moved aside when you need to open the door.
Heavy moving blankets are the budget option. Hang 3-4 layers of thick moving blankets from a curtain rod mounted above the door opening.
The mass of the layered blankets absorbs mid and high frequency reflections and adds a small amount of mass to reduce sound leakage through the door.
For better performance, build removable panel frames that stand in front of the door. Construct lightweight wooden frames, fill them with 4 inches of rigid fiberglass, wrap them in acoustically transparent fabric, and lean them against the door wall.

acoustically transparent fabric
Two or three 4 x 8 foot panels cover the full door opening and provide dramatically better absorption than blankets. This approach also qualifies as temporary acoustic treatment since you can move the panels aside whenever you need to open the garage door.
Priority 5: Floor Treatment
After the walls, corners, ceiling, and door are addressed, the floor is the final surface to treat. A thick area rug (with a dense pad underneath) placed under and around the listening and recording area absorbs mid and high frequency reflections from the concrete floor.
The rug does not need to cover the entire garage floor — just the area where recording and monitoring happen. A 10 x 12 foot rug covers the primary zone in most setups.
For rooms where the floor reflections are still problematic after adding a rug, consider interlocking rubber gym tiles as a second layer. The rubber adds mass and density that absorbs slightly lower frequencies than carpet alone.
Soundproofing vs Acoustic Treatment In A Garage
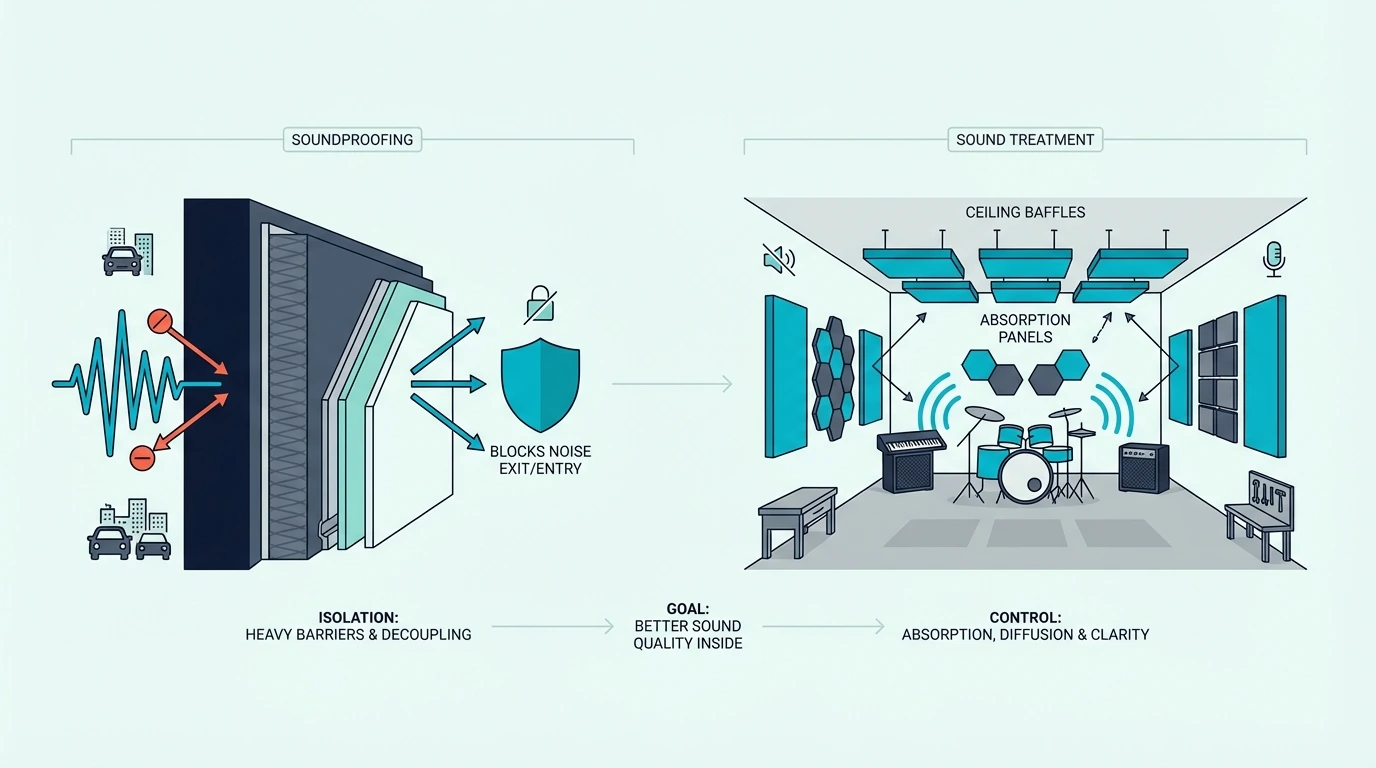
Garage studio builders often conflate two different problems: acoustic treatment (controlling how sound behaves inside the room) and soundproofing (preventing sound from entering or leaving the room). They require completely different solutions.
What Treatment Does
Acoustic treatment absorbs and diffuses sound energy inside the room. Panels on walls reduce reflections.
Bass traps in corners control low-frequency buildup. A ceiling cloud catches overhead reflections.
Treatment makes the room sound better for recording and mixing. It does not stop your neighbors from hearing your drums.
What Soundproofing Requires
Soundproofing requires mass, decoupling, and airtight construction. A soundproofed garage would need double-layer drywall with Green Glue damping compound on the existing concrete walls (adding mass), a floating floor decoupled from the concrete slab (preventing vibration transfer), and a sealed, heavy replacement for the garage door (eliminating the biggest leak).
A full soundproofing build for a garage runs 5,000-15,000 dollars or more — far beyond most home studio budgets. Acoustic treatment alone (the focus of this guide) runs 500-1,500 dollars for meaningful results.
The Practical Middle Ground
Most garage studio builders prioritize treatment over soundproofing because treatment directly improves recording and mixing quality, while soundproofing primarily benefits the neighbors.
The practical compromise is to seal the obvious gaps (around the garage door, any windows, and the entry door to the house), add treatment to improve the interior acoustics, and schedule loud sessions during hours that minimize neighbor impact.
If sound isolation is genuinely critical — for example, if you record drums regularly or your garage shares a wall with a neighbor’s bedroom — soundproofing needs to be part of the build. But for most vocal, podcast, and music production work, treatment alone transforms a garage from unusable to functional.
Common Mistakes When Treating A Garage
Garages are different enough from typical rooms that the standard acoustic treatment advice often leads people astray. These are the most frequent mistakes.
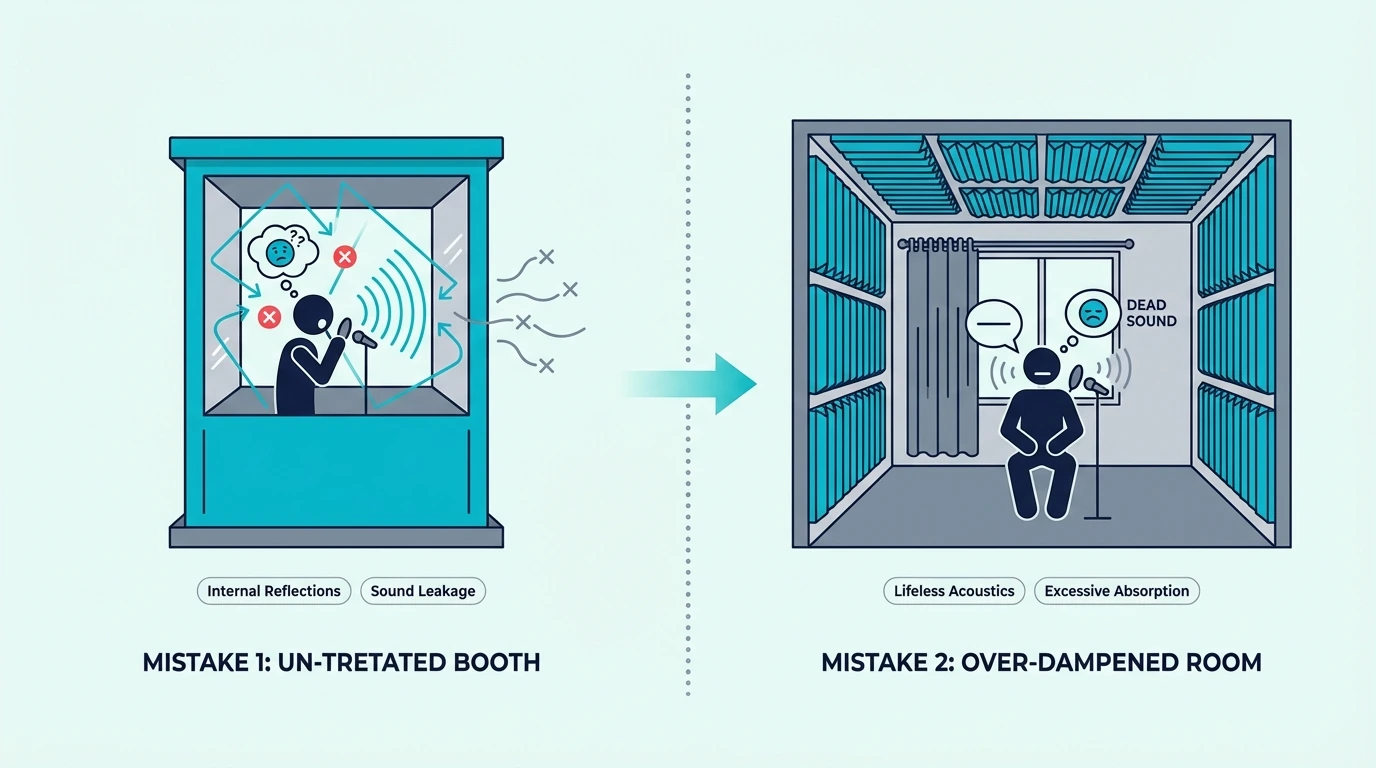
Covering Every Wall With Foam
The instinct to cover every square inch of concrete with foam tiles is understandable — the walls are obviously the problem, so covering them seems logical. But thin foam absorbs only the highest frequencies and leaves the bass and low-mid problems (which dominate in concrete rooms) completely untouched.
The result is a room that sounds dull and dead in the high end but still boomy, muddy, and reverberant in the low end. That tonal imbalance is worse for mixing than the untreated room because at least the untreated room has consistent (if excessive) reverb across the spectrum.
Ignoring The Corners
Bass traps in corners deliver more acoustic improvement per dollar than any other treatment in a garage. Yet many builders spend their entire budget on wall panels and leave the corners empty.
Untreated corners allow bass energy to pile up unchecked. No amount of wall panel coverage compensates for missing corner treatment.
Allocate at least 30-40% of your treatment budget to bass traps before spending on wall panels.
Mounting Panels Flat Against Concrete
Panels mounted directly against concrete lose a significant portion of their low-frequency absorption potential. The air gap behind a panel is critical for extending absorption into the frequencies where garages need the most help.
Every panel in a garage should be mounted with at least a 2-inch air gap. Use furring strips, standoff brackets, or French cleats to create the gap.
The small extra effort during installation pays for itself in dramatically better low-frequency performance.
Treating The Wrong Surfaces First
Some builders start with the ceiling or the rear wall because those surfaces are easy to reach. In a garage, the corners and first reflection points should come first because they address the highest-impact problems.
The treatment priority sequence for a garage is: corners → first reflection points on side walls → front wall behind monitors → ceiling cloud → rear wall → garage door wall → floor. Following this sequence ensures that each dollar spent delivers the maximum acoustic improvement.
Expecting Treatment To Soundproof The Room
No amount of acoustic panels will stop sound from passing through a thin metal garage door. If your expectation is that treatment will eliminate noise complaints from neighbors, you will be disappointed.
Treatment controls the sound inside the room. Soundproofing controls the sound that passes through the room’s boundaries.
They are separate problems with separate solutions and separate budgets.
Budget Planning For Garage Treatment
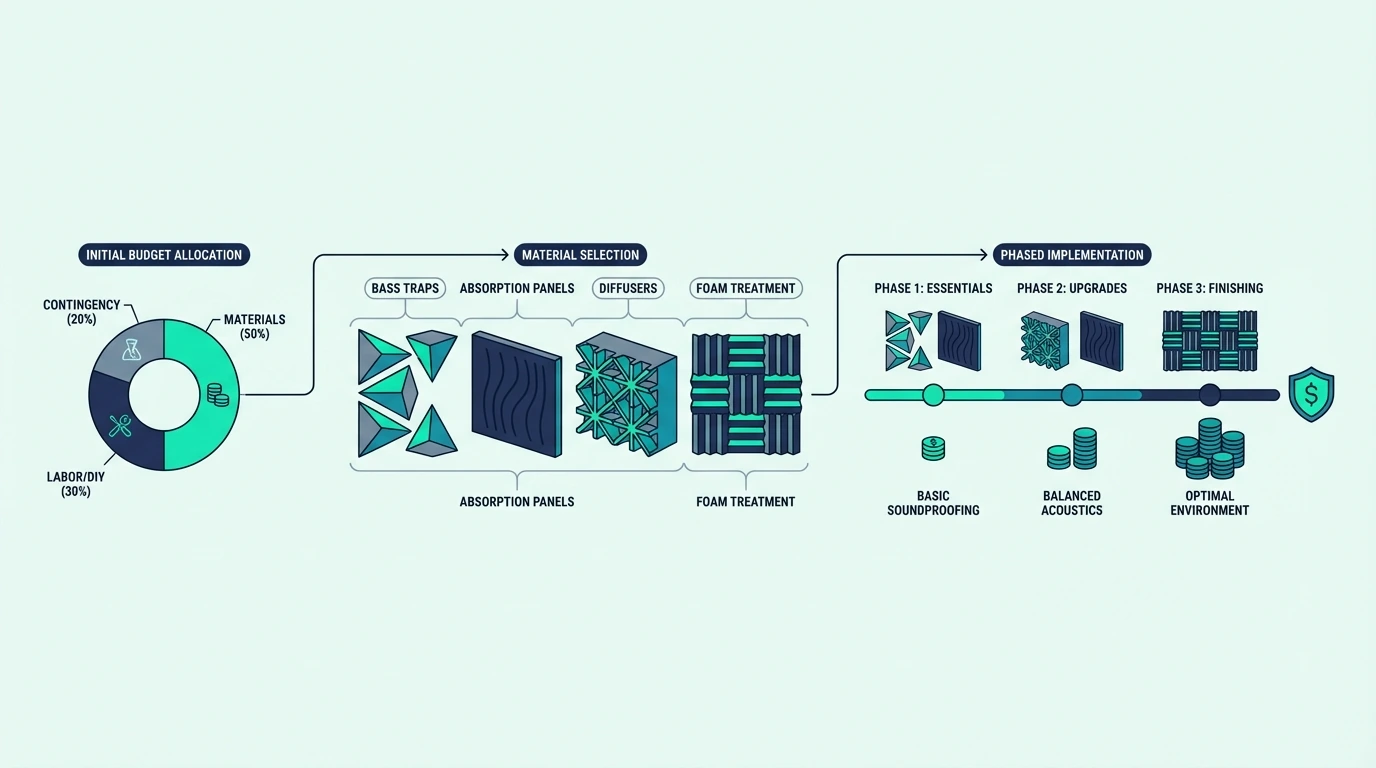
A realistic treatment budget for a two-car garage depends on whether you buy pre-built panels or build your own.
DIY Build (500-800 dollars)
A DIY approach using rigid fiberglass insulation (Owens Corning 703 or Rockwool Safe’n’Sound), lumber for frames, and fabric for wrapping runs 500-800 dollars for a comprehensive setup that includes corner bass traps, 12-16 wall panels, and a ceiling cloud.
The materials cost is low because rigid fiberglass insulation is sold at building supply stores for 1-2 dollars per square foot at standard 2-foot by 4-foot sheet sizes. The time investment is typically a full weekend or two of cutting, framing, wrapping, and mounting. Rockboard 60 mineral wool boards are the most popular rigid insulation for DIY garage builds — the 6 lb per cubic foot density provides the deep low-frequency absorption that concrete rooms specifically demand.

Rockboard 60 mineral wool boards
Pre-Built Panels (1,000-1,500 dollars)
Pre-built fiberglass panels from manufacturers like UMIACOUSTICS, Olanglab, or GIK Acoustics run 2-3 times the cost of DIY but arrive ready to hang. For a full garage treatment, plan on 1,000-1,500 dollars for panels, bass traps, and mounting hardware from the top acoustic treatment brands.
The convenience premium is worth it if you lack tools, time, or confidence to build your own. The acoustic performance of pre-built and DIY panels using the same core material is identical — the difference is labor and finish quality.
What To Buy First
If budget is tight, spend the first 200 dollars on corner bass traps and materials for a ceiling cloud. Those two treatments address the biggest problems (bass buildup and overhead reflections) and deliver the most noticeable improvement.
A pre-built treatment kit is another option that bundles panels and hardware at a lower total cost than buying components separately.
Add wall panels at first reflection points next, then expand coverage to the remaining wall surfaces as budget allows. The garage door treatment comes last because it primarily affects sound isolation rather than interior acoustics.
Setting Up Your Mix Position
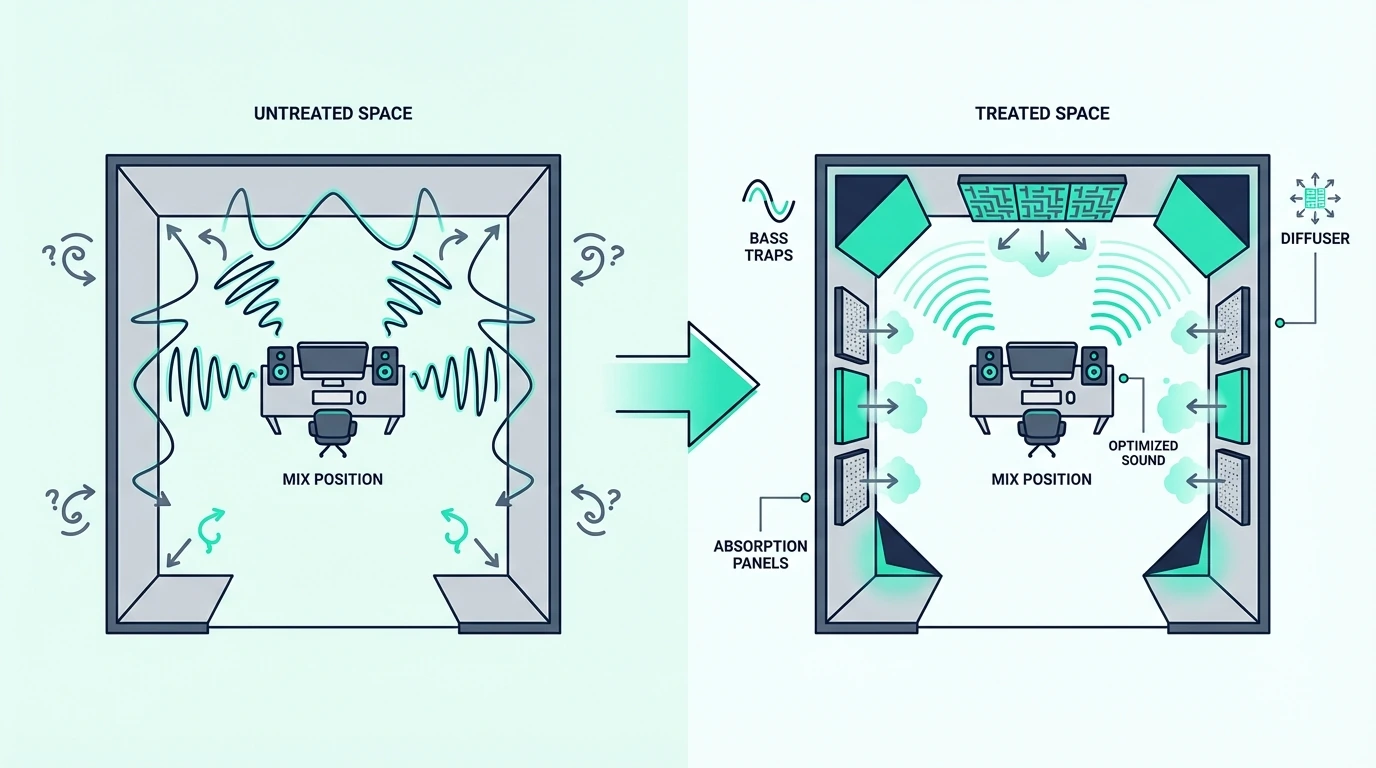
Where you sit in a treated garage matters as much as the treatment itself. Room modes create bass nulls and peaks at specific positions, and placing your monitors and chair in the wrong spot can undo much of what the treatment accomplishes.
The 38% Rule
Place your listening position at approximately 38% of the room length from the front wall (the wall behind your monitors). This position avoids the worst nulls from the first and second axial modes in the length dimension.
In a 20-foot garage, that puts your head at roughly 7.5 feet from the front wall. In a 16-foot garage, it is about 6 feet.
Monitor Placement
Position your monitors symmetrically between the side walls, at ear height when you are seated. Each monitor should be the same distance from its nearest side wall.
Avoid placing monitors in corners or directly against the front wall. Both positions excite room modes more aggressively and make the bass response harder to control.
Pull the monitors at least 2-3 feet away from the front wall. The gap between the monitors and the wall reduces the boundary effect that artificially boosts bass frequencies near hard surfaces.
Angle each monitor inward so the tweeters point toward your ears when you are seated at the mix position. The three points — left monitor, right monitor, and your head — should form an equilateral triangle with sides of 3-5 feet depending on room size.
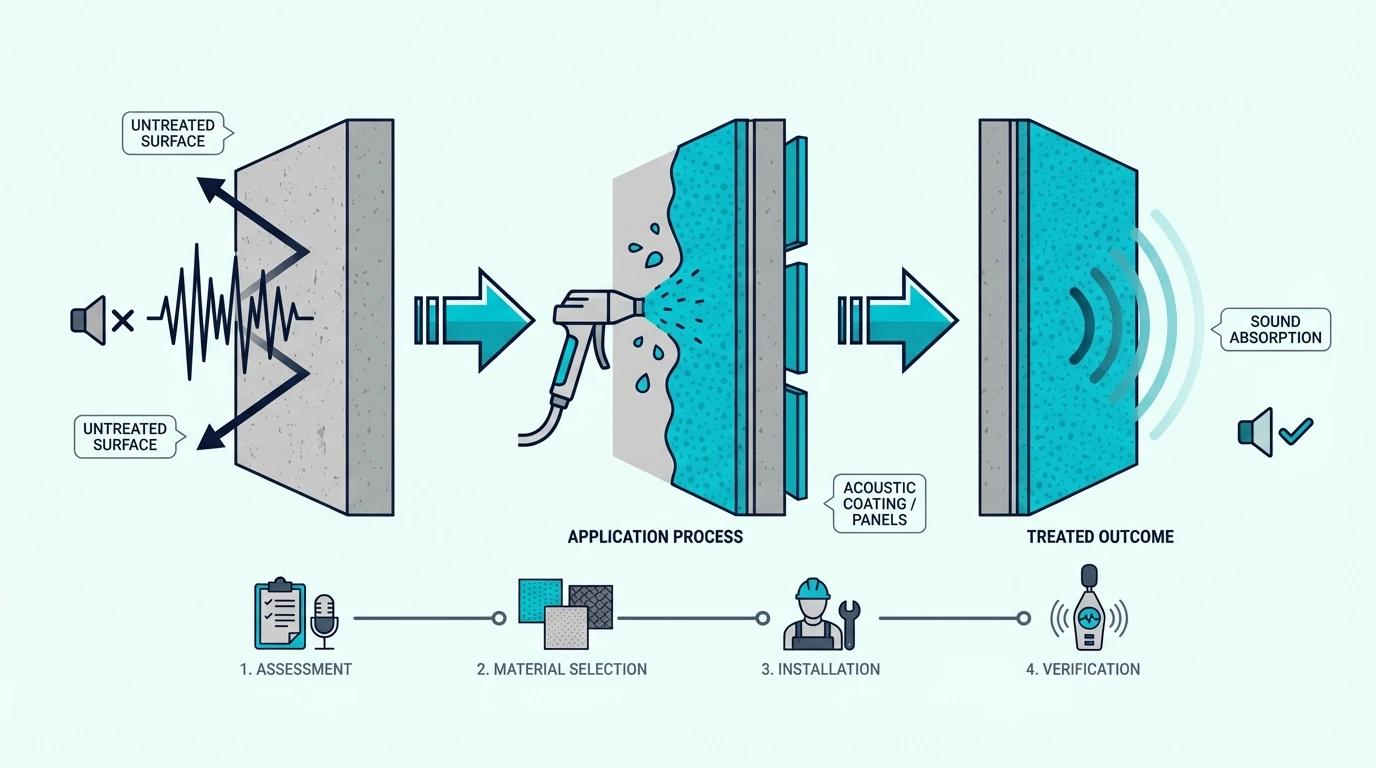
Test Before And After Treatment
Use a measurement microphone and room analysis software (REW is free) to measure the frequency response and reverb time at your listening position before installing treatment. Then measure again after each phase of treatment.
The before-and-after measurements show you exactly what each treatment step accomplished and help you identify remaining problems that need attention. Without measurement, you are guessing — and in a room as challenging as a garage, guessing wastes money.
Pay particular attention to the RT60 measurement (reverb time) and the low-frequency response curve below 300 Hz. The RT60 tells you how much total absorption the room has, and the low-frequency curve reveals which room modes are still causing peaks and nulls at your listening position.
The Bottom Line
Garages are the hardest rooms to treat acoustically because concrete walls, bare floors, metal doors, and boxy shapes create problems at every frequency. Standard bedroom-level treatment is not enough.
The treatment sequence that delivers results in a garage is: corner bass traps first (as thick as possible), wall panels with air gaps at first reflection points, a ceiling cloud above the mix position, and removable treatment over the garage door.
Prioritize corners and reflections before covering large wall areas. A garage treated in this order will sound dramatically better than the same room treated randomly, even if the total panel count is identical.
The full guide to acoustic treatment covers placement fundamentals for any room. The cost breakdown compares DIY, commercial, and professional installation ranges.
For corner-specific guidance, the corner treatment guide details trap construction and placement for maximum bass control.
If your garage doubles as a home theater, the treatment priorities shift slightly — the theater guide covers the differences. For rooms with concrete walls specifically, the concrete treatment guide addresses material and mounting strategies in more detail.
If you are treating a garage specifically for vocal recording, the vocal treatment guide covers mic placement and panel positioning for the cleanest capture. Garages that share a concrete slab and wall construction with basements benefit from many of the same treatment strategies.
Frequently Asked Questions
How to acoustically treat a garage?
Start with thick bass traps (6 inches of rigid fiberglass) in every corner. Then add wall panels at first reflection points, mounted with a 2-4 inch air gap off the concrete.
Install a ceiling cloud above your listening position, and hang heavy blankets or removable panels in front of the garage door.
The treatment sequence matters because bass problems dominate in concrete rooms. Addressing corners first ensures that the wall panels you install afterward work in a room where the low end is already under control.
How to make a garage less echoey?
The echo in a garage comes from sound bouncing between hard parallel surfaces — concrete walls, floor, and ceiling. Adding 6-8 thick absorption panels at the first reflection points on the side walls and a ceiling cloud above the center of the room eliminates most of the audible echo.
For the floor, a thick area rug with a dense pad underneath absorbs mid and high frequency reflections that contribute to the echoey quality. Corner bass traps address the boomy, reverberant low-end that outlasts the mid/high echo. For a quick start without DIY construction, Olanglab fiberglass panels mount directly to concrete walls and provide immediate absorption at first reflection points.
How much does it cost to acoustically treat a garage?
A DIY treatment build using rigid fiberglass insulation and lumber costs 500-800 dollars for a two-car garage. Pre-built panels from commercial manufacturers run 1,000-1,500 dollars for equivalent coverage.
Budget builds that prioritize corners and first reflections can deliver meaningful improvement for as little as 200-300 dollars. Full-room treatment that addresses every surface including the garage door costs more but transforms the space into a genuinely usable recording and mixing environment.
Is acoustic treatment the same as soundproofing a garage?
No — they solve different problems. Acoustic treatment controls reflections and reverb inside the room, making it sound better for recording and mixing.
Soundproofing prevents sound from passing through the walls, floor, ceiling, and door, making the room quieter from the outside.
Treatment uses absorptive materials (fiberglass panels, bass traps, curtains). Soundproofing uses mass, decoupling, and airtight seals (double drywall, floating floors, sealed doors). A budget acoustic treatment setup does not meaningfully reduce sound leakage through concrete walls or a metal garage door.