Portable Recording Booth Vs Acoustic Treatment (Which One Actually Fixes Your Sound?)
Portable recording booth vs acoustic treatment is not really a competition between two equal options — but the way forums and gear sites frame the debate makes it sound like picking one or the other is a simple preference call when the two tools solve fundamentally different problems.
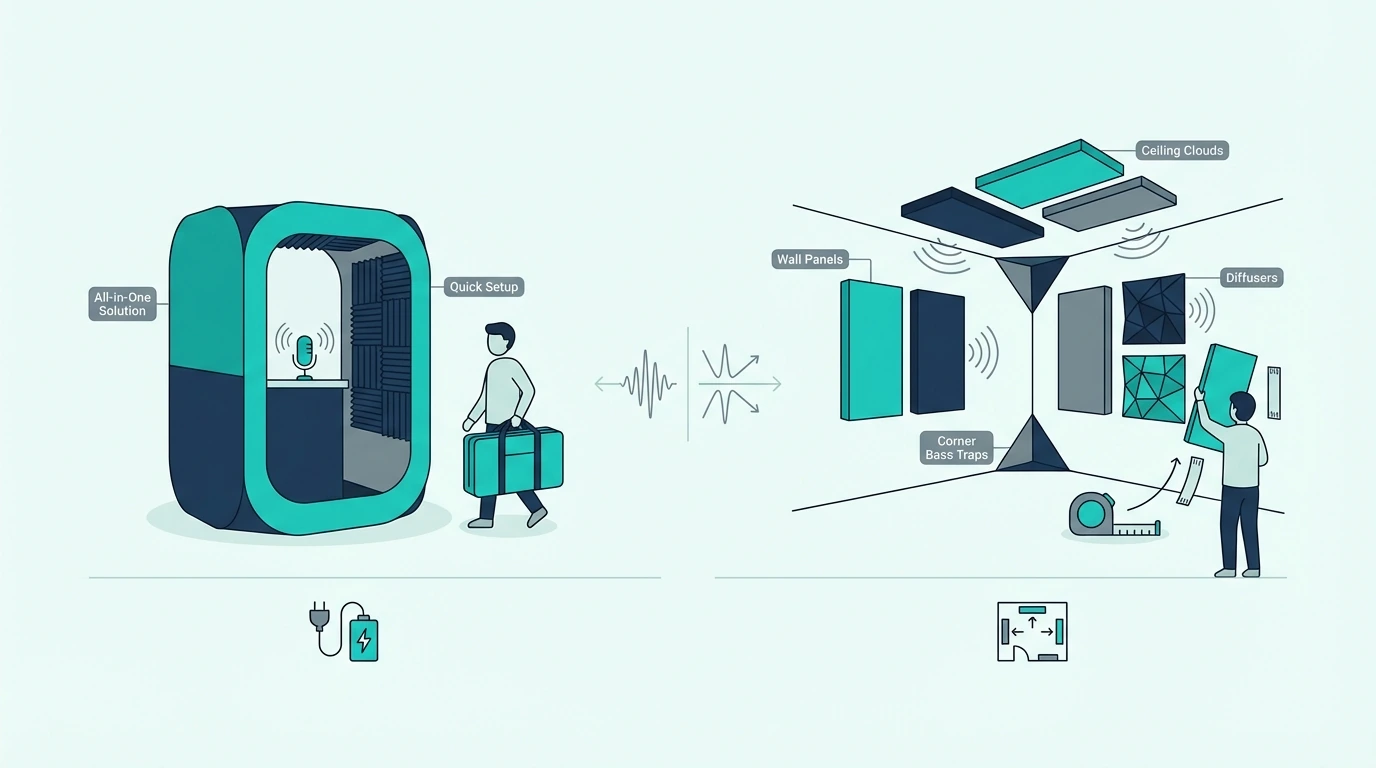
A portable vocal booth shields the microphone from reflections coming from behind and to the sides. Acoustic treatment changes the way the entire room behaves by absorbing, diffusing, or redirecting sound waves at the surfaces where they bounce.
One is a targeted mic-level fix that travels with you. The other is a room-level transformation that benefits every sound source and every listening position in the space.
The confusion comes from the fact that both options reduce unwanted room sound on recordings. They do it through completely different mechanisms, at completely different scales, and with completely different tradeoffs in cost, permanence, and effectiveness.
Below, this guide breaks down exactly what each option does, where each one falls short, and how to decide which approach — or which combination — matches your recording situation, your budget, and your space.
Portable vocal booths and reflection filters reduce mic-level reflections from specific directions but cannot control bass buildup, full-room reverb, or reflections from untreated surfaces. Room acoustic treatment addresses the entire space — walls, ceiling, corners — and benefits recording, mixing, and listening equally. Choose a booth if you rent, travel, or need a quick vocal fix; choose treatment if you own the space and want accurate sound for everything you do in the room.
Portable Recording Booth Vs Acoustic Treatment — What Each One Actually Does
Before choosing between these two approaches, you need to understand what problem each one solves — because the overlap is smaller than most people assume. A portable booth and room treatment share the goal of reducing unwanted reflections, but they attack the problem from opposite directions and at very different scales.
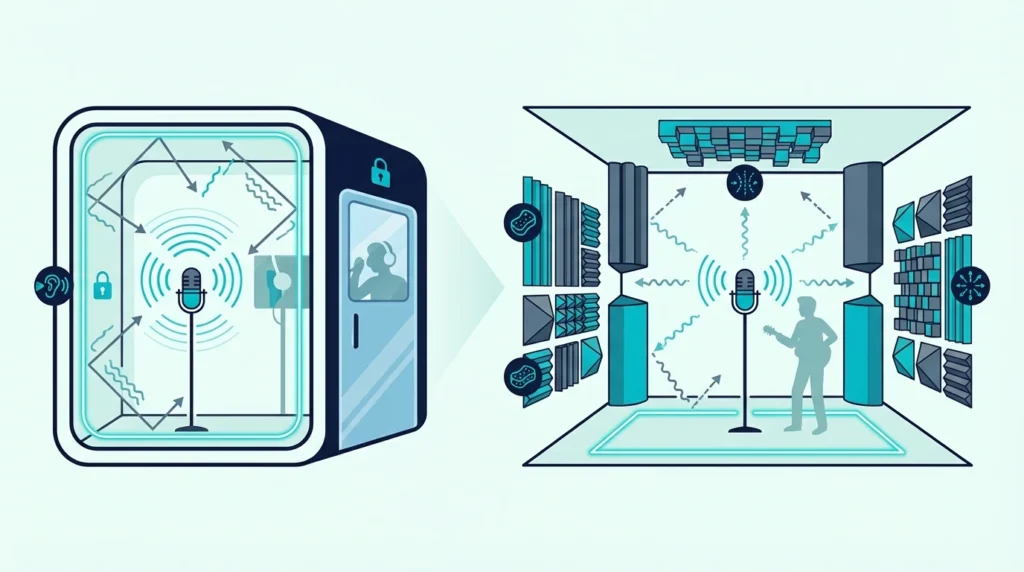
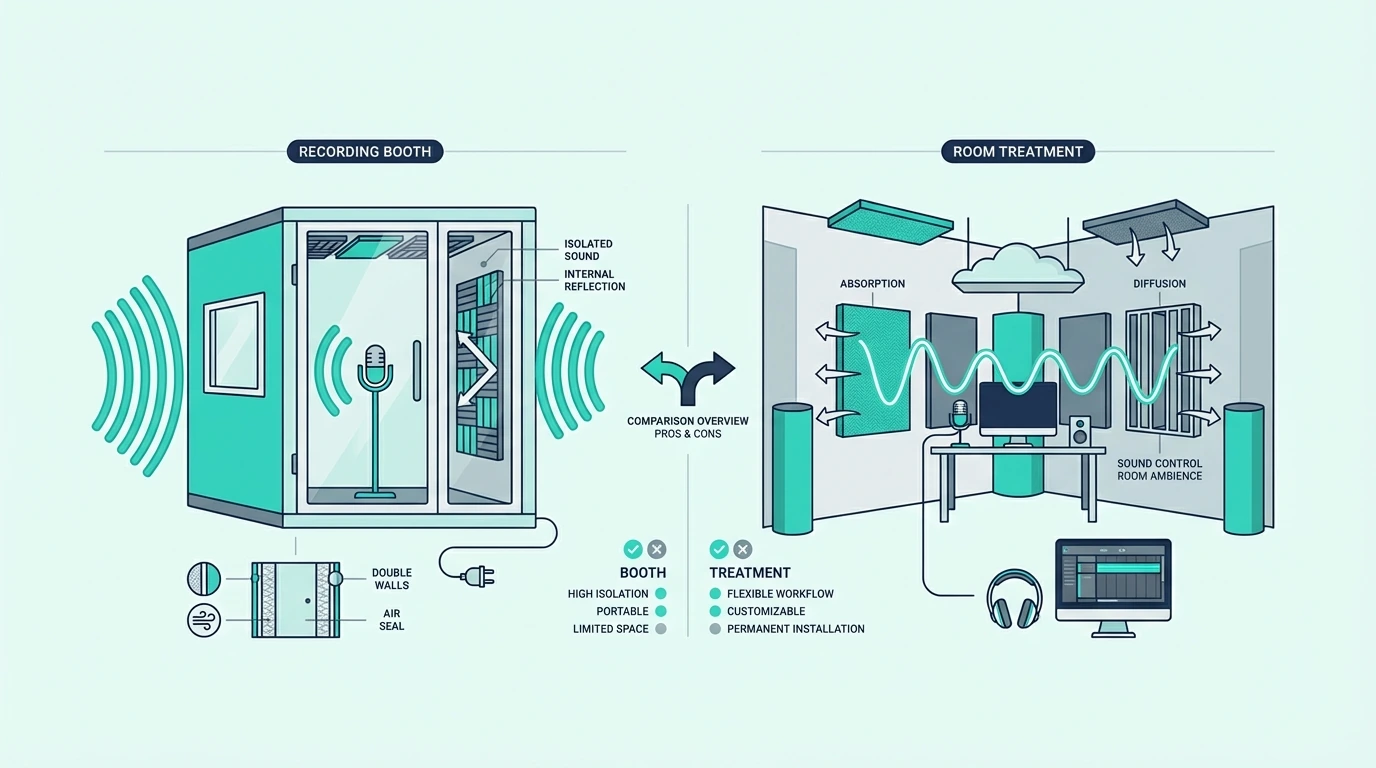
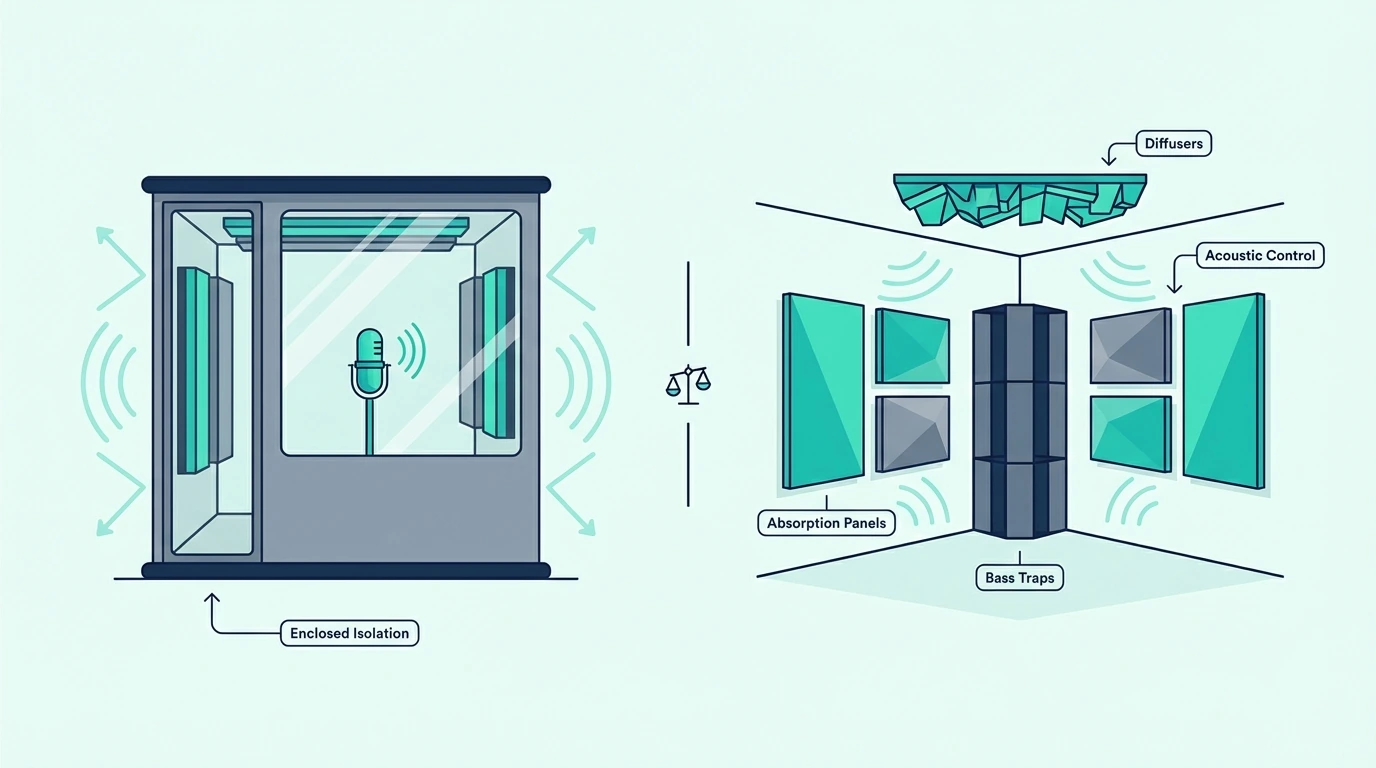
A portable vocal booth works by placing absorptive material directly around the microphone. The shield intercepts sound waves that would otherwise bounce off the wall behind the mic, reflect back into the capsule, and color the recording with room tone.
The mic hears less of the room because the booth physically blocks a portion of the reflected energy before it reaches the diaphragm. The key word is “portion” — the booth only covers a fraction of the total reflective surface area in the room.
Room acoustic treatment works by changing the acoustic behavior of the room itself. Panels on walls absorb reflected energy at the surface before it ever reaches the mic — or your ears, or your monitors.
Bass traps in corners reduce low-frequency buildup that no booth can touch. Diffusers on the rear wall scatter reflected energy into many small reflections that arrive at different times and from different angles, keeping the room alive without creating discrete echoes.
The room becomes a better acoustic environment for every activity that happens inside it — recording, mixing, monitoring, and casual listening. The fundamental difference is scope: a booth protects the microphone, while treatment fixes the room.
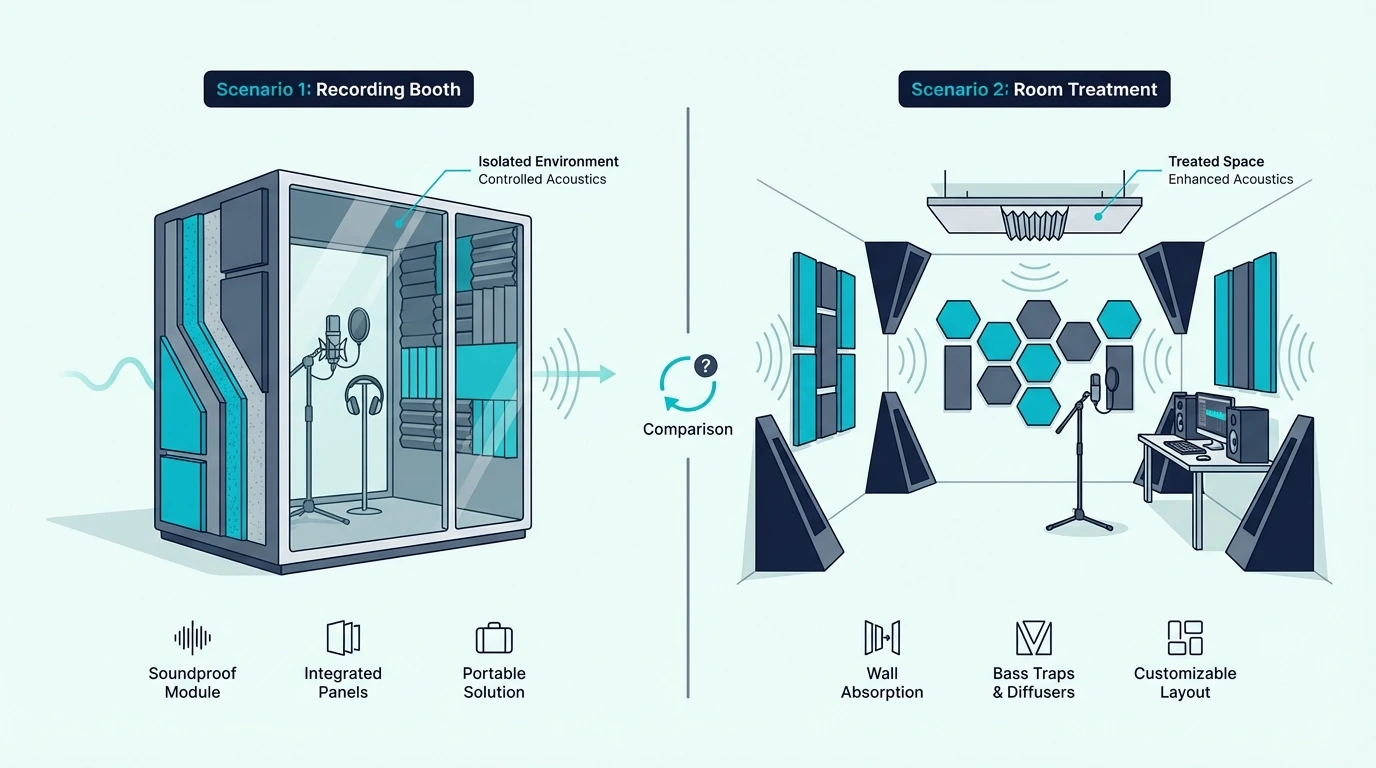
What Is A Portable Recording Booth?
The term “portable recording booth” covers a wide range of products — from small foam-lined shields that clip onto a mic stand to full walk-in enclosures that surround the vocalist. What they share is portability and the goal of reducing the amount of room sound that reaches the microphone during recording.
Understanding the two main categories — reflection filters and full booths — helps clarify what you are actually buying and what each type can realistically deliver.
Reflection Filters And Vocal Shields
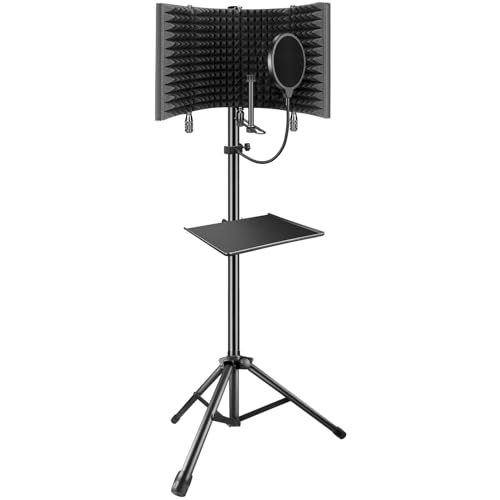
Reflection filters are the most common and most affordable type of portable booth. They are semi-circular or multi-panel shields lined with acoustic foam or dense fabric that mount behind the microphone on a standard mic stand.
The shield blocks reflections coming from behind and to the sides of the mic. Sound waves that would normally hit the wall behind the microphone, bounce back, and enter the rear or sides of the capsule are absorbed by the foam lining instead.
A typical reflection filter like the Professional Studio Microphone Isolation Shield folds flat for transport and clips onto any standard mic stand. The foldable design makes it practical for mobile recording sessions, podcast setups in shared spaces, or home studios where permanent treatment is not an option.
Professional Studio Microphone Isolation Shield
The limitation is coverage — a reflection filter only shields one direction, the rear hemisphere of the microphone. Sound bouncing off the ceiling, the floor, the side walls, and the wall the vocalist faces still enters the capsule freely.
In a highly reverberant room, a reflection filter might reduce room tone by 20-30%. That is noticeable on the recording, but far from eliminating it.
Reflection filters also do almost nothing below 300-500 Hz because the foam lining is too thin to absorb low-frequency energy. Bass buildup from corner modes and standing waves passes through the shield as though it were not there.
The weight of the filter on a mic stand is another practical concern. Heavier models require a sturdy boom stand to avoid tipping, and the added mass can introduce vibration transfer from the floor through the stand into the mic if the stand is not properly isolated.
Despite these limitations, reflection filters remain popular because they solve an immediate, visible problem — audible room echo on vocal takes — for a very low cost. The key is understanding that they are a partial solution, not a complete one.
Full Portable Vocal Booths
Full portable vocal booths are enclosures — fabric-and-frame structures or rigid panels — that surround the vocalist on multiple sides. Some resemble small tents with absorptive lining on every interior surface.
Others are rigid boxes with a door and ventilation holes. The build quality and materials vary widely across the price range.
These booths provide significantly more isolation than a reflection filter because they block sound from multiple directions instead of just one. The vocalist records inside a controlled space with absorptive walls on all sides, reducing the amount of room sound that reaches the mic from any angle.
The tradeoffs are substantial, though. Full booths are expensive — typically several hundred to several thousand dollars for a quality unit that actually provides meaningful isolation.
They take up significant floor space, often 4 x 4 feet or more. In a small bedroom studio, that footprint can consume a quarter of the usable room.
They get uncomfortably hot during long sessions because the enclosed space traps body heat and has limited airflow. Vocalists report fatigue and reduced performance quality after 30-60 minutes inside a portable booth without active ventilation.
Most full booths still lack the depth and density of material needed to absorb bass frequencies effectively. Low-frequency room problems persist even inside the enclosure because the thin foam or fabric walls are acoustically transparent to wavelengths below 300 Hz.
Full booths are most practical for voiceover artists who record in shared or rented spaces and need consistent sound without modifying the room. For music production — especially recording instruments beyond just vocals — the limitations outweigh the benefits quickly.
Another consideration is resale value. Portable booths depreciate quickly because the foam interior degrades over time, and used booths are difficult to ship due to their size and weight.
Room treatment panels, by contrast, hold their value much better because fiberglass and mineral wool do not degrade with normal use. A set of well-maintained panels can last a decade or more and still sell for a reasonable fraction of the original price.
If you move to a new space, you can take the panels with you and reinstall them — the only cost is new mounting hardware. A portable booth that has spent two years accumulating body heat, moisture, and foam degradation is a much harder sell on the secondhand market.
Get Studio Tips Weekly
Join 5,000+ creators getting acoustic treatment advice every week.
No spam. Unsubscribe anytime.What Is Room Acoustic Treatment?
Acoustic treatment is the practice of placing absorptive, reflective, or diffusive materials on the surfaces of a room to control how sound behaves inside that space. Unlike a portable booth that shields one microphone, treatment changes the acoustic properties of the entire room.
Every wall, the ceiling, the floor, and the corners become part of a designed acoustic environment. The result benefits every sound source and every listener in the room simultaneously.
How Treatment Changes The Room
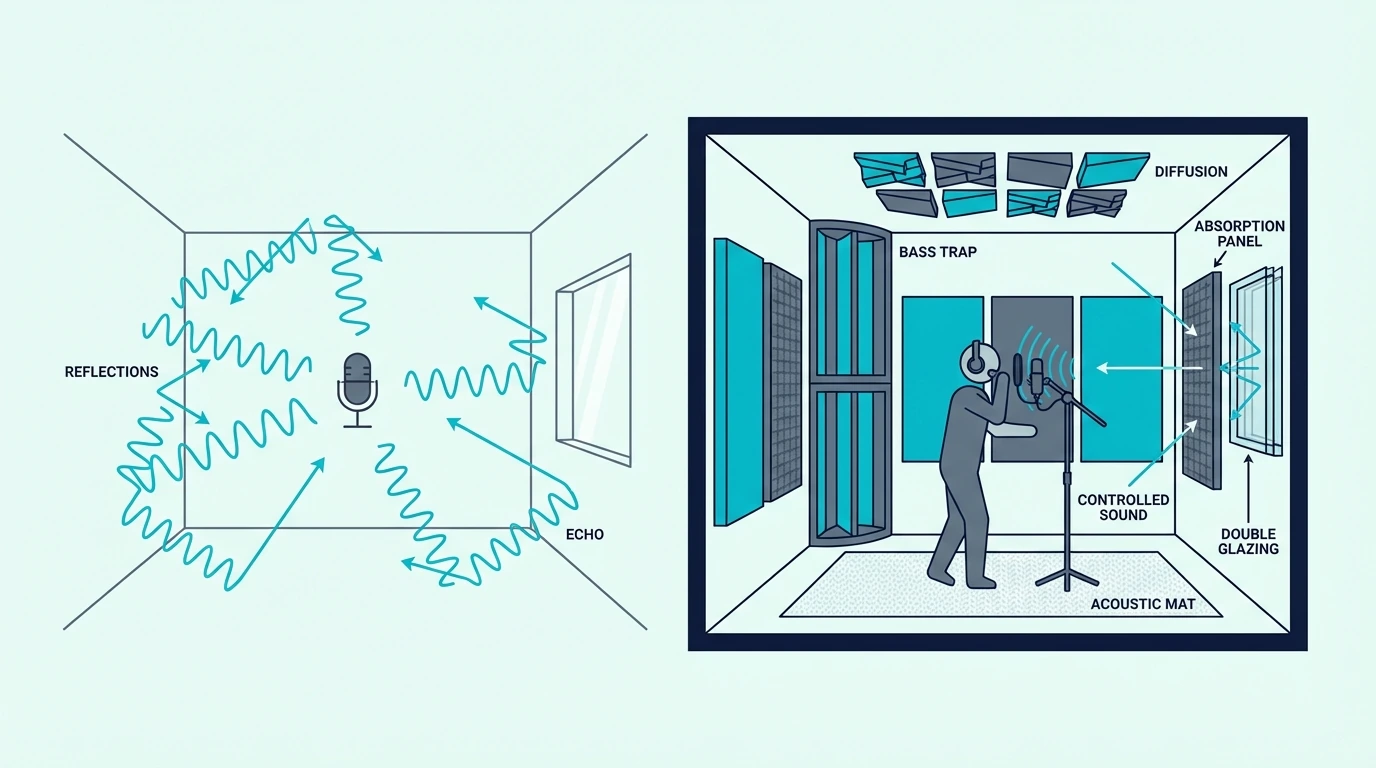
When sound waves leave a speaker or a vocalist’s mouth, they travel outward in all directions. Some energy reaches your ears (or the microphone) directly as the first arrival.
The rest hits the walls, ceiling, and floor, bounces off those surfaces, and arrives at the listening position (or the mic) milliseconds later as reflections. Those reflections are the root cause of nearly every acoustic problem in untreated rooms.
Early reflections — the first bounces off nearby surfaces — interfere with the direct sound and smear stereo imaging, muddy transients, and create comb filtering. The comb filtering makes the frequency response at your mix position wildly uneven, with sharp peaks and nulls that change depending on where you sit.
Late reflections accumulate into reverb that colors every sound with the room’s own decay signature. In small rooms, the reverb time is short but dense, creating a boxy coloration that is immediately audible on vocal recordings and impossible to remove in post-production.
Low-frequency standing waves — caused by sound bouncing back and forth between parallel surfaces — create bass buildup in corners and nulls at other spots. These room modes make the low end completely unreliable for mixing because the bass level at your seat does not match the bass level anywhere else in the room.
Treatment addresses all three problems at the source. Fiberglass or mineral wool panels on walls absorb early and late reflections before they accumulate into problematic reverb.
Bass traps in corners reduce standing wave energy where it concentrates most. Diffusers on the rear wall scatter reflected energy into many small reflections that arrive at different times, keeping the room alive without creating discrete echoes.
What Treatment Covers That A Booth Cannot
The list of acoustic problems that treatment solves but a booth cannot is long:
- Bass control — standing waves and room modes below 300 Hz require thick absorbers in corners, and no portable booth addresses this
- Full-room reverb — a booth reduces reflections at the mic, but the room still reverberates for everything else, which means your monitoring is still compromised
- Stereo imaging — accurate stereo requires controlled first reflections on both side walls and the ceiling, and a booth does nothing for monitoring accuracy
- Multiple sources — treatment benefits every microphone and every speaker in the room simultaneously, while a booth only helps the one mic it surrounds
- Listening accuracy — if you mix, master, or critically listen in the same room, treatment is the only option that improves what you hear from your monitors
The home studio treatment guide covers the full placement sequence for recording rooms. The small room treatment guide addresses the specific challenges that bedrooms and spare rooms present — which is where most people making this decision actually work.
Head-To-Head Comparison
The clearest way to see where each option excels and where it falls short is a direct comparison across the factors that matter most for home recording.
| Factor | Portable Booth / Reflection Filter | Room Acoustic Treatment |
|---|---|---|
| What it treats | The microphone’s pickup pattern | The entire room |
| Frequency range | Mid and high frequencies only (above 300-500 Hz) | Full range including bass (with corner traps) |
| Helps with mixing | No | Yes — flattens frequency response at the listening position |
| Helps with recording | Yes — reduces room tone on the mic | Yes — reduces room tone everywhere |
| Portability | High — folds flat, travels easily | Low — mounted to walls and corners |
| Installation | Clips onto mic stand in seconds | Requires wall mounting with clips, adhesive, or hardware |
| Renter-friendly | Yes — no wall modifications | Partially — command strips and freestanding panels work, but ideal placement requires mounting |
| Cost for basic setup | 30-100 dollars for a reflection filter | 200-500 dollars DIY or 500-1,500 dollars commercial panels |
| Bass control | None | Yes — corner bass traps address room modes |
| Coverage | One microphone, one direction | Every source and every listener in the room |
The table makes the scope difference clear. A reflection filter is a focused, temporary, mic-level tool.
Treatment is a comprehensive, permanent (or semi-permanent), room-level solution. They are not interchangeable — they solve different layers of the same problem.
The frequency range row is worth emphasizing. Bass problems cause the most damage to recordings and mixes in small rooms, and neither a reflection filter nor a full portable booth addresses them at all.
If your room has audible bass buildup — a boomy quality on vocals, an uneven low end on playback — only corner bass traps will fix it. That single limitation eliminates portable booths as a standalone solution for anyone who also mixes in their recording space.
Which Should You Choose?
The decision between a portable booth and room treatment depends on four variables: whether you own or rent the space, whether you record only or also mix in the room, how many different sources you record, and your budget timeline. No single answer fits every situation, so the right approach depends on which of these variables weighs heaviest for you.
When A Portable Booth Makes Sense
A reflection filter or portable booth is the right choice when the room is not yours to modify. If you rent an apartment or work in a shared space, mounting panels on walls is either against the lease or impractical because you will move within a year or two.
Portable booths also make sense for mobile recording — podcast interviews at different locations, on-site voiceover work, or field recording where you need consistent vocal sound without any room prep. The filter travels in a bag, clips onto a stand, and gives you a baseline level of reflection control regardless of the space.
If your recording needs are limited to solo vocals or voiceover — one microphone, one person, in a consistent position — a reflection filter handles the most audible reflections for a fraction of the cost of treating the room. The recording will not be as clean as it would in a treated room, but it will be significantly better than recording with a bare mic in an untreated space.
Budget matters too. A reflection filter costs 30-100 dollars, while a basic DIY room treatment setup starts around 200 dollars in materials.
Commercial panels for a small room run 500-1,500 dollars. If the budget is tight and the need is immediate, a reflection filter buys meaningful improvement today while you save for treatment.
Renters who want something more effective than a reflection filter but less permanent than wall-mounted panels can explore temporary acoustic treatment options. Freestanding panels, heavy curtains, and strategically placed furniture all improve the room without drilling holes.
When Room Treatment Wins
Room treatment is the clear winner when you own the space — or plan to stay long enough to justify the investment — and when you do more than just record vocals through a single microphone. The benefits compound across every activity you do in the room.
If you mix in the same room where you record, treatment is non-negotiable. A reflection filter does nothing for your monitoring.
Every EQ decision, every reverb send, every panning choice is filtered through the room’s acoustic distortion. Without treatment, your mixes compensate for problems that only exist in your room, and they fall apart on every other playback system.
If you record multiple sources — acoustic guitar, amplifiers, drums, or ensemble vocals — a single reflection filter behind one mic cannot help the other mics in the room. Treatment improves the acoustic environment for every source simultaneously.
That means every microphone in the room captures a cleaner signal with less room coloration. The difference is audible on the first playback.
If bass is a problem — and in small rooms it always is — treatment is the only solution. Portable booths and reflection filters cannot absorb low frequencies because they lack the mass and depth of material required.
Corner bass traps built from 4-inch thick fiberglass or mineral wool address standing waves that no portable product can touch. The difference in the low end after installing corner traps is one of the most dramatic acoustic improvements most home studio owners ever experience.
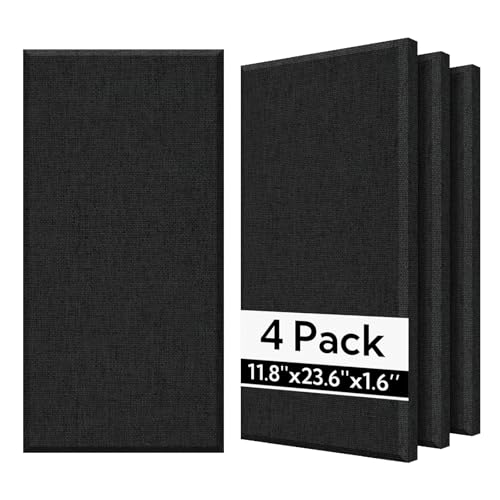
Room treatment with panels like the UMIACOUSTICS Fiberglass Panels gives you a permanent improvement that benefits recording, mixing, and casual listening equally. The included brackets simplify installation, and the 2-inch fiberglass core handles the mid and high frequencies where vocal reflections are most audible.

UMIACOUSTICS Fiberglass Panels
When You Need Both
The best setup for many home studios is a combination: room treatment as the foundation, with a reflection filter as a supplemental tool for specific recording situations. This layered approach is more common in professional studios than most beginners realize.
Treat the room first — corner bass traps, ceiling cloud, and side wall panels at first reflection points. That handles the room-level problems (bass modes, reverb, monitoring accuracy) that no portable product can fix.
Then add a reflection filter behind the vocal mic if your recording position faces an untreated wall or window. The filter catches the remaining reflections from the one direction you could not panel — perhaps because of a window, a door, or a surface that is impractical to cover.
This layered approach gives you the best of both worlds. You get a treated room that sounds accurate for mixing and general recording, plus targeted mic-level shielding for the one spot where reflections still sneak through.
Common Myths About Booths And Treatment
Several persistent myths make this decision harder than it needs to be. Clearing them up saves money and prevents the disappointment that comes from buying the wrong solution for the actual problem.
Myth: A Reflection Filter Is A Substitute For Treatment
A reflection filter reduces reflections from one direction — behind the microphone. It does not reduce reverb from the ceiling, the floor, the side walls, or the wall the vocalist faces.
In a small, reverberant room, a reflection filter improves the recording noticeably but does not come close to the clarity of a properly treated space. The filter is a supplement, not a substitute.
Treating it as a replacement for room treatment sets expectations that the product cannot meet. The frustration that follows is one of the most common complaints on recording forums.
Myth: Foam Panels Are Real Acoustic Treatment
Thin acoustic foam tiles — the kind sold in multi-packs for decorating studio walls — absorb some high-frequency energy above 1-2 kHz. They do almost nothing below 500 Hz, which is where bass buildup, room modes, and the low-mid muddiness that ruins recordings and mixes actually live.
Real acoustic treatment uses dense, rigid fiberglass (like Owens Corning 703) or mineral wool (like Rockwool Safe’n’Sound) at 2-4 inches thick. These materials absorb across a much wider frequency range, including the low-mids that foam misses entirely. Rockboard 60 mineral wool boards are a popular DIY choice — the rigid boards cut to size easily, and the 6 lb per cubic foot density absorbs effectively down into the low-mids where foam fails completely.

Rockboard 60 mineral wool boards
The fiberglass treatment guide covers material selection in detail. The cost difference between foam and fiberglass is smaller than most people expect, especially when you account for the fact that foam requires twice the coverage to achieve half the result.
Myth: Booths Fix Bass Problems
No portable booth — not a reflection filter, not a vocal shield, not even a full walk-in enclosure — can meaningfully absorb bass frequencies. Bass waves are long (an 80 Hz wave is over 14 feet long) and require thick, dense material to absorb.
A 1-inch foam-lined shield or a fabric-walled enclosure is acoustically transparent to low frequencies. The bass passes through the booth material as though it were not there.
If bass buildup is your problem — boomy recordings, low-end mud in your mixes, or uneven bass response at your listening position — the only effective solution is corner bass traps made from rigid fiberglass or mineral wool at 4 inches minimum thickness.
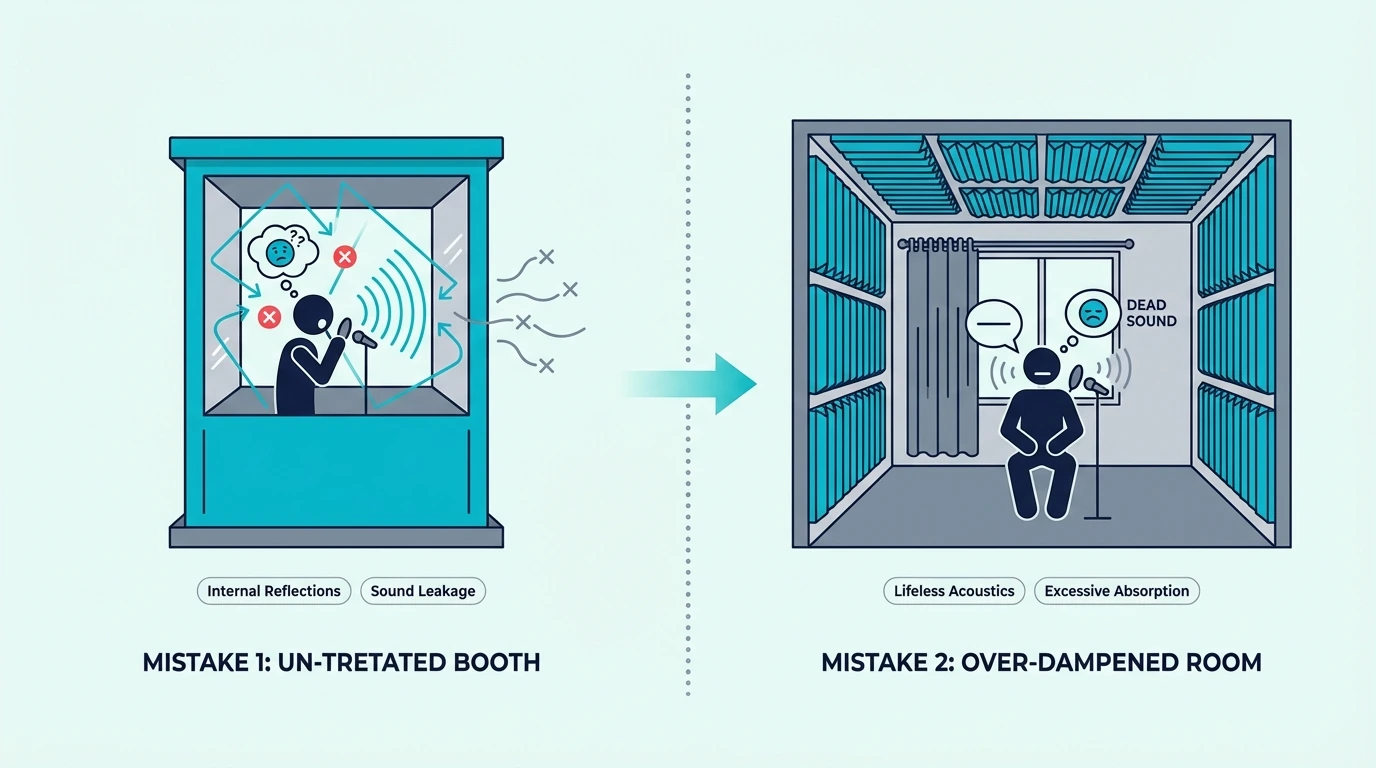
Myth: Treatment Makes The Room Sound Dead
Over-treatment is a real concern, but a properly designed treatment plan does not deaden the room. The goal is controlled acoustics — absorbing reflections at specific problem spots while leaving other surfaces untreated or using diffusion to scatter energy.
A treated room should sound natural, clear, and balanced — not lifeless. If the room feels dead after treatment, too much absorption was placed on surfaces that did not need it.
The mixing room treatment guide explains how to balance absorption and diffusion to avoid over-damping. Most rooms need treatment on 30-40% of their surface area — not every wall from floor to ceiling.
Myth: You Only Need Treatment If You Record Professionally
Even casual recording benefits from basic treatment. A bedroom podcast setup, a YouTube voiceover channel, or a hobbyist home studio all sound noticeably better with two or three panels at first reflection points and a pair of corner bass traps.
The improvement is not reserved for professional-grade projects. Anyone who listens critically or records audio of any kind hears the difference immediately.
Cost Comparison
Budget is often the deciding factor, so a clear cost breakdown helps frame the decision in practical terms.
Reflection Filter / Portable Booth Costs
A basic reflection filter runs 30-70 dollars. Mid-range filters with better foam density and larger coverage panels cost 60-120 dollars.
Full portable vocal booths (walk-in enclosures) range from 300 to 3,000 dollars depending on size, materials, and isolation rating. The price climbs steeply for models with meaningful bass isolation, which starts around 1,500 dollars.
For most home recordists, a 50-80 dollar reflection filter provides the best value in the portable category. Spending more gets you better materials but not dramatically better acoustic performance — the fundamental limitation of shielding only one direction remains regardless of price.
Room Treatment Costs
A DIY room treatment setup — building panels from fiberglass or mineral wool, pine frames, and fabric — costs 200-500 dollars for a bedroom-sized studio. That covers 4-6 wall panels and 2-4 corner bass traps, which is enough to control the worst reflections and tighten the low end.
Commercial pre-made panels for the same coverage run 500-1,500 dollars depending on brand, panel size, and whether you buy individual panels or a bundled room kit. The cost breakdown guide compares DIY, commercial, and professional installation ranges in detail.
The cost gap narrows when you consider what each dollar buys. A 60 dollar reflection filter improves one microphone’s recording in one direction.
A 300 dollar DIY treatment setup improves every microphone, every speaker, and every listening position in the room — permanently. On a per-benefit basis, treatment delivers far more value per dollar spent. For builders who want commercial panels without DIY construction, Olanglab fiberglass panels deliver real fiberglass absorption at the lowest entry point in the commercial panel market — a 4-pack costs about the same as a mid-range reflection filter but treats the actual room.
Olanglab fiberglass panels
Long-Term Value
A reflection filter is a consumable-grade purchase — it does its job, but it does not appreciate in value or compound its benefits over time. Treatment is an investment that pays dividends every time you record, mix, or listen in the room.
If you plan to produce music seriously for more than a year in the same space, treatment is the better long-term investment even if the upfront cost is higher. The improvement to your mixing accuracy alone — fewer revision cycles, better client feedback, mixes that translate on the first pass — repays the cost quickly in time saved.
The math works out clearly over a two-year timeline. A 60 dollar reflection filter gives you a small improvement on one mic for two years.
A 400 dollar DIY treatment setup gives you a dramatically better room for recording, mixing, and listening — every day, for every project, for as long as you stay in the space. The per-session cost of treatment drops to pennies within the first few months.
For those on a tight budget who want to start with something while they plan a full treatment setup, the budget acoustic treatment guide covers the most cost-effective panels and DIY approaches available.
The Bottom Line
A portable recording booth and room acoustic treatment solve different layers of the same problem. A booth shields one microphone from reflections in one direction, while treatment fixes the room itself — every surface, every frequency, every source, every listener.
Choose a reflection filter if you rent, travel, or need a quick vocal improvement on a tight budget. Choose room treatment if you own the space, mix in the same room, or record anything beyond solo vocals.
The ideal setup for most home studios combines both: treatment as the foundation for accurate acoustics, and a reflection filter as a supplemental tool for the one spot where reflections still sneak past the panels.
The full guide to acoustic treatment covers every surface type and placement priority. For budget-friendly panel options, the roundup compares what works at every price point.
If you want to know whether temporary treatment solutions can bridge the gap while you save for a permanent setup, the guide breaks down what delivers real results without permanent installation.
Frequently Asked Questions
Do vocal booths need acoustic treatment?
Yes — even inside a full portable booth, the interior surfaces create reflections that color the recording. The foam or fabric lining inside most booths absorbs some mid and high frequency energy.
The enclosed space can actually amplify low-frequency problems by trapping bass energy in a small volume with no escape path. Adding a small amount of thicker absorptive material inside the booth improves the internal acoustics significantly.
Are reflection filters worth it?
Reflection filters provide a real but limited improvement — they reduce reflections from behind the microphone by 20-30%, which is audible on vocal recordings in reverberant rooms. They are worth the 50-80 dollar investment as a supplemental tool.
They are not worth it as a replacement for proper acoustic treatment if your goal is professional-quality recordings or accurate mixing. The two serve different purposes at different scales.
Can I use blankets instead of acoustic treatment?
Heavy blankets and moving pads absorb some mid and high frequency energy and can serve as a temporary measure. They work better than bare walls but significantly worse than purpose-built panels because they lack the density and thickness to absorb lower frequencies.
Blankets are a reasonable stopgap while you save for proper treatment. They should not be considered a permanent solution for any serious recording or mixing work.
What is the most effective soundproofing material?
Soundproofing (blocking sound transmission between rooms) and acoustic treatment (controlling sound behavior within a room) are different disciplines that use different materials. Mass-loaded vinyl, double drywall, and decoupled wall construction block sound transmission between spaces.
Fiberglass panels and mineral wool absorb reflections inside the room. Most home recordists need treatment, not soundproofing — unless external noise (traffic, neighbors, HVAC) is bleeding into the recording.
How do I know if I need a booth or treatment?
Record a vocal take with the mic in your normal position, then clap your hands sharply and listen for the room’s decay. If you hear a noticeable ring or flutter echo, the room needs treatment.
If the room sounds reasonably controlled but you still hear room tone on close-mic vocals, a reflection filter behind the mic may be enough. If the room rings and the vocals sound roomy, you need treatment first and can add a filter later as a supplement.
The recording without treatment guide covers techniques for getting the cleanest possible recordings before you invest in either option.