Bass Traps Vs Absorbers — Why They Are Not The Same Thing And When You Need Each

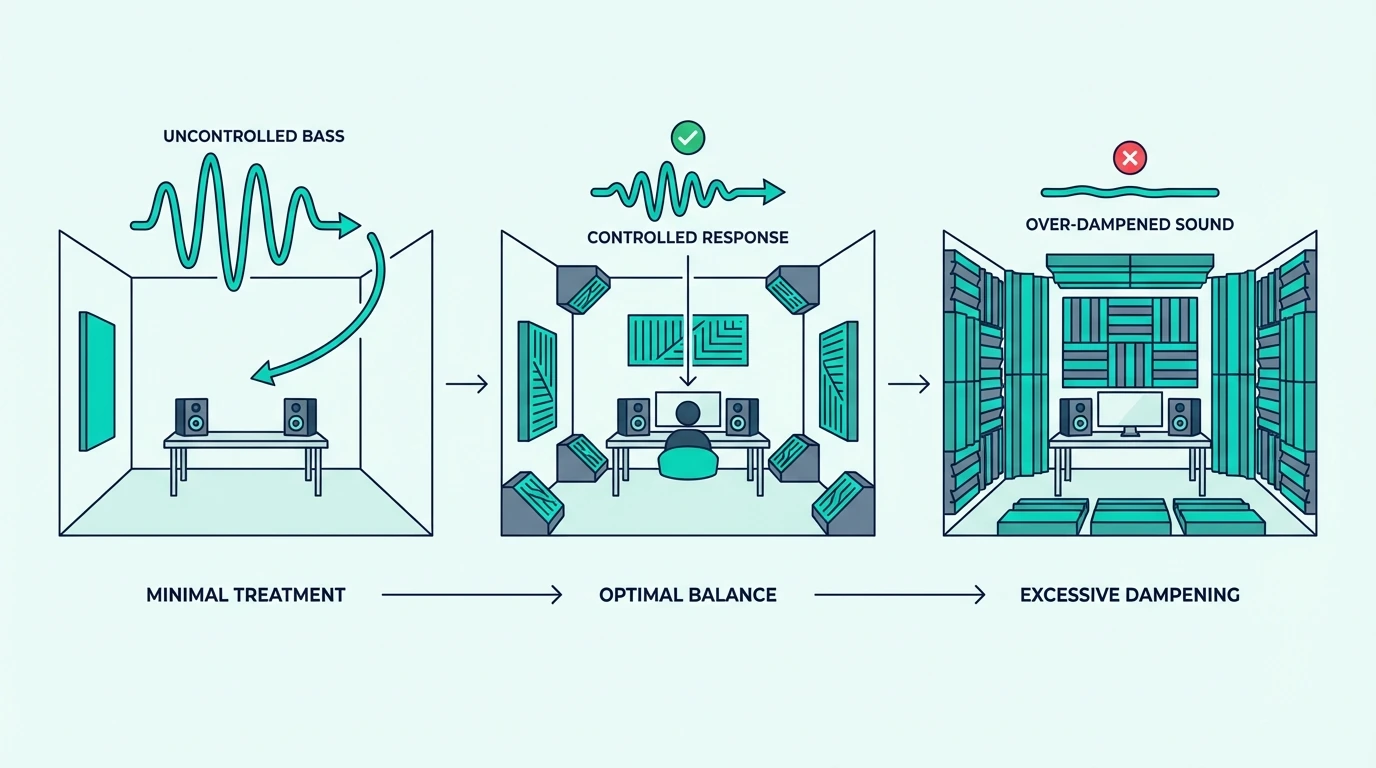
Bass traps vs absorbers is a comparison that sounds like two separate products — but the reality is that bass traps are a specific type of absorber, and confusing the two leads to rooms that look fully treated while the worst acoustic problems remain completely unaddressed. The terminology overlap causes more bad purchasing decisions than any other topic in acoustic treatment.

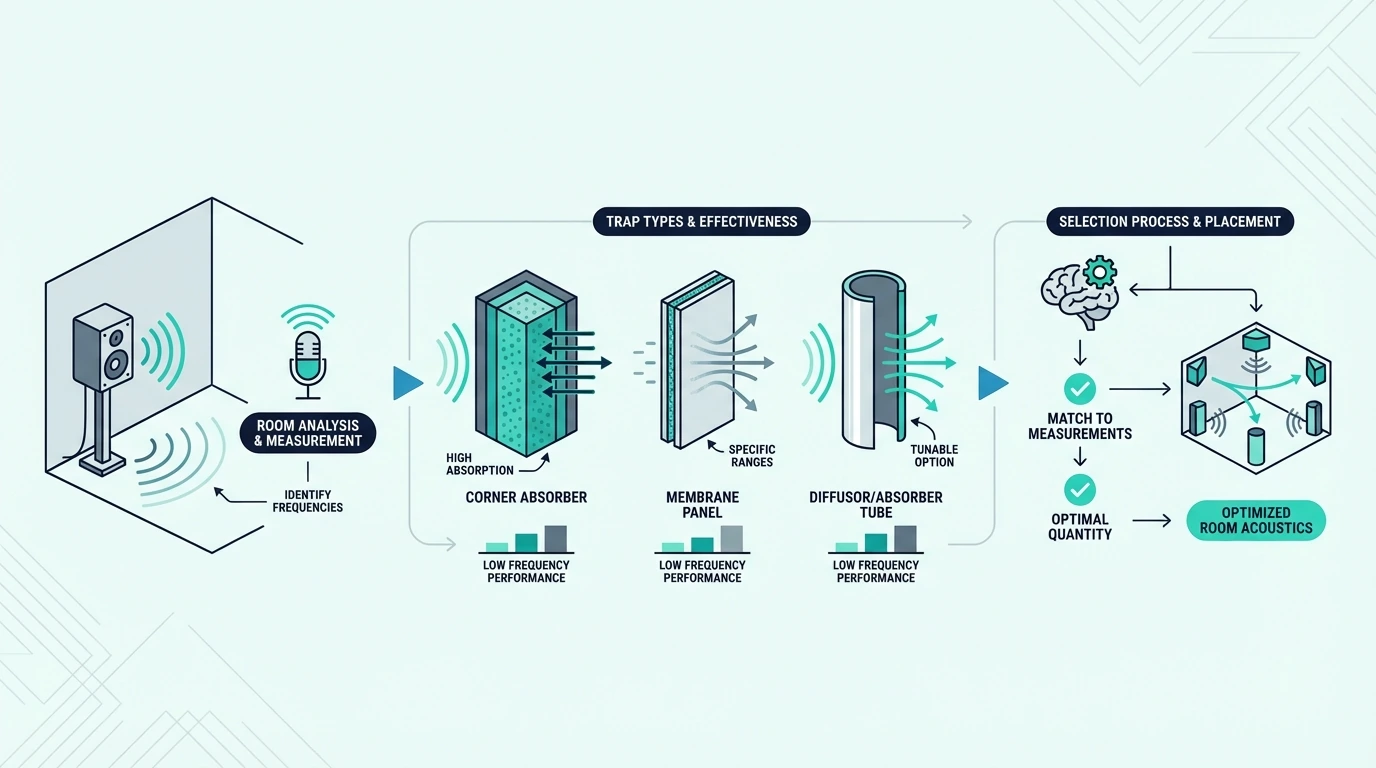
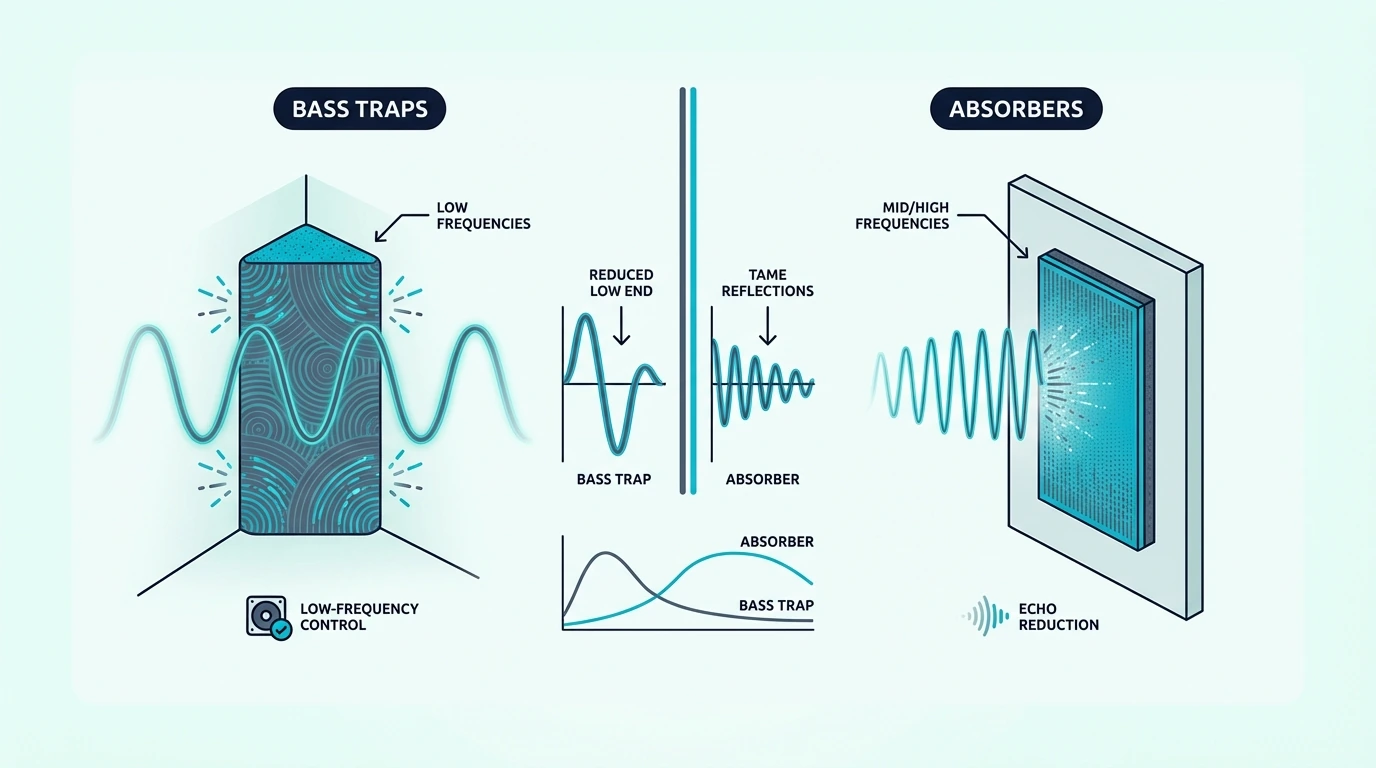
The distinction comes down to frequency range and placement — “absorbers” in common usage refers to thin panels (1-2 inches) mounted on walls to tame mid and high frequency reflections above 300 Hz. “Bass traps” refers to thicker panels (4+ inches) or resonant devices positioned in corners to absorb low frequencies below 300 Hz where room modes create the biggest problems.

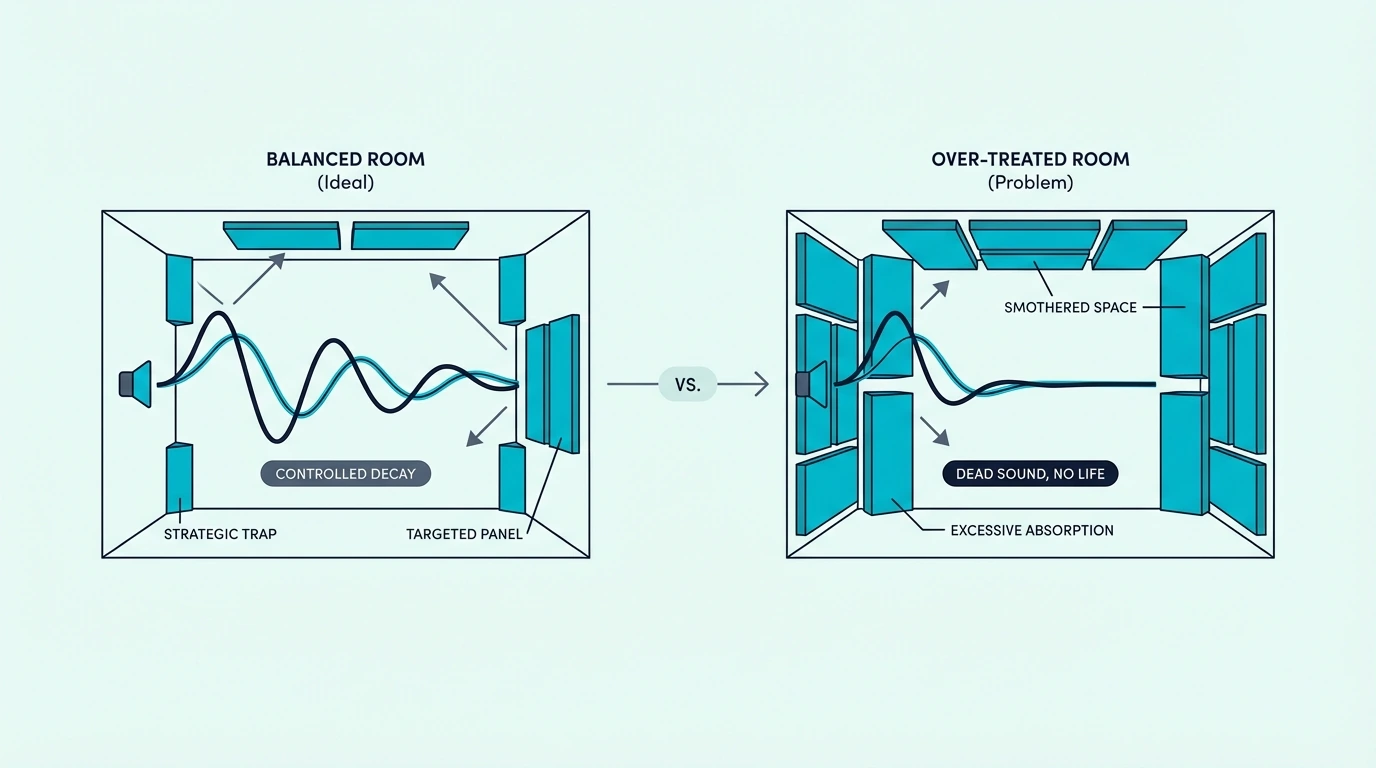
A room with only broadband absorbers still sounds boomy and uneven in the bass, while a room with only bass traps still has flutter echo and harsh reflections in the mids and highs. Understanding what each one actually does prevents you from over-investing in one type while neglecting the other.

Below, you will find exactly how bass traps differ from broadband absorbers, whether you need both, how a single thick panel can serve double duty, and clear guidance on which to buy first.

Quick Takeaway

Bass traps ARE absorbers, but not all absorbers are bass traps. Standard absorber panels (1-2 inches thick, wall-mounted) handle mid/high frequencies above 300 Hz. Bass traps (4+ inches thick, corner-mounted) handle low frequencies below 300 Hz. Most rooms need both — bass traps in corners first for room modes, then broadband absorbers at reflection points for imaging and clarity.

Bass Traps vs Absorbers — Are They The Same Thing?

Overlap between bass traps and broadband absorbers

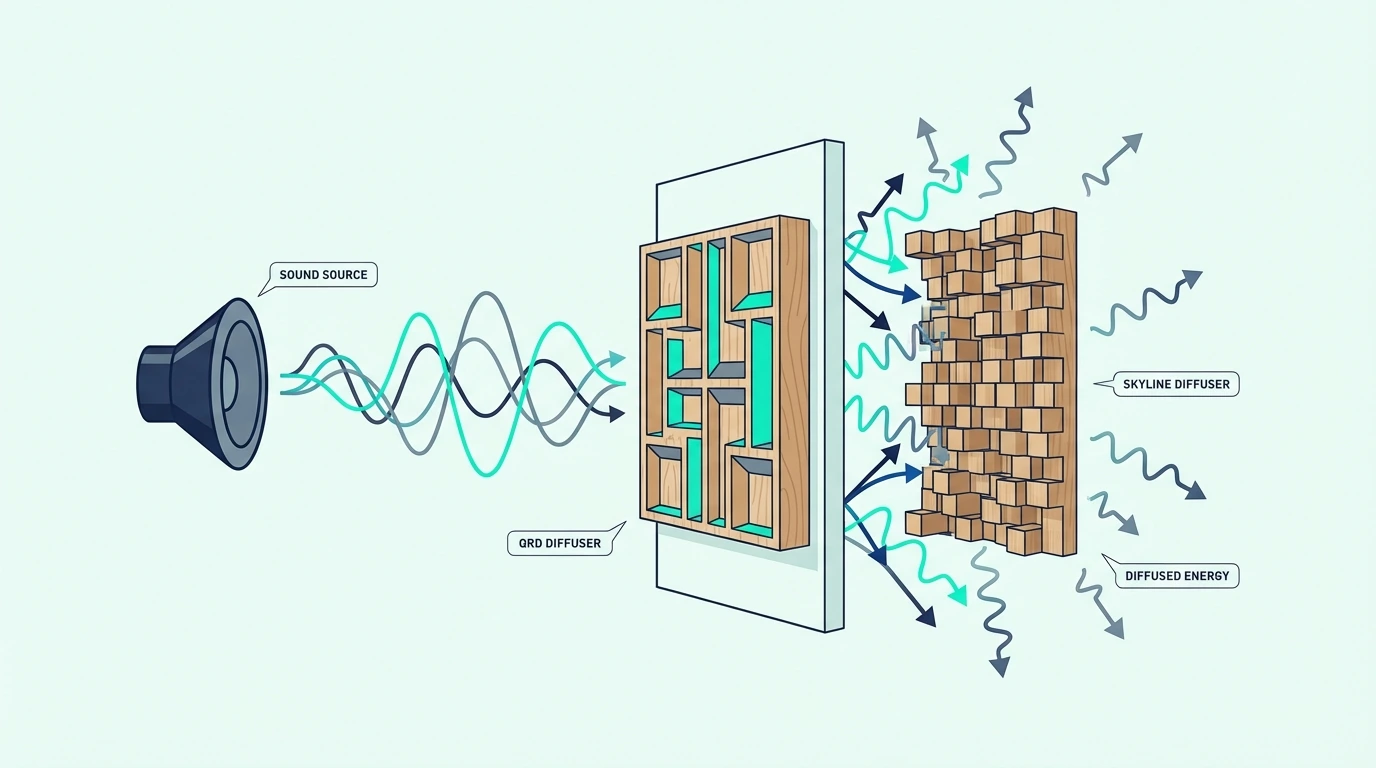
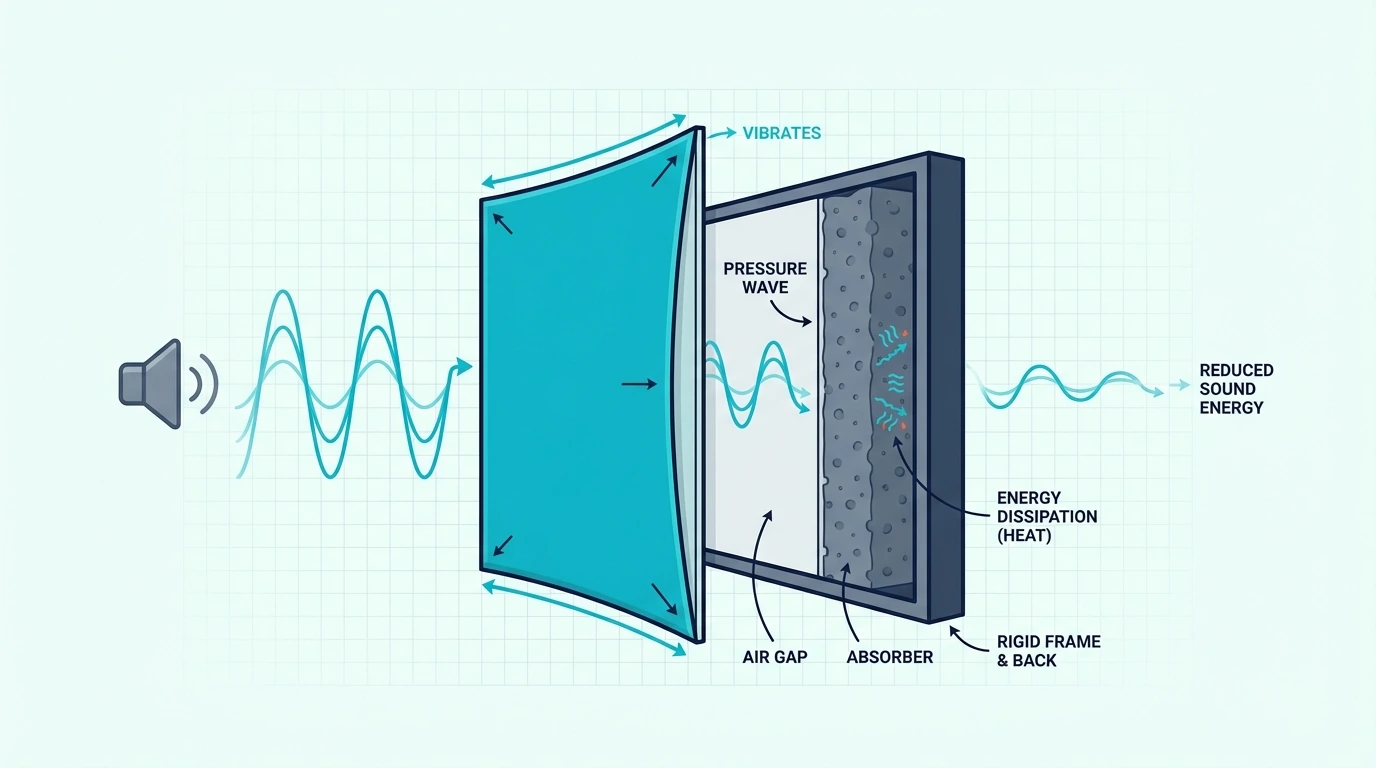
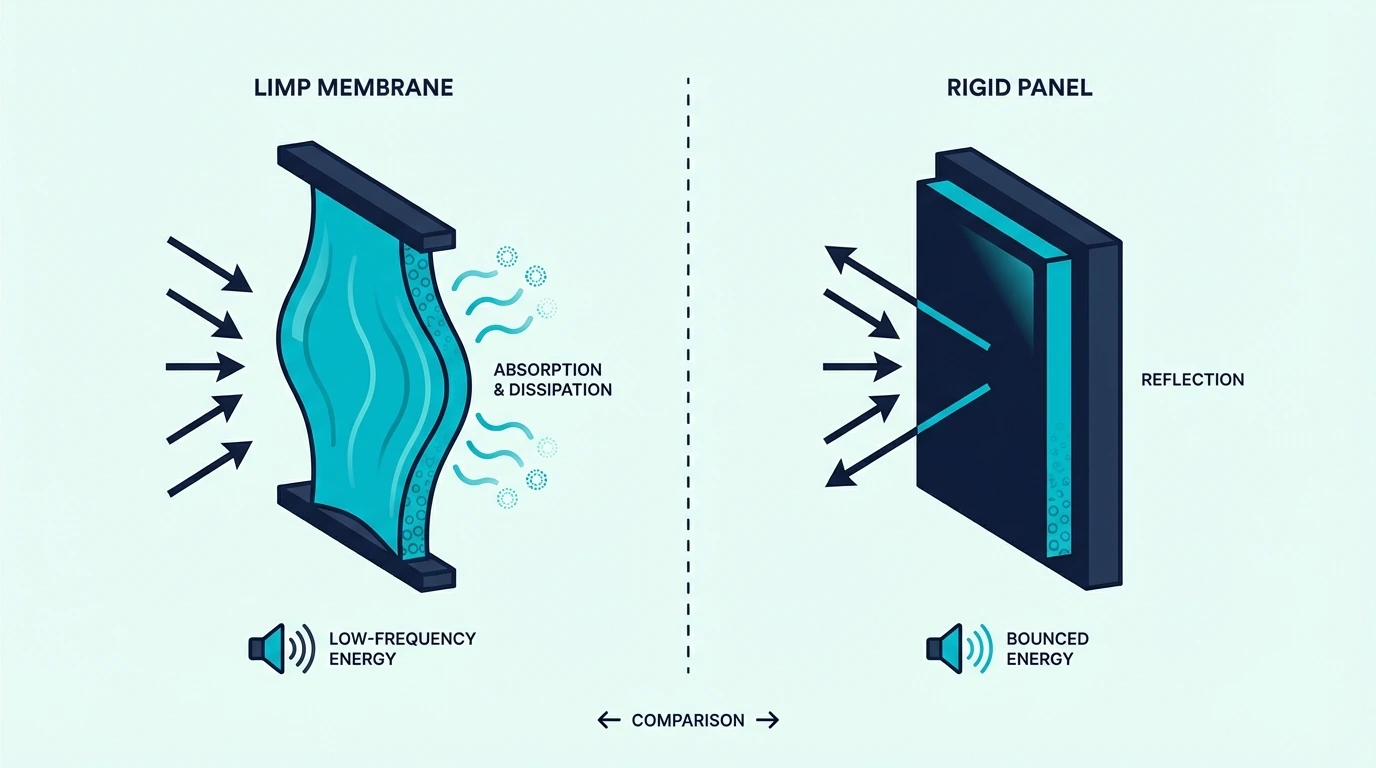
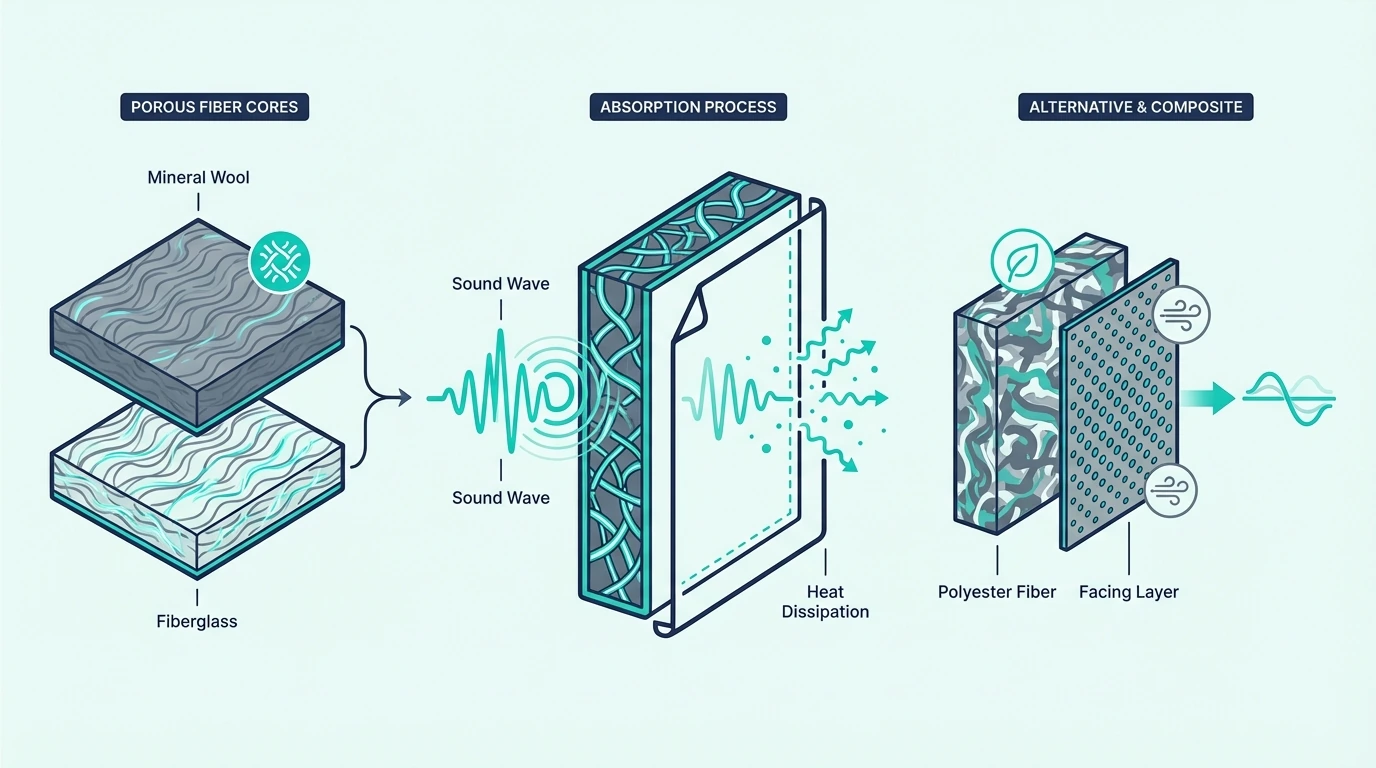
Bass traps and absorbers both convert sound energy into heat through friction — air molecules vibrate through porous material, and the resistance removes energy from the sound wave. The physics is identical, but the design parameters that determine which frequencies get absorbed are completely different.

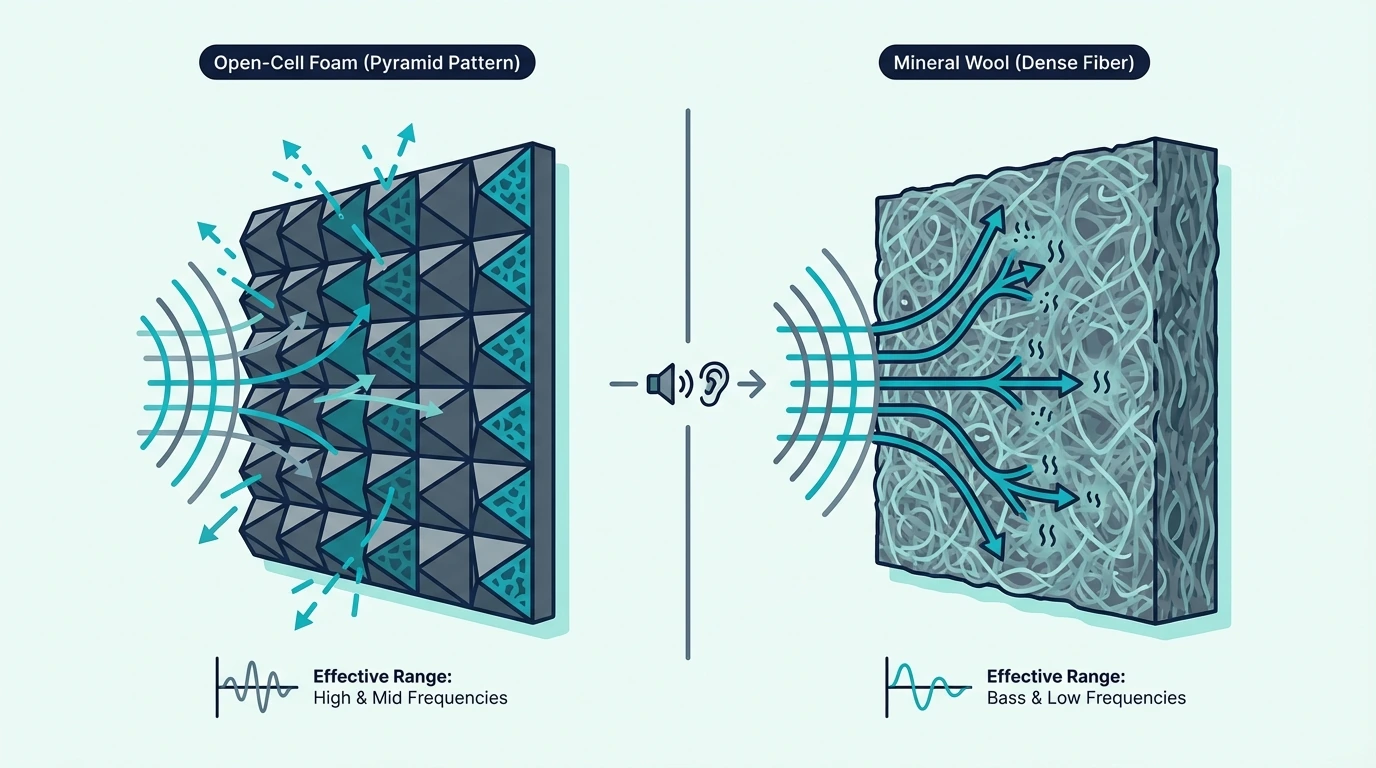
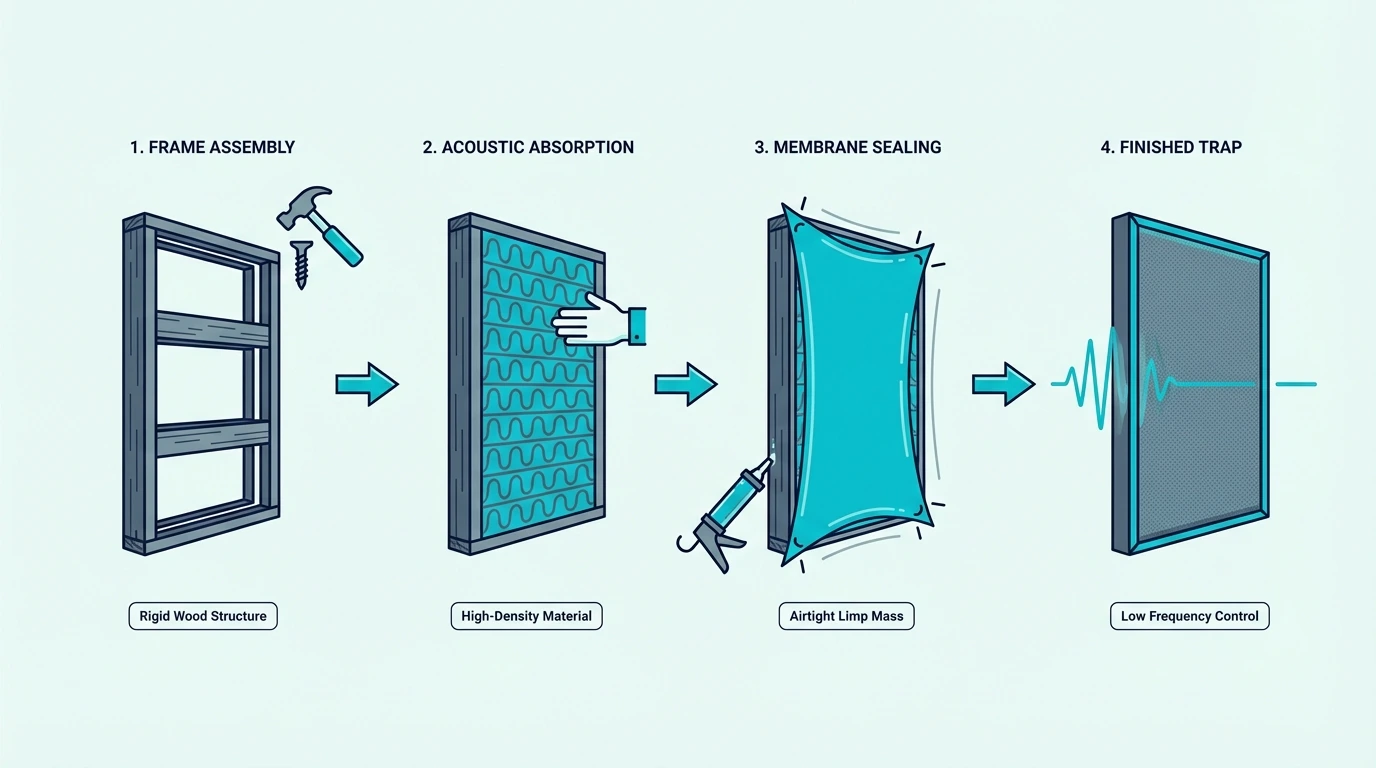
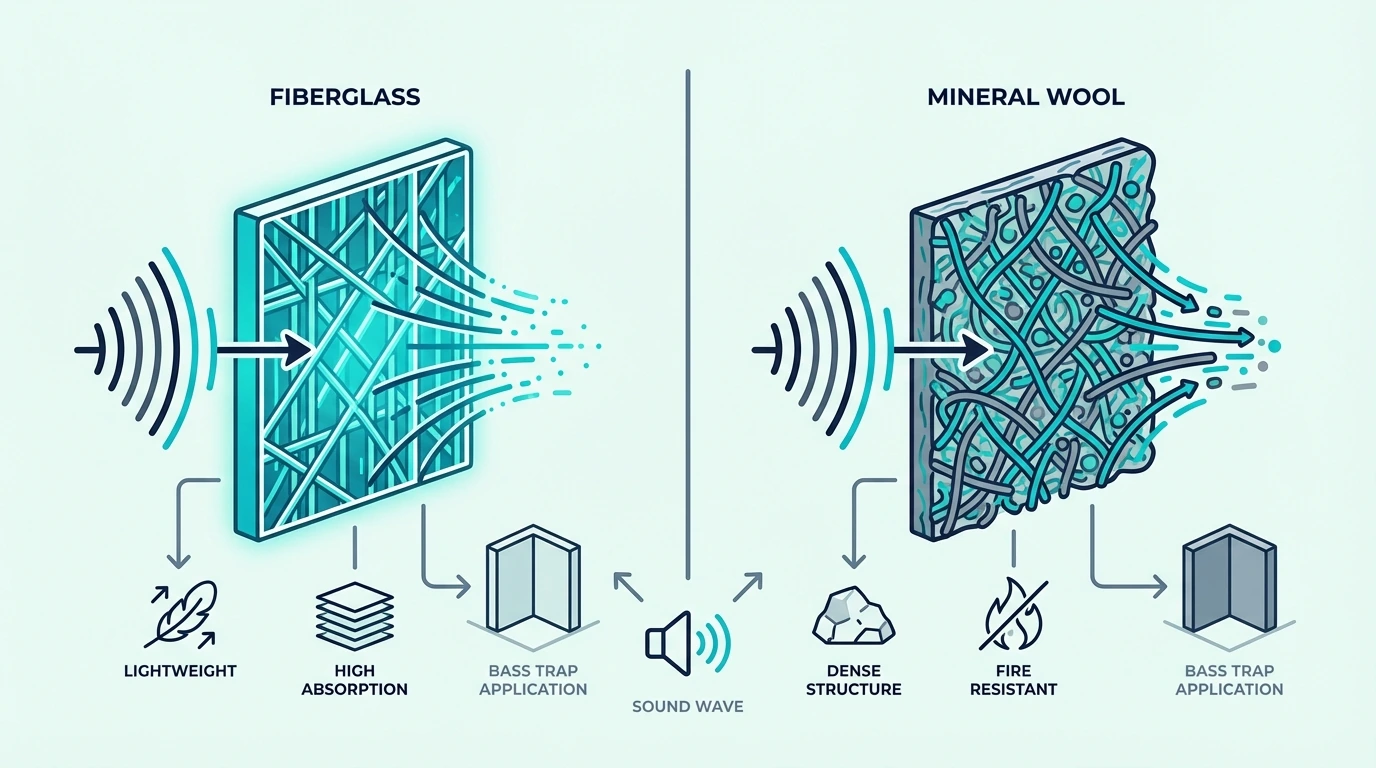
When people say “absorbers,” they typically mean acoustic panels — rectangular panels of mineral wool, fiberglass, or foam, usually 1-2 inches thick, mounted flat on walls. These panels absorb mid and high frequencies (roughly 300 Hz and above) effectively because those shorter wavelengths interact well with thin material at wall surfaces.

When people say “bass traps,” they mean thicker, denser panels (4+ inches) or tuned resonant devices (Helmholtz resonators, membrane absorbers) designed specifically to absorb low frequencies below 300 Hz. Bass wavelengths are 4-56 feet long, so absorbing them requires either substantially more material depth or a resonant design that targets specific frequency bands.

The confusion exists because the acoustic treatment industry uses “absorber” as both a general category (anything that absorbs sound) and a specific product type (thin wall panels). Bass traps are absorbers in the general sense, but they are not “absorbers” in the product sense — and the performance difference between a 2-inch wall panel and a 4-inch corner trap at 100 Hz is enormous.

How Bass Traps Differ From Broadband Absorbers

Key differences between bass traps and absorbers

The practical differences between bass traps and broadband absorbers come down to three factors: thickness, placement, and frequency target.

Thickness And Frequency Range

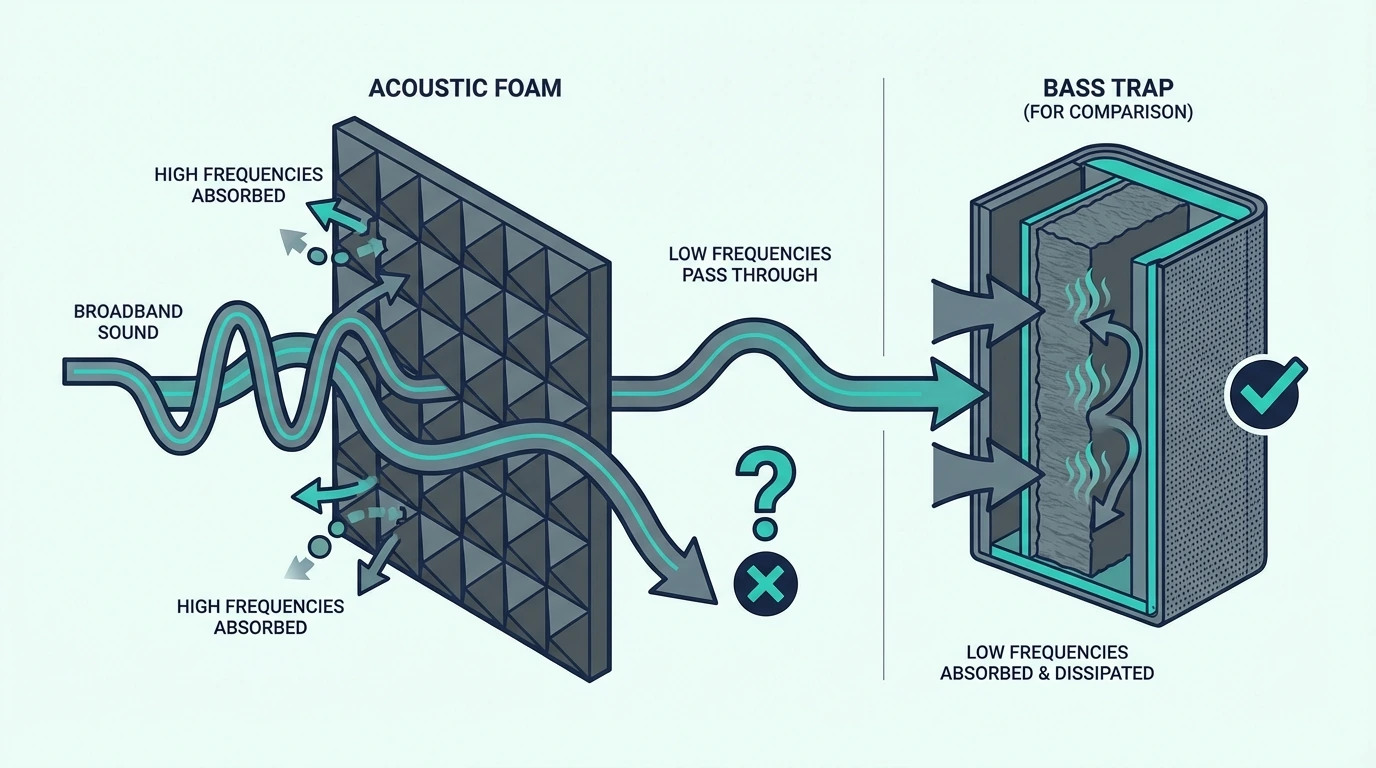
A panel’s thickness determines the lowest frequency it can absorb effectively. The rule of thumb: a porous absorber works well at frequencies where the panel depth equals roughly one-quarter of the wavelength.

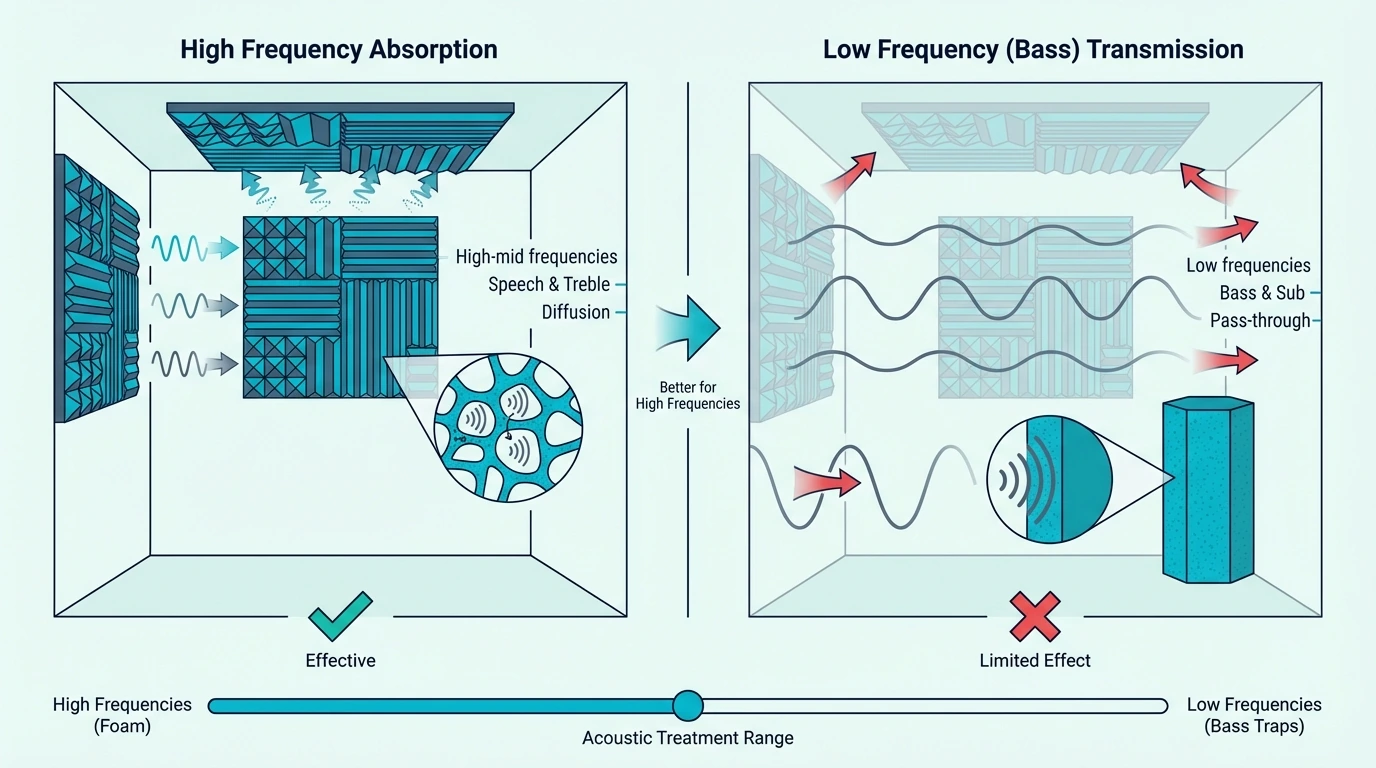
A 2-inch panel reaches quarter-wavelength effectiveness around 1,700 Hz — it absorbs well above that frequency but drops off rapidly below it. At 125 Hz (a common problem frequency), a 2-inch panel absorbs only 10-15% of the energy hitting it.

A 4-inch panel reaches quarter-wavelength effectiveness around 850 Hz and maintains useful absorption down to 200-250 Hz when mounted with an air gap. At 125 Hz, a 4-inch panel absorbs 40-60% of the energy — four to five times more than the 2-inch panel at the same frequency.

This is why thickness is the single biggest differentiator between a “panel absorber” and a “bass trap” — the same material at double the thickness absorbs an octave lower in the frequency spectrum.

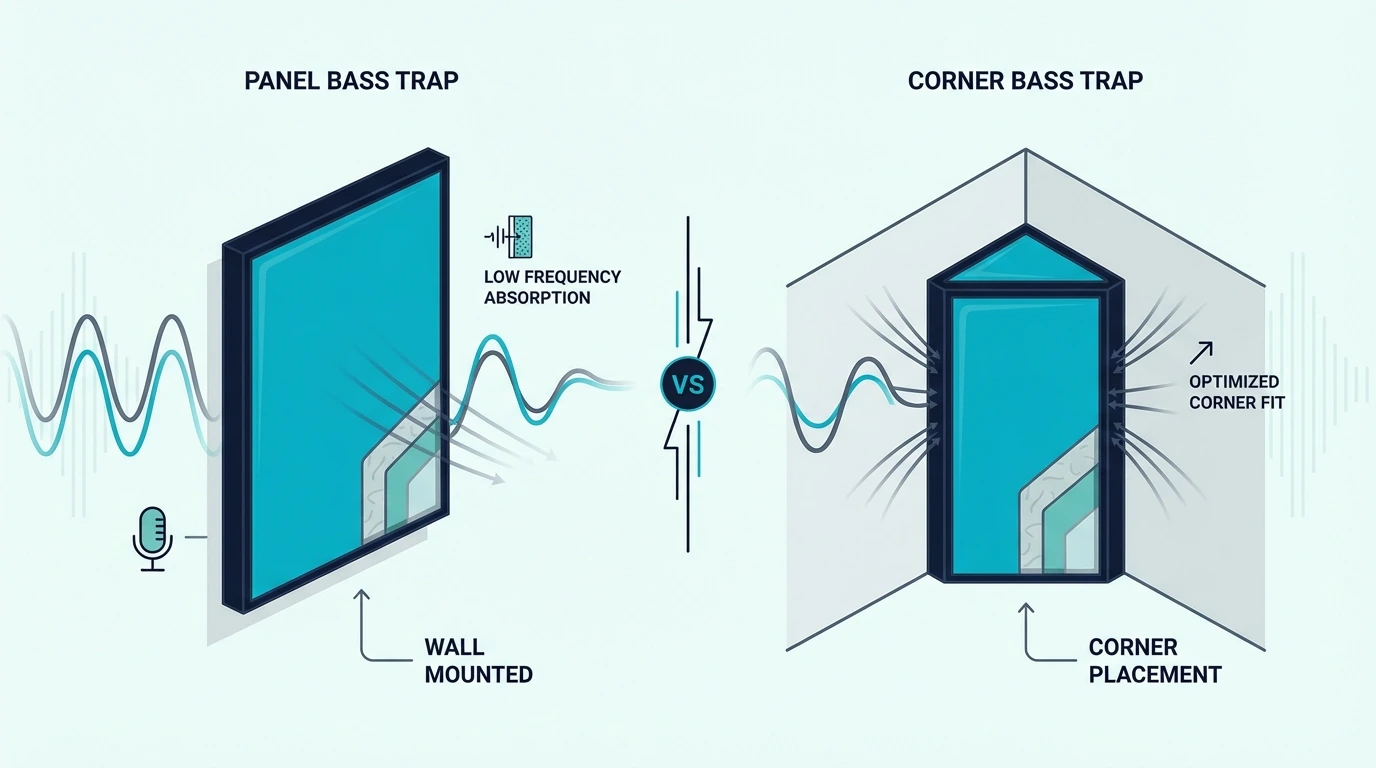
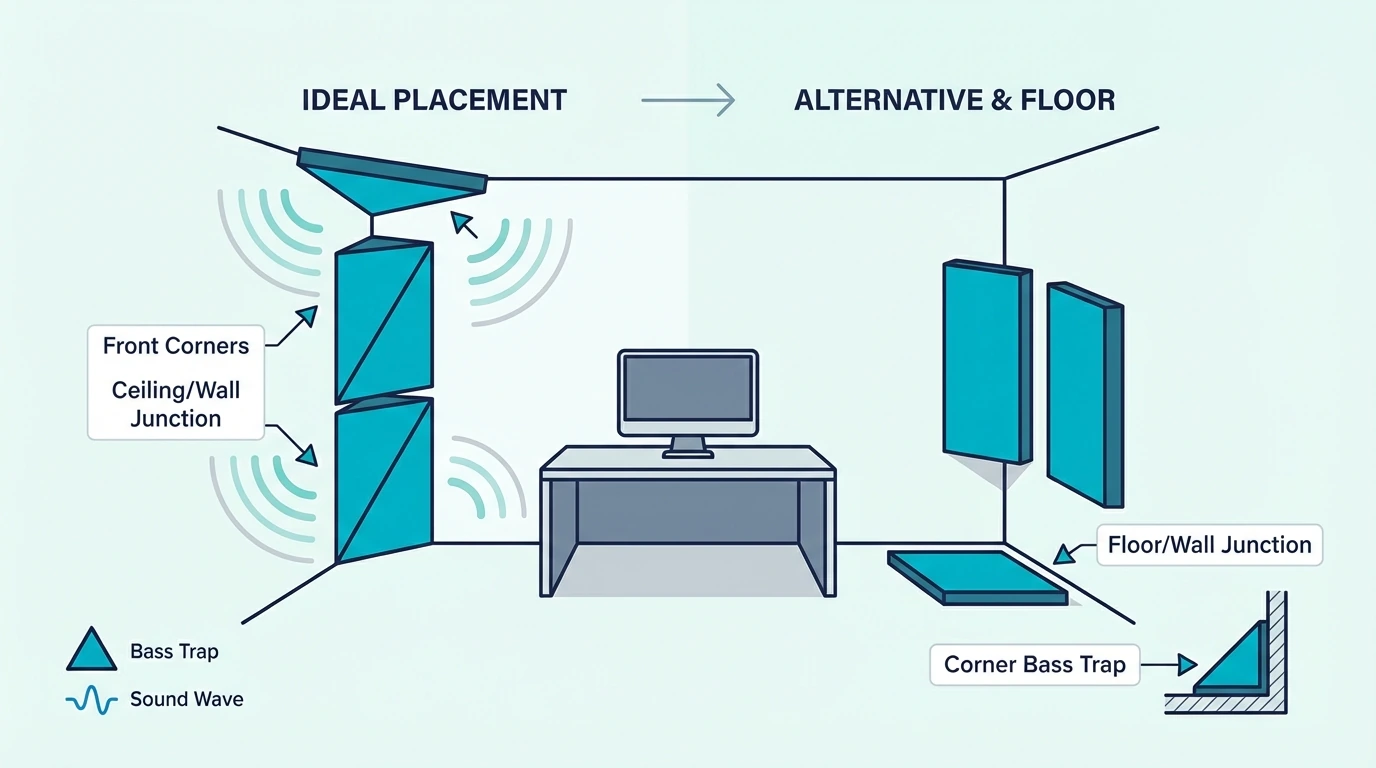
Placement Differences

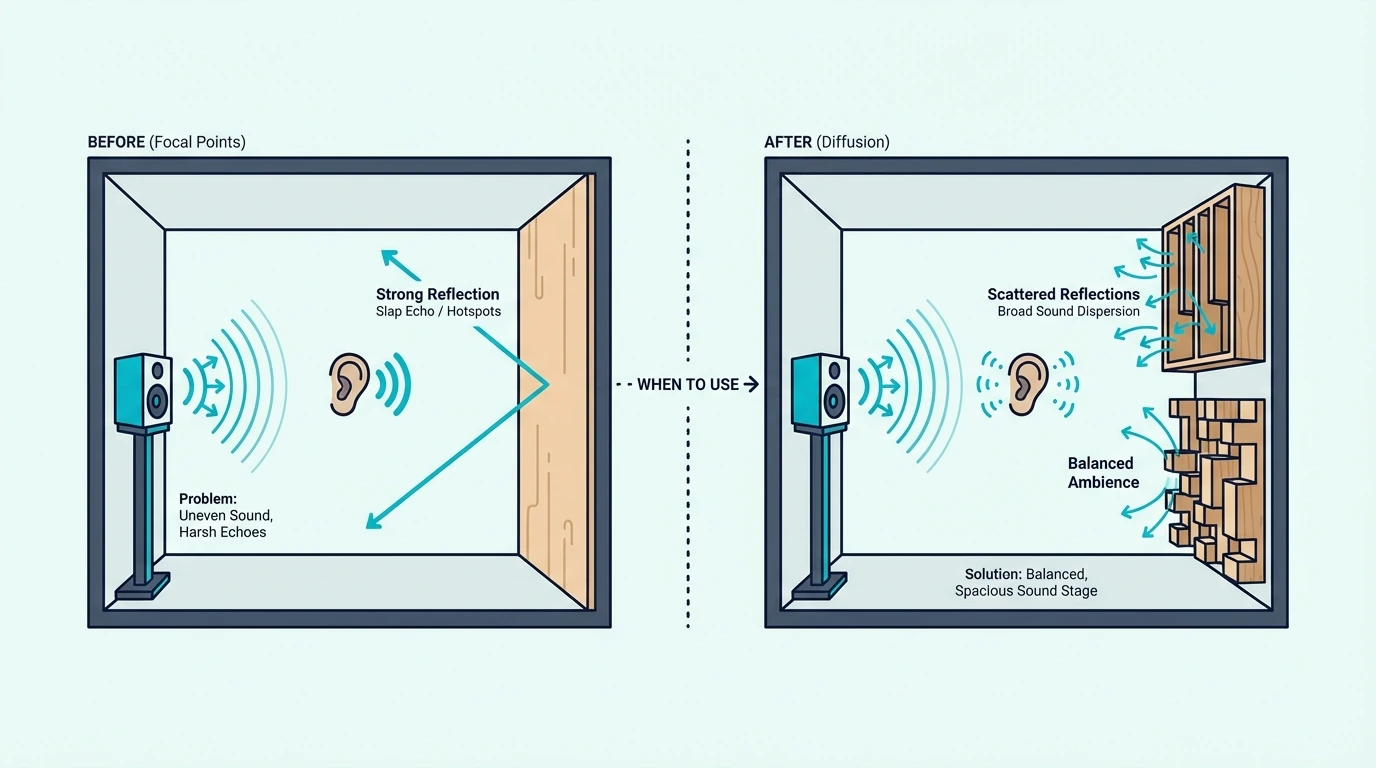
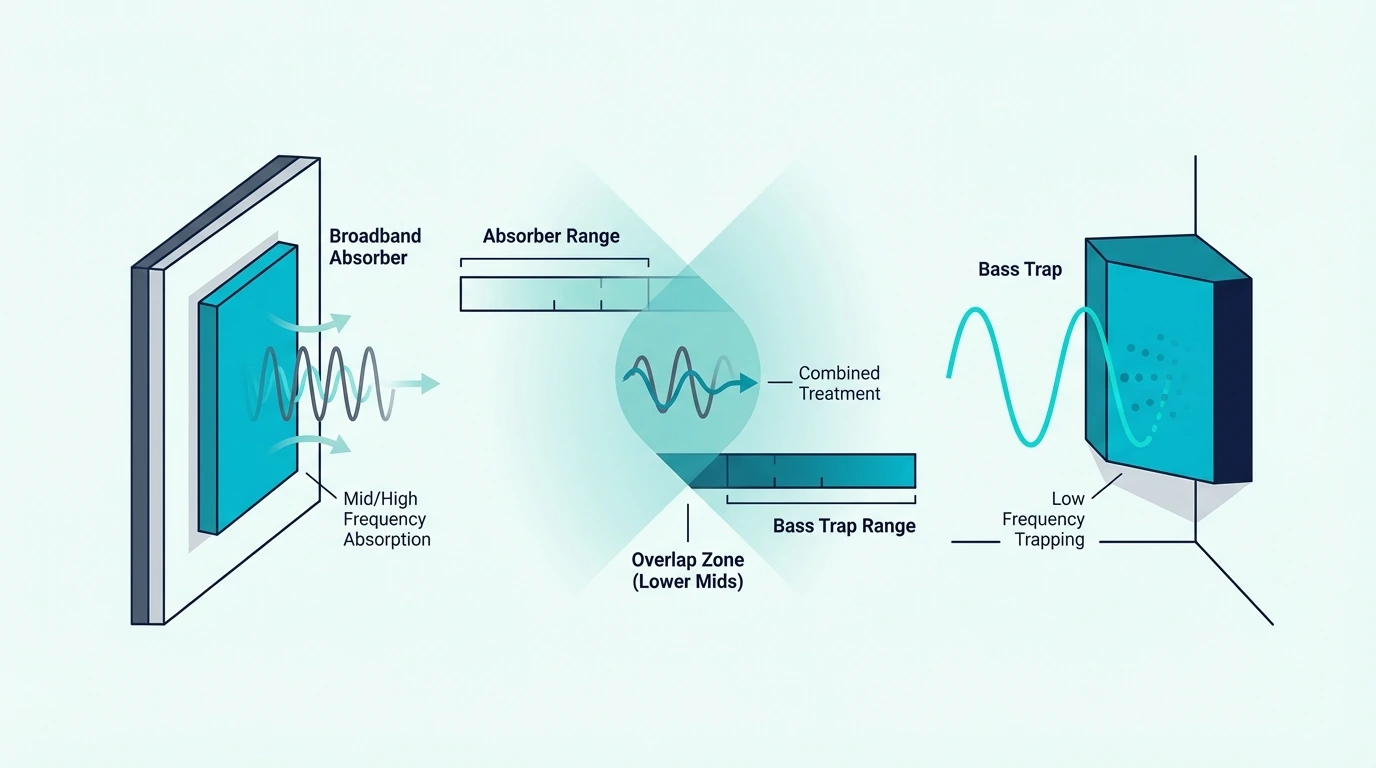
Broadband absorbers mount flat on walls at first reflection points — the spots on side walls, ceiling, and front wall where sound from your speakers bounces directly to your ears. This positioning targets early reflections that cause comb filtering and smear stereo imaging.

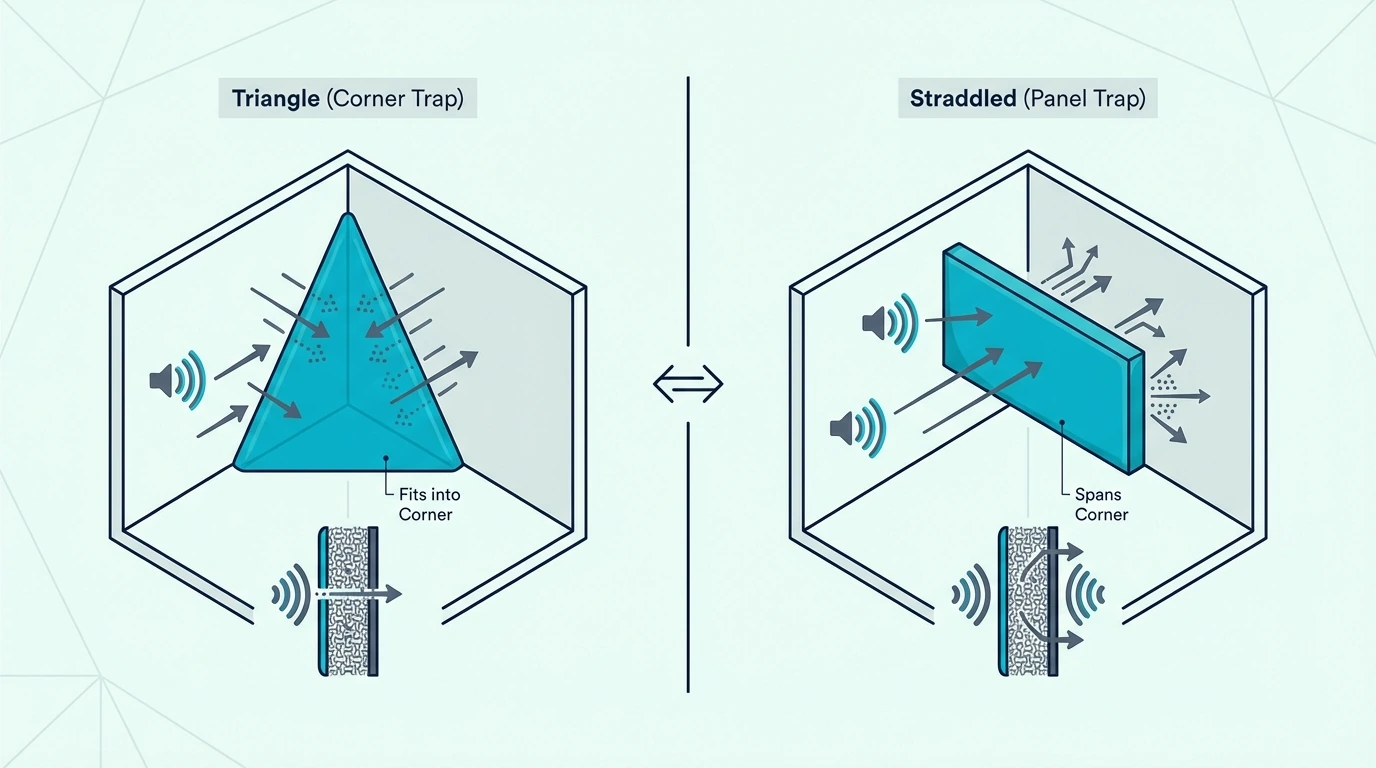
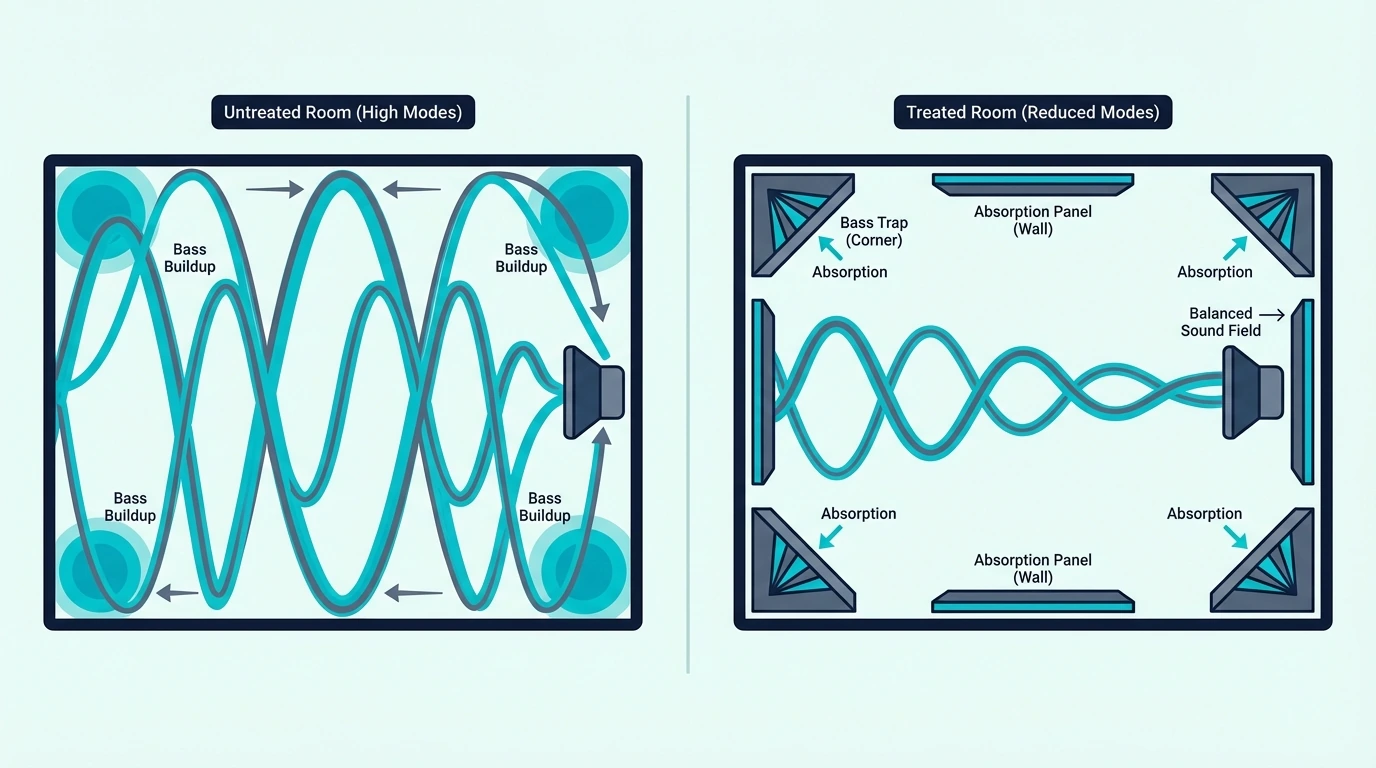
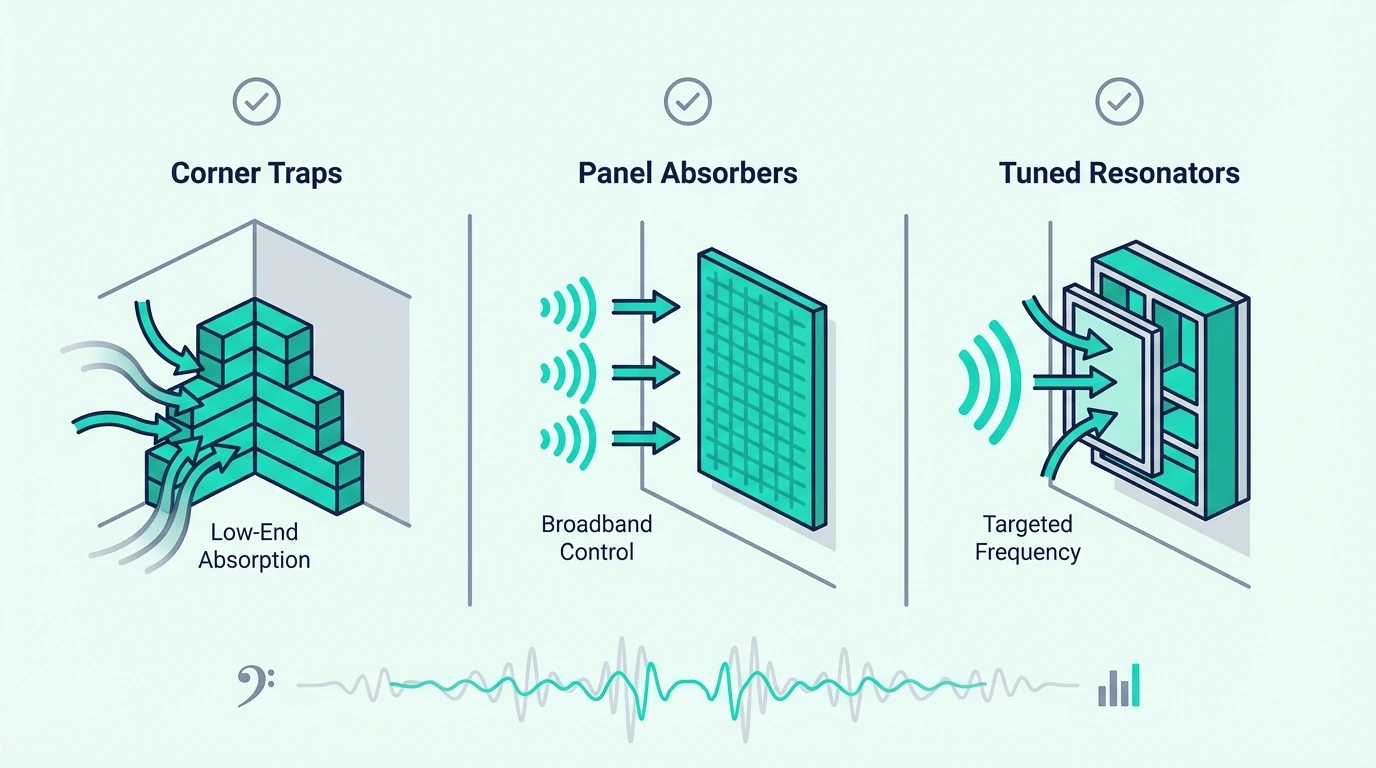
Bass traps mount in corners where two or three room boundaries meet. Corner placement is critical because bass pressure naturally concentrates at boundaries, and corners compound this effect — a panel in a corner is exposed to 2-4x more bass energy than the same panel on a flat wall, which means it absorbs proportionally more bass per square foot.

The air gap created by straddling a panel across a corner at 45 degrees adds effective depth. A 4-inch panel straddled across a corner creates 8-12 inches of total absorptive depth (panel + air gap), extending useful absorption down to 100-125 Hz without requiring a thicker panel.

Do You Need Both Bass Traps And Absorbers?

When a room needs both bass traps and absorbers

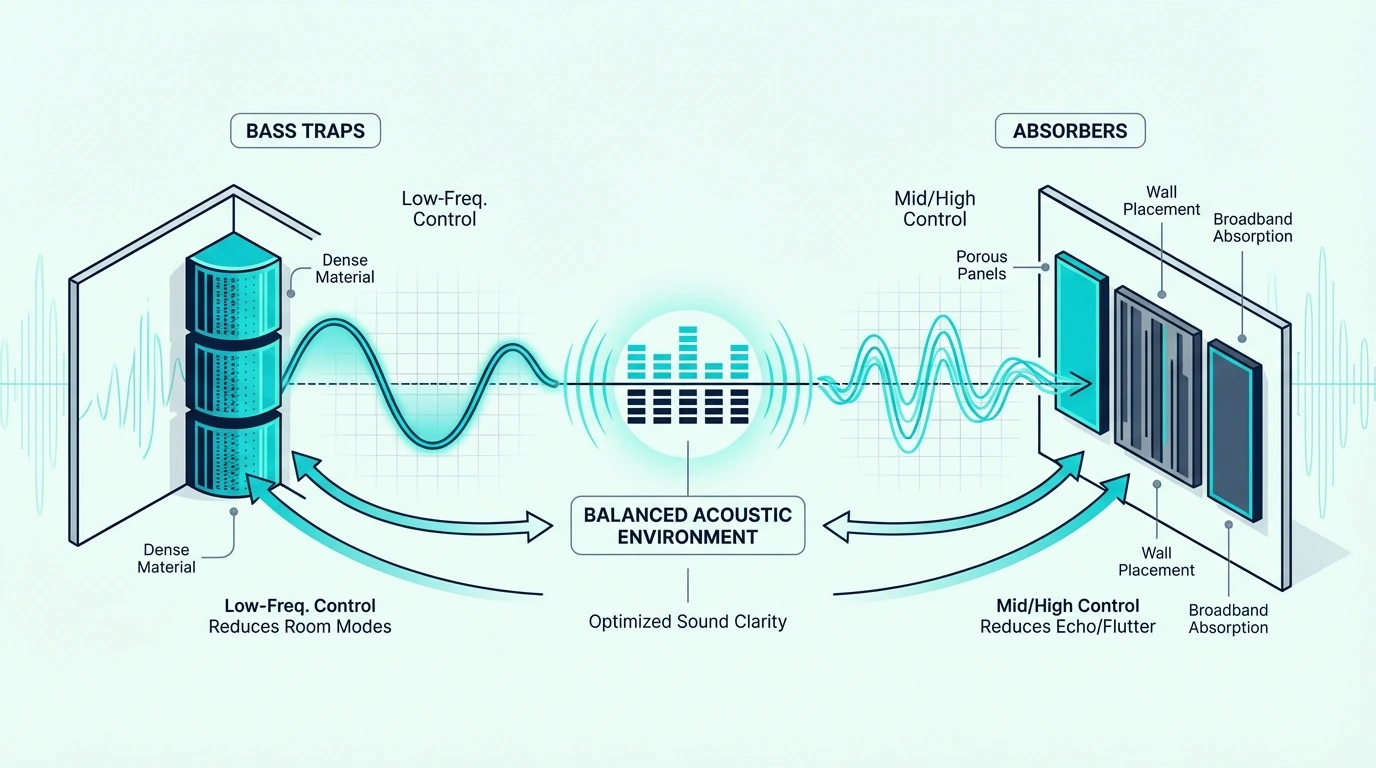
In almost every room used for music production, mixing, or critical listening — yes, you need both. They solve different problems that exist independently of each other.

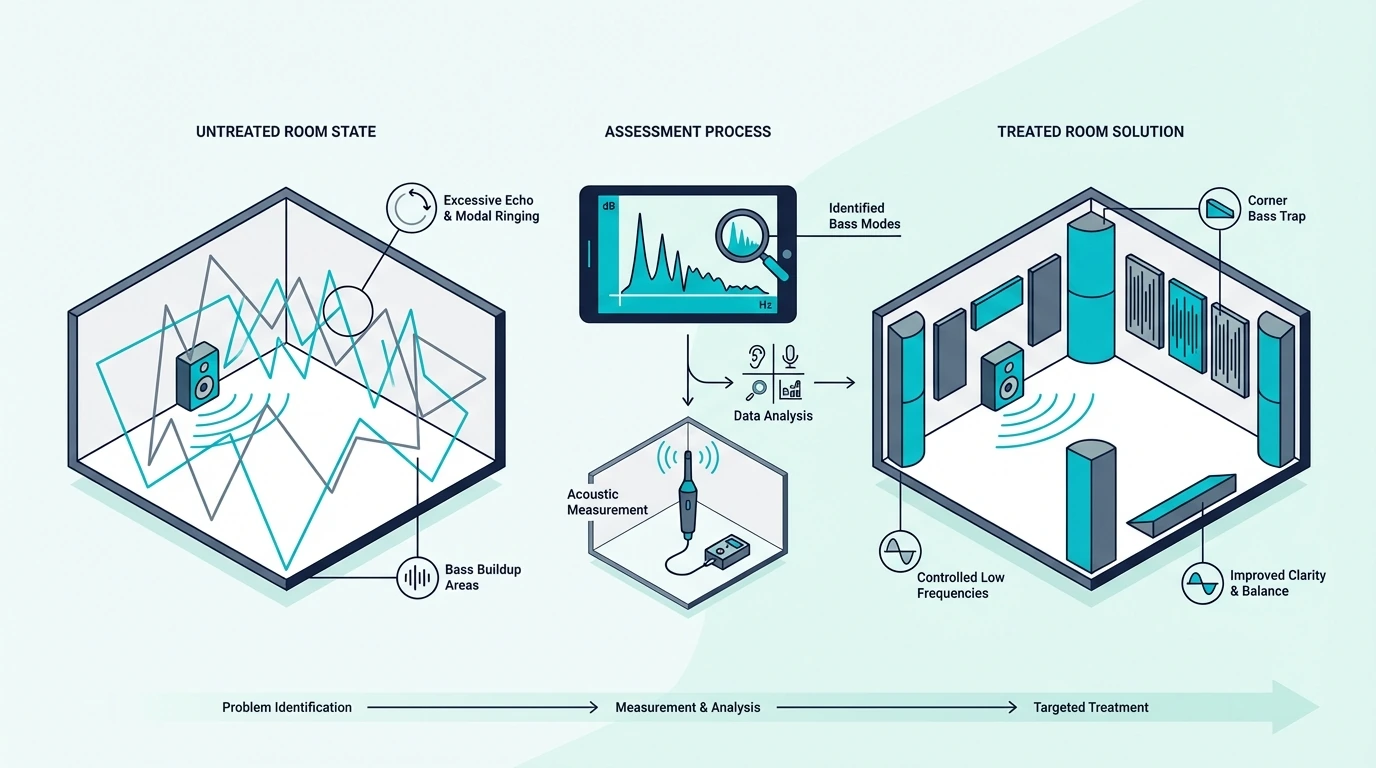
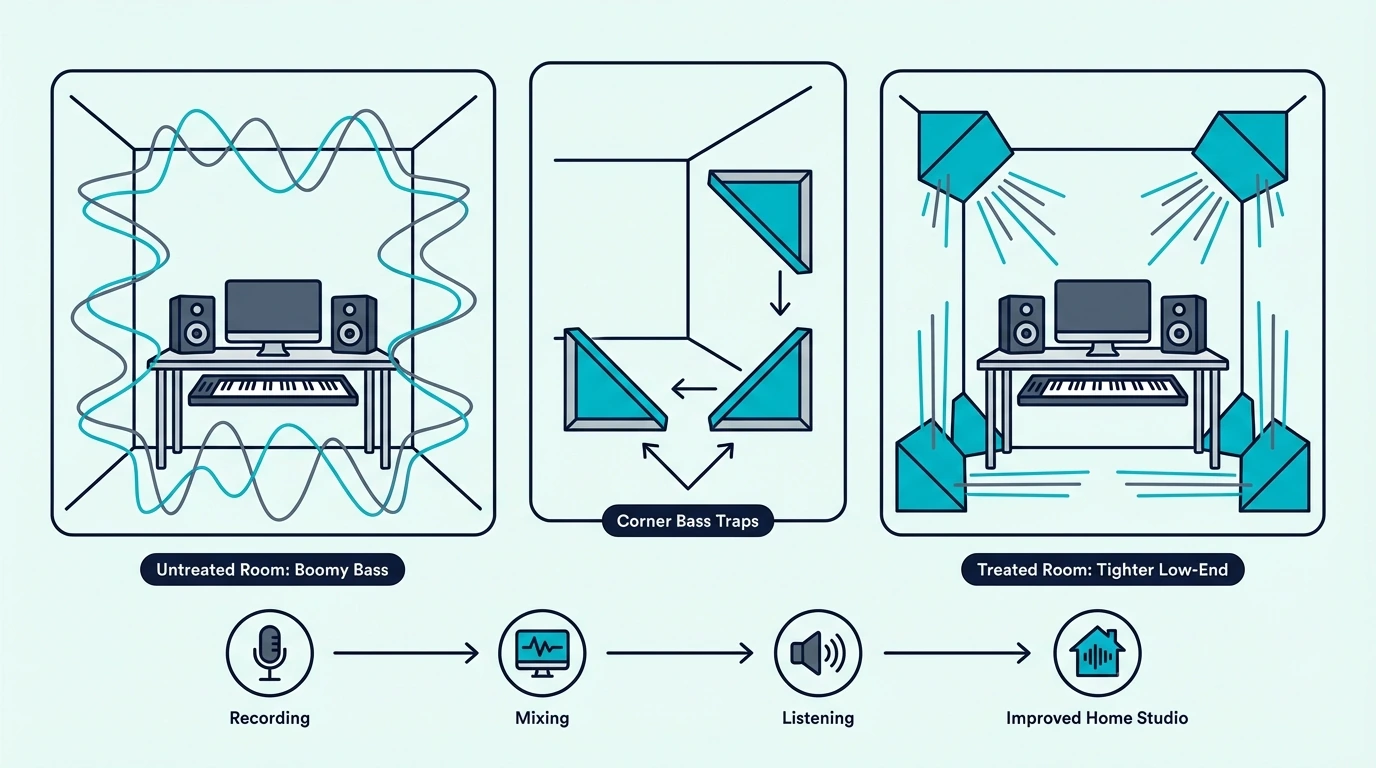
Without bass traps: Room modes cause peaks and nulls in your bass response — sometimes 20+ dB of variation across the frequency spectrum below 300 Hz, with certain bass notes booming excessively while others nearly disappear depending on your listening position. No amount of broadband absorber panels on walls will fix this because they lack the thickness and corner placement to absorb those frequencies.

Without broadband absorbers: Early reflections from walls and ceiling arrive at your ears 5-20 milliseconds after the direct sound, causing comb filtering that colors your perception of the music, while flutter echo between parallel walls creates a metallic “boing” on transients. Bass traps in corners do nothing for these mid/high frequency problems at wall reflection points.

The treatment priority is always bass traps first. Room modes cause the most severe acoustic damage and are the hardest to fix, so corner treatment gives you the biggest improvement per dollar. Once bass is controlled, add broadband absorbers at first reflection points to clean up the mid and high frequency issues.

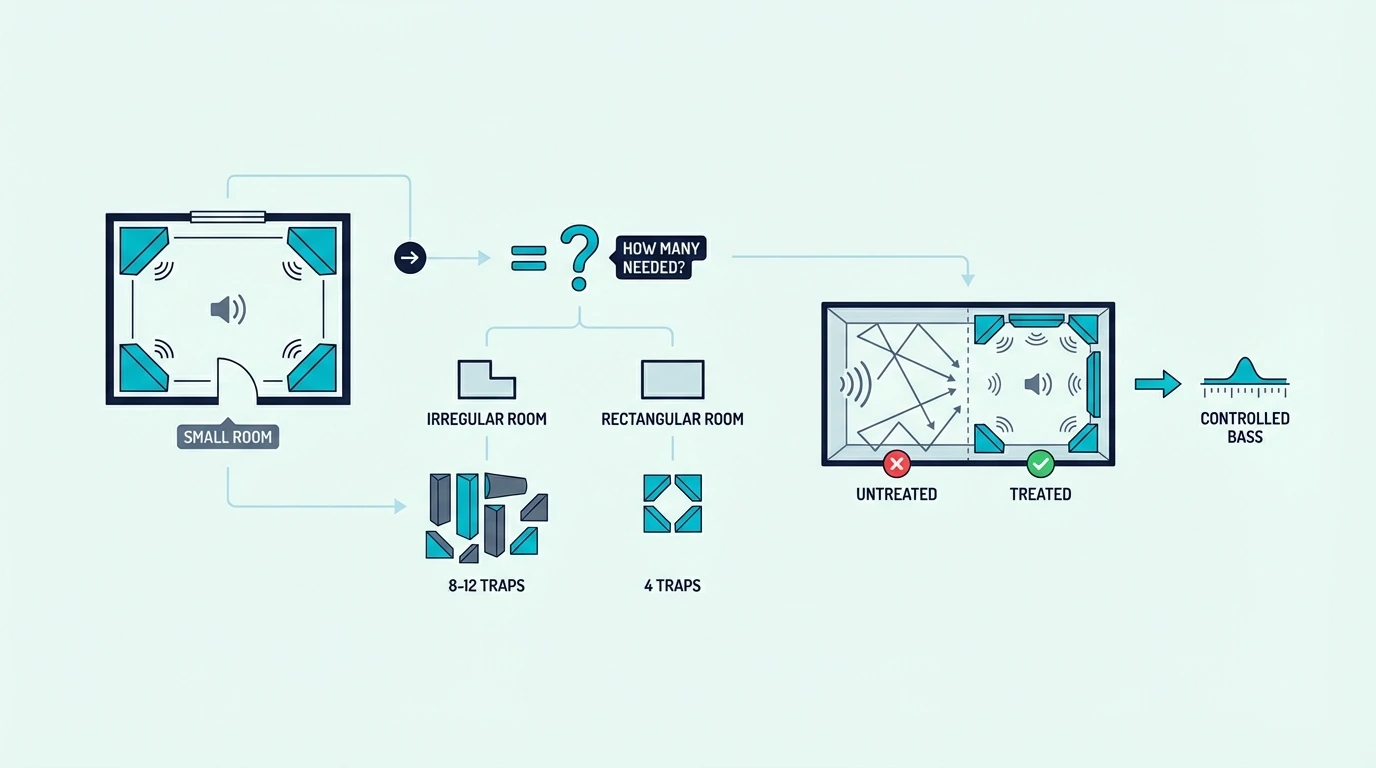
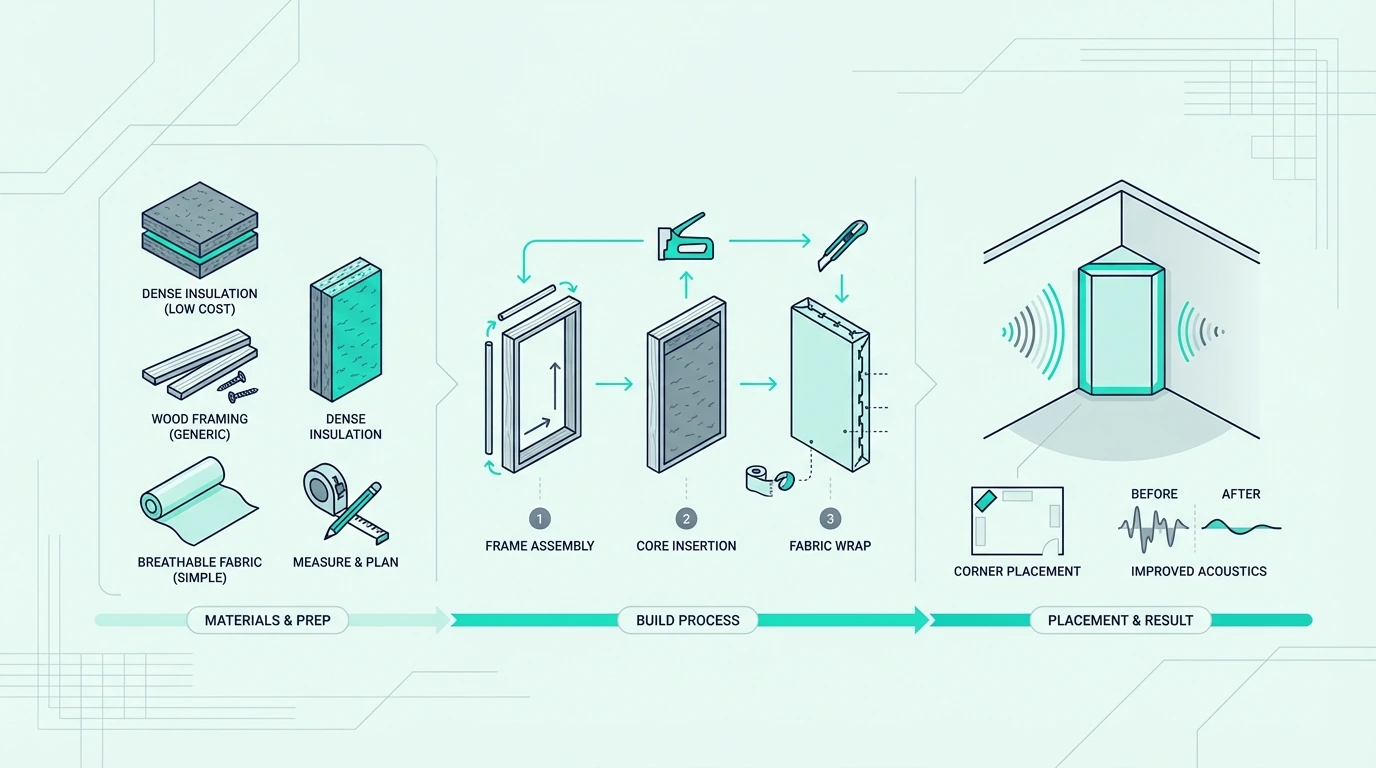
For a typical home studio, plan for 4-8 bass traps in corners (vertical wall-wall corners and ceiling-wall edges) plus 4-6 broadband absorber panels at first reflection points on side walls, ceiling, and rear wall.

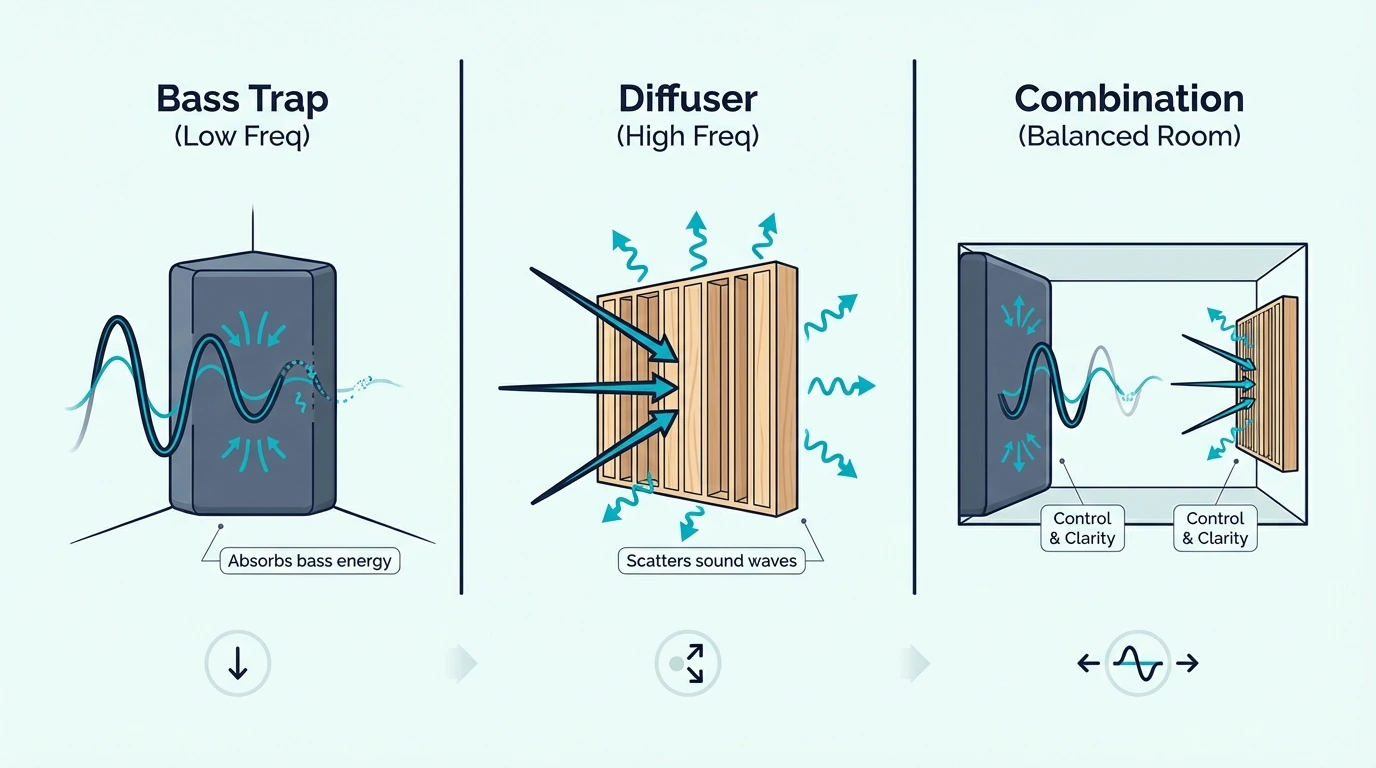
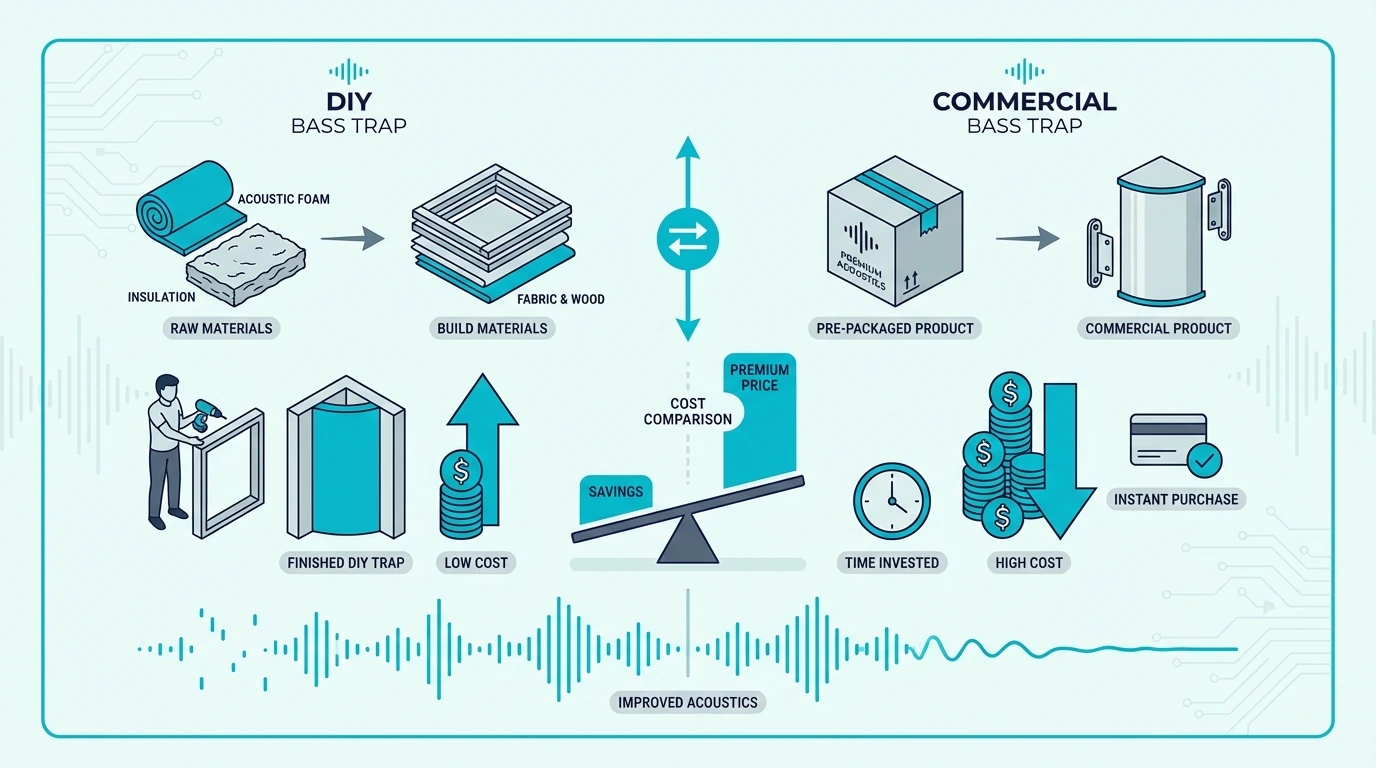
Can A Thick Absorber Panel Double As A Bass Trap?

Dual-purpose panels that absorb bass and midrange reflections

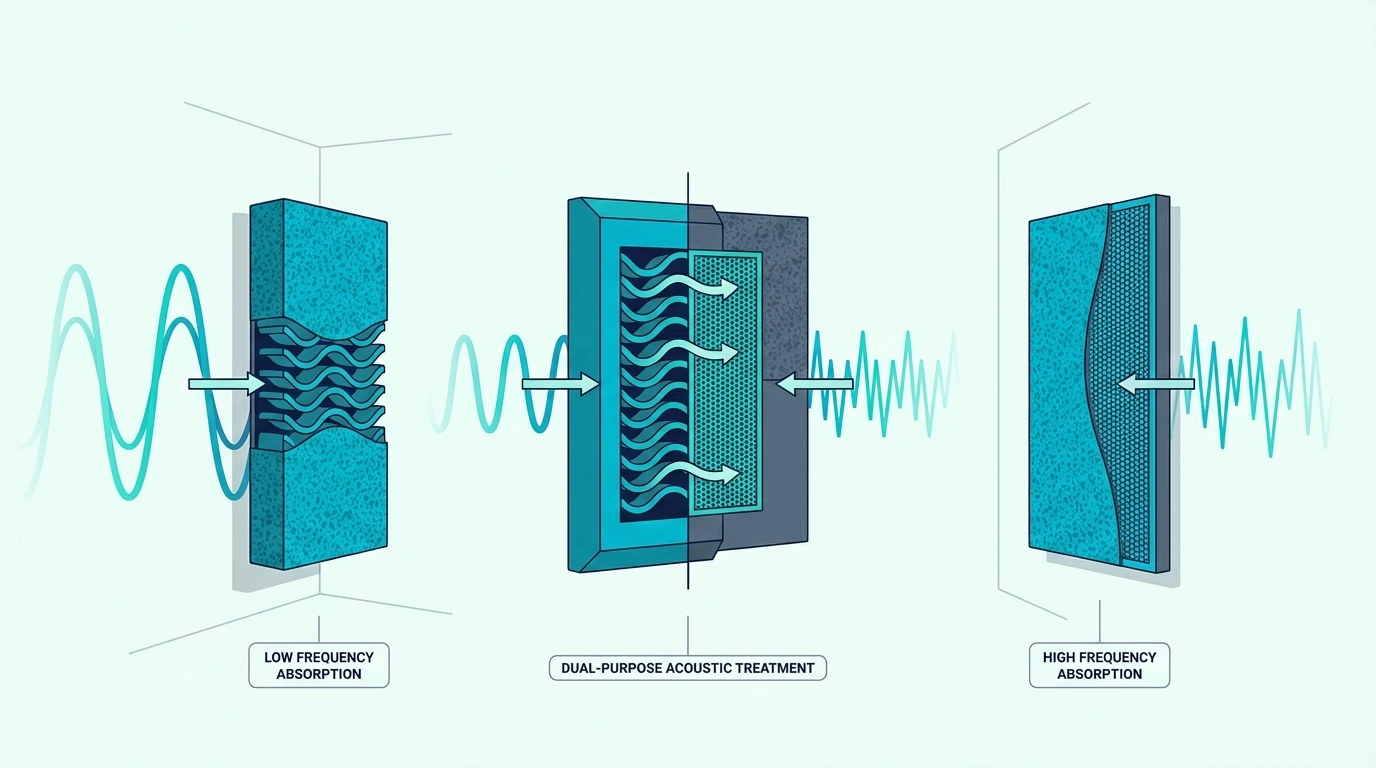
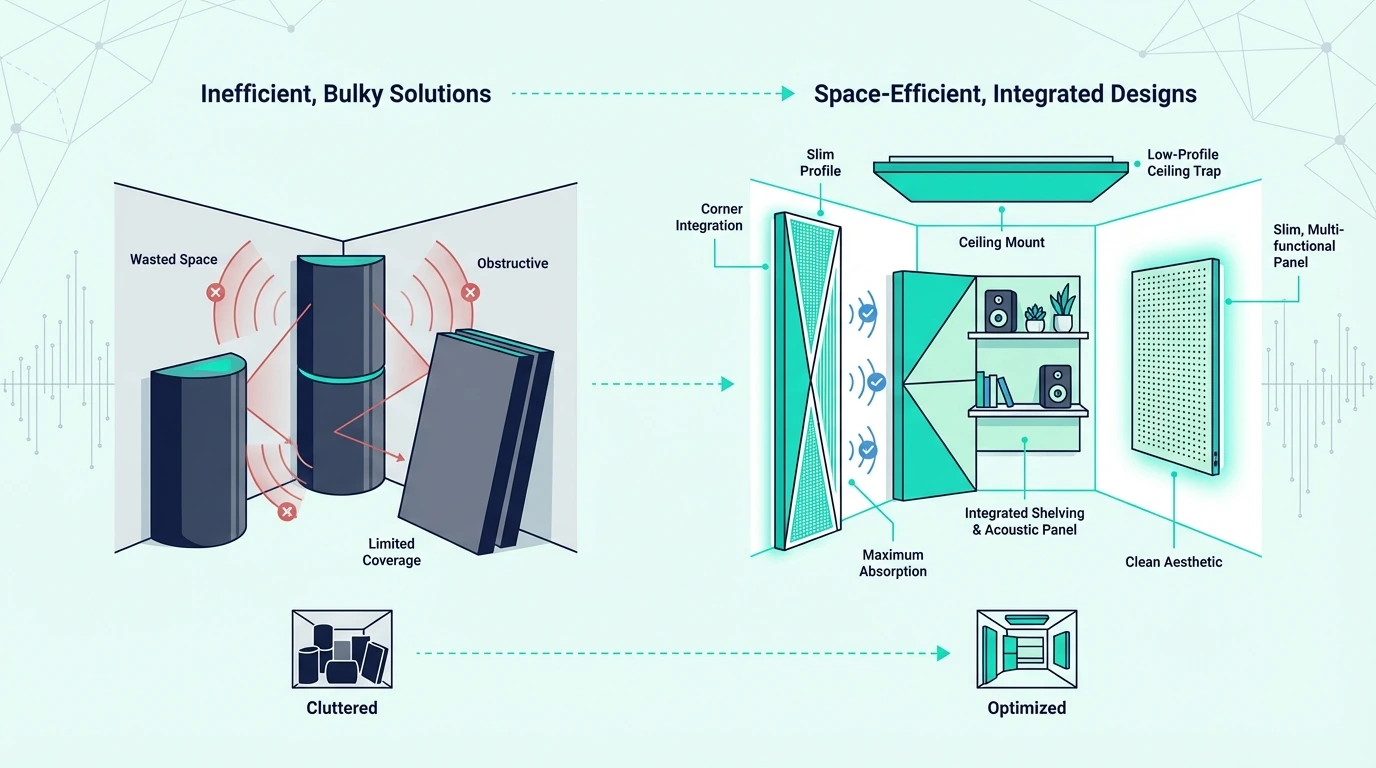
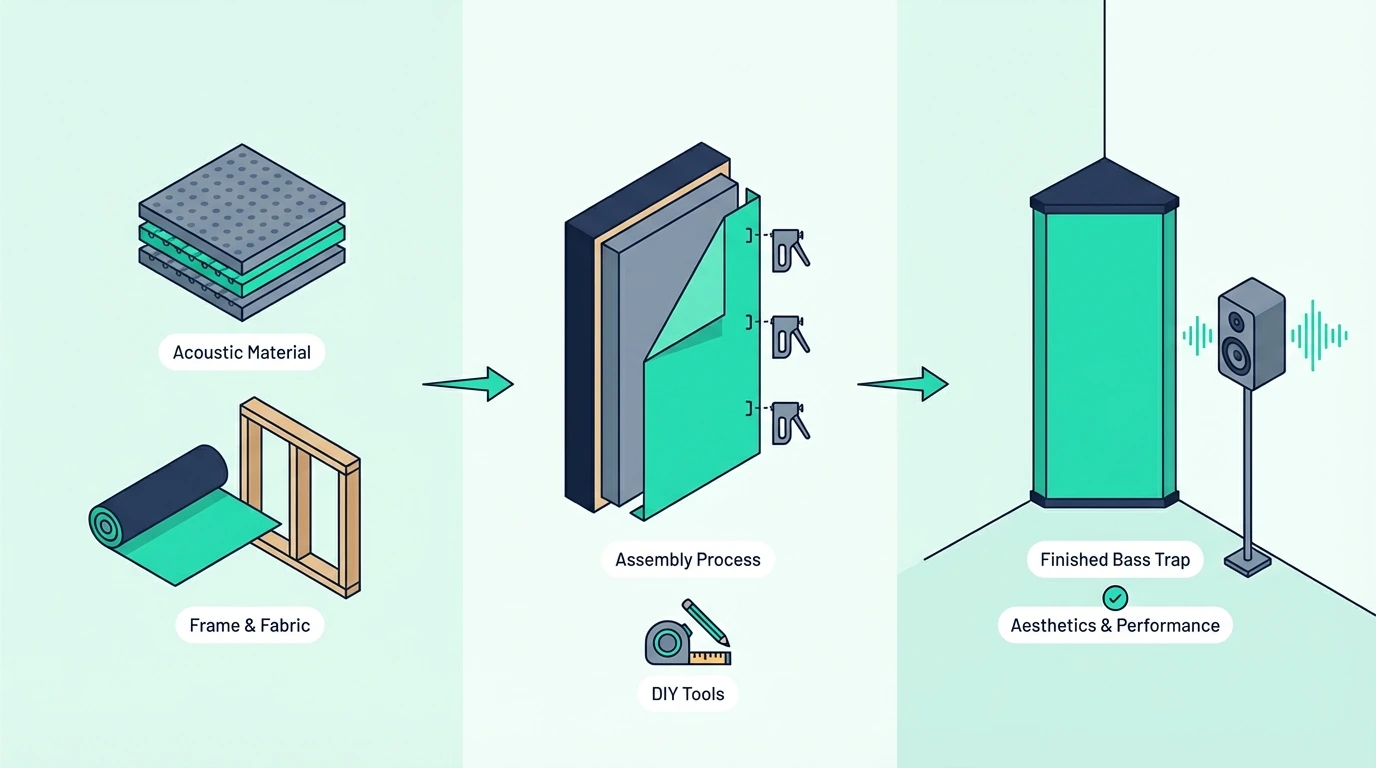
A 4-inch broadband absorber panel mounted in a corner functions as both a bass trap and a broadband absorber — this crossover is the most cost-effective approach for most rooms, and it is how professional studio designers typically specify treatment.

The key insight: there is no magic boundary between “absorber” and “bass trap.” A 4-inch mineral wool panel absorbs across the full frequency spectrum — bass, mids, and highs — with the absorption coefficient varying by frequency. In a corner position, that same panel absorbs significantly more bass than it would on a flat wall, effectively becoming a bass trap while retaining its broadband absorption capabilities.

This dual-purpose approach works because the thicker panel does not sacrifice mid/high absorption to gain bass absorption — it simply adds bass capability on top of the broadband performance. A 4-inch panel absorbs mids and highs just as well as a 2-inch panel (often better), while also reaching an octave deeper into the bass range.

The practical strategy: buy or build 4-inch panels for everything instead of mixing 2-inch absorbers with 4-inch bass traps — place them in corners first (where they function as bass traps), then at reflection points (where they function as broadband absorbers). You get both treatments from a single panel design, simplifying construction and reducing costs.

The Bottom Line

Bass traps and absorbers use the same physics but target different frequency ranges through differences in thickness and placement — standard 1-2 inch absorber panels handle mids and highs on walls, while 4+ inch bass traps handle lows in corners. Most rooms need both, and 4-inch panels in corners give you the best of both worlds.

For corner bass treatment, the 4 Pack Bass Traps for Ceiling Corner provides ready-made corner pieces to start addressing your room’s low-frequency problems first.

For more comprehensive corner coverage, the 8 Pack Bass Traps Acoustic Foam Corner gives you enough pieces to treat all four vertical corners before adding broadband absorber panels at reflection points.

Frequently Asked Questions

How much of a difference do bass traps make?

Bass traps typically reduce the worst room mode peaks by 6-10 dB, which is a dramatic and clearly audible improvement — the bass response becomes tighter, more even, and more predictable across the listening area. Bass traps work most effectively when placed in corners where bass pressure is highest.

Do sound absorbers work better than sound insulation?

Sound absorbers and sound insulation serve completely different purposes. Absorbers treat reflections inside a room (improving how the room sounds to someone inside it), while insulation blocks sound transmission between rooms (preventing sound from passing through walls, floors, or ceilings).

Should I buy absorbers or bass traps first?

Buy bass traps first — bass traps are necessary because low-frequency room modes cause the most severe acoustic problems and are impossible to fix with thin absorber panels. Once your corners are treated and the bass is controlled, add broadband absorber panels at first reflection points to address mid and high frequency issues.

Bass Trap Vs Diffuser — Which One Your Room Actually Needs First

Bass trap vs diffuser is a choice that seems like a matter of preference — but it is actually a matter of sequence, and getting the order wrong leaves the biggest acoustic problems in your room completely untreated. Both tools reshape how sound behaves in a space, yet they solve fundamentally different problems using opposite physical mechanisms.

Bass traps absorb low-frequency energy and convert it to heat, reducing the room modes and standing waves that cause boomy, uneven bass response. Diffusers scatter mid and high frequency reflections across a wide area, preserving the sound energy while eliminating focused echoes and flutter between parallel surfaces.

The confusion comes from treating both as interchangeable “acoustic treatment” when they target different frequency ranges entirely. Diffusers cannot fix bass problems (the wavelengths are too long for any practical diffuser size), and bass traps in the wrong position waste their absorption on frequencies that a diffuser would handle better.

Below, you will find exactly when to use each one, how broadband absorbers fit into the picture, a practical room layout combining both, and clear answers to the most common questions about diffusion vs absorption.

Quick Takeaway

Bass traps absorb low-frequency energy (below 300 Hz) while diffusers scatter mid/high frequencies (above 500 Hz) without removing energy from the room. Always install bass traps first because untreated room modes cause the worst acoustic problems, then add diffusers to rear walls and ceiling areas where you want to preserve liveliness without creating focused reflections.

Bass Trap vs Diffuser — What Is The Difference?

Key differences between bass traps and diffusers

A bass trap is a porous or resonant device that absorbs sound energy — air molecules vibrate through dense material (mineral wool, fiberglass) or against a tuned membrane, and the friction converts acoustic energy into tiny amounts of heat. The sound energy is permanently removed from the room, reducing the amplitude of reflections and standing waves.

A diffuser is a rigid surface with wells or fins of varying depths that scatter incoming sound waves in multiple directions simultaneously. The sound energy stays in the room (nothing is absorbed), but instead of bouncing back as a single focused reflection, it spreads across a wide angle — creating a sense of spaciousness without the harsh echo of a flat wall.

The practical difference: bass traps make a room quieter and drier at low frequencies by removing energy, while diffusers make a room sound larger and more open at mid/high frequencies by redistributing energy. They solve completely different problems, which is why most well-treated rooms use both.

When To Use Bass Traps

When to use bass traps in a room

Bass traps are the right tool when your room has low-frequency problems — boomy corners, muddy bass response, specific notes that ring or sustain longer than others, or a listening position where the bass sounds dramatically different depending on where you sit. These are symptoms of room modes (standing waves), and bass traps work by absorbing the excess energy at room boundaries where it concentrates.

Bass traps are necessary in virtually every small to medium room used for music production, mixing, or critical listening. Room modes are a physics problem that exists in every enclosed space — the smaller the room, the more pronounced the modes and the more essential the treatment.

The priority placement for bass traps is always corners first (where two or three boundaries meet and bass pressure is highest), then ceiling-wall edges, and finally flat wall surfaces if additional absorption is needed. Corner placement gives you 2-3x more bass absorption per panel than flat-wall mounting because of the pressure zone concentration at room boundaries.

When To Use Diffusers

When to use diffusers instead of bass traps

Diffusers are the right tool when your room sounds too dead after absorption treatment, when you want to preserve a sense of space and liveliness, or when parallel walls create flutter echo that you want to eliminate without further deadening the room.

The most common diffuser positions are the rear wall (behind the listening position in a studio) and the ceiling above the mix position. These locations scatter reflections that would otherwise arrive at your ears as delayed copies of the direct sound, causing comb filtering and imaging problems.

Diffusers require distance to work properly — the listener needs to be at least 3-4 feet from the diffuser for the scattered sound to blend into a coherent, spacious field. If you sit too close, the scattered reflections arrive at nearly the same time and sound chaotic rather than spacious, which is why diffusers belong on rear walls and ceilings rather than side walls near the listening position.

One critical limitation: diffusers cannot treat bass frequencies because a diffuser needs wells at least one-quarter wavelength deep to scatter a given frequency effectively. At 100 Hz, that means wells nearly 3 feet deep — far beyond any practical wall-mounted product, so most commercial diffusers work effectively from 500 Hz upward only.

Broadband Absorbers vs Bass Traps vs Diffusers

Three-way comparison of bass traps, diffusers, and absorbers

The three-way comparison between broadband absorbers, bass traps, and diffusers clarifies where each tool fits in a complete treatment plan.

Broadband absorbers are panels (typically 2-4 inches of mineral wool or fiberglass) mounted flat on walls at first reflection points, absorbing mid and high frequencies (250 Hz and above) effectively but lacking the thickness or corner placement needed for deep bass absorption. Their primary job is taming early reflections that color the direct sound.

Bass traps are thicker panels (4+ inches) or tuned resonant devices positioned in corners and at room boundaries, extending absorption into the low-frequency range (below 250 Hz) where room modes cause the biggest problems. Many bass traps also absorb mids and highs, making them the most versatile single treatment option.

Diffusers preserve sound energy while scattering it, maintaining room liveliness without creating focused reflections. They work above 500 Hz and belong on surfaces where absorption would make the room too dead — typically rear walls and ceiling areas away from the mix position.

Can A Single Panel Do Both?

Hybrid panels exist that combine absorption on one side with a diffusive surface on the other, but they compromise on both functions — the absorption layer is typically too thin for meaningful bass treatment, and the diffuser pattern is too shallow for effective scattering. For most applications, dedicated panels for each purpose outperform hybrids.

How To Combine Bass Traps And Diffusers In One Room

Room layout showing where bass traps and diffusers belong

Combining bass traps and diffusers follows a clear priority sequence based on which problems cause the most damage to your room’s sound.

Step 1 — Bass traps in all corners. Install 4-inch minimum thickness panels straddled across vertical wall-wall corners and ceiling-wall edges to address room modes, the single biggest acoustic problem in untreated rooms. Budget roughly 60-70% of your treatment investment here.

Step 2 — Broadband absorbers at first reflection points. Mount 2-4 inch panels on side walls at the mirror points between your speakers/monitors and listening position, plus the ceiling above the mix position. This cleans up early reflections that smear stereo imaging and frequency response.

Step 3 — Diffusers on rear wall. Mount QRD (Quadratic Residue Diffuser) or skyline-style diffusers on the wall behind your listening position. This scatters late reflections that would otherwise create comb filtering, while preserving the room’s sense of depth and space that full absorption would eliminate.

Step 4 — Additional treatment as needed. Fine-tune with additional bass traps if room modes persist, or more diffusion on the ceiling if the room still sounds too focused. The goal is controlled bass, clean reflections, and a natural sense of space — not a completely dead room.

For rooms where budget is limited, skip the diffusers entirely and focus on bass traps plus broadband absorbers. Bass traps and absorbers solve the problems that actually damage your sound quality, while diffusers are an enhancement that improves comfort and spaciousness but is not essential for accurate monitoring.

The Bottom Line

Bass traps and diffusers solve opposite problems using opposite mechanisms — traps remove bass energy, diffusers scatter mid/high energy. Always start with bass traps because untreated room modes cause far more damage to sound quality than untreated reflections that diffusers address.

For effective corner bass treatment, the 4 Pack Bass Traps for Ceiling Corner provides ready-made corner pieces that install quickly as your first treatment step.

For broader coverage across more corners before adding diffusion, the 8 Pack Bass Traps Acoustic Foam Corner gives you enough material to treat all four vertical corners before investing in diffusion.

Frequently Asked Questions

When to use diffusion vs absorption?

Use absorption (bass traps and broadband panels) to solve specific acoustic problems — room modes, flutter echo, comb filtering from early reflections. Use diffusion when those problems are already addressed and you want to add spaciousness and liveliness without introducing focused reflections back into the room.

Can diffusers fix bass problems?

Diffusers cannot fix bass problems because bass wavelengths (4-56 feet long) are far too large for any wall-mounted diffuser to scatter effectively — a diffuser would need wells nearly 3 feet deep to scatter 100 Hz, which is completely impractical. Bass problems require dense absorptive materials or tuned resonant devices positioned at room boundaries.

Should I buy bass traps or diffusers first?

Buy bass traps first — every time, without exception. Untreated room modes cause the most severe acoustic damage in any small or medium room, and bass traps targeting those frequencies produce the biggest audible improvement per dollar spent. Add diffusers only after your bass and early reflection problems are solved.

Corner Vs Panel Bass Trap — Which Design Controls Bass Better And Where Each One Belongs

Corner vs panel bass trap is a comparison most people skip because both designs use the same materials — but where you place that material changes everything about how much bass it actually absorbs. Getting this wrong means spending the same money for dramatically less bass control, and most rooms end up under-treated in the low end because panels went on flat walls instead of into corners.

Corner bass traps sit in or across room corners where bass pressure is highest, using the boundary effect to maximize low-frequency absorption. Flat panel bass traps mount directly on walls, treating the wall surface but missing the concentrated bass energy that builds up in corners.

Most rooms need both, but the priority order matters. Treating corners first gives you the biggest improvement per dollar spent on bass control, while flat wall panels are better suited for mid-frequency reflections and first reflection points.

Below, you will find exactly how each design works, when to use triangle superchunks vs straddled panels, how commercial options like the Monster Bass Trap and Tri Trap compare, and a clear decision guide for choosing between corner traps and flat panels in your room.

Quick Takeaway

Corner bass traps absorb 2-3x more bass energy than identical panels mounted flat on walls because corners are pressure zones where bass energy naturally concentrates. For bass control, always treat corners first with 4-inch minimum thickness panels straddled at 45 degrees (creating an air gap for deeper absorption), then add flat wall panels at first reflection points for mid/high frequency treatment.

Corner Bass Trap vs Panel Bass Trap — What Is The Difference?

Key differences between corner bass traps and panel bass traps

A corner bass trap is any absorptive panel positioned in or across a room corner — either straddled at 45 degrees across the corner (creating an air gap behind it) or filling the corner completely as a triangular “superchunk.” The corner placement puts the absorber where bass energy is most concentrated.

A panel bass trap is the same absorptive material mounted flat against a wall surface. The panel sits directly on the boundary with minimal or no air gap behind it, treating reflections at that wall surface.

The critical distinction is geometry, not materials — a 4-inch Rockwool panel performs very differently depending on whether it is straddled across a corner (with 8-12 inches of effective depth including the air gap) or mounted flat on a wall (with only 4 inches of absorptive depth). The corner-mounted version absorbs meaningfully at frequencies an octave lower than the same panel on a flat wall.

How Corner Traps Work Differently Than Flat Panels

How room corners concentrate bass energy

Corner traps outperform flat panels for bass because of two physics principles: pressure zone concentration and air gap depth.

Why Corners Have More Bass Energy

Bass standing waves create pressure maxima at room boundaries — where two boundaries meet (a wall-wall corner), the pressure from both surfaces compounds, and where three boundaries meet (a tri-corner), pressure from all three surfaces overlaps. This compounding effect makes corners the highest-pressure zones in any room.

This boundary effect means a room corner has roughly 2-4x the bass pressure of a flat wall surface at mid-room height. Placing an absorber in a corner exposes it to more bass energy per square foot than the same absorber on a flat wall — and more energy exposure means more absorption.

The practical result: a single 2×4 foot panel in a corner absorbs more bass than the same panel centered on a wall. This is why corner placement is always the first priority for bass treatment, regardless of the specific panel design.

The Air Gap Advantage Of Corner Mounting

When you straddle a panel across a corner at 45 degrees, the triangular space behind the panel creates a natural air gap. For a 4-inch panel in a standard 90-degree corner, this gap ranges from 8 to 12 inches depending on the panel width and exact angle.

Air gaps dramatically increase low-frequency absorption because bass velocity (particle movement) peaks at a distance from the boundary, not at the boundary itself. A 4-inch panel flat on a wall only absorbs well above 200 Hz, but the same panel with an 8-inch air gap absorbs well down to 125 Hz because the combined depth reaches the velocity peak of those lower frequencies.

This is the single biggest reason corner traps outperform flat panels for bass — you get 2-3x the effective depth using the same amount of material, purely from the geometry of corner mounting.

Triangle (Superchunk) vs Straddled Panel In Corners

Triangular corner bass traps compared with straddled panel traps

Both designs go in corners, but they use different amounts of material and perform differently at the lowest frequencies.

Superchunk (triangle) traps fill the entire corner with stacked triangular wedges of insulation, typically cut from rectangular batts — a superchunk using 24-inch batts creates roughly 17 inches of solid absorptive depth, the maximum possible for that corner dimension. They provide the deepest bass absorption of any porous absorber design.

Straddled panel traps mount a flat rectangular panel at 45 degrees across the corner, leaving the air gap open behind. They use significantly less material (one panel vs dozens of triangular wedges) but rely on the air gap for low-frequency reach rather than solid absorptive mass.

Performance comparison: Superchunks absorb more total energy across all frequencies because they have more absorptive material, and at very low frequencies (below 80 Hz), the solid mass of a superchunk outperforms a straddled panel with an air gap. Above 100 Hz, the performance difference narrows significantly — a straddled 4-inch panel with a deep air gap provides 80-90% of a superchunk’s absorption in that range.

Cost and practicality: Superchunks require 3-5x more insulation material than straddled panels for the same corner height. For most home studio applications, straddled panels offer the best performance-per-dollar ratio because the frequencies they miss (below 80 Hz) are often below the room’s fundamental mode anyway.

Monster Bass Trap vs Tri Trap

Monster bass traps compared with triangular corner traps

The Monster Bass Trap and Tri Trap are two commercial product formats that represent the panel and triangle approaches, respectively.

Monster Bass Traps are large rectangular panels (typically 4-6 inches thick, 2×4 feet or larger) designed for corner mounting in the straddled position, using rigid fiberglass or mineral wool at professional density wrapped in acoustically transparent fabric. Prices range from $150-300+ per panel depending on size and manufacturer.

Tri Traps are triangular-profile products designed to fill the corner completely — similar to a superchunk but manufactured as a single piece or stackable modules using either dense foam or mineral wool insulation shaped to fit the corner geometry. Prices range from $80-200+ per module depending on material and size.

The key trade-off mirrors the DIY comparison: Monster-style panels are more space-efficient and visually cleaner, while Tri Trap designs provide deeper absorption but consume the entire corner volume. For most rooms, the Monster panel format straddled across corners gives the best balance of performance, aesthetics, and cost.

Building your own versions of either design costs one-third to one-half the price of commercial products using identical materials.

When To Use Corner Traps vs Flat Wall Panels

Decision guide for choosing corner or panel bass traps

The decision between corner traps and flat wall panels depends on which frequencies you need to control.

Use corner traps when: Your primary problem is bass — boomy, uneven low-end response below 300 Hz, specific room modes that ring at certain bass notes, or monitoring that sounds dramatically different depending on where you sit. Corner traps are always the first treatment to install because they give you the most bass absorption per panel.

Use flat wall panels when: Your primary problem is mid and high frequency reflections — flutter echo between parallel walls, comb filtering at the listening position from early reflections, or an overly bright/harsh room character. Flat panels at first reflection points and rear walls address these issues effectively.

Most rooms need both. The optimal treatment order is:

  1. Front wall vertical corners (corner traps), then rear wall vertical corners
  2. Ceiling-wall edges (corner traps)

Then add flat panels:

  1. First reflection points on side walls
  2. Rear wall

This priority sequence addresses bass first (where most rooms have the worst problems) and then adds mid/high treatment as budget allows.

The Bottom Line

Corner bass traps absorb significantly more bass than flat wall panels because corners concentrate bass energy and the straddled mounting geometry creates a deep air gap that extends low-frequency reach. Always treat corners first — a single 4-inch panel straddled across a corner outperforms the same panel flat on a wall by roughly 2-3x for bass frequencies below 200 Hz.

For budget-friendly corner treatment, the 4 Pack Bass Traps for Ceiling Corner provides ready-made triangular corner pieces that install in minutes.

For covering more corners with a value pack, the 8 Pack Bass Traps Acoustic Foam Corner gives you enough pieces for comprehensive corner treatment across all four vertical corners.

Frequently Asked Questions

Do corner bass traps make a difference?

Corner bass traps make a significant, measurable difference — placing absorbers in corners typically reduces the worst room mode peaks by 6-10 dB, which is clearly audible as a tighter, more controlled bass response. Corners are the single most effective position for bass treatment because they sit at pressure maxima where bass traps work most efficiently.

What is the best shape for a bass trap?

Shape matters less than thickness, material density, and placement — a rectangular 4-inch mineral wool panel straddled across a corner performs nearly as well as a triangular superchunk filling the same corner at one-third the material cost. The best shape is whichever one gets 4+ inches of dense absorptive material into your room corners.

What is the difference between a bass trap and an acoustic panel?

Bass traps are thick (4+ inches), dense panels designed to absorb low frequencies below 300 Hz, and they work best mounted in corners or at ceiling-wall edges. Standard acoustic panels are thinner (1-2 inches), target mid and high frequency reflections (500 Hz and above), and mount flat on walls at first reflection points. Both use similar materials, but bass traps require the extra thickness to reach low enough in the frequency spectrum.

Bass traps vs foam is a comparison that confuses most people because the terms overlap — some foam products are marketed as “bass traps,” but the foam itself rarely absorbs bass frequencies effectively. The distinction matters because choosing wrong means spending money on treatment that looks like it’s solving your bass problems while the actual low-frequency issues remain completely untreated.

The core issue is physics, not marketing — bass wavelengths are 4-56 feet long, and absorbing them requires either thick, dense material or a tuned resonant design. Standard acoustic foam is 1-2 inches thick and low-density, which makes it excellent for taming mid and high frequency reflections above 500 Hz but nearly transparent to bass below 200 Hz.

Understanding the real difference between bass traps and foam saves you from the most common acoustic treatment mistake: covering your walls in foam panels and wondering why the room still sounds boomy and uneven in the low end.

Below, you’ll find exactly what separates bass traps from foam, why foam fails at low frequencies with real absorption data, how Auralex foam compares to Rockwool, when foam is actually good enough, and whether bass traps can remove too much bass.

Quick Takeaway

Bass traps are any device designed to absorb low frequencies (typically below 300 Hz), while foam is a specific material that primarily absorbs mid and high frequencies. Effective bass trapping requires 4-inch minimum thickness dense material like mineral wool or fiberglass — standard 1-2 inch acoustic foam absorbs less than 20% of energy below 200 Hz compared to 80%+ for properly thick mineral wool panels.

Bass Traps Vs Foam — What Is The Difference?

Key differences between bass traps and acoustic foam

Bass traps” is a broad category describing any acoustic device that absorbs low-frequency sound energy. This includes porous absorbers (mineral wool panels, fiberglass panels), Helmholtz resonators, membrane absorbers, and yes — even foam panels designed for corner mounting.

“Foam” refers specifically to open-cell acoustic foam, a lightweight material manufactured in wedge, pyramid, egg-crate, or flat panel shapes. Foam is the most recognizable acoustic treatment product because it’s affordable, widely available, and easy to install.

The confusion happens because some foam products are shaped and marketed as “bass traps” — triangular foam wedges designed for corner mounting, for example. The shape helps somewhat (corner mounting creates an air gap that extends effective absorption depth), but the material itself limits how deep into the bass range the absorption reaches.

Not all bass traps are foam, and most foam panels aren’t effective bass traps. A 4-inch mineral wool panel straddled across a corner absorbs meaningfully down to 100-125 Hz, while a foam corner trap of the same dimensions absorbs meaningfully only down to 250-300 Hz due to its lower density and different cellular structure.

Why Foam Struggles With Bass Frequencies

Limitations of acoustic foam for low-frequency control

Foam’s limitation with bass comes down to two factors: thickness and density. Bass absorption requires the absorptive material to be positioned at a meaningful fraction of the sound wavelength — roughly one-quarter wavelength for peak absorption.

A 100 Hz sound wave is about 11 feet long, so quarter-wavelength absorption requires roughly 2.8 feet of absorptive depth. A 2-inch foam panel provides about 1.5% of that required depth, which is why its absorption at 100 Hz is negligible.

Density compounds the problem — acoustic foam typically weighs 1-2 lbs per cubic foot, while mineral wool and rigid fiberglass used in proper bass traps weigh 3-8 lbs per cubic foot. Denser materials create more friction against air particle movement (converting sound energy to heat), and the higher the density, the more efficient the conversion at any given thickness.

NRC Ratings — Foam vs Mineral Wool At Low Frequencies

NRC (Noise Reduction Coefficient) ratings average absorption across 250-2000 Hz, which hides foam’s bass weakness behind its strong mid/high performance. The real comparison shows up in the absorption coefficients at individual frequencies where bass traps matter.

At 125 Hz, typical 2-inch acoustic foam shows an absorption coefficient of 0.10-0.15 (absorbs 10-15% of energy). A 4-inch mineral wool panel at the same frequency shows 0.65-0.80 (absorbs 65-80% of energy) — roughly five times more effective.

At 250 Hz, foam improves to 0.30-0.45 while mineral wool reaches 0.90-1.00. The gap narrows at higher frequencies — by 1000 Hz, both materials absorb 0.85+ — but the bass range is exactly where the performance gap matters most for home studio and listening room treatment.

Auralex Bass Traps Vs Rockwool

Auralex foam and Rockwool bass traps compared

Auralex is the most recognized acoustic foam brand, and their LENRD (Low End Node Reduction Device) corner bass trap is the product most people compare against DIY Rockwool panels. Here’s how they stack up.

Auralex LENRD bass traps are triangular foam wedges designed for corner mounting — 24 inches tall, about 1.5 lbs each, and they install in minutes with adhesive. Performance-wise, they show meaningful absorption starting around 250 Hz and peak above 500 Hz, making them effective for upper bass and low-mid cleanup but limited below 200 Hz.

Rockwool (mineral wool) panels at 4-inch thickness mounted in corners absorb meaningfully from 125 Hz upward when straddled across the corner with an air gap. They weigh 3-4 lbs per panel and require a frame and fabric covering, but the acoustic performance extends a full octave deeper into the bass range than foam alternatives.

Cost comparison: A set of 4 Auralex LENRDs costs roughly $120-150 retail, while four DIY Rockwool panels using Safe’n’Sound or ComfortBoard cost $60-100 in materials (insulation, lumber, fabric). The DIY option costs less and performs better — the trade-off is the time and effort required to build them.

The practical takeaway: if you need treatment specifically for bass frequencies below 200 Hz, Rockwool panels outperform Auralex foam products at every price point. If you mainly need upper-bass and mid-frequency cleanup (250 Hz and above), Auralex products work and save construction time.

When Foam Bass Traps Are Good Enough

When acoustic foam works instead of bass traps

Foam bass traps are genuinely adequate in several scenarios where deep bass absorption isn’t the primary goal.

Voice recording and podcasting: Voice frequencies sit between 80-300 Hz (fundamental) with harmonics extending much higher. Foam panels absorb the mid and high frequency reflections that cause the worst voice recording problems (comb filtering, room coloration), and the bass below 200 Hz is less critical for speech clarity.

Flutter echo treatment: The rapid “boing” sound between parallel walls is a mid/high frequency problem that foam handles perfectly. Even thin foam panels eliminate flutter echo at the frequencies where it’s most audible, and adding foam corner traps provides bonus upper-bass absorption.

Casual music rooms: If you’re practicing guitar, rehearsing with a band, or casually mixing music without professional accuracy requirements, foam treatment improves the room’s overall sound quality without the cost or effort of proper mineral wool treatment.

Installing foam bass traps takes minutes with adhesive spray or command strips, versus the hours required for building and mounting mineral wool panels. For renters who can’t mount heavy panels or drill into walls, foam’s light weight and removable adhesive make it the only practical option.

Can Bass Traps Take Away Too Much Bass?

Over-absorption risk from using too much foam

Dense bass traps can absolutely remove too much bass from a room, creating an environment that sounds unnaturally dead and uncomfortably dry in the low end. Foam bass traps almost never cause this problem because they don’t absorb enough bass energy to overdamp the room’s low-frequency response.

Over-absorption typically happens when thick mineral wool or fiberglass panels cover too much of the room’s boundary surfaces — treating more than 50% of walls, corners, and ceiling with dense absorbers can strip the room of its natural warmth and reverb.

The symptoms are easy to identify: speech sounds muffled and lifeless, music feels thin and lacking body, and the room creates an uncomfortable “pressure” sensation during extended listening. Bass traps work by absorbing excess energy at room boundaries, but the goal is controlled bass — not eliminated bass.

The fix is simple: remove flat-wall panels until the room sounds natural again, while keeping corner traps in place (corners are high-pressure zones that benefit from absorption regardless). For most rooms, corner and ceiling-edge treatment is the sweet spot — heavy bass absorption where it matters most, with enough untreated surface area to preserve the room’s acoustic character.

The Bottom Line

Bass traps vs foam comes down to what frequencies you need to control. Foam handles mid and high frequency reflections (250 Hz and above) effectively and affordably, but it’s the wrong tool for bass problems below 200 Hz — the exact range where untreated rooms cause the worst monitoring and listening issues.

For actual bass control, invest in 4-inch minimum thickness mineral wool or fiberglass panels mounted in room corners and ceiling edges. The 4 Pack Bass Traps for Ceiling Corner works as a budget starting point for upper-bass and mid-frequency treatment.

For deeper bass absorption across more corners, the 8 Pack Bass Traps Acoustic Foam Corner provides the volume needed to cover all four vertical corners at a reasonable price.

Frequently Asked Questions

Do bass traps keep bass in the room?

No — bass traps absorb internal sound reflections within the room, reducing reverb and standing wave buildup. They don’t block bass from leaving the room or prevent bass from entering — that requires mass-loaded barriers, decoupled construction, or other soundproofing measures that are fundamentally different from acoustic treatment.

How to mount foam bass traps?

Foam bass traps mount with adhesive spray (3M Super 77 or equivalent), heavy-duty command strips, or impaling clips screwed into the wall. For corner mounting, apply adhesive to both edges of the triangular foam piece and press it into the corner — the foam is light enough that adhesive alone holds it permanently without mechanical fasteners.

Is foam or fiberglass better for bass?

Fiberglass (and mineral wool) outperform foam for bass absorption by a wide margin — at 125 Hz, a 4-inch fiberglass panel absorbs roughly 5x more energy than a 2-inch foam panel of equal surface area. For frequencies above 500 Hz, the performance gap closes significantly and foam becomes a cost-effective alternative.

How To Bass Trap A Room — The Complete Step-By-Step Process From Measurement To Placement

How to bass trap a room is a question that trips up most people because they skip straight to buying panels and mounting them in corners — but without measuring the room first, you’re guessing at which frequencies need treatment, how many traps you need, and whether your placement is actually solving the problem or just making the room look treated.

The difference between a properly bass-trapped room and a randomly treated one is dramatic. A measured approach can flatten your room’s bass response by 10-15 dB at the worst modes, while random corner placement might only reduce problems by 3-5 dB and miss the frequencies causing the biggest issues entirely.

Bass trapping a room follows a clear four-step process: assess the room’s specific problems, choose the right type of bass trap for those problems, position the traps in the highest-impact locations, then measure again to verify and adjust.

Below, you’ll find each step explained with practical instructions you can follow today — from free measurement tools to exact placement priority, plus how to know when you’ve added enough treatment and when to stop.

Quick Takeaway

Bass trapping a room is a four-step process: measure your room’s problem frequencies using REW or a room mode calculator, choose broadband porous traps (4-inch minimum mineral wool or fiberglass) for general treatment, place them in corners and ceiling-wall edges in priority order (front corners first), then measure again to verify improvement. Most rooms need 4-8 traps to achieve meaningful bass control.

How To Bass Trap A Room — The Complete Process

Complete process for bass trapping a room

How to bass trap a room properly means following a systematic workflow rather than guessing. The process mirrors how professional acousticians treat studios — measure, diagnose, treat, verify — scaled down to what you can do with free tools and affordable materials.

The biggest mistake people make is skipping step one (assessment) and jumping straight to buying traps. Without knowing your room’s specific problems, you might spend $500 on treatment that targets 200 Hz when your worst mode is at 63 Hz — a frequency that needs much thicker or deeper treatment to address.

Every room is different because every room has different dimensions, construction materials, and furniture layouts. A 10×12 foot bedroom has completely different room modes than a 15×20 foot dedicated studio, which means the treatment plan for each room is unique even if the general approach is the same.

Step 1 — Assess Your Room’s Bass Problems

Room assessment before adding bass traps

Assessment tells you exactly where your room’s bass problems are so you can target them specifically. You have two approaches: calculation-based (free, fast, approximate) and measurement-based (more accurate, requires basic equipment).

Using A Room Mode Calculator

A room mode calculator takes your room’s length, width, and height and outputs the frequencies where standing waves will form. These calculators are free online — enter your dimensions in feet or meters and you’ll get a list of axial, tangential, and oblique modes.

Focus on the axial modes first — these are the strongest standing waves, forming between pairs of parallel surfaces with harmonics at predictable intervals (a 10-foot room has modes at 56 Hz, 112 Hz, 168 Hz, etc.). The modes from your shortest dimension will be the highest in frequency, while the longest dimension produces the lowest modes.

Look for clusters where multiple modes fall close together in frequency. A cluster of 2-3 modes within a 10 Hz band creates a reinforced peak that’s harder to treat than an isolated mode — these clusters are your highest-priority targets.

Listening Tests You Can Do Right Now

Play a slow sine sweep (20-200 Hz) through your monitors at moderate volume and walk slowly around the room. You’ll hear the bass get dramatically louder in corners and along walls, and quieter (or nearly silent) at certain spots in the room — those quiet spots are nulls where standing waves cancel.

Stand in each corner and listen carefully during the sweep — the corner where bass sounds loudest and most boomy is where your first bass trap should go. This test doesn’t tell you the exact frequency, but it identifies the worst positions quickly.

Clap your hands sharply and listen for flutter echo — a rapid ringing “boing” sound. Flutter echo is a mid/high frequency problem (not bass), but it tells you the room has strong parallel-wall reflections that will also affect bass frequencies in those same dimensions.

Step 2 — Choose The Right Bass Traps For Your Room

Choosing the right bass traps for a room

With your room’s problems identified, match the trap type to the severity and frequency range of each problem.

Broadband porous traps (mineral wool or fiberglass panels) are the right choice for 90% of rooms — they absorb across a wide frequency range and forgive placement imprecision, meaning even imperfect positioning still provides meaningful absorption across the bass spectrum. Use 4-inch minimum thickness for any trap intended to address bass below 200 Hz.

Tuned resonant traps (Helmholtz resonators or membrane absorbers) target a specific narrow frequency band. Use these only if you’ve identified a single dominant room mode that broadband treatment hasn’t adequately reduced — they’re a surgical tool, not a general-purpose solution.

Material choice determines how deep into the bass range your traps will reach — mineral wool and rigid fiberglass at 3+ PCF density are the standard materials. Acoustic foam absorbs above 300-500 Hz but contributes little to bass absorption below 200 Hz.

For most rooms, start with broadband porous traps in the corners and add tuned traps later only if measurement shows a stubborn mode that corner treatment didn’t resolve.

Step 3 — Set Up And Position Your Bass Traps

Positioning bass traps in room corners and boundaries

How to set up bass traps follows a strict priority order based on where bass energy concentrates most. Treat positions in this order and stop when measurement shows acceptable results.

Priority 1 — Front wall vertical corners: The two corners where the front wall meets the side walls are the highest-impact positions because bass energy is strongest where three surfaces converge, and these corners directly affect what you hear at the listening position. Mount traps floor-to-ceiling, straddled across the corner at 45 degrees with an air gap behind.

Priority 2 — Rear wall vertical corners: Same treatment as front corners. Rear wall reflections cause comb filtering at the listening position, and corner-mounted traps at the rear address both the corner pressure zone and the rear wall reflection simultaneously.

Priority 3 — Front ceiling-wall edges: The junction where the ceiling meets the front wall is a high-pressure zone that vertical corner traps miss. Mount a trap along this edge to catch bass energy accumulating at the upper front boundary.

Priority 4 — Remaining ceiling-wall edges and side wall treatment: After the primary positions are covered, add traps along the remaining ceiling edges and at side wall first reflection points if budget and space allow.

Installing bass traps with L-brackets, French cleats, or adhesive depends on the mounting surface and whether you’re renting or own the space. Straddled corner mounting requires brackets that hold the panel at 45 degrees across the corner.

Step 4 — Measure And Adjust

Measuring and adjusting bass trap placement

After placing your initial traps, measure the room again using the same method as step one. Compare the before and after frequency response curves to see exactly where and how much improvement you achieved.

A successful first round of treatment typically reduces the worst room mode peaks by 6-10 dB. If peaks are still above 6 dB over the average response level, consider adding more treatment at the remaining priority positions.

Signs that you’ve added enough treatment: the bass response curve is relatively smooth (peaks and nulls within 6 dB of average), speech and music sound natural and balanced at the listening position, and there’s still some natural room ambiance (the room doesn’t sound uncomfortably dead).

Signs that you need more treatment: specific bass notes still boom noticeably at the listening position, the frequency response still shows peaks above 10 dB, or bass traps haven’t made an audible difference (likely a placement or thickness issue rather than quantity).

Stop adding treatment if the room starts sounding too dead — overly dampened rooms lose their natural reverb and become uncomfortable to work in. The goal is controlled bass, not eliminated bass.

The Bottom Line

How to bass trap a room comes down to four steps: measure your room’s specific problems, choose broadband porous traps at 4-inch minimum thickness, place them in corners and ceiling edges in priority order, and verify with measurement. Most rooms achieve significant improvement with 4-8 strategically placed traps.

The 4 Pack Bass Traps for Ceiling Corner is a practical starting point for treating all four corners quickly with minimal setup time.

For rooms that need more coverage, the 8 Pack Bass Traps Acoustic Foam Corner provides enough pieces for comprehensive corner and edge treatment, or build your own DIY bass traps for one-third the cost of commercial panels.

Frequently Asked Questions

How to use a bass trap?

Place bass traps in room corners and ceiling-wall junctions where bass energy naturally accumulates — straddle them across the corner at a 45-degree angle for maximum absorption depth. Start with the corners behind your monitors (or primary listening position) and expand to rear corners and ceiling edges as budget allows.

Where should you put bass traps?

Front wall corners are the highest priority, followed by rear wall corners, then ceiling-wall edges at the front and rear walls. Full placement details depend on your specific room dimensions and where the worst modes concentrate, but this priority order works for the vast majority of rectangular rooms.

How deep do bass traps need to be?

Bass traps need a minimum of 4 inches of thickness to absorb meaningfully below 200 Hz — 6 inches reaches deeper into the bass range and is ideal for most applications. Straddling a 4-inch panel across a corner with an air gap behind it effectively doubles the acoustic depth to 8-12 inches, which is why corner mounting outperforms flat-wall mounting for bass treatment.

Bass Traps For Small Room — Why Compact Spaces Need More Treatment, Not Less

Bass traps for small room setups are counterintuitively more critical than in large rooms — but most people assume a small space needs less treatment, when the physics actually works in reverse. A 10×12 foot bedroom has room modes packed so tightly together in the bass range that untreated corners can boost certain frequencies by 15-20 dB, making accurate listening or mixing virtually impossible.

The challenge with small rooms isn’t just that bass problems are worse — it’s that floor space is precious, so every square inch of treatment needs to earn its place. Bulky corner traps that work perfectly in a large studio can eat up usable space in a bedroom or home office to the point where the room becomes impractical.

The solution is choosing space-efficient bass trap designs that maximize absorption while minimizing their physical footprint — straddled corner panels with air gaps, ceiling-edge traps that use otherwise dead space, and superchunk designs tucked into corners you weren’t using anyway.

Below, you’ll find why small rooms have the worst bass problems, how many traps you actually need, the most space-efficient designs, whether over-treatment is a real risk, and why commercial traps cost so much (plus cheaper alternatives).

Quick Takeaway

Small rooms need more bass treatment per cubic foot than large rooms because their shorter dimensions create stronger, more closely spaced room modes. Treat all four vertical corners with 4-inch minimum thickness panels as the baseline, then add ceiling-wall edge traps. Use straddled corner panels (not flat-mounted) to maximize absorption depth without eating floor space.

Why Small Rooms Have The Worst Bass Problems

Small room modes that bass traps help control

Room modes are standing waves that form between parallel surfaces, and their frequencies are determined by the distance between those surfaces. A 10-foot dimension creates a fundamental mode at approximately 56 Hz, with harmonics at 112 Hz, 168 Hz, and so on — all squarely in the bass range where bass traps absorb.

In a large room (say, 20×30 feet), the fundamental modes start lower and spread out more across the frequency spectrum. In a small room, the modes are crammed into a narrow band between 50 and 300 Hz, creating multiple overlapping peaks and nulls that make the bass response wildly uneven from one listening position to another.

The boundary effect compounds the problem — in a small room, you’re always sitting close to at least one wall, often within a quarter wavelength of the room’s worst modes. This proximity amplifies the bass peaks you hear at your listening position beyond what you’d experience in the same spot of a larger room.

Small rooms also have proportionally more corner length relative to their volume. A 10×12×8 foot room has 160 linear feet of edges (where walls, floor, and ceiling meet) packed into just 960 cubic feet — that’s a lot of high-pressure bass zones crammed into a tiny space.

How Many Bass Traps Does A Small Room Need?

How many bass traps a small room needs

Small rooms need proportionally more treatment than large rooms, but the absolute number of traps is manageable because there are fewer corners and edges to treat. Here’s a practical framework based on room size.

Prioritizing Treatment In A Tight Space

When floor space is limited, prioritize treatments that use vertical and overhead space rather than floor area. Corner traps straddled at 45 degrees use the dead space behind them (which you couldn’t use for anything else) while keeping the room’s usable area intact.

Ceiling-wall edge traps mount in the 90-degree junction where the ceiling meets the wall — space that’s completely wasted otherwise. These positions are high-pressure zones for bass and treating them costs zero floor space.

Wall-mounted panels flat against the wall are the least space-efficient option for bass treatment. They take up wall space you might need for shelving, monitors, or equipment, and their bass absorption is limited without an air gap behind them.

Minimum Effective Treatment For A Small Room

4 corner traps + 2 ceiling edges = the minimum effective package. This covers the four vertical wall-to-wall corners (the strongest bass pressure zones) plus the two front ceiling-wall edges (where bass buildup affects your listening position most directly).

For a bedroom-sized room (roughly 10×12 feet), this minimum package requires: – 4 panels at 2×4 feet each for the vertical corners (straddled at 45 degrees) – 2 panels at 2×4 feet for the front ceiling edges

Total material cost for DIY builds: roughly $80-120 for all six traps. This level of treatment typically reduces the worst room mode peaks by 6-10 dB — enough to make a clearly audible improvement in monitoring accuracy.

Best Bass Trap Designs For Small Rooms

Space-efficient bass trap designs for small rooms

Space efficiency is the deciding factor for small room bass trap designs. The goal is maximum acoustic depth with minimum physical footprint.

Straddled corner panels are the best overall choice for small rooms — a 4-inch panel mounted at 45 degrees across a corner creates an air gap of 8-12 inches behind it, giving you the acoustic equivalent of a 12-16 inch deep absorber while only projecting about 6 inches into the room from each wall. Install them with L-brackets or French cleats.

Superchunk corner traps fill the corner completely with triangular insulation wedges, creating the deepest possible absorber (17+ inches for a 24-inch batt). They take up more visible corner space than straddled panels, but the space behind a superchunk was unusable anyway — you’re converting dead corner volume into acoustic treatment.

Ceiling cloud panels hung 2-4 inches below the ceiling absorb bass at the ceiling boundary without touching the walls or floor. In a small room where wall and floor space is at a premium, ceiling-mounted traps are the most space-efficient option after corner traps.

Avoid freestanding bass traps or floor-to-ceiling tube traps in small rooms — they consume floor area that you need for furniture, equipment, or simply moving around. Every trap in a small room should mount to a wall, corner, or ceiling.

Can You Over-Treat A Small Room?

Avoiding over-treatment with bass traps in small rooms

Over-treating a small room with bass absorption is a real risk, and the result is a room that sounds uncomfortably dead — conversations feel muffled, music loses its energy, and the space becomes fatiguing to work in for extended periods.

The rule of thumb is to leave at least 40-50% of your wall and ceiling surface area untreated (or treated with reflective/diffusive elements rather than absorption). Bass traps in corners and edges are fine because those surfaces were already acoustically “dead” zones, but covering large flat wall areas with thick absorption panels can overdamp the room’s natural reverb.

Signs of over-treatment include speech sounding unnaturally dry (no room ambiance at all), clapping producing almost no audible reflection, and a feeling of “pressure” or discomfort when spending time in the room. If you notice these symptoms, remove some flat-wall panels while keeping the corner traps in place.

The ideal balance for a small room is heavy corner treatment (all four corners plus ceiling edges) combined with minimal flat-wall absorption — perhaps just first reflection point panels on the side walls. This addresses the bass modes without killing the room’s natural liveness.

Why Are Bass Traps So Expensive?

Cost breakdown for bass traps in a small room

Commercial bass traps from brands like GIK Acoustics, Primacoustic, and RealTraps cost $120-250+ per panel, which adds up fast when you need 4-8 of them. The cost comes from three factors: materials, labor, and shipping.

The insulation material itself (mineral wool or rigid fiberglass) is the cheapest component — roughly $5-15 per panel worth of material. The frame, professional-grade fabric wrapping, and hardware add $30-50 in materials, and the skilled labor to build a clean, consistent product adds another $30-50.

Shipping is often the biggest surprise — a 2×4 foot, 4-inch thick panel weighs 10-15 lbs and can’t be folded or compressed, so it ships as a large, heavy box. Freight costs for a set of 4-6 panels can easily exceed $50-100.

Building your own bass traps eliminates the labor and shipping costs entirely. A DIY panel using the same insulation and a simple lumber frame costs $15-40 per trap versus $150+ commercial — roughly one-third the price for identical acoustic performance.

If DIY isn’t an option, foam bass traps offer a budget middle ground. The 4 Pack Bass Traps for Ceiling Corner covers four corners for under $50.

For comprehensive corner coverage at a fraction of commercial panel pricing, the 8 Pack Bass Traps Acoustic Foam Corner provides enough pieces for all four vertical corners in a small room.

The Bottom Line

Bass traps for small rooms are more important than in large spaces because compact dimensions create stronger, more densely packed room modes that wreck bass accuracy. Treat all four vertical corners and at least two ceiling-wall edges as the minimum effective package, using straddled corner panels to maximize acoustic depth without sacrificing floor space.

Four-inch minimum thickness mineral wool or fiberglass is the performance baseline — thinner panels and foam help with mids and highs but won’t address the bass modes that cause the worst problems in small rooms. Budget $80-120 for a complete DIY treatment package, or look at foam alternatives if construction isn’t practical.

Frequently Asked Questions

What size bass traps for a small room?

Standard 2×4 foot panels at 4-inch minimum thickness work well in small rooms when straddled across corners. For maximum bass absorption in tight spaces, superchunk corner traps (triangular insulation wedges stacked floor-to-ceiling) reach deeper into the bass range than any panel design.

Do small rooms need more or fewer bass traps?

Small rooms need more bass treatment per cubic foot than large rooms because their shorter dimensions create stronger room modes concentrated in the bass range. A 10×12 foot room needs at least 4 corner traps and 2 ceiling-edge traps (6 total) to achieve meaningful bass control — proportionally more coverage than a room twice its size.

Can furniture help with bass in a small room?

Heavy furniture like bookshelves, couches, and upholstered chairs absorbs some mid-frequency energy and breaks up flutter echo, but furniture doesn’t meaningfully absorb bass frequencies below 200 Hz. Furniture helps with general room acoustics, but it can’t replace proper bass traps for treating room modes.

Bass Traps For Home Studio — Where To Place Them And How Many You Actually Need

Bass traps for home studio setups solve the one acoustic problem that foam panels and wall treatment can’t touch — but most home producers either skip them entirely or place them wrong, leaving the room’s worst bass modes completely untreated while wondering why their mixes sound muddy on every other playback system.

Most home studio owners start with foam panels on the walls and wonder why their mixes still sound muddy or bass-heavy. The foam addresses flutter echo and mid/high reflections, but it does almost nothing below 300 Hz — the range where bass traps work and where untreated rooms cause the biggest problems.

The good news is that bass trapping a home studio doesn’t require covering every surface. Strategic placement in the right corners and wall-ceiling junctions delivers 80% of the improvement with 20% of the coverage.

Below, you’ll find why home studios specifically need bass traps, exactly where to place them, how many you need based on room size, the best options at different budgets, and the most common mistakes to avoid.

Quick Takeaway

Every home studio needs bass traps in at least the four vertical wall corners — two behind the monitors and two at the rear wall. Use 4-inch minimum thickness mineral wool or fiberglass panels straddled across corners for effective bass absorption. Small bedroom studios need 4-6 traps minimum, while dedicated studio rooms benefit from 8-12 traps covering corners plus ceiling-wall junctions.

Why Do Home Studios Need Bass Traps?

Why home studios need bass traps

Home studios sit in rooms designed for living, not listening — bedrooms, spare rooms, and basements with dimensions that create strong room modes in the 50-200 Hz range. These modes cause certain bass notes to boom 10-15 dB louder than others at your listening position, making accurate monitoring impossible.

The parallel walls in typical rectangular rooms are the core problem — sound waves bounce back and forth between parallel surfaces, creating standing waves where bass energy piles up at the boundaries (walls, corners, ceiling) and cancels in other spots. Your mix sounds completely different depending on where you sit in the room.

Without bass traps, you’ll compensate for what you hear rather than what’s actually in the mix. If your room boosts 80 Hz by 12 dB, you’ll unconsciously cut 80 Hz in your mix — then play it back in a car or on headphones and wonder where all the low end went.

Bass traps reduce these peaks by absorbing the excess energy at room boundaries. Even modest treatment — four corner traps — can reduce the worst room modes by 6-10 dB, which is the difference between guessing at your low end and actually hearing it accurately.

Where To Put Bass Traps In A Home Studio

Bass trap placement guide for a home studio

Bass trap placement follows a clear priority order based on where bass energy concentrates most in a rectangular room. Start at the top of this list and work down as budget allows.

Front Wall Treatment

The two vertical corners where the front wall meets the side walls are the highest-priority positions in any home studio. Bass energy is strongest where three surfaces meet (two walls plus the floor or ceiling), and the front wall is where your monitors sit — so treating these corners directly improves what you hear at the mix position.

Mount traps floor-to-ceiling in both front corners, straddled across the corner at a 45-degree angle. This creates an air gap behind the trap that extends its effective absorption depth beyond the panel’s physical thickness.

If your monitors are close to the front wall (within 2-3 feet), add a panel flat on the front wall between the monitors. This addresses the boundary reinforcement that boosts bass when speakers are near a wall surface.

Rear Wall And Side Wall Treatment

Rear wall corners are the second priority — bass energy reflects off the rear wall back toward your listening position, creating comb filtering that makes the low end sound uneven. Treat both rear corners the same way as the front: floor-to-ceiling traps straddled across the corner.

Side wall reflection points matter more for mid and high frequencies than bass, but if your room is narrow (under 10 feet), side wall bass treatment helps reduce the lateral room modes. Place panels at the first reflection points on each side wall.

Ceiling-wall junctions are the next priority after vertical corners. The edges where the ceiling meets the walls are high-pressure zones for bass — mounting traps along these edges (especially at the front and rear walls) catches bass energy that vertical corner traps miss.

How Much Bass Trapping Does A Home Studio Need?

How much bass treatment a home studio needs

The amount of bass trapping depends on room size, room shape, and how critical your listening accuracy needs to be. Here’s a practical framework based on how many bass traps different room types typically need.

Bedroom Studios

A typical bedroom (10×12 feet or smaller) has severe room modes because the dimensions are short relative to bass wavelengths. These rooms need proportionally more treatment than larger spaces.

Minimum: 4 corner traps (all four vertical corners, floor-to-ceiling). This addresses the worst room modes and gives you a baseline level of monitoring accuracy.

Recommended: 6 traps — four vertical corners plus two ceiling-wall edge traps at the front wall. This covers the primary and secondary bass buildup zones and gets you roughly 80% of what’s achievable with full treatment.

Dedicated Studio Rooms

Larger dedicated rooms (12×16 feet or bigger) have more spread-out room modes and generally less severe bass problems per mode. You have more surface area to treat, but the treatment doesn’t need to be as dense.

Minimum: 6 traps — four vertical corners plus front wall panel between monitors.

Recommended: 8-12 traps — four vertical corners, four ceiling-wall edge traps, and additional flat-wall panels at the front and rear walls. This level of treatment gives professional-grade monitoring accuracy for mixing and mastering.

Best Bass Trap Options For Home Studios

Best bass trap options for home studios

Home studio bass traps range from $10 DIY builds to $200+ commercial panels. The acoustic performance depends primarily on the insulation material and thickness, not the brand name or price tag.

DIY mineral wool traps ($15-40 per trap) deliver the best performance per dollar — build a simple frame from 1×4 lumber, fill it with 4-inch Rockwool Safe’n’Sound or ComfortBoard, and wrap it in muslin. These perform identically to commercial panels at one-third the cost, and the full DIY bass trap build guide covers the process step by step.

Commercial fiberglass/mineral wool panels ($120-200+ per trap from GIK Acoustics, Primacoustic, or ATS Acoustics) use the same core materials as DIY traps with professional-grade fabric and frames. Worth it if appearance matters or you don’t want to build.

Foam bass traps are the most convenient option — the 4 Pack Bass Traps for Ceiling Corner installs in minutes and covers four corners at once. Foam works best as a starting point for casual recording rather than critical mixing.

For covering all corners efficiently, the 8 Pack Bass Traps Acoustic Foam Corner provides enough pieces for all four vertical corners and is a practical choice when budget is the priority.

Common Home Studio Bass Trap Mistakes

Common home studio bass trap mistakes

The most common mistake is treating a home studio with only thin acoustic foam and assuming the bass is handled. Standard 2-inch foam panels absorb well above 500 Hz but barely touch frequencies below 200 Hz — the exact range where room modes cause problems.

Another frequent error is only treating two corners instead of four — bass energy exists in all corners equally, so leaving the rear corners untreated means half the room’s bass problems persist. The improvement from two to four corner traps is nearly as significant as the improvement from zero to two.

Placing bass traps flat against walls instead of straddling them across corners reduces their effectiveness significantly. A 4-inch panel flat on a wall absorbs down to roughly 400 Hz, while the same panel straddled across a corner with an air gap absorbs down to 200 Hz — that air gap effectively doubles the acoustic depth.

Skipping ceiling treatment entirely is another common oversight — the ceiling-wall junctions are high-pressure zones for bass, and most home studios treat only the vertical corners while ignoring the horizontal edges above. Even two traps along the front ceiling edge make a noticeable difference in low-frequency accuracy.

The Bottom Line

Bass traps for home studio environments are the most important acoustic treatment investment you can make — more impactful than wall panels, diffusers, or any other room treatment for improving mix accuracy. Start with four corner traps in the vertical wall corners (minimum), expand to 6-8 traps including ceiling-wall edges, and use 4-inch minimum thickness mineral wool or fiberglass for real bass absorption.

Skip thin foam as your primary bass treatment and invest in proper insulation-based traps — either DIY builds or commercial panels. The difference in monitoring accuracy is immediately audible and will improve every mix you make in your studio.

Frequently Asked Questions

How many bass traps do I need for a home studio?

A minimum of four bass traps (one per vertical corner) is the starting point for any home studio. For bedroom-sized studios, six traps (four corners plus two ceiling-wall edge pieces) covers the critical zones, while dedicated mixing rooms benefit from 8-12 traps for professional accuracy.

Are foam bass traps good enough for home recording?

Foam bass traps are adequate for casual recording where perfect low-frequency monitoring isn’t critical — vocals, podcasts, and acoustic instruments benefit from even basic foam treatment. For mixing and mastering, mineral wool or fiberglass traps absorb significantly deeper into the bass range and give you the accuracy needed to make reliable low-end decisions.

How many corner bass traps do you need?

Ideally, treat all four vertical corners in your room — each corner is a high-pressure zone where bass energy accumulates equally. If budget forces you to choose, prioritize the two front wall corners (behind your monitors) first, then add the rear corners as soon as possible for balanced bass absorption throughout the room.

How To Build A Membrane Bass Trap — DIY Resonant Absorber For Targeted Low Frequencies

How to build a membrane bass trap is one of the most searched DIY acoustic questions because membrane traps solve a problem that standard porous absorbers can’t — they target specific bass frequencies with surgical precision using a fraction of the depth, but the build requires careful calculation and airtight construction that most guides gloss over.

A membrane bass trap works differently from a standard porous bass trap. Instead of absorbing sound through friction in a fibrous material, a membrane trap uses a thin, flexible panel mounted over a sealed air cavity — the panel vibrates at a specific resonant frequency, converting that frequency’s energy into heat through the panel’s internal damping and any absorptive material inside the cavity.

The advantage is depth efficiency — a membrane trap only 4 inches deep can absorb at 60-80 Hz, where a porous absorber would need to be 2-3 feet thick to reach the same frequency. The disadvantage is narrow bandwidth, as membrane traps only absorb effectively within a small range around their tuned frequency.

Below, you’ll find the resonance formula explained in practical terms, a complete step-by-step build guide, the difference between limp mass and rigid panel designs, and how to build a tube-style variant.

Quick Takeaway

A membrane bass trap is a sealed box with a flexible front panel that vibrates at a calculated resonant frequency, absorbing that specific bass frequency range. Build one from MDF or plywood for the box, thin plywood (3-6mm) or mass-loaded vinyl for the membrane, and mineral wool inside to widen the absorption bandwidth. Use the formula f = (60 / √(m × d)) where m is membrane mass in kg/m² and d is cavity depth in meters to calculate your target frequency.

What Is A Membrane Bass Trap And How Does It Work?

How a membrane bass trap absorbs targeted low frequencies

A membrane bass trap (also called a panel absorber or diaphragmatic absorber) is a sealed box with a thin, flexible front panel that resonates at a specific frequency. When bass sound waves hit the panel, it flexes back and forth — this mechanical vibration converts acoustic energy into heat through friction within the panel material and any damping material inside the cavity.

The resonant frequency depends on two factors: the mass of the membrane panel and the depth of the sealed air cavity behind it. A heavier panel or a deeper cavity produces a lower resonant frequency, while a lighter panel or shallower cavity produces a higher one.

This makes membrane traps fundamentally different from porous absorbers like fiberglass and mineral wool panels — porous absorbers work across a broad frequency range but need massive depth to reach low bass. Membrane traps target a narrow frequency band but do it in a compact package.

The practical benefit is treating specific room modes — the resonant frequencies where your room amplifies bass unevenly. If your room has a 63 Hz mode causing a 12 dB peak at your listening position, a membrane trap tuned to 63 Hz addresses that exact problem without absorbing the frequencies that don’t need treatment.

How To Calculate Your Membrane Trap Dimensions

Resonance formula for tuning a membrane bass trap

The resonant frequency of a membrane bass trap follows this simplified formula:

f = 60 / √(m × d)

Where: – f = resonant frequency in Hz – m = surface mass of the membrane in kg/m² – d = depth of the air cavity in meters

For example, a 3mm plywood membrane (approximately 1.8 kg/m²) over a 100mm (0.1m) deep cavity produces a resonant frequency of approximately 60 / √(1.8 × 0.1) = 60 / √0.18 = 60 / 0.424 = 141 Hz.

Choosing Your Target Frequency

Measure your room to find the worst bass mode before designing your trap. Use free software like REW (Room EQ Wizard) with an inexpensive measurement microphone to run a frequency sweep at your listening position.

Look for peaks in the 40-150 Hz range — these are the room modes causing the most audible problems, and the tallest peak is your primary target frequency. A room mode calculator (based on your room’s length, width, and height) can also predict where modes will occur.

Panel Mass And Cavity Depth Trade-offs

You can hit the same target frequency with different combinations of panel mass and cavity depth. A heavier panel with a shallow cavity produces the same resonant frequency as a lighter panel with a deeper cavity.

Heavier panel (thicker plywood or MLV): More compact overall depth but harder to get the panel to vibrate freely. Requires careful edge mounting to avoid dampening the panel’s movement.

Deeper cavity: Easier to build and more forgiving of construction imperfections. The deeper the box, the lower you can tune without needing an extremely heavy membrane.

For most DIY builds, a cavity depth of 100-200mm (4-8 inches) with 3-6mm plywood as the membrane covers the practical range of 60-150 Hz — the zone where most room mode problems live.

Step-By-Step Membrane Bass Trap Build

Build steps for a DIY membrane bass trap

This build creates a membrane trap approximately 600×600mm (24×24 inches) face area with adjustable cavity depth. Total material cost is roughly $30-50 per trap.

Building The Sealed Box

Cut five pieces of 18mm (3/4-inch) MDF or plywood — four sides and one back panel. The internal dimensions determine your cavity depth, so plan accordingly (100-200mm deep for most applications).

Assemble the box with wood glue and screws at every joint, then apply a bead of acoustic sealant (or standard silicone caulk) along every interior seam — the box must be completely airtight for the trap to function correctly. Any air leak acts as a port that changes the resonant behavior unpredictably.

Add internal bracing if the box is larger than 600mm in any dimension. A single cross-brace of MDF glued and screwed across the center of the back panel prevents the box walls from resonating at unwanted frequencies.

Attaching The Membrane

Cut your membrane material (3-6mm plywood or mass-loaded vinyl) to match the outer dimensions of the box opening. The membrane should cover the open face completely with no gaps.

Attach the membrane to the box frame using screws every 50-75mm (2-3 inches) around the perimeter, with a gasket of foam weatherstrip tape between the membrane and the box edge. The weatherstrip creates an airtight seal while allowing the membrane to vibrate freely.

Do not glue the membrane directly to the box — gluing over-constrains the edges and reduces the panel’s ability to flex, which raises the effective resonant frequency and reduces absorption efficiency.

Adding Internal Damping

Place a layer of mineral wool or fiberglass insulation inside the cavity, covering the back wall but not touching the membrane. Leave a 25-50mm (1-2 inch) air gap between the damping material and the membrane face.

The damping material widens the absorption bandwidth from a narrow spike (perhaps 10-15 Hz wide) to a broader curve (30-50 Hz wide). Without damping the trap only absorbs at its exact resonant frequency, but with damping it covers a useful range on either side.

A 50mm (2-inch) layer of mineral wool at 4+ PCF density inside the cavity is sufficient. More damping material broadens the bandwidth further but reduces the peak absorption at the center frequency — it’s a tradeoff between depth and breadth of absorption.

Limp Mass vs Rigid Panel Membrane Traps

Limp membrane and rigid panel bass traps compared

Membrane traps use two fundamentally different panel types, and each behaves differently acoustically.

Rigid panel traps use thin plywood (3-6mm) as the membrane — the plywood has its own stiffness, which means it vibrates as a plate with complex modal patterns across its surface. This creates multiple resonant peaks at harmonically related frequencies, giving somewhat broader absorption than a single-frequency design.

Limp mass traps use materials with no inherent stiffness — mass-loaded vinyl (MLV), rubber sheeting, or heavy fabric. A limp mass membrane vibrates purely based on its weight and the air spring behind it, producing a cleaner single resonant peak at the calculated frequency.

For DIY builds, rigid plywood panels are easier to work with and more forgiving of construction imperfections. Limp mass designs require more careful sealing and edge treatment because the flexible material is harder to attach airtight.

If you’re targeting a single known room mode, a limp mass design gives more precise tuning. If you want broader bass absorption across a range, a rigid plywood panel with internal damping is the more practical choice.

How To Build A Tube (Round) Bass Trap

Tube trap build for low-frequency absorption

Tube bass traps use a cylindrical form — typically cardboard sonotube or PVC pipe — instead of a rectangular box. The circular cross-section creates a naturally rigid enclosure that resists flexing, and the aesthetic is distinctive compared to rectangular panels.

Materials: A 12-inch diameter sonotube (available at concrete supply stores for $15-25 per 4-foot section), a circular disc of 3-6mm plywood for each end cap, and mineral wool insulation for internal damping.

Build process: Cut the sonotube to your desired length (typically 24-48 inches), then cut two plywood circles to fit the tube diameter. Attach one circle permanently as the back cap with adhesive and screws, fill the interior with mineral wool leaving a 1-2 inch gap from the front opening, and attach the front membrane circle using screws and weatherstrip gasket tape.

The resonant frequency follows the same formula as rectangular traps — the tube’s cross-sectional area and depth determine the air volume, while the membrane mass sets the resonance point. Tubes look impressive standing vertically in corners and work well as corner-mounted treatments.

The Bottom Line

A membrane bass trap targets specific bass frequencies that porous absorbers can’t reach at practical depths — build one from MDF, thin plywood, and mineral wool for $30-50 per trap. Use the resonance formula to calculate dimensions for your room’s worst mode, and ensure completely airtight construction for proper function.

For general bass control across a broad frequency range, standard porous bass traps are simpler and more forgiving to build. The 4 Pack Bass Traps for Ceiling Corner handles broadband absorption without any calculation or sealed construction.

For treating multiple corners efficiently, the 8 Pack Bass Traps Acoustic Foam Corner covers all four vertical corners and pairs well with a tuned membrane trap for targeted problem frequencies.

Frequently Asked Questions

What is the best shape for a bass trap?

Rectangular is the easiest shape to build and performs identically to cylindrical or triangular designs acoustically. Shape has minimal impact on absorption performance — thickness (for porous traps) or tuning accuracy (for membrane traps) matters far more.

Can you build a tuned bass trap without calculations?

Building a tuned membrane trap without calculations defeats the purpose — the entire value of a resonant trap is targeting a specific frequency. Without calculating the resonance point, you’re guessing at the dimensions and may end up with a trap tuned to a frequency that doesn’t need treatment in your room.

How does a membrane trap compare to a Helmholtz trap?

Both are resonant absorbers that target specific frequencies, but they work through different mechanisms. A membrane trap uses panel vibration to absorb energy, while a Helmholtz resonator uses air resonating through a port or slot. Helmholtz traps are harder to build accurately because the port dimensions are critical and small errors cause large tuning shifts.

DIY Cheap Bass Trap — Budget Builds That Actually Absorb Low Frequencies

A diy cheap bass trap built from hardware store mineral wool costs under $15 per corner and absorbs more bass than commercial foam traps selling for $50-80 each, but most budget build guides skip the critical details about material density and thickness that determine whether your cheap trap actually works or just decorates the corner.

The cheapest effective bass trap material is Rockwool Safe’n’Sound at roughly $1 per square foot — stack it into corners at 4+ inches thick and you get real bass absorption down to 200 Hz. Household items like blankets and towels can help with mid-frequency reflections, but they lack the density and rigidity to absorb low-frequency sound waves.

Building budget bass traps doesn’t require woodworking skills or expensive tools. The simplest effective design is stacking insulation batts directly into the corner with no frame at all — the corner walls hold the material in place.

Below, you’ll find the cheapest materials that actually work for bass absorption, a step-by-step budget corner trap build, how DIY compares to commercial options, and ways to make your budget traps look presentable.

Quick Takeaway

The cheapest effective bass trap is Rockwool Safe’n’Sound stacked directly into corners — no frame needed, under $15 per corner. For a finished look, wrap the insulation in cheap muslin fabric ($3-5/yard) stapled to a simple 1×3 lumber frame. Avoid relying on blankets, towels, or thin foam as primary bass treatment — they absorb mid/high frequencies but barely touch the bass range below 200 Hz.

Can You Build Effective Bass Traps On A Budget?

Budget bass trap effectiveness compared with cost

You can build bass traps that perform as well as $150+ commercial panels for under $30 each — the acoustic performance comes from the insulation material, not the brand, frame, or fabric. A $15 bag of Rockwool Safe’n’Sound absorbs just as effectively as the mineral wool core inside a $180 GIK Acoustics panel.

The key is choosing the right material at the right thickness — a cheap trap that’s too thin or uses the wrong material won’t absorb bass no matter how carefully you build it. A cheap trap with proper 4-inch mineral wool in the right placement will outperform an expensive foam trap every time.

Budget doesn’t mean cutting corners on the physics — it means cutting costs on the frame, fabric, and finish while keeping the acoustic core at the right specs.

Cheapest Materials That Actually Work

Low-cost materials for DIY bass traps

Not all cheap materials absorb bass. The ones that work share two properties: enough density to create friction with sound waves (3+ PCF) and enough thickness (4+ inches) to interact with bass wavelengths.

Mineral Wool On A Budget

Rockwool Safe’n’Sound ($50-60 per bag of 6 batts) is the budget king for bass traps — each batt is 15.25×47 inches at 3 inches thick, and doubling them up gives you 6 inches of effective bass absorption. One bag treats two full corners.

Safe’n’Sound is designed as building insulation, not acoustic treatment, but the acoustic properties are nearly identical to products marketed specifically for studios. It’s stocked at Home Depot and Lowe’s, so you can pick it up the same day you decide to build.

Rockwool ComfortBoard 80 costs more (roughly $2 per square foot) but comes as rigid boards that hold their shape without a frame. If you want the simplest possible build — no frame, no stapling — ComfortBoard stacked in a corner is the fastest path to bass absorption.

Household Items As Bass Traps

Thick moving blankets folded and stuffed into corners provide some acoustic benefit, but they primarily absorb mid and high frequencies. A folded moving blanket is roughly 1-2 inches thick equivalent, which doesn’t reach bass frequencies effectively.

Pillows and towels stacked in corners create even less absorption — their density is too low to convert bass-frequency sound energy to heat. They may reduce flutter echo and room brightness, but they won’t address room modes or bass buildup.

The honest assessment: household items are better than nothing for general room acoustics, but they’re not real bass traps. If your room has genuine bass problems (boomy corners, uneven low-frequency response), you need proper insulation material.

How To Build A Cheap Corner Bass Trap

Budget DIY bass trap build steps

The cheapest effective bass trap requires zero woodworking — just stack insulation batts directly into the corner. Total cost: under $15 per corner.

What you need: – 2-3 Rockwool Safe’n’Sound batts (from a $50-60 bag that treats multiple corners) – A utility knife for cutting (optional — batts can be folded or stacked as-is)

Step 1: Take a Safe’n’Sound batt and fold it diagonally, pressing the folded edge into the corner where two walls meet. The batt’s natural rigidity holds it in a triangular shape against the corner.

Step 2: Stack additional folded batts on top until you reach the ceiling or run out of material. Four batts stacked vertically covers roughly 6 feet of corner height.

Step 3: For a superchunk approach, cut batts diagonally with a utility knife to create triangular pieces that nest tightly into the corner. This fills more of the corner volume and improves low-frequency absorption below 100 Hz.

That’s it — no frame, no fabric, no hardware, with the walls holding the insulation in place and gravity keeping the stack compressed. If the stack leans, press a scrap piece of lumber across the front to hold it in position.

For a slightly more finished version, build a simple triangular frame from three pieces of 1×3 lumber and stretch muslin over it. Lean the fabric-covered frame against the corner to hide the insulation behind it.

DIY Bass Traps vs Commercial: Is Cheap Worth It?

DIY bass trap cost compared with commercial bass traps

The cost comparison strongly favors DIY bass traps for anyone willing to spend a few hours building:

Option Cost Per Trap Bass Performance Appearance
DIY (no frame, insulation only) $10-15 Excellent Poor
DIY (framed + muslin wrap) $25-40 Excellent Good
Commercial foam (Auralex, etc.) $50-80 Moderate Good
Commercial fiberglass (GIK, Primacoustic) $120-200+ Excellent Excellent

Commercial foam traps cost 3-5x more than DIY mineral wool traps but absorb less bass because foam is less dense. You’re paying for convenience and appearance, not better acoustic performance.

Rigid Mineral Wool vs Foam Traps

Rigid mineral wool at 4 inches thick absorbs meaningfully down to 200 Hz when corner-mounted, while acoustic foam at the same thickness only reaches roughly 400 Hz — a full octave higher. The foam simply lacks the density to interact with longer bass wavelengths.

Foam traps have one genuine advantage — zero construction required. The 4 Pack Bass Traps for Ceiling Corner installs in minutes with adhesive. If time matters more than performance, foam is a reasonable starting point.

For maximum bang-for-the-buck across multiple corners, the 8 Pack Bass Traps Acoustic Foam Corner provides enough pieces to cover all four vertical corners at a fraction of professional panel costs.

Making Budget Bass Traps Look Good

Affordable ways to make budget bass traps look better

Raw insulation in corners looks terrible, but you can make budget traps presentable without spending much on aesthetics.

Muslin curtain ($5-10 total): Hang a strip of muslin fabric from the ceiling in front of the insulation stack using small cup hooks, and hem the muslin with iron-on tape for a clean edge. The muslin is acoustically transparent, so it doesn’t affect absorption.

Thrift store fabric ($2-5 per panel): Browse thrift stores for large fabric pieces — curtains, bed sheets, or tablecloths in solid colors work well. Stretch the fabric over a simple 1×3 lumber frame and lean or mount it in front of the corner treatment.

Simple wood frame ($8-12 per panel): Build a triangular frame from three pieces of 1×3 lumber, wrap it in muslin, and use it as a cover panel for the insulation behind it. The frame adds a finished, intentional look to what would otherwise be a pile of insulation in a corner.

Painting bass traps is another option once they’re wrapped — use latex paint applied lightly to the fabric surface to match your room’s color scheme without blocking sound transmission.

The Bottom Line

A diy cheap bass trap using Rockwool Safe’n’Sound costs under $15 per corner and absorbs as much bass as commercial panels costing ten times more. Stack insulation directly into corners for the fastest, cheapest build, or add a simple frame and muslin wrap for under $30 per trap with a polished appearance.

Skip household items like blankets and towels as your primary bass treatment — they help with general acoustics but don’t address the low frequencies where room modes cause the worst problems. Invest in proper mineral wool insulation and your bass traps will work as effectively as anything on the market.

Frequently Asked Questions

Can a blanket be a good bass trap?

A thick moving blanket provides some mid-frequency absorption when folded and placed in a corner, but it’s not an effective bass trap. Blankets lack the density and thickness needed to absorb below 300 Hz — they’re better used as supplementary treatment alongside proper mineral wool or fiberglass traps.

What is the cheapest effective bass trap material?

Rockwool Safe’n’Sound at roughly $1 per square foot is the cheapest material that delivers real bass absorption. A single bag ($50-60) contains enough insulation to treat 4+ corners when doubled up to 6 inches thick — making the per-corner cost under $15.

Are cheap foam bass traps worth it?

Cheap foam bass traps absorb mid and high frequencies effectively but perform poorly below 200 Hz — the range where most room mode problems live. They’re worth it as a convenience upgrade over bare walls, but don’t expect them to solve genuine bass problems in your room.

Bass Trap Material — Which Insulation And Fabric Actually Works For Low Frequencies

Bass trap material determines how effectively your traps absorb low frequencies, but most people choose based on brand name or price without understanding that the material’s density, porosity, and thickness interact to set the absorption floor — and some popular materials barely touch bass frequencies at all.

The core absorber material matters most — rigid fiberglass and mineral wool are the two proven performers for bass trapping because their fiber structure and density allow sound energy to convert to heat as it passes through. Open-cell foam works for mid and high frequencies but struggles below 200 Hz at standard thicknesses.

The wrapping fabric matters too — use the wrong material and you’ll reflect sound before it reaches the absorber. Acoustically transparent fabrics like muslin and Guilford of Maine let sound pass through freely, while dense fabrics like silk and canvas act as partial reflectors.

Below, you’ll find a head-to-head comparison of fiberglass vs mineral wool, why foam falls short for bass, which wrapping fabrics work, and whether alternative materials like ductboard and kraft-faced insulation belong in your bass traps.

Quick Takeaway

Rigid fiberglass (Owens Corning 703) and mineral wool (Rockwool Safe’n’Sound or ComfortBoard 80) are the best bass trap materials — both absorb effectively at 4-6 inch thickness when corner-mounted. Mineral wool is cheaper and easier to handle. Foam traps are convenient but limited below 200 Hz. Wrap traps in acoustically transparent fabric like muslin or Guilford of Maine, never in silk, vinyl, or plastic sheeting.

What Materials Are Bass Traps Made Of?

Overview of core materials used in bass traps

Bass traps use porous absorptive materials that convert sound energy into heat through friction as air molecules move through the material’s fiber structure. The three main categories are rigid fiberglass, mineral wool, and open-cell acoustic foam.

Rigid fiberglass (Owens Corning 703, 705) is the industry standard for professional acoustic panels and bass traps. Its glass fiber matrix creates a dense, porous structure that absorbs broadly across the frequency spectrum when thick enough.

Mineral wool (Rockwool Safe’n’Sound, ComfortBoard 80) performs similarly to fiberglass at comparable densities. It’s made from spun volcanic rock fibers and is often cheaper and more widely available at hardware stores.

Open-cell acoustic foam is the most convenient option — it comes pre-shaped in corner wedge profiles and requires no framing or wrapping. The tradeoff is reduced low-frequency performance compared to fiberglass and mineral wool at the same thickness.

The key properties that determine a material’s bass absorption performance are density (measured in PCF — pounds per cubic foot), porosity (how easily air flows through it), and thickness. For bass trapping, you need at least 3-6 PCF density and 4+ inches of thickness to absorb meaningfully below 250 Hz.

Which Is Better for Bass Traps: Rigid Fiberglass or Mineral Wool?

Fiberglass and mineral wool compared for bass traps

Rigid fiberglass and mineral wool are the two dominant materials for DIY bass trap builds, and they perform similarly enough that your choice often comes down to price and availability rather than acoustic performance.

Both materials absorb sound through the same mechanism — air forced through tightly packed fibers creates friction that converts acoustic energy to heat. At matched densities, their absorption coefficients are within 5-10% of each other across the entire frequency range.

Owens Corning 703 vs Rockwool ComfortBoard

Owens Corning 703 is the most commonly referenced bass trap material in studio building guides — it has a density of 3 PCF, comes in standard 2×4 foot panels at 2 or 4 inch thickness, and has well-documented absorption data. A 4-inch 703 panel has an NRC of approximately 1.0, meaning it absorbs virtually all sound at mid and high frequencies.

Rockwool ComfortBoard 80 has a density of 8 PCF — more than double the density of 703. This higher density gives it slightly better absorption per inch at bass frequencies (below 250 Hz), but the difference narrows significantly when both materials are mounted in corners with air gaps.

Rockwool Safe’n’Sound is the budget option at roughly 2.5-3 PCF density — it costs significantly less than either 703 or ComfortBoard and is stocked at most Home Depot and Lowe’s locations. For budget builds, Safe’n’Sound delivers 80-90% of the performance of premium materials at a fraction of the cost.

Which Is Safer To Handle?

Fiberglass produces fine glass fibers that irritate skin, eyes, and lungs during cutting and installation. You need gloves, long sleeves, safety glasses, and an N95 respirator when working with OC 703.

Mineral wool is easier to handle — it produces fewer airborne fibers during cutting and causes less skin irritation. You should still wear an N95 mask when cutting it, but the overall handling experience is more forgiving than fiberglass.

Both materials are safe once installed and wrapped in fabric. The fiber exposure risk is limited to the building phase, and proper PPE eliminates the health concern.

Can Foam Bass Traps Match Fiberglass Performance?

Foam and fiberglass compared for bass trap performance

Acoustic foam is the most popular bass trap material by sales volume because it’s sold as ready-to-install corner pieces that require no construction. The 4 Pack Bass Traps for Ceiling Corner is a typical example — triangular foam wedges designed for corner mounting.

Foam’s limitation for bass trapping is its lower density compared to fiberglass and mineral wool — most acoustic foams are 1-2 PCF, which means they need to be significantly thicker to achieve the same bass absorption. A 4-inch foam trap absorbs roughly as much bass as a 2-inch rigid fiberglass panel.

The advantage of foam is convenience — no frame building, no fabric wrapping, no PPE during installation. For rooms where moderate bass improvement is acceptable and ease of installation is the priority, foam bass traps work as a practical starting point.

For serious bass control — studio mixing rooms, mastering suites, home theaters with dedicated subwoofers — fiberglass or mineral wool at 4-6 inch thickness is the clear choice. The construction effort pays off in dramatically better low-frequency absorption.

What Fabric Should You Wrap Bass Traps In?

Breathable wrapping fabrics for bass traps

The fabric wrapping on a bass trap must be acoustically transparent — meaning it lets sound pass through freely without reflecting or filtering frequencies before they reach the absorber material. A reflective or dense fabric turns your bass trap into a partial mirror.

Muslin is the most common DIY wrapping fabric — it’s cheap (under $5 per yard), widely available at fabric stores, and acoustically transparent. Hold unbleached muslin up to your mouth and blow through it to confirm air passes freely.

Guilford of Maine (GoM) fabrics are the professional standard — specifically engineered for acoustic transparency and available in dozens of colors and textures. GoM fabric costs more ($15-30 per yard) but gives a polished, professional appearance.

Burlap works acoustically but has a rough texture and a distinct visual style. It’s acoustically transparent and cheap, making it popular for rustic or industrial-styled studios.

Speaker grill cloth is another proven option — it’s designed to let sound through and comes in black, which matches most studio aesthetics.

Avoid any fabric you can’t easily blow air through. If it feels thick, stiff, or tightly woven against your lips, it will reflect mid and high frequencies before they reach the absorber.

What Alternative Materials Work for Bass Traps?

Alternative materials for building bass traps

People frequently ask about unconventional materials for bass traps, usually because they’re cheaper or more accessible than standard rigid fiberglass and mineral wool. Some work, some don’t.

Can You Use Ductboard For Bass Traps?

Ductboard is rigid fiberglass with a foil vapor barrier on one side — it’s the same glass fiber material as OC 703, just with a reflective face. Remove the foil facing and the underlying fiberglass works well for bass traps.

The foil face must come off because it reflects sound instead of letting it pass into the fiberglass — peel or scrape it away, then treat the board like standard rigid fiberglass. Ductboard is often available at HVAC supply stores at lower prices than dedicated acoustic boards.

Kraft Paper vs Plastic Vapor Barrier

Kraft-faced insulation (the brown paper backing on common fiberglass batts) partially reflects sound at mid and high frequencies. For bass trapping, this reflection isn’t necessarily a problem — bass wavelengths are long enough to pass through kraft paper with minimal reflection.

Plastic vapor barriers (poly sheeting) reflect more sound than kraft paper and should be removed. If your insulation batts come with a plastic face, peel it off before using the material in bass traps.

For DIY installations, unfaced insulation batts are the simplest option — no peeling, no waste, and you know the sound reaches the absorber without any barrier.

The Bottom Line

Rigid fiberglass and mineral wool are the proven performers for bass trap builds — choose based on price and availability rather than acoustic differences, since both absorb comparably at matched densities. Rockwool Safe’n’Sound offers the best value for budget-conscious builders.

Foam traps like the 8 Pack Bass Traps Acoustic Foam Corner work for moderate bass improvement with zero construction effort. Wrap DIY traps in muslin or Guilford of Maine fabric, and avoid dense or reflective wrappings.

For a premium material alternative, the 2 Pack Wooden Acoustic Bass Traps offer solid wooden construction with built-in fabric facing for a polished look.

Frequently Asked Questions

Can muslin be used for bass traps?

Muslin is one of the best wrapping fabrics for bass traps — it’s acoustically transparent, inexpensive, and available at any fabric store. Use medium-weight unbleached muslin and staple or glue it to the back of your trap frame for a clean finish.

Can you use silk for bass trap wrapping?

Silk is not ideal for bass trap wrapping because its tight weave reflects mid and high frequencies before they reach the absorber material. The bass frequencies will still pass through (their wavelengths are too long to be affected by the fabric), but you’ll lose absorption above 1 kHz where the silk acts as a partial reflector.

Are bass traps necessary for voice over?

Bass traps are necessary for voice over booths because small enclosed spaces accumulate bass energy rapidly — the smaller the booth, the worse the bass buildup. A voice booth without bass traps produces a boxy, boomy sound on recordings that’s difficult to fix with EQ in post-production.