What Materials Diffuse Sound? (Why Rigidity Matters More Than You Think)

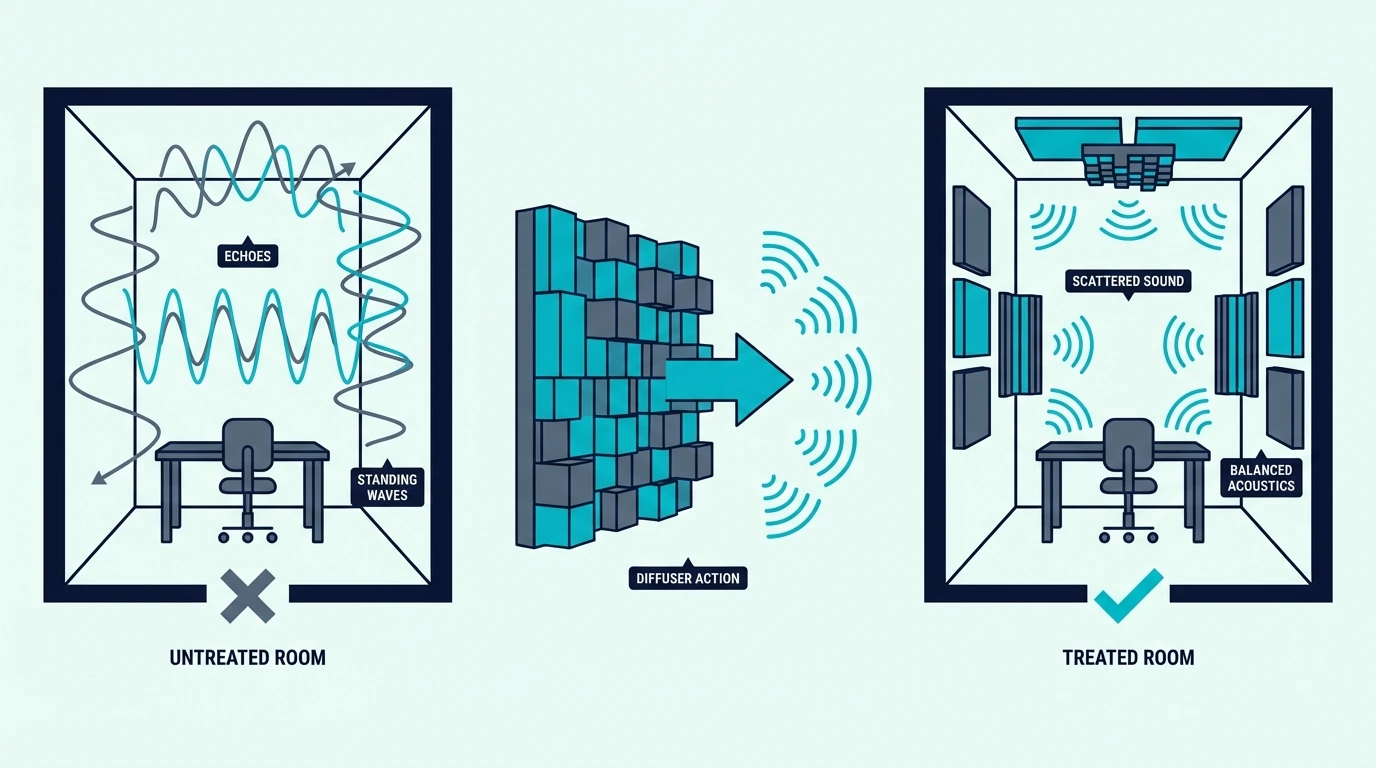
What materials diffuse sound depends on one property above all others — rigidity, but most people confuse diffusion materials with absorption materials and end up buying soft, porous panels that do the opposite of what they need.

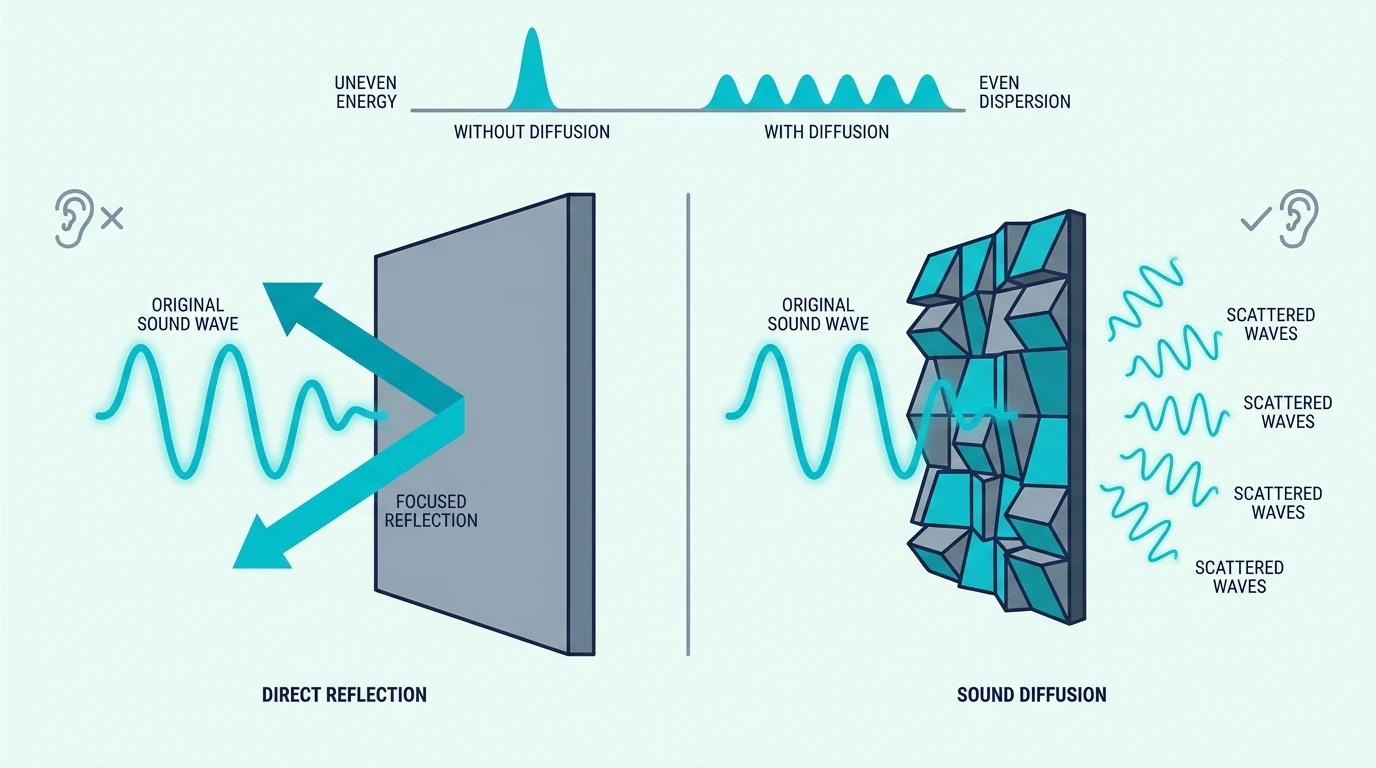
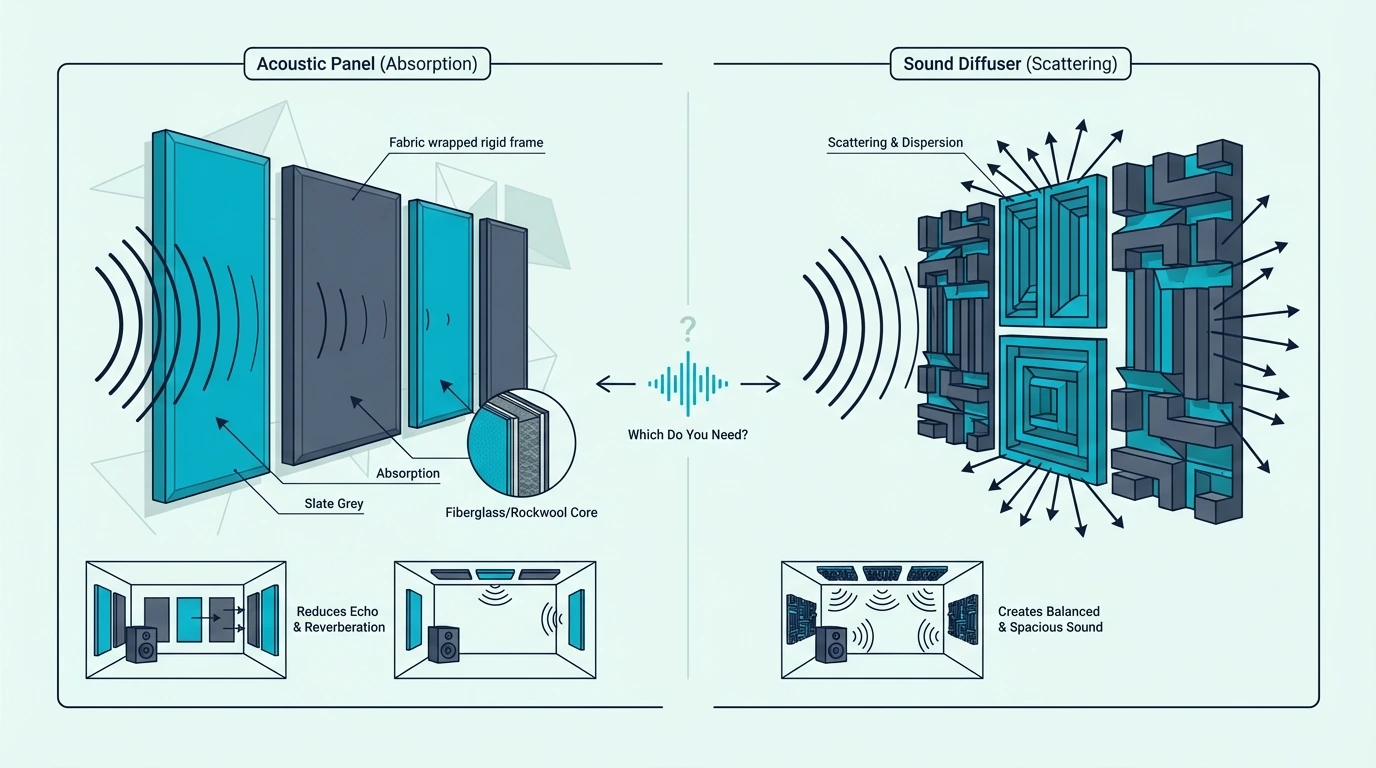
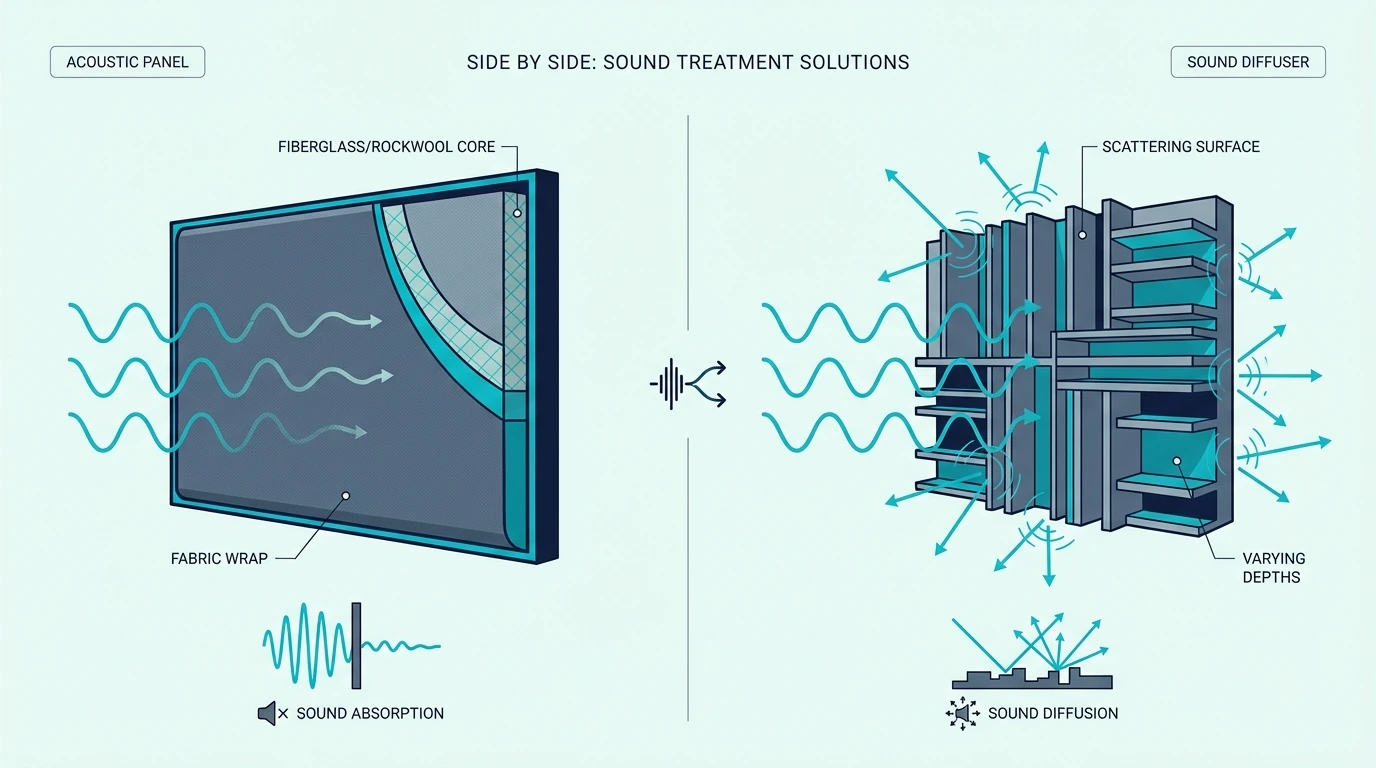
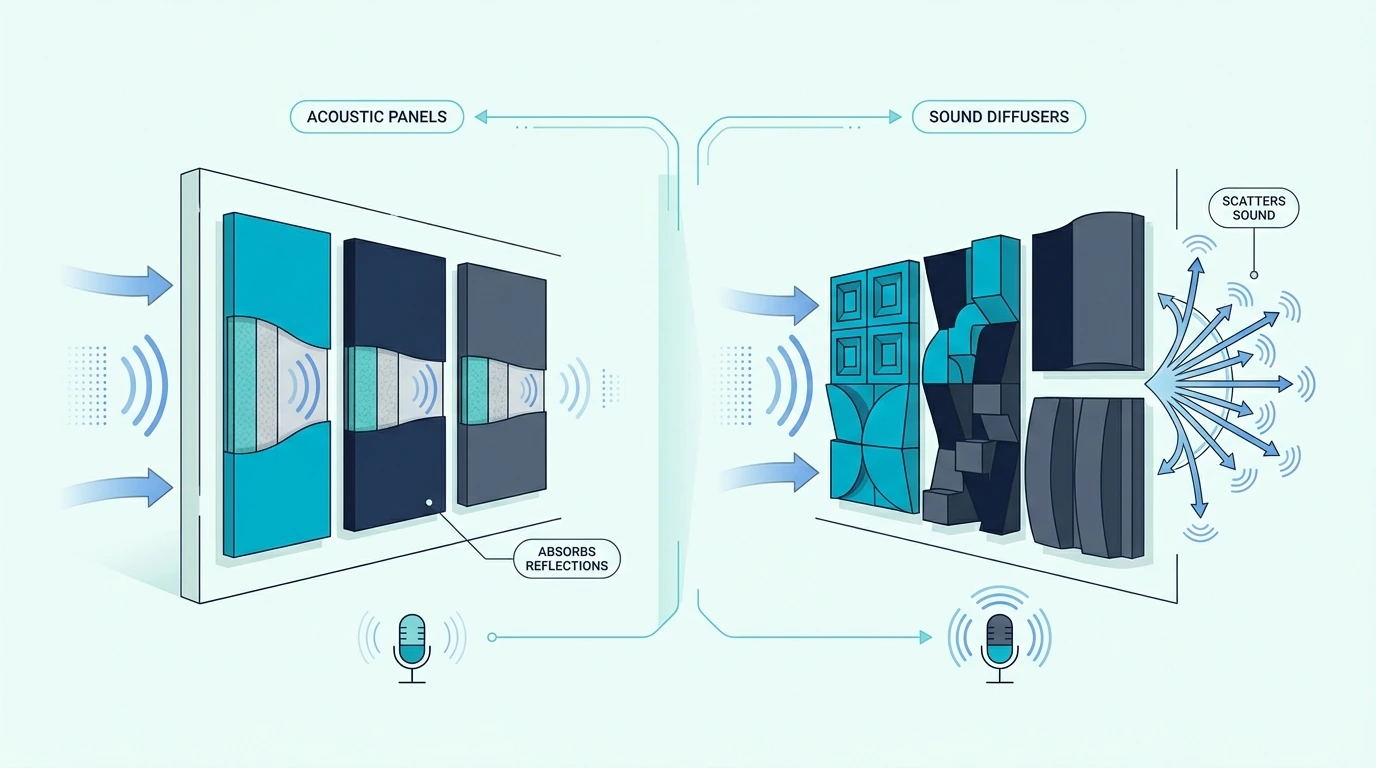
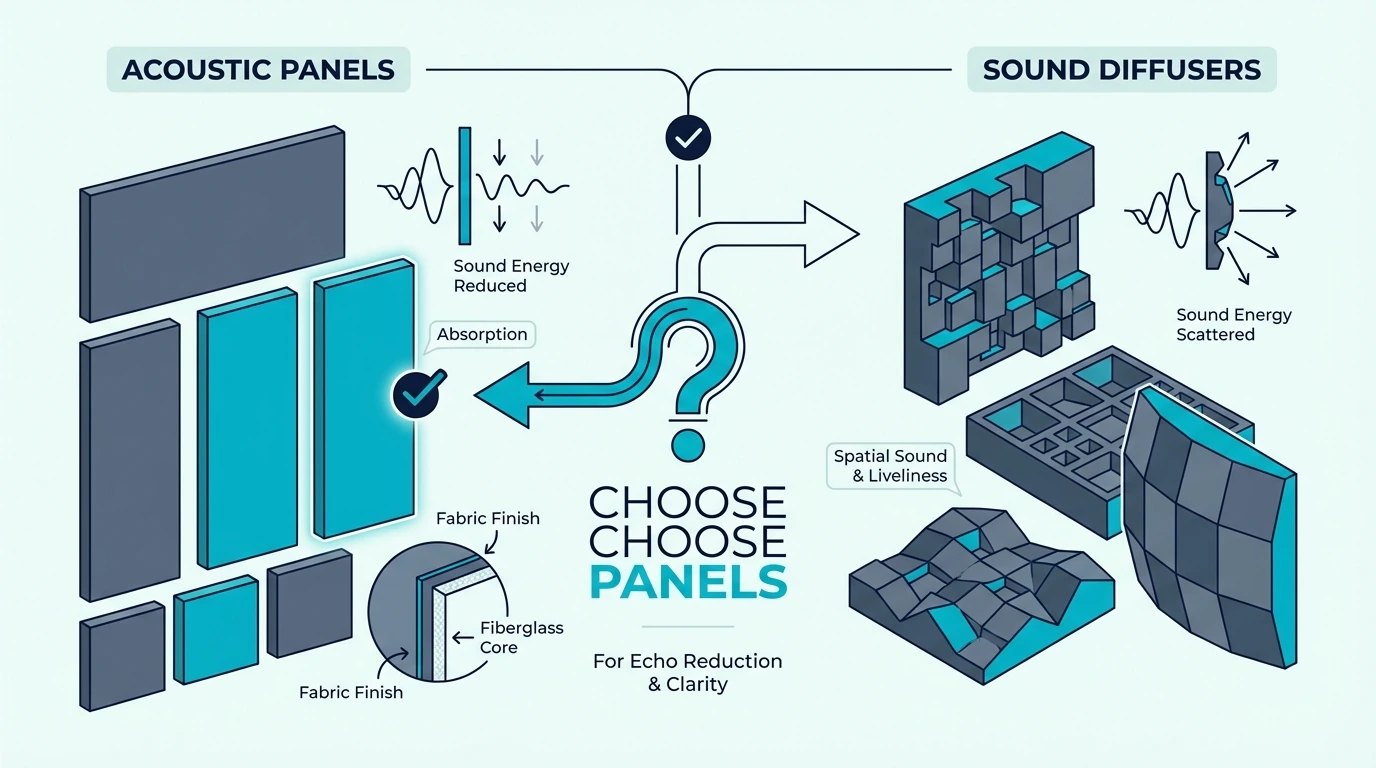
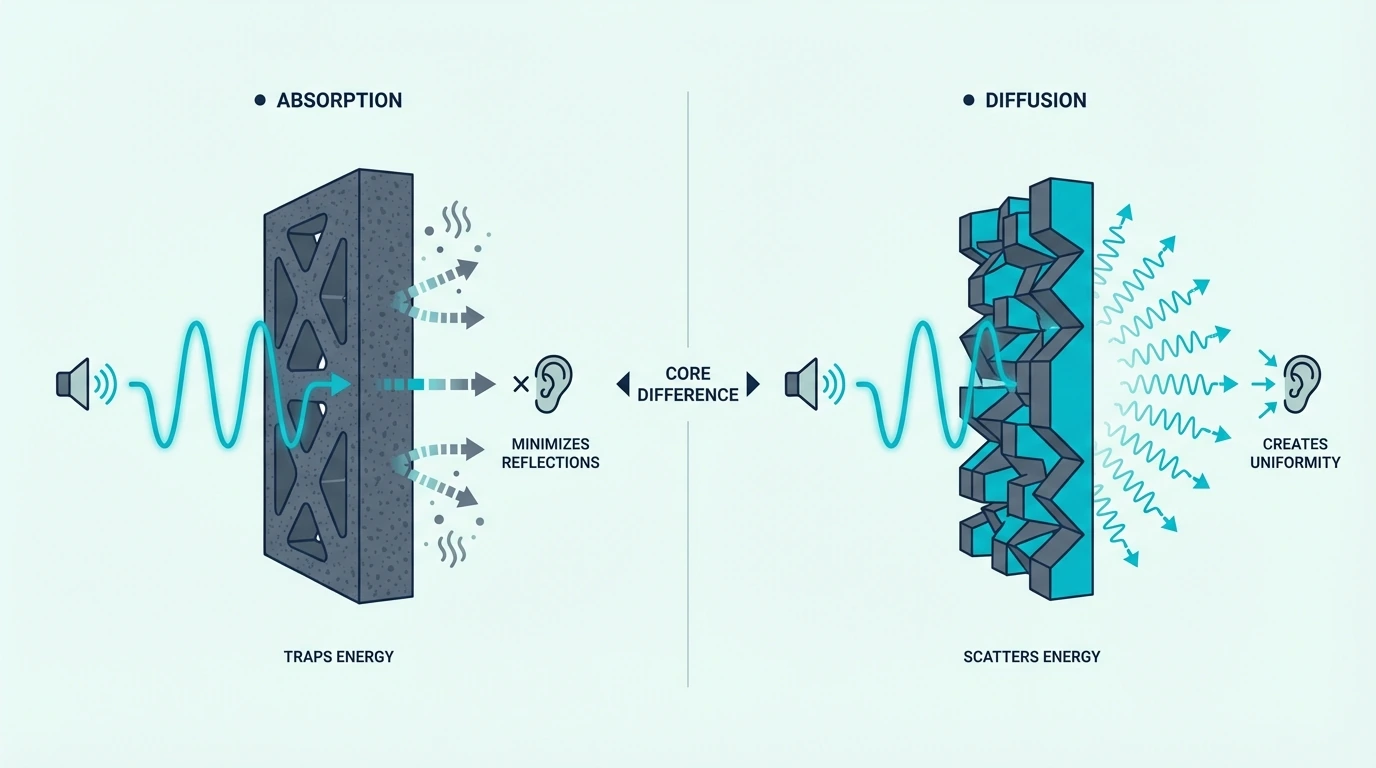
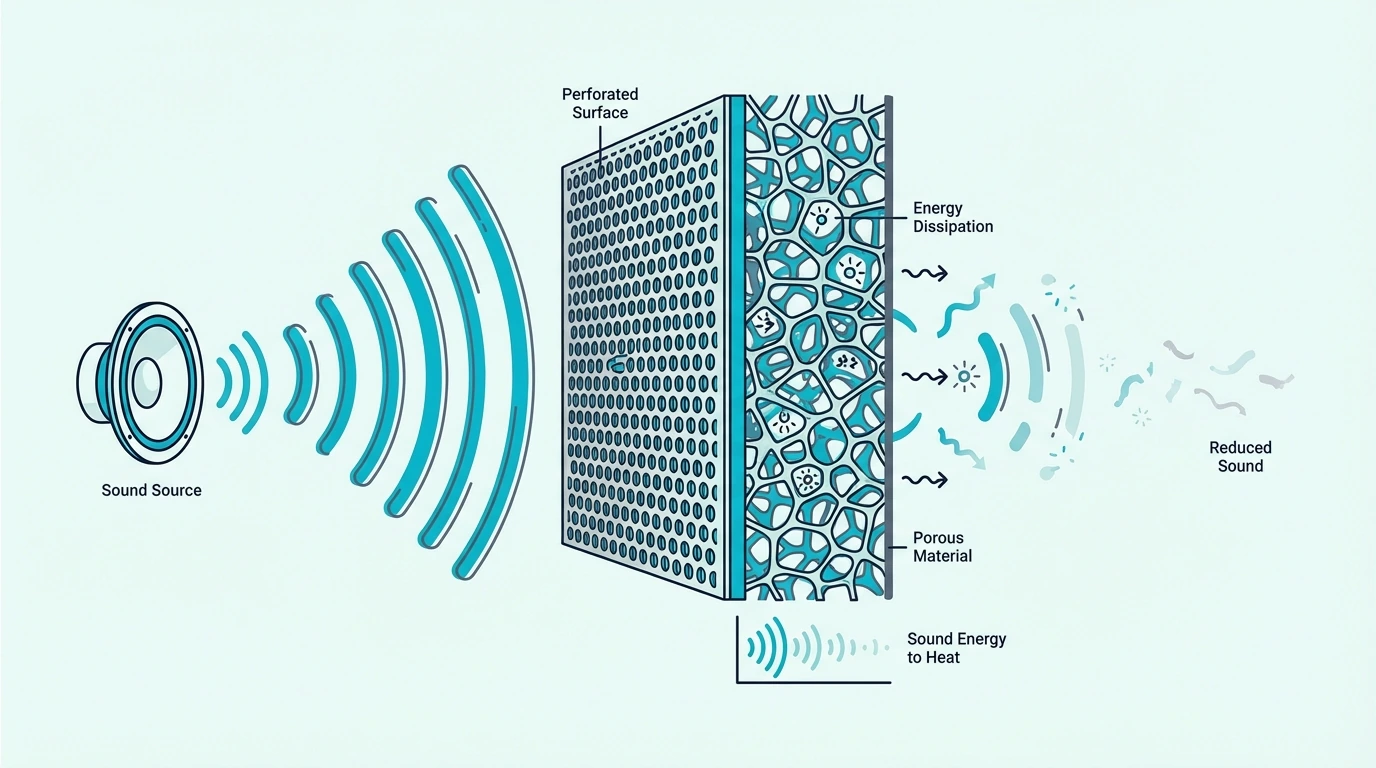
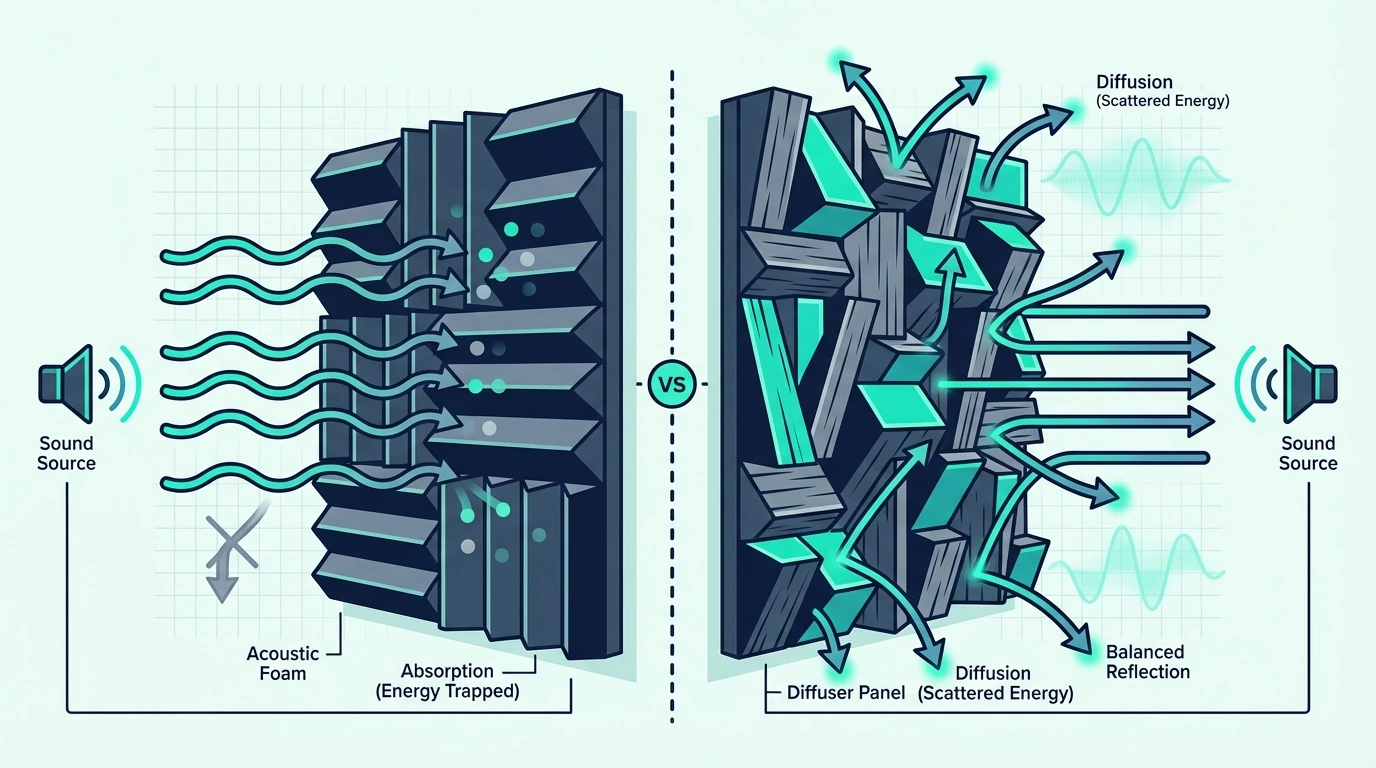
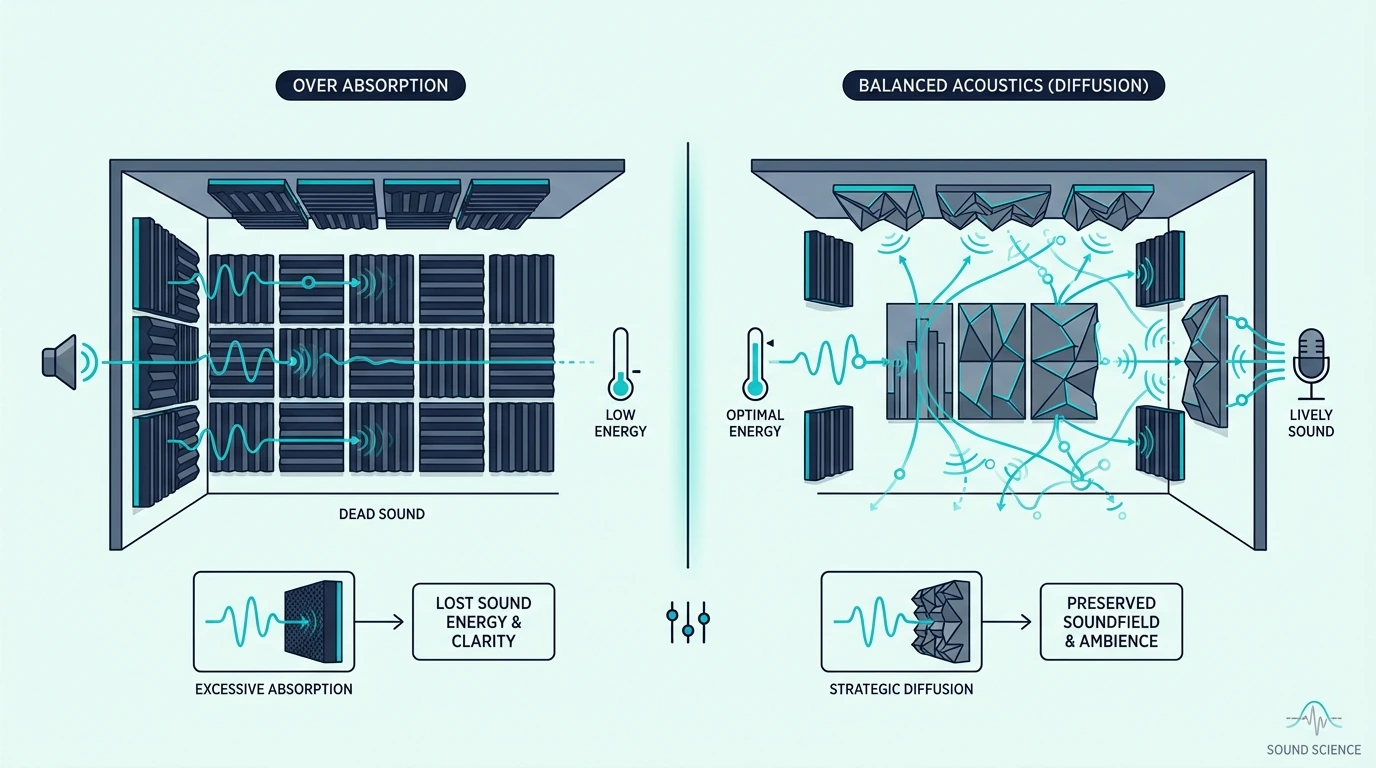
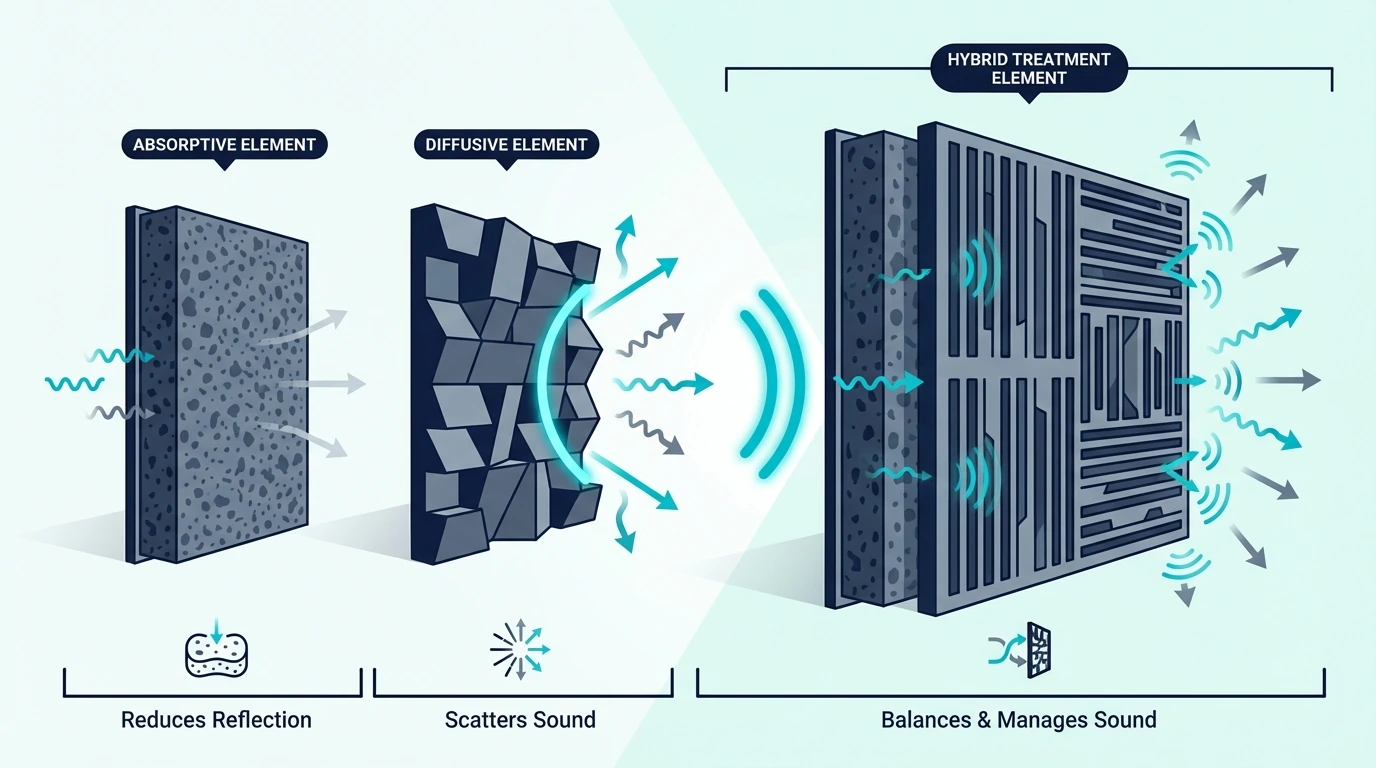
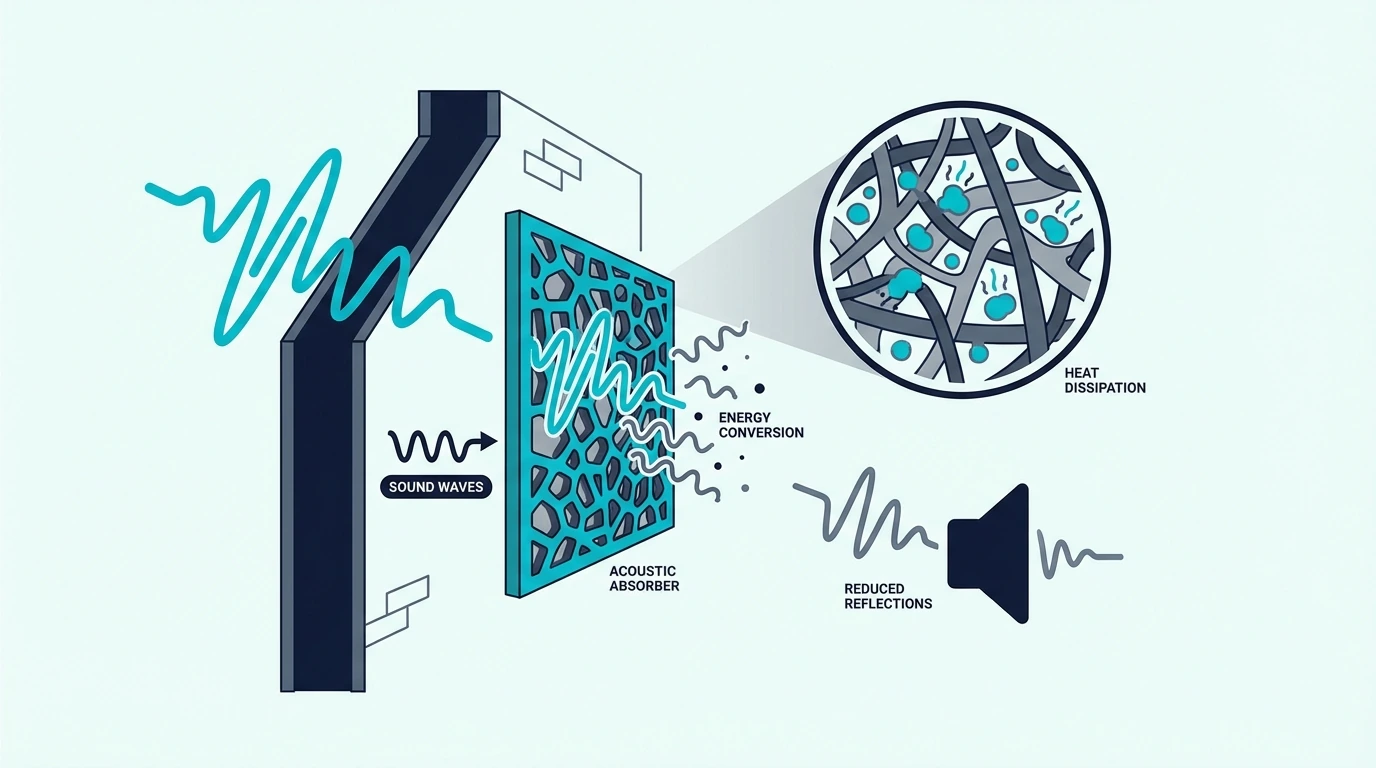
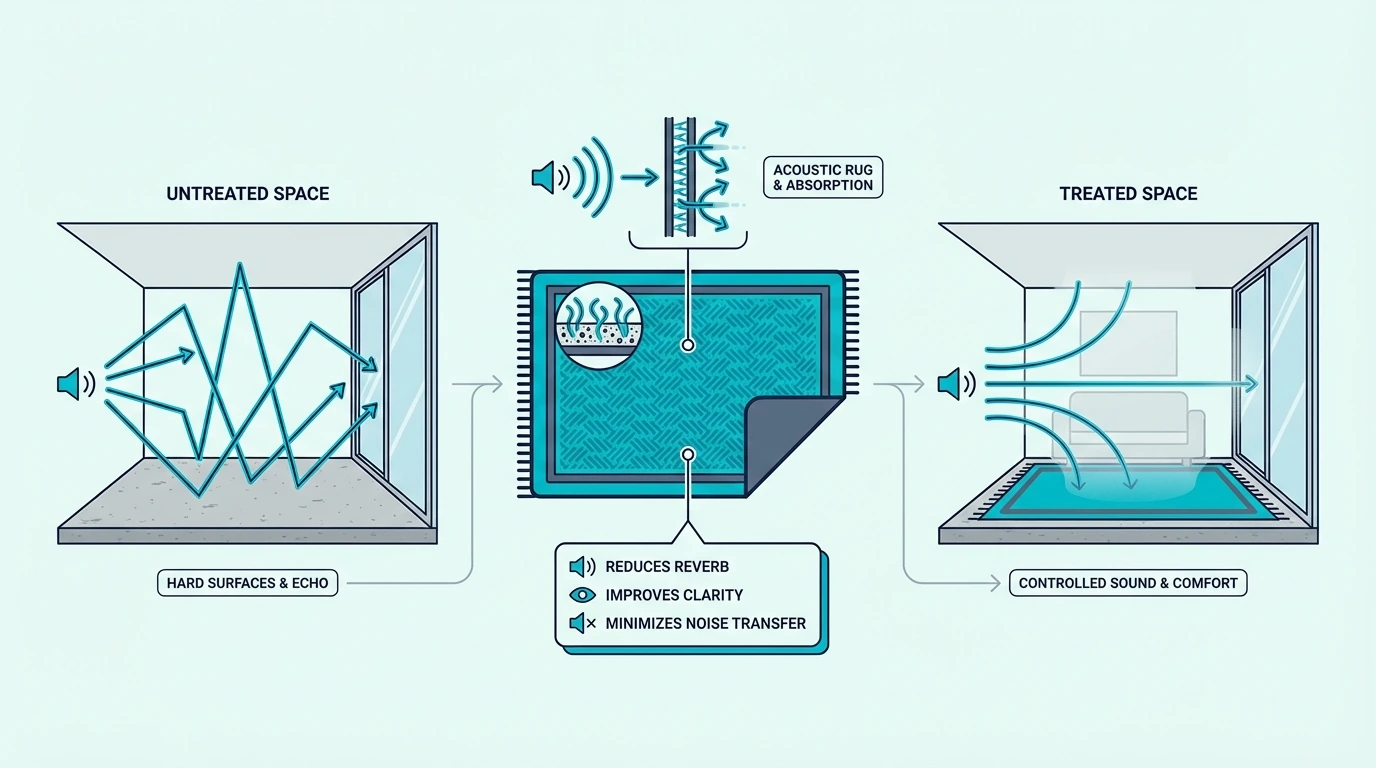
The problem is that absorption and diffusion require completely different material physics. Porous materials like fiberglass and foam absorb sound energy, while diffusion needs a hard, reflective surface shaped with varying depths to scatter sound waves across the room.

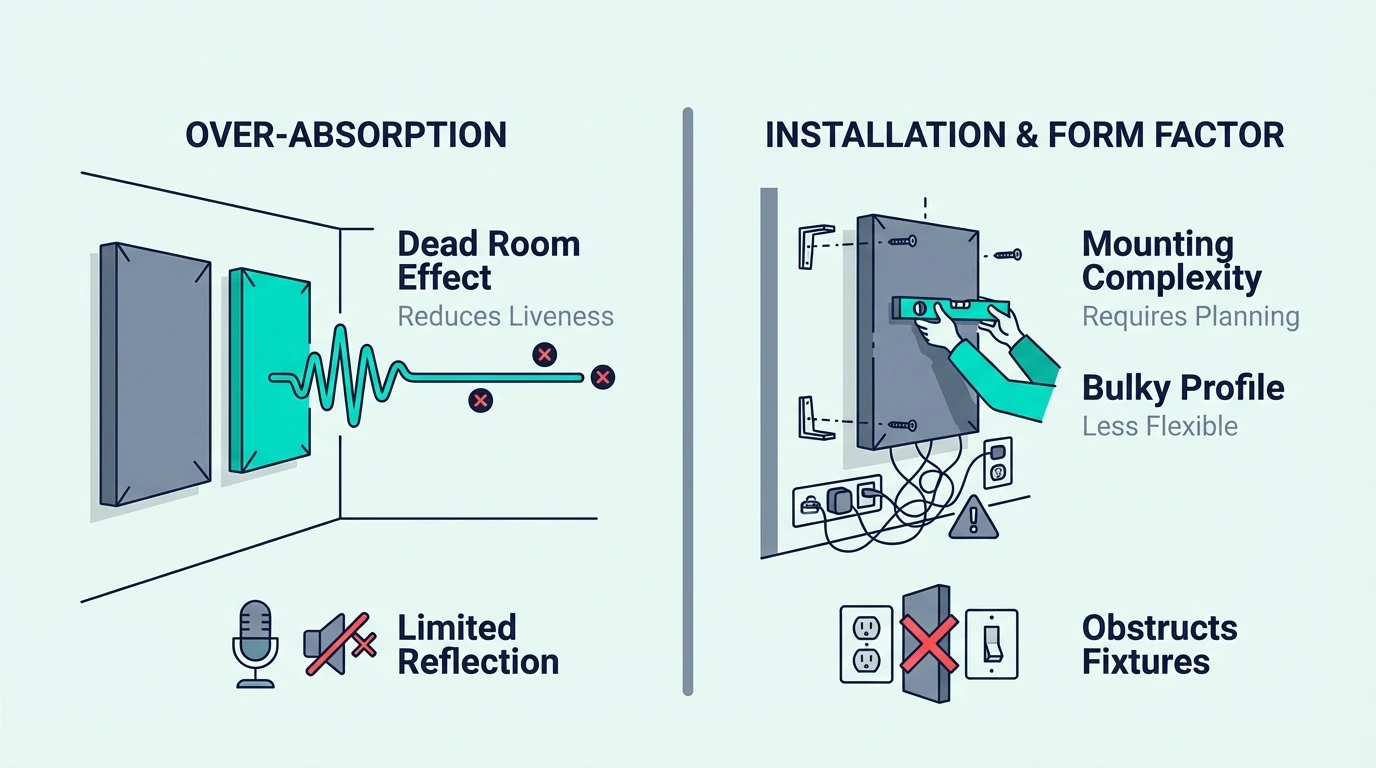
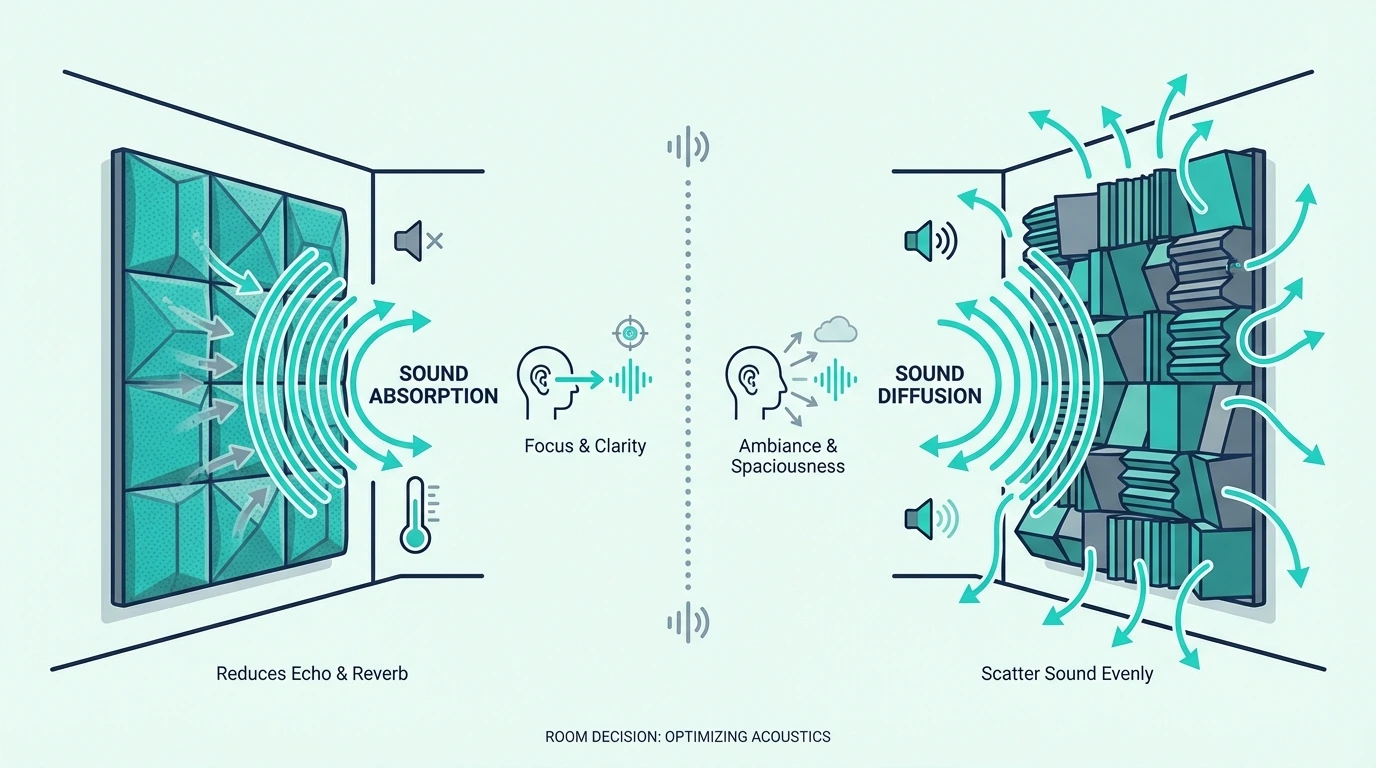
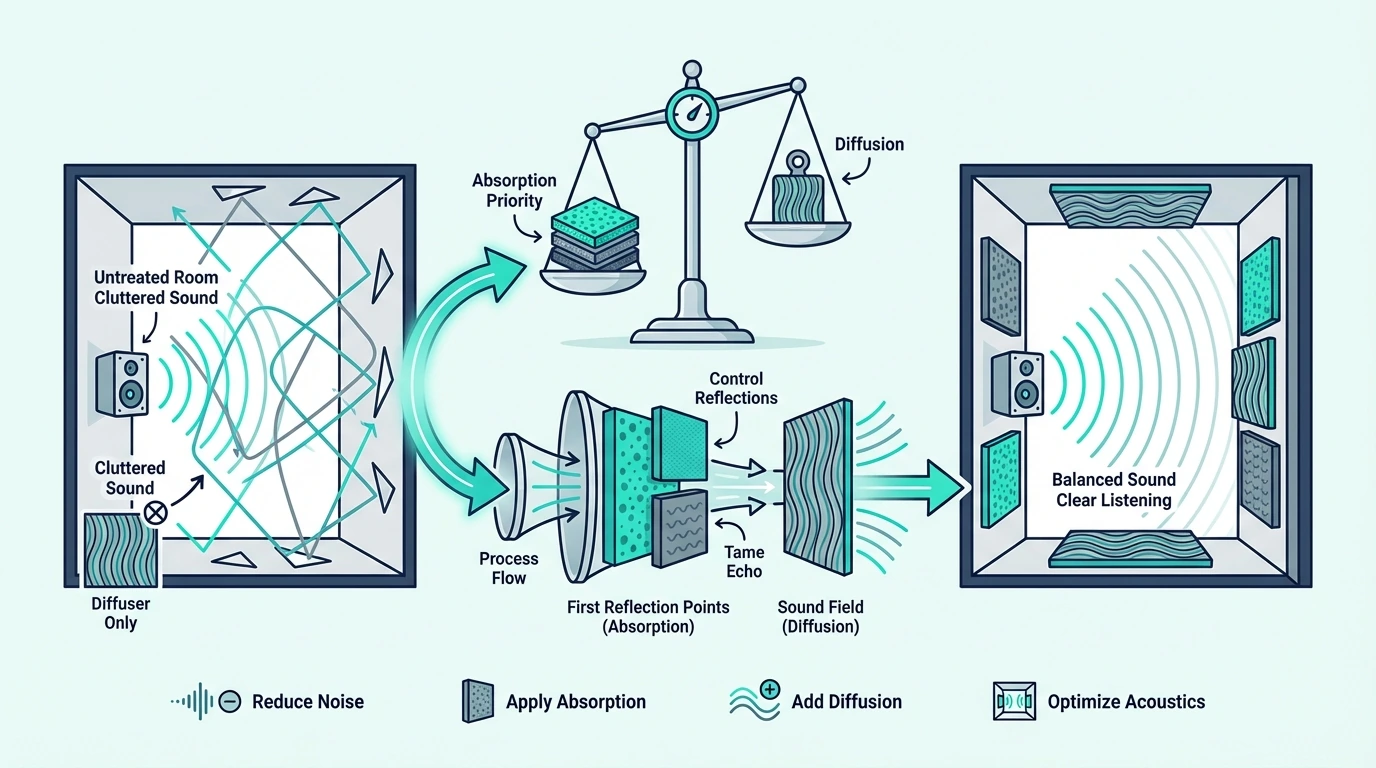
Choosing the right material means your diffuser actually redirects reflections evenly instead of deadening the room — so you get controlled liveliness rather than harsh echoes or lifeless silence.

Below, you’ll see which materials work for each diffuser type, from professional hardwoods to budget-friendly alternatives.

Quick Takeaway

Sound diffusion requires hard, rigid materials that reflect sound waves rather than absorb them. Hardwoods (oak, maple) are the professional standard for QRD and skyline diffusers. Baltic birch plywood is the best budget option for DIY builds. Plastic and EVA foam work for lightweight, high-frequency diffusers but lack the mass for full-range scatter.

What Materials Diffuse Sound — And Why Does Material Choice Matter?

Choosing materials for sound diffusion

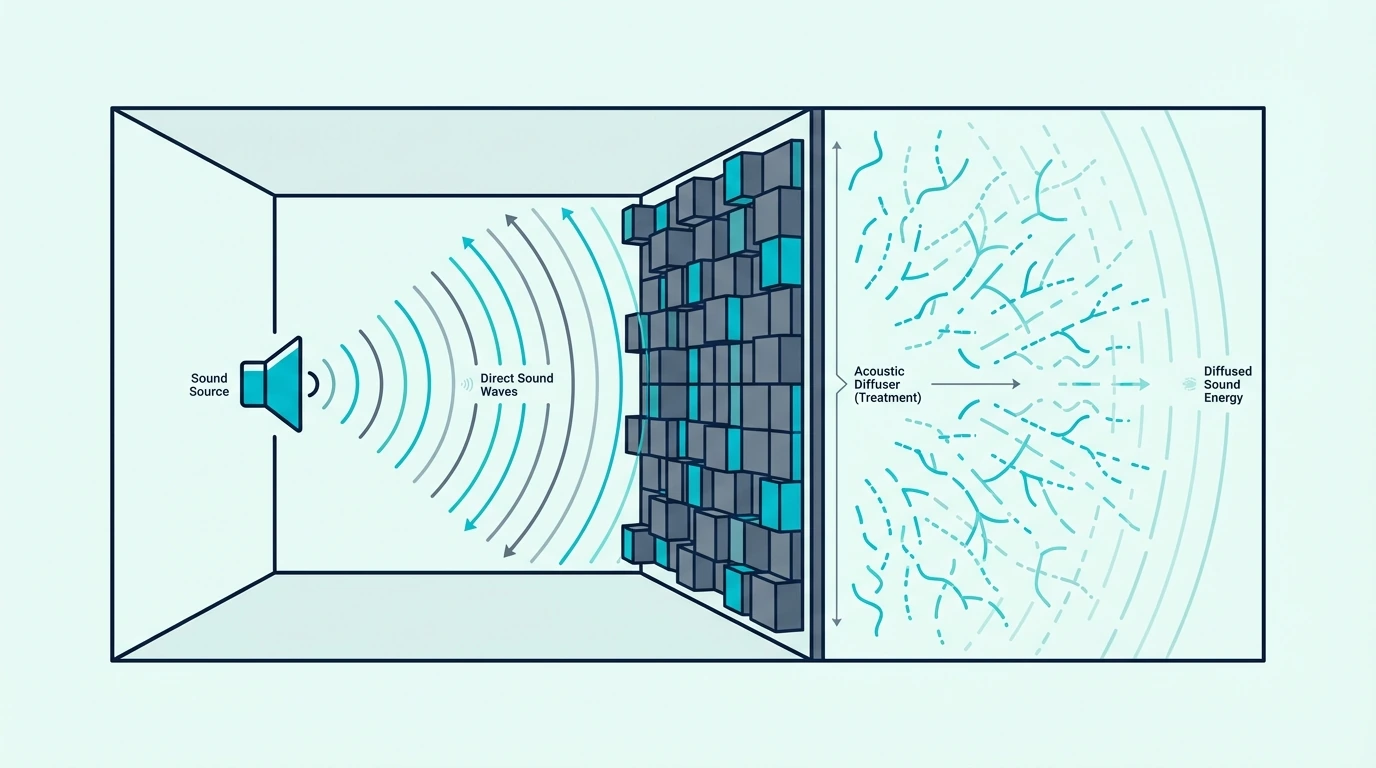
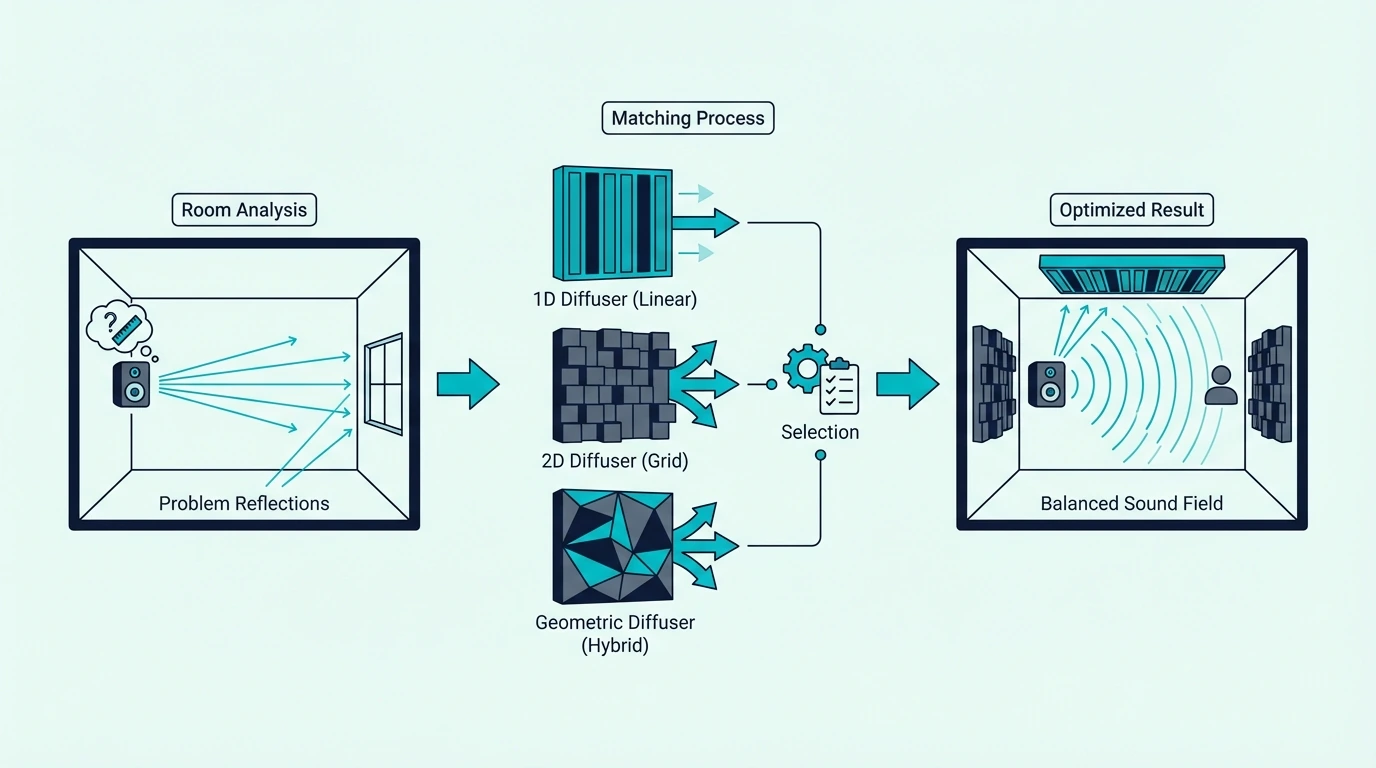
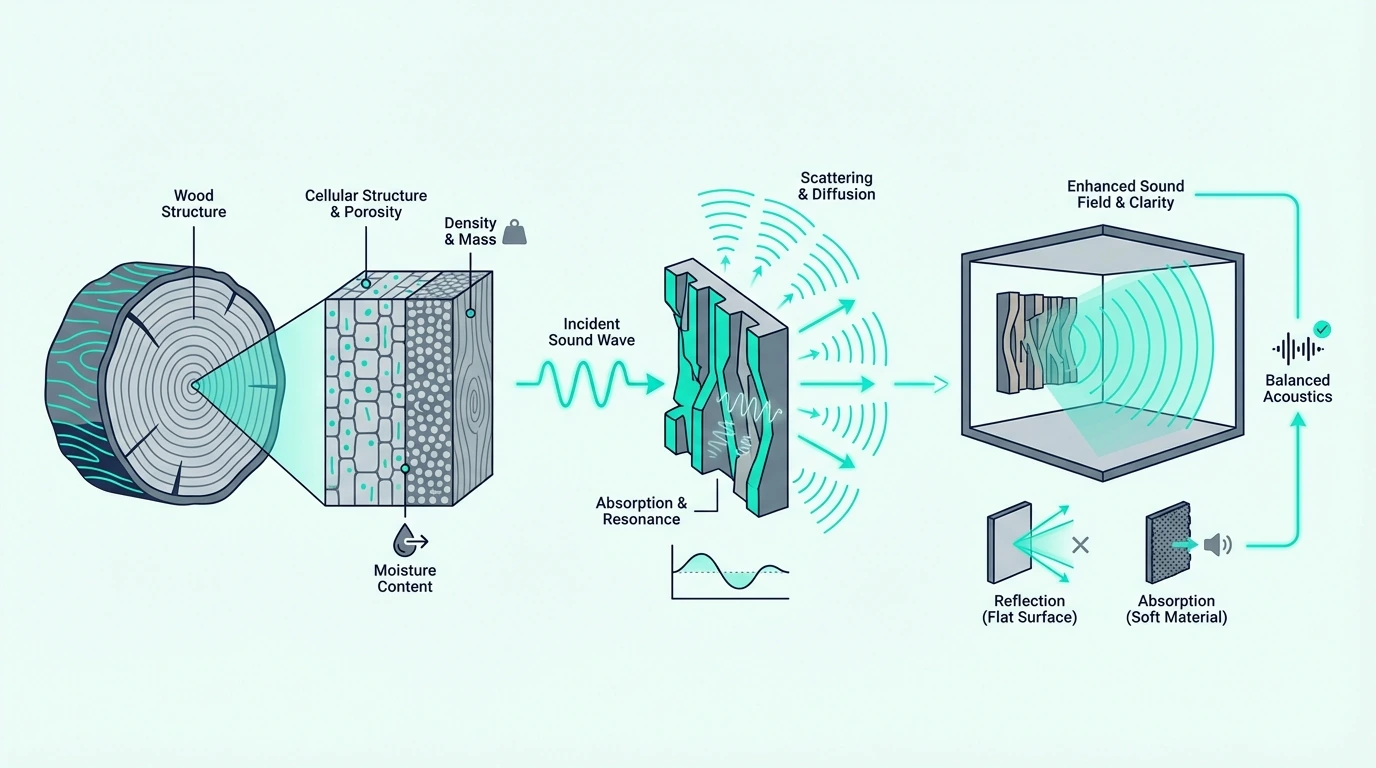
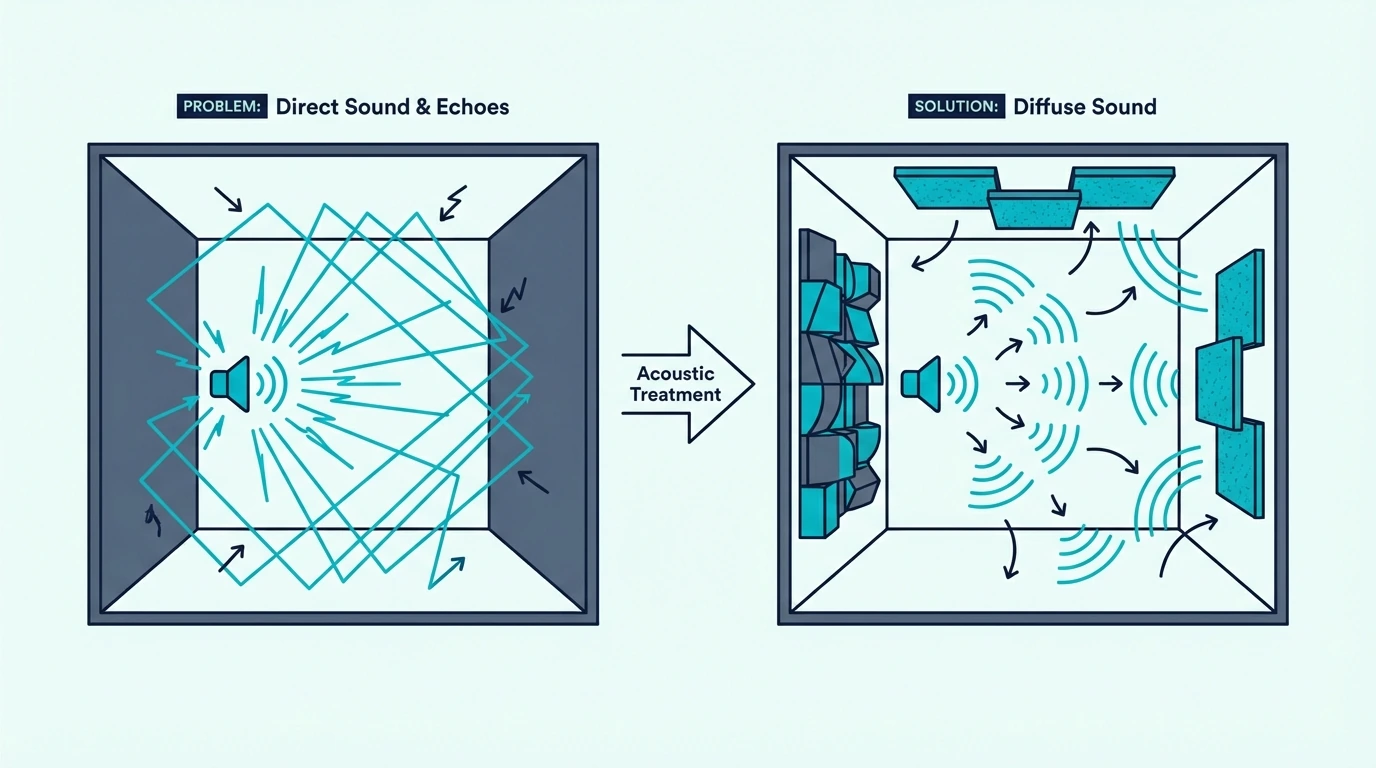
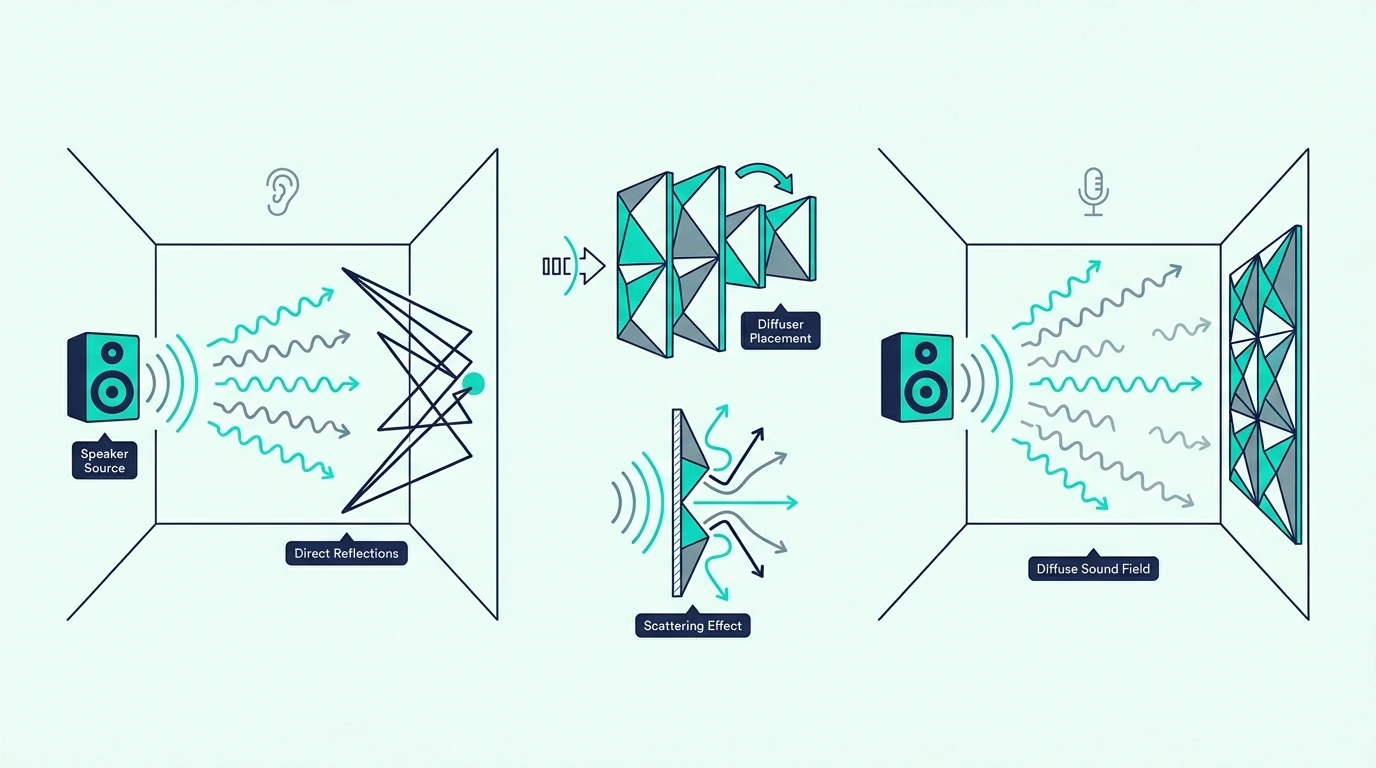
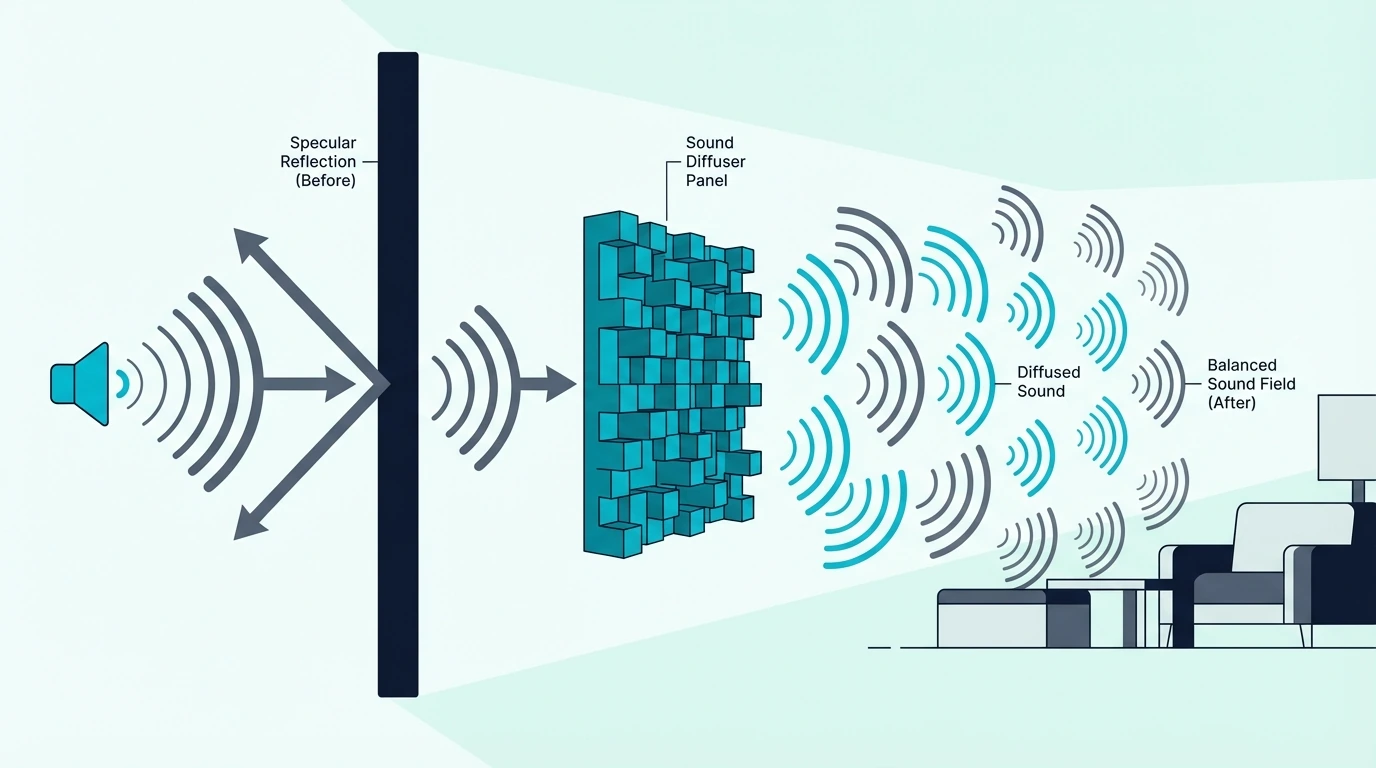
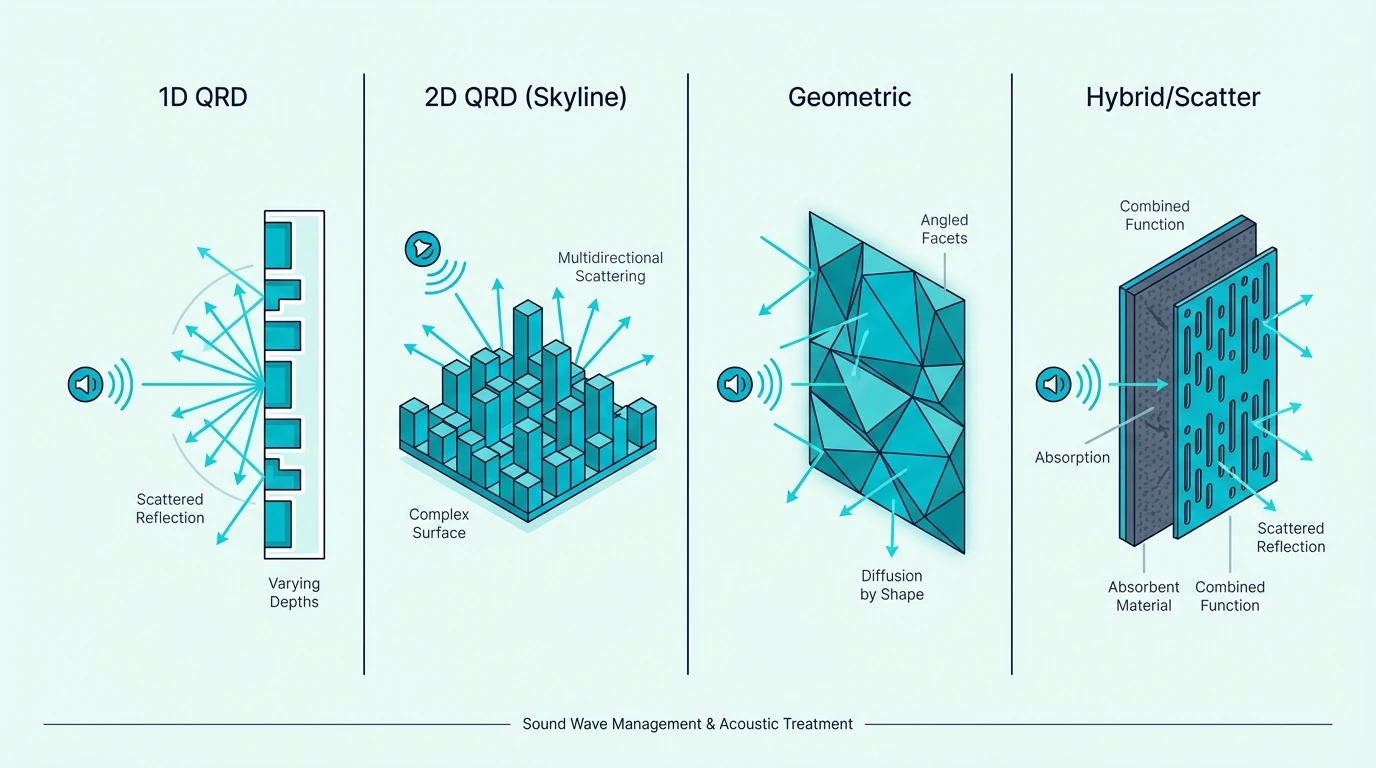
A diffuser works by bouncing sound waves off a rigid surface with varying depths — wells, blocks, or slats arranged in a mathematical sequence. The material’s job is to reflect energy cleanly without absorbing it or flexing under pressure.

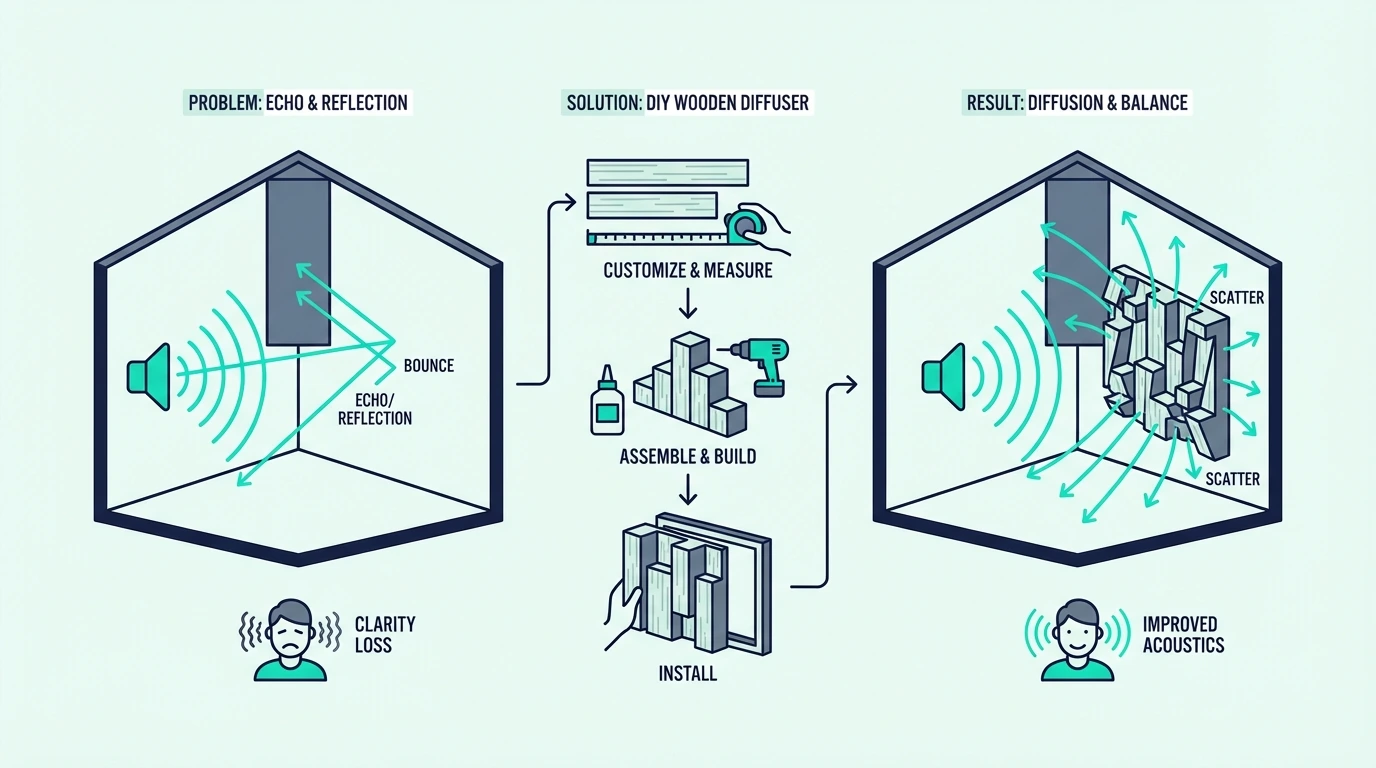
If the material is too soft, it absorbs sound energy instead of redirecting it. If it flexes at certain frequencies, the panel resonates and creates coloration — adding its own unwanted tonal character to the scattered reflections.

This is the opposite of what absorption materials do. For how absorption and diffusion differ at the physics level, that guide covers why you need rigid materials for one and porous materials for the other.

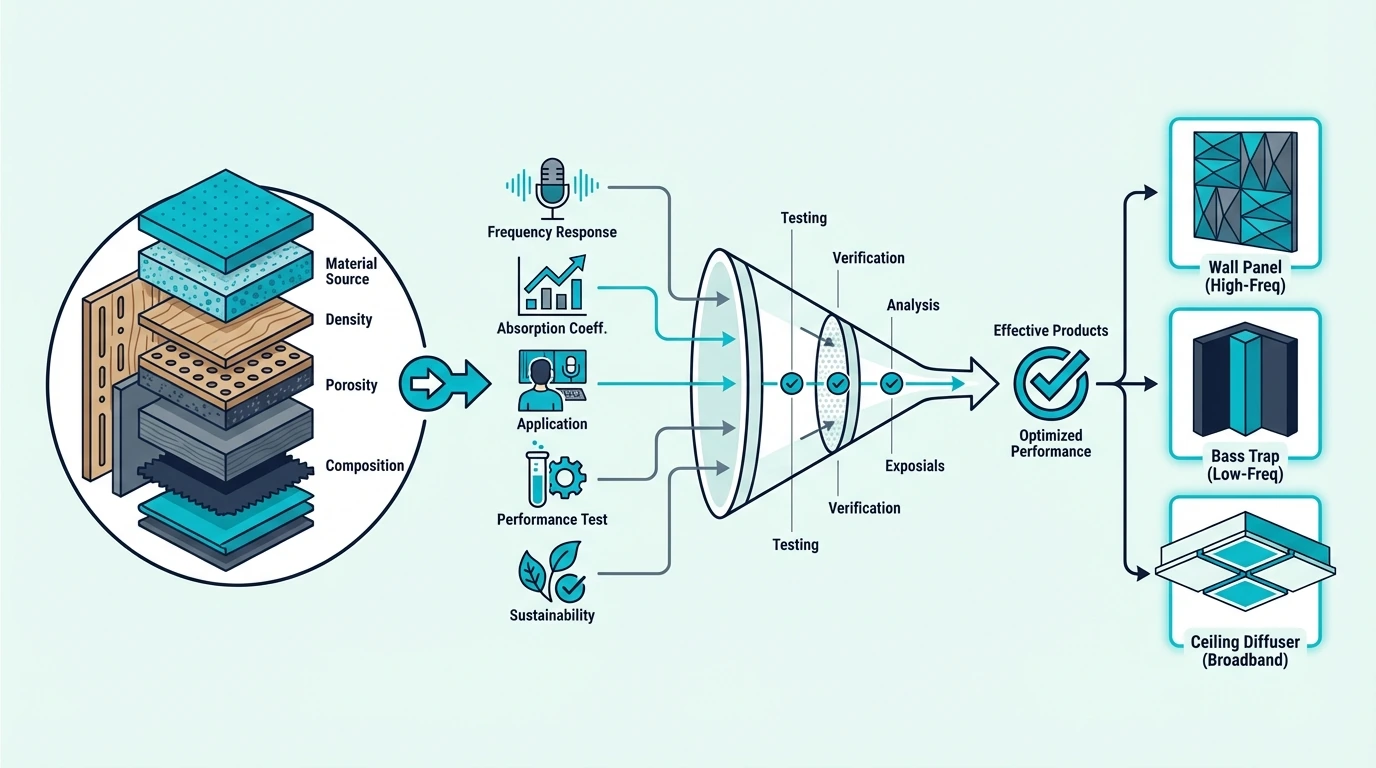
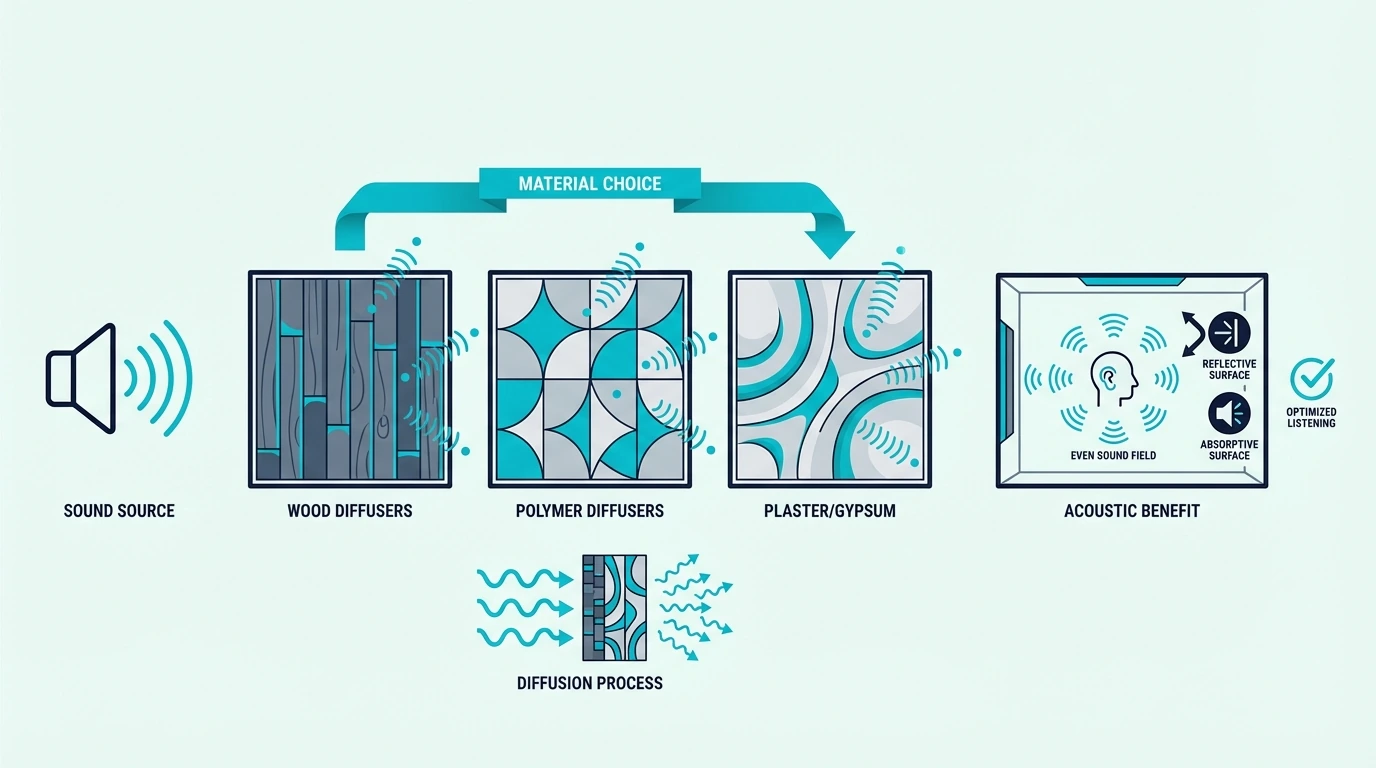
The ideal diffusion material is dense, rigid, non-resonant, and machinable into precise shapes. Wood dominates because it checks every box — but it’s not the only option.

Which Woods Are Used For Sound Diffusers?

Wood types used for sound diffusers

Hardwoods For Professional Diffusers

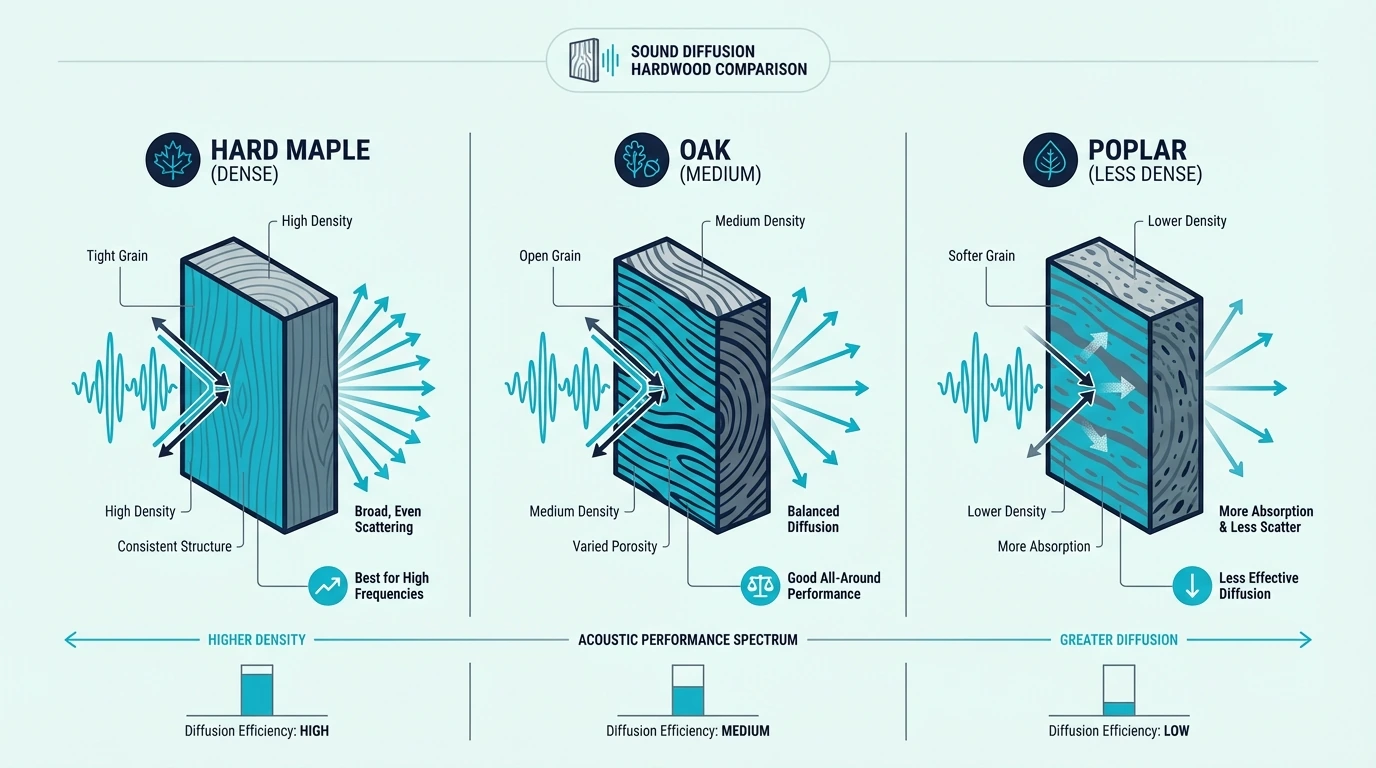
Oak, maple, and walnut are the materials most professional diffuser manufacturers use. Their density (typically 40-50 lbs per cubic foot) ensures clean, predictable reflections without resonance or flex.

Density matters because a low-mass surface vibrates when hit by sound waves — converting acoustic energy into mechanical vibration instead of reflecting it cleanly. Dense hardwoods resist that vibration, which is why they produce tighter, more controlled scatter patterns than softwoods like pine or cedar.

Hard maple is the gold standard — its tight grain structure and high density produce the most neutral reflections. White oak is a close second with the added benefit of moisture resistance.

Walnut offers a warmer aesthetic with similar acoustic performance. For a detailed comparison of which wood species perform best in diffuser construction, that guide ranks options by density, workability, and cost.

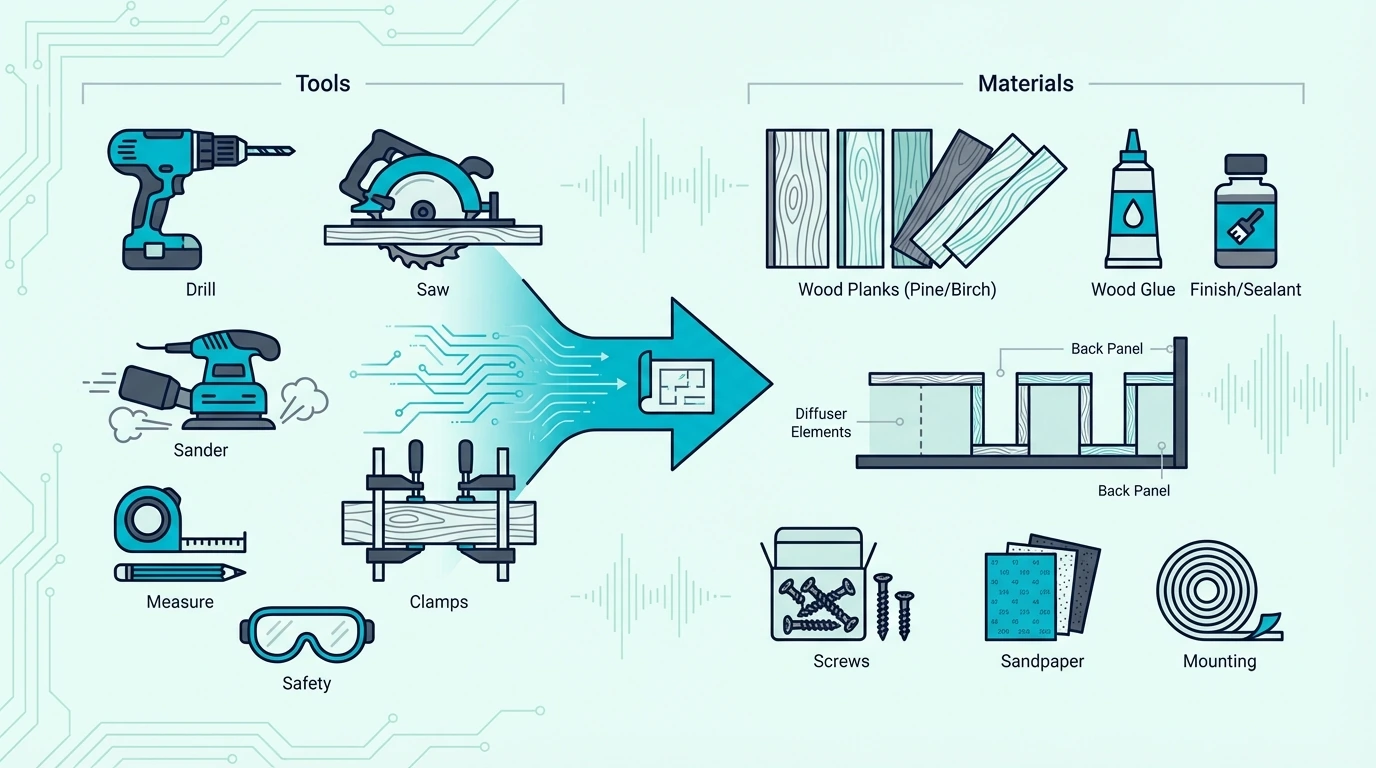
Plywood And MDF For Budget Builds

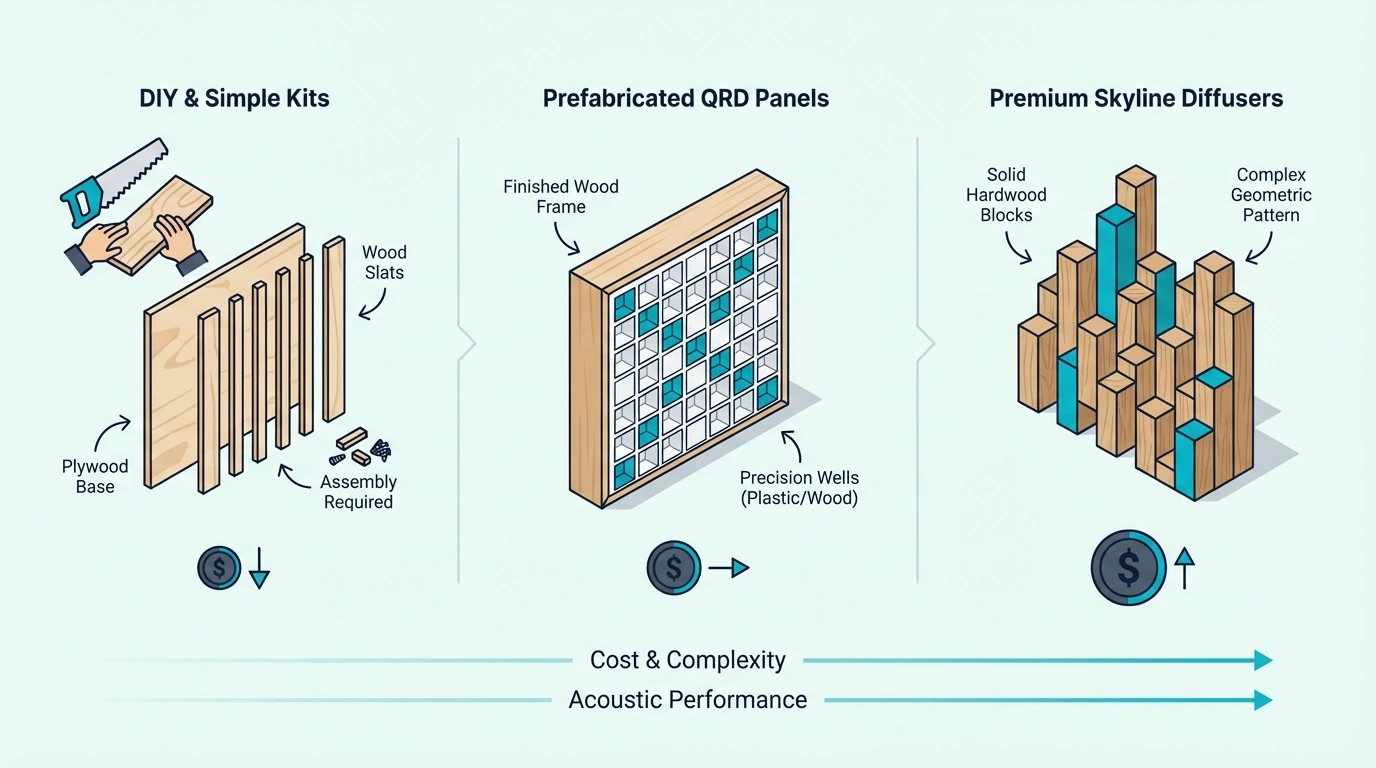
Baltic birch plywood is the DIY diffuser builder’s best friend. Its cross-laminated layers resist warping, and the consistent density produces clean reflections across the panel surface.

A 3/4-inch Baltic birch sheet costs $40-60 at most lumber yards — enough material for two 24×24-inch QRD panels. That’s a fraction of what pre-built wood diffusers cost for equivalent coverage.

MDF (medium-density fiberboard) is cheaper per sheet but heavier and extremely moisture-sensitive. A single exposure to humidity can swell MDF enough to change the well depths — which shifts the scatter pattern off its calculated frequencies.

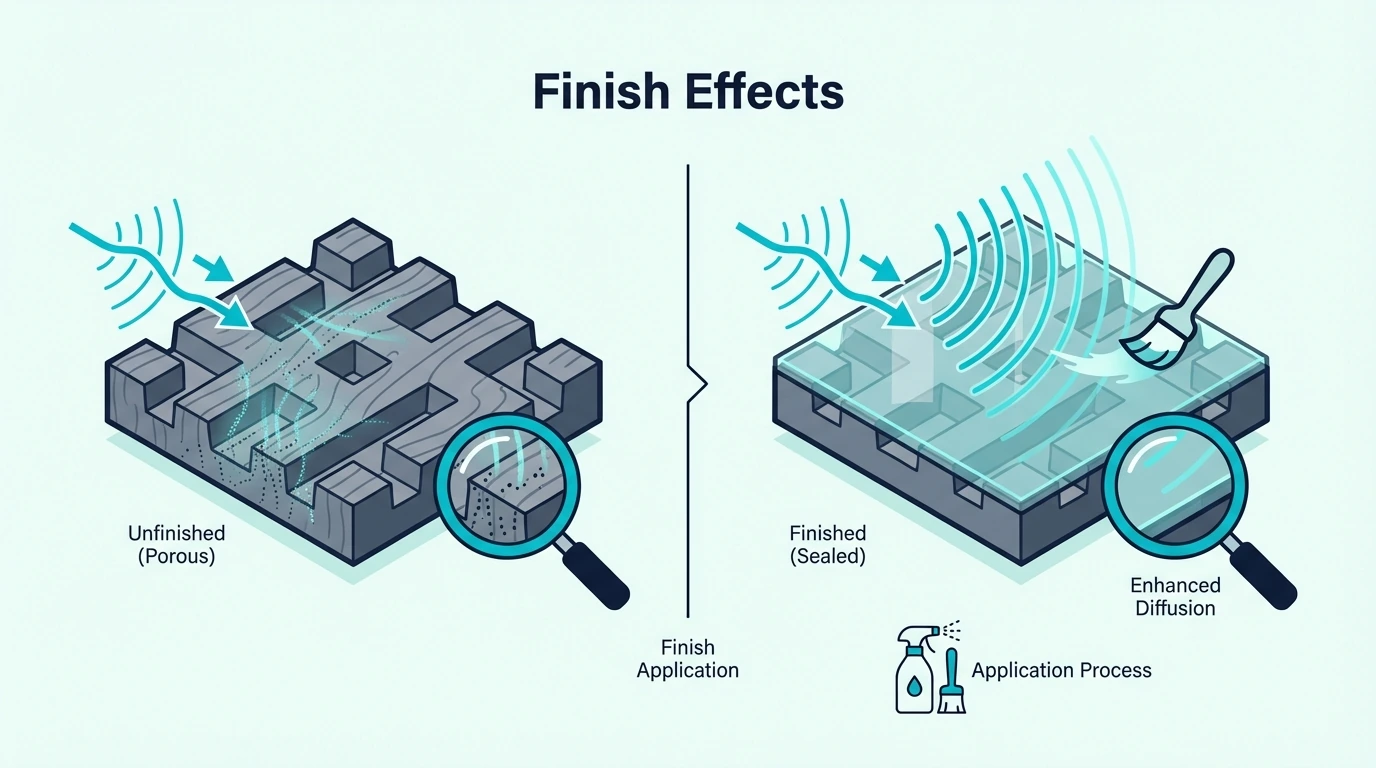
For either material, seal the surface with polyurethane to maximize reflectivity. Raw wood absorbs a small percentage of high-frequency energy — a sealed surface keeps those reflections clean.

Our DIY wooden sound diffuser guide covers the full build process using both plywood and hardwood.

What Types Of Acoustic Diffusers Use Different Materials?

Sound diffuser types by material and shape

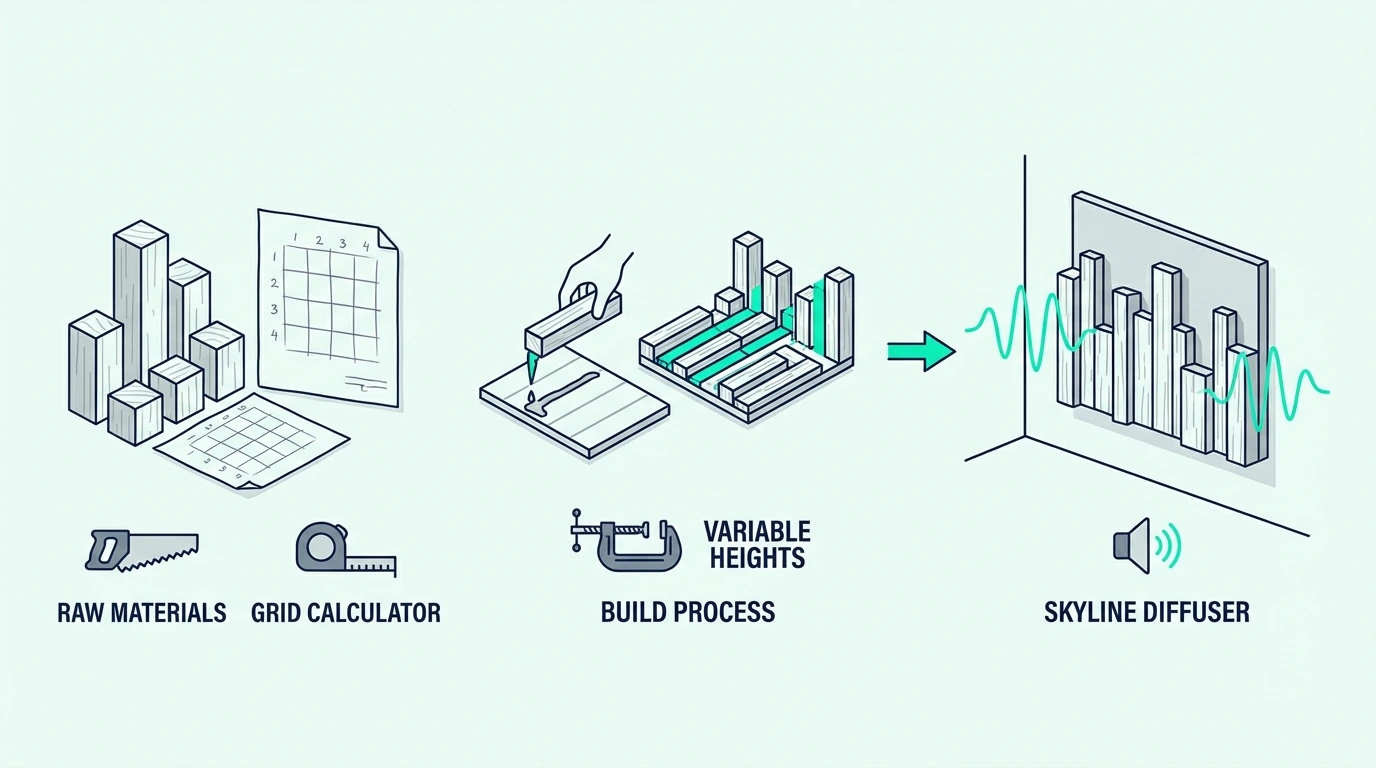
QRD And Skyline — Wood Construction

QRD (Quadratic Residue Diffuser) panels use a series of wells at mathematically calculated depths, carved or assembled from wood. The well depths follow a prime-number sequence that ensures even scattering across the design bandwidth.

The wood must hold tight tolerances during machining — router passes that chip or splinter change the effective well depth. This is another reason hardwoods and quality plywood outperform softwoods for QRD construction.

Skyline diffusers use blocks of varying heights glued to a backboard. Both designs require wood rigid enough to maintain precise dimensions — even a 1/8-inch deviation in well depth shifts the target frequency by 50-100 Hz.

The BXI Wood Sound Diffuser (1D QRD) is a solid-wood example — calculated well depths in a 24×24-inch panel that scatters mid-frequency energy across a wide horizontal arc.

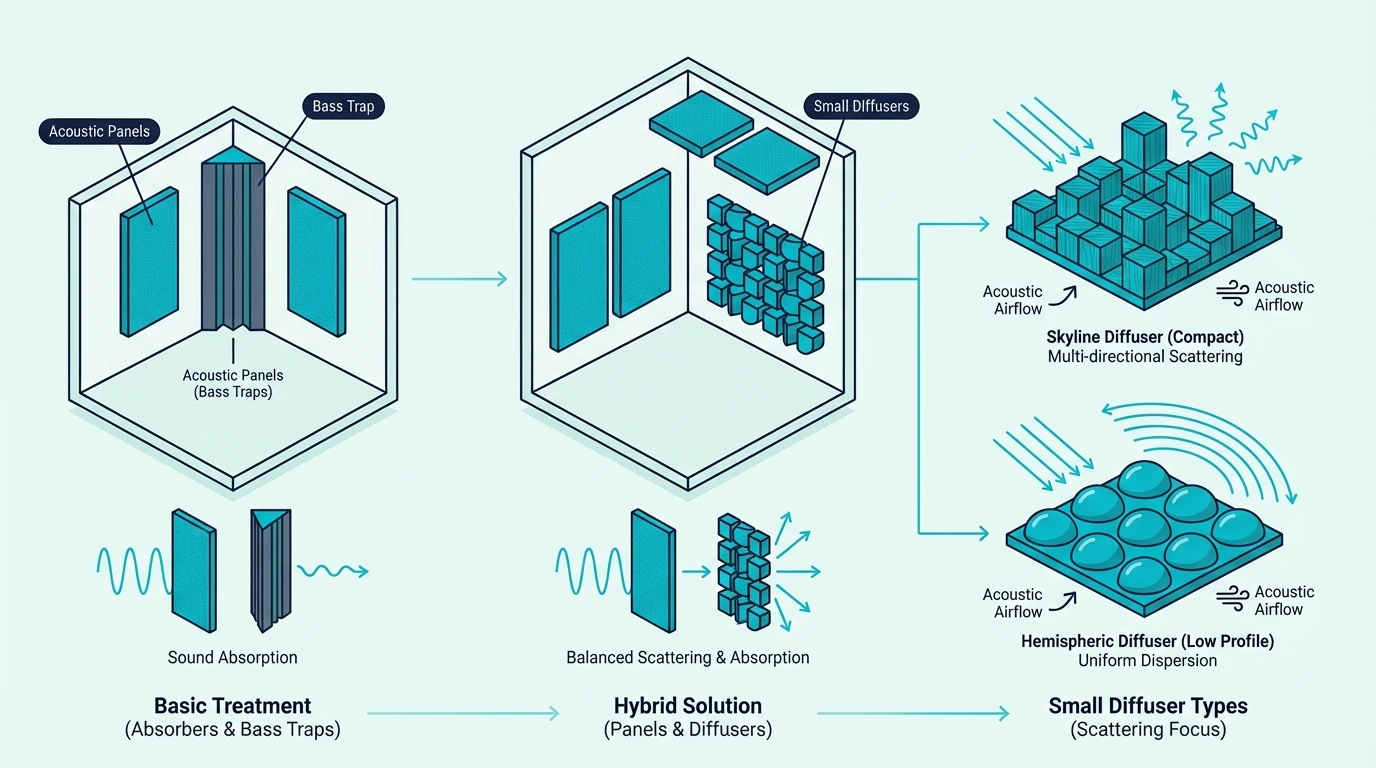
Polycylindrical And Curved — Wood Or Plastic

Polycylindrical diffusers use a curved surface to scatter sound across a broader arc than flat-faced designs. The curve can be formed from bent plywood (steam-bent or kerfed) or thermoformed plastic.

These designs trade precision for coverage — they scatter more evenly across a room but can’t target specific frequency ranges as precisely as QRD panels. Concert halls and auditoriums use curved architectural elements for exactly this reason.

Slat-style diffusers bridge the gap between curved and well-based designs. Wood slats at varying depths scatter mid-high frequencies while delivering a modern aesthetic that works in living spaces and studios alike.

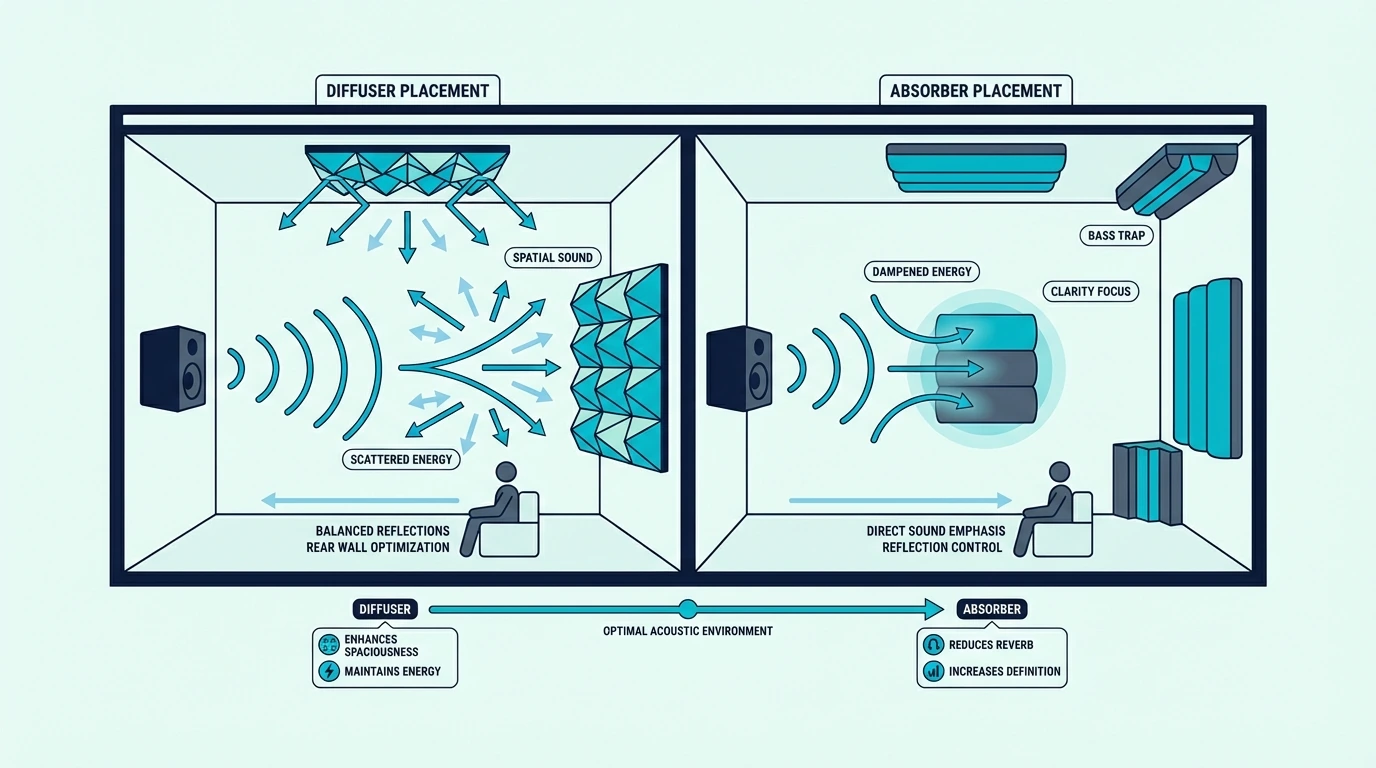
For how diffusers compare to absorption panels, that guide covers when each treatment type is the right choice.

EPS And Thermoformed Plastic

Expanded polystyrene (EPS) and thermoformed ABS/HIPS are the materials behind most budget commercial diffusers. They’re lightweight, cheap to manufacture, and can be molded into complex shapes that would be difficult or expensive to machine from wood.

The main advantage of plastic is cost per unit. A thermoformed diffuser panel costs roughly half the price of an equivalent wood panel, making it practical to cover larger wall areas on a tight budget.

The tradeoff is mass. Lightweight plastic panels may flex at lower frequencies, which means they absorb low-mid energy instead of scattering it.

This limits their effective range to roughly 2 kHz and above. For rooms where only high-frequency flutter echo is the problem, that’s sufficient — but studios needing full-range scatter should stick with wood.

The EVA Acoustic Diffusers (4-Pack) use rigid EVA foam in a waffle pattern — effective for high-frequency scatter at a fraction of wood panel prices, though they won’t match solid wood for full-range diffusion.

3D-Printed Diffusers

PLA and PETG filaments with high infill percentages (80%+) produce rigid enough surfaces for mid-to-high frequency diffusion. Open-source QRD and skyline STL files are available online, making custom designs accessible to anyone with a printer.

The material cost per panel is low — a few dollars of filament versus $30-70 for an equivalent wood build. The tradeoff is print time, which can run 20-40 hours per panel section depending on size and infill.

The limitation is build volume. Most consumer 3D printers max out at 8-10 inches per axis — far smaller than the 24-inch panels needed for effective mid-frequency scatter.

Tiling multiple printed sections introduces seams that can disrupt the scatter pattern. Some builders work around this by printing modular blocks that mount to a shared plywood backboard — combining printed precision with wood’s structural rigidity.

For the physics behind why these materials work, that guide covers how surface shape and material rigidity interact to create controlled scattering.

The Bottom Line

Wood is the default diffuser material for good reason — dense, rigid, machinable, and aesthetically versatile. Hardwood for professional builds, Baltic birch plywood for budget DIY.

Plastic and foam alternatives work for high-frequency scatter but lack the mass for full-range diffusion below 2 kHz. 3D-printed panels are a growing option for custom designs, limited mainly by printer build volume.

Match the material to the frequency range you need to treat. Wood handles everything from 500 Hz to 8 kHz depending on well depth.

Plastic and foam cover 2 kHz and above. Natural diffusion from bookshelves and irregular surfaces scatters unpredictably but costs nothing.

For where to place your finished diffusers, that guide covers rear wall, ceiling, and first reflection point positioning. And our best sound diffusers roundup compares the top pre-built options across all material types.

Frequently Asked Questions

What materials are used to diffuse sound?

Hard, rigid materials — primarily wood (oak, maple, plywood), rigid plastics (ABS, HIPS), and dense foam composites (EVA). The key requirement is that the surface reflects sound waves rather than absorbing them, so porous materials like fiberglass and open-cell foam are excluded.

What is an example of sound diffusion?

A QRD panel on the rear wall of a recording studio scatters reflections into a diffuse wash instead of a focused echo. Concert halls achieve the same effect naturally through ornate moldings, coffered ceilings, and irregular wall surfaces.

What is the best material for a sound diffuser?

Hard maple or white oak for maximum acoustic performance and durability. Baltic birch plywood for budget builds — it’s rigid, stable, and costs a fraction of hardwood. Seal either surface with polyurethane to maximize reflectivity.

What Is Diffusion In Sound? (Why Scattered Reflections Beat Dead Silence)

What is diffusion in sound comes down to one physical event — sound waves hit an uneven surface and scatter in many directions instead of bouncing straight back, but only if the surface irregularities are the right size for the frequencies causing problems.

Your room has hard, flat walls that act like acoustic mirrors, and the reflections they create cause flutter echo and comb filtering that make everything from music to speech sound harsh and unnatural.

Diffusion solves that without removing energy from the room — so you can fix those harsh reflections while keeping the space sounding alive and open instead of dead and claustrophobic.

Below, you’ll see the physics of why surfaces scatter sound, then hear what diffusion actually sounds like in a real room.

Quick Takeaway

Sound diffusion is the scattering of sound waves off an irregular surface. Instead of reflecting in one direction (like a flat wall), the sound spreads evenly across the room. This preserves the room’s natural energy and liveliness while eliminating harsh focused reflections. Diffusion is not absorption — it redistributes sound energy rather than removing it.

What Is Sound Diffusion In Simple Words?

Simple explanation of sound diffusion in a room

Think of light hitting a smooth mirror versus a rough stone wall. The mirror sends a sharp, focused beam back at you — that’s specular reflection.

The rough wall scatters light in every direction so no single beam blinds you — that’s diffusion.

Sound behaves the same way. A flat drywall surface reflects sound waves in a single, coherent direction — creating the slap-back echo you hear when you clap in an empty room.

An irregular surface breaks that reflection into dozens of smaller waves traveling in different directions.

The scattered waves still carry the same total energy as the original reflection. Nothing is absorbed or lost — the energy is redistributed across the room instead of concentrated in one path.

This is what separates diffusion from the two other acoustic concepts people confuse it with. Absorption removes sound energy from the room using porous materials like fiberglass or foam.

Soundproofing blocks sound from passing through walls using mass and isolation. Diffusion does neither — it keeps the energy in the room but prevents it from causing problems.

For a deeper look at what a sound diffuser actually does as a physical device, that guide covers the panel types and designs that create controlled diffusion.

What Causes Sound To Diffuse?

Surface Shape And Sound Wavelength

The key principle is scale. A surface irregularity only scatters a sound wave if the irregularity is comparable in size to the wave’s wavelength.

A 1 kHz sound wave has a wavelength of about 13.5 inches. Surface features smaller than that — say, the texture of a brick wall — scatter higher frequencies but let 1 kHz pass by as if the surface were flat.

Features deeper than 13.5 inches scatter 1 kHz and everything above it.

This is why engineered diffusers have wells or blocks of specific depths. Each depth targets a specific frequency range, and the mathematical sequence of depths (typically based on prime number calculations) ensures even scattering across the design bandwidth.

Flat surfaces reflect all frequencies in a single direction regardless of wavelength. The flatter and harder the surface, the more mirror-like the reflection — which is why untreated drywall rooms have the worst flutter echo problems.

Natural Vs Engineered Diffusion

Bookshelves filled with irregularly sized books create natural diffusion. The varying depths of book spines scatter mid and high frequencies in unpredictable directions — which is why a room full of bookshelves sounds warmer and more pleasant than the same room with bare walls.

Irregular architecture works the same way. Exposed brick, stone walls, coffered ceilings, and bay windows all create scattering at various frequencies depending on the depth of their surface features.

Engineered diffusers — QRD panels, skyline blocks, and slat designs — take this principle and make it precise. Instead of random scattering, the well depths follow a mathematical sequence that guarantees even distribution across a target frequency range.

The BXI Wood Sound Diffuser (1D QRD) is a good example of engineered diffusion — calculated well depths in solid wood that scatter mid-frequency energy across a wide horizontal arc.

For which materials work best for engineered diffusion, that guide compares wood, plastic, and composite options.

What Does Diffusion Sound Like In A Room?

How sound diffusion changes room sound

Untreated Room Vs Diffused Room

An untreated room with flat, parallel walls produces flutter echo — a rapid series of reflections that ping-pong between opposite surfaces. Clap your hands in a small, empty room and you’ll hear it as a metallic ringing that sustains for a second or more.

Add diffusers to one wall and that flutter echo disappears. The reflections still happen, but they scatter in so many directions that no coherent ping-pong pattern can form.

The room sounds open and alive without the harsh artifacts.

Compare this to adding absorption panels instead. The flutter echo also disappears, but the room loses its sense of space — it sounds smaller, tighter, and after extended listening, fatiguing.

For how absorption and diffusion compare in practice, that guide covers when to use each approach.

Concert Halls As The Gold Standard

The best concert halls in the world — Vienna’s Musikverein, Boston Symphony Hall, Amsterdam’s Concertgebouw — achieve their legendary acoustics through architectural diffusion. Ornate moldings, columns, coffered ceilings, and curved surfaces scatter sound waves naturally across every seat.

No two reflections arrive from the same direction. The result is a rich, enveloping sound field where every instrument occupies its own space — the opposite of a gymnasium where everything blurs into reverberant mush.

Modern concert hall design still relies on this principle. Acoustic architects calculate surface geometry to create controlled diffusion at specific frequency ranges, applying the same physics that a small QRD panel uses — just at building scale.

Where Is Sound Diffusion Used?

Recording Studios And Mixing Rooms

The rear wall behind the mixing position is the most common location for purpose-built diffusers. Engineers need to hear accurate reflections that reveal the depth and width of a stereo image — but those reflections must be diffuse, not focused.

A bare rear wall creates a strong specular reflection that interferes with the direct sound from the monitors. A diffused rear wall scatters that energy into a smooth wash that supports spatial perception without causing comb filtering.

For where to place diffusers in a studio, that guide covers rear wall, ceiling, and first reflection point options.

Ceilings above the listening position are the second most common application. Vertical flutter echo between a flat ceiling and desk/console surface is a persistent problem in studios — ceiling diffusers eliminate it while preserving the room’s vertical spaciousness.

The BXI 2D Skyline Diffuser is designed specifically for ceiling mounting — its block pattern scatters in both horizontal and vertical planes, which is what overhead treatment requires.

Concert Halls And Auditoriums

Architectural diffusion is designed into the building itself. Shaped wall panels, balcony fronts, and ceiling geometry create scattering without separate acoustic panels.

The advantage is scale. A concert hall can create diffusion at frequencies as low as 100 Hz because the architectural features are large enough to scatter long wavelengths.

A 24-inch studio diffuser can only scatter down to roughly 1 kHz.

Houses of worship use the same principles — vaulted ceilings, stone columns, and irregular wall surfaces create the reverberant but intelligible sound that makes speech and music fill a large space without becoming muddy.

Home theaters benefit from diffusion on the rear and side walls behind the seating area. The surround channels in a 5.1 or 7.1 system rely on scattered reflections to create the immersive envelope that makes movies sound three-dimensional.

If you’re treating a smaller space, our guide to diffusers in small rooms covers the distance constraints and workarounds.

The Bottom Line

Sound diffusion is the scattering of reflections off irregular surfaces — it preserves room energy while eliminating the focused echoes that make untreated rooms sound harsh.

Every room has some natural diffusion from furniture and architectural features. Engineered diffusers make that scattering precise and predictable — targeting specific frequency ranges where problems actually exist.

The choice between natural and engineered diffusion depends on how critical the listening environment is. A living room with bookshelves and mixed furniture already has decent scattering.

A mixing studio needs calculated, repeatable results.

For building your own diffuser panels, our DIY wooden sound diffuser guide covers both QRD and skyline designs. And our best sound diffusers roundup compares the top pre-built options.

Frequently Asked Questions

What does diffusion mean in audio?

Diffusion in audio refers to the even scattering of sound reflections across a room. Instead of a focused echo bouncing straight back from a wall, the sound spreads in many directions — creating a smooth, spacious sound field without harsh artifacts.

What does diffusion mean in music?

In music production and room acoustics, diffusion means treating a room so reflections scatter evenly rather than creating focused echoes or dead spots. Studios use diffuser panels on rear walls and ceilings to preserve the natural ambience that makes recordings sound three-dimensional.

What is the difference between diffusion and absorption?

Absorption removes sound energy from the room — porous materials convert sound waves to heat, making the room quieter and drier. Diffusion redistributes that energy by scattering it in many directions, keeping the room lively and spacious. Most well-treated rooms use both.

Sound Diffuser Vs Acoustic Panel? (One Kills Sound — The Other Redirects It)

Sound diffuser vs acoustic panel is the first decision you face when treating a room, but most people get it backwards — they cover every wall with absorption panels and wonder why the space sounds lifeless and claustrophobic.

The confusion starts because “acoustic panel” has become a catch-all term that covers both absorbers and diffusers, even though they do opposite things to sound waves bouncing around your room.

Knowing which one your room actually needs means the difference between a space that sounds controlled and open versus one that sounds dead or still has harsh flutter echo.

You’ll start with what each type does to reflections, then match the right treatment to your specific room and use case.

Quick Takeaway

Acoustic panels absorb sound energy — they reduce reflections, lower reverb time, and make a room quieter. Sound diffusers scatter sound energy — they spread reflections evenly while keeping the room sounding alive. Most rooms need both: absorption at first reflection points and diffusion on the rear wall.

Sound Diffuser Vs Acoustic Panel — Which Do You Need?

Decision guide for choosing a sound diffuser or acoustic panel

An acoustic panel and a sound diffuser sit on opposite ends of the treatment spectrum. One removes sound energy from the room, the other redistributes it.

Acoustic panels use porous materials — fiberglass, mineral wool, or open-cell foam — that convert sound energy into tiny amounts of heat. The reflection disappears.

The room gets quieter, tighter, and more controlled.

Sound diffusers use rigid surfaces with varying depths — wells, blocks, or slats — that scatter reflections across a wide arc instead of absorbing them. The energy stays in the room but arrives at your ears from many directions instead of one harsh bounce.

Neither blocks sound from passing through walls — that’s soundproofing, which is a completely different discipline. Both treat what happens to sound inside the room.

For a deeper look at how diffusers work at the physics level, that guide covers the scattering mechanics in detail.

What Does Each One Do To Your Room’s Sound?

Sound diffuser and acoustic panel compared side by side

Acoustic Panels — Absorption

When sound waves hit a porous panel, they enter the material and lose energy to friction as they pass through the fiber structure. High frequencies absorb first — a 2-inch panel catches most energy above 500 Hz.

The result is a lower RT60 (reverberation time), reduced echo, and a tighter sound field. Recording studios and podcast rooms rely on this effect to create clean, dry audio with minimal room coloration.

The tradeoff is that every reflection you absorb is energy the room loses permanently. Remove too many reflections and the room sounds unnaturally dead — a problem so common it has a name: over-absorption.

Thicker panels absorb lower frequencies. A 4-inch panel reaches down to roughly 250 Hz, while a 2-inch panel mostly catches energy above 500 Hz. The thickness you need depends on how much low-mid energy is causing problems in your space.

Sound Diffusers — Scattering

A diffuser’s rigid surface bounces sound waves back into the room, but the varying depths (wells in a QRD, blocks in a skyline) cause each reflected wave to arrive at slightly different times. This breaks up the coherent reflection into a wash of scattered energy.

The room stays lively and spacious without the harsh, focused reflections that cause flutter echo and comb filtering. Mixing and mastering engineers use rear-wall diffusers specifically because they preserve the sense of depth in a stereo image.

The key requirement is distance. A diffuser needs at least 2 meters between the panel and the listener for the scatter pattern to develop fully — closer than that and the reflections arrive too quickly to separate from the direct sound.

The BXI Wood Sound Diffuser (1D QRD) is a textbook example — calculated well depths in solid wood that scatter mid-frequency energy across a wide horizontal arc.

When Should You Choose Diffusers Over Acoustic Panels?

When to choose sound diffusers for a room

Mixing And Mastering Rooms

The rear wall behind your listening position is classic diffuser territory. Absorption there would remove the room’s depth cues — the subtle reflections that give your mix a sense of three-dimensional space.

Diffusers scatter those rear-wall reflections so they arrive at your ears as a diffuse wash instead of a focused bounce. You keep the spatial information without the comb filtering that a bare wall creates.

For exact placement guidance, that guide covers rear wall, ceiling, and first reflection point positioning.

Home Theaters And Living Rooms

A living room treated entirely with absorption panels feels like a recording booth — clinical, uncomfortable, and wrong for casual listening. Diffusers preserve the spacious, immersive quality that makes movie soundtracks and music sound engaging.

The Art3d Wood Slat Acoustic Panels are purpose-built for this scenario — wood slat aesthetics that scatter mid-high frequencies while looking like modern wall art instead of studio equipment.

When Should You Choose Acoustic Panels Over Diffusers?

When to choose acoustic panels for a room

Recording Booths And Podcast Rooms

Maximum reflection control is the goal here. You want the driest possible signal hitting the microphone — no room sound, no reflections, no coloration.

Absorption panels on all walls and the ceiling give you that. The goal is a signal-to-noise ratio where the direct voice dominates and room reflections are inaudible.

Diffusers would keep reflections alive in the room, which is exactly what you don’t want when recording vocals or dialogue. Panels are also cheaper per square foot and lighter — both advantages in a small booth.

A typical vocal booth uses 2-4 inch fiberglass or mineral wool panels on three walls and the ceiling, leaving only the floor and door untreated. This configuration drops the RT60 to under 0.3 seconds — dry enough for broadcast-quality voice recording.

Small Rooms With Severe Echo

Diffusers need a minimum distance of about 2 meters between the panel and the listener for the scatter pattern to develop properly. In rooms smaller than 100 square feet, that distance doesn’t exist.

Absorption panels work regardless of room size because they remove energy instead of redirecting it. For treating small rooms with diffusion, that guide explains the distance constraints and workarounds.

The exception is shallow diffusers that scatter only high frequencies — these work at closer distances because short wavelengths develop their scatter pattern faster. But for full-range treatment in a tight space, panels are the practical choice.

If your room is somewhere between — large enough for diffusion but still echo-prone — a combination of panels at first reflection points and a diffuser on the rear wall addresses both problems simultaneously.

What Are The Drawbacks Of Each?

Panel Core vs Diffuser Structure

Acoustic panels are lightweight, inexpensive, and simple to build or buy. A 2×4-foot fiberglass panel costs $30-50 and mounts with picture hooks.

Diffusers are heavier, more expensive, and harder to manufacture accurately. The materials that make effective diffusers — hardwood, plywood, rigid composites — cost more per square foot than fiberglass or mineral wool.

A single 24×24-inch wood diffuser like the BXI 2D Skyline weighs over 9 lbs and requires proper mounting hardware — a different installation challenge than hanging a fabric-wrapped panel.

Consider Your Goal And Budget

Panels are the budget-friendly starting point — a full room of absorption treatment costs less than two or three wood diffusers. If your room has severe echo or you’re building a recording booth, panels solve the problem faster and cheaper.

Diffusers are the refinement step — they address what happens after you’ve tamed the worst reflections with absorption. Most well-treated rooms use both.

For a detailed comparison of absorption and diffusion, that guide covers how to balance both approaches in the same room. And if you’re considering building your own panels, our DIY wooden sound diffuser guide walks through both QRD and skyline builds.

The Bottom Line

Use acoustic panels where you need reflections removed — first reflection points, recording booths, and problem corners.

Use diffusers where you need reflections scattered — rear walls, ceilings above listening positions, and any space where over-absorption would kill the room’s character.

Most rooms need both — the standard professional approach treats first reflection points with absorption and the rear wall with diffusion. Our best sound diffusers roundup compares the top pre-built options if you’d rather buy than build.

Frequently Asked Questions

Are sound diffusers worth it?

Yes — for mixing rooms, home theaters, and any space where you want controlled reflections without the lifeless feel of over-absorption. For recording booths and podcast rooms, acoustic panels are the better investment.

When to use sound diffusers?

When your room sounds too dead after adding absorption, or when you want to treat the rear wall without losing the room’s natural ambience. Diffusers are the complement to absorption, not a replacement.

What are the disadvantages of acoustic panels?

Over-absorption is the biggest risk — a room with too many panels sounds claustrophobic and fatiguing after extended sessions. Panels also can’t create the controlled liveliness that diffusers provide — they only subtract energy.

Best Sound Diffuser? (4 Panels That Actually Scatter — Not Just Decorate)

Best sound diffuser won’t be the one with the highest Amazon rating — it’s the one that actually scatters sound waves instead of just absorbing them or looking acoustic.

Your room still has flutter echo and harsh reflections bouncing between walls, but most “diffuser” listings are flat PVC tiles or foam panels that can’t scatter sound because they lack the varying depths that real diffusion requires.

The four diffusers below passed our verification: real QRD wells, skyline blocks, or slat depths that create measurable scatter patterns — so you can fix those reflections without wasting money on decorative panels.

You’ll see what each panel does best, which rooms they fit, and how to avoid the fakes that dominate search results.

Quick Takeaway

The BXI Wood Sound Diffuser (1D QRD) is the best overall pick for rear walls in studios and listening rooms — calculated well depths deliver precise one-dimensional scatter at $73. For ceilings, the BXI 2D Skyline scatters in both planes. The Art3d Wood Slat panels win on aesthetics for living spaces, and the EVA Waffle diffusers offer the lowest entry price at $70 for a 4-pack.

How We Chose The Best Sound Diffusers

Selection criteria for choosing sound diffusers

We searched Amazon for every product listed as a “sound diffuser” or “acoustic diffuser” — and rejected over 80% of the results. Most were absorption panels, decorative PVC tiles, or foam products that Amazon’s algorithm lumps into diffuser categories despite having zero scattering capability.

Material And Build Quality

A real diffuser must be rigid. Sound waves need to bounce off the surface cleanly — if the material flexes or absorbs, the panel acts as a partial absorber instead of a scatterer.

Wood is the gold standard: dense, rigid, and reflective. Every panel on this list uses either solid wood or rigid EVA composite — materials that reflect sound energy instead of converting it to heat.

We rejected all foam products (absorbers, not diffusers), all flat PVC tiles (decorative, no varying depths), and all fabric-wrapped panels (absorption panels marketed as diffusers).

Frequency Range And Room Fit

Well depth determines the lowest frequency a diffuser can scatter. A panel with 2.8-inch wells scatters from roughly 1 kHz up — covering the range where flutter echo and speech clarity live.

Deeper panels scatter lower frequencies but cost more and weigh more. For most home studios and listening rooms, the 1-4 kHz range covers the critical frequencies.

Every panel below specifies its effective scatter range so you can match it to your room size and listening distance.

Best Sound Diffusers — Our Top Picks

Top sound diffuser picks for room acoustics

Four verified diffusers that actually scatter sound. Each serves a different use case — rear wall, ceiling, living space aesthetics, or budget entry point.

Best Overall: BXI Wood Sound Diffuser (1D QRD)

The BXI Wood Sound Diffuser (1D QRD) is a textbook Quadratic Residue Diffuser — wells of mathematically calculated depths that scatter sound horizontally across a wide arc.

The 1D design means it scatters in one plane (left-right when mounted vertically on a wall). For most rear-wall applications, that’s exactly what you want — the primary reflection path from speakers to rear wall to your ears is horizontal.

Solid wood construction at 9 lbs per panel means it reflects cleanly without flexing. The 2.8-inch maximum well depth scatters from roughly 1 kHz up, covering the frequency range where flutter echo and comb filtering cause the most problems in home studios.

Mount two or three panels side by side on the rear wall, centered behind your listening position. If you need vertical scatter too, rotate one panel 90 degrees.

Best For Ceilings: BXI Wood Sound Diffuser (2D Skyline)

The BXI Wood Sound Diffuser (2D Skyline) uses blocks of varying heights to scatter sound in both horizontal and vertical planes simultaneously.

The 2D scatter pattern makes it purpose-built for ceilings, where reflections arrive from all directions — not just one plane like a rear wall. It also works well in small rooms where you can’t control the primary reflection path.

Same solid wood construction as the QRD model, slightly heavier at 9.3 lbs. The included mounting hardware simplifies ceiling installation, which is the hardest part of any diffuser setup.

The higher price reflects the more complex manufacturing — each block height is individually calculated rather than cut from a single well-depth sequence.

Best Looking: Art3d Wood Slat Acoustic Panels

The Art3d Wood Slat Acoustic Panels bridge the gap between acoustic treatment and interior design. The wood slat pattern scatters mid-high frequencies while looking like modern wall art.

The scatter depth is shallower than the BXI models, which limits diffusion to higher frequencies. For a dedicated mixing studio, the BXI QRD or Skyline is a better acoustic choice.

But for living rooms, home theaters, and multipurpose spaces where your partner has veto power over what goes on the walls, the Art3d delivers real acoustic benefit without looking like studio equipment. The 4.5-star rating across 900+ reviews confirms the aesthetic appeal.

At 47×24 inches, each panel covers nearly twice the wall area of the BXI models — fewer panels needed for the same coverage.

Best Budget: EVA Acoustic Diffusers (4-Pack)

The EVA Acoustic Diffusers (4-Pack) pack four panels for $70 — less than the cost of a single BXI panel. The waffle-pattern surface creates multi-directional scatter from a rigid EVA composite.

EVA is less dense than wood, which means slightly less clean reflection at the highest frequencies. The tradeoff is weight — at 1.2 lbs per panel, these mount with adhesive strips instead of heavy-duty hardware.

The smaller 12×12-inch size makes them versatile for odd spaces: above a desk, around a podcast mic setup, or scattered across a ceiling where full-size panels won’t fit. Use four panels to cover a 24×24-inch area — the same footprint as one BXI panel.

For home studios on a tight budget, the EVA pack lets you experiment with diffuser placement before investing in premium wood panels.

How To Choose The Right Diffuser For Your Room

Matching sound diffuser type to room size and use

The right pick depends on three factors: where you’re mounting, what the room is used for, and how much the panel’s appearance matters.

How Big Of A Diffuser Do I Need?

Bigger panels scatter lower frequencies. The BXI 24×24-inch panels cover down to roughly 1 kHz — adequate for most studios and listening rooms.

The Art3d’s larger 47×24-inch footprint covers more wall area per panel but doesn’t scatter lower frequencies (the slat depth is shallower). It’s better for broad coverage of higher frequencies.

For full rear-wall treatment, plan for enough panels to cover the width of wall directly behind your listening position — typically 4-6 feet of coverage.

In smaller rooms under 150 square feet, two 24×24-inch panels often provide enough scatter to break up the rear wall reflection. Larger rooms or dedicated mixing suites benefit from three or four panels spanning the full wall width behind the mix position.

What Is The Best Height For A Diffuser?

Center wall-mounted diffusers at seated ear height — roughly 36-42 inches from the floor for most chairs. This positions the panel in the direct reflection path between your speakers and ears.

Ceiling diffusers go directly above the listening position. The BXI Skyline with its 2D scatter pattern is specifically designed for this orientation.

Avoid mounting diffusers too close to the listening position — sound needs at least 2 meters of travel distance between the panel and your ears for the scatter pattern to develop fully. Closer than that and the reflections arrive too quickly to separate from the direct sound.

The Bottom Line

The BXI 1D QRD is the best overall choice for rear-wall diffusion in studios and listening rooms — precise scattering, solid construction, and a reasonable price per panel.

Add the BXI 2D Skyline for ceiling treatment if vertical flutter echo is a problem. Choose Art3d for living spaces where aesthetics matter, and EVA for budget experimentation.

For a deeper understanding of how these panels work and why material rigidity matters, our sound diffuser guide covers the physics behind every design type.

Frequently Asked Questions

Are sound diffusers worth it?

Yes — if your room sounds too dead after adding absorption panels, diffusers restore the natural ambience that makes a space sound alive. They’re essential for mixing rooms and home theaters where you need controlled reflections without the claustrophobic feel of over-absorption.

What’s the best diffuser brand?

BXI offers the best combination of real acoustic engineering and reasonable pricing for home studios. For premium commercial installations, RPG and Vicoustic are the industry standards — but their panels start at $200+ each.

What is the best sound diffuser for a home studio?

A QRD diffuser on the rear wall is the standard starting point. The BXI 1D QRD at $73 per panel gives you calculated well depths in solid wood — mount two or three behind your mix position for immediate improvement in stereo imaging and depth.

How To Make A Wooden Sound Diffuser? (QRD + Skyline Build Guide)

How to make a wooden sound diffuser is simpler than most people think, but the precision of your well depths determines whether the panel actually scatters sound or just looks like it should.

Your room still has flutter echo and harsh reflections bouncing off the rear wall — and commercial diffusers cost $70-110 per panel, which adds up fast when you need three or four to cover the wall behind your listening position.

Building your own means a diffuser that fits your room’s exact dimensions, targets the specific frequencies causing problems, and costs a fraction of retail — with identical acoustic performance.

You’ll start with the tools and math, then walk through both QRD and skyline builds step by step.

Quick Takeaway

Build a QRD diffuser by calculating well depths with an online calculator, cutting wood strips to those depths, and gluing them into a frame. Use 3/4-inch Baltic birch plywood or hardwood, seal with polyurethane, and mount on the rear wall at least 2 meters from your listening position. A skyline diffuser is easier — blocks of varying heights glued to a backboard, no precision wells required.

How To Make A Wooden Sound Diffuser — And Why Build One?

Why building a wooden sound diffuser can improve room sound

A pre-built QRD diffuser like the BXI Wood Sound Diffuser (1D QRD) costs $73 for a single 24×24-inch panel. Cover a rear wall and you’re looking at three or four panels — $220-290 before shipping.

The same coverage in Baltic birch plywood runs $60-80 total in materials. The tradeoff is your time and a table saw, but the acoustic result is identical because diffusion depends on geometry, not brand name.

DIY also unlocks custom sizing. Commercial panels come in fixed dimensions, but your room might need a 30-inch wide panel or a specific depth to target frequencies below 1 kHz.

Building your own means the panel fits the room instead of the other way around.

The two most common DIY designs are QRD (Quadratic Residue Diffuser) and skyline. QRD uses wells of calculated depths — more precise, more complex to build.

Skyline uses blocks of varying heights — easier to cut, more forgiving of small errors. For a primer on how diffusers work at the physics level, that guide covers the scattering principles behind both designs.

What Tools And Materials Do You Need?

Tools and materials for a DIY wooden sound diffuser

The build requires basic woodworking tools. Nothing exotic — if you own a table saw, you already have the most important piece.

Tools

A table saw is essential for cutting strips to consistent widths. Inconsistent widths create gaps between wells that leak sound through instead of reflecting it — defeating the entire design.

Beyond the saw, you need a measuring tape, carpenter’s square, wood glue, clamps (at least 4 bar clamps), 120-grit sandpaper, and a brush for applying finish. A miter saw helps for crosscutting blocks to height if you’re building a skyline design.

Nice-to-have additions: a digital caliper for checking well depths against the calculator output, and a brad nailer for reinforcing glue joints while they dry. Neither is strictly necessary, but both speed up the build.

What Frequencies Do I Diffuse?

The frequency range your diffuser scatters depends entirely on well depth. An online QRD calculator takes two inputs — the prime number (which determines the number of wells) and the design frequency (the lowest frequency you want to scatter) — and outputs the exact depth for each well.

For most home studios and listening rooms, a design frequency of 800-1,200 Hz covers the range where flutter echo and comb filtering cause the most problems. That translates to maximum well depths of roughly 2-3 inches.

Targeting lower frequencies means deeper wells — a 500 Hz design frequency needs wells up to 6 inches deep, which makes the panel heavy and harder to mount. For treating a full room, that guide covers how diffuser frequency range fits into the bigger treatment picture.

How Do You Build A QRD Diffuser Step By Step?

QRD wooden sound diffuser build steps

A QRD is the gold standard of diffuser designs — mathematically precise scattering backed by decades of acoustic research. The build is straightforward once you have your depth sequence.

Calculating Well Depths

Search for “QRD diffuser calculator” online — several free tools exist. Input a prime number (7 is the most common for home builds, giving 7 wells per period) and your design frequency.

The calculator outputs a sequence of depths — for example, a prime-7 QRD at 1,000 Hz might produce: 0”, 1.35”, 2.70”, 0.68”, 0.68”, 2.70”, 1.35”. Each number is the depth of one well, and the sequence repeats across the panel.

Write down every depth and double-check before cutting. A 1/8-inch error in well depth shifts the scattering frequency by 50-100 Hz — noticeable in a critical listening environment.

For the best wood species to use in your build, that guide compares hardwoods, softwoods, and plywood options.

Building The Diffuser Frame And Wells

Cut your stock into strips of equal width — 1.5 to 2 inches is standard. Each strip becomes a well divider, and the spaces between dividers are the wells.

Cut well bottoms to the calculated depths. Glue each bottom piece to the base of its well, then glue the divider strips on either side.

Work in sections: assemble 3-4 wells at a time, clamp until the glue sets (at least 30 minutes for wood glue), then add the next section. Rushing this step creates gaps that leak sound and weaken the structure.

Finish with a frame around the perimeter — it adds rigidity and hides any edge imperfections. The frame should be the same height as the tallest well divider so the front face is flush.

How Do You Build A Skyline Diffuser?

Skyline wooden sound diffuser build steps

A skyline diffuser scatters sound using blocks of varying heights instead of wells — making it the more forgiving DIY option. Small cutting errors matter less because each block is independent.

Cutting And Arranging The Blocks

Cut square blocks (typically 2×2 inches) to varying heights using the same QRD calculator output — but interpret the depths as heights instead. The tallest blocks scatter the lowest frequencies.

Glue each block to a 3/4-inch plywood backboard using wood glue, pressing firmly and wiping excess from the edges. Let the full panel cure overnight before handling — blocks that shift during mounting will create uneven scatter.

Arrange the blocks on a flat backboard in a pattern that avoids clustering similar heights together. A randomized-looking arrangement scatters more evenly than organized rows.

The BXI Wood Sound Diffuser (2D Skyline) is a commercial example of this design — studying its block arrangement gives you a template for how varying heights should be distributed across the panel face.

Finishing And Mounting

Sand all surfaces with 120-grit, then 220-grit for a smooth finish. Two coats of satin polyurethane seals the wood and hardens the surface for maximum reflectivity.

Avoid thick paint or heavy stain — anything that fills the gaps between blocks reduces the effective height differences and degrades the scatter pattern. A clear coat preserves the wood grain while maximizing acoustic performance.

If you want a wood-slat aesthetic without the build complexity, the Art3d Wood Slat Acoustic Panels deliver mid-high frequency scatter as a ready-made alternative.

Mount the finished panel on the rear wall using French cleats or Z-brackets — both distribute the weight evenly and allow easy removal for repositioning. For detailed mounting methods on different wall types, our diffuser hanging guide covers drywall, concrete, and ceiling installation.

The Bottom Line

A QRD build requires more precision but delivers mathematically optimal scattering. A skyline build is faster and more forgiving — ideal for first-time builders.

Either way, the material cost is a fraction of commercial options. Use 3/4-inch Baltic birch for budget builds, oak or maple for premium results, and always seal the surface with polyurethane.

For how diffusion fits alongside absorption in a full room treatment plan, that guide covers the balance between the two approaches.

For where to place your finished panel, that guide covers the rear wall, ceiling, and first reflection point options. And if you decide building isn’t for you, our best sound diffusers roundup compares the top pre-built alternatives.

Frequently Asked Questions

What is the best wood for a sound diffuser?

Hard maple and white oak for maximum reflection quality — both score above 1,300 on the Janka hardness scale. For budget builds, 3/4-inch Baltic birch plywood delivers excellent results at roughly a third of the cost.

How much does it cost to build a DIY diffuser?

A single 24×24-inch QRD panel in Baltic birch plywood costs roughly a third of a commercial equivalent. The same panel in hardwood runs about half the retail price.

The savings multiply fast when you need three or four panels to cover a rear wall.

How to make a QRD sound diffuser?

Use an online QRD calculator to generate well depths, cut wood strips to those depths, and glue them into a frame with consistent-width dividers. The step-by-step process is covered in the build section above — the critical detail is cutting wells to the exact calculated depth.

Best Wood For Sound Diffuser? (Material Matters More Than You Think)

Best wood for a sound diffuser depends on one property most people overlook — density determines how cleanly the surface reflects sound, and that’s what separates a diffuser that actually scatters from one that absorbs half the energy before it gets the chance.

You’ve picked a QRD or skyline design, calculated the well depths, but the wood you build it from quietly decides whether those calculations translate to real diffusion or muffled reflections.

Choosing the right wood means your diffuser scatters mid and high frequencies with the precision the math intended — crisp, even dispersion across the listening position instead of a dull, partially absorbed return.

You’ll start with the properties that matter most, then match specific hardwoods, softwoods, and plywood options to your budget and build skill.

Quick Takeaway

Hard maple and white oak are the best woods for sound diffusers — dense, rigid, and dimensionally stable. For DIY builds on a budget, Baltic birch plywood outperforms solid softwoods at a fraction of the cost. Seal any wood surface with polyurethane or lacquer to maximize reflectivity and prevent moisture warping that ruins well-depth accuracy.

What Makes A Good Wood For Sound Diffusers?

Wood properties that matter for sound diffusers

A diffuser’s job is to reflect sound waves off surfaces at different depths — scattering them across the room instead of bouncing them back in a focused beam. The wood has to be rigid enough to reflect cleanly without flexing or absorbing energy.

Density And Hardness

Dense wood reflects more sound energy and absorbs less. That’s the fundamental tradeoff — a soft, porous material like balsa or untreated pine absorbs a portion of every sound wave that hits it, which defeats the purpose of a diffuser.

The Janka hardness scale gives you a quick comparison. Hard maple scores 1,450 lbf, white oak hits 1,360 lbf, and walnut comes in at 1,010 lbf — all excellent for diffusion.

Compare that to pine at 380-690 lbf. The gap isn’t subtle — maple reflects roughly 95% of the sound energy that pine lets partially absorb.

For a real-world example of what dense wood sounds like in a finished diffuser, the BXI Wood Sound Diffuser (1D QRD) uses solid wood construction that delivers the clean reflection quality you’re aiming for in a DIY build.

Dimensional Stability And Moisture Resistance

A QRD diffuser’s scattering pattern depends on precise well depths — sometimes calculated to fractions of a millimeter. If the wood warps, swells, or shrinks with humidity changes, those depths shift and the diffusion pattern degrades.

Oak and maple are dimensionally stable — they resist warping even in rooms with fluctuating humidity like basements or garages. Walnut performs similarly but costs significantly more per board foot.

Pine and cedar move considerably with moisture changes. If you build a QRD from untreated pine in a humid climate, the wells can shift enough within months to alter the scattering frequency range.

Which Hardwoods Work Best For Sound Diffusers?

Hardwood options compared for sound diffusers

Professional diffuser manufacturers overwhelmingly use hardwoods — and for good reason. The density, stability, and tonal quality of hardwoods make them the standard for critical listening environments.

Oak And Maple

White oak and hard maple are the workhorses of commercial diffuser production. Both score above 1,300 on the Janka scale, resist moisture warping, and machine cleanly for precise well cuts.

Oak has a slightly more open grain that some builders prefer for aesthetics — the grain pattern shows through clear finishes and adds visual character to what’s otherwise a functional panel. Maple is denser and harder, with a tighter grain that creates a slightly smoother reflecting surface.

Cost is comparable for both species at most lumber yards. For a standard 24×24-inch QRD panel, expect roughly two to three times the cost of a softwood equivalent — competitive with buying a pre-built diffuser when you factor in the quality.

Walnut And Mahogany

Walnut brings a rich dark tone that makes diffusers look like premium furniture. At 1,010 lbf Janka, it’s softer than oak or maple but still firmly in the “excellent for diffusion” range — the density loss compared to maple is acoustically negligible.

Mahogany sits at roughly 800-900 lbf depending on species. The tonal quality competitors reference as “warm” comes from the wood’s resonant properties — mahogany vibrates slightly more than maple, which can add a subtle coloration to the scattered sound.

The tradeoff is cost. Walnut runs $8-15 per board foot and mahogany can hit $12-20, making a single 24×24 panel $60-100+ in lumber alone.

For most home studios, oak or maple delivers 95% of the acoustic performance at half the price. If you want to see what a finished commercial wood diffuser looks like, the BXI Wood Sound Diffuser (2D Skyline) shows the quality level achievable with dense wood construction.

Which Softwoods And Plywood Work For Budget Diffusers?

Budget wood options for DIY sound diffusers

Not everyone needs premium hardwood. If you’re building your first diffuser or treating a home studio on a budget, several cheaper materials perform surprisingly well — especially with the right finish.

Baltic Birch Plywood

Baltic birch is the most popular DIY diffuser material for a reason. The cross-laminated layers create a panel that’s denser and more dimensionally stable than solid softwood, at roughly $3-5 per square foot.

The void-free construction means you can cut precise wells without hitting internal gaps — a problem with standard construction plywood that ruins well-depth accuracy. Baltic birch machines cleanly, holds screws well, and takes finish beautifully.

For most DIY builds, 3/4-inch Baltic birch is the sweet spot. It’s rigid enough to reflect cleanly, stable enough to hold its shape for years.

If you’d rather skip the build entirely, the Art3d Wood Slat Acoustic Panels use a wood slat design that delivers solid mid-high frequency scatter without any woodworking. Our DIY wooden diffuser guide covers the full build process using Baltic birch.

MDF And Pine

MDF (Medium Density Fiberboard) machines better than any natural wood — router bits cut through it like butter, creating perfectly clean well walls. The uniform density means consistent reflection quality across the entire panel surface.

The downsides are weight and moisture sensitivity. A 24×24 MDF panel weighs 30-40% more than the same panel in Baltic birch, making ceiling mounting difficult.

One exposure to significant moisture can cause permanent swelling that destroys the well geometry.

Pine works for practice builds and non-critical spaces. The softness means some high-frequency absorption, but for a garage practice room or home theater where absolute precision isn’t required, sealed pine gets the job done at the lowest lumber cost available.

Does Wood Thickness And Finish Affect Diffusion?

How wood finish affects sound diffuser performance

The wood species gets the most attention, but thickness and surface treatment have a measurable impact on how the finished diffuser performs. Getting these right can compensate for a budget wood choice — and getting them wrong can undermine even the best hardwood.

The Impact Of Material Density On Sound Diffusion

Thicker panels resonate less. A 3/4-inch hardwood panel stays rigid when hit by a bass wave that would make a 1/4-inch panel flex and absorb energy.

For QRD diffusers, the dividers between wells need to be thick enough to stay rigid at the lowest frequency the diffuser is designed to scatter. Thin dividers vibrate sympathetically and blur the time differences between wells — degrading the precision of the scatter pattern.

The minimum practical thickness is 1/2 inch for hardwoods and 3/4 inch for softwoods and plywood. Going thicker adds weight without meaningful acoustic improvement — diminishing returns kick in fast above these thresholds.

For specifics on which materials diffuse sound, that guide compares wood against plastic and composite alternatives.

Sealed Vs Raw Wood Surfaces

A polyurethane or lacquer finish transforms the reflective properties of any wood. Sealed surfaces are harder, smoother, and reflect sound more consistently than raw wood — which has microscopic pores that absorb a small percentage of high-frequency energy.

The difference is most audible above 4 kHz. Raw softwood absorbs enough high-frequency energy to noticeably dull the scattered sound compared to the same wood with two coats of polyurethane.

Two to three coats of satin or gloss polyurethane is the standard finish for DIY diffusers. Avoid thick paint — it fills well edges and changes the effective well depth, which shifts the diffuser’s design frequency.

Understanding how diffusers work at the physics level makes it clear why these small details matter. And for a full room diffusion walkthrough, that guide shows how your finished panel fits into the bigger treatment picture.

The Bottom Line

Hard maple or white oak for maximum performance. Baltic birch plywood for budget DIY builds.

Seal whatever you choose with polyurethane to maximize reflectivity.

Skip pine and MDF unless you’re building a practice piece or treating a non-critical space. The density difference between hardwood and softwood is acoustically significant — not a marketing distinction.

For where to place your finished diffuser, that guide covers rear wall, ceiling, and first reflection point positioning. And if you’d rather buy than build, our best sound diffusers roundup compares the top pre-built options.

Frequently Asked Questions

What is the best wood for acoustic diffusers?

Hard maple and white oak deliver the best combination of density, dimensional stability, and cost. Both score above 1,300 on the Janka hardness scale, which means they reflect sound cleanly without absorbing high-frequency energy.

What wood absorbs the most sound?

Softwoods like balsa, cedar, and untreated pine absorb the most because their lower density and open grain structure let sound energy penetrate instead of reflecting. That’s why they’re poor choices for diffusers but acceptable for certain absorption applications.

What is the best wood for sound resonance?

Mahogany and spruce resonate the most — which is why they’re used for guitar bodies and violin tops. For diffusers, resonance is undesirable because you want clean reflection, not vibration — so harder, denser woods like maple outperform resonant species.

Do wood sound diffusers work?

Yes — wood is the industry standard material for professional diffusers. The rigid surface reflects sound cleanly while the varying well depths or block heights scatter it across the room. For a deeper look at the physics, our do wood diffusers work guide covers the research.

Sound Absorption Vs Diffusion? (They Fix Different Problems)

Sound absorption vs diffusion trips up nearly everyone who treats a room for the first time — because both are acoustic treatment, but they solve completely different problems.

You’ve covered your walls with panels and the echo is gone, but the room sounds dead and claustrophobic — that’s what happens when you absorb reflections that should have been scattered instead.

Matching the right treatment to the right wall means a room that sounds controlled and open at the same time — clarity without the lifeless compression that drives you out after thirty minutes.

You’ll start with understanding what each mechanism actually does to sound energy, then place each type where it belongs.

Quick Takeaway

Absorption converts sound energy to heat, reducing reverb time and controlling specific reflections. Diffusion scatters reflections into smooth ambient energy without removing them. Most rooms need absorption at first reflection points and the front wall, diffusion on the rear wall — the live-end/dead-end layout that professional studios have used since the 1980s.

Sound Absorption Vs Diffusion — What’s The Difference?

Core difference between sound absorption and diffusion

Both are acoustic treatment, but they solve fundamentally different problems. Confusing them leads to rooms that are either too dead or still problematic — and a lot of wasted money on the wrong panels.

Absorption targets specific reflections and removes them. The sound wave enters a porous material, bounces around inside the fibers, and converts to heat — gone from the room entirely.

Diffusion targets reflections and redirects them. The sound wave hits an uneven surface and scatters into dozens of smaller reflections that spread across the room evenly.

The energy stays — your brain still senses the room’s size and character — but without focused echoes or flutter.

Think of it this way: absorption is a sponge that soaks up water. Diffusion is a sprinkler head that takes one stream and fans it out in every direction.

Both control the water, but one removes it and the other redistributes it. For a product-level comparison, our diffuser vs absorber guide covers the specific panels and when each earns its spot.

How Does Sound Absorption Work?

Mechanism of sound absorption in acoustic treatment

Sound waves carry kinetic energy. When they hit a hard, flat surface like drywall, nearly all that energy bounces back.

Absorption materials interrupt that bounce by trapping the wave inside a fibrous or porous structure.

Porous Materials And The NRC Scale

Fiberglass and mineral wool are the industry standards because their dense fiber networks create millions of tiny air channels. Sound enters, bounces between fibers, and loses energy as friction converts it to heat.

The NRC (Noise Reduction Coefficient) measures how much sound a material absorbs on a 0-to-1 scale. An NRC of 0.85 means 85% of the sound energy that hits the surface gets absorbed — only 15% reflects back.

Bare drywall scores about 0.05 NRC. Budget foam hits 0.30-0.50.

Quality fiberglass panels reach 0.95+, which is why studios use them instead of foam despite the higher cost.

Which Frequencies Does Absorption Target?

Material thickness determines which frequencies get absorbed. A 2-inch panel handles mid and high frequencies well but lets bass pass right through — the wavelengths are too long for the material to capture.

A 4-inch panel extends absorption down to roughly 250 Hz. Below that, you need bass traps — thick absorbers wedged into corners where low frequencies naturally build up.

The air gap trick helps without adding thickness. Mounting a 2-inch panel with a 2-inch gap behind it gives you the absorption of a 4-inch panel at a fraction of the weight.

The gap lets the panel interact with lower-frequency wavelengths that would otherwise pass through.

How Does Sound Diffusion Work?

Mechanism of sound diffusion scattering reflections

Where absorption converts energy to heat, diffusion relies purely on geometry. A rigid surface with varying depths or heights forces different parts of the same sound wave to reflect at different angles and times.

Surface Geometry And Scattering

A QRD (Quadratic Residue Diffuser) uses wells of mathematically calculated depths. Sound enters each well, reflects off the bottom, and exits at a slightly different time than the neighboring wells — creating a fan of scattered reflections instead of one focused beam.

Skyline diffusers use the same principle with blocks of varying heights instead of wells. The BXI Wood Sound Diffuser (2D Skyline) scatters in both horizontal and vertical planes — useful for ceilings and rear walls where reflections arrive from multiple directions.

Well depth determines the lowest frequency scattered. A 2.8-inch panel scatters from roughly 1 kHz up, covering the range where speech intelligibility and flutter echo live.

The Role Of Material Rigidity

Diffusers must be rigid — wood, hard plastic, or dense composites. If the surface flexes when sound hits it, the material absorbs energy instead of reflecting it cleanly.

This is why foam “diffusers” don’t work as actual diffusers. Foam is soft and porous — it absorbs sound rather than scattering it, regardless of what shape it’s molded into.

The BXI Wood Sound Diffuser (1D QRD) uses solid wood for exactly this reason — the rigid surface reflects cleanly while the calculated well depths handle the scattering math. For a full breakdown of which materials work for diffusion, that guide covers wood, plastic, and composite options.

When Does A Room Need Absorption Vs Diffusion?

Room decision guide for absorption versus diffusion

The decision depends on what you’re hearing and what you’re doing in the space. Each problem has a clear treatment — the skill is diagnosing which problem you actually have.

Use Absorption When

Recording booths and podcast rooms need maximum reflection control. Any reflection that reaches the microphone colors the recording — and unlike mixing, you can’t undo a bad recording with EQ later.

Rooms with severe echo problems — long reverb tails, muddy speech, or boomy bass — need absorption first. These are symptoms of too much uncontrolled energy bouncing around, and diffusion alone won’t solve them.

Bass buildup in corners is exclusively an absorption problem. Low frequencies pile up where walls meet, creating pressure zones that no diffuser can address.

Corner-mounted bass traps are the only fix.

Use Diffusion When

Mixing rooms and mastering suites need controlled reflections to preserve spatial cues. Engineers rely on hearing the room’s natural ambience to make mix decisions that translate to other playback systems.

Home theaters and listening rooms benefit from diffusion because immersion requires reflected energy. A completely absorbed theater sounds flat and small — scattered reflections make the space feel expansive and three-dimensional.

The Art3d Wood Slat Acoustic Panels work well in living spaces where aesthetics matter — the wood slat design scatters mid-high frequencies while looking like intentional decor rather than studio equipment.

Hybrid Approach

Most professional rooms use both treatments in specific zones. The live-end/dead-end (LEDE) layout puts heavy absorption at the front wall and first reflection points, then diffusion on the rear wall.

The front absorbs early reflections that would interfere with direct speaker output. The rear scatters late reflections into smooth ambience that keeps the room feeling alive.

A common starting ratio is 60% absorption, 30% diffusion, 10% untreated surfaces. Adjust based on what you hear — if the room feels dead, swap some absorbers for diffusers.

If it’s still echoey, add more absorption. Our diffuser placement guide covers exactly where each treatment type goes.

What Happens When You Over-Absorb A Room?

Over-absorption caused by too much acoustic treatment

This is the strongest argument for understanding diffusion — because almost everyone who treats a room for the first time over-absorbs it. Absorption panels are cheaper, easier to find, and feel like they’re “doing something” immediately.

Symptoms Of Over-Absorption

The room sounds tight and claustrophobic — like wearing headphones in a closet. Listening for more than 30 minutes becomes fatiguing because your brain can’t detect spatial cues.

Mixes made in over-absorbed rooms consistently sound too bright when played elsewhere. The engineer compensates for the dead highs by boosting them, then the mix sounds harsh on every other system.

Clap your hands in the center of the room. If you hear almost nothing — no tail, no decay, just a flat thud — the room is over-absorbed.

Fixing An Over-Absorbed Room

The fix is straightforward: remove absorption panels from the rear wall and replace them with diffusers. This restores ambient energy without reintroducing the focused echoes you originally treated.

Start with one or two diffuser panels on the rear wall directly behind the listening position. If the room still feels too dead, remove side-wall absorption next and test with diffusion instead.

For the mounting details and hardware, that guide walks through hanging diffusers on drywall, concrete, and ceiling surfaces.

Preventing Over-Absorption

Plan both treatments from the start instead of covering every wall with absorption and fixing it later. Map your room into zones: dead end (front), live end (rear), first reflections (sides), and corners (bass traps).

This approach costs the same as blanket absorption but sounds dramatically better. For a complete room diffusion walkthrough, that guide covers the full treatment process from first panel to final tuning.

The Bottom Line

Absorption and diffusion solve different problems — removal vs redistribution. Most rooms need both, and the placement determines which one works where.

Absorb at first reflection points and the front wall to clean up early reflections. Diffuse the rear wall to preserve natural room energy without focused echoes.

Trap bass in the corners.

That LEDE layout covers the vast majority of studios, home theaters, and listening rooms. For the full picture on what diffusers actually do at a physics level, that guide covers the mechanics behind every design type.

Frequently Asked Questions

Is absorption or diffusion more important?

Neither dominates — they serve different functions. A recording booth needs almost pure absorption, while a mastering suite needs significant diffusion.

For most multipurpose rooms, start with absorption at first reflection points and add diffusion to the rear wall.

Can you have too much diffusion in a room?

Yes, particularly in small rooms. Diffusers need minimum clearance (2+ meters) to scatter properly.

In a room under 10×10 feet, scattered reflections arrive too close together and create comb filtering instead of smooth ambience.

What is the sound absorption coefficient?

The NRC (Noise Reduction Coefficient) rates a material’s absorption from 0 to 1.0 — where 1.0 means total absorption. Quality fiberglass panels score 0.90-0.95, budget foam scores 0.30-0.50, and bare drywall scores about 0.05.

How To Diffuse Sound In A Room? (The Fix Most People Skip)

How to diffuse sound in a room comes down to one thing most people overlook — scattering reflections instead of just absorbing them.

If your room sounds echoey with bare walls but claustrophobic after you hang absorption panels everywhere, you’ve hit the exact problem diffusion solves.

The right diffuser placement turns harsh, focused reflections into smooth ambient energy that keeps your room sounding open and natural — without the deadness that comes from over-absorbing.

Below, you’ll see where diffusers go, which types match your room, and how to balance diffusion with absorption so you’re not guessing at what your walls need.

Quick Takeaway

To diffuse sound in a room, mount QRD or skyline diffusers on the rear wall (at least 2 meters from your listening position), use absorption at first reflection points and the front wall, and add ceiling diffusion if flutter echo persists. This live-end/dead-end layout is the industry standard for studios, home theaters, and critical listening rooms.

How To Diffuse Sound In A Room — And Why Does It Matter?

Concept diagram showing sound diffusion in a room

That echoey slap you hear when you clap in an empty room is sound bouncing off flat walls in a focused beam — and it’s the problem diffusion was designed to solve. If you’ve already tried absorption and the room sounds too dead, diffusion is the missing piece.

What Is Sound Diffusion?

Sound diffusion scatters a focused reflection into dozens of smaller ones that arrive from different angles over a spread of 10-20 milliseconds. Instead of one sharp echo bouncing straight back at you, you get a smooth wash of ambient energy that your brain interprets as natural room sound.

The mechanism is purely geometric. A diffuser’s uneven surface — wells of varying depths in a QRD panel, blocks of varying heights in a skyline design — forces different parts of the same sound wave to reflect at different angles and times.

That scattered energy still exists in the room. Your ears still sense the space’s size and character, but without the harsh comb filtering or flutter echo that flat walls create.

This is fundamentally different from absorption, which converts sound energy into heat and removes it from the room entirely. Diffuser vs absorber — one redirects energy, the other deletes it.

Why Diffusion Matters For Room Sound Quality

A room with zero treatment sounds terrible — flutter echoes, ringing sustains, and frequency cancellations make everything from music to speech sound colored and uneven. Most people fix this by covering walls with absorption panels or foam.

The problem shows up after they’ve absorbed too much. The room goes from echoey to lifeless — tight, claustrophobic, and fatiguing to listen in for more than thirty minutes.

Diffusion fixes this by controlling reflections without removing them. Professional studios figured this out in the 1980s: you need some reflected energy for a room to sound natural, you just need it spread evenly instead of concentrated in focused beams.

The result is a space that sounds controlled and open at the same time. Clarity without deadness — that’s the balance diffusion delivers.

What Problems Does Sound Diffusion Solve In A Room?

Room acoustic problems that sound diffusion helps solve

The problems diffusion targets are specific and measurable — not vague “bad sound” complaints. Each one has a physical cause that diffusion’s scattering mechanism directly addresses.

Flutter Echo And Comb Filtering

Flutter echo is that metallic “zing” you hear when you clap between two parallel walls. Sound bounces back and forth in a rapid ping-pong pattern, creating a sustained ringing that colors everything in the room.

Try this: stand between two bare parallel walls and clap once. If you hear a bright, ringing sustain instead of a clean decay, that’s flutter echo.

Comb filtering happens when a direct sound and its reflection arrive at your ears with a slight time delay. Certain frequencies cancel while others reinforce — the result is an uneven frequency response that shifts depending on where your head is.

A diffuser on one of those parallel walls breaks the ping-pong pattern immediately. The scattered reflections arrive from multiple angles at multiple times, so they can’t reinforce into a focused flutter.

One BXI Wood Sound Diffuser (1D QRD) on the rear wall is often enough to eliminate the worst flutter echo in a home studio.

The Over-Absorbed “Dead Room” Problem

Absorption panels are the first treatment most people buy — and the easiest to overdo. A room with absorption on every wall sounds artificially tight, like wearing headphones in a closet.

The issue is biological, not just aesthetic. Your brain uses reflected sound to gauge room size, distance, and spatial orientation.

Remove all reflections and your brain gets confused — listening becomes fatiguing because there are no spatial cues to process.

Studios call this “dead room syndrome.” Engineers who mix in over-absorbed rooms make compensating EQ decisions that don’t translate to other playback systems.

They boost highs because the room absorbs them, then the mix sounds harsh everywhere else.

Diffusion is the antidote. Swapping absorption panels for diffusers on the rear wall restores the room’s ambient energy while keeping reflections scattered and controlled.

The room feels open and alive again without the harsh echoes you started with. For a deeper look at this tradeoff, sound absorption vs diffusion covers when each approach wins.

Where Should You Place Diffusers In A Room?

Placement guide for sound diffusers in a room

Knowing that diffusion scatters sound is step one — knowing where to scatter it determines whether the treatment actually works. The same panel in the wrong spot either does nothing or creates new problems.

Rear Wall (The Default Starting Point)

The rear wall catches the strongest delayed reflection in any room. Sound travels from your speakers (or the sound source) to the back wall and bounces straight back — arriving late enough to hear as a distinct echo.

This is where diffusion makes the biggest difference with the least effort. A QRD or skyline panel on the rear wall scatters that focused return into ambient energy that reaches your ears from multiple angles over a spread of milliseconds.

The critical requirement is distance. You need at least 2 meters between the diffuser and your listening position for the scattered reflections to separate properly.

Below that distance, the reflections arrive too close together and create comb filtering instead of smooth diffusion. Our diffuser placement guide covers the math behind this distance rule.

If your room is too short for rear-wall diffusion, diffusion in small rooms covers the workarounds — ceiling mounting, shallow high-frequency panels, and alternative layouts that still work.

Ceiling And First Reflection Points

Ceiling flutter echo is the second most common problem after rear-wall reflections. The vertical bounce between a hard floor and hard ceiling creates a rapid “zing” that’s especially audible in rooms under 9 feet.

The BXI Wood Sound Diffuser (2D Skyline) is purpose-built for ceiling mounting — the 2D design scatters sound in both horizontal and vertical planes, which is exactly what you need when the reflection comes straight down.

First reflection points on the side walls are more debated. Most mixing engineers absorb here for tighter stereo imaging, but home theaters and listening rooms sometimes benefit from diffusion — scattered side reflections preserve the surround field without the comb filtering of a bare wall.

The rule of thumb: absorb at first reflection points if you’re mixing music, diffuse if you’re building a listening or theater space where immersion matters more than clinical precision. For how many diffusers your room actually needs, that guide walks through the calculation.

What Types Of Diffusers Work Best For Room Treatment?

Types of sound diffusers compared

The physics principles from earlier — surface geometry and well depth — show up differently depending on the diffuser design. Matching the right type to your room and use case prevents wasting money on a panel that can’t do its job at the distance you have.

QRD And Skyline Diffusers

A QRD (Quadratic Residue Diffuser) uses wells of mathematically calculated depths arranged in a row. Sound enters the wells and reflects out at different times, scattering horizontally across a wide arc.

This one-dimensional scatter makes QRD panels ideal for rear walls where the primary reflection path is horizontal.

Skyline diffusers work on the same principle but scatter in two dimensions. Blocks of varying heights spread sound both horizontally and vertically — making them the better choice for ceilings or rooms where reflections come from multiple directions.

The frequency range depends on depth. A panel with 2.8-inch deep wells scatters frequencies from roughly 1 kHz upward.

Deeper wells push the effective range lower, but the panel gets heavier and sticks further off the wall.

For most home studios and listening rooms, the 1-4 kHz scatter range covers the frequencies where clarity and speech intelligibility live — and where flutter echo is most audible. If you’re considering building your own, our DIY wooden diffuser guide covers the well-depth calculations.

Polycylindrical And Curved Diffusers

Curved surfaces scatter sound differently from wells and blocks. A polycylindrical (barrel-shaped) diffuser spreads reflections across a broad arc with a smoother frequency response than a QRD — no sharp cutoff at the low end, just a gradual rolloff.

Concert halls have used curved surfaces for centuries. The barrel-vaulted ceilings in classical music venues are essentially giant polycylindrical diffusers that scatter orchestral sound across the entire audience.

The tradeoff is precision. A QRD scatters specific frequencies with mathematical exactness.

A curved diffuser scatters more broadly but less evenly — some angles get more energy than others.

For home theaters and living rooms where aesthetics matter as much as acoustics, the Art3d Wood Slat Acoustic Panels offer a middle ground — wood slats that scatter mid-high frequencies while looking like modern wall art instead of studio equipment. For a deeper breakdown of which materials work best for different room types, that guide covers wood, plastic, and foam options.

Can You Combine Diffusion With Absorption?

Hybrid acoustic treatment using absorption and diffusion

Nearly every professional room uses both — the question isn’t whether to combine them, but where each one goes. Getting this balance right is the difference between a room that sounds naturally controlled and one that sounds either dead or chaotic.

The Live-End/Dead-End Concept

Professional studios have used the live-end/dead-end (LEDE) layout since the 1980s, and it remains the standard for control rooms, mastering suites, and serious listening rooms.

The front wall — behind the speakers — gets heavy absorption. This is the “dead end” where you want zero early reflections interfering with the direct sound from your monitors.

The rear wall gets diffusion. This is the “live end” where scattered reflections add natural ambience without creating focused echoes.

The contrast between dead front and live rear gives your brain two distinct signals: clean direct sound from the speakers and diffuse ambient energy from behind.

First reflection points on the side walls get absorption (for mixing) or diffusion (for listening rooms). Bass traps go in the corners to handle low-frequency buildup that neither absorption panels nor diffusers can address.

Creating Better-Sounding Rooms

The transformation is dramatic. An untreated room with bare drywall might have a reverb time of 1.0-1.2 seconds — enough to make speech muddy and music blurred.

Add absorption at the front wall and first reflection points, and that drops to 0.4-0.6 seconds. The room sounds cleaner and tighter immediately.

Now add diffusion to the rear wall. The reverb time doesn’t change much, but the character shifts — the room sounds open and dimensional instead of flat and compressed.

Music has depth, dialogue has presence, and you can listen for hours without fatigue.

That’s the combination working: absorption removes the problematic reflections, diffusion preserves the ones that make the space feel alive. Understanding what a sound diffuser actually does at a physics level helps you decide which ratio your room needs.

If you’re weighing diffusers vs acoustic panels for your next purchase, that comparison breaks down when each type earns its spot.

The Bottom Line

The single most impactful diffusion move for any room is a QRD or skyline panel on the rear wall, at least 2 meters from where you sit. That one placement eliminates the strongest delayed reflection and adds natural ambience that makes the space sound three-dimensional.

From there, absorb at first reflection points, trap bass in the corners, and add ceiling diffusion if the room height allows it. The LEDE layout covers 90% of rooms — dead front, live rear, treated ceiling.

If the room still sounds harsh after the rear wall is diffused, the problem is usually flutter echo between parallel surfaces. Find the offending wall pair with a clap test and treat one side.

For specifics on how to choose and mount your diffuser panels, that guide walks through the hardware and placement.

Frequently Asked Questions

How many diffusers do you need for a room?

Most rooms need 2-4 panels on the rear wall to cover the area directly behind the listening position. Exact count depends on panel size and wall width — a 12-foot rear wall takes three 24-inch QRD panels side by side.

Our coverage calculator gives room-specific numbers.

Do diffusers work in small rooms?

Only certain types. Standard QRD panels need 2+ meters of clearance to scatter properly, which most rooms under 10×10 feet can’t provide.

Shallow high-frequency diffusers and 2D skyline panels work at shorter distances because they spread energy across more angles — reducing the minimum clearance needed.

Is diffusion better than absorption?

They solve different problems — most rooms need both. Absorption controls reverb time and eliminates specific problem reflections. Diffusion preserves room energy while preventing focused echoes. The live-end/dead-end layout uses absorption up front and diffusion behind you, which gives you both clarity and natural spaciousness.

Do Sound Diffusers Work In Small Rooms? (Only If You Pick The Right Type)

Do sound diffusers work in small rooms — or do they just waste wall space that should go to absorption? The honest answer is that most standard diffusers won’t perform as intended in rooms under 10×10 feet, but certain types still make a measurable difference if you understand why the physics changes at close range.

The core issue is distance. A diffuser scatters sound into multiple reflections that need physical space to separate before reaching your ears.

In a large studio, that separation happens naturally — in a bedroom or vocal booth, the walls are too close for it to develop.

Below, you’ll see which diffuser types still help in tight spaces, why experts recommend absorption first, and how to set up a small-room treatment plan that gets both clarity and liveliness without wasting money on panels that can’t do their job.

Quick Takeaway

Standard QRD diffusers need at least 2 meters of clearance to scatter properly — a distance most small rooms can’t provide. In rooms under 100 square feet, prioritize absorption at first reflection points and bass traps in corners first. If you still want diffusion, use 2D skyline diffusers or shallow high-frequency panels on the rear wall or ceiling, where the scattering distance is longest.

Do Sound Diffusers Work In Small Rooms — Or Are They A Waste Of Money?

Small room acoustic challenge for sound diffusers

The short answer is: standard diffusers don’t work well in small rooms, and no amount of clever mounting changes that. The physics is non-negotiable — scattered reflections need travel distance to separate, and a room that’s 8 feet deep doesn’t have it.

A QRD diffuser designed for frequencies down to 500 Hz produces reflections that need roughly 3 wavelengths of travel distance to fully separate. At 500 Hz, that’s about 6.5 feet of clearance between the panel and your ears — already most of the room’s depth in a typical bedroom studio.

The result isn’t silence or a bad reflection. It’s worse — a comb-filtered version of the original sound that colors specific frequencies and makes your room’s response less even, not more.

That said, certain diffuser designs still work in compact spaces. The key is matching the diffuser type to the distances your room actually provides, rather than installing a full-range panel that needs more space than you have.

Why Do Most Experts Say Diffusers Don’t Work In Small Rooms?

Expert reasoning about diffusers in small rooms

Every acoustician who advises against small-room diffusion is talking about the same problem: the gap between near-field and far-field scattering. Understanding this distinction explains why a panel that transforms a 20×15 control room sounds terrible in a 10×8 bedroom.

The Minimum Scattering Distance Problem

When sound hits a diffuser, each well or block redirects a portion of the wave at a different angle and timing. Close to the panel, these redirected waves overlap chaotically — they haven’t spread enough to create an even sound field.

Move far enough away and the individual reflections blend into a smooth, diffuse wash of sound energy. That transition point — where chaotic overlap becomes even diffusion — is the minimum scattering distance.

For most QRD diffusers targeting frequencies down to 500-1000 Hz, that distance is 2-3 meters (roughly 7-10 feet). In a room that’s 10 feet deep with your listening position 3 feet from the front wall, the rear wall is only 7 feet behind you.

Factor in the depth of the diffuser itself and you’re right at the threshold — or below it.

Far Field Vs Near Field Scattering

In the far field, the scattered reflections have spread enough that the sound energy arriving at your ears is roughly equal from all directions. Your brain perceives this as natural ambience — open, spacious, free of harsh reflections.

In the near field, you’re hearing individual scattered reflections before they’ve blended. The result is comb filtering — certain frequencies reinforce while others cancel, creating an uneven frequency response that changes depending on exactly where your head is.

Near-field scattering is actively worse than a flat wall reflection. A flat wall gives you one clean reflection your brain can process.

Near-field diffusion gives you dozens of partially-separated reflections that interfere with each other — muddying the sound rather than improving it.

For the full breakdown of how scattering works, what a sound diffuser does covers the physics in detail.

Which Diffusers Can Still Help In A Small Room?

Sound diffuser options for small rooms

Not all diffusers need the same clearance distance. Two design features reduce the minimum scattering distance: scattering in multiple planes and targeting only high frequencies.

2D Skyline Diffusers

A 1D QRD diffuser scatters sound in one plane — typically horizontal. All the scattered energy spreads left-right but stays concentrated vertically, which means you need more distance for the reflections to separate in that single plane.

A 2D skyline diffuser scatters in both horizontal and vertical planes simultaneously. The energy spreads across a hemisphere instead of a single arc, which means less energy per angle and faster blending at shorter distances.

The EVA Acoustic Diffusers (4-Pack) use this approach — a waffle pattern that scatters sound across multiple angles within a compact 24×24-inch footprint. In a small room, mount them on the rear wall where you have the most distance from your listening position.

Shallow High-Frequency Diffusers

High frequencies have shorter wavelengths, which means they need less travel distance to scatter properly. A shallow diffuser that only targets frequencies above 1-2 kHz can work in rooms where a full-range panel fails.

The tradeoff is obvious: you’re only diffusing the high end. Low-mid reflections still bounce back unscattered.

In practice, this still helps because high-frequency flutter echo — the metallic “zing” between parallel walls — is one of the most audible problems in small rooms.

The BXI Wood Sound Diffuser (2D Skyline) fits this role — the varying block heights scatter mid-high frequencies across both planes while fitting a compact 24×24-inch rear wall or ceiling spot.

When Should You Choose Absorption Over Diffusion In A Small Room?

Why absorption is often the priority in small rooms

In most small rooms, absorption solves the biggest problems that diffusion can’t touch at close range. Bass buildup in corners, strong early reflections from nearby walls, and excessive reverb time all respond to absorption — and none of them improve with diffusion at short distances.

Absorption First, Diffusion Second

Bass traps in the corners handle the low-frequency buildup that makes small rooms sound boomy and undefined. Absorption panels at first reflection points on the side walls clean up the early reflections that smear your stereo image.

These two treatments alone transform a small room from echoey and muddy to controlled and clear. They’re also cheaper per square foot than wood diffusers, and they work regardless of the distance between the panel and your ears.

Once absorption handles the major problems, add diffusion where you have the most clearance — usually the rear wall or ceiling. The Art3d Wood Slat Acoustic Panels on the rear wall add diffusion without eating much depth — the slat pattern scatters mid-high frequencies while keeping the panel under an inch thick.

The Small-Room LEDE Layout

The live-end/dead-end concept still applies in small rooms, just with adjusted proportions. The front half of the room — the “dead end” facing you — gets heavy absorption: panels at first reflection points, absorption behind the speakers, and bass traps in the front corners.

The rear half — the “live end” behind you — gets lighter treatment. If you have at least 1.5 meters between your listening position and the rear wall, a 2D diffuser works there.

If the distance is shorter, use absorption on the rear wall too and move diffusion to the ceiling.

Ceiling diffusion often works better in small rooms than rear-wall diffusion because the floor-to-ceiling distance is typically longer than the wall-to-listener distance. For detailed placement strategies, that guide covers every position.

If you’re weighing diffuser vs absorber tradeoffs, that comparison helps you decide what goes where. And for the underlying physics of why these treatments behave differently, absorption vs diffusion covers the science.

The Bottom Line

Standard diffusers need more space than most small rooms provide. In rooms under 10×10 feet, absorption handles the biggest problems — bass buildup, early reflections, and excessive reverb — without any distance requirements.

If you want diffusion in a small room, use 2D skyline diffusers or shallow high-frequency panels and mount them where you have the most clearance: rear wall first, ceiling second. Skip 1D QRD panels unless your rear wall is at least 2 meters from your listening position.

Start with absorption at first reflection points and bass traps in the corners. Add diffusion only after those fundamentals are covered — it’s a finishing touch, not a foundation.

For more on whether wood diffusers are worth it, that guide covers material performance. And for how many panels your room actually needs, check how many diffusers you need.

Frequently Asked Questions

Do diffusers work in small rooms?

Only certain types — 2D skyline diffusers and shallow high-frequency panels can help in rooms under 100 square feet. Standard QRD diffusers need at least 2 meters of clearance to scatter properly, which most small rooms can’t provide.

What is the minimum room size for a QRD diffuser?

Generally 10×12 feet or larger, so you have at least 2 meters between the diffuser and your listening position. Below that distance, the scattered reflections create comb filtering instead of smooth diffusion.

What is the 38% rule in room acoustics?

The 38% rule suggests placing your listening position at 38% of the room’s length from the front wall — roughly one-third of the way in. This position minimizes the impact of standing waves and room modes, giving you the most even bass response at your listening spot.

Sound Diffuser Vs Sound Absorber? (Which One Your Room Actually Needs)

Sound diffuser vs sound absorber is the first decision you’ll face when treating a room — but only if you understand what each one does to sound energy. One removes it, the other redirects it, and picking wrong can leave your room sounding worse than when you started.

Most people default to absorption because foam panels are cheap and everywhere. The problem is that a room with too much absorption sounds dead — lifeless and claustrophobic, like recording inside a closet.

Below, you’ll see exactly when absorption is the right call, when diffusion solves the problem better, and how most professional studios use both in a specific layout that balances clarity with natural room energy.

Quick Takeaway

Sound absorbers remove sound energy from a room (reducing echoes, reverb, and noise), while sound diffusers redirect it (scattering reflections to preserve liveliness without harsh echoes). Most rooms need both — absorption at first reflection points and the front wall, diffusion on the rear wall — following the live-end/dead-end layout used in professional studios.

Sound Diffuser Vs Sound Absorber — What’s The Difference?

Core difference between a sound diffuser and absorber

An absorber converts sound energy into heat. A diffuser bounces sound energy back into the room — just scattered across multiple directions and arrival times instead of a single focused reflection.

That single difference changes everything about how your room sounds. Absorption makes a room quieter and more controlled by removing reflections.

Diffusion keeps the room lively and spacious by breaking up reflections without eliminating them.

The mechanism and the result are completely different, though.

If you’re new to this topic, understanding what a sound diffuser does gives you the foundation for everything that follows.

What Is Sound Absorption?

How sound absorbers reduce room reflections

Sound absorption happens when sound waves enter a porous material and lose energy through friction. The air molecules vibrating inside fiberglass, mineral wool, or open-cell foam slow down as they push through the material’s fibers — and that kinetic energy converts to a tiny amount of heat.

The result is simple: less sound bouncing back into the room.

How Absorption Materials Work

Every absorption material has an NRC (Noise Reduction Coefficient) rating between 0 and 1. An NRC of 0.85 means the material absorbs 85% of the sound energy that hits it and reflects only 15%.

Fiberglass and mineral wool panels (2-4 inches thick) typically hit NRC ratings of 0.80-1.05. Professional-grade fiberglass panels hit NRC ratings near 1.0 — meaning they absorb virtually all sound energy that reaches them.

Acoustic foam wedges and pyramids land lower, around 0.40-0.70, because they’re thinner and less dense.

The thickness matters because it determines which frequencies get absorbed. A 2-inch panel absorbs mid and high frequencies well but lets bass pass through almost untouched.

A 4-inch panel reaches deeper into the low-mid range.

What Absorption Does To A Room

Absorption reduces reverb time — the duration sound lingers after the source stops. In an untreated bedroom, reverb time might be 0.8-1.2 seconds.

Add absorption panels at key spots and you can bring that down to 0.3-0.5 seconds.

The room sounds tighter, more controlled, and easier to work in. Dialogue is clearer, music sounds more defined, and the “echoey” quality disappears.

The tradeoff is liveliness. Over-absorb a room and it feels like the walls are pressing in on you — no sense of space, no natural ambience.

Recording vocals in a heavily absorbed booth sounds clean, but mixing in one makes your ears fatigue within an hour.

What Is Sound Diffusion?

How sound diffusers scatter room reflections

Sound diffusion happens when a reflection hits an uneven surface and scatters in multiple directions at different times. Instead of one strong reflection bouncing straight back at you, you get dozens of weaker reflections arriving from different angles over a spread of 15-20 milliseconds.

Your brain interprets those scattered reflections as natural ambience — the sense that you’re in a room with space around you.

How Diffusion Scatters Sound

A QRD (Quadratic Residue Diffuser) uses wells of mathematically calculated depths to create phase differences in the reflected sound. Each well depth corresponds to a specific wavelength — when the reflections emerge from the wells, they interfere constructively and destructively in a pattern that spreads the sound energy evenly across the hemisphere.

Skyline diffusers work on the same principle but in two dimensions. The varying block heights scatter sound both horizontally and vertically, making them effective for ceiling mounting where reflections come from all angles.

The BXI Wood Sound Diffuser (2D Skyline) uses this two-dimensional approach — solid wood blocks at varying heights that scatter rear-wall reflections evenly instead of bouncing them straight back at the listener.

What Diffusion Does To A Room

A diffused room sounds open and spacious without the harsh echoes of an untreated space. The reflections are still there — your brain still senses the room’s size and character — but they arrive scattered enough that no single reflection dominates.

This is why concert halls use diffusion extensively. The audience needs to feel immersed in the music, surrounded by natural reverb that enhances the performance.

Flat, absorptive walls would make a concert hall sound like a recording booth — technically clean but emotionally empty.

For a deeper look at the physics, sound absorption vs diffusion covers the acoustic principles in more detail.

When Should You Use Absorption, Diffusion, Or Both?

When to use a diffuser or absorber in a room

The right treatment depends on where the problem is and what you’re using the room for. The wrong choice isn’t just unhelpful — it actively makes things worse.

When To Use Absorption

Recording booths and vocal isolation rooms need absorption almost exclusively. The goal is to capture only the direct sound from the performer without room reflections coloring the recording.

First reflection points — the spots on your side walls where sound bounces once between speakers and ears — are absorption territory in mixing environments. A strong early reflection from a side wall creates comb filtering that smears your stereo image, and absorption eliminates it cleanly.

Small rooms under 100 square feet with low ceilings often need more absorption than diffusion. The distances are too short for scattered reflections to develop properly, so diffusion at close range creates a blurred, comb-filtered mess instead of smooth ambience.

Our small-room diffusion guide covers the distance thresholds.

When To Use Diffusion

Mixing rooms, mastering suites, and dedicated listening rooms benefit from diffusion on the rear wall. You want the space behind you to sound lively and open — not dead — so your ears have a natural reference point.

Home theaters and music listening rooms prioritize immersion over clinical precision. Absorbing every reflection strips the spatial cues that make surround sound feel three-dimensional.

Diffusion preserves those cues while preventing harsh echoes.

The EVA Acoustic Diffusers (4-Pack) offer a budget-friendly starting point — a lightweight waffle pattern that scatters high frequencies across your rear wall.

When To Use Both

Most real-world rooms need both. The live-end/dead-end (LEDE) layout is the industry standard: absorption on the front wall and first reflection points (the “dead end” facing you), diffusion on the rear wall (the “live end” behind you).

This layout gives your brain two distinct signals. Clean, direct sound arrives from the front without interference from early reflections.

Scattered, diffuse energy arrives from behind, preserving the room’s natural sense of space.

If you’re building a home studio, start with absorption at the first reflection points and front wall, then add diffusion to the rear wall. That combination handles 80% of room problems.

For placement specifics, where to put sound diffusers walks through every position.

What Are The Best Placement Strategies For Absorption And Diffusion?

Placement strategies for sound diffusers and absorbers

Knowing what each treatment does matters less than knowing where to put it. The same panel in the wrong spot either does nothing or creates new problems.

First Reflection Points

Use the mirror trick: sit at your listening position and have someone slide a mirror along the side wall at ear height. Where you see the speaker reflected is the first reflection point.

Absorption panels go here — typically 2-4 inch thick fiberglass or mineral wool. A 4-pack of fabric-wrapped panels covers both first reflection points plus the front wall.

Side wall reflections arrive within 5-15 milliseconds of the direct sound. That’s short enough to cause comb filtering (frequency cancellations) that shifts your stereo image.

Absorption eliminates the reflection entirely, giving you tighter imaging and more accurate panning.

Rear Wall Treatments

The rear wall is diffusion territory. Sound travels from your speakers to the back wall and returns as a delayed reflection — late enough to hear as a distinct echo but not late enough to blend into natural reverb.

Diffusers scatter that reflection into dozens of weaker arrivals spread over time. The Art3d Wood Slat Acoustic Panels handle this while doubling as wall art — the wood slat pattern blends into home studio and listening room decor.

Keep at least 2 meters between the diffuser and your listening position. Below that distance, the scattered reflections don’t have enough travel time to separate properly.

Ceiling Treatments

Ceiling choice depends on height. Rooms with ceilings above 9 feet can handle diffusion overhead — the distance gives scattered reflections enough room to develop.

Rooms with ceilings below 9 feet usually need absorption instead. The short floor-to-ceiling distance means flutter echo cycles rapidly, and diffusion at close range creates comb filtering rather than smooth scatter.

A 2-inch absorption panel above the listening position solves the flutter without killing the room’s openness. The BXI Wood Sound Diffuser (1D QRD) works overhead in rooms with 9+ foot ceilings — the scattered reflections have enough distance to separate before reaching your ears.

For a complete ceiling guide, see diffuser placement strategies.

The Bottom Line

Absorption removes sound energy, and diffusion redirects it. Most rooms need both — absorption up front to clean the direct sound path, diffusion behind you to keep the space alive.

Start with the LEDE layout: absorb at first reflection points and the front wall, diffuse on the rear wall. Add ceiling treatment based on height.

The biggest mistake is over-absorbing. If your room feels dead and claustrophobic, you’ve gone too far with absorption and need to swap some panels for diffusers.

If it still sounds echoey and harsh, you need more absorption at the reflection points or a diffuser with better scatter coverage on the rear wall.

For more on whether wood diffusers actually work, that guide covers the science behind material choice. And if you’re deciding between diffuser panels vs acoustic panels, that comparison breaks down the product categories.

If you want to build your own panels, our DIY wooden sound diffuser guide walks through the build process. For choosing between diffusion materials, that guide covers wood, plastic, and polystyrene options.

Once you know how many panels you need, how many diffusers you actually need gives you the calculation.

Frequently Asked Questions

What is the difference between sound diffusion and absorption?

Absorption removes sound energy from a room by converting it to heat inside porous materials like fiberglass or mineral wool. Diffusion keeps the energy in the room but scatters it across multiple directions and arrival times, turning a harsh single reflection into smooth ambient energy.

When to use sound diffusers?

Use diffusers on rear walls behind the listening position, in rooms where you want to preserve natural liveliness, and in spaces prioritizing immersion over clinical control. Mixing rooms, home theaters, and music listening rooms all benefit from diffusion.

Can you use both diffusers and absorbers together?

Yes — most professional studios use both in a live-end/dead-end layout. Absorption goes at first reflection points and the front wall to clean the direct sound path.

Diffusion goes on the rear wall to maintain spaciousness behind the listener.

Are sound diffusers worth it?

If your room sounds dead or claustrophobic after adding absorption, diffusers restore the liveliness you lost. They’re essential for any room where you listen critically — the scattered reflections give your brain spatial cues that flat absorption panels remove entirely.