Best DJ Controller for Scratching — 6 Picks Ranked by Jog Wheel Response

Best DJ controller for scratching depends on one thing above all else — jog wheel quality. But most controller reviews treat jog wheels as an afterthought, burying the spec that matters most behind channel counts and software bundles.

The problem is that a controller with sluggish, low-resolution jog wheels turns every chirp and flare into a muddy mess, no matter how sharp your technique is.

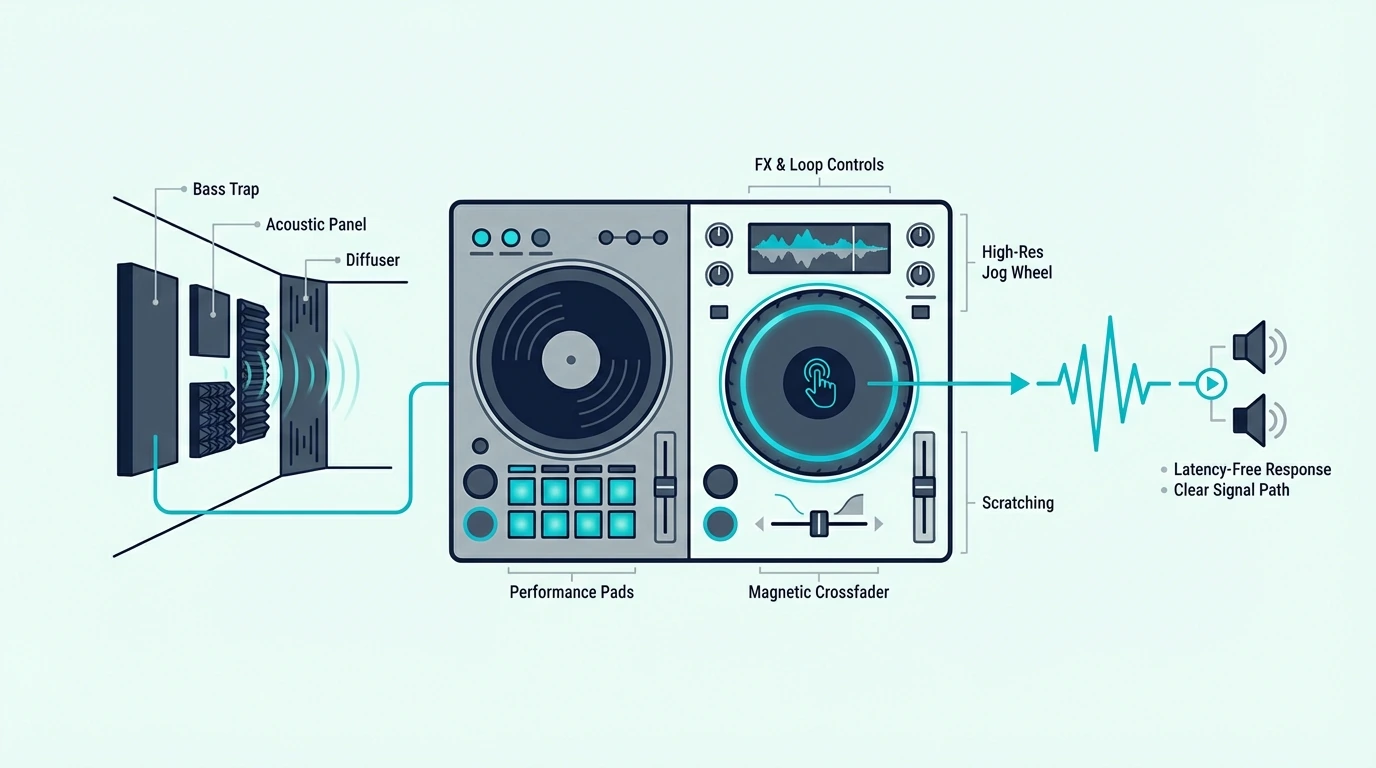
Scratching requires jog wheels that track finger movement with millisecond precision. When you drag your finger across the platter, the software must respond instantly — any latency between physical movement and audio output destroys the tight, percussive sound that defines turntablism.

That responsiveness gap is caused by differences in jog wheel resolution and the MIDI data rate each controller sends to the software. Higher-resolution wheels send more position data per rotation, which means tighter scratch tracking.

Below, you will find six controllers ranked by scratch performance — from battle-style units purpose-built for turntablism to versatile options that handle scratching alongside standard mixing.

Quick Takeaway

To find the best DJ controller for scratching, prioritize large jog wheels (8 inches or more), battle-style layout (wheels above the mixer), low-latency MIDI response, and a sharp crossfader curve. The Pioneer DJ DDJ-REV1 is the best overall scratch controller because its battle-style layout and Serato-optimized mapping deliver the tightest scratch response at this price.

What Makes a Controller Good for Scratching

Controller features that matter for DJ scratching

Jog Wheel Size and Resolution

Larger jog wheels give your fingers more surface area for scratch movements. An 8-inch wheel lets you execute full baby scratches, transforms, and flares without running out of platter space mid-movement.

Resolution determines how many position updates the jog wheel sends per rotation. Higher resolution means the software tracks your finger more precisely — which translates to tighter, more defined scratch sounds.

Battle-Style vs Standard Layout

Battle-style controllers position the jog wheels above the mixer section, mirroring how turntables sit relative to a standalone mixer. This orientation gives scratch DJs a more natural hand position — wrists stay straight instead of angling downward.

Standard layout controllers place jog wheels beside the mixer. They work for scratching, but the hand positioning feels less natural for extended scratch sessions.

Crossfader Curve

A sharp crossfader curve cuts audio instantly when the fader reaches either end. Scratch DJs need this sharp cut for transform scratches, where you rapidly open and close the crossfader to create rhythmic patterns.

A smooth crossfader curve blends audio gradually — useful for mixing, but the opposite of what scratching demands. The best controllers offer adjustable crossfader curves so you can switch between scratch and blend modes.

Software Scratch Algorithms

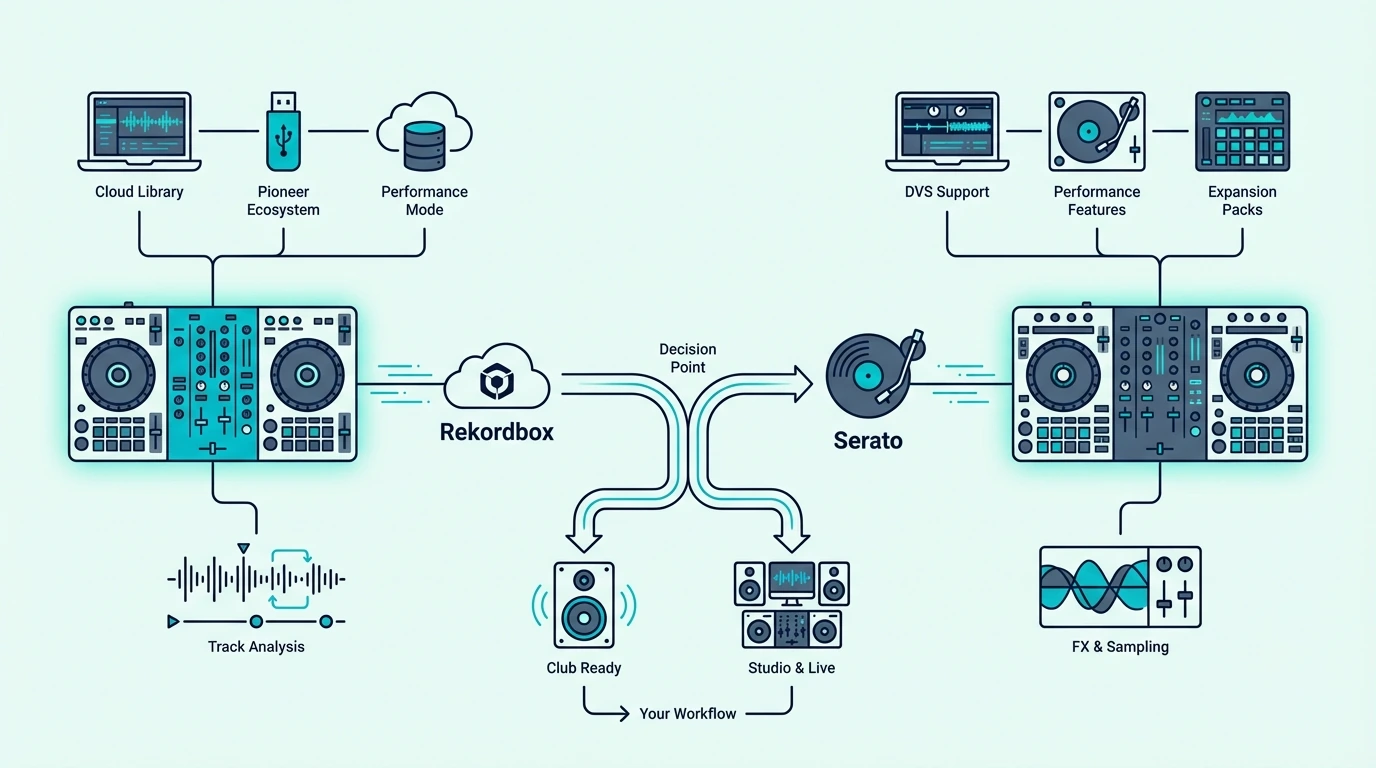
Serato and Virtual DJ have the most refined scratch algorithms. Both platforms process jog wheel input with minimal latency and produce authentic vinyl-like scratch sounds.

Rekordbox supports scratching but prioritizes mixing features over turntablist tools.

If scratching is your primary style, Serato-compatible controllers offer the tightest integration with scratch-focused features like DVS support and performance pad scratch modes.

Our Top 6 Scratch DJ Controllers

Top DJ controller picks for scratching

1. Pioneer DJ DDJ-REV1 — Best Overall

The Pioneer DJ DDJ-REV1 is the only controller on this list with a true battle-style layout — jog wheels sit above the mixer section, mirroring turntable positioning. The large jog wheels send high-resolution position data to Serato, producing tight scratch response that budget controllers cannot match.

Lever FX are dedicated hardware toggles that trigger Serato effects with a flick. During scratch routines, your hands stay on the platters while your fingers trigger echo-outs, reverb tails, and filter sweeps — no reaching for software buttons.

The Serato-exclusive mapping means every scratch technique tracks accurately. Chirps stay crisp, flares stay clean, and transforms cut precisely where you expect them to.

2. Pioneer DJ DDJ-FLX4 — Best All-Rounder

The Pioneer DJ DDJ-FLX4 handles scratching alongside standard mixing in a versatile package. The jog wheels are responsive enough for basic scratch techniques — baby scratches, chirps, and simple transforms — though they lack the battle-style positioning that dedicated scratch DJs prefer.

The dual Rekordbox and Serato support means you can practice scratching on Serato (the superior scratch platform) and switch to Rekordbox for club prep. That flexibility earns it the all-rounder spot for DJs who scratch as one part of a broader mixing style.

3. Numark Mixtrack Platinum FX — Best 4-Deck Scratch

The Numark Mixtrack Platinum FX adds 4-deck capability to scratch sessions. Load scratch samples on decks 3 and 4 while your main tracks run on decks 1 and 2 — a workflow that turntablists use for complex routine performances.

Jog wheel displays show track position directly on the hardware. That visual feedback matters during scratch routines where you need to know exactly where the sample starts without glancing at the laptop screen.

4. Hercules DJControl Inpulse 500 — Best for Learning

The Hercules DJControl Inpulse 500 has the largest jog wheels of any controller under three hundred on this list. Adjustable tension lets you dial in the platter resistance that matches your scratch style — lighter for fast transforms, heavier for controlled baby scratches.

The LED light guides are designed for transition timing, not scratching specifically. They teach rhythm awareness that translates to better scratch timing as your technique develops.

5. Hercules DJControl Inpulse 200 MK2 — Best Budget

The Hercules DJControl Inpulse 200 MK2 is the cheapest controller on this list with a built-in sound card and jog wheels large enough for basic scratch practice. The wheels are smaller than the Inpulse 500, which limits the range of scratch movements you can execute.

For beginners learning their first baby scratch and chirp, the 200 MK2 handles the fundamentals at a budget-friendly price. Upgrade to the REV1 or Inpulse 500 once your technique demands more platter real estate.

6. Pioneer DJ DDJ-FLX2 — Best Portable

The Pioneer DJ DDJ-FLX2 is the most portable option for scratch practice on the go. The jog wheels are the smallest on this list, which severely limits scratch range — but for maintaining muscle memory during travel, it beats not practicing at all.

Serato compatibility means your scratch sessions use the same software and audio engine as your main practice controller. The techniques transfer directly when you return to a full-size unit.

Scratch Technique Basics for Controller DJs
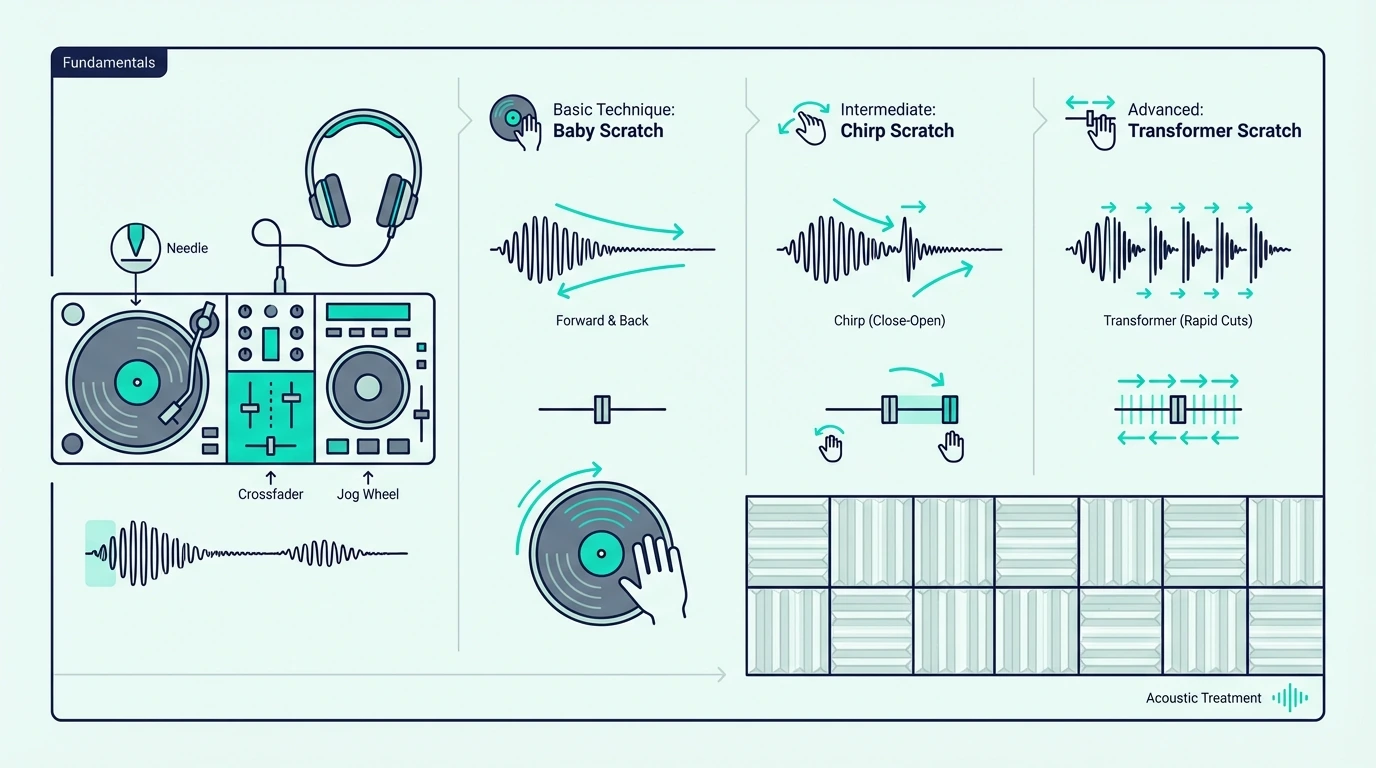
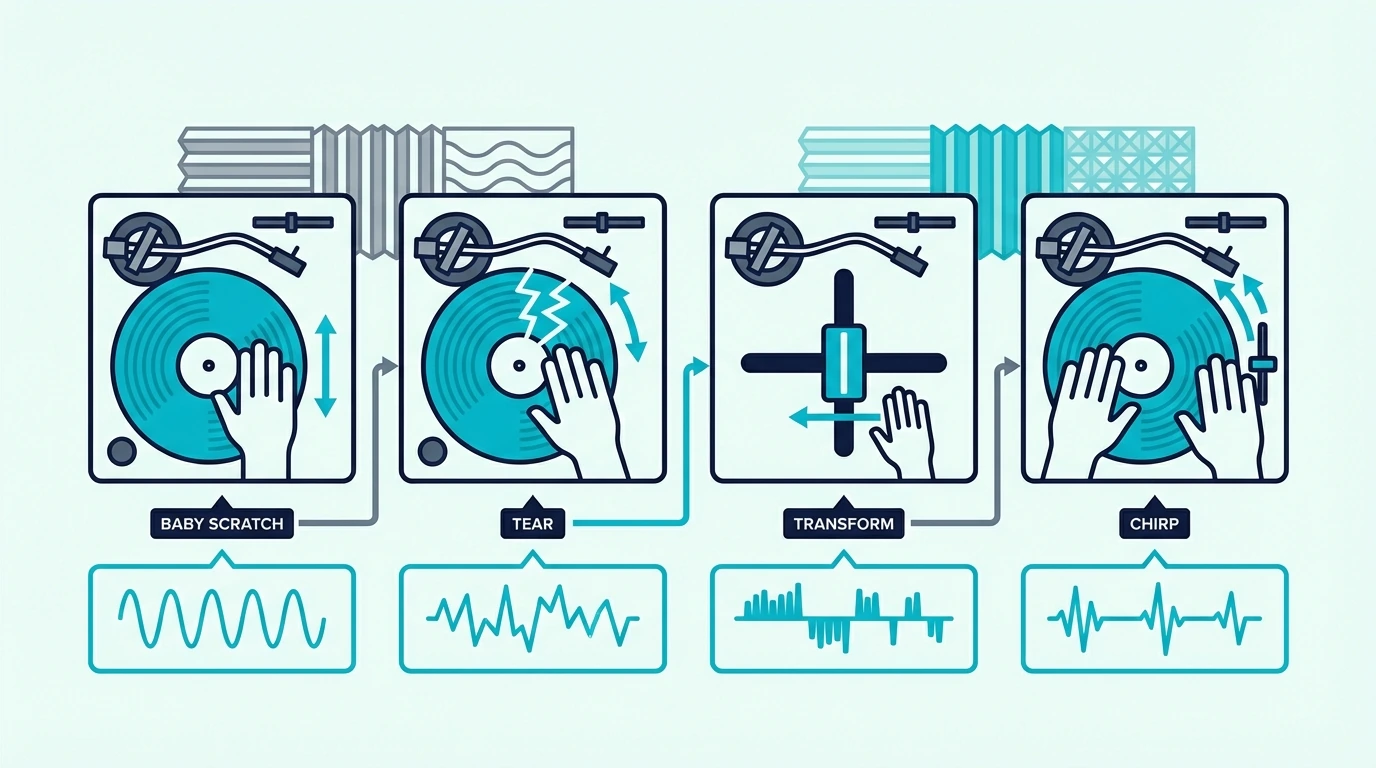
Guide to beginner DJ scratching techniques

Baby Scratch

The baby scratch is the foundation of turntablism. Move the jog wheel forward and backward in a steady rhythm while the crossfader stays open.

No crossfader movement means every scratch sound plays through the speakers — which makes the baby scratch the simplest technique to learn and the hardest to perfect.

Focus on keeping the forward and backward movements equal in speed and distance. Uneven scratches sound sloppy.

Even scratches create a percussive rhythm that locks into the beat of the track playing on the other deck.

Chirp Scratch

The chirp adds crossfader movement to the baby scratch. Close the crossfader as the jog wheel changes direction — the brief silence between forward and backward movements creates a “chirp” sound that cuts each scratch into distinct rhythmic hits.

Timing the crossfader close with the direction change is the challenge. Start slow, and speed up only when the timing becomes automatic.

A clean chirp at 90 BPM is more impressive than a sloppy chirp at 140.

Transform Scratch

The transform keeps the jog wheel moving in one direction while you rapidly open and close the crossfader. The result is a stuttering, machine-gun-like pattern that transforms a single scratch movement into multiple rhythmic hits.

This technique requires a sharp crossfader curve — the fader must cut audio instantly at both ends. Controllers with adjustable crossfader curves let you dial in the sharp cut that transforms demand.

The DDJ-REV1 excels here because its crossfader is tuned for scratch performance out of the box.

The Bottom Line

The Pioneer DJ DDJ-REV1 is the best DJ controller for scratching because its battle-style layout, large jog wheels, and Serato-optimized mapping deliver the tightest scratch response at this price. For DJs who scratch as part of a broader mixing style, the DDJ-FLX4 balances scratch capability with versatile mixing features.

Scratching is a physical skill that improves with daily practice. Pick a controller with jog wheels that respond to your fingers, and dedicate 15 minutes per session to scratch drills — the muscle memory builds faster than you expect.

Frequently Asked Questions

Can you scratch on a DJ controller?

Yes — most DJ controllers with jog wheels support scratching. The quality depends on jog wheel size, resolution, and the software’s scratch algorithm.

Controllers with battle-style layouts and large platters deliver the best scratch experience.

What size jog wheels do you need for scratching?

Jog wheels of 6 inches or larger support basic scratch techniques. For serious turntablism (flares, crabs, chirps at speed), 8-inch or larger wheels provide the surface area and precision needed for clean execution.

Is Serato or Rekordbox better for scratching?

Serato is the industry standard for scratching. Its scratch algorithms are more refined, its DVS support is more mature, and most scratch-focused controllers (DDJ-REV series, Rane units) are designed around Serato integration.

Do I need a battle-style controller for scratching?

No — standard-layout controllers support scratching. A battle-style layout makes scratching more comfortable for extended sessions because the jog wheel positioning mirrors turntable placement.

It is a preference, not a requirement.

Best MIDI Keyboard for Cubase — 6 Controllers for Scoring, Mixing, and Production

Best MIDI keyboard for Cubase matters more than for most DAWs because Cubase handles MIDI data with a depth that simpler platforms skip entirely. Expression Maps, Quick Controls, and the Score Editor all respond differently depending on what your controller sends, but most buyers never check those details before purchasing.

The problem is caused by Cubase’s professional-grade MIDI architecture demanding more from a controller than basic note input. A keyboard that works fine in GarageBand may fail to transmit the articulation switches, aftertouch data, or CC messages that Cubase’s orchestral workflows depend on.

We tested 6 controllers through Cubase’s specific features — Quick Controls mapping, Score Editor compatibility, Expression Map triggering, and mixer integration. Every pick below was evaluated on how well it handles Cubase’s advanced MIDI capabilities, not just whether the keys play notes.

Below you will find our top picks sorted by use case, followed by a setup guide for maximizing any MIDI keyboard in Cubase.

Quick Takeaway

The best MIDI keyboard for Cubase is the M-AUDIO Keystation 49 MK3 for general production — 49 full-size keys with transport controls at a hundred nine dollars. Composers working with Expression Maps should consider the M-AUDIO Keystation 88 MK3 for full-range orchestral input. Budget producers can start with the Nektar SE49 at under eighty dollars with built-in Cubase integration.

Why Cubase Demands More From A MIDI Keyboard

Cubase MIDI features for controller workflows

Cubase is the DAW of choice for film composers, orchestral arrangers, and producers who need the deepest MIDI editing tools available. Those tools only reach their potential when paired with a controller that transmits the right data.

Quick Controls Need Assignable Knobs

Cubase’s Quick Controls let you assign up to 8 parameters per track to a set of hardware knobs. Load a synth plugin and Quick Controls surface the most important parameters — filter cutoff, resonance, envelope attack, LFO rate — for instant hands-on tweaking.

A MIDI keyboard with 8 assignable knobs maps directly to Quick Controls through Cubase’s MIDI learn. The Akai MPK Mini MK3’s 8 knobs are purpose-built for this workflow.

Expression Maps Change Everything For Orchestral Work

Cubase’s Expression Maps let you trigger different articulations (legato, staccato, pizzicato, tremolo) from your MIDI keyboard using keyswitches. No other DAW handles articulation switching this natively.

A controller with enough keys to dedicate a bottom octave to keyswitches while still playing melodies above requires at least 49 keys. Composers working with large orchestral templates often need 88 keys to cover both keyswitch ranges and playable notes simultaneously.

The Score Editor Needs Full-Size Keys

Cubase includes a professional notation editor that displays MIDI data as traditional sheet music. Entering notes into the Score Editor works best with full-size keys because the velocity sensitivity and key spacing match how notation is written — dynamic markings correspond to playing force, and proper finger spacing prevents accidental adjacent notes.

Mini keys introduce errors in the Score Editor because the cramped spacing makes it difficult to play accurate intervals. If notation work is part of your Cubase workflow, full-size keys are not optional — they are required for efficient input.

Mixer Integration Through Generic Remote

Cubase’s Generic Remote setup lets you map any MIDI CC message to any mixer or transport function. Faders control track volume, knobs adjust sends, and buttons trigger solo, mute, and record arm. The configuration saves as a preset that loads with every project.

Controllers with 9 faders (like the Novation Launchkey 61 MK4) map to Cubase’s mixer channels for hands-on mixing without touching the mouse. That workflow mirrors a physical mixing console and speeds up the mix process significantly.

Which MIDI Keyboards Work Best With Cubase

Top MIDI controller picks for Cubase

Here are 6 controllers ranked by Cubase compatibility, from the best overall to the most affordable option.

The M-AUDIO Keystation 49 MK3 wins Best Overall for Cubase because 49 full-size keys handle both melody input and keyswitch triggering comfortably. The transport controls integrate with Cubase’s playback natively, and the synth-action keys respond accurately for Score Editor work.

The Akai Professional MPK Mini MK3 earns Best Compact because the 8 knobs map perfectly to Cubase’s Quick Controls. The 8 pads handle drum programming through Cubase’s Drum Editor, and the compact form factor fits alongside a larger keyboard in a dual-controller setup.

For composers and film scorers, the M-AUDIO Keystation 88 MK3 provides the full keyboard range that Expression Maps and orchestral templates demand. The 88 semi-weighted keys give you dedicated keyswitch octaves plus a full playable range above them.

The Novation Launchkey 61 MK4 takes Best Premium for Cubase users who want the most complete hardware feature set. The 9 faders map to Cubase’s mixer through Generic Remote, the 16 pads handle drum programming, and the 61 semi-weighted keys with aftertouch support expressive orchestral playing.

The Nektar SE49 delivers Best Value with 49 full-size keys and built-in Cubase integration through Nektar’s DAW software. At under eighty dollars, it is the cheapest way to get full-range playing with automatic Cubase parameter mapping.

And the midiplus AKM320 gets you playing in Cubase for under forty dollars. No Quick Controls mapping or mixer integration, but velocity-sensitive keys handle basic note input and simple Score Editor work.

How Do You Set Up a MIDI Keyboard in Cubase

Cubase MIDI controller setup guide

Cubase handles MIDI controller setup through Studio Setup (Studio menu), and the configuration is more detailed than most DAWs because Cubase exposes more mappable parameters.

Basic MIDI Input Setup

Open Studio Setup (Studio, Studio Setup) and click “MIDI Port Setup” in the left panel. Your USB MIDI keyboard should appear in the port list. Ensure the “In All MIDI Inputs” checkbox is enabled for your controller.

Create an instrument track, load any VST instrument, and play. Cubase routes MIDI from your controller to whichever track is selected.

Quick Controls Configuration

Open the Quick Controls tab in the Inspector panel (left side of the arrangement window). Click the “L” (Learn) button next to any Quick Control slot, then twist a knob on your MIDI keyboard. Cubase captures the CC assignment and saves it with the project.

For the MPK Mini MK3, map knobs 1-8 to Quick Controls 1-8. The assignments persist across sessions once saved as part of your project template.

Generic Remote For Mixer Control

Studio Setup contains a “Generic Remote” device that maps MIDI CC messages to Cubase’s mixer, transport, and channel functions. Add a Generic Remote, assign your controller’s faders to mixer volume channels, and save the configuration as a preset.

This one-time setup turns any controller with faders into a physical mixing surface for Cubase. The Launchkey 61 MK4’s 9 faders handle 8 mixer channels plus a master fader — enough for most mixing workflows.

Expression Map Setup For Orchestral Work

Cubase’s Expression Maps live in the Inspector panel under the MIDI Inserts section. Create a new Expression Map, define articulation slots (legato, staccato, marcato), and assign each slot to a keyswitch note on your MIDI keyboard.

During playback, pressing the keyswitch note triggers the corresponding articulation on your orchestral plugin. The Expression Map lane in the Key Editor shows which articulation is active at any point in the timeline, making it easy to edit articulation changes after recording.

Controllers with 88 keys give you the most comfortable keyswitch experience because you can dedicate the bottom two octaves to articulation switches while keeping five full octaves for playing. Smaller controllers require octave shifting mid-performance, which interrupts the creative flow.

Project Templates Save Configuration Time

Save your Quick Controls, Generic Remote, and Expression Map settings as part of a Cubase project template. Every new project loads with your MIDI keyboard fully configured — zero setup time per session.

Create separate templates for different workflows: one for orchestral scoring with Expression Maps pre-loaded, one for electronic production with Quick Controls mapped to synth parameters, and one for mixing with Generic Remote fader assignments active. That template-based approach means your MIDI keyboard adapts to each workflow without reconfiguration.

The Bottom Line

The M-AUDIO Keystation 49 MK3 handles most Cubase workflows at a hundred nine dollars — 49 full-size keys for melody input, keyswitch triggering, and Score Editor work. Composers who need the full range should invest in the M-AUDIO Keystation 88 MK3 for Expression Map work.

Budget-conscious Cubase users should start with the Nektar SE49 — 49 full-size keys with Cubase integration for under eighty dollars.

Frequently Asked Questions

What is the best MIDI keyboard for Cubase?

The M-AUDIO Keystation 49 MK3 is the best overall choice for most Cubase users — 49 full-size keys, transport controls, and a price point under a hundred ten dollars. Composers should consider the 88-key version for full orchestral range.

Does Cubase work with any MIDI keyboard?

Yes — Cubase supports every class-compliant USB MIDI keyboard through its MIDI Port Setup. The difference between controllers is how deeply they integrate with Cubase’s Quick Controls, Generic Remote, and Score Editor.

Do I need 88 keys for Cubase?

Only if you work with orchestral Expression Maps that require dedicated keyswitch octaves alongside a full playable range. For general production, beat making, and synth programming, 49 keys cover everything you need.

Can I use Cubase for free with a MIDI keyboard?

Cubase Elements (the entry-level version) often comes bundled with certain MIDI keyboards and audio interfaces. Steinberg also offers Cubase AI and Cubase LE as free lite versions with select hardware purchases. Check the bundled software list of any controller before buying — you may get Cubase included.

Best DJ Mixing Software — 5 Platforms Reviewed With Pricing and Features

Best DJ mixing software is not a hardware decision — but the software you pick determines which hardware works with it, which clubs you can prep for, and how much you pay over the lifetime of your DJ career. Most beginners treat the software choice as an afterthought, letting their first controller decide for them.

That default approach works until you want to switch. The problem is that every DJ platform stores your cue points, beat grids, playlists, and hot cues in a proprietary format. Rekordbox metadata does not transfer to Serato. Virtual DJ playlists do not import into Traktor. Six months of library work becomes locked to whichever platform you started on.

The cause is an industry where each hardware manufacturer bundles their own software to create ecosystem lock-in. Pioneer pushes Rekordbox, Hercules bundles DJUCED, Numark ships Serato Lite, and Denon runs Engine DJ. Each wants you committed before you realize the tradeoffs.

Below, you will find five DJ mixing platforms reviewed like products — with pricing tiers, feature breakdowns, hardware compatibility, and honest verdicts — so you choose the right ecosystem before investing months of library work into the wrong one.

Quick Takeaway

The best DJ mixing software depends on your goals: Rekordbox for club DJs who need USB export to Pioneer CDJs, Serato DJ for maximum hardware flexibility across brands, Virtual DJ for the most generous free tier, DJUCED for guided beginner learning, and Engine DJ for laptop-free standalone mixing. Every platform offers a free tier that covers beginner fundamentals.

How We Evaluated Each Platform

Comparison grid of DJ mixing software options

What We Compared

We tested each platform across five criteria: free-tier feature depth, paid upgrade value, hardware compatibility range, library management quality, and how fast a complete beginner can go from install to first mix. Platforms that require paid upgrades for basic features (like recording or 4-deck mixing) scored lower than those that include them free.

We also weighted club relevance — whether the software’s library format exports to professional venue hardware. Rekordbox scores highest here because Pioneer CDJs dominate club installations worldwide.

Why Software Choice Matters More Than Hardware

Your controller might last two years before you upgrade. Your software library — cue points, beat grids, playlists, memory cues — represents hundreds of hours of track preparation that you carry across every hardware upgrade. Choosing the wrong software costs more in lost library work than choosing the wrong controller costs in hardware depreciation.

1. Rekordbox — Best for Club DJs

Decision flowchart for choosing DJ mixing software

Pricing

Rekordbox Core is free — it handles library management, track analysis, beat grid editing, and USB export to Pioneer CDJs. Performance mode (live mixing on your laptop) unlocks automatically with any Pioneer or AlphaTheta controller. No subscription needed if you own compatible hardware.

The Creative plan (subscription) adds cloud library sync and video features. Most DJs never need it — the free Core tier plus a Pioneer controller covers everything.

Key Features

Track analysis detects BPM, musical key, and phrase boundaries with the highest accuracy of any platform we tested. Beat grid editing lets you manually correct tracks the algorithm misreads — essential for tracks with live drummers or tempo variations.

USB export is Rekordbox’s killer feature. Prepare your set at home, export to a USB drive, and walk into any club with Pioneer CDJs. Your cue points, beat grids, and playlists load instantly on the venue’s decks without a laptop.

Best Controller Pairing

The Pioneer DJ DDJ-FLX4 unlocks Rekordbox Performance mode automatically and also supports Serato — the only Rekordbox controller at this price with dual-platform support.

Verdict

Rekordbox is the correct choice if you plan to play at clubs. No other platform matches its USB export workflow to Pioneer CDJs. The free tier is generous enough that most DJs never pay a subscription.

2. Serato DJ — Best Hardware Flexibility

Serato DJ software review section

Pricing

Serato DJ Lite is free with any compatible controller — it covers 2-deck mixing, basic effects, and library management. Serato DJ Pro costs a monthly subscription or one-time purchase, unless your controller unlocks it natively (Rane and high-end Pioneer units include Pro activation).

Pro adds 4-deck support, Serato Stems (real-time vocal isolation), DVS support, recording, and expanded effects.

Key Features

Hardware compatibility is Serato’s defining advantage. Pioneer, Numark, Hercules, Rane, and Denon all make Serato-compatible controllers. You can switch hardware brands without rebuilding your library or relearning the software.

DVS (Digital Vinyl System) lets you control digital files with real vinyl on turntables — the preferred workflow for scratch DJs and turntablists. No other platform’s DVS implementation is as mature or widely supported.

Best Controller Pairing

The Numark Mixtrack Platinum FX is the most feature-rich Serato Lite controller at this price — 4-deck support, jog wheel displays, and dedicated effects paddles. For Serato-focused setups, it delivers the best value.

Verdict

Serato is the correct choice if you want maximum hardware flexibility or plan to scratch with DVS. The free Lite tier covers beginners, and Pro unlocks professional features when you need them.

3. Virtual DJ — Best Free Tier

VirtualDJ software review section

Pricing

Virtual DJ Home is completely free for non-commercial use — no time limit, no feature crippling. It includes 2-deck mixing, effects, a sampler, and stem separation. Virtual DJ Pro requires a paid license for 4-deck support, video mixing, broadcasting, and commercial use.

No other DJ platform offers stem separation in its free tier. That single feature gives VDJ Home a significant advantage for beginners who want to experiment with vocal isolation and instrumental mixing at zero cost.

Key Features

Stem separation isolates vocals, drums, bass, and melody from any track in real time. This creative tool opens mashups, acapella blends, and instrumental transitions that other free-tier platforms cannot touch.

The broadest MIDI controller support of any platform — native mappings for major brands plus MIDI Learn for everything else. The Hercules DJControl Inpulse 500 works with VDJ alongside DJUCED, giving you two platforms from one controller.

Verdict

Virtual DJ is the correct choice if budget is your primary constraint. The free tier gives you more creative tools than any competitor’s free offering. Start here if you are exploring DJing before committing to an ecosystem.

4. DJUCED — Best for Learning

DJUCED software review section

Pricing

DJUCED is free with any Hercules controller. It is not available as a standalone purchase — you must own Hercules hardware to use it. No subscription, no activation code needed beyond the controller itself.

Key Features

The Intelligent Music Assistant (IMA) analyzes your tracks and suggests compatible songs based on key and energy level. Beat-sync coaching highlights when your beats drift, teaching ear training in real time. LED light guides on compatible Hercules controllers pulse in sync with the beat to show optimal transition timing.

The Hercules DJControl Starlight is the cheapest way to access DJUCED with a built-in sound card — pocket-sized learning at the lowest investment.

Verdict

DJUCED is the correct choice if you are a complete beginner who wants guided instruction built into the software. The tradeoff is Hercules-only hardware lock-in — plan to switch platforms when you outgrow the teaching tools.

5. Engine DJ — Best for Standalone Systems

Engine DJ software review section

Pricing

Engine DJ desktop is free for library management and USB preparation. Performance mode runs on Denon DJ and RANE standalone hardware — no laptop, no subscription. The cost is in the hardware itself (standalone controllers start around six hundred).

Key Features

Laptop-free operation is Engine DJ’s defining feature. The Denon DJ SC LIVE 4 runs Engine DJ on a 7-inch touchscreen with built-in Wi-Fi streaming from Tidal, SoundCloud, Amazon Music, and Beatport.

Engine DJ imports Rekordbox and Serato libraries, which means migration from those platforms is straightforward. Your existing cue points and beat grids transfer without rebuilding from scratch.

The standalone controller market is built entirely around Engine DJ. If laptop-free reliability is your priority, this is the only platform that delivers it.

Verdict

Engine DJ is the correct choice if you want to eliminate the laptop entirely. The hardware cost is higher than controller-based setups, but the reliability and simplicity of a self-contained system justifies the investment for mobile and resident DJs.

Which Software Should You Pick

Guide to choosing the right DJ mixing software

Quick Decision Guide

If you gig at clubs with Pioneer CDJs → Rekordbox. If you want maximum controller flexibility → Serato. If budget is everything → Virtual DJ Home. If you want guided learning → DJUCED. If you want no laptop → Engine DJ.

The Pioneer DJ DDJ-FLX2 is the only budget controller that supports both Rekordbox and Serato — letting you explore two ecosystems before committing. If you cannot decide, start there.

The Bottom Line

The Rekordbox ecosystem wins for club DJs because USB export to Pioneer CDJs is unmatched. Serato wins for hardware flexibility across the widest range of controller brands.

Virtual DJ wins for beginners on a budget because its free tier includes stem separation and a sampler that other platforms lock behind paid upgrades. Pick the platform that matches your goals and your local scene — the software you learn first shapes every DJ habit you build.

Frequently Asked Questions

What is the best free DJ software?

Virtual DJ Home offers the most features at zero cost — 2-deck mixing, effects, stem separation, and a sampler with no time limit. Rekordbox Core is the best free option for library management and USB export to club CDJs.

Can I switch DJ software later?

You can switch, but your cue points, beat grids, and playlists do not transfer between platforms. Engine DJ imports from Rekordbox and Serato. All other migrations require manual re-preparation of your library. Choose carefully upfront to avoid this cost.

Is Serato or Rekordbox better for beginners?

Both teach the same core mixing skills. Rekordbox is better if you plan to play at clubs with Pioneer gear. Serato is better if you want flexibility to use controllers from multiple brands. The DDJ-FLX4 supports both, which lets you explore without commitment.

Do I need to pay for DJ software?

No — every major DJ platform offers a free tier that covers beginner mixing. Virtual DJ Home, Rekordbox Core, Serato DJ Lite, and DJUCED are all free with compatible hardware. Paid upgrades unlock advanced features like 4-deck mixing, stems, and recording.

Which DJ software do professional DJs use?

Most club DJs use Rekordbox (for Pioneer CDJ integration) or Serato DJ Pro (for DVS and hardware flexibility). Mobile and wedding DJs split between Rekordbox, Serato, and Virtual DJ Pro depending on their controller brand. Battle/scratch DJs overwhelmingly choose Serato for its DVS maturity.

Best MIDI Keyboard for GarageBand — 6 Controllers That Work the Moment You Plug In

Best MIDI keyboard for GarageBand is one of the easiest buying decisions in music production, but most guides overcomplicate it. GarageBand recognizes virtually every USB MIDI keyboard instantly — the real question is which controller unlocks GarageBand’s specific features without wasting money on extras you will never use.

The problem is caused by buying a controller loaded with DAW-specific integration for Ableton or FL Studio when GarageBand does not use any of those proprietary mapping systems. You pay extra for features that sit dormant while GarageBand’s own Smart Controls, Drummer tracks, and Learn to Play lessons go untouched.

We tested 6 controllers specifically through GarageBand’s workflow on both Mac and iPad. Every pick below was evaluated on plug-and-play reliability, key feel with GarageBand’s instrument library, and whether the controller adds real value beyond basic note input.

Below you will find our top picks sorted by use case, followed by a setup guide for getting the most out of any MIDI keyboard in GarageBand.

Quick Takeaway

The best MIDI keyboard for GarageBand is the Akai MPK Mini MK3 for most users — keys, pads, and knobs in one plug-and-play package. Beginners learning piano through GarageBand should choose a 49-key controller like the M-AUDIO Keystation 49 MK3 or Nektar SE49 for proper two-handed playing. Budget users can start with the midiplus AKM320 for under forty dollars.

Why GarageBand Makes MIDI Keyboards Easy

Why GarageBand works easily with MIDI keyboards

GarageBand is the most beginner-friendly DAW for MIDI keyboard users, and that simplicity is by design. Apple built GarageBand to work with any class-compliant USB MIDI device without drivers, configuration, or manual mapping.

True Plug-And-Play On Mac

Connect a USB MIDI keyboard to your Mac, open GarageBand, and create a software instrument track. Press a key and you hear sound immediately. No preferences menu, no MIDI settings panel, no driver downloads.

This zero-configuration approach means every controller on this list works with GarageBand the moment you plug it in. The difference between controllers is what they add beyond basic note input — pads for drum programming, knobs for Smart Controls, or enough keys for GarageBand’s Learn to Play piano lessons.

GarageBand On iPad Changes The Equation

GarageBand on iPad supports USB MIDI keyboards through Apple’s Camera Connection Kit (Lightning) or directly via USB-C on newer iPads. The same plug-and-play experience applies — connect the controller and GarageBand detects it automatically.

Bluetooth MIDI controllers skip the adapter entirely on iPad. The connection process mirrors pairing AirPods — open Bluetooth settings, find the controller, and GarageBand sees it instantly. That wireless option matters for iPad-based production where cables add clutter to a portable setup.

GarageBand’s Built-In Instruments Are Surprisingly Deep

GarageBand ships with a library of instruments that punches well above its free price tag — grand pianos, electric pianos, synthesizers, orchestral strings, brass, woodwinds, and a Drummer AI that generates realistic drum patterns.

A MIDI keyboard with velocity sensitivity lets you play these instruments expressively. The grand piano responds to gentle touches with soft notes and hard strikes with loud, bright tones. That dynamic range is what separates a MIDI keyboard performance from clicking notes into the piano roll.

Which MIDI Keyboards Work Best With GarageBand

Top MIDI keyboard picks for GarageBand

Here are 6 controllers ranked by how well they serve GarageBand users, from the most feature-complete to the most affordable.

The Akai Professional MPK Mini MK3 wins Best Overall because the 8 MPC pads complement GarageBand’s Drummer tracks perfectly. Tap out drum patterns on the pads while playing melodies on the keys — a workflow GarageBand supports natively without any configuration.

The M-AUDIO Keystation 49 MK3 is the Best 49-Key pick for anyone using GarageBand’s Learn to Play piano lessons. The full-size synth-action keys let you practice proper finger positioning — something mini keys cannot provide. Transport controls handle playback during recording sessions.

The M-AUDIO Keystation Mini 32 MK3 earns Best Compact for GarageBand users who need portability. The bundled Ableton Live Lite gives you a second DAW option when you outgrow GarageBand, and the 32 mini keys handle basic melody and chord input at a MacBook-friendly size.

The Nektar SE49 delivers Best Value with 49 full-size keys for thirty dollars less than the M-AUDIO. If you want two-handed playing range for GarageBand piano and do not need pads or transport controls, this is the smartest spend.

The midiplus AKM320 is the Best Budget option — thirty-two velocity-sensitive keys for under forty dollars that GarageBand recognizes the instant you plug in. No extras, but the velocity sensitivity alone transforms how GarageBand’s instruments respond to your playing.

And the Nektar SE25 at under fifty dollars is the lightest controller on this list at 1.3 pounds. Perfect for GarageBand on a MacBook at a coffee shop or in a dorm room.

How Do You Get the Most Out of GarageBand With a MIDI Keyboard

GarageBand MIDI keyboard tips for beginners

GarageBand hides several MIDI keyboard features behind simple settings that most users never discover. Here is how to unlock them.

Smart Controls With Knobs

Open Smart Controls (press B) in GarageBand and the panel shows knobs that adjust the selected instrument’s most important parameters. If your MIDI keyboard has assignable knobs, you can map them to these Smart Controls through GarageBand’s MIDI learn.

Click the Learn button in Smart Controls, twist a knob on your controller, and the mapping saves automatically. The Akai MPK Mini MK3’s 8 knobs are particularly useful here — map them to filter cutoff, reverb, chorus, and other parameters for hands-on sound design.

Drummer Track Integration

GarageBand’s Drummer generates realistic drum patterns that respond to your playing style. Select a Drummer track, choose a genre and drummer personality, and the AI creates patterns that complement your song.

A MIDI keyboard with pads lets you override Drummer on specific hits — tapping a snare fill or adding a cymbal crash at exactly the right moment. That hybrid approach (AI patterns plus manual accents) produces more natural-sounding drums than either method alone.

Learn To Play Lessons

GarageBand includes built-in piano lessons that display notes on a staff while highlighting the corresponding keys on a virtual keyboard. A MIDI keyboard with full-size keys and enough range (at least 49 keys) lets you follow along with proper technique.

Mini-key controllers work for these lessons technically, but the cramped spacing builds bad finger habits that transfer poorly to a real piano. If learning piano is your primary goal, invest in full-size keys from the start.

Recording MIDI In GarageBand

GarageBand’s MIDI recording captures every nuance your controller sends — note timing, velocity, pitch bend, and sustain pedal data. The recording appears as a green MIDI region on the timeline that you can edit note-by-note in the piano roll editor.

Quantization (snapping notes to the grid) fixes timing mistakes after recording. GarageBand offers strength-adjustable quantization, so you can tighten timing without making the performance sound robotic. That post-recording flexibility means you do not need to play perfectly — close enough is good enough.

Audio Units And Third-Party Instruments

GarageBand supports Audio Unit (AU) plugins on Mac, which means third-party virtual instruments work alongside the built-in library. Free plugins like Vital (wavetable synth) and Spitfire LABS (orchestral samples) expand your sound palette dramatically without leaving GarageBand.

Your MIDI keyboard controls these third-party instruments identically to the built-in ones. Load a plugin on any software instrument track, and the controller plays it with full velocity sensitivity and CC control.

Upgrading To Logic Pro Later

GarageBand is intentionally designed as the on-ramp to Logic Pro. Every GarageBand project opens in Logic Pro without conversion, and every skill you learn transfers directly.

That upgrade path means your MIDI keyboard investment carries forward. A controller that works well in GarageBand today works identically in Logic Pro tomorrow — same plug-and-play connection, same MIDI data, same workflow.

The Bottom Line

The Akai MPK Mini MK3 is the best all-around choice for GarageBand because it covers keys, pads, and knobs in one affordable package. For piano learners, the M-AUDIO Keystation 49 MK3 provides the full-size keys that GarageBand’s Learn to Play lessons require for proper technique development.

GarageBand works with every USB MIDI keyboard — so even the midiplus AKM320 at under forty dollars gets you playing GarageBand’s full instrument library with real velocity sensitivity.

Frequently Asked Questions

Does GarageBand work with any MIDI keyboard?

Yes — GarageBand on Mac supports every class-compliant USB MIDI keyboard without drivers or configuration. Plug in via USB, create a software instrument track, and play. GarageBand on iPad works through Apple’s Camera Connection Kit or directly via USB-C.

What is the best MIDI keyboard for GarageBand on iPad?

The Akai MPK Mini MK3 works with iPad through Apple’s Camera Connection Kit (Lightning) or USB-C. For wireless connection, the M-VAVE controller’s Bluetooth MIDI pairs directly with iPad without any adapter.

Do I need a MIDI keyboard for GarageBand?

GarageBand includes Musical Typing (press Cmd+K) that turns your computer keyboard into a basic MIDI input device. The limitation is zero velocity sensitivity — every note plays at the same volume. A dedicated MIDI keyboard adds dynamics and expression that Musical Typing cannot replicate, starting at under forty dollars.

Can I use GarageBand as a stepping stone to a professional DAW?

GarageBand is designed as the entry point to Logic Pro. Every project, every recording, and every skill transfers directly. Your MIDI keyboard works identically in both applications. When GarageBand’s track limits or plugin restrictions become a barrier, upgrading to Logic Pro is seamless.

Best Standalone DJ Controller — 6 Systems That Replace Your Laptop Entirely [2026]

Best standalone DJ controller eliminates the one piece of gear every DJ secretly hates bringing to gigs — the laptop. But most buyers don’t realize that “standalone” covers everything from battery-powered party units to motorized-platter club systems, and the price gap between them is enormous.

The problem is that a crashed laptop mid-set ends your night. Every working DJ has experienced the spinning wheel of death during a peak-hour transition, and no amount of backup planning fixes the ten seconds of silence while your MacBook recovers.

Standalone controllers solve that failure point by running their own operating system — but the tradeoff is cost. True standalone units start where laptop controllers peak, because the built-in screen, processor, and storage replace what your computer normally handles.

Below, you will find six options ranked from true standalone systems to high-value laptop alternatives — so you can decide whether ditching the laptop is worth the investment for your specific DJ workflow.

Quick Takeaway

To find the best standalone DJ controller, decide whether you need true laptop-free operation (touchscreen, built-in storage, Wi-Fi streaming) or a reliable laptop-based alternative. The Denon DJ SC LIVE 4 is the best overall standalone system because it offers 4-deck mixing with a 7-inch touchscreen, Wi-Fi streaming, and zero laptop dependency.

What Makes a Controller Standalone

Standalone DJ controller compared with laptop DJ setup

True Standalone vs Laptop-Dependent

A true standalone controller has its own processor, screen, and storage. You load tracks from a USB drive or stream via Wi-Fi — no laptop touches the signal chain.

Engine DJ and Rekordbox Export are the two operating systems that power standalone units.

A laptop-dependent controller sends MIDI commands to software on your computer. The controller has no brain of its own — remove the laptop, and it becomes a paperweight.

Most controllers under five hundred fall into this category.

The Reliability Argument

Standalone systems eliminate laptop crashes, OS updates mid-gig, and USB driver conflicts. The controller boots into a dedicated DJ environment with no background processes competing for resources.

That reliability costs money. A standalone unit that matches the feature set of a laptop controller plus laptop runs two to three times the price.

The question is whether your gig frequency justifies that premium.

Streaming Integration

Modern standalone units connect to Wi-Fi and stream directly from Tidal, SoundCloud, Amazon Music, and Beatport. That means you can access millions of tracks without storing them locally — a feature laptop controllers also offer through their software, but standalone units do it without any computer in the chain.

The software ecosystem you choose determines which streaming services are available. Engine DJ (Denon, RANE) supports the widest range of streaming platforms on standalone hardware.

Our Top 6 Standalone and Laptop-Alternative Controllers

Top standalone DJ controller picks

1. Denon DJ SC LIVE 4 — Best Overall Standalone

The Denon DJ SC LIVE 4 is the best standalone DJ controller because it replaces your laptop with a 7-inch touchscreen, 4-deck mixing on Engine DJ, and built-in Wi-Fi streaming from Tidal, SoundCloud, Amazon Music, and Beatport.

Track browsing, waveform display, and library management all happen on the touchscreen. No laptop, no cables beyond power and speakers — the simplest possible DJ setup for mobile and resident DJs.

At 14 pounds, the SC LIVE 4 is built for gigs where you drive to the venue. It is not a backpack-friendly travel unit.

2. RANE SYSTEM ONE — Best Premium Standalone

The RANE SYSTEM ONE is the flagship standalone system for DJs who want motorized platters that feel like real vinyl. The platters spin with adjustable torque, delivering scratch response that no capacitive-touch jog wheel can match.

Engine DJ handles standalone operation, and Serato DJ Pro activates when you connect a laptop — giving you a hybrid system that works both ways. Club-grade build quality means this unit handles nightly use without degradation.

The price reflects the professional market this targets. For working DJs who need the most reliable, best-feeling standalone system available, the SYSTEM ONE justifies every dollar.

3. Numark Mixstream Pro Go — Best Portable Standalone

The Numark Mixstream Pro Go is the only standalone controller with a built-in rechargeable battery and speakers. Unplug it from the wall, carry it to a park, and start DJing — no power outlet, no external speakers, no laptop required.

Wi-Fi streaming from Amazon Music, Beatport, SoundCloud, and Tidal means your entire music library travels with the unit. The 7-inch touchscreen runs Engine DJ for track browsing and waveform display.

Two-channel operation limits you to basic A-to-B mixing. For pool parties, outdoor events, and impromptu sessions where portability trumps channel count, the Mixstream Pro Go is unmatched.

4. Gemini Sound CDM-4000BT — Best Budget Standalone

The Gemini Sound CDM-4000BT is the most affordable true standalone system on this list. Dual CD players and USB inputs let you mix from physical media without any software — the same workflow DJs used before laptops existed.

Bluetooth connectivity adds phone streaming as a backup source. The basic LCD display shows track info without the touchscreen interface that pricier units offer.

This is a no-frills standalone for DJs who value simplicity over features. If you own a CD or USB music collection and want to mix without touching a computer, the CDM-4000BT delivers that at the lowest possible price.

5. Pioneer DJ DDJ-FLX4 — Best Laptop Alternative

The Pioneer DJ DDJ-FLX4 is not a standalone unit — it requires a laptop. It earns a spot on this list because many DJs searching for “standalone” actually want the most reliable laptop-based setup at the best price.

Rekordbox and Serato dual support means your music library exports to a USB drive for club CDJs. The Smart Fader produces clean transitions while you learn.

If standalone pricing exceeds your budget, the FLX4 plus a reliable laptop gets you gigging for a third of the cost.

6. AlphaTheta DDJ-GRV6 — Best 4-Channel Laptop Alternative

The AlphaTheta DDJ-GRV6 is the laptop-based alternative for DJs who need four channels but cannot justify standalone pricing. The Groove Circuit effects engine and club-style layout mirror what you would find behind a DJM-900NXS2.

If your path leads to club residencies and the Rekordbox ecosystem, the GRV6 builds the right muscle memory while keeping your total investment under a thousand dollars.

Standalone vs Laptop — The Real Cost Comparison

Cost comparison of standalone and laptop DJ setups

Total Cost of Ownership

A standalone system like the SC LIVE 4 costs around twelve hundred dollars. A laptop-based setup (DDJ-FLX4 plus a MacBook Air) costs roughly the same — but you get a computer that serves double duty for everything else in your life.

The difference is reliability. A standalone system dedicates 100 percent of its processing power to DJing.

A laptop splits resources between DJ software, OS updates, notifications, and background processes.

When Standalone Makes Sense

Mobile DJs who gig weekly benefit most from standalone reliability. One fewer device to charge, transport, and troubleshoot means faster setup and fewer failure points.

Resident DJs with a permanent booth also benefit — the controller stays mounted, always ready, with no laptop to forget at home.

When a Laptop Setup Wins

Bedroom DJs, hobbyists, and beginners get more value from a laptop setup. The computer handles music management, video calls, streaming, and DJ practice.

A budget controller plus an existing laptop costs under three hundred.

The math only shifts toward standalone once you gig frequently enough that laptop reliability becomes a professional liability.

The Bottom Line

The Denon DJ SC LIVE 4 is the best standalone DJ controller because it eliminates every laptop dependency — touchscreen, Wi-Fi streaming, 4-deck mixing, and Engine DJ all run on the hardware itself. For DJs who cannot justify standalone pricing, the Pioneer DJ DDJ-FLX4 delivers the most reliable laptop-based setup at a fraction of the cost.

Standalone is an investment in reliability. Decide based on how often you gig — not how cool the touchscreen looks in YouTube reviews.

Frequently Asked Questions

What is a standalone DJ controller?

A standalone DJ controller has its own processor, screen, and storage — it plays music and mixes tracks without a connected laptop. You load tracks from USB drives or stream via Wi-Fi.

Denon’s SC LIVE series and the RANE SYSTEM ONE are the leading standalone platforms.

Is standalone worth the extra cost?

For DJs who gig weekly, standalone pays for itself in reliability and faster setup times. For bedroom DJs and hobbyists, a laptop-based controller delivers the same mixing experience at a lower total cost.

Can I use a standalone controller with a laptop too?

Most standalone controllers support hybrid mode — they run independently or connect to a laptop for expanded features. The Denon SC LIVE 4 connects to a laptop for Serato DJ Pro access.

The RANE SYSTEM ONE activates Serato Pro when a laptop is connected.

What is Engine DJ?

Engine DJ is the operating system that powers Denon DJ and RANE standalone controllers. It handles track analysis, library management, and performance features without a computer.

Engine DJ imports Rekordbox and Serato libraries, so you do not need to rebuild your collection from scratch.

Best MIDI Controller for Ableton — 6 Options That Actually Integrate With Session View

Best MIDI controller for Ableton is a question that comes down to one feature most buyers overlook: Session View integration. Any MIDI keyboard plays notes in Ableton, but only a few controllers let you launch clips, control the mixer, and browse instruments without touching the mouse.

The problem is caused by Ableton’s dual-view workflow (Session View plus Arrangement View) demanding more from a controller than most DAWs. A keyboard that only sends notes ignores the clip-launching, scene-triggering, and real-time mixing that define Ableton’s creative advantage.

We tested 6 controllers through Ableton’s full workflow — Session View clip launching, mixer control, instrument browsing, and real-time performance. Every pick below was evaluated on how deeply it integrates with Ableton, not just whether the keys work.

Below you will find our top picks sorted by integration depth, followed by a guide on setting up any MIDI controller in Ableton Live.

Quick Takeaway

The best MIDI controller for Ableton is the Novation Launchkey 61 MK4 — it auto-maps to Session View, the mixer, and instrument controls the moment you plug in. For a compact alternative, the Akai MPK Mini MK3 works well through MIDI learn. Budget producers can pair the M-AUDIO Keystation Mini 32 MK3 with its bundled Ableton Live Lite license for under sixty dollars.

Why Ableton Needs Session View Integration

Ableton Live Session View controlled by a MIDI controller

Ableton Live is built around two views that no other DAW replicates: Session View (a grid of clips you launch in real time) and Arrangement View (a traditional linear timeline). Most MIDI keyboards only interact with Arrangement View because they send notes and nothing else.

Session View Is Where Ableton Shines

Session View turns music production into a live performance. Each cell in the grid holds a clip — a drum loop, a bass riff, a synth pad — and you trigger them in any combination by clicking or, with the right controller, by pressing a physical pad.

That real-time clip launching is what separates Ableton from every other DAW. A controller with RGB pads that mirror Session View’s grid lets you perform arrangements on the fly, experiment with combinations you would never try with a mouse, and record those improvisations directly into Arrangement View.

Mixer And Device Control

Ableton’s mixer responds to MIDI CC messages, meaning a controller with faders can ride volume levels across tracks without switching to a mouse. Knobs can map to device parameters — filter cutoff on a synth, send levels on a return track, macro controls on a Rack.

Controllers with native Ableton integration auto-map these assignments. Generic controllers require manual MIDI mapping through Ableton’s MIDI learn mode, which works but takes setup time for every new project template.

Instrument Browsing From Hardware

The Novation Launchkey series lets you browse Ableton’s instrument and preset library directly from the controller — scrolling through sounds, loading patches, and auditioning them without opening the browser window. That hardware-level browsing keeps you in a creative flow that clicking through folders on screen interrupts.

No other controller manufacturer offers this depth of Ableton preset browsing from hardware. It is a genuine workflow advantage that compounds across every session.

Capture MIDI And Loop Recording

Ableton’s Capture MIDI feature retroactively records what you just played, even if you forgot to press record. A MIDI keyboard with responsive velocity sensitivity makes Capture especially powerful because the dynamics of your improvisation are preserved exactly as you played them.

Loop recording in Session View lets you layer MIDI performances on top of each other in real time. Play a chord progression, then add a bass line on the next pass, then a melody on the third. A controller with enough keys for two-handed playing makes this layered workflow practical.

Which MIDI Controllers Work Best With Ableton

Top MIDI controller picks for Ableton Live

Here are 6 controllers ranked by Ableton Live integration, from the deepest native support to the most affordable entry point.

The Novation Launchkey 61 MK4 is the undisputed Best Overall for Ableton producers. The 16 RGB pads mirror Session View clips, the 9 faders control the mixer, and the knobs auto-map to whichever device is selected. Plug in via USB-C and every Ableton-specific feature activates automatically.

The Akai Professional MPK Mini MK3 earns Best Compact for producers who want keys, pads, and knobs in a portable unit. The 8 MPC pads can trigger clips in Session View through MIDI mapping, and the 8 knobs map to any Ableton parameter. No native Ableton integration, but MIDI learn setup takes under five minutes.

The M-AUDIO Keystation 49 MK3 takes Best 49-Key for Ableton users who need full-range playing. The bundled Ableton Live Lite license adds immediate value, and the transport controls handle playback without keyboard shortcuts. Pair it with a Novation Launchpad for clip launching alongside the keys.

The M-AUDIO Keystation Mini 32 MK3 is the Best With Lite pick because the bundled Ableton Live Lite license means you get both hardware and software for fifty-nine dollars. If you do not own Ableton yet, this is the cheapest way to start producing in Ableton’s ecosystem.

The Nektar SE49 delivers Best Value with 49 full-size keys at under eighty dollars. Nektar’s DAW integration software handles basic Ableton mapping automatically, though it lacks the deep Session View control that Novation provides.

And the Nektar SE25 gets you playing in Ableton for under fifty dollars. Velocity-sensitive keys handle note input, and Nektar’s integration software provides basic transport control.

How Do You Set Up a MIDI Controller in Ableton Live

Ableton MIDI controller setup guide

Ableton handles MIDI controller setup through Preferences, and the process differs depending on whether your controller has native integration.

Native Controllers (Novation Launchkey, Push)

Open Ableton Live Preferences (Cmd+Comma on Mac, Ctrl+Comma on Windows) and navigate to the Link/Tempo/MIDI tab. Novation Launchkey controllers appear automatically in the Control Surface dropdown. Select “Launchkey MK4” and set the input and output ports.

Close Preferences and the controller is fully integrated. Pads mirror Session View, faders control the mixer, and knobs map to the selected device. Zero manual configuration needed.

Generic Controllers (MIDI Learn)

For controllers without native Ableton support, use MIDI learn mode. Click the MIDI button in the top right corner of Ableton (or press Cmd+M). Every mappable parameter highlights in blue.

Click any parameter — a volume fader, a knob, a button — then move the corresponding control on your MIDI keyboard. Ableton captures the MIDI CC message and creates a permanent mapping. Press Cmd+M again to exit MIDI learn mode.

Save the mapping as your default template (File, Save Live Set as Default Set) so it loads automatically with every new project. That one-time investment means you configure once and never think about it again.

Optimizing For Live Performance

Ableton’s Session View becomes a performance instrument when paired with the right controller. Map pad rows to different tracks, assign scenes to a single button press, and use the crossfader for DJ-style transitions between sections.

The Launchkey MK4’s 16 pads handle this natively. For controllers with 8 pads (like the MPK Mini MK3), map the top row to clip launches and the bottom row to scene triggers.

That 8-pad split covers most live performance needs. Combine it with Ableton’s Follow Actions (automatic clip transitions on a timer) and you have a semi-automated live set controlled from a single compact controller.

Using Multiple Controllers Together

Ableton handles multiple MIDI controllers simultaneously without conflict. A popular setup pairs a 49-key keyboard for instrument playing with a dedicated pad controller for Session View clip launching.

Each controller gets its own input port in Preferences. Ableton routes MIDI from each device independently, so you can play keys on one controller while triggering clips on another without any routing issues.

This modular approach lets you start with a budget keyboard and add specialized controllers as your Ableton workflow grows more complex.

The Bottom Line

The Novation Launchkey 61 MK4 is the best controller for serious Ableton producers — native Session View integration, mixer control, and instrument browsing from hardware justify the premium price. For a more affordable all-in-one option, the Akai MPK Mini MK3 covers keys, pads, and knobs at ninety-nine dollars.

New to Ableton entirely? The M-AUDIO Keystation Mini 32 MK3 bundles an Ableton Live Lite license with 32 keys for fifty-nine dollars — the cheapest entry into Ableton’s ecosystem.

Frequently Asked Questions

What is the best MIDI controller for Ableton Live?

The Novation Launchkey MK4 series offers the deepest native Ableton integration — Session View clip launching, mixer control, instrument browsing, and device mapping all work automatically. The Akai MPK Mini MK3 is a strong alternative that works through MIDI learn.

Does Ableton work with any MIDI keyboard?

Yes — Ableton Live supports every class-compliant USB MIDI keyboard. Open Preferences, enable the controller in the Link/Tempo/MIDI tab, and the keys work immediately. The difference between controllers is integration depth — native support versus manual MIDI learn.

Is Ableton Live Lite worth using?

Ableton Live Lite is a fully functional DAW limited to 8 tracks and 2 effects per track. For beginners and budget producers, those limits rarely become a problem during the first year. It includes the same core instruments and audio engine as the full version — the upgrade path to Standard or Suite is seamless when you need more tracks.

Can I use Ableton with a MIDI keyboard and a Launchpad together?

Yes — Ableton supports multiple MIDI controllers simultaneously. A common setup pairs a keyboard controller for note input with a Launchpad for Session View clip launching. Each device gets its own MIDI port assignment in Preferences, and Ableton treats them as independent inputs.

What Is Green Glue For Soundproofing (And Does It Actually Work)

What is Green Glue for soundproofing? It works, but only when it sits inside the right wall or ceiling build.

That is where buyers get frustrated. They pay for the compound, then find the room still leaks through thin drywall, open seams, or a weak door.

The better result comes from using Green Glue for the job it actually does. In the right assembly, it reduces panel vibration and makes voices, TV noise, and bass less intrusive.

So the real decision is not whether the tube is good. It is whether your wall is ready for damping or still needs a more basic upgrade first.

The sections below walk through how Green Glue works, where it fits, when it pays off, and when mass or decoupling should come before it.

Quick Takeaway

What is Green Glue for soundproofing? It is a viscoelastic damping compound applied between two rigid layers (usually drywall) that converts vibration energy into heat. It reduces the amount of sound that transmits through the panel assembly. Green Glue works best as one layer in a multi-layer wall or ceiling build, and it disappoints most when treated as a standalone fix without addressing mass, insulation, and sealing.

How Green Glue Works Inside a Wall Assembly

What Green Glue compound does in soundproofing assemblies

The useful question is not whether Green Glue is real. It is what job it actually does once it is trapped between two rigid layers.

That matters because buyers usually hear the brand name before they understand the physics. Once the physics is clear, the rest of the decision gets much easier.

The damping mechanism

Green Glue matters because drywall does not just block sound. It also vibrates when sound energy hits it.

Put one rigid sheet against another and that motion can pass through the stack. Green Glue sits between the layers and turns part of that motion into tiny amounts of heat instead.

That is why it belongs in the same conversation as soundproof drywall. Both approaches are trying to stop the second panel from joining the first panel’s vibration.

The effect shows up most clearly in speech, TV, and general household noise. Those mid frequencies are where panel vibration often becomes a big part of what you hear on the far side.

Green Glue also has a very specific identity. It is not a structural adhesive, so the drywall still needs screws to clamp the sandwich together.

This is also why ordinary construction glue is not a substitute. A rigid adhesive hardens into a bridge, while Green Glue works because it stays flexible after curing.

What Green Glue does not do

Once that damping role is clear, its limits matter just as much. Green Glue does not add meaningful mass, seal perimeter leaks, replace cavity insulation, or break stud contact.

That list matters because buyers often expect one product to fix the whole wall. It cannot.

If air is slipping around outlet boxes or perimeter joints, the sound has already bypassed the drywall face. If the studs are carrying vibration, Green Glue never sees that path either.

The easiest way to think about it is as a multiplier on a decent wall. Put it on a weak build and the result stays weak.

Put it on a wall that already has mass, sealing, and absorption, and the compound starts working on one of the few important paths left.

Where Green Glue fits in a build

That is why Green Glue belongs late in the decision tree, not first. The usual place is between the first and second drywall layers on a wall or ceiling.

In a retrofit, the first layer may be the drywall you already have. The new layer goes over it with Green Glue on the back, which is why the product is popular on shared walls and ceilings that you do not want to demolish.

It can also sit between drywall and plywood, plywood and plywood, or rigid layers in some floor builds. The rule is simple: two panels, tight contact, and a vibration path you are trying to calm.

For most homeowners the tube format is the practical choice because it works with a standard caulk gun. A case of 12 tubes covers roughly 6 sheets of drywall at the recommended 2 tubes per sheet for walls.

That retrofit logic is a big reason the product stays popular with homeowners. Soundproofing an existing wall covers the broader second-layer approach when Green Glue is part of the plan.

Real-World Performance: When Green Glue Delivers

How Green Glue works for soundproofing walls and ceilings

Once Green Glue’s job is clear, the next issue is payoff. Buyers do not really want chemistry; they want to know when the wall starts feeling quieter in real life.

That answer depends less on the brand and more on the assembly around it. Green Glue helps most when it is refining a wall that is already halfway serious.

When Green Glue makes the biggest difference

Green Glue earns its keep when the rest of the wall is already respectable. That is when panel vibration becomes one of the main paths left to improve.

If the cavity already has dense fill like AFB Acoustical Fire Batts, the seams are sealed, and the drywall already has decent mass, damping becomes a smarter next dollar than random add-ons.

That is why published improvements usually show up as assembly gains, not miracle-product gains. Add Green Glue between two 5/8-inch drywall layers and the wall often improves by about 3–9 STC points compared with the same stack without it.

The biggest gains often sit in the low-to-mid bands around 100–500 Hz. That is the range where voices, TV wash, traffic, and bass annoyance still leak even after basic upgrades.

In plain terms, Green Glue helps most when the wall is already serious enough that the remaining problem is the drywall sandwich itself. Shared walls, media rooms, and apartments are common examples, which is why Soundproofing an apartment often leads back to damping as a later-stage upgrade.

Why Green Glue alone disappoints

That same logic explains the disappointment stories. Green Glue fails expectations when people ask it to cover for missing mass, missing seals, or a weak door.

A single drywall sheet with Green Glue smeared on the back is not a damping system. The compound needs two rigid faces so it can sit between their motion and resist it.

Even with two layers, air leaks can still win. If sound is pouring through outlet openings, perimeter cracks, or a hollow-core door, the wall face is no longer the dominant path.

Stud-borne vibration creates the same problem from another angle. If the framing is carrying the energy, the compound between drywall sheets only touches part of the transmission.

That is why Green Glue should never be sold as the answer by itself. It is a strong component, but only after the assembly stops failing in more obvious ways.

Curing time and patience

Even on a good wall, Green Glue is not an instant result. The damping layer improves as it cures.

The rough rule is about 80% performance in the first 48 hours and full performance in roughly 7–30 days, depending on temperature and humidity. Cooler or wetter rooms sit on the slower end of that range.

That delay confuses plenty of DIY installers. They tap the wall the next day, hear only a small difference, and assume the product was oversold.

A better approach is to treat the first week as setup time, not verdict time. Ventilate the room, let the smell fade, and judge the wall after the compound has settled into its final flexible state.

The patience point matters because Green Glue is often used in retrofit rooms where expectations are already high. Test too early and you risk blaming the product for a timeline issue instead of a physics issue.

Application: Layers, Quantity, and Common Mistakes

How to apply Green Glue between drywall layers

Once you decide damping belongs in the build, installation details start deciding whether you get the published result or a watered-down version.

Green Glue is easy to apply, but it is not forgiving of lazy sequencing. Small mistakes outside the tube can erase the benefit inside it.

Which layers to sandwich

Green Glue belongs between two rigid sheets. Most often that means drywall over drywall.

The first sheet goes up normally. The compound then goes on the back of the second sheet in a random pattern before that second layer is screwed into place.

That random layout is not a gimmick. It helps create uneven damping across the panel instead of forming one uniform hard film.

The same idea also works with drywall-to-plywood, plywood-to-plywood, or retrofit drywall over an existing wall face. What matters is rigid panel contact, not the exact board combination.

If you also need more mass, a layer such as Trademark Soundproofing Mass Loaded Vinyl can join the same build. That move makes sense when thickness is limited and the wall still needs heavier panel behavior, not just calmer vibration.

How much compound per sheet

Once the stack is set, coverage becomes the next real decision. Too little compound is the most common quiet underperformance.

The standard rule is 2 tubes per 4×8 sheet on walls and 3 tubes per sheet on ceilings. Ceilings get more because gravity and low-frequency transfer make those assemblies harder to calm.

That math gets real fast. An 8-by-12 wall needs about 6 tubes, and a whole room with four walls plus a ceiling can push you toward a pail instead of cases of tubes.

More is not automatically better, though. Over-application mainly burns budget, while under-application gives you a thinner damping layer than the assembly was designed around.

A case of 12 tubes covers about 6 sheets at wall coverage. That makes planning easier before you buy drywall, not after the second layer is already leaning against the wall.

Installation mistakes that ruin performance

Coverage alone does not save a sloppy build. Most Green Glue failures come from the surrounding details.

The first mistake is treating the panel face and ignoring the perimeter. If the edges, outlet boxes, and other penetrations are not sealed with acoustic caulk, sound can bypass the new drywall layer entirely.

The second mistake is poor panel contact. Green Glue still needs screws because the compound works best when the two rigid layers are clamped together instead of floating unevenly.

The third mistake is solving the wrong surface first. If a hollow door and visible bottom gap are still the easiest leak, a under-door draft stopper can tell you more in one hour than another wall layer will tell you after a full weekend.

That is why door control still belongs early in the sequence. Soundproofing a door and best door sweep for soundproofing matter because Green Glue cannot rescue a room that is still bleeding sound through the opening beside the wall.

Alternatives: When Something Else Works Better

Alternatives to Green Glue for soundproofing projects

Even when Green Glue is applied correctly, it is not always the first or best upgrade. The smarter move is to compare damping against the problem that is actually dominating the room.

That comparison usually comes down to three forks: does the wall still need more mass, does the framing need decoupling, or are you already at the stage where damping is the right refinement.

Extra mass vs damping

Start with mass if the wall is still light. A flimsy single layer of 1/2-inch drywall usually gains more from heavier board than from a damping layer between weak panels.

That is because mass changes the wall’s basic resistance before damping starts refining it. If the panel is too light, the assembly never gives Green Glue a strong foundation to work from.

A test layer such as TroyStudio High Density Mass Loaded Vinyl can help you gauge whether the wall still needs weight more than refinement. It adds mass, but it does not replace damping, which is exactly why the comparison is useful.

Green Glue becomes more attractive once the wall already has decent weight. At that point the question shifts from making the wall heavier to calming the panel vibration that is still left.

Decoupling for structure-borne noise

Mass solves airborne transfer better than structure-borne transfer. That distinction decides a lot of wasted budgets.

If the complaint is footsteps, mechanical vibration, or bass you can feel in the framing, the rigid connection through studs or joists is often the main path. Green Glue does not break that path.

This is where resilient channel, isolation clips, or floating floor details can outperform damping by a wide margin. They attack the connection itself instead of just calming the panels attached to it.

In a strong assembly, decoupling and Green Glue are partners rather than rivals. Decoupling cuts the direct bridge, and Green Glue reduces the vibration that still reaches the drywall sandwich.

If you can only choose one, match it to the noise type. Use damping for airborne-heavy complaints and decoupling for structure-borne complaints such as the scenarios in Soundproofing a ceiling, soundproofing between floors, and soundproofing a wall.

When Green Glue still earns its place

That comparison leaves Green Glue in a very clear role. It earns its place when a second drywall layer is already part of the plan and you want more performance without reopening the whole strategy.

That is why it makes sense in retrofits, ceiling rebuilds, studios, and media rooms. The labor for the second layer is already happening, so the compound adds damping without forcing a more invasive jump.

It also earns its place when you have already checked the obvious weak links. A quick diagnostic with US Cargo Control Sound Dampening Blanket or a door test can keep you from spending on the wall when the leak is actually elsewhere.

The cost math is not mysterious. Green Glue usually adds about 15–25% to the drywall portion of a project, which is often worth it once the room already justifies a second layer.

That is why it stays in serious build conversations even when alternatives exist. In the right assembly, it is not hype or magic; it is simply the cleanest way to add damping without changing the whole wall concept.

Compare this page with soundproof drywall vs regular drywall, does MLV soundproofing work, best soundproofing material, best insulation for soundproofing, soundproofing an existing wall, and does soundproofing work if you are still sorting the assembly logic.

Then use is soundproofing worth it, soundproofing an apartment, soundproofing a basement, soundproofing a studio, soundproofing a home theatre room, and the broader soundproofing hub to keep the Green Glue decision in proportion to the whole project.

The Bottom Line

What is Green Glue for soundproofing? It is the damping layer that sits between two rigid panels and reduces how much vibration the second panel receives.

That makes it useful when you are already building a real wall or ceiling sandwich. It does not replace mass, sealing, insulation, or decoupling.

For most residential jobs, the order stays simple. Seal leaks, fill the cavity, add the second layer, and then use Green Glue to calm the panel transfer that is left.

If you are planning new construction, that upgrade is easy to justify because the second layer is already in the plan. If you are doing a retrofit, it is worth it only when you are actually willing to add that second rigid layer.

If you are not adding drywall, Green Glue has no real job. In that case, fix the actual weak path first, whether that is the door, the window, the wall mass, or the framing connection.

For renters who cannot modify walls at all, lighter options like soundproof curtains on windows can still help a little while you focus on removable leak control.

Frequently Asked Questions

How long does green glue last?

Green Glue is designed to last the life of the wall assembly. Once cured, it maintains its viscoelastic damping properties indefinitely under normal indoor conditions.

The compound remains flexible inside the wall for decades, which is what allows it to continue converting vibration energy into heat over time. Unlike rigid adhesives that harden and lose damping ability, Green Glue is specifically formulated to stay viscoelastic permanently.

Best DJ Controller for Virtual DJ — 6 Picks With Native VDJ Mapping

Best DJ controller for Virtual DJ narrows your options more than most buyers expect — but not because Virtual DJ is picky about hardware. The software supports nearly every MIDI controller on the market.

The real issue is that “compatible” and “natively mapped” are two very different things, and the gap between them determines whether you spend your first session mixing or troubleshooting.

A natively mapped controller works the moment you plug it in. Every knob, fader, pad, and jog wheel talks to Virtual DJ without manual MIDI assignment.

A generic “compatible” controller requires you to map each control yourself — a tedious process that beginners shouldn’t waste time on.

That mapping gap is caused by how Virtual DJ handles hardware detection. Controllers with built-in VDJ definitions load instantly.

Controllers without them dump you into the MIDI mapping editor before you hear a single beat.

Below, you will find six controllers ranked by their Virtual DJ integration quality — from plug-and-play mapped units to versatile multi-platform options — so you start mixing instead of configuring.

Quick Takeaway

To find the best controller for Virtual DJ, prioritize units with native VDJ mapping (plug-and-play detection) over generic MIDI controllers that require manual setup. The Pioneer DJ DDJ-FLX4 is the best overall choice because it supports Virtual DJ natively alongside Rekordbox and Serato, giving you three platforms in one device.

Why Virtual DJ Mapping Matters

VirtualDJ controller mapping explained

Native Mapping vs MIDI Learn

Virtual DJ maintains a database of controller definitions. When you plug in a supported controller, VDJ loads the correct mapping automatically — every knob, pad, and fader works without configuration.

Controllers outside that database still work via MIDI Learn mode, where you manually assign each physical control to a software function. That process takes 30-60 minutes and requires understanding MIDI channels, CC numbers, and note assignments.

Virtual DJ Free vs Pro

Virtual DJ offers a free version (VDJ Home) that supports basic 2-deck mixing with no time limit. The Pro version adds 4-deck support, video mixing, stem separation, broadcasting, and removes the watermark from video output.

Most controllers on this list work with both tiers. The free version covers every beginner need — upgrade to Pro only when you outgrow two decks or need video/broadcast features.

The Multi-Platform Advantage

Virtual DJ’s biggest strength is hardware flexibility. Controllers designed for Serato or Rekordbox often work with VDJ through native mappings or community-created definitions.

That means a Serato controller can double as a VDJ controller with zero additional cost.

This cross-platform compatibility makes Virtual DJ the most forgiving software choice for beginners who might switch hardware later.

Our Top 6 Virtual DJ Controllers

Top VirtualDJ controller picks

1. Pioneer DJ DDJ-FLX4 — Best Overall

The Pioneer DJ DDJ-FLX4 earns the top spot because it works natively with Virtual DJ, Rekordbox, and Serato DJ — three platforms from one controller. That triple compatibility means you can experiment with VDJ’s feature set while keeping Rekordbox for club prep.

The Smart Fader produces clean transitions while you learn manual EQ technique. USB-C connectivity and a built-in sound card handle headphone cueing with zero perceivable latency.

Eight performance pads per deck map to VDJ’s hot cue, loop, and sampler modes without manual configuration. The compact 2-deck layout keeps the learning curve gentle while giving you room to grow into more advanced VDJ features like stem separation and video mixing.

2. Hercules DJControl Inpulse 200 MK2 — Best for Virtual DJ

The Hercules DJControl Inpulse 200 MK2 ships with a native Virtual DJ mapping that loads automatically on first connection. Hercules co-develops VDJ definitions with the Virtual DJ team, which means every control responds exactly as expected.

Built-in light guides pulse in sync with the beat to teach transition timing. The sound card handles headphone cueing at this mid-range price point, making it the most VDJ-optimized controller under two hundred.

3. Numark Party Mix II — Best for Parties

The Numark Party Mix II works with Virtual DJ through a community MIDI mapping that covers all essential controls. The built-in LED light show syncs to your mix in real time, adding visual impact that elevates house parties.

The missing sound card means no headphone cueing without an external interface. For casual VDJ sessions where you cue by waveform, that tradeoff is acceptable at this price.

4. Hercules DJControl Starlight — Best Portable

The Hercules DJControl Starlight fits in a jacket pocket and includes a native VDJ mapping from Hercules. The built-in sound card provides headphone cueing — a feature the larger Numark Party Mix II skips.

Tiny jog wheels eliminate serious scratching. For VDJ mixing on the go, the Starlight delivers more functionality per square inch than anything else at this price tier.

5. Numark DJ2GO2 Touch — Best Under 100

The Numark DJ2GO2 Touch works with Virtual DJ via MIDI mapping at the lowest price on this list. Touch-capacitive jog wheels and a built-in audio interface handle the core VDJ workflow — load, cue, match, blend.

No performance pads means hot cues and loops require mouse clicks. Once you outgrow that limitation, you will know exactly which VDJ features matter for your upgrade.

The ultra-compact form factor makes the DJ2GO2 the cheapest way to test whether Virtual DJ fits your mixing style before committing to a larger investment.

6. Pioneer DJ DDJ-FLX2 — Best Value

The Pioneer DJ DDJ-FLX2 supports Virtual DJ alongside Rekordbox and Serato in a package that weighs under two pounds. Bluetooth connectivity lets you mix from your phone when a laptop is not available.

The FLX2 gives you the same triple-platform flexibility as the FLX4 in a smaller, lighter package. For VDJ users who also want Rekordbox for club prep, the FLX2 covers both at a mid-range price.

Virtual DJ Tips for New Controller Owners

VirtualDJ controller tips for beginners

Check the VDJ Hardware Database

Virtual DJ maintains an official list of natively supported controllers at virtualdj.com/products/hardware.html. Check this list before buying — controllers with native definitions save hours of MIDI mapping.

The top-rated controllers from Pioneer, Hercules, and Numark all appear in the VDJ database. Generic no-name controllers rarely do.

Use VDJ Home to Start

Virtual DJ Home (free tier) supports 2-deck mixing with no time limit. You do not need the Pro license to learn the fundamentals — beatmatching, EQ blending, and transition timing all work identically on the free version.

Upgrade to Pro only when you need four decks, video mixing, stem separation, or broadcast output. Most beginners will not hit those limits for at least six months.

Map Missing Controls Manually

If your controller lacks a native VDJ definition, the MIDI Learn feature lets you assign any physical control to any VDJ function. Click the function in VDJ, move the physical control, and the mapping saves permanently.

The process is straightforward for basic controls (play, cue, crossfader) and more complex for effects and pad modes. Hercules and Pioneer controllers rarely need manual mapping — Numark and budget brands sometimes do.

Explore VDJ Stems Early

Virtual DJ pioneered real-time stem separation before Serato or Rekordbox added it. Even on VDJ Home, you can isolate vocals, drums, bass, and melody from any track in real time — a creative tool that opens up mashups, acapella blends, and instrumental transitions.

Controllers with performance pads make stem control intuitive. Each pad triggers a different stem mute, letting you drop the vocals out of one track while keeping the drums from another.

The Bottom Line

The Pioneer DJ DDJ-FLX4 is the best Virtual DJ controller because triple-platform support gives you VDJ, Rekordbox, and Serato in one device. For a VDJ-optimized experience at a lower price, the Hercules DJControl Inpulse 200 MK2 ships with native VDJ mapping out of the box.

Virtual DJ works with nearly every controller — the difference is how fast you go from plugging in to mixing. Start with a natively mapped unit and let VDJ’s feature depth reveal itself as your skills develop.

Frequently Asked Questions

Does Virtual DJ work with any controller?

Virtual DJ supports most MIDI controllers through either native mapping (plug-and-play) or manual MIDI Learn configuration. Controllers from Pioneer, Hercules, Numark, and Denon have the best native VDJ support.

Is Virtual DJ free?

Virtual DJ Home is completely free for non-commercial use with no time limit. It supports full 2-deck mixing with basic features including effects and a sampler.

Virtual DJ Pro requires a paid license for 4-deck support, video mixing, stem separation, and commercial use.

Which is better — Virtual DJ or Serato?

Virtual DJ offers more features in its free tier (2-deck mixing, effects, sampler) than Serato DJ Lite. Serato has tighter hardware integration with Pioneer and Rane controllers.

For beginners exploring on a budget, VDJ Home gives you more to work with at zero cost.

Can I use Virtual DJ for live gigs?

Yes — Virtual DJ Pro is used by professional DJs worldwide for club, mobile, and festival performances. The Pro license is required for commercial use.

For home practice and non-commercial events, VDJ Home is sufficient.

Best MIDI Keyboard for Logic Pro — 6 Controllers That Integrate Without the Hassle

Best MIDI keyboard for Logic Pro is not just about finding keys that send notes — it is about finding a controller that talks to Logic’s Smart Controls, Alchemy synth, and Drummer tracks, but most controllers won’t do that without manual configuration.

The problem most Logic Pro users hit is buying a controller that works at a basic level but ignores the features that make Logic unique. You get keys that play notes, and that is where the integration stops.

Smart Controls, Quick Sampler, and the massive built-in instrument library sit untouched because the controller does not know they exist.

We tested 6 controllers specifically through Logic Pro’s workflow — Smart Controls mapping, transport integration, and how well each one handles Logic’s instrument switching. Every pick below was evaluated on real Logic Pro compatibility, not just generic MIDI functionality.

Below you will find our top picks sorted by use case, followed by a guide on what Logic Pro features to look for in a MIDI keyboard.

Quick Takeaway

The best MIDI keyboard for Logic Pro is the M-AUDIO Keystation 49 MK3 for most producers — 49 full-size keys with transport controls that work natively with Logic. For the deepest integration with Smart Controls and instrument browsing, the Novation Launchkey 61 MK4 auto-maps everything. Budget producers can start with the Nektar SE49 at under eighty dollars.

Why Logic Pro Needs Specific Controller Features

Logic Pro features for MIDI controller workflows

Logic Pro is a Mac-exclusive DAW with features that no other platform replicates. Understanding those features explains why some controllers unlock Logic’s full potential while others leave most of it on the table.

Smart Controls Change The Game

Logic Pro’s Smart Controls assign the most important parameters of any instrument or plugin to a single panel of knobs and sliders. Load a piano patch and Smart Controls surface the brightness, reverb, and dynamics knobs automatically. Load a synth and it surfaces filter cutoff, resonance, and envelope controls.

A MIDI keyboard that auto-maps to Smart Controls gives you instant tactile access to whatever instrument you are playing — no manual MIDI learn required. The Novation Launchkey series does this natively, and most other controllers can be configured through Logic’s Controller Assignments.

Logic Pro’s Instrument Library Is Massive

Logic Pro ships with over 70 GB of instruments, loops, and samples — the largest bundled library of any DAW. That library includes Alchemy (a professional wavetable synth), Studio Strings, Studio Horns, and hundreds of sampled instruments.

A MIDI keyboard with enough keys to play these instruments expressively matters more in Logic than in most DAWs. An 88-key controller unlocks Logic’s full piano and orchestral libraries. A 25-key mini controller works for synths and beat making but limits orchestral work.

Transport Controls Save Mouse Clicks

Logic Pro’s transport bar (play, stop, record, cycle) responds to MIDI controller transport buttons. Controllers with dedicated transport buttons — like the M-AUDIO Keystation series — let you control playback from the keyboard without reaching for the mouse.

That convenience compounds across a full session. Start recording, punch in, cycle a section, jump to a marker — all from the controller.

Aftertouch And Expression

Logic Pro’s Alchemy synth and many third-party plugins respond to aftertouch — pressure applied to a key after the initial strike. Controllers that transmit aftertouch data unlock expressive modulation that cheaper keyboards cannot provide.

The Novation Launchkey MK4 series sends polyphonic aftertouch, meaning each key transmits independent pressure data. That level of expression matters when playing Logic’s orchestral patches and Alchemy’s wavetable presets where subtle dynamics define the realism of a performance.

Which MIDI Keyboards Work Best With Logic Pro

Top MIDI controller picks for Logic Pro

Here are 6 controllers ranked by Logic Pro compatibility, from the best overall to the most affordable option.

The M-AUDIO Keystation 49 MK3 wins Best Overall because it delivers 49 full-size keys with transport controls at a price that undercuts most competitors. Logic Pro recognizes the transport buttons immediately, and the 49-key range handles two-handed playing across Logic’s piano and synth patches comfortably.

The Novation Launchkey 61 MK4 takes Best Premium for producers who want the deepest Logic Pro integration available. The 61 semi-weighted keys, 16 RGB pads, and 9 faders auto-map to Logic’s Smart Controls, mixer, and instrument browser the moment you plug in. No other controller matches this level of automatic integration.

The Akai Professional MPK Mini MK3 earns Best Compact for Logic Pro producers who prioritize desk space and portability. The 8 pads work well with Logic’s Drummer tracks and Quick Sampler, and the 8 knobs can be mapped to Smart Controls through MIDI learn.

For pianists and composers working with Logic’s orchestral libraries, the M-AUDIO Keystation 88 MK3 puts all 88 semi-weighted keys on your desk. Logic’s Studio Strings, Studio Horns, and Alchemy patches sound their best when played across the full keyboard range with real velocity expression.

The Nektar SE49 delivers the best value for Logic Pro users on a budget — 49 full-size keys with Nektar’s DAW integration for under eighty dollars. You lose transport controls compared to the M-AUDIO, but the key feel and range are comparable.

And the Nektar SE25 at under fifty dollars is the cheapest way to start playing Logic Pro’s instruments with a real MIDI keyboard. Velocity-sensitive mini keys with DAW integration handle basic melody input and synth programming.

How Do You Set Up a MIDI Keyboard in Logic Pro

Logic Pro MIDI controller setup guide

Logic Pro handles MIDI keyboard setup more smoothly than most DAWs, but a few configuration steps unlock the full integration potential.

Plug-And-Play Basics

Connect your MIDI keyboard via USB and open Logic Pro. The controller appears automatically as a MIDI input source. Create a new software instrument track, load any patch from the library, and play.

Logic Pro assigns incoming MIDI to whichever track is selected. Switching between tracks switches which instrument your keyboard controls — no repatching needed.

Smart Controls Mapping

Open the Smart Controls panel (press B) and click the “i” button to access Controller Assignments. Logic Pro shows which parameters are assigned to which MIDI CC numbers.

For controllers with native Logic integration (like the Novation Launchkey), these assignments happen automatically. For generic controllers, click “Learn” next to any Smart Control parameter, then twist the corresponding knob on your MIDI keyboard. Logic saves the mapping permanently.

Using Pads With Drummer And Quick Sampler

Logic Pro’s Drummer tracks respond to MIDI note input — each drum pad on your controller triggers a specific drum element. The pad controllers map naturally to Drummer because the velocity sensitivity captures realistic dynamics that quantized patterns lack.

Quick Sampler lets you load any audio file and play it chromatically from your MIDI keyboard. Drop a vocal chop into Quick Sampler, and your controller becomes a chromatic vocal instrument.

That workflow makes the MPK Mini MK3’s 8 pads especially useful for sample-based production in Logic.

Key Commands And Controller Assignments

Logic Pro’s Controller Assignments window (accessible via Logic Pro → Control Surfaces → Controller Assignments) lets you map any MIDI CC message to any Logic function. This goes beyond Smart Controls — you can assign knobs to track volume, solo, mute, send levels, and even key command shortcuts.

Save your controller assignment profile as a template so it loads automatically with every new project. That one-time setup investment pays dividends across every session for the life of your controller.

The Bottom Line

The M-AUDIO Keystation 49 MK3 is the right choice for most Logic Pro users — 49 full-size keys with transport controls at a hundred nine dollars. If you want the deepest automatic integration, the Novation Launchkey 61 MK4 auto-maps to Smart Controls without any manual setup.

Budget-conscious Logic users should start with the Nektar SE49 — 49 full-size keys for under eighty dollars is hard to beat at any experience level.

Frequently Asked Questions

Does Logic Pro work with any MIDI keyboard?

Yes — Logic Pro supports every class-compliant USB MIDI keyboard without additional drivers. Plug in via USB and Logic recognizes the controller immediately. The difference between controllers is integration depth, not basic compatibility.

What is the best keyboard to use with Logic Pro?

The M-AUDIO Keystation 49 MK3 is the best overall choice for most Logic Pro users — 49 full-size keys, transport controls, and a hundred nine dollar price point. For deeper integration with Smart Controls and the mixer, the Novation Launchkey series offers automatic mapping.

Do I need a MIDI keyboard for Logic Pro?

You can use Logic Pro’s Musical Typing feature (press Cmd+K) to play instruments from your computer keyboard. The limitation is zero velocity sensitivity — every note hits the same. A dedicated MIDI keyboard adds dynamics, expression, and speed that Musical Typing cannot replicate.

Is the Akai MPK Mini good for Logic Pro?

The Akai MPK Mini MK3 works well with Logic Pro through MIDI learn. The 8 pads are particularly useful for Drummer tracks and Quick Sampler, and the 8 knobs can map to Smart Controls. You lose the native auto-mapping that Novation offers, but the manual setup takes only a few minutes.

Best Rekordbox DJ Controller – 6 Picks for Club-Ready Mixing at Home

Best rekordbox DJ controller is the search every aspiring club DJ eventually makes — but most buyers don’t realize that Rekordbox compatibility alone doesn’t guarantee a smooth transition to club gear. The problem is that Pioneer’s own controller lineup spans budget models to professional workstations, and the wrong pick teaches habits that fall apart the moment you step behind a CDJ-2000NXS2 setup.

Rekordbox is the software ecosystem that powers nearly every professional DJ booth in the world. Your cue points, beat grids, playlists, and hot cues all live inside Rekordbox — and they transfer directly to club CDJs via USB.

That seamless export is the cause of Rekordbox’s dominance and the reason most serious DJs choose it over Serato or Traktor.

But not every “Rekordbox compatible” controller prepares you equally for that club environment. A compact 2-deck unit with simplified EQ teaches different muscle memory than a 4-channel controller with full Beat FX and dedicated filter knobs.

Below, you will find six controllers ranked by how well they mirror the club CDJ workflow — so you can practice at home on hardware that directly translates to real gigs.

Quick Takeaway

To find the best Rekordbox DJ controller, prioritize units that mirror the CDJ club layout (4-channel mixer, Beat FX section, full-size jog wheels). The Pioneer DJ DDJ-FLX4 is the best overall Rekordbox controller for beginners because it bundles Rekordbox natively with a clean 2-deck layout and dual Serato support as a backup.

Why Rekordbox Matters for Club DJs

Rekordbox controller workflow for club-style DJing

The Club Standard

Nearly every professional DJ booth runs Pioneer CDJ-2000NXS2 decks with a DJM-900NXS2 mixer. Those decks read USB drives prepared in Rekordbox — your cue points, beat grids, playlists, and memory cues all transfer automatically.

No other DJ software offers that level of club integration. Serato requires a laptop at the venue. Traktor needs a controller or audio interface. Rekordbox lets you walk into a club with a USB stick and start playing.

Home Practice to Club Performance

The controller you practice on shapes the muscle memory you bring to the club. A controller with Beat FX paddles, dedicated filter knobs, and a 4-channel mixer section teaches the same physical workflow as a CDJ setup.

A controller that simplifies or removes those elements creates a gap between practice and performance. That gap shows up as fumbled transitions and missed effects the first time you play on real club gear.

Rekordbox Software Tiers

Rekordbox offers a free tier (Core) that handles library management, track analysis, and USB export. The Performance mode — which turns your laptop into a DJ platform — requires a compatible controller or a paid subscription.

Every Pioneer and AlphaTheta controller on this list unlocks Rekordbox Performance mode automatically. No subscription needed, no activation code — plug in the controller and the full DJ interface appears.

Our Top 6 Rekordbox Controllers

Top Rekordbox DJ controller picks

1. Pioneer DJ DDJ-FLX4 — Best Overall

The Pioneer DJ DDJ-FLX4 is the best entry point into the Rekordbox ecosystem because it unlocks full Performance mode while also supporting Serato DJ as a backup platform. That dual compatibility is unique at this price — every other Rekordbox controller in this range locks you to Pioneer’s ecosystem exclusively.

The Smart Fader smooths transitions automatically during crossfader moves. USB-C connectivity and a built-in sound card handle headphone cueing with zero perceivable latency.

Eight performance pads per deck handle hot cues, loops, and samples — the same pad workflow you will encounter on CDJ setups at venues. The compact 2-deck layout keeps the learning curve gentle while building habits that scale.

2. Pioneer DJ DDJ-FLX2 — Best Budget

The Pioneer DJ DDJ-FLX2 is the cheapest way to get native Rekordbox Performance mode. Bluetooth connectivity means you can mix from your phone using WeDJ when a laptop is not available.

The jog wheels are smaller than the FLX4, which limits precise plattering. For learning Rekordbox library management, beat grid editing, and cue point placement — the skills that transfer directly to club CDJs — the FLX2 covers everything at a budget-friendly price.

The software experience is identical to the FLX4, so every cue point, beat grid, and playlist you create transfers seamlessly when you upgrade hardware.

3. AlphaTheta DDJ-GRV6 — Best 4-Channel

The AlphaTheta DDJ-GRV6 is the closest you can get to a club CDJ layout without buying CDJs. Four channels, a dedicated effects section with the Groove Circuit engine, and a mixer layout that mirrors the DJM-900NXS2 — every physical movement transfers directly to the booth.

This is not a beginner controller. The dense layout and 4-channel routing require experience to navigate under pressure. If you have outgrown a 2-deck setup and your next goal is club residencies, the GRV6 bridges the gap between bedroom and booth.

4. Denon DJ SC LIVE 4 — Best Standalone

The Denon DJ SC LIVE 4 is a standalone system that runs Engine DJ — not Rekordbox. It earns a spot on this list because Rekordbox libraries can be imported into Engine DJ, and the standalone workflow (no laptop, USB-based track loading) mirrors how club CDJs operate.

For DJs who want the club experience of loading tracks from a USB stick without a laptop, the SC LIVE 4 is the most affordable standalone option. The 7-inch touchscreen replaces the laptop entirely.

5. Hercules DJControl Inpulse 500 — Best for Learning

The Hercules DJControl Inpulse 500 does not support Rekordbox — it runs DJUCED and Serato DJ Lite. It earns a spot here because its built-in teaching features (LED light guides, IMA coaching) accelerate the fundamentals faster than any Rekordbox controller can.

The skills you learn — beatmatching, EQ blending, phrase matching — transfer to any platform. Once those fundamentals are solid, switching to a Rekordbox controller is seamless because the core DJ techniques are software-agnostic.

6. Hercules DJControl Starlight — Best Portable

The Hercules DJControl Starlight is another non-Rekordbox option that earns its place through portability and value. The built-in sound card at this price point makes it a viable practice tool for DJs who want a backup controller for travel.

The fundamental mixing skills transfer to Rekordbox when you upgrade to a Pioneer unit. Pocket-sized form factor means you can practice anywhere without committing desk space to a full controller.

Rekordbox vs Serato — Which Ecosystem Fits You

Decision guide for choosing Rekordbox or Serato controllers

Choose Rekordbox If

Your goal is playing at clubs. Nearly every professional venue runs Pioneer CDJs with Rekordbox integration. Your cue points, beat grids, and playlists export to a USB drive and load directly onto the venue’s decks — no laptop setup, no cables, no compatibility questions.

Rekordbox also handles library management better than any competitor. Track analysis, beat grid editing, and playlist organization are built into the free Core tier.

Choose Serato If

You want maximum controller flexibility. Serato supports controllers from Pioneer, Numark, Hercules, Rane, and Denon — the widest hardware compatibility of any DJ platform. If you plan to switch controllers frequently or want the option to use non-Pioneer hardware, Serato gives you more room to move.

The DDJ-FLX4 supports both, which makes it the safest first purchase if you are undecided.

The Dual-Platform Advantage

Controllers that support both Rekordbox and Serato let you explore without commitment. Practice on Rekordbox for club prep, then switch to Serato for casual sessions or when using a friend’s non-Pioneer controller.

The DDJ-FLX4 and DDJ-FLX2 are the only controllers at their price points that offer genuine dual-platform support.

The Bottom Line

The Pioneer DJ DDJ-FLX4 is the best Rekordbox DJ controller because dual-platform support gives you Rekordbox for club prep and Serato as a flexible backup. For DJs targeting club residencies, the AlphaTheta DDJ-GRV6 mirrors the club CDJ layout closer than any other home controller.

Every hour you spend practicing on Rekordbox at home is an hour that transfers directly to the booth. Your cue points, beat grids, and playlists follow you on a USB stick — no re-preparation needed when you step up to real CDJs.

Frequently Asked Questions

Which DJ controllers use Rekordbox?

All Pioneer DJ and AlphaTheta controllers support Rekordbox natively — the DDJ-FLX4, DDJ-FLX2, DDJ-GRV6, DDJ-FLX10, and DDJ-REV series all unlock Rekordbox Performance mode automatically. Non-Pioneer controllers (Numark, Hercules, Denon) do not support Rekordbox.

Which is better — CDJ or XDJ?

CDJs (like the CDJ-2000NXS2) play CDs and USB drives with larger jog wheels and pro-grade build quality. XDJs skip the CD drive for a lower price while keeping the same Rekordbox USB integration. For home practice, an XDJ or controller is more practical — CDJs are overkill outside a club.

Is the DDJ-400 or FLX4 better?

The DDJ-FLX4 replaced the DDJ-400 and is better in every measurable way — USB-C connectivity, dual Rekordbox and Serato support, Smart Fader, and improved jog wheel response. The DDJ-400 is discontinued and should only be considered if found at a significant discount.

Can I use Rekordbox without a Pioneer controller?

Rekordbox Core (library management, track analysis, USB export) works without any controller — it is free desktop software. Rekordbox Performance mode (live DJ mixing on your laptop) requires either a compatible Pioneer/AlphaTheta controller or a paid subscription.