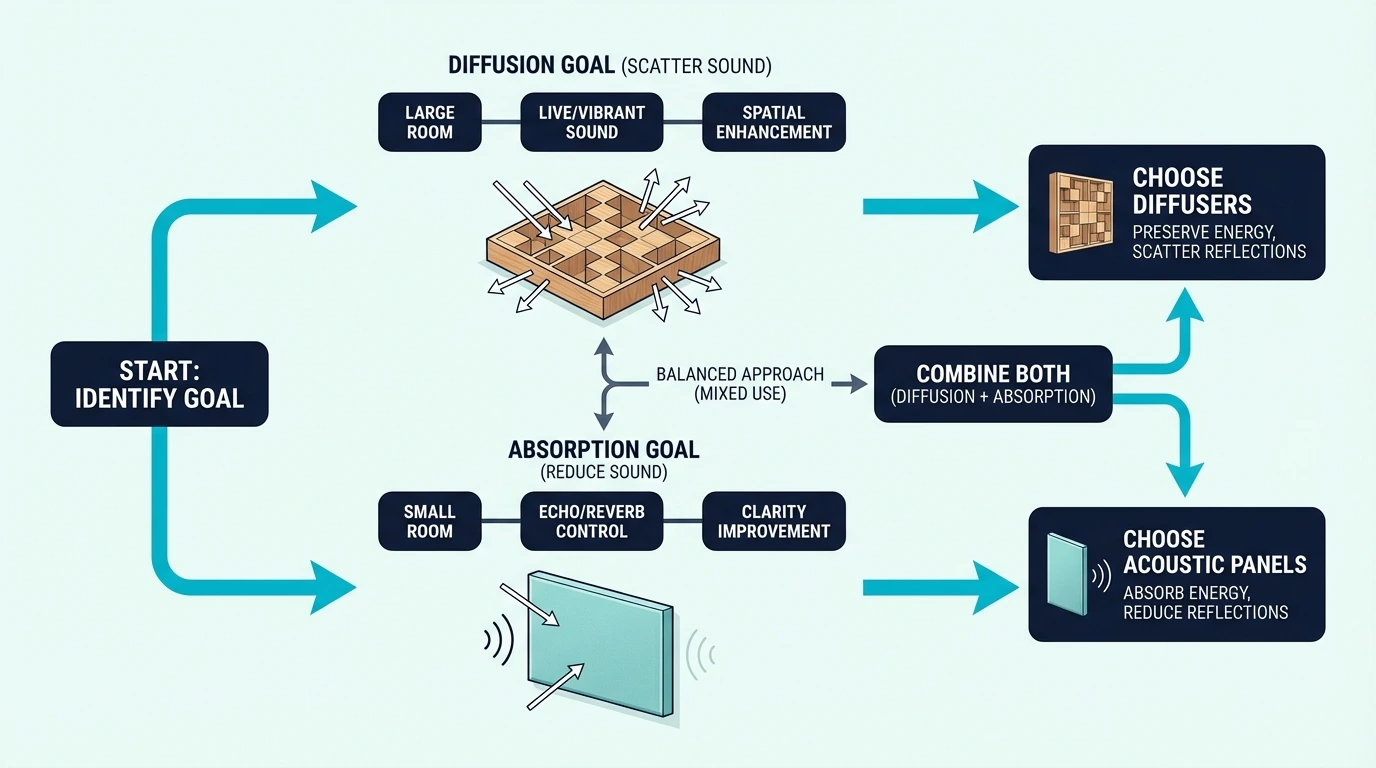
Acoustic panels vs bass traps both absorb sound, yes, but they solve different problems in a room. Choose the wrong one and you can treat a space and still hear the same issues.
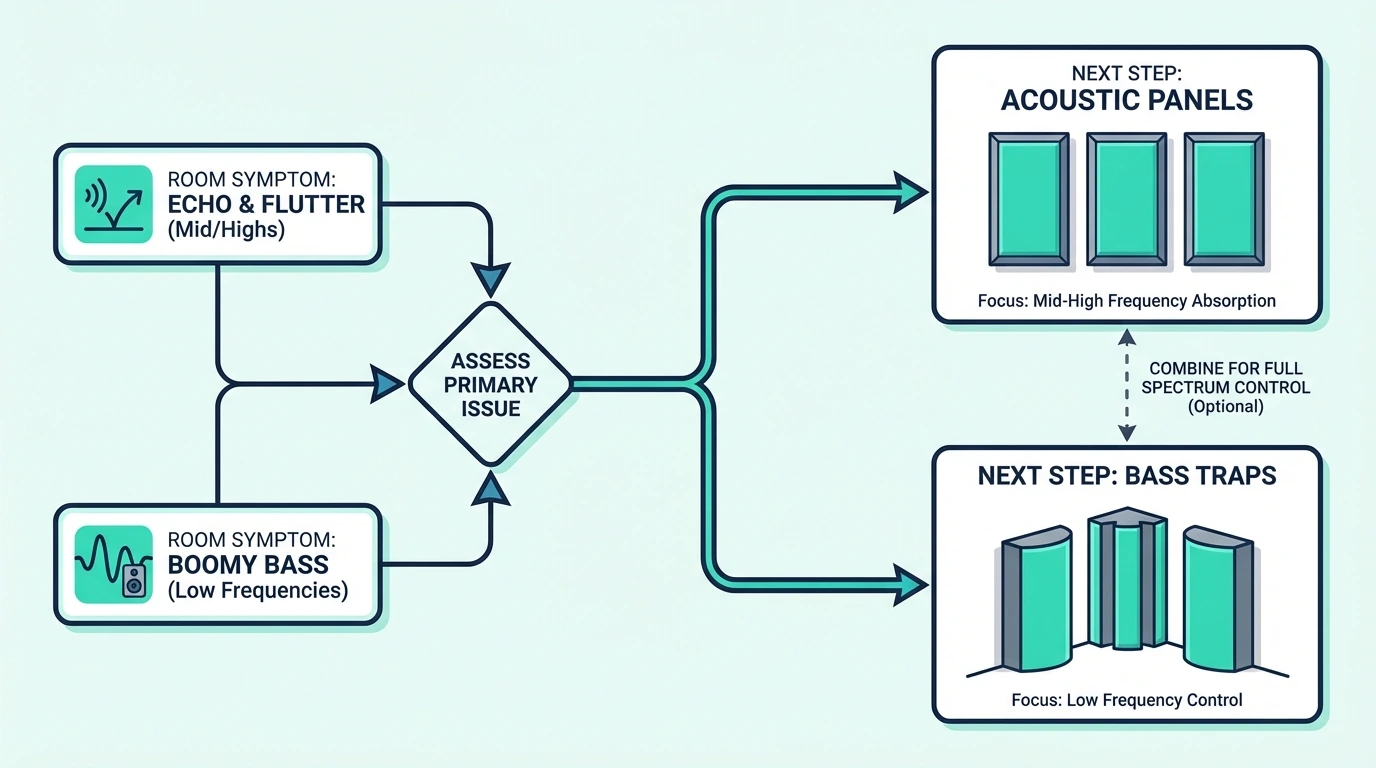
Harsh echo and smeared clarity happen when mid/high reflections bounce off bare walls and ceilings. Boomy, muddy low end usually comes from bass energy building up in corners and room modes.
Match the symptom to the right tool so you can reduce the problem fast and get cleaner, more direct sound. You will also avoid wasting money adding more panels when the real issue is bass (or vice versa).
Start with panels at first-reflection points if reflections are the issue, or start with traps in the front corners if bass is the issue. Below, the comparison table and next-steps checklist make the decision and placement order clear.
Quick Takeaway
Acoustic panels absorb mid-high frequencies (250 Hz and above) and mount on walls at reflection points. Bass traps absorb low frequencies (20–250 Hz) and install in corners where bass energy accumulates.
You typically need both for complete room treatment — start with panels if your main issues are echo and voice clarity, or bass traps if you are dealing with boomy, undefined low end. Neither replaces the other.
Acoustic Panels vs Bass Traps: What Is the Difference?
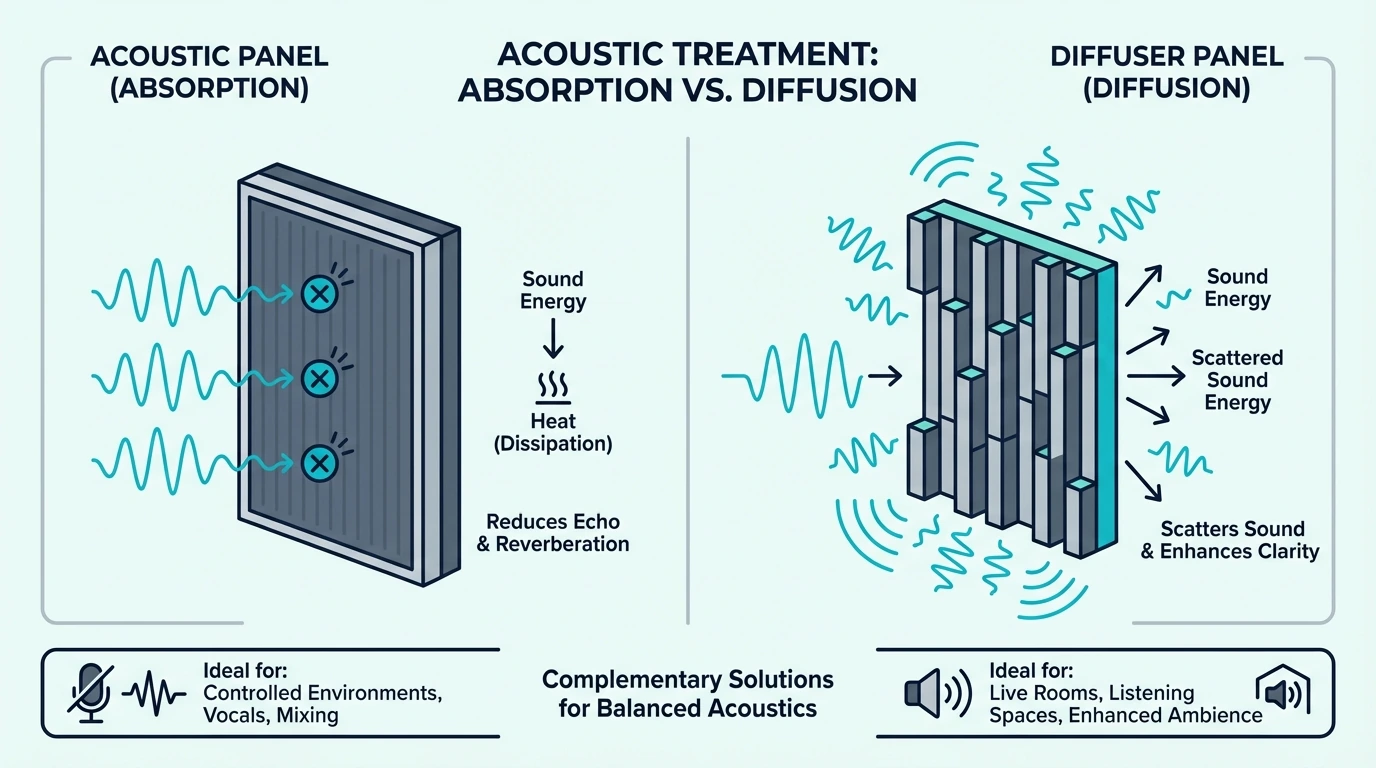
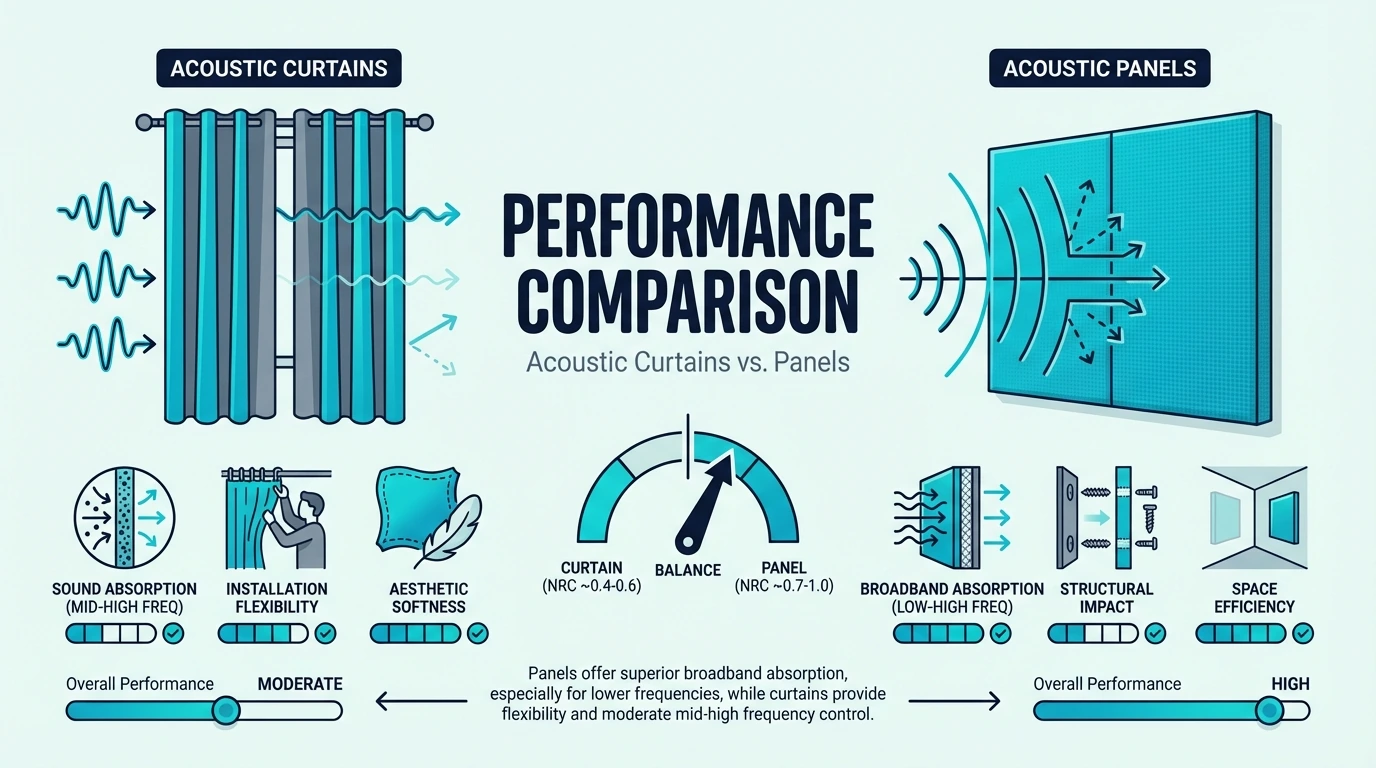
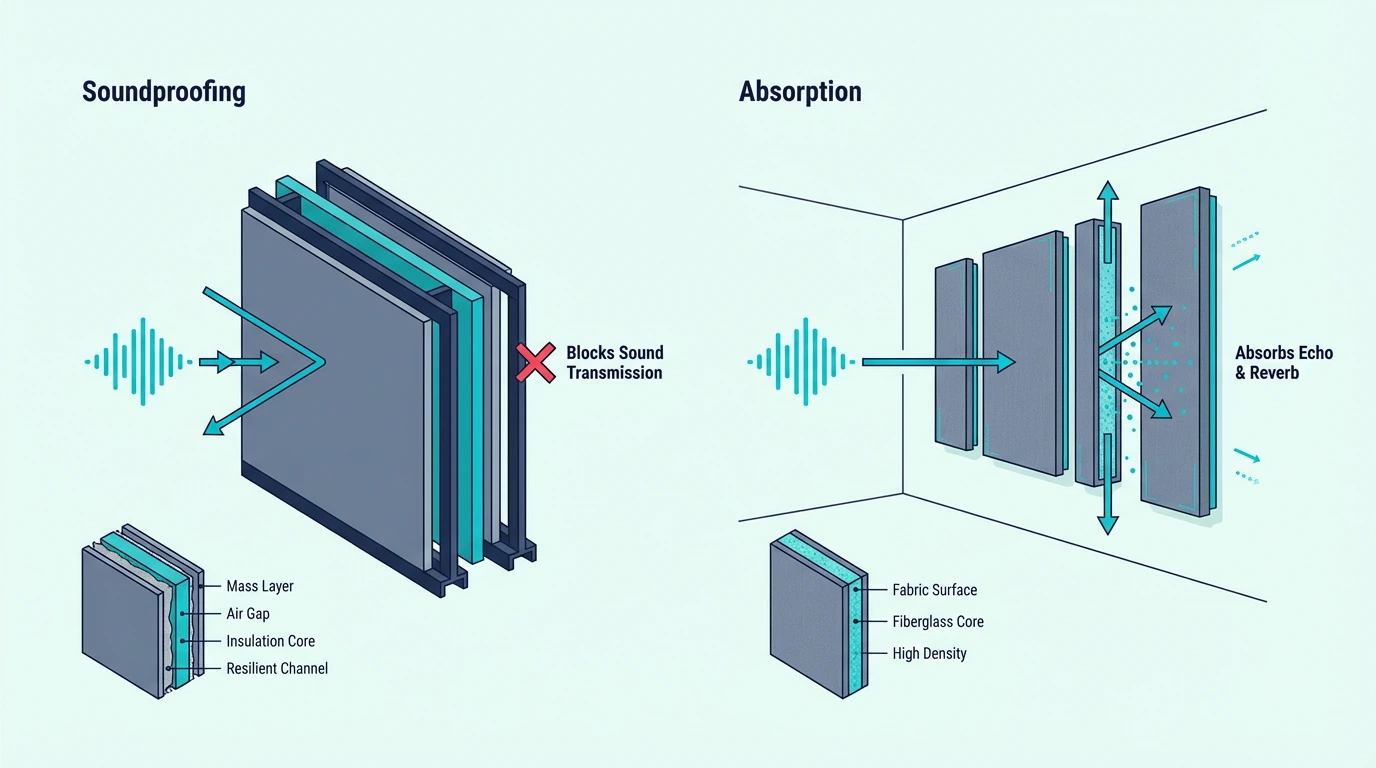
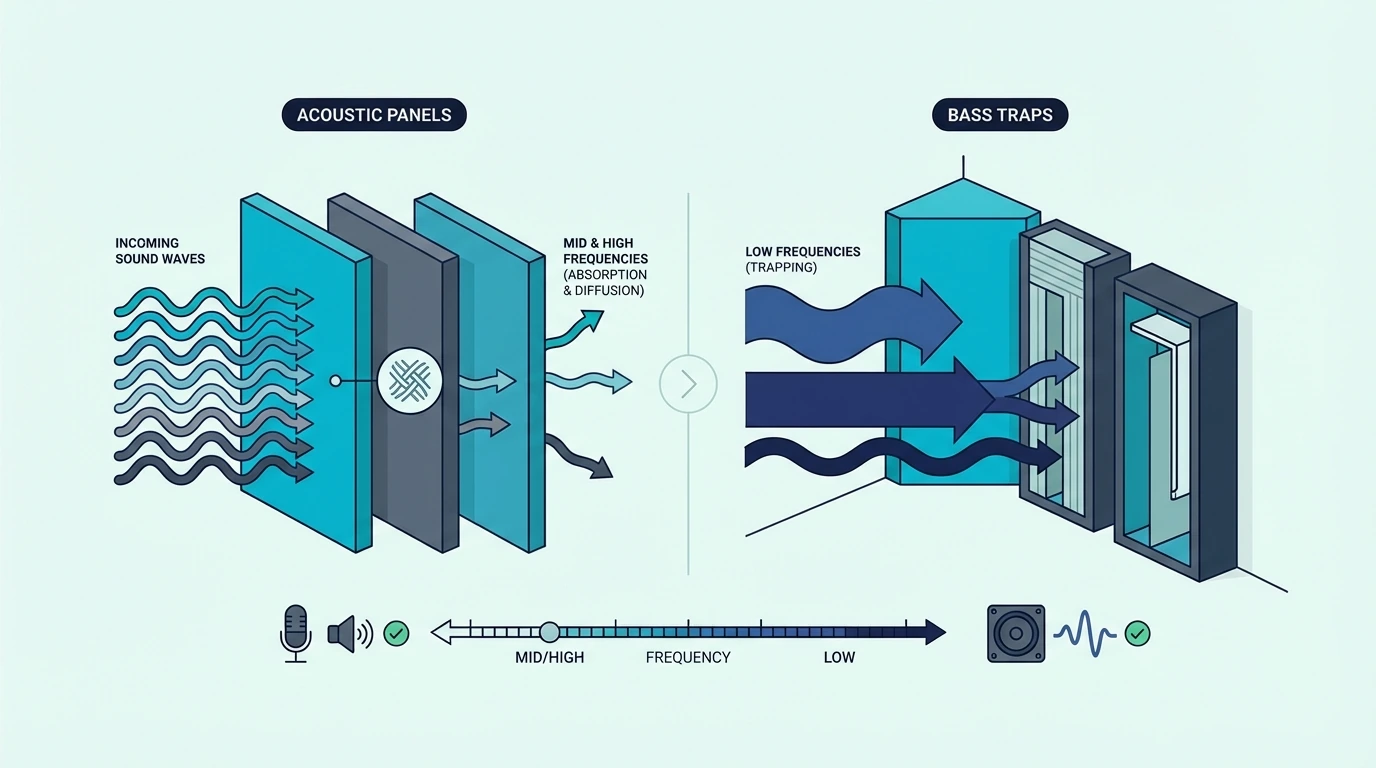
Acoustic panels and bass traps both absorb sound, but they target different parts of the frequency spectrum. The split is a hard line at roughly 250 Hz: panels handle everything above it, and traps handle everything below it.
Acoustic Panels Target Mid and High Frequencies
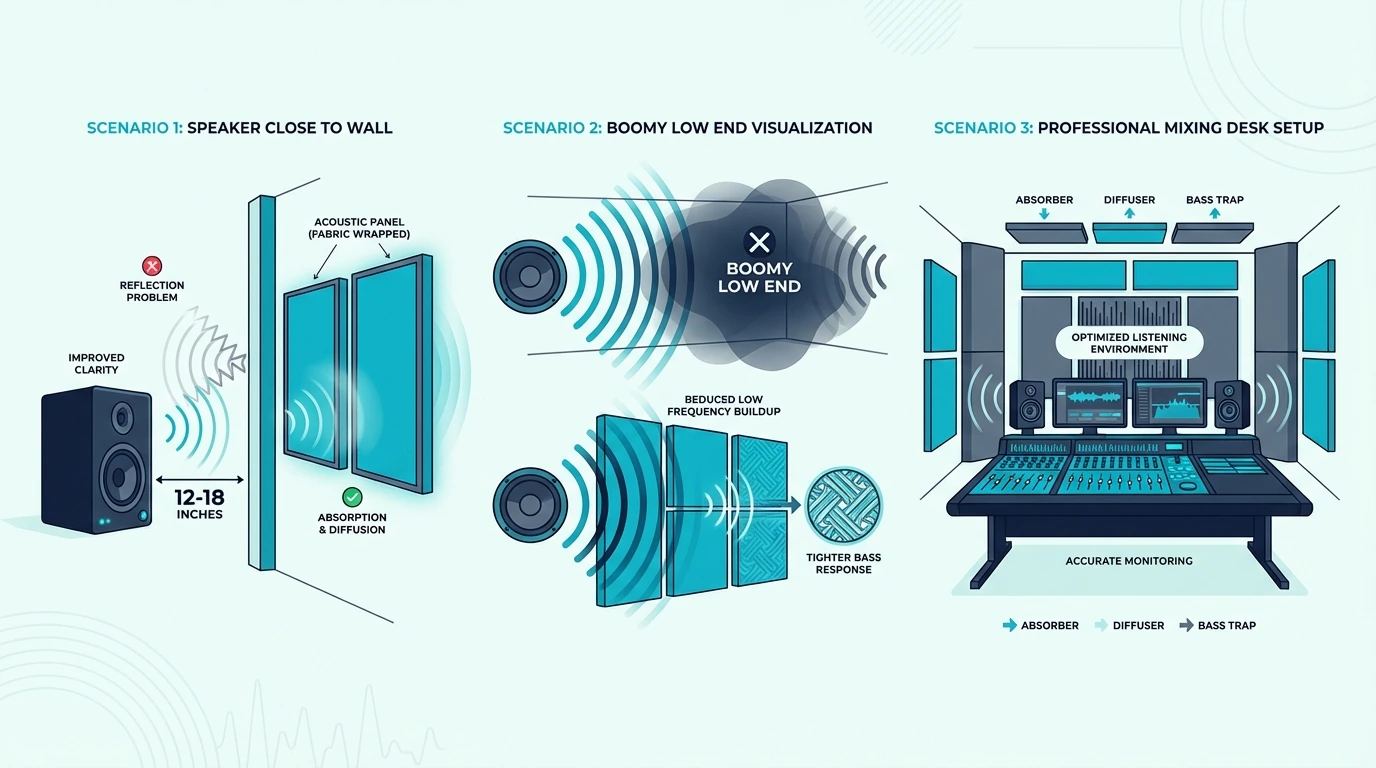
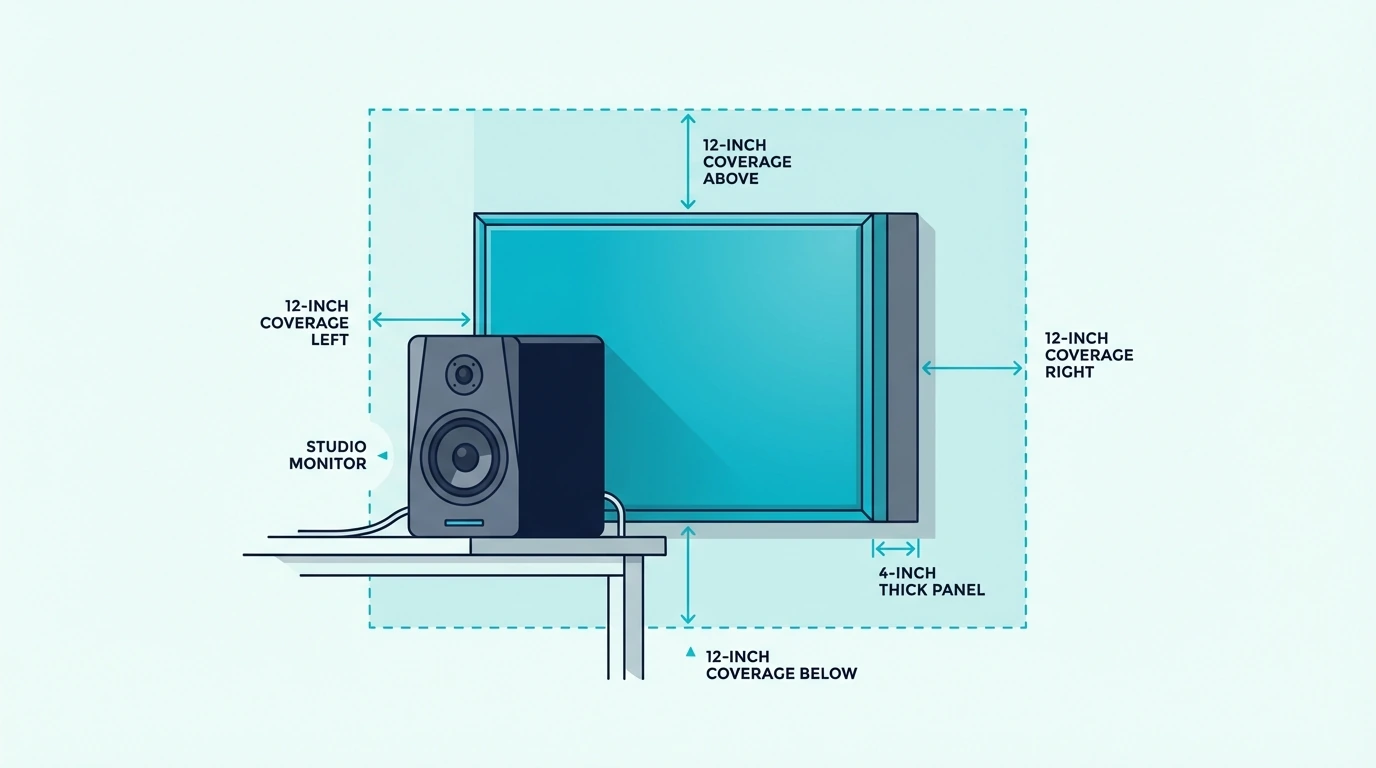
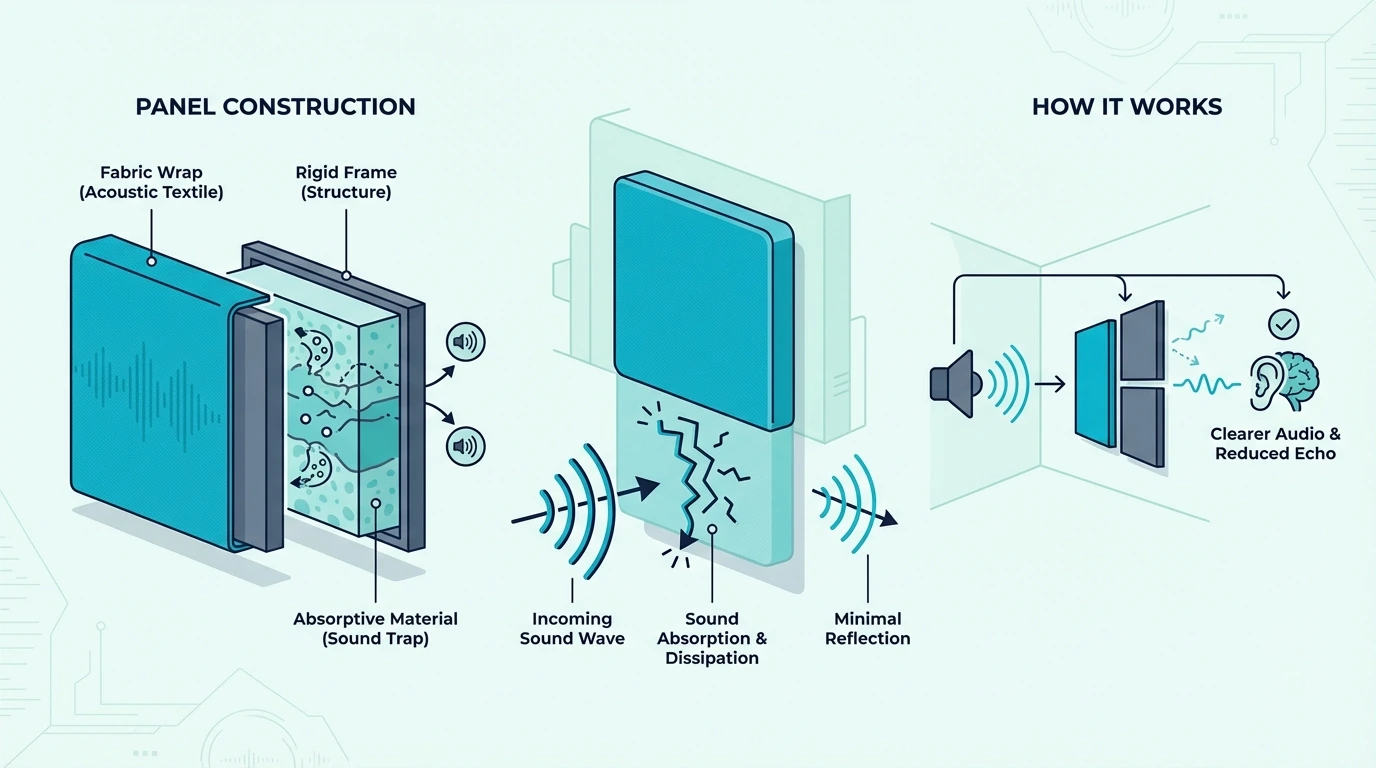
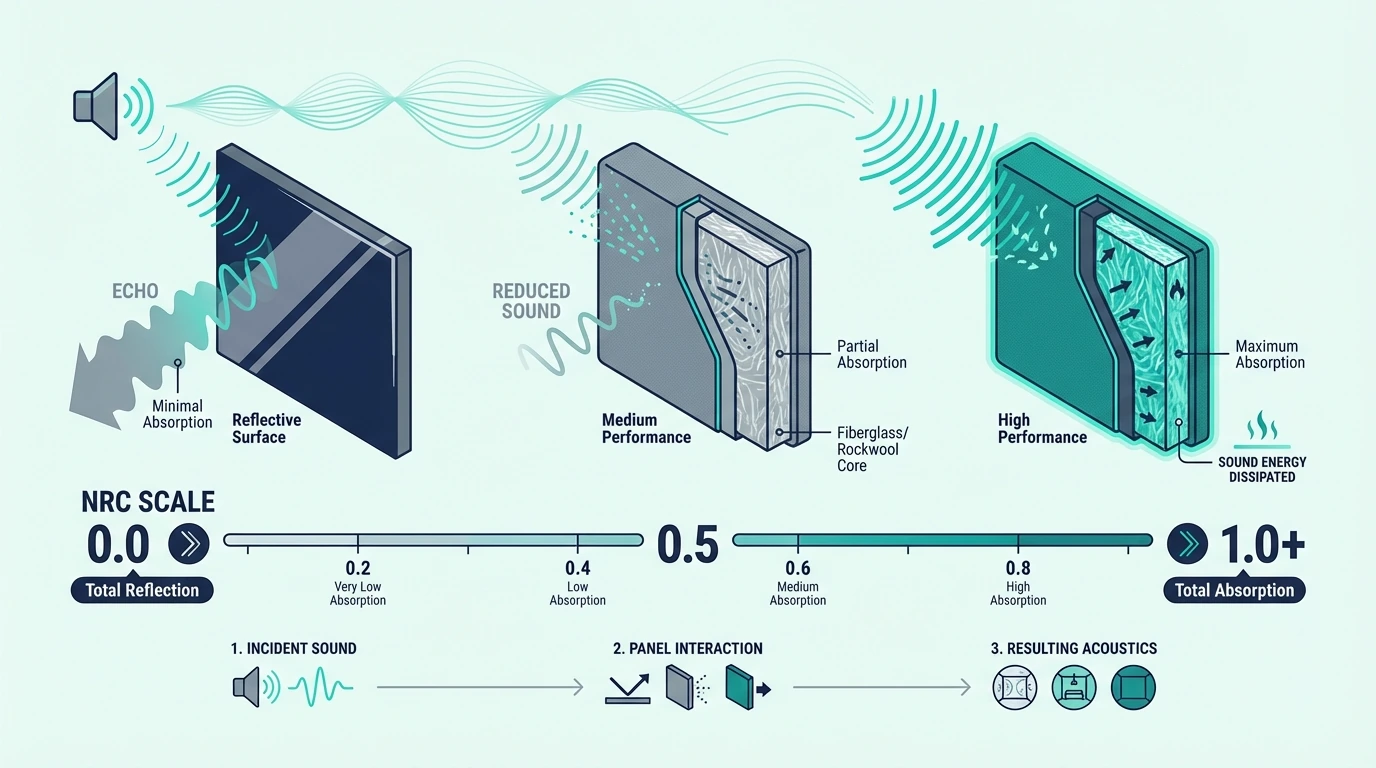
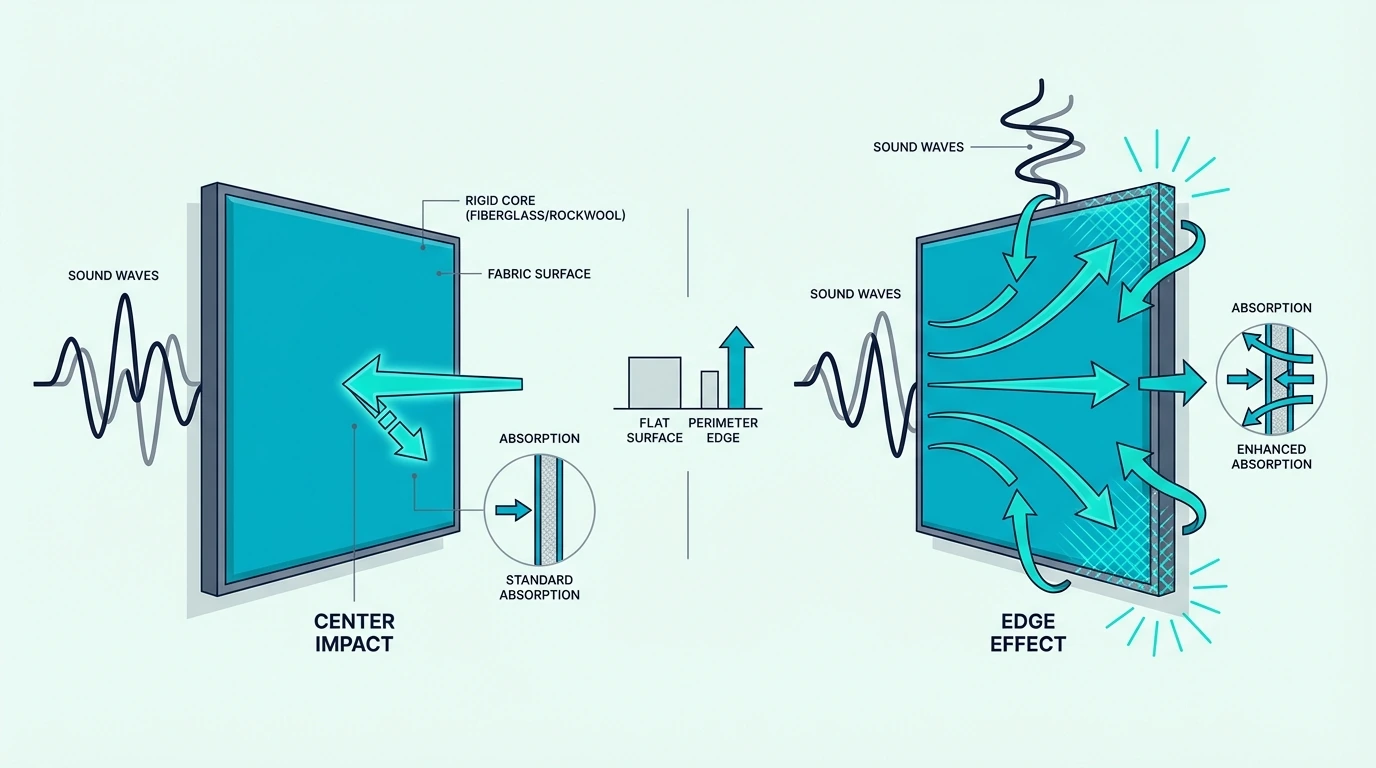
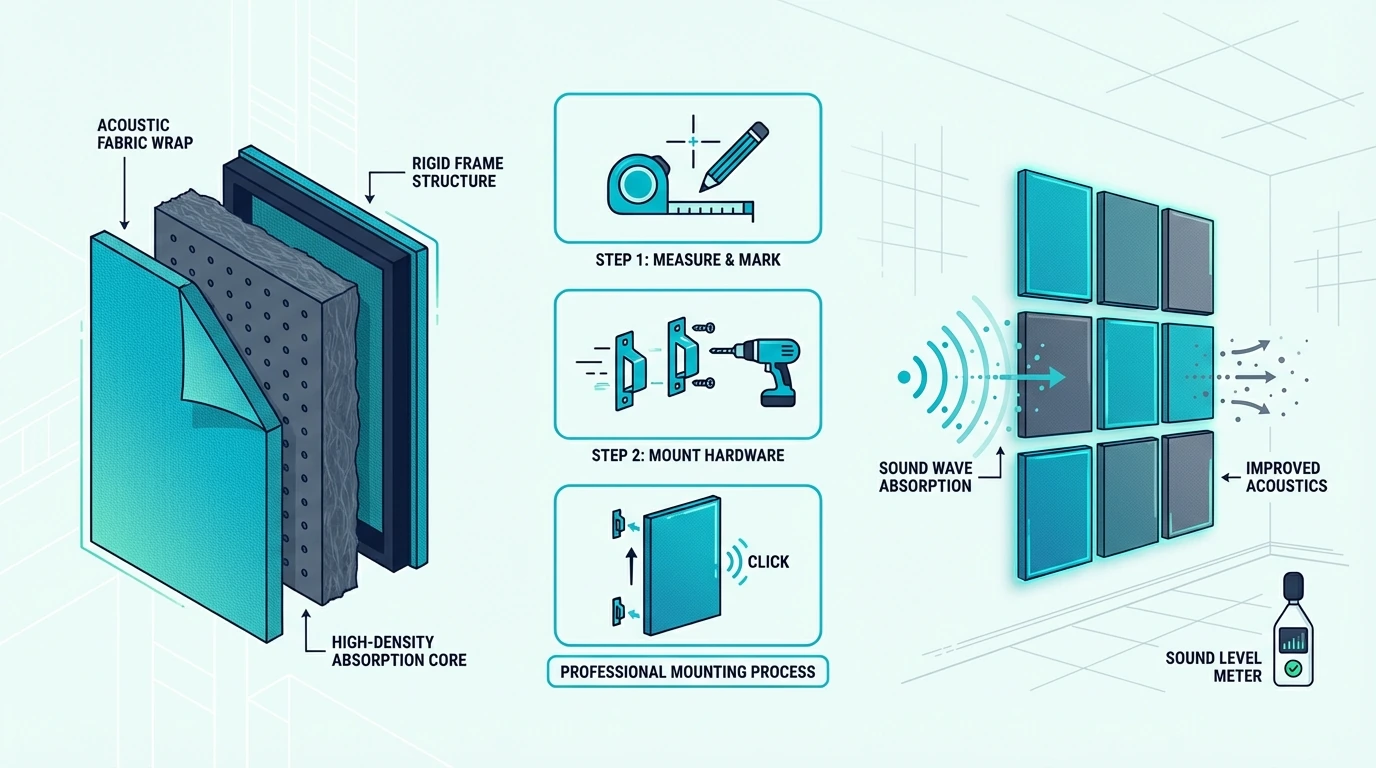
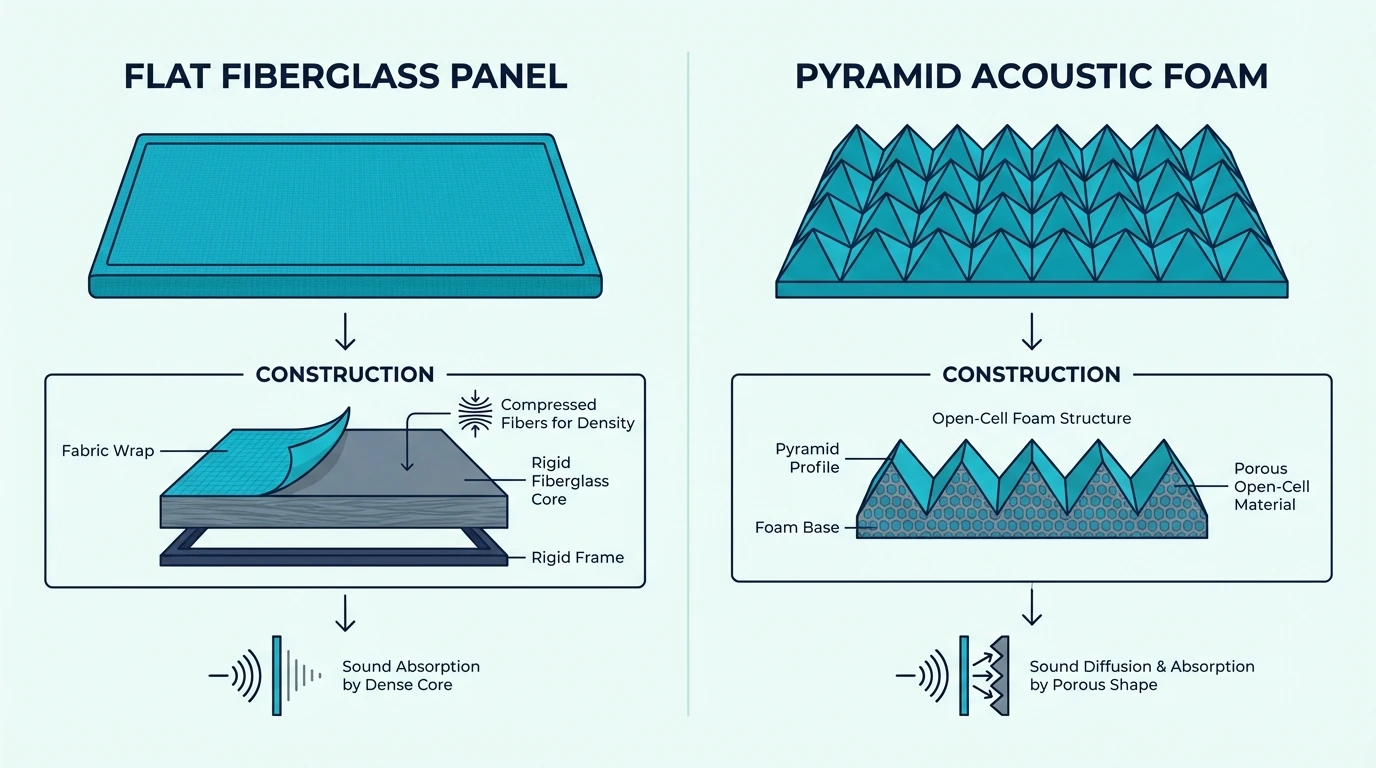
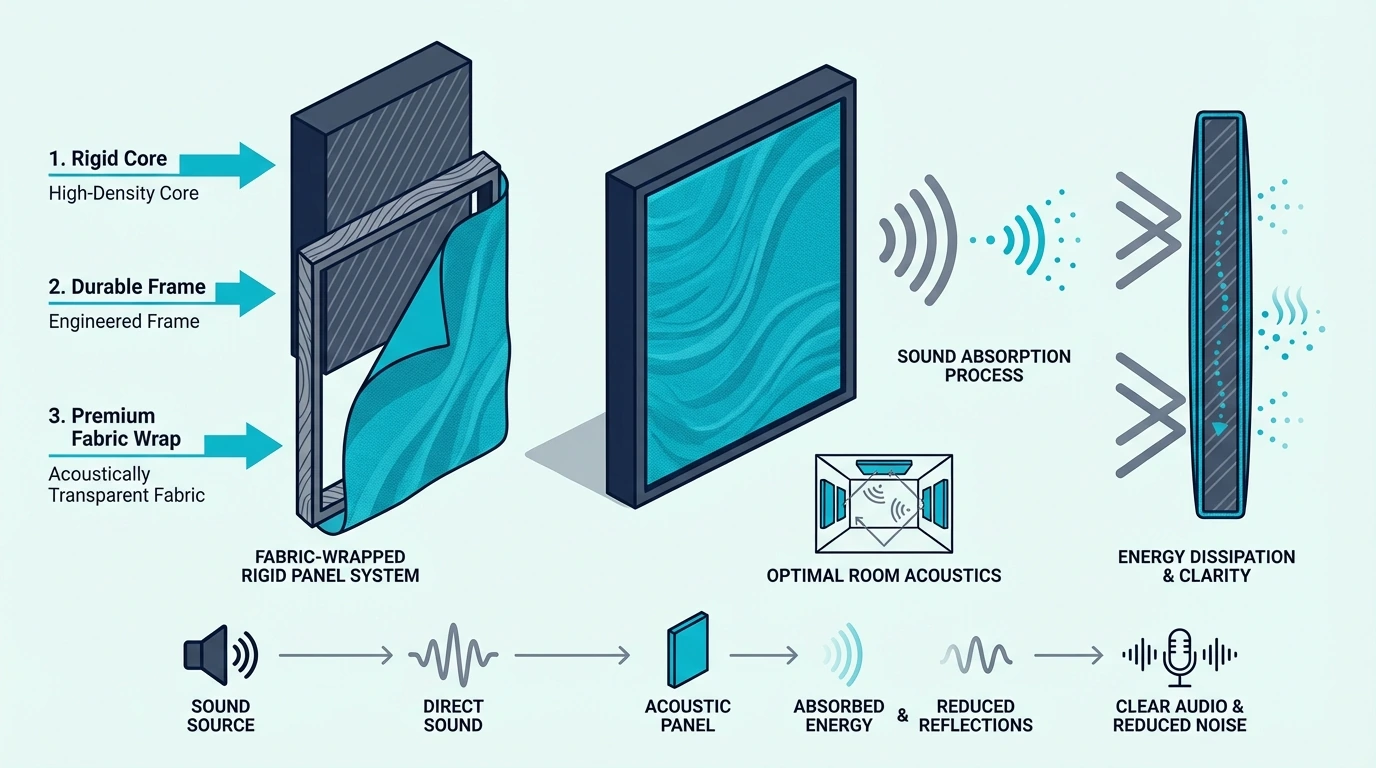
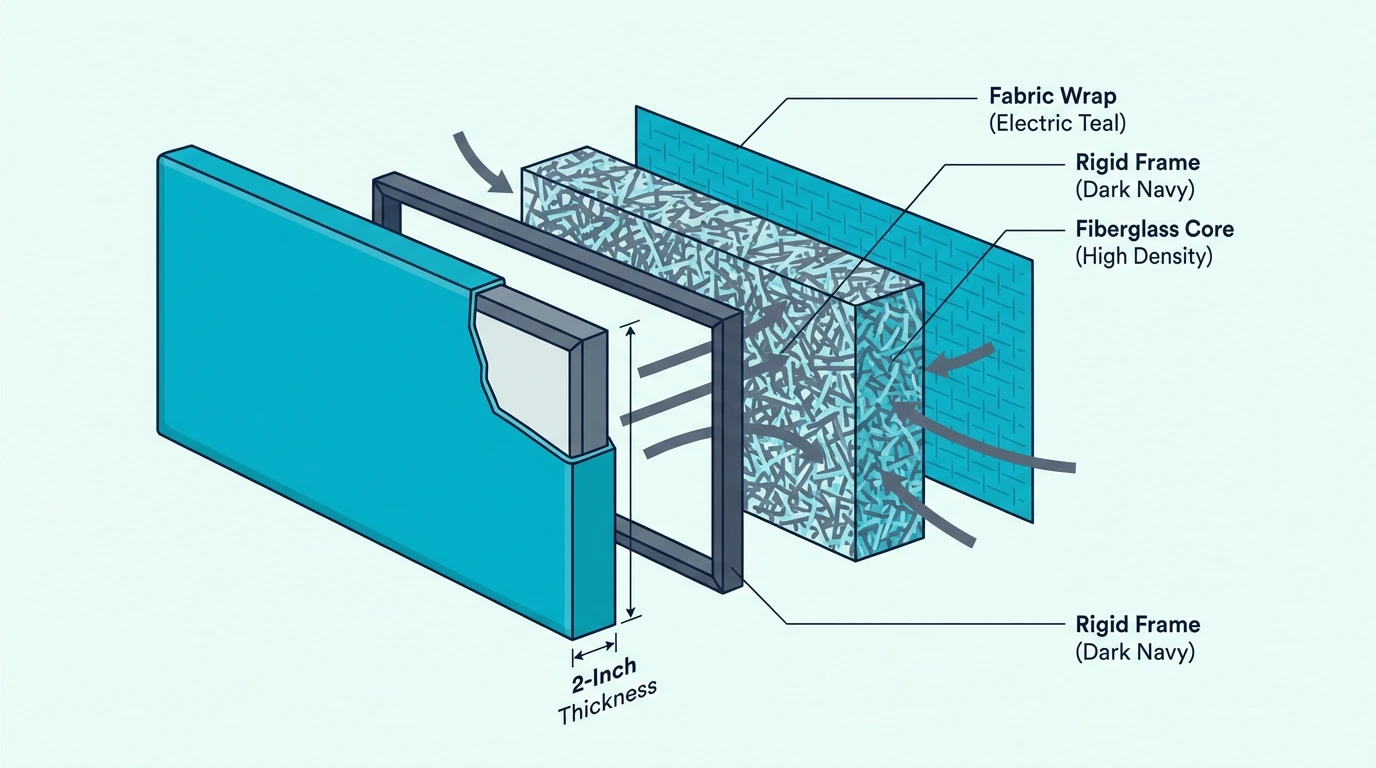
That upper range—from 250Hz through 20kHz—is the territory of standard acoustic panels. The 2-inch thick fabric-wrapped rectangles you see in professional studios exist specifically to absorb human voice fundamentals, guitar body resonance, cymbal shimmer, and the clarity range where most sonic detail lives.
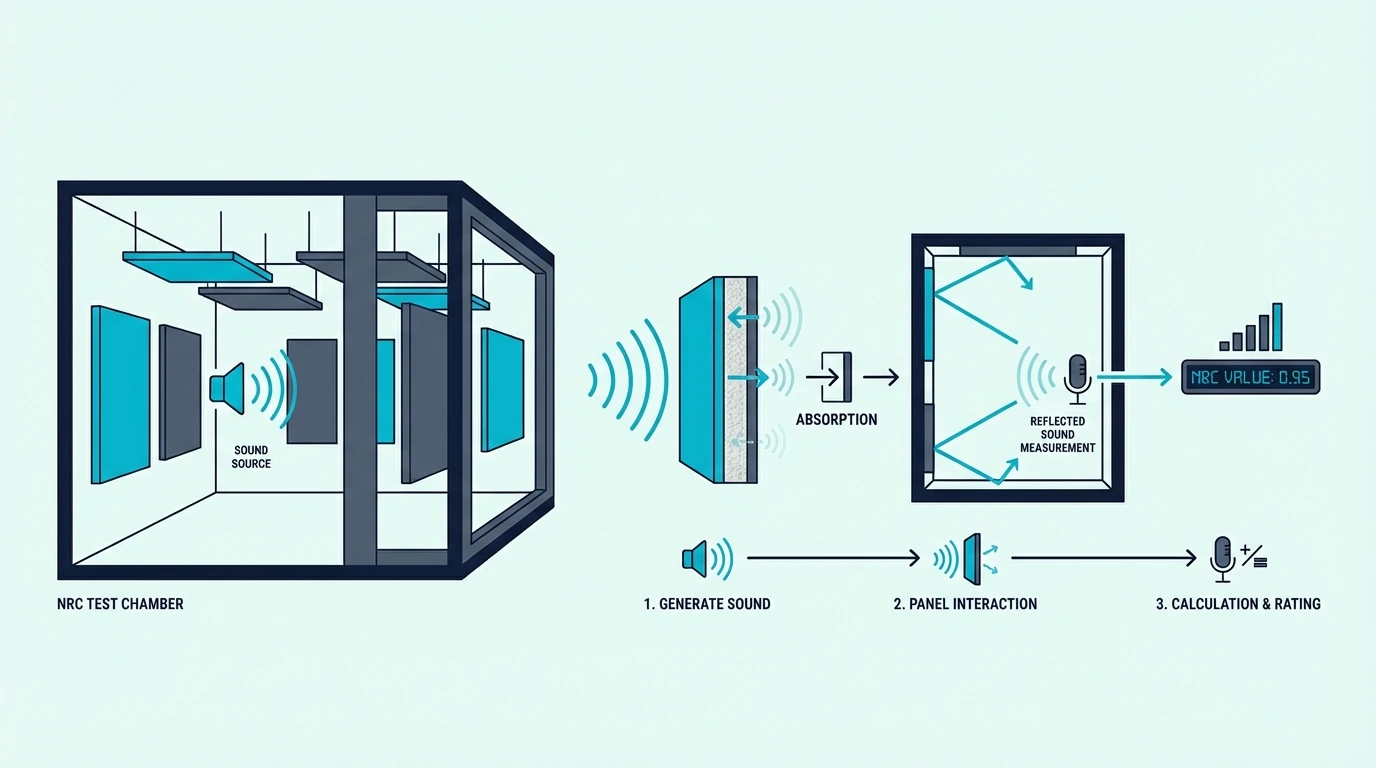
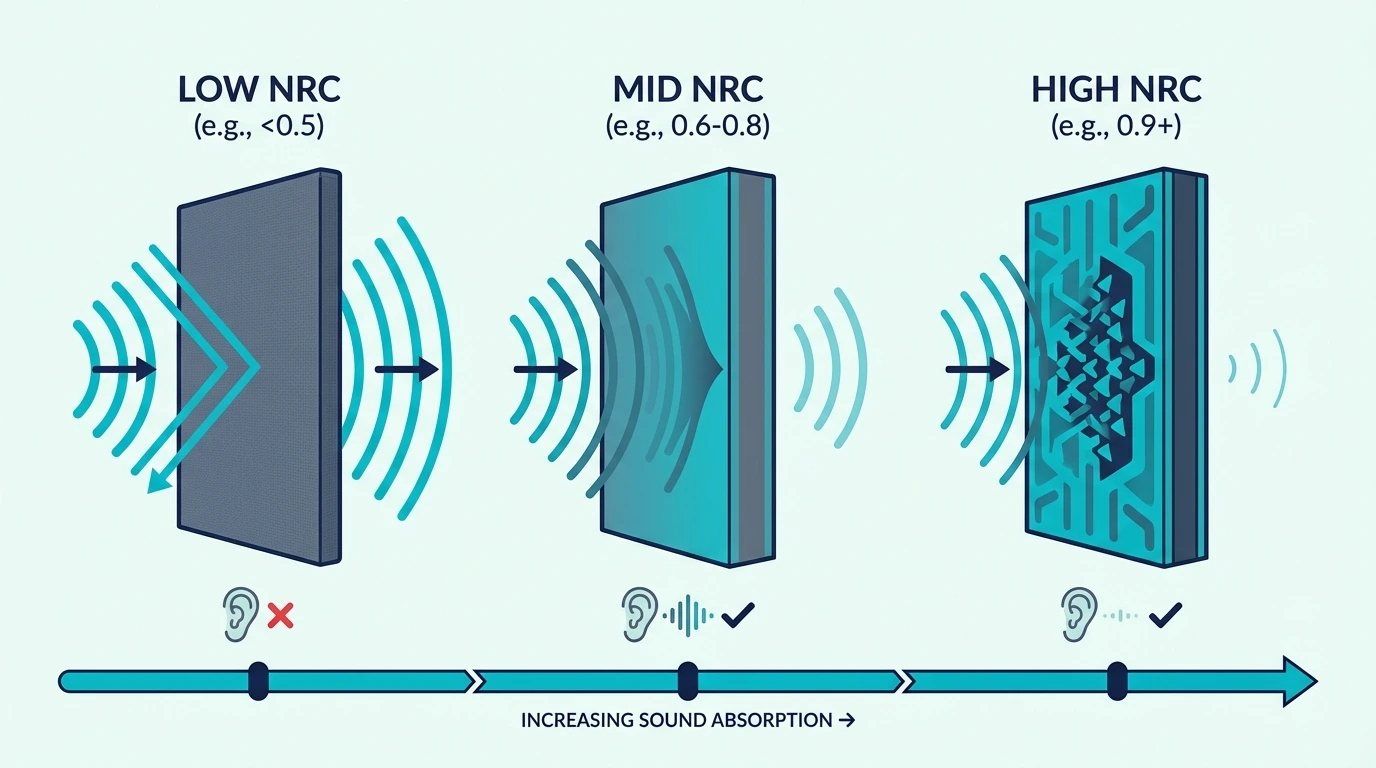
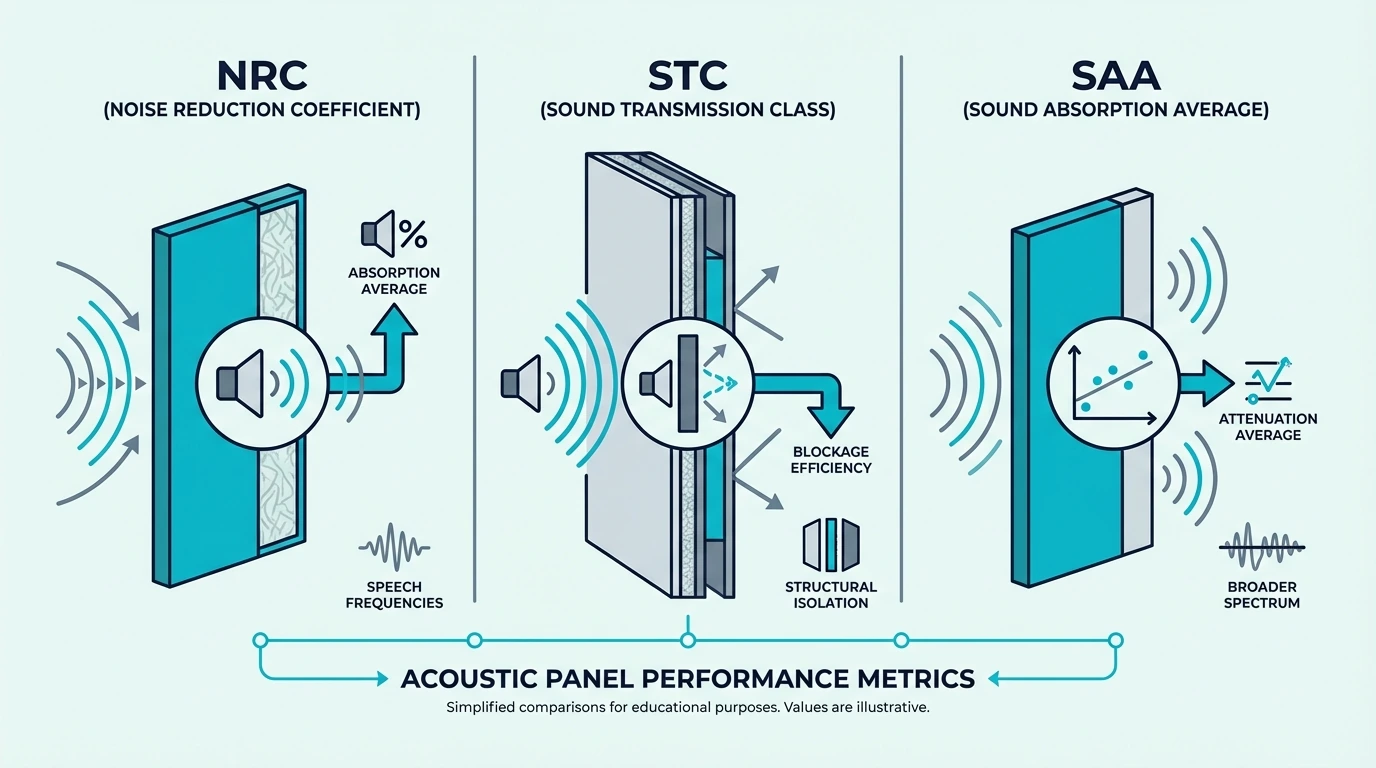
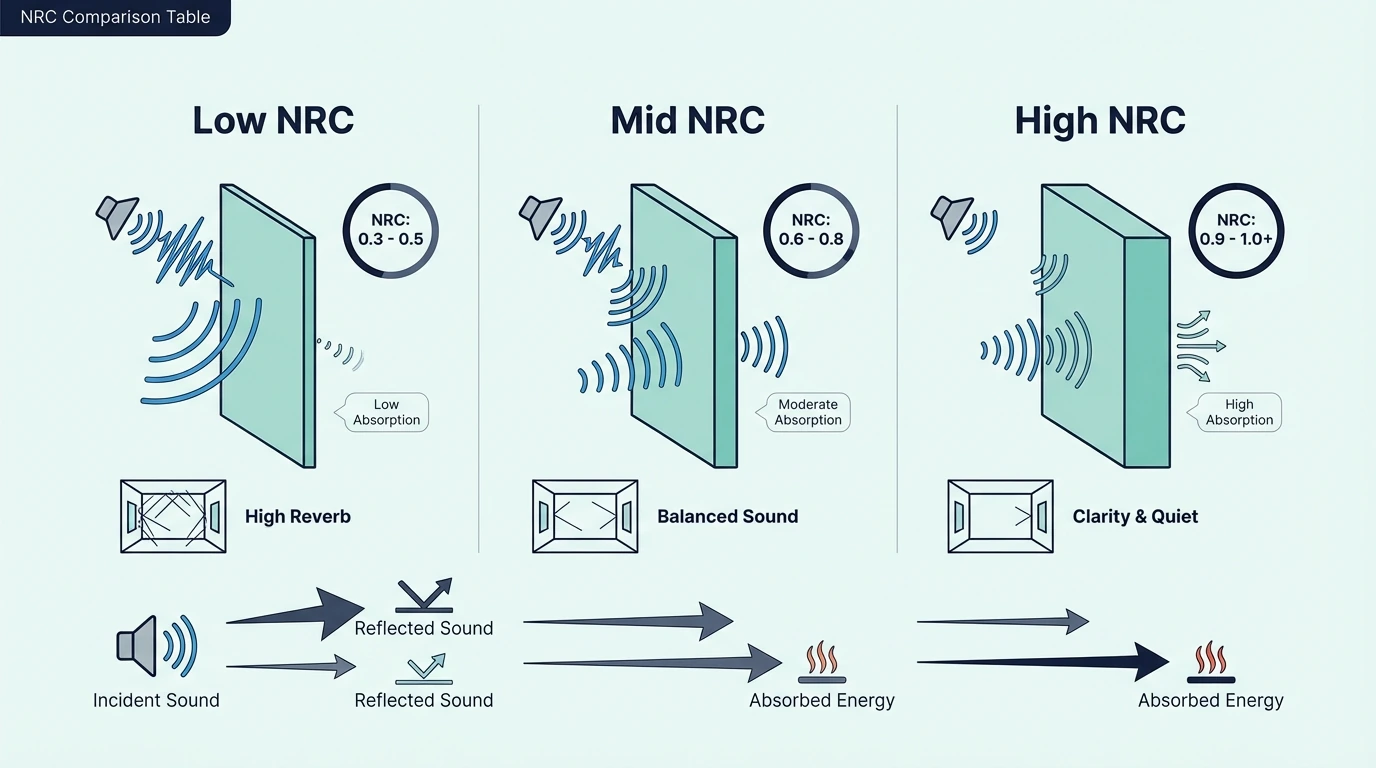
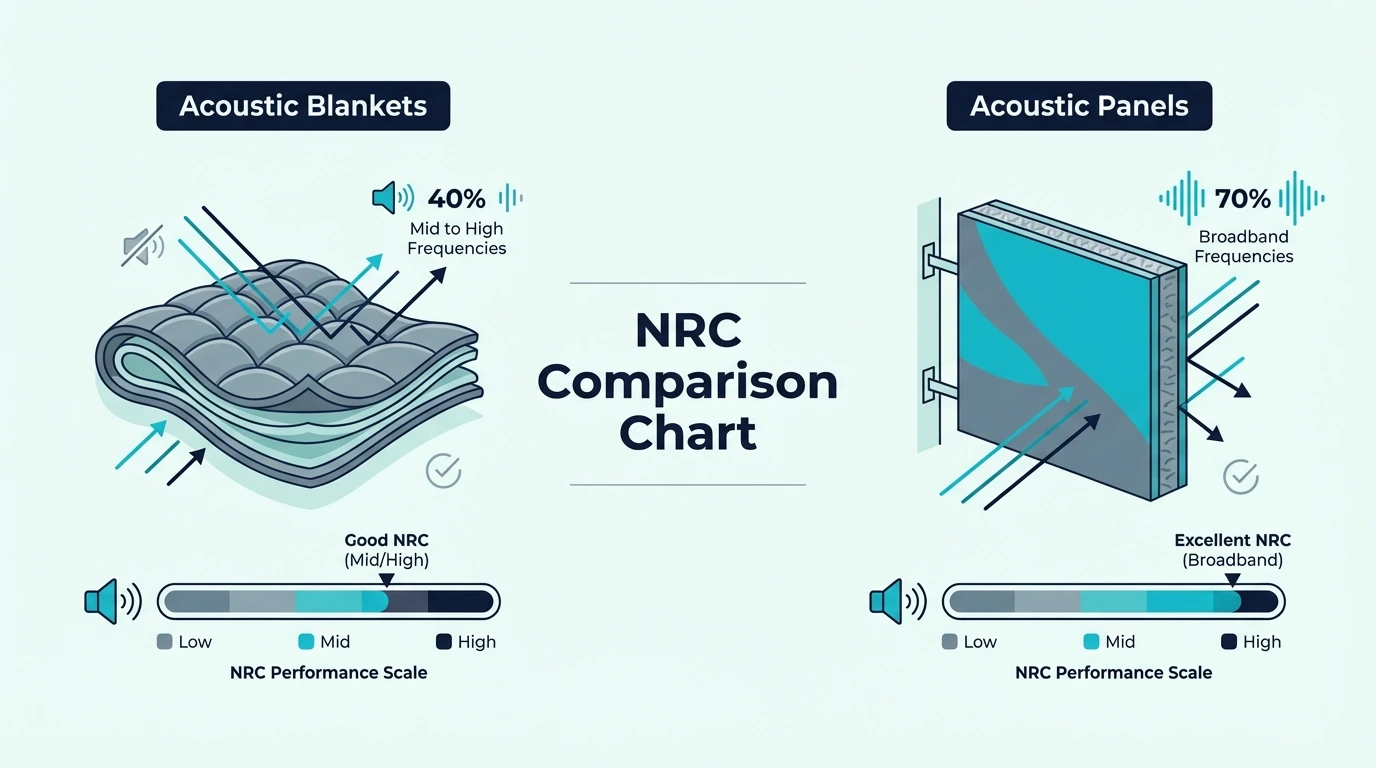
A quality panel with an NRC rating of 0.85 or higher absorbs 85% of sound energy in this range. That is enough to transform a live, reflective room into a controlled acoustic environment.
Clap your hands in the room and listen for a ringing tail or flutter echo. If you hear it, those panels are the fastest fix.
What Are Acoustic Panels Good For?
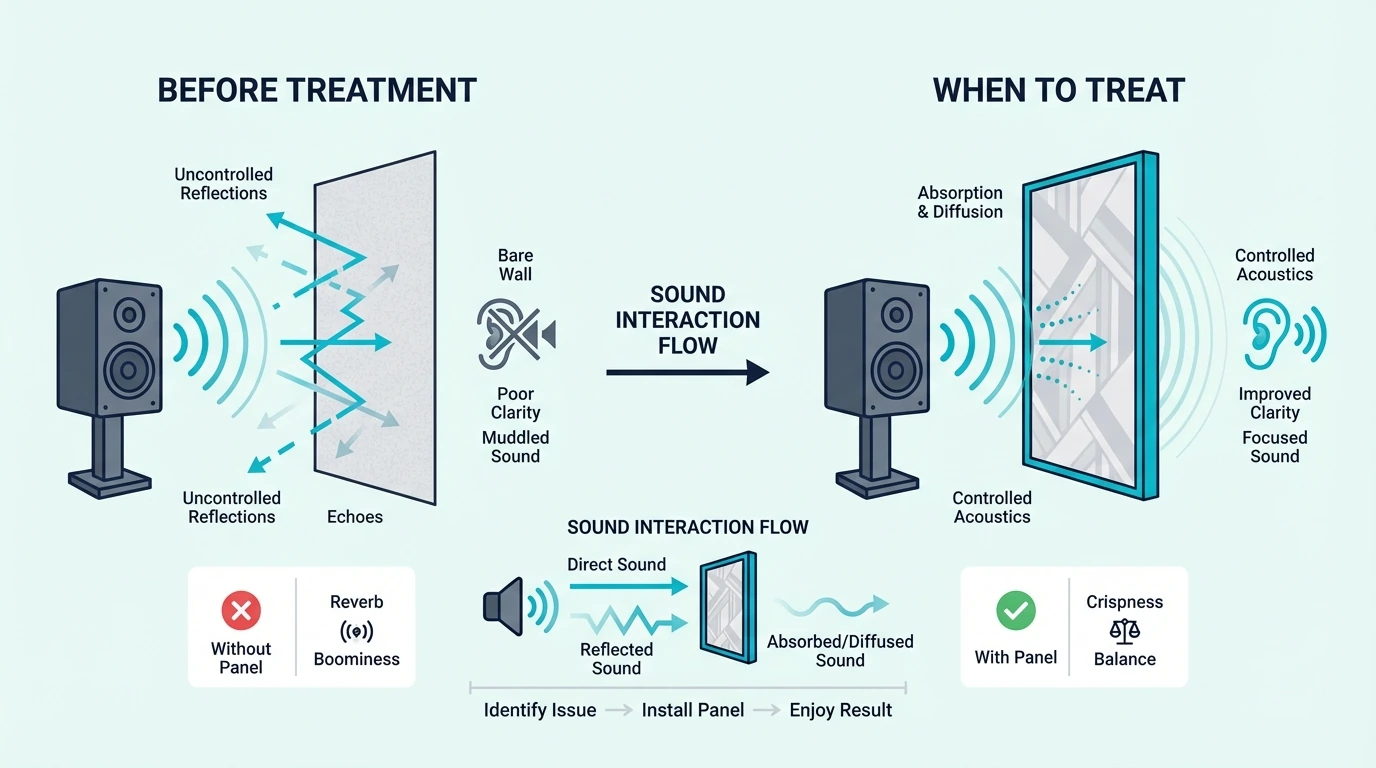
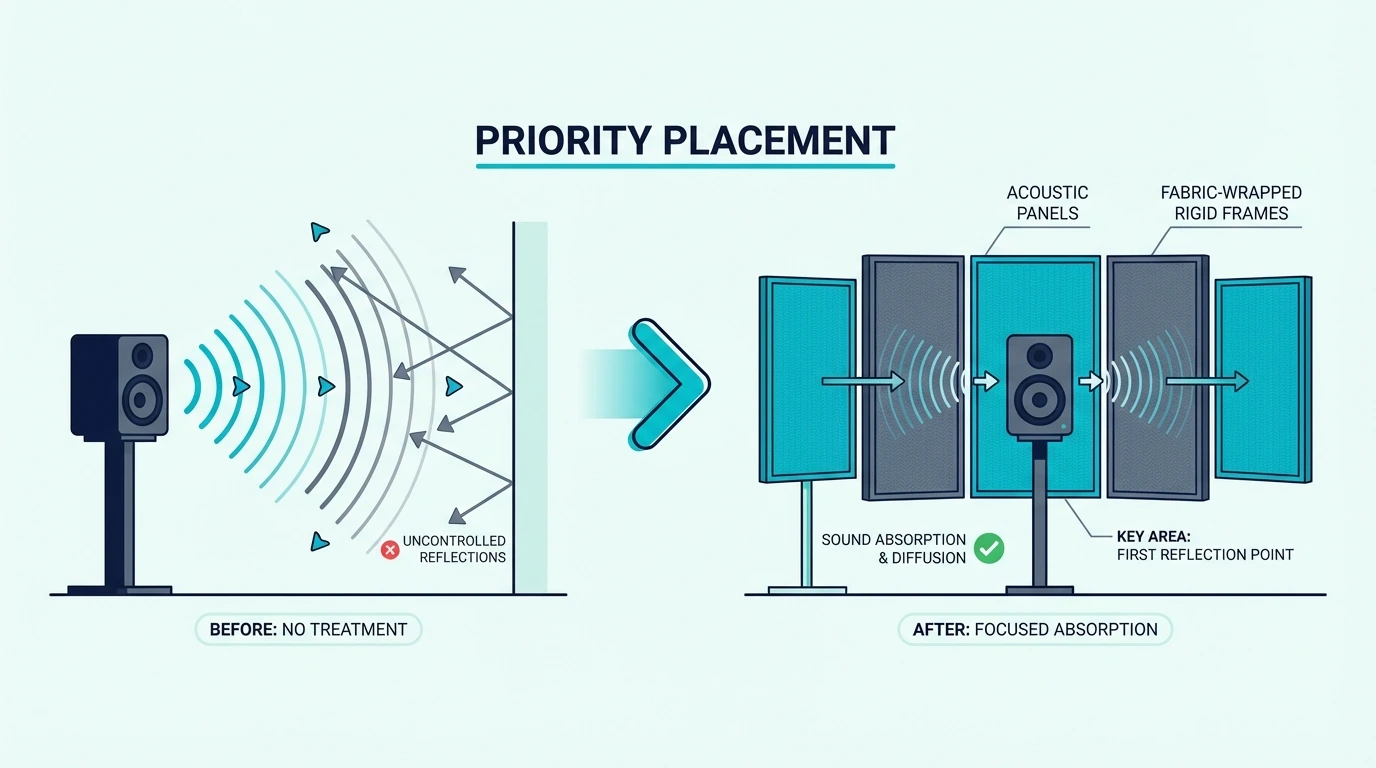
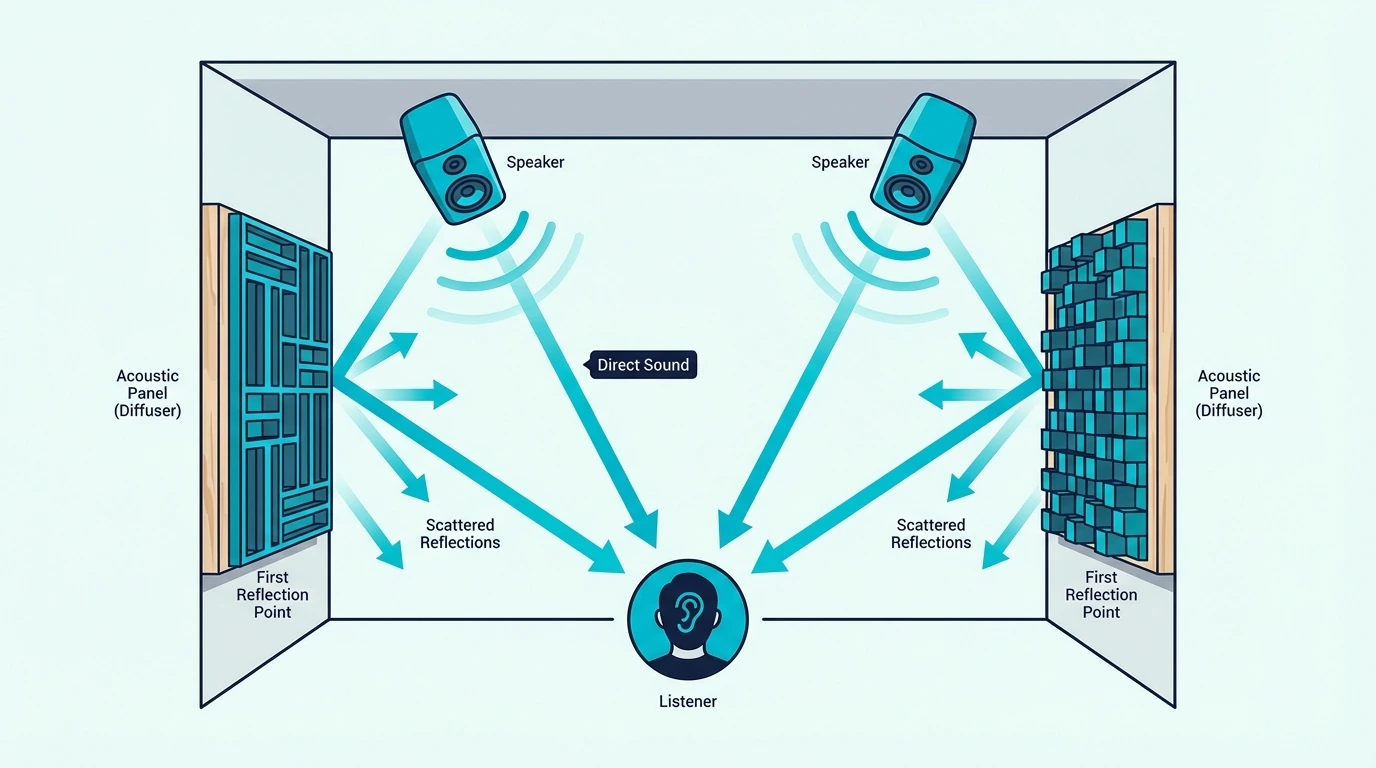
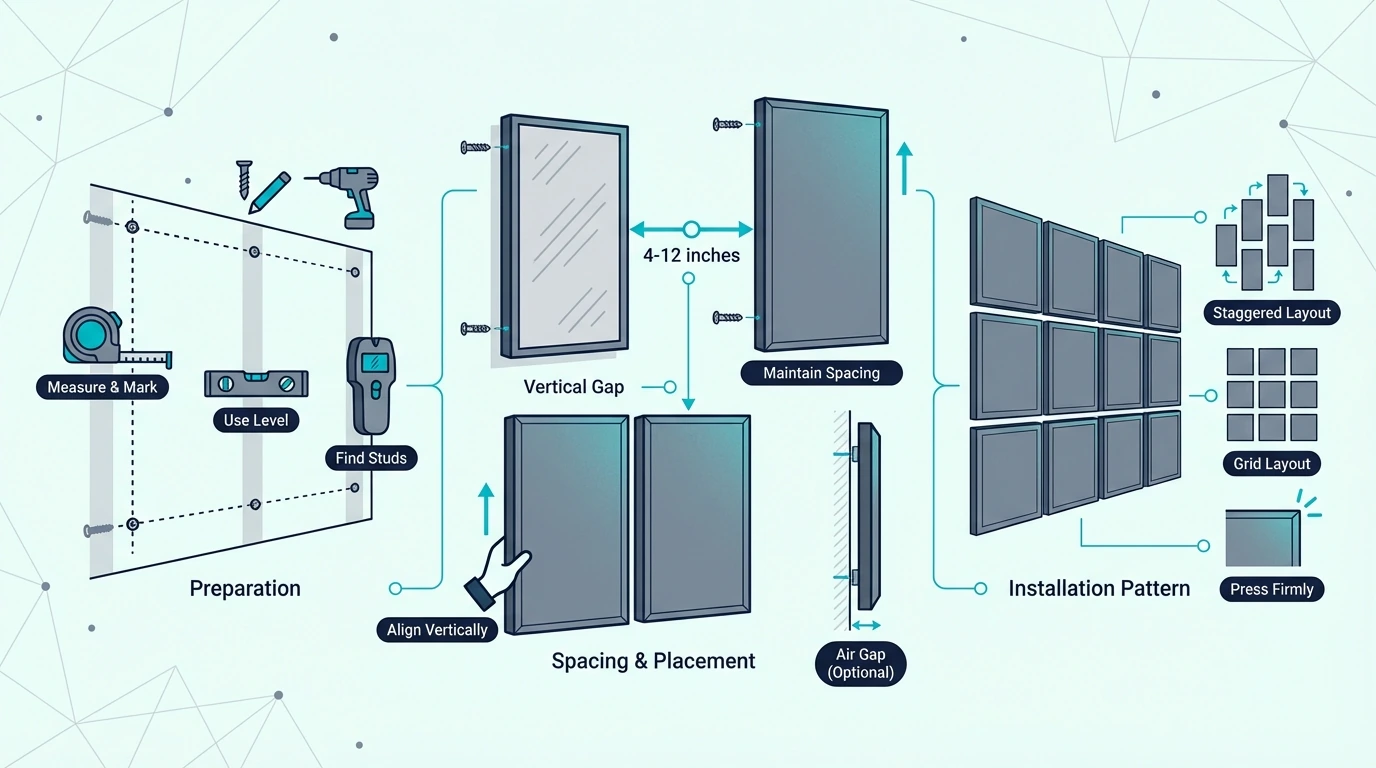
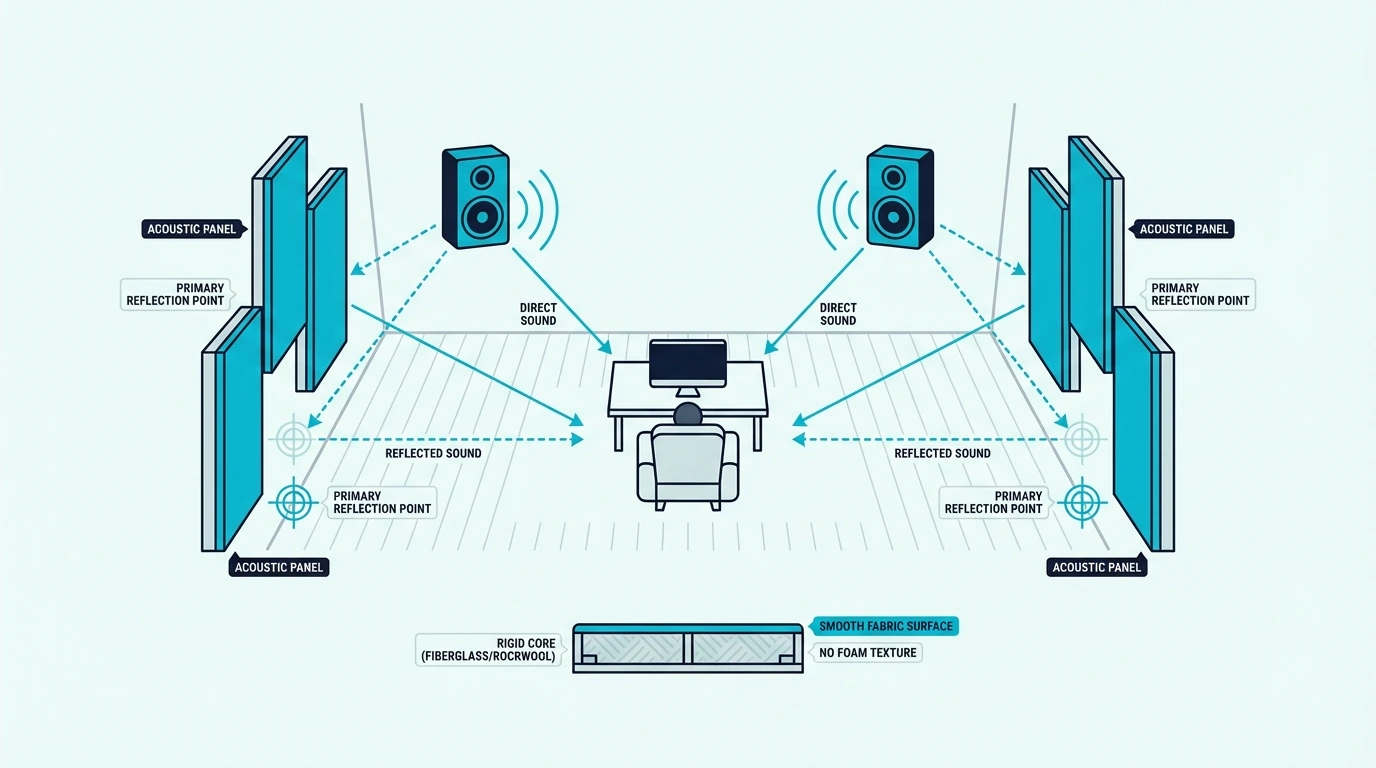
The best place to deploy that mid-high absorption is at your first reflection points—the spots on your walls where sound bounces directly from your speakers (or voice) to your ears. These early reflections cause comb filtering and smeared imaging that makes mixing difficult and recordings sound amateur.
For home studios focused on vocals and podcasting, treating these reflection points often provides 80% of the acoustic improvement you will ever need, simply because voice frequencies sit squarely in the panel’s effective range.
But for music production involving heavy kicks or synths, panels are necessary but insufficient. They will clean up the mids and highs beautifully, but your low end will remain a boomy, unpredictable mess without dedicated bass treatment.
Understanding how acoustic panels work helps explain why material thickness drives this frequency split so aggressively.
If you want a straightforward “standard” panel to start with, the UMIACOUSTICS 4 PCS Acoustic Panels are a typical 2-inch fiberglass option for mid/high reflection control.
What Are Bass Traps?

Because panels cannot absorb deep energy, you need bass traps to handle everything below 250Hz. How deep they actually reach depends on two structural factors: material thickness and corner placement.
What Frequencies Do Bass Traps Absorb?
The thickest traps target the 20Hz to 250Hz range—everything from deep sub-bass rumble through the fundamental frequencies of a kick drum and male vocal chest resonance.
The most common bass problems in home studios occur between 60Hz and 200Hz, where room modes create massive standing waves. These modes cause certain bass frequencies to boom excessively while others virtually disappear from the listening position, making accurate mixing impossible.
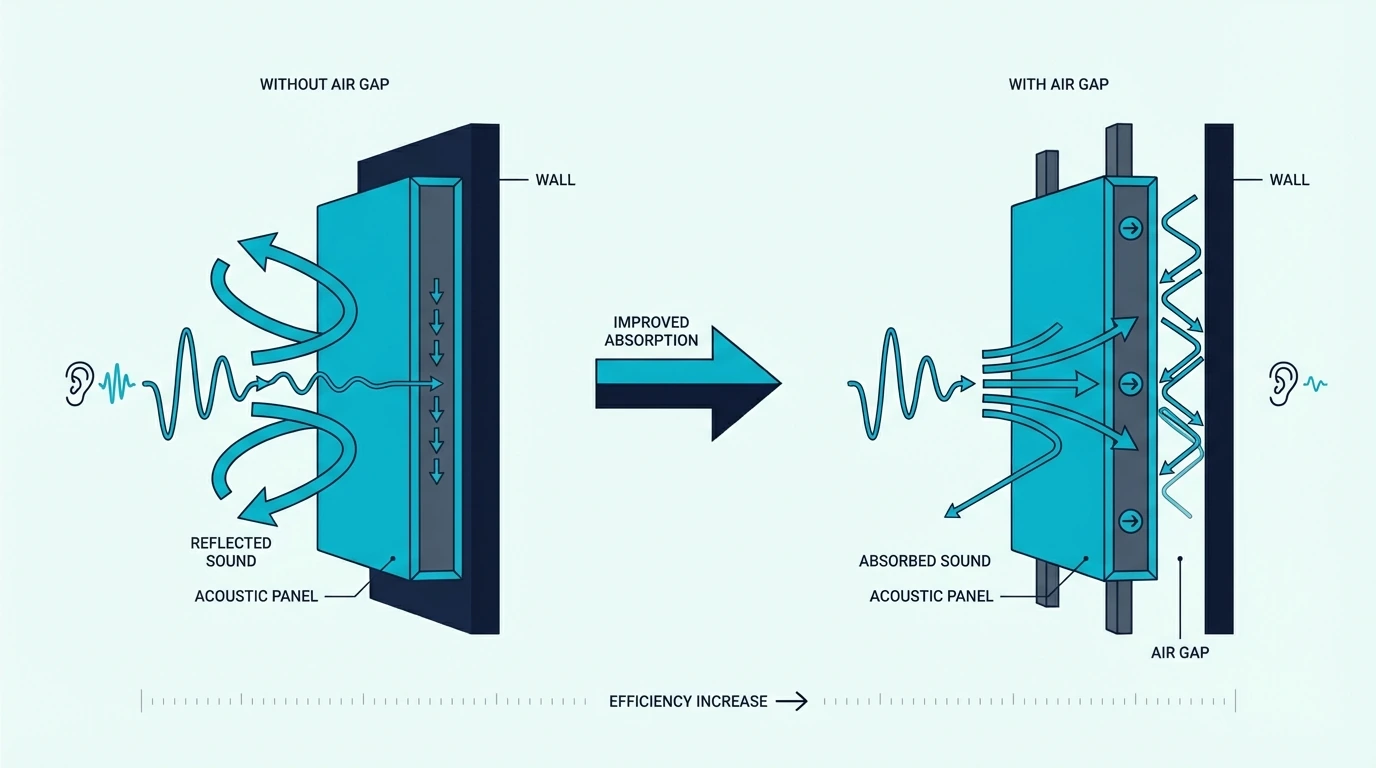
A well-designed bass trap can provide strong absorption down to 80 Hz or lower. When you add an air gap behind a thick trap, that effective absorption extends even further into the sub-bass range.
The DIY bass trap guide explains the exact materials and thickness required for meaningful low-end absorption if you want to build your own.
For an entry-level corner option, the 8 Pack – Bass Traps Acoustic Foam Corner can help with mild issues.
Why Are Low Frequencies So Hard to Control?
Those deep frequencies require so much material because they behave fundamentally differently than mids and highs. At 100Hz the wavelength is over 11 feet, and at 50Hz it exceeds 22 feet — which is often longer than the physical dimensions of the room.
When wavelengths approach the size of your room, standing waves form as sound bounces between parallel surfaces, creating predictable zones of reinforcement (loud spots) and cancellation (dead spots). That is why the bass can sound overwhelmingly loud at your desk but completely disappear when you walk to the back of the room.
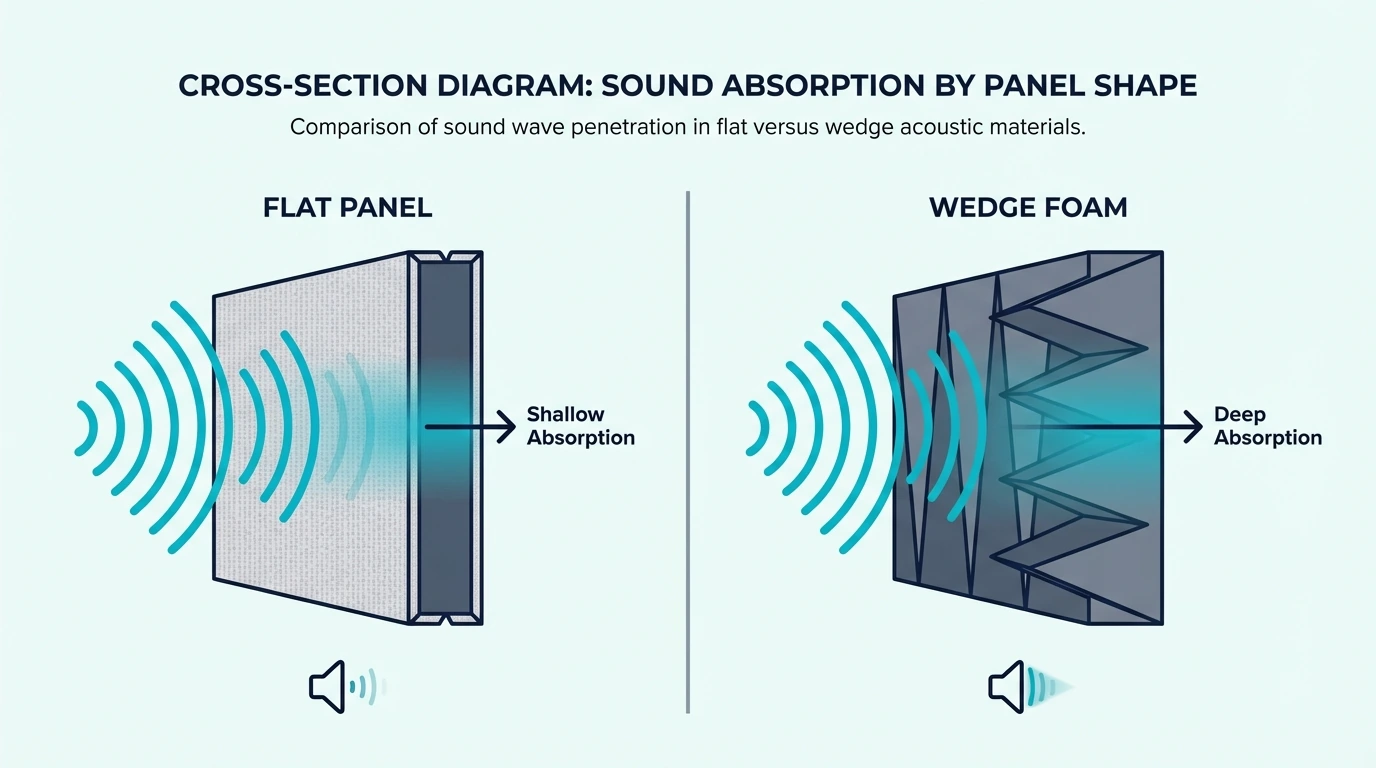
Standard panels cannot touch these massive waves because a 2-inch depth is tiny compared to an 11-foot wavelength. Bass traps solve this physics problem through sheer bulk—more material depth means more friction to convert that acoustic energy into heat.
Corner placement amplifies this effectiveness because room corners are pressure zones where bass energy naturally pools. Treating corners captures the bass where it is most concentrated.
For deeper low-end control in those corners, the ATS Acoustics Corner Bass Trap is a thick fiberglass option built for serious low-frequency problems.
Can Acoustic Panels Work as Bass Traps?
Many people buy standard panels, cover their walls, and still hear a boomy room because they assume “acoustic treatment” means “treats all frequencies.” Two things explain why panels fail at this job — the physics of material depth, and the one mounting trick that partially bridges the gap.
Why Panels Cannot Handle Bass
The failure traces back to the wavelength math mentioned earlier: a 2-inch panel is simply too shallow to interact with an 11-foot 100Hz wave. The wave passes through the thin material with minimal friction and loses almost no energy.
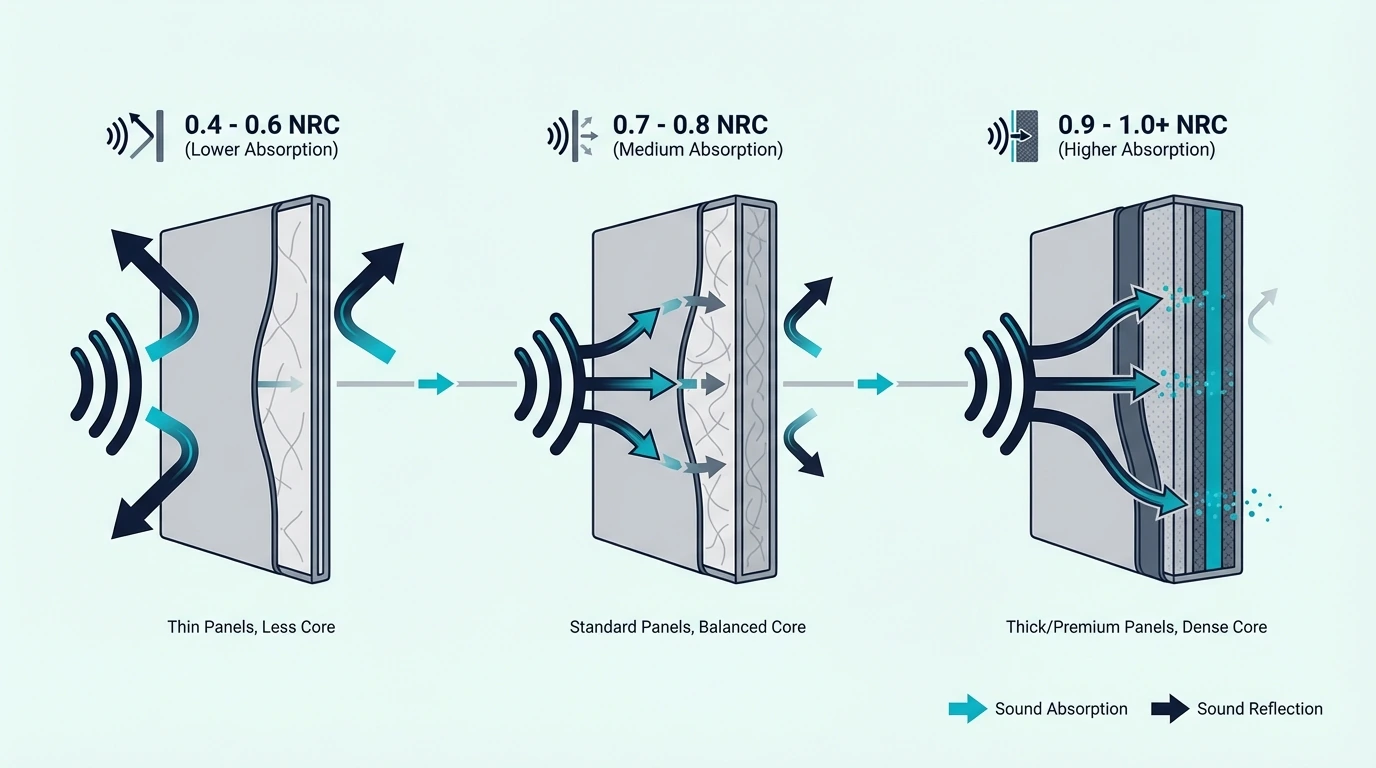
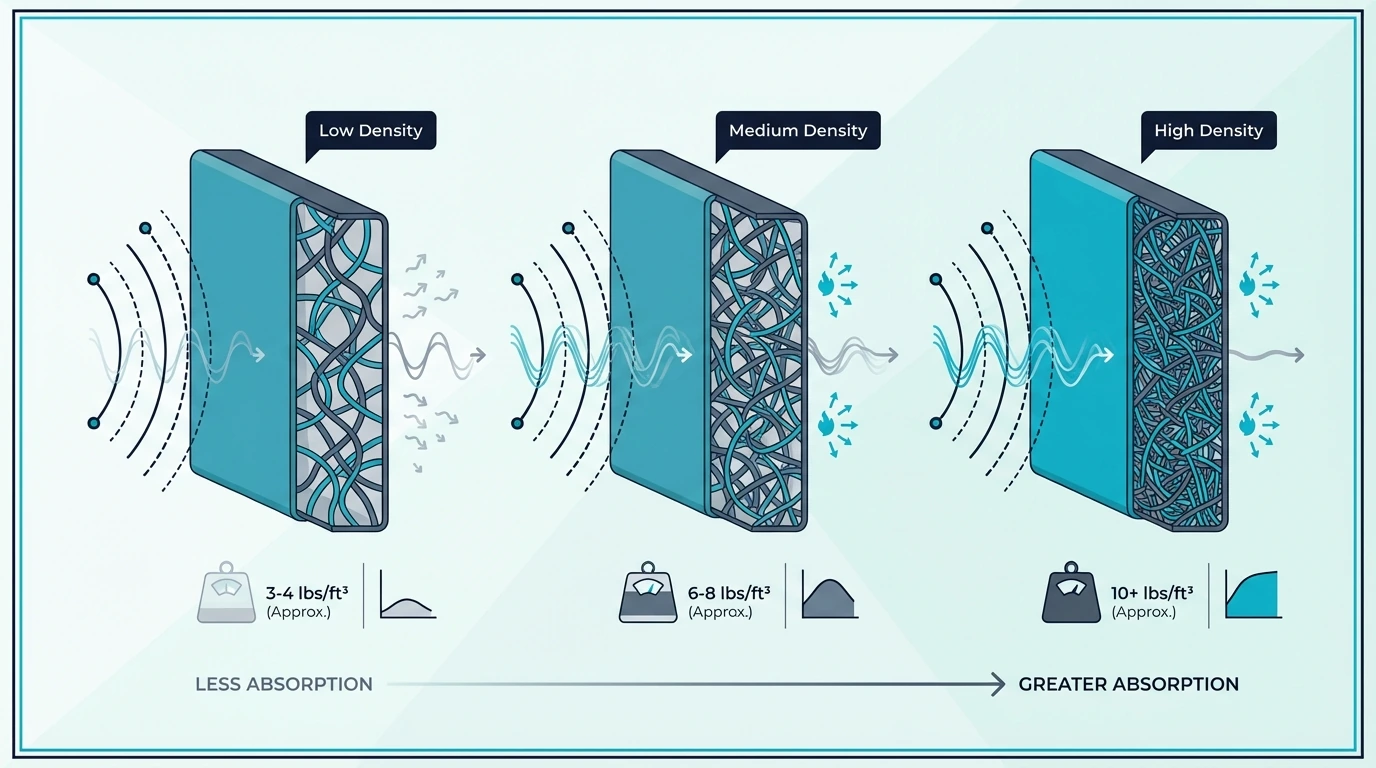
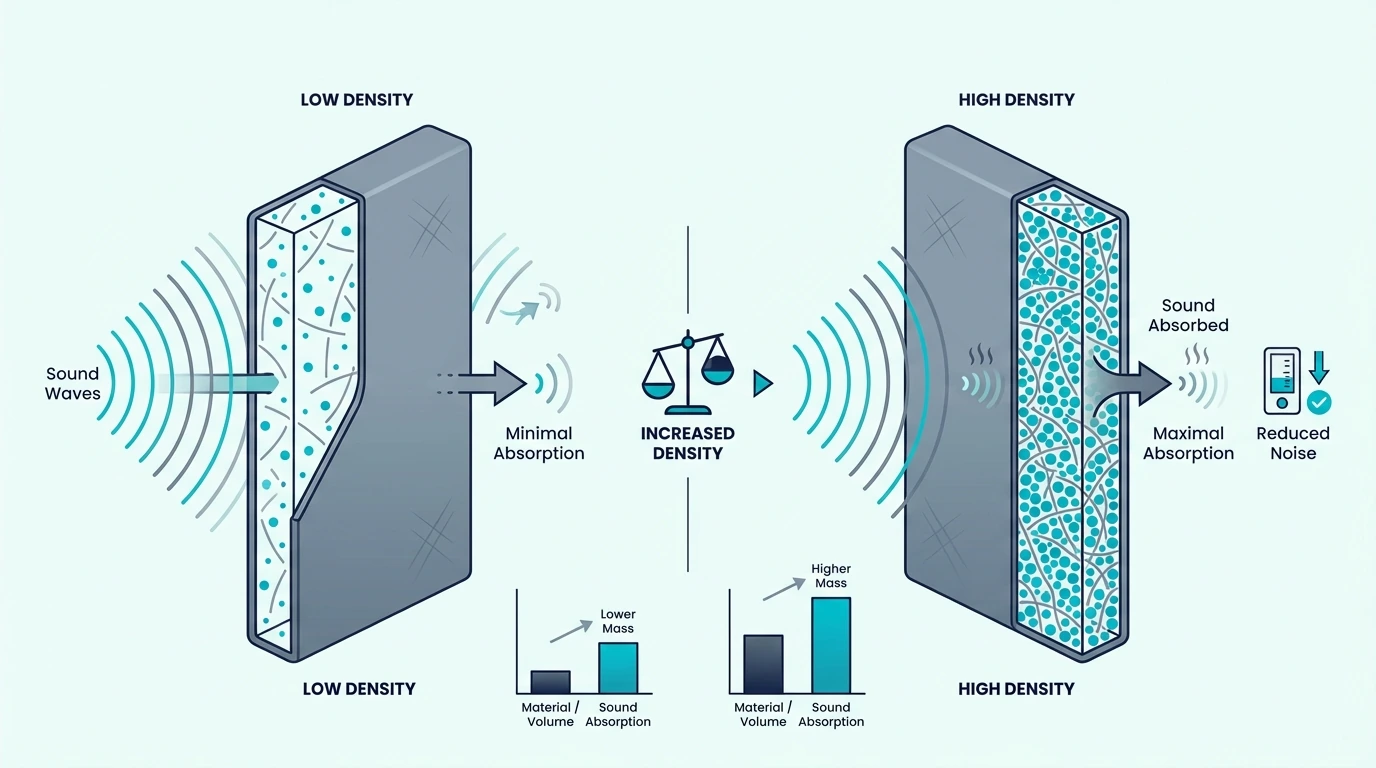
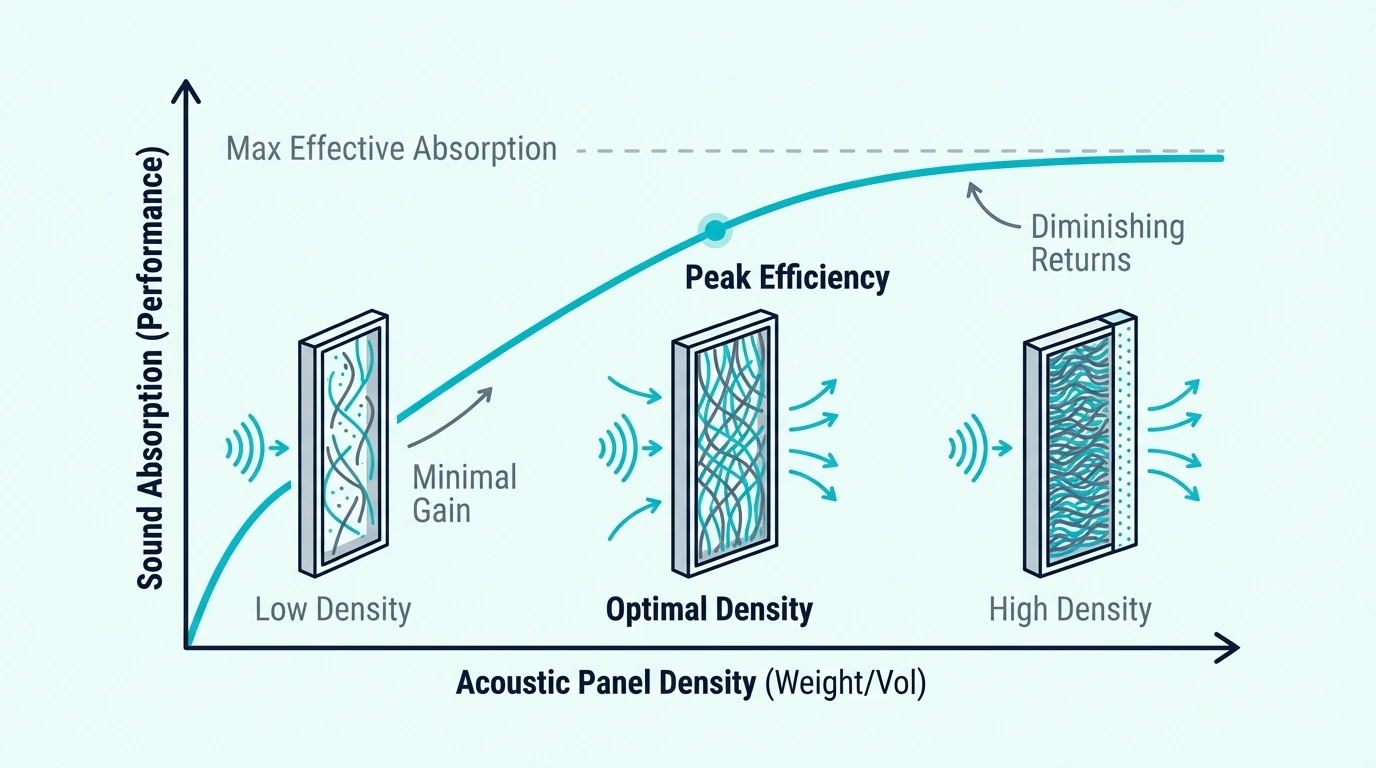
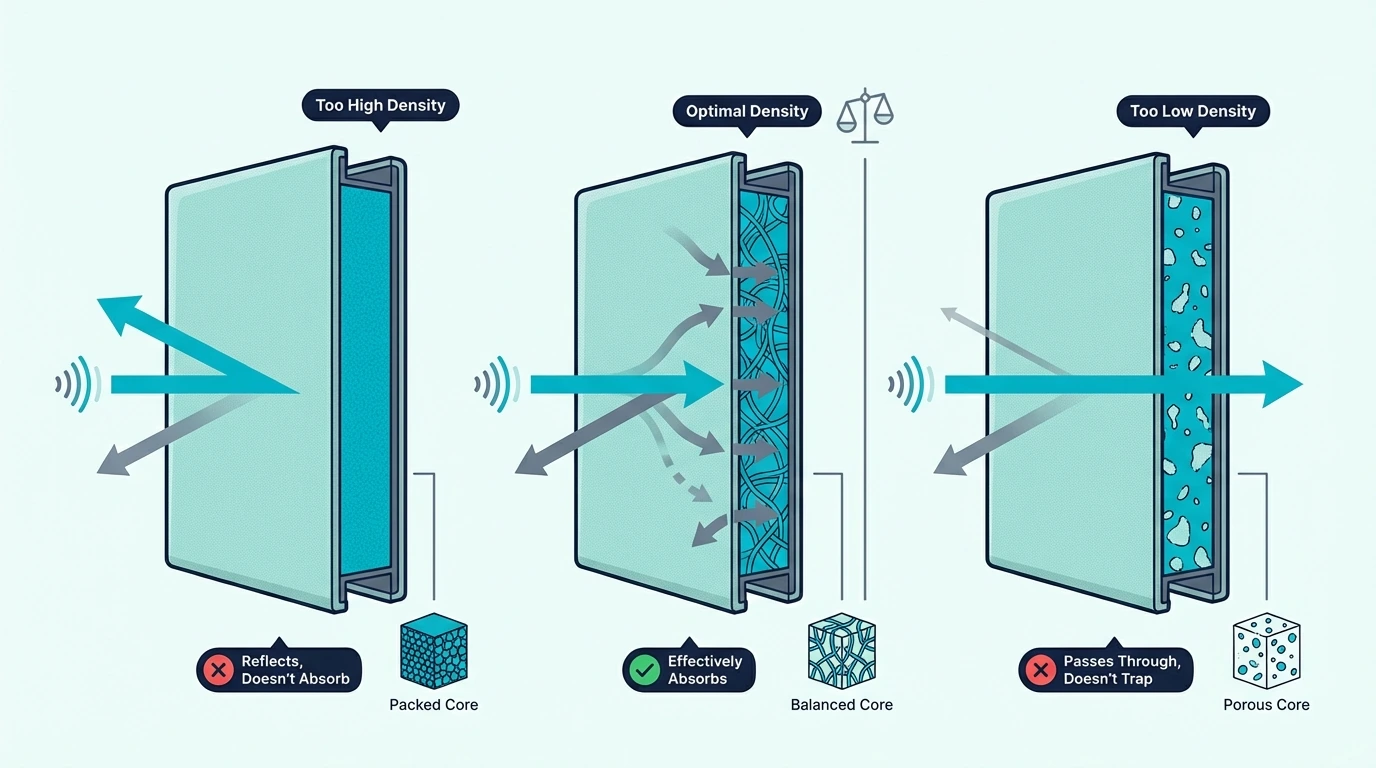
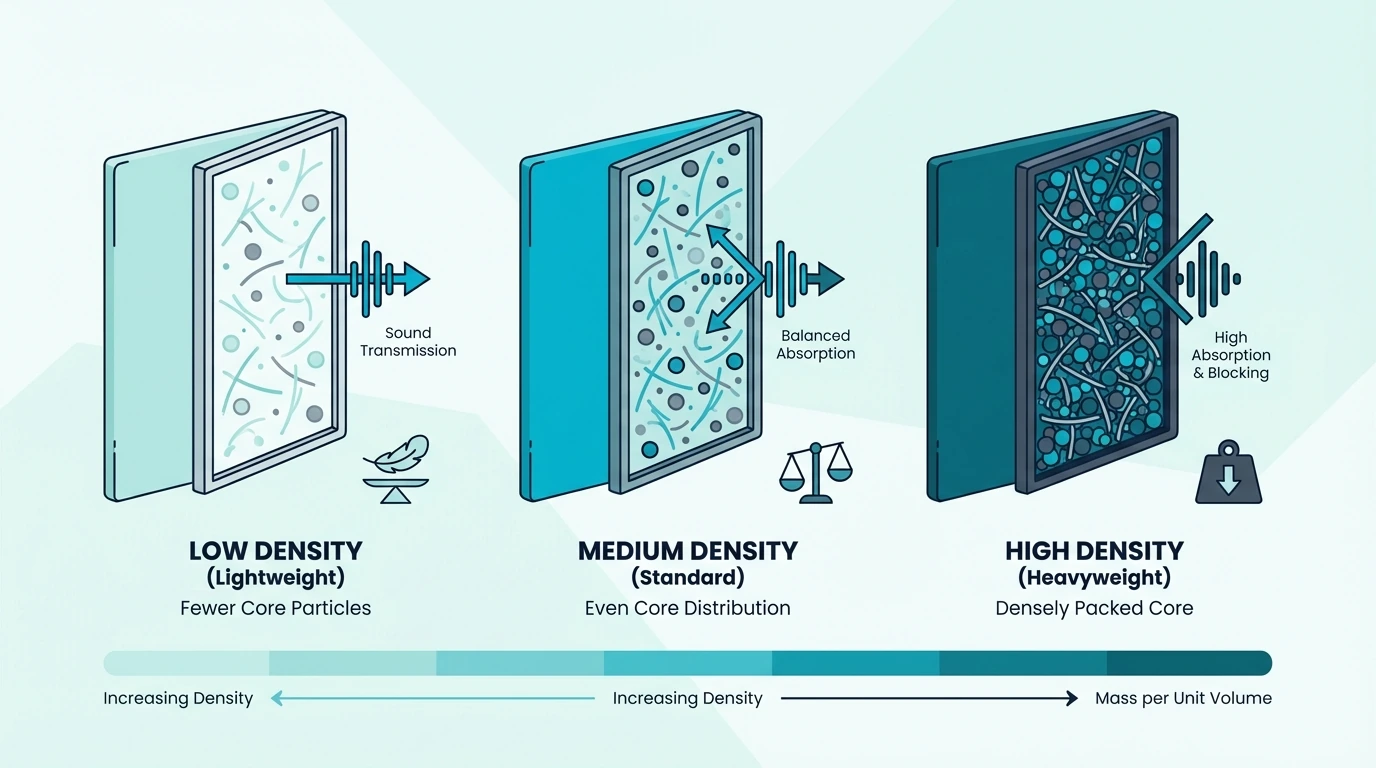
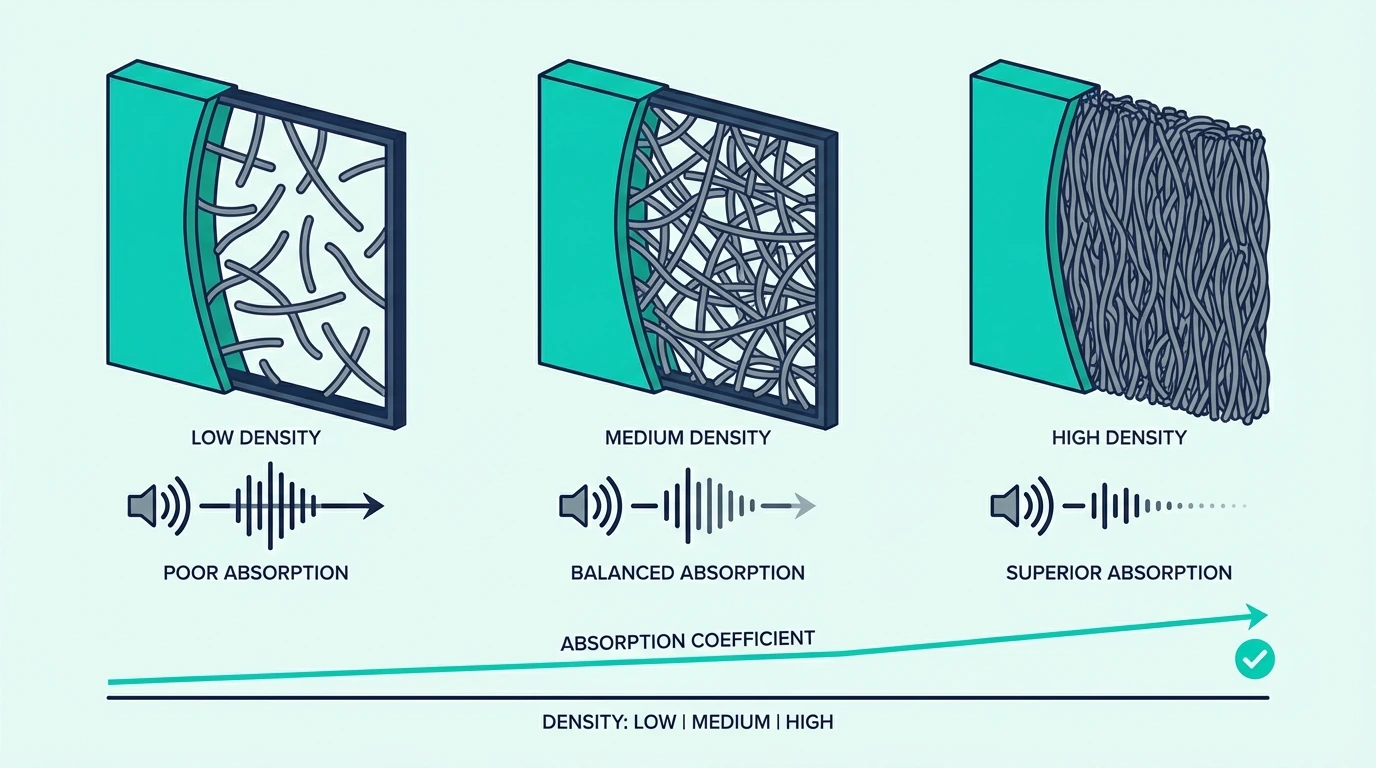
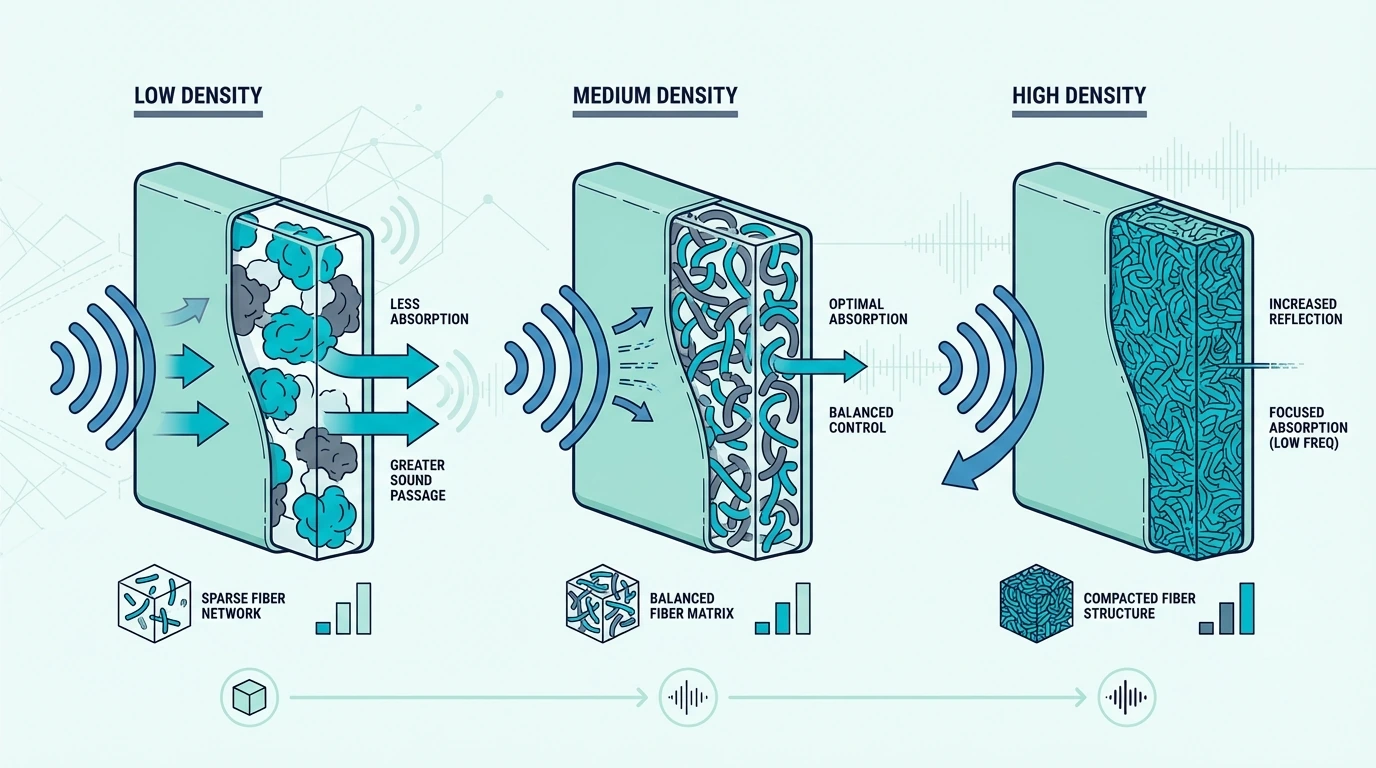
Increasing panel density does not help much—you can pack more fibers into those 2 inches, but the fundamental depth limitation remains. The wave needs distance to dissipate, and thin panels do not provide it.
You can demonstrate this yourself by playing a bass-heavy track and standing near a wall covered in standard panels, because you will still feel the bass vibrating through. Now stand in a corner with a dedicated bass trap and the difference in low-end control is immediately obvious.
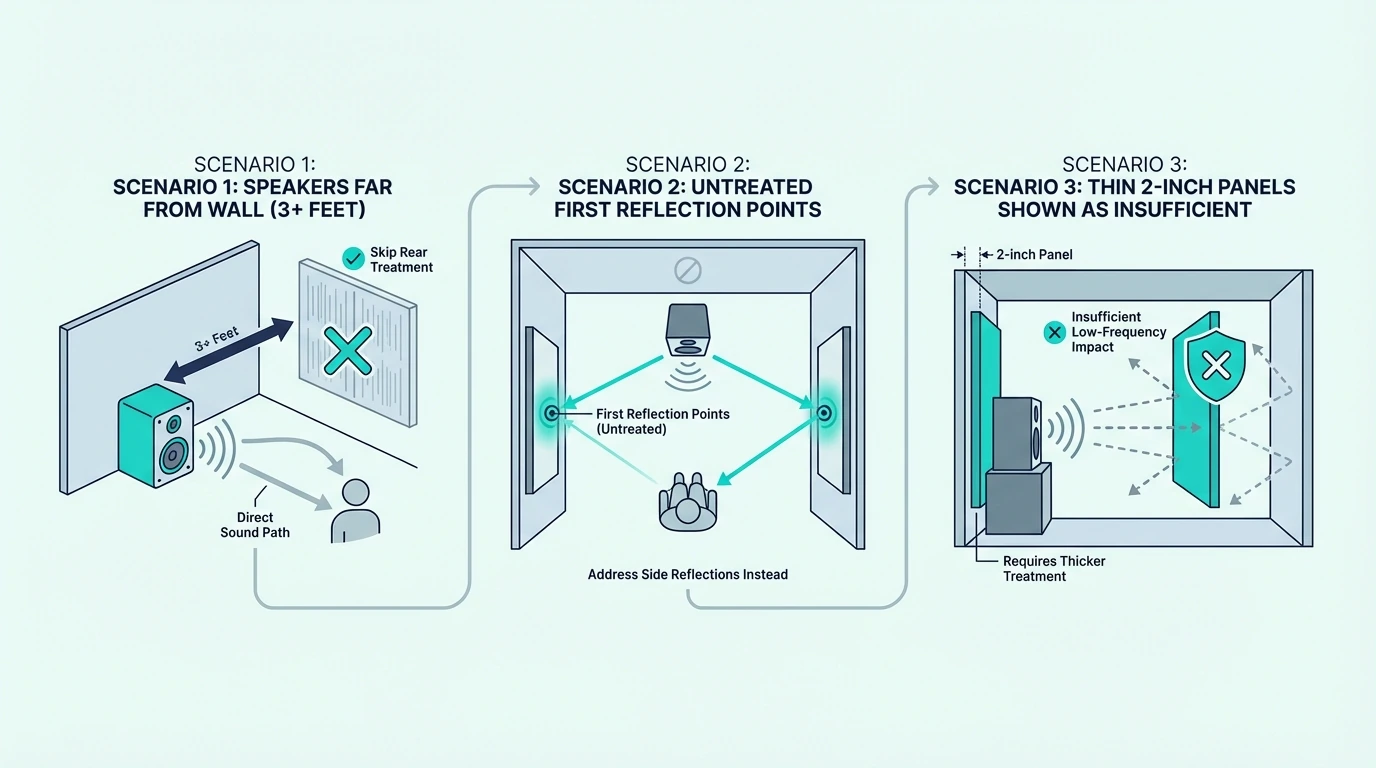
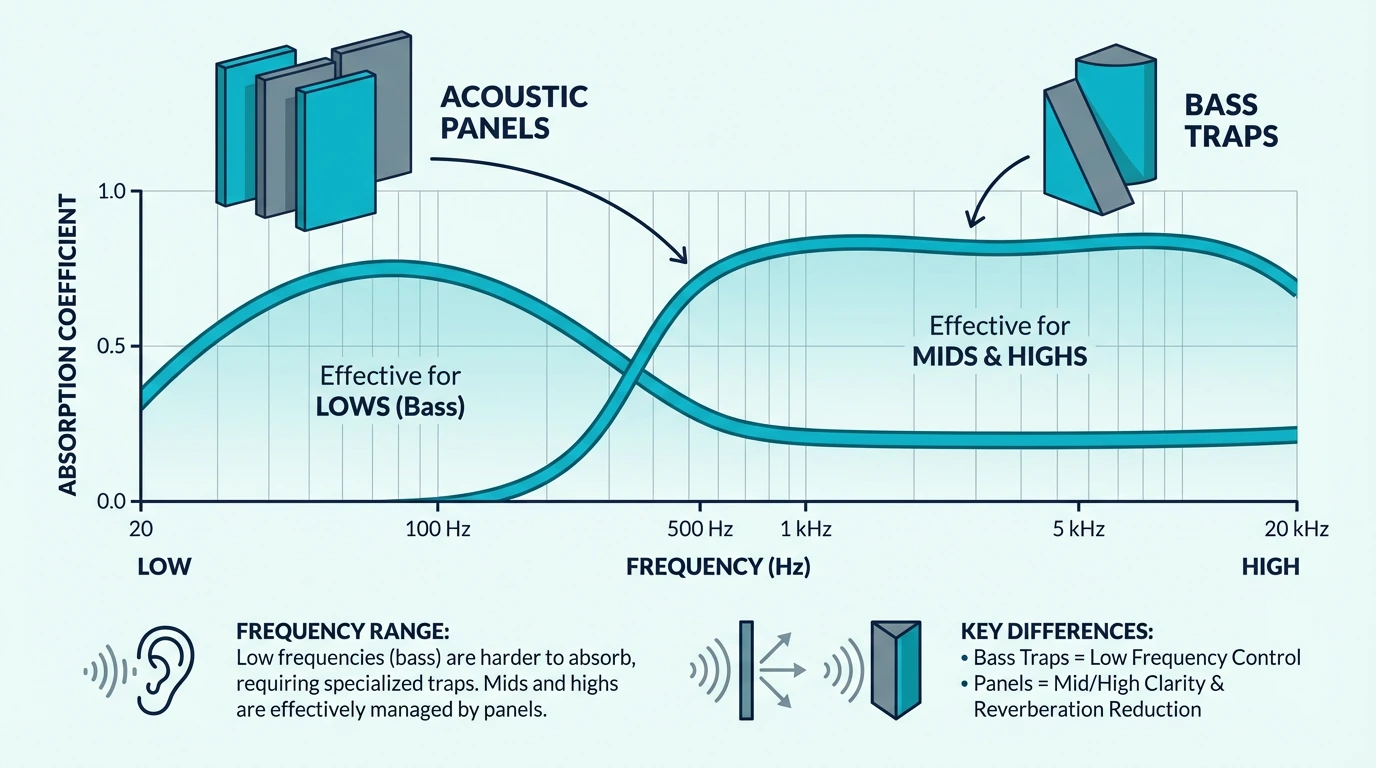
Some manufacturers market “bass-absorbing panels” at 2-inch thickness, but the physics is the same. If you check absorption coefficient charts, you will typically see effective absorption starting at 250-500Hz, not the 80-125Hz range where most bass problems live.
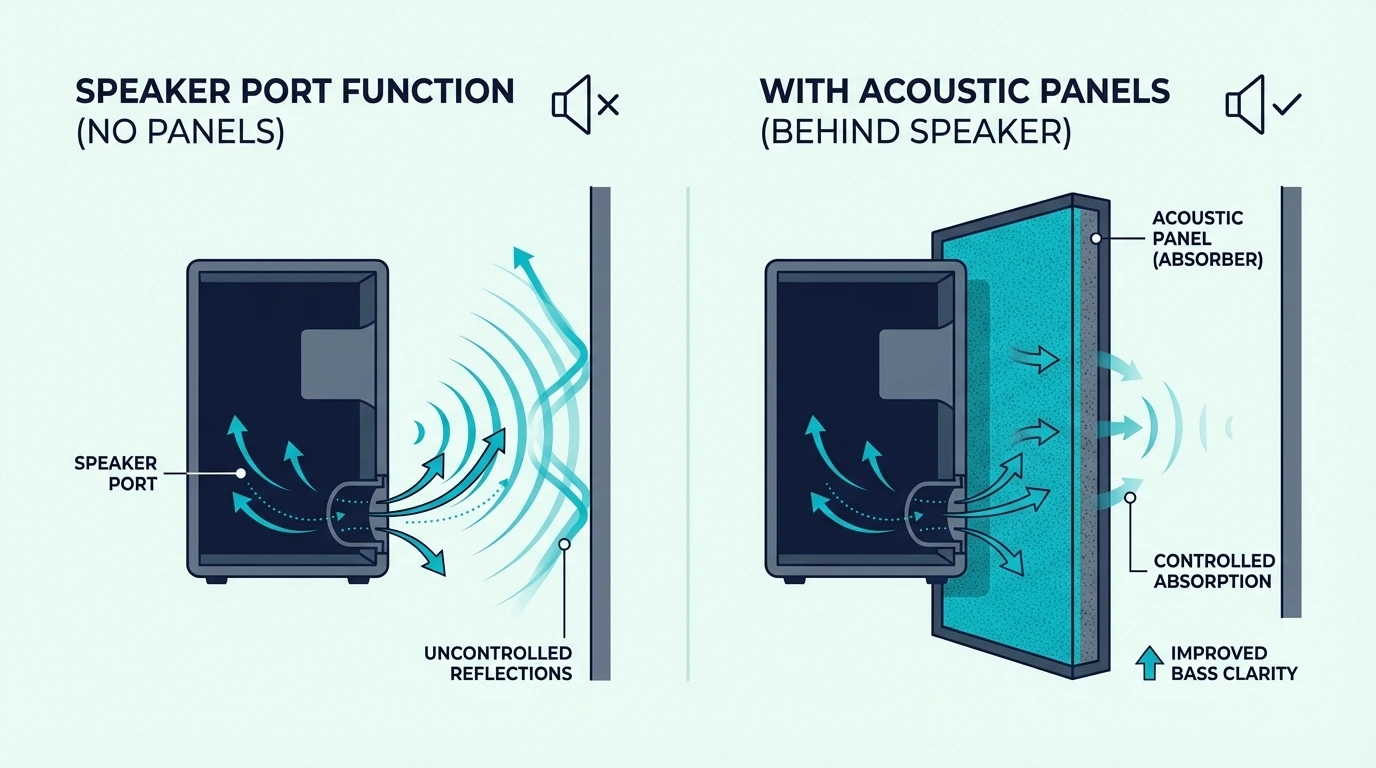
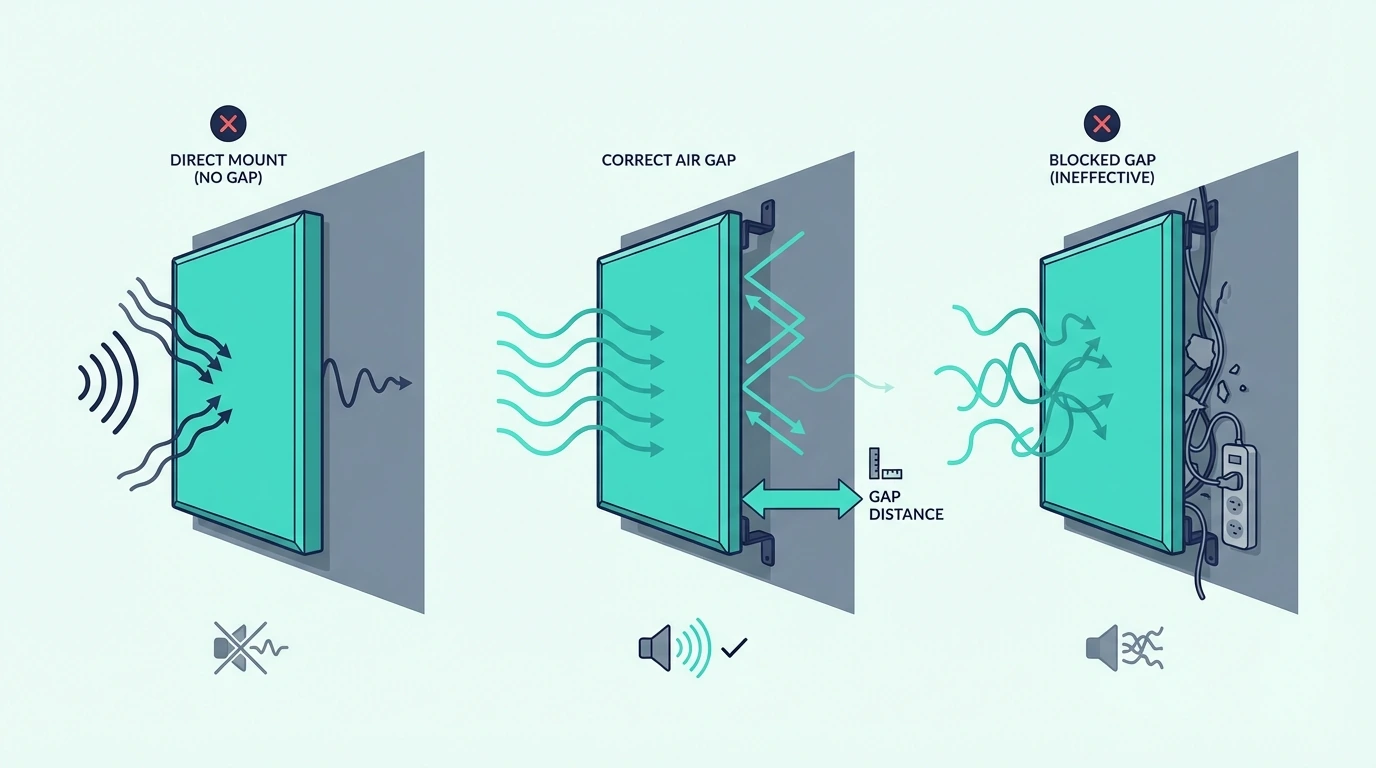
The Only Panel Configuration That Helps Bass
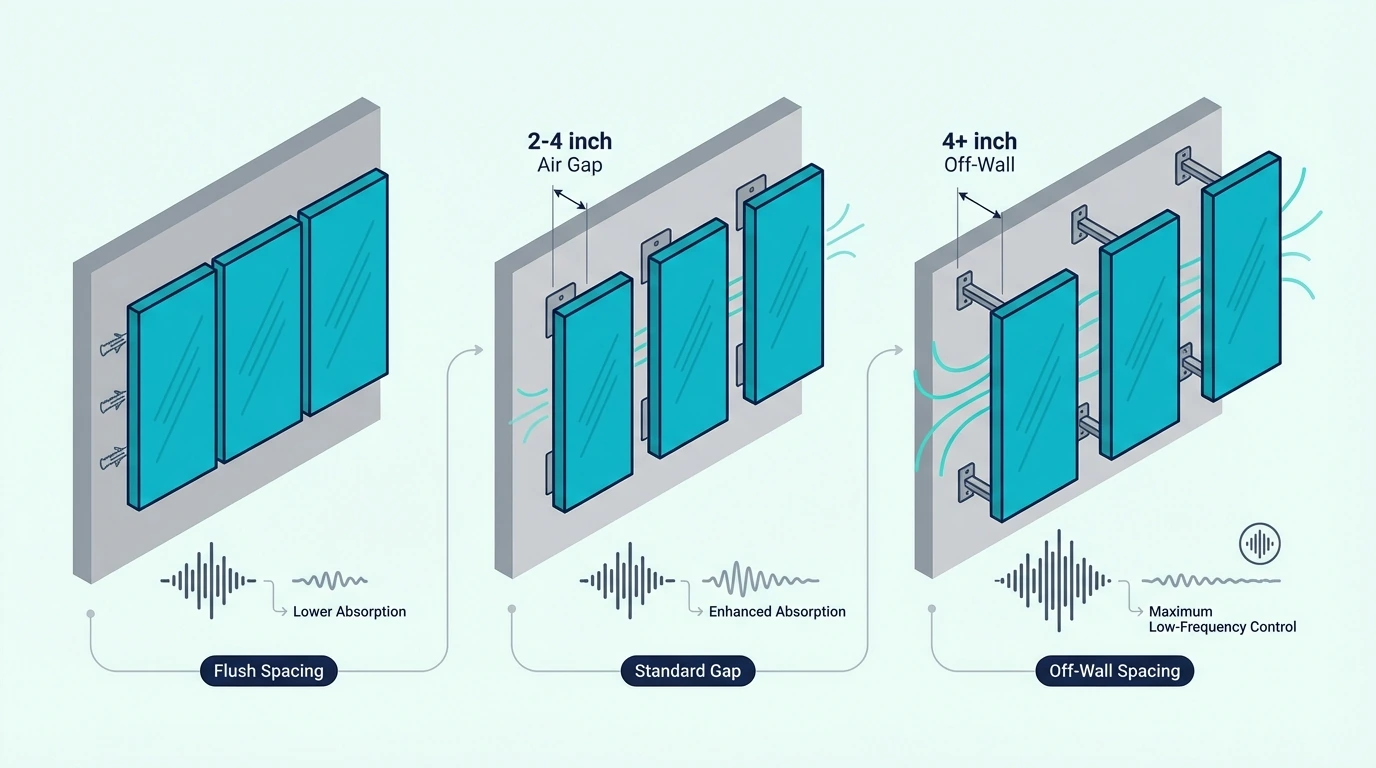
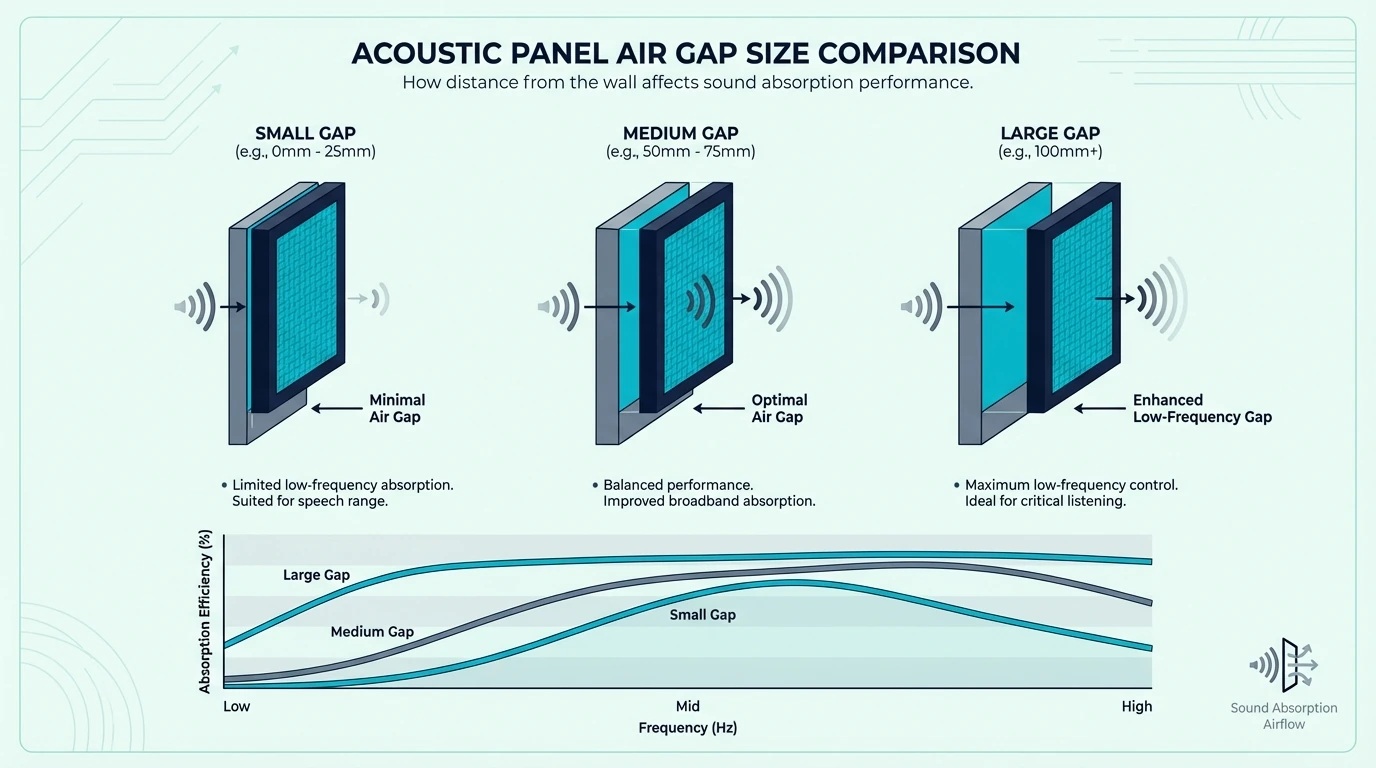
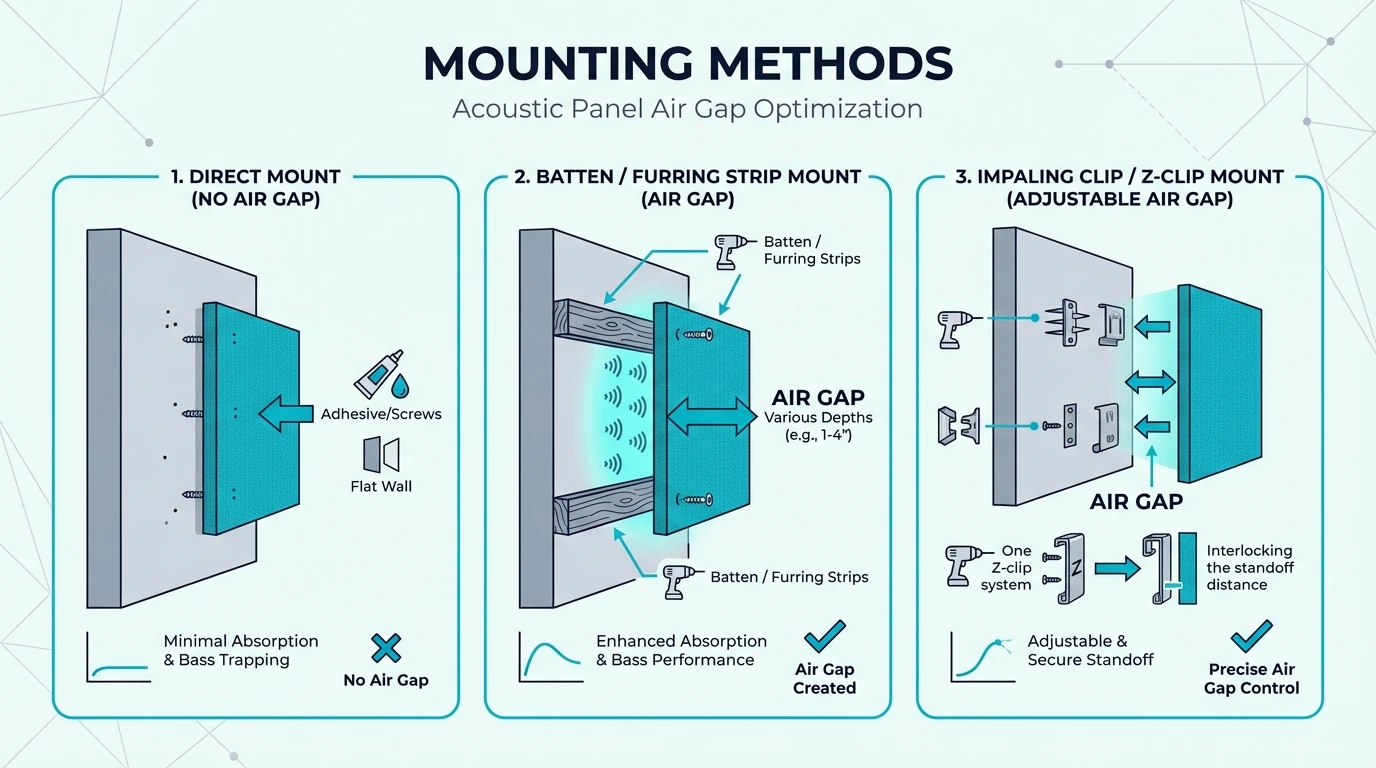
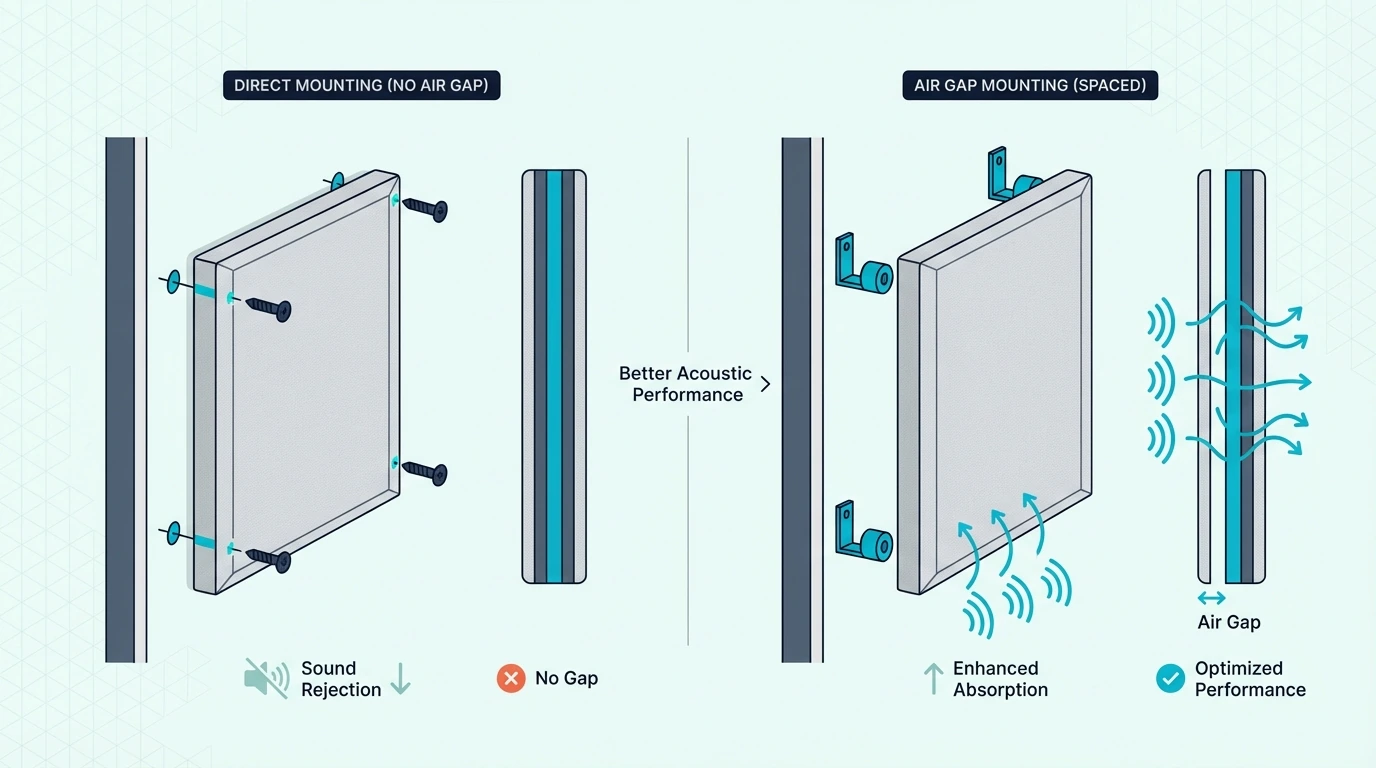
You can artificially deepen that material interaction by adding an air gap behind standard panels. A 2-inch panel mounted 4 inches off the wall performs closer to a 6-inch panel for certain frequencies. The air gap installation guide explains when this helps and how to mount panels safely.
But even with generous air gaps, standard panels will never match the raw performance of dedicated bass traps. If your primary acoustic problem is low-end room modes, treating with thicker purpose-built traps delivers far better results than trying to force thin panels to do a job they were not built for.
Do You Need Both Panels and Bass Traps?
Because they fix entirely different problems, most rooms eventually require both panels and traps. But the order in which you should buy them depends entirely on what the room is used for.
For Home Studios: Usually Yes
If you are producing, recording, or mixing music, both treatments are mandatory for a reliable room. You need panels to handle the flutter echo and comb filtering that smears your stereo imaging, while simultaneously needing bass traps to flatten out the room modes that make your low end unreliable.
Studios without bass treatment suffer from notoriously inconsistent mixes. What sounds huge and punchy at the mixing desk might sound completely hollow in your car — because you were EQing the mix to compensate for the room’s false bass boost.
The recording studio panel guide covers panel selection, but any serious setup must budget for corner treatment alongside wall absorption.
For Home Theaters: Depends on Content
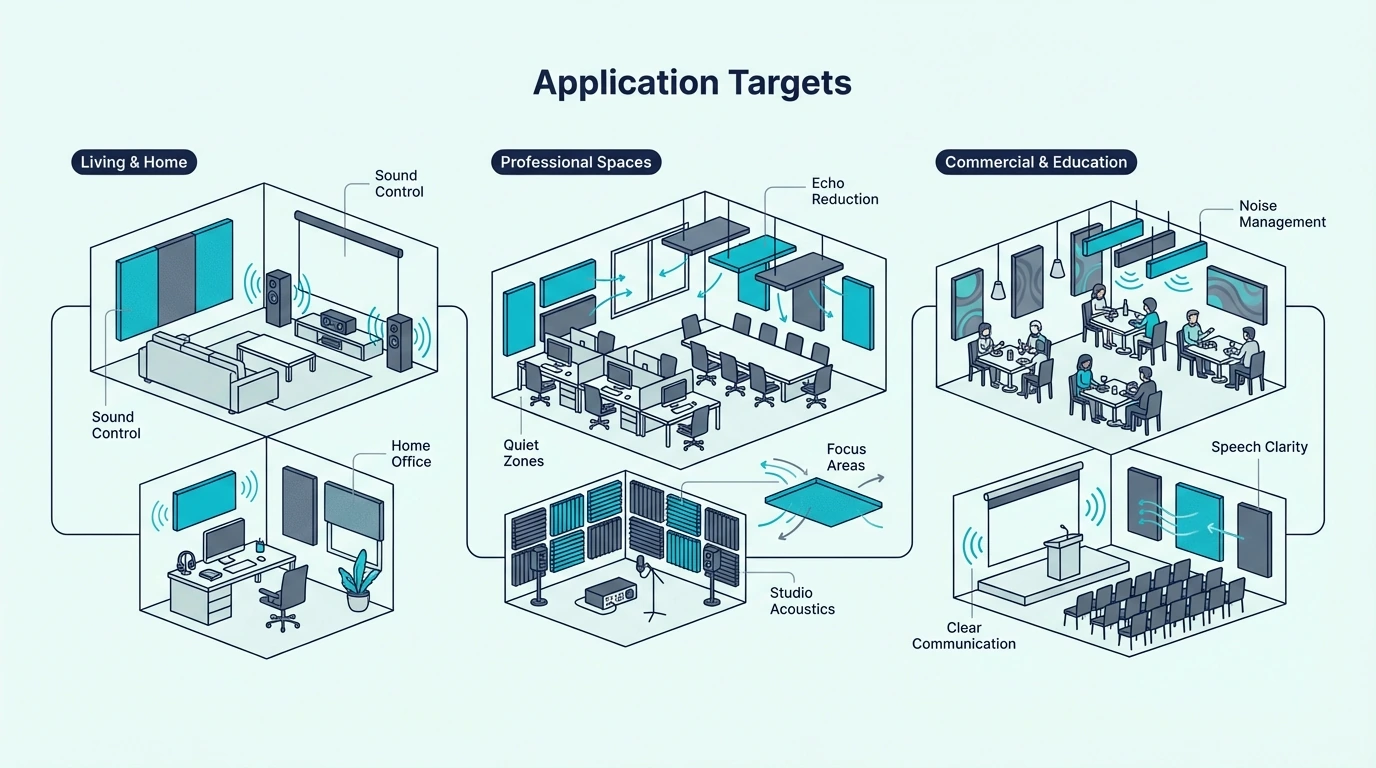
Home theaters shift the priority slightly. If you watch explosive action movies or listen to bass-heavy soundtracks, traps are essential to keep the deep rumbles controlled and tight rather than booming chaotically around the room.
But if the theater is primarily used for dialogue-focused content like news, talk shows, or documentaries, panels alone might suffice. Speech frequencies sit perfectly within the standard panel absorption range. The home theater panel guide has specific recommendations for both scenarios.
Budget Approach: Panels First
When budget constraints force you to choose one or the other, standard panels almost always deliver a more obvious initial improvement. The reduction in room echo and the massive boost to voice clarity from treating first reflection points is immediately audible to anyone.
Bass traps, by contrast, address problems that are structurally critical but often less obvious to untrained ears until the mid-high clutter is cleared out. Many beginners do not even realize they have a bass problem until they have treated all the reflections and the underlying low-end boom finally becomes exposed.
Start with 4-6 panels at primary reflection points, such as the Olanglab Fiberglass Acoustic Wall Panels 4 Pack. Add bass traps when budget allows, prioritizing corners behind your listening position first.
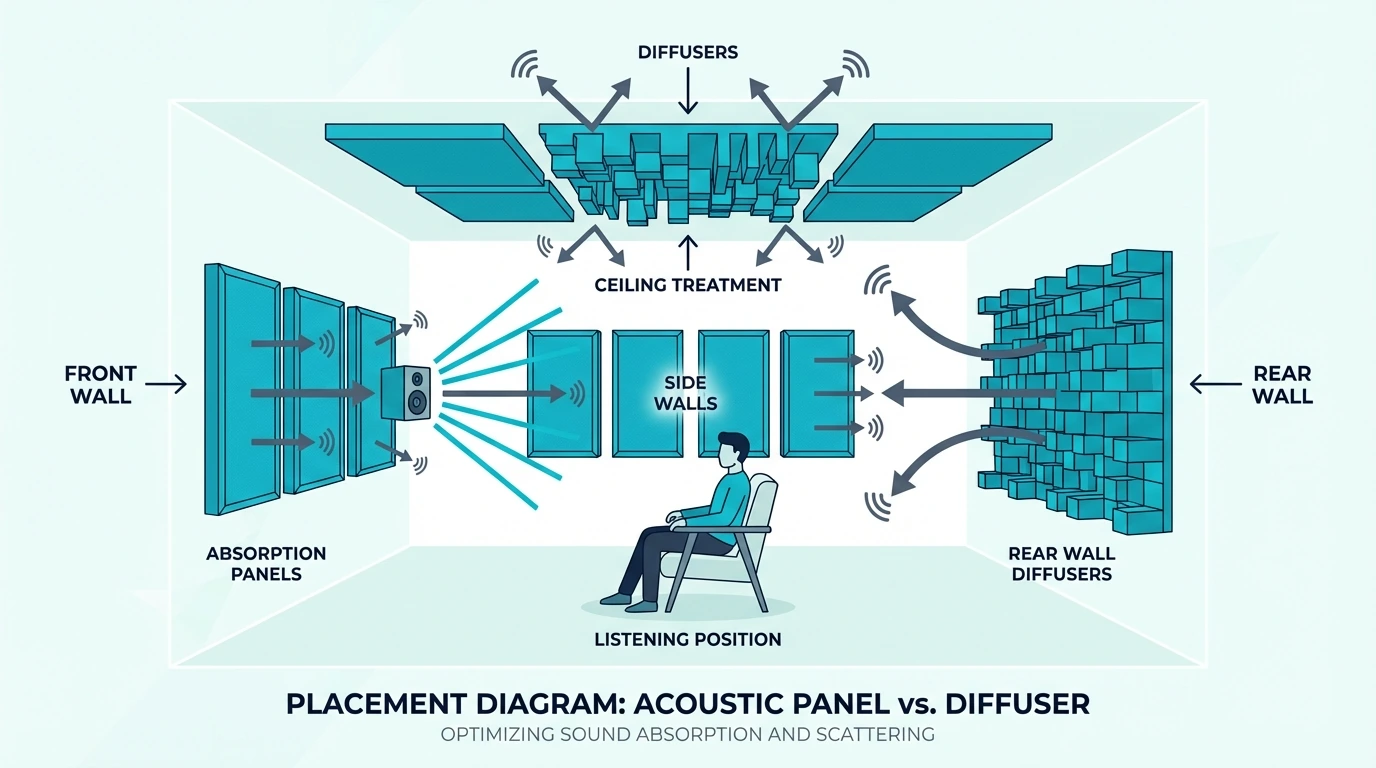
Where Does Each Type Go?
Because they target different physics, the placement rules for each treatment are completely separate. You are hunting pressure zones for traps and bounce paths for panels.
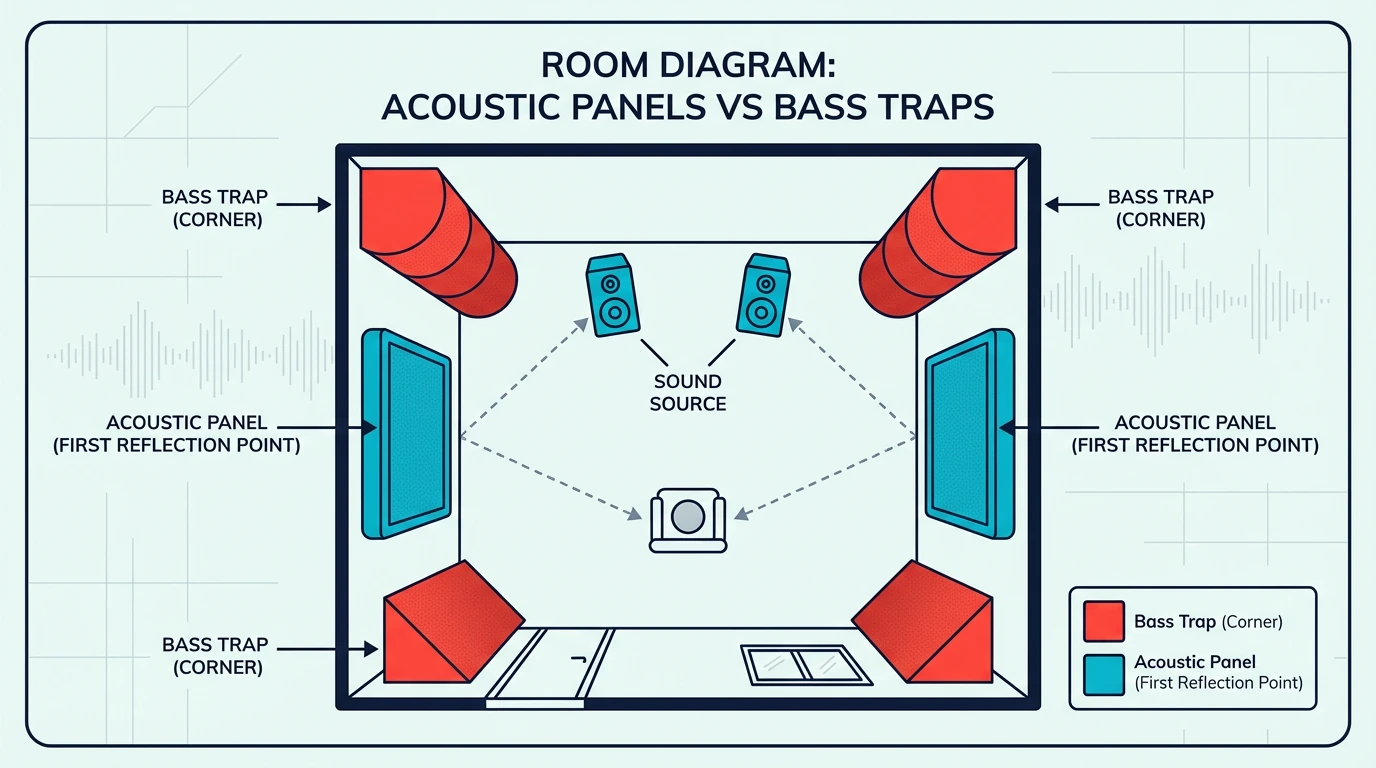
Bass Traps: Corners First
The highest pressure zones in any room are the corners where three surfaces meet (wall-wall-ceiling or wall-wall-floor). Bass energy naturally accumulates here, making these tri-corners the absolute most effective real estate for deep absorption.
You should prioritize the vertical wall-to-wall corners first, ideally running floor-to-ceiling treatment to capture the maximum amount of energy per square foot. If budget allows, extend the traps horizontally into the wall-ceiling junctions.
Putting a bass trap in the middle of a flat wall provides minimal benefit because you are missing the pressure zone entirely.
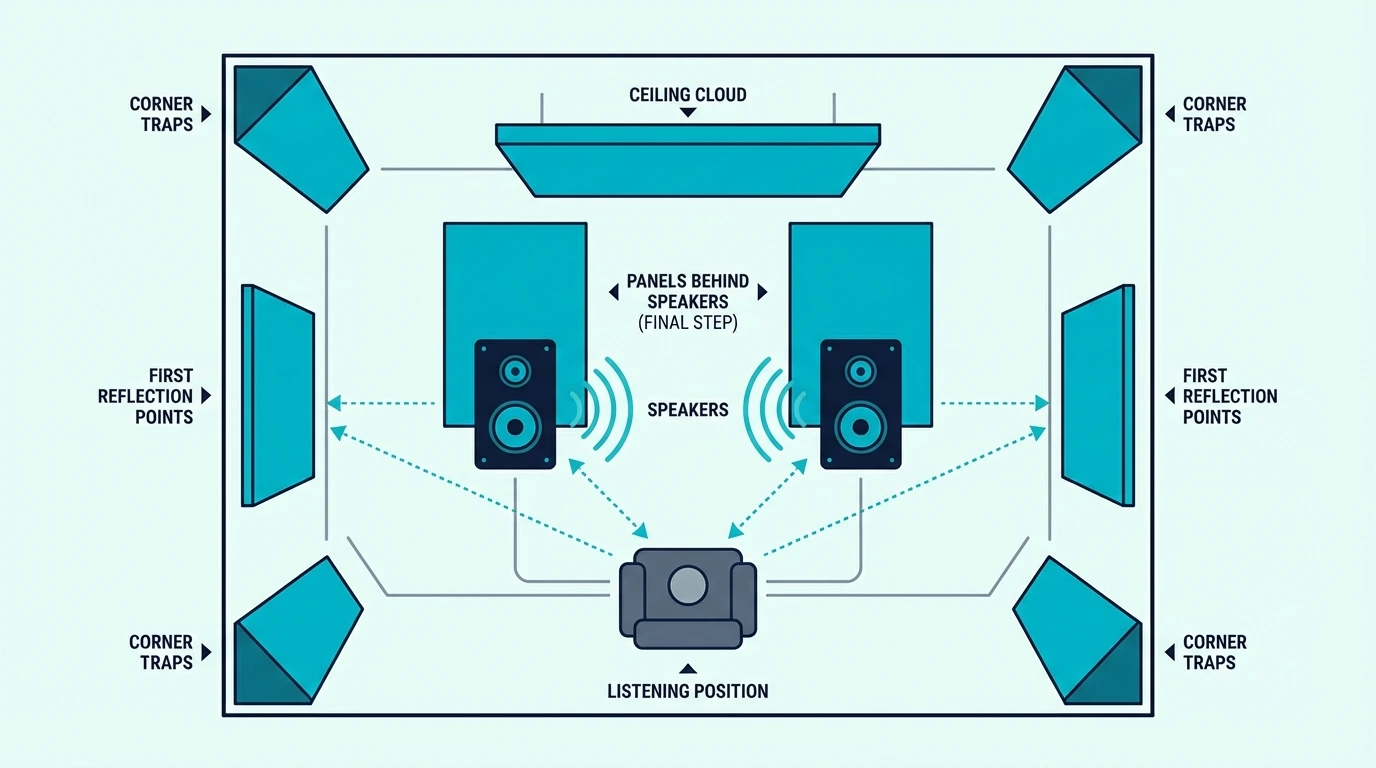
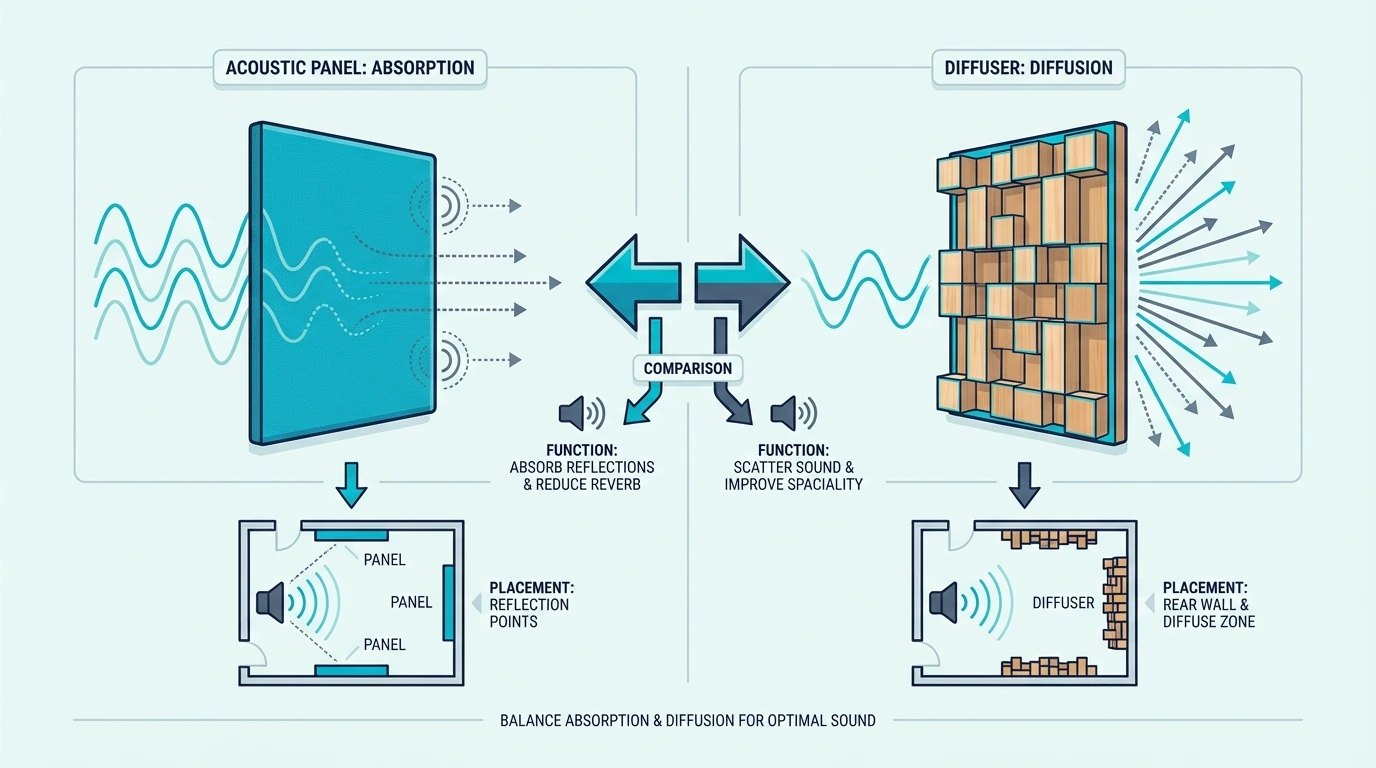
Acoustic Panels: First Reflection Points
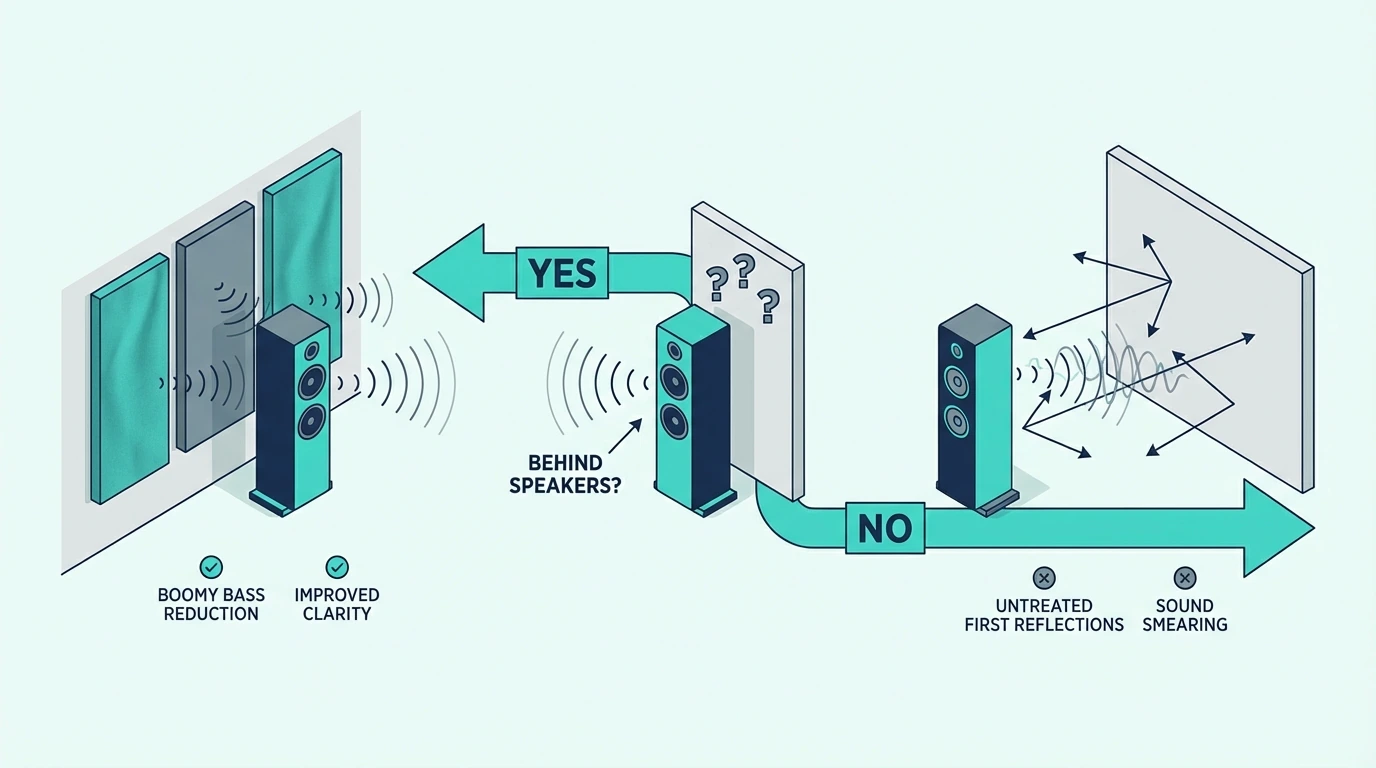
Conversely, panels belong squarely on the flat wall surfaces, specifically at the spots where sound bounces from your monitors to your ears.
You find these bounce paths using the mirror trick: sit in your listening chair while someone slides a flat mirror along the side walls. Wherever you can see the speaker cone in the reflection is exactly where a panel needs to be mounted.
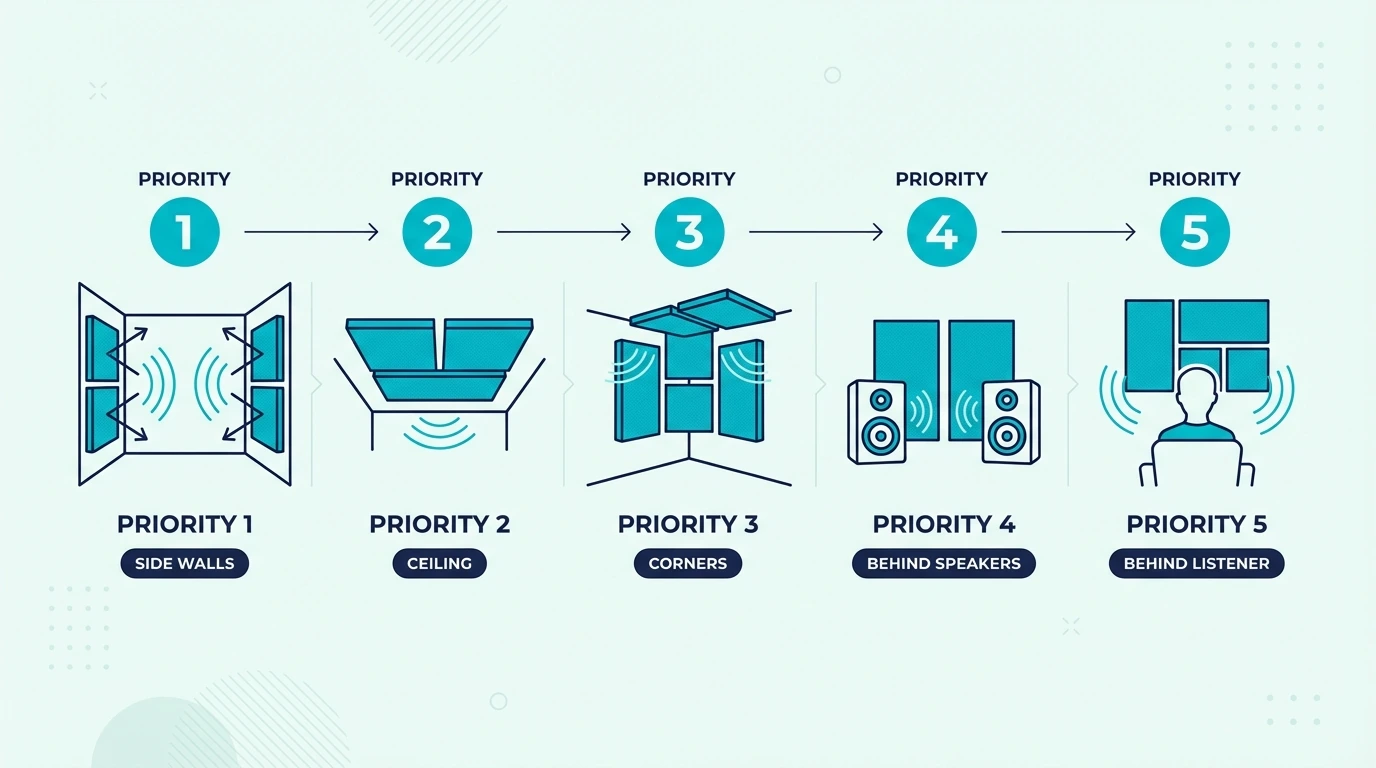
Treat the side walls at ear height first, then move to the front wall behind the speakers if they are positioned close to the drywall. A ceiling cloud above the desk is the next priority, leaving the rear wall for last if flutter echo still persists.
The panel placement guide includes detailed positioning strategies for every room shape.
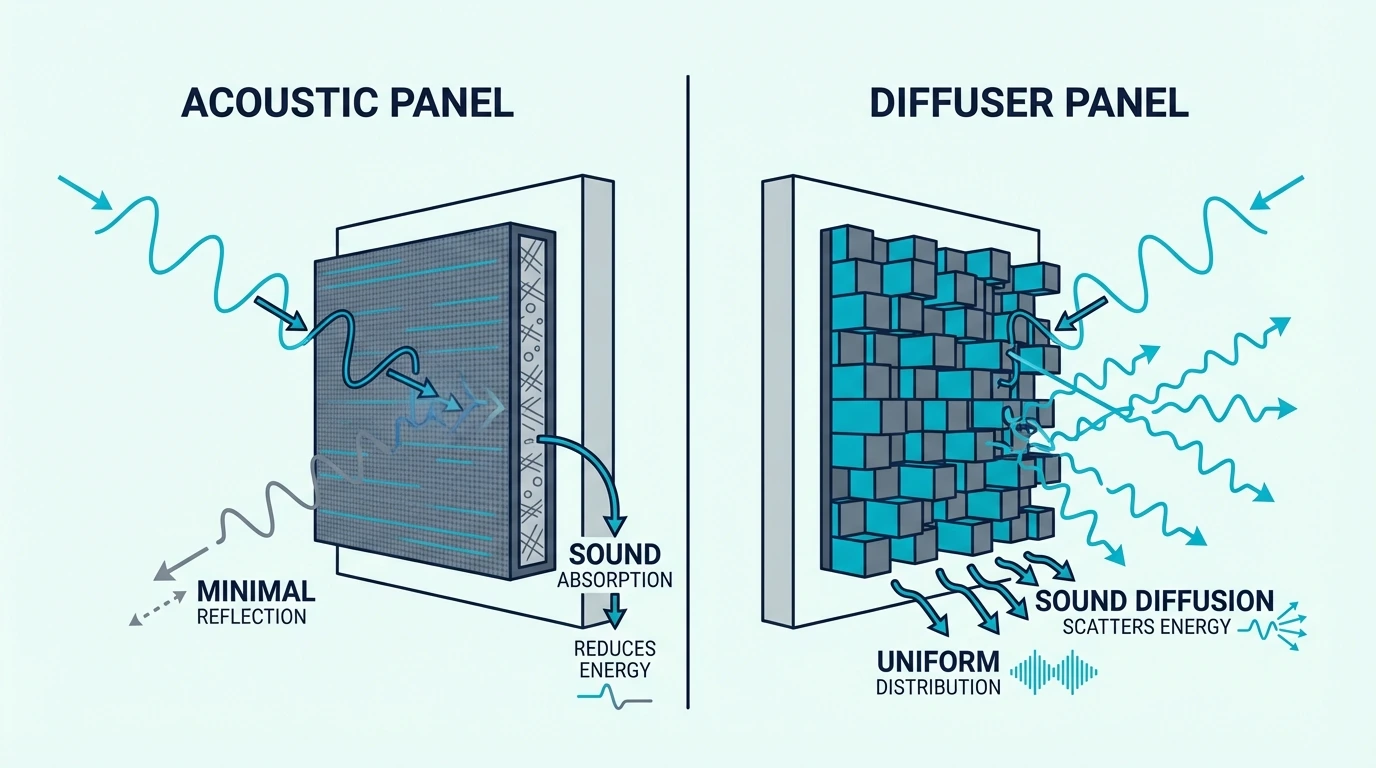
How Do Acoustic Panels and Bass Traps Compare Side by Side?
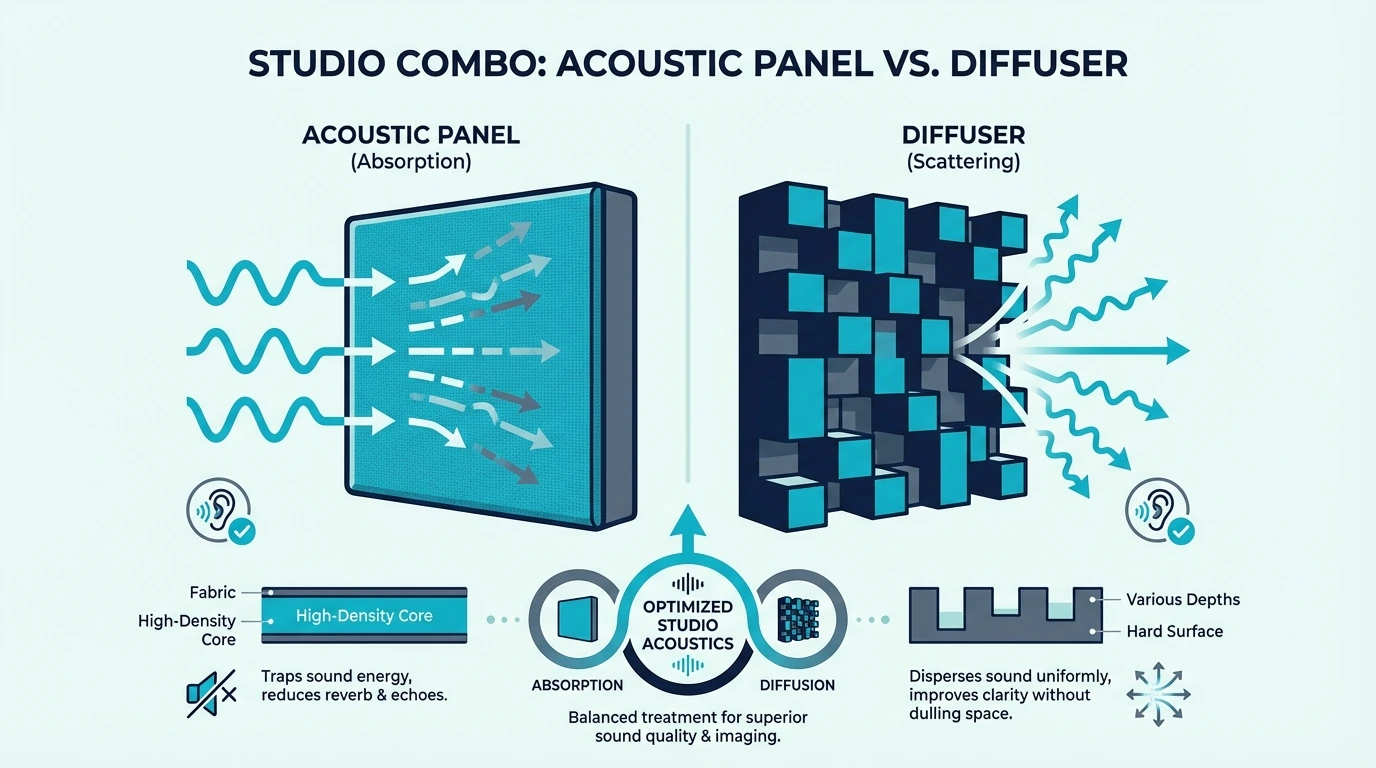
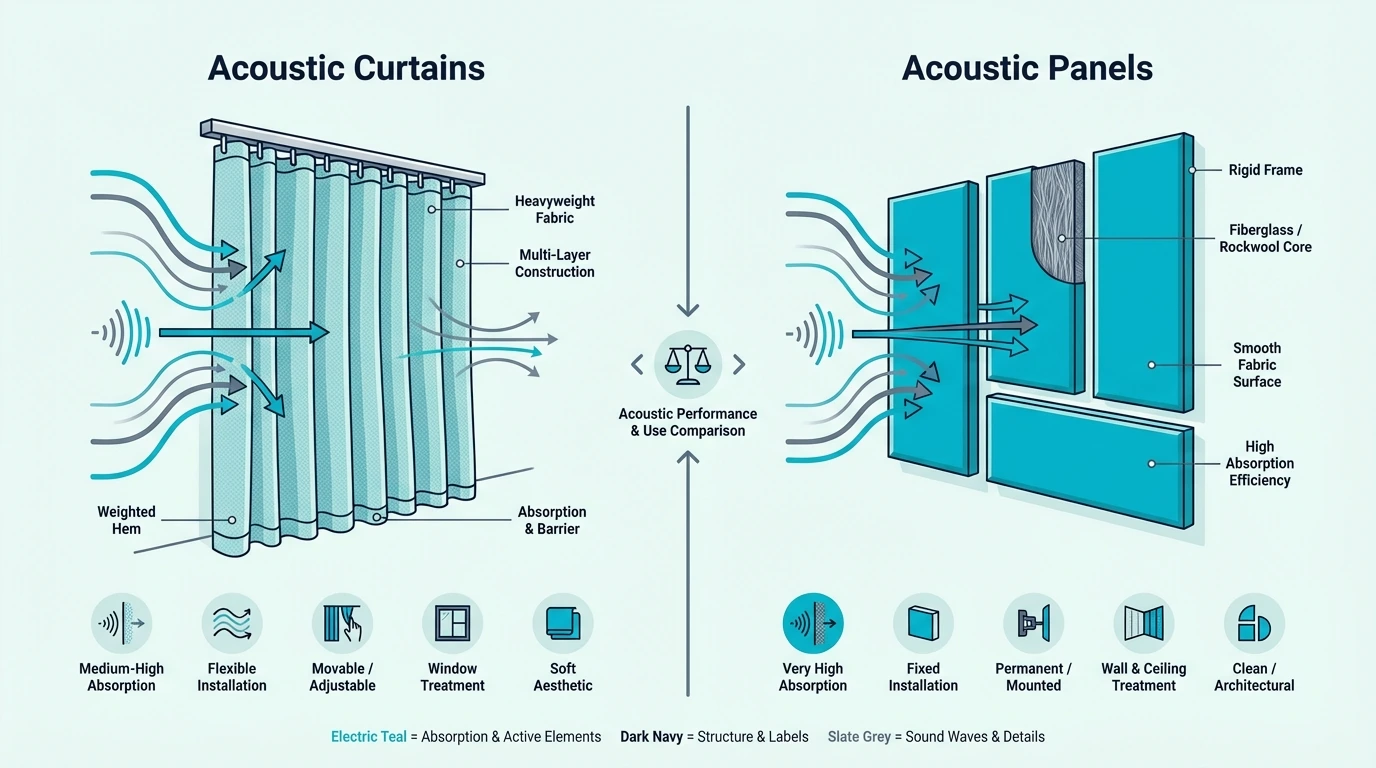
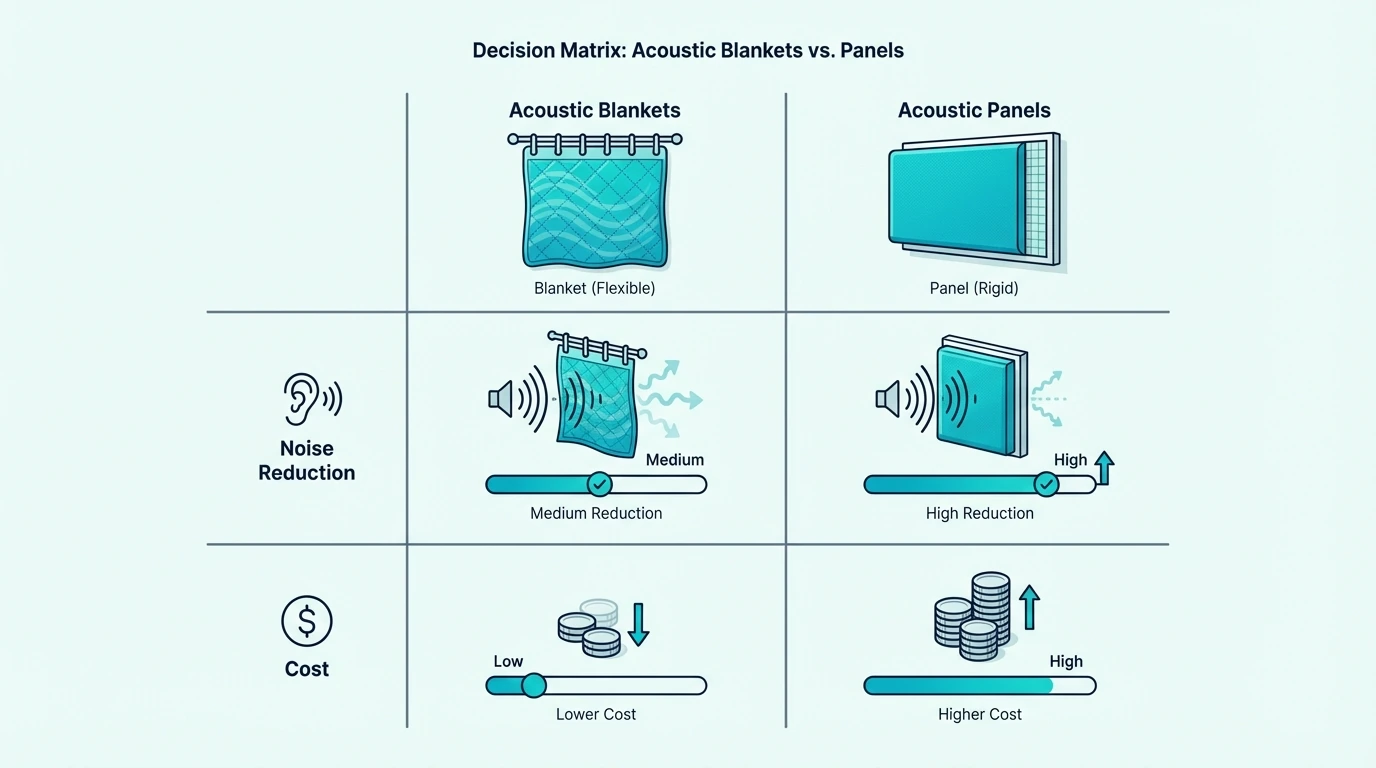
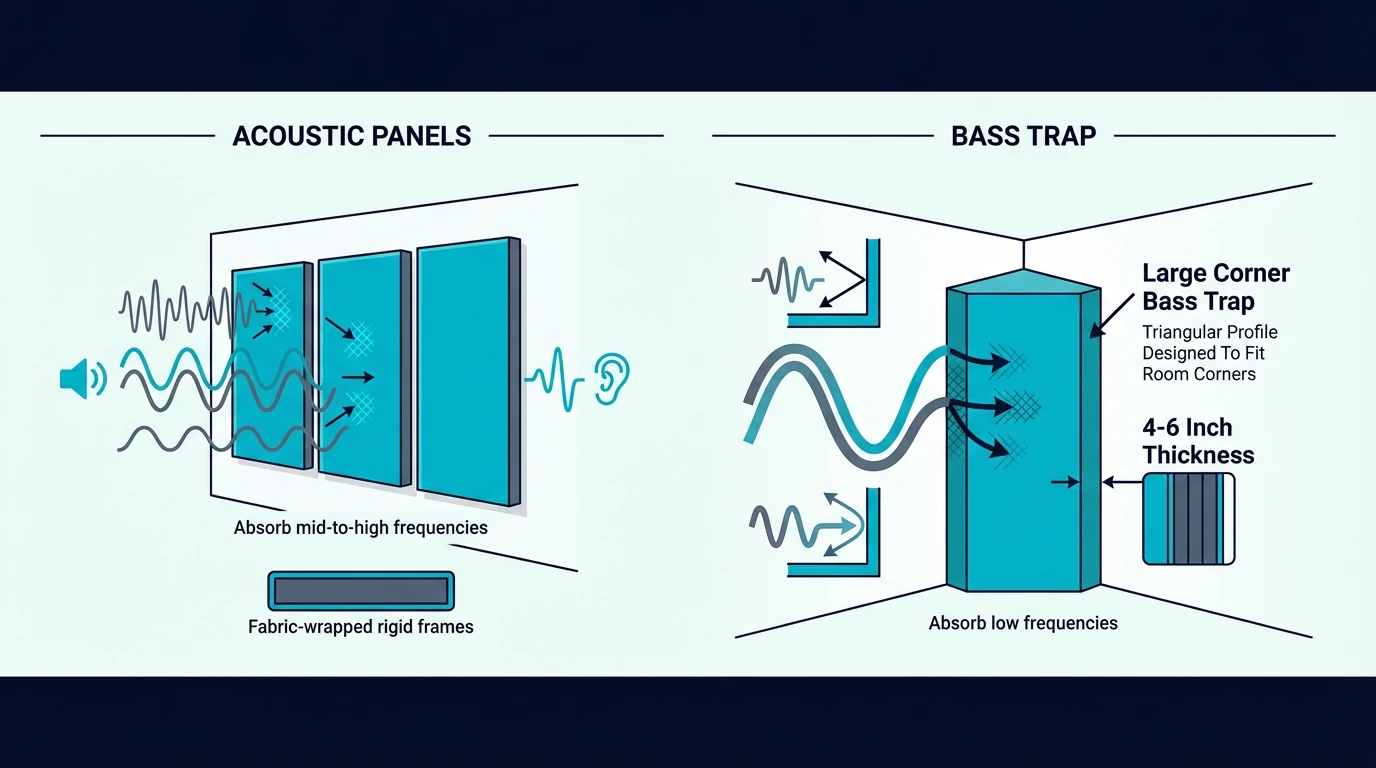
Acoustic panels focus on mid and high frequencies (roughly 250Hz and up) and are usually 2-4 inches thick in standard 24×48 sizes. Bass traps focus on low frequencies (roughly 20-250Hz) and are typically 4-6 inches thick or more, often in corner-friendly shapes.
Panels go on walls at first reflection points to reduce echo and improve clarity, while bass traps go in corners (pressure zones) to control room modes and tighten low end. Panels are usually cheaper per unit and take minimal wall space, while bass traps cost more and consume corner space but solve problems panels cannot.
What Should You Do Next?
Panels and traps solve different acoustic problems, and neither can replace the other.
Start with the symptom you hear most and add the second treatment as you expand coverage.
For most home studios and listening rooms, start with acoustic panels at first reflection points to clean up imaging and clarity. Then add bass traps to corners as budget allows, especially if you mix bass-heavy music or hear obvious room boom.
If you are building out a new space, plan for both from the start. The combined cost of complete treatment is lower than iteratively discovering you need additional products after initial installation.
The best acoustic panels guide covers panel recommendations, and the acoustic panels hub covers placement, installation, and room-specific treatment strategies.
Conclusion
The single biggest mistake in acoustic panels vs bass traps treatment is buying more of the same product when the problem is actually in a different frequency range. Four extra panels will not fix an 80 Hz room mode, and four corner traps will not clean up a slapback echo at 2 kHz.
Diagnose the frequency first, then match the tool. That one decision saves more money and delivers faster results than any product upgrade.
The panel count guide helps you calculate how many of each you need, and the hanging guide covers hardware for every wall and corner type.
Frequently Asked Questions
These quick answers cover the most common buying and placement questions when you are comparing panels and bass traps.
Use them as a final check before you order products or build your own treatment.
Which Should I Buy First — Panels or Bass Traps?
Panels first for most situations. The clarity improvement from treating first reflection points is immediately noticeable and panels cost less per unit.
Exception: if you hear obvious boominess or notes that disappear, prioritize bass traps — the low-end improvement will be more dramatic.
How Many of Each Do I Need?
For a typical 10×12 home studio: 4-6 panels at side wall and speaker reflection points, plus 2-4 bass traps prioritizing front corners. Larger rooms scale proportionally, but the ratio stays roughly equal between panels and traps.
Can I Use Thick Panels Instead of Bass Traps?
A 4-inch panel with an air gap approaches bass trap performance above 125 Hz. Below that — the 60–100 Hz range where most room modes live — purpose-built corner traps still win.
Corners concentrate bass energy where flat walls do not, so a thick panel on a flat wall still misses the highest-pressure zones that traps are designed to treat.
Do Bass Traps Replace Corner Panels?
Bass traps in corners replace the need for panels in those same corners — you would not install both in the same spot. But bass traps do not eliminate the need for panels at first reflection points on flat wall surfaces, so complete treatment still requires both types.