Best DIY Acoustic Treatment For Home Studio (Complete Build Guide)
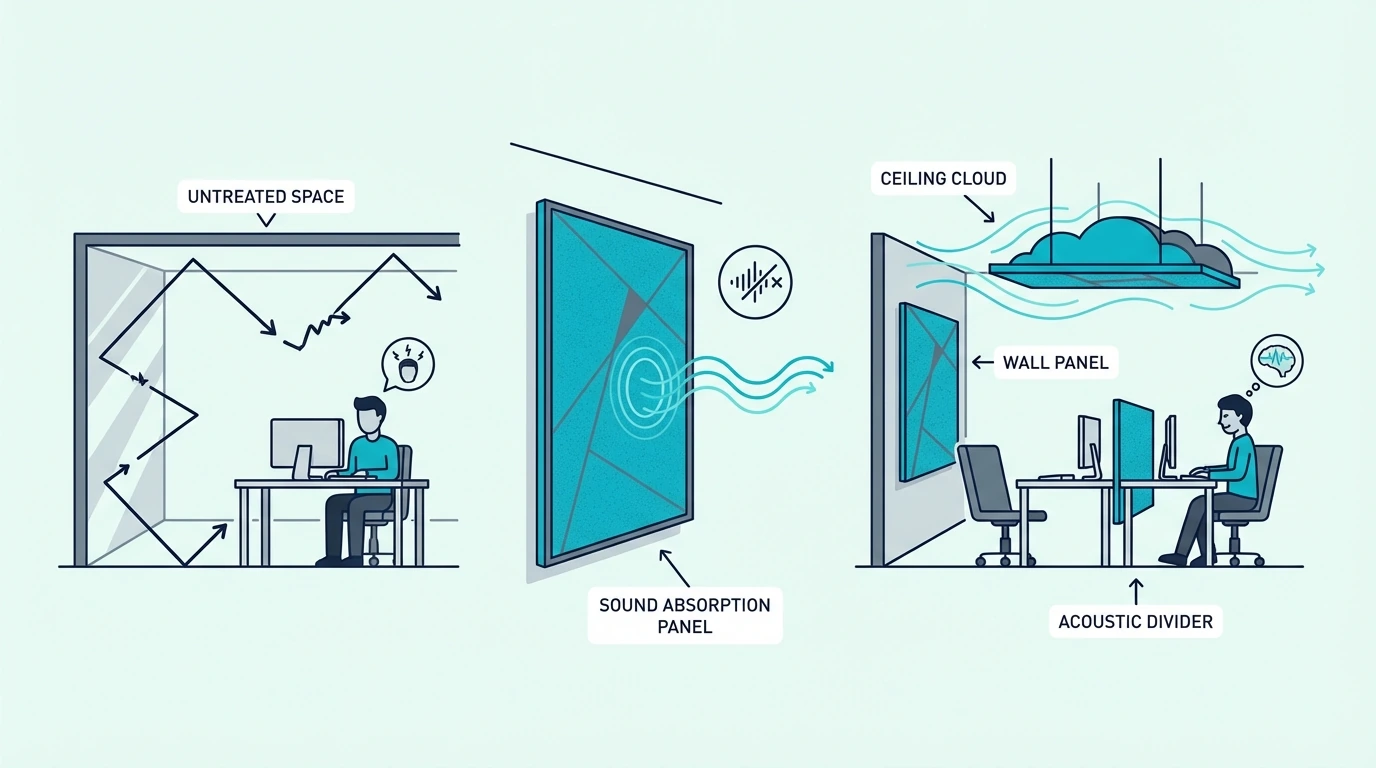
Best DIY acoustic treatment for home studio builds costs 50-70% less than buying commercial panels, but only if you use the right materials and place the panels where they actually matter — bare walls covered in random panels do almost nothing compared to targeted treatment at the spots where reflections cause the most damage.
The problem most home studio builders face is not a lack of panels — it is panels made from the wrong material, placed in the wrong locations. A room full of thin foam squares looks treated but still sounds muddy and boxy because foam does not absorb the low-mid frequencies where most room problems live.
DIY panels built from rigid fiberglass or mineral wool boards solve the actual acoustic problems. A 2-inch panel made from 3 lb per cubic foot insulation achieves NRC 1.0 — absorbing virtually all mid and high frequency energy.
A 4-inch bass trap in the corners controls the low-frequency buildup that makes mixes translate poorly to other systems.
Below you will find the complete materials list, step-by-step build instructions, and placement priorities for a full home studio treatment. Start with two panels at the first reflection points on the side walls — that single step produces the biggest improvement in recording and mixing accuracy.
Quick Takeaway
DIY acoustic panels built from rigid fiberglass or mineral wool cost 15-25 dollars each in materials and outperform most commercial panels selling for 50-100 dollars. Build 2-inch thick panels for wall reflections and 4-inch thick bass traps for corners. Place panels at first reflection points first, then add bass traps, then treat the ceiling. A full home studio treatment (8-10 panels plus bass traps) costs 200-400 dollars in materials.
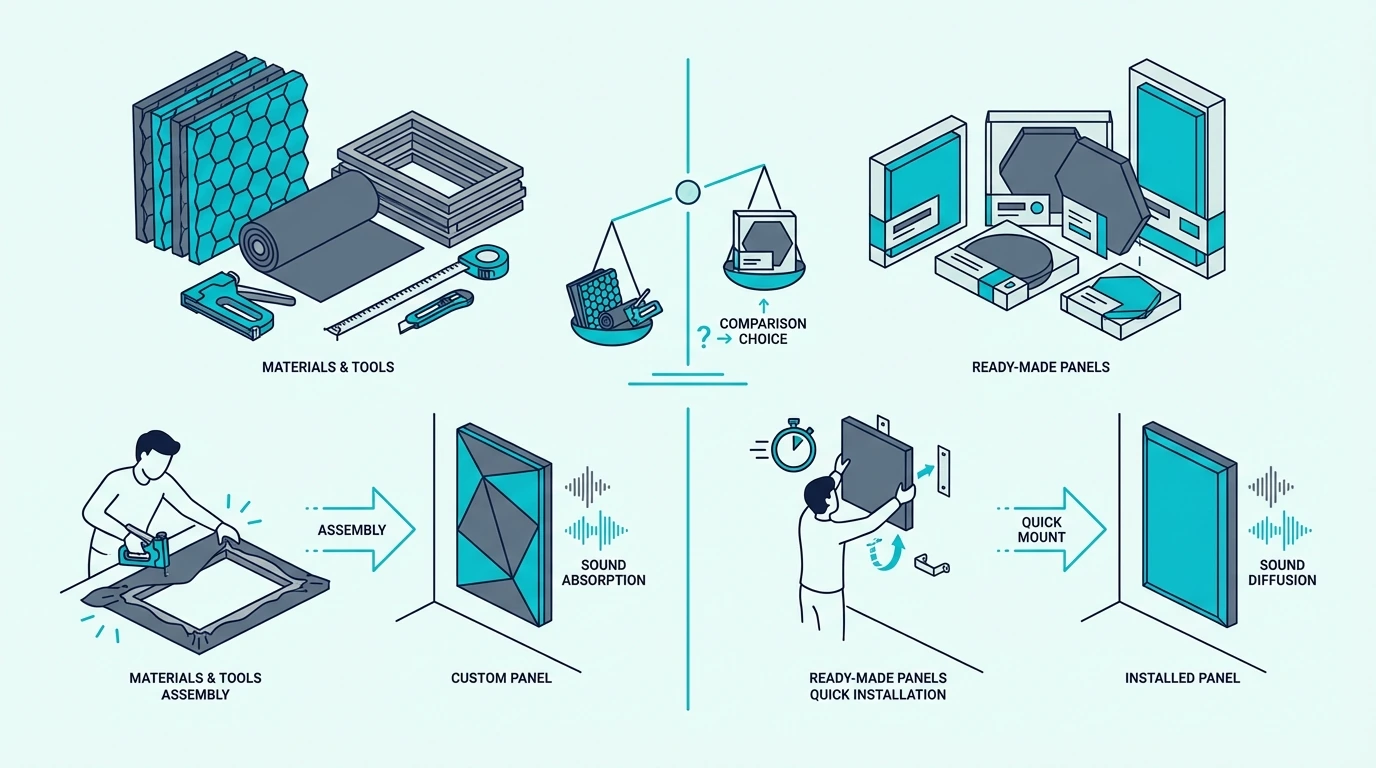
Why DIY Is The Smart Choice For Home Studio Treatment
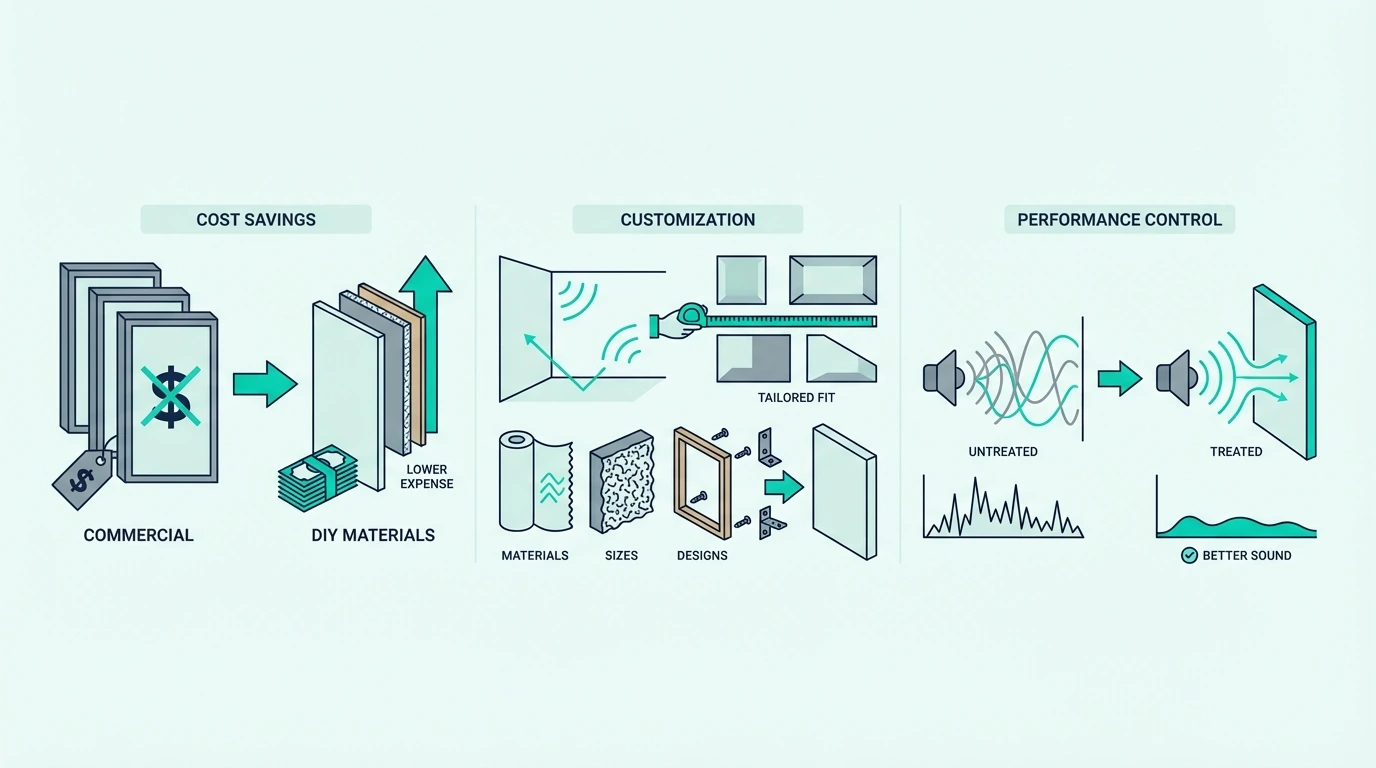
DIY acoustic panels outperform most commercial alternatives at a fraction of the cost. The reason is simple — you control the insulation material, thickness, and density, which are the only factors that determine acoustic performance.
Commercial panels charge a premium for aesthetics, packaging, and brand name. The actual insulation inside most commercial panels is the same material you can buy at an insulation distributor or hardware store for far less.
A DIY 2×4 foot panel costs approximately 15-25 dollars in materials depending on the insulation you choose. A comparable commercial panel costs 50-100 dollars.
For a full studio treatment requiring 8-12 panels, the savings add up to hundreds of dollars.
The tradeoff is time and effort. Building panels requires basic tools, a workspace, and a few hours of construction time.
If your time is worth more than the savings, pre-built kits deliver good results with zero build time.
For everyone else, DIY is the clear winner. The cost breakdown guide compares DIY versus commercial at every price point.
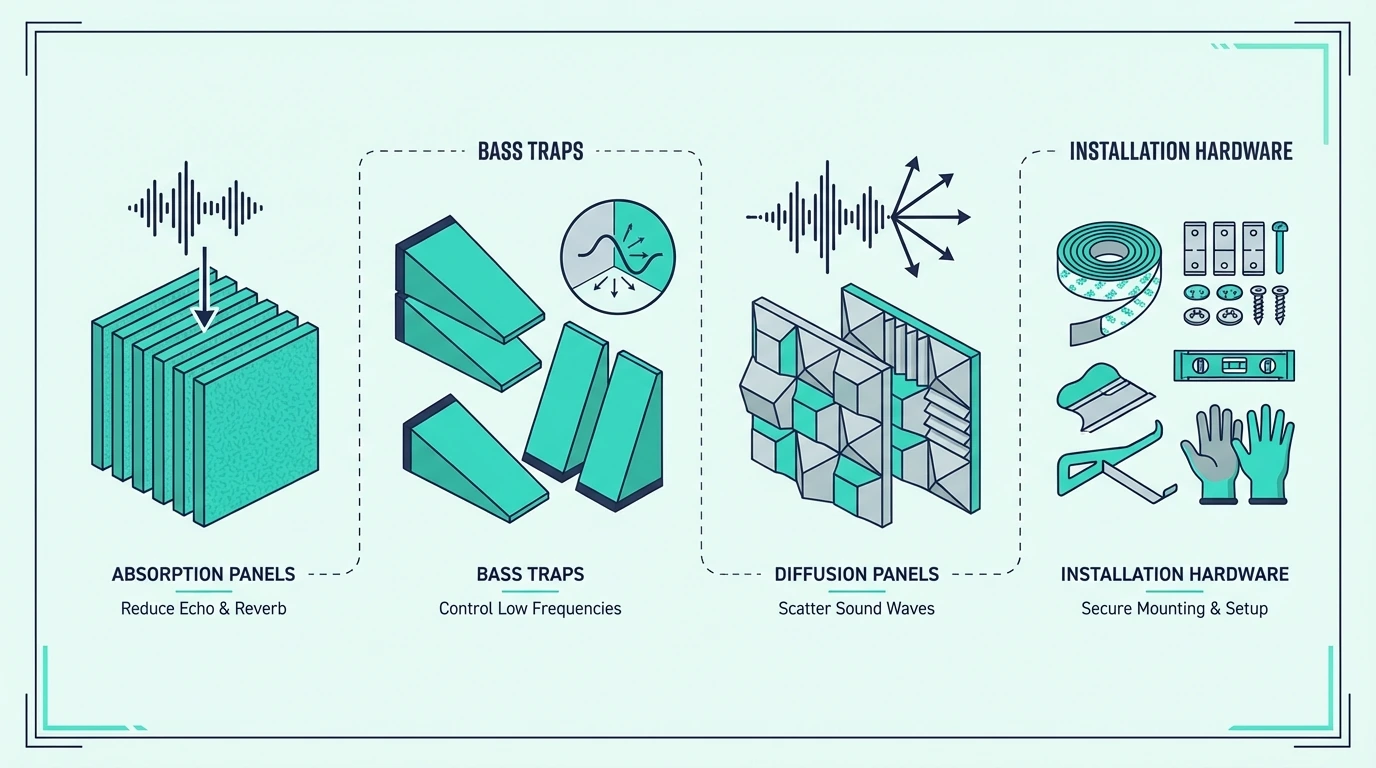
What Materials Do You Need For DIY Acoustic Panels
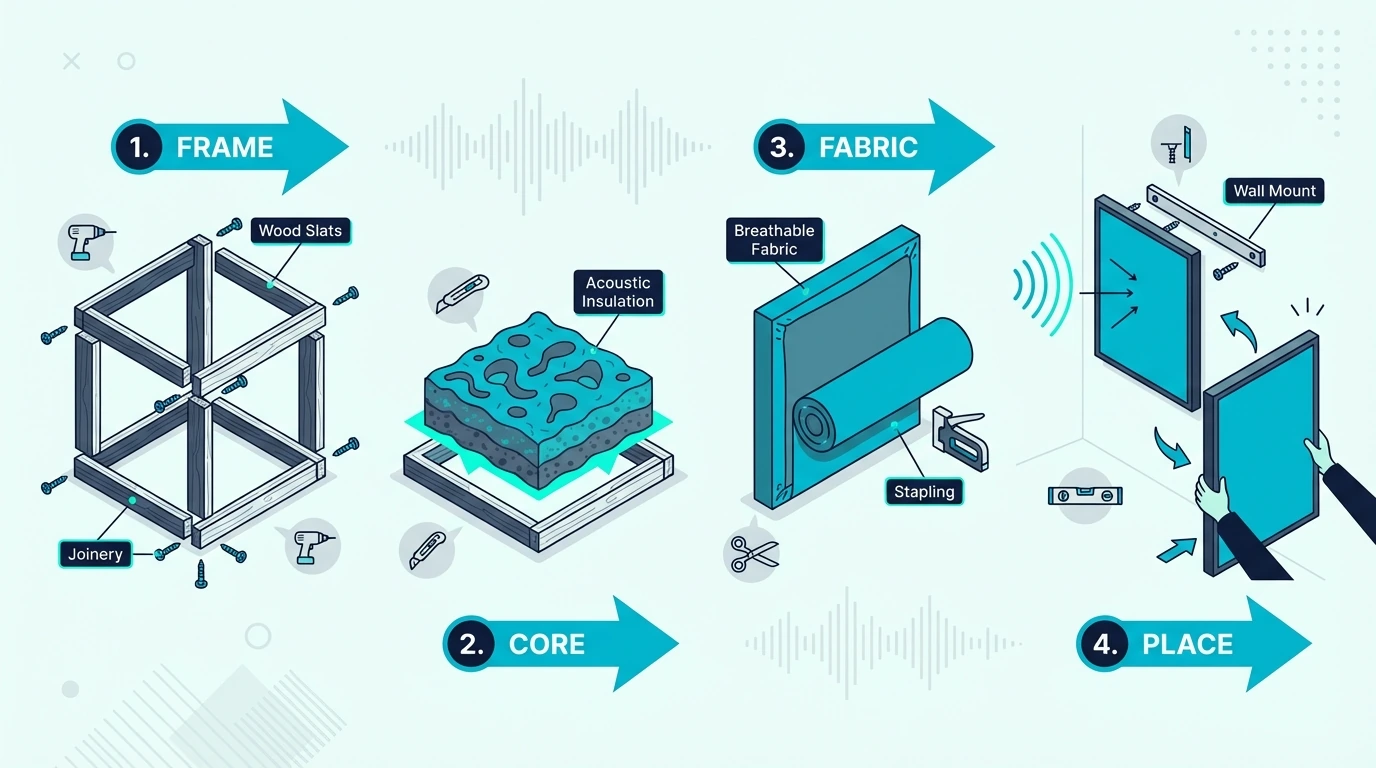
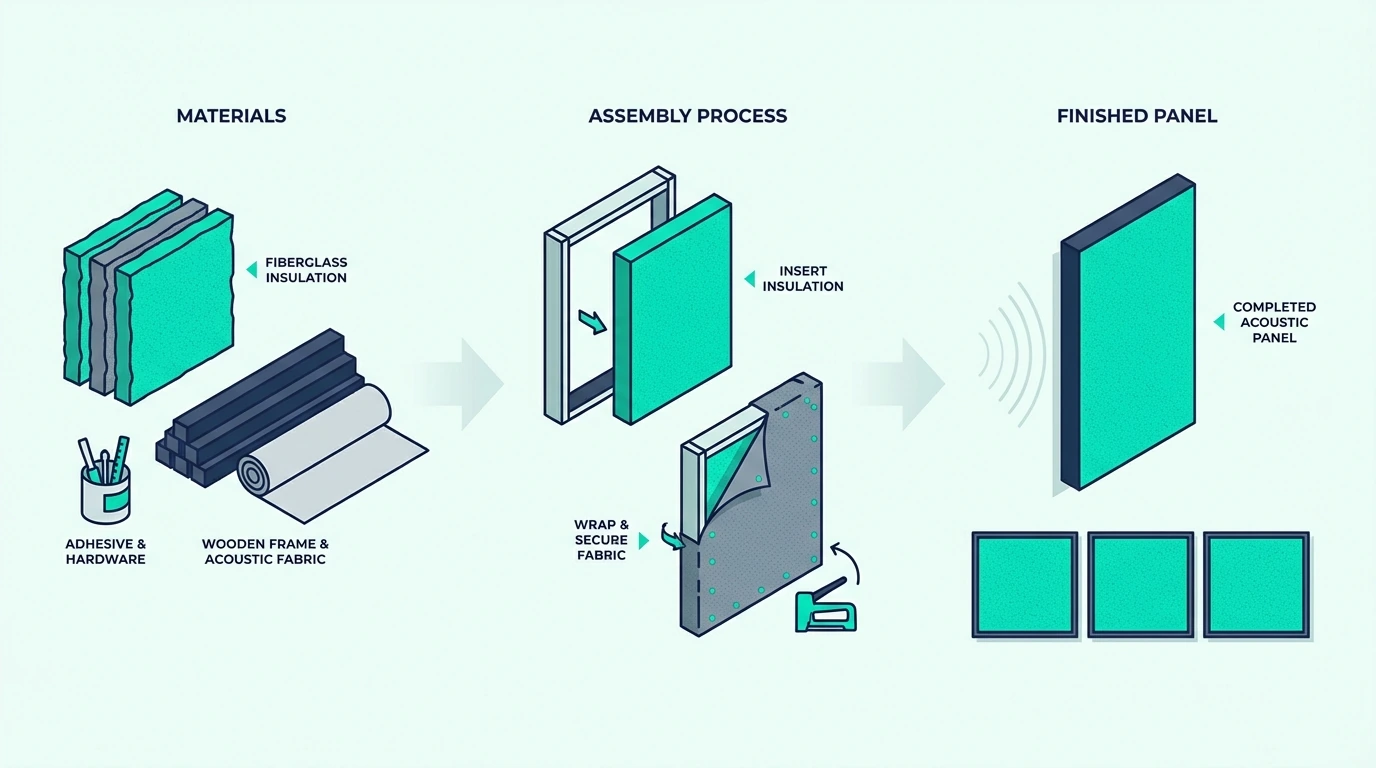
Every DIY acoustic panel has three components: insulation core, frame, and fabric covering. The insulation is the only component that affects acoustic performance — the frame and fabric are structural and cosmetic.
Insulation — Rockwool vs Fiberglass
The two standard insulation materials for DIY acoustic panels are rigid fiberglass (like Owens Corning 703) and mineral wool (like Rockwool or Rockboard). Both work well.
The choice comes down to availability and price in your area.
Rigid fiberglass at 3 lb per cubic foot density is the traditional recommendation. OC 703 at 2 inches thick achieves NRC 1.0.
It holds its shape, cuts cleanly with a bread knife, and fits into frames without compression.
Mineral wool at similar densities performs nearly identically.
Rockboard 60 rigid mineral wool boards come in standard 24×48 inch sizes ready to drop into a frame. The 6 lb per cubic foot density makes them particularly effective for bass traps where maximum low-frequency absorption matters.
Rockwool Safe’n’Sound batts from hardware stores are the budget option. They are not rigid boards — they are flexible batts that need a frame to hold their shape.
They cost roughly 1 dollar per square foot compared to 3-4 dollars per square foot for rigid boards. The acoustic performance is slightly lower but still vastly superior to foam.
Standard wall panels use 1×4 lumber (actual dimensions 3/4 x 3-1/2 inches) for the frame. This creates a frame depth of approximately 3.5 inches — enough for a 2-inch insulation board with air space behind it.
For thicker bass traps, use 1×6 or 2×4 lumber. A 2×4 frame accommodates 4 inches of insulation or two stacked 2-inch boards.
Hardware list per panel: – 4 pieces of 1×4 lumber cut to size (two at 48 inches, two at 22.5 inches for a 24×48 panel) – 8 wood screws (2.5 inch) – 2 L-brackets or corner braces (optional but add rigidity) – 2 picture hanging D-rings with screws – Corresponding wall anchors or hooks
Total lumber and hardware cost per panel is approximately 5-8 dollars depending on local lumber prices.
Fabric — What Works And What Does Not
The fabric covering a panel must be acoustically transparent — meaning sound passes through it to reach the insulation behind. If the fabric reflects sound, the insulation does nothing.
Fabrics that work: Guilford of Maine is the industry standard. Burlap, speaker cloth, and loosely woven polyester blends also work.
Fabrics that do not work: Canvas, vinyl, leather, and tightly woven cotton reflect too much sound. If you hold the fabric to your mouth and blow through it, you should feel air pass through easily.
If the fabric blocks airflow, it blocks sound.
The simple test: hold the fabric up to your mouth and blow. If air passes through freely, the fabric works for acoustic panels.
How To Build DIY Acoustic Panels — Step By Step
The build process is the same regardless of which insulation material you choose. Each panel takes approximately 30-45 minutes once you have the materials ready.
Building The Frame
Cut your 1×4 lumber to size. For a standard 24×48 inch panel, cut two pieces at 48 inches (long sides) and two pieces at 22.5 inches (short sides — accounting for the 3/4 inch thickness of the long pieces on each end).
Pre-drill pilot holes to prevent splitting. Screw the short pieces between the long pieces using two screws per corner.
The frame should be square — check by measuring diagonally from corner to corner. Both diagonal measurements should be equal.
For panels larger than 24×48 inches, add a cross brace across the middle for rigidity. This prevents the frame from warping over time.
Installing The Insulation
Cut the insulation to fit snugly inside the frame. Use a bread knife or serrated edge for fiberglass and a utility knife for mineral wool.
The insulation should press lightly against the frame sides without compression — compressed insulation loses air space and absorbs less effectively.
Wear gloves, long sleeves, and a dust mask when handling fiberglass or mineral wool. Both materials release fine particles that irritate skin and lungs. For rooms with concrete walls, use masonry anchors instead of drywall screws when mounting the finished panels.
Work outdoors or in a well-ventilated space.
For bass traps requiring 4 inches of insulation, stack two 2-inch boards inside the deeper frame. They should fit without adhesive — the frame holds them in place.
Wrapping With Fabric
Lay the fabric face-down on a clean surface. Place the panel face-down on top of the fabric, centered.
Pull one long side of the fabric over the back of the frame and staple every 3-4 inches using a staple gun.
Flip to the opposite long side. Pull the fabric taut (not stretched — just smooth with no wrinkles) and staple.
Repeat for the top and bottom short sides.
For the corners, fold the fabric neatly like wrapping a gift — fold one flap under, then pull the other over it and staple. Clean corner folds make the difference between a professional-looking panel and a sloppy one.
Trim excess fabric on the back with scissors. The finished panel should have smooth, wrinkle-free fabric on the front with all staples hidden on the back.
How To Build DIY Bass Traps
Bass traps follow the same construction process but use thicker insulation and are designed for room corners where low-frequency energy accumulates.
Corner Bass Trap Design
The most effective DIY bass trap is a flat panel mounted across a room corner with an air gap behind it. Build a standard 24×48 inch panel with a 2×4 frame (3.5 inches deep) and fill it with 4 inches of insulation — two stacked 2-inch rigid boards.
Mount the panel across the corner at a 45-degree angle. The triangular air space behind the panel acts as additional absorption volume, extending the effective low-frequency performance below what the insulation thickness alone would achieve.
A single bass trap in each of the four vertical room corners makes a dramatic difference in low-frequency clarity. For builders who prefer a no-construction option for corners, TroyStudio foam bass traps friction-fit into corners without frames and address mid-bass buildup while you plan a full fiberglass build. The corner treatment guide covers bass trap placement and sizing in detail.
Floor-To-Ceiling Bass Traps
For maximum bass control, build floor-to-ceiling bass traps that span the entire height of the room corner. These require longer frames (typically 6-8 feet) and more insulation, but they provide significantly more low-frequency absorption than smaller panels.
Use 2×4 lumber for the frame to support the weight of the insulation over the full height. Add at least two cross braces to prevent the frame from bowing.
Floor-to-ceiling traps are the single most effective treatment for small rooms where bass modes cause the most audible problems. They are especially critical for mixing rooms where accurate bass monitoring determines mix quality.
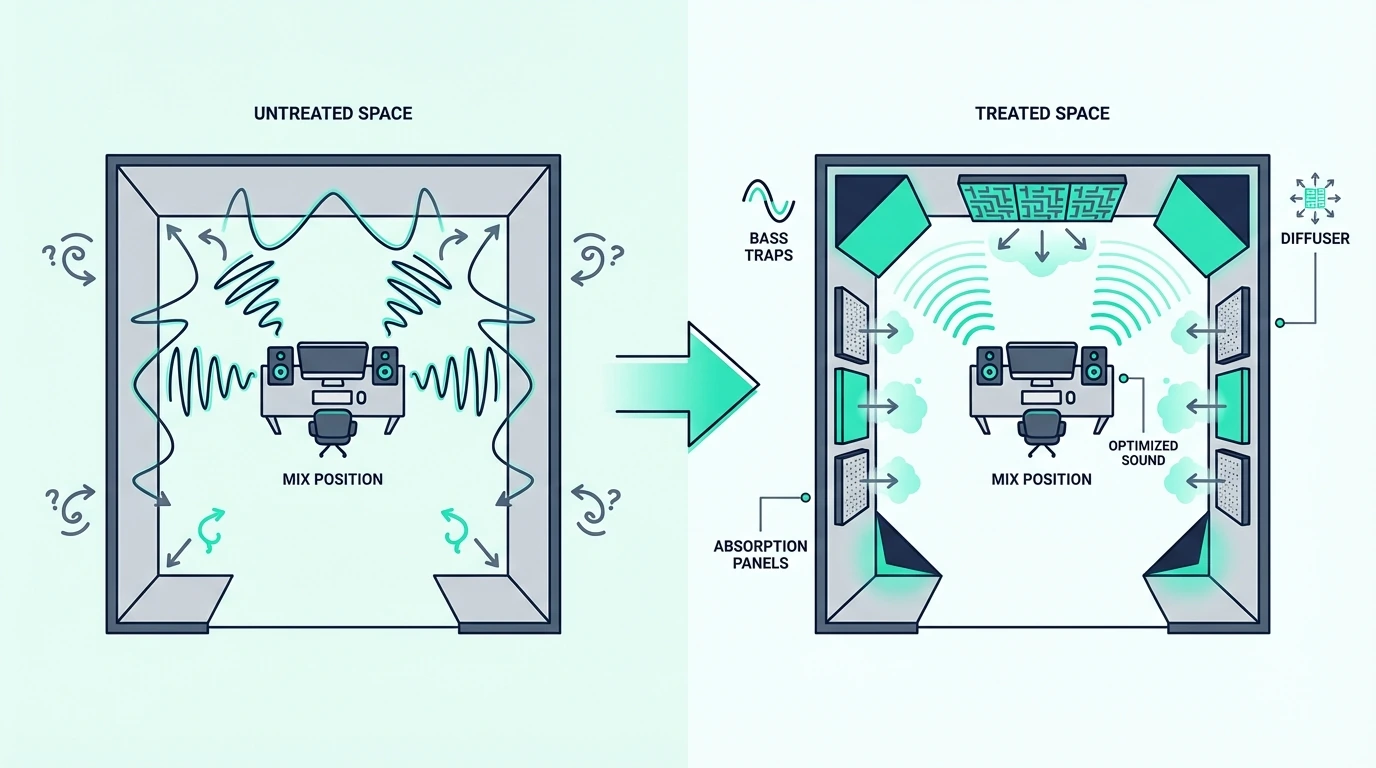
Where To Place DIY Panels — Priority Order
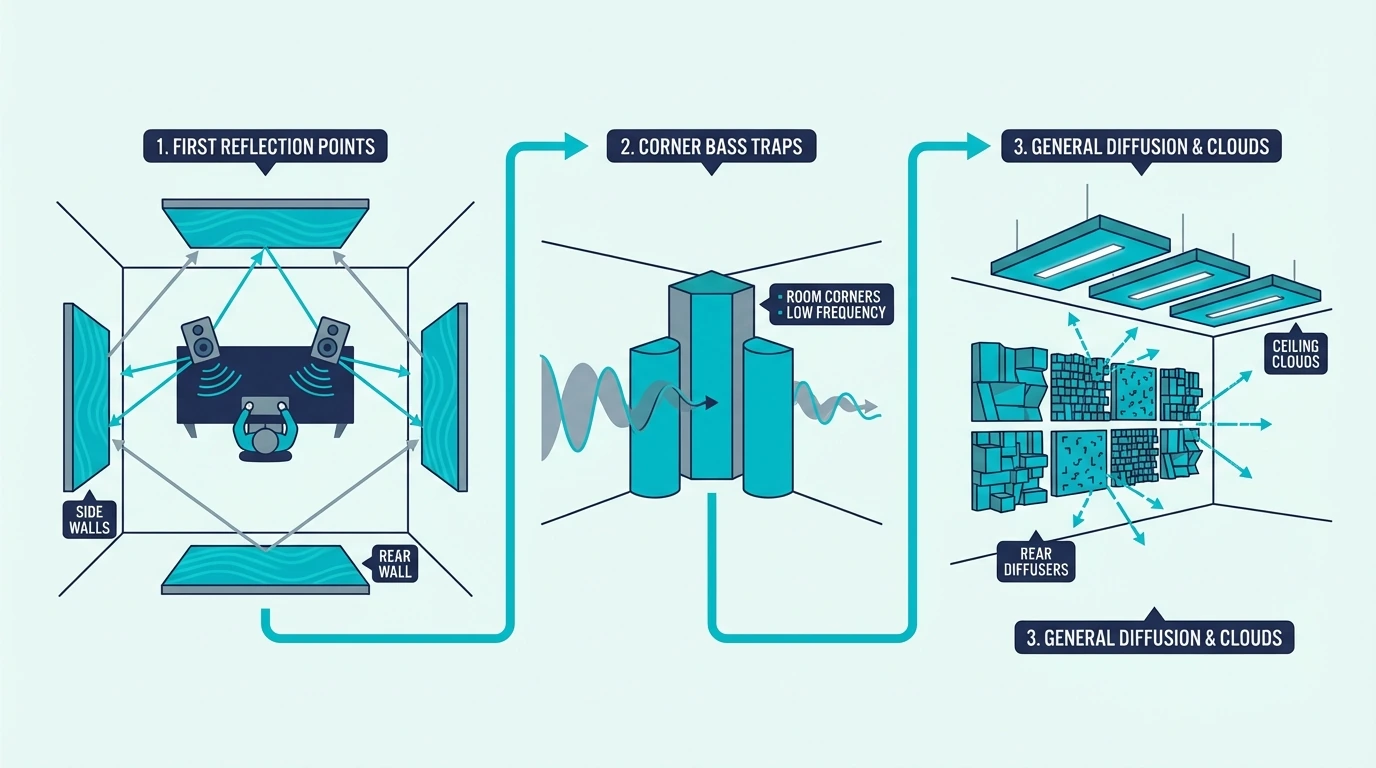
The placement priority for a home studio follows the same order regardless of room size:
First reflection points on side walls — the spots where sound from your speakers bounces off the side walls to your listening position. Sit at the mix position and have someone slide a mirror along each side wall. Where you can see the speaker cone in the mirror is the first reflection point.
Ceiling reflection point — directly above the equilateral triangle formed by your speakers and listening position. A ceiling cloud at this position eliminates the ceiling reflection that causes comb filtering.
Corner bass traps — all four vertical corners. Start with the front two corners behind your speakers. Add the rear corners if budget allows.
Rear wall — absorption or diffusion on the rear wall controls late reflections that add unwanted reverb to your monitoring.
Front wall behind speakers — reduces the immediate reflection from the wall behind your monitors.
The home studio treatment guide covers room-specific placement with measurements and diagrams. For small rooms, the treatment priorities shift slightly because standing waves are more severe at shorter wall distances.
DIY vs Pre-Built — When To Skip The Build
DIY panels deliver the best performance per dollar, but not everyone wants to build.
If you prefer convenience over cost savings, pre-built fiberglass panels arrive ready to hang. A 4-pack covers two first reflection points and delivers meaningful improvement with zero build time.
The tradeoff is thickness. Most affordable pre-built panels are 1 inch thick, which limits absorption to frequencies above approximately 500 Hz.
DIY panels at 2-4 inches thick absorb deeper into the frequency range where room problems are most severe.
For a full comparison of pre-built options at every price point, the budget treatment guide ranks commercial panels by performance per dollar.
The Bottom Line
DIY acoustic treatment is the most cost-effective way to treat a home studio. Rigid fiberglass or mineral wool panels at 2 inches thick absorb more effectively than commercial alternatives at 2-3 times the price.
Build wall panels first for first reflection points, then add corner bass traps. A full treatment of 8-10 panels plus four bass traps costs 200-400 dollars in materials and transforms an untreated room into a usable recording and mixing environment.
The full guide to acoustic treatment covers the complete treatment workflow from room analysis to final placement. For rooms where you cannot mount permanent panels, the temporary treatment guide covers portable and removable alternatives.
Frequently Asked Questions
How much does it cost to build DIY acoustic panels?
A single 24×48 inch panel costs approximately 15-25 dollars in materials — insulation, lumber, fabric, and hardware. A full home studio treatment of 8-10 panels plus bass traps costs 200-400 dollars total.
The biggest variable is insulation cost. Rigid boards like Owens Corning 703 and Rockboard cost more per panel than flexible batts (Rockwool Safe’n’Sound) but produce a cleaner build that holds its shape without additional support.
Are DIY acoustic panels as good as commercial ones?
DIY panels using the same insulation material at the same thickness perform identically to commercial panels. In many cases, DIY panels outperform commercial alternatives because you can choose thicker insulation and higher density materials that budget commercial panels cannot afford to include.
Commercial panels pay for aesthetics, brand name, and convenience. The acoustic performance comes entirely from the insulation core, which you can source yourself for far less.
What tools do I need to build acoustic panels?
The minimum tool list: a saw (miter saw or circular saw) for cutting lumber, a drill for pilot holes and screws, a staple gun for attaching fabric, a tape measure, and a utility knife or bread knife for cutting insulation. A speed square helps ensure square corners.
If you do not own these tools, the home theater guide covers simpler construction methods that require fewer specialized tools.
Should You Cover Walls In Moving Blankets For Acoustic Treatment (Honest Answer)
Should I cover walls in moving blankets for acoustic treatment — it is one of the most common budget questions in home studio building, but moving blankets provide mild mid-frequency absorption while doing nothing for the bass and low-mid problems that actually ruin recordings and mixes.
A heavy moving blanket hung on a wall absorbs some sound energy above roughly 500 Hz. That reduces high-frequency brightness and takes some of the harshness out of a reflective room.
The problem is that the reflections causing muddy, boxy recordings live in the 200-500 Hz range, and moving blankets are not dense enough or thick enough to absorb at those frequencies. Hanging blankets on every wall gives you a room that sounds slightly muffled in the highs while the low-mid problems remain completely untouched.
Below you will find what moving blankets actually do acoustically, how they compare to purpose-built acoustic blankets and panels, and when they make sense versus when you should spend the money on proper treatment instead. Start with two fiberglass panels at first reflection points — they solve the problem blankets cannot.
Quick Takeaway
Moving blankets absorb some mid and high frequency energy above 500 Hz but do not control bass or low-mid reflections where most room problems live. They are a reasonable temporary solution for rental spaces and extreme budget constraints but should not be your primary acoustic investment. Two fiberglass panels at first reflection points outperform an entire room of hanging blankets for recording and mixing accuracy.
Moving Blankets vs Acoustic Blankets – What Is The Difference
Not all blankets perform the same acoustically. The difference between a standard moving blanket and a purpose-built acoustic blanket is significant enough to affect whether hanging them on your walls is worth the effort.
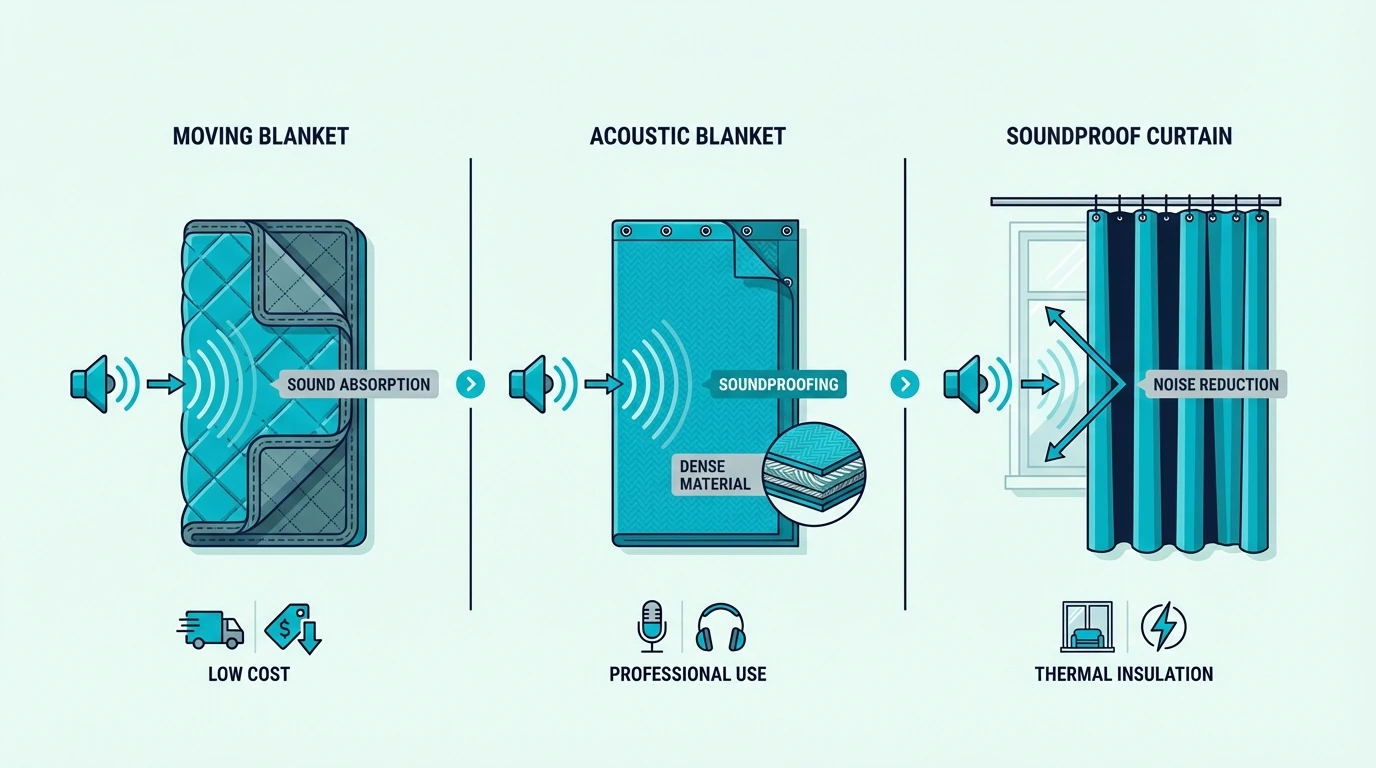
What Moving Blankets Actually Do
Moving blankets are dense woven pads designed to protect furniture during transport. They typically weigh 5-8 lb each and consist of a woven cotton or polyester shell filled with recycled textile padding.
That mass and padding absorbs some mid and high frequency sound energy. A single moving blanket hung flat on a wall provides roughly NRC 0.2-0.4 depending on the blanket — meaning it absorbs 20-40% of the sound energy that hits it in the mid-high range.
For comparison, a 2-inch fiberglass panel achieves NRC 1.0 — absorbing virtually all sound energy across the full mid and high frequency range. A moving blanket provides roughly one-quarter to one-third of the absorption of a proper panel.
Moving blankets do nothing meaningful below approximately 500 Hz. The low-frequency room modes and the 200-500 Hz reflections that cause boxy, muddy recordings pass through blankets as if they were not there.
The performance also varies wildly between brands. A cheap, thin moving blanket absorbs almost nothing useful. A heavy-duty blanket with dense fill performs noticeably better, though still far below purpose-built acoustic materials.
What Purpose-Built Acoustic Blankets Offer
Acoustic blankets — also called sound blankets or producer blankets — are designed specifically for sound absorption. They are heavier (typically 10-15 lb each), use denser fill material, and include grommets along the top edge for easy hanging.
A good acoustic blanket achieves NRC 0.5-0.8 — significantly better than a moving blanket but still well below a fiberglass panel. The higher mass absorbs slightly deeper into the low-mid range, extending useful absorption down to approximately 300-400 Hz.
The US Cargo Control sound dampening blanket is a typical example — 96 x 80 inches with built-in grommets for hanging. One blanket covers a full wall section and absorbs more effectively than a standard moving blanket due to the heavier construction.
Acoustic blankets cost 2-3 times more than moving blankets. Whether the upgrade is worth it depends on how long you plan to use them — for a weekend recording session, moving blankets are fine; for a semi-permanent setup, acoustic blankets justify the premium.
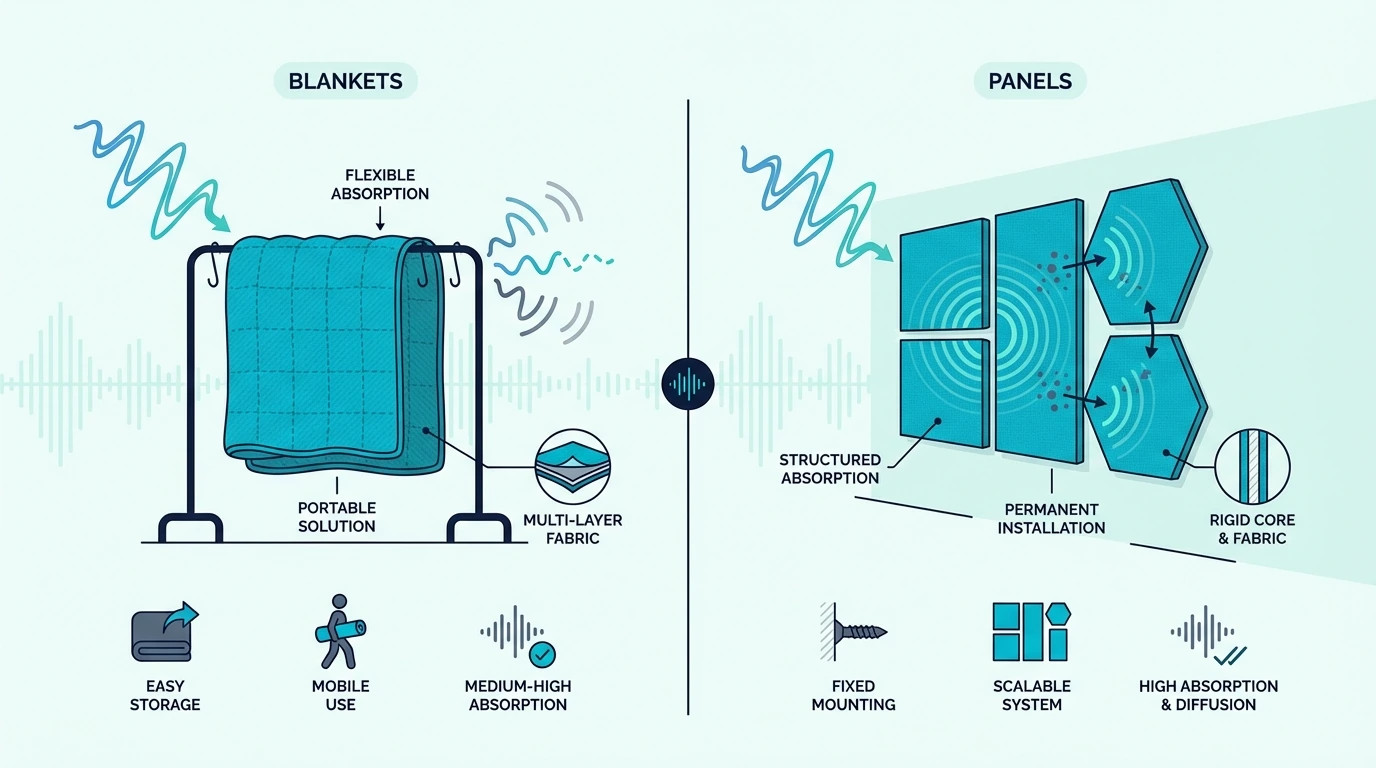
Moving Blankets vs Acoustic Panels – Which Is Better
Acoustic panels outperform blankets in every measurable acoustic metric. The question is not which sounds better — panels always win — but whether the convenience and lower commitment of blankets makes them the right choice for your situation.
When Moving Blankets Make Sense
Moving blankets are a reasonable choice in a narrow set of circumstances:
Rental spaces where you cannot mount anything on walls and need a removable solution
Temporary recording setups where you need quick absorption for a single session or project
Extreme budget constraints where you already own moving blankets and cannot afford any alternative
Vocal booth improvisation where blankets draped around a microphone position reduce the closest reflections
In these situations, blankets provide some improvement over bare walls. The room will sound less bright and less echoey, which helps reduce the worst artifacts in vocal recordings.
The temporary treatment guide covers additional portable and removable options that work alongside blankets for non-permanent setups.
When Panels Are The Better Choice
Panels are the better choice in every situation where you can mount them:
Permanent or semi-permanent studios where you want consistent, reliable acoustic performance
Mixing rooms where accurate monitoring requires controlled reflections across the full frequency range
Any room where bass and low-mid control matters — blankets cannot address these frequencies regardless of how many you hang
A 4-pack of fiberglass wall panels costs roughly the same as two acoustic blankets but absorbs across a wider frequency range including the low-mid frequencies where room problems are most severe. Two panels at first reflection points improve recording and mixing accuracy more than blankets covering every wall in the room.
The fiberglass treatment guide covers DIY panel construction for builders who want even better performance at a lower cost per panel.
How To Use Moving Blankets For Acoustic Treatment
If blankets are your best available option, proper placement maximizes the limited absorption they provide.
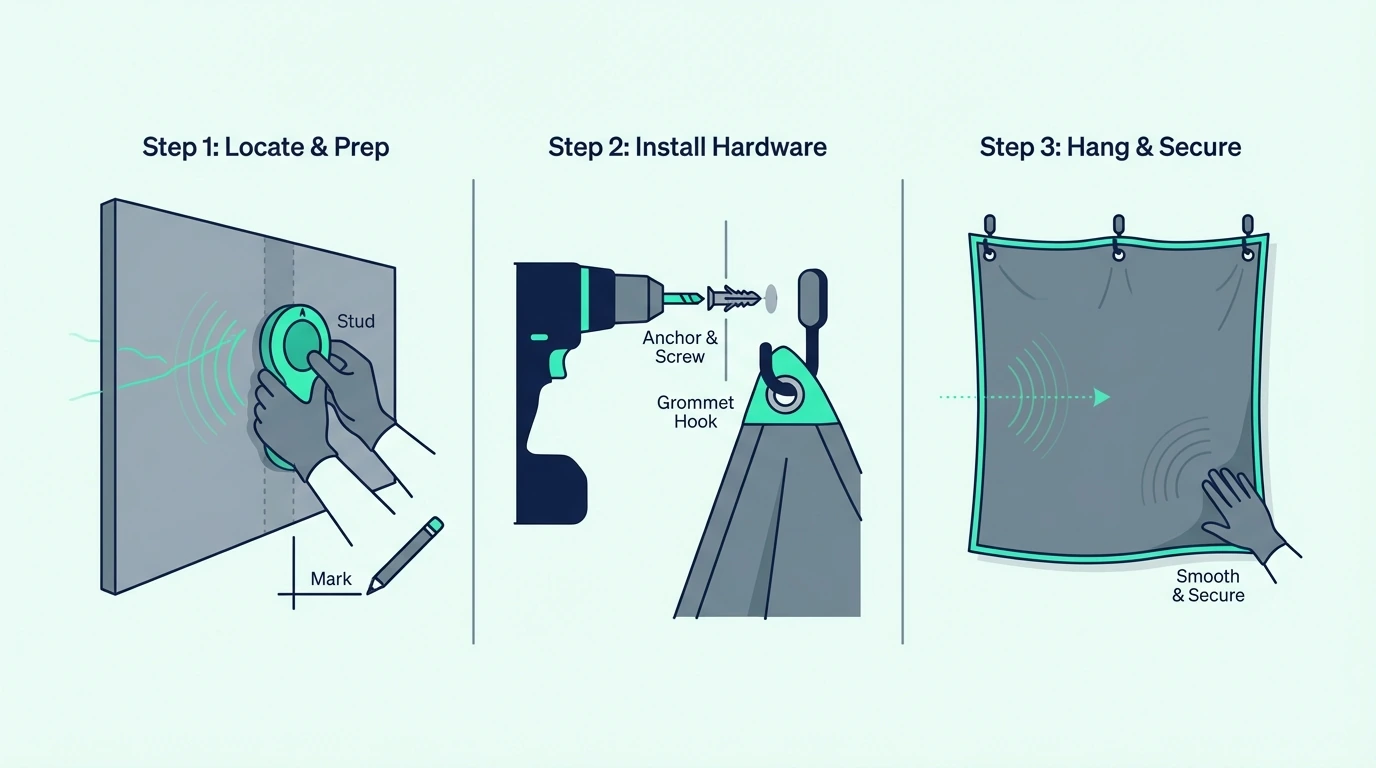
Hanging Methods
Use grommets, binder clips on a curtain rod, or heavy-duty Command hooks with clips. Hang blankets flat against the wall at the first reflection points — the spots on the side walls, ceiling, and rear wall where sound bounces from your speakers to your listening position.
For vocal recording, hang blankets behind the microphone and behind the singer. These two positions catch the strongest early reflections that cause the boxy coloration in vocal recordings.
Double-Layering For More Absorption
Two blankets layered on top of each other absorb more than a single blanket. The additional thickness extends the useful absorption range slightly lower in frequency and increases the overall NRC by approximately 30-50%.
If you have enough blankets, double-layer at the first reflection points rather than single-layer across more wall area. Concentrated treatment at the most critical positions outperforms thin treatment spread across the entire room.
Leave an air gap between the blanket and the wall if possible — even 1-2 inches of space improves low-frequency absorption. Draping the blanket over a curtain rod instead of pressing it flat against the wall creates this gap naturally.
What Blankets Cannot Fix
No amount of blankets will control bass modes in the room corners. For low-frequency problems, you need corner bass traps built from dense material — 4 inches of fiberglass or mineral wool minimum.
Blankets also cannot fix the room if you hang them on every surface. Over-treating with blankets creates a room that sounds dead and muffled in the highs while the lows remain uncontrolled — the worst of both worlds for mixing.
The Bottom Line
Moving blankets provide mild mid and high frequency absorption. They are a reasonable temporary solution for rental spaces and budget builds but should never be your primary acoustic investment.
If you can mount anything on walls, fiberglass or Rockwool panels at first reflection points deliver dramatically better results per dollar spent. Two panels outperform a room full of blankets for the acoustic problems that matter most.
The full guide to acoustic treatment covers placement priorities that deliver the biggest improvements. The cost breakdown compares blankets, DIY panels, and pre-built panels at every price point.
Frequently Asked Questions
Are moving blankets good for soundproofing?
No — moving blankets do not block sound between rooms. They provide mild acoustic absorption within a room, which reduces reflections and echo.
Soundproofing requires mass, decoupling, and airtight construction — none of which blankets provide. A moving blanket on a wall will not meaningfully reduce how much sound passes through to the other side.
How do you use moving blankets for acoustic treatment?
Hang them at first reflection points using grommets, clips, or Command hooks. Prioritize the wall behind the microphone, the wall behind the singer, and the side walls at the listening position.
Double-layer blankets at priority positions rather than single-layer across more area. Concentrated treatment at critical reflection points outperforms thin coverage spread across the room.
Can you soundproof a wall with blankets?
No — blankets lack the mass needed to block sound transmission through walls. Even the heaviest acoustic blanket reduces sound transmission by only 2-3 dB, which is barely perceptible.
For actual soundproofing, you need mass-loaded vinyl, double drywall with Green Glue, or isolation clips with resilient channel. The home theater guide explains the difference between treatment and soundproofing in practical terms.
Can You Use A Rug For Acoustic Treatment (What Rugs Actually Fix And What They Cannot)
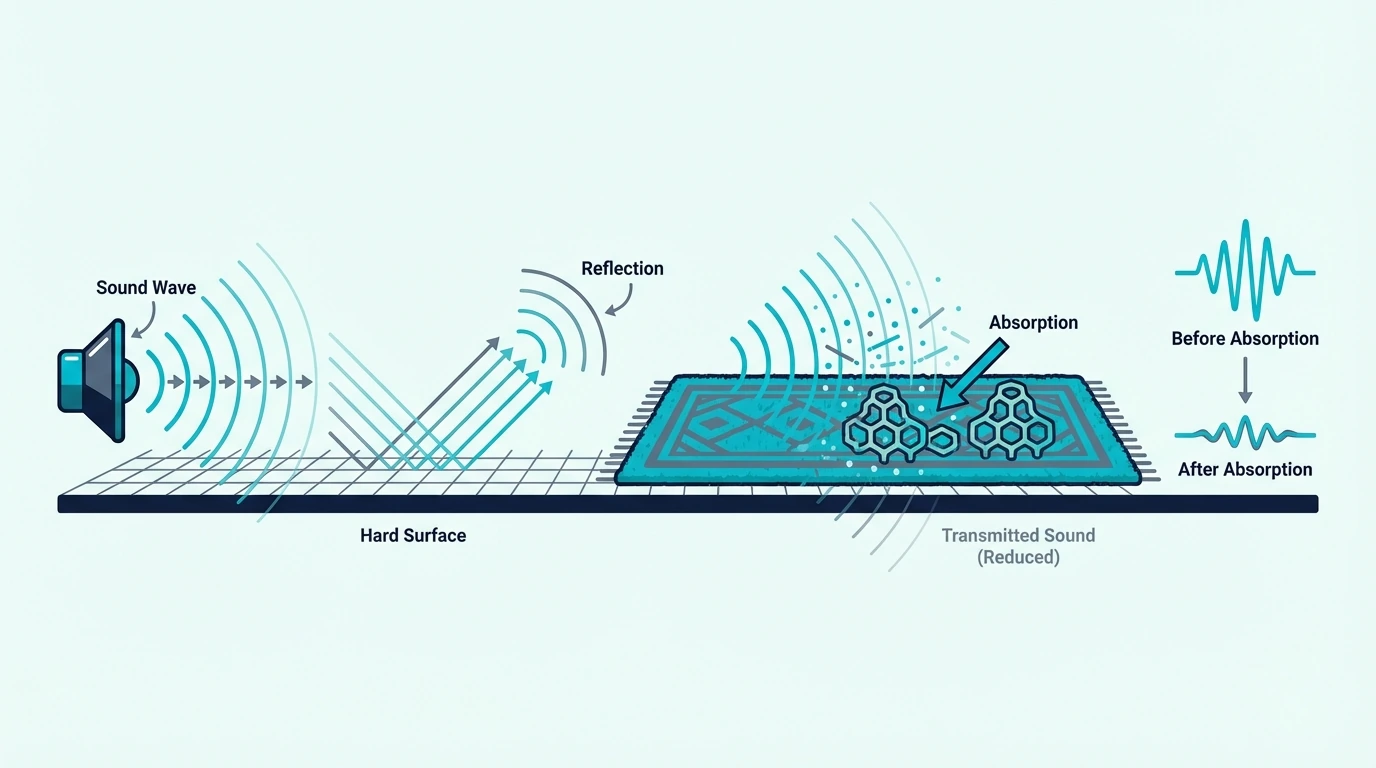
Can you use a rug for acoustic treatment is one of the most common questions from people setting up a recording or listening space, but the honest answer is that rugs help with one narrow problem while leaving the main acoustic issues completely untouched.
A thick rug on a hard floor absorbs some mid and high frequency reflections that bounce between the floor and ceiling. That reduces flutter echo and takes a small amount of brightness out of the room.
The problem is that the reflections causing muddy recordings and unreliable mixes come from walls, corners, and the ceiling — surfaces a rug does not touch. A rug treats roughly 10-15% of the acoustic problem in a typical room while the other 85-90% continues bouncing off every other surface.
Below you will find exactly what rugs can and cannot do acoustically, when they are worth using, and what delivers better results at a similar price. Start with wall panels at first reflection points — they address the reflections that actually damage your recordings.
Quick Takeaway
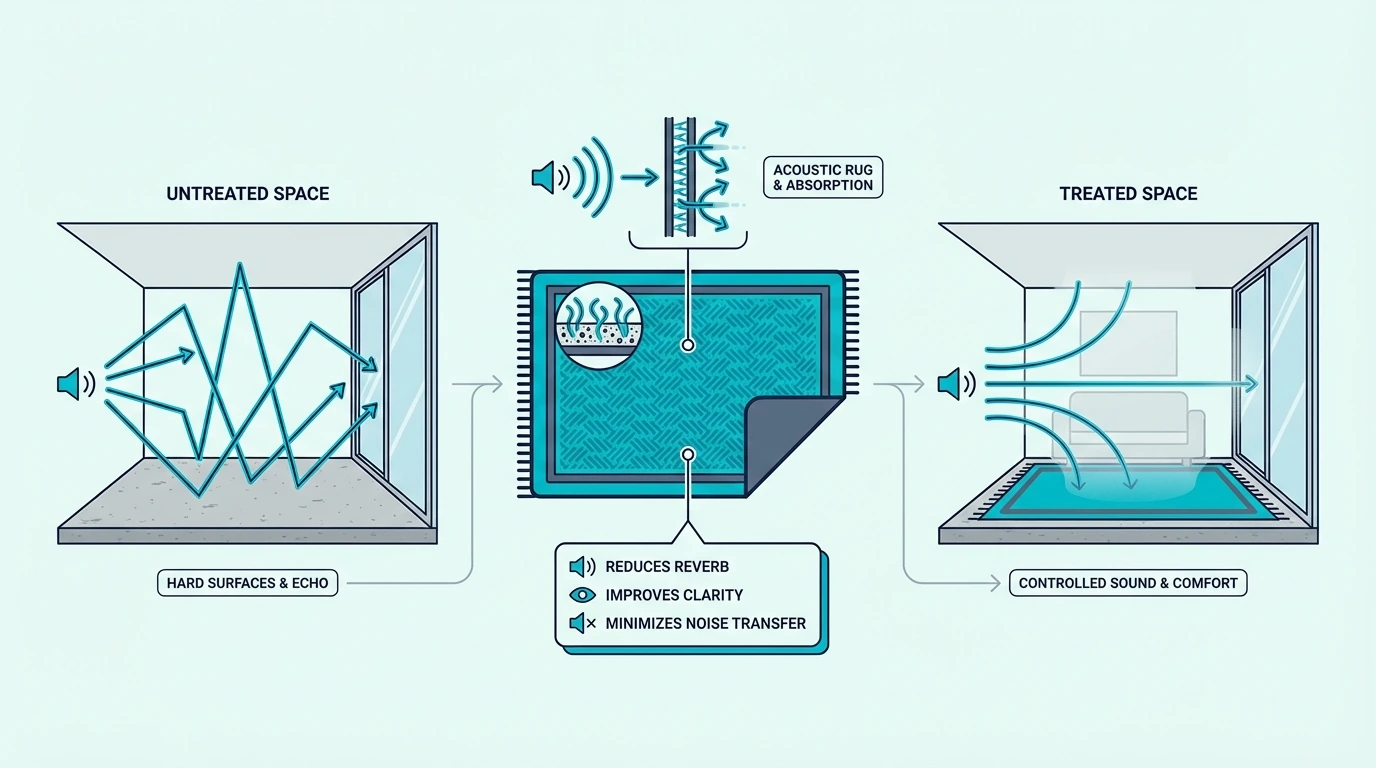
Rugs absorb some mid and high frequency reflections off hard floors, reducing flutter echo and footstep noise. They do not control bass, eliminate wall reflections, or replace purpose-built acoustic panels. A thick wool or shag rug is a useful supplement to proper treatment but should never be your first or only acoustic investment.
How Well Do Rugs Absorb Sound?
Rugs absorb sound, but understanding how much and at which frequencies prevents you from expecting results they cannot deliver.
What Rugs Can Do
A thick rug on a bare floor reduces flutter echo — the rapid series of reflections that bounces between the floor and ceiling in rooms with hard surfaces. Flutter echo creates a metallic, ringing quality that is particularly noticeable when you clap your hands in an empty room.
A dense wool or shag rug eliminates most of that flutter echo. It also absorbs footstep noise and reduces the overall high-frequency brightness of a room with hard flooring.
In living rooms, home theaters, and home offices, a rug makes an audible difference in how the room sounds for conversation and casual listening. The room feels less harsh and echoey with a thick rug covering a significant portion of the bare floor.
What Rugs Cannot Do
Rugs do not absorb bass frequencies. The low-frequency room modes that cause boomy, muddy sound in small rooms are completely unaffected by any rug, regardless of thickness or material.
Rugs do not control wall reflections. The early reflections from side walls, the front wall, and the rear wall are the primary cause of comb filtering and imaging problems in recording and mixing environments.
A rug on the floor does nothing to address these.
Rugs do not replace corner bass traps. The low-frequency buildup in room corners requires thick, dense absorption — 4 inches of rigid fiberglass or mineral wool minimum.
No rug or carpet provides that level of absorption at those frequencies.
The acoustic properties of even the thickest rug are limited to frequencies above approximately 500 Hz. Below that threshold, the rug is acoustically transparent — sound passes through it and reflects off the hard floor underneath as if the rug were not there.
When Are Rugs Worth Using For Acoustics?
Rugs make acoustic sense in specific situations where they supplement proper treatment or where permanent treatment is not possible.
Rooms With Hard Floors And Flutter Echo
If your room has hardwood, tile, concrete, or laminate flooring and you hear a distinct ringing when you clap, a thick rug directly addresses that problem. Place the rug in the area between your listening position and the speakers or microphone.
A deep pile wool rug or a thick shag rug absorbs more effectively than a thin flatweave rug. The thicker and denser the material, the lower in frequency the absorption extends.
Adding a thick rug pad underneath further improves absorption by increasing the total thickness of the absorptive layer. The combination of rug plus pad can absorb effectively down to approximately 300-400 Hz for floor reflections.
Apartments And Rentals
For renters who cannot mount panels on walls, a rug is one of the few acoustic improvements that requires no modification to the space. Combined with temporary treatment options like freestanding panels and blanket-covered mic shields, a rug contributes to an overall reduction in room reflections.
In shared living spaces where a dedicated studio is not possible, a rug is a practical compromise. It will not solve serious acoustic problems, but it reduces the worst of the flutter echo without requiring any installation.
The key for renters is combining a rug with other non-permanent solutions. A thick rug on the floor, heavy curtains on the windows, and a portable reflection filter behind the microphone collectively reduce room reflections enough to produce usable recordings in an otherwise untreated space.
As A Supplement To Wall Treatment
The most effective use of a rug is as one component of a complete treatment plan. After you have addressed the walls and corners — which are the primary sources of acoustic problems — a rug handles the remaining floor reflections.
In a room that already has wall panels at first reflection points and bass traps in the corners, adding a thick rug completes the treatment by absorbing the floor-to-ceiling reflections that the wall treatment does not cover.
The small room treatment guide covers the full placement priority order. Floors are typically the last surface to treat because wall and corner reflections cause more audible problems.
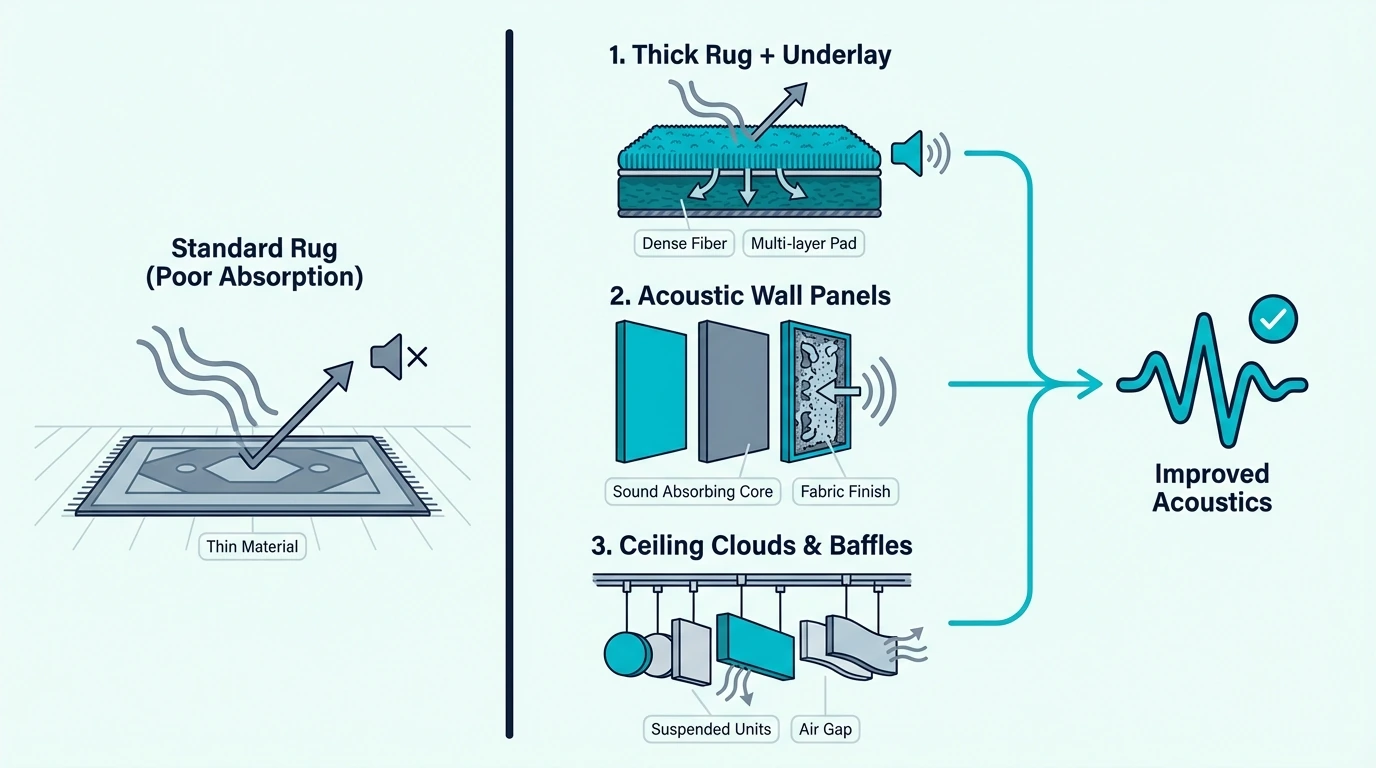
Best Rug Types For Acoustics
Not all rugs absorb equally. The key factors are thickness, density, and material:
Thick wool rugs absorb the most across the widest frequency range due to the natural density and fiber structure of wool
Shag rugs with deep pile (1 inch or more) absorb well due to the air trapped between the long fibers
Flatweave rugs absorb the least — they are too thin and dense to trap much sound energy
Synthetic rugs fall between wool and flatweave depending on pile depth and density
A rug covering at least 60-70% of the floor area between your speakers and listening position provides the most acoustic benefit. Smaller rugs help less because sound reflects off the uncovered floor area around them.
Better Alternatives At Similar Cost
A thick area rug costs 50-150 dollars depending on size and material. That same budget delivers significantly more acoustic improvement when spent on purpose-built absorption.
Two DIY fiberglass panels built from hardware store materials cost approximately 25-40 dollars each. Mounted at the first reflection points on the side walls, they address the reflections that cause the most damage to recording and mixing accuracy.
For dedicated recording spaces where floor treatment matters, interlocking sound absorbing floor tiles absorb more effectively than a rug. They interlock without adhesive so they can be laid down and picked up without damaging the floor.
If your budget allows only one purchase and you are choosing between a rug and wall panels, choose wall panels every time.
Fiberglass wall panels address the reflections that actually cause recording and mixing problems. Wall reflections contribute far more to acoustic issues than floor reflections in any room.
The Bottom Line
Rugs absorb mid and high frequency reflections from hard floors. They reduce flutter echo, footstep noise, and overall room brightness.
They do not control bass, address wall reflections, or replace purpose-built acoustic panels. A rug is a useful supplement to proper treatment but should never be your primary acoustic investment.
The full guide to acoustic treatment covers the treatment priorities that deliver the biggest improvements. The cost breakdown compares what you get per dollar spent on rugs versus panels versus bass traps.
For rooms where you cannot mount anything on walls, the blankets as treatment guide covers other soft-goods options that provide more absorption than a rug alone.
Frequently Asked Questions
Do rugs help with room acoustics?
Yes — rugs provide modest mid and high frequency absorption from hard floors. A thick wool or shag rug reduces flutter echo between the floor and ceiling and takes some brightness out of the room.
They do not address wall reflections, bass modes, or the primary acoustic problems in recording and mixing rooms. Treat rugs as a supplement, not a solution.
What is the best flooring for acoustics?
Carpet absorbs the most floor reflections. A thick carpet with dense pad underneath absorbs effectively from approximately 300 Hz up through the full audible range.
Hard floors with a thick rug and pad are the next best option. Hard floors without any covering reflect nearly all sound energy back into the room, contributing to flutter echo and overall reverb time.
Can I use a rug instead of acoustic panels?
No — rugs only treat floor reflections. The main acoustic problems in any room come from walls, ceiling, and corners.
Wall reflections at first reflection points cause comb filtering that damages recording clarity and mixing accuracy. Corner bass modes cause low-frequency buildup that muddies the entire frequency balance. A rug addresses neither of these problems.
How To Use Fiberglass Insulation As Acoustic Treatment (The Complete DIY Guide)
How to use fiberglass insulation as acoustic treatment is one of the most practical questions in home studio building, but most builders grab the wrong product — the fluffy pink batts from the hardware store — and end up with panels that barely touch the low-mid frequencies where room problems actually live.
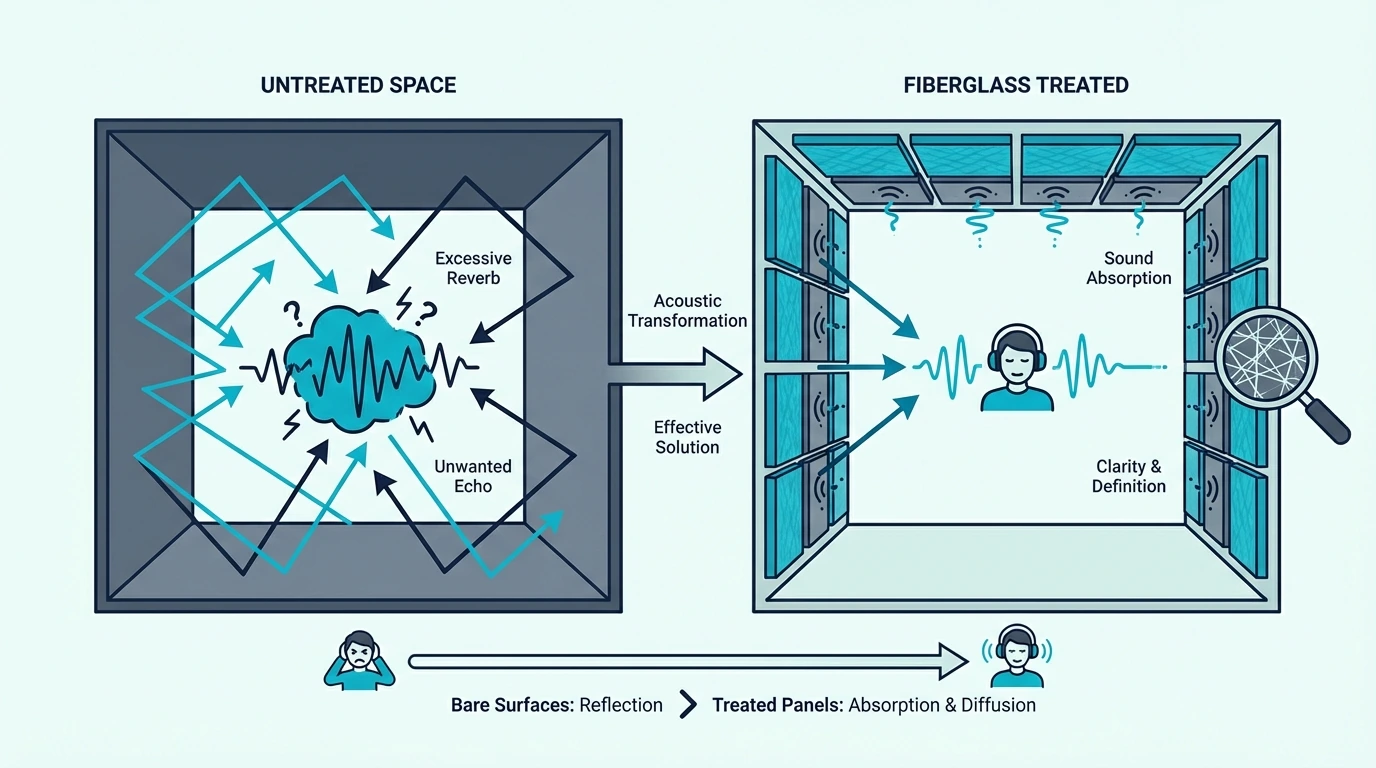
Those room problems are reflections bouncing off untreated walls and arriving at your microphone milliseconds after the direct sound. The result is muddy, boxy recordings that no amount of EQ can fully fix.
Rigid fiberglass boards like Owens Corning 703 absorb effectively from 250 Hz through the entire audible range, turning a reflective room into a clean recording and mixing environment at a fraction of what pre-built panels cost.
Below you will find which fiberglass products work, how to build panels step by step, and how fiberglass compares to Rockwool and foam. Start with 2-inch rigid boards at 3 lb per cubic foot density — that single specification gets you broadband absorption across the full vocal and instrument range.
Quick Takeaway
Rigid fiberglass boards (OC 703 at 3 lb per cubic foot) are the most effective and cost-efficient material for DIY acoustic panels. Build 1×4 lumber frames, cut the fiberglass to fit, wrap in acoustically transparent fabric, and mount with a 2-4 in air gap. A full room treatment using DIY fiberglass panels costs 300-600 dollars compared to 1,000-2,000 dollars for equivalent pre-built panels.
Which Fiberglass Products Work For Acoustic Treatment?
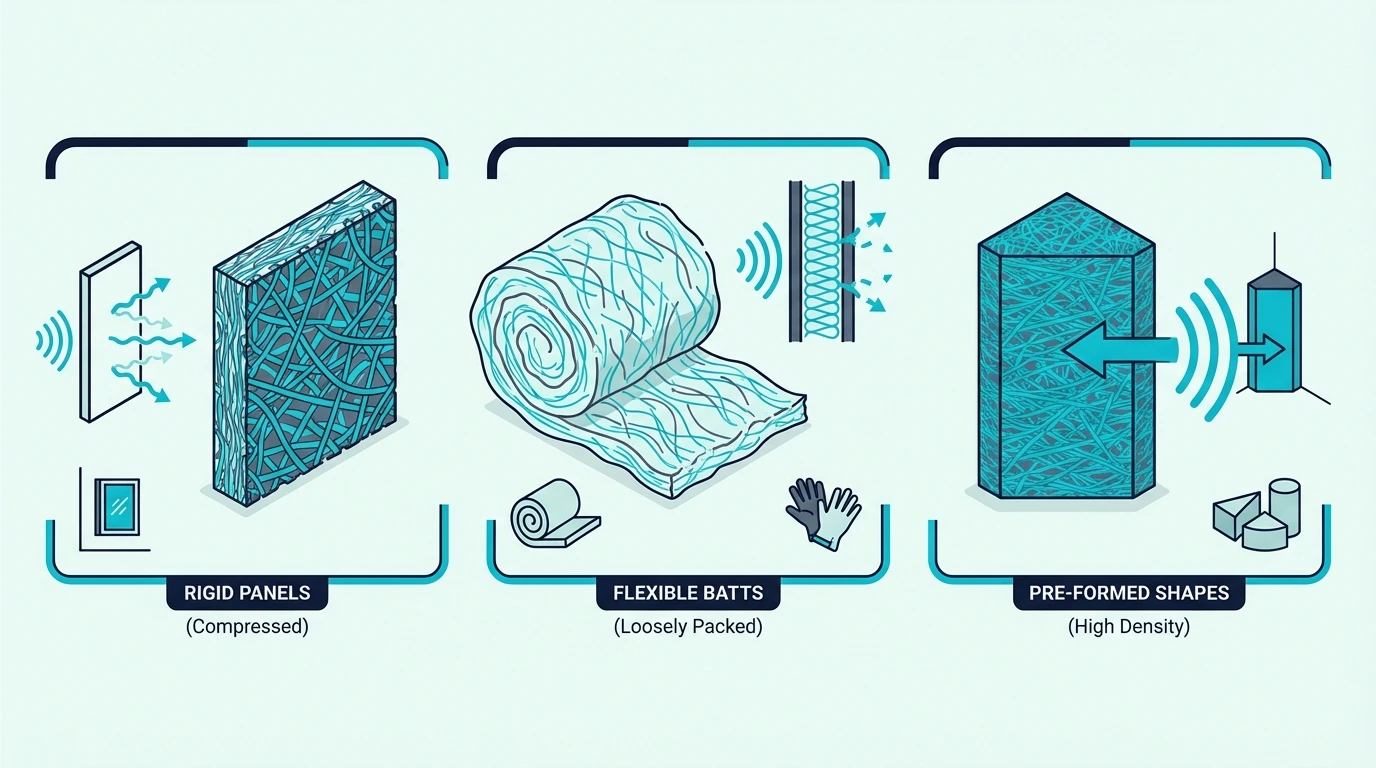
Not all fiberglass insulation performs the same acoustically. The two main categories — rigid boards and batt insulation — differ in density, handling, and absorption performance.
Rigid Fiberglass Boards (OC 703 And 705)
Owens Corning 703 is the benchmark product for DIY acoustic panels. It has a density of 3 lb per cubic foot, which provides an NRC (Noise Reduction Coefficient) of 1.0 at 2 inches thick — meaning it absorbs virtually all sound energy that hits it across the mid and high frequency range.
OC 705 is the denser variant at 6 lb per cubic foot. It absorbs lower frequencies more effectively per inch of thickness, making it the better choice for bass traps where you need maximum low-frequency absorption in a compact form factor.
The Owens Corning 703 6-pack provides enough material for six standard 2 x 4 foot panels. The semi-rigid boards hold their shape without a frame, though framing them produces a cleaner finished product.
Fiberglass Batt Insulation
Standard R-13 or R-19 fiberglass batts from hardware stores (the fluffy pink rolls) also absorb sound. They are far cheaper than rigid boards — typically 0.50-1.00 dollars per square foot versus 2-3 dollars for rigid boards.
The tradeoff is density. Batt insulation runs roughly 0.5-1.0 lb per cubic foot, which means it absorbs less effectively in the low-mid range (200-500 Hz) where room problems are most severe.
Batts also require a frame to hold their shape. Without rigid structure, they sag and compress over time, reducing their effective thickness and absorption performance.
For builders on a tight budget, R-19 batts in a 2×4 frame produce panels that outperform any foam product on the market. They are not as effective as OC 703 panels of the same thickness, but they cost 60-70% less.
The cost comparison guide breaks down the full price-per-panel math for both options.
How To Build Fiberglass Acoustic Panels
Building your own fiberglass acoustic panels is straightforward if you have basic tools and follow a consistent process. Each panel takes 30-45 minutes once you have a system.
Building The Frame
For 2-inch panels, use 1×4 lumber (which is actually 0.75 x 3.5 inches). For thicker panels or bass traps, use 2×4 lumber.
Cut four pieces to create a rectangular frame. Standard panel sizes are 24 x 48 inches or 24 x 24 inches.
Screw or staple the corners together — the frame does not need to be furniture-grade, just square and rigid.
If you are using rigid fiberglass boards, the frame is optional. The boards hold their shape on their own and can be wrapped without a frame.
Framed panels look more professional and are easier to mount.
Cutting And Fitting The Fiberglass
Score rigid fiberglass boards with a utility knife and snap them along the score line. For batt insulation, use a long serrated knife (a bread knife works) and cut slightly oversize so the batt fits snugly in the frame.
The fiberglass should fill the frame completely without gaps at the edges. Gaps allow sound to pass through untreated, creating an acoustic leak that reduces the panel’s effectiveness.
Wrapping In Fabric
Wrap the panel in acoustically transparent fabric — any fabric you can breathe through easily works. Burlap, muslin, and purpose-made speaker cloth are common choices.
Lay the fabric face-down, place the panel on top, pull the fabric taut over the back, and staple it to the frame. Work from the center of each side outward, alternating sides to keep the tension even.
The fabric serves two purposes: it contains the fiberglass fibers (important for health and air quality) and it gives the panel a finished appearance. Never leave fiberglass exposed — the loose fibers irritate skin, eyes, and lungs.
Handling Fiberglass Safely
Fiberglass releases tiny glass fibers when cut or handled. These fibers cause skin irritation on contact and can irritate the lungs if inhaled.
Wear long sleeves, gloves, safety glasses, and a dust mask (N95 or better) whenever you cut or handle fiberglass. Work in a well-ventilated area or outdoors if possible.
After handling, wash your clothes separately and shower immediately. The irritation is temporary and stops once the fibers are removed from skin contact.
Once the fiberglass is wrapped in fabric and sealed, the fibers cannot escape. Finished panels are completely safe to hang in any room, including bedrooms and home studios where you spend extended time. SoundAssured acoustical fabric is a budget-friendly wrapping option that lets sound pass through to the fiberglass core while keeping fibers fully sealed.
Mounting With An Air Gap
Mount panels with a 2-4 inch air gap between the panel and the wall. The air gap dramatically extends the panel’s low-frequency absorption — a 2-inch panel with a 2-inch air gap absorbs as effectively at low frequencies as a 4-inch panel mounted flat.
Use French cleats, Z-clips, or simple L-brackets with standoff spacers to create the gap. For concrete or brick walls, use masonry anchors with standoff brackets.
The air gap is the single most important mounting detail. Panels mounted flat against the wall waste a significant portion of their absorption potential in the frequency range where most rooms need the most help.
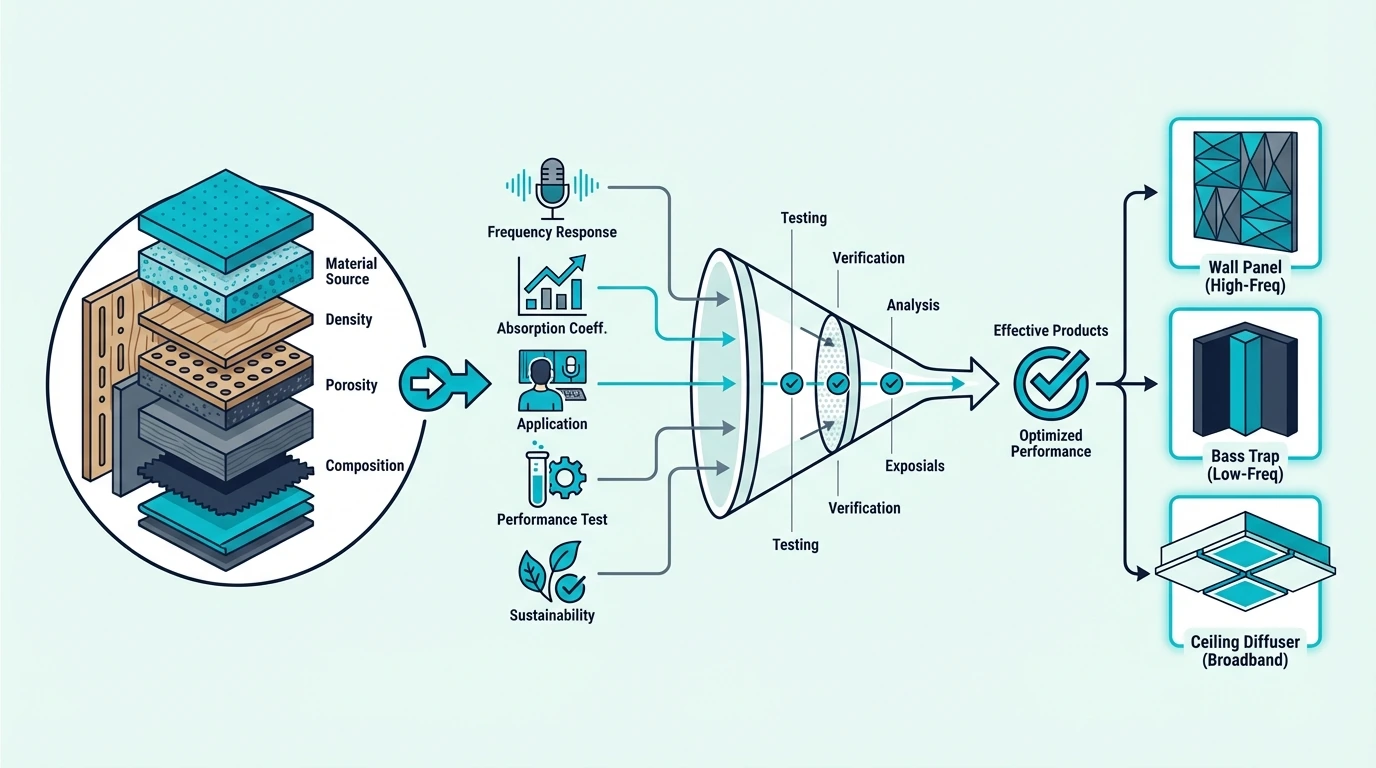
Fiberglass vs Rockwool vs Foam
Three materials dominate the DIY acoustic treatment market. Each has strengths, and the right choice depends on your budget, priorities, and willingness to build.
Fiberglass (OC 703, Batts)
Fiberglass offers the highest absorption per inch of any common treatment material. A 2-inch panel of OC 703 achieves NRC 1.0 — effectively perfect broadband absorption.
The downsides are handling difficulty (requires protective gear) and cost for rigid boards. Fiberglass is the professional’s choice when acoustic performance is the top priority.
Rockwool (Safe’n’Sound, ComfortBoard)
Rockwool is a mineral wool product that performs nearly as well as fiberglass. Rockwool Safe’n’Sound is widely available at hardware stores and costs less per square foot than OC 703.
Rockwool is denser than fiberglass batts (though less dense than OC 703 rigid boards), easier to cut cleanly, and less irritating to handle. For most home studio builders, Rockwool is the practical choice that delivers 90-95% of the performance at 60-70% of the cost.
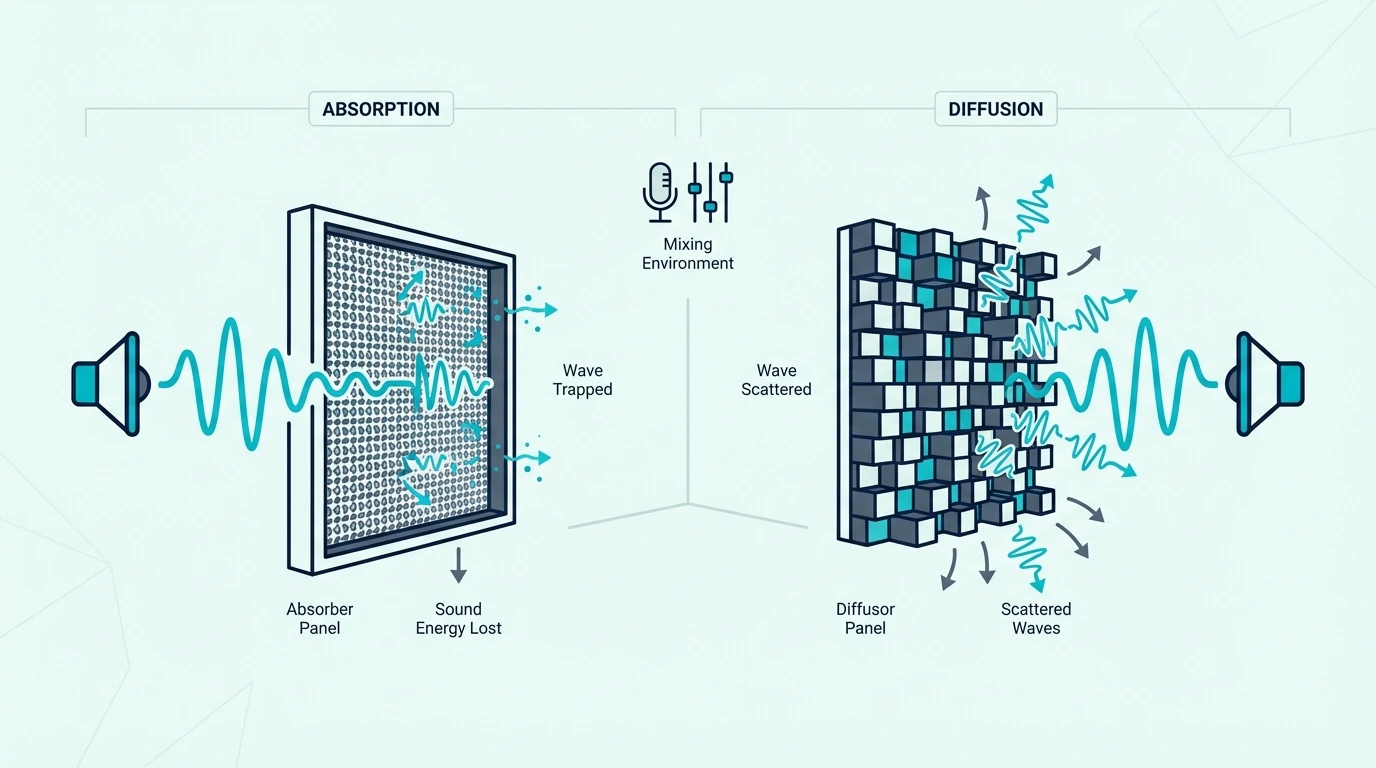
Acoustic Foam
Foam panels are the easiest to install — peel-and-stick adhesive, no frame, no wrapping. But they are the least effective material by a wide margin.
Standard 2-inch foam absorbs primarily above 1,000 Hz. It does almost nothing in the 200-500 Hz range where most room problems live.
Foam is adequate for taming high-frequency flutter echoes but cannot replace fiberglass or Rockwool for serious acoustic treatment.
For the best acoustic performance: fiberglass rigid boards (OC 703 for panels, OC 705 for bass traps). For the best value: Rockwool Safe’n’Sound in a 2×4 frame.
For the easiest install with limited effectiveness: foam.
If you want fiberglass performance without the DIY build process, pre-built fiberglass panels like the UMIACOUSTICS fiberglass panels arrive ready to hang with included mounting brackets. They use the same fiberglass core as DIY panels and skip the construction step entirely.
For builders on a tighter budget who still want fiberglass absorption, the Olanglab 1-inch fiberglass panels offer a lower entry price. The 1-inch thickness absorbs effectively above 500 Hz but is less useful for low-mid control — mount them with a 2-3 inch air gap to extend their effective range downward.
The Bottom Line
Fiberglass insulation — especially rigid boards like OC 703 — is the most effective material available for DIY acoustic treatment. It absorbs more sound per inch than any alternative, and building your own panels from raw fiberglass boards costs 60-70% less than buying equivalent pre-built panels.
The build process is simple: frame, fiberglass, fabric wrap, mount with an air gap. Handle the raw fiberglass with protective gear, wrap it completely in fabric, and the finished panels are safe for any room.
For complete room treatment kits that include panels and bass traps, the kit comparison covers pre-built options at every budget.
Frequently Asked Questions
Is fiberglass insulation good for acoustic treatment?
Yes — rigid fiberglass (OC 703 at 3 lb per cubic foot) is one of the best acoustic treatment materials available. A 2-inch panel achieves NRC 1.0, meaning it absorbs virtually all sound energy across the mid and high frequency range.
Standard fiberglass batt insulation from hardware stores also works but is less dense and less effective per inch. Both types significantly outperform acoustic foam for small room treatment.
Is fiberglass better than rockwool for acoustics?
Fiberglass rigid boards (OC 703) have a slight edge in absorption per inch over equivalent Rockwool products. The difference is small — roughly 5-10% in most frequency ranges.
Rockwool is cheaper, more widely available at hardware stores, and easier to handle. For most home studio builders, either material produces excellent results.
Is fiberglass safe for acoustic panels?
Yes — once the fiberglass is wrapped in fabric, the glass fibers cannot escape. Finished panels are completely safe for any room including bedrooms and studios.
During construction, wear gloves, long sleeves, eye protection, and a dust mask. The raw fibers irritate skin and lungs on contact.
Once wrapped and sealed, the panels pose no health risk.
Can I use regular insulation for soundproofing?
Fiberglass insulation is acoustic treatment, not soundproofing. Treatment absorbs sound energy inside the room (reducing reflections, echo, and reverb).
Soundproofing prevents sound from passing through walls and ceilings.
Fiberglass panels on your walls will make your recordings and mixes sound dramatically better. They will not meaningfully reduce how much sound your neighbors hear. The home theater treatment guide explains the distinction in a practical context.
What Kind Of Acoustic Treatment Reduces Boxy Vocals (And How To Fix Your Room)
What kind of acoustic treatment reduces boxy vocal recordings comes down to one thing — absorbing the 200-500 Hz energy that bounces off nearby walls and arrives at your microphone slightly after the direct sound, but the fix only works if you treat the right surfaces in the right order.
That boxy, hollow quality on vocals is not a microphone problem or an EQ problem. It is a room problem.
Sound leaves the singer’s mouth, hits the nearest walls, and reflects back to the mic a few milliseconds later. Those delayed reflections create phase cancellation in the low-mid range that your ears hear as boxiness.
The treatment that fixes it is thick absorption — 2 inches minimum of fiberglass or mineral wool — placed on the wall behind the singer, behind the microphone, and in the room corners. Treat those three surfaces first and the boxy coloration drops dramatically before you touch a single EQ knob.
Below you will find exactly what causes boxiness, which surfaces to treat first, and why EQ alone cannot fix the problem. Start with the wall directly behind the singer — that single panel delivers the biggest improvement.
Quick Takeaway
Boxy vocals come from 200-500 Hz buildup caused by early reflections off nearby walls and room modes in small spaces. The fix is thick absorption panels (2 in minimum) behind the singer, behind the microphone, and bass traps in the corners. This treatment addresses the root cause — EQ can reduce the symptom but cannot eliminate the comb filtering that creates the boxy quality.
What Causes Boxy Vocals?
Boxiness is a specific acoustic problem with a specific cause. Understanding the physics helps you target the treatment precisely instead of guessing which walls to cover.
Early Reflections And Comb Filtering
When a singer performs, sound radiates outward from their mouth in all directions. The direct sound travels straight to the microphone.
At the same time, sound also travels to the nearest walls, bounces off, and arrives at the mic a few milliseconds later.
That timing difference creates comb filtering — a pattern of peaks and cancellations in the frequency response. In a typical home studio where the singer stands 2-4 feet from the nearest wall, the comb filtering lands squarely in the 200-500 Hz range.
Your ears interpret that pattern as boxiness — a hollow, tubular quality that makes vocals sound like they were recorded inside a cardboard box. The closer the singer stands to a reflective surface, the stronger the effect.
Room Modes In Small Rooms
Room modes are standing waves that form between parallel surfaces. Every room has them, but smaller rooms have modes that fall directly in the vocal frequency range.
A room dimension of roughly 5-11 feet produces axial modes between 100-500 Hz. That overlaps almost perfectly with the fundamental frequency and first harmonics of most singing and speaking voices.
When a vocalist stands at a point where a room mode peaks, the frequencies at that mode are amplified. If the mode falls in the 200-400 Hz range, the result is a pronounced boxy quality that no amount of mic technique can overcome.
Moving the singer even 1-2 feet can change which modes they excite. But the only permanent fix is absorption — specifically, corner bass traps that reduce the strength of the modes themselves.
How To Treat A Room For Clearer Vocals
The treatment priority for vocal recording is different from the priority for mixing. For vocals, you are treating the surfaces closest to the singer and microphone first because those create the strongest early reflections.
Behind The Singer
The wall directly behind the singer is the single most important surface to treat for vocal boxiness. Sound from the singer’s mouth radiates backward, hits that wall, and bounces directly back through the singer and into the front of the microphone.
A cardioid microphone rejects sound from directly behind, but it does not reject sound arriving from the sides or at oblique angles. The reflected sound from the wall behind the singer arrives at angles the mic cannot fully reject.
Place a thick absorption panel — at least 2 inches of rigid fiberglass or mineral wool — centered on the wall directly behind where the singer stands. The panel should be at least 2 x 4 feet to cover the primary reflection zone at head height.
The UMIACOUSTICS 4-Pack Fiberglass Panels provide enough coverage for the behind-singer position with panels to spare for other treatment points. The 2-inch fiberglass core absorbs effectively in the 200-500 Hz range where boxiness lives.
Behind The Microphone
The wall behind the microphone is the second priority. Sound that passes by the microphone continues to the wall behind it, reflects, and travels back into the front of the mic.
This creates another set of delayed reflections that contribute to the boxy character.
If you cannot mount a panel on that wall, a microphone isolation shield serves a similar purpose. It mounts on the mic stand behind the capsule and absorbs reflections that would otherwise bounce off the wall and back into the mic.
A reflection filter does not replace proper room treatment — it only addresses reflections from one direction. But in rooms where permanent wall treatment is not possible, it provides measurable improvement on vocal clarity.
Corner Bass Traps
Corner bass traps address the room modes that cause low-frequency boxiness. Modes concentrate energy in the corners where walls meet, so treating the corners reduces the strength of those modes across the entire room.
For vocal recording, prioritize the two corners closest to the singer. Even two thick bass traps in the nearest corners reduce the 200-400 Hz buildup that contributes most to the boxy quality.
The traps need to be thick — 4 inches minimum of rigid fiberglass or mineral wool. Thinner foam traps help with mid-bass (300-500 Hz) but do not reach the deeper modes below 200 Hz that also cause problems.
Ceiling Cloud
A ceiling cloud above the recording position catches vertical reflections between the floor and ceiling. In rooms with low ceilings (8 feet or less), these vertical reflections arrive quickly and contribute to the overall boxy coloration.
The ceiling cloud is the fourth priority — after behind-singer, behind-mic, and corner treatment. If budget is limited, the first three treatments deliver the majority of the improvement.
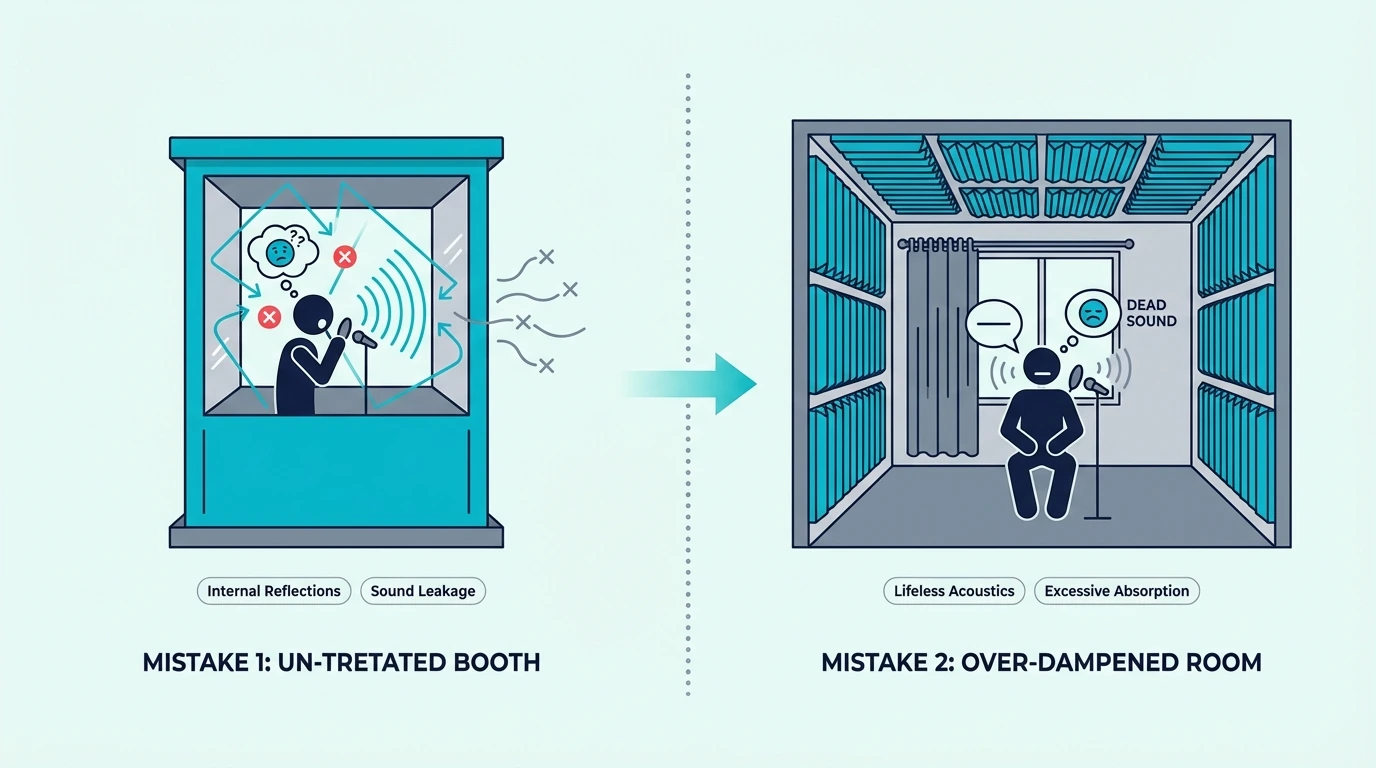
What About Portable Vocal Booths?
For singers who cannot permanently treat their space — renters, shared rooms, or musicians who record in different locations — a portable vocal booth offers a budget-friendly starting point.
These foldable shields reduce reflections arriving at the mic from behind and to the sides. They do not address room modes or reflections from surfaces the shield does not cover, so they are a partial solution — but a meaningful one for spaces where wall-mounted panels are not an option.
For a deeper comparison of portable booths versus full room treatment, the booth vs treatment guide covers the tradeoffs in detail.
Why EQ Cannot Replace Treatment
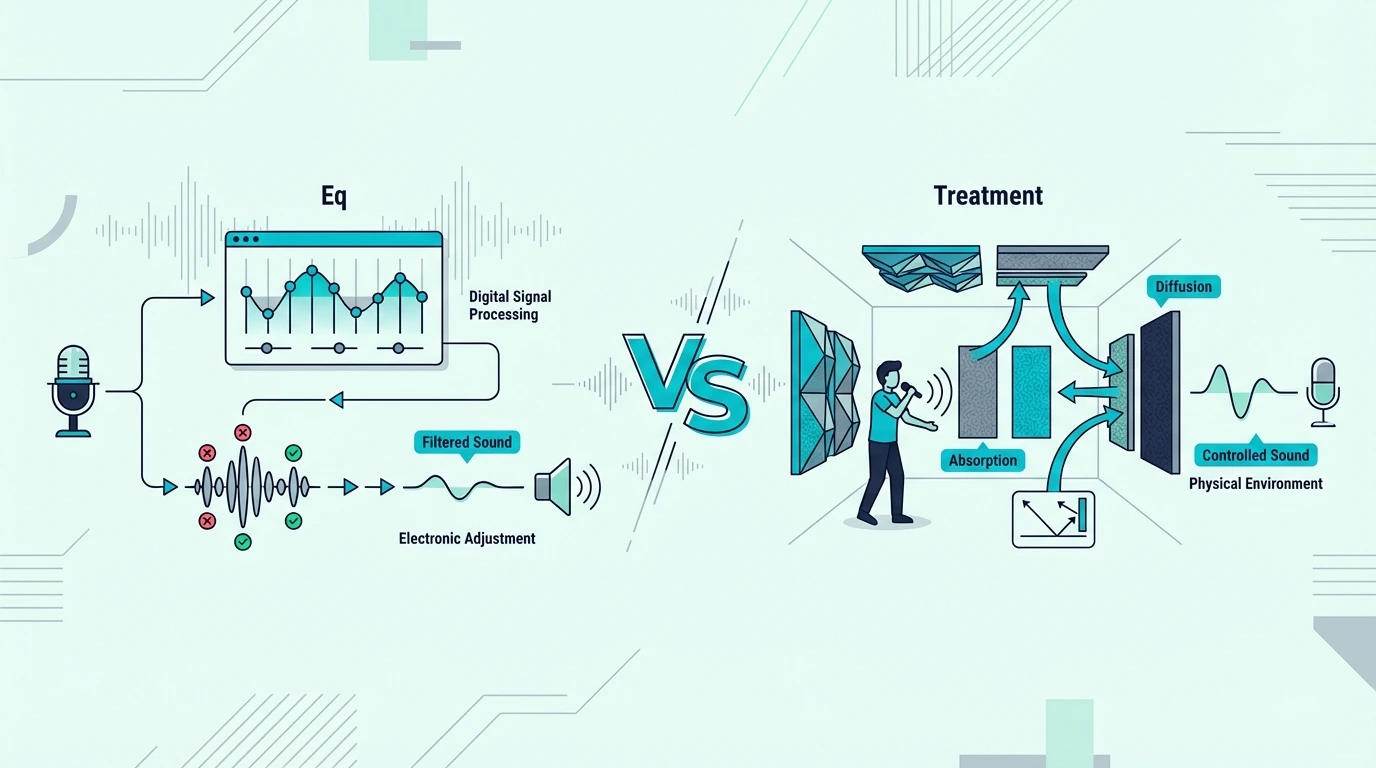
Many engineers try to fix boxy vocals with EQ — typically a 2-4 dB cut in the 200-500 Hz range. This reduces the perceived boxiness, but it does not fix the underlying problem.
The boxy quality comes from comb filtering — a complex pattern of peaks and nulls created by the timing difference between the direct sound and the reflected sound. EQ applies a broad reduction across the frequency range.
When you cut 300 Hz with EQ, you cut both the direct sound and the reflected sound equally. The comb filtering pattern remains intact.
The vocal sounds thinner but still boxy.
Acoustic treatment removes the reflected energy before it reaches the microphone. The direct sound arrives clean, without the delayed copies that create the interference pattern.
The result is a vocal that sounds full and present without the boxy coloration — and without losing low-mid body to EQ cuts.
The practical approach is to treat the room first, then use EQ for fine-tuning. A well-treated room needs far less corrective EQ, and the EQ you do apply works more predictably because it is shaping a clean signal rather than trying to mask a room problem.
The Bottom Line
Boxy vocals are caused by early reflections and room modes in the 200-500 Hz range. The treatment that fixes them is thick absorption on the wall behind the singer, the wall behind the microphone, and bass traps in the nearest corners.
Treat those three surfaces first — they deliver the majority of the improvement. A ceiling cloud and broader wall coverage add incremental benefit after the primary treatment is in place.
For rooms where permanent treatment is not possible, the temporary treatment guide covers portable and removable options that still deliver meaningful results.
Frequently Asked Questions
How to make vocals sound less boxy?
Place a thick absorption panel (2 inches of fiberglass or mineral wool) on the wall directly behind the singer. Add a second panel or reflection filter behind the microphone.
These two treatments address the early reflections that cause the 200-500 Hz buildup your ears hear as boxiness. Corner bass traps in the two nearest corners further reduce the room modes that contribute to the problem. For DIY builders, Rockboard 60 mineral wool boards produce enough material for behind-singer panels and corner traps from a single 6-pack.
Will acoustic treatment give my vocal more clarity?
Yes — reducing early reflections and room modes directly improves vocal clarity. The microphone captures more direct sound and less reflected energy, which means the raw recording has better definition before any processing.
Treatment does not add clarity artificially. It removes the room interference that was masking the clarity already present in the performance.
How to EQ out boxiness?
Apply a gentle cut (2-4 dB) with a wide bell shape centered around 250-400 Hz. Sweep the frequency slowly while listening to find the specific range where the boxiness is most pronounced.
EQ reduces the symptom but does not eliminate the comb filtering that causes it. Acoustic treatment is the more effective fix because it removes the reflected energy before it reaches the microphone rather than trying to subtract it afterward.
Is acoustic treatment enough for recording vocals?
Acoustic treatment addresses the room’s contribution to the vocal sound. It does not replace good microphone technique, proper gain staging, or a quality microphone.
A well-treated room with a budget microphone produces cleaner vocals than an untreated room with an expensive microphone. The room is the biggest variable in vocal recording quality — treat it first, then invest in gear upgrades.
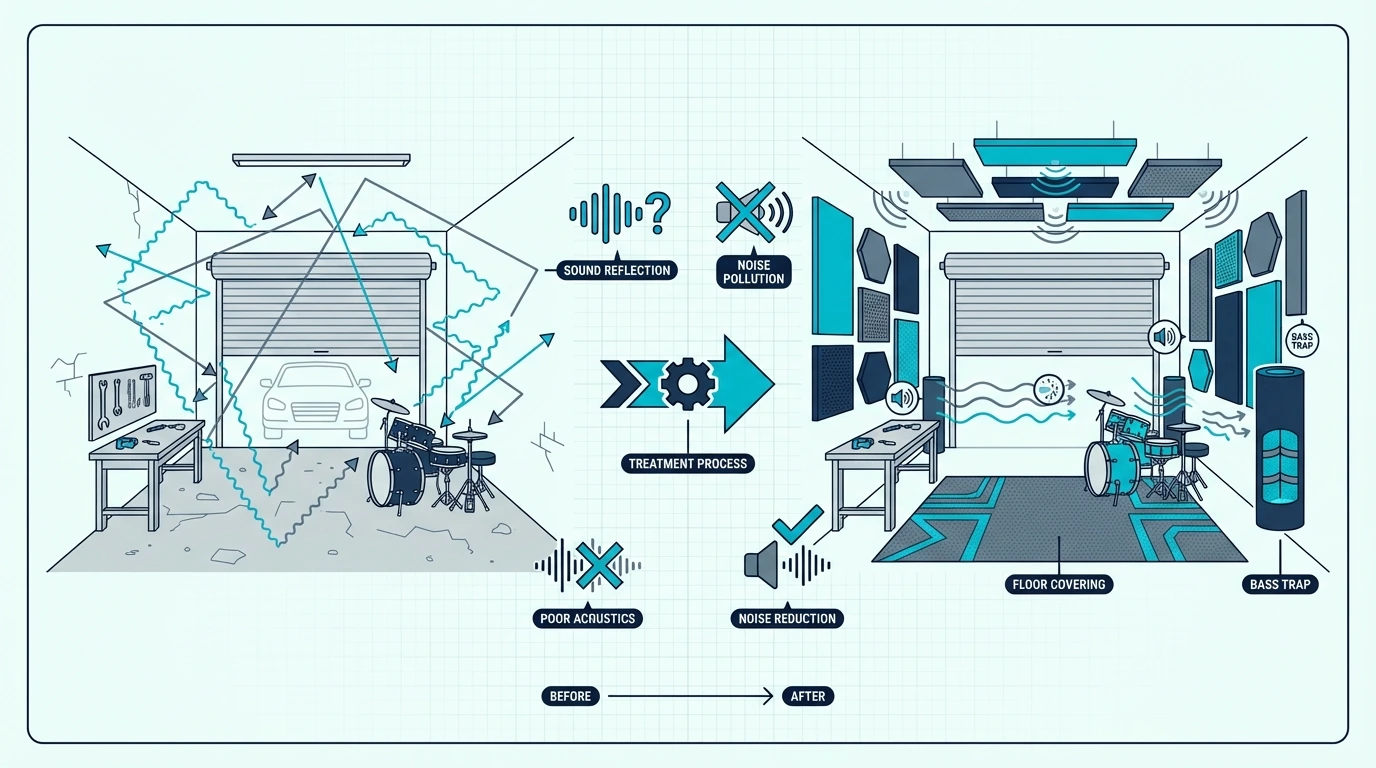
Acoustic Treatment For Garage Studio (Complete Guide To Taming The Worst Room In Your House)
Best acoustic treatment for garage recording studio setups starts with accepting an uncomfortable truth — garages are acoustically the worst rooms in most houses, but they keep showing up in “build your home studio” guides as if slapping foam on the walls will fix them.
Concrete walls reflect nearly 100% of sound energy. Thin metal garage doors leak sound in both directions.
Bare concrete floors turn every footstep into a reverberant thud. The boxy shape of a standard two-car garage creates powerful room modes that stack bass energy in the corners until the low end is completely unreliable.
None of that means a garage cannot become a functional recording or mixing space. It can — but the treatment approach has to match the severity of the problems, and the problems in a garage are more severe than in any other room you are likely to work in.
This guide covers the specific acoustic challenges garages present, which treatment methods actually work on concrete and metal surfaces, how to treat the garage door wall without permanent modification, and how to build a treatment plan that prioritizes the highest-impact fixes first. Start with corner bass traps — they deliver the biggest improvement per dollar in any concrete room.
Quick Takeaway
Garages are the most acoustically challenging rooms for recording and mixing because concrete walls, metal doors, and bare floors reflect nearly all sound energy. Treatment priorities are: corner bass traps first (6 in thick minimum for concrete rooms), wall panels mounted with air gaps off the concrete, a ceiling cloud above the listening position, and heavy blankets or removable panels over the garage door. Budget 500-1,500 dollars for meaningful treatment of a two-car garage.
Why Garages Are Acoustically Terrible
Every room has acoustic problems, but garages concentrate the worst ones into a single space. Understanding why garages are so much harder to treat than bedrooms or living rooms helps you avoid the common mistake of applying bedroom-level treatment to a garage-level problem.
Concrete And Cinder Block Walls
Concrete is one of the most reflective building materials for sound. A poured concrete or cinder block wall reflects over 97% of the sound energy that hits it across the entire frequency range — from deep bass through the highest audible frequencies.
Compare that to standard drywall on wood studs, which absorbs a small percentage of energy (especially at low frequencies where the drywall flexes slightly). In a bedroom, the walls are already doing a tiny amount of absorption before you add any treatment.
In a garage, the walls do nothing. Every sound wave that leaves your monitors or your vocalist’s mouth bounces off the concrete at nearly full strength, hits the opposite wall, bounces back, and continues rattling around the room until the energy finally dissipates through friction with the air.
The result is a reverb time (RT60) that can exceed 2 seconds in an untreated garage. For reference, a well-treated studio control room targets 0.3-0.4 seconds.
You are starting 5-7 times above the target. That gap is why garage treatment requires thicker materials and more coverage than a standard small room setup.
The Garage Door Problem
The garage door is the single weakest point in the room — acoustically and structurally. A standard single-layer metal garage door has almost no mass and provides minimal sound isolation.
Sound passes through the door in both directions. Neighbors hear your music production.
Traffic noise, lawn equipment, and environmental sounds enter your recordings. Even with the door fully closed, the thin metal panels transmit enough outside noise to ruin a quiet vocal take.
The door also vibrates sympathetically when bass frequencies hit it. The thin metal panels resonate at specific frequencies, which adds coloration to your monitoring and creates rattling artifacts during loud playback.
Sealing the gaps around the garage door is the first priority. The rubber gaskets at the bottom and sides of most garage doors are designed for weather, not sound.
Replacing them with acoustic-grade seals or adding a second layer of weatherstripping reduces the most obvious leakage path.
Bare Concrete Floor
A concrete floor reflects sound just as efficiently as concrete walls. Sound waves bounce off the floor and reach your ears (or your microphone) milliseconds after the direct sound, adding another layer of early reflections to an already reverberant space.
In rooms with carpet or wood over a subfloor, the floor provides some absorption — especially a thick carpet pad, which absorbs mid and high frequencies effectively. A bare concrete garage floor provides zero absorption.
Adding a thick area rug under and around your listening position is one of the cheapest and most effective treatments for a garage studio. It will not solve the bass problems, but it tames the mid and high frequency reflections from the floor that contribute to the overall harshness of the room.
Boxy Shape And Parallel Surfaces
Most garages are rectangular boxes with perfectly parallel walls, a flat ceiling parallel to the floor, and no architectural features that break up sound paths. This is the worst possible geometry for acoustics.
Parallel surfaces create flutter echo — a rapid series of reflections that bounce back and forth between two hard, flat surfaces. In a garage with concrete on every side, flutter echo is extreme and audible on every transient sound.
The rectangular shape also creates strong room modes — resonant frequencies where the room dimensions cause bass energy to reinforce itself at specific frequencies and cancel itself at others. A typical two-car garage (roughly 20 x 20 feet) has its fundamental axial modes in the 28-56 Hz range, which means bass notes in that range will be dramatically louder at some positions in the room and nearly silent at others.
No Existing Insulation
Most garages are unfinished spaces with no insulation in the walls or ceiling. In a bedroom, the fiberglass insulation inside the wall cavity provides some absorption (especially for sound that penetrates the drywall).
In a garage, there is nothing behind the concrete — just more concrete or the exterior of the building.
The ceiling situation varies. Some garages have an attic space above with insulation in the ceiling joists.
Others have a flat concrete or open-rafter ceiling with no insulation at all.
If your garage has an uninsulated ceiling, that becomes a third reflective surface (in addition to the floor and walls) that contributes to the overall reverb problem. An insulated ceiling at least provides some absorption overhead, which slightly reduces the starting RT60.
How Sound Behaves In A Concrete Room
Before jumping to treatment solutions, it helps to understand exactly what happens to sound in a concrete box. The physics explain why some treatments work in garages and others are a waste of money.
Reflection Patterns
In a drywall room, sound waves lose a few percent of their energy on each bounce. After 5-10 bounces, the reflected energy has decayed significantly.
In a concrete room, sound waves lose almost nothing on each bounce. This difference is what makes concrete rooms feel so much more reverberant than drywall rooms of the same size.
The practical effect is that reflected energy dominates the room much more aggressively than in a typical home studio. At your listening position, you hear a mix of direct sound from the monitors and a wall of reflected energy from every surface in the room.
That reflected energy arrives at different times depending on the distance from each surface. The first reflections from nearby walls arrive quickly and create comb filtering — a pattern of peaks and nulls in the frequency response that changes with every small head movement.
Later reflections from more distant surfaces blend together into a reverberant wash that smears transients, muddies the stereo image, and makes critical listening nearly impossible without treatment.
Room Modes In A Garage
Room modes are the most damaging acoustic problem in any small room, and they are especially severe in concrete garages because the rigid walls do not flex or absorb any bass energy.
An axial mode occurs when a bass frequency’s wavelength matches a dimension of the room (or a multiple of it). The sound wave bounces between two parallel surfaces and reinforces itself, creating a standing wave with areas of high pressure (where the bass sounds unnaturally loud) and areas of low pressure (where the bass nearly disappears).
In a 20-foot dimension, the fundamental axial mode is at approximately 28 Hz. The second harmonic is at 56 Hz, the third at 84 Hz, and so on.
A 16-foot dimension puts modes at 35 Hz, 70 Hz, and 105 Hz.
The three dimensions of the room each produce their own series of modes. Where modes from different dimensions overlap at similar frequencies, the bass problems intensify dramatically.
This is why corner bass traps are the highest priority treatment for a garage studio. The corners are where all three room dimensions intersect, and where bass energy from all axial modes concentrates at maximum pressure.
Why Foam Tiles Are Not Enough
Thin acoustic foam tiles (the 1-inch or 2-inch squares sold in packs of 12 or 24) are the most commonly purchased acoustic treatment on Amazon. In a bedroom with drywall walls, they provide modest absorption of mid and high frequencies and can reduce flutter echo noticeably.
In a concrete garage, foam tiles are nearly useless. They absorb a narrow slice of the frequency range (roughly 1 kHz and above) and do nothing for the massive bass and low-mid problems that dominate the room’s acoustic character.
A garage needs treatment that absorbs across the full frequency range — including the low frequencies where room modes cause the most damage. That requires thick, dense absorbers (4-6 inches of rigid fiberglass or mineral wool) and corner-mounted bass traps, not thin foam tiles on flat walls.
How To Acoustically Treat A Garage Studio
The treatment plan for a garage follows the same principles as any other room — but everything needs to be bigger, thicker, and more extensive because the starting conditions are so much worse.
Work through these priorities in order. Each step builds on the previous one, and skipping ahead wastes money because you will not hear the benefit of wall panels if the bass problems are not addressed first.
Priority 1: Corner Bass Traps — Extra Thick
Bass traps in the corners are the single highest-impact treatment you can install in a garage studio. If you only have budget for one thing, this is it.
In a drywall room, 4-inch bass traps are standard. In a concrete garage, go thicker — 6 inches of rigid fiberglass or mineral wool is the minimum recommended thickness for meaningful low-frequency absorption against concrete.
Fill every available corner. A standard garage has four vertical wall-wall corners, four ceiling-wall junctions, and four floor-wall junctions.
The vertical corners are the highest priority because they are the easiest to treat and address the widest range of modes.
For a budget starting point, foam corner traps like the TroyStudio Bass Traps 12-Pack provide a measurable improvement in the mid-bass range (200-500 Hz) at a fraction of the cost of fiberglass traps. They will not reach the deep bass modes below 100 Hz, but they tame the mid-bass buildup that contributes most to the muddy, boomy quality of an untreated garage.
For deeper bass control, build DIY corner traps from rigid fiberglass (Owens Corning 703 or equivalent) at 6 inches thick, mounted diagonally across each corner with an air gap behind them. The air gap extends the effective absorption depth and improves low-frequency performance significantly.
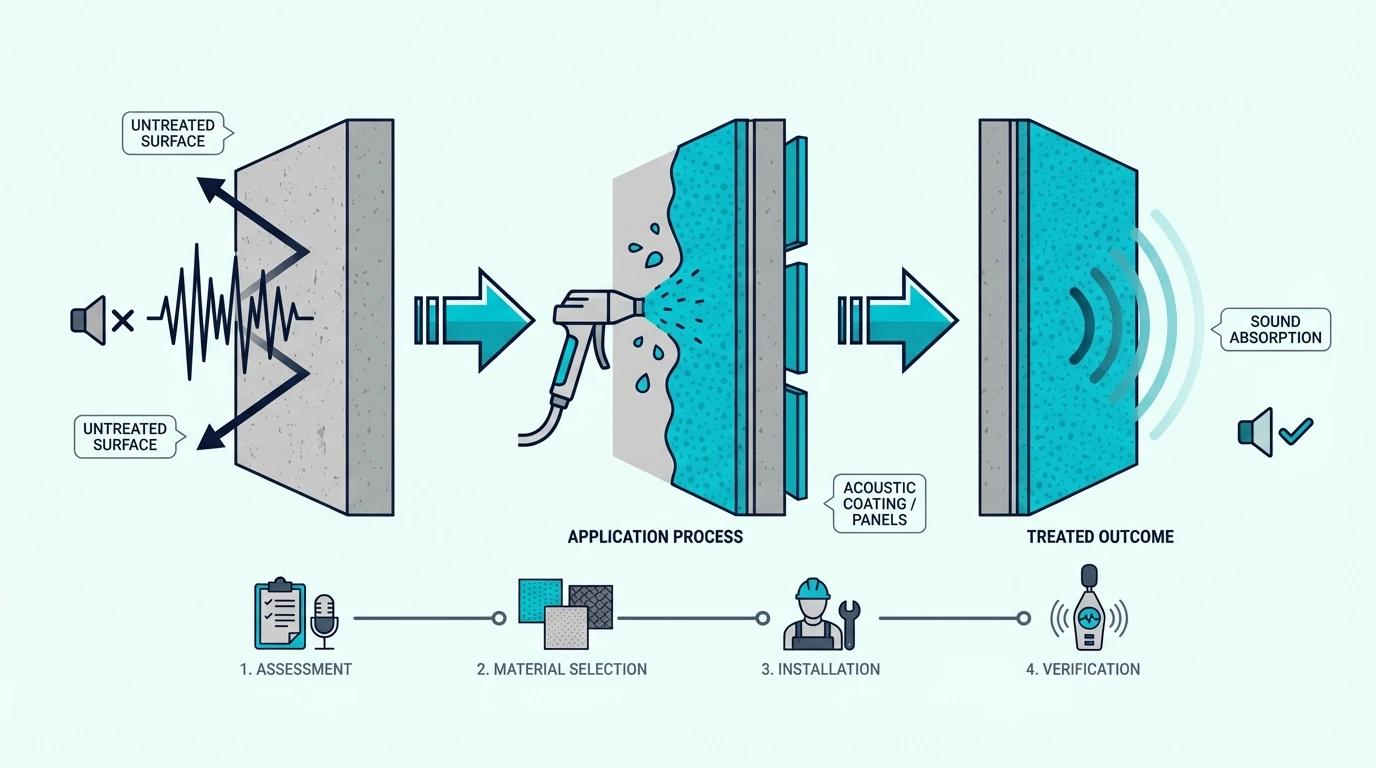
Priority 2: Wall Panels With Air Gaps
Wall panels on concrete need to be mounted differently than panels on drywall. The key difference is the air gap.
On drywall, you can mount a panel flat against the wall and get reasonable performance because the wall itself flexes slightly at low frequencies, adding a small amount of absorption. Concrete does not flex — it is acoustically rigid.
Mounting a 2-inch fiberglass panel flat against concrete gives you absorption starting at approximately 500 Hz. Mounting the same panel with a 2-inch air gap behind it effectively doubles the absorption depth, extending performance down to approximately 250 Hz.
A 4-inch air gap pushes absorption even lower. The air gap is free — it only costs a few dollars in mounting hardware — so there is no reason to skip it in a concrete room.
The UMIACOUSTICS Fiberglass Panels include hanging brackets that simplify mounting. Use concrete anchors (Tapcon screws or equivalent) to secure the brackets, and add spacers behind the panel to create a 2-4 inch air gap between the panel and the concrete wall.
Place panels at the first reflection points on both side walls, the wall behind your monitors, and the rear wall behind your listening position. In a garage, you will need more panels than in a bedroom because the room is larger and the reflections are stronger.
A two-car garage typically needs 12-16 panels (each 2 x 4 feet) to cover the primary reflection points adequately. That is 3-4 times the panel count of a bedroom studio — which is why treatment cost for a garage runs significantly higher.
Priority 3: Ceiling Cloud
A ceiling cloud is a large absorptive panel suspended horizontally below the ceiling above the listening position. It catches the strong vertical reflections between the ceiling and the floor that are among the earliest and most damaging reflections in any room.
In a garage, the ceiling cloud is especially important because most garage ceilings are low (8-9 feet) and made of drywall, open rafters, or concrete — all of which create strong overhead reflections.
Build a ceiling cloud from two or three large panels of 2-inch rigid fiberglass, suspended with eye bolts and wire. The cloud should cover an area of at least 4 x 6 feet centered above the mix position. Olanglab 24×48 inch fiberglass panels work well for pre-built ceiling clouds — two panels side by side create the minimum cloud footprint with no DIY construction required.
Hang the cloud 4-6 inches below the ceiling to create an air gap that improves low-frequency absorption. The suspension hardware also decouples the cloud from the ceiling structure, which prevents vibration transfer.
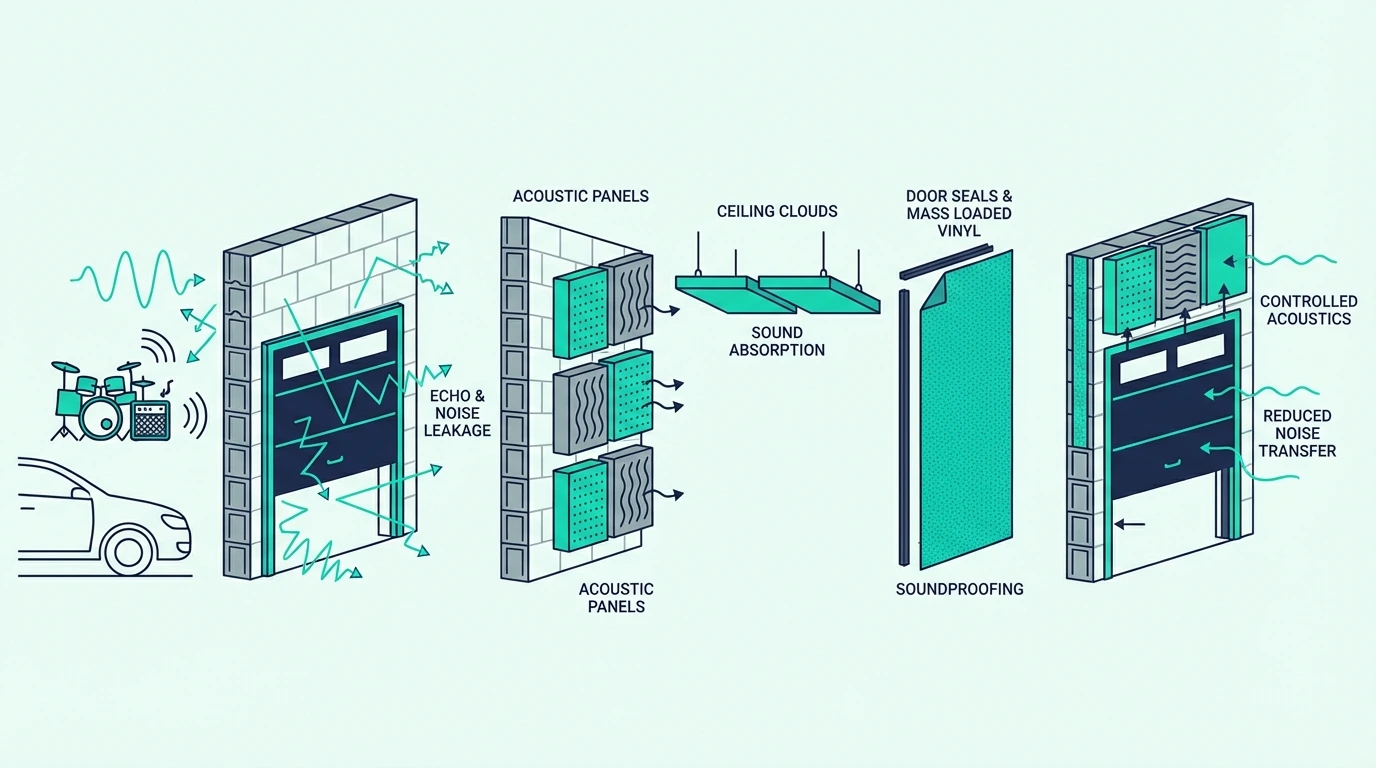
Priority 4: Treating The Garage Door Wall
The garage door wall is the most challenging surface in the room. The door itself is thin, vibrates at bass frequencies, leaks sound through gaps, and cannot support heavy panel mounts.
The most practical approach is removable treatment — panels or blankets that hang in front of the door during recording and mixing sessions and can be moved aside when you need to open the door.
Heavy moving blankets are the budget option. Hang 3-4 layers of thick moving blankets from a curtain rod mounted above the door opening.
The mass of the layered blankets absorbs mid and high frequency reflections and adds a small amount of mass to reduce sound leakage through the door.
For better performance, build removable panel frames that stand in front of the door. Construct lightweight wooden frames, fill them with 4 inches of rigid fiberglass, wrap them in acoustically transparent fabric, and lean them against the door wall.
Two or three 4 x 8 foot panels cover the full door opening and provide dramatically better absorption than blankets. This approach also qualifies as temporary acoustic treatment since you can move the panels aside whenever you need to open the garage door.
Priority 5: Floor Treatment
After the walls, corners, ceiling, and door are addressed, the floor is the final surface to treat. A thick area rug (with a dense pad underneath) placed under and around the listening and recording area absorbs mid and high frequency reflections from the concrete floor.
The rug does not need to cover the entire garage floor — just the area where recording and monitoring happen. A 10 x 12 foot rug covers the primary zone in most setups.
For rooms where the floor reflections are still problematic after adding a rug, consider interlocking rubber gym tiles as a second layer. The rubber adds mass and density that absorbs slightly lower frequencies than carpet alone.
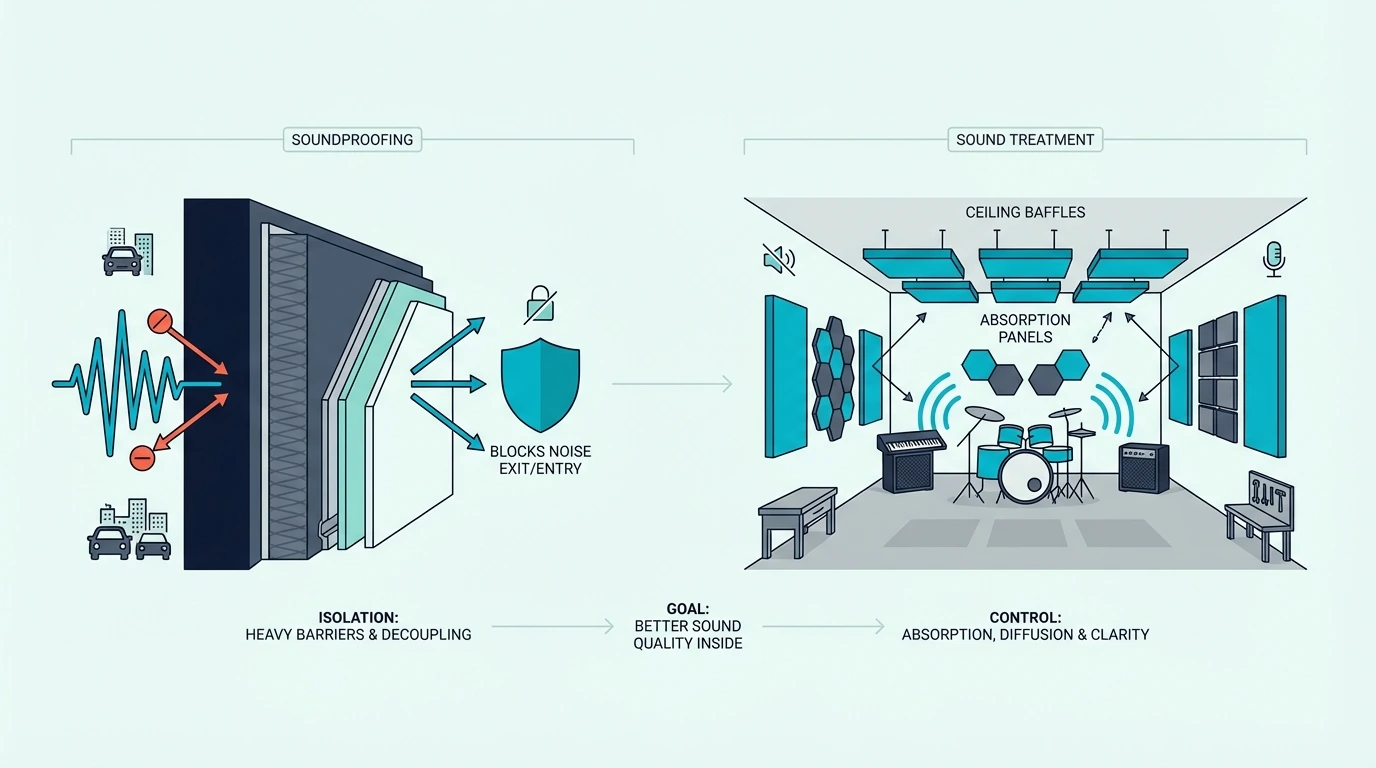
Soundproofing vs Acoustic Treatment In A Garage
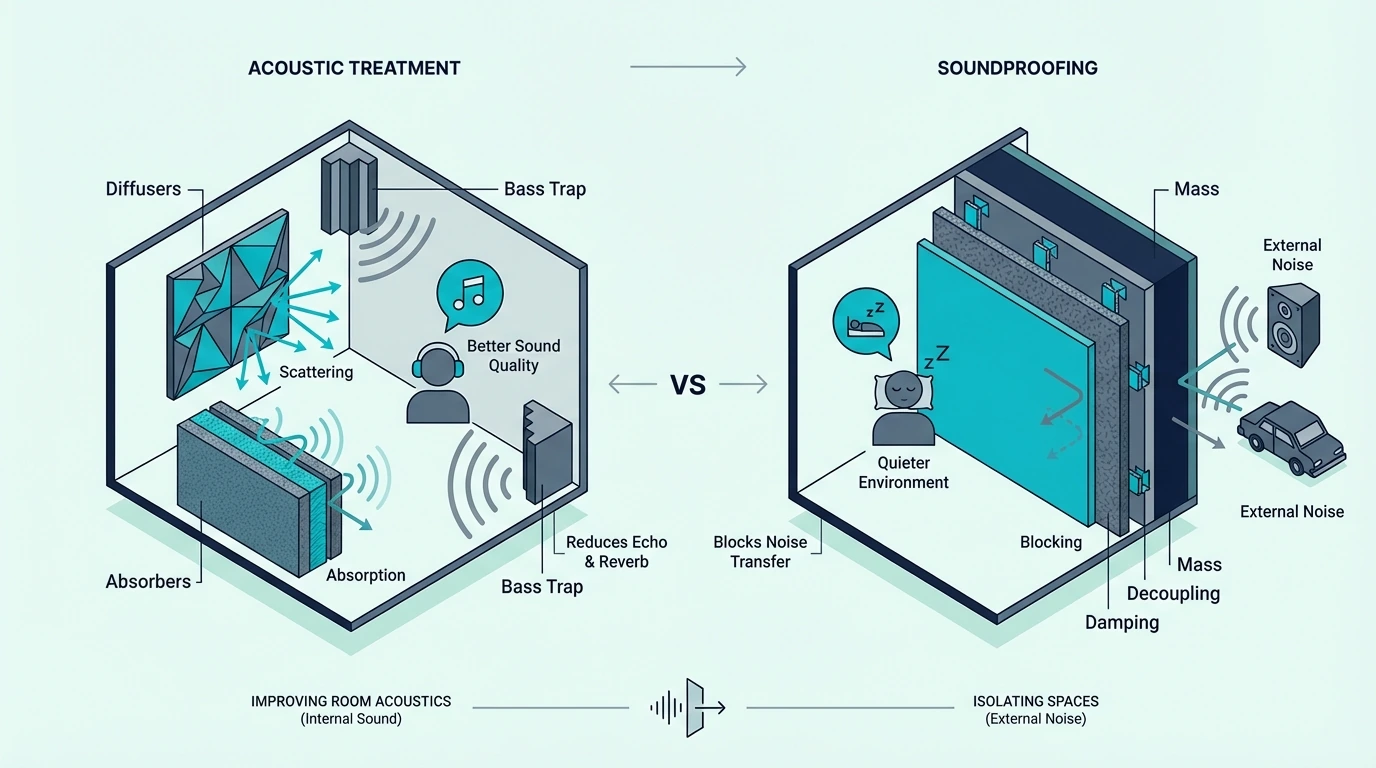
Garage studio builders often conflate two different problems: acoustic treatment (controlling how sound behaves inside the room) and soundproofing (preventing sound from entering or leaving the room). They require completely different solutions.
What Treatment Does
Acoustic treatment absorbs and diffuses sound energy inside the room. Panels on walls reduce reflections.
Bass traps in corners control low-frequency buildup. A ceiling cloud catches overhead reflections.
Treatment makes the room sound better for recording and mixing. It does not stop your neighbors from hearing your drums.
What Soundproofing Requires
Soundproofing requires mass, decoupling, and airtight construction. A soundproofed garage would need double-layer drywall with Green Glue damping compound on the existing concrete walls (adding mass), a floating floor decoupled from the concrete slab (preventing vibration transfer), and a sealed, heavy replacement for the garage door (eliminating the biggest leak).
A full soundproofing build for a garage runs 5,000-15,000 dollars or more — far beyond most home studio budgets. Acoustic treatment alone (the focus of this guide) runs 500-1,500 dollars for meaningful results.
The Practical Middle Ground
Most garage studio builders prioritize treatment over soundproofing because treatment directly improves recording and mixing quality, while soundproofing primarily benefits the neighbors.
The practical compromise is to seal the obvious gaps (around the garage door, any windows, and the entry door to the house), add treatment to improve the interior acoustics, and schedule loud sessions during hours that minimize neighbor impact.
If sound isolation is genuinely critical — for example, if you record drums regularly or your garage shares a wall with a neighbor’s bedroom — soundproofing needs to be part of the build. But for most vocal, podcast, and music production work, treatment alone transforms a garage from unusable to functional.
Common Mistakes When Treating A Garage
Garages are different enough from typical rooms that the standard acoustic treatment advice often leads people astray. These are the most frequent mistakes.
Covering Every Wall With Foam
The instinct to cover every square inch of concrete with foam tiles is understandable — the walls are obviously the problem, so covering them seems logical. But thin foam absorbs only the highest frequencies and leaves the bass and low-mid problems (which dominate in concrete rooms) completely untouched.
The result is a room that sounds dull and dead in the high end but still boomy, muddy, and reverberant in the low end. That tonal imbalance is worse for mixing than the untreated room because at least the untreated room has consistent (if excessive) reverb across the spectrum.
Ignoring The Corners
Bass traps in corners deliver more acoustic improvement per dollar than any other treatment in a garage. Yet many builders spend their entire budget on wall panels and leave the corners empty.
Untreated corners allow bass energy to pile up unchecked. No amount of wall panel coverage compensates for missing corner treatment.
Allocate at least 30-40% of your treatment budget to bass traps before spending on wall panels.
Mounting Panels Flat Against Concrete
Panels mounted directly against concrete lose a significant portion of their low-frequency absorption potential. The air gap behind a panel is critical for extending absorption into the frequencies where garages need the most help.
Every panel in a garage should be mounted with at least a 2-inch air gap. Use furring strips, standoff brackets, or French cleats to create the gap.
The small extra effort during installation pays for itself in dramatically better low-frequency performance.
Treating The Wrong Surfaces First
Some builders start with the ceiling or the rear wall because those surfaces are easy to reach. In a garage, the corners and first reflection points should come first because they address the highest-impact problems.
The treatment priority sequence for a garage is: corners → first reflection points on side walls → front wall behind monitors → ceiling cloud → rear wall → garage door wall → floor. Following this sequence ensures that each dollar spent delivers the maximum acoustic improvement.
Expecting Treatment To Soundproof The Room
No amount of acoustic panels will stop sound from passing through a thin metal garage door. If your expectation is that treatment will eliminate noise complaints from neighbors, you will be disappointed.
Treatment controls the sound inside the room. Soundproofing controls the sound that passes through the room’s boundaries.
They are separate problems with separate solutions and separate budgets.
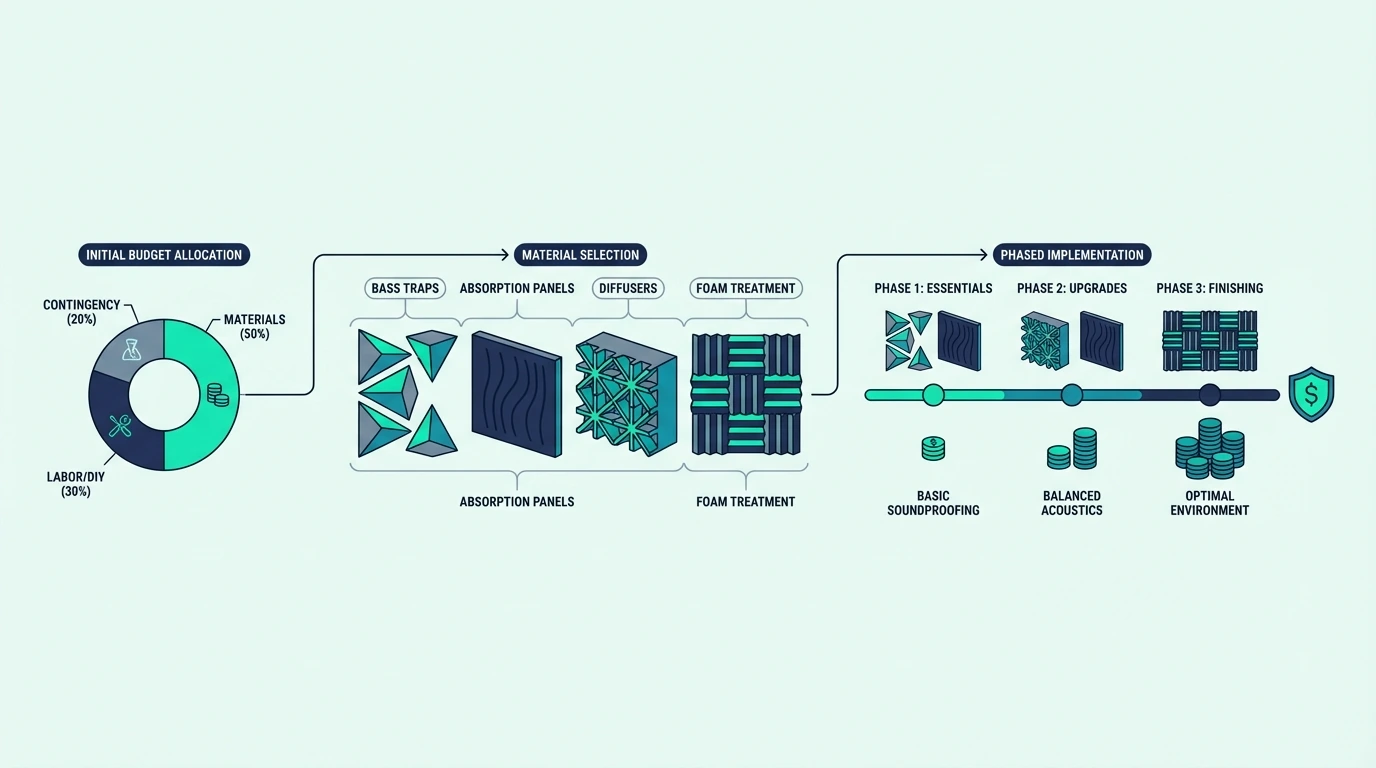
Budget Planning For Garage Treatment
A realistic treatment budget for a two-car garage depends on whether you buy pre-built panels or build your own.
DIY Build (500-800 dollars)
A DIY approach using rigid fiberglass insulation (Owens Corning 703 or Rockwool Safe’n’Sound), lumber for frames, and fabric for wrapping runs 500-800 dollars for a comprehensive setup that includes corner bass traps, 12-16 wall panels, and a ceiling cloud.
The materials cost is low because rigid fiberglass insulation is sold at building supply stores for 1-2 dollars per square foot at standard 2-foot by 4-foot sheet sizes. The time investment is typically a full weekend or two of cutting, framing, wrapping, and mounting. Rockboard 60 mineral wool boards are the most popular rigid insulation for DIY garage builds — the 6 lb per cubic foot density provides the deep low-frequency absorption that concrete rooms specifically demand.
Pre-Built Panels (1,000-1,500 dollars)
Pre-built fiberglass panels from manufacturers like UMIACOUSTICS, Olanglab, or GIK Acoustics run 2-3 times the cost of DIY but arrive ready to hang. For a full garage treatment, plan on 1,000-1,500 dollars for panels, bass traps, and mounting hardware from the top acoustic treatment brands.
The convenience premium is worth it if you lack tools, time, or confidence to build your own. The acoustic performance of pre-built and DIY panels using the same core material is identical — the difference is labor and finish quality.
What To Buy First
If budget is tight, spend the first 200 dollars on corner bass traps and materials for a ceiling cloud. Those two treatments address the biggest problems (bass buildup and overhead reflections) and deliver the most noticeable improvement.
A pre-built treatment kit is another option that bundles panels and hardware at a lower total cost than buying components separately.
Add wall panels at first reflection points next, then expand coverage to the remaining wall surfaces as budget allows. The garage door treatment comes last because it primarily affects sound isolation rather than interior acoustics.
Setting Up Your Mix Position
Where you sit in a treated garage matters as much as the treatment itself. Room modes create bass nulls and peaks at specific positions, and placing your monitors and chair in the wrong spot can undo much of what the treatment accomplishes.
The 38% Rule
Place your listening position at approximately 38% of the room length from the front wall (the wall behind your monitors). This position avoids the worst nulls from the first and second axial modes in the length dimension.
In a 20-foot garage, that puts your head at roughly 7.5 feet from the front wall. In a 16-foot garage, it is about 6 feet.
Monitor Placement
Position your monitors symmetrically between the side walls, at ear height when you are seated. Each monitor should be the same distance from its nearest side wall.
Avoid placing monitors in corners or directly against the front wall. Both positions excite room modes more aggressively and make the bass response harder to control.
Pull the monitors at least 2-3 feet away from the front wall. The gap between the monitors and the wall reduces the boundary effect that artificially boosts bass frequencies near hard surfaces.
Angle each monitor inward so the tweeters point toward your ears when you are seated at the mix position. The three points — left monitor, right monitor, and your head — should form an equilateral triangle with sides of 3-5 feet depending on room size.
Test Before And After Treatment
Use a measurement microphone and room analysis software (REW is free) to measure the frequency response and reverb time at your listening position before installing treatment. Then measure again after each phase of treatment.
The before-and-after measurements show you exactly what each treatment step accomplished and help you identify remaining problems that need attention. Without measurement, you are guessing — and in a room as challenging as a garage, guessing wastes money.
Pay particular attention to the RT60 measurement (reverb time) and the low-frequency response curve below 300 Hz. The RT60 tells you how much total absorption the room has, and the low-frequency curve reveals which room modes are still causing peaks and nulls at your listening position.
The Bottom Line
Garages are the hardest rooms to treat acoustically because concrete walls, bare floors, metal doors, and boxy shapes create problems at every frequency. Standard bedroom-level treatment is not enough.
The treatment sequence that delivers results in a garage is: corner bass traps first (as thick as possible), wall panels with air gaps at first reflection points, a ceiling cloud above the mix position, and removable treatment over the garage door.
Prioritize corners and reflections before covering large wall areas. A garage treated in this order will sound dramatically better than the same room treated randomly, even if the total panel count is identical.
For corner-specific guidance, the corner treatment guide details trap construction and placement for maximum bass control.
If your garage doubles as a home theater, the treatment priorities shift slightly — the theater guide covers the differences. For rooms with concrete walls specifically, the concrete treatment guide addresses material and mounting strategies in more detail.
If you are treating a garage specifically for vocal recording, the vocal treatment guide covers mic placement and panel positioning for the cleanest capture. Garages that share a concrete slab and wall construction with basements benefit from many of the same treatment strategies.
Frequently Asked Questions
How to acoustically treat a garage?
Start with thick bass traps (6 inches of rigid fiberglass) in every corner. Then add wall panels at first reflection points, mounted with a 2-4 inch air gap off the concrete.
Install a ceiling cloud above your listening position, and hang heavy blankets or removable panels in front of the garage door.
The treatment sequence matters because bass problems dominate in concrete rooms. Addressing corners first ensures that the wall panels you install afterward work in a room where the low end is already under control.
How to make a garage less echoey?
The echo in a garage comes from sound bouncing between hard parallel surfaces — concrete walls, floor, and ceiling. Adding 6-8 thick absorption panels at the first reflection points on the side walls and a ceiling cloud above the center of the room eliminates most of the audible echo.
For the floor, a thick area rug with a dense pad underneath absorbs mid and high frequency reflections that contribute to the echoey quality. Corner bass traps address the boomy, reverberant low-end that outlasts the mid/high echo. For a quick start without DIY construction, Olanglab fiberglass panels mount directly to concrete walls and provide immediate absorption at first reflection points.
How much does it cost to acoustically treat a garage?
A DIY treatment build using rigid fiberglass insulation and lumber costs 500-800 dollars for a two-car garage. Pre-built panels from commercial manufacturers run 1,000-1,500 dollars for equivalent coverage.
Budget builds that prioritize corners and first reflections can deliver meaningful improvement for as little as 200-300 dollars. Full-room treatment that addresses every surface including the garage door costs more but transforms the space into a genuinely usable recording and mixing environment.
Is acoustic treatment the same as soundproofing a garage?
No — they solve different problems. Acoustic treatment controls reflections and reverb inside the room, making it sound better for recording and mixing.
Soundproofing prevents sound from passing through the walls, floor, ceiling, and door, making the room quieter from the outside.
Treatment uses absorptive materials (fiberglass panels, bass traps, curtains). Soundproofing uses mass, decoupling, and airtight seals (double drywall, floating floors, sealed doors). A budget acoustic treatment setup does not meaningfully reduce sound leakage through concrete walls or a metal garage door.
Best Acoustic Treatment Kits (6 Room Kits That Actually Work In 2025)
Best acoustic treatment kit searches spike every time someone realizes their recordings sound like they were made inside a bathroom — but most kit roundups recommend foam tile packs that absorb almost nothing below 1 kHz and leave the real problems (bass buildup, flutter echo, muddy low-mids) completely untreated.
A good acoustic treatment kit should include panels that absorb across a meaningful frequency range and — ideally — bass traps or corner treatment that addresses the low end where small rooms cause the most damage. Kits that only include thin foam tiles are decorating products, not acoustic treatment.
This guide covers what separates a real treatment kit from a foam tile pack, which kits deliver genuine acoustic improvement for different room sizes and budgets, and how to fill the gaps that even the best kits leave behind.
Quick Takeaway
The best acoustic treatment kits use fiberglass or high-density polyester cores instead of thin foam, include mounting hardware, and cover enough wall area to treat first reflection points in a bedroom-sized studio. No single kit handles every acoustic problem — pair wall panels with corner bass traps for a complete setup. Our top overall pick is the 4-Pack Room Kit for its large panel size, included hardware, and broad mid/high absorption.
How We Chose The Best Acoustic Treatment Kits
Every kit on this list passed a five-point evaluation based on the factors that actually determine acoustic performance — not marketing claims or Amazon badge counts.
Core material — fiberglass and mineral wool absorb across a wider frequency range than foam. High-density polyester fiber is a step below fiberglass but still outperforms standard acoustic foam.
Kits using thin open-cell foam were excluded because foam tiles lack the density to absorb anything below the high-frequency range.
Panel thickness — thinner panels absorb less low-frequency energy. A 1-inch panel is effective above 500 Hz, while a 2-inch panel reaches down to about 250 Hz.
Thickness determines how much of the problem the kit can actually solve. For rooms where low-mid mud is the primary complaint, 2-inch panels are the minimum.
Coverage area — a kit needs to cover enough wall surface to treat the primary reflection points in a typical bedroom or spare-room studio. Kits with panels too small or too few to make a measurable difference were excluded.
Mounting hardware — kits that include brackets, clips, or adhesive strips save time and money. Kits that ship panels with no mounting solution force a separate purchase.
Value per square foot — price alone is misleading because panel sizes vary. A cheaper kit with tiny panels can cost more per square foot of coverage than a pricier kit with large panels.
What Should An Acoustic Treatment Kit Include?
A complete acoustic room treatment setup needs two categories of products: broadband absorption panels for walls and ceiling, and bass traps for corners. Most kits on Amazon cover the first category but not the second.
Understanding what each component does helps you evaluate whether a kit is complete or whether you need to add pieces.
Broadband Absorption Panels
Wall panels are the foundation of any acoustic treatment setup. They absorb mid and high frequency reflections at first reflection points — the spots on the side walls, ceiling, and rear wall where sound from your monitors bounces directly to your listening position.
Panels made from fiberglass or mineral wool at 2 inches thick absorb effectively from about 250 Hz up through the full audible range. Panels at 1 inch thick start absorbing around 500 Hz, which still covers the most audible flutter echo and harshness but misses the low-mids.
For a bedroom-sized home studio, you need 4-8 panels to cover the primary reflection points on both side walls, the wall behind your monitors, and ideally the ceiling above your listening position. The exact number depends on panel size — four large panels (46 x 23 inches each) cover roughly the same area as eight smaller panels (12 x 12 inches each).
Bass Traps Are Non-Negotiable
Bass traps are the single highest-impact treatment you can add to a small room. Corner treatment addresses low-frequency buildup where it concentrates most — in the corners where walls meet walls, walls meet the ceiling, and walls meet the floor.
Without bass traps, the low end in your room is unreliable. Bass notes pile up in corners and create nulls at other spots, which means what you hear at your mix position does not match what the recording actually sounds like.
Most Amazon panel kits do not include bass traps. That is the single biggest gap you need to fill.
A kit of wall panels plus a separate set of corner bass traps gives you a dramatically more complete treatment than panels alone.
DIY Kits vs Pre-Built Kits
Pre-built kits arrive ready to hang — panels are wrapped, sized, and often include mounting hardware. The convenience comes at a price premium of 2-3x over building your own panels from raw materials.
DIY kits use the same core materials (rigid fiberglass or mineral wool) but require you to cut insulation, build frames, and wrap fabric yourself. A DIY setup for a bedroom studio runs 200-400 dollars in materials versus 500-1,200 dollars for comparable pre-built coverage — which is why the best budget acoustic treatment guide leans heavily toward DIY builds.
The tradeoff is time and skill. If you own basic tools and have a free weekend, DIY delivers more acoustic treatment per dollar.
If you want panels on the wall this week with no construction, pre-built kits are the faster path. Most pre-built kits ship ready to mount within 30 minutes of opening the box.
Our Top Picks For Best Acoustic Treatment Kits
Each kit below serves a different room size, budget, or treatment priority. No single kit handles every acoustic problem in every room — the right choice depends on your space, your budget, and whether you already have partial treatment in place.
Best Overall Kit
The 4-Pack Room Kit (46 x 23 in) is the best starting point for a bedroom-sized studio. Four large panels cover the primary first reflection points on both side walls, and the included mounting hardware means no separate purchases.
The 1-inch high-density polyester core absorbs mid and high frequencies where flutter echo and harshness live. It does not reach deep enough for bass control below 300 Hz, so you still need corner traps — but for the wall-panel foundation, this kit delivers the most coverage per dollar.
Best Mid-Range Fiberglass Kit
The UMIACOUSTICS 4-Pack Fiberglass Panels steps up to a 2-inch fiberglass core that absorbs down to approximately 250 Hz — reaching the low-mids that 1-inch panels miss. The included hanging brackets make installation straightforward.
The 12 x 12 inch panel size is compact, which is both an advantage and a limitation. The panels fit in tight spots between windows and in narrow wall sections where larger panels would not work.
You need more of them to cover the same area, so plan on ordering multiple 4-packs for a full room. Two 4-packs (eight panels total) provides enough coverage for the primary first reflection points in a standard bedroom studio.
Best Value Fiberglass Kit
The Olanglab Fiberglass Panels 4-Pack delivers genuine fiberglass absorption at a lower price point than most competitors. The rectangular 11.8 x 23.6 inch shape is well-suited for side wall first reflection points where a taller panel catches more of the reflected energy path.
The tradeoff is no included mounting hardware — you need to source your own clips or adhesive strips. That adds 10-20 dollars to the total but still keeps the per-panel cost below most fiberglass alternatives.
Best Large-Format Panels
The UMIACOUSTICS 2-Pack Large Panels (47.2 x 23.6 in) are for rooms that need maximum wall coverage with minimum panel count. Each panel covers nearly 8 square feet of wall surface, so two panels handle an entire side wall’s first reflection zone.
The 2-inch fiberglass core matches the absorption depth of the smaller UMIACOUSTICS panels. Two of these large panels plus two of the smaller 4-pack gives you a flexible mix of sizes for different wall sections.
Large-format panels also reduce the number of seams between panels on a wall. Fewer seams means a cleaner visual installation and slightly more consistent absorption across the treated surface, since gaps between panels can allow reflections to pass through untreated.
For larger rooms where coverage area is the primary challenge, starting with large-format panels and filling gaps with smaller units is the most efficient approach.
Best For Ceiling And Rear Wall
The Olanglab Sound Absorbing Panels 2-Pack (47.2 x 23.6 in) work especially well as a ceiling cloud or rear wall treatment where large, continuous coverage matters more than fitting into tight spaces. Two panels side by side create a cloud that covers the critical zone above the listening position.
The fiberglass core absorbs effectively across mid and high frequencies, and the fabric wrap comes in neutral colors that blend with most room decor. For ceiling mounting, pair these with eye hooks and wire for a suspended installation.
Best Budget Bass Trap Add-On
The TroyStudio Bass Traps 12-Pack fills the corner gap that none of the panel kits above address. Twelve triangular foam pieces cover all four vertical corners of a standard room plus the ceiling-wall junctions where bass energy concentrates.
Foam bass traps absorb less low-frequency energy than rigid fiberglass traps at the same thickness. These work best for mid-bass taming (200-500 Hz) rather than deep bass control below 100 Hz.
For a budget build, they are a meaningful step up from untreated corners — and at under 20 dollars, they are the easiest add-on to any panel kit. Pair them with any of the wall panel kits above for a more balanced room treatment that addresses both flat surfaces and corners.
The Bottom Line
No single acoustic treatment kit handles every problem in every room. The best approach is a panel kit for wall absorption combined with corner bass traps for low-frequency control.
For a bedroom-sized studio on a moderate budget, the 4-Pack Room Kit plus the TroyStudio Bass Traps covers the essentials for under 140 dollars total. For deeper absorption and better low-mid control, upgrade to fiberglass panels from UMIACOUSTICS or Olanglab.
The full guide to acoustic treatment covers placement priorities for every surface. The budget treatment roundup focuses on the most cost-effective options if total spend is the primary constraint.
The brand comparison guide breaks down which manufacturers deliver the best quality at each price tier.
Frequently Asked Questions
Are acoustic treatment kits worth it?
Pre-built kits cost more per panel than DIY alternatives built from raw fiberglass and lumber. The value comes from convenience — panels arrive wrapped, sized, and often with mounting hardware included.
If your time is worth more than the price difference, kits are worth it. If budget matters more than convenience, building your own panels from Owens Corning 703 or Rockwool Safe’n’Sound saves 40-60% on materials.
What size kit do I need?
A bedroom studio (10 x 12 feet or similar) needs 4-8 wall panels to cover the primary first reflection points, plus corner bass traps for the four vertical corners. A larger room (15 x 20 feet or more) needs 10-16 panels and more extensive corner treatment.
Start by identifying which surfaces need treatment first. Always prioritize bass traps and first reflection points over blanket-covering every wall.
Do I need bass traps if my kit has wall panels?
Yes — wall panels and bass traps solve different problems. Wall panels absorb mid and high frequency reflections from flat surfaces.
Bass traps absorb low-frequency energy that accumulates in corners. The two types of treatment complement each other — neither one alone delivers a balanced result.
A room with panels but no bass traps will sound cleaner in the mids and highs but still have boomy, uneven bass. Adding corner treatment is the single biggest upgrade you can make after installing wall panels.
Acoustic Treatment For Windows (How To Fix The Biggest Reflection Problem In Your Room)
Best acoustic treatment for glass starts with understanding why windows are the single most reflective surface in most rooms — but most guides skip the explanation and jump straight to recommending foam tiles that do almost nothing against a flat pane of glass.
Glass reflects nearly 100% of the sound energy that hits it. A large window acts like an untreated wall section that you cannot mount panels on, bouncing every frequency back into the room with almost no absorption.
The result is flutter echo between the window and the opposite wall, harsh high-frequency reflections that smear stereo imaging, and a bright, ringy quality that makes the room sound larger and less controlled than it actually is. Standard acoustic panels on the surrounding walls help, but they cannot fix what the glass itself is doing.
Below, this guide covers why windows cause specific acoustic problems, which treatment options actually work on glass surfaces, and how to balance acoustic performance with the practical need for natural light.
Quick Takeaway
Windows reflect nearly all sound energy and create flutter echo, harsh reflections, and uncontrolled brightness in any room. Heavy acoustic curtains are the most practical treatment — they absorb mid and high frequency reflections when drawn and preserve natural light when open. For maximum control, pair curtains with removable window plugs made from rigid fiberglass for recording and mixing sessions.
Why Windows Are An Acoustic Problem
Glass is one of the hardest, smoothest, and most acoustically reflective materials in any building. Where drywall absorbs a small percentage of sound energy on contact, glass reflects virtually everything — from low bass frequencies all the way through the high end.
A single large window in a room creates the same acoustic effect as an untreated concrete wall. Every sound wave that hits the glass bounces back at nearly full strength, adding reflected energy to the direct sound and increasing the overall reverberation time.
Flutter Echo From Glass
Flutter echo is the most immediately audible problem that windows cause. When a window sits opposite a hard wall — or worse, opposite another window — sound bounces back and forth between the two parallel reflective surfaces in a rapid series of reflections.
The result is a metallic ringing quality that follows every sharp transient: claps, consonants in speech, snare hits, and pick attacks on guitar. Flutter echo is easy to identify — clap your hands in the room and listen for a rapid “zing” or “ping” that rings for a fraction of a second after the clap.
In small rooms where the window and opposite wall are close together, flutter echo is more pronounced because the reflections arrive faster and overlap more tightly. The smaller the gap between the two surfaces, the more the flutter echo sounds like a tonal ring rather than a series of discrete reflections.
High-Frequency Reflections
Glass reflects high frequencies with particular efficiency because its smooth, hard surface does not scatter or diffuse the incoming sound waves. The reflection comes back as a near-perfect mirror image of the original wave.
Those strong high-frequency reflections interfere with the direct sound from your monitors or speakers. At your listening position, the reflected energy from the window arrives milliseconds after the direct sound and creates comb filtering — a pattern of sharp peaks and nulls in the frequency response that changes your perception of the mix.
Bass Leakage vs Bass Reflection
Windows also vibrate at low frequencies because thin glass has relatively little mass. A bass note from a subwoofer or a kick drum can physically vibrate the glass pane, which transmits some of that energy outside as airborne sound.
This is a soundproofing problem, not an acoustic treatment problem. Acoustic treatment controls reflections inside the room — it does not prevent sound from passing through the glass to the outside.
If bass leakage through windows is your main concern, the solution is heavier glass, secondary glazing, or window plugs — not curtains or panels.
How To Treat Windows Acoustically
Treating a window is different from treating a wall because you need to preserve access to natural light and ventilation. Permanent panel mounting is not practical on glass, so window treatments must be removable, retractable, or both.
The three main options — heavy curtains, removable window plugs, and panels on adjacent walls — each address different parts of the problem. Most rooms benefit from a combination.
Heavy Acoustic Curtains
Heavy floor-to-ceiling curtains are the most practical and most popular acoustic treatment for windows. When drawn closed, the fabric absorbs mid and high frequency reflections that would otherwise bounce off the glass.
The key is weight and density. Thin decorative curtains do almost nothing acoustically because the fabric is too light to resist sound wave energy.
The curtain needs enough mass to slow down and absorb the incoming sound rather than letting it pass through to the glass and reflect back.
A budget option like the NICETOWN Blackout Curtain Panels uses a triple-weave construction that adds enough mass to absorb mid and high frequency reflections. The floor-length design covers the full window surface when drawn, and the panels open completely for natural light during non-critical listening.
For rooms where acoustic performance matters more — home studios, home theaters, and dedicated listening rooms — a 3-layer acoustic curtain delivers noticeably better absorption. The RYB HOME 3-Layer Soundproof Curtains sandwich a blackout layer between two felt layers, which absorbs more acoustic energy across a wider frequency range than a single-layer curtain.
Hang curtains as close to the ceiling as possible and let them fall to the floor. Gaps at the top or bottom allow sound to reach the glass and reflect back around the curtain edge, which reduces the treatment’s effectiveness.
Removable Window Plugs
Window plugs are rigid panels — typically built from fiberglass or mineral wool in a wooden frame — sized to fit snugly inside the window opening. When inserted, they cover the glass completely and absorb reflections across a much wider frequency range than curtains can manage.
A 2-inch thick fiberglass plug absorbs effectively down to about 250 Hz. A 4-inch plug extends that absorption into the low-mids where curtains have minimal effect.
The tradeoff is total light blockage — with the plug inserted, no natural light enters the room. This makes plugs ideal for dedicated recording or mixing sessions where light is irrelevant.
For rooms that double as living spaces, plugs work best as a session-only tool that you insert before recording and remove afterward.
Building window plugs is a straightforward DIY project. Cut rigid fiberglass to the window opening dimensions, wrap it in breathable fabric, and add handles for easy insertion and removal.
The total material cost for a standard window runs 30-60 dollars. That makes plugs one of the most cost-effective treatments per square foot of coverage.
Panels On Adjacent Walls
When the window itself cannot be covered — because you need the light, or the window is too large, or the room serves a dual purpose — treating the walls adjacent to the window reduces the damage that window reflections cause.
Panels on the wall opposite the window break up the flutter echo path by absorbing the energy that would otherwise bounce back toward the glass. Panels on the side walls near the window intercept angled reflections before they reach your listening position.
Fiberglass panels like the Olanglab Fiberglass Panels fit in the wall space between and beside windows without blocking any glass. The compact rectangular shape works in the narrow wall sections that typically surround window frames.
This approach does not treat the glass itself, but it reduces the total reflected energy in the room by absorbing a portion of the sound before and after it hits the window. Combined with curtains, adjacent wall panels bring the window area’s acoustic impact close to that of a fully treated wall.
The Bottom Line
Windows are the most reflective surface in most rooms, and leaving them untreated undermines whatever panels and bass traps you install on the surrounding walls. The reflected energy from a large window can dominate the room’s acoustic character.
Heavy curtains are the practical first step — they absorb mid and high frequency reflections when drawn and preserve natural light when open. For critical listening and recording, removable window plugs deliver the best acoustic performance at the cost of blocking all light.
To estimate the total project cost including window treatment, the pricing guide breaks down DIY, commercial, and professional installation ranges.
Frequently Asked Questions
Can you put acoustic panels over windows?
Yes — removable fiberglass panels sized to the window opening are one of the most effective acoustic treatments for glass. The panels absorb reflections across a much wider frequency range than curtains and eliminate flutter echo completely when inserted.
The tradeoff is that panels block all natural light while in place. Build them with handles for easy removal so you can switch between treated and untreated modes depending on whether you are recording or just using the room normally. Rockboard 60 mineral wool boards cut to exact window dimensions with a utility knife and friction-fit into the opening for a snug removable plug.
Do curtains help with room acoustics?
Heavy floor-to-ceiling curtains absorb mid and high frequency reflections and noticeably reduce flutter echo from glass surfaces. The heavier and denser the curtain fabric, the more acoustic energy it absorbs.
Standard decorative curtains provide minimal acoustic benefit because the fabric is too thin and lightweight. For measurable improvement, choose curtains marketed as blackout or soundproof — they use heavier materials that resist sound wave energy rather than letting it pass through.
Acoustic Treatment For Mixing (How To Hear What Your Mix Actually Sounds Like)
Best acoustic treatment for mixing fixes the one variable that no plugin, monitor upgrade, or headphone can compensate for — but most bedroom producers ignore it entirely and wonder why their mixes fall apart on other systems.
Your room colors every decision you make behind the console. A bass bump at 80 Hz from a corner mode makes you pull the low end too far, a dip at 200 Hz from a wall cancellation makes you push the low-mids too hard, and early reflections from bare side walls smear the stereo image until panning feels like guesswork.
The fix is not expensive monitors or room correction software. Treating the room with panels at specific spots removes the acoustic distortion between your speakers and your ears so you finally hear what the mix actually contains.
Below, this guide covers the exact treatment sequence for a mixing room — where to sit, what to treat first, and how to balance absorption and diffusion so the room helps your mixing instead of sabotaging it.
Quick Takeaway
To treat a mixing room, set your listening position at 38% from the front wall, install bass traps in all available corners, place 2-inch fiberglass panels at the first reflection points on both side walls and the ceiling, and add absorption or diffusion on the rear wall. That sequence addresses the problems in order of severity and gives you the flattest, most accurate monitoring environment for the least cost.
Why Your Room Is Your Most Important Mixing Tool
Every mixing decision you make is filtered through the room before it reaches your ears. If the room adds 6 dB of bass at 80 Hz, you instinctively mix the low end too quiet — and the mix sounds thin on every other system.
If the room creates a null at 120 Hz in your listening position, you push that frequency too hard and the mix booms everywhere else. Neither problem is audible while you are mixing — you only discover it when you play the track in the car.
The room is not a neutral container for your monitors. It is an active participant in the signal chain, and without treatment, it adds its own EQ curve, its own reverb, and its own stereo distortion to everything you hear.
Professional mixing studios spend more on room construction and treatment than on any single piece of gear because they understand that accurate monitoring is the foundation of every mixing decision. A treated bedroom with mid-range monitors consistently produces better mixes than an untreated room with flagship speakers.
That is the real argument for treatment — not that the room will sound better, but that your mixes will translate better to every system your listeners use.
How To Acoustically Treat A Room For Mixing
The treatment sequence for a mixing room follows a strict priority order because each step depends on the one before it. Skip a step or do them out of order, and the later treatments solve the wrong problems.
Step 1 — Set Up Your Listening Position
Before you hang a single panel, position your monitors and chair correctly. The treatment layout for every other step depends on where you sit.
Place your listening position at 38% of the room length from the front wall — the wall your monitors face. That spot minimizes the interaction between your seat and the strongest room modes in the lengthwise dimension, giving you the flattest bass response the room can offer before any treatment.
Set up an equilateral triangle between your two monitors and your head. The distance from each monitor to your ears should equal the distance between the two monitors.
Angle each monitor so it points directly at your near ear. Tweeters should be at ear height, not angled up from a desk surface.
Keep the monitors at least 8-12 inches from the front wall unless they are designed for boundary placement. The gap prevents the wall from reinforcing certain frequencies and creating a colored low-mid response that treatment alone cannot fix.
Step 2 — Tame Bass With Corner Traps
Bass traps in every available corner are the single highest-impact treatment in any mixing room. Low-frequency standing waves pile up where surfaces meet, and corners — where two or three surfaces converge — accumulate the most energy.
Install broadband absorbers made from fiberglass or mineral wool in all four vertical corners, floor to ceiling if possible. A minimum thickness of 4 inches is necessary to absorb meaningfully below 100 Hz.
Thinner traps help with the low-mids but miss the bass frequencies where room modes cause the worst problems. If you can only afford one thickness, go thicker — the low end is where untreated rooms cause the most damage to mix decisions.
An air gap between the trap and the wall extends the effective absorption depth without adding more material. A 4-inch trap mounted with a 2-inch air gap performs like a 6-inch trap for most practical purposes — a useful technique when budget or space is tight.
The front corners behind the monitors deserve the thickest treatment because the monitors drive the most energy into those junctions. Rear corners handle the reflected bass that the front traps miss.
Step 3 — Treat First Reflection Points
First reflections are the sound waves that bounce off the nearest wall surface and arrive at your ears within 5-15 milliseconds of the direct sound from the monitors. Those reflections interfere with the direct signal and smear the stereo image, muddy the transients, and create a comb-filtering effect that makes the frequency response at your seat wildly uneven.
Use the mirror trick to find each reflection point: sit in your mixing position and have someone slide a mirror along the side wall at tweeter height. Every spot where you can see a monitor driver in the mirror is a first reflection point that needs a panel.
Panels at the first reflection points on both side walls — typically two per side — restore the clarity and imaging that bare walls destroy. A 2-inch thick fiberglass panel absorbs the frequencies above 250 Hz where imaging and transient detail live.
For the side walls, panels like the Olanglab Fiberglass Panels fit between the monitor plane and the listening position without taking up floor space. The fiberglass core handles the critical mid and high frequency range where reflection damage is most audible during mixing.
If your room allows larger panels, the UMIACOUSTICS Large Acoustic Panels cover an entire first reflection zone per panel — no gaps between smaller tiles means no untreated spots leaking reflections through.
The ceiling above the mix position is the third first-reflection surface. A ceiling cloud — a single panel or pair of panels hung horizontally above your head — intercepts the overhead reflection that otherwise collapses the vertical dimension of the stereo image.
Panels with included mounting hardware like the UMIACOUSTICS 4-Pack with Brackets simplify ceiling mounting — the brackets handle the weight and alignment so you are not improvising with hooks and wire.
Step 4 — Rear Wall Treatment
The rear wall is the last surface to treat because its reflections arrive latest and cause the least acute damage. That does not mean it is unimportant — rear wall reflections add coloration to the low-mids and affect how the room decays after transients, which directly impacts your perception of reverb tails and spatial effects.
In small rooms (under 150 square feet), absorption on the rear wall is the safer choice because the wall is close enough to your seat that reflected energy arrives quickly enough to cause comb filtering.
In larger rooms where the rear wall sits 8 feet or more behind the listening position, diffusion scatters the reflected energy into many small reflections that arrive at different times and from different angles. That scattered energy keeps the room from feeling dead while preventing any single strong reflection from coloring the mix.
Absorption vs Diffusion For Mixing Rooms
A common mistake in home mixing rooms is covering every surface with absorption until the room feels lifeless. That over-damped environment is just as problematic for mixing as an untreated room — you lose the natural sense of space, and mixes made in a dead room tend to have too much reverb and too much high-frequency energy because the mixer compensates for what the room lacks.
The goal is a balanced room, not a dead one. Absorption at the specific spots where reflections cause measurable problems — corners, first reflection points, and the ceiling above the mix position — combined with diffusion on surfaces where scattered energy keeps the room alive.
For most home mixing rooms, that means absorption on the front half of the room (corners, side walls between monitors and listener, ceiling above the seat) and diffusion or a mix of absorption and diffusion on the rear half.
If you want to estimate the total project cost, mixing rooms typically need 8-12 panels plus 4 corner bass traps. The best treatment kits bundle those components into a single purchase with matched coverage.
The Bottom Line
Treating a mixing room follows a non-negotiable sequence: listening position first, corner bass traps second, first reflection panels third, and rear wall treatment last. Every step builds on the previous one, and skipping any step undermines the ones that follow.
The investment pays for itself in mixes that translate — tracks that sound on your client’s car stereo the way they sounded on your monitors.
The full guide to acoustic treatment covers every surface type and placement strategy. For budget-friendly options that still deliver accurate monitoring, the roundup breaks down what works at every price point.
Frequently Asked Questions
What is the 38% rule room acoustics?
The 38% rule places your listening position at 38% of the room’s length from the front wall. That distance minimizes the interaction between your seat and the strongest axial room modes in the lengthwise dimension.
The rule is a starting point — not a universal solution — and the exact optimal position depends on your room’s dimensions and ceiling height.
Does acoustic treatment make a difference for mixing?
Treatment is the single biggest improvement you can make to mixing accuracy, more impactful than upgrading monitors or adding outboard gear. An untreated room adds its own EQ, reverb, and stereo distortion to everything you hear, and every mixing decision you make compensates for problems that only exist in your room.
How much acoustic treatment do I need for a mixing room?
At minimum, a mixing room needs 4 corner bass traps, 2-4 side wall panels at first reflection points, 1-2 ceiling panels above the listening position, and 1-2 rear wall panels. That adds up to 8-12 treatment pieces total, covering roughly 30-40% of the room’s wall and ceiling area — enough to flatten the frequency response and tighten the stereo image without over-damping the space. For DIY builders, a 6-pack of Rockboard 60 mineral wool boards produces enough material for both corner traps and wall panels in a single purchase.
Acoustic Treatment For Office Spaces (Stop Losing Productivity To Noise)
Best acoustic treatment for office spaces solves the one problem that open floor plans, glass walls, and hard ceilings were never designed to handle — but every employee notices within minutes of sitting down.
Conversations carry across the room, conference calls echo so badly that remote participants ask you to repeat yourself, and the constant background hum of keyboards, HVAC, and coworker chatter makes focused work nearly impossible without headphones.
The fix isn’t more walls or expensive renovations. Acoustic panels at the right spots, ceiling treatment overhead, and in some cases a sound masking system reduce noise levels enough to restore speech privacy and deep focus — without changing the layout.
Below, this guide covers what makes offices so acoustically hostile, what treatment each type of office space needs, and where to place panels for the biggest improvement with the least disruption.
Quick Takeaway
To treat an office acoustically, start with fabric-wrapped absorption panels on walls near desks and meeting areas at seated ear height, add acoustic ceiling tiles or a ceiling cloud above the noisiest zones, and consider a sound masking system for open-plan spaces where panel treatment alone cannot provide enough speech privacy.
What Makes Offices Acoustically Challenging?
An office is built from the worst possible combination of materials for sound control — hard drywall, glass partitions, concrete floors, and flat ceilings that turn every conversation into a room-wide broadcast. Understanding where the noise problems come from helps you target treatment where it actually matters.
Open-Plan Office Problems
Open floor plans remove the walls that would normally block sound between workstations. Without barriers, a conversation at one desk travels unobstructed to every other desk in the line of sight — and the hard ceiling overhead amplifies the problem by reflecting that sound back down across the entire space.
The result is a constant wash of overlapping speech, keyboard noise, and phone calls that raises the ambient noise floor high enough to make concentration difficult. Studies consistently show that office noise is the number one workplace complaint, ahead of temperature, lighting, and space.
Productivity drops measurably in high-noise environments because the brain spends energy filtering unwanted sound instead of processing the task at hand. Even workers wearing headphones lose focus during the transition between noise and silence as colleagues come and go.
Absorption panels on nearby walls reduce the reflected energy, but they cannot block direct sound paths between desks. That gap is where sound masking fills in — a low-level background noise system that makes individual conversations less intelligible at a distance without adding obvious noise.
Conference Room Problems
Conference rooms suffer from a different version of the same physics. Parallel hard walls create flutter echo — a rapid series of reflections that bounce back and forth between two flat surfaces, producing a metallic ringing quality on every voice.
Remote participants on video calls hear that flutter echo even more clearly than people in the room because the microphone captures the reflected sound alongside the direct voice. The call quality drops, and everyone on the other end starts asking you to repeat yourself.
Glass walls — popular in modern office design — are among the most reflective surfaces in any building. A conference room with two or three glass walls reflects nearly as much sound energy as a tiled bathroom, which is why so many glass-walled meeting rooms sound harsh and echoey despite looking sleek.
What Acoustic Treatment Do Offices Need?
Each noise problem in an office maps to a specific type of treatment. Wall panels handle speech reflections, ceiling treatment controls overhead bounce, and sound masking addresses the direct paths that absorption alone cannot block.
Wall-Mounted Acoustic Panels
Fabric-wrapped acoustic panels mounted at seated ear height — roughly 3-4 feet above the floor — intercept the reflections that carry speech across the room. Panels on walls adjacent to desks and meeting areas deliver the most noticeable improvement because those surfaces reflect the most direct conversational energy.
In conference rooms, panels on the wall opposite the display screen and on at least one side wall eliminate the flutter echo that ruins video calls. Two to four panels per conference room typically handle the worst reflections.
The mirror trick works here too — sit in the main chair and have someone slide a mirror along the wall at ear height. Every spot where you can see the screen or the speaker system in the mirror is a first reflection point that needs a panel.
For open-plan areas, fiberglass-core panels like the Olanglab Fiberglass Panels absorb the speech frequencies where most office noise problems live. The neutral fabric wrap blends with professional decor, and the rectangular shape fits between windows and doorframes without looking out of place.
If aesthetics rank as high as performance — and in client-facing offices they usually do — decorative options like the Mollywell Hexagon Acoustic Panels double as wall art while absorbing mid and high frequency reflections. The self-adhesive backing installs in minutes with no holes — a real advantage in leased office spaces where wall damage means losing the deposit.
Ceiling Treatment
The ceiling is the largest unbroken reflective surface in most offices, and it bounces every sound from every direction back down onto the work floor. Acoustic ceiling tiles — the drop-in type that replace standard grid tiles — are the most common office ceiling treatment because they integrate into existing suspended ceiling frameworks without visible modification.
For offices with exposed ceilings (concrete, ductwork, or open structure), suspended acoustic baffles or ceiling clouds hung above the noisiest zones absorb overhead reflections that tile grids cannot reach.
The combination of wall panels and ceiling treatment typically reduces reverberation time by 30-50% in a standard office room. That reduction is enough to noticeably improve speech clarity in meetings and reduce the carry distance of conversations in open areas.
For offices planning a ceiling upgrade, the cost of acoustic treatment varies significantly between replacing drop-ceiling tiles (relatively cheap per square foot) and installing suspended clouds or baffles (higher cost but more effective in exposed-ceiling spaces).
Sound Masking
Sound masking adds a low-level engineered background noise — usually pink or white noise shaped to the speech frequency range — that raises the ambient floor just enough to make conversations unintelligible beyond 10-15 feet.
The concept sounds counterintuitive: adding noise to reduce noise. What masking actually does is narrow the radius within which speech is intelligible, which creates zones of acoustic privacy without physical barriers.
Masking works best in open-plan offices where absorption panels reduce reflections but cannot block the direct sound path between desks. The two strategies complement each other — panels cut the reflected energy, and masking covers the direct energy that panels cannot reach.
For executive offices and boardrooms where aesthetics justify the investment, premium decorative panels like the Art3d Wood Slat Wall Panels deliver a high-end finish with acoustic felt backing that absorbs mid and high frequencies behind the slats. They cover full walls with fewer seams than smaller panel formats.
The Bottom Line
Office acoustic treatment follows a clear three-step priority: wall panels at ear height near desks and in conference rooms first, ceiling treatment to reduce overhead bounce second, and sound masking for open-plan zones where panels alone cannot provide enough speech privacy.
Even a basic setup — four to six wall panels in a conference room and upgraded ceiling tiles in the noisiest areas — transforms a harsh, echoey office into a space where people can focus and communicate without fighting the room.
The full guide to acoustic treatment covers placement priorities for every surface type. If budget is tight, the budget acoustic treatment roundup shows what delivers real results at the lowest cost, and the best treatment kits simplify the buying process for outfitting a full room in one order.
If you need to estimate the total project cost, the pricing guide breaks down DIY, commercial, and professional installation ranges so you can match the approach to your office budget.
Frequently Asked Questions
Do acoustic panels work in offices?
Acoustic panels reduce reverberation time and improve speech intelligibility in every type of office space. In conference rooms, two to four panels eliminate flutter echo and dramatically improve video call quality.
In open-plan areas, panels on nearby walls reduce the reflected energy that carries conversations across the room.
Where should acoustic panels be placed in an office?
Mount panels at seated ear height (3-4 feet above the floor) on walls adjacent to desks, meeting areas, and conference rooms. In conference rooms, prioritize the wall opposite the screen and at least one side wall.
For open-plan offices, focus on the walls closest to the largest clusters of workstations. Panels with included brackets like the UMIACOUSTICS 4-Pack with Brackets simplify office installation — the included hardware handles mounting without extra trips to the hardware store.
What is sound masking?
Sound masking is a system that emits a low-level engineered background noise — typically shaped to the speech frequency range — through ceiling-mounted speakers. The added noise raises the ambient floor just enough to make individual conversations unintelligible beyond a short distance, creating zones of acoustic privacy without physical barriers.