Does Soundproof Foam Work? (What Foam Actually Does)

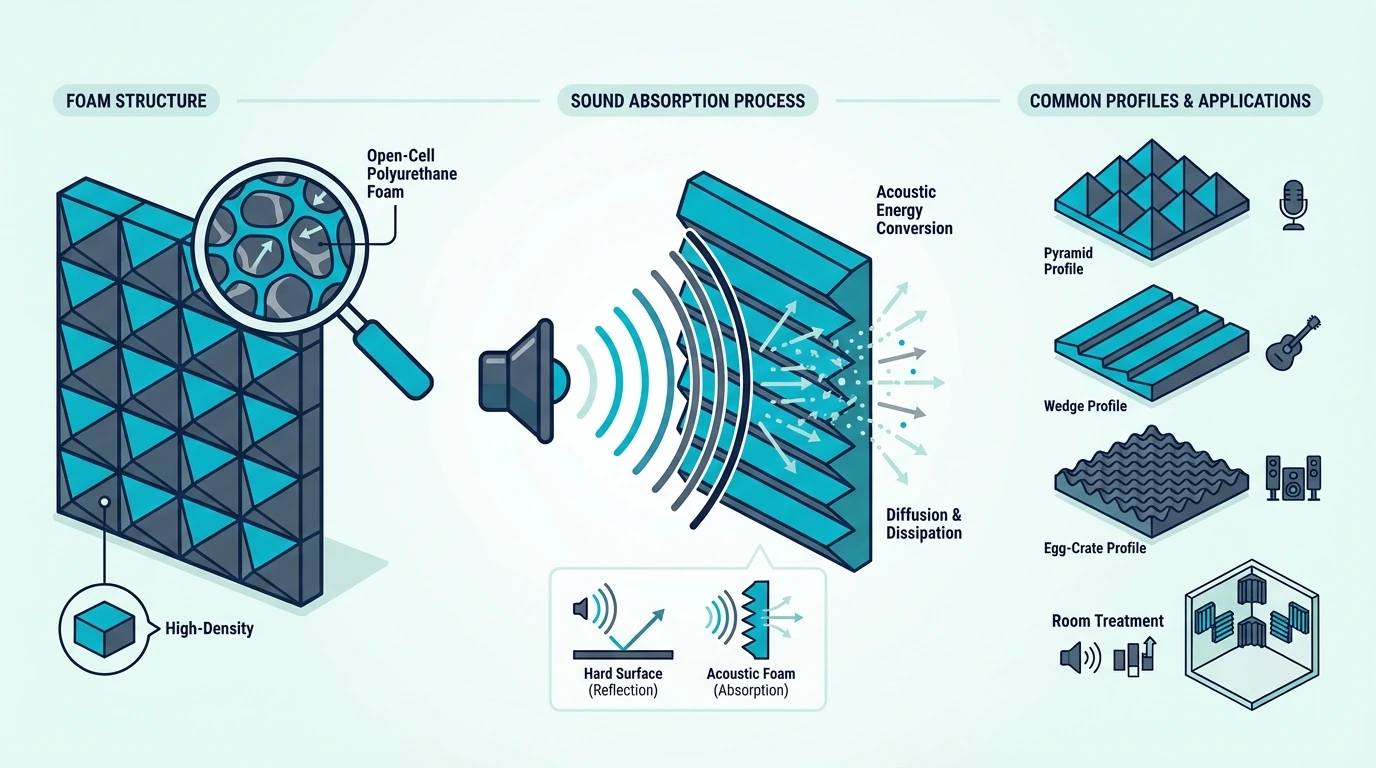
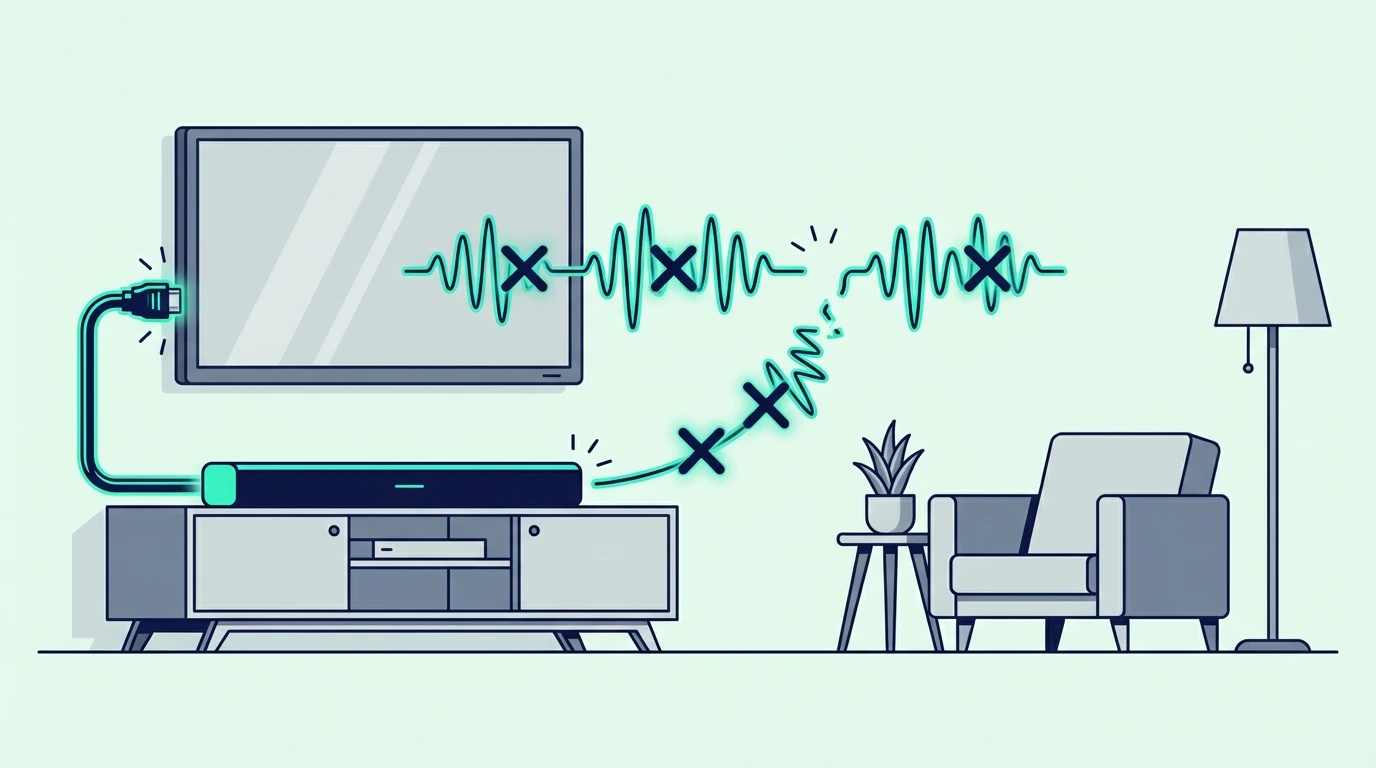
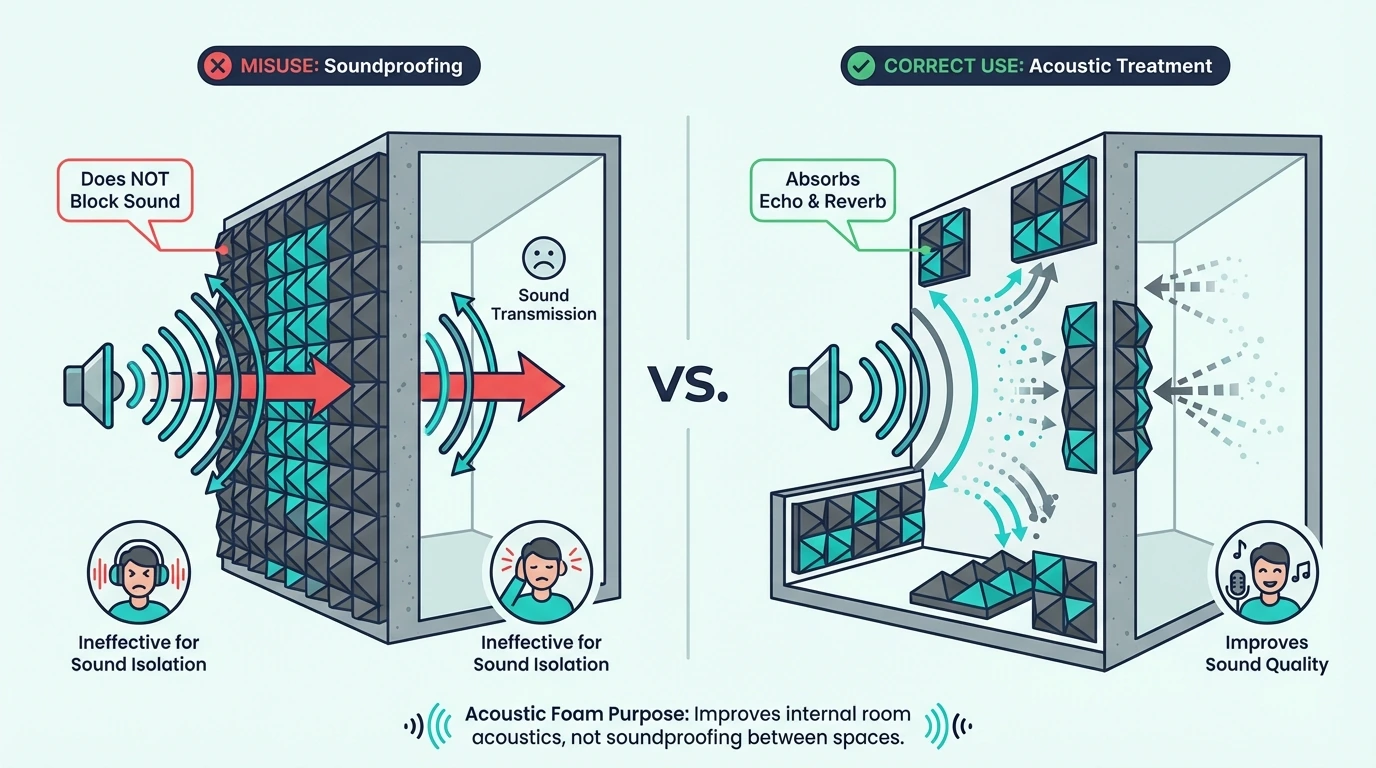
Does soundproof foam work sounds like a yes-or-no question, but most of the confusion starts with the name itself. What many people call soundproof foam is usually acoustic foam, and acoustic foam is much better at changing how a room sounds than stopping noise from getting through the structure.

That is why people cover a wall with foam and still hear neighbors, traffic, voices, or TV through it. The foam may be doing something real, but it is usually solving echo, reverb, and harsh reflections instead of actual sound transmission.

The good news is that foam still has a real job. Once you separate sound absorption from true soundproofing, it becomes much easier to tell when foam is worth buying, when it is being oversold, and what to use instead if the real goal is blocking noise.

Below, you’ll see what foam actually changes, where it helps, why it usually fails as a soundproofing fix, what works better than foam for blocking noise, and how to decide whether to buy it or skip it.

Quick Takeaway

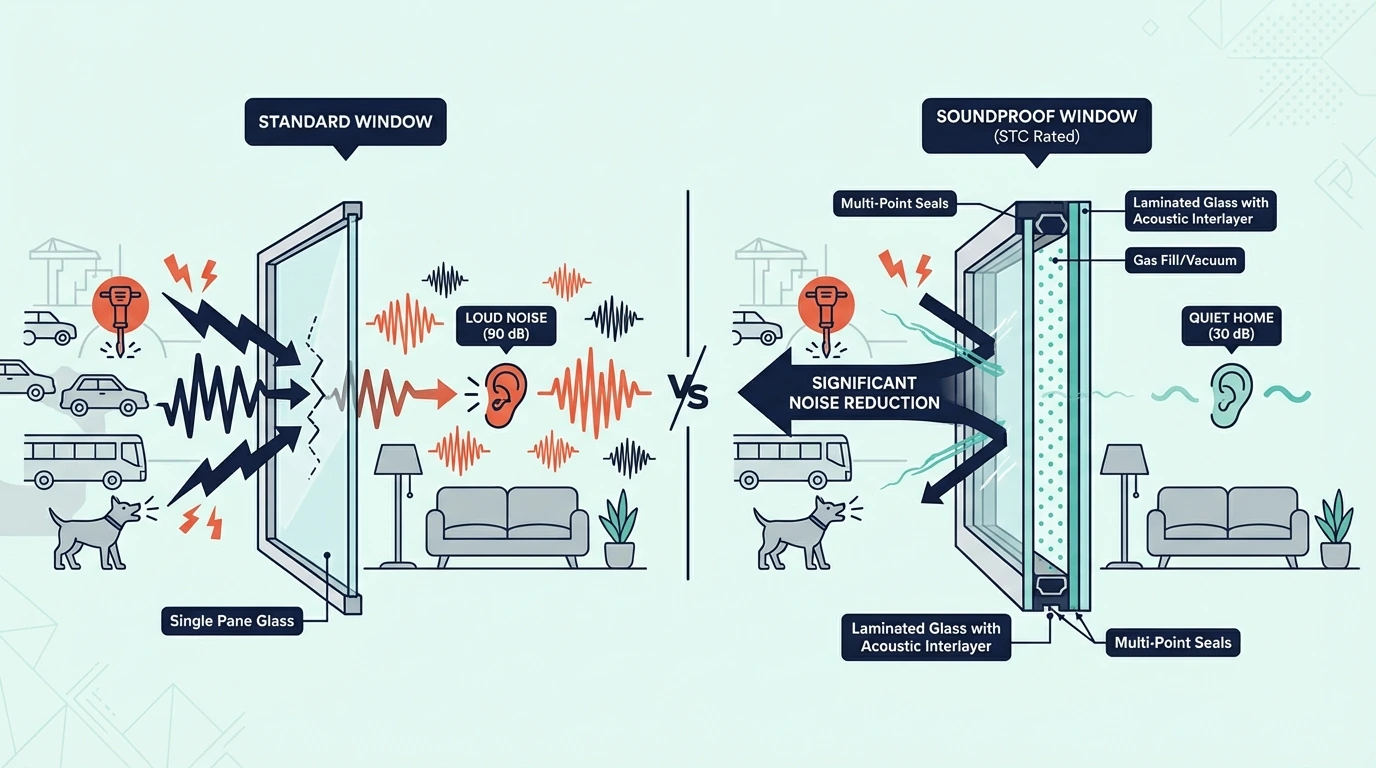
Soundproof foam usually does not truly soundproof a room. In most cases, it absorbs echo and improves room acoustics more than it blocks sound from getting in or out. If your goal is better recordings, clearer speech, or a less harsh room, foam can help. If your goal is stopping neighbor noise, outside noise, or sound transfer through walls, doors, ceilings, or windows, you usually need mass, sealing, insulation, damping, or a stronger assembly instead.

The Confusion Behind “Soundproof Foam”

Overview of whether soundproof foam works

Now that the core confusion is on the table, the direct answer is simple: foam can work, but usually not for the job people hope it will do. Most foam products sold to everyday buyers are treatment products, not true soundproofing systems.

Why the myth persists

The confusion starts with visual cues. People think foam is soundproofing because photos of recording studios, podcast booths, and music rooms often show foam on the walls. That visual cue makes it easy to assume the foam is what keeps sound from getting in or out.

Marketing makes the confusion worse. Terms like soundproof foam, studio foam, soundproofing panels, and acoustic foam get mixed together even though they do not all describe the same job.

A product like AFB Mineral Wool Insulation Batts is a good example because it looks like a soundproofing product to most buyers, yet it mainly behaves like an absorptive surface treatment.

What foam actually changes

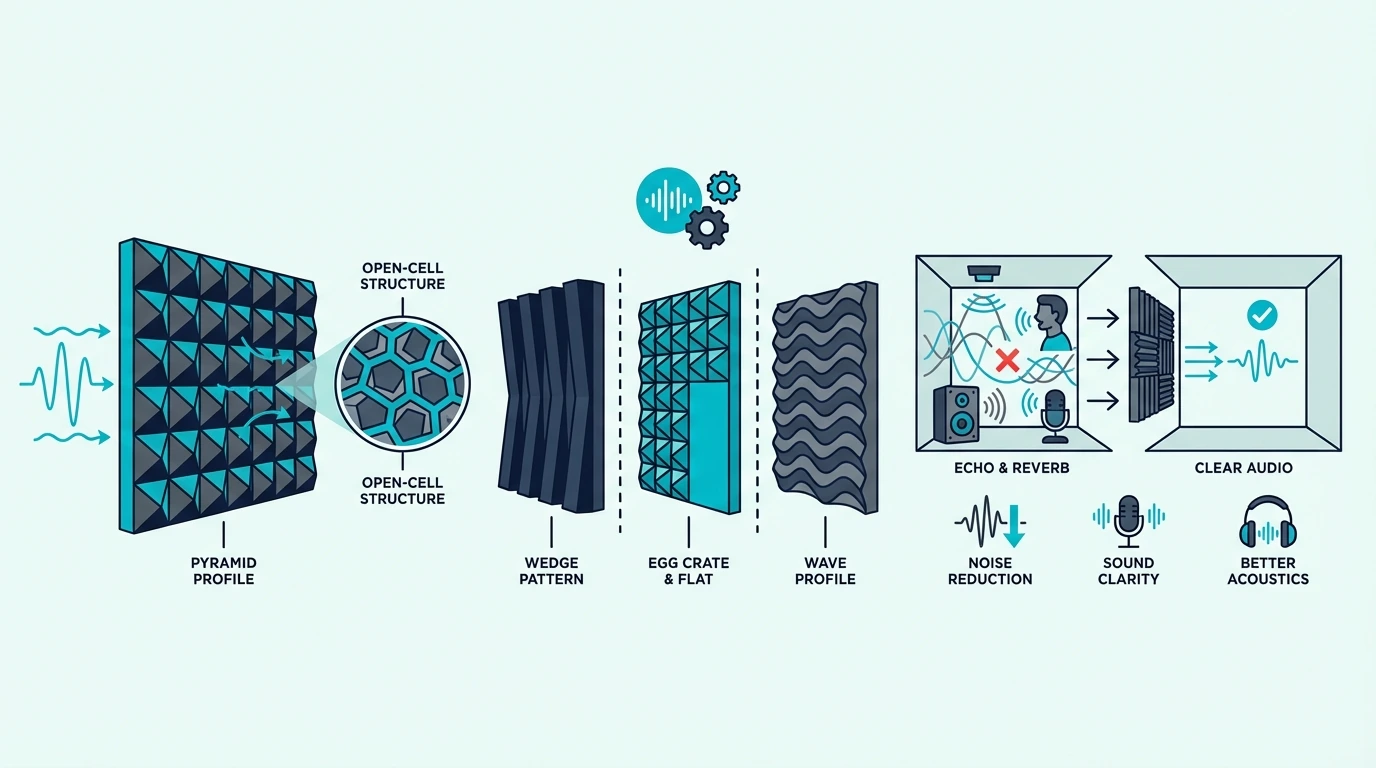
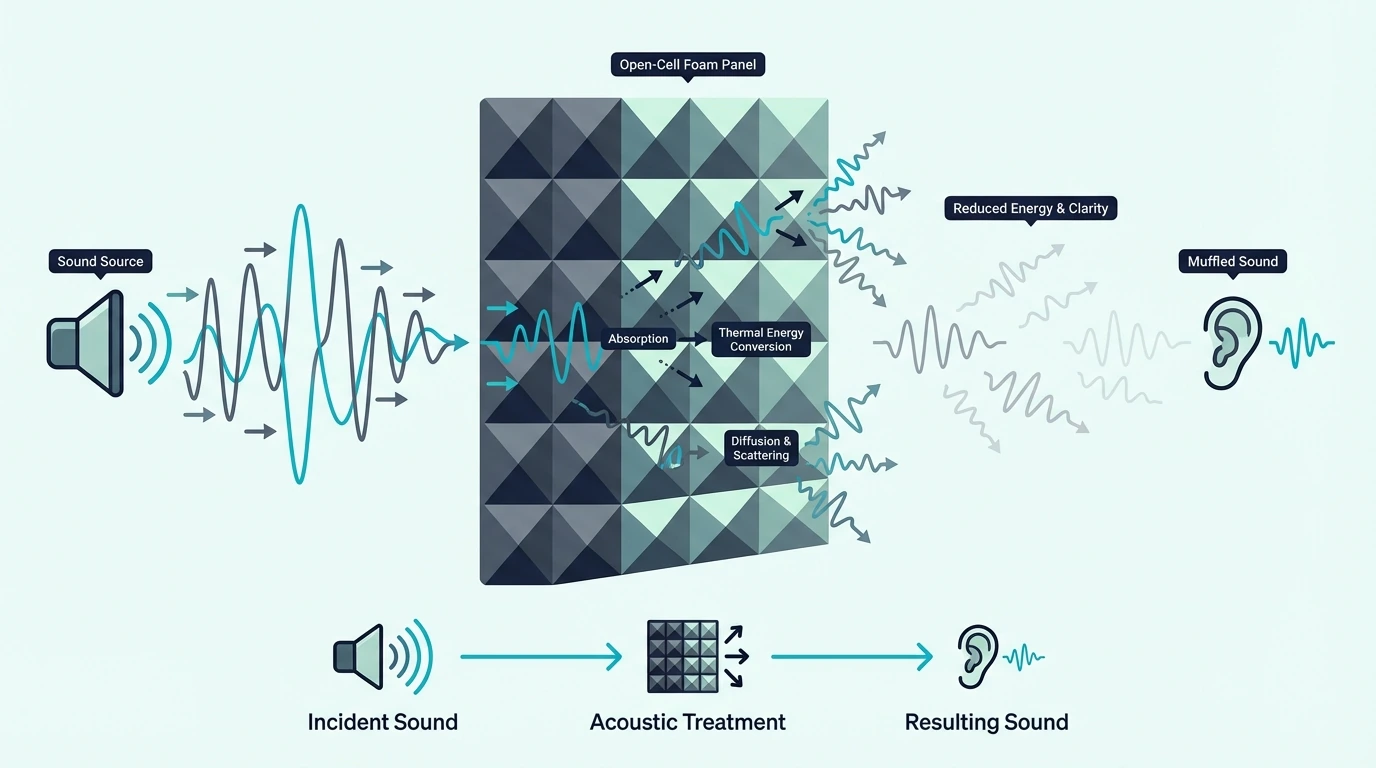
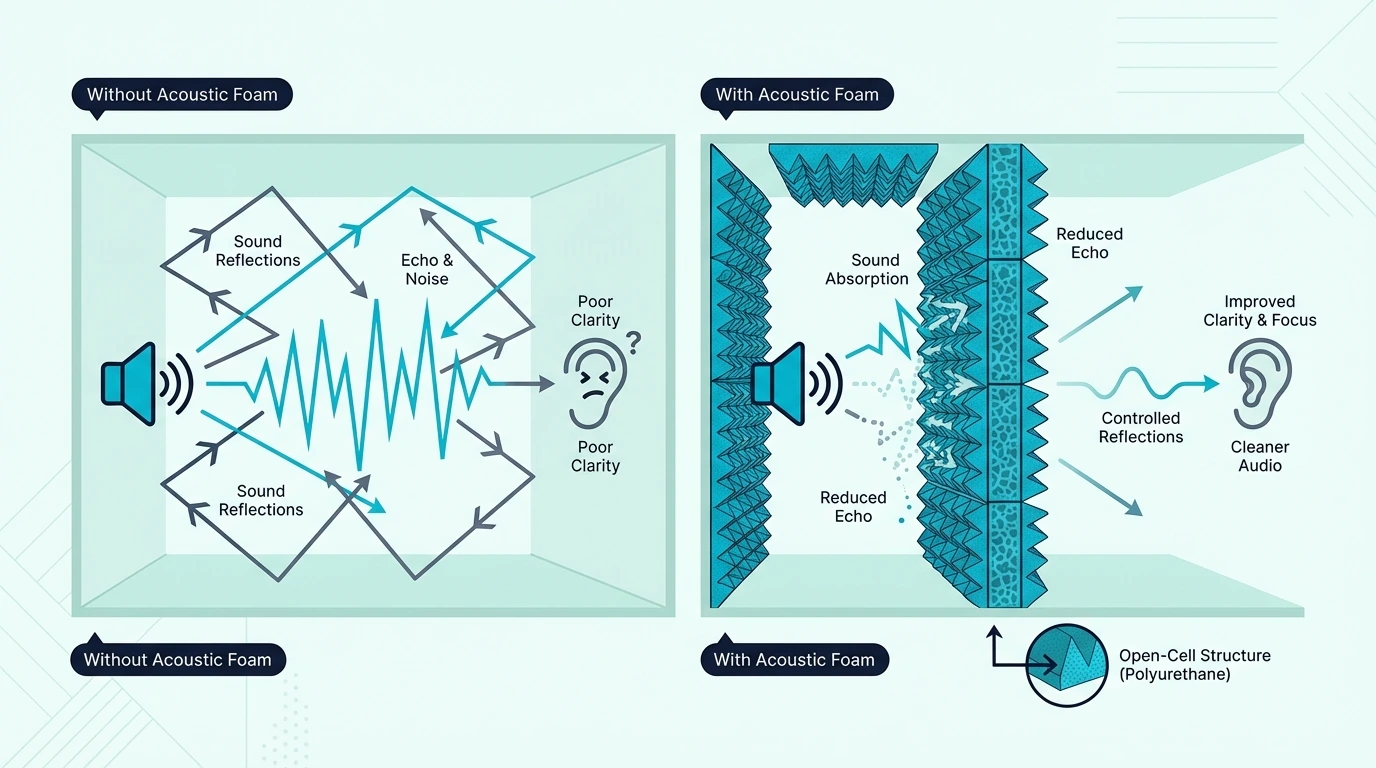
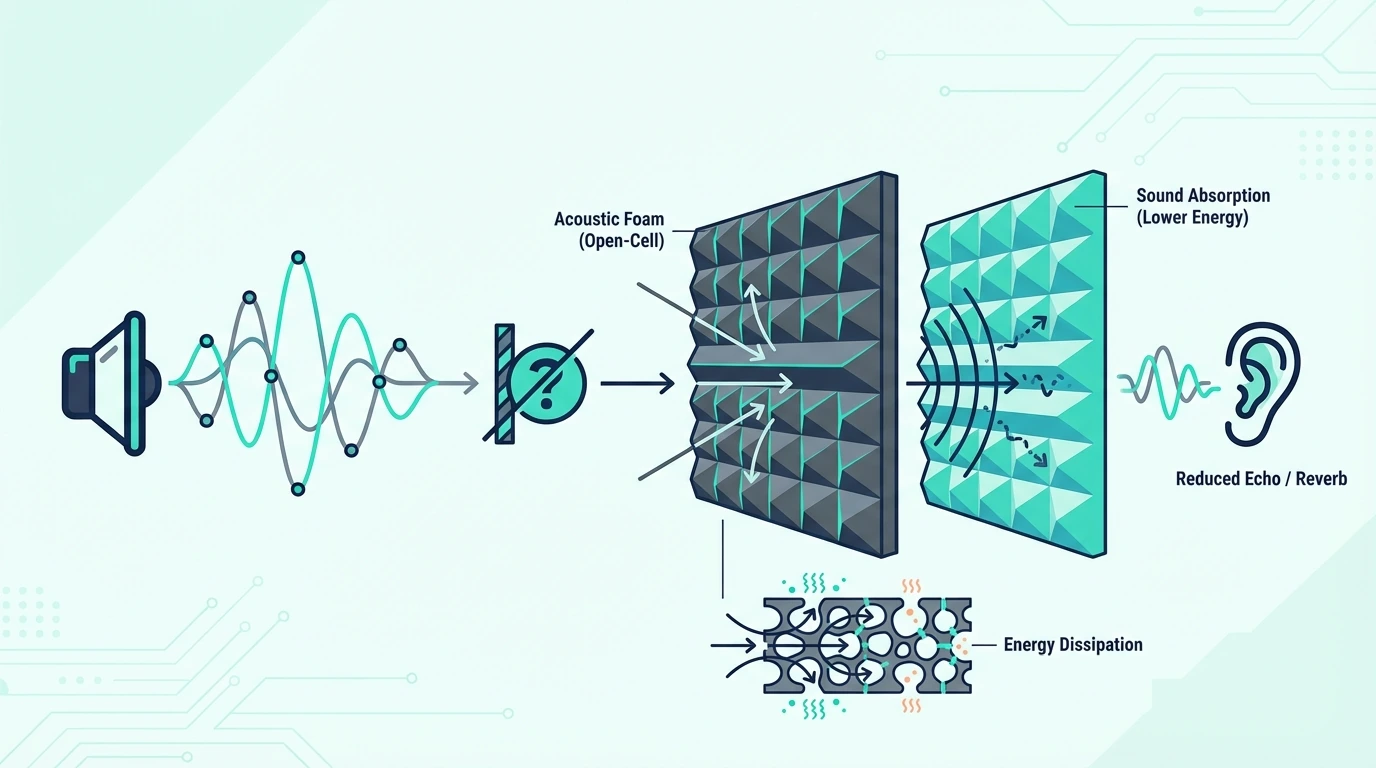
Once you see past the marketing, foam’s real capability becomes clearer. Foam mainly changes what happens after sound is already inside the room. It helps reduce reflections, shortens echo, softens harshness, and can make speech or recordings easier to hear.

That is why foam belongs more naturally in conversations about room acoustics than in a full how to soundproof a room plan. If the room sounds hollow, bright, or splashy, foam may help. If sound is moving through the wall itself, the real problem is elsewhere.

Why foam fails at blocking noise

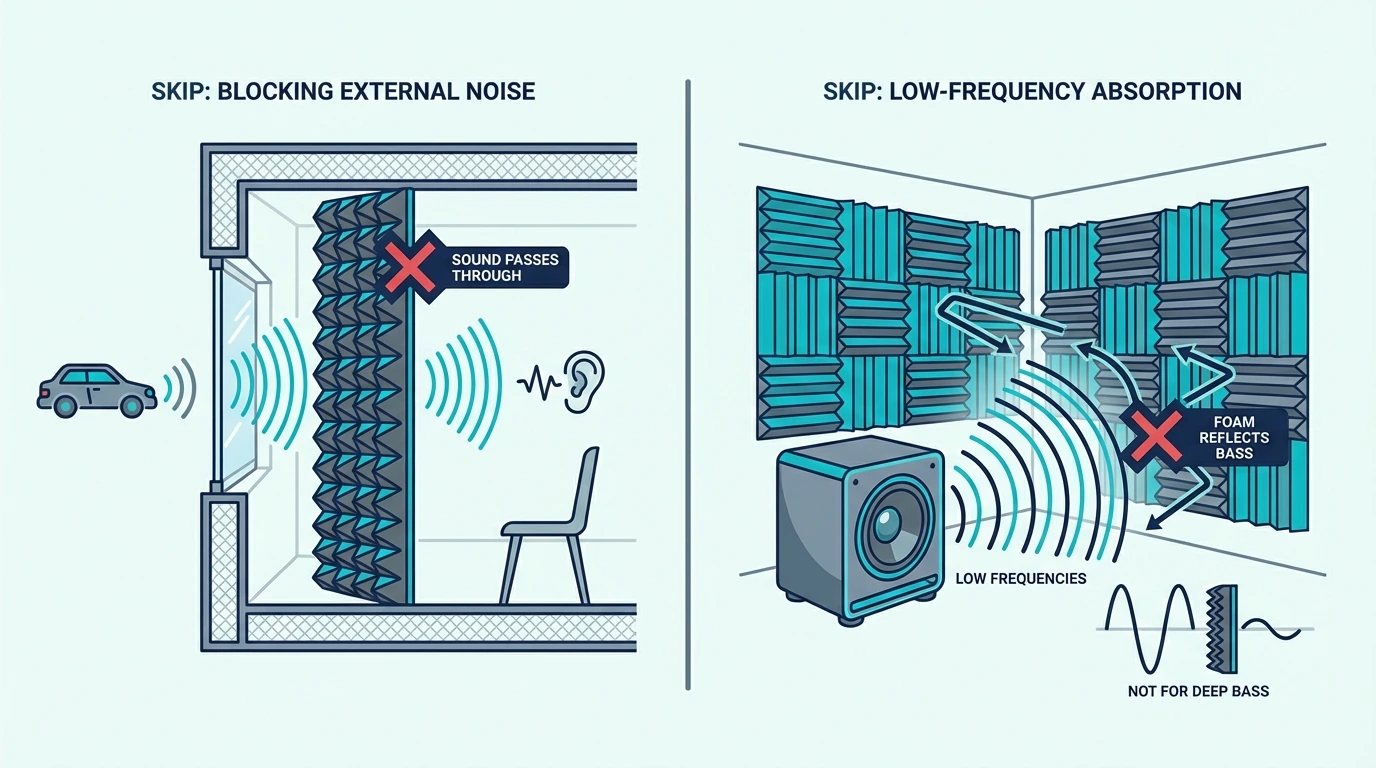
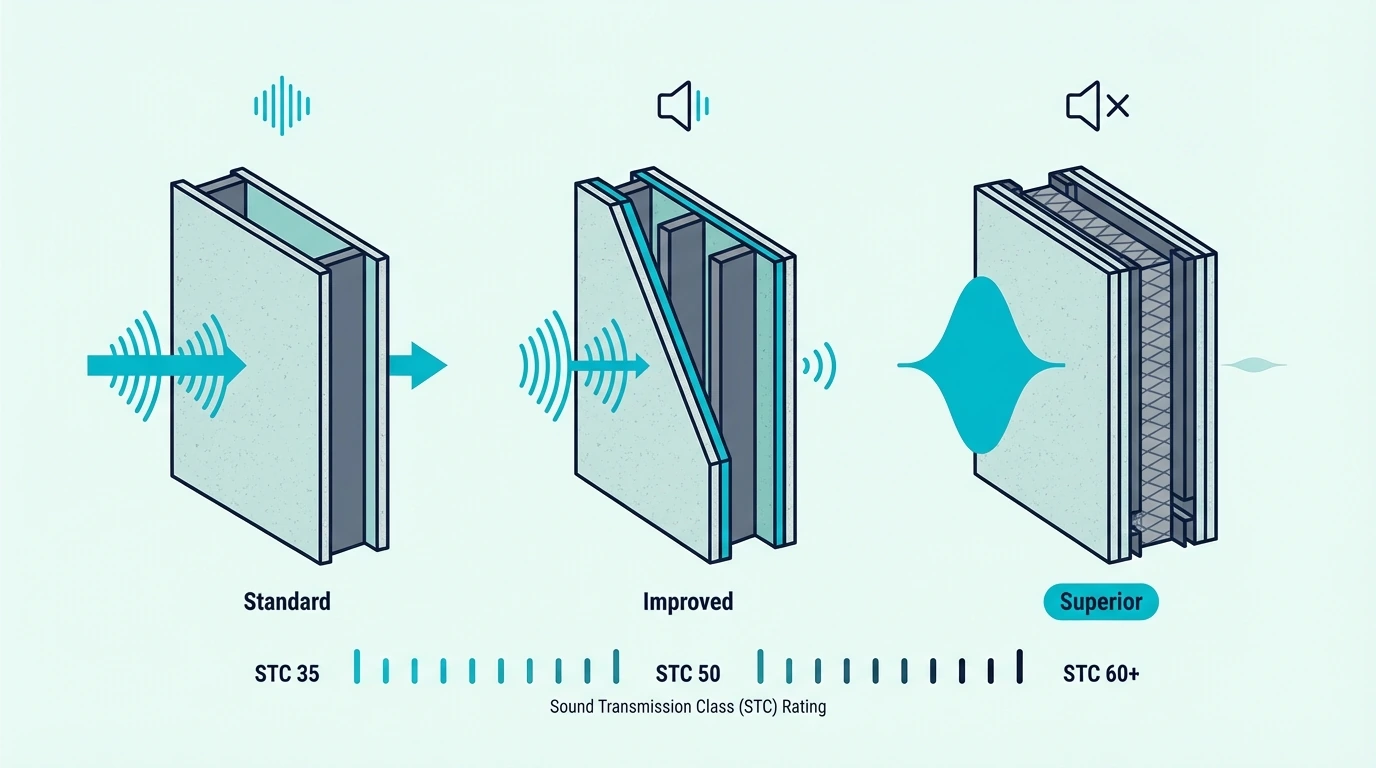
That absorption strength also reveals the core weakness. Foam usually does not stop much sound transmission because it lacks the mass needed to resist sound waves. It is soft, light, and porous, which is helpful for absorption but weak for blocking noise through a wall, ceiling, door, or window.

That is the same reason the difference between sound deadening vs soundproofing matters so much here. A product can reduce harshness inside the room and still do very little to stop sound crossing the structure.

Where Foam Actually Earns Its Keep

Benefits of foam for echo control rather than soundproofing

Once you stop asking foam to do the wrong job, its real strengths are easier to appreciate. Foam can be genuinely useful when the goal is controlling the sound inside the space rather than blocking transmission to another one.

Recording studios and content rooms

Foam’s real value shows up in spaces where reflections are the enemy. Foam is useful in recording studios, podcast rooms, voiceover booths, gaming rooms, and content spaces where reflections are the real problem. It can make a room sound less splashy, reduce flutter echo, and improve speech clarity for mics and monitors.

That is why studio owners often use foam after the shell is already acceptable for leakage, not as the whole soundproofing plan. This is also where pages like do soundproof panels work and best soundproofing panels help clarify what treatment products are actually for.

The perceived-quiet effect

That studio benefit extends to everyday rooms too. Yes, foam can make a room feel quieter to the person inside because there is less reflected energy bouncing back at them. That softer impression is real, but it is not the same thing as meaningfully reducing the amount of sound getting through a building assembly.

This is why people sometimes swear foam “worked” while their neighbor still hears them. The room feels calmer, but the transmission path remains mostly intact.

Best placement for foam you already own

That perceived improvement works best when the foam is in the right spot. If you already have foam, use it where reflection control matters most. That usually means the biggest hard surfaces around a desk, mic position, listening position, or other area where echo is obvious.

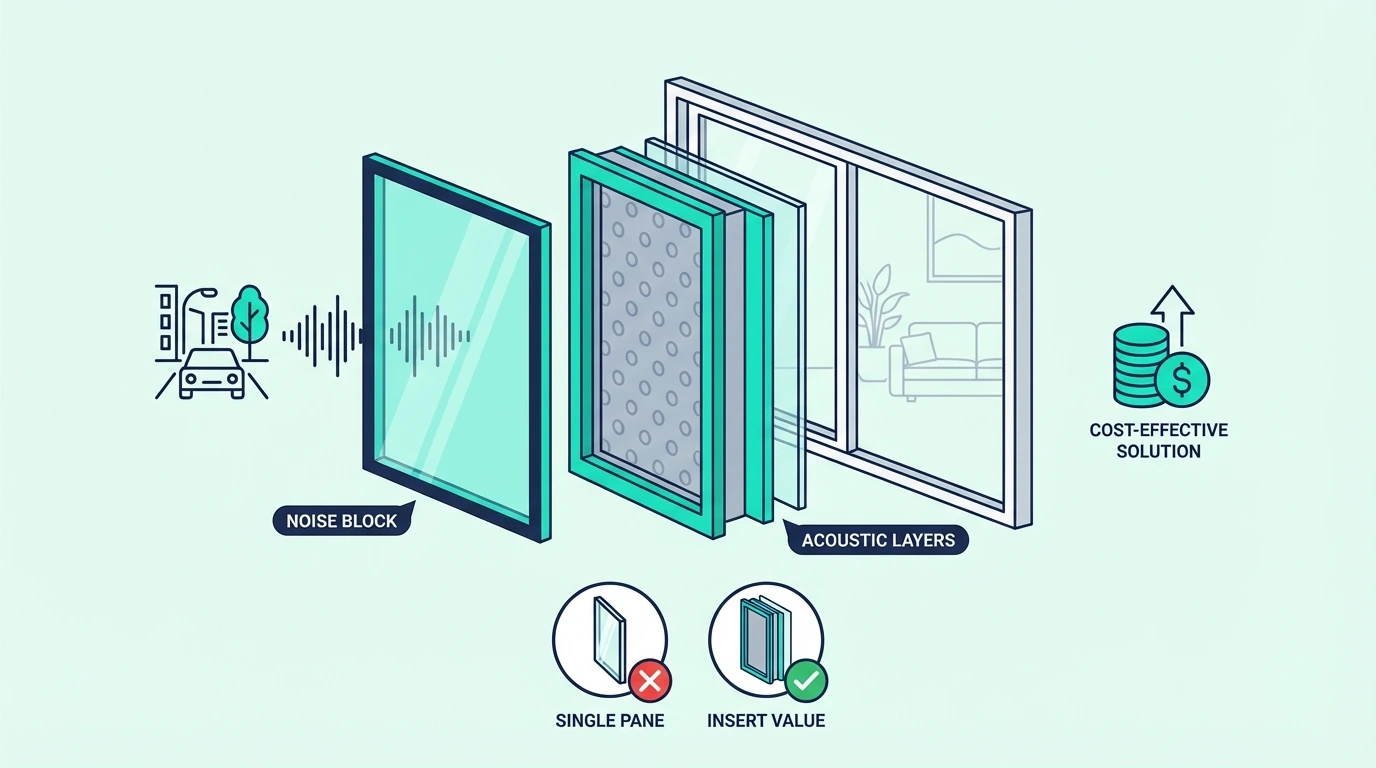
Foam also makes more sense in rooms where the real complaint is clarity or harshness instead of privacy. If the issue is outside noise, shared-wall noise, or leakage through weak openings, start shifting your attention toward how to soundproof a wall, how to soundproof a door, and how to soundproof windows instead.

What Happens When Foam Meets Real Soundproofing Problems

Common misuse of foam for blocking noise

This is where foam disappoints people most. If you use it as a true soundproofing fix, the problem usually stays louder than expected because the main transmission path was never really addressed.

Noisy neighbors through walls

This is where the gap between absorption and blocking becomes most painful. Foam may slightly change how your side of the room feels, but it usually does not solve a serious neighbor-noise problem on its own. Shared-wall noise often needs more mass, better sealing, and sometimes a stronger wall system rather than another soft surface layer.

That is why buyers who are dealing with neighbor noise should connect this topic to how to soundproof an apartment and how to soundproof a wall. Those pages align better with the real physics of blocking sound.
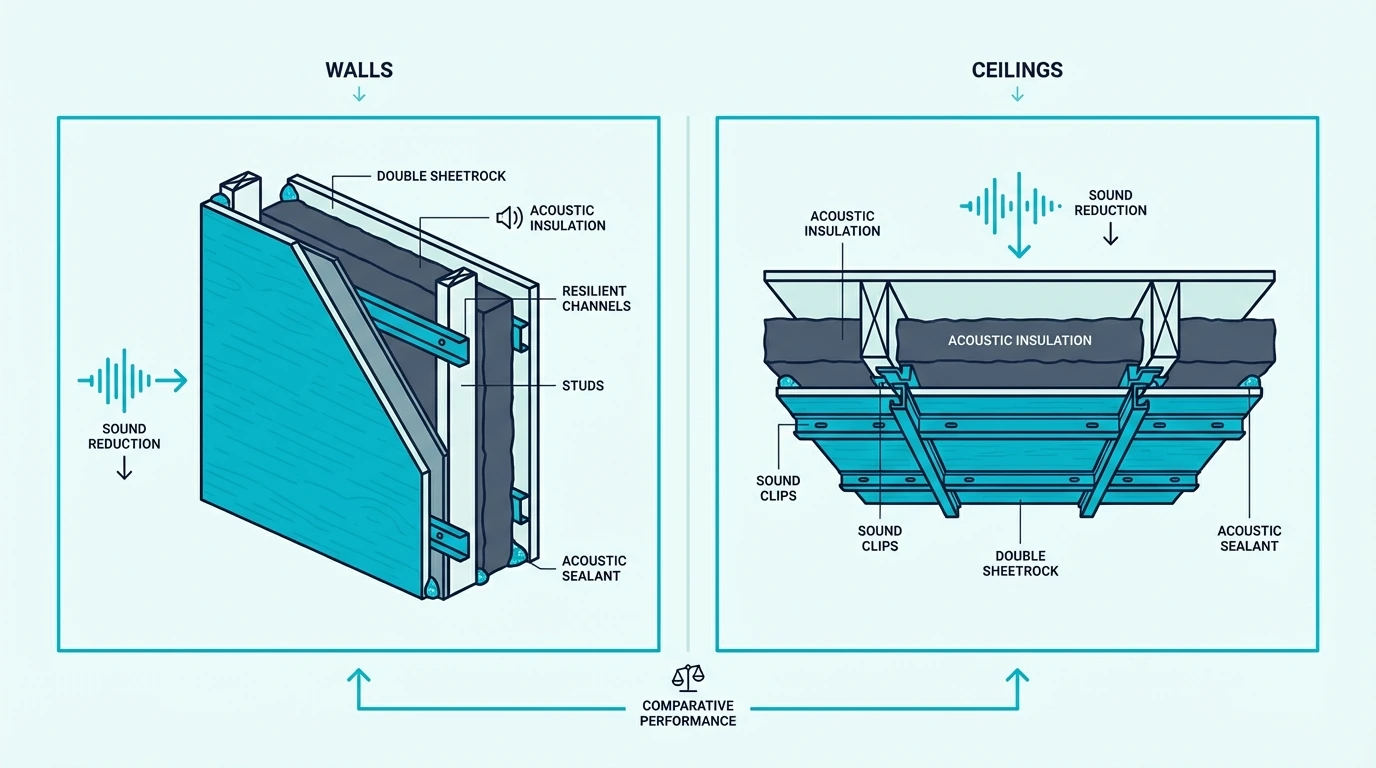
Ceilings and floors

The wall limitation applies even more strongly overhead and underfoot. Usually foam does not help very much when the main problem is transmission. Ceiling and floor complaints often involve impact noise, flanking paths, and structure-borne vibration, which foam is especially weak at solving.

If the issue is above or below you, the better next pages are usually how to soundproof a ceiling and how to soundproof a floor. Foam on the visible surface rarely competes with a better assembly.

The narrow slice foam can help with

Despite those failures, foam is not completely useless against noise. Foam can shave down some reflected harshness and may slightly soften how obvious certain high-frequency sounds feel inside the room. It can also help reduce the sense of “liveliness” that makes a space seem louder than it really is.

That is still different from true sound blocking. If you need a slightly heavier temporary layer than foam, something like US Cargo Control 96 x 80 in Extra Large Sound Dampening Blanket with Grommets is a better example of a stopgap than foam, even though it still does not replace real soundproofing.

What Actually Works When the Goal Is Blocking Noise

Alternatives to foam for real soundproofing

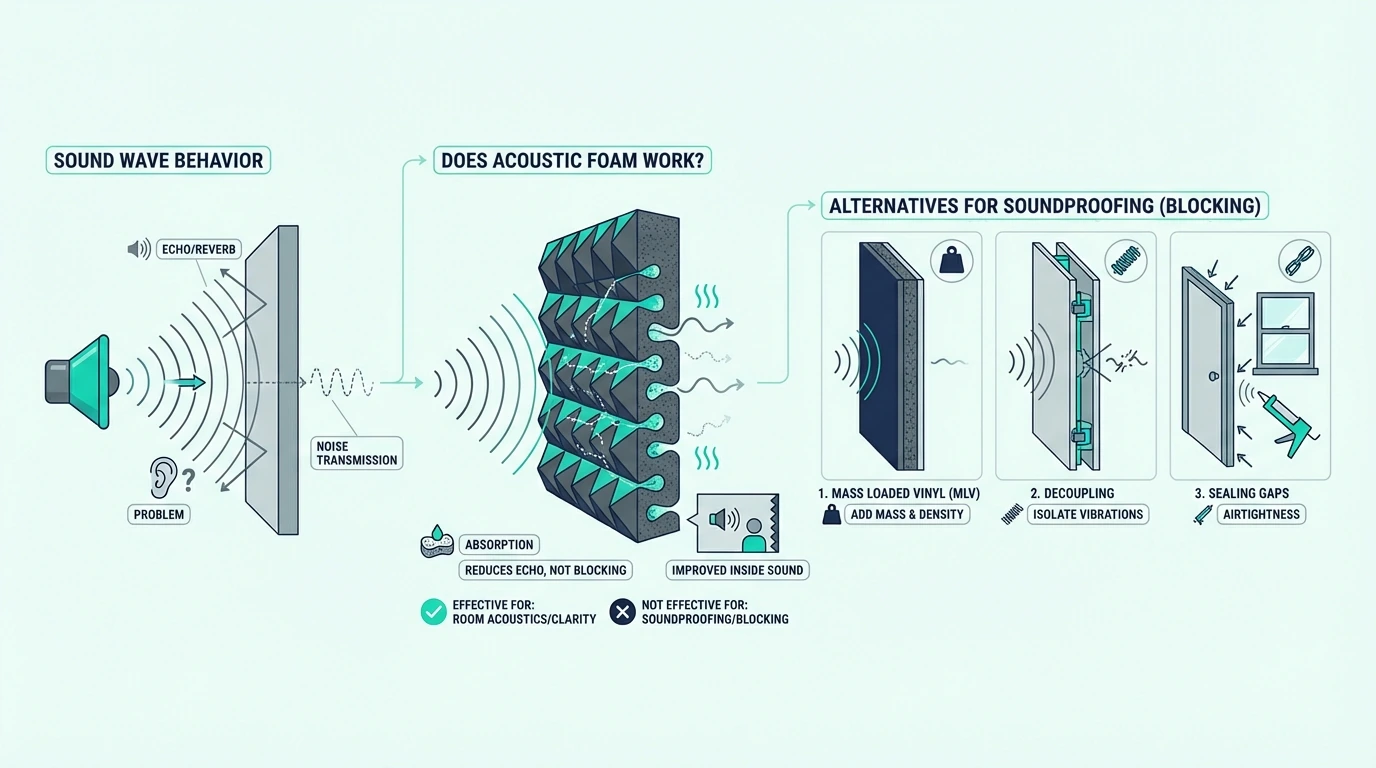
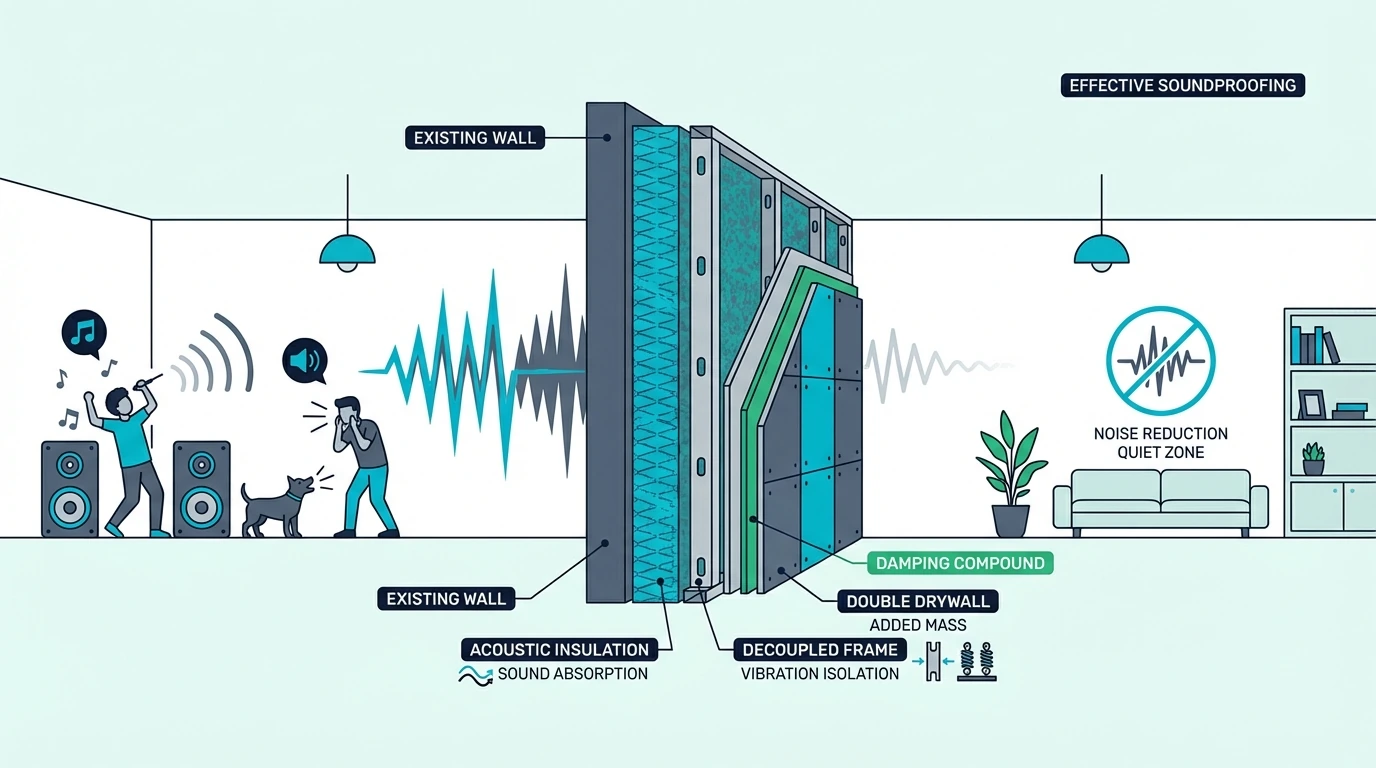
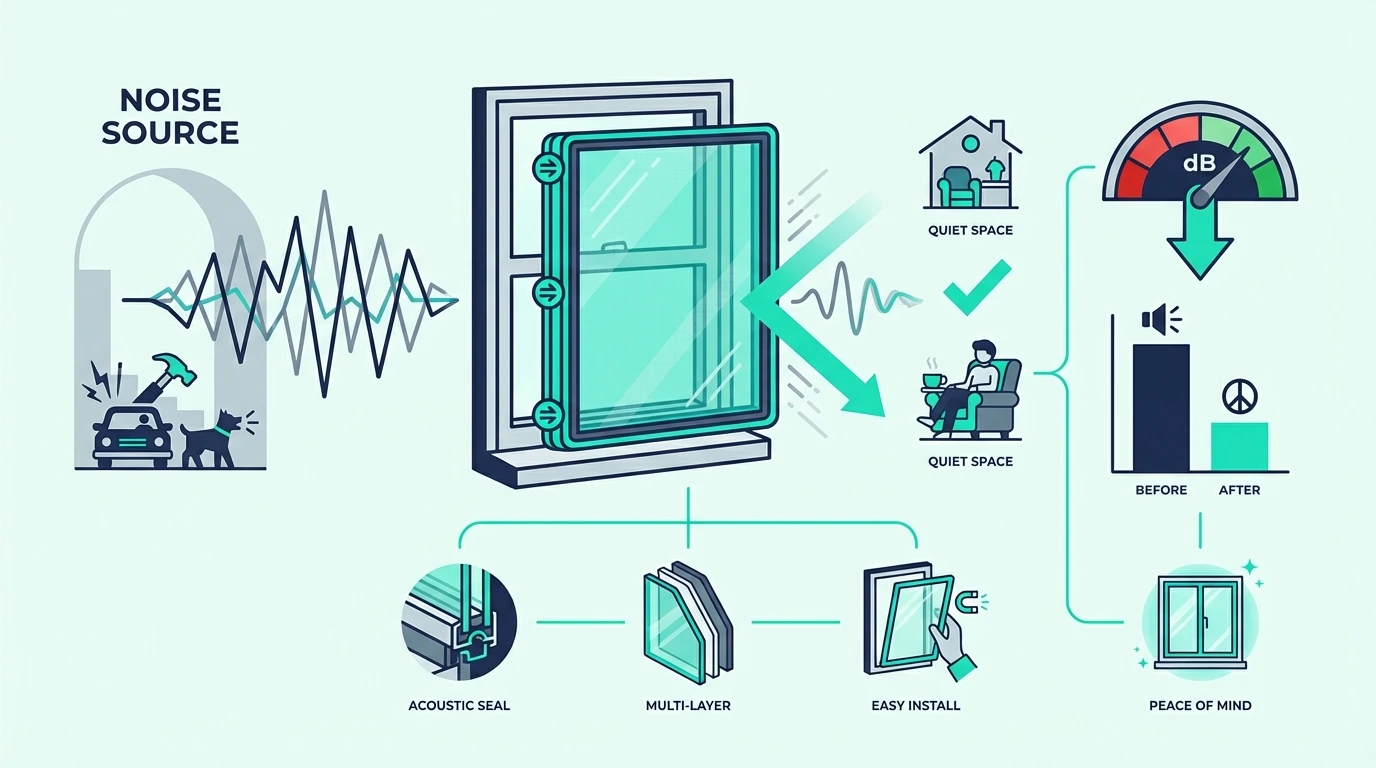
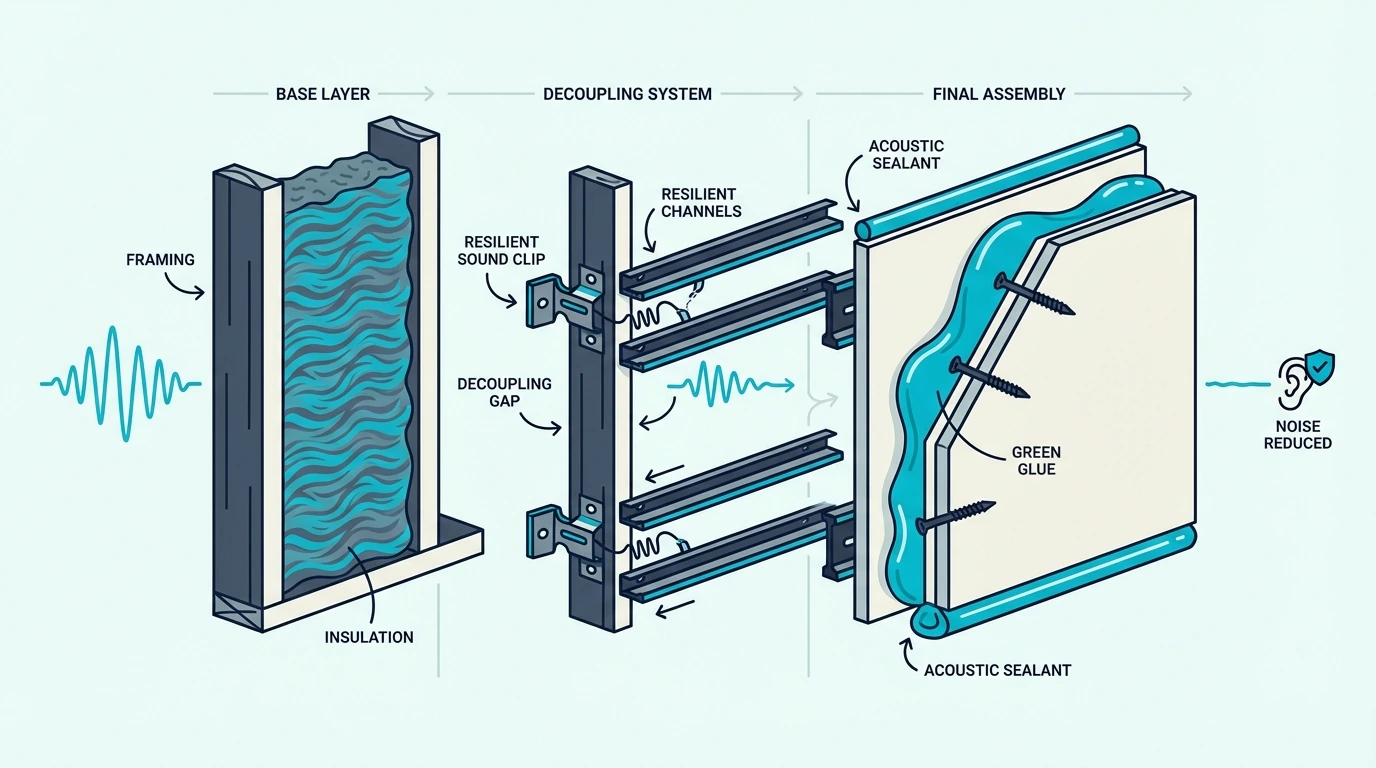
Now that the foam myth is clearer, the better question is what actually works when the goal is blocking noise. Real soundproofing usually comes from the same core ideas over and over again: mass, sealing, damping, insulation, and sometimes decoupling.

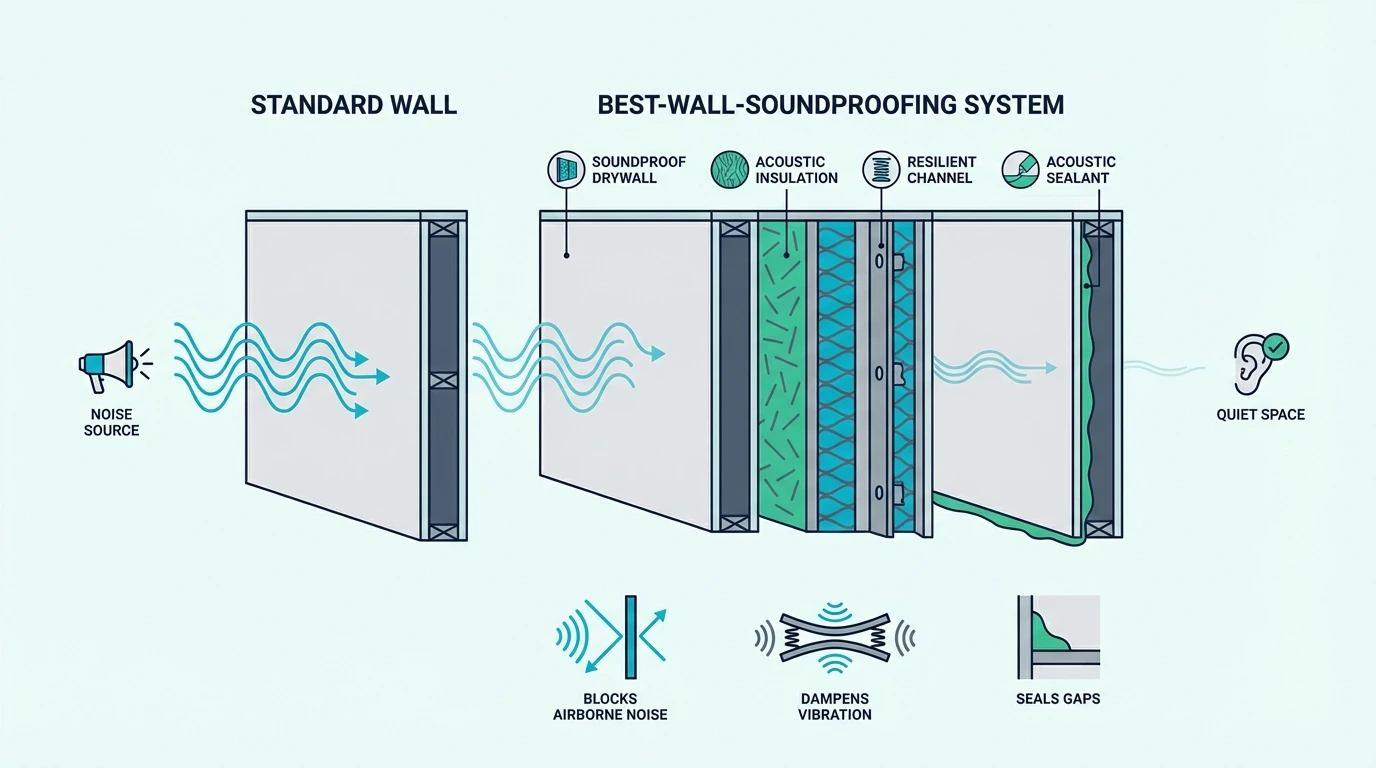
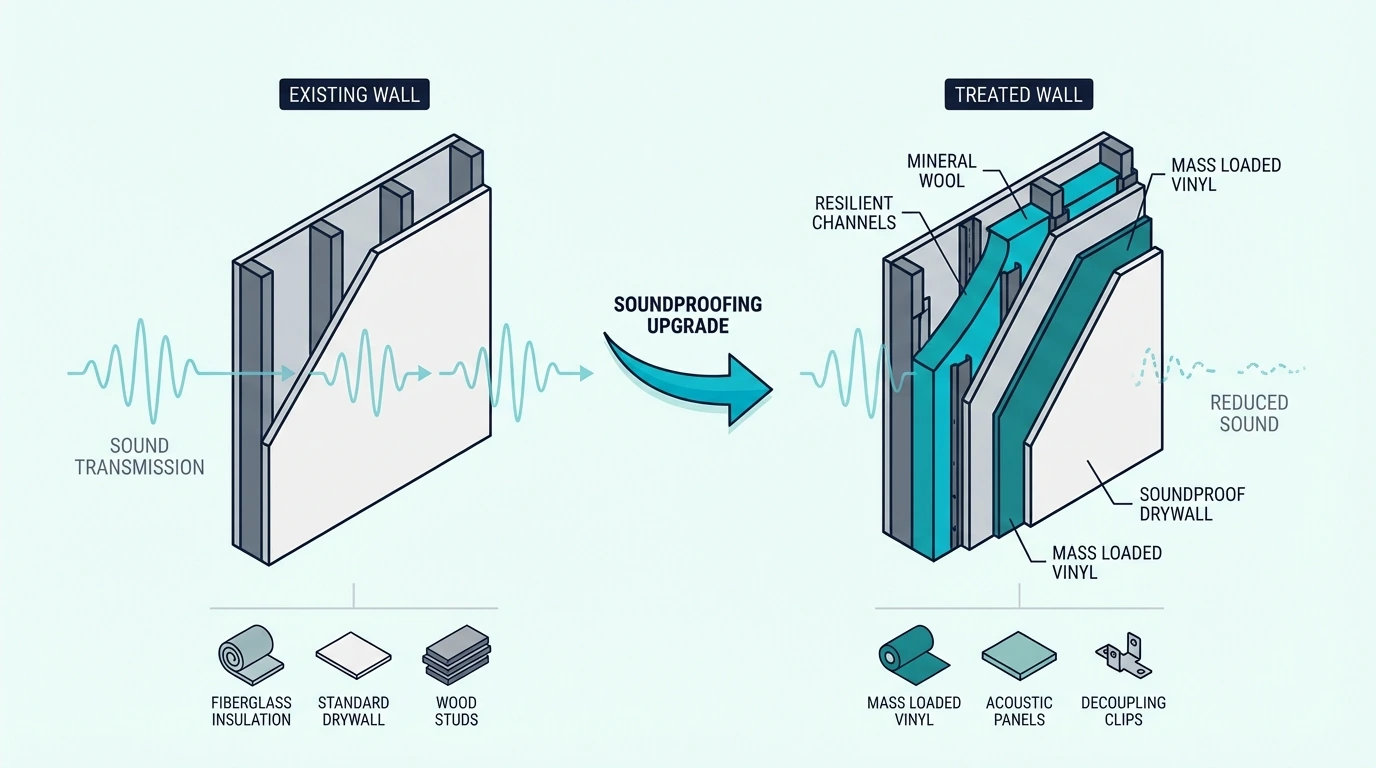
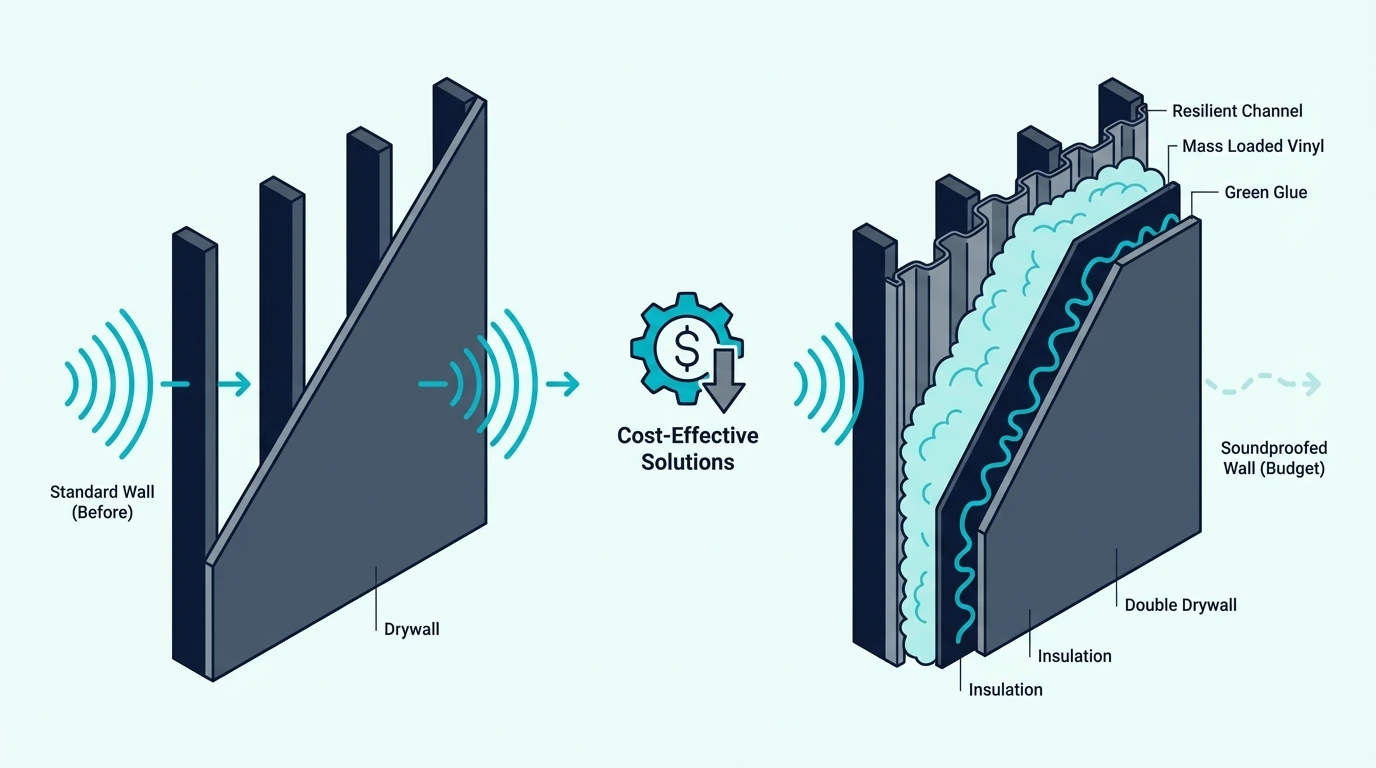
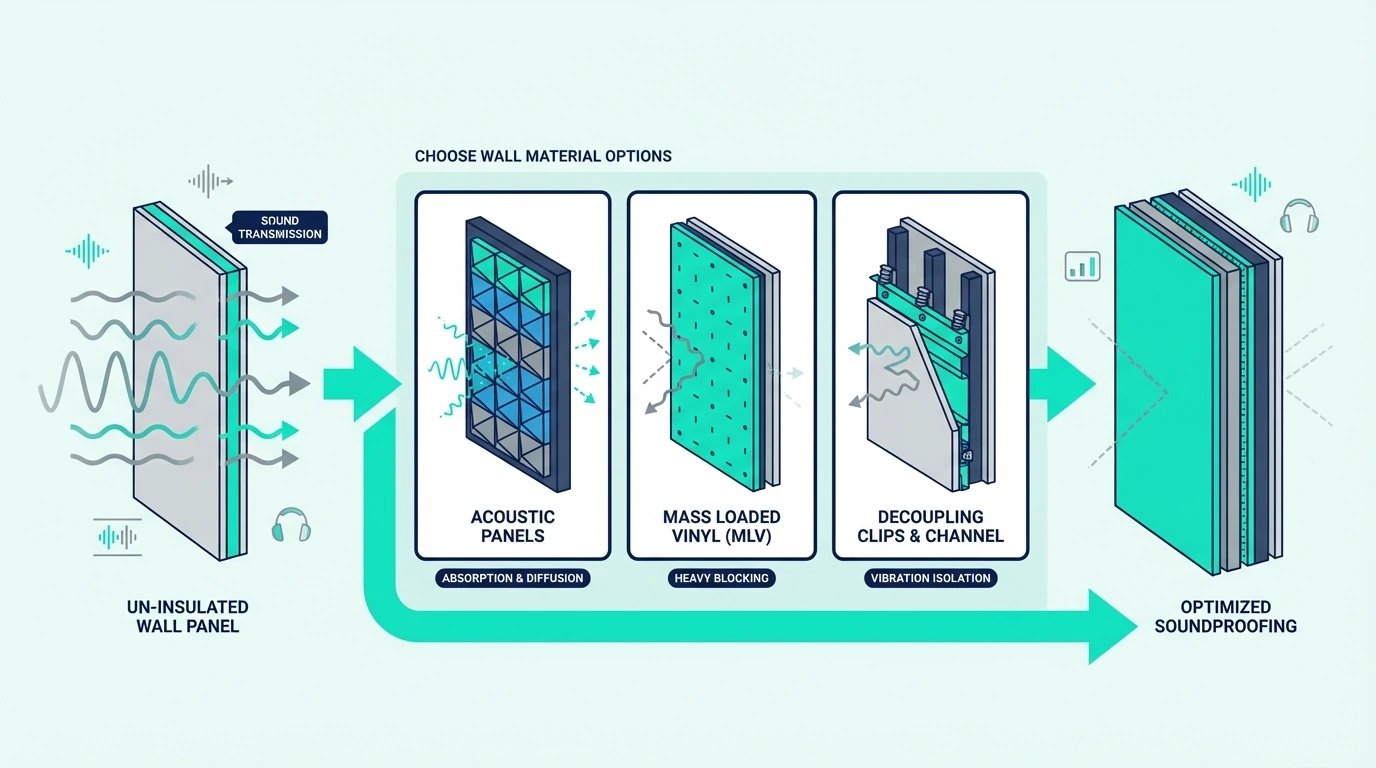
Materials that add real mass

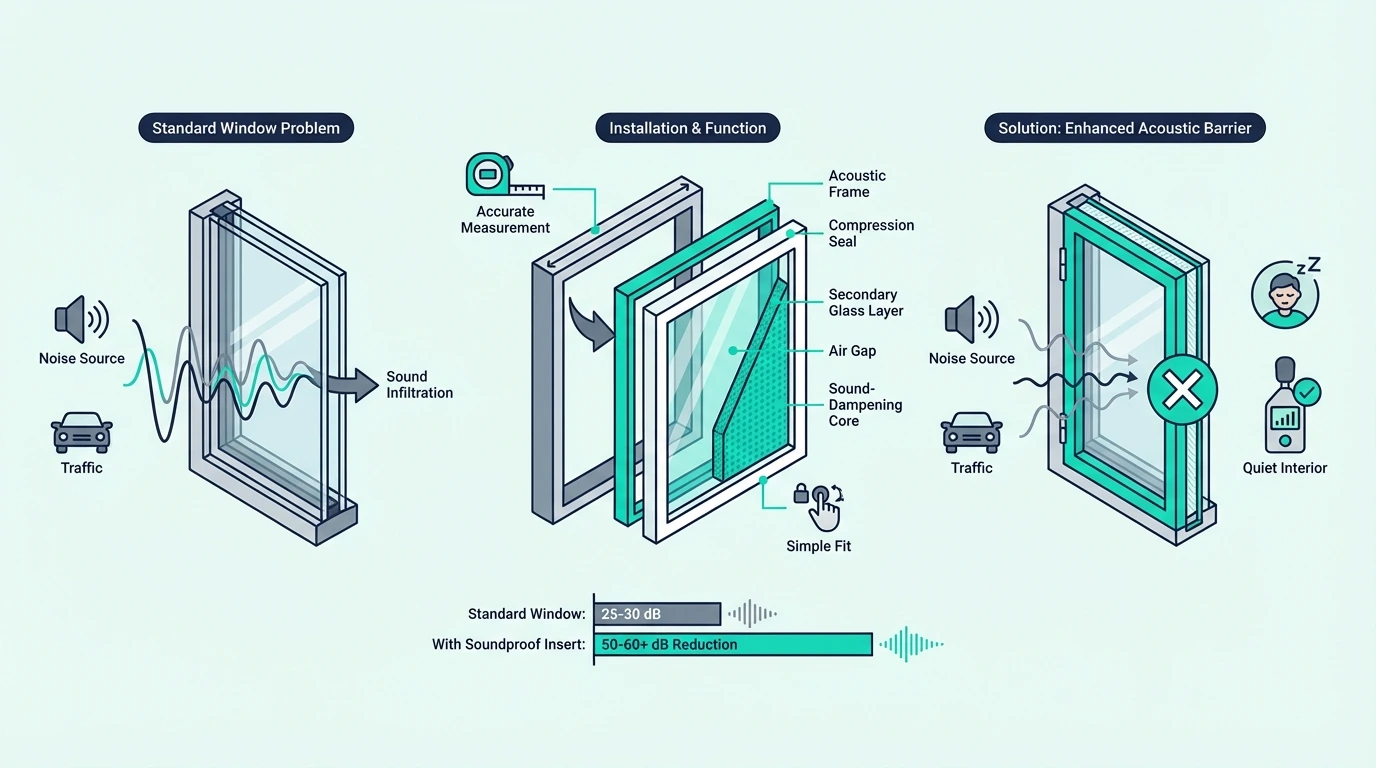
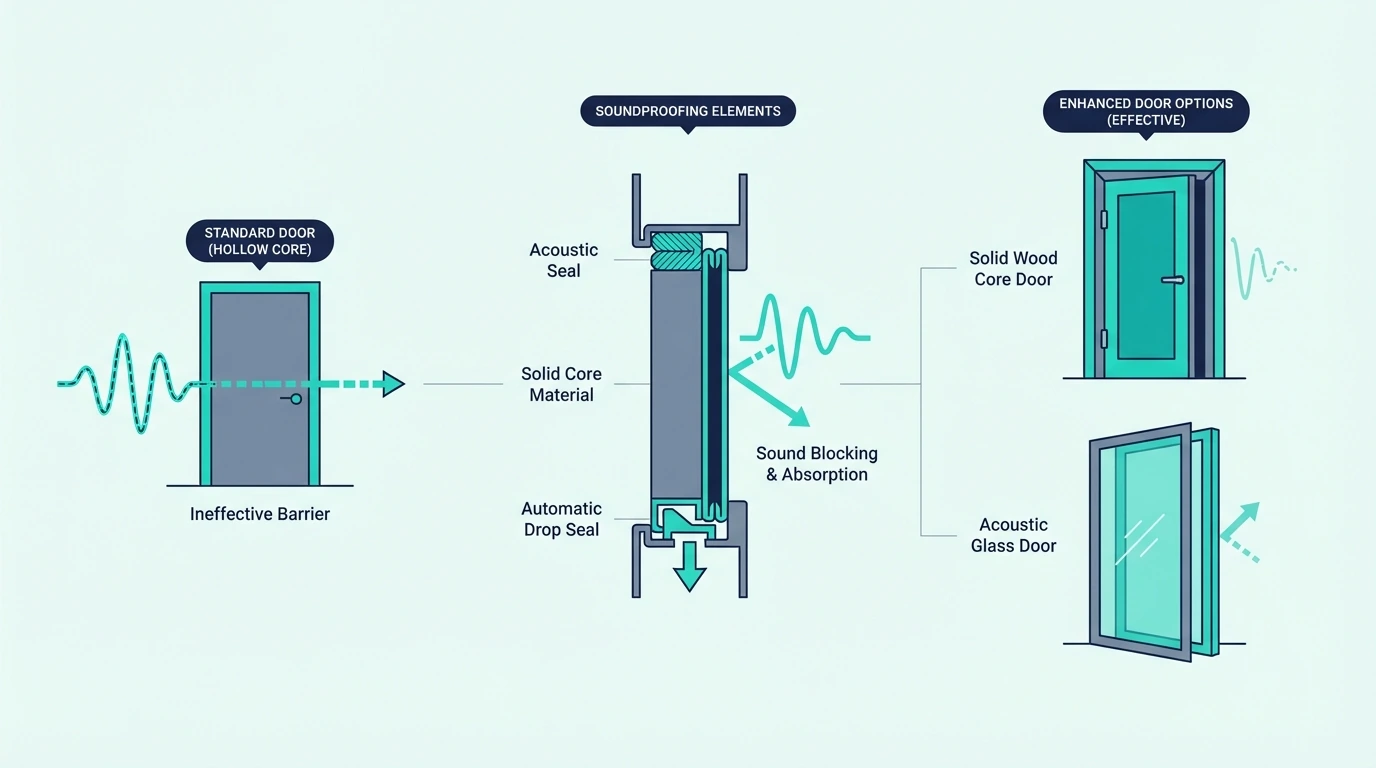
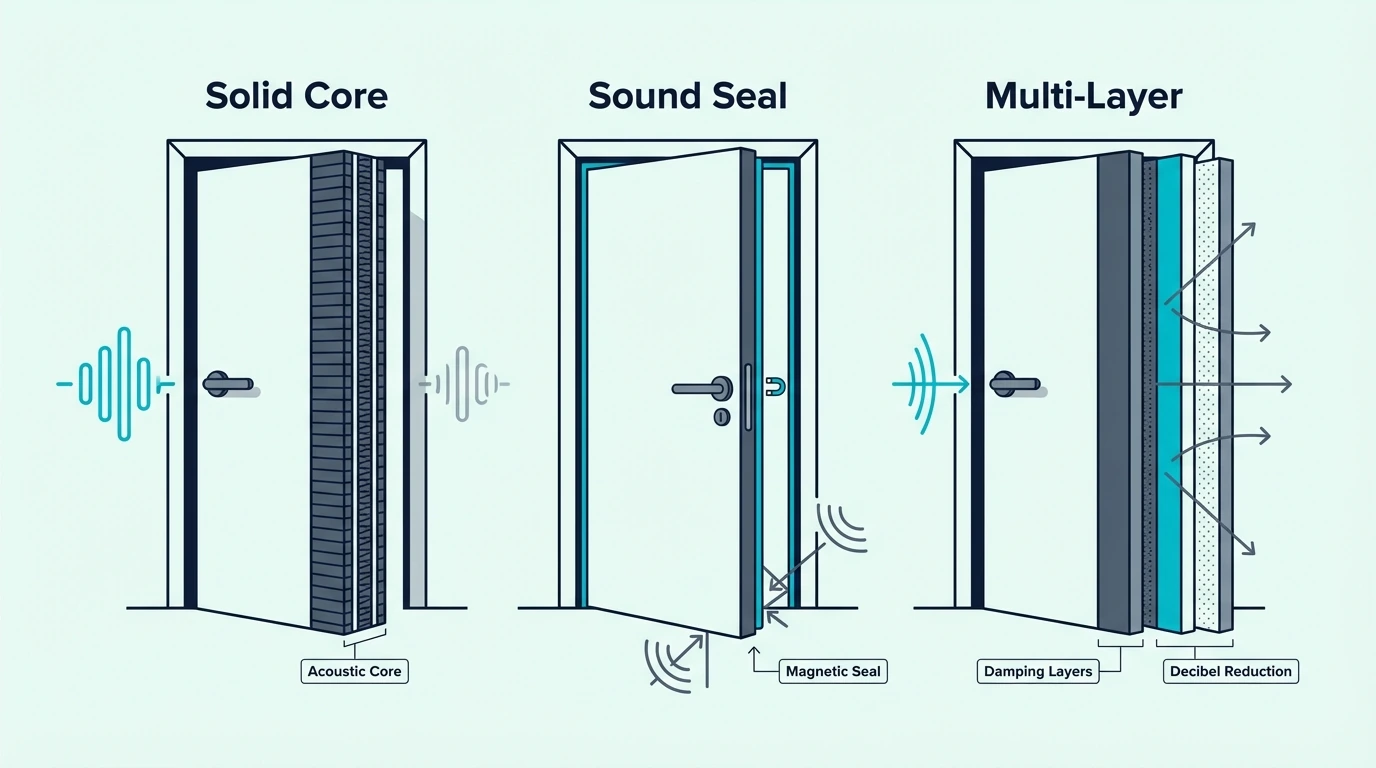
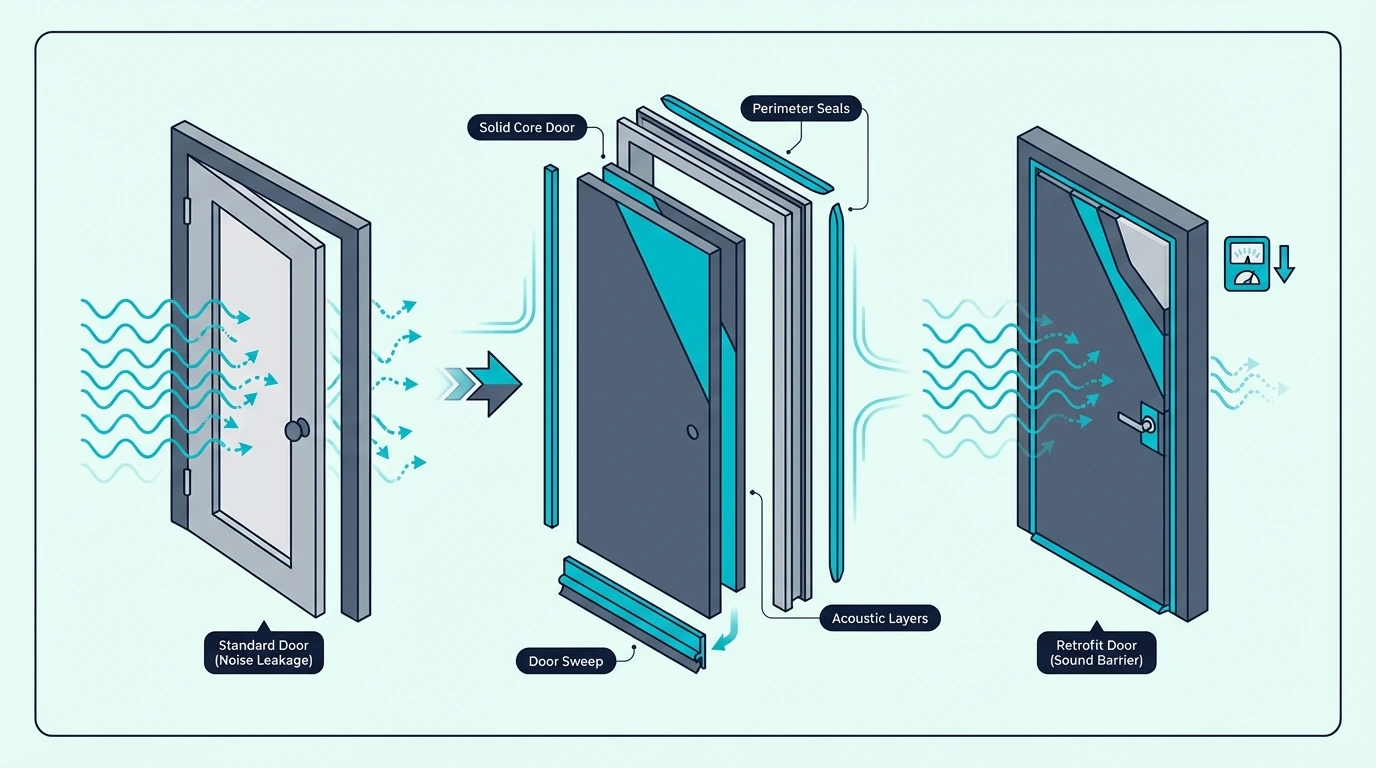
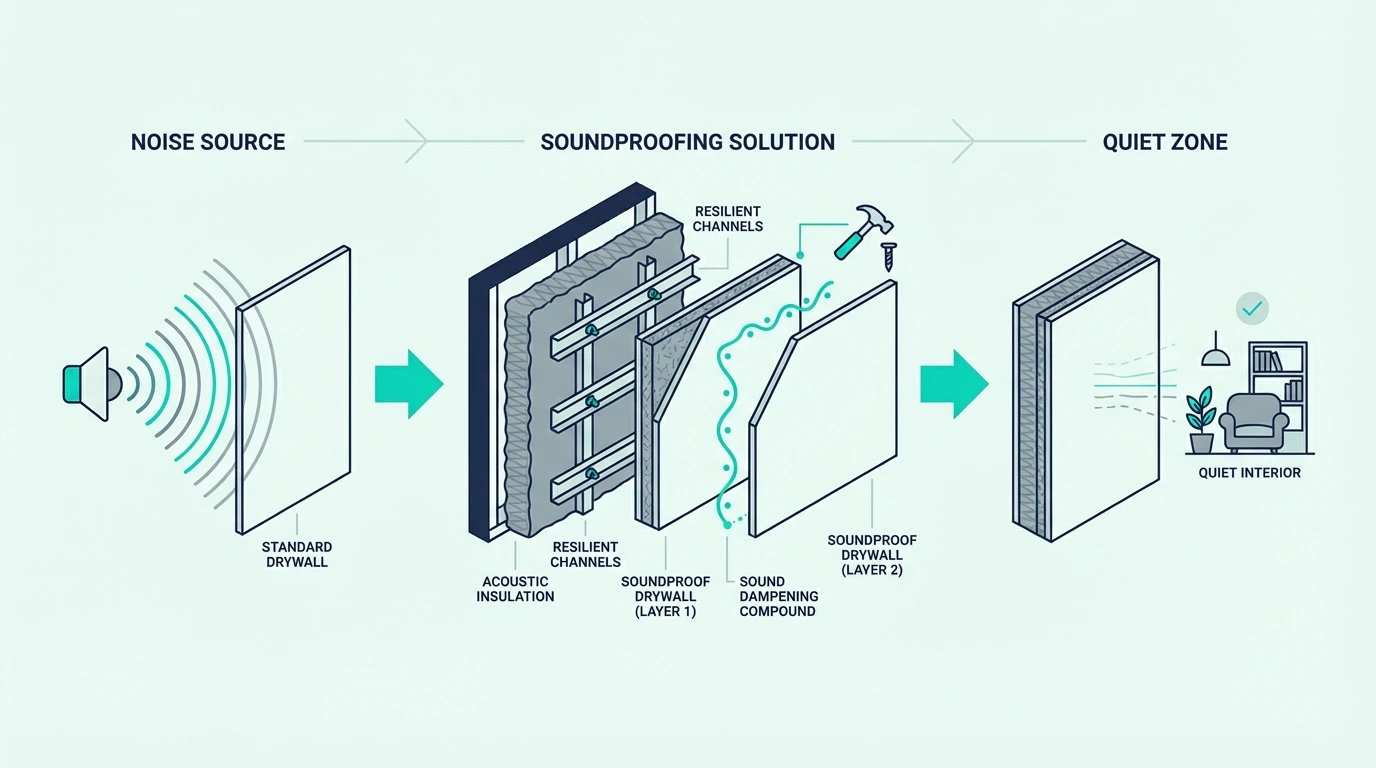
The missing ingredient in every foam failure is mass. Materials that add mass work better because they resist sound transmission more effectively than lightweight foam. That includes thicker drywall systems, mass loaded vinyl, solid-core doors, better window solutions, and other denser layers chosen for isolation rather than echo control.

A product like Trademark Soundproofing Mass Loaded Vinyl 1lb MLV Soundproofing for Wall Sound is a much better example of soundproofing logic because it is built around blocking transmission rather than just absorbing reflections.

Insulation and decoupling

Mass handles the face of the barrier, but the cavity and the structural path need attention too. Insulation and decoupling matter more when the problem is inside the wall, ceiling, or floor system itself. That is especially true for louder noise, lower frequencies, or any space where the existing assembly is too light and too directly connected.

That is also why best insulation for soundproofing and best soundproofing material are better guides for real isolation than foam marketing pages. They speak to the structure, not just the surface finish.

The cheapest real improvement

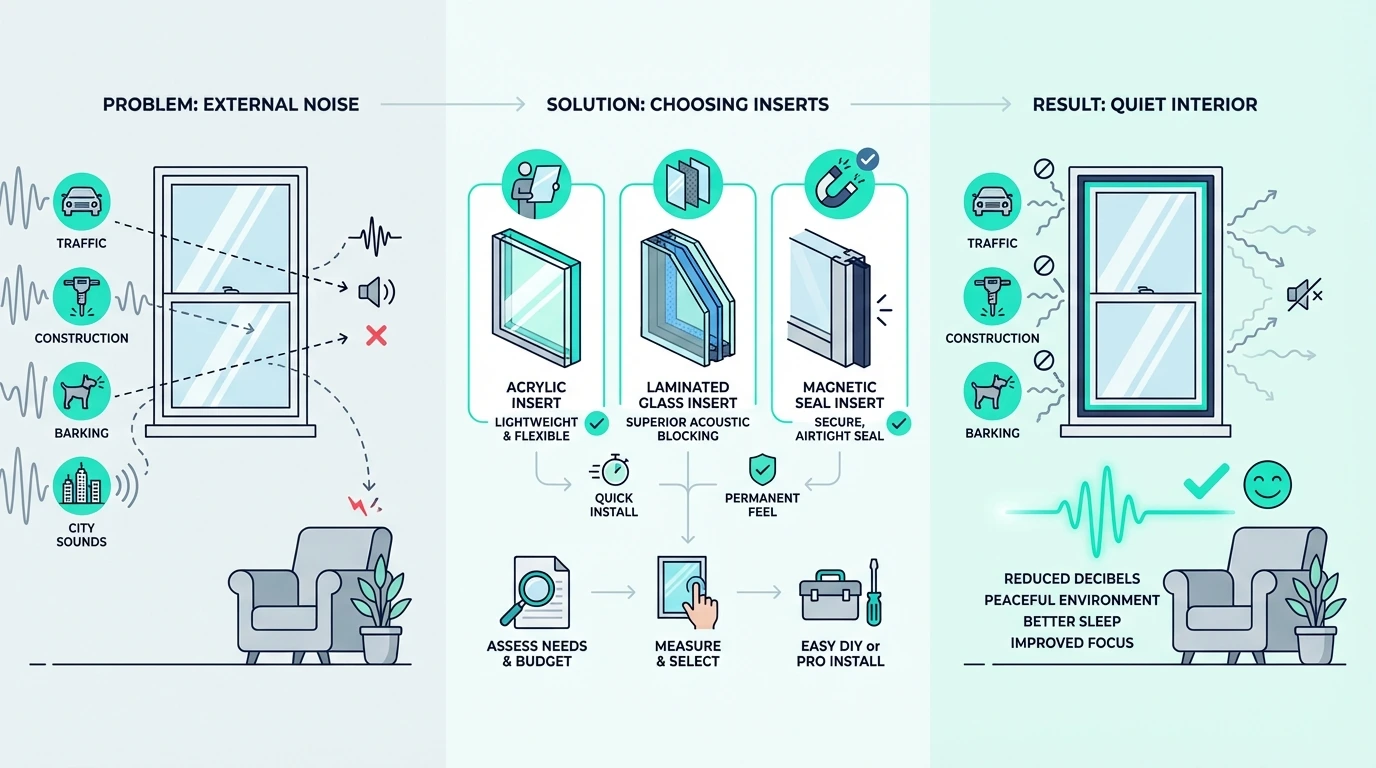
If mass and insulation feel like too much commitment right now, the cheapest real improvement is sealing. Start by fixing the biggest leak before buying a wall full of foam. A lot of rooms leak more around doors, window edges, thresholds, or visible gaps than through the broad wall surface people obsess over.

That is where a simple product like 33 Ft Gray Self-Adhesive Soundproofing Weather Stripping for Doors and Windows makes more sense than another foam panel if the room is obviously leaking through openings.

If You Still Want Foam: Which Type and When

Which foam works for acoustic treatment, not soundproofing

This is one of the most common search intents, and the honest answer is that the best foam for true soundproofing is usually no foam at all. Foam can still be useful, but mostly when you judge it as absorption treatment instead of a true sound blocker.

Thickness and absorption range

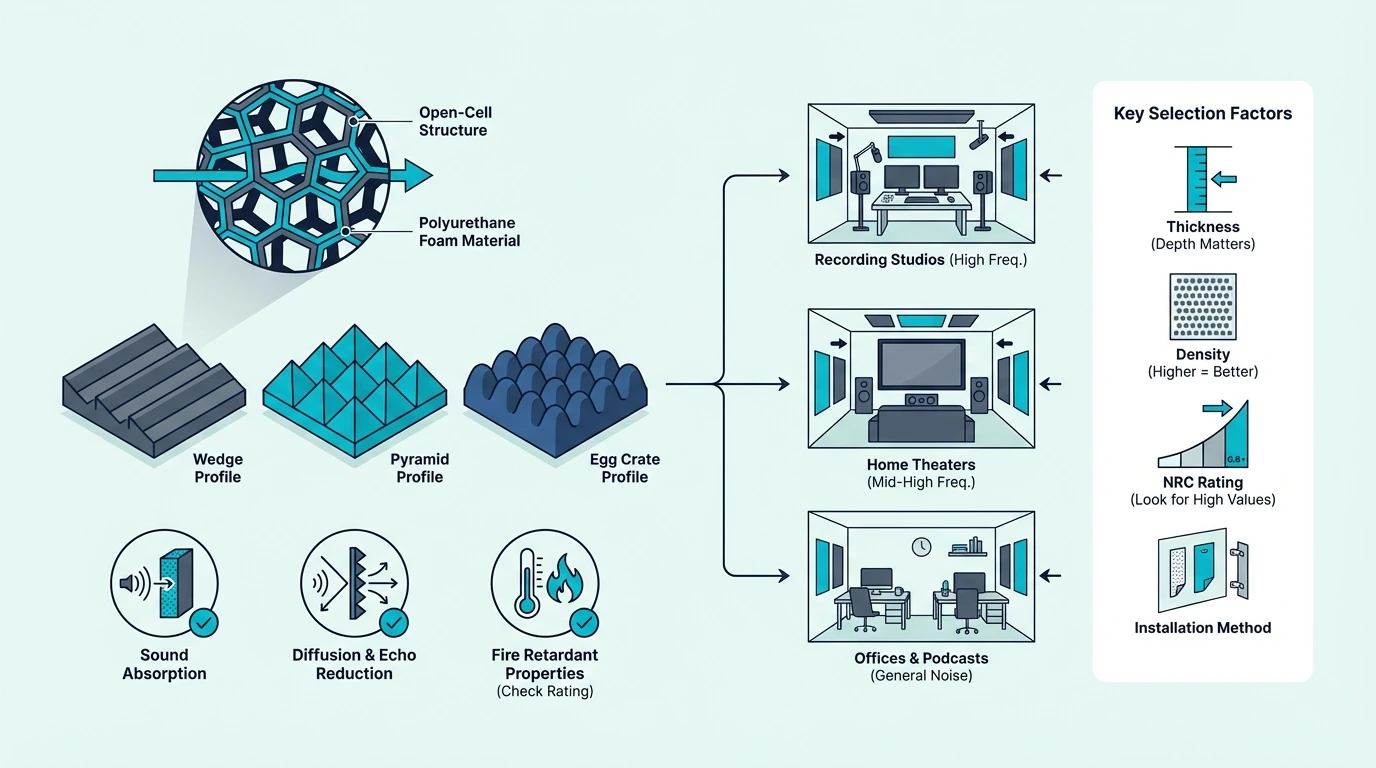
If you have confirmed the problem is room acoustics, thickness matters for absorption. Thicker foam is generally better at absorption, especially as you move down from very high frequencies into broader midrange control. That does not mean it suddenly becomes a strong barrier against wall transmission.

So yes, thickness can matter for room treatment, but it does not solve the core problem that foam still lacks the mass and assembly strength needed for serious isolation.

Real panels vs household foam

That thickness advantage only applies to purpose-made products. Purpose-made foam panels are more predictable and more useful than random household materials when your goal is absorption. They usually look cleaner and perform more consistently than improvised mattress toppers, packing foam, or egg crate bedding.

That still does not turn them into real soundproofing. If the comparison is between two absorption materials, better foam panels win. If the comparison is between foam and a real soundproofing strategy, the foam is still the wrong category.

Buy vs skip: the one-rule filter

With the right type and thickness in mind, the final question is simple. Buy foam when the room sounds bad and you are trying to improve echo, reverb, or recording clarity inside the space. Skip it when the real problem is sound getting through the wall, ceiling, floor, door, or window.

That one rule prevents most wasted money. If your priority is privacy or blocking noise, move toward the broader soundproofing hub, wall guide, and materials guide instead of relying on foam terminology.

The Bottom Line

Does soundproof foam work is really a question about what you want foam to do. Foam can work well for echo control, room comfort, and cleaner in-room acoustics, but it is usually far weaker at stopping sound from traveling through a building assembly.

If your goal is a calmer-sounding room, foam may be worth buying. If your goal is blocking neighbor noise, outside noise, or transmission through walls, floors, ceilings, doors, or windows, you will usually get better results by focusing on mass, sealing, insulation, and stronger assemblies instead.

Frequently Asked Questions

What is the cheapest way to reduce noise through walls?

The cheapest improvement is usually to identify the biggest leak first instead of covering the whole room blindly. If the wall is truly the path, cheap fixes can help a little, but stronger results usually come from better sealing, more mass, and a better wall system.

Does Foam Work Better For Echo Than Soundproofing?

Yes. Foam is usually much better at reducing echo, reverb, and harsh reflections inside a room than it is at blocking sound through a wall or ceiling.

What Should I Use Instead Of Foam To Block Noise?

Use materials and methods chosen for soundproofing rather than absorption. That usually means better sealing, more mass, stronger door or window treatment, insulation, damping, and sometimes a more isolated wall or ceiling assembly.

Best Soundproofing For Walls (Ranked By What Actually Works)

Best soundproofing for walls sounds like it should be one product, but wall noise is rarely that simple. The best option changes depending on whether the wall is already built, whether the noise is voices or low bass, and whether you can open the assembly or need a renter-safe workaround.

That is why so many people waste money on foam tiles, decorative wall panels, and stick-on “soundproof” products that barely reduce transmission. Wall soundproofing works when you add mass, reduce vibration, seal air leaks, and stop treating echo-control products like they belong in the same category.

The good news is that the strongest wall upgrades are predictable once you know your constraint. Once you match the build to the noise path, wall soundproofing becomes much more about choosing the right system than chasing mystery products.

Start by deciding whether you need a full wall assembly upgrade or a temporary compromise for a finished wall, then choose products that actually fit that job. Below, you’ll find the best soundproofing for walls by wall type, budget, and use case, plus which products are worth buying now versus which ones only make sense as temporary compromises.

Quick Takeaway

For most serious wall-noise problems, the best-performing material is mass loaded vinyl installed inside a rebuilt wall assembly, while the best cost-to-performance upgrade for many homes is still extra drywall plus damping and good sealing. For renters or finished walls you cannot open, heavy sound blankets can help as a temporary mass layer, but they should be treated as a compromise rather than a permanent wall soundproofing system.

Wall Soundproofing Basics: Noise Type, Assembly, and Build Stage

Overview of the best wall soundproofing methods

The best wall soundproofing depends on whether you are trying to block airborne noise, reduce neighbor noise through a party wall, or improve a finished wall without demolition. The best answer for a new build is not always the best answer for an already-finished bedroom wall.

Airborne noise vs structural vibration

Voices, TV, barking dogs, and general household noise are airborne problems, which means the wall needs more mass and better sealing. Bass, subwoofers, and repeated impacts are harder because vibration travels through the framing as well as the drywall surface.

That distinction is why a product that looks impressive on the wall can still fail badly. If you want the broader breakdown of what different materials actually do, our best soundproofing material guide is the best starting point before you buy the wrong wall product.

Why no single product works alone

That noise-type split explains why no single product handles everything. A wall assembly needs several things at once: mass to resist vibration, damping to reduce resonance between rigid layers, cavity absorption when the wall is open, and sealed edges so sound does not leak around the upgrade.

No single product does all of that by itself.

That is why Trademark Soundproofing Mass Loaded Vinyl is one of the strongest products in this roundup, but it still works best as part of a wall system rather than as a magic sheet hung randomly on a finished surface. If you only want one rule, it is this: systems beat products.

New construction vs existing walls

How many of those system layers you can actually install depends on whether the wall is open. New construction or a wall that is already being opened gives you the best results because you can combine cavity insulation, mass layers, damping, and even decoupling.

That is the moment when wall soundproofing can move from “better” to “meaningfully quieter.”

Existing finished walls are more constrained, which is why retrofit advice often sounds less exciting. You can still improve them, but you usually get the best return from added drywall, damping, and strategic sealing rather than chasing thin decorative wall products.

Existing Wall Upgrades: Drywall, Insulation, and Decoupling

Existing wall soundproofing methods compared

Existing walls are where most people need the clearest buying advice because demolition is expensive and many rooms need a better result without full reconstruction.

Extra drywall and damping

Adding another layer of 5/8-inch drywall with a damping layer between the old and new surfaces is the best cost-to-performance move for many finished walls. It adds mass across the whole wall plane and improves performance more consistently than thin stick-on solutions.

If you are already opening the wall or rebuilding a problem surface, Trademark Soundproofing Mass Loaded Vinyl becomes one of the strongest wall-upgrade products you can add without eating much thickness. For the full material decision tree, compare it against the other barrier and insulation options in best soundproofing material and best insulation for soundproofing.

Insulation inside the cavity

Drywall and damping handle the face of the wall, but the cavity behind them still needs attention. Insulation matters when the wall cavity is open or when you are building a new stud wall.

Mineral wool is usually the better choice because it is denser, friction-fits well, and helps reduce resonance inside the cavity more effectively than lightweight fiberglass.

What insulation does not do is replace mass. If the wall is already closed and you are hoping blown-in or cavity-only insulation will turn a loud shared wall into a quiet one, expectations usually get ahead of reality.

Decoupling for serious vibration problems

Mass and insulation handle most airborne noise, but structure-borne vibration needs a different layer. Decoupling is worth it when the wall is part of a home theater, music room, duplex party wall, or any situation where ordinary drywall upgrades still leave too much transfer.

Isolation clips, resilient channel, or double-stud strategies reduce the direct vibration path between the noisy side and the quiet side.

It is more work, but it is the difference between a cosmetic upgrade and a serious wall assembly. That matters especially when the same room is already dealing with ceiling or floor transfer, which is why our main soundproofing hub breaks these surfaces apart instead of treating every noise problem like a wall-only issue.

Budget Wall Soundproofing: What Helps and What Wastes Money

Cheap ways to soundproof a wall

Cheap wall soundproofing can help a little, but only when you are honest about what “cheap” can realistically do. Low-cost wall fixes are mostly about reducing leakage and adding temporary mass, not creating a true high-isolation wall.

Cheap fixes that actually help

Sealing gaps around outlets, baseboards, trim edges, and obvious penetrations is the cheapest place to start. Rearranging furniture, adding a full-height bookcase on the noisy wall, or upgrading soft finishes can also help a little when the problem is mild.

For finished walls you cannot open, a VEVOR Sound Dampening Blanket is one of the few low-cost products that at least adds some real mass. It is not a permanent wall solution, but it makes more sense than foam when you need a reversible first step.

Which Cheap Wall Ideas Are Mostly Hype?

Foam tiles, decorative acoustic squares, and lightweight “soundproof wall panels” are the biggest traps in this category. They can reduce echo inside the room, but they do not block much sound through the wall itself because they add very little mass.

That is the key difference between room treatment and sound blocking. If you are sorting out that confusion, compare this article with best soundproofing panels so you can separate absorptive wall products from actual wall soundproofing materials.

When saving beats spending now

If the cheap fixes barely dent the problem, that is the signal to save rather than buy more of the same. If you are dealing with a shared bedroom wall, noisy neighbors, or persistent TV and speech transfer, cheap surface products usually end up costing more in the long run because they delay the real fix.

In those cases, it is smarter to save for a full wall upgrade than buy several rounds of products that were never strong enough.

If you need a heavier temporary option while you save, the US Cargo Control Sound Dampening Blanket adds more mass than ultra-light blanket options. It still belongs in the temporary column, but it is the more serious renter or utility-room pick.

Shared Walls with Noisy Neighbours

Shared wall soundproofing for noisy neighbours

Shared-wall noise is one of the most common reasons people search for the best wall soundproofing in the first place. It is also where weak products get exposed fastest, because party-wall noise tends to be persistent and frustrating.

The materials that matter most

For a shared wall, the strongest materials are the ones that add mass across the full surface and work inside a wall system rather than just on the face. That usually means additional drywall, damping, mineral wool if the wall is open, and optionally a barrier layer like Soundsulate Next Generation MLV.

The reason MLV stays near the top of most serious wall shortlists is simple: it adds a lot of mass without eating much thickness. For shared-bedroom walls, duplex walls, and condo walls, that matters more than decorative surface products ever will.

When the wall is already finished

Those material choices assume you can open the wall, but most shared-wall complaints come from rooms that are already finished. If the wall is already finished, the best move is usually to add another drywall layer with damping rather than try to stick thin products directly on the paint.

Existing-wall soundproofing is always a compromise, but a full-surface mass upgrade still beats small patch fixes.

When you cannot rebuild the wall yet, heavy blankets can serve as a temporary layer over the noisiest section. They are not permanent solutions, but a properly mounted US Cargo Control Sound Dampening Blanket can at least reduce some surface leakage until you commit to a real wall build.

When Might The Noise Be Flanking Around The Wall Instead?

Not all “wall noise” is actually traveling straight through the wall. It can flank through the ceiling line, floor framing, electrical boxes, HVAC paths, doors, or even adjacent window assemblies, which is why some wall projects seem underwhelming even when the materials were technically correct.

If the noise still feels oddly loud after you improve the wall, step back and compare the whole room against the broader options in the soundproofing hub. That keeps you from overspending on one surface while the real weak point sits right next to it.

Choosing the Right Wall Material: Budget, Performance, and Thickness

How to choose soundproofing materials for walls

The easiest way to choose is to stop asking for the single best product and start asking what role the product needs to play in the wall. Once you do that, the shortlist gets much clearer.

Budget vs performance vs thickness

For pure performance inside a rebuild, Trademark Soundproofing Mass Loaded Vinyl is the strongest all-around barrier in this roundup. For a cheaper temporary first step on a finished wall, VEVOR Sound Dampening Blanket is the better starter pick.

Thickness matters most when the wall cannot move far into the room. That is where MLV holds its value, because it gives you meaningful mass in less space than building up the wall with several bulky surface products.

Realistic cost expectations

Those product choices set the price range, but the full picture depends on how deep the project goes. Surface-level fixes can stay under a few hundred dollars, especially if you are just sealing and trying a temporary blanket layer.

A real wall upgrade with drywall, damping, insulation, finishing labor, and possible decoupling quickly moves into the much more serious renovation range.

That difference is exactly why cheap wall soundproofing advice is so often misleading. The goal is not to pretend a temporary product equals a rebuilt wall, but to help you spend intelligently between “buy time” and “fix it properly.”

The combination that works best

Cost makes more sense once you see what a complete wall system actually includes. The best wall builds usually combine cavity absorption, added mass, damping, and airtight detailing.

In practice, that often means mineral wool inside the cavity, a damping layer, an extra drywall layer, and sometimes MLV or decoupling if the wall needs stronger performance.

If you want the most reliable buying path, treat this article as the BOFU layer and use best soundproofing material, best insulation for soundproofing, and best soundproofing panels as your supporting comparison set. That gives you the full product context without mixing wall blocking with acoustic treatment.

The Bottom Line

The best soundproofing for walls is not the prettiest product or the one with the most marketing claims. It is the material that fits the wall type, the noise path, and the amount of construction you can actually do.

If you want the strongest real wall barrier in this roundup, Trademark Soundproofing Mass Loaded Vinyl is the best fit when the wall is being rebuilt and performance matters most.

If you need a premium wall-build option with a similar role, Soundsulate Next Generation MLV is the upgrade pick for higher-end wall assemblies.

If you are still in the temporary stage, US Cargo Control Sound Dampening Blanket is the better renter-safe stopgap, while VEVOR Sound Dampening Blanket is the cheapest place to begin.

For the broader comparison set, keep this article tied to the rest of your BOFU research in the soundproofing hub, best soundproofing material, best insulation for soundproofing, and best soundproofing panels.

Frequently Asked Questions

How To Block Out 100% Of Noise?

You usually cannot block 100 percent of noise with a normal residential wall retrofit. The closest approach is a full isolated wall assembly with mass, damping, cavity insulation, and airtight detailing, but even then flanking paths can still carry sound around the wall.

How Do You Soundproof A Wall That’s Already Built?

The best retrofit method is usually adding another drywall layer with damping and sealing the perimeter carefully. If you cannot rebuild the wall yet, heavy temporary barriers can help a little, but they do not replace a full wall assembly upgrade.

How To Install Sound Insulation In Walls?

Sound insulation works best when the wall cavity is open, because the material needs to sit between the studs rather than on the surface. Install the insulation without compressing it, then pair it with added mass and good sealing so the wall system does more than absorption alone.

Best Soundproof Windows For Home (And What Actually Works)

Best soundproof windows for home sounds like a simple replacement-window question, but most buyers are really choosing between three different paths: full replacement windows, retrofit inserts or secondary glazing, and temporary add-ons that reduce leakage or soften street noise. The best option changes completely depending on whether you own the home, how severe the noise is, and whether the current window frame is worth keeping.

That is why so many people overspend on the wrong fix. Some buy expensive replacement windows when the main issue is actually leakage around the sash, while others buy curtains or foam and expect them to perform like laminated acoustic glass when they never had enough mass or air gap to do that job.

The good news is that quiet-window buying gets much easier once you separate true window performance from retrofit support products. If you know when you need better glazing, when a secondary layer is enough, and when a cheap sealing upgrade is the smart first move, you can spend much more intelligently.

Start by deciding whether you need a real window upgrade, a renter-friendly retrofit, or a temporary stopgap for one noisy opening. Below, you’ll see what actually makes one window quieter than another, which direct-buy products are worth considering, and when the smartest move is not an Amazon fix at all.

Quick Takeaway

The most effective soundproof windows use better glass, better frames, tighter seals, and a larger air gap than standard units. For many homes, a true insert or laminated replacement window will outperform any curtain or seal product, but direct-buy retrofit products still have a place: weatherstripping for leakage, layered curtains for moderate street noise, removable plugs for severe nighttime noise, and temporary high-mass barriers when replacement is not realistic yet.

Before You Buy: What Makes a Window Quiet

What to know before buying soundproof windows for a home

The first thing to know is that no residential window is perfectly soundproof. The real goal is lower noise transmission, which depends on how much mass, separation, sealing, and frame quality the window system gives you.

The factors that matter most

The strongest quiet-window setups usually combine laminated glass, multiple panes or a meaningful secondary air gap, tight perimeter seals, and a frame that does not leak.

A good quiet window is not just thicker glass. It is the whole assembly working together.

That is why a weak frame or leaky sash can undermine an otherwise decent pane package. If air gets around the window, the glazing specs matter less than buyers expect.

Which homes benefit most

That assembly-level thinking narrows the field quickly. Street-facing bedrooms, homes near traffic, train lines, airports, barking-dog corridors, and dense urban lots benefit the most because windows are often the weakest point in the room envelope.

If the wall is solid but the window is thin and leaky, the window becomes the obvious upgrade target.

This is especially true in older homes where the frame is still usable but the sealing and glazing no longer match the noise environment. If you need the full room-level decision tree before committing to the window alone, start with the soundproofing hub and compare it with buyer guides like best soundproof curtains.

Upgrade vs cheaper fix

A real window upgrade is worth it when the glass itself is the bottleneck or when the frame is old enough that sealing alone will not solve the problem. If the existing unit leaks badly but is otherwise decent, cheaper fixes can make sense first.

That is why buyers should think in stages. Seal leakage first, then decide whether the remaining noise justifies inserts, secondary glazing, or full replacement.

The Quietest Window Types: Laminated, Triple, and Secondary Glazing

Most effective soundproof window types compared

The quietest residential windows are usually laminated or acoustically optimized units with strong frames and well-controlled air gaps. In many homes, a secondary window layer or insert can also outperform standard double-pane replacement windows because the extra separation helps more than buyers expect.

Laminated vs standard double pane

Usually, yes. Laminated glass is better at reducing a wider range of outside noise than ordinary double-pane glass because the interlayer helps damp vibration instead of letting the pane ring as freely.

That does not mean every laminated window automatically wins. A poorly sealed laminated unit can still disappoint if the frame and installation are weak.

Acoustic windows vs triple glazing

Laminated glass wins on damping, but triple glazing sometimes enters the conversation too. Triple glazing can help with thermal performance and sometimes noise, but a well-designed acoustic window with laminated glass and better damping can outperform a generic triple-pane unit for traffic and mid-frequency urban noise.

That is why quiet-window shopping should focus on the whole assembly and realistic outdoor noise rather than assuming more panes always means more silence. If you are comparing soft add-ons against true window performance, keep guides like best soundproof window inserts in the same decision set.

Full replacement vs inserts and secondary glazing

With laminated and triple options compared, the next question is whether you need to replace the whole unit. Not automatically.

A high-quality replacement window can be the right long-term answer, but inserts and secondary glazing often deliver better noise reduction per dollar when the existing frame is still decent and the real win comes from adding a second barrier and air gap.

That is why retrofit solutions remain attractive for many homes. You can often get a meaningful improvement without opening the wall or replacing the whole unit.

The Best Direct-Buy Soundproof Window Products

Best soundproof window options for homes

For homeowners buying right now, the best choice depends on whether the job is leakage control, renter-safe retrofit, severe nighttime noise, or a DIY removable plug while you plan a larger upgrade. These are not all “windows” in the pure replacement sense, but they are the most practical direct-buy options for home window noise control.

The easiest way to use this section is to treat it like a buying ladder. Start with the cheapest fix that answers the real weak point, then move up only when the remaining noise tells you the glass, the air gap, or the opening still needs more help.

Best Overall Soundproof Window Option

If your main problem is leakage around the sash or frame, 33 Ft Soundproofing Weather Stripping is the smartest first buy because it addresses the easiest failure point in many older home windows. It will not turn a weak pane into an acoustic window, but it often delivers the highest first-dollar value when air leakage is obvious.

For buyers who want a rational order of operations, this is the product to start with before moving up to curtains, inserts, or replacement. In many homes, sealing tells you whether the real problem is the gap or the glass.

Best Value Soundproof Window Option

For a renter-friendly or finished-room retrofit, RYB HOME Soundproof Curtains is the better value buy than most gimmicky stick-on window products. It is not a substitute for laminated glass or a true insert, but it can reduce harsh outdoor noise, improve comfort, and work in spaces where permanent modifications are off the table.

If your window plan is primarily a retrofit strategy, compare this pick with broader BOFU options like best soundproof curtains and best soundproof blankets before you choose the cheapest fabric solution on the market.

Best Premium Upgrade Option

For buyers willing to build a removable plug or add serious mass around a problematic opening, Trademark Soundproofing MLV is the strongest premium direct-buy option in this roundup. It makes sense when the buyer understands they are building a system, not hanging a miracle sheet on glass.

That is a key distinction. MLV is powerful when it becomes part of a removable plug, secondary barrier, or sealed frame detail. It is weak value when buyers expect it to behave like a finished acoustic window with no structure behind it.

That is also why it belongs later in the buying ladder, not first. You move to this kind of product after sealing and lighter retrofit ideas stop being enough, not before you have confirmed the window really needs more mass.

Best Option For Existing Homes Or Retrofits

If you need a temporary high-mass barrier before replacement or inserts, US Cargo Control Sound Dampening Blanket is the better short-term answer for severe nighttime noise than cheap foam or thin film. It is not elegant, but it adds more mass than lightweight decorative products and can buy you time in the worst locations.

This is the kind of option that makes sense when replacement is months away, when you are testing how much the window is really responsible for the noise, or when you need a reversible fix in an existing home.

It also helps buyers avoid spending on the wrong permanent project too early. If a temporary high-mass layer barely changes the room, the window may not be the only weak point worth chasing next.

Realistic Expectations: What Window Upgrades Actually Deliver

How well soundproof windows work against outside noise

Yes, but only when the fix matches the actual weak point. Quiet-window marketing often fails buyers because it blurs the difference between true acoustic windows, secondary glazing, and low-cost accessories that only handle drafts or light high-frequency noise.

How much noise reduction to expect

A well-chosen insert, laminated unit, or better replacement window can make a noticeable difference, especially for traffic, voices, and general urban noise. Severe low-frequency noise is harder, which is why some buyers still need a broader room strategy even after upgrading the window.

That is also why expectation management matters so much in this category. Buyers chasing “100 percent noise blocking” almost always need more than one surface strategy.

What matters besides the glass

Installation quality, sash compression, frame condition, perimeter sealing, and the wall around the window still matter. A strong glass package inside a weak install can underperform more than people expect.

That is why even a simple product like soundproofing weather stripping can punch above its price when the real problem is obvious leakage. It is not glamorous, but it often clarifies whether you truly need a new window system.

When the problem is bigger than the window

If the room still feels loud after you improve the window, the sound may be flanking through the wall, ceiling line, door, vents, or floor junctions. In that case, spending more on the window alone will not solve the whole problem.

That is where the rest of your BOFU comparison stack matters. Use the soundproofing hub, best soundproofing for walls, and best door sweep for soundproofing to check whether the window is truly the bottleneck.

The Bottom Line

The best soundproof windows for home are the ones that match the real noise path, the condition of the existing frame, and the level of disruption you are willing to accept. For true performance, a well-designed insert, secondary glazing layer, or laminated replacement window usually beats cheap accessories by a wide margin.

For direct-buy products, start with weatherstripping if leakage is obvious, move to layered curtains for renter-safe retrofit value, and use MLV or a heavy sound blanket when you need stronger temporary mass while planning a permanent upgrade.

If you are still comparing all the related BOFU options around openings and weak surfaces, keep this page tied to best soundproof window inserts, best soundproof curtains, best soundproof blankets, and the broader soundproofing hub.

Frequently Asked Questions

How to block out 100% of noise?

You usually cannot block 100 percent of noise through a normal residential window opening. The closest approach is a high-quality window system plus strong sealing and, if necessary, secondary layers that reduce leakage and add separation.

What are the best quiet windows?

The best quiet windows are usually laminated or acoustically optimized units with tight frames and good installation. In many homes, inserts or secondary glazing can also outperform ordinary replacement windows for noise reduction per dollar.

Are Soundproof Window Inserts Worth It?

Yes, when the existing frame is decent and the main goal is better noise reduction without full replacement. They are often one of the smartest middle-ground options between cheap add-ons and a full new window package.

Best Soundproof Window Inserts (What To Buy And What To Skip)

Best soundproof window inserts are usually the ones that create a meaningful air gap over your existing window, but only if the insert fits tightly enough to seal the edges and the material adds real mass where it matters.

That is why so many buyers get mixed results. A loose-fitting acrylic panel or a thin DIY layer can look like a proper insert while still letting sound leak around the edges, and the difference between a tight seal and a leaky fit is often the difference between noticeable noise reduction and wasted money.

The smarter approach is to match the insert type to the noise problem, the window size, and the budget before shopping. Once you know whether you need a custom-fit acrylic insert, a heavy DIY barrier, or a simpler temporary layer, the right product becomes much easier to find.

Below, you will see which window inserts actually work, what to look for in each price tier, how fit and material affect performance, and when inserts are not enough on their own.

Quick Takeaway

Best soundproof window inserts work by adding an air gap and mass over the existing window without replacing it. Custom-fit acrylic inserts from specialty manufacturers deliver the strongest results, but DIY inserts built with dense barrier material can also make a real difference when the fit is tight and the edges are sealed properly.

Before You Buy: How Window Inserts Actually Work

What to know before buying soundproof window inserts

Before you compare products, you need to understand what makes an insert work and when it makes more sense than other window fixes.

The air gap and seal principle

Window inserts work when they create a sealed air gap between the insert and the existing window glass. That air gap is where most of the additional sound reduction happens, and the seal around the edges is what keeps the gap effective.

The performance depends heavily on fit. A custom-measured insert with compression seals can reduce outside noise noticeably, while a loose panel with visible gaps around the edges will barely change the result.

That is the same weak-link logic that makes best soundproof windows for home a useful companion page when you are comparing insert-level fixes against full window replacements.

Inserts vs full window replacement

That seal-dependent performance makes inserts especially attractive when the existing window is in reasonable condition, you want to avoid the cost and disruption of a full replacement, or you are renting and cannot modify the window permanently. They are also the strongest mid-range option when sealing and curtains are not enough but a full replacement is not justified.

That makes them especially appealing in city apartments, bedrooms facing busy streets, and home offices where the frame is still usable but the glass path is clearly weak. In those situations, an insert often gives you a meaningful step up without turning the project into full exterior window work.

If the window frame is damaged, the glass is cracked, or the window is single-pane in a severe noise environment, a full replacement may be the better long-term investment. But for most buyers dealing with moderate traffic noise, neighbor sound, or general urban background, an insert is often the smarter first step.

Which noise types inserts handle best

Even a well-sealed insert has frequency limits. Inserts are best at reducing outside airborne noise: traffic, construction, voices, and general city sound.

They are less effective against low-frequency bass, vibration through the building structure, or noise that is entering through the wall rather than the window.

That distinction matters because some buyers install a window insert and are disappointed when the noise does not drop enough, only to discover that the window was never the main weak point. Checking whether the noise is louder near the window or equally loud across the wall helps you avoid that mistake before spending.

The Best Soundproof Window Inserts

Best soundproof window insert product options

Once you narrow the category, the best picks separate into custom-fit inserts, DIY barrier builds, and temporary layers that test whether the window is the real bottleneck before you commit to a bigger investment.

The cleanest way to use this section is to decide whether you are building a real insert, testing the window with a removable barrier, or tightening the supporting seals that help an insert do its job. That keeps the product choices connected to the actual insert path instead of reading like a grab bag of unrelated noise products.

Best Overall Soundproof Window Insert

For the strongest all-around window barrier material, Trademark Soundproofing Mass Loaded Vinyl is the strongest core material for a DIY window insert because it adds meaningful mass where lighter materials fall short.

This is the right pick when you want to build an insert that performs closer to a custom acrylic panel but at a fraction of the cost. You mount the MLV over a frame or directly against the window recess, seal the edges, and the added mass reduces transmission across the frequency range that matters most for traffic and voice noise.

It is also easier to justify when the window shape is straightforward and you can build a frame that seats consistently. Odd trim profiles, crank hardware, deep sills, and frequent window use are usually the details that push buyers back toward a simpler removable layer or a true custom-fit insert path.

Best Removable Window Insert

For renters and seasonal-use situations, US Cargo Control Sound Dampening Blanket is the most practical removable option because it adds a heavy absorptive layer over the window opening without requiring permanent installation.

This is the right pick when you want to test whether covering the window reduces the noise enough to justify a permanent insert, or when you need a renter-friendly barrier that can come down when you move.

That test step matters more than buyers expect. If a removable barrier barely changes the room, it is a strong clue that the real problem may be the surrounding wall, the ceiling path, or the broader opening strategy rather than the glass alone.

Best Premium Window Insert

For buyers who want a stronger permanent barrier, Trademark Soundproofing Mass Loaded Vinyl (larger roll) provides more coverage for bigger windows or multi-window projects where the standard roll is not enough.

This is the premium choice because it lets you build a denser, more complete DIY insert system across a whole room instead of treating one window at a time.

Best Budget-Friendly Window Insert Option

For the lowest-cost entry into window barrier treatment, soundproofing weather stripping is the most useful budget starting point because it targets the edge gaps that make or break any window insert installation.

This is the right pick when you already have a barrier layer and need to seal the edges, or when you want to test whether closing the gaps around your existing window frame makes a noticeable difference before investing in heavier materials.

That also keeps the budget pick in the right lane. It is not the insert by itself, but it is often the cheapest way to make an insert idea succeed instead of leak around the perimeter.

Best Companion Seal For Window Inserts

For the wall area around the window frame, acoustic caulk can reduce leakage around the window recess so the insert itself performs closer to its potential.

Best Temporary Window Barrier

For quick testing before committing to a permanent build, Boxer Studio Sound Dampening Blanket is a practical diagnostic tool that helps you confirm the window is the main noise path before spending on a permanent insert.

Choosing the Right Insert: Thickness, Fit, and Mounting

How to choose soundproof window inserts

The roundup matters, but the better buying decision comes from matching the insert to the window and the noise problem you actually have.

Acrylic thickness vs air gap

Thicker acrylic or glass adds more mass, which helps with noise reduction. But the air gap between the insert and the existing window usually contributes more to performance than the insert thickness alone.

A thinner insert with a well-sealed 2-inch air gap will often outperform a thicker insert pressed flat against the glass with no gap.

Why fit matters more than material

That air-gap advantage disappears if the edges leak. Sound leaks through gaps the same way it leaks under doors and around window frames.

A tight-fitting insert with compression seals around the edges will outperform a larger, heavier panel that leaves even small air gaps visible.

This is the same weak-link principle that drives results in best door sweep for soundproofing and best soundproof interior doors. The barrier is only as strong as its weakest seal.

Removable vs permanent

Removable inserts are better for renters, seasonal use, and situations where you want to open the window regularly. Permanent or semi-permanent inserts are better when noise reduction is the priority and you are willing to trade window access for stronger performance.

The better choice also depends on how often the window has to function like a normal window. A bedroom that stays shut for sleep may tolerate a denser semi-permanent insert much better than a kitchen or living room window that needs regular airflow.

Window Insert Costs and Value Compared to Other Fixes

Cost breakdown for soundproof window inserts

Insert costs range from under $50 for a basic DIY build with foam and barrier material to $300–$800+ per window for custom-measured acrylic inserts from specialty manufacturers.

What drives the price up

Custom sizing, thicker acrylic, laminated glass options, and compression-seal mounting systems all push the price higher. Larger windows cost more because the insert material and frame need to be bigger, and professional measurement adds labor cost.

Large window groups raise the budget fastest because they multiply every part of the job at once: material, frame size, sealing time, and visual impact. That is also where it becomes worth comparing whether one especially noisy opening should get the first insert before you scale the idea across the whole room.

Inserts vs curtains vs replacement

Those costs make more sense in context. Inserts are usually worth it when sealing and curtains have already been tried and the window glass path is still the main bottleneck.

They cost less than full window replacement, deliver stronger results than curtains or weatherstripping alone, and can be removed if you move or change your mind.

For a lighter comparison, best soundproof curtains covers the tier below inserts, and best soundproof windows for home covers the tier above.

The main downsides

The main downsides are reduced window access, potential condensation between the insert and the glass, and appearance. Most inserts make the window harder to open, and trapped moisture between layers can cause problems in humid climates if the seal is not designed to allow some ventilation.

That is why inserts work best when the buyer is honest about tradeoffs before ordering materials. If you need frequent ventilation, easy cleaning, and zero visual change, you may be happier starting with best soundproof curtains or by moving up to a full replacement path instead of forcing the wrong insert style into the room.

The Bottom Line

Best soundproof window inserts work by adding an air gap and mass over the existing window without replacing it. The strongest results come from custom-fit inserts with tight seals, but DIY builds using dense barrier material can deliver meaningful improvement at a fraction of the cost.

For most buyers, the right first step is testing whether covering the window makes a real difference before committing to a permanent or expensive insert. If the test confirms the window is the main noise path, invest in the tightest-fitting, densest insert you can justify.

If the window turns out to be less important than the wall, door, or ceiling, redirect the budget to the actual weak point instead.

Compare this page with the broader soundproofing hub and best soundproofing panels so the window insert decision stays in proportion to the rest of the room.

Frequently Asked Questions

Are there any downsides to acoustic window inserts?

Yes, the main downsides are reduced window access, potential moisture buildup between layers, and appearance changes. Most inserts make the window harder to open, and in humid climates condensation can form between the insert and the glass if ventilation is not managed.

Best Soundproof Interior Doors (What Actually Blocks More Noise)

Best soundproof interior doors are usually solid-core hinged doors, but the quietest pick can still disappoint if the frame leaks and the bottom gap is wide open.

That is why people replace a hollow-core slab and still feel underwhelmed. Door weight matters, but fit, seals, sweeps, and realistic expectations matter almost as much.

The good news is that you do not need a studio-grade acoustic door to make a bedroom, office, laundry room, or media room noticeably quieter. In most homes, the biggest upgrade is choosing the right solid-core door and pairing it with proper perimeter sealing.

Below, you’ll see which interior door types are worth buying, which ones to skip, how to choose between replacement and retrofit, and which budget upgrades help when full replacement is not practical.

Quick Takeaway

The best soundproof interior doors are solid-core hinged doors with a good fit and proper perimeter sealing. Hollow-core doors are the weakest starting point, while sliding, pocket, and bi-fold doors usually seal worse than standard hinged slabs. For most homes, the smartest move is a solid-core composite or engineered-core interior door plus weatherstripping, a sweep, and realistic expectations about the rest of the wall.

Before You Buy: Why Most Interior Doors Fail at Blocking Sound

What to know before buying a soundproof interior door

Now that the core answer is clear, interior-door soundproofing starts with fixing the weakest link. In many homes, that weak link is a lightweight hollow-core slab with open gaps around the jamb and under the door.

The hollow-core problem

Hollow-core doors are bad at blocking noise because they do not have much mass. Their thin skins and air-filled honeycomb core make them light, affordable, and easy to hang, but also easy for sound to move through.

What separates a quiet door from a loud one

That lack of mass is the starting point, but it is not the only factor. The biggest differences come from core density, slab thickness, fit, and sealing.

A heavier solid-core door usually blocks more sound than a thin hollow-core slab, but the best result still depends on a frame that closes tightly and leaves as few leak points as possible.

Replacement vs retrofit

Once you know mass and sealing drive the result, the next question is whether the current slab is worth saving. Replacing the door is better when the slab is hollow-core, flimsy, or already badly fitted.

At that point, adding accessories can help a little, but the slab itself stays the limiting factor.

If the door is already solid-core and reasonably well hung, retrofitting can make more sense. That is where the broader soundproofing hub becomes more useful than starting over with a new slab automatically.

The Best Soundproof Interior Doors by Use Case

Best soundproof interior door picks

Once you know what actually matters, the best picks become more practical than flashy. The strongest interior-door options usually share the same traits: solid core, good thickness, hinged operation, and a layout that can actually seal.

The easiest way to use this section is to match the pick to the job. Start by deciding whether you need the safest all-around replacement, a stronger premium-style slab, a smarter budget jump from hollow-core, or the best fit for a bedroom or office that needs daily privacy.

That distinction matters because not every room needs the same level of finish or daily noise control. A laundry room, office, shared bedroom wall, and media room can all justify different spending even when the core soundproofing logic stays the same.

Best Overall Soundproof Interior Door

For most homes, the best overall pick is a mainstream solid-core composite or molded hinged slab from a widely available brand such as Masonite. It gives the best balance of density, availability, price, and everyday installation compatibility.

That mainstream category also tends to be easier to source locally, which matters more than buyers expect. A common solid-core slab is easier to replace, trim, hang, and pair with matching hardware than a niche premium model that creates longer lead times and fussier install decisions.

If you also care about the wider room shell, compare this with best soundproofing material and best sheetrock for soundproofing so the door upgrade fits the full partition, not just the slab.

Best Solid-Core Interior Door For Soundproofing

If you want the strongest premium-style option, an engineered solid-core interior door from brands such as Belldinni or higher-end MDF-core lines is the best category to shop. These doors pair better slab density with cleaner factory finishing and stronger sealing potential.

They also make more sense in rooms where privacy has a real daily payoff, such as work-from-home offices, media rooms, and bedrooms beside busy living spaces.

That is the tier worth considering when you already know the room is used hard every day and the door will stay there for years. If the project is more about fixing a glaring hollow-core weakness than building a polished forever room, the mainstream solid-core tier usually brings better value.

Best Budget Upgrade From A Hollow-Core Door

If the real goal is escaping hollow-core performance without overspending, the smarter budget move is keeping the finish simple and upgrading the slab quality first. The best budget upgrade is usually a plain primed solid-core slab rather than a decorative model.

That keeps the money focused on what blocks more sound: more mass and a better starting slab.

Best Interior Door For Bedrooms Or Home Offices

Once daily privacy becomes the priority, sealing consistency matters just as much as raw slab weight. For bedrooms and home offices, the best pick is a solid-core hinged slab that can close tightly against perimeter seals.

A flush or molded-panel solid-core door often works well here because privacy and voice control matter most.

This is usually the use case where buyers notice bad doors fastest. Sleep disruption, work calls, hallway chatter, and TV spill all make small sealing failures feel bigger, which is why a plain well-fitted solid-core slab often outperforms a prettier door that still leaks around the frame.

This is also where sliding and pocket doors usually fall behind. If a bedroom or office needs everyday quiet, use the same priorities you would apply to best soundproof curtains and best soundproof windows for home: fix the obvious secondary openings, but keep the solid-core door as the anchor of the room.

Choosing the Right Door: Core, Seals, and Ratings

How to choose a soundproof interior door

Now that the main door categories are clear, the smarter buying question is which door gives you the best total result once slab type, gaps, hardware, and room use all get factored in together.

Solid core as the default

For most interior soundproofing needs, yes, solid core is the best practical category. It gives you the mass that hollow-core doors lack without forcing you into specialty commercial acoustic-door pricing.

It also gives you a better platform for every follow-up fix. Better seals, a tighter latch side, and improved bottom-gap control all matter more when the slab itself is not undermining the upgrade from the start.

Door sweeps, seals, and thresholds

A solid-core slab only delivers its full potential when the gaps around it are closed. Gaps can ruin a good slab fast.

A solid-core door with a big bottom gap or loose perimeter fit can still leak enough sound to feel disappointing.

That is why perimeter sealing belongs in the buying decision, not just the retrofit section. A product like Black Rubber Weather Stripping Door Seal Strip is the kind of low-cost upgrade that often matters more than buyers expect.

If you need a second perimeter option for a wider frame or mixed door-and-window leakage, 33 Ft Gray Self-Adhesive Soundproofing Weather Stripping for Doors and Windows fits the same logic.

What STC-style ratings actually tell you

With the right slab and seals in place, ratings help compare options. A higher STC number tells you that a tested door system resists sound better than a weaker one, but it does not guarantee silence in your exact house.

Ratings are useful for comparison, yet real-world results still depend on installation, frame quality, threshold sealing, and the surrounding wall assembly.

Retrofitting an Interior Door Without Replacing It

Retrofitting an existing interior door for better soundproofing

If a full replacement is not practical yet, the next best move is to attack the biggest leaks around the existing slab. Retrofitting will not turn a hollow-core door into an acoustic door, but it can still help when the gaps are doing a lot of the damage.

The retrofit fixes that help most

The best retrofit fixes are the simple ones that tighten obvious leak points. Bottom-gap blockers, better weatherstripping, and temporary heavier layers are the first things to consider.

A product like MAXTID Under Door Draft Stopper for Bottom of Doors is a practical first example because many interior doors leak heavily at the floor line.

A more polished alternative is HomeProtect Door Draft Stopper 36 Inch Under Door Draft Blocker Door Sweep if you want an easier quick retrofit.

When retrofitting hits its limit

Those gap fixes help, but they cannot overcome a fundamentally weak slab. Retrofitting is not enough when the door is hollow-core and the privacy demand is high.

At that point, you can improve the perimeter and still remain stuck with a lightweight door that simply does not have enough mass.

That is also when a heavier temporary layer like US Cargo Control 96 x 80 in Extra Large Sound Dampening Blanket with Grommets makes more sense as a stopgap or test than as a permanent answer.

If you are going beyond stopgaps and actually rebuilding the opening or the partition beside it, a heavier material such as Trademark Soundproofing Mass Loaded Vinyl 1lb belongs in the conversation too.

Budget expectations

Expect retrofits to cost less but also do less. If you need the lowest-cost path first, compare these fixes with best soundproofing panels and best insulation for soundproofing so you do not buy a door accessory when the bigger weakness is really the surrounding build.

The practical budget ladder is simple: seal a decent door first, replace a bad hollow-core slab second, and save heavier rebuild measures for openings that still fail after those basics are done. That sequence avoids overspending on accessories when the slab is hopeless and avoids unnecessary full replacement when the real issue is just air leakage.

That order also makes troubleshooting easier. When you change one weak point at a time, it becomes much clearer whether the door, the frame, or the surrounding wall is still the main problem.

The Bottom Line

Best soundproof interior doors are almost always solid-core hinged doors that fit well and seal well. Hollow-core slabs are the main thing to avoid, while sliding, pocket, and bi-fold options usually start at a sealing disadvantage for sound control.

For most homes, the smartest path is simple: replace a hollow-core door with a solid-core slab, then tighten the perimeter with the right seals and bottom-gap control. If the room still leaks badly after that, check whether the next weak link is the window, the curtain strategy, or the wider opening plan instead of assuming the door is still the only problem.

Frequently Asked Questions

What are the best interior doors for sound proofing?

The best interior doors for soundproofing are usually solid-core hinged doors because they offer more mass and better sealing potential than hollow-core doors. A well-fitted solid-core composite or engineered-core door is the best practical starting point for most homes.

What is the best door to block out noise?

The best door to block out noise is usually a solid-core hinged door with tight perimeter sealing and a controlled bottom gap. A good slab helps, but the frame fit and seals matter enough that a poorly sealed premium door can still disappoint.

Is sound deadening doors worth it?

Yes, if you mean upgrading a weak interior door so it leaks less sound. Replacing a hollow-core slab or sealing a decent solid-core door is often worth it, but expectations should stay realistic because the surrounding wall and gaps still matter too.

Best Soundproof Foam (What Helps, What Doesn’t, And Our Top Picks)

Best soundproof foam is one of the most misleading searches in this category, but that does not mean foam is useless. Most products sold under this term are really acoustic foam, which helps with echo inside a room rather than true soundproofing through walls or doors.

That mismatch is why so many buyers feel burned. They want less neighbor noise or TV bleed, then end up with a product that mainly changes room tone instead of blocking transmission.

Below, you’ll see which foam products are worth buying, who they actually help, and when to switch to real soundproofing materials instead.

Quick Takeaway

The best soundproof foam for most buyers is really the best acoustic foam for echo control. Thicker 2-inch foam can improve a home studio, streaming room, or vocal corner, but foam still will not block much wall noise, bass, or serious outside sound on its own.

Before You Buy: What Foam Can and Cannot Do

Basics of foam for acoustic treatment versus soundproofing

The soundproofing myth

No, not in the way most people mean it. Foam absorbs sound energy inside the room, but it does not add enough mass or isolation to stop sound from moving through the room shell.

That means foam can make a recording space sound cleaner while still doing almost nothing for a neighbor’s TV, barking through drywall, or bass from the next room. If your goal is blocking transmission, foam is usually the wrong first purchase.

If the real leak is a weak opening rather than room echo, start with soundproof interior doors or better seals before buying foam.

What foam actually does well

That lack of blocking ability does not make foam useless — it just means the real strength is somewhere else. Foam is much better at taming slapback, flutter echo, and harsh reflections in small rooms.

When a room sounds bright, splashy, or hollow, foam can calm that down quickly.

True soundproofing materials do a different job. Products like heavier soundproofing panels, better seals, layered wall upgrades, and window inserts aim to reduce sound passing between spaces rather than changing the sound inside one room.

If you are trying to improve a weak opening before rebuilding a room, door sweep upgrades often make more sense than adding more foam.

Who benefits most

Those two categories — echo control vs noise blocking — point to a specific buyer profile. Foam makes the most sense for buyers who need a cleaner room sound without construction work.

Streamers, podcasters, casual musicians, gamers, and renters usually get the clearest value from it when the problem is echo rather than real isolation.

That distinction matters most in small bedrooms and desk setups where the room sounds sharp, boxy, or tiring long before sound leakage becomes the main complaint. In those cases, a modest foam layout can make monitoring, calls, streaming, and vocals feel more controlled without pretending the walls suddenly became soundproof.

The Best Soundproof Foam Products

Top foam picks for echo control and acoustic treatment

The easiest way to use this roundup is to start with the room problem, not the foam shape. Once you know whether you need a balanced starter set, broader coverage, a cheap test pack, or a shape-specific add-on, the picks narrow quickly.

If you want the safest all-around pick, the TroyStudio Thick Acoustic Foam Panels gives most buyers the best balance of thickness and trust. For larger coverage, the Focusound Acoustic Panels 50 Pack and the VEVOR Acoustic Foam Panels 24 Pack both work well.

Shape-specific buyers also have solid choices. The 24 Pack Pyramid Acoustic Foam Panels is a safer pyramid-style option, the JBER Acoustic Wedge Studio Foam Corner Block works best as an add-on, and the JBER 12 Pack Acoustic Foam Panels 1 Inch is the cheapest test case.

That is also why pack math matters more than most listings make it seem. A 12-pack can improve a desk corner or the wall behind a mic, but it rarely transforms a full bedroom, rehearsal wall, or larger gaming space on its own.

None of these picks should be judged by the same standard as a mass-loaded barrier or rebuilt wall assembly. The right comparison is how well they tame harsh reflections for the money, how easy they are to deploy in a real room, and how honestly they match the problem buyers are actually trying to solve.

Best Overall Soundproof Foam

For most buyers, the safest move is starting with a balanced 2-inch panel rather than chasing the cheapest foam or the biggest pack. TroyStudio Thick Acoustic Foam Panels is the best overall pick because it gives buyers the stronger 2-inch profile most rooms need.

If you actually need to stop sound through a wall, move toward heavier temporary barriers or heavier wall upgrades instead.

Best Foam For Home Studios

Once you already know the room needs broader coverage, buying too small usually creates more frustration than savings. Focusound Acoustic Panels 50 Pack is the strongest fit for buyers who already know they need more wall coverage. A hobby studio or rehearsal corner can burn through a small pack quickly, so a larger set avoids the awkward second order.

It also gives you enough pieces to treat the obvious early reflections without covering every wall in foam. That usually produces a more believable improvement than scattering a few random squares around the room and expecting a full transformation.

Best Budget Soundproof Foam

If you are still diagnosing the room and do not want to overcommit, the cheapest useful test is still a small 1-inch pack. JBER 12 Pack Acoustic Foam Panels 1 Inch is the budget pick when the goal is learning what foam can do before spending more.

Budget foam works best as a diagnostic buy, not a final room-treatment plan. If a small starter layout clearly calms the room, the smarter next move is usually thicker 2-inch foam or better placement, not stacking more thin bargain panels everywhere.

Best Thick Foam For More Aggressive Echo Control

If 1-inch starter foam feels too light but a 50-pack feels excessive, a mid-size 2-inch option is the cleaner middle ground. 24 Pack Pyramid Acoustic Foam Panels is the safer choice for buyers who want a fuller 2-inch setup without moving into a huge pack.

Choosing the Right Foam: Shape, Thickness, and Coverage

Buying guide for choosing acoustic foam

Wedge vs pyramid vs egg-crate

Not exactly, but the gap is smaller than many listings suggest. Wedge and pyramid foam can both work well when the thickness and placement are right, which is why the pyramid-style 24-pack and the TroyStudio option belong in the same practical class.

Marketing often treats pattern as if it changes the physics more than it really does. In practice, thin foam and bad placement ruin results faster than choosing wedges over pyramids, so buyers should prioritize thickness and layout first.

Thickness vs shape

Yes, by a wide margin. The JBER 1-inch pack is fine when the room only needs lighter high-frequency control, while the VEVOR 2-inch pack makes more sense when voice or instruments are involved.

That is why buyers so often feel disappointed by thin bargain foam. It can shave off a little brightness, but it rarely gives the calmer midrange and fuller control people expect when they are talking about speech, guitar, streaming, or basic recording.

How much coverage you actually need

Most rooms need less foam than buyers assume. A small desk setup may only need a starter pack at the first reflection points.

That usually means the wall directly behind the mic or speakers, the nearest side reflection, or the single surface that throws the most obvious slapback. Treating one or two real trouble spots almost always beats spreading a few panels thinly across every wall just because the room still looks empty.

A fuller hobby-studio setup may justify a larger pack like the Focusound 50-pack, while the JBER corner-block set works better as a supplement.

The safer rule is to treat first-reflection areas, the wall behind the mic or speakers, and the harshest bare surfaces before buying more. Coverage beats decoration, and deliberate placement beats turning foam into wall art.

When Foam Is Not the Right Tool

When to skip foam and use real soundproofing materials

Neighbor noise through walls

Skip foam as the primary answer. Neighbor noise, TV bleed, traffic through weak windows, and rumble from outside point you toward better soundproof windows, heavier curtains, window inserts, or even better soundproofing materials rather than decorative foam squares.

Foam may make your own room sound less harsh while the noise still comes straight through the wall. That is why so many buyers think soundproof foam is fake when the real issue is that they bought an absorption product for a transmission problem.

Bass-heavy problems make that mismatch even worse because foam is weakest exactly where many complaints feel most intrusive. If the issue is subwoofer rumble, shared-wall thump, or low-end vibration, foam usually changes the room vibe more than the amount of noise that escapes or enters.

Better wall or door isolation

A wall or door that leaks sound needs mass and airtightness first. That usually means better seals, a more solid door, layered upgrades, or products like door sweeps and soundproof interior doors.

The same rule applies to thin shared walls. If the core problem is the assembly itself, skip foam and move toward heavier wall-focused solutions or more complete room-treatment plans.

For window-heavy rooms, the next real step is usually window inserts, not more absorption foam on the wall beside the glass.

A simple diagnostic helps here: if the noise is clearly strongest at a door edge, window perimeter, or another obvious gap, foam is solving the wrong problem. Seal the leak first, then use absorption only if the room still sounds harsh after the isolation basics are handled.

When foam is still worth buying anyway

Despite those limits, foam is worth buying when the room itself sounds worse than the noise outside it. That includes bright gaming rooms, vocal corners, desktop production setups, and content rooms where reverb control matters more than isolation.

That is also where honest product picks become useful. The right foam can improve clarity and reduce slapback, especially in rooms that are too lively but do not need heavier soundproofing products.

If you know the room needs real blocking rather than cleaner tone, start with better soundproofing materials before buying more foam.

That does not make foam a bad purchase. It just means foam is the right tool only after you define the job correctly, which is the difference between a smart acoustic treatment buy and a disappointing fake-soundproofing purchase.

The Bottom Line

The best soundproof foam for most people is really the best acoustic foam for echo control, which is why the TroyStudio Thick Acoustic Foam Panels remains the strongest overall pick. It gives buyers the cleaner, more controlled room sound they usually want when they search this term.

If you need broader coverage, the Focusound 50-pack is the better studio fit, while the JBER 12-pack is the right cheap test if you are still diagnosing the room.

Frequently Asked Questions

What kind of foam is best for soundproofing?

No foam is the best answer for true soundproofing between rooms. The best foam for most buyers is usually thick acoustic foam for echo control, while real soundproofing needs mass, sealing, damping, or decoupling.

Does soundproof foam really work?

Yes, but only for the job foam is actually built for. It works for reducing reflections and making a room sound less echoey, not for stopping much noise through a wall.

How to block out 100% of noise?

A normal room almost never reaches 100 percent noise blocking with light retrofit materials. The closest approach needs a heavily isolated room shell with airtight construction, decoupling, and much more mass than foam can provide.

Does spray foam provide soundproofing?

Spray foam can help with sealing and insulation in some assemblies, but it is not the main tool for serious soundproofing. Buyers who need real isolation usually get better results from airtight detailing plus heavier wall or window upgrades.

Best Sheetrock for Soundproofing (What Actually Helps)

Best sheetrock for soundproofing is usually 5/8-inch drywall, but the board alone rarely fixes the noise problem people are actually trying to solve.

That is the part many buyers miss when they start comparing Sheetrock, soundproof drywall, plasterboard, and thicker gypsum board. The panel matters, but the real result comes from the full wall or ceiling system around it.

If you are dealing with voices through a shared wall, TV bleed in a home office, or upstairs noise over a basement ceiling, the best drywall choice depends on whether you need a stronger baseline, a thinner premium upgrade, or a layered build with damping.

Below, you’ll see when standard 5/8-inch drywall is good enough, when specialty sound-rated drywall is worth the extra cost, what thickness actually helps, and why sealing, damping, and decoupling often matter as much as the drywall panels themselves.

Quick Takeaway

For most projects, the best sheetrock for soundproofing is standard 5/8-inch drywall used as part of a complete assembly. Specialty soundproof drywall can be worth it when you need better performance with less thickness or less labor, but drywall alone is rarely the full answer if gaps, flanking paths, or structural vibration are still in play.

Drywall Types for Soundproofing: Standard, Specialty, and Layered

Choosing drywall for soundproofing walls and ceilings

The best drywall choice starts with one honest reset: Sheetrock is a brand name, but most buyers are really asking which gypsum board or drywall products give the best soundproofing performance.

In practical terms, you are usually choosing between regular drywall, heavier 5/8-inch drywall, and specialty soundproof drywall with a viscoelastic core. The right answer changes with budget, wall thickness limits, labor, and how much sound transmission you are actually trying to reduce.

Standard 5/8-inch drywall as the baseline

For many homes, yes. Standard 5/8-inch drywall is the most practical baseline because it adds more mass than 1/2-inch drywall, improves fire resistance in many assemblies, and gives you a stronger starting point for reducing airborne noise.

That makes it a smart default for shared bedrooms, home office walls, and many basic remodels where you want a real improvement without jumping straight to premium panels. If you are comparing room-level priorities first, our guide on how to soundproof a room helps frame where drywall fits in the bigger plan.

The reason 5/8-inch works so often is simple: more mass makes the wall harder to move. It will not create silence by itself, but it usually beats lightweight drywall when the rest of the assembly is reasonably solid and well sealed.

When specialty soundproof drywall earns its premium

Specialty soundproof drywall becomes easier to justify when you need more performance from less thickness or you want to avoid building up multiple regular layers. Products like QuietRock, SilentFX, and SoundBreak XP are specifically designed with damping layers that help reduce vibration inside the panel itself.

That can make them attractive in renovations where space is tight, trim details are already set, or the project needs a cleaner one-panel upgrade path. In a tighter room where every inch matters, that tradeoff can beat adding a second standard layer plus extra finishing labor.

Specialty panels also make more sense when the wall or ceiling already has decent fundamentals and you are trying to push performance higher without a full rebuild. But if the weak point is really the door, the window, or a leaky joint, premium drywall can still disappoint because the rest of the room shell is still leaking.

If you are comparing full wall approaches rather than just panel brands, our guide to best soundproofing walls helps show where drywall upgrades fit inside a stronger assembly.

Multiple layers vs one specialty panel

Specialty panels solve the thickness problem, but they are not always the best value. Two layers of standard drywall with damping compound between them can be a very strong alternative. Two layers of standard drywall with damping compound between them can be a very strong value play because you add both mass and vibration control in one move.

That approach often makes sense when you are already opening the wall, redoing trim, or treating a shared partition where thickness is less of a problem than cost. It also pairs naturally with broader wall strategies like the ones covered in how to soundproof a wall.

If you want the classic example of that layered approach, Green Glue Noiseproofing Compound exists for exactly that use case.

A single specialty panel can still win when simplicity, thinner build-up, or faster installation matters more than lowest material cost. The real comparison is not just panel versus panel, but complete assembly versus complete assembly.

Drywall Thickness and Why It Only Tells Part of the Story

Drywall thickness options for better soundproofing

Thickness matters because it usually means more mass, and more mass usually means better resistance to airborne sound transmission. But thickness only tells part of the story because damping, layering, and the rest of the assembly still shape the final result.

That is why buyers who focus only on sheet thickness sometimes overestimate the jump from one panel to another. The drywall helps, but the system still decides the result.

Why 5/8-inch usually beats 1/2-inch

The short answer is weight. A 5/8-inch panel gives you more mass than a 1/2-inch panel, which usually improves how the wall resists movement when sound waves hit it.

That extra mass is why 5/8-inch drywall shows up so often in better soundproofing assemblies, home theaters, and shared-wall upgrades. It is also why many people treat it as the normal first step before looking at more expensive soundproof drywall products.

For ceilings and floor-adjacent assemblies, the same logic still applies, but the noise path may change what matters most. If the bigger complaint is impact noise from above, drywall thickness may help less than the floor-side fix explained in how to soundproof a floor or a better soundproof ceiling strategy below the joists.

When thicker drywall does not help as much as expected

That mass advantage has a ceiling. Thicker drywall usually helps, but it is still possible to spend more and solve the wrong problem if flanking, leakage, or structural vibration are doing most of the work.

For example, a heavier wall can still underperform if the studs bridge vibration directly, the electrical boxes leak air, or the window beside the wall is the real weak point. In those cases, added thickness gives some improvement, but not the full payoff buyers expect.

This is also where Sound Transmission Class language gets misunderstood. STC is a rating for a full tested wall system, not a promise attached to one gypsum board sheet floating in isolation.

When two layers beat thicker panels

If a single thicker panel still leaves gaps in performance, two layers with damping compound usually close them. Two layers make more sense when you want a larger improvement from common materials and you have room to build outward. The combination gets stronger when you add damping compound between the layers because the assembly resists both motion and resonance better than a simple single-sheet upgrade.

That approach is often more compelling for serious shared-wall problems, bedrooms beside living rooms, and home office partitions where speech privacy matters. If your project is already reaching into deeper upgrades, you may also want to compare the full system against other options in best soundproofing material before choosing drywall alone as the centerpiece.

For a heavier barrier-layer example, Soundsulate 1 lb MLV shows what you add when changing the assembly matters more than changing drywall brand names.

The tradeoff is labor, thickness, and finishing complexity. More layers mean more weight, more perimeter sealing, and more work around trim, boxes, and openings.

What to Pair with Drywall for Real Soundproofing Results

Full soundproof drywall assembly with damping and insulation

Drywall works best as one part of a soundproofing assembly, not as a standalone cure-all. If the article stopped at drywall choice, it would miss the very upgrades that usually decide whether the finished room feels noticeably quieter or only slightly different.

This is the system-thinking section buyers actually need, because the right panel can still underperform when the supporting details are weak. Drywall is the face of the wall, but not the whole strategy.

Damping compound between layers

Yes, often. Damping compound is worth serious consideration when you are already using double drywall because it helps reduce vibration transfer between the layers instead of letting the wall ring more freely.

That matters most in speech-heavy problems, TV bleed, and general airborne noise where a stronger layered wall can pay off clearly. It is one of the simplest ways to get more out of a multi-layer drywall build without jumping straight to a more complex decoupled wall.

If you still mix up damping with absorption, read sound deadening vs soundproofing before you buy materials that solve the wrong problem.

Insulation behind the drywall

Damping handles vibration between the face layers, but the cavity behind them still matters. Insulation inside the cavity helps absorb sound energy and reduce resonance in the air space, which is why it often improves the performance of a drywall assembly.

What it does not do is replace mass, airtightness, or damping. If you are choosing the cavity layer at the same time, our breakdown of best insulation for soundproofing helps separate what insulation can do from what drywall still needs to do.

A product like Rockwool ComfortBoard 80 is a good example of the kind of cavity-side material that helps the drywall assembly perform better without pretending insulation replaces the drywall itself.

A good way to think about it is this: drywall handles the face of the assembly, while insulation helps calm what happens inside it. You usually want both working together instead of expecting one to carry the whole load.

When decoupling matters more than the drywall itself

Insulation and damping both work inside the assembly, but neither breaks the direct vibration path through the studs. Decoupling becomes more important when vibration is traveling through the framing and re-radiating on the other side. That is why hard cases like home theaters, drums, heavy footfall, and persistent shared-wall problems often resist simple drywall-only upgrades.

Once the studs or joists are carrying the energy, adding another face layer helps less than people hope. In those situations, resilient channel, isolation clips, or a more isolated assembly can change the result more than switching from one drywall panel to another.

That is especially true in apartments and attached homes where flanking paths complicate the picture. If the broader context is rental or shared-building noise, our guide on how to soundproof an apartment can help you set realistic expectations before you commit to drywall alone.

Walls vs Ceilings: Where Drywall Upgrades Pay Off Most

Soundproof drywall choices for walls versus ceilings

The answer depends on the noise path. Walls and ceilings can both benefit from better drywall, but buyers usually get the best results when they match the upgrade to the specific source instead of treating every surface the same way.

This is where many projects waste money by upgrading the easiest surface instead of the noisiest one. A smart drywall choice still needs the right target.

Walls: side-to-side airborne noise

Soundproof drywall helps most on walls when the main problem is room-to-room airborne noise like speech, TV audio, or general household sound coming through a shared partition. In those cases, a better drywall assembly can make a real difference because the wall is directly in the transmission path.

That is why bedroom walls, home office walls, and townhouse or condo party walls are such common candidates. If the issue is mostly side-to-side transfer, the wall upgrade often earns its keep faster than a ceiling-first strategy.

Ceilings: overhead noise and its limits

The same mass-and-damping logic applies overhead, but ceilings hit the limit of drywall-only thinking faster. Ceilings benefit most when the noise is coming from above and the joist cavity can be upgraded as part of the project. Basement ceilings, upstairs living-room bleed, and some duplex layouts are common cases where better drywall helps as part of a broader ceiling assembly.

But ceiling noise is also where buyers hit the limit of drywall-only thinking fastest. Footsteps and impact noise often point to the floor above, structural vibration, or a need for stronger isolation details instead of just a heavier board below.

For that specific use case, see how to soundproof a basement ceiling before assuming a better drywall panel is the whole fix.

When drywall alone is not enough

Whether the upgrade targets a wall or a ceiling, drywall alone falls short when the room has obvious leakage, flanking paths, or a problem driven by impact and structure-borne vibration rather than simple airborne sound. In those cases, drywall still contributes, but it cannot carry the whole project.

If your noise problem still revolves around a thin window, a hollow door, or an unsealed opening, fix that first. If it revolves around a high-vibration ceiling or a weak shared wall, drywall may need help from sealing, damping, insulation, or decoupling before the project feels like true progress.

If the real complaint is next-door speech or TV through one partition, compare your plan against how to soundproof a wall from noisy neighbours so you do not over-focus on drywall thickness alone.

The Bottom Line

Best sheetrock for soundproofing usually means standard 5/8-inch drywall for the baseline, specialty soundproof drywall when space or labor favors a premium panel, and double-layer builds when you want stronger value from a full assembly. The best choice is the one that fits the actual noise path, not just the most expensive board on the shelf.

If you are treating a shared wall, drywall choice matters. If the real leak is the opening, floor, ceiling, or full room shell, combine that drywall decision with the right supporting fix instead of expecting gypsum board alone to do all the work.

Frequently Asked Questions

Is soundproof drywall worth it?

Soundproof drywall is worth it when you need better performance with less build-up or less installation complexity than a double-drywall assembly. It is less compelling when the real weak point is leakage, flanking, or structural vibration that the premium panel cannot fix on its own.

Is two layers of drywall better than soundproof drywall?

Sometimes, yes. Two regular layers with damping compound can be a better value and a stronger upgrade when thickness is acceptable, while specialty soundproof drywall can win when space, labor, or cleaner installation matters more.

What drywall thickness is best for blocking sound?

For most standard builds, 5/8-inch drywall is the best practical starting point for blocking sound because it adds more mass than 1/2-inch drywall. It still works best as part of a complete system with sealing, insulation, and sometimes damping or decoupling.

JBL Soundbar 9.1 vs 5.1: Is Dolby Atmos Worth the Upgrade?

The JBL soundbar 9.1 vs 5.1 decision looks simple at first: pay more, get Dolby Atmos. The catch is that the Atmos upgrade only pays off when your room can actually return those height effects.

That is where buyers get burned. The 9.1 can sound far more cinematic in the right room, but vaulted ceilings, ceiling fans, and extra ceiling height can scatter the reflected sound enough that the premium lands flat.

The good news is that this choice gets much easier once you match each bar to your room and content mix. You can usually tell pretty quickly whether the 9.1 will earn its premium or whether the 5.1 already gives you the smarter value.

Below, we’ll break down what each JBL system includes, how the Atmos upgrade performs in real rooms, and which setup fits different budgets and room configurations. That should make the next move obvious before you spend on the wrong JBL package.

Quick Takeaway

The JBL Bar 5.1 is the better value for most rooms because it already gives you detachable wireless surrounds and a powerful 10-inch subwoofer. If most of your viewing is standard streaming, cable, or non-Atmos discs, it covers the experience that matters.

The JBL Bar 9.1 earns its premium only if you have a flat standard-height ceiling and regularly watch Atmos content. If your ceiling is vaulted, very high, or broken up by fans, save the premium and go with the 5.1.

What Does Each JBL System Actually Include?

JBL 9.1 and JBL 5.1 soundbars compared

Both JBL systems share the same core design philosophy — a main soundbar with detachable wireless surround speakers that magnetically attach to the bar for charging and detach for room placement during use. The difference is entirely in the Atmos height channel hardware.

What Does the JBL Bar 5.1 Actually Give You?

The JBL Bar 5.1 is a 5.1-channel system with three front channels (left, center, right) in the main bar, two detachable wireless battery-powered surround speakers, and a 10-inch wireless subwoofer. The surround speakers charge by magnetically attaching to either end of the main bar and run for up to 10 hours on a single charge when detached.

This design solves the biggest problem with traditional 5.1 soundbar systems. You get true discrete surround from physically separated rear speakers without running speaker wire across your room, and the surround speakers deliver genuine rear channel audio that bar-only surround simulation cannot match.

If you want the broader buying context behind that step-up, the best Dolby Atmos soundbar guide shows where physical rears and height effects start to matter. It is a good next read if you are still deciding whether detachable rears matter more than Atmos branding.

The 5.1 supports virtual Dolby Atmos processing through its standard drivers, simulating height effects without dedicated upfiring hardware. That adds some perceived height but is noticeably less convincing than the physical upfiring drivers in the 9.1, and the soundbar buying guide explains how channel counts translate into real use.

What Does the JBL Bar 9.1 Add Over the 5.1?

The JBL Bar 9.1 is technically a 5.1.4 Dolby Atmos system — the same 5.1 base configuration as the Bar 5.1 plus four dedicated upward-firing drivers specifically designed to bounce sound off your ceiling and back down to your listening position. Two upfiring drivers sit in the main bar, and two are built into the detachable surround speakers.

These upfiring drivers handle the Dolby Atmos height channel, creating the perception of sound coming from above — rain falling overhead, helicopters passing over, ambient atmospheric effects that add a vertical dimension to the soundstage. The effect is most pronounced during Atmos-encoded content available on Netflix, Disney+, Apple TV+, and 4K Blu-ray discs.

The 9.1 uses the same 10-inch wireless subwoofer and the same detachable surround speaker design as the 5.1, with the surround speakers being slightly larger to accommodate the upfiring drivers inside. Our soundbar fundamentals guide explains how different driver configurations affect audio performance, and the best overall soundbar guide helps frame when bigger channel counts are actually worth paying for.

How Does Real-World Performance Change by Room?

Rear speaker and Atmos differences between JBL 9.1 and 5.1 soundbars

The spec sheet makes the 9.1 look like a straightforward upgrade, but real-world Atmos performance depends heavily on your room’s physical characteristics in ways that standard surround does not. That is why the same price jump can feel dramatic in one room and underwhelming in another.

Why Do Atmos Height Channels Depend So Much on Your Ceiling?

The upfiring drivers in the JBL Bar 9.1 work by projecting sound upward at an angle so it reflects off the ceiling and arrives at your ears from above. This reflection trick requires a flat, hard ceiling at standard height (8-10 feet), because vaulted, angled, or very high ceilings scatter the reflected sound before it lands cleanly.

In a room with a flat ceiling at 8-9 feet, the Atmos effect from the 9.1 is genuinely impressive — overhead rain, flyover effects, and ambient height audio are clearly perceptible and add a layer of immersion the 5.1 cannot deliver. In a room with a 12+ foot ceiling or cathedral-style vaulting, the Atmos effect is subtle to undetectable, making the price premium hard to justify.

If you’re trying to price the upgrade path, the best overall soundbar guide helps frame the broader budget ladder. The best Dolby Atmos soundbar guide shows when paying more for height effects makes more sense.

How Similar Are These Bars With Standard Surround Content?

For standard 5.1 surround content (which is the majority of movies and TV shows), both systems perform identically — the same front channels, same wireless surround speakers, and same subwoofer deliver the same surround experience. The 9.1’s additional Atmos drivers only activate when receiving Atmos-encoded content.

If most of your viewing is standard 5.1 content from cable TV, standard streaming, or non-Atmos Blu-rays, the 5.1 delivers the full experience without the Atmos premium. For large-room movie use, a current example is JBL Bar 700MK2 5.1.2ch Soundbar System with Subwoofer and Rear Speakers, which is a stronger fit for more immersive movie playback.

The TV-to-soundbar guide explains why HDMI eARC matters for Dolby Atmos passthrough. The soundbar-to-TV connection guide covers the setup basics for both systems.

Which JBL Bar Is the Better Value?

The JBL Bar 9.1 typically costs several hundred dollars more than the Bar 5.1, and that premium buys four upfiring drivers plus native Atmos decoding — a worthwhile investment if your room supports Atmos and you regularly watch Atmos content. Buyers who want the full JBL ecosystem with a smaller price jump can look at the JBL Bar 700MK2, which gives you 5.1.2-channel Dolby Atmos with physical rear speakers and a wireless subwoofer at a lower price than the 9.1.

The best Dolby Atmos soundbar guide covers the soundbar side of that value question if you are still comparing premium Atmos options. The soundbar setup guide covers the configuration work both JBL systems still need after you buy.

Which Rooms Should Just Buy the JBL Bar 5.1?

If your ceiling is vaulted, very high, or interrupted by fans, the Bar 5.1 is usually the smarter buy because it gives you the same detachable surrounds and subwoofer without asking the room to cooperate with reflected height effects. The best overall soundbar guide is the next stop if you want to compare that value play against other strong systems in the same budget band.

The 5.1 also makes more sense if your content mix is mostly standard streaming, cable, sports, or older discs. In those cases, the best soundbars for dialogue guide and the TV-to-soundbar guide help more than paying extra for Atmos hardware you rarely trigger.

Who Should Stretch for the JBL Bar 9.1?

The 9.1 is the better pick if you have an 8-10 foot flat ceiling and you actually watch Atmos-heavy movies, premium streaming mixes, or immersive games often enough to notice the height layer. Buyers in that lane should also compare it against the best Dolby Atmos soundbar roundup and the best gaming soundbar guide before paying flagship money.

It also makes more sense if you want the most theater-like JBL package without stepping to a receiver and separate speakers. If you are still weighing that jump, the broader soundbar hub helps map the rest of the category.

The Bottom Line

The JBL Bar 5.1 is the better value for most rooms — it delivers true wireless surround with detachable rear speakers and a powerful subwoofer that handles the vast majority of movie and TV content at its best. The 9.1 is worth the upgrade only if you have a flat ceiling at standard height and regularly watch Atmos-encoded content.

Our JBL vs Polk soundbar comparison covers how JBL’s systems compare to Polk’s dialogue-focused alternatives, and the broader soundbar hub maps the next decision path if you still want to compare brands, setups, and room fits. That gives you an easy next step if this comparison narrowed the field but did not fully close the decision.

Frequently Asked Questions

Is JBL 9.1 worth buying?

The JBL Bar 9.1 is worth buying if you have a flat ceiling at standard height (8-10 feet) and regularly watch Dolby Atmos content on Netflix, Disney+, or 4K Blu-ray. The four upfiring Atmos drivers create a genuinely immersive overhead audio effect that the 5.1 cannot replicate — but in rooms with vaulted or very high ceilings, the effect is significantly diminished.

Is JBL Bar 5.1 worth it?

The JBL Bar 5.1 is excellent value for a true wireless surround system — the detachable battery-powered rear speakers deliver genuine 5.1 separation without speaker wire, and the 10-inch subwoofer provides deep bass for movies and music. It handles the vast majority of content at full quality and is the better choice for rooms where Atmos ceiling reflection won’t work effectively.

For large-room movie use, a current example is JBL Bar 5.1, which is a strong fit for TV and movies when you want fuller bass. It makes the most sense when you want the JBL layout without paying flagship Atmos money.

Does the JBL 9.1 have Dolby Atmos?

Yes, the JBL Bar 9.1 has native Dolby Atmos with four dedicated upward-firing drivers — two in the main bar and two in the detachable surround speakers. These physical upfiring drivers bounce sound off your ceiling for genuine overhead audio effects, unlike soundbars that only simulate Atmos through DSP processing on standard forward-facing drivers.

Atmos Soundbar vs 5.1: Which System Sounds Better for Your Room?

Atmos soundbar vs 5.1 sounds like a simple spec comparison, but these systems solve immersion in completely different ways.

Many buyers choose the Atmos badge or the 5.1 label first, then end up with the wrong kind of performance for their room — height effects that fade under a vaulted ceiling, or rear speakers that never get placed correctly because the seating layout cannot support them.

Once you separate overhead height from true horizontal surround, the decision gets easier. You can match the system to your room, your content habits, and the kind of immersion you will actually hear.

The first move is to check whether your room can support upfiring height effects or proper rear-speaker placement. That single reality check usually tells you whether an Atmos soundbar or a 5.1 system makes more sense.

Quick Takeaway

An Atmos soundbar adds height effects from upfiring drivers or dedicated Atmos channels, which gives movies a vertical dimension a standard 5.1 system lacks unless it adds extra speakers. A traditional 5.1 system still wins on pure left-right and behind-you surround accuracy because its speakers are physically placed around the room.

Choose an Atmos soundbar if you want simpler setup and your ceiling can support the height effect. Choose 5.1 if rear-speaker placement is easy and precise horizontal surround matters more than Atmos height.

How Do Atmos Soundbars and 5.1 Systems Create Surround Sound?

Dolby Atmos soundbar compared with a 5.1 speaker system

The core difference between these systems is how they create the spatial audio experience — one adds a vertical dimension, the other perfects the horizontal one.

Atmos Soundbar: Height Effects + Virtual Surround

A Dolby Atmos soundbar like the Samsung Q800F 5.1.2ch Q Series Soundbar + Subwoofer uses upfiring drivers that bounce sound off your ceiling to create the impression of audio coming from above — rain, helicopters, ambient atmosphere in the overhead space. That height dimension is something a standard 5.1 system simply cannot produce without adding dedicated ceiling or upfiring speakers.

For horizontal surround, an Atmos soundbar relies on psychoacoustic processing and side-firing drivers to simulate the effect. The simulation is convincing for casual viewing, but it cannot match the precision of speakers physically positioned behind your seating area.

Some premium Atmos soundbars include optional or bundled wireless rear speakers that shrink the gap between virtual and true surround. Even then, the height effect still depends on ceiling shape and room acoustics in a way discrete 5.1 surround does not.

Traditional 5.1: True Horizontal Surround

A 5.1 system places five speakers around your room — front left, center, front right, surround left, and surround right — plus a subwoofer. When a car drives past in a movie, the sound physically moves from your front speakers through your surround speakers because those speakers are actually in different positions around you.

This physical separation creates pinpoint directional accuracy that no soundbar processing can fully replicate. You hear exactly where sounds originate in the horizontal plane because the speakers are physically positioned at those locations, delivering a level of spatial precision that virtual surround algorithms cannot reproduce.

The tradeoff is that a 5.1 system has zero height capability out of the box — rain falls from ear level, helicopters fly past at ear level, and overhead ambient effects play from the same horizontal plane as everything else. Adding height requires upgrading to a 5.1.2 or 5.1.4 system with an Atmos-capable receiver and additional speakers.

Which Dimension Matters More?

For movies with Atmos soundtracks (available on Netflix, Disney+, Apple TV+, and Blu-ray), the height effects add genuine immersion. Overhead rain, spatial atmosphere, and objects moving in the vertical space are experiences a flat 5.1 system misses entirely.

For standard 5.1 content, which still represents the majority of TV shows, older movies, and a large share of streaming libraries, the traditional system’s precise horizontal surround wins.

That is why the best answer changes by content library. Atmos showcases vertical movement better, but 5.1 still handles the broadest mix of everyday TV and movie material with fewer assumptions about your ceiling.

Our soundbar vs receiver guide covers the broader comparison between soundbar convenience and discrete speaker systems.

Which Fits Better in Real Rooms: Atmos Soundbar or 5.1?

Height effects and surround placement in Atmos soundbar versus 5.1 setup

Beyond raw audio quality, the practical gap between these two systems is significant and often determines the final purchasing decision.

Setup and Complexity

An Atmos soundbar connects with one HDMI cable, powers on, and starts playing — the wireless subwoofer pairs automatically. Total setup is usually under 10 minutes with no speaker wire, no receiver, and very little calibration work.

A traditional 5.1 system requires an AV receiver, five speakers, a subwoofer, speaker wire runs to multiple locations, and a longer setup process that often includes calibration. If you want the simpler route, a good Atmos bar keeps the entire project far closer to plug-and-play.

For buyers who care more about keeping hardware minimal than maxing out low-end output, an all-in-one Atmos option like the Samsung S60D 5.0ch Soundbar with Wireless Dolby Atmos Audio shows why an Atmos bar can feel more realistic in everyday living rooms than a receiver project that never gets fully finished.

If you are comparing Atmos channel layouts inside the soundbar category itself, the 5.1 vs 3.1.2 soundbar guide is the closer follow-up than another receiver discussion. Our soundbar vs receiver guide covers the receiver-specific tradeoffs in more detail.

Cost Comparison

A quality Atmos soundbar with a wireless subwoofer usually costs $250-600, though higher-output Atmos packages can stretch above that when you want stronger bass and bigger room coverage. That is still usually simpler than jumping straight into a receiver stack.

A comparable traditional 5.1 setup starts higher because you need the receiver and speakers separately. Adding Atmos to that 5.1 system later pushes the total up again because now you are paying for extra speakers and Atmos-capable electronics.

The cost gap is the primary reason many buyers choose an Atmos soundbar first. You get height effects and simplified setup in one purchase for less than the cost of many entry-level receiver-based builds.

That budget reality matters because cheap 5.1 does not automatically beat a competent Atmos soundbar. In ordinary living rooms, a better-tuned Atmos bar often makes more sense than stretching a receiver build so thin that speaker quality and placement both suffer.

Room Requirements

An Atmos soundbar needs a flat, hard ceiling between roughly 8 and 10 feet for the upfiring drivers to bounce sound effectively — vaulted ceilings, textured popcorn ceilings, and ceiling fans reduce or eliminate the height effect. The bar itself sits below the TV with no major placement burden beyond that ceiling requirement.

A traditional 5.1 system needs space for rear speakers behind the seating area, clear cable paths or power access, and enough distance for the surrounds to work properly. If a full receiver-based 5.1 build feels too complex, a wireless-rear package like the Sony BRAVIA Theater System 6 narrows the gap while staying simpler than a traditional component stack.

Room shape can break either option for a different reason. A vaulted ceiling hurts Atmos bounce, while a couch against the back wall makes proper 5.1 rear placement difficult.

Apartment living can tilt the decision too. A room may support Atmos bounce just fine, yet visible rear-speaker wire, speaker stands, or wall mounting can still make a traditional 5.1 setup unrealistic.

Our soundbar buying guide covers room-fit considerations in more detail.

Content Availability

Most streaming content is mixed in 5.1, which both systems handle well. Dolby Atmos content is growing on Netflix, Disney+, Apple TV+, and Amazon Prime, but it is still a fraction of the total catalog, so height channels often sit idle on everyday TV.

Streaming Atmos is also compressed, so the logo does not automatically mean a dramatic leap over good 5.1 playback. On Blu-ray or higher-quality Atmos tracks the height effect is easier to hear, but on casual streaming the practical difference can be smaller than buyers expect.

Sports, news, YouTube, and plenty of routine TV watching rarely exploit Atmos in a meaningful way. If that is most of your use, traditional surround accuracy or simple overall convenience may matter more than chasing height just because the logo is available.

If you want the soundbar-side breakdown of Atmos channel counts, the 5.1 vs 3.1.2 soundbar guide shows how height channels change the decision inside the soundbar category. And if you already know Atmos is the priority, the best Dolby Atmos soundbar roundup is the better buying next step.

The Bottom Line

An Atmos soundbar adds a vertical dimension that a standard 5.1 system can’t match — overhead effects, spatial atmosphere, and height-based audio are exclusive to Atmos unless you add ceiling speakers to your 5.1. A traditional 5.1 system delivers more accurate horizontal surround from physically placed speakers that no soundbar processing can fully replicate.

Choose an Atmos soundbar if you want height effects, simple one-cable setup, and good virtual surround in one device under $600. Choose a 5.1 system if precise horizontal surround matters most and you have the room layout, budget ($800+ for speakers plus a receiver), and willingness to run speaker wire and calibrate the system properly.

For understanding how soundbars work fundamentally, start there, and the 5.1 vs 3.1.2 soundbar guide covers the most useful Atmos-versus-channel-count decision inside the soundbar category. For connection setup, our HDMI ARC guide covers the cleanest way to feed surround audio to any soundbar.

Frequently Asked Questions

Is Dolby Atmos worth it in a soundbar?

Yes, if you have a flat ceiling between 8-10 feet and watch Atmos content on streaming services or Blu-ray — the height effects add genuine immersion for movies mixed in Atmos. If your ceiling is vaulted or textured, the upfiring drivers won’t bounce effectively and the Atmos premium isn’t justified.

Why does Netflix show 5.1 instead of Atmos?

Netflix only outputs Atmos on its Premium plan ($22.99/month) and only on titles that have been mixed in Atmos. If your plan, device, or the specific title doesn’t support Atmos, Netflix falls back to 5.1 — which is still excellent surround audio that both Atmos soundbars and 5.1 systems handle well.

Is 5.1.2 enough for Atmos?

Yes — 5.1.2 is the entry point for a proper Dolby Atmos experience with five ear-level channels, one subwoofer, and two height channels reproducing the vertical dimension. A 5.1.4 adds more overhead coverage, but the improvement over 5.1.2 is subtle in most rooms.

Is a 5.1 or 2.1 soundbar better?

A 5.1 soundbar is better for surround effects and dialogue clarity because it has more discrete channels including a center channel and surround speakers. A 2.1 is better for budget-conscious buyers who want a major upgrade from TV speakers without building a bigger system — the best budget soundbar roundup is the more useful next step if cost matters most.

Why Does My Soundbar Keep Cutting Out? How To Fix It [2026]

Why does my soundbar keep cutting out? It sounds like a hardware defect, but the real fault usually lives somewhere else in the signal chain.

Dialogue disappears for a second, the subwoofer drops mid-movie, or the whole system skips every few minutes even though the volume looks normal.

Intermittent audio almost always comes from an HDMI ARC handshake, a weak Bluetooth link, a bad optical cable, a firmware bug, or a sound mode that mutes the signal at the wrong moment.

Once you isolate which connection is failing, you can fix it in under 15 minutes and stop rebooting the TV every night so you get stable sound again.

Below, we’ll start with the fastest checks, then break down HDMI ARC, optical, Bluetooth, quiet-scene dropouts, and the signs that the soundbar hardware itself is the problem.

Quick Takeaway

To stop your soundbar from cutting out, first figure out whether the dropout happens over HDMI ARC, optical, Bluetooth, or only on the wireless subwoofer and rear speakers.

Most intermittent audio problems come from a weak cable, a bad ARC handshake, or a TV audio-format mismatch.

Others trace to wireless interference or an aggressive sound mode rather than a dead soundbar.

If the whole bar cuts out on every source even after a cable swap, reset, and firmware update, hardware failure becomes much more likely.

Why Does My Soundbar Keep Cutting Out on Some Sources but Not Others?

Diagnostic map for a soundbar that keeps cutting out

That quick split matters because intermittent audio is really several different problems wearing the same label. Start by separating what is dropping out, then check whether the issue follows one source or follows the entire system.

Full dropout vs partial dropout

If the main bar, the subwoofer, and any rear speakers all go silent at the same moment, the failure is usually higher up the chain.

That points to the TV output, the HDMI ARC or optical connection, the source device, or the soundbar’s own main board.

If the bar keeps playing but the subwoofer drops out, that is a different failure entirely.

In that case, the root cause is usually the wireless link between the bar and the sub, not the TV-to-soundbar connection.

The same goes for rear speakers in a surround sound package. Partial dropout usually means pairing, interference, or placement trouble rather than some global signal collapse.

Run one fast test before touching menus.

Play the TV’s own menu sounds, then a built-in streaming app, then music over Bluetooth, and note whether the same part drops out each time.

That first separation tells you whether to keep thinking about signal path or to focus on the speaker module that is failing.

It also makes guides like what soundbar channels mean and what a soundbar actually does more useful, because you can map the failure to the part of the system that owns that job.

Source-specific vs universal dropouts

Once you know whether the whole system or only one piece is cutting out, the next question is source consistency.

If Netflix cuts out but your game console does not, that is not the same problem as a soundbar that skips on everything.

Built-in TV apps, external streamers, cable boxes, and Bluetooth all take different audio paths.

A dropout that only happens on one app often points to that app’s audio format, a weak streamer handshake, or a buggy source device rather than to the soundbar itself.

A dropout on every source is more serious, but it still does not automatically mean the bar is dying. It just means the shared part of the chain is the place to look first.

Use the simplest isolation test possible.

Try one built-in TV app, one external HDMI source, and one direct Bluetooth device, then write down what cuts out and after how long.

That simple log will save you from changing six settings at once and losing the root cause.

The same discipline is what makes connecting a soundbar to a TV and checking whether a soundbar works with any TV much easier when something feels unstable.

How Do You Stop HDMI ARC or eARC Dropouts?

HDMI ARC and eARC dropouts causing soundbar audio cuts

If the problem follows TV apps and HDMI-connected sources, ARC or eARC is the first suspect.

That path is convenient, but it depends on the TV, the soundbar, the cable, and CEC control all agreeing with each other at the same time.

Rebuilding the ARC handshake

ARC problems usually come from a broken handshake rather than from a permanently broken port.

The TV and the soundbar negotiate control, audio return, and audio format together, which is why one bad setting can make the whole path feel flaky.

Turn both devices off fully, unplug them for about 30 seconds, then reconnect only the soundbar to the TV’s actual ARC or eARC port.

After that, power on the TV first, then the soundbar, and reselect the external audio device in the TV menu.

CEC settings matter more than most people realize.

Samsung calls it Anynet+, LG calls it Simplink, Sony uses Bravia Sync, and if that control layer is off, ARC can look alive while audio still keeps falling apart.

Leave eARC enabled only if the setup actually needs it. On some combinations of older TVs and newer bars, standard ARC is more stable than eARC during troubleshooting because it removes one extra negotiation step.

Firmware updates belong early in this process, not after hours of guessing.

That is exactly where HDMI ARC setup and the format behavior in why a soundbar says PCM become relevant, because both explain why a seemingly healthy bar can still receive the wrong signal.

Swapping the cable and relaxing the audio format

A bad HDMI cable can create intermittent audio without creating a total failure. That makes it harder to spot, because the picture may keep working while the audio path drops for a second at a time.

Use a known-good cable before blaming the soundbar. A current example is Amazon Fire TV Soundbar, which is a strong fit for Balanced TV and movie upgrade.

Then simplify the audio format.

Set the TV to Auto, Pass Through, or Bitstream first, but if dropouts continue, temporarily force PCM as a test and see whether stability returns.

That does not mean PCM is the best long-term choice. It simply tells you whether the instability is coming from a surround-format handshake rather than from the soundbar’s hardware.

If PCM is stable and passthrough is not, your next move is format and connection troubleshooting, not shopping for a replacement. That same pattern is why HDMI vs optical for soundbars matters so much when dropouts seem random.

What Should You Do If the Problem Only Happens on Optical?

Optical cable fallback for soundbar audio dropouts

Optical is less feature-rich than ARC, but it is often more predictable.

If optical is the only connection acting up, the problem usually sits in the cable fit, the TV output menu, or a format mismatch that the TV is handling badly.

Reseating the cable and re-choosing the TV output

Optical cables fail in boring ways. A connector that is not fully seated, a damaged tip, or dust in the port can create quick dropouts that feel like software trouble even though the real cause is physical.

Pull the cable out on both ends and click it back in firmly. Many people stop one millimeter too early, especially behind a wall-mounted TV where the connector is hard to see.

Then go back into the TV menu and explicitly select Optical, Digital Audio Out, or External Audio System. Some TVs keep the port electrically alive but refuse to send stable sound until that output mode is chosen again.

For large-room movie use, a current example is Bose Smart Dolby Atmos Soundbar, which is a strong fit for Atmos streaming and immersive TV audio.

What optical can and cannot carry

Optical can handle stereo PCM and compressed Dolby Digital 5.1 just fine.

What it cannot do is carry the full higher-bandwidth formats that make eARC valuable, so it should be treated as a stable fallback rather than as the best path for every system.

That limitation matters during diagnosis. If your soundbar becomes rock solid on optical but keeps dropping over ARC, the soundbar itself has just passed a very important test.

In plain English, that means the bar can still play properly when the signal path is simplified.

The instability is probably living in the ARC handshake, the TV’s eARC behavior, or the HDMI cable rather than in the bar’s main amplifier section.

LG and Samsung sets make this especially confusing because firmware updates sometimes reset the digital output mode after you think the issue is solved.

That is why the best follow-up reading here is not a generic buyer guide but the connection-specific logic in TV-to-soundbar setup and the tradeoff breakdown in optical versus HDMI audio.

Why Does Bluetooth Audio Keep Skipping on a Soundbar?

Bluetooth skipping as a cause of soundbar cutouts

If the soundbar only cuts out when a phone, tablet, or TV is using Bluetooth, stop thinking about cables for a minute.

Bluetooth dropouts usually come from interference, distance, or device conflicts, not from a failing amplifier.

Reducing interference and device conflicts

Bluetooth looks simple because it is wireless, but it is more fragile than HDMI or optical.

Wi-Fi routers, streaming boxes, game controllers, crowded apartment networks, and even a phone tucked behind your body can weaken the link enough to create short skips.

Keep the source device within about 10 to 15 feet while testing. If the dropout disappears at close range, the soundbar was not failing at all — the wireless environment was.

Then clear out the pairing list if the bar supports multiple remembered devices.

A soundbar that keeps trying to reconnect to an old tablet or laptop can look unstable even though it is doing exactly what it was told to do.

Also disable battery-saving modes on the phone or tablet during the test. Aggressive power management can throttle the Bluetooth device, especially during background app switching or when the screen locks.

This is the same reason Bluetooth soundbar pairing and TV-to-soundbar Bluetooth setup succeed in one room and fail in another even with the same hardware.

When Bluetooth is the wrong connection for TV audio

Bluetooth is convenient for music from a phone. It is usually a compromise for TV audio.

TVs often use weaker Bluetooth implementations than phones do, and that means more lip-sync issues, more compression, and more random reconnect behavior.

If TV Bluetooth keeps skipping while ARC or optical stays stable, that is not a mystery to solve forever — it is a sign to stop using Bluetooth for that job.

Treat Bluetooth as the backup connection or the casual music path. Use ARC or optical for the main TV signal whenever possible, because those connections are simply better suited to continuous audio and surround sound formats.

For large-room movie use, a current example is Yamaha Audio SR-B20A Sound Bar with Built-in Subwoofers and Bluetooth, which is a strong fit for TV and movies when you want fuller bass.

If the goal is stable movie or game audio, the smartest fix is often changing the connection type rather than changing the soundbar.

That is also why a practical article like how soundbars work with TVs is more useful here than chasing another round of wireless pairing tips.

Why Do the Subwoofer or Rear Speakers Cut Out While the Bar Keeps Playing?

Wireless subwoofer dropout in a soundbar system

This is where many people misdiagnose the problem. When the main bar keeps playing but the bass or rear channels vanish, the TV connection is usually innocent and the wireless speaker link is what needs attention.

Placement and interference fixes

Wireless subwoofers and rear modules do not use the same path as the TV-to-bar connection. They rely on a separate wireless link, so they can fail even while the front bar sounds perfectly normal.

Start with placement.

A subwoofer shoved inside a cabinet, pinned behind dense furniture, or parked directly beside a router has a much harder time holding a stable link than one sitting in the open with a clear path to the bar.

Distance matters too. In most living rooms, keeping the wireless sub within roughly 15 to 25 feet of the bar with as few thick obstacles as possible makes a real difference.

Power also matters more than people think. A flaky wall outlet, loose power cable, or power strip that keeps browning out under load can look exactly like a wireless dropout.

That partial-channel behavior is easier to understand once you know what each channel is supposed to do, which is why soundbar channel layouts and the system tradeoffs in soundbar versus home theater help frame what is actually failing.

Re-pairing before assuming hardware failure

Most soundbar systems give the subwoofer and rear speakers their own pairing routine.

It may be labeled Pair, ID Set, or hidden behind a reset sequence, but it exists for exactly this kind of instability.

Re-pair the wireless modules first, then test again with one stable source for at least 10 minutes.

Do not change the TV connection, the sound mode, and the pairing status all at once or you will lose the signal of what fixed it.

Check firmware updates after the re-pair, especially on Samsung and LG systems that bundle bar, subwoofer, and rear behavior into one update cycle.

A wireless bug can survive across months of normal use and then show up only after a router change or a TV firmware change nearby.

If the subwoofer still drops even after moving it, re-pairing it, and testing different outlets, then hardware starts to move higher on the suspect list.

At that point, the logic in how to tell if a soundbar is bad becomes more useful than another round of generic setup advice.

Why Does a Soundbar Cut Out During Quiet Scenes or Low Volume?

Quiet scene audio causing a soundbar to seem like it cuts out

This version of the problem feels especially weird because the soundbar may work perfectly during loud action scenes. Then it starts dipping in and out during soft dialogue, ambient background noise, or low-volume late-night watching.

Sound modes that mute soft signals

Many soundbars include night mode, auto volume, adaptive sound, dialogue enhancement, or dynamic range compression.

Those features can help in the right room, but they can also clamp down on quiet signals so aggressively that soft content seems to disappear.

This is not always a defect.

Sometimes the bar is reacting exactly as the sound mode tells it to react, especially if the soundtrack hovers right around the threshold where the processor decides a signal is too soft to keep open.

Turn those modes off one at a time. If the dropout vanishes the moment night mode or adaptive processing is disabled, you just found a settings problem instead of a hardware problem.

Some bars also combine those listening modes with auto-standby or eco behavior.

When the bar sees a few seconds of soft dialogue or near-silence, it can misread the signal as inactivity and shut the audio path until a louder sound wakes it back up.

TV eco modes can create the same symptom from the other end.

If quiet-scene cutouts line up with sleep settings, green modes, or auto power-off behavior, disable those before you decide the soundbar itself is failing.

Streaming apps can make this even murkier by switching between ads, stereo menus, and surround sound content on the fly.

That quick format shift is one reason a system can feel stable for half an hour and then suddenly start misbehaving.

Using a repeatable test instead of guessing

Do not diagnose this kind of dropout by flipping through random scenes. Use one repeatable test clip with soft dialogue, low ambient sound, and at least a few minutes of continuous playback.

Run the same clip three ways if you can: built-in TV app, external streamer, and a second connection type such as optical.

When the dropout follows one app or one connection only, the problem gets much easier to pin down.

Also test at the exact volume where the issue usually happens.

A soundbar that behaves at volume 35 but starts cutting in and out at volume 10 is telling you something very different from one that fails at all levels.

That is usually the moment when people stop guessing and start seeing the pattern.

If you still cannot separate a settings issue from a real failure after that, the next useful checkpoint is how to tell whether the soundbar itself is bad.

When Is It Probably a Hardware Fault?

Hardware fault signs in a soundbar that keeps cutting out

After all those connection checks, one question remains. What if the soundbar really is the bad part of the system?

Signs of actual hardware failure

Hardware failure usually looks consistent, not mysterious.

The strongest sign is a soundbar that cuts out on every source, every connection type, and every cable even after a full reset.

Heat is another clue. If the bar plays normally for 20 to 30 minutes and then starts dropping audio as the chassis warms up, an internal amplifier or power-supply issue becomes much more believable.

Listen for relay clicks, power-light resets, or one permanently weak channel that stays bad on TV audio and Bluetooth alike.

Those symptoms are hard to pin on an HDMI cable or TV menu setting because they survive even when the signal path changes.

Age matters too, but it is not the only factor.

Many soundbars last five to ten years or more, yet poor ventilation, heavy daily use, or repeated power issues can shorten that window significantly.

Before replacing the soundbar

Factory-reset the bar, update the firmware, move it to a different outlet, and test it with one known-good source.

That last pass matters because replacement decisions go wrong when the real culprit was the TV, the cable, or the wireless environment all along.

If the soundbar is under warranty, document the behavior with a short video and write down the exact conditions that trigger it.

Manufacturers respond much better to repeatable evidence than to a general complaint that the sound is sometimes weird.

If it is out of warranty and still fails on every path, replacement becomes the practical answer.

This is where diagnosing a bad soundbar and the bigger value question in whether a soundbar is worth it intersect, because you do not want to replace a bar before you are sure the rest of the chain is clean.

A new soundbar will not fix a bad TV menu, a weak HDMI lead, or a noisy wireless environment.

But when every test points back to the same bar, replacing it is the clean fix rather than a guess.

The Bottom Line

Most soundbar cutouts are connection problems, not dead-soundbar problems.

If you isolate the failure by source, by connection type, and by whether the whole system drops or only the wireless modules do, the root cause usually becomes obvious faster than most people expect.

Start with the path that fails most often in your room, not with random settings changes.

ARC and eARC issues want handshake and cable checks, optical issues want fit and output checks, Bluetooth wants interference control, and partial subwoofer dropouts want wireless placement and re-pairing.

If the bar still cuts out on every source after all of that, treat it as a hardware diagnosis and move on with confidence instead of guessing. That is the point where troubleshooting has done its job.

Frequently Asked Questions

How do I stop my soundbar from cutting out?

Start by checking whether the problem happens on HDMI ARC, optical, Bluetooth, or only on the wireless subwoofer and rear speakers.

Once you isolate the failing path, the fix is usually straightforward: rebuild the ARC handshake, swap the cable, reselect the TV output, reduce Bluetooth interference, or re-pair the wireless speakers.

Why does my sound keep cutting in and out?

Because some part of the audio chain is unstable.

That can be a TV audio setting, a weak cable, a bad wireless link, a buggy app, or a sound mode that keeps clamping down on soft audio.

Why does my sound bar keep going off?

If the whole soundbar goes off, look at power, HDMI ARC, firmware, and the TV audio output first.

If only the bass or rear speakers disappear, the bar is usually still fine and the wireless speaker link is where the problem lives.

How long should a soundbar last?

A decent soundbar often lasts five to ten years or longer when it has good ventilation and a stable power source.

If yours is cutting out much earlier than that, check the connection path and firmware before assuming age is the reason.

Why does my soundbar cut out during quiet moments?

That usually points to night mode, auto volume, adaptive sound, or another processing mode that is muting soft signals too aggressively.

Turn those features off, then test the same quiet scene again before you blame the hardware.

Why does only my subwoofer keep cutting out?

Because the subwoofer usually uses a separate wireless link from the main bar.

Move it farther from routers and metal furniture, re-pair it, try another outlet, and only then start suspecting a failing subwoofer module.