Bass Trap Thickness — How Thick Do Bass Traps Need To Be?

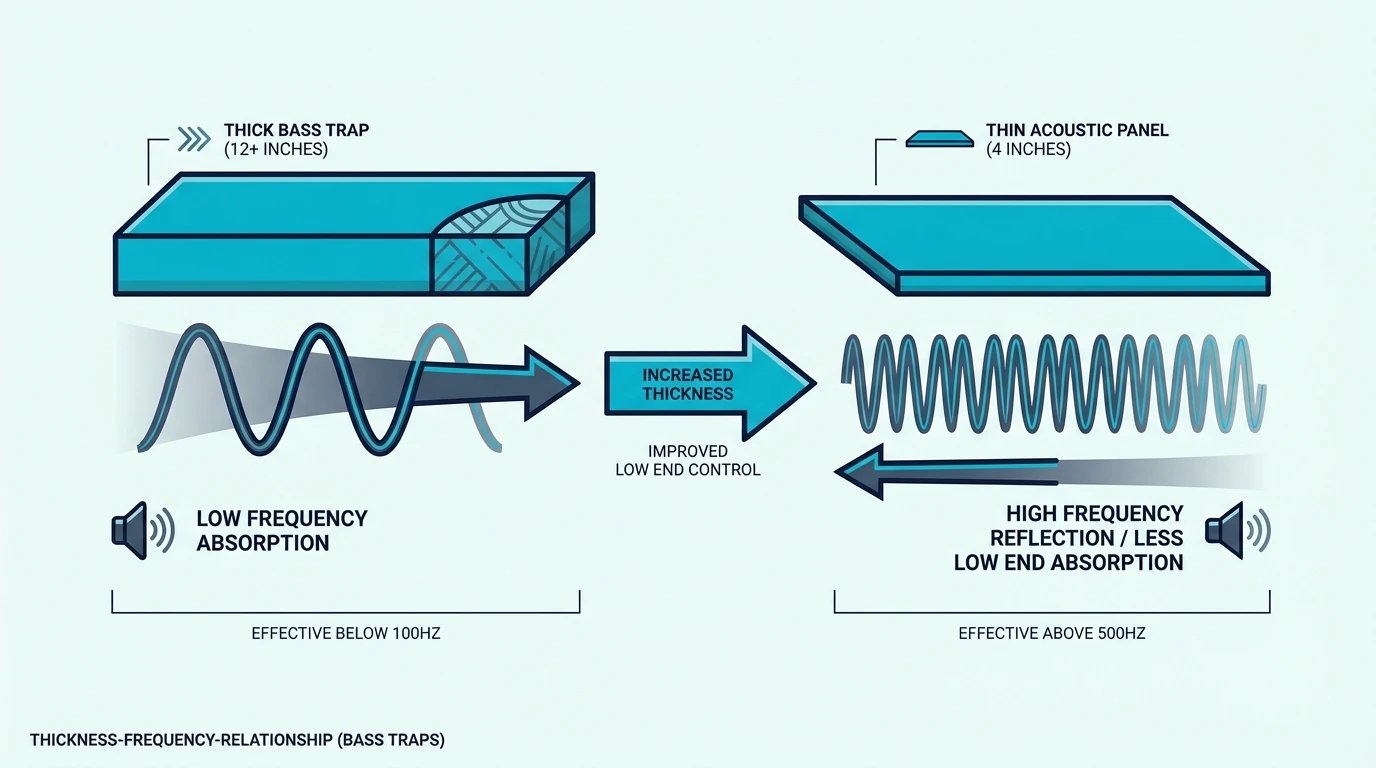
Bass trap thickness is the single most important factor in how low a trap can absorb, but most people buy 2-inch panels thinking they’re getting bass treatment when those panels barely touch anything below 500 Hz.

The physics is direct: a porous absorber needs to be at least one-quarter of the wavelength of the lowest frequency it can absorb effectively. A 100 Hz sound wave is about 11 feet long, which means its quarter wavelength is nearly 3 feet — far thicker than any commercially available panel.

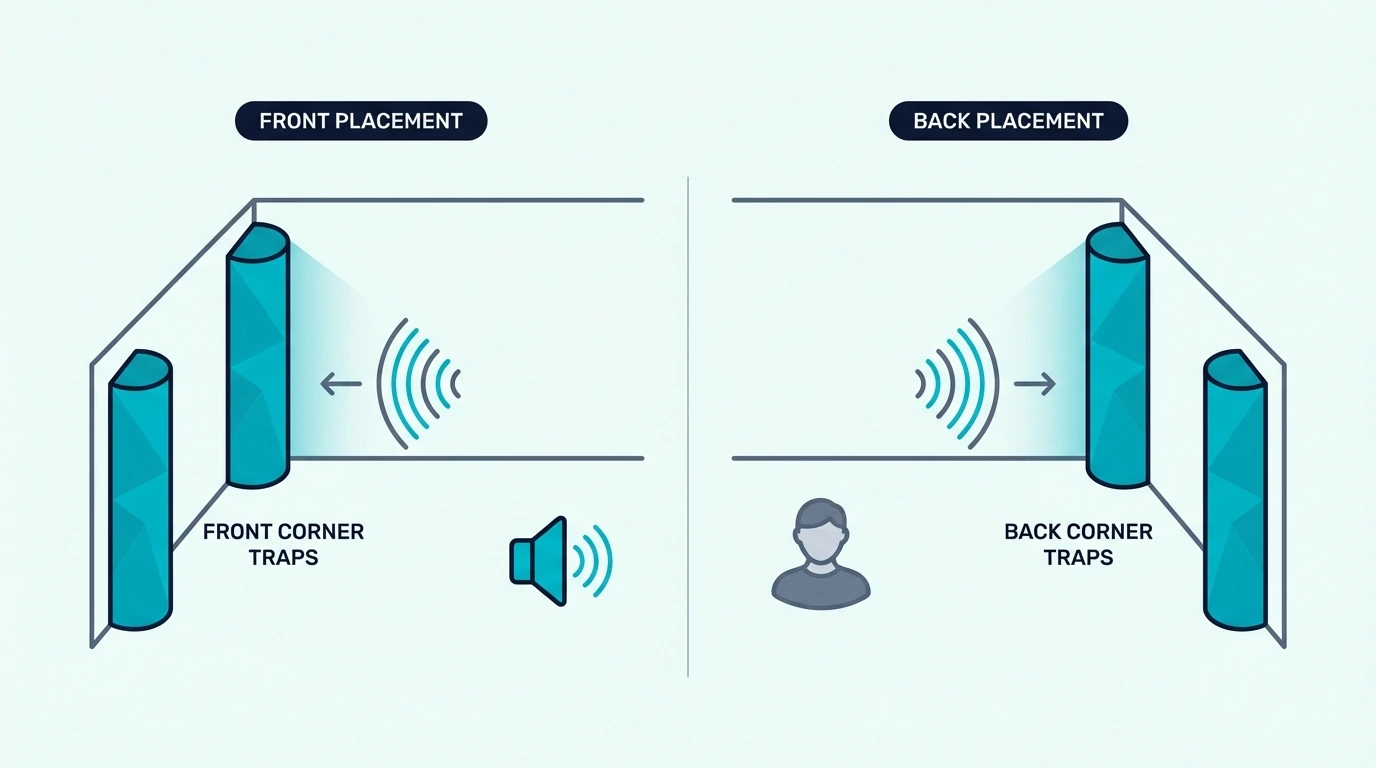
Corner mounting and air gaps compensate for thickness limitations by placing the absorptive material at the point of maximum particle velocity, but thickness still sets the floor. A 2-inch trap in a corner absorbs better than a 2-inch trap on a flat wall, but it still won’t reach the deep bass that a 6-inch trap handles easily.

Below, you’ll find the exact relationship between bass trap thickness and frequency absorption, when 4-inch traps are enough versus when you need 6 inches or more, and how material density interacts with thickness to determine real-world performance.

Quick Takeaway

A 4-inch thick bass trap is the minimum for meaningful bass absorption (effective down to roughly 250 Hz when corner-mounted). Six-inch traps reach approximately 160 Hz, and superchunk corner fills (17+ inches) absorb down to 80 Hz. Thickness matters more than material density for bass frequencies — a 4-inch trap at 3 PCF outperforms a 2-inch trap at 6 PCF for low-frequency absorption.

Why Does Bass Trap Thickness Matter?

Quarter-wavelength rule for bass trap thickness

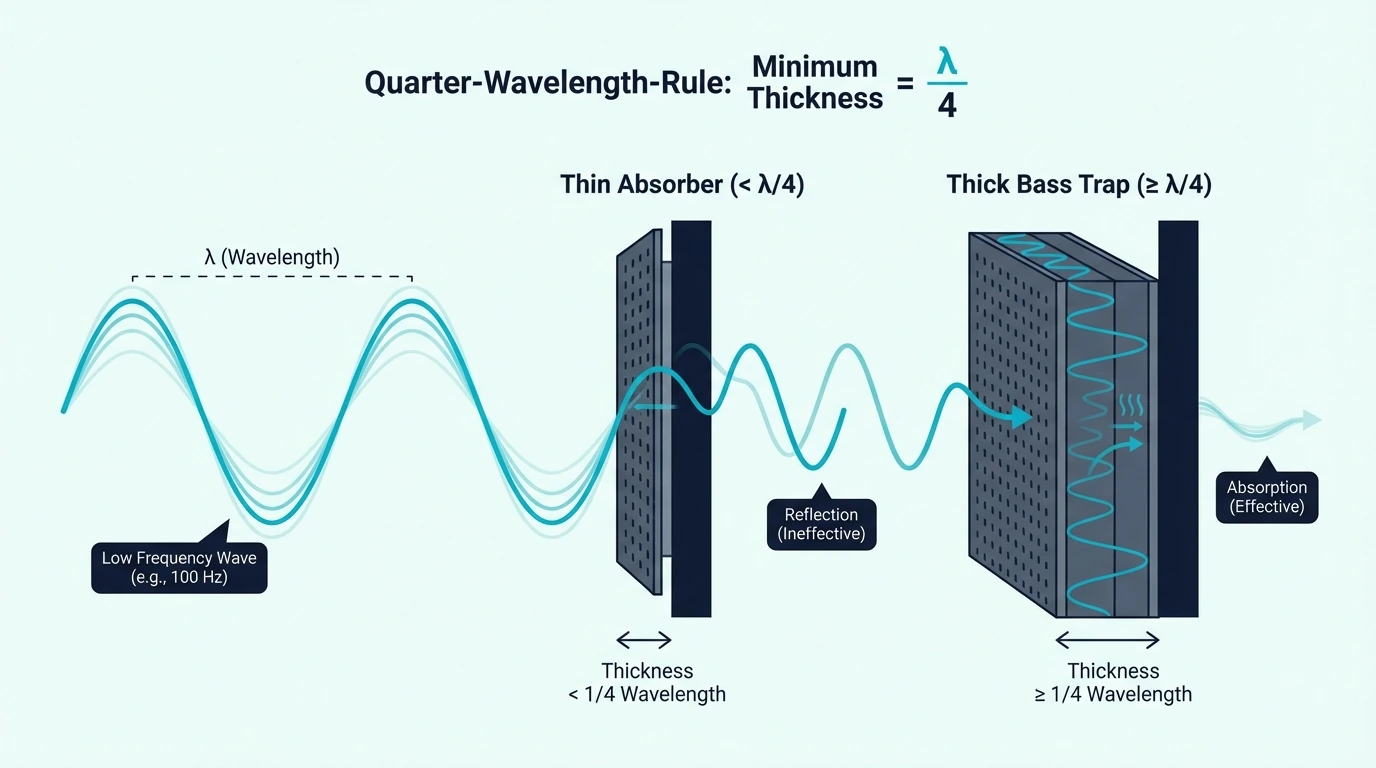
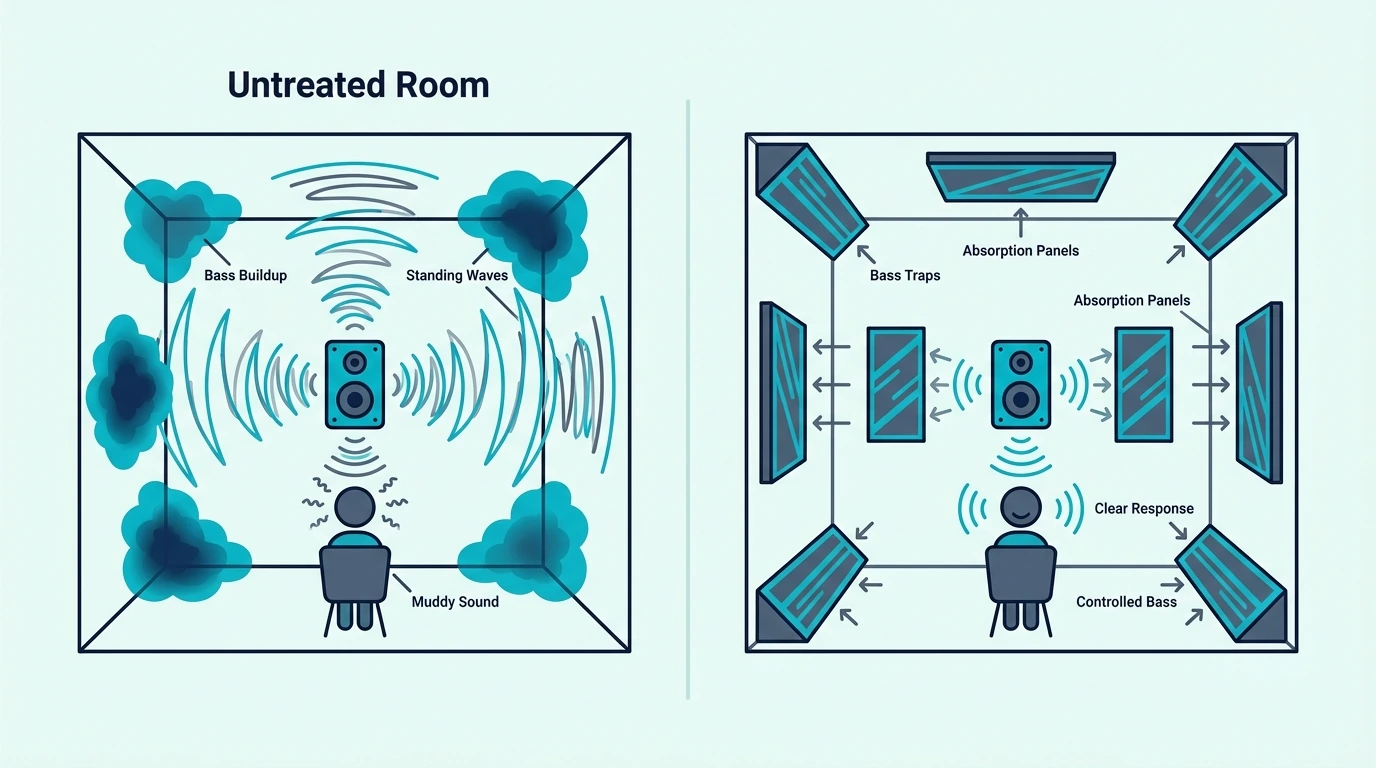
Bass trap thickness matters because of the quarter-wavelength rule — a porous absorber works best when its depth equals at least one-quarter of the target frequency’s wavelength. Below that thickness, the material simply cannot interact with enough of the sound wave to convert it to heat.

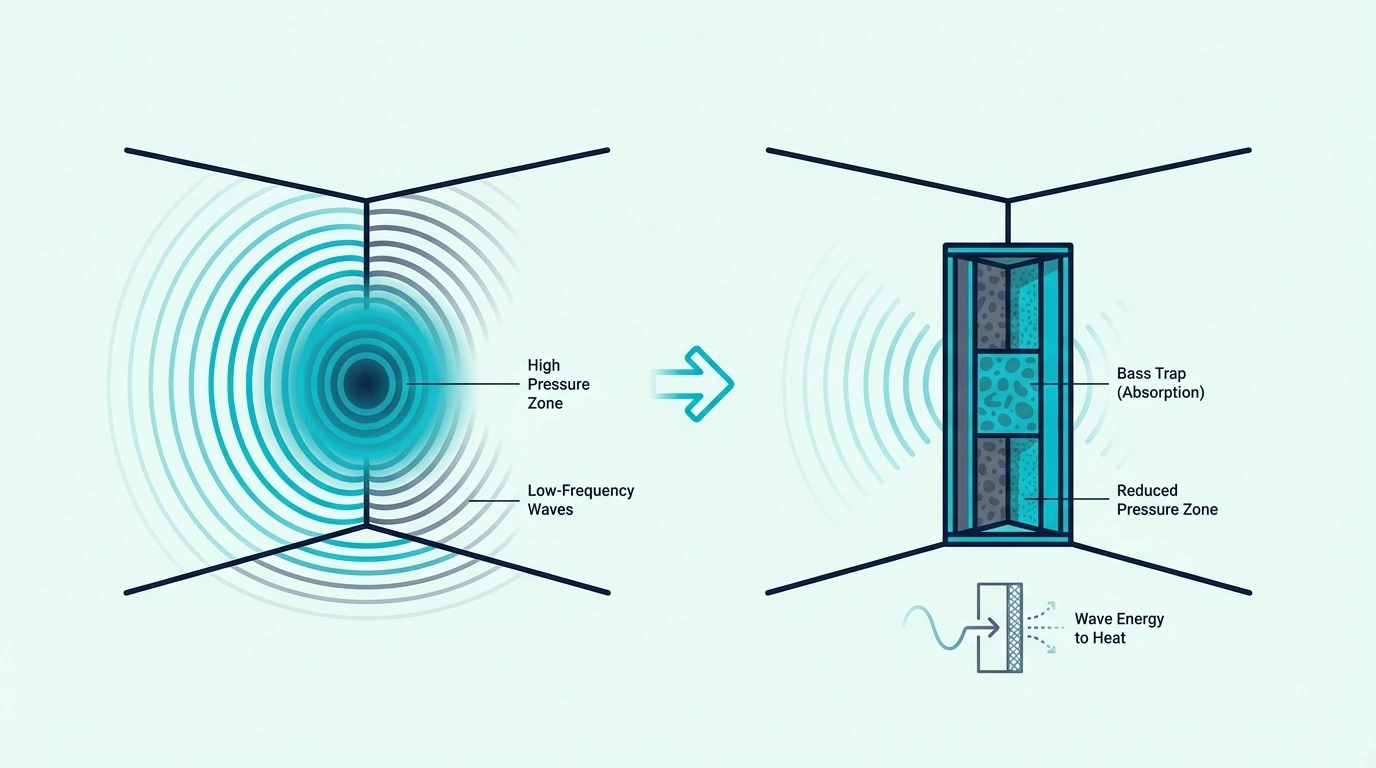
Sound waves at bass frequencies are physically long — a 100 Hz wave is about 11.3 feet, a 60 Hz wave is about 18.8 feet, and a 40 Hz wave stretches to 28.2 feet. The quarter wavelengths (2.8 feet, 4.7 feet, and 7 feet respectively) make flush-mounted porous absorption impractical for deep bass.

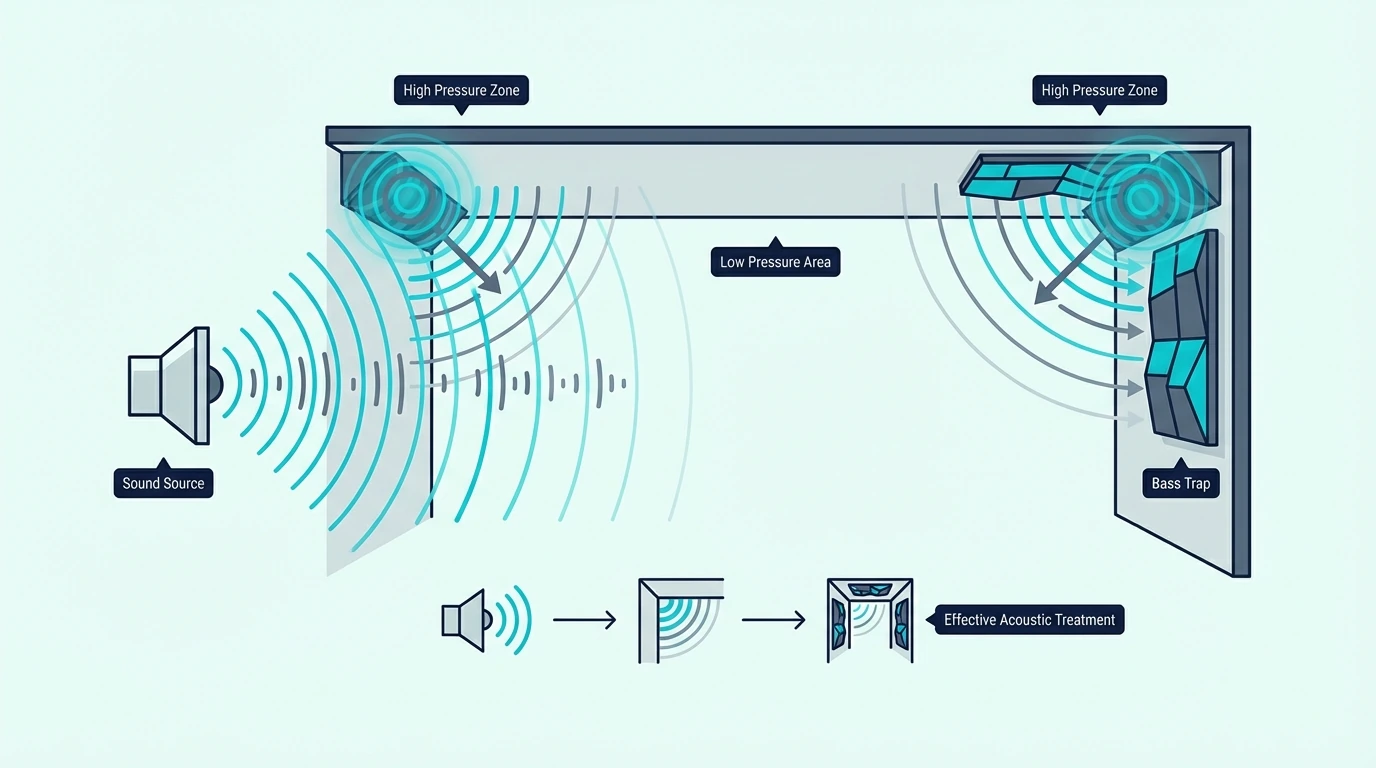
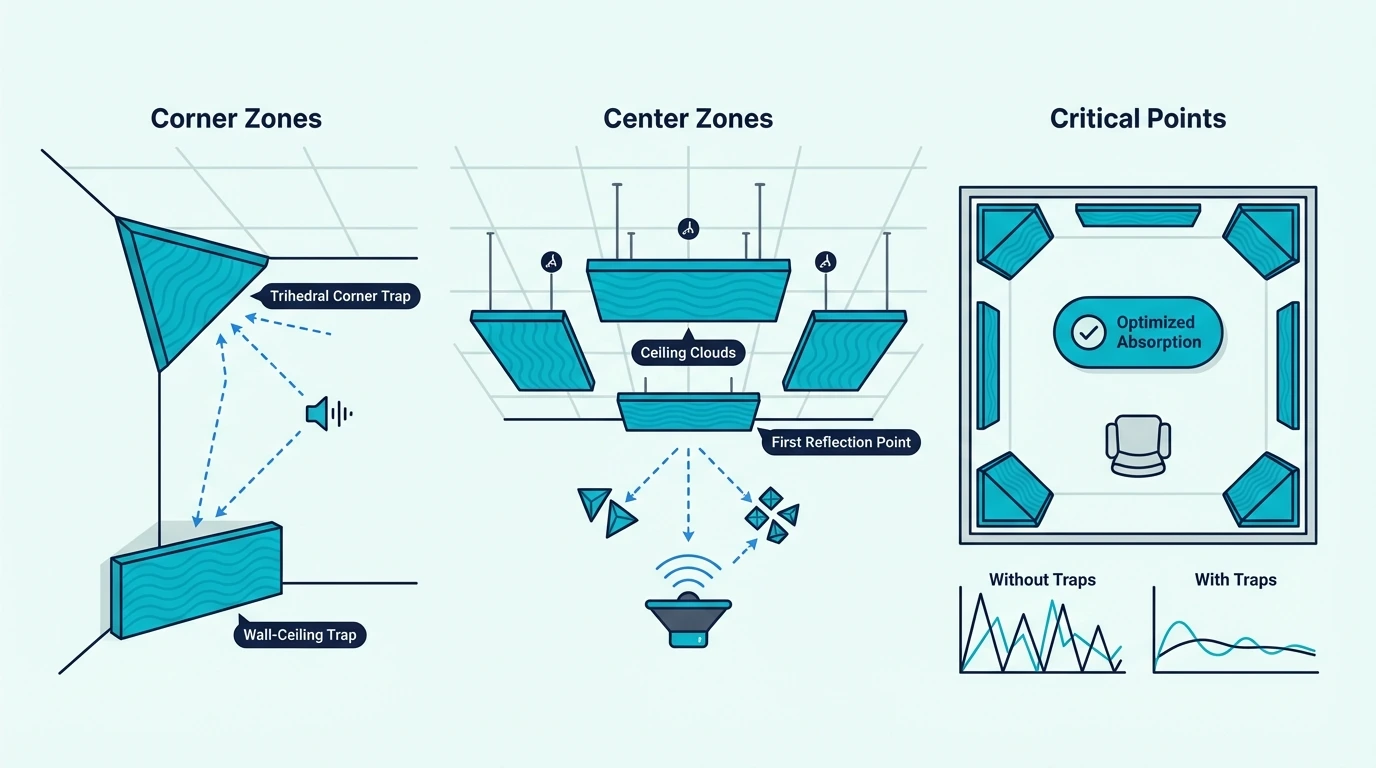
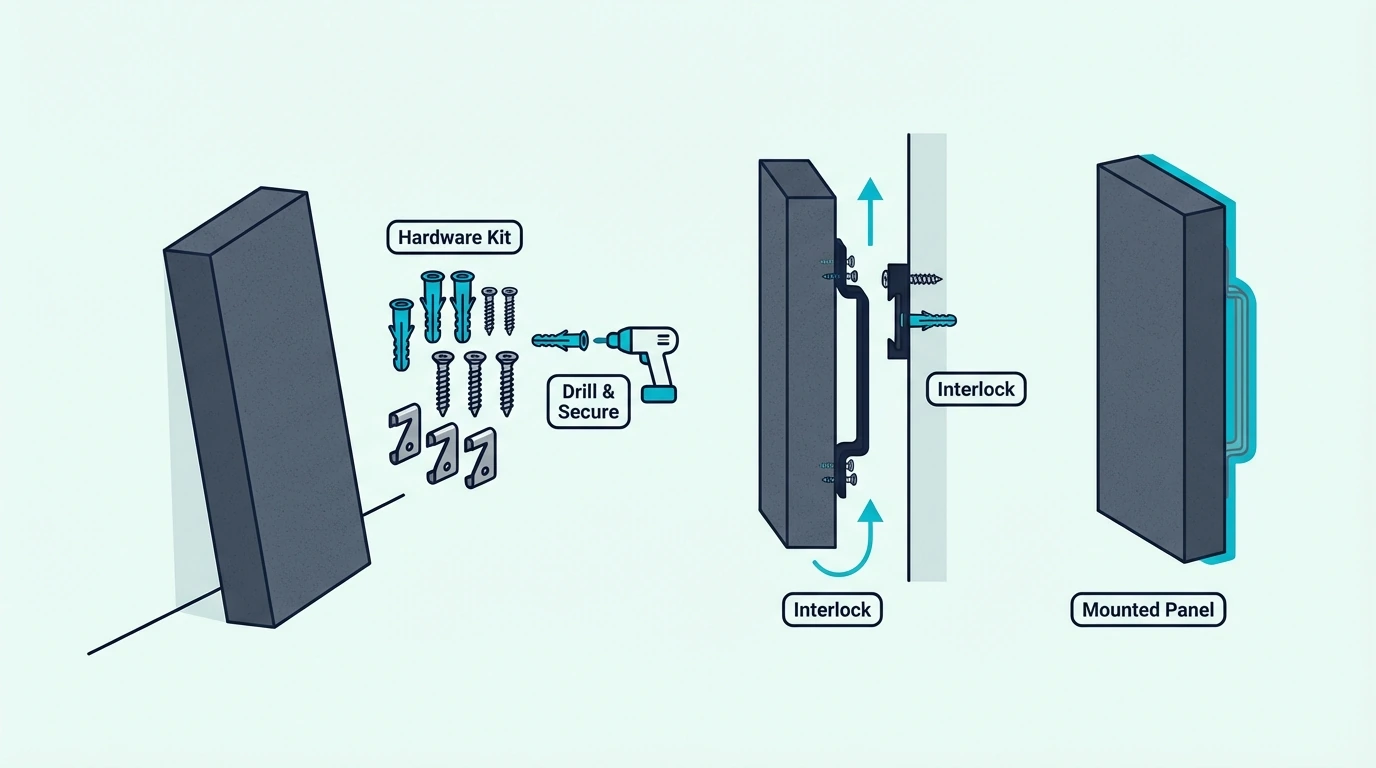
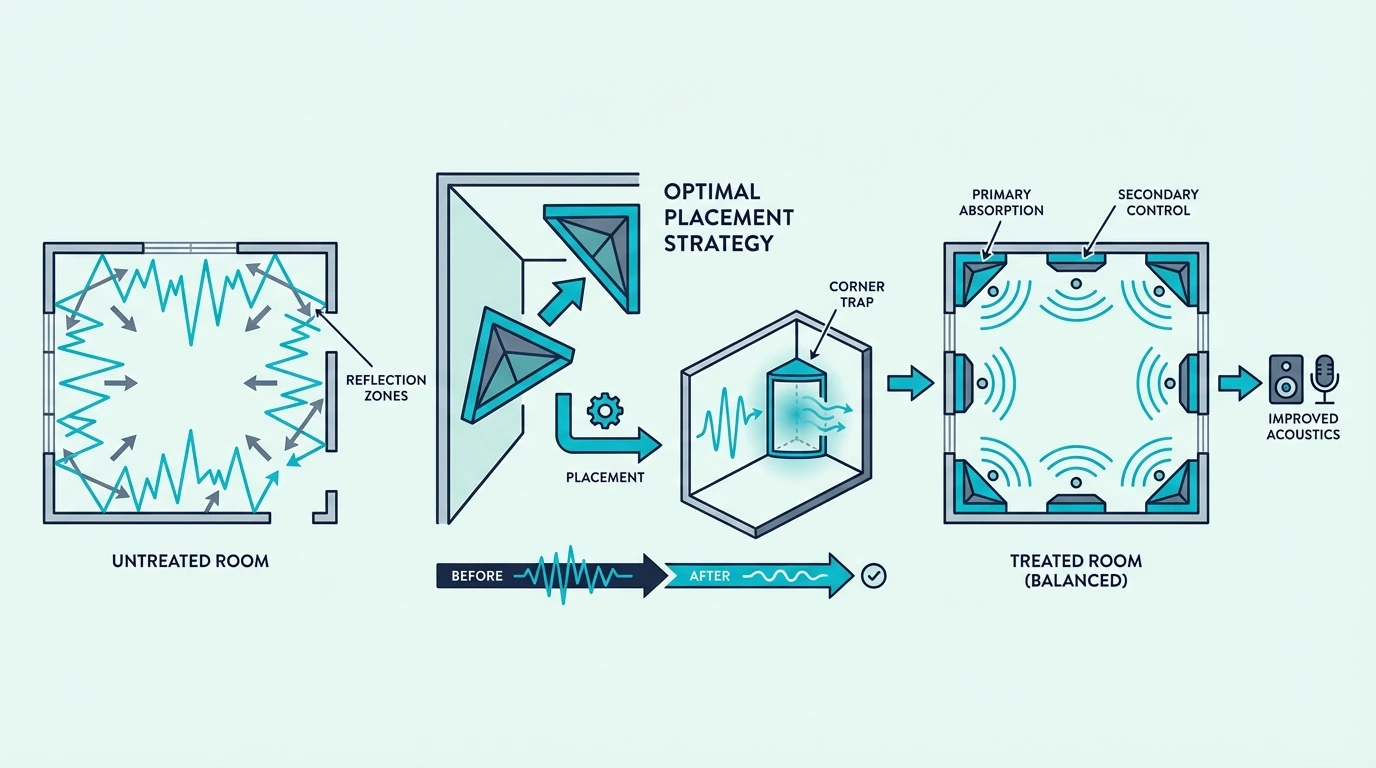
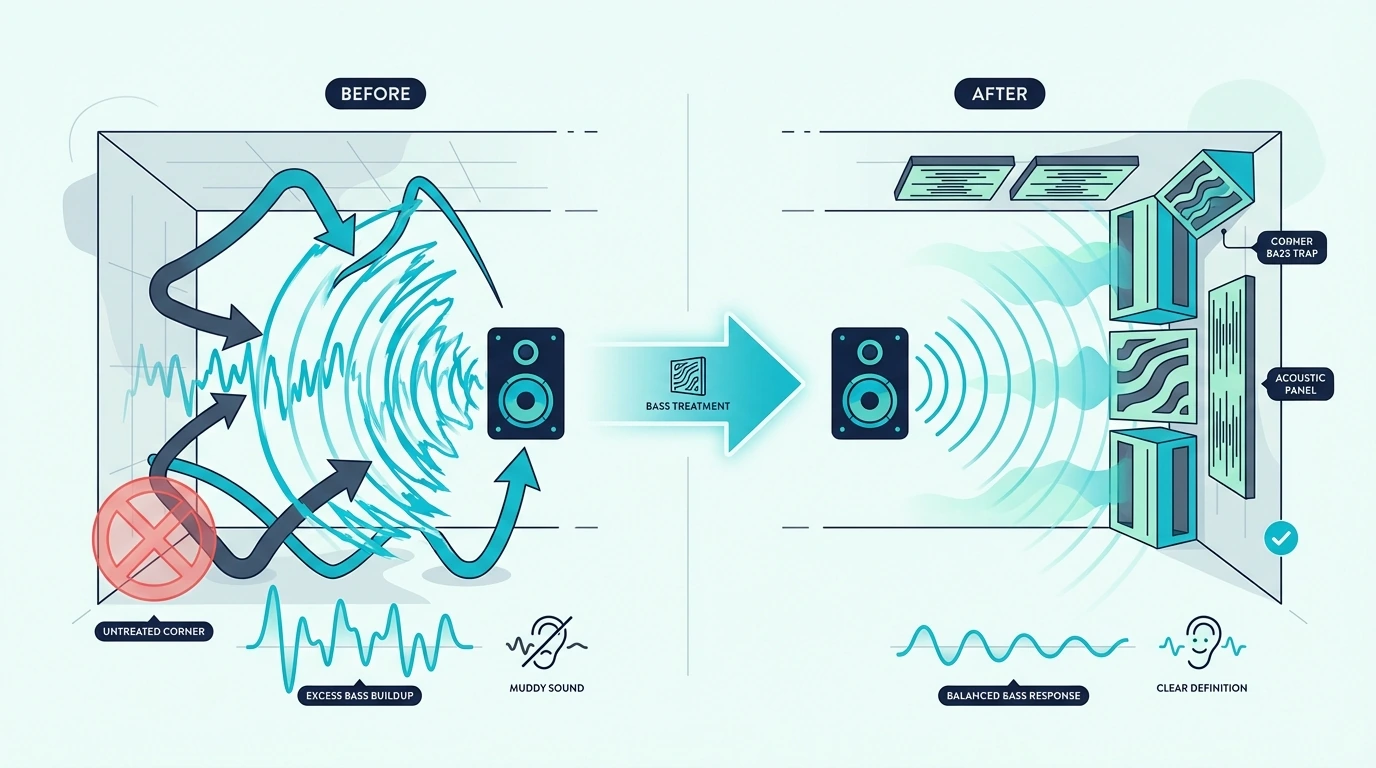
This is why corner placement is so critical — mounting a trap in a corner with an air gap behind it effectively extends the acoustic depth beyond the physical thickness of the material. A 4-inch trap straddled across a corner with an 8-inch air gap behaves acoustically like a 12-inch deep absorber.

Thickness is the bottleneck that no amount of material quality can overcome. The densest, most expensive mineral wool at 2 inches thick still cannot absorb at 100 Hz, while cheap fiberglass at 6 inches thick can.

How Does Bass Trap Thickness Affect Frequency Absorption?

Chart linking bass trap thickness to absorbed frequency

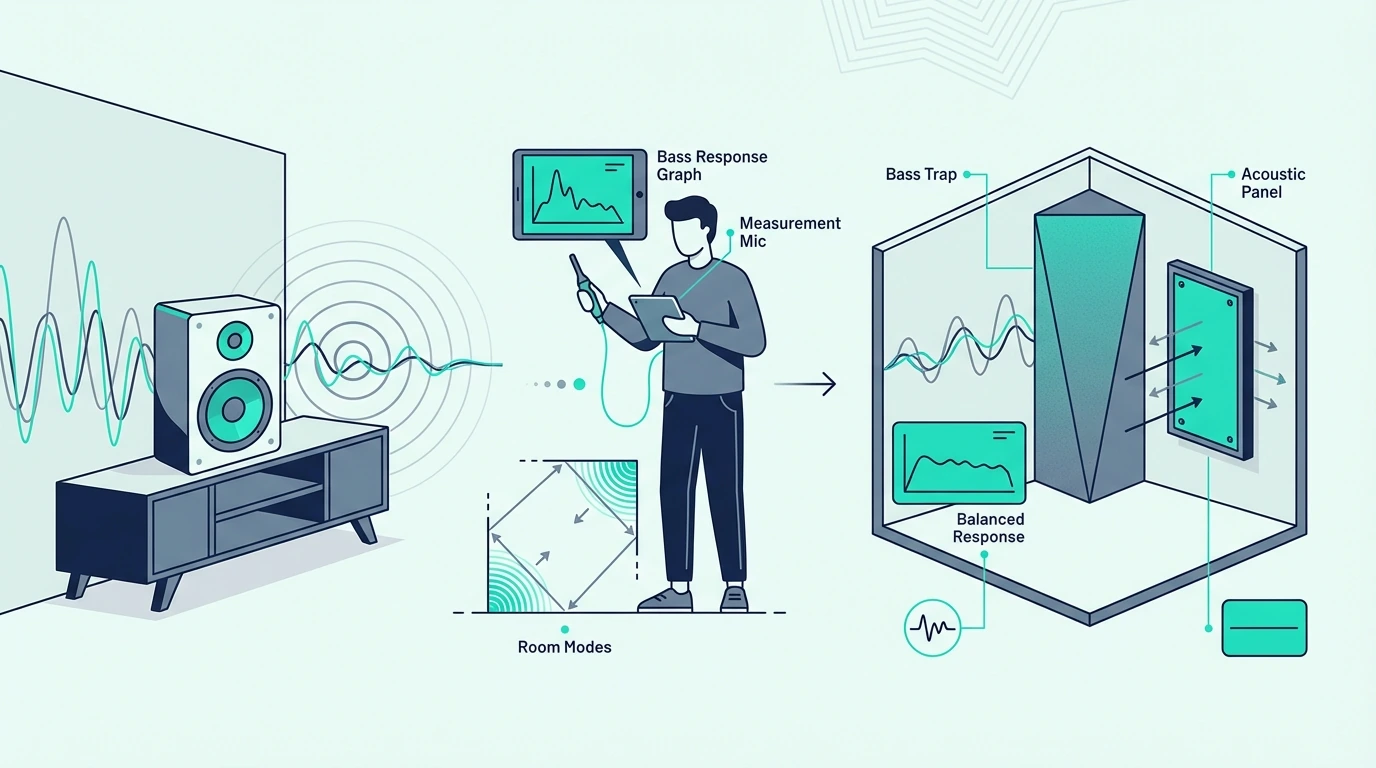
The relationship between bass trap thickness and the lowest frequency a bass trap absorbs follows predictable physics. Here are the approximate effective ranges for common thicknesses when corner-mounted with an air gap:

Thickness Lowest Effective Frequency (Corner) Lowest Effective Frequency (Flat Wall)
2 inches ~400 Hz ~800 Hz
4 inches ~200 Hz ~400 Hz
6 inches ~125 Hz ~250 Hz
8 inches ~100 Hz ~200 Hz
12 inches ~70 Hz ~125 Hz
17+ inches (superchunk) ~50 Hz ~80 Hz

These numbers assume standard rigid fiberglass or mineral wool at 3-6 PCF density. The “corner” column assumes a straddled mount with the natural air gap that creates.

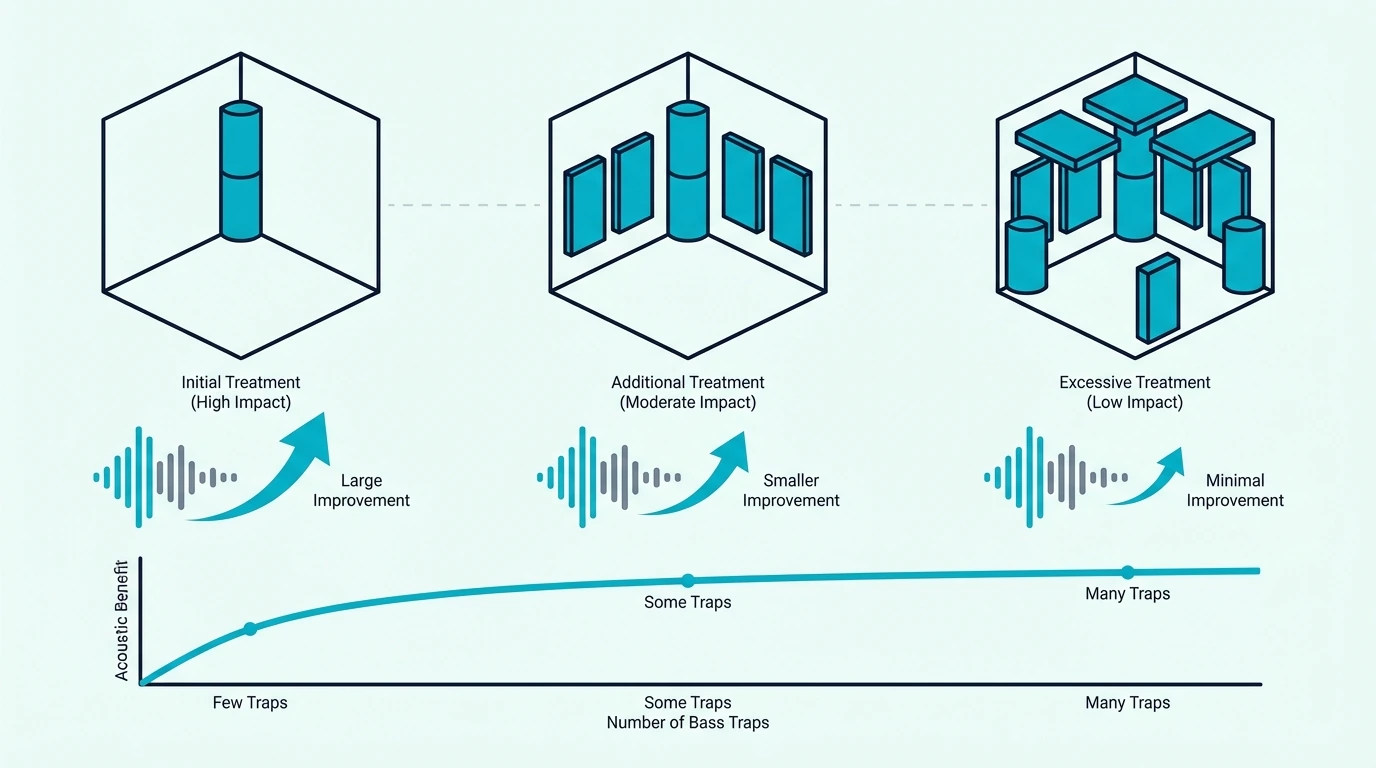
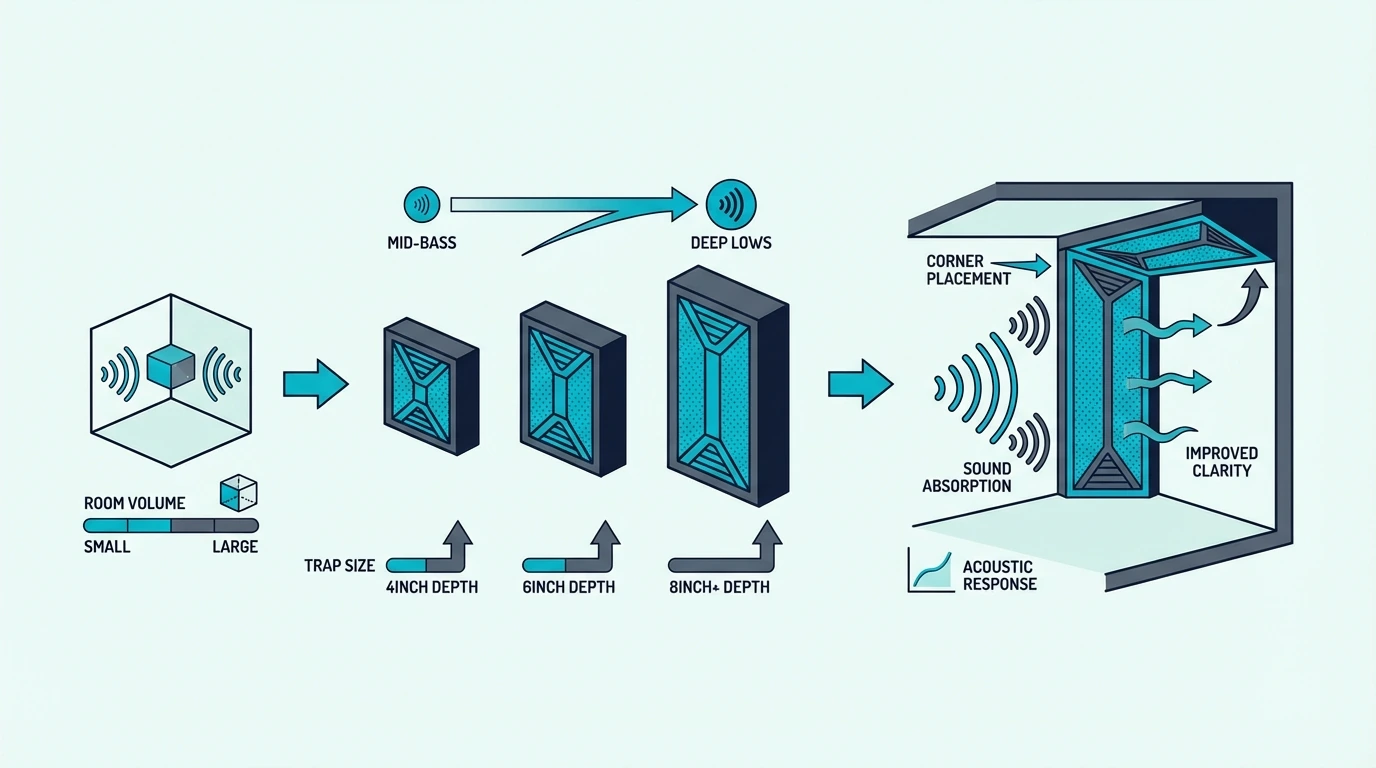
The key takeaway: every doubling of thickness extends the effective range down by roughly one octave. Going from 2 to 4 inches is a bigger jump in bass absorption than going from 4 to 6, because 2 inches barely touches bass frequencies at all.

Should You Choose 4-Inch or 6-Inch Bass Traps?

Four-inch and six-inch bass traps compared

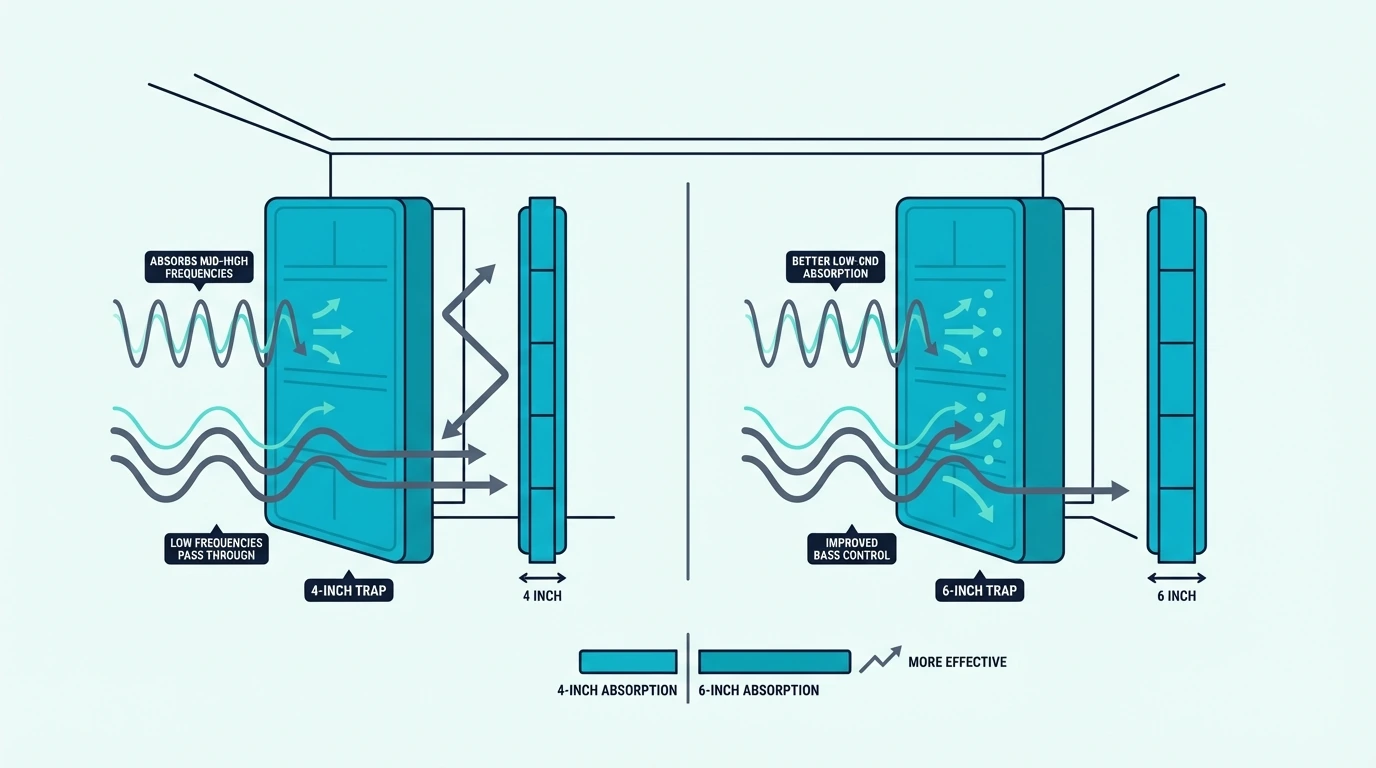
The 4-inch vs 6-inch decision is the most common thickness choice people face when buying or building bass traps. Both are viable, and the right choice depends on your room’s problems and your budget.

A 4-inch trap corner-mounted reaches down to approximately 200 Hz with useful absorption. A 6-inch trap in the same position reaches approximately 125 Hz — a significant improvement that covers the range where most room modes cause the worst problems.

The cost difference between 4 and 6 inches is typically 30-50% more for materials. A 4-inch Owens Corning 703 panel costs roughly $15-20, while a 6-inch panel (or two stacked 3-inch panels) runs $22-30.

When 4-Inch Is Enough

Four inches works well when:

  • Your room already has mild bass issues (±6 dB variations in the 100-200 Hz range)
  • You’re supplementing existing treatment and need to fill remaining corners
  • Budget is the primary constraint and you’d rather have more 4-inch traps in more corners than fewer 6-inch traps
  • Your room has ceiling treatment that handles the vertical modes, and you’re adding wall traps for horizontal modes above 200 Hz

When To Go 6-Inch Or Thicker

Six inches or more is the right choice when:

  • Your room has severe mode problems below 150 Hz (±10 dB or more at specific frequencies)
  • You’re building a control room or mastering suite where bass accuracy is mission-critical
  • Your room dimensions create strong modes in the 80-150 Hz range (common in rooms under 15 feet in any dimension)
  • You’re doing a DIY build where the extra material cost is small compared to the labor you’re already investing

For most home studios, 4-inch corner traps deliver excellent value. For dedicated mixing rooms where bass decisions affect client work, 6-inch traps are worth the extra investment.

Is It Better To Have Thicker Or Bigger Bass Traps?

Thicker bass traps compared with larger bass trap coverage

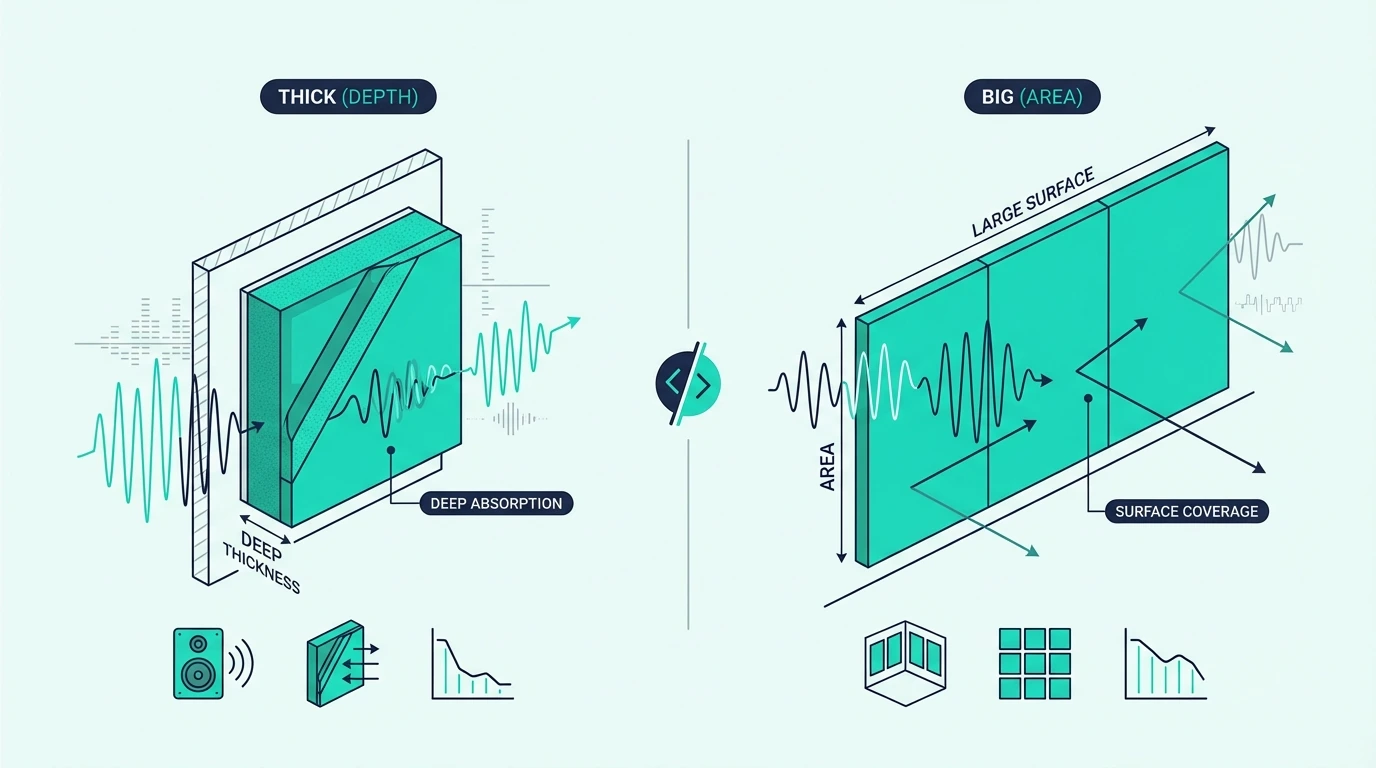
If you have to choose between a thicker trap or a physically larger one, thickness wins for bass frequency absorption. A 4-inch trap that’s 2×4 feet absorbs lower frequencies than a 2-inch trap that’s 4×4 feet, even though the larger trap has twice the surface area.

Surface area matters for how much total energy the trap absorbs at frequencies it can reach. A bigger trap removes more energy from the room at those frequencies, which is valuable for mid-range and upper-bass control.

Thickness determines how deep into the bass range the trap reaches. No amount of surface area extends the frequency range — a 2-inch trap covering an entire wall still won’t absorb effectively at 100 Hz.

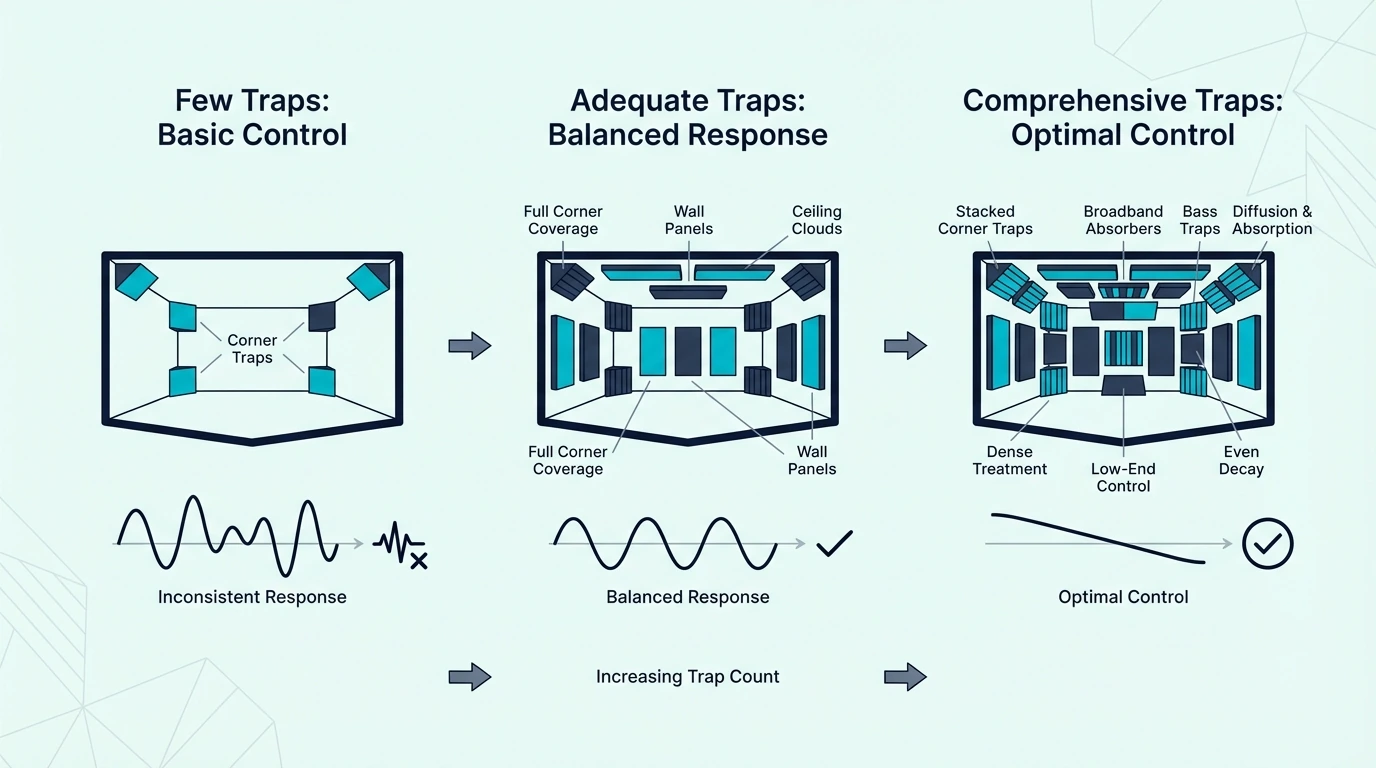
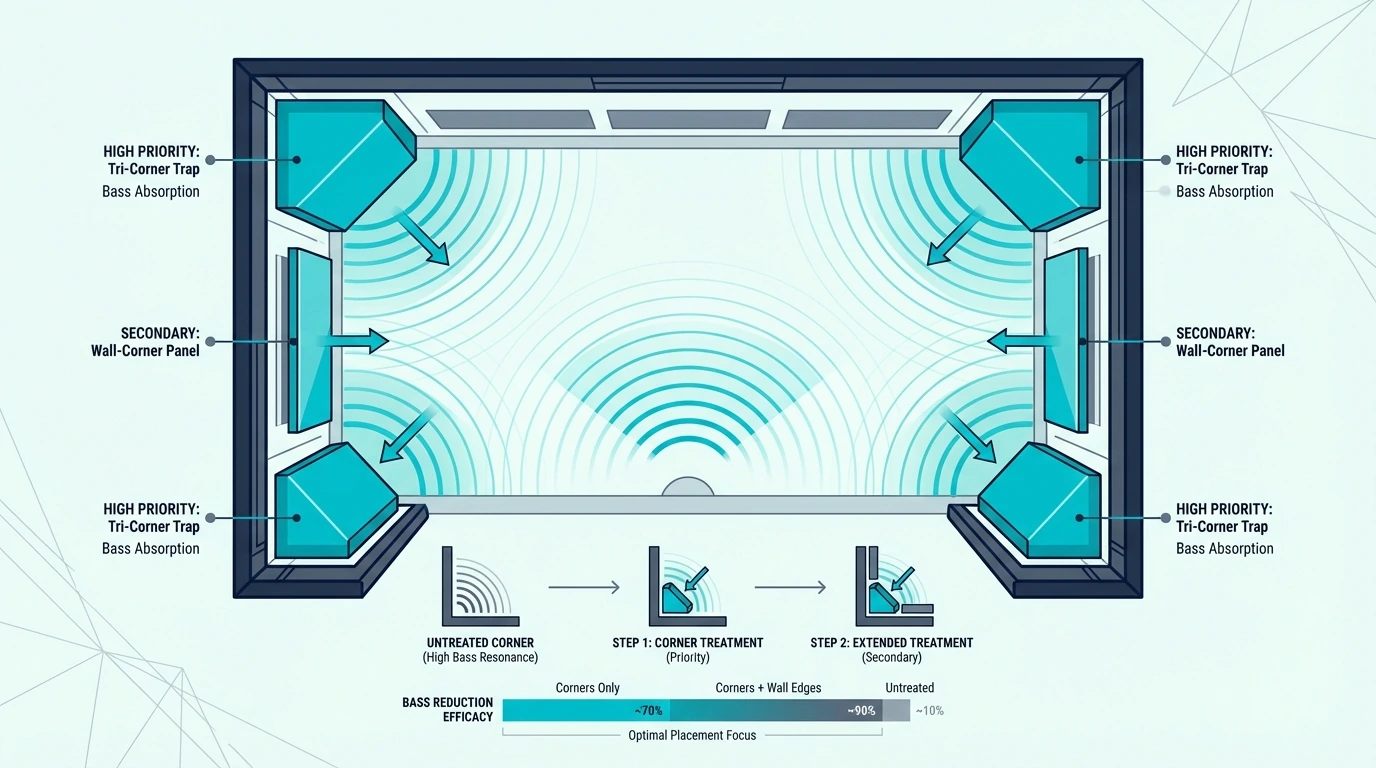
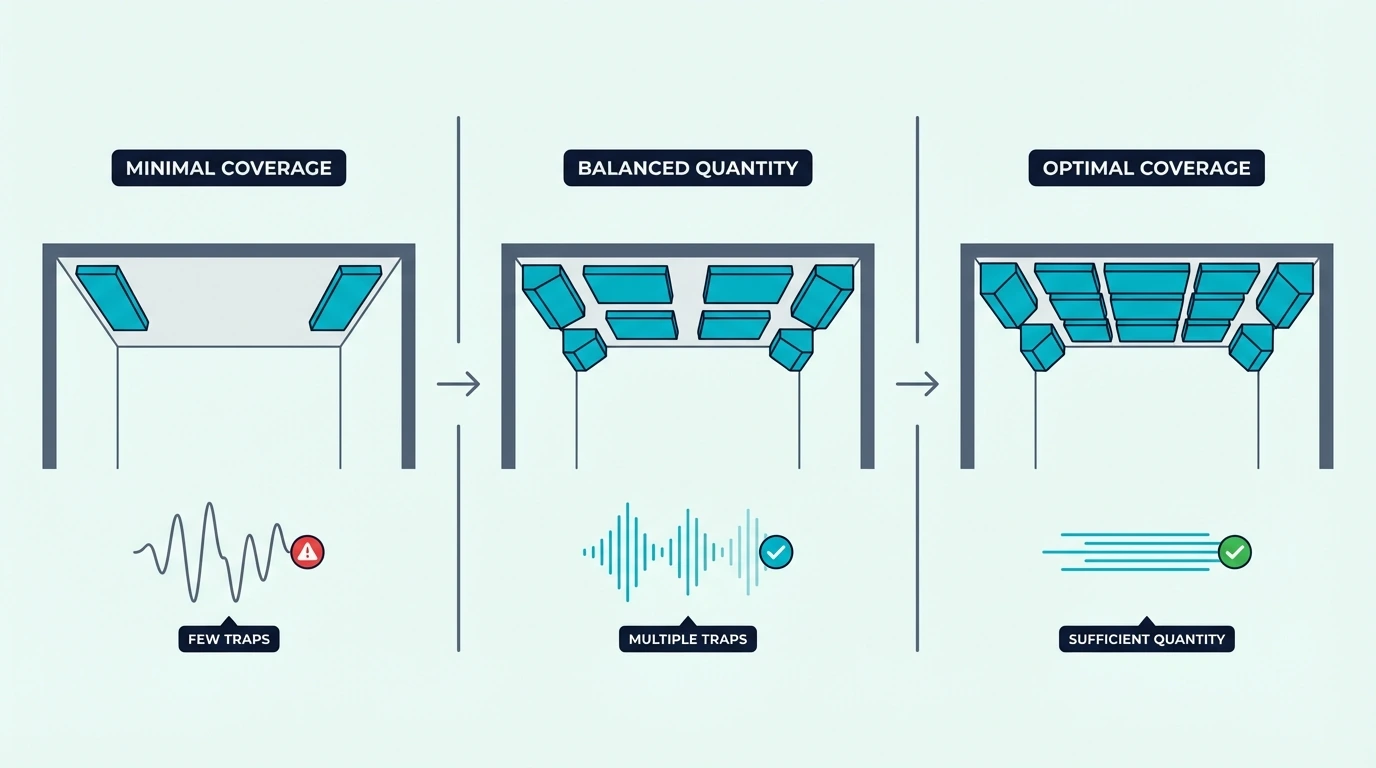
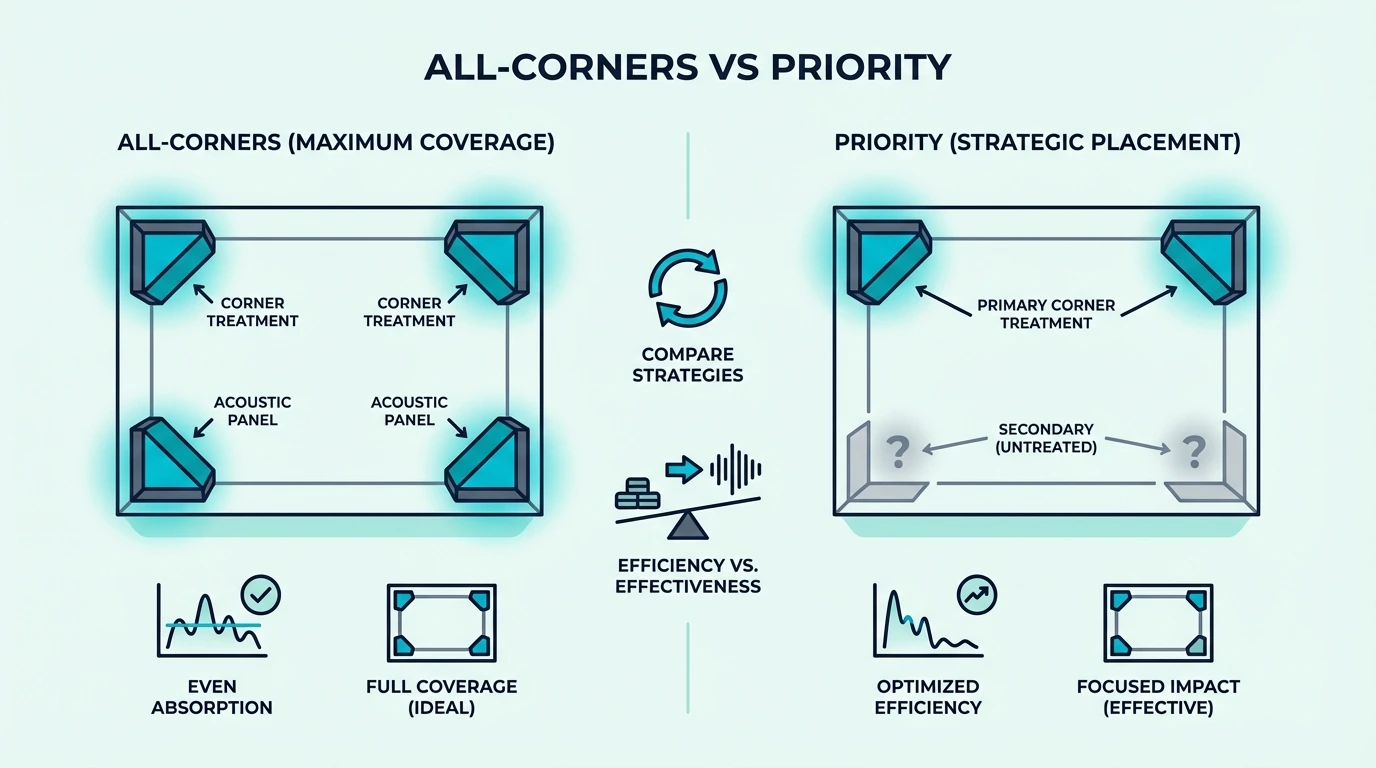
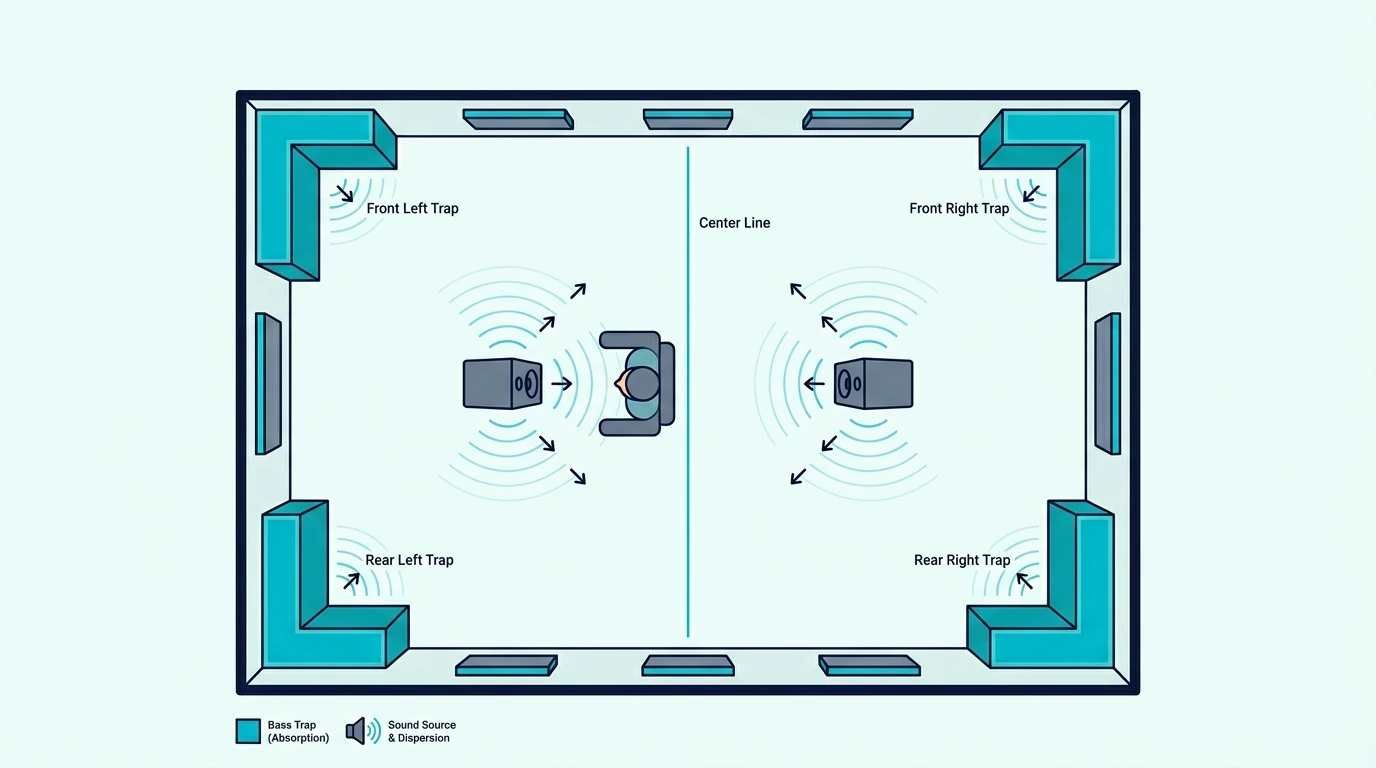
The practical answer for most rooms: maximize thickness in the corners first (where bass pressure is highest), then add surface area coverage along the edges and walls. Four 6-inch corner traps plus four 2-inch reflection panels is a better combination than eight 4-inch panels spread evenly.

What Is The Best Density For Bass Traps?

Material density considerations for bass trap thickness

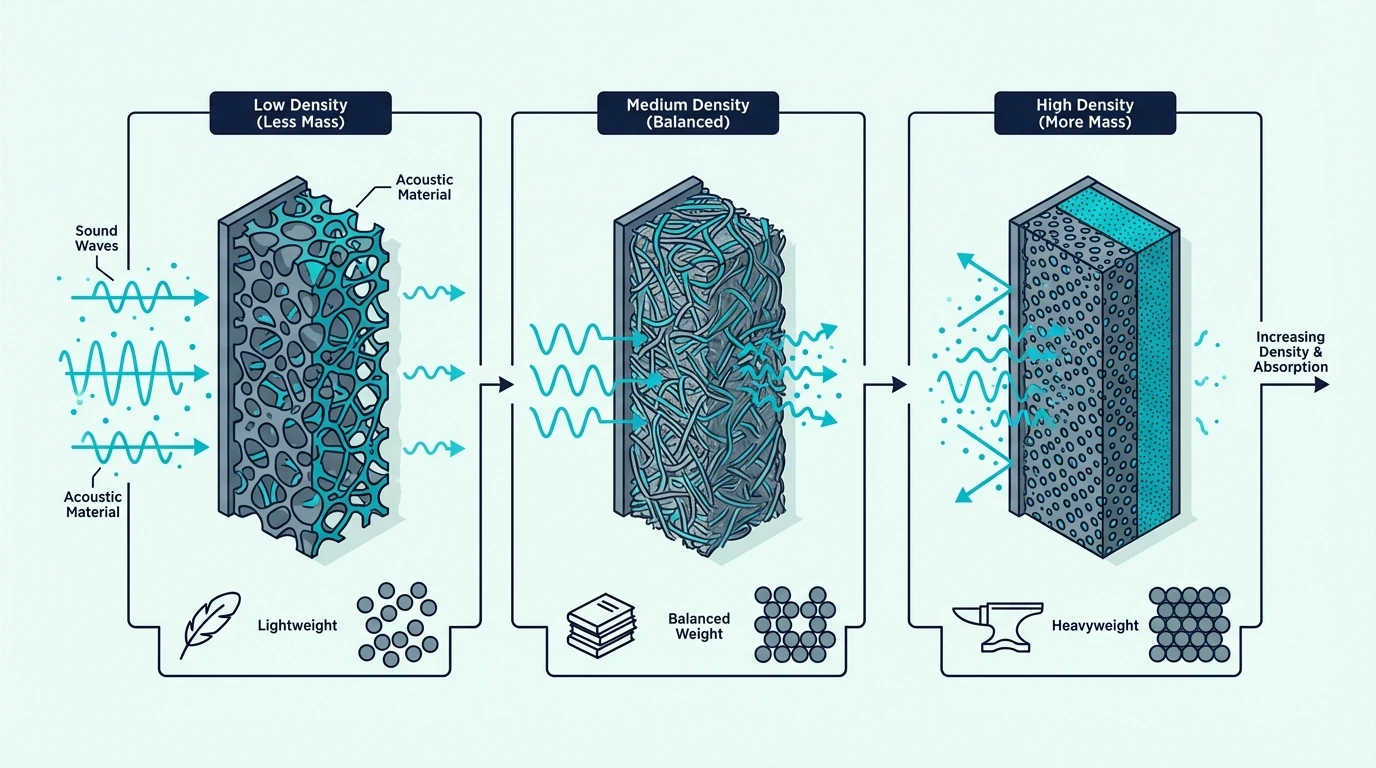
Material density (measured in PCF — pounds per cubic foot) affects how efficiently the material converts sound to heat, but its impact on bass absorption is secondary to thickness. The ideal density range for bass traps is 3-6 PCF for fiberglass and 4-8 PCF for mineral wool.

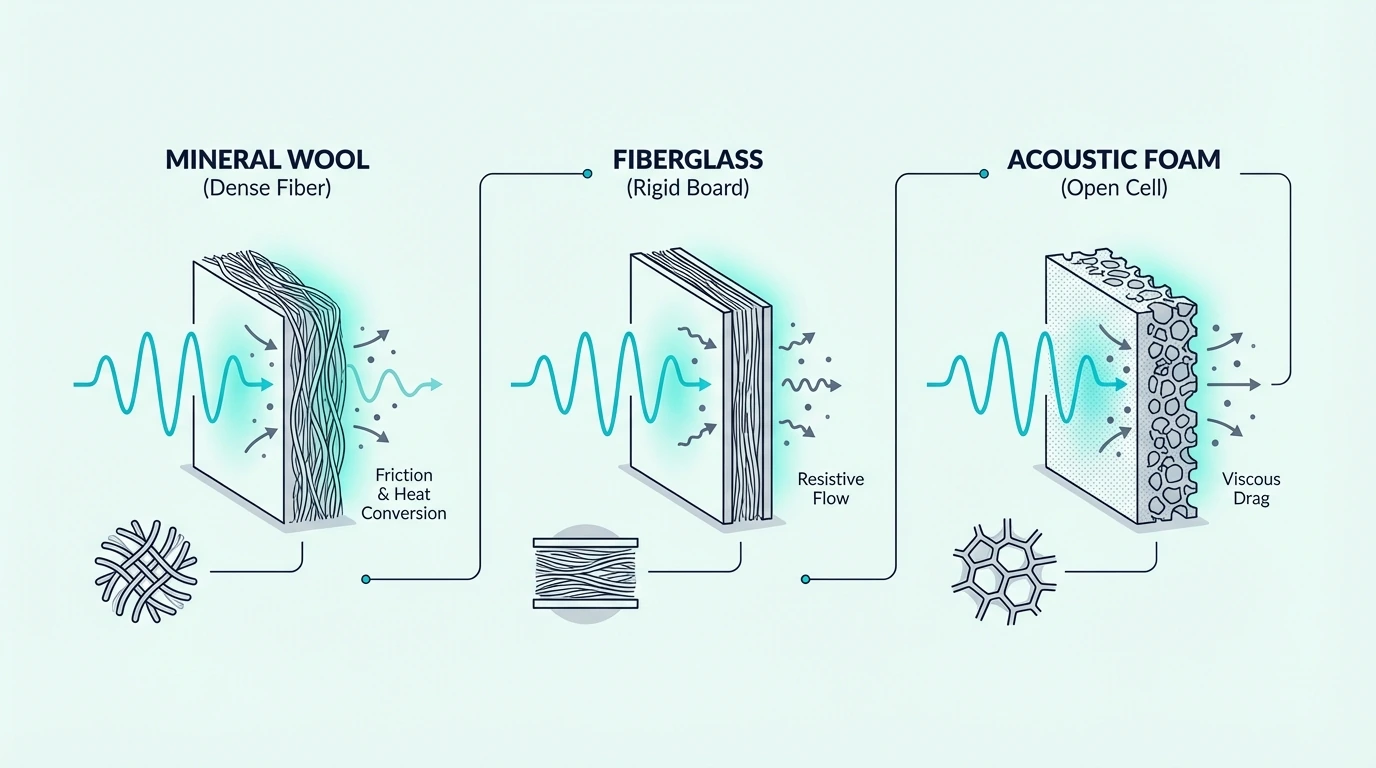
3 PCF fiberglass (Owens Corning 703) is the standard for acoustic panels and bass traps. It absorbs well across the full frequency range when thick enough and is lightweight, easy to cut, and widely available.

6 PCF fiberglass (Owens Corning 705) is denser and absorbs slightly more efficiently at mid-bass frequencies (100-300 Hz) per inch of thickness. The improvement over 703 is real but modest — roughly 10-15% better absorption coefficient at bass frequencies.

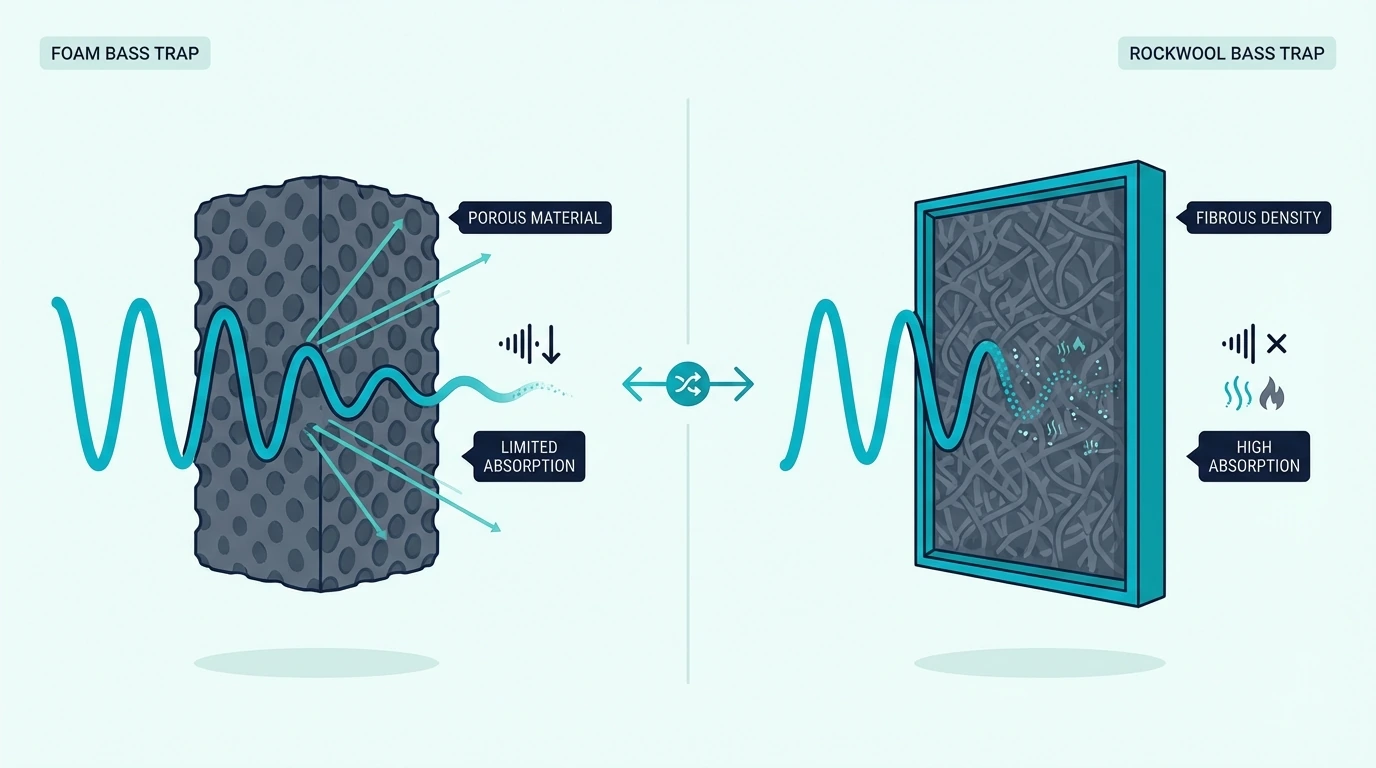
4-8 PCF mineral wool (Rockwool Safe’n’Sound, Comfortboard 80) performs similarly to fiberglass at comparable densities. Mineral wool is often cheaper and more fire-resistant, making it popular for budget DIY builds.

Above 8 PCF, diminishing returns set in quickly — ultra-dense materials can actually reflect some high-frequency sound rather than absorbing it, and the added weight makes mounting more difficult. For bass traps specifically, staying in the 3-6 PCF range and adding thickness is almost always a better investment than increasing density.

The Bottom Line

Bass trap thickness is the primary factor in low-frequency absorption — thicker traps absorb lower frequencies, and no amount of density or surface area compensates for insufficient depth. Four inches is the minimum for meaningful bass control when corner-mounted, six inches reaches the critical 80-150 Hz range where most room problems live.

The 4 Pack Bass Traps for Ceiling Corner provides 12-inch deep triangular corner traps that reach lower than standard flat panels.

For maximum coverage across multiple corners, the 8 Pack Bass Traps Acoustic Foam Corner lets you stack pieces for increased effective thickness in each corner.

For professional-grade thickness and absorption, the 2 Pack Wooden Acoustic Bass Traps provide superior bass absorption with their thick wooden construction.

Frequently Asked Questions

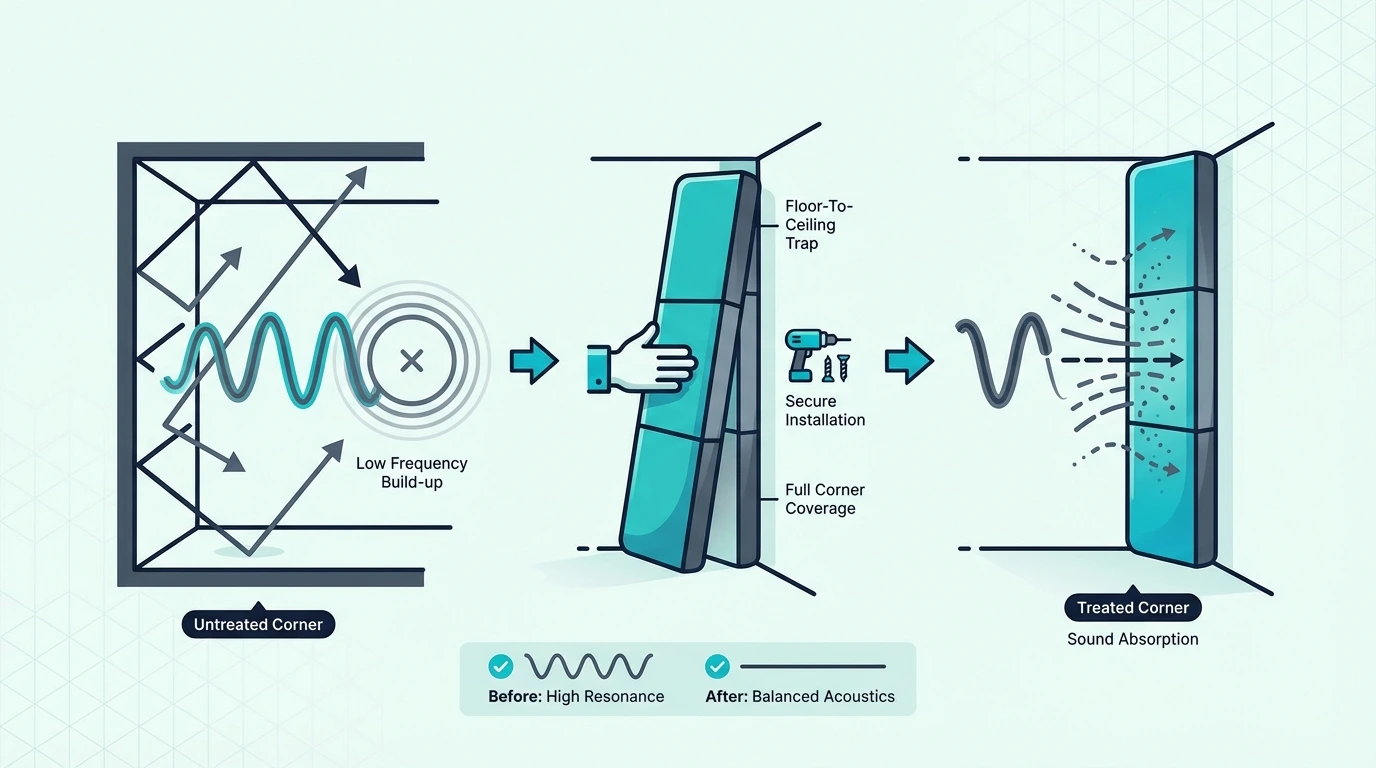
The recommended minimum size is 2×4 feet at 4 inches thick for flat panel traps, or 12-inch triangular wedges for corner-specific traps. Floor-to-ceiling height (typically 8 feet) is ideal for corner-mounted traps because it ensures every vertical room mode is intercepted at that position.

How long does a bass trap need to be?

Floor-to-ceiling length is ideal for corner bass traps because it catches all vertical room modes. If full height isn’t possible, 4 feet is the practical minimum — mount the trap at the ceiling line (touching the ceiling) rather than centered on the wall for maximum bass absorption.

Do corner bass traps work?

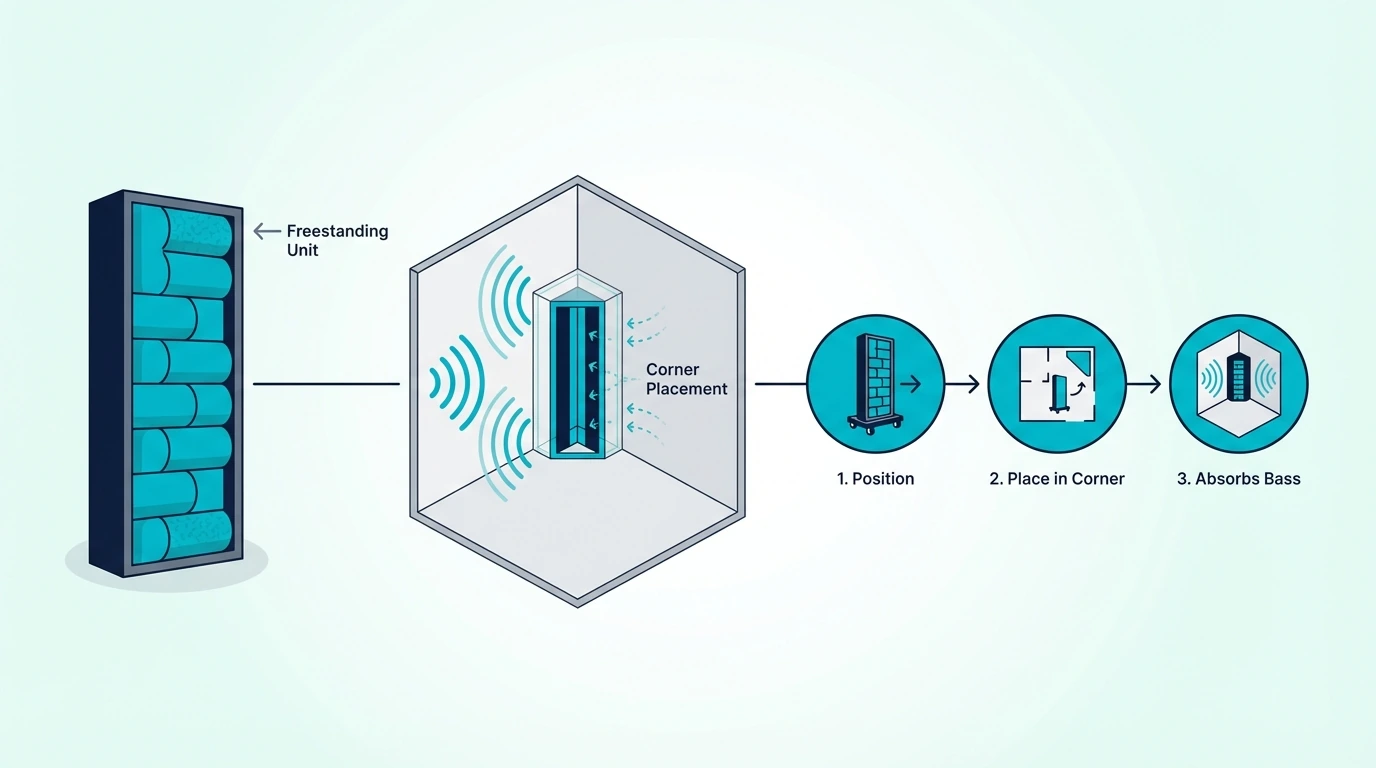
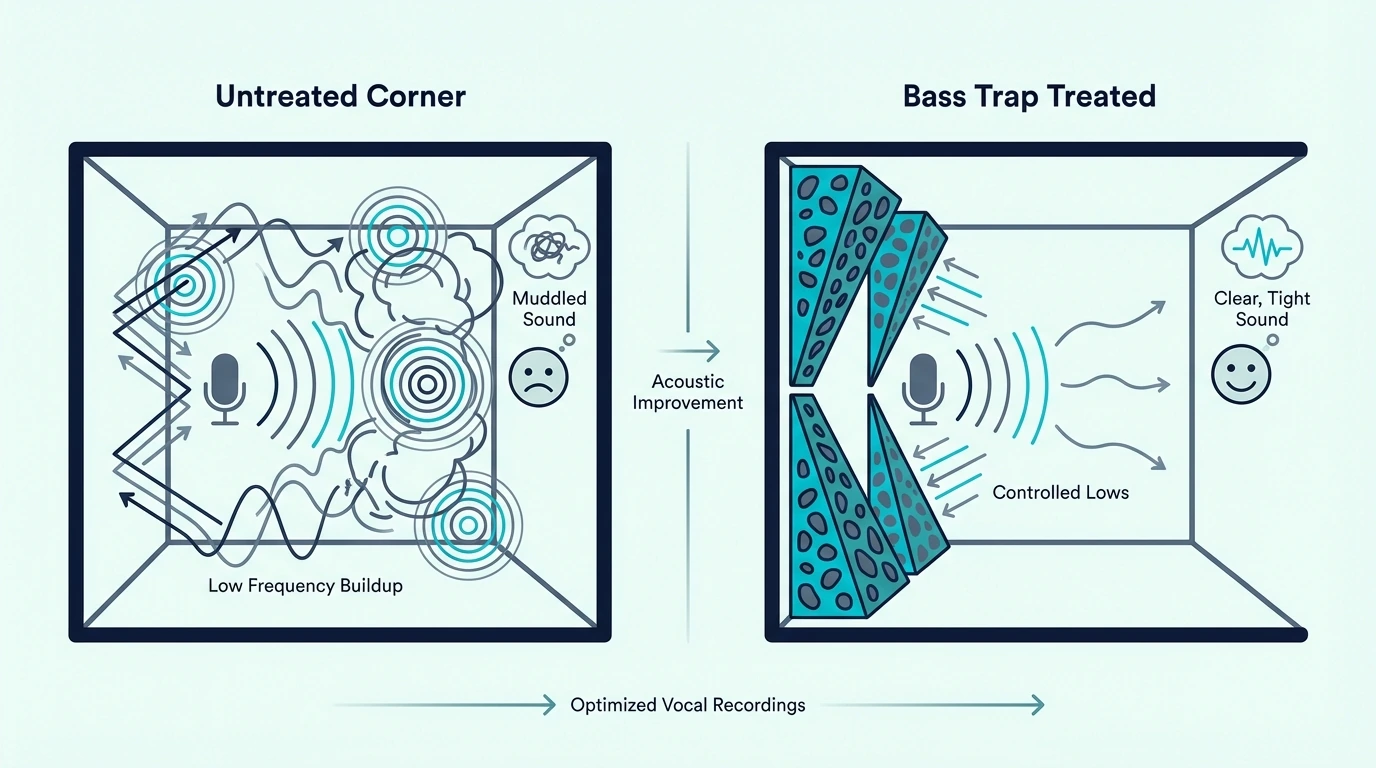
Corner bass traps work exceptionally well because corners are where bass pressure is highest in any room. A trap in the corner absorbs dramatically more bass energy than the same trap on a flat wall, which is why corner mounting is the standard recommendation for bass treatment.

Can you use acoustic panels as bass traps?

Only if the panels are thick enough — at least 4 inches for meaningful bass absorption. Standard 1-2 inch acoustic panels absorb mid and high frequencies effectively but have almost no effect on bass.

If your existing panels are 4 inches or thicker and made from rigid fiberglass or mineral wool, they function as bass traps when placed in corners.

How Many Bass Traps Do I Need — Room Size Guide With Coverage Rules

How many bass traps do i need depends on your room size, the severity of your bass problems, and how much of the room’s corner and edge surface area you can cover, but the short answer for most home studios is four to eight traps placed in the highest-priority corners.

The real question isn’t a fixed number — it’s how much corner and edge coverage you can achieve. A room with four thick traps filling the front wall corners floor-to-ceiling outperforms a room with twelve small foam wedges scattered randomly around the perimeter.

Bass problems are worse in smaller rooms because room modes are more densely packed and fall in the critical listening range. A 10×12 foot bedroom studio needs more treatment per cubic foot than a 20×30 foot live room, even though the live room has more total surface area.

Below, you’ll find specific trap counts by room size, whether you need traps in every corner, how to calculate coverage for your space, and when to stop adding traps before you over-treat the room.

Quick Takeaway

Start with 4 bass traps in the front wall corners (floor-to-ceiling if possible), then add rear corners (8 total), then wall-ceiling edges (12+). Small rooms under 150 sq ft need 4–6 traps minimum. Measure your room’s frequency response with REW before and after each round of treatment to know when you’ve done enough. Stop adding traps when your bass response is within ±6 dB across the 40–200 Hz range.

How Many Bass Traps Do I Need?

Overview of how many bass traps a room needs

The number of bass traps you need follows a simple priority system based on your room’s corners and edges. Every room has the same physics — bass pressure is highest at boundaries, and corners where boundaries meet concentrate that pressure.

4 traps (minimum effective setup): Two floor-to-ceiling traps straddling the front wall corners — this addresses the most critical bass buildup for monitoring and recording accuracy. If budget is tight, start here.

8 traps (strong foundation): All four vertical wall-wall corners, floor to ceiling. This handles the primary axial modes in the length and width dimensions and gives you a balanced, symmetrical treatment.

12+ traps (comprehensive treatment): All vertical corners plus wall-ceiling edge traps along the front and sides. This adds vertical mode control that wall-only treatment misses.

The trap count assumes standard-sized traps (24×48 inches or similar). Smaller traps like 12-inch foam wedges count as partial coverage — you’d need two or three to cover the same junction length as one full-sized panel.

How Many Bass Traps For A Small Room?

Bass trap treatment plan for a small room

Small rooms need more bass treatment relative to their size because room modes are more densely packed and fall directly in the frequency range where music has the most energy. A room with an 8-foot ceiling has its fundamental height mode at 70 Hz — right where kick drums and bass guitars live.

The smaller the room, the fewer corners and edges you have, but each one matters more. In a small room, every untreated corner creates audible problems.

Bedroom Studios (Under 150 sq ft)

A bedroom-sized studio (10×12 to 10×15 feet) needs a minimum of 4–6 bass traps to achieve usable monitoring accuracy. The priority order:

  1. Two floor-to-ceiling traps in the front wall corners (behind/beside your monitors)
  2. Two floor-to-ceiling traps in the rear wall corners
  3. Two wall-ceiling edge traps along the front wall junction

In rooms this small, the front wall corners are so close to your listening position that untreated bass buildup directly colors what you hear. Treating just the front corners often produces a noticeable improvement in bass clarity within the first few minutes of listening.

Home Theaters And Listening Rooms

Home theaters and dedicated listening rooms benefit from 6–8+ traps because immersive audio relies on even bass response across a wider seating area — not just a single sweet spot. Multiple listeners at different positions in the room need consistent bass levels.

Cover all four vertical corners first (4 traps), then add ceiling-wall edge traps at the front and side junctions (2–4 more). For rooms with subwoofers, the front wall corners and the wall behind the sub deserve the thickest treatment because the sub excites those boundaries most intensely.

Rear surround speaker positions also benefit from corner treatment. Bass from rear channels reflects off the back wall and side walls, creating mode interactions that corner traps reduce.

Do I Need Bass Traps In Every Corner?

Corner priority guide for placing bass traps

Every corner is ideal, but front corners give you roughly 60% of the total benefit for about 30% of the cost. The priority falloff between positions is steep — the first four traps do more than the next eight combined.

Here’s the diminishing returns curve:

  • First 2 traps (front corners): Biggest single improvement — typically 4–8 dB reduction at the worst modal peaks
  • Next 2 traps (rear corners): Adds another 2–4 dB reduction and improves bass consistency across the room
  • Next 4 traps (ceiling edges): Adds 1–3 dB improvement and controls vertical modes
  • Beyond 8 traps: Incremental improvements that require measurement to confirm

If you can only afford treatment for two corners, choose the front — if you can do four, do all wall-wall verticals, and if you can do eight, add ceiling edges. Each step adds real improvement, but the first step adds the most.

Bass traps are necessary in every serious listening room, but “every corner” isn’t required to achieve a dramatic improvement over an untreated room.

How To Calculate Bass Trap Coverage For Your Room

Coverage calculator for bass trap quantity

A practical coverage calculation uses the total length of corners and edges in your room as the baseline. Every rectangular room has 4 vertical wall-wall corners and 8 horizontal wall-ceiling/wall-floor edges — that’s your total treatable surface.

Step 1: Measure your vertical corners. Multiply your ceiling height by 4 (corners). An 8-foot ceiling gives you 32 linear feet of vertical corner to potentially treat.

Step 2: Measure your horizontal edges. Add the perimeter of your room twice (ceiling edges + floor edges). A 10×12 room has a 44-foot perimeter, so 88 linear feet of horizontal edges total.

Step 3: Calculate your current coverage. Add up the total linear feet of corners and edges your traps actually cover. Four floor-to-ceiling traps in a room with 8-foot ceilings covers 32 feet of the total 120 feet — about 27%.

Target: Covering 25–40% of your total corner and edge surface area delivers strong results for most rooms. Below 25%, you’re likely leaving significant modal energy untreated, and above 40%, you’re in the territory of diminishing returns.

Use room measurement software like REW (Room EQ Wizard) with a calibrated microphone to verify your results. The measurement tells you exactly which frequencies still need attention and whether more traps will help or whether you’ve reached the practical limit for porous absorption.

When To Stop Adding Bass Traps

Diminishing returns from adding more bass traps

Over-treating a room with bass traps is a real risk that makes the space sound unnaturally dead and uncomfortable. The goal is controlled, even bass — not zero bass energy.

Measurement-based stopping point: Run a frequency sweep with REW at your listening position — if your bass response is within ±6 dB from 40–200 Hz, you’ve achieved excellent results. Getting to ±3 dB requires either perfect room dimensions or a combination of absorption and electronic room correction.

Listening-based signs you’ve gone too far: – Speech sounds thin and unnatural in the room – Clapping produces no audible decay at all (too dead) – Music sounds “small” and lacks body even at normal volumes

If your room feels over-treated, remove a trap or two from the rear corners or sides first. The front corner treatment should stay — it’s doing the most critical work for your monitoring accuracy.

The balance between absorption and diffusion matters once you’ve covered your corners — diffusers scatter sound energy rather than absorbing it, keeping the room lively while reducing flutter echo and comb filtering. A room with bass traps in the corners and diffusers on the rear wall often sounds better than a room with absorbers everywhere.

The Bottom Line

Start with 4 bass traps in the front wall corners and measure your room’s frequency response before and after. Add rear corners next (8 total), then ceiling edges (12+), measuring after each addition to confirm improvement.

Small rooms under 150 sq ft need 4–6 traps minimum, while home theaters benefit from 8+. The 4 Pack Bass Traps for Ceiling Corner covers a pair of corners to get you started.

For rooms that need broader coverage across multiple corners, the 8 Pack Bass Traps Acoustic Foam Corner delivers enough pieces to treat all four vertical corners.

The TroyStudio Bass Traps 24 Pack is ideal for larger rooms or home theaters needing 8+ traps.

Stop adding traps when your measured bass response is within ±6 dB across the 40–200 Hz range — beyond that, you’re spending money for marginal gains.

Frequently Asked Questions

How much of a difference do bass traps make?

Bass traps typically reduce problem frequencies by 6–10 dB at modal peaks, which is a dramatic audible improvement. The first set of corner traps makes the biggest difference — going from untreated to four corner traps is far more noticeable than going from four to eight.

Can you have too many bass traps?

Yes — over-absorption makes a room sound dead, thin, and uncomfortable for both recording and listening. Balance bass traps with some reflective or diffusive surfaces to keep the room feeling natural.

If speech sounds thin or music lacks body, you’ve over-treated.

What is the best Rockwool for bass traps?

Rockwool Safe’n’Sound and Rockwool Comfortboard 80 are the two most popular options. Safe’n’Sound is cheaper and widely available at hardware stores — it works well for DIY bass trap builds when packed into frames at 2–4 inch thickness.

Comfortboard 80 is denser and performs slightly better per inch but costs more.

Bass Traps Ceiling — Why Overhead Treatment Controls The Low End Most People Miss

Bass traps ceiling installations target the wall-ceiling junctions and overhead zones that most people ignore when treating a room, but these locations hold some of the highest bass pressure in any rectangular space — and skipping them leaves vertical room modes completely untreated.

Most studio owners start with corner traps on the walls and stop there. The ceiling-wall edges where vertical and horizontal surfaces meet create the same kind of pressure buildup as wall-wall corners, and vertical standing waves (floor-to-ceiling modes) are often the worst offenders in rooms with standard 8-foot ceilings.

Ceiling bass traps address the dimension most rooms struggle with most. An 8-foot ceiling height produces a fundamental mode at 70 Hz — right in the problem range for music production — and the only way to absorb that mode is with treatment at or near the ceiling surface.

Below, you’ll find where to place ceiling bass traps, how to hang them securely, how many you need, and whether ceiling clouds or edge-mounted traps give you better results.

Quick Takeaway

Ceiling bass traps belong at the wall-ceiling edges first (where walls meet the ceiling), then as suspended cloud panels above the listening position. Mount them with eye hooks into ceiling joists using wire or chain, leaving a 2-4 inch air gap for better low-frequency absorption. Four edge traps covering the front and side wall-ceiling junctions make the biggest difference in most rooms.

Why Put Bass Traps On The Ceiling?

Ceiling pressure zones where bass traps can help

Every rectangular room has three sets of standing waves — length modes (front-to-back), width modes (side-to-side), and height modes (floor-to-ceiling). Wall-mounted bass traps in corners address the length and width modes effectively, but height modes need treatment at the ceiling or floor boundaries.

An 8-foot ceiling creates its fundamental axial mode at approximately 70 Hz, with harmonics at 141 Hz, 211 Hz, and so on. These frequencies have their pressure maxima at the floor and ceiling surfaces — the only places where absorptive treatment can intercept them.

The wall-ceiling junction is where height modes overlap with length and width modes simultaneously, creating intense bass pressure concentrations that rival the tri-corners where three walls meet. Treating these junctions addresses multiple mode families with a single trap.

Ceiling treatment also reduces the vertical component of flutter echo and comb filtering that affects recordings and monitoring accuracy. A room with thorough wall treatment but no ceiling treatment often sounds tight in the horizontal plane but loose and uncontrolled vertically.

Where To Place Bass Traps On The Ceiling

Placement guide for ceiling bass traps

Ceiling bass trap placement follows the same pressure-based priority as wall placement — treat the highest-pressure zones first.

Priority 1: Front wall-ceiling edge. The junction where your front wall meets the ceiling sits directly above your monitors and catches both the ceiling height mode and the front wall length mode. This is the single most impactful ceiling position for mixing accuracy.

Priority 2: Side wall-ceiling edges. The two side junctions running the length of the room catch height modes plus width modes. Treating these edges on both sides maintains symmetrical absorption for stereo imaging.

Priority 3: Rear wall-ceiling edge. The back junction addresses rear reflections that bounce off the ceiling and return to the listening position. Treat this after the front and sides are covered.

Priority 4: Center ceiling (cloud position). A suspended panel directly above the listening position catches first-ceiling reflections and contributes to overall bass absorption.

Wall-Ceiling Edge Traps

Edge traps sit in the 90-degree angle where the wall meets the ceiling, running along the junction line. These are the most effective ceiling positions because they sit at the pressure maximum of both the height mode and the adjacent wall’s modes.

A typical edge trap is a 2-4 foot section of 4-6 inch thick rigid fiberglass or mineral wool, either straddled across the junction at 45 degrees or mounted flat against the ceiling near the wall. Straddling creates an air gap and absorbs deeper into the bass range.

For full coverage, run edge traps along the entire front wall-ceiling junction and at least 4-6 feet along each side wall junction from the front. This covers the critical zone around your monitoring position.

Ceiling Cloud Bass Traps

Ceiling clouds are panels suspended below the ceiling surface with an air gap between the panel and the ceiling. The air gap dramatically improves low-frequency absorption — a 4-inch cloud panel hung 4 inches below the ceiling absorbs roughly as deep as an 8-inch panel mounted flush.

Clouds work best directly above the listening position (the “sweet spot”) where they catch the first ceiling reflection before it reaches your ears. A cloud panel 4-6 feet wide and 2-4 feet deep centered above the mix position handles this reflection effectively.

The tradeoff with clouds is that they only treat the area directly above them, while edge traps treat the entire junction line. For bass absorption specifically, edge traps give you more coverage per dollar — clouds excel at controlling the first reflection point, which is more of a mid/high-frequency concern.

How To Hang Bass Traps On The Ceiling

Mounting methods for ceiling bass traps

Ceiling mounting requires more robust hardware than wall mounting because gravity works against you. Every fastener must support the full weight of the panel with a safety margin.

The safest approach: screw eye hooks directly into ceiling joists (not just drywall), then hang the trap from the hooks using aircraft cable or chain. That setup supports 50+ lbs per hook and won’t pull out over time.

For lighter foam traps like the 4 Pack Bass Traps for Ceiling Corner, adhesive can work for edge-mounted installations where the foam wedges into the corner junction. The corner shape itself helps hold the foam in place while the adhesive cures.

The TroyStudio Bass Traps 24 Pack provides maximum coverage for ceiling installations.

Mounting Into Drywall vs Joists

Ceiling joists (the structural wood framing behind the drywall) are the only reliable anchor points for heavy ceiling panels — use a stud finder to locate joists, then drive lag screws or heavy-duty eye hooks directly into the wood. Each joist anchor point supports 30-50+ lbs.

Drywall alone cannot hold acoustic panels long-term — toggle bolts rated for 15-20 lbs can hold lightweight foam panels temporarily, but they may pull through over months as the drywall fatigues. Never hang rigid fiberglass panels heavier than 5 lbs from drywall-only anchors.

If your joists don’t align with where you need the trap, install a French cleat or mounting board that spans between two joists, then hang the trap from the board. This gives you mounting flexibility without compromising structural support.

Hanging With An Air Gap

Suspend ceiling panels below the surface using wire or chain to create an air gap that extends low-frequency absorption. The gap between the panel back and the ceiling surface lets air move freely, increasing the trap’s effective acoustic depth.

A 2-4 inch air gap is the sweet spot for most installations — cut four equal lengths of aircraft cable or light chain, attach one end to each corner of the panel frame and the other end to ceiling-mounted eye hooks. Adjust the cable length until the panel hangs level with the desired gap.

For DIY cloud panels, build a simple wooden frame from 1×3 lumber, fill it with rigid fiberglass insulation, wrap it in acoustically transparent fabric, and hang it from four points. The frame adds rigidity that prevents the panel from bowing under its own weight.

How Many Ceiling Bass Traps Do You Need?

How many ceiling bass traps a room needs

The number of ceiling bass traps depends on your room size and how much wall treatment you already have. Ceiling treatment supplements wall corner traps — it doesn’t replace them.

Minimum effective setup (2-4 traps): Cover the front wall-ceiling edge with 2 traps straddling the junction. This addresses the most critical ceiling zone for monitoring accuracy.

Strong setup (4-6 traps): Front edge (2 traps) plus side edges (1-2 traps per side starting from the front). This covers the primary reflection zone around the listening position.

Comprehensive setup (6-8+ traps): All four edges plus a ceiling cloud above the listening position. This level of treatment addresses the majority of vertical mode energy in a typical room.

For rooms that already have thorough corner treatment on the walls, adding ceiling edge traps is the logical next step. If your room has minimal wall treatment, invest in wall corners first — they give you more bass reduction per trap than ceiling positions.

The 8 Pack Bass Traps Acoustic Foam Corner provides enough pieces to cover multiple ceiling edge positions in a single purchase, making it a practical starting point for ceiling treatment. For premium ceiling installations, the 2 Pack Wooden Acoustic Bass Traps offer professional-grade absorption for ceiling mounting.

The Bottom Line

Ceiling bass traps address the vertical room modes that wall-only treatment misses entirely. Wall-ceiling edge junctions are the highest-priority ceiling positions, followed by suspended cloud panels above the listening position.

Mount ceiling traps into joists (never drywall alone) using eye hooks and wire, with a 2-4 inch air gap for extended bass absorption. Prioritize the front wall-ceiling edge and work outward as budget allows — even two edge traps at the front make a noticeable difference in bass accuracy.

Frequently Asked Questions

Can you use regular acoustic panels on the ceiling for bass?

Regular 2-inch acoustic panels absorb mid and high frequencies effectively but don’t reach deep enough for bass control. You need at least 4-inch thick panels made from rigid fiberglass or mineral wool to absorb meaningfully below 200 Hz, and 6 inches is better for reaching the 80-125 Hz range where most ceiling modes fall.

Do ceiling bass traps need to be in corners?

Ceiling bass traps work best at the wall-ceiling edge (which is a corner — just a horizontal one), but suspended cloud panels hung away from any wall also absorb bass effectively. The edge positions absorb more bass per trap because they sit at pressure maxima, while clouds rely on their air gap to extend frequency reach.

How far below the ceiling should a bass trap hang?

A 2-4 inch air gap between the panel and the ceiling surface is ideal for most ceiling installations. This gap extends the trap’s effective acoustic depth without the panel hanging low enough to feel intrusive in rooms with standard 8-foot ceilings.

How To Hang Bass Traps In Corners — Every Mounting Method Explained

How to hang bass traps in corners depends on the trap type and your wall situation, but the method matters less than getting the trap into the corner in the first place — a bass trap sitting on the floor in a corner outperforms a perfectly mounted panel on a flat wall every time.

Corner mounting concentrates your bass trap where low-frequency pressure is highest. The mounting hardware just needs to hold the trap securely at the right angle — straddling the corner at roughly 45 degrees with an air gap behind it for maximum absorption.

Most people overthink the installation and underthink the placement. A few Command strips or L-brackets get the job done for foam traps, while heavier fiberglass panels need French cleats or wire hanging systems.

Below, you’ll find step-by-step instructions for every common mounting method — corner straddling, wall mounting, foam attachment, damage-free options, and when simply setting traps on the ground works fine.

Quick Takeaway

Hang bass traps in corners by straddling them at a 45-degree angle across the corner, creating an air gap behind the panel. Use French cleats or wire for heavy fiberglass/mineral wool panels, adhesive spray or Command strips for foam traps, and impaling clips for panels with fabric wrapping. Floor-to-ceiling installation catches the most bass energy, but even partial-height traps in corners make a significant difference.

How To Hang Bass Traps In Corners

Corner mounting methods for bass traps

Hanging bass traps in corners means bridging the trap across two walls so it sits at an angle with open space behind it. This straddling position puts the absorptive material where bass pressure peaks while the air gap behind the panel extends its effective depth.

The simplest approach: screw a small L-bracket or angle bracket into each wall near the top of where the trap will sit, then rest the trap on the brackets. For floor-to-ceiling installations, brackets at the top prevent tipping while the floor supports the weight.

For lighter foam traps like the 4 Pack Bass Traps for Ceiling Corner, adhesive alone holds them in place because they weigh almost nothing. Heavier rigid fiberglass panels (4-8 lbs each) need mechanical fasteners.

The TroyStudio Bass Traps 24 Pack offers maximum corner coverage for larger rooms.

Straddling vs Flush Corner Mounting

Straddling means the trap bridges across the corner at an angle, touching both walls at the edges with a triangular air gap behind it. This is the preferred method because the air gap increases low-frequency absorption — a 4-inch panel with a 6-inch air gap behind it absorbs as deep as an 8-10 inch panel mounted flush.

Flush mounting presses the trap flat against one wall in the corner, which saves space but sacrifices the air gap benefit. Use flush mounting only when the room is too narrow for straddled traps or when treating wall-ceiling edges where straddling isn’t practical.

The air gap behind a straddled trap depends on the panel width and corner angle. A 24-inch wide panel straddled across a 90-degree corner creates roughly 8.5 inches of air gap at the deepest point — enough to significantly extend bass absorption depth.

How To Mount Bass Traps On Walls

Wall mounting hardware for bass traps

Wall-mounted bass traps use the same hardware as heavy picture frames and shelving, scaled up for panel weight. The right method depends on your trap’s weight and your wall type.

French cleats are the gold standard for heavy panels (5+ lbs) — screw one half of the cleat to the wall (into studs), the other half to the back of the trap frame. The interlocking angle makes hanging easy, supports significant weight, and lets you remove and reposition traps without new holes.

Wire hanging systems use two D-ring hangers on the trap’s frame connected by picture wire, hung from a wall screw or hook. This works for medium-weight panels (3-8 lbs) and allows slight angle adjustment after hanging.

Impaling clips (Z-clips) mount to the wall with screws, and the trap pushes onto the sharp points that grip the panel material. These work well for fabric-wrapped fiberglass panels and hold firmly without a frame.

Mounting Without Damaging Walls

For renters or anyone avoiding wall damage, several options exist that skip screws entirely.

Command strips (heavy-duty, rated for 12-16 lbs per set) hold lightweight panels securely and remove cleanly. Use multiple strips per panel — at least four for a 2×4 foot panel — and follow the weight rating carefully.

Tension poles (floor-to-ceiling spring-loaded poles) let you clip or strap panels at any height without touching the walls. Shower curtain tension rods work for lightweight foam, while heavy-duty studio poles handle rigid panels.

Freestanding frames built from 2×4 lumber create a portable structure that leans into the corner and holds panels at the correct angle without any wall contact. This option works especially well for DIY bass traps where you’re already building a custom solution.

How To Attach 6-Inch Bass Traps

Six-inch thick bass traps are heavier than standard 2-4 inch panels and need more robust mounting. A single 6-inch rigid fiberglass panel (24×48 inches) weighs 6-10 lbs depending on the insulation density.

French cleats are the best option for 6-inch traps because they handle the weight easily and distribute the load across the cleat length. Mount the wall cleat into studs (not just drywall anchors) for panels over 8 lbs.

For corner installations, an L-bracket approach works well: screw a metal L-bracket into each wall near the top, then rest the thick panel across both brackets. Add a small retaining bracket or cord at the top to prevent the panel from tipping forward.

How To Hang Foam Bass Traps

Mounting techniques for foam bass traps

Foam bass traps are the easiest to install because they’re lightweight — typically under 2 lbs per piece. The 8 Pack Bass Traps Acoustic Foam Corner and similar foam wedges can be mounted with adhesive alone. For heavier premium traps requiring mechanical mounting, the 2 Pack Wooden Acoustic Bass Traps provide professional-grade absorption.

Adhesive spray (3M Super 77 or similar) bonds foam directly to the wall or ceiling surface — apply spray to both the wall and the foam back, wait 30 seconds for it to get tacky, then press firmly. The bond is strong but will damage paint when removed.

Command strips (medium weight) work for foam traps and remove cleanly — stick strips to the flat back surfaces of the foam and press against the wall. For triangular corner traps, place strips on both faces that contact the walls.

T-pins or pushpins work for foam mounted on drywall or drop ceilings — push pins through the foam into the wall surface. The method is quick and damage-minimal but doesn’t hold well on smooth or hard surfaces.

Avoid heavy mounting hardware on foam — screws and brackets can tear through the soft material. If the foam won’t hold with adhesive or pins, attach it to a thin backer board (1/4-inch MDF or cardboard) first, then mount the board.

Can You Just Set Bass Traps On The Ground?

Freestanding bass traps placed in room corners

Setting bass traps directly on the floor in corners works and is the fastest possible installation method. Floor placement puts the trap at the tri-corner junction where two walls meet the floor — one of the highest pressure zones in the room.

Freestanding placement is ideal for: – Superchunk traps (stacked triangular insulation) that fill the entire corner from floor up – Temporary setups where you’re testing how many traps you need before committing to permanent installation – Rental spaces where wall mounting isn’t allowed

The limitation is height coverage — a 4-foot freestanding trap treats the lower half of the corner but misses the upper tri-corners and wall-ceiling edges. For home studios where floor-standing is the only option, lean panels into the corner at a slight angle and stack them as high as practical.

Freestanding traps can tip forward, especially in corners with smooth walls. A small furniture bracket or cord connecting the top of the trap to a wall screw keeps it stable without requiring the full weight-bearing hardware of a wall-mounted installation.

Do Corner Bass Traps Need To Be Floor To Ceiling?

Floor-to-ceiling bass trap installation

Floor-to-ceiling bass traps deliver the best results because they intercept every room mode at that corner position. Different frequencies have their pressure maxima at different heights, and a full-height trap catches all of them.

Partial-height traps still help — a 4-foot panel in the corner absorbs significantly more bass than no treatment. The improvement from zero traps to partial traps is much larger than the improvement from partial to full-height.

If you can only do partial height, prioritize the top of the corner (ceiling junction) over the middle of the wall. The tri-corner where two walls meet the ceiling concentrates more bass energy than the mid-wall region.

For small rooms with 8-foot ceilings, two 4-foot panels stacked vertically achieve full coverage without requiring a single panel tall enough to reach floor to ceiling. Stack them with the seam at mid-height and the top panel touching the ceiling.

The Bottom Line

Mounting bass traps in corners uses the same basic hardware you’d use for shelves and heavy pictures — French cleats for heavy panels, adhesive for foam, and Command strips for damage-free installation. The method matters less than getting the trap into the corner with an air gap behind it.

Begin at the front wall corners, mount traps floor-to-ceiling when possible, and straddle them at an angle across the corner rather than flush against one wall. Even the simplest installation — foam wedges pressed into corners with adhesive spray — delivers meaningful bass improvement the moment it goes up.

Frequently Asked Questions

Should I put bass traps in every corner?

Every corner is ideal, but front wall corners give the biggest return on investment. Start with four traps covering the front corners (two upper, two lower tri-corners), then add rear corners and ceiling edges as budget allows.

How to mount Auralex bass traps?

Auralex LENRD bass traps come with adhesive tabs or can be mounted using Auralex’s Tubetak Pro liquid adhesive applied to the flat back surfaces. Press the LENRD into the corner with the curved face pointing into the room and hold for 30 seconds — for damage-free mounting, use heavy-duty Command strips on the flat contact surfaces instead.

Where to install corner bass traps?

Install corner bass traps at the tri-corners first — where two walls meet the floor or ceiling. Front wall corners behind your monitors are the highest priority, followed by rear wall corners, then wall-ceiling edges along the sides of the room.

Bass Traps Placement — Where To Put Them For Maximum Low-End Control

Bass traps placement determines whether your acoustic treatment actually solves your room’s problems or just decorates the walls, but most people get it wrong by spreading traps evenly around the room instead of concentrating them where bass energy is highest.

Corners are where bass energy accumulates most intensely in any rectangular room. Every room mode — the standing waves that cause boomy, uneven bass — has its maximum pressure at the room boundaries, and corners where two or three surfaces meet stack those pressure zones on top of each other.

Putting bass traps flat on wall centers or randomly around the room wastes absorption capacity on locations where bass pressure is moderate at best. The same trap in a corner intercepts dramatically more low-frequency energy, making placement the single biggest factor in how effective your treatment performs.

Below, you’ll find the exact priority order for bass trap placement, whether you need traps in every corner, how size and air gaps affect performance, and whether symmetrical placement actually matters for stereo imaging.

Quick Takeaway

Place bass traps in corners first — tri-corners (where two walls meet the floor or ceiling) are the highest priority, followed by vertical wall-wall corners and wall-ceiling edges. Front wall corners behind your monitors matter most for mixing accuracy. An air gap of 2-4 inches behind the trap increases low-frequency absorption. Symmetrical placement preserves stereo imaging for critical listening.

Where Should You Place Bass Traps In A Room?

Diagram showing optimal bass trap placement in a room

Bass traps placement follows one rule above all others: put them where bass energy is highest. In every rectangular room, that means corners — and not all corners are equally important.

The priority order for bass trap placement, from most effective to least:

  1. Tri-corners (where two walls meet the floor or ceiling) — highest bass pressure in the room
  2. Vertical wall-wall corners — second highest pressure zones
  3. Wall-ceiling edges (the long horizontal lines where walls meet the ceiling)
  4. Wall-floor edges (often impractical due to furniture)
  5. Wall centers (least effective for bass, better for mid/high reflection control)

This priority order isn’t opinion — it’s physics. Bass pressure maxima always occur at room boundaries, and corners where multiple boundaries intersect concentrate the most energy.

Tri-Corner Placement (Floor-Wall-Wall)

Tri-corners are where three surfaces converge — the two spots on each wall where it meets another wall and the floor, plus the two spots where it meets another wall and the ceiling. A typical rectangular room has eight tri-corners total.

These locations see the highest bass pressure of anywhere in the room because every axial mode (length, width, and height) has its pressure maximum at the boundaries. Where three boundaries converge, three sets of pressure maxima stack, creating the most intense bass energy concentration.

Placing any type of bass trap in a tri-corner delivers more absorption per square foot than any other position. If you can only afford four traps, put them in the four front tri-corners (the two upper and two lower corners of your front wall).

Wall-Ceiling Corners

Wall-ceiling corners — the long horizontal edges running the length and width of your room — are the second priority after tri-corners. These edges see pressure maxima from two axial modes simultaneously (the wall dimension and the ceiling height).

Ceiling-mounted bass traps along these edges are particularly effective because they treat both vertical and horizontal room modes with a single installation. Floor-to-ceiling vertical corner traps handle the same job from a different angle.

The front wall-ceiling edge (above your monitors) and the two side wall-ceiling edges closest to your listening position deserve treatment first. Rear wall-ceiling edges come after the front is handled.

Should You Put Bass Traps In All Corners?

All-corner bass trap placement compared with priority corners

The ideal scenario is bass traps in every corner of the room — all eight tri-corners and all twelve edges. In practice, budget and space constraints force you to prioritize.

Here’s how to get the most impact from limited treatment:

  • 4 traps (minimum effective setup): Front wall vertical corners, floor to ceiling. This handles the most critical bass buildup for mixing and listening.
  • 8 traps (strong setup): Front wall corners + rear wall corners, all floor to ceiling. Treats all vertical corner modes.
  • 12+ traps (comprehensive): All vertical corners + wall-ceiling edges along the front and sides. Covers the majority of modal energy in the room.

The front corners matter more than the rear because your monitors excite the front wall first, and the direct reflections from the front wall reach your ears before rear reflections. Treating the front wall corners and the wall behind your monitors makes the biggest audible difference in bass accuracy.

For small rooms where every corner trap feels like it’s eating your space, even two floor-to-ceiling traps straddling the front corners make a meaningful improvement. Two traps in the right spots outperform six traps in the wrong spots.

How Big Should Bass Traps Be?

Bass trap sizing guide for different rooms

Bigger bass traps absorb lower frequencies more effectively — there’s no way around the physics. The size variables that matter are thickness (depth), height, and width.

Thickness is the most critical dimension — a 4-inch thick trap is the minimum for meaningful bass absorption when corner-mounted. Six inches reaches deeper into the bass range, and superchunk fills (17+ inches of triangular insulation filling the entire corner) provide the broadest low-frequency coverage.

Height determines how much of the corner’s modal energy the trap intercepts — floor-to-ceiling traps capture all vertical modes at that corner. A 4-foot trap mounted at ear height only treats the modes it physically overlaps with, missing the lowest modes that concentrate near the floor and ceiling.

Width (face dimension) matters for how much of the corner the trap spans. A 24-inch wide panel straddling a corner at 45 degrees creates a deeper effective air gap than a 12-inch panel, extending low-frequency reach.

How High Should Bass Traps Be?

Floor-to-ceiling installation is the gold standard for bass traps. This ensures the trap intercepts every room mode at that corner regardless of frequency, since different modes have pressure maxima at different heights.

If full-height installation isn’t possible, position traps at the top of the wall (touching the ceiling) rather than centered on the wall. Bass energy is often strongest in the tri-corners near the ceiling because heat rises and creates convection-driven pressure patterns that compound with modal pressure.

A partial-height trap (4 feet) mounted at the ceiling line outperforms the same trap centered at ear height for pure bass absorption. For combined bass and mid-frequency treatment at the listening position, a full-height approach covers both.

How Far Should Bass Traps Be From The Wall?

An air gap between the bass trap and the wall significantly increases low-frequency absorption. The air gap extends the effective acoustic depth of the trap without adding more material.

A 4-inch trap with a 4-inch air gap behind it absorbs roughly as well as an 8-inch trap flush-mounted. The air gap works because sound velocity is highest away from boundaries — the trap material sitting in this high-velocity zone converts more energy to heat.

The optimal air gap is 2-4 inches for most installations — beyond 4 inches, returns diminish and the trap begins to protrude too far into the room. Corner-straddled traps naturally create an air gap (the space behind the angled panel), which is one reason corner mounting is so effective.

Does Bass Trap Placement Need To Be Symmetrical?

Symmetrical bass trap placement around a listening position

Symmetrical bass trap placement matters if you’re mixing music or doing any work that requires accurate stereo imaging. Asymmetric treatment causes one side of the room to absorb differently than the other, shifting the perceived stereo center.

For critical listening rooms (mixing studios, mastering suites), place traps symmetrically — what’s in the left front corner should match the right front corner. This applies to the number of traps, their size, and their position.

For home theaters, podcast rooms, and casual listening spaces, symmetry is less critical — bass mode reduction benefits your room regardless of whether the left and right sides match perfectly. Treat wherever you can, even if the result is asymmetric.

One exception: if your room is physically asymmetric (one wall has a large window, the other is solid drywall), you may need asymmetric treatment to compensate. The wall with the window reflects bass differently than the solid wall, and matching treatment levels may require different trap quantities on each side.

Bass Traps In Front Or Back Of The Room?

Front corner and back corner bass trap placement compared

If you have to choose between front and back, treat the front wall first — especially behind and around your monitors. The front wall is the closest boundary to your speakers, and it creates the strongest early bass reflections that interfere with your direct sound.

The rear wall deserves treatment next because bass that passes your listening position reflects off the back wall and returns, creating a second set of interference patterns. Rear wall corner traps clean up this reflected energy.

A balanced approach distributes treatment between front and back: 60% of your traps on the front wall corners and edges, 40% on the rear. This ratio addresses both the initial reflections from the front wall and the return reflections from the rear.

Side wall corners are the third priority. They address lateral modes (width-based standing waves) that are typically higher in frequency than length-based modes and often partially handled by furniture, bookshelves, and other room contents.

For DIY builders on a budget, start with two corner traps on the front wall. Add rear corners next, then install ceiling edge traps last.

The Bottom Line

Bass traps placement follows a clear priority: tri-corners first, then vertical wall-wall corners, then wall-ceiling edges. Front wall corners matter most for mixing accuracy, and an air gap behind each trap extends low-frequency absorption without adding thickness.

Symmetrical placement preserves stereo imaging for critical listening. If budget is limited, four floor-to-ceiling traps in the front corners deliver the single biggest improvement in bass accuracy you can make to any room.

The 4 Pack Bass Traps for Ceiling Corner gives you a starting point for corner treatment on a budget.

For broader coverage across more corners, the 8 Pack Bass Traps Acoustic Foam Corner covers multiple positions in a single purchase.

For the best absorption in corner positions, the 2 Pack Wooden Acoustic Bass Traps provide superior performance with their wooden construction.

Frequently Asked Questions

How thick should bass traps be?

Bass traps should be at least 4 inches thick for meaningful low-frequency absorption when mounted in corners. Six inches reaches lower frequencies, and superchunk fills (17+ inches) provide the deepest broadband bass absorption available from porous materials.

Should bass traps go in middle or top corners?

Top corners (where the wall meets the ceiling) are more effective than mid-wall positions because they’re tri-corner or edge locations where bass pressure is highest. If using partial-height traps, mount them touching the ceiling rather than centered on the wall for maximum bass absorption.

Do Auralex bass traps work in corners?

Auralex LENRD bass traps and similar foam corner traps work for mid-bass frequencies (200-500 Hz) when placed in corners but don’t reach as low as denser fiberglass or mineral wool alternatives. They’re a good starting point for treating upper bass muddiness, though rooms with severe low-frequency modes need thicker, denser treatment.

Can You Paint Bass Traps — And What Happens When You Do?

Can you paint bass traps — technically yes, but painting them always reduces acoustic performance to some degree because every coating restricts airflow through the porous surface that makes bass traps absorb sound.

Bass traps work because air molecules move freely through millions of tiny pores in the absorptive material. Friction between the moving air and the pore walls converts sound energy into heat. Any paint layer — even a thin one marketed as “acoustically transparent” — adds resistance to that airflow and reduces the amount of sound energy the trap can convert.

The reduction ranges from minor on a lightly misted fabric-wrapped panel to severe on open-cell foam covered with standard wall paint, but the direction is always the same: painted traps absorb less than unpainted traps. There is no coating that preserves 100% of the original performance.

Below, you’ll find which trap types lose the most, which coatings do the least damage, what to do if you absolutely must paint, and the better alternatives if you want color without sacrificing the acoustics you paid for.

Quick Takeaway

Painting bass traps always reduces acoustic performance because any coating restricts the airflow that makes porous absorbers work. Even “acoustically transparent” paints and light mist coats measurably reduce absorption — especially at mid and high frequencies where the surface layer matters most. The best approach is to avoid painting entirely by choosing your fabric color during construction or buying traps in the color you want. If you must paint, fabric-wrapped traps lose the least performance with fabric spray paint in very light coats, but expect some absorption loss regardless.

Can You Paint Bass Traps — And Does It Affect Performance?

How paint can affect bass trap absorption

Painting bass traps always affects their acoustic performance because every porous absorber relies on unrestricted airflow through the material’s surface. Sound waves push air molecules into tiny pores, and friction between the moving air and the pore walls converts acoustic energy into heat. Paint adds a layer that resists that airflow.

A single coat of standard wall paint can cut high-frequency absorption by 30-50% and reduce mid-frequency performance by 15-25%. Even products marketed as “acoustically transparent” measurably increase surface flow resistivity — the coating may preserve most performance, but “most” is not “all.”

Low-frequency absorption is less affected than mids and highs because bass wavelengths are long enough to interact with the absorber’s full depth regardless of surface conditions. But the cumulative effect across all frequencies means a painted trap is always a worse trap than the same panel unpainted.

The real question is not whether painting affects performance — it does — but whether the cosmetic benefit is worth the acoustic cost. In most cases, better alternatives exist.

Which Types Of Bass Traps Lose The Most From Painting?

Bass trap types that can be painted safely

Different bass trap constructions lose different amounts of performance when painted. The damage depends on how directly the paint contacts the absorptive material.

Foam Bass Traps — Highest Performance Loss

Foam bass traps suffer the most from painting because the foam itself is the absorptive surface with no protective layer between paint and working material.

Open-cell acoustic foam has large, visible pores that clog easily. Even a light mist coat partially seals these pores, and the absorption loss compounds with each additional coat. Two coats of spray paint on foam typically reduces mid-frequency absorption by 20-30% and high-frequency absorption by even more.

Solvent-based spray paints (including many Rust-Oleum varieties) can dissolve certain foam types entirely, turning your bass trap into a melted, sticky mess. The bottom line with foam: do not paint it. Buy foam in the color you want, or cover it with acoustically transparent fabric if the color bothers you.

Fabric-Wrapped Bass Traps — Moderate Performance Loss

Fabric-wrapped traps lose less performance than foam because the fabric sits between the paint and the absorptive core. But the fabric itself is part of the acoustic design, chosen specifically for its airflow characteristics, and painting it changes those characteristics.

Fabric spray paint (Tulip or Simply Spray) bonds to individual threads rather than forming a continuous film, which preserves more breathability than standard paint. But even fabric spray paint adds mass and reduces the open area between threads — measurable in airflow resistance tests even if the effect seems subtle by ear.

Brushing or rolling paint onto fabric-wrapped traps causes the worst damage — brushes push paint through the weave and into the insulation behind it, while rollers apply far too much product per pass. If you insist on painting a fabric-wrapped panel, spraying is the only method that keeps the damage manageable.

What Paint Causes The Least Damage To Bass Traps?

Paint type comparison for bass traps

No paint leaves bass trap performance fully intact, but some types cause far less damage than others. If you have decided the cosmetic trade-off is worth it, these options minimize the acoustic cost.

Fabric spray paint (Tulip, Simply Spray) causes the least absorption loss on fabric-wrapped panels. These products bond to individual threads rather than forming a film, preserving more of the fabric’s open weave. Performance loss is typically under 10% at mid frequencies with a single light coat — still measurable, but the smallest penalty available.

Thinned latex paint (50% paint, 50% water) sprayed in very light coats is the next-best option. Thinning reduces the amount of solid material deposited per pass, but each additional coat adds more resistance. Three to four light coats for full color coverage will reduce mid-frequency absorption by roughly 10-15%.

“Acoustically transparent” paints (Acousti-Coat, Benjamin Moore acoustical ceiling paint) are marketed as safe for acoustic surfaces. They perform better than standard paint, but independent testing shows they still increase surface flow resistivity. “Transparent” is relative, not absolute.

Paints that cause severe or total performance loss:Oil-based paint — forms an impermeable film that completely seals pores – Primer — designed specifically to seal surfaces, the opposite of what you need – Thick latex without thinning — too viscous, fills pores rather than coating fibers – Polyurethane or varnish — creates a hard, impermeable shell

The wooden frame, mounting hardware, and any non-acoustic structural elements can be painted freely. The frame does not absorb sound, so sealing it has zero acoustic impact.

How To Minimize Damage If You Must Paint Bass Traps

Step-by-step process for painting bass traps

If you have weighed the trade-off and decided to paint, this process keeps the performance loss as small as possible. It applies to fabric-wrapped traps only — foam traps should not be painted at all.

Before you start: Remove the trap from the wall or corner, work in a well-ventilated area with drop cloths, mask off hardware and mounting brackets, and test your paint on a scrap piece of the same fabric first.

Step 1: Choose your paint and thin it. Use fabric spray paint or thin standard latex 50/50 with water. Never use unthinned paint directly from the can.

Step 2: Apply the first coat. Hold the spray 12-18 inches from the surface and use smooth, sweeping passes — each pass should be light enough that you can still see the original color through the new coat. If using a spray gun with thinned latex, set pressure low (15-20 PSI) to minimize paint volume per pass.

Step 3: Let it dry completely. Every paint type needs full drying before the next coat — usually 30-60 minutes for spray paint, 2-4 hours for thinned latex. Applying a second coat over wet paint creates a thick, sealed layer that causes significantly more absorption loss.

Step 4: Stop at the fewest coats possible. Each additional coat adds more airflow resistance. If partial color coverage is acceptable, two coats cause less damage than four. Dark colors over light surfaces are the worst case because they need the most coats for full coverage.

Step 5: Measure the damage. Let the painted trap cure for 24-48 hours before reinstalling. Compare the before and after frequency absorption response at your listening position with a calibrated mic like miniDSP UMIK-1 USB Measurement Calibrated Microphone, because measuring the room is the only reliable way to know how much performance the paint cost you.

What guarantees the worst results: – Brushing or rolling paint onto the acoustic surface – Applying one thick coat instead of multiple thin ones – Painting over dusty or dirty surfaces – Using primer before paint (primer is designed to seal)

What Should You Do Instead Of Painting Bass Traps?

Alternatives to painting bass traps for adding color

The better approach is to get the color you want without any paint touching the acoustic surface.

Choose fabric color during construction. If you are building DIY bass traps, select your wrapping fabric in the color you want from the start. An acoustically transparent option like Guilford of Maine Sona Acoustical Fabric lets you re-wrap or build in the finish you want without sealing the working surface. This gives you complete color control with zero absorption penalty, and it produces a more professional finish than any painted surface.

Re-wrap existing panels with new fabric. If you already own fabric-wrapped traps and dislike the color, removing the old fabric and re-wrapping with a new color is straightforward. The insulation core is reusable, and re-wrapping takes about 20 minutes per panel with a staple gun — far less time than painting multiple coats with drying time between each.

Buy traps in the color you want. For foam traps, color selection at purchase is the only way to get the look you want without sacrificing performance. The 8 Pack Bass Traps Acoustic Foam Corner comes in black, which blends into most home studio environments without needing paint. If you need the frame to match furniture, finish only the non-acoustic wood trim — not the absorptive surface itself.

Use strategic placement to hide traps. Bass traps work best in corners — positions that are naturally less visible. Ceiling-wall edges, behind furniture, and upper corners are all high-performance positions that also happen to be out of direct sight lines.

The Bottom Line

Painting bass traps always reduces acoustic performance. The reduction ranges from minor (a single light mist of fabric spray paint on a wrapped panel) to severe (standard wall paint on open-cell foam), but no paint leaves absorption fully intact.

The recommended approach is to avoid painting entirely — choose your fabric color during construction, re-wrap existing panels with new fabric, or buy foam traps in the color you want. These alternatives give you full color control with zero acoustic compromise.

If you decide to paint anyway, use only fabric spray paint or thinned latex (50/50 with water) applied with a spray gun in the fewest coats possible. Never brush, roll, prime, or use oil-based paint on any acoustic surface. And measure the before-and-after difference so you know exactly what the paint cost you in acoustic performance.

Frequently Asked Questions

Can SONOpan panels be painted?

SONOpan acoustic panels can be painted because they’re rigid engineered wood panels, not porous absorbers. Standard latex paint, primer, and even oil-based finishes work fine on SONOpan since the panel’s sound-absorbing mechanism doesn’t rely on surface porosity the way fiberglass or foam does.

Does painting bass traps void the warranty?

Most manufacturers’ warranties don’t cover modifications including painting — companies like GIK Acoustics and ATS Acoustics explicitly note that painting or modifying the fabric covering voids their product warranty. If warranty coverage matters, consider placement and fabric color selection instead of painting.

Can you stain wooden bass trap frames?

Wooden frames on bass traps can be stained, painted, or finished with any product you want. The frame is structural, not acoustic — it holds the absorptive material in place but doesn’t participate in sound absorption.

Refinishing the frame has zero impact on the trap’s acoustic performance.

Helmholtz Resonator Bass Trap — How It Works And How To Build One

Helmholtz resonator bass trap designs target specific low frequencies that porous absorbers can’t reach, but building one that actually works requires understanding the physics behind the tuning — not just copying dimensions from a forum post.

A Helmholtz resonator is a sealed box with a port (hole or slot) that resonates at a precise frequency determined by the cavity volume and port dimensions. When sound at that frequency enters the port, the air inside oscillates and friction converts the acoustic energy to heat.

This makes Helmholtz traps the surgical tool of acoustic treatment — they eliminate a specific problem frequency without affecting the rest of your room’s sound. Porous absorbers treat everything broadly, while a Helmholtz trap zeros in on the one mode that’s causing havoc.

Below, you’ll see exactly how the resonance mechanism works, when to use a Helmholtz trap instead of standard absorption, how to calculate dimensions for your target frequency, and a step-by-step build guide for a DIY 100 Hz trap.

Quick Takeaway

A Helmholtz resonator bass trap is a sealed cavity with a port that absorbs sound at a specific tuned frequency. It targets frequencies as low as 30-60 Hz that porous absorbers can’t reach without impractical thickness. Build one by calculating port dimensions from the formula f = (c/2π) × √(S/(V×L)), using MDF or plywood for the enclosure and adding internal damping material. Best used alongside broadband porous traps to address stubborn room modes that show up in measurement data.

What Is A Helmholtz Resonator Bass Trap?

Anatomy diagram of a Helmholtz resonator bass trap

A Helmholtz resonator bass trap is a type of resonant absorber — a sealed enclosure with a carefully sized opening that absorbs sound energy at one specific frequency. The concept dates back to Hermann von Helmholtz in the 1860s, and the physics hasn’t changed since.

The simplest analogy is blowing across the top of an empty bottle — the bottle produces a single tone because the air in the neck and the air in the body form a resonant system. A Helmholtz bass trap works the same way, except instead of producing sound, it absorbs it.

What makes this type of trap valuable is its ability to reach frequencies that porous absorbers can’t touch without extreme thickness. A porous trap needs roughly 34 inches of depth to absorb effectively at 100 Hz, while a Helmholtz resonator can absorb at 100 Hz — or even 40 Hz — in a box just 12-18 inches deep.

The tradeoff is bandwidth — a porous absorber treats everything above its cutoff frequency, while a Helmholtz resonator absorbs strongly at its tuned frequency and within about 10-20 Hz on either side. You’re trading breadth for depth.

How Does A Helmholtz Resonator Work?

Physics of Helmholtz resonance for low-frequency absorption

The physics of a Helmholtz resonator involves two elements working together: the air in the port acts as a vibrating mass, and the air in the sealed cavity acts as a spring. Together they form a mass-spring system with a natural resonant frequency.

When a sound wave at the resonant frequency arrives at the port, the air in the neck begins oscillating back and forth. The air in the cavity behind it compresses and expands with each cycle, storing and releasing energy like a spring.

Friction between the moving air and the port walls, plus viscous losses within the cavity, converts that kinetic energy into heat. The energy that entered the port as sound exits as a tiny amount of thermal energy — the sound at that frequency is absorbed.

At frequencies well above or below the resonant point, the impedance mismatch prevents efficient energy transfer into the system. The incoming sound wave essentially bounces off the port instead of coupling into it, which is why absorption drops off sharply away from the tuned frequency.

The Tuning Formula Explained

The resonant frequency of a Helmholtz resonator is calculated with this formula:

f = (c / 2π) × √(S / (V × L))

Where: – f = resonant frequency in Hz – c = speed of sound (343 m/s at room temperature) – S = cross-sectional area of the port (m²) – V = volume of the cavity (m³) – L = effective length of the port (physical length + 0.8 × port radius for end correction)

In practical terms: a larger cavity lowers the frequency, a larger port raises it, and a longer port neck lowers it. You adjust these three variables to hit your target frequency.

For a rectangular slot instead of a circular port, S becomes the slot width × slot length, and L becomes the panel thickness plus end corrections. Slotted designs are common in DIY builds because cutting straight slots in MDF is easier than drilling precise circular ports.

Single-Frequency vs Broadband Helmholtz Traps

A standard Helmholtz resonator with a single port has a narrow absorption band — typically ±10-15 Hz around the center frequency. This is ideal when you have one specific mode dominating your room.

Broadband Helmholtz designs use multiple ports of different sizes, or slotted panels with varying slot widths, to create overlapping resonances that cover a wider frequency range. Some commercial products use perforated panels with hundreds of small holes, effectively creating many tiny Helmholtz resonators that together absorb across a band of 40-60 Hz.

Adding damping material (fiberglass or mineral wool) inside the cavity also widens the absorption band at the cost of peak absorption. A heavily damped Helmholtz resonator behaves more like a hybrid between resonant and porous absorption — broader but less deep at the center frequency.

A cavity-filling material like the AFB Acoustical Fire Batts, Mineral Wool Insulation is the kind of material builders use when they want to damp the cavity without changing the trap into a normal porous absorber.

When Should You Use A Helmholtz Trap Instead Of A Porous Absorber?

Decision guide for Helmholtz versus porous bass traps

The decision between Helmholtz and porous traps comes down to what your room measurements show. If you have broad, general bass problems across many frequencies, porous absorbers are the right tool — but if you have one or two specific frequencies that spike dramatically above the rest, a Helmholtz trap targets those spikes with precision porous treatment can’t match.

Run a room measurement using REW (Room EQ Wizard) with a calibrated microphone at your listening position and look at the frequency response below 200 Hz. A room with general unevenness (5-8 dB variations across many frequencies) needs broadband porous treatment in the corners first.

A calibrated mic like the miniDSP UMIK-1 USB Measurement Calibrated Microphone makes that measurement step actionable, because tuning a Helmholtz box without knowing the exact problem frequency is mostly guesswork.

A room that shows one massive peak — say 15-20 dB at exactly 63 Hz — after porous treatment is installed has a stubborn mode that broadband absorption alone can’t flatten. That’s the case for a Helmholtz resonator tuned to 63 Hz.

If you need help with layout, start with proper bass trap placement before tuning a resonator.

The practical workflow for most rooms follows this sequence:

  1. Install corner-mounted porous traps first (handles the majority of bass problems).
  2. Measure again to see what’s left.
  3. If a specific frequency still dominates, build or buy a Helmholtz resonator tuned to that frequency.

Skipping step 1 and jumping straight to Helmholtz traps is a mistake — you’d need a separate resonator for every problem frequency, which is far more expensive and complex than broadband treatment. Porous traps handle 80% of bass problems, and Helmholtz traps clean up the remaining 20%.

How To Build A DIY Helmholtz Bass Trap

DIY Helmholtz bass trap build diagram

Building a Helmholtz bass trap is a woodworking project that requires precision in the port dimensions but forgives minor variations in the box construction. The enclosure just needs to be airtight and the correct internal volume — the acoustic performance depends almost entirely on the port geometry.

DIY Materials

  • 3/4-inch MDF or plywood for the enclosure panels
  • Wood glue and screws for assembly
  • Acoustic caulk or silicone to seal all joints airtight
  • 2-inch rigid fiberglass or mineral wool for internal damping
  • A saw and drill (table saw preferred for clean slot cuts)

A sealant like Acoustical Caulk (29 oz) 1 Tube with clean up wipe is the right kind of finishing material for this build, because even small leaks can shift the effective tuning or kill the trap’s performance entirely.

The total material cost for a single Helmholtz trap runs $30-60 depending on wood choice and whether you already have tools. Compare that to $200-500+ for commercial tuned absorbers.

Choosing Your Target Frequency

Before cutting any wood, identify which frequency you need to target. You have two approaches.

Room mode calculator: Enter your room dimensions (length × width × height in feet) into an online room mode calculator, and it will show you every axial, tangential, and oblique mode your room produces. The axial modes (single-dimension reflections) are the strongest and most likely to need treatment.

Measurement-based approach: Use REW with a measurement microphone to capture your room’s actual frequency response at your listening position. This shows you not just the theoretical modes but how they interact with your specific speaker placement, existing treatment, and room furnishings — revealing the real problem frequencies, which may differ from calculated modes.

For most rectangular rooms, the worst modes fall between 40-120 Hz — anything below 40 Hz is usually felt more than heard and rarely needs treatment in home studios. Modes above 120 Hz are typically handled well by 4-6 inch porous corner traps.

Building A 100 Hz Helmholtz Trap

Here’s a practical example targeting 100 Hz — a common problem frequency in rooms around 11-12 feet long.

Target: 100 Hz resonant frequency

Design choices: – Cavity volume: 0.027 m³ (roughly 18” × 18” × 6” internal) – Slot width: 1 cm (0.01 m) – Slot length: 40 cm (0.4 m) — runs the full width of one panel – Panel thickness: 19 mm (3/4” MDF) – Effective port length: ~25 mm (with end corrections)

Verification: f = (343 / 6.28) × √(0.004 / (0.027 × 0.025)) = 54.6 × √(5.93) = 54.6 × 2.44 ≈ 133 Hz

To bring that down to 100 Hz, increase the cavity depth to 10 inches or widen the slot slightly. This is the iterative part of the design — adjust one variable at a time until the formula outputs your target frequency.

Assembly steps:

  1. Cut five MDF panels for the box (top, bottom, two sides, back). The front panel gets the slot.
  2. Cut the slot in the front panel — a straight 1 cm × 40 cm slot, centered vertically.
  3. Glue and screw the box together, leaving the front panel off.
  4. Line the inside back wall with 2-inch rigid fiberglass for internal damping.
  5. Seal every joint with acoustic caulk — any air leak changes the tuning or kills performance.
  6. Attach the slotted front panel with screws and seal the perimeter.
  7. Mount the finished trap against the wall at your problem area (corners or wall centers where the mode is strongest).

The internal damping material widens the absorption band slightly and prevents the resonator from “ringing” — oscillating for too long after the source stops. Without damping, a Helmholtz trap can actually make transient response worse by sustaining energy at its tuned frequency.

How To Make A Tuned Bass Trap

Methods for tuning a bass trap to target frequencies

Helmholtz resonators are one approach to making tuned bass traps, but membrane (diaphragmatic) traps offer an alternative tuning method that some DIY builders find simpler to construct.

A membrane trap uses a thin, flexible front panel (typically 1/8” or 3/16” plywood or MDF) mounted over a sealed cavity. The panel mass and cavity depth determine the resonant frequency, and the panel vibrates at that frequency, converting acoustic energy to heat through internal friction.

The membrane tuning formula is simpler: f = 60 / √(m × d), where m is the panel mass in kg/m² and d is the cavity depth in meters.

For example, a 3mm plywood panel (about 1.8 kg/m²) over a 10 cm deep cavity: f = 60 / √(1.8 × 0.1) = 60 / √0.18 = 60 / 0.424 ≈ 141 Hz. Deeper cavity or heavier panel lowers the frequency.

Membrane traps tend to have a slightly wider absorption band than Helmholtz resonators, making them more forgiving of construction tolerances. They’re also easier to build — no precision port cutting required, just a sealed box with a flexible front panel.

The choice between Helmholtz and membrane comes down to target frequency and bandwidth. Helmholtz traps reach lower frequencies more easily (below 60 Hz) with narrower, more precise targeting, while membrane traps work well in the 60-150 Hz range with moderate bandwidth.

Both types complement porous absorber bass traps rather than replacing them. The ideal room treatment pairs broadband porous absorption for general bass control with one or two tuned traps addressing specific stubborn modes identified through measurement.

The Bottom Line

Helmholtz resonator bass traps are precision tools for targeting specific low frequencies that porous bass traps can’t reach without impractical thickness. They work by using a sealed cavity and port to create a resonant system that absorbs energy at one tuned frequency.

Build one only after installing broadband porous treatment and measuring to identify remaining problem frequencies. The DIY build is accessible for anyone comfortable with basic woodworking, and the materials cost a fraction of commercial tuned absorbers.

For most home studios, the combination of corner-mounted porous traps plus one or two Helmholtz resonators for stubborn modes delivers professional-grade bass control without professional-grade pricing.

Frequently Asked Questions

How do you calculate Helmholtz resonator dimensions?

Use the formula f = (c/2π) × √(S/(V×L)), where c is the speed of sound (343 m/s), S is the port area, V is the cavity volume, and L is the effective port length. Adjust cavity volume, port size, or port length until the formula outputs your target frequency.

Can you build a Helmholtz bass trap from plywood?

Plywood works well for Helmholtz bass trap enclosures — 3/4-inch plywood provides sufficient rigidity and mass to prevent the walls from vibrating and changing the tuning. MDF is slightly better because it’s denser and more uniform, but plywood is easier to work with and performs nearly identically for this application.

What is the difference between a Helmholtz trap and a membrane trap?

Both are resonant absorbers that target specific frequencies, but they work differently — a Helmholtz trap uses a port (hole or slot) where air oscillates in and out of a sealed cavity, while a membrane trap uses a flexible front panel that vibrates over a sealed cavity. Helmholtz traps reach lower frequencies with narrower bandwidth, while membrane traps are easier to build and absorb across a slightly wider band.

How Many Types Of Bass Traps Are There — And Which One Fits Your Room?

How many types of bass traps are there — three main categories exist, but most people only ever encounter one of them, and picking the wrong type for your specific room problem is how good money gets wasted on treatment that doesn’t solve anything.

The three types are porous absorbers, resonant absorbers, and active bass traps. Each handles low-frequency energy through a completely different mechanism, targets different frequency ranges, and works best in different situations.

Porous absorbers are the workhorses you see in most studios — fiberglass panels, mineral wool chunks, and foam wedges stuffed into corners. Resonant absorbers are the precision tools tuned to specific problem frequencies, while active traps use electronics to cancel bass but remain expensive and rare outside professional facilities.

Below, you’ll see exactly how each type works, what frequencies it covers, and a clear decision framework for choosing the right one based on your room, budget, and the specific bass problems you’re trying to solve.

Quick Takeaway

There are three main types of bass traps: porous absorbers (broadband, most common), resonant absorbers (tuned to specific frequencies), and active bass traps (electronic cancellation). For most home studios and listening rooms, porous absorbers in 4-6 inch rigid fiberglass or mineral wool deliver the best results per dollar. Resonant absorbers add surgical precision for stubborn room modes that broadband treatment alone can’t tame.

How Many Types Of Bass Traps Are There — And Why Does It Matter?

Three main bass trap types compared

Understanding the different types of bass traps matters because each one solves a different aspect of the low-frequency problem. Buying the wrong type is like using a hammer when you need a screwdriver — the tool works fine, just not for your job.

Bass traps fall into three categories based on how they convert sound energy into heat or cancel it out. The distinction isn’t academic — it determines which frequencies get absorbed, how much space the trap requires, and whether it treats your room’s problems broadly or targets one specific frequency.

Most rooms benefit from starting with porous absorbers because they handle the widest frequency range for the least cost. Resonant absorbers come into play when measurement data shows a stubborn mode that porous treatment alone can’t flatten, and active traps remain a niche solution for high-budget facilities chasing the last few dB of perfection.

What Are Porous Absorber Bass Traps?

Porous absorber bass trap types

Porous absorbers are the most common type of bass trap and the one most people should start with. They work through velocity-based absorption — sound waves pass through the material’s tiny pores, and friction between the moving air and the pore walls converts acoustic energy into heat.

The key advantage of porous absorbers is broadband coverage — a single 4-inch rigid fiberglass panel absorbs everything from about 100 Hz up through the entire midrange and treble. One type of treatment handles bass problems, first reflection points, and general room liveliness simultaneously.

Panel-Style Porous Traps

Panel-style porous traps are flat rectangular panels made from rigid fiberglass (Owens Corning 703/705) or mineral wool (Rockwool). They mount on walls or straddle corners at a 45-degree angle, creating an air gap behind the panel that extends their low-frequency reach.

A 4-inch panel spanning a corner with 4-8 inches of air behind it absorbs meaningfully down to 80-100 Hz. Commercial versions from companies like GIK Acoustics and ATS Acoustics come pre-wrapped in fabric and ready to hang, while DIY builders can achieve identical acoustic performance at roughly half the cost.

A prebuilt option like the (4 Pack) Sound Absorption-Diffuse Corner Bass Trap Pulse shows what panel-style porous treatment looks like when you want real depth instead of a thin decorative foam wedge.

Superchunk Corner Traps

Superchunk traps fill an entire corner from floor to ceiling with stacked triangular wedges of rigid insulation. The name comes from the massive chunk of material — typically 24-inch right triangles cut from 2-inch batts and stacked alternating orientation.

The sheer depth of material (often 17+ inches from corner to face) gives superchunks absorption reaching down to 50-60 Hz. They’re the most effective porous absorber design for deep bass, but they consume significant room volume and only fit rooms where losing corner space is acceptable.

If you’re building them yourself, rigid stock like the Rockwool ComfortBoard 80 Rigid Stone Wool Insulation Board gives you the kind of dense mineral wool superchunks are built from once you cut and stack it into full-corner wedges.

For small rooms where superchunks would dominate the space, panel-style traps with air gaps offer a practical compromise between bass absorption depth and room footprint.

What Are Resonant Absorber Bass Traps?

Resonant absorber bass trap types

Resonant absorbers work through pressure-based absorption rather than velocity. Instead of letting sound pass through a porous material, they use a resonating element — a tuned cavity or a vibrating membrane — that oscillates at a specific frequency and dissipates that energy as heat.

The defining characteristic of resonant absorbers is narrow-band targeting. Where a porous absorber treats everything above its cutoff frequency, a resonant absorber focuses its absorption on a 20-40 Hz window centered on its tuning frequency.

Helmholtz Resonator Traps

Helmholtz resonators use a sealed cavity with a small port or neck opening. When sound at the resonant frequency hits the port, the air in the neck oscillates back and forth, and internal friction dissipates the energy.

The tuning frequency depends on the cavity volume, port diameter, and neck length. A well-built Helmholtz resonator can target frequencies as low as 30-40 Hz with high absorption at the tuned point — frequencies that would require impractically thick porous material to address.

The tradeoff is specificity — a Helmholtz trap tuned to 63 Hz absorbs strongly at 63 Hz but does almost nothing at 80 Hz or 50 Hz. You need to know exactly which frequency is your problem, which requires room measurement with software like REW (Room EQ Wizard).

A measurement mic like the miniDSP UMIK-1 USB Measurement Calibrated Microphone is what lets you find that exact problem frequency before you build or buy a tuned absorber.

Membrane (Diaphragmatic) Traps

Membrane traps — also called diaphragmatic absorbers — use a thin, flexible front panel (typically MDF or plywood) mounted over a sealed air cavity filled with absorption material. When bass energy hits the panel, it vibrates at its resonant frequency, and the internal absorption converts that mechanical energy to heat.

Membrane traps typically target the 40-100 Hz range depending on panel mass, cavity depth, and internal damping. They’re broader than Helmholtz resonators (absorbing across a wider band) but narrower than porous absorbers.

Professional studios sometimes use tuned membrane traps from companies like Real Traps or RPG to address specific room modes that broadband porous treatment can’t fully control. For most home studios, they’re overkill unless measurement data reveals a severe mode that thicker porous treatment can’t flatten.

How Do Active Bass Traps Work?

Active bass trap system for low-frequency control

Active bass traps use electronics — microphones, processors, and speakers — to cancel low-frequency energy in real time. A microphone detects the bass buildup in a corner, a DSP processor calculates the inverse waveform, and a speaker outputs the cancellation signal.

The concept is identical to noise-cancelling headphones, scaled up to room acoustics. Active traps can target frequencies as low as 20 Hz with precision that passive treatment can’t match, and they take up far less physical space than the porous equivalent.

The downsides are cost (professional active traps run $1,000-3,000+ per unit), complexity (they require calibration and power), and the fact that they only cancel bass at a specific zone rather than treating the entire room. Products like the PSI Audio AVAA C20 represent the current state of the art, but they’re primarily found in mastering studios and broadcast facilities.

For home studio budgets, passive porous absorbers deliver 80-90% of the improvement at a fraction of the cost. Active traps are a finishing tool, not a starting point.

Which Type Of Bass Trap Should You Choose?

Decision guide for choosing a bass trap type

The right type depends on three factors: your budget, your room’s specific problems, and how much space you can dedicate to treatment.

Start with porous absorbers if you haven’t treated your room yet. Prebuilt corner panels and DIY mineral-wool builds both work, but denser 4-inch fiberglass or mineral wool still absorb deeper bass than entry-level foam.

Either way, corner-mounted porous absorbers solve the majority of room acoustic problems.

Add resonant absorbers only after measuring your room with porous treatment installed. If a specific frequency still shows a severe peak (10+ dB above the average), a Helmholtz resonator or membrane trap tuned to that frequency adds the surgical precision porous absorbers can’t provide.

Consider active traps only if you’re building a professional mastering or broadcast room with the budget to match. They’re the most effective tool for deep bass control but unnecessary for home studios, project studios, and home theaters.

The 80/20 rule applies strongly here: porous absorbers in your room’s corners deliver 80% of the total improvement. Proper placement matters more than trap type for most people — four well-placed porous corner traps outperform a single expensive resonant absorber in the wrong spot.

The Bottom Line

Three types of bass traps exist — porous absorbers, resonant absorbers, and active traps — and each serves a distinct role in acoustic treatment. Porous absorbers handle broadband bass problems, resonant absorbers target specific stubborn frequencies, and active traps provide electronic precision at premium cost.

For most rooms where bass traps are necessary, start with 4-inch porous absorbers in the corners. Measure after installation, and only add resonant or active treatment if measurement data shows specific problems that broadband absorption can’t solve.

Frequently Asked Questions

What are the different types of bass traps?

The three main types are porous absorbers (fiberglass, mineral wool, foam — broadband absorption), resonant absorbers (Helmholtz resonators and membrane traps — tuned to specific frequencies), and active bass traps (electronic systems that cancel bass using inverse waveforms).

What is the best shape for a bass trap?

Triangular wedges that fit into corners are the most effective shape because they place absorption material where bass pressure is highest. Superchunk configurations — stacked triangles filling the entire corner — provide the deepest bass absorption of any porous design.

How much of a difference do bass traps make?

Bass traps typically reduce room mode peaks by 6-15 dB, which is a dramatic improvement in bass accuracy. The difference between an untreated room and one with four corner bass traps is immediately audible — tighter, more even bass with less boominess and fewer dead spots.

How thick should bass traps be?

For porous absorbers, 4 inches is the minimum recommended thickness for meaningful bass absorption. Six inches reaches lower frequencies, and superchunk fills (17+ inches deep) provide the deepest broadband absorption available from porous materials.

What Frequencies Does A Bass Trap Absorb — And How Low Can They Really Go?

What frequencies does a bass trap absorb — typically 20 to 300 Hz for porous types, but the exact range depends entirely on the trap’s design, thickness, and material density, and most budget traps don’t reach nearly as low as their marketing claims suggest.

Bass traps target the frequency range where room acoustics cause the most damage. Standing waves, modal buildup, and boomy corners all live in the low end, and without absorption tuned to those frequencies, your room distorts everything you hear below about 300 Hz.

Understanding which frequencies your traps actually absorb — not just which frequencies they claim to absorb — is the difference between solving your room’s problems and wasting money on treatment that looks good but doesn’t reach the frequencies causing trouble.

Below, this guide breaks down the absorption ranges for every major trap type, how thickness determines the lowest frequency a trap can handle, why corners matter so much, and whether foam or rockwool delivers better low-end performance.

Quick Takeaway

Porous bass traps (fiberglass, mineral wool) absorb broadly from about 80–300 Hz and above, with thicker panels reaching lower. Resonant traps (Helmholtz, membrane) target narrow frequency bands as low as 30–60 Hz. Foam traps typically only absorb effectively above 250 Hz. For most home studios, 4-inch rigid fiberglass corner traps cover the critical range where room modes cause the worst problems.

What Frequencies Does A Bass Trap Absorb — And Why Does It Matter?

Frequency range chart for bass trap absorption

The term “bass” in acoustics covers roughly 20 to 300 Hz — the range where bass traps do their work. But not every bass trap absorbs the full range equally, and that distinction matters more than most people realize.

Room modes — the standing waves created by sound bouncing between parallel surfaces — concentrate in the 30–200 Hz range for typical rooms. A 15-foot room has its fundamental axial mode at about 37 Hz, with harmonics at 74 Hz and 111 Hz stacking on top of each other.

The frequencies your bass traps need to absorb depend on your room’s dimensions and the problems you’re trying to solve. A small bedroom studio might have its worst mode at 90 Hz, while a larger control room battles issues down at 40 Hz.

What Frequency Range Do Different Bass Trap Types Cover?

Bass trap type comparison by frequency range

The two main categories of bass traps — porous absorbers and resonant absorbers — handle frequencies in fundamentally different ways, and choosing between them depends on whether you need broadband treatment or surgical precision.

Porous Absorber Frequency Response

Porous absorbers (rigid fiberglass like Owens Corning 703/705, mineral wool like Rockwool, and dense foam) work by converting sound energy into heat as air molecules vibrate through the material’s tiny pores. They absorb across a wide frequency range — broadband — with effectiveness determined primarily by thickness.

A 2-inch porous panel absorbs well from about 500 Hz up but drops off sharply below 250 Hz. A 4-inch panel extends meaningful absorption down to roughly 100–125 Hz, while a 6-inch panel or superchunk (triangle filling an entire corner) reaches 60–80 Hz with useful absorption.

A prebuilt example like the ATS Acoustics Corner Bass Trap, Low Frequency Range shows what real depth looks like in practice: the thicker the trap, the lower it can absorb.

The key principle: a porous absorber needs to be at least one-quarter of the target wavelength thick to absorb that frequency effectively. At 100 Hz, the wavelength is about 11 feet — so quarter-wavelength is roughly 34 inches, which is why thin panels can’t touch deep bass.

Resonant Absorber Frequency Targeting

Resonant absorbers — Helmholtz resonators and membrane (diaphragmatic) traps — work on a completely different principle. Instead of absorbing broadly, they’re tuned to resonate at specific frequencies, absorbing energy in a narrow band centered on that tuning frequency.

A well-designed Helmholtz resonator can target frequencies as low as 30–40 Hz with high absorption at the tuned frequency. Membrane traps use a vibrating panel over a sealed air cavity and typically target 40–100 Hz depending on the panel mass and cavity depth.

The tradeoff is precision versus coverage. Resonant absorbers hit their target frequency hard but don’t help much outside a 20–30 Hz window around that center point, while porous absorbers handle everything from their low cutoff through the entire midrange.

How Does Thickness Affect Frequency Absorption?

Relationship between bass trap thickness and absorbed frequency

Thickness is the single most important variable in determining how low a porous bass trap can absorb. The physics is simple — thicker material interacts with longer wavelengths.

The quarter-wavelength rule gives you a practical shortcut: divide the speed of sound (1,130 feet/second) by four times the target frequency to get the minimum thickness needed. For 100 Hz, that’s 1,130 ÷ 400 = about 2.8 feet — nearly 34 inches of material depth.

That sounds impractical, and it is for flat wall panels. Corner mounting solves this because placing a trap across a corner creates an air gap behind it that effectively doubles the acoustic thickness.

A 4-inch panel mounted across a corner with 8 inches of air behind it behaves closer to a 12-inch absorber.

Here’s how common thicknesses perform in practice:

  • 2-inch foam or fiberglass — Effective above 250–500 Hz, handles mids and highs but doesn’t meaningfully absorb bass.
  • 4-inch rigid fiberglass/mineral wool — Effective down to 100–125 Hz when corner-mounted with an air gap, the practical sweet spot for most small studio rooms.
  • 6-inch rigid fiberglass — Reaches 60–80 Hz corner-mounted with excellent broadband performance.
  • Superchunk (full corner fill) — Fills the entire tri-corner with insulation. Reaches 50–70 Hz depending on density and corner dimensions.

That 4-inch range is the practical starting point for home studios that need real low-end control without building full superchunks.

If you’re building traps yourself, a pack like the 8 Pcs Rockwool Mineral Wool Insulation Board gives you the raw material to stack depth and actually chase the 80–125 Hz range instead of stopping at upper mids.

The right thickness for your setup depends on which frequencies your room measurements show as problematic. Treating a 90 Hz mode doesn’t require the same depth as treating a 45 Hz mode.

Why Do 90-Degree Corners Trap Bass Frequencies?

Corner pressure zones where bass traps are most effective

Bass energy accumulates in corners because of how sound waves interact with room boundaries. This isn’t a coincidence of room design — it’s physics that applies to every rectangular room.

When a sound wave hits a wall, the air molecules at the boundary can’t move — they’re blocked by the surface. This creates a pressure maximum at the wall, where the wave’s energy converts from velocity (moving air) to pressure (compressed air).

Where two walls meet at 90 degrees, two boundary pressure maxima overlap, creating even higher pressure. Where three surfaces meet (wall-wall-ceiling or wall-wall-floor), three pressure maxima stack, creating the highest bass energy concentration anywhere in the room.

This is exactly why bass trap placement in corners delivers the most absorption per square foot. A trap in a tri-corner intercepts the highest concentration of bass energy, making it dramatically more effective than the same trap flat on a wall center.

For room modes specifically, the corners are where every axial mode has its maximum pressure regardless of frequency. Whether it’s a 40 Hz fundamental or a 120 Hz harmonic, the corners always see the highest pressure — which is why even a few corner traps make such a large difference.

Foam vs Rockwool — Which Absorbs Lower Frequencies?

Foam and Rockwool compared for low-frequency absorption

Rockwool (mineral wool) absorbs significantly lower frequencies than foam at the same thickness, and the reason comes down to density and airflow resistance.

Standard acoustic foam has a density around 1–2 lbs per cubic foot. Rockwool (like Roxul Safe’n’Sound or Rockwool ComfortBatt) runs 2.5–4 lbs per cubic foot, while rigid fiberglass panels (Owens Corning 703) sit around 3 lbs per cubic foot.

Higher density means more friction when air molecules vibrate through the material, which translates to more energy converted to heat — especially at lower frequencies where the air displacement is larger.

At 4 inches thick in a corner mount, here’s the practical comparison:

  • Acoustic foam — NRC drops below 0.5 at 125 Hz and becomes negligible below 100 Hz, with an effective range of roughly 250 Hz and up.
  • Rockwool/mineral wool — Maintains NRC above 0.6 at 125 Hz and still provides useful absorption at 80 Hz, extending the effective range to roughly 80–100 Hz.
  • Rigid fiberglass (703) — Similar to rockwool performance, sometimes slightly better at the lowest frequencies due to optimized fiber structure.

For bass traps specifically, the right material choice is rigid fiberglass or mineral wool — not foam. Foam bass traps marketed as “corner traps” work as mid-frequency absorbers, but they don’t reach the frequencies where actual bass problems live.

A foam set like the Acoustic Corner Bass Traps 4 Pack can still clean up 250–500 Hz muddiness and fluttery low mids in corners, but it is not a substitute for dense mineral wool when the problem lives below 125 Hz.

The Bottom Line

Bass traps absorb frequencies from roughly 20 to 300 Hz, but the specific range depends on trap type, thickness, and material. Porous absorbers handle the broadest range and reach lower with more depth, while resonant absorbers target narrow problem frequencies with surgical precision.

For most rooms, 4-inch mineral wool or rigid fiberglass in the corners covers the 80–300 Hz range where the biggest room problems live. If your room has severe modes below 80 Hz, you’ll need either thicker porous treatment or a tuned resonant absorber for that specific frequency.

Frequently Asked Questions

What is the lowest frequency a bass trap can absorb?

Tuned resonant absorbers (Helmholtz resonators and membrane traps) can target frequencies as low as 20–30 Hz. Porous absorbers in superchunk corner configurations typically reach down to about 50–60 Hz with meaningful absorption, while standard 4-inch panels bottom out around 100 Hz.

Do bass traps only work on bass frequencies?

Porous bass traps absorb across a broad frequency range — everything from their low-frequency cutoff through the entire midrange and high end. A 4-inch fiberglass panel absorbs bass, midrange, and treble simultaneously, which is why they’re called broadband absorbers.

Is rockwool good for bass traps?

Rockwool is one of the best materials for DIY bass traps. Its density (2.5–4 lbs/ft³) provides effective low-frequency absorption, it’s easy to work with for DIY builds, fire-resistant, and significantly cheaper than pre-made acoustic panels while delivering comparable or better performance.

Are Bass Traps Necessary — Or Can You Get Away Without Them?

Are bass traps necessary — yes, but only if you care about accurate sound in any enclosed space, and skipping them is the single biggest acoustic treatment mistake people make in home studios, listening rooms, and home theaters.

Every room has bass problems caused by its own geometry. Low frequencies bounce between walls and pile up in corners, creating spots where bass booms out of control and other spots where it nearly vanishes.

Bass traps absorb that excess energy so your room stops lying to you about what the bass actually sounds like. The difference between a treated and untreated room isn’t subtle — it’s the difference between guessing at your mix and hearing it accurately.

Below, this guide helps you figure out whether your specific room needs bass traps, what happens if you skip them, whether vocal booths need them, and what the realistic alternatives look like.

Quick Takeaway

Bass traps are necessary for any room where accurate listening matters — recording studios, mix rooms, home theaters, and critical listening spaces. Without them, room modes create uneven bass response that no amount of EQ or speaker repositioning fully fixes. Start with porous absorber traps in the corners where walls meet, and you’ll hear the improvement immediately.

Are Bass Traps Necessary — And Why Does It Matter?

Untreated room showing common bass problems

The question isn’t really whether bass traps work — they absolutely do. The real question is whether your room’s bass problems are bad enough to justify the investment.

The short answer: if you’re doing anything that requires accurate sound — mixing music, mastering, critical listening, or even watching movies where you want consistent bass across multiple seats — then yes, bass traps are necessary. Room modes exist in every enclosed rectangular space, and they distort your perception of bass frequencies whether you realize it or not.

The longer answer depends on what you’re doing. A casual podcast recording in a treated vocal booth may not need dedicated bass trapping, and a bedroom producer mixing on headphones 90% of the time has different priorities than someone mixing on studio monitors in a dedicated room.

But if you’re making decisions based on what you hear from speakers in a room, untreated bass is actively working against you.

How Do You Know If You Need Bass Traps?

Room bass testing setup for deciding if bass traps are needed

Before spending money, run a few quick tests that tell you exactly how bad your room’s bass problems are.

Play a bass frequency sweep (20-200 Hz) through your monitors at moderate volume and walk slowly around the room while it plays. If the bass gets dramatically louder in corners and near walls, then drops when you move toward the center, you’re hearing room modes in action.

Try the clap test — stand in the center of your room and clap once, hard. If you hear a low-frequency ring or sustained rumble after the clap, that’s modal energy decaying slowly because nothing in the room is absorbing it.

A more precise approach: use a free room analysis tool like REW (Room EQ Wizard) with a calibrated USB mic such as the miniDSP UMIK-1 USB Measurement Calibrated Microphone. It shows you exactly which frequencies are boosted or cut at your listening position, and by how much.

If your measurements show peaks and dips of 10 dB or more in the bass range, bass traps will make a dramatic difference. Even 6 dB swings are worth treating if you’re mixing or mastering.

The bottom line on testing: if any of these methods reveal uneven bass in your room, the right number of traps placed in the right corners solves most of the problem.

What Happens If You Skip Bass Traps?

Before-and-after comparison of bass treatment results

Skipping bass traps doesn’t mean your room sounds “a little off.” It means your room is actively distorting the bass frequencies you hear, and every decision you make based on that distorted sound carries the error forward.

Signs Your Room Has Bass Problems

The most obvious sign is inconsistent bass — a track sounds bass-heavy at your desk but thin when you stand up or move two feet to the side. That’s a standing wave creating a pressure zone at your listening position.

Mixes that sound great in your room but fall apart on car speakers, headphones, or other systems are another red flag. You’re compensating for what your room adds or subtracts, and those compensations become errors everywhere else.

Vocal recordings that sound muddy or boomy even with a good microphone and pop filter often trace back to low-frequency buildup in the recording space. The mic captures everything the room is doing, including the modal resonances you might not consciously notice.

Headphone mixes that translate perfectly everywhere except your monitors are another telltale sign. Your headphones bypass the room entirely, so when the monitor version sounds different, the room is the variable — not your mix decisions.

Even a few well-placed traps in two or four corners eliminate the worst of these problems. DIY builds based on Rockboard 60 Mineral Wool Rigid Acoustic Insulation Board are one of the most cost-effective ways to get there. The improvement from zero treatment to basic corner trapping is the single biggest jump in room accuracy you can make.

Are Bass Traps Necessary For A Vocal Booth?

Vocal booth setup using bass traps

Vocal booths present a counterintuitive problem — because they’re small, their room modes are actually at higher frequencies than a large room, which means bass buildup happens in a range that directly affects the human voice.

A typical 4×6-foot vocal booth has its fundamental axial mode around 94 Hz and harmonics at 188 Hz and 282 Hz. That 188 Hz harmonic sits right in the low-mid range where male voices carry warmth and weight.

Without bass trapping, that booth resonates at those frequencies and adds a boxy, boomy quality to every vocal recording. You can high-pass filter it out later, but that also removes the natural chest resonance that makes a vocal sound full and present.

The fix is simple: 4-inch thick porous absorber panels in at least two corners of the booth. Even in a space that small, corner trapping smooths out the modal response and gives you cleaner vocal takes that need less corrective EQ.

For budget builds, a foam pack like the 12 Pack Bass Traps Corner Acoustic Foam fits easily into booth corners and gives you enough pieces to treat multiple tri-corners without building a full custom set.

What Are The Alternatives To Bass Traps?

Alternatives to bass traps for low-frequency control

Several alternatives get mentioned in forums and Reddit threads, and while some have merit, none fully replace what bass traps do.

EQ correction software (like Sonarworks Reference or IK Multimedia ARC) measures your room’s frequency response and applies inverse EQ to flatten it digitally. This works at your exact measurement point but doesn’t fix the room — move your head six inches and the correction falls apart.

EQ correction also can’t fix nulls (frequency dips) because boosting a null just adds energy the room immediately cancels.

Speaker repositioning using the 38% rule (placing your listening position 38% of the room’s length from the front wall) can minimize the worst modal peaks at your ears. This helps, but it only addresses what you hear at one position — the modes still exist everywhere else.

Furniture and soft furnishings absorb some high-frequency reflections but have almost zero effect on bass. A couch doesn’t absorb 80 Hz — the wavelength is over 14 feet long and passes right through fabric and foam cushions.

A little foam in obvious corners can take the edge off boxiness, but that’s still partial treatment rather than a true replacement for bass traps.

Once you move to denser mineral wool or fiberglass and thicker corner coverage, you’re no longer using an alternative at all — you’re simply building more effective bass traps.

The honest conclusion: alternatives can complement bass traps, but none replace them. EQ correction plus bass traps is better than either alone, and proper placement with the right materials solves what software and furniture simply cannot.

The Bottom Line

Bass traps are necessary for any room where you need to trust what you hear. The physics of enclosed spaces guarantees bass problems, and no amount of software correction or furniture rearrangement eliminates what physical absorption solves.

Start with two to four porous absorber bass traps in the corners where your walls meet the ceiling, as thick as your space allows. That single step delivers the largest improvement in room accuracy per dollar spent.

Frequently Asked Questions

What do corner bass traps do?

Corner bass traps absorb low-frequency sound energy that accumulates where two or three room surfaces meet. Corners see the highest bass pressure because multiple room modes converge at those points, making them the most effective placement for any type of bass absorption.

Do foam corner bass traps work?

Foam corner bass traps work for frequencies above about 250 Hz, which helps with muddiness and boxiness. They’re less effective below 200 Hz compared to rigid fiberglass or mineral wool traps, so they’re a good starting point but not a complete solution for deep bass problems.

Do home theaters need bass traps?

Home theaters benefit significantly from bass traps because movie soundtracks rely heavily on deep bass effects. Without treatment, the bass response varies wildly between seats — one spot booms while another sounds thin.

Even in small rooms, corner bass traps smooth out the response so every seat gets consistent, impactful bass.