Best MIDI Keyboard for FL Studio — 6 Controllers Tested With Fruity Loops

Best MIDI keyboard for FL Studio is not just about finding a good controller — it is about finding one that speaks FL Studio’s language without forcing you to manually map every knob, pad, and fader.

The problem most FL Studio producers hit is buying a generic MIDI keyboard that works but does not integrate. You plug it in, the keys play notes, and that is where the magic stops. The channel rack, mixer, and piano roll sit untouched because the controller has no idea how FL Studio organizes its workflow.

Native integration changes everything. A controller built for FL Studio maps its controls to the channel rack, mixer faders, and transport automatically — so you spend time making beats instead of configuring MIDI learn assignments.

Below you will find 6 controllers ranked by how well they work specifically with FL Studio, from the purpose-built Novation FLkey to budget options that still get the job done.

Quick Takeaway

The best MIDI keyboard for FL Studio is the Novation FLkey Mini — it is the only controller with native FL Studio integration that maps the channel rack, mixer, and piano roll automatically. If you want more keys or multi-DAW flexibility, the Akai MPK Mini MK3 and M-AUDIO Keystation 49 MK3 both work well with FL Studio through manual MIDI learn setup.

Why FL Studio Needs A Different Approach

FL Studio workflow with a MIDI controller

FL Studio’s workflow is fundamentally different from Ableton, Logic, or Cubase. Understanding those differences explains why some controllers excel here and others feel like they are fighting the software.

The Channel Rack Changes Everything

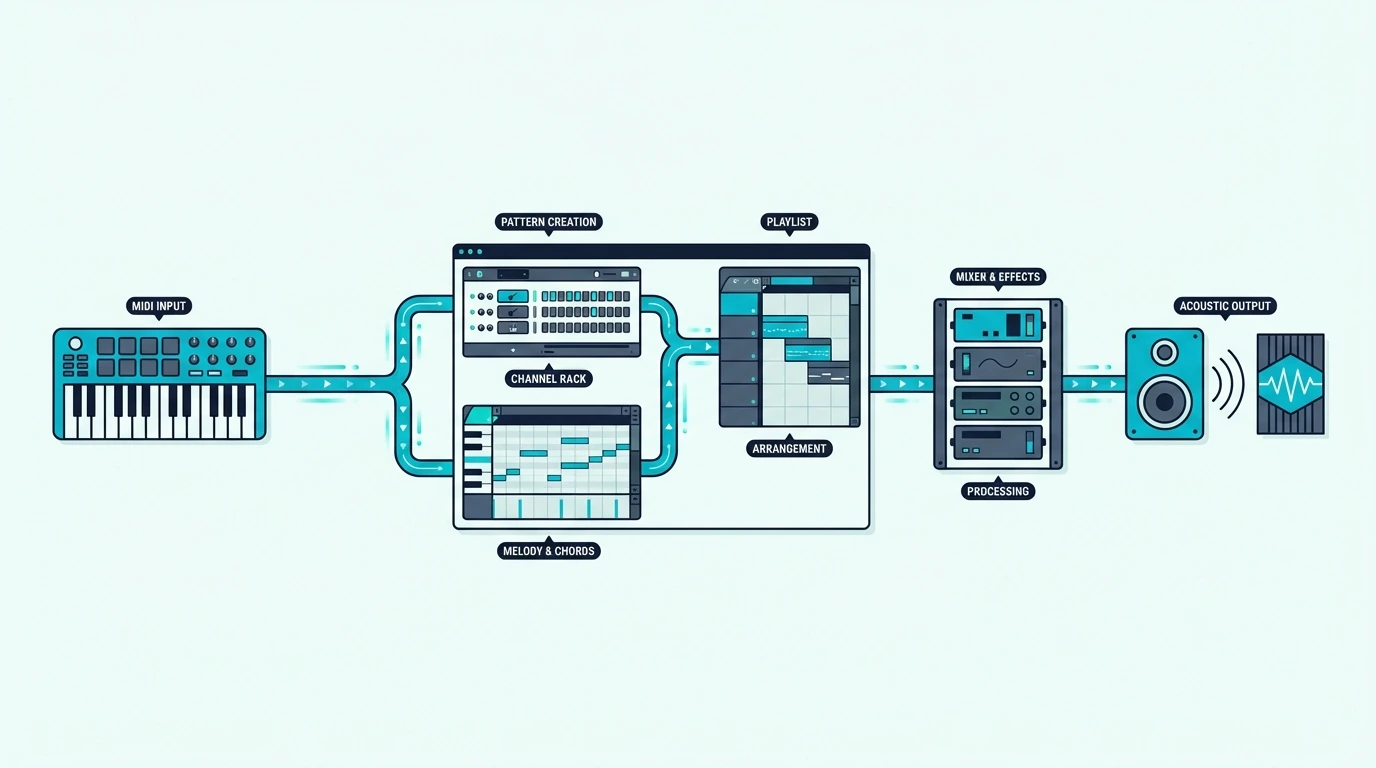
FL Studio organizes instruments in a channel rack — a vertical list where each row is a different sound (kick, snare, hi-hat, synth lead). Most DAWs organize by horizontal tracks. That architectural difference means a controller designed for track-based DAWs misses FL Studio’s primary navigation structure entirely.

A controller with native FL Studio integration maps its pads directly to channel rack slots. Press pad 1 and it triggers the kick. Press pad 5 and it fires the synth. That direct connection eliminates the mouse-clicking that slows down pattern creation.

Pattern-Based Production

FL Studio builds songs from patterns, not linear arrangements. You create a 4-bar drum pattern, a separate bass pattern, a separate melody pattern, then arrange them in the playlist. Controllers that understand this workflow let you switch between patterns from hardware.

Generic controllers treat FL Studio like any other DAW — they send note data and nothing else. The pattern and channel rack features that define FL Studio’s speed advantage go completely unused.

Piano Roll Integration

FL Studio’s piano roll is arguably the most powerful MIDI editor in any DAW. Ghost notes, slide notes, per-note automation, and scale highlighting make complex programming fast — but only if your controller feeds velocity and aftertouch data accurately.

Controllers with poor velocity curves compress your dynamics, making every note feel the same. The picks below all deliver usable velocity response that takes advantage of FL Studio’s expressive piano roll.

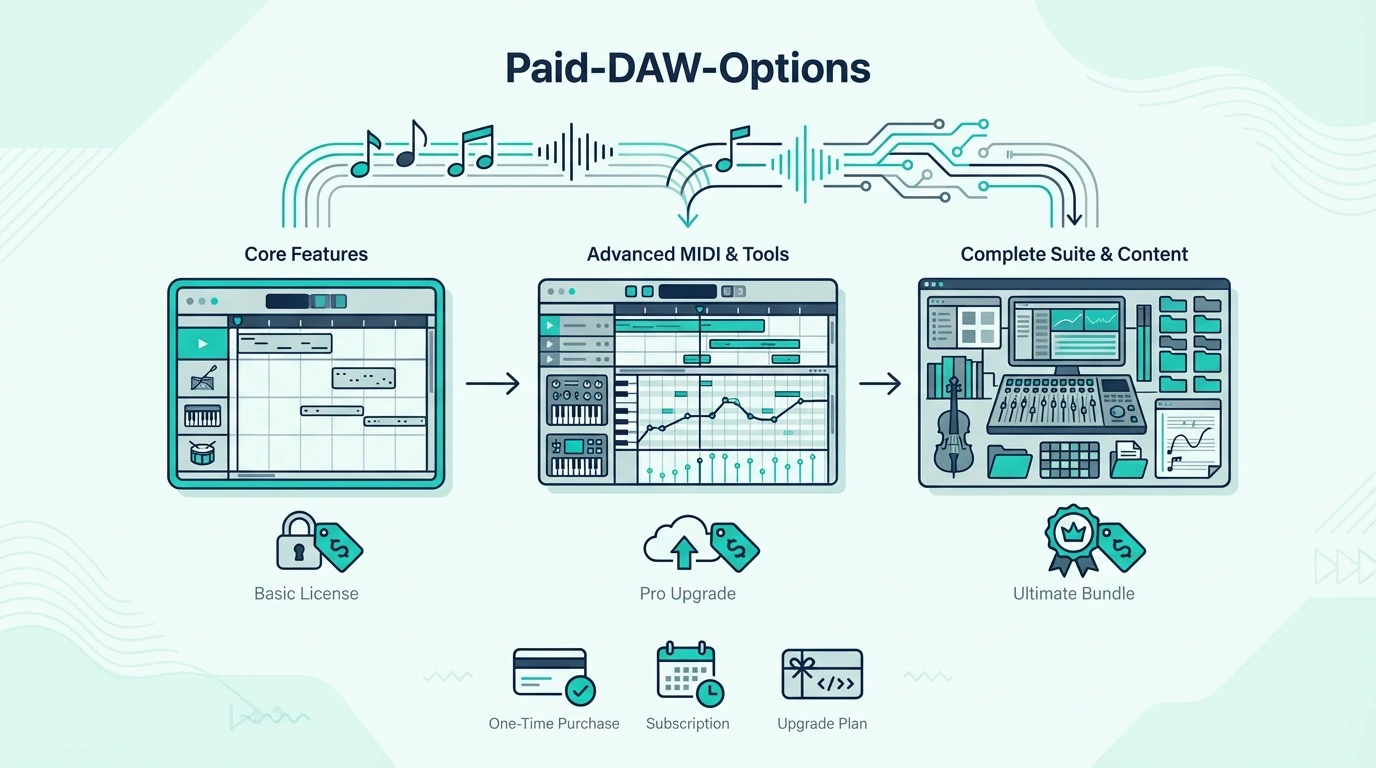
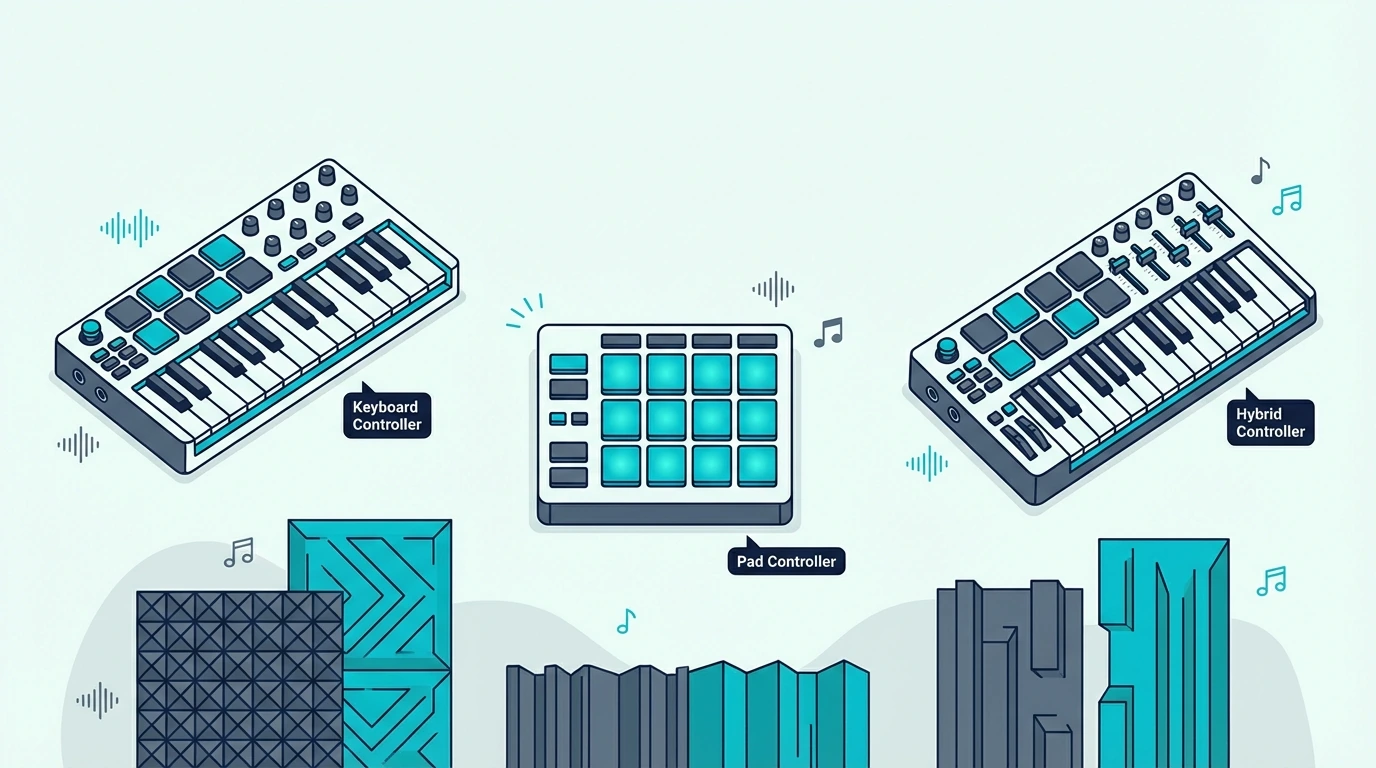
Which MIDI Keyboards Work Best With FL Studio

Top MIDI controller picks for FL Studio

Here are 6 controllers ranked by FL Studio compatibility, from purpose-built to budget-friendly.

The Novation FLkey Mini is the only controller built specifically for FL Studio. Plug it in and the pads map to the channel rack, the knobs control the mixer, and the keys play whichever instrument is selected — zero configuration required. The 4.7-star rating across 1,155 reviews confirms that the native integration works as advertised.

The Akai Professional MPK Mini MK3 costs twenty dollars less and works with every DAW — not just FL Studio. You lose native channel rack integration, but the 8 MPC-style pads and 8 knobs still map to FL Studio through MIDI learn. If you might switch DAWs later, this flexibility justifies the manual setup time.

For producers who need two-handed playing range, the M-AUDIO Keystation 49 MK3 delivers 49 synth-action keys with transport controls that work in FL Studio for play, stop, and record. The full-size keys make chord progressions and melody work significantly more comfortable than any 25-key mini controller.

The Nektar SE49 gives you 49 full-size keys for under eighty dollars — the cheapest way to get full-range playing in FL Studio. Nektar’s DAW integration software handles basic mapping automatically.

The M-VAVE 25 Key MIDI Controller adds Bluetooth connectivity for FL Studio Mobile on tablets and phones. USB mode works with desktop FL Studio for latency-critical recording.

And the midiplus AKM320 gets you playing in FL Studio for under forty dollars. No pads or knobs, but FL Studio’s built-in FPC plugin handles drum triggering from the keyboard if you map it through MIDI learn.

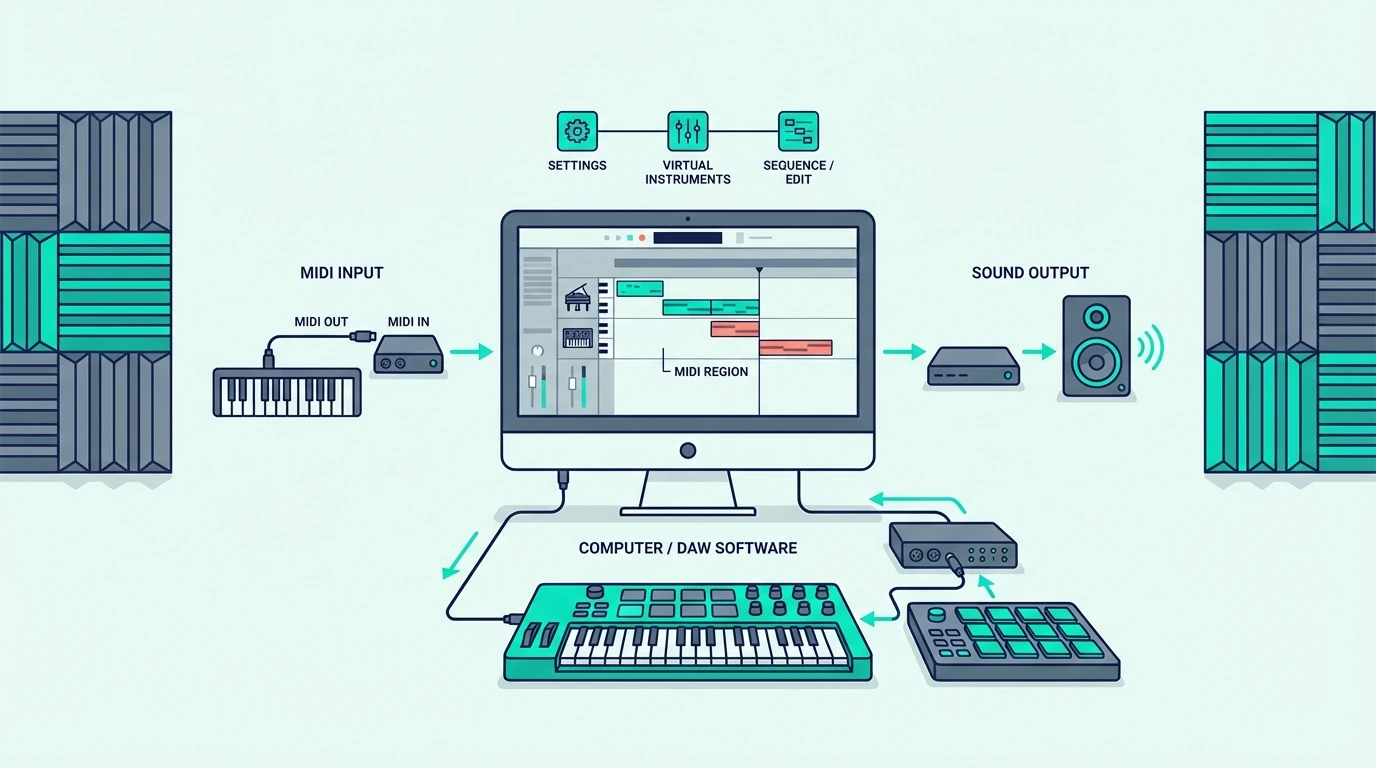
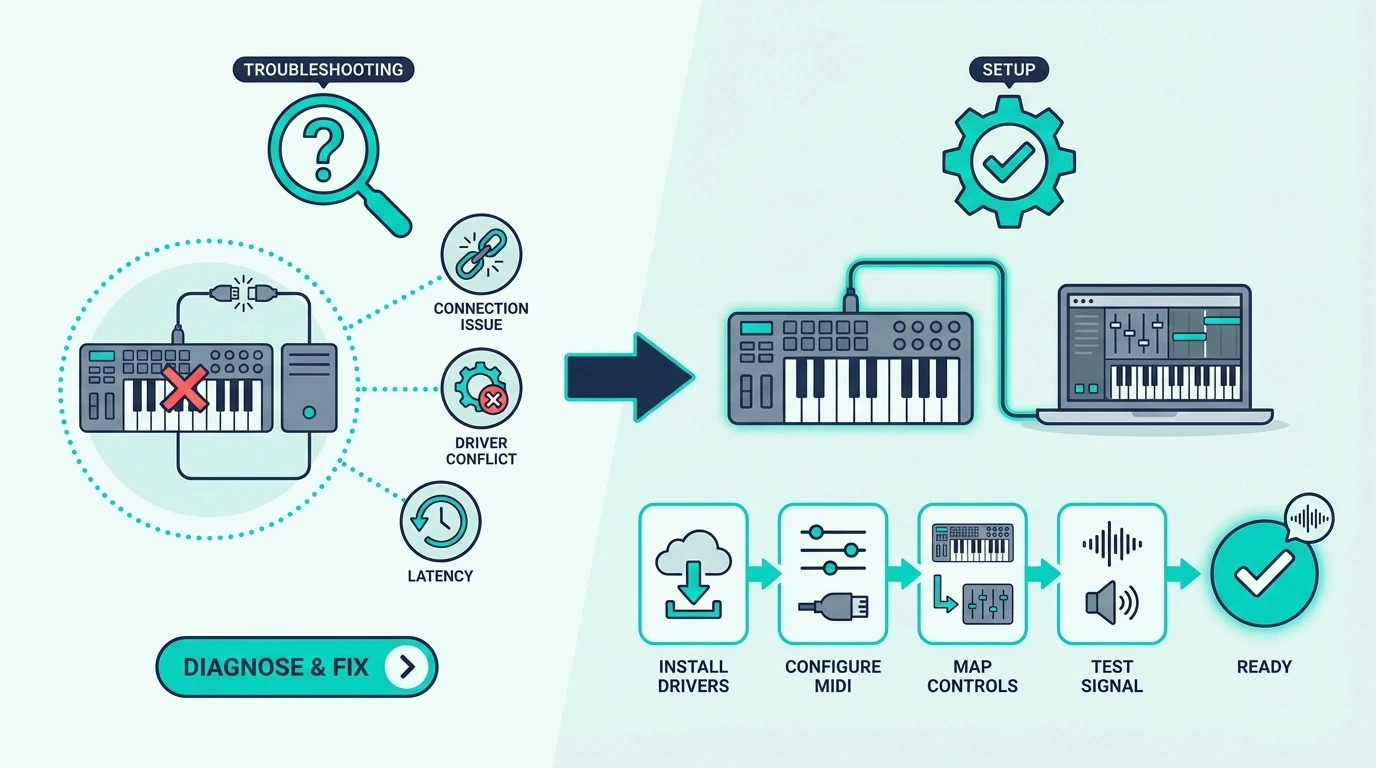
How To Set Up Any MIDI Keyboard In FL Studio

FL Studio MIDI controller setup guide

FL Studio recognizes most USB MIDI keyboards instantly, but getting the most out of your controller requires a few configuration steps.

Basic Setup (All Controllers)

Open FL Studio, go to Options, then MIDI Settings. Your controller should appear in the input list.

Click Enable on your controller’s entry and close the settings window. Select any channel in the channel rack and press a key on your controller.

If you hear sound, the basic setup is complete. FL Studio routes MIDI input to whichever channel is currently selected.

MIDI Learn For Knobs And Faders

Right-click any knob or fader in FL Studio and select “Link to controller.” Then twist the knob or move the fader on your MIDI keyboard.

FL Studio captures the MIDI CC message and creates a permanent link between your hardware control and the software parameter. This process takes about 30 seconds per knob.

For an 8-knob controller like the MPK Mini MK3, plan 4 minutes of one-time setup to map the controls you use most — typically mixer volume, pan, and a few effect sends. The mappings save with your FL Studio template, so you configure once and never touch it again.

FLkey Native Integration (Novation Only)

The Novation FLkey series skips all manual setup. Plug in via USB, and the controller automatically maps pads to the channel rack, knobs to the mixer, and transport buttons to FL Studio’s playback controls.

The integration extends to the piano roll — scale mode highlights only the notes in your chosen scale. That feature alone prevents wrong notes during live recording sessions.

No other controller manufacturer offers this level of FL Studio-specific integration. If FL Studio is your permanent DAW, the FLkey’s native mapping saves hours of configuration compared to any generic controller.

Velocity Curve Adjustment

FL Studio lets you adjust the velocity curve for any MIDI controller through the MIDI Settings panel. If your keyboard feels too sensitive or too stiff, the velocity curve slider compensates without requiring hardware changes.

Most budget MIDI keyboards benefit from a slight curve adjustment. Lowering the curve makes soft notes easier to trigger, while raising it gives you more dynamic range for expressive playing.

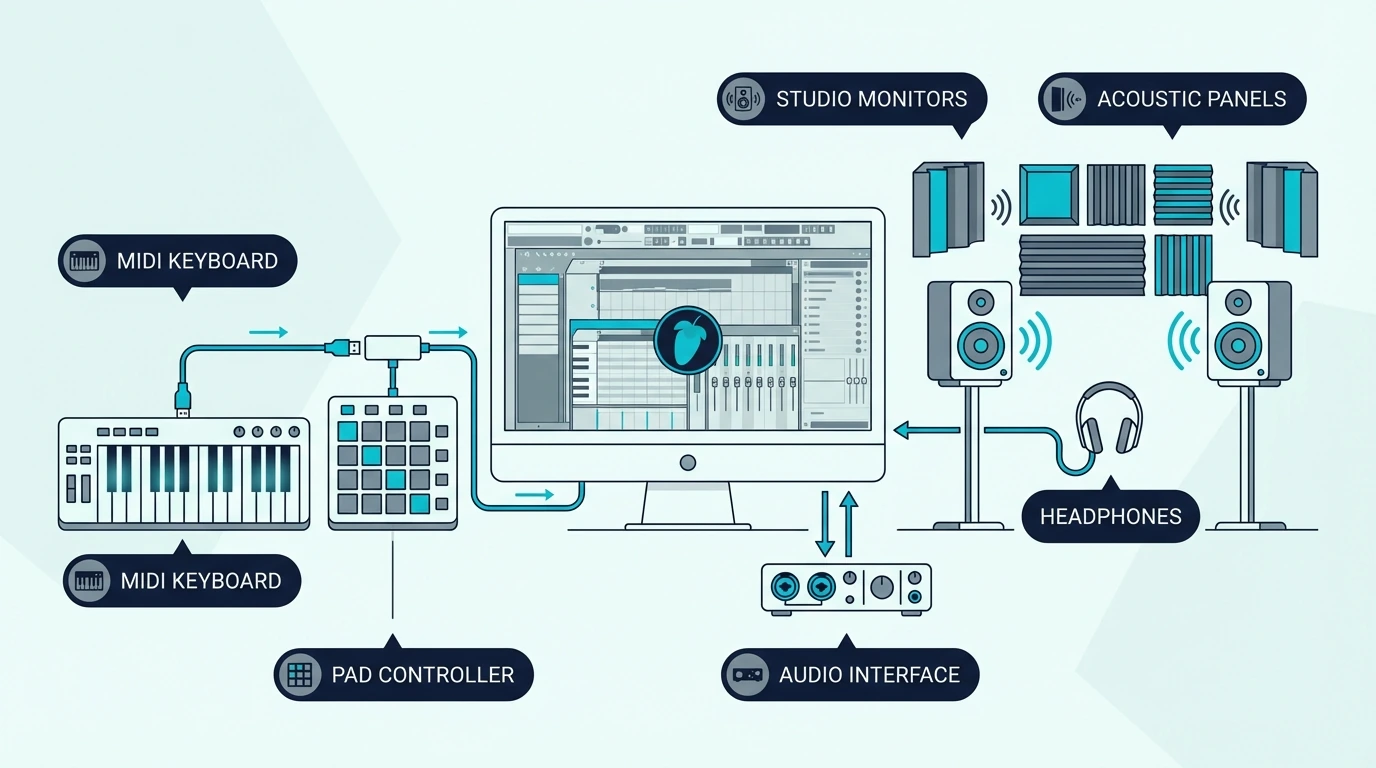
Multi-Controller Setups

FL Studio supports multiple MIDI controllers simultaneously. A common setup pairs a 25-key controller with pads for beat making alongside a 61-key controller for melody and chord work.

Each controller gets its own MIDI port assignment in the settings. FL Studio treats them as independent input devices, so you can play keys on one while triggering samples on the other without any conflict.

The Bottom Line

The Novation FLkey Mini is the clear winner for dedicated FL Studio producers — native channel rack and mixer integration eliminates the manual mapping that every other controller requires. If you want multi-DAW flexibility alongside solid FL Studio performance, the Akai MPK Mini MK3 at ninety-nine dollars is the safer long-term investment.

Budget producers can start with the midiplus AKM320 and upgrade later when FL Studio becomes the center of their workflow.

Frequently Asked Questions

What is the best MIDI keyboard for FL Studio on a budget?

The Nektar SE49 at seventy-nine dollars gives you 49 full-size keys with DAW integration — the most key range per dollar for FL Studio producers. For even tighter budgets, the midiplus AKM320 at under forty dollars handles basic melody and chord input.

Do I need a MIDI keyboard specifically designed for FL Studio?

No — any USB MIDI keyboard works with FL Studio through the built-in MIDI learn system. The Novation FLkey series adds native integration that saves setup time, but it is a convenience feature rather than a requirement. The Akai MPK Mini MK3 works perfectly in FL Studio with a few minutes of MIDI learn configuration.

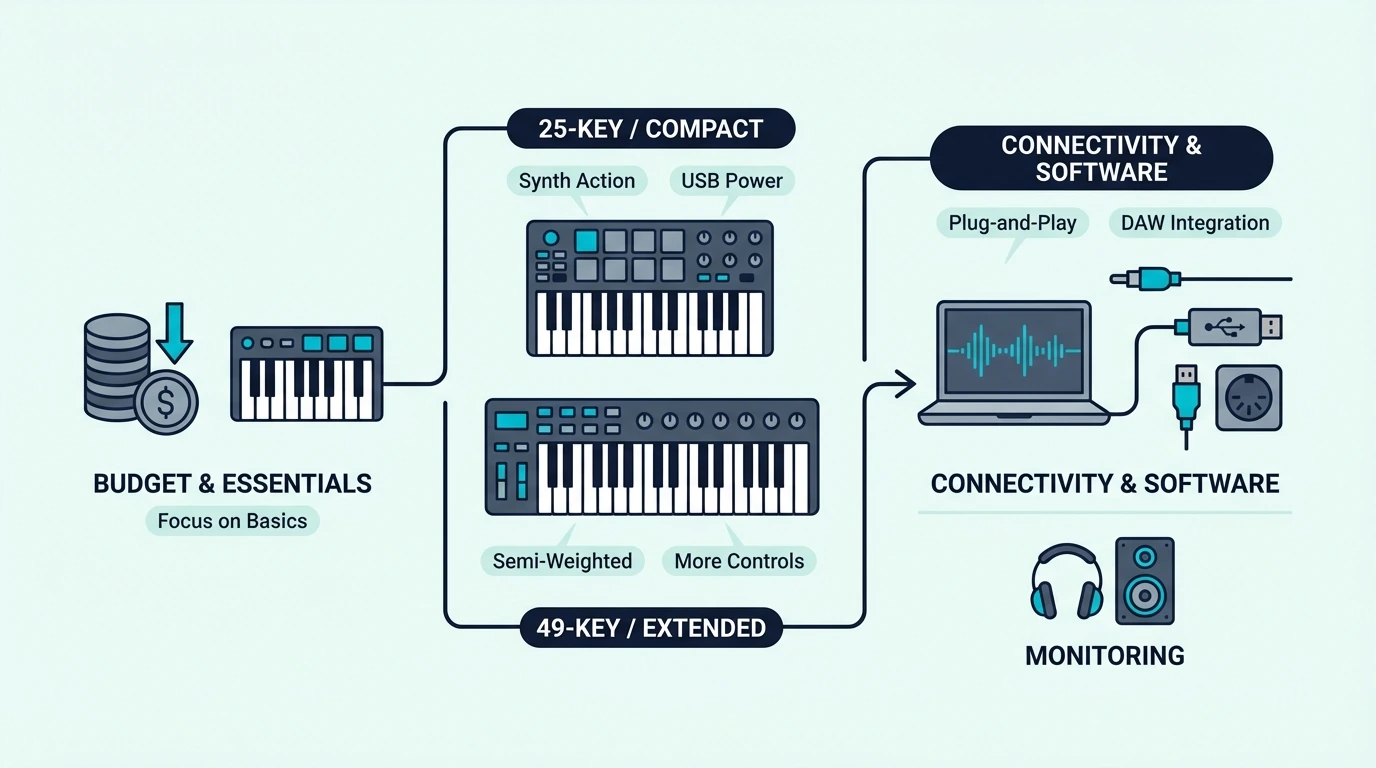
How many keys do I need for FL Studio?

Twenty-five keys handle beat making, synth programming, and one-handed melodies — the core FL Studio workflow for most producers. Upgrade to 49 keys if you play two-handed chord progressions or want to practice piano alongside production.

Can I use FL Studio Mobile with a MIDI keyboard?

Yes — FL Studio Mobile on iOS and Android supports USB and Bluetooth MIDI input. The M-VAVE controller’s Bluetooth connectivity pairs directly with FL Studio Mobile for cable-free production on tablets. USB-connected controllers work through Apple’s Camera Connection Kit (Lightning or USB-C) on iPad.

How To Soundproof A Home Theatre Room (What Works And What To Skip)

How to soundproof a home theatre room can work, but only if you decide whether the real problem is dialogue leaking through a weak door, bass shaking the structure, or a room that sounds muddy inside while still disturbing the rest of the house.

Home theatre projects disappoint when those problems get mixed together. Acoustic panels help the room sound cleaner, but they do almost nothing for the low-frequency thump that reaches a bedroom above or the movie dialogue slipping through a hollow-core door.

Get the diagnosis right and the plan becomes simpler: fix the biggest leak first, contain bass with real mass and decoupling where needed, then add treatment so the system sounds better inside the room instead of just louder.

Start with which home-theatre path is failing first, then move through what doors, walls, ceilings, floors, and subwoofers actually need, and when a finished-room fix is enough versus when the room needs a stronger build.

Quick Takeaway

The best way to soundproof a home theatre room is to identify which path is really failing first. If movie dialogue and general soundtrack loudness are escaping, start with the door and obvious leakage; if the complaint is bass thump or vibration, assume the floor, ceiling, or shared wall path needs heavier mass and decoupling; and if the room only sounds messy inside, that is acoustic treatment rather than real soundproofing.

Home-Theatre Soundproofing Starts With The Failing Path

Overview of soundproofing a home theatre room

The first shift is diagnostic. You are not trying to make every surface in the room equally important.

You are trying to identify which part of the theatre is leaking the most movie sound into the rest of the house. That makes the complaint more useful than the product list.

Dialogue Leakage, Bass Transfer, And Muddy Sound Are Different Problems

If people outside the room mainly hear dialogue, effects, or general soundtrack loudness, the weak point is usually a door, shared wall, vent, or a thin ceiling assembly.

If the complaint is thump, rumble, or vibration that seems to travel everywhere, the subwoofer and structure path are the real problem.

Internal echo is a different category again. If the room sounds harsh or muddy inside but the rest of the house is not especially bothered, you are solving acoustic treatment first, not real containment.

Doors, Shared Boundaries, And Floors Usually Leak First

The door is often first because many theatre rooms still use a hollow-core interior door with visible side and bottom gaps.

After that, the shared wall or ceiling usually takes over, especially when the theatre borders a bedroom, hallway, office, or living space.

The floor matters most when the subwoofer sits directly on a rigid surface and the complaint is felt as much as heard.

Vents, recessed lights, and other penetrations also deserve attention because home theatre sound can flank around the surfaces you already upgraded.

Finished Rooms Improve More Easily Than They Fully Isolate

A finished theatre can usually be improved enough for normal movie nights by tightening leaks, upgrading the door, adding a stronger wall or ceiling strategy, and getting bass under better control.

What it usually cannot do without real construction is contain reference-level subwoofer playback so completely that the rest of the house hears almost nothing.

Expectations matter early. If the goal is “less annoying and more private,” a finished-room plan can go far.

If the goal is “cinema bass at midnight with bedrooms next door,” the room is asking for heavier work from the start.

Highest-Impact Upgrades Depend On The Loudest Leak

Home theatre soundproofing priorities

Once the path is clear, the theatre gets easier to rank. The best upgrade is usually the one that fixes the loudest leak first, not the most interesting product.

That usually means the door first for dialogue leakage, then the wall or ceiling beside the most affected room, and then the floor or subwoofer path when bass is the main complaint.

Doors Are Usually The First High-ROI Upgrade

The door is the highest-value first fix when people outside the room can hear dialogue, effects, or general movie loudness even at moderate volume.

A hollow-core slab with a bottom gap can leak more sound than many buyers expect, which is why theatre owners often over-treat walls while the door remains the real weak point.

Start with perimeter sealing and the bottom gap. A product like HomeProtect Door Draft Stopper 36 Inch Under Door Draft Blocker Door Sweep makes sense when the obvious failure is under the slab, and 33 Ft Gray Self-Adhesive Soundproofing Weather Stripping makes sense when the perimeter still leaks at the jamb.

If the door is still too light after sealing, that is when a solid-core replacement becomes more important than adding another decorative layer inside the room.

Pair this step with soundproofing a door and best door sweep for soundproofing so the first upgrade stays specific instead of generic.

Shared Walls And Ceilings Need Real Assembly Work Once The Door Is Fixed

Shared walls and ceilings become the main job when the door has already been tightened and the noise is still strongest in the room next door, the room above, or the hallway outside.

This is most common in attached homes, apartments, bonus rooms over garages, and basements under bedrooms.

If the assembly is still closed, the realistic finished-room path is usually more mass plus damping rather than random surface accessories.

That is where Green Glue Noiseproofing Compound between drywall layers starts to make sense, especially when movie playback still leaks after the door and gaps are already under control.

If the wall or ceiling is open, cavity support and decoupling matter more. Mineral wool like AFB Mineral Wool Insulation belongs inside the cavity, while RSIC-1 Resilient Sound Isolation Clips (10 Pack) make sense when you need to break the direct vibration path in a stronger wall or ceiling rebuild.

That is the same assembly logic behind soundproofing a wall, soundproofing a ceiling, and soundproofing between floors.

Subwoofers Turn The Project Into A Structure Problem

A subwoofer changes the project because bass does not respect the same shortcuts that sometimes help with mid-range movie sound.

If the complaint is thump through the floor, rumble in a bedroom above, or vibration in the next room even when dialogue is not especially loud, the structure path is the real problem.

That usually means source control matters more than people expect. Subwoofer placement, slightly lower late-night levels, avoiding the boomiest corner placement, and separating the cabinet from the floor can all help before you tear into the room.

If the bass still dominates after those changes, the room usually needs heavier mass, decoupling, or both rather than more treatment panels.

For the heavier bass path, compare this section with soundproofing a basement and soundproofing an apartment when the theatre shares structure with bedrooms or neighbors.

Acoustic Treatment And Soundproofing Solve Different Jobs

Acoustic treatment versus sound isolation in a home theatre

This distinction matters more in a theatre than almost any other room because buyers legitimately need both.

The mistake is doing them in the wrong order and then blaming the wrong product category.

Acoustic Treatment Cleans Up The Room Inside

Acoustic treatment improves the movie experience inside the room by reducing slap echo, tightening imaging, and making dialogue easier to understand.

Panels like UMIACOUSTICS Acoustic Panels help at first-reflection points, on the rear wall, or anywhere the room is making the system sound splashy and confused.

Treatment is about clarity and control, not containment. It can make the soundtrack sound dramatically better inside the room while doing almost nothing for the person trying to sleep down the hall.

Soundproofing Controls What Leaves The Room

Soundproofing improves what leaves the room and what enters it. It relies on sealing, mass, damping, decoupling, and better assemblies on the door, wall, ceiling, floor, and vent paths.

A damping layer like Green Glue belongs in that structure-first category because it helps wall and ceiling layers shed vibration instead of passing more of it into the rest of the house.

Treatment and soundproofing should not compete for the same first dollar. If the theatre is still leaking badly, more panels inside the room are solving the wrong problem first.

Dedicated Theatres Need Containment Before Treatment

Most dedicated theatres need both because a room that is well-contained but untreated can still sound disappointing, and a room that is beautifully treated but leaky can still create family conflict.

The order should usually be containment first, then treatment once the room shell is doing its job.

That is especially true when the theatre shares walls with bedrooms, offices, or a living area. Keep acoustic treatment vs soundproofing and how to soundproof a room close to this section so the categories stay separate.

Budget Theatre Plans Need Triage, Not Shopping Sprees

Budget plan for soundproofing a home theatre room

Budget home theatre soundproofing works best when it behaves like triage. The goal is not a fake room-within-a-room on a tiny budget.

The goal is to spend the first money where it produces the biggest drop in disturbance.

Lower-Cost Fixes Help Most When The Room Is Already Finished

The best lower-cost fixes are door-bottom control, perimeter weatherstripping, vent and trim sealing, dense furniture on the noisiest wall, and smarter subwoofer use at night.

A bottom seal like HomeProtect and perimeter sealing like 33 Ft Gray Self-Adhesive Soundproofing Weather Stripping are boring upgrades, but they often outperform more glamorous purchases because they attack real air leaks.

If the theatre is finished and you want one serious next step, plan around the weakest assembly instead of buying a little of everything.

That may mean saving for a better door, one stronger wall build, or a ceiling upgrade above the seats instead of filling the room with products that never touch the actual leak path.

Most Home-Theatre Soundproofing Hype Is Just Lightweight Treatment

Acoustic foam, thin decorative tiles, miracle paint, and generic “soundproof panels” are the most overpromised home-theatre fixes because they sound technical while adding almost no mass.

They may change the feel of the room, but they do not solve bass leakage or a light wall, ceiling, or door.

The same warning applies to thin curtains and lightweight fabric panels sold as full theatre soundproofing.

If the product does not seal a leak, add meaningful mass, or belong inside a real assembly, it is probably not the right first buy.

Bigger Construction Is Worth It Once The Room Proves The Need

A bigger build becomes worth it when the theatre is used often, the subwoofer is staying, bedrooms or neighbors are actually affected, and the obvious finished-room fixes have already been tried.

That is the point where Green Glue, mineral wool, stronger door work, and decoupled wall or ceiling assemblies start to make financial sense because repeated small purchases are no longer the cheaper path.

If the room is in an attached home, over or under a bedroom, or in a basement with a hard ceiling and aggressive bass, step up sooner.

Use soundproof room cost, best soundproofing material, best insulation for soundproofing, and soundproofing a basement to judge whether the next move should be one bigger build instead of another round of minor fixes.

The Bottom Line

How to soundproof a home theatre room gets easier once you decide which path is actually failing first.

If dialogue and general soundtrack loudness are leaking, start with the door and obvious air leaks.

If the problem stays strongest in the next room or the room above, move to the shared wall or ceiling assembly next.

If bass is the complaint, stop treating it like a simple panel problem and move toward source control, heavier mass, and decoupling.

If the room only sounds messy inside, treat the acoustics after the shell is under control.

Use this as the theatre-first decision guide, then move to the matching surface guides: soundproofing a door, soundproofing a wall, soundproofing a ceiling, and how to soundproof a room.

Frequently Asked Questions

How to soundproof a room for home theater?

Soundproof a home theater room by treating the door and obvious leaks first, then strengthening the wall, ceiling, or floor path that is actually letting the soundtrack escape. If bass is the main complaint, expect a heavier build than you would need for normal TV or voice noise.

How to reduce noise in home theater?

Reduce noise in a home theater by sealing the door, controlling the subwoofer path, and adding real mass, damping, or decoupling where the room is leaking most. Acoustic treatment can improve the sound inside the room, but it will not do much for the people outside it.

What absorbs the most sound?

Inside a theatre room, dense mineral wool and fiberglass-based treatment absorb the most reflected sound energy. For blocking sound from leaving the room, though, the stronger tools are mass, damping, decoupling, and sealed assemblies rather than absorbers alone.

How do I block noise on a shared wall?

Block noise on a shared wall by sealing perimeter gaps first, then moving to more mass and a stronger wall build if the wall is still the main path. In a serious theatre retrofit, that usually means another drywall layer, damping, cavity support, and sometimes decoupling rather than a light decorative panel.

Best Serato DJ Controller — 6 Picks That Actually Unlock Serato Pro Features

Best Serato DJ controller searches return dozens of options — but most lists ignore the single factor that matters most: which Serato tier your controller actually unlocks. A controller bundled with Serato DJ Lite gives you two decks and basic mixing, while one that unlocks Serato DJ Pro gives you four decks, stem separation, and DVS support.

That distinction isn’t marketing fluff — Serato DJ Lite caps your creative options at two virtual decks with no recording, no sampler, and no Serato Stems. Upgrading to Serato DJ Pro later costs an additional subscription unless your controller unlocks it natively.

The problem is caused by Amazon listings that rarely clarify which Serato tier ships with each controller. You end up buying a unit that says “Serato compatible” on the box, only to discover it includes Lite with a paid Pro upgrade path.

Below, you will find six controllers ranked by their Serato integration depth — from budget Lite bundles to Pro-unlocking powerhouses — so you know exactly what software features your purchase activates before you spend a dollar.

Quick Takeaway

To find the best Serato DJ controller, check which Serato tier (Lite vs Pro) the controller unlocks out of the box. The Pioneer DJ DDJ-FLX4 is the best overall Serato controller because it supports both Serato DJ and Rekordbox natively, with a clean 2-deck layout and built-in sound card.

What Makes a Great Serato Controller

Serato DJ controller tiers compared

Serato DJ Lite vs Serato DJ Pro

Serato DJ Lite ships free with most entry-level controllers, giving you two virtual decks, basic EQ, crossfader control, and access to your local music library. That covers every fundamental mixing technique a beginner needs.

Serato DJ Pro unlocks four decks, the sampler, recording, DVS support, Serato Stems for real-time vocal isolation, and expanded effects. Controllers that natively unlock Pro — like the Rane Performer or Pioneer DDJ-FLX10 — save you the subscription cost.

Hardware Mapping Quality

Not all Serato controllers map identically. Pioneer and Rane units have the tightest integration because Serato co-develops the mappings with those manufacturers.

Every pad mode, filter sweep, and effect toggle responds instantly with zero configuration.

Third-party controllers from Hercules and Numark also support Serato, but some advanced features require manual MIDI mapping. For beginners, the difference is negligible.

For working DJs who rely on pad modes and stem controls during live sets, native mapping matters. A controller with co-developed Serato integration responds to every input without lag or misconfigured controls.

Jog Wheel Feel on Serato

Serato’s scratch algorithms depend on precise jog wheel data. Controllers with high-resolution jog wheels (like the DDJ-REV1’s battle-style platters) produce tighter scratch response than budget wheels that send fewer data points per rotation.

If scratching is your primary style, jog wheel resolution should rank higher than channel count or effects in your decision.

Our Top 6 Serato DJ Controllers

Top Serato DJ controller picks

1. Pioneer DJ DDJ-FLX4 — Best Overall

The Pioneer DJ DDJ-FLX4 wins best overall because it natively supports both Serato DJ and Rekordbox — the only controller at this price with genuine dual-platform compatibility. You can practice on Serato at home and switch to Rekordbox for club prep without buying new hardware.

The Smart Fader smooths transitions by automatically managing bass EQ during crossfader moves. It produces clean mixes from day one while you build manual technique.

USB-C connectivity and a built-in sound card handle headphone cueing with zero perceivable latency. The compact layout keeps the learning curve gentle while still offering eight performance pads per deck for hot cues and loops.

2. Pioneer DJ DDJ-REV1 — Best for Scratching

The Pioneer DJ DDJ-REV1 is the only controller on this list designed specifically for scratch DJs running Serato. The battle-style layout flips the traditional orientation — jog wheels sit above the mixer section — mirroring turntable positioning that scratch DJs prefer.

Large jog wheels with low-latency response deliver tight scratch performance that budget controllers cannot match. The Serato-exclusive mapping means every scratch technique (chirps, flares, transforms) tracks accurately.

The REV1 also includes Lever FX — dedicated hardware toggles that trigger Serato effects with a flick, keeping your hands on the platters during scratch routines instead of reaching for software buttons.

3. Numark Mixtrack Platinum FX — Best 4-Deck Serato

The Numark Mixtrack Platinum FX is the most affordable way to run four decks on Serato. Jog wheel displays show track position, BPM, and time remaining directly on the hardware — so your eyes stay on the controller instead of bouncing to the laptop screen.

Dedicated effects paddles on each deck let you trigger filter sweeps, echoes, and reverb without touching the software. That hands-on approach to effects is what separates the Platinum FX from simpler Serato controllers in this price range.

4. Hercules DJControl Inpulse 500 — Best for Learning

The Hercules DJControl Inpulse 500 pairs Serato DJ Lite compatibility with built-in LED light guides that physically show you when to start transitions. The IMA coaching algorithm suggests compatible tracks from your library in real time.

Large jog wheels with adjustable tension give this unit a premium feel. The tradeoff is dual-software management — Hercules bundles DJUCED alongside Serato, so you need both installed, though you only use one at a time.

5. Hercules DJControl Starlight — Best Budget Serato

The Hercules DJControl Starlight is the cheapest Serato-compatible controller that includes a built-in sound card. That combination — Serato support plus headphone cueing — makes it the best entry point for DJs who want to learn the Serato workflow without a large upfront investment.

The pocket-sized form factor means tiny jog wheels, which rules out scratching. For beatmatching and blend-style mixing on Serato, the Starlight handles the fundamentals at a price that most budgets can absorb.

6. Numark DJ2GO2 Touch — Best Under 100

The Numark DJ2GO2 Touch proves you can run Serato DJ Lite for less than a pair of headphones. Touch-capacitive jog wheels and a built-in audio interface handle the core Serato workflow — load, cue, match, blend.

The missing performance pads mean hot cues and loops require mouse clicks in the software. That limitation matters less on Serato DJ Lite, which caps these features anyway.

Serato DJ Lite vs Pro — Which Do You Need

Serato Lite and Serato Pro features compared

When Lite Is Enough

Serato DJ Lite covers two-deck mixing with basic EQ, crossfader, and filter control. If your goal is learning beatmatching, practicing transitions, and building a music library, Lite has everything you need for your first six to twelve months.

Most beginner controllers bundle Serato DJ Lite. The software is free with any compatible controller — no subscription, no activation code, no expiration.

When You Need Pro

Serato DJ Pro becomes essential when you outgrow two decks. Four-deck mixing, Serato Stems, DVS support for controlling software with real vinyl, and the full effects suite all require Pro.

Pro costs a monthly subscription or a one-time purchase unless your controller unlocks it natively. The Pioneer DDJ-FLX10 and Rane controllers include Pro activation, saving you the ongoing cost.

Upgrade Path Strategy

Start with a Lite-bundled controller and master two-deck mixing on the free tier. When you consistently feel limited by two decks or need stems and recording, upgrade to a controller that unlocks Pro natively rather than paying the subscription on top of your current hardware.

That sequential approach avoids the most common Serato mistake: paying for Pro features before you have the skills to use them. The money saved on software goes further when invested in a better controller down the line.

The Bottom Line

The Pioneer DJ DDJ-FLX4 is the best Serato DJ controller because dual-platform support gives you Serato and Rekordbox in one device. For scratch DJs, the DDJ-REV1 delivers the tightest scratch response at this price.

Every controller on this list bundles Serato DJ Lite at minimum. Pick the one that matches your budget and mixing style, then let the software grow with you.

Frequently Asked Questions

Which DJ controller uses Serato?

Most Pioneer DJ, Numark, Hercules, and Rane controllers support Serato — the DDJ-FLX4, DDJ-REV1, Mixtrack Platinum FX, and DJControl Starlight all bundle Serato DJ Lite. Higher-end units like the Rane Performer and Pioneer DDJ-FLX10 unlock Serato DJ Pro natively.

What is the best Pioneer DJ controller for Serato?

The Pioneer DJ DDJ-FLX4 is the best Pioneer Serato controller for most DJs because it supports both Serato and Rekordbox. For scratch-focused DJs, the DDJ-REV1 offers a battle-style layout with Serato-exclusive mapping optimized for turntablism.

Can I upgrade from Serato DJ Lite to Pro?

Yes — Serato offers both monthly subscriptions and a one-time purchase to upgrade from Lite to Pro on any compatible controller. Alternatively, buying a controller that natively unlocks Pro (like the Rane Performer or DDJ-FLX10) eliminates the ongoing subscription cost.

Is Serato better than Rekordbox?

Neither is objectively better — they serve different ecosystems. Serato supports the widest range of controller brands, while Rekordbox integrates tightest with Pioneer CDJ club setups.

If your local clubs run Pioneer gear, Rekordbox prepares you for that workflow. If you want maximum hardware flexibility, Serato is the safer choice.

Do I need Serato DJ Pro as a beginner?

No — Serato DJ Lite covers every beginner mixing technique including two-deck mixing, beatmatching, EQ blending, and basic effects. Upgrade to Pro only when you need four decks, stems, DVS, or recording capabilities.

Best Software to Use With MIDI Keyboard — Free and Paid Options That Actually Work

Best software to use with MIDI keyboard is the first question every new controller owner asks, but the answer depends on whether you want to make beats, record piano, design synth sounds, or do all three — and most guides fail to make that distinction.

The problem is caused by grabbing the first free DAW you find without checking if it actually supports your controller’s features. A MIDI keyboard with 8 assignable knobs is useless when your software cannot map them.

We sorted the best options by use case and budget — from completely free DAWs that handle everything a beginner needs, to professional platforms that justify their price with workflow features you will not find elsewhere. Each recommendation includes the controller that pairs best with it.

Below you will find our top software picks organized by DAW type, followed by controller pairings that maximize each platform’s strengths.

Quick Takeaway

The best software for a MIDI keyboard depends on your workflow. GarageBand (free on Mac) and Cakewalk (free on Windows) are the strongest free options. FL Studio dominates for beat making, Ableton Live leads for live performance and electronic production, and Logic Pro offers the deepest virtual instrument library for Mac users. Choose a controller with native integration for your DAW to skip manual mapping.

What Software Do You Need For A MIDI Keyboard?

A MIDI keyboard sends data — it does not make sound. You need two pieces of software to hear anything: a digital audio workstation (DAW) and at least one virtual instrument plugin.

The DAW is your recording studio. It receives MIDI data from your keyboard, routes it to a virtual instrument, records your performance, and lets you edit, mix, and export the final track.

DAWs — Your Production Hub

Every DAW handles MIDI input, audio recording, mixing, and arrangement. The differences show up in workflow philosophy, bundled instruments, and how deeply your MIDI keyboard integrates.

Some DAWs prioritize linear recording (Logic Pro, Cubase) while others focus on loop-based production (Ableton Live, FL Studio). Neither approach is better — it depends on how you think about music.

Virtual Instruments — Where Sound Comes From

Virtual instruments (VSTs, AUs) are the software synths, pianos, drums, and orchestral libraries that respond to your MIDI keyboard input. Most DAWs bundle a starter set of instruments, and you can add thousands more from third-party developers.

The quality gap between bundled instruments varies wildly. Logic Pro includes a professional-grade library worth hundreds of dollars.

Some free DAWs include barely functional sounds that need immediate replacement.

What Is the Best Free Software for a MIDI Keyboard

Free does not mean limited — the best free DAWs compete with paid options for beginners and even intermediate producers. Here are the strongest free platforms sorted by operating system.

GarageBand (Mac Only)

GarageBand ships free on every Mac and includes a surprisingly deep virtual instrument library — pianos, synths, drums, and orchestral sounds that rival entry-level paid plugins. The interface is intuitive enough that complete beginners produce their first track within an hour.

The catch is Mac exclusivity. Windows users need a different option entirely.

GarageBand also caps out when your projects grow complex — at that point, upgrading to Logic Pro (which reads all GarageBand project files) is the natural next step.

A controller like the M-AUDIO Keystation Mini 32 MK3 works plug-and-play with GarageBand and also bundles Ableton Live Lite as a second DAW option.

Cakewalk by BandLab (Windows Only)

Cakewalk is the most capable free DAW on Windows — it was a professional paid product (SONAR) before BandLab acquired it and made it free. The feature set includes unlimited audio and MIDI tracks, professional mixing tools, and a notation editor.

The learning curve is steeper than GarageBand. Cakewalk assumes some familiarity with DAW concepts, so complete beginners may find the interface overwhelming at first.

Any USB MIDI keyboard works with Cakewalk out of the box. The midiplus AKM320 paired with the free Cakewalk download gets you a complete production setup for under forty dollars.

Bundled DAW Lite Versions

Most MIDI keyboards bundle a lite version of a professional DAW. Akai controllers include MPC Beats, while M-AUDIO and Novation controllers include Ableton Live Lite.

These are not trial versions — they are permanent licenses with real functionality.

The limitation is track count and plugin slots. Ableton Live Lite caps at 8 tracks and 2 effects per track.

MPC Beats limits you to the MPC workflow. For many beginners, those caps never become a problem during the first year of learning.

Which Paid DAWs Work Best With a MIDI Keyboard

Paid DAWs justify their price through deeper instrument libraries, advanced MIDI editing, unlimited track counts, and native controller integration. Here are the four platforms that dominate music production.

FL Studio — Best For Beat Making

FL Studio’s piano roll is the most powerful MIDI editor in any DAW. Features like ghost notes (seeing other tracks’ notes while editing), slide notes, and per-note automation make complex beat programming faster than any competitor.

The lifetime free updates policy means you pay once and receive every future version at no additional cost. No other major DAW offers this.

The Novation FLkey Mini was designed specifically for FL Studio — the pads control the channel rack, the knobs map to the mixer, and the keys play instruments without any manual configuration.

Ableton Live — Best For Electronic Music And Live Performance

Ableton’s Session View lets you launch clips, loops, and scenes in real time — a workflow no other DAW replicates as smoothly. For electronic producers and live performers, this clip-launching approach changes how you think about arrangement.

The built-in instruments (Wavetable, Operator, Drift) are production-ready out of the box. Many professional releases are made entirely with Ableton’s stock plugins.

The Novation Launchkey 61 MK4 integrates with Ableton at a level no other controller matches — Session View control, mixer mapping, and instrument browsing all happen automatically the moment you plug in.

Logic Pro — Best Virtual Instrument Library (Mac Only)

Logic Pro includes the most comprehensive bundled instrument and loop library of any DAW — over 70 GB of content covering every genre. The Alchemy synth alone rivals standalone plugins that cost hundreds of dollars.

Mac exclusivity limits the audience, but for Mac owners, Logic Pro at its one-time purchase price is the best value in professional DAWs.

The M-AUDIO Keystation 49 MK3 works seamlessly with Logic Pro’s Smart Controls — the transport buttons control playback, and the keys map to whichever instrument is selected on the active track.

Cubase — Best For Composition And Scoring

Cubase has the strongest MIDI editing and notation features of any DAW, making it the default choice for film composers, orchestral arrangers, and anyone who works with complex MIDI data. The Score Editor lets you view and edit MIDI as traditional sheet music.

The Expression Map system lets you trigger articulations (legato, staccato, pizzicato) from your MIDI keyboard — essential for realistic orchestral mock-ups. No other DAW handles this as natively.

How To Get Your Computer To Recognize Your MIDI Keyboard

Most modern MIDI keyboards work plug-and-play over USB, but occasionally the connection fails. Here is the troubleshooting sequence that resolves 95 percent of recognition issues.

USB Connection Checklist

Plug the MIDI keyboard directly into your computer — not through a USB hub. Hubs can cause power delivery issues that prevent the controller from initializing properly.

Try a different USB port. Some computers have USB 2.0 and USB 3.0 ports that behave differently with certain controllers.

If one port fails, the next one often works.

DAW MIDI Settings

Open your DAW’s preferences and navigate to the MIDI input settings. Your controller should appear in the list of available MIDI devices.

If it does not appear, restart the DAW with the controller already plugged in — some DAWs only scan for MIDI devices at launch.

In Ableton, go to Preferences → Link/Tempo/MIDI and enable both Track and Remote for your controller. In FL Studio, open Options → MIDI Settings and enable your controller in the input list.

Driver Issues (Rare)

Class-compliant USB MIDI keyboards (which includes nearly every modern controller) require no driver installation. If your keyboard shipped before 2015 or uses a proprietary connection, check the manufacturer’s website for updated drivers compatible with your operating system version.

The Bottom Line

The Akai MPK Mini MK3 with its bundled MPC Beats software is the fastest path from unboxing to making music — no separate software purchase required. If you already own a DAW, match your controller to its native integration: FLkey for FL Studio, Launchkey for Ableton, and any quality MIDI keyboard for Logic Pro or Cubase.

Start with free software if you are unsure which workflow suits you. GarageBand (Mac) and Cakewalk (Windows) cost nothing and teach you the fundamentals that transfer to any paid DAW later.

Frequently Asked Questions

What is the best free software for a MIDI keyboard?

GarageBand (Mac) and Cakewalk by BandLab (Windows) are the strongest free options. GarageBand offers a deeper instrument library while Cakewalk provides more advanced mixing and MIDI editing tools.

Which DAW is best for MIDI editing?

FL Studio has the most powerful piano roll for beat-focused MIDI editing. Cubase leads for notation-based editing and orchestral composition.

Ableton excels at real-time MIDI manipulation and clip-based workflows.

Is MIDI still used in music production?

MIDI is the backbone of modern music production. Every DAW, virtual instrument, and hardware controller communicates through MIDI data.

The protocol has evolved (MIDI 2.0 launched in 2020 with higher resolution and bidirectional communication), but the core concept of sending performance data between devices remains unchanged.

Do I need to buy software separately from my MIDI keyboard?

Not necessarily. Most MIDI keyboards bundle a DAW lite version and virtual instruments. The best beginner controllers include Ableton Live Lite, MPC Beats, or similar software that works as a complete starting point. You only need to buy software if you outgrow the bundled version or want a specific platform.

Does MLV Soundproofing Work (And When Is It Worth Using)

Does MLV soundproofing work is a fair question because mass loaded vinyl is one of the most recommended soundproofing materials online, but it only delivers real results when it is installed correctly as part of a proper assembly rather than stapled loosely to a wall and expected to fix everything by itself.

That is why buyer opinions split so sharply. People who use MLV inside a well-built wall assembly with insulation, sealing, and proper attachment report noticeable improvement.

People who hang it over drywall with gaps at the edges report almost no change. The material works, but the application determines whether you get a meaningful result or a frustrating waste of money.

The better way to evaluate MLV is to understand what it actually does, where it fits in the assembly, and when other approaches deliver the same or better result for less effort. Once you know those boundaries, the decision becomes much clearer.

Below, you will learn what MLV is, what noise it helps with, when it works best, where it falls short, what alternatives exist, and how to decide whether it is worth using for your specific project.

Quick Takeaway

Does MLV soundproofing work? Yes, mass loaded vinyl adds meaningful mass to walls, ceilings, floors, and other barriers, which reduces airborne noise transmission. It works best when installed inside an assembly with insulation and sealed edges, and it disappoints most when used as a standalone surface treatment with gaps that let sound bypass the barrier.

What MLV Is and What It Actually Does to Sound

Overview of how mass loaded vinyl works for soundproofing

Now that the core answer is clear, the next step is understanding what MLV actually is and what it can realistically do.

The material and how it works

Mass loaded vinyl is a dense, flexible sheet material made from vinyl loaded with heavy fillers like barium sulfate or calcium carbonate. It is designed to add mass to a barrier without adding significant thickness, which makes it useful in situations where you need to increase the weight of a wall, ceiling, or floor assembly without rebuilding it.

Standard MLV weighs about 1 pound per square foot and is typically 1/8 inch thick. That combination of high density and thin profile is what makes it attractive for retrofit soundproofing — it fits between drywall layers, staples to studs, and wraps around pipes and ducts in spaces where thicker materials would not work.

The material is rated by its Sound Transmission Class (STC), which measures how much sound it blocks when tested as part of an assembly. A single layer of 1 lb MLV typically adds 3–8 STC points to whatever assembly it is installed in, depending on the other layers present.

That is a meaningful contribution, but it also shows why MLV works best as a component rather than a standalone fix — the other layers in the assembly determine how much of that contribution actually reaches the listener as reduced noise.

A standard 1 lb MLV roll like Trademark Soundproofing Mass Loaded Vinyl is the most common format and covers 100 square feet per roll, which is enough for a typical bedroom wall.

Which noise types MLV handles best

That mass-in-a-thin-profile design determines which noise MLV can actually reduce. MLV is most effective against airborne noise: voices, TV audio, music without heavy bass, and general household sound that travels through walls, ceilings, and floors. These mid-to-high-frequency sounds are the easiest to reduce with added mass because the sound waves are shorter and lose energy more readily when they hit a dense barrier.

Low-frequency bass is harder. MLV helps with bass to some degree because it adds mass, but it is not heavy enough on its own to stop deep bass from a subwoofer, drum kit, or loud amplifier.

Those frequencies require significantly more mass, air gaps, and decoupling than a single layer of MLV can provide.

Why some buyers think MLV failed them

Despite those real capabilities, negative reviews are common — and almost always trace back to installation. Most negative experiences come from three installation mistakes: gaps at the seams and edges, mounting over drywall instead of inside the assembly, and expecting MLV to fix a problem that requires decoupling or sealing rather than mass.

Gaps are the most common issue. MLV works by adding continuous mass to the barrier path.

Any gap — even a small one at a seam, around an outlet, or at the floor line — creates a flanking path that lets sound bypass the barrier. Buyers who install MLV with care and seal every edge report much better results than those who leave visible gaps.

Where MLV Delivers the Strongest Results

Best use cases for mass loaded vinyl soundproofing

MLV delivers the strongest results when it is part of a layered assembly rather than the only upgrade.

Wall assemblies: the strongest application

Wall assemblies are the most common and most effective application for MLV. The standard approach is to install MLV between the studs and the drywall, or between two layers of drywall, with sealed seams and edges.

This adds mass directly to the transmission path where it has the most impact.

A wall with insulation in the cavity, MLV on the studs, and sealed drywall over the top will outperform the same wall without MLV by a measurable margin — typically 3–8 STC points depending on the rest of the assembly. That improvement is enough to make neighbor voices significantly quieter and to reduce general household noise transfer noticeably.

Filling the cavity with AFB Acoustical Fire Batts before layering MLV over the studs is one of the strongest residential wall upgrades available. Soundproofing a wall and soundproofing an existing wall cover the full range of wall assembly options.

Floors, ceilings, and doors

The same mass-addition logic extends beyond walls. MLV helps on ceilings when installed between the joists and the drywall, following the same logic as wall assemblies. It helps on floors when used as an underlayment layer beneath the finish floor, adding mass to the floor assembly to reduce impact and airborne noise transfer to the room below.

On doors, MLV can be applied to the back of a hollow-core door to add mass, but a solid-core door replacement is usually a better investment because it provides mass, density, and better edge sealing in one upgrade. Before either option, sealing the gap at the bottom with a MAXTID Under Door Draft Stopper often reveals whether the door gap was the main leak path all along.

Soundproofing a door covers when MLV on the door makes sense versus when a replacement is the better path.

MLV also works well for wrapping pipes, ducts, and mechanical equipment where the goal is to reduce noise radiation from a specific source. Soundproofing drain pipes and soundproofing a vent both use MLV as a primary treatment material.

Why MLV works better as part of a system

Those applications all share one pattern: MLV performs best alongside other layers. Because soundproofing is a system, not a single product. MLV adds mass, but mass alone does not address every part of the noise path.

Insulation absorbs sound energy inside the cavity. Decoupling prevents vibration from traveling through the structure.

Sealing closes the air paths where sound leaks around the barrier.

When all four — mass, absorption, decoupling, and sealing — work together, the result is much stronger than any one of them alone. MLV is the mass layer, and it performs best when the other three are also present.

Dense mineral wool batts inside the cavity complement MLV by handling the sound energy that mass alone does not absorb. best insulation for soundproofing covers the companion materials that make MLV assemblies stronger.

MLV Limitations: Mass Alone Is Not Enough

Limits of mass loaded vinyl for blocking noise

MLV has real limitations that are worth understanding before you buy.

Why MLV alone disappoints

The system-thinking from the previous section also explains the failures. MLV is one layer in a multi-layer system. If the wall has no insulation, the drywall is directly attached to the studs, and the outlets and joints are unsealed, adding MLV addresses only the mass deficit while leaving the absorption, decoupling, and sealing deficits untouched.

That is why MLV-only upgrades sometimes disappoint. The mass improvement is real, but it is limited by whichever other weakness remains.

A wall with MLV but no insulation will perform better than the same wall without MLV, but it will still underperform compared to a wall that addresses all four factors together.

Bass: where mass alone falls short

That multi-layer gap hits hardest with low-frequency bass. Low-frequency bass is harder.

MLV helps with bass to some degree because it adds mass, but it is not heavy enough on its own to stop deep bass from a subwoofer, drum kit, or loud amplifier.

Those frequencies require significantly more mass, air gaps, and decoupling than a single layer of MLV can provide.

Stopping bass requires significantly more mass — multiple layers of drywall, concrete, or thicker barrier materials — plus air gaps and decoupling to prevent structure-borne vibration from bypassing the mass entirely.

If bass is the primary complaint, MLV is a useful component but not a standalone solution.

Installation mistakes that ruin performance

Even in a proper assembly, sloppy installation can undo the investment. Unsealed seams are the biggest mistake. MLV seams must be overlapped and sealed with acoustical caulk or taped with a compatible barrier tape.

A butt joint with no overlap or seal creates a direct flanking path that sound will exploit.

Mounting MLV loosely on the wall surface instead of attaching it tightly to the studs or between drywall layers is the second biggest mistake. Loose MLV can vibrate independently and actually re-radiate sound instead of blocking it.

The material needs to be in firm, continuous contact with the structure to perform correctly.

Using too-thin MLV is another overlooked issue. Products marketed as “sound barrier” that weigh significantly less than 1 lb per square foot do not deliver the same mass benefit as standard MLV, even though they look similar.

Always check the weight-per-square-foot spec before buying.

Leaving gaps around outlets, switches, pipe penetrations, and the perimeter of the sheet is the third most common mistake. Every penetration needs to be sealed, and every edge needs to meet the adjacent surface or be caulked closed.

When Something Else Works Better Than MLV

Alternatives to mass loaded vinyl for soundproofing

MLV is not always the best choice. Sometimes simpler or more targeted approaches deliver a better return.

Extra drywall with damping compound

A second layer of drywall with a viscoelastic damping compound like Green Glue Noiseproofing Compound between the layers can match or exceed MLV’s mass contribution while also adding damping — something MLV alone does not provide. This “double drywall with Green Glue” approach is often cheaper per square foot than MLV and delivers stronger combined performance because it addresses both mass and damping in one step.

The tradeoff is thickness. Two layers of 5/8-inch drywall add about 1-1/4 inches to the wall, while MLV adds only 1/8 inch.

If space is tight, MLV wins on profile. If space allows the extra thickness, double drywall usually wins on performance and cost.

Soundproof drywall vs regular drywall covers this comparison in detail.

Decoupling for structure-borne noise

Drywall-plus-damping handles mass and vibration control, but neither it nor MLV breaks the direct structural path. Decoupling matters more when the noise is structure-borne rather than airborne. If footsteps, vibration, or impact noise is the main complaint, adding mass with MLV will help less than breaking the rigid connection between the noise source and the listening space.

Resilient channels, sound isolation clips, and floating floor systems all address structure-borne transfer by decoupling the finish surface from the framing. In those cases, the decoupling upgrade delivers more improvement per dollar than MLV because it targets the dominant transmission path.

Soundproofing a ceiling and soundproofing between floors cover the decoupling options for common residential applications.

The decision framework

With mass, damping, and decoupling options all on the table, the decision comes down to your specific noise path. Start by identifying the noise type. If the noise is airborne (voices, TV, music without heavy bass), MLV is a strong candidate.

If the noise is structure-borne (footsteps, vibration), decoupling should come first.

Then check the rest of the assembly. If the wall already has insulation and sealed joints, MLV is the logical next mass upgrade.

If the wall is empty, uninsulated, and unsealed, address those gaps first because they are cheaper to fix and will deliver more improvement per dollar.

For windows, MLV is rarely practical because it blocks light and is difficult to mount over glass. A heavy curtain like RYB HOME Soundproof Divider Curtain adds mass over the glass without blocking all light and comes down when you move — a more practical solution for window noise than trying to make MLV work on a surface it was not designed for.

For a budget test, a small roll of MLV like TroyStudio High Density Mass Loaded Vinyl on the weakest section of the wall can confirm whether mass is the missing factor before you invest in covering the entire surface.

For projects where the noise is severe or the standard MLV feels insufficient, a next-generation formulation like Soundsulate Next Generation Mass Loaded Vinyl offers denser construction that performs better at low frequencies while maintaining the thin profile that makes MLV practical.

Compare this page with the broader soundproofing hub, soundproofing an apartment, and does soundproofing work so the MLV decision stays in proportion to the rest of the project.

The Bottom Line

Does MLV soundproofing work? Yes, mass loaded vinyl adds meaningful mass to barrier assemblies and reduces airborne noise transmission when installed correctly with sealed seams and edges.

It works best inside a wall, ceiling, or floor assembly alongside insulation, sealing, and ideally decoupling, and it disappoints most when used as a standalone surface treatment with gaps that let sound bypass the barrier.

For most residential projects, MLV earns its place as the mass layer in a multi-layer assembly. It is not a magic fix by itself, but when combined with insulation, sealing, and proper installation, it is one of the most effective and space-efficient soundproofing materials available for the money.

Frequently Asked Questions

How to block out 100% of noise?

Blocking 100% of noise requires a fully sealed room-within-a-room construction with mass, decoupling, and absorption on every surface, which is impractical for most residential situations. The realistic goal is reducing noise enough that it no longer disrupts sleep, work, or daily comfort.

What is better than mass loaded vinyl?

In many situations, a double layer of drywall with a damping compound between them delivers equal or better performance than MLV at a lower total cost. Decoupling with resilient channels or isolation clips also delivers more improvement than MLV when the noise is structure-borne rather than airborne.

Can I put MLV over drywall?

You can put MLV over existing drywall and then add a second layer of drywall over the MLV, which creates a sandwich that adds both mass and some damping. Mounting MLV on the surface of drywall without covering it is less effective because the exposed edges are harder to seal and the finish is not practical for a living space.

Best DJ Mixer for Beginners — 4 Standalone Mixers That Outlast Any Controller

Best DJ mixer for beginners targets a different audience than best beginner DJ controller — but most guides confuse the two by recommending all-in-one controllers to people who actually want a standalone mixer. If you own turntables, plan to spin vinyl, or want hardware that works without a laptop, a standalone DJ mixer is what you need.

The problem is that standalone mixers require separate audio sources (turntables or CDJs) plugged into the inputs. Buying a mixer without understanding that requirement is the most common gear mistake in the DJ community.

That confusion is caused by Amazon and Google blending “DJ mixer” and “DJ controller” results together. A mixer is a dedicated audio device that blends signals from external sources. A controller is a USB device that controls software on your laptop. They solve different problems for different setups.

Below, you will find four standalone DJ mixers ranked for beginners who own or plan to buy turntables or CDJs — plus one controller alternative for those who realize mid-article that a standalone mixer is not what they need.

Quick Takeaway

A standalone DJ mixer blends audio from turntables or CDJs without any laptop or software. The Pioneer DJ DJM-250MK2 is the best beginner standalone mixer because it delivers Pioneer club-grade sound quality with built-in DVS support at the lowest DJM price point. If you do not own turntables or CDJs, you need a DJ controller instead — not a mixer.

Who Actually Needs a Standalone DJ Mixer

Standalone DJ mixer compared with controller mixer setup

Vinyl DJs and Turntablists

If you own turntables (Technics 1200s, Audio-Technica AT-LP120, Reloop RP-7000) or plan to buy them, a standalone mixer is the only way to blend their output. Turntables produce analog audio through phono cables — a standalone mixer accepts those signals, applies EQ and effects, and sends the combined output to your speakers.

No controller can replace this workflow. Controllers talk to software. Turntables produce real audio. The mixer sits between the turntables and your speakers as the analog blending engine.

CDJ Users

DJs who use CDJs (Pioneer CDJ-2000NXS2, CDJ-3000, or XDJ series) also need a standalone mixer. Club installations run CDJs into a mixer — learning on the same hardware at home means zero adjustment when you step into the booth.

The Rekordbox ecosystem connects the home mixer to the club via USB export. Prepare your tracks at home, export to USB, and load them onto club CDJs.

Who Should Get a Controller Instead

If you do not own turntables or CDJs and want to start DJing with just a laptop, you need a DJ controller — not a standalone mixer. Controllers include virtual decks, a mixer section, and a sound card in one USB device.

The rest of this article is for DJs who need actual standalone mixing hardware.

Our Top 4 Standalone DJ Mixers for Beginners

Top six DJ mixer picks for beginners

1. Pioneer DJ DJM-250MK2 — Best Overall

The Pioneer DJ DJM-250MK2 is the entry point into Pioneer’s legendary DJM mixer line. The Magvel crossfader delivers the same smooth, precise action found on the DJM-900NXS2 that sits in nearly every professional club booth. That feel transfers directly — practice at home, perform at the venue, same muscle memory.

Built-in DVS (Digital Vinyl System) support means you can control Rekordbox or Serato with timecoded vinyl, bridging the gap between analog turntablism and digital music libraries. The USB sound card handles the DVS routing without any external hardware.

Two channels with switchable phono/line inputs accept turntables (phono) or CDJs (line) on each channel. The 3-band EQ and dedicated filter knob cover every mixing technique a beginner needs to learn.

2. Numark M2 — Best Budget

The Numark M2 is the cheapest standalone DJ mixer that accepts turntable phono inputs — the essential requirement for vinyl DJing. Metal rack-mountable construction means this mixer survives years of use, transport, and the occasional drink spill that every gigging DJ eventually encounters.

The replaceable crossfader is a feature that budget mixers rarely include. When the crossfader wears out (and it will, especially for scratch DJs), you swap it for a new one instead of replacing the entire mixer. That repairability makes the M2 a long-term investment rather than a disposable purchase.

No built-in effects means a pure analog signal path — audio goes in, gets EQ’d and blended, and comes out clean. Some DJs prefer this simplicity because it forces you to develop mixing technique without relying on effects as a crutch.

3. Numark Scratch — Best for Scratching

The Numark Scratch is the only mixer on this list that includes a professional-grade Innofader crossfader and a full Serato DJ Pro license out of the box. The Innofader delivers the tightest cut action available — tournament scratch DJs use this exact fader mechanism in competition.

Serato DJ Pro inclusion (normally a paid subscription) saves you the ongoing software cost. Eight performance pads built into the mixer let you trigger hot cues, loops, and samples without touching the laptop — a feature usually found only on controllers.

The tradeoff is Serato exclusivity — Rekordbox DVS users need to look at Pioneer’s DJM line instead. For Serato-focused scratch DJs, the Numark Scratch delivers more value per dollar than any other mixer at this price.

4. Pioneer DJ DJM-S7 — Best Premium

The Pioneer DJ DJM-S7 is the mixer that professional scratch DJs and battle champions use. The Magvel Fader Pro crossfader is the tightest, most responsive fader Pioneer has ever built — a direct upgrade over the standard Magvel in the DJM-250MK2.

Twenty-two Beat FX (echo, reverb, delay, flanger, and more) are controlled via a touch strip that responds to finger position and pressure. Bluetooth audio input lets you stream from your phone as a backup source — useful for filling dead air during setup.

This is not a beginner-budget mixer. It earns a spot on this list because serious turntablists who plan to compete or perform professionally should know what the end-game hardware looks like before investing in stepping stones they will replace within a year.

What If You Are Not Sure You Need a Mixer

Common misconceptions about beginner DJ mixers

The Controller Alternative

If you read this far and realized you do not own turntables or CDJs, the Pioneer DJ DDJ-FLX4 is the controller that most closely mimics the mixer workflow. Its built-in mixer section uses the same 3-band EQ layout as Pioneer’s DJM line, and Rekordbox compatibility means your library preparation transfers to club CDJ setups.

A controller costs less than a mixer-plus-turntables setup. One device, one USB cable, one software window — and you are mixing.

When to Upgrade From Controller to Mixer

Most DJs start on controllers and move to standalone mixers once they develop a preference for vinyl or CDJ workflows. The upgrade path typically happens after one to two years, when you have enough skill and gig income to justify the additional hardware investment.

The mixing techniques you learn on a controller — EQ blending, crossfader cuts, phrase matching — transfer directly to a standalone mixer. The hardware changes, but the ear training stays.

How to Set Up a Standalone DJ Mixer

Setup guide for a first DJ mixer

Connect Your Audio Sources

Plug turntable phono cables into the mixer’s phono inputs (Channel 1 and Channel 2). If using CDJs, plug RCA cables into the line inputs. Set each channel’s input selector to match (phono for turntables, line for CDJs).

Ground your turntables by connecting the ground wire from each turntable to the mixer’s grounding post. Skipping this step causes a loud 60Hz hum through your speakers.

Connect Speakers and Headphones

Run RCA cables from the mixer’s master output to your powered speakers. Plug headphones into the mixer’s headphone jack — usually 1/4-inch on the front panel.

The mixer’s master volume controls speaker level. The headphone volume and cue buttons control what you hear in your headphones independently from the speakers.

Set Gain Levels

Play a track on each channel and adjust the channel gain (trim) knob until the level meter peaks in the yellow zone — never in the red. Red means clipping, which adds distortion that no amount of EQ can fix.

Proper gain staging is the single most important technical skill for mixer DJs. Every transition, EQ cut, and effect sounds cleaner when your levels are calibrated correctly.

The Bottom Line

The Pioneer DJ DJM-250MK2 is the best standalone DJ mixer for beginners because it delivers Pioneer club-grade sound quality with DVS support at the entry-level DJM price. For the tightest budget, the Numark M2 proves you can start mixing vinyl for under a hundred and twenty.

A standalone mixer is an investment in hardware that never becomes obsolete — turntables and mixers from the 1990s still work in clubs today. That longevity is something no software-dependent controller can promise.

Frequently Asked Questions

What is a good DJ mixer to start with?

The Pioneer DJ DJM-250MK2 is the best beginner standalone mixer because it delivers the same Magvel crossfader and sound quality found in Pioneer’s professional DJM line. For budget-conscious beginners, the Numark M2 offers essential mixing features with phono inputs at the lowest price.

Do I need turntables to use a DJ mixer?

Yes — a standalone mixer requires external audio sources (turntables, CDJs, or media players) connected to its inputs. The mixer blends those signals but does not play music on its own. If you want to mix without turntables, a DJ controller is the right choice.

What is the difference between a DJ mixer and a DJ controller?

A DJ mixer is a standalone device that blends analog audio from turntables or CDJs — no laptop needed. A DJ controller is a USB device that controls DJ software on your laptop, with a built-in mixer section. Controllers include virtual decks; standalone mixers need external audio sources.

Is a standalone mixer better than a controller?

Neither is better — they serve different setups. A standalone mixer is better for vinyl DJs and CDJ users who want laptop-free reliability. A controller is better for beginners who want the lowest-cost, most portable path to mixing with a laptop and digital music files.

How much does a beginner DJ mixer cost?

Entry-level standalone mixers start around one hundred and twenty (Numark M2) and go up to four hundred (Pioneer DJM-250MK2) for club-grade quality. Professional battle mixers like the DJM-S7 cost over a thousand. Budget controllers with built-in mixer sections start under a hundred.

Alternative Soundproofing Materials (What Works And What Doesn’t)

Alternative soundproofing materials can work, but only when you mean real assembly upgrades like Green Glue, resilient channel, isolation clips, and underlayment instead of DIY wall hacks that never had enough mass or decoupling to matter.

Most buyers get stuck because search results mix those real materials with foam, curtains, towels, and other surface add-ons, so they end up buying a product that solves the wrong problem or barely changes the noise at all.

The practical way through it is to match the material to the job: damping for finished drywall builds, decoupling for open wall or ceiling rebuilds, cavity absorption as support, and underlayment for floor impact control.

Below, I will show you which alternatives belong in walls, ceilings, and floors, when each one makes sense, and where they still need mass and airtightness around them.

Quick Takeaway

Alternative soundproofing materials work best when they are real assembly materials, not household stand-ins. For finished walls and ceilings, Green Glue makes sense inside a new drywall layer; for rebuilds, resilient channel is the lower-cost decoupling route while isolation clips with hat channel are the stronger modern upgrade; for floor replacements, acoustic underlayment helps mostly with impact noise; and for open cavities, mineral wool supports the build but does not replace mass, damping, or decoupling on its own.

Real Alternatives vs Household Hacks

Overview of alternative soundproofing materials

The useful way to read alternative here is not whatever happens to be cheap or easy to hang on a surface.

It is what else can replace or supplement the standard mass-only approach inside a real wall, ceiling, or floor assembly.

The confusion problem

The category gets muddled because articles mix Green Glue, resilient channel, isolation clips, acoustic curtains, foam, egg cartons, and towels into one giant list.

That creates the false impression that every product is just another version of soundproofing, when in reality some belong in real assemblies and others barely affect transmission at all.

The four real jobs

Once you separate the assembly materials from the household fillers, real alternatives usually do one of four jobs: damping, decoupling, cavity absorption, or impact control.

Green Glue handles damping, resilient channel and isolation clips handle decoupling, mineral wool supports the cavity, and floor underlayment targets footfall and structure-borne floor noise.

Those categories are not interchangeable. A damping compound cannot replace decoupling hardware, and underlayment cannot do the job of a rebuilt wall or ceiling assembly.

What falls outside those four jobs

None of those four categories include egg cartons, towels, thin foam, or decorative curtains. Those products do not add enough mass or structural separation to matter.

That is the same boundary explained in does soundproof foam work, where absorption gets mistaken for true blocking.

Wall and Ceiling Alternatives: Damping, Decoupling, and Cavity Fill

Substitutes for traditional soundproofing materials

Once you focus on real assemblies, the wall and ceiling alternatives become much easier to rank.

The best option depends on whether you are overlaying a finished surface or rebuilding from the framing side.

Green Glue As A Damping Alternative

Green Glue makes sense when you are adding a second layer of drywall to a wall or ceiling and want more than just extra mass.

A product like Green Glue Noiseproofing Compound converts vibration between drywall layers into heat, which is why it belongs in real retrofit builds instead of DIY surface hacks.

Resilient channel as a lower-cost decoupling route

Green Glue works on finished surfaces, but when the wall or ceiling is already open to framing, decoupling becomes the bigger lever. Resilient channel is the older budget way to separate new drywall from the studs.

A product like Trademark Soundproofing RC-1 Resilient Channel can still work well in careful wall and ceiling rebuilds, especially in projects closer to soundproofing an existing wall and soundproofing a ceiling.

That does not make resilient channel useless. It just means clips are usually the better answer when labor, framing accuracy, and overall performance matter more than keeping hardware costs down.

Isolation clips as the stronger replacement

Resilient channel gets the job done in careful builds, but it is less forgiving than the modern alternative. Isolation clips paired with hat channel break the vibration path more reliably.

A product like RSIC-1 Resilient Sound Isolation Clips separates drywall from framing more reliably than resilient channel alone, which is why serious rebuilds usually step up to clips when performance matters most.

Mineral wool as the cavity support layer

Damping and decoupling handle the board-level work, but the cavity between the layers still matters. Mineral wool fills that role as a support layer rather than a standalone fix.

It helps inside open cavities in the same assembly-first way covered in soundproofing a wall and how to soundproof a room, but it does not replace mass, damping, or decoupling on its own.

Floor Alternatives: Underlayment and Impact Control

Alternative soundproofing materials organized by surface

Floor projects follow different rules because impact noise matters more there than airborne wall transmission.

That is why underlayment belongs in this conversation while Green Glue and resilient channel usually do not.

Underlayment For Impact-Noise Control

Underlayment is the alternative material that makes sense when you are replacing a floor and want to reduce footfall, chair scrape, and light structure-borne transfer.

A product like FloorMuffler Ultra Seal Underlayment 300SF belongs under a new hard floor, not on top of a finished room as a magic fix.

That is why it fits better with soundproofing a floor and best soundproof underlayment for hardwood than with generic room-hack advice.

When underlayment helps and when it disappoints

That kind of underlayment makes the biggest difference when the complaint is footstep noise from the surface itself.

It disappoints when the real issue is airborne transfer through the whole floor-ceiling assembly, because that is when you usually need a broader system like the one described in soundproofing between floors.

That is why underlayment makes the most sense in upstairs rooms, hard-floor renovations, and condo-style floor builds where footsteps are the main complaint.

It is much less impressive when voices, TV, or bass are already moving through joists, cavities, and ceiling drywall below.

Choosing the Right Alternative by Access Level

Where alternative soundproofing materials stop working

The fastest way to choose the right material is by access level and noise type, not by whatever product sounds most technical.

That keeps you from buying floor underlayment for a wall problem or Green Glue for a project that really needs decoupling.

Finished walls and ceilings

If the room is finished and you are willing to add new drywall, Green Glue is usually the first serious alternative to consider.

It lets you improve a finished surface without opening the framing, though you still need good sealing and realistic expectations about how much one added layer can do.

Open rebuilds

When the wall is already open, the Green Glue retrofit path does not apply — you have direct access to the framing. Start by deciding whether the budget supports resilient channel or a clip-and-hat-channel build.

Clips are the stronger route, resilient channel is the cheaper route, and both work best when paired with insulation, new drywall, and airtight perimeter details.

In practice, the best-performing builds usually stack more than one category together. That means some combination of cavity insulation, decoupling hardware, extra drywall mass, damping, and sealed edges instead of expecting one product to carry the entire result.

Floor projects

Walls and ceilings offer multiple layers to work with, but floor projects usually come down to one material decision. If you are already replacing the floor finish, underlayment is the obvious first alternative.

If you are not replacing the floor at all, it usually makes more sense to look at the whole project cost through soundproof room cost before buying an underlayment that never gets installed where it belongs.

When Alternatives Still Fall Short

Where alternative soundproofing materials stop working

Alternative materials still fail when the build has no mass, no airtightness, or too much flanking around the upgraded surface.

That is why Green Glue still needs drywall, clips still need new board layers, and underlayment still cannot fix a weak shared wall or a leaky door.

When you still need mass

Damping and decoupling help a lot, but they do not replace the need for actual board layers, sealed edges, and full-surface coverage.

If the assembly stays light and leaky, the material will look right on paper and still disappoint in the room.

Bass and flanking: where single materials fail

Even with proper mass and decoupling, alternatives can still underperform when bass or flanking paths are involved. Low-frequency energy and indirect paths are where buyers most often overestimate one material.

If the noise is bypassing the upgraded surface through joists, side walls, ducts, or the floor perimeter, you need a broader assembly strategy rather than just a better product category.

The Bottom Line

Alternative soundproofing materials are real assembly choices like Green Glue, resilient channel, isolation clips, and underlayment — not household fillers.

The right pick depends on whether you need damping, decoupling, cavity support, or impact control. If the build still lacks mass and airtight sealing, the material is only one part of the fix.

Frequently Asked Questions

What is the alternative to resilient channel?

The main modern alternative to resilient channel is isolation clips paired with hat channel. That system decouples drywall from framing more reliably and is usually the stronger choice when performance matters more than budget.

Is Green Glue a real soundproofing material?

Yes, but it is a damping material rather than a standalone barrier. It works between drywall layers in a real wall or ceiling build, not as a paint-on shortcut over an unchanged surface.

Does underlayment soundproof a floor?

Underlayment helps mostly with impact noise from footsteps and hard-floor contact. It can be part of a quieter floor build, but it will not solve all airborne transfer through the full floor-ceiling assembly by itself.

Best Budget MIDI Keyboard — 7 Controllers Under 110 Dollars That Actually Deliver

Best budget MIDI keyboard searches pull up dozens of controllers that look identical in product photos, but the gap between a usable budget controller and a regrettable one comes down to key feel, build quality, and whether the bundled software actually works.

The mistake most budget buyers make is choosing the cheapest option without checking what you sacrifice at that price point. A controller with dead-feeling keys and no velocity sensitivity costs the same as one with responsive keys and bundled DAW software — if you know where to look.

We tested controllers across every price tier under one hundred ten dollars and narrowed the field to 7 that deliver real value. Every pick below was evaluated on key response, build durability, software bundle quality, and verified user feedback at scale.

Below you will find our top budget picks organized by price tier, followed by a practical guide on what to prioritize when your budget is limited.

Quick Takeaway

The best budget MIDI keyboard is the Akai MPK Mini MK3 at ninety-nine dollars — it combines keys, pads, knobs, and bundled software in one package. For under fifty dollars, the Nektar SE25 and midiplus AKM320 both deliver velocity-sensitive keys with plug-and-play USB connectivity. If you need full-size 49-key range on a budget, the Nektar SE49 hits that target for under eighty dollars.

What Makes A Good Budget MIDI Keyboard

What makes a good budget MIDI keyboard

A budget MIDI keyboard needs to clear a minimum quality bar to be worth buying at all. Spending forty dollars on a controller with mushy keys and no velocity sensitivity wastes money you could put toward one that actually improves your workflow.

Velocity Sensitivity Is Non-Negotiable

The single most important feature on any MIDI keyboard — budget or premium — is velocity sensitivity. This means the keys detect how hard you press them and translate that force into MIDI velocity data.

Without velocity sensitivity, every note plays at the same volume regardless of how you touch the keys. That removes the entire expressive dimension that separates a MIDI keyboard from clicking notes with a mouse.

Every controller on this list has velocity-sensitive keys. If you find a cheaper option that lacks this feature, skip it entirely.

Build Quality At Budget Prices

Budget controllers use more plastic than premium ones — that is expected. The question is whether the plastic flexes under normal playing pressure.

We checked each controller for chassis rigidity, key wobble, and connector stability. A USB port that wiggles after three months of use renders the controller unreliable, regardless of how good the keys feel.

Software Bundles Add Hidden Value

A budget controller that ships with a free DAW lite version and virtual instruments effectively saves you an additional hundred or more dollars in software costs. That bundled software is often the difference between a controller that works on day one and one that sits unused because you have nothing to play through it.

The best MIDI keyboards at every price point include legitimate production software — not trial versions that expire.

What Are the Best Budget MIDI Keyboards by Price

Budget MIDI keyboard picks by price tier

Here are 7 budget controllers organized from cheapest to most capable, each serving a different balance of price and features.

Under 50 Dollars

The midiplus AKM320 delivers 32 velocity-sensitive mini keys for under forty dollars. No pads, no knobs, no frills — just keys that respond to your touch and work with any DAW the moment you plug in.

The Nektar SE25 costs ten dollars more but adds automatic DAW integration through Nektar’s software and weighs just 1.3 pounds. If portability matters, this is the lightest controller on the list.

Under 80 Dollars

The M-AUDIO Keystation Mini 32 MK3 steps up from the bare-bones picks by bundling Ableton Live Lite — a fully functional DAW that many professionals use as their primary platform. Fifty-nine dollars gets you 32 mini keys plus production software.

The Nektar SE49 is the standout in this tier. For under eighty dollars, you get 49 full-size synth-action keys — the same key count that costs well over a hundred dollars from M-AUDIO or Novation. If you want two-handed playing range without breaking budget, this is the pick.

The M-VAVE 25 Key MIDI Controller packs the most features per dollar in this tier: 25 keys, 8 drum pads, 8 knobs, and Bluetooth connectivity for eighty dollars. The Bluetooth option lets you produce on a tablet or phone without cables.

Under 110 Dollars

The Akai Professional MPK Mini MK3 is the most popular budget controller for good reason. Twenty-five keys, 8 MPC-style pads, 8 assignable knobs, a built-in arpeggiator, and MPC Beats software — all for ninety-nine dollars. Over 30,000 verified reviews make this the safest budget purchase on the list.

The M-AUDIO Keystation 49 MK3 stretches the budget ceiling to one hundred nine dollars but gives you 49 full-size synth-action keys with transport controls. If you need serious key range and are willing to spend a bit more, this is the best 49-key option at this price.

What Should You Look for in a Budget MIDI Keyboard

Buying guide for budget MIDI keyboards

The picks above cover specific recommendations. This section helps you understand the tradeoffs at each price point so you can make an informed decision even if your exact needs do not match one of our top picks.

What You Get Under 50 Dollars

At this price point, expect 25 to 32 mini keys with velocity sensitivity and USB connectivity. You will not get drum pads, assignable knobs, or bundled DAW software (with rare exceptions like Nektar’s integration software).

These controllers work for basic melody input, simple chord entry, and learning the fundamentals. They are not designed for complex production workflows — but they get your hands on keys for the price of a nice lunch.

What Changes Between 50 And 80 Dollars

This tier adds meaningful upgrades: bundled DAW software (Ableton Live Lite), better build quality, and either more keys (49 full-size) or extra controls (pads and knobs). The Nektar SE49 stands out here because 49 full-size keys at this price is genuinely unusual.

Bluetooth connectivity also appears in this range with controllers like the M-VAVE. Wireless MIDI is convenient for mobile production on tablets and phones, though USB remains more reliable for latency-critical recording.

What 100 Dollars Gets You

At the hundred-dollar mark, you enter the territory of complete production controllers. The Akai MPK Mini MK3 bundles keys, pads, knobs, an arpeggiator, and a full DAW with virtual instruments. That combination typically costs twice as much from competitors.

This is also where key action quality improves noticeably. The M-AUDIO Keystation 49 MK3 at one hundred nine dollars delivers synth-action keys that feel substantially better than budget mini keys.

When To Spend More

If you find yourself limited by mini keys after a few months of production, upgrading to a weighted MIDI keyboard or a 61-key controller makes sense. The budget controllers on this list are designed as starting points — they excel at getting you productive quickly, but dedicated pianists and advanced producers eventually want better key action and more range.

The good news: MIDI is a universal standard. Every project file and workflow you build on a budget controller transfers seamlessly to any upgrade.

The Bottom Line

The Akai MPK Mini MK3 is the best budget MIDI keyboard for most producers because it packs keys, pads, knobs, and software into a single ninety-nine-dollar unit. If ninety-nine dollars stretches your budget, the Nektar SE49 gives you 49 full-size keys for twenty dollars less.

For the absolute tightest budgets, the midiplus AKM320 at under forty dollars proves you do not need to spend much to start making music with a real MIDI keyboard.

Frequently Asked Questions

What is a good starter MIDI keyboard on a budget?

The Akai MPK Mini MK3 at ninety-nine dollars is the most recommended starter because it includes keys, pads, knobs, and bundled software. For tighter budgets, the Nektar SE25 gets you playing for under fifty dollars.

Is it worth getting a MIDI keyboard under 50 dollars?

Yes — even the cheapest MIDI keyboards with velocity-sensitive keys outperform a computer keyboard for music input. Velocity sensitivity alone transforms how your music sounds by capturing dynamics that mouse-drawn notes cannot replicate.

Is the Akai MPK Mini good for budget producers?

The Akai MPK Mini MK3 is the default budget recommendation across the music production community. Over 30,000 verified reviews, a 4.6-star rating, and bundled MPC Beats software make it the safest purchase at ninety-nine dollars. The only limitation is mini keys — pianists who need full-size key feel should look at the Nektar SE49 or M-AUDIO Keystation 49 instead.

What is the best budget MIDI keyboard with weighted keys?

True weighted (hammer-action) keys do not exist in the budget tier under one hundred fifty dollars. The closest option is semi-weighted keys on controllers like the Nektar Impact GXP49, which typically starts around one hundred thirty dollars. If weighted keys are essential, consider saving for a dedicated weighted MIDI keyboard rather than compromising on a budget alternative.

How To Soundproof A Studio (What Works And What To Skip)

How to soundproof a studio is a question that every home producer, podcaster, and musician eventually asks, but only after realizing that acoustic foam on the walls did not stop the neighbor’s lawnmower from ruining a take or keep the drum session from shaking the whole house.

That is why studio soundproofing projects fail so often. Buyers confuse acoustic treatment with sound isolation, spend money on products that improve the room’s internal sound quality without reducing how much noise travels in or out, and then blame the products instead of the approach.

The better way to think about studio soundproofing is to separate studio-first isolation goals from broader music-room containment. Isolation keeps outside noise out and studio noise in, treatment makes the room usable for recording, mixing, or monitoring, and the right build depends on whether the space is for takes, streaming, production, or loud rehearsal.

Below, you will learn what to prioritize first, which materials actually isolate a studio, which common approaches are overrated, and when professional help makes more sense than a DIY build.

Quick Takeaway

How to soundproof a studio depends on separating isolation from treatment. Isolation uses mass, decoupling, damping, and sealing to keep noise in or out. Treatment uses absorbers, bass traps, and diffusers to improve the sound inside the room. Most studio builds need both, but isolation comes first because treatment cannot fix a room that leaks noise through the walls.

A Studio Build Only Works When You Define The Isolation Problem First

Overview of soundproofing a recording studio

Once isolation and treatment are separated, the next job is defining the studio in practical terms.

A vocal booth, mix room, and rehearsal-heavy studio do not ask the shell to do the same job.

The Studio Type Sets The Isolation Standard

The type of studio changes the isolation requirement dramatically. A vocal booth for podcasting, voiceover, or singing usually needs moderate isolation from outside noise but does not generate much noise itself.

A production or mix room needs quiet surroundings and predictable monitoring more than it needs rehearsal-grade containment. That makes outside intrusion, HVAC, and weak openings more important than brute-force band-room construction.

A rehearsal-heavy studio for drums or amplified music is the outer edge of the studio category because it behaves more like a loud music room than a quiet production room. If that is the real use case, compare this page with soundproofing a room for music or soundproofing a room for drums before you assume a generic studio build guide is the right fit.

Home studios in apartments and shared buildings face the hardest constraints because the noise travels through shared walls, floors, and ceilings that you may not be able to modify heavily. That overlap with soundproofing an apartment is worth checking if your studio is in a multi-unit building.

The Main Noise Direction Tells You Where To Spend

Outside noise intrusion — traffic, neighbors, HVAC, footsteps — is the problem when you need a quiet room for recording or mixing. Studio sound leakage — drums, amplified guitars, monitor speakers at mixing volume — is the problem when your studio noise is disturbing others.

Most studios deal with both directions, but the dominant direction determines where the heaviest work needs to go. A podcast or mix room in a noisy neighborhood prioritizes keeping noise out, while a rehearsal-heavy studio in a residential area prioritizes keeping sound in.

Studios Need A Lower Noise Floor Than Normal Rooms

Studios are harder because the performance standard is higher. A bedroom only needs to be quiet enough for sleep.

A studio often needs to be quiet enough for a sensitive microphone or clean monitoring, which is a much lower noise-floor target.

Studios also deal with a wider frequency range. Low-frequency bass from monitors, drums, and amplifiers is the hardest sound to contain because it requires significantly more mass and isolation than mid-range speech or TV noise, which is why studio builds often need more deliberate wall, door, floor, ceiling, and ventilation choices than a general music room.

Most Studio Budgets Should Attack The Shell Before Anything Else

Soundproofing priorities for a studio

With the use case clear, the build order becomes much easier to trust.

In most studios, weak openings and shared structure expose themselves long before exotic construction details do.

Doors, Windows, And Shared Walls Usually Fail First

Yes, almost always. The door is usually the first weak link because most studios start in ordinary rooms with hollow-core doors and visible gaps.

The window is usually next because glass is thin relative to the wall and outside noise shows up fast on microphones. Walls matter most once the openings are improved or when the studio shares structure with a neighbor.

Treating the door first delivers the highest return per dollar in most studio builds. A solid-core door with a proper sweep, perimeter sealing, and a threshold seal can improve isolation more than any single wall upgrade.

If the studio has visible light under the slab, a first-step product like HomeProtect Door Draft Stopper is usually worth trying before you assume the wall assembly is the main bottleneck.

Soundproofing a door and best door sweep for soundproofing cover the specific options.

For windows, adding mass or an air gap with an insert is the standard studio approach because microphones punish glass leakage quickly. Soundproofing windows and best soundproof window inserts cover the window-specific path.

Floors And Ceilings Become Critical When Vibration Enters The Structure

Floors and ceilings matter most when the studio is above or below another occupied space or when stands, monitors, and instruments are feeding vibration into the structure. That is where studio advice stops being generic room advice and starts becoming assembly work.

A floating floor — a decoupled platform that sits on resilient pads rather than directly on the subfloor — is the standard studio approach for severe floor-to-floor transfer. It is also one of the more expensive and disruptive upgrades, which is why it is usually reserved for serious builds rather than casual home studios.

For lighter-use rooms where you want to test whether top-side vibration is part of the problem before building a full platform, TroyStudio Thick Sound Absorbing Interlocking Floor Mats is a more realistic diagnostic step.

Soundproofing a floor and soundproofing between floors cover the assembly options.

If the room’s main problem is daily loud practice, bass containment, or drum rehearsal rather than recording isolation or monitoring, compare this page with soundproofing a room for music and soundproofing a room for drums. Those pages are better at sorting the complaint path before you escalate into full studio-build language.

Room-Within-A-Room Is Reserved For Severe Isolation Targets

A room-within-a-room makes sense when the isolation requirement is severe — typically for professional recording studios, drum rooms, and any space where loud sound needs to be fully contained without affecting the surrounding building.

The concept is exactly what it sounds like: a second set of walls, floor, and ceiling built inside the existing room with an air gap between the two shells. The air gap and the decoupled construction prevent vibration from transferring between the shells, and the added mass of the second shell blocks airborne sound.

This is the gold standard for studio isolation, but it is also the most expensive and space-consuming approach. Most home studios do not need a full room-within-a-room build.

A well-executed single-shell upgrade with mass, decoupling, damping, and sealing can achieve enough isolation for home recording, podcasting, streaming, and moderate-volume production.

Studio Soundproofing Uses Layered Assemblies, Not One Miracle Material

Materials used for studio soundproofing

Once the shell priorities are clear, material choices stop looking mysterious.

What matters is the job each layer performs inside the assembly.

Mass Materials Carry The Heaviest Part Of The Load

Mass loaded vinyl (MLV) and multiple layers of drywall are the two most common mass-adding materials in studio builds. MLV like Trademark Soundproofing Mass Loaded Vinyl is installed between drywall layers or directly on the studs before the finish layer.

Double drywall with a damping compound between the layers adds both mass and vibration damping.

Dense insulation in the wall and ceiling cavities — mineral wool or fiberglass batts — adds absorption inside the assembly, which reduces the resonance that would otherwise amplify certain frequencies through the structure. A stud-bay product like AFB Acoustical Fire Batts fits the studio case when the walls or ceiling are already open, because it improves cavity absorption without pretending to replace the heavier layers.

Damping And Decoupling Keep Vibration From Bridging The Shell

Viscoelastic damping compounds (like Green Glue) applied between drywall layers convert vibration energy into heat, which reduces the amount of sound that transmits through the panel. A product like Green Glue Noiseproofing Compound makes sense once the studio build is moving past surface fixes and into real layered construction.

Resilient channels and sound isolation clips decouple the drywall from the studs so vibration cannot travel directly from the structure into the finish surface.

Acoustic sealant around every joint, penetration, and edge of the assembly is the final critical material. Sealant closes the air paths that would otherwise let sound bypass the mass and decoupling you just installed.

A studio with excellent mass and decoupling but unsealed joints will still leak noticeably.

Foam And Decorative Fixes Are Easy To Overrate

Acoustic foam is the most overrated studio material because it is marketed as “soundproofing” when it is actually acoustic treatment. Foam absorbs reflections inside the room, which improves recording clarity and reduces echo, but it adds almost no mass to the wall and does not block sound from entering or leaving.

Acoustic panels are excellent for treatment after the isolation is built, but they should never be confused with soundproofing materials. If you are choosing between treatment panels and MLV for a studio that leaks noise, the MLV addresses the isolation problem while the panels do not.

Thin decorative panels, tapestries, and egg cartons are the other common overrated options. They change the look of the room but contribute almost nothing to either isolation or meaningful acoustic treatment.

Most Failed Studio Builds Confuse Treatment With Isolation

Common studio soundproofing mistakes

The most expensive mistakes usually happen after people buy treatment products for an isolation problem.

The room sounds more controlled inside, but the barrier itself stays weak.

Panels Improve The Room But They Do Not Strengthen The Barrier

Because panels are porous and lightweight. They absorb sound energy inside the room by reducing reflections, but they do not add mass to the wall structure and cannot block sound from passing through.

Covering every wall with foam panels will make the room sound dead and dry inside, but the neighbor’s TV will be just as audible and your drum session will still shake the building.

This distinction between treatment and isolation is the most important concept in studio soundproofing. Does soundproof foam work and acoustic treatment vs soundproofing both cover this boundary in detail.

Small Gaps Can Undo Heavy Construction

Because sound follows the path of least resistance. A studio with excellent wall isolation but a hollow-core door with a visible bottom gap will perform as if the walls were barely treated because most of the sound enters and exits through the door.

The same applies to unsealed electrical outlets, light switches, HVAC penetrations, and any opening that creates an air path through the barrier. A bead of acoustic caulk around outlet boxes, perimeter joints, and service penetrations is one of the cheapest and most impactful steps in any studio build because it closes the leaks that would otherwise bypass the rest of the assembly.

Professional Design Pays Off When The Noise Floor Must Be Truly Low

Call a professional when the studio needs to handle loud sound sources, meet a recording-grade noise floor, or add ventilation without giving back the isolation. A studio acoustician can model the room, specify the assembly, and verify the result with measurements.

Professional help is also worth considering when the studio is in a rented space, a multi-story building, or a situation where noise complaints could become a legal issue. Getting the build right the first time is cheaper than retrofitting a failed DIY attempt, especially once fresh-air and HVAC paths have to stay usable without turning into leak paths.

For broader context, compare this page with soundproofing a wall, soundproofing a ceiling, best insulation for soundproofing, best soundproofing material, and the broader soundproofing hub so the studio build stays grounded in the same assembly principles that apply to every other room.

The Bottom Line

How to soundproof a studio comes down to separating isolation from treatment and matching the shell to a studio-first use case. Mass, decoupling, damping, and sealing are the four pillars of studio isolation, and they need to work together across every surface — walls, ceiling, floor, door, and window — to deliver real results.

For most home studios, the best first step is upgrading the door, sealing every air gap, and adding mass to the weakest wall or ceiling section. Those three upgrades address the biggest leak paths at the lowest cost, and they give you a clear baseline for deciding whether heavier construction like resilient channels, double drywall, or a floating floor is worth the additional investment.

If your real goal is mostly loud music practice, bass playback, or drum rehearsal rather than recording or monitoring, compare this page with soundproofing a room for music and soundproofing a room for drums. Those pages own the broader music-room lane, while this one is strongest when the room has to behave like a real studio.

Frequently Asked Questions

How do I reduce noise in my studio?

Reduce noise in your studio by identifying the weakest barrier — usually the door or window — and treating it with mass, sealing, and a better closure. Then add mass and insulation to the walls and ceiling as budget allows, focusing on the surfaces closest to the noise source.

Does rockwool soundproof?

Rockwool helps with soundproofing when used inside wall or ceiling cavities because it adds density and absorption to the assembly. It is not a standalone soundproofing solution, but it improves the performance of a wall system when combined with proper mass, decoupling, and sealing.

What materials block high frequency sound?

Dense, heavy materials like mass loaded vinyl, multiple layers of drywall, and sealed assemblies are the most effective at blocking high-frequency sound. High frequencies are easier to block than low frequencies because the sound waves are shorter and lose energy more quickly when they hit a massive barrier.

Best MIDI Keyboard for Beginners — 6 Controllers That Will Not Overwhelm You [2026]

Best MIDI keyboard for beginners searches return hundreds of options, but most reviews fail to answer the question that actually matters: which controller lets a complete beginner start making music in minutes without drowning in features they do not understand yet?

The mistake most first-time buyers make is grabbing whatever has the most buttons and pads. More controls means more confusion when you have not learned what MIDI even does yet.

We tested controllers specifically through the lens of a beginner — setup speed, bundled software quality, learning curve, and whether you will outgrow it in three months. These 6 picks balance simplicity with enough capability to grow into.

Below you will find our top picks sorted by use case, followed by a guide on what actually matters when choosing your first MIDI keyboard.

Quick Takeaway

The best MIDI keyboard for beginners is the Akai MPK Mini MK3 — it combines keys, pads, and knobs in one affordable unit with bundled software included. If budget is tight, the midiplus AKM320 gets you playing for under forty dollars. Beginners who want to learn piano-style playing should start with a 49-key model like the M-AUDIO Keystation 49 MK3 or Nektar SE49.

How We Chose the Best Beginner MIDI Keyboards

How beginner MIDI keyboards were chosen

A beginner MIDI keyboard needs to do one thing above all else: get out of your way so you can focus on learning. We scored every controller on four criteria that matter most to someone who has never touched a MIDI device before.

Setup Speed

The single biggest barrier for beginners is the gap between unboxing and making sound. Every controller we recommend works over USB plug-and-play — no driver downloads, no MIDI routing configuration, no audio interface required.

We timed each controller from plugging in to hearing the first note through bundled software. Controllers that required more than five minutes of setup lost points immediately.

Bundled Software Quality

A MIDI keyboard without software is like a steering wheel without a car. Beginners who do not already own a DAW need bundled software that works on day one.

We evaluated the included DAW lite versions and virtual instruments for each controller. The best bundles (like Akai’s MPC Beats + plugin suite) give you a complete production environment.

The worst bundles give you a trial version that expires in 30 days.

Room To Grow

A controller you outgrow in two months is a waste of money. We looked for features that beginners will not use immediately but will appreciate as their skills develop — assignable knobs, drum pads, arpeggiators, and DAW-specific integration modes.

The sweet spot is a controller that feels simple on day one but reveals deeper capabilities as you learn. That eliminates both bare-bones keyboards with zero extras and complex studio controllers with 50 buttons.

Price-To-Capability Ratio

Beginners should not spend premium prices on features they cannot use yet. We weighted value heavily — a controller that delivers 80 percent of the functionality at 50 percent of the price wins over a marginally better unit that costs twice as much.

Every pick on this list falls between thirty and one hundred ten dollars. That range covers everything from basic key input to full production controllers with pads, knobs, and professional-grade software bundles.

What Are the Best MIDI Keyboards for Beginners

Top MIDI keyboard picks for beginners

Here are the 6 controllers we recommend for beginners, each serving a different starting point.

The Akai Professional MPK Mini MK3 is the best overall choice for beginners because it covers every production workflow in one compact unit. The 25 mini keys handle melodies, the 8 MPC-style pads handle beats, and the 8 assignable knobs handle mixing — all for under a hundred dollars with MPC Beats software included.

If you want full-size keys for two-handed playing and eventual piano learning, the M-AUDIO Keystation 49 MK3 gives you 49 synth-action keys with transport controls. The full-size keys let you practice proper finger positioning from day one instead of developing bad habits on cramped mini keys.

The Nektar SE49 delivers the same 49-key full-size layout for thirty dollars less than the M-AUDIO. You lose transport controls, but you gain automatic DAW integration through Nektar’s software at a price point that is hard to beat.

For the tightest budgets, the midiplus AKM320 proves you do not need to spend much to start learning. Thirty-two velocity-sensitive keys for under forty dollars — plug it in and play.

The M-AUDIO Keystation Mini 32 MK3 fits in a backpack and includes Ableton Live Lite — a legitimate DAW that many professionals still use as their primary platform. If portability matters more than key count, this is your pick.

And the Donner N-25 Mini MIDI Keyboard packs keys, pads, and knobs into a sub-fifty-dollar package with Bluetooth connectivity. The build quality cannot match the Akai at twice the price, but the feature set per dollar is exceptional for beginners testing the waters.

What Beginners Should Look For

What beginners need in a MIDI keyboard

The Top Picks section gives you specific recommendations. This section helps you understand why those picks work, so you can make your own decision if none of them fit your exact situation.

Key Count: Start With 25 Or 49

Twenty-five keys are enough for single-hand melodies, bass lines, and synth parts. Beat makers and electronic producers rarely need more because octave buttons let you shift the range instantly.

Forty-nine keys suit beginners who want to learn piano-style playing alongside production. Two-handed chord progressions require at least four octaves, and 49-key controllers provide that range without taking over your entire desk.

Skip 88-key models as a beginner unless you are specifically studying classical piano. The extra cost and desk space are not justified until you know you need the full range.

Bundled Software Saves Hundreds

A beginner-friendly controller that ships with a DAW lite version and virtual instruments saves you from spending an additional hundred to three hundred dollars on software before you can make any sound.

The best MIDI keyboards include legitimate production software. Akai bundles MPC Beats, M-AUDIO bundles Ableton Live Lite, and Novation bundles both Ableton Live Lite and their own sound packs.

These are not demos — they are full working applications with no expiration date.

Pads And Knobs Are Nice But Not Essential

If you plan to make beats, drum pads add real value from day one. If you plan to play melodies and chords, you can skip pads entirely and save money on a keys-only controller.

Assignable knobs become useful once you start sound design and mixing. As a beginner, you will spend most of your time learning to play notes before you start tweaking filter cutoffs.

Knobs are a “nice to have” that becomes “essential” roughly six months into your production journey.

Avoid These Beginner Mistakes

Buying a weighted keyboard as your first MIDI controller is overkill unless you are specifically learning classical piano. Weighted keys add cost and weight without benefiting beat makers or electronic producers.

Choosing a controller based on the number of buttons is another common trap. A 25-key controller with 8 pads, 8 knobs, and bundled software outperforms a bare 61-key controller with nothing else for most beginner workflows.

The Bottom Line

The Akai MPK Mini MK3 is the safest first purchase because it covers keys, pads, knobs, and software in one unit — and over 30,000 verified buyers agree. If you want full-size keys for piano practice, the Nektar SE49 gives you 49 keys for under eighty dollars.

Start with what fits your budget and workflow. You can always upgrade later — MIDI is a universal standard, so every project file and skill you build transfers to any future controller.

Frequently Asked Questions

Is the Akai MPK Mini good for beginners?

The Akai MPK Mini MK3 is the most recommended beginner controller for good reason. It combines 25 velocity-sensitive keys, 8 MPC-style drum pads, 8 assignable knobs, and bundled MPC Beats software in a compact USB-powered package.

Over 30,000 reviews confirm its reliability.

Can a beginner use a MIDI keyboard without knowing piano?

You do not need piano skills to use a MIDI keyboard productively. Beat makers use single-finger melodies and pad triggers.

Electronic producers use three or four keys at a time for chord stabs. Even basic note input sounds more natural on a MIDI keyboard than mouse-drawn notes because the velocity variation is real.

Is it worth getting a MIDI keyboard or should I use my computer keyboard?

A dedicated MIDI keyboard is worth it even at the lowest price point. Computer keys have no velocity sensitivity — every note hits at the same volume with zero expression.

A forty-dollar MIDI keyboard like the midiplus AKM320 adds dynamics that transform how your music sounds.

What DAW should beginners use with a MIDI keyboard?

Start with whatever comes bundled with your controller. Akai controllers include MPC Beats. M-AUDIO and Novation controllers include Ableton Live Lite. All three are capable enough for years of learning. GarageBand (free on Mac) is another excellent starting point. Upgrade to a full DAW like FL Studio, Ableton, or Logic Pro only when you hit the limits of the lite version.