How To Make Your Backyard Soundproof (What Actually Works Outdoors)

How to make your backyard soundproof sounds like an outdoor version of room soundproofing, but that is exactly where most bad advice starts.

A yard has open sides, open sky, and far more flanking paths than a sealed room, so the usual indoor fixes fall apart fast. Foam panels, studio blankets, decorative screens, and most sheet-based indoor materials do not survive weather well and do not solve the core outdoor path anyway.

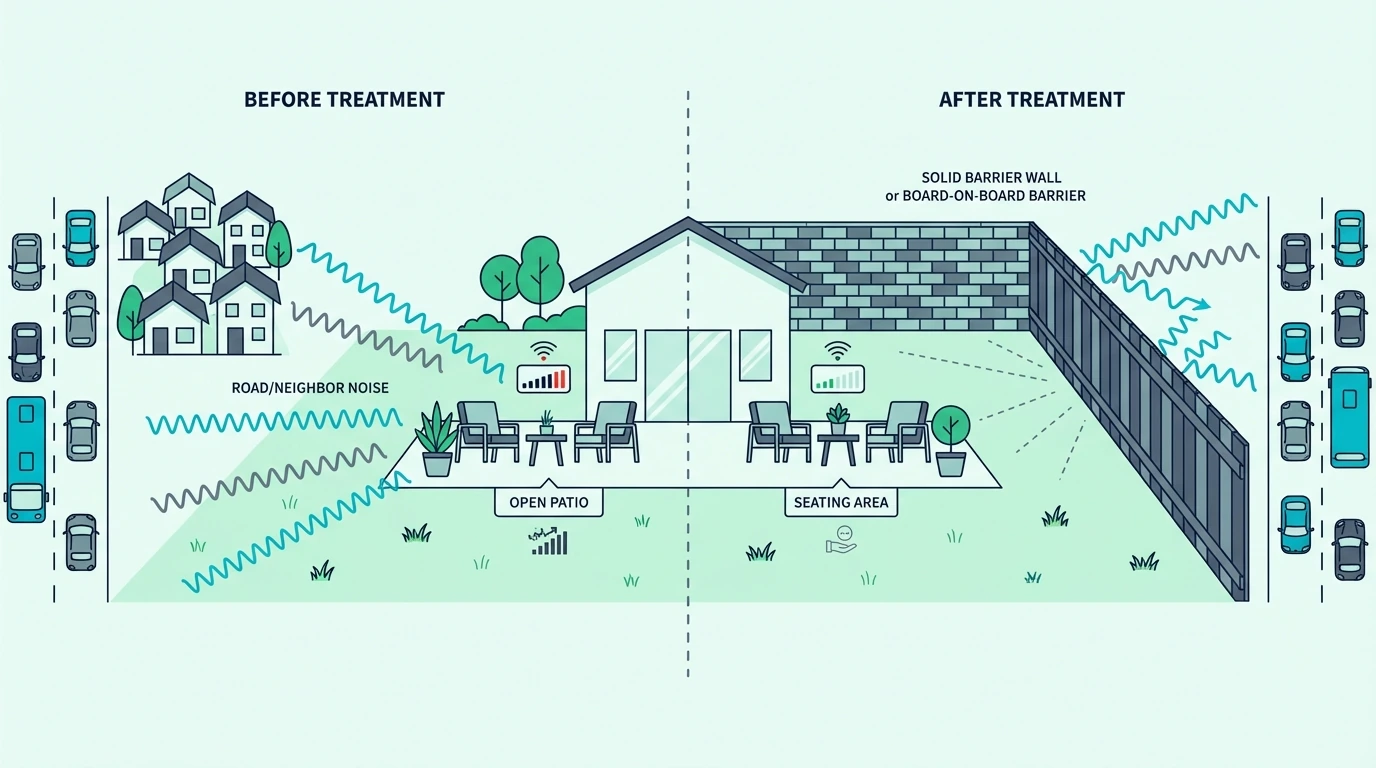
The real outdoor strategy is narrower and more structural. If you want the yard itself to feel quieter, the main answer is a solid, weatherproof barrier wall or fence with no gaps, enough height, and the right placement between you and the noise source.

If the same noise is also getting into the house, the next layer is improving the building envelope with better windows, heavier doors, tighter seals, and in some cases wall or floor work. Those are house-side follow-up fixes, not exposed backyard treatments.

The sections below walk through what actually works outdoors, when a barrier wall is the right move, when the house itself needs treatment, why complete backyard silence is unrealistic, and which outdoor noise ideas are mostly hype.

Quick Takeaway

How to soundproof a backyard really means reducing outdoor noise with a solid barrier wall or fence, then fixing the house-side weak points if noise still gets indoors. Weatherproof mass and continuity are what matter outside, which is why masonry, concrete, dense timber, and composite barriers belong in this conversation while foam, fabric panels, blankets, and exposed MLV do not. Product-style recommendations only become relevant once the noise path reaches the house envelope at the windows, doors, or interior wall build.

How To Make Your Backyard Soundproof

Overview of backyard soundproofing options

Now that the outdoor-versus-indoor split is clear, the first step is deciding whether you are trying to quiet the yard itself, the house beside it, or both.

If your main goal is… Start here What usually comes next
A quieter patio, deck, or seating zone Solid barrier wall, fence, or return screen in the loudest direction Tighten gaps at gates, fence edges, and bottom lines
Less outdoor noise getting into the house Barrier where it best interrupts the path Windows, doors, and wall upgrades on the house side
Both a calmer yard and calmer nearby rooms Outdoor barrier first, then diagnose the building envelope Sealing, glazing, heavier doors, or wall/floor follow-up

Identifying The Noise Type

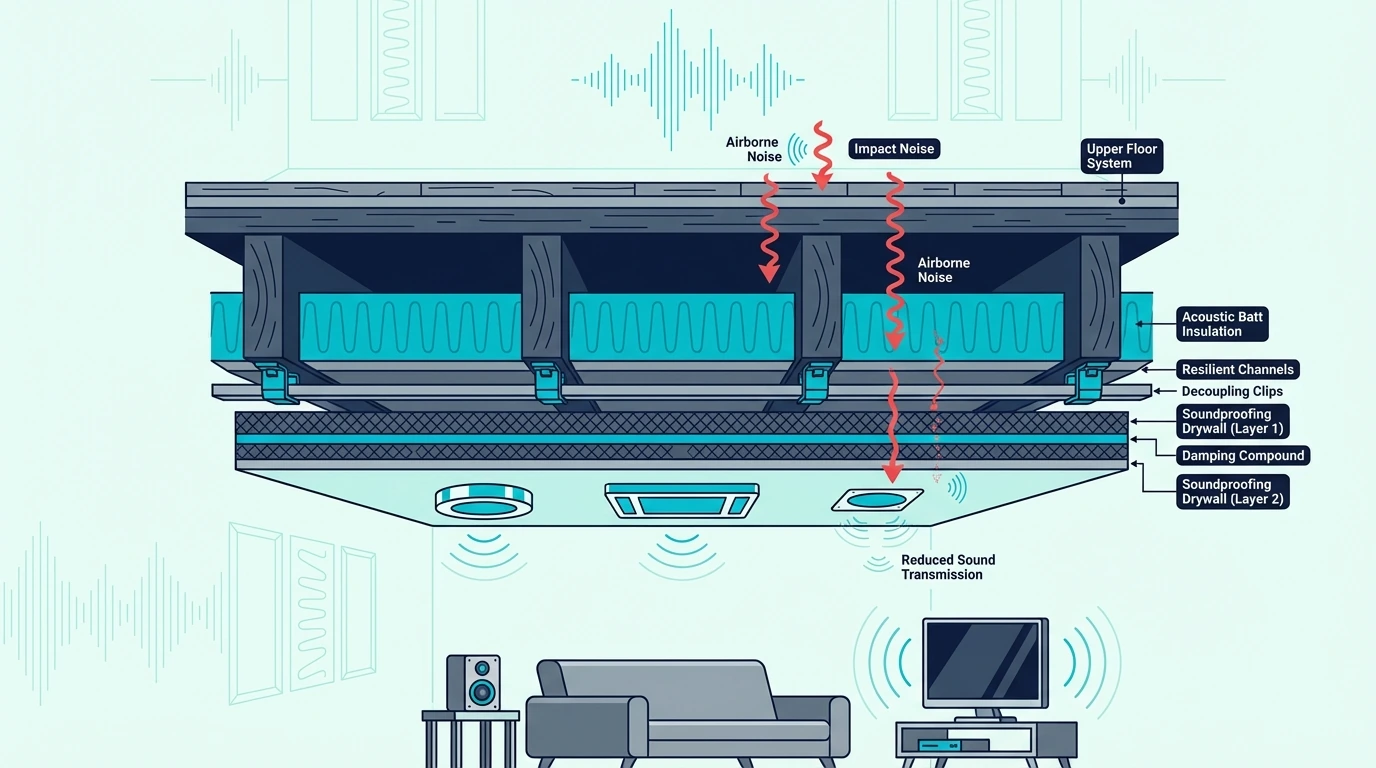
The noise path changes the fix. Airborne traffic, neighbor conversations, music, and yard equipment are barrier problems, while structure-borne rumble that makes the house floor or walls vibrate is a different class of issue that usually needs floor isolation or broader outside-noise room treatment.

Why Outdoor Sound Travels So Easily

Once you know the noise type, the next question is why it reaches you so easily—sound travels in open air with almost nothing to stop it, which is why outdoor projects depend so heavily on line-of-sight blocking. Indoors, you can seal a room and build mass into every surface, but a backyard has open sides, open sky, and far more flanking paths.

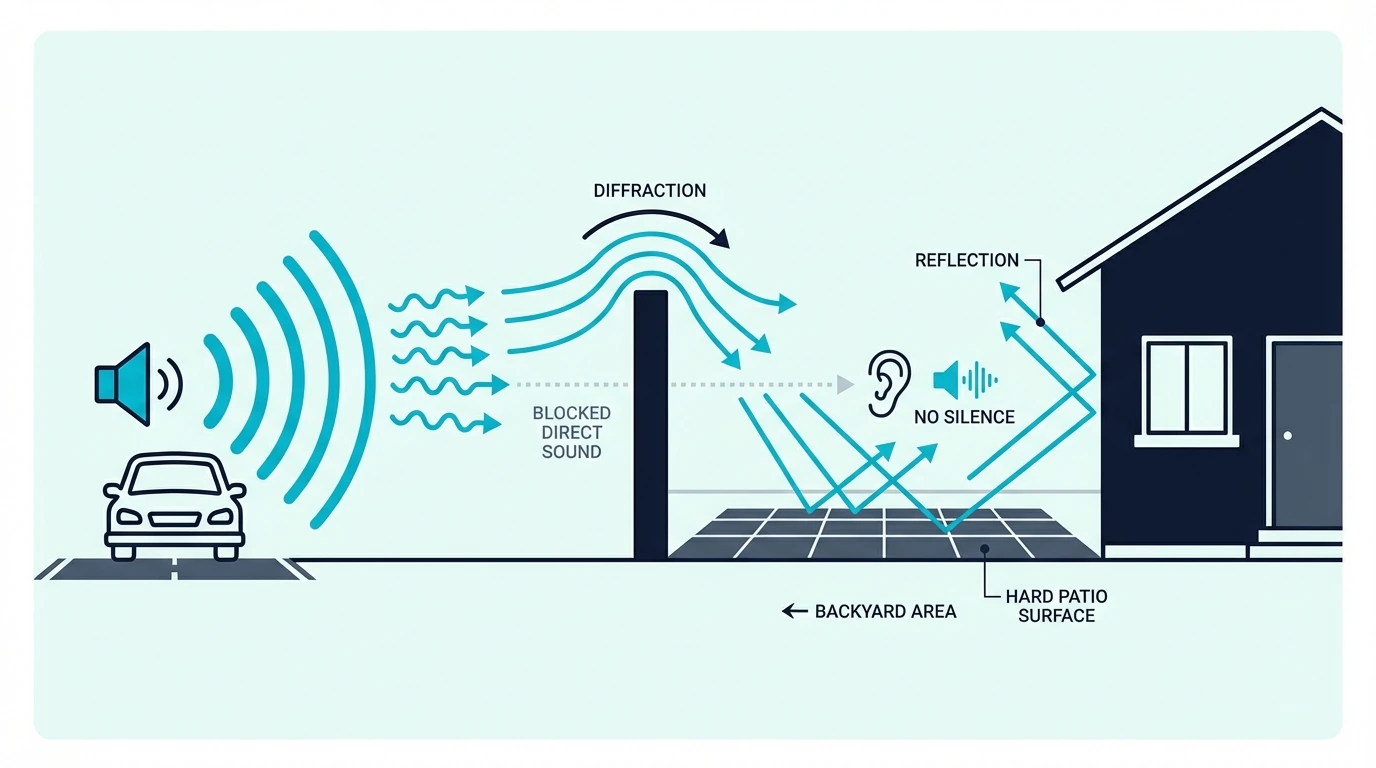
Hard surfaces like concrete patios, masonry walls, and siding also reflect sound back into the listening area. That is why a patio can feel louder than the source alone would suggest even when the yard looks partially enclosed.

Realistic Improvement Levels

That easy outdoor travel sets the ceiling for how much any barrier can help—a solid, continuous wall or gap-free fence can often reduce perceived noise by roughly 5–10 dB when the source is at or near barrier height. That is enough to make speech less intelligible and everyday traffic less dominant at a patio or seating area.

Total silence is not achievable outdoors because sound diffracts over and around barriers and reflects off nearby hard surfaces. The goal is always reduction, not elimination, and the best projects accept that from the start.

The Most Effective Outdoor Noise Fixes

Outdoor noise reduction solutions for a backyard

Once the goal is clear, the most effective outdoor noise reduction still comes down to one idea: heavy, continuous barriers placed between you and the noise source.

Fences And Barriers

Fences help most when they are solid, tall, continuous, and positioned close to either the noise source or the listening area. Masonry, concrete block, rendered brick, dense timber board-on-board, and well-built composite fences fit this job far better than chain-link, lattice, slatted screens, or fabric windscreens.

Height still matters because the barrier only works on the sound path it actually intercepts. A 6-foot barrier can help with ground-level traffic and neighbor activity, but taller and denser assemblies perform better when local code and site conditions allow.

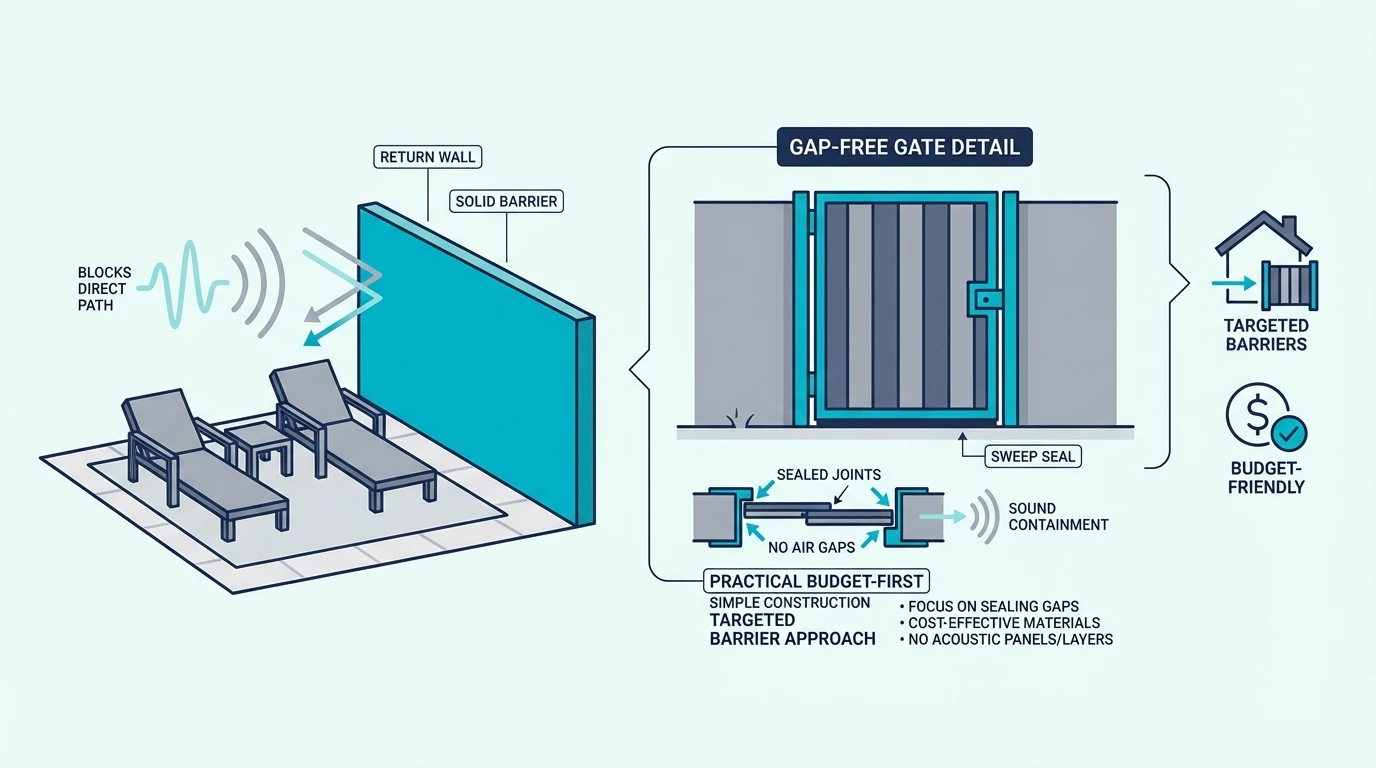
The key idea is continuity, not a specialty sheet product. If you can see daylight through the fence or around the gate, sound will use that opening.

Landscaping As A Companion Layer

A solid fence handles the heavy blocking, but landscaping can only soften noise slightly—the effect is modest unless the planting depth is extremely large. A single row of hedges or trees adds privacy and visual screening, yet it does not replace the mass of a true barrier wall.

Landscaping works best as a companion to the real barrier rather than the barrier itself. Use it to support privacy, reduce harsh reflections, and improve how the space feels, but rely on solid construction for the actual noise reduction.

Source Direction And Barrier Placement

Landscaping helps the feel, but where the barrier sits matters more than most people expect. A wall close to the source or close to the seating area intercepts a bigger portion of the sound path than a barrier stranded in the middle of the yard.

That is why a small return wall or privacy screen around the patio can outperform a weak perimeter fence in the spot that matters most. If the house is still the main receiver, move next to window upgrades, door sealing and heavier slabs, or wall upgrades rather than adding random outdoor treatments.

If the door or window frame still has obvious leakage, 33 Ft Self-Adhesive Soundproofing Weather Stripping is the kind of low-cost house-side test that helps confirm whether leakage is still the bottleneck before you spend on heavier glazing or a new door. It belongs on the protected building envelope, not on the outdoor barrier itself.

Why Complete Outdoor Silence Is Unrealistic

Limits of making a backyard soundproof

That barrier logic helps, but it also has a ceiling. Understanding that limit keeps expectations realistic and saves money on outdoor fixes that overpromise.

Low Frequencies And Distant Roads

Low-frequency sound waves are long, carry more energy, and diffract more easily around and over barriers. A fence that helps with speech or general neighbor activity may barely touch the low rumble of heavy traffic because the bass energy keeps bending past the obstacle.

Distant roads are also hard to stop because the sound arrives from a wide angle instead of one tidy point source. A barrier can block the direct line, but reflections and over-the-top travel still reach the yard.

Gaps In The Fence

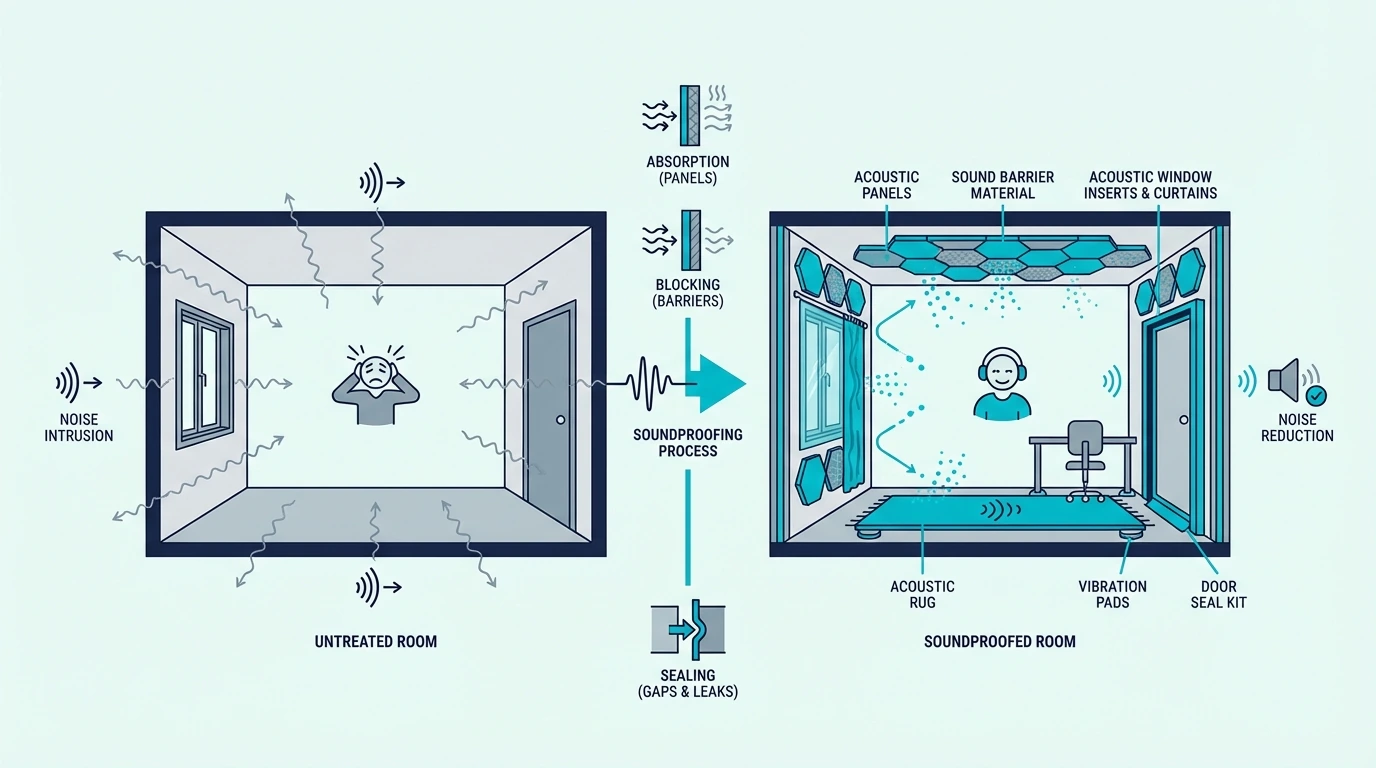
Low frequencies bend over barriers, but gaps let everything through at full strength—they defeat the heavy section beside them just like gaps around a door or window. The same weak-link principle shows up in soundproofing a door and soundproofing windows, where sealing often changes performance more than a thicker surface alone.

That is why bottom gaps, loose gates, and misaligned boards deserve attention before exotic materials. Board-on-board, tongue-and-groove, and well-sealed gate edges work because they remove the easy path.

When Good Enough Is Good Enough

Sealing gaps and managing low frequencies covers the outdoor side, so a backyard solution is good enough when the yard becomes usable and the house interior is no longer taking the same noise hit. If outdoor comfort improves but indoor noise still dominates, the bottleneck has moved to the house.

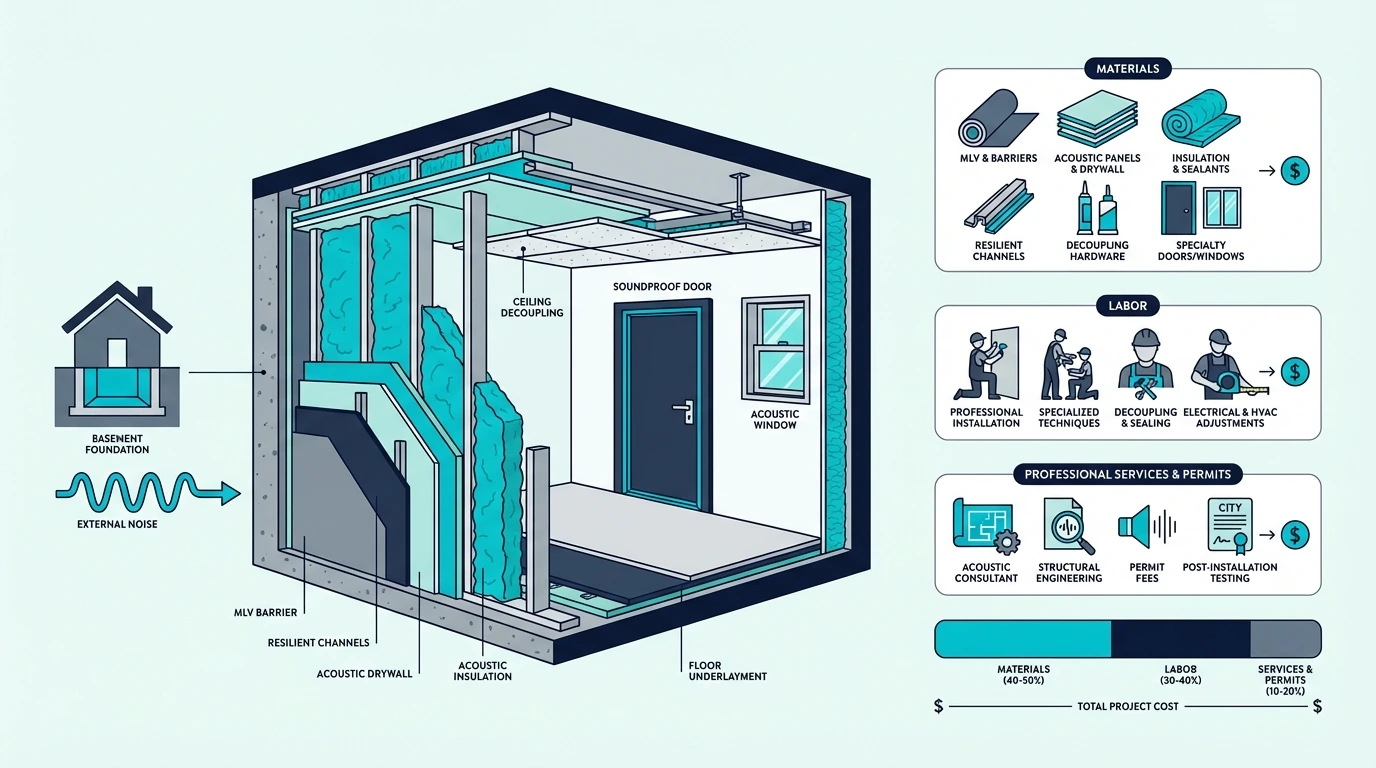
That is the point where a protected interior insert build with Trademark Soundproofing Mass Loaded Vinyl, better glazing, heavier doors, or upgraded existing walls becomes more relevant than any extra layer you could hang outside. This is an indoor follow-up step after the yard barrier has already done what it can.

If heavy trucks, rail, or nearby mechanical systems are creating actual vibration underfoot, a fence will not solve it because the problem is structure-borne. That is when floor treatment or specialist decoupling advice becomes more relevant than anything you can hang outdoors.

Reducing Backyard Noise On A Budget

Budget planning for backyard soundproofing

Once the limits are clear, the budget version gets easier to prioritize. Budget outdoor fixes work best when focused on solid construction and the exact area where you actually sit.

Budget Fixes That Actually Help

Closing gaps in an existing fence is still the cheapest effective move. Adding overlapping boards, sealing the bottom gap, stiffening loose sections, and making sure the gate closes tightly can turn a weak boundary into a meaningfully better barrier.

If a full perimeter rebuild is out of budget, build one solid patio-side screen or short return wall in the noisiest direction. That often creates a noticeably calmer seating zone for less money than trying to treat the whole yard at once.

Outdoor Noise Ideas That Are Mostly Hype

Those budget fixes work because they add real mass or seal real gaps—which is why water features, bamboo screens, lattice, and thin fabric windscreens fall short, since they mainly change what you see or focus on. They may improve comfort or provide masking, but they do not deliver real outdoor sound blocking because they lack mass and continuity.

Outdoor rugs, cushions, and soft furnishings can reduce a bit of harsh reflection around the patio, which makes the space feel less sharp. They do not block incoming traffic or neighbor noise, so they should be treated as comfort upgrades rather than soundproofing.

Focusing On One Seating Zone

With the hype cleared out, the budget question becomes where to concentrate—one zone is almost always the most cost-effective approach. Building a small privacy wall, pergola-side screen, or dense return barrier around the patio costs far less than rebuilding the entire property line and usually delivers a bigger improvement where you actually spend time.

If the house interior is still the bigger complaint, spend the next dollar on window inserts, better glazing, tighter doors, or broader outside-noise treatment instead of temporary outdoor add-ons.

Fixing The House Instead Of The Yard

Common backyard soundproofing mistakes

Most outdoor noise-reduction failures come from applying indoor logic outside or from spending more on the yard after the real bottleneck has already moved to the house.

Indoor Materials On An Exposed Fence

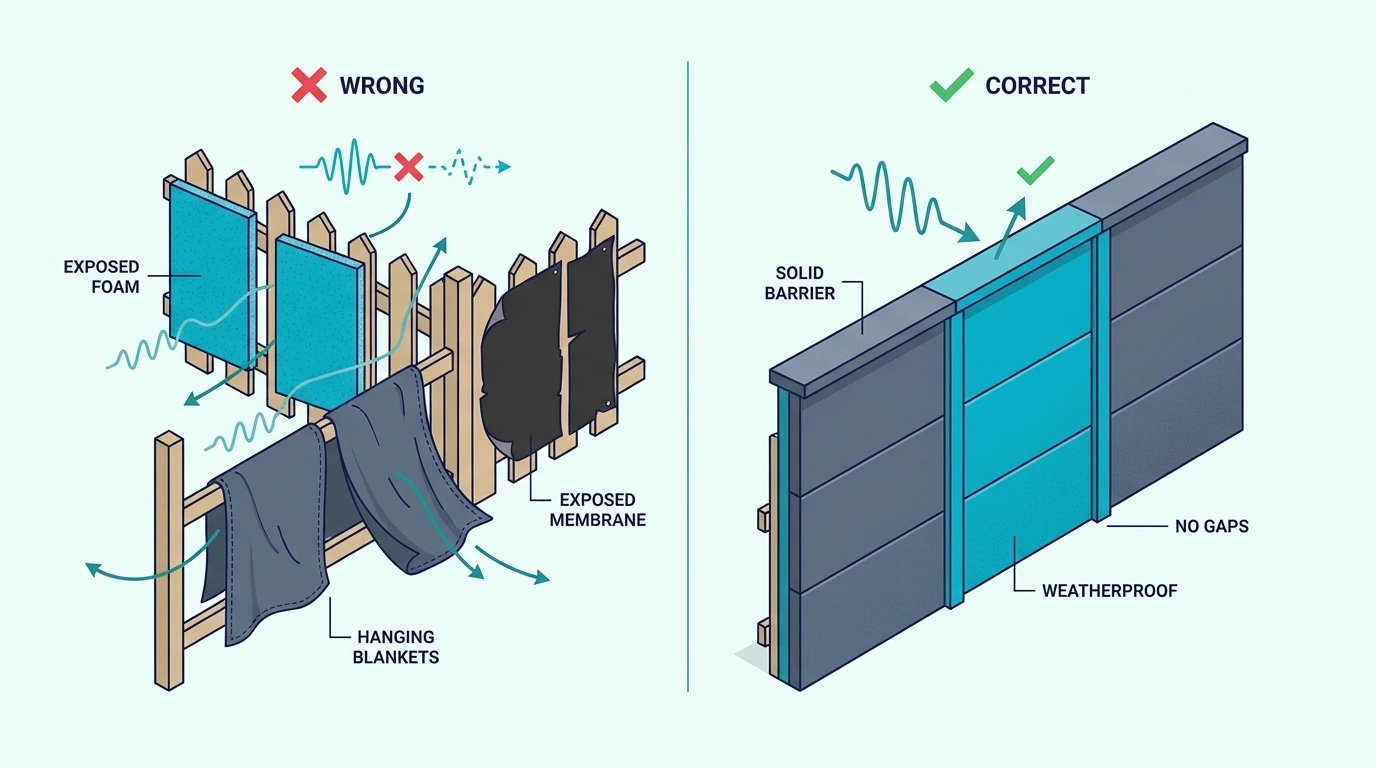
Acoustic foam, fabric panels, studio blankets, and exposed MLV are not designed for rain, UV, humidity, dirt, and temperature swings. Even before weather damages them, they still do not behave like a durable outdoor barrier because they are too light, too exposed, or too maintenance-heavy.

That is why an exposed backyard should be framed around solid construction, not soft add-ons. If a material cannot live outside full time, it should not be the center of an outdoor recommendation.

Windows, Doors, And Walls As The Next Step

Those indoor materials fail outside, but they perform where the house envelope actually needs them—and once the yard barrier is doing what it can, the house envelope is often the next bottleneck. If the patio feels better but the same traffic or neighbor noise still gets indoors, the next dollar usually belongs on windows, doors, trim joints, or the wall assembly rather than on more exposed outdoor add-ons.

If the handoff is still at the sealing stage, a bead of Acoustical Caulk (29 oz) around trim joints and frame cracks is a more honest first move than trying to hang more material outside. If the next step is a protected interior build, Trademark Soundproofing Mass Loaded Vinyl belongs inside a protected wall or insert build, not hanging in the weather.

Calling A Contractor Or Acoustic Consultant

When the project crosses from sealing and patching into structural construction, professional help becomes the safer path. That means a permanent masonry wall, a taller boundary upgrade, a custom gate detail, or a build that has to satisfy local setback and height rules. The same applies when the real next step is acoustic glazing, heavier door assemblies, wall upgrades, or decoupling inside the house.

For broader context on the house-side fixes that often follow a backyard barrier project, compare this page with soundproofing a room from outside noise, soundproofing windows, soundproofing a wall, soundproofing a floor, and the broader soundproofing hub.

The Bottom Line

How to make your backyard soundproof in the real world means building a solid, weatherproof, gap-free barrier where it actually intercepts the sound path. The outdoor answer is not foam, blankets, or exposed MLV but dense construction that can survive weather and keep its performance over time.

If the same noise is also entering the house, move quickly to the house-side weak points with better glazing, heavier doors, wall upgrades, and vibration control where needed. A quieter patio is realistic, but complete outdoor silence is not.

Frequently Asked Questions

How do I soundproof my backyard?

Soundproof your backyard by building or upgrading to a solid, continuous, gap-free barrier wall or fence and placing it where it best interrupts the sound path. If the noise still gets into the house, treat the windows, doors, or walls next.

How to block out 100% of noise?

Blocking 100% of outdoor noise is not possible because sound travels over, around, and through barriers in open air. The realistic goal is making the yard and nearby rooms meaningfully quieter, which is achievable with the right barrier and building-side follow-up.

How to block sound from neighbor’s yard?

Block sound from a neighbor’s yard by upgrading the shared boundary to a solid, tall, gap-free fence or wall and tightening every weak point around the gate and bottom edge. A smaller screen around the patio can also help if the seating zone is the main priority.

What should I not use outdoors for backyard soundproofing?

Do not treat acoustic foam, studio blankets, fabric panels, or exposed MLV as permanent exposed-yard solutions. They either fail in weather, lack enough mass, or create a maintenance-heavy setup that is weaker than a proper outdoor barrier build.

Best MIDI Keyboard — We Tested 8 Controllers So You Do Not Have To

Best MIDI keyboard options flood Amazon with nearly identical-looking 25-key controllers, but the differences between them determine whether your production workflow speeds up or grinds to a halt.

The problem is not finding a MIDI keyboard — it is finding the right one. A beat maker who buys an 88-key weighted controller wastes money and desk space.

A pianist who grabs a 25-key mini controller struggles with cramped keys that ruin their playing technique.

We narrowed it down to 8 controllers that actually deserve your money, sorted by use case so you can skip the research and get to making music. Every pick below was evaluated on key feel, build quality, software integration, and real user feedback from thousands of verified reviews.

Below you will find our top picks organized by category — from the best overall to the best budget option — along with a breakdown of what to look for when choosing your first (or next) MIDI keyboard.

Quick Takeaway

The best MIDI keyboard depends on your workflow. The Akai MPK Mini MK3 wins best overall for its combination of keys, pads, and knobs at a fair price. Producers who need full-range playing should look at the M-AUDIO Keystation 49 MK3 or Nektar SE49. Budget-conscious beginners can start with the Nektar SE25 for under fifty dollars.

How We Chose the Best MIDI Keyboards

How MIDI keyboards were chosen for comparison

Picking the best MIDI keyboard is not about specs alone — it is about matching the controller to how you actually produce music. We evaluated over 20 controllers and narrowed the field to 8 based on four criteria that matter most in daily production use.

Key Feel And Playability

The keys are the interface between your musical ideas and the software. We tested synth-action, semi-weighted, and full-weighted options across key counts from 25 to 88.

Controllers with mushy, unresponsive keys got cut immediately regardless of their feature list.

Velocity sensitivity accuracy matters just as much as feel. Some budget controllers compress the velocity range so hard that you lose the difference between a gentle touch and a firm strike.

Every pick on this list delivers a usable 0–127 velocity curve out of the box.

Software Integration And Bundled Content

A MIDI keyboard that requires 30 minutes of manual mapping before you can play a note fails the workflow test. The best controllers auto-map to major DAWs — Ableton, FL Studio, Logic Pro, and GarageBand — the moment you plug them in.

Bundled software adds real value for beginners who do not own a DAW yet. We factored in the quality of included plugins and DAW lite versions when scoring each controller.

Build Quality And Portability

Cheap plastic that flexes when you play hard has no place in a studio. We checked chassis rigidity, knob resistance, pad responsiveness, and connector durability on every controller.

Portability scored higher for 25-key models since their primary advantage is grab-and-go production. For 49-key and larger models, we weighted stability and desk footprint instead.

Real User Feedback At Scale

Amazon reviews below 1,000 tell you almost nothing — the sample is too small. We prioritized controllers with thousands of verified reviews to identify real-world reliability patterns that short-term testing misses.

Every pick on this list has a 4.3-star minimum across hundreds or thousands of reviews.

What Are the Best MIDI Keyboards Right Now

Overview of top MIDI keyboard picks

Here is the full lineup, organized by the use case each controller serves best.

The Akai Professional MPK Mini MK3 takes Best Overall because no other controller in this price range combines keys, pads, knobs, and software integration this effectively. Over 30,000 verified reviews confirm what hands-on testing reveals — this is the default recommendation for a reason.

The M-AUDIO Keystation 49 MK3 wins Best 49-Key for producers who need two-handed playing range without the bulk of a full 88-key board. The synth-action keys feel responsive enough for fast leads and comfortable enough for chord progressions.

If your DAW of choice is FL Studio, the Novation FLkey Mini connects and controls the channel rack, mixer, and piano roll without any manual mapping. That native integration saves hours of setup time compared to generic controllers.

For producers who want the most complete feature set regardless of price, the Novation Launchkey 61 MK4 delivers 61 semi-weighted keys, 16 RGB pads, 9 faders, and deep DAW integration in a single unit.

The Nektar SE49 earns Best Value by offering 49 full-size keys with DAW integration at a price point where most competitors only give you 25 mini keys.

Need wireless freedom? The M-VAVE 25 Key MIDI Controller pairs with tablets and phones over Bluetooth while still offering USB for latency-critical studio work.

For pianists and composers who need the full range, the M-AUDIO Keystation 88 MK3 puts all 88 semi-weighted keys on your desk at a price that undercuts most competitors by a significant margin.

And the Nektar SE25 proves you do not need to spend much to get started — 25 velocity-sensitive keys with DAW integration for under fifty dollars.

What To Look For In A MIDI Keyboard

Buying guide for choosing a MIDI keyboard

The Top Picks section tells you which controllers we recommend. This section explains the decisions behind those choices so you can evaluate any MIDI keyboard — including ones not on this list.

Key Count And Size

Twenty-five keys cover two octaves — enough for one-handed melodies, bass lines, and synth leads. Most beat makers and electronic producers never need more.

Forty-nine keys span four octaves, letting you play two-handed chord progressions and basic piano parts without constantly shifting octaves.

Sixty-one and 88 keys serve pianists and composers who need the full keyboard range. The tradeoff is desk space — an 88-key controller stretches over four feet wide.

Measure your workspace before committing to anything larger than 49 keys.

Key Action Type

Synth-action keys feel light and bouncy, responding instantly to fast playing. They suit electronic producers, synth programmers, and anyone who values speed over piano-realistic feel.

Semi-weighted keys add spring resistance under each key, creating a more substantial feel without the weight of a real piano. This middle ground works for most producers.

Fully weighted (hammer-action) keys simulate acoustic piano feel through a mechanical hammer mechanism. Pianists who split time between a MIDI controller and a real piano prefer this action because the muscle memory transfers directly.

Pads, Knobs, And Extra Controls

Keys alone handle note input, but modern production demands more. Drum pads let you finger-drum beats and trigger samples.

Assignable knobs give you tactile control over synth parameters, mixer levels, and effect sends. Transport buttons (play, stop, record) keep your hands on the controller instead of reaching for the mouse.

Controllers that bundle all three — like the MPK Mini MK3 — eliminate the need for separate hardware. Keys-only controllers cost less but may require a second piece of gear down the line for pad triggering or knob-based sound design.

DAW Compatibility

Every MIDI keyboard works with every DAW at a basic level — that is the beauty of the MIDI standard. The difference is integration depth.

Native integration means the controller auto-maps to your DAW’s mixer, transport, and instrument parameters without manual configuration. The Novation FLkey series does this for FL Studio.

The Novation Launchkey series does it for Ableton Live. Akai controllers integrate deeply with their MPC software.

If you use Cubase, Logic Pro, or a less common DAW, look for controllers with open MIDI mapping — the ability to assign any control to any parameter manually. Most controllers on this list support both native and manual mapping.

The Bottom Line

The Akai Professional MPK Mini MK3 is the right starting point for most producers because it covers keys, pads, and knobs in a single USB-powered unit. If you need more key range, the M-AUDIO Keystation 49 MK3 and Nektar SE49 give you full-size 49-key layouts at very different price points.

Match the controller to your workflow, not to a spec sheet. Beat makers need pads. Pianists need weighted keys. Producers on a budget need the Nektar SE25 to get started without overthinking it.

Frequently Asked Questions

What is the best MIDI keyboard for beginners?

The Akai MPK Mini MK3 is the most recommended starter controller because it includes keys, pads, knobs, and bundled software in one package. If budget is tight, the Nektar SE25 gets you playing for under fifty dollars.

How many keys do I need on a MIDI keyboard?

Twenty-five keys work for beat making, synth programming, and one-handed melody input. Forty-nine keys let you play two-handed chord progressions comfortably.

Choose 61 keys or 88 keys only if you play piano-style parts that require full-range access without octave shifting.

Do MIDI keyboards work with all DAWs?

Yes — MIDI is a universal standard, so every MIDI keyboard works with every DAW at a basic level. The difference is integration depth.

Some controllers (like the Novation FLkey for FL Studio or Launchkey for Ableton) offer native auto-mapping that eliminates manual setup. Generic controllers work with any DAW but may require manual MIDI mapping for advanced features.

Is a MIDI keyboard worth it if I already have a piano?

If your piano has MIDI output (USB or 5-pin DIN), you can use it as a MIDI controller without buying a separate keyboard. If it does not have MIDI output, a dedicated MIDI keyboard adds software instrument access and DAW control that your acoustic or basic digital piano cannot provide.

Soundproof Drywall Vs Regular Drywall (What Actually Changes And When It Matters)

Soundproof drywall vs regular drywall is a comparison that matters most when you are building or renovating a wall and want to know whether the premium product is worth the extra cost, but only if you understand that no single drywall layer solves a noise problem by itself.

Many buyers overspend on specialty drywall and still feel disappointed. The drywall is one layer in a multi-layer assembly, and upgrading it while leaving the insulation thin, the seals open, and the framing rigidly connected changes less than most product descriptions suggest.

The better way to evaluate the decision is to compare the drywall options within the context of the full wall assembly. Once you understand what soundproof drywall actually adds and when that addition matters versus when cheaper alternatives deliver the same result, the spending decision becomes much clearer.

Start with what changes inside the panel, then move to when the premium really pays off, where the cost stops making sense, and which alternatives usually deserve the money first.

This guide makes that order explicit so you can decide whether you need a specialty panel, a stronger full assembly, or simply a better-value drywall strategy.

Quick Takeaway

Soundproof drywall vs regular drywall comes down to a built-in damping layer that reduces vibration transfer through the panel. It helps most when the rest of the wall assembly is already well-built, but it is not a substitute for insulation, sealing, and decoupling — and a double layer of regular drywall with a damping compound between them can often match or exceed its performance at a lower total cost.

The Real Difference Is Built Into The Panel

Difference between soundproof drywall and regular drywall

The product sounds more dramatic than it usually behaves in a full wall assembly.

The useful question is not whether specialty drywall is different, but how much that difference actually changes the wall once the other layers are factored in.

Soundproof Drywall Adds Damping Between Gypsum Layers

Soundproof drywall uses a viscoelastic damping layer sandwiched between two gypsum layers. That damping layer converts vibration energy into heat instead of transmitting it through the panel, which reduces the amount of sound that passes through the drywall itself.

The most common brand is QuietRock, but other manufacturers offer similar products. The key specification is the Sound Transmission Class (STC) rating, which measures how much sound the panel blocks.

Soundproof drywall typically rates 3–8 STC points higher than standard drywall of the same thickness when tested as a standalone panel.

Drywall Choice Can Shift Performance, But Usually Not By Itself

The drywall layer contributes to the overall wall performance, but it is only one factor. A wall’s STC rating depends on the combination of drywall, insulation, framing, air gaps, and sealing.

Upgrading the drywall alone while leaving the rest of the assembly unchanged typically improves the wall by 3–5 STC points, which is noticeable but modest.

For context, a 5 STC improvement is roughly equivalent to a perceptible-but-not-dramatic reduction. Voices that were clearly audible may become muffled, but they will not disappear.

The bigger gains come from treating the full assembly rather than upgrading one layer.

Regular Drywall Stays Competitive In A Strong Assembly

Regular drywall is good enough when the wall already has adequate insulation, the framing is decoupled, and the seals are tight. In those cases, the drywall layer is not the bottleneck, and upgrading it delivers diminishing returns compared to what the rest of the assembly is already doing.

Standard 5/8-inch drywall also outperforms 1/2-inch for sound simply because it is heavier. If you are choosing between thicknesses of regular drywall, the thicker option is almost always better for sound and often cheaper than switching to specialty panels.

That same mass-first logic applies across every surface in the room, which is why soundproofing a ceiling and soundproofing between floors follow the same assembly principles as wall drywall decisions.

The Premium Only Pays Off In The Right Wall

When soundproof drywall is worth it

Once you know what the specialty panel adds, the buying decision gets narrower.

The premium only pays off when the rest of the wall is strong enough for the drywall layer to become the next real bottleneck.

Specialty Panels Help Most When The Assembly Is Already Strong

Soundproof drywall makes the biggest difference when used in an otherwise well-built wall assembly. If the wall already has dense insulation in the cavity, resilient channels or isolation clips on the framing, and sealed joints and penetrations, the drywall layer becomes the next meaningful upgrade because the other weak points have already been addressed.

It also makes sense when you want to maximize performance in a single layer — for example, when adding a second layer of drywall is not practical because of space constraints, door clearance, or trim complications. In those cases, one layer of soundproof drywall delivers better performance per inch than one layer of standard drywall.

Weak Walls Hide Most Of The Premium’s Benefit

The extra cost is hard to justify when the rest of the wall assembly is weak. If the wall has no insulation, rigid framing with no decoupling, and visible air gaps around outlets and penetrations, upgrading to soundproof drywall will not produce a noticeable improvement because the noise is bypassing the drywall through easier paths.

It is also hard to justify when a double layer of regular drywall with a damping compound like Green Glue Noiseproofing Compound between them achieves similar or better STC performance at a lower total cost. That combination adds mass and damping without the premium price of specialty panels.

The Full Assembly Usually Matters More Than One Material

Because sound follows the weakest path, not the strongest. A wall with excellent drywall but thin insulation, rigid framing, and unsealed penetrations will perform worse than a wall with standard drywall, dense insulation, resilient channels, and tight sealing.

Soundproofing a wall always starts with the assembly rather than the surface material. The drywall is the last layer to optimize, not the first, and getting the foundation right before upgrading the drywall delivers a much stronger return on investment.

Cost Changes The Value Calculation Fast

Cost comparison of soundproof drywall and regular drywall

Price is what turns this from a technical comparison into a real project decision.

Once the specialty panel costs several times more per sheet, you have to compare not just performance but what else the same budget could buy in the assembly.

The Extra Cost Pays For Built-In Damping

Soundproof drywall typically costs two to four times more per sheet than standard drywall of the same thickness. The premium pays for the viscoelastic damping layer and the manufacturing process that bonds the multiple layers together.

For a typical bedroom wall, the material cost difference between standard and soundproof drywall can range from a few hundred dollars for a single wall to over a thousand for a full room. That premium is the reason alternatives like double drywall with damping compound exist — they deliver comparable performance with cheaper materials.

Labor Usually Changes Less Than Material Cost

Soundproof drywall is heavier than standard drywall, which can increase handling time and may require additional help during installation. The hanging, taping, and finishing process is essentially the same, so the labor increase is modest.

The bigger labor consideration is whether you are installing soundproof drywall as a single layer or as part of a decoupled assembly. If the wall needs resilient channels or isolation clips, the labor for those components is the same regardless of which drywall goes on top.

The Premium Makes Sense Mostly When Thickness Is Limited

The premium makes sense when space is tight, when you want a single-layer solution, and when the rest of the assembly is already performing well. It also makes sense in multi-family projects where the per-unit cost is amortized across many walls and the time savings of a single-layer install add up.

For single-room residential projects, the math usually favors double drywall with damping compound because the total cost is lower and the performance is equal or better. If you are budgeting for a full room, the soundproof room cost breakdown puts the drywall decision into the context of total project spending.

Alternatives Usually Win The Value Argument

Alternatives to soundproof drywall for wall assemblies

The comparison usually stops being abstract once you price the alternatives side by side.

Once you compare specialty drywall against the main alternatives, the better-value path is often the one that improves mass, damping, sealing, or decoupling in a more complete way.

Double Drywall With Damping Usually Wins On Value

A double layer of regular drywall with a viscoelastic damping compound between the layers is the most common alternative because it adds both mass and damping at a lower total cost. Two layers of 5/8-inch standard drywall with Green Glue Noiseproofing Compound between them typically outperform a single layer of soundproof drywall by 2–4 STC points because the total mass is higher.

The tradeoff is thickness. Two layers of drywall plus compound add about 1-1/4 inches to the wall, which affects door frames, window trim, and outlet boxes.

If that thickness is acceptable, the double-layer approach is almost always the better value.

Adding a mass loaded vinyl barrier like Trademark Soundproofing Mass Loaded Vinyl between the drywall layers is another option that adds mass in a thinner profile than a full second drywall sheet.

Insulation, Seals, And Decoupling Usually Matter First

Insulation, sealing, and decoupling matter more than the drywall choice in most residential situations because they address the biggest sound transfer paths first.

Adding dense insulation to an empty wall cavity can improve the wall by 5–10 STC points. Sealing air gaps around outlets, switches, and penetrations can add another 2–5 points.

Decoupling the drywall from the studs with resilient channels or isolation clips adds another 5–10 points. Each of those upgrades delivers more improvement per dollar than switching from standard to soundproof drywall, especially in rooms where existing wall upgrades have to be chosen carefully.

If the wall is already open, a stud-bay product like AFB Acoustical Fire Batts is usually a smarter first upgrade than premium drywall because it improves cavity absorption across the full wall assembly. At the finishing stage, a bead of Acoustical Caulk (29 oz) around outlet boxes, perimeter joints, and small penetrations helps preserve those gains by stopping leaks that would otherwise bypass the heavier wall layers.

Choose Based On The Assembly Weakness, Not The Marketing

Start with the assembly fundamentals: insulation, sealing, and decoupling. If those are already in place and the noise is still too high, compare the cost of soundproof drywall versus double standard drywall with damping compound.

If space is tight and a single layer is required, soundproof drywall wins on convenience. If space allows two layers, the double-layer approach usually wins on both cost and performance, much like the tradeoffs you see when soundproofing a ceiling or planning room-level soundproofing costs.

For a temporary diagnostic before committing to drywall work, a heavy blanket like VEVOR Sound Dampening Blanket hung on the suspect wall can help you confirm that the wall is actually the main noise path before spending on a drywall upgrade.

Compare this page with best insulation for soundproofing, green glue soundproofing, soundproofing an existing wall, and the broader soundproofing hub so the drywall decision stays in proportion to the rest of the assembly.

The Bottom Line

Soundproof drywall vs regular drywall gets much easier to decide once you stop treating the panel like the whole wall.

If the assembly is weak, spend first on insulation, sealing, and decoupling.

If the assembly is already strong and you need the best value, double regular drywall with damping usually wins.

If the assembly is already strong but thickness is limited, soundproof drywall is where the premium finally makes sense.

That is the decision rule that keeps you from paying for a specialty panel before the rest of the wall is ready to benefit from it.

Frequently Asked Questions

What drywall is best for soundproofing?

The best drywall for soundproofing depends on the assembly. In a well-built wall with insulation and decoupling, soundproof drywall like QuietRock adds meaningful damping.

For most projects, two layers of standard 5/8-inch drywall with a damping compound between them deliver stronger performance at a lower total cost.

Is soundproof drywall worth the extra cost over regular drywall?

It depends on the rest of the wall. If the assembly already has dense insulation, decoupled framing, and sealed penetrations, soundproof drywall adds meaningful damping as the finishing layer.

If those fundamentals are missing, the premium is hard to justify because a double layer of standard drywall with a damping compound often delivers equal or better results for less money.

Top Beginner DJ Controllers — 6 Picks That Will Not Waste Your First Year

Top beginner DJ controllers should teach you real skills from day one — but most “beginner-friendly” lists recommend the same mid-range controllers that intermediate DJs use, burying new DJs under features they won’t touch for months.

The mistake most first-time buyers make is choosing a controller based on brand loyalty or YouTube hype instead of matching the unit to their actual software goals. Pioneer locks you into Rekordbox, Hercules pairs with DJUCED, and Numark bundles Serato.

Pick the wrong ecosystem, and you will waste time relearning when you upgrade.

That mismatch between controller and workflow is the single biggest cause of gear regret in the DJ community. Reddit threads are full of beginners who bought a controller, struggled for three months, and blamed themselves — when the real issue was a bad hardware-software pairing.

Below, you will find six controllers ranked specifically for first-time DJs, with clear guidance on which software ecosystem each one locks you into, so you can start building real skills instead of second-guessing your purchase.

Quick Takeaway

To pick the best beginner DJ controller, match the unit to the software ecosystem you want to grow into (Rekordbox for club prep, Serato for flexibility, DJUCED for guided learning). The Pioneer DJ DDJ-FLX4 wins best overall because it supports both Rekordbox and Serato with a layout simple enough for day-one mixing.

What Makes a Controller Beginner-Friendly

Beginner DJ controller features explained

Layout Simplicity

A beginner controller should have two decks, a crossfader, basic EQ knobs, and performance pads — nothing more. Every additional button adds cognitive load during a mix, and cognitive load is the enemy of learning.

Controllers with four channels, dedicated effects sections, and complex routing options belong in the hands of DJs who already mix by instinct. When you are still thinking about which knob does what, extra features slow you down.

Software Bundling

The controller you buy determines the software you learn — and switching platforms later means relearning workflows, keyboard shortcuts, and library management from scratch. That hidden cost makes the initial software choice more important than the hardware itself.

Pioneer controllers bundle Rekordbox, which mirrors what clubs run on CDJ setups. Hercules includes DJUCED with built-in teaching tools, and Numark ships with Serato DJ Lite.

Each path is valid — the wrong choice is no choice at all.

Built-In Sound Card

A sound card lets you hear the next track privately in your headphones while the audience hears the current one. Without it, you cannot cue by ear — the single most important DJ skill that separates real mixing from playlist management.

Every controller on this list above the ultra-budget tier includes a sound card. If your budget forces a choice between a sound card and performance pads, pick the sound card every time.

Jog Wheel Quality

Cheap jog wheels with plastic platters and zero resistance make beatmatching harder because your fingers cannot feel the track speed. Even at the beginner level, jog wheels should respond to touch pressure and offer enough surface area for nudging.

Controllers with capacitive-touch jog wheels detect whether your finger is resting on the surface — which lets the software distinguish between scratching and track seeking. That distinction matters from your very first session.

Our Top 6 Beginner DJ Controllers

Top six beginner DJ controller picks

1. Pioneer DJ DDJ-FLX4 — Best Overall

The Pioneer DJ DDJ-FLX4 earns the top spot because it is the only controller at this price that works natively with both Rekordbox and Serato DJ. That dual compatibility means you can explore both ecosystems before committing, which no other beginner controller offers.

The Smart Fader automatically adjusts low-end EQ during crossfader moves, producing clean transitions even when your manual technique is still developing. It is a training wheel that sounds professional — and you can turn it off once your ears catch up to your hands.

Two-channel operation keeps the layout clean — eight performance pads per deck, a dedicated filter knob, and a sound card that handles headphone cueing with zero perceivable latency.

The only real limitation is the 2-channel ceiling — once you want to layer four tracks or run acapellas alongside instrumentals, you will need to upgrade to a 4-channel unit. For your first year of mixing, two channels are more than enough.

2. Pioneer DJ DDJ-FLX2 — Best Value

If the FLX4 stretches your budget, the Pioneer DJ DDJ-FLX2 gives you the same dual-software compatibility in a package that weighs under two pounds. Bluetooth connectivity lets you mix from your phone using WeDJ — useful for casual sessions when you do not want to set up a laptop.

The jog wheels are smaller than the FLX4, which limits scratching precision. For beatmatching and blending — the skills every beginner should master first — the smaller wheels are perfectly adequate.

This is the controller for DJs who want Pioneer’s ecosystem without Pioneer’s price. The software experience is identical to the FLX4, so everything you learn here transfers directly when you upgrade.

3. Hercules DJControl Inpulse 500 — Best for Learning

The Hercules DJControl Inpulse 500 is the only controller on this list that actively teaches you how to DJ while you use it. LED light guides on the jog wheels pulse in sync with the beat, showing you the exact moment to start a transition.

The IMA (Intelligent Music Assistant) goes further by analyzing your tracks and suggesting compatible songs from your library. Think of it as a DJ instructor that never loses patience and is always watching the waveform.

Large jog wheels with adjustable tension give the Inpulse 500 a premium feel that most sub-three-hundred controllers lack. The build quality matches controllers in the next price tier.

The tradeoff is ecosystem lock-in — Hercules pairs with DJUCED (their proprietary software) and Serato DJ Lite. If you plan to DJ at clubs running Rekordbox on Pioneer CDJs, the Inpulse 500 will not prepare you for that specific workflow.

4. Numark Party Mix II — Best for Parties

The Numark Party Mix II is the most popular entry-level controller on Amazon for a reason — it includes a built-in LED light show that syncs to your music, making every house party feel like a proper gig.

The lights are not a gimmick. They react to bass hits, build-ups, and drops, giving your audience a visual element that elevates even a basic two-track blend.

The catch is the missing sound card — you cannot preview tracks in headphones without an external audio interface. For bedroom practice where you cue by watching waveforms on screen, that is workable.

For live gigs where you need to cue by ear, you will need to add an interface.

At this price, no other controller gives you as much visual impact. If your first DJ goal is throwing memorable house parties rather than preparing for club sets, the Party Mix II delivers exactly that.

5. Hercules DJControl Starlight — Best Portable

The Hercules DJControl Starlight is the smallest controller on this list — and the only one in the budget tier that includes a built-in sound card. That combination makes it the smartest choice for beginners who travel frequently or need a controller that fits in a backpack alongside a laptop.

The jog wheels are tiny, which eliminates serious scratching. For mixing and blending, the small platters work fine because beatmatching relies more on ear training than wheel size at the beginner stage.

RGB lighting on the base adds a visual flair that makes the Starlight a conversation piece at gatherings. It is a party trick and a legitimate practice tool in the same pocket-sized package.

6. Numark DJ2GO2 Touch — Best Under 100

The Numark DJ2GO2 Touch proves that you can start learning to DJ for less than a pair of headphones. Touch-capacitive jog wheels, a crossfader, and a built-in audio interface all come packaged with Serato DJ Lite.

The sacrifice is performance pads — without them, hot cues, loops, and samples require mouse clicks in the software. That limitation actually simplifies the learning process by forcing you to focus on the two core skills: beatmatching and EQ blending.

Once those fundamentals are solid, you will know exactly which features matter for your next controller. The DJ2GO2 is a stepping stone, not a destination — and the cheapest way to find out if DJing is your thing before investing more.

How to Choose Your First Controller

Decision flowchart for choosing a beginner DJ controller

Match the Software to Your Goals

If you plan to DJ at clubs that run Pioneer CDJ setups, learn on Rekordbox — which means choosing the DDJ-FLX4 or DDJ-FLX2. If you want the widest hardware compatibility, start with Serato.

If you want built-in coaching, Hercules with DJUCED is the only option with real-time teaching features.

The software decision matters more than the hardware decision because your muscle memory, library organization, and performance habits all form around a specific platform.

Set a Realistic Budget

Controllers under a hundred teach fundamentals but lack features you will want within months. Controllers between one-fifty and three-fifty hit the sweet spot — enough features to grow into, enough quality to last two or more years of regular practice.

Spending more than four hundred on your first controller is rarely justified — the skills you develop in your first year do not require premium jog wheels or motorized platters. Save the upgrade budget for when you know exactly what features your DJ style demands.

Prioritize Sound Card Over Features

A built-in sound card unlocks headphone cueing — the ability to preview and align the next track in your headphones while the audience hears the current one. This single feature transforms DJing from a visual exercise (watching waveforms) into an audio skill (training your ears).

Controllers that skip the sound card force you to develop bad habits. You learn to cue by looking instead of listening, which creates a ceiling that gets harder to break the longer you rely on it.

Consider Your Space

Compact controllers fit on a laptop stand or a small desk, while full-size controllers need dedicated desk space. The DDJ-FLX2 and Starlight work on a nightstand, but the Inpulse 500 needs a real desk or a DJ stand.

Measure your practice space before buying. A controller that does not fit comfortably in your setup will not get used — and an unused controller teaches nothing.

Common Beginner Mistakes to Avoid

Common mistakes when buying a first DJ controller

Buying Too Much Controller

Four-channel controllers, motorized jog wheels, and stem separation features target DJs who have already mastered two-channel mixing. Buying a top-tier controller as a beginner is like learning to drive in a Formula 1 car — the extra capability gets in the way of building fundamentals.

Start with two decks and master beatmatching, EQ blending, and phrase matching on a simple layout. Then upgrade when the limitation is real, not theoretical.

Ignoring the Software Ecosystem

Your controller is a gateway to a software platform — switching from Serato to Rekordbox after a year means rebuilding your cue points, re-analyzing your library, and relearning keyboard shortcuts. The software you choose on day one shapes your entire DJ workflow.

Talk to DJs in your local scene and find out what software the venues use. Match your controller to that ecosystem, and every practice session at home directly prepares you for real gigs.

Skipping Headphone Cueing Practice

New DJs often rely on the sync button and waveform matching to align tracks. Those tools work, but they create a dependency that collapses the moment you play on unfamiliar gear without visual aids.

Practice cueing by ear from day one — even if it sounds rough at first, your ears will calibrate faster than you expect. Within a month, you will align beats by listening, and that skill transfers to every DJ setup you will ever touch.

The Bottom Line

The Pioneer DJ DDJ-FLX4 is the best beginner DJ controller because dual-software support means you never get locked into the wrong ecosystem. If budget matters more than flexibility, the DDJ-FLX2 gives you the same software in a lighter package.

Stop researching and start mixing. The best controller is the one you actually practice on — and every pick on this list gets you from unboxing to mixing faster than any previous generation of DJ gear.

Frequently Asked Questions

What is the best controller for a beginner DJ?

The Pioneer DJ DDJ-FLX4 is the best overall beginner controller because it supports both Rekordbox and Serato DJ, includes a sound card for headphone cueing, and features a Smart Fader that produces clean transitions while you learn manual EQ technique.

What is the rule of 32 in DJing?

The rule of 32 states that most dance music is structured in 32-bar phrases — meaning every major transition (intro, verse, chorus, drop) happens every 32 bars. Knowing this helps you time transitions so they land on musical boundaries instead of cutting into the middle of a phrase.

Is it too late to start DJing at 27?

Age is irrelevant in DJing — the core skills (beatmatching, EQ blending, track selection) are ear-training exercises that improve with practice at any age. Many successful mobile, wedding, and club DJs started in their late twenties or thirties.

Do I need headphones to DJ?

Headphones are essential for cueing — previewing the next track before the audience hears it. You do not need DJ-specific headphones to start, but you do need a controller with a built-in sound card to use them.

Should I learn on Serato or Rekordbox?

If your local clubs run Pioneer CDJ setups, learn Rekordbox — your library, cue points, and workflow will transfer directly to club gear. If you want flexibility to switch controllers from different brands, Serato supports the widest range of hardware. Both platforms teach the same core DJ skills.

What Is A MIDI Keyboard? Key Counts, Action Types, and Features Explained

What is a MIDI keyboard? It is a piano-key MIDI controller, but buying the wrong one can make every session feel cramped, lifeless, or more complicated than it should.

That frustration usually starts when people compare price before range, key feel, and control layout, even though those three choices decide whether the keyboard fits their workflow.

The good news is that the right MIDI keyboard is easier to pick once you judge it by how you actually play, write, and record.

Start with the range your hands need, then the action under your fingers, then the extra controls, and only after that decide whether a MIDI keyboard even makes more sense than a digital piano.

That order is exactly how the rest of this guide breaks the decision down.

Quick Takeaway

A MIDI keyboard is a piano-key MIDI controller. Choose key count by playing style: 25 keys for beat making and portability, 49 keys for two-handed playing, 61 keys for wide voicings and keyswitches, or 88 keys for full piano range. Key action type matters equally: synth-action for speed, semi-weighted for versatility, or hammer-action for authentic piano feel. Extra features like pads, knobs, and aftertouch add production value but increase cost.

Key Count Decides How Much Music You Can Play Without Fighting The Board

What a MIDI keyboard is and how it works

Key count is the first and most visible specification on any MIDI keyboard, and it determines what you can play comfortably without reaching for the octave shift buttons. Each size targets a specific workflow.

25 Keys Work Best When Portability Matters More Than Range

Twenty-five keys span two octaves – enough for one-handed melodies, bass lines, synth leads, and basic chord stabs. This is the standard size for compact all-in-one controllers that prioritize portability and feature density over playing range.

Beat makers and electronic producers choose 25-key boards because their workflow centers on short melodic phrases and pad-based drum programming rather than extended piano performances. The compact size fits beside a laptop without dominating the desk.

49 Keys Usually Hit The Best Balance For Everyday Production

Once you want to play with both hands more often, the limitations of mini boards show up quickly.

Forty-nine keys span four octaves, which is enough range for two-handed chord progressions, bass-with-melody combinations, and most piano literature without constant octave shifting. 49-key controllers hit the practical sweet spot for producers who play keys as their primary input method.

The M-AUDIO Keystation 49 MK3 represents this category well – 49 full-size keys with transport controls at a hundred nine dollars, fitting on a standard desk alongside a monitor and speakers.

61 And 88 Keys Make Sense Only When Your Parts Truly Need The Space

More keys become worth it when range is solving a real musical problem rather than just looking impressive on paper.

61 keys span five octaves, adding room for split keyboard zones, wide jazz voicings, and orchestral keyswitches. 88 keys cover the full piano range for classical repertoire, film scoring, and any playing that requires both extremes of the keyboard simultaneously.

The tradeoff is desk space and cost. A 61-key controller measures roughly 40 inches wide.

An 88-key stretches past four feet. Both cost two to five times more than a 49-key equivalent.

Key Action Changes How The Keyboard Teaches Your Hands

MIDI keyboard compared with a regular keyboard

Key action determines how the keys feel under your fingers, and the difference between action types is dramatic. This is the specification most buyers overlook, and it affects every playing session more than key count does.

Synth Action Prioritizes Speed And Fast Production Response

Synth-action keys use a simple spring mechanism with minimal resistance. The keys feel light and bouncy, returning to rest position almost instantly.

This action favors speed – fast synth leads, rapid repeated notes, and organ-style playing.

Every MIDI keyboard under two hundred dollars uses synth action. The feel is nothing like an acoustic piano, which is by design – these are production tools optimized for responsiveness, not piano simulation.

Semi-Weighted Action Sits In The Practical Middle

This is the compromise many hybrid producers end up preferring.

Semi-weighted keys add spring resistance that creates a more substantial feel without simulating piano hammer weight. The keys push back enough to feel musical but remain light enough for extended production sessions without finger fatigue.

The Novation Launchkey MK4 series and similar mid-range controllers use semi-weighted action. Producers who play piano-style parts alongside electronic production prefer this middle ground because it handles everything adequately.

Fully Weighted Action Matters Most For Real Piano Technique

That middle ground stops being enough when authentic piano feel is the goal.

Fully weighted keys use a mechanical hammer mechanism that simulates acoustic piano response. The bass keys feel heavier than the treble keys, matching how a real grand piano behaves.

Pianists who practice classical repertoire, prepare for recitals, or teach lessons need hammer action because anything lighter builds muscle memory that does not transfer to a real piano. The tradeoff is weight (20-30 pounds), cost (four hundred dollars and up), and slower key return that limits fast electronic playing.

Extra Controls Only Pay Off When They Support Your Real Workflow

Why producers use MIDI keyboards

Beyond keys, MIDI keyboards bundle various extra controls that add production value. Understanding which features genuinely help your workflow prevents overpaying for extras you will never touch.

Velocity Sensitivity Is The One Feature You Should Never Skip

Every MIDI keyboard worth buying detects how hard you press each key and transmits that force as a velocity value (0-127). Soft touches produce quiet notes, hard strikes produce loud notes.

This dynamic range is what makes a MIDI keyboard feel musical.

Never buy a keyboard without velocity sensitivity. Some ultra-cheap models send the same velocity regardless of how you play, which removes the entire expressive advantage of MIDI input.

Pitch And Mod Wheels Add Expression Faster Than Most Beginners Expect

Once velocity is covered, expression controls are the next meaningful upgrade.

Pitch bend and mod wheels sit on the left side of most MIDI keyboards. The pitch wheel bends notes up or down for guitar-style slides on synth leads.

The mod wheel controls vibrato, filter sweeps, or any parameter you assign.

Controllers that omit these wheels (common on mini keyboards) sacrifice expression that makes MIDI performances sound musical rather than mechanical.

Pads Help Beat Makers More Than Traditional Keyboard Players

That is why add-on features should always be judged by genre and workflow.

The Akai Professional MPK Mini MK3 popularized the keyboard-plus-pads format. The 8 velocity-sensitive MPC pads handle finger drumming, sample triggering, and clip launching alongside the keys.

Pads add genuine production value for beat makers. Keyboard players who never make beats can skip pads and invest in better key quality instead.

Knobs And Faders Matter When You Want Less Mouse Dependence

The same filter applies to control surfaces.

Physical knobs that map to DAW parameters (filter cutoff, reverb depth, track volume) give you hands-on control that mouse sliders cannot match. Eight knobs is the standard count on all-in-one controllers.

Faders appear on premium controllers like the Novation Launchkey 61 MK4, mapping directly to mixer channels for physical volume control during mixing.

Aftertouch Becomes Valuable Only After You Know You Will Use It

This is one of the easiest premium features to overpay for too early.

Aftertouch measures pressure applied to a key after the initial strike. Press harder and the note responds with vibrato, filter modulation, or volume swell.

Only mid-range and premium controllers transmit aftertouch.

Channel aftertouch sends one pressure value for all held keys. Polyphonic aftertouch sends independent pressure per key – a premium feature that adds per-note expression for orchestral and synthesizer performances.

Transport Controls Matter Most For Players Who Record In Real Time

Convenience features are worth buying only when they match how often you actually perform into the DAW.

Play, stop, record, and navigation buttons let you control your DAW from the keyboard without reaching for the mouse. The M-AUDIO Keystation series includes transport controls on every model.

Budget keyboards like the midiplus AKM320 skip transport controls to hit lower price points. The convenience only matters if you record MIDI performances frequently rather than programming notes in the piano roll.

A MIDI Keyboard And A Digital Piano Solve Different Problems

Beginner guide to MIDI keyboards

This comparison trips up beginners who see piano-style keys on both products and assume they are interchangeable. The functional difference determines which one serves your needs.

A MIDI Keyboard Exists To Control External Sounds

A MIDI keyboard contains no sound engine, no speakers, and no audio output. Press a key with nothing connected and you hear silence.

It depends entirely on a computer, tablet, or sound module to generate audio from the MIDI data it sends.

That dependency gives you access to unlimited virtual instruments through software. The sound variety through plugins far exceeds what any built-in sound engine could provide.

A Digital Piano Exists To Play Sound Immediately

That is why the choice is really about use case, not appearance.

A digital piano or synthesizer contains built-in sounds that play through speakers or audio outputs. Press a key and you hear music immediately – no computer required.

Many digital pianos also include MIDI output, letting them double as MIDI controllers when connected to a computer.

The Better Buy Depends On Whether You Need Software Flexibility Or Standalone Play

Once the difference is framed that way, the choice gets easier.

If you produce music on a computer and want maximum sound flexibility at minimum cost, get a MIDI keyboard. A forty-dollar controller playing free piano plugins produces more realistic sound than a two-hundred-dollar digital piano with built-in presets.

If you need standalone playing capability without a computer – for practice, live performance, or situations where booting a laptop is not practical – get a digital piano with MIDI output so you get both worlds.

The Bottom Line

A MIDI keyboard is a piano-key MIDI controller, but the right one is defined less by price than by three practical decisions: range, feel, and controls.

Match key count to your playing style – 25 keys for beat making, 49 keys for two-handed production, 88 keys for full piano range. Match key action to your instrument background – synth-action for electronic producers, weighted action for pianists.

Start with fewer features at a lower price and upgrade when specific limitations frustrate your workflow. The best beginner MIDI keyboards cover every essential at under a hundred dollars.

Frequently Asked Questions

How many keys should a beginner MIDI keyboard have?

Twenty-five keys handle beat making and basic melodies. Forty-nine keys suit beginners who want two-handed playing.

Start with 25 if you are unsure – upgrade to 49 only if you find yourself constantly reaching for octave buttons.

Do you need weighted keys on a MIDI keyboard?

Only if you practice piano technique alongside production. Weighted keys simulate acoustic piano feel and develop proper finger strength.

For synth programming, beat making, and general production, synth-action keys are lighter, cheaper, and more responsive.

Is a MIDI keyboard the same as a synthesizer?

No. A synthesizer generates its own sound through oscillators and filters.

A MIDI keyboard sends control data to external software and produces no audio on its own. Some synthesizers include MIDI output, functioning as both a standalone instrument and a MIDI controller simultaneously.

What is the difference between mini keys and full-size keys?

Mini keys measure roughly 60 percent the width of standard piano keys. They save space and reduce cost but feel cramped for pianists with trained finger spacing.

Full-size keys match standard piano dimensions and support proper technique development. Mini-key controllers suit portability-focused producers while full-size suit keyboard players.

Best DJ Controller — We Tested 8 Units So You Do Not Have To

Best DJ controller options flood Amazon with nearly identical spec sheets and marketing promises. The real differences only show up once you plug in, load a track, and try to beatmatch at 2 AM with sweaty hands.

But most “best of” lists rank controllers by spec sheets alone — without considering how the jog wheels actually feel or whether the bundled software locks you into an ecosystem you will outgrow in six months. The problem is that a wrong first purchase wastes months of practice time on a layout that fights you instead of teaching you.

The cause is usually a mismatch between the controller’s software ecosystem and the DJ’s actual goals — because Pioneer, Serato, and Engine DJ each lock you into a different workflow.

We narrowed the field to eight controllers across every budget tier so you can avoid that mistake. Each pick earned its spot based on build quality, software compatibility, and how fast a beginner can go from unboxing to mixing.

Below, you will find our top picks, head-to-head comparisons, and the one feature most buyers overlook that determines whether a controller grows with you or gets shelved within a year.

Quick Takeaway

To find the best DJ controller, match the unit to your software preference (Rekordbox, Serato, or Engine DJ), your channel needs (2-deck for beginners, 4-deck for advanced), and your portability requirements. The Pioneer DJ DDJ-FLX4 wins best overall for its dual-software support and beginner-friendly layout.

How We Chose the Best DJ Controller

Testing methodology for DJ controllers

What We Tested

Every controller on this list went through the same evaluation: unbox, install the bundled software, beatmatch two tracks manually (no sync button), apply a filter sweep, set four hot cues, and run a 15-minute mix. That sequence tests jog wheel responsiveness, fader smoothness, pad sensitivity, and software latency in a real-world scenario.

We also weighed each unit, measured desk footprint, and checked whether the sound card handled headphone cueing without audible latency. Controllers that skipped the built-in sound card got docked unless the price justified the omission.

What Mattered Most

Software compatibility ranked highest. A controller locked to one platform limits your options if you switch ecosystems later.

Units that support both Rekordbox and Serato scored higher than single-platform devices.

Build quality came second. Plastic jog wheels that flex under pressure, wobbly crossfaders, and loose EQ knobs all signal a controller that will not survive a year of regular practice.

We prioritized units with metal jog wheel platters and firm fader action.

Our Top Picks at a Glance

Comparison grid of top DJ controller picks

Best Overall: Pioneer DJ DDJ-FLX4

The Pioneer DJ DDJ-FLX4 earns the top spot because it works natively with both Rekordbox and Serato DJ — no extra licenses, no compatibility headaches. That dual-platform support means you can practice on the same software your local club runs, then switch without buying new hardware.

The Smart Fader feature smooths transitions by automatically adjusting bass levels when you move the crossfader. Beginners love it because mixes sound clean from day one while they build manual EQ skills.

Best Budget: Pioneer DJ DDJ-FLX2

If the FLX4 stretches your budget, the Pioneer DJ DDJ-FLX2 delivers the same dual-software compatibility in a smaller, lighter package. Bluetooth connectivity means you can even mix from your phone using the WeDJ app — a feature no other controller at this tier offers.

The tradeoff is jog wheel size — they are noticeably smaller than the FLX4, which makes precise scratching harder. For pure mixing and blending, though, the FLX2 punches well above its weight.

Best for Learning: Hercules DJControl Inpulse 500

The Hercules DJControl Inpulse 500 is the only controller on this list with built-in LED light guides that physically show you when to start a transition. The IMA (Intelligent Music Assistant) algorithm coaches beatmatching in real time — like having a DJ instructor built into the hardware.

Large jog wheels with adjustable tension give this unit a more premium feel than its price suggests. The only downside is ecosystem lock-in: Hercules pairs with DJUCED and Serato only, so Rekordbox users should look elsewhere.

Best DJ Controllers by Category

DJ controller recommendations by use case

Best for Parties: Numark Party Mix II

Not every DJ needs a professional-grade setup. The Numark Party Mix II targets house parties and casual gigs with a built-in LED light show that syncs to your music.

Plug it in, and the lights react to the beat automatically.

The missing sound card means you cannot preview tracks in headphones without an external audio interface. For casual mixing where you cue by waveform instead of ear, that is an acceptable compromise at this price.

Best 4-Channel: AlphaTheta DDJ-GRV6

When two decks feel limiting, the AlphaTheta DDJ-GRV6 opens up four channels with the Groove Circuit — a hardware effects engine that adds texture without touching software. The club-style layout mirrors what you would find on a CDJ-2000NXS2 setup, making the transition to pro gear seamless.

This is not a beginner controller — four channels, dedicated effects sections, and a dense button layout require time to master. If you have outgrown a 2-deck setup and want something that grows with you into club-ready territory, the GRV6 is the logical next step.

Best Standalone: Denon DJ SC LIVE 4

The Denon DJ SC LIVE 4 eliminates the laptop entirely. A 7-inch touchscreen handles track browsing, waveform display, and library management — all running on Engine DJ OS.

Built-in Wi-Fi lets you stream directly from Tidal, SoundCloud, and other services without a phone or computer.

At 14 pounds, portability is the tradeoff — this is a standalone system built for fixed installations and mobile DJs who drive to gigs. If laptop reliability worries you and you want the simplest possible setup, the SC LIVE 4 removes every point of failure except the controller itself.

Best Portable: Hercules DJControl Starlight

The Hercules DJControl Starlight fits in a jacket pocket. Despite its size, it includes a built-in sound card — something the larger and pricier Numark Party Mix II skips.

That means you get proper headphone cueing even in this ultra-compact form factor.

The jog wheels are tiny, which rules out serious scratching. For traveling DJs who need a practice rig on the road or a backup controller that fits in a laptop bag, the Starlight delivers more functionality per square inch than anything else on the market.

Best Under 100: Numark DJ2GO2 Touch

The Numark DJ2GO2 Touch proves you can start DJing without breaking the bank. Touch-capacitive jog wheels, a crossfader, and a built-in audio interface come packaged with Serato DJ Lite — everything you need to learn the fundamentals.

The sacrifice is performance pads — without them, hot cues, loops, and samples require mouse clicks in the software. Once you outgrow this limitation, you will know exactly which features matter for your upgrade, which makes the DJ2GO2 a smart first investment rather than a dead end.

What to Look for When Buying

Feature checklist for buying a DJ controller

Software Compatibility

The controller you buy determines the software you use — and switching later costs money. Pioneer and AlphaTheta controllers pair with Rekordbox, Numark and Hercules units bundle Serato DJ Lite, and Denon standalone systems run Engine DJ.

Ask yourself one question: what software do the DJs around you use? If you plan to play at clubs with Pioneer CDJ setups, learning on Rekordbox makes the transition seamless.

Channels and Deck Count

Two channels handle 90 percent of DJ mixing — blending Track A into Track B is the foundation of every DJ set. Four channels let you layer samples, run acapellas, or mix between four separate tracks, but they are unnecessary for beginners.

Start with two decks. When you consistently feel limited by two channels, upgrade to a 4-deck controller with confidence that you will actually use the extra channels.

Built-In Sound Card

A sound card lets you hear the next track in your headphones while the audience hears the current one. Without it, you cannot cue tracks by ear — you are stuck relying on waveform matching in the software.

Every controller on this list above the budget tier includes a sound card. If you are choosing between two similarly priced units, pick the one with the sound card — that single feature separates practice-grade mixing from performance-ready DJing.

Jog Wheel Size and Type

Larger jog wheels give more precise control, especially for scratching. Capacitive touch wheels detect finger placement, while motorized wheels spin like vinyl for a tactile, analog feel.

Budget controllers use small capacitive wheels, mid-range units offer larger ones with tension adjustment, and pro-tier controllers feature motorized platters. Match the jog wheel type to your DJ style — scratch DJs need motorized or large capacitive, blend DJs can work with anything.

The Bottom Line

The Pioneer DJ DDJ-FLX4 is the best DJ controller for most people because it supports both Rekordbox and Serato, includes a quality sound card, and teaches good habits with its Smart Fader. If budget is tight, the DDJ-FLX2 gives you the same software ecosystem in a smaller package.

Every controller on this list is a legitimate starting point or upgrade. The worst decision is no decision — pick the one that matches your software preference and budget, then spend the next six months learning to mix instead of researching gear.

Frequently Asked Questions

What controller do most DJs use?

Pioneer DJ controllers dominate the market, with the DDJ-FLX4 and DDJ-1000 being the most common models for home and mobile DJs. Club setups almost universally run Pioneer CDJ-2000NXS2 decks with a DJM mixer, which is why practicing on Rekordbox at home makes the club transition smoother.

Which is better — a 2-channel or 4-channel controller?

Two channels cover every standard DJ transition: blend, cut, fade, and filter sweep. Four channels add the ability to layer extra tracks and samples simultaneously, so start with two channels unless you already know you want to run complex, multi-deck sets.

Do I need a laptop to DJ?

Most controllers require a laptop running DJ software. Standalone controllers like the Denon SC LIVE 4 have built-in screens and processors that eliminate the laptop entirely — but they carry a premium price.

For beginners, a controller plus laptop is the most cost-effective path.

What software should I learn first?

Pick the software that matches your local scene — if clubs in your area use Pioneer gear, learn Rekordbox. If you want maximum flexibility, Serato DJ supports the widest range of controllers, and Virtual DJ is the most feature-rich free option for experimenting before committing.

How long does it take to learn DJing on a controller?

Most beginners can beatmatch two tracks manually within two to four weeks of daily practice. Building a 30-minute set with smooth transitions takes two to three months.

Developing a personal style and reading a crowd takes a year or more — but the mixing fundamentals come faster than most people expect.

How Do You Soundproof A Basement (What Works And What To Skip)

How do you soundproof a basement works, but only when you stop treating the ceiling like the whole answer.

That ceiling-first mistake is why people insulate one surface, then still hear footsteps from above, sound spilling through the stairwell, and noise moving through the ducts.

Once you diagnose the loudest path first, the basement gets meaningfully calmer and the next dollar stops going into the wrong assembly.

The first move is matching the room use to the weakest leak, then deciding whether the real fix belongs on the ceiling, the door, the ducts, the walls, or the full envelope.

Quick Takeaway

How do you soundproof a basement depends on whether you are trying to keep upstairs noise out, keep basement noise in, or make a finished basement feel calmer overall. The strongest results come from matching the use case to the weakest path first, then deciding whether the project really needs a ceiling build, a better stairwell door, duct sealing, wall work, or a fuller basement envelope upgrade.

Matching The Fix To The Basement

Overview of basement soundproofing methods

The first decision is not material choice.

It is deciding what the basement needs to do and which path is breaking that goal.

Basement situation First priority What usually matters next Typical scope
Basement office or bedroom under a noisy floor above Ceiling and floor-above path Stairwell door and ducts Moderate
Home theater or drum room in the basement Ceiling plus full basement envelope Door, walls, ducts, and flanking paths High
Finished basement family room with general noise bleed Weakest leak first Ceiling or door depending on diagnosis Moderate
Unfinished basement before finishing Whole-plan design Ceiling, walls, door, and utilities together Best long-term ROI

Start With Room Use

Room use changes the whole project because it changes the direction of the problem.

A home theater or music room needs to keep loud sound inside the basement so it does not disturb the rest of the house.

A basement office or bedroom needs to keep noise from upstairs out so you can work or sleep in peace.

Those are opposite goals, and they usually change which part of the basement deserves the first dollar.

Trace The Weakest Leak Paths

Once the use case is clear, the next job is tracing where sound actually escapes.

The ceiling is often the main transfer path because the joists connect the basement directly to the floor above. The stairwell door, HVAC ductwork, and any openings for pipes, wires, or vents can be just as important because sound follows the path of least resistance.

An unfinished basement with open joists, exposed ductwork, and a hollow stairwell door will leak sound through every one of those paths regardless of how well you treat the ceiling.

That full-envelope view is what keeps basements from turning into ceiling-only money pits.

Unfinished Basements Give You Better Leverage

Those leak paths are much easier to fix while they are still exposed.

An unfinished basement gives you direct access to joist bays, wall cavities, and mechanical runs, which makes it easier to add insulation, mass, and isolation in the right order before the finish layer closes everything up.

A finished basement is harder because the drywall is already up and the hidden details are already locked in.

Improving a finished basement usually means selective retrofits, added layers, or opening sections back up, which raises cost and disruption fast.

The Best Approach By Scenario

What is possible when soundproofing a basement

Once the weak paths are visible, the plan changes with the job the room is doing.

An office, a theater, and a finished family room may share the same structure, but they do not justify the same build.

Office And Bedroom Builds

A basement office or bedroom usually needs the best control of upstairs footfall, voices, and general household spill.

That usually means the ceiling and the floor-above path come first, then the stairwell door and any duct runs that are acting like sound tunnels.

If the room is finished and the problem is moderate, a selective retrofit can still help.

If the room is unfinished, joist-bay insulation and a better ceiling assembly give you the cleanest upgrade path.

Theater, Drum Room, And Loud-Use Builds

An office or bedroom tries to keep outside noise out, but a theater, drum room, or loud rehearsal space flips the problem.

These uses usually justify treating the ceiling, stairwell door, ducts, and often the walls together because the goal is keeping louder sound inside the basement instead of just softening the room.

At that point basement projects start looking more like a real room-isolation build.

If the basement is carrying bass or repeated impact, lighter accessories stop being honest answers very quickly.

Finished Living Space Needs Tighter Diagnosis

Loud-use builds justify broad treatment, but a finished family room or basement apartment needs the most disciplined diagnosis because reopening everything is expensive.

In that situation, it often makes more sense to target the loudest leak first, whether that is the stairwell door, the ceiling line, the duct path, or one exterior-facing wall.

The same decision-making overlaps with apartment-style soundproofing logic.

If the basement is serving as living space, “good enough for daily comfort” is often the smarter target than chasing studio isolation.

Budget Basement Soundproofing

Budget basement soundproofing options

That scenario view keeps the budget conversation honest.

Cheap fixes help when they remove a real leak or prove where the bigger leak is, not when they pretend to replace a full assembly.

Start With Air Leaks And Open Cavities

Sealing air gaps around the stairwell door, duct penetrations, pipe holes, and electrical boxes is the cheapest fix that consistently works.

Sound follows air paths, so closing visible leaks is still the highest-value basement starting point.

Once the obvious leaks are tighter, open joist bays are the next honest budget move in an unfinished basement.

A practical cavity-fill product like AFB Acoustical Fire Batts, Mineral Wool Insulation reduces cavity resonance and gives you a better baseline before heavier work.

For a quick temporary test, a blanket like VEVOR Sound Dampening Blanket hung at the stairwell can show you whether the door path matters more than the ceiling path.

Cheap Fixes That Mostly Waste Money

Those budget steps work because they target real leaks, which is exactly why the usual gimmicks fall flat.

Egg cartons, thin foam tiles, and carpet remnants stapled to the ceiling are common basement suggestions because they look busy and feel cheap. They add almost no mass, create no meaningful barrier, and mostly just change the look without changing the noise.

Drop ceiling tiles marketed as “acoustic” can help with echo inside the basement but do not block significant noise transfer between floors.

They absorb reflections, not transmission, and that distinction matters because most basement soundproofing complaints are about transfer, not echo.

When The Budget Version Is Enough

With the hype out of the way, a budget fix is good enough when the basement is used for light activity like office work, a guest room, or casual TV watching.

Sealing gaps and adding joist-bay insulation can bring transfer down enough for those uses without forcing a full ceiling rebuild.

When The Ceiling Is Worth Treating

Basement ceiling soundproofing priority area

Budget work often reveals whether the ceiling is truly the bottleneck.

When it is, the ceiling deserves serious money; when it is not, the door, ducts, or walls may still be louder.

Ceiling First Makes Sense In Direct Floor Transfer

The ceiling becomes the main priority when the dominant complaint is noise moving directly between the basement and the floor above.

Footsteps, voices, TV spill, and general household activity usually point you there first.

If the basement use is louder than normal living, the ceiling matters even more because it is the biggest direct connection to the rest of the house.

That is where basement ceiling soundproofing becomes a subproject in its own right rather than a side note.

Open Ceilings Still Give You A Mid-Tier Upgrade

When the ceiling is the priority but a full drywall build is not in scope, an unfinished basement still gives you room to improve the assembly.

Filling the joist bays, sealing penetrations, and adding a continuous mass layer like Soundsulate Next Generation, 1 lb. Mass Loaded Vinyl can still make a real difference.

The limit is still performance.

Without a finished mass layer and, in louder projects, decoupling, the ceiling usually tops out sooner than people hope.

Side Paths Can Still Beat The Ceiling

A no-drywall ceiling upgrade has limits, and those limits often expose the next bottleneck.

If the stairwell, vents, or wall line are just as loud, a hollow stairwell door, unsealed ducts, or bare walls may deliver more improvement per dollar than another ceiling layer.

The stairwell door is often the most underpriced win in the whole basement.

Tightening that path with 33 Ft Gray Self-Adhesive Soundproofing Weather Stripping for Doors and Windows, plus better door mass, can beat a lot of misplaced ceiling spending.

For those side paths, compare this page with soundproofing a door, soundproofing a vent, and soundproofing a wall. If impact transfer through the structure is still the bigger complaint, soundproofing between floors is the next system-level comparison to read.

Cost Breakdown

Cost factors for soundproofing a basement

Once the scope is honest, basement cost makes more sense by scenario than by one giant range.

The budget swings because each use case changes how much of the envelope you are really rebuilding.

Basement project What is usually included Practical range
Light-use unfinished basement Gap sealing, joist-bay insulation, door sealing, small fixes About $500 to $2,000
Finished basement retrofit Door and duct fixes, selective ceiling or wall upgrades, added layers About $1,500 to $5,000+
Loud-use basement build Ceiling assembly, better door, duct sealing, wall work, higher isolation target About $3,000 to $10,000+

Light-Use Basement Costs

The light-use tier usually means gap sealing, joist-bay insulation, and a better stairwell door or tighter door sealing.

This is the tier that makes the most sense for guest rooms, offices, and calmer finished basements that do not need studio-level isolation.

If you want a broader room-side cost benchmark, compare the basement scope against soundproof room cost.

That helps keep a basement plan in proportion instead of turning one weak path into an oversized renovation.

High-Performance Basement Costs

Once the use case gets louder, the budget stops being about patches and starts being about assemblies.

A higher-performance build usually means real ceiling work, more mass, better sealing, and more attention to side paths. A product like Rockwool Roxul Mineral Wool 8 lb Density Soundproofing Fire Resistant Insulation Batts 2 Inch starts making more sense only when the basement use is loud enough to justify the heavier assembly.

A higher-performance basement build is what you price for drums, louder theater use, repeated upstairs-downstairs transfer, or any situation where lighter fixes have already hit their limit.

This is also where the ceiling article, door article, and floor-to-floor transfer article start overlapping as one system plan.

When A Contractor Pays Off

Those bigger builds also create more ways to guess wrong.

Bring in a contractor when the use case is loud, the basement is already finished, or the noise seems to be moving through several paths at once. Professionals matter most when you need a full-envelope plan instead of one more guess at the ceiling.

For broader context on materials and methods, compare this page with best insulation for soundproofing, soundproofing between floors, and the broader soundproofing hub so the basement plan stays in proportion to the rest of the house.

The Bottom Line

Most basement soundproofing failures do not come from using the wrong material first.

They come from treating one surface while the rest of the basement is still acoustically open.

The smarter rule is to ask which path is loudest right now, then spend the next dollar there.

For most homeowners, that means sealing the air leaks, insulating accessible joist bays, and figuring out whether the stairwell door or ceiling is the bigger bottleneck before committing to a larger build.

Once that answer is clear, it gets much easier to decide whether the basement only needs a comfort upgrade or a real high-performance isolation plan.

Frequently Asked Questions

Is it possible to soundproof a basement?

Yes, but the result depends on how many basement paths you treat and how loud the use case really is. A guest room or office is much easier to quiet than a basement drum room or theater, especially once low-frequency transfer starts pushing you toward full ceiling isolation work.

What is the cheapest soundproofing option?

The cheapest useful option is usually sealing the obvious air leaks and tightening the stairwell door path. In an unfinished basement, joist-bay insulation is the next honest low-cost step.

How to block out 100% of noise?

Blocking 100% of noise from a basement requires a room-within-a-room construction with mass, decoupling, and sealing on every surface, which is impractical for most residential basements. The realistic goal is reducing noise enough that it no longer disrupts activity on either floor, and that is achievable with proper insulation, mass, and sealing.

Can you soundproof a finished basement?

Yes, but finished basements are usually more expensive to improve because the drywall and hidden details are already in place. Finished-basement projects work best when you diagnose the loudest leak first instead of opening everything blindly.

What Is A MIDI Controller? Here Is What Actually Matters

What is a MIDI controller? It is any device that sends performance data to software or hardware, but the term sounds simpler than the category really is.

That confusion starts because people use “MIDI controller” as if it means keyboard, even though the same label also covers pads, knobs, foot switches, and other control surfaces. Beginners then buy the wrong form factor for their workflow and end up with gear that technically works but feels wrong on the desk.

The good news is that the category gets much easier once you separate the protocol from the hardware shapes and the setup choices.

Start with what MIDI itself is, then the controller families it creates, then how those controllers connect to a real rig, and finally how to choose the right one for the way you write music.

Quick Takeaway

A MIDI controller is any hardware device that sends Musical Instrument Digital Interface data to software or other hardware. The category includes keyboard controllers, pad controllers, knob/fader units, foot controllers, and wind controllers. None of them produce sound on their own — they all depend on a connected DAW, sound module, or app to generate audio. Choose the type that matches your primary input method: keys for melodies, pads for beats, knobs for mixing, or foot switches for hands-free control.

MIDI Is The Shared Language Behind Every Controller Type

Overview of what a MIDI controller does

MIDI stands for Musical Instrument Digital Interface — a universal communication protocol created in 1983 that lets electronic music devices talk to each other. Every MIDI controller, regardless of its physical form, speaks this same language.

The protocol defines how performance data is encoded and transmitted. When you interact with any MIDI controller — pressing a key, hitting a pad, turning a knob, pressing a foot switch — the device translates your physical gesture into a standardized digital message.

Different MIDI Messages Describe Different Musical Actions

A MIDI “Note On” message carries three values: note number (which pitch, 0-127), velocity (how hard you struck it, 0-127), and channel (which of 16 possible instrument lanes should respond). Release the note and a “Note Off” message follows.

Control Change (CC) messages handle everything that is not a note — knob positions, fader levels, pedal states, mod wheel positions. Each CC message targets a specific parameter number (0-127) with a value (0-127).

Program Change messages switch between presets or patches on the receiving device. Press a button on a foot controller and it sends a Program Change that loads a different guitar amp preset or synth patch instantly.

MIDI Stays Powerful Because It Sends Instructions Instead Of Audio

That message-based design is the reason the format is still so useful decades later.

MIDI messages are tiny — a few bytes per event. That means zero latency over USB, minimal bandwidth requirements, and the ability to edit every aspect of a performance after recording.

Change the velocity of a single drum hit, move a note to a different beat, swap the responding instrument entirely — all without re-recording.

Audio recordings lock you into the sound captured at the moment of recording. MIDI recordings are instructions that can be reinterpreted endlessly through different virtual instruments and settings.

The Category Makes Sense Once You Group Controllers By Input Method

Common types of MIDI controllers

Once MIDI itself is clear, the huge product range stops looking random.

The market splits into controller families based on how you prefer to input musical ideas, and each family fits a different workflow better.

Keyboard Controllers Fit Melody, Harmony, And Traditional Playing Best

Keyboard-style MIDI controllers use piano keys as the primary input. They range from 25 mini-keys that fit in a backpack to full 88-key weighted models that simulate an acoustic piano.

Keyboard controllers are the most popular MIDI controller type because piano-style input maps naturally to melody writing, chord progressions, bass lines, and orchestral composition. A controller like the M-AUDIO Keystation 49 MK3 gives you 49 full-size keys with transport controls for under a hundred ten dollars.

For a deeper look at key counts, key action types, and keyboard-specific features, see our dedicated MIDI keyboard guide.

Pad Controllers Make More Sense For Beats, Samples, And Clip Launching

Not everyone writes music through piano technique, which is why the next category exists.

Pad controllers replace keys with velocity-sensitive rubber pads arranged in a grid — typically 8 or 16 pads. Finger drummers tap out beats with their fingertips rather than pressing piano keys.

The pad format excels at three specific workflows: finger drumming (tapping kick, snare, and hi-hat patterns in real time), sample triggering (chopping audio and playing slices rhythmically), and clip launching (triggering loops and scenes in DAWs like Ableton Live).

The Akai Professional MPK Mini MK3 bridges both categories — 25 mini keys for melodies alongside 8 MPC-style pads for beats. That dual-input design explains its popularity with over 30,000 verified reviews.

Knob And Fader Controllers Put Parameters Under Your Hands

Other producers already have notes covered and care more about control after the notes are recorded.

Not every MIDI controller has keys or pads. Dedicated knob and fader units send Control Change messages for hands-on mixing, sound design, and parameter control.

Producers map physical faders to DAW mixer channels for volume riding across multiple tracks. Sound designers assign knobs to synth parameters — filter cutoff, resonance, envelope attack — then sculpt sounds with both hands simultaneously instead of clicking tiny on-screen sliders.

Transport controllers add play, stop, record, and navigation buttons for DAW control without touching the mouse. Many keyboard controllers bundle transport controls as an added feature.

Foot Controllers Free Your Hands During Performance

That same logic applies to live players who cannot spare their hands for patch changes.

Foot controllers send MIDI messages through floor-mounted switches and expression pedals, freeing your hands for playing an instrument.

Guitarists use MIDI foot switches to change amp presets and effects patches mid-song. Keyboardists use them to switch between piano, organ, and synth sounds between songs during live performance.

Expression pedals send continuous CC data for foot-controlled volume swells, filter sweeps, and wah effects.

Specialized Controllers Extend MIDI To Other Instrument Families

And MIDI does not stop at the obvious controller shapes.

MIDI extends to virtually every instrument type. Wind controllers (Akai EWI, Roland Aerophone) translate breath pressure and fingering into MIDI, giving woodwind players access to every virtual instrument.

Electronic drum pads convert stick hits into MIDI note data, letting acoustic drummers trigger electronic sounds. String-to-MIDI converters use hex pickups to translate guitar playing into MIDI, though latency remains a challenge compared to dedicated keyboard or pad input.

Connection Choice Shapes How Easy The Setup Feels In Practice

Decision guide for whether you need a MIDI controller

Every MIDI controller needs a receiving device to generate sound. The connection method determines compatibility, latency, and setup complexity.

USB Keeps Computer-Based Music Making The Simplest

The vast majority of modern MIDI controllers connect via USB, which handles both data and power through a single cable. Plug into your computer, open your DAW, and the controller works immediately — no drivers, no external power supply, no configuration on Mac or Windows.

USB is the default connection for computer-based production. Every controller recommended on this site uses USB as its primary connection.

Bluetooth Trades Cable Freedom For Some Added Latency

Wireless convenience sounds great until timing matters.

Bluetooth MIDI eliminates cables entirely, pairing wirelessly with computers, iPads, and phones. The tradeoff is 5-15 milliseconds of added latency — imperceptible for casual playing but noticeable during precision recording.

Bluetooth controllers are ideal for mobile production on tablets and phones where USB adapters add clutter.

5-Pin DIN Still Matters In Hardware-Focused Rigs

Older does not mean obsolete here.

The original MIDI connection from 1983 uses round 5-pin DIN cables. These appear on hardware synthesizers, rack-mounted sound modules, guitar processors, and professional studio equipment.

5-Pin connections carry MIDI data only — no power. A USB-to-MIDI interface bridges legacy hardware with modern computer setups for under twenty dollars.

A Controller Still Needs Software Or Hardware To Make Sound

And this is the part beginners need to hear clearly.

A MIDI controller requires two software components to produce sound: a DAW (digital audio workstation) for recording and routing, and at least one virtual instrument plugin for sound generation.

Free options exist for both. GarageBand (Mac) and Cakewalk (Windows) are full-featured free DAWs.

Most controllers bundle lite DAW versions — the MPK Mini MK3 includes MPC Beats, and M-AUDIO controllers include Ableton Live Lite.

For a complete guide to software options, see our best software for MIDI keyboard article.

The Right First Controller Depends On How You Capture Ideas

MIDI controller compared with a keyboard

At this point the buying decision becomes much simpler.

If you play melodies, chords, and piano-style parts, start with a keyboard controller. If you make beats and trigger samples, start with a pad controller or an all-in-one that includes both keys and pads.

If you perform live and need hands-free patch switching, add a foot controller. If you already own a keyboard and want hands-on mixing, add a knob/fader unit.

Most beginners start with an all-in-one controller (keys + pads + knobs) under a hundred dollars because it covers every workflow type in a single purchase. The midiplus AKM320 at under forty dollars lets you test whether MIDI production fits your creative process with minimal financial risk.

For a detailed guide on choosing the right controller based on key count, DAW, and budget, check our decision framework article.

The Bottom Line

A MIDI controller is any hardware device that turns physical gestures into MIDI data for software or hardware to interpret as music. The category spans keyboards, pads, knobs, foot switches, and specialized instruments for different kinds of players.

No MIDI controller produces sound on its own. They all depend on a connected DAW, sound module, or app.

That dependency is the core strength — one controller plays unlimited virtual instruments through software, while a standalone keyboard limits you to its factory sounds. Start with the controller type that matches how you create, then expand your setup as your workflow evolves.

Frequently Asked Questions

Is a MIDI controller the same as a MIDI keyboard?

No — a MIDI keyboard is one type of MIDI controller. The “MIDI controller” category also includes pad controllers, foot controllers, knob/fader units, wind controllers, and drum controllers.

A MIDI keyboard specifically uses piano-style keys as its primary input method.

Can a MIDI controller work without a computer?

A MIDI controller needs something to receive its data and generate sound. That can be a computer running a DAW, a hardware synthesizer with MIDI input, a standalone sound module, or a tablet/phone running a music app.

Do I need to know how to play piano to use a MIDI controller?

No. Pad controllers require no keyboard skills.

Even keyboard-style controllers benefit producers who play single-note melodies, tap out bass lines, or program one chord at a time. Piano proficiency helps but is not a prerequisite for making music with MIDI.

How much does a MIDI controller cost?

MIDI controllers range from under forty dollars for a basic budget keyboard to several hundred dollars for premium 61 or 88-key models with weighted keys and deep DAW integration. Most producers spend between eighty and one hundred twenty dollars on their first controller.

How To Soundproof A Rental Room (What Works Without Losing Your Deposit)

How to soundproof a rental room is a different problem than soundproofing a home you own, but only because the best fixes in a rental have to be reversible, removable, and safe for the walls, doors, and windows you are not allowed to modify permanently.

So many renters feel stuck because the noise is real, the disruption is daily, and the most common advice involves construction-level changes that no landlord will approve.

The result is either doing nothing or wasting money on products that barely help because they were not designed for the actual weak point in the room.

The better approach is to treat the rental constraint as a filter, not a limitation. There are real fixes that work without damaging anything, and the key is matching them to the noise path that matters most in your specific room.

Start with which parts of a rental room leak the most sound, then move through which reversible fixes actually help, how to reduce shared-wall neighbor noise without modification, how to handle ceiling and floor noise, and when the honest answer is that the room itself is the problem.

This guide makes that order practical so you can decide whether your next renter-safe fix belongs at the door, the window, the wall, or the one quiet zone that matters most.

Quick Takeaway

How to soundproof a rental room works best when you focus on the weakest barrier first — usually the door, then the window, then the shared wall — using reversible fixes like sealing, heavy blankets, and removable panels. The strongest renter-friendly results come from covering the right surface completely rather than spreading thin upgrades everywhere.

Rental-Room Soundproofing Starts With The Weakest Barrier

Overview of renter-friendly room soundproofing

The smartest first step is identifying what you are actually dealing with.

Airborne Noise, Impact Noise, And Street Noise Need Different Fixes

The type of noise changes which fix matters most. Neighbor voices and TV sound through a shared wall are airborne noise that responds to mass and sealing.

Upstairs footsteps are impact noise that responds to cushioning and decoupling. Traffic and street noise through windows respond to sealing and heavier window coverage.

Knowing which type you have saves you from buying the wrong product. A foam panel on the wall will not stop footsteps from above, and a rug on the floor will not stop voices coming through the wall beside you.

Doors, Windows, And Shared Walls Usually Leak First

The door is almost always the weakest point. Most interior doors in rentals are hollow-core with visible gaps at the bottom and sides.

The window is usually the second weakest, especially if it is single-pane or has air leaks around the frame.

Shared walls come third because they are at least solid, even if they are thin. Ceilings and floors are usually the hardest to treat in a rental because you cannot modify the structure from either side.

That is the same weak-link logic that drives results in soundproofing an apartment and the broader soundproofing a door guide. The barrier that leaks the most is where your first dollar should go.

Rentals Usually Improve More Than They Completely Isolate

Expect a noticeable improvement, not total silence. Renter-friendly fixes can typically reduce noise enough that neighbor voices become a faint murmur instead of a clear conversation, and traffic noise drops from intrusive to background-level.

That improvement is meaningful for sleep, focus, and daily comfort, even if the room is not perfectly quiet. The goal is “quiet enough” rather than “silent,” and that bar is achievable in most rentals with the right approach.

Renter-Friendly Fixes Work Best When They Stay Reversible And Targeted

Renter-friendly soundproofing methods that avoid damage

The constraint is real, but it does not eliminate the strongest first moves. It just changes the order: seal the obvious leaks, add removable mass to the weakest surface, then ask whether landlord approval unlocks anything more effective.

Reversible Fixes Help Most When They Start With Openings

The three highest-value renter-friendly fixes are sealing door and window gaps, hanging a heavy blanket or curtain over the weakest surface, and adding a thick rug with a dense pad on hard floors. That order matters because openings usually leak more sound than the wall people instinctively want to treat first.

Sealing gaps with removable foam strips like Cuysfead Foam Seal Strip is the single most cost-effective renter-friendly move because it closes the air paths that carry the most noise per square inch. If you can feel air moving around the door or window frame, that path is transmitting more sound than you probably realize.

Once the leaks are controlled, the next step is covering the noisiest surface completely rather than decorating several surfaces lightly. One heavy blanket on the real weak point usually beats a handful of thin foam tiles spread around the room.

Most “Renter-Friendly” Hype Is Just Lightweight Decoration

Egg cartons, thin tapestries, and cheap foam tiles are the most commonly recommended and least effective renter-friendly options. They add almost no mass, create no meaningful barrier, and mostly just make the room look different without changing the noise.

Command-strip mounted thin panels are another overpromise. They can help with echo inside the room, but they do not add enough mass to block noise coming through the wall from the other side.

Landlord Permission Can Unlock Better Reversible Options

Ask about hanging heavy items from the wall, applying removable adhesive products, swapping curtain hardware, and whether they already have a policy for weatherstripping, rugs, or recurring noise complaints. Some landlords will allow minor changes like seal strips or heavier curtain rods if you explain the purpose and promise to restore the original condition.

Getting permission in writing protects you at move-out and sometimes opens the door to slightly better options than pure no-contact fixes allow.

Shared-Wall Noise Usually Decides Whether The Rental Feels Livable

Rental room shared wall soundproofing options

Shared-wall noise is the most common and most frustrating rental noise problem because the wall is the one surface you usually cannot modify.

Neighbor Noise Improves Most With Removable Mass On The Real Wall

The most effective renter-friendly approach for shared walls is adding mass to the wall surface using heavy, dense materials that you can remove later. A sound dampening blanket like US Cargo Control Sound Dampening Blanket hung on the shared wall adds both mass and absorption, which reduces the amount of neighbor noise that reaches you.

Placing a heavy bookshelf loaded with books against the shared wall also helps because it adds mass to the weakest section. The combination of a blanket behind a loaded bookshelf is one of the strongest no-damage approaches available.

Doors And Windows Can Outrank The Wall Very Quickly

If the noise is louder near the door or window than near the shared wall, the wall is not the main weak point.

In that case, treat the door first with a removable sweep like the HomeProtect Door Draft Stopper and perimeter sealing, then cover the window with a heavier curtain like RYB HOME Soundproof Curtains or a blanket.

That one-two combination often delivers more improvement than anything you could do to the wall because it closes the obvious leak paths first.

Compare this with soundproofing windows and best door sweep for soundproofing for the specific product options that work in rental situations.

Some Buildings Stay The Hard Limit Even After Good Renter Fixes

The building is the limiting factor when the walls are paper-thin, the floors transmit every footstep, and the structure itself carries sound through the framing regardless of what you put on the surfaces. Older buildings with minimal insulation and thin party walls fall into this category most often.

In those cases, renter-friendly fixes can still help, but the improvement ceiling is lower. If you have tried the main reversible fixes and the noise is still severely disruptive, the honest answer may be that the room itself is not suitable for your noise sensitivity, and looking for a quieter unit or a different floor may be more practical than spending more on products.

Ceiling And Floor Noise Need Damage-Free Workarounds, Not Fantasy Fixes

Ceiling and floor soundproofing options for rental rooms

Ceiling and floor noise are the hardest rental noise problems because renters usually control neither side of the structure. That means the smartest approach is reducing what you can at the listening position, the walking surface, or the one zone where quiet matters most.

Upstairs Footsteps Usually Need Softer Surfaces Below, Not More Wall Products

If footsteps from above are the main complaint, the most effective renter-friendly move is softening the room below the noise and reducing the harsh reflections that make each impact feel sharper. A thick rug with a dense pad in the area where you spend the most time helps because it absorbs some of the reflected energy and makes the room feel less hard and echoey.

You usually cannot treat the ceiling itself without landlord cooperation, so the renter-safe goal is lowering the perceived loudness rather than pretending you can fully block the structure-borne path. Heavy curtains, blankets on the walls, and soft furnishings all help because they reduce the reverberant buildup that makes impact noise feel louder than it actually is.

Downstairs Complaints Usually Improve With Rugs And Behavior First

If you are the one making noise for neighbors below, thick rugs and pads are the most effective and most expected courtesy. Many lease agreements in multi-story buildings require floor coverage for exactly this reason.

Walking softly, using furniture pads under chair legs, and avoiding hard-soled shoes on bare floors are free fixes that many people overlook. The combination of rugs plus behavioral awareness is usually enough to satisfy a reasonable downstairs neighbor.

A Quiet Zone Often Beats Trying To Quiet The Whole Room

If you cannot quiet the whole room, focus on the area where noise matters most.

For sleep, that usually means the bed wall or headboard corner. For work, it means the desk area and the path between you and the noisiest surface.

A heavier renter blanket like US Cargo Control Sound Dampening Blanket hung behind the bed or beside the desk can create a noticeably quieter zone within the room even when the rest of the space is still noisy.

Budget Rental Fixes Work Best When They Prove The Real Weak Point

Budget plan for soundproofing a rental room

Yes, and the budget approach is often the smartest approach because it forces you to diagnose the real problem before you buy decorative fixes that do not touch the real weak point.

Cheap Rental Wins Start With Sealing And Selective Mass

Sealing door and window gaps is the cheapest fix that consistently works. Foam seal strips can be installed in minutes, and if the door has a visible gap at the bottom, a removable draft stopper or adhesive sweep is the next cheapest upgrade.

After sealing, the next best budget move is adding mass to the noisiest surface. A heavy blanket, a loaded bookshelf, or even moving existing furniture against the shared wall can make a measurable difference without buying anything new.

Thin “Soundproof” Products Usually Waste Budget In Rentals

Thin foam panels marketed as “soundproof” are the biggest waste of money in rental soundproofing. They absorb echo inside the room but do not block noise from outside, and they usually cost more than a proper seal strip or a heavy blanket that would actually help.

Expensive white-noise machines are also overrated as a soundproofing substitute. They can mask light noise, but they do not reduce transmission, so they belong in the comfort category rather than the soundproofing category.

Sometimes The Honest Next Step Is A Better Unit, Not Another Product

Move beyond DIY when you have sealed the gaps, covered the weakest surfaces, and the noise is still disrupting sleep or work. At that point, the options are asking the landlord for permission to make bigger changes, requesting a quieter unit or floor, or accepting that the building itself is the limit.

If you are also comparing broader room-level fixes, soundproofing a wall, soundproofing a ceiling, and best soundproof curtains cover the permanent and semi-permanent options that become available if the landlord cooperates or if you eventually move to a place you own.

The Bottom Line

How to soundproof a rental room gets much easier once you treat the renter limits as a filter instead of a dead end.

If the room leaks most at the door or window, start there with sealing and removable coverage first.

If the shared wall is still the loudest path after that, add removable mass where the noise is actually strongest instead of decorating the whole room.

If ceiling or floor noise is the main problem, focus on softer surfaces and one quiet zone rather than pretending a renter can rebuild the structure.

If the building is still the hard limit after the best reversible fixes, use that information honestly and compare this page with the broader soundproofing hub and soundproofing a bedroom so the rental fix stays in proportion to the rest of your options.

Frequently Asked Questions

How can I stop hearing my neighbors through walls in an apartment?

The most effective renter-friendly approach is adding mass to the shared wall with a heavy blanket or loaded bookshelf, sealing the door and window gaps, and reducing the reverberant buildup inside the room with soft furnishings and rugs.

How to sound proof a rental property?

Soundproof a rental property by focusing on the weakest barriers first — usually doors and windows — with reversible fixes like seal strips, heavy curtains, and sound dampening blankets. Avoid permanent modifications unless the landlord gives written permission.

What Are DJ Controllers? (The Only Guide You Actually Need)

What are DJ controllers? They are the fastest way to get hands-on DJ control without buying separate decks and a mixer first, but that convenience also makes it easy to buy the wrong kind of setup.

That is where beginners get stuck. Because they shop by pad count, screen size, or brand prestige first, they end up with a layout that slows down learning instead of helping it.

The payoff of understanding controllers properly is that you can match the hardware to the actual skills you are trying to build and skip a lot of unnecessary cost.

Start with what a controller really is, then how it works with DJ software, then why many DJs choose it over a mixer-only setup, and finally whether you need one to learn well.

Quick Takeaway

To start DJing, you need a DJ controller (a USB device with jog wheels, faders, and performance pads), a laptop, and DJ software like Serato or Rekordbox. Controllers mirror the layout of professional CDJ setups at a fraction of the cost, letting you practice every core DJ skill from your desk.

DJ Controllers Exist To Put Real Mixing Skills Within Reach

Anatomy diagram of a DJ controller

A Controller Is The Hands-On Side Of DJ Software

A DJ controller is a hardware interface that sends MIDI signals to DJ software running on your laptop. It doesn’t process audio on its own — every fader move, jog wheel spin, and button press translates into a digital command that your software interprets.

That distinction matters because it explains why controllers cost a fraction of what CDJ setups do. The heavy lifting happens in software, not hardware.

The Layout Mirrors A Traditional Deck-And-Mixer Workflow

Once that core idea is clear, the physical layout makes more sense too.

Every controller shares the same basic DNA: two jog wheels (one per deck), a crossfader in the center, volume faders for each channel, EQ knobs (usually high, mid, low), and a set of performance pads. The jog wheels simulate vinyl platters — spin them forward to nudge a track ahead, pull back to slow it down.

Performance pads sit below the jog wheels and handle hot cues, loops, samples, and effects depending on which mode you activate. Dedicated buttons for play, cue, sync, and headphone monitoring round out the layout.

Different DJs Use Controllers For Different Reasons

That shared layout is why the same basic device can serve very different kinds of DJs.

Bedroom DJs learning to mix use entry-level 2-deck controllers. Mobile DJs running weddings and corporate events carry mid-range units with built-in sound cards.

Club-adjacent DJs who want to practice at home on the same software they’ll encounter on a CDJ-2000 setup gravitate toward 4-channel controllers from Pioneer DJ.

The common thread is software dependency. Every controller needs a laptop and a DJ application to function — which brings us to how the signal actually flows.

The Controller Only Makes Sense Once You See The Signal Path

Signal flow from DJ controller to laptop

USB Control, Software Playback, And Audio Output Form One Loop

Plug a USB cable from the controller into your laptop. DJ software — Serato, Rekordbox, or Virtual DJ — detects the controller automatically and maps every knob, fader, and pad to a specific software function.

You load a track onto Deck A using the software, and the waveform appears on screen. When you push the play button on the physical controller, the software starts playback.

Twist the bass EQ knob, and the software cuts low frequencies from that channel’s output. Every physical movement maps to a specific digital action.

The Built-In Sound Card Is What Makes Real Cueing Possible

That control loop only becomes useful for actual mixing once the audio routing is handled properly.

Audio routes from the software through the controller’s built-in sound card and out to your speakers via RCA or XLR outputs on the back of the unit. Most mid-range and up controllers include a sound card.

That built-in sound card is critical — it lets you preview the next track in your headphones while the audience hears the current one.

Without a sound card, you’d hear the same audio in your headphones and speakers, making smooth transitions impossible. Budget controllers that skip the sound card force you to buy an external audio interface, which defeats the “all-in-one” appeal.

Jog Wheel Feel Changes How The Controller Teaches Your Hands

Once the signal path is working, the next question is how the hardware actually feels under pressure.

Jog wheels come in two flavors: capacitive touch and motorized. Capacitive touch wheels detect your finger placement and speed — most entry-to-mid-range controllers use this type.

Motorized wheels physically spin like vinyl, giving tactile resistance for scratching. They cost more, but scratch DJs consider the upgrade non-negotiable.

The size matters more than most beginners realize. A 6-inch jog wheel feels cramped for scratch DJs, while an 8-inch wheel mirrors the feel of a CDJ platter.

If scratching is your priority, wheel size and tension adjustment should top your checklist.

The Real Point Is Getting CDJ-Style Workflow Without CDJ Money

Cost comparison between DJ controllers and CDJs

Cost Is The Obvious Advantage, But Not The Only One

A pair of Pioneer CDJ-3000s and a DJM-900NXS2 mixer costs more than most used cars. A controller that gives you access to the same Rekordbox software and a nearly identical workflow runs at a fraction of that price.

That price gap is the single biggest reason controllers dominate the beginner and intermediate market.

The tradeoff is build quality and standalone capability. CDJs work without a laptop — controllers don’t, which means your DJ setup is only as reliable as your computer.

Portability Makes Controllers Practical For Daily Use

That price advantage would matter less if controllers were awkward to live with, but portability is part of the appeal too.

Controllers weigh between 2 and 15 pounds depending on size. A standalone unit with a built-in screen eliminates the laptop entirely, but those carry a premium price tag.

For mobile DJs who need to fit gear in a backpack, compact 2-deck controllers like the Pioneer DJ DDJ-FLX4 deliver full functionality without the bulk.

Software Choice Quietly Becomes An Ecosystem Decision

That portability advantage leads straight into the next reality buyers miss.

Every major DJ software platform — Serato DJ, Rekordbox, Traktor Pro, and Virtual DJ — designs its interface around controller input. When you buy a controller, you typically get a license for one of these platforms included.

Pioneer controllers bundle Rekordbox. Numark and most Hercules units come with Serato DJ Lite.

That bundled software matters because upgrading later (Serato DJ Lite to Serato DJ Pro, for example) adds a significant cost. Choosing the right controller upfront locks you into an ecosystem.

Think about which software your DJ friends use and which platform the clubs in your area run.

A Controller And A Mixer Solve Two Different Problems

DJ controller and mixer compared side by side

Mixers Blend Live Audio Sources While Controllers Command Software

A DJ mixer is a standalone audio device that takes physical audio inputs — turntables, CDJs, phones, microphones — and blends them into one output signal. A mixer processes real audio signals with no laptop required.

A controller is a MIDI device that sends commands to software. It doesn’t need to process audio at all, though most include a sound card for convenience.

Remove the laptop, and the controller is a paperweight.

A Mixer Makes Sense When Multiple Audio Sources Need A Home

That difference becomes practical the moment you look at real-world setups.

If you spin vinyl or use CDJs, you need a dedicated mixer. Two turntables plus a mixer is the classic DJ setup.

It still sounds better than any controller for purists who want direct analog signal paths and motorized platters with real vinyl resistance.

Mixers also make sense in multi-DJ environments — clubs install a mixer permanently, and visiting DJs plug their own gear into it. A controller can’t serve that role because it’s tied to one laptop’s software instance.

A Controller Makes More Sense When One Laptop-Based Rig Is The Goal

For most new DJs, that is the more realistic starting point.

For home practice, bedroom mixing, streaming, and mobile gigs where you’re the only DJ, a controller is the logical choice. One device, one cable, one software window — and you’re mixing.

The Hercules DJControl Inpulse 300 MK2 even includes built-in light guides that teach beatmatching in real time — something no standalone mixer can do.

Controllers also handle effects processing inside software, which means you get reverb, delay, flangers, and beat-synced effects without buying external hardware. For a deeper breakdown, see our guide to DJ mixers.

You Can DJ Without A Controller, But The Ceiling Arrives Fast

Laptop-only DJ setup without a controller

Laptop-Only Mixing Works, But Precision Suffers

Every major DJ platform supports mouse-and-keyboard mixing. Virtual DJ, Serato, and Rekordbox all let you load tracks, set cue points, and crossfade using only your trackpad.

It works — technically.

The problem is precision — clicking a crossfader with a mouse is like playing piano with your elbows. You can produce something, but the nuance disappears.

Phone And Tablet DJing Is Real, But It Hits A Limit Quickly

Touchscreen DJing proves the same point from a different angle.

Apps like djay by Algoriddim turn an iPad into a functional DJ setup with touchscreen jog wheels and crossfaders. For casual mixing at house parties, it’s surprisingly capable.

But touch screens lack tactile feedback — you can’t feel the resistance of a jog wheel or the click of a fader without physical hardware. For anything beyond casual playlist blending, you’ll hit the ceiling fast — which is why most serious beginners invest in hardware early.

Physical Controls Build The Muscle Memory Screens Cannot

That is the real reason controllers matter.

Physical controls let you develop muscle memory. After a few weeks with a real jog wheel, your hands learn where the cue button sits without looking.

That muscle memory is what separates a DJ who can react to a crowd from one who stares at a screen.

The Numark Mixtrack Platinum FX takes this further with jog wheel displays that show track position directly on the hardware, so your eyes stay on the decks instead of bouncing between the controller and your laptop screen.

If you’re serious about learning, a controller isn’t optional — it’s the foundation everything else builds on. And once you have the hardware down, learning to mix becomes the next natural step.

The Bottom Line

DJ controllers exist to turn laptop DJing into a real hands-on workflow that you can afford, carry, and actually learn on. They are not magic shortcuts, but they are the most practical bridge between curiosity and real mixing skill.

Pick a controller that matches the software ecosystem you want to grow into — not the one with the most buttons. If you’re ready to buy, our best DJ controllers roundup breaks down the top picks by budget and skill level.

Frequently Asked Questions

What is the point of a DJ controller?

A DJ controller gives you physical knobs, faders, and jog wheels to manipulate DJ software instead of using a mouse. It makes beatmatching, scratching, and live mixing feel natural and responsive — the same way a steering wheel beats a keyboard for driving games.

Do I need a laptop to use a DJ controller?

Most controllers require a laptop running DJ software. The exceptions are standalone units like the Pioneer XDJ-AZ or Denon Prime 4+, which have built-in screens, storage, and streaming — but those carry a premium price tag.

How much should I spend on my first DJ controller?

A quality beginner controller with a built-in sound card and bundled software falls in the mid-range price tier. Budget models that skip the sound card force you to buy a separate audio interface, which defeats the savings.

Check our best beginner DJ controllers list for current picks.

Can I use any DJ software with any controller?

Not always — some controllers only work with specific software (Pioneer controllers are optimized for Rekordbox, Rane controllers for Serato). Most mid-range controllers support multiple platforms, but check compatibility before buying.

What is the difference between 2-deck and 4-deck controllers?

A 2-deck controller lets you mix between two tracks at once — enough for most DJ styles. A 4-deck controller adds two more virtual decks for layering samples, acapellas, or running four tracks simultaneously.

Beginners should start with 2 decks and upgrade when they feel limited.