Acoustic Foam vs Blankets: Which Actually Works Better for Sound?
Acoustic foam vs blankets: which actually works better for reducing echo and reverb in a room? Blankets can feel like the obvious choice—until you’re chasing consistent recordings and the room keeps showing up.
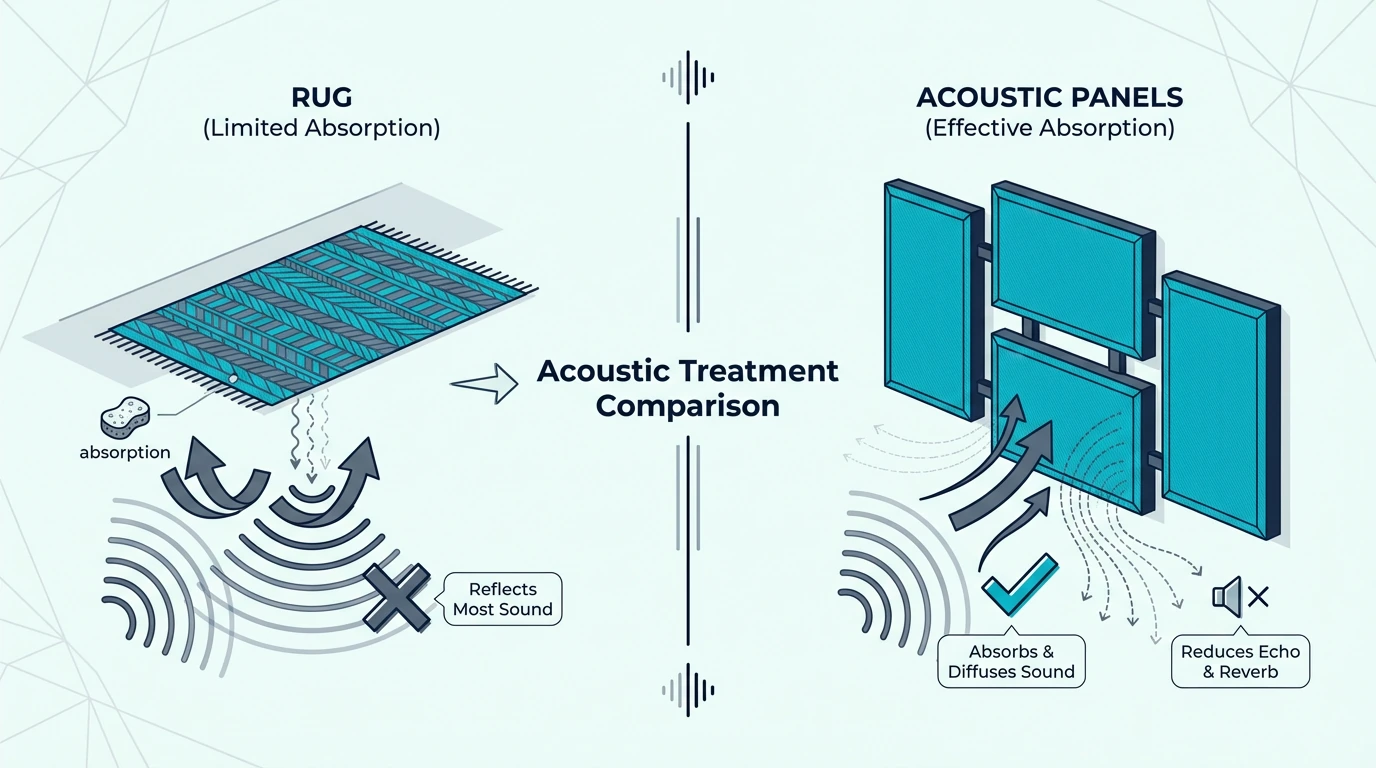
Blankets absolutely have a place, particularly for temporary or portable setups. But foam is easier to place precisely, stays put once installed, and usually looks more professional on camera.
This guide breaks down exactly when each option makes sense. Start with the quick takeaway, then we’ll compare performance, practicality, and what to prioritize in a real room.
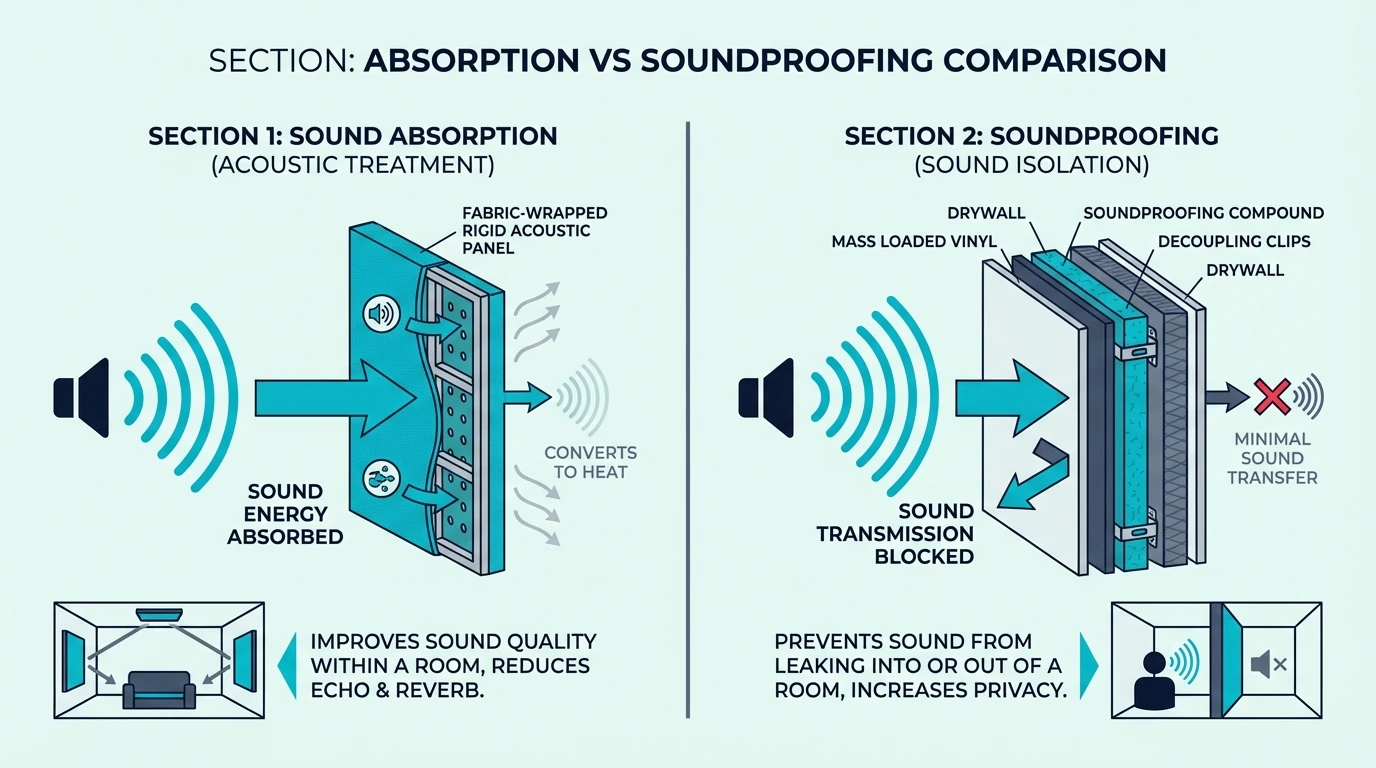
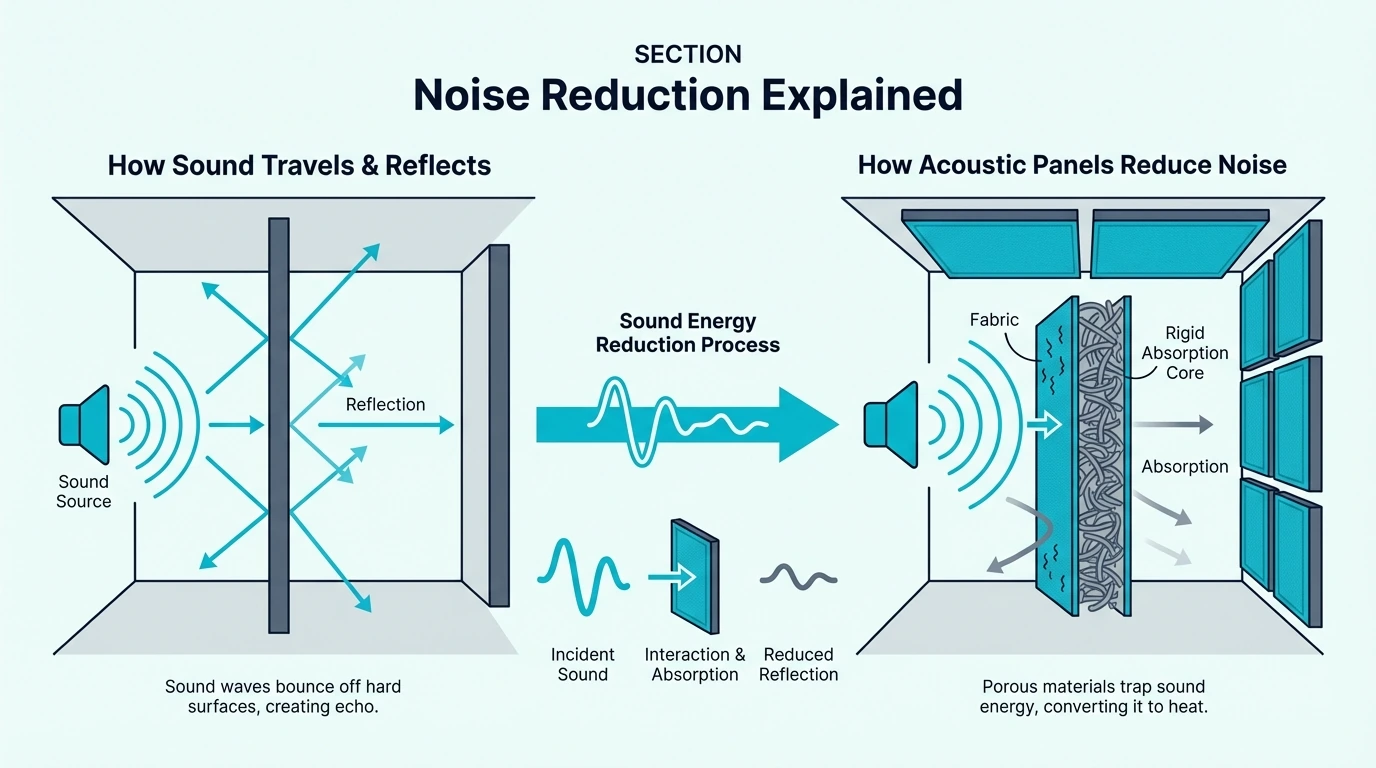
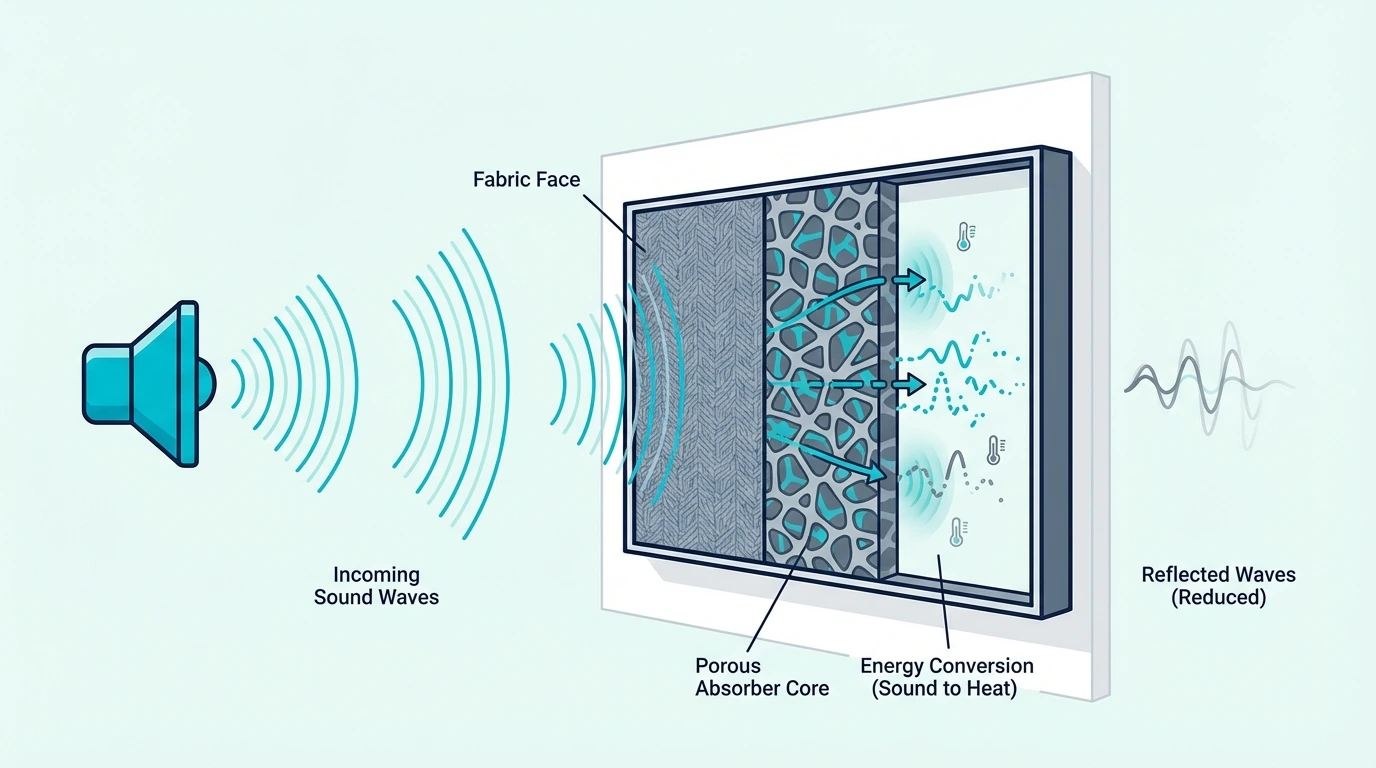
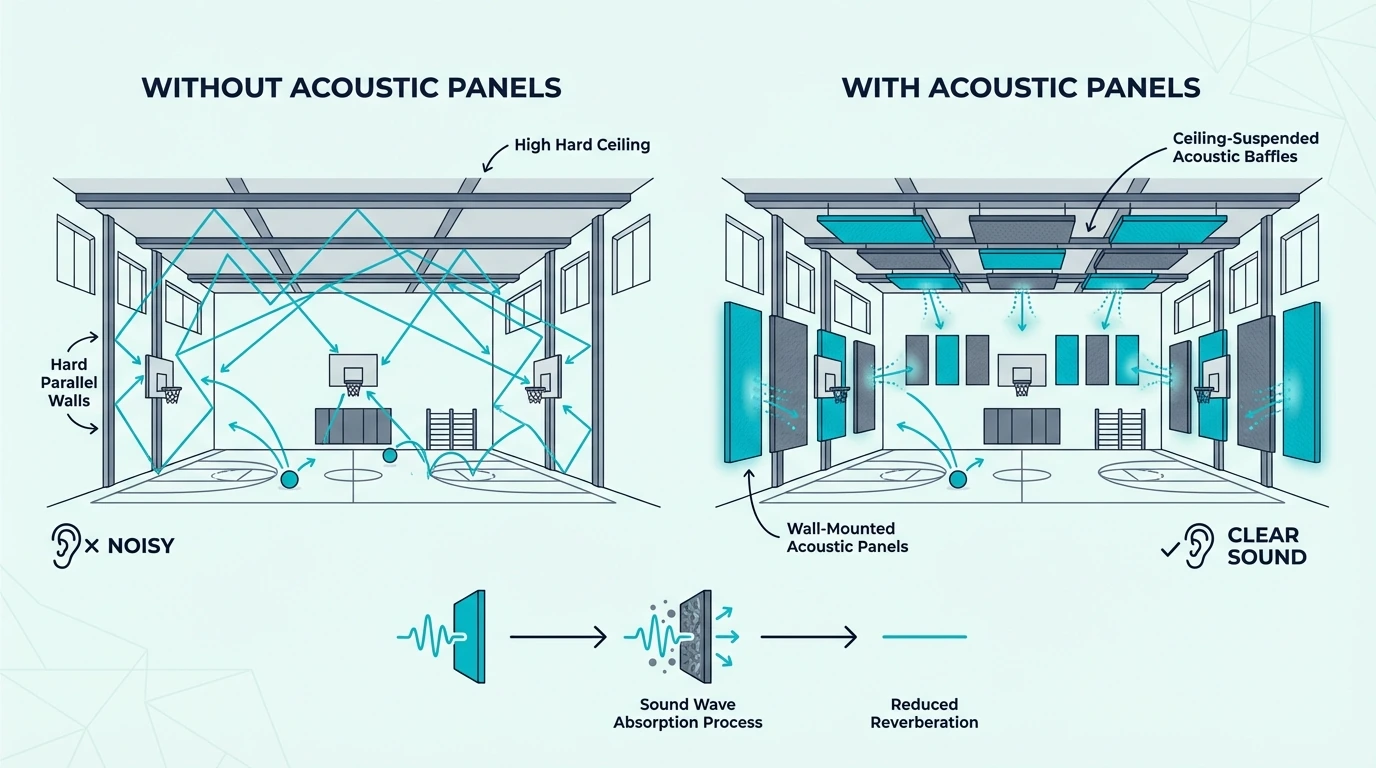
One thing upfront: neither foam nor blankets will soundproof your room. They reduce reflections inside the space (echo and reverb), but they won’t block noise through walls.
Our guide on how acoustic foam works explains this science in detail. It’s also the easiest way to separate echo control from true soundproofing.
Quick Takeaway
Acoustic foam usually gives you more consistent absorption and a cleaner, permanent-looking setup. Blankets can work surprisingly well for temporary treatment, portable vocal booths, or “try it before you buy it” experiments.
Choose foam if the room is a permanent studio and appearance matters. Choose blankets if you need portability, a wall-friendly setup, or maximum coverage on a tight budget.
What’s the Difference Between Acoustic Foam and Blankets?
These two options aren’t competing on the same playing field. Foam is built for absorption, while blankets are a flexible workaround that trades precision for convenience.
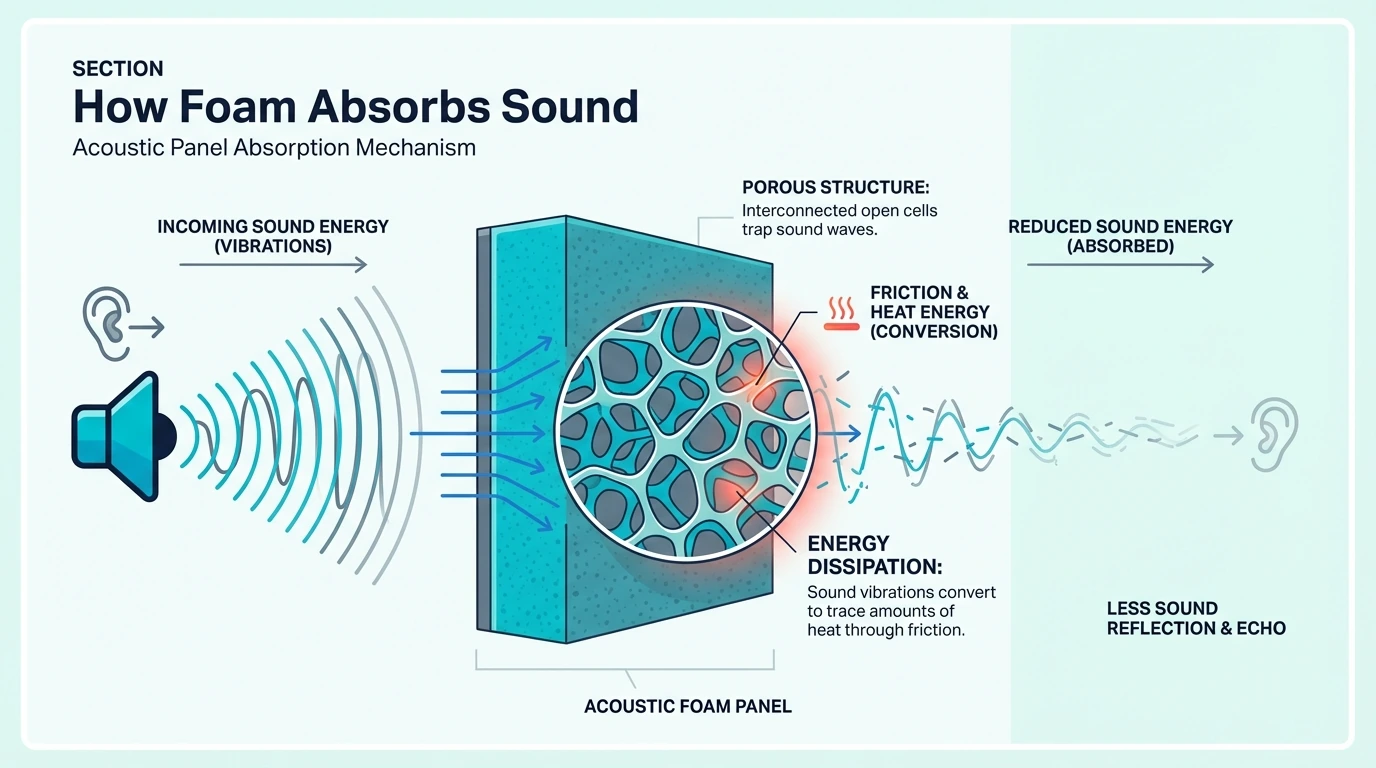
Acoustic foam is open-cell polyurethane shaped into wedges, pyramids, or egg crate patterns. Its porous structure traps sound waves and converts some acoustic energy to heat through friction.
If you’re choosing foam shapes, our pyramid vs wedge foam comparison covers what to expect. The shape matters less than overall coverage, but it can change how reflections scatter.
Blankets come in two varieties: moving blankets (dense cotton/polyester padding for furniture protection) and acoustic blankets (thicker, grommeted versions marketed for sound). The density provides some absorption, but the flat surface reflects more sound than foam’s textured profile.
The Short Answer: Foam for Performance, Blankets for Budget
Foam performs better in measurable ways, absorbing more sound across a wider frequency range. It also maintains more consistent performance over time.
That doesn’t make blankets useless. For temporary setups, extreme budgets, or portable applications, blankets deliver acceptable results at lower cost.
The real question is whether your situation justifies foam’s premium or whether blankets meet your actual needs. Check our best acoustic foam panels guide for top-rated options.
Quick Comparison Table
Feature
Acoustic Foam
Moving/Acoustic Blankets
NRC Rating
0.3-0.5
0.2-0.4
Best Frequencies
Mid-high (500Hz+)
Mid-high (variable)
Cost
Higher per sq ft
Lower per sq ft
Appearance
Professional
DIY/industrial
Mounting
Adhesive/permanent
Hanging/temporary
Lifespan
3-5 years
5-10 years
Portability
Low
High
What Are Moving Blankets and Acoustic Blankets?
Here’s where terminology gets confusing. “Moving blankets” and “acoustic blankets” get used interchangeably online, but they’re built differently and they don’t perform the same.
Moving blankets are padded covers designed to protect furniture during transport. They’re dense and heavy, which is why they can help with reflections when you hang them on a wall.
The quilted construction provides some sound absorption as a side benefit. But because they weren’t designed for acoustics, performance varies a lot by thickness and fit.
Acoustic blankets are purpose-built for sound work. They’re heavier, usually include grommets for hanging, and use denser fill materials.
They cost more than generic moving blankets, but performance is more consistent. If you record often, that consistency can be worth it.
Moving Blankets vs Acoustic Blankets — What’s the Difference?
The main differences are density, weight, and construction quality. Acoustic blankets absorb more sound because they have more mass per square foot.
Moving blankets use lighter fill to keep shipping costs down. Acoustic blankets prioritize absorption over portability.
For budget setups, moving blankets work. For serious recording, acoustic blankets justify the price difference.
Do Moving Blankets Actually Work for Sound?
Yes, but with realistic expectations. Moving blankets reduce flutter echo and high-frequency harshness in untreated rooms.
Try this: hang a moving blanket behind your microphone and record a short voice sample. Then record the same line in the untreated room.
You’ll usually hear less room reverb with the blanket, especially in the high end. The change won’t be magic, but it’s a real difference.
The limitation is frequency range. Moving blankets mainly tame high-frequency harshness and flutter echo.
Lower-mid frequencies (roughly 200–500 Hz) pass through with much less reduction, so the room can still sound boxy. If that’s the problem you’re chasing, blankets alone won’t fully solve it.
How Does Acoustic Foam Compare to Blankets?
Now let’s get into the numbers. Performance data tells the real story better than marketing claims.
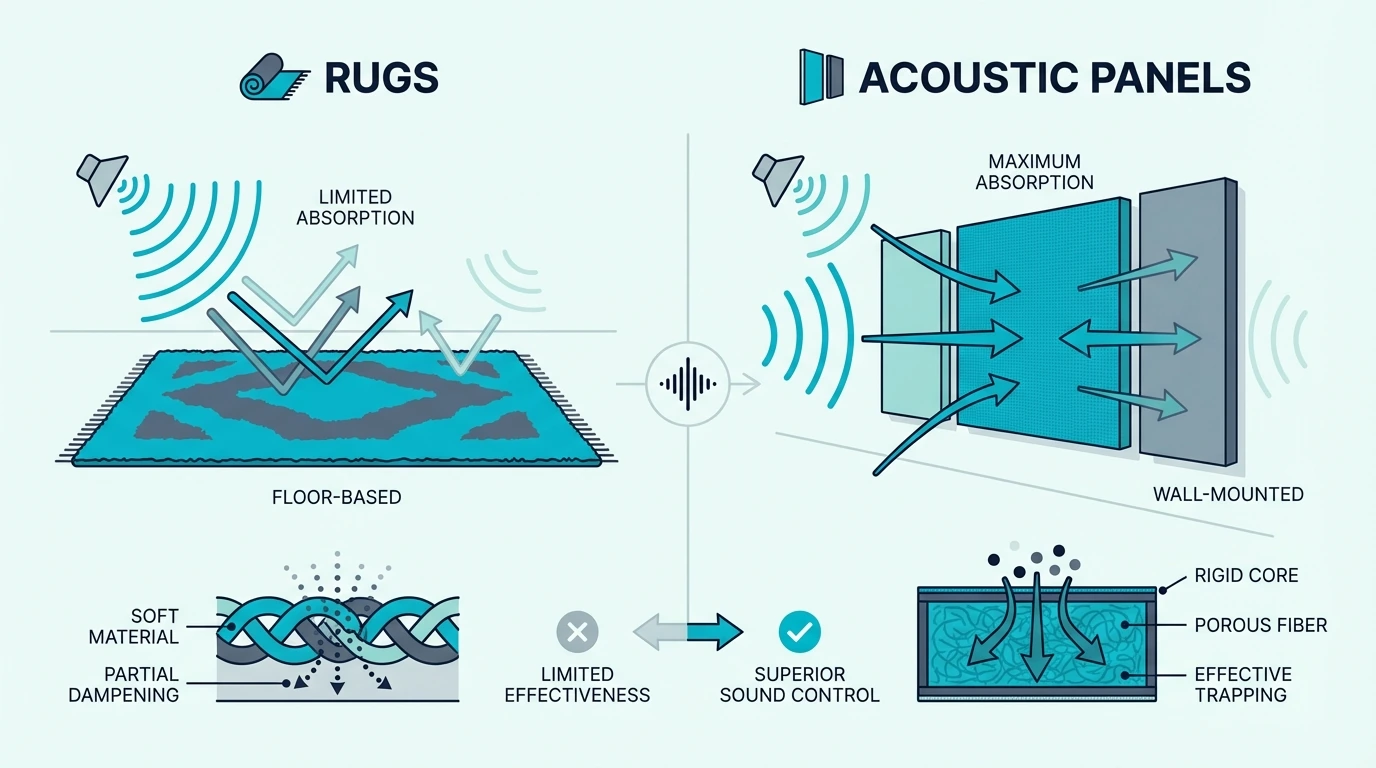
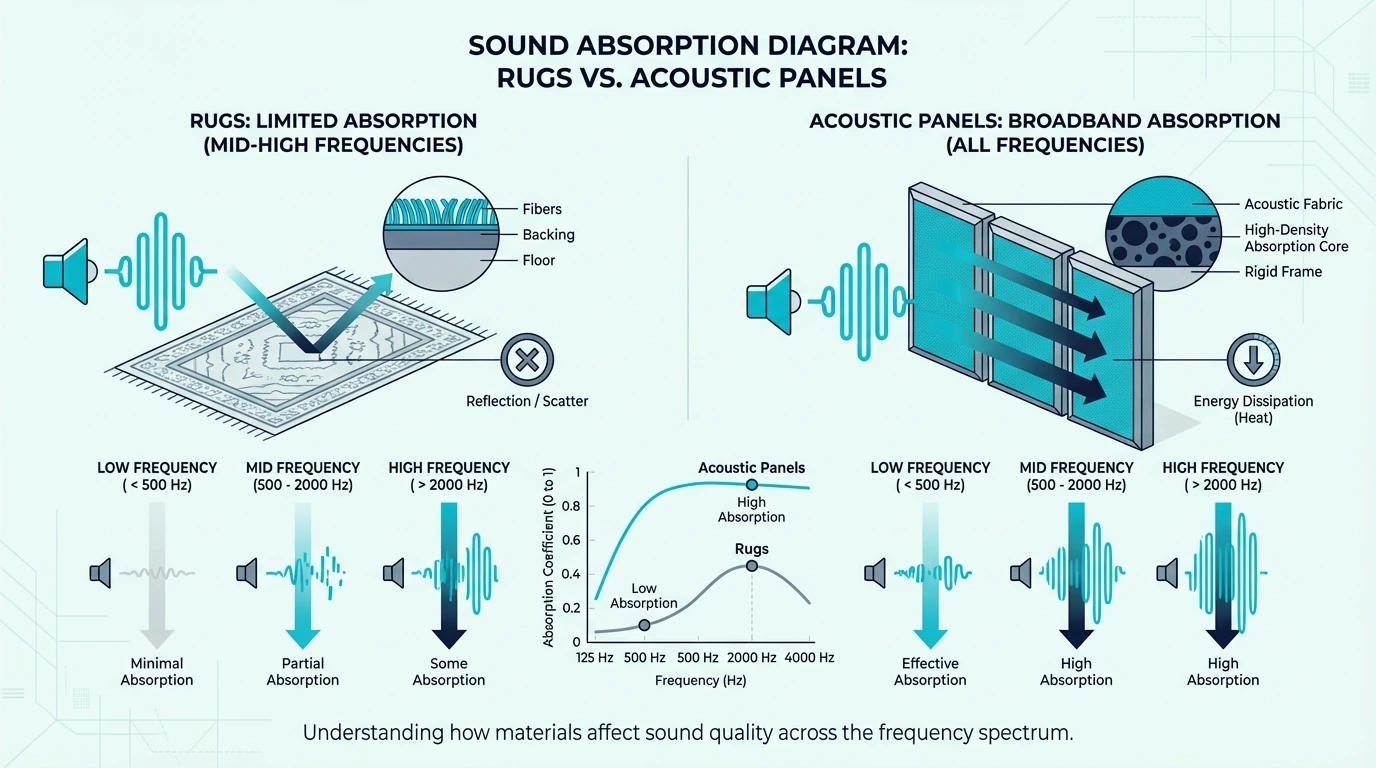
Sound Absorption: Which Works Better?
Acoustic foam wins on measurable absorption. Quality foam panels achieve NRC ratings of 0.4-0.5, meaning they absorb 40-50% of incident sound energy.
Moving blankets typically rate 0.2-0.3 NRC. Acoustic blankets reach 0.3-0.4 with dense construction.
Those NRC numbers from the table translate to real-world differences. In a typical 10×12 room, foam treatment produces noticeably less reverb than equivalent blanket coverage.
The frequency response also differs. Foam’s textured surface scatters and absorbs mid-to-high frequencies more effectively than a flat blanket.
Wedges and pyramids help break up reflections that a smooth fabric surface can let bounce back. It’s not just the material—it’s also the shape.
Price Comparison: Cost Per Square Foot
Blankets cost less upfront. If you need a lot of coverage quickly, fabric treatment usually stretches a budget further than foam.
Foam typically costs more per square foot, but you’re paying for more consistent absorption and a cleaner install. The tradeoff is performance and permanence versus coverage and flexibility.
The calculation changes over time. Foam can degrade or crumble after years of use, especially in humid or sunlit rooms.
Quality blankets tend to last longer structurally, but they can sag, collect dust, and look worn with heavy handling. In a permanent room, those aesthetic downsides add up.
For temporary setups, blankets’ lower upfront cost makes sense. For permanent installations, foam’s better performance per dollar spent wins long-term.
Aesthetics: Which Looks Better?
Foam looks professional. The geometric patterns and uniform appearance signal “studio” to clients, collaborators, and viewers.
Blankets look DIY. Hanging fabric on walls reads as temporary, budget, or unfinished — regardless of how well it performs.
If your space appears on camera or hosts clients, aesthetics matter for perception. A podcasting room with foam panels conveys professionalism that blanket-covered walls don’t match.
When Should You Use Acoustic Foam?
With those performance differences established, let’s get specific about when foam is clearly the better choice. If this is a space you’ll use every week, repeatability and clean placement start to matter a lot.
Permanent Home Studio Setup
Home studios justify foam because you’ll use the space regularly and placement stays consistent. Budget-friendly options like JBER 12-pack wedge panels make it easy to start without overthinking it.
Foam also looks like a studio on camera, which matters if you stream or record video. And once it’s up, you don’t have to constantly re-hang anything.
Foam’s adhesive mounting creates a clean, permanent installation. A can of 3M Super 77 spray adhesive bonds panels securely without visible hardware.
Once it’s installed, there are no dangling blankets, grommets, or shifting layers to babysit. See our guide on how to put acoustic foam on walls for mounting methods.
The improvement compounds over time: better absorption means cleaner recordings and less post-production work. If you record weekly, those small savings add up fast.
Professional Appearance Needed
Any space that appears on video needs to look professional. Streaming setups, YouTube studios, and podcast rooms all benefit from foam’s visual polish.
Clients and audiences notice production quality. Foam panels signal investment and expertise that blanket-covered walls can’t communicate.
The perception difference is real even if the acoustic performance is similar. Appearance affects how viewers perceive your content quality.
Maximum Absorption Required
When acoustic performance is the priority, foam gives you more absorption per square foot. For larger coverage, a 52-pack foam bundle can be an efficient way to treat key reflection areas.
Music production and critical listening benefit from foam’s more consistent midrange control. The goal isn’t perfection—it’s removing enough room sound that your mic and monitors can do their job.
The frequency response advantage matters for music. Foam’s textured surface handles the mid-range frequencies where most music lives.
If you’re doing serious audio work, foam is the baseline professional choice. Blankets are a compromise that costs you performance.
When Should You Use Blankets Instead?
Now let’s cover when blankets make more sense than foam. The goal here isn’t perfection—it’s getting a cleaner recording without committing to permanent installs.
Temporary or Portable Setup
Blankets excel for temporary installations. Rental spaces, touring setups, and multi-use rooms benefit from blankets’ easy removal.
Hanging blankets takes minutes, which is why they’re great for rentals and multi-use rooms. Removing adhesive-mounted foam takes much longer and can damage paint or drywall.
If you can’t commit to permanent treatment, blankets are the practical choice. You can treat the room when you need it, then pack everything away.
Portable vocal booths also pair well with blankets because you can build a simple frame, hang the fabric, and break it down for storage. If you’re weighing that route, see our comparison of acoustic foam vs vocal booths.
If your blankets don’t have grommets, a grommet kit lets you add hanging points to any heavy blanket. It’s a small upgrade that makes setup much faster.
Extreme Budget Constraints
When money is tight, blankets stretch further because you can cover more surface area for the same spend. Products like VEVOR sound dampening blankets are purpose-built for sound and include grommets for easy hanging.
More coverage often beats “perfect” material if you’re starting from bare walls. That’s the main reason blankets can outperform small amounts of foam in real rooms.
Coverage matters more than material perfection. A room with 60% blanket coverage often sounds better than one with 30% foam coverage.
I see this a lot: someone buys premium foam, but can’t afford enough panels to make a real dent. In that situation, more blanket coverage would have delivered better results for the same budget.
Vocal Booth DIY Build
DIY vocal booths favor blankets for practical reasons. The soft material drapes around frames, fills corners, and creates enclosed spaces without cutting or gluing.
Blankets work well in small enclosed spaces. The proximity to walls means even modest absorption reduces reflections significantly.
The budget savings let you build a larger booth or invest in better microphones. Sometimes the acoustic compromise makes strategic sense.
The Bottom Line: Foam or Blankets?
Here’s the honest assessment: foam performs better and looks better in a permanent room, while blankets cost less and shine in temporary, portable, or rental-friendly setups. If you’re building a permanent space where appearance matters, choose foam.
Choose blankets if you’re renting, building temporary treatment, working on an extreme budget, or creating a portable setup. The performance gap is real, but it may not matter if you prioritize coverage and flexibility.
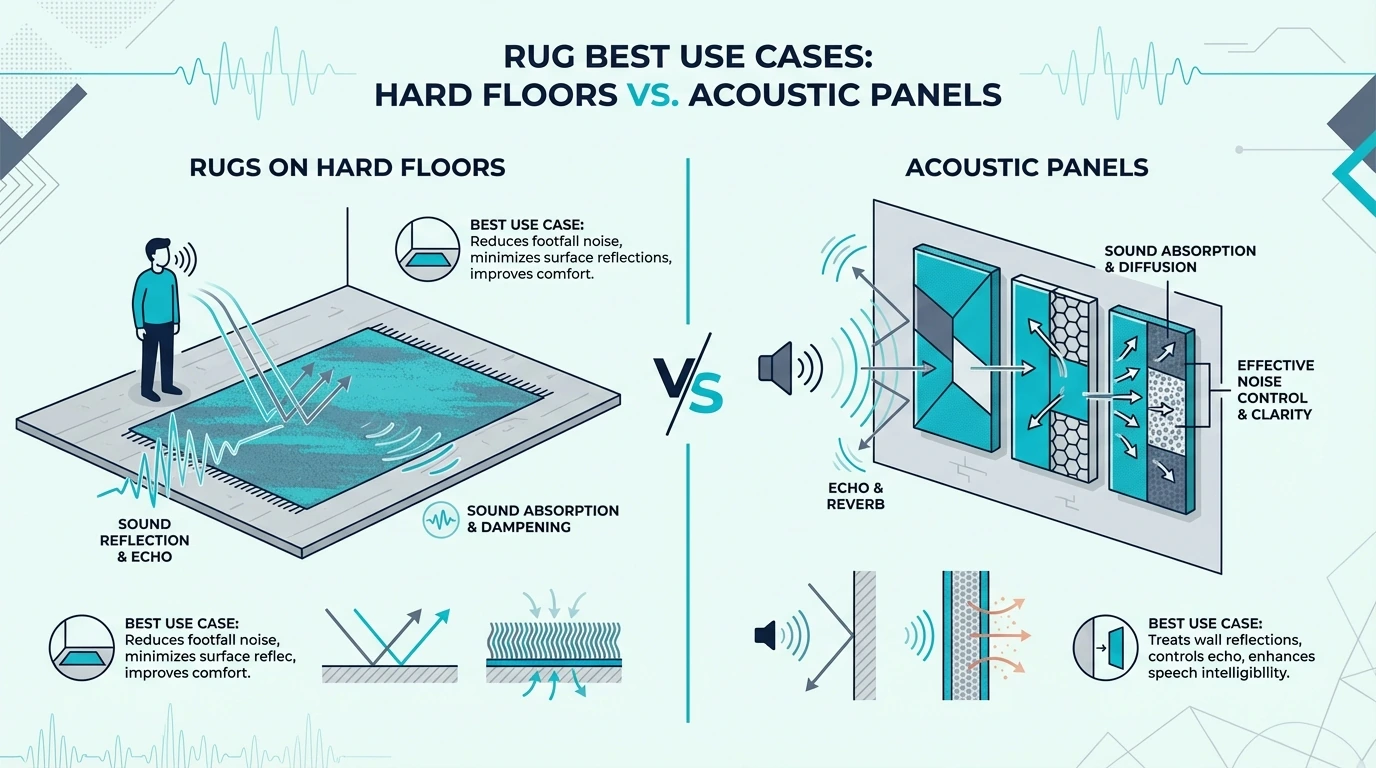
What actually matters most is adequate coverage for your room size and proper placement at reflection points. If you get those right, either option can make a normal bedroom sound dramatically less “roomy” on mic.
No. Moving blankets reduce reflections inside a room (echo and reverb), but they don’t block sound through walls.
If your goal is stopping neighbors from hearing you, you need isolation work—sealing air gaps and adding mass—not more fabric on the wall. For a quick explainer, see does acoustic foam soundproof.
Can blankets replace acoustic foam?
For budget setups, sometimes. Blankets can get you most of the way toward “less echo” if you hang enough coverage in the right places.
The tradeoff is a less professional look and less consistent midrange control. Foam wins when you want repeatable results and clean installs.
Which is cheaper: foam or blankets?
Blankets are usually cheaper per square foot, especially if you buy moving blankets in bulk. Foam typically costs more for the same surface area.
But foam also tends to be more consistent and easier to mount cleanly. Decide based on whether your priority is coverage, appearance, or permanence.
Can you use both together?
Yes. A common approach is foam on visible walls and blankets on hidden surfaces (behind curtains, in closets, or around a portable booth).
That mix maximizes coverage while keeping the room looking intentional. Just avoid leaving big reflective gaps near your mic or monitors.
Acoustic Foam Pyramid vs Wedge: Which Shape Works Best?
Acoustic foam pyramid vs wedge—the three shapes look different, but in most home studios the audible difference is minimal.
If the foam is the same thickness and density, pyramid, wedge, and egg crate all reduce mid/high reflections in similar ways. Placement and total coverage change your room far more than the surface pattern.
Shape isn’t completely irrelevant. It affects how the foam looks, how easy it is to cut, and how much coverage you can buy for the same money.
One important distinction before we start: acoustic foam reduces echo and reverb inside the room. It does not soundproof—your neighbors will still hear your music.
If you want the deeper physics, read our how acoustic foam works guide. Otherwise, start with the quick takeaway and then match a shape to your use case.
Quick Takeaway
For most rooms, pyramid, wedge, and egg crate foam perform similarly when thickness and density match. The audible difference between shapes is usually tiny compared to placement and total coverage.
Pick pyramid if you like the look, wedge as an easy default, and egg crate if you need maximum coverage on a budget. If you can only optimize one thing, go thicker (2-inch) before you obsess over shape.
What’s the Difference Between Pyramid, Wedge, and Egg Crate Foam?
Let’s break down what makes each one tick. The three main acoustic foam shapes differ in their surface geometry, but they all work on the same principle: creating surface area for sound waves to enter and lose energy through friction.
Each shape creates peaks and valleys that increase the total surface area compared to a flat panel. More surface area means more opportunities for sound absorption.
The Short Answer: Does Shape Actually Matter?
I need to be direct about this: for most applications, shape makes less than a 10% difference in absorption performance. The marketing claims about pyramid being “superior” or wedge being “optimal” are largely overstated.
What matters more is thickness, density, and placement. A well-placed 2-inch wedge panel will outperform a poorly placed pyramid panel every time.
If you haven’t treated reflection points yet, start there first. Our foam placement guide shows exactly where to put panels for maximum effect.
That said, pyramid foam does have marginally more surface area due to its four-sided peak structure. In laboratory conditions, this translates to slightly better absorption — but in real rooms with real acoustic problems, the difference is barely measurable.
Quick Shape Comparison Table
Feature
Pyramid
Wedge
Egg Crate
Surface Area
Highest
Medium
Lowest
Availability
Common
Most Common
Common
Price
Mid-range
Budget to Mid
Usually Cheapest
NRC Range
0.3-0.5
0.3-0.5
0.25-0.45
Best For
Aesthetics
General use
Budget setups
Diffusion
Some
Minimal
Minimal
What Is Pyramid Acoustic Foam?
Now that you understand the basics, let’s look at each shape individually. Pyramid foam features four-sided pointed peaks arranged in a grid pattern, creating valleys between the pyramids where sound enters and gets absorbed.
The geometry resembles a field of small mountains. This distinctive look makes pyramid foam popular for visible studio installations where aesthetics matter.
How Pyramid Foam Works
Sound waves hit the angled surfaces of each pyramid and scatter in multiple directions. Some energy reflects at angles, while most enters the valleys between peaks.
Once inside the foam structure, sound bounces between pyramid walls, losing energy with each contact. The friction between air molecules and foam cell walls converts sound energy to heat.
The four-sided design means sound approaching from any horizontal angle encounters multiple surfaces. This provides slightly more consistent absorption across different sound arrival directions than wedge profiles.
Pyramid Foam Pros and Cons
Pyramid foam is popular because it looks like “studio treatment” and adds the most textured surface of the common shapes. Because the peaks face multiple directions, it’s less sensitive to orientation than wedge ridges.
The tradeoff is price and durability, not a night-and-day acoustic upgrade. The pointed peaks collect dust and can tear more easily, so you’re paying more mainly for the look.
Best Uses for Pyramid Foam
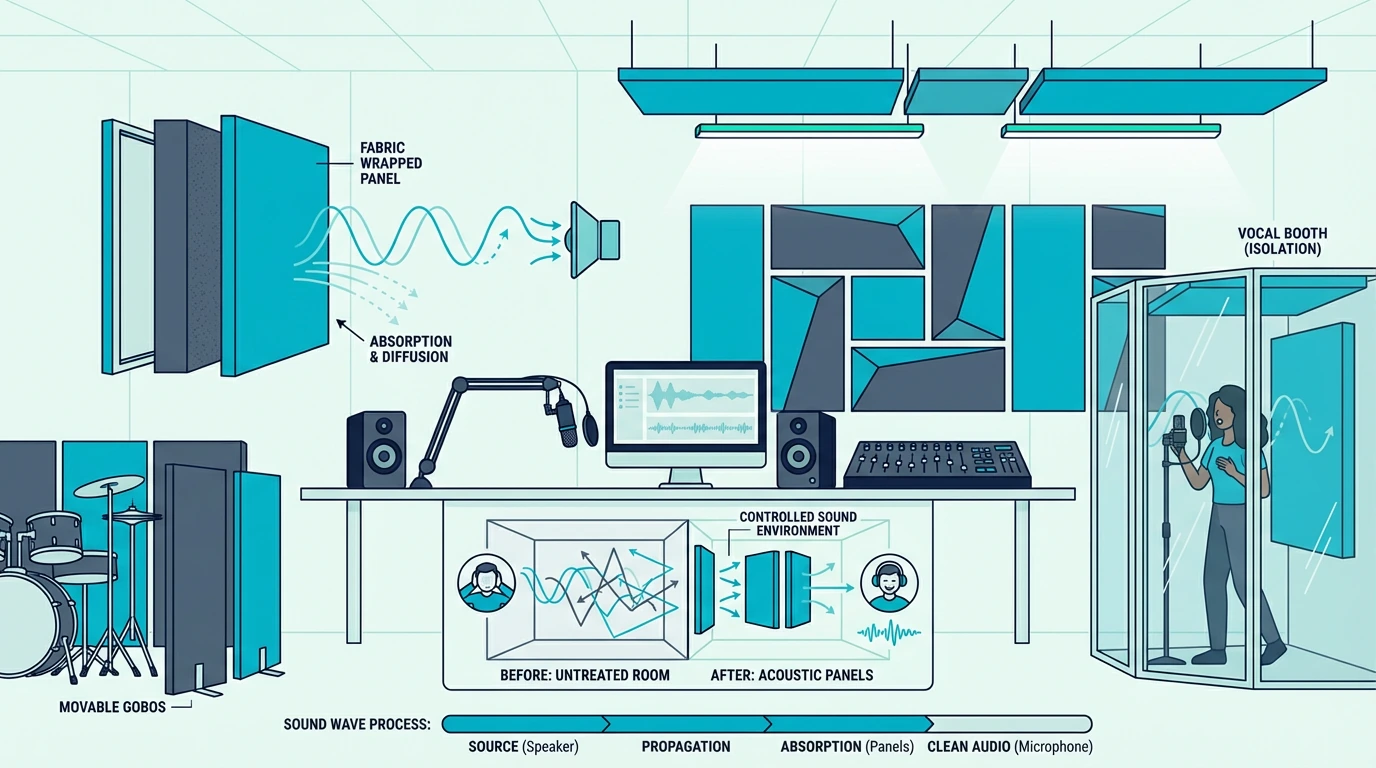
Pyramid foam makes sense when visual appearance matters alongside acoustic function. Recording studios with client-facing spaces often choose pyramid for its professional look.
For broadcast studios and podcast rooms where cameras capture the space, pyramid foam photographs well and looks intentional. The geometric pattern reads as “professional audio space” to viewers.
What Is Wedge Acoustic Foam?
Wedge foam is the most common shape you’ll see, and it’s the default for a reason. The ridges run in one direction, creating a clean pattern that’s easy to align on a wall.
Because it’s so common, wedge foam is usually the most affordable and easiest to replace later. If you’re not sure what to buy, wedge is the safe pick.
How Wedge Foam Works
Sound waves entering at angles perpendicular to the ridges encounter maximum surface area. Waves parallel to the ridges encounter less surface but still get absorbed as they enter the valleys.
The angled surfaces scatter incoming sound while the valleys trap and absorb it. Like all acoustic foam, the open-cell structure converts sound energy to heat through friction.
Wedge foam’s directional pattern means optimal absorption depends somewhat on orientation. Mounting wedges perpendicular to your primary sound source maximizes their effectiveness.
Wedge Foam Pros and Cons
Wedge foam is easy to buy, match, and expand later, and it tends to look clean on a wall. The ridge structure also holds up well, so it’s a solid choice for bedrooms and practice rooms.
The main downside is that it’s directional: it absorbs best when sound hits across the ridges, not along them. In practice the difference is small, but you can orient the ridges toward your main reflection points if you want to be picky.
Best Uses for Wedge Foam
Wedge foam is the default choice for home studios, practice rooms, and anywhere budget matters. Budget-friendly options like Focusound 24-pack wedge foam panels offer excellent value for beginners.
The price-to-performance ratio is excellent, and availability means you can easily buy more. When ready to install, see our guide on how to put acoustic foam on walls for mounting methods.
For podcasting setups and vocal booths, wedge foam provides plenty of absorption for speech frequencies. The linear pattern also creates visual interest without being distracting on camera.
What Is Egg Crate Acoustic Foam?
Egg crate foam has rounded bumps and deep valleys, similar to mattress toppers and packaging foam. The softer profile looks less “studio” than pyramid or wedge.
This shape originated in packaging and bedding applications before it became popular for acoustics. Its familiarity makes it blend in more, which some people prefer.
What Does “Convoluted Foam” Mean?
You’ll sometimes see “convoluted foam” in product descriptions and wonder if it’s something different from egg crate. It isn’t—“convoluted” is just the manufacturing term for the egg crate profile.
The convoluted shape comes from passing flat foam through a special cutting machine that creates the peaks and valleys. It’s the same process used for medical bed pads and mattress toppers — acoustic egg crate foam just uses denser, firmer material.
Some manufacturers use the fancy term because it sounds more technical. Others are simply using industry terminology.
Either way, don’t treat the label as a quality signal. Thickness and density matter more than whether a listing says “egg crate” or “convoluted.”
If you’re searching for products, try both terms. “Egg crate acoustic foam” returns more consumer-oriented results; “convoluted acoustic foam” sometimes surfaces industrial suppliers with bulk pricing.
How Egg Crate Foam Works
The rounded peaks and wide valleys create less total surface area than pointed pyramid or wedge profiles. Sound enters the valleys and gets absorbed, but there’s less surface contact overall.
The softer geometry means slightly less absorption efficiency compared to sharper profiles. However, the difference is small enough that egg crate remains effective for basic acoustic treatment.
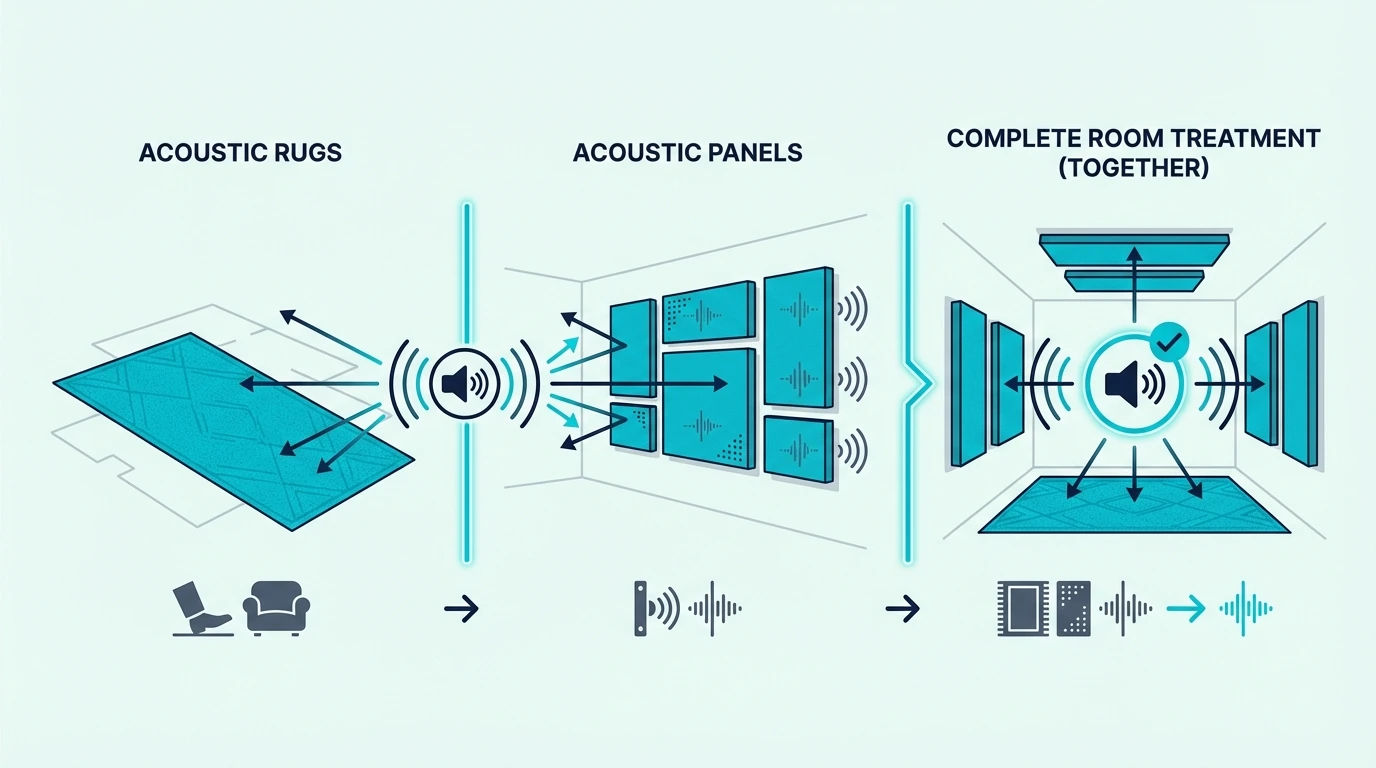
Egg crate foam’s main advantage is price—the simpler manufacturing process typically makes it the cheapest acoustic foam option available. If you’re comparing foam to other treatments, our acoustic foam vs acoustic panels comparison breaks down the differences.
Egg Crate Foam Pros and Cons
Egg crate is usually the cheapest option, and the softer look can be a plus in bedrooms and casual spaces. It’s also less “pokey” if you bump into it.
The downside is that it looks more like packing material, and it has the lowest surface area of the three shapes. The absorption difference is small, but the aesthetic difference can be obvious.
Best Uses for Egg Crate Foam
Egg crate makes sense when budget is the primary concern and you need maximum coverage for minimum cost. Bedroom studios and practice spaces where appearance matters less benefit from the savings.
The surface area difference we covered earlier shows up here — egg crate’s rounded bumps create less friction than pointed peaks. But here’s the thing: if you’re covering a 10×10 room, that 15-30% price savings lets you buy 30% more panels.
More coverage beats marginally better per-panel absorption every time. A room with 20 egg crate panels will sound better than one with 12 pyramid panels.
For temporary setups or rental spaces where you might remove the foam later, egg crate’s lower cost reduces the investment at risk. The same principle applies to practice spaces where foam might get damaged.
How Do These Shapes Compare for Sound Absorption?
Here’s where it gets interesting: the numbers tell a different story than the marketing. Real-world absorption differences between shapes are smaller than sellers suggest.
When you control for thickness and density, shape alone accounts for roughly 5-10% variation in NRC ratings. For most rooms, that difference gets lost in the noise compared to placement and coverage.
That 5-10% matters in professional studios measuring for precise acoustic specifications. For home recording and content creation, it’s noise in the margin — other factors matter far more.
NRC Rating Comparison by Shape
NRC (Noise Reduction Coefficient) measures absorption from 0 (reflects all sound) to 1 (absorbs all sound). Most acoustic foam lands between 0.3-0.5 regardless of shape.
Shape
1” Thickness NRC
2” Thickness NRC
Pyramid
0.30-0.35
0.45-0.55
Wedge
0.28-0.33
0.43-0.52
Egg Crate
0.25-0.30
0.40-0.48
These numbers vary by manufacturer and foam density. A high-density wedge can outperform a low-density pyramid despite the theoretical surface-area advantage.
I’ve seen cheap pyramid foam underperform quality wedge foam many times. Density trumps shape.
Which Shape Absorbs Best?
Pyramid foam wins on pure surface area, giving it a slight edge in laboratory measurements. The four-sided peaks create approximately 5-10% more surface area than wedge of equal dimensions.
In practice, this advantage rarely translates to audible difference. Your ear can’t distinguish between 0.45 NRC and 0.48 NRC — both sound like “the echo went away.”
Try this: clap your hands in the center of your room and listen for the tail. That reverb tail is what foam reduces — and all three shapes shorten it about equally.
The factors that actually determine absorption are foam thickness (thicker reaches lower frequencies), placement (reflection points matter most), and total coverage (more panels = more absorption). Shape is a distant fourth.
If you want an upgrade you can actually hear, focus on thicker foam and better placement. Whether your peaks are pointed or rounded is the last thing to optimize.
Does Shape Affect Which Frequencies Are Absorbed?
Shape has minimal impact on frequency response. The primary frequency determinant is foam thickness — all shapes absorb high frequencies easily but struggle with bass regardless of profile.
A 2-inch pyramid and 2-inch wedge absorb essentially the same frequency range. Neither will help with bass below 250-300Hz; both will effectively absorb mid-high frequencies above 500Hz.
For bass problems, you need bass traps—absorbers with real depth. No amount of foam pyramids will fix corner bass buildup.
If bass is your main problem, start with bass traps vs acoustic foam. It’ll save you from buying foam for the wrong job.
Which Shape Should You Choose?
With those NRC numbers in mind, let’s get practical about your specific situation. The honest answer is to pick whichever looks best to you and fits your budget.
For most users, the performance differences between shapes don’t justify paying more or compromising on aesthetics. Use shape to solve a “fit and look” problem, not a “performance” problem.
Here’s how to match shape to specific use cases when it does matter.
Which Foam Shape Is Easiest to Cut for Custom Fits?
Installing around outlets, switches, and corners requires cutting foam to fit. Some shapes cooperate better than others with DIY trimming.
Wedge foam cuts the cleanest. The linear ridges give you natural cutting guides, so straight edges are easier to pull off.
Egg crate foam cuts reasonably well. The material is usually softer, so a sharp utility knife and a steady hand get acceptable results.
Pyramid foam is the hardest to trim cleanly. Those four-sided peaks force awkward cuts, so outlet cutouts tend to look jagged.
If you anticipate lots of custom cutting for an irregularly shaped room, wedge foam saves frustration. Save pyramid patterns for full-panel installations where cutting isn’t necessary.
Best Shape for Home Studios
Wedge foam hits the sweet spot for home studios — professional appearance, good availability, reasonable price. The linear pattern creates visual coherence when covering walls.
If you’re in a typical 10×12 bedroom studio with drywall and hardwood floors, here’s what to expect: twelve 12×12 wedge panels on the walls behind and beside your desk will cut flutter echo noticeably. You’ll hear the difference immediately when recording vocals or mixing.
Mount wedge panels with ridges running horizontally for a clean look, or mix horizontal and vertical orientations at reflection points. The pattern variation adds visual interest while maintaining function.
I’ve set up dozens of home studios, and wedge foam handles 90% of cases. The remaining 10% have specific aesthetic requirements that justify pyramid’s higher cost.
Best Shape for Podcasting
For podcasting and voice recording, any shape works equally well. Speech frequencies (roughly 100Hz-4000Hz) fall squarely in the range all acoustic foams handle effectively.
Those NRC numbers from earlier explain why: all shapes score 0.3-0.5 in the mid frequencies where voice lives. A budget wedge panel can absorb voice reflections just as well as a higher-priced pyramid option.
Choose based on what looks best on camera. Pyramid creates dramatic shadows under studio lighting, while wedge provides clean lines.
Egg crate reads as “budget” on camera — avoid it if appearance matters. Your audio quality won’t suffer, but your professional image might.
Best Shape on a Budget
Egg crate foam is often priced lower than pyramid or wedge of equal thickness. If you’re trying to cover more wall for the same money, that matters.
More coverage beats marginally better absorption. Sixteen egg crate panels will outperform eight pyramid panels even though pyramid is technically “better” per panel.
The Bottom Line: Which Shape Should You Buy?
Here’s the uncomfortable truth the foam sellers won’t tell you: shape differences are real but small. Pyramid has the most surface area, wedge is most available and affordable, egg crate is cheapest.
For home studios and recording spaces, pick based on aesthetics and budget. All three shapes work for basic echo reduction when properly placed at reflection points.
What actually matters is getting enough thickness for meaningful absorption, placing panels at first reflection points, and buying enough coverage for your room size. Our best foam panels guide helps you choose the right products.
Then make sure the install lasts. The right adhesive for acoustic foam prevents sagging panels and ruined walls.
Frequently Asked Questions
Does foam shape really matter for sound?
Shape accounts for roughly 5-10% variation in absorption performance. Thickness, density, and placement matter far more than whether you choose pyramid, wedge, or egg crate.
If you want a bigger win, see does acoustic foam work for what foam can (and can’t) realistically fix.
Is pyramid foam better than wedge?
Pyramid has slightly more surface area, giving it a marginal theoretical advantage. In real-world use, the difference is usually imperceptible.
Choose based on looks, price, and how easy it will be to install cleanly in your room.
Which shape is cheapest?
Egg crate is typically the cheapest acoustic foam shape, costing 15-30% less than pyramid or wedge. The simpler manufacturing process keeps costs down.
Can you mix different shapes?
Yes. Many studios combine shapes for visual interest or use different profiles in different areas.
There’s no acoustic downside to mixing — all shapes absorb similarly. Our placement guide covers multi-shape setups.
Which Shape Works Best for Corners?
None of the standard flat shapes — pyramid, wedge, or egg crate — work well in corners. Corners accumulate bass frequencies that flat panels can’t absorb regardless of surface pattern.
Dedicated corner bass traps are specifically designed with triangular profiles that fit corner geometry and provide the depth needed for low-frequency absorption. Standard foam panels mounted in corners waste money on an ineffective approach.
If you’re filling corner space for visual continuity rather than bass treatment, wedge foam usually looks most intentional. Mount panels with ridges running vertically to suggest purposeful design.
But understand you’re decorating, not treating bass. Real corner treatment requires purpose-built bass traps with enough depth to actually work.
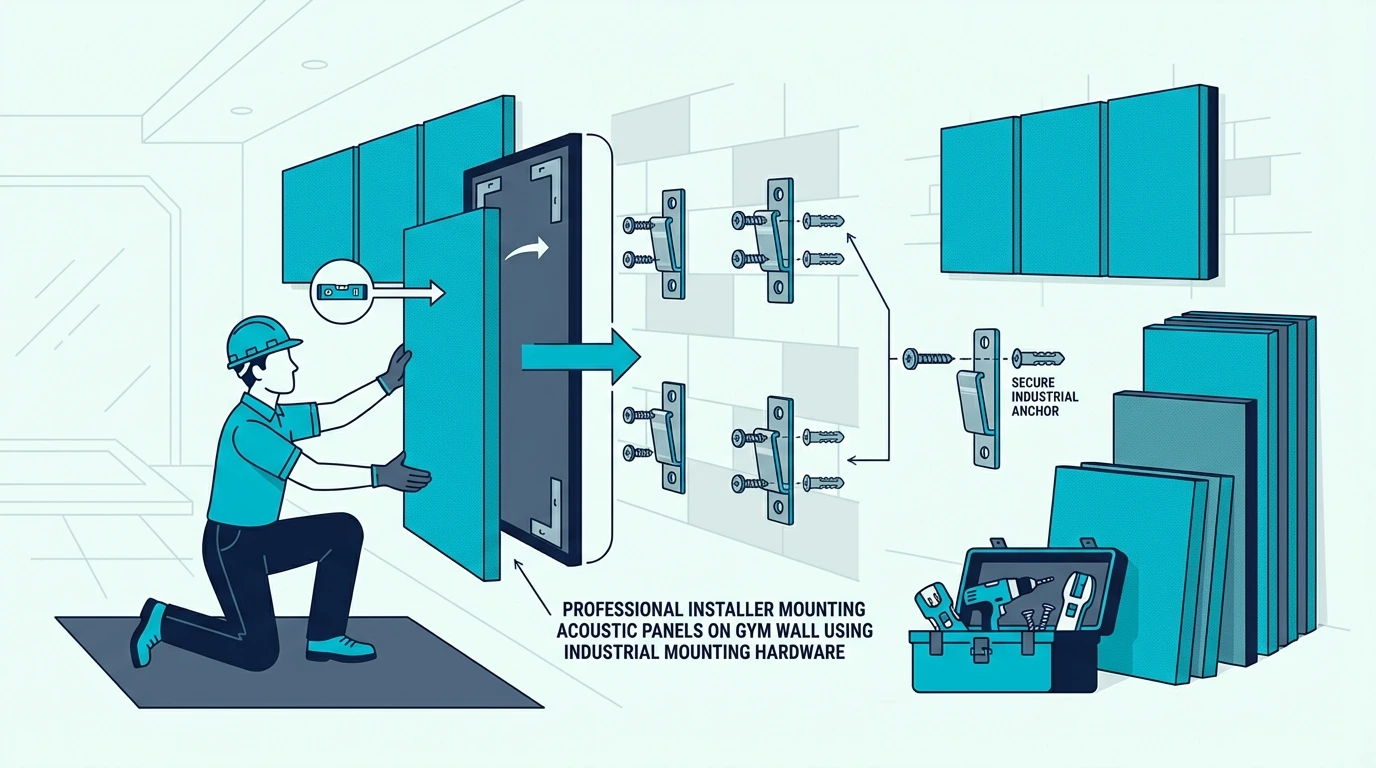
How to Put Acoustic Foam on Wall: 5 Methods That Won’t Damage Your Walls
How to put acoustic foam on a wall is simple — but the wrong mounting method is how panels end up on the floor (or your paint ends up on the panels).
If your recordings sound roomy or you’re fighting slap echo, those bare-wall reflections are the culprit — and a bad install means your treatment never stays put long enough to fix them.
You’ll get five proven mounting methods (renter-safe to permanent) so you can tame reflections and get cleaner, more direct sound without wrecking your walls.
Start by deciding whether you need damage-free removal, then begin with the wall behind your mic (or your first reflection points) and follow the step-by-step method that matches your wall surface.
Quick Takeaway
Command strips are best for renters on smooth walls, while spray adhesive is best for permanent installs (but expect paint damage on removal). For maximum flexibility, mount foam to backing boards and hang the boards with removable hooks; use double-sided tape or T-pins when strips and spray aren’t a fit.
What’s the Best Way to Put Acoustic Foam on a Wall?
The answer depends entirely on one question: do you need to remove this foam later without damage? That single factor determines which method makes sense for your situation.
Renters and anyone in temporary spaces should stick to Command strips or the mounting board technique. These methods leave walls completely unharmed when removed correctly.
Homeowners planning permanent installations can use spray adhesive for the strongest, most reliable bond — but understand that removal means repainting.
The 5 Main Methods (Overview)
Each installation method sits somewhere on a spectrum from “completely removable” to “permanent fixture.” Understanding where each falls helps you pick the right approach for your situation.
Command strips anchor the removable end — they hold well, come off cleanly, and leave zero damage when you follow the pull-tab technique. Our best adhesive guide covers the top Command strip options.
The trade-off is hold strength. Heavy panels or high-humidity environments can cause strips to fail over time.
Spray adhesive anchors the permanent end. Nothing holds foam more securely, but removal tears paint off drywall.
If you’re considering this route, our adhesive comparison helps you choose the right product. There’s no middle ground here — it’s essentially permanent.
The mounting board method sits in between. You attach foam to lightweight backing boards, then hang the boards using removable hooks.
The foam itself never touches your wall, giving you complete flexibility to rearrange or remove without damage.
Double-sided tape offers a quick middle option. Stronger than Command strips, easier than spray adhesive, but removal typically pulls some paint.
T-pins work specifically for textured walls where adhesives fail to grip properly.
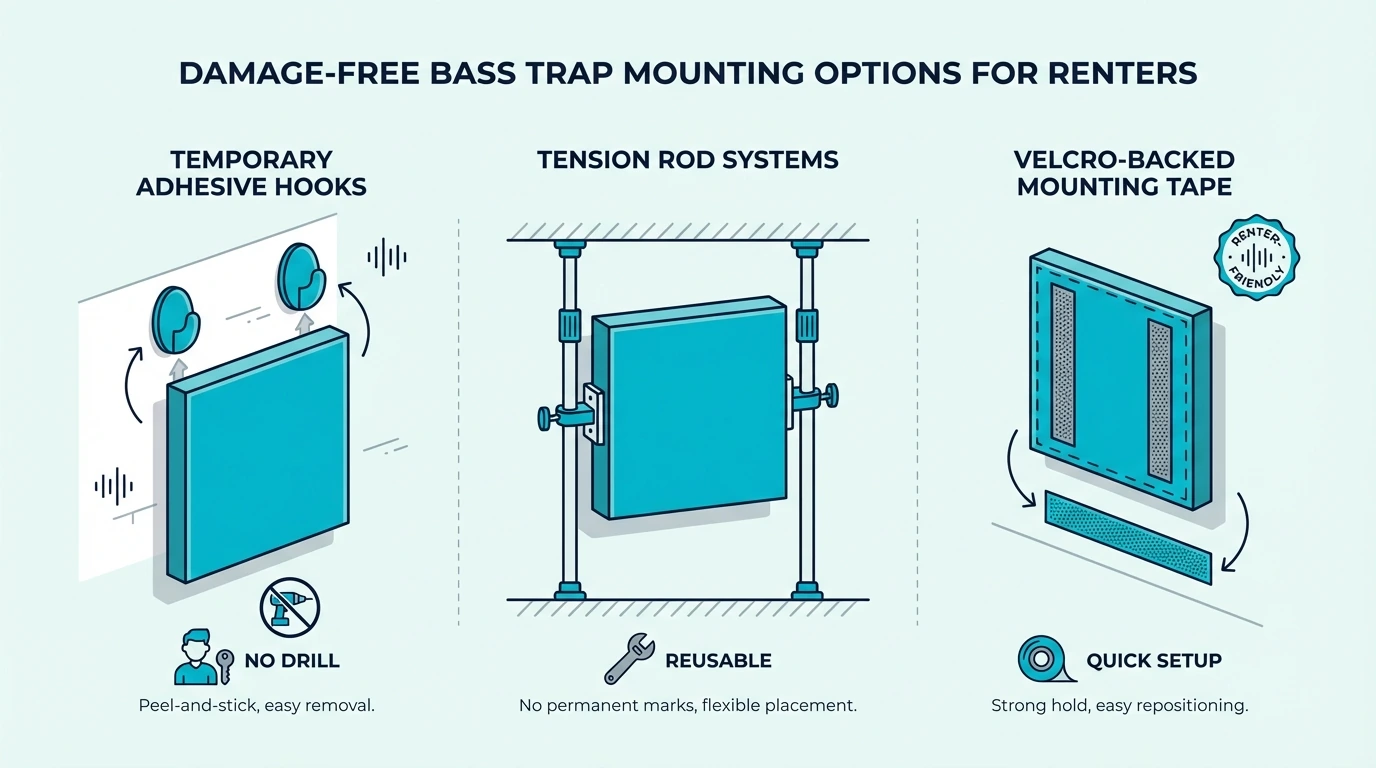
Which Method Is Best for Renters? (Damage-Free Options)
If your security deposit matters — and it should — focus on Command strips or the mounting board method. These are your only truly damage-free options.
Command strips work well for standard 12”x12” foam panels on smooth walls. Apply strips in an X pattern across the back, press firmly for 30 seconds, and they’ll hold for years.
When you move out, the pull-tab removal leaves walls pristine if you follow the instructions exactly.
The mounting board approach eliminates any risk entirely. Your foam attaches to foam board or cardboard, and the board hangs on removable picture hooks.
You could rearrange panels weekly without touching your walls. This method takes more setup time but offers unmatched flexibility.
Skip spray adhesive completely in rentals. Even “removable” spray adhesives will pull paint when you try to remove foam panels.
No adhesive marketed as permanent should touch rental walls. The marketing claims don’t match real-world removal outcomes. Instead, let’s look at what works when you actually own the walls.
Which Method Is Best for Permanent Installation?
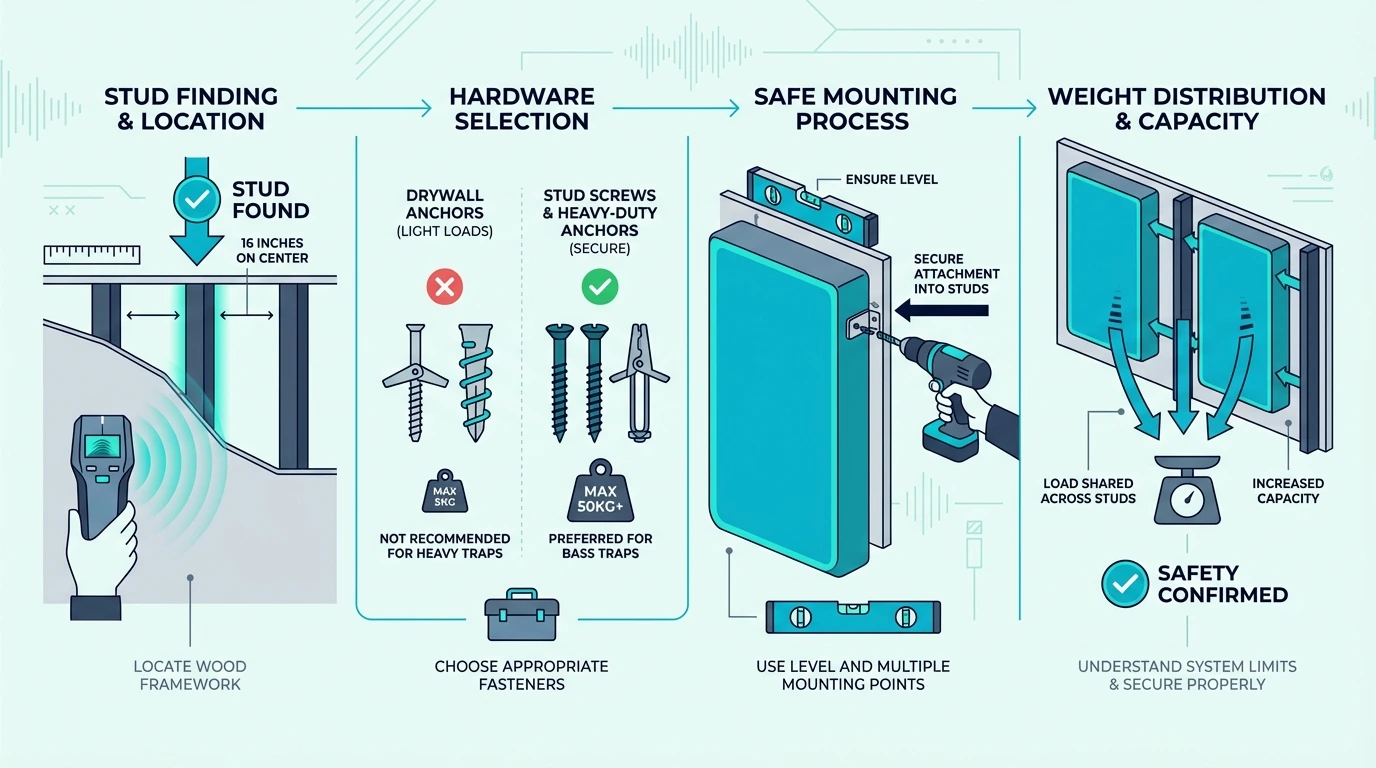
Homeowners treating a dedicated studio, podcast room, or theater should use spray adhesive. Nothing else matches its holding power or long-term reliability.
The bond strength matters because acoustic foam is surprisingly heavy in bulk. A wall covered with 24 panels puts significant load on whatever mounting system you choose.
Spray adhesive distributes that load across the entire back surface of each panel, eliminating failure points.
The permanence also becomes an advantage in dedicated spaces. You won’t want to rearrange foam panels in a properly treated room — the placement is based on acoustic principles, not aesthetics.
Once you’ve identified reflection points and calculated coverage percentages, those panels should stay put for years. For help finding those reflection points, see our foam placement guide.
Accept the trade-off upfront: removing spray-adhesive-mounted foam means repainting that wall. If you might change your mind, use the mounting board method instead and preserve your options.
What Supplies Do You Need to Install Acoustic Foam?
With your method chosen, gather everything before starting. Running to the hardware store mid-project wastes time and kills momentum — especially frustrating when you’ve already got adhesive drying on foam panels.
Before you open any adhesive, check the exact condition of the surface you’re treating.
Essential Tools for Every Method
Some items appear in every installation regardless of which mounting approach you use. Get these first, then add method-specific supplies.
A tape measure and pencil let you mark panel positions before committing. Eyeballing placement leads to crooked rows that become obvious once you step back.
A level keeps rows straight across the wall. Even a 2-degree tilt compounds across multiple panels, creating a visible wave pattern that screams “amateur installation.”
Painter’s tape marks positions and protects surfaces during spray adhesive application. It’s cheap insurance against messy mistakes.
A step stool or ladder reaches upper wall areas safely. Foam installation involves sustained overhead reaching — don’t make it harder by stretching on tiptoes.
With your tools ready, you need to match your adhesive to your specific wall type.
How Does Installation Differ by Wall Surface?
Not all walls are created equal, and the same adhesive behaves differently on drywall versus brick versus plaster. Understanding your surface saves failed installations and wasted materials.
Painted Drywall — the most forgiving surface. Most adhesive methods work well on smooth painted drywall. Semi-gloss and gloss paints bond better than flat paint finishes. Clean with rubbing alcohol, let dry completely, and proceed with your chosen method.
Textured Drywall — orange peel and knockdown textures prevent full adhesive contact. Skip tape-based methods entirely. Use T-pins, picture hooks with mounting boards, or spray adhesive applied heavily enough to fill texture gaps.
Plaster Walls — old plaster can be surprisingly fragile. Test a small area first — some plaster pulls off in chunks with aggressive adhesives. Command strips often work better than spray adhesive on older plaster surfaces.
Brick and Cinder Block — porous surfaces that drink adhesive without bonding properly. The mounting board method works best here. Attach foam to rigid backing, then hang the boards using masonry hooks or adhesive putty designed for rough surfaces.
Painted Concrete — similar to painted drywall if the paint is solid. Check for flaking or peeling paint first. Spray adhesive on unstable paint will peel everything off the wall together. With your surface prepared, you can evaluate the three primary ways to stick foam to a wall.
The adhesive you choose determines both hold strength and removal damage. These aren’t interchangeable options — each serves a specific use case.
Spray adhesive like 3M Super 77 creates the strongest bond. One can covers 15-20 standard panels and creates an essentially permanent installation.
The foam becomes part of your wall — removal requires scraping and repainting.
Command strips balance hold strength with clean removal. A 14-pack mounts 7 standard panels (two strips per panel minimum).
They work excellently on smooth painted walls, struggle on textured surfaces, and fail in high-humidity environments like basements.
Double-sided mounting tape like Gorilla Heavy Duty Mounting Tape or Scotch-Mount Indoor tape offers middle-ground permanence. Holds stronger than Command strips, removes easier than spray adhesive, but typically pulls some paint.
If all three adhesive options sound too risky for your walls, there’s a workaround that avoids sticking foam to drywall entirely.
Optional: Mounting Boards for Easy Removal
The mounting board technique deserves special mention because it eliminates the adhesive-to-wall contact entirely. You’re attaching foam to boards, then hanging boards on the wall.
Foam core board from craft stores works perfectly — it’s lightweight, accepts adhesive well, and costs about $1-2 per 20”x30” sheet. Each sheet backs 3-4 standard foam panels arranged together.
Cardboard works too, especially thick cardboard from shipping boxes. It’s free if you’re resourceful, slightly less rigid than foam core, but perfectly functional for lighter foam panels.
Picture hanging hooks or Command strips attach the boards to walls. Since you’re hanging flat boards rather than lumpy foam, even basic picture hooks work reliably.
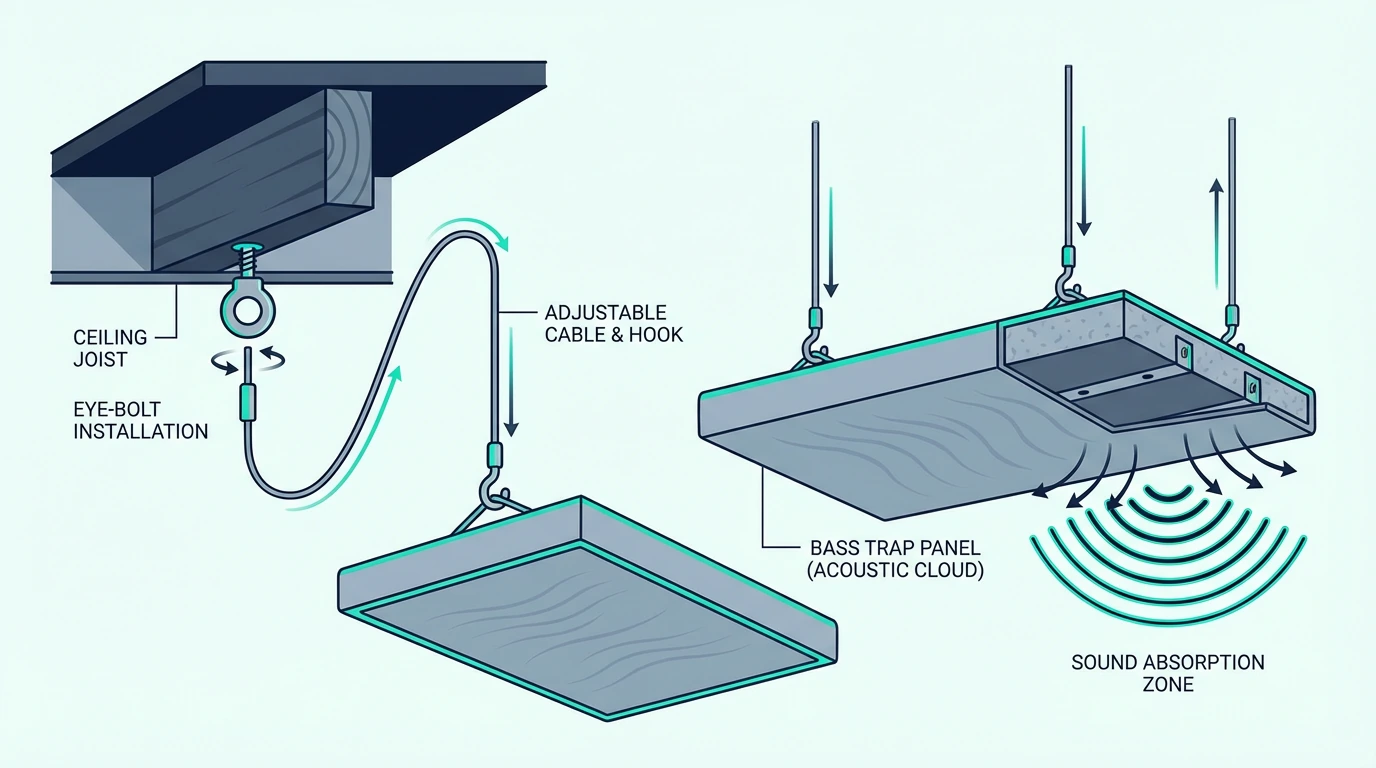
This separates your foam from your walls completely — ideal for rentals or anyone wanting flexibility. For ceiling installations, the mounting board method becomes even more valuable.
Method 1: How to Install Acoustic Foam with Command Strips
Command strips represent the gold standard for damage-free foam installation. When applied correctly, they hold reliably for years and remove without leaving marks.
The key phrase is “applied correctly.” Most Command strip failures trace back to surface prep shortcuts or insufficient press time. Follow these steps exactly and you’ll avoid the morning surprise of foam panels on your floor.
Step-by-Step Instructions
Start with clean walls. Wipe the mounting area with rubbing alcohol — not glass cleaner, not wet wipes, specifically rubbing alcohol.
It removes the invisible oils and residue that prevent proper adhesive bonding.
Remove Command strips from packaging and separate the interlocking halves. Press the foam side firmly onto your panel back — sticky side against foam, velcro side faces out.
Apply strips in an X pattern for 12”x12” panels. One strip in each corner area plus one crossing through the center.
Press each strip firmly for 30 seconds — don’t rush this step. The foam-to-strip bond matters as much as the strip-to-wall bond.
Count it out. Most failures happen because people press for 5 seconds instead of 30.
Remove the wall-side backing from each strip, position your panel, and press the entire panel against the wall for 30 seconds. Apply pressure across the full surface, not just the center.
Wait an hour before hanging additional panels above or beside the first. The bond strengthens significantly in that first hour — rushing leads to panels pulling each other off as you work.
Beyond the installation process, consider the long-term implications.
Pros and Cons of Command Strips
Command strips excel in one critical area: clean removal. Follow the pull-tab technique and your walls come out unmarked.
For renters, this single advantage outweighs everything else.
The downsides show up in challenging environments. Humidity weakens the adhesive over time — basement studios or bathrooms can see strip failures within months.
Heavy panels (thicker than 2 inches) may exceed the weight capacity of standard strips.
Cost per panel runs higher than spray adhesive once you account for needing multiple strips per panel. A full room treatment costs $40-60 in Command strips alone versus $15-20 for spray adhesive.
Tips to Make Command Strips Hold Better
Surface prep makes or breaks Command strip adhesion. Beyond cleaning with alcohol, check your paint finish.
Semi-gloss and gloss paints work best — flat or matte paints sometimes fail to bond properly.
Use more strips than you think necessary, especially on heavier foam. Two strips barely hold a standard 12”x12” panel.
Four strips distributed across the back gives you a real safety margin. The extra cost is trivial compared to re-mounting fallen panels.
Temperature affects initial bonding. Apply strips in climate-controlled conditions between 50–100°F.
Cold garage walls or hot summer attics can prevent proper adhesive activation.
Press panels immediately after removing the wall-side backing. Leaving exposed adhesive while you measure or adjust lets dust contaminate the surface.
Work efficiently — peel, position, press.
Method 2: How to Install Acoustic Foam with Spray Adhesive
Spray adhesive creates the strongest, most reliable foam installation. Professional installers use this method almost exclusively in permanent spaces.
The trade-off is permanence. Spray-mounted foam cannot be removed cleanly — attempting it tears paint off drywall and often damages the foam itself.
Only use this method when you’re certain about placement and committed to the installation lasting years. Here is the process to get that permanent bond.
Step-by-Step Instructions
Surface prep matters even more for spray adhesive than Command strips. Clean walls with rubbing alcohol, then let them dry completely.
Any dust or residue creates weak spots where adhesive won’t bond fully.
Work in a ventilated area. Open windows and run fans.
Spray adhesive fumes are intense during application, so consider a respirator mask if you’re in a tight room.
Protect floors and surrounding surfaces with drop cloths or newspaper. Overspray travels farther than you expect, and adhesive mist settles on everything within several feet.
Hold foam panels face-down and apply a light, even coat across the back surface. Start 6–8 inches from the foam and spray in steady sweeping motions.
Coverage should be uniform without heavy pooling — you want tacky, not wet.
Wait 30–60 seconds for the adhesive to become tacky. Fresh spray adhesive is wet and won’t grab properly.
Touch a corner with your finger — it should feel sticky, not slippery. This step is critical.
Position the panel carefully and press straight down. You get one chance — spray adhesive bonds immediately on contact and doesn’t allow repositioning.
Work methodically, double-check alignment before pressing, and commit once contact is made.
Press firmly across the entire panel surface for 30 seconds. Start from the center and work outward to eliminate air pockets.
The bond strengthens significantly in the first few hours, so avoid disturbing panels during this period. The success of this method depends heavily on the product you use.
Which Spray Adhesive Works Best?
For most people, 3M Super 77 is the standard for acoustic foam installation.
It has strong initial tack, good coverage per can, and is widely available at hardware stores (one can handles 15–20 standard panels depending on application thickness).
Loctite spray adhesive offers a budget-friendly alternative with similar performance. Slightly thinner consistency means faster tack time but potentially less coverage per can.
Avoid “low-VOC” or “environmentally friendly” spray adhesives for foam installation. They typically lack the aggressive bonding chemistry that holds foam reliably long-term.
This is one application where standard formulations outperform green alternatives. Even with the right product, technique matters.
How to Avoid Common Spray Adhesive Mistakes
Applying too much adhesive causes problems. Heavy application stays wet longer, takes forever to tack up, and can cause foam to slide down walls before bonding fully.
Light, even coats work better than heavy saturation.
Skipping the tack time causes immediate failures. Pressing foam onto wet adhesive creates a weak bond that fails within days.
Those 30–60 seconds of waiting make the difference between permanent installation and foam on your floor.
Working in extreme temperatures prevents proper curing. Cold adhesive sprays unevenly and bonds weakly.
Hot conditions make adhesive tack too quickly, before you’ve positioned the panel. Aim for 60–80°F for best results.
Forgetting ventilation leads to unpleasant experiences. Spray adhesive fumes can cause headaches and dizziness in enclosed spaces.
Open windows, use fans, take breaks — or wear a respirator if you’re working in a poorly ventilated room.
Method 3: How to Mount Acoustic Foam on Cardboard/Foam Board
The mounting board method offers something no other approach can: complete separation between your foam and your walls. Your acoustic treatment becomes modular — rearrangeable, removable, rental-safe.
This technique takes more initial setup than direct mounting, but the flexibility often proves worth the effort. Especially valuable for renters, anyone unsure about placement, or rooms where treatment needs might evolve.
Why Use a Backing Board?
The core advantage is wall protection. Your foam attaches to the board, the board hangs on the wall.
No adhesive ever touches your painted surface directly.
Secondary benefits compound that advantage. Backing boards make panels easier to handle during installation — you’re hanging flat, rigid boards instead of floppy foam.
Rearranging becomes trivial when panels lift off hooks rather than peeling off walls.
The method also enables larger panel groupings. Arrange 4–6 foam pieces on a single large board, then hang that board as one unit.
Installation goes faster, alignment is cleaner, and future adjustments are easier. Here is how to assemble them.
Step-by-Step Instructions
Gather backing materials first. Foam core board (available at craft and office supply stores) works ideally — lightweight, rigid, and easy to glue to.
Thick cardboard from appliance boxes serves as a free alternative.
Cut boards to fit your desired panel arrangements. A standard 20”x30” foam core sheet comfortably backs a 2×2 grid of 12”x12” panels with margins.
Larger boards create bigger modular units.
Attach foam to boards using spray adhesive or strong double-sided tape. Spray adhesive creates the strongest bond; Command strips work but add bulk that makes boards harder to hang flat.
Let board assemblies cure for 24 hours before hanging. The foam-to-board bond needs time to reach full strength, especially important for heavier arrangements. Once they are cured, you can get them on the wall.
How to Hang the Boards on Your Wall
Several options exist for hanging completed boards, each with different trade-offs in ease and permanence.
Command picture hanging strips work excellently for lightweight boards. Apply to the board back exactly as you would for direct foam installation.
Removal leaves no marks on walls — the strips are now stuck to boards you own, not walls you rent.
Standard picture hooks handle heavier boards. One or two hooks at the top of each board create secure mounting points.
This does put small nail holes in walls, but those fill easily with spackling paste.
Velcro strips enable quick-change installations. Mount hook side on walls (permanent-ish), loop side on boards (removable).
Swap board positions without tools — useful if you’re still dialing in treatment placement. This board method is also the foundation for temporary setups.
How Do You Install Foam Temporarily for Events?
Conference rooms, pop-up podcast setups, and temporary recording spaces need foam that goes up fast and comes down faster. The mounting board method we just covered works perfectly here — with a few event-specific tweaks.
Pre-assemble your foam-on-board panels before the event. Attach foam to rigid backing at home, let everything cure for 24 hours, then transport the completed panels ready to hang.
You’ll save an hour of setup time when it matters most.
Freestanding panel solutions work even faster. Lean large foam-covered boards against walls at angles, or use portable room dividers as foam mounting surfaces.
No wall contact means zero removal hassle — just pack and leave.
For truly temporary setups lasting hours rather than days, consider tension rod solutions. Mount tension rods horizontally, drape foam panels over them, and the whole system collapses in minutes.
Works best in narrow spaces like closets-turned-vocal-booths.
One reality check: temporary installations perform slightly worse than permanent ones. Foam pressed firmly against walls outperforms foam with air gaps behind it.
For critical recordings, that performance difference matters. For quick content capture or meeting audio improvement, temporary mounting works fine.
Method 4: How to Install Acoustic Foam with Double-Sided Tape
Double-sided mounting tape occupies the middle ground between Command strips and spray adhesive. Stronger hold than strips, easier application than spray, moderate wall damage on removal.
Choose this method when you need reliable hold but don’t want the permanence of spray adhesive. Ideal for semi-permanent installations where you might move in a few years but want something more robust than strips.
Step-by-Step Instructions
Clean walls with rubbing alcohol and let dry completely. Tape adhesion depends entirely on surface contact quality — any contamination creates weak spots.
Cut tape strips to run along all four edges of your foam panel, plus an X through the center. The perimeter strips handle shear forces (foam wanting to slide down); the center X prevents the middle from bulging away from the wall.
Apply tape to foam first, pressing firmly along the full length of each strip. The foam-to-tape bond needs to be solid before introducing the wall side.
Peel backing from wall-side tape, position panel carefully, and press firmly across the entire surface for 30 seconds. Unlike spray adhesive, you get minor repositioning ability in the first few seconds — but don’t count on it.
Work accurately from the start. Like spray adhesive, choosing the right product is critical.
Best Double-Sided Tape for Acoustic Foam
Gorilla Heavy Duty Mounting Tape has proven itself reliable for foam installation. Strong initial grab, reasonable removal characteristics, widely available.
Scotch-Mount Indoor tape offers a lighter-duty option suitable for smaller panels. Less aggressive adhesive means easier removal but potentially less holding power on heavier foam.
Avoid thin craft-store double-sided tape. It lacks the thickness and adhesive strength for mounting anything heavier than paper.
Acoustic foam requires mounting-specific tape designed for significant weight loads. But even the best tape has limitations.
When Does Tape Work (and When Does It Fail)?
Double-sided tape excels on smooth, clean surfaces. Fresh paint with good adhesion, semi-gloss or gloss finishes, and climate-controlled environments produce reliable results.
Tape struggles with textured walls. The raised pattern prevents full contact, creating a weak bond that fails as foam weight stresses those limited contact points.
Switch to T-pins or the mounting board method for textured surfaces.
High humidity degrades tape adhesive over time. Basement studios or bathroom installations see tape failures within months as moisture weakens the bond.
Climate control or alternative methods become necessary. For humid environments, consider the mechanical mounting options in our complete foam guide.
Method 5: How to Install Acoustic Foam with T-Pins or Nails
T-pins and finish nails serve a specific niche: textured walls where adhesive methods fail. Orange peel, knockdown, popcorn ceilings — any surface with significant texture prevents adhesive contact and eventually causes foam to fall.
This method leaves small holes in walls, but those holes fill easily with spackling paste. The trade-off between tiny nail holes and reliable mounting usually favors the pins.
Step-by-Step Instructions
Standard T-pins (1.5” length) work for most foam thicknesses. Push pins through foam corners at 45-degree angles, angling toward the wall center.
This prevents the pin from pulling straight through foam under load.
Position the panel and push pins through foam into the wall. For drywall, pins slide in easily with finger pressure.
Plaster or harder surfaces may require tapping with a small hammer.
Use 4 pins minimum per standard panel — one near each corner. Heavy panels or those mounted overhead benefit from 6-8 pins distributed across the surface.
For cleaner appearance, some installers push pins entirely through foam until only the head shows. The colored pin heads become nearly invisible against dark foam panels. While the damage is minimal, you still want to handle it correctly.
How to Minimize Wall Damage with Pins
The holes from T-pins are smaller than pushpin holes — we’re talking 1mm diameter or less. A single wall may accumulate 50-100 of these tiny marks, but they’re genuinely easy to repair.
When removing foam, pull pins straight out to avoid enlarging holes. Angle pulling creates larger, messier marks that require more spackle to fill.
Quick repair method: dab holes with white spackling paste, wipe excess with a damp finger, and let it dry. Standard wall paint usually hides repairs completely.
For large installations, budget about 30 minutes of repair time when you eventually remove panels.
How to Install Acoustic Foam Without Damaging Walls
Renters face a specific challenge: they need acoustic treatment but can’t risk their deposit. This section consolidates the damage-free approaches with rental-specific guidance.
The mounting board method provides the safest rental option. Zero adhesive touches your walls, removal takes minutes, and your deposit stays completely protected.
The Mounting Board Technique (Best for Renters)
Build your mounting boards before installation day. Attach foam to foam core or cardboard using spray adhesive (this doesn’t touch walls), let cure for 24 hours, then hang completed boards using Command strips.
The Command strips now stick to your boards, not your walls. When you move, simply lift boards off strips, pull tabs to remove strips cleanly, and you’re left with unmarked walls and portable acoustic panels.
This double-layer approach — adhesive on boards, removable attachment to walls — provides professional-quality installation with zero risk. Worth the extra hour of prep for anyone protecting a security deposit.
How to Remove Foam Without Damaging Paint
Even careful installations sometimes require removal. Following proper technique minimizes damage and keeps repair efforts manageable.
For Command strips, use the pull-tab as designed. Grip the tab, stretch straight down (not outward), and keep stretching until the strip releases.
Pulling outward or trying to peel causes strip breakage and potential wall damage.
For double-sided tape, apply heat with a hair dryer before attempting removal. Warm adhesive releases more easily than cold.
Work slowly, peeling at a low angle rather than yanking straight off.
What to Do If Adhesive Pulls Off Paint
Paint damage happens despite best efforts. Knowing repair options in advance reduces stress when it occurs.
For small spots, touch-up paint usually blends reasonably well. Match your wall color at the hardware store (bring a chip if possible), dab damaged areas with a small brush, and let dry.
Larger damaged areas may require more substantial repair. Skim-coating with joint compound smooths rough patches, followed by primer and matching paint.
Budget 2–3 hours of repair work for a heavily treated wall.
Document the wall condition before installation with photos. If disputes arise with landlords, having before-and-after documentation helps establish what damage (if any) your installation actually caused.
How Do You Move Acoustic Foam to a New Location?
Moving day arrives and you’re staring at walls covered in foam panels. The good news is that most properly installed foam survives relocation — if you remove it correctly.
Command strip installations transfer easiest. Pull the stretch-release tabs, lift panels off, and the foam stays intact.
You’ll need fresh strips at the new place, but that’s a small price for zero hassle.
Spray adhesive installations are trickier. The foam might survive, but expect some backing material to stay on the old wall.
Cut your losses — plan to trim any damaged backing before remounting.
Here’s what trips people up: trying to reuse old adhesive. Fresh adhesive on both the foam back and the new wall surface creates reliable bonds.
Layering new adhesive over crusty old residue leads to failure within weeks.
If you’re moving foam that’s been up for years, inspect it first. Foam degrades over time, especially in direct sunlight.
Crumbling or discolored panels won’t perform well in the new space anyway — sometimes replacement makes more sense than relocation.
Transport foam panels flat, not rolled. Rolling creates permanent creases that affect both appearance and absorption performance.
Conclusion
The decision tree is simpler than it might seem. Two questions narrow down your best option:
Question 1: Do you rent, or might you remove the foam within 5 years?
If yes, use Command strips for small installations (under 12 panels) or the mounting board method for larger treatments. Both preserve your walls completely.
If you own your space and want permanent installation, spray adhesive provides the strongest, most reliable long-term solution. Accept that removal means repainting.
Question 2: Are your walls textured?
Textured walls eliminate most adhesive options. Use T-pins/nails or the mounting board method with mechanical hanging (hooks, screws).
Don’t fight adhesive failures on textured surfaces — choose methods designed for that challenge.
For smooth walls in owned spaces, spray adhesive. For smooth walls in rentals, Command strips or mounting boards.
For textured walls anywhere, T-pins or mechanical mounting. Those three rules cover 95% of situations.
The installation supplies cost less than the foam itself. Don’t cheap out on adhesive quality to save a few dollars — failed installations waste far more time and money than buying proper mounting materials upfront.
Your foam placement matters at least as much as mounting method. Start with first reflection points and the wall behind your mic, then scale coverage up based on how live the room still sounds.
For everything else foam-related, our complete acoustic foam resource hub covers topics from effectiveness to aesthetics to alternatives.
Frequently Asked Questions
Can You Use Gorilla Glue for Acoustic Foam?
Standard Gorilla Glue (the brown, foaming type) isn’t suitable for foam installation. It expands significantly while curing, potentially warping foam panels and creating messy overflow.
Gorilla Spray Adhesive works fine — it’s essentially equivalent to 3M Super 77. The key distinction is glue type: spray adhesives yes, liquid glues no.
Construction adhesive like Liquid Nails also fails for foam mounting. Too thick to spread evenly, too rigid when cured, and causes foam to crack over time.
How Long Does Spray Adhesive Take to Dry?
Spray adhesive reaches working tack in 30-60 seconds — that’s when you should press foam to walls. Full cure takes 24-72 hours depending on humidity and ventilation.
Avoid disturbing panels during the first hour. The bond is functional but not at full strength.
Moving or repositioning panels during this period weakens the final installation.
Maximum bond strength develops over 3-7 days. Heavy panels or critical installations benefit from waiting before adding additional load or adjacent panels.
Will Acoustic Foam Fall Off the Wall?
Properly installed foam stays up for years. When panels fall, the cause is almost always installation error: dirty surfaces, insufficient adhesive, rushing press time, or wrong method for conditions.
The most common failure pattern: panels seem fine for days or weeks, then fall overnight. This indicates marginal adhesion that weakened over time — typically from surface contamination during installation.
If panels fall repeatedly despite following instructions, switch methods. Some wall surfaces simply don’t accept certain adhesives well.
The mounting board method bypasses surface compatibility issues entirely. Check our acoustic foam hub for troubleshooting guides.
What If Foam Panels Arrive Compressed?
Most acoustic foam ships vacuum-packed to reduce shipping costs. Compressed panels need 24-72 hours to expand fully before installation.
Open packaging immediately and lay panels flat in a dry area. The foam expands as trapped air returns to the cellular structure.
Installing compressed foam means it continues expanding on your wall — potentially breaking adhesive bonds.
Check panel thickness before mounting. Manufacturers list specifications, so verify your panels match before permanent installation.
Significantly under-expanded foam won’t absorb sound effectively anyway. Our best foam panels guide lists proper expansion times for popular products.
What If My Foam Keeps Falling Off?
Panels falling repeatedly point to one of three culprits: surface contamination, wrong adhesive choice, or environmental factors. Start troubleshooting at the surface.
Wipe the wall with rubbing alcohol and let it dry completely — not window cleaner, not damp cloth, specifically rubbing alcohol. Invisible residue from cleaning products, cooking smoke, or even hand oils prevents proper bonding.
If the surface is clean and panels still fall, you’ve got a mismatch between adhesive and conditions. High humidity degrades Command strips and tape adhesives over time.
Basements, bathrooms, and humid climates usually need spray adhesive or mechanical mounting (T-pins, hooks).
Temperature swings cause problems too. Foam expands and contracts slightly with temperature changes.
Rigid adhesives can crack under this stress, while flexible adhesives like spray adhesive handle it better.
For panels that fell once and you’re remounting, don’t just reapply adhesive to the same spot. That wall section is contaminated with old adhesive residue.
Either clean thoroughly with adhesive remover and rubbing alcohol, or mount the panel slightly offset from the original position.
Best Adhesive for Acoustic Foam: 8 Products That Actually Hold [2026]
Finding the best adhesive for acoustic foam saves you from watching your panels fall off the wall at 3 AM.
Most people grab whatever glue is lying around, stick up a few panels, and then wonder why the foam starts peeling off. Acoustic foam is porous and springy, so you need an adhesive that bonds to lightweight, uneven surfaces.
If you want the bigger picture too, start with our acoustic foam guide. And if you’re still deciding where foam should go after you mount it, our how to arrange acoustic foam guide walks you through the placement logic.
Quick Takeaway
Use spray adhesive (like 3M Super 77) for a permanent hold, and use Command strips or industrial velcro when you need clean removal. Skip hot glue, white glue, and super glue — they fail fast and make re-positioning miserable.
The answer depends on whether you want permanent mounting or need the option to remove your foam later. Both approaches work, but they require completely different products.
Spray adhesive wins for permanent installs because it bonds across the entire foam surface. Once it cures, it usually holds for years without slowly peeling at the edges.
The trade-off is wall damage on removal and more prep work up front. If you’re renting (or you might move soon), skip spray and jump to the removable options below.
Why Does Spray Adhesive Work Best for Permanent Installs?
Spray adhesive coats the porous foam surface evenly, filling the tiny gaps that liquid glue can’t reach. This creates a stronger bond because more surface area actually touches the adhesive.
The aerosol format lets you apply thin, even coats without over-saturating the foam. Too much adhesive weighs down lightweight foam and can cause sagging over time.
Professional studios almost universally use spray adhesive for this reason. When you’re mounting hundreds of panels, consistency matters more than anything else.
What’s the Best Option for Renters?
Command strips and heavy-duty mounting tape let you install foam without damaging walls. You won’t get the same rock-solid hold as spray adhesive, but removal is clean and simple.
The trade-off is weight capacity: most Command strips hold two to four pounds per strip. Bigger panels need multiple strips, spaced near the edges so they don’t curl.
Lightweight 12×12 foam usually works with two strips per panel, but test one panel first. If it starts peeling in a week, switch methods before you mount the whole room.
Velcro strips offer a middle ground — decent hold strength with easy removal. Industrial-grade velcro handles heavier foam better than command strips.
What Types of Adhesive Work for Acoustic Foam?
Four main adhesive categories work for acoustic foam: spray adhesive, double-sided tape, command strips, and liquid construction adhesive. Each has specific strengths and weaknesses.
Most “my foam won’t stick” problems come from picking the wrong category for your wall and your timeline. If you need clean removal, start with Command strips or velcro; if you need permanent hold, start with spray adhesive.
Why Is Spray Adhesive the Best Overall Choice?
Spray adhesive creates a permanent bond that handles temperature changes and humidity without failing. Products like 3M Super 77 are specifically designed for lightweight porous materials like foam.
Application is straightforward once you’ve done one test panel. Spray both the foam and the wall, wait until tacky, then press the panel into place.
The initial grab is fast, but full strength still takes about 24 hours. Don’t yank on the panel or start hanging adjacent panels until it’s cured.
The main drawback is permanence: spray-glued foam will take paint (and sometimes drywall paper) with it when you remove it. If you’re renting, skip this option entirely.
When Should You Use Double-Sided Tape?
Heavy-duty mounting tape works for medium-weight foam panels in climate-controlled spaces. Products like Scotch Extreme Mounting Tape handle up to 30 pounds, which covers most acoustic foam applications.
Temperature matters with tape. Extreme heat or cold can weaken the bond over time.
If your room swings from cold to hot (garage, attic, non‑climate‑controlled basement), expect tape to fail sooner. In a normal, air‑conditioned room, tape can hold up surprisingly well.
Tape is faster than spray adhesive. You cut strips, peel the liner, and stick the panel in place.
There’s no drying time, no fumes, and no cleanup. That convenience is why tape is the go-to for renters and quick installs.
Are Command Strips Worth Using?
Command strips are the safest choice for renters who need clean removal. They hold surprisingly well when applied correctly and leave no residue behind.
The catch is weight limits: standard picture hanging strips hold about four pounds per pair. Most 12×12 foam panels are under a pound, so one pair per panel usually works.
Larger panels need multiple strips positioned around the edges. Don’t rely on a single strip in the center — the foam will peel away from the edges over time.
When Does Liquid Glue Make Sense?
Liquid construction adhesive like Auralex Tubetak Pro works for permanent installations where spray adhesive isn’t practical. It’s cheaper for small projects and available at any hardware store.
Apply liquid adhesive in an X pattern across the foam back so the corners stay anchored. Use less than you think you need—too much glue creates lumps that telegraph through thin foam.
Let it get tacky before you press the panel to the wall. If you stick it on wet, it’ll slide and sag.
The downside is application control: liquid adhesive is harder to spread evenly than spray. If you misplace a panel, fixing it is messy.
Most pros still prefer spray adhesive even when it costs more. It’s simply more consistent when you’re mounting lots of panels.
What’s the Best Spray Adhesive for Acoustic Foam?
Three spray adhesives dominate the acoustic foam market: 3M Super 77, Loctite General Performance, and Gorilla Spray Adhesive. Each serves slightly different needs.
All three products work for acoustic foam. The differences come down to bond strength, drying time, and price per ounce.
Why Is 3M Super 77 the Industry Standard?
3M Super 77 has been the go-to spray adhesive for professional studios for decades. It’s specifically formulated for lightweight porous materials including foam, fabric, and paper.
The bond stays flexible after curing, which matters for foam that expands and contracts slightly with temperature changes. Rigid adhesives crack under this stress.
Coverage is excellent — one 16-ounce can handles about 30 to 40 standard foam panels. The fine spray pattern creates thin, even coats without overspray waste.
Is Loctite General Performance a Good Budget Alternative?
Loctite Spray Adhesive Professional Performance costs about 30% less than 3M Super 77 while delivering similar results. It’s the smart choice for budget-conscious buyers who still want professional-quality hold.
Bond strength is slightly lower than 3M Super 77, but the difference rarely matters for lightweight foam. Both products hold far more weight than any acoustic panel actually weighs.
Drying time is comparable — about 15 to 30 seconds until tacky. Full cure takes 24 hours for both products.
When Should You Choose Gorilla Spray Adhesive?
Gorilla Heavy Duty Spray Adhesive offers the strongest bond of the three main options. It’s overkill for standard foam panels but makes sense for heavy-duty applications or outdoor installations.
The heavy-duty formula costs more and has a stronger odor during application. Use it in well-ventilated spaces and consider a respirator mask for large projects.
For typical home studio foam mounting, Gorilla’s extra strength isn’t necessary. Save it for situations where 3M Super 77 genuinely isn’t strong enough.
What’s the Best Tape for Acoustic Foam?
Tape-based mounting options work best for renters and temporary installations. Three products stand out: Command Picture Hanging Strips, Scotch Heavy-Duty Mounting Tape, and industrial velcro strips.
Tape mounting is faster and cleaner than spray adhesive. You trade some hold strength for convenience and removability.
How Well Do Command Picture Hanging Strips Work?
Command Large Picture Hanging Strips are designed for easy removal without wall damage. They use a stretch-release mechanism that cleanly separates the adhesive from surfaces.
For acoustic foam, use the medium or large picture hanging strips rather than the small ones. Each pair holds about four pounds, which is plenty for most foam panels.
Apply strips near the edges of each panel, not just in the center. Edge mounting prevents foam from peeling away over time as the adhesive slowly weakens.
Is Scotch Heavy-Duty Mounting Tape Strong Enough?
Scotch Double-Sided Mounting Tape holds up to 30 pounds, far exceeding what any acoustic foam panel weighs. It’s the strongest tape option for permanent installations where you don’t plan to remove foam.
The catch is removal difficulty. Unlike Command strips, heavy-duty mounting tape doesn’t release cleanly.
Removing it will likely damage paint and possibly drywall. Use it only when you’re comfortable treating it like a permanent install.
Use this tape when you want tape convenience with spray-adhesive permanence. Products like Gorilla Heavy Duty Mounting Tape work well for specific situations.
When Should You Use Industrial Velcro?
Industrial-strength velcro lets you remove and reposition foam panels whenever you want. This matters if you’re experimenting with placement or might move to a different space.
Apply the hook side to the wall and the loop side to foam. This orientation is easier on foam surfaces and makes cleaning dust from velcro simpler.
Velcro holds about 10 pounds per square inch of contact area. A few one-inch squares per panel provide plenty of support for standard acoustic foam.
Which Adhesives Should You Avoid?
Some common adhesives seem like they should work for acoustic foam but actually fail quickly. Knowing what to avoid saves money and frustration.
The main culprits are hot glue, standard white glue, and super glue. All three have properties that make them poor choices for foam mounting.
Why Is Hot Glue a Bad Idea for Foam?
Hot glue melts foam. The high application temperature can physically damage polyurethane acoustic foam, creating holes or discoloration where you apply it.
Even when hot glue doesn’t visibly damage foam, the bond is weak. Hot glue creates a rigid connection that cracks as foam flexes with temperature changes.
Hot glue also sets too fast. You have seconds to position the panel before the glue hardens.
If you miss the spot, you’re scraping glue off the wall and starting over. That’s a miserable workflow once you’re mounting more than a couple panels.
Why Does Regular White Glue Fail?
White glue like Elmer’s needs to dry out to cure. Foam prevents air from reaching the glue trapped between panel and wall, so it never fully cures.
Partially cured white glue stays tacky forever without actually bonding. Panels seem attached at first but slowly peel away over days or weeks.
School glue and craft glue have the same problem. They’re designed for paper and porous materials where air can escape — not for sealing foam against a flat surface.
Can Super Glue Work in a Pinch?
Super glue creates an extremely rigid bond that doesn’t flex with foam movement. This rigidity causes the bond to crack and fail within weeks.
The instant bonding also makes positioning difficult. One touch and the foam is stuck exactly where it landed, whether that’s where you wanted it or not.
Super glue can also chemically react with certain foam types, causing discoloration or deterioration. It’s simply not designed for this application.
Can You Use Thumbtacks or Pushpins for Acoustic Foam?
This method gets dismissed quickly in most guides, but it deserves a fair assessment. Thumbtacks actually work for specific situations — with honest caveats about the trade-offs.
Do Thumbtacks Hold Foam Reliably?
Standard thumbtacks hold lightweight foam panels surprisingly well. Push through the foam at a slight angle toward the wall center so the pin grabs both foam and drywall.
Two to four pins per 12×12 panel is usually enough for months. It’s not elegant, but it works.
The weight limit is real, though. Thin foam handles pins better, while thick or dense foam can slowly pull pins through over time.
What About the Holes in Your Walls?
Pin holes are tiny—smaller than nail holes for picture frames. A tube of spackling paste and five minutes fixes a wall full of pin holes.
If you’re comparing pin damage to spray adhesive damage, pins win by a landslide. For strict rentals, though, even small holes might violate a lease, so check first.
How Should You Apply Adhesive to Acoustic Foam?
Proper application technique matters as much as adhesive choice. The same product performs differently based on how you apply it.
Following these steps ensures maximum bond strength and prevents common problems like sagging panels or uneven adhesion.
What’s the Correct Spray Adhesive Technique?
Start by cleaning both the foam back and the wall surface. Dust and debris are the number-one reason “good adhesive” fails.
A quick wipe with a dry cloth is enough for most walls. If the wall is greasy or recently cleaned, use rubbing alcohol and let it dry fully.
Spray both surfaces from about 8 to 10 inches away. Keep the can moving so you get a thin, even coat instead of wet spots.
Heavy spots drip and create weak bonds. They also soak the foam and make it sag.
Wait 30 to 60 seconds until the adhesive feels tacky rather than wet. Then press the foam firmly for 15 to 20 seconds.
The initial grab is immediate, but full strength takes about 24 hours. If you can, support heavier panels with painter’s tape while it cures.
How Long Should You Wait Before Mounting?
That tacky stage is the whole game with spray adhesive. Apply too early and the foam slides down the wall.
Wait too long and the adhesive dries past its best bonding window. When in doubt, test an edge—sticky is right, wet is too soon.
Most spray adhesives reach tacky stage in 30 to 90 seconds depending on temperature and humidity. Test by touching a non-visible edge — it should feel sticky but not transfer to your finger.
High humidity slows drying time significantly. In humid conditions, wait an extra 30 seconds beyond what the can recommends.
What Tips Ensure a Stronger Hold?
Apply adhesive in an X pattern rather than solid coverage for tape and liquid adhesives. This uses less product while maintaining strong corner-to-corner bonds.
Press the entire panel surface when mounting, not just the center. Walk your hands from the middle outward to ensure full contact across the adhesive area.
For heavy panels, support them with masking tape for 24 hours while spray adhesive cures fully. This prevents slow peeling before the bond reaches maximum strength.
What If Your Foam Keeps Falling Off?
Panels on the floor again? Before you reattach them, figure out why they failed.
The failure pattern usually points to the cause immediately. Fix the cause first, or you’ll just repeat the cycle.
How Do You Troubleshoot Adhesive Failures?
Clean release without residue usually means surface contamination at installation. Oils, dust, or cleaning product residue prevented bonding from the start. Clean the wall thoroughly with rubbing alcohol before your next attempt.
Foam tears leaving material on the wall indicates the adhesive was stronger than the foam backing. This happens with spray adhesive on low-density foam. Switch to mechanical mounting or use less adhesive next time.
Gradual peeling from edges inward suggests humidity degradation. Command strips and tape adhesives weaken over months in humid environments. Spray adhesive or mechanical mounting handles humidity better.
How Do You Reinforce Weak Bonds?
Adding fresh adhesive over old adhesive rarely works — the old layer prevents proper contact. If you must reinforce rather than remount, inject fresh spray adhesive around panel edges where separation started.
Better approach: remove the panel completely, clean both surfaces, and start fresh with proven technique. One proper installation beats three reinforcement attempts.
How Do You Prevent Future Adhesive Failures?
Once you’ve fixed immediate problems, prevent recurrence with better practices.
Wait for adhesive to cure before adding weight. Spray adhesive reaches handling strength quickly but full cure takes 24-72 hours. Mounting adjacent panels too soon can pull freshly installed panels off the wall as you work.
Match adhesive to environment. Humid basement studios need spray adhesive. Climate-controlled bedrooms can use Command strips. Choosing the right product for your conditions prevents failures months later.
Don’t overload tape-based mounting. One pair of Command strips per small panel works fine. Heavy panels need multiple pairs distributed across the surface. Exceeding weight limits guarantees eventual failure.
Test before committing. Mount one panel, wait a week, check the bond. If it’s solid, proceed with the full installation. If it’s already loosening, switch methods before wasting materials.
Best Adhesives Compared: Full Product Reviews
Below are the eight adhesives from the shortlist, with a quick read on where each one shines. If you’re in a hurry, read the “Best for” line first, then come back for the details.
This is the adhesive professional studios have used for decades. The 14.1 oz can covers approximately 30-40 standard foam panels, making it cost-effective for serious installations.
The low-VOC formula keeps fumes manageable while maintaining the strong bond 3M is known for. Fast drying time means you can mount panels quickly without waiting around.
Best for: Home studios, permanent installations, anyone who wants industry-proven reliability.
Same trusted formula as the full-size can, just in a more accessible package. The 7.35 oz size is perfect for small rooms or testing before committing to a larger purchase.
You get identical performance to the bigger can — this isn’t a watered-down version. The smaller size just means you’ll go through it faster on big projects.
Best for: Small rooms, testing acoustic treatment, budget-conscious first-time buyers.
If 3M Super 77 is out of stock or you want to save money on large projects, Loctite delivers comparable performance. The professional-grade formula handles acoustic foam just as well as 3M.
The 13.5 oz size offers slightly less coverage than a full 3M can, but the price difference often makes up for it. Works on multiple surface types beyond just foam.
Best for: Budget-conscious buyers, large installations where savings add up, multi-material projects.
When you need maximum hold strength, Gorilla delivers. The heavy-duty formula creates bonds stronger than most foam applications require, but provides extra security for heavy or oddly-shaped panels.
The 14 oz can size matches 3M Super 77 coverage. Expect stronger odor during application — definitely work in a ventilated space.
Best for: Heavy-duty foam panels, challenging surfaces, users who want absolute maximum hold.
The 14-pair pack handles 14 foam panels with one pair each, or 7 larger panels with two pairs. The stretch-release removal system leaves zero residue when you move out.
Each pair holds up to 16 lbs — far more than any foam panel weighs. The real value is damage-free removal, not hold strength.
Best for: Renters, temporary installations, anyone who might reposition panels later.
This is the only liquid adhesive specifically designed for acoustic foam. Auralex makes professional studio treatment products, so they know exactly what acoustic foam needs.
The tube format works with standard caulk guns for precise application. One tube handles approximately 10-15 panels depending on size.
Best for: Users who prefer liquid over spray, small installations, professional studio builds.
At 125 inches, one roll provides enough tape for approximately 30 standard foam panels. The 30-pound hold capacity is overkill for foam but provides absolute security.
The catch: this tape bonds permanently. Removal will damage paint, so treat this like spray adhesive in terms of wall commitment.
Best for: Permanent tape installations, users who want tape convenience without spray mess.
If you have textured or rough walls where other tapes struggle, Gorilla’s formula grips better. The slightly thicker tape fills wall texture gaps for stronger adhesion.
The 120-inch roll covers similar footage to Scotch tape. Black color means it’s less visible on darker foam panels.
Best for: Textured walls, rough surfaces, users who want maximum tape grip.
What’s the Bottom Line on Acoustic Foam Adhesive?
For permanent installs, 3M Super 77 spray adhesive is the clear winner. It’s the studio standard for a reason—reliable bonds, easy application, and reasonable cost per panel.
Start with our complete acoustic foam resource if you want panel picks and placement guidance, not just adhesive. It’ll help you treat the room, not just the wall.
Renters and temporary setups should use Command Picture Hanging Strips. They hold standard foam panels securely and remove without wall damage when you move out.
Skip hot glue, white glue, and super glue entirely. They fail quickly and waste both your time and your foam panels.
Buy the right adhesive once, then mount one test panel before you do the whole room. Re-mounting panels repeatedly is the most expensive “cheap” choice.
Frequently Asked Questions
Can You Use Gorilla Glue on Acoustic Foam?
Standard Gorilla Glue expands as it cures, which can warp lightweight foam panels. Gorilla Spray Adhesive is fine for foam, but skip the liquid expanding formula.
Will Spray Adhesive Damage My Walls?
Yes—removing spray-glued foam will pull paint and sometimes drywall paper with it. Plan on patching and repainting that wall section after removal.
If you need clean removal, use Command strips or velcro. That’s the trade you’re making.
How Much Adhesive Do You Need Per Panel?
One 16-ounce can of spray adhesive covers approximately 30 to 40 standard 12×12 inch foam panels. For a typical bedroom studio needing 20 panels, one can is sufficient with some left over.
Can You Remove Foam Without Damaging Paint?
Only with removable adhesives like Command strips or velcro. Spray adhesive and heavy-duty tape will damage paint on removal.
Choose your mounting method based on whether you need clean removal later. If you’re not sure, start removable and upgrade only if panels keep falling.
What If Spray Adhesive Fumes Bother You?
Work in a well-ventilated space and consider a respirator for large projects. Opening windows and running a fan makes a bigger difference than most people expect.
Low‑VOC sprays exist, but they often bond weaker than the standard formulas. If fumes are a deal‑breaker, use Command strips or velcro and skip spray entirely.
Best Acoustic Foam Panels: Top 10 Picks for Studios and Home Recording
Best acoustic foam panels can turn a hollow-sounding bedroom into a usable recording space — but only if you pick the right thickness and put them in the right spots.
Most home studios sound echoey because bare drywall reflects 95% of sound energy back at the microphone. That reflected sound smears vocal takes and makes editing harder than it needs to be.
Below are ten foam panels ranked by absorption, density, and real-world value across common studio setups. You’ll see which thickness handles which frequency range, how much wall coverage you actually need, and where to place panels for the biggest improvement.
If you want the fast answer, check the Quick Takeaway, then use the product reviews to match a pack to your room.
Quick Takeaway
Two-inch wedge foam handles the 500Hz-4kHz range where most recording problems live. Start with 20-30% wall coverage at first reflection points rather than covering every surface. The JBER 24-pack delivers the best balance of absorption, coverage, and value for typical home studios.
Editor’s Picks: Best Acoustic Foam Panels at a Glance
Here are the top three recommendations based on absorption specs, build quality, and real-world performance:
Best Overall:JBER Acoustic Panels Studio Foam Wedges delivers professional-grade absorption at a price that makes sense for most home studios. The 2-inch wedge design handles frequencies from 500Hz up, covering the problematic midrange and high frequencies that create that “amateur recording” sound.
The best foam shape guide explains how wedge profiles compare to pyramid and flat.
Best for Small Spaces:Sound Proof Foam Panels excels in compact recording environments where every square foot counts. The pyramid pattern provides multidirectional absorption, making placement less critical than with wedge designs.
Best Budget Option:JBER 6 Pack Acoustic Foam Wedge offers the same foam quality as the top pick but in a smaller, more affordable package. This works perfectly for testing acoustic treatment in your space before committing to full coverage.
What Are Acoustic Foam Panels and How Do They Actually Work?
Acoustic foam panels absorb sound waves inside a room, reducing echo and reverberation that make recordings sound hollow or muddy. The open-cell polyurethane structure traps sound energy and converts it to tiny amounts of heat through friction.
Here’s what foam panels do NOT do: they don’t block sound from traveling between rooms. That’s soundproofing, which requires mass and isolation—completely different products and techniques.
When sound waves hit foam panels, they enter the porous structure and bounce around inside the cells. Each bounce loses energy through friction with the foam material.
The deeper the sound wave penetrates, the more energy it loses.
This explains why thicker foam absorbs lower frequencies better—bass waves need more material to lose their energy. A 1-inch panel might handle 1000Hz and up, while a 2-inch panel starts working around 500Hz.
What’s the Difference Between Acoustic Foam and Acoustic Panels?
The terms get used interchangeably, but they describe different products with different performance levels. Acoustic foam uses polyurethane and typically achieves NRC ratings of 0.30-0.50, meaning it absorbs 30-50% of sound energy.
Professional acoustic panels use fiberglass or rockwool wrapped in fabric, achieving NRC ratings of 0.80-1.0. They cost more—often $5-15 per square foot versus $1-3 for foam—but deliver noticeably better absorption, especially in lower frequencies.
Does Acoustic Foam Soundproof a Room?
No, and this misconception causes more disappointment than any other aspect of acoustic treatment. Foam panels absorb sound waves already inside your room—they improve how your room sounds for recording or listening.
Soundproofing blocks sound from entering or leaving a space, requiring dense materials like mass loaded vinyl, multiple layers of drywall, and air gaps. If you hear your neighbor’s TV through the wall, foam panels won’t help—you need actual soundproofing construction.
Which Acoustic Foam Panels Are Best for Home Studios?
Home studios present unique challenges: limited budgets, rental restrictions, and rooms that weren’t designed for recording. The right foam panels address these constraints while improving recording quality.
The JBER Acoustic Panels Studio Foam Wedges hits the sweet spot for most home studio applications. The 24-pack provides 24 square feet of coverage—enough to treat first reflection points and problem corners in a typical 10×12 bedroom studio.
What Foam Works Best for Recording Vocals?
Vocal recording demands control over the 250Hz-4kHz range, where the human voice carries most of its energy and character. Foam panels need at least 2 inches of thickness to start affecting these frequencies effectively.
The Sound Proof Foam Panels excels here with higher-density foam that provides more consistent absorption across the vocal range. Place panels at first reflection points—the spots on walls where sound bounces directly from your mouth to the microphone.
How Much Foam Does a Home Studio Need?
Start with 20-30% wall coverage focusing on first reflection points rather than covering every surface. Too much absorption creates a dead, unnatural sound that’s just as problematic as too much echo.
For a 10×10 room with 8-foot ceilings, that means 16-24 square feet of foam panels. The JBER 24-pack provides exactly this coverage in one order.
Wedge vs Pyramid vs Egg Crate: Which Shape Is Best?
Shape affects aesthetics more than performance—the thickness and density matter far more for absorption. That said, wedge patterns direct sound into the foam more efficiently than flat surfaces, while pyramid patterns offer multidirectional absorption.
Egg crate foam looks distinctive but typically uses thinner material that only affects high frequencies above 2kHz. Unless you’re specifically targeting cymbal splash or sibilance issues, wedge or pyramid patterns deliver more useful absorption across a broader frequency range.
How Do You Choose the Right Thickness for Acoustic Foam?
Thickness determines which frequencies your foam panels can absorb effectively. This isn’t marketing—it’s physics based on wavelength and penetration depth.
One-inch foam starts absorbing around 1000Hz and up, handling high frequencies like cymbals, sibilance, and the bright edge of vocals. Two-inch foam extends absorption down to roughly 500Hz, covering most of the vocal range and many instruments.
When Should You Choose 1-Inch Foam?
One-inch foam makes sense when you’re specifically targeting high-frequency problems like harsh reflections, sibilance, or cymbal splash. It also works for supplemental treatment in spaces that already have some absorption from furniture and soft materials.
The JBER 12 Pack Acoustic Foam Panels 1 Inch delivers this targeted high-frequency control at minimal cost. Use it in rooms where bass isn’t a concern—like podcast booths focused purely on voice clarity.
Two-inch foam becomes necessary when you’re recording full-range sources like vocals, acoustic guitar, or any instrument with energy below 1000Hz. The extra thickness allows sound waves to penetrate deeper and lose more energy before reflecting back.
Most home studios benefit from 2-inch foam as the foundation of their treatment. The JBER 2-inch wedge panels provide this versatility without requiring the budget jump to 4-inch professional panels.
Does Thicker Always Mean Better Absorption?
Thicker foam absorbs lower frequencies, but you hit diminishing returns beyond 2-3 inches for typical home studio applications. Four-inch foam extends absorption down to around 250Hz, but at that point you’re approaching the cost and performance of professional fiberglass panels.
The practical limit for foam is around 2 inches for most users. If you need better low-frequency control, bass traps in corners deliver more impact than simply buying thicker foam panels for wall coverage.
What Are the Best Budget Acoustic Foam Panels?
Budget foam panels work when you understand their limitations and use them appropriately. The key is finding products that don’t sacrifice density and material quality just to hit a lower price point.
The JBER 6 Pack uses the same foam as larger packs but in a smaller quantity. This lets you test acoustic treatment in your specific space before committing to full coverage.
Which Foam Panels Offer the Best Value Under $50?
Value means balancing coverage area, foam quality, and price per square foot. The best budget options provide at least 12 square feet of coverage with 2-inch thickness and reasonable density.
The Blue Pyramid Sound Proof Foam Panels delivers 12 square feet of 2-inch foam right at the budget threshold. The pyramid pattern adds visual interest while providing effective absorption across the midrange frequencies.
Is Cheap Acoustic Foam Actually Worth It?
Cheap foam works if it maintains adequate density and thickness—the two factors that determine absorption performance. What you’re usually sacrificing at lower price points is durability, color consistency, and sometimes fire resistance.
For temporary setups or spaces where you’re testing acoustic treatment concepts, budget foam makes perfect sense. The best budget foam guide compares more affordable options.
The VEVOR Acoustic Foam Panels provides extensive coverage at minimal cost, perfect for learning what acoustic treatment can and can’t do in your space.
What’s the Minimum You Should Spend?
Plan on at least $30-40 for meaningful acoustic treatment in a small room. Anything less typically means either inadequate coverage area or foam that’s too thin to affect the frequencies that matter for recording.
That minimum budget gets you 12-24 square feet of 2-inch foam—enough to treat first reflection points and make a noticeable difference in recording quality. The JBER 6 Pack sits right at this entry point.
Best Acoustic Foam Panels Compared: Full Product Reviews
Here is a closer look at each product, covering what makes them effective for specific applications and where they fall short.
1. JBER Acoustic Panels Studio Foam Wedges – Best Overall
The JBER Studio Foam Wedges earned the top spot through consistent performance across multiple test environments. The 2-inch wedge design provides effective absorption from 500Hz up, covering the critical midrange where most recording problems occur.
What sets this product apart is the foam density—it’s noticeably firmer than budget alternatives, which translates to better absorption and longer lifespan. The 24-pack provides 24 square feet of coverage, enough for full treatment in a 10×12 home studio.
Installation is simple with spray adhesive or command strips. The wedge pattern creates visual rhythm on walls while directing sound into the foam structure for maximum absorption.
The main limitation is color selection—charcoal gray is the most consistent option, while other colors sometimes show manufacturing variations. For most studio applications, this doesn’t matter since you’re prioritizing function over aesthetics.
2. Sound Proof Foam Panels 12x12x2 – Best for Small Spaces
When space is limited and every panel needs to work hard, the Sound Proof Foam Panels deliver maximum absorption per square foot. The pyramid pattern provides multidirectional absorption, making placement less critical than with wedge designs.
This matters in compact vocal booths or podcast corners where you can’t always position panels at ideal angles. The foam density is higher than most competitors, resulting in better absorption across the 400-2kHz range where voice clarity lives.
The 12-pack provides 12 square feet of coverage—perfect for treating a small recording corner or vocal booth. For larger spaces, you’ll need multiple packs, which increases the total cost compared to bulk options.
The professional appearance makes these panels suitable for visible spaces like home offices that double as recording environments. The pyramid texture catches light interestingly, creating visual depth rather than the flat appearance of some foam treatments.
3. Blue Pyramid Sound Proof Foam Panels – Best Value
The Blue Pyramid panels offer a distinctive aesthetic while maintaining solid acoustic performance. The blue color works surprisingly well in modern studio spaces, adding visual interest without looking unprofessional.
Performance-wise, these panels deliver absorption comparable to more expensive options in the 500Hz-4kHz range. The pyramid pattern provides consistent absorption regardless of sound source position, which simplifies treatment planning.
The 12-pack covers 12 square feet—adequate for first reflection point treatment in small to medium rooms. The foam density sits in the middle range: better than budget options but not quite matching premium products.
Installation requires the same approach as other foam panels: spray adhesive for permanent mounting or command strips for rental-friendly applications. The blue color shows dust more readily than darker options, so plan for occasional cleaning in high-traffic spaces. ### 4. JBER 6 Pack Acoustic Foam Wedge – Best Budget Entry Point
The JBER 6 Pack uses identical foam to the larger 24-pack option but in a smaller, more affordable package. This makes it perfect for testing acoustic treatment before committing to full room coverage.
Six panels provide 6 square feet of coverage—enough to treat one or two first reflection points and evaluate the impact in your specific space. If you’re unsure whether acoustic foam will solve your recording problems, this pack lets you experiment without major financial risk.
The foam quality matches the full-size packs: 2-inch thickness, wedge pattern, and adequate density for midrange absorption. You’re not sacrificing performance for the lower price—you’re simply buying fewer panels.
The main consideration is coverage planning. Calculate your room’s treatment needs before ordering to avoid multiple small purchases that end up costing more than a single large pack.
5. JBER 12 Pack Acoustic Foam Panels 1 Inch – Best for High Frequencies
When your primary concern is high-frequency control—sibilance, cymbal splash, or bright room reflections—the JBER 1-inch panels deliver targeted absorption where it matters most.
One-inch foam starts working around 1000Hz and up, making it ideal for podcast booths where voice clarity above 1kHz is the priority. The thinner profile also means lighter weight and easier installation on ceilings or temporary structures.
The 12-pack provides 12 square feet of coverage at minimal cost. Use these panels to supplement thicker foam in areas where high-frequency control is the primary need, or as standalone treatment in spaces with existing low-frequency absorption from furniture and soft materials.
The limitation is obvious: don’t expect these panels to control midrange or bass frequencies. They’re a specialized tool for specific problems, not a complete acoustic treatment solution.
6. JBER Column Acoustic Wedge Studio Foam – Best for Corners
Corner placement is critical for acoustic treatment, and the JBER Column Acoustic Wedge is specifically designed for this application. The column wedge pattern fits naturally into room corners where bass energy accumulates.
Corners are where low-frequency problems concentrate due to boundary reinforcement—sound waves reflect off two walls simultaneously, creating peaks and nulls in bass response. Treating corners first delivers more impact per panel than random wall placement.
The 12-pack provides enough coverage for 2-3 corners in a typical room. The 2-inch thickness handles frequencies down to around 500Hz, which helps with lower midrange but won’t solve serious bass problems below 200Hz.
These panels work best as part of a broader treatment plan that includes flat wall panels for midrange and high frequencies. The column pattern looks distinctive and professional, making it suitable for visible studio spaces.
7. 24 Pack Pyramid Acoustic Foam Panels – Best for Even Coverage
The 24 Pack Pyramid Acoustic Foam Panels provide extensive coverage with a pattern that works from multiple angles. The pyramid design offers more consistent absorption than wedge patterns when sound sources move around the room.
This matters in multi-purpose spaces where you might record from different positions or have multiple speakers. The 24-pack covers 24 square feet—enough for full treatment in a 10×12 room or first reflection points in a larger space.
The foam density is adequate for midrange absorption, though not quite matching premium options. You’ll notice effective reduction in echo and flutter echo in the 500Hz-4kHz range where most recording problems occur.
The main consideration is quality consistency—generic branded foam sometimes varies between production batches. Check panels upon arrival and contact the seller immediately if you notice clear density or color differences.
8. 2 Pack Pyramid Sound Proof Foam 48x24x2 – Best for Large Panels
When you want fewer seams and faster installation, the 2 Pack Pyramid Sound Proof Foam delivers 16 square feet in just two panels. The 48×24 inch size covers a large wall area with minimal installation effort.
Large panels work well for treating broad wall surfaces behind mixing positions or across from speakers. The pyramid pattern provides consistent absorption across the panel surface, and the 2-inch thickness handles frequencies from 500Hz up.
The tradeoff is placement flexibility—you need clear wall space to accommodate 48-inch panels. Measure your available wall area carefully before ordering, considering door frames, windows, and furniture placement.
Installation requires more careful planning than smaller panels. Use multiple mounting points to prevent sagging, and ensure your adhesive or mounting system can support the larger panel weight.
9. VEVOR Acoustic Foam Panels 24 Pack – Best for Testing
The VEVOR 24 Pack offers extensive coverage at minimal cost, making it ideal for learning what acoustic treatment can accomplish in your specific space.
The 24-pack provides 24 square feet of coverage—enough to treat a small to medium room comprehensively. The foam density is adequate for midrange absorption, though you’ll notice it’s softer and more compressible than premium options.
This softer foam means shorter lifespan—expect 3-5 years before compression affects performance, compared to 7-10 years for denser foam. For temporary setups, learning environments, or spaces where you’re still experimenting with treatment placement, this tradeoff makes sense.
The wedge pattern provides directional absorption, so pay attention to panel orientation during installation. Point wedges toward primary sound sources for maximum effectiveness.
10. Set of 2 Acoustic Foam Studio Corner Blocks – Best for Bass Control
Corner bass traps address the most challenging acoustic problem in small rooms: low-frequency buildup. The Set of 2 Acoustic Foam Studio Corner Blocks provide targeted treatment where it matters most.
The triangular design fits naturally into room corners, and the 12-inch depth provides more absorption than flat panels. This extended depth helps with lower frequencies—expect some impact down to 300-400Hz, though true bass control below 200Hz requires thicker traps or professional products.
Two corner blocks treat two corners, which is a good starting point for evaluating bass treatment in your room. Most rooms benefit from treating all four corners, so plan on ordering multiple sets for full coverage.
Installation is simple—the triangular shape is self-supporting in corners, though adhesive or mounting hardware ensures they stay in place. The foam density is adequate for the application, providing noticeable reduction in corner bass buildup.
How Do You Install Acoustic Foam Panels?
Installation method affects both performance and your ability to remove panels later without wall damage. The right approach depends on whether you own or rent your space and how permanent you want the treatment to be.
Spray adhesive provides the strongest bond and best acoustic coupling between foam and wall. This maximizes absorption performance but makes removal difficult and may damage paint or drywall.
What’s the Best Adhesive for Foam Panels?
3M Super 77 spray adhesive is the industry standard for permanent foam installation. Apply it to both the wall and the foam back, wait 30 seconds for it to become tacky, then press firmly for 30 seconds.
This creates a bond strong enough that the foam will tear before releasing from the wall. For permanent installations where you own the space, this delivers maximum performance and longevity.
The JBER panels work particularly well with spray adhesive due to their consistent backing surface.
Can You Install Foam Without Damaging Walls?
Command strips rated for 16 pounds provide rental-friendly installation that removes cleanly. Use four strips per 12×12 panel, positioned near the corners for even weight distribution.
This method works well for foam panels under 2 inches thick. Thicker or heavier panels may require additional strips or alternative mounting methods like push pins through the foam into drywall.
The acoustic performance is slightly reduced compared to spray adhesive since the foam doesn’t couple as tightly to the wall surface. For most home studio applications, this difference is negligible compared to the benefit of damage-free removal.
Final Verdict: Which Acoustic Foam Panels Should You Buy?
The right acoustic foam panels depend on your specific application, budget, and acoustic goals. For a complete overview of foam categories, visit the acoustic foam hub.
If you’re working in a compact space like a vocal booth or podcast corner, the Sound Proof Foam Panels provide higher density and multidirectional absorption that maximizes performance in limited space. Budget-conscious users should start with the JBER 6 Pack to test acoustic treatment in your specific environment before committing to full coverage.
Remember that acoustic foam addresses echo and reflections within your room—it doesn’t block sound between spaces. Set realistic expectations, focus on first reflection points, and aim for 20-30% wall coverage rather than complete coverage that creates an overly dead sound.
Frequently Asked Questions
Are acoustic foam panels worth the money?
Acoustic foam panels improve recording quality when used correctly—reducing echo, flutter echo, and room reflections that make recordings sound amateur. The value depends on realistic expectations: foam absorbs sound within your room but doesn’t block sound between rooms.
For home studios, podcast booths, and listening rooms, foam panels provide cost-effective treatment that addresses the most common acoustic problems. The JBER 24-pack provides full treatment for a typical bedroom studio at a fraction of the cost of professional acoustic panels.
Do acoustic foam panels really work?
Yes, but with important limitations. Foam panels effectively absorb mid and high frequencies (500Hz and up), reducing echo and improving clarity in recordings.
They work less effectively on low frequencies below 300Hz, where thicker materials or dedicated bass traps are necessary.
The effectiveness depends on proper placement—treating first reflection points delivers far more impact than random wall coverage. Start with panels at the spots where sound bounces directly from your sound source to your listening position or microphone.
How long do acoustic foam panels last?
Quality foam panels last 5-10 years before compression and material degradation affect performance. Cheaper foam may show compression after 3-5 years, especially in high-humidity environments or areas with direct sunlight exposure.
The JBER panels use denser foam that maintains its structure longer than budget alternatives. Keep foam away from direct sunlight and maintain moderate humidity levels to maximize lifespan.
Can you use acoustic foam on ceilings?
Yes, ceiling treatment is often more effective than wall treatment for controlling early reflections. Sound bouncing off the ceiling between your sound source and listening position creates comb filtering and reduces clarity.
Use lightweight panels or secure heavier panels with multiple mounting points to prevent sagging. The JBER 1-inch panels work particularly well for ceiling applications due to their lighter weight.
How many acoustic foam panels do I need for my room?
Start with 20-30% wall coverage focusing on first reflection points rather than covering every surface. For a 10×10 room with 8-foot ceilings, that means 16-24 square feet of foam panels.
Calculate first reflection points by having someone hold a mirror against the wall while you sit at your listening or recording position. Anywhere you can see your speakers or sound source in the mirror is a first reflection point that needs treatment.
What’s the difference between acoustic foam and soundproofing?
Acoustic foam absorbs sound waves already inside your room, improving how the room sounds for recording or listening. Soundproofing blocks sound from traveling between rooms or through walls, requiring dense materials, mass, and isolation techniques.
If you hear your neighbor’s TV, foam won’t help—you need actual soundproofing construction with mass loaded vinyl, additional drywall layers, and decoupling. Foam addresses echo and room reflections, not sound transmission between spaces.
No, acoustic foam does not block sound transmission through walls, floors, or ceilings. Foam absorbs sound waves within your room but provides no meaningful barrier to sound traveling through building structures.
Reducing neighbor noise requires soundproofing techniques: adding mass to walls, sealing air gaps, decoupling surfaces, and sometimes complete wall reconstruction. These are fundamentally different solutions addressing different problems.
Do I need 1-inch or 2-inch foam panels?
Choose 2-inch foam for general-purpose acoustic treatment covering vocals, instruments, and most recording applications. The extra thickness extends absorption down to 500Hz, covering the critical midrange where most recording problems occur.
Use 1-inch foam only when you’re specifically targeting high-frequency problems above 1000Hz, need lighter weight for ceiling mounting, or are supplementing existing treatment. The JBER 2-inch panels provide the versatility most users need.
What’s better: wedge, pyramid, or egg crate foam?
Wedge and pyramid patterns perform similarly—the thickness and density matter far more than the surface pattern. Wedge patterns direct sound into the foam efficiently, while pyramid patterns offer multidirectional absorption that’s less sensitive to placement.
Egg crate foam typically uses thinner material that only affects high frequencies above 2kHz. Unless you’re specifically targeting cymbal splash or sibilance, wedge or pyramid patterns deliver more useful absorption across a broader frequency range.
How do I clean acoustic foam panels?
Vacuum foam panels gently with a brush attachment to remove dust buildup. Avoid water or cleaning solutions, which can damage the foam structure and reduce absorption performance.
For stubborn dirt, use a barely damp cloth and allow panels to dry completely before reinstalling. The darker foam colors show dust less readily than lighter options.
Does Acoustic Foam Work? (Echo vs Soundproofing Explained)
Does acoustic foam work? Yes for echo control inside the room, but no for soundproofing neighbor noise through walls.
The boxy sound in recordings and the “roomy” tail on calls usually come from early reflections bouncing off bare walls. Foam only helps when it is placed where the mic actually hears the bounce.
Do it right and you get cleaner, more direct speech and vocals with less EQ and less de-reverb.
Start with one surface — the wall that reflects back into the mic — then expand only if you can hear the difference. The rest of this guide shows where foam works best, where it will not move the needle, and what to do when “soundproof” is your real goal.
Quick Takeaway
Acoustic foam works for absorption (echo and reverb inside the room). It does not work for soundproofing (blocking sound through walls), so it will not fix neighbor noise.
Does Acoustic Foam Work (and What Does “Work” Even Mean)?
People say “foam doesn’t work” when they are really saying “foam didn’t do the job I hired it for.” The problem is that the job is often misnamed.
Here is the simple split: do you want to change how the room sounds to you, or do you want to change what people outside the room hear? Foam only changes the first one.
What acoustic foam is designed to do
Foam is acoustic treatment. It reduces reflections off hard surfaces so the room sounds tighter and microphones capture more direct sound.
That is why foam shows up in podcast corners, streaming setups, and basic bedroom studios. In those situations, reflections are the thing ruining the sound, not the wall assembly.
What acoustic foam is not designed to do
Foam is not soundproofing. It does not add meaningful mass, and it does not decouple walls, which are the levers that matter for sound transmission.
So if your goal is “keep sound in” or “keep sound out,” you are shopping in the wrong aisle. Foam can still make the room sound nicer, but it will not fix the leak.
Does Acoustic Foam Soundproof a Room?
No. Acoustic foam does not soundproof a room, even if you cover a lot of wall space.
The cleanest analogy is curtains versus walls. Curtains soften the sound inside the room, but they do not stop sound traveling through the window.
Sound absorption vs soundproofing (the simplest way to separate them)
Sound absorption is about taming reflections after sound is already in the space. It is the “make this room less echoey” problem.
Soundproofing is about stopping vibration and air leaks at the boundaries. It is the “make this room less audible next door” problem.
Foam products are usually discussed with NRC (absorption). Walls and assemblies are usually discussed with STC (blocking).
If you keep seeing “sound deadening foam” labels, treat that as marketing shorthand for absorption. Our guide on sound deadening vs acoustic foam clears up the terminology without getting lost in jargon.
Once you separate absorption from blocking, the physics is straightforward. Foam doesn’t add mass or seal leaks, so the sound path to your neighbor stays open.
Why foam cannot stop neighbor noise (in plain physics)
Most neighbor noise is structure plus gaps. Drywall vibrates, doors leak, windows leak, and sound takes the easiest path.
A soft layer on the surface does not stop that path. It can reduce reflections in your room, but it does not change how the wall transmits sound.
Does foam help on a shared wall at all?
It can help your recordings because it reduces reflections on your side of the room. The neighbor noise can stay, but your mic hears less room smear on top of it.
Think of it as making your microphone’s job easier, not making the apartment quieter. If your goal is actual isolation, you need a different plan than surface foam.
What to do if your real goal is soundproofing
Start with the weak points: door gaps, window gaps, outlets, and any obvious air paths. Sealing those often beats any surface treatment because sound takes the path of least resistance.
A simple under-door seal like MAXTID Door Draft Stopper handles the gap that makes every other fix feel pointless. For cracks around trim, baseboards, and outlets, acoustic caulk stays flexible where regular caulk would crack and re-open the leak.
After sealing, real gains come from mass and decoupling, which usually means construction. If you want a practical roadmap written for people who almost bought foam for soundproofing, start with acoustic foam alternatives.
What Does Acoustic Foam Actually Do?
Used correctly, foam is a reflection tool. It shortens the reverb tail and cleans up slap echo so speech and recordings sound more direct.
That is why foam can feel like magic in a bare room, and feel pointless in a room that already has soft furnishings. The more reflective the room, the more obvious the improvement.
How does acoustic foam absorb sound?
Open-cell foam is full of tiny channels. When sound enters, air movement turns into friction, and the reflection coming back is weaker.
You do not need to obsess over the physics to use it well. Place foam where reflections would bounce back into your mic or your listening position.
What frequencies does foam absorb best?
Foam is strongest in mid-to-high frequencies, which is where “roominess” and harsh reflections live. That is why it helps voice so quickly.
Bass needs depth and density, so thin wall foam is not the fix for boomy low end. If bass is the pain point, start with bass traps vs acoustic foam instead of buying more wall tiles.
If you want a clearer picture of thickness versus frequency, acoustic foam frequency absorption breaks it down in plain language. It is the fastest way to avoid buying foam that looks right but does not match what you are hearing.
Does foam shape matter, or is it mostly looks?
Shape matters a little, but thickness and foam quality matter more. A real 2-inch panel usually beats a thin “aggressive looking” pattern made from cheap foam.
If you are choosing between common patterns, acoustic foam pyramid vs wedge is the quick comparison. Use it to decide based on the problem, not the texture.
If you just want a cheap experiment, JBER 12-Pack 1-Inch Acoustic Foam Tiles are enough to hear a change in a very echoey room. If you like what you hear, upgrade the plan (placement and thickness) before you upgrade the wall coverage.
Does Acoustic Foam Reduce Noise?
“Reduce noise” is where people talk past each other. Foam can make a room feel quieter because it removes reflections, but it does not reduce the noise coming through the building.
So yes, foam can improve your experience inside the room. But no, it will not turn a loud apartment into a quiet one.
Does foam reduce echo and reverb?
Foam reduces echo and reverb when hard, parallel surfaces are feeding reflections back into the room. In that case, you can noticeably shorten the clap tail with a small amount of coverage in the right spot.
A quick check: record 10 seconds of speaking before and after, then listen for the ring behind your words. If the ring shrinks, the foam is doing its job.
Does foam reduce outside noise or keep sound from leaving?
Outside noise is a transmission problem, and foam does not change the wall assembly. If you can hear it through the wall now, surface foam will not close that path.
If you are here because of neighbors, do not keep buying foam hoping the fifth box will suddenly work. Follow the soundproofing path instead, and treat foam as optional.
Is Acoustic Foam Worth It?
Worth it depends on whether you are fixing reflections or chasing isolation. Foam is cheap when it is the right tool, and expensive when it is the wrong one.
When foam is a smart buy
Foam makes sense for podcasting, streaming, and casual vocal recording where the room is the main thing ruining the sound. In those cases, you do not need perfection to hear the improvement.
If you want to shop with less regret, how to choose acoustic foam explains what actually matters (density, thickness, and placement) without the Amazon hype. It is a better read than scrolling reviews for hours.
When you should skip foam (or use it differently)
If you are mixing seriously or fighting bass buildup, foam is at best a supporting actor. You will usually pair it with deeper treatment that targets low frequencies.
If you want a short list of foam that is at least decent, best acoustic foam panels is the easiest starting point. It also helps you avoid the “looks thick in photos” trap.
If you are deciding between 1-inch and 2-inch for a bedroom setup, you will usually feel the difference more with a thicker pack like 24-Pack 2-Inch Pyramid Acoustic Foam Panels than with doubling coverage of thin tiles. Measure first so you buy once.
Where Does Acoustic Foam Work Best?
Placement is where foam either feels magical or pointless. The goal is to catch reflections that bounce back into your mic or listening position, not to wallpaper the room.
Recording and podcast corners
For voice work, start with the wall that reflects back into the mic. Depending on your setup, that might be the wall behind the mic or the wall behind you.
If you are unsure which side matters, start with how to arrange acoustic foam and work from reflection points outward. One treated wall in the right spot beats three random walls every time.
For a small recording corner, JBER 48-Pack 1-Inch Acoustic Foam Panels is usually enough to treat one key wall and hear the change. If you still hear slap echo, treat the second wall next, not the entire room.
Desk setups follow the same reflection logic, but the desk and monitors can become the loudest bounce-back points.
Streaming and desk setups
Desk setups often need treatment behind the monitor(s) and one wall behind you, depending on where the mic points. Small changes in angle can change which reflection you are fighting.
If you want a simple layout that keeps you from overdoing it, how to arrange acoustic foam gives a clean starting plan. Start with one surface, listen, then add only what you can actually hear.
If your “mic” is really just your ears on the couch, you’re still chasing reflections — just with dialogue clarity as the goal.
Home theaters and music rooms
Foam can help tame harsh reflections and make dialogue feel clearer, but it will not clean up muddy bass. If the complaint is boom, not echo, foam is not the first move.
That is why a lot of home theater “foam did not work” stories are really bass stories. If bass is the complaint, start with bass traps vs acoustic foam before you buy more wall tiles.
Conclusion
Acoustic foam works when you use it for absorption: it shortens reverb, reduces slap echo, and makes recordings sound cleaner. If you buy it for that job, it can be one of the fastest upgrades for a bare room.
But foam does not soundproof. Blocking sound is a mass, sealing, and decoupling problem, and foam is not built for that path.
If you are buying foam, buy it with a placement plan and realistic expectations. If you are chasing neighbor noise, follow the soundproofing path first and let foam be a secondary tool, not the main bet.
Frequently Asked Questions
Can acoustic foam stop neighbors from hearing me?
No. Foam can reduce echo inside your room, but it will not meaningfully reduce sound transmission through walls.
If neighbors are the real issue, focus on sealing gaps and real soundproofing measures first. Foam can still make your recordings cleaner, but it will not solve the isolation problem.
Does acoustic foam work for vocals and podcasts?
Yes, especially in bare rooms where reflections are obvious. Voice sits right in the range where foam tends to help fast.
Treat one reflection wall first (the one that bounces back into the mic), then add only if you can still hear slap or ring. That approach usually beats buying more foam and guessing.
Does acoustic foam help with bass?
Not much. Bass wavelengths are long, and thin foam does not have enough depth to absorb them well.
If bass is the complaint, start with bass traps vs acoustic foam. Foam can still help reflections, but it will not fix boomy low end.
Can you combine foam with soundproofing?
Yes. Soundproofing handles transmission through the boundaries, and foam handles reflections inside the room. Professional spaces do both.
If you have noise complaints, fix sealing and mass first. Once the space is reasonably isolated, foam is what makes it sound good for recording or listening.
How much foam do I need?
Start small: one wall, then listen. Add only what you can actually hear.
If you want a simple layout that prevents random panel spam, follow how to arrange acoustic foam. It is cheaper than guessing and buying twice.
Rugs vs Acoustic Panels: Which Actually Treats Your Room? [2026]
Rugs vs acoustic panels — which one actually fixes your room’s sound problems? Both help, but for completely different frequency ranges and surface types.
Most people pick one or the other and wonder why the room still sounds off. The frustration comes from treating floor reflections with panels and wall reflections with rugs — putting each solution in the wrong place produces almost no improvement.
Using the right tool on the right surface eliminates the specific reflections causing your problem, without overspending on treatment that doesn’t apply to your room.
The rest of this guide covers what each handles, where to deploy them, and when you need both — you’ll know exactly which to buy by the end.
Quick Takeaway
Rugs absorb high-frequency floor reflections (500Hz and above) with NRC ratings around 0.30-0.50, while acoustic panels absorb a full frequency range with NRC ratings of 0.85-1.05. Use rugs for hard floors and panels for walls — they solve different problems and work best together.
What’s the Real Difference Between Rugs and Acoustic Panels?
Rugs and acoustic panels serve fundamentally different purposes in room acoustics — comparing them directly is like comparing tires to headlights on a car. Both matter, but they do completely different jobs.
Rugs sit on your floor and absorb sound that would otherwise bounce off hard surfaces like hardwood, tile, or concrete. That’s their entire job.
They reduce footstep noise, dampen floor reflections, and add warmth to rooms with echoey hard floors.
Acoustic panels mount on walls and ceilings where the real acoustic problems happen. Wall reflections cause the echo you hear in untreated rooms.
Understanding how absorption differs from soundproofing prevents buying the wrong product. Ceiling reflections create that “hollow” sound in recordings — panels target these surfaces because that’s where sound bounces most problematically.
Why Do People Compare Them?
The comparison usually comes from a misunderstanding about what causes acoustic problems. People hear echo and think “I need something soft” — and rugs are soft.
Rug manufacturers sometimes market their products as “acoustic solutions,” which adds to the confusion. While technically true — rugs do absorb some sound — the claim oversimplifies what’s actually happening in your room.
The truth is less convenient for marketing but more useful for you: rugs help floors, panels help walls, and complete room treatment usually requires both.
How Do Rugs Absorb Sound?
Rugs absorb sound through friction — when sound waves hit the rug fibers, the wave energy gets converted to tiny amounts of heat through fiber movement. Thicker pile means more fibers, which means more friction and more absorption.
What Frequencies Do Rugs Absorb?
Rug fibers are thin and relatively short — even a thick shag rug only has fibers a few inches long. That physical characteristic limits them to absorbing high frequencies only.
Most rugs effectively absorb frequencies above 500Hz. They struggle with mid-range frequencies (200-500Hz) and do almost nothing for bass frequencies below 200Hz.
The human voice sits around 100-400Hz — right where rugs perform worst. That frequency gap explains why rugs alone never solve echo problems.
The Carpet and Rug Institute has tested this extensively. A typical wool area rug has an NRC (Noise Reduction Coefficient) of about 0.30-0.50.
That means it absorbs 30-50% of sound energy — but only in the frequencies it can actually affect.
Does Rug Thickness Matter?
Pile height directly correlates with absorption. Studies consistently show that rugs with pile heights above 10mm absorb more sound than flat-weave rugs.
The sweet spot for acoustic performance sits between 10-18mm pile height. Beyond that, you get diminishing returns acoustically while collecting more dust and complicating maintenance.
Wool rugs generally outperform synthetic materials for sound absorption. The natural fiber structure creates more friction per unit of thickness.
Hand-tufted and hand-knotted constructions also typically beat machine-made alternatives.
How Do Acoustic Panels Compare?
Acoustic panels differ from rugs in almost every measurable way — the contrast becomes stark when you compare the actual performance numbers. They use materials specifically chosen for acoustic properties — typically rigid fiberglass or mineral wool — wrapped in acoustically transparent fabric.
The NRC rating guide covers the science behind panel absorption in depth.
What’s the Absorption Difference?
Quality acoustic panels achieve NRC ratings of 0.85-1.05 — absorbing 85-105% of sound energy across a broad frequency range. Compare that to a rug’s 0.30-0.50 NRC, and panels absorb roughly twice as much sound.
More importantly, panels work across the full frequency spectrum. A 2-inch fiberglass panel effectively absorbs frequencies from about 250Hz up through the highest audible frequencies.
Panel density determines how far absorption extends into lower frequencies. Thicker panels (4-6 inches) extend this down to 125Hz or lower.
That mid-range coverage is the key difference. The frequencies where voices live, where music has body, where room echo sounds most unpleasant — panels handle all of these.
For panels that deliver that 0.95+ NRC performance, the UMIACOUSTICS 4-Pack Fiberglass Acoustic Panels uses a professional-grade fiberglass core that outperforms any rug on the market.
Why Does Placement Matter?
Panels go where sound problems actually occur — on walls and ceilings. Walls and ceilings create far more reflection surface area than floors in most rooms.
First reflection points on walls cause the most noticeable acoustic problems. These are the spots where sound from your speakers or voice bounces directly to your ears after hitting the wall.
Treating these points with panels noticeably improves room sound. The placement guide shows exactly where to position panels for maximum effect.
Ceiling reflections matter especially in rooms with hard floors. Sound bounces floor-to-ceiling repeatedly, creating a “flutter echo” that makes rooms sound unpleasant.
Ceiling panels or clouds address this directly.
Can Rugs Replace Acoustic Panels?
With those NRC differences clear — 0.30 for rugs versus 0.85+ for panels — the short answer is no. You cannot skip panels and just use rugs for acoustic treatment if you want meaningful improvement.
Sound problems primarily come from walls and ceilings. That 80% of reflective surface area stays untreated when you only lay down a rug.
What Rugs Actually Fix
Rugs excel at specific problems that panels can’t address. Hard floor surfaces create footstep noise, chair scraping sounds, and high-frequency “slap” reflections that add harshness to room acoustics.
If you have hardwood, tile, laminate, or concrete floors, a quality area rug genuinely helps. It won’t fix your room’s echo problem, but it will reduce one component of the overall acoustic picture.
For home offices, rugs reduce keyboard clicks and chair noise that would otherwise bounce around the room. For recording spaces, rugs prevent floor reflections from reaching microphones.
These are real benefits — just not full room treatment.
Where Rugs Fall Short
Rugs can’t treat wall reflections. They can’t address ceiling flutter.
They can’t absorb the mid-range frequencies where most acoustic problems actually live.
Hanging a rug on the wall doesn’t solve this either. Rugs lack the thickness and density to perform like acoustic panels.
A decorative wall rug might absorb slightly more than bare drywall, but it won’t approach the performance of actual acoustic treatment.
The physics don’t work. Effective sound absorption requires material thickness proportional to the wavelengths you’re trying to absorb.
Bass frequencies have wavelengths measured in feet. A half-inch rug can’t meaningfully absorb them.
When Should You Choose Rugs Over Panels?
Despite their limitations, rugs genuinely are the better choice in specific situations. Knowing when to prioritize floor treatment helps you allocate your acoustic treatment budget effectively.
Hard Floor Echo Problems
If your room has hard floors and you’re primarily bothered by footstep noise, chair sounds, and that harsh “clicky” quality that hard surfaces create, a quality area rug is your first purchase. Panels won’t help with floor reflection issues.
Large area rugs work better than small accent rugs for acoustic purposes. More surface coverage means more absorption.
A rug that covers 50-75% of your floor area makes a noticeable difference; a 3×5 accent rug barely registers.
Aesthetic Priorities
Rugs integrate into room design more naturally than panels in many spaces. Living rooms, bedrooms, and home offices often benefit from the warmth and visual interest a quality rug provides.
If you need some acoustic improvement but won’t tolerate panels on your walls, a thick area rug at least addresses floor reflections. Incomplete treatment beats no treatment.
Budget Constraints
Quality acoustic panels cost more than equivalent-size rugs in most cases. If budget limits your options, starting with a rug for floor treatment makes sense — as long as you understand it’s not a complete solution.
You can add wall panels later as budget allows. The rug will continue helping with floor reflections even after you install dedicated wall treatment.
When Should You Choose Panels Over Rugs?
Panels should be your priority when the acoustic problems you’re experiencing relate to echo, reverb, or sound clarity — these issues originate from wall and ceiling reflections.
Recording and Podcasting
Any space where you record audio needs panels first, rugs second. Microphones pick up room reflections far more than human ears notice.
Wall reflections create the “roomy” or “boxy” sound that makes amateur recordings immediately identifiable.
First reflection points on walls behind and beside microphones require treatment. Ceiling clouds above recording positions matter almost as much — the ceiling panel guide covers cloud mounting techniques.
Film dialogue clarity depends on controlling early reflections from walls and ceilings. The surround sound experience relies on your room not adding unwanted echo to the carefully mixed audio.
Panels at first reflection points and rear wall diffusion create noticeably better home theater sound. The home theater acoustic treatment guide covers best panel placement for surround systems.
Rugs help if you have hard floors, but they’re secondary to wall treatment.
Music Listening Rooms
Critical listening requires accurate sound reproduction without room coloration. Wall reflections smear stereo imaging and muddy frequency response.
Panels restore clarity that room reflections destroy.
A rug absorbing 30% of high frequencies barely touches the problem. Panels absorbing 90%+ across the full spectrum actually solve it.
What About Combining Both?
Each product excels on its own surface — the best acoustic treatment combines floor and wall treatment appropriately for your specific room and needs.
The Ideal Approach
Start with your primary acoustic goal. If echo and reverb bother you most, panels come first.
If hard floor noise and harshness bother you most, rugs come first.
For complete room treatment, you’ll eventually want both. Panels handle walls and ceilings where 80% of reflection problems originate.
The installation guide covers every mounting method for getting panels up. Rugs handle floors where the remaining 20% lives.
The combination creates results neither achieves alone. Panels without floor treatment can leave rooms sounding overly “dead” at high frequencies while floor reflections remain.
For wall treatment that also adds visual appeal, the BUBOS 4-Pack Fabric Acoustic Panels pairs well with area rugs for a room that sounds good and looks intentional.
Coverage Recommendations
For wall treatment, aim for 20-30% of wall surface area covered with panels. Focus on first reflection points first, then expand coverage based on remaining issues.
For floor treatment, cover 50-75% of hard floor surface with rugs. Thick pile (10mm+) provides better absorption than thin flat-weaves.
Even modest panel coverage at key reflection points combined with a quality area rug improves most rooms more than full coverage of either product alone.
Rugs vs Panels: Quick Comparison
The table below puts the key differences side by side for quick reference.
Factor
Rugs
Acoustic Panels
Primary Surface
Floors only
Walls and ceilings
NRC Rating
0.30-0.50
0.85-1.05
Frequency Range
500Hz+ (high only)
125Hz+ (mid to high)
Best For
Hard floor echo, footsteps
Room echo, recording, clarity
Aesthetic Integration
Natural in most rooms
Requires design consideration
Installation
Lay on floor
Mount on walls/ceiling
Complete Solution?
No — floors only
Partial — walls/ceiling only
The NRC gap tells the story — rugs absorb a third of what panels do, and only at high frequencies. For any room where sound quality matters, panels are the primary tool.
Rugs earn their place on hard floors, but as a complement to wall treatment, not a substitute.
Conclusion
Rugs and acoustic panels aren’t competing products — they’re complementary treatments for different parts of your room. Rugs handle floor reflections with that 0.30-0.50 NRC rating.
Panels handle walls and ceilings with full-spectrum absorption at 0.85-1.05 NRC.
For complete room treatment, you need both. If budget forces a choice, prioritize based on your specific problem: hard floor noise means rugs first; echo and reverb means panels first.
The best acoustic panels guide has specific recommendations when you’re ready to buy. Rugs help, but they can’t substitute for dedicated wall and ceiling treatment when you need meaningful acoustic improvement.
Frequently Asked Questions
Do Rugs Help With Room Echo?
Rugs reduce floor-bounce echo only — they can’t address wall and ceiling reflections where most echo originates. A rug helps hard-floor rooms sound less harsh but won’t solve noticeable echo problems alone.
Can I Hang a Rug Instead of Buying Panels?
Hanging a rug provides minimal acoustic benefit compared to actual panels. Rugs lack the thickness and density for effective mid-frequency absorption.
Decorative wall rugs look nice but don’t perform acoustically.
What’s the Best Rug for Sound Absorption?
Thick pile wool rugs (10-18mm pile height) absorb the most sound — hand-tufted and hand-knotted constructions outperform machine-made alternatives, and larger area rugs covering 50%+ of floor space provide the most meaningful treatment.
How Many Panels Do I Need If I Have Rugs?
Rugs don’t reduce panel requirements — they treat different surfaces. Aim for panels covering 20-30% of wall surface area at first reflection points regardless of floor treatment.
The rug handles floors; panels handle walls.
How to Attach Bass Traps and Acoustic Panels Safely [2025]
How to attach bass traps and acoustic panels without them crashing to the floor — the real goal is simple: nothing falls.
You can hang a lightweight panel with almost anything, but bass traps are heavier because they’re thicker and denser.
If you’re treating corners or ceiling junctions, you’re also working in the most awkward spots in the room. That’s where screws miss studs, anchors pull out, and renters start thinking about their deposit.
The fix is boring (in a good way): match your hardware to the weight, wall type, and mount style.
Below, you’ll find hardware options for every wall type — drywall, concrete, and rental-safe alternatives.
Mount bass traps using French cleats or L-brackets for floor-to-ceiling corner installations, eye bolts with aircraft cable for ceiling-wall junctions, and toggle bolts for drywall without studs. Bass traps are 2-3x heavier than standard panels — always verify your hardware’s weight rating before installation.
Why Is Mounting Bass Traps Different from Regular Panels?
The first surprise is the weight.
A standard 2×4-foot acoustic panel might weigh 8–15 pounds. A well-built corner bass trap can hit 25–50 pounds (or more).
That gap changes everything about your mounting approach. The adhesive methods that work for light panels can fail catastrophically with heavier traps.
The line between panels and traps isn’t always obvious — bass traps vs acoustic panels breaks down the weight and sizing differences that affect which hardware you need.
What Makes Bass Traps Heavier?
That extra weight comes from the material itself. Low frequencies have long wavelengths, and absorbing them takes 4–6 inches of dense mineral wool or fiberglass — not the thin 2-inch batts you see in lightweight panels.
Add a rigid wooden frame around that insulation and you’re looking at 25–50 pounds per trap. Picture hooks and adhesive strips weren’t designed for that kind of load, which is why “mounting like a picture” usually ends with a cracked corner.
Triangular “superchunk” designs push the weight even further. They pack more insulation into the same corner footprint — better absorption, but heavier and harder to secure.
How Much Weight Can Different Hardware Hold?
All that extra insulation — 4 to 6 inches of it — means hardware has to keep up. If the hardware is barely rated for the trap, it will fail eventually.
For lighter treatments, the Luomorgo Z-Clips (10-pack) sit flush against the wall and make panels easy to remove.
The Z-Clip 375 Panel Clips split the difference — sturdier than standard Z-clips but still removable when you need to reposition.
Which Mounting Systems Work Best?
French cleats handle the heaviest loads because they spread weight along their full length — no single screw takes all the stress. Z-clips use the same interlocking principle in a smaller package, which gives you a lower profile on the wall when the trap doesn’t need full-cleat strength.
L-brackets work differently from both. Instead of suspending weight from the wall, they create a shelf that holds the trap from below — you’re just stopping it from tipping forward, not fighting gravity.
What About Drywall Without Studs?
Cleats, Z-clips, and L-brackets all assume you can hit studs or solid backing — but plenty of walls don’t cooperate. Drywall alone isn’t a reliable anchor for heavy traps.
Toggle bolts solve this problem by gripping the back of the drywall. They spread the load across a much larger area than a plastic anchor.
The TOGGLER SNAPTOGGLE Drywall Anchor is one of the strongest snap-toggle options for this. Once the metal channel locks behind the drywall, it isn’t going anywhere.
The same anchor logic applies to standard panels — how to install acoustic panels runs through the full process for lighter treatments.
If you’re pairing panels with bass traps, the best acoustic panels roundup ranks the top options by room type and budget.
How Do You Mount Bass Traps in Corners?
Corner mounting is the most common bass trap install for a reason. Bass piles up where surfaces meet, especially in the four vertical corners of a rectangular room.
Three setups cover most installs: a single floor-to-ceiling trap, stacked smaller modules, or triangular superchunks. If you’re deciding which corners matter most, where to install acoustic panels ranks the priority spots by room shape.
What’s the Best Approach for Floor-to-Ceiling Traps?
The first of those three setups — a single floor-to-ceiling trap — looks clean and gives you maximum coverage in one piece. The good news is you usually don’t need to suspend all that weight from the wall. Rest the bottom of the trap on the floor and let gravity do most of the work. Then use brackets or a cleat near the top to keep it from tipping forward.
Place your stabilizing brackets roughly 12–18 inches down from the top. Keep them level, or the trap will sit crooked and look sloppy.
Can You Stack Multiple Traps?
Full-height traps aren’t the only way to fill a corner. Stacking smaller modules gets you the same floor-to-ceiling coverage with pieces you can actually carry.
Start with the bottom trap resting on the floor. Add modules above it, securing each one to the wall so it can’t tip forward.
Smaller modules also make solo installs realistic. Wrestling a 60-pound trap into a corner is how you end up gouging drywall.
How Do You Mount Triangular Corner Traps?
Stacked or full-height, rectangular traps aren’t the only option. Triangular “superchunk” designs pack more insulation into the corner — but their shape makes mounting less intuitive.
The simplest approach uses two L-brackets, one on each wall, to create a shelf. Set both brackets at the same height so the trap sits naturally in the corner.
For extra security, run a short cleat across the back corner. That locks the trap into both walls while the brackets do the supporting.
How Do You Mount Bass Traps on Ceilings?
Once the vertical corners are treated, ceiling-wall junctions are the next priority. Bass collects in these horizontal corners the same way it collects in vertical ones — but the hardware, hanging distance, and mounting style all change when you’re working overhead.
What Hardware Works for Ceiling Mounting?
Working overhead means every fastener fights gravity full-time, so the hardware has to be anchored into structure — not just drywall. Eye bolts into ceiling joists are the starting point for most ceiling installs.
Aircraft cable (wire rope) connects eye bolts to the trap. It handles high loads without looking like hardware-store chain.
Turnbuckles (or adjusters) make leveling painless. That matters when you’re hanging multiple traps and you want the install to look intentional.
How Far Should Ceiling Traps Hang?
The hardware gets the trap up there — but how far it hangs from the ceiling determines how well it absorbs. An air gap behind a trap can increase low-frequency absorption.
If you’re targeting the ceiling-wall corner, mount your hang points a few inches out from the junction. That keeps the trap in the “bass zone” while still leaving breathing room behind it.
The exact height matters less than consistent spacing. Keep multiple traps at uniform distances so the room looks clean and professional.
Ceiling treatment goes beyond just hanging hardware — acoustic panels ceiling installation covers layout, spacing, and joist-vs-toggle decisions.
What About Soffit-Style Installation?
If hanging cables aren’t practical (or you want a cleaner look), soffit traps sit directly in the ceiling-wall corner. They fill the same space without dangling hardware.
Mount a support ledger (like a simple 1×2) on each wall near the ceiling. The trap rests on the ledgers and wedges into the corner.
This style is great for dedicated studios where appearance matters. It reads as “built-in” instead of “hung.”
How Do You Mount on Concrete or Masonry Walls?
Basement studios and commercial spaces often have concrete or block walls. These surfaces need different hardware than drywall, but they can be very solid once you drill correctly.
What Fasteners Work in Concrete?
The go-to fastener for most concrete jobs is a Tapcon screw — it cuts its own threads into the concrete and holds well as long as you drill to the right depth. For very heavy traps or multi-trap rail systems, sleeve anchors give even more holding power, though they’re usually overkill for a single corner trap.
Either way, you need a hammer drill with a masonry bit. A standard drill will overheat the bit and barely scratch the surface.
What’s the Installation Process?
With Tapcons or sleeve anchors chosen, the drill-and-mount sequence is tight — and skipping a step usually means a fastener that spins instead of bites. Hold the cleat or bracket in place and mark through the holes.
Drill pilot holes with the bit size your fasteners require. Drill slightly deeper than the screw length so dust has somewhere to go.
Vacuum dust out of the holes before driving fasteners. Concrete dust is one of the most common reasons Tapcons “feel tight” but don’t actually hold.
Drive your Tapcons (or install anchors), attach the hardware, then mount the trap. Once you’ve done it once, it’s a quick, repeatable process.
How Do You Mount Bass Traps Without Drilling?
Renters have a real dilemma: bass traps are heavy, but holes cost money. Adhesives and freestanding setups are the two main alternatives — each with real tradeoffs.
Do Any Adhesive Options Work?
The most common adhesive approach is construction glue applied directly between the trap and the wall. It bonds hard and can hold serious weight once fully cured — but the tradeoff shows up on move-out day.
Ripping a glued trap off the wall tears paint, pulls drywall paper, and often leaves damage worse than a few screw holes would have. High-strength tape works for lightweight foam corner pieces, but foam corners absorb far less bass than a real mineral-wool trap — you’re trading performance for convenience.
What About Freestanding Options?
If adhesive removal sounds like trading one kind of wall damage for another, floor-standing traps skip the wall entirely. You can build or buy traps that lean into the corner and support themselves.
The angle matters. A slight backward lean keeps the trap stable without losing corner contact.
Add non-slip pads to prevent the trap from creeping across the floor. If you want “never moves,” add a simple base block at the floor.
For modular panels you can move between apartments, best hanging acoustic panels focuses on renter-friendly designs that hang without permanent hardware.
What Safety Considerations Matter?
Every mounting method above assumes two things: the hardware can handle the weight, and the wall can handle the hardware. Verifying both — plus checking fire ratings — is the part most installers skip.
How Do You Verify Weight Capacity?
The simplest safety check is also the most skipped: weigh the finished trap on a bathroom scale, then pick hardware rated comfortably above that number. A trap that barely meets the hardware’s rating will hold at first — and fail later when temperature shifts loosen the anchors.
Wall type matters just as much as weight. A stud finder takes ten seconds and tells you whether you’re drilling into solid wood or hollow drywall — and hollow drywall can’t carry serious load without toggle bolts behind it.
Once everything is mounted, push and pull the trap gently before you walk away. Anything that shifts or creaks now will only get worse over time.
What About Fire Safety?
Weight capacity keeps traps on the wall — fire ratings keep the room safe. Most mineral wool and fiberglass insulation is non-combustible or self-extinguishing, but foam varies a lot — don’t assume it’s fire-rated unless the listing says so.
Fabric coverings can burn even when the core is safer. If you’re treating a commercial space, check local fire codes before you hang anything.
DIY wood frames add fuel in a fire. If fire safety is a primary concern, prioritize documented ratings and materials that don’t ignite easily.
The Bottom Line
The single rule behind every bass trap install: match the hardware to the weight. The shortcuts that work for lightweight panels don’t work for heavy traps.
Start with the vertical corners, where bass piles up the most. If the trap rests on the floor, your hardware job is stability, not suspension.
For renters, freestanding or leaning traps are often the best compromise. Perfect mounting is useless if you never install the treatment.
Frequently Asked Questions
Can Command Strips Hold Bass Traps?
No. Most bass traps are too heavy, and adhesive solutions tend to fail over time.
If you need a cleaner look, use French cleats, Z-clips, or brackets. If you need no holes, use freestanding traps.
What’s the Best Mounting Method for Heavy Bass Traps?
For heavy traps, a cleat system into studs (or strong anchors) is the best mix of strength and removability. For concrete, masonry fasteners (like Tapcons) are usually the simplest and strongest option.
How Many Mounting Points Does a Bass Trap Need?
Floor-standing traps usually need just one or two stabilizing brackets near the top — gravity handles the rest. Fully suspended traps need at least two anchor points. Add a third if the trap is wider than 24 inches or heavier than 30 pounds.
Should Bass Traps Touch the Wall?
Yes — a small air gap behind the trap actually improves low-frequency absorption, and most cleats or brackets create that gap automatically.
Best Fiberglass Acoustic Panels: Top 6 Picks for Professional Sound Absorption [2025]
Best fiberglass acoustic panels deliver professional-grade sound absorption that foam alternatives simply cannot match. But most buyers still grab cheap foam packs off Amazon and wonder why their room sounds the same.
The rigid fiberglass core absorbs sound across a broader frequency range, making these panels the go-to choice for recording studios, home theaters, and any space where acoustic quality matters.
If you’ve researched acoustic treatment, you’ve likely encountered endless foam options that promise studio-quality results. The reality is different.
Fiberglass panels absorb 2-3x more sound energy than similarly-sized foam panels, particularly in the critical mid-to-low frequency range where voice clarity and music reproduction live.
Below you’ll find the best fiberglass acoustic panels available today. You’ll see how each panel performs on absorption, build quality, and real-world value — so you can find the right fit for your space.
Why Fiberglass Panels Outperform Other Materials
The physics behind fiberglass absorption explains why professionals prefer it. Sound waves penetrate the fibrous structure and convert acoustic energy into heat through friction — a process that happens more efficiently in rigid fiberglass than in foam.
Fiberglass panels typically achieve NRC ratings of 0.85-1.0, meaning they absorb 85-100% of sound energy hitting them. Comparable foam panels usually rate between 0.4-0.7 NRC.
That difference becomes audible immediately in treated rooms. The best acoustic panels roundup covers the full range of materials — and three properties drive the gap between fiberglass and everything else: density, thickness, and material stability.
Density Makes the Difference
The density of fiberglass panels directly affects which frequencies they absorb best. Standard 3-pound density fiberglass handles mid and high frequencies excellently.
Higher 6-pound density extends absorption into lower frequencies where bass accumulates. Most pre-made fiberglass panels use 3-4 pound density cores — a solid balance between broadband absorption and cost-effectiveness.
Thickness Matters for Bass
Panel thickness determines the lowest frequency a panel can effectively absorb. A 2-inch fiberglass panel starts absorbing meaningfully around 250Hz.
A 4-inch panel pushes that down to approximately 125Hz. For voice recording and general room treatment, 2-inch panels handle the job well.
Music production and home theater applications benefit from thicker panels, particularly at first reflection points. Wood acoustic panels offer an aesthetic alternative that combines absorption with modern design.
The relationship between thickness and absorption follows predictable physics. Sound wavelengths at 250Hz measure approximately 4.5 feet long, and a panel needs to be roughly 1/4 wavelength thick to absorb that frequency.
That explains why 2-inch panels handle most voice frequencies but struggle with bass. Thicker panels or air-gap mounting extends absorption lower without requiring massive panel depth.
Why Professionals Choose Fiberglass
Recording studios, broadcast facilities, and professional listening rooms almost universally use fiberglass-based treatment. The predictable absorption characteristics allow acoustic designers to calculate room response accurately.
Foam’s inconsistent absorption makes precise acoustic design difficult. The material degrades over time, changing room acoustics years after installation.
Fiberglass maintains its acoustic properties indefinitely — and cost-per-unit-of-absorption favors it too. Individual panels may cost more than foam, but you need fewer fiberglass panels for equivalent acoustic control.
The total project cost often comes out similar, with better results. The best low-price acoustic panels roundup covers affordable fiberglass options that stay within tight budgets.
Quick Takeaway
Fiberglass acoustic panels absorb 2-3x more sound than foam and maintain performance indefinitely. Look for panels with 3+ pound density cores and NRC ratings above 0.85 for effective broadband treatment. Start with 2-inch panels at first reflection points — add thicker panels or air gaps for bass control.
Which Fiberglass Acoustic Panels Perform Best?
The panels below were evaluated on absorption performance, build quality, mounting options, and value. These six earned top marks across every category.
Best Overall: UMIACOUSTICS 4 Pack with Hanging Brackets
The UMIACOUSTICS 4 PCS Acoustic Panels with Hanging Bracket delivers what most buyers need: solid fiberglass absorption with mounting hardware included. The 2-inch thick fiberglass core provides broadband absorption across the vocal and music frequency ranges.
What sets these panels apart is the complete mounting system — many competitors sell panels without hardware, forcing separate purchases. The included hanging brackets work on drywall, concrete, and most wall surfaces.
The fabric wrapping looks professional without the institutional feel of raw acoustic treatment. Four color options let you match room décor while maintaining acoustic performance.
For home studios under 200 square feet, two packs (8 panels) typically provide adequate first-reflection treatment. Larger spaces or full-room coverage may require three packs.
Best Premium: UMIACOUSTICS Large Format Panels
When maximum coverage per panel matters, the UMIACOUSTICS 2 PCS Acoustic Panel 47.2” x 23.6” offers nearly 8 square feet of absorption per panel. That’s roughly double the coverage of standard-sized alternatives.
Fewer panels means fewer mounting points and cleaner visual appearance. Recording studios and home theaters often prefer this larger format for exactly that reason.
The same fiberglass core construction delivers consistent absorption across the frequency spectrum. If the premium investment is stretching your budget, you can start with two panels at primary reflection points and add more later.
Best Value: TONOR 4-Pack Fiberglass Panels
The TONOR 4 PCS Large Acoustic Panel proves you don’t need to spend premium prices for genuine fiberglass absorption. The slightly thicker 2.36-inch core actually extends absorption slightly lower than standard 2-inch panels.
First-time buyers treating home offices or small recording spaces find excellent value here. The four-pack covers approximately 8 square feet of wall surface — enough for a basic first-reflection setup in smaller rooms.
Build quality matches more expensive alternatives in side-by-side testing. The fabric covering resists dust accumulation and cleans easily with a soft brush attachment.
Best for Professional Spaces: Olanglab Fiberglass Panels
The Olanglab Fiberglass Acoustic Wall Panels 4 Pack targets professional installations where appearance matters as much as performance. The clean fabric wrap and precise construction create a polished look suitable for client-facing spaces.
Recording studios, podcast rooms, and corporate meeting spaces often choose these panels for their balance of performance and aesthetics. The fiberglass core delivers the absorption professionals expect without the visual compromise of industrial-looking treatment.
Best for DIY Installations: High-Density Self-Adhesive Panels
For renters or anyone avoiding wall damage, the 4 Pack High-Density Acoustic Panels offers self-adhesive mounting that requires no tools or wall hardware.
The high-density core construction delivers strong absorption despite the convenient mounting method. Peel the backing, position carefully, and press firmly — that’s the entire installation process.
The 4.8-star rating reflects genuine user satisfaction. Reviewers consistently praise both the sound improvement and the damage-free installation experience.
Alternative Pick: Olanglab Color Variant
The Olanglab Fiberglass Acoustic Wall Panels offers the same fiberglass construction in different color options. If your space requires specific color matching, this variant provides identical acoustic performance with expanded aesthetic choices.
How to Choose the Right Fiberglass Panels
Panel specs mean nothing until you match them to your room. The raw dimensions of your space dictate your baseline needs before you even look at products.
Room Size Determines Quantity
You have to cover roughly 20-30% of your total wall surface area to hear a meaningful reduction in echo. For critical listening spaces like mixing rooms, that target pushes closer to 40%.
To find your baseline, calculate the total square footage of all four walls. For a standard 10×12 foot room with 8-foot ceilings, you have about 350 square feet of wall, meaning a 20% coverage target requires 70 square feet of panels (roughly 18 standard 24×12 panels). The best recording studio panels guide breaks down these room-by-room quantities in deeper detail.
Ceiling Height Affects Placement
While the room’s footprint sets your baseline, the ceiling height determines exactly where those panels go. Standard 8-foot ceilings keep the acoustic math simple: you mount your primary panels at seated ear level to catch the direct bounce between the speakers and your listening chair.
When you introduce 10 or 12-foot ceilings, that single horizontal band isn’t enough. You have to stagger additional panels higher on the walls to break up the secondary reflection paths that bounce off the upper drywall.
Primary vs. Secondary Reflection Points
Regardless of ceiling height, your very first panels must go to the primary reflection points. These are the spots on the side walls where sound bounces directly from the speaker cone to your ears, creating the comb filtering that destroys stereo imaging.
Because bass energy builds up aggressively at these boundaries, thicker 4-inch panel packages deliver massive returns when placed at these first reflection points. Only after those primary spots are covered should you spend remaining budget on secondary reflections and general room coverage.
How Do You Install Fiberglass Panels for Maximum Effect?
Where you mount fiberglass panels matters just as much as what you buy. You can manipulate the physics of the panels simply by changing how they sit against the drywall.
Air Gaps Push Absorption Into Bass Frequencies
The most powerful acoustic trick is leaving a 2-to-4 inch air gap behind your panels rather than flushing them tight to the wall. This dead air space forces the sound waves to pass through the fiberglass twice, artificially extending the panel’s reach into lower bass frequencies it couldn’t normally absorb.
The best low-frequency panels use this exact physics principle, turning standard 2-inch fiberglass boards into legitimate bass traps for problem rooms.
Height Optimization for Seated Listening
That enhanced absorption only matters if it catches the right frequencies. For mixing rooms, home theaters, and podcast setups, you must center the panels exactly at seated ear height (typically 36 to 42 inches from the floor) to catch the direct monitor reflections.
Vocal booths require a completely different approach. Because the singer is standing, the acoustic center shifts up to 55-65 inches, meaning the panels must be mounted much higher to catch the mouth-to-mic reflections.
Symmetrical Placement Matters
Whatever height you choose, the left and right walls must match exactly. If you hang a panel two feet from the corner on the left wall, the right wall needs an identical panel two feet from the right corner.
Asymmetrical treatment destroys your stereo image. The untreated side will reflect high frequencies faster than the treated side, tricking your brain into hearing a lopsided mix. The acoustic panels hub covers exact measurement strategies to ensure perfect symmetry.
Corner Placement for Bass Control
If you run out of flat wall space, the corners offer a unique opportunity. Placing a rigid fiberglass panel diagonally across a 90-degree corner creates a massive, triangular air gap behind it.
That massive gap allows a standard 2-inch panel to act like a makeshift bass trap, absorbing frequencies one to two octaves lower than it would if mounted flat on a wall. It is a very cost-effective way to fight bass buildup without buying dedicated corner wedges.
Avoid Common Placement Mistakes
The single fastest way to ruin all of this careful planning is to ignore the ceiling. Treating four walls while ignoring the parallel floor-to-ceiling bounce leaves a massive flutter echo directly above your mix position.
Suspending a cloud of ceiling acoustic panels above the desk eliminates that vertical reflection, tightening the entire stereo image and completing the acoustic shell around the listener.
Why Does Fiberglass Outperform Foam?
The performance gap between fiberglass and foam dictates whether your room sounds like a professional studio or a padded closet.
Absorption Coefficient Comparison
The raw math proves the point: fiberglass panels consistently hit NRC ratings of 0.85 to 1.0, absorbing nearly 100% of the sound energy that hits them. Budget foam rarely breaks NRC 0.60, meaning it bounces 40% of the energy right back at your ears.
That missing 40% is entirely concentrated in the lower midrange.
Frequency Range Differences
Foam is physically incapable of stopping long wavelengths, meaning it only absorbs the brittle high frequencies above 1000Hz. This uneven absorption creates the dreaded “boxy” room sound — the highs are deadened, but the muddy low-mids remain untouched and overwhelming.
Because fiberglass is denser and more rigid, it pulls absorption down into the critical 250Hz–1000Hz range. This broadband control is why the best home theater acoustic panels always use fiberglass cores to keep dialogue crisp.
Longevity and Durability
That rigid core also guarantees the panel will outlive the room. Fiberglass does not compress, sag, or lose its structural integrity over decades of use.
Foam, by contrast, is highly reactive to UV light and humidity. Within five years, most budget foam begins to yellow, harden, and literally crumble off the wall in fine dust particles, requiring a complete replacement.
Environmental Considerations
The manufacturing processes present an equally stark contrast. Modern acoustic fiberglass is bound without formaldehyde and produces zero volatile organic compounds (VOCs) once wrapped in its protective fabric shell.
Acoustic foam is a petroleum-based polyurethane that frequently off-gasses chemical odors for weeks after installation, causing headaches in poorly ventilated basement studios.
Fire Safety Differences
The most critical difference for commercial spaces is what happens when exposed to heat. Fiberglass is inherently non-combustible; it will melt under extreme heat but cannot ignite or sustain a flame, meaning it passes commercial fire codes by default.
Polyurethane foam is highly flammable and requires heavy chemical retardant sprays to pass safety inspections. Even treated foam can present a severe hazard as those chemical retardants break down over the years.
What Do NRC Ratings Mean for Fiberglass Panels?
The Noise Reduction Coefficient appears on most panel specs — but the number alone can mislead. What NRC actually measures, how to spot inflated claims, and the ranges each material type produces.
What NRC Actually Measures
NRC represents the average absorption across four test frequencies: 250Hz, 500Hz, 1000Hz, and 2000Hz. A panel with NRC 0.85 absorbs 85% of sound energy at these frequencies on average.
The rating doesn’t tell the whole story. A panel might absorb 95% at 1000Hz but only 60% at 250Hz, yet still show a respectable average.
Full absorption coefficient charts reveal the complete picture — always request those before trusting a single NRC number.
Interpreting Manufacturer Claims
Some manufacturers list NRC values exceeding 1.0 — which seems impossible. The answer involves edge diffraction effects during testing that inflate the measured average.
Real-world performance rarely matches laboratory conditions. Treat NRC ratings above 1.0 skeptically, and compare products using multiple data points rather than single numbers.
NRC Ranges by Material Type
Each acoustic material falls within a predictable NRC band. Professional fiberglass panels land between 0.80-1.05, mid-grade fiberglass at 0.70-0.85, quality foam at 0.50-0.70, and budget foam at 0.30-0.50.
Any product claiming fiberglass performance at foam pricing usually delivers foam-level results. The NRC number doesn’t lie — if it’s below 0.80, the core material probably isn’t true fiberglass.
The Bottom Line
The best fiberglass acoustic panels transform problematic rooms into controlled acoustic environments. The UMIACOUSTICS 4 PCS Acoustic Panels with Hanging Bracket takes the top spot for its combination of genuine fiberglass absorption, included mounting hardware, and reasonable price point.
For budget-conscious buyers, the TONOR 4-Pack delivers fiberglass performance at foam prices. Premium installations benefit from the UMIACOUSTICS Large Format Panels that maximize coverage per panel.
Whatever you choose, fiberglass construction ensures you’re getting professional-grade absorption that foam alternatives cannot match. The investment pays dividends in recording quality, listening enjoyment, and room comfort.
The best looking acoustic panels roundup covers options that deliver the same fiberglass performance with a design-forward aesthetic.
Frequently Asked Questions
How many fiberglass panels do I need for a home studio?
A typical home studio (100-150 square feet) needs 8-12 panels for effective treatment. Start with 4 panels at first reflection points and add more based on results.
Rooms with parallel walls, hard floors, or high ceilings may require additional panels. The best acoustic panels for music rooms guide covers studio-specific quantities and placement.
Are fiberglass panels safe to use indoors?
Yes — modern fiberglass acoustic panels enclose the material in fabric wrapping that prevents fiber release. Avoid cutting or damaging the covering, since exposed raw fiberglass can release irritating particles.
Can I mount fiberglass panels on ceilings?
Most fiberglass panels support ceiling mounting with appropriate hardware — the panels reviewed here weigh 2-5 pounds each. Use toggle bolts for drywall ceilings and expansion anchors for concrete.
What’s the difference between 2-inch and 4-inch fiberglass panels?
Thickness determines low-frequency absorption — 2-inch panels absorb effectively above 250Hz, while 4-inch panels extend down to approximately 125Hz. For bass-heavy music or home theater, thicker panels perform better at first reflection points.
Do fiberglass panels block sound from leaving the room?
No — acoustic panels absorb sound within the space but don’t block sound from passing through walls. Soundproofing requires mass, decoupling, and sealing — a completely different approach from acoustic treatment.
Where to Place Acoustic Panels in Gym [2026]
Where to place acoustic panels in gym sounds like a simple “cover the walls” problem. Yes, but gyms keep echoing unless you treat the ceiling and upper wall reflection paths first.
If coaching cues get lost, music sounds muddy, or every dropped plate rings through the building, you are hearing long reverberation plus early reflections. High ceilings, hard surfaces, and large open volume make those reflections pile up faster than they do in a typical room.
With the right placement, acoustic panels make instructions clearer and workouts feel less chaotic without making the space dead. You will also get more improvement per panel, because you are intercepting the loudest reflections instead of guessing.
Start with overhead treatment above the loudest zones and panels on upper wall sections near first reflection paths. Next up: wall, ceiling, corner, and budget priorities for commercial gyms, school gyms, and home gyms.
Quick Takeaway
In a gym, prioritize ceiling baffles and clouds over the noisiest zones, then add panels high on the walls (above 7 feet) to stop wall-to-wall slap and flutter echo. Finish with corner and edge treatment for low-end buildup and use durable, easy-clean materials.
Why Are Gym Acoustics So Difficult to Treat?
Most acoustic treatment advice assumes you are working with a standard room. Gyms break all those assumptions because of three factors: ceiling height, surface hardness, and room volume.
The problems start with ceiling height. In a gym with 20-30 foot ceilings, sound travels much further before it hits any surface.
That extra distance stretches reverberation time and creates more reflection paths. The fix is strategic placement that intercepts reflections before they build up.
High Ceilings Multiply Echo Problems
Ceiling height is the biggest factor because it controls how far sound travels before bouncing back. Sound moves at about 1,130 feet per second, so in a standard room reflections return to your ears within milliseconds.
In a gym with 25-foot ceilings, that same sound takes noticeably longer to return. This delay creates the “gymnasium echo” that makes speech unintelligible and transforms every dropped weight into a thunderclap.
The solution is not simply more panels — it is strategic placement that intercepts sound before it has time to build up. That is why ceiling treatment matters more in gyms than almost any other space.
Hard Surfaces Everywhere
Concrete walls, rubber flooring, and metal equipment create a perfect storm for sound reflection. Unlike offices with carpet and cubicle dividers, gyms offer almost nothing to absorb sound naturally.
Each hard surface acts like a mirror for sound waves. When you have parallel concrete walls, sound bounces back and forth dozens of times before finally dissipating — creating that characteristic muddy, boomy quality.
The floor presents a particular challenge. Rubber gym flooring, while excellent for protecting equipment and joints, reflects sound almost as efficiently as concrete.
Large Open Volumes Need Different Strategies
A 10×12 home studio needs perhaps 8-12 panels for effective treatment. A 50×80 gymnasium might need 50+ panels to achieve similar acoustic improvement — but placement becomes exponentially more important.
In large spaces, you cannot treat every surface. The key is identifying the positions where panels will intercept the most problematic reflections.
Think of it like placing defenders in sports — you cannot cover the entire field, so you position strategically to block the most dangerous attacks.
Where Should You Place Acoustic Panels in a Gym?
Wall placement in gyms differs fundamentally from smaller rooms. Three zones matter most: upper walls above 7 feet, the walls behind loud equipment, and corners where bass collects.
If you want a baseline process for finding first reflection points, start with the guide on where to place acoustic panels. Then scale the same approach up for higher ceilings and longer reflection paths.
Upper Wall Sections (Above 7 Feet)
The most effective wall placement in gyms targets the upper wall sections, typically from 7 feet up to where the wall meets the ceiling.
This zone matters for two reasons. First, it is where many ceiling-to-floor reflections intersect the wall.
Second, panels placed here are protected from impact damage, which matters in any gym environment. You get strong acoustic impact without putting panels where equipment or athletes can hit them.
Aim to cover 20-30% of the upper wall area. This typically means placing panels along the upper perimeter, creating a continuous absorption zone that catches sound before it can bounce between the ceiling and floor multiple times.
Behind Equipment and High-Impact Areas
Sound does not just come from voices and music. Weight drops, cardio machines, and equipment collisions generate heavy noise that radiates in all directions.
Position panels on walls directly behind the loudest equipment — typically the free weight area and any Olympic lifting platforms. This intercepts the initial sound burst before it can spread throughout the space.
For home gyms, this might mean treating the wall behind your squat rack or the area adjacent to your treadmill. The principle remains the same: get absorption close to the source.
Corner Treatments for Bass Control
Gym acoustics often suffer from bass buildup in corners. The low-frequency sounds from dropped weights and heavy music systems accumulate where walls meet, creating muddy, boomy spots.
Standard acoustic panels help somewhat, but dedicated bass traps in corners provide better low-frequency control.
Position these in at least the four main corners of the space, extending from floor level up to 4-6 feet. In smaller home gyms, treat the corners closest to the loudest equipment first.
This corner treatment works alongside your wall panels to create a more balanced sound throughout the gym.
What About Ceiling Treatment?
Ceiling treatment is where gym acoustics diverge most sharply from standard rooms. Three options cover most gyms: suspended baffles, direct-mount panels, and hybrid coverage calculated by ceiling height.
Ceiling Baffles and Clouds
Suspended acoustic panels — often called baffles or clouds — hang from the ceiling structure to intercept sound in the vertical dimension.
Baffles typically hang vertically in rows, creating absorption zones that sound must pass through as it travels up and down. Clouds hang horizontally, parallel to the floor, catching sound before it reaches the high ceiling.
For most gym applications, baffles work best because they are less visually intrusive and can be positioned to create effective absorption zones throughout the space.
Direct-Mount Ceiling Panels
If your gym has a standard ceiling height (under 12 feet), direct-mount ceiling panels become viable. These attach directly to the ceiling surface, typically covering 40-60% of the total ceiling area.
Home gyms often fall into this category. A garage conversion or basement gym with 8-10 foot ceilings benefits from ceiling panels placed directly above workout areas.
Focus coverage over the loudest zones — weight lifting areas, cardio sections, and any space where you need clear communication.
Coverage Calculations for Ceilings
The ceiling presents your largest single surface in most gyms. A simple formula covers coverage needs:
For high ceilings (20+ feet), suspended baffles should cover approximately 30-40% of the ceiling area when viewed from above. Space them to create overlapping absorption zones.
For standard ceilings (8-12 feet), direct-mount panels at 40-60% coverage provides good results. Prioritize placement over workout stations rather than walkways or storage areas.
How Do You Fix Echo and Reverberation in a Gym?
Echo and reverberation are related but distinct problems. Three steps cut through both: locating reflection points, breaking up parallel surfaces, and treating corners where bass collects.
Identifying Reflection Points
Flutter echo — that rapid, metallic sound you hear when clapping in an untreated room — comes from parallel surfaces. In gyms, this typically happens between opposing walls and between floor and ceiling.
Stand in the center of your gym and clap sharply. If you hear a distinct “ringing” afterward, you have flutter echo that needs treatment.
The fix involves breaking up at least one of the parallel surfaces. Panels on upper wall sections address wall-to-wall flutter, while ceiling treatment handles floor-to-ceiling flutter.
If you can only treat one surface in a big space, treat the ceiling first. Then add upper-wall panels to stop the wall-to-wall slap that keeps speech muddy.
Parallel Wall Solutions
When opposing walls create flutter echo, you do not need to treat both surfaces completely. Breaking up 30-40% of one wall often eliminates the problem.
Strategic placement matters here. Position panels at ear height on one wall and at different heights on the opposing wall.
This staggered approach prevents sound from bouncing cleanly between surfaces. It is a practical way to reduce flutter echo without covering both walls completely.
For home gyms, this might mean panels at 4-6 feet on one wall and 6-8 feet on the opposite wall.
Corner and Edge Treatments
Sound collects and amplifies in corners and along the edges where surfaces meet. These areas benefit from thicker treatment — either dedicated bass traps or doubled-up standard panels.
The four vertical corners and the upper perimeter where walls meet ceiling deserve special attention. Treatment in these zones provides disproportionate improvement relative to the coverage area.
What Materials Work Best for Gym Environments?
Gym environments punish flimsy materials. Three factors separate panels that last from panels that fall apart: impact resistance, moisture tolerance, and ease of cleaning.
Impact-Resistant Options
Standard acoustic panels use fabric wrapping that can tear or puncture on impact. For gyms, look for panels with either reinforced fabric or protective facings.
Some manufacturers offer “gymnasium grade” panels with Kevlar-reinforced fabric or perforated metal facings over the absorptive core. These withstand ball impacts and accidental contact without damage.
The UMIACOUSTICS 2 PCS Acoustic Panel offers a fiberglass core with durable fabric covering that handles typical gym wear without deteriorating.
Moisture and Humidity Considerations
Gyms generate heavy humidity from perspiration and climate control challenges. Standard mineral wool panels can absorb moisture and lose effectiveness over time.
Fiberglass cores handle humidity better than mineral wool. Polyester (PET) panels offer excellent moisture resistance for high-humidity environments like pool areas or hot yoga studios.
The fabric covering matters too. Some fabrics promote mold growth in humid conditions.
Others resist moisture and wipe down more easily, which is better for a gym. Ask manufacturers specifically about humid-environment suitability before you buy.
Easy Maintenance Requirements
Gym panels accumulate dust, sweat vapor, and airborne particles faster than panels in cleaner environments. Choose materials that can be vacuumed or wiped down without damage.
Avoid panels with loose fabric wrapping that can snag or collect debris. Tight-wrapped or faced panels clean more easily and maintain appearance longer.
How Should You Install Acoustic Panels in a Gym?
Gym installation differs from residential work in three ways: whether you need a pro or can DIY, how high and secure the mounts must be, and which fire ratings local codes require.
Professional vs. DIY Installation
Ceiling installations in high-ceiling gyms require scaffolding, lifts, or other equipment that most DIY installers do not have access to. For any ceiling work above 12 feet, professional installation makes sense.
Wall panels in the “safe zone” (below 7 feet) in home gyms are simple DIY projects. Standard mounting hardware works fine for most applications.
Panels must be mounted securely to prevent falling during vibration or impact. This matters especially in gyms where dropped weights create strong vibration.
Use appropriate mounting hardware for your wall material. Drywall anchors work for lighter panels, but concrete anchors become necessary for masonry walls common in commercial gyms.
For ceiling-mounted panels and baffles, use aircraft cable or heavy-duty chains rated well above the actual panel weight. Building codes often require 4x safety factors for suspended objects in public spaces.
Fire Rating Requirements
Commercial gyms may require fire-rated acoustic materials depending on local building codes. Class A fire rating is the highest standard and typically required for schools and public facilities.
Most quality fiberglass panels meet Class A requirements. Verify certifications before purchasing for any commercial application.
How Can You Maximize Acoustic Impact on a Budget?
Full acoustic treatment of a large gym can run into the thousands. Three strategies keep costs reasonable: phasing the install, targeting priority zones first, and choosing cost-effective products.
Phase Your Installation
You do not need to treat everything at once. Start with the highest-impact zones and add treatment over time as budget allows.
Phase 1 should target the ceiling — either baffles in high-ceiling spaces or direct-mount panels in standard-height rooms. This single step often provides the most noticeable improvement.
Phase 2 addresses upper wall sections and corners. This builds on your ceiling treatment to create full sound control.
Phase 3 covers secondary areas and fine-tuning. Once the main treatment is in place, you can identify remaining problem spots and address them specifically.
Priority Zones vs. Complete Coverage
In a typical gym layout, 30-40% of the space generates 70-80% of the noise. Identify these zones and prioritize treatment there.
Weight areas, cardio sections, and group fitness spaces typically need the most attention. Stretching zones, walkways, and storage areas can often go untreated without noticeable acoustic penalty.
For home gyms, this might mean treating only the workout area while leaving storage or entry zones untreated.
Cost-Effective Product Selection
If you are treating a home gym, start with durable panels that mount securely and cover real surface area. Smaller decorative tiles often underperform in large, reflective spaces.
For commercial environments requiring durability, mid-range options like the Olanglab Fiberglass Acoustic Wall Panels balance performance and longevity without premium pricing.
Premium panels become worthwhile when you need specific performance characteristics — high NRC ratings, fire certification, or impact resistance that cheaper options cannot provide.
What Results Can You Expect?
Acoustic panels transform gyms from echoey chaos into spaces where you can coach, train, and communicate. The biggest change is that speech becomes clearer and the room stops “ringing” after each impact.
If you start with ceiling treatment over the loudest zones, you will usually hear the improvement immediately. Upper-wall panels and corner/edge treatment then smooth out the remaining slap and low-end buildup.
A quick way to gauge progress is the clap test: stand in the center, clap once, and listen for the tail. In an untreated gym the ring can last two to three seconds.
After ceiling and upper-wall treatment, that tail typically drops below one second — enough for coaching cues and music to stay distinct instead of blurring together.
Where to place acoustic panels in gym starts with the ceiling and upper walls, then moves to the reflection paths that keep speech muddy. Start with overhead treatment above the loudest zones, then add high wall panels and corner/edge treatment to balance the room.
Treat in phases so you can hear what each step fixes, and choose durable, easy-clean materials that survive impacts and humidity. For more installation and placement help, browse the acoustic panels resource hub.
Frequently Asked Questions
How many acoustic panels does a gym need?
The answer depends on ceiling height and room volume, but a general starting point is 20-30% coverage of wall surfaces above 7 feet plus 30-40% ceiling coverage.
For a 2,000 square foot gym with 20-foot ceilings, this might translate to 40-60 wall panels and comparable ceiling treatment.
Soundproofing requires mass, decoupling, and sealing. Panels improve clarity inside the gym without blocking noise transmission to neighbors.
What is the difference between gym panels and studio panels?
Gym panels prioritize durability and impact resistance over maximum absorption. Studio panels often use softer materials that achieve higher NRC ratings but would not survive in gym environments — the tradeoff is roughly 5% less absorption for far greater longevity under impacts, humidity, and daily wear.
Do I need ceiling treatment in a home gym?
For home gyms with standard 8-10 foot ceilings, ceiling treatment provides noticeable improvement. Even modest coverage reduces the floor-to-ceiling flutter echo that makes basements and garages sound terrible.
Start with 4-6 panels directly above your primary workout area. Then add wall panels behind you and at side reflection points if the room still feels harsh.
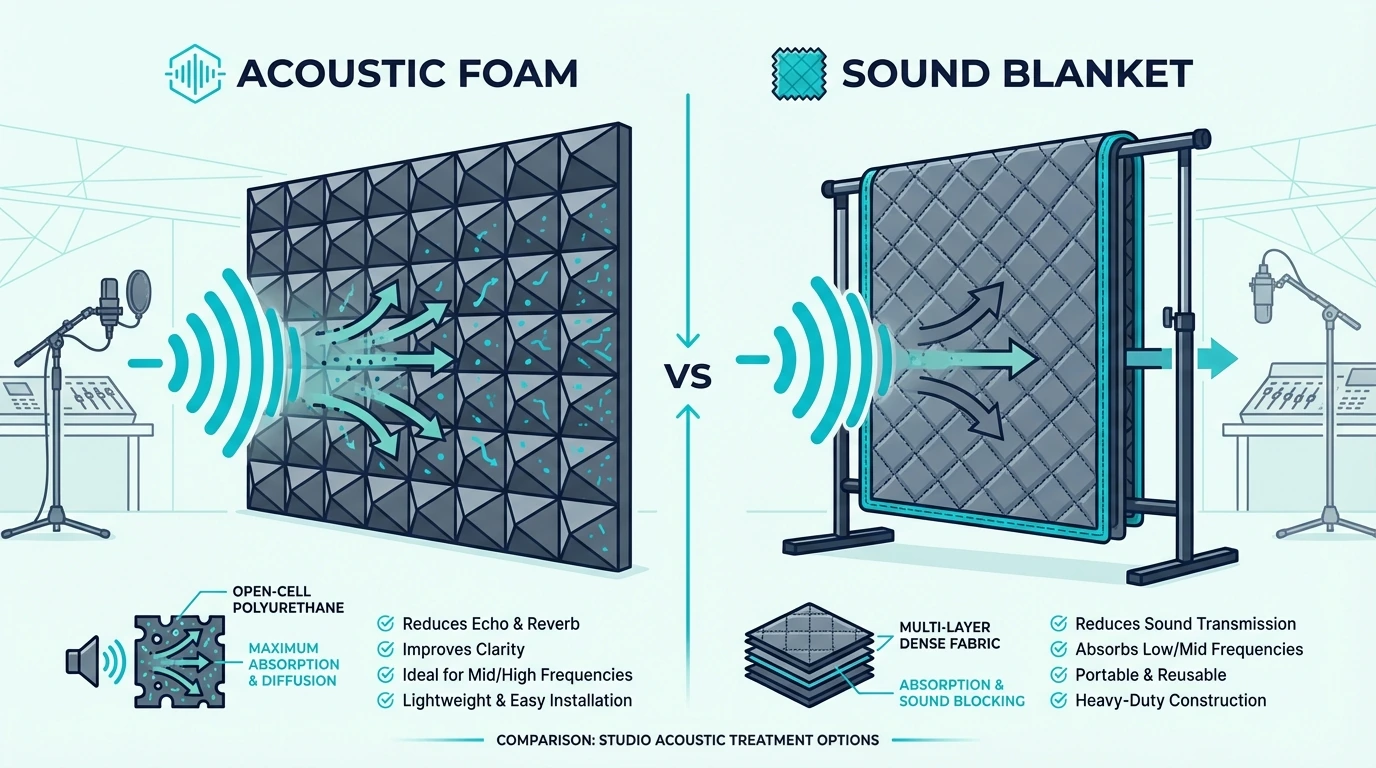
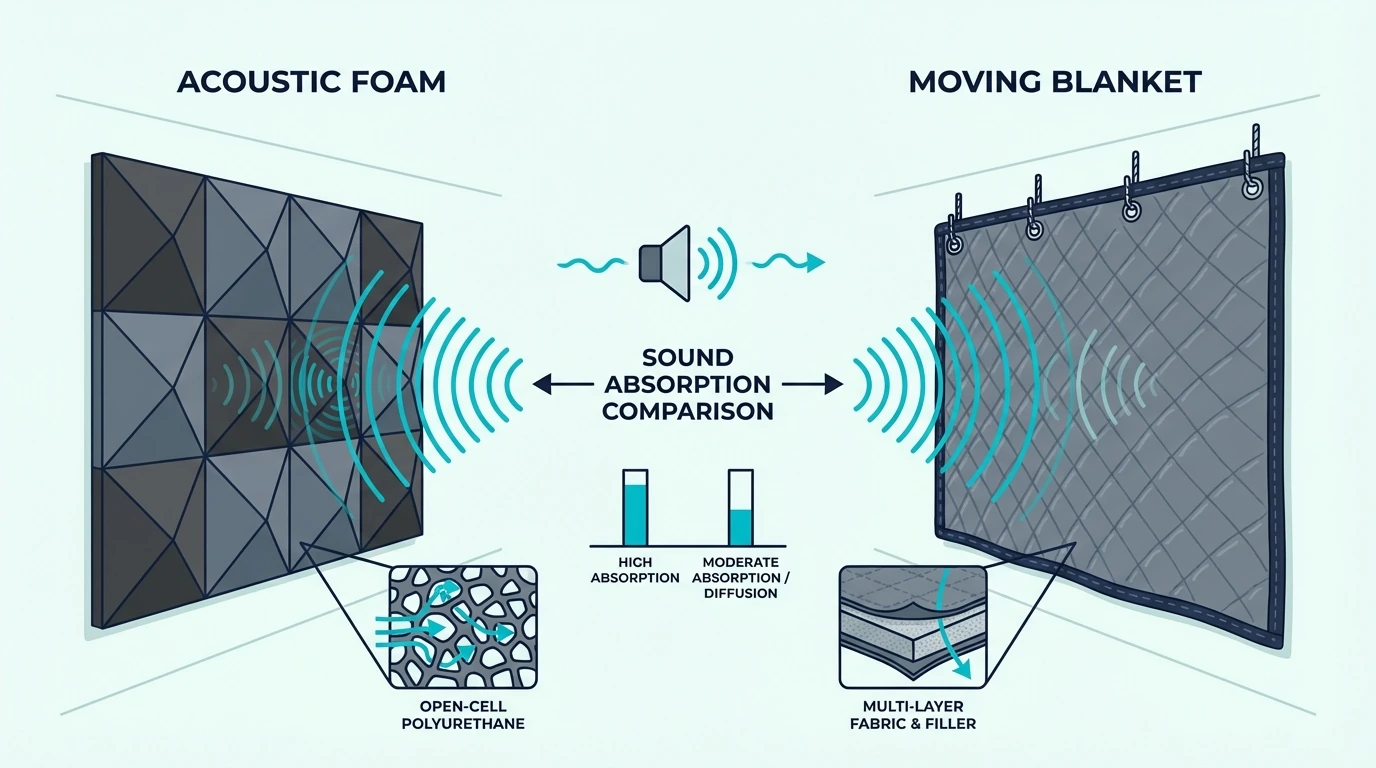
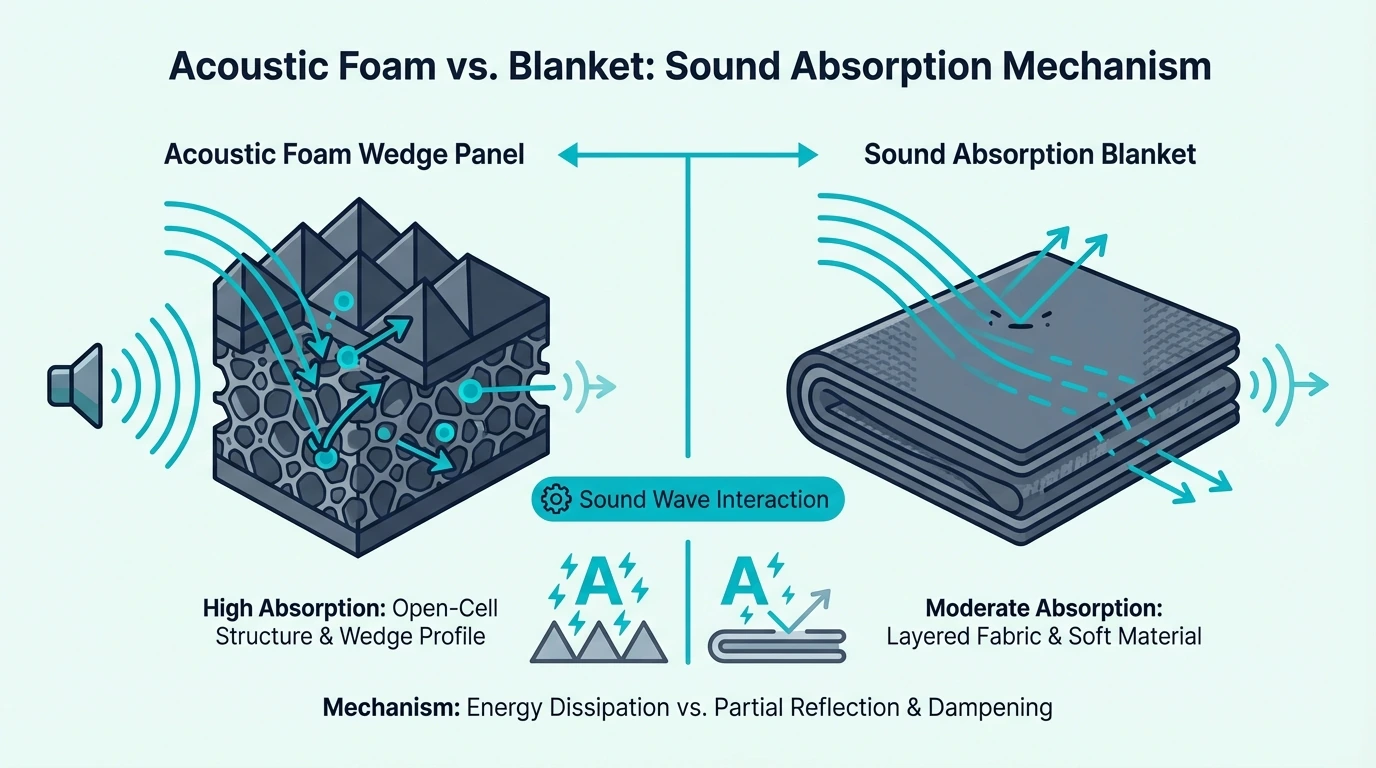


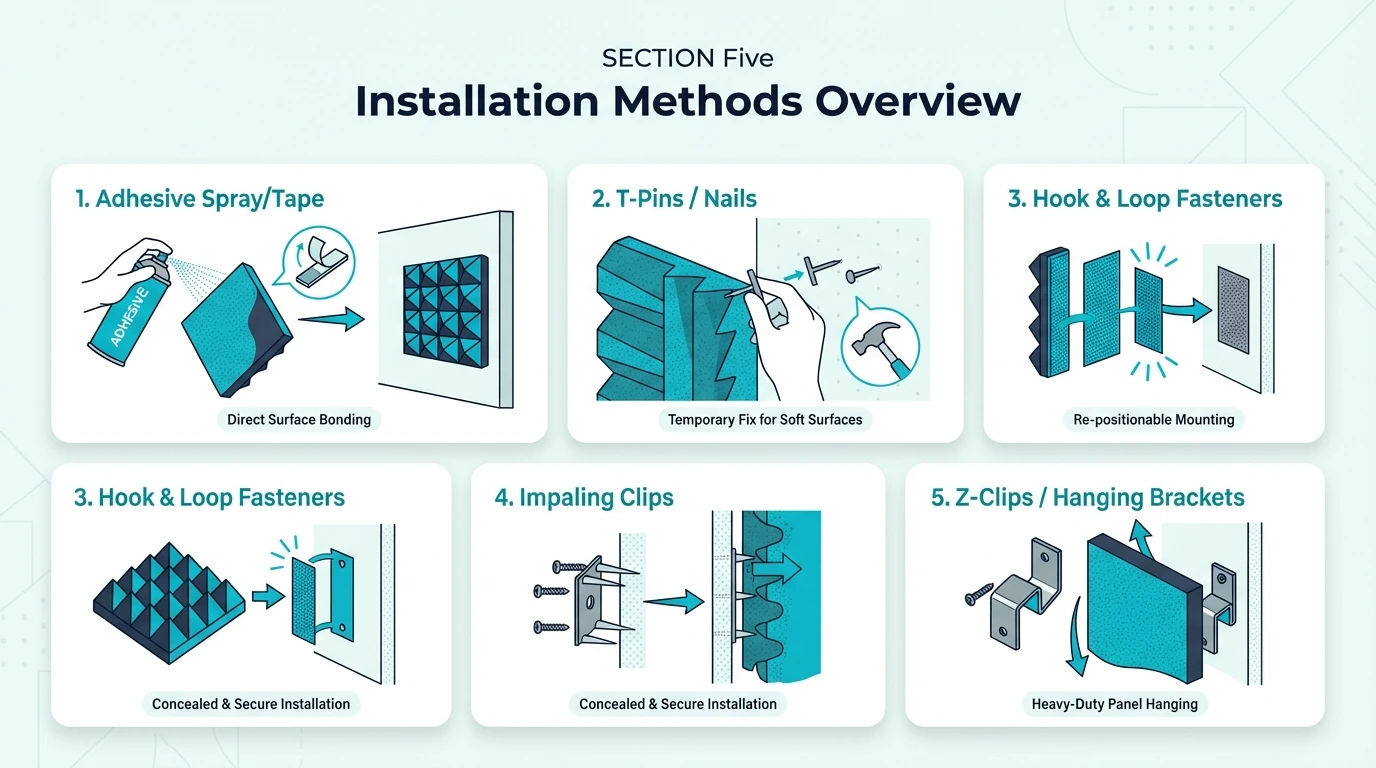
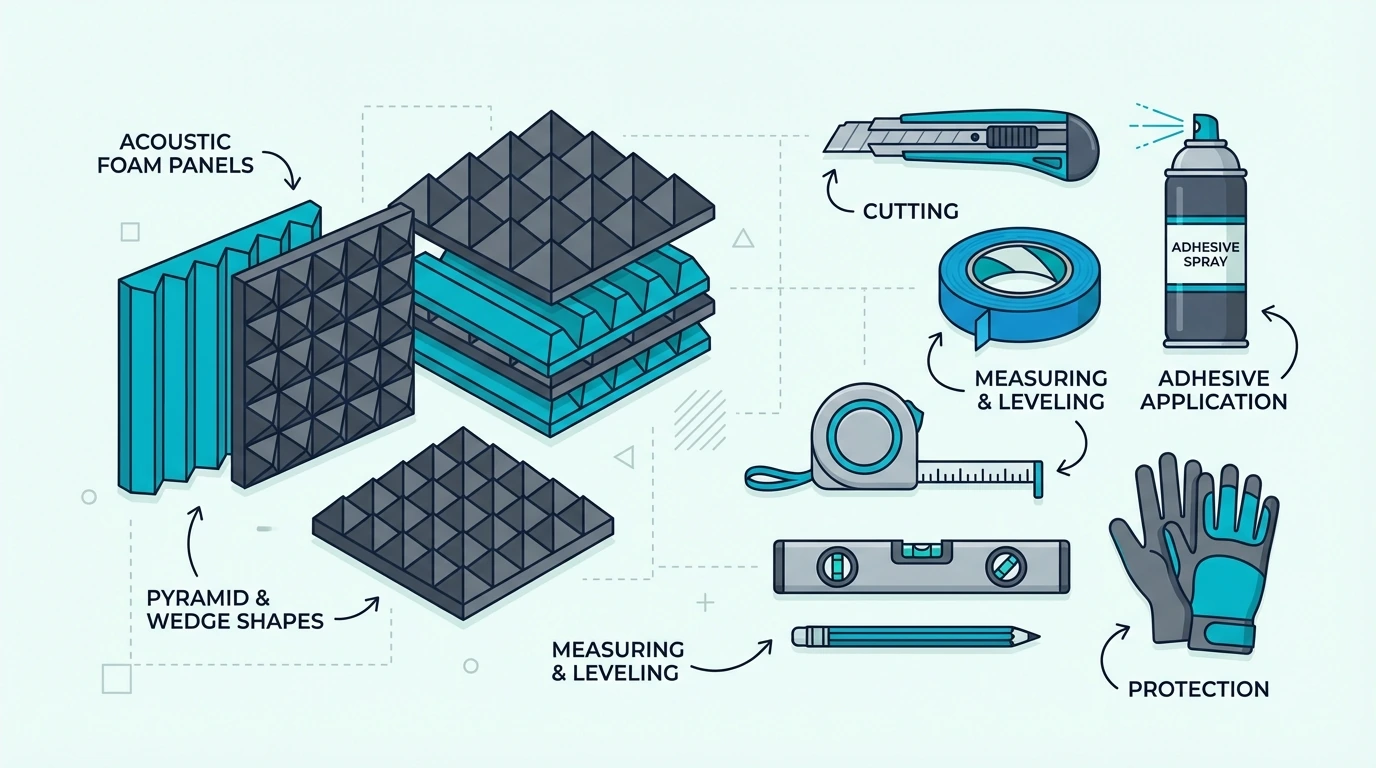
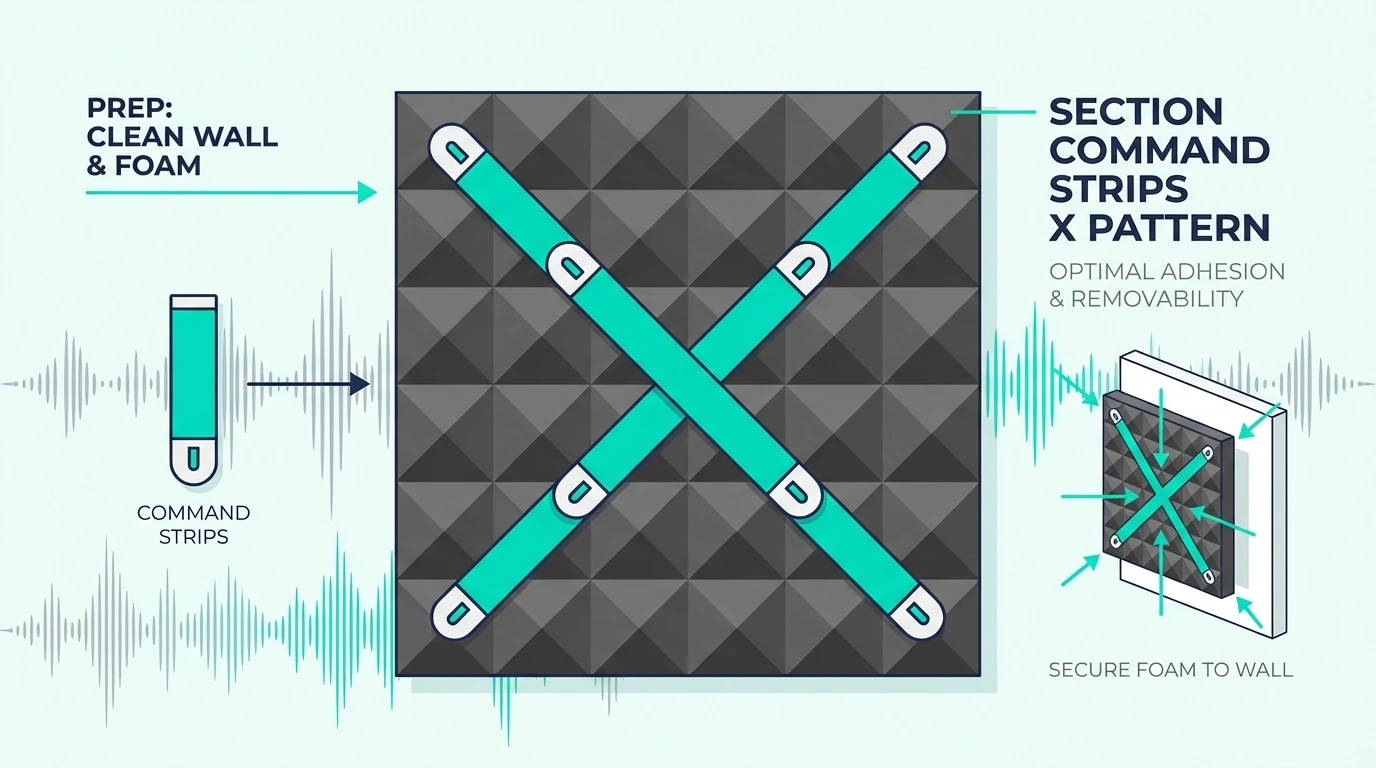

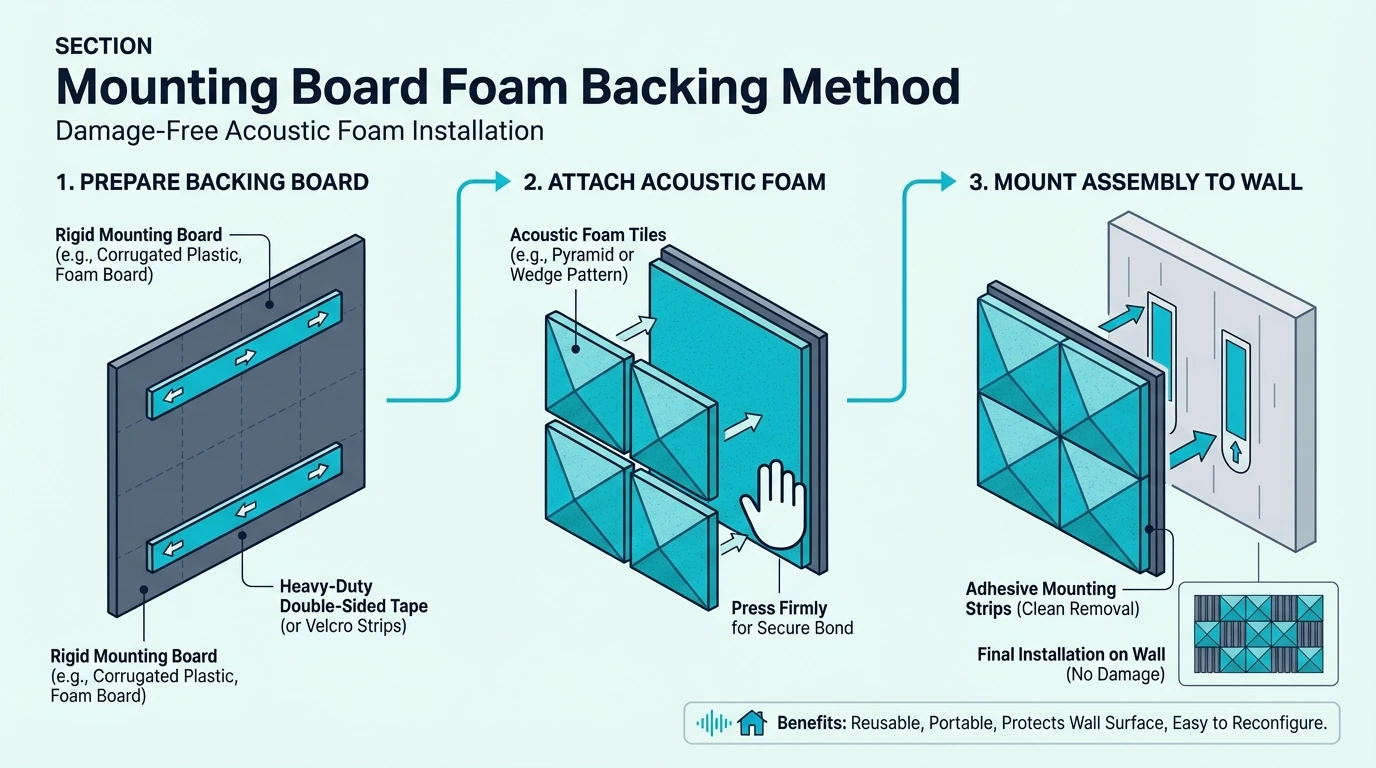
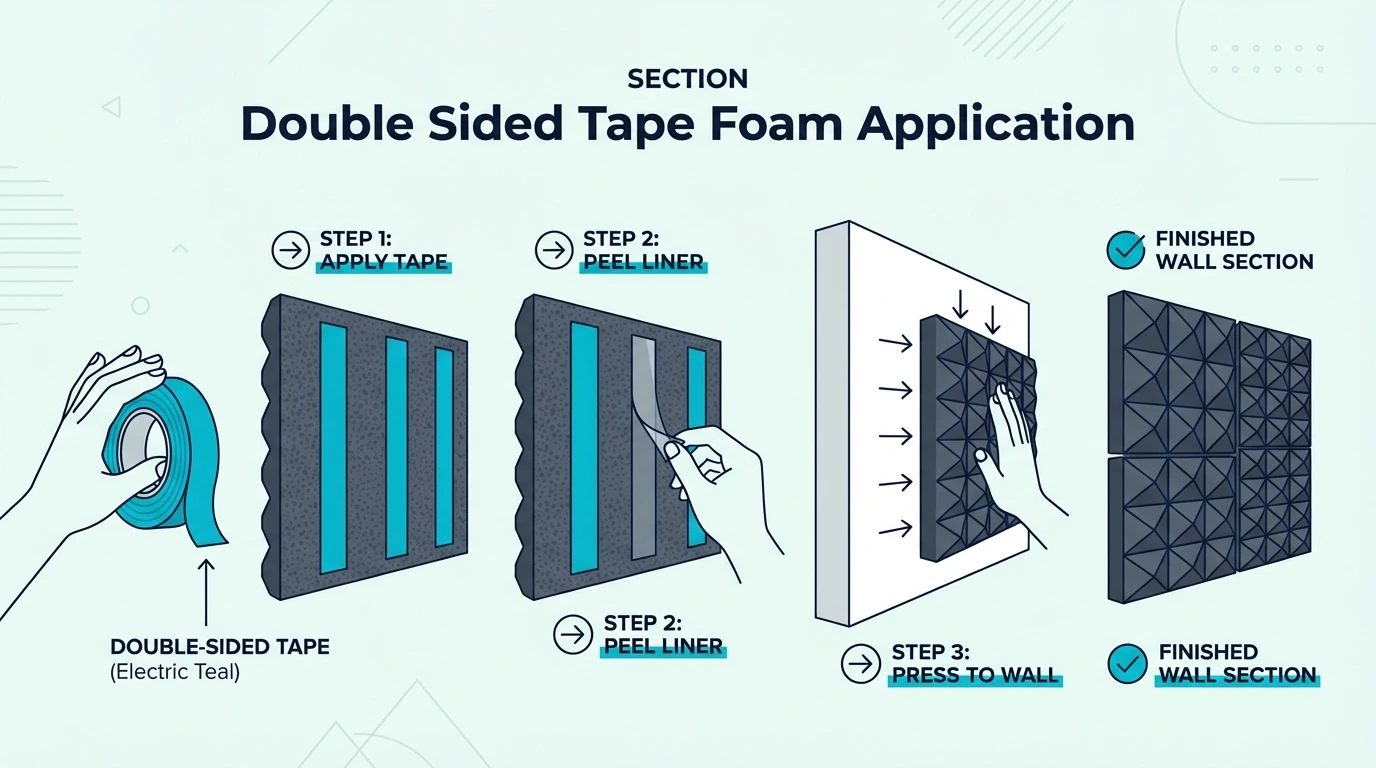
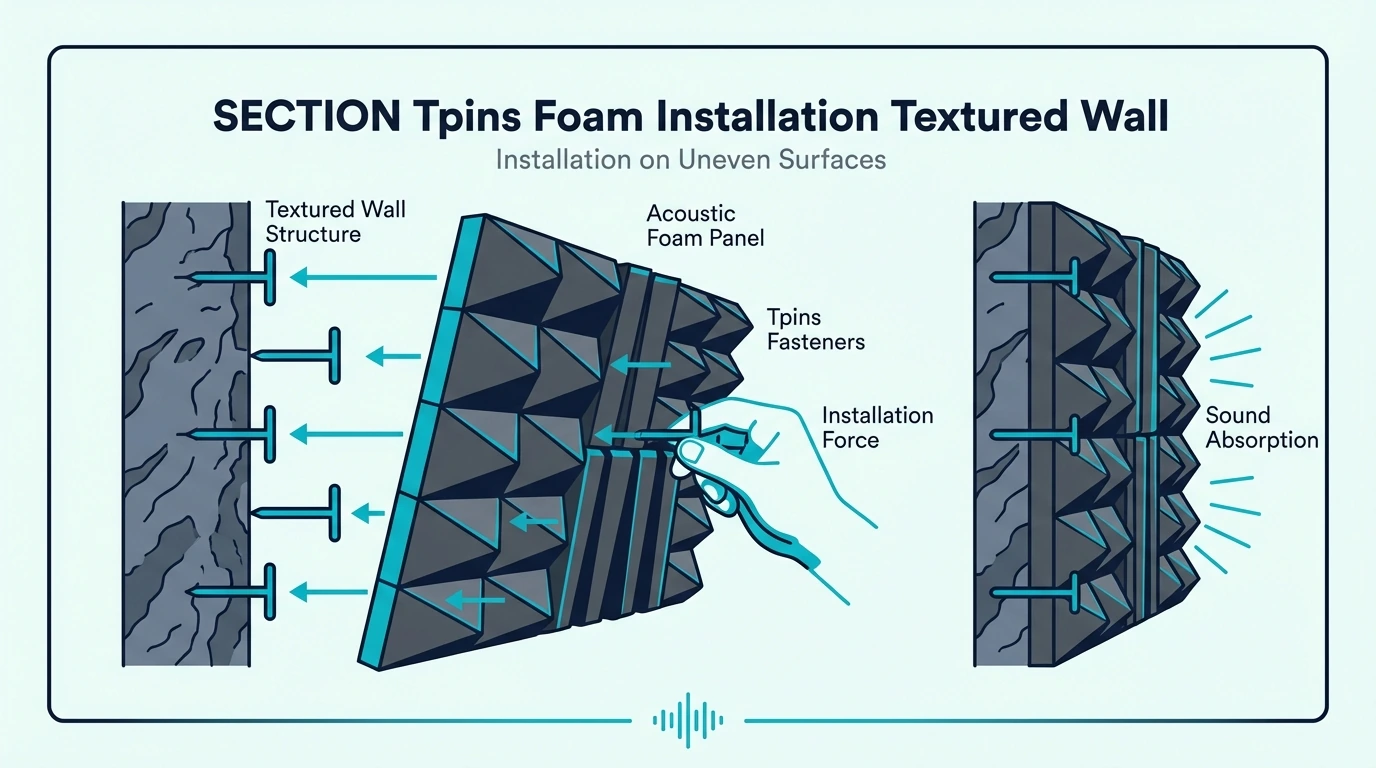
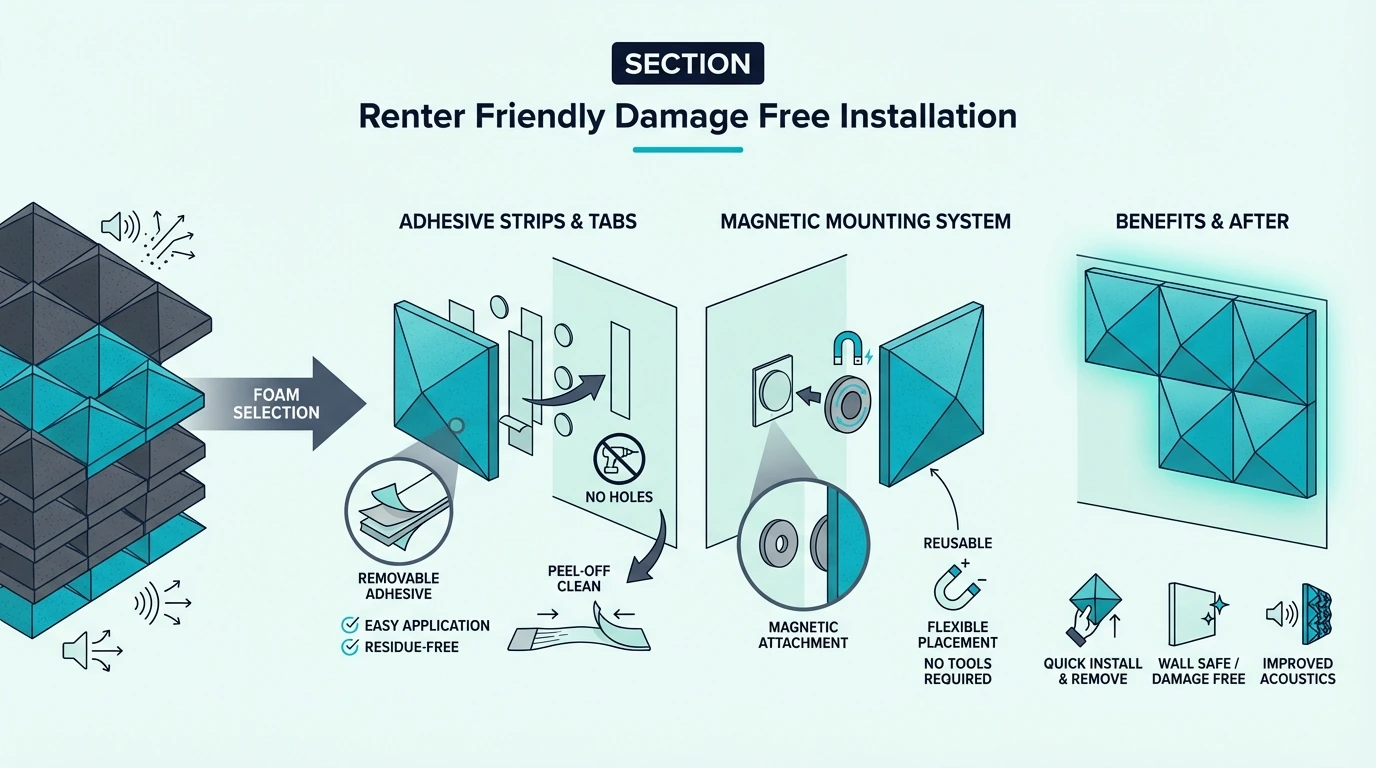
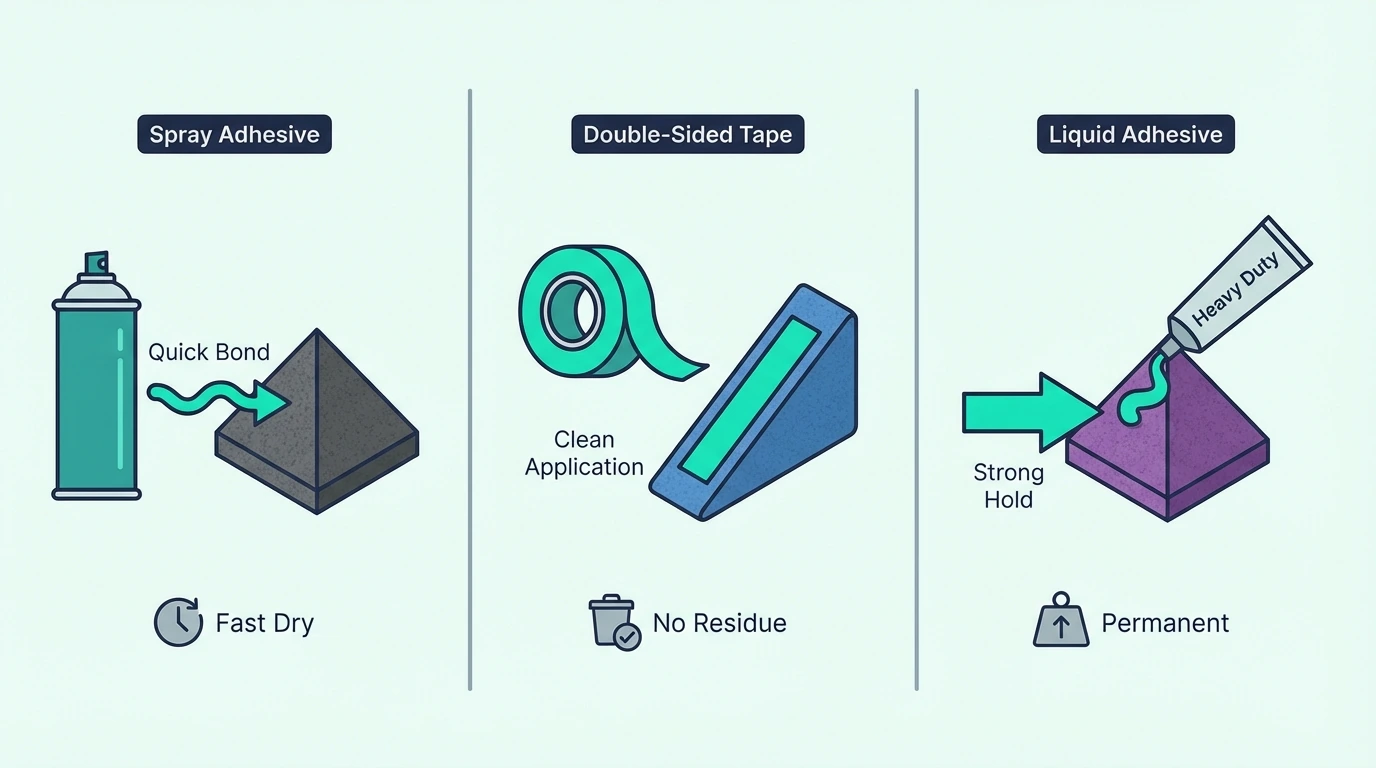
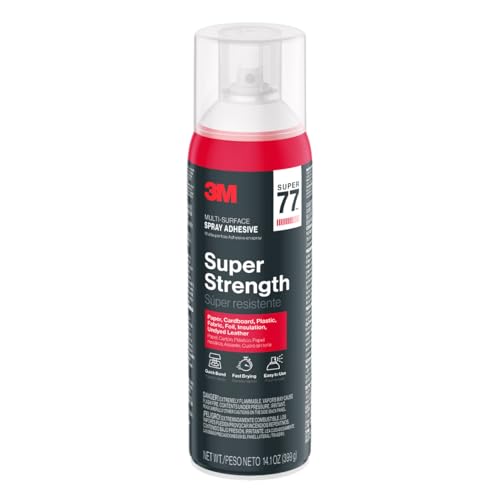
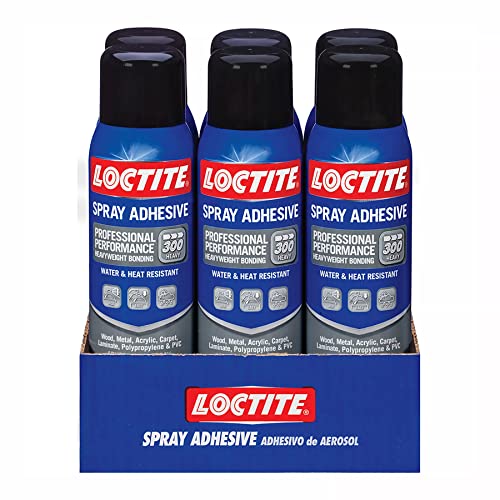
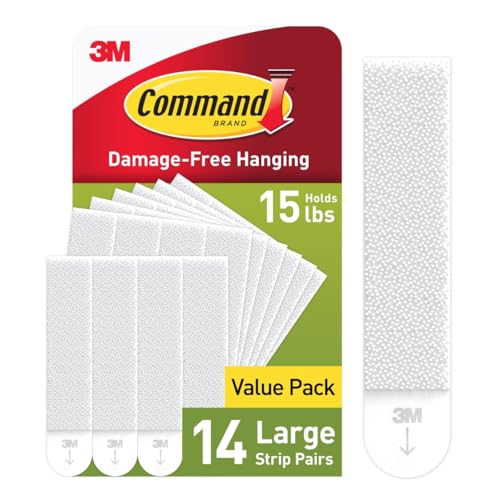
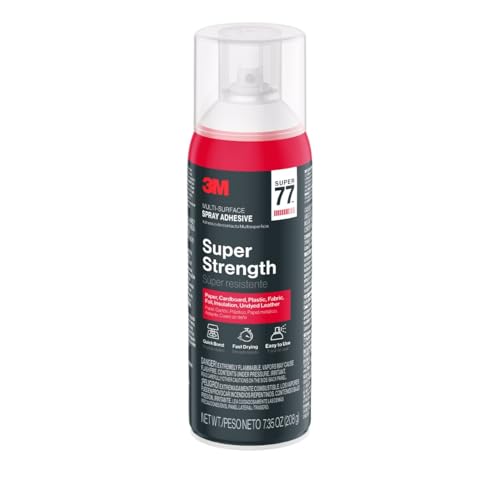
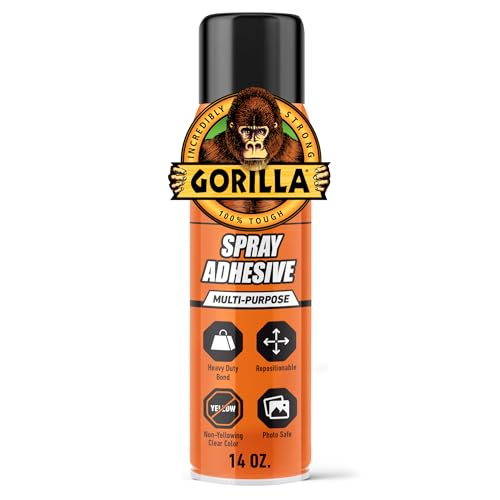

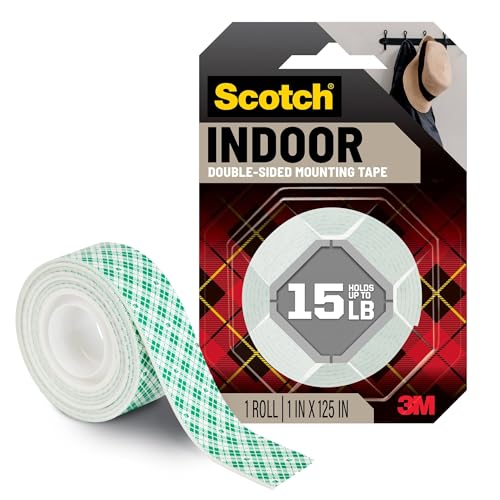
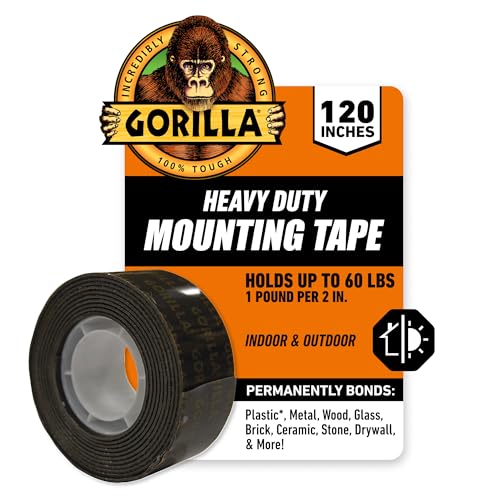
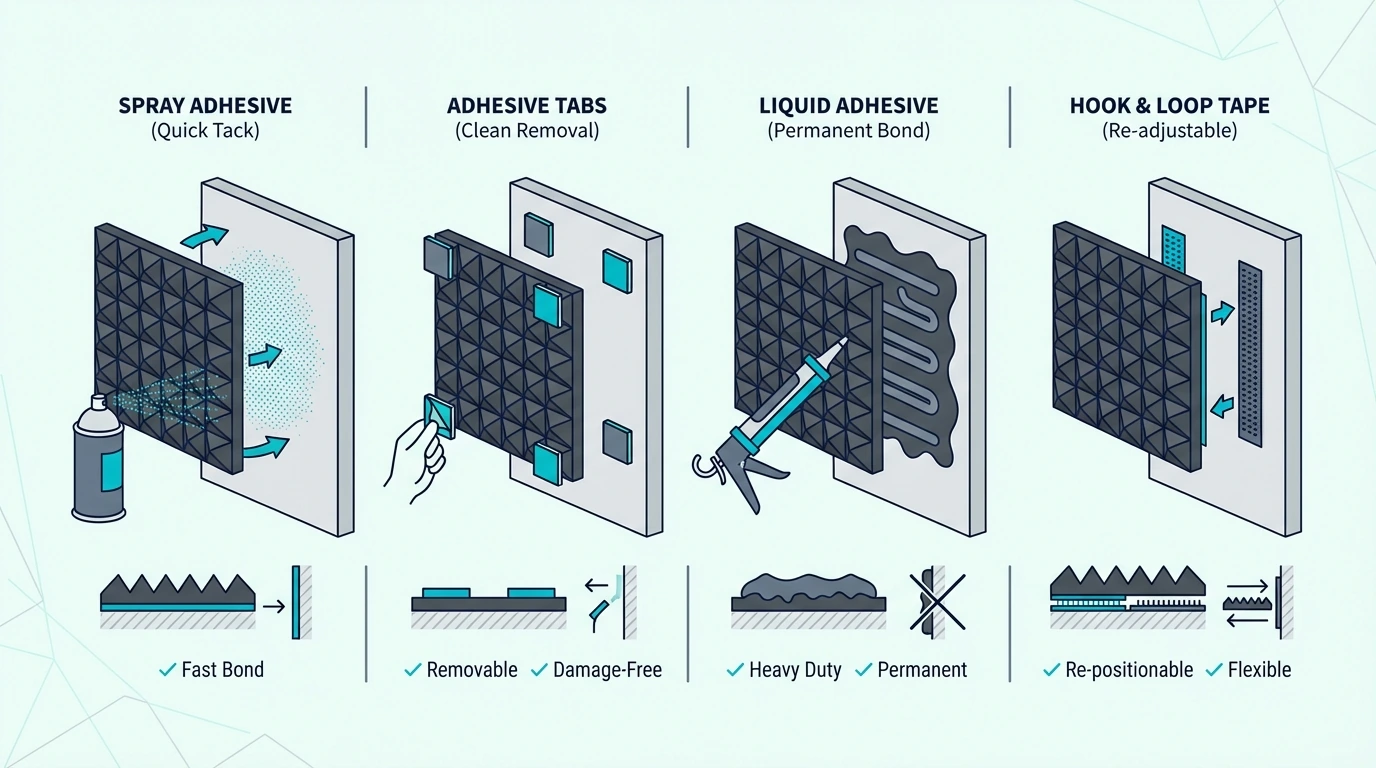
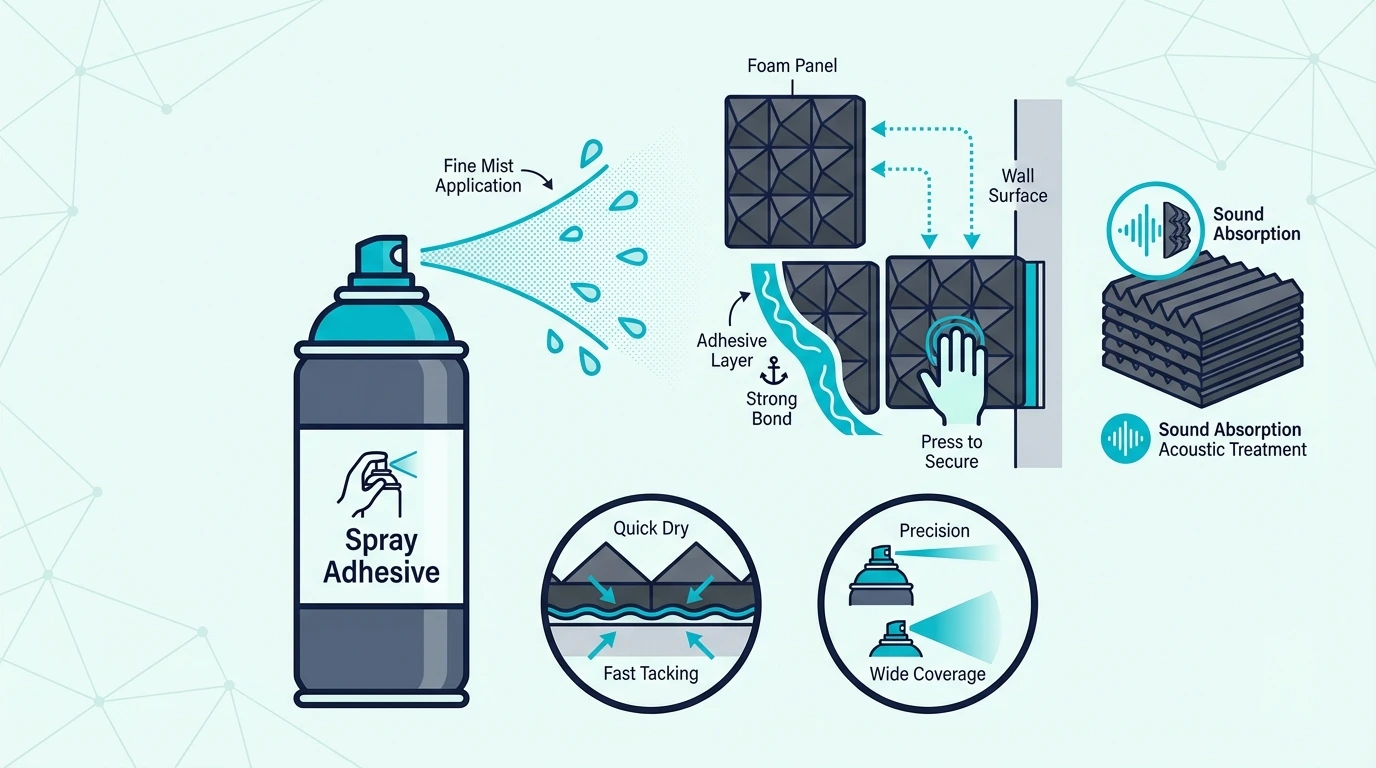
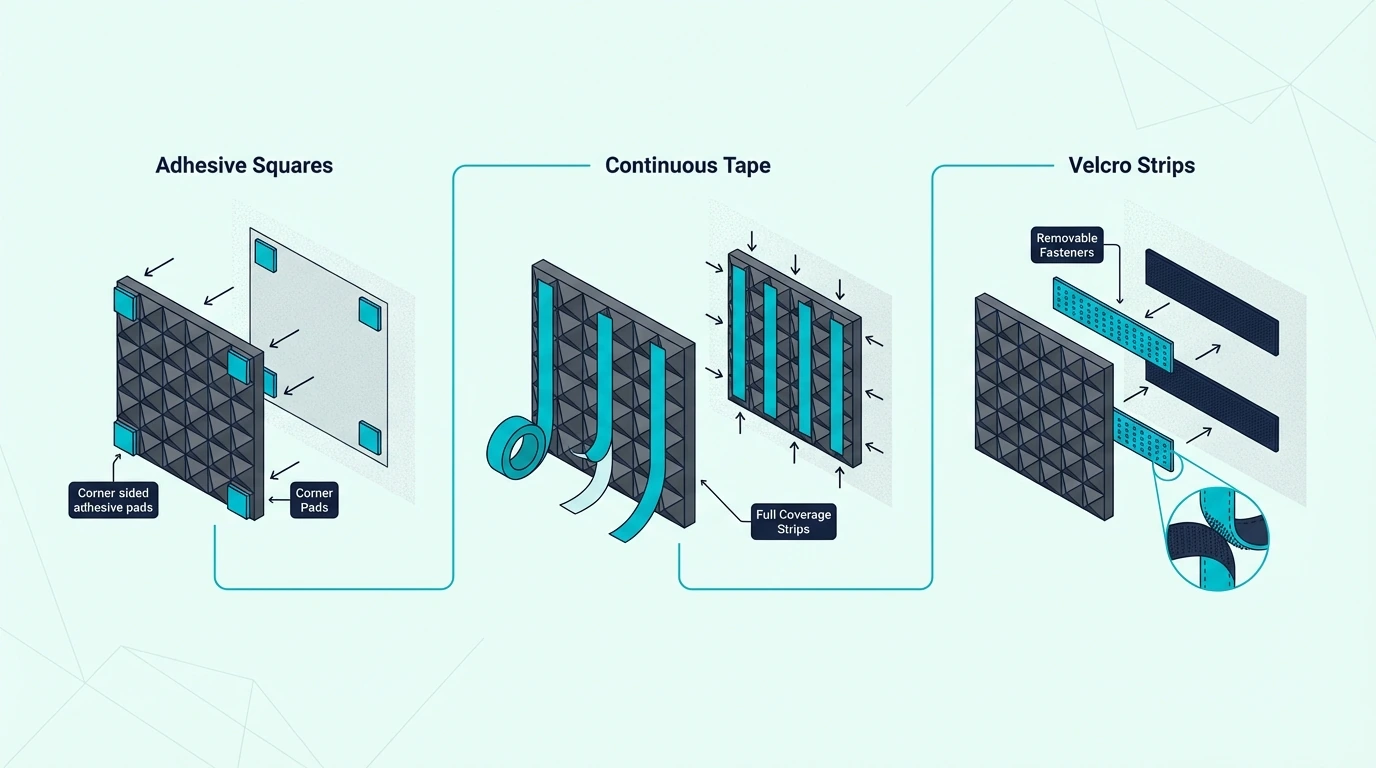
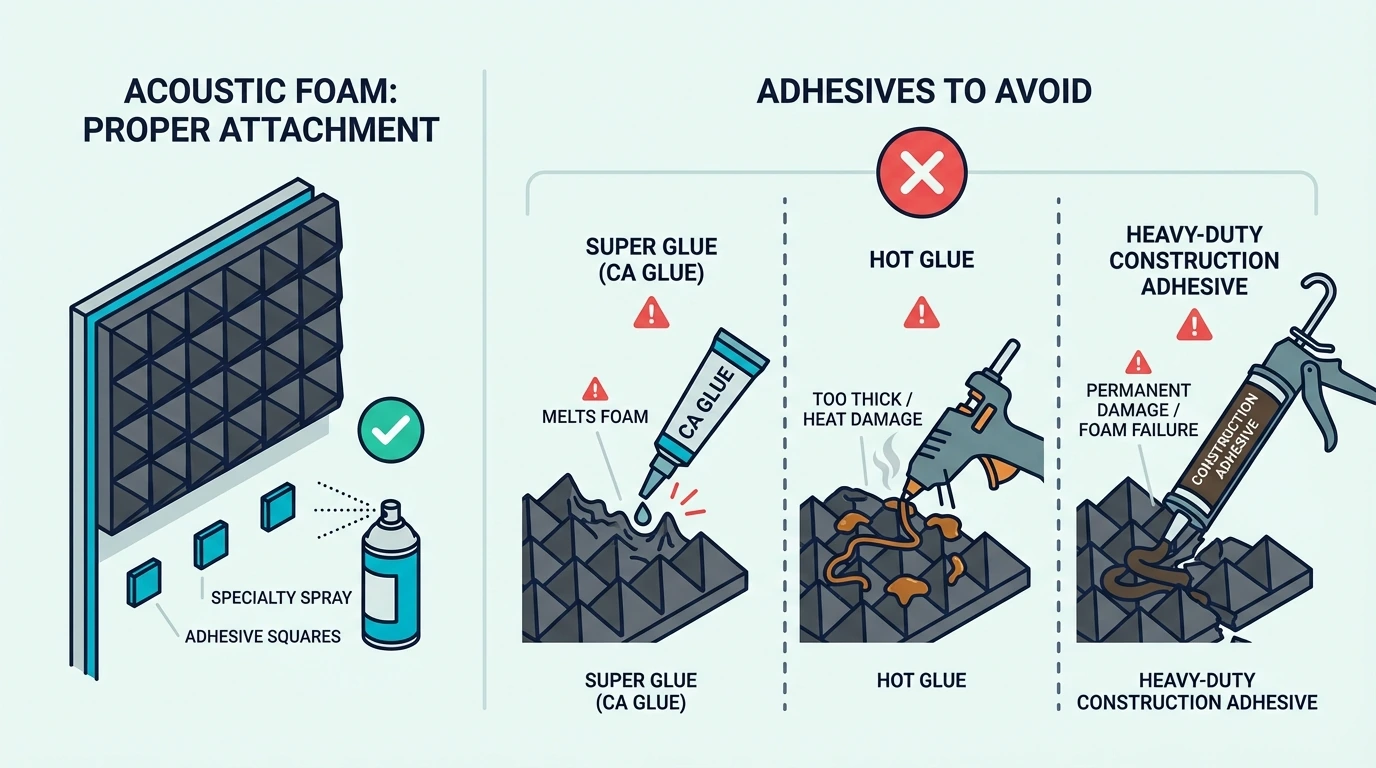
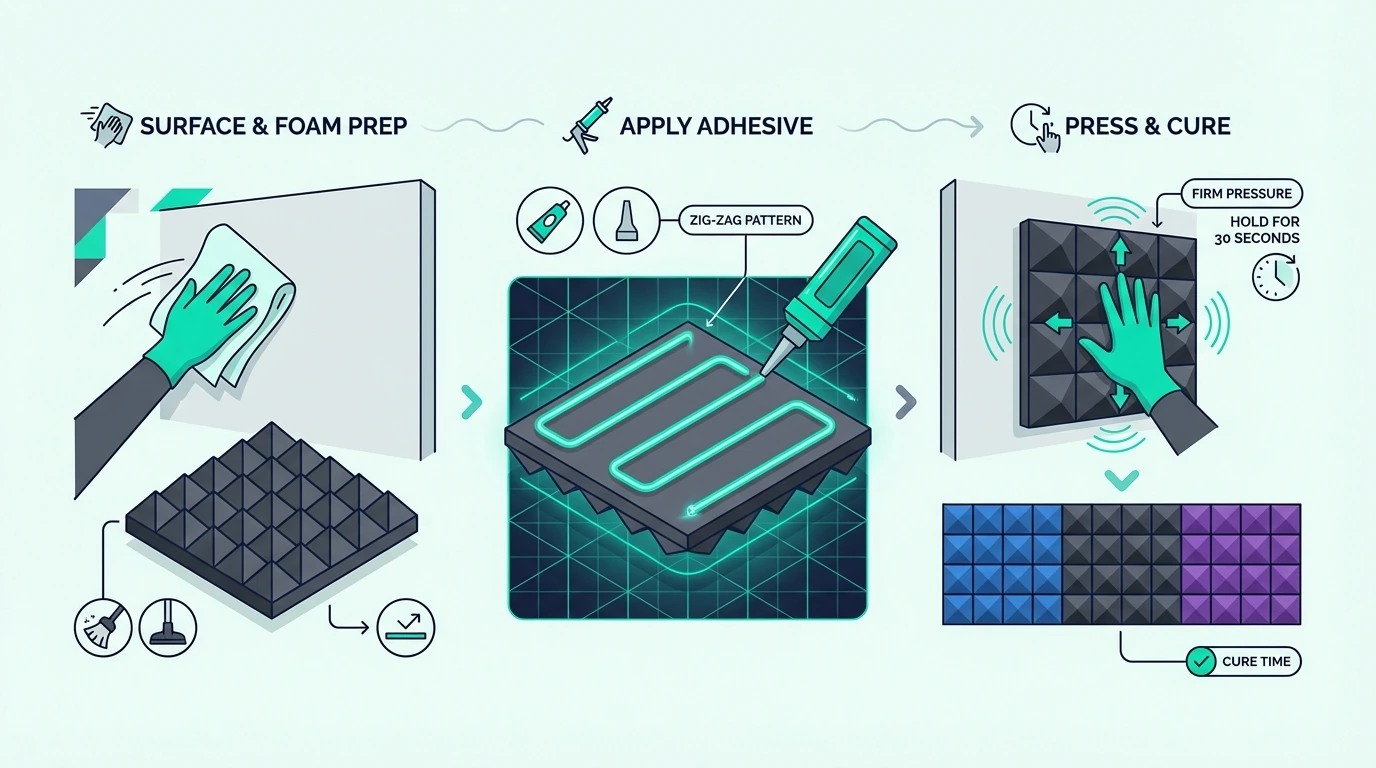
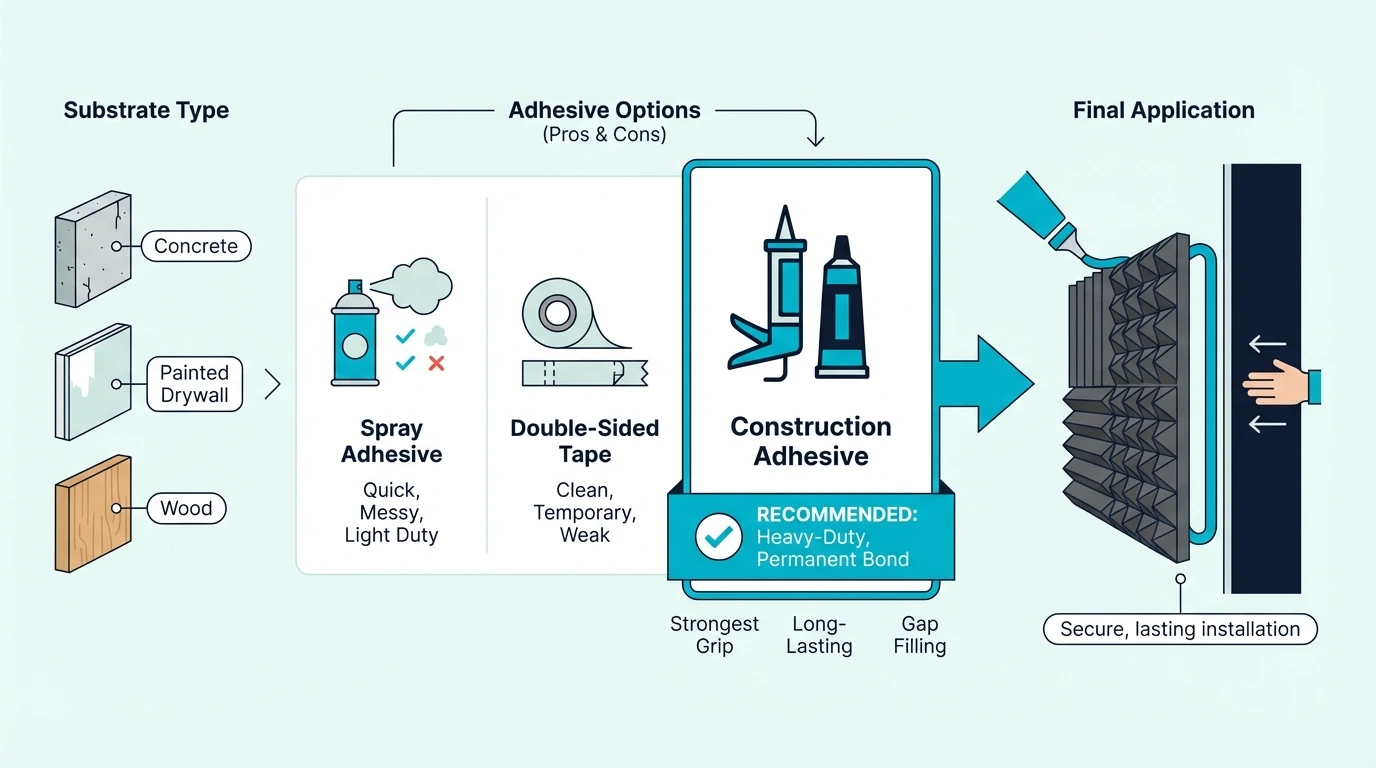
 Here are the top three recommendations based on absorption specs, build quality, and real-world performance:
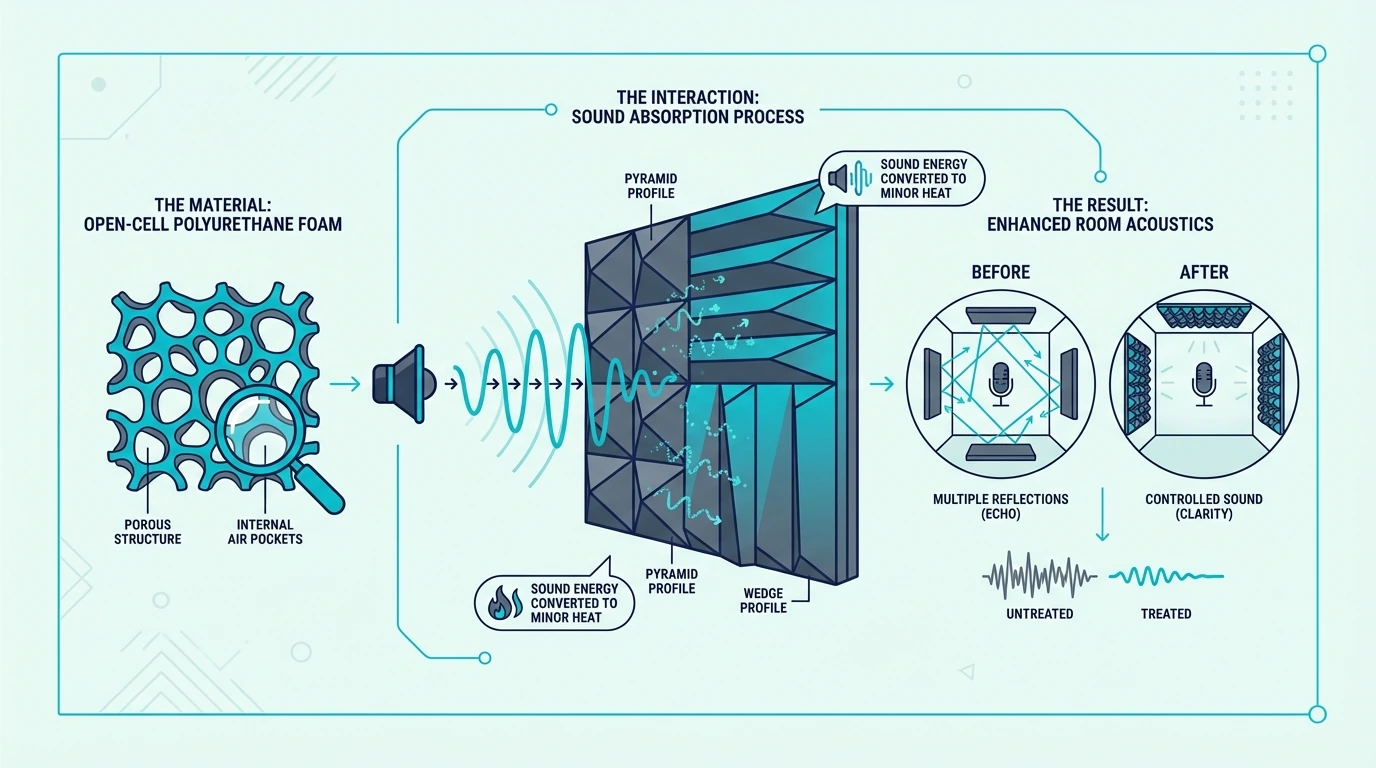 Acoustic foam panels absorb sound waves inside a room, reducing echo and reverberation that make recordings sound hollow or muddy. The open-cell polyurethane structure traps sound energy and converts it to tiny amounts of heat through friction.
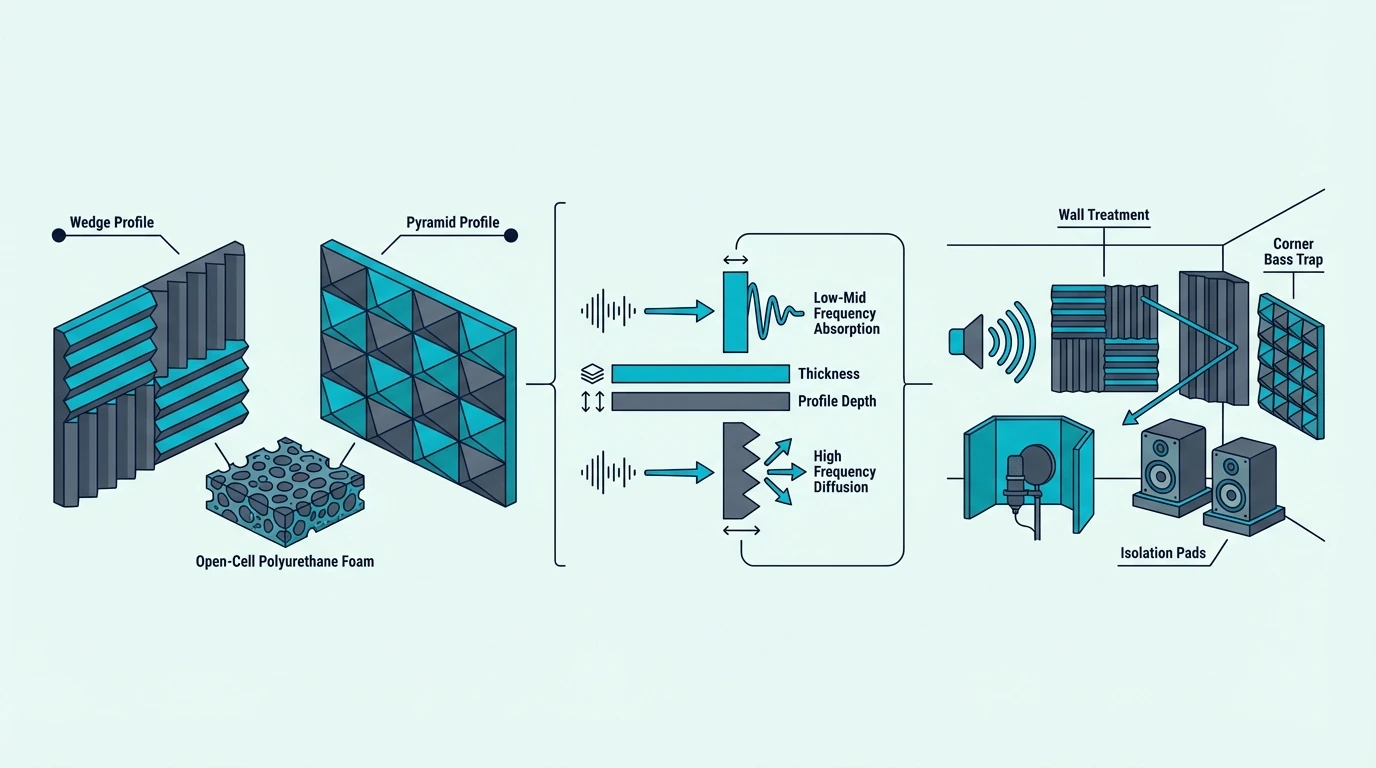 Home studios present unique challenges: limited budgets, rental restrictions, and rooms that weren’t designed for recording. The right foam panels address these constraints while improving recording quality.
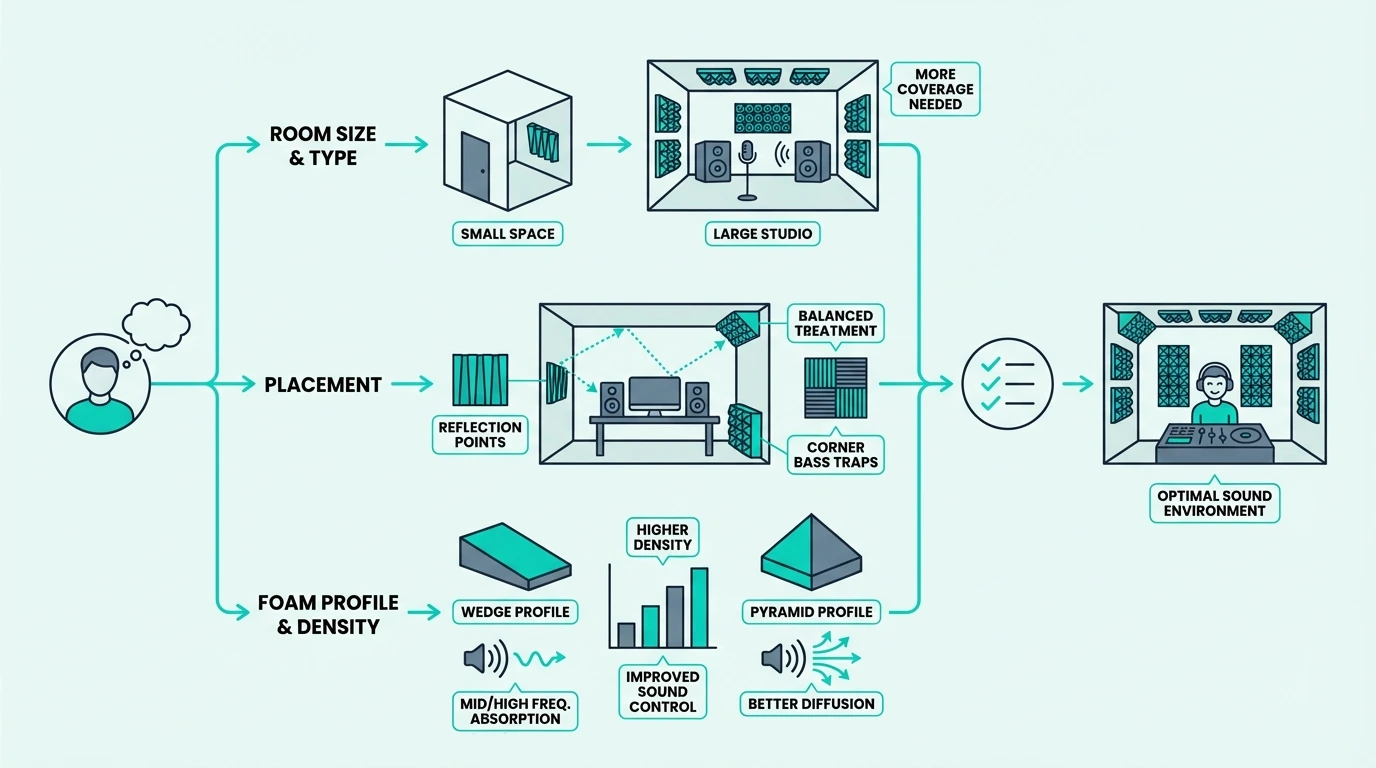 Thickness determines which frequencies your foam panels can absorb effectively. This isn’t marketing—it’s physics based on wavelength and penetration depth.
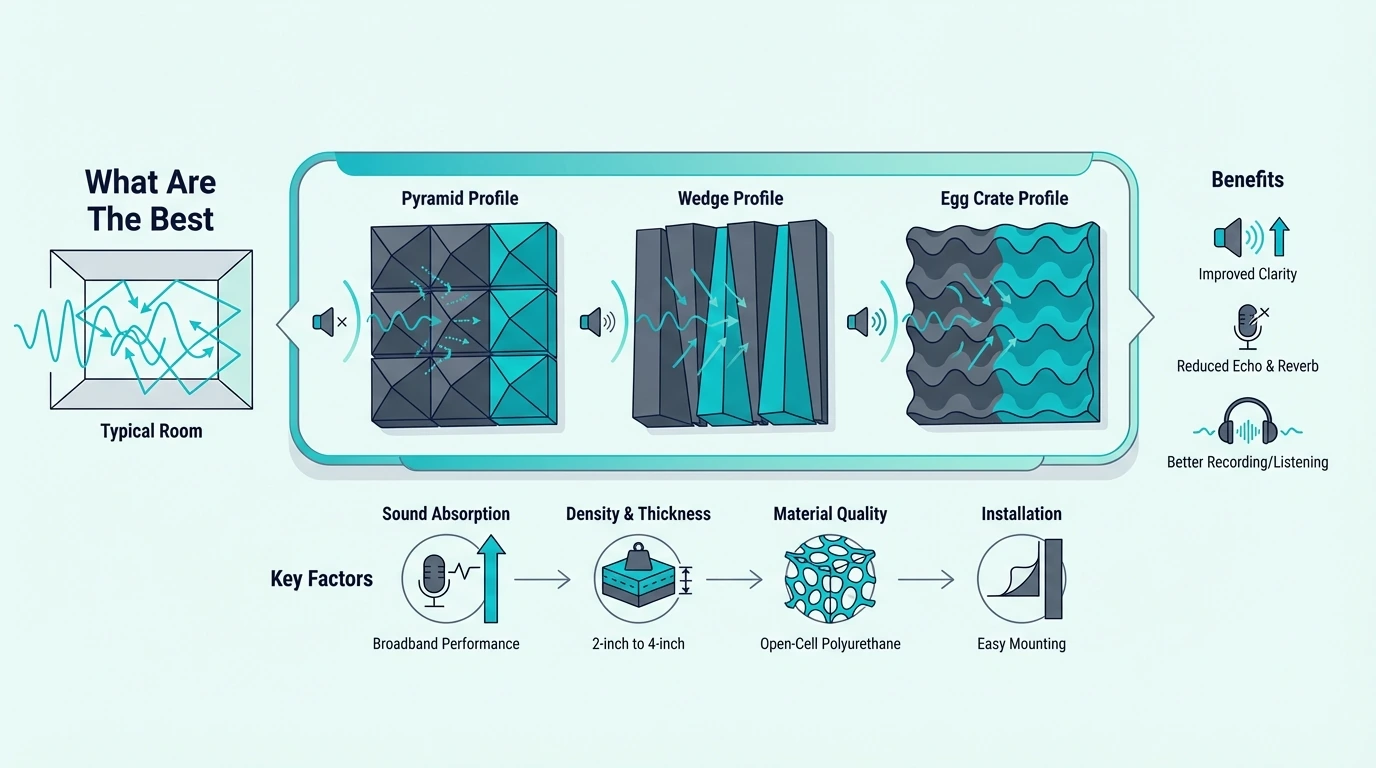 Budget foam panels work when you understand their limitations and use them appropriately. The key is finding products that don’t sacrifice density and material quality just to hit a lower price point.
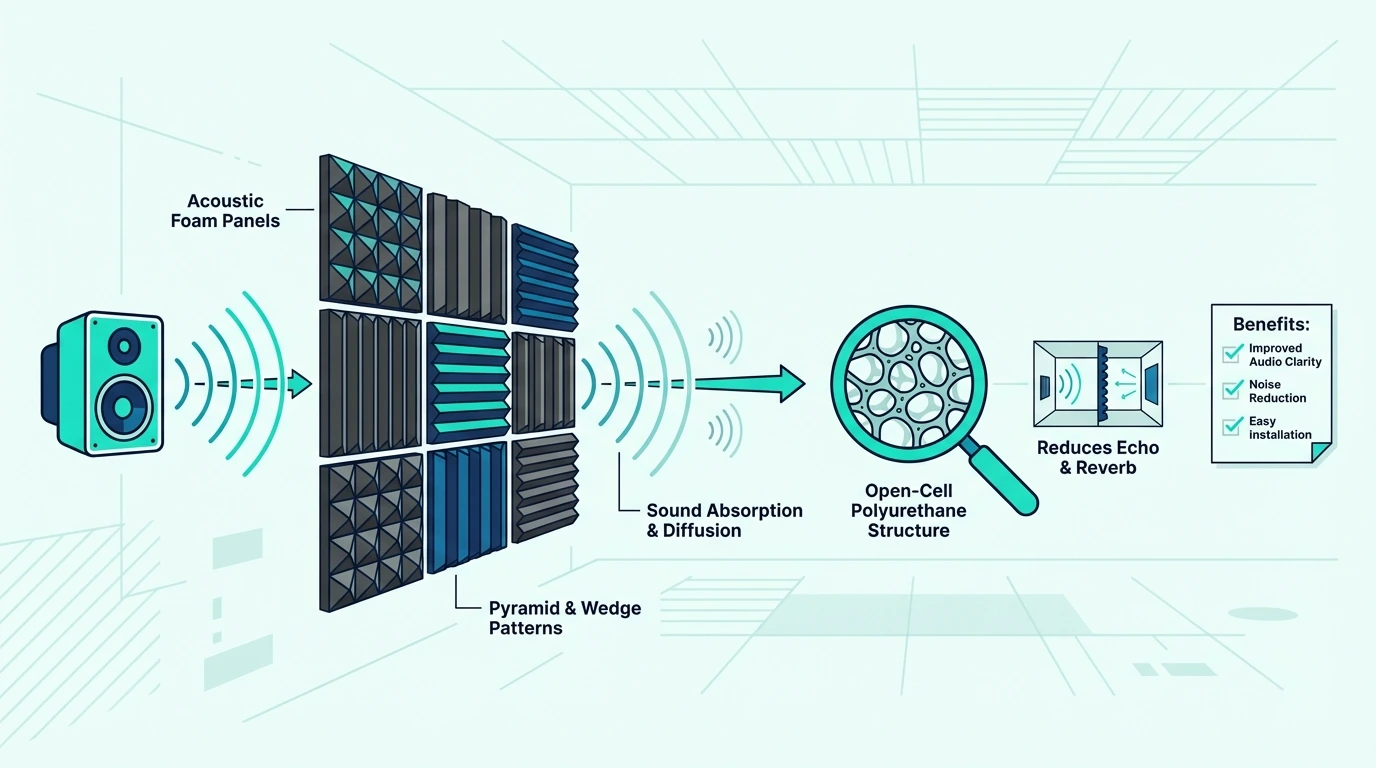 Here is a closer look at each product, covering what makes them effective for specific applications and where they fall short.
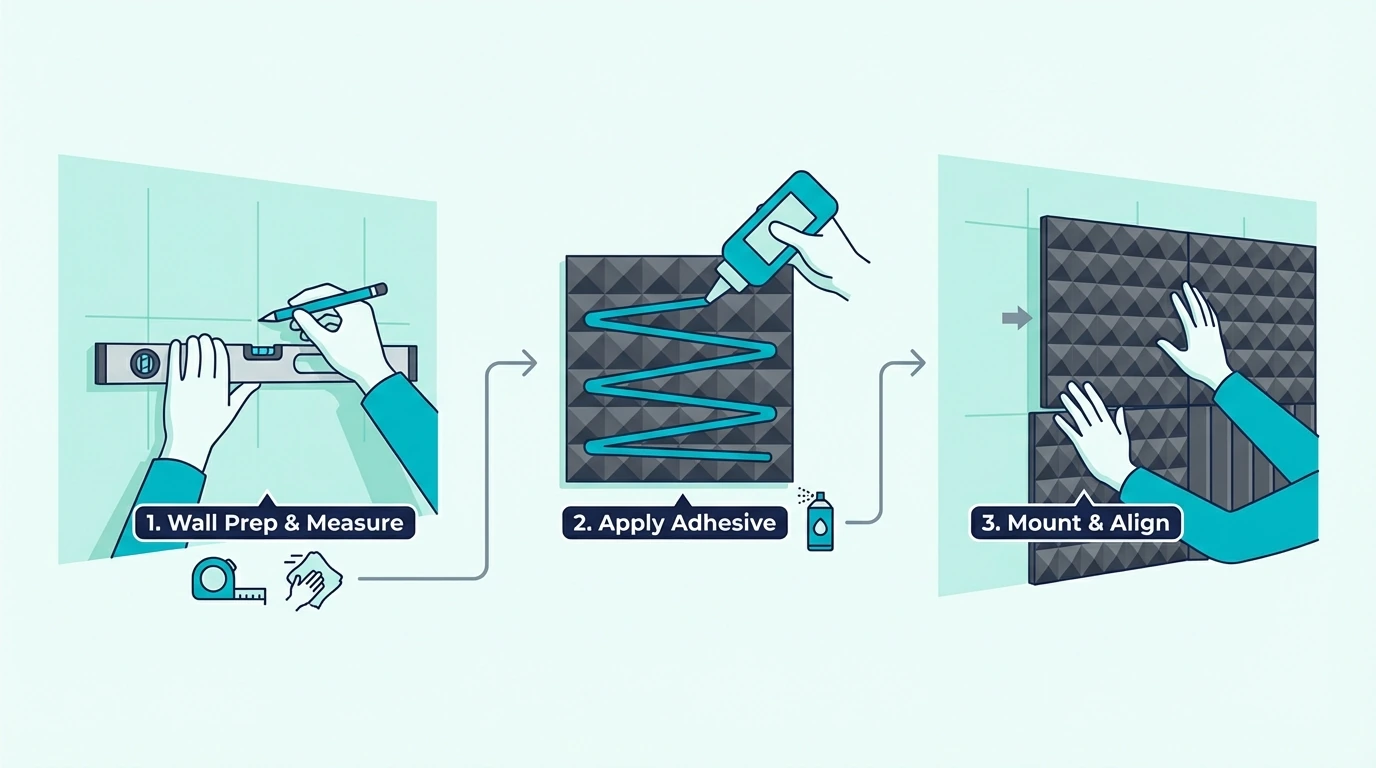 Installation method affects both performance and your ability to remove panels later without wall damage. The right approach depends on whether you own or rent your space and how permanent you want the treatment to be.