How To Soundproof A Bedroom For Better Sleep

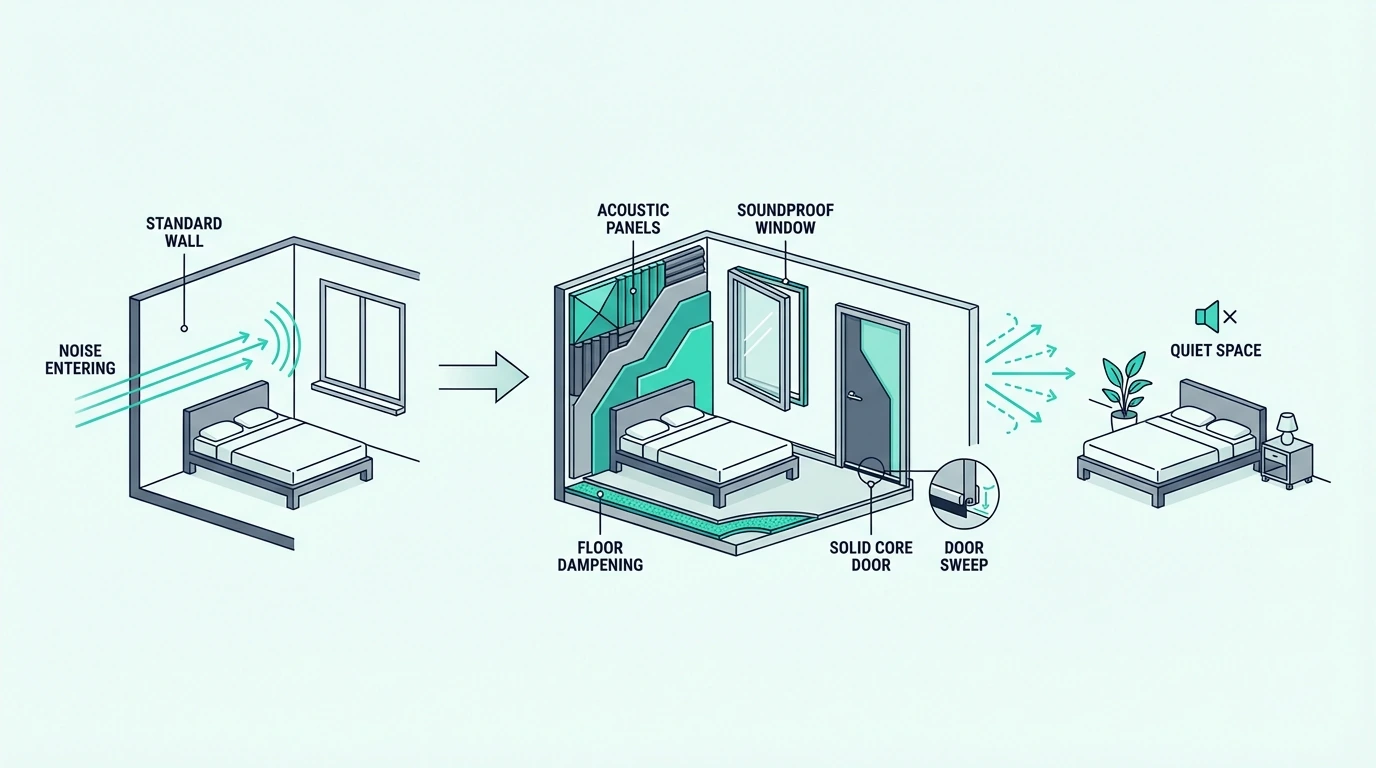
How to soundproof bedroom spaces for better sleep works, but only if you stop treating every noisy bedroom like the same project.

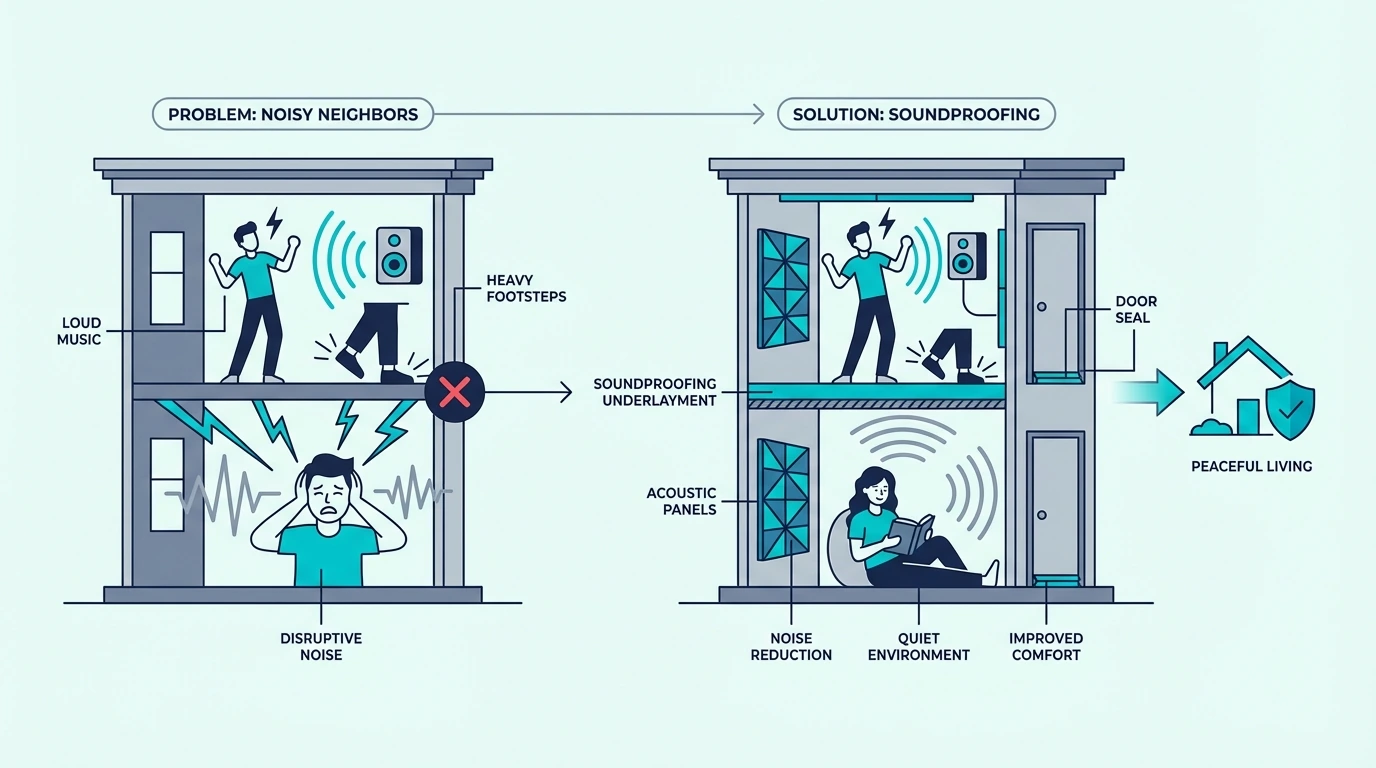
Traffic through a loose window needs a different fix from hallway noise under the door, a neighbor on the other side of a party wall, or footsteps coming from above.

When that diagnosis is wrong, even a decent product feels like wasted money because the real weak point is still open.

Get the order right and the room changes fast: fewer wake-ups, more privacy, and a bedroom that feels calmer at night instead of constantly exposed.

The first move is figuring out which surface is actually leaking the most, then matching the upgrade to that path before cheap fixes and support layers take over the budget.

Quick Takeaway

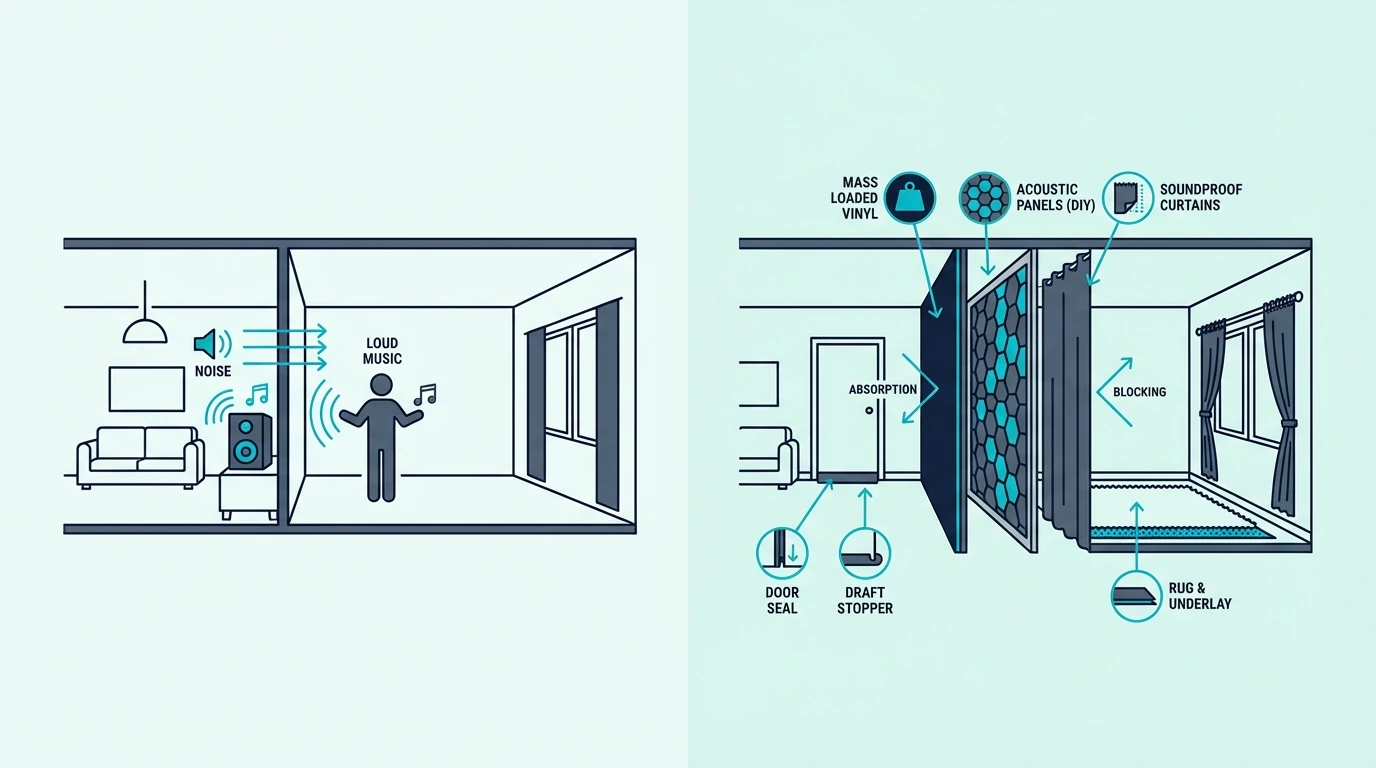
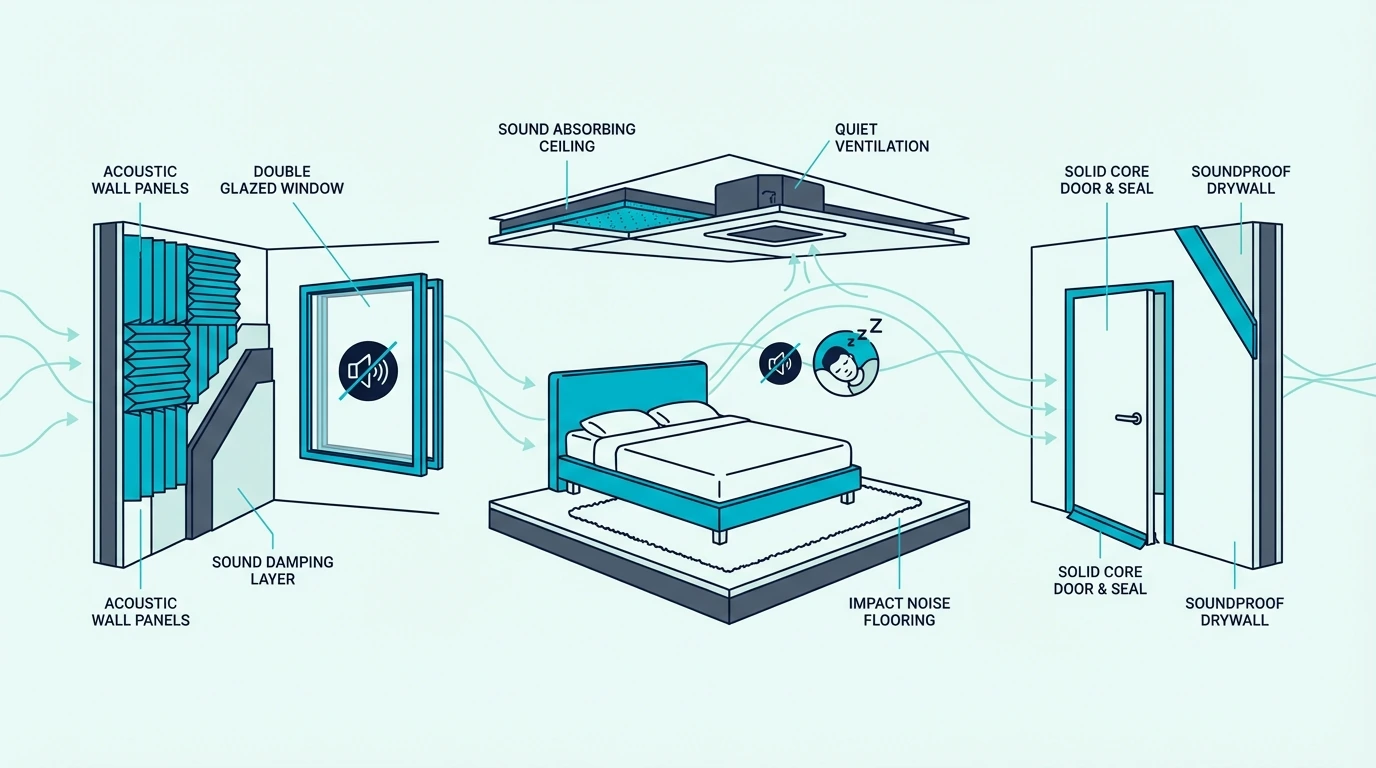
The best way to soundproof a bedroom is to identify the main leak first, then upgrade that surface in the right order: tighten obvious gaps, improve the weakest opening, add real mass or damping where it belongs, and stop spending on decorative “soundproofing” products that do not match the noise path. In most bedrooms, windows, doors, shared walls, and ceilings matter more than the floor, while rugs, curtains, and furniture work best as support layers rather than full solutions.

Diagnose The Bedroom’s Weakest Surface

Overview of bedroom soundproofing priorities

The first shift is mental.

You are not trying to make the whole bedroom behave like a studio shell.

You are trying to stop the specific noise that is breaking sleep, privacy, or nighttime calm, which makes diagnosis more important than shopping.

Start With The Noise Pattern

Start with the pattern, not the product.

If the noise spikes when trucks pass, dogs bark, or wind pushes against the facade, the window side is usually where the bedroom is losing.

If the sound is voices in the hallway, television from the living room, or early-morning household activity, the bedroom door and its gaps usually matter more than the wall across the room. A hollow-core door can leak more nighttime noise than people expect.

If the problem is neighbors next door, the shared wall becomes the main suspect. If the noise is footsteps, thuds, or impact-style transfer from above, the ceiling path deserves attention before you spend money on the wall beside the bed.

Bedroom soundproofing has to start with what is actually waking you up.

The same room can have five possible weak points, but only one or two usually dominate the real experience.

If the noise is clearly tied to one path already, pair this guide with how to block outside noise, how to soundproof a wall, or how to soundproof a ceiling instead of treating the whole bedroom equally.

Test The Usual Leak Order

In most bedrooms, the usual order is window, door, shared wall, ceiling, then floor.

That does not mean the floor never matters, but it is less often the first receiving-side fix when the goal is better sleep.

Stand in the room while the noise is happening and move toward each weak point. Listen at the window frame, the sash, the bedroom door edges, under the door, the shared wall beside the bed, and the ceiling line.

If the sound gets noticeably sharper near one of those areas, start there instead of treating every surface at once. This sounds simple, but it saves a huge amount of wasted money.

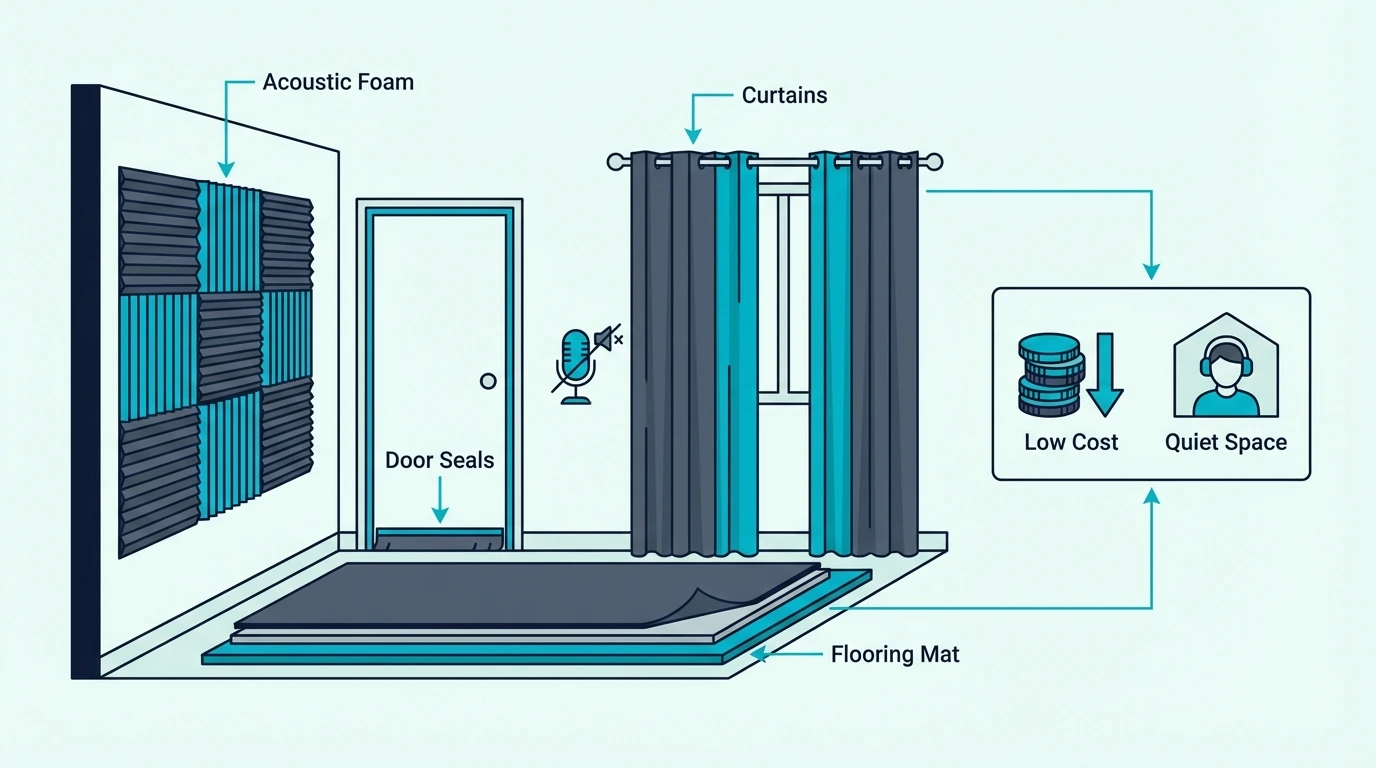
Visible light and obvious drafts are also clues. If the door edge glows at night or the window trim leaks air, airtightness products like 33 Ft Gray Self-Adhesive Soundproofing Weather Stripping for Doors and Windows are worth trying before you assume the bedroom needs a full rebuild.

Think of the room like a cooler with the lid partly open. Adding more insulation to the sides helps less if the main gap is still wide open at the top.

Match Expectations To The Room You Have

An existing bedroom can usually be improved more than people expect, but not every fix produces the same kind of change.

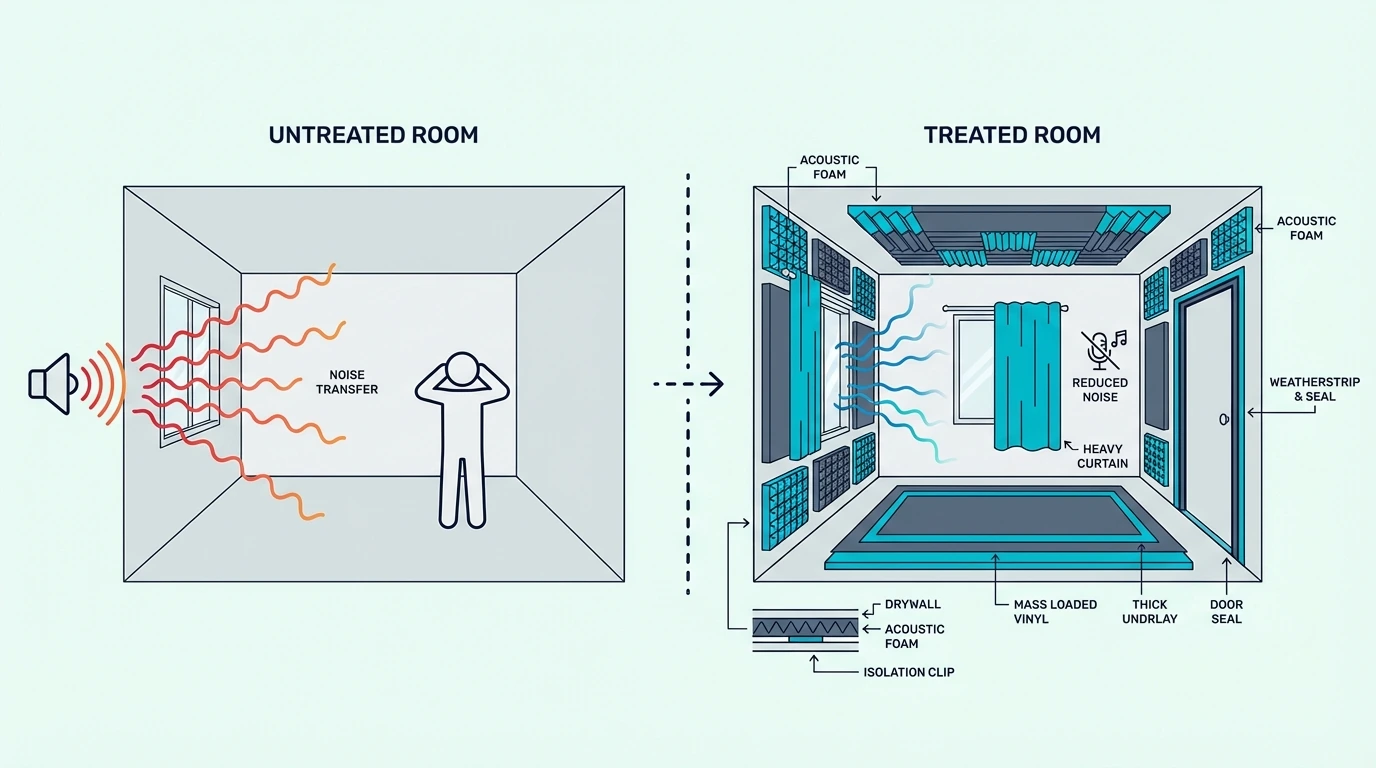
Sealing, better door control, smarter window layering, rugs, and layout changes can all improve sleep and privacy without rebuilding the whole room.

What most people should not expect is silence from one quick add-on. A single curtain, a bit of foam, or one decorative panel will not turn a noisy street-facing bedroom into a dead-quiet sleeping space.

That is not failure. Bedroom soundproofing is often about getting from repeated wake-ups to manageable sleep, or from embarrassing privacy leaks to a room that feels more protected.

For example, a 10×12 bedroom with one leaky window and a hollow-core door can improve a lot with targeted fixes. A bedroom beside noisy neighbors and under a heavy-footed upstairs room is a more ambitious project from the start.

So the goal is not perfection. The goal is to match the level of work to the level of nighttime disruption.

Upgrade The Surface That Is Losing First

Bedroom soundproofing upgrades for walls, windows, and doors

Once you know the main path, the bedroom starts to make more sense. The best upgrade is rarely the most exciting product.

It is usually the upgrade that targets the loudest surface first and stops the room from leaking where it is weakest.

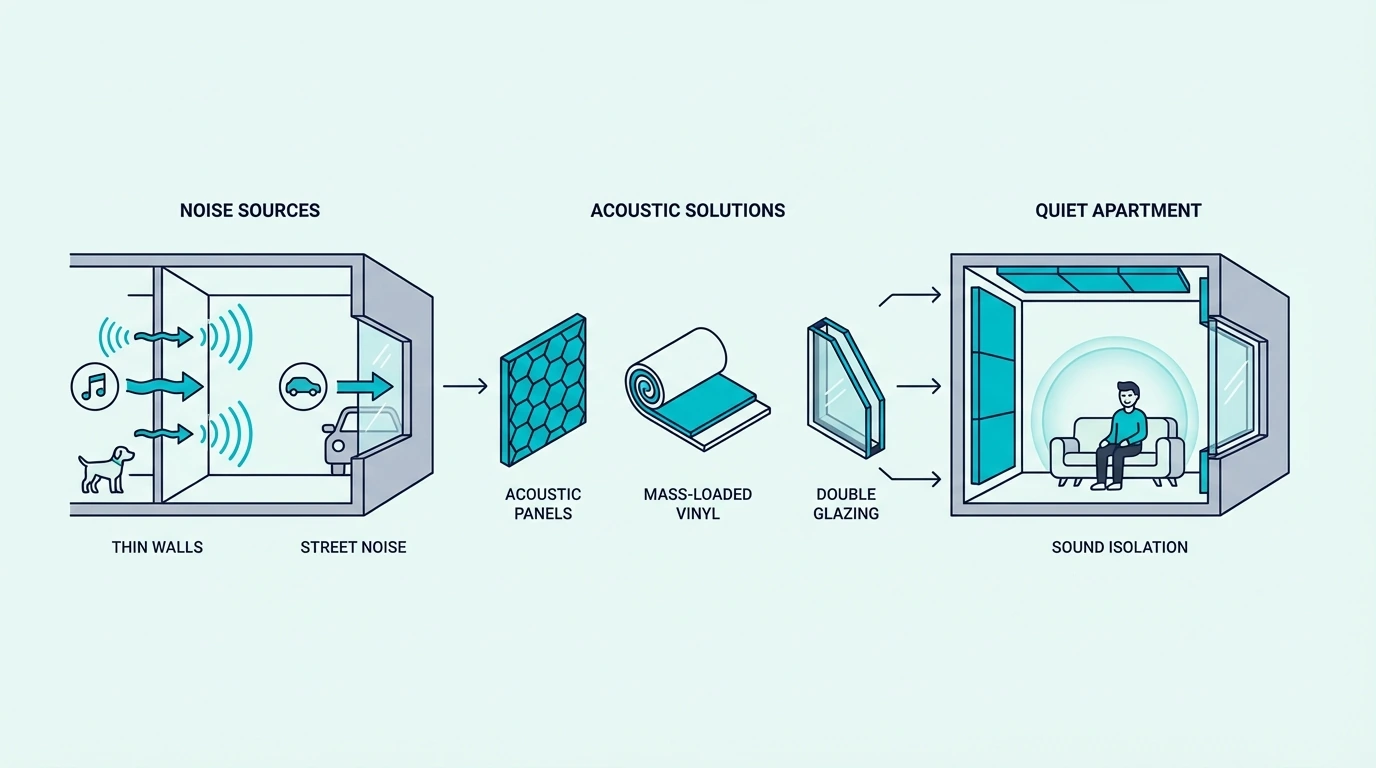
Windows Usually Lead Outside-Noise Problems

Windows are usually first when the bedroom faces a road, driveway, busy sidewalk, barking dogs, or general street activity.

If the sound is louder near the glass or frame than it is by the interior wall, the window deserves the first serious attention.

The fix order is usually seal first, then add a support layer, then consider a better secondary barrier if needed. Tightening the frame matters because a leaky bedroom window often behaves like a partially open vent at night.

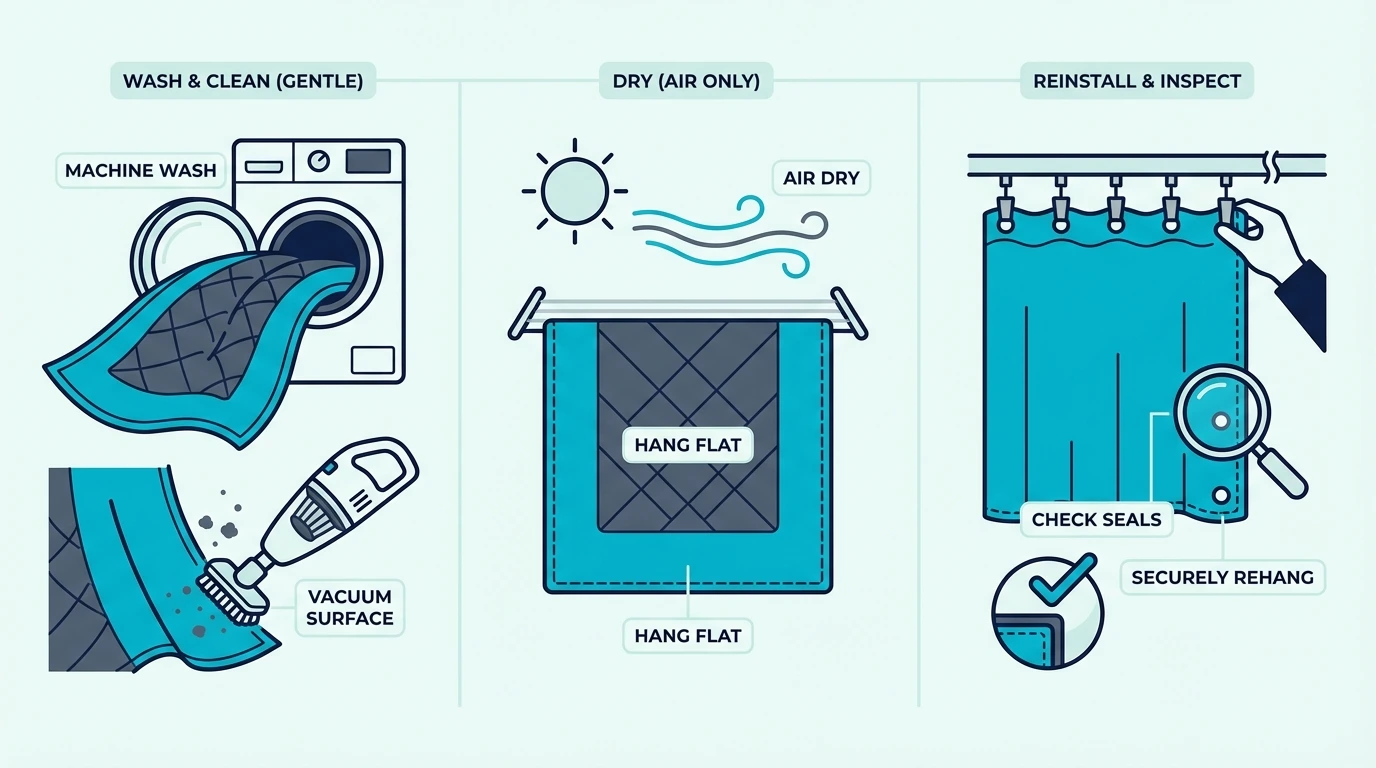
That is where a support product like RYB HOME Soundproof Divider Curtain can make sense, but only as a support layer. Curtains help a bedroom feel calmer, yet they do not replace a weak glass and frame assembly.

Bedroom windows usually respond best to a layered approach instead of one dramatic purchase. If outside noise is the real problem, compare this page with how to soundproof windows, how to block outside noise, and best soundproof windows for home.

If the reader only changes one thing on a street-facing bedroom, the window is often the smartest place to start.

Doors Often Leak Everyday Household Noise

The bedroom door matters more than most people think because it often handles the noisiest everyday path in the house.

Hallway conversations, television sound, kitchen activity, and early alarms from other rooms frequently leak through the door before the wall becomes the main issue.

The bedroom door is usually the best-value first fix for internal household noise.

If the room opens to a busy corridor or shared living area, start there before you spend money on the far wall.

The first fix is the obvious gap at the bottom. A product like HomeProtect Door Draft Stopper 36 Inch Under Door Draft Blocker Door Sweep will not make a hollow-core door heavy, but it can reduce one of the most obvious leakage paths in the room.

After that, the question becomes frame compression and door mass. If the side gaps still leak or the slab itself is very light, the reader may need a more complete door strategy instead of just a bottom seal.

That handoff is why how to soundproof a door and the best door sweeps for soundproofing should sit close to this section. The bedroom door is often the easiest place to buy back quiet.

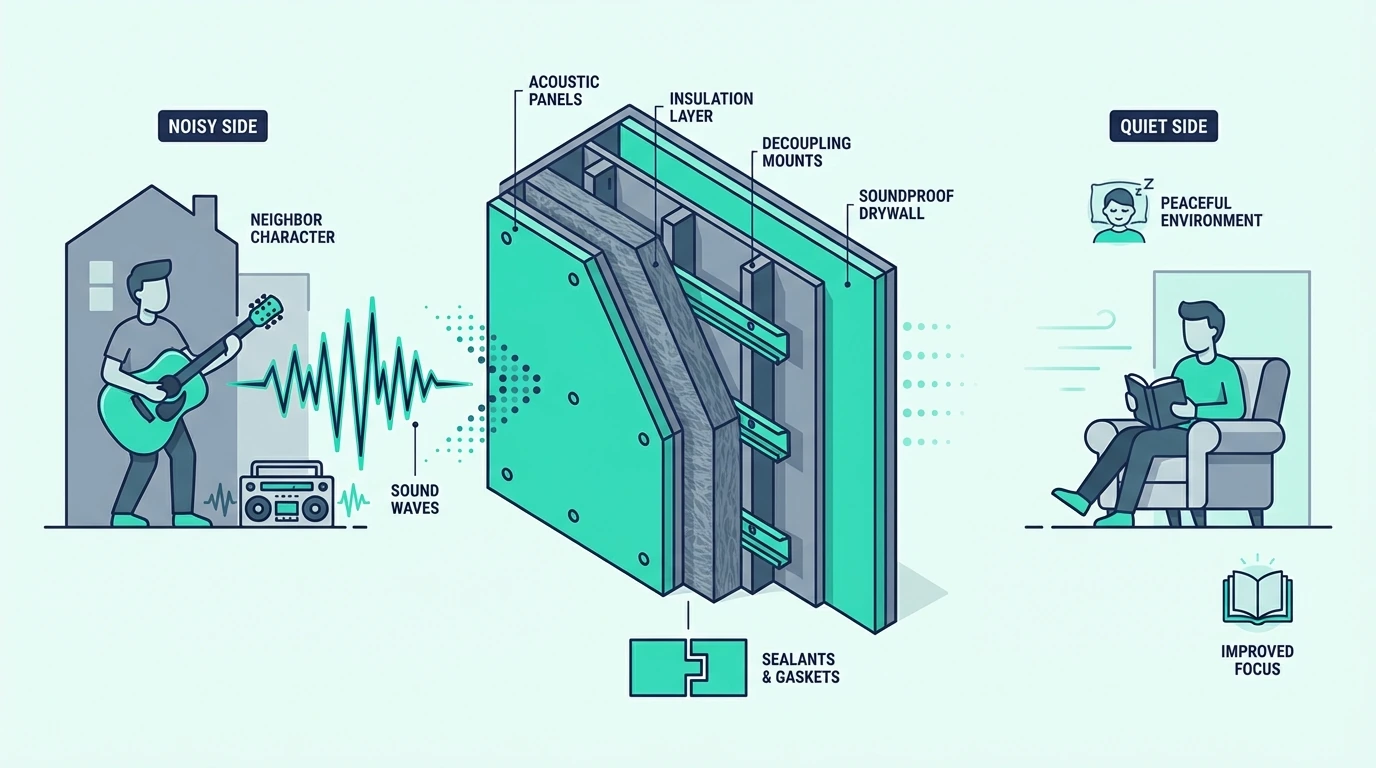
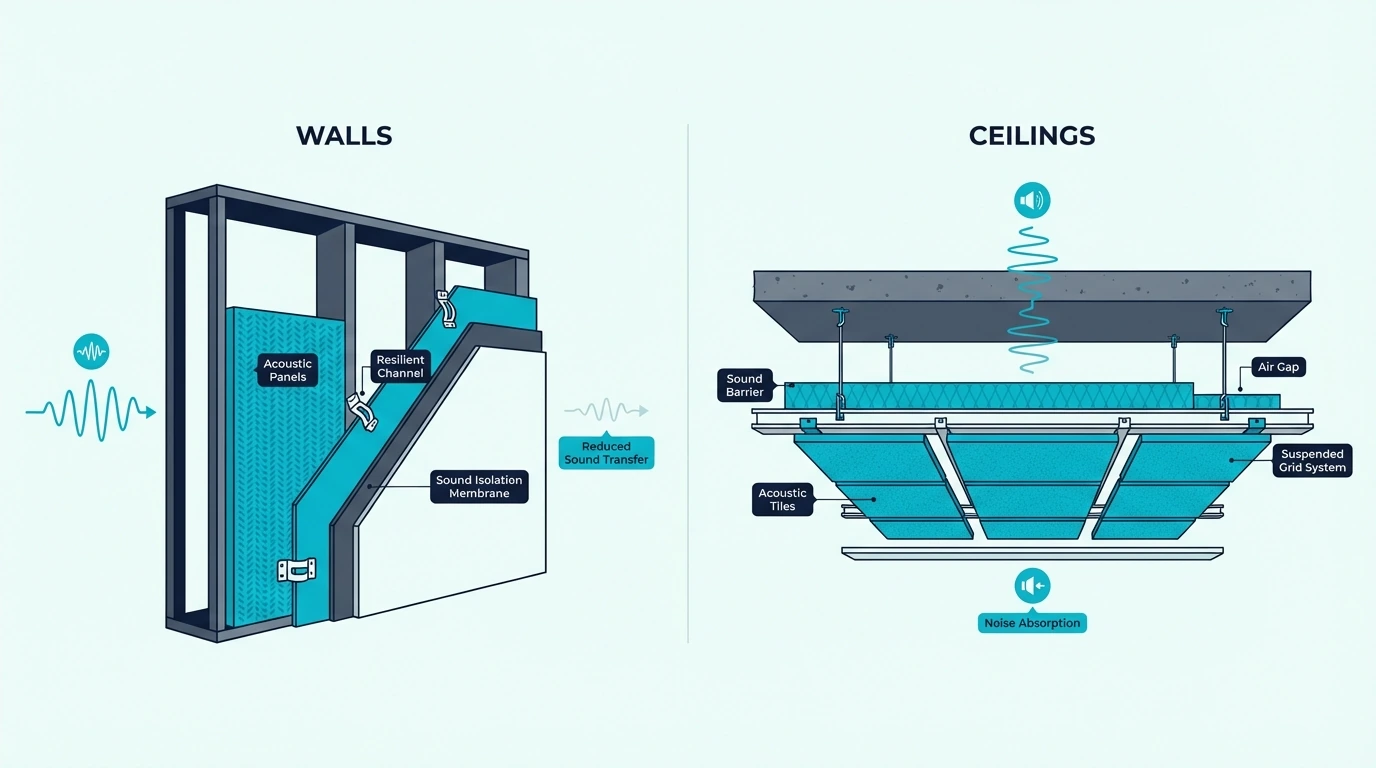
Shared Walls Need Real Assembly Work

The shared wall is the real issue when the noise feels strongest beside the bed, the dresser, or one side of the room and clearly tracks activity next door.

If the bedroom shares a wall with a neighbor, a bathroom, a TV room, or a busy internal space, that partition may be the real failure point.

Bedroom readers need honesty here. Curtains and rugs might still make the room feel calmer, but they will not do much if the wall itself is too light.

For finished rooms, the first moves are still sealing around trim, outlets, and obvious perimeter gaps. If the problem stays strong after that, the wall often needs real mass or a better assembly rather than more décor.

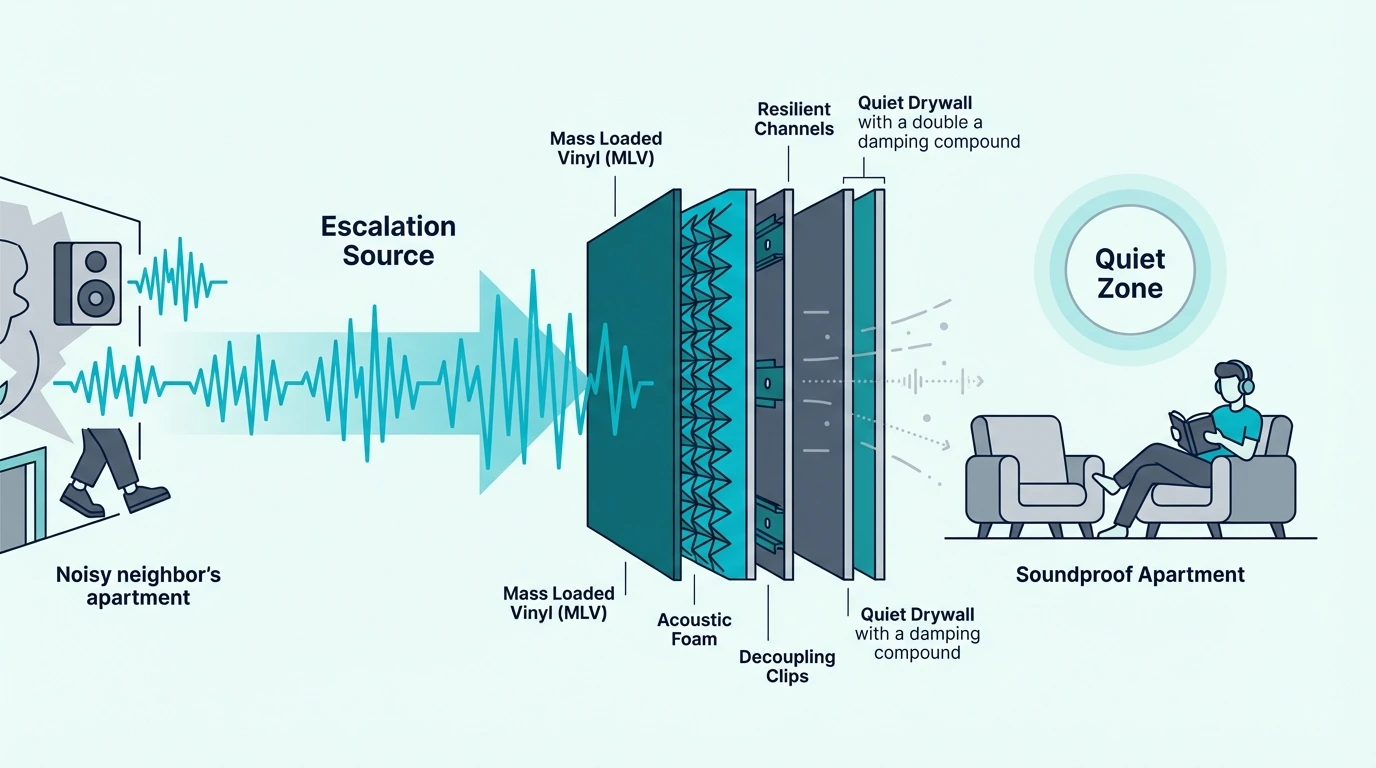
That is where products like Trademark Soundproofing Mass Loaded Vinyl start to make sense. They belong in a real retrofit context, not as something casually pinned to a finished bedroom wall and forgotten.

If the reader is adding another drywall layer, Green Glue Noiseproofing Compound is the kind of product that matches the physics better. It is not cheap décor, but it is the sort of material that belongs in a wall strategy when better sleep depends on the partition itself.

For deeper wall-specific builds, hand the reader to how to soundproof a wall from noisy neighbours, how to soundproof an existing wall, and how to soundproof a wall.

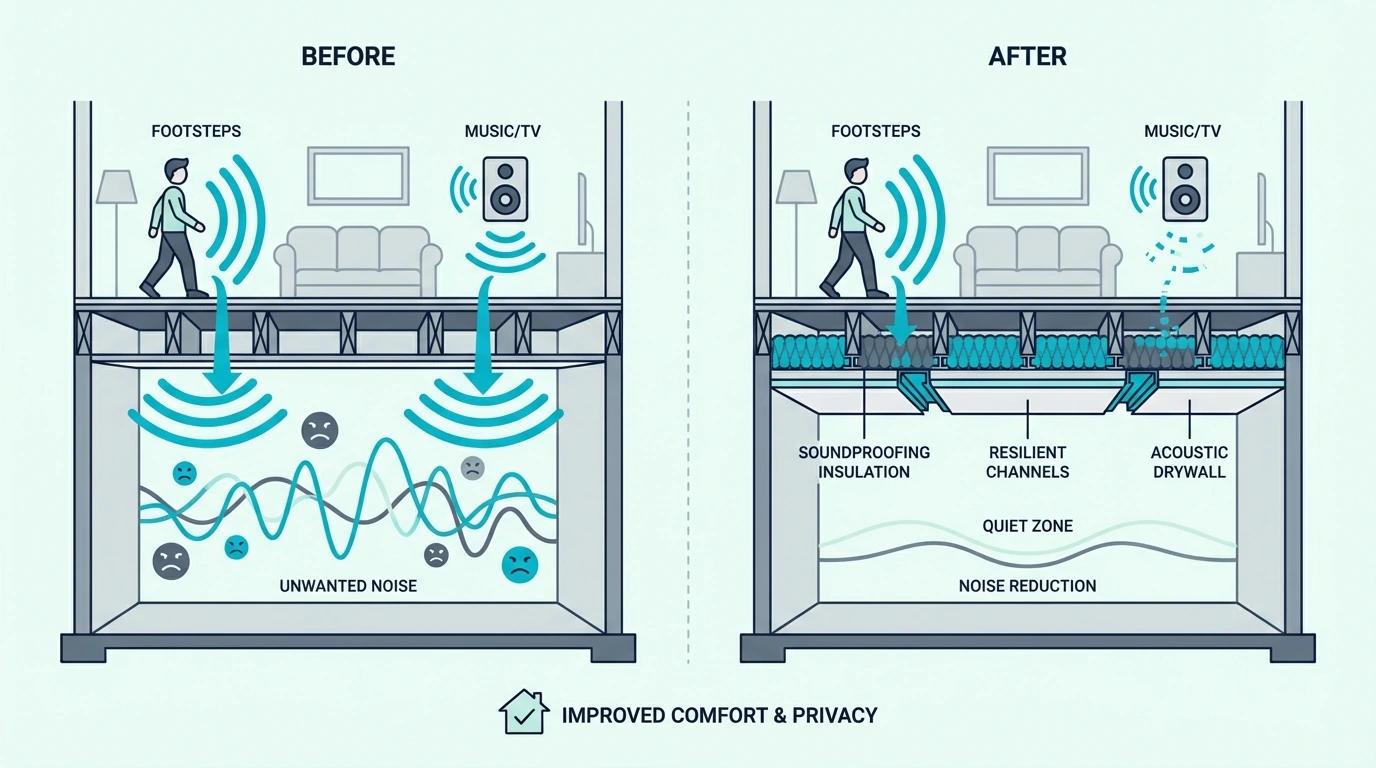
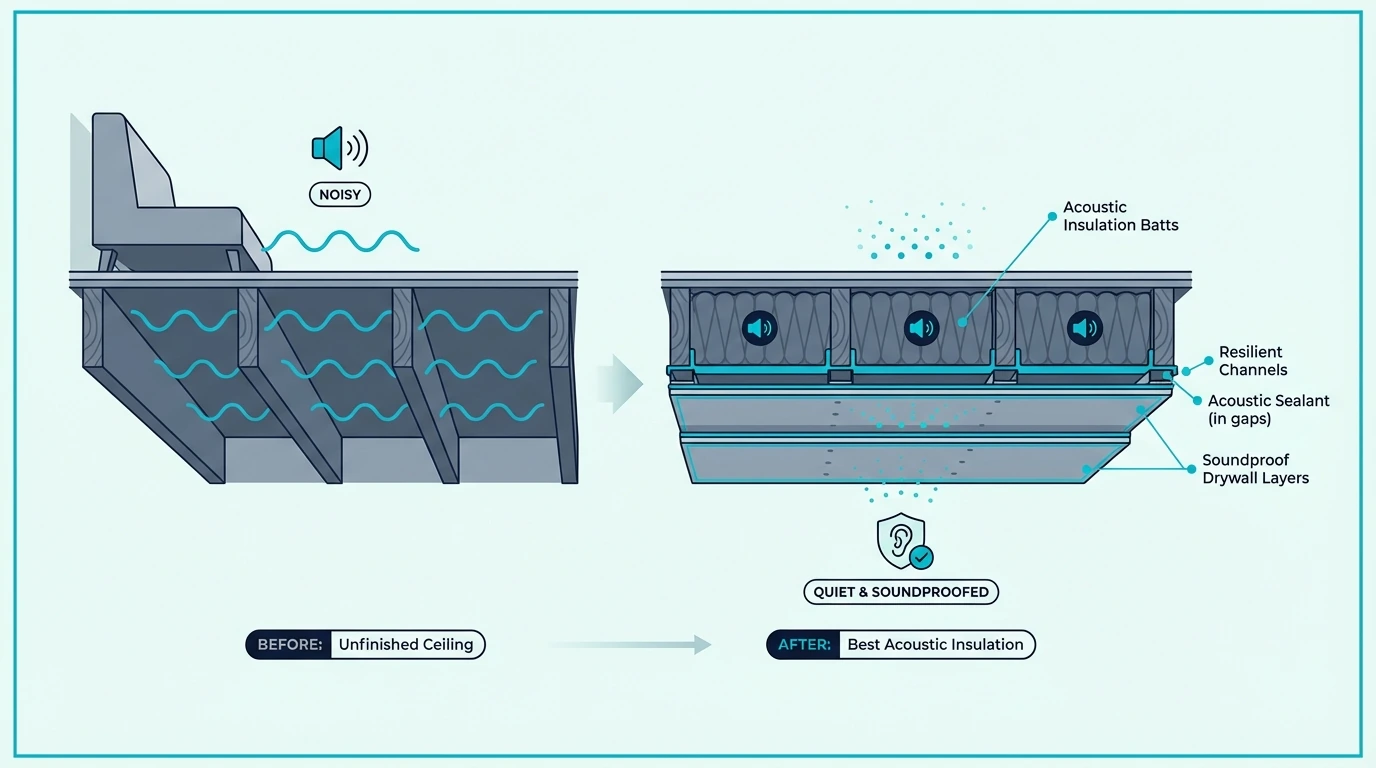
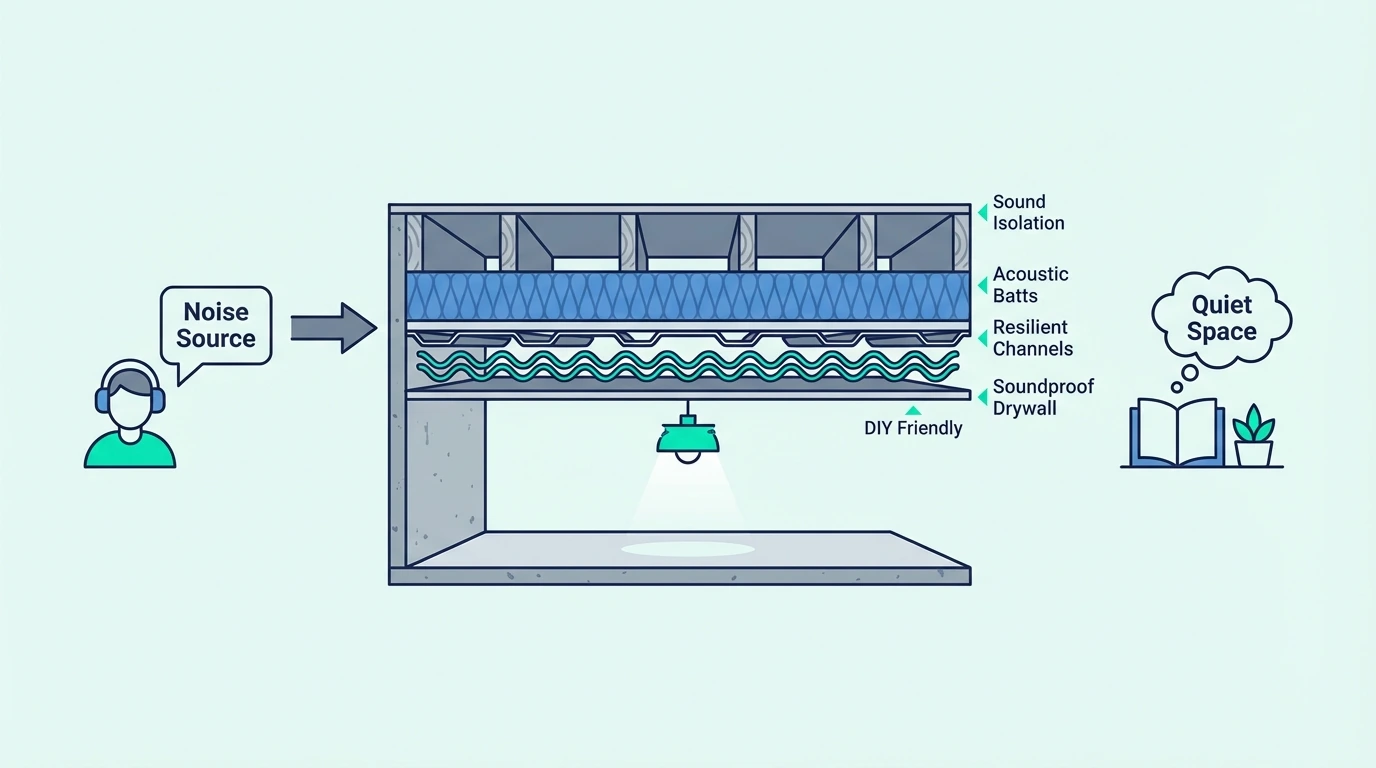
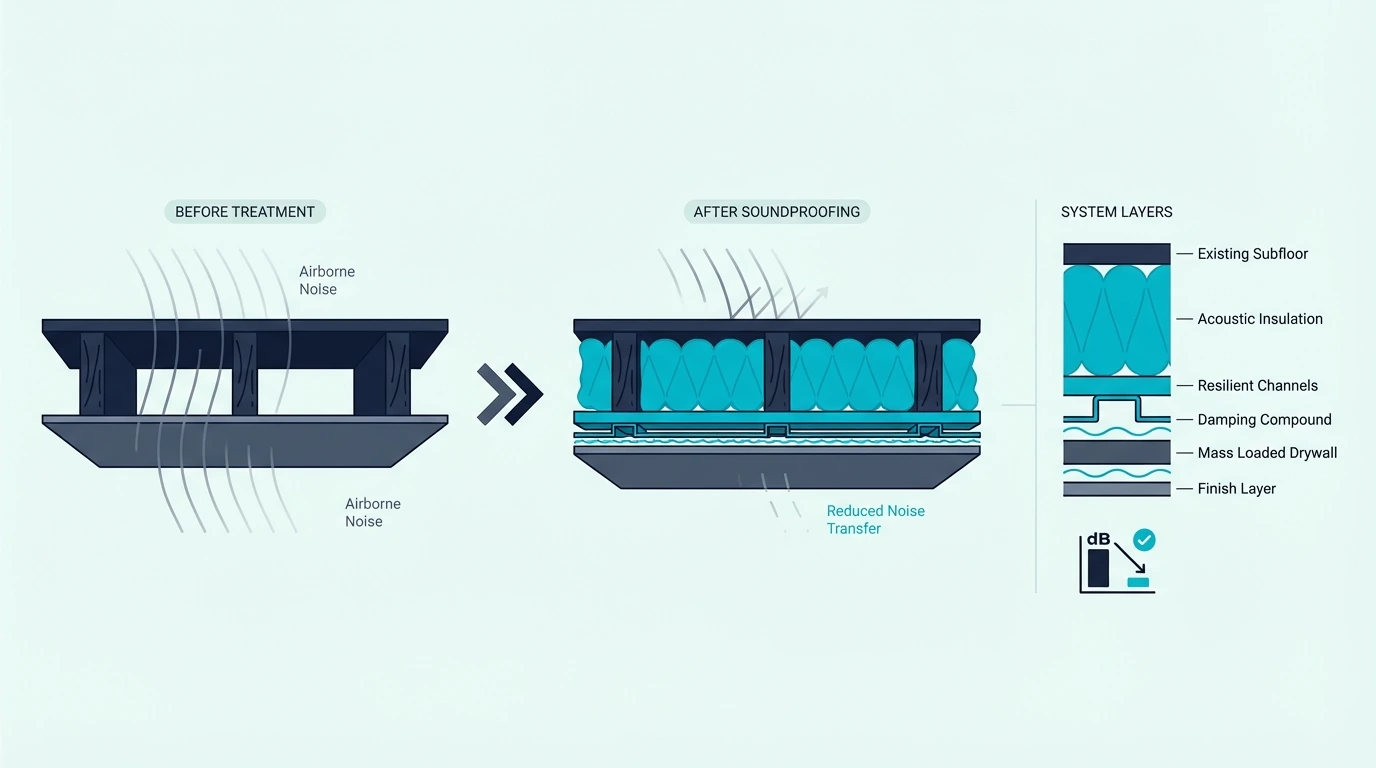
Ceilings Matter When The Noise Has Impact

Ceiling treatment matters when the problem sounds like impact instead of just airborne leakage.

Footsteps, heel strikes, chair movement, and sharp thuds from above usually point to the ceiling path, not the wall beside the bed.

That difference matters because impact noise is harder to cheat around. A soft product on the bedroom wall will not do much if the structure above is carrying vibration straight into the ceiling below.

If the ceiling is staying closed, expectations need to stay realistic. Small comfort improvements can help the room feel better, but stronger results usually come from a rebuilt ceiling or source-side floor work above.

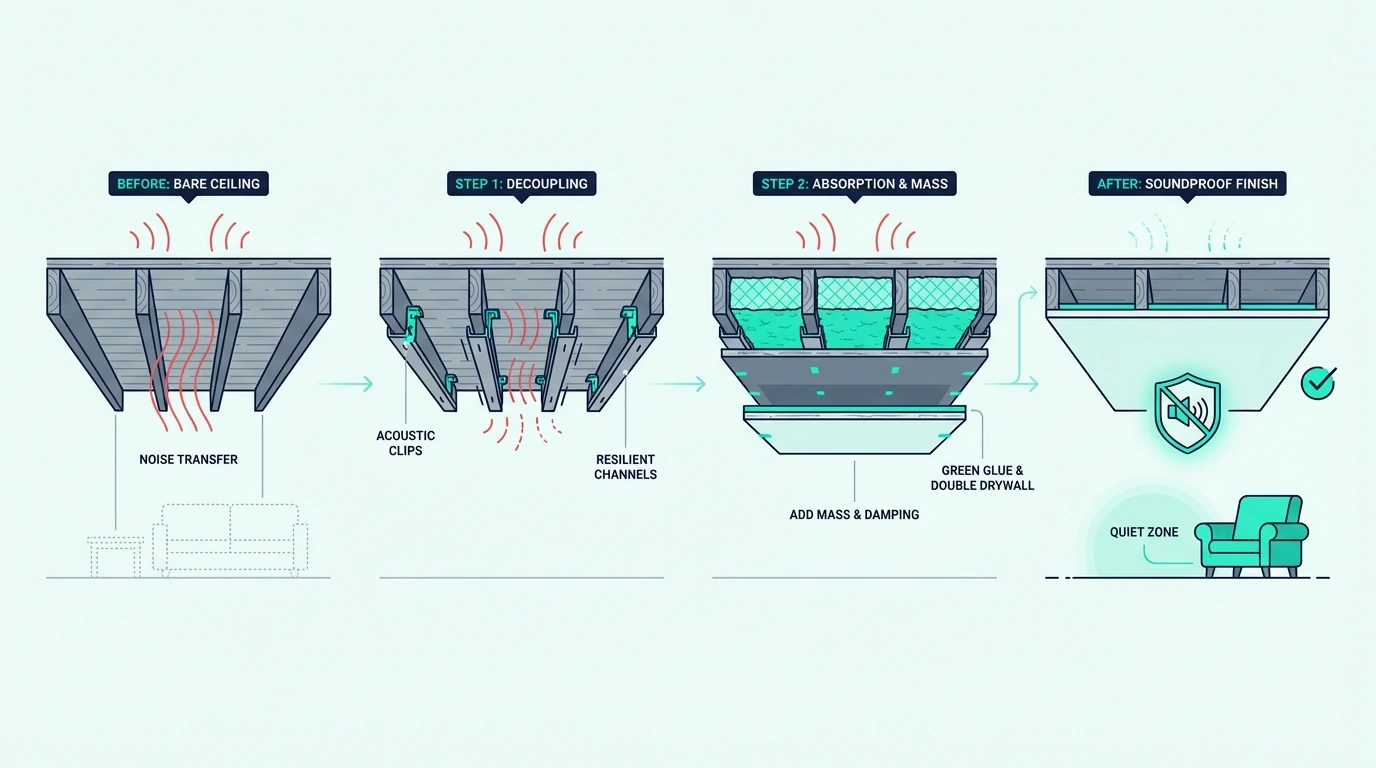
When the ceiling is being opened or rebuilt, cavity fill like AFB Acoustical Fire Batts, Mineral Wool Insulation belongs inside the assembly, not on the room face.

If the bedroom needs a more serious decoupled ceiling, isolation hardware like RSIC-1 Resilient Sound Isolation Clips (10 Pack) are the kind of upgrade that can actually change the structure path. When upstairs noise is the real issue, this section should hand off to how to soundproof a ceiling.

Floors Are Usually The Supporting Layer

The floor matters, but usually not in the way readers first expect.

If the bedroom is the receiving room, the floor is less often the first place to attack than the window, door, wall, or ceiling.

Bedroom floors matter more for source-side control, comfort, and reflection. Rugs and dense pads can make the room feel less sharp and help reduce some transmission out of the bedroom, but they are rarely the main fix for incoming street or neighbor noise.

The exception is a renovation or remodel where the bedroom floor is already being redone. In that case, the floor becomes a real opportunity to reduce sound leaving the room or to build a better surface under a floating floor.

That is where a product like FloorMuffler Ultra Seal Underlayment 300SF makes sense. It is a renovation product, not the first answer for a finished bedroom that is receiving noise from outside.

So floors belong in the bedroom conversation, but they should stay in the right place. They are usually the supporting or renovation case, not the first place to spend your first soundproofing dollar.

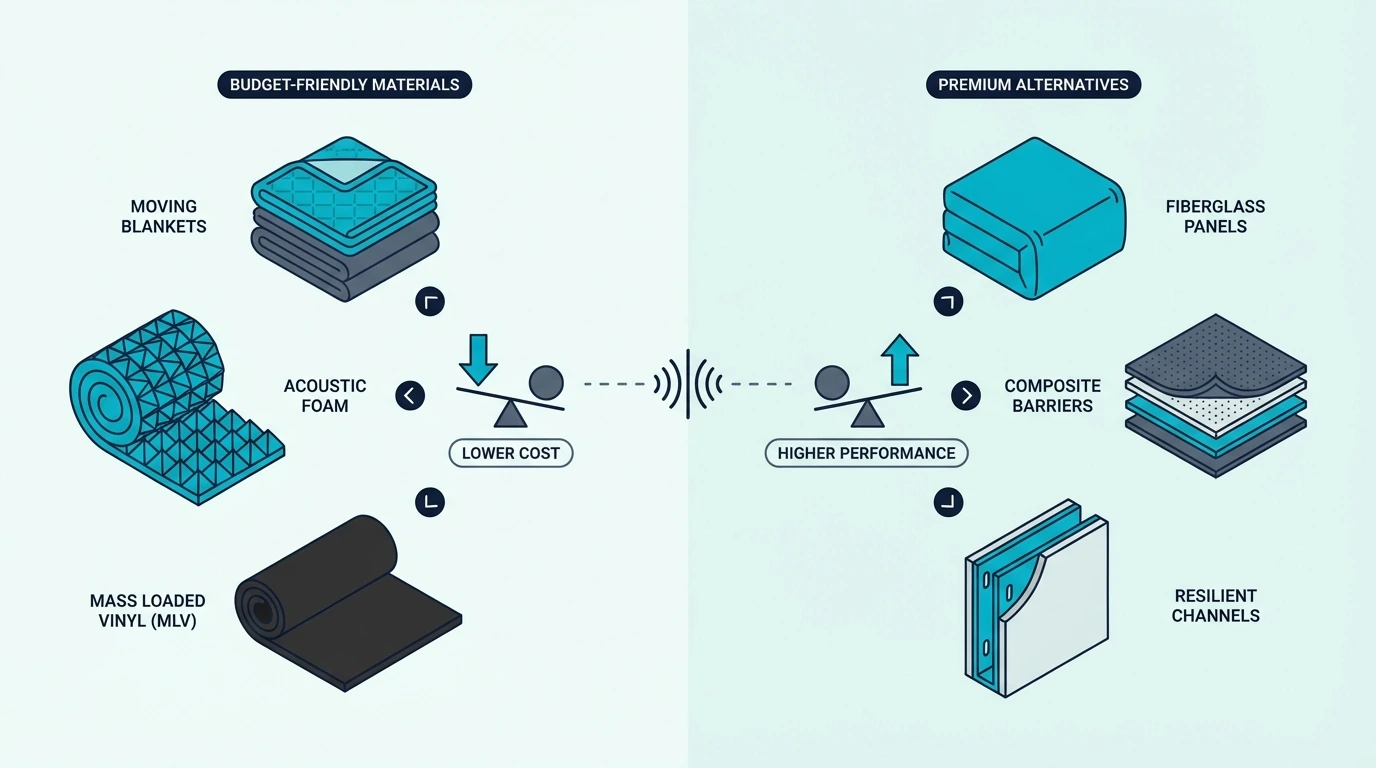
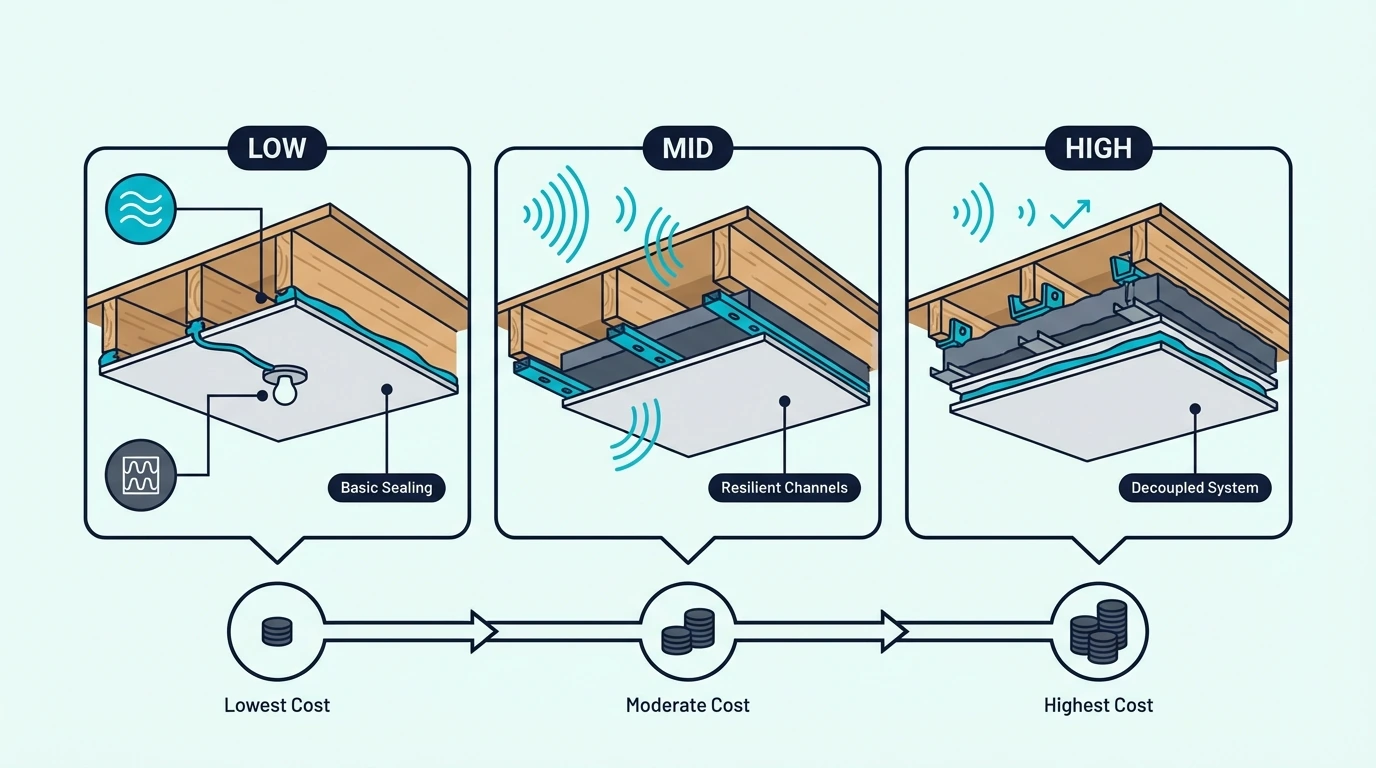
Use Cheap Fixes As Triage, Not A Full Build

Cheap ways to soundproof a bedroom

Cheap bedroom soundproofing works best when it acts like triage. The goal is not to fully isolate the room on a tiny budget.

The goal is to spend the first money where it reduces the most nighttime disruption. That usually means sealing, better door control, smarter window layering, and a few layout changes that make the room feel calmer fast.

Cheap Wins Close Gaps And Support Weak Openings

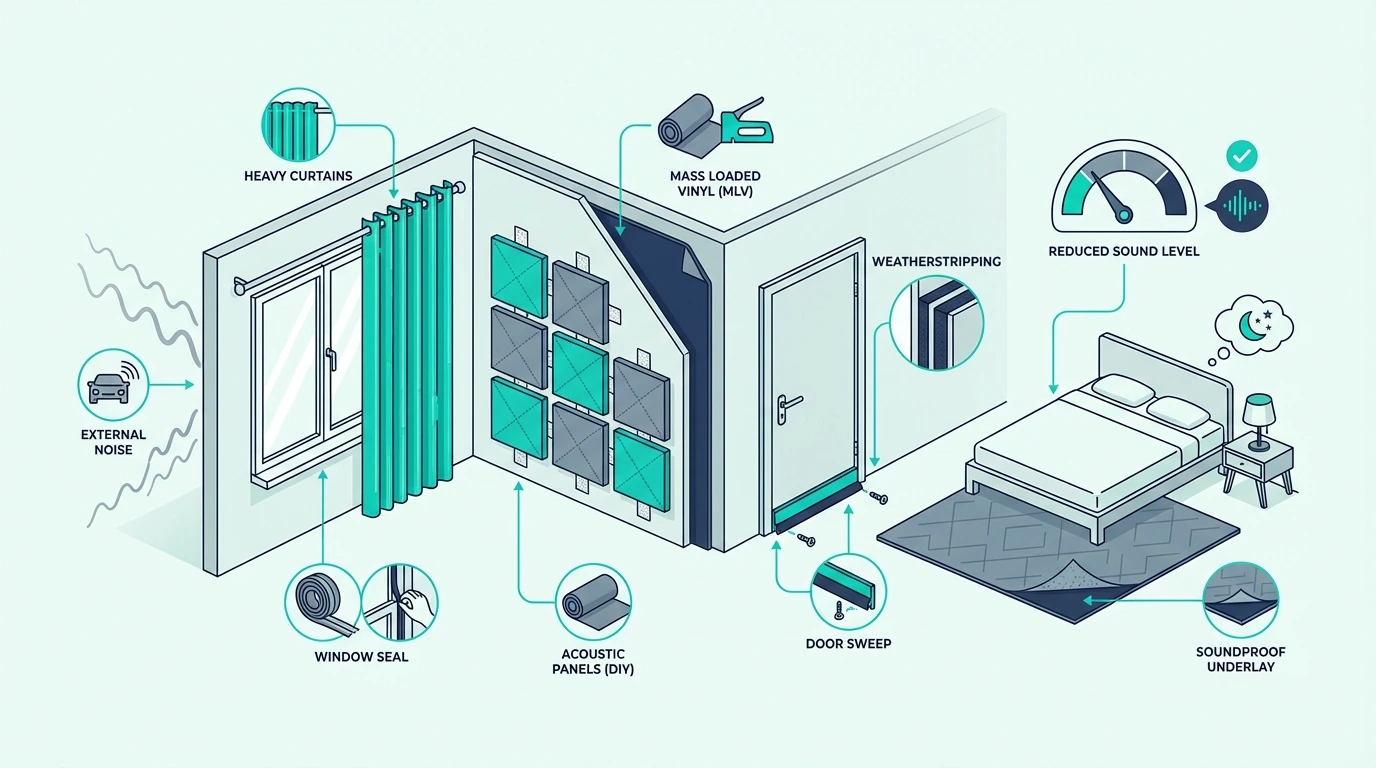
The cheapest fixes that help most are the ones that close obvious leakage or support the weakest surface.

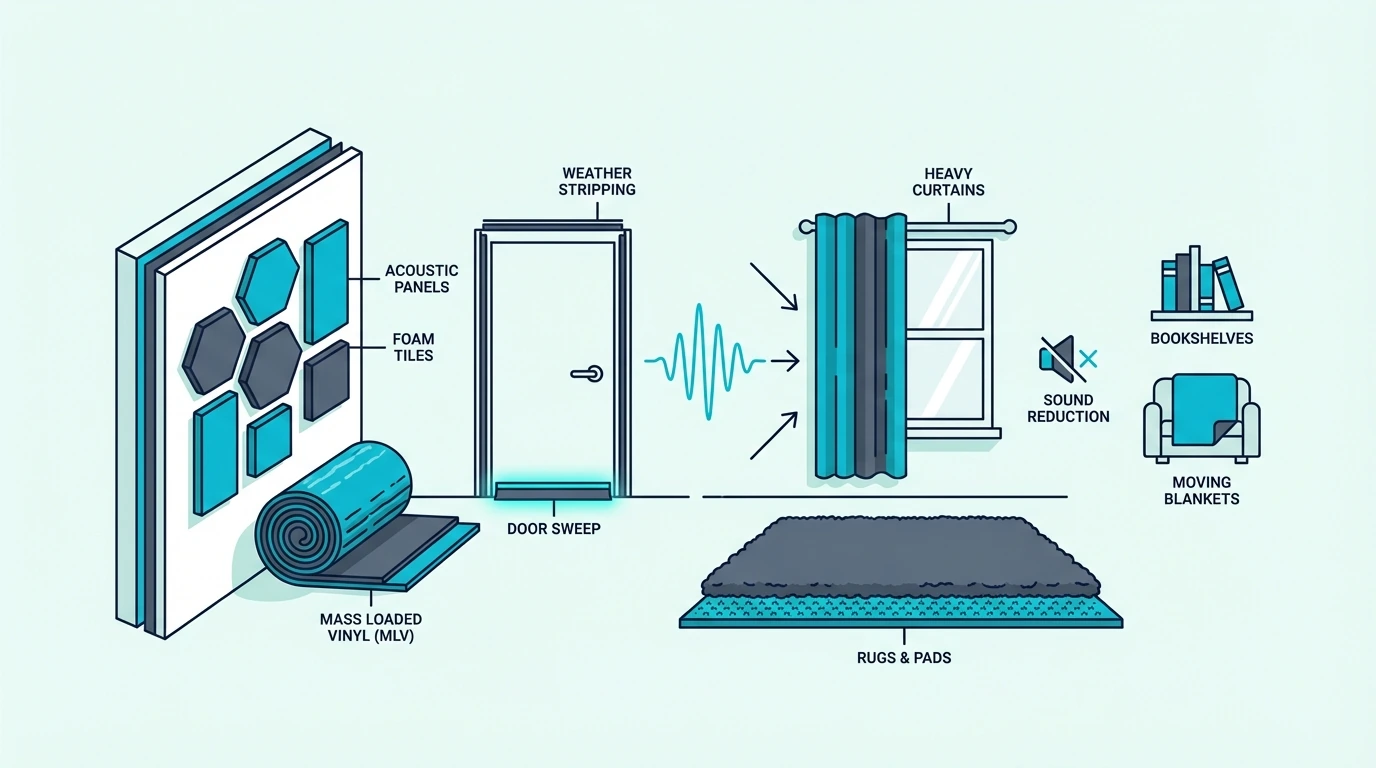
Weatherstripping, a real door-bottom seal, trim sealing, rugs on hard floors, heavier window layering, and dense furniture on the noisy side can all make a real difference.

Cheap bedroom soundproofing usually looks boring.

It is often a combination of a few honest fixes rather than one exciting product that promises too much.

If trim joints, casing gaps, or baseboard cracks are still part of the leak, Acoustical Caulk (29 oz) 1 Tube with clean up wipe is usually a smarter purchase than another decorative layer.

The other low-cost win is layout. Moving the bed off the loudest wall, putting a full bookcase on the noisy side, and adding a thick rug can help the room feel calmer even before stronger work happens.

If budget is the main concern, pair this page with how to soundproof a room cheaply and how to soundproof a room so the first money goes to the right place.

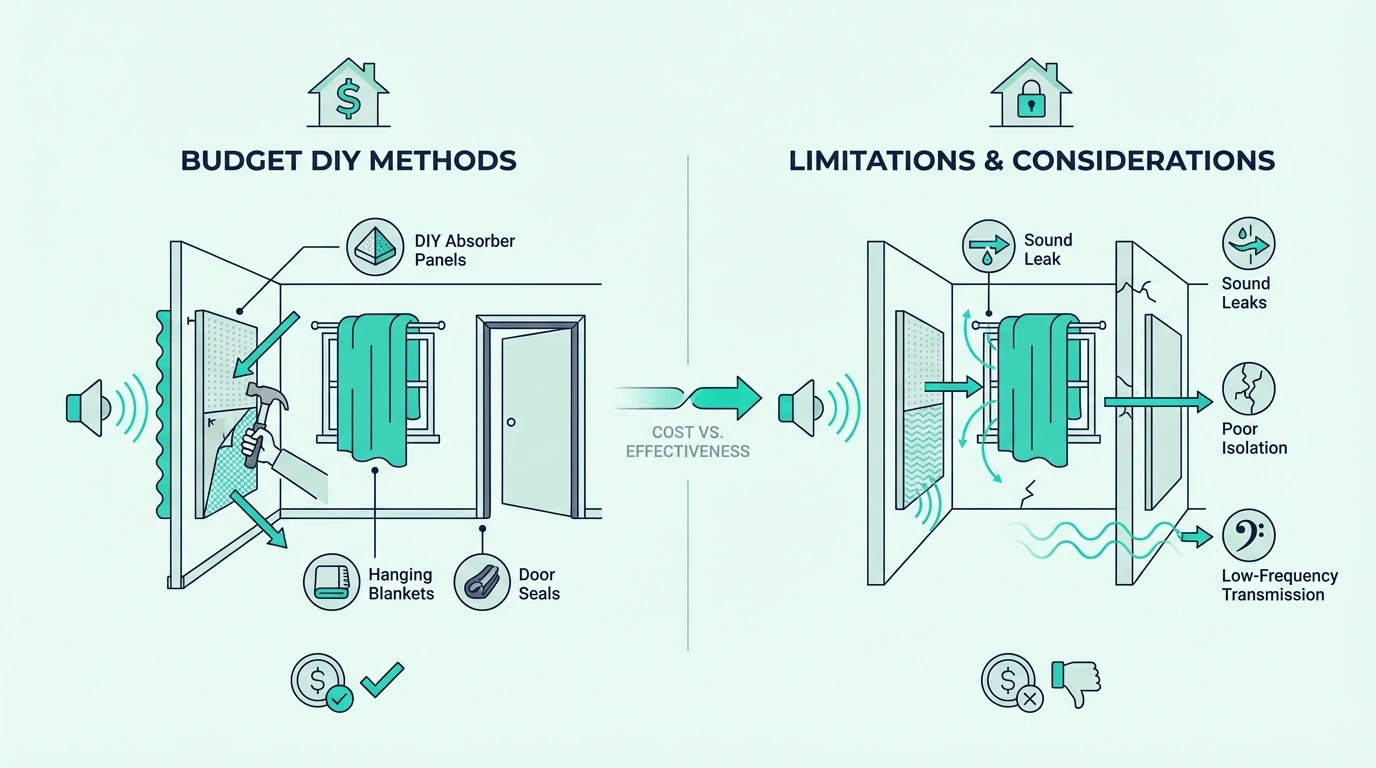
Cheap Products Fail When They Add No Mass

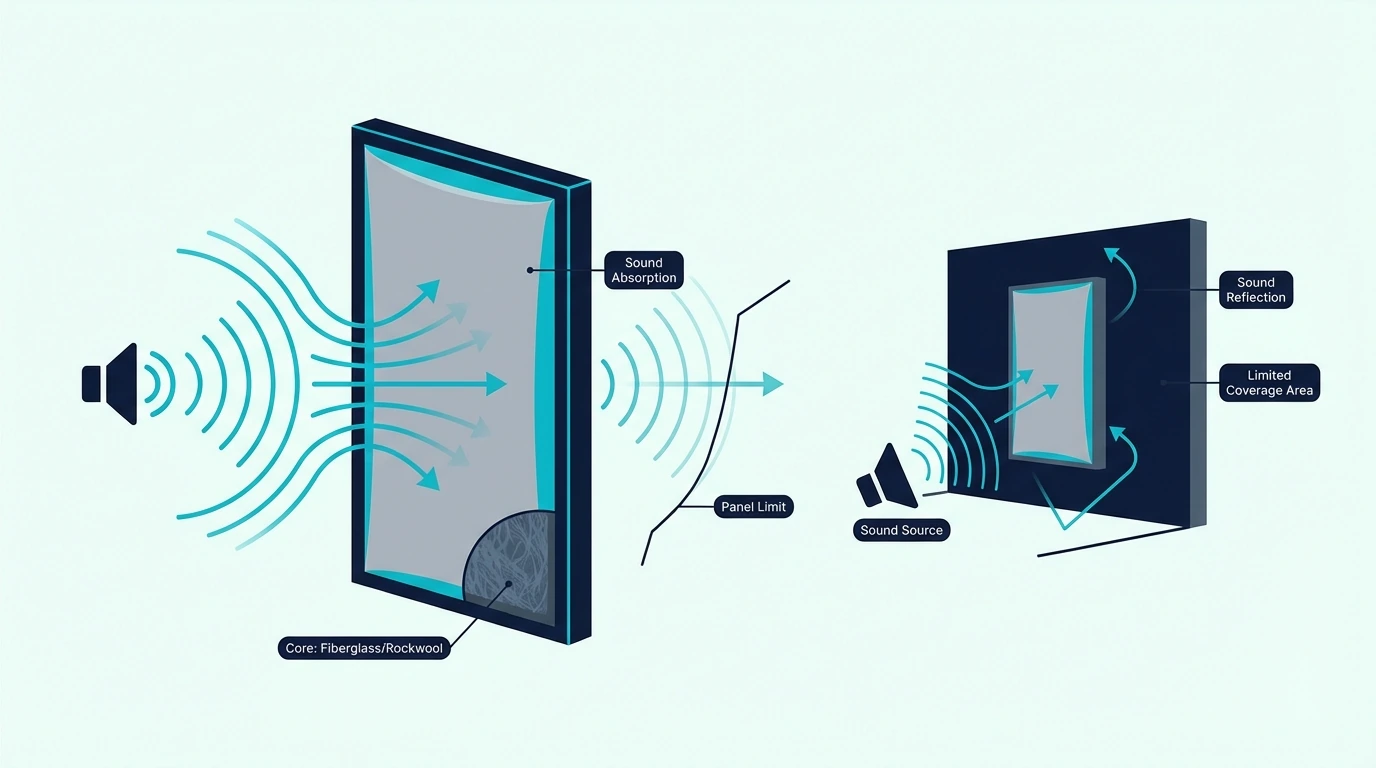
Thin acoustic foam, decorative felt squares, miracle paint, and anything marketed as “soundproof” while adding almost no mass are mostly hype for bedroom noise control. They may change the room’s internal feel, but they rarely solve the problems that actually wake people up at night.

A bedroom guide has to stay grounded in real weak points.

If the product does not seal, add meaningful mass, or support a genuine leak path, it is probably not the best first buy.

This matters even more in sleep-focused rooms because buyers are often tired, frustrated, and easy to oversell. Bedroom soundproofing is where hype is most likely to waste money fast.

The simplest rule is this: if the item is light, decorative, and pitched as a universal fix, be skeptical.

Cheap Fixes Are Enough For Moderate Problems

Cheap fixes are often enough when the bedroom problem is moderate rather than extreme.

If the room only needs to feel calmer, if the goal is better privacy instead of full isolation, or if the problem is one obvious leaky window or door, smaller fixes may be all the room really needs.

That is especially true in finished bedrooms and rentals. A well-sealed door, a tighter window, a rug, and a calmer room layout can be enough to move the space from annoying to livable.

The limit shows up when the cheap fixes help only a little and the wake-ups keep happening. That is the room telling you the assembly itself is weak, not just the edges around it.

So cheap bedroom fixes are not fake. They just need the right target and the right expectation.

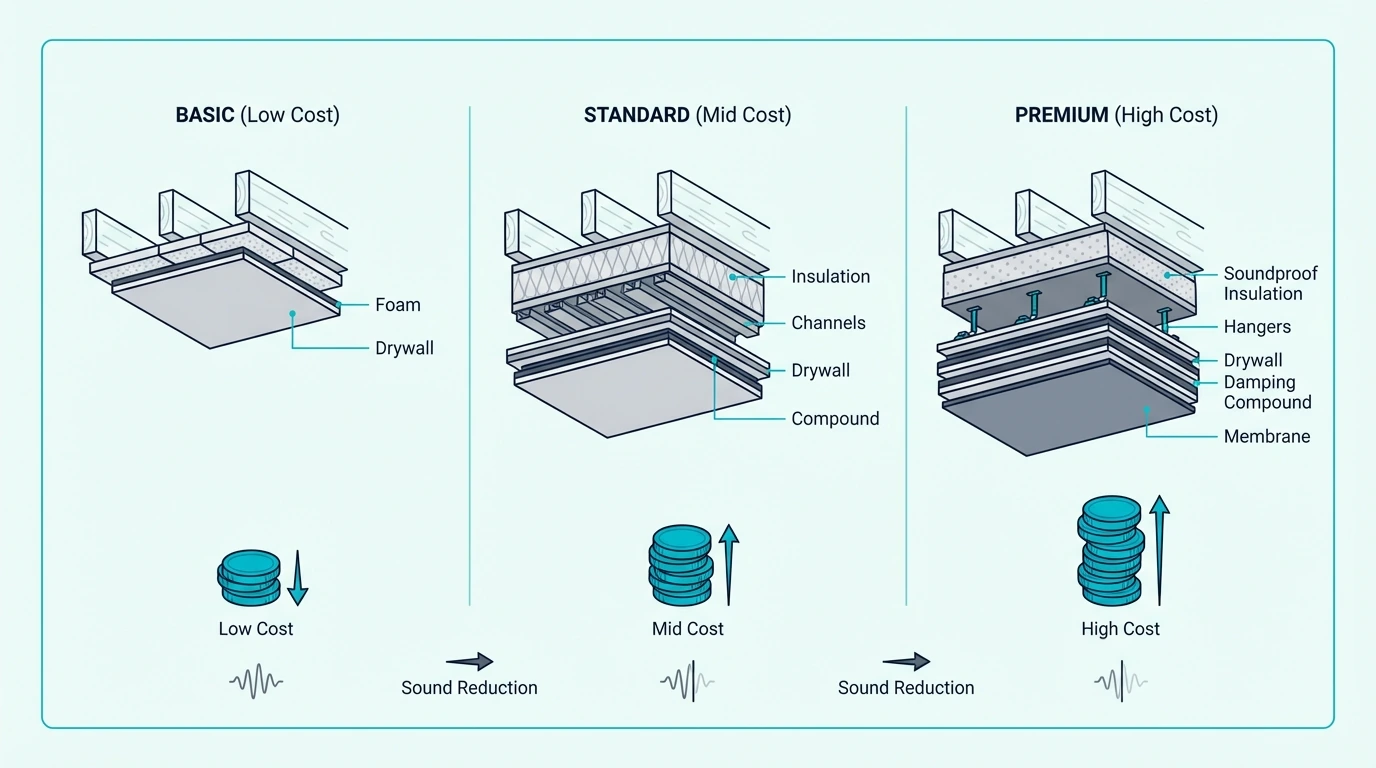
Know When The Bedroom Needs More Than Cheap Fixes

Apartment bedroom soundproofing options

Every bedroom has a point where cheap fixes stop being the honest answer. That point usually arrives when the room is losing through structure, low-frequency energy, or several weak surfaces at once.

Once the problem crosses that line, the smart move is not “buy more cheap things.” It is “pick the next real upgrade with clear eyes.”

Some Noise Problems Blow Past Budget Fixes

Bass-heavy music, repeated street noise, upstairs impact noise, and severe shared-wall transfer usually need more than cheap fixes. These are the kinds of problems that blow past basic sealing and soft support layers.

The same is true when the bedroom has several weak points working together. A leaky window, hollow-core door, and thin shared wall can stack into one sleep problem that no single cheap accessory will fix.

That does not mean the small fixes were a waste. It means they were the screening step that revealed what the room actually needs.

If the bedroom is still waking the person up after the obvious leaks are tightened, the next answer is usually a better surface build, not more accessories.

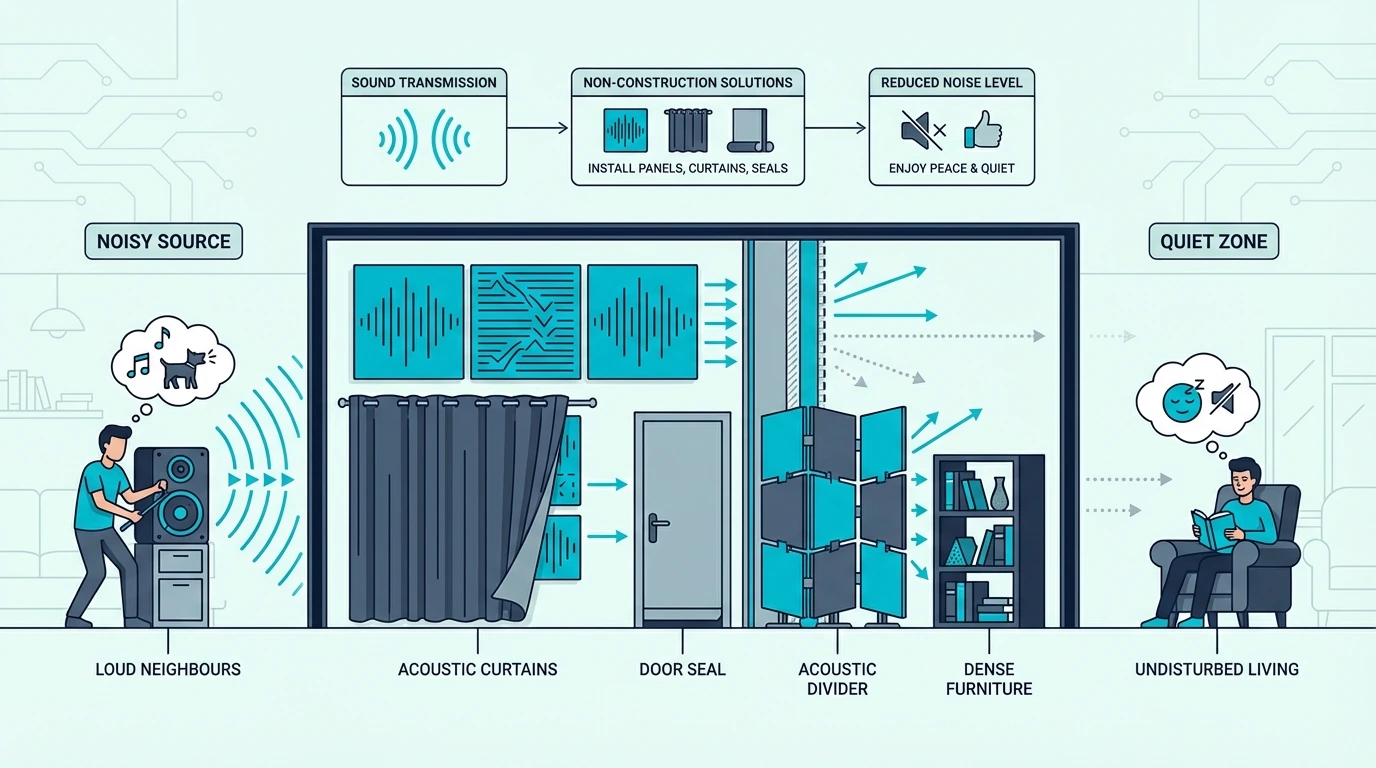
Apartments Need Damage-Free Priorities

Apartment bedrooms need a stricter mindset because the lease, the shared structure, and the building rules limit what is practical.

The best apartment plan is usually the best damage-free fix for the main path, not a fantasy rebuild.

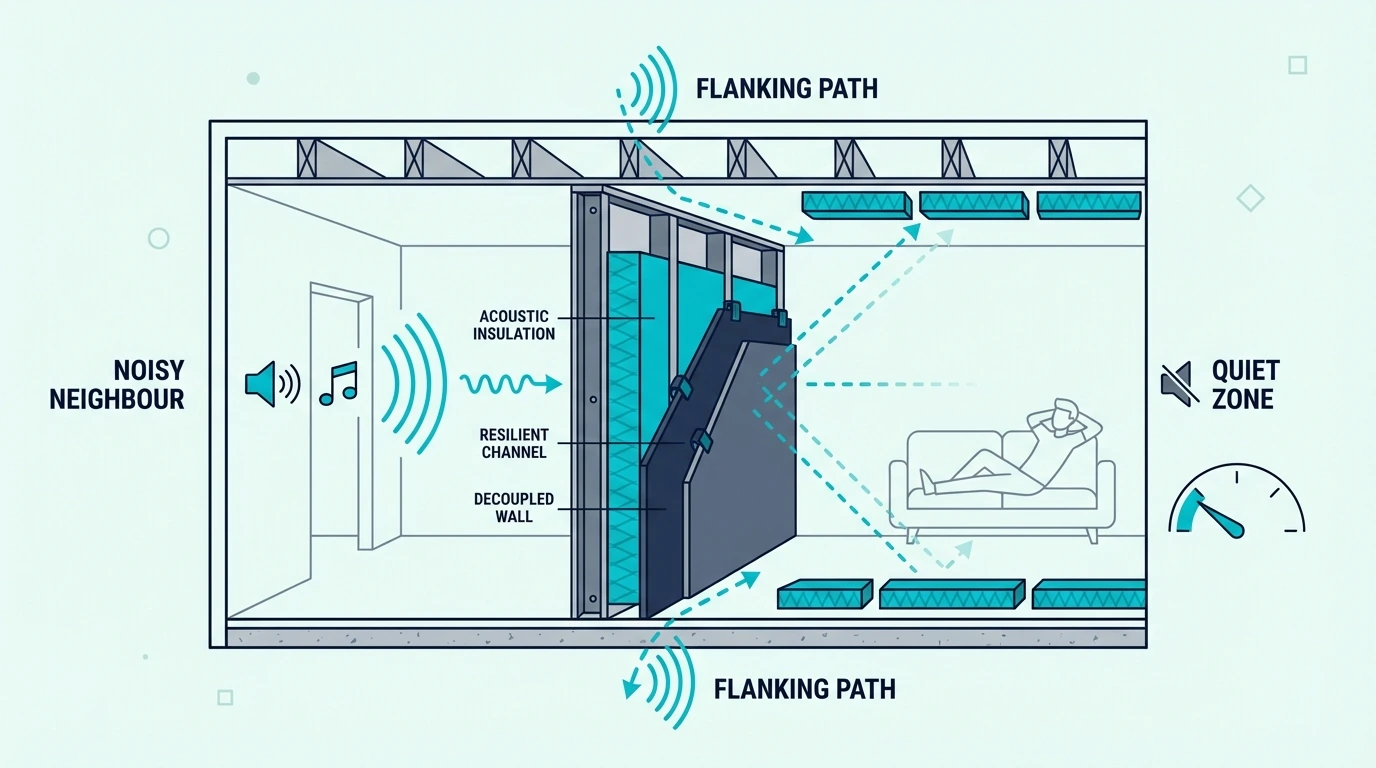
If the problem is next door, focus on the party wall and the flanking gaps around it. If the problem is above, understand that ceiling and structure paths are harder to cheat around with renter-safe accessories.

Apartment bedrooms are also where reader frustration can lead to bad buying decisions. The article should keep steering people back to diagnosis instead of treating every nearby surface out of panic.

For the apartment-specific version of this problem, connect this section with how to soundproof an apartment, how to soundproof a wall from noisy neighbours, and how to soundproof a floor when source-side or downstairs transmission enters the decision.

Save For Stronger Upgrades When Sleep Is Still Breaking

Save for a stronger upgrade when the bedroom has an important job and the small fixes are clearly not enough.

Shift workers, light sleepers, people beside busy streets, and anyone dealing with repeated neighbor conflict hit that line faster than casual readers do.

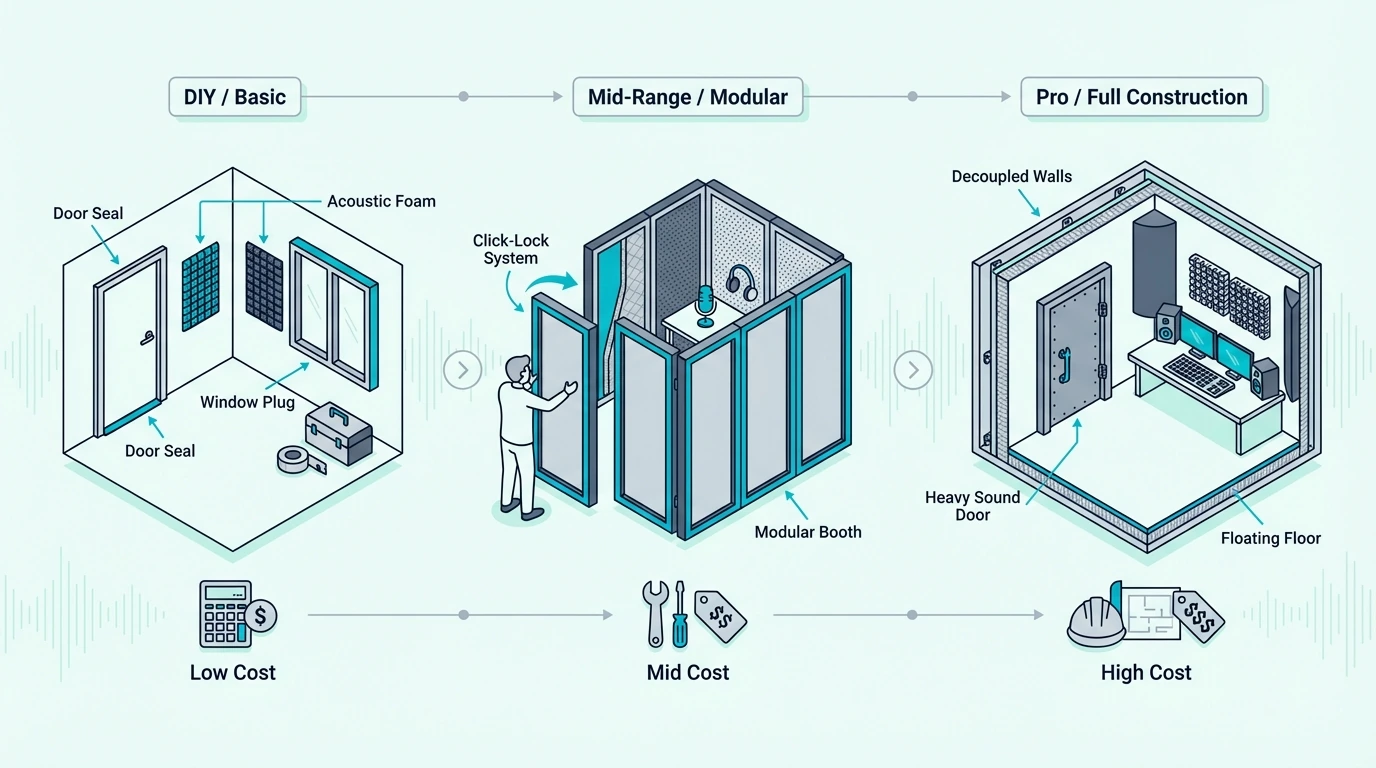
That is the point where a better door, a better window strategy, a ceiling rebuild, or a real wall assembly change starts to make more sense than repeated small purchases. What looks “cheaper” at first often becomes more expensive once three or four weak fixes fail in a row.

If you only have one weekend, use it this way: tighten the obvious door and window leaks, seal the trim and frame gaps, add the best support layers you can, and then reassess what is still waking you up. The second round of spending should be based on what remains, not on what looked most appealing online.

When the room is clearly ready for more than DIY, hand the reader to how much it costs to soundproof a room, best soundproofing material, and how to soundproof a room for the broader assembly logic.
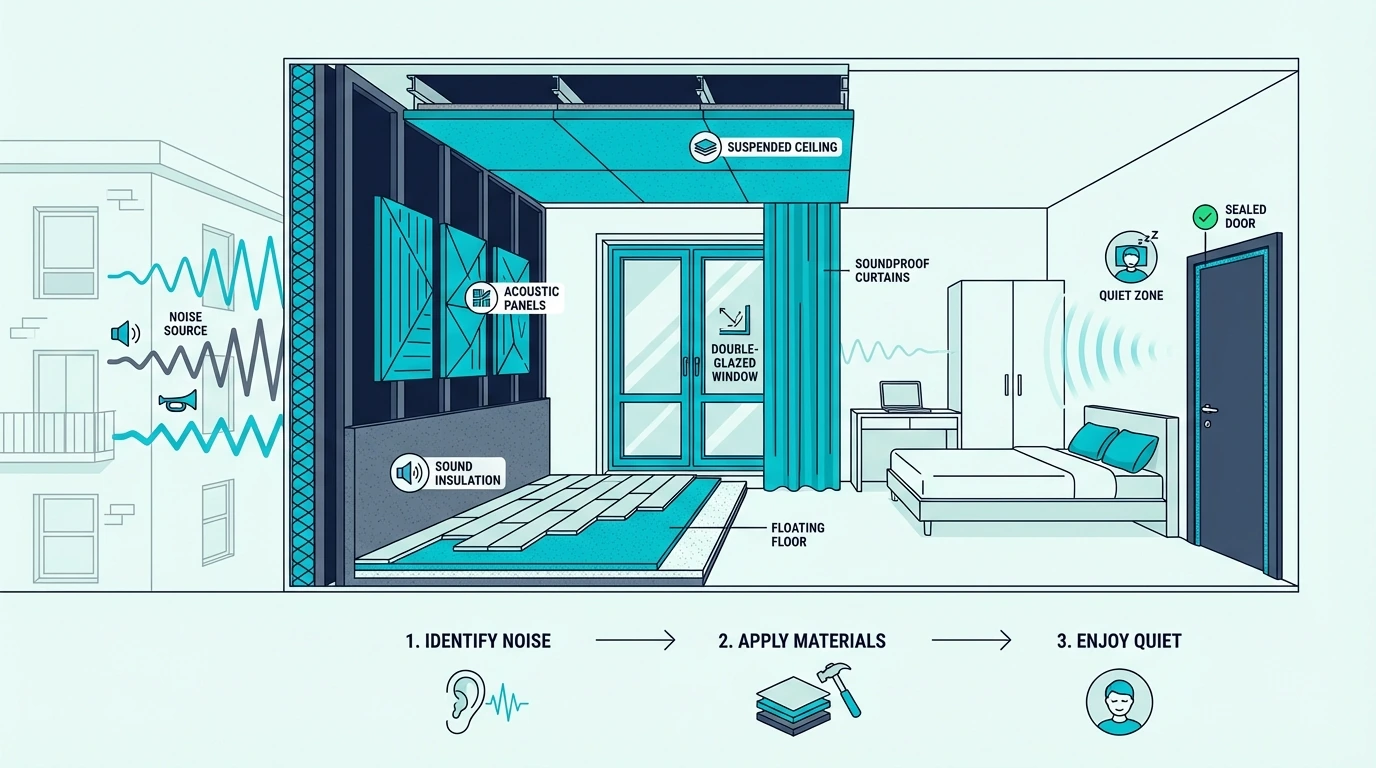
The Bottom Line

How to soundproof a bedroom for better sleep stops being confusing once you make one decision first: which surface is actually breaking the night?

If trucks, barking, or outside noise are waking you up, start at the window.

If hallway spill and household activity are the problem, start at the door.

If neighbors are bleeding through beside the bed, start at the wall.

If footsteps and thuds are the real issue, start at the ceiling.

That is the rule that keeps the budget honest.

Use cheap fixes when the problem is moderate and the leak is obvious. Save for stronger upgrades when the bedroom still feels exposed after the first honest round of sealing, support layers, and layout changes.

Then move to the surface guide that matches the real weak point in your room: how to soundproof a room, how to soundproof windows, how to soundproof a door, how to soundproof a wall, and how to soundproof a ceiling.

Frequently Asked Questions

Does rockwool soundproof?

Rockwool can help when it is part of a real wall or ceiling assembly because it improves absorption inside the cavity. On its own, though, it is not the whole answer for a bedroom that is mainly leaking through the window, door, or perimeter gaps.

How do you soundproof a room that is already built?

In an already-built bedroom, start with the biggest leak and use the best retrofit option for that surface first. That usually means sealing gaps, tightening the door or window, and then moving to stronger wall or ceiling work only if the smaller fixes are not enough.

How to stop noise from coming through walls?

Start by confirming the wall is really the main path and not the door, window, or ceiling around it. If the wall is the issue, the best fixes usually involve more mass, better sealing, and a stronger wall build rather than thin decorative panels.

How To Soundproof A Wall From Noisy Neighbours (What Actually Works)

How to soundproof a wall from noisy neighbours can work, but only if you match the fix to the actual shared-wall problem. The right solution for TV voices through a light stud wall is not the right solution for bass through a masonry party wall, and neither one works well if the real leak is actually the ceiling edge, the floor, or a nearby door.

That is why so many neighbor-noise projects disappoint. People hang foam, add one decorative panel, or buy “soundproof” products without understanding how sound waves, sound transfer, and sound vibrations are moving through the existing wall assembly in the first place.

When the diagnosis is wrong, even a well-installed product can feel like a waste of money.

The good news is that shared-wall soundproofing can make a meaningful difference when you match the method to the wall type, the noise type, and the likely flanking paths. Sometimes a wall-only upgrade really is the answer.

Other times the smartest move is a lighter retrofit, a renter-safe compromise, or a broader room strategy that includes the wall plus nearby flanking paths.

Start by figuring out whether you have a brick or stud shared wall and whether the wall is truly the main weak point. Then you can decide if you need a lighter retrofit, a stronger drywall-and-damping build, or a more complete system that deals with the surrounding room as well.

Quick Takeaway

The best way to soundproof a wall from noisy neighbours is usually to add mass, improve sealing, and in stronger builds combine damping or decoupling with insulation inside the assembly. Solid brick party walls and light stud walls need different strategies, and wall-only fixes often disappoint if the noise is also flanking through floors, ceilings, doors, or window details. For already-built rooms, renter-safe or non-destructive fixes can dampen noise a little, but the biggest improvements usually come from rebuilt shared-wall systems.

If you want the fastest answer first, use this matrix before the full diagnosis. It shows which shared-wall approach usually fits the noise type, wall type, and amount of construction you can tolerate.

Situation Best starting move What to expect
Voices or TV through a light stud wall Add sealing plus a new 5/8-inch drywall layer with damping Usually the best value upgrade for clear airborne noise
Bass or repeated music through a light wall Plan for a more separated front assembly, not just another thin surface layer Stronger improvement, but more thickness and labor
Noise through a brick or masonry party wall Focus on sealing and a stronger inner build-up in front of the wall Better than soft surface products, but still build-dependent
Renting or avoiding major construction Seal nearby gaps, add dense furniture, and use temporary heavy barriers Modest improvement only
Wall is not clearly the loudest surface Diagnose flanking at the door, ceiling line, floor edge, and outlets first Wall-only work may disappoint if the leak is elsewhere

Shared-Wall Soundproofing Only Works After A Proper Diagnosis

Overview of soundproofing a wall from noisy neighbours

The first step is not choosing a product.

The first step is working out what kind of neighbour noise you are actually dealing with and how it is getting through the wall.

A shared wall that leaks speech, television sound, and general voices behaves differently from a wall that seems to carry bass, low rumbles, or heavy thuds. That difference matters because the level of mass, damping, and separation required is not the same across all noise types.

Airborne Voices And Low-Frequency Bass Do Not Ask The Same Thing From The Wall

Voices, TV dialogue, midrange music, and general living noise are usually airborne noise problems. These are often the easiest shared-wall issues to improve because adding mass, damping, sealing, and in the right cases insulation can reduce sound transmission across the wall more effectively.

Bass is harder because lower frequencies carry more energy, travel farther through the structure, and make the wall assembly vibrate more aggressively.

That is why readers dealing with subwoofers, gaming setups, home theater noise, or repetitive music often feel like the wall is “impossible” to treat. The problem is not that soundproofing solutions never work.

The problem is that low-frequency sound transfer asks more from the wall system than speech-level noise does. In practice, that usually means more thickness, more mass, and more tolerance for construction than people first expect.

It also helps to separate airborne noise from impact-style noise. If what you are hearing feels more like vibration, repeated knocks, or transferred structure-borne energy, the fix may involve more than the shared wall alone.

That is where readers should compare this page with how to soundproof a ceiling, how to soundproof a floor, and the broader how to soundproof a room guide before blaming the wall only.

The Shared Wall Is Not Always The Only Leak Path

A shared wall is often the obvious suspect, but not always the true main weak point. Sound can flank around the wall through a door frame, an adjacent window, a floor perimeter gap, ceiling junctions, outlet boxes, vents, or a stud connection that ties the sound into nearby surfaces.

That is why simple diagnosis matters so much. Stand near the wall, but also listen at the door, the ceiling line, the corners, and any openings close to the shared surface.

If the wall is the loudest surface, treat it first. If the edge details are nearly as loud, you may need a combined approach rather than a wall-only build.

It also helps to test at different times of day. A party wall that seems mainly like a voice problem in the afternoon may reveal stronger bass transfer at night, and that changes the kind of build that makes sense.

This is also why modest flanking fixes are sometimes worth trying before a larger wall project. A product like soundproofing weather stripping is not a wall system, but it can reveal whether adjacent gaps are making the shared wall problem feel worse than it really is.

Realistic Targets Protect You From Wasting Money

This is where expectation-setting protects readers from spending badly. Small retrofits can dampen noise a little.

Heavier surface additions and better assemblies can reduce sound more clearly. A rebuilt shared wall with mass, damping, cavity treatment, and careful sealing can make a big difference.

What most people cannot buy is perfect silence from a single finished-wall add-on. If the goal is “I want to hear less TV and fewer voices,” there are many effective solutions.

If the goal is “I never want to hear my neighbor again,” the wall may need much more thickness, more cost, and more structural work than the average DIY reader expects. That is especially true where the existing wall is light, poorly sealed, or tied tightly into the rest of the structure.

That honest framing matters because it shapes the whole article. You are not choosing between “works” and “does not work.”

You are choosing between modest improvement, meaningful reduction, and a high-performance build.

Brick Walls And Stud Walls Fail In Different Ways

Wall type considerations for neighbour noise soundproofing

The wall type matters because a solid brick party wall and a light stud wall fail in different ways.

A heavy existing wall already has more mass, so the strategy often centers on sealing, damping, and adding a new independent layer where needed. A lighter stud wall is more vulnerable to sound transfer through the cavity and the shared framing, so the plan changes much faster.

That is why two neighbors with the same complaint can need very different effective solutions. One may benefit from a front build-up on top of an already heavy wall, while the other needs a fuller lightweight-wall assembly upgrade.

Masonry Walls Usually Need A Better Inner Build-Up, Not Soft Surface Products

A brick or masonry party wall already gives you one useful thing: mass. That means you may not need to chase the exact same build logic you would use on a thin stud wall.

Instead, the question becomes whether the current wall needs more airtightness, a better isolated layer in front of it, or a new build-up that reduces direct contact and dampens sound waves more effectively. In many masonry cases, the wall itself is not “too light.” The weakness is more often at the finish layer, the edge details, or the lack of a more separated inner skin.

For a masonry wall, simple thin treatments are usually weak value. If a wall is already heavy, the problem is often not that it needs a soft decorative covering.

The problem is that it needs a stronger front assembly or a better sealed finish that helps dampen sound and reduce sound transmission across the full surface. Readers often get better results by thinking in terms of “new inner layer” rather than “wall decoration.”

This is where high-mass materials can make sense when the job justifies them. A product like Trademark soundproofing mass loaded vinyl is not a first-step fix for every reader, but it is the kind of material that matches a serious masonry shared-wall upgrade better than a cheap foam layer ever will.

Stud Walls Improve Most When The Whole Assembly Gets Better

A stud wall is different because the cavity, the studs, the board layers, and the connections all affect sound transfer.

A light existing wall often benefits from a fuller system approach: additional drywall or other mass layers, damping between layers, cavity insulation where appropriate, and in higher-performance builds some degree of decoupling so the new surface is less directly tied to the old vibrating wall.

Stud walls are also where weak workmanship shows up fast. Gaps, poorly sealed perimeters, shallow cavities, and direct rigid connections all make it easier for neighbour noise to move through the assembly.

This is why stud walls can sometimes deliver better improvement than readers expect when upgraded properly. The existing wall has less mass to begin with, but it also has more room for system-level gains if you add mass, change the cavity behavior, and reduce direct vibration transfer.

That said, cavity treatment alone is not enough. Wall insulation helps, but it is rarely the whole answer.

The best stud-wall improvements come from combining wall insulation with added mass, damping, and full sealing rather than expecting one component to solve everything. If you want the material-level comparison behind that logic, connect this article with best insulation for soundproofing, best soundproofing material, and best soundproofing panels.

Uncertainty About Wall Type Should Change The First Step, Not Stop The Project

Start simple. A tap test, the wall thickness, the age and style of the building, and what sits on the other side can give useful clues.

A hollow or lighter response often points toward a stud wall. A dense, hard, and more solid feel often points toward masonry or brick.

You can also use context. Apartments, newer partitions, and some interior dividing walls are more likely to be stud constructions.

Older terraces, semi-detached homes, and many true party-wall situations are more likely to involve brick or masonry. Townhouses can go either way, which is why a quick field check still matters.

If you still are not sure, plan around uncertainty instead of pretending certainty. Focus on the strategies that help diagnose first: listen for flanking, check adjacent openings, and avoid buying thin “quick fixes” that would be weak value on either wall type.

That cautious approach prevents a lot of wasted cost. It also keeps you from locking yourself into a wall treatment that makes less sense once the wall type is finally confirmed.

The Best Shared-Wall Upgrade Depends On How Much Construction You Can Tolerate

Best wall soundproofing solutions for neighbour noise

The best shared-wall solution is usually the one that matches both the noise level and the amount of construction you can tolerate.

This is the core decision section because it separates meaningful upgrades from partial compromises.

It is also where readers need to decide whether they want a proper assembly upgrade or simply the best available improvement for an existing wall.

If you want the fastest build-level answer, most readers fall into one of the four tracks below. The goal is to match the wall system to the actual neighbour-noise problem instead of stacking random products on the surface.

Goal Build level Typical assembly Best fit
Stop light leakage around a mostly decent wall Light retrofit Seal edge gaps, outlets, nearby door or window details, and add dense room-side layers Mild voices where flanking is obvious
Improve a finished light wall without a full rebuild Mid-tier wall build New 5/8-inch drywall layer with Green Glue Noiseproofing Compound, plus sealing Voices, TV, and moderate music through a stud wall
Get stronger performance from a light stud wall Serious stud-wall build Cavity insulation, a more separated front assembly, new drywall, and full perimeter sealing Repetitive, stronger, or bass-heavier transfer
Upgrade a heavy brick or masonry party wall Serious masonry build Sealed existing wall plus a new inner build-up rather than soft wall coverings Masonry walls that still leak neighbour noise

Added Drywall And Damping Often Give The Best Mid-Tier Return

Extra drywall helps because it adds mass. Damping helps because it reduces how strongly the wall layers resonate and transmit sound vibrations.

Together, they are often the most practical upgrade path for a finished shared wall when you can accept added thickness and moderate construction. For many homeowners, this is the sweet spot between weak surface add-ons and full decoupled rebuilds.

For a typical finished stud wall leaking voices or TV noise, the practical mid-tier build is perimeter sealing plus one new 5/8-inch drywall layer with Green Glue Noiseproofing Compound between rigid layers. If the existing wall is especially light or the transfer is stronger than normal speech, add Trademark soundproofing mass loaded vinyl before the new drywall rather than expecting a soft wall covering to do the same job.

This is often the point where readers start seeing the difference between a cosmetic upgrade and an actually effective solution. It is also why the main wall article, how to soundproof a wall, should sit alongside this page when you want the broader wall logic beyond the neighbour-specific case.

Decoupling Earns Its Thickness When Vibration And Bass Dominate

Decoupling is worth it when the shared-wall problem is serious enough that simply adding mass to the existing wall may not get you where you want to go. If the noise is repetitive, strong, or bass-heavy, or if the existing wall is light enough that vibration transfer is a major part of the problem, resilient systems or more separated front assemblies become much more attractive.

The tradeoff is thickness, cost, and labor. Decoupling is not usually the answer for readers looking for the easiest weekend project.

Think of this as the serious-build track: a more separated front assembly in front of the shared wall, then new board layers and full sealing. On a light stud wall with repetitive music or bass, this is often where the upgrade starts becoming meaningfully stronger rather than just heavier.

On masonry, the equivalent move is usually an isolated inner skin in front of the party wall rather than trying to glue soft materials straight to the brick. That is why decoupling belongs in the serious-fix bucket even though it is not necessary for every neighbor-noise problem.

Insulation Matters Most When It Supports A Complete Wall System

Insulation matters most when it is part of a full shared-wall assembly rather than a standalone idea. In a stud wall, cavity insulation can help absorb sound and reduce some internal resonance, and a product like AFB Mineral Wool Insulation works best when paired with better board layers, damping, and careful sealing of the whole system.

The practical opened-wall sequence is cavity insulation first, then better board layers or a more separated front assembly, then careful sealing at outlets and perimeters. That is the point where insulation starts helping the full wall system instead of acting like an isolated idea.

This is where many DIY readers lose the thread. They hear that wall insulation helps and assume the cavity fill is the project.

In reality, cavity treatment is one part of a broader system that needs to control sound transfer across the whole wall. If the cavity is improved but the wall still leaks through outlets, edges, or weak board layers, the result will still feel incomplete.

Finished Rooms Can Still Improve Without A Full Rebuild

Reducing neighbour noise without construction

Yes, but the limits matter. A finished shared wall can sometimes be improved without major construction, but non-destructive solutions usually dampen noise a little rather than deliver the big jump people associate with true soundproofing.

That does not make them pointless. It just means they belong in the “modest help” bucket rather than the “major reduction” bucket.

Non-Destructive Fixes Belong In The Modest-Improvement Bucket

Furniture placement, heavy shelving, dense storage, layered soft surfaces, temporary barriers, and careful sealing around nearby leaks can all help a little.

These are not fake improvements. They are just smaller improvements.

That distinction matters because small gains can still be useful. If the shared wall mainly carries occasional voices or moderate TV noise, even a modest reduction can improve sleep, focus, or daily comfort.

This is especially true in bedrooms, nurseries, and home offices where reducing the sharpest noise peaks matters more than chasing complete isolation.

A renter-safe temporary barrier like the VEVOR sound dampening blanket fits this category. It is not a replacement for a rebuilt party wall, but it can help as a temporary barrier, a test layer, or a finished-room compromise.

Renters Usually Do Better With Layered Reversible Fixes

Renters should think in reversible layers: large furniture on the shared wall, rugs if the room has hard floors, denser curtains near nearby openings, removable shelves or storage, and temporary heavy barriers where allowed.

The best renter strategy is usually to combine several modest fixes instead of expecting one product to solve a structural problem. That layered approach can also help identify which part of the room is really causing the most trouble before money goes into bigger work.

That is why apartment readers should keep one eye on the broader room context. If the “shared wall” problem is really part wall, part door gap, and part outside noise, the more relevant companion pages may be how to soundproof an apartment, how to soundproof a door, and how to soundproof windows.

Thin Foam And Miracle Products Usually Belong In The Wrong Category

Thin acoustic foam, lightweight stickers, decorative felt tiles with little density, and products marketed like miracle solutions are mostly hype when the real goal is to reduce sound transmission through a shared wall.

They may change room sound or slightly dampen reflections, but they do not give the kind of adding-mass, damping, or sealing benefits a serious neighbor-noise problem usually needs.

That is why readers should be careful with language like “soundproof existing wall” or “soundproof a neighbouring wall” when the suggested product has almost no mass.

If the product cannot meaningfully reduce sound transmission, it is not the main answer to a noisy neighbour problem. Cheap products can still have a place, but only when their limitations are understood from the start.

Flanking Paths Explain Why A Good Wall Build Can Still Disappoint

Flanking noise paths around a shared wall

This is the section most people need and most articles underplay. A shared wall can be treated correctly and still underperform because sound is not always loyal to the wall you decided to fix.

That does not mean the wall upgrade failed. It may simply mean the room was behaving like a system and the wall was only part of that system.

Floors, Ceilings, And Side Junctions Can Bypass The Upgraded Wall

Yes. Sound can travel through floors, ceilings, adjacent walls, framing connections, sockets, trims, and gaps where the wall meets other surfaces.

This is called flanking, and it is one of the main reasons wall-only projects can feel disappointing. It is also why the wall may sound quieter in the middle than at the room edges.

That is why system thinking matters more than product shopping. If the noisy neighbors share a floor line, a ceiling line, or a connected wall junction, treating only the most visible wall surface may not control the full path of sound transfer.

If the loudest spots are outlets, trim transitions, or perimeter cracks rather than the wall field itself, a sealant like Acoustical Caulk (29 oz) is often the cheapest way to stop a good wall plan from being bypassed by small leaks.

This is especially common in apartments and terraces where the party wall is tightly tied into the surrounding structure. In those buildings, a good wall build can still leave some residual transfer because the noise is partly bypassing the upgraded surface.

This is also where readers benefit from connecting articles instead of isolating them. If wall treatment seems logical but the result is still weak, compare your situation with how to soundproof a ceiling, how to block outside noise, and how to soundproof a room cheaply to identify what the wall build may have missed.

Sometimes The Better Investment Is Above Or Below The Wall

The ceiling or floor may be the better place to work when the wall treatment makes only a small improvement, when impact-style vibration seems to dominate, or when the room layout suggests sound is entering from above, below, or around the shared partition rather than through it directly.

That is why good shared-wall diagnosis includes the surrounding assembly. If the wall is one leg of a larger soundproofing problem, the better investment may be a ceiling treatment, a floor strategy, or a mixed plan rather than a thicker wall alone.

Readers often resist this conclusion because it feels like the wall project “should” have solved everything. In reality, the room is only telling you where the next weak path lives.

Professional Help Makes Sense Before You Sacrifice Too Much Depth Or Budget

Call a professional when the wall use case is important enough that guesswork would be expensive, when the room needs a higher-performance build, or when you suspect a more technical party-wall assembly involving fire, structure, code, or complex flanking paths.

A professional can help confirm the wall type, the weak points, and the improvement level the current room can realistically support. That becomes especially valuable once you are considering thicker assemblies, room-depth loss, or a more permanent system with multiple components.

This is especially true if you are about to lose meaningful room depth or spend heavily on a rebuilt assembly. A stronger design is much easier to live with when the thickness, cost, and expected result have been planned honestly from the start.

The Bottom Line

How to soundproof a wall from noisy neighbours is really about choosing the right level of intervention for the right wall. If the shared wall is light and clearly the weak point, a fuller system with added mass, damping, insulation, sealing, and sometimes decoupling is often the most effective path.

If the wall is already heavy, you may need a better front assembly, better edge sealing, or a stronger understanding of where sound is flanking around the party wall.

The goal is not to buy the most dramatic product. The goal is to build the right response to the actual shared-wall problem.

That diagnosis usually saves more money than another random surface product ever will.

For lighter problems and finished rooms, small retrofits can still dampen noise and improve comfort, but they should be judged as modest improvements rather than miracle cures.

The smartest next step is to pair this page with the articles that match the actual weak point in your room: the soundproofing hub, how to soundproof a wall, how to soundproof an apartment, how to block outside noise, and how much it costs to soundproof a room.

Frequently Asked Questions

How can I stop hearing my neighbor through walls?

Start by confirming the shared wall is the main path, then improve sealing and decide whether the problem calls for a modest retrofit or a rebuilt wall assembly. If the noise is strong or bass-heavy, small surface fixes usually will not be enough on their own.

How can I soundproof my walls cheaply?

Cheap wall soundproofing usually means modest improvements like furniture placement, temporary heavy barriers, and fixing flanking leaks near the shared wall. Those can help a little, but stronger neighbor-noise problems usually need more mass or a better wall system.

How can I soundproof a shared wall?

The most effective shared-wall approach is usually to add mass, use damping where appropriate, seal everything carefully, and in stronger builds consider insulation and some degree of decoupling. The exact plan depends on whether the wall is masonry or stud construction.

What can I put on my walls so I don’t hear my neighbors?

On a finished wall, dense furniture, heavy temporary barriers, and carefully chosen retrofit layers can help more than thin foam or decorative panels. If you need a major improvement, the best answer is usually not something you simply stick to the wall surface.

How To Soundproof A Room Cheaply (What Actually Helps On A Budget)

How to soundproof a room cheaply can work, but only if you stop trying to cheaply “fully soundproof” the whole room and fix the weakest leak first.

Most budget attempts fail because the money goes to foam tiles, gimmicky panels, or random blankets when the real problem is usually a door gap, a loose window, a perimeter crack, or a light shared surface.

If you use cheap fixes where they actually help, you can reduce speech bleed, soften outside noise, and make a finished room feel calmer without wasting money on fake shortcuts.

Start with leakage, then improve the weakest opening, then decide whether the room still needs a stronger build.

This guide walks through the cheap fixes worth trying first, the ones that are usually a waste, and the point where saving for real construction becomes the smarter move.

Quick Takeaway

The cheapest useful soundproofing plan usually starts with the obvious leaks: door bottoms, door frames, window gaps, and trim cracks. After that, rugs, heavier curtains, dense furniture, and a better room layout can help a finished room feel quieter, but cheap fixes stop working fast when the real problem is bass, footsteps, severe traffic noise, or heavy transfer through a shared wall or ceiling.

Cheap Soundproofing Works Best As Triage, Not As A Full Rebuild

Overview of cheap room soundproofing options

Cheap soundproofing works when you treat it like triage. You are not building a studio shell on a tiny budget.

You are looking for the cheapest move that fixes the loudest leak first. That usually means the door, window, or room perimeter before it means the wall itself.

Cheap Fixes Make A Difference When They Target Real Leakage

The best cheap fixes are usually boring. Door seals, frame seals, cracked trim joints, rugs on hard floors, and heavy furniture against the weakest surface routinely outperform “soundproofing” products that look more impressive in photos.

A basic product like HomeProtect Door Draft Stopper 36 Inch Under Door Draft Blocker Door Sweep can be a smarter first purchase than a decorative wall product. If the biggest leak is under the door, fixing that one path can change the room more than covering part of a wall with something light.

The same logic applies to layout. A thick rug, a loaded bookshelf, and a bed or dresser moved off the weak wall can all help in small but real ways when they support the main fix instead of replacing it.

Sealing Gaps Comes Before Any Heavier Cheap Upgrade

Sound loves air gaps. If light is visible under the door or the window trim feels drafty, that leak can undercut every other cheap improvement in the room.

Frame compression from 33 Ft Gray Self-Adhesive Soundproofing Weather Stripping for Doors and Windows and flexible sealant like Acoustical Caulk (29 oz) 1 Tube with clean up wipe usually belong near the top of any cheap plan because they target the easiest paths first.

Before you buy anything heavier, check the room the same way you would check a cooler with the lid cracked open. If the opening is still there, the room is leaking before the wall build even gets a chance to matter.

If your main leak is already obvious, use how to soundproof a door and how to soundproof windows next instead of spreading weak fixes across the whole room.

Cheap Gimmicks Fail When They Add No Mass And Fix No Leak

Thin foam squares, miracle paint, egg cartons, and adhesive “soundproof” tiles all fail the same test. They do not add meaningful mass, they do not create a real seal, and they do not decouple anything.

That does not mean every cheap product is bad. It means cheap products only help when they are solving the right cheap problem.

If the problem is air leakage, cheap sealing products can help a lot. If the problem is bass through a shared wall, the cheap answer is usually not another accessory.

Built Rooms Force Cheap Fixes To Stay Outside The Shell

Low-cost soundproofing for an already built room

An already-built room changes the rules because you are working from the outside of the shell. That pushes you toward removable fixes, sealing, layout changes, and small upgrades that do not involve opening framing.

Finished Rooms Improve Through Small Exterior Gains

You can improve the door, tighten the window, seal trim joints, add rugs and pads to hard floors, move dense furniture onto the weakest wall, and soften the room side of a noisy opening. These are all real finished-room moves because they work with the space you already have.

That is also why finished-room soundproofing is usually about stacking small gains. You are not rebuilding the assembly, so the goal is to reduce the most obvious failure points and make the room livable enough for sleep, work, or day-to-day comfort.

If you need the full shell logic, use this page together with how to soundproof a room. This article is the cheap-first screen, not the whole construction playbook.

Renters Need Cheap Fixes That Stay Reversible

Renters should focus on reversible fixes: door sweeps, weatherstripping, caulk only where allowed, rugs, heavier curtains, furniture placement, and soft source-side changes. That is the zone where you can make a room quieter without turning the lease into a problem.

A curtain like RYB HOME Soundproof Divider Curtain belongs in that support category. It can help a window wall feel calmer, but it should sit behind the real priorities of sealing and leak control.

This is also where “free” fixes matter. If you can move the bed off the weak wall, push a loaded shelf onto the noisy side, or add a thick rug you already own, do that before buying decorative products that solve the wrong problem.

Some Built Rooms Still Need More Than Cheap Surface Fixes

A bigger upgrade is the only real answer when the room is losing to low frequency, repeated impact, or a very light shared assembly. Bass-heavy music, strong traffic, upstairs footsteps, and severe neighbor transfer often blow past what cheap surface fixes can do.

Budget readers need a stop point. Cheap retrofits are worth trying first, but they should not trap you in endless small spending when the room is clearly asking for mass, decoupling, or a better door or window.

Noisy-Neighbor Problems Reward Honest Cheap Triage

Cheap room soundproofing for neighbour noise

Noisy-neighbor problems are where cheap fixes need the most honesty. Sometimes the room just needs better sealing, but sometimes the wall is too light and the cheap answer only gets you a small improvement.

Shared Walls Improve Cheaply Through Dense Support First

The best cheap shared-wall fixes are usually furniture placement, dense shelving, and perimeter sealing around the wall before buying specialty materials. A filled bookcase or wardrobe can sometimes help more than a cheap thin panel because it adds actual depth and weight where the wall is weakest.

That does not turn the wall into a high-performance assembly. It simply means you are getting the most honest low-cost gain first.

If the neighbor noise still points clearly to one party wall after you tighten the room, go straight to how to soundproof a wall or how to soundproof an apartment instead of guessing with more accessories.

Flanking Paths Often Beat The Wall In Finished Rooms

Many people assume the wall is the problem when the real weakness is the door, the window, or the perimeter where the surfaces meet. Cheap shared-wall fixes often disappoint because they treat the wrong surface with perfect confidence.

If the noise gets sharper near the glass or the door edge, the money will usually go farther there first. Cheap soundproofing works best when you diagnose the loudest path instead of treating every nearby surface equally.

That is especially true for outside noise. If the room is dealing with traffic or street sound, use how to block outside noise and how to soundproof windows before assuming a shared wall is the whole problem.

Cheap Plans Fail Fast When They Solve The Wrong Surface Beautifully

Skip any product whose whole pitch is that it sticks to the wall and magically “soundproofs” the room. Also skip treating one surface heavily before you confirm that it is actually the dominant path.

Cheap soundproofing needs discipline more than shopping. The lowest-cost plan still fails if you solve the wrong problem beautifully.

Cheap Materials Only Matter When They Match The Weak Point

Budget materials for soundproofing a room

The best cheap materials are the ones that solve common weak points without pretending to be a complete rebuild. They are modest, targeted, and usually tied to leakage, reflection, or one weak opening.

Rugs, Curtains, And Weatherstripping Are Worth It In The Right Jobs

Yes, when they are solving the right problem. Rugs and dense pads help hard floors feel less sharp, curtains can soften a reflective window side, and weatherstripping helps reduce air leakage at doors and windows.

None of them are magical by themselves. Together, though, they often form the best low-cost stack available in a finished room because they improve several weak points at once.

Budget soundproofing usually looks modest instead of dramatic. It is often a bundle of small useful moves that add up better than one flashy purchase.

Mass Loaded Vinyl Only Makes Sense Once Simpler Cheap Fixes Are Done

Sometimes, but only when it is replacing several weaker purchases. MLV is not usually the first cheap material to buy because simple sealing and opening fixes are almost always better first-dollar moves.

It becomes more sensible when the room clearly needs one focused mass layer, one removable plug, or one smarter upgrade instead of several low-cost accessories that never solve the core issue.

Value matters more than sticker price. If the room clearly needs more mass, repeating cheaper mistakes is not actually the budget option.

Acoustic Foam Usually Solves Echo, Not Isolation

Acoustic foam is usually not the answer because people buy it expecting sound isolation, while foam mostly helps with echo and internal reflections. It can help a room sound less harsh without doing much to stop sound crossing the shell.

Foam is often the wrong first budget purchase for people trying to block outside noise, reduce neighbor transfer, or make a bedroom quieter. If you want the material side explained in more detail, compare this article with best soundproofing material and best insulation for soundproofing.

Cheap Soundproofing Stops Helping Once The Room Needs Structure

Limits of cheap room soundproofing fixes

Cheap soundproofing stops being enough when the problem demands more mass, more separation, or a structural change that low-cost add-ons cannot deliver.

That does not mean the cheap fixes were pointless. It means they were the screening step, not the full solution.

Some Noise Problems Exceed The Budget-Fix Ceiling Early

Bass-heavy music, strong traffic noise, upstairs footsteps, and severe shared-wall transfer often need stronger assemblies than a budget retrofit can provide. The same is true when the room has several weak surfaces leaking at once instead of one clear weak point.

Readers need a clean off-ramp. If the cheap fixes only make a tiny difference, the lesson is not that soundproofing never works.

The lesson is that the room needs a stronger path than accessories can provide.

Saving Makes More Sense Once Cheap Gains Flatten Out

It is better to save when the room has an important job like sleep, remote work, privacy, or repeated neighbor conflict and the cheap fixes are clearly not getting close. In that case, repeated small spending can become more expensive than planning one stronger fix well.

If the room is already telling you that the window, door, ceiling, or one shared surface is the real problem, use this page as the cheap-first test and then move to how much it costs to soundproof a room, how to soundproof a ceiling, or how to soundproof a floor depending on the dominant path.

One Weekend Is Enough To Fix The Cheapest High-ROI Problems

If you only have one weekend, use this order: fix the visible door gap, seal the frame and trim, tighten the noisiest window, add a rug or pad if the floor is hard, and move the heaviest furniture to the weakest surface. That sequence usually gives the most useful cheap improvement in a finished room.

It is not glamorous, but it is realistic. Cheap soundproofing works best when you remove the obvious failures first and only then decide whether the room deserves stronger materials.

The Bottom Line

How to soundproof a room cheaply is really a question of priority, not miracle products.

If the room leaks at the door, window, or trim, start there before you touch the wall.

If the room still fails after those cheap fixes, put the next money into the single dominant path instead of spreading it across accessories.

If the problem is bass, footsteps, or a very light shared assembly, treat this page as the budget screen and then move to the more focused pages that match the real weak point in your room: the how to soundproof a room hub, how to soundproof a wall, how to soundproof a door, and how to soundproof windows.

Frequently Asked Questions

How do you block noise from a shared wall?

Start with the cheapest realistic steps first: move dense furniture to the wall, seal nearby gaps, and confirm that the door or window is not the real weak point. If the wall is still obviously losing after that, you probably need a stronger wall-specific upgrade.

How to block sound between rooms?

Blocking sound between rooms usually starts with the door, frame, and other openings because those are common weak points. If sealing and simple support layers do not help enough, the shared wall or ceiling path may need a more serious fix.

What Is The Cheapest Way To Reduce Outside Noise In A Room?

The cheapest way is usually to improve the window and door area first with sealing, tighter compression, curtains as a support layer, and better room layout. Outside noise often feels like a wall problem when the real leak is the window or frame gap.

How Much Does It Cost To Soundproof A Room? (Real Material Lists By Room Type)

How much does it cost to soundproof a room? Most guides give you one national-average number, but that won’t help because a bedroom with one noisy shared wall is a completely different project from a home theater that needs every surface treated.

Most cost guides fail because they give you a vague national-average range when the real answer requires actual product quantities multiplied by actual room dimensions.

A 10 × 12 bedroom is not the same budget as a 14 × 16 home theater or a 12 × 14 drum room that needs floor isolation on top of everything else.

Start with the side-by-side room summary, then move through the core material costs and the room-by-room builds for bedrooms, home offices, home theaters, studios, and practice rooms.

This guide makes that math practical so you can decide whether you need a targeted one-wall budget, a door-and-window upgrade, or a full-shell build with floor and ceiling work.

Quick Takeaway

A 10 × 12 bedroom with one shared wall treated runs about $619 in materials. A 10 × 10 home office with two walls and a solid core door upgrade runs about $972. A 14 × 16 home theater with walls, ceiling, floor, and a solid core door runs about $3,589. A 12 × 14 recording studio with full decoupling runs about $4,286. A 10 × 12 drum practice room with floor isolation runs about $3,957. Every number below is built from real Amazon product prices multiplied by the actual square footage each room requires.

Side-By-Side Summary: All Room Types At A Glance

If you want the fastest answer first, this table shows the most common room scopes and what each one costs in materials before labor.

Room Type Size Surfaces Treated Material Total
Bedroom (1 shared wall + door + window) 10 x 12 1 wall, door, window $619
Bedroom (2 walls + door) 10 x 10 2 walls, door $699
Home office (2 walls + door upgrade + window) 10 x 10 2 walls, solid door, window $972
Home office (1 wall + door upgrade) 8 x 10 1 wall, solid door $703
Home theater (full build) 14 x 16 4 walls, ceiling, floor, door $3,589
Home theater (full build) 12 x 14 4 walls, ceiling, floor, door $3,007
Recording studio (decoupled) 12 x 14 4 walls, ceiling (decoupled), door, window $4,286
Recording studio (decoupled) 10 x 12 4 walls, ceiling (decoupled), door, window $3,717
Practice room with floor 10 x 12 4 walls, ceiling, floor, door $3,957
Practice room with floor 12 x 14 4 walls, ceiling, floor, door $4,726

Core Material Costs Set The Baseline For Every Room Budget

Overview of soundproof room cost ranges

The summary table gives you the range, but the room-by-room math only works if the material baseline is real.

Every build below uses these exact products, their current Amazon prices, and the full-unit coverage you actually have to buy.

Material Product Unit Price Coverage Per Unit
Mass loaded vinyl Trademark Soundproofing MLV $129.99 100 sq ft per roll
Damping compound Green Glue Noiseproofing Compound $278 per case 192 sq ft (6 sheets of 4 x 8)
Drywall (5/8-inch) Standard 4 x 8 ft sheet from local supplier ~$15 per sheet 32 sq ft per sheet
Cavity insulation AFB Mineral Wool Insulation $99.99 per bag ~48 sq ft per bag
Rigid insulation board Rockwool ComfortBoard 80 $125.42 per pack ~48 sq ft per pack
Sound isolation clips Premium Sound Isolation Clips (100 Pack) $149.99 ~200 sq ft at 24 x 48 OC
Hat channels Trademark Soundproofing Hat Channel (20 Pack) $159.99 per pack 172 linear ft (20 x 8.6 ft)
Acoustical caulk Acoustical Caulk (29 oz) $29.14 per tube 1 room perimeter per 2 to 3 tubes
Weatherstripping 33 Ft Soundproofing Weather Stripping $15.99 per roll 33 ft (about 2 door frames)
Door draft stopper HomeProtect Door Draft Stopper $11.99 1 door
Automatic door bottom 36 in Automatic Door Bottom Sweep $25 1 door
Solid core door Lioncode Solid Core Door Slab $180 1 door
Soundproof curtains RYB HOME Soundproof Curtains $79.95 per pair 1 standard window
Rubber floor underlayment Rubber Flooring Underlayment (4 x 30 ft) $200 per roll 120 sq ft per roll
Drum and studio floor mats TroyStudio Interlocking Floor Mats (16 Pcs) $60 per set ~12 sq ft (equipment pad)

The Room Budgets Only Work If You Price Full Retail Units

Every room section uses the same formula. The surface area comes from real dimensions, and every room in this guide assumes an 8-foot ceiling.

The quantity is the number of full retail units you need to buy, not the neat fraction you consume. That keeps the totals honest because checkout cost, not theoretical leftovers, is what hits your budget.

The tables below do not include labor, paint, mud and tape, trim replacement, or electrical adjustments. Those costs vary too much by region and skill level to price honestly.

What you see is the material you need to buy and the real total at the register.

Bedroom Costs Stay Lowest When The Scope Stays Focused

Soundproofing cost per square foot breakdown

Bedrooms are where most readers learn the first real pricing lesson: you usually do not need a full-shell build to sleep better.

The budget stays sane when you fix the weak link first, then expand only if the noise path demands it.

Bedrooms Usually Fail At One Wall, The Door, Or The Window

Most bedrooms leak through one shared wall, one exterior wall, or the door before they fail anywhere else. Treating every surface too early is the fastest way to overspend on a sleep problem.

The shared wall in an apartment or the exterior wall facing traffic is usually the main path. The door is almost always a hollow-core slab that leaks badly, which is why how to soundproof a door matters so much.

The window is the other common weak point. The ceiling and remaining walls usually stay out of scope unless upstairs footsteps are part of the problem, in which case the ceiling soundproofing guide applies.

A One-Wall Bedroom Budget Usually Lands In The Mid-$600s

That triage logic is why the first bedroom example prices one shared wall, basic door sealing, and one window treatment. One shared wall is 12 x 8 = 96 sq ft, then the door and window treatments stack on top.

Material Product Qty Needed Unit Price Line Total
MLV for shared wall Trademark Soundproofing MLV 1 roll (100 sq ft) $129.99 $129.99
Green Glue for shared wall Green Glue Compound 1 case (covers 192 sq ft) $278 $278
Drywall for shared wall 5/8-inch drywall sheets 3 sheets (96 sq ft) ~$15 each $45
Acoustical caulk Acoustical Caulk (29 oz) 2 tubes $29.14 $58.28
Door weatherstripping 33 Ft Weatherstripping 1 roll $15.99 $15.99
Door bottom seal HomeProtect Door Draft Stopper 1 $11.99 $11.99
Window curtains RYB HOME Soundproof Curtains 1 pair $79.95 $79.95
Total $619.20

If the bedroom also has upstairs footstep noise and the ceiling needs treatment, add 1 roll of MLV ($129.99), 1 case of Green Glue ($278), 4 sheets of drywall ($60), and 1 bag of mineral wool insulation ($99.99) if the cavity is accessible. That pushes the total closer to $1,190.

If you are in an apartment, the apartment soundproofing guide covers the unique constraints renters face. For bedroom-specific details beyond cost, see how to soundproof a bedroom.

A Second Wall Pushes The Bedroom Budget Up Faster Than Most Readers Expect

Once you add a second wall, the leftover-material advantage disappears and the totals jump quickly. Two walls at 10 x 8 = 160 sq ft.

Material Product Qty Needed Unit Price Line Total
MLV for two walls Trademark Soundproofing MLV 2 rolls (200 sq ft) $129.99 $259.98
Green Glue for two walls Green Glue Compound 1 case (covers 192 sq ft) $278 $278
Drywall for two walls 5/8-inch drywall sheets 5 sheets (160 sq ft) ~$15 each $75
Acoustical caulk Acoustical Caulk (29 oz) 2 tubes $29.14 $58.28
Door weatherstripping 33 Ft Weatherstripping 1 roll $15.99 $15.99
Door bottom seal HomeProtect Door Draft Stopper 1 $11.99 $11.99
Total $699.24

For more detail on the wall build itself, see how to soundproof a wall and how to soundproof an existing wall.

Home-Office Costs Rise Quickly Once Speech Privacy Matters

Cheapest ways to soundproof a room

That bedroom logic still applies in a home office, but the priority shifts from sleep to speech privacy.

Once calls and meetings are involved, the door stops being a side note and becomes one of the first items that deserves real money.

Home Offices Usually Spend Their First Real Money On The Door

Two interior walls shared with living spaces or hallways are the typical weak points. The bigger shift is the door, because voices leak through a hollow slab and perimeter gaps faster than most people expect, which is why best soundproof interior doors matters once privacy becomes the goal.

If the office faces a busy street, the window joins the scope and the window soundproofing guide explains the options from curtains to inserts. Ceilings and floors usually stay out of the build unless the office is above or below a noisy room.

The Typical Office Budget Pairs Two Walls With A Real Door Upgrade

That is why the main office example keeps the wall assembly from the bedroom section but swaps the cheap door seal for a solid-core slab and automatic bottom. Two walls at 10 x 8 = 160 sq ft, plus a solid core door replacement and window curtains.

Material Product Qty Needed Unit Price Line Total
MLV for two walls Trademark Soundproofing MLV 2 rolls (200 sq ft) $129.99 $259.98
Green Glue for two walls Green Glue Compound 1 case $278 $278
Drywall for two walls 5/8-inch drywall sheets 5 sheets ~$15 each $75
Acoustical caulk Acoustical Caulk (29 oz) 2 tubes $29.14 $58.28
Solid core door Lioncode Solid Core Door Slab 1 $180 $180
Automatic door bottom 36 in Automatic Door Bottom Sweep 1 $25 $25
Door weatherstripping 33 Ft Weatherstripping 1 roll $15.99 $15.99
Window curtains RYB HOME Soundproof Curtains 1 pair $79.95 $79.95
Total $972.20

The door upgrade alone (solid core slab + automatic door bottom + weatherstripping) costs about $221 but often delivers the biggest single improvement in speech privacy because the hollow-core door was the worst leak in the room. For a deeper look at door seal options, see best door sweeps for soundproofing.

If you are working from home in a rental, the rental room soundproofing guide covers what you can do without permanent modifications.

Cutting One Wall Drops The Price Faster Than Cutting The Door

If the room only shares one noisy wall, the first place to trim cost is wall coverage, not the door upgrade. Smaller office with one shared wall at 10 x 8 = 80 sq ft.

Material Product Qty Needed Unit Price Line Total
MLV for one wall Trademark Soundproofing MLV 1 roll $129.99 $129.99
Green Glue for one wall Green Glue Compound 1 case $278 $278
Drywall for one wall 5/8-inch drywall sheets 3 sheets ~$15 each $45
Acoustical caulk Acoustical Caulk (29 oz) 1 tube $29.14 $29.14
Solid core door Lioncode Solid Core Door Slab 1 $180 $180
Automatic door bottom 36 in Automatic Door Bottom Sweep 1 $25 $25
Door weatherstripping 33 Ft Weatherstripping 1 roll $15.99 $15.99
Total $703.12

For more on door-specific work, see how to soundproof a door.

Home-Theater Budgets Jump Because Every Surface Is In Play

Common soundproof room cost scenarios

Once the goal changes from speech privacy to bass containment, the budget stops moving in hundred-dollar steps.

Home theaters are where every untreated surface starts acting like a leak, which is why the math jumps so hard.

Bass Turns Every Surface Into Part Of The Problem

All four walls need mass and damping because bass radiates in every direction, and best soundproofing for walls shows the material options behind that choice. The ceiling joins the build because low-frequency sound keeps traveling through the structure instead of politely staying in the room.

The floor needs an underlayment layer to keep vibration out of rooms below. The door also has to be solid core and properly sealed because a hollow-core slab defeats every other upgrade around it.

The dedicated home theater soundproofing guide covers the build sequence in detail.

A 14 x 16 Theater Shows What A Full-Shell Build Really Costs

Once you treat all four walls, the ceiling, and the floor, surface area becomes the main cost driver.

Four walls: 2(14 x 8) + 2(16 x 8) = 224 + 256 = 480 sq ft. Ceiling: 224 sq ft.

Floor: 224 sq ft.

Material Product Qty Needed Unit Price Line Total
MLV for walls + ceiling Trademark Soundproofing MLV 7 rolls (700 sq ft covers 704) $129.99 $909.93
Green Glue for walls + ceiling Green Glue Compound 4 cases (768 sq ft covers 704) $278 $1,112
Drywall for walls + ceiling 5/8-inch drywall sheets 22 sheets (704 sq ft) ~$15 each $330
Cavity insulation (ceiling) AFB Mineral Wool 5 bags (240 sq ft covers 224) $99.99 $499.95
Acoustical caulk Acoustical Caulk (29 oz) 4 tubes $29.14 $116.56
Rubber floor underlayment Rubber Flooring Underlayment 2 rolls (240 sq ft covers 224) $200 $400
Solid core door Lioncode Solid Core Door Slab 1 $180 $180
Automatic door bottom 36 in Automatic Door Bottom Sweep 1 $25 $25
Door weatherstripping 33 Ft Weatherstripping 1 roll $15.99 $15.99
Total $3,589.43

If you add ceiling decoupling with isolation clips and hat channels for impact noise from above, add 1 pack of isolation clips ($149.99) and 1 pack of hat channels ($159.99). That pushes the total to about $3,900.

Shrinking The Room Helps, But It Does Not Make A Theater Cheap

A smaller theater saves material, but the build logic barely changes because the same layers still show up on every surface.

Four walls: 2(12 x 8) + 2(14 x 8) = 192 + 224 = 416 sq ft. Ceiling: 168 sq ft.

Floor: 168 sq ft.

Material Product Qty Needed Unit Price Line Total
MLV for walls + ceiling Trademark Soundproofing MLV 6 rolls (600 sq ft covers 584) $129.99 $779.94
Green Glue for walls + ceiling Green Glue Compound 3 cases (576 sq ft) $278 $834
Drywall for walls + ceiling 5/8-inch drywall sheets 19 sheets (608 sq ft) ~$15 each $285
Cavity insulation (ceiling) AFB Mineral Wool 4 bags (192 sq ft covers 168) $99.99 $399.96
Acoustical caulk Acoustical Caulk (29 oz) 3 tubes $29.14 $87.42
Rubber floor underlayment Rubber Flooring Underlayment 2 rolls (240 sq ft covers 168) $200 $400
Solid core door Lioncode Solid Core Door Slab 1 $180 $180
Automatic door bottom 36 in Automatic Door Bottom Sweep 1 $25 $25
Door weatherstripping 33 Ft Weatherstripping 1 roll $15.99 $15.99
Total $3,007.31

That is the difference room size makes – a 12 x 14 theater costs about $580 less in materials than a 14 x 16 theater, mostly because of fewer MLV rolls and drywall sheets. For ceiling-specific details, see how to soundproof a ceiling.

For a side-by-side look at window treatment costs, see soundproof windows cost.

Recording-Studio Costs Climb Because Decoupling Changes The Build

Cost comparison for deciding whether soundproofing is worth it

A home theater already shows how expensive full-surface isolation gets.

A recording studio adds the layer that separates serious isolation from consumer-level containment: decoupling the structure itself.

Decoupling Is What Moves A Theater Into Studio Pricing

Walls get MLV, Green Glue, and a new layer of soundproof drywall mounted on isolation clips and hat channels to break the vibration path. The ceiling gets the same decoupled assembly, which is why studio pricing rises long before the room gets bigger.

Stud and joist cavities get mineral wool insulation. The door gets replaced with a solid core slab and sealed with an automatic door bottom.

Windows get heavy curtains at minimum, or ideally a secondary glazing panel if the budget allows. The studio soundproofing guide walks through the full build sequence.

A 12 x 14 Studio Shows The Cost Of Full Isolation

That decoupling hardware compounds fast once you spread it across walls and ceiling.

Four walls: 416 sq ft. Ceiling: 168 sq ft.

Total treated: 584 sq ft.

Material Product Qty Needed Unit Price Line Total
MLV for walls + ceiling Trademark Soundproofing MLV 6 rolls $129.99 $779.94
Green Glue for walls + ceiling Green Glue Compound 3 cases $278 $834
Drywall for walls + ceiling 5/8-inch drywall sheets 19 sheets ~$15 each $285
Isolation clips (walls + ceiling) Premium Sound Isolation Clips 3 packs (300 clips for ~584 sq ft) $149.99 $449.97
Hat channels (walls + ceiling) Trademark Hat Channel 2 packs (344 lin ft) $159.99 $319.98
Cavity insulation (all cavities) AFB Mineral Wool 12 bags (~576 sq ft) $99.99 $1,199.88
Acoustical caulk Acoustical Caulk (29 oz) 4 tubes $29.14 $116.56
Solid core door Lioncode Solid Core Door Slab 1 $180 $180
Automatic door bottom 36 in Automatic Door Bottom Sweep 1 $25 $25
Door weatherstripping 33 Ft Weatherstripping 1 roll $15.99 $15.99
Window curtains RYB HOME Soundproof Curtains 1 pair $79.95 $79.95
Total $4,286.27

A Smaller Studio Saves Surface Area, Not The Decoupling Logic

Shrinking to 10 x 12 saves material, but it does not remove the clips, channels, or cavity fill that define the build.

Four walls: 352 sq ft. Ceiling: 120 sq ft.

Total treated: 472 sq ft.

Material Product Qty Needed Unit Price Line Total
MLV for walls + ceiling Trademark Soundproofing MLV 5 rolls $129.99 $649.95
Green Glue for walls + ceiling Green Glue Compound 3 cases (576 sq ft) $278 $834
Drywall for walls + ceiling 5/8-inch drywall sheets 15 sheets ~$15 each $225
Isolation clips (walls + ceiling) Premium Sound Isolation Clips 2 packs (200 clips) $149.99 $299.98
Hat channels (walls + ceiling) Trademark Hat Channel 2 packs $159.99 $319.98
Cavity insulation (all cavities) AFB Mineral Wool 10 bags (~480 sq ft) $99.99 $999.90
Acoustical caulk Acoustical Caulk (29 oz) 3 tubes $29.14 $87.42
Solid core door Lioncode Solid Core Door Slab 1 $180 $180
Automatic door bottom 36 in Automatic Door Bottom Sweep 1 $25 $25
Door weatherstripping 33 Ft Weatherstripping 1 roll $15.99 $15.99
Window curtains RYB HOME Soundproof Curtains 1 pair $79.95 $79.95
Total $3,717.17

The big cost drivers in a studio build are the isolation clips and hat channels (decoupling hardware) and the cavity insulation across every stud and joist bay. Those two categories alone add about $1,500 to $1,700 compared to a non-decoupled build.

Decoupling is what separates a studio from a bedroom upgrade – without it, impact noise and low-frequency vibration still travel through the structure. For related build details, see how to soundproof a room.

If you want to understand why MLV works or how soundproofing works at the physics level, those guides explain the principles behind these costs.

Practice-Room Costs Add Floor Isolation On Top Of Studio-Level Work

Practice room soundproofing cost estimate

A studio budget already assumes loud sound needs serious isolation.

A practice room adds impact vibration, which is why the floor stops being optional and starts acting like part of the shell.

Impact Vibration Is What Pushes Practice Rooms Past Studio Costs

Everything a studio needs is still here, but the floor joins the problem because drum kicks and bass amps send force straight into the structure. That extra vibration is what turns a loud room into a neighbor problem even when the walls are already upgraded.

The floor needs a rubber underlayment layer under the finished surface plus an isolation pad under the kit or amp, and the drum room soundproofing guide covers that layer in detail. Walls and ceiling keep the same decoupled MLV-plus-Green-Glue-plus-drywall assembly, while how to soundproof a room for music covers the broader build logic.

A 10 x 12 Practice Room Adds Floor Isolation Without Reducing The Rest Of The Build

This is the first example where floor treatment is part of the core budget instead of an upgrade on the side.

Four walls: 352 sq ft. Ceiling: 120 sq ft.

Floor: 120 sq ft. Total wall + ceiling treated: 472 sq ft.

Material Product Qty Needed Unit Price Line Total
MLV for walls + ceiling Trademark Soundproofing MLV 5 rolls $129.99 $649.95
Green Glue for walls + ceiling Green Glue Compound 3 cases $278 $834
Drywall for walls + ceiling 5/8-inch drywall sheets 15 sheets ~$15 each $225
Isolation clips (walls + ceiling) Premium Sound Isolation Clips 2 packs $149.99 $299.98
Hat channels (walls + ceiling) Trademark Hat Channel 2 packs $159.99 $319.98
Cavity insulation (all cavities) AFB Mineral Wool 10 bags (~480 sq ft) $99.99 $999.90
Rubber floor underlayment Rubber Flooring Underlayment 1 roll (120 sq ft) $200 $200
Drum riser isolation mats TroyStudio Interlocking Floor Mats 2 sets (~24 sq ft) $60 $120
Acoustical caulk Acoustical Caulk (29 oz) 3 tubes $29.14 $87.42
Solid core door Lioncode Solid Core Door Slab 1 $180 $180
Automatic door bottom 36 in Automatic Door Bottom Sweep 1 $25 $25
Door weatherstripping 33 Ft Weatherstripping 1 roll $15.99 $15.99
Total $3,957.22

A Larger Practice Room Scales Up Fast Because The Floor Stacks On Top

Once the room gets bigger, floor cost stacks on top of the same wall and ceiling build instead of replacing any of it.

Four walls: 416 sq ft. Ceiling: 168 sq ft.

Floor: 168 sq ft. Total wall + ceiling treated: 584 sq ft.

Material Product Qty Needed Unit Price Line Total
MLV for walls + ceiling Trademark Soundproofing MLV 6 rolls $129.99 $779.94
Green Glue for walls + ceiling Green Glue Compound 3 cases $278 $834
Drywall for walls + ceiling 5/8-inch drywall sheets 19 sheets ~$15 each $285
Isolation clips (walls + ceiling) Premium Sound Isolation Clips 3 packs $149.99 $449.97
Hat channels (walls + ceiling) Trademark Hat Channel 2 packs $159.99 $319.98
Cavity insulation (all cavities) AFB Mineral Wool 12 bags (~576 sq ft) $99.99 $1,199.88
Rubber floor underlayment Rubber Flooring Underlayment 2 rolls (240 sq ft) $200 $400
Drum riser isolation mats TroyStudio Interlocking Floor Mats 2 sets $60 $120
Acoustical caulk Acoustical Caulk (29 oz) 4 tubes $29.14 $116.56
Solid core door Lioncode Solid Core Door Slab 1 $180 $180
Automatic door bottom 36 in Automatic Door Bottom Sweep 1 $25 $25
Door weatherstripping 33 Ft Weatherstripping 1 roll $15.99 $15.99
Total $4,726.32

The floor isolation adds about $320 to $520 to the build depending on room size. For a drum room specifically, the floor soundproofing guide covers the assembly details.

If the practice room is in a basement, see soundproofing a basement ceiling for the overhead work. For readers exploring cheaper first steps before committing to a full build, the cheapest ways to soundproof a room guide is a useful companion to this cost breakdown.

Installed Cost Usually Lands Fifty To One Hundred Percent Higher

Professional installation typically adds 50 to 100 percent on top of the material cost, depending on region and scope. A $700 bedroom project might cost $1,100 to $1,400 installed.

A $4,000 studio build might cost $6,000 to $8,000 with professional labor. The material totals above give you the baseline, so 1.5x to 2x is the practical installed ballpark.

The Same Formula Lets You Price Rooms Not Listed Here

The same math applies to any room. Measure the walls you need to treat (length x 8-foot ceiling height), add the ceiling if needed, add the floor if needed, and multiply the square footage by the per-unit coverage of each product in the reference table at the top of this article.

If you are pricing a room in an apartment, a room facing outside noise, or a basement, use the relevant guide for surface-specific details.

The Bottom Line

The cost to soundproof a room is mostly a scope decision, not a mystery number.

If you only need to fix one wall, one door, or one window, stay in the hundreds and resist the urge to build a full shell.

If bass, drums, or recording quality force you to treat every surface, plan for the thousands because ceiling, floor, and decoupling layers all enter at once.

Measure the surfaces first, price full retail units second, and then decide whether your room deserves a bedroom budget, a theater budget, or a studio budget.

For the build details behind each surface, start with the soundproofing hub, best soundproofing material, best insulation for soundproofing, and how to soundproof a wall.

Frequently Asked Questions

Can You Soundproof A Room For Under $500?

Yes, if the scope is limited to one wall plus door sealing. A single shared wall with MLV, Green Glue, drywall, and caulk costs about $450 to $510 in materials.

Adding a door draft stopper and weatherstripping keeps the total near $480. That is a realistic budget for a targeted single-surface upgrade, not a full room.

How Much Does It Cost To Soundproof One Wall?

A 12 x 8 wall (96 sq ft) needs 1 roll of MLV ($129.99), 1 case of Green Glue ($278), 3 sheets of drywall ($45), and 1 tube of acoustical caulk ($29.14).

The material total is $482.13 at full retail unit prices. The actual material consumed for just that wall is about $370, but you have to buy the full units.

Is A Bedroom Cheaper To Soundproof Than A Home Theater?

Significantly cheaper. A bedroom with one shared wall, a door seal, and window curtains costs about $620.

A home theater with all four walls, ceiling, floor, and a solid core door costs $3,000 to $3,600 – roughly 5x to 6x more – because the theater needs every surface treated and uses much more material.

Why Is A Recording Studio More Expensive Than A Home Theater?

The studio adds isolation clips and hat channels to decouple the ceiling and walls from the building structure, plus mineral wool insulation in every stud and joist bay.

That decoupling hardware and cavity fill adds about $1,500 to $1,700 on top of a standard mass-and-damping build. Studios need this because even small vibrations traveling through the structure ruin recordings.

Do I Need Floor Isolation?

Only if the room generates impact vibration – drums, bass amps, subwoofers, or heavy footsteps – and there is a room below or adjacent that receives that vibration.

Bedrooms and home offices almost never need floor work.

Home theaters benefit from a rubber underlayment under the finished floor. Drum and practice rooms need both a full rubber underlayment and isolation pads under equipment.

How To Soundproof Basement Ceiling (What Works In Finished And Unfinished Basements)

How to soundproof basement ceiling works, but only if you build for the noise you actually have.

Footsteps from above are a structure problem, while voices and TV leaking downward are an assembly problem, and cheap surface treatments barely touch either.

The win is that basement ceilings give you more retrofit options than most rooms because the joist cavity and ceiling layer leave room for absorption, mass, damping, and sometimes decoupling.

Start by separating impact noise from airborne leakage, then match the build to that path. If the basement is part of a bigger room problem, our full how to soundproof a room guide helps you keep the ceiling in proportion with the rest of the shell.

Quick Takeaway

The best basement ceiling soundproofing approach is usually a system, not a single material. If the ceiling is open, start with mineral wool in the joists, then add mass and damping with extra drywall or mass loaded vinyl; if the ceiling is already finished, a new drywall layer with damping is the most realistic upgrade, while blankets are only temporary stopgaps for renters or unfinished spaces.

Why The Basement Ceiling Matters

Why basement ceilings need soundproofing

Before you buy materials, make sure the basement ceiling is actually the weak link.

Once the noise is clearly coming from above, the rest of the section sorts it by noise path, room stakes, and which side of the structure you can realistically treat.

Start With The Noise Path

Everything starts with separating impact noise from airborne leakage.

Upstairs footsteps, chair scrapes, and dropped objects travel as structure-borne vibration, while voices, TV, and music leak through gaps, thin drywall, recessed lights, and empty joist cavities.

Each path rewards a different kind of build.

If the main complaint is speech or media transfer, mass and sealing can move the needle fast; if the main complaint is stomping, the heavier win usually comes from decoupling below or source control above, just like we explain in how to soundproof a ceiling and on the source side in how to soundproof a floor.

Basements below kitchens, family rooms, and hallways usually get hit by both paths at once.

A ceiling can still feel disappointing after one improvement because fixing airborne leakage alone still leaves the floor structure free to radiate impact noise.

Let Room Use Set The Performance Bar

Once you know the noise path, room use tells you how high the performance bar really is.

A basement theater or bedroom needs stronger control of low-frequency spill and general loudness, while a basement office may only need speech privacy and less distraction during work hours.

Utility rooms muddy the picture because machines and structure-borne vibration can stack on top of upstairs activity.

If the basement is part of a broader home-noise problem, compare the ceiling project against adjacent weak points like walls, doors, and windows before assuming the ceiling deserves the whole budget.

Choose The Side That Can Actually Help

That mix of noise type and room stakes decides whether you attack the ceiling, the floor above, or both.

Work on the basement ceiling when you control that side, when the room below is the priority, or when opening the floor above is unrealistic. It is usually the simpler retrofit path because you can work from below without tearing up finished flooring upstairs.

Treat the floor above first when impact noise is the dominant complaint and you can reach that surface.

Thick rugs, dense underlayment, and better floor assemblies attack vibration at the source, which is usually more efficient than trying to catch all of it from below.

Choosing The Right Insulation

Best insulation options for soundproofing a basement ceiling

Once you have confirmed the ceiling is worth rebuilding, insulation is usually the first material people think about.

Insulation belongs inside a larger system, so the real question is which fill works overhead and how much it can actually do.

Mineral Wool Is Usually The Safer Default

Mineral wool is the better default for most basement ceilings because the extra density helps tame cavity resonance and the batts friction-fit more reliably overhead.

A standard joist-bay product like AFB Mineral Wool Insulation also holds shape more reliably overhead, which matters when you are working between floor joists rather than inside a closed wall.

Fiberglass can still help, especially when budget is tight or you already have it on hand.

A rigid fiberglass board like Owens Corning 703 Fiberglass Boards is the main exception because the semi-rigid panels hold their shape between joists without sagging, which makes them a practical alternative to flexible batts in overhead applications.

If you want a deeper breakdown of cavity materials before buying, our guide to the best insulation for soundproofing explains where mineral wool, fiberglass, and other fills actually make sense.

Cavity Fill Helps, But It Hits A Ceiling Fast

That material choice still has a limit: cavity fill cleans up the inside of the assembly, but it does not create the mass that actually blocks strong transmission.

In practical terms, insulation can make a basement sound less hollow and less leaky, yet it still will not fully solve upstairs footsteps or loud bass.

That limit is why people feel underwhelmed after stuffing an open joist cavity and calling it done.

The bigger jumps come when insulation is paired with mass, damping, better sealing, and, when needed, decoupling.

Open Joists Are The Real Opportunity

That limit is also why an open basement ceiling is such an advantage.

Once the cavity is exposed, you can seal around pipes, wiring penetrations, and duct chases, then friction-fit a denser product like Rockwool 8 lb Density Mineral Wool before deciding whether the next layer should stay exposed, get drywalled, or become fully decoupled.

If you leave the joists exposed for an industrial look, expect the performance ceiling to stay lower.

Without a continuous finished layer, the framing and services keep giving noise easy escape routes.

The Most Effective Soundproofing Methods

Effective methods for soundproofing basement ceilings

Once the cavity is doing its part, the real performance gains come from how you close the assembly.

At that point the project stops being about stuffing joists and starts being about mass, damping, and vibration control.

Mass And Damping Handle The Airborne Side

If voices, TV, and general household spill are the main complaint, adding mass below the joists is usually the first serious upgrade.

Extra drywall with Green Glue Noiseproofing Compound between layers is one of the best upgrades for a finished basement ceiling because it adds mass and damping without requiring you to open the floor above.

For voices, TV, general household activity, or moderate music leakage, it usually delivers the best balance of performance, cost, and construction complexity.

When you are already rebuilding the ceiling, a continuous layer of Soundsulate 1 lb Mass Loaded Vinyl can add even more mass inside the assembly.

MLV works best as part of a sealed ceiling build, not as random patches, which is why our best soundproofing material guide treats it as a barrier product rather than a magic surface fix.

Decoupling Is What Changes Footsteps

That airborne-focused build still leaves one big hole: direct connection to the joists.

Mass and damping help, but they cannot fully stop upstairs footsteps if the ceiling drywall is screwed directly into the framing. The vibration travels straight through the fastener into the drywall and radiates as sound below.

Decoupling breaks that direct structural connection, and it is the single biggest factor in stopping impact noise from above.

The professional standard is RSIC-1 Resilient Sound Isolation Clips mounted directly to the joist bottoms. Hat channel snaps into the clips, and all drywall screws go into the hat channel — never into the joists. The rubber isolator in each clip absorbs vibration before it reaches the drywall, and this single step can add up to 15 STC points to the ceiling assembly.

The budget-friendly alternative is a Trademark Soundproofing RC-1 Resilient Channel screwed perpendicular to the joists. Drywall then mounts to the channel instead of the joists. RC-1 channels cost less per square foot than isolation clips and work well when installed carefully, but they are more vulnerable to short-circuiting — a single screw that accidentally penetrates through the channel into a joist defeats the entire purpose of the decoupling.

For any basement that will serve as a bedroom, office, or home theater, decoupling is not optional. It is the difference between a ceiling that reduces some airborne noise and a ceiling that actually controls the footstep and impact noise that makes basements feel unfinished.

Drop Ceilings Are A Convenience Compromise

If a full decoupled drywall build feels too invasive, a drop ceiling lands in the middle.

It is better than an exposed ceiling for noise control, yet it is still not the same thing as a true soundproof ceiling. Standard suspended ceiling tiles help a little with absorption and convenience, yet they usually do not add enough mass to block strong sound transmission on their own.

That does not mean a drop ceiling has no place in a basement. It can be a practical compromise when you need access to plumbing or wiring, but if isolation is the main goal, a drywall-based assembly with insulation, damping, and decoupling will usually outperform it by a wide margin.

The Right Build Sequence

Cheap ways to soundproof a basement ceiling

Knowing the ingredients is not enough because a good ceiling can still fail if the order is wrong.

The build needs to close leakage first, control the cavity second, and only then add the layers that block and isolate.

Step 1: Seal Every Gap And Penetration

Before adding any material, seal every air path. Run acoustic caulk around the ceiling perimeter where it meets the walls, around every pipe and wire penetration, and around duct boots and recessed light housings. Sound travels through air gaps far more easily than through solid material, so even a small unsealed hole can undermine an otherwise strong assembly.

Step 2: Insulate The Joist Cavities

Once the leaks are closed, fill every joist bay.

This absorbs airborne sound energy inside the cavity and prevents resonance between the drywall layers. Use mineral wool like AFB or rigid fiberglass boards like Owens Corning 703 — both products are already linked in the insulation section above. Fill every bay completely.

Partial coverage leaves flanking paths that bypass the insulation.

Step 3: Install Decoupling (Resilient Channels Or Isolation Clips)

That insulated cavity still stays hard-linked until you break the framing path.

This is the step most DIY builders skip, and it is the step that matters most for impact noise. Mount RSIC-1 isolation clips or RC-1 resilient channels to the joist bottoms as described in the decoupling section above.

Every screw in the finished drywall must go into the channel or hat track — never directly into a joist.

Step 4: Hang Drywall With Damping Compound

Only after decoupling is in place does the drywall stack deliver its full value.

Screw 5/8-inch drywall to the resilient channels or hat channel. For maximum performance, apply Green Glue between two layers of drywall. The first layer adds mass, the Green Glue converts vibration into heat, and the second layer adds more mass on top.

This three-part stack is the same approach used in professional recording studios and home theaters.

Step 5: Seal The Perimeter Again

The final seal keeps the new ceiling from leaking around its own edges.

Run acoustic caulk around the entire edge of the finished ceiling where it meets the walls. Do not skip this — a quarter-inch gap around the perimeter can leak enough sound to offset the performance of everything behind it.

Why The Shortcuts Keep Failing

That five-step sequence is the real path, which is why foam tiles, decorative acoustic squares, stick-on panels, and sound blankets hung from joists are not real basement ceiling soundproofing. They may reduce echo inside the basement, but that is a room-acoustics change, not noise isolation from the floor above. Hanging a blanket from exposed joists does not add meaningful mass, does not decouple the structure, and does not seal the assembly.

If you are comparing absorptive products with real blocking materials, look at best soundproofing panels and soundproofing from outside noise side by side and you will see that mass, decoupling, and sealing are what actually reduce noise transmission through a ceiling.

If budget is the constraint, start with steps one and two (sealing and insulation) and save for the decoupled drywall build. A properly sealed and insulated ceiling with a single layer of drywall on resilient channels will outperform any number of blankets, foam tiles, or decorative panels stacked together.

Cost Breakdown

Basement ceiling soundproofing cost breakdown

That five-step path also explains why basement ceiling budgets swing so widely.

You are not paying for one product; you are paying for how complete the assembly needs to be.

The Entry-Level Budget

The cheapest serious tier usually means sealing penetrations, adding insulation between open joists, and possibly installing a simple drywall layer below.

Material-only costs often land around two to five dollars per square foot, depending on the insulation type, drywall thickness, and whether you use damping compound.

Labor can double that range if you hire out the work, especially once taping, mudding, painting, and fixture adjustments are included. Even so, this tier makes sense for many homeowners because it produces a real improvement without a full structural ceiling rebuild.

Costs climb fastest when you have to work around can lights, soffits, low headroom, or irregular joist spacing. In basements, the ceiling is often the most detail-heavy part of the room, so labor planning matters almost as much as material selection.

The High-Performance Budget

Once clips or channels, multiple drywall layers, damping compound, and detail work enter the build, the budget changes fast.

A high-performance basement ceiling goes further with mineral wool, clips or channels, one or two drywall layers, damping compound, careful perimeter sealing, and detail work around lights, ducts, and bulkheads. That kind of assembly often lands in the eight to fifteen dollars per square foot range for materials and labor together, and it can go higher if the basement has complicated mechanical runs.

The cost sounds steep until you compare it with the value of turning a noisy basement into usable square footage. If the project is part of a larger renovation, it is also worth comparing the ceiling upgrade with the overall apartment-style retrofit logic or even a broader room plan from other perimeter noise-control upgrades so you do not overspend on one surface while neglecting another.

When Paying For Labor Makes Sense

That upper tier is not just more material — it is more ways to get the assembly wrong.

Bring in a contractor when the basement will become living space, when impact noise is severe, when you need fire or code compliance integrated into the build, or when there are many recessed lights, ducts, and obstructions. A contractor who understands sound-control assemblies can prevent expensive mistakes like short-circuiting resilient channels, leaving perimeter leaks, or adding mass without addressing the vibration path.

You should also get help when the basement noise problem overlaps with HVAC noise, plumbing transfer, or a full home-theater design. At that point, you are no longer buying a simple materials package; you are designing a system.

The Bottom Line

The basement ceiling that works is the one built around the noise path, not the material list.

Airborne noise responds well to mass, damping, and sealing, while footsteps only change in a major way when you reduce the direct structural link.

That is the decision to make before you spend: are you sealing a leaky assembly or rebuilding an impact path?

If the ceiling is open, insulation plus a properly built new lid gives you the best runway; if it is already finished, an extra drywall layer with damping is usually the next practical move before a full isolated rebuild.

Keep the ceiling in context with the rest of the room.

Our guides on soundproofing a ceiling, soundproofing a floor, blocking outside noise, and the full room soundproofing hub help you avoid fixing one surface while noise keeps leaking through another.

Frequently Asked Questions

What is the cheapest way to soundproof a basement ceiling?

The cheapest real improvement is sealing air gaps and, if the joists are open, adding insulation between them. Hanging a heavy blanket can help temporarily in unfinished basements, but cheap foam products are mostly an acoustic-treatment fix rather than true soundproofing.

How to reduce noise from upstairs to basement?

First identify whether the noise is mostly footsteps or airborne sound like voices and TV. For footsteps, source control on the floor above and decoupling below work best; for airborne noise, add mass, damping, insulation, and perimeter sealing to the basement ceiling assembly.

What is the cheapest soundproofing option?

Sealing leakage paths is usually the best low-cost option because even a strong assembly loses performance if air can slip around it. Cheap products only help when they match the actual problem, which is why acoustic foam is rarely the cheapest effective answer for a basement ceiling.

Can you put a vapor barrier on a basement ceiling?

A vapor barrier is a moisture-control decision, not a soundproofing decision. In many basement ceilings it is unnecessary or even problematic if it traps moisture in the wrong place, so follow local code and the whole basement moisture strategy rather than adding one just because you are addressing sound.

Best Soundproofing Material (Ranked By What Actually Blocks Noise)

Best soundproofing material is not one product, but most buyers search for exactly that — and that single misunderstanding is why the first purchase often does the wrong job entirely.

The problem is that “soundproofing material” gets applied to everything from mass loaded vinyl to acoustic foam, even though one blocks noise through walls and the other only absorbs echo inside the room. Picking the wrong category means the noise stays exactly the same no matter how much you spend.

Below you will find one recommended product for each category of soundproofing material — from mass barriers and damping compounds to door seals and sealants — so you can match the right material to the right surface and get a real result on the first try.

Quick Takeaway

The best soundproofing materials cover four jobs: mass (MLV, extra drywall), damping (Green Glue), cavity absorption (mineral wool), and sealing (acoustic caulk). For walls, drywall plus Green Glue gives the best cost-to-performance ratio. For doors and windows, sealing gaps and adding a curtain or sweep often delivers the biggest improvement per dollar. Start with whatever surface leaks the most noise.

Our Top Picks At A Glance

Comparison of common soundproofing materials

Each material below addresses a different part of the soundproofing problem. Most projects need at least two or three of these working together — mass alone will not help if the edges leak, and sealing alone will not help if the wall is paper-thin.

The picks are organized by the job each material does, not by price. A twelve-dollar door sweep can deliver more perceived improvement than a two-hundred-dollar roll of MLV if the door was the real weak point all along.

Wall and Ceiling Materials: Mass, Damping, and Cavity Fill

Soundproofing materials for walls and ceilings

Walls and ceilings account for the largest surface areas in most rooms, so the materials used here have the biggest impact on overall noise reduction. Three categories matter most: mass barriers, damping compounds, and cavity insulation.

Best Mass Barrier: Mass Loaded Vinyl

Trademark Soundproofing Mass Loaded Vinyl is the strongest barrier material you can buy on Amazon for blocking airborne noise through walls and ceilings.

At 1 lb per square foot, MLV adds density to a wall assembly without adding much thickness. It works best installed as a continuous, sealed layer between two rigid surfaces — typically between drywall layers or stapled to studs before the finish layer goes on.

Gaps between sheets reduce performance significantly, so overlapping seams and sealing edges with acoustic caulk is essential.

MLV earns its value inside wall assemblies where its thin profile and high density matter. Hanging loose MLV on a finished wall provides less benefit than the same weight of additional drywall, because drywall creates a rigid sealed surface.

For the full wall approach, see best soundproofing panels.

Best Damping Compound: Green Glue

Green Glue Noiseproofing Compound is the most tested damping compound for residential wall and ceiling upgrades.

Applied between two layers of drywall, Green Glue converts vibration energy into heat. That means less sound passes through the drywall sandwich to the other side.

Testing shows 3 to 9 STC points of improvement compared to the same two layers without damping — roughly equivalent to cutting perceived loudness by 30 to 50 percent at the frequencies where it works hardest.

A case of 12 tubes covers about 6 sheets of drywall at the recommended 2 tubes per sheet for walls. For most bedrooms and home offices, drywall plus Green Glue is the best cost-to-performance upgrade available without full decoupling.

For application details and common mistakes, see our soundproofing hub.

Best Cavity Insulation: AFB Mineral Wool

AFB Acoustical Fire Batts fill the cavity between wall studs or ceiling joists with dense mineral wool that absorbs sound and reduces resonance.

Without cavity insulation, the air space between drywall layers acts like a drum and can amplify certain frequencies. That is why even a well-sealed, heavy wall can still underperform if the cavity is empty.

Mineral wool is denser and more rigid than standard fiberglass batts, which means it absorbs more low-frequency energy and holds its shape better over the life of the wall.

This material only works inside cavities — it does nothing stuck to the surface of a finished wall. If you are building or opening a wall anyway, filling the cavities is one of the cheapest performance gains available.

For a deeper comparison, see best insulation for soundproofing.

Floor, Door, and Window Materials, And Openings

Soundproofing materials for floors, doors, and windows

Doors, windows, and unsealed openings are almost always the weakest points in any room. Treating them first often delivers the biggest improvement per dollar because the noise concentrates at these leak paths instead of spreading evenly across the wall.

Best Soundproof Curtain: RYB HOME

RYB HOME Soundproof Divider Curtain is the top-rated heavy curtain for reducing noise at windows and open spaces without any construction.

Heavy curtains reduce high-frequency noise by 5 to 10 dB — useful for street noise, barking dogs, and general urban sound when combined with sealed window frames. They do not block low-frequency bass or heavy traffic rumble, so expectations need to match what fabric can physically do.

Curtains earn their keep when the window frame is already sealed and you want an additional layer of mass over the glass, or when you need a renter-friendly fix that comes down when you move. For a deeper comparison, see best soundproof curtains.

Best Door Seal: MAXTID Draft Stopper

MAXTID Under Door Draft Stopper seals the gap under the door — the single most common noise leak path in any room.

Doors are usually the weakest point in a room. A hollow-core door with a visible gap at the bottom transmits nearly as much noise as an open window.

Before spending on wall treatments, sealing the door gap first often reveals whether the door was the bottleneck all along.

At twelve dollars, this is the highest-return starting point in the entire roundup. If the door sweep makes a noticeable difference, the next step is weatherstripping the sides and top of the frame.

If it barely helps, the noise is coming through the wall or ceiling instead, and the budget should go there. For the full door approach, see best door sweep for soundproofing.

Best Sealant: Acoustical Caulk

Acoustical Caulk seals the air gaps around door frames, window trim, electrical boxes, and drywall edges that let sound bypass every other material in the assembly.

Sound follows the path of least resistance. A 1 percent gap in an otherwise solid wall can let through a disproportionate amount of noise because sound concentrates at the weak point.

Acoustic caulk stays flexible permanently, unlike standard caulk that hardens and cracks over time — that flexibility is what makes it suitable for joints that shift with temperature and settling.

This is the material every soundproofing project should start with, regardless of budget. Sealing air paths costs under thirty dollars and often delivers 3 to 5 dB of improvement before any heavier materials go in.

For the broader approach, see our soundproofing hub.

Acoustic Panels, Foam, and Curtains: Treatment vs Soundproofing

Acoustic treatment compared with soundproofing materials

Not every “soundproofing” search is actually about blocking noise. Many buyers are dealing with echo, reverb, or temporary noise problems that call for different materials than mass barriers and damping compounds.

Best Absorption Panel: Owens Corning 703

Owens Corning 703 Fiberglass Boards are the standard for professional acoustic absorption — reducing echo, reverb, and flutter inside a room.

This is not a soundproofing material in the blocking sense. OC 703 does not add mass or stop noise from passing through a wall.

What it does is absorb reflections inside the room, which makes speech clearer, music tighter, and the space feel quieter even though the actual noise transmission has not changed.

It earns a spot in this roundup because many “soundproofing” searches are actually room-treatment problems in disguise. If the issue is echo during video calls or muddy audio in a home studio, absorption panels are the right fix.

If the issue is neighbor noise through a shared wall, panels alone will not help — that requires mass, damping, and sealing. For the full treatment approach, see best soundproofing panels.

Best Temporary Barrier: Sound Dampening Blanket

US Cargo Control Sound Dampening Blanket is the heaviest blanket-style barrier you can buy for temporary or renter-friendly noise reduction.

Hanging a heavy blanket over a weak surface adds mass without construction. It will not match the performance of a drywall-plus-Green-Glue assembly, but it can take the edge off moderate noise in apartments, dorm rooms, and rental spaces where permanent modifications are not allowed.

The grommeted design makes it easy to hang from hooks and reposition as needed. It also works as a diagnostic tool — hang it over the suspected weak surface and listen.

If the noise drops noticeably, you have confirmed where the main leak path is before committing to a bigger investment.

How To Choose The Right Material

Budget materials for soundproofing a room

The decision is simpler than it looks once you think in order of priority instead of trying to pick one product.

Step 1: Seal Air Gaps First

Acoustic caulk and a door sweep cost under fifty dollars combined and close the paths that bypass everything else. Start here regardless of budget.

Step 2: Identify The Weakest Surface

If the door is hollow with gaps, treat the door. If the wall is thin and the door is solid, treat the wall.

If the window rattles, treat the window. Treating the strongest surface while ignoring the weakest wastes money.

Step 3: Match The Material To The Job

Use mass (MLV, extra drywall) for thin surfaces that vibrate easily. Use damping (Green Glue) between rigid layers to reduce vibration transfer.

Use insulation (mineral wool) inside open cavities. Use curtains and blankets when you cannot modify the structure.

Step 4: Combine For Best Results

No single material solves the full problem. A wall treated with MLV but no sealed edges will leak around the perimeter.

A ceiling with insulation but no added mass will still transmit airborne noise through the drywall. The best results come from addressing mass, damping, absorption, and sealing together.

The Bottom Line

The best soundproofing material is always a system, not a single product. Start by sealing air gaps with acoustic caulk, then add mass and damping where sound passes through surfaces.

For most residential wall and ceiling projects, a second layer of drywall with Green Glue between layers delivers the best cost-to-performance ratio. For severe airborne noise, adding mass loaded vinyl to the assembly pushes performance further.

For renters and lighter fixes, a door sweep plus soundproof curtains can deliver noticeable improvement without any construction.

For a complete room-by-room approach, see our soundproofing hub and related guides on best insulation for soundproofing, best soundproofing panels, and best soundproof curtains.

Frequently Asked Questions

What is the most effective soundproofing material?

Mass loaded vinyl (1 lb per square foot) installed as a continuous layer inside a wall assembly is the single most effective material for blocking airborne noise. For maximum performance, combine it with damping compound and an additional layer of drywall.

No single material alone provides complete soundproofing — the best results come from combining mass, damping, absorption, and sealing.

What is the best soundproofing material for walls?

An additional layer of 5/8-inch drywall with Green Glue damping compound between layers provides the best cost-to-performance ratio for most wall projects. For higher performance, add mass loaded vinyl between the drywall layers or install sound isolation clips to decouple the wall surface from the framing.

What is the cheapest soundproofing material that actually works?

Acoustic caulk and a door sweep are the cheapest effective soundproofing materials. Sealing air gaps around doors, windows, and wall penetrations costs under fifty dollars total and can reduce noise by 3 to 5 dB.

After sealing, the next cheapest effective upgrade is an additional layer of standard 5/8-inch drywall.

Does acoustic foam work for soundproofing?

No. Acoustic foam is lightweight and designed to absorb high-frequency reflections inside a room. It adds virtually no mass to a surface and does not block noise transmission through walls, ceilings, or floors.

Foam is room treatment for echo control, not a soundproofing material.

How To Soundproof A Ceiling (What Actually Works And What Doesn’t)

How to soundproof a ceiling is the question that follows the first sleepless night below noisy upstairs neighbors, but most advice online oversimplifies the problem. Ceiling noise is harder to fix than wall noise because it involves both airborne sound (voices, music) and impact noise (footsteps, dropped objects) – and the fixes for each are different.

The frustrating reality is that surface-applied products like foam panels do almost nothing for ceiling noise. Effective ceiling soundproofing requires adding mass, decoupling the ceiling structure, or both – and the scope of work depends entirely on whether you rent or own.

Below, you’ll find how to diagnose which type of ceiling noise you’re dealing with, what actually reduces it, which cheap fixes are worth trying, and when the problem requires professional-level work.

Quick Takeaway

Identify whether the noise is airborne (voices, music) or impact (footsteps, thuds) first – the fix is different for each. For airborne noise, adding a second layer of drywall with damping compound to the existing ceiling provides meaningful reduction. For impact noise, the most effective solution is decoupling the ceiling with resilient channels or sound isolation clips, which requires more invasive work but addresses the root cause.

Diagnose The Ceiling Noise Before You Build

Ceiling soundproofing challenges from impact and airborne noise

Ceilings punish bad diagnosis faster than walls.

They carry both sound through the air and vibration through the building structure, so the right fix depends on which path is actually dominating.

Separate Airborne Noise From Impact Noise

Airborne noise travels through the air and enters the ceiling cavity through gaps and thin materials – voices, TV, music, and barking dogs are airborne. You hear it as a muffled version of the original sound.

Impact noise is created when something strikes the floor above – footsteps, furniture dragging, objects dropping. It travels through the building structure as vibration, which is why it often feels louder and more intrusive than airborne noise.

Footsteps Usually Need More Than Added Mass

Footsteps create structure-borne vibration that travels through the ceiling joists and drywall as a connected solid path. Adding mass helps with airborne noise, but mass alone doesn’t stop vibration traveling through solid materials.

Stopping impact noise requires breaking that solid connection – a process called decoupling. Without decoupling, vibration has a direct path from their floor to your ceiling regardless of how much mass you add.

Confirm The Ceiling Is The Real Leak Path

Before investing in ceiling work, confirm the noise is actually coming through the ceiling. Sound travels through the path of least resistance – sometimes what sounds like ceiling noise is actually leaking through thin walls, around doors, or through shared ductwork and plumbing penetrations.

Listen carefully at different surfaces during a noisy period. If the noise is loudest at the ceiling and diminishes at the walls, the ceiling is the weak point.

Existing Ceilings Need The Strongest Realistic Retrofit

Soundproofing options for an existing ceiling

Most people are working with a finished ceiling already in place.

That limits the menu, but it does not remove the real options.

Added Layers Work Best For Airborne Noise

Without removing the existing drywall, your options are limited to adding layers on the surface. A second layer of 5/8-inch drywall attached with a damping compound like Green Glue Noiseproofing Compound between the layers adds both mass and vibration damping. This approach reduces airborne noise by 5 to 10 dB without major construction.

The trade-off is reduced ceiling height – each layer adds roughly 3/4 inch.

Sealing gaps matters more than most people expect. A tube of acoustical caulk around the ceiling perimeter, at light fixture penetrations, and around ductwork openings closes air paths that leak significant sound.

Mass And Damping Work Better Together

Adding mass to the ceiling makes it harder for sound waves to vibrate the surface. Damping compound between two rigid layers converts vibration energy into heat, so the combination of mass plus damping outperforms either approach alone.

Open Ceilings Let You Add Insulation And Decoupling

If the ceiling cavity above is empty (no insulation between the joists), adding cavity insulation significantly improves performance. Dense mineral wool or fiberglass batts absorb sound within the cavity and reduce resonance, and a product like AFB Mineral Wool Insulation is a strong default when the joists are open or accessible.

For impact noise, decoupling is the most effective solution. Sound isolation clips screw into the ceiling joists, and metal hat channels snap into the clips and hold a new layer of drywall without touching the existing ceiling. This breaks the solid path that impact vibration travels through.

Resilient channels alone (without isolation clips) are a less expensive alternative, but they must be installed correctly – a single screw that short-circuits the channel to the joist eliminates the decoupling benefit entirely.

Cheap Ceiling Fixes Only Help In Specific Cases

Budget options for soundproofing a ceiling

Budget-friendly options exist, but they only help when they match the real leak path.

Cheap ceiling work is mostly about triage, not miracle outcomes.

Low-Cost Fixes Usually Start With Air Gaps And Source Control

Sealing air gaps is the cheapest effective fix. Acoustic caulk around the ceiling perimeter, foam gaskets behind light fixtures, and sealing around any penetrations costs under fifty dollars and takes an afternoon.

If the upstairs unit has hard floors, asking the neighbor to add thick rugs with dense underlayment is the single most cost-effective impact noise reduction available. The fix happens at the source, which is always more effective than treating the receiving room.

Cheap Ceiling Products Fail When They Ignore Physics

Mineral wool batts belong inside a joist cavity, not glued to the underside of a finished ceiling. Surface-mounted batts may change the room’s internal sound slightly, but they do not block noise from the floor above because they add almost no sealed mass and do not address impact vibration. For more on this distinction, see soundproofing panels.

Stick-on mass loaded vinyl sheets marketed for ceilings rarely work as advertised because they don’t create a proper sealed, continuous barrier. A product like Soundsulate 1 lb Mass Loaded Vinyl works when installed correctly as a full layer between drywall sheets – loose patches stuck to a ceiling surface leave gaps that defeat the purpose.

Apartment Ceilings Need A Different Playbook

Living below noisy neighbors in an apartment is the hardest ceiling noise scenario because you typically can’t modify the ceiling structure. Start with a conversation – many people don’t realize how much noise their footsteps create.

If the building has floor coverage requirements (many leases require 80 percent rug coverage), reference those rules. If conversation doesn’t help, document the noise and involve building management.

No-Demolition Ceiling Upgrades Still Have Limits

No-demolition ceiling soundproofing methods

Effective soundproofing is possible without ripping out the existing ceiling.

The real question is how much performance you need and whether the problem is mostly airborne or impact noise.

Surface Layers Are Worth Trying For Moderate Airborne Noise

Adding a second drywall layer directly over the existing ceiling works for moderate airborne noise. Use construction adhesive and screws into the ceiling joists, with damping compound between layers. This keeps the existing ceiling intact and costs less than a full tear-out.

Isolated Ceilings Make Sense When Impact Noise Dominates

For impact noise from above, surface-applied mass alone isn’t enough. A suspended ceiling built with isolation clips and hat channels creates an air gap between the existing ceiling and the new drywall – this gap breaks the solid vibration path.

Filling that new cavity with mineral wool insulation adds absorption that further reduces noise transmission through the assembly. The combination of decoupling plus cavity absorption plus a damped drywall layer is what professional ceiling builds use in condos and recording studios.

The isolated ceiling approach provides 15 to 25 dB of improvement depending on the assembly – the standard recommendation for serious ceiling noise in condos and multi-family buildings.

Build-Down Costs You Height And Budget

Every ceiling modification reduces ceiling height. A single drywall layer costs about 3/4 inch; a full isolated ceiling can reduce height by 2 to 4 inches.

Cost scales with complexity: a drywall overlay runs two to five dollars per square foot for materials. A full isolated system runs eight to fifteen dollars per square foot, plus professional labor if you don’t have drywall experience.

The Bottom Line

How to soundproof a ceiling stops being confusing once you answer two questions first: is the noise airborne or impact, and do you need a moderate retrofit or a serious rebuild?

If the problem is mostly voices, music, or TV bleed, start with sealing and a second drywall layer with damping.

If the problem is footsteps, thuds, and structure-borne vibration, move faster toward decoupling because mass alone will not solve the root cause.

If you rent, lean on source-side rugs, air-gap sealing, and building-management pressure.

If you own and the noise keeps breaking through, an isolated ceiling system is usually the ceiling upgrade that changes the result most.

Use how to soundproof a floor, soundproofing from outside noise, and how to soundproof a room when the real leak path reaches beyond the ceiling itself.

Frequently Asked Questions

Can You Soundproof A Ceiling In An Apartment?

Partially. Renters can seal air gaps and hang heavy blankets, but effective ceiling soundproofing (additional drywall, decoupling) requires landlord permission. Ask your landlord about authorized modifications if the noise significantly impacts livability.

What Is The Best Way To Reduce Upstairs Noise Through A Ceiling?

For airborne noise, add a second layer of 5/8-inch drywall with damping compound between layers. For impact noise (footsteps, thuds), decoupling the ceiling with sound isolation clips and hat channels is the most effective approach. In both cases, seal all air gaps around the ceiling perimeter and light fixtures first.

Can You Soundproof A Ceiling Without Removing Drywall?

Yes. You can add a second layer of drywall directly over the existing ceiling without removing it. Apply damping compound between the old and new layers, screw into the joists through both layers, and seal the perimeter with acoustic caulk. This adds mass and damping without demolition.

Best Soundproof Curtains (We Compared Weight, Layers, And Real Noise Reduction)

Best soundproof curtains is a product category that promises more than it can deliver, but that doesn’t mean the right curtains are useless. Heavy, multi-layered curtains won’t turn a noisy room into a recording studio — but they can meaningfully reduce high-frequency noise through windows and make a room noticeably quieter.

The problem is that most curtains sold as “soundproof” are just standard blackout curtains rebranded with a noise-reduction claim. The difference between a curtain that actually reduces noise and one that just blocks light comes down to weight, layer count, and how much of the window and surrounding wall the curtain covers.

Below, you’ll find which curtains actually perform, how to compare them by the specs that matter, our top picks across price ranges and use cases, and when curtains aren’t enough and you need to upgrade to heavier solutions.

Quick Takeaway

The best soundproof curtains use three or more layers including a dense felt or fiber core, weigh significantly more than standard curtains, and must be mounted wide enough to overlap the wall on both sides of the window frame. Expect 5–10 dB of noise reduction on mid and high frequencies — meaningful for street noise, conversation, and general urban sound, but not enough for heavy bass or construction-level noise.

Before You Buy: What Curtains Can and Cannot Do

What to know before buying soundproof curtains

Understanding what curtains can and cannot do prevents the most common purchase mistake: expecting curtain-level mass to deliver wall-level noise blocking.

Real performance vs marketing

Heavy curtains reduce noise by adding mass and absorption over the window — the weakest point in most rooms for noise transmission.

Independent tests show that well-designed heavy curtains reduce noise by 5 to 10 decibels in the mid and high-frequency range (speech, traffic hiss, horns). That’s roughly a 30 to 50 percent reduction in perceived loudness for those frequencies.

What curtains cannot do is block low-frequency noise — bass from music, truck rumble, aircraft drone, or construction impacts. Low frequencies require heavy, rigid barriers (extra drywall, secondary glazing, acoustic window inserts) because the sound waves are too long and powerful for fabric to stop. If the noise problem is primarily bass, curtains will disappoint no matter how heavy they are.

Blackout vs soundproof: not the same thing

That absorption ability is what separates real sound curtains from relabeled blackout panels. Blackout curtains block light using an opaque coating or dense weave, but most are single-layer and relatively lightweight. A standard blackout curtain weighs 2 to 3 pounds per panel — enough to block photons but not enough mass to meaningfully block sound waves.

Some blackout curtains happen to be dense enough to provide slight noise reduction, and some soundproof curtains include blackout function as a secondary benefit. The overlap creates marketing confusion.

When shopping, look at the layer count and weight rather than the label. A curtain described as “blackout” with a single layer and 2 pounds of weight provides near-zero noise reduction.

A curtain described as “soundproof” with three layers and 6 or more pounds per panel provides both noise reduction and blackout function.

Rooms where heavy curtains help most

Bedrooms facing streets benefit the most. Nighttime traffic, passing conversations, and general urban noise sit in the frequency range where curtains perform best, and the noise reduction combines with the blackout function to improve sleep quality significantly.

Home offices on busy streets or above ground-floor retail benefit from reduced ambient noise during calls and focused work. Nurseries and children’s rooms benefit from both the light blocking and the moderate noise reduction. Living rooms with large windows facing traffic see noticeable improvement in conversational comfort — less need to raise your voice over background noise.

Rooms where curtains help least: rooms where the noise comes through walls or ceilings rather than windows, rooms facing construction sites (impact noise), and rooms where the primary issue is bass from a neighbor’s subwoofer. For wall noise, see our guide to soundproof blankets which mount directly on the problem surface.

What separates a useful curtain from a waste of money

Three factors determine how much noise a curtain actually blocks:

Weight per panel. Heavier curtains block more sound. A standard blackout curtain weighs 2 to 3 pounds per panel.

A genuine noise-reducing curtain weighs 5 to 10 pounds per panel. The weight comes from denser fabric, more layers, or a dedicated sound-absorbing core.

Layer count and core material. Single-layer curtains, even heavy ones, perform worse than multi-layer curtains with a felt or fiber core. The core provides both mass and absorption — it doesn’t just block sound, it converts some sound energy to heat.

Three-layer construction (face fabric, dense core, backing) is the minimum for meaningful noise reduction.

Coverage area. A curtain that covers only the glass leaves the wall around the window exposed. Sound leaks around edges.

The curtain must be wider than the window frame by at least 6 inches on each side and long enough to pool on the floor or seal against the sill. Coverage is the most overlooked factor — a perfectly heavy curtain hung too narrow performs worse than a lighter curtain with full coverage.

Those same three factors also explain why one curtain works in a bedroom while another makes more sense in a studio, nursery, or rental setup. Once the buying criteria are clear, the product picks stop feeling random and start narrowing quickly.

The Best Soundproof Curtains by Use Case

Top soundproof curtain picks

Our picks prioritize actual noise-reducing performance over marketing claims. The easiest way to use this roundup is to start with the room problem you are trying to solve, then use the spec section below to sanity-check the listing details.

Best Overall Soundproof Curtain

If you want the safest default recommendation, RYB HOME 3-in-1 Soundproof Blackout Insulation Curtains are the place to start. The felt core is what sets these apart from standard blackout curtains because it adds meaningful mass and absorption that single-layer curtains lack.

The faux linen face fabric gives these a residential look that works in bedrooms and living rooms without the industrial appearance of raw sound blankets. Multiple buyers specifically confirm reduced street noise and better sleep quality.

At the mid-range price point, these deliver the best balance of performance, appearance, and value for most buyers.

Best Budget Soundproof Curtain

If you’re still testing whether curtains will help at all, NICETOWN Noise Reducing Blackout Curtains are the smartest budget starting point. They’re a single-layer design, but the dense, tightly woven polyester fabric is still heavier than most standard decorative blackout curtains.

At under twenty-five dollars per pair, these are the entry point for testing whether heavier curtains improve your room. They block light completely and reduce high-frequency noise modestly.

If you’re not sure whether curtains will help your specific noise problem, start here before investing in premium multi-layer options.

Best For Full Light And Noise Blocking

If total darkness matters as much as moderate noise reduction, NICETOWN Grey Full Shade Curtain Panels are the better fit. The 4.8-star average across 77,000 reviews is exceptional, and the dense construction still provides moderate noise reduction as a side benefit.

These work best when the primary goal is complete darkness (shift workers, light-sensitive sleepers, nurseries) with noise reduction as a bonus.

The full shade design means zero light bleed, which many “blackout” curtains can’t actually deliver.

The energy-smart construction also reduces drafts through windows — another noise pathway.

Best For Bedrooms

Once sleep is the priority, a felt-core model makes more sense than a basic blackout panel, and RYB HOME Soundproof Curtains 84 inches are the 3-layer version built for standard bedroom windows. The felt core provides the same noise-absorbing properties as the premium model, while the 84-inch length fits standard ceiling heights.

For bedrooms, the combination of complete blackout, noise reduction, and thermal insulation addresses all three comfort factors that affect sleep quality. Mount the rod at least 6 inches wider than the window frame on each side, and let the curtains overlap the wall to minimize sound leakage around the edges.

Best For Home Offices And Studios

For home offices and recording setups, Home Theater Curtains Soundproof Room Separator make more sense because they can cover a window or divide off a quieter work zone. The heavy fabric and ceiling-to-floor design provide better coverage than standard window curtains.

For home offices, hanging this behind your desk as a backdrop reduces both incoming window noise and room echo during video calls. For podcast setups or content creation rooms, the room-dividing function lets you create a smaller, more controlled acoustic space within a larger room.

The grommet mounting makes installation straightforward on both curtain rods and ceiling tracks.

Best For Dust And Noise Combined

If the room also has an air-quality problem, a curtain that solves both issues can make more sense than a pure noise-only pick. KGORGE 4-in-1 Soundproof Anti Dust 100% Blackout Curtains are the standout option here. The four-layer design — face fabric, melt-blown filter, dense core, and backing — creates more total mass than a standard three-layer curtain.

For bedrooms near busy roads or in dusty environments, this solves two problems at once: the melt-blown layer traps airborne particles while the dense construction reduces window noise. Allergy-prone sleepers and households near construction zones benefit most from the dual function.

Best Premium Soundproof Curtain

If you already know curtains help and want the strongest residential fabric option before moving to inserts, this is the tier worth considering. Moondream DecibelControl 3-in-1 Soundproof Curtain is the only curtain in this category backed by a U.S. patent specifically for sound reduction technology. The three-layer construction uses a blackout layer, a thermal lining, and a thick cotton core that adds meaningful mass and absorption.

If your budget allows a step up from the RYB HOME models and you want the strongest fabric-based noise reduction available without resorting to industrial blankets, this is the curtain to buy.

Comparing Curtains: The Specs That Actually Matter

Comparison of soundproof curtain options

Beyond the product picks, these are the specifications and details that determine whether a curtain actually reduces noise in your specific situation.

Weight per panel

Heavier is better for noise reduction. A single panel should weigh at least 3 pounds for basic noise reduction and 5 or more pounds for meaningful performance.

If the product listing doesn’t specify weight, look at the shipping weight and divide by the number of panels — it’s not exact, but it gives you a comparison baseline.

The weight comparison matters most when comparing curtains at similar prices. Two curtains at the same price point with different weights will perform differently — the heavier one blocks more noise.

This is why multi-layer curtains with dense cores outperform single-layer curtains even when the face fabric looks identical.

Layer count and core material

Weight alone does not tell the full story — how that weight is distributed across layers matters just as much. Thermal curtains and soundproof curtains overlap significantly.

Both use multiple layers and dense materials to create a barrier — thermal curtains block heat transfer while soundproof curtains block sound transmission. In practice, a well-made thermal curtain with a dense core provides moderate noise reduction, and a well-made soundproof curtain provides moderate thermal insulation.

Three-layer curtains with a felt, fiber, or high-density polyester core outperform two-layer designs. The core layer adds both mass (for blocking) and absorption (for dampening). If you’re choosing between a two-layer blackout curtain and a three-layer sound-reducing curtain at similar prices, the three-layer option provides better noise performance in almost every case.

Coverage width and length

Width and length matter as much as material quality. Sound finds the path of least resistance — if there’s a gap between the curtain edge and the wall, noise bypasses the curtain through that gap. The curtain functionally becomes a wall, and walls with holes in them don’t block sound.

Mount the curtain rod at least 6 inches wider than the window frame on each side. This means a 36-inch-wide window needs a rod at least 48 inches wide. The curtains should extend from the rod to the floor with minimal gap — pooling slightly on the floor provides the best seal at the bottom.

For ceiling-mounted rods, extending the curtain from ceiling to floor provides the maximum coverage area and eliminates the gap above the curtain where sound typically leaks. This is especially effective in rooms with high ceilings where the distance between the window top and the ceiling creates a large bypass area.

For bay windows and corner windows, you need additional rod segments or a flexible track system to wrap the curtain around corners without gaps. Bay windows are particularly challenging because the angled glass creates multiple leak points.

Measure each segment separately and order curtains wide enough to overlap at every joint.

Best materials for sound absorption

Dense polyester, velvet, and suede fabrics absorb more sound than lightweight cotton or linen. For dedicated soundproof curtains, a felt or dense fiber core provides the most absorption per unit thickness.

For residential windows, fabric-based cores (felt, high-density polyester fiber) hit the sweet spot between weight and practicality. Heavier industrial cores exist but are overkill for home use.

Percent polyester matters: 100 percent polyester curtains hold their shape better, resist moisture, and maintain consistent density over time. Natural fiber blends can sag and thin out, reducing their effectiveness. For sound performance specifically, synthetic fabrics with tight weave patterns outperform natural fibers at the same weight.

Color and texture

Color doesn’t affect sound performance. A black curtain absorbs the same amount of sound as a white curtain of identical weight, material, and construction. Choose color based on your room’s design — the noise reduction will be the same.

Texture matters slightly. Textured surfaces (velvet, suede, heavily woven) provide marginally better high-frequency absorption than smooth satin or silk finishes because the texture creates micro-surfaces that trap sound waves. The difference is small — maybe 1 to 2 percent — but if all other factors are equal, textured fabrics have a slight edge.

Faux linen finishes offer a good middle ground — they look refined enough for living rooms and bedrooms while providing a textured surface that performs slightly better acoustically than smooth polyester. Several of the top-performing curtains in our picks use faux linen as the face fabric over a dense felt core, combining residential aesthetics with genuine noise reduction.

When Curtains Hit Their Ceiling

Limits of curtains for soundproofing

Curtains have a ceiling (roughly 10 dB on high frequencies), and some noise problems exceed what fabric can solve.

Traffic and neighbor noise limits

Curtains reduce noise — they don’t eliminate it. For traffic noise that includes low-frequency rumble (trucks, buses, engines at low RPM), curtains reduce the hissing and high-pitched components but leave the bass largely untouched. You’ll still hear the rumble even with the heaviest curtains.

For neighbor noise through walls, curtains over the window provide zero benefit because the noise isn’t entering through the window. If the noise comes through a shared wall, see our guide to soundproofing panels or sound blankets for that surface.

The next upgrade after curtains

Window inserts are the next step up from curtains. Acoustic window inserts create a secondary glazing layer that blocks significantly more noise than curtains — typically 15 to 25 dB reduction including low frequencies. They’re more expensive but deliver professional-grade results.

If the window seals are the problem (drafts, visible gaps), sealing products and acoustic caulk around the window frame can improve performance before you invest in inserts. Sometimes the curtains aren’t underperforming — the window frame is leaking air and sound around the curtain.

For walls, adding a second layer of drywall with damping compound blocks the frequencies that curtains miss entirely. This is the upgrade path when the noise problem is severe enough to justify construction-level work — see our best soundproofing material guide for those heavier solutions.

Rods and installation matter as much as the curtain

Even the best curtain underperforms on a weak rod. Heavy soundproof curtains can weigh 10 or more pounds per pair — standard spring-tension rods and thin brackets can’t handle the load. Use wall-anchored brackets rated for the curtain weight, and install them into wall studs rather than just drywall.

Ceiling-mounted tracks are the best option for maximum coverage because they eliminate the gap between the rod and the ceiling. Wraparound rods (also called return rods) curve the curtain back to the wall on each side, closing the air gaps at the edges.

Both mounting styles improve noise reduction by 2 to 3 dB compared to standard open-end rods.

For renters who can’t drill into walls, tension rods work if the curtains aren’t too heavy. Stick with lighter single-layer curtains on tension rods and save the heavier multi-layer curtains for situations where you can use wall-anchored brackets.

Using curtains on doors

Curtains hung over interior doors add mass to one of the weakest points in most rooms. A hollow-core apartment door transmits nearly as much noise as an open window.

Hanging a heavy curtain over the door on a rod mounted above the frame provides a low-cost alternative to replacing the door entirely.

For doors that face hallways or noisy common areas, pair a curtain with a door sweep and weatherstripping to seal the air gaps around the frame. The curtain handles the noise that passes through the thin door panel while the seals handle the noise that leaks around it. For a more permanent door solution, see our picks for soundproof interior doors.

Combining curtains with window inserts

For maximum window noise reduction, layering curtains over acoustic window inserts provides the best results. The insert creates a secondary glazing layer that blocks noise transmission, while the curtain adds absorption and eliminates any remaining high-frequency leakage around the insert edges.

This combination can achieve 20 to 30 dB of noise reduction at the window — enough to make a busy street-facing window nearly as quiet as an interior wall. The insert handles low frequencies (traffic rumble, bass) that curtains miss, and the curtain handles high frequencies (conversation, horns) and provides blackout function.

If budget allows only one upgrade, start with the insert. If you already have inserts and want additional performance, adding heavy curtains over them is the most cost-effective next step.

Maintaining Soundproof Curtains

Soundproof curtains require slightly different care than standard curtains because of their weight and construction.

Washing

Most polyester soundproof curtains are machine washable on gentle cycle with cold water. Check the product label first — some three-layer curtains with felt cores recommend spot cleaning only because the core material can shift or bunch in a washing machine.

Tumble dry on low heat or hang dry. High heat can damage the dense core layer and reduce the curtain’s acoustic performance over time.

If the curtain is too heavy for your washing machine, professional dry cleaning is the safest option. Most soundproof curtains only need washing once or twice per year unless they’re in a high-dust or high-moisture environment.

Storage between uses

If you rotate curtains seasonally or remove them during moves, fold them loosely rather than rolling tightly. Tight rolling can compress the felt or fiber core permanently, reducing its density and sound-absorbing properties.

Store in a breathable fabric bag — not plastic — to prevent moisture buildup that can damage the core layer.

For renters who move frequently, heavy curtains are one of the most portable soundproofing investments. Unlike wall-mounted panels or permanent modifications, curtains transfer to any new space and only require a new rod. This makes them the best long-term value for people who rent.

When packing curtains for a move, keep the grommets or hooks attached and fold the curtain around a pool noodle or rolled towel to prevent sharp creases in the core layer. Sharp creases in felt-core curtains can create permanent thin spots where the core compresses and never fully recovers.

A few minutes of careful folding protects your acoustic investment for the next apartment or rental space.

Long-term performance

Dense polyester curtains maintain their performance for 5 to 10 years under normal use. The fabric doesn’t thin or lose density the way natural fibers can. The most common cause of reduced performance is dust accumulation, which can be addressed with regular vacuuming using an upholstery attachment.

Felt-core curtains can lose some density if the core shifts from repeated washing or handling. Inspect the curtains annually by holding them up to light — if you see thin spots or uneven density, the core may have shifted.

Most high-quality three-layer curtains are constructed with quilted or bonded cores that resist shifting.

Doubling up for more reduction

Yes — doubling up curtains on the same rod adds mass and creates an additional air gap layer. Hang the heavier, denser curtain closest to the window and a lighter curtain in front of it. The air gap between the two layers provides additional sound absorption that a single curtain cannot match.

The practical limit is two layers on a single rod. Three or more layers create excessive weight that most curtain rods and wall brackets can’t safely support, and the incremental noise reduction per additional layer diminishes significantly. At the point where two layers of heavy curtains aren’t enough, the problem has outgrown fabric-based solutions and you need to look at window upgrades or acoustic glass upgrades.

The Bottom Line

The best soundproof curtains use three or more layers with a dense felt or fiber core, weigh significantly more than standard blackout curtains, and must be installed wide enough to overlap the wall on both sides of the window.

For most buyers, the RYB HOME 3-in-1 Soundproof Curtains deliver the best balance of noise reduction, appearance, and value. For budget-conscious buyers, the NICETOWN Noise Reducing Blackout Curtains provide a solid starting point at under twenty-five dollars.

If curtains alone don’t solve the problem, upgrade to acoustic window inserts for the windows and soundproofing panels or sound blankets for the walls. For a complete approach to room noise, see our soundproofing hub.

For related product guides, see our picks for soundproof blankets, soundproof doors, soundproof underlayment, and soundproofing insulation.

Frequently Asked Questions

Do Noise Reducing Curtains Really Work?

Yes, heavy multi-layer curtains reduce mid and high-frequency noise by 5 to 10 decibels — roughly a 30 to 50 percent reduction in perceived loudness. They work best on street noise, conversation, and general urban sound entering through windows.

They don’t block low-frequency bass or noise that enters through walls rather than windows.

What Are The Best Sound Proofing Curtains?

Three-layer curtains with a felt or dense fiber core provide the most noise reduction. Our top pick is the RYB HOME 3-in-1 Soundproof Curtain for its combination of performance, appearance, and value.

For budget buyers, the NICETOWN Noise Reducing Blackout Curtains deliver the best value at under twenty-five dollars per pair.

How To Block Out 100% Of Noise?

Curtains alone cannot block 100 percent of noise. Complete noise isolation requires a combination of mass (extra drywall, damping compounds), decoupling (resilient channels separating wall layers), sealing (acoustic caulk on every gap), and absorption (insulation in wall cavities).

Curtains are one component — they reduce window noise by 5 to 10 dB, but total isolation requires treating walls, ceilings, floors, doors, and windows as a system. See our soundproofing hub for window-specific solutions and our soundproofing material guide for wall upgrades.

What Type Of Fabric Absorbs Sound The Best?

Dense polyester, velvet, and suede absorb the most sound per unit weight among residential curtain fabrics. For dedicated sound absorption, felt and high-density polyester fiber cores outperform face fabrics alone. The key factor is always density — tightly woven, heavy fabrics absorb more sound than lightweight, loosely woven materials regardless of the specific fiber type.

How To Soundproof An Apartment (Renter-Friendly Fixes That Actually Work)

How to soundproof an apartment works, but only when you stop chasing owner-level fixes and start with the renter-side weak links you can actually change.

That is what makes apartment noise so frustrating. You hear the upstairs footsteps, the TV through the shared wall, or traffic through thin windows, but most advice assumes you can rip open walls and rebuild the shell.

The reality is narrower, but it is not hopeless. If you prioritize sealing, removable mass, and the noisiest surface first, you can often make the apartment meaningfully calmer without breaking the lease.

The sections below sort out which renter fixes actually matter, which surfaces deserve attention first, and when the problem is big enough to push back on the landlord or rethink the building.

Quick Takeaway

Start with sealing — air gaps under doors, around windows, and at outlet covers are the cheapest and most effective fix. Then add mass where you can: heavy curtains on windows, a sound blanket on the noisiest wall, and rugs on hard floors. These won’t make your apartment silent, but they can reduce noise enough to make it livable.

Why Apartments Are So Hard To Soundproof

Apartment soundproofing challenges from shared walls and floors

Apartments are built to a cost target, not an acoustic standard. Once you see where that cheap construction fails, the useful fixes get much easier to rank.

The Most Common Noise Sources

Upstairs neighbors produce the most common complaint — footsteps, dropped objects, and furniture movement create impact noise that travels through the floor and ceiling structure. This type of noise is structure-borne, meaning it bypasses air gaps and passes directly through the building frame.

Shared walls transmit airborne noise — conversations, TV, music — because single-layer drywall on wood or metal studs without insulation provides minimal sound blocking. Most apartment partition walls rate around STC 33 to 38, which means normal conversation is clearly audible through the wall.

Hallway noise leaks through the front door, which is usually the weakest point in the apartment’s sound envelope. Exterior traffic noise enters through windows, especially if the seals are worn or the glass is single-pane.

What Renters Can Actually Change

Those noise paths are real, but renters can only work on the surface side of the shell. That means sealing air gaps, adding soft furnishings, hanging heavy curtains, placing rugs and underlayment on floors, using door sweeps and weatherstripping, and rearranging furniture—none of which require permanent modifications to the building.

What renters typically cannot do without landlord approval: add drywall layers, install resilient channels, blow insulation into wall cavities, replace doors or windows, or modify any shared or structural surface. Some landlords will approve specific upgrades if you explain the problem and offer to pay — especially if the improvement stays when you leave.

Full Soundproofing Versus Realistic Reduction

Even with those surface-side tools, full soundproofing is not on the table because it requires construction-level work on every surface—walls, ceiling, floor, doors, and windows—which is not possible in a rental. The realistic goal is noise reduction: making the problem quiet enough that it doesn’t disrupt sleep, work, or daily life.

A combination of sealing, mass additions, and strategic furnishing can reduce perceived noise by 5 to 10 decibels, which feels like cutting the noise roughly in half. That’s often enough to turn an unbearable situation into a tolerable one.

Reducing Neighbor Noise

Neighbor noise entering an apartment through walls and ceilings

Once the building limits are clear, the next step is prioritizing the noisiest path. Neighbor noise is the main reason people search for apartment soundproofing, and the right fix depends on where that noise enters.

Shared-Wall Noise

Seal every gap first. Check electrical outlets on the shared wall — sound travels through the open box behind the cover plate. Foam gaskets behind outlet covers and acoustical caulk around the perimeter close these air paths.

Place your heaviest furniture — bookshelves full of books, dressers, wardrobes — against the shared wall. Dense furniture acts as a mass barrier that absorbs and blocks a portion of mid-frequency sound. It’s not real soundproofing, but it provides a few decibels of improvement at zero cost.

For more significant reduction, hang a US Cargo Control Sound Dampening Blanket on the shared wall. The heavy, dense blanket adds mass that blocks mid-frequency noise. Mount it with grommets on a curtain rod for a renter-friendly installation you can remove when you leave.

Upstairs Footsteps And Ceiling Noise

Shared walls respond to sealing and added mass, but ceiling noise is the hardest apartment problem because you cannot modify the ceiling structure and the noise is impact-based rather than airborne. Insulation and mass additions to your ceiling require landlord approval and professional installation.

What you can do: ask your upstairs neighbor to add thick rugs with a removable layer like TroyStudio Thick Sound Absorbing Interlocking Floor Mats over the hard-floor problem zone, or a real underlayment like FloorMuffler Ultra Seal Underlayment if the flooring is already coming up with landlord approval. A polite conversation or a note explaining the situation works more often than people expect. If your building has rules about floor coverage percentages, reference them.

From your side, the only meaningful option is masking — a LectroFan Classic White Noise Machine or a fan that creates a constant background sound to make intermittent footstep noise less noticeable. This doesn’t reduce the noise, but it reduces how much the noise bothers you.

If your landlord approves ceiling work, the same insulation approach used on walls applies overhead. A second layer of drywall with Green Glue between layers adds mass and damping to the ceiling surface, and filling the joist cavity with mineral wool like AFB or a rigid board like Owens Corning 703 absorbs sound energy before it passes through. This is the same assembly described in the landlord-permission section below — the materials work identically on ceilings, but the overhead installation is harder and usually requires professional help. For the full ceiling approach, see our ceiling soundproofing guide.

Hallway And Door Noise

Ceiling fixes are limited from below, but the front door is usually the weakest link you can actually change. Most apartment doors have a visible gap at the bottom and worn weatherstripping around the frame — both are direct air paths for hallway noise.

A door sweep or bottom blocker like HomeProtect Door Draft Stopper on the bottom edge and compression weatherstripping like self-adhesive soundproof weather stripping around the frame closes these gaps. Use adhesive-backed EPDM or silicone weatherstripping that can be removed without damaging the frame. This single fix often produces the most noticeable improvement in apartments where hallway noise is the primary complaint.

If the door itself is hollow-core (knock on it — if it sounds hollow, it is), the door transmits noise even when sealed. Replacing it requires landlord approval, but hanging the same US Cargo Control Sound Dampening Blanket on the inside of the door adds temporary mass.

Surface-By-Surface Strategy

Once the door, wall, and ceiling priorities are clear, the next step is matching each surface to a deeper guide. If the main problem is a shared partition, start with soundproofing a wall and soundproofing an existing wall. If the noise is coming through the entry, treat the door first because hallway leaks are usually easier to improve than an entire wall.

If traffic or street noise is the main complaint, go straight to soundproofing windows and reducing outside noise in a room. For upstairs footsteps, the useful references are soundproofing a ceiling and soundproofing between floors, even though the most effective fix usually has to happen above you. And if your concern is being a better downstairs neighbor, start with rugs, underlayment, and our guide to soundproofing a floor.

Renter-Friendly Fixes Ranked By Effectiveness

Renter-friendly fixes for apartment soundproofing

That path-by-path logic becomes more useful when you rank the renter-safe fixes by return. These are the practical, removable changes most likely to help before you spend more money.

Temporary Fixes That Actually Help

Sealing gaps is the single most effective temporary fix. A bottom blocker like HomeProtect, weatherstripping around the frame, and outlet gaskets cost little, take an afternoon to install, and address the biggest air leaks before you spend on heavier materials.

RYB HOME 3-Layer Soundproof Curtains add mass over windows while also blocking light. Pair them with the same weatherstripping around rattly window sashes, and mount the rod wide enough that the curtains overlap the wall on both sides of the window frame.

Thick rugs with dense underlayment on hard floors reduce impact noise you create (helping your downstairs neighbor) and absorb some reflected sound in your room. If you want a removable top-side layer instead of full carpeting, TroyStudio Thick Sound Absorbing Interlocking Floor Mats are the kind of rental-safe first step that makes sense. They don’t reduce noise coming through the ceiling, but they improve the overall acoustic comfort of the space.

Those real fixes work because they seal or add mass, but egg cartons and thin foam panels do neither—they do not block noise from neighbors. They absorb a small amount of high-frequency echo inside your room, which is a completely different problem. For more on this, see acoustic panels vs soundproofing.

Tapestries and thin wall hangings look nice but add almost no mass. They need to be heavy and dense to affect sound transmission — a decorative tapestry weighing a few ounces doesn’t qualify.

Window films marketed as soundproof are too thin and lightweight to provide any meaningful noise reduction. Save that money for proper curtains or other window treatments.

Furniture Placement For Noise Reduction

With the useless hacks cleared out, the free fixes become the priority. Heavy, dense furniture—bookshelves, wardrobes, dressers—placed against the shared wall with the noisiest neighbor adds free mass between you and the noise source.

Move your bed or desk away from the shared wall. Even a few feet of distance reduces the perceived loudness of noise that does pass through. Position your sleeping or working area on the quietest wall of the room — typically an exterior wall or a wall shared with your own closet or bathroom.

Landlord Upgrades And When To Escalate

At some point the renter-safe fixes stop being enough. Knowing when to escalate saves you from spending money on solutions that cannot solve a structural problem.

Upgrades That Require Permission

Any modification to walls, ceilings, floors, doors, or windows requires landlord approval. This includes adding drywall layers, installing cavity insulation, replacing hollow-core doors with solid-core doors, and adding secondary window glazing.

The most effective shared-wall or ceiling upgrade is a second layer of 5/8-inch drywall with Green Glue Noiseproofing Compound sandwiched between the layers. The damping compound converts sound vibration into heat, and the added drywall mass blocks more noise — together they can add 8 to 12 STC points to a thin apartment partition.

If the landlord agrees to open the wall or ceiling cavity, filling it with AFB Mineral Wool Insulation before closing it back up makes the entire assembly far more effective. The dense mineral wool absorbs sound energy that would otherwise bounce between the drywall layers.

A rigid fiberglass board like Owens Corning 703 Fiberglass Boards is the alternative when the installer wants a rigid panel that holds its shape inside the wall cavity instead of flexible batts.

Stick-on wall products sit in a gray area — they may look removable, but they can still leave residue or pull paint when you take them down. Check your lease or ask your landlord before applying anything directly to wall surfaces.

Paying For Better Materials Or Professional Help

Those permitted upgrades represent the ceiling of what apartment soundproofing can deliver, so if you have sealed gaps, added curtains, placed furniture strategically, and the noise still prevents sleep or work, the problem likely requires structural changes. At that point, a conversation with your landlord about splitting the cost of upgrades (extra drywall on a shared wall with Green Glue and mineral wool, solid-core door replacement, or real floor underlayment) is more productive than buying more temporary products.

Professional acoustic consultation costs two hundred to five hundred dollars and can identify exactly where the noise enters and what fix would be most cost-effective. Some landlords will invest in improvements that increase the property’s value and reduce tenant turnover.

When Moving Beats Upgrading

Even with landlord approval, some buildings are beyond what any reasonable investment can fix. If the noise is low-frequency bass that no treatment can stop, or if the building still transmits unbearable impact through concrete floors, the building itself is the problem. No amount of curtains, blankets, or furniture rearrangement will fix fundamentally poor construction.

Before signing a new lease, test the apartment for noise: visit during evening hours, listen at shared walls, check for gaps under doors, knock on walls to test thickness, and ask current tenants about noise levels. Preventing the problem is easier and cheaper than fixing it.

The Bottom Line

Seal every air gap first — door sweeps, weatherstripping, and outlet gaskets are the cheapest and most effective apartment fixes. Add mass where you can: heavy curtains on windows, a dense blanket or heavy furniture on shared walls, and rugs on hard floors.

Accept that full soundproofing isn’t possible in a rental. The goal is making noise tolerable, not eliminating it. If temporary fixes aren’t enough, escalate to your landlord for structural improvements or evaluate whether the building can support comfortable living.

For room-specific approaches, see our guides on doors, windows, walls, and ceilings. For the complete framework, start with how to soundproof a room.

Frequently Asked Questions

How Can I Stop Hearing My Neighbors Through Walls In An Apartment?

Seal gaps around outlets and along the wall edges with a flexible sealant such as acoustical caulk and foam gaskets. Place heavy furniture — full bookshelves, wardrobes — against the shared wall to add mass. For additional reduction, hang a heavy sound blanket on the wall. These won’t eliminate the noise but typically reduce it enough to stop being a constant distraction.

What Is The Cheapest Way To Soundproof An Apartment?

Weatherstripping tape, a door sweep, and foam outlet gaskets cost under thirty dollars total and address the biggest air leaks where sound enters. After sealing, rearranging heavy furniture against noisy walls is free. Heavy curtains on windows cost thirty to eighty dollars per window and add both mass and light blocking.

Can A Landlord Soundproof An Apartment Better Than A Tenant Can?

Yes — a landlord can authorize structural changes that tenants cannot. Adding a second layer of drywall with damping compound to shared walls, replacing hollow-core doors with solid-core models, and adding wall insulation all require building access and modification. These upgrades provide significantly more noise reduction than any renter-friendly temporary fix.

Best Soundproofing Panels (What Actually Blocks Noise vs What Doesn’t)

Best soundproofing panels is one of the most searched product terms in noise control, but the products most stores label as “soundproofing panels” don’t actually soundproof anything. Acoustic foam panels reduce echo and reverberation inside a room – they don’t block noise from passing through walls, ceilings, or floors.

That distinction matters because buying the wrong product wastes money and leaves you with the same noise problem. Real noise blocking requires mass – dense, heavy materials that stop sound waves from transmitting through a surface.

Below, you’ll find which panel types actually reduce noise transmission, which ones only improve room acoustics, and our top picks for each category so you can buy the right product for your situation.

Quick Takeaway

If your goal is blocking noise through a wall, mass loaded vinyl (MLV) panels and extra drywall with damping compound are the effective products. If your goal is reducing echo inside a room for better audio quality, acoustic foam or fabric-wrapped panels are what you need. Most “soundproofing panels” sold online are acoustic absorption panels – effective for echo, not for noise blocking.

The Two Categories Most Buyers Confuse

What to know before buying soundproofing panels

The term “soundproofing panels” covers two completely different product categories. Understanding which one solves your problem prevents an expensive mistake.

Absorption panels vs mass barriers

Most panels sold as “soundproofing” are acoustic absorption panels – lightweight foam or polyester that absorbs sound energy bouncing around inside a room. They make echo and reverberation quieter, which improves speech clarity and recording quality.

Blocking noise from passing through a wall requires something fundamentally different: mass. Sound waves need heavy, dense barriers to stop them – not lightweight foam.

Mass loaded vinyl, extra layers of drywall, and damping compounds are the products that actually reduce noise transmission between rooms.

Which rooms need which category

That absorption-vs-mass split maps directly to different rooms and complaints. For echo reduction and audio clarity, absorption panels work well in home offices (video calls), recording spaces, gaming rooms, and any room with hard surfaces that create excessive reverberation.

For noise blocking, mass-barrier products work in bedrooms with shared walls, home offices next to noisy rooms, and anywhere you need to reduce sound passing through a surface. The deciding question is whether the noise problem lives inside your room (echo) or enters from outside it (transmission).

The specs that separate good panels from bad ones

Once you know which category you need, the comparison specs change too. For acoustic panels: density, thickness, and NRC (Noise Reduction Coefficient) rating determine absorption performance.

Higher NRC means more echo absorbed. Mounting method matters too – panels with adhesive backing are easier for renters.

For mass-barrier panels: weight per square foot is the primary metric. One pound per square foot of mass loaded vinyl is the standard for residential wall treatment.

Heavier barriers block more sound but cost more and are harder to install.

Panel Types: Fabric-Wrapped, Foam, Decorative, and Ceiling

Types of soundproofing panels compared

Three product categories dominate the market, each solving a different problem.

Fabric-wrapped vs foam panels

Among absorption panels, the biggest performance gap is between fabric-wrapped and foam. Fabric-wrapped fiberglass or mineral wool panels absorb more sound across a wider frequency range than foam panels.

They perform better in the mid and low-mid frequencies where voice energy concentrates, making them the better choice for offices and recording spaces.

Foam panels are cheaper, lighter, and easier to mount with adhesive. They work well enough for high-frequency echo in small rooms but underperform on the mid-range frequencies that matter most for speech and music.

For most applications, fabric-wrapped panels deliver better results per dollar if you can handle the slightly more involved mounting.

Decorative wood-slat and design panels

Fabric-wrapped panels win on performance, but not every room prioritizes raw acoustics over appearance. Wood-slat acoustic panels look attractive and provide moderate absorption behind the slat spacing.

They’re a good fit when visual design matters as much as acoustics – living rooms, modern offices, and client-facing spaces.

The tradeoff is performance per dollar. A decorative wood-slat panel absorbs less sound per square foot than a fabric-wrapped fiberglass panel at the same price point. If pure acoustic performance is the priority, skip the decorative options and invest in functional panels or mass barriers instead.

Ceiling panels

Wall panels handle the most common reflection points, but the ceiling is often the largest untreated hard surface in the room. Ceiling panels help in rooms where sound bounces off a hard ceiling and creates excessive flutter echo – the rapid repetitive echo you hear when you clap in an empty room.

Open-plan offices, podcast rooms, and gaming setups with hard ceilings benefit from ceiling-mounted absorption.

For noise blocking between floors, ceiling panels alone don’t help. Reducing footstep noise from above requires mass added to the ceiling structure and ideally decoupling with resilient channels – not surface-mounted panels.

See our picks for soundproof glass if windows are the weak point in your ceiling-level noise problem.

What Are The Best Soundproofing Panels?

Top soundproofing panel picks

Our picks cover both categories: acoustic panels for echo reduction and mass barriers for noise blocking. Every product was selected based on verified reviews, performance ratings, and value for the application.

Best Rigid Fiberglass Board (Industry Standard)

Owens Corning 703 Semi Rigid Fiberglass Board is the industry standard for building sound-absorbing panels and treating wall cavities. The 703 board is the same material used in professional recording studios, broadcast rooms, and commercial acoustic builds.

At 3 lb per cubic foot density and 2 inches thick, these boards absorb effectively across mid and high frequencies. They are most commonly wrapped in acoustic fabric and mounted on walls as broadband absorbers, or installed directly inside open wall and ceiling cavities for sound attenuation.

Best High-Density Fiberglass Board

Owens Corning 705 High Strength Rigid Fiberglass Board is the denser, stronger sibling of the 703. At 6 lb per cubic foot, it absorbs more energy at lower frequencies and holds its shape better when mounted without a rigid frame.

This is the right pick for bass traps, low-frequency absorbers, and any application where the standard 703 does not provide enough absorption below 250 Hz. Studios and home recording spaces that need serious low-end control should start here.

Best Premium Mineral Wool Panel

Rockwool Roxul Mineral Wool 8 lb Density Soundproofing Insulation (7-Pack) is the strongest mineral wool option for residential soundproofing. The 8 lb density is significantly heavier than standard batts, which means it absorbs more sound energy inside wall and ceiling cavities.

The 7-pack covers enough area for a typical bedroom shared wall. For insulation-focused projects where the joists or studs are exposed, these fit between standard framing and stay in place without fasteners.

Best Value Mineral Wool Batt

AFB Acoustical Fire Batts are the best value mineral wool batts for standard residential soundproofing. They fit standard stud cavities, provide strong sound absorption, and are fire-rated for safe installation.

Inside a wall cavity, these batts can improve the wall’s STC rating by 4 to 8 points compared to an empty cavity. That is a noticeable difference when combined with drywall upgrades or resilient channels.

Best Foil-Faced Mineral Wool Panel

Rockwool 8 lb Density Foil-Faced Stone Wool Insulation combines the soundproofing performance of 8 lb mineral wool with a foil vapor barrier. This is the right pick when the installation needs both acoustic and thermal performance, or where moisture control matters.

The foil facing reflects radiant heat and provides a built-in vapor barrier, making it useful for exterior wall cavities, HVAC duct wrapping, and pipe insulation where unfaced batts would need a separate vapor barrier.

Best Mineral Wool Panel (Smaller Pack)

Rockwool Roxul Mineral Wool 8 lb Density (5-Pack) is the same premium 8 lb density mineral wool in a smaller 5-pack format. This makes sense for smaller projects where you only need to treat one wall section, a ceiling area above a listening position, or a single shared-wall zone.

Choosing Panels: Coverage, Placement, and Installation

How to choose soundproofing panels

The right product depends entirely on what problem you’re solving.

How much coverage you actually need

The amount of panel coverage changes dramatically depending on which category you are buying. For acoustic absorption (echo reduction), covering 25 to 40 percent of the wall area in a room typically provides enough absorption to noticeably reduce reverberation.

You don’t need to cover every surface – focus on the first reflection points (the wall behind your monitor, the wall opposite your speakers, and the ceiling above your listening position).

For mass barriers (noise blocking), you need to cover the entire surface you’re treating. Sound finds any gap, so leaving even a small section untreated creates a weak point that undermines the rest of the installation.

Full coverage is essential for meaningful noise reduction.

Placement priority

Coverage amount only matters if the panels go in the right spots. Acoustic panels work best at first reflection points – the surfaces where sound bounces between you and your speakers or microphone.

For a desk setup, the wall directly behind your monitor and the walls to your left and right at ear height are the priority locations.

Mass barriers cover the entire weak surface. If the noise comes through a shared wall, the entire shared wall needs treatment.

If it comes through a door or window, those surfaces need mass added specifically.

Renter-friendly vs permanent mounting

With placement decided, the last filter is whether you can drill into the walls. Self-adhesive acoustic panels work for renters – they mount without screws and most can be removed without damaging the wall. Command strips provide another renter-friendly mounting option for heavier fabric-wrapped panels.

Mass barriers require permanent installation in most cases – they’re stapled or glued to the wall and covered with drywall. Renters who need noise blocking are limited to temporary solutions like heavy curtains and sound blankets, which add some mass without permanent modification.

When Panels Are Not the Right Answer

Limits of soundproofing panels for blocking noise

Panels have limits, and spending money on the wrong solution wastes both money and time.

Blocking outside or neighbor noise

This is the most common mismatch in the category. Surface-mounted acoustic panels do not block noise from outside or from neighbors.

The foam is too light to stop sound waves – it absorbs reflections inside the room but doesn’t add the mass needed to reduce transmission.

For neighbor noise through walls, mass loaded vinyl behind new drywall is the effective product. For outside noise through windows, acoustic inserts or secondary glazing outperform any panel product.

For a complete overview of product categories, see our soundproofing hub.

When panels alone are enough and when they are not

That blocking limitation defines the boundary. Acoustic panels are enough on their own when the problem is echo and reverberation inside the room.

A room with hard floors, bare walls, and no soft furnishings creates excessive echo that panels can effectively tame.

For noise blocking, panels are never enough on their own. Effective noise reduction requires a system approach: sealing air gaps, adding mass, and sometimes decoupling the wall structure. Panels are one component, not a complete solution.

Budget expectations

Knowing whether you need absorption or blocking also sets the budget. Acoustic foam panels start under twenty-five dollars for basic packs and run up to one hundred dollars or more for premium fabric-wrapped panels. For a typical home office, fifty to one hundred fifty dollars covers enough panels for meaningful echo reduction.

Mass loaded vinyl ranges from thirty dollars for small rolls to several hundred dollars for full-wall coverage. A complete wall treatment (MLV plus new drywall plus damping compound) typically costs five to fifteen dollars per square foot including materials.

The Bottom Line

The most important decision is whether you need echo reduction (acoustic panels) or noise blocking (mass barriers). Buying acoustic foam panels expecting them to block noise from neighbors is the most common and most expensive mistake in this product category.

For echo reduction, self-adhesive acoustic panels at first reflection points solve the problem affordably. For noise blocking, mass loaded vinyl behind drywall with damping compound is the proven approach.

For related products, see our picks for soundproof foam, soundproof drywall, and soundproof underlayment.

Frequently Asked Questions

What Type Of Sound Absorbing Panels Are Best?

Fabric-wrapped fiberglass or mineral wool panels with NRC ratings above 0.80 are the best acoustic absorption panels. They outperform foam across a wider frequency range, especially in the mid-frequencies where voice energy concentrates.

For budget options, high-density foam panels with self-adhesive backing provide adequate absorption at a lower price.

What Is The Most Effective Sound Deadening Material?

Mass loaded vinyl at one pound per square foot is the most effective material for blocking sound transmission through walls. Combined with damping compound and extra drywall, it creates a wall assembly that reduces noise by 10 to 15 decibels – enough to make loud conversation inaudible through the wall.

Do Sound Deadening Panels Actually Work?

Acoustic foam panels work for reducing echo and reverberation inside a room – they noticeably improve audio clarity for calls, recording, and gaming. They do not work for blocking noise from passing through walls, floors, or ceilings.

For noise blocking, you need mass-based products like MLV, extra drywall, or damping compounds, not lightweight foam.