How Much Acoustic Treatment Do I Need (The Real Numbers For Your Room)
How much acoustic treatment do i need — yes, there is an actual formula, but the right amount depends on your room size, what you use the room for, and whether you are solving echo problems or bass problems.
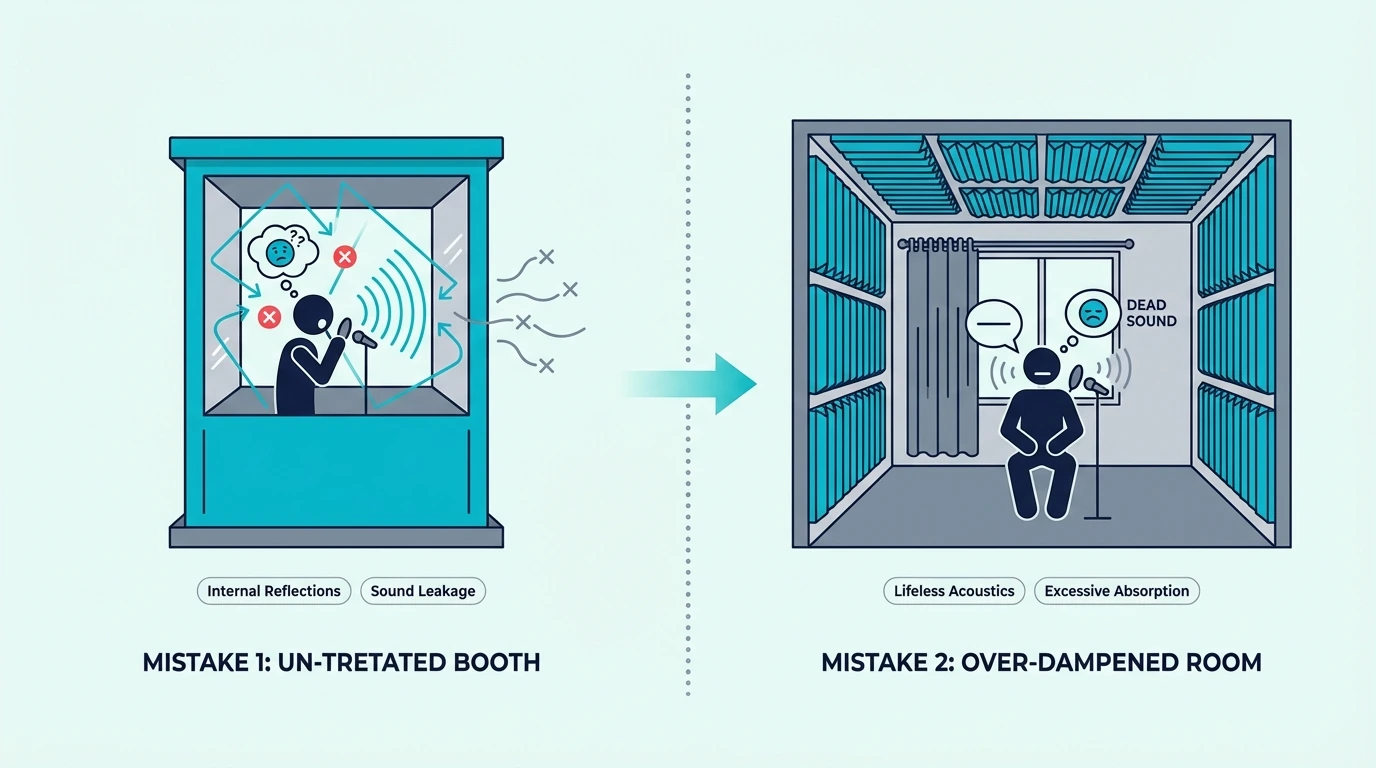
Most people either under-treat and wonder why their room still sounds bad, or over-treat and end up with a dead, lifeless space that makes everything sound flat.
The wrong amount of treatment wastes money in both directions. Too little and you still hear flutter echo and muddy bass.
Too much and vocals lose their natural energy.
Below, this guide breaks down the wall coverage percentages, panel counts, and placement priorities so you can get the right amount of acoustic treatment for your specific room without guessing.
Quick Takeaway
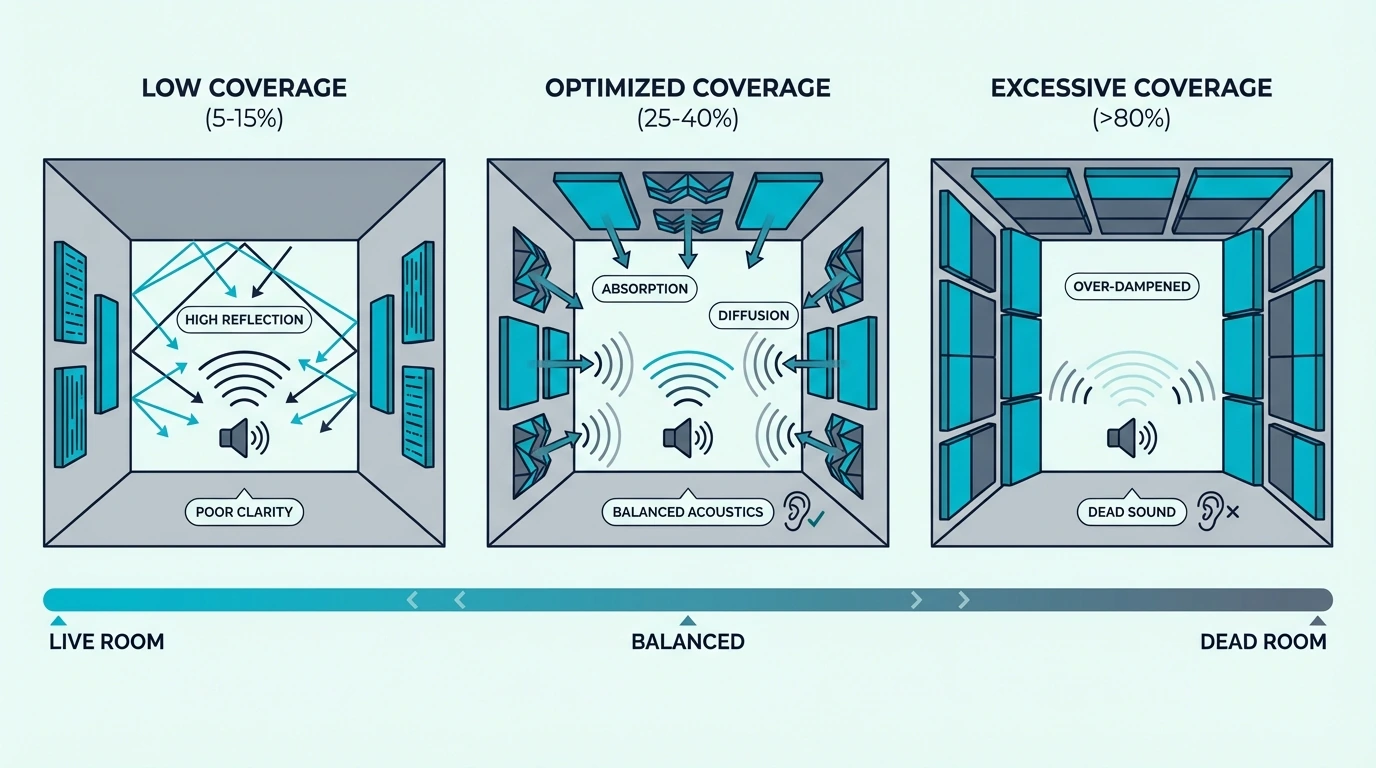
To calculate how much acoustic treatment you need, measure your total wall surface area and plan for 20-40% coverage with absorption panels, depending on room purpose. Home studios need 30-40% coverage plus corner bass traps. Home theaters need 25-35%. Offices need 15-25%. Start with first reflection points and corners, then add panels until the room sounds controlled but not dead. A typical bedroom studio needs 6-10 panels total: 4 corner bass traps, 2 side-wall panels at first reflection points, 1 ceiling cloud, and 1-2 rear panels.
How Much Acoustic Treatment Do I Need — And Why Does It Matter?
Getting the amount right is the difference between a room that works and one that fights you on every mix. Here is what happens when you get it wrong — and why the numbers matter more than most people realize.
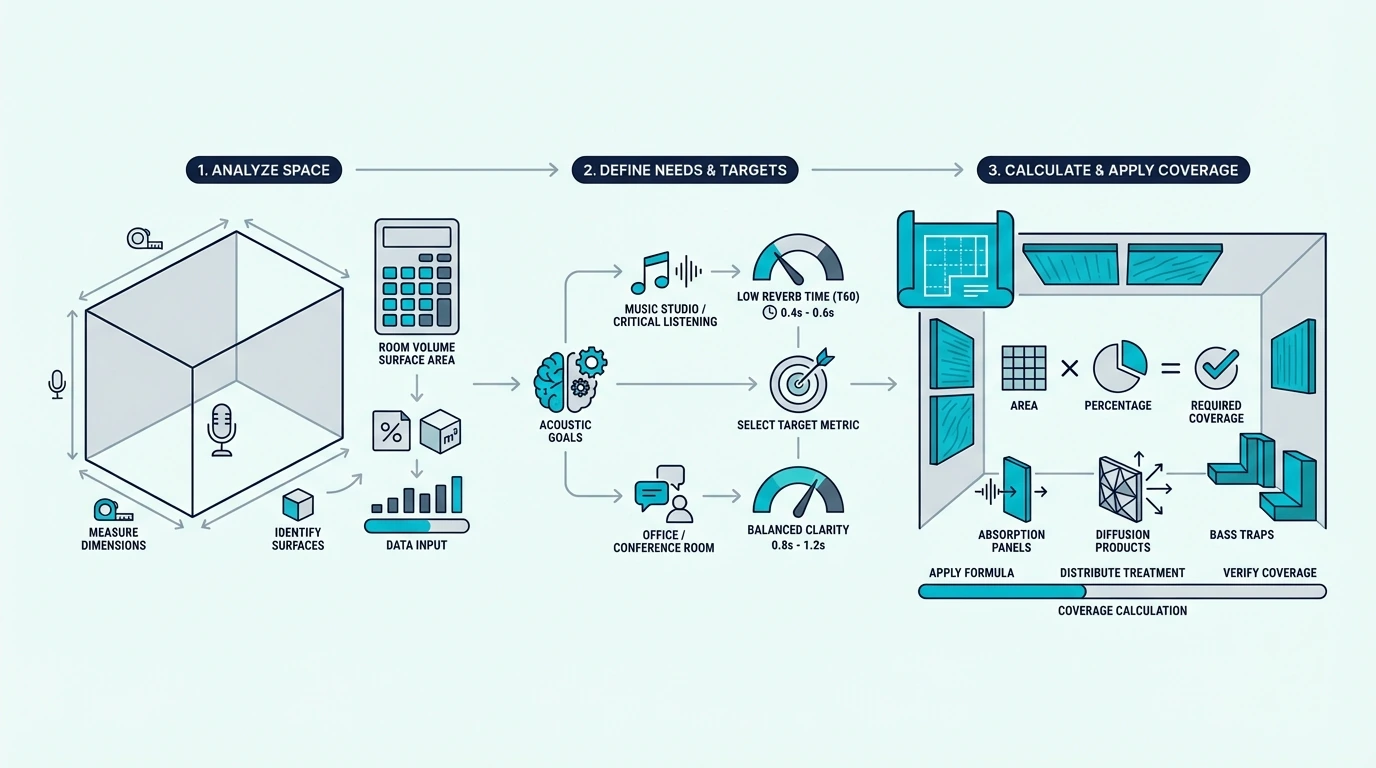
The Wall Surface Area Method
The simplest starting point is wall surface area. Measure the total square footage of your walls (length times height for each wall, added together) and calculate 20-40% of that number.
That percentage is your target coverage for absorption panels. A room with 400 square feet of wall surface needs 80-160 square feet of panel coverage depending on how aggressively you want to treat the space.
Bass traps are separate from that calculation. Corner bass traps handle low frequencies that wall panels cannot absorb, so you add them on top of your wall coverage number.
The mirror trick helps you find where to place panels first. Sit at your mix position and have someone slide a mirror along each wall.
Every spot where you can see your monitors in the mirror is a first reflection point — and those points are your highest-priority panel locations.
Room Purpose Changes The Math
A recording room needs more absorption than a mixing room. When you record vocals or acoustic instruments, you want the microphone to capture as little room sound as possible, which means heavier treatment on walls near the mic.
Mixing rooms need a different balance. Too much absorption kills the natural room sound that helps you judge how a mix translates to other spaces.
For home studios where you both record and mix in the same room, aim for 30-35% wall coverage. That gives you enough absorption for clean recordings without making the room too dead for critical listening.
Listening rooms and home theaters sit at the lower end — 20-30% coverage focused on first reflection points and the rear wall. The goal is clarity without removing the sense of space that makes movies and music feel immersive.
How Do You Calculate Acoustic Treatment Coverage?
The wall surface area method gives you a target number, but turning that number into an actual panel count requires a few more steps. Here is the practical math that tells you exactly how many panels to buy.
Start with your room dimensions. A 12×10 foot room with 8-foot ceilings has approximately 352 square feet of wall surface area (two 12×8 walls plus two 10×8 walls).
At 30% coverage, you need about 105 square feet of panels. A standard 2×4 foot acoustic panel covers 8 square feet.
That means roughly 13 panels — but you will not place them all on walls.
Four of those panels become corner bass traps (stacked in pairs in two corners). One becomes a ceiling cloud above the mix position.
The remaining eight go on walls at first reflection points and behind the monitors.
For larger wall coverage, 24×48-inch panels give you 16 square feet per pair — the same size as most DIY panels.
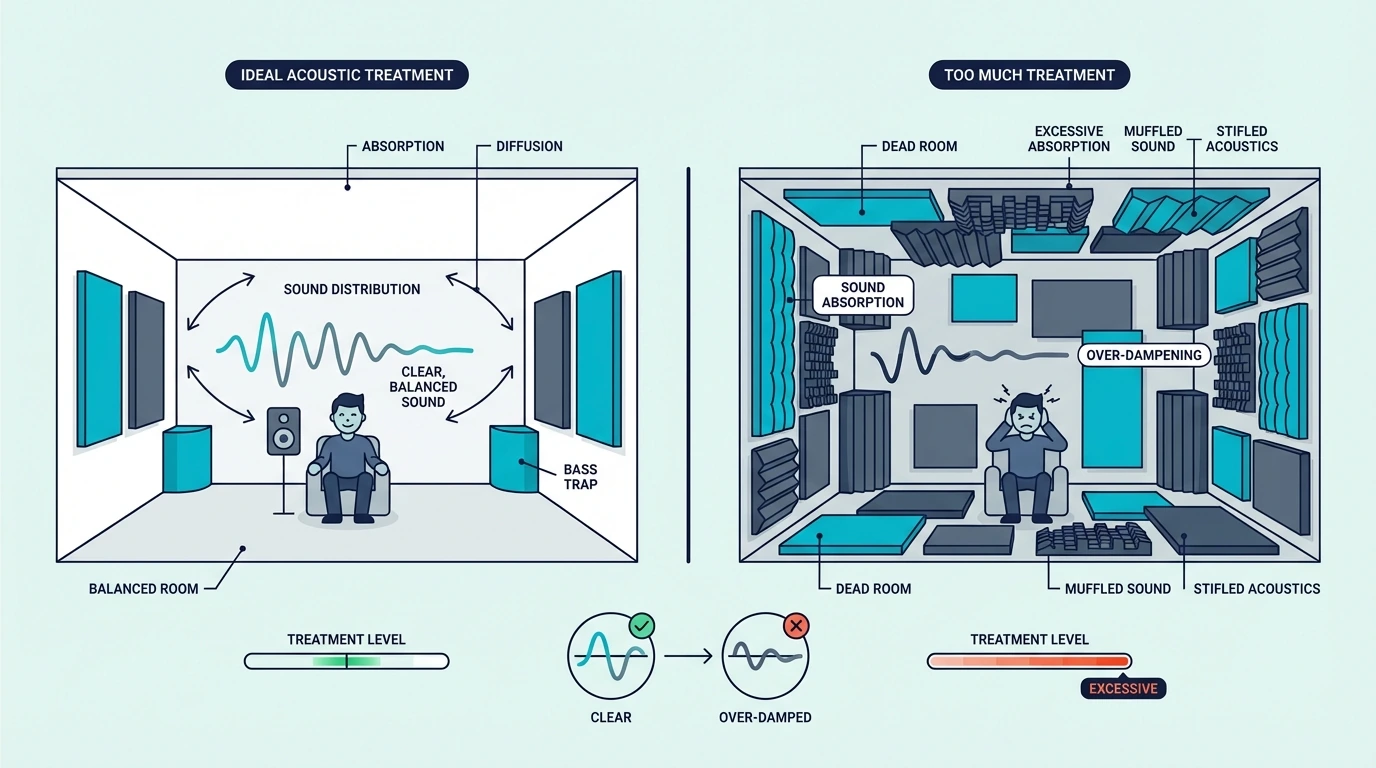
Is There Such A Thing As Too Much Acoustic Treatment?
Absolutely — and over-treating is more common than you would expect. The difference between a well-treated room and an over-treated one is immediately obvious when you walk in and start talking.
Signs You Have Over-Treated
Your voice sounds unnaturally dry when you speak. Clap your hands in the center of the room — if you hear a dull thud with zero decay, you have gone too far.
Recordings in an over-treated room sound lifeless. Vocals lose their natural warmth and presence because the room reflections that give a voice body are completely gone.
Mixing becomes harder, not easier. Without any early reflections, your brain struggles to judge the spatial characteristics of a mix.
Everything sounds flat and narrow in the room, then too wide and reverberant when you play it in a car or on headphones.
The room acoustics feel uncomfortable. Humans are accustomed to hearing some reflected sound.
A completely dead room creates a subtle sense of unease that causes ear fatigue faster than a moderately treated space.
How To Fix An Over-Treated Room
Remove panels from the rear wall first. The rear wall benefits from diffusion more than absorption in most studio setups, because scattered reflections from behind you add a sense of depth without causing comb filtering at the mix position.
Replace some absorption panels with diffusers. Sound absorption and diffusion serve different purposes — absorption removes energy, diffusion redistributes it.
A room with only absorption feels dead. A room with both feels controlled and natural.
Leave some hard surfaces exposed. The ceiling above and behind you, portions of the rear wall, and areas outside the first reflection zones can remain untreated.
Those surfaces provide the natural room sound that keeps recordings and mixes sounding alive. When building replacement panels or adding targeted absorption at specific spots, Rockboard 60 mineral wool boards cut to exact sizes so you can build panels that fit precisely where the room needs them without over-covering adjacent areas.
What Percentage Of Walls Should Be Covered?
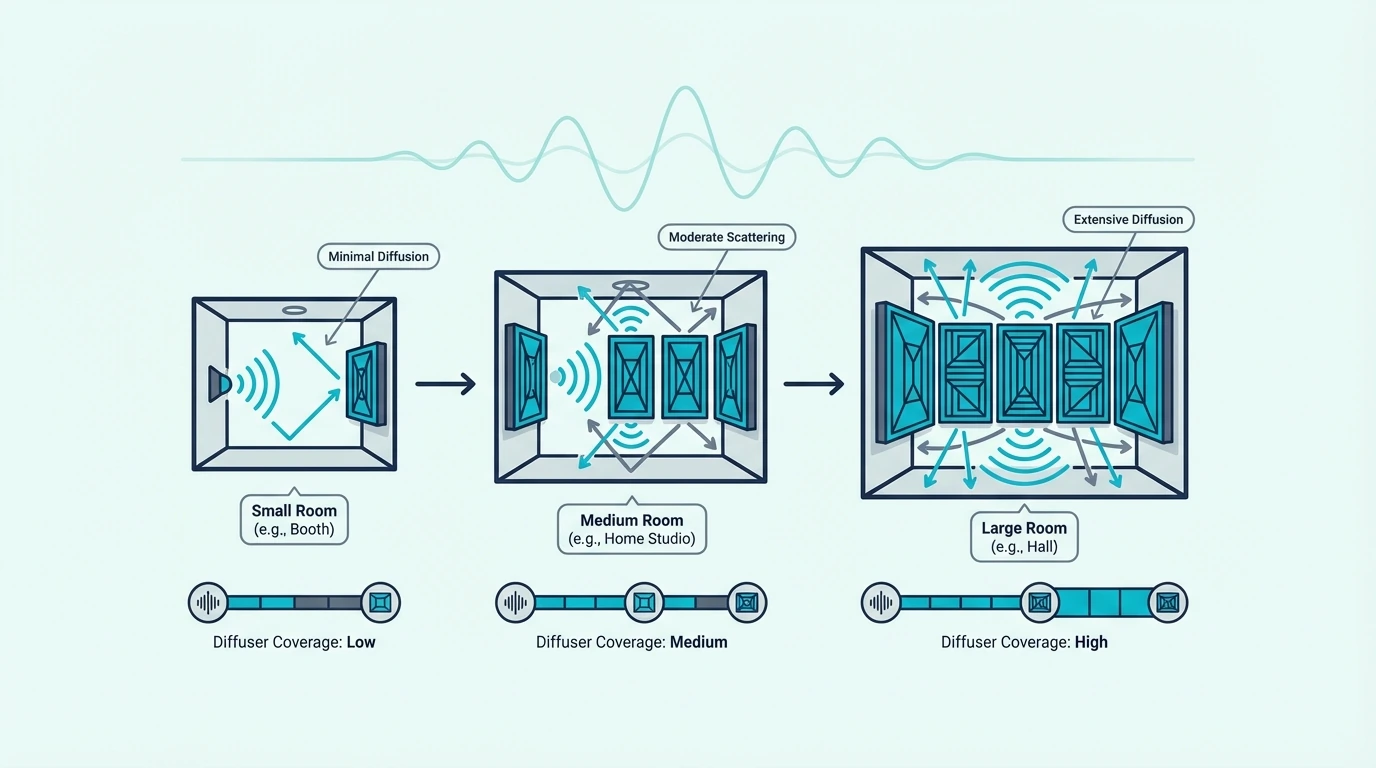
The percentage changes based on room type, and small rooms need higher coverage ratios than large ones because they pack more acoustic problems into less space. Here is a breakdown by use case.
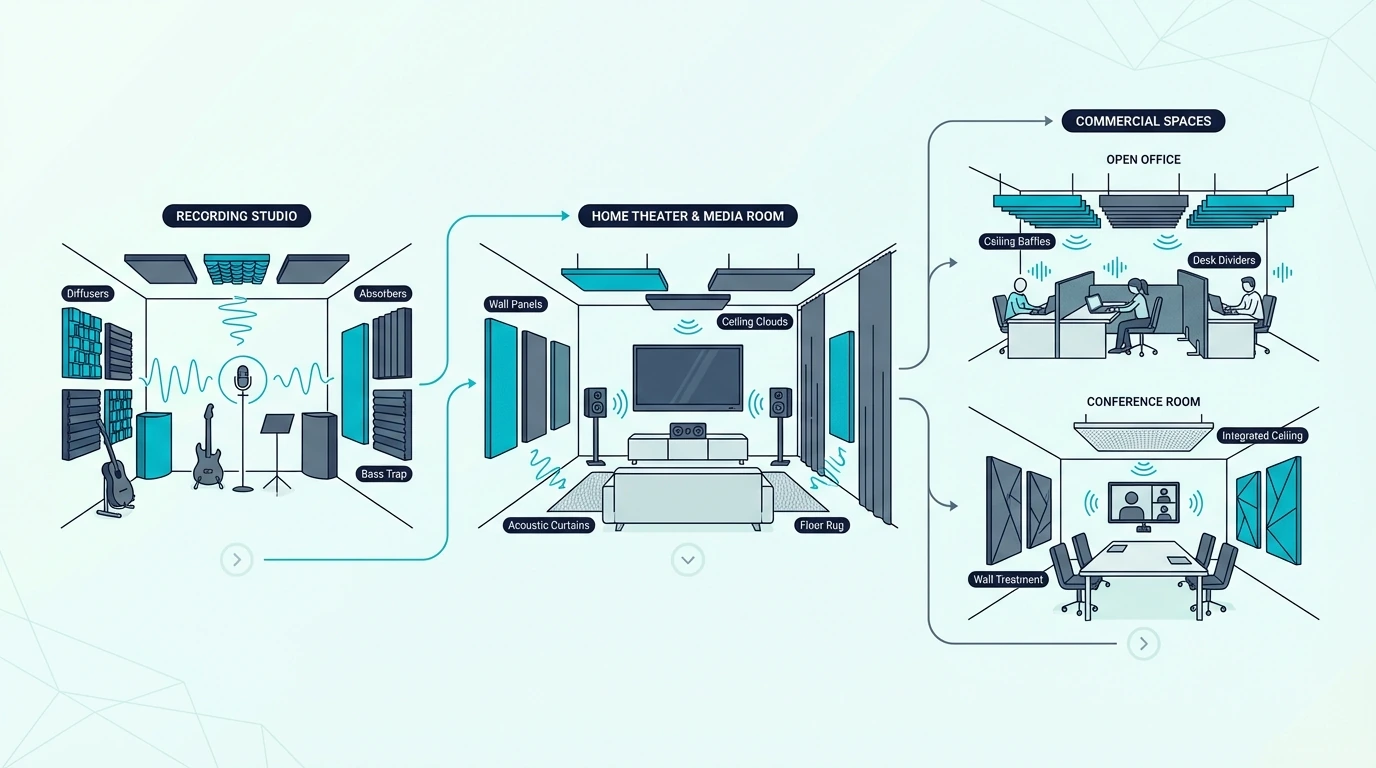
Home Studios
Target 30-40% wall coverage plus 4-8 corner bass traps. The bass traps are non-negotiable — low frequencies are the biggest problem in small rooms, and wall panels do nothing below about 200 Hz. A budget starting point like the TroyStudio Bass Traps 24-Pack gets foam into every corner while you save for thicker fiberglass options.
Place panels at the first reflection points on both side walls, behind the monitors on the front wall, and on the ceiling between you and the monitors. That configuration addresses the most destructive reflections first.
A 4-pack of fiberglass panels with included hanging hardware handles side-wall reflections in a typical bedroom studio with one set.
If you need to prioritize, start with corner bass traps and side-wall panels. Those two positions solve approximately 60-70% of the acoustic problems in a typical home studio.
Home Theaters
Target 25-35% coverage focused on first reflection points and the rear wall. Home theaters benefit from slightly less treatment than studios because you want to preserve the immersive feel of surround sound.
Side-wall panels at the primary listening position prevent harsh early reflections from the front speakers. Rear-wall treatment controls the reflections that arrive late and cause dialogue intelligibility problems.
Diffusion on the rear wall often works better than absorption for home theaters. Scattered reflections add a sense of envelopment that makes movie soundtracks feel more spacious without creating echo.
Offices And Conference Rooms
Target 15-25% coverage focused on speech frequencies. Office acoustic treatment prioritizes intelligibility — reducing the reverb time so that speech is clear across the room.
Ceiling panels are especially effective in offices because most conference table conversations bounce off the ceiling directly. A few well-placed ceiling clouds can solve more problems than twice as many wall panels.
Open-plan offices need more treatment than enclosed conference rooms. The lack of floor-to-ceiling walls means sound travels farther and reflects off more surfaces before decaying.
The Bottom Line
The right amount of acoustic treatment depends on room purpose, but the universal starting point is the same: first reflection points plus corner bass traps. That combination solves the majority of room problems regardless of whether you are building a studio, theater, or office.
The number one mistake is treating walls while ignoring corners. Bass traps handle the frequencies that cause the most mixing problems, and no amount of wall coverage compensates for untreated corners.
Frequently Asked Questions
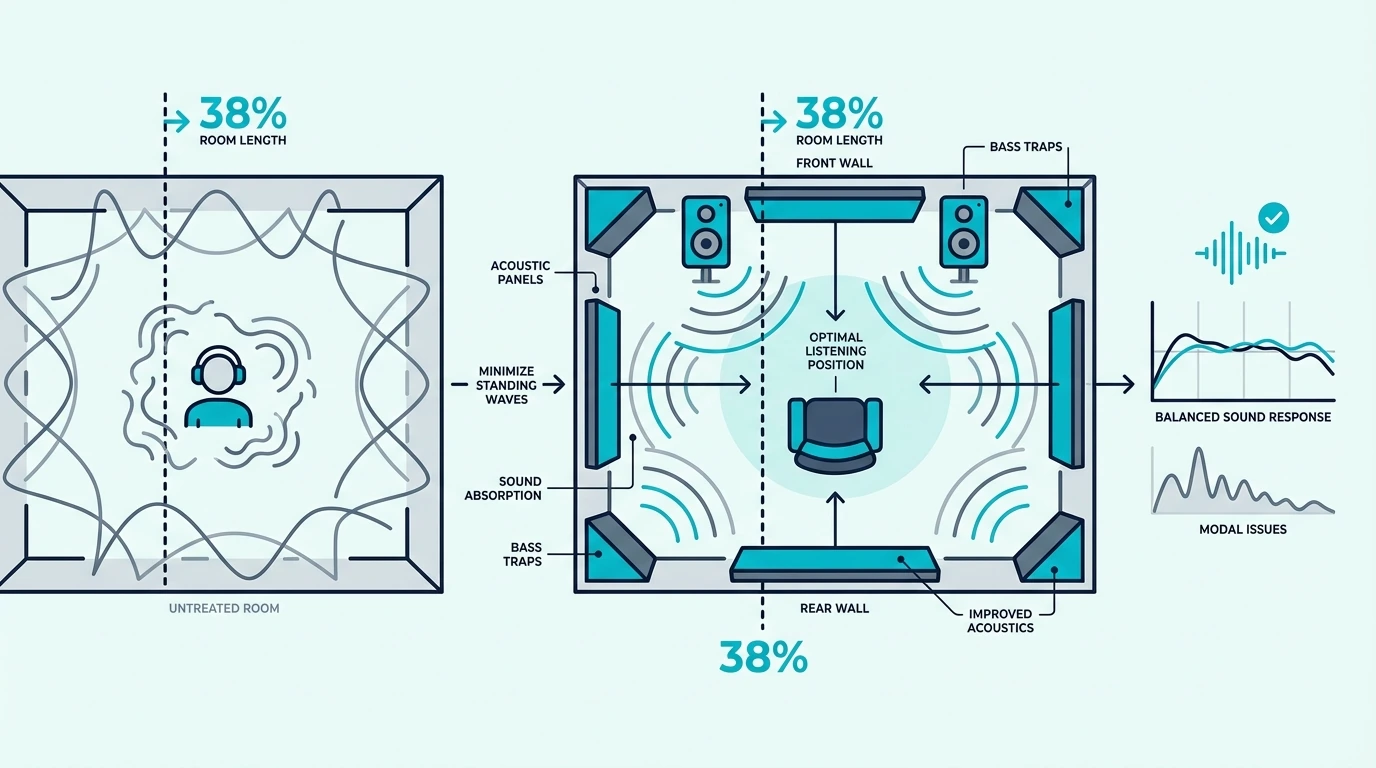
What Is The 38% Rule Room Acoustics?
The 38% rule is a placement guideline for your listening position, not your panels. Place your chair at 38% of the room length measured from the front wall.
That position minimizes the overlap of the strongest bass room modes, giving you the flattest low-frequency response at the mix position.
Is There Such A Thing As Too Much Acoustic Treatment?
Too much absorption makes a room sound lifeless and unnatural. The fix is balance — use diffusion alongside absorption, leave some reflective surfaces untreated, and stop adding panels once clapping in the room produces a short, clean decay rather than a dead thud.
How Many Acoustic Panels Do I Need For A Bedroom Studio?
A typical bedroom studio needs 6-10 panels. Four corner bass traps (stacked in pairs in two corners), two side-wall panels at first reflection points, one ceiling cloud above the mix position, and one to two panels on the front wall behind the monitors. A set like the UMIACOUSTICS 4-Pack with Hanging Hardware covers both side walls at first reflection points in a single purchase. Start with the corners and side walls — those positions deliver the biggest improvement per panel.
Owens Corning Vs Knauf For Acoustic Treatment (Honest Comparison)
Acoustic treatment Owens Corning vs Knauf is a comparison that comes up whenever builders start sourcing rigid fiberglass for DIY panels, but the answer depends less on which brand is technically superior and more on which one you can actually find and afford in your region.
Both manufacturers produce rigid fiberglass insulation boards that work well for acoustic panels and bass traps. The acoustic performance differences between them are small — far smaller than the difference between either brand and cheap acoustic foam.
The problem is that choosing the wrong product — or settling for low-density foam because you could not find either brand locally — leaves reflections bouncing off your walls and muddying every recording and mix you produce in that room. Fiberglass density is what determines how much sound absorption a panel delivers, and both OC and Knauf offer the densities that actually solve room problems.
The real deciding factors are availability, density options, and price per board. Owens Corning dominates the US market with decades of documented acoustic use.
Knauf is the stronger option in Europe and parts of Asia, with a growing US presence.
Below you will find what each brand offers, how they compare on absorption, handling, and cost, and which to choose based on where you live. Start by checking local supplier stock — the best insulation board is the one you can get without paying excessive shipping.
Quick Takeaway
Owens Corning 703 (3 lb per cubic foot) and Knauf Insulation Board perform within 5-10% of each other on acoustic absorption tests. OC 703 is easier to source in the US with more documented acoustic data. Knauf boards are more widely available in Europe and use Ecose bio-based binder technology that reduces skin irritation during handling. Choose whichever is locally available at a reasonable price — both produce excellent acoustic panels.
Owens Corning For Acoustic Treatment
Owens Corning is the default recommendation in nearly every US-based DIY acoustic treatment guide. Their rigid fiberglass boards have been tested, measured, and documented by acousticians and home studio builders for decades.
OC 703 — The Standard Broadband Absorber
OC 703 is a rigid fiberglass board with a density of 3 lb per cubic foot. At 2 inches thick, it achieves an NRC (Noise Reduction Coefficient) of approximately 1.0 — meaning it absorbs virtually all sound energy that hits it across the mid and high frequency range.
That level of absorption is what separates proper acoustic treatment from decorative foam. A 2-inch foam panel typically achieves an NRC of 0.4-0.6, absorbing less than half the energy at the same thickness.
The 703 is the go-to product for wall panels at first reflection points, ceiling clouds, and general broadband absorption. It comes in standard 24 x 48 inch boards that fit common panel frame sizes without cutting.
The OC 703 6-pack is the most common purchase unit for home studio builders. Six boards produce six standard 2 x 4 foot panels — enough for first reflection points and a ceiling cloud in a small room.
OC 705 — For Bass Traps
OC 705 is the denser variant at 6 lb per cubic foot. The higher density absorbs lower frequencies more effectively per inch of thickness, making it the better choice for corner bass traps.
A 4-inch OC 705 bass trap absorbs meaningfully down to 100 Hz. The same thickness of OC 703 starts losing effectiveness below approximately 200 Hz.
The tradeoff is cost — OC 705 boards are roughly 50% more expensive per board than OC 703. For most builds, the recommendation is OC 703 for wall panels and OC 705 for bass traps where low-frequency absorption matters most.
OC Availability And Pricing
OC 703 and 705 are available through insulation distributors, some building supply stores, and online retailers across the US. Pricing runs approximately 20-25 dollars per 24 x 48 inch board at 2 inches thick.
The main drawback is that OC boards are not stocked at standard hardware stores like Home Depot or Lowes. You typically need to order from a specialty insulation distributor or purchase online with shipping costs that can add significantly to the total.
For a detailed breakdown of fiberglass panel costs versus alternatives, the cost comparison guide covers every price tier.
Knauf For Acoustic Treatment
Knauf is one of the largest insulation manufacturers in the world, headquartered in Germany with operations across Europe, Asia, and a growing presence in the US. Their fiberglass insulation boards are widely used for acoustic treatment in European studios.
Knauf Insulation Board
Knauf produces rigid and semi-rigid fiberglass insulation boards in various densities. Their acoustical board products range from approximately 2.5 to 6 lb per cubic foot, overlapping with the OC 703 and 705 density range.
At equivalent densities, Knauf boards perform within 5-10% of Owens Corning products on standard absorption tests. The NRC values are comparable — a 2-inch Knauf board at 3 lb per cubic foot density absorbs essentially the same amount of sound as an OC 703 board of the same dimensions.
The product naming and specification system differs from Owens Corning. Where OC uses the simple 703/705 numbering, Knauf uses regional product names that vary by market.
This makes direct comparison slightly more confusing, but the underlying physics is the same — fiberglass at a given density absorbs a given amount of sound regardless of the brand name on the packaging.
Knauf Ecose Technology
Knauf’s distinguishing feature is their Ecose binder technology. Traditional fiberglass uses a formaldehyde-based binder to hold the glass fibers together.
Knauf Ecose uses a bio-based binder derived from rapidly renewable materials.
The practical benefit for panel builders is reduced skin irritation during handling. Ecose fiberglass is noticeably less itchy than traditional fiberglass when cutting and fitting boards.
You should still wear gloves and a dust mask, but the irritation is milder.
The Ecose binder also gives Knauf boards a distinctive brown color instead of the yellow or pink color of traditional fiberglass. This is purely cosmetic — the color has no effect on acoustic performance.
Knauf Availability And Pricing
In Europe, Knauf insulation boards are readily available at building supply stores and are often cheaper than importing Owens Corning products. In the US, Knauf availability varies significantly by region.
Some US building supply chains carry Knauf products, particularly in regions where Knauf has manufacturing facilities. In other areas, sourcing Knauf boards requires ordering online with shipping costs that may eliminate any price advantage.
Head-To-Head Comparison
Factor
Owens Corning (703/705)
Knauf Insulation Board
Density range
3-6 lb per cubic foot
2.5-6 lb per cubic foot
NRC at 2 in (3 lb density)
~1.0
~0.95-1.0
Binder technology
Formaldehyde-based
Ecose bio-based
Handling comfort
Standard fiberglass irritation
Reduced irritation (Ecose)
US availability
Widely available via distributors
Regional, growing
European availability
Limited, expensive to import
Widely available
Price (US)
20-25 dollars per 2×4 ft board
15-22 dollars where available
Acoustic documentation
Extensive (decades of testing)
Good but less widely cited
Board rigidity
Semi-rigid, holds shape well
Varies by product line
The absorption performance difference between the two brands at equivalent densities is negligible for practical purposes. A room treated with Knauf boards will sound indistinguishable from the same room treated with OC boards of the same density and thickness.
The meaningful differences are logistical. If you are building panels in the US, OC 703 is likely easier and cheaper to source.
If you are in Europe, Knauf boards are the obvious choice.
For builders who cannot source either brand locally, pre-built fiberglass panels skip the sourcing problem entirely. They arrive ready to hang and use the same fiberglass core material — you just pay a premium for the convenience of not building the panels yourself.
The Bottom Line
Owens Corning and Knauf both produce fiberglass insulation boards that make excellent acoustic panels. The absorption performance at equivalent densities is within 5-10% — a difference that is inaudible in any real-world listening environment.
Choose based on availability and price in your region. US builders should default to OC 703 for wall panels and OC 705 for bass traps.
European builders should use Knauf boards at equivalent densities.
For cost planning, the cost guide compares DIY fiberglass panels against pre-built alternatives at every price point.
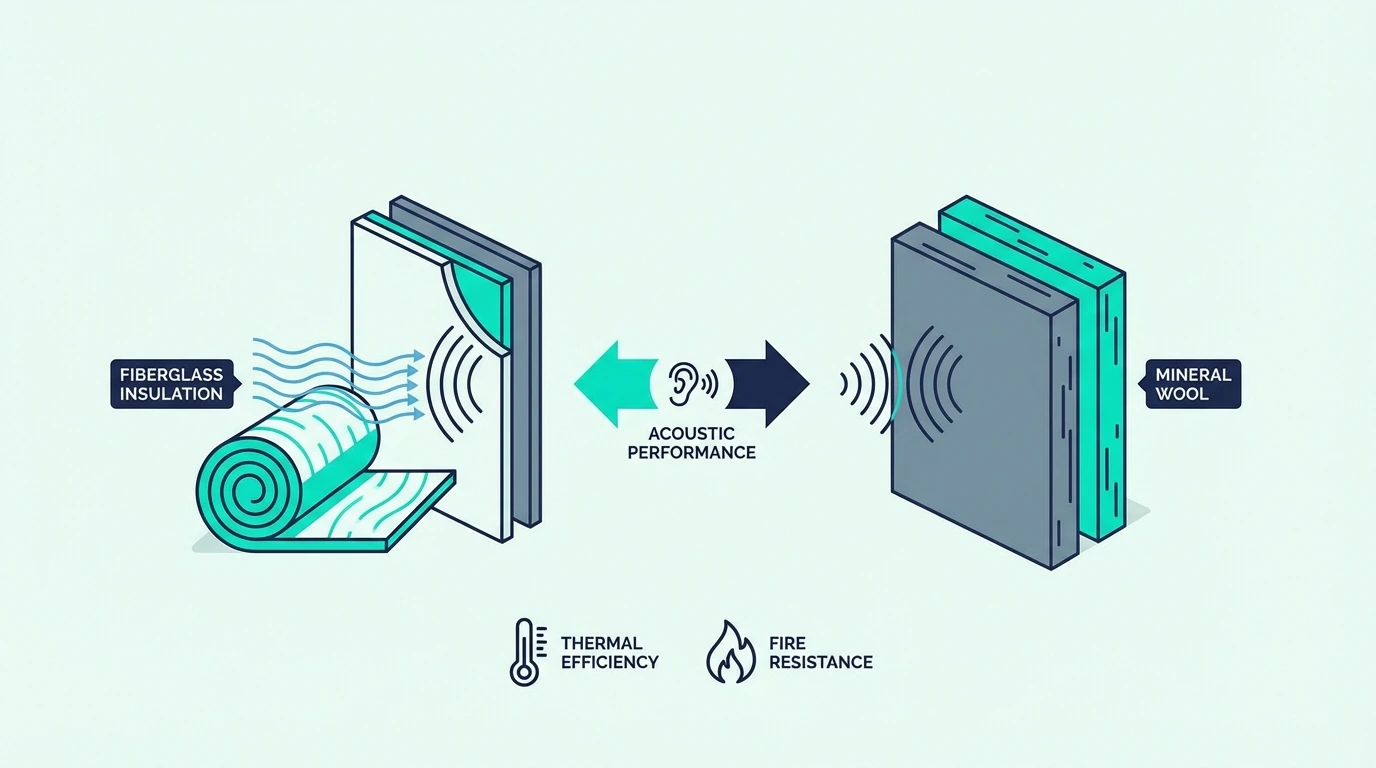
If you are deciding between fiberglass and Rockwool, both materials produce excellent results — the choice often comes down to local availability and personal handling preference, just like the OC vs Knauf decision.
Frequently Asked Questions
Is Knauf insulation good for soundproofing?
Knauf fiberglass boards work well for acoustic absorption panels that control reflections and reverb inside a room. They are not soundproofing products — no insulation board alone prevents sound from passing through walls.
For actual soundproofing, you need mass, decoupling, and airtight construction. The home theater guide explains the distinction between treatment and soundproofing in a practical context.
What is the best insulation for acoustic panels?
OC 703 (3 lb per cubic foot rigid fiberglass) is the most widely recommended product for wall panels. OC 705 or Rockwool AFB is better for bass traps due to higher density.
Knauf boards at equivalent densities perform nearly identically. Use whichever brand is locally available at a reasonable price.
Is OC 703 or 705 better?
OC 703 is better for general wall panels and ceiling clouds — it provides broadband absorption across the mid and high frequency range at a lower cost per board. OC 705 is better for bass traps where maximum low-frequency absorption per inch matters.
Most home studio builds use OC 703 for wall panels and OC 705 for corner bass traps. That combination covers the full frequency range efficiently.
Portable Recording Booth Vs Acoustic Treatment (Which One Actually Fixes Your Sound?)
Portable recording booth vs acoustic treatment is not really a competition between two equal options — but the way forums and gear sites frame the debate makes it sound like picking one or the other is a simple preference call when the two tools solve fundamentally different problems.
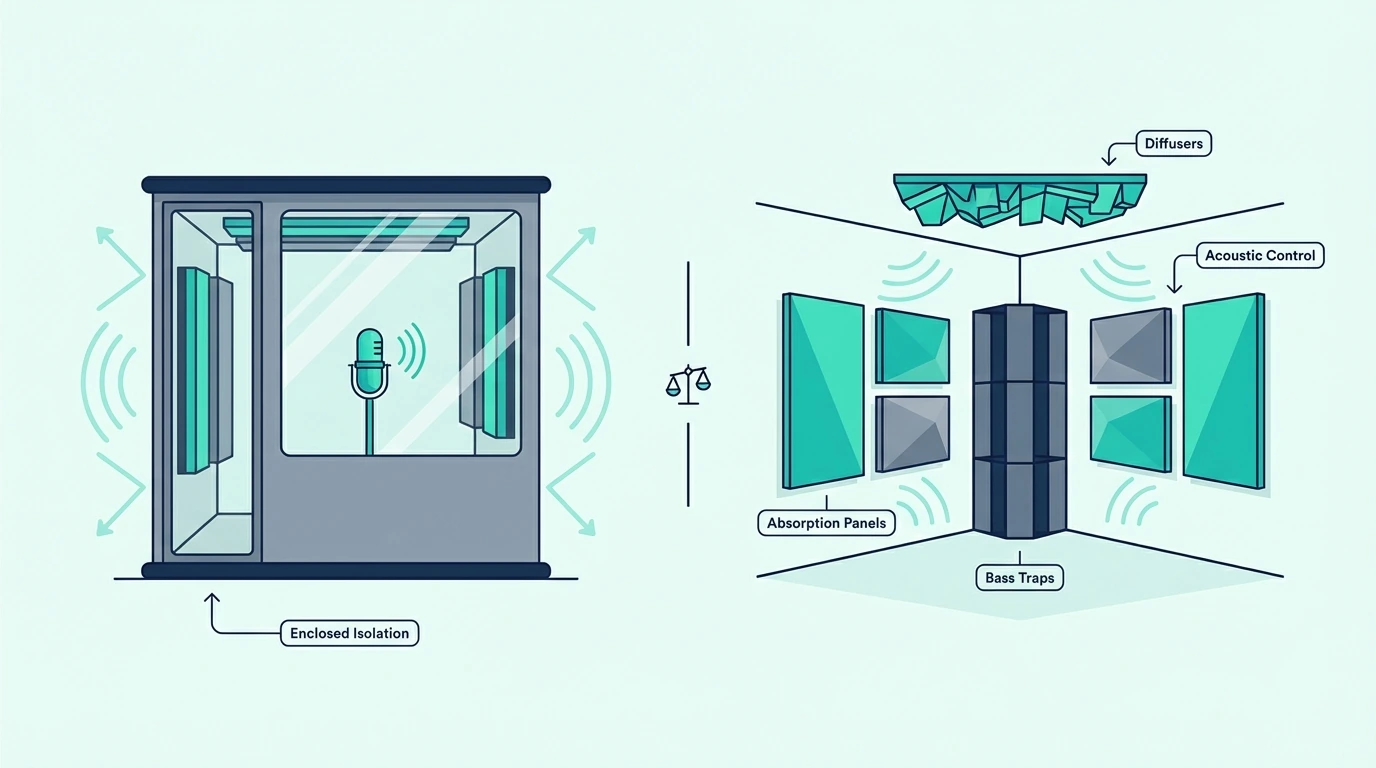
A portable vocal booth shields the microphone from reflections coming from behind and to the sides. Acoustic treatment changes the way the entire room behaves by absorbing, diffusing, or redirecting sound waves at the surfaces where they bounce.
One is a targeted mic-level fix that travels with you. The other is a room-level transformation that benefits every sound source and every listening position in the space.
The confusion comes from the fact that both options reduce unwanted room sound on recordings. They do it through completely different mechanisms, at completely different scales, and with completely different tradeoffs in cost, permanence, and effectiveness.
Below, this guide breaks down exactly what each option does, where each one falls short, and how to decide which approach — or which combination — matches your recording situation, your budget, and your space.
Quick Takeaway
Portable vocal booths and reflection filters reduce mic-level reflections from specific directions but cannot control bass buildup, full-room reverb, or reflections from untreated surfaces. Room acoustic treatment addresses the entire space — walls, ceiling, corners — and benefits recording, mixing, and listening equally. Choose a booth if you rent, travel, or need a quick vocal fix; choose treatment if you own the space and want accurate sound for everything you do in the room.
Portable Recording Booth Vs Acoustic Treatment — What Each One Actually Does
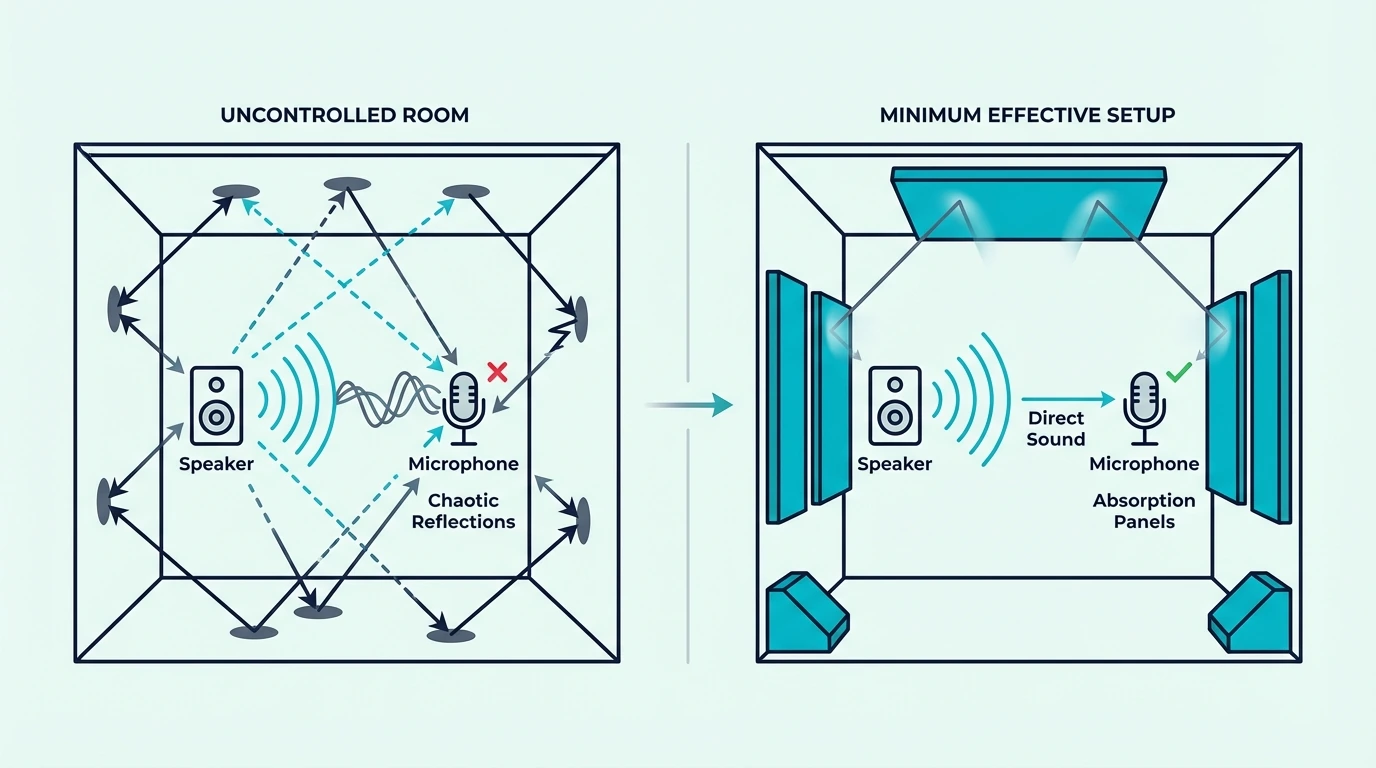
Before choosing between these two approaches, you need to understand what problem each one solves — because the overlap is smaller than most people assume. A portable booth and room treatment share the goal of reducing unwanted reflections, but they attack the problem from opposite directions and at very different scales.
A portable vocal booth works by placing absorptive material directly around the microphone. The shield intercepts sound waves that would otherwise bounce off the wall behind the mic, reflect back into the capsule, and color the recording with room tone.
The mic hears less of the room because the booth physically blocks a portion of the reflected energy before it reaches the diaphragm. The key word is “portion” — the booth only covers a fraction of the total reflective surface area in the room.
Room acoustic treatment works by changing the acoustic behavior of the room itself. Panels on walls absorb reflected energy at the surface before it ever reaches the mic — or your ears, or your monitors.
Bass traps in corners reduce low-frequency buildup that no booth can touch. Diffusers on the rear wall scatter reflected energy into many small reflections that arrive at different times and from different angles, keeping the room alive without creating discrete echoes.
The room becomes a better acoustic environment for every activity that happens inside it — recording, mixing, monitoring, and casual listening. The fundamental difference is scope: a booth protects the microphone, while treatment fixes the room.
What Is A Portable Recording Booth?
The term “portable recording booth” covers a wide range of products — from small foam-lined shields that clip onto a mic stand to full walk-in enclosures that surround the vocalist. What they share is portability and the goal of reducing the amount of room sound that reaches the microphone during recording.
Understanding the two main categories — reflection filters and full booths — helps clarify what you are actually buying and what each type can realistically deliver.
Reflection Filters And Vocal Shields
Reflection filters are the most common and most affordable type of portable booth. They are semi-circular or multi-panel shields lined with acoustic foam or dense fabric that mount behind the microphone on a standard mic stand.
The shield blocks reflections coming from behind and to the sides of the mic. Sound waves that would normally hit the wall behind the microphone, bounce back, and enter the rear or sides of the capsule are absorbed by the foam lining instead.
A typical reflection filter like the Professional Studio Microphone Isolation Shield folds flat for transport and clips onto any standard mic stand. The foldable design makes it practical for mobile recording sessions, podcast setups in shared spaces, or home studios where permanent treatment is not an option.
The limitation is coverage — a reflection filter only shields one direction, the rear hemisphere of the microphone. Sound bouncing off the ceiling, the floor, the side walls, and the wall the vocalist faces still enters the capsule freely.
In a highly reverberant room, a reflection filter might reduce room tone by 20-30%. That is noticeable on the recording, but far from eliminating it.
Reflection filters also do almost nothing below 300-500 Hz because the foam lining is too thin to absorb low-frequency energy. Bass buildup from corner modes and standing waves passes through the shield as though it were not there.
The weight of the filter on a mic stand is another practical concern. Heavier models require a sturdy boom stand to avoid tipping, and the added mass can introduce vibration transfer from the floor through the stand into the mic if the stand is not properly isolated.
Despite these limitations, reflection filters remain popular because they solve an immediate, visible problem — audible room echo on vocal takes — for a very low cost. The key is understanding that they are a partial solution, not a complete one.
Full Portable Vocal Booths
Full portable vocal booths are enclosures — fabric-and-frame structures or rigid panels — that surround the vocalist on multiple sides. Some resemble small tents with absorptive lining on every interior surface.
Others are rigid boxes with a door and ventilation holes. The build quality and materials vary widely across the price range.
These booths provide significantly more isolation than a reflection filter because they block sound from multiple directions instead of just one. The vocalist records inside a controlled space with absorptive walls on all sides, reducing the amount of room sound that reaches the mic from any angle.
The tradeoffs are substantial, though. Full booths are expensive — typically several hundred to several thousand dollars for a quality unit that actually provides meaningful isolation.
They take up significant floor space, often 4 x 4 feet or more. In a small bedroom studio, that footprint can consume a quarter of the usable room.
They get uncomfortably hot during long sessions because the enclosed space traps body heat and has limited airflow. Vocalists report fatigue and reduced performance quality after 30-60 minutes inside a portable booth without active ventilation.
Most full booths still lack the depth and density of material needed to absorb bass frequencies effectively. Low-frequency room problems persist even inside the enclosure because the thin foam or fabric walls are acoustically transparent to wavelengths below 300 Hz.
Full booths are most practical for voiceover artists who record in shared or rented spaces and need consistent sound without modifying the room. For music production — especially recording instruments beyond just vocals — the limitations outweigh the benefits quickly.
Another consideration is resale value. Portable booths depreciate quickly because the foam interior degrades over time, and used booths are difficult to ship due to their size and weight.
Room treatment panels, by contrast, hold their value much better because fiberglass and mineral wool do not degrade with normal use. A set of well-maintained panels can last a decade or more and still sell for a reasonable fraction of the original price.
If you move to a new space, you can take the panels with you and reinstall them — the only cost is new mounting hardware. A portable booth that has spent two years accumulating body heat, moisture, and foam degradation is a much harder sell on the secondhand market.
What Is Room Acoustic Treatment?
Acoustic treatment is the practice of placing absorptive, reflective, or diffusive materials on the surfaces of a room to control how sound behaves inside that space. Unlike a portable booth that shields one microphone, treatment changes the acoustic properties of the entire room.
Every wall, the ceiling, the floor, and the corners become part of a designed acoustic environment. The result benefits every sound source and every listener in the room simultaneously.
How Treatment Changes The Room
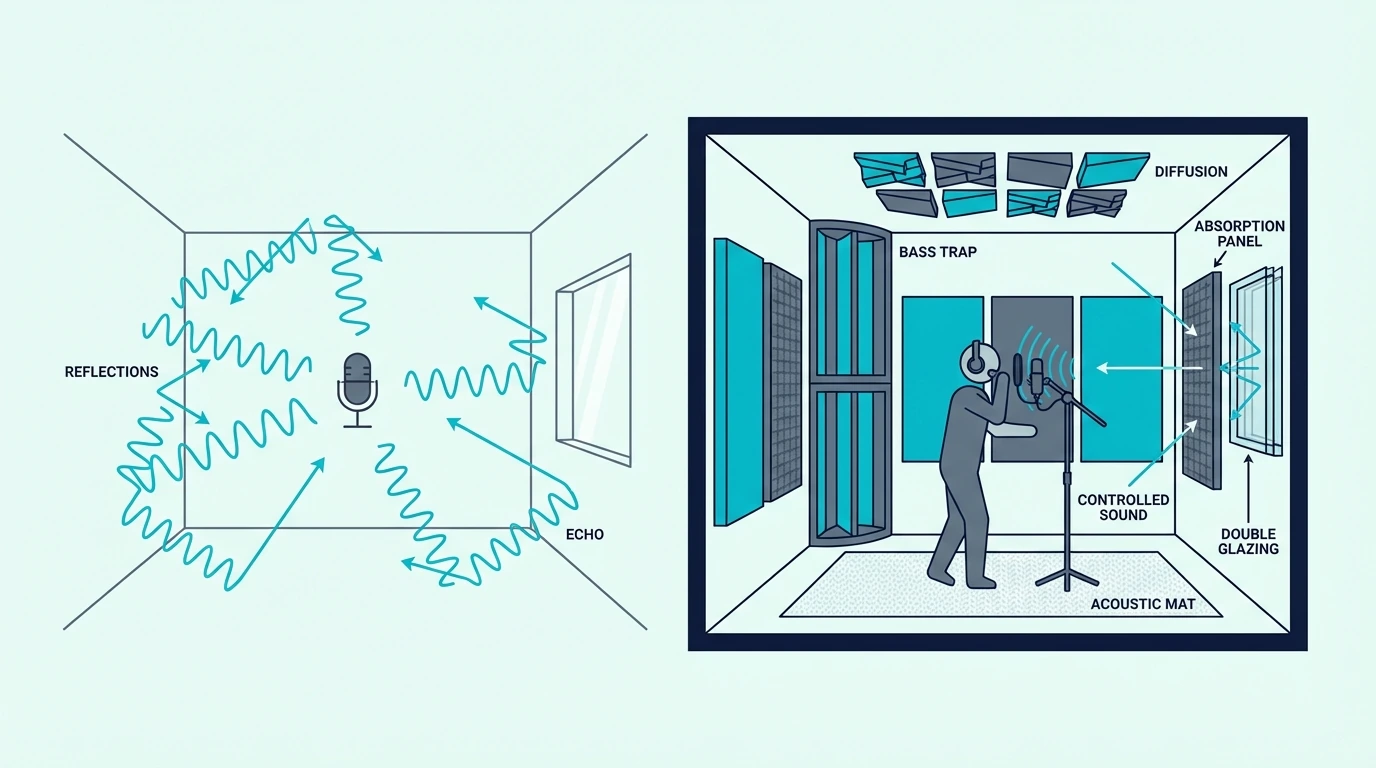
When sound waves leave a speaker or a vocalist’s mouth, they travel outward in all directions. Some energy reaches your ears (or the microphone) directly as the first arrival.
The rest hits the walls, ceiling, and floor, bounces off those surfaces, and arrives at the listening position (or the mic) milliseconds later as reflections. Those reflections are the root cause of nearly every acoustic problem in untreated rooms.
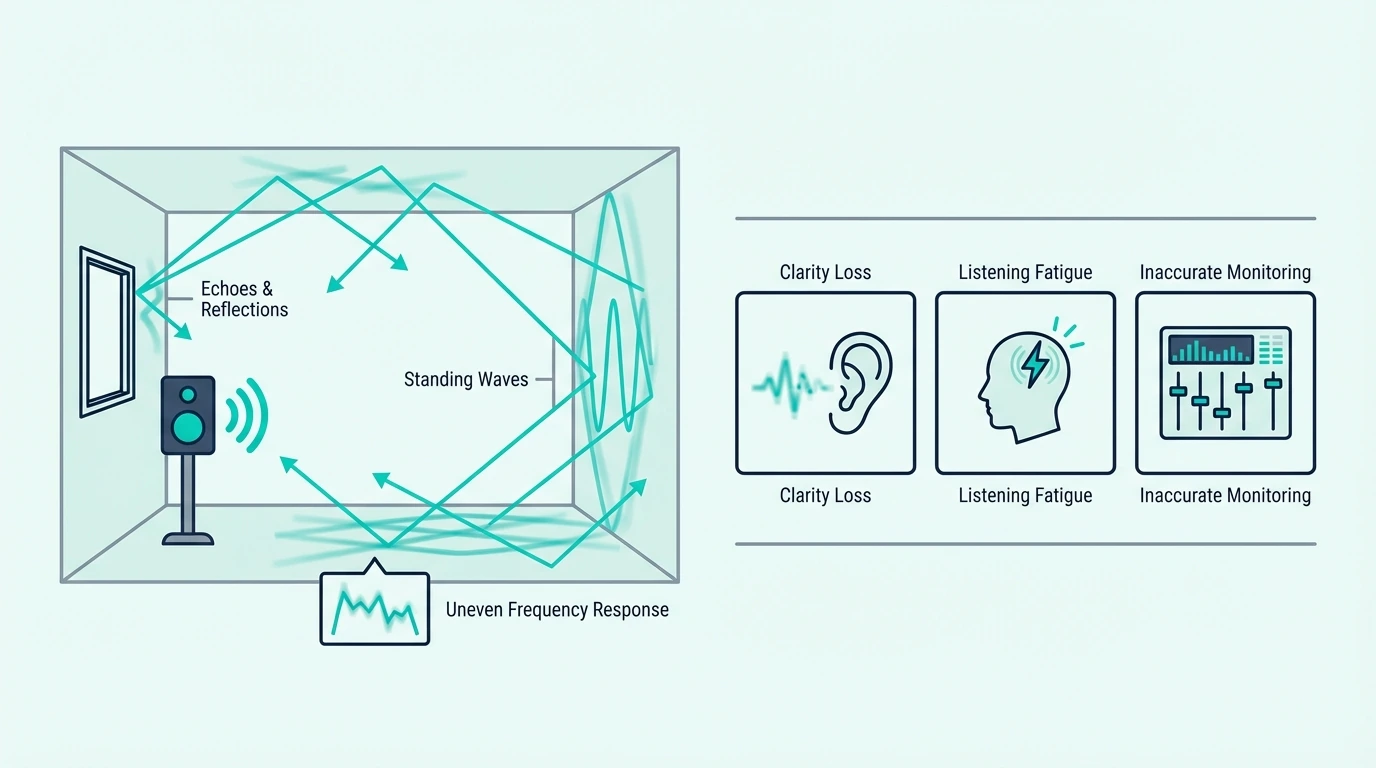
Early reflections — the first bounces off nearby surfaces — interfere with the direct sound and smear stereo imaging, muddy transients, and create comb filtering. The comb filtering makes the frequency response at your mix position wildly uneven, with sharp peaks and nulls that change depending on where you sit.
Late reflections accumulate into reverb that colors every sound with the room’s own decay signature. In small rooms, the reverb time is short but dense, creating a boxy coloration that is immediately audible on vocal recordings and impossible to remove in post-production.
Low-frequency standing waves — caused by sound bouncing back and forth between parallel surfaces — create bass buildup in corners and nulls at other spots. These room modes make the low end completely unreliable for mixing because the bass level at your seat does not match the bass level anywhere else in the room.
Treatment addresses all three problems at the source. Fiberglass or mineral wool panels on walls absorb early and late reflections before they accumulate into problematic reverb.
Bass traps in corners reduce standing wave energy where it concentrates most. Diffusers on the rear wall scatter reflected energy into many small reflections that arrive at different times, keeping the room alive without creating discrete echoes.
What Treatment Covers That A Booth Cannot
The list of acoustic problems that treatment solves but a booth cannot is long:
Bass control — standing waves and room modes below 300 Hz require thick absorbers in corners, and no portable booth addresses this
Full-room reverb — a booth reduces reflections at the mic, but the room still reverberates for everything else, which means your monitoring is still compromised
Stereo imaging — accurate stereo requires controlled first reflections on both side walls and the ceiling, and a booth does nothing for monitoring accuracy
Multiple sources — treatment benefits every microphone and every speaker in the room simultaneously, while a booth only helps the one mic it surrounds
Listening accuracy — if you mix, master, or critically listen in the same room, treatment is the only option that improves what you hear from your monitors
The home studio treatment guide covers the full placement sequence for recording rooms. The small room treatment guide addresses the specific challenges that bedrooms and spare rooms present — which is where most people making this decision actually work.
Head-To-Head Comparison
The clearest way to see where each option excels and where it falls short is a direct comparison across the factors that matter most for home recording.
Factor
Portable Booth / Reflection Filter
Room Acoustic Treatment
What it treats
The microphone’s pickup pattern
The entire room
Frequency range
Mid and high frequencies only (above 300-500 Hz)
Full range including bass (with corner traps)
Helps with mixing
No
Yes — flattens frequency response at the listening position
Helps with recording
Yes — reduces room tone on the mic
Yes — reduces room tone everywhere
Portability
High — folds flat, travels easily
Low — mounted to walls and corners
Installation
Clips onto mic stand in seconds
Requires wall mounting with clips, adhesive, or hardware
Renter-friendly
Yes — no wall modifications
Partially — command strips and freestanding panels work, but ideal placement requires mounting
Cost for basic setup
30-100 dollars for a reflection filter
200-500 dollars DIY or 500-1,500 dollars commercial panels
Bass control
None
Yes — corner bass traps address room modes
Coverage
One microphone, one direction
Every source and every listener in the room
The table makes the scope difference clear. A reflection filter is a focused, temporary, mic-level tool.
Treatment is a comprehensive, permanent (or semi-permanent), room-level solution. They are not interchangeable — they solve different layers of the same problem.
The frequency range row is worth emphasizing. Bass problems cause the most damage to recordings and mixes in small rooms, and neither a reflection filter nor a full portable booth addresses them at all.
If your room has audible bass buildup — a boomy quality on vocals, an uneven low end on playback — only corner bass traps will fix it. That single limitation eliminates portable booths as a standalone solution for anyone who also mixes in their recording space.
Which Should You Choose?
The decision between a portable booth and room treatment depends on four variables: whether you own or rent the space, whether you record only or also mix in the room, how many different sources you record, and your budget timeline. No single answer fits every situation, so the right approach depends on which of these variables weighs heaviest for you.
When A Portable Booth Makes Sense
A reflection filter or portable booth is the right choice when the room is not yours to modify. If you rent an apartment or work in a shared space, mounting panels on walls is either against the lease or impractical because you will move within a year or two.
Portable booths also make sense for mobile recording — podcast interviews at different locations, on-site voiceover work, or field recording where you need consistent vocal sound without any room prep. The filter travels in a bag, clips onto a stand, and gives you a baseline level of reflection control regardless of the space.
If your recording needs are limited to solo vocals or voiceover — one microphone, one person, in a consistent position — a reflection filter handles the most audible reflections for a fraction of the cost of treating the room. The recording will not be as clean as it would in a treated room, but it will be significantly better than recording with a bare mic in an untreated space.
Budget matters too. A reflection filter costs 30-100 dollars, while a basic DIY room treatment setup starts around 200 dollars in materials.
Commercial panels for a small room run 500-1,500 dollars. If the budget is tight and the need is immediate, a reflection filter buys meaningful improvement today while you save for treatment.
Renters who want something more effective than a reflection filter but less permanent than wall-mounted panels can explore temporary acoustic treatment options. Freestanding panels, heavy curtains, and strategically placed furniture all improve the room without drilling holes.
When Room Treatment Wins
Room treatment is the clear winner when you own the space — or plan to stay long enough to justify the investment — and when you do more than just record vocals through a single microphone. The benefits compound across every activity you do in the room.
Every EQ decision, every reverb send, every panning choice is filtered through the room’s acoustic distortion. Without treatment, your mixes compensate for problems that only exist in your room, and they fall apart on every other playback system.
If you record multiple sources — acoustic guitar, amplifiers, drums, or ensemble vocals — a single reflection filter behind one mic cannot help the other mics in the room. Treatment improves the acoustic environment for every source simultaneously.
That means every microphone in the room captures a cleaner signal with less room coloration. The difference is audible on the first playback.
If bass is a problem — and in small rooms it always is — treatment is the only solution. Portable booths and reflection filters cannot absorb low frequencies because they lack the mass and depth of material required.
Corner bass traps built from 4-inch thick fiberglass or mineral wool address standing waves that no portable product can touch. The difference in the low end after installing corner traps is one of the most dramatic acoustic improvements most home studio owners ever experience.
Room treatment with panels like the UMIACOUSTICS Fiberglass Panels gives you a permanent improvement that benefits recording, mixing, and casual listening equally. The included brackets simplify installation, and the 2-inch fiberglass core handles the mid and high frequencies where vocal reflections are most audible.
When You Need Both
The best setup for many home studios is a combination: room treatment as the foundation, with a reflection filter as a supplemental tool for specific recording situations. This layered approach is more common in professional studios than most beginners realize.
Treat the room first — corner bass traps, ceiling cloud, and side wall panels at first reflection points. That handles the room-level problems (bass modes, reverb, monitoring accuracy) that no portable product can fix.
Then add a reflection filter behind the vocal mic if your recording position faces an untreated wall or window. The filter catches the remaining reflections from the one direction you could not panel — perhaps because of a window, a door, or a surface that is impractical to cover.
This layered approach gives you the best of both worlds. You get a treated room that sounds accurate for mixing and general recording, plus targeted mic-level shielding for the one spot where reflections still sneak through.
Common Myths About Booths And Treatment
Several persistent myths make this decision harder than it needs to be. Clearing them up saves money and prevents the disappointment that comes from buying the wrong solution for the actual problem.
Myth: A Reflection Filter Is A Substitute For Treatment
A reflection filter reduces reflections from one direction — behind the microphone. It does not reduce reverb from the ceiling, the floor, the side walls, or the wall the vocalist faces.
In a small, reverberant room, a reflection filter improves the recording noticeably but does not come close to the clarity of a properly treated space. The filter is a supplement, not a substitute.
Treating it as a replacement for room treatment sets expectations that the product cannot meet. The frustration that follows is one of the most common complaints on recording forums.
Myth: Foam Panels Are Real Acoustic Treatment
Thin acoustic foam tiles — the kind sold in multi-packs for decorating studio walls — absorb some high-frequency energy above 1-2 kHz. They do almost nothing below 500 Hz, which is where bass buildup, room modes, and the low-mid muddiness that ruins recordings and mixes actually live.
Real acoustic treatment uses dense, rigid fiberglass (like Owens Corning 703) or mineral wool (like Rockwool Safe’n’Sound) at 2-4 inches thick. These materials absorb across a much wider frequency range, including the low-mids that foam misses entirely. Rockboard 60 mineral wool boards are a popular DIY choice — the rigid boards cut to size easily, and the 6 lb per cubic foot density absorbs effectively down into the low-mids where foam fails completely.
The fiberglass treatment guide covers material selection in detail. The cost difference between foam and fiberglass is smaller than most people expect, especially when you account for the fact that foam requires twice the coverage to achieve half the result.
Myth: Booths Fix Bass Problems
No portable booth — not a reflection filter, not a vocal shield, not even a full walk-in enclosure — can meaningfully absorb bass frequencies. Bass waves are long (an 80 Hz wave is over 14 feet long) and require thick, dense material to absorb.
A 1-inch foam-lined shield or a fabric-walled enclosure is acoustically transparent to low frequencies. The bass passes through the booth material as though it were not there.
If bass buildup is your problem — boomy recordings, low-end mud in your mixes, or uneven bass response at your listening position — the only effective solution is corner bass traps made from rigid fiberglass or mineral wool at 4 inches minimum thickness.
Myth: Treatment Makes The Room Sound Dead
Over-treatment is a real concern, but a properly designed treatment plan does not deaden the room. The goal is controlled acoustics — absorbing reflections at specific problem spots while leaving other surfaces untreated or using diffusion to scatter energy.
A treated room should sound natural, clear, and balanced — not lifeless. If the room feels dead after treatment, too much absorption was placed on surfaces that did not need it.
The mixing room treatment guide explains how to balance absorption and diffusion to avoid over-damping. Most rooms need treatment on 30-40% of their surface area — not every wall from floor to ceiling.
Myth: You Only Need Treatment If You Record Professionally
Even casual recording benefits from basic treatment. A bedroom podcast setup, a YouTube voiceover channel, or a hobbyist home studio all sound noticeably better with two or three panels at first reflection points and a pair of corner bass traps.
The improvement is not reserved for professional-grade projects. Anyone who listens critically or records audio of any kind hears the difference immediately.
Cost Comparison
Budget is often the deciding factor, so a clear cost breakdown helps frame the decision in practical terms.
Reflection Filter / Portable Booth Costs
A basic reflection filter runs 30-70 dollars. Mid-range filters with better foam density and larger coverage panels cost 60-120 dollars.
Full portable vocal booths (walk-in enclosures) range from 300 to 3,000 dollars depending on size, materials, and isolation rating. The price climbs steeply for models with meaningful bass isolation, which starts around 1,500 dollars.
For most home recordists, a 50-80 dollar reflection filter provides the best value in the portable category. Spending more gets you better materials but not dramatically better acoustic performance — the fundamental limitation of shielding only one direction remains regardless of price.
Room Treatment Costs
A DIY room treatment setup — building panels from fiberglass or mineral wool, pine frames, and fabric — costs 200-500 dollars for a bedroom-sized studio. That covers 4-6 wall panels and 2-4 corner bass traps, which is enough to control the worst reflections and tighten the low end.
Commercial pre-made panels for the same coverage run 500-1,500 dollars depending on brand, panel size, and whether you buy individual panels or a bundled room kit. The cost breakdown guide compares DIY, commercial, and professional installation ranges in detail.
The cost gap narrows when you consider what each dollar buys. A 60 dollar reflection filter improves one microphone’s recording in one direction.
A 300 dollar DIY treatment setup improves every microphone, every speaker, and every listening position in the room — permanently. On a per-benefit basis, treatment delivers far more value per dollar spent. For builders who want commercial panels without DIY construction, Olanglab fiberglass panels deliver real fiberglass absorption at the lowest entry point in the commercial panel market — a 4-pack costs about the same as a mid-range reflection filter but treats the actual room.
Long-Term Value
A reflection filter is a consumable-grade purchase — it does its job, but it does not appreciate in value or compound its benefits over time. Treatment is an investment that pays dividends every time you record, mix, or listen in the room.
If you plan to produce music seriously for more than a year in the same space, treatment is the better long-term investment even if the upfront cost is higher. The improvement to your mixing accuracy alone — fewer revision cycles, better client feedback, mixes that translate on the first pass — repays the cost quickly in time saved.
The math works out clearly over a two-year timeline. A 60 dollar reflection filter gives you a small improvement on one mic for two years.
A 400 dollar DIY treatment setup gives you a dramatically better room for recording, mixing, and listening — every day, for every project, for as long as you stay in the space. The per-session cost of treatment drops to pennies within the first few months.
For those on a tight budget who want to start with something while they plan a full treatment setup, the budget acoustic treatment guide covers the most cost-effective panels and DIY approaches available.
The Bottom Line
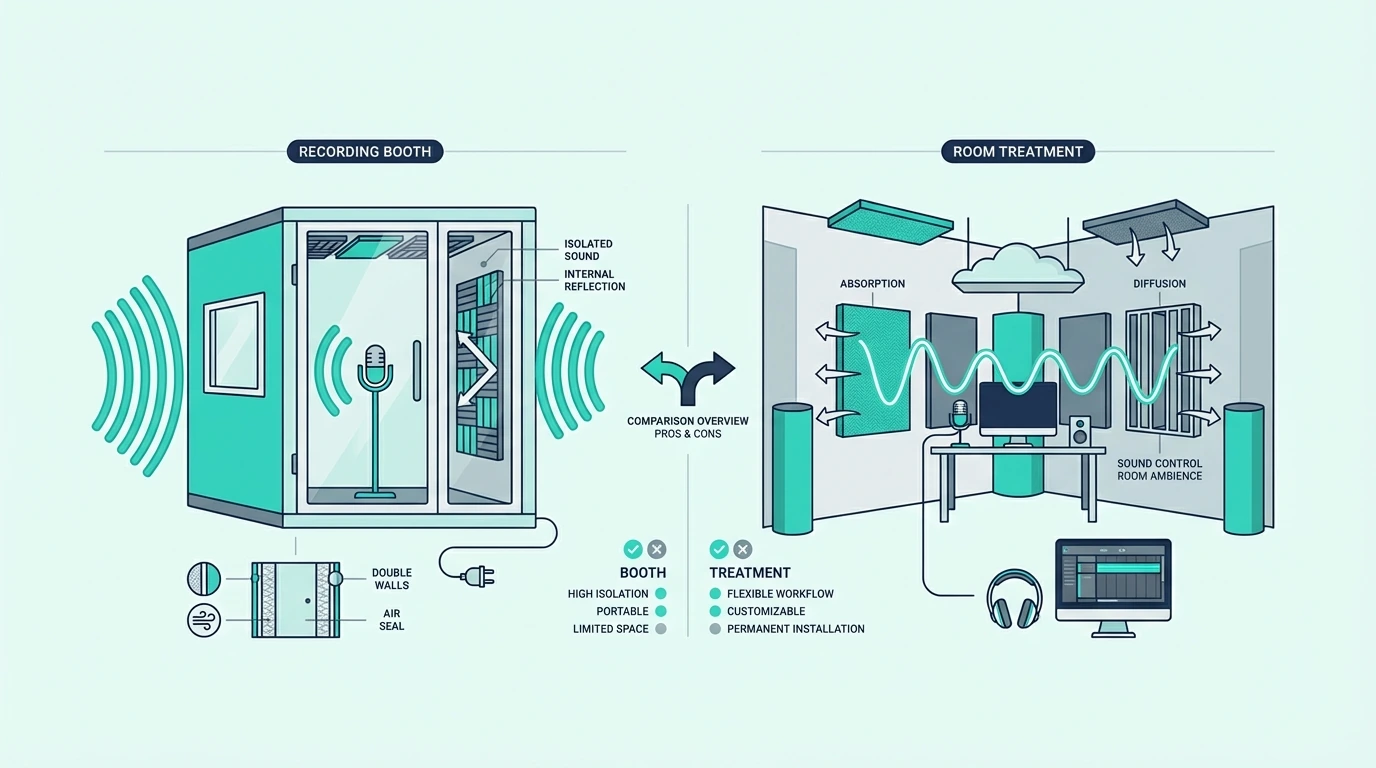
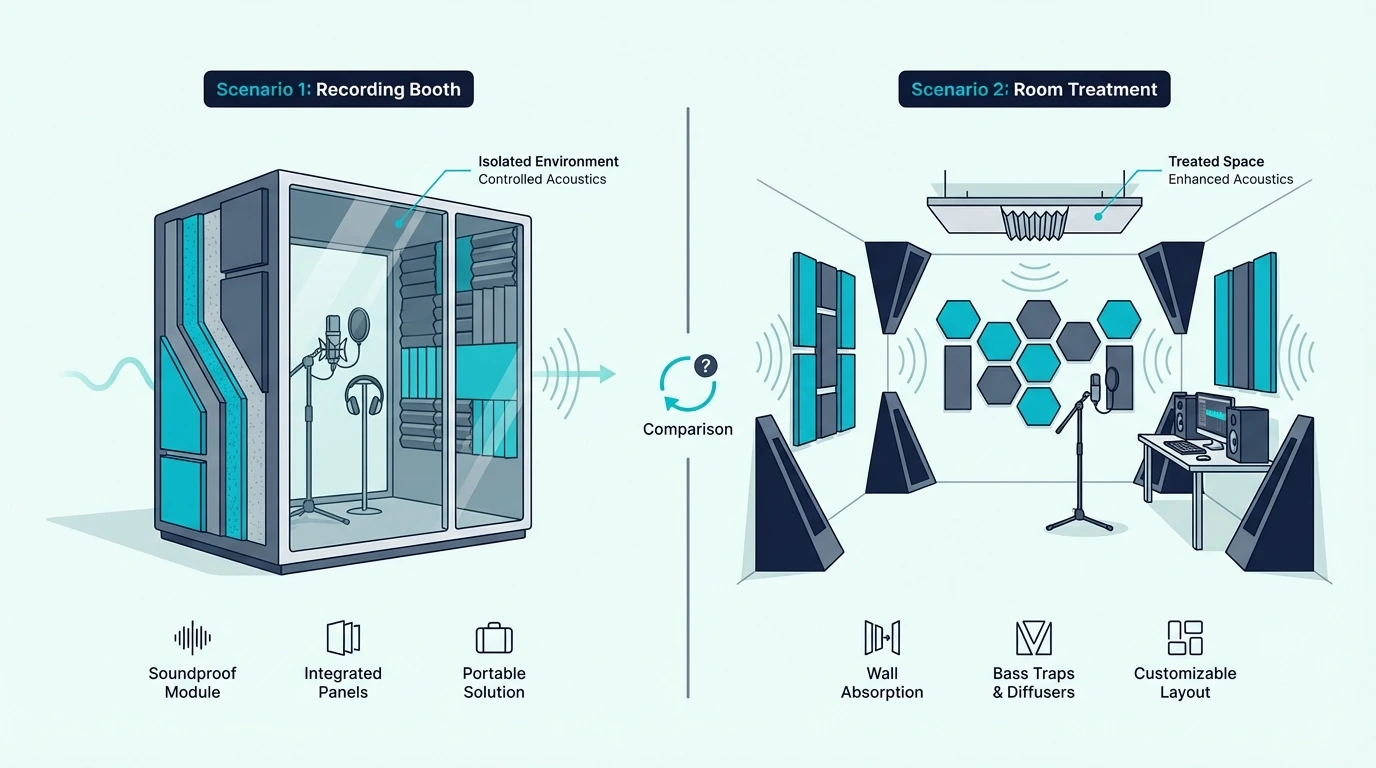
A portable recording booth and room acoustic treatment solve different layers of the same problem. A booth shields one microphone from reflections in one direction, while treatment fixes the room itself — every surface, every frequency, every source, every listener.
Choose a reflection filter if you rent, travel, or need a quick vocal improvement on a tight budget. Choose room treatment if you own the space, mix in the same room, or record anything beyond solo vocals.
The ideal setup for most home studios combines both: treatment as the foundation for accurate acoustics, and a reflection filter as a supplemental tool for the one spot where reflections still sneak past the panels.
If you want to know whether temporary treatment solutions can bridge the gap while you save for a permanent setup, the guide breaks down what delivers real results without permanent installation.
Frequently Asked Questions
Do vocal booths need acoustic treatment?
Yes — even inside a full portable booth, the interior surfaces create reflections that color the recording. The foam or fabric lining inside most booths absorbs some mid and high frequency energy.
The enclosed space can actually amplify low-frequency problems by trapping bass energy in a small volume with no escape path. Adding a small amount of thicker absorptive material inside the booth improves the internal acoustics significantly.
Are reflection filters worth it?
Reflection filters provide a real but limited improvement — they reduce reflections from behind the microphone by 20-30%, which is audible on vocal recordings in reverberant rooms. They are worth the 50-80 dollar investment as a supplemental tool.
They are not worth it as a replacement for proper acoustic treatment if your goal is professional-quality recordings or accurate mixing. The two serve different purposes at different scales.
Can I use blankets instead of acoustic treatment?
Heavy blankets and moving pads absorb some mid and high frequency energy and can serve as a temporary measure. They work better than bare walls but significantly worse than purpose-built panels because they lack the density and thickness to absorb lower frequencies.
Blankets are a reasonable stopgap while you save for proper treatment. They should not be considered a permanent solution for any serious recording or mixing work.
What is the most effective soundproofing material?
Soundproofing (blocking sound transmission between rooms) and acoustic treatment (controlling sound behavior within a room) are different disciplines that use different materials. Mass-loaded vinyl, double drywall, and decoupled wall construction block sound transmission between spaces.
Fiberglass panels and mineral wool absorb reflections inside the room. Most home recordists need treatment, not soundproofing — unless external noise (traffic, neighbors, HVAC) is bleeding into the recording.
How do I know if I need a booth or treatment?
Record a vocal take with the mic in your normal position, then clap your hands sharply and listen for the room’s decay. If you hear a noticeable ring or flutter echo, the room needs treatment.
If the room sounds reasonably controlled but you still hear room tone on close-mic vocals, a reflection filter behind the mic may be enough. If the room rings and the vocals sound roomy, you need treatment first and can add a filter later as a supplement.
The recording without treatment guide covers techniques for getting the cleanest possible recordings before you invest in either option.
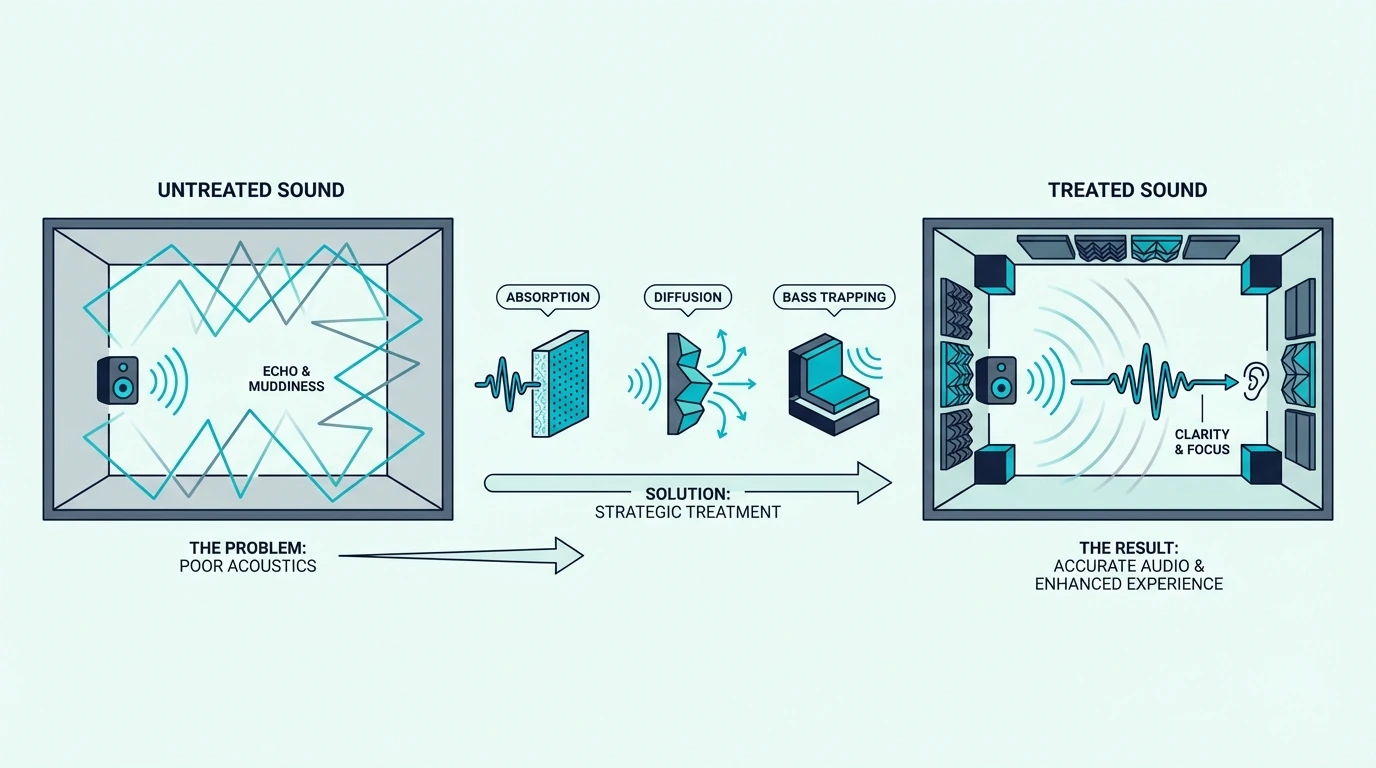
How Acoustic Treatment Works (The Science Behind Better Sound)
How acoustic treatment works is simple in theory — absorb, diffuse, or trap sound energy before it bounces around the room — but most people get the execution wrong, wasting money on the wrong materials in the wrong places.
You can hear the problem in any untreated room. Clap your hands in a bare bedroom and you hear a metallic ring that sustains for a second or more.
That ring is sound bouncing between parallel walls hundreds of times per second, and it colors everything you record or mix in that space.
The fix is not complicated. Strategic placement of absorbers, diffusers, and bass traps intercepts those reflections and either converts them to heat or scatters them so they no longer cause problems.
The starting point is understanding which type of treatment targets which problem, because absorption, diffusion, and bass trapping each work through different physical mechanisms.
Below, this guide explains exactly how each type of acoustic treatment works at a physics level, why thickness and placement matter more than coverage area, and how to prioritize treatment for the biggest impact in your room.
Quick Takeaway
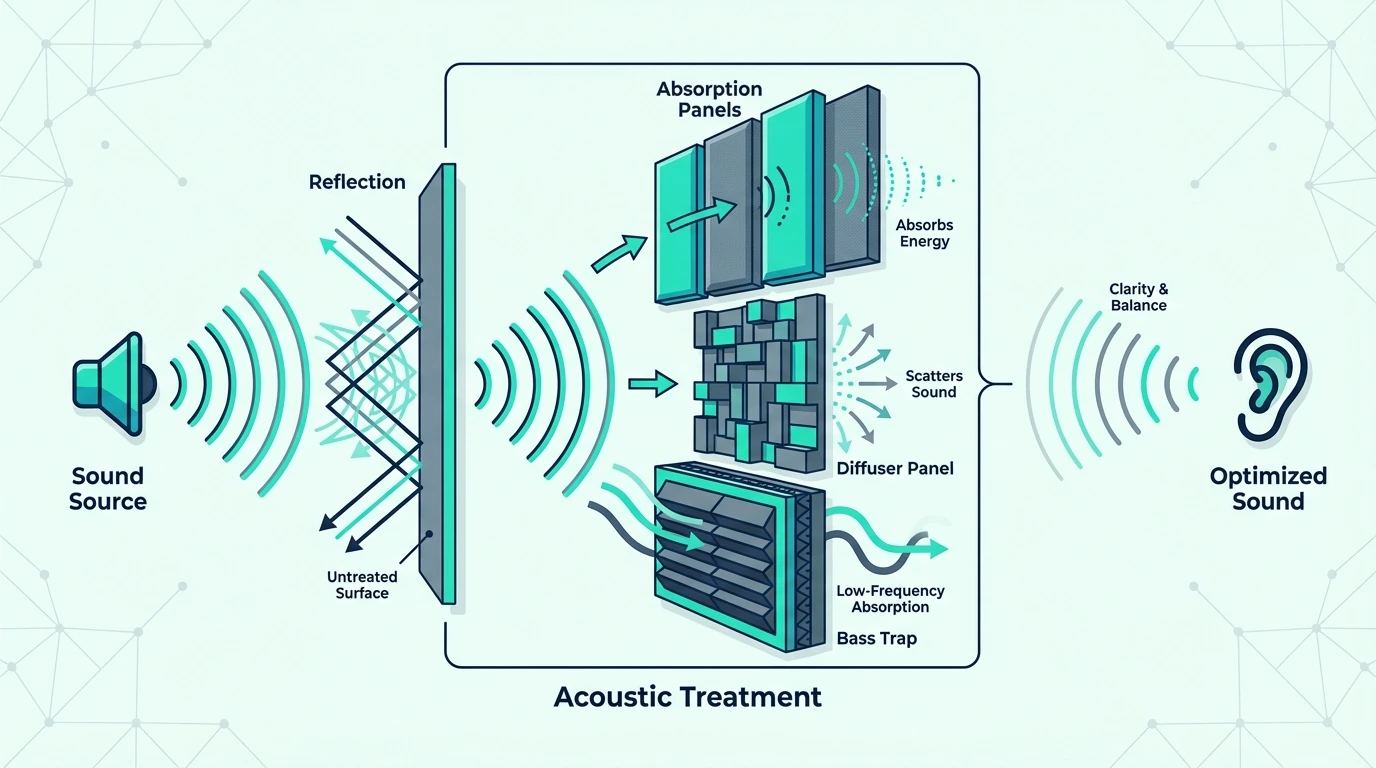
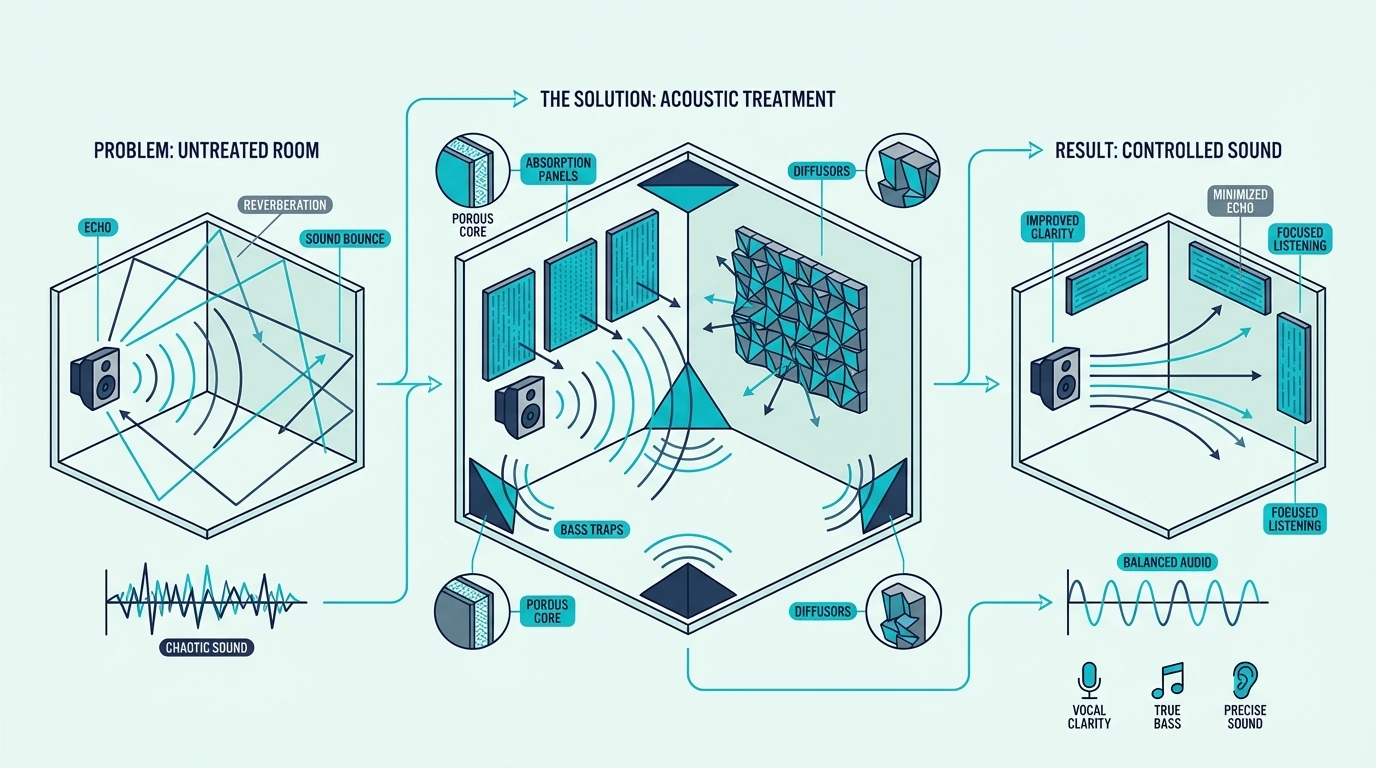
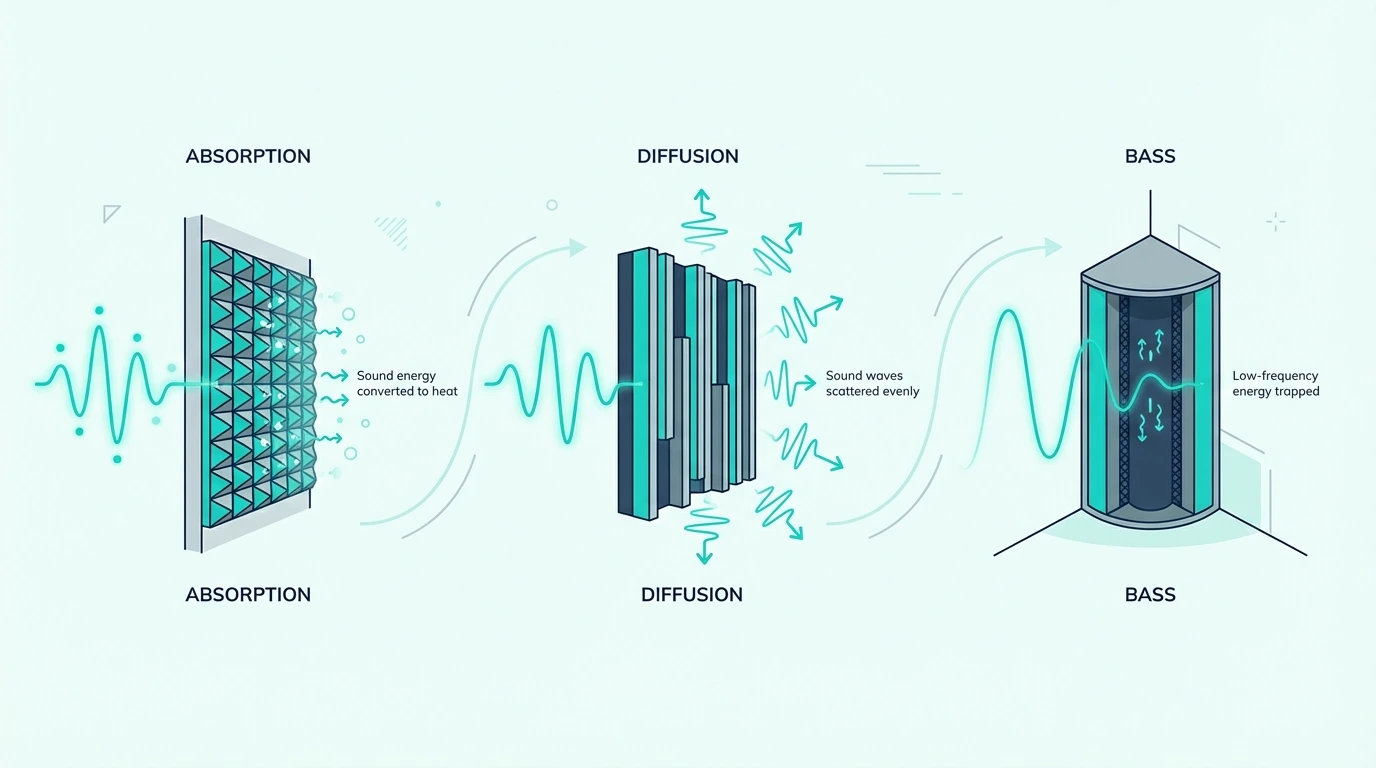
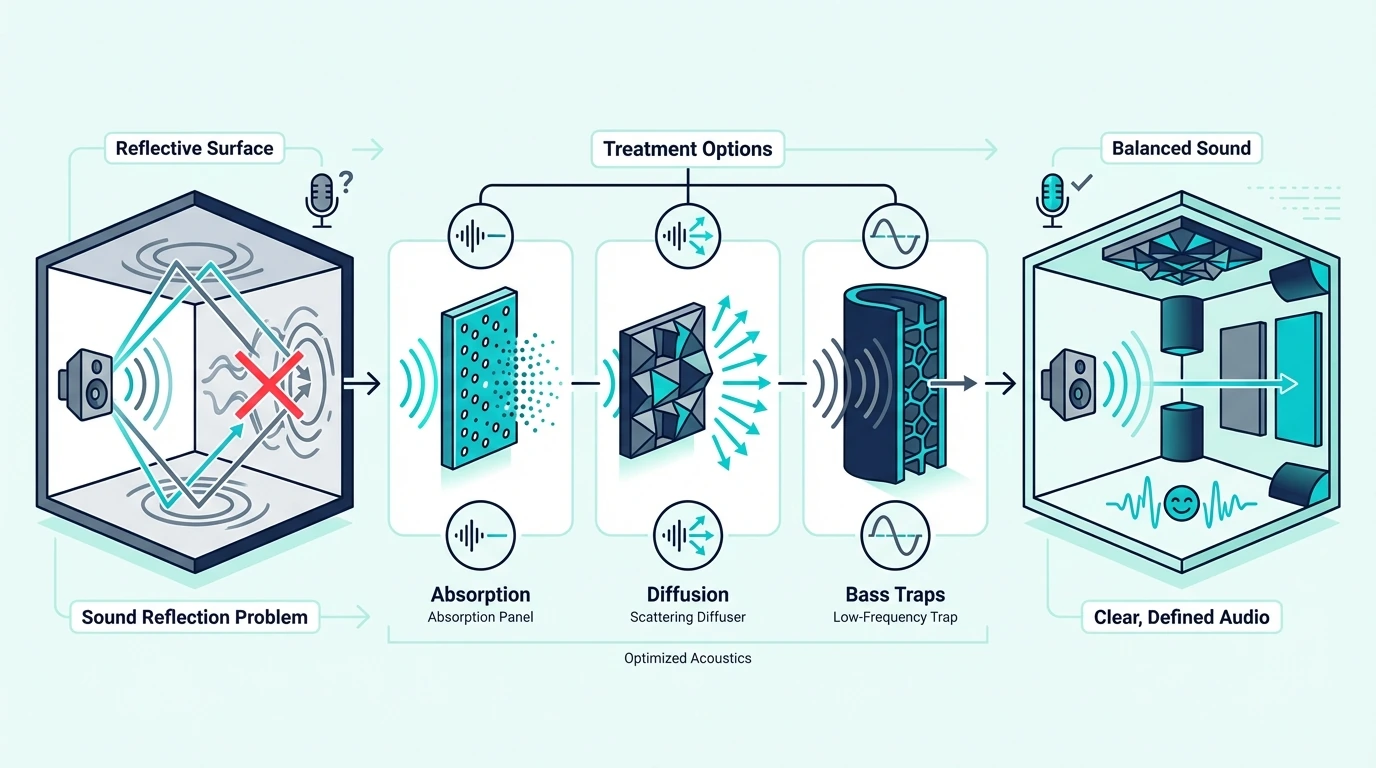
Acoustic treatment works by controlling sound reflections inside a room. Absorption panels convert sound energy to heat through friction in porous materials. Diffusers scatter sound in multiple directions to eliminate hot spots. Bass traps use thick, dense material in corners to absorb low frequencies. The most effective approach combines all three, starting with bass traps in corners and absorption panels at first reflection points.
How Acoustic Treatment Works — The Science In Plain Language
Sound is pressure waves moving through air. When those waves hit a surface, three things can happen: the sound reflects (bounces back), absorbs (converts to heat), or transmits (passes through to the other side).
In an untreated room, most surfaces — drywall, glass, concrete, hardwood — reflect the vast majority of sound energy back into the space. A bare drywall wall reflects roughly 95% of the sound that hits it.
Those reflections combine with the direct sound from your speakers or instruments and create a distorted version of reality. Some frequencies get louder when direct and reflected waves arrive in phase, and others cancel out when they arrive out of phase.
The result is a frequency response at your listening position that looks nothing like what your speakers are actually producing. You might have a 15 dB peak at 80 Hz and a 10 dB null at 120 Hz — and every mix decision you make is a reaction to that distortion rather than the actual music.
Acoustic treatment works by intercepting those reflections before they reach your ears. Absorbers remove energy from the room.
Diffusers redistribute it more evenly. Bass traps target the low frequency problems that are hardest to control.
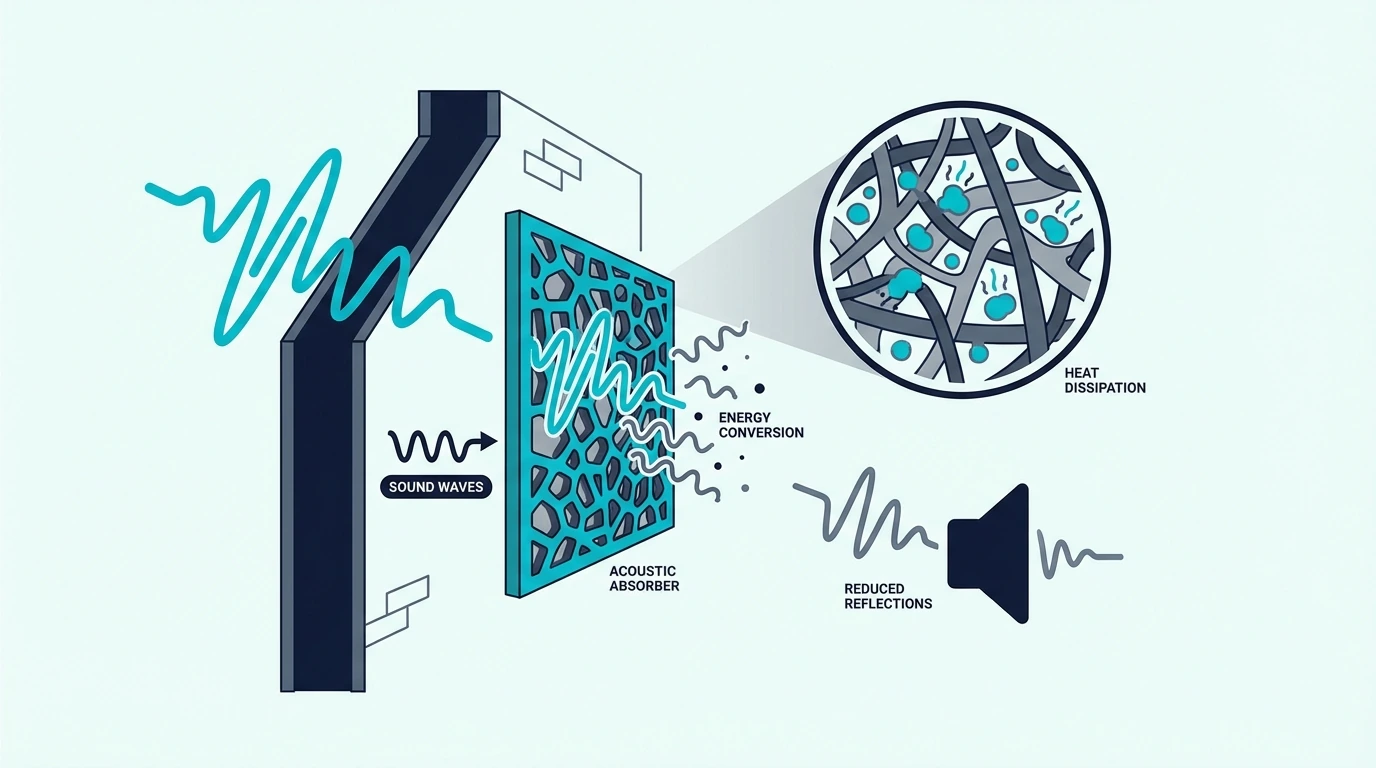
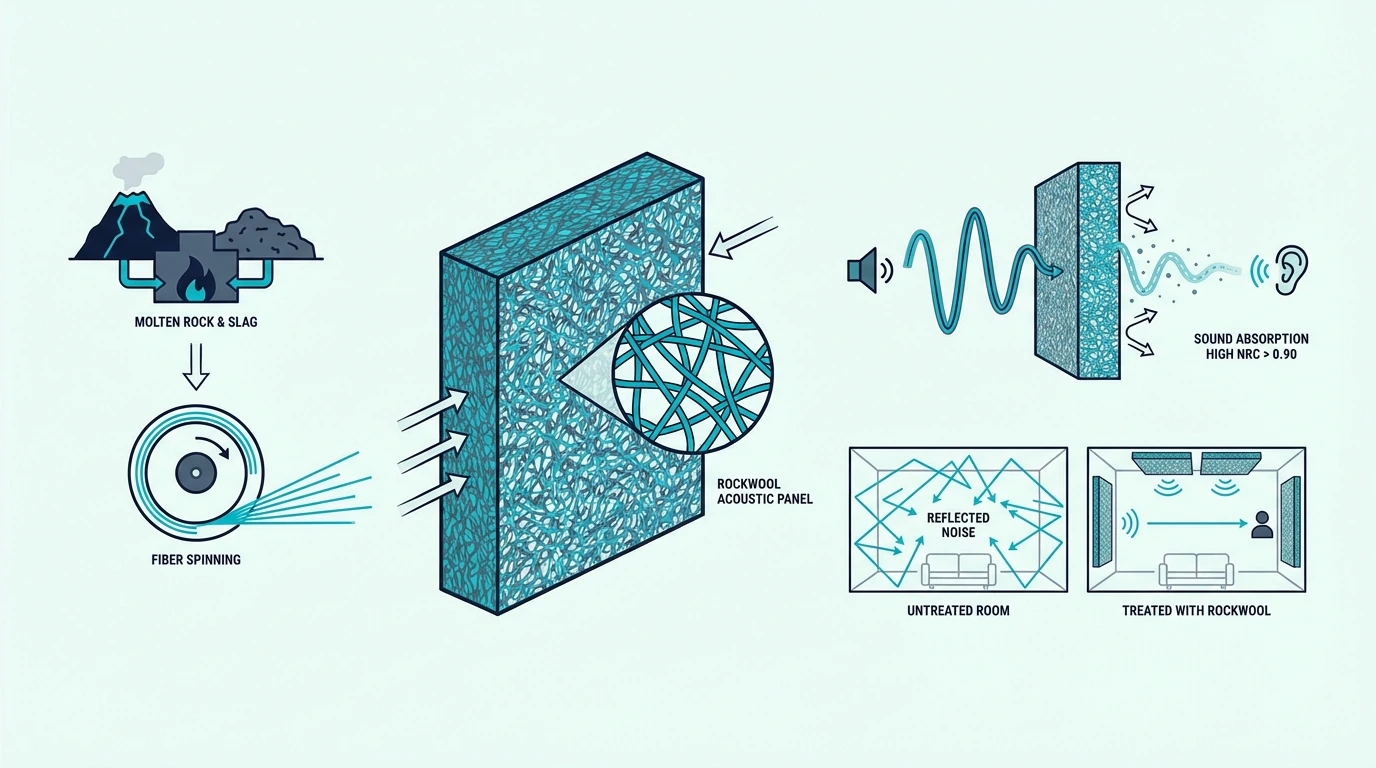
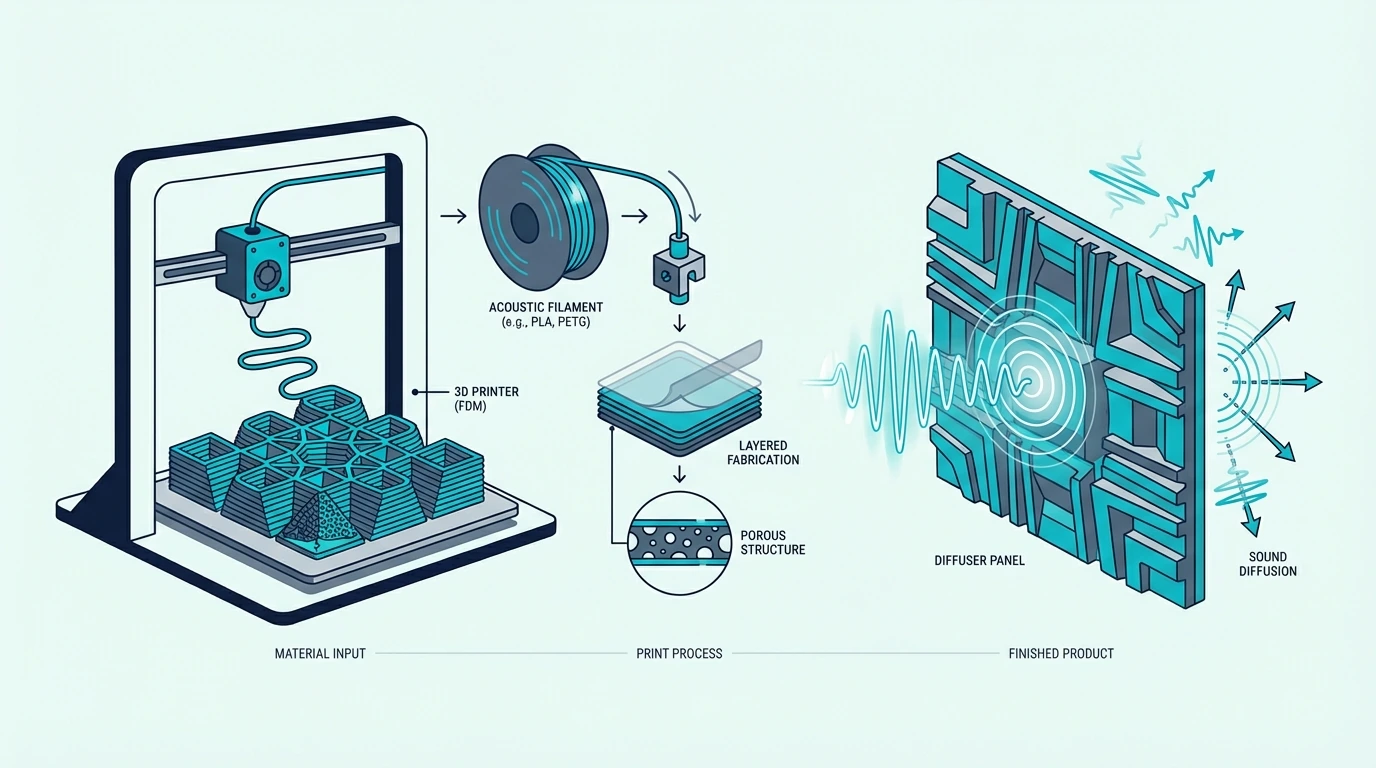
Sound absorption is the most common form of acoustic treatment. It works through a simple physical process: sound waves enter a porous material, and the air molecules vibrating inside the material’s fibers lose energy through friction.
That lost energy converts to a tiny amount of heat — not enough to feel, but enough to significantly reduce the reflected sound. The denser the material and the more internal surface area it has, the more friction occurs and the more sound gets absorbed.
The process is frequency-dependent. High frequencies have short wavelengths and lose energy quickly in even thin materials.
Low frequencies have long wavelengths and need much more material depth to slow down.
This frequency dependency is why a single type of panel cannot solve every acoustic problem. Effective treatment requires matching material thickness to the frequency range you need to control.
The standard measurement is NRC (Noise Reduction Coefficient), which ranges from 0 to 1.0. An NRC of 0.95 means 95% of sound energy is absorbed.
A bare drywall wall has an NRC of about 0.05. A 2-inch fiberglass acoustic panel hits NRC 0.95 or higher.
The three main absorption materials are fiberglass (rigid boards like Owens Corning 703), mineral wool (rockwool), and open-cell foam. Fiberglass and mineral wool perform similarly and both outperform foam, especially at lower frequencies.
For panels that deliver professional-grade absorption, the UMIACOUSTICS Fiberglass Acoustic Panels use a 2-inch fiberglass core that absorbs across the full mid and high frequency range.
Why Thickness Matters
Thickness is the single most important variable in absorption panel performance. A panel absorbs frequencies whose quarter-wavelength is equal to or shorter than the panel’s thickness.
A 1-inch foam panel absorbs well above 2,000 Hz but does almost nothing at 500 Hz. A 2-inch fiberglass panel absorbs effectively down to about 500 Hz.
A 4-inch panel reaches down to about 250 Hz.
This is why foam — which is typically 1 to 2 inches thick — fails as a complete treatment solution. It handles the flutter echo and sibilance range but leaves the mid-bass and bass completely untreated.
Those are the frequencies that cause the worst problems in small rooms. For a deeper look at why egg cartons and cheap foam alternatives fall short, we break down the specific frequency limitations.
For broadband absorption that reaches into the bass range, you need panels that are at least 2 inches thick, and ideally 4 inches for any panel that doubles as a bass absorber. Larger panels in the 24×48-inch range provide the surface area needed for serious broadband treatment.
The Air Gap Trick
One of the most effective techniques in acoustic treatment is mounting panels with an air gap between the panel and the wall. This shifts the absorption curve lower without adding any material thickness.
A 2-inch panel mounted flush against the wall absorbs effectively down to about 500 Hz. The same panel mounted with a 2-inch air gap absorbs down to about 250 Hz — because the air gap effectively doubles the depth of the absorber for low frequencies.
The physics behind this is straightforward. Sound absorption is most effective where air particle velocity is highest, which is a quarter-wavelength from the wall surface.
An air gap moves the absorption material to that optimal position for lower frequencies.
This technique is especially powerful for small room treatment where wall space is limited. You get deeper absorption without building thicker panels.
The practical application is straightforward. Use standoff brackets or spacers to mount your panels 2-4 inches from the wall.
The total effective depth becomes the panel thickness plus the air gap, giving a thin panel the bass absorption of a much thicker one.
Combining this technique with corner mounting is how professional studios achieve deep bass absorption without filling the room with massive traps. A 2-inch panel straddled across a corner with a 4-inch air gap behind it absorbs as effectively as a 6-inch panel mounted flat. Rockboard 60 mineral wool boards are popular for this technique because the 6 lb per cubic foot density maximizes absorption per inch of thickness.
How Does Sound Diffusion Work?
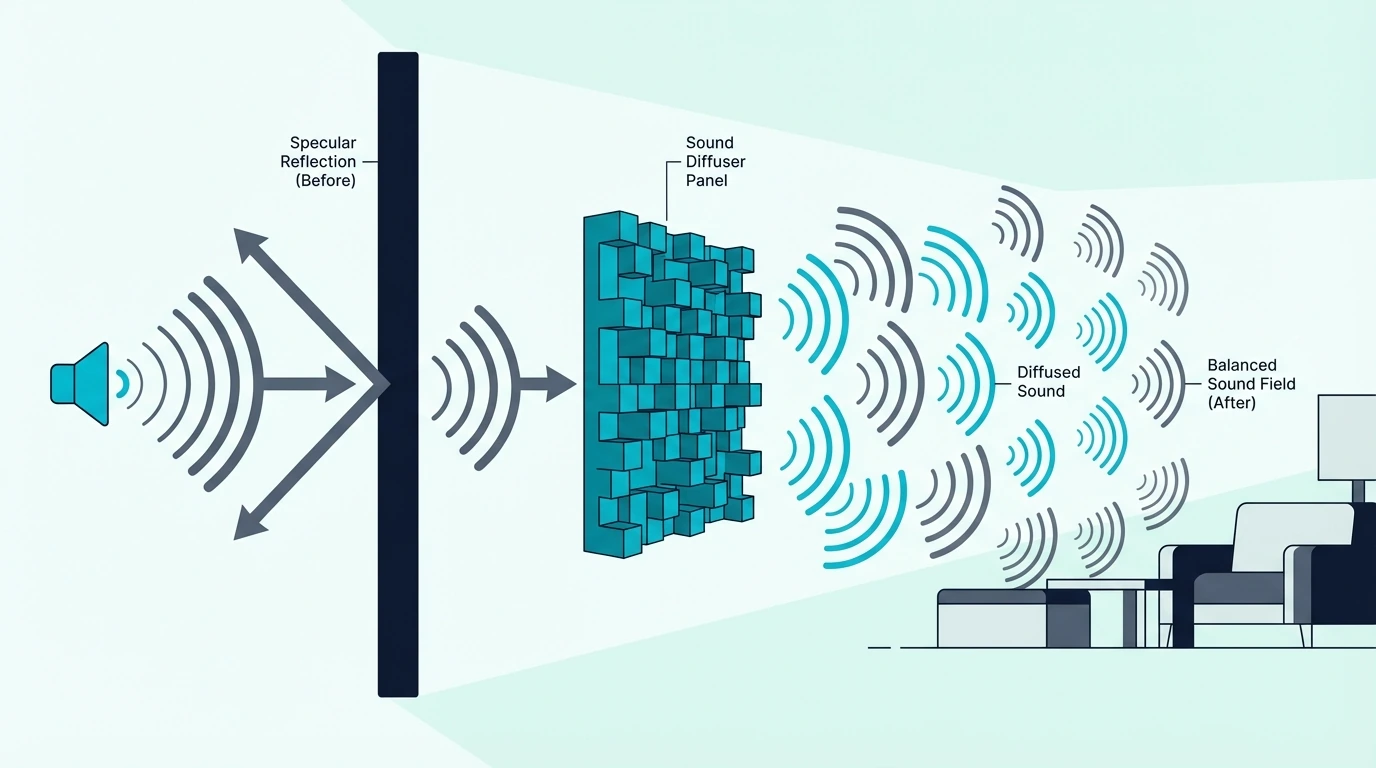
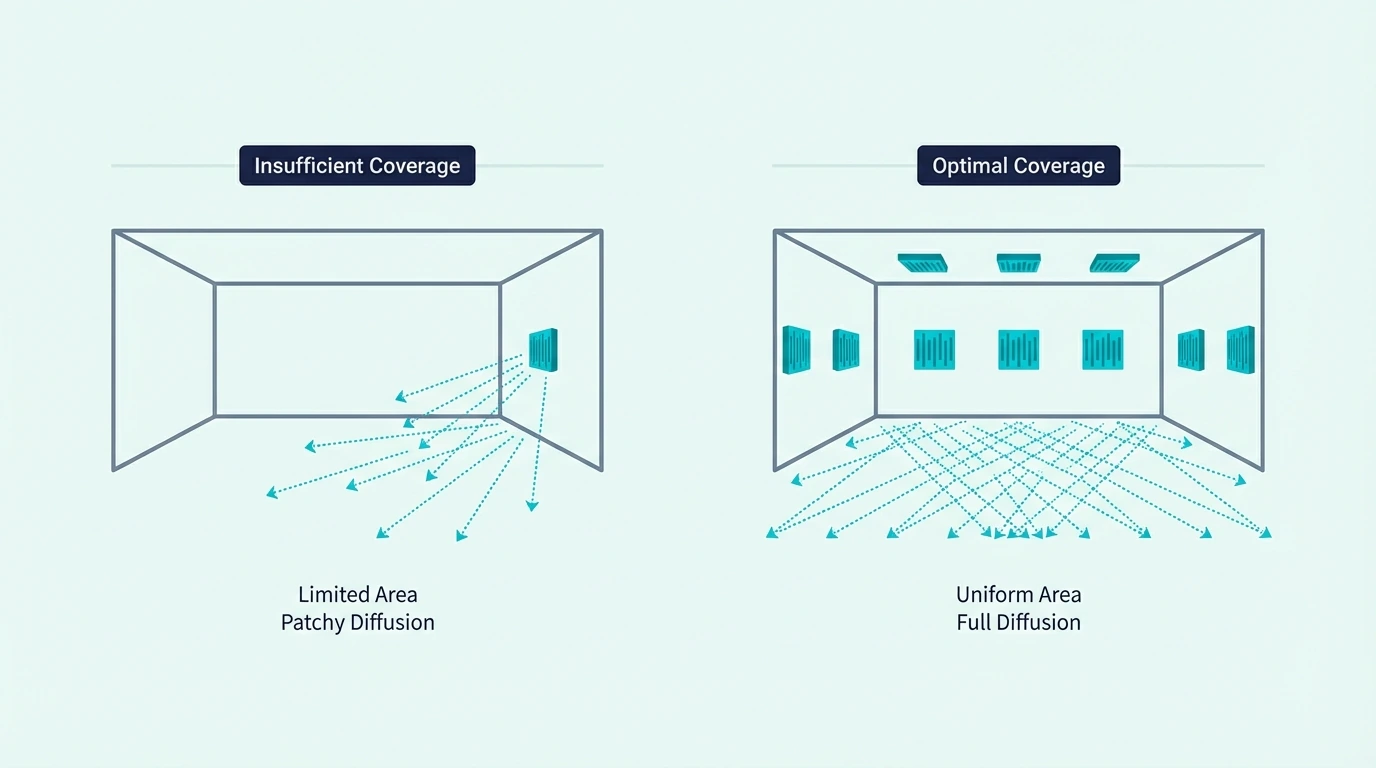
Diffusion takes the opposite approach from absorption. Instead of removing sound energy from the room, diffusers scatter it in multiple directions so that no single strong reflection reaches your ears.
The room stays lively and natural-sounding, but without the problematic echoes and comb filtering that come from flat, hard surfaces. This is why professional studios use diffusers alongside absorbers — a room that is 100% absorbed sounds dead and lifeless.
Diffusers work by presenting surfaces at varying depths to incoming sound waves. When a sound wave hits a diffuser, different parts of the wave reflect off surfaces at different distances, causing the reflected wave to break apart and scatter.
QRD And Skyline Diffusers
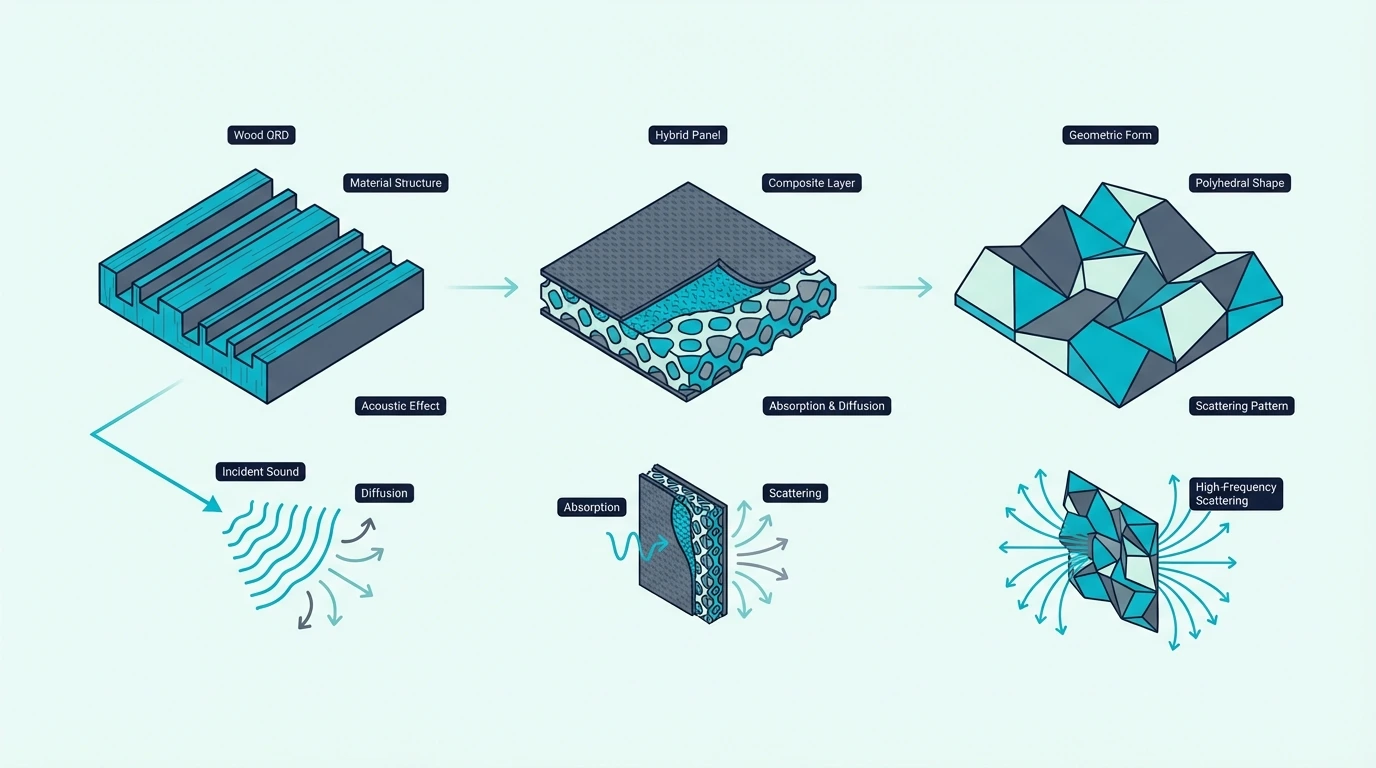
The two most common diffuser designs are QRD (Quadratic Residue Diffusers) and skyline diffusers, both based on mathematical sequences.
QRD diffusers use a series of wells at varying depths calculated from a quadratic residue sequence. The depth differences cause the reflected sound to scatter in a specific, mathematically optimal pattern.
One-dimensional QRD diffusers scatter sound in one plane (left-right), while two-dimensional designs scatter in all directions.
Skyline diffusers use blocks of varying heights arranged in a grid pattern. The effect is similar to QRD — different block heights create different reflection path lengths, scattering the sound evenly across the room.
Natural diffusion also exists in everyday objects. A bookshelf filled with books of different sizes acts as an accidental diffuser, scattering sound off the irregular surfaces of book spines at varying depths.
This is why well-furnished rooms often sound better than bare ones even without any intentional acoustic treatment.
The effective frequency range of a diffuser depends on its well depths and overall size. Deeper wells scatter lower frequencies.
The diffuser must also be large enough relative to the wavelength — a small diffuser only scatters high frequencies. This is why diffusers work best in rooms where the rear wall is at least 8 feet from the listening position.
Diffusion matters most on the rear wall of a mixing room and on the ceiling above the listening position. For mixing room treatment, the front of the room should be absorptive while the rear benefits from diffusion to maintain natural ambience.
How Do Bass Traps Work?
Low frequencies are the hardest to control because their wavelengths are extremely long. A 100 Hz wave is 11 feet long, and a 50 Hz wave stretches 22 feet.
Thin panels cannot absorb these wavelengths because the material is simply too shallow relative to the wave.
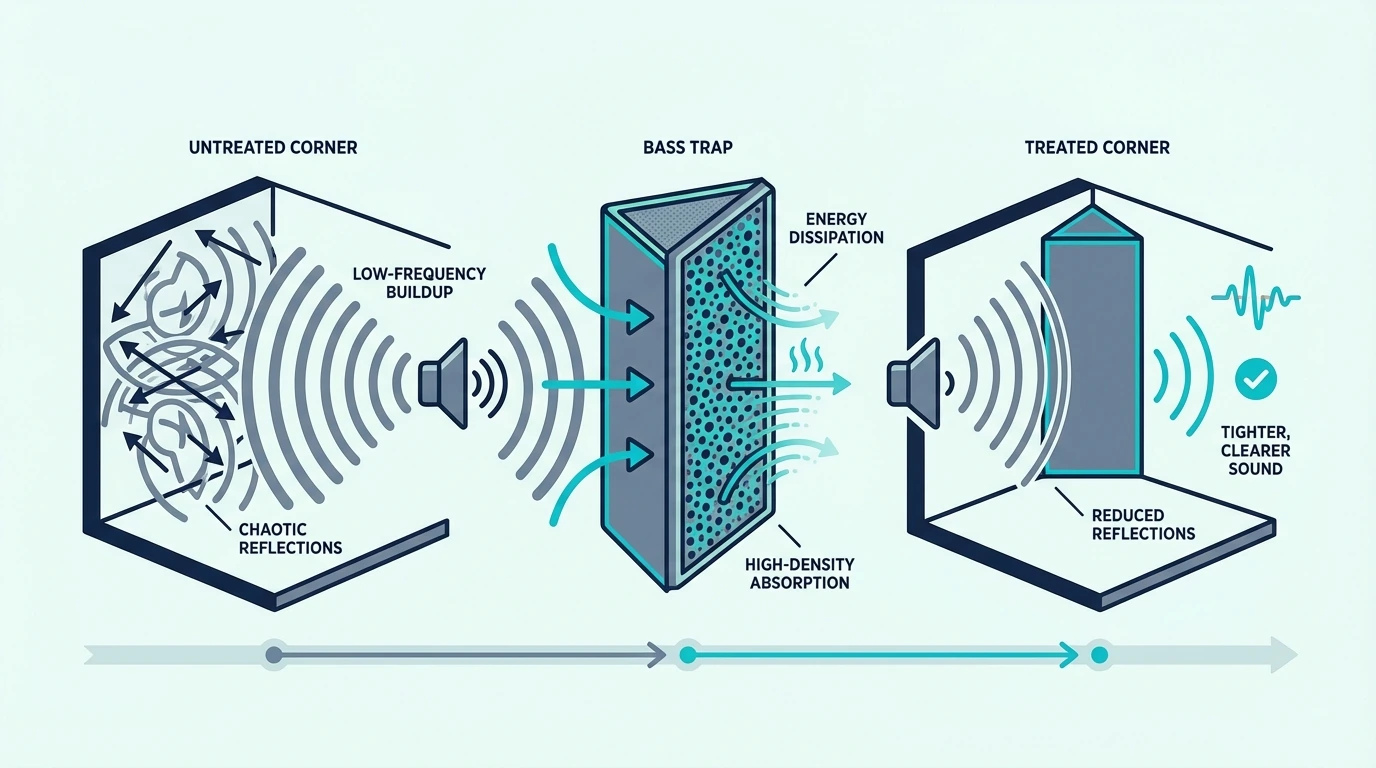
Bass traps solve this by using thick, dense absorptive material — typically 4 to 6 inches of fiberglass or mineral wool — positioned where bass energy naturally concentrates.
The physics is the same as standard absorption, but scaled up. More material depth means more friction over a longer path, which captures more low-frequency energy.
A 4-inch mineral wool bass trap with a 4-inch air gap behind it effectively behaves like an 8-inch absorber for bass frequencies.
For a budget-friendly corner treatment, the TroyStudio Bass Traps 24-Pack provide immediate corner treatment while you plan a more serious fiberglass solution.
Why Corners Are Critical
Sound pressure doubles at every wall boundary and quadruples where two walls meet (a corner). In a tri-corner — where two walls meet the ceiling or floor — pressure is eight times higher than in open space.
This means corners are where bass energy is most concentrated, which makes them the most effective location for bass traps. A bass trap in a corner absorbs far more low-frequency energy than the same trap placed on a flat wall.
The math works in your favor here. Because pressure is multiplied at boundaries, a relatively small amount of absorptive material in a corner has an outsized impact on the room’s overall bass response.
Four corner traps spanning floor to ceiling can reduce room mode severity by more than half.
The front two corners of a mixing room should be the first priority, because they are closest to the monitoring position and have the most direct impact on what you hear. Rear corners come next, followed by ceiling-wall junctions.
Standing waves — the resonant frequencies determined by room dimensions — create predictable patterns of peaks and nulls. At a peak, bass is unnaturally loud, and at a null, it nearly disappears.
Corner bass traps reduce the severity of these peaks, flattening the bass response toward what the speakers are actually producing.
Before-and-after measurements typically show a 10-15 dB reduction in the worst standing wave peaks after installing corner bass traps. That translates directly to more accurate bass at your listening position.
The improvement is not subtle. Mixes made in a room with proper bass trapping translate to other systems on the first bounce, because you are finally hearing what the speakers are actually producing instead of what the room is adding on top.
For home theater setups, bass traps also tighten dialogue and reduce the boomy, one-note bass that plagues most living room systems.
The Bottom Line
Acoustic treatment works by controlling three things: absorption removes excess sound energy, diffusion scatters it evenly, and bass trapping targets the low frequencies that are hardest to manage.
The priority order is clear. Start with bass traps in corners — they address the biggest problems in any small room.
Add absorption panels at first reflection points to clean up the mid and high frequency imaging. Add diffusion to the rear wall last, if the room feels too dead after absorption.
Understanding how each mechanism works helps you make smarter decisions about what to buy and where to place it. A 4-inch panel in the right spot outperforms ten 1-inch foam tiles scattered randomly across your walls.
For budget-conscious builders, the DIY acoustic treatment guide shows how to build panels that perform as well as commercial options at a third of the cost.
Frequently Asked Questions
Does acoustic treatment block sound?
No — acoustic treatment and soundproofing are completely different things. Treatment controls sound reflections within a room to improve what you hear inside it.
Blocking sound between rooms requires mass, isolation, and sealed air gaps — which is soundproofing, not treatment. No amount of foam or fiberglass panels will stop sound from passing through a wall.
How does acoustic foam work?
Acoustic foam absorbs sound through the same friction mechanism as fiberglass — sound waves enter the open-cell structure and lose energy as air molecules vibrate against the foam walls.
The limitation is thickness. Most foam panels are 1-2 inches thick, which means they only absorb mid and high frequencies effectively.
For bass absorption, you need denser, thicker materials like rockwool or rigid fiberglass. Our acoustic treatment cost guide breaks down what each material costs per square foot.
What is the difference between absorption and diffusion?
Absorption removes sound energy from the room by converting it to heat. The room gets quieter and reflections decrease.
Diffusion scatters sound energy in multiple directions without removing it. The room stays lively and natural, but without the focused reflections and echoes that cause problems. Most professional studios use both — absorption at first reflection points and diffusion on the rear wall.
Is Rockwool Good For Acoustic Treatment? (Why Pros Swear By It)
Is rockwool good for acoustic treatment — it is one of the best materials you can use, but most people grab the wrong product or skip the air gap that makes bass trapping actually work.
You spend money on thin foam panels expecting a studio-quality room, only to find that every mix still sounds muddy because the foam does nothing below 500 Hz where your real bass problems live.
Rockwool fixes that. Its dense mineral fiber structure absorbs sound across the full frequency spectrum — including the low end that foam physically cannot touch — at a fraction of what commercial panels cost.
The first step is picking the right rockwool product for your panels and your bass traps, because they need different densities.
Below, this guide covers which rockwool products work for acoustic treatment, how to build DIY panels from raw batts, and how rockwool compares to fiberglass — the other material that dominates the treatment world.
Quick Takeaway
Rockwool is excellent for acoustic treatment. Its dense mineral wool fiber structure absorbs sound across a wide frequency range, including bass frequencies that foam cannot handle. Rockwool Safe n Sound is the most popular choice for DIY panels, while Rockwool AFB offers higher density for bass traps. Both outperform foam at every frequency and cost significantly less than pre-made commercial panels.
Is Rockwool Good For Acoustic Treatment — The Short Answer
Yes — rockwool (also called mineral wool or stone wool) is one of the two best materials for DIY acoustic treatment, alongside rigid fiberglass. Professional studios have used mineral wool for decades because it delivers broadband absorption at a price point that makes full-room treatment affordable.
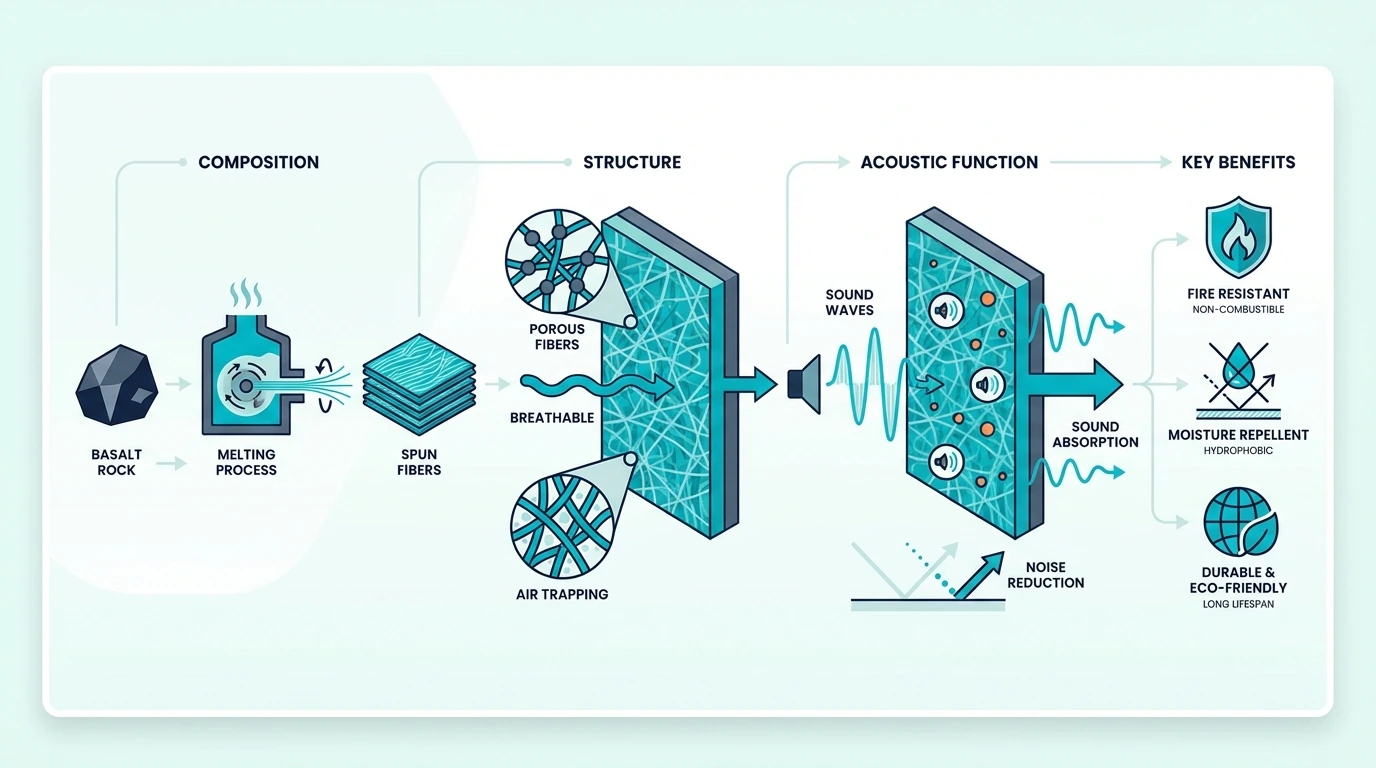
The reason rockwool works so well comes down to its physical structure. The fibers are dense, randomly oriented, and create millions of tiny air pockets that convert sound energy into heat through friction as sound waves pass through the material.
A 2-inch thick rockwool panel achieves an NRC (Noise Reduction Coefficient) of approximately 0.95, which means it absorbs 95% of the sound energy that hits it across the mid and high frequency range. At 4 inches thick, absorption extends well into the bass frequencies — something foam panels physically cannot achieve regardless of thickness.
For a broader look at why material choice matters, see what is acoustic treatment and the role each material plays.
What Makes Rockwool Effective For Acoustic Treatment?
Three properties make rockwool stand out for acoustic treatment: density, fire resistance, and moisture resistance. Each one matters for different reasons.
Density is the primary acoustic factor. Rockwool products designed for acoustic use typically range from 3 to 8 pounds per cubic foot.
Higher density means more friction as sound waves pass through, which translates to better absorption — especially at lower frequencies where long wavelengths need more material to slow down.
Fire resistance is a practical safety advantage. Rockwool is made from volcanic rock and slag, which means it does not burn.
It can withstand temperatures above 2,000°F without igniting, which makes it significantly safer than polyurethane foam — a material that can melt and produce toxic fumes in a fire.
Moisture resistance matters for basements, garages, and any space where humidity is a concern. Rockwool does not absorb water, does not grow mold, and maintains its acoustic properties in damp environments where fiberglass would degrade over time.
Rockwool Safe n Sound — The Most Popular Choice
Rockwool Safe n Sound is the product most DIY builders reach for first, and for good reason. It is widely available at Home Depot and Lowes, it fits standard 2×4 stud cavities, and it delivers excellent mid and high frequency absorption.
Safe n Sound is 3 inches thick with a density of approximately 3.0 lb/ft³. At that density, it absorbs aggressively above 250 Hz and provides meaningful absorption down to about 125 Hz when mounted with an air gap behind it.
For small room treatment, Safe n Sound panels at first reflection points make a dramatic difference in monitoring accuracy.
The limitation is bass. For frequencies below 125 Hz, you need either thicker material or higher density — which is where Rockwool AFB comes in.
Rockwool AFB (Acoustic Fire Batts)
Rockwool AFB is the higher-density option specifically designed for acoustic applications. It is available in 2-inch and 4-inch thicknesses, with a density around 4.0 lb/ft³ for the 2-inch version and higher for thicker cuts.
The 4-inch AFB is the go-to material for DIY bass traps. Mounted across a corner with a 4-inch air gap behind it, a 4-inch AFB panel effectively behaves like an 8-inch trap for low frequencies — enough to tame room modes down to 60-80 Hz in most small rooms.
AFB is harder to find in retail stores but readily available online. For ready-made panels using rigid mineral wool board, the Rockboard 60 Mineral Wool Rigid Insulation Board provides the density and rigidity you need for high-performance DIY panels.
How To Use Rockwool For DIY Acoustic Panels
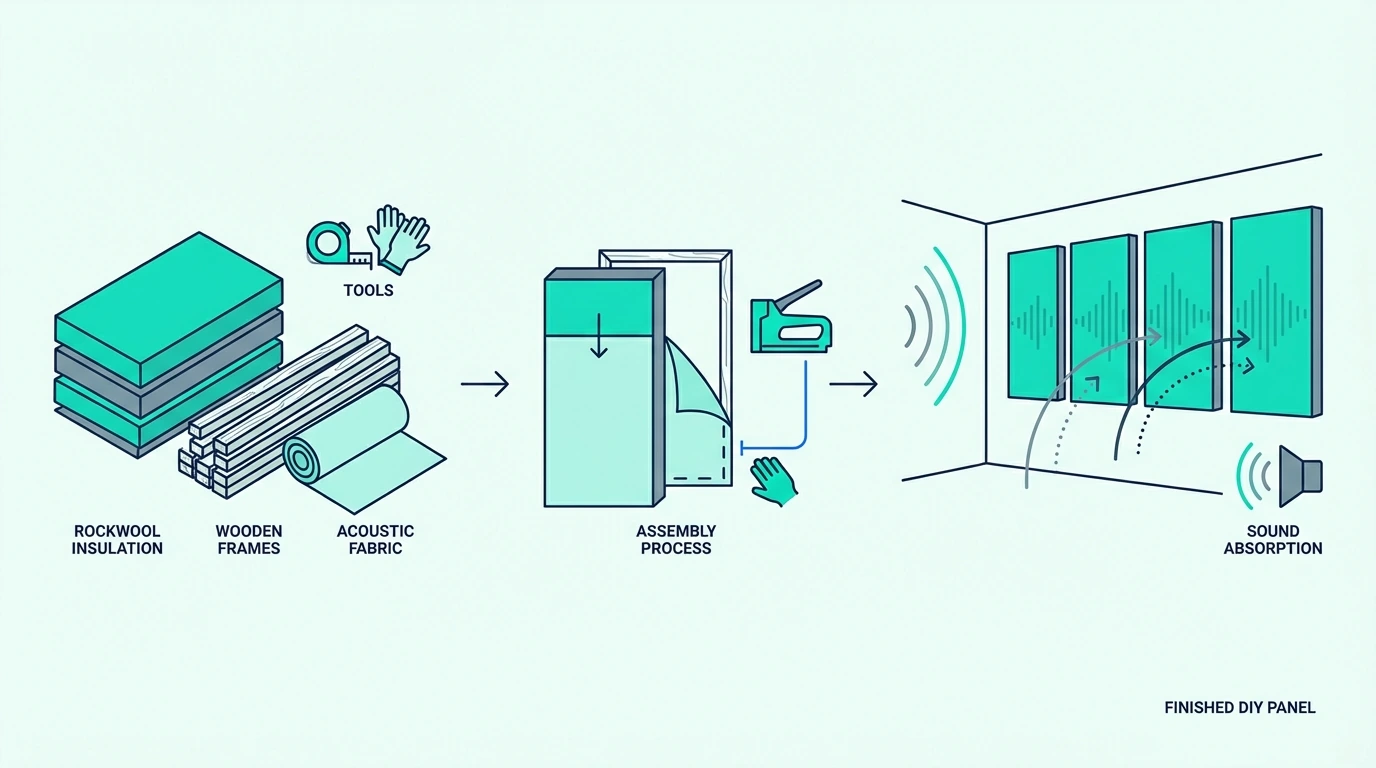
Building your own acoustic panels from rockwool is one of the most cost-effective upgrades you can make to a home studio. A single DIY panel costs roughly a third of what a comparable commercial panel sells for, and the acoustic performance is identical.
Building The Frame
The frame is simple: 1×4 lumber for 2-inch rockwool, or 2×4 lumber for thicker batts. Standard panel sizes are 24×48 inches (the most common) or 24×24 inches for smaller spaces.
Cut four pieces of lumber to size, join them with wood screws or pocket screws to form a rectangle, and optionally add a crossbar in the middle for rigidity on larger panels. The frame does not need to be furniture-grade — it sits behind fabric and nobody sees it.
Cutting And Handling Rockwool Safely
Rockwool mineral fibers irritate skin, eyes, and lungs. Always wear long sleeves, gloves, safety glasses, and a dust mask when cutting and handling the material.
Cut rockwool with a serrated knife or a bread knife — a standard utility knife crushes the fibers instead of cutting them cleanly. Mark your cut line, compress the material slightly with a straightedge, and saw through with the serrated blade.
Once the rockwool is cut to size, press it into the frame and wrap the entire assembly in acoustically transparent fabric. Guilford of Maine FR701 is the industry standard, but any loosely woven fabric that you can blow air through works.
If you want to skip the DIY process entirely, pre-made fiberglass panels deliver comparable performance without any construction. The tradeoff is cost — commercial panels run two to three times the price of raw rockwool batts for the same acoustic result.
The two dominant materials for acoustic treatment are rockwool and rigid fiberglass (typically Owens Corning 703 or Knauf insulation). Both work extremely well, and the differences are smaller than most forum debates suggest.
Fiberglass has a slight edge in absorption per inch at mid and high frequencies. OC 703 at 2 inches thick achieves an NRC of 1.0 in some configurations, compared to rockwool’s 0.95 at the same thickness.
Rockwool has better fire resistance — it does not burn at all, while fiberglass can melt at high temperatures. Rockwool also handles moisture better, making it the superior choice for basements and garages.
Cost depends on your location. In most areas, rockwool Safe n Sound is cheaper per square foot than OC 703, but the gap has narrowed in recent years.
Both are available at major building supply stores.
If you prefer ready-made fiberglass panels over DIY rockwool, the UMIACOUSTICS Fiberglass Acoustic Panels deliver the same broadband absorption with zero build time.
The Bottom Line
Rockwool is an excellent material for acoustic treatment — affordable, effective across the full frequency range, fire resistant, and widely available. It is the material of choice for DIY builders who want professional-grade absorption without the commercial price tag.
Start with Rockwool Safe n Sound for wall panels at first reflection points and Rockwool AFB at 4 inches for corner bass traps. That combination covers the two most critical treatment needs in any home studio.
The main downside is handling. Rockwool mineral fibers irritate skin, eyes, and lungs during cutting and installation, requiring gloves, long sleeves, safety glasses, and a dust mask.
Once installed inside a frame and wrapped in fabric, rockwool is completely safe and poses no ongoing health risk.
What is the best material for acoustic treatment?
Rockwool and rigid fiberglass (like Owens Corning 703) are both excellent and used interchangeably in professional studios. Rockwool is generally cheaper and more fire resistant.
Fiberglass absorbs slightly more sound per inch at mid frequencies. For most home studios, either material produces outstanding results.
Is rockwool better than spray foam for soundproofing?
For acoustic treatment (controlling sound inside a room), rockwool is dramatically better. Spray foam is closed-cell, which means it reflects sound rather than absorbing it — the opposite of what you want for treatment.
Spray foam is designed for thermal insulation and air sealing, not acoustic absorption. Using it on walls or in panels will make room reflections worse, not better.
Is Acoustic Treatment Necessary? (Here Is When It Actually Matters)
Is acoustic treatment necessary — yes, if you record, mix, or critically listen to audio in any room, but the real answer depends on what you are doing and how much the room is working against you.
You set up your home studio, buy decent monitors, and start mixing — but every track sounds different on your car speakers, your headphones, and your friend’s system.
The problem is not your gear or your ears. The problem is that your untreated room is adding its own reverb, bass buildup, and reflections to everything you hear, and you are mixing to compensate for a room you cannot trust.
The fix is straightforward and cheaper than you think. A few strategically placed panels and bass traps can turn an unreliable room into one where your mixes finally translate to every playback system.
The first step is not buying thousands of dollars worth of panels. It is understanding whether your specific situation actually requires treatment and how much you need.
Below, this guide breaks down exactly who needs acoustic treatment, what happens without it, when you can skip it entirely, and the minimum setup that covers most problems.
Quick Takeaway
Acoustic treatment is necessary for anyone recording with microphones, mixing on monitors, or running meetings where speech clarity matters. It is not necessary for casual listening, headphone-only workflows, or well-furnished rooms. The minimum effective setup — 4 bass traps and 2 first-reflection panels — fixes 80% of room problems for a fraction of a full treatment budget.
Is Acoustic Treatment Necessary — And Who Actually Needs It?
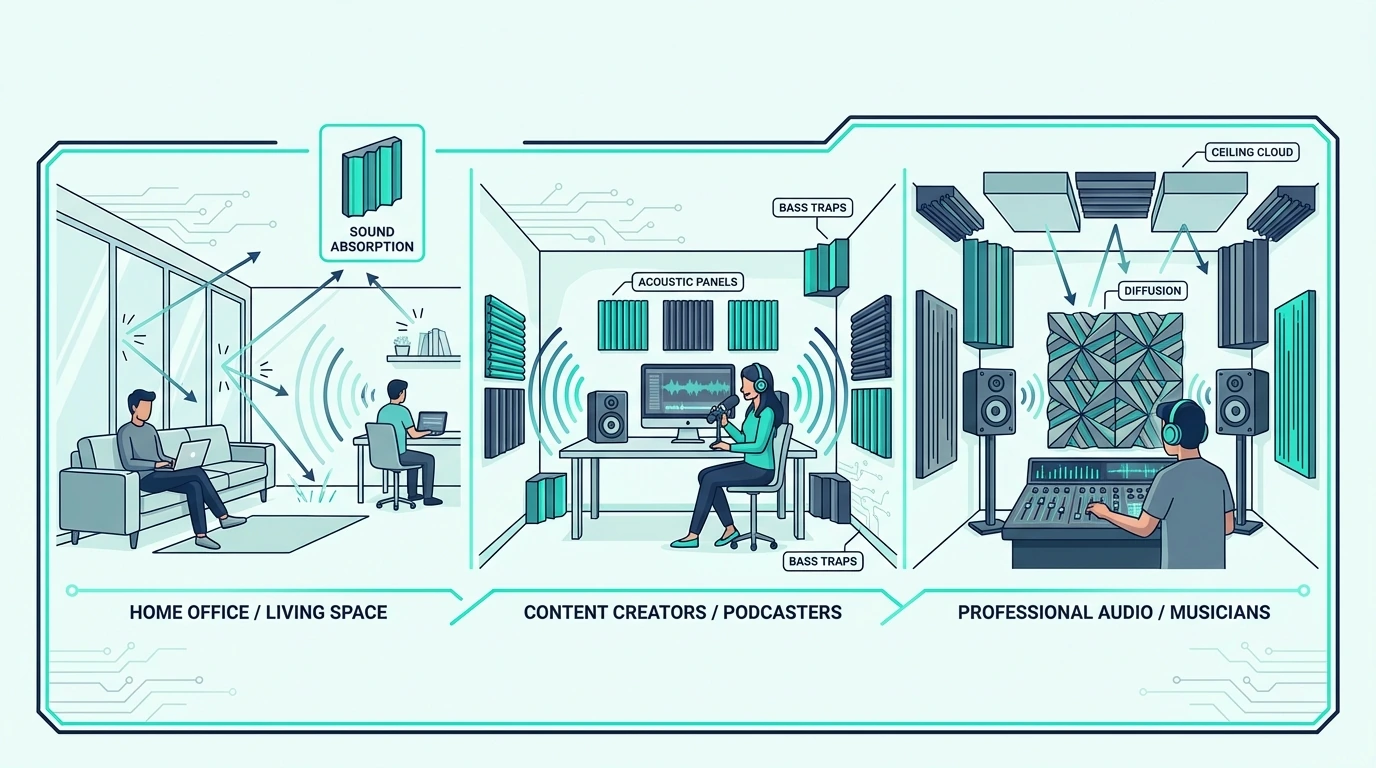
The short answer is that acoustic treatment is necessary for anyone who needs to hear sound accurately in a room. That includes home studio owners, mixing engineers, podcasters, voice-over artists, and anyone running a room where speech intelligibility matters.
If you record vocals or acoustic instruments, the microphone captures everything the room adds — every reflection, every flutter echo, every bass resonance. No plugin removes room sound cleanly once it is baked into a recording.
If you mix music on studio monitors, your room determines what you actually hear. An untreated room can add 15-20 dB of bass boost at certain frequencies while completely canceling others, which means every EQ and level decision you make is a reaction to the room rather than the music.
Home theaters benefit from treatment because surround sound relies on precise speaker-to-ear timing. Offices and conference rooms benefit because speech clarity drops dramatically in reverberant spaces.
For rooms that need to look good while solving acoustic problems, decorative fabric-wrapped panels deliver real absorption in a finish that works in living rooms and offices.
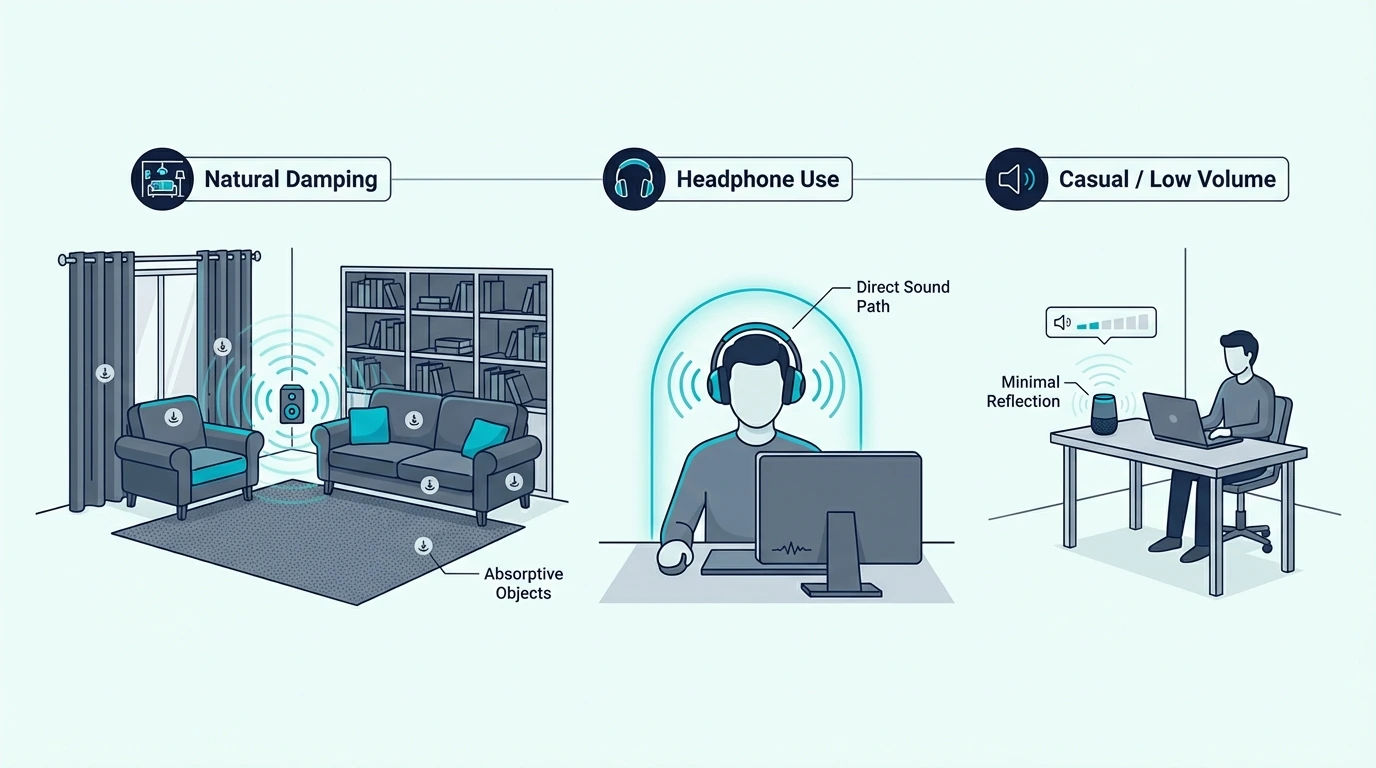
The people who do not need treatment are casual listeners using headphones, anyone working exclusively in headphones for production, and people in rooms that are already well-furnished with soft materials like couches, curtains, and bookshelves. For a deeper dive into the fundamentals, see our guide on what is acoustic treatment.
What Happens In An Untreated Room?
Understanding what actually goes wrong in an untreated room makes the case for treatment far more concrete than any sales pitch. The problems fall into three categories, and each one affects different use cases.
Sound leaves your speakers or instrument and hits the nearest wall. It bounces back with a slight delay — typically 5 to 30 milliseconds in a small room.
That reflected sound combines with the direct sound at your ears, and the result is comb filtering — certain frequencies cancel out while others double in volume. The tonal balance you hear is not what the speakers are actually producing.
How Untreated Rooms Affect Recording
Every microphone in an untreated room captures two signals: the direct sound from the source and the reflected sound from the walls, ceiling, and floor. The closer the microphone is to a wall, the stronger those reflections become.
Vocals recorded in an untreated bedroom typically have a boxy, hollow quality that no amount of EQ can fully fix. The room tone is embedded in the recording at every frequency.
Acoustic instruments are even more sensitive because they project sound in all directions. A guitar recorded three feet from a bare drywall wall picks up a hard reflection that smears the transient detail and makes the recording sound distant and unfocused.
How Untreated Rooms Affect Mixing
Mixing in an untreated room is like editing photos on an uncalibrated monitor — you are making corrections based on inaccurate information. The bass response in a small untreated room is especially unreliable.
Room modes — the resonant frequencies determined by your room dimensions — create peaks and nulls that can swing bass levels by 20 dB or more depending on where you sit. You boost the kick drum because it sounds weak at your position, then play the mix on any other system and the kick is overwhelming.
First-reflection panels solve the mid and high frequency accuracy problem, but you also need corner bass traps to flatten the low end. Without both, your mixes will not translate.
A set of fiberglass panels like the UMIACOUSTICS Fiberglass Acoustic Panels at your first reflection points is the single highest-impact upgrade for mixing accuracy.
When Is Acoustic Treatment Not Necessary?
Treatment is not always worth the investment, and knowing when to skip it saves money and effort.
If your entire workflow happens on headphones — from recording through mixing and mastering — the room acoustics do not affect what you hear. Headphone-only producers can skip treatment entirely and spend that budget on better headphones or reference monitors for final checks.
Rooms that are already heavily furnished absorb a surprising amount of mid and high frequency energy on their own. A living room with a couch, thick curtains, a bookshelf full of books, and a rug on a hardwood floor already has significant natural absorption.
Casual music listening does not require treatment either. If you are not making critical decisions about sound — just enjoying music — the room coloration is part of the experience and most listeners never notice it.
Outdoor recording eliminates room reflections entirely, which is why field recording rarely involves acoustic treatment. The tradeoff is wind noise and environmental sound, but those are separate problems.
The gray area is podcasting with dynamic microphones. A good dynamic mic like the SM7B rejects off-axis room sound far better than a condenser, which means you can get clean recordings in a moderately treated or even untreated room if you stay close to the mic.
The biggest misconception about acoustic treatment is that you need to cover every wall. You do not.
Strategic placement of a small number of panels handles the majority of problems.
The Minimum Effective Setup
The 80/20 rule applies perfectly to acoustic treatment. Four corner bass traps and two first-reflection panels solve roughly 80% of the acoustic problems in a typical home studio for about 20% of the cost of full room treatment.
Start with bass traps in the front two corners of the room, floor to ceiling if possible. These address the room modes that make your bass response unreliable.
A budget-friendly option like TroyStudio Bass Trap 12-Pack gets you started while you save for thicker fiberglass options.
Next, place two absorption panels at the first reflection points on your side walls. Use the mirror trick: sit at your listening position and have someone slide a mirror along the wall until you see a speaker in the reflection.
That spot gets a panel.
For panels that handle first reflections with genuine fiberglass absorption, a 2-inch fiberglass panel set delivers the absorption depth that foam alternatives cannot match.
That minimum setup — corners plus first reflections — is enough to make your monitoring position dramatically more accurate. For a complete walkthrough, see acoustic treatment for home studios.
When To Add More
If you still hear flutter echo after installing the minimum setup, add absorption to the rear wall. Flutter echo happens between parallel surfaces, so treating one side of each parallel pair eliminates it.
If bass is still uneven after corner traps, add traps to the rear corners and consider ceiling treatment at the first reflection point above your listening position. A ceiling cloud — a panel suspended a few inches below the ceiling — catches the reflection that bounces from your speakers off the ceiling to your ears.
The diminishing returns curve is steep. The jump from zero treatment to the minimum setup is enormous.
The jump from minimum to full treatment is noticeable but far smaller. Spend your first budget on the minimum setup and add incrementally based on what your ears and measurements tell you.
If you want to understand the full cost picture before committing, our acoustic treatment cost guide breaks down pricing by approach and room size.
The Bottom Line
Acoustic treatment is necessary for anyone who needs to trust what they hear in a room. Recording engineers, mixing engineers, podcasters, and anyone running a space where speech clarity matters will all benefit measurably.
It is not necessary for headphone-only workflows, casual listening, or rooms that are already well-furnished with soft, absorptive materials.
Start with four corner bass traps and two first-reflection panels. That minimum setup transforms an unreliable room into one you can actually work in, and it costs less than most audio interfaces.
Yes — even a basic setup of four bass traps and two wall panels produces an audible improvement in clarity, bass accuracy, and stereo imaging. Before-and-after measurements typically show a 10-15 dB reduction in the worst room mode peaks.
The difference is most dramatic for mixing, where untreated rooms cause mixes that do not translate to other playback systems.
What are the disadvantages of acoustic foam?
Foam absorbs mid and high frequencies but does almost nothing below 500 Hz, which means it cannot address bass problems — the most common issue in small rooms. Cheap foam also degrades over time, becoming brittle and potentially flammable.
For serious acoustic treatment, fiberglass panels or mineral wool outperform foam at every frequency and last indefinitely. Rockboard 60 mineral wool boards are a popular upgrade path from foam — the rigid boards absorb effectively across the full frequency range including the low-mids that foam misses entirely.
Will acoustic treatment give my vocal more clarity?
Absolutely. Room reflections cause comb filtering that makes vocals sound hollow, boxy, or distant.
Treating the area around your recording position — especially the wall behind the microphone and the first reflection points — removes those reflections and lets the direct vocal signal dominate.
The improvement is audible on the very first take after treatment. You will hear tighter low end, cleaner high frequencies, and a more present, upfront vocal tone.
What Is Acoustic Treatment? (And Why Your Room Sound Matters More Than Your Gear)
What is acoustic treatment — it is the process of controlling how sound behaves inside a room using absorption, diffusion, and bass trapping, but most people confuse it with soundproofing and end up solving the wrong problem entirely.
You record a vocal take that sounded perfect in your headphones, only to play it back and hear a boxy, echoey mess that no amount of EQ can fix.
The fix is not a better microphone or a more expensive interface — it is treating the room itself so reflections, flutter echo, and bass buildup stop sabotaging every recording and mix you make.
The first move is usually a pair of panels on the wall behind your microphone, and you do not need to cover every surface to hear a massive difference.
Below, this guide breaks down exactly what acoustic treatment is, the three types you need to know, where it gets used, and how to choose the right option for your space.
Quick Takeaway
To improve your room sound, you need acoustic treatment — not soundproofing. Treatment controls echo, flutter, and bass buildup inside your room using three tools: absorption panels, diffusers, and bass traps. Start with absorption at your first reflection points and corners, then add diffusion only after the major problems are solved.
What Is Acoustic Treatment — And Why Does It Matter?
Acoustic treatment is the practice of adding materials to a room that change how sound waves interact with the walls, ceiling, and floor. The goal is to control reflections, reduce echo, and tame bass buildup so the room sounds accurate and controlled.
Every untreated room has acoustic problems. Sound leaves your speakers or instrument, hits a hard wall, and bounces back toward you with a slight delay.
Those reflections stack on top of the original sound, smearing the clarity of everything you hear. The technical term is comb filtering, and it is the reason a perfectly good vocal take can sound hollow or phased when you play it back.
The result depends on the room. Small rooms with parallel walls tend to produce flutter echo — that rapid, metallic ringing you hear when you clap your hands in an empty hallway.
Larger rooms with hard surfaces create longer reverb tails that muddy speech intelligibility and make music sound washy.
Bass frequencies are the worst offenders. Wavelengths at 100 Hz are roughly 11 feet long, which means they build up in corners and along walls regardless of what you do to the mid and high frequencies.
A room can sound reasonably clear in the upper range and still have a 15-20 dB bass hump at certain frequencies that makes mixing impossible. You turn up the bass in your mix to compensate for a null at your listening position, then wonder why it sounds boomy on every other system.
This is where acoustic treatment separates itself from soundproofing. Soundproofing blocks sound from traveling between rooms — it involves mass, decoupling, and sealing gaps.
Acoustic treatment controls sound within the room you are already in. They solve completely different problems, and no amount of foam on your walls will stop your neighbor from hearing your subwoofer.
The practical payoff of treatment is immediate. A properly treated home studio lets you trust what you hear from your monitors, which means fewer mix revisions and recordings that translate to other playback systems.
A treated office conference room means participants can actually understand each other without raising their voices. A treated home theater means dialogue stays crisp and surround sound effects land where the director intended.
What Are The Three Types Of Acoustic Treatment?
The foundation concepts are solid — now the question is what you actually put on the walls. Acoustic treatment breaks down into three categories, and each one targets a different part of the problem.
Absorption Panels And Foam
Absorption is the most common form of acoustic treatment, and it does exactly what the name suggests — it converts sound energy into heat as waves pass through a porous material. The thicker and denser the material, the more sound it absorbs across a wider frequency range.
Fiberglass and mineral wool (rockwool) are the gold standard for absorption. A 2-inch thick fiberglass panel with an NRC rating of 0.95 absorbs 95% of the sound that hits it across the mid and high frequencies.
Compare that to bare drywall at roughly NRC 0.05, and the difference is staggering. Even carpet only manages about NRC 0.30, which means untreated rooms reflect the vast majority of sound energy back into the space.
Open-cell polyurethane foam — the pyramid and wedge shapes you see everywhere online — is the budget entry point. Foam absorbs mid and high frequencies reasonably well, but it does almost nothing below 500 Hz because it lacks the density and thickness to slow down longer wavelengths.
For vocal recording and taming flutter echo, foam works. For mixing accuracy across the full frequency spectrum, you need fiberglass or rockwool panels.
Where you place absorbers matters as much as what you buy. The first reflection points — the spots on your side walls, ceiling, and rear wall where sound bounces from your speakers to your ears — are the highest priority.
A simple mirror trick helps you find them: sit in your listening position and have someone slide a mirror along the wall until you can see a speaker in the reflection. That spot gets a panel.
For a typical home studio, a set of fiberglass panels like the UMIACOUSTICS 2-inch fiberglass panels placed at first reflection points will dramatically clean up your monitoring accuracy.
Sound Diffusers
Diffusers take a completely different approach. Instead of absorbing sound, they scatter it in multiple directions so that no single strong reflection reaches your ears.
The room stays lively and natural-sounding, but without the problematic echoes that come from flat, hard surfaces. This is why professional studios use diffusers alongside absorbers — a room that is 100% absorbed sounds dead and unnatural, which is just as bad for mixing as a room full of reflections.
The most common designs are QRD (quadratic residue diffusers) and skyline diffusers, both made from wood or rigid materials with wells or blocks at mathematically calculated depths. The varying depths scatter different frequencies at different angles, breaking up what would otherwise be a coherent reflection.
Diffusion matters most on the rear wall of a mixing room and on the ceiling above the listening position. You want the front of the room to be absorptive (so your direct speaker signal is clean), but the back of the room benefits from diffusion to maintain a sense of space without creating distinct echoes.
One common mistake is using diffusers in rooms that are too small. Diffusers need distance to work — the listener needs to be at least 2-3 meters from the diffuser surface for the scattered sound to blend properly.
In a 10×10-foot bedroom studio, diffusers on the back wall may be too close to do their job, and absorption is usually the better choice. Save diffusion for rooms where the rear wall is at least 8 feet from the listening position, and even then, test with absorption first to establish a clean baseline before introducing scatter.
That tradeoff is even clearer in small rooms, where the rear wall is often too close for diffusion to earn its keep.
Bass Traps
Low frequencies are the hardest to control because their long wavelengths pass through thin materials without slowing down. Bass traps are thick, dense absorbers specifically designed to handle frequencies below 300 Hz, and they belong in the corners of your room where bass energy naturally accumulates.
If you want the placement details, acoustic treatment for corners goes deeper into why corners outperform almost every other position for low-frequency control.
The most effective bass traps are thick panels (4-6 inches of dense fiberglass or rockwool) mounted across the corners of the room, spanning from floor to ceiling. Corner-mounted traps work because the pressure from bass waves is highest where two walls meet, so trapping energy at those points has maximum impact.
Straddling the trap across the corner with an air gap behind it extends absorption even lower. A 4-inch panel mounted 4 inches from the corner wall effectively behaves like an 8-inch trap for the lowest frequencies.
The difference bass traps make is not subtle. Before-and-after measurements with a calibration mic typically show a 10-15 dB reduction in the worst room mode peaks, which translates to a low end that finally sounds even and controllable. For a budget starting point, TroyStudio foam bass traps fit snugly into room corners and tame mid-bass buildup for under 35 dollars — a fraction of the cost of rigid fiberglass traps, though with more limited low-frequency reach.
Where Is Acoustic Treatment Used?
Those three treatment types show up in more places than you might expect. The principles are the same whether the room is a spare bedroom or a concert hall — only the scale changes.
Home Studios And Recording Rooms
This is where most people first encounter acoustic treatment, and for good reason. A home studio with untreated walls is like trying to mix on monitors with broken frequency response — you are making decisions based on what the room is doing to the sound, not what is actually in the recording.
The priority order for a home studio is clear. First, treat the first reflection points on the side walls and ceiling with 2-inch absorption panels.
Second, place bass traps in at least two corners (front corners of the room behind the speakers are highest priority). Third, treat the wall directly behind your listening position with either absorption or diffusion depending on room size.
That sequence alone covers 80% of the acoustic problems in a typical bedroom studio. The remaining 20% involves the wall behind the speakers, floor reflections (a thick rug handles this), and fine-tuning the rear wall treatment.
That is the same logic behind a good mixing room treatment plan: solve the listening position, reflections, and low end before you worry about cosmetics.
The investment pays for itself quickly. Mixes that used to need five rounds of revisions start translating on the first bounce, because you are finally hearing what the speakers are actually producing instead of what the room is adding on top.
Home Theaters And Living Rooms
Home theater acoustic treatment focuses on two things: dialogue clarity and bass management. Surround sound systems rely on precise speaker placement, but the room still determines how those signals arrive at your ears.
Side wall absorption at the first reflection points keeps the center channel (dialogue) sharp. Rear wall treatment — absorption or diffusion — prevents the surround channels from creating confusing echoes.
Bass traps in the corners tame the boomy, one-note bass that plagues most living room setups. Without corner treatment, action scenes rattle the walls while dialogue disappears into a muddy low-end haze. Larger format panels like the Olanglab 24×48 inch fiberglass panels cover more wall area per panel, which keeps the total panel count manageable in rooms where aesthetics matter.
The aesthetic challenge is real in living spaces. A recording studio can have exposed fiberglass panels everywhere, but a living room needs treatment that blends with the decor.
Fabric-wrapped panels in custom colors, acoustic art prints, and furniture placement (bookshelves act as natural diffusers) all help without turning the room into a padded cell. A well-stocked bookshelf on the rear wall acts as an accidental diffuser, scattering sound off the irregular surfaces of book spines at varying depths.
Offices, Classrooms, And Worship Spaces
Speech intelligibility is the main concern in commercial spaces. When background noise levels are high and surfaces are hard (glass, concrete, whiteboard), spoken words bounce around and lose clarity.
Open-plan offices are particularly bad — sound travels freely across the space, and everyone hears everyone.
Ceiling-mounted absorption panels are the most common commercial solution because they treat the largest reflective surface without taking up wall space. Suspended acoustic clouds and baffles catch sound before it can bounce between the ceiling and floor, reducing the overall reverberation time.
Conference rooms benefit from wall-mounted panels at seated ear height, targeting the first reflection paths between speakers and listeners. Classrooms need treatment focused on the front wall (where the teacher stands) and the ceiling above the student area.
The impact on productivity is measurable. Studies on open-plan offices consistently show that reducing reverberation time by even half a second improves focus, reduces fatigue, and cuts the number of times workers ask colleagues to repeat themselves.
Worship spaces face a unique challenge: the congregation needs to hear spoken word clearly, but music benefits from some natural reverb. The solution is usually heavy absorption on the walls and ceiling near the stage/pulpit area, with the rear of the space left more reflective or diffuse.
The same tradeoff shows up in home theater treatment, where you want dialogue to stay clear without making the room feel lifeless.
The key metric in all these commercial settings is RT60 — the time it takes for sound to decay by 60 dB after the source stops. An untreated conference room might have an RT60 of 1.5 seconds, which turns every spoken sentence into an overlapping mess.
Bringing that down to 0.4-0.6 seconds with ceiling panels and wall treatment makes the same room feel focused and controlled. Most acoustic consultants target an RT60 between 0.3 and 0.5 seconds for speech-heavy rooms, and between 0.6 and 0.8 seconds for rooms that also need to support live music.
How Do You Choose The Right Acoustic Treatment?
Knowing the types is one thing — figuring out what your room actually needs is where most people get stuck. The answer starts with listening, not shopping.
Start With Your Biggest Problem
Clap your hands in the center of your room and listen. If you hear a rapid metallic ringing (flutter echo), your parallel walls are bouncing sound back and forth and you need absorption panels on the walls.
If you hear a long, washy tail, the room has too much reverb and you need broader absorption coverage. If speech sounds unclear but the room does not seem particularly echoey, the problem is likely bass buildup masking the midrange.
Each symptom points to a different first purchase. Flutter echo means wall panels.
Excessive reverb means more panels plus ceiling treatment. Bass problems mean corner traps.
That is why budget acoustic treatment advice only works when the first purchase matches the actual problem.
Trying to solve bass problems with thin foam panels is the single most common waste of money in acoustic treatment — foam cannot absorb bass, period.
A quick measurement with a free app like REW (Room EQ Wizard) and a calibrated microphone reveals exactly which frequencies are problematic. The waterfall plot shows how long each frequency takes to decay, which tells you precisely where your room modes are and how much trapping you need.
Even without measurement gear, your ears give you reliable information. Record a voice clip in your untreated room and listen back on headphones — every problem the room adds becomes obvious when you remove the room from the monitoring chain.
Try this: clap once in the center of the room, record it on your phone, and play it back with earbuds. The flutter echo, the bass ring, the harsh reflections — they all jump out when you are not standing inside the problem.
DIY vs Commercial Options
The cost range for acoustic treatment spans from a single weekend DIY project to several thousand dollars for a professionally designed room. The good news is that DIY treatment using rigid fiberglass insulation (like Owens Corning 703) performs identically to commercial panels at a fraction of the cost.
A single 2×4-foot panel of 2-inch OC 703 from a building supply store costs less than a dinner out. Wrap it in acoustically transparent fabric, build a simple wooden frame, and you have a panel that matches or beats commercial products at a fraction of the retail cost.
For those who prefer ready-made options, panels like the Olanglab fiberglass acoustic panels deliver real broadband absorption with a clean, fabric-wrapped finish that works in studios and living spaces alike.
Commercial panels make sense when you value convenience, aesthetics, or do not have the tools and space to build your own. DIY makes sense when budget is tight and you are willing to spend a weekend with a staple gun and some fabric.
If you are comparing bundled solutions instead of buying one piece at a time, acoustic treatment kits help narrow the realistic starter options.
Either way, the acoustic properties of the materials matter more than the finish. A hand-built panel stuffed with rigid fiberglass and wrapped in muslin absorbs just as much sound as a panel with a designer fabric cover — the sound waves do not care what it looks like.
The Bottom Line
The single most impactful thing you can do for your room sound is not upgrading your speakers, your microphone, or your audio interface — it is treating the room itself.
Start with two to four absorption panels at your first reflection points and a pair of bass traps in your front corners. That combination alone transforms a room from acoustically hostile to genuinely usable, and the difference is audible from the first note you play back.
You do not need to treat every surface or spend thousands of dollars. A targeted approach based on your room and your goals gets you 80% of the way there, and you can add more treatment over time as your ears tell you what is still missing.
What is the difference between soundproofing and acoustic treatment?
Soundproofing stops sound from passing through walls, floors, and ceilings using mass, decoupling, and airtight sealing. Acoustic treatment controls how sound behaves inside the room using absorption, diffusion, and bass trapping.
They address completely different problems — soundproofing keeps your bass from reaching the neighbors, while treatment keeps your room from lying to your ears about what your music actually sounds like.
What are the three elements of acoustic treatment?
Absorption, diffusion, and bass trapping. Absorption panels soak up mid and high frequency reflections.
Diffusers scatter sound to eliminate strong echoes while keeping the room lively. Bass traps handle low frequencies that build up in corners.
Most rooms need all three in some combination, but absorption and bass trapping cover 90% of the work in a typical home studio or listening room.
Is a mattress good for acoustic treatment?
A mattress absorbs some mid and high frequency sound, roughly comparable to a thick moving blanket. It will reduce flutter echo and tame some brightness in a pinch.
The problems are that it does nothing for bass frequencies, it is impossible to position precisely at reflection points, and it takes up far more space than a proper panel. For a temporary vocal recording setup, leaning a mattress behind the microphone is better than nothing — but it is not a substitute for even a basic set of 2-inch fiberglass panels.
What Are Sound Diffusers Made Of (Commercial vs DIY Material Breakdown)
What are sound diffusers made of comes down to how rigid and reflective the material is, but most people assume diffusers use the same soft, porous materials as acoustic foam panels — which is the exact opposite of what a diffuser needs.
The wrong material causes reflections to absorb instead of scatter — turning your diffuser into an expensive foam panel that deadens the room rather than controlling it. Acoustic foam absorbs sound energy through porous fibers, which is the opposite of what a diffuser needs.
A diffuser must bounce sound waves off a hard surface shaped with precise well depths or block heights. Soft materials defeat the purpose entirely.
Knowing what commercial diffusers actually use helps you evaluate products accurately and choose materials that scatter sound waves cleanly instead of absorbing them or resonating at unwanted frequencies.
Below, you’ll see what major brands build their diffusers from, which materials work for DIY builds, and why 3D-printed options are gaining traction.
Quick Takeaway
Commercial sound diffusers are made from hardwood (oak, maple), MDF with veneer, thermoformed plastic, or expanded polystyrene (EPS). Hardwood delivers the cleanest reflections due to its density and rigidity. Budget diffusers use plastic or foam composites that work for high frequencies but flex at lower frequencies. DIY builders typically use Baltic birch plywood or 3D-printed PLA/PETG.
What Are Sound Diffusers Made Of — And Why Does Material Matter?
A diffuser scatters sound waves by bouncing them off a rigid surface with varying depths. The material must reflect sound energy cleanly — any flex, porosity, or resonance degrades the scatter pattern.
This is the fundamental difference between diffusion and absorption materials. For how absorption and diffusion differ at the physics level, that guide explains why porous and rigid materials serve opposite acoustic purposes.
The Importance Of Material Rigidity
A diffuser panel that flexes under sound pressure acts as a membrane absorber — converting acoustic energy into mechanical vibration instead of reflecting it. The result is a panel that absorbs low-mid frequencies rather than scattering them.
Rigidity is measured by the material’s modulus of elasticity. Hardwoods like oak and maple have high modulus values, which is why they reflect sound waves with minimal energy loss.
Softwoods like pine and cedar have lower modulus values and flex more easily under sound pressure. Thin plastics and foam flex even more, which is why they only scatter high frequencies where the wavelengths are short enough that the panel doesn’t vibrate.
The Impact Of Material Density On Sound Diffusion
Denser materials reflect more sound energy across a wider frequency range. A 3/4-inch oak panel reflects frequencies from 500 Hz to 8 kHz with virtually no absorption loss.
A thin plastic panel of the same thickness might only reflect cleanly above 2 kHz — below that, the panel vibrates and absorbs rather than scatters. This is why budget plastic diffusers are marketed for “high frequency treatment” rather than full-range diffusion.
What Are Commercial Diffusers Typically Made From?
Solid Hardwood And MDF Diffusers
Professional-grade diffusers from brands like RPG and Vicoustic use solid hardwood — oak, maple, or walnut machined into precise QRD well patterns or skyline block arrays. The wood’s natural density and rigidity produce the cleanest possible scatter pattern.
The machining process matters as much as the material itself. CNC-routed wells hold tolerances within 1/32 of an inch, which keeps the scatter pattern mathematically accurate across the panel’s design bandwidth.
Mid-range brands use MDF (medium-density fiberboard) or HDF (high-density fiberboard) with wood veneer. MDF is cheaper to machine than solid hardwood and produces consistent results, though it’s heavier and extremely moisture-sensitive.
The veneer finish on MDF diffusers serves two purposes — it protects the fiberboard from humidity damage and provides a harder reflective surface than raw MDF. Without veneer, exposed MDF absorbs a small percentage of high-frequency energy through its porous surface.
The BXI Wood Sound Diffuser (1D QRD) uses solid wood construction with calculated well depths — a good example of what mid-price commercial diffusers are made from. For a deeper comparison of which wood species perform best in diffusers, that guide ranks options by density and cost.
Thermoformed Plastic And EPS Diffusers
Budget commercial diffusers use thermoformed ABS, HIPS, or expanded polystyrene (EPS). These materials are lightweight, cheap to mold, and can be shaped into complex patterns that would be expensive to machine from wood.
EPS is the same material used in disposable coffee cups and packaging foam — rigid enough at small thicknesses for high-frequency scatter, but too lightweight to reflect anything below 2-3 kHz without flexing.
The tradeoff is frequency range. Plastic and EPS panels typically scatter effectively above 2-3 kHz but flex at lower frequencies.
For rooms where high-frequency flutter echo is the primary problem, plastic diffusers are adequate. For full-range treatment, wood remains the only reliable option at consumer price points.
PLA (polylactic acid) is the most common filament for printed diffusers — easy to print, rigid at room temperature, and available in every color. PETG offers better impact resistance and slight flexibility that prevents cracking during mounting.
Both filaments cost $15-25 per kilogram, which yields roughly 2-3 small diffuser sections depending on infill density and wall count. That makes material cost negligible compared to the print time investment.
The critical variable is infill percentage. A 20% infill QRD panel is essentially hollow — it flexes under sound pressure and acts more like a membrane absorber than a diffuser.
Aim for 50-80% infill to achieve the rigidity needed for clean mid-frequency scatter. Higher infill adds print time and material cost, but the acoustic difference between 20% and 60% infill is dramatic.
Wall thickness matters equally. Four or more perimeter walls create a rigid outer shell that maintains the precise well depths or block heights the scatter pattern depends on.
Limitations And Workarounds
Consumer 3D printers max out at 8-10 inches per axis. A standard diffuser panel needs 24 inches of continuous surface — which means printing in sections and tiling them onto a shared backboard.
Larger format printers (like the Creality K1 Max or Bambu X1) expand the per-section size to 12 inches, cutting the number of tiles needed by roughly half. But even with larger printers, multi-section assembly is unavoidable for standard 24-inch panels.
Seams between printed sections create flat spots in the scatter pattern. The workaround is to design interlocking edges or mount sections on a plywood backing with minimal visible gaps.
Some builders print individual blocks and glue them to a plywood base, creating a hybrid skyline diffuser that combines printed precision with wood’s structural mass. This approach also solves the rigidity problem — the plywood base provides the mass while the printed blocks provide the calculated geometry.
Commercial diffusers are made from hardwood (premium), MDF with veneer (mid-range), or thermoformed plastic and EPS (budget). The material determines the frequency range the panel can scatter effectively and how long the panel maintains its acoustic properties over time.
For DIY builds, Baltic birch plywood offers the best balance of cost, rigidity, and workability. A single 3/4-inch sheet costs $40-60 and yields enough material for two 24×24-inch QRD panels.
3D-printed PLA/PETG works for custom designs at small scale, provided you use high infill and adequate wall thickness.
Match the material to your acoustic goals. Wood handles full-range diffusion from 500 Hz to 8 kHz.
Plastic and foam cover high frequencies only (2 kHz+). For where to place your diffusers once built or purchased, that guide covers optimal positioning for every room type.
If you’re comparing diffusers against other acoustic treatment options, our diffuser vs acoustic panel guide explains when each approach makes sense for your room.
Frequently Asked Questions
What is the best material for a sound diffuser?
Hardwood (oak or maple) for maximum acoustic performance — dense, rigid, and produces the cleanest reflections. Baltic birch plywood is the best budget alternative with similar rigidity at a fraction of the cost.
Can you 3D print a sound diffuser?
Yes — PLA and PETG both work for small-to-medium diffuser panels. Use 50%+ infill for rigidity, and tile multiple printed sections onto a plywood backboard to achieve standard panel sizes.
How effective are sound diffusers?
Very effective when made from rigid materials and properly sized for the target frequency range. A well-built wood QRD diffuser on the rear wall eliminates flutter echo and comb filtering while preserving the room’s natural energy and spaciousness.
How Many Sound Diffusers Do I Need (The Coverage Math Most People Skip)
How many sound diffusers do i need depends on three variables — your rear wall area, the panel size, and how much coverage your room actually requires, but most people either buy one panel and expect miracles or cover every surface and create acoustic chaos.
A single diffuser on a 10-foot rear wall scatters a fraction of the reflections hitting that surface. The rest bounce back as focused echoes that cause comb filtering and flutter at your listening position.
Getting the count right means you scatter enough energy to eliminate harsh reflections while preserving the room’s natural liveliness — so your mixes translate and your recordings sound clean without the room feeling dead.
Below, you’ll see the exact calculation method, worked examples by room size, and the 38% rule that professional studios use to balance diffusion with absorption.
Quick Takeaway
Most home studios need 4-8 diffuser panels on the rear wall. Calculate by measuring the wall area, choosing your panel size (typically 24×24 inches), and targeting 60-80% coverage of that wall. The 38% rule says roughly 38% of total room surface area should be treated — split between absorption (first reflection points, corners) and diffusion (rear wall, ceiling).
How Many Sound Diffusers Do I Need — And Why Does Coverage Matter?
One diffuser panel on a large rear wall is like putting a single tile on a bare floor — it treats the square footage directly behind it but leaves the rest of the surface untreated. Sound waves hitting the bare sections still bounce back as focused reflections.
Coverage percentage determines how much of the target wall area actively scatters sound. Below 50% coverage, the untreated gaps between panels create an uneven scatter pattern — some frequencies get diffused while others reflect straight back.
The goal is continuous or near-continuous coverage across the primary reflection surface. For most rooms, that means the rear wall behind the listening position and sometimes the ceiling directly overhead.
For deciding where to place diffusers in your specific room layout, that guide covers rear wall, ceiling, and first reflection point positioning.
How Do You Calculate The Number Of Diffusers For A Room?
Factors Affecting The Number Of Diffusers
Five variables control the count. Room size sets the wall area available for treatment.
Panel dimensions determine how much each diffuser covers. Most commercial diffusers come in 24×24-inch or 12×12-inch sizes, which simplifies the math.
Coverage target (typically 60-80% of the rear wall) sets how much of that area you need to fill. Room usage matters too — a mixing studio needs more precise coverage than a casual listening room.
The final factor is the room’s existing acoustic character. Rooms with bookshelves, irregular furniture, and non-parallel walls already have some natural diffusion.
A bare rectangular room with flat drywall needs more engineered coverage. For understanding how sound diffusion works at the physics level, that guide covers why surface shape determines scatter quality.
Example Calculation
Take a typical home studio rear wall: 10 feet wide by 8 feet tall, giving 80 square feet of wall area. Using standard 24×24-inch (2×2 foot) diffuser panels, each panel covers 4 square feet.
At 70% coverage target: 80 × 0.70 = 56 square feet of diffusion needed. Divide by 4 square feet per panel = 14 panels for full 70% rear wall coverage.
If you use smaller 12×12-inch panels (1 square foot each), the count jumps to 56 panels for the same coverage. Panel size has a massive impact on both the installation effort and the total cost.
That’s a significant investment. In practice, most home studios treat the center section of the rear wall (the area directly behind the listening position) at roughly 60-80% coverage, which brings the count down to 6-10 panels depending on how wide you go.
The BXI Wood Sound Diffuser (1D QRD) covers 4 square feet per panel at 24×24 inches — a standard size that makes coverage calculations straightforward.
What Is The 38% Rule In Room Acoustics?
How The Rule Splits Between Absorption And Diffusion
The 38% rule states that roughly 38% of a room’s total surface area should be acoustically treated for balanced sound. That treatment budget splits between absorption and diffusion.
Absorption handles first reflection points (side walls, ceiling above the listening position) and bass buildup (corners). Diffusion handles the rear wall and sometimes the ceiling behind the listening position.
In practice, absorption typically claims 60-70% of the treatment budget, with diffusion covering the remaining 30-40%. For a room with 500 square feet of total surface area, that means roughly 190 square feet of treatment — with 60-75 square feet allocated to diffusion.
Professional mixing rooms and mastering suites often treat 50-60% of total surface area. The extra treatment gives tighter control over the room’s decay characteristics and reduces the RT60 (reverb time) to the 0.2-0.4 second range that critical listening demands.
Home theaters also benefit from heavier treatment — especially diffusion on the rear and side walls behind the seating area. The surround channels in a 5.1 or 7.1 system rely on scattered reflections to create the immersive envelope.
The only risk of over-treating is creating a room that feels uncomfortably dead. If you’re exceeding 50% treatment, make sure diffusion (not just absorption) makes up a significant portion — diffusion preserves room energy while absorption removes it.
Does Room Size Change How Many Diffusers You Need?
Small Rooms (Under 150 Sq Ft)
Small rooms present a unique challenge — the listening position is often too close to the rear wall for diffusion to work properly. Diffusers need at least 3-4 feet of clearance to scatter effectively.
If you have the clearance, 2-4 panels on the rear wall centered behind the listening position is usually sufficient. For rooms where diffusers in small spaces are practical, that guide covers the distance constraints and workarounds.
In very small rooms (under 100 square feet), absorption may be more effective than diffusion. The short distances mean reflected energy arrives so quickly that scattering it doesn’t provide the same benefit as in larger spaces.
Medium And Large Rooms
Medium rooms (150-300 square feet) are the sweet spot for diffusion. You have enough distance for the scatter pattern to develop, and 6-8 panels provide meaningful coverage of the rear wall.
At this room size, you also have enough wall area to create a proper hybrid treatment scheme — absorption on the side walls at first reflection points and diffusion across the rear wall. That combination addresses both early reflections and late-field decay in one setup.
The BXI 2D Skyline Diffuser scatters in both horizontal and vertical planes — ideal for ceiling mounting in medium rooms where overhead flutter echo is common.
Large rooms and professional studios can justify full rear wall coverage (10-16+ panels). At this scale, the investment pays off in noticeably tighter imaging and smoother decay.
Start with 4-6 panels centered on the rear wall behind the listening position. That covers the most critical reflection zone and gives you immediate improvement in imaging and decay smoothness.
If budget is tight, prioritize the center 4-6 foot section of the rear wall directly behind your head. That zone catches the strongest first-order rear reflections — the ones that cause the most audible comb filtering at the mix position.
Scale up to 8-10 panels if your room is larger than 200 square feet or if you’re doing critical mixing work. Full wall coverage (12-16 panels) is reserved for professional studios where every reflection matters.
The EVA Acoustic Diffusers (4-Pack) offer an affordable entry point — four panels per pack at a fraction of wood diffuser prices, though they only scatter high frequencies.
For a complete comparison of the best sound diffusers across all price points, that roundup ranks options by coverage, frequency range, and value. And for building your own panels to reduce costs at scale, our DIY wooden diffuser guide covers the full build process.
Frequently Asked Questions
How do you calculate the number of diffusers?
Measure the target wall area (usually the rear wall), multiply by your coverage percentage (60-80%), then divide by the panel size. A 10×8 foot wall at 70% coverage with 2×2 foot panels needs 14 panels.
Can you use too many diffusers in a room?
Full rear wall coverage is fine and often ideal for studios. The risk comes from treating every surface with diffusion — it creates a chaotic sound field with no clear early reflections, which makes the room feel disorienting rather than controlled.
How far apart should diffusers be spaced?
Mount them edge to edge with no gaps for maximum scatter continuity. Small gaps (1-2 inches) between panels are acceptable for aesthetics but reduce effectiveness slightly — each gap creates a flat reflection point in the scatter pattern.
How To Hang A Sound Diffuser (Wall + Ceiling Methods That Actually Hold)
How to hang sound diffuser panels comes down to matching your mounting method to the panel’s weight, but most people underestimate how heavy wood diffusers are and end up with panels that sag, shift, or fall off the wall entirely.
The problem is that diffusers aren’t lightweight foam tiles — a solid wood QRD or skyline panel can weigh 9-15 pounds per square foot, and drywall anchors rated for picture frames won’t hold that kind of load over time.
Choosing the right hardware means your diffuser stays secure for years without damaging the wall or compromising the scattering pattern — so you get reliable acoustic treatment instead of a safety hazard.
Below, you’ll see the exact hardware and step-by-step methods for both wall and ceiling installations.
Quick Takeaway
French cleats are the most secure mounting method for heavy wood diffusers — they distribute weight across studs and allow easy leveling. For lightweight foam or plastic diffusers, construction adhesive or heavy-duty Command Strips work. Ceiling mounting requires toggle bolts into joists or suspended wire systems rated for the panel weight.
How To Hang A Sound Diffuser — What You Need To Know First
Wood diffusers are significantly heavier than foam acoustic panels. A single 24×24-inch QRD panel weighs 9-15 pounds depending on the wood species and depth.
That weight rules out most adhesive-only mounting methods. Foam panels stick to walls with spray adhesive or Command Strips, but a wood diffuser needs mechanical fasteners anchored into studs or masonry.
Before you start, identify your wall material. Drywall over wood studs is the most common scenario — and the easiest to work with.
Concrete, brick, and metal stud walls each require different anchors and techniques. For understanding what a sound diffuser does and why mounting precision matters for the scatter pattern, that guide covers the basics.
For deciding where to place your diffusers before mounting, that guide covers rear wall, ceiling, and first reflection point positioning based on your room layout.
What Hardware Do You Need To Mount A Diffuser?
French Cleats And Z-Brackets
French cleats are the gold standard for heavy diffuser mounting. A French cleat is a two-piece system — one angled strip screws to the wall (into studs), the other screws to the back of the diffuser, and the two interlock.
The beauty of French cleats is weight distribution. The load spreads across the entire length of the cleat rather than concentrating at two or four screw points.
A 24-inch French cleat screwed into two studs can support 50+ pounds — far more than any single diffuser panel weighs.
Z-brackets work on the same principle but use a Z-shaped metal profile instead of angled wood strips. They’re lighter and thinner, making them a good option when you want the diffuser to sit as close to the wall as possible.
The BXI Wood Sound Diffuser (1D QRD) weighs 9 pounds — well within French cleat range. Most wood diffusers in this class include pre-drilled mounting holes on the back panel.
Adhesive And Glue Methods
Construction adhesive (Liquid Nails or PL Premium) bonds lightweight diffusers directly to the wall surface. This works for foam and thin plastic panels under 3-4 pounds.
Acoustic caulk provides a semi-permanent bond that allows removal without major wall damage. For the EVA Acoustic Diffusers (4-Pack), adhesive strips or construction adhesive are sufficient — each panel weighs under 1 pound.
Heavy-duty Command Strips (the 16-pound rated variety) work for diffusers up to about 5 pounds on smooth, clean surfaces. Textured walls and painted cinder block reduce the bond strength significantly.
How Do You Mount A Diffuser On A Wall Step By Step?
Determine The Position And Mark The Wall
Center the diffuser at seated ear height — roughly 38-42 inches from floor to the center of the panel for most recording studio chairs. Use a tape measure and pencil to mark the center point.
Use a stud finder to locate the nearest studs. Mark both edges of each stud with light pencil lines.
For French cleats, you need the cleat to span at least two studs — studs are typically 16 inches apart.
Hold the diffuser against the wall at the marked position and trace its outline lightly. This confirms the panel will clear any outlets, switches, or other wall features before you drill.
Install Hardware And Attach The Diffuser
Screw the wall-side French cleat into the studs using 2.5-inch wood screws — at least two screws per stud for maximum hold. Use a level across the top edge of the cleat to ensure it’s perfectly horizontal.
Attach the mating cleat to the back of the diffuser, centered and parallel to the wall cleat. Pre-drill to avoid splitting the diffuser’s backboard.
Lift the diffuser onto the wall cleat. The angled profiles lock together under gravity.
Check level and adjust by sliding the panel left or right along the cleat. If you’re building your own panels, our DIY wooden sound diffuser guide includes cleat attachment instructions for both QRD and skyline builds.
For multiple diffusers in a row, install one continuous wall cleat across three or more studs. This ensures perfect alignment between panels and simplifies future rearrangement.
How Do You Hang A Diffuser On The Ceiling?
Toggle Bolts Into Joists
Ceiling mounting demands the strongest possible connection — gravity works against you constantly. Toggle bolts screwed directly into ceiling joists provide the highest weight capacity.
Use a stud finder to locate joists (typically 16 or 24 inches apart in residential construction). Drill pilot holes through the drywall into the joist, then drive lag screws or heavy-duty wood screws through a mounting bracket and into the joist.
The BXI 2D Skyline Diffuser weighs 9.3 pounds — ceiling-mount it with at least four lag screws into two joists for a secure hold that won’t shift over time.
Suspended Wire Systems
For drop ceilings or situations where direct mounting isn’t possible, aircraft cable provides a professional-grade solution. Use galvanized steel cable rated for at least 3× the panel weight.
Attach eye hooks to four points on the diffuser’s back panel. Run cables from each eye hook up through the ceiling to anchor points screwed into joists above.
This method allows height adjustment — simply crimp the cables at different lengths to raise or lower the panel. It’s the standard approach in professional recording studios where ceiling treatment needs to be repositioned during room tuning.
The center of the diffuser should align with seated ear height at the primary listening position. For most studio chairs, that’s 38-42 inches from the floor to the panel center.
Mounting too high aims the scatter pattern over the listener’s head. Mounting too low scatters energy into furniture and floor reflections instead of the listening zone.
If you’re treating a room where people both sit and stand (like a practice space or home theater), split the difference at roughly 44-48 inches. For how to diffuse sound effectively in different room types, that guide covers setup for studios, home theaters, and live rooms.
Ceiling Mounting Position
Position the diffuser directly above the primary listening position or mixing desk. The scattered reflections need to arrive at the listener from above — offset placement sends the scatter pattern to the wrong part of the room.
For rooms with multiple seating positions, center the ceiling diffuser between them. The scatter pattern from a 24-inch panel covers a roughly 6-foot diameter area at ear height, so one well-placed panel serves a typical two-person listening setup.
The Bottom Line
French cleats into studs for heavy wood diffusers — that’s the method that holds securely for years. Adhesive or Command Strips for lightweight foam and plastic panels.
Ceiling mounting requires lag screws into joists or suspended cable systems rated for the load. Never trust drywall anchors alone for overhead panels — the consequences of a 10-pound panel falling onto equipment or people aren’t worth the shortcut.
For choosing which diffusers to mount, our roundup compares the top options. And if you’re building your own panels first, our DIY wooden diffuser guide includes mounting hardware recommendations.
Frequently Asked Questions
What do you use to hang up sound diffusers?
French cleats for heavy wood diffusers (9+ lbs) — they distribute weight across studs. Construction adhesive or heavy-duty Command Strips for lightweight foam and plastic panels under 5 lbs.
Can you hang diffusers with Command Strips?
Only for very lightweight diffusers under about 5 pounds on smooth, clean wall surfaces. Wood QRD and skyline panels are too heavy — they’ll pull Command Strips off the wall within weeks.
How high should a diffuser be on the wall?
Center the panel at seated ear height — roughly 38-42 inches from the floor in a recording studio or listening room. This positions the scatter pattern directly in the listening zone where it has the most acoustic impact.