Where To Put Sound Diffusers? (The Spots That Actually Matter)
Where to put sound diffusers matters more than which diffuser you buy — but only if you understand the one variable most people overlook: distance. A diffuser needs enough space between the panel and your ears for the scattered reflections to separate, and putting one in the wrong spot can make your room sound worse than leaving the wall bare.
The most common mistake is treating diffusers like absorption panels and sticking them at the nearest problem spot. Absorption works up close because it removes energy on contact, but diffusion needs room to breathe.
Mount a diffuser too close to your listening position and the scattered reflections pile up into a blurred mess instead of smooth ambience. Get the placement right, and the same panel transforms your room from echoey and harsh to open and natural.
Below, you’ll see the four key positions — rear wall, first reflection points, ceiling, and how to find them in your specific room — so you know exactly where each panel goes and why.
Quick Takeaway
To place sound diffusers effectively, start with the rear wall (at least 2-3 meters from your listening position), consider the ceiling above your mix position for flutter echo, and leave first reflection points for absorption unless you prioritize spaciousness over pinpoint imaging. Use the mirror trick to find reflection points and the clap test to confirm flutter echo before mounting anything.
Where To Put Sound Diffusers — And Why Does Placement Matter?
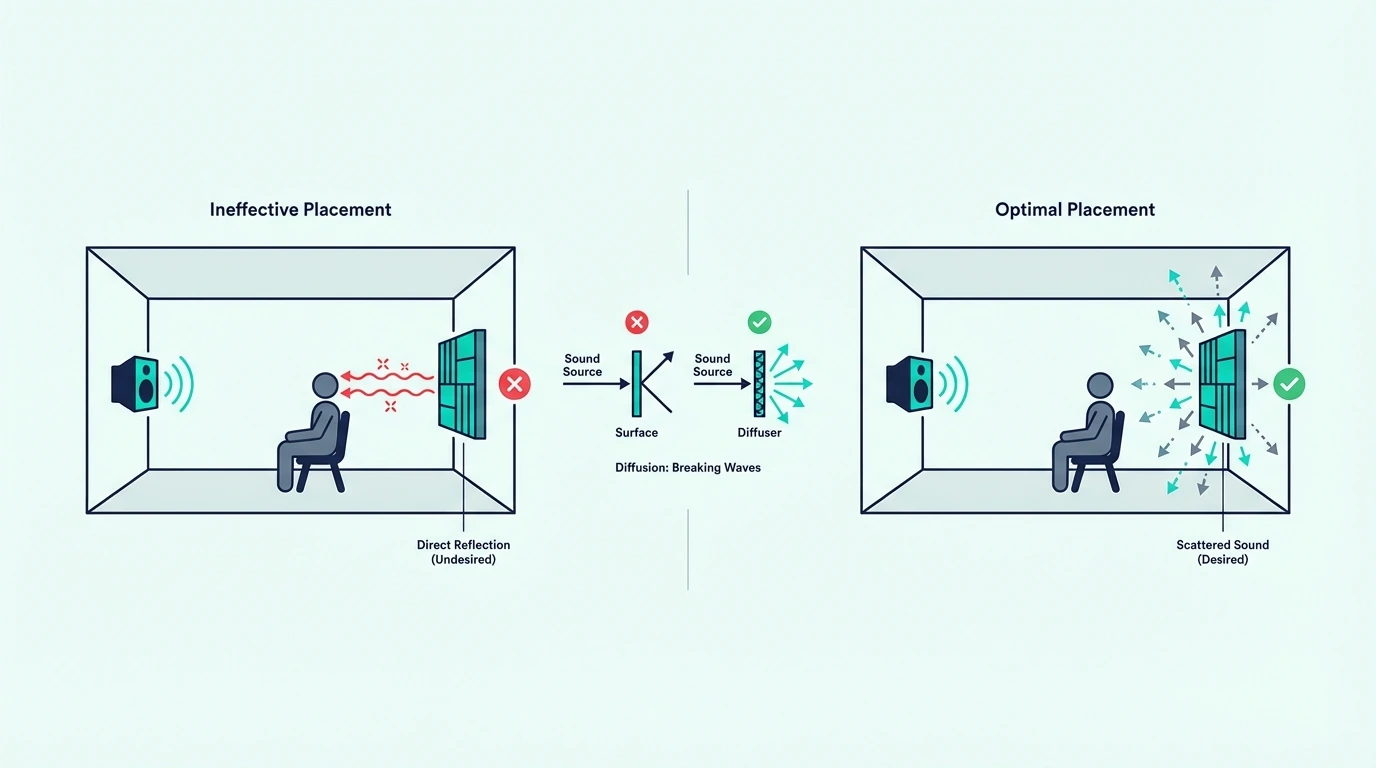
You could buy the most precisely engineered QRD diffuser on the market — but if it’s 3 feet from your head on the rear wall, the scattering pattern collapses before it reaches your ears. Placement isn’t a bonus step; it’s the difference between a panel that works and expensive wall art.
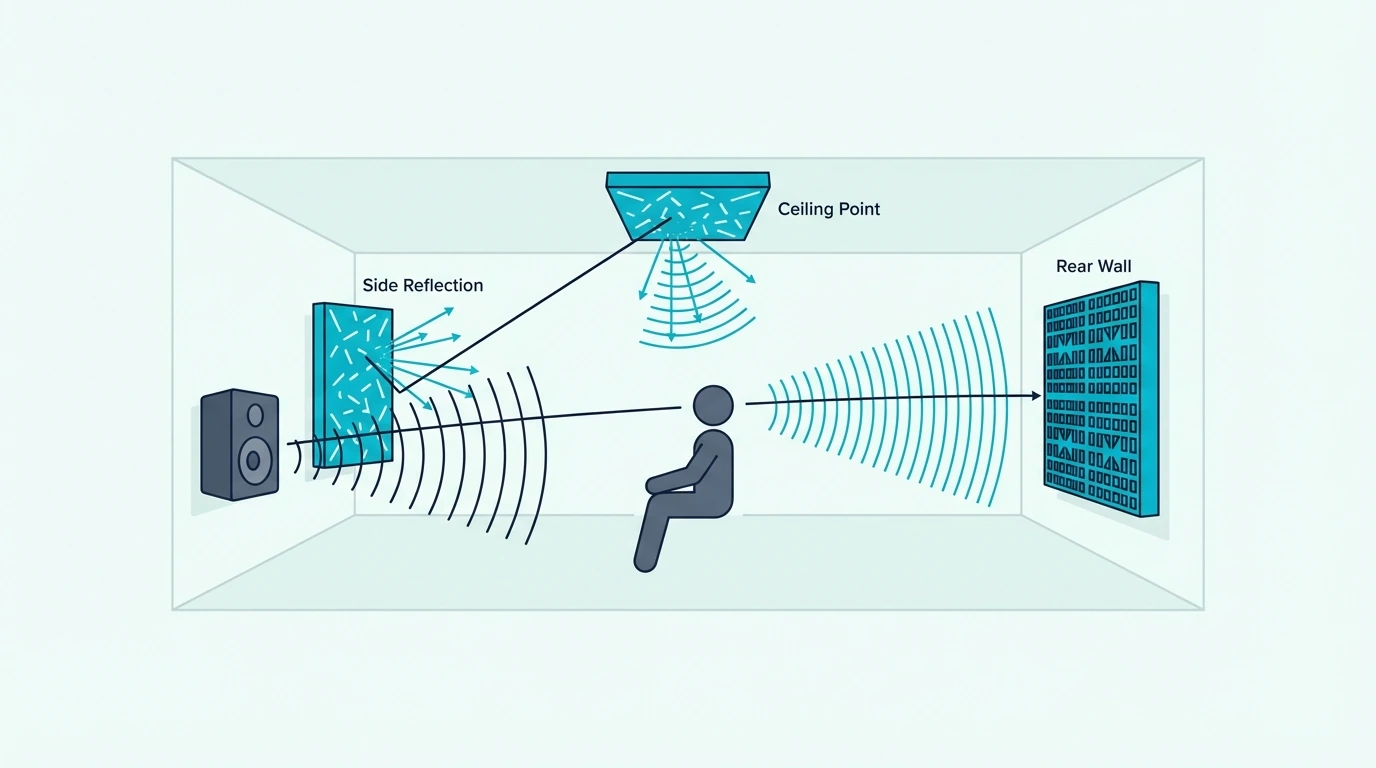
When sound hits a diffuser, the wells or blocks redirect reflections at different angles and different times. Your brain needs those scattered reflections to arrive with enough time separation (roughly 15-20 milliseconds apart) to perceive them as ambience rather than a distinct echo.
Distance creates that separation. Too close, and the reflections arrive almost simultaneously — your ears hear a smeared version of the original reflection, not smooth diffusion.
Too far isn’t usually a problem in home-sized rooms. Too close is the number one reason people think their diffuser “doesn’t work.”
If you’re still building your understanding of what a sound diffuser actually does, start there — placement only matters once you understand the mechanics.
Where Do Diffusers Go On The Rear Wall?
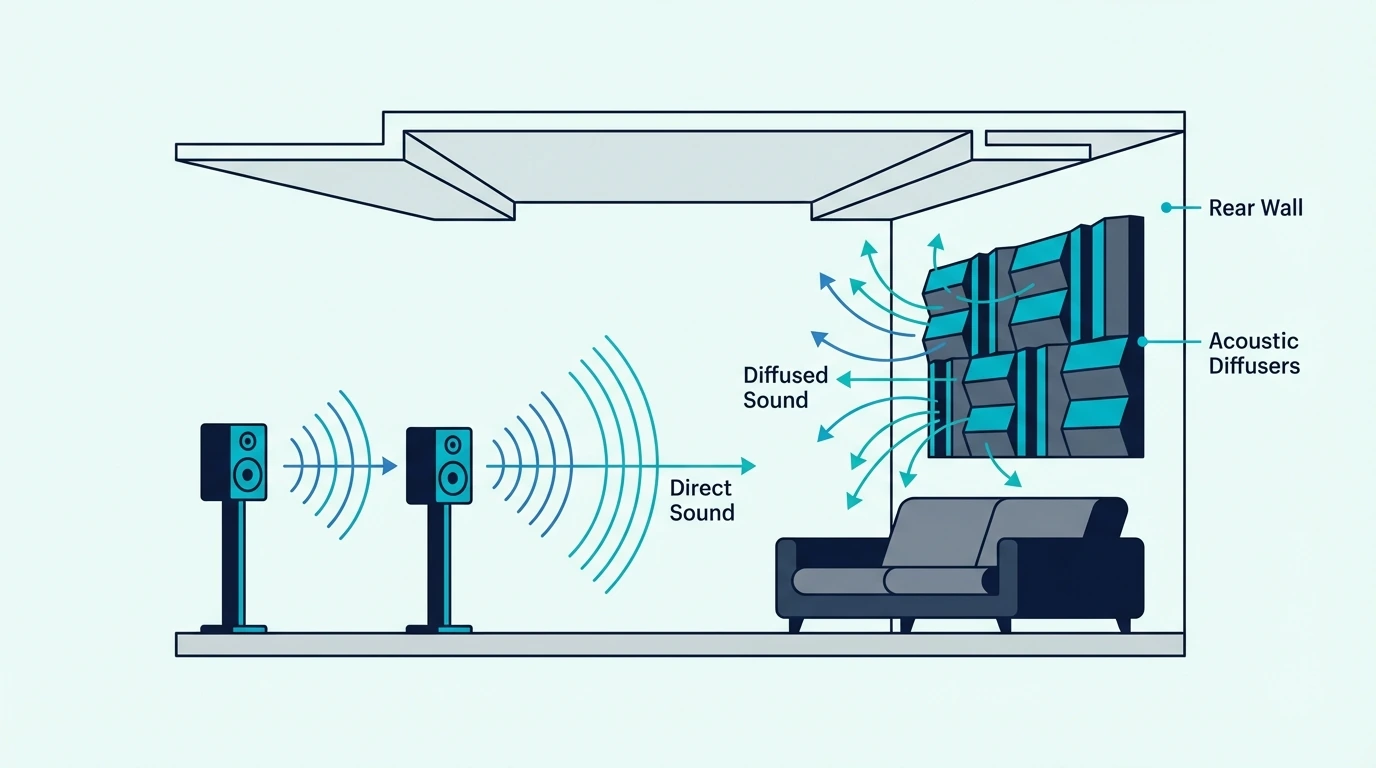
The rear wall is where most diffusers belong — and where most studios install them first. Sound travels from your speakers to the back wall and returns as a delayed reflection that muddies your direct sound.
A diffuser on that wall scatters the bounce so it arrives as ambience instead of a focused echo.
The Live-End/Dead-End Layout
Professional studios have used the live-end/dead-end (LEDE) approach since the 1980s, and it remains the gold standard for control room acoustics. The front wall — behind the speakers — gets heavy absorption to kill early reflections that would smear the stereo image.
The rear wall gets diffusion instead. Scattered reflections from behind you add a natural sense of space without creating discrete echoes that interfere with what you’re hearing from the speakers.
The BXI Wood Sound Diffuser (2D Skyline) is purpose-built for rear-wall placement — the varying block heights scatter reflections across both horizontal and vertical planes instead of bouncing them straight back at the listener.
This layout works because it gives your brain two distinct signals: clean, direct sound from the front (where absorption prevents interference) and diffuse, scattered energy from behind (where the room stays lively). The contrast between dead and live ends is what makes a well-treated room feel both precise and natural at the same time.
Minimum Distance From The Listening Position
The critical number is 2-3 meters (roughly 7-10 feet) between your listening position and the diffuser on the rear wall. Below that distance, the scattered reflections don’t have enough travel time to separate properly.
A diffuser’s lowest effective frequency determines the longest wavelength it scatters. At 1 kHz, that wavelength is about 13.5 inches — the scattered reflections need at least 3 wavelengths of travel distance to fully separate.
At 2 meters, the math works for most mid-frequency diffusers. At 1 meter, even a well-designed panel produces reflections that arrive too close together — your ears hear a colored, comb-filtered version of the original sound instead of clean diffusion.
If your rear wall is less than 2 meters from your listening position, small-room diffusion strategies apply. In that case, absorption on the rear wall with diffusion on the ceiling may be a better layout.
Should You Put Diffusers At First Reflection Points?
First reflection points — the spots on your side walls where sound bounces once between the speakers and your ears — are the most debated placement in room acoustics. The short answer: it depends on whether you prioritize imaging precision or spatial openness.
The Case For Absorption At First Reflections
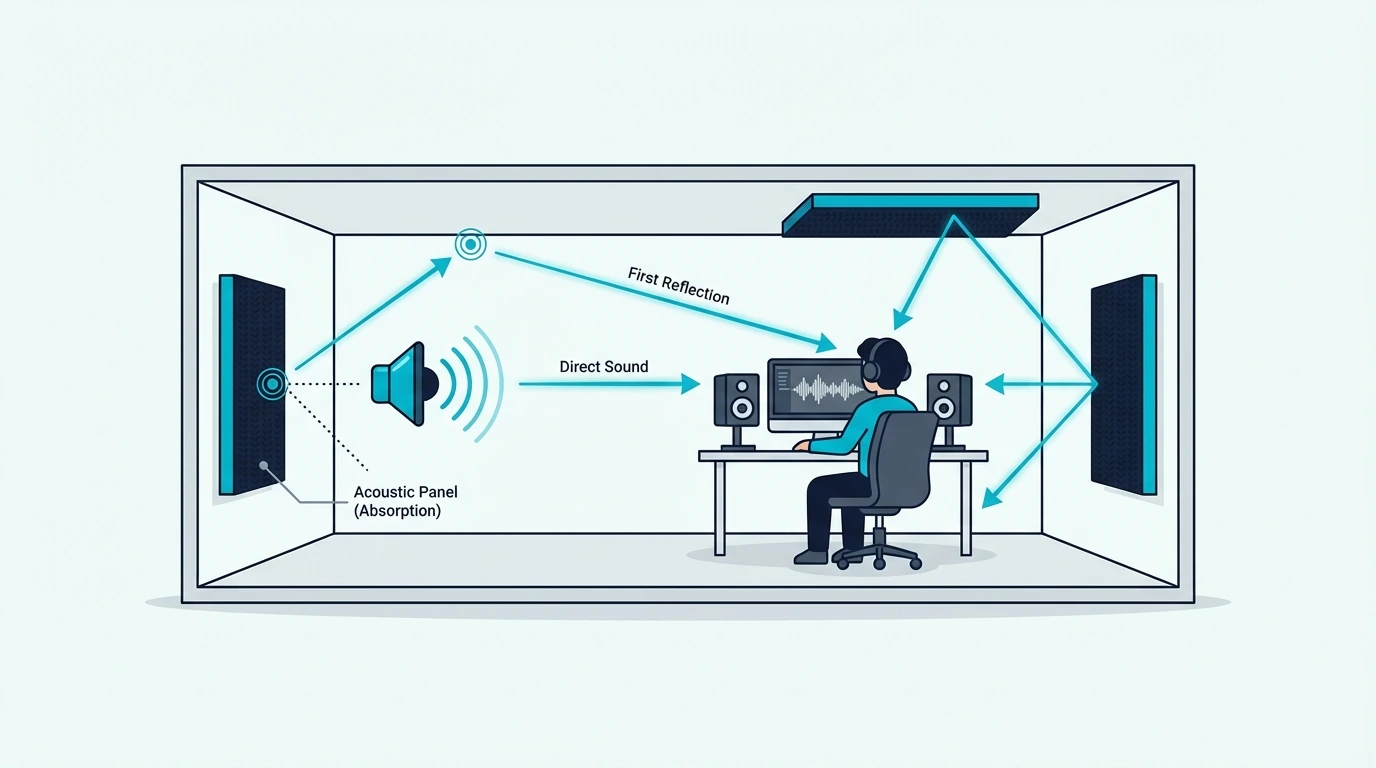
Most mixing engineers absorb at first reflection points, and the reasoning is straightforward. A strong early reflection from the side wall arrives within 5-15 milliseconds of the direct sound and creates comb filtering — certain frequencies cancel, others reinforce, and your stereo image shifts depending on where your head is.
Absorption kills that reflection entirely. The result is tighter stereo imaging, more accurate panning, and a direct sound that reaches your ears without interference.
For critical mixing work where precision matters more than vibe, absorption at the first reflection points is the standard recommendation.
When Diffusion Works At First Reflections
Home theaters and dedicated listening rooms play by different rules. Surround sound systems are designed to create an immersive field, and absorbing every early reflection can make the space feel artificially narrow — like wearing headphones instead of sitting in a room.
Diffusing the first reflection scatters it across time and angle. You still get spatial information — the sense that sound is coming from around you — but without the harsh comb-filtering that a bare wall produces.
Some mastering engineers prefer this approach because it preserves the room’s natural character. It helps them evaluate how a mix will sound in real-world listening environments rather than in an artificially controlled bubble.
The practical rule: if you mix music, absorb at first reflections. If you master, listen critically, or watch movies, try diffusion at those spots first.
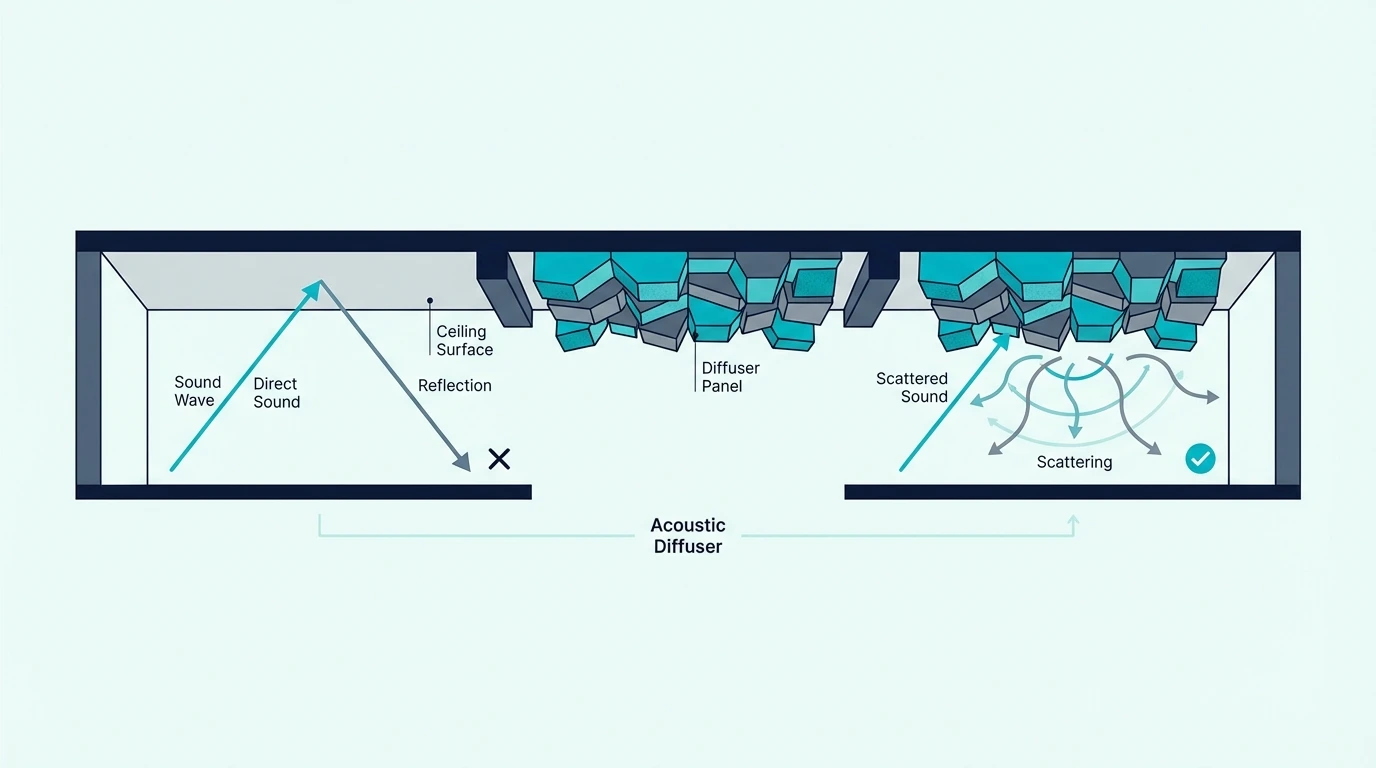
Ceiling reflections are the most overlooked problem in room acoustics. Sound bouncing between a hard ceiling and a hard floor creates vertical flutter echo — a metallic ringing that’s easy to miss because you’re focused on the walls.
When Ceiling Diffusion Helps
Flutter echo between the floor and ceiling is the clearest sign you need ceiling treatment. Clap your hands in the center of the room and listen for a high-pitched “zing” that sustains for a second or more — that’s the vertical bounce you’re hearing.
Rooms with ceilings below 9 feet are especially prone to this because the short distance means the reflections cycle rapidly. Absorption on the ceiling works, but it can make a low-ceilinged room feel oppressively dead.
Diffusion scatters the vertical bounce without removing energy, keeping the room open.
The Art3d Wood Slat Acoustic Panels work well for ceiling mounting because the slat pattern scatters sound across multiple angles — effective for breaking up the vertical flutter echo between floor and ceiling.
Mounting Weight And Safety
Wood diffusers are heavy — a 2×2 foot panel can weigh 9-15 pounds, and you need multiple panels to cover an effective area. Ceiling mounting demands proper hardware anchored into joists or structural members, not just drywall anchors.
If your ceiling is drywall over standard 16-inch-on-center joists, use lag bolts or heavy-duty toggle bolts rated for the panel’s weight plus a safety margin. A panel falling from the ceiling during a session is a safety hazard and an expensive mistake.
For lighter ceiling treatment, the EVA Acoustic Diffusers (4-Pack) weigh under a pound each and can be mounted with adhesive strips — a safer option for renters or rooms where drilling into joists isn’t practical.
How Do You Find The Right Spots In Your Room?
Knowing the theory is one thing — finding the actual spots on your walls and ceiling is what gets the panels mounted in the right place. Two simple tests locate every reflection point without any measurement equipment.
The Mirror Trick And Clap Test
The mirror trick finds first reflection points on your side walls. Sit in your listening position and have someone slide a flat mirror along the wall at ear height.
The exact point where you can see the speaker cone reflected in the mirror is your first reflection point — that’s where sound bounces from the speaker to your ear via the wall.
Mark both side walls (left and right speakers each create their own reflection point). Do the same for the ceiling by lying the mirror flat against it and looking up from your listening position.
The clap test finds flutter echo. Stand in the center of the room and clap your hands sharply once.
If you hear a metallic ringing or rapid “zing” that sustains, you have flutter echo between parallel surfaces — usually the front/rear walls or the floor/ceiling.
The wall pair that produces the flutter echo is where treatment is needed most. If the rear wall rings, that’s your first diffuser position.
If the ceiling rings, ceiling-mounted diffusion will solve it.
Recording Studio Example
A typical home studio setup follows a predictable pattern. The mixing desk faces the short wall, with speakers placed symmetrically and the listener sitting roughly one-third of the way into the room.
In this layout, the front wall (behind the speakers) gets 2-4 inch thick absorption panels covering the area between and around the monitors. Absorption at the first reflection points — one panel per side, centered at ear height — cleans up the early reflections.
The rear wall gets 2-4 diffuser panels covering the area directly behind the listening position. The BXI Wood Sound Diffuser (1D QRD) panels work well here — mount two or three across the rear wall to scatter the delayed reflection into ambience. The goal is to scatter the rear reflection without absorbing it, so the room stays lively behind you while the front stays controlled.
If the ceiling produces flutter echo (common in rooms under 9 feet), a diffuser panel centered above the listening position handles it. For rooms that serve double duty — recording and mixing — understanding when to absorb vs diffuse keeps you from overtreating.
If you’re planning a DIY wooden diffuser build, knowing these positions first ensures you size and shape the panel for where it’s actually going.
The Bottom Line
Rear wall first, ceiling second, first reflection points only if your room and use case call for diffusion over absorption. That priority order covers 90% of rooms.
The distance rule is non-negotiable — keep at least 2 meters between your listening position and any diffuser. If your room is too small for that, move the diffuser to the ceiling or check our small-room guide for alternatives.
Start with the clap test and mirror trick before buying anything. They cost nothing and tell you exactly where your room’s problems live — which means every panel you mount goes in a spot that actually matters.
Frequently Asked Questions
Where to place diffusers in a recording studio?
The rear wall behind the listening position is the standard starting point — it’s the strongest delayed reflection in most control rooms. Center the diffuser panels at ear height, covering at least the width of your listening position.
If flutter echo persists after treating the rear wall, add a ceiling-mounted diffuser above the mix position.
Where to put a diffuser in a living room?
Mount diffusers on the wall behind the main seating area, facing the speakers or TV. This scatters the rear-wall reflection that causes the “echoey room” effect during conversation and music playback.
Avoid placing diffusers on the wall behind the speakers — that position benefits more from absorption.
How far should a diffuser be from the listening position?
At least 2-3 meters (7-10 feet) for the scattering pattern to develop fully. Below that distance, the scattered reflections arrive too close together and your ears perceive them as a colored, smeared reflection instead of smooth ambience.
If your room doesn’t allow that distance on the rear wall, try ceiling placement or side-wall diffusion where the geometry gives more space.
What Does A Sound Diffuser Do? (And Why Most People Get It Wrong)
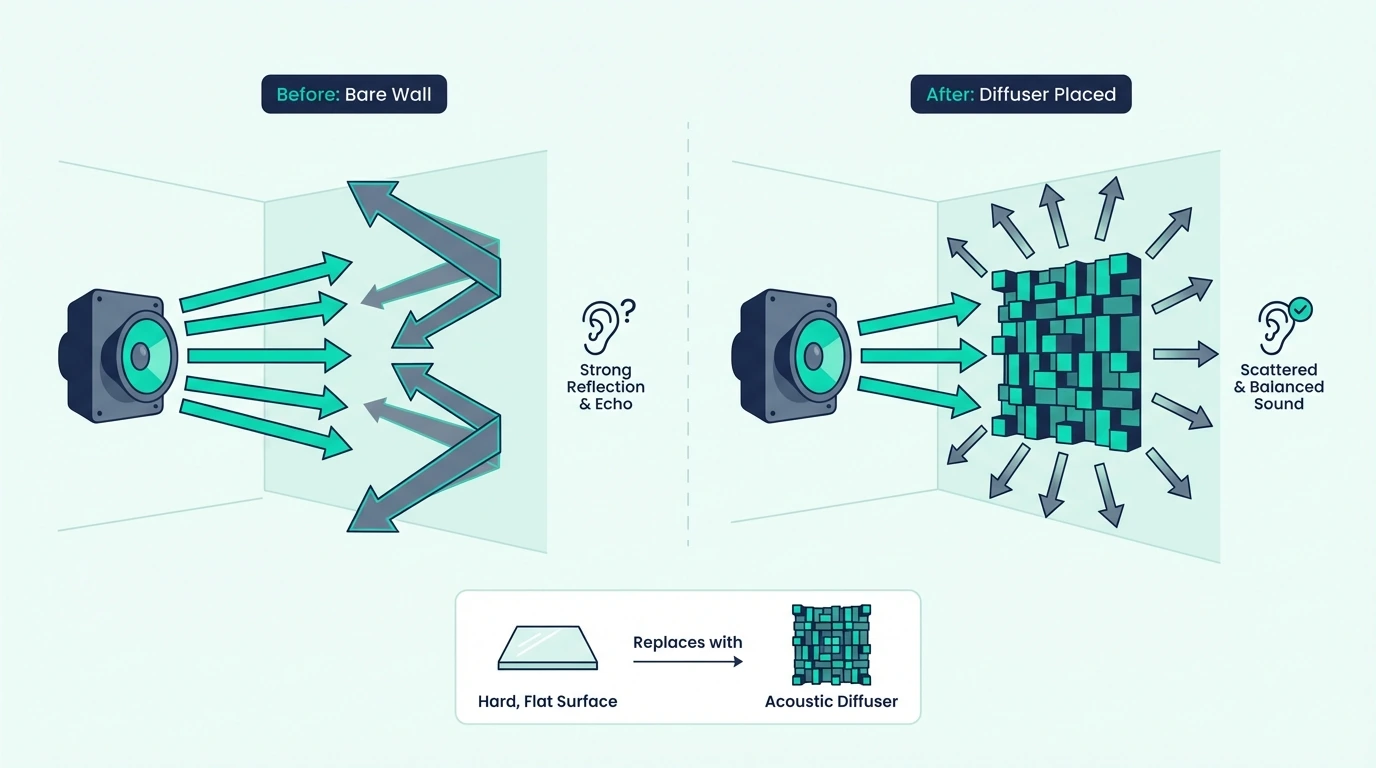
A sound diffuser scatters reflected sound waves across a room instead of letting them bounce straight back at you — but only if the panel’s geometry and placement are right.
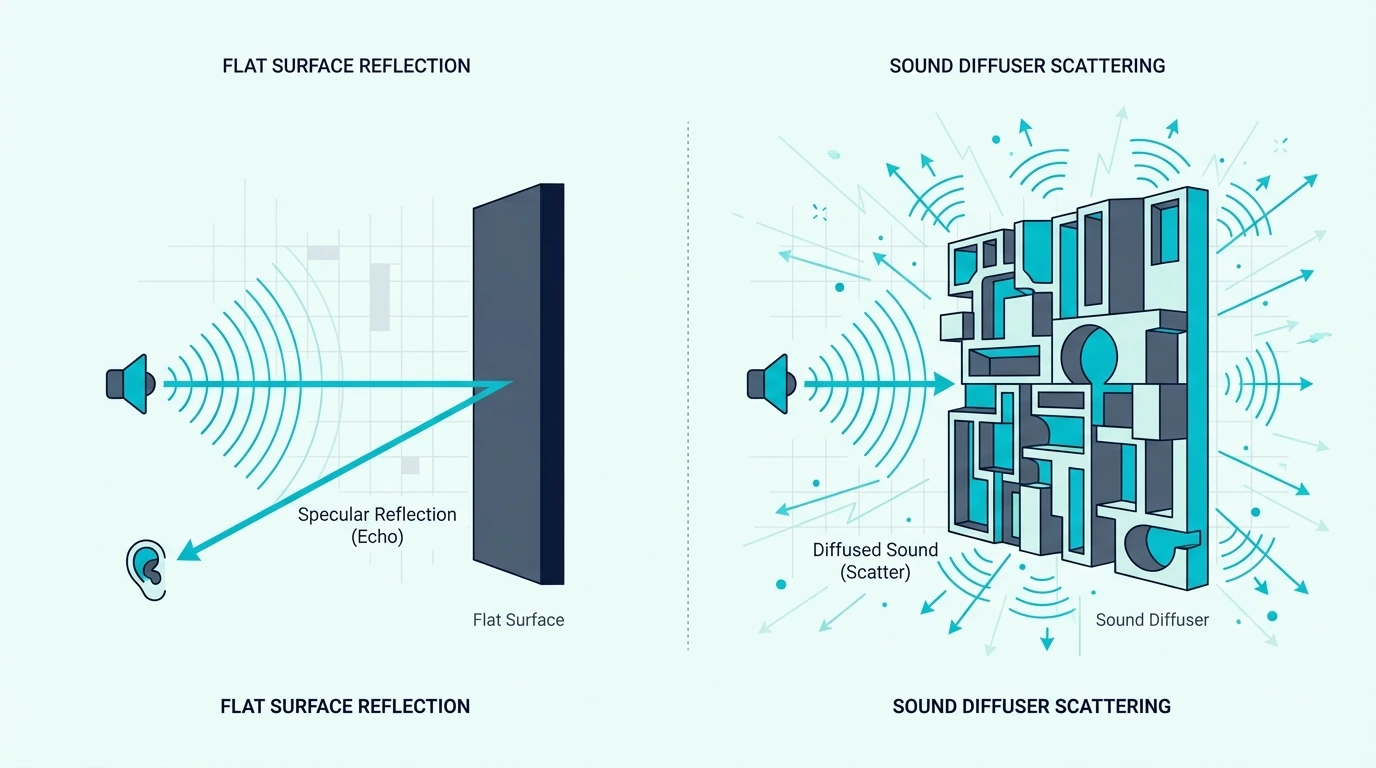
If you’ve ever clapped in an empty room and heard that sharp, ringing slap echo, you’ve heard what happens when sound hits a flat wall and reflects back in a focused beam.
Diffusers break up those reflections into dozens of smaller, softer ones that spread evenly, so the room still feels open and alive but without the harshness.
The trick is knowing which type of diffuser matches your room, where to put it, and why some panels that look like diffusers don’t actually scatter sound at all.
Below, you’ll see exactly how diffusers work at a physics level, the three main types you’ll encounter, and where they belong in a studio, home theater, or living room.
Quick Takeaway
To get real value from a sound diffuser, place it on the rear wall or ceiling of your room (at least 2-3 meters from your listening position), choose a panel with mathematically calculated well depths — QRD or skyline design — and pair it with absorption on the front wall. Diffusers scatter sound to keep a room lively; they don’t absorb or block it.
What Does A Sound Diffuser Do — And Why Does It Matter?
That slap echo from the intro isn’t just annoying — it’s a symptom of a room where sound energy concentrates instead of spreading out. A sound diffuser panel fixes this by redirecting reflections across a wide arc so no single spot in the room gets hammered with a focused bounce.
Think of it like light hitting a disco ball versus a flat mirror. The mirror sends one blinding beam back at you, while the disco ball scatters light in every direction.
Sound diffusers work the same way — they take a strong, focused reflection and break it into many smaller, weaker ones that your ears perceive as natural ambience.
This matters because the alternative — absorbing all reflections — kills the room’s energy. Recording studios and concert halls figured this out decades ago: you need some reflected sound to make a space feel alive, you just need it spread evenly.
Good diffusion makes a room sound open and spacious. Too much absorption makes it tight and dead — like singing in a closet.
No treatment at all? That’s the tile bathroom effect, all flutter echoes and ringing.
Diffusers sit in the sweet spot between those extremes. They don’t remove sound energy — they redistribute it so every seat, every mic position, and every listening angle gets a balanced mix of direct and reflected sound.
How Does A Sound Diffuser Work?
That disco ball analogy covers the concept, but the physics behind it explains why some diffusers work brilliantly and others are just decoration.
How Sound Waves Interact With Flat Vs Uneven Surfaces
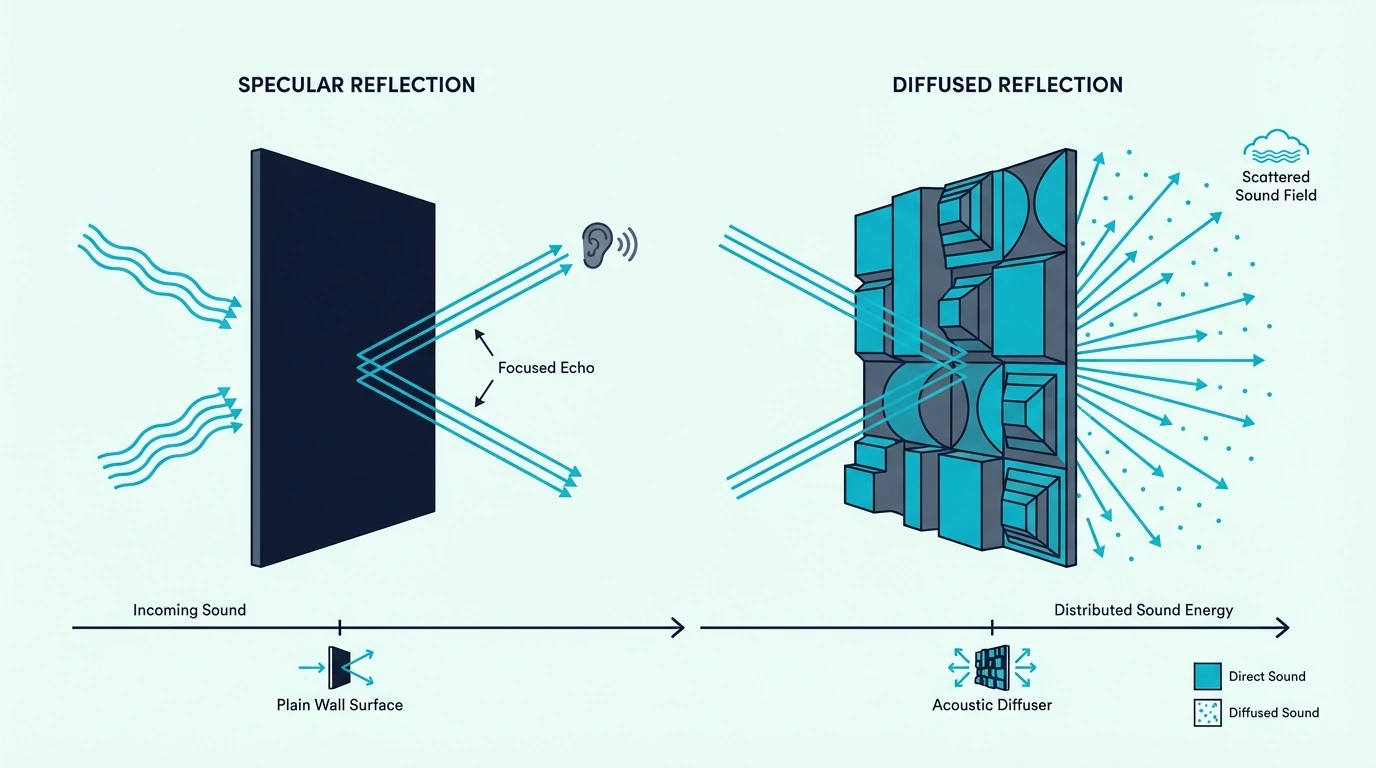
When a sound wave hits a flat wall, it reflects at the same angle it arrived — just like a billiard ball bouncing off a rail. The entire wave stays together as one coherent reflection, which is why you hear a distinct echo.
An uneven surface forces different parts of that same wave to reflect at different angles. Some energy bounces left, some right, some up, some down — all arriving at your ears at slightly different times.
Instead of one sharp echo, you hear a smooth, diffuse wash of sound.
The key word is “uneven” — not “rough.” A textured wall with tiny bumps barely affects sound waves because the bumps are far smaller than the wavelengths involved.
At 1 kHz, a sound wave is about 13.5 inches long. To scatter that wave, the surface variations need to be on a similar scale — inches, not millimeters.
That’s why effective diffusers have deep wells or tall blocks, not just a bumpy texture. The variations need to be large enough relative to the wavelengths you’re targeting.
How Well Depth Determines Which Frequencies Get Scattered
Surface shape is one half of the equation — well depth is the other. Every diffuser has a frequency range it works within, and deeper wells scatter lower frequencies.
A diffuser with wells about 4 inches deep scatters frequencies down to roughly 1 kHz. Double the depth to 8 inches, and you push the effective range down to around 500 Hz.
The Art3d Wood Slat Acoustic Panels use this principle — the varying slat depths put the scatter sweet spot in the 1–4 kHz range where speech clarity and musical detail live.
The math behind this comes from Manfred Schroeder’s work in the 1970s. He developed sequences — quadratic residue sequences — that determine the exact depth of each well so the scattered energy spreads as evenly as possible across all angles.
It’s not random; every well depth is calculated.
This is why purely decorative “diffuser” panels with shallow, uniform grooves don’t actually diffuse. If the wells are all the same depth, or too shallow to interact with audible wavelengths, the panel is just a wall with a pattern on it.
Which Types Of Sound Diffusion Panels Are There?
Those physics principles — surface geometry and well depth — show up differently depending on the diffuser design. Three main types dominate the market, and each one scatters sound in its own way.
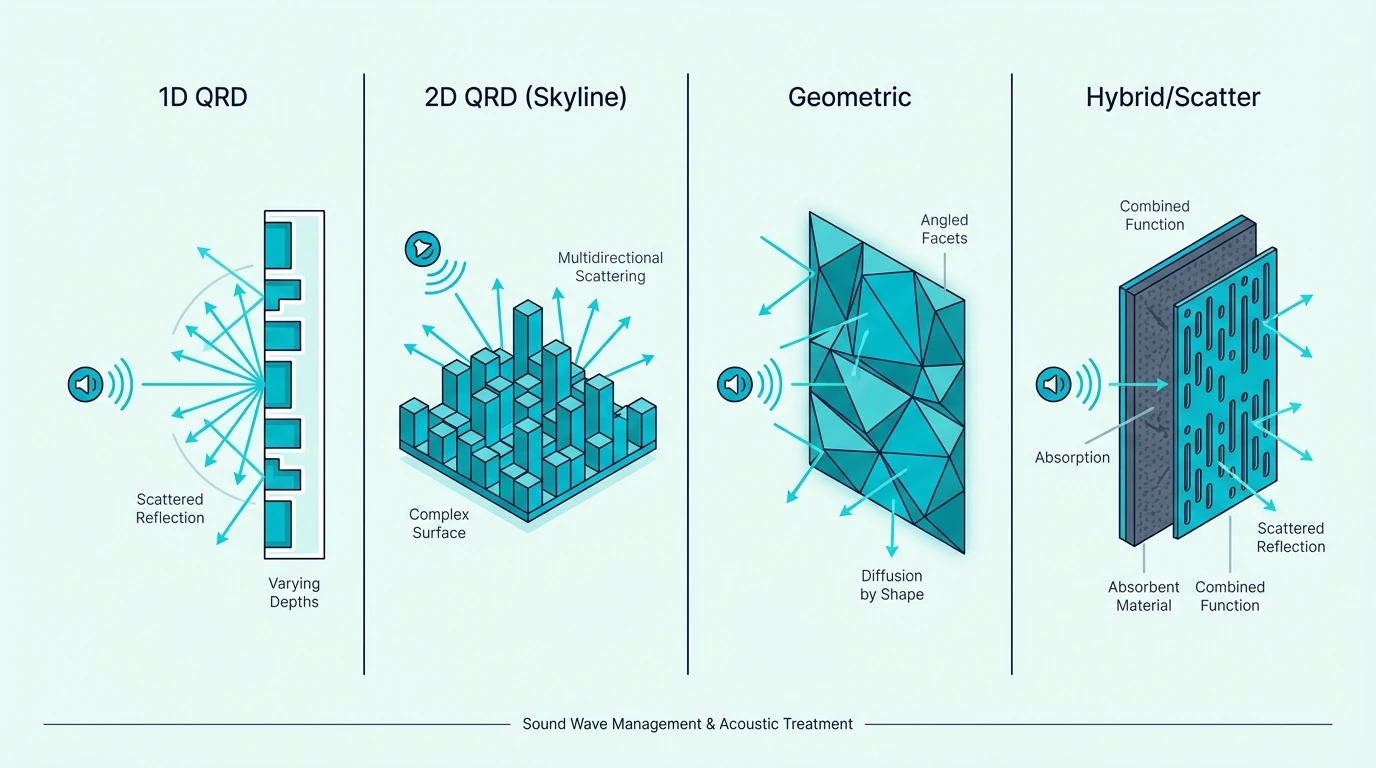
1D Diffusers (QRD)
Picture a row of vertical slots at different depths, like a pipe organ viewed from the side. That’s a 1D (one-dimensional) diffuser — sound hitting the front spreads left and right, but not up and down.
The most common design is the QRD (Quadratic Residue Diffuser), where the depth of each slot follows a mathematical sequence. That sequence ensures the scattered energy distributes evenly instead of clumping at certain angles.
QRD panels are the studio standard for rear walls. They’re the reason control rooms sound open behind the mix position without producing distracting reflections.
If your room is long and narrow — like most home studios — a 1D QRD on the back wall handles the worst reflection path.
The tradeoff: because they only scatter in one plane, a single QRD panel leaves vertical reflections untouched. Studios sometimes mount a second panel rotated 90 degrees to cover both directions.
2D Diffusers (Skyline)
Where a QRD scatters in one direction, a 2D diffuser spreads sound in both the horizontal and vertical planes at the same time. Instead of slots, it uses blocks of varying heights arranged in a grid — which is why they’re often called skyline diffusers.
The BXI Wood Sound Diffuser (2D Skyline) is a typical example — solid wood blocks at calculated heights on a 24×24-inch panel. Each block height follows the same kind of mathematical sequence as a QRD, but applied in two dimensions.
This makes 2D diffusers ideal for ceilings and rooms where reflections come from multiple directions. A ceiling-mounted skyline diffuser scatters sound from the overhead bounce — one of the strongest reflection paths in any room — across the full listening area.
The downside is size. Effective 2D diffusion needs deep block variations, which means the panel sticks out from the wall or ceiling by 2-3 inches at minimum.
In tight rooms, that depth eats into your usable space.
Hybrid Diffusers
Some rooms don’t have the wall space for separate diffusers and absorbers. That’s where hybrid panels come in — they combine diffusion and absorption in a single unit, scattering mid-to-high frequencies off the front face while an absorptive core soaks up low-end energy.
Instead of dedicating one wall to diffusers and another to absorbers, a hybrid panel does both jobs in one footprint. The EVA Acoustic Diffusers (4-Pack) take this approach with a lightweight EVA waffle design that’s easy to mount on ceilings or walls.
The compromise is depth. Because the panel splits its thickness between diffusion and absorption, neither function performs as well as a dedicated panel of the same size.
For most home theaters and living rooms, that tradeoff is worth it. For critical listening rooms, dedicated panels still win.
Where Should Sound Diffusers Be Positioned?
A perfectly designed diffuser in the wrong spot barely does anything. Where you mount it determines whether scattered reflections actually reach your ears at the right time and level.
Primary Reflection Points
Primary reflection points are the spots on your walls and ceiling where sound bounces once between the speakers and your ears. In most rooms, these fall on the side walls about halfway between the speakers and the listening position.
Here’s a quick way to find them: sit in your listening position and have someone slide a mirror along the side wall. The point where you can see the speaker cone in the mirror is your first reflection point.
The debate is whether to absorb or diffuse at these spots. Absorption kills the reflection entirely — clean, but it can make the stereo image feel narrow.
Diffusion scatters it instead, preserving the room’s sense of width while reducing the comb-filtering that colors your sound. Our guide to diffuser placement breaks down when each approach wins.
For most home studios, absorption on the side walls and diffusion on the rear wall gives the best balance. But in larger rooms — especially home theaters — diffusing the side wall reflections keeps the surround sound field alive.
Rear Wall Treatment
The rear wall is the single most common spot for diffusers, and for good reason. Sound travels from your speakers to the back wall and bounces straight back, creating a strong delayed reflection that muddies everything from vocals to kick drums.
This is the core of the live-end/dead-end (LEDE) philosophy that professional studios have used since the 1980s. Heavy absorption on the front wall (the “dead end”), diffusion on the rear wall (the “live end”).
The result is tight, controlled sound at the mix position with a natural sense of space behind you.
For diffusion to work properly on the rear wall, you need distance. The scattered reflections need room to spread before reaching your ears.
If you’re sitting 2 meters from the back wall, a diffuser works well. Sit 1 meter away, and the scattered sound arrives too fast and too strong — small rooms need a different approach.
A good rule of thumb: if the distance from your listening position to the rear wall is less than 3 times the diffuser’s lowest effective wavelength, absorption will serve you better than diffusion at that spot.
When Should Sound Diffusion Panels Be Used?
Placement tells you where — but does your specific room even need diffusion in the first place? That depends entirely on what you’re doing in the space and how it’s built.
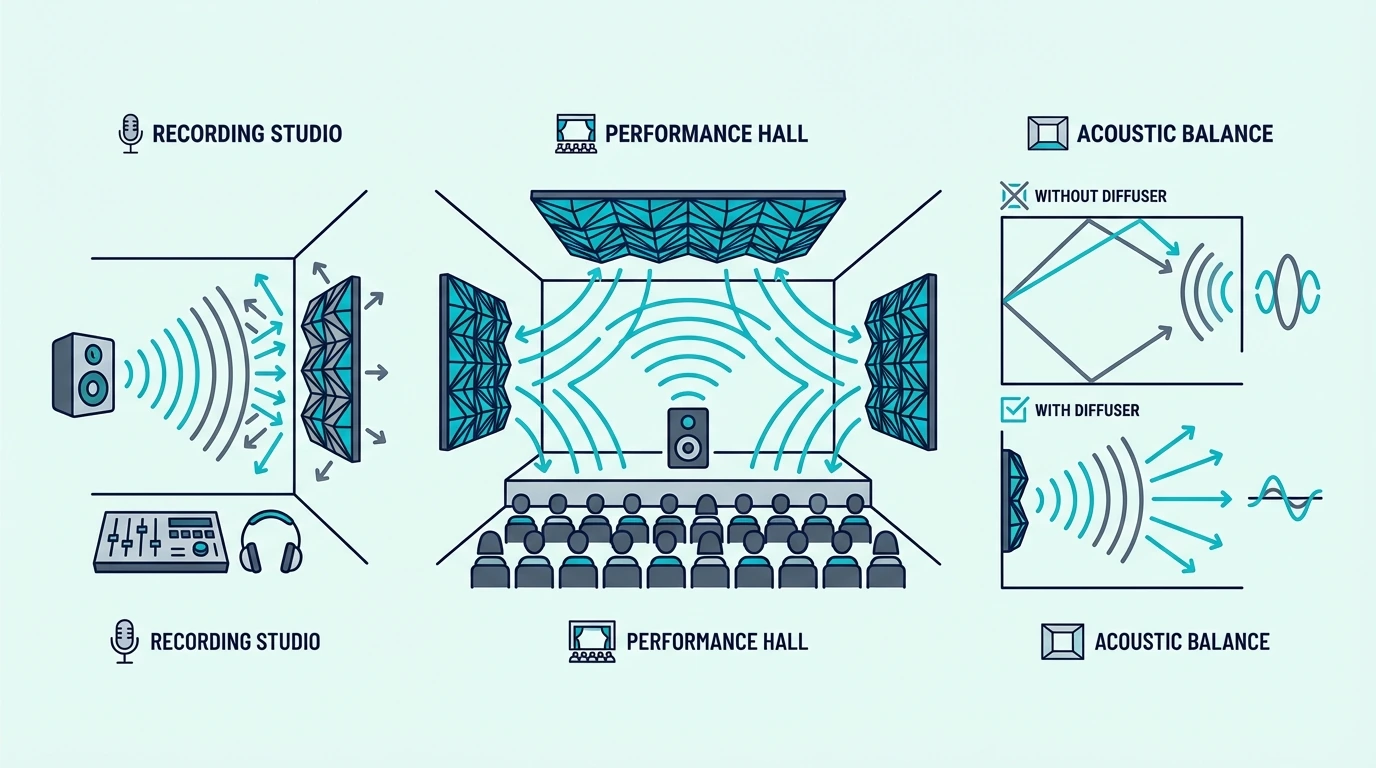
Recording Studios And Control Rooms
Diffusion is non-negotiable in professional recording and mixing environments. Control rooms need a balanced acoustic field so the engineer hears what’s actually in the recording — not what the room is adding.
The standard approach is absorption at the front wall and first reflection points, with QRD or skyline diffusers covering the rear wall and sometimes the ceiling above the mix position. This creates a consistent listening environment where panning decisions, reverb tails, and EQ moves translate accurately to other playback systems.
Studios also use diffusion in live recording rooms — the spaces where instruments are actually played. A room with too much absorption sounds flat and lifeless on recordings.
Diffusers keep the room’s natural reverb character intact while taming the harsh comb-filtering that parallel walls create. If you’re building your own diffuser for a home studio, this is the most impactful spot to start.
The scale matters here. A small bedroom studio with 8-foot ceilings benefits more from absorption than diffusion, because there isn’t enough distance for scattered sound to develop properly.
Once a room exceeds roughly 12×12 feet, diffusion starts earning its place.
Home Theaters And Living Rooms
Home theaters are where diffusion shines for non-professional use. Surround sound systems rely on reflections to create an immersive field, and absorbing everything turns a 7.1 system into an expensive pair of headphones.
The rear wall and side walls of a home theater benefit most from diffusion. The front channels need clean, direct sound — so absorption stays up front.
But the surround channels are designed to create a wide, enveloping field, and diffusers help that scattered sound feel natural rather than pinpoint-localized.
Living rooms are a different story. Most people want the space to sound pleasant for conversation and music, not to mix a record in it.
Diffusers on a wall behind the main seating area reduce flutter echo between parallel walls without making the room feel dead. If you’re curious about which materials work best for living-space aesthetics, wood and fabric-wrapped options blend in more naturally than raw studio panels.
The one place diffusion rarely helps is a room with low ceilings and lots of soft furnishings. Couches, carpet, and curtains already absorb a significant amount of sound — adding diffusion on top of that can make the room sound unfocused rather than improved.
The Bottom Line
A sound diffuser scatters reflections so your room sounds open and natural — not echoey, not dead. The physics is straightforward: uneven surfaces with mathematically calculated depths break focused reflections into an even spread of energy.
For most rooms, a QRD or skyline diffuser on the rear wall paired with absorption on the front wall delivers the biggest improvement. If your room is 12×12 feet or larger, diffusion works — if it’s smaller, prioritize absorption first.
The type of diffuser matters less than getting the placement and distance right. A well-placed budget panel outperforms an expensive one in the wrong spot every time.
A sound diffuser scatters reflected sound waves so they spread evenly across a room instead of bouncing back as a focused echo. Unlike absorption (which removes sound energy), diffusion keeps a space sounding open and lively — which is why studios, home theaters, and listening rooms rely on them.
Are sound diffusers worth it?
Yes — if your room is large enough and you place them correctly. In rooms 12×12 feet or bigger, a rear-wall diffuser noticeably improves clarity and spatial perception.
In smaller rooms, absorption panels are usually a better investment because scattered sound doesn’t have enough distance to develop properly. Read our guide on whether wood diffusers work for a deeper breakdown.
Where to place sound diffusers in a room?
The rear wall is the most effective position for most setups — it catches the strongest delayed reflection and scatters it before it reaches your ears. Ceilings above the listening position and side walls at reflection points are secondary options.
Avoid placing diffusers on the front wall (behind your speakers), where absorption gives better results.
Do Wood Sound Diffusers Work? Yes — Here’s the Science
Do wood sound diffusers work — yes, but only if the build quality and placement are right.
Most people buy a diffuser expecting it to “fix” their room the way absorption panels do, and then wonder why the space still sounds off.
Wood diffusers don’t remove sound energy — they redistribute it, scattering reflections so your room sounds open and natural instead of echoey or dead.
The difference between a diffuser that transforms your room and one that just looks cool on the wall comes down to three things: the wood’s rigidity, the panel’s geometry, and where you put it.
Below, you’ll see exactly how wood diffusers work, how to tell if yours is actually doing its job, and when they’re the wrong tool for the problem.
Quick Takeaway
To get real results from a wood sound diffuser, choose a panel with mathematically calculated well depths (QRD or skyline design), mount it on the rear wall at least 2-3 meters from your listening position, and make sure the wood is rigid enough to reflect — not flex. Thin decorative panels and foam “diffusers” won’t scatter sound properly.
Do Wood Sound Diffusers Actually Work?
Wood diffusers aren’t just studio decoration — they’re precision acoustic tools backed by physics that dates back to the 1970s. If you’re still unclear on what a sound diffuser actually does, start there.
Manfred Schroeder developed the mathematical sequences behind QRD (Quadratic Residue Diffuser) panels, and studios have relied on them ever since.
The principle is straightforward: sound waves hit the diffuser surface and encounter wells of varying depths. Each well delays the reflected wave by a different amount, and when those reflections recombine, they scatter in multiple directions instead of bouncing straight back as a single focused reflection.
Wood is ideal for this job because it’s rigid. When a sound wave hits a hard, dense surface like oak or maple, the energy reflects cleanly — the panel doesn’t absorb it or flex with it.
That rigidity is what separates a working diffuser from a decorative wall panel.
The geometry does the rest. A properly designed QRD diffuser has well depths calculated from a prime number sequence, with each depth targeting a specific wavelength.
A skyline diffuser achieves the same scattering effect through blocks of varying heights arranged in a 2D pattern. The BXI Wood Sound Diffuser (Natural) is a typical example of this design — solid wood blocks at calculated heights, mounted on a flat backing.
The result is a room that sounds spacious and natural. Reflections still exist — your brain needs them to perceive the size and character of a space — but they arrive from multiple angles instead of creating hot spots, comb filtering, or flutter echo.
The underlying principle is sound diffusion — redistributing energy rather than removing it.
The Clap Test Before And After
The fastest way to hear what a diffuser does is embarrassingly simple: clap your hands in the center of your room and listen.
In an untreated room with parallel walls, you’ll hear a metallic ringing that sustains for a second or more — that’s flutter echo, and it’s the sound of reflections bouncing back and forth between two flat surfaces like a ping-pong ball. The “zing” is unmistakable once you know what to listen for.
Mount a wood diffuser on the rear wall and clap again from the same spot. The flutter echo either disappears entirely or softens into a diffuse, even decay.
The room still sounds alive — it doesn’t go dead the way heavy absorption makes a space feel — but the harsh metallic ringing is gone.
If the ringing doesn’t change, either the diffuser is too close to your listening position (the scattering hasn’t had enough distance to spread) or the panel isn’t rigid enough to reflect properly. Both are fixable problems, not evidence that diffusers don’t work.
Measurement Tools (REW And Room EQ)
Your ears catch the obvious changes, but measurement software reveals what’s happening across the full frequency spectrum.
Room EQ Wizard (REW) is free and widely used. Run a sweep measurement before installing the diffuser, then run the same measurement after — same mic position, same speaker position.
The waterfall plot shows how energy decays over time at each frequency, and a working diffuser tightens the decay at mid and high frequencies without killing it entirely.
The RT60 measurement tells you how long sound takes to drop by 60dB. Absorption reduces RT60 by removing energy.
Diffusion reduces the peaks and valleys in the decay curve without necessarily lowering RT60 much — the room stays lively, but the decay becomes smoother and more even across frequencies.
Look at the early reflection window (the first 10-20 milliseconds after the direct sound). A bare wall produces a strong, discrete early reflection that smears your stereo image.
A diffuser breaks that single reflection into many smaller ones arriving from different angles — the energy is still there, but it’s spread across time and direction so your brain processes it as ambience rather than a distinct echo.
When Do Wood Diffusers NOT Work Well?
Knowing when diffusers fail matters as much as knowing when they succeed. The three most common scenarios where wood diffusers underperform have nothing to do with the physics — they’re all about context.
The honest answer is that wood diffusers are the wrong tool in specific situations, and recognizing those situations early saves you money and frustration. Every failed diffuser installation falls into one of these three categories.
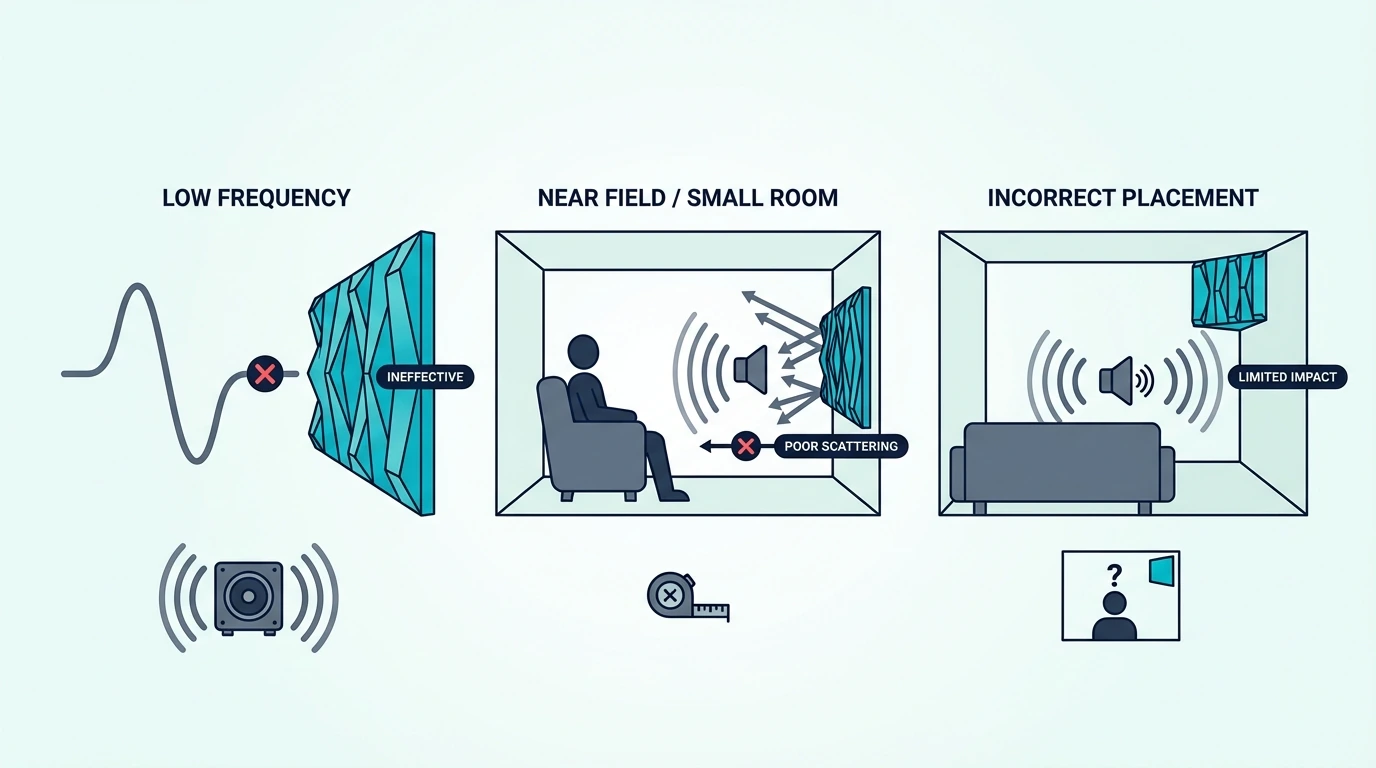
Rooms That Are Too Small
Sound waves need physical distance to scatter after hitting a diffuser — without that distance, the scattered reflections haven’t separated enough to produce the intended effect.
The rule of thumb is that listeners should sit at least 2-3 meters (roughly 7-10 feet) from the diffuser surface. Below that distance, the reflections arrive too close together in time, and your ears perceive them as a single blurred reflection rather than smooth ambience.
In a room that’s 8 feet deep, a rear-wall diffuser puts the listener about 4-5 feet away — well inside the minimum distance for most diffuser designs. The scattering pattern collapses, and the panel behaves more like a flat reflective surface with texture.
Small rooms often benefit more from absorption at the rear wall. That doesn’t mean diffusers are useless in small spaces — it means the ceiling or side walls might be better locations where distance isn’t as constrained.
The physics don’t change; the geometry of your room determines where to put your diffusers so the physics can do their job.
Poor DIY Construction
A wood diffuser is only as good as its build quality, and the three most common DIY mistakes all undermine the acoustic performance.
Gaps between the wells let sound leak through instead of reflecting off the well bottoms. Even small gaps change the effective depth of each well, which shifts the frequency response away from the calculated design.
Tight joinery isn’t just aesthetics — it’s acoustics.
Thin wood that flexes under sound pressure absorbs low-mid energy instead of reflecting it. MDF or plywood thinner than 12mm will vibrate at certain frequencies, converting acoustic energy into heat rather than scattering it.
At that point, your “diffuser” is acting partly as a membrane absorber — the opposite of what you want.
Incorrect well depths throw off the entire scattering pattern. QRD diffusers rely on a specific mathematical sequence (based on a prime number), and eyeballing the depths or rounding them for convenience defeats the purpose.
Free online calculators generate the correct depths for any design frequency — there’s no reason to guess. If you’re planning a DIY wooden sound diffuser build, getting these depths right is the single most important step.
How Do Wood Diffusers Compare To Plastic Or Foam Alternatives?
The material a diffuser is made from determines whether it actually scatters sound or just looks like it should.
Wood, plastic, and foam all interact with sound waves differently, and the differences aren’t subtle — they determine whether the panel works across a useful frequency range or only handles the easy high-frequency stuff that absorption could manage anyway.
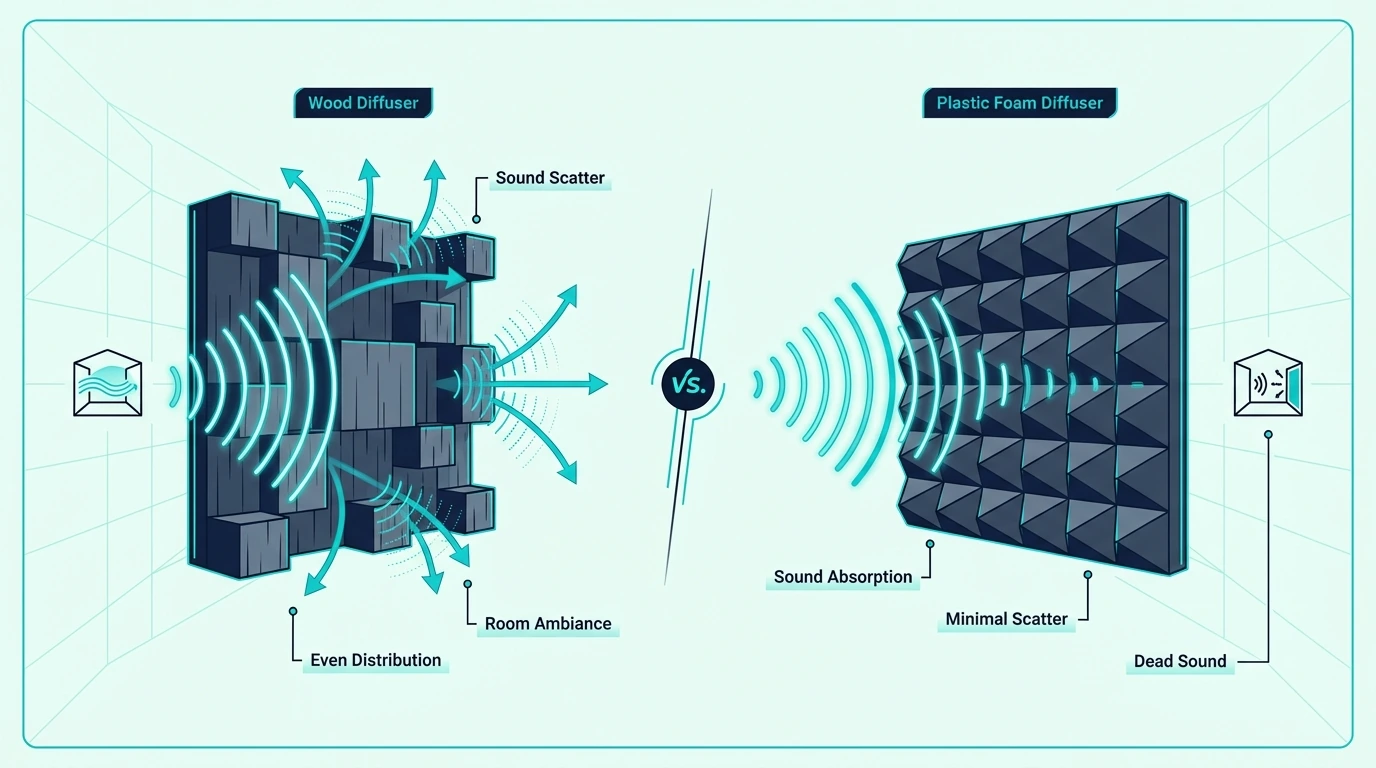
Wood Vs Plastic Diffusers
Wood and plastic both reflect sound, but they don’t do it equally well across all frequencies.
Hardwood (oak, maple, birch ply) is dense and rigid enough to reflect frequencies from roughly 500Hz up through the highest audible range without flexing. The mass of the wood resists the pressure variations of low-mid sound waves, so the reflection stays clean and the scattering pattern holds.
Plastic and EPS (expanded polystyrene) diffusers work well at higher frequencies — 2kHz and above — where the wavelengths are short and the pressure variations are small. Below that range, lighter plastics can flex slightly on impact, absorbing some of the energy instead of reflecting it.
The scattering still happens, but it weakens as you move down the frequency scale.
The tradeoff is weight and cost. Wood diffusers are heavier (a 2×2 foot QRD panel can weigh 15+ pounds) and more expensive to manufacture.
Plastic diffusers are lighter, cheaper, and easier to mount — they just cover a narrower frequency range.
For a home studio or listening room where mid-frequency clarity matters, wood wins — the BXI Wood Sound Diffuser (2D Skyline) is the kind of panel studios reach for, with solid wood construction and calculated block heights.
The EVA Acoustic Diffusers (4-Pack) show the other end of the spectrum — lightweight EVA that’s easier to mount, covering high-frequency scatter without the weight or cost of wood. Our best wood sound diffuser roundup covers more options.
For a large space where you’re mainly taming high-frequency flutter echo, plastic gets the job done at lower cost.
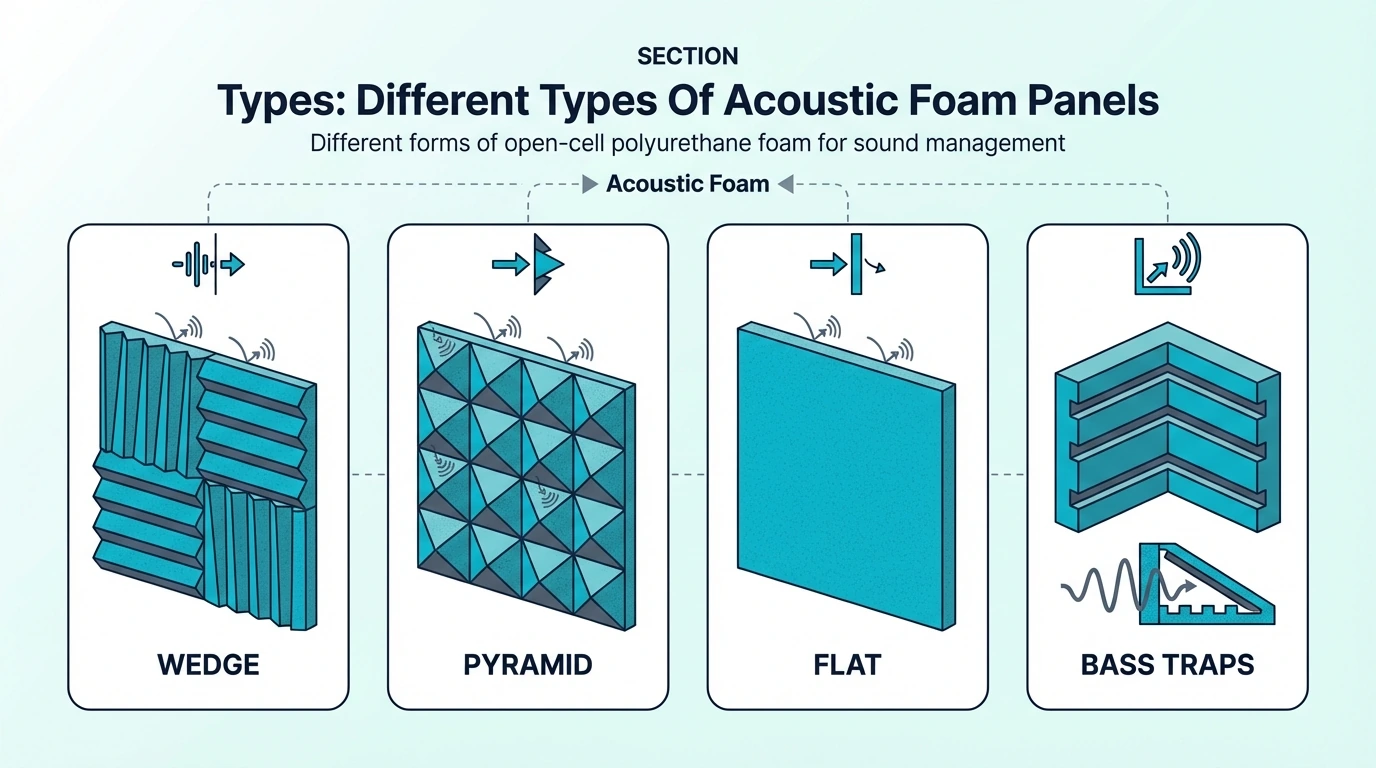
Why “Foam Diffusers” Are Misleading
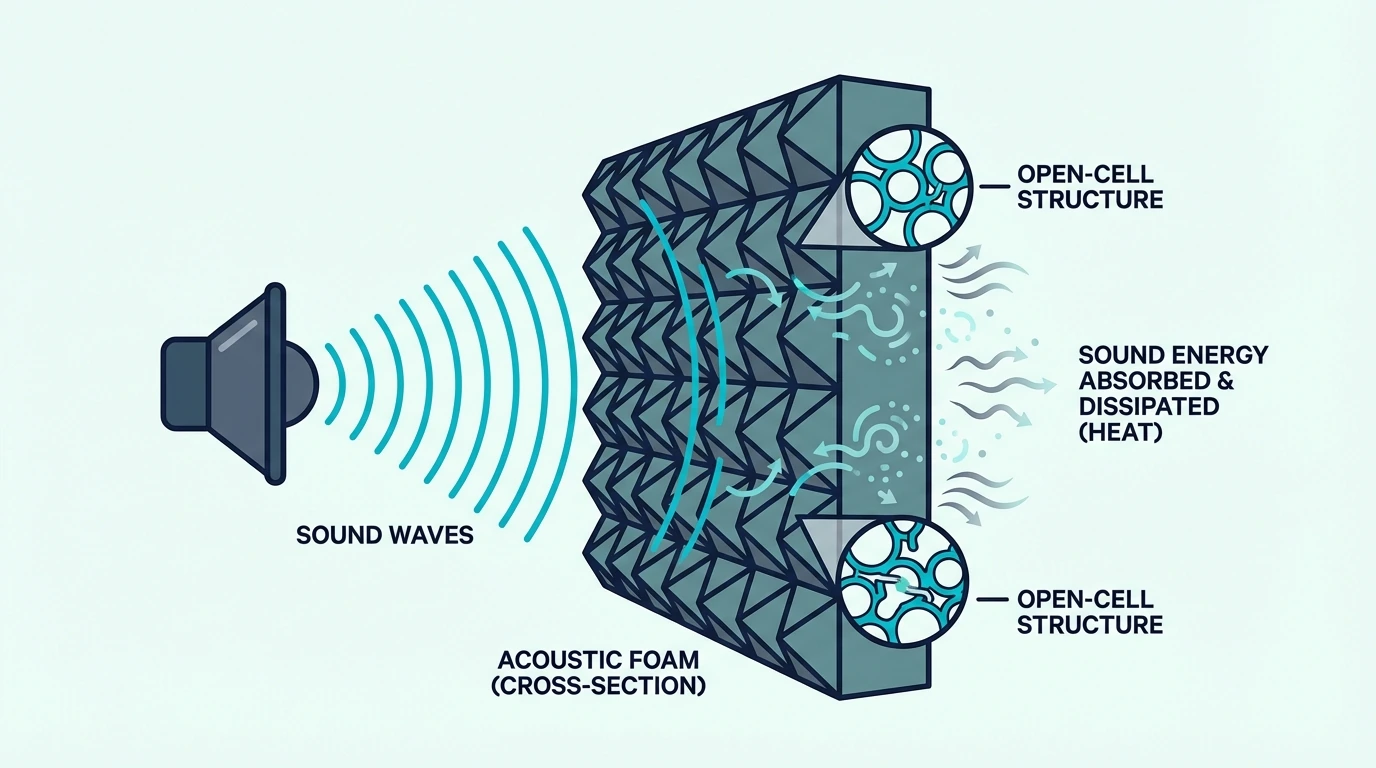
Foam doesn’t scatter sound — it absorbs it. Any product marketed as a “foam diffuser” is fundamentally misnamed.
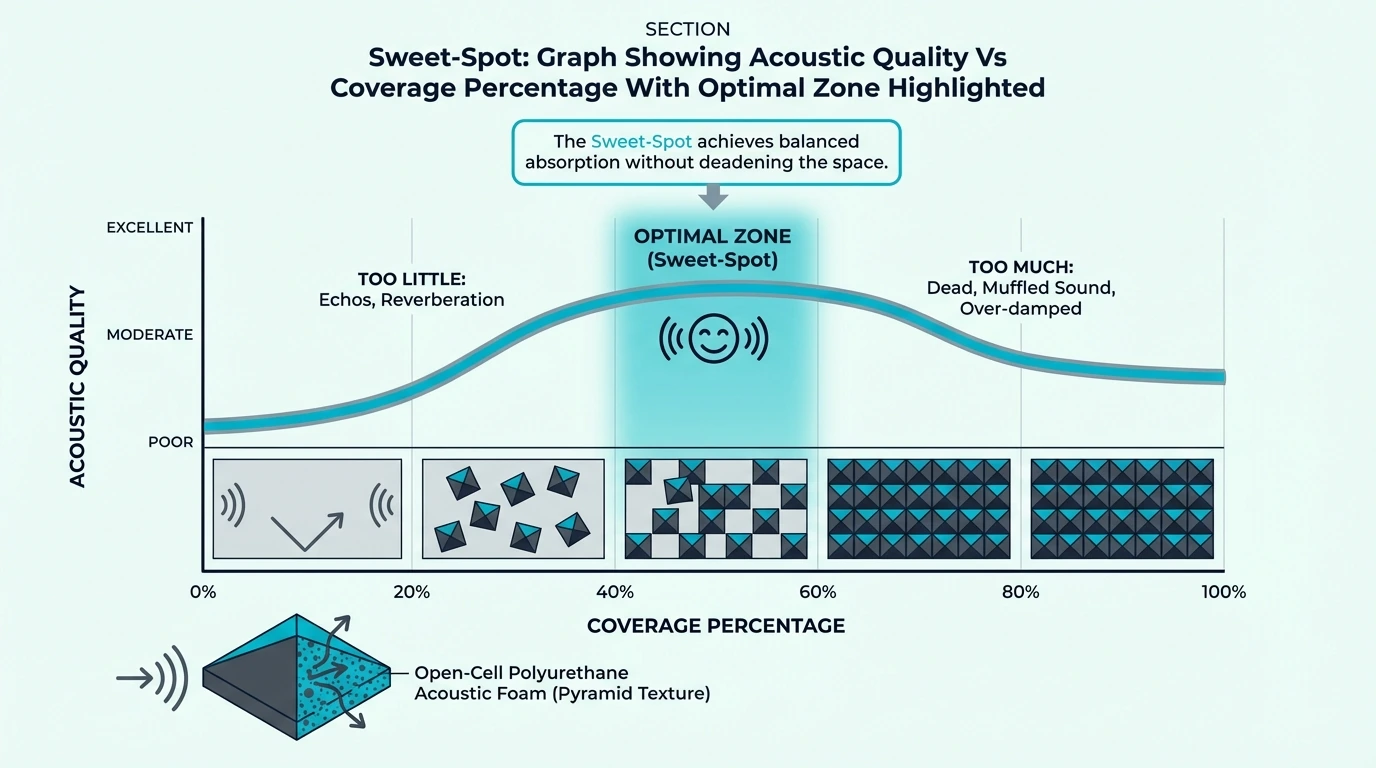
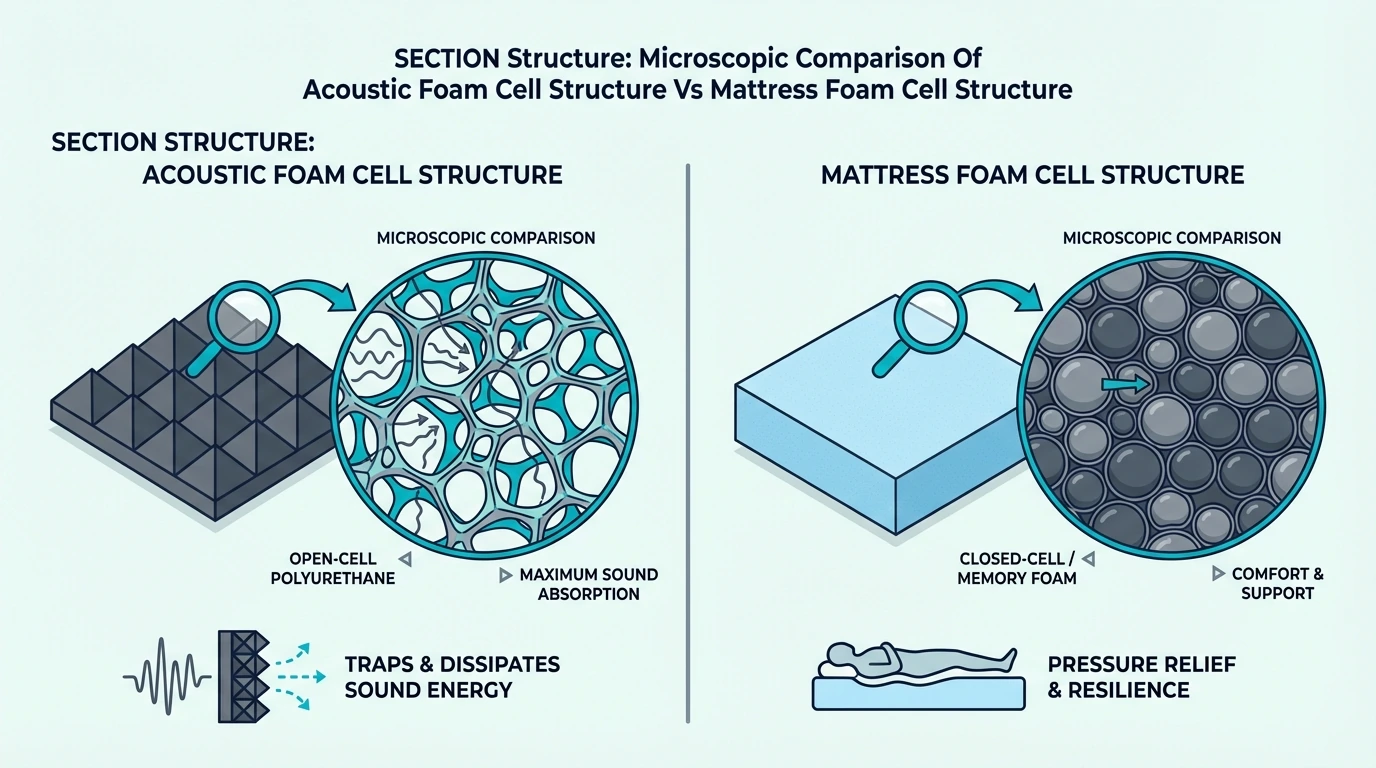
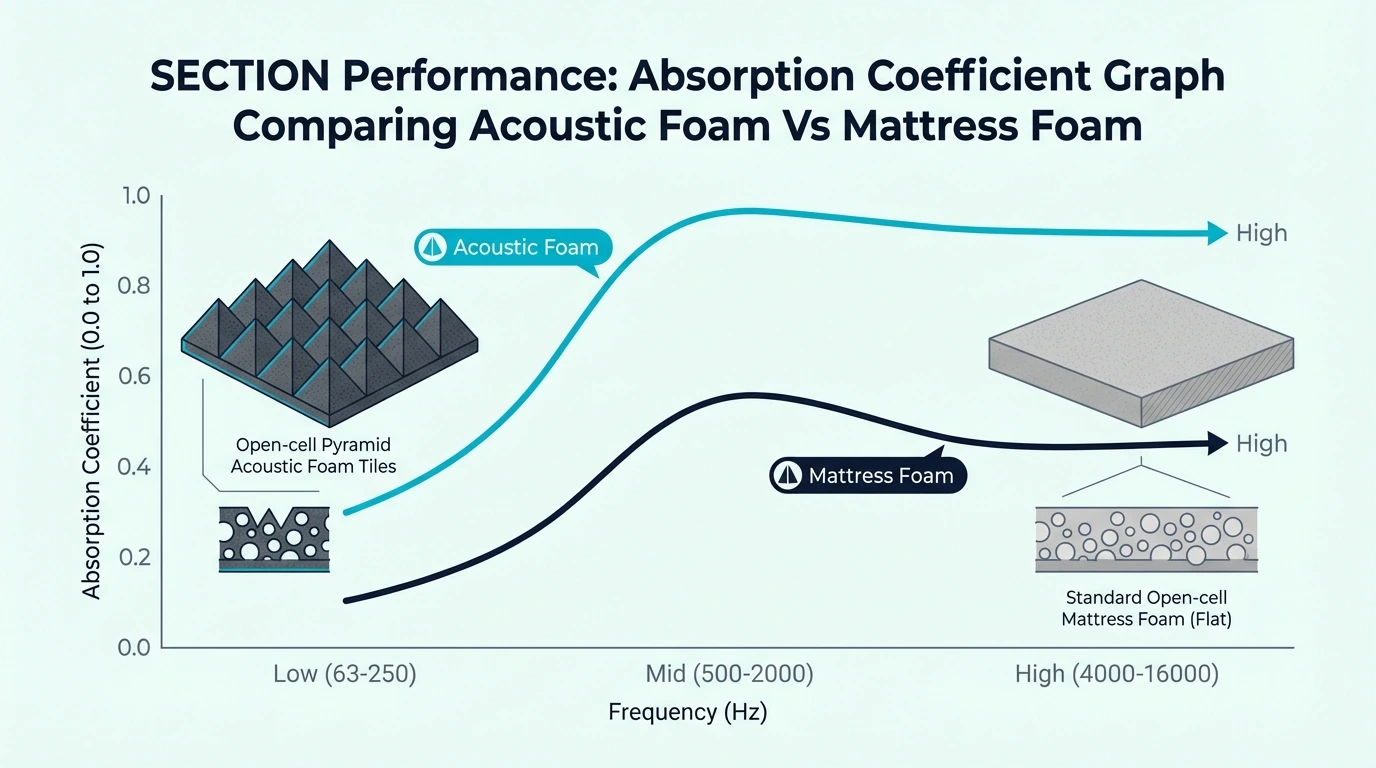
Open-cell foam (the same material in acoustic foam wedges and pyramids) converts sound energy into heat through friction as air moves through the porous structure. When sound hits foam, the energy doesn’t bounce back in a controlled pattern — it gets trapped and dissipated.
That’s absorption, not diffusion.
The shaped surfaces on foam products (pyramids, egg crate, wedges) break up the visual surface, which makes people assume they break up sound reflections the same way. They don’t.
The shapes add marginal surface area for absorption, but they lack the mass and rigidity to reflect anything. At 500Hz, the wavelength is over 2 feet long — a foam pyramid a few inches tall can’t redirect it.
If you need diffusion, you need a rigid surface. If you need absorption, foam works fine for high frequencies at a budget price.
Mixing up the two leads to rooms that are either too dead (all absorption, no diffusion) or still fluttery (foam “diffusers” where real diffusers were needed). The absorption vs diffusion comparison breaks down exactly when each approach fits.
The Bottom Line
Wood diffusers work — and they work exceptionally well when the three fundamentals are in place: rigid construction, calculated geometry, and enough distance between the panel and the listener.
The real question isn’t whether they work, but whether your specific room and situation call for diffusion instead of absorption. If the room sounds harsh and echoey, you likely need absorption first.
If the room sounds controlled but lifeless — or you’re hearing discrete reflections that smear your stereo image — that’s where diffusers earn their keep.
Start with the clap test, match the diffuser to your room’s dimensions, and don’t trust foam products that claim to “diffuse” sound.
The physics is settled. The only variable is the execution.
Frequently Asked Questions
Do wood diffusers actually work?
They do — wood diffusers have been the standard acoustic treatment in professional recording studios and concert halls since the 1970s. The key is that the panel must use a mathematically designed well pattern (QRD or skyline) and be built from rigid wood thick enough to reflect sound rather than flex.
How effective are sound diffusers?
Highly effective when sized and placed correctly. A properly designed wood diffuser scatters mid and high-frequency reflections across a wide angle, eliminating flutter echo and smoothing the room’s decay characteristics without removing energy the way absorption does.
The catch is distance — the listener needs to be at least 2-3 meters away for the scattering to fully develop.
What is the best wood for a sound diffuser?
Dense hardwoods like oak, maple, and walnut reflect sound most cleanly because they resist flexing under acoustic pressure. The Art3d Wood Slat Acoustic Panels use this principle with a modern slat design — a good reference for what wood diffusion can look like when aesthetics and function merge.
Birch plywood and MDF (at 18mm+ thickness) are the most common choices for DIY builds — they’re rigid, affordable, and easy to machine.
Avoid softwoods thinner than 15mm; they’ll vibrate at low-mid frequencies and partially absorb instead of scatter.
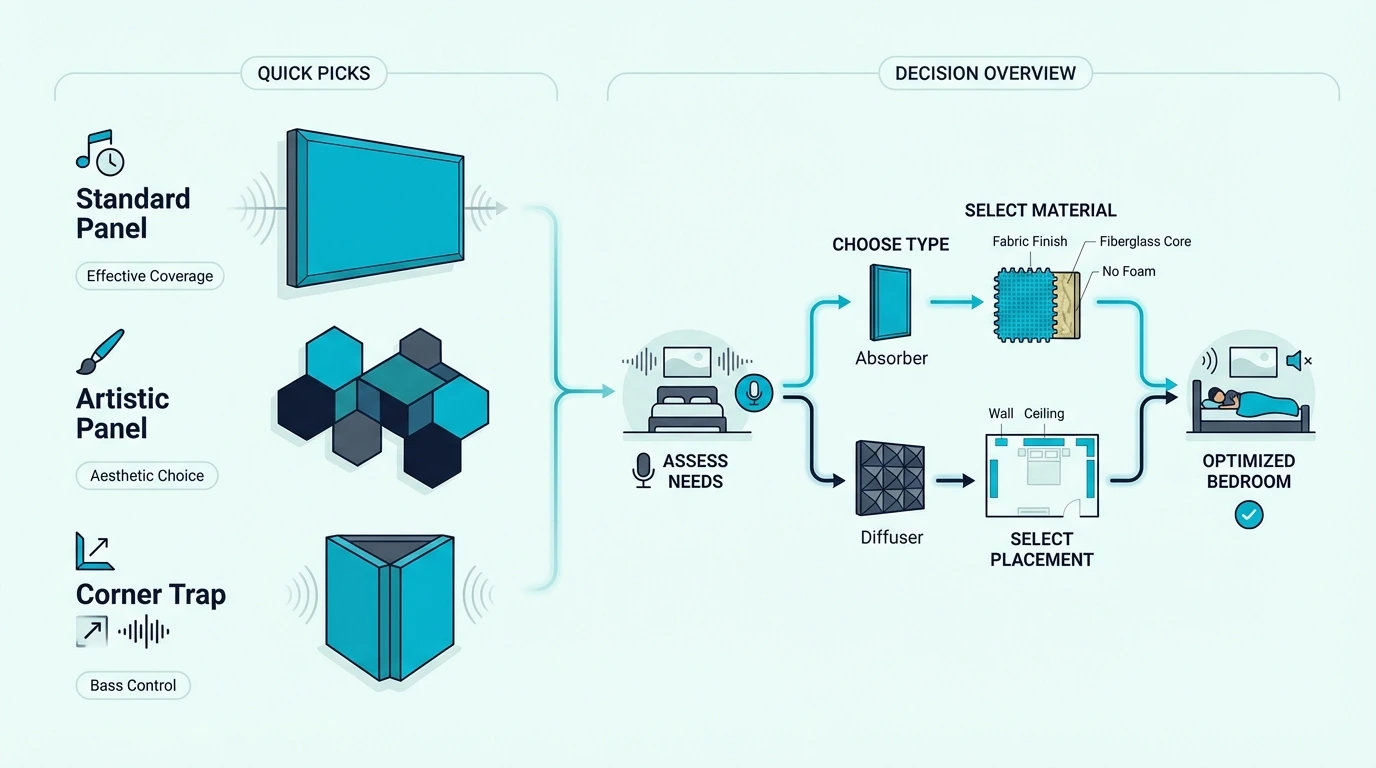
Best Acoustic Panels for Bedroom — Complete Guide [2026]
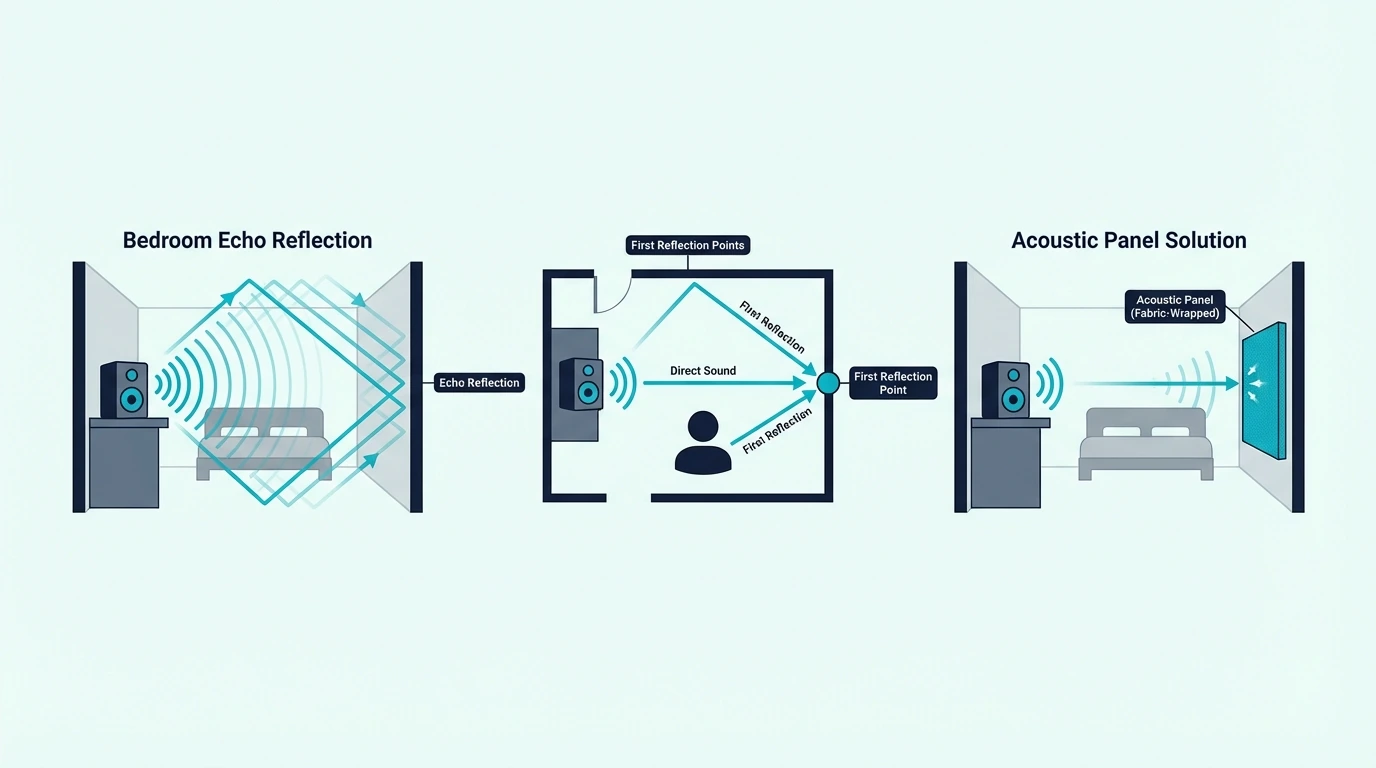
Best acoustic panels for bedroom transform your space from an echoey box into a controlled retreat — but only if you pick panels that look like bedroom decor, not studio gear.
Hard walls, bare floors, and large windows bounce sound around until everything feels hollow. The frustration is real when your music sounds muddy, calls echo, or you can hear every footstep from across the room.
The right panels absorb those reflections so your bedroom sounds cleaner and more controlled. Start with the wall behind your bed and first reflection points — four to eight panels handle most bedrooms.
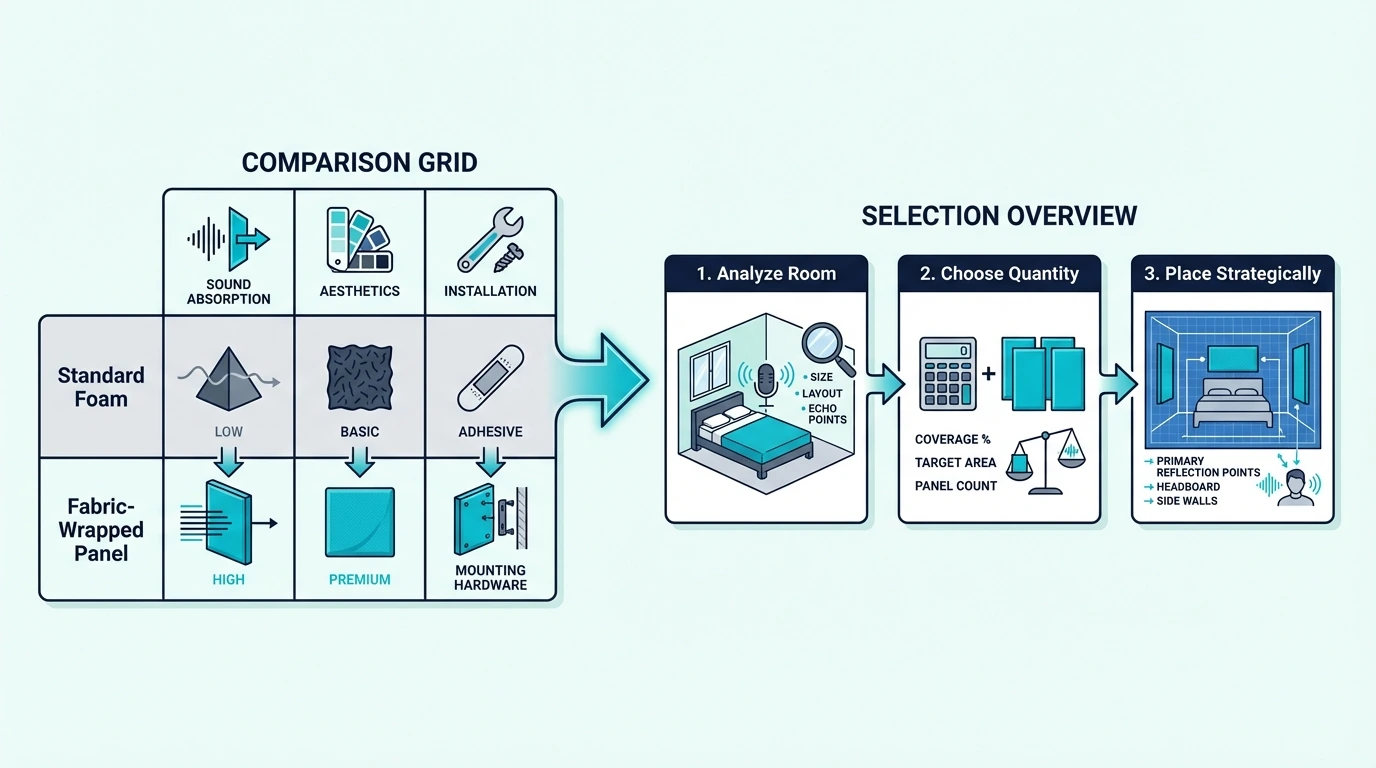
Core material is the part that determines how a panel behaves once you get past basic echo control, especially if you’re deciding between polyester and fiberglass. If you want the highest absorption per panel, fiberglass panels are usually the safer pick. If you want treatment that reads more like decor than studio gear, acoustic art panels are usually the easiest win.
Below, you’ll see the top picks and a placement plan that tells you where panels matter most in a bedroom.
Quick Takeaway
The best acoustic panels for bedrooms prioritize aesthetics alongside absorption. Aim for 1-2 inch fabric-wrapped panels in neutral colors and plan on 4-8 panels, starting with the wall behind your bed and first reflection points.
Quick Picks: Best Acoustic Panels for Bedroom
UMIACOUSTICS 4 PCS Acoustic Panels
Best Overall⭐ 4.6
4 Pack · 2" Thick · Fiberglass Core
✓ Includes mounting hardware✓ Bedroom-friendly colors✗ Mid-range investment
After analyzing hundreds of reviews and testing panel performance, three options stand out for bedroom use. Each balances sound absorption with the aesthetic demands of a living space.
At 2 inches thick, these panels absorb the frequency range that causes most bedroom echo problems. The fabric wrap comes in colors that blend with typical bedroom decor rather than screaming “recording studio.”
Best Budget
For bedrooms where budget matters more than maximum performance, the 18 Pack Black Acoustic Panels deliver surprising value. With over 3,400 reviews, these are among the most purchased bedroom panels on Amazon.
The 0.4-inch thickness limits bass control, but for reducing flutter echo and voice reflections, they work well. The 18-panel quantity lets you cover substantial wall area without a major investment.
Best Decorative
When aesthetics matter as much as acoustics, the 18 Pack Hexagon Acoustic Panels let you create artistic arrangements while improving room acoustics. The unique shape transforms acoustic treatment into wall art.
These work particularly well as accent pieces combined with traditional rectangular panels. Place them in a featured arrangement above your headboard or desk area.
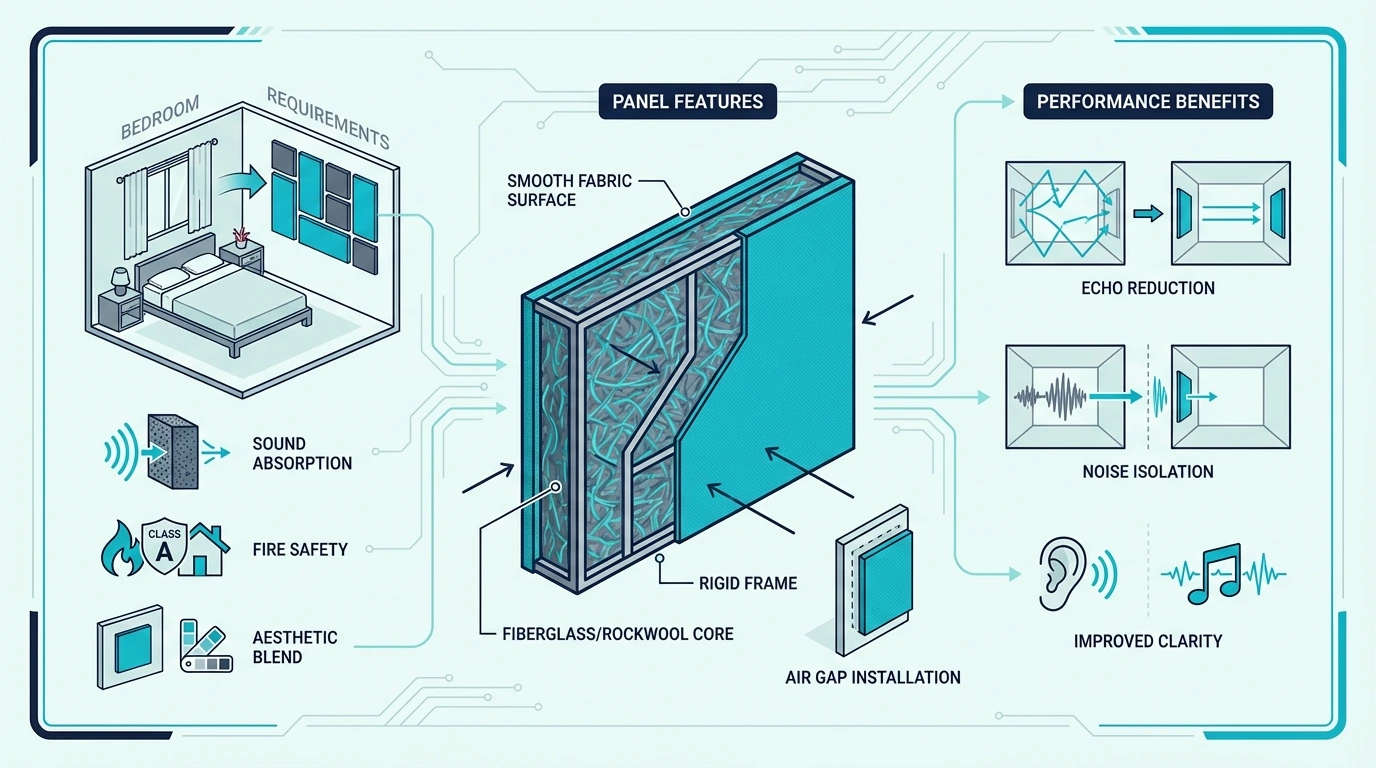
What Makes a Good Acoustic Panel for Bedrooms?
In a bedroom, panels need to solve reflections without making the room feel like a studio. That means you’re balancing absorption, appearance, and how you’ll mount them on real walls.
As a rule of thumb, 1-2 inch fabric-wrapped panels make the biggest difference for echo and voice clarity. If you also want a calmer low end for speakers, step up to thicker fiberglass panels and prioritize first reflection points.
Why Use Acoustic Panels in a Bedroom?
Now that you’ve seen the top picks, it’s worth understanding why bedroom acoustics matter. The same reflection-control fundamentals apply if you record or stream from your bedroom.
Reducing Echo and Reverb
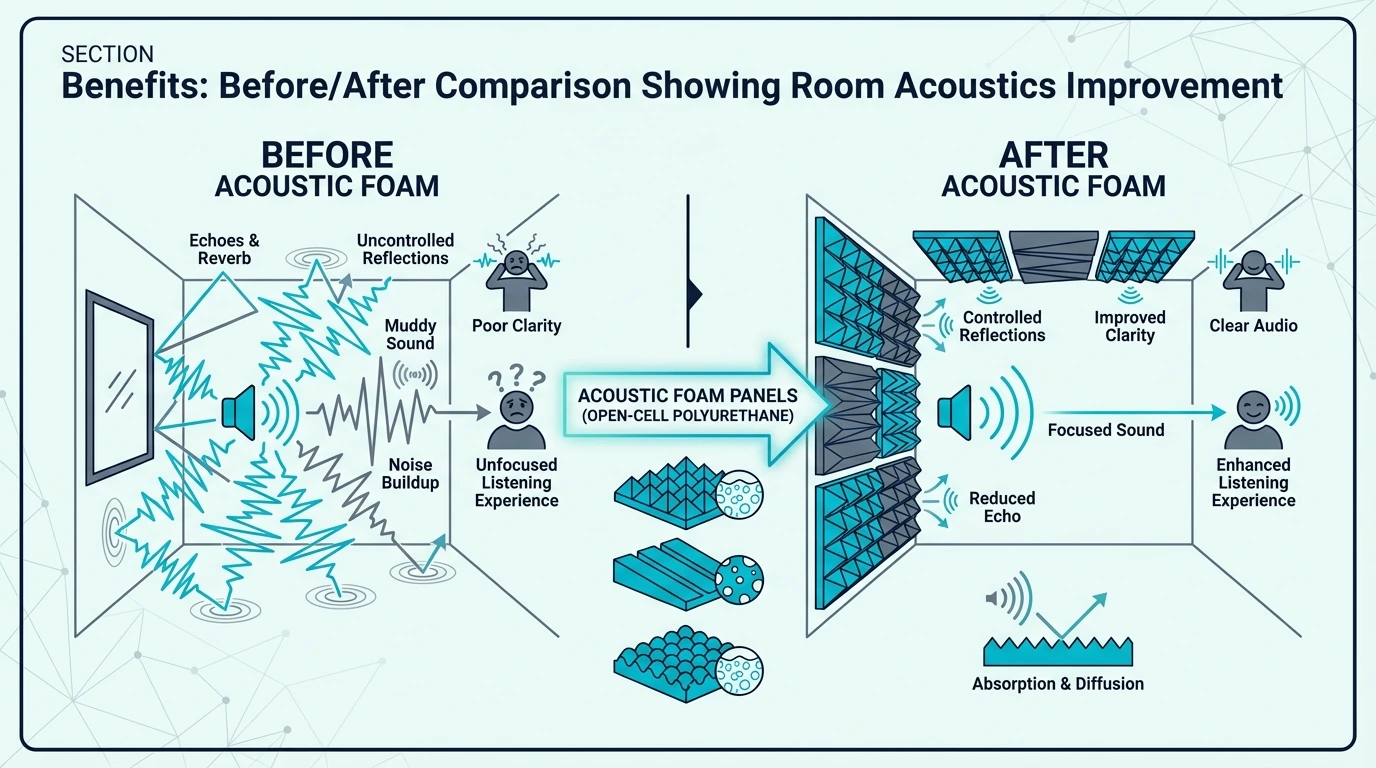
Hard walls, floors, and ceilings reflect sound waves back into the room. When you speak, play music, or watch videos, the original sound mixes with these reflections to create a muddy, unclear audio experience, whether you’re using panels or acoustic foam.
Acoustic panels absorb these reflections before they bounce back to your ears. The result feels like the room “opened up” — cleaner dialogue in movies, tighter bass response from speakers, and less fatigue during long listening sessions.
If you’ve ever noticed how different your voice sounds in a closet full of clothes versus an empty room, you’ve experienced acoustic absorption in action. Panels replicate that effect strategically placed on your walls.
What Panels Won’t Do
That said, panels can help if you’re generating noise others hear. For a full-room plan, think in terms of acoustic treatment rather than one product type, because absorption is only one piece of the puzzle.
What Are the Most Aesthetic Acoustic Panels for Bedrooms?
With the basics covered, here are options that prioritize bedroom aesthetics. Decorative formats like acoustic art panels keep treatment from looking like studio gear.
Art Panel Options
The BUBOS Large Fabric Acoustic Panels demonstrate how acoustic treatment can enhance rather than detract from room design. At nearly 4 feet by 2 feet, each panel makes a visual statement.
Large-format panels work particularly well behind beds as a combined headboard accent and acoustic treatment. One or two panels handle both decoration and sound control.
The best acoustic panels list includes more sizes and finishes if you want to match a specific color palette.
Bedroom-Friendly Colors
Most bedroom panels come in neutral tones that complement standard decor: charcoal gray, beige, cream, and black. These colors absorb visual attention rather than demanding it.
The Olanglab Fiberglass Acoustic Wall Panels come in multiple colors, letting you match your existing color scheme. The beveled edges add visual refinement compared to flat-faced alternatives.
If you’re treating a room with bold wall colors, black panels often work best — they recede visually while still providing absorption. For white or light gray walls, consider panels one or two shades darker than your paint.
What Are the Best Bedroom Acoustic Panels? (Full Reviews)
Building on our top picks, here’s the full selection of bedroom-appropriate panels. Each addresses different priorities in the aesthetic-performance-price triangle.
UMIACOUSTICS 4 PCS Fiberglass Panels
The UMIACOUSTICS 4 PCS Acoustic Panels offer similar performance to our Best Overall pick without the included hanging brackets. If you already have mounting hardware or prefer adhesive installation, this option saves a few dollars.
The 2-inch fiberglass core matches professional studio specifications. For bedroom use, this thickness handles the frequency range most problematic for voice clarity and music playback.
High-Density Self-Adhesive Panels
For renters or anyone avoiding wall damage, the 4 Pack High-Density Acoustic Panels use self-adhesive backing. The 4.8-star rating reflects consistent satisfaction with both performance and installation ease.
The high-density core provides absorption comparable to professional panels. At 2 inches thick and 24 by 12 inches, four panels cover first reflection points on one wall.
Olanglab Fiberglass Wall Panels
Another excellent mid-range option, the Olanglab Fiberglass Acoustic Wall Panels deliver professional-grade absorption in a bedroom-friendly package. The fiberglass core matches what you’d find in commercial installations.
The 11.8 by 23.6 inch dimensions fit standard wall spacing between furniture. Four panels treat one wall adequately, with two packs covering primary reflection points.
Budget 2-Pack Fabric Panels
When you need just a few panels for targeted treatment, the 2 PCS Acoustic Panels offer the lowest entry point. These work well for testing acoustic treatment before committing to larger purchases.
Position these at your primary first reflection point — the wall directly opposite your speakers or TV. If you notice improvement, expand with additional panels.
Are Acoustic Panels Safe for Bedrooms?
Given that you’ll sleep near these materials every night, safety concerns are valid. Here are the most common questions about bedroom panel safety.
Fire Safety
Quality acoustic panels use fire-retardant materials and treatments. Look for products mentioning Class A or Class B fire ratings — these meet building code requirements for wall-mounted materials.
The fiberglass and mineral wool cores in professional panels don’t burn readily. The fabric wrapping typically receives fire-retardant treatment that prevents flame spread.
If fire safety is your primary concern, check whether panels mention Class A or Class B ratings. The top picks list includes panels that call out those ratings.
Air Quality and Off-Gassing
New panels may release volatile organic compounds (VOCs) initially — that “new product” smell. This typically dissipates within a few days in a well-ventilated room.
Fiberglass cores, when properly wrapped in fabric, don’t release particles into bedroom air. The fabric barrier contains any fibers within the panel structure.
For maximum peace of mind, let new panels air out in a garage or spare room for 48-72 hours before bedroom installation.
How Many Panels Does a Bedroom Need?
With all these options, how many panels actually make a difference? The answer depends on your room size and goals, and if bass buildup is part of the issue, bass traps matter more than adding extra wall panels.
Small Bedrooms (100-150 sq ft)
A typical small bedroom needs 4-6 panels for noticeable improvement. Focus on the wall behind your primary listening position — usually behind your bed or at your desk.
Start with 4 panels at ear-height on one wall. Assess the improvement before adding more.
Medium Bedrooms (150-250 sq ft)
Medium bedrooms benefit from 6-10 panels distributed across two walls. Treat the wall behind your listening position plus one adjacent wall.
The corner between these walls often creates bass buildup. Panels placed near corners help control this low-frequency energy accumulation.
Large Bedrooms (250+ sq ft)
Larger bedrooms may need 10-16 panels across three walls plus potentially the ceiling. The increased volume requires more absorption material to achieve similar results.
Consider starting with 8 panels and expanding based on results. Large rooms sometimes surprise you — strategic placement outperforms blanket coverage.
Where Should You Place Acoustic Panels in a Bedroom?
Placement matters more than quantity for bedroom acoustics, so start with the biggest reflection paths. The wall behind your bed, first reflection points, and big glass surfaces are usually the fastest wins for bedroom acoustic panels.
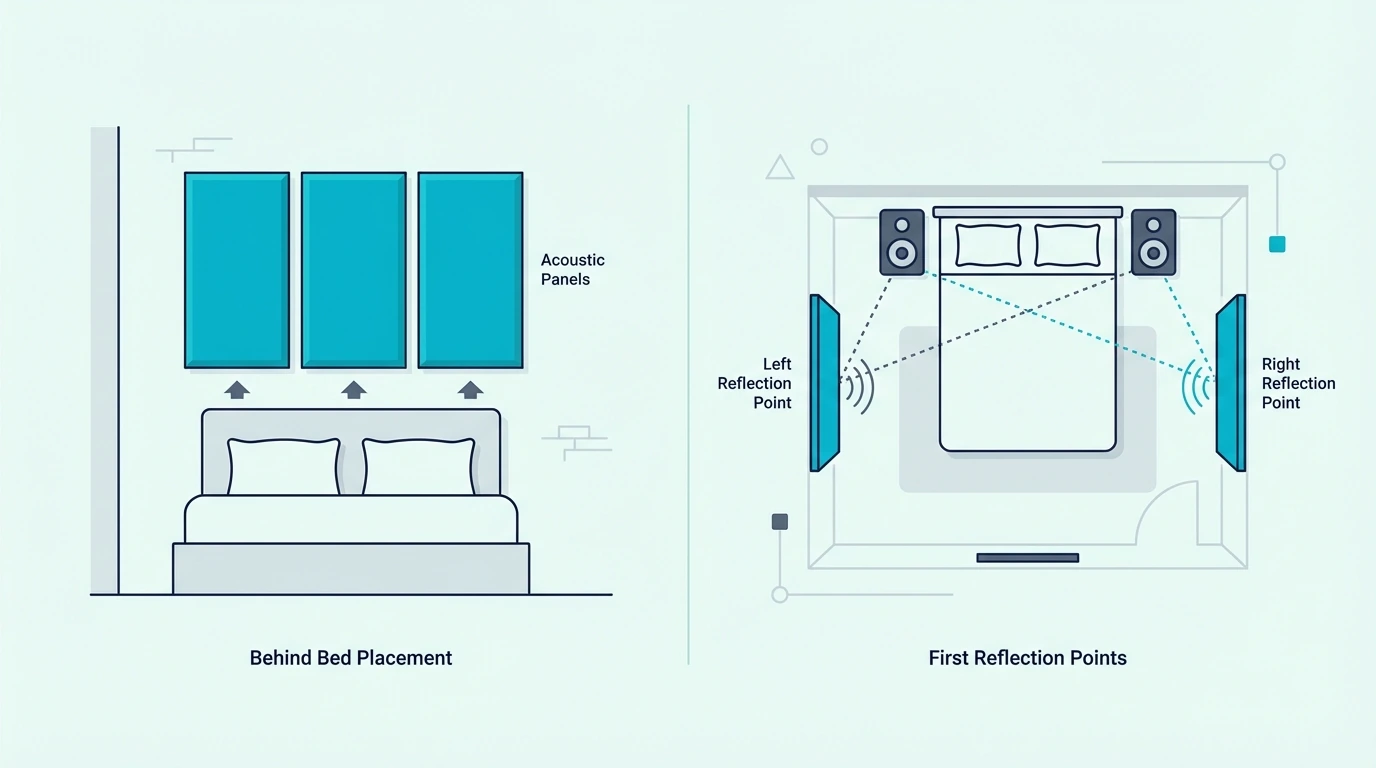
Behind the Bed
The wall behind your headboard reflects sound back toward your ears when watching TV or listening to music in bed. Panels here improve perceived audio quality significantly.
Mount panels at ear-height when you’re sitting up in bed. This targets the most problematic reflection path for bedroom audio.
First Reflection Points
Find first reflection points using the mirror trick: have someone hold a mirror flat against the wall while you sit in your primary position. Where you see your speakers or TV screen reflected, place panels.
These points create the most disruptive reflections because they arrive shortly after the direct sound. Your brain struggles to separate the original from the reflection.
Near Windows and Hard Surfaces
Windows and glass surfaces reflect sound almost completely. Panels adjacent to windows absorb sound that would otherwise bounce off the glass.
If curtains aren’t an option, strategic panel placement nearby compensates. The goal is intercepting sound waves before or after they hit the reflective surface.
How Do You Install Acoustic Panels in a Bedroom?
Installing acoustic panels in a bedroom requires balancing effectiveness with aesthetics. If you’re also treating a hard ceiling, ceiling panels can be worth it in echo-prone rooms.
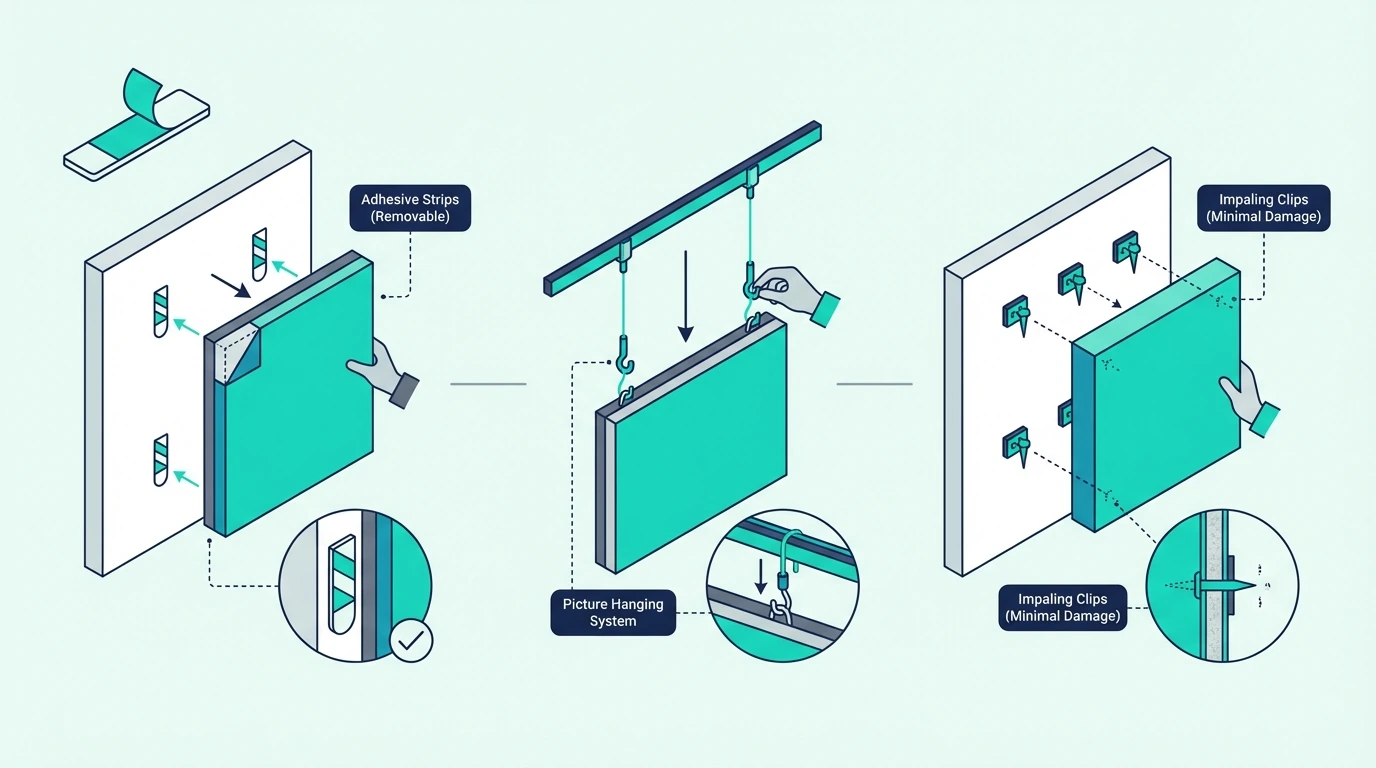
Renter-Friendly Mounting
Command strips and removable adhesive work well for lightweight panels under 5 pounds each. The self-adhesive panels we reviewed earlier include their own mounting solution.
For heavier fiberglass panels, consider impaling clips with small pins. These leave minimal wall damage and hold substantial weight securely.
Symmetrical vs Asymmetrical Placement
Symmetrical placement on opposing walls creates balanced sound absorption. This works best for music listening and home theater setups where you want even frequency response.
Asymmetrical placement with panels on one wall and diffusion (bookshelves, textured surfaces) on the opposite wall creates a more natural sound. Many bedroom users prefer this approach for everyday use.
Combining Panels with Soft Furnishings
Your bedroom likely already contains absorption materials: bedding, curtains, carpets, and upholstered furniture. Panels supplement these existing elements rather than replacing them entirely.
Rooms with minimal soft furnishings need more panels. Bedrooms with thick carpet, heavy curtains, and plush bedding may need fewer panels to achieve the same result.
Consider what’s already in your room before purchasing. The acoustic panels hub has room-by-room layouts you can use as a starting point.
Which Panels Should You Buy?
After covering all the options, here are the specific recommendations for common bedroom scenarios. Use them as a starting point, then prioritize the wall behind the bed and your first reflection points.
For most bedrooms, 4-8 fabric-wrapped panels make the biggest difference because they tame the reflections that smear voices and music. Start with the wall behind the bed and your first reflection points before you add more coverage.
For Most Bedrooms
For most bedrooms with moderate budgets, start with the UMIACOUSTICS panels with hanging brackets. Two packs give you 8 panels for comprehensive treatment of primary reflection points.
For Budget-Conscious Buyers
If budget is tight, the 18 Pack Black Panels let you experience acoustic treatment benefits before larger investments. Use these to identify which walls benefit most, then upgrade selectively.
For Decor-Focused Buyers
For bedrooms where aesthetics are paramount, combine hexagon decorative panels with a few strategic thicker panels. The hexagons add visual interest while the thicker panels handle the absorption work.
If you want to compare styles and sizes across rooms, the acoustic panels hub keeps the main options in one place. Match panel thickness and mounting style to your layout and listening habits.
Conclusion
For most bedrooms, 4-8 fabric-wrapped panels make the biggest difference because they tame the reflections that smear voices and music. Start with the wall behind the bed and your first reflection points before you add more coverage.
If you’re renting, begin with removable mounting and test adhesion on a small area first. Once you hear the difference, upgrade the key positions with thicker fiberglass panels for a more controlled, calmer room.
Frequently Asked Questions
Building on everything we’ve covered about bedroom acoustic treatment, here are direct answers to the most common questions.
Will Acoustic Panels Help Me Sleep Better?
Panels won’t block neighbor noise or traffic sounds — that’s soundproofing territory. However, they do reduce echo that can make nighttime sounds seem more prominent.
If your own movements or an air conditioner create distracting reverb, panels help. For external noise problems, look into soundproofing approaches instead.
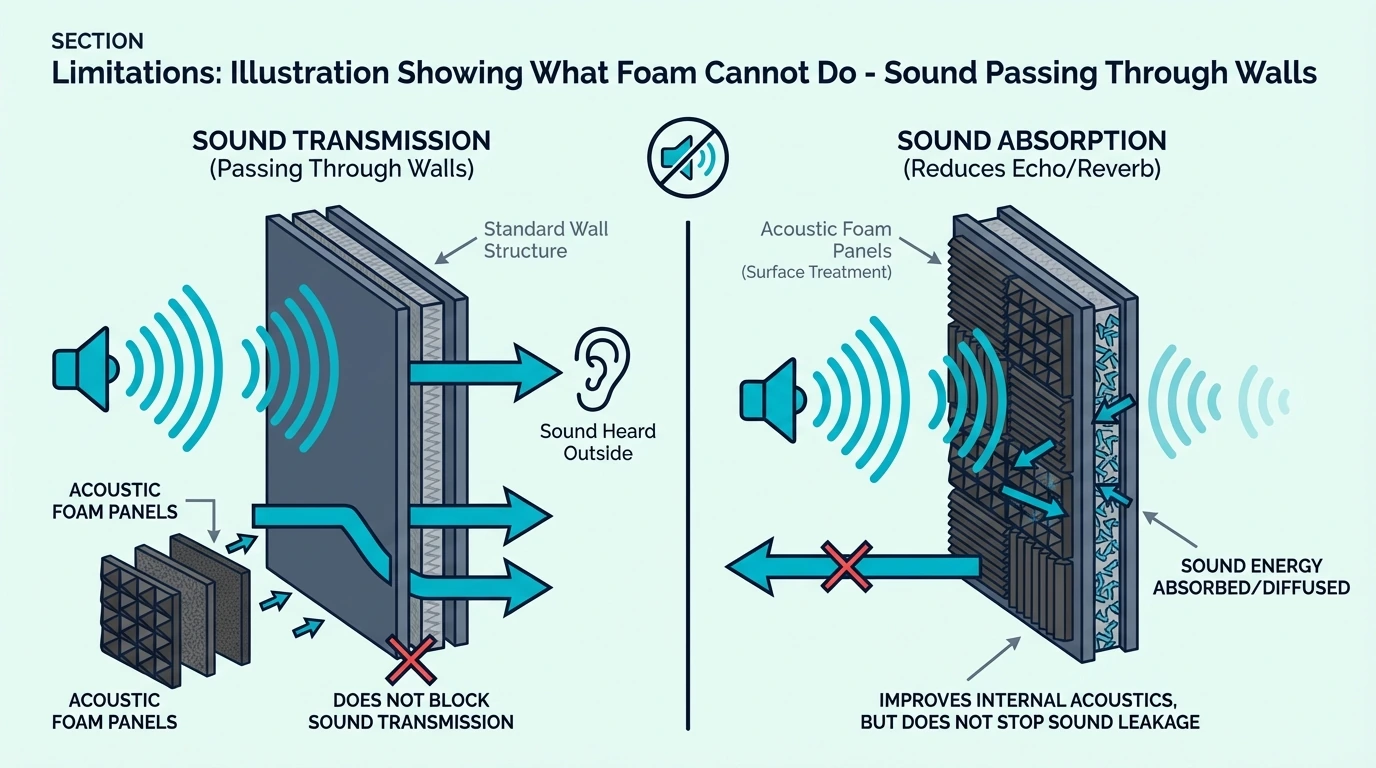
Can Panels Block Noise From Neighbors?
No — this is the most common misconception about acoustic panels. Sound blocking requires mass and sealed barriers, not absorption.
Panels absorb sound waves that are already in your room. Sound traveling through walls needs completely different solutions involving dense materials and construction changes.
Do I Need Panels on the Ceiling?
Ceiling treatment helps but isn’t essential for most bedrooms. The ceiling reflects sound, but those reflections travel further before reaching your ears, making them less problematic.
If your bedroom has very high ceilings or exposed hard surfaces above, ceiling panels can provide meaningful improvement. Standard 8-foot ceilings rarely need overhead treatment.
How to Hang Acoustic Panels: Every Method Explained [2026]
How to hang acoustic panels securely comes down to matching the hardware to your wall type — but most people skip that step and watch their panels hit the floor weeks later.
Wrong anchors, weak adhesive strips, or missing studs cause almost every panel failure. The frustration compounds when you damage drywall or lose a security deposit trying to fix it.
The right mounting method keeps panels up for years and takes about 15 minutes per panel. Start with a stud finder and your panel’s weight, then pick from the five methods below.
Quick Takeaway
Best overall method: Z-clips for permanent installations on drywall — they hold 30+ pounds and self-level. Best for renters: Heavy-duty Command strips for panels under 16 pounds with zero wall damage.
What’s the Best Way to Hang Acoustic Panels?
Let’s start with the question everyone asks first: which method actually works? The answer depends on three things — your wall material, your panel weight, and whether you need to remove them someday.
Most fabric-wrapped acoustic panels weigh between 8 and 15 pounds. That puts them in “totally manageable” territory for most mounting methods, which is good news for DIYers.
Which Method Should You Choose?
Here’s what I’ve learned after seeing dozens of panel installations: it’s less about the panels and more about your walls. Your wall type determines everything else.
Drywall accepts almost any mounting hardware, but the strength comes from hitting studs or using proper anchors. Miss the studs with inadequate anchors, and you’ll learn this lesson the hard way when your panels hit the floor.
Concrete and brick are different beasts entirely. They require specialized fasteners that grip masonry, plus a hammer drill to create pilot holes.
The upside? Once those fasteners are in, they’re not coming out.
Renters have a unique problem — wall damage means losing deposits, and that changes everything. Command strips and adhesive solutions work surprisingly well for lighter panels under 16 pounds.
You’ll need to accept weight limitations, but zero wall damage is worth the tradeoff for many people.
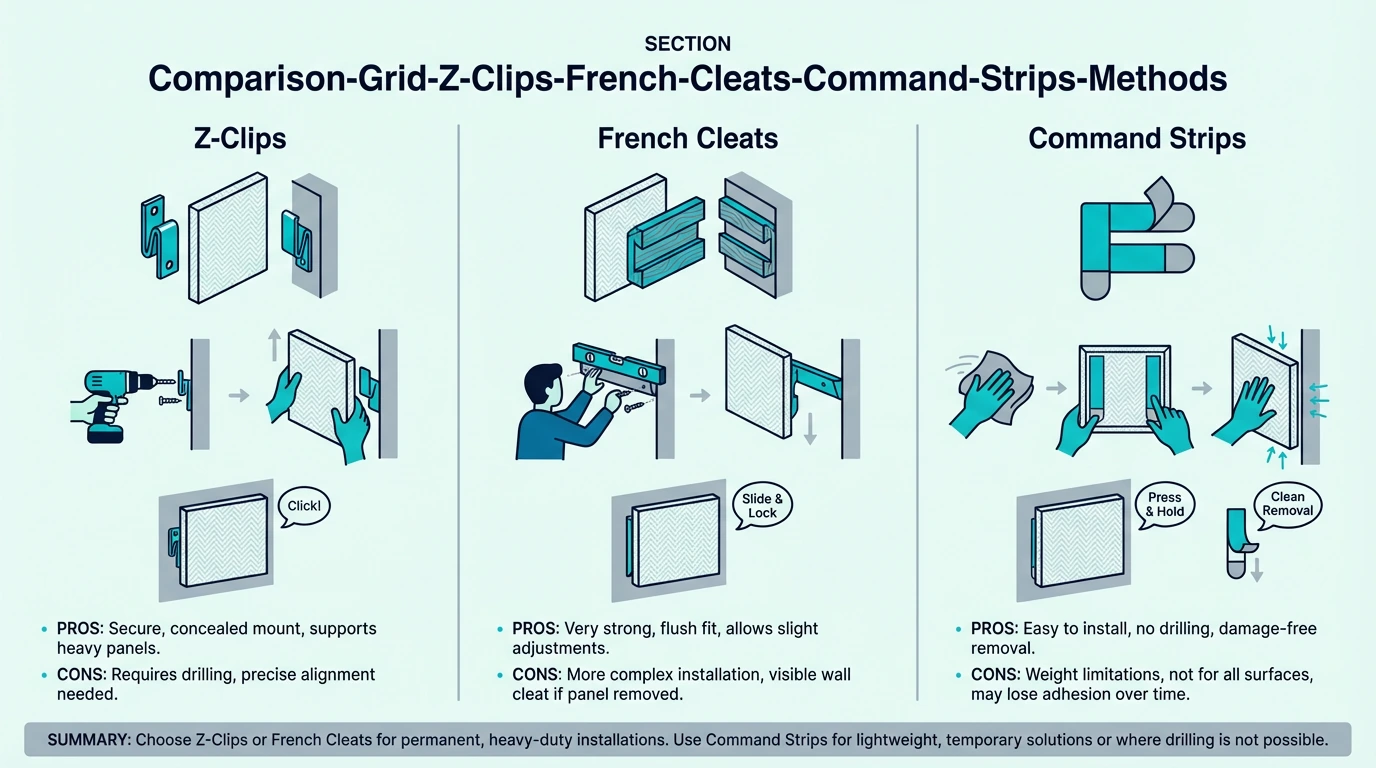
For permanent installations where you own the space, Z-clips or French cleats are what the pros use. These interlocking metal brackets distribute weight across their entire length rather than concentrating it at single screw points.
They’re also surprisingly affordable — under $10 for a pair.
One thing people consistently underestimate: panel weight. A single 24×48 inch fiberglass panel typically weighs 8-12 pounds, but add a dense wooden frame and you’re suddenly looking at 20-30 pounds.
Always check manufacturer specs before buying hardware.
What Hardware Do You Need?
This is where most failures start — using hardware that’s convenient rather than appropriate. French Cleat Z Hangers are the gold standard for most wall-mounted panels, and there’s a reason for that.
Z-clips need the clips themselves, screws appropriate for your wall type, and a level. French cleats need the same, plus a saw if you’re cutting them to size.
For concrete installations, you’ll need a hammer drill, masonry bits, and concrete-specific fasteners like Tapcon screws. The technique is straightforward once you understand it — and the holding power is incredible.
Don’t skip the stud finder for drywall work. Hitting a stud with even one screw provides dramatically more holding power than any drywall anchor alone.
Two minutes with a stud finder beats two hours patching holes from failed mounting attempts.
Now that you understand what hardware exists, let’s dive into the most popular method — and honestly, the one I recommend for most people. Z-clips have earned their reputation for good reason.
These simple interlocking metal brackets handle serious weight while keeping installation straightforward. If you can use a drill and a level, you can install Z-clips.
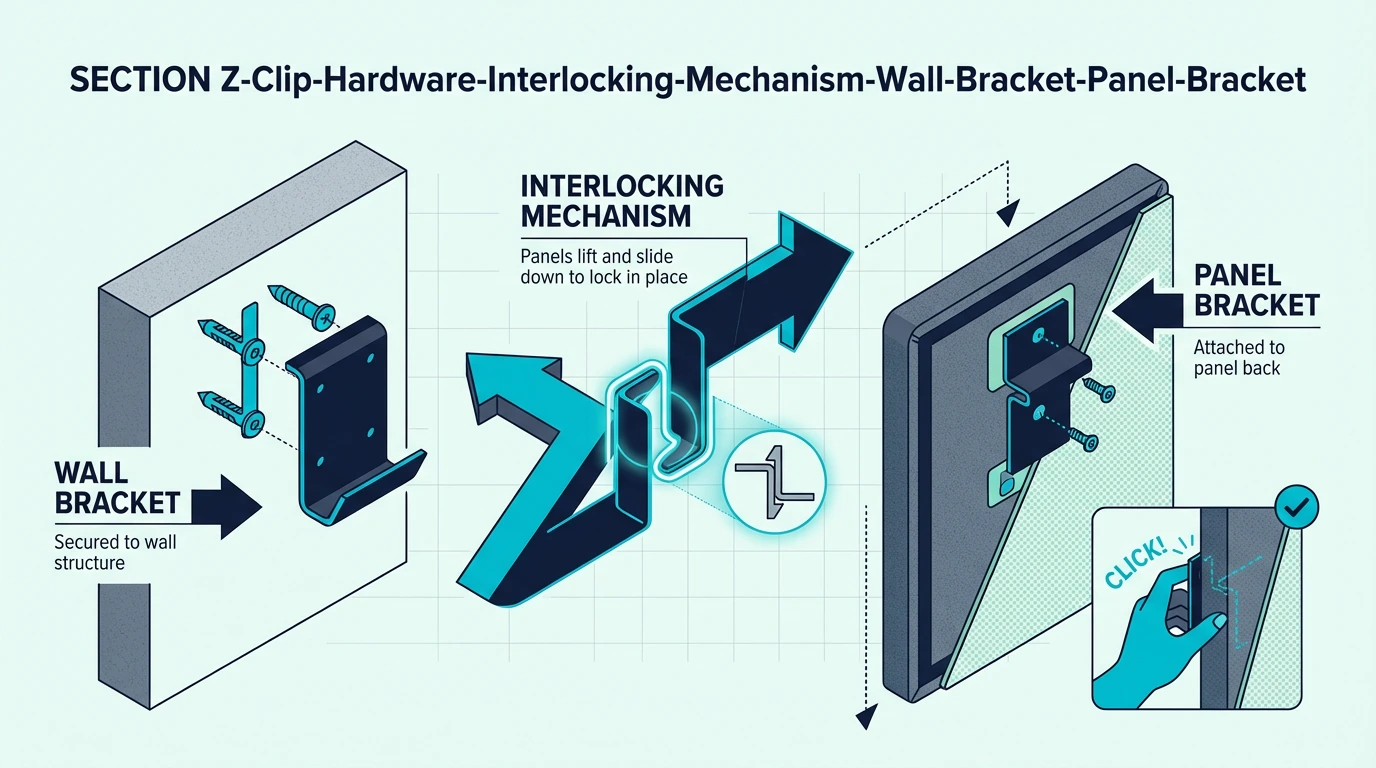
What Are Z-Clips and Why Are They Popular?
Z-clips get their name from their profile shape — view one from the side and it looks like the letter Z. One piece screws to your wall with the hook facing up, and the matching piece screws to your panel with the hook facing down.
The weight distributes across the entire length of the clip rather than concentrating at single screw points. A pair of 24-inch Z-clips can support substantially more weight than four individual screws ever could.
This matters because acoustic panels are surprisingly heavy once you factor in wooden frames. That weight distribution is what lets Z-clips safely hold 30+ pounds.
The installation forgiveness is another massive advantage. Because the clips interlock loosely before you release the panel’s weight, you get a few millimeters of adjustment for leveling.
That might not sound like much, but it’s the difference between panels that look professionally installed and ones that drive you crazy every time you look at them.
Z-clips also make future adjustments painless. You simply lift the panel up and off the wall brackets — no tools required.
The wall clips stay in place, ready for you to rehang whenever you want. Need to repaint? Lift off the panels.
Want to try a different arrangement? Move the wall clips.
Step-by-Step Z-Clip Installation
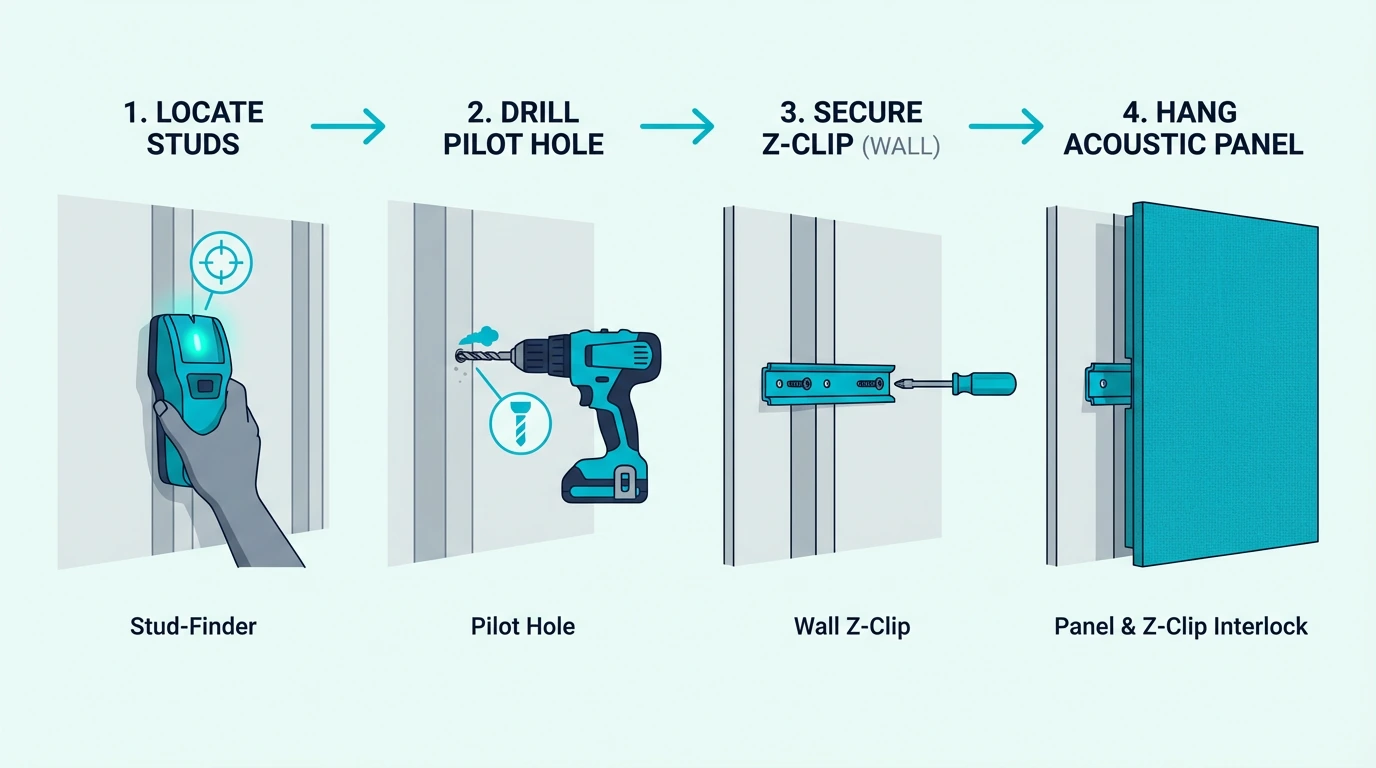
Let’s walk through the actual process, because it’s easier than most people expect. Start by marking where you want your panel’s top edge to sit — use a pencil and level to draw a light horizontal line.
Most people position panels with the top edge 2-3 inches below the ceiling for visual balance. This also leaves room for the mounting hardware and creates a more intentional look than jamming panels right against the ceiling.
Hold the wall-side Z-clip against your mark and grab your stud finder. This 30-second step saves enormous headaches later.
If studs align with your clip, drive screws directly into them — this is the strongest possible mount.
No studs where you need them? You’ll need drywall anchors rated for your panel weight.
Now attach the panel-side Z-clip to your acoustic panel’s frame. Position it 1-2 inches below the top edge so it stays hidden when hung.
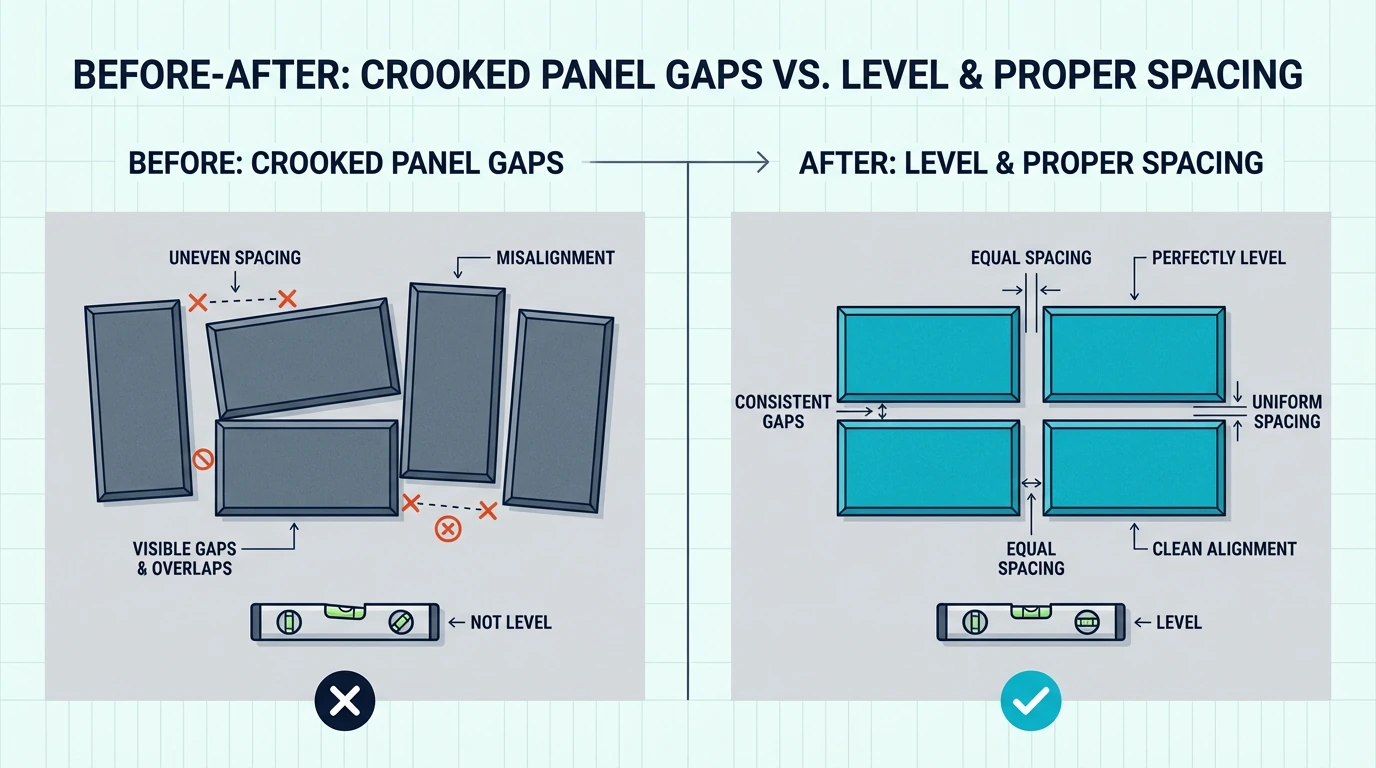
Make absolutely sure both clips are the same distance from the panel edges, or your panel will hang crooked.
Lift your panel, align the clips visually, and hook the panel bracket over the wall bracket. Lower the panel gently until it settles into position.
Check level one more time and adjust if needed. The whole process takes about 10 minutes per panel once you’ve done it once.
How Do You Hang Panels Without Drilling?
Z-clips are great — unless you’re renting. If wall damage means losing your security deposit, you need a different approach entirely.
The good news? Adhesive mounting has come a long way. Command Large Picture Hanging Strips work beautifully for lighter panels and leave walls completely unmarked when removed properly.
Do Command Strips Work for Acoustic Panels?
The honest answer is: yes, but with important limitations. Command strips absolutely work for acoustic panels — just not all of them.
Standard Command picture hanging strips hold about 4 pounds per pair. Heavy-duty strips hold up to 16 pounds total when you use multiple strips together.
That 16-pound limit rules out heavier fabric-wrapped panels, but it covers most foam panels and many lightweight fiberglass options.
The math here is straightforward. For a 10-pound panel, use at least four large Command strip pairs positioned at the corners.
This provides safety margin and prevents the panel from tilting or slowly peeling away over time.
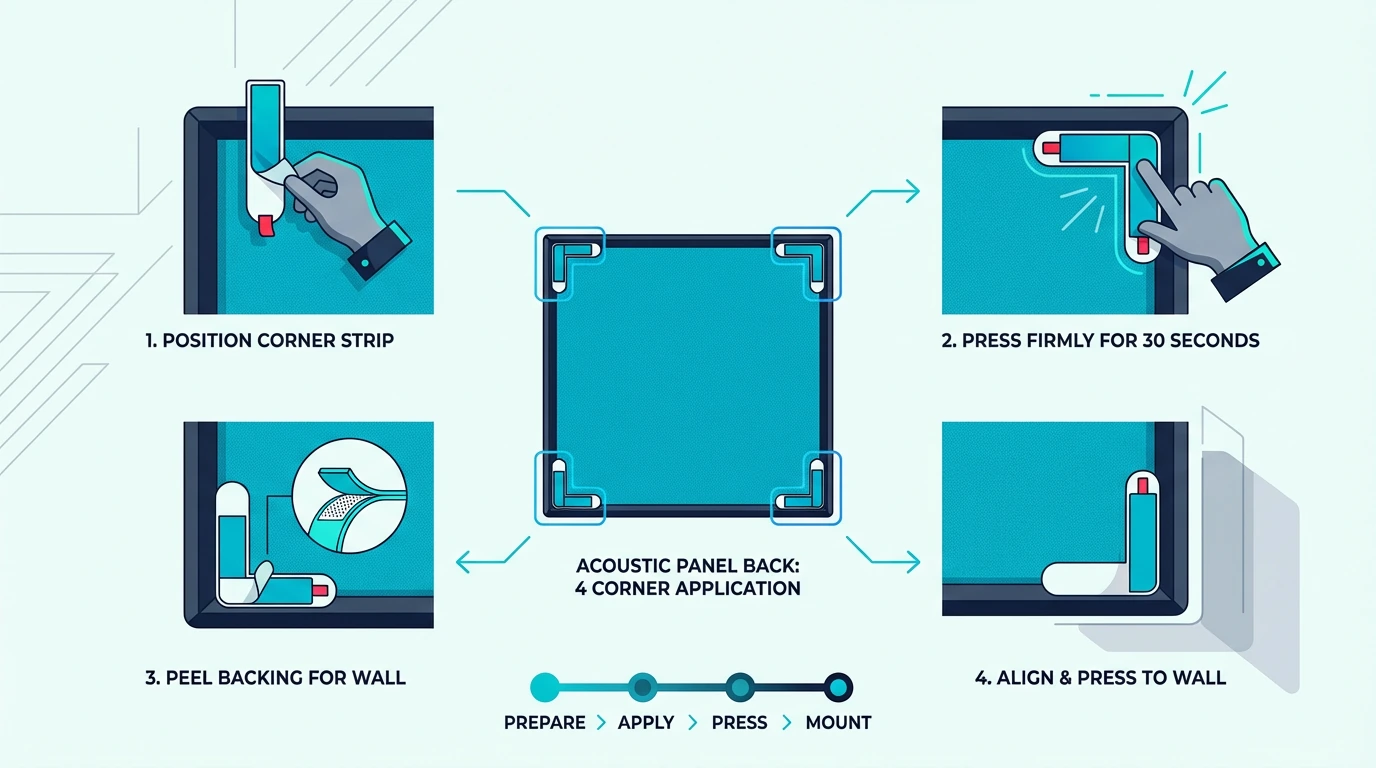
Here’s what most people get wrong: surface preparation. Both the wall and panel back must be clean, smooth, and completely dry.
Wipe both surfaces with rubbing alcohol to remove dust, oils, and any residue. Let them dry completely — rushing this step is why panels fall down three weeks later.
Application technique matters just as much. Press firmly on each strip for 30 seconds, and actually count to thirty — this activates the adhesive bond fully.
Then comes the hard part: waiting. Most Command strips need at least one hour to cure before hanging your panel.
For heavier items, overnight is better. Patience here prevents heartbreak later.
What Weight Can Adhesive Strips Hold?
Understanding weight limits prevents the frustrating experience of watching panels slowly peel off your wall over weeks. Different products have dramatically different capacities, and the packaging isn’t always clear.
Standard small Command strips max out around 4 pounds per pair. That rules them out for anything but the lightest foam panels — we’re talking the thin, decorative stuff.
Large Command strips handle about 12 pounds per pair. Heavy-duty Command strips reach 16 pounds total using multiple strips together.
Industrial Velcro strips typically hold around 10 pounds per pair.
But the packaging doesn’t tell you this: temperature and humidity affect adhesive performance significantly. Strips applied in cold rooms or high humidity may never bond fully.
They’ll seem fine for weeks, then suddenly release.
Adhesive strength also decreases over time, especially in rooms with temperature swings. If you’re in a humid climate or have poor climate control, add extra strips as insurance.
The safest approach is exceeding the minimum requirement by at least 50%. If your panel weighs 10 pounds and strips hold 16 pounds total, that’s technically sufficient.
Adding another pair costs almost nothing and dramatically reduces the chance of waking up to panels on the floor.
Understanding optimal panel placement helps you plan how many panels you’ll need — and whether adhesive mounting will work for your situation.
How Do You Hang Panels on Drywall?
Drywall is what most homes have, and it accepts virtually every mounting method we’ve discussed. The challenge is knowing when drywall alone provides enough support.
Standard half-inch drywall can hold surprising weight with proper anchors — the key word being “proper.” Wrong anchor type is the number one reason panels fall, and it happens way more often than you’d think.
Do You Need to Find Studs?
Here’s the simple rule: for panels over 15 pounds, hit at least one stud. Wall studs are solid wood framing behind your drywall, and they provide the strongest anchor points available in residential construction.
Standard stud spacing is 16 inches on center. That means at least one stud typically falls behind a 24-inch wide panel.
Now, lighter panels under 10 pounds work fine with drywall anchors alone — no studs required. Toggle bolts and snap toggles hold 25-50 pounds in half-inch drywall, far exceeding what most acoustic panels weigh.
The key is understanding how these anchors work. They spread force behind the drywall rather than relying on the drywall itself.
A stud finder makes locating studs trivial. These inexpensive tools detect density changes in the wall and beep when they find framing.
Even if your ideal panel position doesn’t align perfectly with studs, getting at least one screw into solid wood transforms mounting security. The stud carries most of the load while anchors handle the remaining screws.
If you’re calculating how many panels you need, plan stud locations early. It’s much easier to adjust positions by a few inches now than to move panels after they’re installed.
Which Anchors Work Best?
Not all drywall anchors are created equal, and choosing the wrong type is a common mistake. Let me break down what actually works.
Toggle bolts offer the strongest drywall anchor option for acoustic panels. They spread weight behind the drywall using spring-loaded wings that open after passing through the wall.
Quality toggle bolts hold 25-50 pounds depending on size and drywall thickness.
Snap toggles are the evolved version of traditional toggles. They’re easier to install because you can remove and reinsert the screw without losing the toggle behind the wall.
Same weight capacity, much better user experience if you need to adjust anything.
Plastic expansion anchors are what most people grab because they’re cheap and available everywhere. They work adequately for panels under 8 pounds but shouldn’t be your first choice for anything heavier.
The problem with plastic anchors is they creep and deform over time under sustained load. Your panel might stay up for months, then suddenly one morning it’s on the floor.
Self-drilling anchors offer a middle ground. These metal anchors drill their own pilot holes and hold 25-75 pounds depending on design.
They’re quick to install and strong enough for most acoustic panels.
When selecting products, you can find top-rated panels that include mounting hardware — which takes the guesswork out of anchor selection entirely.
How Do You Hang Panels on Concrete or Brick?
Concrete and brick walls require a completely different approach — one that intimidates a lot of people. Once you understand the technique, concrete mounting is actually more secure than drywall.
Your panels literally won’t come down unless you want them to.
The catch? You’ll need specialized hardware that most people don’t have lying around. A Tapcon Concrete Anchors gives you everything needed for professional-quality masonry mounting.
What’s Different About Hard Surfaces?
The fundamental difference is that concrete and brick don’t accept screws the way wood and drywall do. You can’t just drive a screw in — the material is too dense.
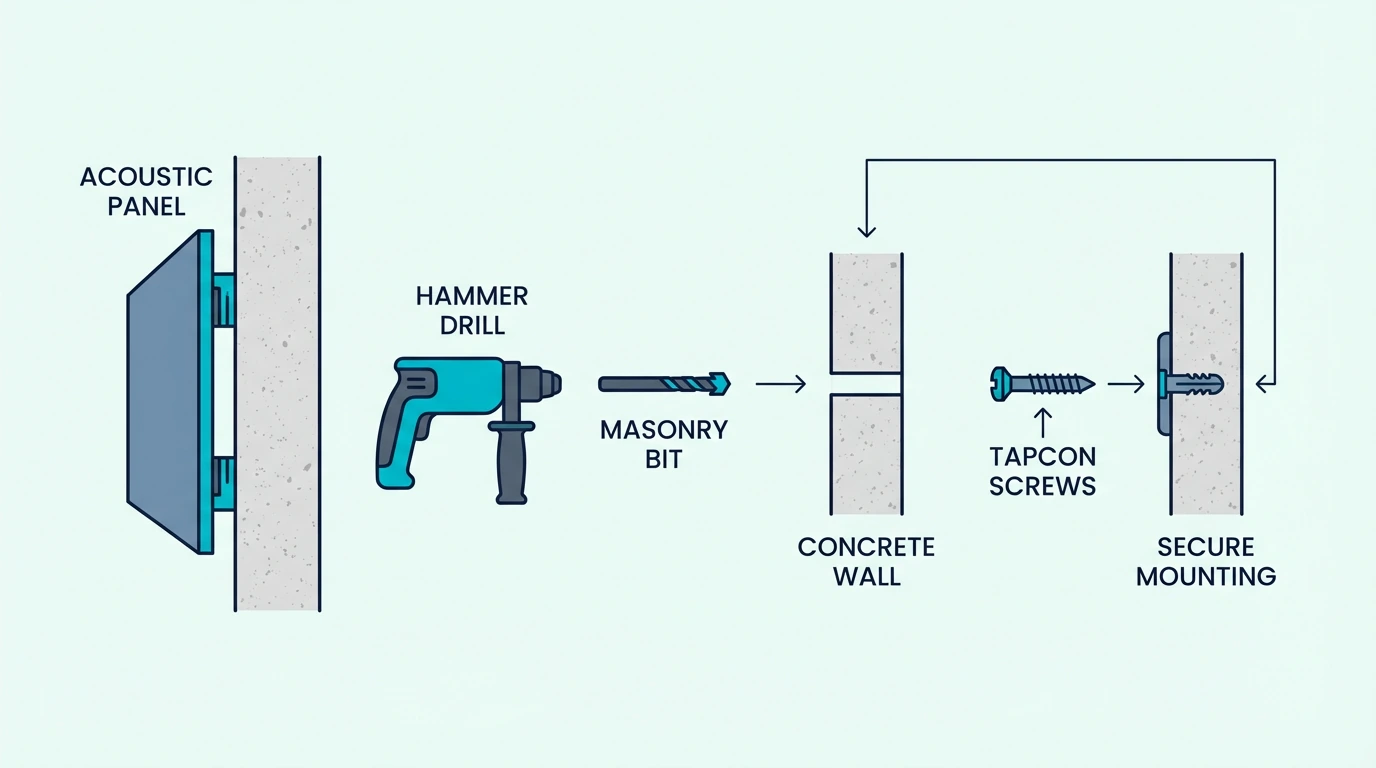
Instead, you must drill pilot holes first using a masonry-specific bit. Then you use fasteners designed to grip inside those holes.
A hammer drill is essential for concrete work. These tools combine rotation with rapid hammering action to break through hard materials.
Regular drills just spin on concrete — they’ll burn out their bits and barely make a mark. You can rent hammer drills from most hardware stores for about $40 per day if you don’t want to buy one.
The massive upside of masonry mounting is the incredible holding power. Once properly installed, concrete fasteners hold substantially more weight than any drywall method.
One detail most people overlook: dust management. Concrete drilling creates fine powder that fills the pilot hole and prevents fastener grip.
Blow out holes with compressed air or a shop vacuum after drilling. This simple step dramatically improves holding strength.
Which Hardware Works on Masonry?
Tapcon screws are the go-to concrete fastener for acoustic panel mounting. These self-tapping screws grip directly into concrete after you drill a pilot hole slightly smaller than the screw diameter.
A single Tapcon can hold 150+ pounds in solid concrete. That’s not a typo — we’re talking about holding power that makes drywall anchors look like toys.
Sleeve anchors provide even more holding power for very heavy installations. These expand behind the masonry surface for maximum grip.
They’re overkill for most acoustic panels, but essential for overhead ceiling installations or extremely heavy custom panels.
Adhesive mounting works on concrete too, though it’s typically a permanent solution. Construction adhesive like Liquid Nails bonds directly to concrete and holds firmly.
The panel can’t be removed without damage, but it will absolutely never fall.
The installation sequence for Tapcon mounting is simpler than it sounds. Mark your mounting points, drill pilot holes with your hammer drill and masonry bit, clear dust from the holes, then drive Tapcon screws through your Z-clip brackets.
The Z-clips work identically on concrete as they do on drywall — only the wall-side fastening method changes.
How Do You Hang Panels on Ceilings?
Ceiling mounting is where things get serious. Everything we’ve discussed so far needs to be stronger and more secure when you’re working overhead — gravity is constantly trying to pull your panels down.
Yes, fundamentally different. Wall-mounted panels rest partially on their hardware, with gravity pushing them into the wall.
Ceiling panels hang entirely from their fasteners, with gravity working against you 24/7.
This changes the hardware requirements completely. You must hit ceiling joists for any panel over 10 pounds — no exceptions.
Joists are the solid wood framing in your ceiling, just like wall studs are in your walls.
Standard joist spacing is 16 inches on center, though some construction uses 24-inch spacing. A stud finder works on ceilings just like walls.
One practical challenge most people don’t anticipate: you can’t hold a panel overhead and drive screws simultaneously. You’ll need help.
A T-brace or helper holds the panel in position while you secure the fasteners. Plan for this before you’re standing on a ladder wondering how to proceed.
The location of ceiling panels matters for acoustic performance too. Recording studio setups often use ceiling “clouds” positioned above the listening position.
These suspended panels prevent sound from bouncing off flat ceiling surfaces and significantly improve room acoustics.
What Hardware Is Safe Overhead?
Direct joist mounting using 2.5-inch wood screws is the truly secure method for heavy overhead panels. Screws must penetrate at least 1.5 inches into the joist.
Toggle bolts work between joists but require careful weight calculations. For ceiling installations, never exceed 50% of the toggle’s rated capacity.
A toggle rated for 50 pounds should hold no more than 25 pounds on a ceiling. This safety margin accounts for dynamic loads — vibrations, air pressure changes, and long-term gravitational stress.
Suspended “cloud” panels using aircraft cable are beautiful but require professional consultation for installations over seating areas. The cables must be rated for dynamic loads, and ceiling anchors need to handle the combined weight of panel plus any lateral forces.
The safest approach for DIY ceiling work is keeping panels small and light. Multiple smaller panels are easier to install safely than single large panels and provide better acoustic coverage by distributing treatment across more ceiling area.
Can You Hang Panels on Doors or Windows?
Doors and windows are where people get creative — and sometimes frustrated. The challenge is that permanent mounting doesn’t make sense when you need to actually use the door or see through the window.
These applications require solutions that balance acoustic effectiveness with daily functionality. The good news is several approaches work well once you understand the constraints.
How Do You Mount Panels on Doors?
Command strips work surprisingly well for lightweight foam panels on doors. Door surfaces are typically smooth and clean, which is exactly what adhesive mounting needs.
But doors hang from hinges designed for the door’s weight alone. Adding even 5 pounds can stress hinges over time, leading to sagging or binding.
Heavier fabric panels require a completely different approach. A freestanding frame that leans against the closed door works better than direct mounting.
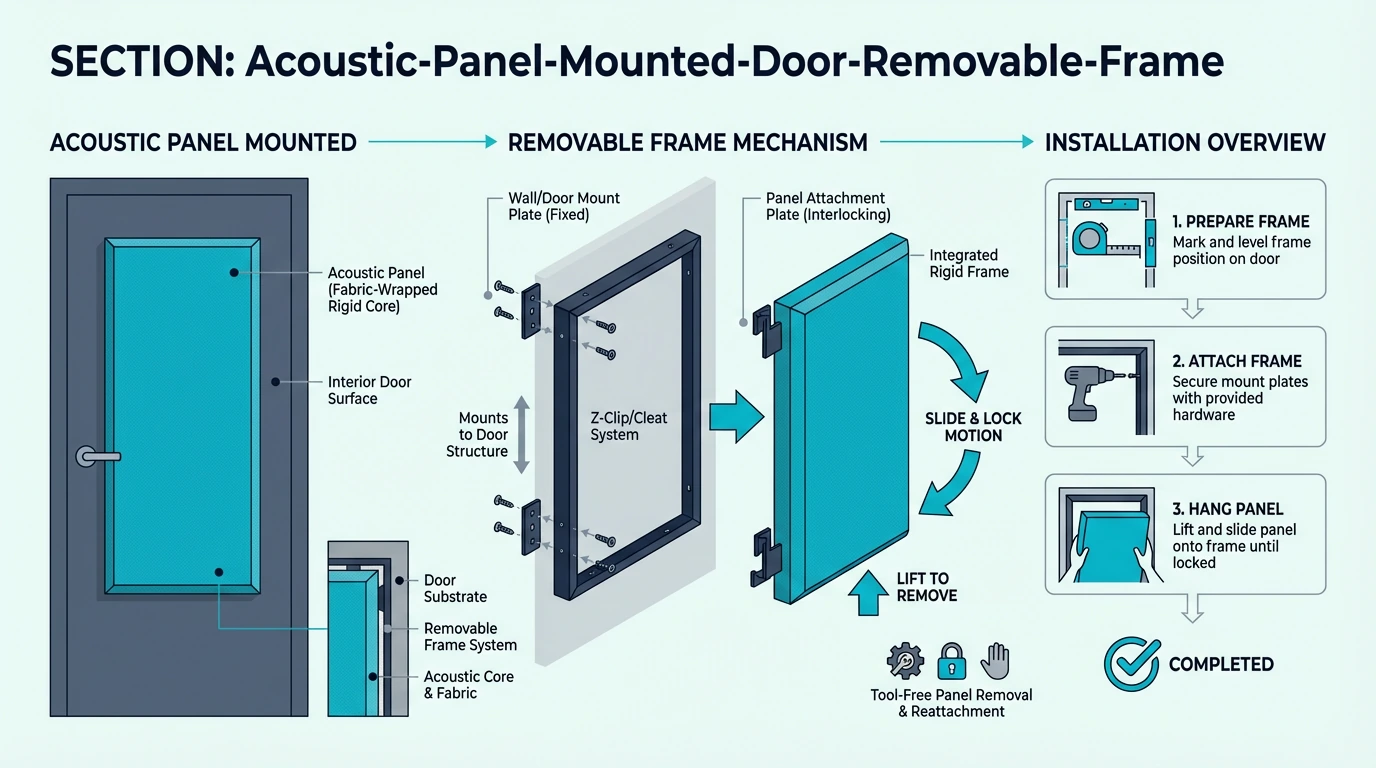
Build or buy a simple wooden frame slightly smaller than your doorway, cover it with acoustic material, and prop it in place. The frame moves out of the way when you need the door.
Over-door hooks provide another option for lightweight treatment. These hooks drape over the top of the door and support acoustic blankets or lightweight panels.
Adhesive options also work for temporary door mounting, especially for foam panels you might want to reposition later.
What About Removable Window Panels?
Acoustic window inserts are one of the more clever solutions out there. These custom-fit panels press against the window opening using foam weatherstripping around the edges.
Building removable window panels is straightforward. Measure your window opening precisely, build a lightweight frame 1/4 inch smaller in each dimension, cover it with acoustic material, and add foam weatherstripping around the perimeter.
The slight oversize after adding weatherstripping creates the pressure fit. Pop the panel in when you need acoustic treatment, pop it out for natural light.
For more permanent window treatment, mount panels on hinged frames that swing open. The hinges attach to the wall beside the window, not the window frame itself.
Magnetic mounting offers another option for metal window frames. Strong rare-earth magnets attached to panel corners grip metal frames securely and release instantly when you pull the panel away.
How Do All Hanging Methods Compare?
At this point, you’ve seen several different mounting methods — and you might be wondering which one actually makes sense for your situation. Let me break this down practically.
No single method wins across every category. The best choice depends entirely on your walls, your panels, and whether you’re renting or own the space.
For guidance on choosing panels themselves, our acoustic panels hub covers selection basics.
Z-clips take about 15 minutes per panel including measuring and leveling. They hold 30+ pounds reliably and remove easily for repositioning.
The tradeoff is small screw holes in your wall, which many renters can’t accept.
French cleats offer even higher weight capacity at 50+ pounds but require more precise installation. The angled interlocking design is stronger than Z-clips but less forgiving of measurement errors. A Heavy Duty French Cleat Hanger includes a built-in level for easier installation.
Command strips take only 5 minutes but max out at 16 pounds. They’re perfect for renters and leave no wall damage when removed properly.
The catch is the adhesive bond can fail over time, especially in humid conditions.
Surface Mount Impaling Clips install in about 3 minutes but work only with foam panels and hold just 5 pounds maximum. They’re specialized hardware for a specific use case.
Tapcon mounting on concrete takes 20 minutes and requires a hammer drill, but provides 150+ pounds of holding power that will literally outlast the building. If you have concrete walls and own the space, this is honestly the best option.
For most home studio applications, Z-clips hit the sweet spot of strength, ease, and affordability. Use Command strips only when wall damage is absolutely unacceptable and your panels are genuinely lightweight.
Save concrete fasteners for permanent installations where failure isn’t an option.
What Mistakes Should You Avoid When Hanging Panels?
Let’s talk about what goes wrong — because learning from other people’s mistakes is a lot cheaper than making your own. Most installation failures come from rushing or choosing hardware based on convenience rather than actual requirements.
The single most common mistake is underestimating panel weight. A 15-pound panel on 12-pound-rated Command strips might stay up for weeks before suddenly releasing.
When it finally falls, it often lands face-down and damages the fabric covering.
If you’re building DIY acoustic panels, factor in frame weight when calculating total panel weight. That wooden frame adds more pounds than people expect.
Can Wrong Hardware Cause Panels to Fall?
Wrong hardware is the number one cause of acoustic panel failures. Mismatched weight capacity causes most problems, but anchor type matters just as much.
Plastic expansion anchors in drywall fail regularly under sustained load. They work fine initially, but the plastic material creeps and deforms over time.
Your panel might stay up for months before suddenly releasing one morning.
Using only one Z-clip per panel is another frequent mistake. A single clip creates a pivot point instead of stable mounting.
The panel swings with vibrations, stresses the clip, and eventually works loose.
Always use at least two clips per panel, positioned near the top corners. This isn’t optional — it’s the minimum for stable mounting.
Skipping pilot holes in masonry causes concrete to crack around fasteners. Without a proper pilot hole, the hammer drill’s energy goes into the surrounding material rather than the drill bit.
Cracked concrete doesn’t hold fasteners reliably.
Installing drywall anchors without checking for studs wastes the strongest mounting option available. Spending two minutes with a stud finder can transform a marginal installation into a bulletproof one.
Should Panels Have an Air Gap?
Here’s something most installation guides skip: air gaps significantly improve low-frequency absorption. Panels mounted flush against walls perform about 30% worse at bass frequencies compared to panels with 2-4 inches of space behind them.
The air gap creates a resonant chamber that enhances absorption at lower frequencies. Your panels actually work better when they’re not touching the wall.
Z-clips and French cleats automatically create a small air gap — usually about half an inch. This built-in spacing provides some acoustic benefit without additional effort.
For maximum bass control, use standoff spacers to increase the gap.
Building standoff spacers is simple. Cut small wooden blocks to your desired gap depth and attach them between the panel and wall.
The panel mounts to the spacers rather than directly to the wall. Two-inch spacers are common for home studio applications.
The air gap also prevents moisture issues. Panels mounted directly against exterior walls can trap condensation and develop mold over time.
The gap allows air circulation and keeps both the wall and panel dry. This matters especially in humid climates or basement studios.
Conclusion
Here’s what matters: matching your hardware to your panel weight and wall type. That single decision determines whether your panels stay up for years or end up on the floor.
Z-clips handle most drywall installations beautifully — they’re what professionals use, and they’re affordable enough for any budget. Command strips serve renters well for lighter panels when wall damage isn’t an option.
Tapcon screws make concrete mounting essentially permanent.
Take ten minutes to assess your specific situation before buying anything. Weigh your panels, identify your wall material, and decide whether you need easy removal later.
Start with your heaviest panel and work backward from there. If that panel needs Z-clips into studs, all your other panels probably do too.
If your heaviest panel is only 8 pounds, adhesive mounting might work throughout your room.
Either way, you now have the knowledge to make that decision confidently — and avoid the frustrating experience of watching your hard work crash to the floor.
Frequently Asked Questions
How Do You Hang Heavy Panels?
For panels over 20 pounds, mount directly into wall studs using 2.5-inch wood screws through Z-clips. If studs don’t align, use toggle bolts rated for at least 1.5 times your panel weight.
Toggle bolts distribute weight behind the drywall, providing far more holding power than surface-mounted anchors.
The key rule: never rely on drywall alone for panels over 25 pounds.
Can You Reposition Panels After Hanging?
Yes — if you chose the right hardware. Z-clips and French cleats allow easy repositioning.
Lift the panel up and off the wall clips, move the wall hardware to the new location, and rehang.
Command strips don’t allow repositioning — removing them destroys the adhesive bond. You’ll need fresh strips at the new location.
Will Hanging Panels Damage Walls?
Any screw-based method leaves holes, though the damage is minor. Z-clips and French cleats typically require 2-4 screw holes per panel.
These holes fill easily with spackle if you remove panels later, and a dab of touch-up paint makes them invisible.
Command strips claim damage-free removal, but they can pull paint in some cases. Test in an inconspicuous area before committing to visible locations.
How Many Mounting Points Does Each Panel Need?
Minimum two mounting points for stability, positioned near the top corners. Panels over 24 inches wide benefit from three points — left, center, and right — to prevent bowing or warping in the middle.
Ceiling panels always need at least four mounting points regardless of size. The constant downward force requires more security than wall mounting.
Position points near each corner and add center points for panels larger than 24×24 inches.
Open-cell vs closed-cell foam sounds like jargon until you buy the wrong kind. Then you’re stuck with foam that feels right in your hand but performs wrong in your room.
The difference comes down to whether the air pockets connect (open-cell) or stay sealed (closed-cell). Get it backwards and you’ll cover your walls with material that reflects sound instead of absorbing it.
Once you know what to look for, picking the right foam takes about ten seconds. Below you’ll find how each type works, how to tell them apart, what the absorption numbers actually say, and three safe open-cell picks to start with.
Quick Takeaway
Open-cell foam has interconnected pores, so air can move through it. Closed-cell foam has sealed bubbles, so it resists air and water movement. For sound absorption (echo control), open-cell is the right structure. For moisture resistance and sealing/insulation, closed-cell is usually the better fit.
What’s the Difference Between Open-Cell and Closed-Cell Foam?
The difference isn’t the shape or the color you see in product photos. It’s whether the air pockets connect to each other (open-cell) or stay sealed as tiny bubbles (closed-cell).
How Open-Cell Foam Works
Open-cell foam has interconnected pores, so air can move through it. That permeability is what lets sound energy get inside the material instead of bouncing off.
When sound enters the foam, air molecules rub against the cell walls as they vibrate. That friction converts a small amount of acoustic energy into heat, so the reflection you hear gets quieter.
The key is penetration: absorption requires the wave to travel through the structure. If it can’t get inside, it can’t be meaningfully absorbed.
How Closed-Cell Foam Works
Closed-cell foam is made of sealed bubbles, so air can’t pass through the bulk material. Sound hits the surface and behaves more like it would on a dense barrier: most of it reflects.
You might get a tiny amount of surface damping, but the foam’s thickness doesn’t get used for absorption because the cells are closed. That’s why closed-cell foam can feel “solid” and still be acoustically reflective.
The Numbers
You’ll sometimes see this difference summarized with absorption coefficients (often rolled up into a single NRC number). Open-cell acoustic foam can land anywhere from roughly 0.3–0.9 depending on thickness and the frequency band being measured.
Closed-cell foams tend to measure much lower for airborne sound absorption, often around the 0.1 range. In practice, they behave closer to a reflective surface than a treatment.
How Can You Tell If Foam Is Open-Cell or Closed-Cell?
Before you buy foam (or glue it to anything), verify the cell structure. A 10-second test beats trusting a product title that says “soundproof foam.”
Visual Inspection
Visually, open-cell foam usually shows visible pores and a sponge-like surface. On a cut edge, the structure looks interconnected, and thin pieces can sometimes look slightly “see-through.”
Closed-cell foam tends to look smoother and more uniform. On a cut edge, you’ll see sealed bubbles, and the material won’t look porous.
Physical Tests
Breathability test: hold the foam to your mouth and try to blow air through it. If air passes easily, it’s open-cell; if it feels blocked, it’s closed-cell.
Compression test: press the foam and release. Open-cell compresses more easily and recovers as air re-enters, while closed-cell resists compression and springs back faster.
Water test: place a drop of water on the surface. Open-cell absorbs; closed-cell beads.
Common Products by Type
Open-cell examples include polyurethane acoustic foam panels, acoustic-grade melamine foam, and reticulated foam. These materials are breathable by design.
Closed-cell examples include neoprene, EVA (yoga mats), polyethylene packaging foam, many “rubbery” foams, and most pool noodles and closed-cell spray foams.
Why Does Closed-Cell Foam Get Mistaken for Acoustic Foam?
People get this wrong for the same reasons most people do: the foam looks similar in photos, the listing language is slippery, and the cheaper option feels like a win.
Visual Similarity
Closed-cell foam can look similar to acoustic foam, especially in egg-crate or textured patterns. If you walk into a hardware store and see foam sheets with acoustic-looking shapes, it’s easy to assume they’ll treat echo.
Some manufacturers even sell closed-cell foam in those familiar “studio” patterns. If you don’t check cell structure, you can buy the look without getting absorption.
Price Difference
Closed-cell foam is often noticeably cheaper than quality open-cell acoustic foam. When you’re on a budget and two products look similar in photos, it’s easy to grab the cheaper one and assume the difference is mostly branding.
The problem is that the performance difference isn’t subtle. If you use the wrong structure, you can spend less and still end up with the same echo you were trying to fix.
Misleading Marketing
Some products use acoustic-adjacent language (“sound foam,” “noise reduction foam”) without being acoustic treatment. If you search for “studio foam” or “soundproofing foam,” you’ll often see closed-cell products mixed in with real open-cell foam.
Always verify cell structure and absorption data. Marketing words alone don’t tell you how the material behaves.
Confusion with Other Properties
Closed-cell foam is excellent at other jobs – thermal insulation, moisture resistance, and flotation. That’s exactly why people assume it will also “insulate” sound.
But thermal insulation and acoustic absorption are different physics. A foam that blocks water and air movement is usually the same kind of foam that reflects sound.
What Is Open-Cell Foam Used For? What About Closed-Cell Foam?
Both types are useful. The trick is matching the foam to the job: airflow and absorption versus sealing and resistance.
Open-Cell Foam Applications
Open-cell foam is common in acoustic treatment (studio foam, absorption panels, podcast rooms, home theaters, and offices) because air can move through it. That airflow is what makes absorption possible.
Real-world example: if you’re recording in a spare bedroom, open-cell foam at first reflection points can reduce the “echoey bathroom” sound that makes dialogue feel amateur. You’ll usually hear a bigger change from placement and coverage than from the foam’s surface pattern.
Outside acoustics, open-cell foams show up in cushions and mattresses (comfort), filtration (air needs to pass), and packaging where breathability matters. Open-cell spray foam is also used for insulation in some builds because it expands and fills cavities, though its role is still different from acoustic treatment.
Closed-cell foam is great when you need a barrier. It’s commonly used for thermal insulation, moisture resistance, flotation, weatherstripping/gaskets, protective packaging, and vibration damping at contact surfaces.
Real-world example: if you’re sealing gaps, insulating a cooler, or building something that needs buoyancy, closed-cell foam is perfect. But if you glue that same foam to your walls expecting it to absorb echo, you’ll be disappointed.
Closed-cell foam is excellent for these purposes—just not for sound absorption.
This is where “open vs closed” stops being a nuance and becomes a yes/no. If air can’t get into the foam, most of the sound energy can’t either.
Absorption Comparison
Frequency
2” Open-Cell Foam
2” Closed-Cell Foam
250 Hz
0.25-0.35
0.05-0.10
500 Hz
0.55-0.70
0.10-0.15
1000 Hz
0.80-0.90
0.15-0.20
2000 Hz
0.85-0.95
0.15-0.20
NRC
0.60-0.75
0.10-0.15
Values are representative ranges; specific products vary.
Practical Implications
Using closed-cell foam for acoustic treatment usually means you get a fraction of the absorption you expected. Even if you cover more area, the foam still behaves reflective because the wave can’t meaningfully penetrate the structure.
That’s why the “cheap foam” route often ends with buying the right material anyway. If your goal is echo control, put your effort into open-cell treatment placed at reflection points.
If you’re buying foam for sound, don’t let the listing decide for you. Use a simple checklist and treat “soundproof foam” as marketing until proven otherwise.
What to Look For
In specs, look for “open-cell” explicitly stated, an NRC/absorption rating, a stated density, and a fire rating. Those details don’t guarantee quality, but the absence of them is a red flag.
Brand names can help, but specs matter more than a logo. If a listing won’t tell you cell structure and absorption data, treat it as “unknown” no matter how confident the copy sounds.
Red flags include no absorption data, vague phrases like “sound foam” without specs, and foam that feels rubbery or unusually firm. If the listing won’t say open-cell vs closed-cell, assume it’s not designed for absorption until you verify.
Questions to Ask
Before purchasing (especially from unknown brands), ask four questions: is it open-cell or closed-cell, what is the NRC/absorption data, what is the foam density, and what fire rating does it carry?
Legitimate acoustic foam sellers can answer these questions. Sellers of repackaged closed-cell foam often cannot.
Three safe open-cell foam picks to start with
If you want to test placement with real open-cell foam, you don’t need to overthink it. Start with a small set you can move around, then scale coverage once you hear the difference.
If you want a thicker, easy-to-mount option for first reflections, try these TroyStudio 2-inch self-adhesive foam panels. They’re a practical way to learn what open-cell absorption actually sounds like in your room.
If you want a simple starter pack that can help tame high-frequency flutter echo, try these Sonicism pyramid foam panels. Just remember: thin foam helps reflections, but it won’t meaningfully treat deep bass.
If you’re buying from an unfamiliar brand, a “high density” claim is not enough on its own. Use the breathability test and look for real absorption data, even with a budget option like these FONESO panels.
Are There Exceptions to the Open-Cell vs Closed-Cell Rule?
A few foams live in the gray area between obviously open-cell and obviously closed-cell. These are the ones that confuse people most (and when they actually matter).
Partially Open-Cell Foam
Some foams have a mix of open and closed cells, so performance falls between the extremes. They may provide some absorption, but they won’t match fully open-cell acoustic foam.
Reticulated Foam
Reticulated foam is open-cell foam with the cell membranes removed, leaving only the skeletal structure. It’s extremely open and breathable, sometimes used in specialized acoustic applications.
Melamine Foam
Melamine foam (similar to Magic Eraser material) is open-cell and can absorb sound well. Acoustic-grade melamine is used in professional installations.
It’s more expensive, but you get stronger performance and better fire resistance than most cheap polyurethane foams.
Composite Materials
Some acoustic products combine foam with other materials. The foam component should still be open-cell for the absorption function to work.
What Are the Most Common Open-Cell vs Closed-Cell Foam Questions?
“Can I Make Closed-Cell Foam Work for Acoustics?”
Not in any practical way. You can cut it, stack it, or poke holes in it, but the cells are still sealed at the microscopic level, so sound can’t penetrate the way it needs to for absorption.
“Is My Existing Foam Open or Closed Cell?”
Use the breathability test: try to blow air through it. If air passes easily, it’s open-cell; if it feels blocked, it’s closed-cell.
“Why Do Some Cheap Foams Claim Acoustic Properties?”
Marketing. If there’s no cell-structure info and no absorption data, treat the claim as noise and verify the material yourself.
“Does Thickness Compensate for Cell Structure?”
No—thickness helps open-cell foam reach lower frequencies, but it can’t turn closed-cell foam into an absorber. A thick piece of closed-cell foam still reflects because the wave can’t get inside.
The Bottom Line
Open-cell vs closed-cell foam isn’t a small detail—it’s the core property that changes how the material behaves. Open-cell breathes, compresses, and can absorb sound; closed-cell resists air and water and behaves more like a barrier.
If you’re treating echo in a room, prioritize open-cell material and placement. If you’re sealing gaps, insulating, or dealing with moisture, closed-cell is often the better tool.
Before you buy, verify cell structure with a quick breathability test and look for real absorption data if the listing claims acoustics. That one check saves you from covering walls with foam that doesn’t actually change your sound.
For more guides on foam types, placement, and mounting, start at the acoustic foam hub.
Frequently Asked Questions
How can I tell if foam is open-cell or closed-cell?
The easiest test is breathability: hold the foam to your mouth and try to blow air through it. If air passes easily, it’s open-cell; if it feels blocked, it’s closed-cell.
You can also look at a cut edge. Open-cell foam shows interconnected pores, while closed-cell foam looks more solid with sealed bubbles.
Will closed-cell foam provide any sound absorption?
Minimal. Compared to open-cell acoustic foam, closed-cell foam absorbs only a small fraction of airborne sound energy.
That small amount usually doesn’t meaningfully improve room acoustics. For practical echo control, treat closed-cell foam as ineffective.
Is memory foam open-cell or closed-cell?
Most memory foam is open-cell, which is why it’s breathable and comfortable for sleeping. But it isn’t optimized for acoustic absorption the way studio foam is.
It can provide a little absorption, but you’ll usually need more material (and more thickness) to get the same effect as purpose-made acoustic foam.
Why is acoustic foam more expensive than other foam?
Acoustic foam uses open-cell formulations tuned for sound absorption, with controlled density and cell structure. It also needs fire-retardant treatment and tighter quality control for consistent performance.
Generic foam is built around other priorities like comfort, insulation, or impact protection. That’s why it can be cheaper and still be the wrong choice for echo control.
Can I use packing foam for acoustic treatment?
Most packing foam is closed-cell (to protect items from moisture and impact), so it won’t absorb sound effectively. Some packing foam is open-cell, but it’s usually low-density and not designed for acoustics.
If you want predictable results, use purpose-made acoustic foam or panels. Otherwise you’re guessing – and often re-buying later.
Does spray foam insulation work for acoustics?
Closed-cell spray foam insulation is not a sound absorber. It tends to reflect airborne sound because it acts like a sealed barrier.
Open-cell spray foam can provide some absorption, but it’s designed for thermal insulation and cavity filling, not room treatment. For sound absorption, use purpose-made acoustic foam or panels placed at reflection points.
What Are Acoustic Foam Panels? Complete Beginner’s Guide
What are acoustic foam panels? They’re the wedge or pyramid-patterned tiles you see on studio walls, but most people buy them expecting soundproofing and end up disappointed when noise still comes through.
The result is wasted money on panels that can’t solve the problem they were bought for. If your room still sounds echoey after treatment, or noise keeps leaking through the wall despite a full foam install, the issue is almost always a mismatch between what foam does and what you expected it to do.
Once you understand the difference between absorption and soundproofing, choosing the right panels and placing them where they matter takes about an afternoon. Below you’ll find how foam panels work, which types exist, who actually needs them, and how to place them for real results.
Quick Takeaway
Acoustic foam panels are porous materials (polyurethane or melamine) that absorb mid and high-frequency sound reflections. They reduce echo, improve speech clarity, and create better recording environments. They do not soundproof rooms, block sound transmission, or absorb bass frequencies.
How Acoustic Foam Panels Work
Understanding the mechanism helps set realistic expectations.
The Absorption Process
When sound waves hit acoustic foam: 1. Waves enter the foam’s open-cell structure 2. Sound travels through interconnected air pockets 3. Air molecules vibrate against cell walls 4. Friction converts sound energy to heat 5. Sound dissipates rather than reflecting back
This process reduces the sound bouncing around your room. The result is a more controlled acoustic environment where reflections don’t compete with the direct signal from your speakers or microphone.
What Gets Absorbed
Acoustic foam primarily absorbs mid and high frequencies: – High frequencies (2kHz+): Very effectively absorbed – Mid frequencies (500Hz-2kHz): Well absorbed – Low frequencies (below 500Hz): Poorly absorbed
This is why foam helps with voice clarity and echo but doesn’t control bass rumble. Bass frequencies require thicker, denser materials.
Hard surfaces (walls, glass, concrete) reflect sound—that’s what creates echo and reverb. Soft, porous surfaces absorb sound.
Acoustic foam is engineered to maximize absorption, reducing the reflections that cause acoustic problems.
Types of Acoustic Foam Panels
Panels come in various configurations for different needs.
Wedge Panels
Description: Parallel ridges with triangular profile Best for: General room treatment, studios, home theaters Characteristics: Good absorption, classic studio look, affordable
Pyramid Panels
Description: Four-sided pyramids in grid pattern Best for: Professional studios, maximum absorption needs Characteristics: Excellent absorption, scatters sound well, higher cost
Flat Panels
Description: Smooth surface, no texture Best for: Video backgrounds, aesthetic-priority spaces Characteristics: Clean look, equivalent absorption to shaped panels
Bass Traps
Description: Thick panels or corner-mounted triangular pieces Best for: Corner placement, low-frequency control Characteristics: Addresses bass that regular panels can’t
Egg Crate Panels
Description: Rounded bumps in alternating pattern Best for: Budget applications Characteristics: Lower cost, often lower quality
Understanding the benefits helps determine if you need them.
Reduce Echo and Reverb
The primary function. Foam absorbs sound that would otherwise bounce off walls, reducing: – Echo (distinct repetition of sound) – Reverb (prolonged sound decay) – Flutter echo (rapid repeated reflections)
Improve Recording Quality
For podcasters, musicians, and content creators, foam panels: – Reduce room sound in recordings – Improve vocal clarity – Create more professional audio – Provide consistent recording environment
For mixing music or critical listening: – Reduce reflections that color what you hear – Improve stereo imaging – Create more accurate monitoring environment – Help identify issues in recordings
Reduce Noise Distraction
In offices and workspaces: – Absorb ambient noise – Improve speech privacy – Reduce distraction from conversations – Create more comfortable acoustic environment
What Can’t Acoustic Foam Panels Do?
Common misconceptions lead to disappointment.
They Don’t Soundproof
This is the biggest misconception. Acoustic foam: – Does NOT block sound from entering your room – Does NOT prevent sound from leaving your room – Does NOT reduce noise from neighbors – Does NOT stop traffic noise
Soundproofing requires mass (heavy materials), decoupling (isolated structures), and sealing (no air gaps). Foam is lightweight and porous—the opposite of what blocks sound.
First reflection points: Where sound bounces from speakers/voice to your ears Behind microphones: Absorbs sound that would reflect back into mic Corners: Where bass accumulates (use bass traps) Ceiling: Often overlooked but important for reflections
Acoustic foam panels are sound-absorbing materials that reduce echo, reverb, and reflections within a room. They improve recording quality, listening accuracy, and general acoustic comfort by absorbing mid and high-frequency sound waves.
They don’t soundproof—foam won’t block noise from neighbors or prevent your sound from disturbing others. They also don’t effectively absorb bass frequencies, which require thicker, denser materials.
If you record audio, mix music, or simply want to reduce echo in a reverberant room, acoustic foam panels provide noticeable improvement. Choose panels with adequate thickness (2”+), appropriate density (1.5+ lb/ft³), and proper fire rating.
Place them strategically at first reflection points and behind recording positions for the best results.
For soundproofing needs, look elsewhere. For acoustic treatment within your room, foam panels are an accessible, effective starting point.
For more guides on foam types, placement, and mounting, start at the acoustic foam hub.
Frequently Asked Questions
Do acoustic foam panels really work?
Yes, for their intended purpose. Foam panels effectively absorb mid and high-frequency sound reflections, reducing echo and reverb.
They don’t work for soundproofing (blocking sound transmission) or bass control—those require different solutions.
How many acoustic foam panels do I need?
For a typical bedroom-sized room, 12-24 panels (12”x12”) for basic treatment, or 24-48 for more thorough coverage. Focus on first reflection points and the area around your recording/listening position rather than covering every wall.
Where should I put acoustic foam panels?
Priority order: wall behind your microphone/speakers first, then side walls at first reflection points, ceiling above your position, and the wall behind your listening position. Use the mirror trick to find first reflection points—where you see your speakers reflected while sitting in your position.
Will acoustic foam panels soundproof my room?
No. Acoustic foam absorbs sound within your room but doesn’t block sound transmission through walls.
Soundproofing requires mass (heavy materials like drywall), decoupling (isolated wall structures), and sealing (no air gaps).
How much do acoustic foam panels cost?
Budget panels run around $1-2 per square foot, quality panels (Auralex, Foamily) $2-4 per square foot, and premium panels $4+ per square foot. A basic room treatment (20-40 square feet) typically costs $40-150 depending on quality.
Can I make my own acoustic panels?
Yes. DIY panels using rockwool or fiberglass insulation wrapped in fabric often outperform foam at similar or lower cost.
They require more effort to build but provide better absorption, especially at lower frequencies.
Is Foam Board Acoustic? Why Rigid Insulation Doesn’t Work for Sound
Is foam board acoustic? No—foam board is rigid insulation, not acoustic treatment.
The panels from hardware stores look like they might absorb sound, but foam board and acoustic foam are fundamentally different materials with opposite acoustic properties.
The confusion makes sense because both are lightweight and come in flat sheets. The difference is that foam board’s sealed cells reflect sound like a wall, while acoustic foam’s open cells absorb it.
Below you’ll find why the physics don’t work, how the absorption numbers compare, what materials actually do the job, and the most common mistakes to avoid.
Quick Takeaway
Rigid foam board insulation (polystyrene, polyisocyanurate) reflects sound rather than absorbing it because its closed-cell structure blocks sound penetration entirely. For actual acoustic treatment, use open-cell acoustic foam, rigid fiberglass panels like Owens Corning 703, mineral wool, or fabric-wrapped acoustic panels.
What Is Foam Board and Why Do People Think It Works for Sound?
“Foam board” is a catch-all term for the rigid insulation panels sold at hardware stores. They come in a few types, and none of them absorb sound.
Common Types
Expanded polystyrene (EPS) is the white beaded foam you see in coolers and packaging. It’s lightweight, cheap, and completely closed-cell—zero acoustic absorption.
Extruded polystyrene (XPS) is the pink or blue rigid board. It’s denser than EPS but still sealed-cell, so it reflects sound the same way.
Polyisocyanurate (polyiso) is the foil-faced board with the highest R-value per inch. The foil face actually makes it worse for sound because it adds a reflective surface on top of an already non-porous material.
What Foam Board Is Designed For
All three types are engineered for thermal insulation: high R-value per inch, moisture resistance, and easy installation. Those properties come from sealed cells that trap still air—the same structure that makes foam board acoustically useless.
Why Doesn’t Foam Board Absorb Sound?
The answer comes down to cell structure, and once you see it, the logic is hard to argue with.
Closed-Cell Structure
Sound absorption requires open, interconnected cells that let sound waves enter and lose energy through friction. Acoustic foam has exactly that—a porous network of open cells.
Foam board has the opposite: sealed cells filled with trapped gas. Sound waves hit the surface and bounce back because there’s nowhere for them to go.
Beyond the cell structure, foam board’s surface is relatively hard and smooth. Sound bounces off it the same way it bounces off drywall—efficiently.
There’s no friction to convert sound energy into heat, which is the mechanism that makes real acoustic materials work.
Wrong Material Properties
Acoustic absorption depends on three things: porosity, airflow resistance in the right range, and a density profile tuned for converting sound to heat. Foam board scores zero on porosity, infinite on airflow resistance, and wrong on density.
It fails on every metric that matters for sound absorption.
How Does Foam Board Compare to Real Acoustic Materials?
The gap between foam board and real acoustic materials is not subtle—it’s a different category entirely.
Absorption Coefficients
Frequency
Foam Board
2” Acoustic Foam
2” Rigid Fiberglass
250 Hz
0.05
0.25
0.55
500 Hz
0.05
0.55
0.85
1000 Hz
0.05
0.80
0.95
2000 Hz
0.10
0.90
0.95
NRC
0.05
0.65
0.85
Foam board absorbs approximately 5% of sound—essentially nothing. Acoustic foam absorbs 65%+; rigid fiberglass absorbs 85%+.
Real-World Impact
If you cover a wall with foam board, you’ll hear no reduction in echo or reverb. The room sounds the same because the material reflects almost everything back.
You may notice a slight change in how the room resonates, but that’s not an improvement—it’s just a different flavor of the same problem.
What Gets Confused with Foam Board?
The name “foam” does most of the damage. People assume anything called foam absorbs sound, but the word tells you nothing about acoustic properties.
“Foam” in the Name
Acoustic foam absorbs sound because it’s open-cell and designed for it. Foam board insulation is closed-cell and designed for thermal—it reflects sound.
Mattress foam absorbs poorly because its density and structure are wrong for the job. Packing foam is closed-cell, so it reflects like foam board.
The word “foam” just describes a physical structure. It doesn’t promise acoustic performance.
Rigid Fiberglass Confusion
Rigid fiberglass panels like Owens Corning 703 look similar to foam board—they’re both rigid, flat, and roughly the same size. But 703 is made of compressed glass fibers with an open, porous structure that absorbs sound across a wide frequency range.
It’s the core material in most professional acoustic panels.
Foam board and rigid fiberglass are opposite materials with opposite acoustic properties. If someone recommended “rigid panels” for your studio, they almost certainly meant fiberglass.
Thermal vs Acoustic Insulation
Thermal insulation and acoustic treatment are different jobs that need different materials. Foam board is excellent for thermal and useless for acoustic.
Fiberglass batts handle both moderately well, while rigid fiberglass is moderate for thermal but excellent for acoustic. Acoustic foam barely insulates heat but absorbs sound effectively.
A material’s R-value tells you nothing about its NRC rating.
If you’ve been eyeing foam board as a budget acoustic fix, these materials actually do the job.
Acoustic Foam
Open-cell polyurethane or melamine foam is purpose-built for sound absorption. It comes in various thicknesses, installs easily, and handles mid-to-high frequency reflections well.
Owens Corning 703 (3 lb/ft³ density) and 705 (6 lb/ft³ density) are the standard core materials in professional acoustic panels. They offer excellent broadband absorption, including lower frequencies that foam struggles with.
They require fabric wrapping for safe handling, but the performance is hard to beat. If you’re looking for a pre-wrapped option, TroyStudio Acoustic Panels skip the DIY wrapping step.
Mineral Wool/Rockwool
Rockwool Safe’n’Sound and ComfortBoard are popular for DIY panels because they absorb well into the low frequencies, resist fire, and cost less than rigid fiberglass.
Commercial fabric-wrapped panels combine a fiberglass or mineral wool core with a fabric covering. They look professional, perform well across a wide frequency range, and cost more than DIY options—but deliver the best combination of performance and appearance.
Can Foam Board Help with Soundproofing?
Absorption and blocking are different problems, and foam board fails at both—but for different reasons.
Sound Blocking vs Absorption
Absorption reduces reflections inside a room. Blocking reduces sound transmission through walls and barriers.
Foam board does neither well, but people sometimes wonder if the “barrier” aspect helps even a little.
Foam Board for Blocking
Foam board adds a small amount of mass and can decouple surfaces if installed with an air gap. In theory, it could also help seal gaps.
In practice, it’s too light to block anything you’d actually notice—additional drywall or mass loaded vinyl would be far more effective for the same effort.
Verdict
Foam board is not a soundproofing solution. Blocking sound requires mass and proper construction techniques, and foam board doesn’t deliver enough of either.
What Mistakes Do People Make with Foam Board and Sound?
These are the most common ways people waste time and money trying to use foam board for sound.
Covering Walls with Foam Board
This is the biggest waste. You spend money on materials and time on installation, and the room sounds exactly the same afterward.
There’s no acoustic benefit because the material reflects sound instead of absorbing it.
Assuming Hardware Store Foam Works
Insulation foam, craft foam, and packing foam are all closed-cell and non-absorptive. The only foam that actually absorbs sound is open-cell acoustic foam sold by audio retailers.
If the label says “insulation,” it’s the wrong product for sound.
Confusing Thermal and Acoustic
A high R-value doesn’t mean a material absorbs sound. Thermal insulation and acoustic treatment rely on completely different physics, and buying a material because it’s good at one doesn’t mean it helps with the other.
The Bottom Line
Foam board is not acoustic. Rigid insulation panels (EPS, XPS, polyiso) have closed-cell structures that reflect sound rather than absorbing it, and no amount of layering or modification changes that.
For acoustic treatment, use materials with open structures that allow sound penetration: acoustic foam, rigid fiberglass (703/705), mineral wool, or fabric-wrapped panels. Even budget acoustic foam far outperforms any amount of foam board insulation.
For more guides on foam types, placement, and mounting, start at the acoustic foam hub.
Frequently Asked Questions
Can I use foam board behind acoustic panels?
It won’t help acoustically. Foam board behind acoustic panels adds no absorption benefit.
If you want an air gap behind panels (which can improve low-frequency absorption), just mount panels away from the wall — no foam board needed.
Is pink/blue foam board the same as acoustic foam?
No. Pink (Owens Corning XPS) and blue (Dow Styrofoam) foam boards are rigid insulation with closed-cell structure. Acoustic foam is open-cell polyurethane or melamine — they look similar but have completely opposite acoustic properties.
Why does foam board have high R-value but no acoustic value?
Thermal insulation traps still air in sealed cells to reduce heat transfer. Acoustic absorption requires open cells that sound can enter, where friction converts sound energy to heat.
Closed cells that make great thermal insulation make terrible acoustic treatment.
Can I make foam board acoustic by drilling holes in it?
No. Drilling holes doesn’t create the interconnected open-cell structure needed for absorption. You’d just have foam board with holes — still mostly reflective.
The cellular structure throughout the material needs to be open, not just the surface, and that’s not achievable by modifying foam board.
What’s the difference between foam board and rigid fiberglass?
Foam board (polystyrene/polyiso) is closed-cell plastic foam that reflects sound. Rigid fiberglass (Owens Corning 703) is compressed glass fibers that absorb sound excellently.
They may look similar as rigid panels, but their acoustic properties are opposite.
Is any type of foam board acoustic?
No common foam board insulation products are acoustic. EPS, XPS, and polyiso are all closed-cell and non-absorptive.
If a product is sold as thermal insulation foam board, assume it has no acoustic value. Look for products specifically marketed for sound absorption with published NRC ratings.
Can You Put Too Much Acoustic Foam? Yes—Here’s What Happens
Can you put too much acoustic foam? Absolutely, but most people don’t realize it until the room sounds worse than before they started.
If your room sounds hollow and muddy, music feels lifeless through your monitors, and long sessions leave you fatigued, too much absorption is usually the cause. Most people assume more foam equals better sound, so they keep adding panels until the room feels like a padded closet.
Once you know the warning signs and the right coverage targets, fixing an over-treated room takes an afternoon. Below you’ll find what over-treatment does to your acoustics, how to spot it, and the coverage range that actually works. For foundational understanding, see how acoustic foam works.
Quick Takeaway
Target 20-30% of wall surface area at first reflection points and problem areas. Signs of over-treatment include muffled speech, lifeless music, uncomfortable or oppressive room feel, and unnaturally dry recordings. The fix is removing panels from low-priority areas (far walls, low positions) until the room sounds natural again, while keeping treatment at first reflection points.
What Happens When You Over-Treat a Room?
Over-treatment creates specific acoustic problems that are just as bad as—sometimes worse than—no treatment at all.
The “Dead Room” Effect
When too much absorption covers your walls, sound has nowhere to reflect. Every wave that leaves your mouth or speakers gets absorbed almost immediately.
The result is an acoustically “dead” space.
Dead rooms feel strange to occupy. Humans evolved hearing reflections—they help us understand space, distance, and environment.
Remove all reflections and something feels fundamentally wrong, even if you can’t articulate why.
Speech in dead rooms sounds muffled and close, like talking into a closet full of clothes. There’s no sense of space or air around the voice.
It’s technically “clean” but unnaturally so.
Music Loses Its Life
Music needs some room interaction to sound engaging. The slight reverb and reflections from walls add dimension, space, and energy to what you hear.
In over-treated rooms, music sounds flat and lifeless. Drums lose their punch.
Vocals feel disconnected from instruments. The stereo image collapses because there are no reflections to create width and depth.
Professional studios don’t eliminate all reflections—they control them. The goal is removing problematic reflections while preserving the beneficial ones that make music sound alive.
Uneven Frequency Response
Here’s a technical problem: foam absorbs mid and high frequencies but not bass. Over-treating with foam creates severe frequency imbalance.
With excessive foam, you absorb most mid/high energy while bass remains largely unaffected. The room becomes bass-heavy and boomy—the opposite of what most people want.
This imbalance makes mixing impossible. You’ll add too much high end to compensate for what the room absorbs, creating mixes that sound harsh everywhere else.
Psychological Discomfort
Anechoic chambers—rooms designed to absorb virtually all sound—are famously uncomfortable. People report anxiety, disorientation, and even hallucinations after extended time in them.
Over-treated home studios aren’t that extreme, but they create a milder version of the same discomfort. The absence of normal acoustic cues makes the space feel wrong.
Extended work sessions become fatiguing.
Your room should feel comfortable to work in for hours. If it feels oppressive or strange, you’ve likely over-treated.
How Much Coverage Do You Actually Need?
The right amount of treatment depends on your room and goals, but general guidelines apply.
The 20-30% Rule
For most rooms, covering 20-30% of wall surface area provides effective treatment without over-deadening. This assumes strategic placement at high-impact locations.
In a 10×12 room with 8-foot ceilings, total wall area is about 352 square feet. At 25% coverage, you need roughly 88 square feet of treatment—about 22 standard 2×2 panels.
That’s far less than covering every wall. And those 22 panels should concentrate at first reflection points and behind speakers, not distribute randomly.
Strategic vs Random Placement
Twenty-two panels at first reflection points outperform forty panels scattered randomly. Location matters more than quantity.
First reflection points, the wall behind your speakers, and corner bass traps address specific acoustic problems. Foam elsewhere provides diminishing returns and eventually creates the dead room effect.
If you’ve treated the priority positions and problems persist, the solution usually isn’t more foam—it’s different treatment (bass traps, diffusion) or addressing the specific remaining issue.
Room Size Considerations
Smaller rooms need less coverage percentage-wise because the walls are closer together. Sound bounces more frequently, so each panel intercepts more reflections.
Larger rooms can handle more coverage without feeling dead because the greater distances allow some natural reverb to develop regardless of wall treatment.
A bedroom studio might need only 15-20% coverage. A large dedicated studio might handle 30-35%.
Adjust based on how the room sounds, not arbitrary targets.
How Do You Know If You’ve Over-Treated Your Room?
Recognizing over-treatment helps you correct it before it ruins your work.
The Clap Test
Clap your hands sharply and listen. In a well-treated room, you hear a short, controlled decay—the sound dies quickly but naturally.
In an over-treated room, the clap sounds “thuddy” with almost no decay at all. It’s like clapping in a closet.
There’s no ring, no tail, just immediate silence.
Some decay is normal and desirable. If your clap produces zero audible reflection, you’ve absorbed too much.
The Voice Test
Speak normally and listen to how your voice sounds. Natural speech has a slight sense of space—you can hear the room around your voice.
In over-treated rooms, your voice sounds unnaturally close and muffled. It feels like speaking into a pillow or heavy blanket.
There’s no “air” around the words.
If you find yourself speaking louder to compensate for the deadness, that’s a sign of over-treatment.
The Comfort Test
Spend an hour working in your treated room. How do you feel?
Well-treated rooms feel comfortable and natural. You can work for extended periods without fatigue or discomfort.
Over-treated rooms feel oppressive. You might notice tension, fatigue, or a vague sense that something is wrong.
The acoustic environment affects your psychological state more than most people realize.
The Music Test
Play familiar music through your speakers. Does it sound engaging and alive, or flat and lifeless?
Music should have energy, dimension, and space. If your favorite tracks sound boring in your room, over-treatment may be the cause.
Compare to how the same music sounds in your car or on headphones. If the room version sounds noticeably worse—not just different—you’ve likely over-absorbed.
How Do You Fix an Over-Treated Room?
If you’ve over-treated, the fix is simple: remove panels until the room sounds natural again.
Start With Low-Priority Areas
Remove foam from locations that matter least first:
Far walls away from your listening/recording position
Low positions below ear level
Areas behind you (if you’re mixing/listening)
Excess coverage beyond first reflection points
Keep treatment at first reflection points and behind your speakers—these high-impact locations should stay treated.
Remove Incrementally
Don’t strip everything at once. Remove a few panels, then test.
Repeat until the room sounds balanced.
The goal is finding the minimum effective treatment—enough to control problems without killing the room. This sweet spot varies by room and personal preference.
Consider Replacing With Diffusion
If removing absorption brings back problems (flutter echo, harsh reflections), consider replacing some foam with diffusers.
Diffusers scatter sound instead of absorbing it. They control reflections while maintaining room liveliness.
A combination of absorption at first reflection points and diffusion elsewhere often works better than absorption everywhere. If you’re looking for a budget-friendly way to test absorption before committing to more coverage, JBER 48 Pack Acoustic Foam Panels give you enough panels to experiment with placement without over-committing.
Over-treatment often creates bass-heavy rooms because foam doesn’t absorb low frequencies. If your room sounds boomy after removing some foam, you may need bass traps rather than more wall panels.
Bass traps in corners address low-frequency buildup without affecting mid/high frequencies. This rebalances the room’s frequency response.
Different rooms have different ideal coverage levels.
Recording Studios
Recording spaces need more control than listening spaces because microphones capture everything. But even recording studios shouldn’t be completely dead.
Recommended coverage: 25-35% of wall surface, concentrated around recording positions. The area immediately around microphones can be heavily treated while the rest of the room maintains some life.
Professional vocal booths are an exception—they’re intentionally very dead because the goal is capturing only the voice with zero room sound. But these are small, purpose-built spaces, not general-purpose rooms.
Mixing/Mastering Rooms
Mixing rooms need accurate monitoring, which requires controlled but not dead acoustics. You need to hear what’s actually in your mix, not what your room adds or subtracts.
Recommended coverage: 20-30% of wall surface at first reflection points, plus bass traps in corners. The rear wall often benefits from diffusion rather than absorption to maintain some sense of space. For studio-specific guidance, see where to place acoustic foam in home studios.
Over-treating a mixing room leads to mixes that don’t translate—they sound good in your dead room but harsh or thin everywhere else.
Home Offices (Video Calls)
Home offices need enough treatment for clear video calls without making the space uncomfortable for all-day work.
Recommended coverage: 15-25% of wall surface, focused on the wall behind your camera and side walls near your desk. This controls reflections that reach your microphone without deadening the entire room.
You’ll spend hours in this space daily. Comfort matters as much as acoustics.
Living Rooms / Media Rooms
Living spaces should feel natural first, acoustically controlled second. Heavy treatment looks and feels wrong in spaces meant for relaxation.
Recommended coverage: 10-20% of wall surface at first reflection points for your primary seating position. Aesthetic panels that blend with décor work better than industrial-looking foam.
Some reverb is fine—even desirable—in living spaces. The goal is reducing obvious problems (flutter echo, harsh reflections) while maintaining a natural, comfortable environment.
The most common mistake is assuming walls should be fully covered. They shouldn’t.
Strategic partial coverage works better than complete coverage.
Full wall coverage absorbs too much mid/high frequency energy while doing nothing for bass. The result is an unbalanced, uncomfortable room.
Treating Floors and Ceilings Excessively
Some treatment on ceilings (clouds above listening positions) helps. Carpet on floors helps.
But covering every horizontal surface creates the same over-treatment problems as excessive wall coverage.
Floors and ceilings contribute to room acoustics, but they’re lower priority than wall first reflection points. Treat them moderately, if at all.
Ignoring Room Purpose
A room used for recording vocals can handle more treatment than a room used for mixing. A dedicated studio can handle more than a multi-purpose living space.
Match treatment level to how you’ll use the room. Don’t apply recording-studio levels of treatment to a home office or living room.
Adding More When Problems Persist
When acoustic problems persist after initial treatment, the instinct is to add more foam. This often makes things worse.
Persistent problems usually indicate wrong placement, wrong type of treatment (foam when you need bass traps), or issues foam can’t solve (noise transmission, HVAC rumble). More foam rarely helps.
Diagnose the specific problem before adding treatment. The guide on how to stop echo with acoustic foam helps identify what’s actually causing issues.
How Do You Find Your Room’s Sweet Spot?
Every room has an ideal treatment level. Here’s how to find yours.
Start Minimal
Begin with the minimum treatment that might solve your problems: 4-6 panels at first reflection points. Test and evaluate before adding more. A starter set like the Foamily 12-Pack Acoustic Wedge Panels covers several first-reflection spots without overbuying.
This approach prevents over-treatment by default. You can always add panels; removing them after you’ve bought and installed them feels wasteful.
After adding panels, do the clap test, voice test, and music test. Has the problem improved?
Does the room still sound natural?
If problems persist, identify what’s wrong before adding more treatment. Is it flutter echo? Add panels at parallel walls.
Bass boom? Add corner traps.
Different problems need different solutions.
Trust Your Ears
Acoustic measurements can help, but your ears are the final judge. If the room sounds good and feels comfortable, the treatment is right—regardless of what measurements or coverage percentages suggest.
Conversely, if the room feels wrong despite “correct” coverage, something needs adjustment. Acoustic treatment serves your perception, not abstract targets.
Leave Room to Adjust
Don’t permanently mount every panel immediately. Use removable mounting (Command strips, Velcro) for at least some panels.
Room acoustics interact in complex ways. The ability to move and remove panels lets you fine-tune until the room sounds right.
The Bottom Line
Yes, you can absolutely put too much acoustic foam. Over-treatment creates dead, uncomfortable spaces where speech sounds muffled, music loses life, and extended work sessions become fatiguing.
The goal is controlled acoustics, not maximum absorption.
Aim for 20-30% wall coverage at strategic locations: first reflection points, behind speakers, and corner bass traps. This level controls problems while maintaining natural room character.
More coverage provides diminishing returns and eventually creates new problems.
If you’ve over-treated, remove panels from low-priority areas until the room sounds natural again. Consider replacing some absorption with diffusion for better balance.
Trust your ears—if the room feels wrong, it probably is, regardless of how much foam you’ve installed.
The best-sounding rooms balance absorption with reflection. They control problems without killing the space’s acoustic life.
For more guides on foam types, placement, and mounting, start at the acoustic foam hub.
Finding that balance takes experimentation, but the result is a room that sounds good and feels comfortable for hours of use.
Frequently Asked Questions
How do I know if I have too much acoustic foam?
Signs of over-treatment include muffled speech that sounds like talking into a pillow, music that feels flat and lifeless, and a room that feels uncomfortable or oppressive. The clap test helps—if clapping produces almost no audible decay, you’ve absorbed too much.
What percentage of walls should acoustic foam cover?
For most rooms, 20-30% coverage at strategic locations provides effective treatment. This means first reflection points, the wall behind speakers, and corner bass traps—not random distribution across all walls.
Smaller rooms may need less (15-20%); larger dedicated studios might handle more (30-35%).
Can too much acoustic foam make a room sound worse?
Yes. Over-treatment creates unbalanced frequency response (too much bass relative to mids/highs), unnatural “dead” acoustics, and psychological discomfort.
Music loses energy, speech sounds muffled, and the space feels oppressive. Moderate, strategic treatment sounds better than excessive coverage.
How do I fix an over-treated room?
Remove panels from low-priority areas first: far walls, positions below ear level, and areas beyond first reflection points. Keep treatment at high-impact locations (first reflections, behind speakers).
Remove incrementally and test until the room sounds natural. Consider replacing some absorption with diffusion for better balance.
Is it better to have too much or too little acoustic foam?
Neither extreme is ideal, but under-treatment is generally easier to fix—you just add more panels. Over-treatment requires removing panels you’ve already bought and installed.
Start with minimal treatment at priority locations and add based on results. This approach prevents over-treatment while ensuring you address actual problems.
Why do professional studios have so much acoustic treatment?
Professional studios use thorough treatment, but it’s carefully balanced—not just maximum foam everywhere. They combine absorption at specific locations, diffusion to maintain liveliness, and bass traps for low-frequency control.
The result looks heavily treated but sounds natural and controlled, not dead.
Acoustic Foam vs Mattress Foam: Why They’re Not the Same
Acoustic foam vs mattress foam seems like an easy budget hack since both have that distinctive egg crate pattern. But trying to save money on bedding foam usually ends in a room that still sounds hollow.
The good news is that understanding cell structure makes it easy to spot materials that actually kill room reflections.
Start with the quick takeaway below to see why mattress foam fails, then each section compares the physics, safety risks, and better budget alternatives that actually work.
Quick Takeaway
Mattress foam provides roughly half the absorption of acoustic foam at best, lacks fire ratings for wall mounting, and degrades faster when hung vertically.
The apparent savings disappear once you factor in the extra coverage needed and shorter lifespan. Budget acoustic foam costs only slightly more and actually does the job.
The Fundamental Differences
The visual similarity hides real structural differences.
Cell Structure
Acoustic foam uses an open-cell structure engineered for sound absorption. Cells are interconnected, allowing sound waves to penetrate deep into the material.
As sound travels through, friction with cell walls converts acoustic energy to heat.
Mattress foam prioritizes comfort and support. Cell structure varies by type — some are more closed, some more open — but none are optimized for acoustic performance.
You can’t tell by looking whether foam has optimized open-cell structure or comfort-focused closed cells. For more on how foam structure affects absorption, see our guide on what type of foam is acoustic foam.
Density
Cell structure isn’t the only physical difference — how tightly that material is packed matters just as much. Density directly affects absorption capability. Acoustic foam: 1.5-2.5 lb/ft³ Higher density means more material for sound to interact with, improving absorption. Quality acoustic foam feels substantial when you handle it.
Mattress foam: 1.0-1.5 lb/ft³ (typically) Lower density provides the softness desired for sleeping comfort. Mattress foam feels lighter and compresses more easily.
The density difference alone accounts for a large performance gap. Lower-density foam simply can’t absorb as effectively.
Fire Rating
Acoustic foam carries fire ratings (Class A or Class B) indicating it meets flammability standards for wall mounting. Quality acoustic foam is treated with fire retardants or made from inherently fire-resistant materials like melamine.
Mattress foam is designed for bedding, where fire standards differ. It may not be rated for vertical wall mounting.
Mounting unrated foam on walls — especially near electrical outlets, lighting, or heat sources — creates potential fire hazards.
Values are representative estimates; specific products vary.
What This Means Practically
Mattress foam absorbs roughly half as much sound as acoustic foam across most frequencies. To achieve similar absorption, you’d need twice as much mattress foam — eliminating any cost savings while creating a bulkier, less attractive installation.
At critical voice frequencies (500 Hz – 2 kHz), the difference is pronounced. Recordings made in rooms treated with mattress foam still sound noticeably roomy compared to proper acoustic treatment.
People who’ve tried mattress foam for acoustic treatment consistently report: – Noticeable but underwhelming improvement – Still persistent echo and reflection – Need for much more coverage than expected – Disappointment compared to expectations
The foam “does something” but doesn’t solve the problem effectively.
Why the Price Difference Exists
Acoustic foam costs more for legitimate reasons.
Material Quality
Acoustic foam uses specific polyurethane formulations optimized for sound absorption, with higher density, consistent open-cell structure, and fire retardant treatment. These formulations cost more than standard bedding foam.
The manufacturing process requires tighter quality control to ensure consistent acoustic performance.
Fire Retardant Treatment
Meeting Class A or B fire ratings requires either chemical fire retardant treatment or specific foam formulations. This adds cost but provides necessary safety for wall-mounted applications.
Quality Control
Acoustic foam manufacturers test absorption performance and maintain consistency across batches. Mattress foam manufacturers optimize for comfort metrics, not acoustic measurements.
Ultimately, this comes down to who the product is actually for.
Market Reality
Acoustic foam serves a specialized market willing to pay for performance. Mattress foam serves a mass market prioritizing low cost.
The price difference reflects these different market positions and quality requirements.
The Hidden Costs of Using Mattress Foam
The apparent savings disappear when you consider total costs.
Reduced Effectiveness
If mattress foam provides half the absorption, you need twice the coverage. A room requiring 40 square feet of acoustic foam treatment needs 80+ square feet of mattress foam for similar results.
At that coverage level, cost savings shrink dramatically. A real foam option like the Blue Pyramid Sound Proof Foam Panels (24-Pack) already gets you proper acoustic material, so the bargain hack stops looking cheap once you price out enough mattress foam to cover the same problem areas.
Faster Degradation
Mattress foam isn’t designed for vertical mounting or long-term wall exposure: – Gravity causes sagging and deformation – UV exposure accelerates breakdown – Lower density means faster compression – No fire retardants may mean faster deterioration
Mattress foam mounted on walls typically shows visible degradation within 1–2 years. Quality acoustic foam lasts 5–10+ years.
Replacement Costs
When mattress foam degrades, you replace it. Over a 5-year period, replacing mattress foam twice costs more than buying acoustic foam once.
Safety Risks
Unrated foam on walls near heat sources or electrical creates fire risk. The potential cost of a fire — even a small one — far exceeds any foam savings.
Professional Perception
If clients, collaborators, or viewers see your space, mattress foam looks amateur. The visual difference is obvious to anyone familiar with studios.
When Mattress Foam Might Be Acceptable
In limited circumstances, mattress foam can serve as a temporary solution.
Temporary Testing
If you’re unsure where to place treatment, mattress foam can help you experiment with positions before investing in proper panels. Use it to find effective locations, then replace with acoustic foam.
Extremely Tight Budgets
If the choice is mattress foam or nothing, some improvement beats bare walls. But even the JBER 12 Pack Acoustic Foam Panels gives you real open-cell treatment to compare against before you settle for bedding foam.
Non-Critical Applications
For casual use—reducing echo in a gaming room, improving voice chat clarity—mattress foam’s limitations may be acceptable. If you’re not recording professionally, “good enough” might be sufficient.
Behind Other Treatment
Mattress foam behind furniture or in non-visible areas can supplement proper treatment. It adds some absorption without the aesthetic or safety concerns of wall mounting.
Conditions for Acceptable Use
If you use mattress foam: – Keep it away from heat sources and electrical – Accept it will need replacement sooner – Use more than you would with acoustic foam – Don’t expect professional results
Better Alternatives
If acoustic foam’s price is the barrier, consider these alternatives that actually work.
Budget Acoustic Foam
Entry-level acoustic foam costs less than premium brands while providing real acoustic performance. Products like TroyStudio Thick Acoustic Foam Panels (36-Pack) deliver legitimate absorption without the premium-brand markup.
Building panels from rockwool insulation and fabric costs less than commercial acoustic panels while outperforming foam. If you have basic DIY skills, this provides the best performance per dollar.
Heavy moving blankets provide decent absorption at very low cost. They’re not pretty, but they work better than mattress foam and can be removed easily.
Household Items
Strategic use of bookshelves, heavy curtains, upholstered furniture, and rugs provides meaningful absorption. These items you may already own contribute to room treatment.
Professional recording/mixing: Use proper acoustic foam or panels. The best foam for recording roundup covers top picks.
Serious hobby recording: Budget acoustic foam provides meaningful improvement at reasonable cost. Worth the investment over mattress foam.
Casual use (gaming, video calls): Budget acoustic foam still recommended, but mattress foam’s limitations may be acceptable if budget is extremely tight.
Temporary/experimental: Mattress foam acceptable for testing placement before permanent installation.
Your Budget Reality
Calculate the true cost: – Mattress foam: Lower upfront, more coverage needed, shorter lifespan, replacement costs – Budget acoustic foam: Moderate upfront, less coverage needed, longer lifespan, no replacement
If mounting foam near: – Electrical outlets – Light fixtures – Heat sources – High-traffic areas
Use only fire-rated acoustic foam. The safety risk isn’t worth any savings.
Conclusion
Mattress foam and acoustic foam look similar but perform very differently. Mattress foam’s lower density, non-optimized cell structure, and lack of fire rating make it a poor substitute for proper acoustic treatment.
The apparent cost savings disappear when you account for reduced effectiveness (requiring more coverage), faster degradation (requiring replacement), and safety concerns (requiring careful placement away from heat and electrical).
Budget acoustic foam from reputable brands provides real acoustic performance at accessible prices. DIY rockwool panels offer even better performance per dollar.
Moving blankets work as temporary solutions. All of these outperform mattress foam for acoustic treatment.
If you’re serious about improving your room’s sound, invest in products designed for that purpose. The small additional cost of proper acoustic foam pays dividends in performance, longevity, and safety.
Frequently Asked Questions
Does mattress foam work for soundproofing?
No — and neither does acoustic foam. Both absorb sound within a room but don’t block sound transmission through walls.
Soundproofing requires mass (heavy materials) and sealing (no air gaps). Mattress foam provides even less absorption than acoustic foam, making it doubly ineffective for soundproofing.
Why does acoustic foam cost so much more than mattress foam?
Acoustic foam uses specific formulations optimized for sound absorption, with higher density, consistent open-cell structure, and fire retardant treatment. Mattress foam prioritizes comfort at low cost, with no acoustic optimization.
The price difference reflects genuine material and manufacturing differences.
Can I treat mattress foam to make it work better acoustically?
No practical treatment improves mattress foam’s acoustic performance. The cell structure and density are inherent to the material.
You could add mass or layers, but at that point you’re better off buying proper acoustic foam or building DIY panels from rockwool.
How can I tell acoustic foam from mattress foam?
Weight: Acoustic foam feels heavier for its size due to higher density. Fire rating: Acoustic foam packaging indicates Class A or B fire rating. Price: Acoustic foam costs more per square foot. Source: Acoustic foam comes from audio/studio suppliers; mattress foam comes from bedding suppliers. Feel: Acoustic foam is firmer; mattress foam compresses more easily.
Is egg crate mattress foam the same as egg crate acoustic foam?
No. The egg crate pattern is just a shape — it doesn’t determine acoustic properties.
Egg crate acoustic foam uses materials optimized for absorption with appropriate density and fire rating. Egg crate mattress foam uses materials optimized for sleeping comfort — same shape, very different performance.
What’s the minimum I should spend on acoustic foam?
Budget acoustic foam from brands like Foamily or BXI provides legitimate acoustic performance at entry-level prices. Below this price point, you’re likely getting mattress foam marketed as acoustic foam, or low-quality material that won’t perform adequately.