Do Bass Traps Work For Outside Noise — Or Are You Solving The Wrong Problem?
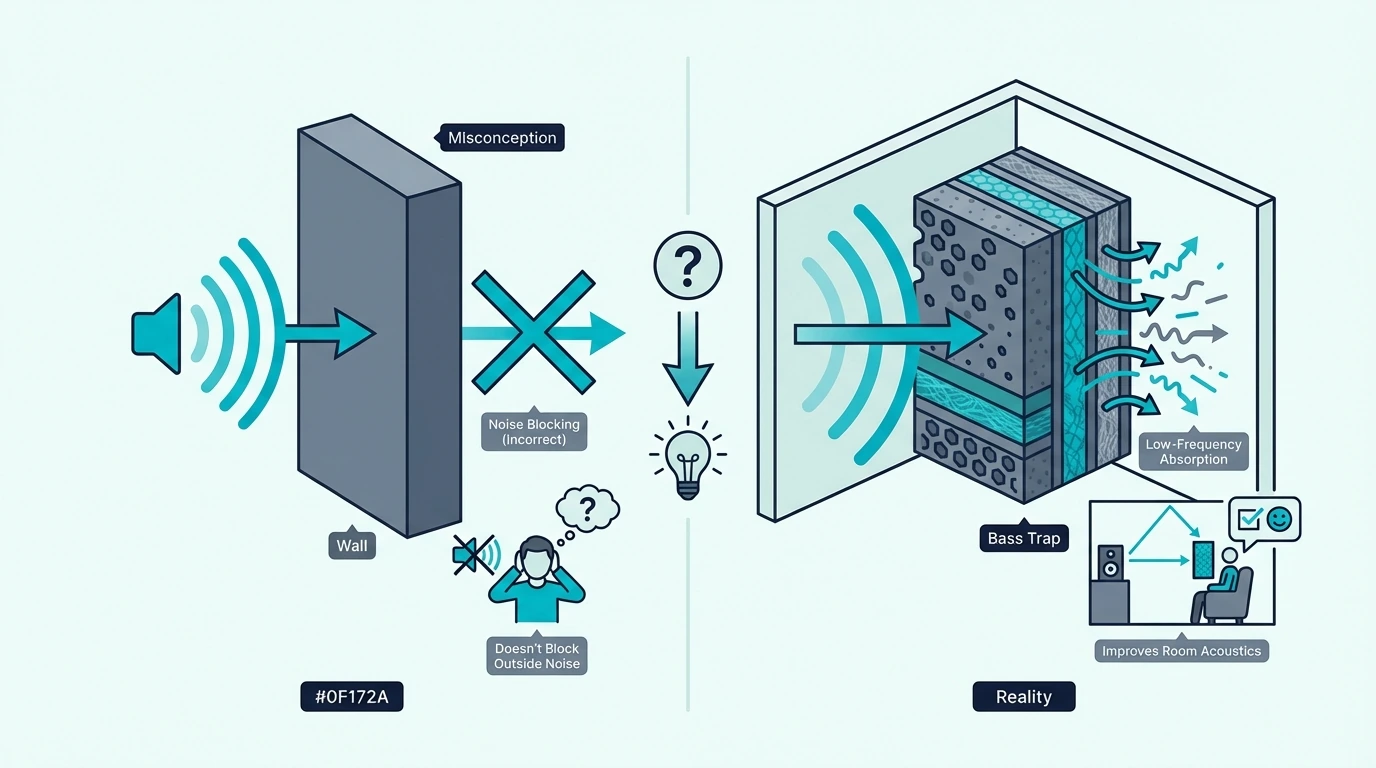
Do bass traps work for outside noise — not in the way most people expect, and confusing what bass traps actually do with what they don’t is the fastest way to waste money on acoustic treatment that won’t solve your problem.
Bass traps absorb low-frequency sound energy bouncing around inside your room. They tame standing waves, clean up muddy bass, and make your listening environment more accurate.
What they don’t do is stop bass from a neighbor’s subwoofer or highway traffic from entering your room in the first place. That’s a soundproofing problem, not an acoustic treatment problem — and the two require completely different solutions.
Below, this guide walks you through exactly what bass traps fix, what they can’t fix, whether foam traps hold up against fiberglass, and what actually works if outside bass noise is driving you crazy.
Quick Takeaway
Bass traps work extremely well for treating internal room acoustics — standing waves, boomy corners, and uneven bass response. They do NOT block outside noise. If your problem is bass coming through walls from neighbors or traffic, you need mass-based soundproofing (dense drywall, decoupled walls, sealed gaps), not absorption. Bass traps and soundproofing solve different problems entirely.
Do Bass Traps Work For Outside Noise — And Why Does It Matter?
The confusion between bass traps and soundproofing costs people real money. Someone hears thumping bass from next door, buys corner foam traps, installs them, and wonders why nothing changed.
The Core Misconception
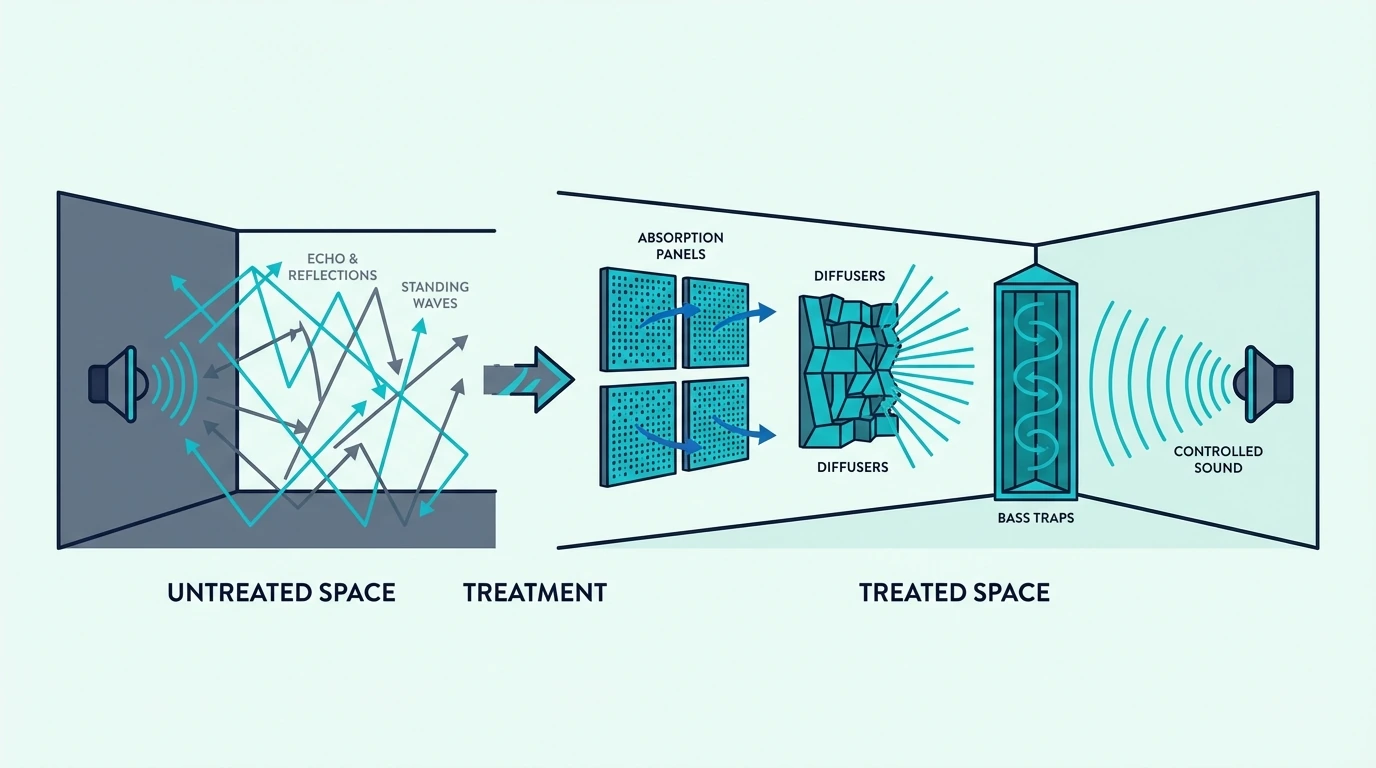
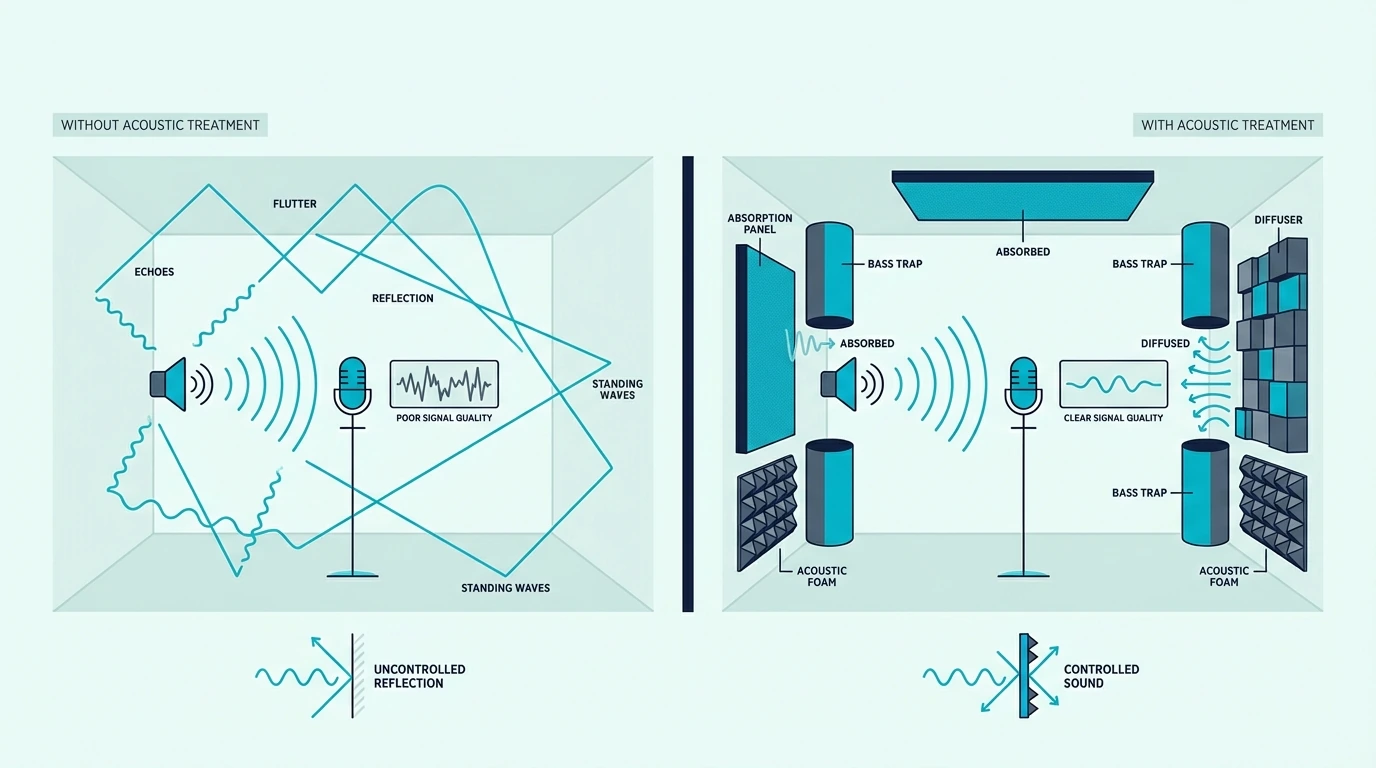
Sound travels through walls, floors, and ceilings by vibrating the structure itself. Low-frequency bass is especially good at this because long wavelengths carry more energy and pass through building materials that stop higher frequencies cold.
A bass trap sits inside your room and absorbs sound that’s already bouncing around between your walls. It reduces reflections, standing waves, and modal buildup — all internal acoustic problems.
But it can’t stop sound from entering the room through the structure. That’s like putting a sponge on your kitchen counter and expecting it to stop water from leaking through the floor below.
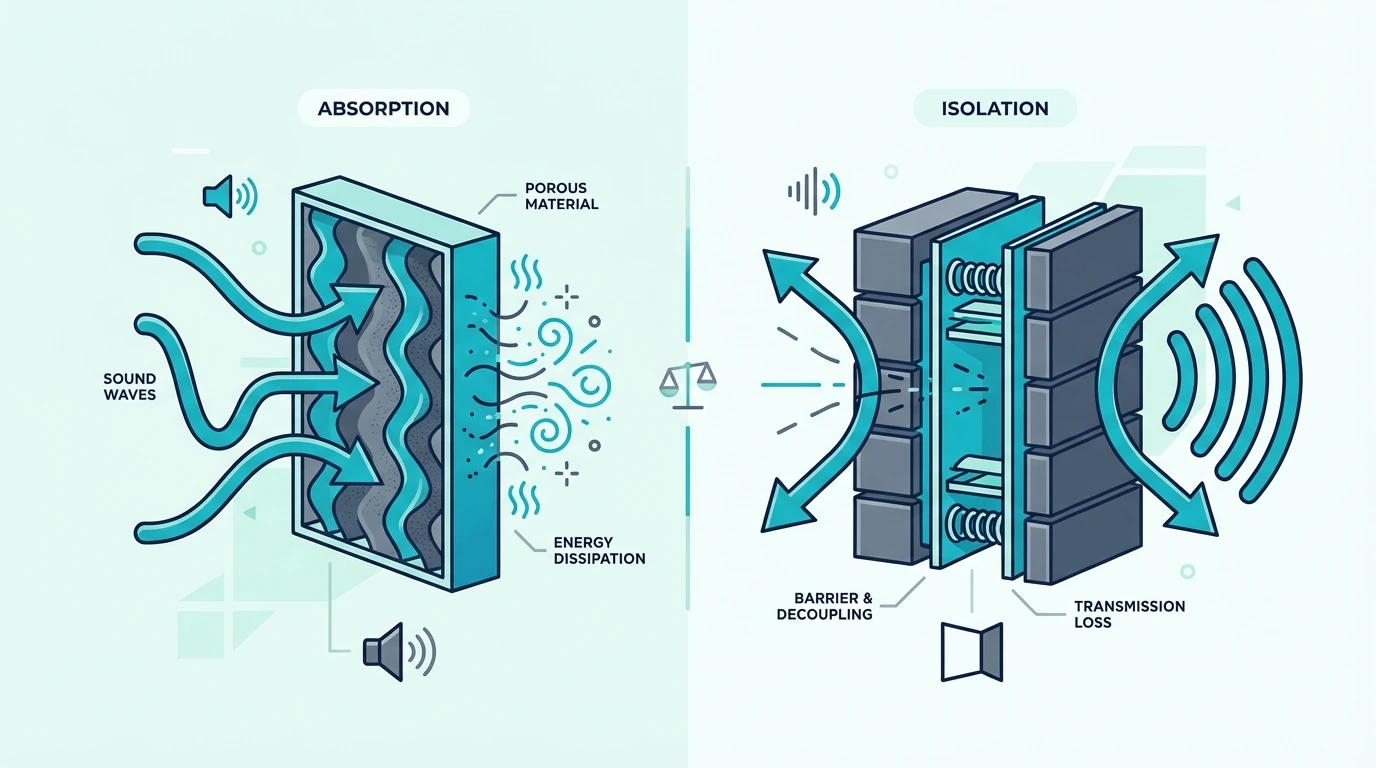
Absorption vs Isolation
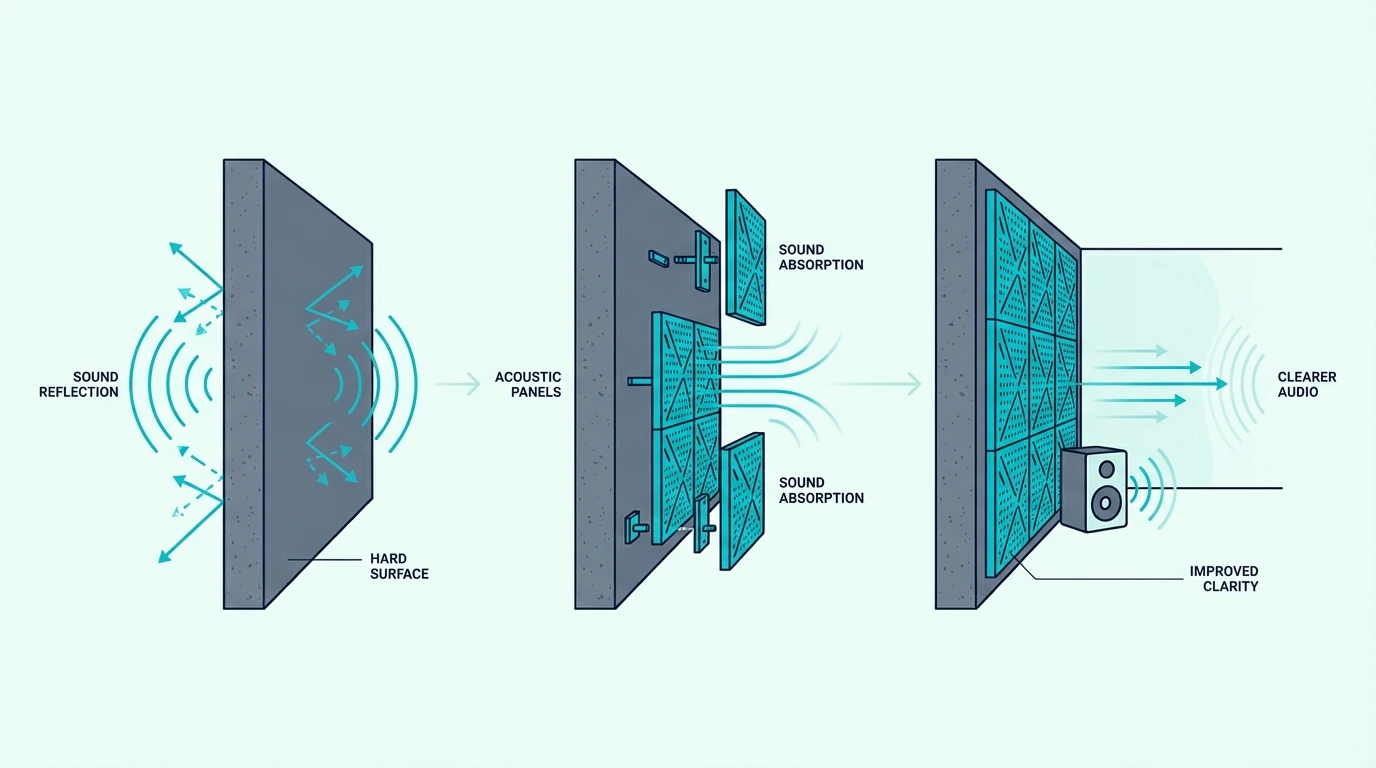
Acoustic absorption and sound isolation are two fundamentally different things. Absorption converts sound energy into heat using porous materials — it makes a room sound better by reducing internal reflections.
Isolation blocks sound transmission between spaces using mass, decoupling, and sealed air gaps — it makes a room sound quieter by preventing external noise from getting in. Bass traps handle absorption; they have zero effect on isolation.
How Do Bass Traps Actually Reduce Low-Frequency Problems?
Understanding what bass traps actually fix explains why they’re so effective at their real job — even if that job isn’t blocking outside noise.
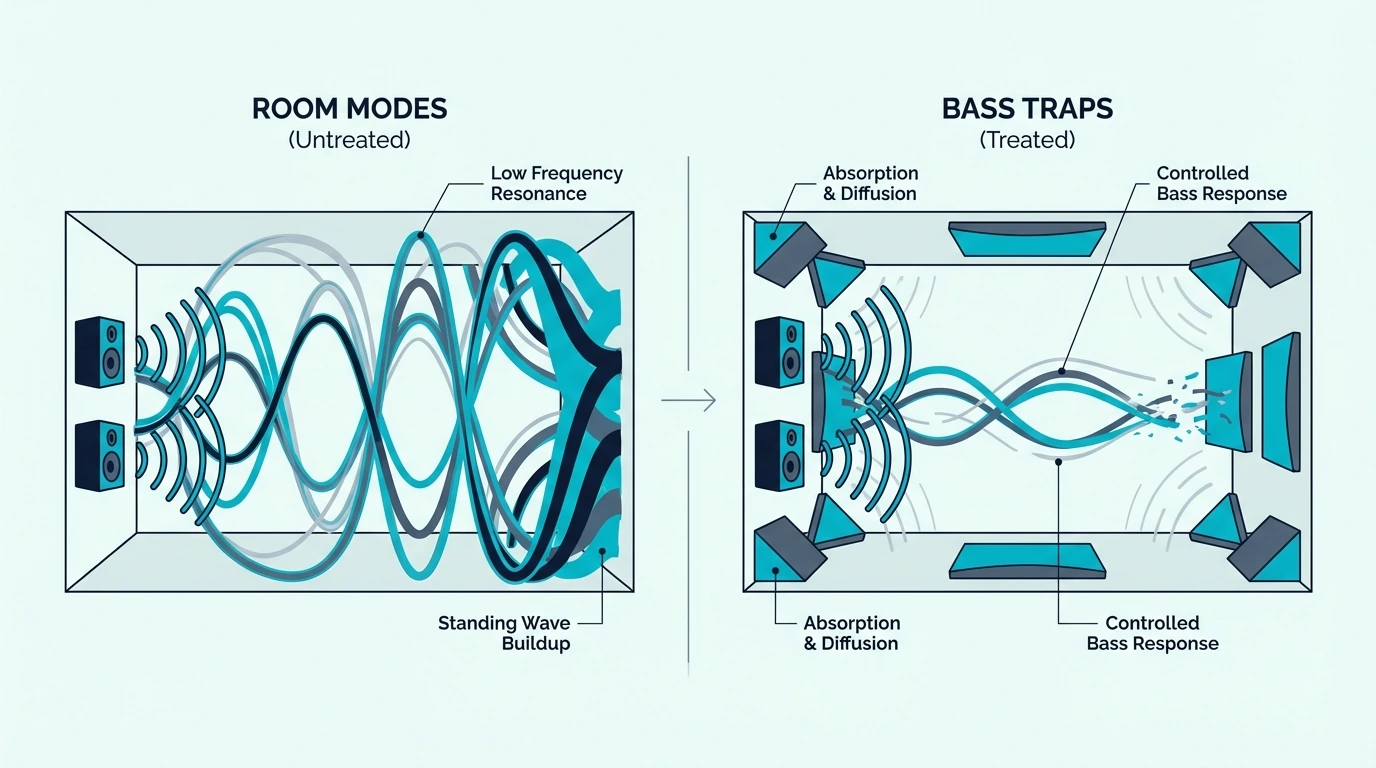
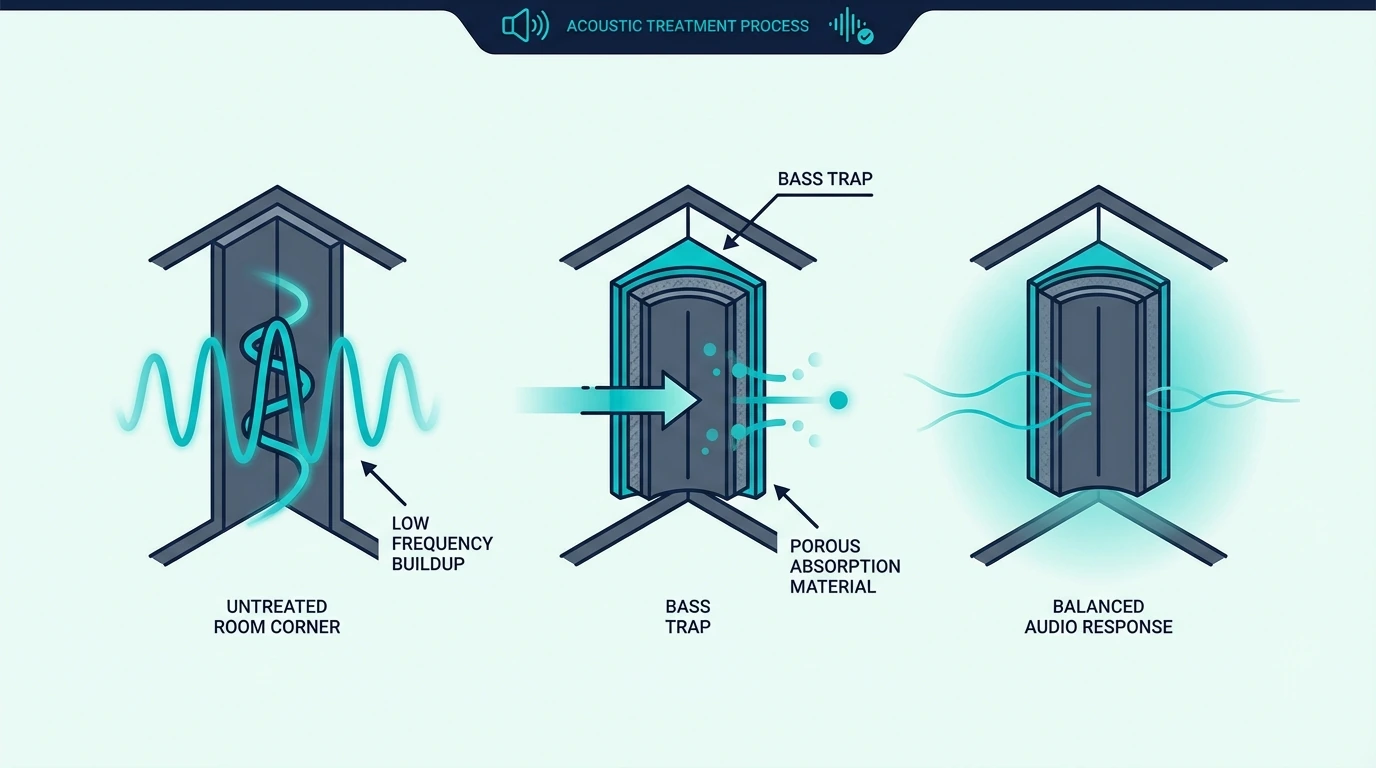
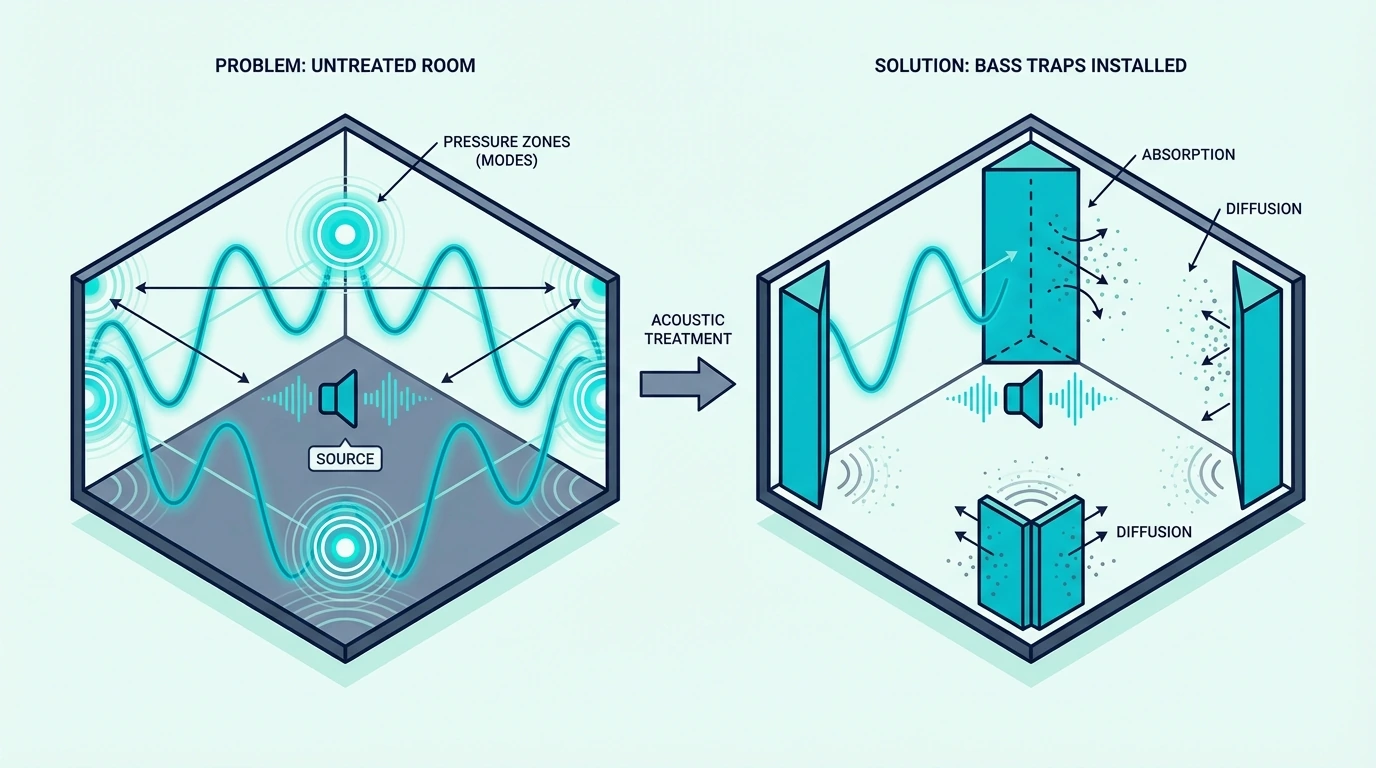
When you play music or speak in a room, low-frequency sound waves bounce between parallel surfaces. At certain frequencies determined by your room’s dimensions, the reflected waves overlap with the incoming waves and create standing waves — zones where bass is dramatically louder or quieter depending on where you stand.
These standing waves pile up in corners where two or three surfaces meet. A 15-foot room has a fundamental mode around 37 Hz, with harmonics at 74 Hz and 111 Hz that stack at specific frequencies in every corner.
Placing bass traps in those corners absorbs the excess pressure before it builds up. The result is flatter, more even bass response across your entire room — not less bass, but more accurate bass.
What Bass Traps Fix vs What They Can’t Fix
Bass traps fix standing waves, modal ringing, boomy low end, and uneven frequency response caused by your room’s geometry. They make mixing, recording, and critical listening dramatically more accurate.
They cannot fix sound transmission through walls, impact noise from footsteps above, HVAC rumble conducted through ductwork, or bass vibrations from a neighbor’s subwoofer. Those problems require structural solutions — added mass, decoupled construction, and sealed penetrations — and understanding whether bass traps are even necessary for your situation saves time and money.
The test is simple: if the problem exists even when nobody is playing audio in your room, bass traps won’t help. If the problem only appears when you’re playing or recording sound, bass traps are exactly the right tool.
Can Bass Traps Block Outside Noise?
This is the question behind the primary keyword, and the direct answer is no — bass traps cannot block outside noise. Here’s the physics of why.
Sound transmission through a wall depends on the wall’s mass, stiffness, and how well it’s sealed. A 100 Hz bass note from a neighbor’s subwoofer vibrates your shared wall like a drum head, and that vibration re-radiates as sound on your side.
To stop that transmission, you need to either add mass (so the wall is harder to vibrate), decouple the surfaces (so vibration can’t transfer between layers), or both. Dense materials like Trademark Soundproofing mass-loaded vinyl, extra layers of 5/8-inch drywall, and resilient channel mounting systems address sound transmission.
A bass trap on your side of the wall absorbs reflected sound inside your room, but the original transmission still happens. The bass still enters — the trap just catches some of it after it’s already inside, which might reduce the perceived volume slightly but won’t solve the core problem.
If outside bass noise is your issue, start with sealing every air gap (outlets, door sweeps, window frames) — air gaps leak more bass than you’d expect. Then consider adding mass to the weakest surface, which is usually the door or window.
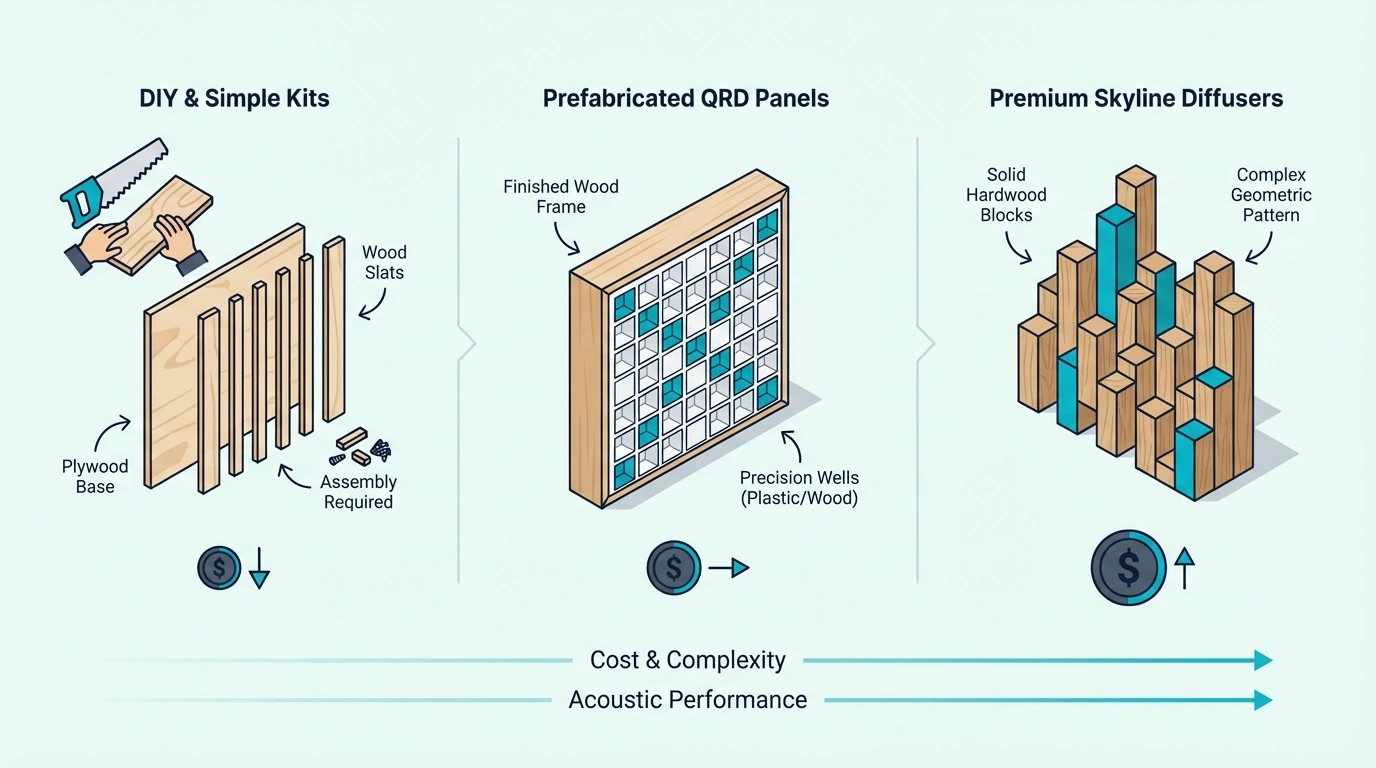
Do Foam Bass Traps Work As Well As Fiberglass?
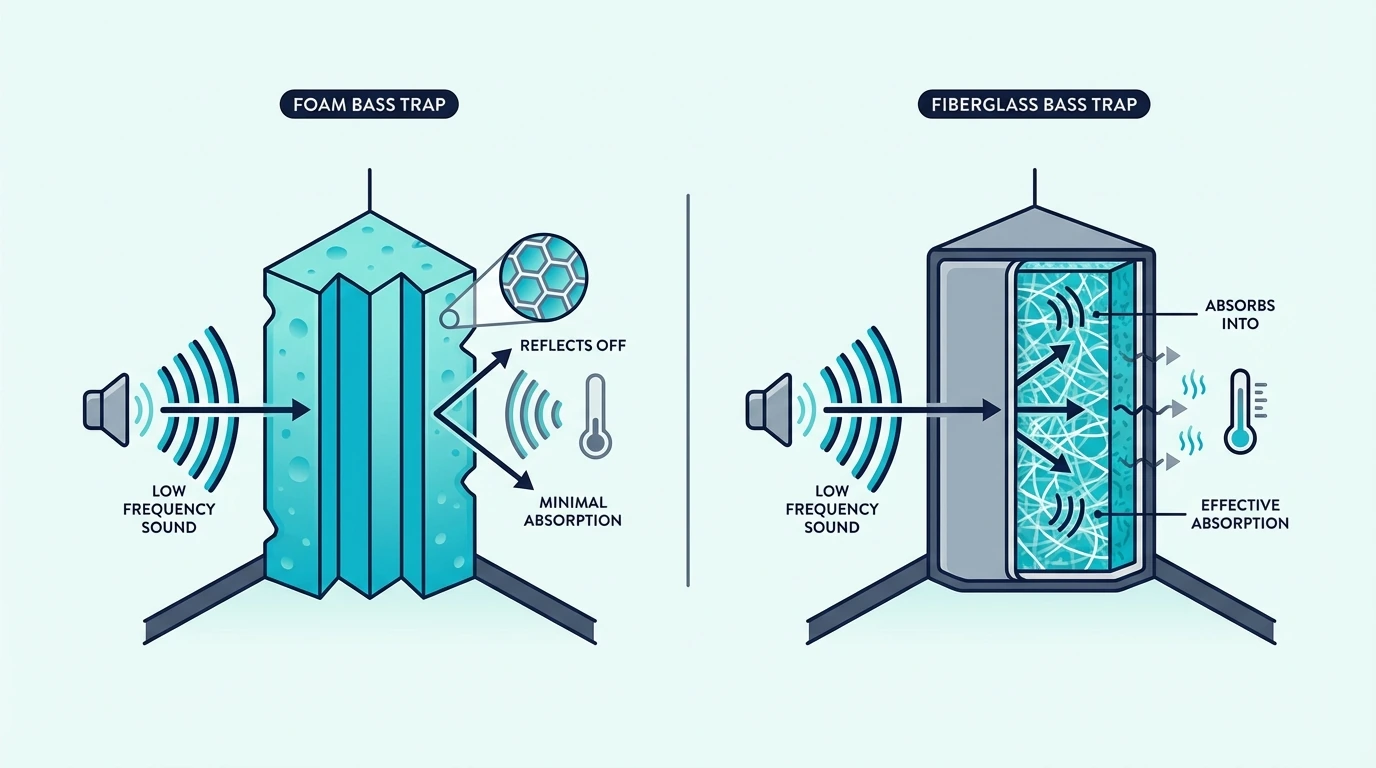
Foam bass traps work, but with a significant asterisk — they’re effective at mid-to-high frequencies and much less effective at actual bass frequencies below 200 Hz.
The triangular foam wedges you see marketed as “bass traps” typically absorb well from about 250 Hz upward. Below that, their density is too low and their thickness too shallow to interact meaningfully with long bass wavelengths.
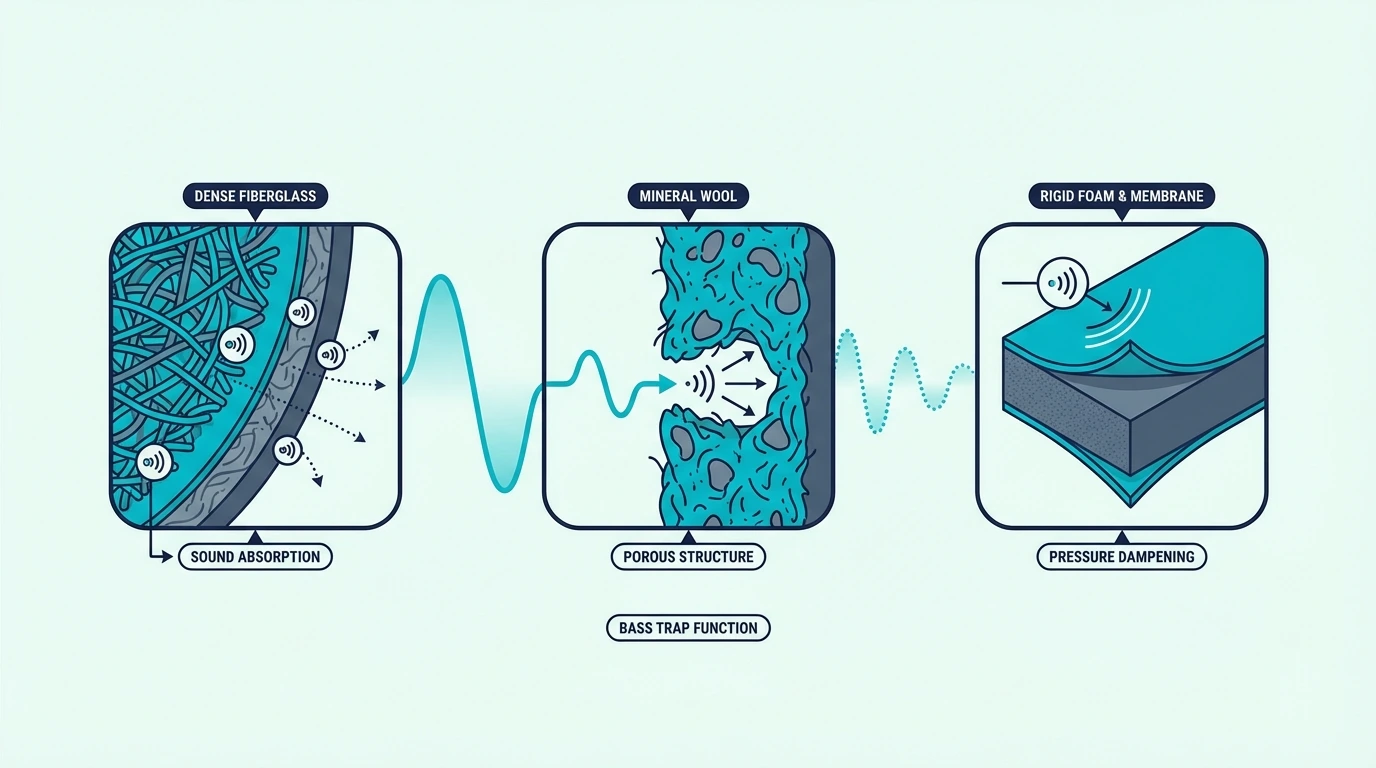
Rigid fiberglass (like Owens Corning 703 or 705) and mineral wool (like Rockwool) are denser, which means more friction when sound passes through the material. A 4-inch rigid fiberglass panel absorbs meaningfully down to 100 Hz, while foam of the same thickness drops off sharply below 250 Hz.
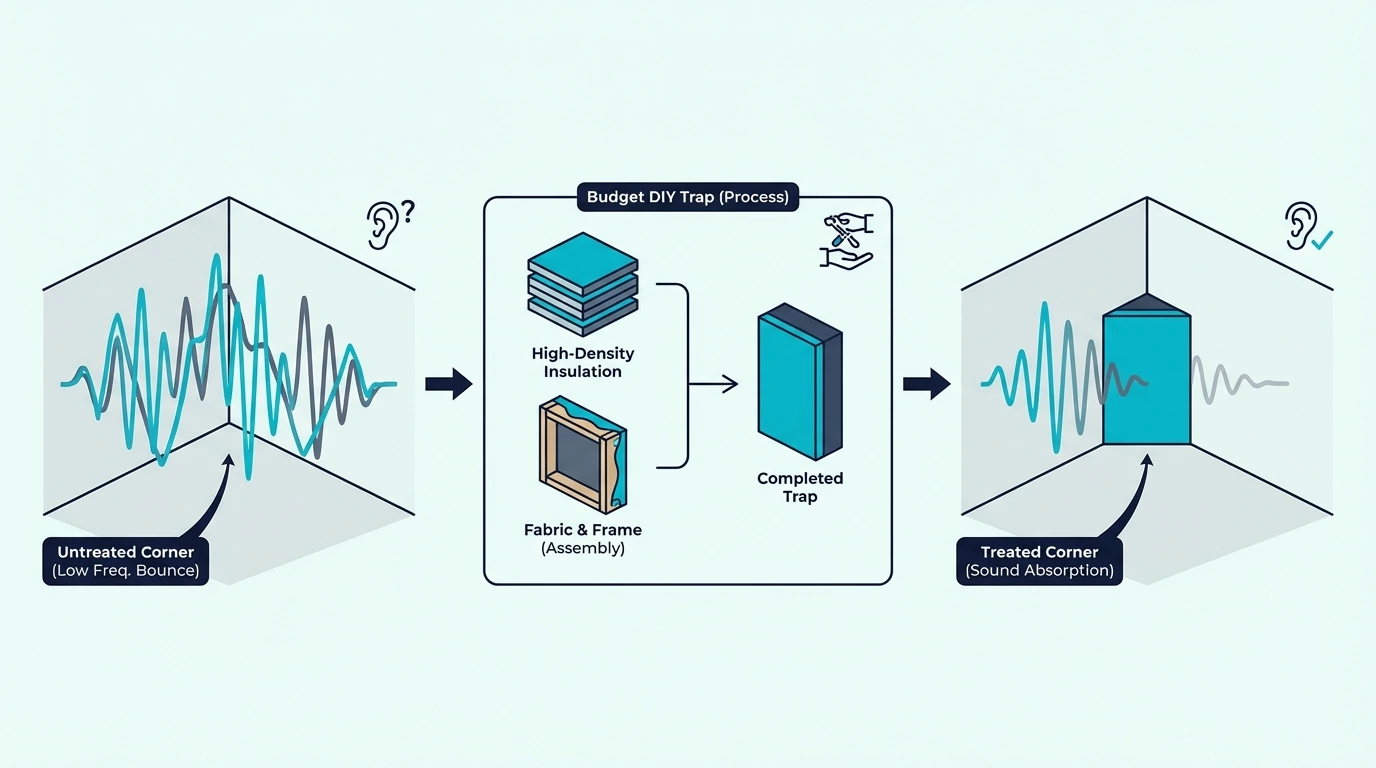
That said, foam options like the 2 Pack Delta Bass Traps for Wall Corners still clean up the 250-500 Hz muddiness range in your corners. For budget-conscious setups where full fiberglass treatment isn’t feasible, foam traps combined with proper placement in tri-corners deliver noticeable improvement — just not deep bass control.
The honest recommendation: if your budget allows, go with rigid fiberglass or mineral wool at 4+ inches. If not, foam traps are better than nothing and far better than untreated corners.
Do Cheap Bass Traps Work?
Cheap bass traps work — up to a point. The question is whether that point solves your specific problem.
Budget foam traps can still make a modest room sound cleaner, especially when you’re fighting upper-bass buildup in small corners. You’ll hear reduced muddiness, tighter vocal clarity, and less boxiness long before you solve true sub-bass problems.
But if your problem is a booming 60 Hz room mode that makes mixing impossible, those budget foam traps won’t reach that low. You’d need thicker treatment — 4-6 inches of rigid fiberglass or mineral wool, ideally with an air gap behind it.
The diminishing returns curve for bass traps is steep — going from zero treatment to basic corner traps delivers the biggest jump in quality. Going from basic foam to professional fiberglass yields a smaller but real improvement, while upgrading from good fiberglass to premium custom traps yields marginal gains that only matter in critical listening environments.
For home studios, the sweet spot is usually a real corner trap with depth and density, such as the ATS Acoustics Corner Bass Trap. A purpose-built trap like that handles everything from deep bass through the midrange far better than thin foam wedges, which is why stepping up pays off once accuracy matters.
The Bottom Line
Bass traps are one of the most effective acoustic treatments you can add to any room — but only for the problems they’re designed to solve. They tame internal room acoustics brilliantly and have zero effect on outside noise transmission.
If your room sounds muddy and boomy, bass traps are the answer. If your neighbor’s subwoofer is the problem, you need mass and isolation — not absorption.
Frequently Asked Questions
Do bass traps reduce noise?
Bass traps reduce internal acoustic problems — standing waves, boomy corners, and uneven bass response inside your room. They do not reduce noise from external sources like traffic, neighbors, or construction because that requires sound isolation, not absorption.
Where not to put bass traps?
Avoid placing bass traps flat against the center of a wall — bass energy is weakest there, and corners where two or three surfaces meet are where bass pressure accumulates most. Also avoid blocking HVAC vents or placing foam traps near heat sources.
How to reduce bass noise from neighbours?
Bass from neighbors travels through your shared wall structure, so you need mass-based solutions — not acoustic treatment. Add layers of 5/8-inch drywall with Green Glue between them, seal every air gap around outlets and door frames, and consider resilient channel mounting to decouple the new drywall from the existing wall.
What Is A Bass Trap — And Why Your Room Sounds Wrong Without One
What is a bass trap — it’s the single most effective piece of acoustic treatment you can add to a room, but most people either skip it entirely or confuse it with regular acoustic panels.
That muddy, boomy low end you hear when you clap in your studio or home theater isn’t a speaker problem — it’s your room fighting back with uncontrolled bass energy piling up in the corners.
The right bass trap fixes that by converting excess low-frequency sound into heat, so you get tighter bass response and cleaner mixes that actually translate to other systems.
You don’t need to cover every wall — corners are where bass energy is strongest, and even two or four traps placed correctly make a dramatic difference.
Below, this guide breaks down how bass traps work, the different types available, what they’re made of, and where standing waves cause the most damage in your specific room.
Quick Takeaway
A bass trap is an acoustic treatment device that absorbs low-frequency sound energy to reduce boomy, muddy acoustics in a room. Place porous absorber bass traps in the corners where walls meet each other and the ceiling — that’s where bass energy accumulates most. Even a few well-placed traps dramatically improve bass response for recording studios, home theaters, and listening rooms.
What Is A Bass Trap — And Why Does It Matter?
A bass trap does exactly what the name suggests — it traps bass frequencies that would otherwise bounce around your room unchecked. Here’s why that matters more than most people realize.
The Core Concept
Every room has a personality when it comes to sound, and bass is where that personality gets ugly. Low frequencies have wavelengths measured in feet — a 100 Hz tone has a wavelength of about 11 feet — which means they interact with your room’s walls, floor, and ceiling in ways that shorter wavelengths never do.
Those interactions create spots where bass is unnaturally loud and other spots where it nearly disappears. You might sit at your mixing desk and hear booming 80 Hz, then move two feet to the left and the bass drops by 10 dB.
A bass trap absorbs that excess energy before it has the chance to pile up. Think of it like a sponge placed where water pools — it doesn’t remove all the water, but it stops the flooding.
The result isn’t less bass overall. It’s more even, more accurate bass across your entire listening environment.
What A Bass Trap Is Not
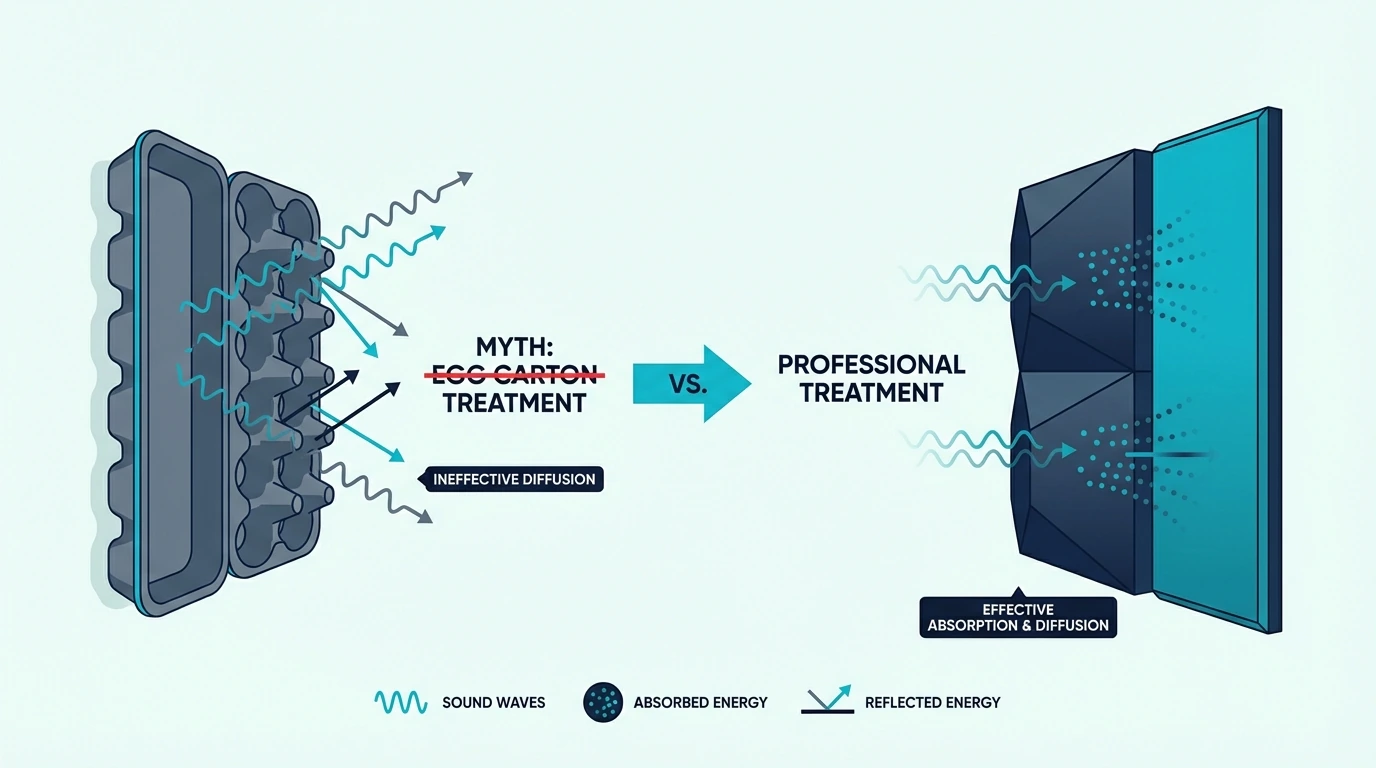
The biggest misconception is that bass traps and acoustic foam do the same job. Standard acoustic foam panels — the pyramid and wedge shapes you see everywhere — handle mid and high frequencies well, but they barely touch anything below 300 Hz.
Bass traps are thicker, denser, and specifically designed to absorb the low-frequency sound that regular panels ignore. A 2-inch foam wedge on your wall won’t fix a 60 Hz buildup in your corner — the wavelength is simply too long for thin material to absorb.
That distinction matters because people spend hundreds on foam, wonder why their room still sounds muddy, and blame their speakers or their ears. The room was the problem the entire time.
How Does Bass Absorption Work?
Now that you know what a bass trap does, the natural question is how — and the physics behind it explain why placement and thickness matter so much.
Absorption vs Dissipation
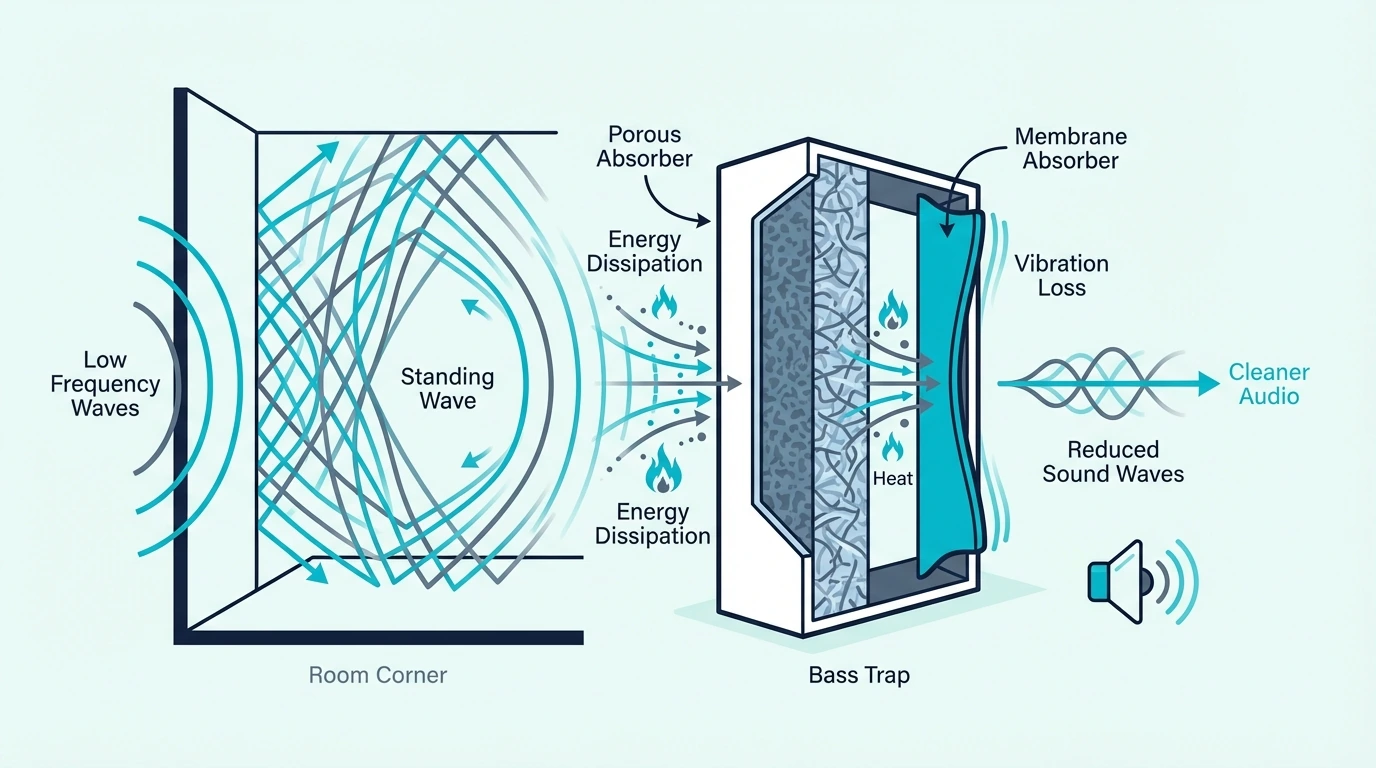
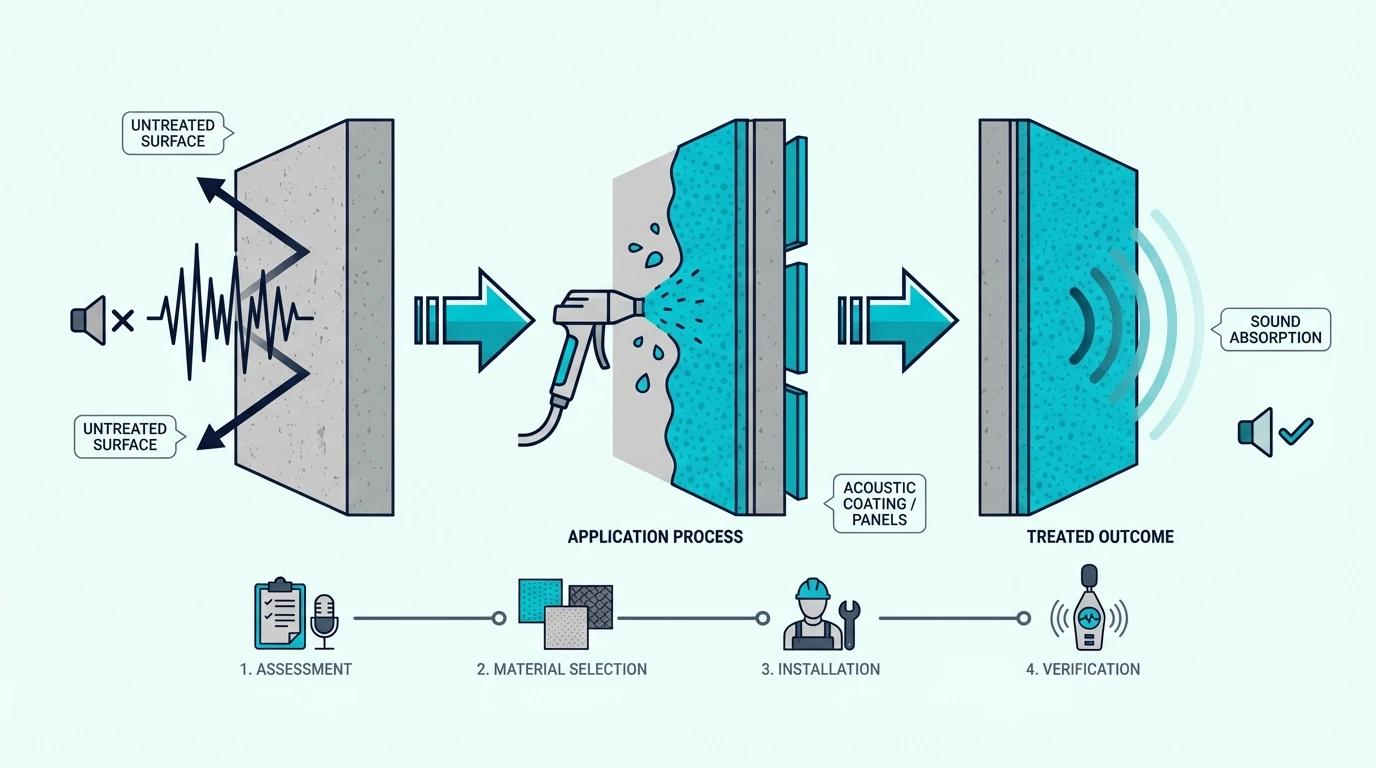
When sound waves hit a porous absorber bass trap, the air molecules vibrating inside the material rub against the fibers. That friction converts acoustic energy into a tiny amount of heat — so small you’d never feel it, but enough to remove the sound from the room.
The key word here is “porous.” The material needs air passages — microscopic channels between fibers — for the sound wave to enter and lose energy. A solid wall reflects sound; a porous absorber lets sound in and doesn’t let it back out.
That’s why the right material determines everything about a bass trap’s performance. Dense fiberglass and mineral wool have the ideal fiber structure for friction-based absorption across a wide frequency range.
Why Low Frequencies Are Harder To Control
Higher frequencies have short wavelengths — a 4,000 Hz tone is about 3.4 inches long. A 2-inch panel intercepts a significant portion of that wavelength, so it absorbs effectively.
Drop down to 80 Hz, and the wavelength stretches to over 14 feet. A 2-inch panel can’t even interact with a meaningful fraction of that wave.
You need much thicker treatment — typically 4 inches minimum, with 6+ inches being far more effective.
That thickness requirement is exactly why bass traps look different from regular acoustic panels. They’re bulkier because they have to be — physics doesn’t negotiate.
Air gaps behind the trap amplify the effect. Mounting a 4-inch trap with a 4-inch air gap behind it gives you performance closer to an 8-inch solid trap, because the air gap positions the absorber where the sound wave’s particle velocity is highest.
What Are The Different Types Of Bass Traps?
The absorption principle stays the same, but bass traps split into two fundamentally different categories — and picking the wrong one for your situation wastes money. Here’s what separates them.
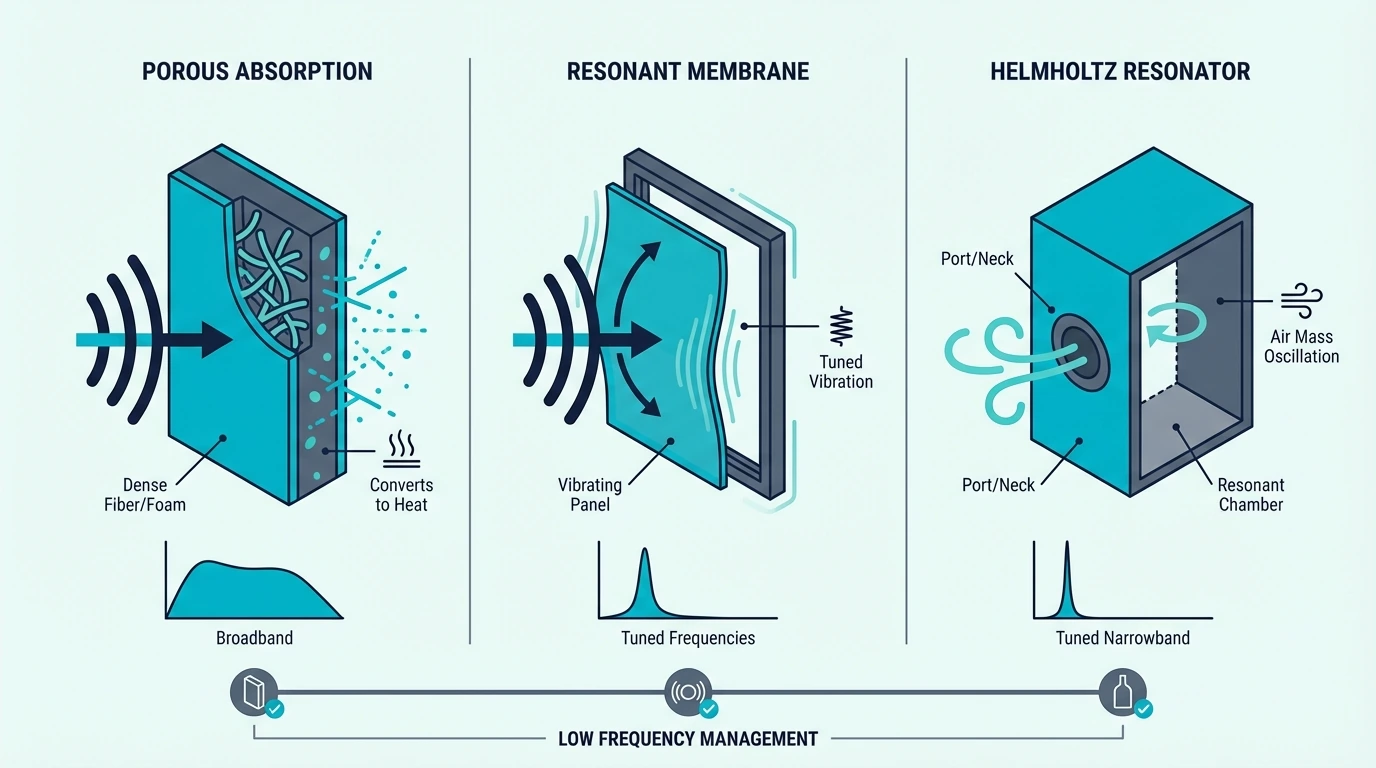
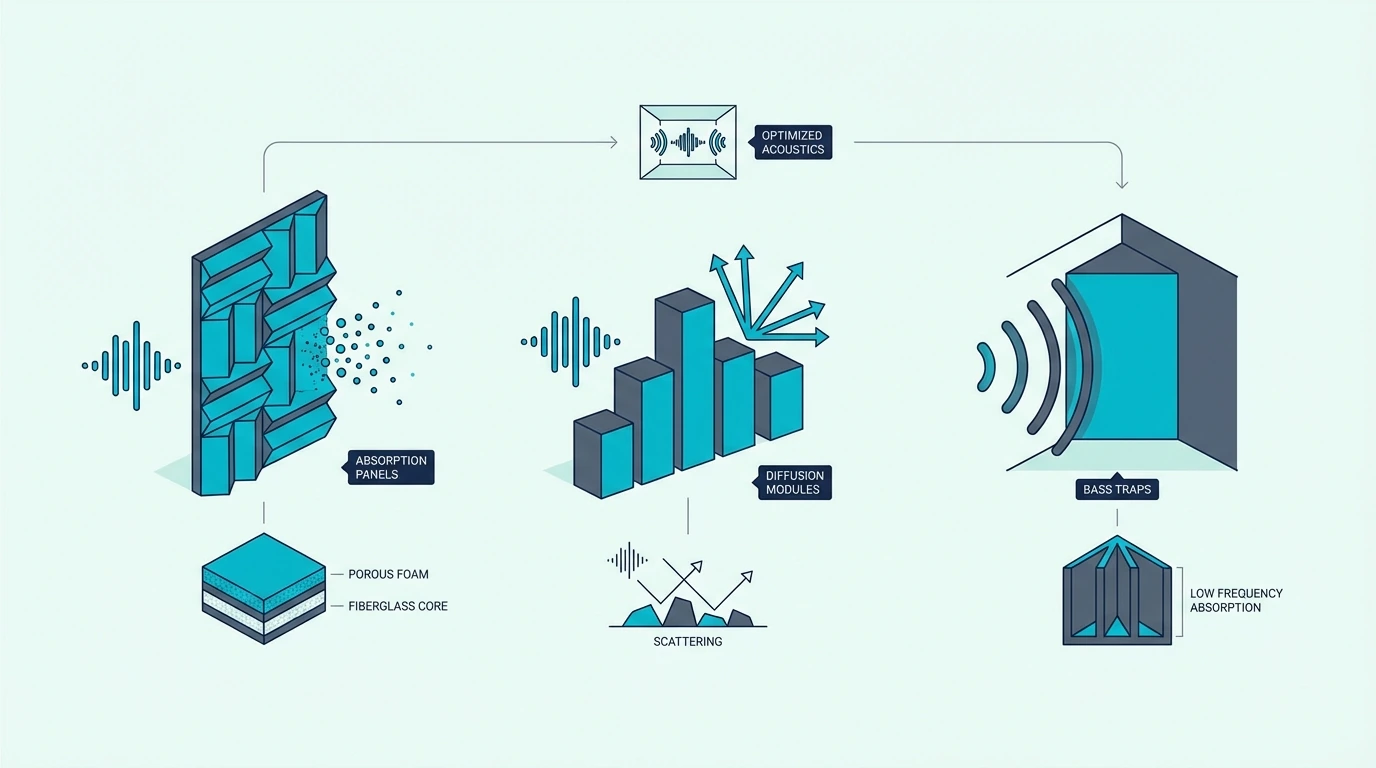
Porous Absorber Bass Traps
The most common type, and the one most people should start with. Porous absorbers use dense fibrous material — usually rigid fiberglass or mineral wool — to absorb sound across a broad range of frequencies.
Their biggest strength is also their simplest: they work on everything from deep bass up through the highs. A thick porous absorber in a corner doesn’t just tame the 60 Hz boom — it cleans up the 200 Hz muddiness and the 500 Hz boxiness too.
The DIY crowd loves porous traps because the build is simple — a wooden frame stuffed with Owens Corning 703 or Rockwool, wrapped in Guilford of Maine Sona acoustical fabric. Commercial versions from companies like GIK Acoustics and ATS use the same principle with tighter quality control.
The tradeoff is size — effective porous bass traps need to be thick. A 2-inch panel marketed as a “bass trap” won’t do much below 250 Hz, and you need 4-6 inches of dense material to reach into the real bass range.
Resonant Absorber Bass Traps
Where porous absorbers work broadband, resonant absorbers are tuned to specific frequency ranges. The two main subtypes are Helmholtz resonators and membrane (diaphragmatic) absorbers.
A Helmholtz resonator uses an enclosed cavity with a precisely sized opening — when bass hits the opening at the trap’s tuned frequency, the air inside resonates and the energy gets absorbed. Membrane absorbers work differently: a flexible front panel vibrates at its resonant frequency, converting that specific band of bass energy into heat through internal damping.
The advantage of resonant traps is surgical precision — if you have a vicious 63 Hz room mode that porous traps only partially tame, a tuned membrane absorber built for that exact frequency can knock it down hard without touching anything else.
The disadvantage is equally clear: they only work in a narrow band. And they’re harder to build correctly — the tuning depends on cavity depth, membrane mass, and damping material, and getting any of those wrong shifts the absorption away from your target frequency.
Achieving Balanced Bass With The Right Type
Most recording studios and home theaters get the best results by starting with porous absorbers in every corner and adding resonant absorbers only if measurement reveals a stubborn room mode that the broadband traps can’t fully solve.
Jumping straight to Helmholtz resonators without addressing broadband bass first is like trying to tune a guitar with one string wildly out — you fix the obvious problems first, then fine-tune. The full breakdown of trap types covers each design in more detail.
What Are Bass Traps Used For?
The physics and types make sense in theory — so what does this actually look like in a real room? Every use case benefits differently.
Recording studios rely on bass traps to get an accurate listening environment. Without them, your studio monitors lie to you — that bass-heavy mix you’re hearing at your desk might sound thin three feet away because the room modes are coloring what you hear.
Engineers who treat their rooms with proper bass trapping consistently report tighter low end, better stereo imaging, and mixes that translate to car speakers and headphones without surprises.
Home theaters face a different version of the same problem. That action movie explosion that rattles your chest in one seat turns into a muddy thud in another.
Bass traps smooth out the response across more seats, so the entire couch gets impactful bass instead of just the lucky center spot. Proper bass trapping is necessary in any room where consistent bass reproduction matters.
Even podcast studios and voiceover booths benefit. Low-frequency rumble from HVAC systems, traffic, and footsteps gets amplified by room modes.
Bass traps reduce that ambient buildup so your recordings stay clean without aggressive high-pass filtering that strips warmth from voices.
A solid entry point for any of these scenarios is the Pulse corner bass trap 4-pack, which gives you a purpose-built starting point for treating multiple corners without building frames yourself.
What Are Bass Traps Made Of?
The material inside a bass trap determines how much bass it actually absorbs — and the difference between good and bad materials is massive. Here’s what works, what doesn’t, and why.
Rigid Fiberglass vs Mineral Wool
The two workhorses of professional bass trapping are rigid fiberglass (like Owens Corning 703 or 705) and mineral wool (like Rockwool Safe’n’Sound or Rockwool ComfortBoard).
Rigid fiberglass boards have a higher density — OC 703 hits about 3 lb/ft³, and OC 705 reaches 6 lb/ft³. That density means more fiber per cubic inch, more friction when sound passes through, and stronger absorption particularly in the low-mid range.
OC 705 is the go-to for dedicated bass traps because its density handles lower frequencies more effectively.
Mineral wool (Rockwool) is slightly less dense but significantly cheaper and easier to source. For most home studio builds, the performance difference between mineral wool and rigid fiberglass in a corner trap is smaller than you’d expect — especially when the trap is 4+ inches thick with an air gap behind it.
A DIY-friendly example is Rockboard 60 mineral wool boards, which give you a rigid core that’s easy to frame into a broadband trap.
The real-world difference shows up below 100 Hz. OC 705 at 4 inches absorbs meaningfully at 80 Hz, while equivalent mineral wool needs 6 inches to match.
If space is tight, fiberglass wins. If budget is tight, mineral wool gets you 80% of the way there.
Can Acoustic Foam Work As A Bass Trap?
Foam bass traps exist — you’ve probably seen the triangular corner wedges. They absorb mid and high frequencies effectively, but their performance drops off sharply below 250 Hz.
The reason is density — acoustic foam is far less dense than fiberglass or mineral wool, typically under 2 lb/ft³. That lower density means fewer fibers for the sound wave to interact with, and low-frequency waves pass right through without losing much.
If you want the best possible bass absorption, step up from lightweight foam wedges to thick fiberglass or mineral-wool traps instead. Foam can help with 250-500 Hz muddiness, but true sub-150 Hz control comes from dense material and real thickness, not just a corner shape.
How Do Bass Traps Handle Standing Waves And Room Modes?
Everything above explains what bass traps do and how they do it — but the reason they’re necessary in the first place comes down to one specific room phenomenon that most people have never heard of.
Standing waves form when bass frequencies bounce between two parallel surfaces — like your front and back walls — and the reflected wave overlaps with the incoming wave. At certain frequencies determined by the distance between those walls, the waves reinforce each other and create a resonance called a room mode.
Every room has multiple modes — a 15-foot room has a fundamental axial mode at about 37 Hz, with harmonics at 74 Hz, 111 Hz, and so on. Those are the frequencies where your room artificially boosts bass, and the places where that boost is strongest are the corners where two or three surfaces meet.
That’s the scientific reason bass trap placement always starts with corners. The corners are where the pressure from multiple room modes stacks up — a tri-corner where two walls meet the ceiling sees pressure buildup from three different axial modes simultaneously.
Try this: play a steady bass tone at your room’s fundamental frequency (you can calculate it by dividing 1,130 by twice your room’s length in feet). Walk from the center of the room toward a corner.
You’ll hear the bass get dramatically louder. That’s the standing wave in action — and that’s exactly what a bass trap in that corner would absorb.
Without treatment, those modes don’t just make bass louder — they make it uneven. One frequency booms while the frequency 20 Hz above it practically vanishes.
The right number of traps in the right corners flattens that response so every note in the bass range plays at roughly the same level.
The Bottom Line
The single most impactful acoustic upgrade for any room isn’t fancy speakers or expensive microphones — it’s addressing the bass energy that your room’s geometry amplifies and distorts.
Start with porous absorber bass traps in two or four corners, as thick as your space allows, and you’ll hear the difference on your very first listening session. Everything else — resonant absorbers, diffusers, broadband panels — builds on that foundation.
Frequently Asked Questions
What is the purpose of a bass trap?
A bass trap absorbs excess low-frequency sound energy that builds up in a room, particularly in corners where walls meet. Without them, bass frequencies resonate unevenly — some notes boom while others disappear — which ruins the accuracy of everything you hear, record, or mix in that space.
How do I know if I need bass traps?
Clap your hands in the center of your room and listen for a low-frequency “ring” or sustained rumble. If bass sounds boomy in some spots and thin in others, or your mixes consistently have bass problems when you play them elsewhere, your room has untreated modal issues that bass traps would fix.
What is the difference between a bass trap and acoustic panel?
Standard acoustic panels are typically 1-2 inches thick and target mid-to-high frequencies (above 300 Hz). Bass traps are 4+ inches thick with denser material, designed specifically to absorb low frequencies below 300 Hz.
Both are acoustic treatment — bass traps just go deeper into the frequency range.
Where not to put bass traps?
Avoid placing bass traps flat against the center of a wall with no air gap — that position wastes their potential because bass energy is weakest at wall centers and strongest at corners. Also avoid blocking ceiling-mounted fixtures or HVAC vents, and never place foam traps near heat sources that could degrade the material.
Best Acoustic Treatment Brands (Ranked By Material Quality And Performance)
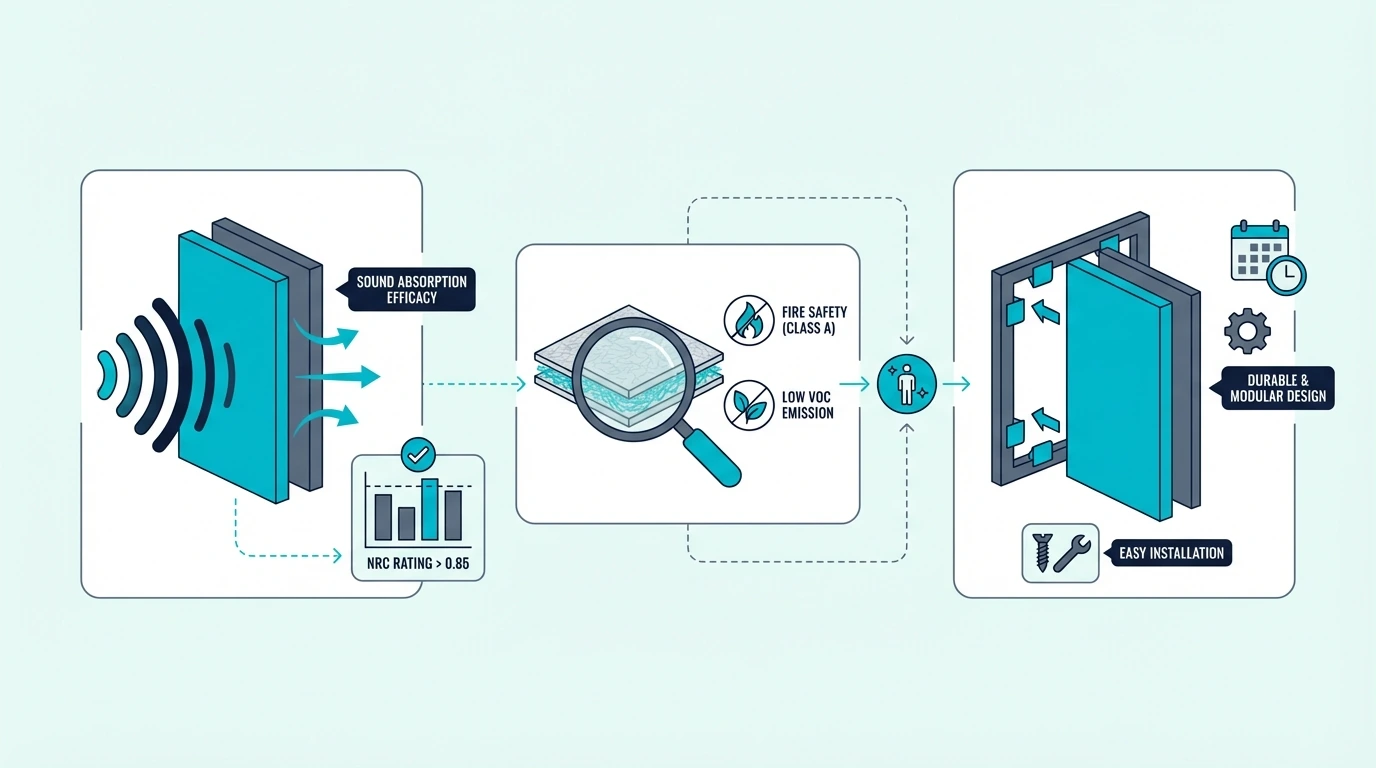
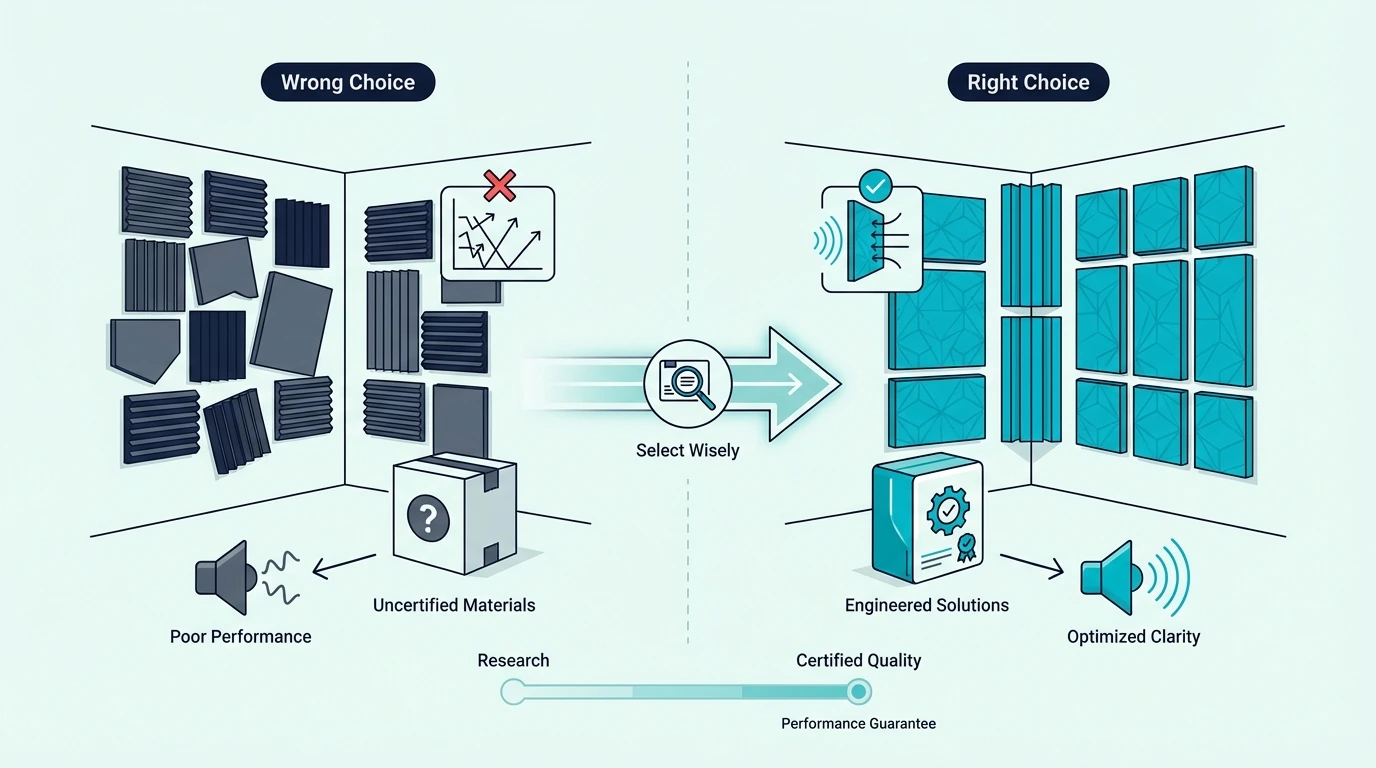
Best acoustic treatment brands are the ones that use dense fiberglass or mineral wool cores, publish tested NRC ratings, and offer a full product range including panels, bass traps, and mounting hardware — but most buyers never check these details and end up with thin foam panels from brands that prioritize marketing over acoustic performance.
The difference between a quality acoustic treatment brand and a mediocre one is not subtle. A 2-inch fiberglass panel from a reputable brand absorbs broadband frequencies effectively, while a 1-inch foam panel from a cheap brand barely touches frequencies below 1,000 Hz.
This guide ranks the best acoustic treatment brands available on Amazon based on material quality, absorption performance, product range, and value for money. Every brand listed here uses fiberglass or mineral wool — the two materials that professional acousticians actually specify for studio treatment.
Below you will find detailed brand profiles, direct product comparisons, selection criteria explained, and specific recommendations for different budgets and room types. Start with the selection criteria section if you want to understand what separates a good brand from a bad one before looking at specific products.
Quick Takeaway
The best acoustic treatment brands use fiberglass or mineral wool cores with published NRC ratings. UMIACOUSTICS and Olanglab lead the mid-range with pre-built fiberglass panels. Rockboard dominates the DIY insulation category with high-density mineral wool boards. ATS Acoustics offers professional-grade dedicated bass traps. SoundAssured provides essential accessories for DIY builders. Avoid any brand that only sells thin foam panels without absorption data — foam is cosmetic, not acoustic treatment.
How We Chose The Best Acoustic Treatment Brands
Every brand in this guide was evaluated against five criteria that determine real-world acoustic performance. Marketing claims and Amazon badge status were not factors — only measurable product characteristics mattered.
The acoustic treatment market on Amazon is flooded with products that look similar but perform very differently. These five criteria separate brands that deliver genuine sound absorption from brands that sell decorative wall hangings marketed as treatment.
Material Quality And Density
The core material determines absorption performance. Fiberglass and mineral wool are the only materials that provide effective broadband absorption across the full frequency range relevant to music production and speech recording.
Dense fiberglass (typically 3-6 lb per cubic foot) absorbs effectively from approximately 250 Hz upward in a 2-inch panel. Mineral wool at 6-8 lb per cubic foot extends absorption slightly deeper into the low frequencies due to its higher density.
Foam — even thick acoustic foam — has significantly lower density than fiberglass or mineral wool. This means foam panels absorb primarily high frequencies and provide minimal absorption below 500 Hz.
The best treatment materials guide covers why material density directly determines low-frequency absorption performance.
Any brand that only sells foam panels was excluded from this guide. Foam has a narrow use case (flutter echo reduction in vocal booths), but it is not a substitute for proper broadband treatment.
The density difference is dramatic. A typical acoustic foam panel weighs approximately 0.5-1 lb per cubic foot.
A fiberglass panel at 3 lb per cubic foot is 3-6 times denser, which translates directly to 3-6 times more absorption at low frequencies. This is not a marginal difference — it is the difference between treatment that works and treatment that does not.
NRC Ratings And Published Data
NRC (Noise Reduction Coefficient) is the standard measure of absorption performance. It ranges from 0 (no absorption) to 1.0 (total absorption).
The rating represents the average absorption across four test frequencies: 250 Hz, 500 Hz, 1,000 Hz, and 2,000 Hz. Higher NRC means more sound energy is absorbed rather than reflected back into the room.
Reputable brands publish NRC data for their products. This allows direct comparison between panels of different brands, thicknesses, and materials.
Brands that do not publish NRC data are either untested or underperforming — both are reasons to avoid them.
A quality 2-inch fiberglass panel typically achieves an NRC of 0.85-1.0. A quality 4-inch panel or a 2-inch panel with an air gap reaches NRC 1.0 or higher at specific frequencies. The best acoustic panels guide ranks panels by verified NRC performance.
NRC above 1.0 is possible because the coefficient measures average absorption and diffraction effects at panel edges can contribute additional absorption beyond the panel’s physical surface area. An NRC of 1.05-1.10 is common for thick, well-mounted fiberglass panels.
Product Range
The best acoustic treatment brands offer more than one product type. A complete treatment setup requires wall panels for first reflection points, bass traps for corners, and potentially ceiling clouds for overhead reflections.
Brands that only sell one panel size in one thickness are limited. The best brands offer multiple thicknesses (1-inch, 2-inch, 4-inch), multiple sizes (24×24, 24×48), bass traps, and mounting hardware.
A brand with a complete product range allows you to source your entire treatment setup from one manufacturer. This ensures consistent aesthetics, compatible mounting systems, and a single point of contact for warranty or support issues.
Pre-built panels should arrive with clean fabric wrapping, rigid frames, and no exposed insulation. Poorly finished panels shed fiberglass particles, look unprofessional, and may not hang properly.
For raw insulation boards (used in DIY builds), build quality means consistent density, clean cuts, and rigid boards that hold their shape when mounted vertically. Boards that sag or crumble are unusable for panel construction.
Edge integrity is another indicator. Quality insulation boards maintain crisp edges when cut with a bread knife or drywall saw.
Boards that crumble or fray at the edges produce messy panels and require extra fabric to conceal imperfections. Rockboard 60 scores well on edge integrity due to its high density, which holds the mineral wool fibers together firmly during cutting.
Value For Money
Value is measured in cost per square foot of effective absorption — not just the sticker price. A $90 pack of four 24×24-inch panels covers 16 square feet at $5.63 per square foot.
A $160 pack of two 24×48-inch panels covers 16 square feet at $10.00 per square foot.
Both may deliver identical absorption performance, but the first option costs 44% less per square foot. This guide factors in cost-per-square-foot alongside absorption performance to identify the best value at each price tier.
DIY builds shift the value calculation further. Raw insulation boards cost $2-4 per square foot, and frame materials add $1-2 per square foot.
A complete DIY panel costs approximately $3-6 per square foot — half the price of most pre-built panels with equivalent or better absorption. The savings compound quickly when treating an entire room that requires 10-20 panels.
What Should You Look For In An Acoustic Treatment Brand?
Before comparing specific brands, you need to know what separates effective acoustic treatment from decorative wall panels that happen to look like treatment. The features that matter most are not the ones listed on Amazon product pages.
Core Material Is Everything
The single most important factor is the core material. Fiberglass and mineral wool are the only materials that provide meaningful broadband absorption for music production and recording.
Fiberglass panels use rigid fiberglass boards (like Owens Corning 703 or equivalent) wrapped in acoustically transparent fabric. The fiberglass converts sound energy to heat through friction as sound waves pass through the porous material.
The denser the fiberglass, the more friction occurs per unit of thickness, which is why higher-density boards absorb more effectively at lower frequencies. A 3 lb per cubic foot board absorbs noticeably more bass than a 1.5 lb per cubic foot board of the same dimensions.
Mineral wool panels use dense rockwool boards (like Rockboard 60 or equivalent) in the same configuration. Mineral wool is slightly denser than fiberglass at the same thickness, which gives it a marginal advantage in low-frequency absorption.
Both materials are fire-resistant, moisture-resistant, and dimensionally stable over time. Neither degrades or loses absorption performance with age, which means panels built with quality fiberglass or mineral wool will perform identically ten years from now.
The best fiberglass panels guide provides detailed absorption coefficient data for different fiberglass densities and thicknesses. The best studio panels guide covers specific insulation board differences for recording environments.
Thickness Determines Low-Frequency Reach
A 1-inch panel absorbs effectively above approximately 500 Hz. A 2-inch panel extends down to approximately 250 Hz.
A 4-inch panel reaches approximately 125 Hz. Each doubling of thickness extends the effective absorption range approximately one octave lower.
For music production, 2-inch panels are the minimum useful thickness. For bass-heavy genres or rooms with severe low-frequency problems, 4-inch panels or 2-inch panels with an air gap behind them are necessary.
The air gap trick is one of the most cost-effective upgrades in acoustic treatment. Mounting a 2-inch panel with a 2-inch air gap behind it provides absorption equivalent to a 4-inch panel at a fraction of the cost.
The best ceiling panels guide covers this technique extensively for overhead panels where thickness is limited by room height.
Any brand that primarily sells 1-inch panels is targeting the budget or decorative market — not serious acoustic treatment. One-inch panels are acceptable for speech-only recording (podcasts, voice-over) where bass absorption is less critical.
The exception is 1-inch panels mounted with a significant air gap (4-6 inches) behind them. The air gap extends effective absorption depth, allowing a thin panel to absorb lower frequencies than its thickness alone would suggest.
This technique is commonly used for panels mounted over reflective glass surfaces where flush mounting would block natural light.
Mounting Hardware Matters
Panels are only effective when properly mounted. The best brands include mounting hardware or offer it as an accessory.
Common mounting methods include impaling clips, Z-clips, wire hangers, and adhesive strips. Each method creates a different air gap depth behind the panel, which directly affects low-frequency absorption.
Panels mounted with an air gap between the panel and the wall absorb significantly more low-frequency energy than panels mounted flush. The best treatment kits guide covers mounting methods and their effect on absorption performance.
A 2-inch air gap is the most common configuration. Z-clips naturally create approximately a 1-inch gap, while French cleats or custom brackets can create gaps of 2-4 inches.
The optimal air gap depth depends on the target frequency range and available wall space.
Our Top Picks For Best Acoustic Treatment Brands
Each brand below is evaluated on material quality, product range, build quality, and value. Products are linked with current pricing for direct comparison.
These are not the only brands selling acoustic treatment on Amazon, but they represent the best options across different price points, product types, and user skill levels. Each brand solves a different part of the treatment equation.
UMIACOUSTICS — Best Mid-Range Fiberglass Panels
UMIACOUSTICS has established itself as one of the most popular acoustic panel brands on Amazon for home studio builders. Their panels use a fiberglass core wrapped in fabric with included mounting hardware.
The brand consistently receives high ratings from buyers who are upgrading from foam panels and hearing the difference that real fiberglass treatment makes for the first time. The jump from foam to fiberglass is the single biggest upgrade most home studio owners can make.
The standout feature is the included hanging brackets. Most competing brands sell panels without mounting hardware, which adds 10-20 dollars to the total cost and requires a separate purchase.
The brackets create a small air gap between the panel and the wall, which improves low-frequency absorption compared to panels mounted flush. This is a meaningful acoustic benefit that most buyers do not realize they are getting with the included hardware.
UMIACOUSTICS 2-inch fiberglass panels deliver broadband absorption that outperforms any foam panel at a similar price point. The 4-pack at $98.99 covers two first reflection points — the single highest-priority treatment position in any room.
At $6.19 per square foot, UMIACOUSTICS panels represent solid mid-range value. They are not the cheapest option per square foot, but the included hardware and consistent build quality justify the modest premium over bare-bones competitors.
For a typical home studio treatment setup (8-12 panels), two to three UMIACOUSTICS 4-packs at $98.99 each provides comprehensive wall coverage for $200-300. Add DIY corner bass traps and the total room treatment cost stays under $500.
The best studio panels guide explains why first reflection points are the highest-priority treatment position and how four panels at these positions produce the biggest audible improvement.
For larger rooms that need more than 8 panels, buying multiple UMIACOUSTICS 4-packs keeps the per-panel cost consistent. The brand does not offer bulk discounts, but the included mounting hardware saves $40-80 compared to buying panels and hardware separately from different brands.
Olanglab — Best Budget-To-Mid Range With Multiple Options
Olanglab offers the widest product range of any Amazon acoustic panel brand, with panels available in 1-inch and 2-inch thicknesses, 24×24-inch and 24×48-inch sizes, and various pack quantities.
This range means you can build an entire room treatment setup from a single brand. Wall panels, thicker panels for corners, and large-format panels for broad wall coverage — all from the same product line with matching aesthetics.
Consistency across products matters for rooms where panels are visible. Matching fabric color, frame profile, and overall finish across different panel sizes creates a cohesive look that mismatched brands cannot achieve.
Olanglab 1-inch fiberglass panels at $86.99 for a 4-pack are the most affordable fiberglass panels in this roundup. At $5.44 per square foot, they undercut most competitors while still using a real fiberglass core instead of foam.
The 1-inch thickness is the primary trade-off. These panels absorb effectively above 500 Hz — excellent for speech frequencies and flutter echo control — but they do not reach the low-frequency absorption that 2-inch panels provide.
For podcasters and voice-over artists, this is perfectly adequate. Speech frequencies sit primarily between 500 Hz and 4,000 Hz, which falls entirely within the effective absorption range of 1-inch fiberglass panels.
For those who need deeper absorption, Olanglab 2-inch 24×48-inch panels provide broadband absorption in a large format. Each panel covers 8 square feet, which means fewer panels needed for equivalent coverage.
The best acoustic panels guide covers treatment planning for rooms where aesthetic consistency across many panels matters. Olanglab’s matching product line makes this straightforward.
Rockboard — Best Raw Insulation For DIY Builds
Rockboard is not a finished panel brand — it is the insulation brand that DIY panel builders use inside their frames. Rockboard 60 mineral wool boards are the most popular raw material for homemade acoustic panels and bass traps.
The 6 lb per cubic foot density is the key specification. This density provides excellent absorption across a wide frequency range, including low frequencies when used in thick configurations (4-6 inches for bass traps).
At 6 lb per cubic foot, Rockboard 60 is denser than most fiberglass insulation boards (typically 3-4 lb per cubic foot). This additional density translates to measurably better low-frequency absorption, which is why mineral wool is the preferred material for bass traps specifically.
Rockboard 60 mineral wool boards in a 6-pack provide 48 square feet of raw insulation — enough to build six 24×48-inch panels or three stacked 4-inch bass traps. At $2.56 per square foot for the raw material, DIY builds using Rockboard are the most cost-effective way to treat a room.
The trade-off is labor. Building frames, cutting insulation, wrapping fabric, and mounting the finished panels takes 4-8 hours for a full room setup.
But the absorption performance matches or exceeds pre-built panels costing 3-4 times more per square foot. For anyone comfortable with basic woodworking, Rockboard DIY builds offer the highest performance-to-cost ratio available.
The best treatment materials guide provides detailed comparisons of insulation options for building panels with Rockboard and similar products.
For bass traps specifically, stacking two Rockboard 60 boards creates a 4-inch thick trap that absorbs effectively down to approximately 125 Hz. Mounting these stacked boards diagonally across room corners places the absorber at the highest-pressure point for low-frequency standing waves, which maximizes bass absorption per dollar spent.
ATS Acoustics — Best Professional-Grade Panels And Bass Traps
ATS Acoustics is a US-based manufacturer that has been producing acoustic treatment for professional studios for decades. Their products carry a premium price tag compared to Amazon marketplace brands.
However, the build quality and acoustic performance reflect professional standards that justify the investment for serious studio environments. ATS panels are the products that recording studios, broadcast facilities, and post-production houses actually install.
ATS panels use rigid fiberglass cores with precision fabric wrapping. The frames are more robust than marketplace competitors, and the finished panels hang straight without warping or sagging over time.
The company also offers a free room analysis service where you submit room dimensions and photos, and their acousticians recommend specific products and placement positions. This level of support is rare from any acoustic treatment brand and adds significant value beyond the physical products.
ATS Acoustics corner bass traps are purpose-built for the highest-pressure locations in a room. Unlike generic panels straddled across corners, these traps are designed specifically for corner mounting with optimized depth and density for low-frequency absorption.
At $249.99 per trap, ATS products are a significant investment. Treating four corners costs approximately $1,000 — compared to $200-300 for DIY traps using Rockboard insulation.
The premium buys convenience, professional build quality, and a warranty. For commercial studios where time is money and client perception matters, ATS products justify their cost.
The acoustic treatment hub explains why corners are the highest-priority treatment position and links to detailed bass trap comparison resources.
SoundAssured — Best Accessory Brand For DIY Builders
SoundAssured specializes in acoustic accessories — primarily acoustically transparent fabric for wrapping DIY panels. They are not a panel manufacturer, but their products are essential for anyone building their own treatment.
Acoustically transparent fabric looks identical to standard upholstery fabric but allows sound to pass through without reducing absorption performance. Using non-transparent fabric on a panel can reduce its NRC by 10-20%, which defeats the purpose of using quality insulation inside.
The test for acoustic transparency is simple: hold the fabric against your mouth and blow. If air passes through easily, the fabric is acoustically transparent.
If it resists airflow, it will reflect sound and reduce panel performance. Common household fabrics like canvas, denim, and vinyl are not acoustically transparent and should never be used for panel wrapping.
SoundAssured acoustical fabric at $21.95 is the most popular panel wrapping fabric on Amazon. Combined with Rockboard insulation and a simple wooden frame, this fabric completes a professional-looking DIY panel for approximately $15-25 per panel — a fraction of the cost of pre-built alternatives.
The fabric is available in multiple colors, which matters for rooms where treatment needs to blend with existing decor. Black is standard for studios, but white, grey, and other options suit living rooms, home theaters, and offices.
For DIY builders treating a home theater or living room, fabric color choice is often the most visible design decision in the entire treatment project. Choosing a color that matches or complements existing furniture prevents treatment from looking like an industrial afterthought.
The best acoustic art panels guide covers aesthetic considerations for treatment in shared or visible spaces where panel appearance affects room design.
Brand Comparison At A Glance
Brand
Material
Best For
Price Range
Pre-Built?
UMIACOUSTICS
Fiberglass
Mid-range studio panels
Mid
Yes
Olanglab
Fiberglass
Budget panels, multiple sizes
Low-Mid
Yes
Rockboard
Mineral Wool
DIY bass traps and panels
Low
No (raw boards)
ATS Acoustics
Fiberglass
Professional bass traps
Premium
Yes
SoundAssured
Fabric
DIY panel wrapping
Low
Accessory only
Brands To Avoid
Not every brand on Amazon selling “acoustic panels” provides real acoustic treatment. Several categories of products should be avoided entirely.
The products below look like treatment and are marketed as treatment, but they deliver a fraction of the absorption performance that fiberglass or mineral wool panels provide. Buying these products wastes money that could go toward real treatment.
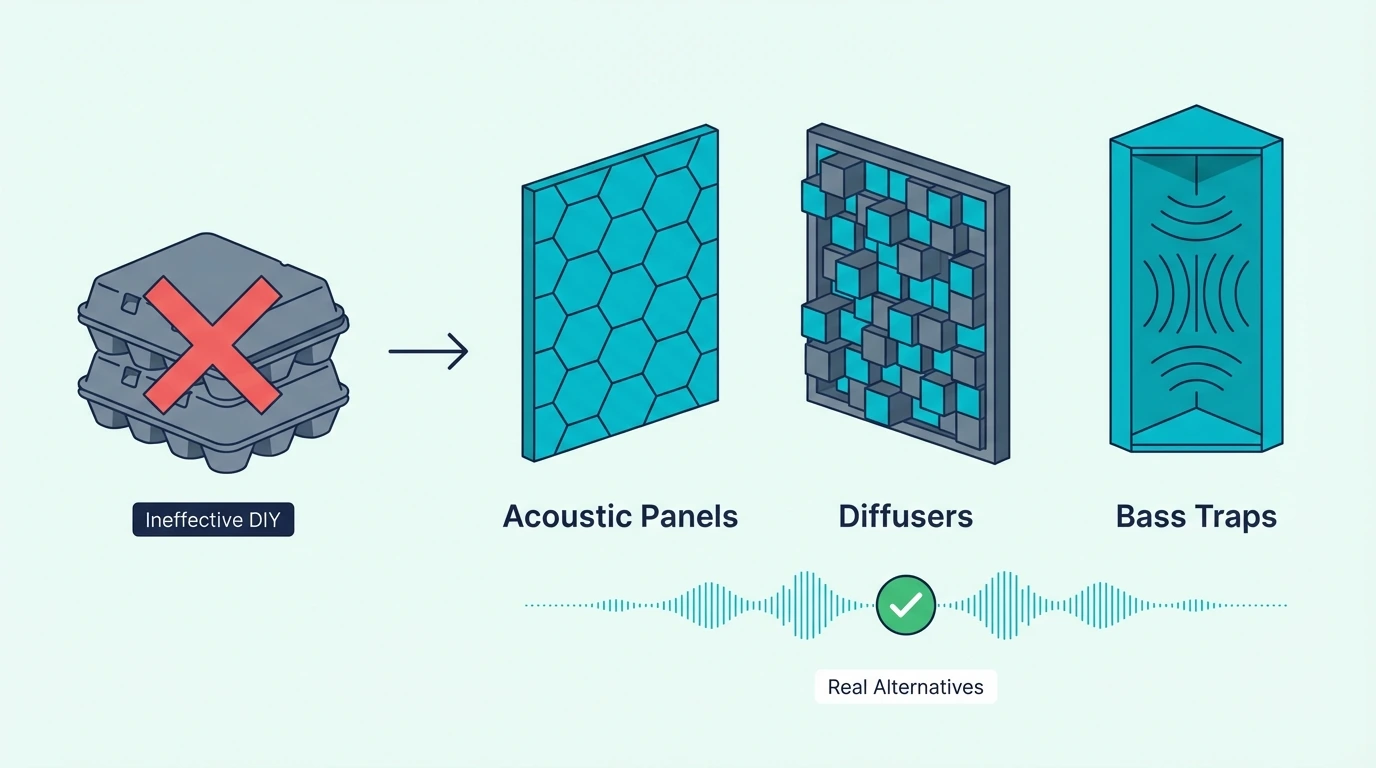
Thin Foam Panels
Brands selling 1-inch or 2-inch open-cell foam panels (typically the pyramid or wedge-shaped panels) provide minimal broadband absorption. These products absorb high frequencies (above 2,000 Hz) but do almost nothing below 500 Hz.
Pyramid and wedge shapes are designed to increase surface area, which marginally improves high-frequency absorption. But the fundamental limitation is material density — no amount of surface shaping compensates for foam’s extremely low density compared to fiberglass.
Foam panels have an NRC of approximately 0.3-0.5 in typical 2-inch configurations — compared to 0.85-1.0 for fiberglass panels of the same thickness. The acoustic treatment hub explains why thin porous materials fail at low-frequency absorption.
The visual similarity between foam and fiberglass panels is what makes this category so misleading. Both come in rectangular shapes, both mount on walls, and both are marketed as “acoustic treatment.” But the absorption performance difference is massive — a fiberglass panel absorbs 2-3 times more energy across the frequency spectrum than a foam panel of identical dimensions. The best fiberglass panels guide covers verified absorption data for panels that actually perform.
Polyester Felt Panels
Decorative felt panels (often sold as “acoustic panels” on Amazon) are designed primarily for aesthetics. They reduce flutter echo in offices and living rooms but do not provide the broadband absorption needed for music production or critical listening.
Many of these products feature attractive designs, hexagonal shapes, or custom prints that make them popular for office and living room decoration. As decoration, they are fine.
As acoustic treatment for recording or mixing, they are inadequate.
If a panel is less than 1 inch thick and made of compressed polyester felt, it is a decorative product. It may reduce high-frequency harshness in a room, but it is not acoustic treatment by any professional standard.
These panels are commonly marketed with claims like “reduces echo” or “improves room acoustics.” While technically true in a narrow sense (they do absorb some high-frequency energy), the improvement is minimal compared to fiberglass or mineral wool panels of any thickness. The best ceiling panels guide covers real fiberglass options that work for both wall and overhead treatment.
Brands Without Published Specs
Any brand that does not publish NRC data, core material specifications, or panel density should be treated with suspicion. Reputable manufacturers are transparent about performance data because their products can withstand scrutiny.
The absence of specifications usually means the product underperforms. It is more cost-effective to buy verified products from the brands listed above than to gamble on unspecified products at a slightly lower price.
A common tactic is listing “sound absorption” as a feature without providing any NRC data. Any panel absorbs some sound — even a cardboard box.
The question is how much, at which frequencies, and whether that absorption is meaningful for your application. Without published data, you cannot answer any of these questions.
How To Choose The Right Brand For Your Room
The best brand for you depends on your budget, your willingness to do DIY construction, and your room’s specific acoustic problems.
Budget Under $200
Start with Olanglab 1-inch panels for first reflection points and basic flutter echo control. A 4-pack at $86.99 handles the two most important wall positions.
Add a second 4-pack for the rear wall and ceiling reflection if budget allows. Even four panels at first reflection points produce a noticeable improvement in recording clarity.
This setup will not provide deep bass absorption, but it addresses the most audible problems in a small room. The best budget treatment guide covers treatment priorities ranked by audible impact for tight budgets.
If the room sounds boomy (excessive bass), add DIY corner treatment using heavy blankets or moving blankets folded and hung in corners. This is not ideal, but it provides some low-frequency absorption at zero additional cost until you can invest in proper bass traps.
Budget $200-$500
UMIACOUSTICS 2-inch panels for first reflection points combined with Rockboard 60 boards for DIY corner bass traps provides a comprehensive treatment setup. This combination treats both broadband reflections and low-frequency buildup.
Four UMIACOUSTICS panels at $98.99 handles reflection points. Three to four Rockboard boards at approximately $20 each, plus frame materials and SoundAssured fabric, builds two to three corner bass traps for approximately $100-150 total.
The best studio panels guide details this exact configuration as the recommended baseline for home studio mixing rooms.
Budget $500+
At this budget, you can choose between a full DIY build using Rockboard (maximum performance per dollar) or a full pre-built setup using UMIACOUSTICS and ATS Acoustics (maximum convenience).
A full DIY build using Rockboard 60 insulation treats an entire room — four corner bass traps, four wall panels, and a ceiling cloud — for approximately $400-600 including all materials. This matches the performance of a $2,000+ professional installation.
A full pre-built setup using UMIACOUSTICS panels and ATS corner traps costs $800-1,200 but requires no construction skills or tools. The treatment kits guide covers complete pre-built packages for different room sizes.
The choice between DIY and pre-built is primarily about time versus money. If you value your time at $30-50 per hour and the DIY build takes 8 hours, the labor cost is $240-400.
This narrows the gap between DIY and pre-built significantly. For professionals whose income depends on studio time, pre-built panels often make more financial sense.
Renters And Temporary Spaces
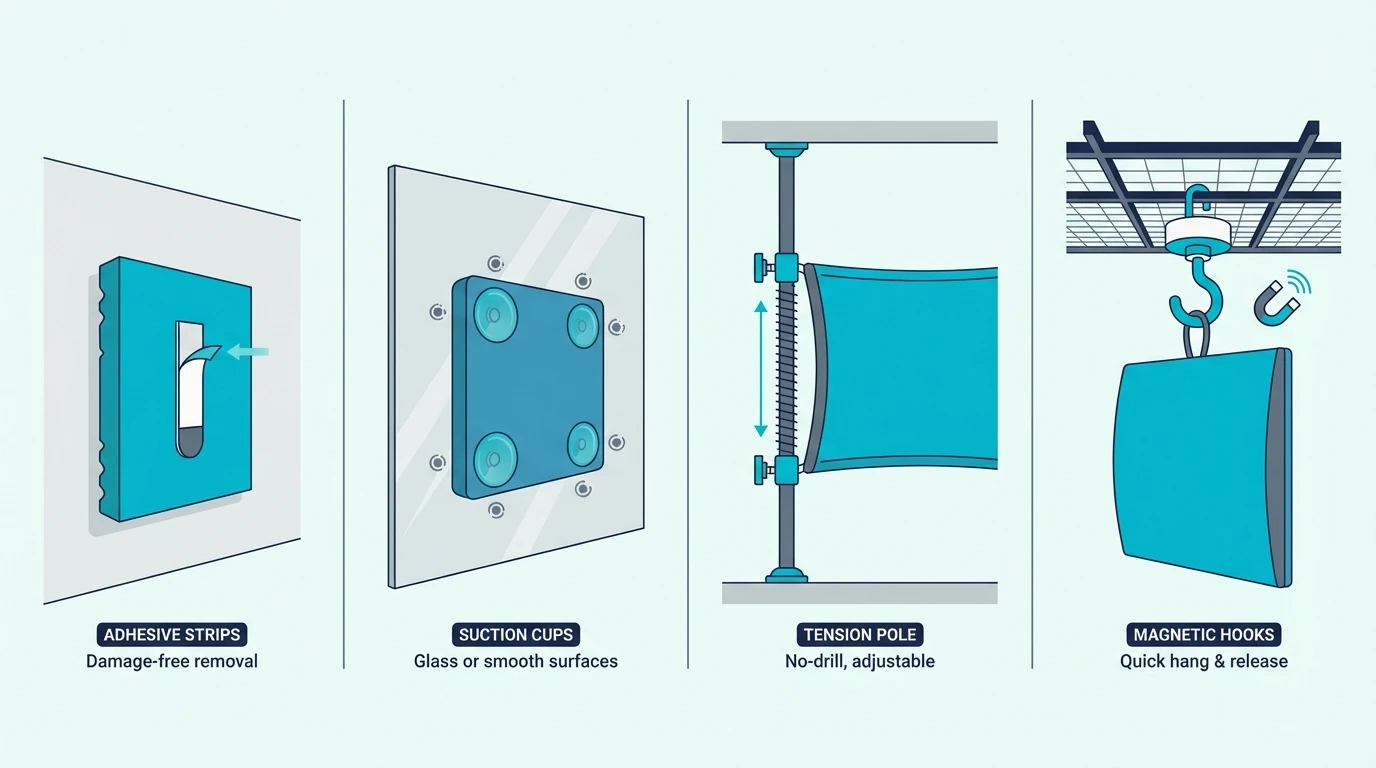
Olanglab 1-inch panels with command strip mounting are the best option for renters. The lightweight panels hang securely without screws or permanent hardware and remove cleanly when you move.
The key advantage for renters is zero wall damage. Command strips hold the lightweight 1-inch panels securely and peel off without leaving marks, holes, or adhesive residue.
This eliminates security deposit concerns that prevent many renters from treating their rooms. Portable and removable options also exist for extremely temporary setups where even command strips are not practical.
Home Theaters
Home theaters require more treatment surface area than music studios because the listening area is larger and includes multiple seating positions. Olanglab’s range of panel sizes (24×24 and 24×48) allows you to mix formats based on wall dimensions.
Side wall panels at first reflection points are the highest priority, followed by rear wall diffusion or absorption, then ceiling treatment. The best acoustic panels guide provides a complete treatment plan with panel placement recommendations.
For rooms that double as living spaces, panel aesthetics become a primary consideration alongside acoustic performance. Olanglab and UMIACOUSTICS both offer neutral fabric colors that blend with most interior design styles.
The acoustic treatment hub covers complementary treatment approaches that work alongside panels without adding more wall-mounted products.
The Bottom Line
The best acoustic treatment brands use fiberglass or mineral wool cores with published NRC ratings and offer multiple product types. UMIACOUSTICS leads the mid-range with convenient pre-built panels.
Olanglab covers the budget segment with real fiberglass at the lowest price point.
Rockboard dominates the DIY category with high-density mineral wool boards that deliver professional absorption at a fraction of pre-built panel prices. ATS Acoustics offers premium professional-grade bass traps for those who want top-tier corner treatment without DIY construction.
SoundAssured rounds out the ecosystem with essential accessories for DIY builders. Combined with Rockboard insulation and basic frame materials, their acoustical fabric turns raw materials into professional-looking panels at a fraction of pre-built prices.
Avoid any brand selling thin foam panels as “acoustic treatment.” Foam absorbs high frequencies but provides minimal absorption below 500 Hz — which is where most room acoustic problems actually exist.
The full guide to acoustic treatment covers the complete treatment workflow from material selection through installation. The best treatment kits guide helps determine which complete packages match your room and budget.
The budget treatment guide ranks the most cost-effective options across all price ranges.
Frequently Asked Questions
What is the best acoustic treatment brand?
For pre-built panels, UMIACOUSTICS offers the best combination of fiberglass core quality, included mounting hardware, and mid-range pricing. For DIY builds, Rockboard provides the highest-performing raw insulation at the lowest cost per square foot.
ATS Acoustics is the best choice for those who want professional-grade products and are willing to pay the premium. There is no single “best” brand — the right choice depends on your budget and whether you prefer pre-built convenience or DIY value.
For most home studio builders on a moderate budget, the combination of UMIACOUSTICS panels at reflection points and Rockboard DIY bass traps in corners delivers professional-grade treatment for under $500.
Is GIK Acoustics better than Auralex?
GIK Acoustics uses rigid fiberglass cores in their panels, which provides broadband absorption across the full frequency spectrum. Auralex primarily sells foam products, which absorb effectively above 1,000-2,000 Hz but provide minimal low-frequency absorption.
For broadband treatment in a studio, fiberglass-based products outperform foam. Auralex foam panels are adequate for flutter echo control in vocal booths or podcast rooms where only speech frequencies need absorption.
Auralex does offer some fiberglass products in their professional line, but these are significantly more expensive than competing fiberglass brands and harder to find on Amazon. For most buyers, the brands listed in this guide offer better value for fiberglass treatment. The best treatment materials guide compares fiberglass and mineral wool options across all major brands.
Are expensive acoustic panels worth it?
Mid-range brands like UMIACOUSTICS and Olanglab offer excellent acoustic performance at reasonable prices. The acoustic difference between a $100 fiberglass panel and a $300 premium panel from a boutique brand is minimal — both use similar core materials and achieve similar NRC ratings.
Premium brands primarily add build quality, aesthetic finish, and customer support. If your panels will be visible in a living room or commercial space, the upgraded finish may justify the cost.
For a dedicated studio where appearance is secondary, mid-range panels deliver identical acoustic performance.
Can I mix brands in the same room?
Yes. Treatment performance depends on material and placement, not brand consistency.
Using UMIACOUSTICS panels at reflection points and Rockboard DIY bass traps in corners is a common and effective approach. Many professional studios use products from three or four different manufacturers in the same room.
The only consideration is aesthetic. Panels from different brands may have slightly different fabric textures or frame profiles.
In a studio where appearance is secondary to performance, this is irrelevant. In a living room or home theater, matching panels from a single brand like Olanglab provides visual consistency.
How many panels do I need from any brand?
The number of panels depends on room size and treatment goals. A small home studio (10×12 feet) typically needs 8-12 panels plus 2-4 corner bass traps.
A larger room or home theater may need 16-24 panels. The general rule is approximately one panel per 15-20 square feet of floor area for adequate broadband treatment.
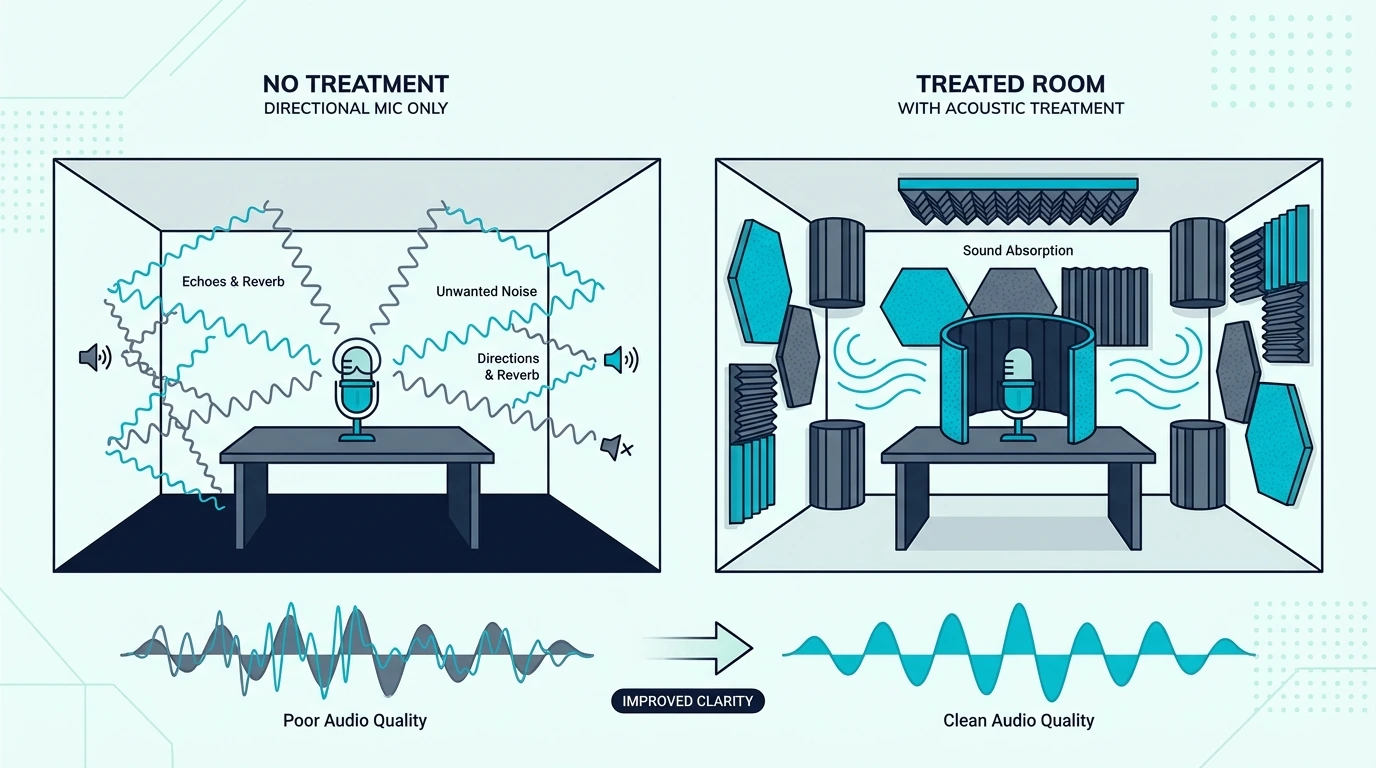
Acoustic Treatment Vs Directional Mic For Podcast (Which Matters More)
Acoustic treatment vs directional mic for podcast recording is not an either-or decision — but if you have to choose one first, treatment fixes problems that no microphone can solve, while a directional mic only reduces how much room sound reaches the capsule without actually improving the room itself.
Every podcaster eventually faces this question. The room sounds echoey or hollow, and the two most common solutions are buying a better microphone or treating the room with acoustic panels.
A directional microphone rejects sound from certain angles. Acoustic treatment removes reflections from the room entirely.
They solve different parts of the same problem, and understanding the difference saves you from spending money on the wrong upgrade first.
Below you will find exactly what each approach does for podcast audio, where each one falls short, and the specific order to invest in them for the biggest improvement per dollar. Start with basic treatment if your room has audible echo — no microphone can fix that.
Quick Takeaway
A directional microphone reduces room pickup by rejecting sound from behind and the sides, but reflections arriving from the front still reach the capsule. Acoustic treatment removes those reflections from the room entirely, improving audio for every microphone and every person in the space. For podcast recording, treat the room first with panels at reflection points, then choose a cardioid dynamic mic for maximum room rejection.
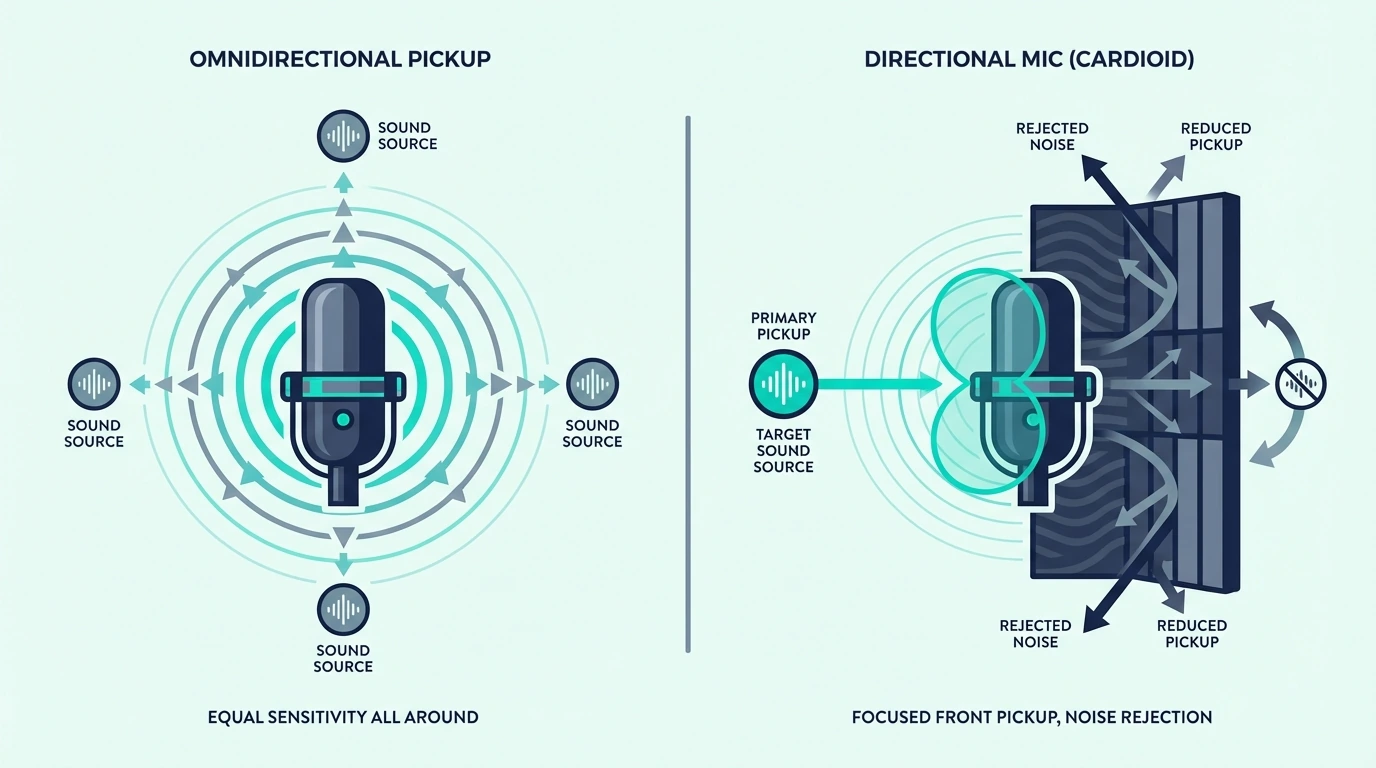
How Does A Directional Microphone Help?
A directional microphone picks up sound primarily from one direction and rejects sound from other angles. This means room reflections arriving from behind and the sides of the mic are reduced relative to the speaker’s voice directly in front.
The most common directional pattern for podcasting is cardioid. A cardioid mic picks up sound from the front, partially from the sides, and rejects sound from directly behind.
Cardioid Vs Supercardioid Vs Shotgun
Cardioid mics reject sound from behind by approximately 20-25 dB. They have the widest front pickup angle, which is forgiving of slight head movements during long podcast sessions.
Supercardioid mics have a tighter front pickup but include a small rear lobe that picks up some sound from directly behind. They reject more from the sides than a cardioid, which helps in rooms where side wall reflections are the dominant problem.
Shotgun mics are extremely directional and reject the most off-axis sound. However, they color off-axis sound rather than simply reducing it, which can create an unnatural quality in reflective rooms.
Shotgun mics work best outdoors or in well-treated spaces where there are few reflections to color. They are rarely the right choice for indoor podcast recording.
For most podcasters, a dynamic cardioid mic like the Shure SM7B or Rode PodMic provides the best balance of room rejection and natural sound quality. Dynamic mics are also less sensitive than condenser microphones, which means they pick up less room ambience overall.
Limitations Of Directional Mics
Directional mics reduce room pickup but do not eliminate it. Reflections that arrive from the front — including the primary wall behind the speaker — still reach the capsule at full strength.
Close-mic technique (speaking 2-4 inches from the capsule) helps by increasing the ratio of direct voice to room reflections. But even with close-mic technique, a reverberant room still sounds reverberant.
Proximity effect is another consideration. All directional mics boost bass frequencies when the speaker is very close.
This can make podcast audio sound muddy or boomy, requiring EQ correction that reduces low-end clarity.
The is treatment necessary guide explains when mic technique alone is sufficient and when treatment becomes essential for professional-quality podcast audio.
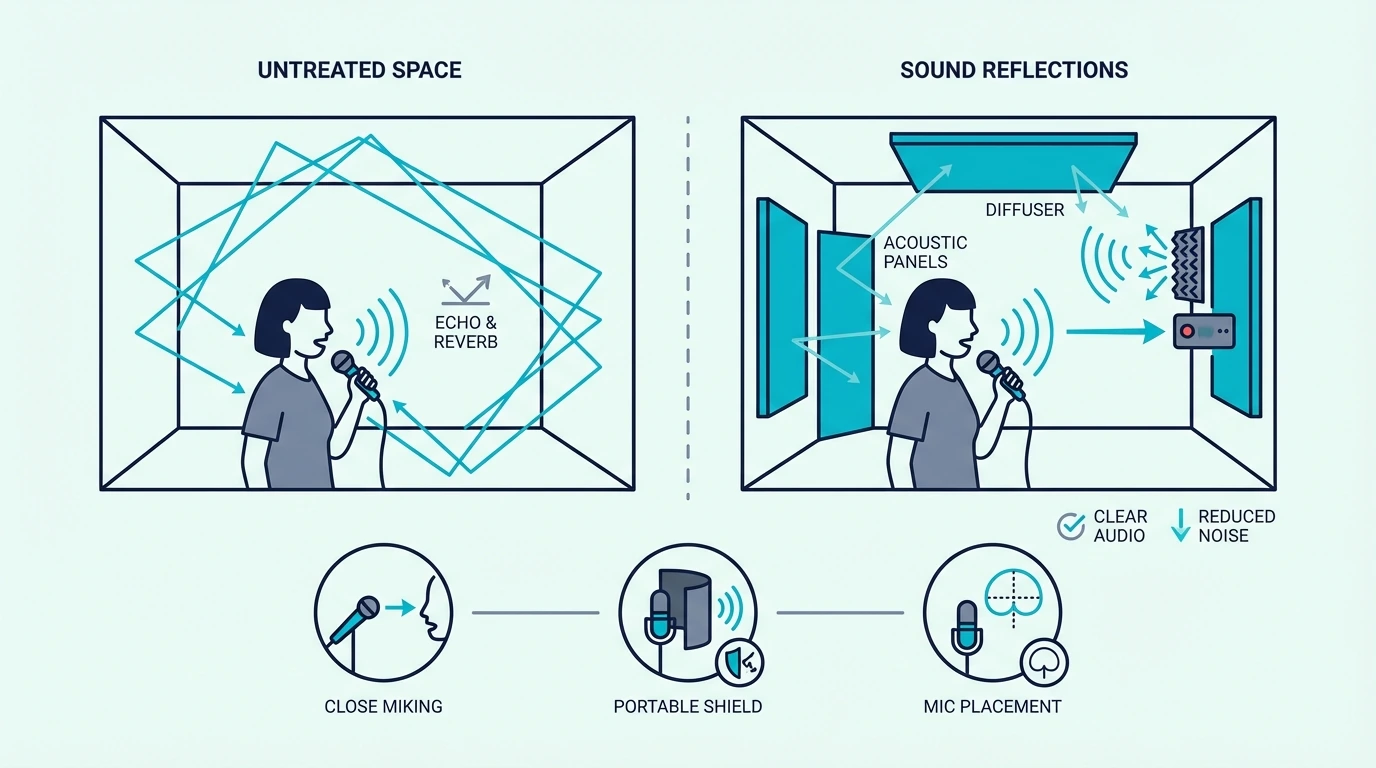
How Does Acoustic Treatment Help Podcasting?
Acoustic treatment physically removes reflections from the room. Panels absorb sound energy so that reflections from walls, ceiling, and floor are dramatically reduced before they reach any microphone in the room.
This means treatment improves audio for every microphone — regardless of its polar pattern. A treated room makes an omnidirectional mic sound better, a cardioid mic sound better, and even a phone recording sound better.
What Treatment Does For Podcast Audio
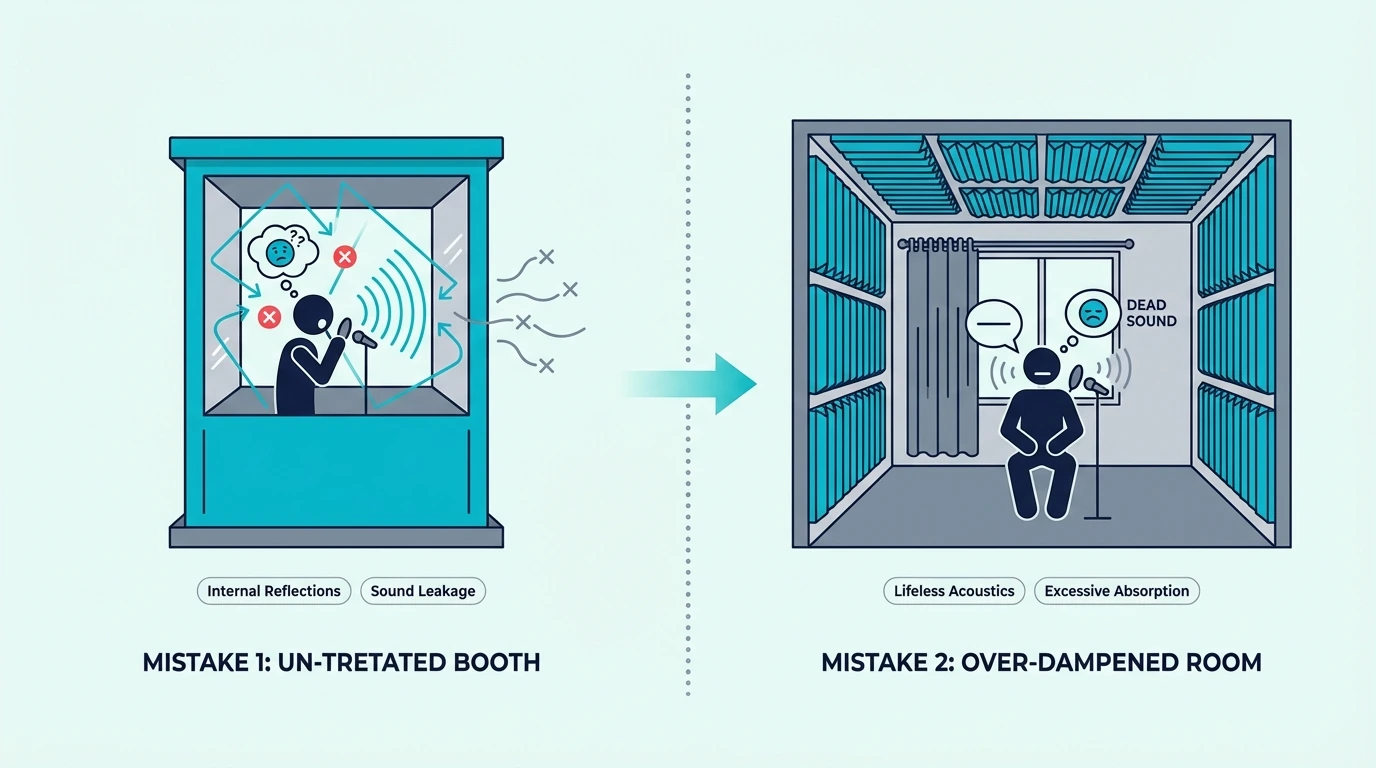
Treatment reduces reverb time, which is the single biggest factor in podcast audio quality. A room with a reverb time above 0.5 seconds sounds echoey and unprofessional.
Treatment brings this down to 0.2-0.3 seconds, where speech sounds clean and intelligible.
Treatment also eliminates flutter echo — the rapid metallic ringing between parallel walls that creates a harsh, artificial quality in untreated rooms. The how treatment works guide explains the physics of reflection absorption in detail.
For video podcasters, treatment also reduces room coloration that viewers perceive as low production quality. Even if the audio is post-processed, listeners can tell the difference between a recording made in a treated room and one made in an untreated space with heavy processing applied after the fact.
The fiberglass treatment guide covers the specific panel materials that provide the best absorption for speech frequencies.
Minimum Treatment For A Podcast Room
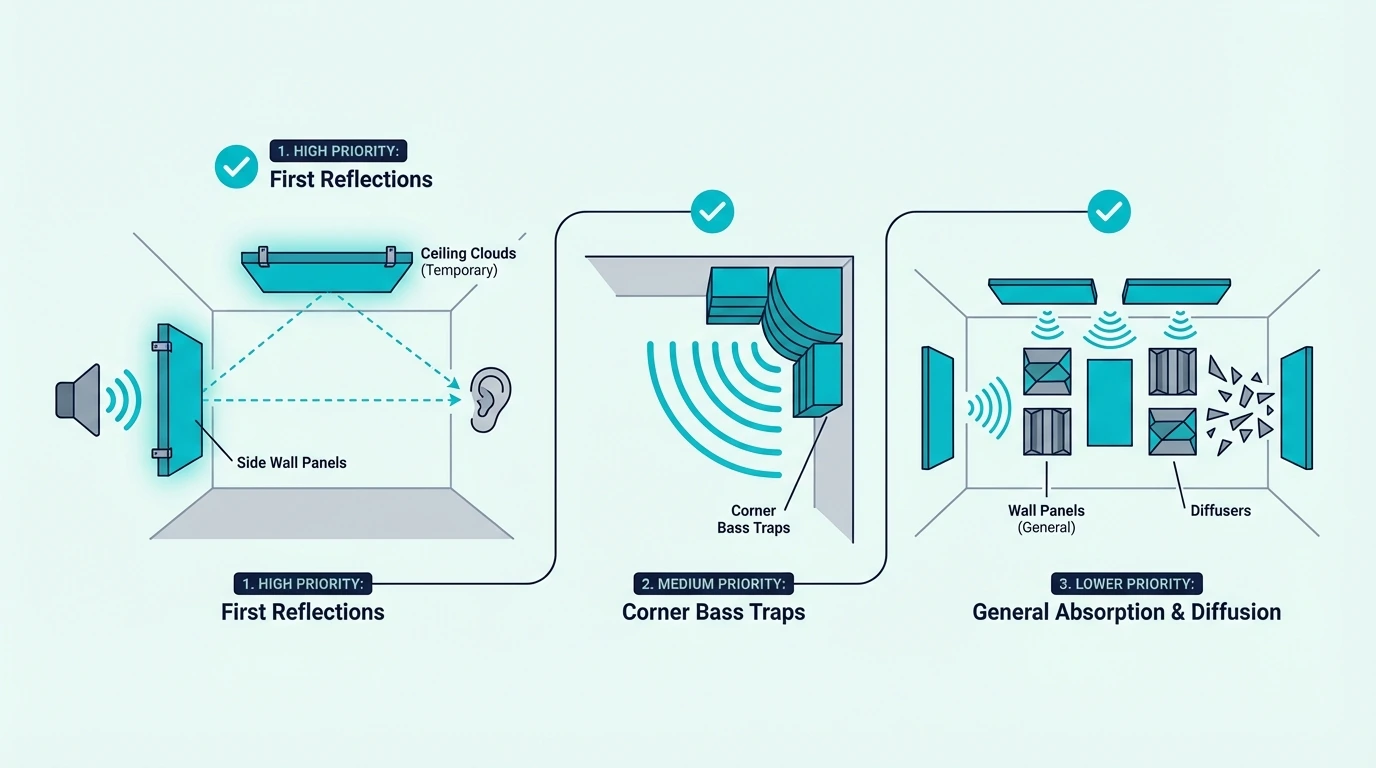
A podcast room does not need full studio treatment. The minimum effective setup is two to four panels at first reflection points — the spots on the side walls where sound from the speaker bounces directly toward the microphone.
The small room guide explains how to find first reflection points using the mirror trick. The process takes five minutes.
Fiberglass acoustic panels at first reflection points absorb the strongest reflections that reach a podcaster’s microphone from the front and sides. A 4-pack of 2-inch fiberglass panels treats both side wall reflection points and provides an immediately audible improvement.
If the room sounds boomy, add corner bass traps to absorb low-frequency energy that builds up where walls meet. Even a single heavy blanket hung behind the microphone reduces direct reflections from the back wall.
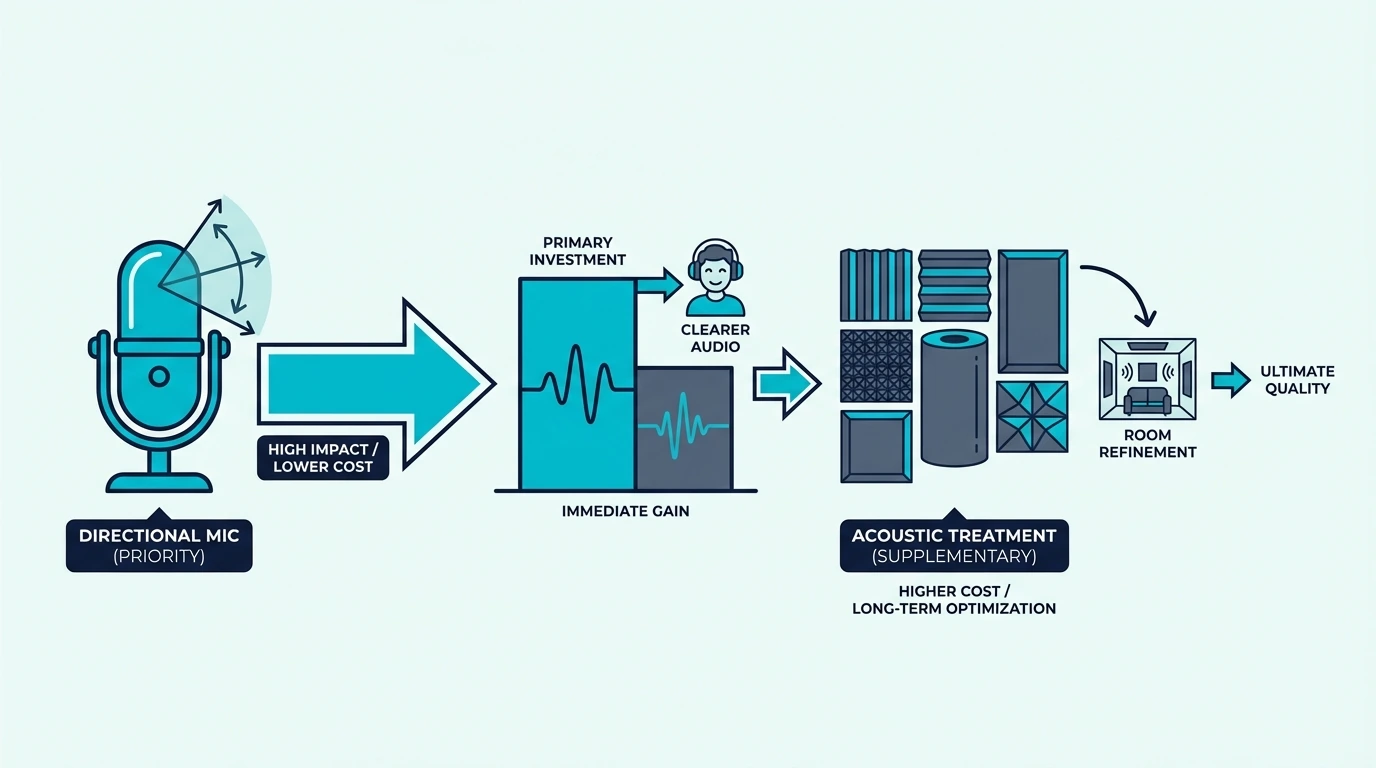
Which Should You Invest In First?
A good directional mic is cheaper and faster to set up. A dynamic cardioid mic costs 100-400 dollars and requires no room modifications.
Treatment requires panels, mounting hardware, and installation time.
But treatment has a bigger long-term impact. It fixes the room for every recording session, every microphone, and every person who records in the space.
A directional mic only reduces room pickup for one microphone position at one angle.
If your budget is limited, start with a dynamic cardioid mic and close-mic technique. This gives you the fastest improvement for the least money.
Then add treatment panels as budget allows, starting with first reflection points.
If your room has obvious echo or reverb, treatment should come first regardless of budget. No microphone — no matter how directional or expensive — can fix a room that rings.
For renters or podcasters in temporary spaces, Olanglab fiberglass panels mount with command strips and remove without damaging walls. The 1-inch fiberglass core absorbs speech-frequency reflections that a directional mic cannot reject.
The temporary treatment guide covers portable and removable options for podcasters who cannot make permanent room changes. The cost breakdown guide compares treatment pricing across different room sizes and panel types.
The Bottom Line
Treatment and a directional mic solve different problems. Treatment removes reflections from the room.
A directional mic reduces how much of the remaining room sound reaches the capsule.
For the best podcast audio, use both. Treat the room first — even minimal treatment at reflection points dramatically improves recording quality.
Then use a dynamic cardioid mic with close-mic technique to maximize the voice-to-room ratio.
The full guide to acoustic treatment covers the complete workflow from first panel through full room setup. The home studio guide includes treatment priorities ranked by impact for recording spaces.
Frequently Asked Questions
What kind of mic is best for podcasts?
A dynamic cardioid microphone is the best choice for most podcasters. Dynamic mics are less sensitive than condensers, which means they pick up less room ambience.
The cardioid pattern rejects sound from behind.
Popular options include the Shure SM7B, Rode PodMic, and Electro-Voice RE20. All three are dynamic cardioid mics that perform well in untreated or partially treated rooms.
What are the disadvantages of a directional mic?
Proximity effect boosts bass when the speaker is very close, requiring EQ correction. Off-axis sound is colored rather than simply rejected, which can create an unnatural quality if strong reflections arrive from the sides.
Directional mics also require consistent positioning. Moving off-axis during a long recording session changes the tonal character of the voice, which creates inconsistent audio across the episode.
This is especially problematic for interview-style podcasts where multiple hosts move naturally while speaking. Each head turn shifts the voice off-axis and changes the recorded tone.
Can a good mic replace acoustic treatment?
No. A directional microphone reduces room pickup but cannot eliminate reflections that arrive from the front.
Treatment physically removes those reflections from the room, which no microphone technology can replicate.
The DIY treatment guide shows how to build effective panels for 15-25 dollars each — often less than the cost difference between a budget mic and a premium directional mic.
Best Acoustic Treatment For Corners (Bass Traps Guide)
Best acoustic treatment for a corner is a thick bass trap straddled across the corner with an air gap behind it — but most people either skip corners entirely or treat them with thin panels that do nothing for the low frequencies where corners cause the most damage.
Corners are where bass energy is highest in any room. Sound pressure doubles at every wall boundary and quadruples where three surfaces meet.
Treating corners first gives the biggest acoustic improvement per panel of any treatment position in the room.
The reason corners matter more than walls is physics: low-frequency standing waves always peak at room boundaries. A bass trap in a corner absorbs energy at the point of maximum pressure, which is dramatically more effective than the same panel placed on a flat wall section.
Below you will find why corners accumulate bass energy, what types of corner treatment work best, how many corners to treat, and the specific panel thickness required for effective low-frequency absorption. Start with the four vertical wall-wall corners — they provide the most improvement for the least cost.
Quick Takeaway
Corners accumulate the most bass energy in any room. Treat all four vertical wall-wall corners with bass traps at least 4 inches thick, straddled diagonally across the corner with an air gap behind. Add tri-corner treatment (where walls meet the ceiling and floor) for maximum bass control. Corner treatment provides more acoustic improvement per panel than any other placement position.
Why Do Corners Need Special Treatment?
Sound pressure in a room is not evenly distributed. Low-frequency standing waves create pressure patterns where certain positions have very high pressure and others have very low pressure.
Corners consistently have the highest pressure of any position in the room. This is why professional studios always treat corners before any other surface — the return on investment per panel is highest at these positions.
How Bass Builds Up In Corners
Low-frequency standing waves peak at room boundaries — the walls, floor, and ceiling. At a single wall boundary, sound pressure is approximately double the mid-room value.
Where two walls meet (a vertical corner), the pressure from both boundaries combines. The result is approximately four times the pressure found at the center of the room.
This pressure multiplication is why a single bass trap in a corner absorbs more low-frequency energy than the same trap placed anywhere else in the room. The panel intercepts sound at maximum pressure, which maximizes the energy transfer from sound wave to heat.
This concentration of energy makes corners the most effective location for bass absorption. A bass trap in a corner encounters far more low-frequency energy per square foot than the same trap on a flat wall.
The how treatment works guide explains the physics of standing waves and pressure distribution in detail.
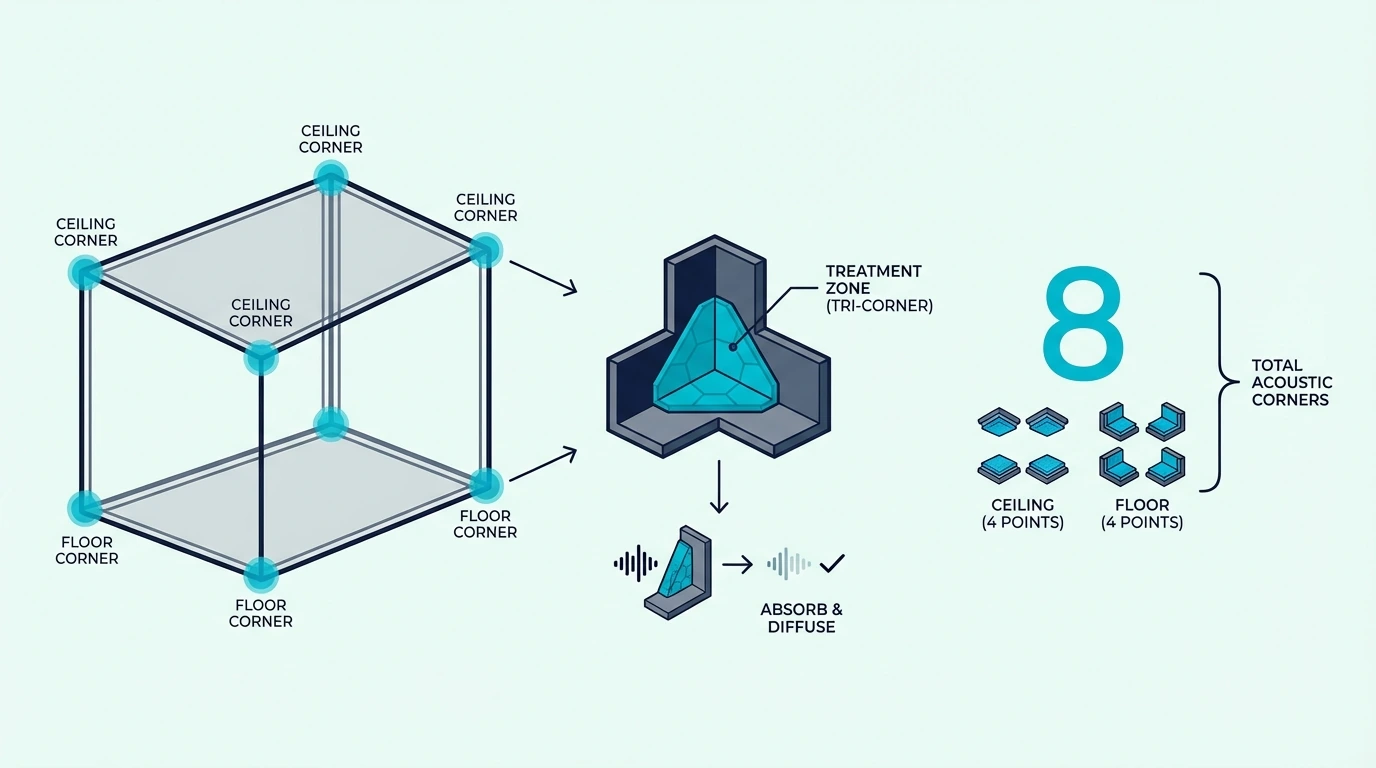
Tri-Corners Vs Wall-Wall Corners
Tri-corners — where two walls meet the ceiling or floor — have the highest pressure of any position in a room. Three boundaries converge at these points, creating approximately eight times the mid-room pressure.
Wall-wall vertical corners are the next highest-pressure location. These run floor-to-ceiling at each of the four room corners and are the most practical positions to treat because they offer the most surface area for bass trap placement.
In a typical rectangular room, the four vertical corners provide approximately 32-40 linear feet of treatment surface in a room with 8-10 foot ceilings. That is more than enough space to mount effective bass traps without consuming usable floor or wall area.
For small rooms where bass problems are most severe, treating both tri-corners and vertical corners provides the maximum bass control possible. For most rooms, starting with the four vertical corners delivers the majority of the improvement.
What Types Of Corner Treatment Work Best?
Not all corner treatment is equally effective. The key variables are panel thickness, mounting method, and the air gap behind the panel.
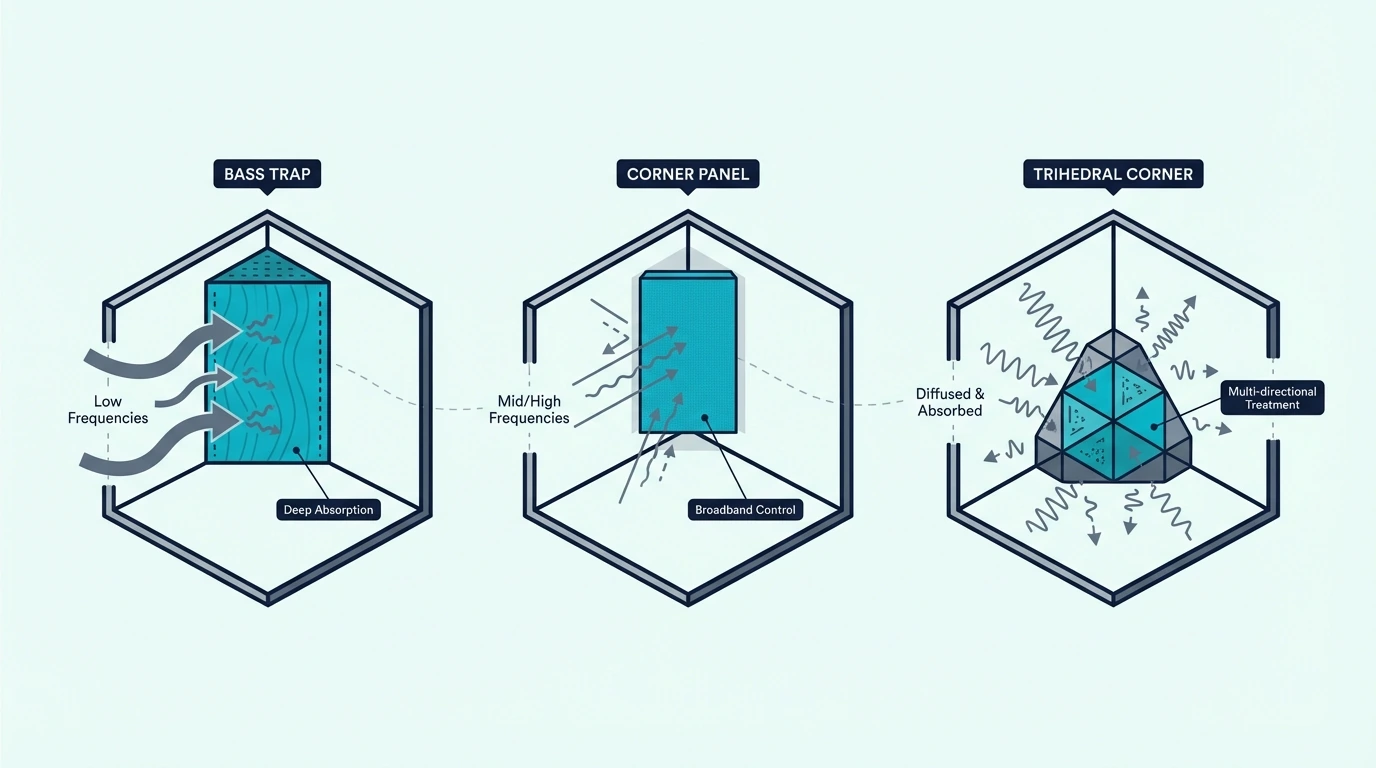
Straddled Broadband Absorbers
A flat panel mounted diagonally across a corner — straddled from wall to wall — is the most effective and most common approach. The panel sits at a 45-degree angle with a triangular air gap behind it.
This air gap is critical. It adds effective absorption depth without increasing the panel thickness.
A 4-inch panel straddled across a corner with a 12-inch air gap behind it absorbs bass frequencies as effectively as a much thicker panel mounted flush.
Rockboard 60 mineral wool boards at 6 lb per cubic foot density are ideal for building straddled corner bass traps. Stack two boards to 4 inches of thickness and mount them diagonally across each corner with L-brackets attached to the adjacent walls.
The DIY treatment guide covers step-by-step construction of straddled corner bass traps including frame dimensions and fabric wrapping techniques.
Triangular Corner Traps
Triangular traps are wedge-shaped panels that fit flush into the corner rather than straddling across it. They use less room space than straddled panels but have a smaller air gap behind them, which reduces their low-frequency effectiveness.
Triangular traps work best as a supplement to straddled panels — not as a replacement. Use them in corners where a straddled panel would protrude too far into the room, such as behind a door or in a walkway.
The absorption performance difference between straddled and triangular traps is significant. A straddled 4-inch panel with a 12-inch air gap absorbs effectively down to 80 Hz, while a triangular trap of the same thickness in the same corner only reaches approximately 150 Hz before performance drops off.
Pre-Built Panel Options
For those who prefer ready-to-hang treatment without DIY construction, UMIACOUSTICS fiberglass panels with included hanging brackets can be straddled across corners using the brackets mounted to adjacent walls. The 2-inch fiberglass core provides broadband absorption, and the air gap behind adds effective low-frequency depth.
The fiberglass treatment guide compares panel thicknesses and their absorption coefficients at different frequencies.
How Many Corners Should You Treat?
All of them, ideally. At minimum, treat the four vertical wall-wall corners from floor to ceiling.
This addresses the highest-pressure locations with the most practical surface area for treatment.
After the four vertical corners, add treatment to the wall-ceiling tri-corners above the listening position. These are the next highest-priority locations for bass control.
A room with all four vertical corners and all four ceiling tri-corners treated will have significantly flatter bass response than a room with panels covering twice as much flat wall area. The placement matters more than the total square footage of treatment.
Olanglab 24×48 inch fiberglass panels provide substantial corner coverage when straddled diagonally. A 2-pack treats the two front corners behind the speakers — the highest-priority pair for mixing rooms.
For mixing rooms, symmetrical corner treatment is essential. Treat corresponding corners identically to maintain balanced stereo imaging.
Asymmetrical treatment creates different bass absorption on each side of the listening position, which shifts the perceived stereo center.
The cost breakdown guide helps budget for corner treatment across different room sizes and treatment quality levels.
The Bottom Line
Corners are the highest-priority treatment position in any room. Bass energy concentrates at room boundaries, and corners — where two or three boundaries meet — have the highest pressure of any position.
Treat all four vertical corners with panels at least 4 inches thick, straddled diagonally with an air gap behind them. Add tri-corner treatment for maximum bass control.
The full guide to acoustic treatment covers the complete treatment workflow from corner bass traps through wall panels and ceiling clouds. For home studio builders, corner treatment is always the first step.
Frequently Asked Questions
Does acoustic treatment need to be symmetrical?
For mixing and critical listening, yes. Symmetrical treatment ensures balanced stereo imaging by creating equal absorption on both sides of the listening position.
For general recording or voice work, symmetry is less critical. Treat the corners and first reflection points that are accessible and practical for your room layout.
Can acoustic panels go around corners?
Yes — straddling a panel diagonally across a corner with an air gap behind it is the most effective bass trap placement method. The air gap dramatically increases low-frequency absorption compared to mounting the same panel flat on a wall.
Mount the panel using L-brackets or wire attached to both adjacent walls. The panel should span from wall to wall at a 45-degree angle.
How thick should corner bass traps be?
Minimum 4 inches for meaningful low-frequency absorption. 6 inches is better, and the air gap behind a straddled panel adds effective depth beyond the panel thickness itself.
A 4-inch panel straddled across a corner with a 12-inch air gap behind it absorbs bass frequencies down to approximately 80-100 Hz effectively. Thicker panels or larger air gaps extend absorption to even lower frequencies.
For rooms with severe bass problems below 80 Hz, stacking panels to 6 inches thick and maximizing the air gap is the most cost-effective approach. As a budget starting point while you plan thicker fiberglass builds, TroyStudio foam bass traps fill all four corners immediately for under 35 dollars and tame the mid-bass while you build more serious fiberglass traps.
Acoustic Treatment Vs Digital Room Correction (Which Do You Actually Need)
Acoustic treatment vs digital room correction is a debate that confuses most home studio builders — but the answer is straightforward once you understand what each one actually does, because treatment and correction solve fundamentally different problems and one cannot replace the other.
The confusion comes from the fact that both claim to “fix your room.” Treatment does it by physically absorbing and scattering sound energy.
Room correction software does it by applying EQ to flatten the frequency response at your listening position. They sound like they do the same thing, but they work on completely different aspects of your room’s acoustic problems.
Treatment fixes the room itself — reducing reverb time, eliminating flutter echo, and taming bass buildup for everyone in the room and every microphone in it. Room correction adjusts the signal at one position.
It cannot remove reverb, stop flutter echo, or change how the room sounds to a microphone.
Below you will find exactly what each approach fixes, what it cannot fix, and the specific order to implement them for the best result. Start with physical treatment — it solves the problems that software cannot touch.
Quick Takeaway
Acoustic treatment and digital room correction are not interchangeable. Treatment physically absorbs sound energy, reducing reverb time and flutter echo for everyone in the room. Room correction software applies EQ to flatten frequency response at one listening position but cannot fix reverb, echo, or comb filtering. Always treat the room first with physical panels and bass traps, then use room correction to fine-tune remaining bass mode issues at the sweet spot.
What Is Acoustic Treatment?
Acoustic treatment uses physical materials — fiberglass panels, mineral wool bass traps, and diffusers — to change how sound behaves inside a room. Panels absorb sound energy, converting it to heat through friction as sound waves pass through the porous material.
The how treatment works guide covers the physics in detail. The key point is that treatment removes energy from the room permanently — once a sound wave is absorbed, it is gone.
What Treatment Does Well
Treatment reduces reverb time — the amount of time sound lingers in a room after the source stops. A shorter reverb time means cleaner recordings and more accurate monitoring because you hear more direct sound and less room coloration.
Treatment also eliminates flutter echo between parallel walls, reduces comb filtering from strong early reflections, and tames bass buildup in corners. These improvements benefit every position in the room and every microphone.
The fiberglass treatment guide covers the specific materials and panel thicknesses that deliver the most absorption per dollar.
The mixing room guide explains why these physical improvements are essential for accurate mix decisions.
What Treatment Cannot Fix
Treatment absorbs sound — it cannot add frequencies that are missing. If your room has a bass null (a position where certain frequencies cancel out), treatment cannot fill that gap because the problem is caused by destructive interference between direct and reflected sound waves.
Treatment also has diminishing returns. After covering approximately 30-40% of wall area with absorption, additional panels provide progressively less improvement and can make a room sound unnaturally dead if overdone.
Treatment also cannot perfectly flatten frequency response at your listening position. It provides broad improvement across the room, but fine-tuning the response curve at one specific position requires measurement and targeted correction.
What Is Digital Room Correction?
Digital room correction software measures your room’s frequency response using a calibration microphone, then applies EQ filters to compensate for peaks and dips. The goal is a flat frequency response at your listening position.
Popular room correction tools include Sonarworks SoundID Reference (the most common in studios), Dirac Live (popular in home theater), and REW (free, for measurement and manual correction).
What Room Correction Does Well
Room correction excels at flattening bass response at the listening position. Low-frequency room modes create severe peaks and dips that are difficult to treat physically — bass traps help but rarely eliminate modes completely.
Correction software measures these peaks and dips, then applies precise EQ cuts and boosts to flatten the response. The result is more accurate bass monitoring at the sweet spot, which directly improves low-end mix decisions.
Correction also compensates for speaker-specific frequency response issues. If your monitors have a slight bump at 3 kHz or a dip at 200 Hz, correction software can flatten those anomalies along with the room response.
What Room Correction Cannot Fix
Room correction cannot reduce reverb time. A reverberant room still sounds reverberant after correction — the software adjusts the frequency balance of what you hear, but the reflections are still physically bouncing around the room.
Correction cannot eliminate flutter echo. The rapid metallic ringing between parallel walls continues regardless of any EQ applied to your monitoring chain.
Correction only works at the measurement position. Move one foot to the left and the correction is no longer accurate.
This means it helps the engineer at the sweet spot but does nothing for a vocalist tracking in the same room, a second listener, or any microphone.
The correction also does not help recordings. If you record in a room with long reverb time, that reverb is captured by the microphone regardless of what correction software is doing to your monitoring.
Should You Use Treatment, Correction, Or Both?
Both — but in the right order. Treatment first, correction second.
This is not debatable in professional audio engineering, and the reason is simple: correction cannot fix physical acoustic problems.
Treatment First — Always
No amount of DSP processing can remove reverb from a live room. No EQ curve can stop flutter echo.
No software can make a microphone hear a dry, controlled room when the room is actually reflective and uncontrolled.
Fiberglass acoustic panels at first reflection points physically absorb the reflections that room correction software cannot touch. Two panels on the side walls and bass traps in the corners solve the majority of problems that no amount of DSP can address.
For budget-conscious builders, Olanglab fiberglass panels provide an affordable entry into physical treatment. The fiberglass core absorbs mid and high frequency reflections that DSP cannot remove from the room.
Correction On Top — For Fine-Tuning
After treatment is in place, room correction software fine-tunes what treatment cannot fully resolve. Bass modes are the primary target — even with thick bass traps, most small rooms still have residual peaks and dips below 200 Hz.
Run room correction after treatment to flatten remaining bass response issues at your listening position. This combination of physical treatment plus digital correction produces the most accurate monitoring environment possible in a home studio.
The small room guide explains why bass modes are especially problematic in compact spaces and how treatment and correction work together to manage them.
The Bottom Line
Treatment and room correction are complementary tools, not alternatives. Treatment fixes the physical room — reverb, flutter echo, comb filtering, and broad frequency balance.
Correction fine-tunes the remaining bass response at your listening position.
Always treat first. Two panels at first reflection points and bass traps in the corners solve the problems that software cannot.
Add room correction after treatment to flatten residual bass modes. The full guide to acoustic treatment covers the complete treatment workflow.
The is treatment necessary guide explains when treatment alone is sufficient and when correction adds meaningful value.
Frequently Asked Questions
Can digital room correction replace acoustic treatment?
No. Room correction adjusts frequency response at one listening position.
It cannot reduce reverb time, eliminate flutter echo, fix comb filtering from early reflections, or improve how the room sounds to a microphone.
A room with long reverb and flutter echo still has those problems after correction — the software only changes the frequency balance of the monitoring signal at the sweet spot.
What is the best room correction software?
Sonarworks SoundID Reference is the most popular choice for music studios. It measures your room and applies a correction profile to your monitoring output.
Dirac Live is widely used in home theater systems and works with a wide range of AV receivers. REW (Room EQ Wizard) is free and provides measurement tools plus manual correction capabilities for users who prefer hands-on control.
All three require a calibration microphone to measure your room. The measurement process takes approximately 15-30 minutes and produces a frequency response curve that shows exactly where your room’s problems are.
Should I treat my room before using room correction?
Yes — always. Treatment solves physical problems (reverb, echo, early reflections) that correction cannot address.
Correction works best when the room is already reasonably well-treated.
Running correction in an untreated room produces poor results because the software tries to compensate for problems it cannot actually fix. Treat first, measure, then apply correction to fine-tune the remaining bass response.
Do Egg Cartons Work For Acoustic Treatment (The Honest Answer)
Do egg cartons work for acoustic treatment is one of the most persistent myths in home recording — but the honest answer is no, egg cartons provide essentially zero meaningful acoustic absorption and using them wastes time you could spend on solutions that actually improve your room.
The myth persists because egg cartons look like acoustic foam. The bumpy, textured surface appears similar to the pyramid or wedge patterns used on real acoustic panels.
But acoustic treatment works because of material density and thickness, not surface shape. A material needs to be porous and thick enough for sound waves to enter and lose energy through friction.
Egg cartons are thin cardboard with almost no mass. They do not absorb sound — they scatter a tiny amount of high-frequency energy while doing nothing at the mid and low frequencies where room problems actually exist.
Real treatment costs less than most people expect and delivers dramatically better results. Even the cheapest proper acoustic panel outperforms any amount of egg cartons by a wide margin.
Below you will find exactly why egg cartons fail acoustically, what they actually do to sound, and the specific alternatives that solve room problems starting at 15 dollars per panel. Start with two fiberglass panels at first reflection points — that single upgrade outperforms a room completely covered in egg cartons.
Quick Takeaway
Egg cartons do not work for acoustic treatment. They are thin cardboard that absorbs less than 5% of sound energy at any frequency. The bumpy shape scatters a tiny amount of high-frequency sound but provides no meaningful absorption. Real acoustic panels made from fiberglass or mineral wool absorb 90%+ of mid and high frequency energy. Two DIY panels at first reflection points cost 30-50 dollars total and outperform an entire room covered in egg cartons.
Why Do People Think Egg Cartons Work?
The egg carton myth comes from a visual association. Acoustic foam panels have textured surfaces — pyramids, wedges, or egg-crate patterns — and egg cartons have a similar bumpy shape.
The assumption is that the shape is what makes acoustic treatment work.
That assumption is wrong. The shape of acoustic foam is a secondary design feature that helps with high-frequency scattering.
The primary mechanism of sound absorption is the material itself — open-cell foam with a porous structure that converts sound energy into heat through friction as air molecules move through the material.
Shape Vs Material — Why It Matters
Sound absorption happens when sound waves enter a porous material and lose energy through friction with the material fibers or cell walls. The denser and thicker the material, the more energy it absorbs across a wider frequency range.
Acoustic foam works because it is an open-cell porous material. Sound enters the foam, passes through the interconnected air pockets, and loses energy with each interaction.
A 2-inch thick acoustic foam panel absorbs 50-80% of mid and high frequency energy. That is 10-80 times more absorption than egg cartons provide.
Egg cartons are closed-cell cardboard — a thin, rigid material with no internal air pockets for sound to pass through. Sound hits the cardboard surface and bounces off almost entirely.
The absorption coefficient of cardboard is approximately 0.01-0.05, meaning it absorbs 1-5% of sound energy.
What Egg Cartons Actually Do
Egg cartons scatter a small amount of high-frequency sound due to their uneven surface. When a sound wave hits the bumpy surface, the reflections break into multiple directions rather than bouncing back in a single coherent reflection.
This scattering slightly reduces flutter echo — the rapid metallic ringing between two parallel walls. But it does not remove the sound energy from the room.
The same energy is still present, just redirected. A room with egg cartons on every wall still has the same reverb time and the same frequency response problems as a bare room.
At frequencies below approximately 2,000 Hz — where the majority of room problems exist — egg cartons have no measurable effect. Bass buildup, muddy low-mids, and comb filtering from wall reflections remain completely unchanged.
Egg cartons also present a fire hazard. Cardboard is flammable, and covering walls with it near studio lighting and electrical equipment creates a genuine safety risk that real acoustic materials — which are typically fire-rated — do not.
The how treatment works guide explains the physics of sound absorption in detail, including why material porosity matters more than surface shape.
What Should You Use Instead Of Egg Cartons?
Real acoustic treatment uses materials that absorb sound through their porous structure. The three most common options, ranked from best to most budget-friendly:
DIY Rockwool Or Fiberglass Panels
DIY panels built from rigid fiberglass or mineral wool insulation are the best-performing budget option. A 2-inch panel made from 3 lb per cubic foot insulation achieves NRC 1.0 — absorbing virtually all mid and high frequency energy.
The total cost per panel is approximately 15-25 dollars in materials: a wooden frame, insulation board, and fabric wrap. Two panels at first reflection points on your side walls produce a dramatic, immediately audible improvement.
The small room guide explains first reflection point placement using the mirror trick — the process takes five minutes and tells you exactly where your panels need to go.
For those who prefer a ready-to-hang solution, UMIACOUSTICS fiberglass panels include hanging brackets and a 2-inch fiberglass core that absorbs 90%+ of mid and high frequency sound. A 4-pack treats two first reflection points — the highest-priority positions in any room.
Budget Acoustic Foam
Acoustic foam is not as effective as fiberglass or mineral wool panels, but it is infinitely better than egg cartons. A 2-inch acoustic foam panel absorbs 50-80% of mid and high frequency energy compared to the 1-5% that egg cartons provide.
Foam works best for controlling flutter echo and reducing high-frequency harshness. It does not absorb low frequencies effectively — bass problems require thicker, denser materials like the fiberglass and mineral wool panels described above.
If you are choosing between foam and fiberglass, fiberglass wins at every price point and every frequency. Foam only makes sense when you need the lightest possible panel for a surface that cannot support heavier materials.
The cost breakdown guide compares foam pricing against fiberglass and mineral wool panels across different room sizes.
Moving Blankets
Heavy moving blankets hung on walls provide NRC 0.2-0.4 — absorbing 20-40% of mid and high frequency energy. They are not as effective as fiberglass panels, but they cost 10-20 dollars each and can be hung temporarily.
Moving blankets are a reasonable temporary solution while you save for proper panels. The blankets as treatment guide covers hanging methods and realistic performance expectations.
For budget-conscious setups, Olanglab fiberglass panels offer a step up from blankets with real fiberglass absorption in a fabric-wrapped panel that mounts with command strips. The 1-inch thickness handles mid and high frequencies where egg cartons and blankets fall short.
The Bottom Line
Egg cartons do not work for acoustic treatment. They are thin cardboard that absorbs less than 5% of sound energy.
The bumpy shape scatters a tiny amount of high-frequency sound but provides no meaningful improvement.
Two DIY fiberglass panels at first reflection points cost 30-50 dollars and absorb 90%+ of the reflections that damage your recordings and mixes. That single upgrade outperforms a room completely covered in egg cartons.
The full guide to acoustic treatment covers the complete treatment workflow from first panel through full room setup. For the home studio setup guide, treatment priorities are ranked by impact so you know exactly where to start.
The fiberglass treatment guide covers panel thickness, density options, and construction details for the most effective treatment material.
Frequently Asked Questions
Do egg cartons reduce echo?
Barely. Egg cartons scatter a tiny amount of high-frequency sound due to their uneven surface, which can slightly reduce flutter echo between parallel walls.
But they do not absorb any meaningful amount of sound energy.
Real echo reduction requires absorption — materials that convert sound energy into heat. Even a heavy blanket absorbs 20-40% of mid-high frequency sound, which is 4-40 times more than egg cartons.
What is the cheapest effective acoustic treatment?
DIY panels with mineral wool or fiberglass in wooden frames cost 15-25 dollars per panel and achieve NRC 1.0. Two panels at first reflection points dramatically improve room acoustics for a total investment of 30-50 dollars.
The budget treatment guide ranks every option by performance per dollar from free techniques through commercial panel packages.
Can cardboard soundproof a room?
No. Cardboard has almost no mass or absorption properties.
Soundproofing — blocking sound from entering or leaving a room — requires dense, heavy materials like mass loaded vinyl, concrete, or double layers of drywall.
Acoustic treatment and soundproofing are different things. Treatment controls sound reflections inside a room.
Soundproofing blocks sound transmission between rooms. Cardboard does neither effectively.
The is treatment necessary guide explains when you need treatment, when you need soundproofing, and how to tell the difference based on your specific recording or mixing problems.
Best Acoustic Treatment For Concrete Room (Complete Guide)
Best acoustic treatment for concrete room setups requires a different approach than standard drywall rooms — but most treatment guides ignore this, leaving concrete room builders with generic advice that underperforms in the most challenging acoustic environment.
The problem is that concrete reflects nearly 100% of sound energy at every frequency. Drywall absorbs a small percentage of bass energy through panel flexing, but concrete does none of that.
The result is severe reverb, metallic flutter echo, and bass buildup that makes untreated concrete rooms unusable for recording or mixing.
Thicker panels, dedicated corner bass traps, and air gaps behind every panel solve the specific problems concrete creates. A properly treated concrete room performs as well as any drywall studio — it just requires more material in the right places.
Below you will find the exact treatment plan for concrete rooms: which panels to use, how thick they need to be, where to mount them, and why air gaps matter more here than in any other room type. Start with corner bass traps — they solve the most damaging problem first.
Quick Takeaway
Concrete rooms need thicker treatment than drywall rooms. Use 4-6 inch bass traps in all corners, 2-4 inch wall panels mounted with air gaps at first reflection points, and a ceiling cloud above the listening position. Plan for 40-50% wall coverage compared to the 20-30% typical for drywall rooms. Mount panels 2-4 inches off the concrete surface — the air gap dramatically improves low-frequency absorption.
Why Concrete Rooms Are So Challenging
Concrete is one of the most acoustically reflective building materials. It is dense, rigid, and non-porous — all properties that cause it to reflect sound rather than absorb it.
Extreme Reflectivity
A concrete wall reflects approximately 97-99% of the sound energy that hits it. For comparison, standard drywall reflects approximately 90-95% — still highly reflective, but the difference is audible.
The result in an untreated concrete room is long reverb times, harsh metallic flutter echo between parallel walls, and a bright, ringing quality that makes speech difficult to understand and music impossible to mix accurately. Clap your hands in an empty concrete room and the echo sustains for several seconds.
Flutter echo is particularly severe between parallel concrete walls. The sound bounces back and forth with almost no energy loss per reflection, creating a rapid metallic ringing that colors every recording made in the space.
Even placing furniture in a concrete room barely dents the problem. Soft furnishings absorb some mid and high frequency energy, but concrete walls return bass and low-mid frequencies at full strength regardless of what else is in the room.
Bass Buildup In Concrete Rooms
Drywall panels flex slightly at low frequencies, which absorbs a small amount of bass energy with each reflection. This natural damping does not exist with concrete.
In a concrete room, low-frequency energy bounces between surfaces with virtually zero absorption. Room modes — the resonant frequencies determined by room dimensions — are far more pronounced.
Bass notes sustain longer, overlap with each other, and create severe peaks and nulls throughout the room.
This makes accurate bass monitoring nearly impossible without treatment. The mixing room guide explains how room modes affect mix decisions and why bass traps are the highest-priority treatment for any mixing space.
How To Treat A Concrete Room For Audio
The treatment priority order for concrete rooms is the same as any room, but every element needs to be thicker and more extensive.
Thick Corner Bass Traps — The Highest Priority
Corner bass traps are the single most important treatment in a concrete room. Low-frequency energy concentrates in room corners where two or three surfaces meet, and concrete corners trap more bass energy than drywall corners because none of it leaks through the walls.
Build or buy bass traps at least 4 inches thick for vertical corners. For maximum effectiveness, use 6-inch thick traps or stack two layers of 2-inch rigid insulation.
Rockboard 60 mineral wool boards at 6 lb per cubic foot density are ideal for concrete room bass traps. Stack two or three boards to reach 4-6 inches of total thickness. The high density provides maximum low-frequency absorption where concrete rooms need it most.
Mount bass traps across corners at a 45-degree angle with an air gap behind them. The triangular air space behind the panel adds effective absorption depth without increasing the panel thickness.
Treat all four vertical wall corners plus the wall-ceiling corners above the listening position. Concrete rooms benefit from bass trapping in every available corner.
Wall Panels With Air Gaps
Wall panels in concrete rooms should be mounted 2-4 inches off the wall surface rather than flush against it. The air gap behind the panel dramatically improves low-frequency absorption by allowing the panel to work as a diaphragmatic absorber at lower frequencies.
Use L-brackets or spacer blocks to create the air gap. Attach the bracket to the concrete wall with concrete anchors or tapcon screws, then mount the panel to the bracket.
UMIACOUSTICS fiberglass panels with included hanging brackets simplify installation on concrete surfaces. The 2-inch fiberglass core handles mid and high frequency reflections while the air gap behind extends absorption into the low-mid range.
Place panels at first reflection points on both side walls, the wall behind the speakers, and the rear wall behind the listening position. Concrete rooms typically need 40-50% wall coverage compared to 20-30% in drywall rooms.
For rooms where drilling into concrete is not an option, the temporary treatment guide covers freestanding panel options that lean against walls or stand on floor bases without any wall mounting.
The fiberglass treatment guide covers panel thickness recommendations and NRC data for different air gap configurations.
Ceiling And Floor Treatment
A ceiling cloud above the listening position eliminates the ceiling reflection that causes comb filtering with the direct sound from your speakers. In concrete rooms with concrete ceilings, this reflection is especially harsh.
Suspend a 2-4 inch thick panel from the ceiling using wire or chains attached to concrete anchors. Position it directly above the equilateral triangle formed by your speakers and listening position.
For concrete floors, a thick rug or carpet reduces the floor-ceiling flutter echo that plagues rooms with two parallel hard surfaces. The rugs as treatment guide explains which rug types provide the most acoustic benefit.
If carpet installation is not an option, alternative floor treatment methods include interlocking rubber mats or dense carpet tiles laid without adhesive.
Surface Coverage Requirements
Concrete rooms need more treatment area than drywall rooms to achieve the same reverb time reduction. Plan for approximately 40-50% of total wall surface area covered with absorption.
For a typical 12×10 foot room with 8-foot ceilings, that means approximately 150-180 square feet of panel coverage across all walls plus ceiling treatment. Large 72×48 inch acoustic panels cover significant wall area efficiently — a 6-pack provides 144 square feet of coverage.
The cost breakdown guide helps budget for the additional coverage concrete rooms require. For DIY builders, constructing your own panels reduces the cost of high-coverage treatment significantly.
The Bottom Line
Concrete rooms are the most acoustically challenging common room type, but they respond well to proper treatment. The key differences from drywall rooms are thicker bass traps (4-6 inches minimum), air gaps behind wall panels, and 40-50% wall coverage instead of 20-30%.
Start with corner bass traps in all four vertical corners. Add wall panels at first reflection points with 2-4 inch air gaps.
Finish with a ceiling cloud and floor treatment.
The full guide to acoustic treatment covers treatment priorities for all room types. For basement studios with concrete walls and floors, the garage treatment guide addresses the specific combination of concrete surfaces, large volumes, and mounting strategies that apply to basement studios as well.
Frequently Asked Questions
How to make a concrete room less echoey?
Add absorption panels to the walls at first reflection points with 2-4 inch air gaps behind them. Install thick bass traps in all corners.
Add a ceiling cloud above the listening position.
Concrete rooms need more treatment than typical rooms — plan for 40-50% wall coverage with 2-4 inch thick panels rather than the 20-30% sufficient for drywall rooms.
Can you soundproof a concrete room?
Concrete already provides excellent soundproofing — it blocks sound transmission between rooms effectively due to its mass and density. The problem in concrete rooms is internal acoustics, not sound leakage.
What concrete rooms need is acoustic treatment (absorption panels and bass traps to control reflections inside the room), not soundproofing (additional mass to block sound from entering or leaving). The home studio guide explains the difference between treatment and soundproofing.
How much treatment does a concrete room need?
More than a drywall room. Plan for 40-50% wall coverage with panels that are 2-4 inches thick, plus 4-6 inch thick bass traps in every corner.
A typical 12×10 foot concrete room needs approximately 8-12 wall panels, 4-8 corner bass traps, a ceiling cloud, and floor treatment. The total cost ranges from 400-800 dollars for DIY builds to 1,500-3,000 dollars for commercial panels. A budget starting point for corners is the TroyStudio 24-pack foam bass traps — they fill all four corners immediately while you plan thicker fiberglass builds for deeper bass control.
The small room guide covers additional treatment considerations for compact concrete spaces where room modes are especially severe at shorter wall distances.
How To Do Temporary Acoustic Treatment (No Wall Damage, Full Performance)
How to do temporary acoustic treatment is the first question renters, shared-space users, and mobile recordists need answered — you can get real acoustic improvement without drilling holes, leaving adhesive residue, or losing your security deposit, but only if you choose methods that actually absorb sound rather than just covering walls with decorative material.
The problem most temporary setups face is not a lack of options — it is choosing options that look like treatment but perform poorly. Thin foam tiles on command strips absorb almost nothing below 500 Hz.
A single blanket draped over a mic stand blocks one reflection while the rest of the room remains untreated.
Effective temporary treatment uses the same materials as permanent treatment — fiberglass, mineral wool, or dense acoustic blankets — mounted with removable hardware that leaves walls undamaged when you move out.
Below you will find every temporary mounting method ranked by performance and wall impact, a budget breakdown from cheapest to most effective, and the specific products that work best for damage-free installation. Start with two panels at first reflection points hung on command strips or freestanding frames — that single step produces the biggest improvement.
Quick Takeaway
Temporary acoustic treatment works best with real absorptive materials (fiberglass or mineral wool panels) mounted on removable hardware like heavy-duty command strips, industrial velcro, or freestanding floor frames. Avoid thin foam as your primary treatment. Two panels at first reflection points and two corner bass traps on freestanding frames deliver 80% of the improvement of a permanent installation with zero wall damage.
Solutions That Do Not Damage Walls
Temporary treatment falls into two categories: panels mounted with removable adhesive, and freestanding panels that never touch the wall at all. Both work.
The right choice depends on whether your landlord allows any wall contact or requires zero-contact solutions.
The acoustic performance of temporary treatment is identical to permanent treatment when you use the same materials. A fiberglass panel on command strips absorbs exactly the same amount of sound as a fiberglass panel screwed into the wall.
The only difference is the mounting method.
This means the treatment priorities are the same regardless of whether your setup is permanent or temporary. Treat the first reflection points first, then add corner bass traps, then treat the ceiling if possible.
The cost breakdown guide covers pricing for every option below, including both the panels and the mounting hardware.
Temporary Mounting Methods For Acoustic Panels
The mounting method determines how much weight the wall can support, how easy the panels are to reposition, and how much (if any) wall damage occurs when you remove them.
Command Strips And Adhesive Velcro
Heavy-duty Command strips rated for 12-16 lb hold most acoustic panels securely. A standard 24×24 inch fiberglass panel weighs 3-5 lb — well within the capacity of two Command strip pairs.
Apply the strips to the panel frame (not the fabric), press firmly for 30 seconds, and wait one hour before hanging. When you move out, pull the tab straight down to release the adhesive without damaging the wall surface.
Industrial-strength adhesive velcro works similarly but allows you to remove and rehang panels repeatedly without replacing the adhesive. Apply hook-side strips to the wall and loop-side to the panel back.
Both methods leave walls undamaged when removed properly. Avoid pulling Command strips away from the wall at an angle — always pull straight down along the wall surface to activate the stretch-release mechanism.
Freestanding Panel Frames
Freestanding frames hold panels upright with zero wall contact. They are the only truly damage-free option because nothing touches the wall surface at any point.
Build a simple T-shaped base from 2×4 lumber: a 24-inch horizontal foot piece with a vertical upright screwed into the center. Attach the acoustic panel to the upright with screws or velcro.
The wide base prevents tipping. You can also build an A-frame stand from two panels hinged at the top — this creates a self-supporting structure that stands on its own without any base at all.
Commercial mic stand adaptors also hold lightweight panels. Thread a panel onto a standard mic stand boom arm for a portable, repositionable treatment point that you can move between sessions.
The downside of freestanding frames is floor space. Each panel and its base occupies approximately 2 square feet of floor area, which adds up in small rooms where every inch matters.
Freestanding frames are ideal for corner bass traps because they naturally sit across the corner at a 45-degree angle with an air gap behind them — exactly the configuration that maximizes low-frequency absorption.
Tension Rods And Curtain Systems
Tension rods installed between two parallel walls hold acoustic blankets, heavy curtains, or lightweight panel arrays without any hardware touching the wall surface.
Use a heavy-duty tension rod rated for at least 20 lb in a window frame, doorway, or between two close walls. Hang acoustic blankets from the rod using curtain rings with clips.
The blankets hang flat against the wall behind them, creating an absorption surface.
This method works particularly well for window treatment — hang a dense acoustic curtain on a tension rod in the window frame to absorb reflections from the glass surface without permanent mounting.
For ceiling treatment, some renters use adhesive ceiling hooks (rated for smooth ceilings) with lightweight panels suspended on wire. This creates a temporary ceiling cloud that can be removed without damage to most ceiling finishes.
Leaning Panels Against Walls
The simplest temporary method is leaning panels against the wall at a slight angle. This requires no mounting hardware at all and creates a natural air gap between the panel and the wall that improves low-frequency absorption.
Lean panels at first reflection points on the side walls, propped against the wall at approximately 10-15 degrees from vertical. The bottom edge sits on the floor and friction holds the panel in place.
This method works for thicker, heavier panels that are stable enough not to slide. It does not work for lightweight foam tiles or thin panels that tip over easily.
For additional stability, place a rubber shelf liner strip under the bottom edge of the panel. The rubber grips the floor surface and prevents the panel from sliding outward over time.
Temporary Treatment Options By Budget
From cheapest to most effective, here are the temporary treatment options ranked by acoustic performance per dollar.
Moving Blankets And Heavy Curtains (Under 50 Dollars)
Moving blankets are the cheapest temporary absorption material. A heavy-duty moving blanket hung from Command hooks or a tension rod provides NRC 0.2-0.4 — absorbing 20-40% of mid and high frequency energy that hits it.
The limitation is frequency range. Moving blankets absorb almost nothing below 500 Hz, which means the bass and low-mid problems that cause muddy, boxy recordings remain untouched.
Heavy blackout curtains perform similarly to moving blankets and look better in a living space. NICETOWN blackout curtain panels are a popular renter-friendly option — their triple-weave fabric absorbs mid and high frequency reflections while also blocking light, and they hang on a tension rod with zero wall contact.
For best results, double-layer blankets at the first reflection points rather than single-layer across more wall area. Two blankets stacked together absorb 30-50% more than a single blanket.
The blankets as treatment guide covers performance data, hanging methods, and when blankets make sense versus when you need to upgrade to panels.
Acoustic Foam With Removable Adhesive (50-150 Dollars)
Acoustic foam tiles mounted with Command strips are the most common temporary treatment. They are lightweight, easy to install, and remove cleanly from most wall surfaces.
The acoustic limitation is the same as blankets — foam absorbs mid and high frequencies but does almost nothing below 500 Hz. A room treated entirely with 1-2 inch foam still has the same bass problems as an untreated room.
Foam works as a supplement to bass traps, not as a replacement. Use foam at first reflection points for mid-high absorption and pair it with thicker freestanding panels in the corners for bass control.
When mounting foam with Command strips, apply the strips to the foam first and let the adhesive bond for at least 10 minutes before pressing to the wall. This ensures the strip bonds fully to the foam surface before bearing the weight of the tile.
For small rooms where bass buildup is severe, foam alone is not sufficient regardless of how much you install.
Fiberglass Panels With Removable Mounting (150-300 Dollars)
Fiberglass or mineral wool panels on Command strips or adhesive velcro deliver the same acoustic performance as a permanent installation. A 2-inch fiberglass panel achieves NRC 1.0 regardless of how it is mounted.
UMIACOUSTICS fiberglass panels include hanging brackets that mount on small Command hooks or nails. The 2-inch fiberglass core absorbs across the full mid and high frequency range including the low-mids where foam and blankets fall short.
A 4-pack covers two first reflection points — the highest-priority treatment positions in any room. Add a second 4-pack for rear wall treatment or use them as freestanding corner absorbers.
The fiberglass treatment guide covers panel thickness, density options, and NRC data for different configurations.
Freestanding DIY Panels (100-250 Dollars)
Building DIY panels with freestanding bases delivers the best acoustic performance of any temporary option. You control the insulation type, thickness, and density while the freestanding design requires zero wall contact.
Build standard 24×48 inch panels with 2-inch mineral wool or fiberglass insulation in a 1×4 lumber frame. Add a T-shaped base (a 24-inch foot piece with a vertical upright) to each panel.
The total materials cost per freestanding panel is approximately 25-35 dollars.
Freestanding panels can be repositioned instantly — slide them to different wall positions, angle them into corners for bass trapping, or move them to a different room entirely. No remounting, no adhesive, no wall contact.
For renters who move frequently, freestanding DIY panels are the only treatment investment that transfers fully to any new space. Wall-mounted panels need new adhesive and positioning in each new room, but freestanding panels simply move with you.
Portable Vocal Booths And Isolation Shields (40-100 Dollars)
For vocal recording specifically, a microphone isolation shield mounts directly on a mic stand with zero wall contact. It blocks the rear wall reflection that causes the most coloration in vocal recordings.
Isolation shields do not treat the room — they treat the microphone position only. They are best used alongside room treatment, not as a replacement for it.
For maximum isolation in a completely untreated space, the TroyStudio enclosed vocal booth surrounds the microphone on all sides for maximum reflection blocking. It folds flat for storage and works on a desktop or mic stand.
The placement priority is the same whether your treatment is temporary or permanent. Treat these positions in order:
First reflection points on side walls — the spots where sound from your speakers bounces to your listening position. Two panels here produce the single biggest improvement in any room.
Corner bass traps — freestanding panels leaned into corners at a 45-degree angle. Start with the two front corners behind your speakers.
Ceiling above the listening position — a suspended panel or ceiling cloud if your ceiling finish allows adhesive hooks.
Rear wall — absorption behind the listening position controls late reflections that add unwanted reverb.
Wall behind speakers — reduces the reflection from the front wall.
For mixing rooms, first reflection points and bass traps are non-negotiable even in temporary setups. For vocal recording, the wall behind the microphone and the wall behind the singer are the highest priorities.
The mirror trick identifies first reflection points accurately: sit at the mix position and have someone slide a small mirror along the side wall. Where you can see the speaker cone reflected in the mirror is the exact spot to place your panel.
For home theater setups, the same placement priorities apply but with additional emphasis on the rear wall where surround reflections cause the most interference.
Common Mistakes With Temporary Treatment
Temporary treatment fails most often because of material choice, not mounting method. These are the mistakes that waste money without improving the room.
Covering Every Wall With Thin Foam
Covering all four walls with 1-inch foam creates a room that sounds dead in the highs but still has the same bass and low-mid problems as an untreated room. The result is worse than selective treatment at key positions.
Two thick panels at first reflection points outperform twenty foam tiles spread across every wall. Target placement always beats broad coverage with inferior materials.
Ignoring Bass Traps
Bass problems are the most audible issue in small rooms, and no amount of wall-mounted foam or blankets addresses them. Freestanding bass traps in the corners are essential even in temporary setups.
A single 4-inch thick panel leaned into each front corner makes a dramatic difference in bass clarity. This is the treatment most temporary setups skip, and it is the treatment that matters most for mixing accuracy. TroyStudio foam bass traps friction-fit into corners with zero mounting hardware and cover all four vertical corners in a room for under 35 dollars.
Using Non-Acoustic Materials
Egg cartons, carpet scraps, and packing foam do not absorb sound in any meaningful way. The egg cartons guide explains why these materials fail acoustically despite looking like they should work.
Stick with materials designed for sound absorption: fiberglass, mineral wool, dense acoustic blankets, or at minimum, proper acoustic foam from a reputable manufacturer.
The Bottom Line
Temporary acoustic treatment delivers the same performance as permanent treatment when you use the same materials. The difference is the mounting method, not the acoustic result.
Start with fiberglass or mineral wool panels at first reflection points, mounted on Command strips, adhesive velcro, or freestanding frames. Add corner bass traps on freestanding bases.
This setup costs 150-300 dollars, leaves zero permanent wall damage, and provides 80% of the improvement of a full permanent installation.
For pre-assembled solutions, the treatment kit guide covers packages that include panels and mounting hardware together.
Frequently Asked Questions
How to install acoustic panels without damaging walls?
Use heavy-duty Command strips rated for 12-16 lb per pair, or industrial adhesive velcro strips. Apply to the panel frame, press firmly, and wait one hour before hanging.
When removing, pull Command strips straight down along the wall to activate the stretch-release adhesive. Do not pull outward — that tears the adhesive and can damage paint.
How to mount acoustic foam temporarily?
Command strips work well for lightweight foam tiles. Apply two strips per tile — one near the top and one near the bottom.
For larger foam panels, use four strips (one in each corner). The total weight of a standard 12×12 inch foam tile is under 1 lb, which is well within the capacity of even the lightest Command strips.
What is the best temporary acoustic treatment for renters?
Freestanding DIY panels with T-shaped bases deliver the best performance with zero wall contact. Build 24×48 inch panels with 2-inch mineral wool insulation and a lumber frame with attached feet.
For lower budgets, fiberglass panels on Command strip brackets are the next best option. They require minimal wall contact and remove cleanly.
For vocal recording only, a microphone isolation shield mounted on a mic stand provides targeted treatment at the recording position with zero room modification.
What is the 38 percent rule in room acoustics?
The 38 percent rule is a starting point for speaker and listening position placement. It suggests placing your listening position at 38% of the room length from the front wall to minimize the impact of the strongest room modes.
This positioning reduces how much bass energy builds up at the listening position. It works in any room — temporary or permanent — and costs nothing to implement.
The home studio setup guide covers speaker placement and room positioning alongside treatment placement for the most effective combined approach.
How To Record Music Without Acoustic Treatment (Practical Techniques That Work)
How to record music without acoustic treatment is a question every home studio builder faces at some point — you can get usable recordings in an untreated room, but only if you use specific microphone techniques and room choices that minimize how much the space damages your sound.
The problem with recording in an untreated room is that reflections from bare walls, ceiling, and floor reach the microphone milliseconds after the direct sound. Those reflections cause comb filtering, boxy coloration, and a roomy quality that no amount of post-production processing can fully remove.
The techniques below reduce the ratio of reflected sound to direct sound reaching the microphone. They are compromises — none of them replace proper treatment — but they produce recordings that are dramatically better than pointing a microphone at a singer in the middle of a bare room.
Start with microphone distance. Getting the source closer to the mic is the single most effective thing you can do in an untreated space.
Quick Takeaway
Recording without treatment requires close microphone technique (4-8 inches from the source), a cardioid polar pattern to reject rear reflections, and a small furnished room or closet that naturally dampens sound. A portable isolation shield behind the microphone blocks the worst wall reflections. These techniques produce usable recordings but cannot match the clarity of a properly treated room.
Techniques For Recording In An Untreated Room
Every technique below targets the same goal: increasing the ratio of direct sound (from the source) to reflected sound (from the room) reaching the microphone.
Get Close To The Microphone
Microphone distance is the most powerful variable you control. At 4-6 inches from the source, the direct sound is so much louder than the room reflections that the microphone captures mostly the source with minimal room coloration.
At 12-18 inches, the room reflections become audible. At 3 feet or more, the room dominates the recording — you hear almost as much reflected sound as direct sound.
For vocals, position the singer 4-8 inches from a cardioid condenser or dynamic microphone. Use a pop filter to manage plosives at that close distance.
For acoustic guitar, place the microphone 6-10 inches from the 12th fret area. Closer placement emphasizes the strings and body resonance while reducing the room contribution.
The tradeoff with close-mic technique is proximity effect — bass buildup that occurs when a directional microphone is very close to the source. A high-pass filter at 80-100 Hz during recording or mixing corrects this without losing important low-frequency content.
Use A Closet Or Small Furnished Room
A walk-in closet full of hanging clothes is one of the best untreated recording spaces available. The clothes act as absorption, the small volume limits the distance reflections travel, and the irregular surfaces break up flutter echo.
A small bedroom with a bed, curtains, bookshelves, and soft furniture also works well. Every soft surface in the room absorbs some mid and high frequency energy, reducing the overall reverb time.
Avoid large empty rooms with hard surfaces — they produce the most audible room coloration. A garage, bathroom, or unfurnished living room with hardwood floors is the worst possible recording environment without treatment.
The small room treatment guide explains why smaller rooms with soft furnishings naturally outperform larger empty spaces for untreated recording.
Improvise With Blankets And Pillows
Heavy blankets hung behind and around the microphone position absorb some mid and high frequency reflections. They do not replace proper panels, but they measurably reduce the coloration from the nearest wall surfaces.
Hang a blanket on the wall directly behind the microphone — this is the wall whose reflections cause the most damage because they arrive at the microphone from behind, opposite the source. A second blanket behind the singer catches reflections that would otherwise bounce off the rear wall and back into the microphone.
Pillows and cushions piled on nearby hard surfaces (desks, dressers, shelves) further reduce reflections in the immediate recording area. The goal is not to treat the whole room — just to dampen the surfaces closest to the microphone.
The blankets as treatment guide covers what blankets can and cannot do acoustically, including the frequency range they affect and the best hanging methods.
Use A Microphone Isolation Shield
A microphone isolation shield mounts behind the microphone on a standard mic stand and blocks reflections from reaching the rear of the capsule. It is the single most targeted tool for recording in untreated rooms because it addresses the wall reflection that causes the most coloration.
Isolation shields work best for vocals and voiceover where the source is directly in front of the microphone. They are less effective for instruments that radiate sound in all directions because the shield only covers a narrow arc behind the mic.
For budget builds, the XTUGA isolation shield provides similar rear-reflection blocking at a lower price point. It folds flat for storage and sets up in seconds for mobile recording sessions.
Choose The Right Microphone Pattern
Cardioid microphones reject sound from behind the capsule — exactly where the wall reflection arrives in a typical recording setup. This natural rejection pattern reduces room pickup by 15-25 dB from the rear compared to an omnidirectional microphone.
For untreated rooms, cardioid is almost always the right choice. It captures the source from the front while rejecting the worst wall reflections from behind.
Avoid omnidirectional patterns in untreated rooms. Omni microphones pick up equally from all directions, which means they capture every room reflection with the same sensitivity as the source.
Post-Production Fixes For Untreated Room Recordings
Software tools can reduce room coloration after recording, but they cannot fully remove it. Prevention through mic technique and room choice is always more effective than post-production correction.
De-Reverb Plugins
De-reverb plugins like iZotope RX analyze the reverb tail in a recording and attenuate it. They work well for mild room coloration — reducing a slightly roomy vocal to something closer to a dry studio sound.
They struggle with heavy room coloration. If the original recording has obvious echo or boxiness, de-reverb processing introduces artifacts that sound metallic or phasey.
The more room sound the plugin tries to remove, the worse the artifacts become.
EQ And Noise Gates
A noise gate cuts the signal when the source stops, eliminating the room reverb tail between phrases. This cleans up vocal recordings significantly by removing the audible room sound in the gaps between words.
EQ cuts in the 200-400 Hz range can reduce boxy room coloration. A narrow cut at the specific frequency where the room resonates removes some of the muddy quality without affecting the overall tone of the recording.
These tools help, but they cannot replace what proper microphone technique prevents in the first place. The vocal treatment guide covers the recording chain from room treatment through post-production.
Why Acoustic Treatment Is Still Worth It
All the techniques above are compromises. They reduce room problems but do not eliminate them.
Even basic treatment — two DIY panels at first reflection points and two corner bass traps — eliminates the reflections that these workarounds only partially address. The total cost for four DIY panels is approximately 60-100 dollars in materials.
The difference between recording in an untreated room with good mic technique and recording in a treated room with the same technique is not subtle. Treatment removes the low-mid buildup and comb filtering that no microphone position or isolation shield can address.
For anyone recording regularly, treatment pays for itself in saved editing time within the first few sessions. The cost breakdown compares every treatment option from free techniques through professional installation.
The Bottom Line
Recording without treatment requires close microphone technique, a cardioid polar pattern, and the smallest, most furnished room available. An isolation shield behind the microphone blocks the worst wall reflections.
These techniques produce usable recordings but cannot match a treated room. Even a minimal treatment setup of two wall panels and two bass traps eliminates the problems that workarounds can only reduce.
The full guide to acoustic treatment covers treatment priorities from first purchase through complete room setup. For temporary or rental situations, the temporary treatment guide covers portable options that require no wall mounting.
Frequently Asked Questions
How do YouTubers get such good audio?
Most YouTubers with clean audio use close microphone technique (6-12 inches from the mouth), a cardioid dynamic microphone like the SM7B, and at least minimal room treatment behind the microphone. Many also use noise gates and light de-reverb processing in post-production.
The combination of close mic distance and a treated wall behind the microphone handles the majority of room problems. The rest is handled in post.
How to record music without background noise?
Record in the quietest room available — interior rooms with no exterior walls produce less traffic and environmental noise. Use a cardioid microphone pointed away from noise sources.
Apply a noise gate to cut the signal between phrases.
For persistent background noise (HVAC, computer fans), a noise reduction plugin like iZotope RX or Audacity’s noise reduction tool samples the noise floor and subtracts it from the recording. Close mic technique also helps because the source-to-noise ratio improves as the mic gets closer to the source.
Can you fix room reverb in post-production?
De-reverb plugins reduce mild room coloration but cannot fully remove it. Heavy room reverb leaves artifacts after processing that sound metallic or hollow.
Prevention is always more effective than correction. Proper mic technique in a furnished small room produces cleaner recordings than de-reverb processing applied to recordings made in a large untreated space. The mixing treatment guide explains how room acoustics affect both recording and monitoring accuracy.