How To Soundproof A Room From Outside Noise (Traffic, Neighbors, And Street Sound)
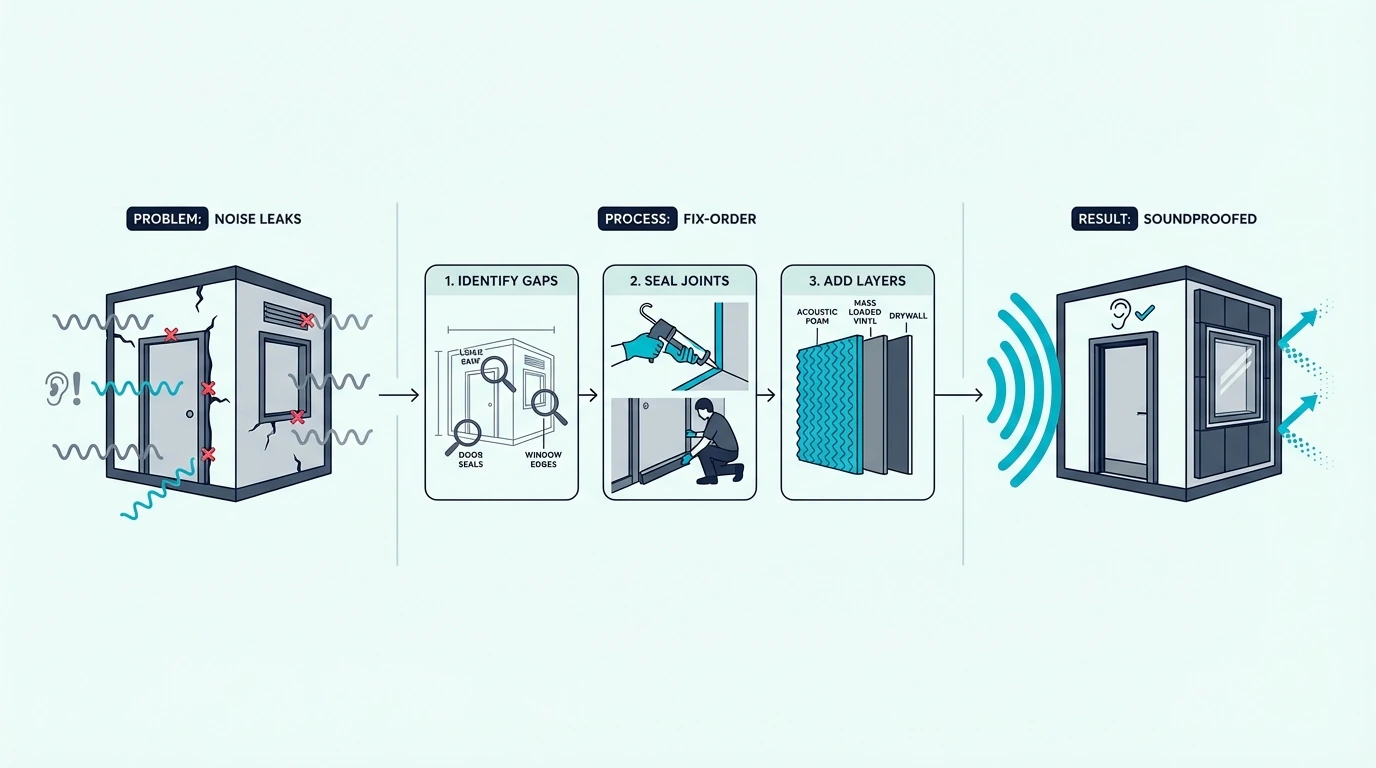
How to soundproof a room from outside noise is a question that sounds simple, but the answer depends entirely on where the noise is getting in. Most people blame their windows, and windows are often part of the problem — but outside noise exploits every weak point in the room’s shell, and fixing only one while ignoring the others wastes money.
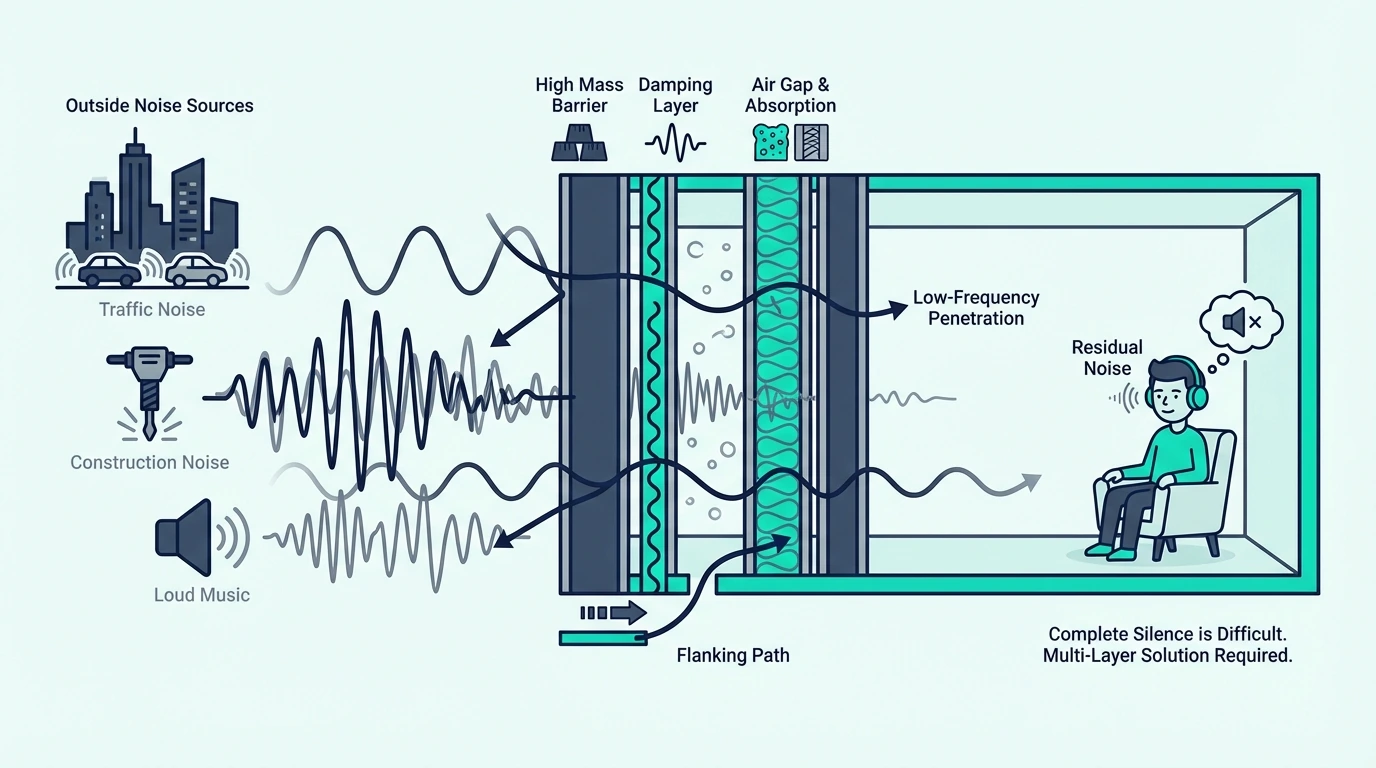
The reason outside noise is harder to block than room-to-room noise is because it contains more low-frequency energy. Traffic rumble, aircraft drone, and bass from nearby music all sit in the frequency range that passes through lightweight building materials most easily.
Below, you’ll find how to diagnose where outside noise enters your room, which fixes to prioritize first, what actually works on a budget, and when the problem requires professional-level upgrades.
Quick Takeaway
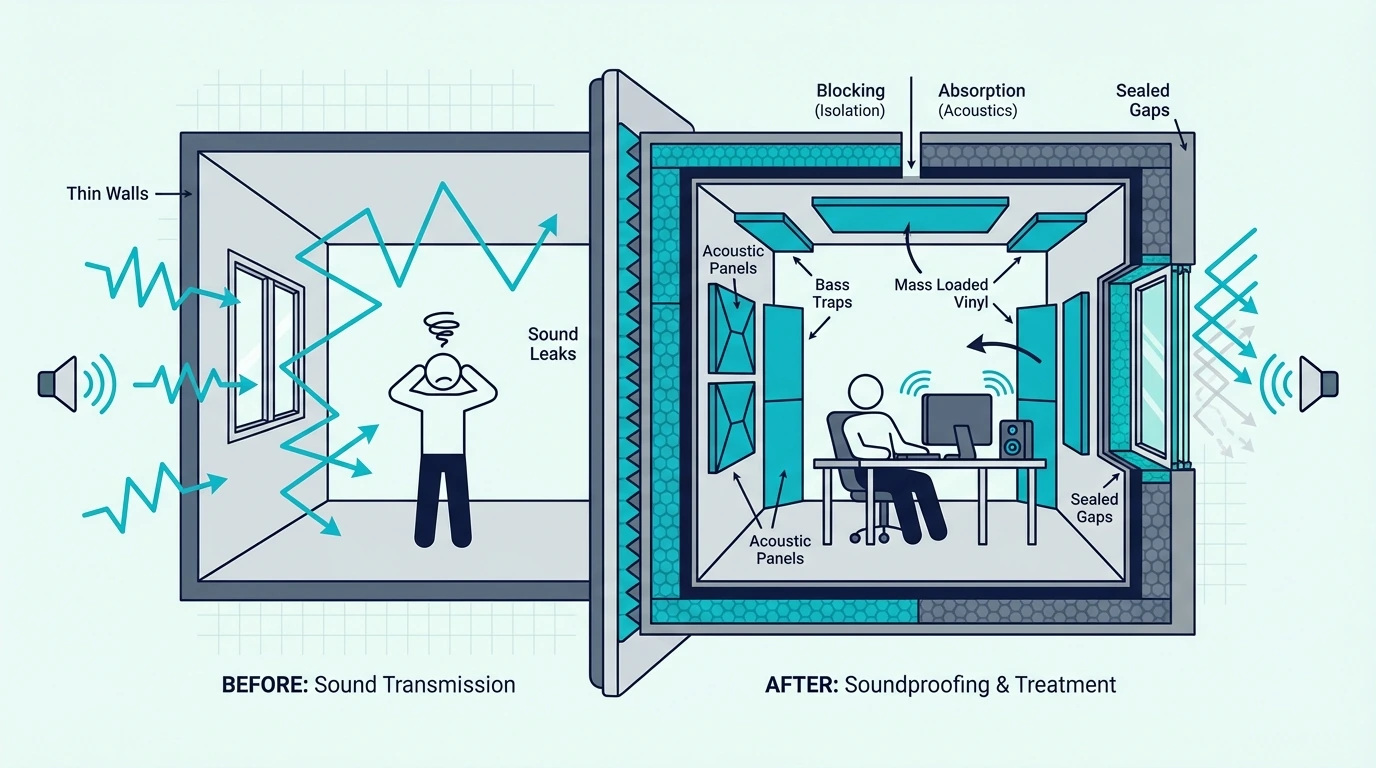
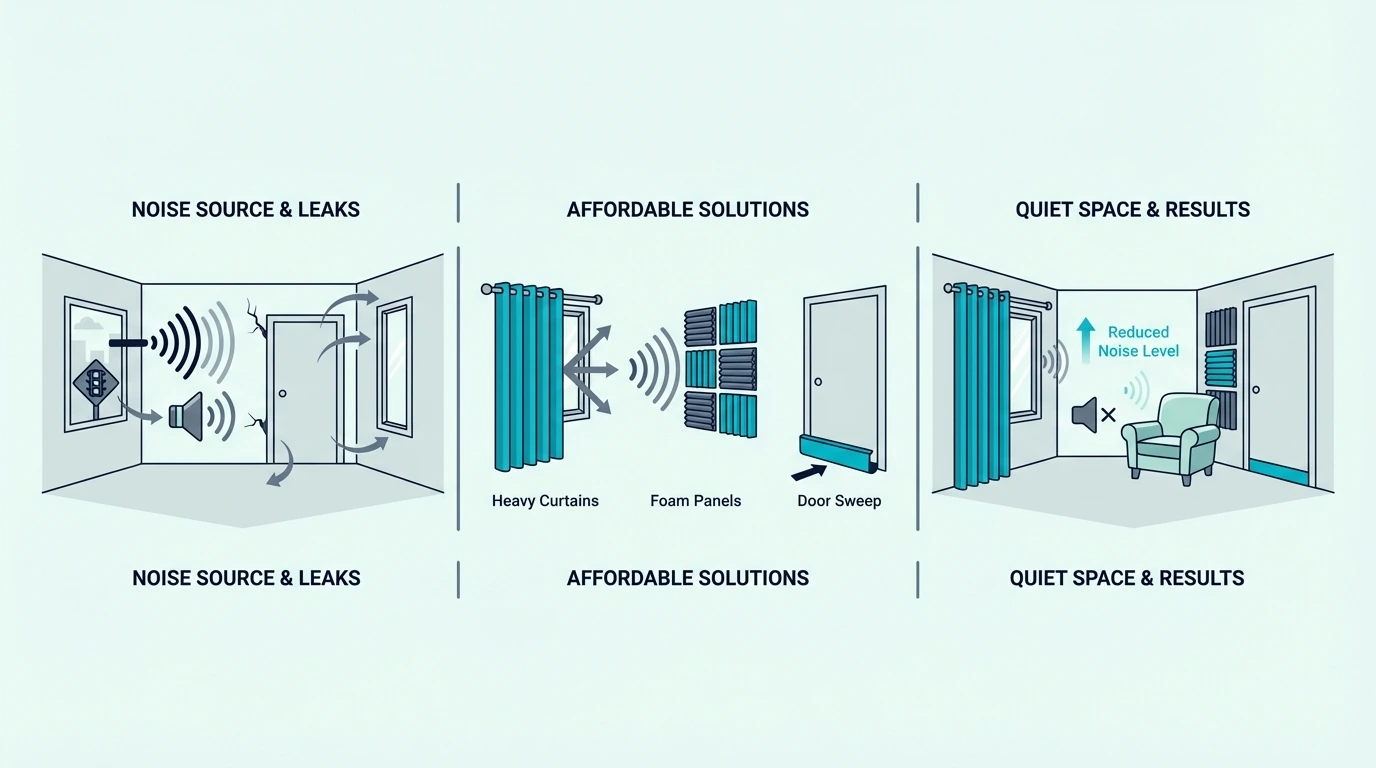
Start by sealing every air gap — around windows, doors, outlets, and vents. Air gaps are the cheapest fix and the biggest noise leak in most rooms. After sealing, add mass to the weakest surfaces: heavier curtains on windows, weatherstripping and sweeps on doors, and extra drywall on thin walls. A properly sealed room with targeted mass upgrades can reduce outside noise by 10–20 decibels.
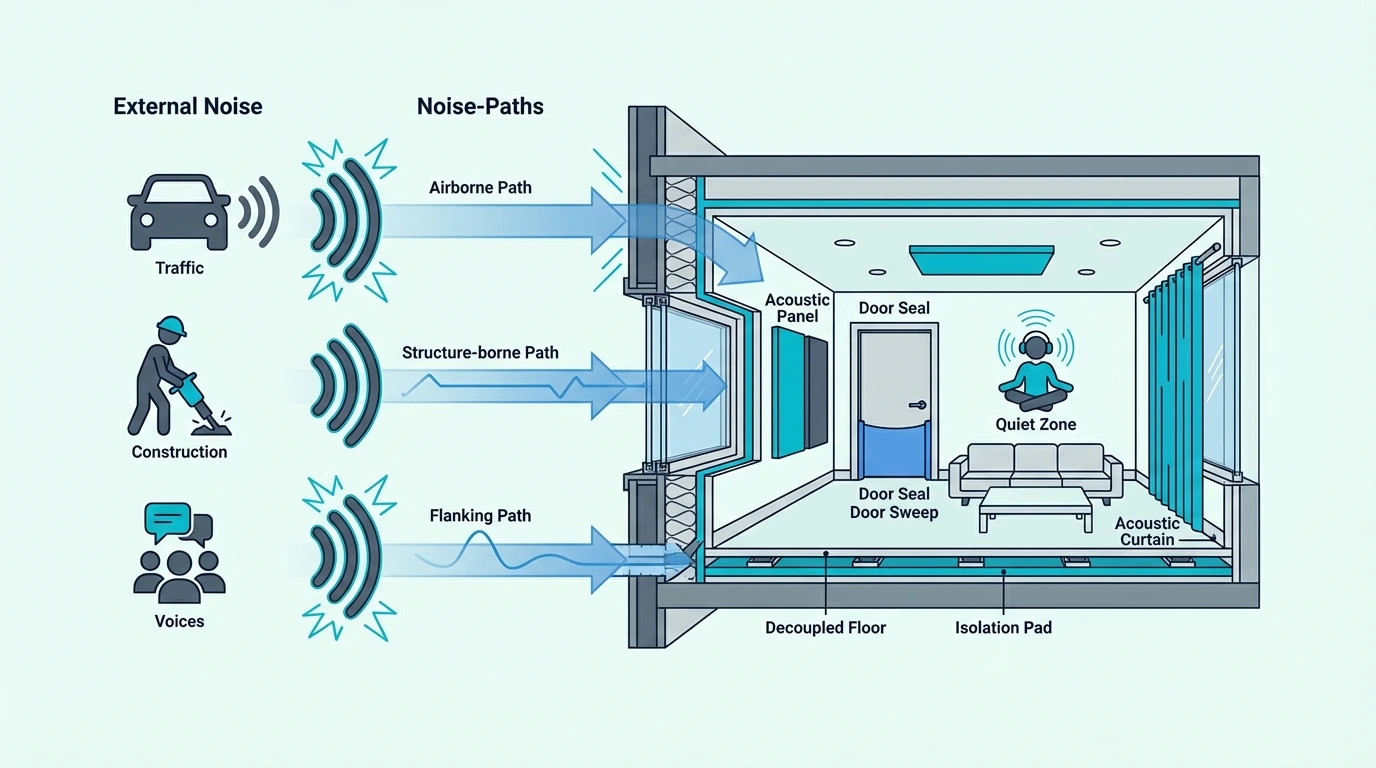
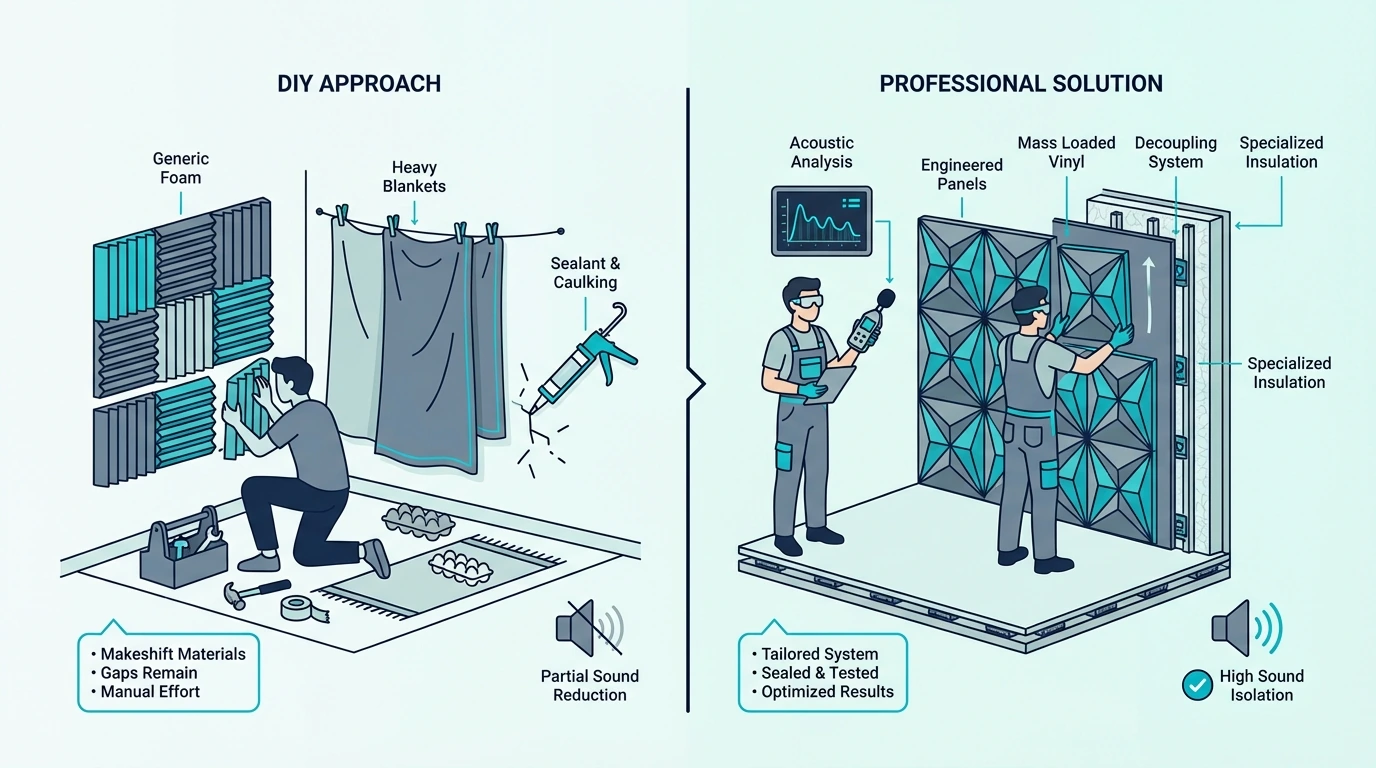
Outside Noise Uses The Weakest Path Into The Room
Before you buy anything, you need to know which part of the shell is actually losing.
Outside noise reaches the room through every surface and opening that faces the exterior, but it rarely enters each one equally.
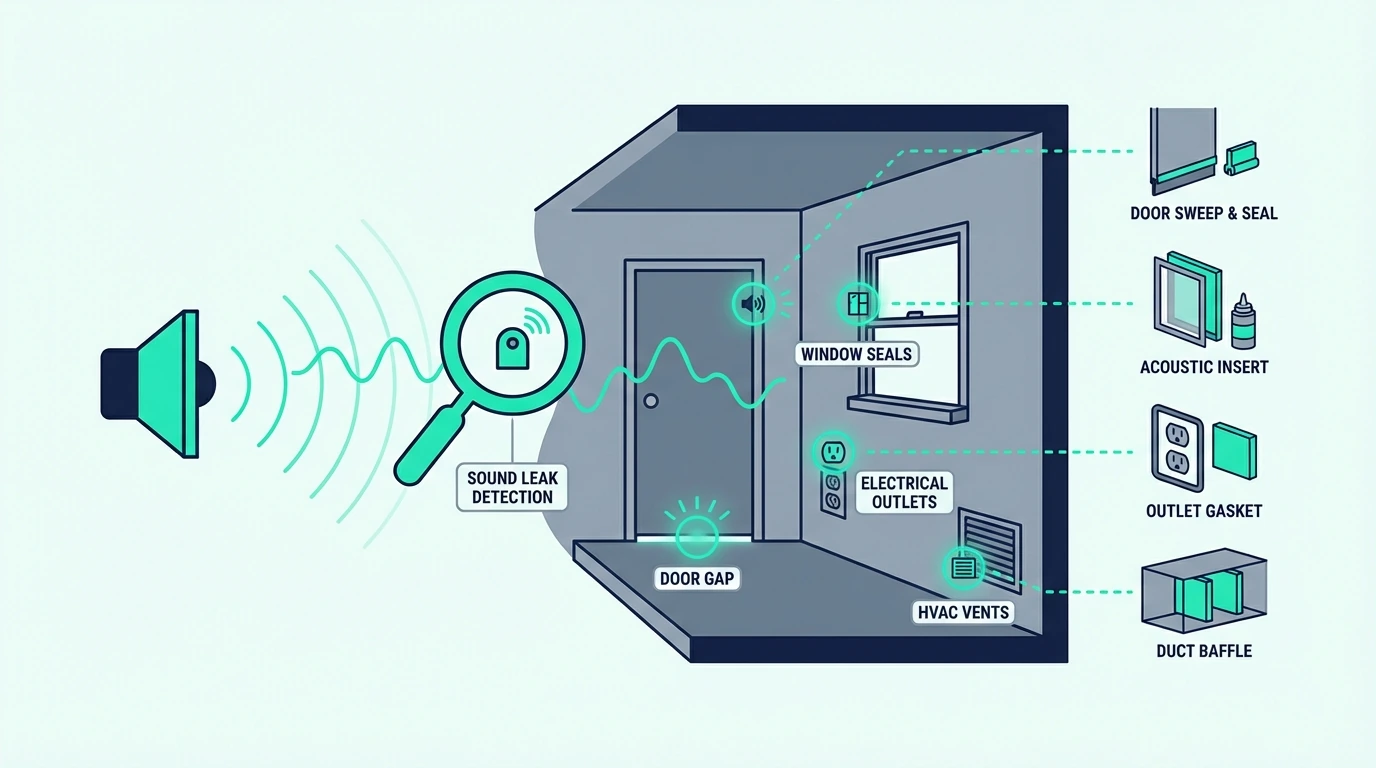
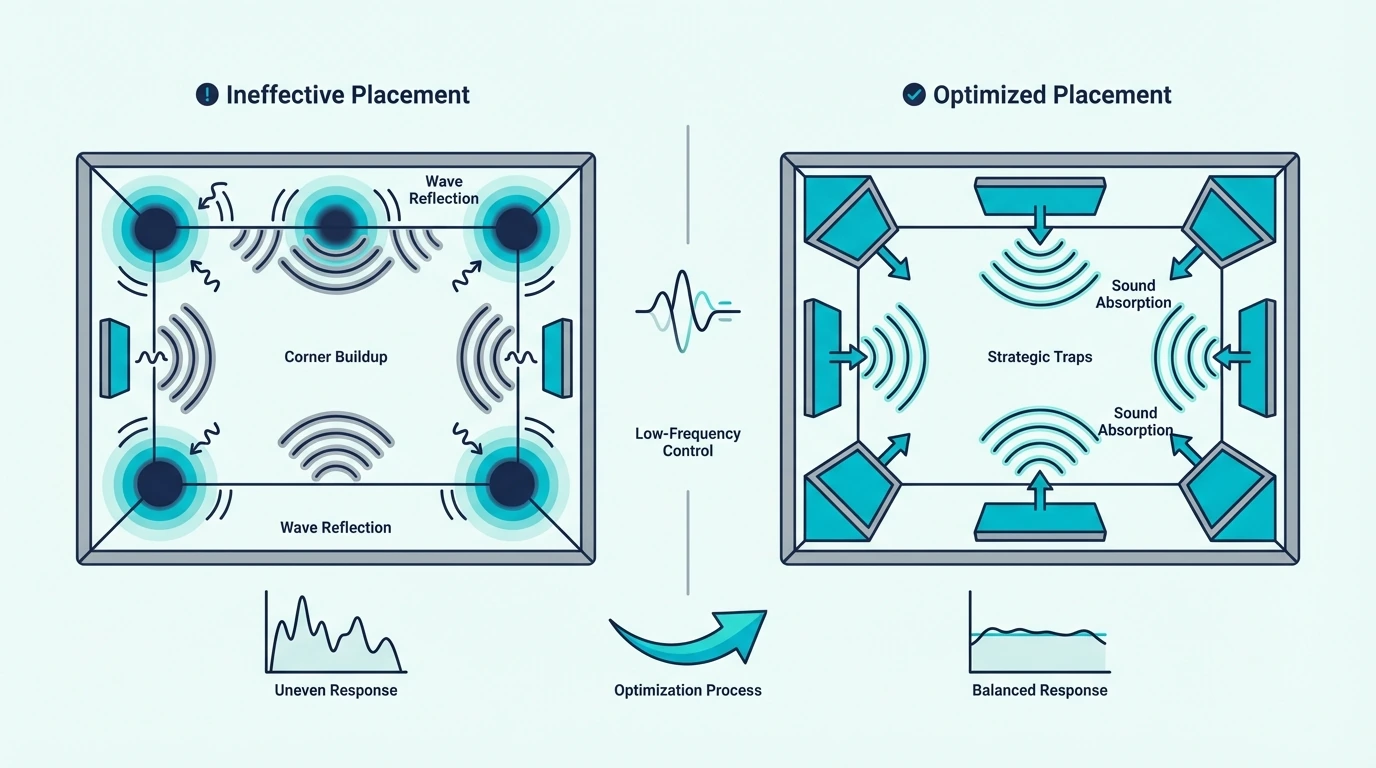
The Loudest Leak Usually Tells You Where To Start
Walk through the room while outside noise is present. Press your ear close to the window glass, then the window frame edges, then the door, then the walls.
The noise will be loudest at the weakest point.
If the noise is loudest at the window edges rather than the glass center, air gaps around the frame are the primary leak. If it’s loudest at the door bottom, the gap under the door is the main path.
If it seems to come from everywhere equally, the walls themselves lack enough mass to block the sound — or structure-borne vibration is traveling through the building frame.
Windows Are Common Culprits, But Not Automatic Ones
Windows are often the biggest weak point because glass is thin and lightweight compared to walls, and window frames develop air gaps over time as seals dry out and frames shift. A single-pane window with worn weatherstripping can leak as much sound as an open hole.
That said, a sealed double-pane window in good condition may not be the primary problem. If your door has a visible gap at the bottom or your walls are thin single-layer drywall, those surfaces might be leaking more noise than the window.
Diagnosis before spending is the key principle — fixing windows only helps if windows are actually the main leak.
Doors, Vents, And Thin Walls Keep The Problem Going
Exterior doors are common weak points because they’re thinner than walls and often have gaps at the threshold, sides, and top. Interior doors facing hallways that connect to exterior spaces can also transmit outside noise indirectly.
HVAC vents, bathroom exhaust ducts, and any penetration through an exterior wall create direct air paths for sound. A vent connected to the outside is essentially a hole in the wall with a grate over it — sound travels through ductwork surprisingly well.
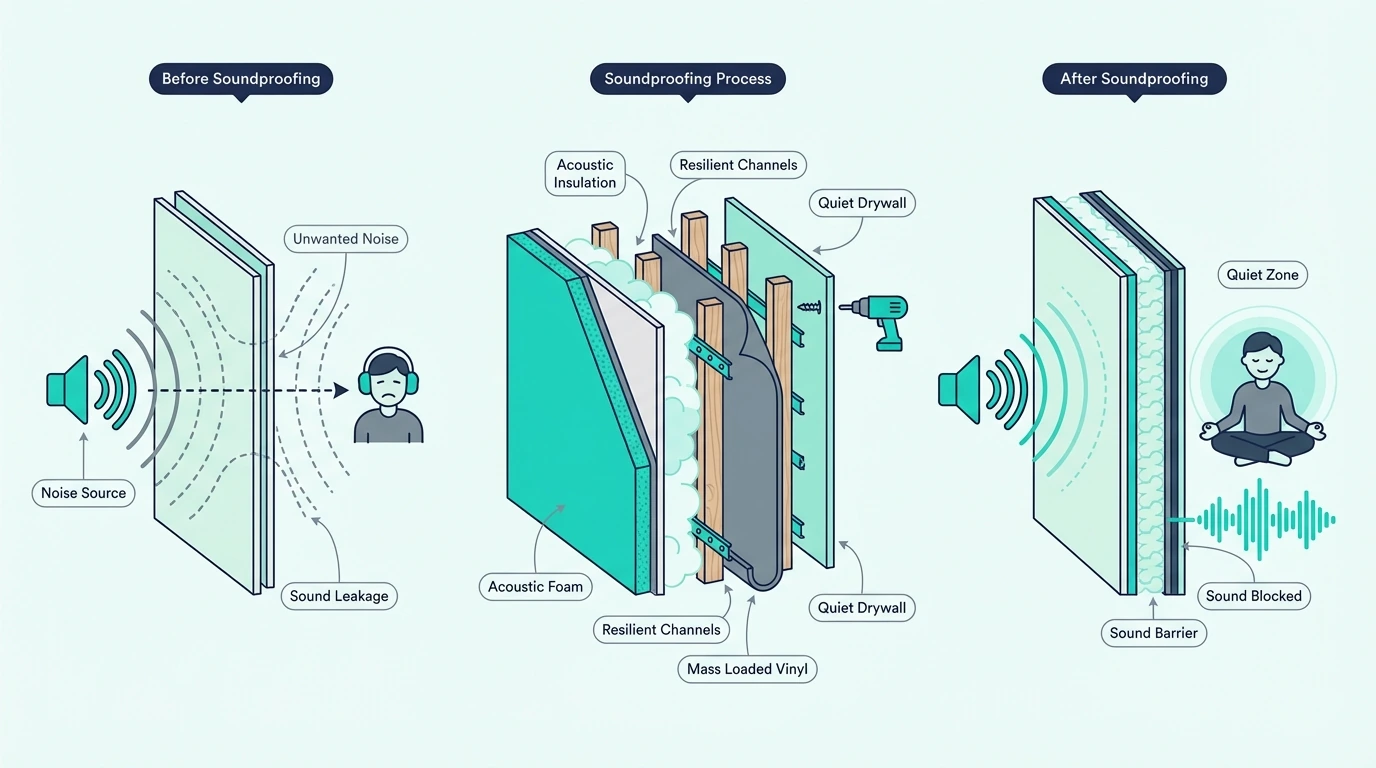
Thin walls — especially in apartments and older construction — may transmit noise through the wall structure itself even when fully sealed. Single-layer drywall on wood studs without insulation rates around STC 33, which means traffic noise and loud conversation pass through clearly.
The First Money Should Go To Sealing And The Weakest Opening
Once the path is clear, the upgrade order becomes much easier to trust.
The cheapest fixes often deliver the biggest improvement, which is why spending hundreds on window inserts while a gap under the door leaks noise freely is such a common mistake.
Air Leaks Beat Heavier Upgrades Every Time
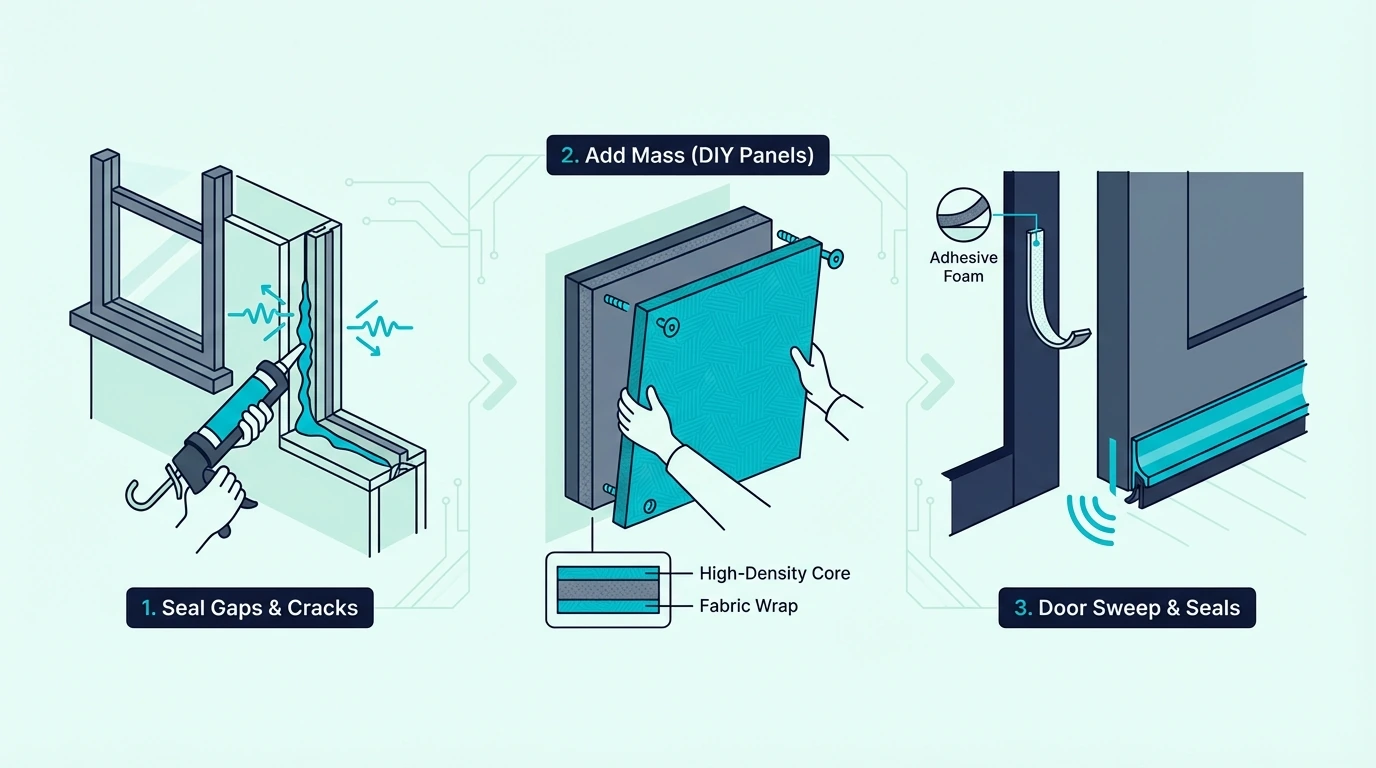
Air gaps are the single biggest source of sound leakage in most rooms, and sealing them costs almost nothing. Acoustic caulk around window frames, door frames, and where walls meet floors and ceilings closes the air paths that sound exploits first.
Foam gaskets behind electrical outlet and light switch covers on exterior walls take five minutes per outlet and cost pennies. Weatherstripping around doors and windows — compression-style EPDM or silicone, not the cheap foam that compresses permanently — seals the operable gaps that open and close daily, and a product like self-adhesive soundproof weather stripping is a practical place to start.
A door sweep or automatic door bottom like under-door draft stopper closes the gap at the threshold. This single fix can make a noticeable difference if the door currently has visible daylight at the bottom.
Windows Need More Than Curtains When Glass Is The Real Bottleneck
Heavy curtains add a layer of mass and absorption between the window and the room. RYB HOME 3-Layer Soundproof Curtains use a felt core sandwiched between fabric layers, adding more mass than standard blackout curtains.
Mount the rod wide enough to overlap the wall on both sides of the window.
Curtains help with mid and high-frequency noise but don’t do much against low-frequency traffic rumble. When traffic noise is the primary problem and curtains aren’t enough, acoustic window inserts — clear acrylic panels that mount inside the window frame with a meaningful air gap — provide significantly better noise reduction.
Mass Upgrades Matter After The Leaks Are Controlled
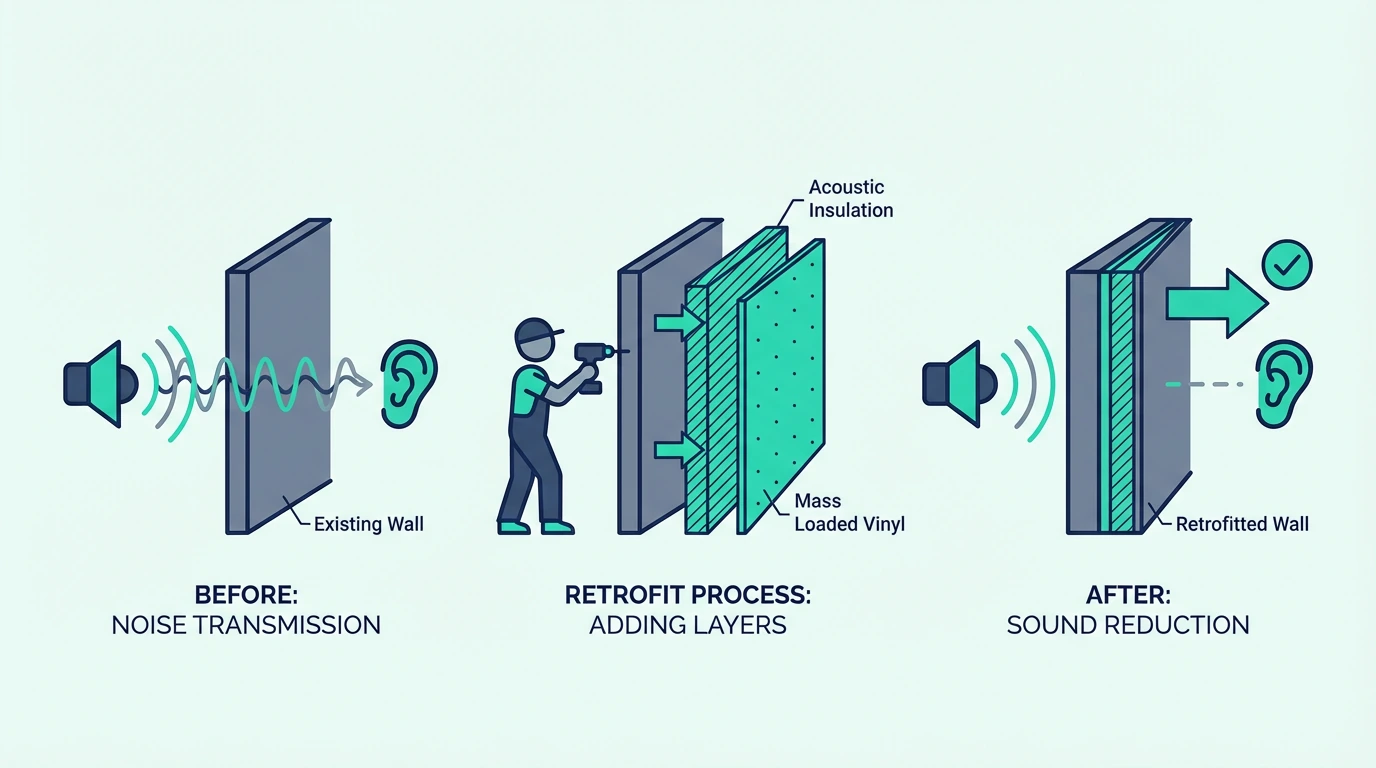
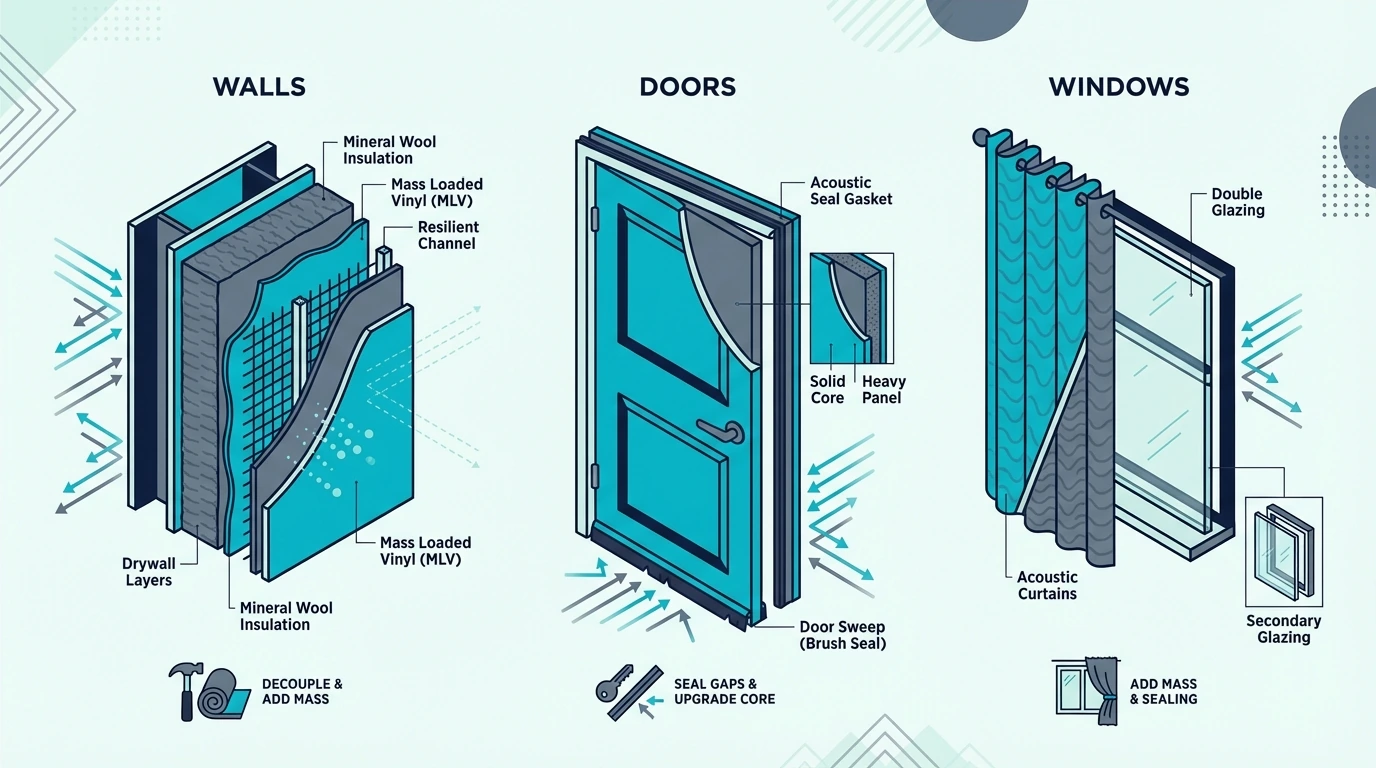
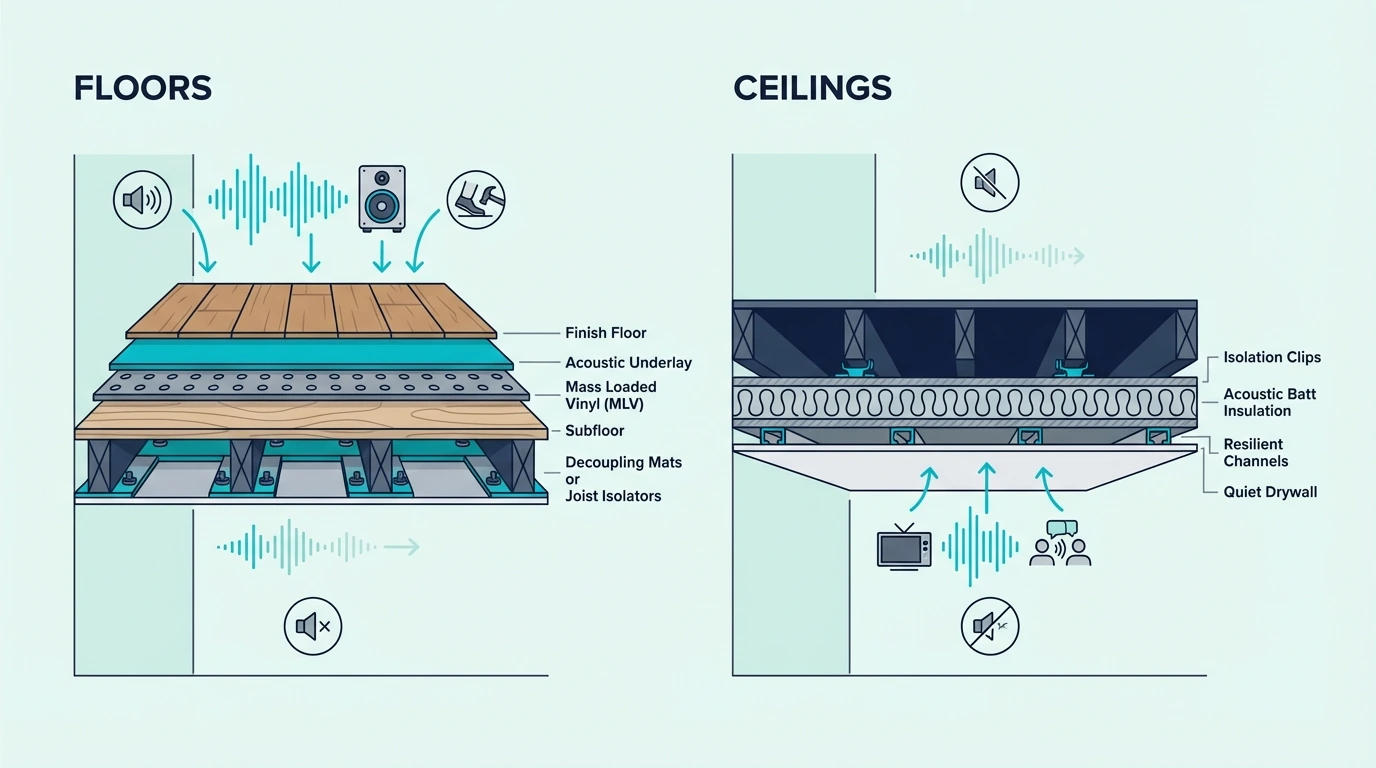
If the walls are thin — single-layer drywall without insulation — adding a second layer of 5/8-inch drywall with damping compound between the layers adds mass that blocks more sound. This is the most effective wall retrofit for outside noise and typically adds 8 to 12 STC points.
When the wall cavity is open during a retrofit, filling it with a dense mineral wool product like AFB Mineral Wool Insulation before closing it back up with new drywall makes the entire assembly significantly more effective. The cavity fill absorbs sound energy that would otherwise bounce between the drywall layers and transmit through.
For doors, replacing a hollow-core interior door with a solid-core door makes a meaningful difference. If the door is already solid, the gaps around the frame are usually the bigger problem — focus on weatherstripping and sweeps instead.
For walls that you can’t modify, hanging a heavy sound dampening blanket on the noisiest wall section adds temporary mass that helps with mid-frequency noise. It’s not a real soundproofing solution, but it’s removable and provides a few decibels of improvement.
Budget Fixes Help Most When The Room Is Simply Leaky
Budget limits do not stop you from improving the room.
They just force you to separate honest small wins from products that only sound convincing.
Cheap Wins Usually Come From Sealing And Simple Mass
Sealing gaps is the cheapest and most effective fix — acoustic caulk, weatherstripping, and door sweeps cost ten to thirty dollars total and take an afternoon.
After sealing, the next cheap step is usually a heavier window layer or better furniture placement at the noisiest surface. Those moves will not solve low-frequency traffic noise on their own, but they can make a room noticeably calmer while you figure out whether the real weak point is the window, the door, or the wall.
Rearranging furniture so that bookshelves full of books sit against the noisiest wall adds free mass. It’s not a real soundproofing fix, but dense furniture absorbs and blocks a small amount of mid-frequency sound.
Most Cheap Soundproofing Hype Solves The Wrong Problem
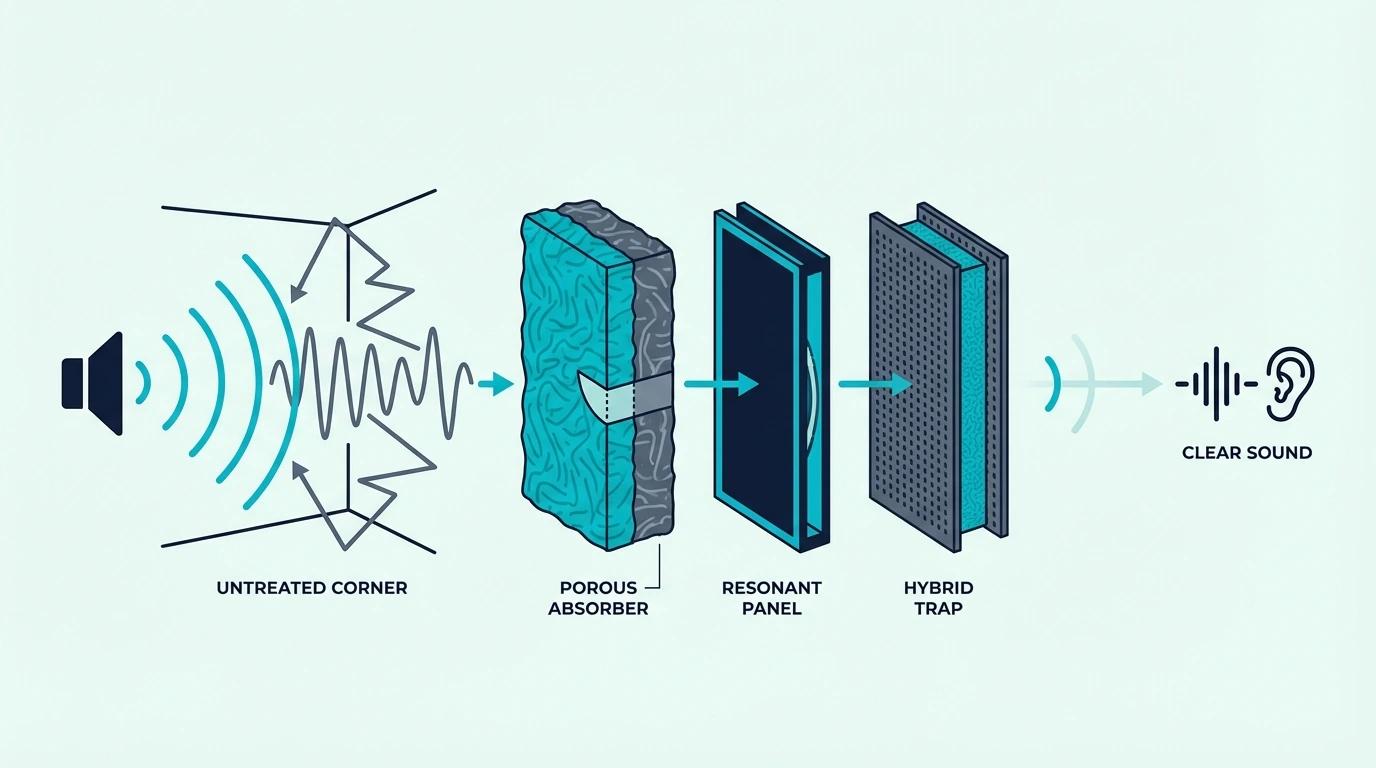
Egg cartons, thin tapestries, and acoustic foam panels on the wall do not block outside noise. They absorb a small amount of high-frequency echo inside the room, which is a completely different problem than stopping sound from passing through a wall or window.
Window film marketed as “soundproof” adds almost no mass and provides negligible noise reduction. The film is too thin and light to affect sound transmission in any measurable way.
Rubber floor mats and carpet on the floor don’t reduce outside noise coming through walls and windows. They help with impact noise from footsteps inside the room, which is unrelated to exterior noise.
Renters Still Have Useful Reversible Moves
Renters can seal gaps with removable weatherstripping tape, hang heavy curtains, place dense furniture against the noisiest wall, and use a door draft stopper at the bottom of the door. A reversible heavy layer like the US Cargo Control sound dampening blanket can also be useful over one especially weak window or door when you need a temporary test before more permanent work.
None of these are permanent modifications.
For a more comprehensive approach to noise in rented spaces, see our rental room soundproofing guide. The principles are the same — seal, add mass, and treat the weakest surface — but the methods need to be reversible.
Outside Noise Gets Expensive Because Low Frequencies Punish Light Structures
Even after the easy wins, some outside noise will still be audible.
That is where the problem stops feeling random and starts looking like a physics limit.
Traffic And Aircraft Noise Overwhelm Lightweight Assemblies
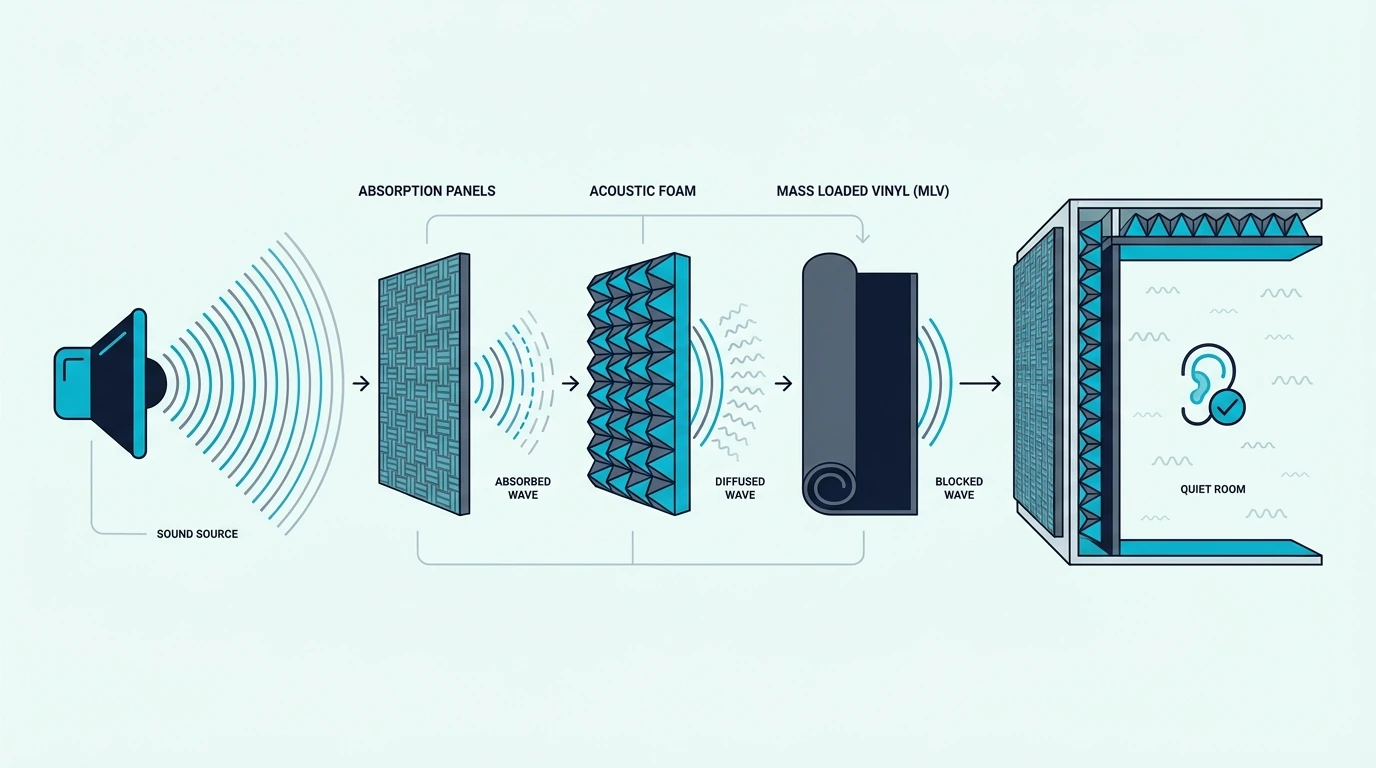
Low-frequency sound waves are long and carry more energy than high-frequency sounds. They pass through lightweight barriers like glass, drywall, and wood framing more easily because these materials vibrate at the frequencies traffic and aircraft produce.
Blocking low-frequency noise requires either substantial mass (multiple layers of heavy drywall and a product like 1 lb mass loaded vinyl) or decoupling (separating the room surfaces from the building structure so vibrations can’t transfer). Both approaches are expensive compared to sealing and adding curtains, which is why traffic noise near busy roads often requires professional-level solutions.
Complete Isolation Means Construction, Not Accessories
Complete sound isolation from outside noise is possible but requires construction-level work: fully decoupled walls, ceiling, and floor; multiple layers of mass on every surface; sealed and treated windows (usually secondary glazing or acoustic inserts); and no direct air connections to the outside.
Recording studios and broadcast rooms achieve this level of isolation, but the cost typically runs thousands to tens of thousands of dollars. For most residential situations, the goal is noise reduction — making outside noise quiet enough that it doesn’t disrupt sleep, work, or conversation — rather than complete elimination.
Noise Shifts Fast When Only One Weak Point Gets Fixed
Sound finds the weakest path. If you soundproof the wall but leave the window untreated, the noise shifts to the window.
If you treat the window but ignore the door, the door becomes the new weak point.
This is why a system approach — sealing everything first, then adding mass to the weakest remaining surface, then reassessing — works better than spending your entire budget on one surface. For the complete room-level approach, see our how to soundproof a room guide.
Cost Rises With Build Depth, Not With Frustration
Once the problem reaches this stage, the pricing stops being mysterious.
Cost scales predictably from cheap sealing to serious construction, with each tier delivering a measurable step up in noise reduction.
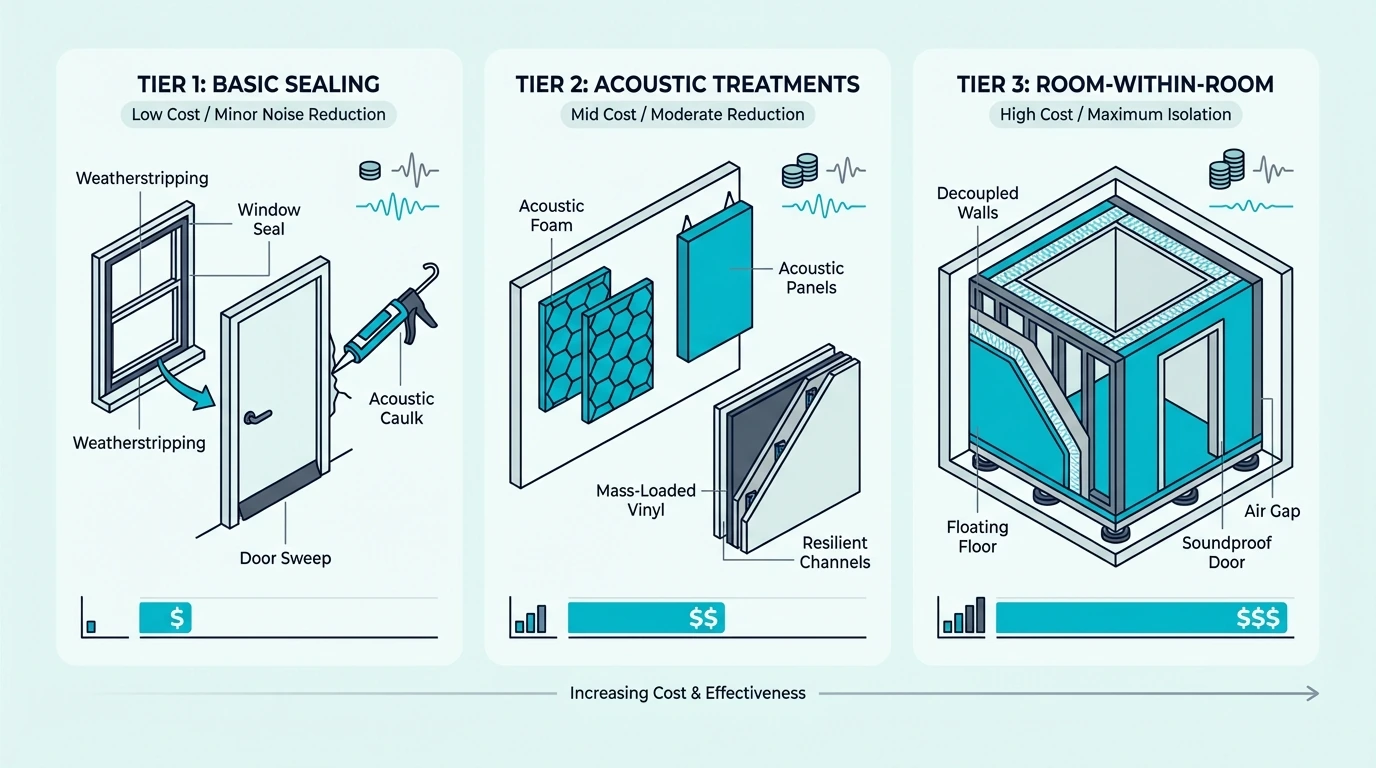
The Entry Tier Is Mostly Sealing And Window Coverings
Acoustic caulk, weatherstripping, a door sweep, and outlet gaskets cost ten to fifty dollars total and take a weekend afternoon. This addresses air gaps and is the single highest-value investment for most rooms.
Adding heavy curtains or blackout curtains to windows adds thirty to one hundred dollars per window depending on quality and size.
Better Windows, Doors, And Walls Cost Real Money
Acoustic window inserts range from two hundred to five hundred dollars per window. Secondary glazing panels installed professionally run three hundred to eight hundred dollars per window including labor.
Both provide significantly better noise reduction than curtains alone, especially for traffic noise.
Replacing a hollow-core door with a solid-core door costs one hundred fifty to four hundred dollars including hardware. Professional wall insulation with added drywall and damping compound runs five to fifteen dollars per square foot installed.
A rigid fiberglass board like Owens Corning 703 Fiberglass Boards is commonly used in these assemblies when the installer wants a rigid panel that holds its shape inside the wall cavity.
Professional Help Pays Off When Low Frequencies Survive The Basics
If you’ve sealed gaps, added curtains, and the noise is still unacceptable — especially low-frequency traffic or aircraft noise — a soundproofing professional can diagnose specific weak points with acoustic testing equipment and recommend targeted solutions.
Professional consultation typically costs two hundred to five hundred dollars. The solutions they recommend (window replacement, wall rebuilds, HVAC duct treatment) can range from one thousand to ten thousand dollars depending on scope.
For rooms where noise impacts sleep quality, work productivity, or home office functionality, the investment often pays for itself in improved quality of life.
The Bottom Line
Seal every air gap first — it’s the cheapest fix and often the most effective. Then add mass to the weakest surface: curtains on windows, sweeps on doors, extra drywall on thin walls.
Treat multiple weak points rather than over-investing in one.
Outside noise is harder to block than interior noise because of its low-frequency content, but most rooms can be improved significantly with a combination of sealing and targeted mass additions. Complete isolation requires construction work and professional design, but meaningful noise reduction is achievable on any budget.
How Do I Make It So I Can’t Hear Anything Outside My Room?
Complete silence requires a fully decoupled room — walls, ceiling, and floor isolated from the building structure — with multiple layers of mass and no air connections to the outside. This is a construction project costing thousands of dollars.
For most people, sealing air gaps and adding mass to the weakest surfaces reduces noise enough to eliminate distraction.
Is There A Device That Cancels Outside Noise?
White noise machines and active noise-canceling headphones mask outside noise by adding a constant sound that makes intermittent noises less noticeable. They don’t physically block or cancel the sound waves entering the room — they make your brain less aware of them.
For actual noise reduction, you need physical barriers: sealing, mass, and insulation.
What Is The Best Noise For Blocking Outside Noise?
White noise and pink noise are the most commonly used masking sounds. Pink noise emphasizes lower frequencies and is generally more effective at masking traffic rumble than white noise, which sounds harsher.
Brown noise goes even deeper and works well for very low-frequency disturbances. These are masking tools, not soundproofing — they don’t reduce the actual noise entering the room.
How Do You Block External Sound In A Room?
Seal every air gap around windows, doors, outlets, and vents with acoustic caulk and weatherstripping. Add mass to the weakest surfaces — heavy curtains on windows, a solid-core door with proper seals, and extra drywall on thin walls.
Address the biggest leak first, then work down the list. For a complete approach, see our room soundproofing guide.
Best Insulation For Soundproofing (Rockwool vs Fiberglass vs The Rest)
Best insulation for soundproofing is one of the most searched topics in noise control, but most answers skip the uncomfortable truth – insulation alone doesn’t soundproof anything. It’s one component in a system, and choosing the wrong insulation (or the right insulation without the rest of the system) wastes money.
The difference matters because insulation that helps with sound and insulation that barely matters comes down to density, fit, and what you pair it with. R-value – the number most people use to compare insulation – measures thermal resistance, not acoustic performance.
Below, you’ll find which insulation types actually reduce noise, how rockwool and fiberglass compare in real-world wall assemblies, and what else you need alongside insulation to get meaningful sound reduction.
Quick Takeaway
Mineral wool (rockwool) is the best cavity insulation for soundproofing – it’s denser than fiberglass, holds its shape better in wall cavities, and provides superior mid-frequency absorption. But insulation only works as part of a complete wall system: you still need mass (extra drywall), damping, and proper sealing to achieve real noise reduction.
How Insulation Contributes to Soundproofing
Not all insulation performs equally for sound. Understanding what matters acoustically – versus thermally – prevents you from buying based on the wrong spec.
Insulation as a system component
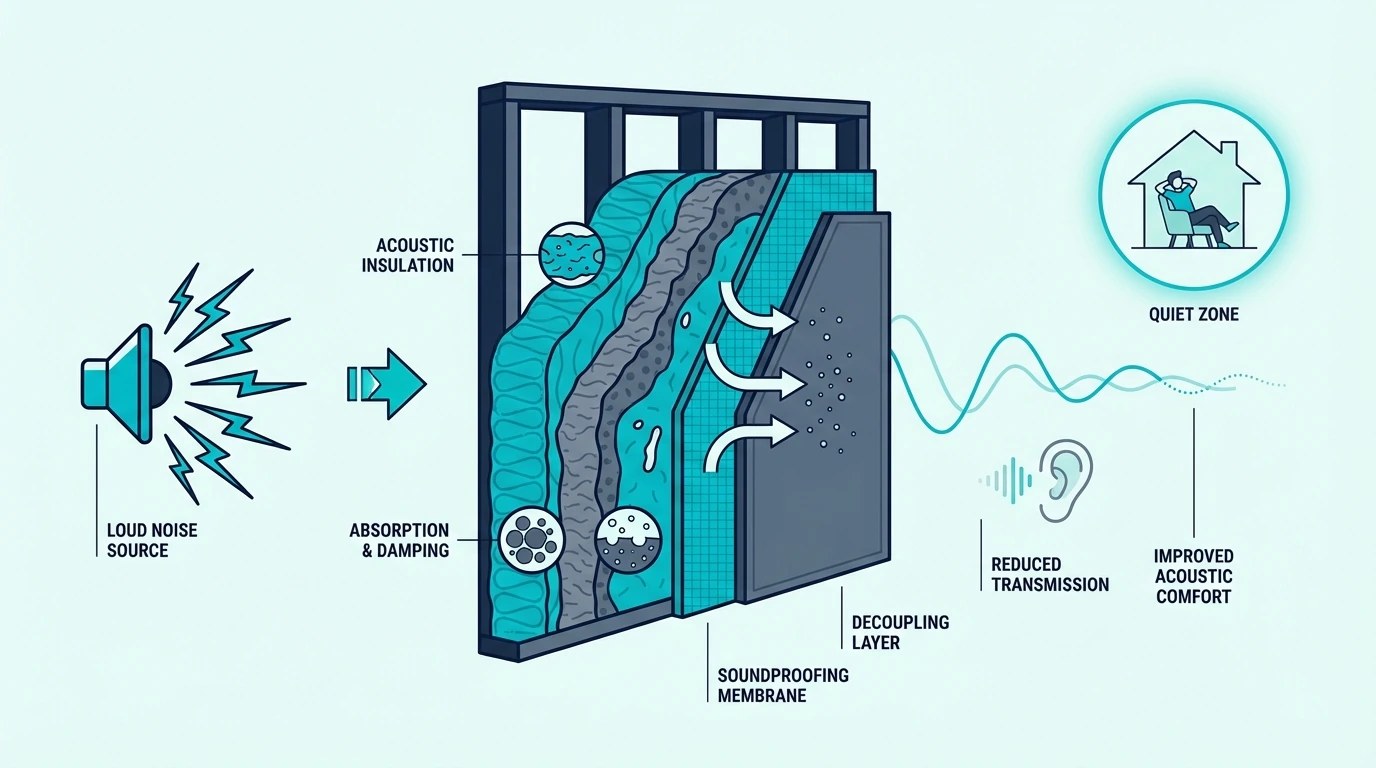
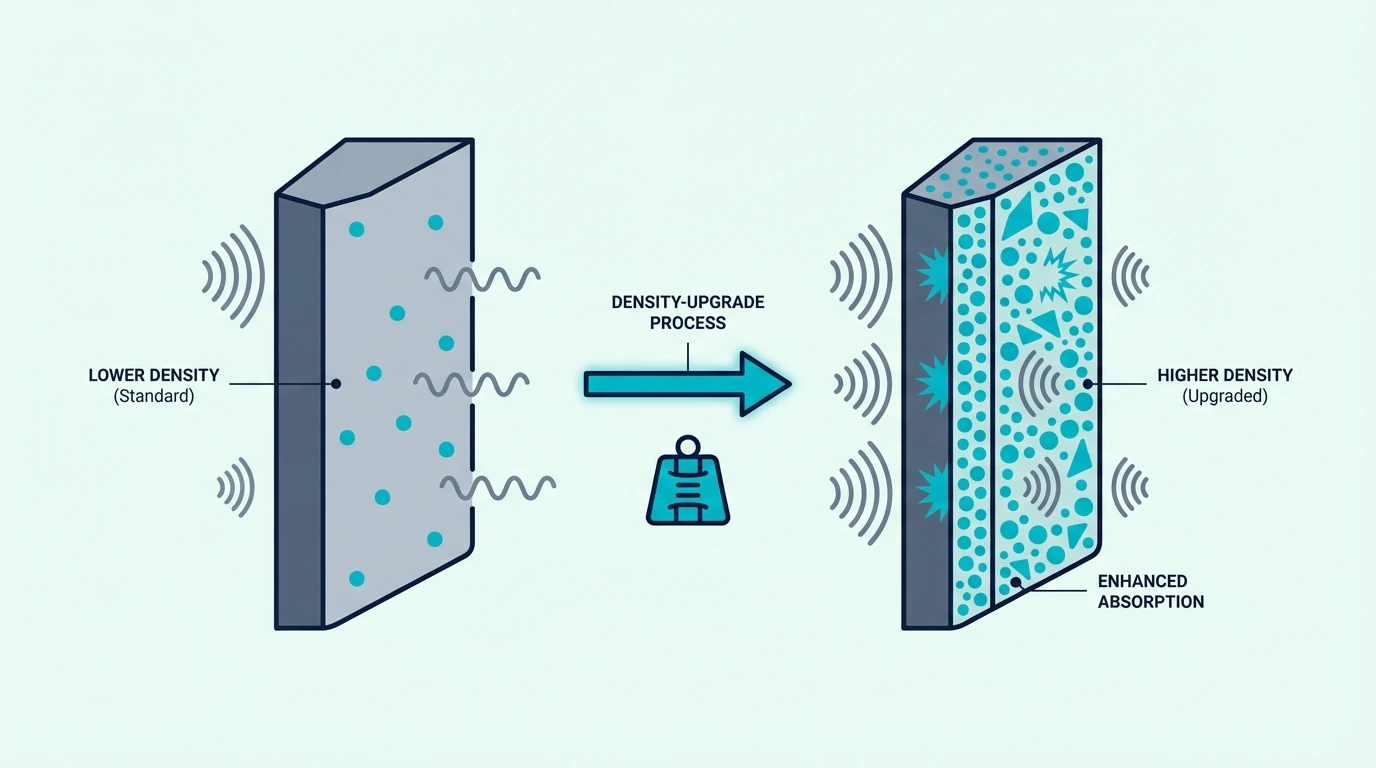
Insulation absorbs sound energy traveling through the air cavity inside a wall. Without insulation, the cavity acts like a drum – sound hits one side, the air space resonates, and the other side radiates the noise.
Filling that cavity with insulation dampens the resonance and absorbs a portion of the sound energy passing through. This typically adds 4 to 8 STC points to a wall assembly – meaningful, but not enough on its own to make a noisy wall quiet.
The insulation is one layer in a system that also needs mass (drywall thickness), damping (compounds that convert vibration to heat), and air sealing (caulk at every gap and penetration). Skipping any of those and relying on insulation alone produces disappointing results.
Density, thickness, and fit
That supporting role explains why not all insulation performs equally. Once you stop treating insulation as a magic fix, density is the first spec that actually changes the result.
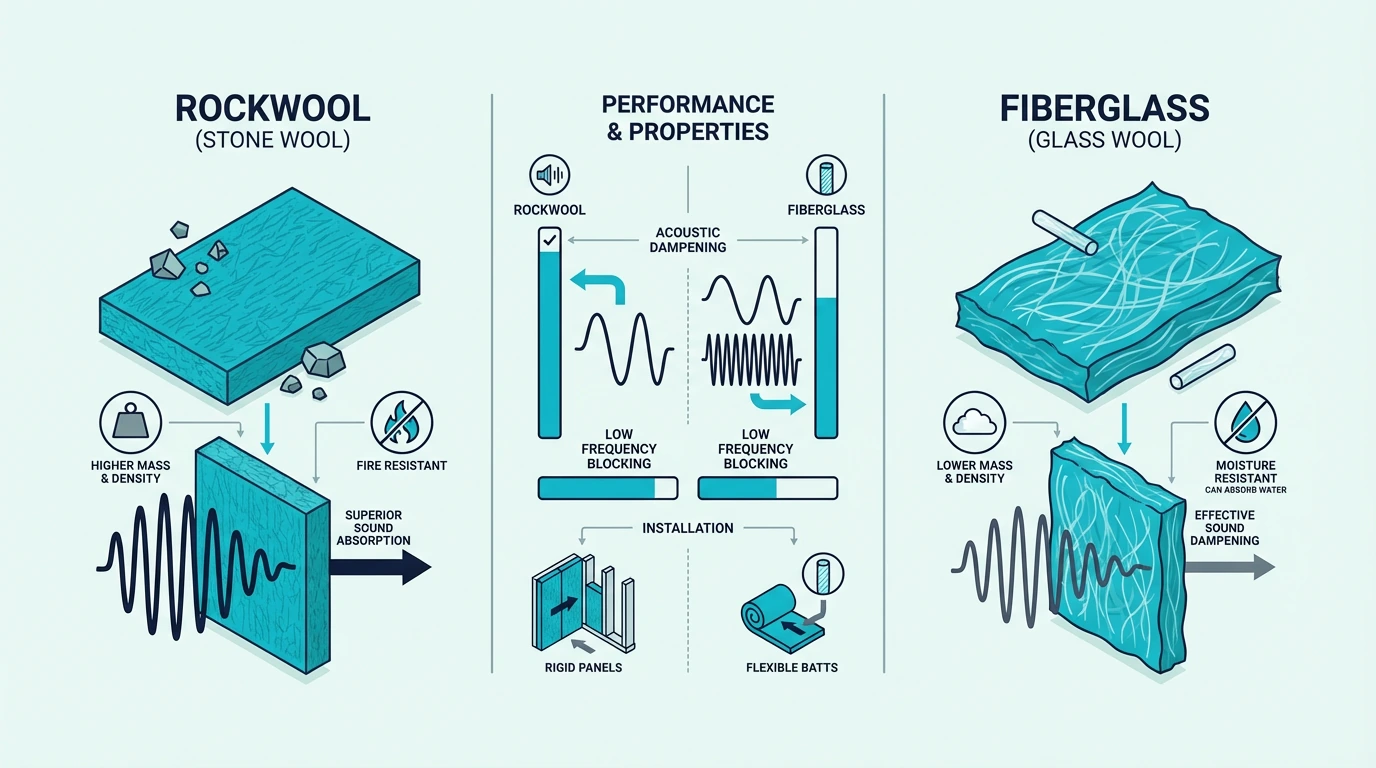
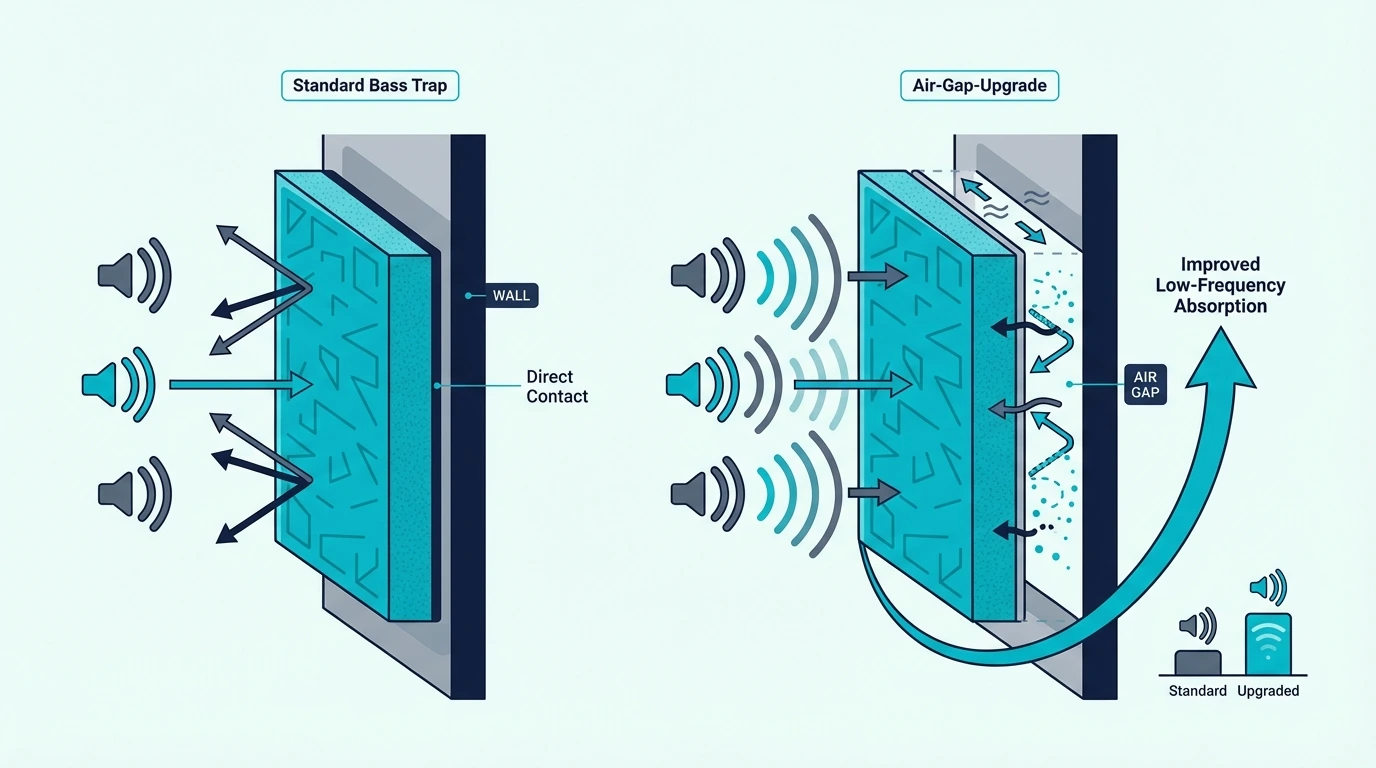
Denser insulation absorbs more sound energy per inch of thickness. Mineral wool at 4 to 8 pounds per cubic foot outperforms standard fiberglass at 0.5 to 1 pound per cubic foot for this reason.
Fit matters second. Insulation that’s cut too small leaves air gaps around the edges, and sound exploits those gaps the same way it exploits any unsealed penetration. Batt insulation should friction-fit snugly in the cavity with no compression and no gaps.
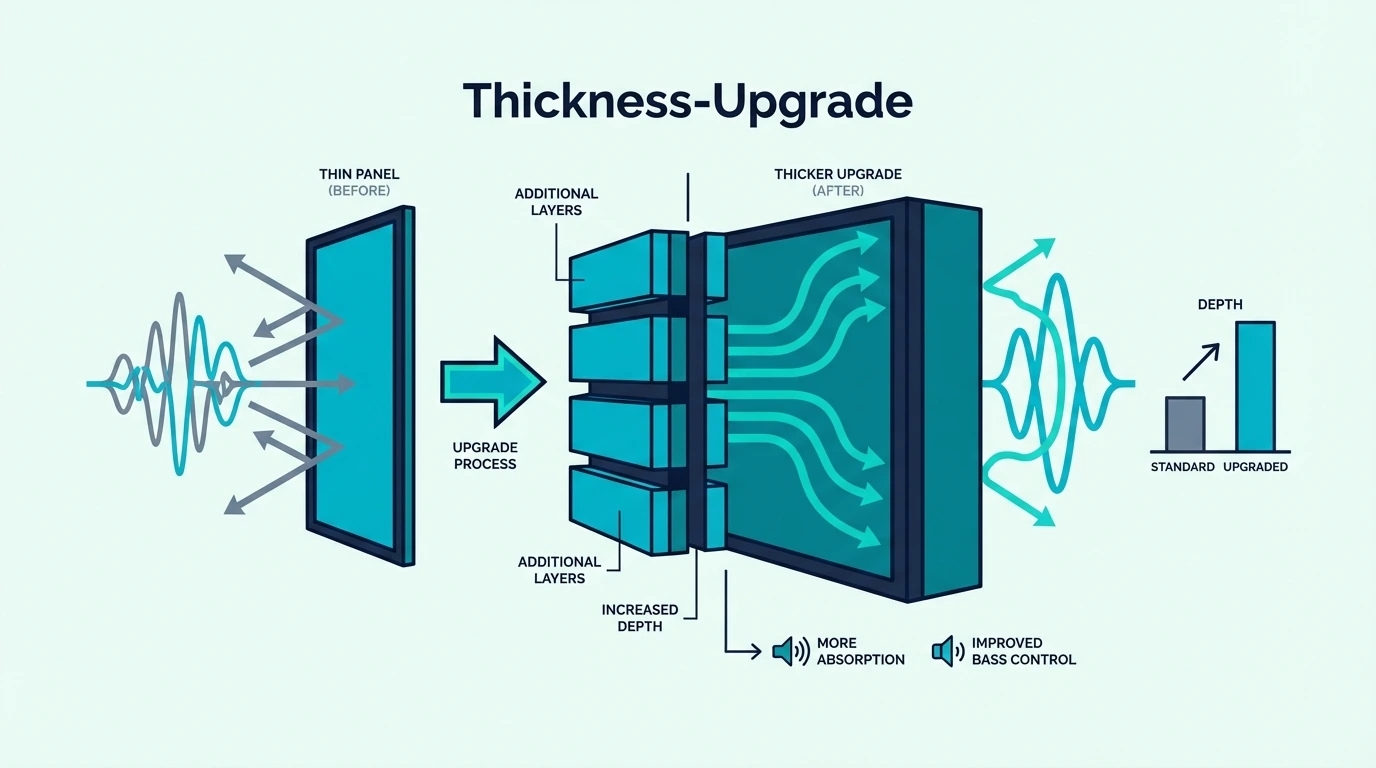
Thickness matters less than most people expect. Going from 3.5 inches (standard 2×4 wall) to 5.5 inches (2×6 wall) of the same insulation adds roughly 2 to 3 STC points – a barely perceptible difference. Spending that money on denser insulation or an extra layer of drywall produces a bigger improvement.
Airborne noise vs impact noise
Even well-fitted dense insulation has a limit: it primarily helps with airborne noise – voices, TV, music – because it absorbs the pressure waves traveling through the wall cavity. For this type of noise, cavity insulation is an essential part of the solution.
Impact noise – footsteps, door slams, objects dropped on floors – travels through the building structure as vibration. Insulation in the cavity does very little against structure-borne vibration because the sound bypasses the air space entirely by traveling through the studs and framing.
Stopping impact noise requires decoupling (resilient channels or clip systems) to break the vibration path, which is a different problem than what insulation solves.
Rockwool vs Fiberglass for Sound
This is the most common comparison, and the answer is straightforward for acoustic applications.
Where rockwool wins
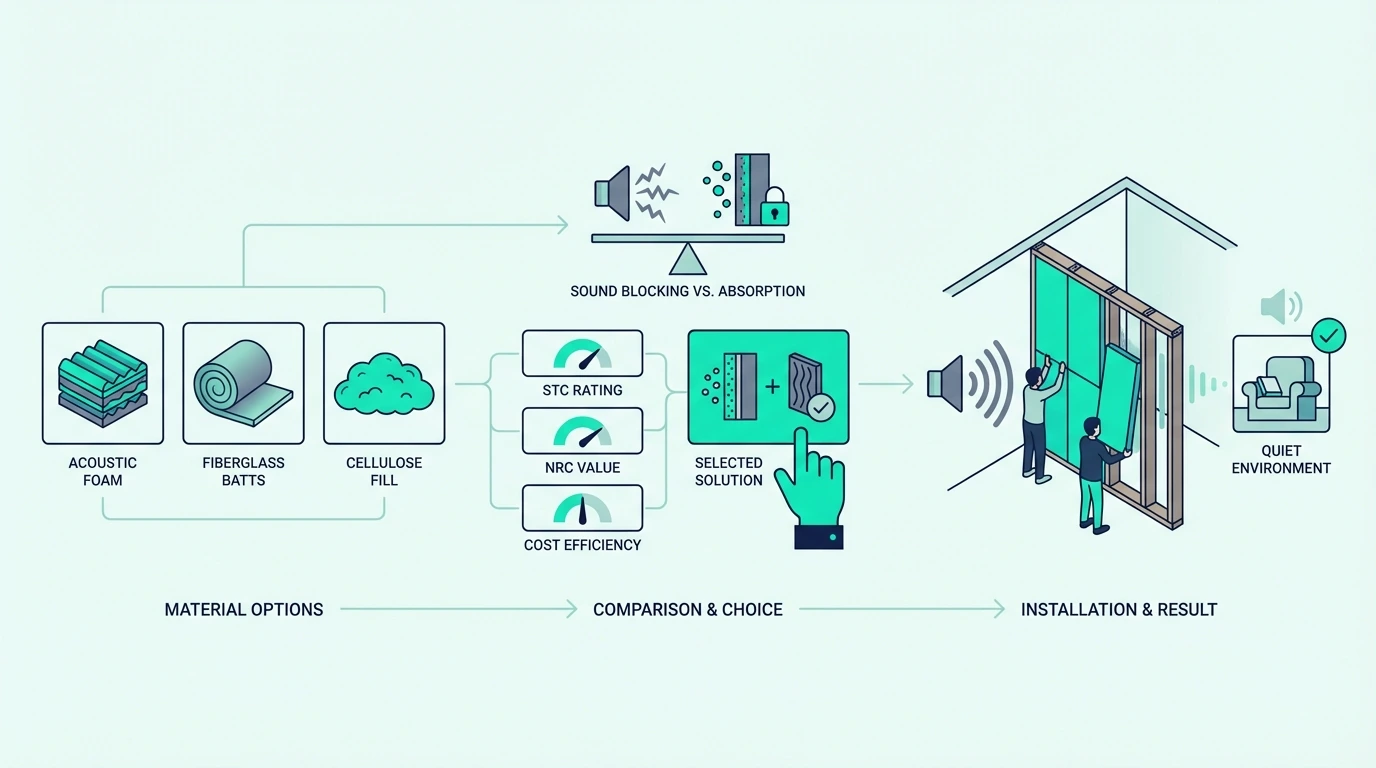
Rockwool (mineral wool) is denser, stiffer, and holds its shape in the cavity without sagging over time. Its density – typically 4 to 8 pounds per cubic foot – gives it better sound absorption across the frequency range that matters most for speech and music.
That density advantage is why Safe ‘n’ Sound-style batts keep coming up in real wall builds, not just in spec sheets. A batt product like AFB Mineral Wool Insulation is a good example because it friction-fits tightly in standard stud cavities and doesn’t need stapling or support.
Handling is also easier in some ways – rockwool batts cut cleanly with a serrated knife and don’t release the itchy glass fibers that make fiberglass unpleasant to work with.
When fiberglass still makes sense
Rockwool’s density advantage comes at a higher price. Fiberglass costs less per square foot and is available everywhere. For projects where the budget is tight and every dollar of insulation money matters, standard R-13 fiberglass batts in the wall cavity still provide a meaningful acoustic improvement over an empty cavity.
If you’re insulating an entire house and soundproofing is a secondary goal behind thermal performance, fiberglass makes sense because you’re already installing it. That doesn’t make it the acoustic winner, but it can still be the practical choice.
If you want a denser fiberglass-based option for a more specialized build, Owens Corning 703 Semi Rigid Fiberglass Board gives you more control than standard fluffy batts, though it’s usually reserved for higher-performance assemblies rather than full-house thermal installs.
The real-world gap between them
With both options on the table, the practical question is how much the difference actually matters. In controlled lab tests, rockwool typically adds 2 to 4 more STC points than fiberglass of the same thickness. In a real wall assembly with drywall, sealing, and proper construction, that translates to a small but measurable difference.
The honest answer is that the gap between rockwool and fiberglass is smaller than the gap between having any insulation and having none. An empty cavity wall at STC 33 jumps to STC 37-39 with fiberglass and STC 39-43 with rockwool. Both are significant improvements; rockwool is incrementally better.
Best Insulation by Location: Walls, Ceilings, and Basements
Different spaces have different noise challenges. The best insulation choice depends on what you’re building and what noise you’re trying to stop.
Interior partition walls
For interior walls between rooms, rockwool batts (like Safe ‘n’ Sound) in 2×4 stud cavities are the standard recommendation. They’re designed for the application, fit standard framing, and provide the best acoustic performance per inch.
If the wall is already closed and you can’t access the cavity, blown-in cellulose is an alternative – it’s dense enough to provide reasonable acoustic absorption and can be installed through small holes drilled in the drywall. It’s not as effective as rockwool batts, but it’s far better than leaving the cavity empty.
Ceilings and between floors
The same rockwool-first logic applies above, but the challenge changes because impact noise dominates. Ceiling insulation for noise between floors follows the same principle – dense cavity fill – but the challenge is different because impact noise (footsteps) dominates over airborne noise.
Rockwool batts in the joist cavity help with airborne sound but do almost nothing for footfall impact. For impact noise, you need decoupling (resilient channels on the ceiling joists) or a floating floor assembly above. Insulation supports these systems but doesn’t replace them.
Basements, garages, and utility rooms
Unlike finished rooms, basements and garages often have exposed framing, which makes insulation installation straightforward. Use rockwool batts in the stud or joist cavities and combine them with a properly sealed drywall finish for the best result.
For these louder spaces, a denser product like Rockwool 8 lb Density Mineral Wool can make sense when the space is louder and you want more control than basic residential batts usually give.
But even there, cavity fill is still only half the story. Pairing the insulation with mass loaded vinyl behind the drywall adds the mass component that insulation alone can’t provide. The combination of dense cavity fill plus a mass barrier on the surface creates a wall assembly that outperforms either material used alone.
What to Pair with Insulation for Real Results
Insulation is the foundation, not the complete solution. Here’s what makes it work.
Extra drywall and damping compound
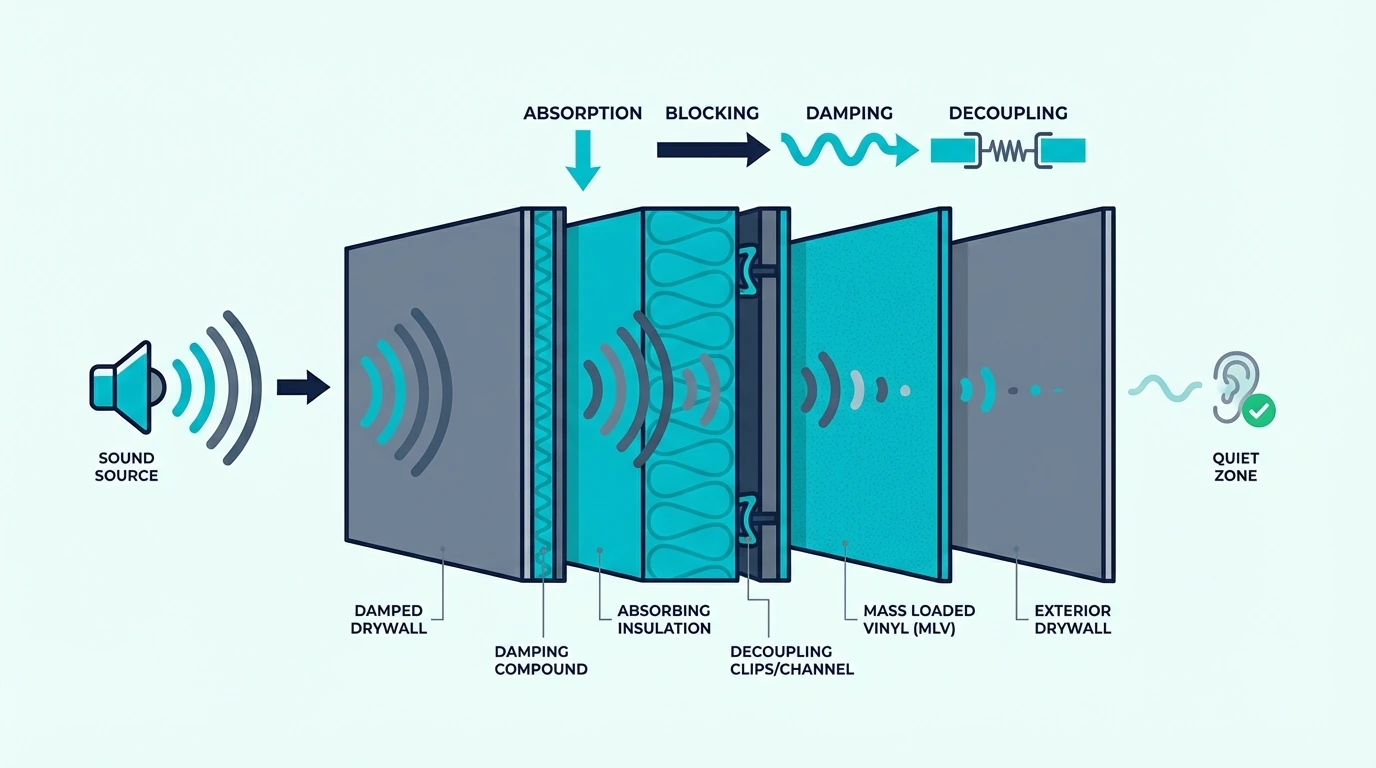
Adding a second layer of 5/8-inch drywall with damping compound (like Green Glue) between the layers is the single most effective upgrade you can add to an insulated wall. The damping compound converts vibration energy into heat, and the extra drywall adds mass.
An insulated wall with double drywall and damping compound on one side typically reaches STC 48 to 52 – enough to make loud speech inaudible through the wall. Without the extra drywall, the same wall with insulation alone sits around STC 39 to 43.
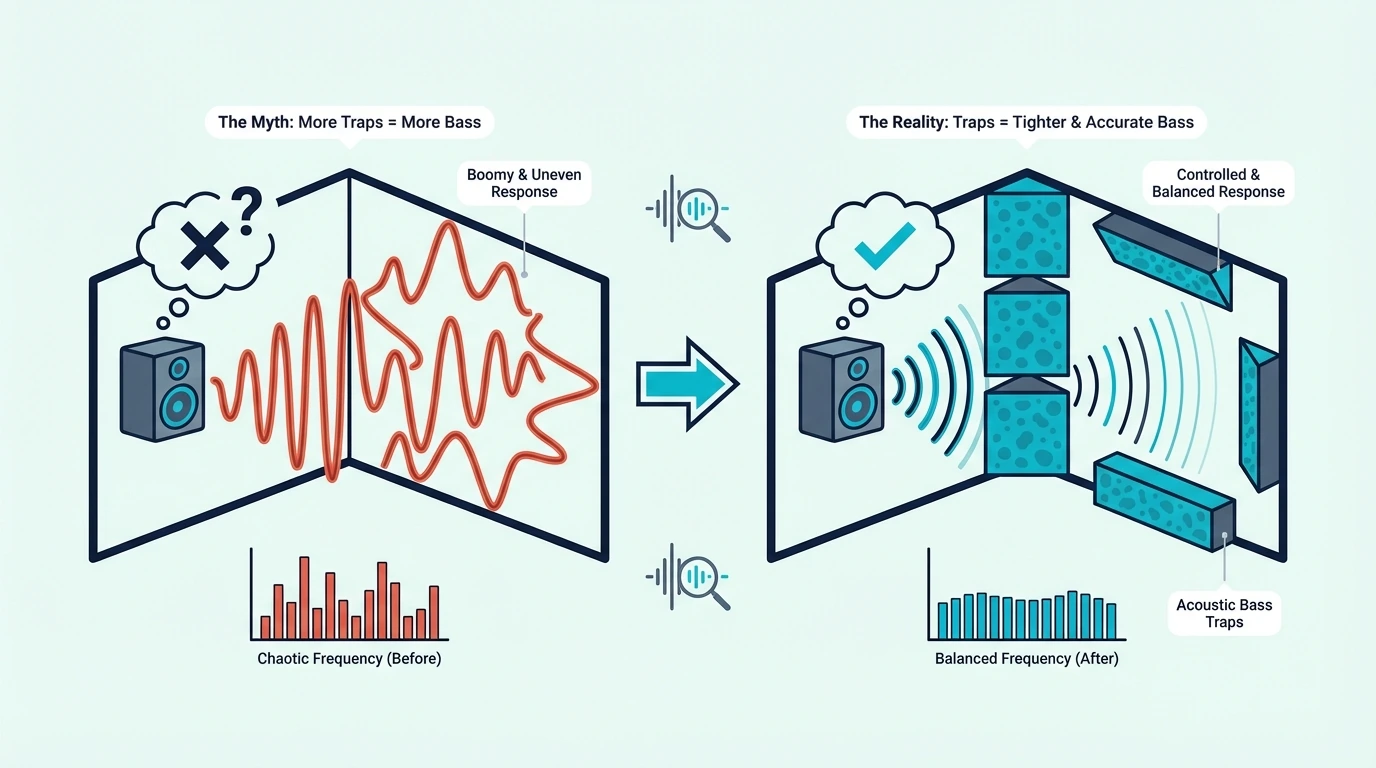
Resilient channels and clips
Those STC gains from extra drywall cover airborne noise well, but structure-borne noise needs a different layer. Decoupling is worth adding when you need to stop structure-borne noise (bass, impact) or when you need the highest possible STC rating. A clip-and-channel system with insulation, double drywall, and a properly planned mass layer can reach STC 55 to 60 – studio-grade isolation.
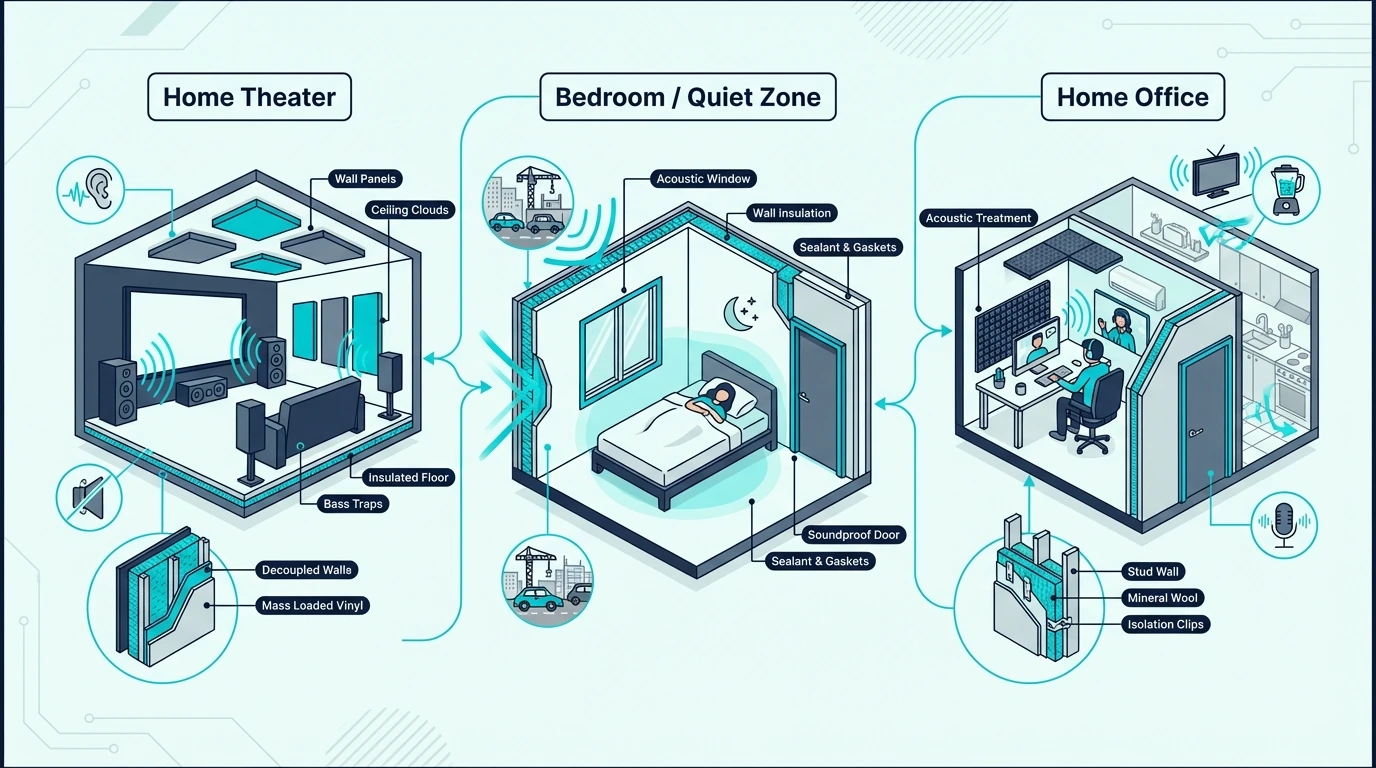
For most residential applications – bedrooms, offices, and shared walls – insulation plus extra drywall and damping delivers enough improvement without the added complexity and cost of decoupling.
Installation mistakes that ruin performance
Even the best assembly fails if the details are sloppy. Gaps around insulation batts let sound bypass the material entirely. Cut batts to fit snugly without compression – compressed insulation loses both thermal and acoustic performance.
Unsealed electrical boxes, pipe penetrations, and gaps at the top and bottom plates create air paths that insulation can’t fix. Every penetration needs acoustic caulk or putty pads.
Resilient channels installed incorrectly – with screws that penetrate through the channel into the stud – create a rigid connection that defeats the entire purpose of decoupling. This is the most common and most expensive installation mistake in wall soundproofing.
Choosing the Right Insulation for Your Project
For most wall and ceiling soundproofing projects, the decision framework is simple.
If you can access the cavity and budget allows, use rockwool batts (Safe ‘n’ Sound or equivalent). If budget is tight, fiberglass batts are a meaningful second choice.
If the cavity is already closed, blown-in cellulose is the practical option.
If you cannot access the cavity, skip cavity insulation entirely and spend that money on the layers the wall can still accept – better sealing, more drywall mass, damping compound, or a proper barrier layer. Insulation only makes sense once the cavity is actually open.
Regardless of which insulation you choose, pair it with at minimum a properly sealed drywall surface. For serious noise problems, add a second drywall layer with damping compound.
The insulation handles cavity absorption; the drywall and sealing handle mass and air-tightness.
Insulate the wall cavity with dense batts (rockwool is ideal), seal every gap and penetration with acoustic caulk, and add mass with an extra layer of drywall and damping compound. These three steps – insulation, sealing, and mass – address the main paths sound uses to pass through a wall.
Is Rockwool Or Fiberglass Better For Sound?
Rockwool is better – it’s denser, absorbs more sound energy, and holds its shape in the cavity. The real-world difference is 2 to 4 STC points in a typical wall assembly. Both are significantly better than an empty cavity, but rockwool consistently outperforms fiberglass for acoustic applications.
Is Insulation Alone Enough For Soundproofing?
No. Insulation absorbs sound in the wall cavity but doesn’t add mass or seal air gaps – the other two critical components of sound blocking. A wall with only insulation and single-layer drywall reaches STC 37 to 43, which still allows conversation to be heard. Adding extra drywall with damping and proper sealing pushes that to STC 48 to 52.
How To Soundproof A Wall (Existing Walls, Shared Walls, And Budget Fixes)
How to soundproof a wall works best when you diagnose the weak point first, because a leaky outlet box, a thin drywall partition, and a vibration-heavy shared wall do not fail for the same reason.
That is where most projects go wrong. People buy surface products that calm echo inside the room, but they never fix the wall assembly that is actually passing sound from one side to the other.
The good news is that wall soundproofing can make a real difference when you match the build to the problem. Existing walls, party walls, and budget retrofits all use the same physics, but they do not ask for the same level of construction.
Start by separating leakage from vibration and airborne voices from structure-borne thumps. Then you can decide whether the next move is sealing, added mass, or a more complete decoupled wall build.
Quick Takeaway
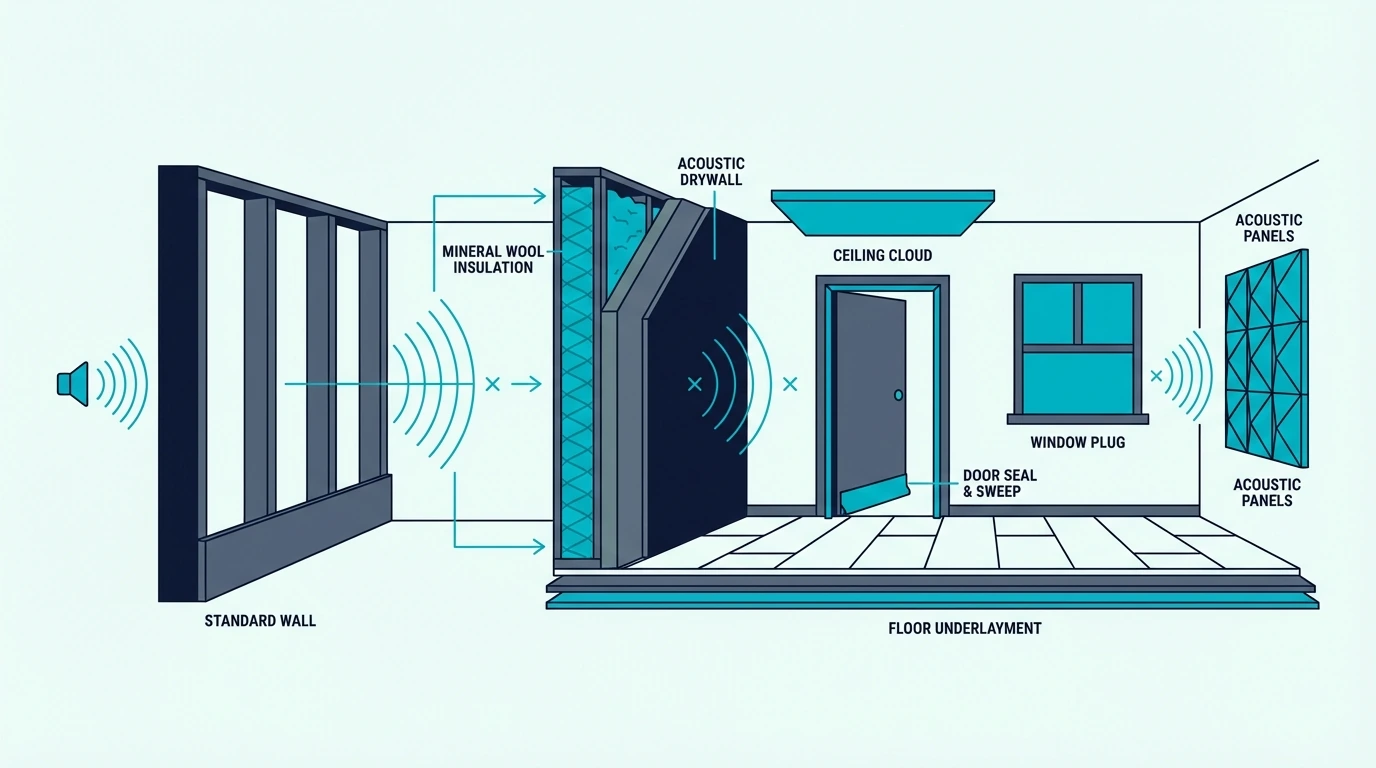
Seal every gap in the wall first – outlets, trim joints, and any cracks or penetrations. After sealing, add mass with an extra layer of drywall and damping compound. For serious noise problems, decouple the wall with resilient channels or a clip system. A sealed wall with added mass can improve sound isolation by 10 – 15 decibels compared to a standard single-layer drywall wall.
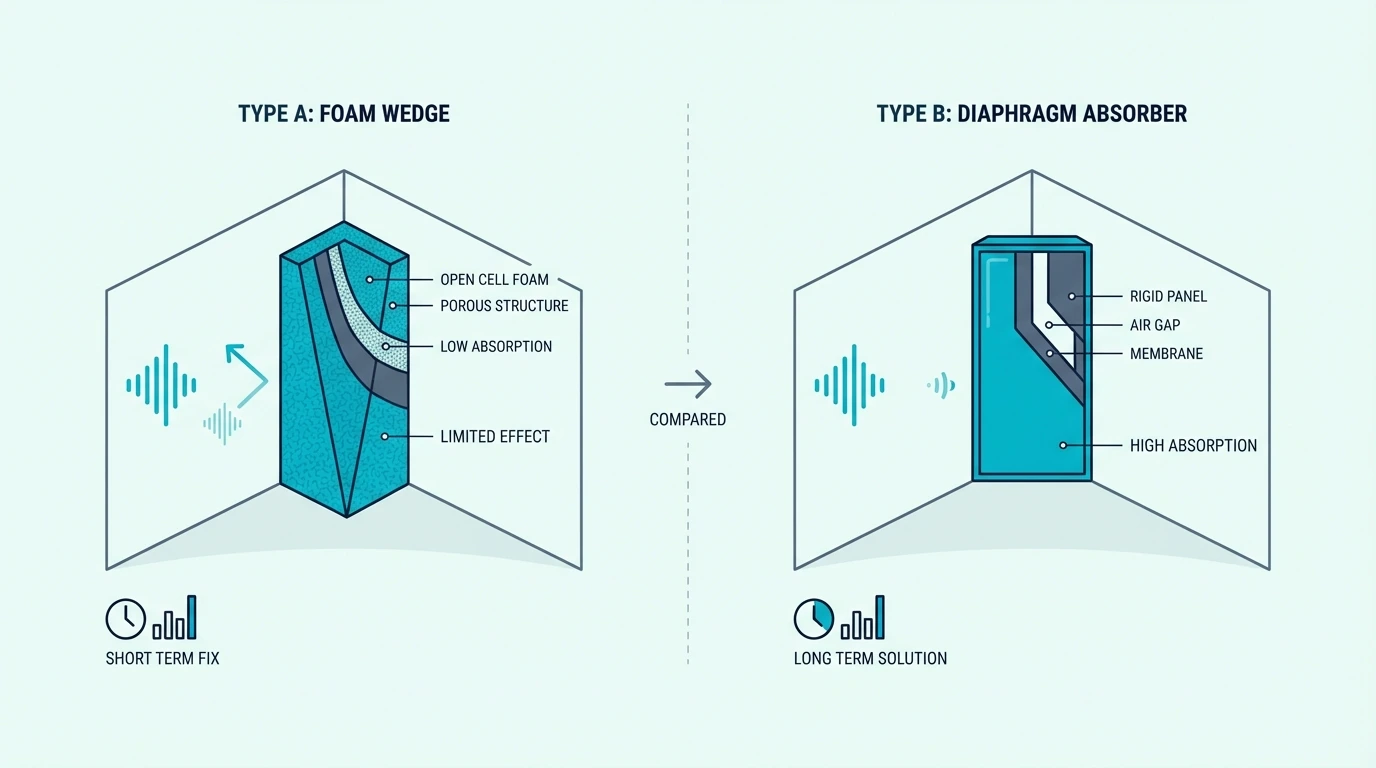
Effective Wall Soundproofing Starts With The Physics
If you skip the physics, every product pitch starts to sound equally convincing.
In reality, walls leak sound in predictable ways, and those failure points tell you which upgrade is worth paying for.
Standard Residential Walls Leak Sound For Predictable Reasons
Standard interior walls – a single layer of 1/2-inch drywall on each side of 2×4 studs – rate around STC 33 to 35. That means normal conversation is audible through the wall, and loud speech or music is clearly heard.
The first weakness is low mass. A light wall simply does not have enough weight to resist airborne sound energy very well.
The studs connecting both sides of the wall create a direct vibration path. Sound hits one side, vibrates the stud, and radiates from the other side.
That structural connection is why adding insulation between the studs helps but does not solve the problem on its own.
Gaps around electrical outlets, light switches, and where the wall meets the floor or ceiling create air paths that sound exploits. A single unsealed electrical box can leak as much sound as a hole the size of your fist.
Better Isolation Usually Means Meaningful Reduction, Not Total Silence
Once you see why walls fail, the goal becomes clearer.
Full sound isolation – the kind recording studios achieve – requires a completely decoupled wall with no structural connections, multiple layers of mass, and airtight sealing. That’s a construction project, not a retrofit.
For most residential situations, the goal is noise reduction – making the sound quiet enough that it doesn’t bother you. Reducing noise by 10 to 15 decibels makes loud conversation sound like a murmur, which is enough for most bedrooms and home offices.
That realistic target matters because it keeps you from chasing studio-level expectations with a finished-wall retrofit.
Airborne Voices And Structural Vibration Pull You Toward Different Fixes
Expectation setting only helps if it leads to the right diagnosis.
Airborne noise – voices, TV, music – travels as pressure waves through the air and through the wall structure. Mass and sealing are the primary defenses.
Structure-borne noise – footsteps from above, bass vibration, plumbing rattle – travels through the building frame itself. Decoupling the wall from the structure is the only effective approach for this type of noise, because mass alone can’t stop vibration that’s already in the framing.
If you hear voices through the wall, mass and sealing will help. If you feel bass vibration or hear thumping, you need decoupling – and you may need to address the ceiling and floor too, since structure-borne noise travels through all connected surfaces.
Existing Walls Improve Most In A Clear Retrofit Order
Once you know whether the wall is leaking air or moving too easily, retrofit decisions stop feeling random.
Existing walls usually improve most when you handle the cheap leakage paths first, then add heavier layers only if the remaining problem justifies them.
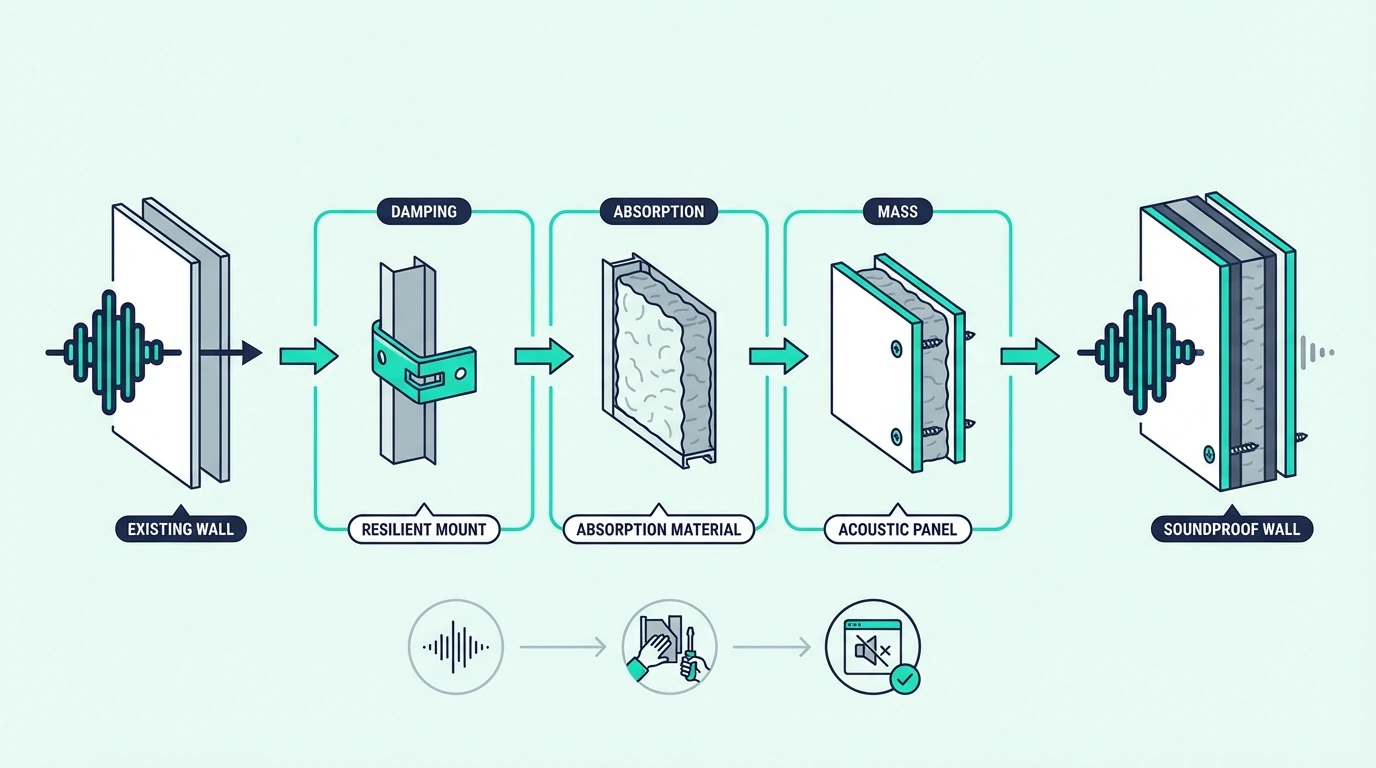
Seal The Leaks Before You Buy Heavy Materials
Seal every electrical outlet and light switch on the shared wall with acoustic putty pads or foam gaskets behind the cover plates. This alone can make a noticeable difference if the outlets are back-to-back with the neighboring room.
Run acoustic caulk along the base of the wall where it meets the floor, along the top where it meets the ceiling, and around any trim or casing. These joints flex with building movement and develop gaps over time.
Check for any penetrations – cable TV lines, phone jacks, pipe chases – and seal them with acoustic caulk or fire-rated foam. Every unsealed penetration is a direct air path for sound.
Added Mass And Damping Usually Give The Best Mid-Tier Return
Once leakage is under control, the next upgrade should add something the wall does not already have enough of: weight and vibration control.
The most effective retrofit is adding a second layer of 5/8-inch drywall over the existing wall with a damping compound (like Green Glue) sandwiched between the layers. The damping compound converts vibration energy into heat, and the extra drywall adds mass.
This combination typically adds 8 to 12 STC points to the wall – enough to drop clearly audible conversation to barely perceptible background noise. The total thickness added is less than an inch.
Trademark Soundproofing Mass Loaded Vinyl is an alternative to the drywall-and-damping approach. MLV adds dense mass in a thin, flexible sheet that can be stapled or glued to the existing wall before adding a finish layer of drywall over it.
Decoupling Earns Its Cost When The Wall Still Passes Too Much Vibration
That drywall-and-damping build solves a lot of airborne noise problems, but it does not remove the stud connection itself.
Decoupling means breaking the direct structural connection between one side of the wall and the other. Resilient channels – metal strips screwed horizontally across the studs – create a flexible mount for the new drywall layer so vibrations in the studs don’t transfer directly to the surface.
Clip-and-channel systems (like RSIC clips with hat channel) perform better than resilient channels because they provide more separation and handle a wider range of frequencies. They’re more expensive and slightly more complex to install but deliver measurably better results.
Decoupling is worth the extra work when you’ve already added mass and sealing and the noise is still too loud, or when structure-borne vibration (bass, impact noise) is the primary problem. For airborne noise like conversation, mass and sealing often provide enough improvement without decoupling.
Shared Walls Force You To Maximize What One Side Can Do
That staged retrofit logic matters even more on a party wall because you usually control only your side of the assembly.
The goal is no longer perfect isolation. The goal is extracting the biggest realistic improvement from one-sided treatment without pretending structure-borne flanking paths do not exist.
Airborne Neighbour Noise Usually Responds To Sealing And Added Mass
Start with the same sealing steps: outlets, base trim, ceiling joint, and any penetrations. Then add mass – the drywall-plus-damping-compound approach works well here because it’s the most effective retrofit you can do from one side.
For apartments where you can’t modify the wall permanently, hanging heavy sound dampening blankets on the shared wall adds mass without permanent modification. They won’t match drywall for performance, but they’re fully removable.
Structural Transfer Reveals The Limits Of A Wall-Only Project
Once the noise feels more like bass, impact, or vibration, the wall stops behaving like a simple air-leak problem.
Bass and impact noise traveling through a shared wall require decoupling on your side. A clip-and-channel system with a new layer of drywall creates separation from the existing structure.
If the noise is coming through both the wall and the floor or ceiling, treating only the wall won’t solve the problem. Structure-borne sound finds the weakest path, and treating one surface just moves the apparent noise source to an untreated one.
The Shared Wall Comes First Only When It Is Clearly The Loudest Surface
That is why the listening test still decides the order of work.
If the shared wall is clearly the primary noise path – you can localize the sound to that wall by standing in the room and listening – treat the wall first. If the noise seems to come from everywhere, the structure-borne vibration is traveling through multiple surfaces and a whole-room approach will be more effective.
Cheap Wall Soundproofing Only Works When Cheap Means Strategic
Budget constraints are real, but cheap advice is where a lot of wall soundproofing articles become actively unhelpful.
The cheapest useful fixes either close real leakage paths or add real mass. Most viral shortcuts do neither.
Start With The Lowest-Cost Fixes That Address Leakage
Sealing gaps costs almost nothing and delivers the highest return per dollar. Acoustic caulk, outlet gaskets, and foam backer rod for larger gaps total ten to twenty dollars and take an afternoon.
After sealing, the next cheapest meaningful upgrade is a second layer of drywall with damping compound. A sheet of 5/8-inch drywall costs roughly fifteen dollars, and a tube of damping compound costs around twenty dollars.
For a single wall in a bedroom, the total materials might run fifty to one hundred dollars.
Most Cheap Surface Tricks Fail Because They Add Almost No Mass
That is the line cheap products either cross or fail.
Egg cartons, carpet remnants, and thin tapestries on the wall are effectively useless for soundproofing. They absorb a tiny amount of high-frequency energy inside the room but add zero mass to the wall structure.
Moving furniture against the shared wall – bookshelves full of books, heavy dressers – adds a small amount of mass and can help slightly with mid and high-frequency sound. It’s not a real soundproofing solution, but it’s free and provides a modest improvement.
Renters Need Reversible Mass And Better Expectations
That modest-improvement category still matters when drilling, framing, or adding drywall is off the table.
Heavy blankets or quilts hung on the shared wall from hooks add some mass. Freestanding bookshelves loaded with books placed against the wall add more.
Neither is a real soundproofing treatment, but together they provide a few decibels of improvement that can make a shared-wall situation more bearable.
Good wall soundproofing is really a prioritization problem. Seal leaks first, add mass next, and bring in decoupling only when the wall is still passing too much vibration or low-frequency energy.
The most common mistake is buying surface treatments – foam, decorative panels, tapestries – and expecting them to block sound through a wall. Surface treatments improve acoustics inside the room, while blocking transmission requires mass, sealing, and sometimes decoupling.
For a complete approach to noise in your space, see our guide to soundproofing a room, which covers doors, windows, ceilings, and floors alongside walls.
Frequently Asked Questions
How Do You Block Noise From A Shared Wall?
Seal all gaps and penetrations (outlets, trim, pipes) with acoustic caulk and putty pads first. Then add mass – a second layer of 5/8-inch drywall with damping compound between the layers is the most effective single-side retrofit for shared walls.
Does Rockwool Soundproof A Wall?
Rockwool insulation in the wall cavity absorbs sound energy traveling through the air space between studs, which reduces transmission by 4 to 8 STC points.
A standard stud-bay product like AFB Mineral Wool Insulation works well in most wall renovations, while a denser option like Rockwool 8 lb Density Mineral Wool makes sense when you’re chasing maximum performance in a serious shared-wall rebuild.
It helps, but it’s not a complete solution on its own – you still need mass and sealing on both faces of the wall for meaningful improvement.
What Is The Cheapest Way To Soundproof A Wall?
Seal every gap with acoustic caulk and add foam gaskets behind outlet covers – total cost under twenty dollars. If you can afford more, add a second layer of drywall with damping compound for fifty to one hundred dollars per wall section.
These two steps together deliver the best noise reduction per dollar spent.
How To Soundproof Windows (Without Replacing Them)
How to soundproof windows without replacing them starts with one uncomfortable truth: many noisy windows are failing at the edges before they are failing at the glass, but most people spend money on the glass first. Loose seals, dried caulk, and sloppy sash contact often leak more sound than people realize.
That is good news if you want a retrofit instead of a renovation. It means the first real wins usually come from better sealing and a stronger secondary barrier, not from tearing the whole unit out on day one.
The harder part is knowing where the simple fixes stop being enough. Traffic rumble, weak single-pane glass, and badly designed window types can still push you toward inserts, plugs, or eventually replacement.
Start by working out whether the weak point is the frame, the glass, or the whole window design. Then you can move through the retrofit ladder without wasting money on upgrades that solve the wrong problem.
That is the order the rest of this guide follows.
Quick Takeaway
Seal gaps around the window frame first — acoustic caulk and compression weatherstripping eliminate the air paths that leak the most sound. After sealing, add a secondary barrier like a window insert or heavy curtain. A sealed window with an acoustic insert can reduce outside noise by 15–20 decibels compared to a single-pane window with worn seals.
Noisy Windows Usually Fail Through Leaks, Light Glass, Or Weak Designs
Windows are usually the lightest part of the exterior wall, so they start behind the rest of the room before you even look at the details.
What matters next is identifying which weakness is actually dominating the noise path.
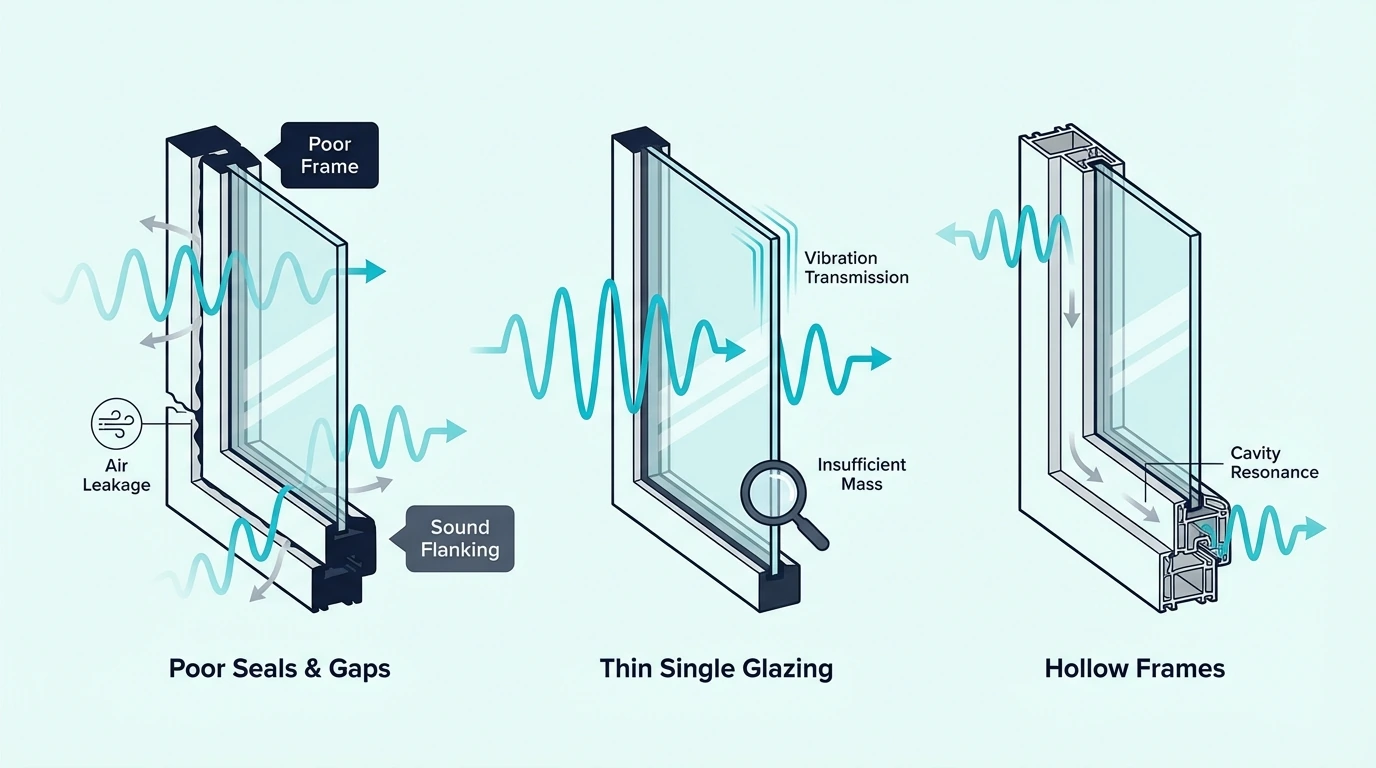
Existing Windows Often Leak More At The Frame Than Through The Center Of The Glass
In most cases, the gaps are the bigger problem. A window with worn weatherstripping or cracked caulk around the frame has visible air paths that sound exploits freely.
Test it yourself: press your ear close to the window frame edges while traffic or music plays outside. If the noise is loudest at the edges, gaps are your primary leak.
If it’s loudest at the center of the glass, the pane itself is the weak point.
Single-pane windows have an STC rating of around 26 to 28. Standard double-pane windows rate 28 to 32.
Neither is impressive compared to a basic insulated wall at STC 35 to 45, but the difference between a sealed and unsealed window is far larger than the difference between single and double glazing.
Traffic Rumble Exposes The Limits Of Lightweight Glazing
That edge-versus-center test also explains why some window fixes feel impressive for voices but disappointing for road noise.
Traffic noise contains a heavy low-frequency component — engine rumble, tire roar, and exhaust drone all sit below 500 Hz. Low-frequency sound waves are long, carry more energy, and pass through lightweight barriers like glass more easily than mid-range or high-frequency sounds.
This is why you might seal every gap and still hear a deep rumble from the road. The glass vibrates at those frequencies because it doesn’t have enough mass to resist the pressure waves.
Addressing traffic noise specifically requires either thicker glass, laminated glass, or a secondary barrier with a meaningful air gap — reducing outside noise at the window is always harder than blocking voices or TV audio. The same low-frequency challenge applies to choosing soundproofing materials for any surface in the room.
Some Window Types Start From A Worse Position Than Others
Once low-frequency limits are in view, window design matters more too.
Old single-pane windows with wood or aluminum frames top the list. The frames shrink, warp, or corrode over time, opening gaps that didn’t exist when the window was new.
The putty glazing that holds the glass in place dries out and cracks, creating another air path.
Sliding windows — both horizontal sliders and single-hung or double-hung sash windows — perform worse than casement windows because the sliding mechanism creates gaps that can’t be compressed with weatherstripping the way a casement window seals against its frame.
Jalousie (louvered) windows are the worst of all. The overlapping glass slats create multiple air gaps that are nearly impossible to seal.
If you have jalousie windows and noise is a concern, replacement is the only realistic option.
Existing Windows Improve Most When You Climb The Retrofit Ladder In Order
That weak-point diagnosis leads directly to the retrofit order.
Most people do not need to jump straight from a noisy window to a replacement quote. The practical path is sealing first, then secondary barriers, then heavier compromises only when the smaller tiers have clearly hit their ceiling.
Sealing The Frame And Sash Is The First Real Upgrade
Start with acoustic caulk along every joint between the window frame and the wall. Standard silicone caulk works, but acoustic caulk stays flexible longer and doesn’t crack with building movement.
Run a bead along the interior trim where it meets the wall and along the frame where it meets the trim.
Replace worn weatherstripping around the sash with compression-style EPDM or silicone strips. Foam weatherstripping compresses permanently within months — spend a few dollars more on rubber or silicone that maintains its seal.
For operable windows, check the lock mechanism. Many windows don’t pull tight enough against their seals when locked.
Adjusting or replacing the lock hardware so the sash compresses firmly against the weatherstripping costs nothing and makes the seals actually effective.
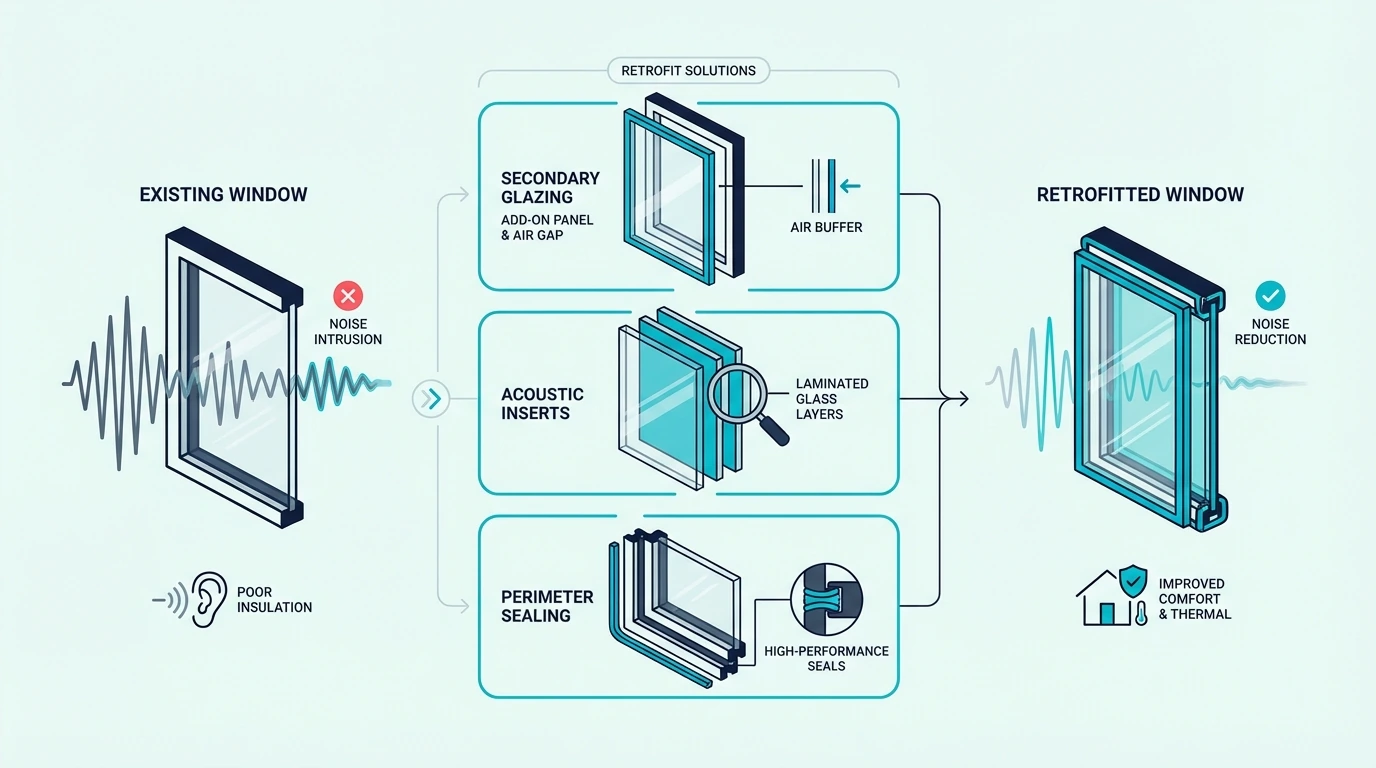
Inserts Work When You Need A Better Barrier Without A Full Tear-Out
Once the obvious leaks are under control, the question changes from air path to barrier strength.
Window inserts — secondary acrylic or glass panels that mount inside the existing window frame — are the most effective retrofit short of full replacement. They create an air gap between the insert and the existing glass, and that air gap is what blocks sound.
The wider the air gap, the better the noise reduction. A two-inch gap provides meaningful improvement; a four-inch gap approaches the performance of a dedicated acoustic window.
Most inserts mount with compression tubes or magnetic strips and can be removed seasonally.
Inserts work especially well for apartment windows and rental properties because they’re fully removable and don’t modify the existing window. They’re also effective for bedroom windows facing busy streets where traffic noise disrupts sleep.
Curtains And Plugs Solve Different Versions Of The Same Constraint
That stronger insert tier is not always the immediate answer, though.
Heavy curtains add a layer of mass and absorption between the window and the room. RYB HOME 3-Layer Soundproof Curtains use a felt core sandwiched between fabric layers, which adds more mass than standard blackout curtains.
Curtains won’t match inserts or secondary glazing for noise reduction, but they’re the fastest, cheapest option for renters who need some improvement now. Mount the curtain rod wide enough that the curtains overlap the wall on both sides of the window, and let them puddle slightly on the floor to minimize gaps.
Window plugs — dense foam or MDF panels cut to fit snugly inside the window frame — block sound effectively but also block all light and ventilation. Backing a plug with a US Cargo Control Sound Dampening Blanket adds mass and absorption to the plug face.
They’re a practical solution for music rooms or recording spaces where total blackout is acceptable, but not for living spaces where you need the window to function.
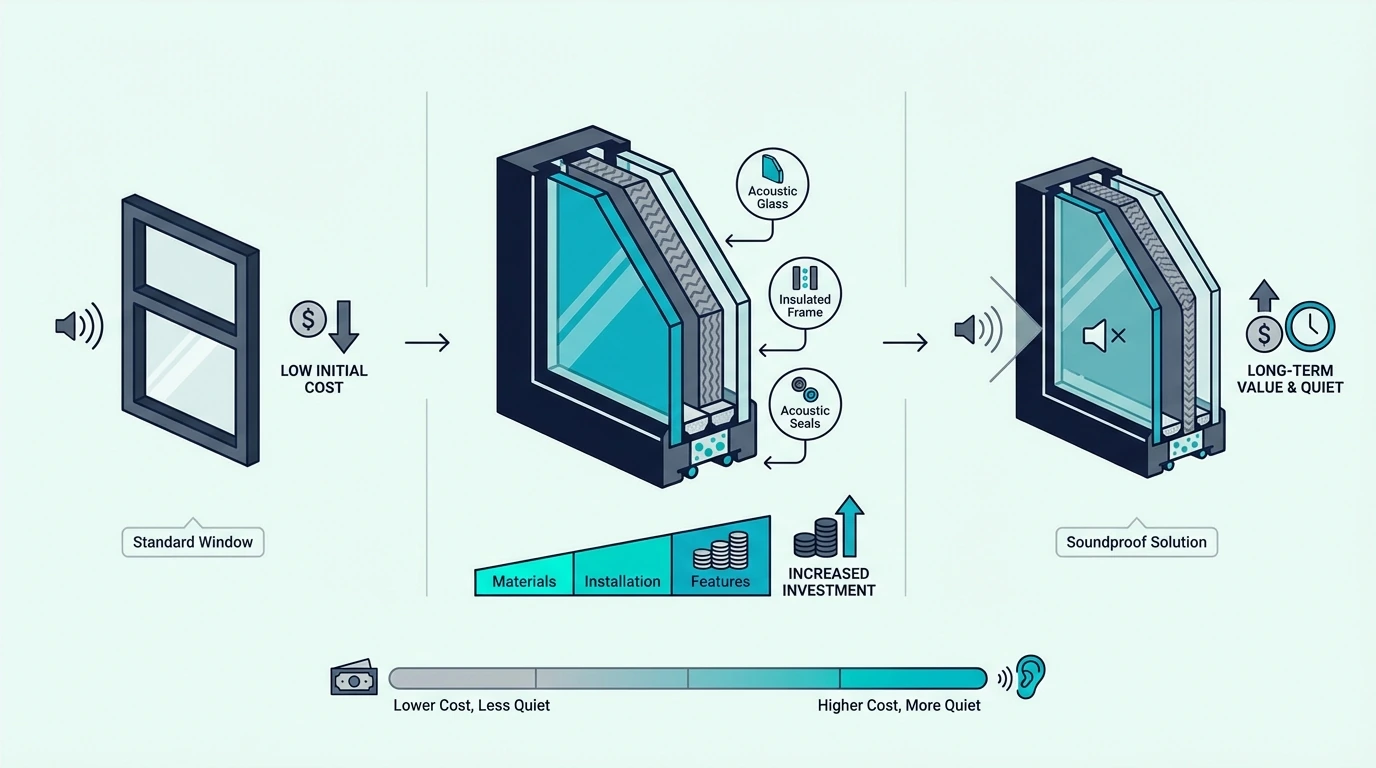
Cost Rises In Clear Tiers As The Retrofit Gets Stronger
Once the retrofit ladder is clear, the budget becomes easier to read.
Each tier costs more because it is trying to solve a harder version of the problem, not because the prices are random.
Basic DIY Sealing Stays The Cheapest Meaningful Tier
Acoustic caulk, weatherstripping, and lock adjustment costs ten to thirty dollars per window and takes under an hour. This fixes the gap leaks that account for most noise transmission in older windows.
Inserts And Secondary Layers Occupy The Middle Ground
Once sealing is no longer enough, you move into the tier that changes the barrier itself rather than just tightening the edges.
Acoustic window inserts range from roughly two hundred to five hundred dollars per window depending on size and brand. Secondary glazing panels installed by a professional run three hundred to eight hundred dollars per window including labor.
Heavy soundproof curtains cost fifty to one hundred dollars per window and provide moderate improvement with the advantage of easy installation and full removability.
Replacement Earns Its Cost Only When The Existing Window Is The Limiting Factor
That is the point where retrofit logic runs out.
Full window replacement with acoustic-rated units costs five hundred to fifteen hundred dollars per window installed. It makes sense when the existing frames are damaged, the glass is single-pane, and you plan to stay in the home long enough to justify the investment.
Laminated glass windows — which sandwich a damping layer between two glass panes — outperform standard double-pane for sound because the interlayer absorbs vibration. If you’re replacing windows specifically for noise, specify laminated glass rather than standard insulated glass units.
For a full breakdown of costs across all surfaces, see our guide to soundproofing costs.
The Bottom Line
Good window soundproofing is really about sequencing. Seal the gaps first, add the strongest removable barrier that matches your needs, and replace the window only when the unit itself is too weak or too damaged for retrofits to carry further.
Windows are one piece of a room’s sound barrier. Even perfectly soundproofed windows won’t help if the door or walls are leaking noise.
Seal the frame gaps with acoustic caulk and compression weatherstripping first. Then add a window insert with at least a two-inch air gap — the air space between the insert and existing glass is what blocks low-frequency traffic rumble most effectively.
What Is The Best Way To Soundproof Existing Windows?
Acoustic window inserts deliver the best retrofit performance without replacing the window. They mount inside the frame, create a secondary air barrier, and can reduce noise by 10 to 15 decibels when combined with proper frame sealing.
Do Soundproof Curtains Really Work On Windows?
They help, but expectations matter. Heavy three-layer curtains reduce mid and high-frequency noise by 5 to 8 decibels — enough to soften voices and general street noise.
They won’t block bass-heavy traffic rumble or construction noise because they lack the mass and air-gap separation that inserts or secondary glazing provide.
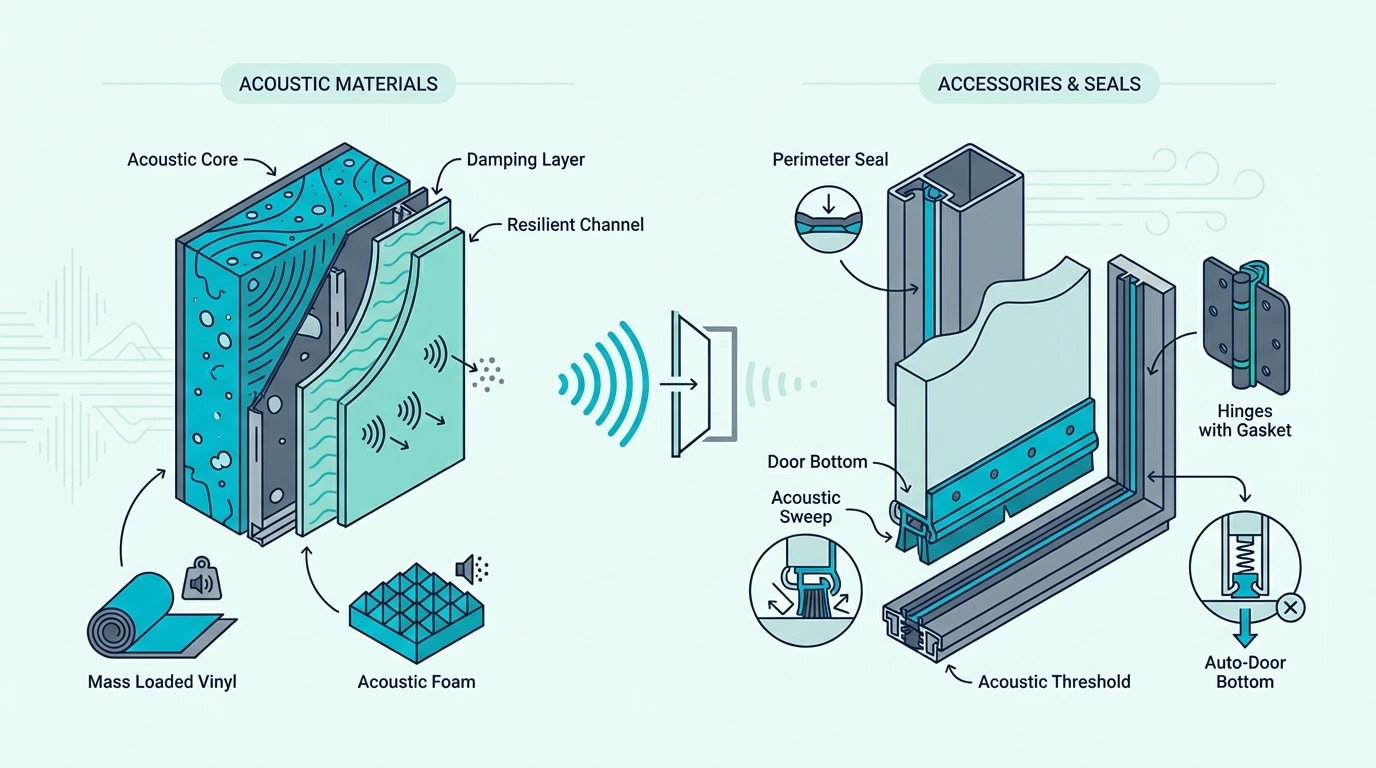
How To Soundproof A Door (Seals, Mass, Upgrades — In The Right Order)
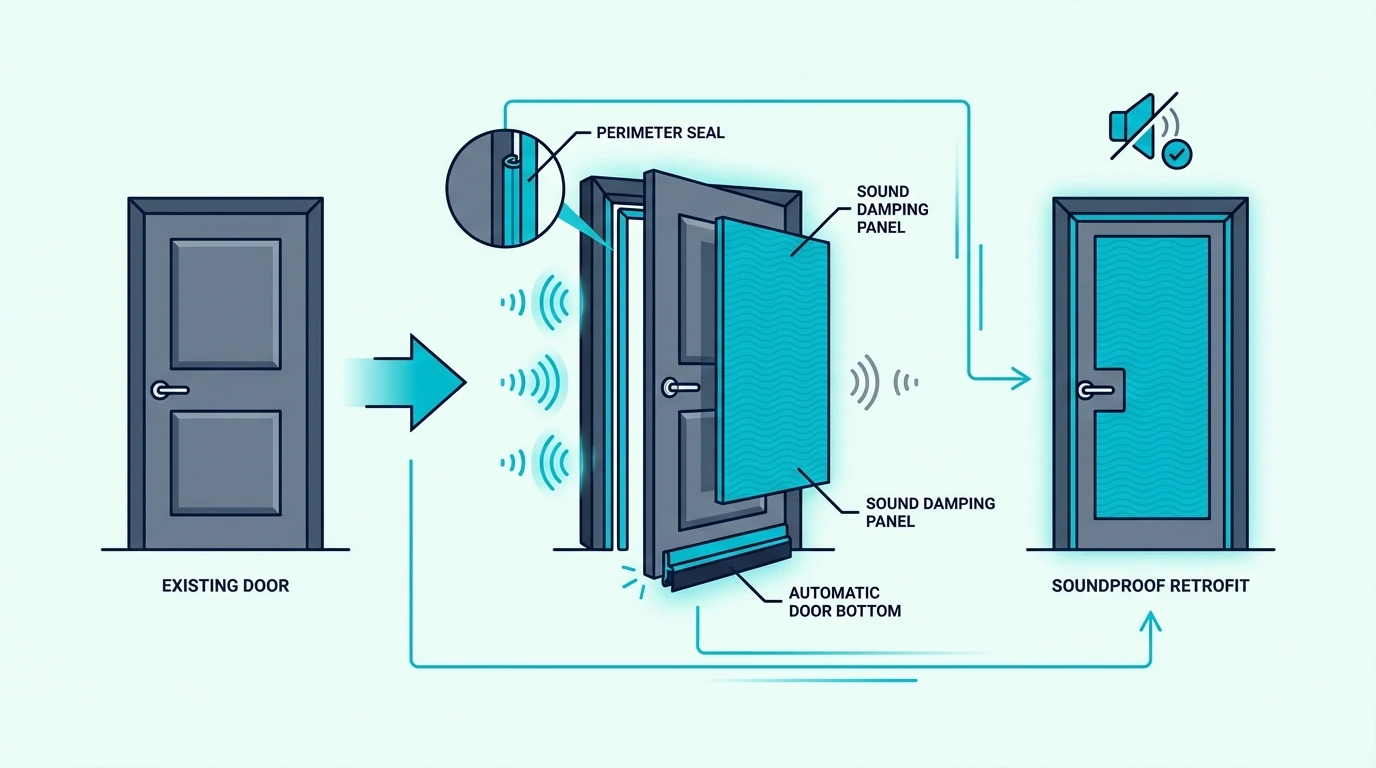
How to soundproof a door seems straightforward, but the door is almost always the weakest link in any room’s sound barrier — and most people try to fix the wrong part of it first. Adding foam panels or hanging a blanket on the door slab does almost nothing when there’s a half-inch gap at the bottom letting sound pour through like an open window.
The gap between a door and the floor, the crack between the door and the frame, and the hollow-core slab itself each leak sound in different ways. Fixing just one of those and ignoring the others leaves most of the noise problem untouched.
Once you address all three — seals, mass, and the door itself — in the right order, the noise reduction is dramatic and immediately obvious. The best part is that the most effective fixes are also the cheapest, so you won’t need to start with an expensive door replacement.
This guide walks through exactly why doors leak sound, how to diagnose your specific problem, which fixes deliver the most noise reduction per dollar, and when it actually makes sense to replace the door entirely. Every recommendation is ordered by impact so you spend money where it matters most.
Quick Takeaway
To soundproof a door effectively, seal the gaps first — a door sweep at the bottom, weatherstripping around the frame, and acoustic caulk at the casing joints. These cheap fixes eliminate the air paths that leak the most sound. After sealing, add mass to the door slab with a dense barrier or upgrade to a solid-core door. A sealed solid-core door can reduce noise transmission by 25–30 decibels compared to a typical unsealed hollow-core door.
Diagnose Why The Door Is Failing
Every room is only as soundproof as its weakest point, and in most homes that weak point is the door. Understanding exactly where sound escapes explains why some fixes work and others waste your money.
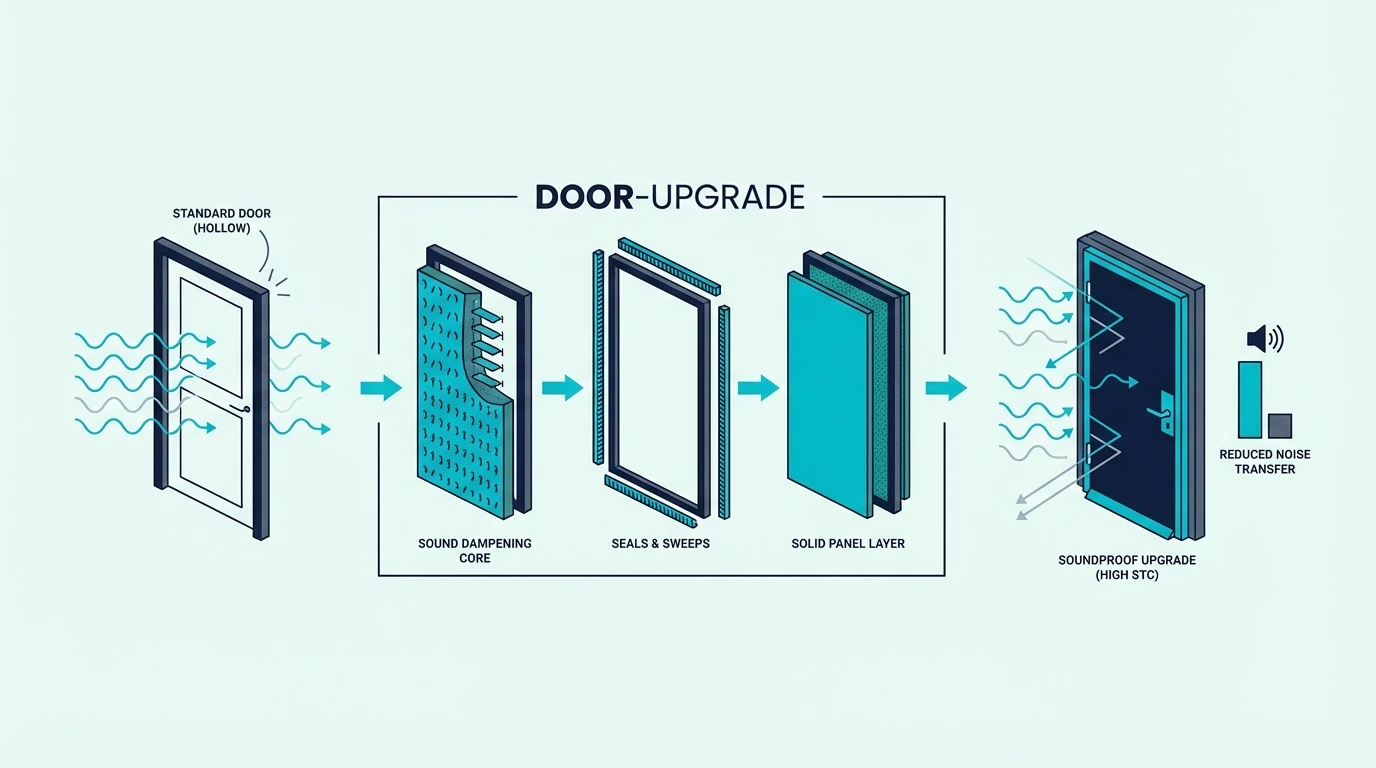
Hollow-Core Slabs Leak Because They Have Almost No Mass
Hollow-core doors are the standard interior door in most homes built after the 1960s. They’re made from two thin sheets of hardboard or MDF over a cardboard honeycomb frame, and the entire assembly weighs around 15 to 20 pounds.
Soundproofing depends on mass — heavier materials resist vibration better and transmit less sound energy. A hollow-core door has almost no mass, which is why you can hear a normal conversation through one as clearly as if it were open.
The STC (Sound Transmission Class) rating of a typical hollow-core door is around 20 to 25, which means speech is easily understood through it. For comparison, a standard drywall wall with insulation rates around 35 to 40 STC, so the door is performing far worse than the wall it sits in.
Even a perfectly sealed hollow-core door will still transmit more sound than the surrounding wall. The slab itself vibrates like a drum head at speech frequencies, turning every conversation on the other side into clearly audible noise in your room.
If you knock on a hollow-core door and then knock on the wall next to it, you’ll hear the difference immediately. The door produces a thin, resonant thud while the wall gives a dull, flat sound. That resonant quality is the door vibrating freely — and every vibration radiates sound energy to the other side.
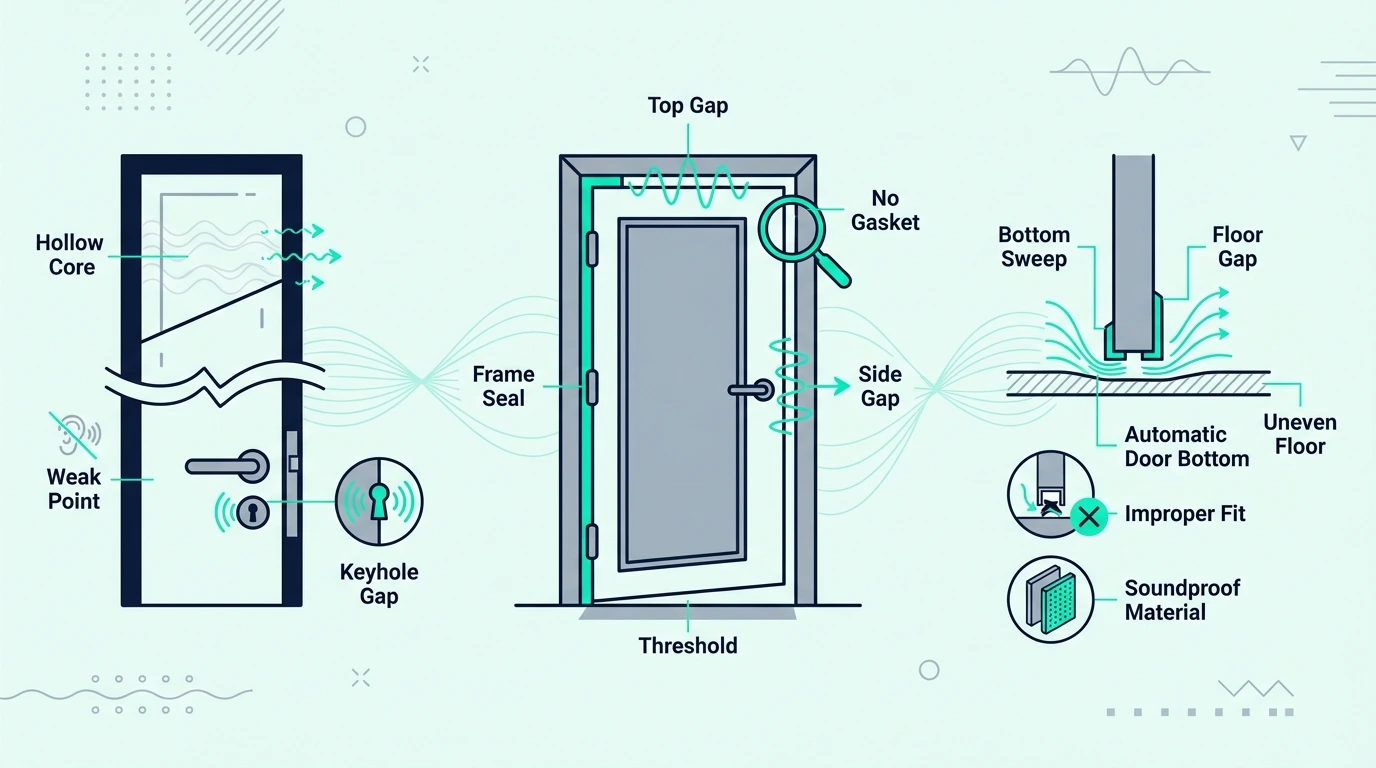
Gaps Around The Door Often Leak More Than The Slab
Here’s the part most people underestimate: the gaps around a door can leak more sound than the door slab itself. A gap of just 1% in a wall’s total surface area can let through 50% of the sound energy that would otherwise be blocked.
The gap at the bottom of the door is the biggest offender. Most interior doors have a visible gap between the bottom edge and the floor — sometimes a quarter inch, sometimes a full inch. That gap is acoustically transparent, meaning sound passes through it with almost zero resistance.
The side and top gaps between the door edge and the frame are smaller but still significant. When you close a standard interior door, there’s typically a sixteenth to an eighth inch of clearance on all three sides. Those thin gaps create a continuous air path that sound exploits.
Check this yourself right now: stand in a quiet room with the door closed and hold your hand along the bottom edge. If you feel air movement, sound is moving through the same path. The basics of room soundproofing always start with finding and sealing air gaps, and doors are where most of those gaps live.
The Noise Type Changes Which Fix Matters Most
Not all door noise problems are the same, and the fix depends on what you’re hearing. Voices from a hallway, bass from a neighboring apartment, and traffic noise from outside all behave differently when they hit a door.
Airborne noise — conversations, TV audio, music without heavy bass — travels as pressure waves through the air. Sealing gaps and adding mass to the door are highly effective against airborne noise because you’re eliminating air paths and adding resistance to vibration.
Low-frequency noise — bass, subwoofer rumble, deep mechanical hum — is much harder to stop with a door alone. Bass wavelengths are long, carry more energy, and pass through building materials that block higher frequencies. If bass is your main problem, door improvements will help but won’t solve it completely — you’ll also need to address the walls between you and the noise source.
Impact noise from the door itself — slamming, rattling in the frame, vibration transfer through the hinges — requires a different approach than noise passing through the door. Felt bumpers, adjusting the strike plate, and ensuring the door hangs plumb address impact noise directly.
Identifying your noise type before spending money saves you from buying the wrong fix. A quick test: if the noise gets dramatically quieter when you press a pillow firmly against the door face, the slab is the main path and mass will help. If the noise barely changes, the gaps are the primary leak and sealing comes first.
Understanding how soundproofing works at a basic level helps you make smarter decisions throughout the process. Mass, damping, decoupling, and absorption each solve a different part of the problem, and doors benefit primarily from mass and sealing.
Existing Doors Need Seals Before Mass
Now that you know where sound leaks and what type of noise you’re dealing with, the retrofit process follows a clear priority order. Start with seals because they’re cheap and effective, then add mass if sealing alone isn’t enough.
Seals And Sweeps Are The First Move
Always. Sealing the perimeter is the highest-value fix for any door soundproofing project, and it costs almost nothing compared to replacing the door.
A door sweep attaches to the bottom of the door and creates a seal against the floor or threshold when the door closes. The MAXTID Under Door Draft Stopper is a popular option with over 18,000 reviews because it screws directly to the door bottom and creates a reliable seal without adhesive that peels off over time.
Weatherstripping around the door frame handles the side and top gaps. Use compression-style seals — neoprene, EPDM rubber, or silicone — rather than the thin foam strips that come in cheap kits. Foam compresses permanently within a few months and stops sealing. The D-Shape Rubber Weather Stripping Seal uses EPDM rubber that maintains its compression over thousands of open-close cycles.
Together, a door sweep and perimeter weatherstripping can reduce sound leakage through the door assembly by 5 to 10 decibels — a difference you’ll notice immediately, especially with speech and TV audio.
The order matters: install the sweep first, then the weatherstripping. The sweep addresses the biggest single gap, so you’ll hear an immediate improvement that tells you whether the remaining side and top gaps need attention too. Many people find the sweep alone is enough for their needs and skip the weatherstripping entirely — though for best results, do both.
Mass Helps After The Gaps Are Controlled
After sealing, if you still hear too much noise through the door slab itself, adding mass is the next step. Mass resists vibration, and more mass means less sound energy passes through.
The simplest approach is a sheet of Trademark Soundproofing Mass Loaded Vinyl adhered directly to the door face. At one pound per square foot, MLV adds significant mass without excessive thickness, and it can be cut to fit around the doorknob and hinges.
A less expensive alternative is a sheet of 1/2-inch MDF (medium-density fiberboard) glued and screwed to the door face. MDF is dense, flat, and readily available at any hardware store. One sheet adds roughly 30 to 40 pounds to the door, which meaningfully increases its sound-blocking ability.
Be aware that adding mass changes the door’s weight, which affects how it hangs and swings. You may need to add a third hinge or upgrade to heavier-duty hinges if the door starts sagging. Check the hinge screws go into the stud, not just the door jamb, to handle the extra load.
The Frame Can Still Leak After The Slab Is Sealed
The door frame itself often has hidden gaps that leak sound even when the door is well-sealed. A product like Acoustical Caulk (29 oz) along the casing — where the door trim meets the wall — seals micro-gaps that aren’t visible but still transmit noise.
The threshold at the bottom of the door frame deserves attention too. If there’s no threshold (common on interior doors), the door sweep has to seal against bare floor, which is harder to make airtight. Adding an adjustable threshold gives the sweep a flat, consistent surface to seal against.
Check the gap between the door frame and the rough opening in the wall. Builders often leave this gap loosely filled with fiberglass or not sealed at all. Pull off the casing trim, fill the gap with acoustic caulk or low-expansion spray foam, and replace the trim.
Electrical outlets or light switches near the door are another flanking path. Sound that can’t get through the sealed door will find its way through the thinnest point in the nearby wall instead. Putty pads behind nearby outlet covers cost almost nothing and close this backdoor for sound.
Above-door transfer vents — the louvered grilles installed above some interior doors for HVAC airflow — are acoustic disasters. A transfer vent is essentially an open hole in the wall, and it can undo everything you’ve done to seal the door. If you have one, cover it with a solid plate or replace it with a sound-dampened transfer duct that maintains airflow while blocking the direct sound path.
Cheap Door Fixes Work Best When They Target Leaks
Those retrofit techniques range from inexpensive sealing to more substantial mass additions. If budget is the primary constraint, there’s a clear hierarchy of what delivers the most noise reduction per dollar spent.
Low-Cost Wins Start With The Sweep, Gasket, And Caulk
Door sweeps and weatherstripping together cost under thirty dollars and consistently deliver the biggest improvement for the least money. If you do nothing else, do this — it eliminates the paths that leak the most sound.
Acoustic caulk around the door casing is the second cheapest fix. A single tube costs a few dollars and takes 20 minutes to apply. Run it along every joint where trim meets wall and where trim meets door frame.
Adjusting the strike plate and latch so the door pulls tight against the weatherstripping when closed is free and makes the seal actually work. Many doors don’t close tightly enough for the weatherstripping to compress properly, which means you’ve installed seals that don’t seal.
Hanging a heavy moving blanket over the door during noisy hours is an ugly but effective temporary fix. A proper US Cargo Control Sound Dampening Blanket with grommets hangs on hooks above the door frame and adds a mass barrier that also absorbs some reflected sound.
Cheap Products Fail When They Add No Seal Or Mass
Thin adhesive foam strips marketed as “soundproofing tape” compress flat within weeks and stop creating a seal. They’re the most common waste of money in door soundproofing because they feel like they’re working when you first install them, then quietly fail.
Egg crate foam glued to a door does nothing measurable for soundproofing. Foam is lightweight and has no mass, so it cannot block sound transmission. It absorbs some echo inside the room, but that has zero effect on noise passing through the door.
Magnetic door seals designed for pet doors and draft prevention create a partial seal but can’t match the compression and coverage of proper weatherstripping. They work for drafts but don’t create the airtight barrier that sound reduction requires.
Door draft snakes — the weighted fabric tubes that sit on the floor against the bottom of the door — are marginally better than nothing but significantly worse than a proper door sweep. The snake doesn’t move with the door, so it creates a seal only when someone remembers to kick it into place.
Renters Need Removable Versions Of The Same Priorities
Renters face a specific constraint: every modification needs to be removable without damaging the door or frame. The good news is that the most effective fixes — sweeps and weatherstripping — install with screws or adhesive that leave minimal marks.
Adhesive-backed EPDM weatherstripping peels off cleanly from most painted or stained door frames when you move out. Clean the frame with rubbing alcohol before applying so it sticks properly during your tenancy, and use a hair dryer to soften the adhesive when it’s time to remove it.
For apartment-wide noise issues that go beyond the door, our guide to soundproofing an apartment covers the full range of renter-friendly fixes for walls, ceilings, and windows alongside doors.
A slide-under door sweep — the kind that wraps around the bottom of the door rather than screwing into it — works for apartment doors where you can’t drill holes. These sweeps use the door’s own weight to hold themselves in place and slide on and off in seconds.
Heavy curtains or sound blankets hung from a tension rod above the doorway add mass without touching the door or frame. They won’t match the performance of a proper seal-and-mass treatment, but they’re fully removable and provide meaningful noise reduction for bedrooms and home offices.
Upgrade The Slab Only After The Gaps Are Controlled
Those budget fixes handle sealing and temporary mass, but sometimes the door slab itself is the limiting factor. Once you’ve sealed every gap and the noise still comes through the door face, the slab needs to be heavier — and that means upgrading.
Solid-Core Doors Change The Baseline Fast
A solid-core door weighs 50 to 80 pounds compared to 15 to 20 pounds for a hollow-core door. That three-to-four-times increase in mass translates directly to better sound blocking.
In STC terms, a solid-core door typically rates 27 to 30 compared to 20 to 25 for hollow-core. When properly sealed with weatherstripping and a door sweep, a solid-core door can reach an effective STC of 30 to 35 — enough to reduce normal conversation to a barely audible murmur.
The improvement is most dramatic for mid-range and high-frequency sounds — voices, TV audio, and music. Low-frequency bass still passes through because even a solid-core door doesn’t have enough mass to resist those long wavelengths.
Solid-core doors come in two main types: particleboard core (cheaper, heavier) and solid wood (more expensive, slightly less heavy but better looking). For pure soundproofing performance, the particleboard core is usually the better value because it’s denser.
A quick way to check whether your door is hollow or solid: knock on it. A hollow-core door produces a distinct echoing thud, while a solid-core door produces a flat, dead knock with almost no resonance.
You can also check the weight — if you can swing the door with one finger on the edge, it’s almost certainly hollow.
Acoustic Doors Go Beyond A Heavy Residential Slab
A purpose-built soundproof door — the kind sold by acoustic manufacturers — goes beyond a solid core. These doors combine multiple features that residential doors lack: higher mass (some exceed 100 pounds), integrated perimeter seals with adjustable compression, automatic door bottoms that drop a seal when the door closes, and sometimes a limp-mass core designed specifically to dampen vibration.
Dedicated soundproof doors achieve STC ratings of 45 to 55, which is in the range where loud speech becomes inaudible. Studio doors and broadcast booth doors at the high end can exceed STC 60.
The construction is fundamentally different. Where a solid-core residential door is a single slab, an acoustic door may have a sand-filled core, a lead sheet layer, or a composite of dense materials separated by damping compounds. The frame and hinges are also heavier duty to support the weight.
These doors serve a specific market: recording studios, broadcast facilities, medical offices, and home theaters where genuine sound isolation is required. For most residential applications, a sealed solid-core door delivers enough improvement without the cost and complexity of a specialty door.
Replace The Door When The Slab Is Still The Bottleneck
Replace the door when sealing and mass additions have been done correctly and the noise is still unacceptable. If you’ve installed proper weatherstripping, a quality door sweep, and added MLV or MDF to the door face, and the noise level still bothers you, the door slab is the bottleneck.
A solid-core interior door costs roughly the same as the combined cost of weatherstripping, a sweep, and an MDF panel. If you’re starting from scratch on a hollow-core door, it often makes more financial sense to buy a solid-core replacement and seal it properly than to retrofit the hollow-core door with mass additions.
The installation matters as much as the door itself. A solid-core door that doesn’t close tightly against its seals — because the frame is warped, the hinges are misaligned, or the threshold is uneven — will perform worse than a well-sealed hollow-core door. Budget for proper hanging and alignment if you’re not confident doing it yourself.
For bedroom doors where the main complaint is voices or hallway noise, a sealed solid-core door is almost always sufficient. For music rooms and studios where heavy bass or high volume is involved, a dedicated acoustic door is the only way to reach the isolation level you actually need.
Different Door Types Fail In Different Ways
The retrofit techniques above work well for standard hinged interior doors, but not every door in your home swings on hinges. French doors, sliding doors, pocket doors, barn doors, and garage doors each have specific weaknesses that require different approaches.
French Doors Leak Through Glass And Meeting Seams
French doors are beautiful and terrible at blocking sound. The glass panels transmit noise easily because glass is thin and rigid, and the meeting point where the two doors close together creates a long vertical gap that’s nearly impossible to seal tightly.
The glass itself has an STC rating of around 26 to 28 for standard single-pane, which is comparable to a hollow-core door. Upgrading to laminated glass or adding a secondary glazing panel improves this, but the real problem is the seal between the two doors.
Astragal seals — vertical strips that mount on the edge of one door to overlap the gap where both doors meet — help close the center gap. Pair them with compression weatherstripping on all four sides of each door’s frame, plus a coordinated door sweep or threshold system at the bottom.
For rooms where you need serious noise isolation, French doors may need to be replaced entirely with a solid soundproof interior door. If keeping the French door aesthetic is essential, a second set of solid doors or acoustic window inserts mounted behind the French doors creates a double-barrier system with a meaningful air gap.
Sliding And Pocket Doors Struggle To Compress A Seal
Sliding doors — including closet sliders, barn doors, and patio sliders — share one fundamental problem: they don’t compress against a seal when they close. A hinged door pulls tight against weatherstripping when the latch engages, but a sliding door just parks next to the frame.
Barn doors mounted on exterior tracks are the worst offenders. They hang in front of the wall rather than sitting inside a frame, leaving gaps on all four sides — top, bottom, and both edges. Sound leaks around every edge because there’s no mechanism to create compression.
Pocket doors that slide into the wall have a different issue: the pocket cavity creates a resonant space inside the wall that can actually amplify certain frequencies. The door itself has no seal at all when closed — it just sits loosely in the opening. If you’re considering a pocket door for a new build, understand that you’re trading acoustic performance for space savings — a tradeoff that makes sense for closets but not for rooms where noise isolation matters.
Improving any sliding door starts with adding brush or compression seals to the top and sides, and a floor-mounted seal or guide at the bottom. For barn doors, mounting the track closer to the wall and adding perimeter weatherstripping to the wall surface around the opening helps close the edge gaps. None of these fixes will match a sealed hinged door, but they can reduce noise meaningfully if combined with the same budget sealing techniques you’d use on a standard hinged door.
If you’re choosing between door styles for a new installation, hinged doors always outperform sliding, pocket, and barn doors for sound isolation. The compression seal mechanism of a hinged door is the key advantage — no sliding door design can replicate it without complex and expensive modifications.
Garage And Exterior Doors Need Different Expectations
Garage doors present unique challenges because of their size, segmented construction, and the gaps between panels. A standard metal garage door has an STC of around 20 to 25 — similar to a hollow-core interior door but covering a much larger opening.
The gaps between garage door panels flex and shift every time the door opens and closes, which means rigid seals break down quickly. Rubber seals designed specifically for garage door panel joints are the first line of defense, along with a proper bottom seal that conforms to uneven garage floors.
Insulated garage doors with polyurethane or polystyrene cores perform significantly better than single-skin metal doors. If you’re using your garage as a workshop, band rehearsal space, or home gym and noise is an issue, upgrading to an insulated door is the most impactful single change.
Exterior entry doors are already heavier than interior doors — most are solid wood, fiberglass, or steel — so the slab itself is less of a problem. The weak points are usually the weatherstripping (which degrades with sun and weather exposure), the threshold seal, and the gap under the door. Inspect and replace exterior seals annually, especially the door sweep and the compression gasket in the frame.
Front doors that face a busy street benefit from a storm door as a secondary barrier. The air gap between the storm door and the entry door creates a buffer zone that reduces both outside noise and thermal transfer.
If your front door has sidelights (the narrow glass panels flanking many entry doors), those are often the weakest point in the entry assembly — even weaker than the door itself. Treat sidelights the same way you’d treat a glass panel for soundproofing: seal the frames, and consider adding a secondary glazing panel or acoustic window insert if outside noise is severe.
Accessories Decide Whether The Retrofit Actually Works
Whether you’re sealing an existing door or upgrading to a new one, the accessories and materials you choose determine how well the entire assembly performs. Here’s what each component actually does and when it’s worth the investment.
Sweeps And Thresholds Close The Biggest Leak Path
A door sweep seals the gap between the bottom of the door and the surface below it. A threshold provides the flat, elevated surface that the sweep seals against. Together, they create an airtight barrier at the largest opening in the door assembly.
Without a threshold, the sweep has to seal against whatever floor surface is there — carpet, hardwood, tile, or an uneven transition strip. Carpet compresses unevenly, hardwood may have gaps between planks, and transition strips create ridges. None of these provide a consistent sealing surface.
An adjustable aluminum threshold screws to the floor and lets you dial in the exact height for a tight seal. The best combination is an automatic door bottom (a seal that drops down when the door closes and retracts when it opens) paired with an adjustable threshold. This creates a tight seal when closed without dragging on the floor when the door swings.
For interior doors, where a raised threshold might be a tripping hazard, a surface-mount door sweep that seals against the flat floor is the practical compromise. It won’t create as tight a seal as a threshold-and-automatic-bottom combination, but it’s far better than the bare gap most doors have.
Gaskets Only Work When The Compression Is Right
A door gasket is weatherstripping specifically designed for the top and side gaps between the door and the frame. Unlike cheap foam strips, a proper gasket uses compression seals — typically kerf-in (slotted into a groove in the frame) or surface-mount — that maintain their shape and spring-back over time.
The gasket’s job is to create an airtight perimeter seal when the door latches closed. For this to work, the door must actually compress the gasket when it closes, which means the gasket needs to be the right thickness for your door’s clearance. Too thin and it won’t make contact; too thick and the door won’t latch.
Kerf-in gaskets sit inside a groove cut into the door stop and are nearly invisible when installed. Surface-mount gaskets attach to the face of the door stop with screws or adhesive and are visible but easier to install without special tools.
For soundproofing, look for gaskets rated for acoustic applications rather than just weatherproofing. Acoustic gaskets use denser rubber compounds and are designed to maintain consistent compression across the full perimeter, which matters more for sound blocking than thermal sealing. The same principle applies to choosing a door sweep — look for compression-style sweeps with dense rubber or silicone blades rather than brush or felt types.
The difference between acoustic-rated and standard weatherstripping isn’t always obvious from the packaging. Check the material — silicone and dense EPDM outperform foam and felt.
Check the profile — D-shape and P-shape compress more evenly than flat or hollow profiles. And check the mounting method — kerf-in and screw-mount last longer than adhesive-only options.
Blankets And Panels Are Support Layers, Not Seal Replacements
Sound blankets hung over a door add mass and some absorption, which reduces both transmitted sound and reflected sound. They’re a legitimate temporary fix for rental spaces, studios, and situations where you can’t modify the door permanently.
The limitation is that a blanket draped over a door doesn’t seal the gaps. Sound leaks around the blanket’s edges, through the gap at the bottom, and through any space between the blanket and the door. A blanket works best when combined with proper sealing — not as a replacement for it.
Rigid door panels — sheets of MDF, plywood, or mass-loaded vinyl cut to door size and mounted on the surface — add permanent mass. They’re more effective than blankets because they physically become part of the door, but they also add weight that affects how the door hangs.
Foam “soundproofing” panels sold for doors are the least effective option. They reduce echo inside the room but don’t add enough mass to block sound transmission — soundproof foam doesn’t work the way most people expect. If a product weighs next to nothing and advertises “soundproofing” for doors, it’s solving a different problem than the one you have.
The best material choice depends on whether your upgrade is temporary or permanent. For temporary or renter-friendly fixes, heavy blankets and removable sweeps are the practical choice. For permanent upgrades, MLV or MDF bonded to the door slab combined with purpose-built soundproofing materials for the seals delivers the most reliable long-term performance.
Door Costs Scale With The Performance Target
Those materials and accessories span a wide price range, and understanding what each tier delivers helps you budget for the result you actually need. Door soundproofing scales predictably from cheap DIY to professional installation.
Basic Retrofits Buy The Cheapest Real Improvement
A basic retrofit — door sweep, weatherstripping, and acoustic caulk — runs between twenty and fifty dollars for a single door. This is the starting point for everyone, regardless of budget, because it addresses the gaps that leak the most sound.
The tools required are minimal: a screwdriver, tape measure, utility knife, and caulk gun. Most people complete the installation in under an hour, including cutting the sweep to length and fitting the weatherstripping.
At this price point, you should expect a noticeable reduction in speech and TV audio coming through the door. The improvement won’t be dramatic enough for a recording studio, but it’s typically sufficient for bedroom privacy, home office quiet, and reducing hallway noise in apartments.
If you’re upgrading from a door with no sealing at all — which is the default state of most interior doors — this basic retrofit is the single biggest bang-for-your-buck improvement in home soundproofing. The same budget-friendly approach applies to every surface in a room, but doors give the fastest return because they start with the biggest gaps.
Mid-Level Budgets Buy More Slab Mass Or A Better Door
A mid-level upgrade adds mass to the sealed door. A sheet of 1/2-inch MDF for the door face costs roughly twenty to thirty dollars. MLV (mass loaded vinyl) costs more — typically seventy to one hundred and fifty dollars depending on the size of the door and the weight of the vinyl.
If you’re replacing the door entirely, a solid-core interior door ranges from one hundred to three hundred dollars depending on size, style, and material. Add another fifty to one hundred dollars for a new door sweep, threshold, and perimeter gaskets.
Total cost for a properly sealed solid-core door installation — including the door, hardware, sweep, gaskets, and acoustic caulk — typically falls between two hundred and four hundred dollars. If you’re installing it yourself, that’s all materials. Hiring a carpenter to hang the door adds another one hundred fifty to three hundred dollars.
This mid-range investment gets you into the STC 30-to-35 range when done correctly, which is where normal conversation becomes difficult to hear through the closed door. For most residential soundproofing goals, this tier delivers the best balance of cost and performance.
The exact cost depends on how many doors you’re treating. A single bedroom door is straightforward, but a whole-house upgrade — every bedroom, bathroom, and home office — multiplies the material cost while reducing the per-door labor if you batch the work. For a full-house estimate, see our breakdown of soundproofing costs by room.
Pros Matter When The Frame Or Performance Target Gets Serious
Call a professional when the door frame is warped, the rough opening is significantly out of square, or you need to install a heavy acoustic door that requires reinforced framing. A solid-core door weighing 60-plus pounds needs proper support, and a specialty acoustic door over 100 pounds requires professional installation.
Professional acousticians make sense when you need verified performance — for example, a home recording studio that needs to meet a specific STC target. An acoustician can measure the door assembly’s actual sound transmission, identify flanking paths you might miss, and specify the exact products and installation details needed.
Frame modifications — adding a threshold where none exists, deepening the door stop to accommodate thicker gaskets, or rebuilding the rough opening to eliminate air gaps — are carpentry tasks that benefit from professional skill. A poorly hung door with great sealing will still underperform because the seals won’t compress evenly.
For home theater rooms and drum rooms, professional installation is almost always necessary because the noise levels are extreme and the tolerance for sound leakage is near zero. These rooms typically need a dedicated acoustic door assembly — not just a solid-core residential door — and the framing must be reinforced to support the weight.
The cost for professional door soundproofing installation ranges from a few hundred dollars for hanging and sealing a standard solid-core door to several thousand dollars for a full acoustic door assembly with frame modifications. The investment makes sense when you’ve tried DIY approaches and can’t reach the performance level you need.
The Bottom Line
How to soundproof a door gets much simpler once you answer one question first: is the real leak in the gaps, in the slab, or in the whole door assembly?
If you can see or feel gaps, start with the sweep, the frame seals, and the casing leaks.
If the door is sealed and still sounds thin, add mass or move to a solid-core slab.
If the room needs high isolation for bass, drums, or theater-level volume, expect the solution to move beyond a normal residential door.
That is the rule that keeps you from wasting money in the wrong order.
Start by sealing every gap: install a door sweep at the bottom, apply compression weatherstripping around the frame, and run acoustic caulk along the casing joints. After sealing, add mass to the door slab with a sheet of MDF or mass-loaded vinyl glued to the surface. These two steps — sealing and mass — address the two primary paths sound uses to pass through a door.
What Is The Cheapest Soundproofing Option For A Door?
A door sweep and D-profile weatherstripping together cost under thirty dollars and consistently deliver the biggest improvement for the least money. They seal the air gaps that leak the most sound, and the installation takes under an hour with basic tools.
How Much Does It Cost To Soundproof A Door?
Basic DIY sealing (sweep, weatherstripping, caulk) costs twenty to fifty dollars. Adding a mass layer like MDF or MLV brings the total to one hundred to two hundred dollars. A full solid-core door replacement with proper sealing runs two hundred to four hundred dollars in materials, or five hundred to seven hundred dollars with professional installation.
Is It Better To Replace A Door Or Retrofit It?
Retrofit first. Sealing a hollow-core door gives you an immediate baseline improvement for minimal cost.
If the sealed door still transmits too much noise, replace it with a solid-core model — but keep the seals you installed because the new door needs them too. The only reason to replace before sealing is if the existing door is physically damaged or won’t close properly.
How To Soundproof A Room (What Actually Works And What Does Not)
How to soundproof a room works, but only if you stop treating every surface the same and fix the weak point that is actually leaking sound.
That is where most room projects go sideways. The real failure is often the door, window, vent, or ceiling, while the budget gets burned on foam, blankets, and decorative products that barely reduce transmission at all.
Get the order right and the room gets quieter in a way you can actually feel. Speech bleed drops, traffic softens, and the shell stops wasting money on fake shortcuts.
Start by figuring out whether your problem is airborne noise, impact noise, or simple leakage. That tells you whether the right next move is sealing, more mass, cavity insulation, decoupling, or source-side floor work.
The sections below walk through diagnosis first, then the weak-point order, then the right fixes for walls, doors, windows, floors, ceilings, and vents.
Quick Takeaway
To soundproof a room, seal leaks first, then upgrade the surface that is actually failing: doors and windows for obvious air paths, walls for neighbor noise, ceilings and floors for footsteps, and deeper rebuilds when vibration is involved. Real soundproofing means mass, damping, insulation, and decoupling used in the right assembly, not foam panels or soft furnishings pretending to block sound.
What Soundproofing Actually Means
Before you decide which wall, door, or ceiling needs work, you need the right definition. If you mix up soundproofing with acoustic treatment, the whole plan starts solving the wrong problem.
The Line Between Soundproofing And Acoustic Treatment
Soundproofing is about reducing transmission between spaces. If your goal is more sleep, more privacy, or less noise from outside the room, you are trying to stop sound from crossing the room shell.
Acoustic treatment is about how the room sounds after the noise is already inside. Panels, foam, bass traps, and curtains can calm reflections and reverb without doing much to block noise from the next room.
The easiest way to picture it is sponge versus brick. A sponge absorbs some energy in the room, but a heavier sealed barrier blocks more of it from passing through in the first place.
That difference is why people get fooled by “soundproof panel” marketing. If you want the physics behind that line first, how soundproofing works and do soundproof panels work make it clear fast.
Full Isolation Versus Practical Noise Reduction
That brick-side barrier can go very far, but a truly isolated room is a construction project, not a product purchase. The serious version uses a room-within-a-room layout, isolated framing, floating floors, sealed penetrations, and controlled ventilation.
Most homeowners and renters do not need that extreme. They need a room that drops speech, TV spill, traffic rumble, or footstep energy enough that the space feels usable again.
That is a realistic goal because sound reduction stacks. Even a moderate drop changes what your ears register, especially when the loudest leak gets fixed first instead of spreading weak upgrades across every surface.
So do not think in terms of “perfect” versus “worthless.” Think in tiers: sealing and door work first, better wall and ceiling assemblies next, and full decoupling only when the noise source justifies it.
The Most Common Leak Points
Working in those tiers only helps if you know where sound is actually getting in. It goes through the weakest link in the room shell, then flanks around the stronger surfaces you paid to upgrade.
That is why a decent wall can still perform badly when the door has a visible undercut or the window frame leaks around the trim. The shell only performs as well as its worst opening.
The usual leak points are predictable: hollow-core doors, single-pane or leaky windows, wall-to-floor joints, outlet boxes on shared walls, vents, recessed lights, and lightly built ceilings. Once you see the room that way, the upgrade path gets much more practical.
Think of it like a cooler with the lid cracked open. The insulation still exists, but the opening is what controls the real-world result.
Finding The Weak Points In Your Room
Once the weak-link idea is clear, the next job is diagnosis. Five careful minutes of testing beats a weekend of buying the wrong materials.
Testing For Sound Leaks
The simplest test is still one of the best. Have someone talk, play music, or run the normal noise source outside the room while you walk the inside perimeter and listen for places where the sound suddenly gets clearer or sharper.
Pay close attention to the door edges, window trim, outlets, baseboards, and the ceiling line above the loudest wall. Those spots usually tell you more than the middle of the drywall does.
If you want a quick leak test, hold a tissue or light strip near the door and window edges. If air movement shows up, you already found a sound path too.
You can also use a phone sound meter for comparison. The point is not lab accuracy. It is identifying the three or four loudest spots so your first fixes hit the biggest leaks.
Airborne Noise Versus Impact Noise
Once those loudest spots are mapped, start sorting what each one carries. Airborne noise—voices, TV, traffic, barking—pushes on the wall, door, or window and gets through when that surface is too light, too leaky, or both.
Impact noise is footsteps, dropped objects, chair scrapes, and low thuds that travel through framing or concrete. That energy rides the structure, which is why it can stay annoying even after you add soft surface treatments.
The fix changes with the type. Airborne noise usually responds first to sealing and added mass. Impact noise usually pushes you toward source-side floor treatment or decoupled ceiling and wall assemblies.
Most rooms have both. If the sound is mostly speech and TV, think leakage and mass first. If the ceiling physically “thumps” when someone walks above, think structure and decoupling.
Gaps, Vents, And Hidden Sound Paths
Whether the noise is airborne or structural, it still exploits every opening in the shell. A strong wall with an unsealed door edge can perform worse than a simpler wall with a properly sealed perimeter.
Vents are one of the biggest misses in whole-room planning. A duct run can behave like a tunnel between rooms, which is why people sometimes fix a wall and still hear voices because the path was overhead the whole time.
Outlets and switches on shared walls are another repeat offender, especially when boxes are back to back. They reduce mass, create leakage paths, and sit exactly where people forget to look.
That is why the first step in any cheap soundproofing plan should be sealing, not surface decorating. If the room is leaking, heavier upgrades cannot show their real value.
Walls, Doors, And Windows
Once the leak paths are mapped, start with the parts of the shell that fail most often. In real homes, that usually means the door first, then the window, then the wall assembly behind them.
Shared-Wall Noise
Shared-wall noise is usually voices, TV, and everyday living sounds, which means your first priority is sealing the wall perimeter and every penetration before you assume the whole wall needs rebuilding.
If the wall is staying closed, the best next move is usually another drywall layer with Green Glue Noiseproofing Compound between the layers. That gives you more mass and more damping without opening the studs.
That is the core wall workflow we use again and again: seal first, add mass second, add cavity absorption when the wall is open, and only jump to decoupling when the noise source is severe enough to justify it. If your whole problem lives on one party wall, go deeper with how to soundproof an existing wall or soundproofing a wall from noisy neighbors.
Hollow-Core Doors And Door Gaps
That same seal-first logic applies to doors, which fail in two ways at once: they are often too light, and they almost always leak. A door upgrade usually delivers more real-world improvement than starting with the wall beside it.
If the room still has a hollow-core door, replacing it with a solid-core slab is usually the biggest single door upgrade you can make. For the full door workflow, use this page together with how to soundproof a door and the best door sweeps for soundproofing.
Window Inserts And Secondary Glazing
With the door sealed and upgraded, the next opening to check is the glass. If traffic, barking, or general street noise feels sharper near the glass than the wall beside it, the window should move to the top of your list.
If the window is still the weak link, a properly fitted insert or secondary glazing panel makes much more sense than another soft curtain. The insert works by creating a sealed secondary barrier and a deeper air gap, which is why it outperforms lighter add-ons.
Once the side-wall leaks are more under control, look up and down. Floors and ceilings are where people discover that impact noise follows a different playbook than speech and TV bleed.
Upstairs Footsteps And Source-Side Fixes
Upstairs footsteps are a source-side problem first. If you control the floor above, you will usually get more value treating that floor than throwing random materials at the ceiling below.
If you do not control the upstairs room, then the ceiling below becomes the main treatment surface. That usually means a decoupled ceiling build rather than a cosmetic patch.
Even before a rebuild, thick rugs with dense pads can still help reduce the sharpness of impact energy at the source. They are not a full fix, but they are one of the few removable changes that can improve footsteps from above.
Ceiling Noise From Below
That source-side priority flips when the ceiling is your only option. The assembly has to handle both airborne leakage and structure-borne vibration, so it needs to be tighter, heavier, and ideally less directly connected to the framing above it.
If the ceiling path already has insulation and decoupling, the remaining impact energy often lives in the floor stack itself. Underlayment makes the most sense when that floor is already being replaced—especially in upstairs bedrooms, offices, nurseries, and media rooms with hard flooring.
It is much less attractive as a standalone project because finished floors have to come up first. If the floor is staying put, your effort usually goes farther on seals, doors, windows, or the ceiling below.
The key is coverage and context. Wall-to-wall underlayment inside a real floor assembly can help a lot, but partial coverage or a thin stock pad will not behave like a serious acoustic floor system.
Once the room-by-room workflow is clear, it helps to sort the common materials by what job they actually do. That makes it much easier to avoid buying the right material for the wrong layer.
Mineral Wool As A Cavity Fill
Mineral wool helps inside a wall or ceiling cavity because it reduces resonance and absorbs some energy as sound moves through the assembly.
That is why products like AFB Acoustical Fire Batts, Mineral Wool Insulation and denser batts matter during open-wall and open-ceiling work. They support the system, but they do not replace mass, sealing, or decoupling.
The mistake is treating mineral wool like a surface product. It belongs inside the assembly, not exposed on the room side as a fake “soundproof wall” layer.
So if the room is already finished and you are not opening anything, mineral wool is usually not your first move. If the cavity is accessible, though, it is one of the best supporting materials you can add.
Mass Loaded Vinyl And Extra Drywall
Mineral wool handles the cavity, but the face of the assembly still needs enough mass to resist vibration. Mass loaded vinyl and extra drywall both target that need—adding barrier weight rather than fixing leaks or structure-borne shortcuts.
Drywall is usually the more straightforward move because it is cheaper, finish-ready, and easy for contractors to work with. Add Green Glue Noiseproofing Compound between layers, and the assembly behaves better across a wider range of noise.
So if you are rebuilding the surface anyway, extra drywall with damping is the default answer. If space is tight or the assembly needs a thinner heavy layer, MLV becomes more attractive.
Acoustic Foam And Soft Furnishings
Mass and damping handle the heavy lifting, which is why lighter materials fall short. Foam, soft panels, blankets, and thick curtains can make a room sound less harsh without doing much to stop transmission through the shell.
That is because they are light. Real soundproofing materials are either heavy, well sealed, vibration-isolating, or all three.
Soft furnishings still help in supporting roles. Rugs can reduce floor reflections, curtains can calm a bright window wall, and a fuller room can feel less noisy because it is less reflective.
Just keep the goal straight. If you need to block sound between rooms, read does soundproof foam work once, then move your budget back toward sealing, mass, and better assemblies.
Soundproofing A Room On A Budget
Most people should start cheap, but cheap only works when it targets the real leak. That means the order matters more than the budget number.
After that, move furniture strategically. A loaded bookshelf on the noisiest shared wall and a thick rug in the room are not miracles, but they can support the main fixes without much added cost.
If the room still sounds bad after those steps, that is your sign the assembly itself is too weak. Then the budget conversation shifts from cheap sealing to real retrofit work.
Budget Strategy For Finished Rooms
Once those first-round sealing fixes are in place, the budget question shifts to how far the rest of the money can stretch. A finished room limits you to the outside of the shell, which means better door performance, window sealing, removable source-side floor softening, and selective added mass where it counts most.
For renters, the most realistic mix is door sealing, window sealing, thick rugs, and a removable companion layer like RYB HOME Soundproof Divider Curtain over the noisiest opening. It is not a primary barrier, but it is one of the few removable add-ons that can still provide some practical value.
For owners, the best budget strategy is still concentration, not coverage. Put the money into the single wall, door, or window facing the noise source instead of doing weak partial upgrades all around the room.
If the room is already built and the cheap fixes helped only a little, the next honest step is usually another drywall layer or a better door, not more accessories.
Cheap Fixes That Waste Money
Knowing where to spend also means knowing where not to. Egg cartons, lightweight foam tiles, and miracle paints all fail the same test: they do not add meaningful mass, they do not seal, and they do not decouple anything.
Loose door snakes and random fabric hung on a wall also get oversold. If they do not create a real seal or a real barrier layer, their contribution is usually tiny.
Curtains belong in the “supporting layer” category, not the “main fix” category. That is why soundproof curtains can be useful around a better window strategy without being the strategy.
The simplest rule is this: if the product is light, decorative, and sold as a universal answer, be skeptical.
Upgrading A Room That Is Already Built
Once the basic sealing and targeted cheap fixes are done, the next question is whether the finished room can be improved enough from the surface or whether the assembly itself has to change.
Surface-Side Upgrades Without Demo
The best no-demo wall upgrade is usually another drywall layer with Green Glue Noiseproofing Compound between layers. It is one of the few upgrades that can materially improve a finished room without opening the studs.
Windows, doors, and vent penetrations can also be improved without demolition. Inserts, sweeps, weatherstripping, caulk, and better grille sealing are exactly the kinds of upgrades finished rooms respond to first.
Surface-side mass and damping can only take you so far before the noise demands a deeper rebuild. Drums, subwoofers, repeated impact, and serious privacy requirements all push you in that direction.
That is when decoupling stops being optional. Clips, channels, rebuilt wall faces, and eventually room-within-a-room design are what keep structure-borne energy from walking straight through the framing.
The threshold is usually obvious in practice. If sealing and added mass improved the room but bass and heavy thuds are still dominating, the remaining problem is probably structural.
That is also the point where careful design matters more than buying more materials. A poorly executed “heavy” room can still lose badly to a properly decoupled one.
Music Rooms And High-Demand Spaces
That decoupling threshold arrives fastest in rooms built for loud, bass-heavy sources. Music rooms follow the same workflow, but the louder the source gets, the less forgiving the shell becomes.
For casual playing, seal the door and window, add mass to the worst wall, and treat the ceiling if the room is below someone else. For drums, subwoofers, or serious monitoring, plan on decoupling and likely some kind of floating or isolated floor strategy.
That is why a music room often becomes the clearest case for clips, channels, layered drywall, and airtight detailing everywhere. The room has to handle more energy over a wider frequency range than a normal bedroom or office.
By this point, the real decision is no longer whether DIY is possible. It is whether the room still lives in the sealing-and-retrofit zone or has crossed into the assembly-rebuild zone.
Realistic Projects For Renters And Beginners
Door sweeps, weatherstripping, caulk, rugs, and window sealing are all realistic beginner projects. They are also the first projects renters and apartment dwellers should prioritize because they do not require opening the structure.
Removable window layers and heavier curtains can also be beginner-friendly when the room needs a non-destructive comfort upgrade. Just remember they are support layers, not substitutes for better assemblies.
Renters should focus on removable fixes, source-side softening, and the noisiest opening first. Owners can go a step further into new drywall, better doors, and more permanent ceiling or wall work.
If your room shares the same constraints, read this alongside how to soundproof an apartment so you do not plan a build your lease will never allow.
The Case For Professional Help
Those beginner-friendly fixes cover a lot of ground, but some projects cross a line where DIY risk outweighs the savings. Professional help becomes worth it when you are rebuilding ceilings, adding new drywall layers across large areas, modifying electrical boxes, or installing decoupling hardware that can be ruined by sloppy fastening.
This matters most on ceilings and heavier wall rebuilds. A bad install can short-circuit the whole system, waste materials, and leave you with a mess that still leaks sound.
Even if you stay hands-on, it can be worth getting an acoustician or experienced contractor to confirm the dominant path before you spend on a bigger build. That is especially true when the room has multiple possible weak points like a shared wall plus a vented ceiling line.
The more the room starts looking like a system build instead of a sealing job, the more valuable expert input becomes.
Cost By Project Depth
Whether you hire help or stay hands-on, the budget still follows the same pattern. Sealing and door work sit at the low end, layered wall and ceiling retrofits live in the middle, and decoupled or room-within-a-room projects are the expensive end of the spectrum.
That is why diagnosis matters so much. If the room only needs the door, window, and trim tightened up, you can improve it without turning it into a renovation.
If the room needs new drywall layers, ceiling rebuilds, or decoupled framing, you are no longer doing a light fix. You are doing construction, and the budget needs to be treated that way.
The best way to soundproof a room is to treat it like a shell and work in the right order. Seal the leaks, upgrade the weakest opening, then strengthen the surface that is actually failing.
For most rooms, that means door gaps, window leakage, and perimeter cracks first. After that, shared walls, ceilings, or floors get the next layer of attention depending on whether the problem is speech, traffic, or impact noise.
If those steps still leave you with bass, vibration, or heavy transfer, the room is telling you it needs decoupling instead of more accessories. That is the line between a simple fix and a real isolation build.
True 100% soundproofing means a room-within-a-room build with isolated walls, a floating floor, a decoupled ceiling, and sealed ventilation. For most homes, the smarter goal is strong noise reduction rather than absolute silence.
Can You Soundproof A Room Cheaply?
Yes, if the room’s main problem is leakage rather than major structural transfer. Cheap fixes like sealing the door, tightening the window, and caulking the trim can make a meaningful difference, but they will not solve bass-heavy or impact-driven noise on their own.
What Is The Best Material To Soundproof A Room?
There is no single best material because soundproofing works as a system. For most rooms, the best combination is airtight sealing, a heavier wall or ceiling face, damping between layers, and decoupling when the noise source is severe enough to require it.
Best Bass Trap For Vocals — 6 Picks That Tighten Low-End In Your Vocal Room
Best bass trap for vocals options range from budget foam wedges to wooden panel absorbers — but the wrong choice leaves your vocal recordings with the same muddy low-end buildup you are trying to fix. Vocal booths and small recording rooms amplify bass problems because their short wall dimensions create strong room modes right in the 80-300 Hz range where vocal body and warmth live.
Bass traps matter more for vocal recording than almost any other application because untreated bass buildup masks the clarity and detail that separates a professional vocal take from a bedroom demo. The proximity effect from condenser microphones makes this worse by boosting low frequencies the closer the vocalist stands to the mic.
We evaluated dozens of bass traps specifically for vocal recording applications, testing corner fit in booth-sized spaces, absorption at vocal-relevant frequencies, pack sizing for small rooms, and verified buyer feedback from studio users. Below you will find our top picks and a complete buyer’s guide for choosing the best bass trap for vocals in any recording space, whether you are building a vocal booth or treating a home studio.
Quick Takeaway
The best bass trap for vocals is an 8-pack foam corner trap that treats all four corners of your vocal room or booth. For professional vocal studios needing deeper bass control, wooden bass traps with internal absorption outperform foam at the frequencies that matter most for vocal clarity. Start with corner treatment before adding any other acoustic panels.
Our Top Picks
These six bass traps deliver the best results for vocal recording spaces, from compact booths to full home studios.
Vocal recording demands specific acoustic conditions that differ from general music production. We evaluated every product against criteria tuned to vocal applications.
Absorption at vocal frequencies (80-300 Hz) was the primary criterion because this range contains the bass buildup and room resonance problems that muddy vocal recordings. Products with sufficient thickness and density to absorb in this range scored highest.
Size compatibility with vocal spaces matters because vocal booths and isolation rooms are typically much smaller than full studios. Traps that fit tight corners without consuming valuable floor space scored higher.
Pack count relative to room size determines whether one purchase actually solves the problem. A typical vocal booth has four corners and two to four ceiling-wall edges that need treatment.
Fire safety and material quality was verified through certifications and buyer reports. Vocal booths are enclosed spaces where fire-retardant materials are essential.
Why Vocal Recording Needs Bass Traps
Vocal booths and small recording rooms create severe bass buildup because their short wall dimensions produce strong room modes concentrated in the 80-200 Hz range. A typical 6×4 foot vocal booth has its first room mode around 94 Hz — right where vocal body and chest resonance live.
Without bass traps in the corners, this buildup makes vocals sound boomy and unfocused on playback even when they sounded clean through headphones during recording. The microphone captures the room resonance along with the performance, and no amount of EQ can cleanly separate the two after the fact.
The proximity effect from condenser and dynamic microphones compounds this problem by boosting frequencies below 200 Hz as the vocalist moves closer to the capsule. Bass traps absorb this excess energy before it reaches the microphone, giving you cleaner raw takes that need less corrective processing.
This is why professional vocal studios always treat corners first — even before investing in reflection filters or vocal shields. Corner bass traps address the root cause of muddy vocals while reflection filters only treat symptoms.
What Are the Best Bass Traps for Vocal Booths?
Vocal booths demand compact bass traps that fit tight corners without eating into the limited space where the vocalist stands. Every inch matters in a 4×6 or 5×5 foot booth.
The 4 Pack Bass Traps for Ceiling Corner is our top pick for vocal booths because the 16.5-inch triangular profile covers more corner surface than standard foam wedges. Four pieces treat two full corners from floor to ceiling, and a second pack completes all four corners.
For booth builders on a tight budget, the TroyStudio 12 Pack stacks neatly in booth corners at under nineteen dollars. The 4x4x12-inch pieces stack vertically to create floor-to-ceiling columns in two corners per pack.
The Sonic Acoustics 12 Pack also works well in booths because the 7×7-inch triangular footprint takes up minimal corner space while the 12-inch depth provides meaningful absorption at vocal-relevant frequencies.
What Are the Best Bass Traps for Home Studio Vocals?
Home studios used for vocal recording typically have larger rooms than dedicated booths, which means different bass trap requirements. The room modes occur at lower frequencies and the corners are farther from the microphone position.
The advantage of larger rooms is that you have more options for corner bass trap sizing and placement. The disadvantage is that you need more material to treat the same number of corners.
The 8 Pack Bass Traps Acoustic Foam Corner is the best starting point for home studio vocal recording because the 8-piece count treats all four vertical corners in one purchase. Treating every corner creates even bass absorption across the room rather than the lopsided treatment that happens when you only treat two corners.
For home studios where vocal quality justifies a higher investment, the Wooden Acoustic Bass Traps deliver absorption that foam cannot match at the frequencies below 100 Hz where home studio room modes are strongest.
The TroyStudio 12 Pack Charcoal offers a visual upgrade for home studios where aesthetics matter alongside room acoustics. The charcoal finish blends with darker studio setups and recording furniture.
What To Look For In Bass Traps For Vocals
Choosing bass traps for vocal recording requires attention to factors that general acoustic treatment guides often overlook. Here is what matters most for vocal applications.
Thickness For Vocal Frequencies
Four inches of acoustic foam absorbs effectively at 200 Hz and above, which handles most vocal booth bass buildup. Six inches reaches down to around 150 Hz, covering the chest resonance range that causes the most audible muddiness in vocal recordings.
For rooms with severe low-end problems below 150 Hz, wooden or mineral-wool bass traps outperform any thickness of foam. The best bass traps for deep bass control use denser materials that create more friction per inch of depth.
Portable vs Permanent Options
Portable bass traps make sense for multi-use rooms where vocals are recorded alongside other activities. Freestanding corner panels can be positioned during recording sessions and stored afterward.
The tradeoff with portable traps is that repositioning them between sessions introduces inconsistency in your room acoustics, which makes it harder to develop reliable mixing habits.
Permanent corner traps mounted with adhesive or brackets deliver better results because they maintain consistent positioning session after session. For dedicated vocal rooms and booths, permanent installation is always the better investment because even small changes in trap position alter the room’s frequency response.
If you are setting up a permanent vocal space, treat all four corners first with the best bass traps you can afford, then add broadband absorption panels on the walls closest to the microphone.
The Bottom Line
The best bass trap for vocals for most recording spaces is the 8 Pack Bass Traps Acoustic Foam Corner — treating all four corners of your vocal room in a single purchase with fire-retardant foam backed by thousands of verified reviews. For dedicated vocal booths, the 4 Pack Bass Traps for Ceiling Corner delivers the best booth-specific performance.
Start with all four corner positions treated from floor to ceiling, then consider adding corner bass traps at ceiling-wall junctions for further improvement. Corner treatment alone transforms vocal clarity more than any other single room treatment.
Frequently Asked Questions
Do you need bass traps for voice over?
Yes — voice-over booths are typically even smaller than vocal recording booths, which means stronger room modes at higher bass frequencies. Even two corner bass traps in a voice-over booth noticeably reduces the boomy quality that makes spoken word recordings sound unprofessional.
How many bass traps for a vocal booth?
A typical 4×6 foot vocal booth needs 4-8 corner bass traps to treat all four vertical wall-wall corners from floor to ceiling. Start with the two corners closest to the microphone position, then add the remaining two corners and ceiling-wall edges for complete treatment.
Can foam bass traps work for vocals?
Foam bass traps handle the upper bass range (150-300 Hz) that causes most vocal recording problems effectively. For casual and home recording, foam corner traps provide sufficient bass control at a fraction of the cost of mineral wool or wooden alternatives.
Professional studios that need absorption below 100 Hz should consider wooden or mineral-wool options instead.
Best Corner Bass Trap — 6 Picks For Taming Low-End Buildup In Every Corner
Best corner bass trap options range from cheap foam wedges to wooden panels with internal absorption — but most products marketed as corner bass traps only absorb mids and highs while leaving the actual bass frequencies untouched. Picking the wrong corner trap means stacking foam that looks like acoustic treatment but does nothing for the 60-200 Hz buildup causing your real problems.
Corner placement matters more than any other factor in bass control because sound pressure doubles at every wall-wall boundary and quadruples where three surfaces meet. A mediocre trap in the right corner outperforms a premium trap on a flat wall because pressure zones concentrate bass energy exactly where corners are.
We tested and compared dozens of corner bass traps based on material density, corner fit, pack size, absorption depth, and verified buyer feedback. Below you will find our top picks, breakdowns by use case, design comparisons, and a buyer’s guide to help you choose the best corner bass trap for your room.
Quick Takeaway
The best corner bass trap for most rooms is an 8-pack foam corner trap that covers all four vertical wall-wall corners from floor to ceiling. For deeper bass absorption below 100 Hz, upgrade to wooden or mineral-wool corner traps. Prioritize corner coverage quantity over individual trap quality — four treated corners always outperform two corners with premium traps.
Our Top Picks
After comparing dozens of corner bass trap options, these six products deliver the best combination of corner fit, absorption performance, and value. 8 Pack Bass Traps Acoustic Foam Corner
Corner bass traps need to absorb low-frequency energy where it concentrates most — in the corners where walls, floors, and ceilings meet. We evaluated every product against five criteria specific to corner performance.
Low-frequency absorption was weighted highest because corners are high-pressure zones where bass energy peaks. Products with deeper profiles and denser materials scored higher because thicker traps absorb lower frequencies — a 4-inch foam trap absorbs meaningfully at 200 Hz while a 12-inch trap reaches down to 80 Hz.
Corner fit and design matters because a trap that does not sit flush leaves gaps where bass energy passes through untreated. Triangular profiles and wedge shapes scored higher than flat panels because they nestle into the 90-degree junction naturally.
Pack size relative to room needs determines whether one purchase solves the problem. Most rooms need treatment in all four vertical corners plus ceiling-wall edges, so products with 8+ pieces provide better coverage per dollar.
Build quality and safety was verified through material certifications and buyer reviews. Fire-retardant materials are non-negotiable for acoustic treatment in enclosed spaces.
Acoustic performance per dollar was the tiebreaker — how much measurable bass reduction each dollar of corner treatment delivers.
What Are the Best Corner Bass Traps for Home Studios?
Recording studios need corner bass traps that deliver accurate low-end control for mixing decisions. The goal is not maximum absorption but flat frequency response — you want your corners absorbing bass evenly rather than creating dead zones at some frequencies.
Corner treatment is the first step in any bass trap treatment plan for studios because corners concentrate more bass energy per square foot than any other surface in the room.
The 8 Pack Bass Traps Acoustic Foam Corner is our top pick for home studios because the 8-piece count treats all four vertical corners in a single purchase. The 8x8x12-inch triangular profile sits flush in standard corners, and the 12-inch depth provides meaningful absorption into the upper bass range.
For studios where budget allows serious investment, the 2 Pack Wooden Acoustic Bass Traps delivers absorption that foam cannot match. The wooden construction with internal acoustic fill creates a broadband absorber that works across a wider frequency range.
Home studios with limited corner space should consider the 8 Pack Bass Traps 9.8in — the wider 9.8-inch profile covers more corner surface area per piece, making each trap more effective without needing to stack as many vertically.
What Are the Best Corner Bass Traps for Home Theaters?
Home theater corner bass traps need to tame the low-frequency buildup that makes movie dialogue muddy and bass effects boomy, while blending visually with living space aesthetics. The right corner treatment transforms a boomy home theater into a space where you hear detail in every scene.
The Sonic Acoustics 12 Pack works well for home theaters because the triangular design fits corners without protruding far into the room. The black finish blends with darker theater rooms, and the 12-pack covers all four vertical corners plus ceiling-wall edges.
For home theaters where appearance matters as much as performance, the Wooden Acoustic Bass Traps look like furniture rather than studio equipment. The wood finish integrates with home decor in a way that exposed foam never will.
For budget home theater setups, the TroyStudio 12 Pack provides enough pieces to treat the two corners behind your primary seating position for under twenty dollars — the single most impactful placement for home theater bass control.
What Are the Best Corner Bass Trap Designs?
Three corner bass trap designs dominate the market, each delivering different performance characteristics at different price points. Understanding which design works best for your room prevents wasting money on the wrong type of bass trap.
Tri-Corner Wedge Traps
Triangular foam wedges sit directly in the 90-degree wall-wall junction with the flat face angled at 45 degrees. This design creates a natural air gap behind the foam, extending effective absorption depth beyond the physical thickness of the material.
The air gap behind a tri-corner wedge can add 2-4 inches of effective depth without any additional cost, making wedge traps punch above their weight class in bass absorption per dollar.
The 8 Pack Bass Traps Acoustic Foam Corner uses this design — the triangular profile fits corners naturally and the 8-inch face provides a reasonable absorption surface.
Stacked Column Traps
Smaller foam pieces (4x4x12 inches) stacked vertically create a column of absorption from floor to ceiling. You can customize height and density by adjusting how many pieces you stack, making columns the most adaptable corner treatment format.
Stacked columns also let you start with partial coverage and add pieces over time as your budget allows — a practical advantage over single-piece wedges that require full commitment upfront.
The TroyStudio 24 Pack is built for stacked column placement — the 24-piece count gives you enough to build full-height columns in all four corners with pieces left over for ceiling-wall edges.
Wooden Panel Traps
Wooden bass traps with internal absorption material combine a rigid outer shell with porous fill to create broadband absorption. The wood acts as a partial membrane absorber at lower frequencies while the internal fill handles broadband absorption.
The membrane effect means wooden traps absorb frequencies that porous materials alone cannot reach — typically 40-80 Hz where room modes cause the most severe problems in smaller spaces.
The 2 Pack Wooden Bass Traps represents this category — delivering the deepest bass absorption of any pre-made corner trap in our lineup.
What Should You Look for When Buying Corner Bass Traps?
The difference between effective and ineffective corner bass traps comes down to measurable factors that product listings often obscure behind marketing language. Here is what actually matters when choosing corner treatment.
Size And Fit
Floor-to-ceiling coverage delivers the most bass absorption per dollar. Partial-height treatment leaves untreated sections where bass energy passes through unabsorbed.
Every gap in your corner coverage is a leak in your bass management system — even a two-foot untreated section near the ceiling allows significant bass energy to bypass your treatment entirely.
Measure your ceiling height and calculate pieces needed — most rooms need 6-8 stacked pieces (4-inch size) or 3-4 larger wedges (8-12 inch size) per corner.
Standard drywall corners are 90 degrees, but older buildings can differ slightly — triangular foam wedges handle minor angle variations well while rigid panel traps need exact angles to sit flush. Always dry-fit your traps before applying adhesive to confirm the angle works with your specific corners.
DIY vs Commercial Corner Traps
Commercial corner traps cost less per unit of absorption than DIY builds when you factor in time. A pack of foam corner traps from the best bass traps list costs under thirty dollars and installs in minutes, while a DIY mineral wool corner trap requires framing lumber, fabric, hardware, and several hours per trap.
DIY corner traps outperform commercial foam at low frequencies because you can use denser materials (mineral wool at 3-6 PCF versus foam at 1-2 PCF) and build to custom thicknesses. If you need deep bass control below 100 Hz and have construction skills, DIY is the better investment.
For most rooms, commercial foam corner traps solve the upper bass problems (150-300 Hz) that cause the most audible issues. Commercial traps are the practical choice when convenience matters more than reaching the deepest frequencies.
Material And Absorption Coefficient
Open-cell acoustic foam absorbs sound by converting air movement into heat through friction within the foam cells. Denser foam creates more friction and absorbs lower frequencies, but all foam has a practical limit around 100-150 Hz.
Mineral wool and fiberglass (used in professional acoustic treatment) absorb deeper into the bass range because their higher density creates more friction per inch. These materials are the standard for recording studios where accurate bass response determines mix quality.
The absorption coefficient at 125 Hz is the single most useful specification for comparing corner bass traps. Most foam products provide NRC ratings averaging 250-2000 Hz, which tells you almost nothing about bass performance.
When shopping, prioritize material density over brand names. A no-name 3 PCF mineral wool trap outperforms a branded 1.5 PCF foam trap at every frequency below 200 Hz regardless of marketing claims or Amazon review counts.
The Bottom Line
The best corner bass trap for most rooms is the 8 Pack Bass Traps Acoustic Foam Corner — covering all four vertical corners in a single purchase with fire-retardant foam backed by thousands of verified reviews. For premium corner treatment, the Wooden Acoustic Bass Traps deliver absorption that foam cannot match.
Start with all four vertical wall-wall corners treated from floor to ceiling — this addresses more bass energy than any other single treatment strategy. Then add treatment at the top of each corner where ceiling meets walls for further improvement.
Frequently Asked Questions
What is the best corner bass trap for the money?
The Sonic Acoustics 12 Pack delivers the most corner coverage per dollar — 12 triangular pieces for under twenty-seven dollars treats all four vertical corners with pieces to spare. For deeper bass absorption, the Wooden Bass Traps offer the best performance per dollar in the premium category.
Position corner bass traps straddling the wall-wall junction at a 45-degree angle, starting from the floor and stacking to the ceiling for maximum coverage. Leave a 1-2 inch air gap behind the trap if possible — this gap extends the effective absorption depth and improves low-frequency performance without costing any extra material.
Are ceiling corner bass traps worth it?
Ceiling-wall corners are high-pressure zones that most people overlook, making them one of the highest-impact placements after vertical wall-wall corners. Treating even two ceiling-wall edges closest to your listening position noticeably reduces bass buildup that vertical corner traps alone cannot fully address.
See our best bass traps guide for ceiling-compatible options.
Best Bass Traps — 6 Tested Picks That Actually Absorb Low Frequencies
Best bass traps come in dozens of shapes and materials — but most foam options absorb mids and highs effectively while barely touching the low frequencies where your room actually needs help. Choosing the wrong bass trap means spending money on treatment that looks like it is working but leaves standing waves and bass buildup exactly where they were.
The difference between effective and ineffective bass traps comes down to material density, panel thickness, and corner placement — factors that product listings rarely explain because they focus on NRC ratings that average out the bass frequencies entirely. A trap rated NRC 0.9 can still absorb almost nothing at 80 Hz if it is too thin or too lightweight.
We evaluated dozens of bass trap products based on material type, thickness, pack size, corner coverage, and verified buyer feedback to find the options that deliver real bass absorption. Below you will find our top picks, a comparison table, category breakdowns, and a buyer’s guide to help you choose.
Quick Takeaway
The best bass traps for most rooms are foam corner traps in 8-packs or larger that cover all four vertical corners plus ceiling-wall edges. For serious low-end control below 100 Hz, wooden or mineral-wool-filled traps outperform foam at every frequency but cost significantly more. Start with foam corner traps to address upper bass problems, then upgrade to denser materials as your budget allows.
Our Top Picks
After comparing dozens of bass trap options, these six products stand out for their combination of absorption performance, build quality, and value across different budgets and room sizes.
We evaluated bass traps on five criteria that determine real-world performance, not marketing claims.
Absorption at low frequencies matters more than overall NRC ratings because bass traps need to work below 300 Hz where room modes cause the biggest problems. Products with thicker profiles and denser materials scored higher because thicker panels absorb lower frequencies.
Material density separates bass traps that actually absorb bass from those that only handle mids and highs. Dense foam or mineral wool (2+ PCF) creates more friction against sound waves, converting more bass energy into heat.
Pack size and corner coverage determines how much of your room you can treat per purchase. Bass traps work best when they cover all four vertical corners plus ceiling-wall edges.
Build quality and fire safety was verified through buyer reviews and material specifications. Fire-retardant foam is non-negotiable for treatment installed in an enclosed space.
Value for money was calculated as absorption performance per dollar — how much bass each dollar of treatment actually removes from your room’s problem frequencies.
What Are the Best Broadband Bass Traps?
Broadband bass traps absorb across a wide frequency range from deep bass through mids and highs, making them the most versatile option for rooms that need general acoustic improvement.
The 8 Pack Bass Traps Acoustic Foam Corner earns our Best Overall pick because its 8-piece count covers all four vertical corners in a single purchase and its 12-inch depth provides meaningful absorption into the upper bass range. Stack two or three pieces per corner for maximum coverage.
For the best possible bass absorption, the 2 Pack Wooden Acoustic Bass Traps uses wooden construction with internal acoustic fill to deliver absorption that foam alone cannot match. The 4.8-star rating reflects genuine performance, though you will need multiple packs to treat all corners.
What Are the Best Cheap Bass Traps?
Budget bass traps under a hundred dollars can still make a meaningful difference in rooms where bass problems are noticeable but not severe enough to justify professional-grade treatment.
The TroyStudio Bass Traps 12 Pack is the cheapest effective option, giving you enough dense foam pieces to treat two full vertical corners for under twenty dollars. The 4x4x12-inch pieces stack vertically in corners and provide absorption from 200 Hz upward.
The Sonic Acoustics 12 Pack offers a triangular 7x7x12-inch design that fits corners more snugly than flat-sided pieces. The triangular profile creates a natural air gap between the foam and the wall, which extends absorption to lower frequencies.
For even more coverage, the TroyStudio 24 Pack doubles the piece count, letting you cover all four vertical corners plus start on ceiling-wall edges in a single purchase.
What Are the Best Bass Traps for Small Rooms?
Small rooms have the worst bass problems because their dimensions create standing waves at frequencies you can actually hear — typically 80-200 Hz in rooms under 150 square feet. The good news is that small rooms need fewer traps to make a noticeable difference.
The 4 Pack Bass Traps for Ceiling Corner is purpose-built for smaller rooms where you want maximum corner coverage without using excessive wall space. The 16.5-inch triangular design covers significantly more corner surface than standard 8-inch pieces.
For small rooms on a tight budget, grab the TroyStudio 12 Pack in two vertical corners closest to your listening position, then add a second pack for the remaining corners once you hear the improvement. This staged approach lets you verify the impact before committing to full-room treatment.
What To Look For When Buying Bass Traps
The bass trap market is full of products that claim bass absorption while delivering mostly mid-frequency treatment. Here is what actually matters.
Material And Density
Foam bass traps are the most affordable option and work well for upper bass (150-300 Hz). Dense foam (2+ PCF) outperforms lightweight foam significantly at lower frequencies.
Mineral wool and fiberglass traps (3-6 PCF) absorb deeper into the bass range and are the professional standard for home studio treatment. These require frames and fabric covering, making them better suited for DIY builders willing to invest construction time.
Wooden bass traps with internal acoustic fill represent the premium tier — they combine the structural rigidity of a tuned panel with broadband porous absorption. These cost more per unit but deliver the deepest bass absorption available in a pre-made product.
Size And Thickness
A minimum of 4 inches of thickness is needed for any meaningful bass absorption. Thicker traps (6-12 inches) reach lower frequencies, and adding an air gap behind the trap extends its effective depth without additional material cost.
Larger panels cover more corner surface area per piece, reducing installation time and eliminating gaps between smaller stacked pieces. For rooms with severe bass problems, prioritize thickness over surface area.
When comparing products, ignore NRC ratings that average across 250-2000 Hz and look for absorption coefficients at 125 Hz specifically — that single number tells you more about bass trap performance than any other specification on the product listing.
The Bottom Line
The best bass traps for most rooms are the 8 Pack Bass Traps Acoustic Foam Corner for their combination of coverage, reliability, and value — covering all four vertical corners in a single purchase with fire-retardant foam backed by thousands of verified reviews. For premium performance, the Wooden Acoustic Bass Traps deliver absorption that foam cannot match.
Start by treating all four vertical wall-wall corners from floor to ceiling — this single step addresses more bass energy than any other placement strategy. Add ceiling-wall edge treatment next for further improvement.
Frequently Asked Questions
What bass traps should I get?
Start with an 8-pack or 12-pack of foam corner traps to cover all four vertical corners in your room — this addresses the most bass energy for the least cost. If your budget allows, upgrade to mineral wool or wooden bass traps for deeper low-frequency absorption below 100 Hz.
Are GIK Acoustics bass traps worth it?
GIK Acoustics bass traps are independently tested and deliver measurable performance that exceeds most foam alternatives, making them worth the premium for dedicated studios where accurate bass response matters for mixing decisions. For casual listening rooms or budget-conscious builds, foam corner traps provide a meaningful improvement at a fraction of the cost.
What are the best bass traps for home theater?
Home theater bass traps should prioritize corner placement with thick panels (4+ inches minimum) to address the low-frequency buildup that makes movie dialogue muddy and bass effects boomy. Start with corner traps in all four vertical corners plus ceiling-wall edges behind the seating position for the biggest improvement in clarity.
How To Improve Bass Traps — 5 Upgrades That Make Your Existing Treatment Work Harder
How to improve bass traps is a question that assumes you need to buy new ones — but most bass traps already in your room are underperforming because of how they are installed, not because of what they are made of. Small changes to positioning, air gaps, and density can double or triple the low-frequency absorption of the same panels you already own.
The frustrating reality is that bass traps installed flat against walls or with insufficient thickness absorb mostly mids and highs while barely touching the bass frequencies they are supposed to target. This leaves room modes largely untreated even in rooms that look fully covered with acoustic treatment.
The good news is that every upgrade in this guide works with existing panels — you do not need to replace anything. Moving a panel from a flat wall into a corner, adding an air gap behind it, or stacking a second layer of insulation costs little or nothing and produces measurable improvements you can hear immediately.
Below, you will find five specific upgrades ranked by impact, the physics behind why each one works, whether bass traps actually increase bass (they do not), and answers to the most common questions about improving bass trap performance.
Quick Takeaway
The fastest way to improve bass traps is to add an air gap behind them (even 2-4 inches extends absorption to lower frequencies) and move them into corners where bass pressure is 2-4x higher than flat walls. These two changes alone can double your low-frequency absorption without buying any new panels.
How To Improve Bass Trap Performance
Improving bass trap performance comes down to five variables you can control: air gap depth, panel thickness, material density, placement position, and coverage area. Each variable independently affects how much bass energy your traps absorb, and optimizing even one of them produces an audible difference.
The upgrades below are ranked by impact-per-effort — the first two (air gaps and placement) cost nothing and produce the biggest improvements, while the later upgrades (thickness and density) require purchasing additional materials but extend performance even further into the low-frequency range.
Before making any changes, identify your worst bass problems first. Use a measurement microphone and Room EQ Wizard (free software) to see which frequencies have the biggest peaks and nulls in your room — this tells you exactly which frequencies your bass traps need to absorb and helps you prioritize upgrades that target those specific problems.
Add An Air Gap Behind Your Bass Traps
Adding an air gap behind your bass traps is the single most impactful upgrade you can make because sound absorption happens where air particle velocity is highest, and for low frequencies, the velocity peak occurs at a distance from the wall boundary, not at the wall itself.
A bass trap mounted flush against a wall sits in a pressure maximum (high pressure, low velocity) for bass frequencies. The absorber needs particle velocity to convert sound energy into heat, so flush mounting wastes the trap’s potential at the frequencies where you need it most.
Pulling the trap just 2-4 inches off the wall moves part of the absorber into a higher-velocity zone, dramatically increasing its bass absorption. A 4-inch mineral wool panel with a 4-inch air gap absorbs nearly as much at 125 Hz as an 8-inch solid panel — you effectively double the absorptive depth using nothing but empty space.
How Much Air Gap Is Enough?
A 2-inch air gap provides a noticeable improvement at frequencies above 200 Hz and some benefit at 125 Hz. This is the minimum worth implementing if space is tight.
A 4-inch air gap is the sweet spot for most rooms — it extends meaningful absorption down to 100-125 Hz without consuming excessive floor space. For home studios and listening rooms, this is the most practical target.
Beyond 6 inches, you hit diminishing returns for porous absorbers — each extra inch contributes less than the previous one. If you need absorption below 80 Hz, consider a Helmholtz resonator or membrane bass trap instead of piling on more air gap.
The simplest way to add an air gap is to mount your panels on Z-clips, French cleats, or simple wooden spacer blocks attached to the wall. For corner-straddled panels, angling the panel at 45 degrees across the corner creates the air gap automatically — the triangular space behind the panel provides 8-12 inches of effective depth.
Increase Bass Trap Thickness
After optimizing air gaps, the next biggest improvement is increasing the thickness of your bass traps. Every doubling of thickness extends the effective absorption range down by roughly one octave — a 2-inch panel absorbs well above 500 Hz, a 4-inch panel reaches 250 Hz, and a 6-inch panel extends to around 160 Hz.
The easiest way to increase thickness is to stack panels — if you currently have 2-inch panels, adding a second 2-inch batt directly behind the first one gives you a 4-inch panel without any new framing or construction. Use the same insulation material for the added layer, or upgrade the rear layer to a denser material for even better performance.
For DIY builders, switching from 2-inch to 4-inch batts in existing frames is often possible by simply removing the back panel, inserting the thicker material, and reattaching. If the frame depth does not accommodate the thicker batt, add a 2-inch batt behind the existing 2-inch batt and let it extend beyond the frame — the rear layer does not need to be contained within the frame to function.
Stacking works because sound waves do not care about frame boundaries — they interact with the total depth of absorptive material regardless of whether it is one continuous piece or multiple layers pressed together. There is no meaningful acoustic penalty for using layered construction versus a single thick batt.
Upgrade To Higher-Density Insulation
Material density directly affects absorption efficiency — denser material creates more friction per unit of thickness, converting more sound energy into heat at every frequency. Upgrading your insulation density is especially effective if your current traps use low-density foam or lightweight fiberglass.
The density sweet spot for bass traps is 3-6 pounds per cubic foot (PCF) — below 3 PCF, the material lacks enough fiber density to create sufficient friction for bass wavelengths. Above 8 PCF, the material becomes so dense that it starts reflecting some high-frequency energy, though this trade-off is minor and the bass absorption continues to improve.
Common upgrade paths:
Acoustic foam (1-2 PCF) to Rockwool Safe’n’Sound (3.5 PCF) — this is the most dramatic improvement you can make. Mineral wool at the same thickness as foam absorbs roughly 2-3x more energy at frequencies below 250 Hz because the higher fiber density creates proportionally more friction against bass particle movement.
Owens Corning 703 (3 PCF) to Rockwool ComfortBoard 80 (5 PCF) — a moderate upgrade that improves bass absorption by roughly 20-30% at 125 Hz. Both are already in the effective range, so this upgrade has less impact than going from foam to mineral wool.
If you cannot replace your insulation, you can still improve density by compressing the material — pushing a 6-inch batt into a 4-inch cavity increases its effective density by 50% without any material cost. The trade-off is reduced thickness, so this works best when combined with an air gap behind the compressed panel.
Optimize Bass Trap Placement
Where your bass traps sit in the room matters as much as what they are made of. Moving traps from flat walls to corners is the highest-impact zero-cost upgrade because corners have 2-4x the bass pressure of flat wall surfaces.
The priority sequence for placement optimization:
Move traps from flat wall centers to vertical wall-wall corners first — every room has four vertical corners, and each one concentrates bass energy from two intersecting boundaries. A single panel straddled across a corner absorbs more bass than the same panel centered on a flat wall between the corners.
Next, add treatment to ceiling-wall edges — these are horizontal “corners” where the ceiling meets each wall, and they are the second-highest-pressure zones in the room. Panels mounted along these edges catch bass energy that wall-only treatment misses entirely.
Finally, treat tri-corners (where two walls and the ceiling or floor meet) if your bass trap count allows it. These eight points in every rectangular room have the highest bass pressure of any location because three boundaries converge.
Straddling vs flush corner mounting: A panel straddled at 45 degrees across a corner outperforms the same panel mounted flush in the corner by a significant margin. The straddled position creates a natural air gap (the triangular space behind the panel), while flush mounting places the absorber directly against the wall boundary in the low-velocity pressure zone.
For small rooms, placement optimization often matters more than material upgrades because the room modes are more severe and the corners are closer to the listening position. Even repositioning two panels from flat walls to corners can reduce the worst room mode by 3-6 dB.
Do Bass Traps Increase Bass?
Bass traps do not increase bass — they reduce excess bass energy at specific frequencies where room modes create peaks. The common misconception comes from the fact that after installing bass traps, the bass often sounds “better” and more defined, which some listeners interpret as “more bass” when it is actually “cleaner, tighter bass.”
Here is what actually happens: in an untreated room, certain bass frequencies are boosted 10-20 dB by standing waves (room modes), while other frequencies are canceled by 10-15 dB at the same listening position. This creates a wildly uneven bass response where some notes are painfully loud and others nearly disappear.
Bass traps work by reducing those peaks — they absorb the excess energy that causes the 10-20 dB boost, bringing the response closer to flat. The frequencies that were being masked by the overwhelming peaks suddenly become audible, which makes the overall bass response sound fuller and more detailed even though the total bass energy in the room has decreased.
The result is that bass traps are necessary not because they add bass, but because they reveal the bass that was already there but was being hidden by the room’s resonances. Your subwoofer or speakers were producing those frequencies all along — the room modes were just preventing you from hearing them accurately.
The Bottom Line
Improving bass traps starts with the two free upgrades: add air gaps behind your panels (4 inches is ideal) and move them into corners where bass pressure is highest. These changes alone can double your low-frequency absorption without spending a dollar on new materials.
For the next level of improvement, increase panel thickness to 4+ inches by stacking, and upgrade to denser insulation material (3-6 PCF mineral wool or rigid fiberglass).
For ready-made corner treatment, the 4 Pack Bass Traps for Ceiling Corner provides triangular corner pieces that maximize the air gap advantage of corner mounting.
Stacking bass traps doubles the effective thickness, which extends absorption down by roughly one octave. A stack of two 2-inch panels performs similarly to a single 4-inch panel at most frequencies, making stacking the most cost-effective way to upgrade thin panels without replacing them.
Does adding fabric over bass traps reduce performance?
Acoustically transparent fabric (like standard speaker grille cloth or muslin) has no measurable impact on absorption at any frequency. Thick, dense fabrics like vinyl, leather, or heavy canvas will reduce high-frequency absorption, but standard coverings pass sound through without meaningful resistance.
Should I replace foam bass traps with mineral wool?
Replacing foam with mineral wool produces the single biggest material upgrade available — mineral wool at 3-4 PCF absorbs 2-3x more bass energy than acoustic foam at 1-2 PCF at the same thickness. If your budget allows only one upgrade, swapping foam for Rockwool or rigid fiberglass in your existing trap frames delivers the most improvement per dollar.